Embed Size (px)
Citation preview

1
ANDROID
USER INTERFACE
FUNDAMENTAL UI DESIGN
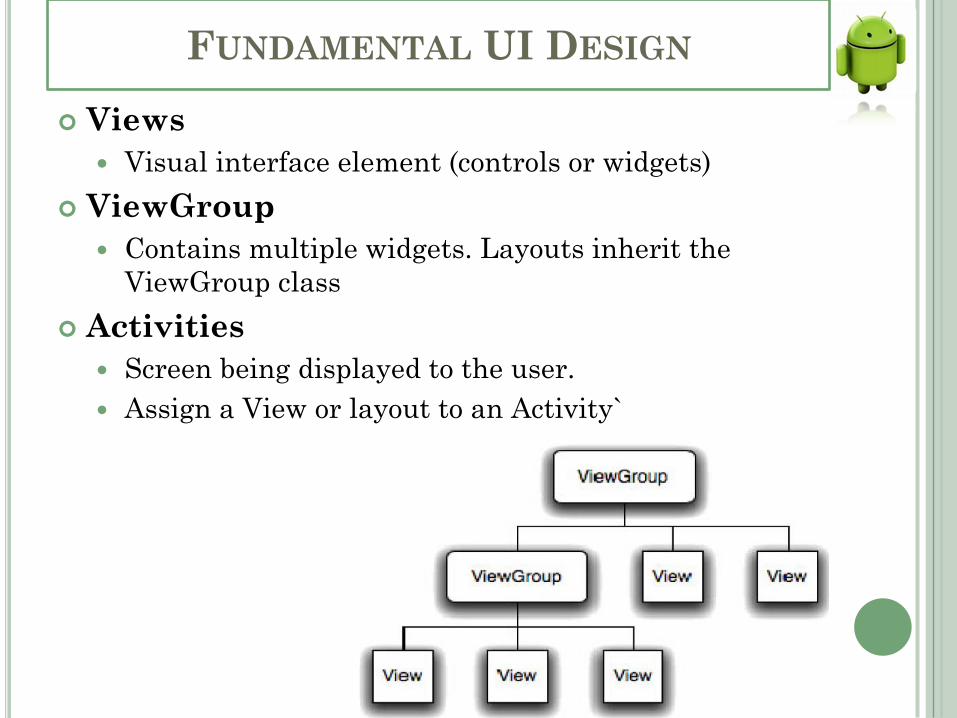
Views
Visual interface element (controls or widgets)
ViewGroup
Contains multiple widgets. Layouts inherit the
ViewGroup class
Activities
Screen being displayed to the user.
Assign a View or layout to an Activity`

FUNDAMENTAL UI DESIGN
Typically, you define your UI using an XML file
(e.g., the main.xml file located in the res/layout
folder of your project)
FUNDAMENTAL UI DESIGN
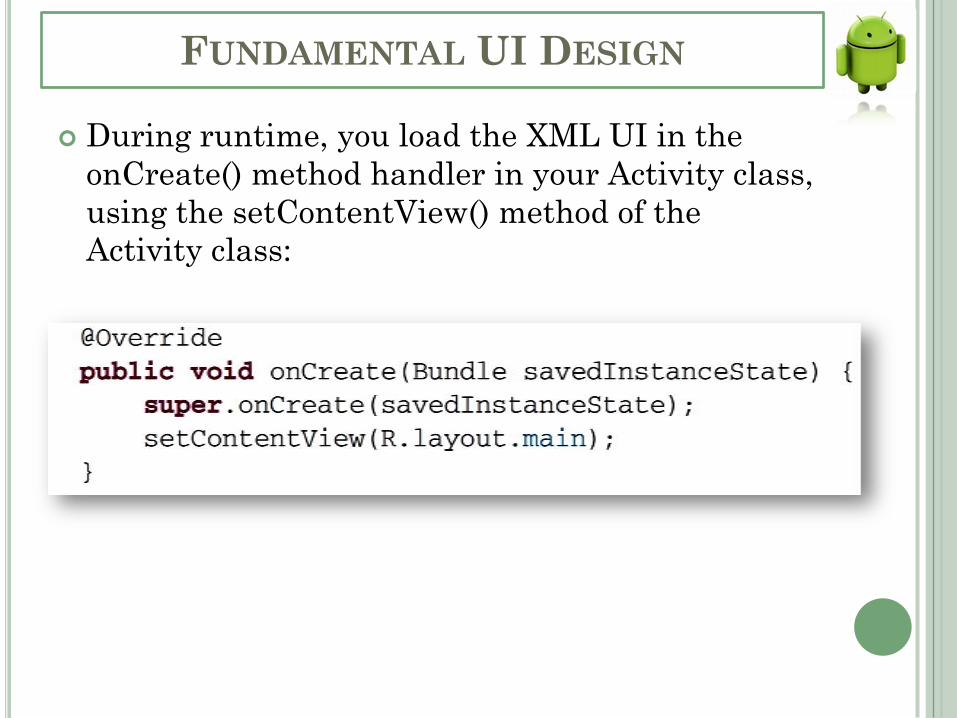
During runtime, you load the XML UI in the
onCreate() method handler in your Activity class,
using the setContentView() method of the
Activity class:

VIEWS AND VIEWGROUPS
An activity contains views and ViewGroups.
View: is a widget that has an appearance on
screen.
Examples of views are buttons, labels, and textboxes.
A view derives from the base class android.view.View.
ViewGroup: One or more views grouped
together
provides the layout in which you can order the
appearance and sequence of views.
Examples of ViewGroups include LinearLayout and
FrameLayout.
A ViewGroup derives from the base class android.view.ViewGroup.
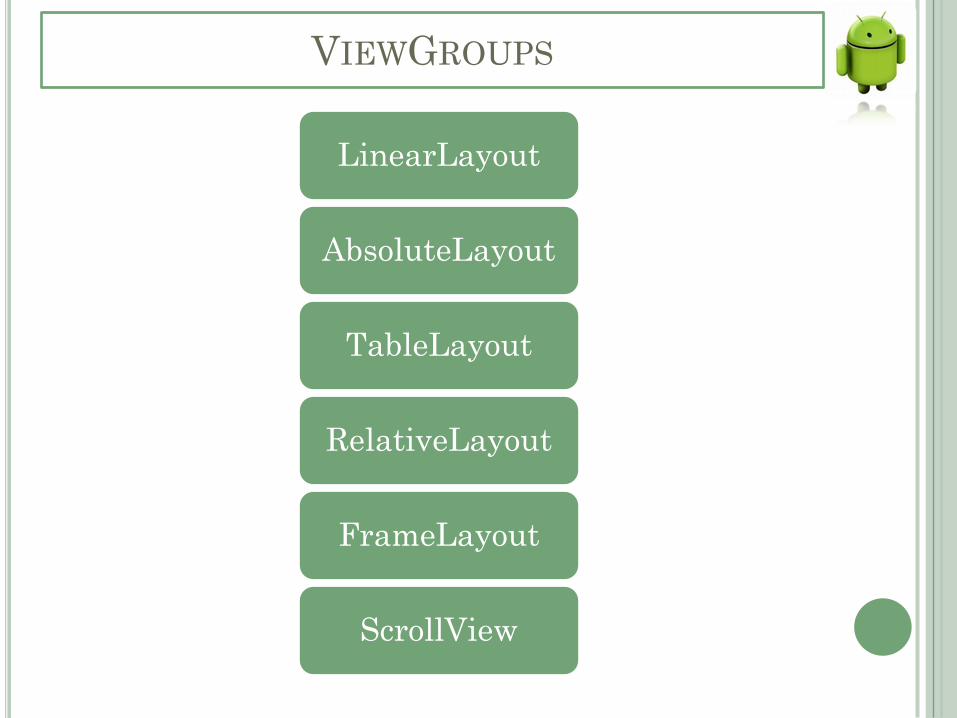
VIEWGROUPS
LinearLayout
AbsoluteLayout
TableLayout
RelativeLayout
FrameLayout
ScrollView
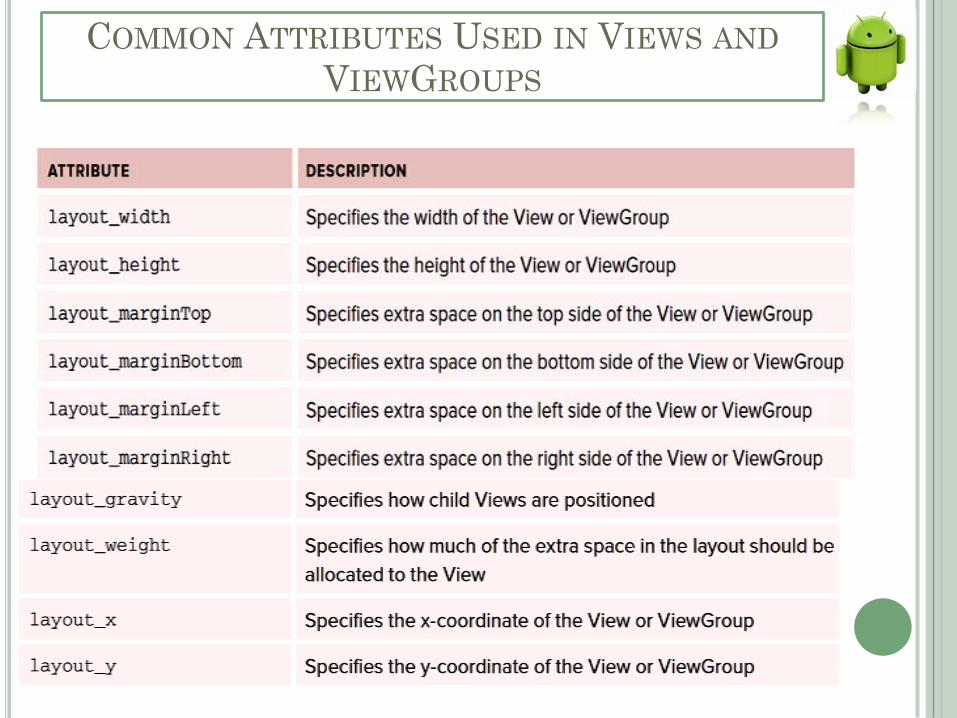
COMMON ATTRIBUTES USED IN VIEWS AND
VIEWGROUPS
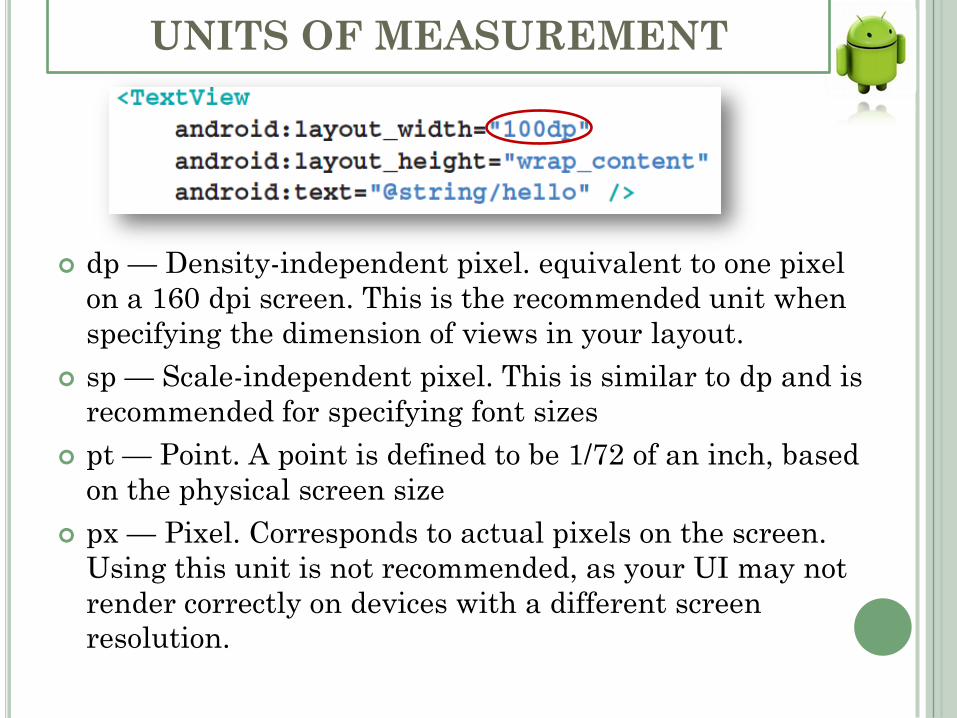
UNITS OF MEASUREMENT
dp — Density-independent pixel. equivalent to one pixel
on a 160 dpi screen. This is the recommended unit when
specifying the dimension of views in your layout.
sp — Scale-independent pixel. This is similar to dp and is
recommended for specifying font sizes
pt — Point. A point is defined to be 1/72 of an inch, based
on the physical screen size
px — Pixel. Corresponds to actual pixels on the screen.
Using this unit is not recommended, as your UI may not
render correctly on devices with a different screen
resolution.
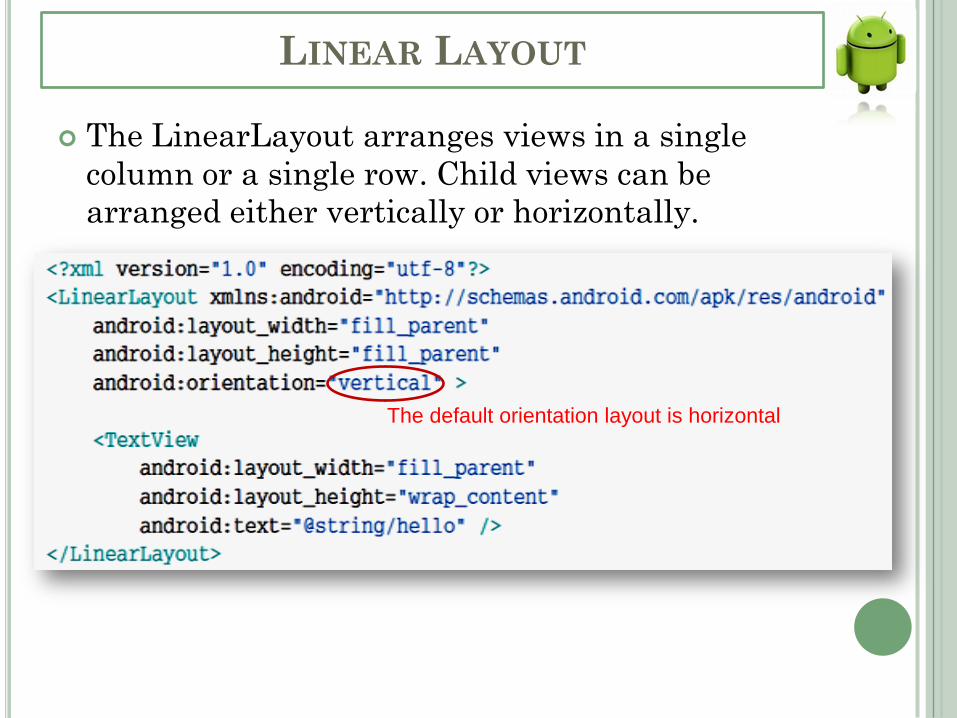
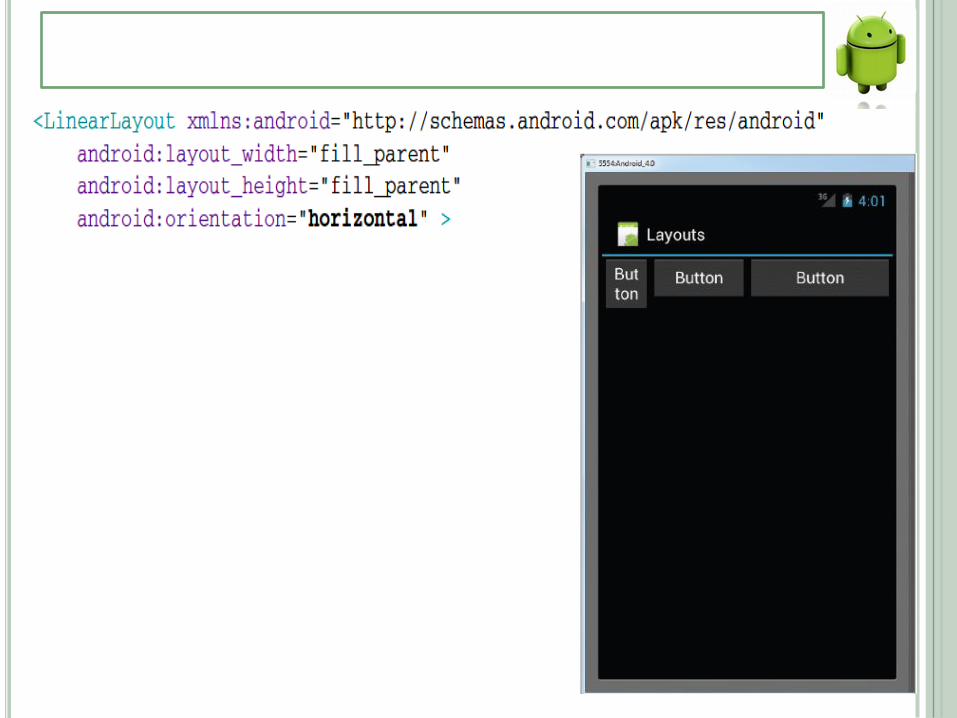
LINEAR LAYOUT
The LinearLayout arranges views in a single
column or a single row. Child views can be
arranged either vertically or horizontally.
The default orientation layout is horizontal
LinearLayout also supports assigning a weight to individual children with the android:layout_weight attribute. This attribute assigns an "importance" value to a view in terms of how much space is should occupy on the screen. A larger weight value allows it to expand to fill any remaining space in the parent view. Child views can specify a weight value, and then any remaining space in the view group is assigned to children in the proportion of their declared weight. Default weight is zero.
For example, if there are three text fields and two of them declare a weight of 1, while the other is given no weight, the third text field without weight will not grow and will only occupy the area required by its content. The other two will expand equally to fill the space remaining after all three fields are measured. If the third field is then given a weight of 2 (instead of 0), then it is now declared more important than both the others, so it gets half the total remaining space, while the first two share the rest equally.
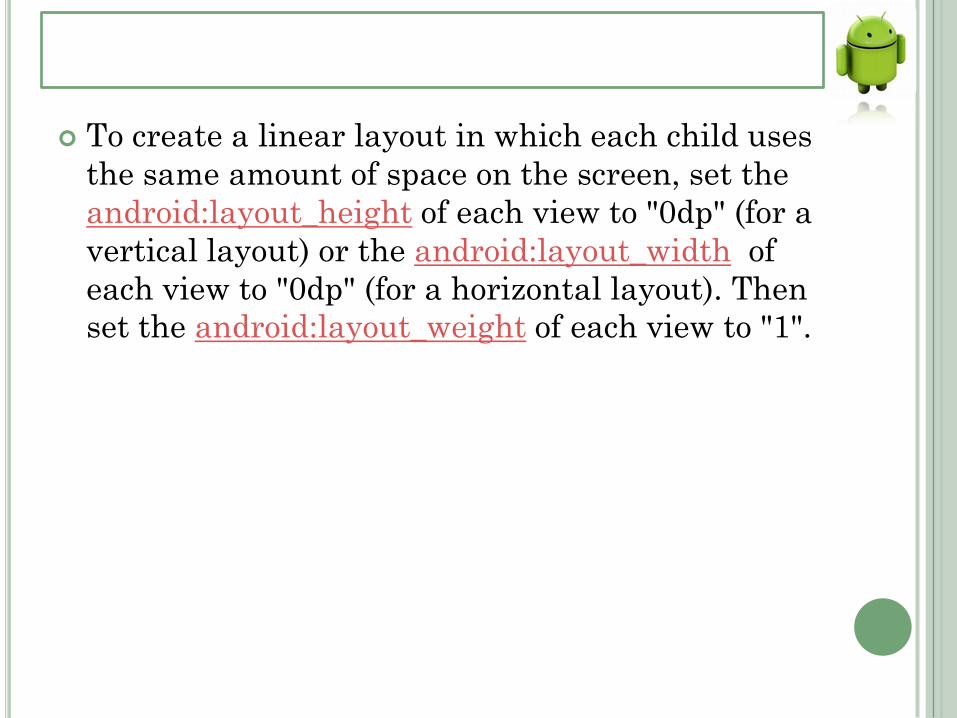
To create a linear layout in which each child uses
the same amount of space on the screen, set the
android:layout_height of each view to "0dp" (for a
vertical layout) or the android:layout_width of
each view to "0dp" (for a horizontal layout). Then
set the android:layout_weight of each view to "1".

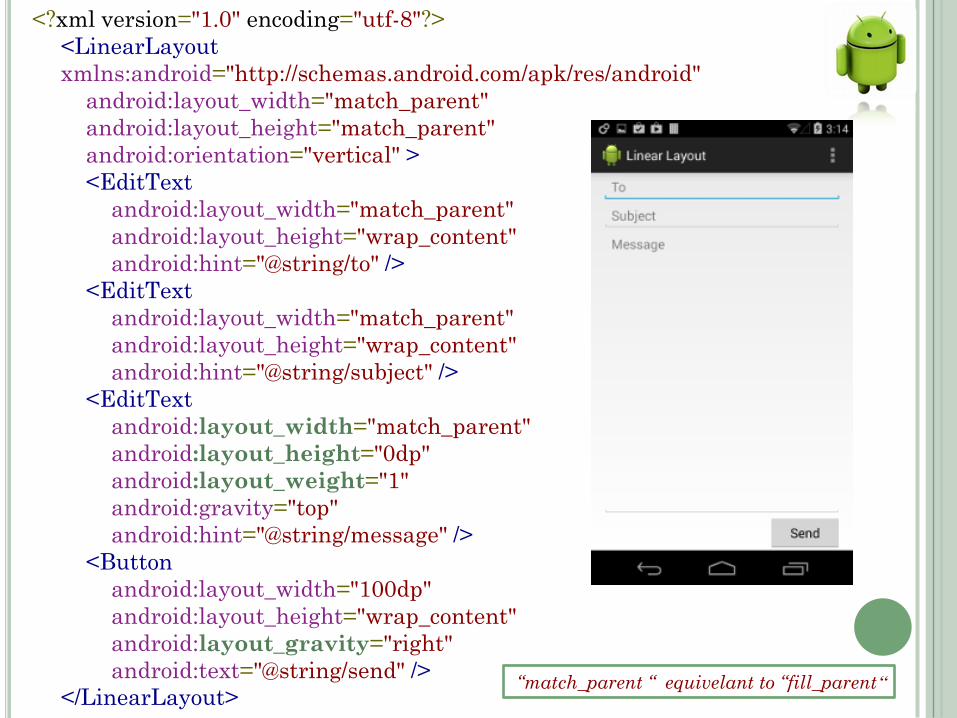
<?xml version="1.0" encoding="utf-8"?>
<LinearLayout
xmlns:android="http://schemas.android.com/apk/res/android"
android:layout_width="match_parent"
android:layout_height="match_parent"
android:orientation="vertical" >
<EditText
android:layout_width="match_parent"
android:layout_height="wrap_content"
android:hint="@string/to" />
<EditText
android:layout_width="match_parent"
android:layout_height="wrap_content"
android:hint="@string/subject" />
<EditText
android:layout_width="match_parent"
android:layout_height="0dp"
android:layout_weight="1"
android:gravity="top"
android:hint="@string/message" />
<Button
android:layout_width="100dp"
android:layout_height="wrap_content"
android:layout_gravity="right"
android:text="@string/send" />
</LinearLayout>”“match_parent “ equivelant to “fill_parent
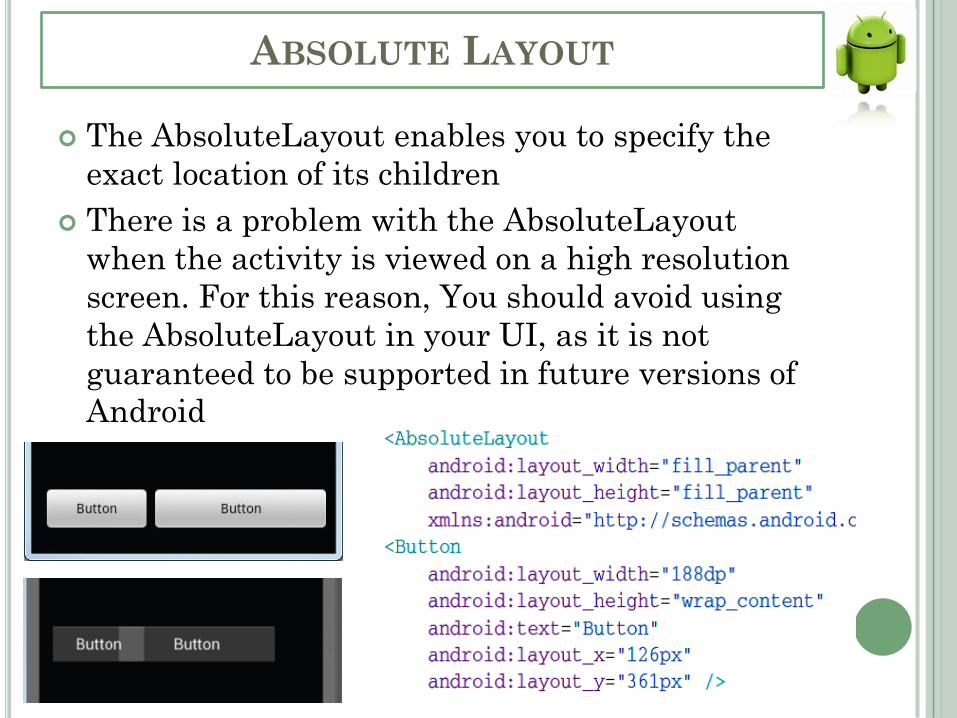
ABSOLUTE LAYOUT
The AbsoluteLayout enables you to specify the
exact location of its children
There is a problem with the AbsoluteLayout
when the activity is viewed on a high resolution
screen. For this reason, You should avoid using
the AbsoluteLayout in your UI, as it is not
guaranteed to be supported in future versions of
Android
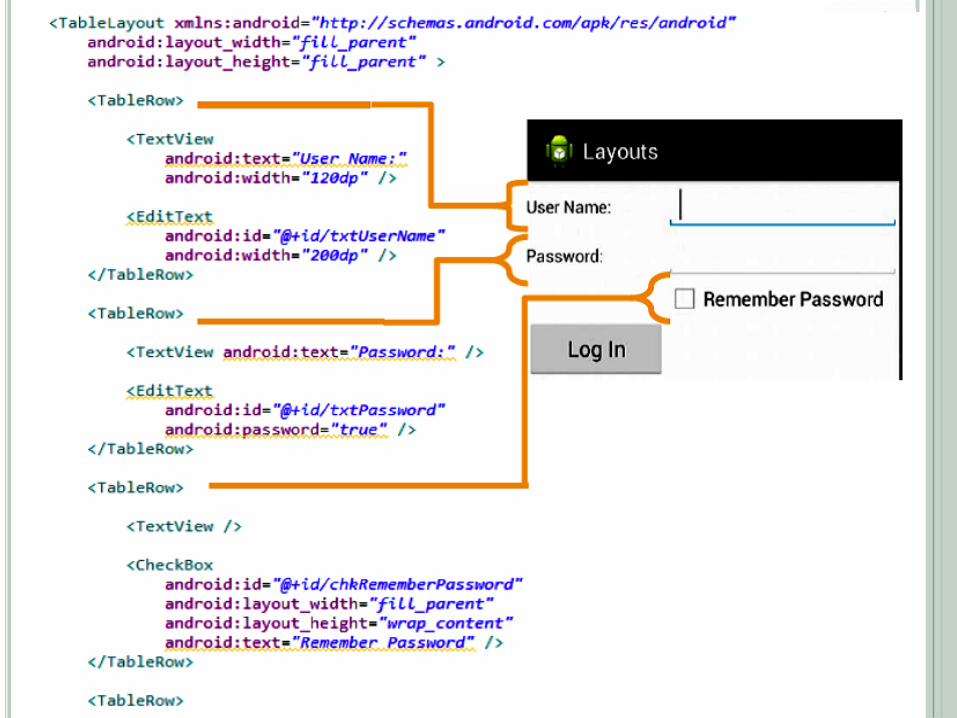
TABLELAYOUT
Table layout arranges its child views in
rows and columns.
You use the <TableRow> element to
designate a row in the table.
Each row can contain one or more views.
Each view you place within a row forms a
cell.
The width of each column is determined
by the largest width of each cell in that
column.
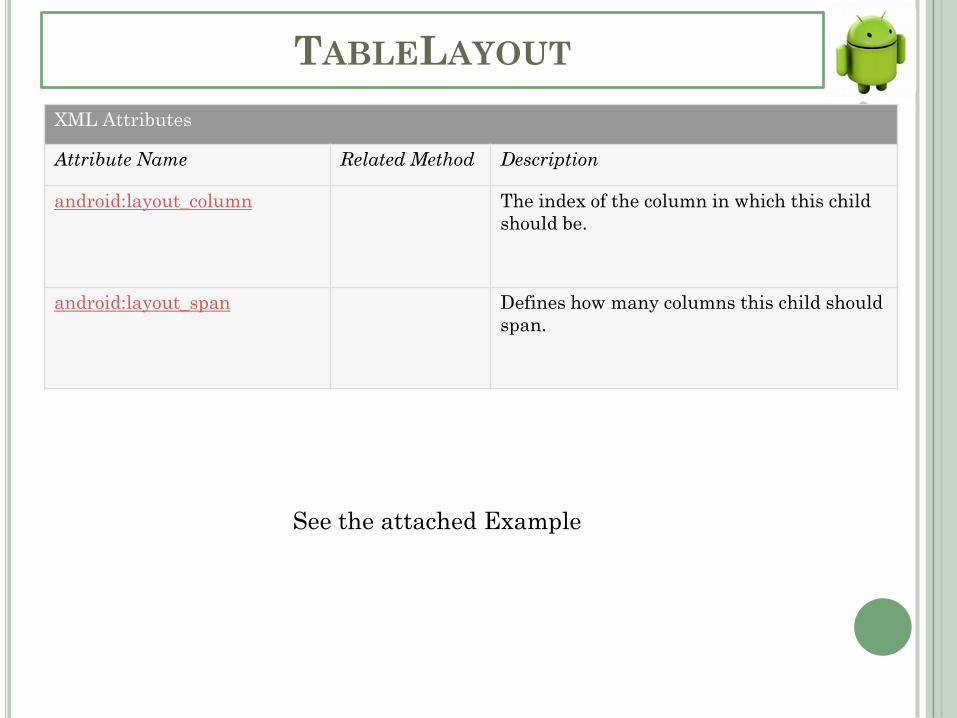
TABLELAYOUT
XML Attributes
Attribute Name Related Method Description
android:layout_column The index of the column in which this child
should be.
android:layout_span Defines how many columns this child should
span.
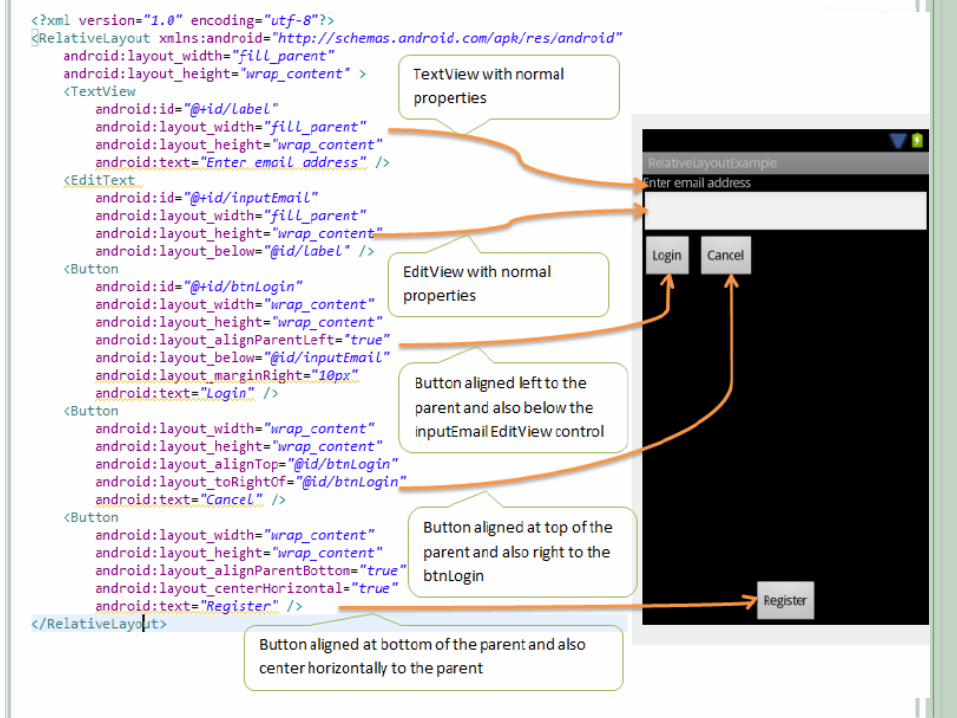
See the attached Example
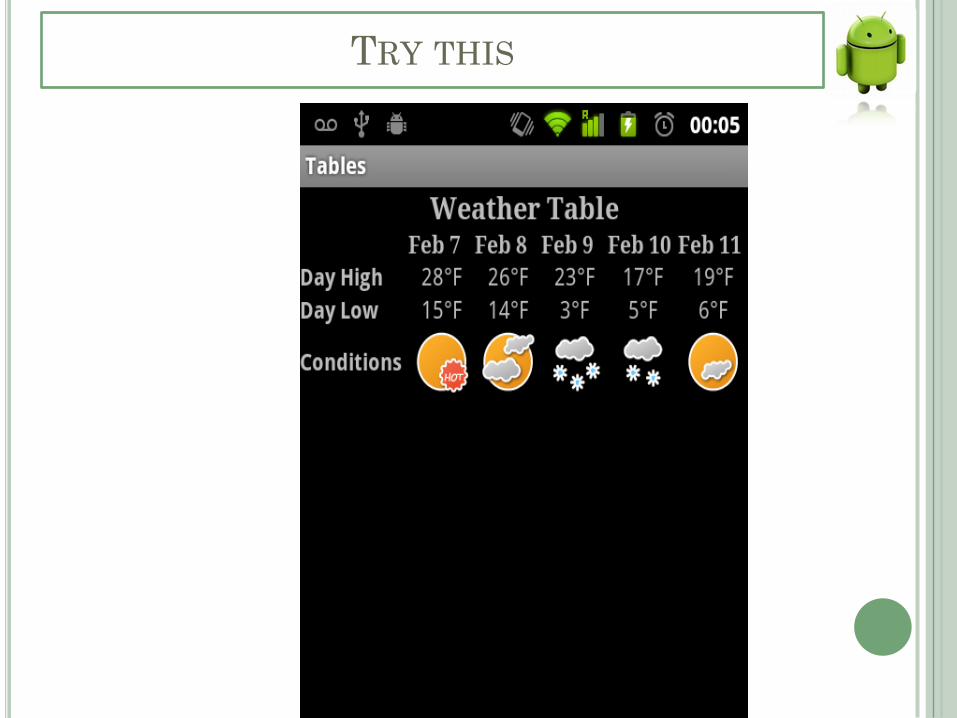
TRY THIS
RELATIVE LAYOUT
Relative Layout provides a great deal of flexibility for your layouts, allowing you to define the position of each element within the layout in terms of its parent and the other Views.
Each view embedded within the RelativeLayouthas attributes that enable it to align with another view. These attributes are as follows:
➤ layout_alignParentTop
➤ layout_alignParentLeft
➤ layout_alignLeft
➤ layout_alignRight
➤ layout_below
➤ layout_centerHorizontal
The value for each of these attributes is the ID for the view that you are referencing.
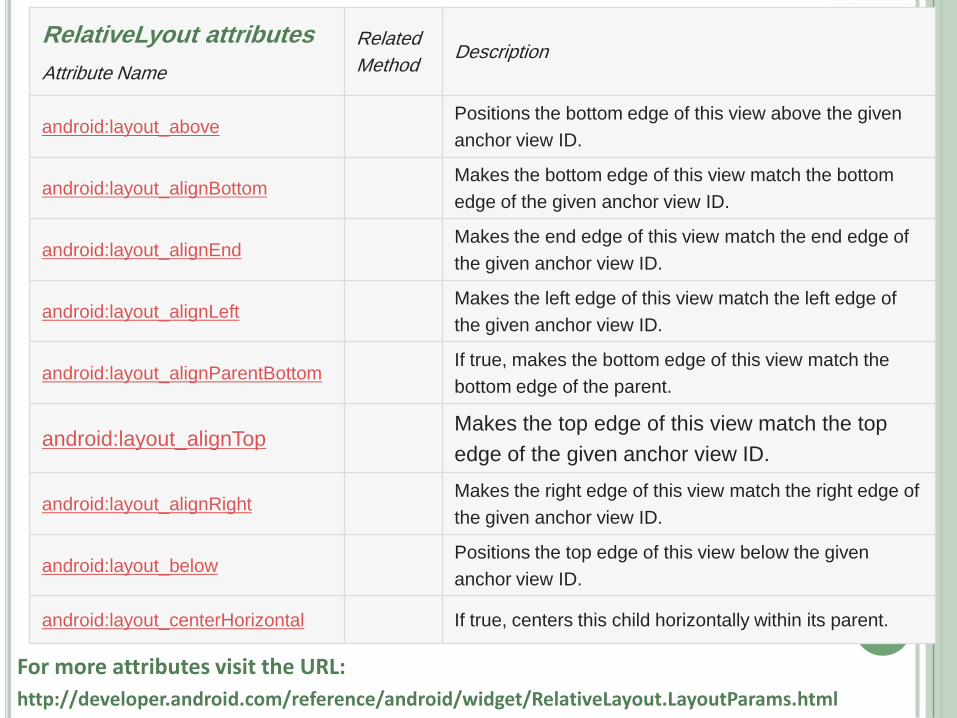
RelativeLyout attributes
Attribute Name
Related
MethodDescription
android:layout_abovePositions the bottom edge of this view above the given
anchor view ID.
android:layout_alignBottomMakes the bottom edge of this view match the bottom
edge of the given anchor view ID.
android:layout_alignEndMakes the end edge of this view match the end edge of
the given anchor view ID.
android:layout_alignLeftMakes the left edge of this view match the left edge of
the given anchor view ID.
android:layout_alignParentBottomIf true, makes the bottom edge of this view match the
bottom edge of the parent.
android:layout_alignTopMakes the top edge of this view match the top
edge of the given anchor view ID.
android:layout_alignRightMakes the right edge of this view match the right edge of
the given anchor view ID.
android:layout_belowPositions the top edge of this view below the given
anchor view ID.
android:layout_centerHorizontal If true, centers this child horizontally within its parent.
For more attributes visit the URL:
http://developer.android.com/reference/android/widget/RelativeLayout.LayoutParams.html
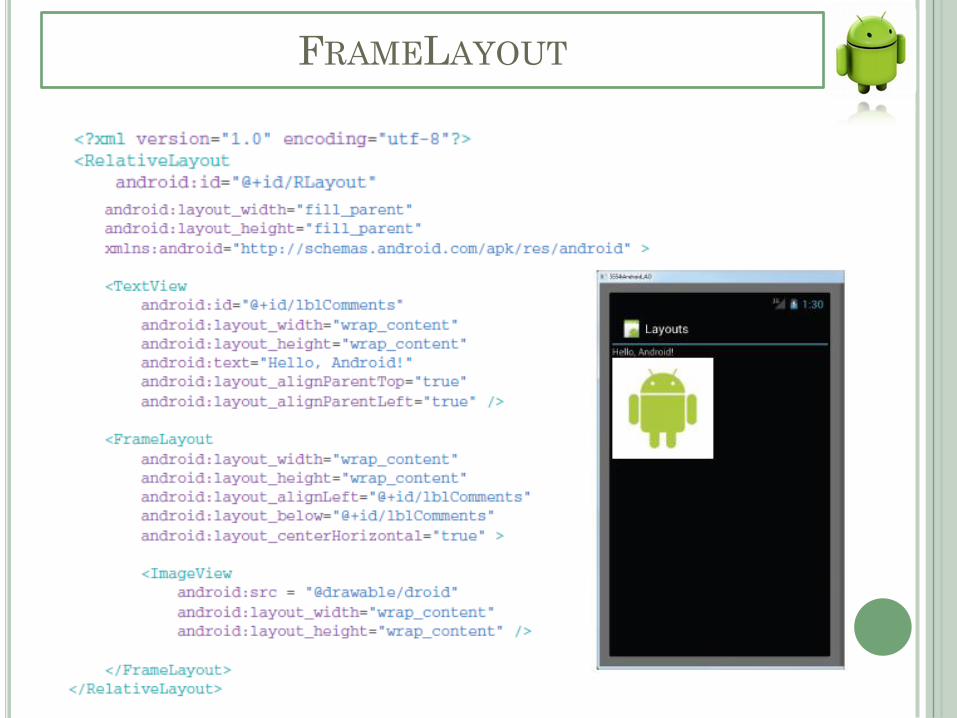
FRAMELAYOUT
The FrameLayout is a placeholder on
screen that you can use to display a single
view.
Views that you add to a FrameLayout are
always anchored to the top left of the
layout.
Frame layouts are the normal layout of
choice when you want to overlap views.
FRAMELAYOUT
FRAMELAYOUT
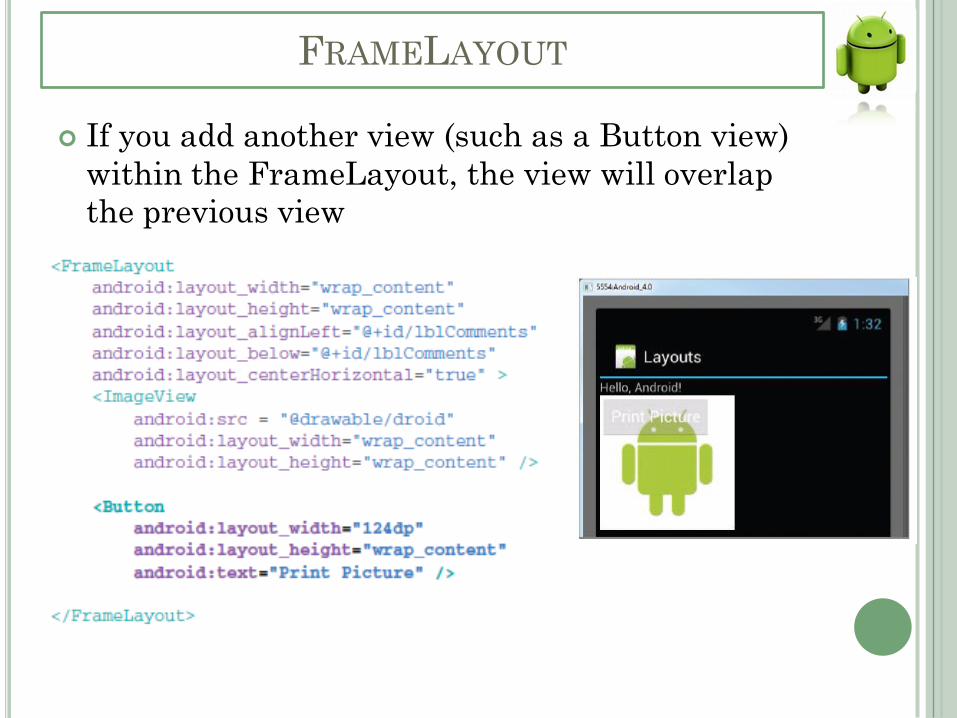
If you add another view (such as a Button view)
within the FrameLayout, the view will overlap
the previous view
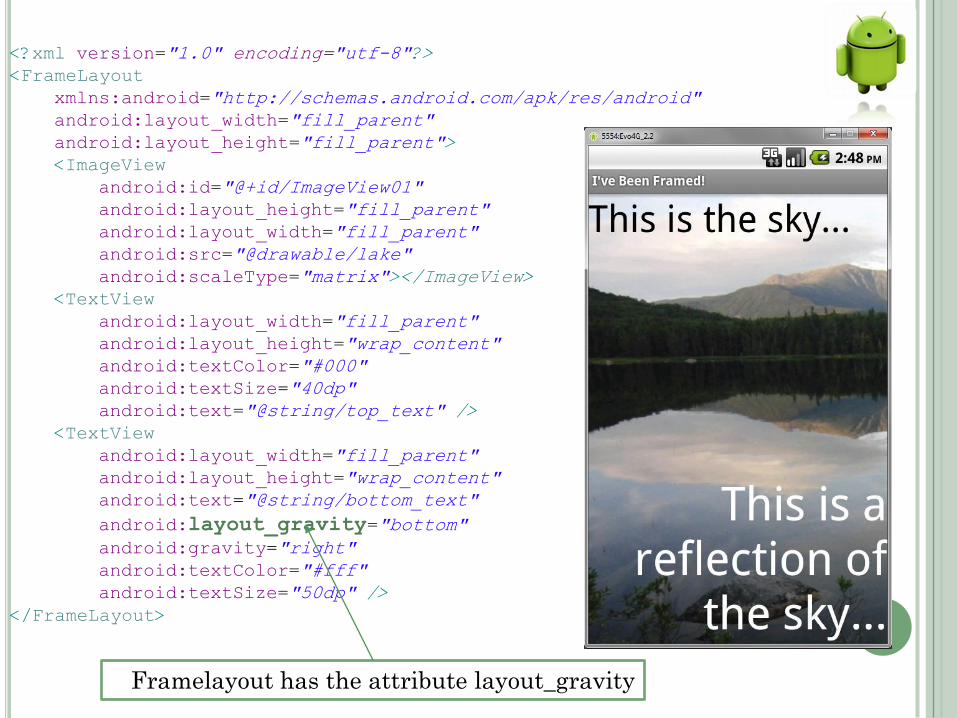
<?xml version="1.0" encoding="utf-8"?>
<FrameLayout
xmlns:android="http://schemas.android.com/apk/res/android"
android:layout_width="fill_parent"
android:layout_height="fill_parent">
<ImageView
android:id="@+id/ImageView01"
android:layout_height="fill_parent"
android:layout_width="fill_parent"
android:src="@drawable/lake"
android:scaleType="matrix"></ImageView>
<TextView
android:layout_width="fill_parent"
android:layout_height="wrap_content"
android:textColor="#000"
android:textSize="40dp"
android:text="@string/top_text" />
<TextView
android:layout_width="fill_parent"
android:layout_height="wrap_content"
android:text="@string/bottom_text"
android:layout_gravity="bottom"
android:gravity="right"
android:textColor="#fff"
android:textSize="50dp" />
</FrameLayout>
Framelayout has the attribute layout_gravity
SCROLLVIEW
A ScrollView is a special type of FrameLayout in
that it enables users to scroll through a list of
views that occupy more space than the physical
display.
The ScrollView can contain only one child view or
ViewGroup, which normally is a LinearLayout.
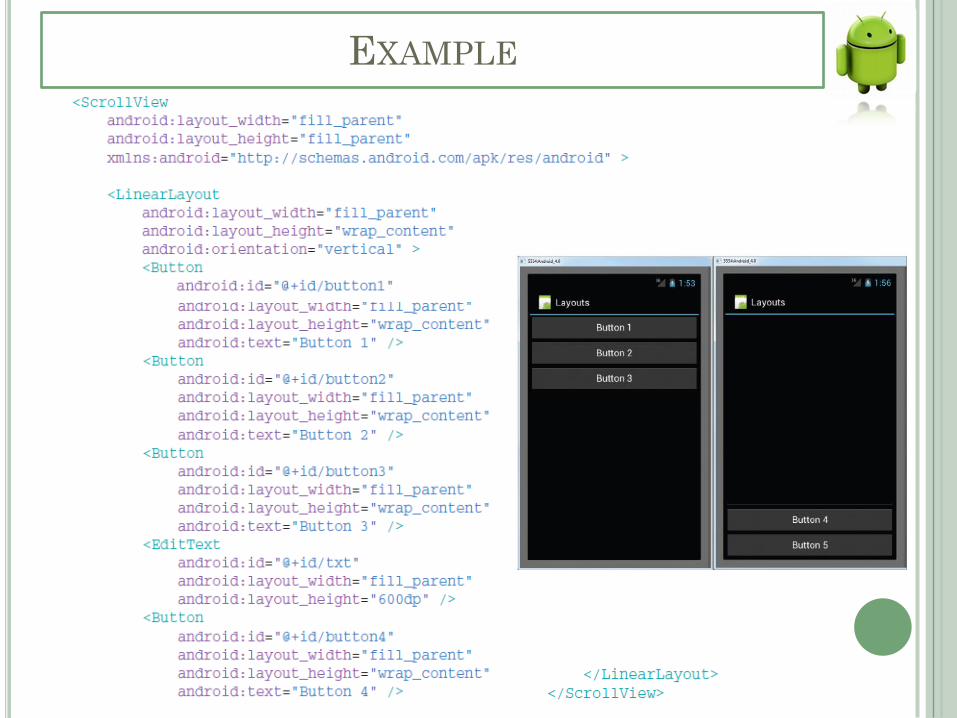
EXAMPLE
ADAPTING TO DISPLAY
ORIENTATION
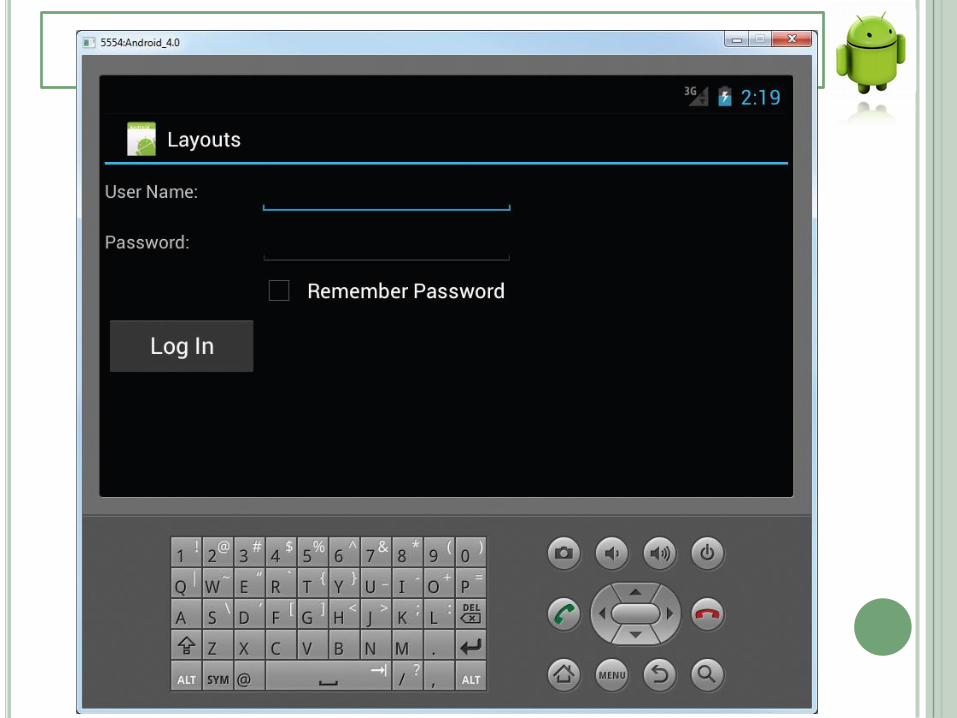
Android supports two screen orientations: portrait and landscape.
When you change the orientation of your Android device, your current activity is destroyed and then recreated.
The current activity that is displayed automatically redraws its content in the new orientation.
However, when the views are redrawn, they may be drawn in their original locations
when the screen orientation is set to landscape a lot of empty space on the right of the screen could be used and any additional views at the bottom of the screen would be hidden.
ADAPTING TO DISPLAY
ORIENTATION
In general, you can employ two techniques to
handle changes in screen orientation:
Anchoring — The easiest way is to ―anchor‖ your
views to the four edges of the screen. Whenthe screen
orientation changes, the views can anchor neatly to
the edges.
Resizing and repositioning —resizing each and
every view according to the current screen
orientation.
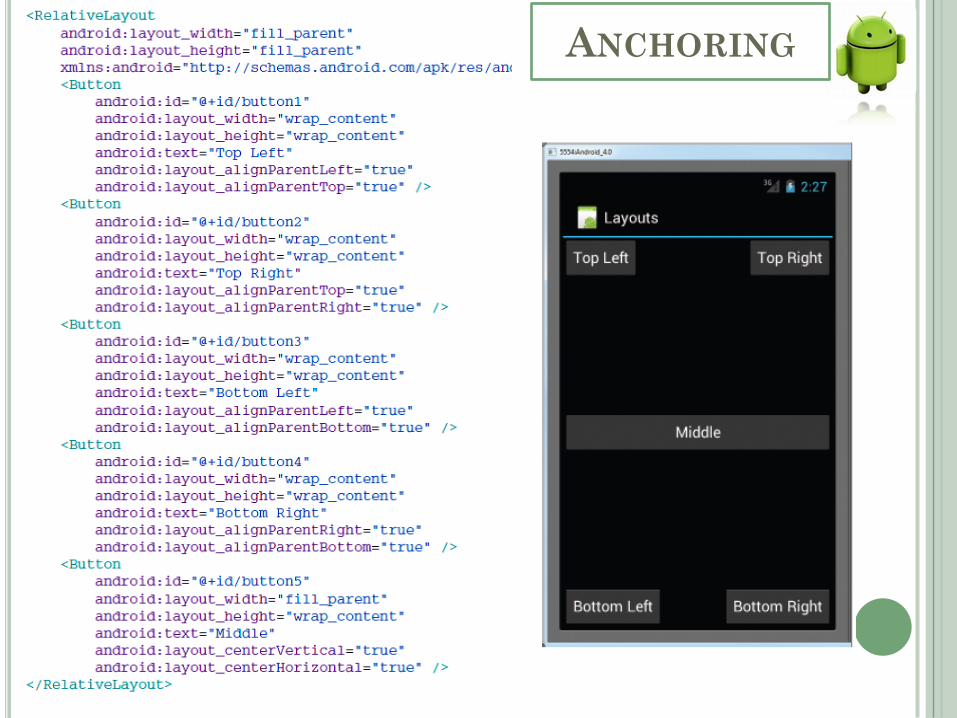
ANCHORING
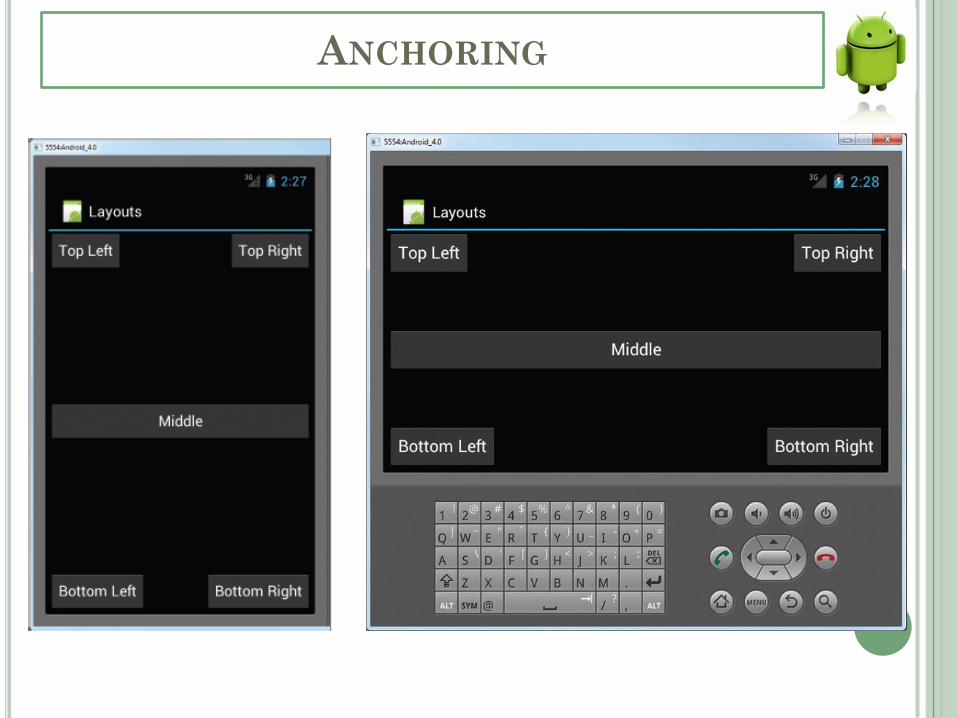
ANCHORING
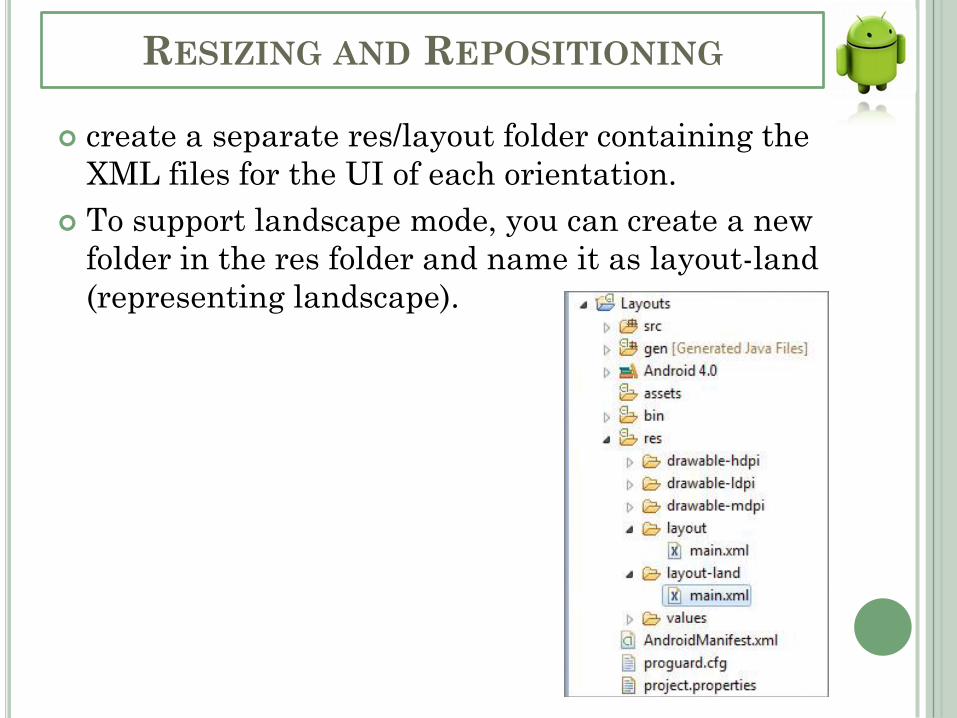
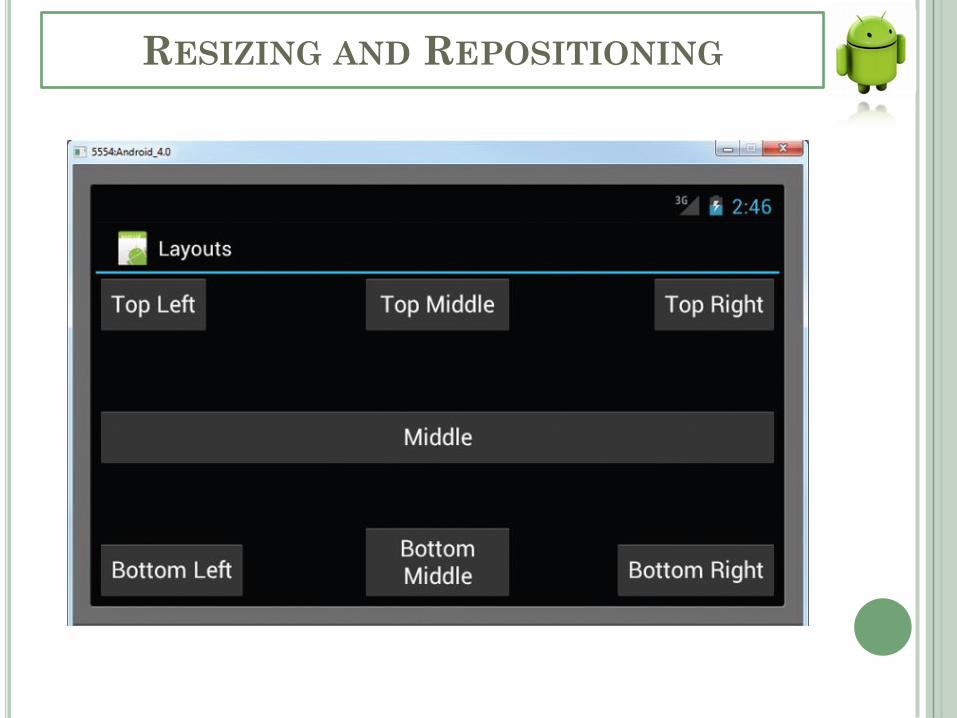
RESIZING AND REPOSITIONING
create a separate res/layout folder containing the
XML files for the UI of each orientation.
To support landscape mode, you can create a new
folder in the res folder and name it as layout-land
(representing landscape).
RESIZING AND REPOSITIONING
MANAGING CHANGES TO SCREEN
ORIENTATION
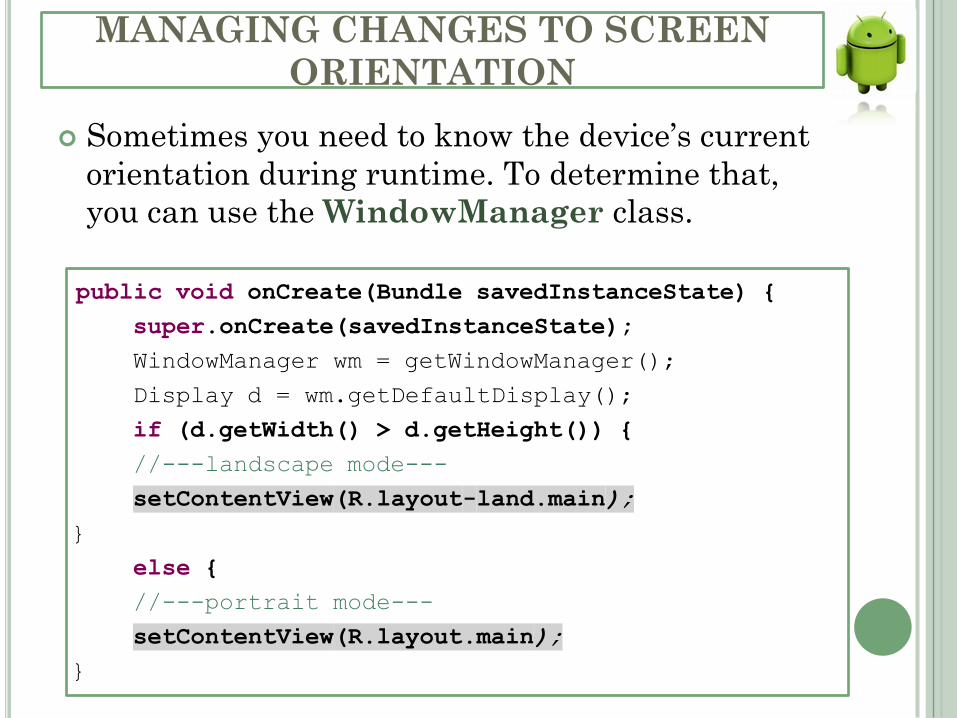
Sometimes you need to know the device’s current
orientation during runtime. To determine that,
you can use the WindowManager class.
public void onCreate(Bundle savedInstanceState) {
super.onCreate(savedInstanceState);
WindowManager wm = getWindowManager();
Display d = wm.getDefaultDisplay();
if (d.getWidth() > d.getHeight()) {
//---landscape mode---
setContentView(R.layout-land.main);
}
else {
//---portrait mode---
setContentView(R.layout.main);
}
CONTROLLING THE ORIENTATION OF THE
ACTIVITY
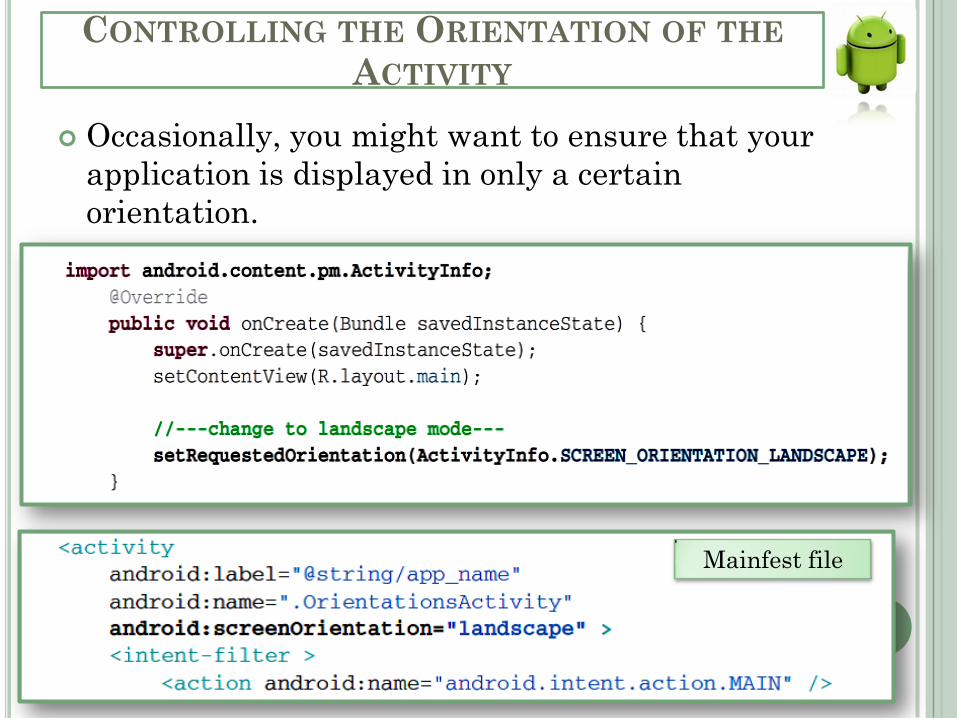
Occasionally, you might want to ensure that your
application is displayed in only a certain
orientation.
Mainfest file
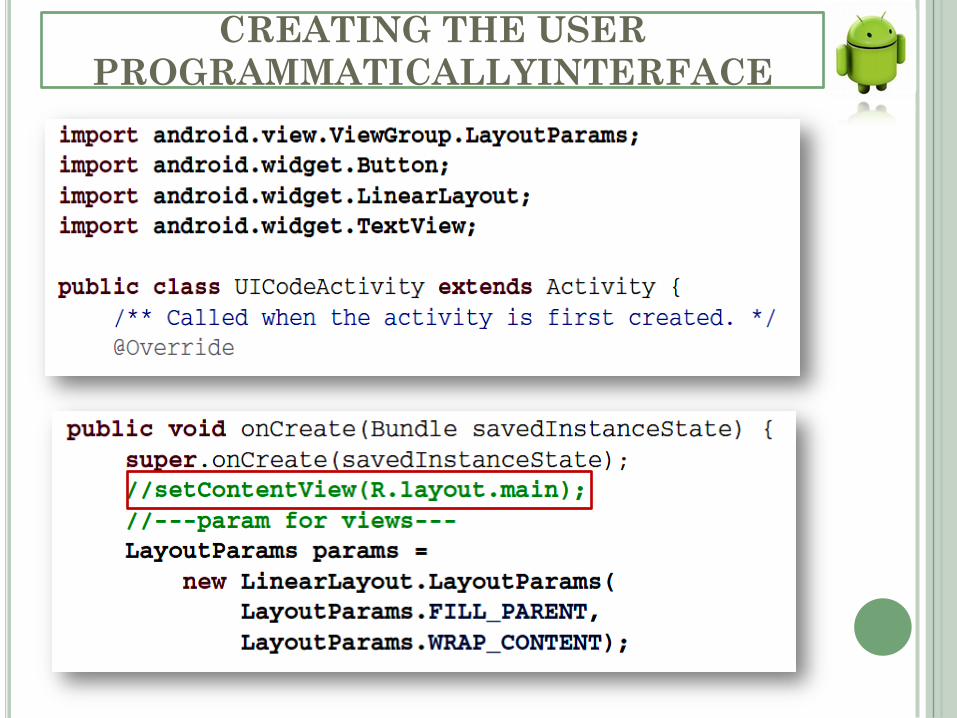
CREATING THE USER
PROGRAMMATICALLYINTERFACE
CREATING THE USER
PROGRAMMATICALLYINTERFACE
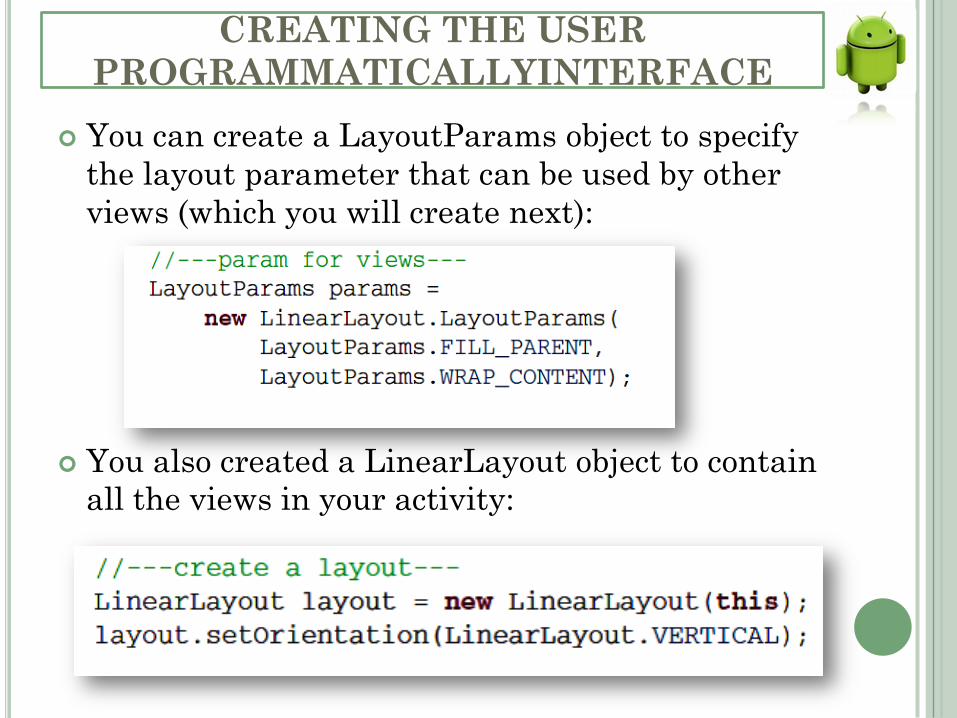
You can create a LayoutParams object to specify
the layout parameter that can be used by other
views (which you will create next):
You also created a LinearLayout object to contain
all the views in your activity:
CREATING THE USER
PROGRAMMATICALLYINTERFACE
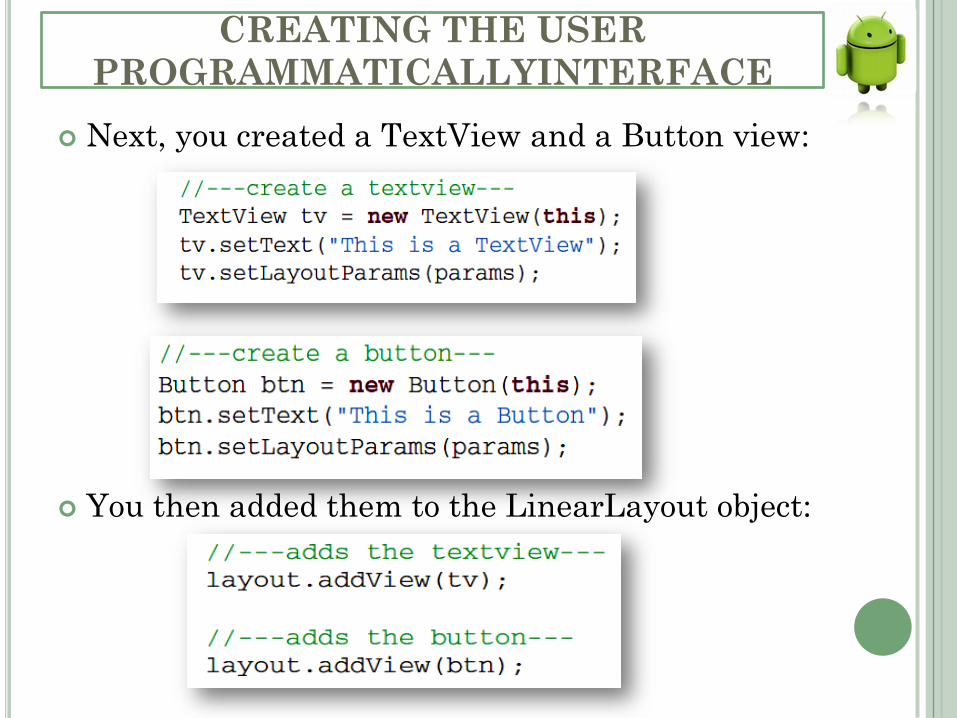
Next, you created a TextView and a Button view:
You then added them to the LinearLayout object:
CREATING THE USER
PROGRAMMATICALLYINTERFACE
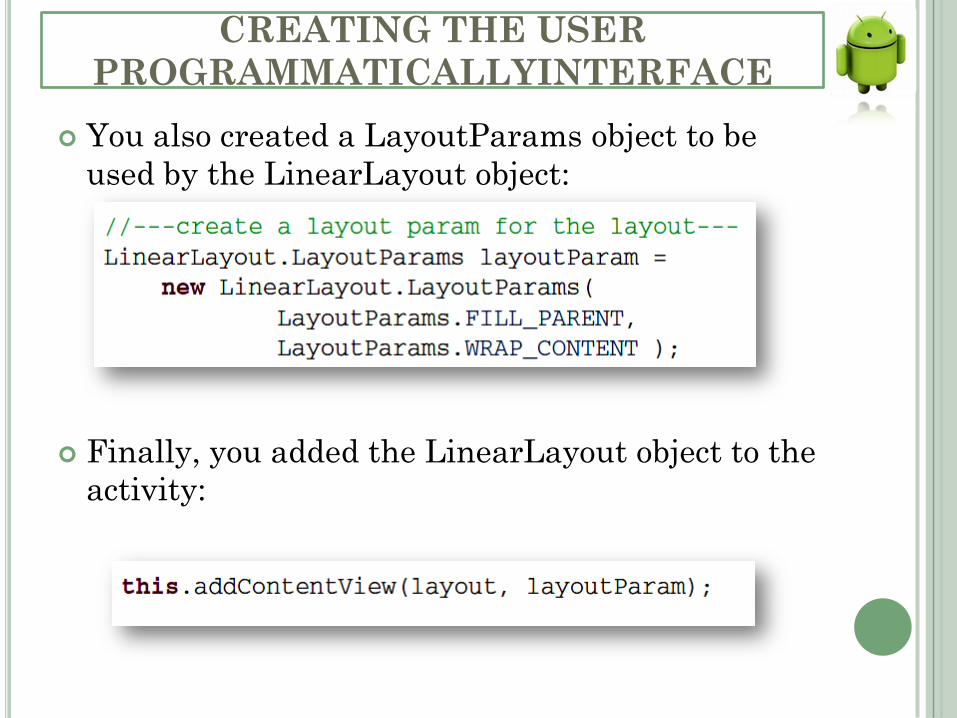
You also created a LayoutParams object to be
used by the LinearLayout object:
Finally, you added the LinearLayout object to the
activity:
USING BASIC VIEWS
•➤ TextView
•➤ EditText
•➤ Button
•➤ ImageButton
•➤ CheckBox
•➤ ToggleButton
•➤ RadioButton
•➤ RadioGroup
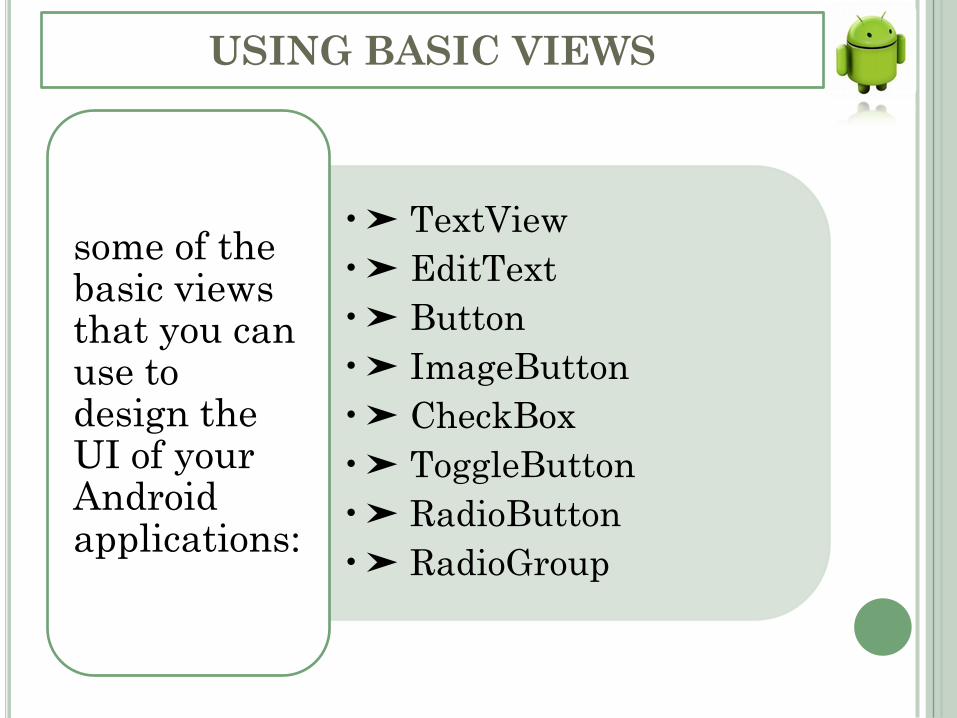
some of the basic views that you can use to design the UI of your Android applications:
USING BASIC VIEWS

USING BASIC VIEWS
The id attribute is an identifi er for a view so that it may later be
retrieved using the View.findViewById() or Activity.findViewById()
methods.
USING BASIC VIEWS
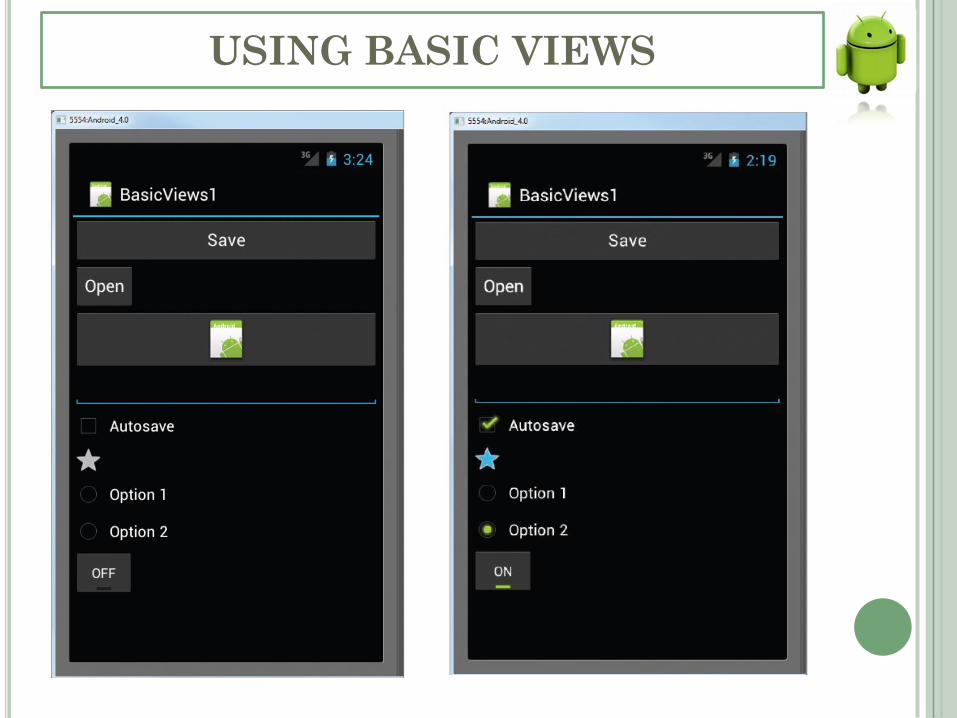
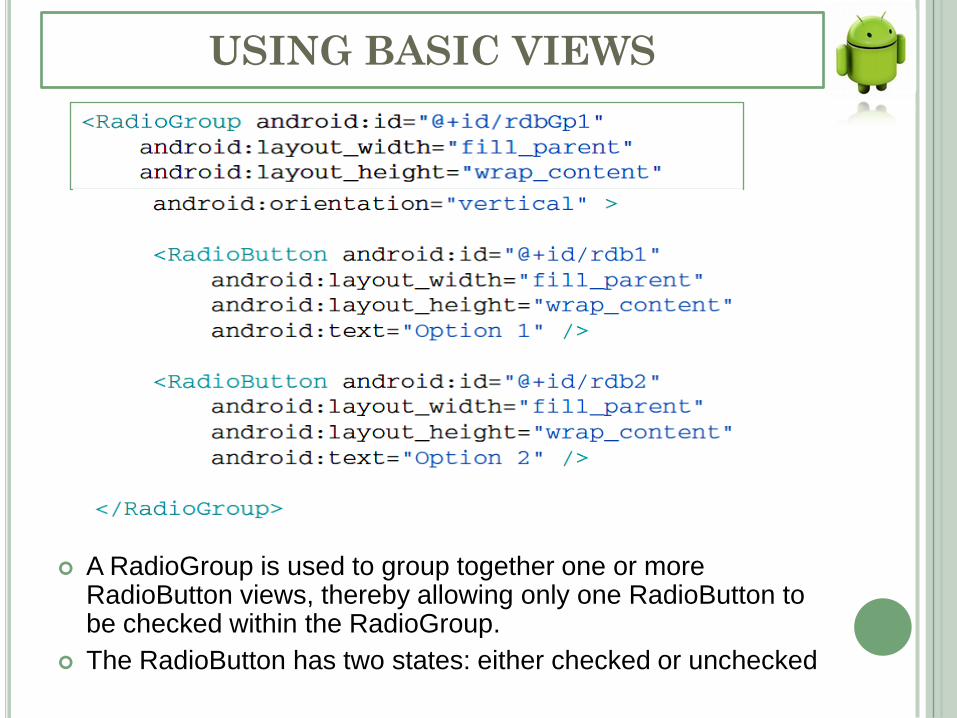
A RadioGroup is used to group together one or more RadioButton views, thereby allowing only one RadioButton to be checked within the RadioGroup.
The RadioButton has two states: either checked or unchecked
HANDLING VIEW EVENTS
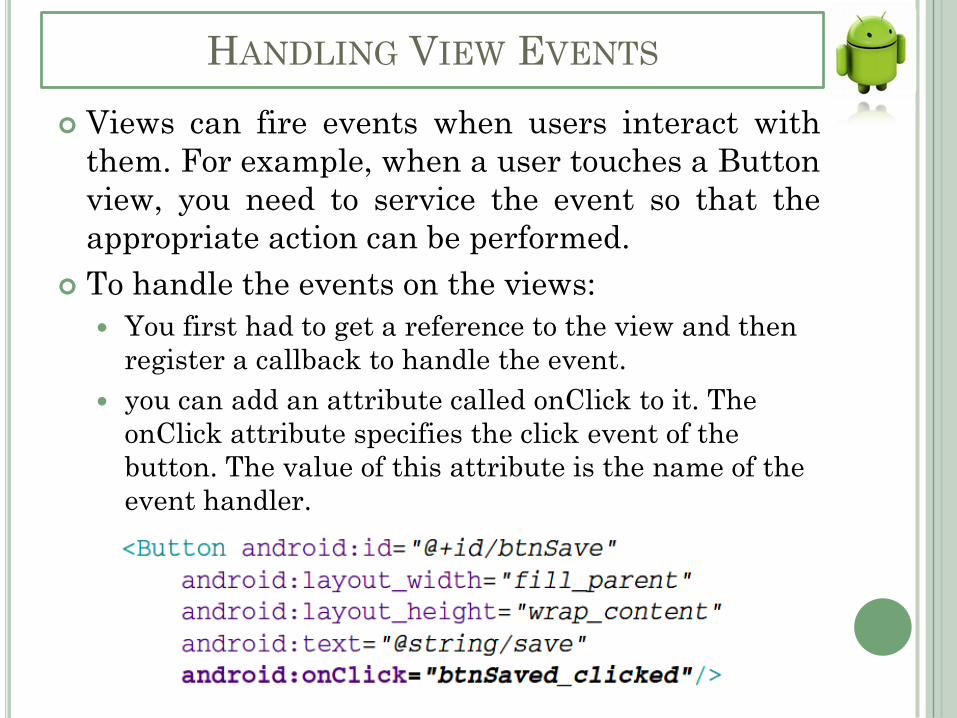
Views can fire events when users interact with
them. For example, when a user touches a Button
view, you need to service the event so that the
appropriate action can be performed.
To handle the events on the views:
You first had to get a reference to the view and then
register a callback to handle the event.
you can add an attribute called onClick to it. The
onClick attribute specifies the click event of the
button. The value of this attribute is the name of the
event handler.
HANDLING VIEW EVENTS
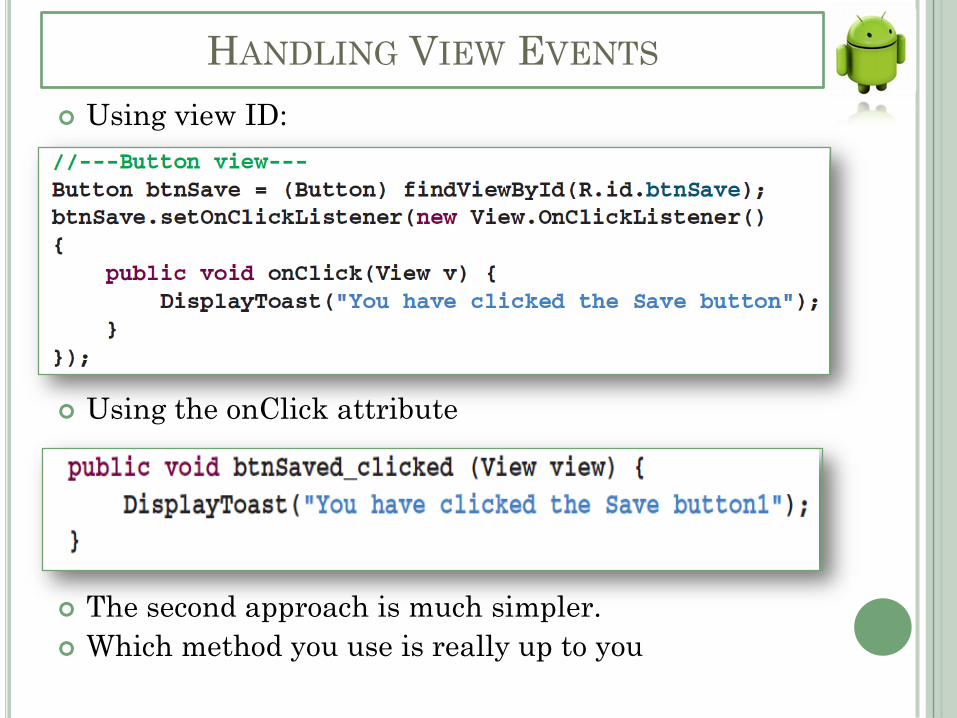
Using view ID:
Using the onClick attribute
The second approach is much simpler.
Which method you use is really up to you
HANDLING VIEW EVENTS
AUTOCOMPLETETEXTVIEW
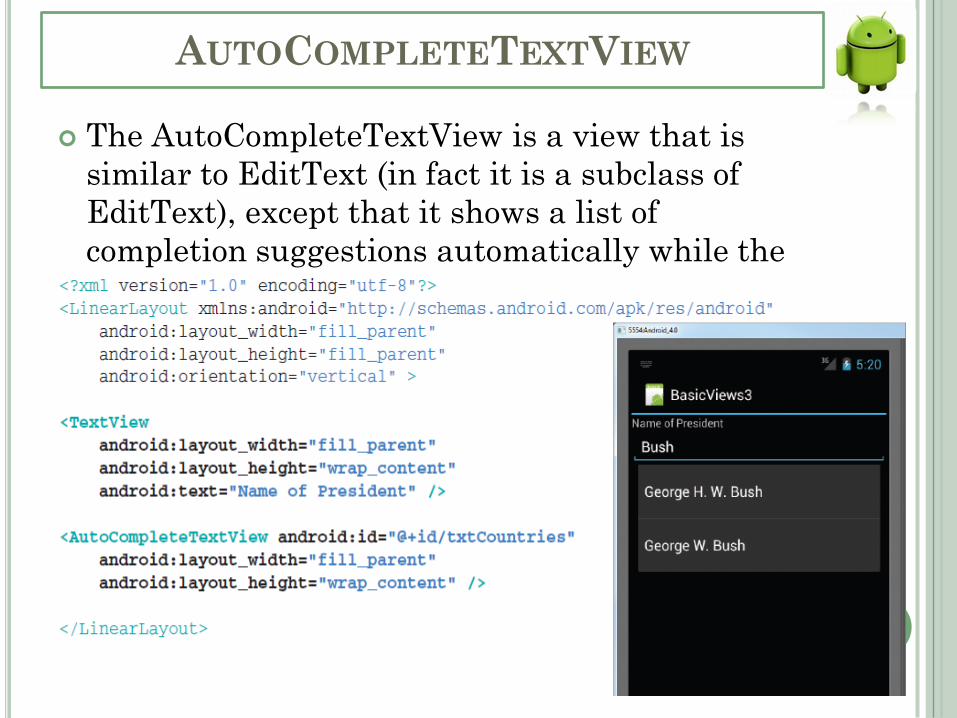
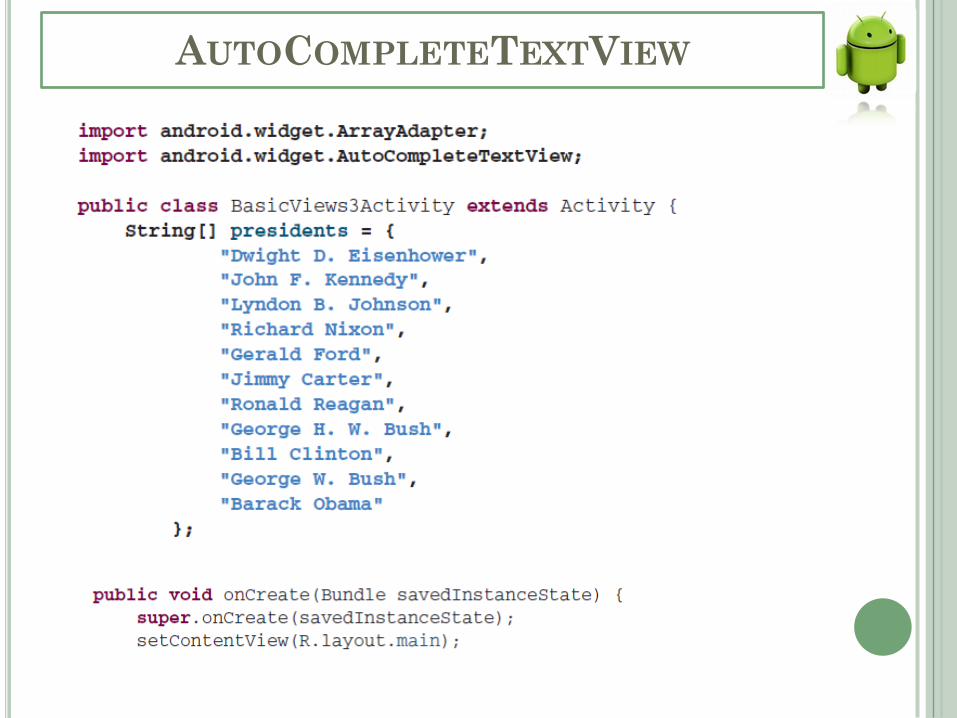
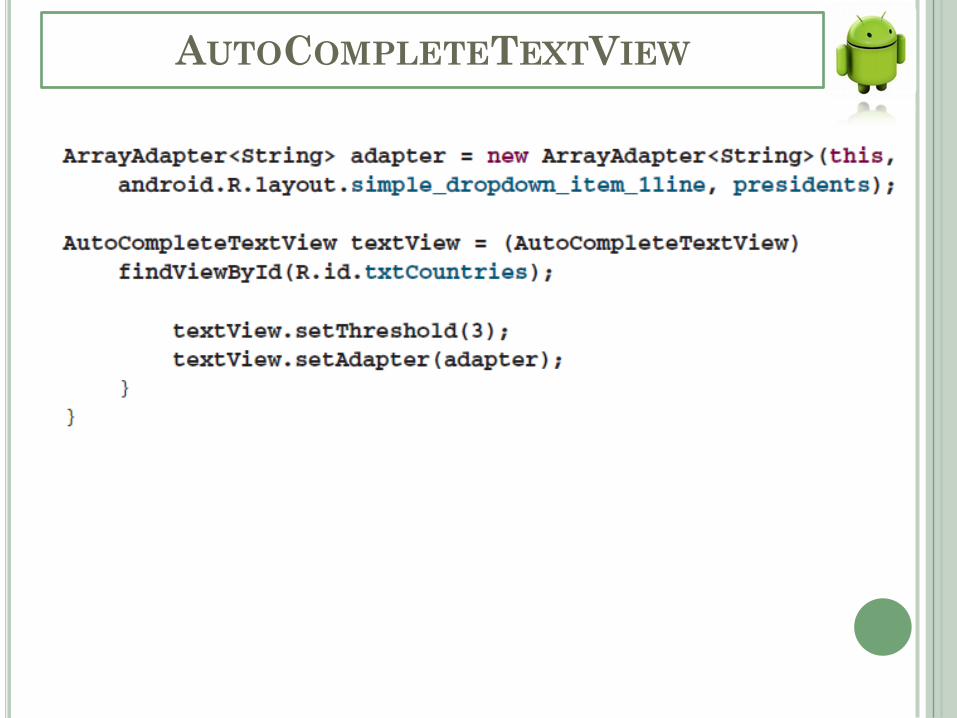
The AutoCompleteTextView is a view that is
similar to EditText (in fact it is a subclass of
EditText), except that it shows a list of
completion suggestions automatically while the
user is typing.
AUTOCOMPLETETEXTVIEW
AUTOCOMPLETETEXTVIEW
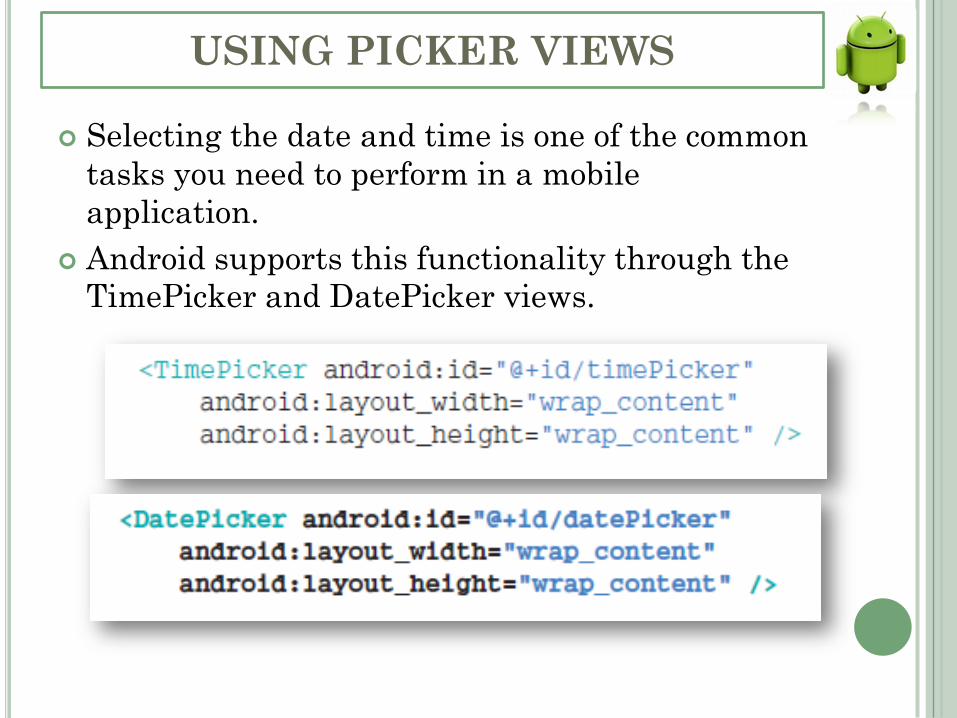
USING PICKER VIEWS
Selecting the date and time is one of the common
tasks you need to perform in a mobile
application.
Android supports this functionality through the
TimePicker and DatePicker views.
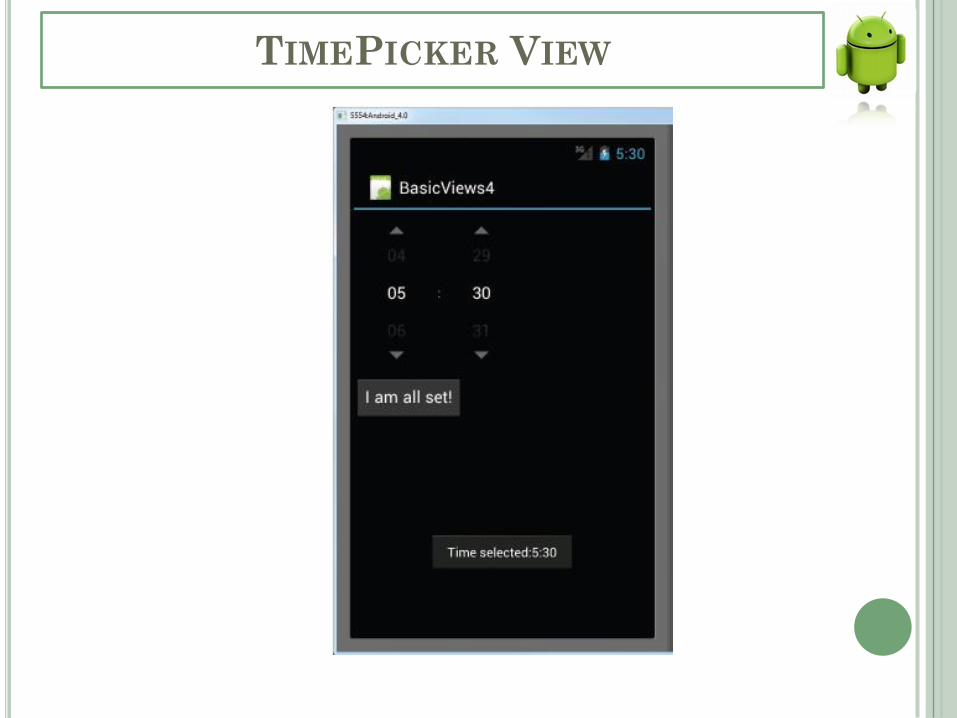
TIMEPICKER VIEW
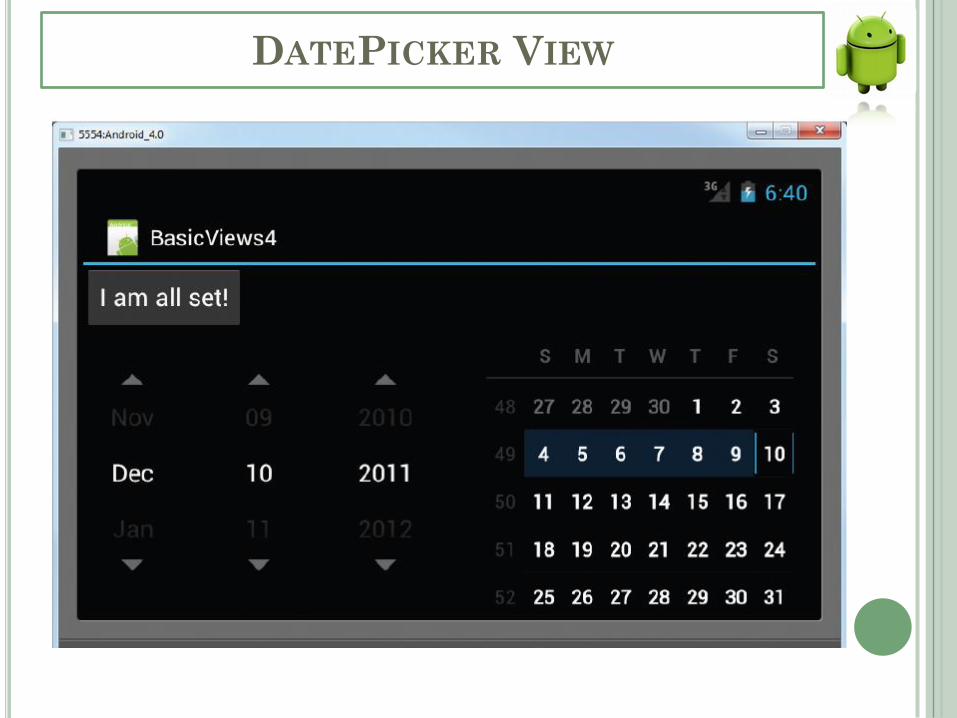
DATEPICKER VIEW
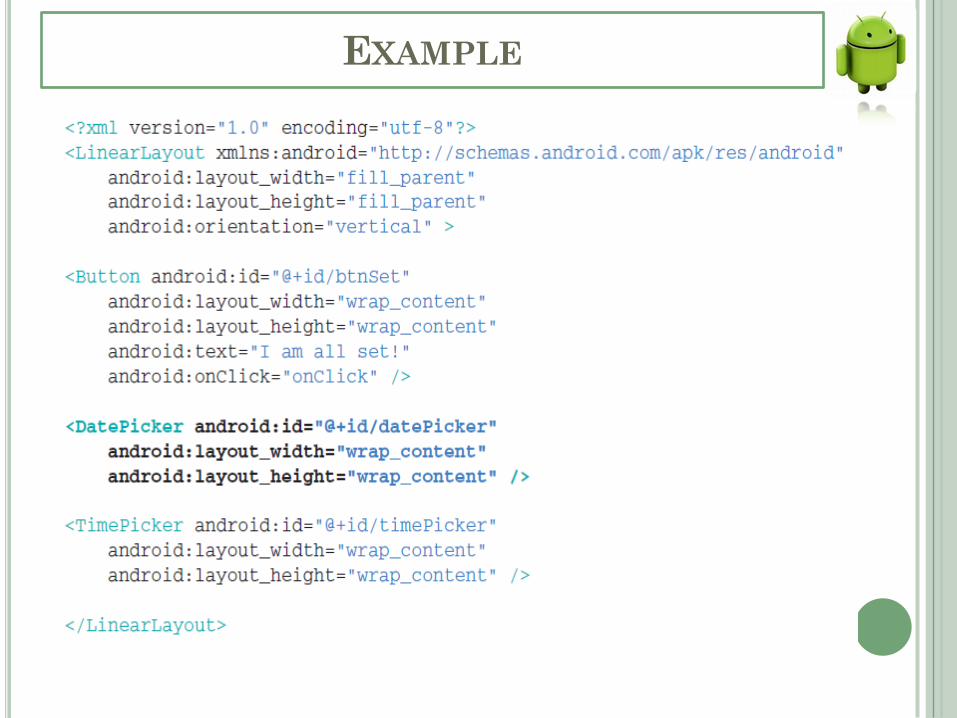
EXAMPLE
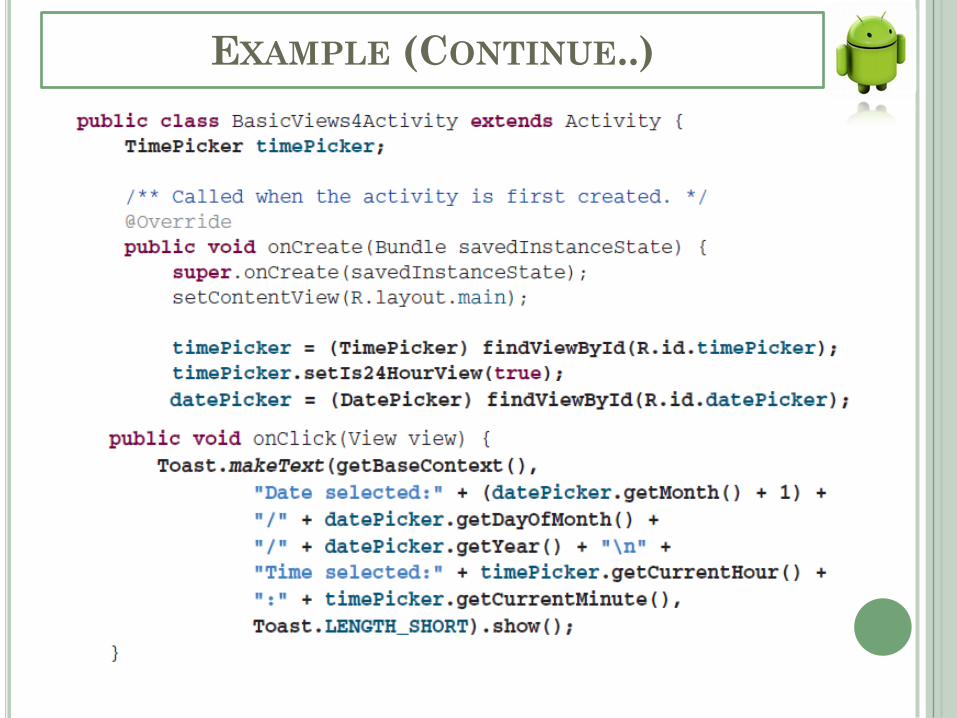
EXAMPLE (CONTINUE..)
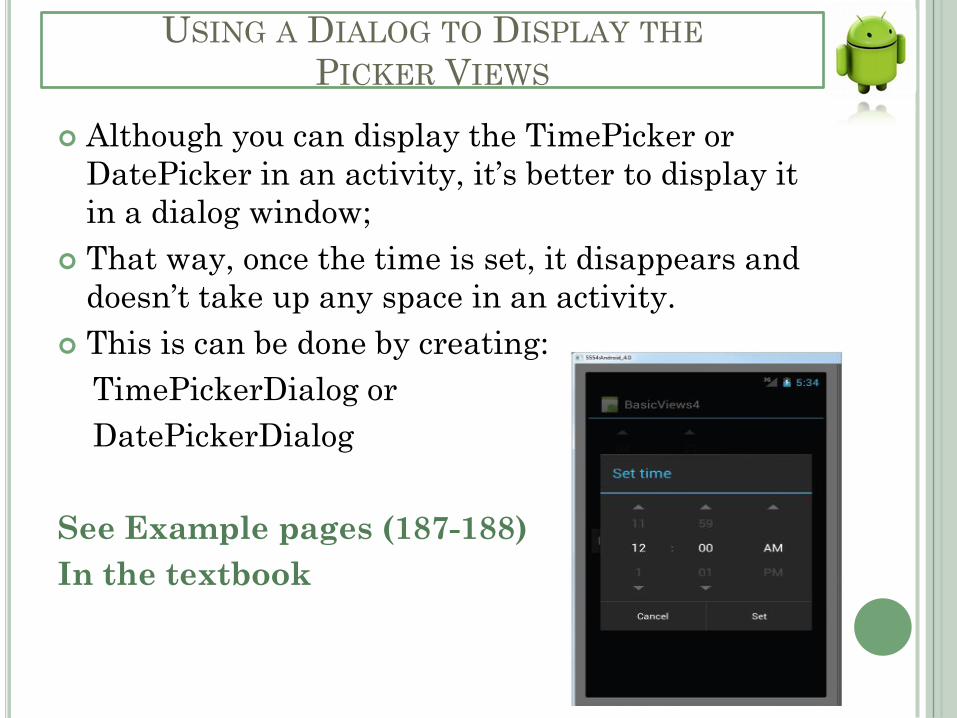
USING A DIALOG TO DISPLAY THE
PICKER VIEWS
Although you can display the TimePicker or
DatePicker in an activity, it’s better to display it
in a dialog window;
That way, once the time is set, it disappears and
doesn’t take up any space in an activity.
This is can be done by creating:
TimePickerDialog or
DatePickerDialog
See Example pages (187-188)
In the textbook
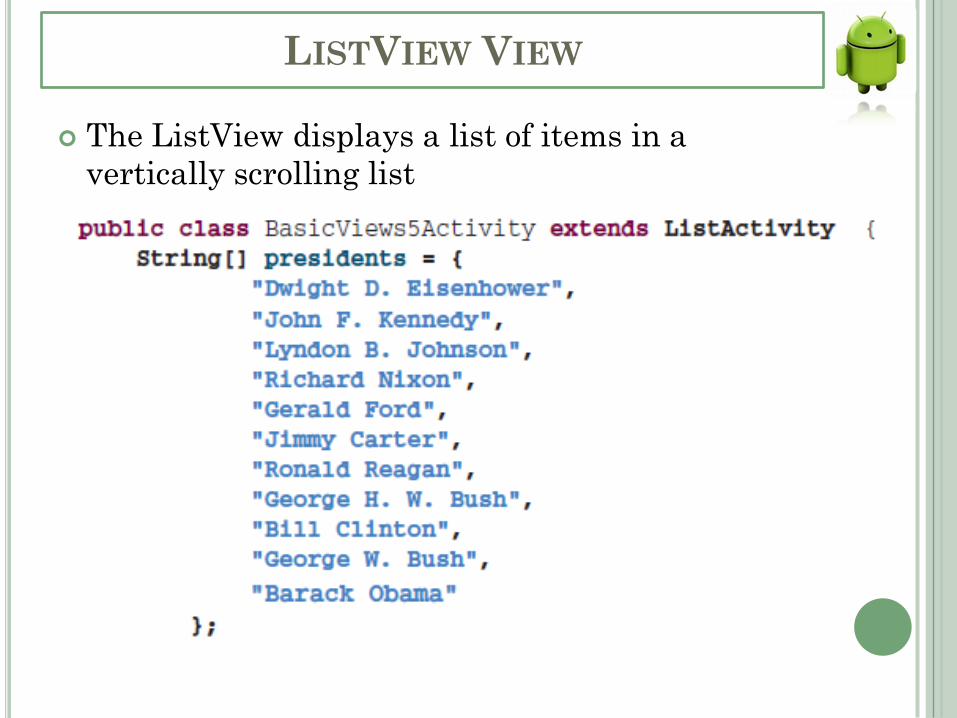
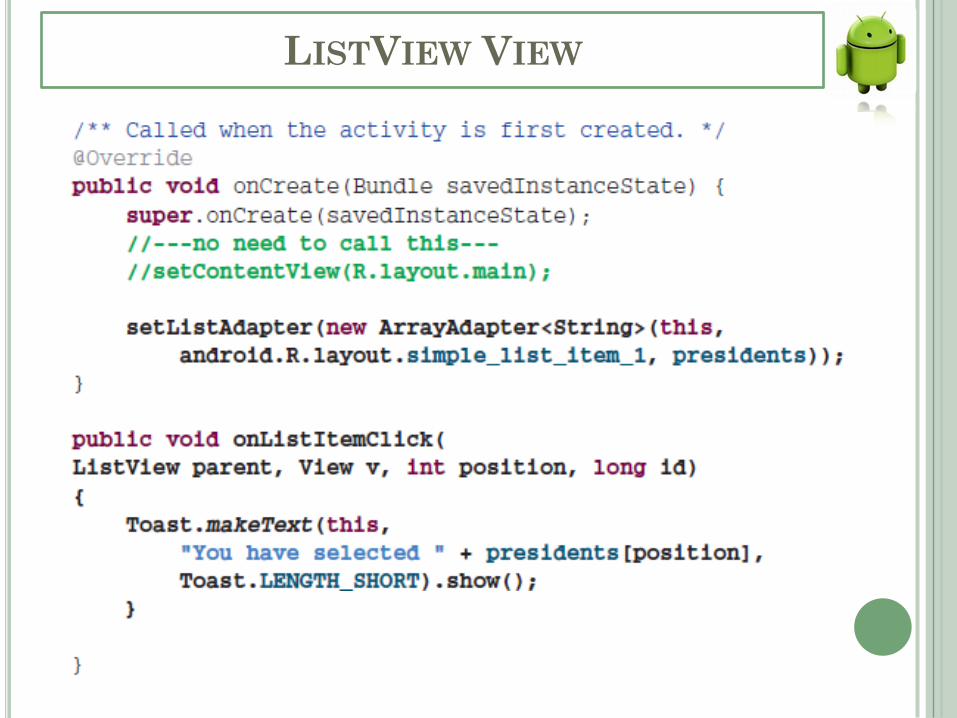
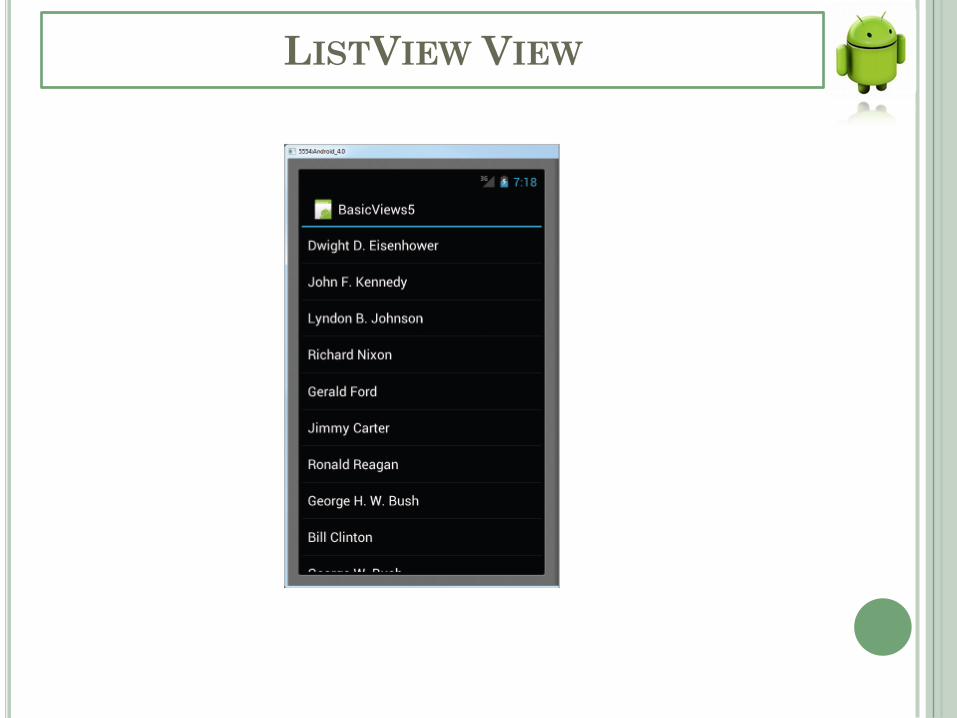
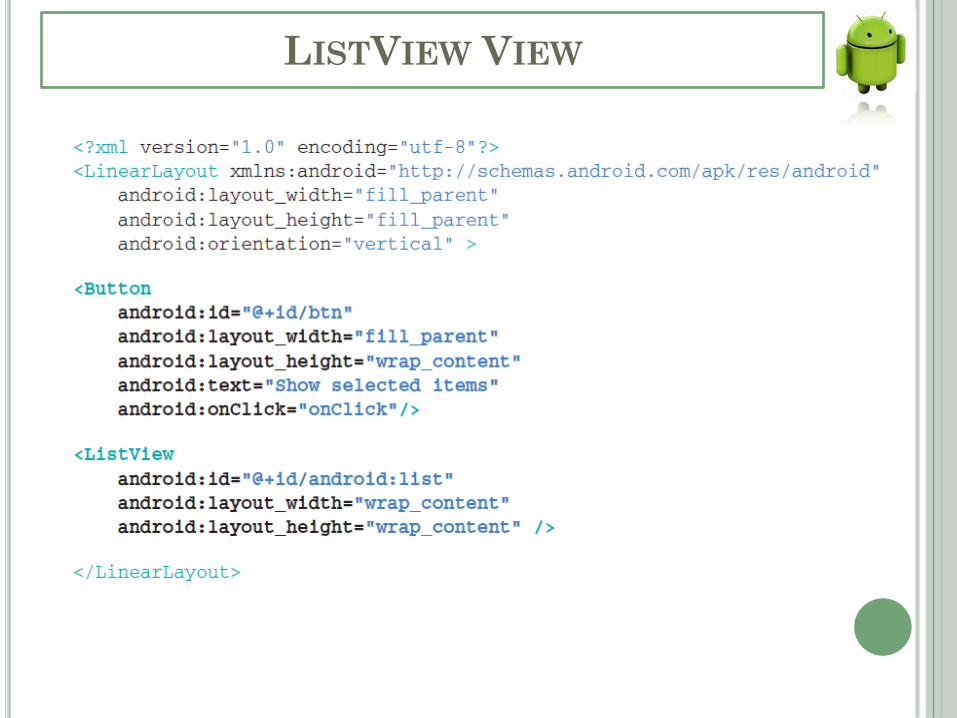
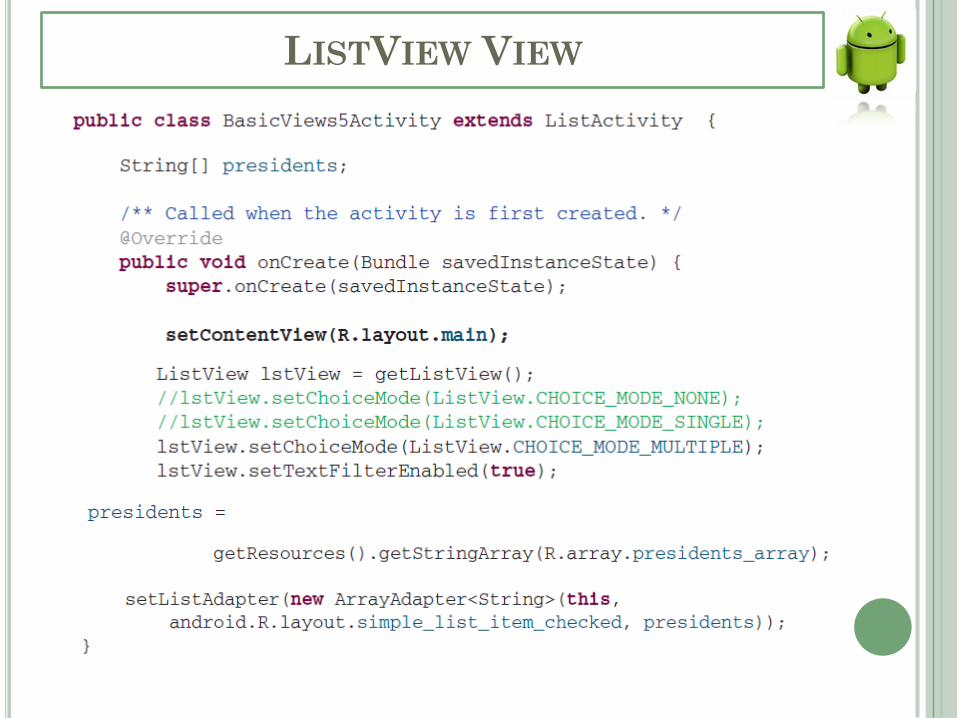
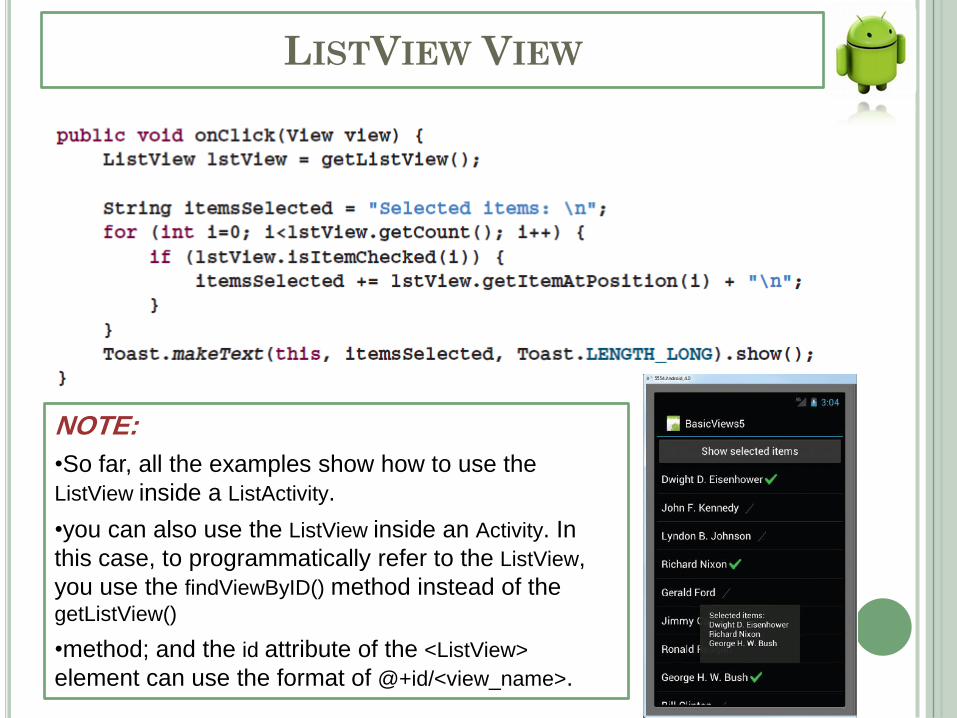
LISTVIEW VIEW
The ListView displays a list of items in a
vertically scrolling list
LISTVIEW VIEW
LISTVIEW VIEW
LISTVIEW VIEW
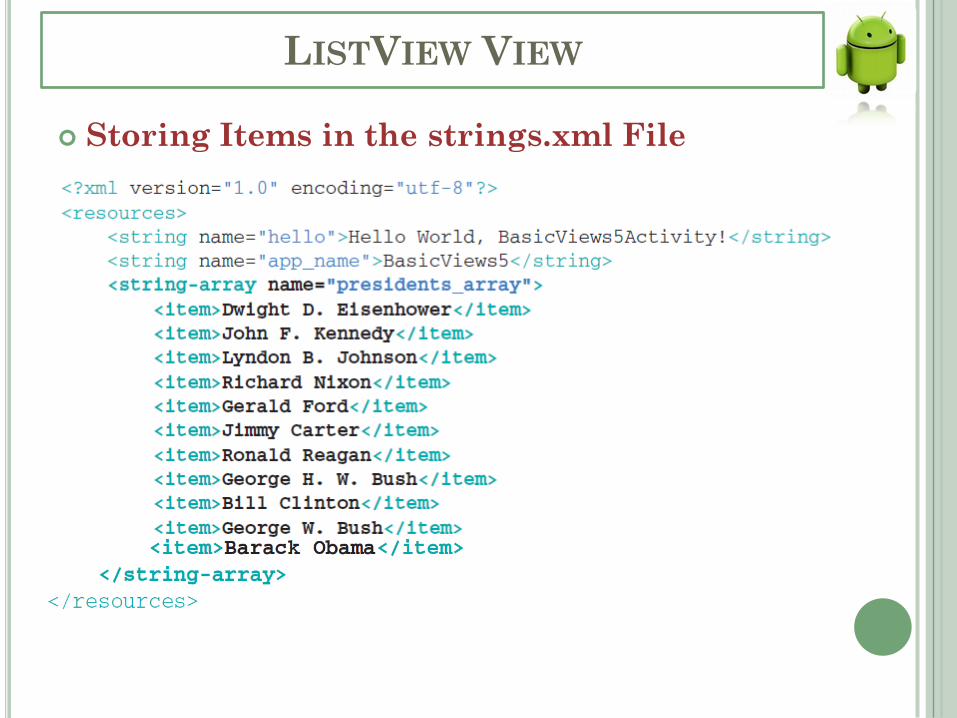
Storing Items in the strings.xml File
LISTVIEW VIEW
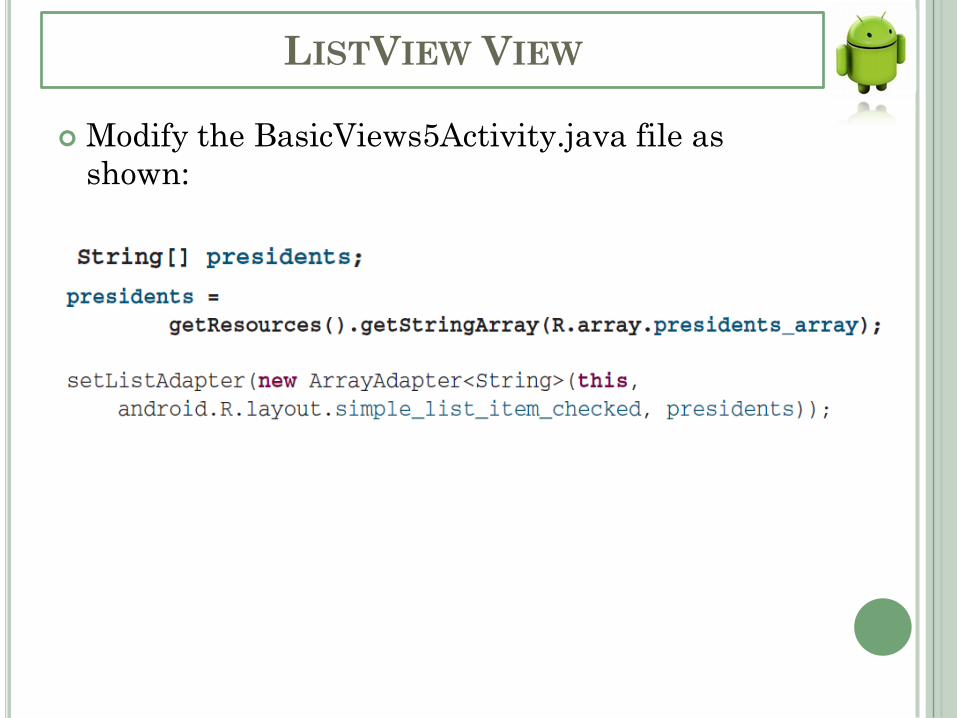
Modify the BasicViews5Activity.java file as
shown:
LISTVIEW VIEW
LISTVIEW VIEW
LISTVIEW VIEW
NOTE:
•So far, all the examples show how to use the
ListView inside a ListActivity.
•you can also use the ListView inside an Activity. In
this case, to programmatically refer to the ListView,
you use the findViewByID() method instead of the getListView()
•method; and the id attribute of the <ListView>
element can use the format of @+id/<view_name>.
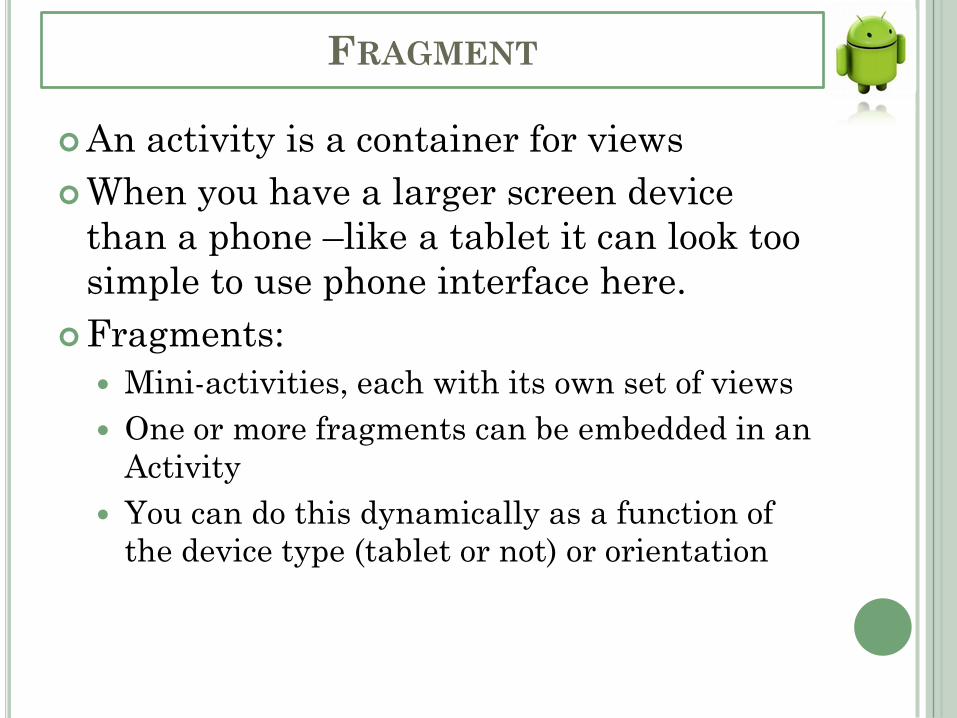
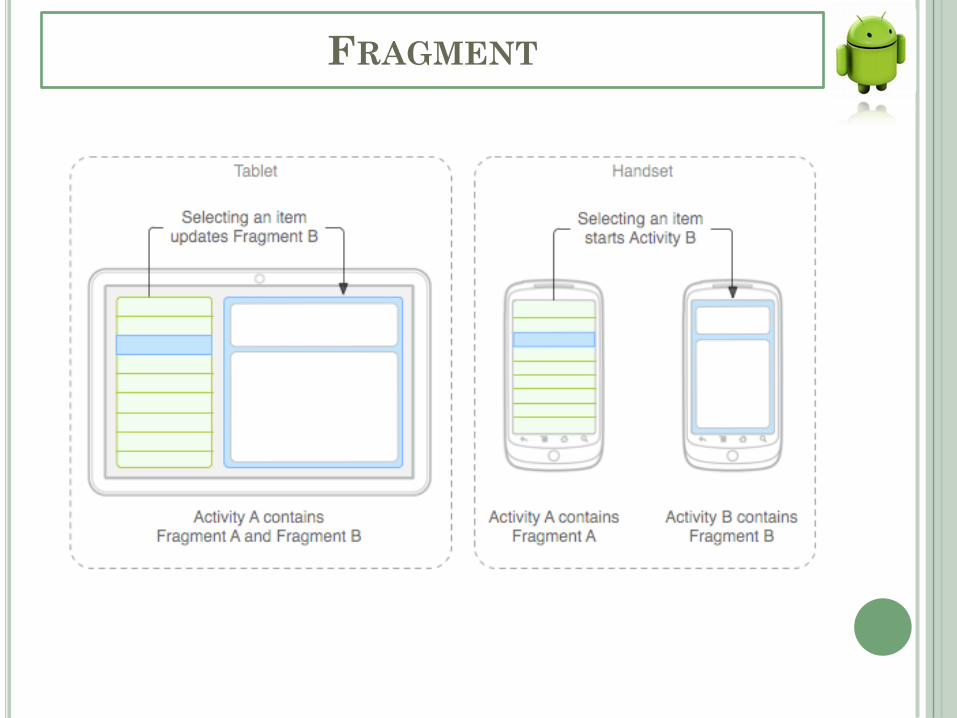
FRAGMENT
An activity is a container for views
When you have a larger screen device
than a phone –like a tablet it can look too
simple to use phone interface here.
Fragments:
Mini-activities, each with its own set of views
One or more fragments can be embedded in an
Activity
You can do this dynamically as a function of
the device type (tablet or not) or orientation
FRAGMENT
FRAGMENT
A Fragment represents a behavior or a portion of
user interface in an Activity.
You can combine multiple fragments in a single
activity to build a multi-pane UI and reuse a
fragment in multiple activities.
You can think of a fragment as a modular section
of an activity, which has its own lifecycle,
receives its own input events, and which you can
add or remove while the activity is running (sort
of like a "sub activity" that you can reuse in
different activities).
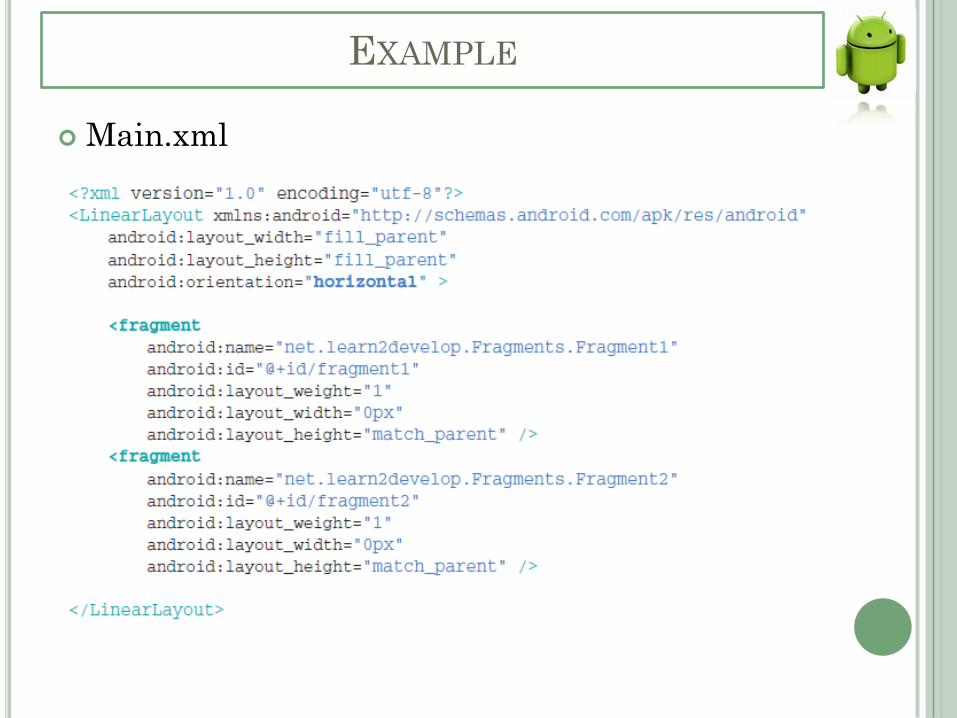
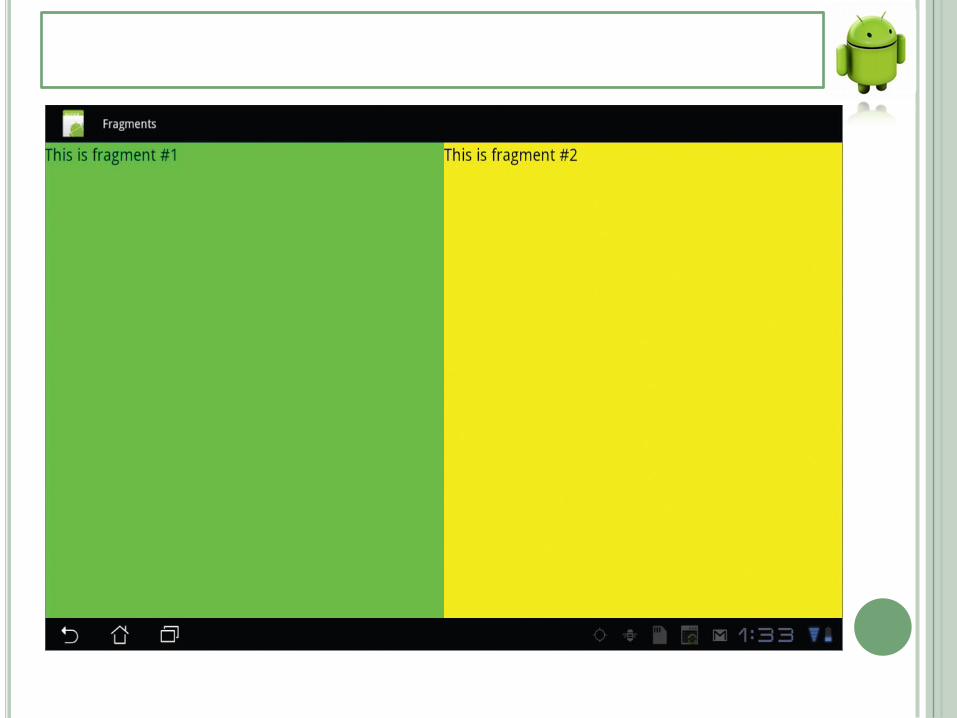
EXAMPLE
Main.xml
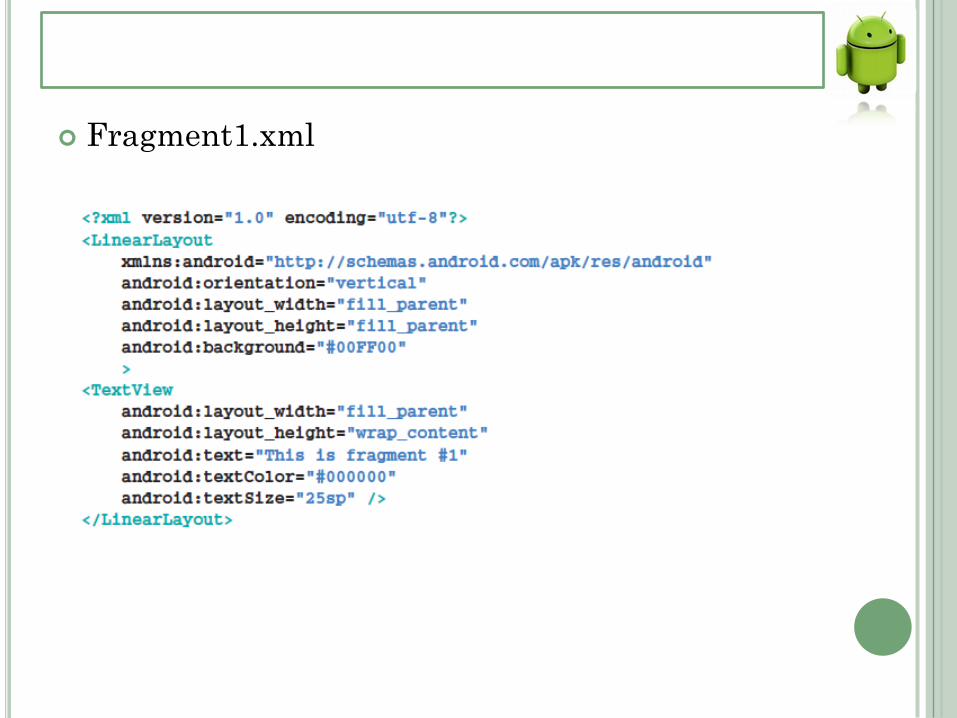
Fragment1.xml
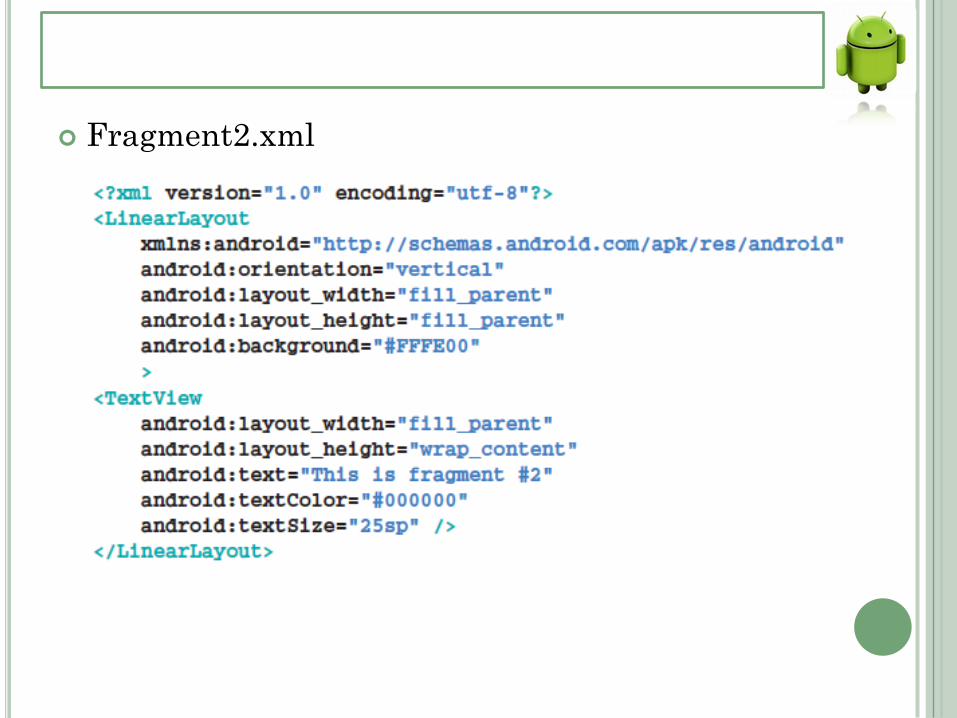
Fragment2.xml
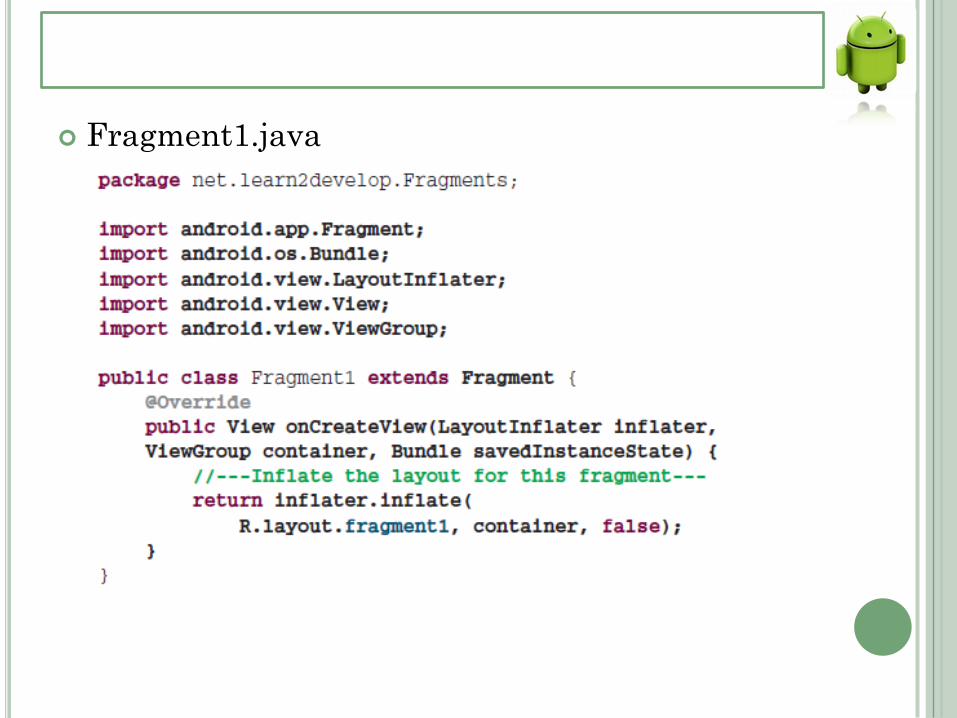
Fragment1.java
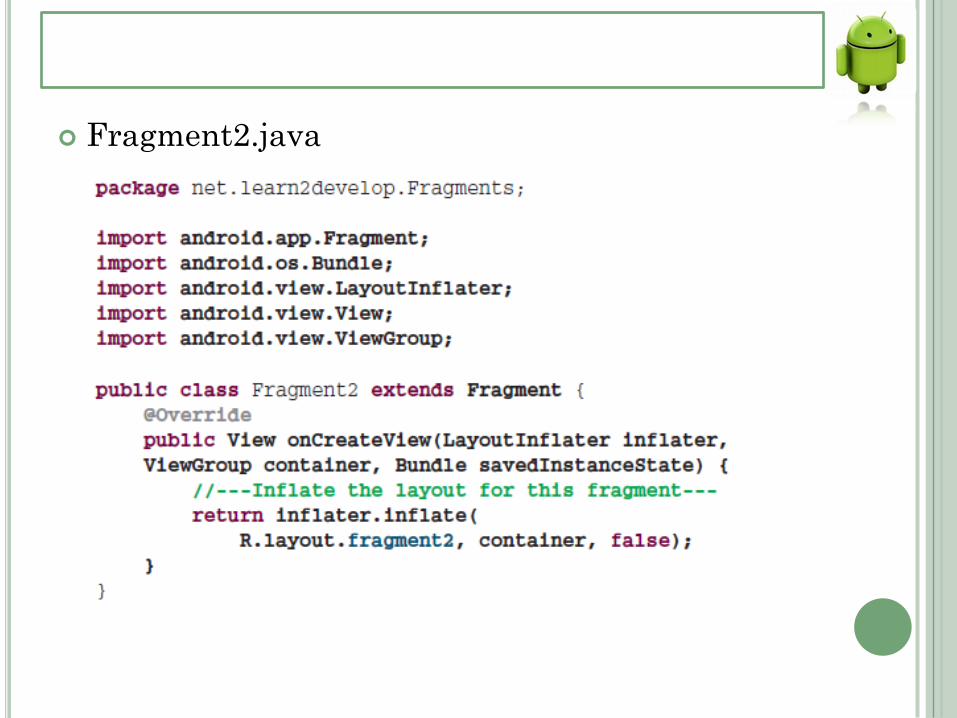
Fragment2.java
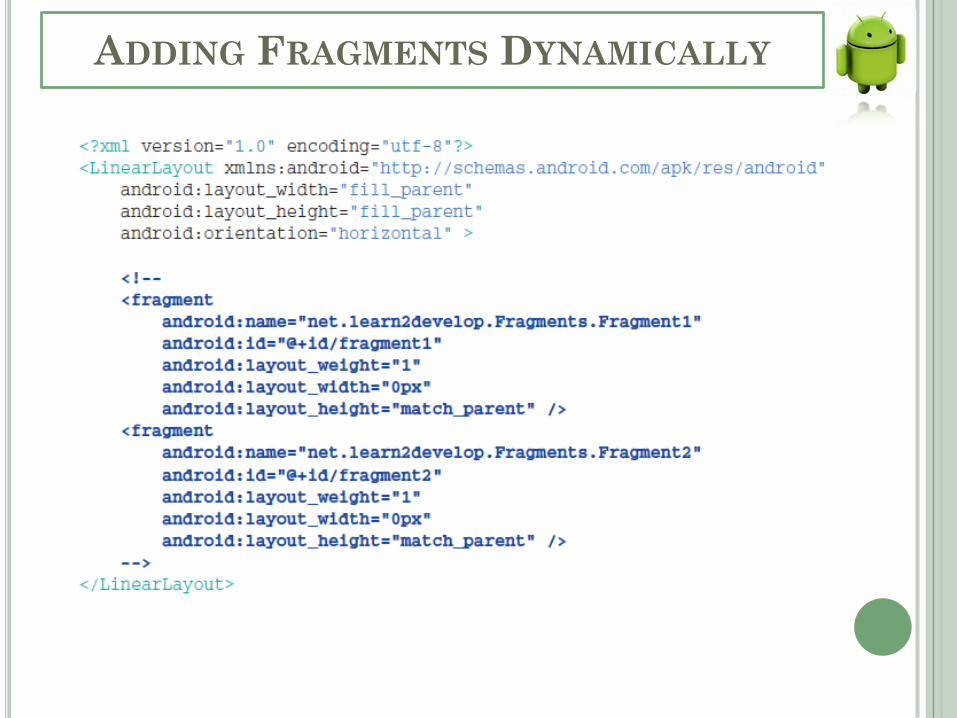
ADDING FRAGMENTS DYNAMICALLY
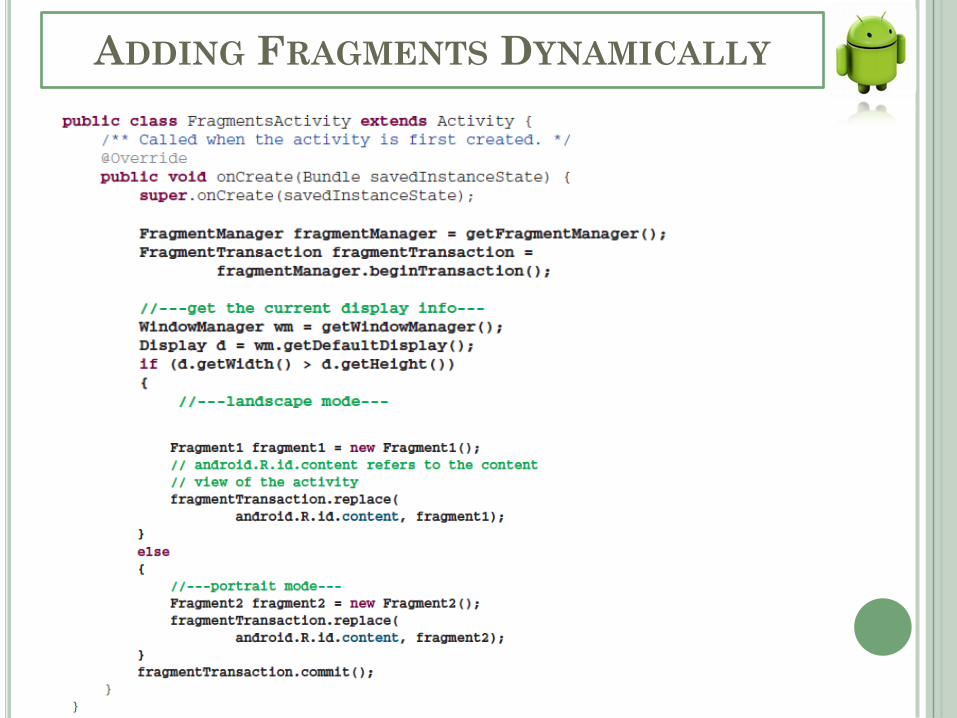
ADDING FRAGMENTS DYNAMICALLY
END
Any Questions
?