Embed Size (px)
Citation preview

Page 1 of 4
3940 Dr. Martin Luther King DriveSt. Louis, MO 63113
P/N 00911998 FORM NO. K1136 R12/07 ECO-I-007-07
INSTALLATION, OPERATION & MAINTENANCE DATA SHEET
“EBB” SERIES EMERGENCY BATTERY OPERATED FACTORY-SEALED LIGHTING FIXTURE
READ THIS SHEET CAREFULLY BEFORE BEGINNING INSTALLATION.
“EBB” SERIES EMERGENCY BATTERY OPERATED
FACTORY-SEALED LIGHTING FIXTURECAUTION:Before installing, make sure you are compliant with area classifications, failure to do so may result in bodily injury, death and property damage. Do not attempt installation until you are familiar with the following procedures. All installation must comply with the applicable Electrical Code.
Make sure that the circuit is de-energized before starting installation or maintenance.
Verify that the installation is grounded. Failure to ground will create electrical shock hazards, which can cause serious injury and or death.
Technical information, advice and recommendations contained in these documents is based upon information that Killark believes to be reliable. All the information and advice contained in these documents is intended for use only by persons having been trained and possessing the requisite skill and know-how and to be used by such persons only at their own discretion and risk. The nature of these instructions is informative only and does not cover all of the details, variations or combinations in which this equipment may be used, its storage, delivery, installation, check out, safe operation and maintenance. Since conditions of use of the product are outside of the care, custody and control of Killark, the purchaser should determine the suitability of the product for his intended use, and assumes all risk and liability whatsoever in connection therewith.
Page 2 of 4
3940 Dr. Martin Luther King DriveSt. Louis, MO 63113
P/N 00911998 FORM NO. K1136 R12/07 ECO-I-007-07
1. IMPORTANT SAFEGUARDS READ AND FOLLOW ALL SAFETY
INSTRUCTIONS:
1. Do not use this equipment for other than the intended use as specified on the equipment nameplate.
2. Turn OFF the supplying circuit before beginning installation or performing any maintenance, including re-lamping. UNIT MUST BE MOVED TO A NON-HAZARDOUS LOCATION BEFORE MAINTENANCE, INCLUDING, RELAMPING, HAS BEGUN. Service should be performed by qualified service personnel.
3. Do not use outdoors. 4. Do not mount near gas or electric heaters. 5. Do not attempt to service the batteries; they are
maintenance free. The batteries contain acid that cause burns to the skin and eyes. If acid is spilled on skin or in the eyes, flush with water and contact a physician immediately.
6. Batteries must be recycled or disposed of properly.
7. Equipment should be mounted in locations and at heights where it will not readily be subjected to tampering by un-authorized personnel.
8. The use of accessory equipment not recommended by the manufacturer; as it may cause an unsafe condition. CAUTION: Halogen cycle lamps may be used in this equipment. To avoid shattering: do not operate lamp in excess of rated voltage; protect lamp against abrasion, scratches and liquids when lamp is operating. Dispose of lamp properly.
9. See unit nameplate for specific hazardous location suitability and specific supply wire (minimum temperature rating). Do not operate this unit if the ambient temperature exceeds the rating shown.WARNING: Do not operate this unit on an ungrounded system.
NOTE: All installations must comply with the applicable local and/or National Electrical Code.
Page 3 of 4
3940 Dr. Martin Luther King DriveSt. Louis, MO 63113
P/N 00911998 FORM NO. K1136 R12/07 ECO-I-007-07
2. INSTALLATION:
1. Install unit’s mounting accessory per instructions supplied with the mount.
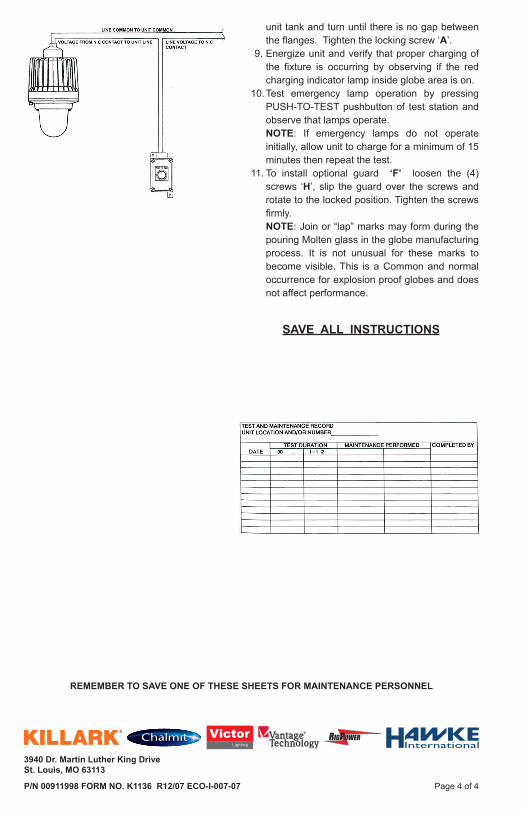
2. Install unit’s pushbutton test station per instructions supplied with the station. Station must be wired to fixture mount to provide a method of disconnecting the supply source from the unit. An example of how this can be completed is shown in wire schematic in illustrations.
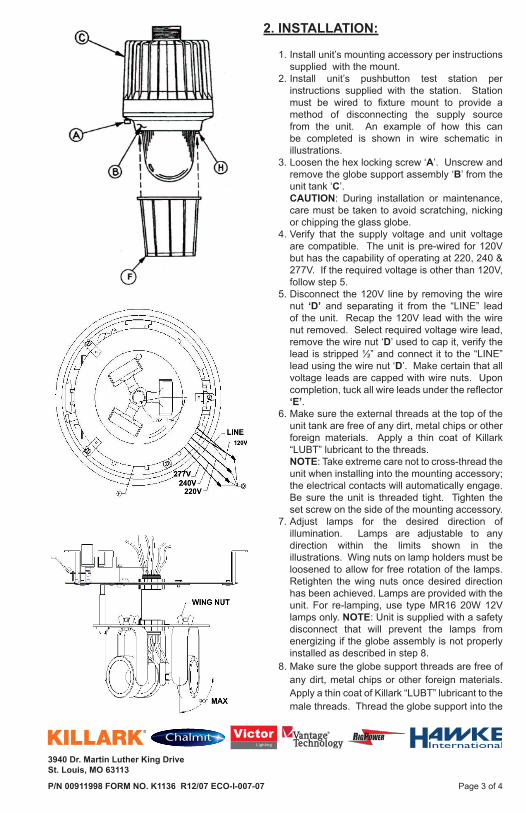
3. Loosen the hex locking screw ‘A’. Unscrew and remove the globe support assembly ‘B’ from the unit tank ‘C’. CAUTION: During installation or maintenance, care must be taken to avoid scratching, nicking or chipping the glass globe.
4. Verify that the supply voltage and unit voltage are compatible. The unit is pre-wired for 120V but has the capability of operating at 220, 240 & 277V. If the required voltage is other than 120V, follow step 5.
5. Disconnect the 120V line by removing the wire nut ‘D’ and separating it from the “LINE” lead of the unit. Recap the 120V lead with the wire nut removed. Select required voltage wire lead, remove the wire nut ‘D’ used to cap it, verify the lead is stripped ½” and connect it to the “LINE” lead using the wire nut ‘D’. Make certain that all voltage leads are capped with wire nuts. Upon completion, tuck all wire leads under the reflector ‘E’.
6. Make sure the external threads at the top of the unit tank are free of any dirt, metal chips or other foreign materials. Apply a thin coat of Killark “LUBT” lubricant to the threads. NOTE: Take extreme care not to cross-thread the unit when installing into the mounting accessory; the electrical contacts will automatically engage. Be sure the unit is threaded tight. Tighten the set screw on the side of the mounting accessory.
7. Adjust lamps for the desired direction of illumination. Lamps are adjustable to any direction within the limits shown in the illustrations. Wing nuts on lamp holders must be loosened to allow for free rotation of the lamps. Retighten the wing nuts once desired direction has been achieved. Lamps are provided with the unit. For re-lamping, use type MR16 20W 12V lamps only. NOTE: Unit is supplied with a safety disconnect that will prevent the lamps from energizing if the globe assembly is not properly installed as described in step 8.
8. Make sure the globe support threads are free of any dirt, metal chips or other foreign materials. Apply a thin coat of Killark “LUBT” lubricant to the male threads. Thread the globe support into the
3940 Dr. Martin Luther King DriveSt. Louis, MO 63113
P/N 00911998 FORM NO. K1136 R12/07 ECO-I-007-07 Page 4 of 4
unit tank and turn until there is no gap between the flanges. Tighten the locking screw ‘A’.
9. Energize unit and verify that proper charging of the fixture is occurring by observing if the red charging indicator lamp inside globe area is on.
10. Test emergency lamp operation by pressing PUSH-TO-TEST pushbutton of test station and observe that lamps operate. NOTE: If emergency lamps do not operate initially, allow unit to charge for a minimum of 15 minutes then repeat the test.
11. To install optional guard ‘F’ loosen the (4) screws ‘H’, slip the guard over the screws and rotate to the locked position. Tighten the screws firmly.NOTE: Join or “lap” marks may form during the pouring Molten glass in the globe manufacturing process. It is not unusual for these marks to become visible. This is a Common and normal occurrence for explosion proof globes and does not affect performance.
SAVE ALL INSTRUCTIONS
REMEMBER TO SAVE ONE OF THESE SHEETS FOR MAINTENANCE PERSONNEL