Embed Size (px)
Citation preview
1 | P a g e
Presented by the Saskatchewan Wildlife Federation
Archery in
Saskatchewan Schools An Instructional Resource
Aligned with Saskatchewan Curriculum
Grades 4-12
July, 2013
2 | P a g e
Presented by the Saskatchewan Wildlife Federation
Resource Intent
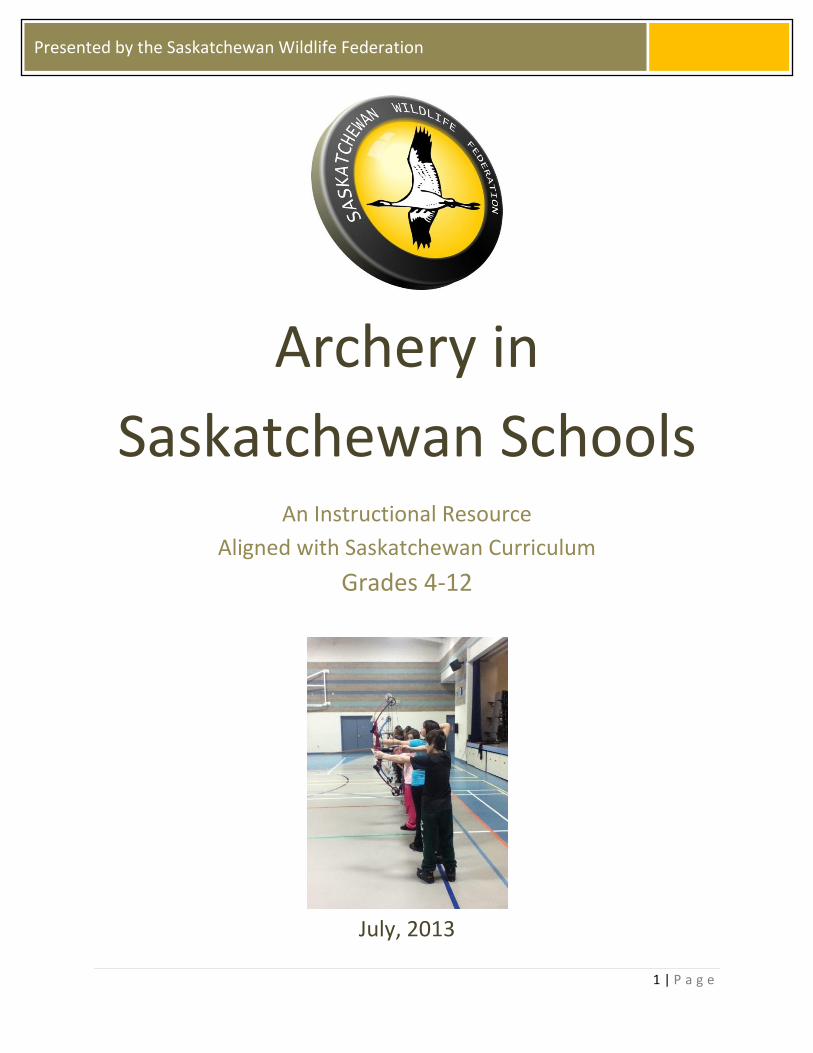
The Saskatchewan Wildlife Federation believes in the value of archery as a way for Saskatchewan students to develop strong skills, both academically and socially. The intention of this document is to connect archery instruction with Saskatchewan curricular outcomes, and provide lesson plan suggestions, assessment ideas and social skill development for students in grades four through twelve. Regardless of the year you choose to introduce archery to your students, this guide provides a sequential, developmental approach with curricular connections at each grade level, designed to promote archery as an enjoyable lifetime activity.
Acknowledgements
This resource would not have been possible without the full support and willingness to share resources by the National Archery in the Schools Program. Their various curricular documents provided much of the foundation for this instructional resource.
Thanks also to Randy Steciuk, who shared his insight and experience, enabling this document to be responsive, accurate and engaging.
©July 2013. All rights reserved. Permission is granted to reproduce activities and information from this
document for classroom use only.
Consultant: Katie White Photography: Randy Steciuk

3 | P a g e
Presented by the Saskatchewan Wildlife Federation
Contents Resource Overview 3
Equipment 5 Assessment and Ongoing Activities 6 A Brief History of Archery 7 Scoring 12 Archery Range Rules 14 Archery Safety Procedures 15
Lesson Plans 16
Lesson One: String Bow Success Activity One: Introduction to Archery 17 Activity Two: Eleven Steps to Archery Success 22 Lesson Two: Shoot Straight, Be Safe Activity One: Safety Procedures 26 Activity Two: Applying Safety Skills to Practice Time 29 Lesson Three: The History of Archery 31 Lesson Four: Practice Makes Perfect Activity One: Communication, Cooperation, Rules and Respect 37 Activity Two: The Benefits of Practice 45 Activity Three: Competition and Sportsmanship 48 Lesson Five: Applying Our Learning Activity One: Let’s Play! 51 Activity Two: Benefits of Exercise 53 Activity Three: Persuading Others 58 Lesson Six: Measuring Skills and Understanding 63
Appendix of Resources 65
Assessment Rubrics Listening and Following Directions 66 Individual Skill Development 67 Health-Related Fitness Development 68 Playing the Game 70 Safety 72 Group Skills 73 Archery Journal 74 Informational Text 75 Persuasive Text 77 Teaching Archery to Persons with Disabilities 79 Archery Theory and Assistive Devices 88 Core Exercises 94
Glossary of Archery Terms 97 Sample Games and Activities 99
References and Additional Resources 102
4 | P a g e
Presented by the Saskatchewan Wildlife Federation
Resource Overview
This instructional resource has been designed to support Saskatchewan Curricula in Grades 4-12. The resource provides a valuable support to the English Language Arts, Physical Education, Health Education, Mathematics, Science, Wellness, Physics, Native Studies and Social Studies curricular documents but is not intended to replace these curricula. The resource consists of lesson plans and corresponding support materials and appendices, which address many outcomes at all grade levels. Regardless of when instruction begins for students, the lessons are designed to connect to specific outcomes at all grade levels.
Please note: Anyone instructing archery must be safety certified with a Basic Archery Instructor certification.
Below are a list of Enabling Knowledge, Skills and Processes developed through NASP:
Enabling knowledge
Safety strategies
Archery equipment
Archery techniques
Basic shooting form
Archery rules
Scoring procedure
Archery etiquette and sportsmanship
Archery history
Physical, social and emotional benefits of archery
Enabling skills and processes:
Research skills
Listening skills
Observation skills
Hand-eye coordination
Refinement of motor skills
Self-evaluation
Following directions
Scoring
Skill improvement through practice
Effective group participation
Communication skills
Cooperation skills
Practicing responsibility and respect
5 | P a g e
Presented by the Saskatchewan Wildlife Federation
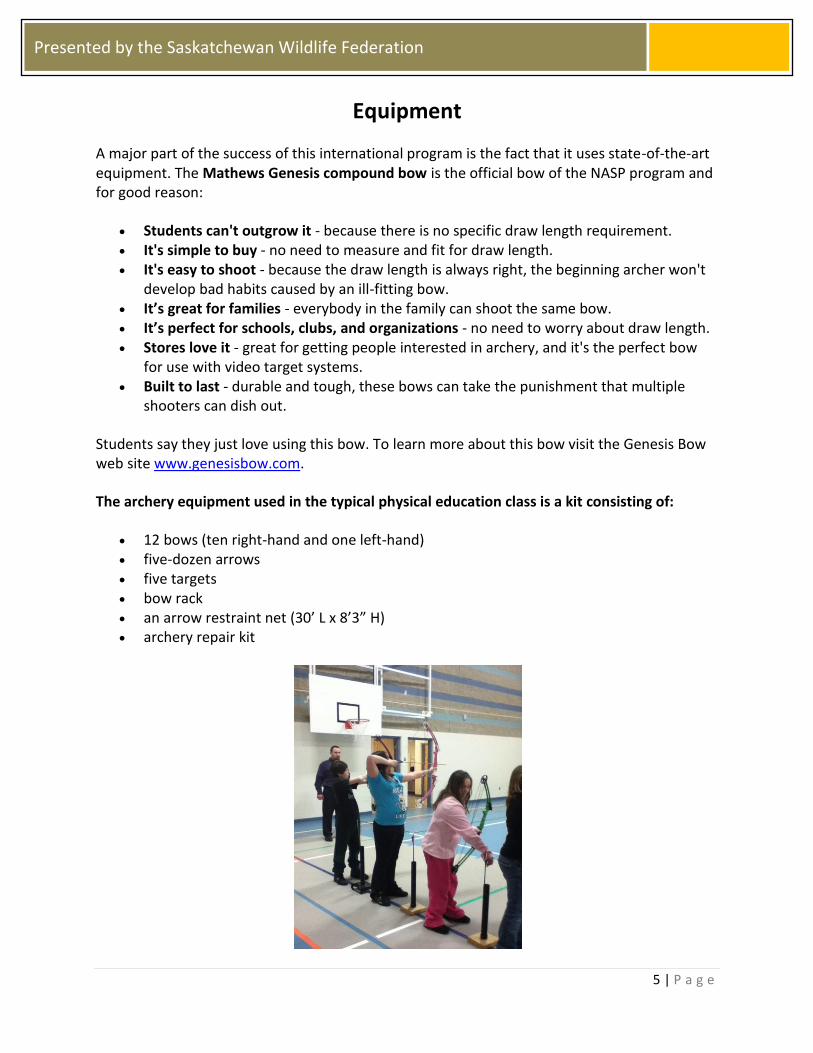
Equipment
A major part of the success of this international program is the fact that it uses state-of-the-art equipment. The Mathews Genesis compound bow is the official bow of the NASP program and for good reason:
Students can't outgrow it - because there is no specific draw length requirement. It's simple to buy - no need to measure and fit for draw length. It's easy to shoot - because the draw length is always right, the beginning archer won't
develop bad habits caused by an ill-fitting bow. It’s great for families - everybody in the family can shoot the same bow. It’s perfect for schools, clubs, and organizations - no need to worry about draw length. Stores love it - great for getting people interested in archery, and it's the perfect bow
for use with video target systems. Built to last - durable and tough, these bows can take the punishment that multiple
shooters can dish out.
Students say they just love using this bow. To learn more about this bow visit the Genesis Bow web site www.genesisbow.com.
The archery equipment used in the typical physical education class is a kit consisting of:
12 bows (ten right-hand and one left-hand) five-dozen arrows five targets bow rack an arrow restraint net (30’ L x 8’3” H) archery repair kit
6 | P a g e
Presented by the Saskatchewan Wildlife Federation
Assessment
Assessment requires thoughtful planning and implementation to both support the learning process and to inform teaching. All assessment of student achievement must be based on the outcomes in the provincial curriculum. Assessment involves the systematic collection of information about student learning and is used to:
Determine achievement of provincial curricula outcomes
Determine effectiveness of teaching strategies employed and plan for future instruction
Provide opportunity for student self-reflection on learning Included within this resource are different assessment tools and events that can be used to measure student progress. The instruments can be personalized to meet individual classroom needs. The rubrics provided are designed to capture the continuum of learning. This will help to determine where additional supports are need at each stage of learning. A variety of assessment events can be used to measure this continuum of learning. The rubrics are based on curricular outcomes and have four levels: Fully Meeting Grade Level Expectations with Enriched Understanding (EU), Fully Meeting Grade Level Expectations (FM), Mostly Meeting Grade Level Expectations (MM) and Not Yet Meeting Grade Level Expectations (NY). It is recommended that instruments such as the ones provided be used at several points in the learning process in order to determine progress. Variety and balance of assessment approaches are recommended when collecting information about student acquisition of knowledge and skills. The activities in this resource invite teachers to engage in formative assessment (assessment for the purpose of learning), feedback and, when appropriate, summative assessment (assessment for the purpose of reporting progress).
Suggested Ongoing Activities
The following ongoing activities are recommended to assist students in gaining a deeper understanding of the skills and understanding needed in order to be proficient in archery:
Journal Reflective questions are embedded in all lessons to facilitate deeper student understanding. Students can use a notebook to write and/or otherwise represent; to collect information and pictures relating to archery; to record and comment on games; and to share with students and other audiences.
Health-Related Fitness Activities and Logs Any number of activities relating to health-related fitness should be ongoing and accompany all archery instruction. Logs in which to record fitness appraisals as well as activities that build cardiovascular endurance, flexibility, muscular endurance, and muscular strength are essential parts of a strong archery program.
7 | P a g e
Presented by the Saskatchewan Wildlife Federation
A Brief History of Archery The bow and arrow are two of the oldest tools known to mankind, dating back to the Stone Age. As the bow and arrow became dominate, history began to change. Creating lore and legends of Attila, King of the Huns, Genghis Khan, Robin Hood and William Tell, the bow and arrow literally changed the world. Modern American archery history began in 1828 with the first organized recreational archery club formed in Philadelphia, growing to over six million archers today. Archery adapts easily to individual physical needs and archers face only the challenge of improving their own score, competing against others or testing their skills in pursuit of wild game. Excellent physical condition is not required for beginning archery classes. Upper body, shoulder and arm strength can be developed, as can hand-eye coordination, and both gross and fine motor skills. For a student, competitive shooting matches provide an opportunity to both compete against one’s self and to share in personal achievements, team spirit and team pride in competition with others. Participating with a team can create feelings of unity between students and their peers and allows students to develop disciplined self-control. Students’ knowledge of shooting can enhance their enjoyment of the outdoors, thanks to the many options that shooting presents. * * * * * * * * * * * Experts believe the bow and arrow are one of the three most important inventions in human history – right alongside the discovery of fire and the development of speech. Once, sticks and stones were human’s only weapons against bigger, stronger and faster predators. But armed with the bow and arrow, humans suddenly became the most efficient hunters on Earth, able to shoot prey accurately from a safe distance. The bow and arrow gave humans greater protection, a diet richer in protein, and also a more abundant supply of the raw materials like bone, sinew and hide, upon which early people depended for survival. The bow and arrow were crucially important to human survival at one time. Even though guns replaced bows as a weapon almost 400 years ago, archery has evolved as a sport because it is now a unique and rewarding challenge. There are now at least five million archers in the English-speaking world. Today, the “twang” of the bowstring can be heard at schools, municipal parks, club ranges and in the programs of various youth groups. The reasons for this popularity are simple. It is a sport that can be practiced at any time of the year, indoors or out, in any part of the world, with friends or alone. It is relatively inexpensive. Unlike athletes in many other sports, an archer can improve with age, since endurance and skill are far more important than brute strength. Archers in their 80s have won competitions!
8 | P a g e
Presented by the Saskatchewan Wildlife Federation
Cave paintings, such as those discovered in Eastern Spain, prove that humankind has hunted with a bow and arrow for at least 12,000 years. Ancient arrowheads found at Bir-El-Atir in Tunisia date back even further, some as early as forty thousand years ago. 3500 BC: The ancient Egyptians used two kinds of wooden longbows, the simple one-piece or “self: bow and the double recurve type. They also used the shorter composite bows, made of Oryx horn and wood. Many of these bows were imported from master boyers in Syria and Asia Minor. The Egyptians’ leaf-shaped and diamond-shaped arrowheads were made of flint and later bronze. 1700 BC: The Assyrians, who dominated the Middle East for centuries, were the first to use mounted archers. Their powerful composite bows were uniquely triangular in shape and short enough to be easily handled by archers on horseback. 1200 BC: The Hittites’ skillful use of archery from chariots was an effective form of mobile warfare. Their light, fast chariots enabled them to out-maneuver and out-shoot their opponents in many Middle Eastern battles. 100 BC: Although the Romans were great soldiers, unparalleled in hand-to-hand combat, they were ineffective archers. To compensate for this, they hired professional bowmen from nations within their frontiers, who fought under the Latin name: Cohortes Sagittariorum. AD 100: The Parthians were Asiatic horse-archers who invented the art of twisting around in the saddle and shooting backward while at full gallop. Known as the “Parthian Shot,” this acrobatic maneuver enabled the lightly armored Parthians to ride swiftly through enemy ranks, shooting arrows in any direction. AD 1066: The Vikings introduced the longbow to the French when they settled in Normandy in the 8th century. The Normans became expert bowmen, and the archers led by William, Duke of Normandy, use the longbow to defeat King Harold’s Saxon army at the Battle of Hastings in 1066. The superiority of the longbow persuaded later generations of Englishmen to adopt it as their main weapon. AD 1200: The Mongols, armed with powerful composite bows and iron-tipped arrows, conquered most of the world known to them. All of Asia and Europe trembled before these fierce, disciplined, nomadic horse-archers, who, led by the military genius, Genghis Khan, perfected the art of mobile warfare. AD 1400: English archers, shooting the mighty longbow and “cloth yard” (37 inches) shafts, gained everlasting fame and respect in the 13th and 14th centuries by defeating the French in such historical battles as Crecy, Potiers and Agincourt. AD 1600: The bow and arrow began as a weapon in ancient Japan, but by the 17th century, had evolved into a ceremonial archery or kyudo. Still very much a tradition, archers shoot arrows
9 | P a g e
Presented by the Saskatchewan Wildlife Federation
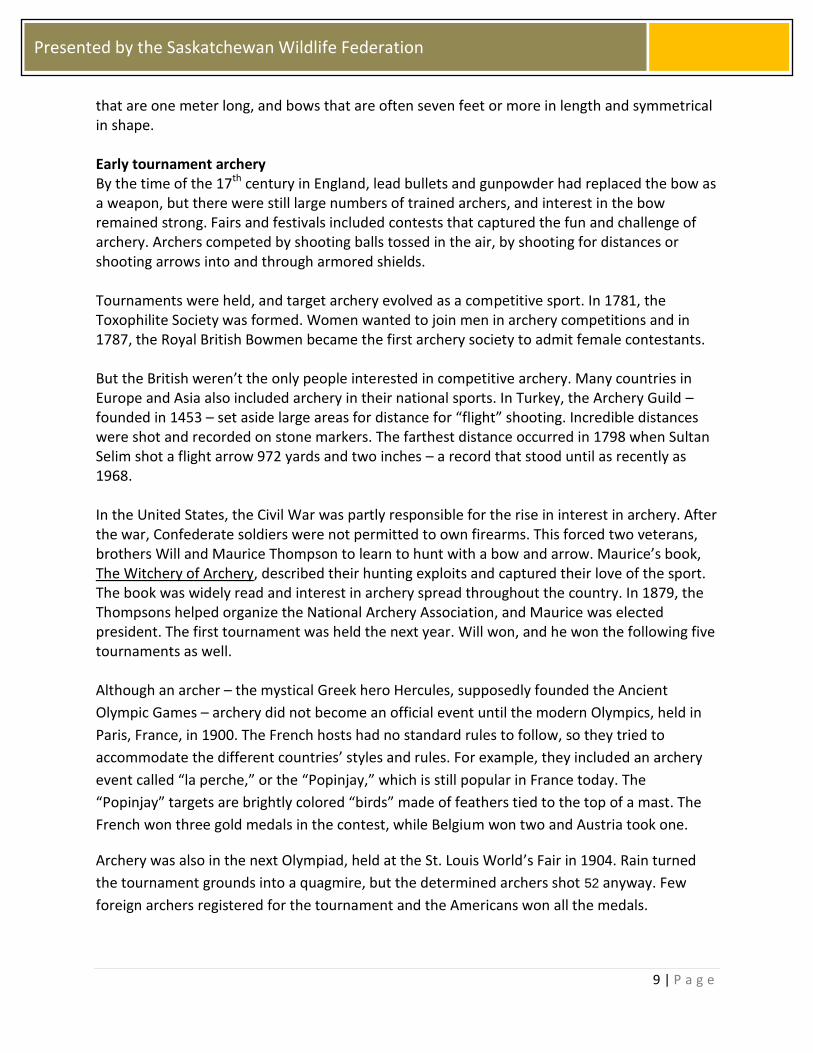
that are one meter long, and bows that are often seven feet or more in length and symmetrical in shape. Early tournament archery By the time of the 17th century in England, lead bullets and gunpowder had replaced the bow as a weapon, but there were still large numbers of trained archers, and interest in the bow remained strong. Fairs and festivals included contests that captured the fun and challenge of archery. Archers competed by shooting balls tossed in the air, by shooting for distances or shooting arrows into and through armored shields. Tournaments were held, and target archery evolved as a competitive sport. In 1781, the Toxophilite Society was formed. Women wanted to join men in archery competitions and in 1787, the Royal British Bowmen became the first archery society to admit female contestants. But the British weren’t the only people interested in competitive archery. Many countries in Europe and Asia also included archery in their national sports. In Turkey, the Archery Guild – founded in 1453 – set aside large areas for distance for “flight” shooting. Incredible distances were shot and recorded on stone markers. The farthest distance occurred in 1798 when Sultan Selim shot a flight arrow 972 yards and two inches – a record that stood until as recently as 1968. In the United States, the Civil War was partly responsible for the rise in interest in archery. After the war, Confederate soldiers were not permitted to own firearms. This forced two veterans, brothers Will and Maurice Thompson to learn to hunt with a bow and arrow. Maurice’s book, The Witchery of Archery, described their hunting exploits and captured their love of the sport. The book was widely read and interest in archery spread throughout the country. In 1879, the Thompsons helped organize the National Archery Association, and Maurice was elected president. The first tournament was held the next year. Will won, and he won the following five tournaments as well. Although an archer – the mystical Greek hero Hercules, supposedly founded the Ancient
Olympic Games – archery did not become an official event until the modern Olympics, held in
Paris, France, in 1900. The French hosts had no standard rules to follow, so they tried to
accommodate the different countries’ styles and rules. For example, they included an archery
event called “la perche,” or the “Popinjay,” which is still popular in France today. The
“Popinjay” targets are brightly colored “birds” made of feathers tied to the top of a mast. The
French won three gold medals in the contest, while Belgium won two and Austria took one.
Archery was also in the next Olympiad, held at the St. Louis World’s Fair in 1904. Rain turned
the tournament grounds into a quagmire, but the determined archers shot 52 anyway. Few
foreign archers registered for the tournament and the Americans won all the medals.

10 | P a g e
Presented by the Saskatchewan Wildlife Federation
Competitors donned their best sporting finery for the 1908 Olympics in England. As the chief archery authority of the host country, the Royal Toxophilite Society set the rules for the competition, which included 25 ladies and 15 gentlemen from Great Britain, 11 gentlemen from France and one American. The rules established by the Society covered more than shooting. Manners on the field were also a concern. For example, Rule #8 read: “The gentlemen will not be allowed to smoke at the ladies’ targets.” Great Britain won six medals that year, France four, and the lone American gentlemen, Henry Richardson, returned home with a bronze. Sweden chose not to include archery in the 1912 Stockholm Olympics and in 1916, due to World War I, the Olympics were not held. But in 1920, when the games were held in Belgium, the host country included archery because it was popular there. “Popinjay” was a major event. Not surprisingly, Belgium swept six medals, with the Netherlands, France and England each winning one. After the 1920 Olympiad, archery was not a part of the Olympic Games for more than a half century. Archery enthusiasts, anxious to compete in international tournaments, knew that universal rules needed to be established. The breakthrough came in 1931, when Poland hosted the first international archery tournament, and with the help of France and Poland organized the Federation Internationale de Tir A L’Arc. Now known as FITA, it is the central authority for international archery competition today. Later tournament archery By the 1972 Olympics in Munich, FITA rules were recognized throughout the world, and the “FITA round” was adopted for Olympic competition. In the single FITA round, men competitors shot six sets of arrows from distances of 90, 70, 50, and 30 meters; the women, the same number of arrows from 70, 60, 50, and 30 meters. Olympic archers shot two FITA rounds in the four days’ competition, and the top three men and women with the highest combined totals were awarded gold, silver or bronze medals, respectively. This format continued unchanged in the ensuing Olympics, held in 1976, 1980 and 1984. Then, in the 1988 Games, the competition was changed to feature two new rounds – the Grand FITA and Grand FITA Team Event. The Grand FITA round consisted of an Open Round shot as a FITA round, and the Finals Round, in which the 24 men and 24 women with the highest scores in the Open FITA compete. The Finals Round was an elimination in which archers shot nine arrows from each of four distances of the FITA Round. After 36 arrows, six archers were dropped and those left would move on to the next round. This process of elimination continued until only eight men and eight women remained for the exciting final 36 arrows. In the Grand FITA Team Round, teams from each country are made up of the top three archers from the Open Round shooting at the same time. The scoring was cumulative, and the eight best teams in the Grand Finals shot their final arrows starting at the shortest distance. In 1992, a more challenging round was developed. The ‘New Olympic Round’ featured match competition among the competitors. During the first two days of the competition, the archers
11 | P a g e
Presented by the Saskatchewan Wildlife Federation
shot a single FITA round as before. The top 32 archers advanced to single elimination match play, shooting one-on-one against their competition. Twelve arrows, shot at 70 meters determined who competed for a medal. A single arrow broke ties closest to the center, in a shoot-off. The new Olympic Round provided spectators with a fast-paced competition that often came down to the last arrow to determine the winner.
Image courtesy of Clip Art
12 | P a g e
Presented by the Saskatchewan Wildlife Federation
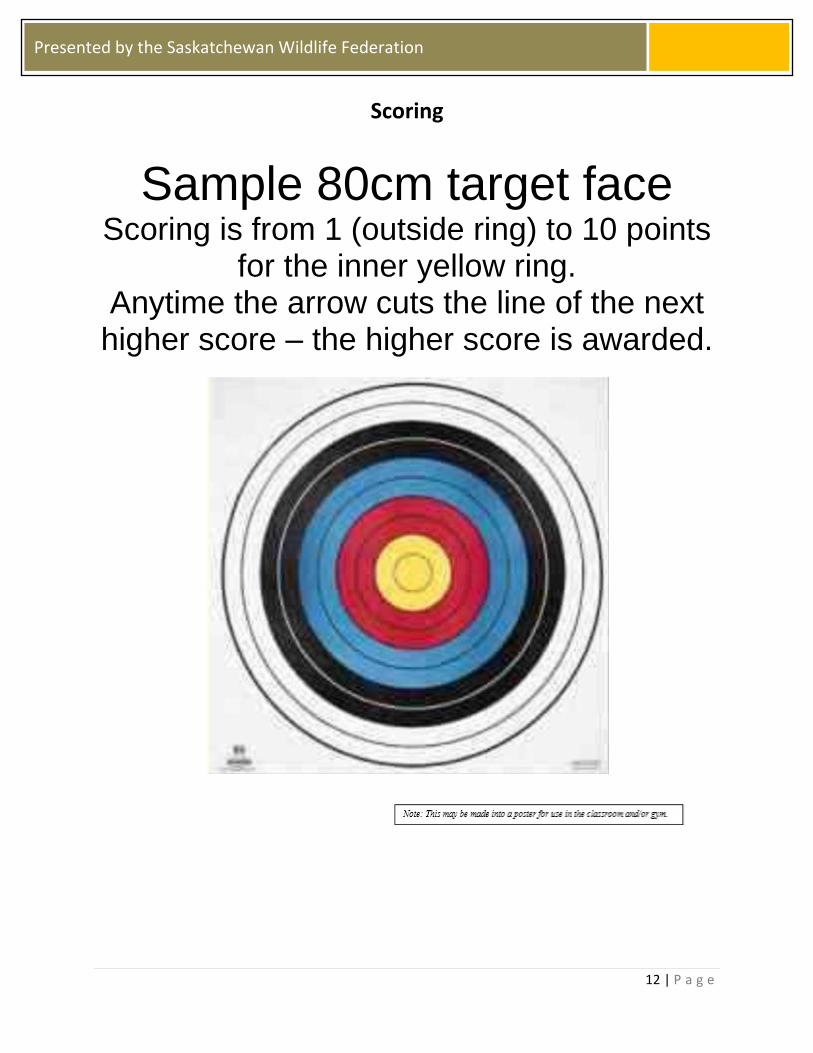
Scoring
Sample 80cm target face Scoring is from 1 (outside ring) to 10 points
for the inner yellow ring. Anytime the arrow cuts the line of the next
higher score – the higher score is awarded.
13 | P a g e
Presented by the Saskatchewan Wildlife Federation
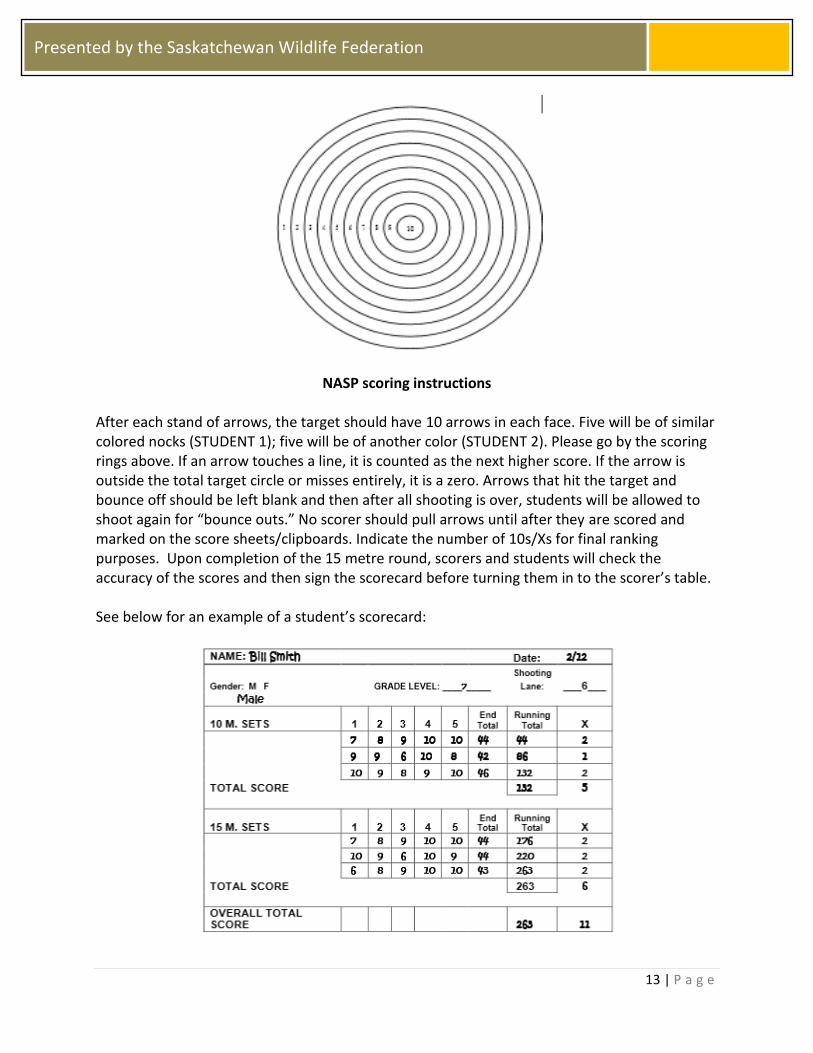
NASP scoring instructions After each stand of arrows, the target should have 10 arrows in each face. Five will be of similar colored nocks (STUDENT 1); five will be of another color (STUDENT 2). Please go by the scoring rings above. If an arrow touches a line, it is counted as the next higher score. If the arrow is outside the total target circle or misses entirely, it is a zero. Arrows that hit the target and bounce off should be left blank and then after all shooting is over, students will be allowed to shoot again for “bounce outs.” No scorer should pull arrows until after they are scored and marked on the score sheets/clipboards. Indicate the number of 10s/Xs for final ranking purposes. Upon completion of the 15 metre round, scorers and students will check the accuracy of the scores and then sign the scorecard before turning them in to the scorer’s table. See below for an example of a student’s scorecard:
14 | P a g e
Presented by the Saskatchewan Wildlife Federation
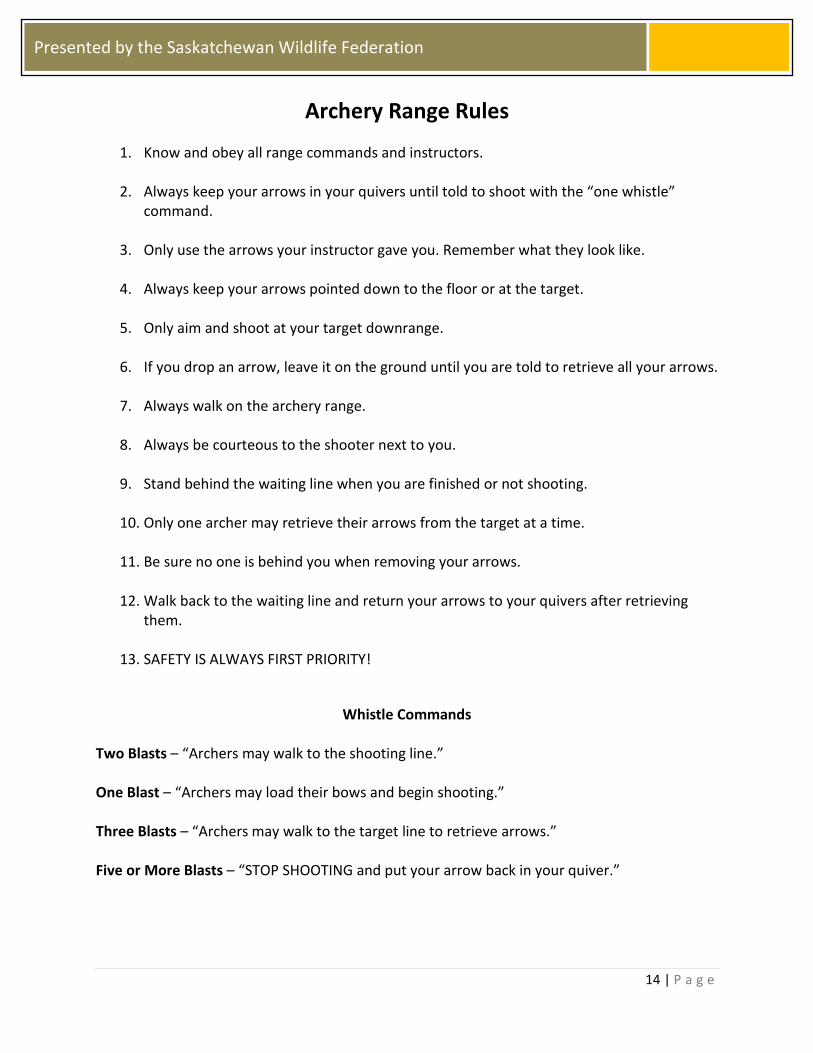
Archery Range Rules
1. Know and obey all range commands and instructors.
2. Always keep your arrows in your quivers until told to shoot with the “one whistle” command.
3. Only use the arrows your instructor gave you. Remember what they look like.
4. Always keep your arrows pointed down to the floor or at the target.
5. Only aim and shoot at your target downrange.
6. If you drop an arrow, leave it on the ground until you are told to retrieve all your arrows.
7. Always walk on the archery range.
8. Always be courteous to the shooter next to you.
9. Stand behind the waiting line when you are finished or not shooting.
10. Only one archer may retrieve their arrows from the target at a time.
11. Be sure no one is behind you when removing your arrows.
12. Walk back to the waiting line and return your arrows to your quivers after retrieving
them.
13. SAFETY IS ALWAYS FIRST PRIORITY!
Whistle Commands Two Blasts – “Archers may walk to the shooting line.” One Blast – “Archers may load their bows and begin shooting.” Three Blasts – “Archers may walk to the target line to retrieve arrows.” Five or More Blasts – “STOP SHOOTING and put your arrow back in your quiver.”
15 | P a g e
Presented by the Saskatchewan Wildlife Federation
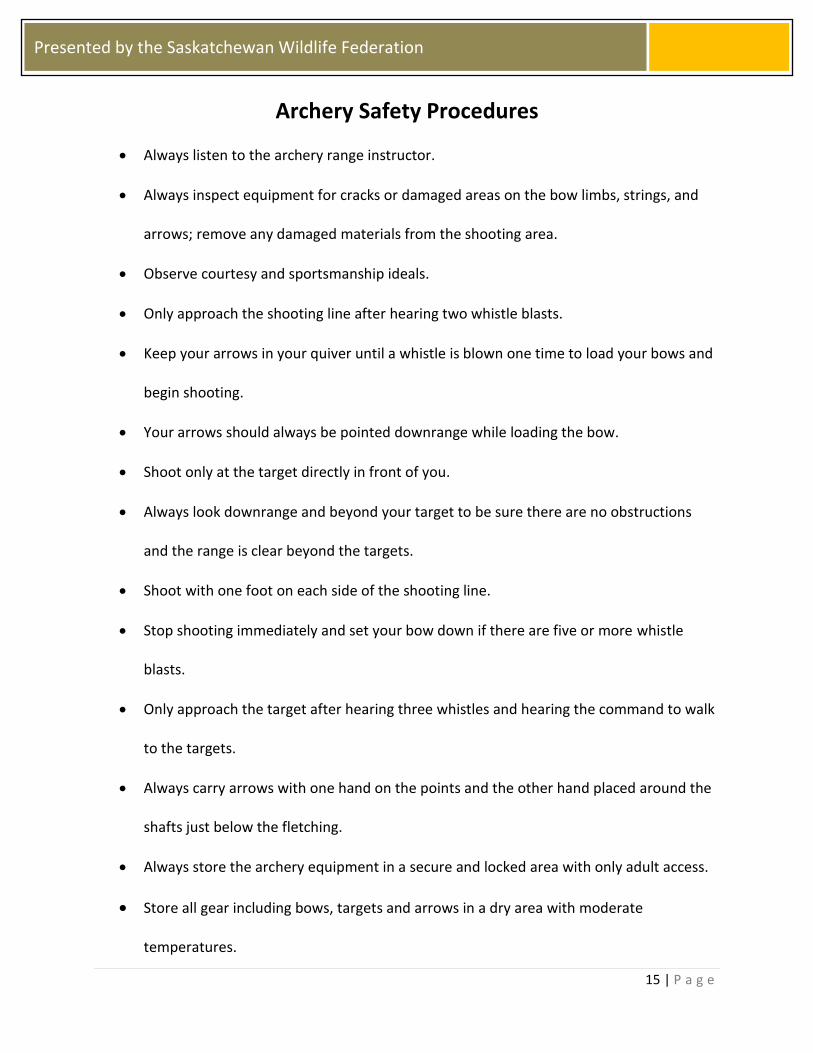
Archery Safety Procedures
Always listen to the archery range instructor.
Always inspect equipment for cracks or damaged areas on the bow limbs, strings, and
arrows; remove any damaged materials from the shooting area.
Observe courtesy and sportsmanship ideals.
Only approach the shooting line after hearing two whistle blasts.
Keep your arrows in your quiver until a whistle is blown one time to load your bows and
begin shooting.
Your arrows should always be pointed downrange while loading the bow.
Shoot only at the target directly in front of you.
Always look downrange and beyond your target to be sure there are no obstructions
and the range is clear beyond the targets.
Shoot with one foot on each side of the shooting line.
Stop shooting immediately and set your bow down if there are five or more whistle
blasts.
Only approach the target after hearing three whistles and hearing the command to walk
to the targets.
Always carry arrows with one hand on the points and the other hand placed around the
shafts just below the fletching.
Always store the archery equipment in a secure and locked area with only adult access.
Store all gear including bows, targets and arrows in a dry area with moderate
temperatures.

16 | P a g e
Presented by the Saskatchewan Wildlife Federation
Lesson Plans
17 | P a g e
Presented by the Saskatchewan Wildlife Federation
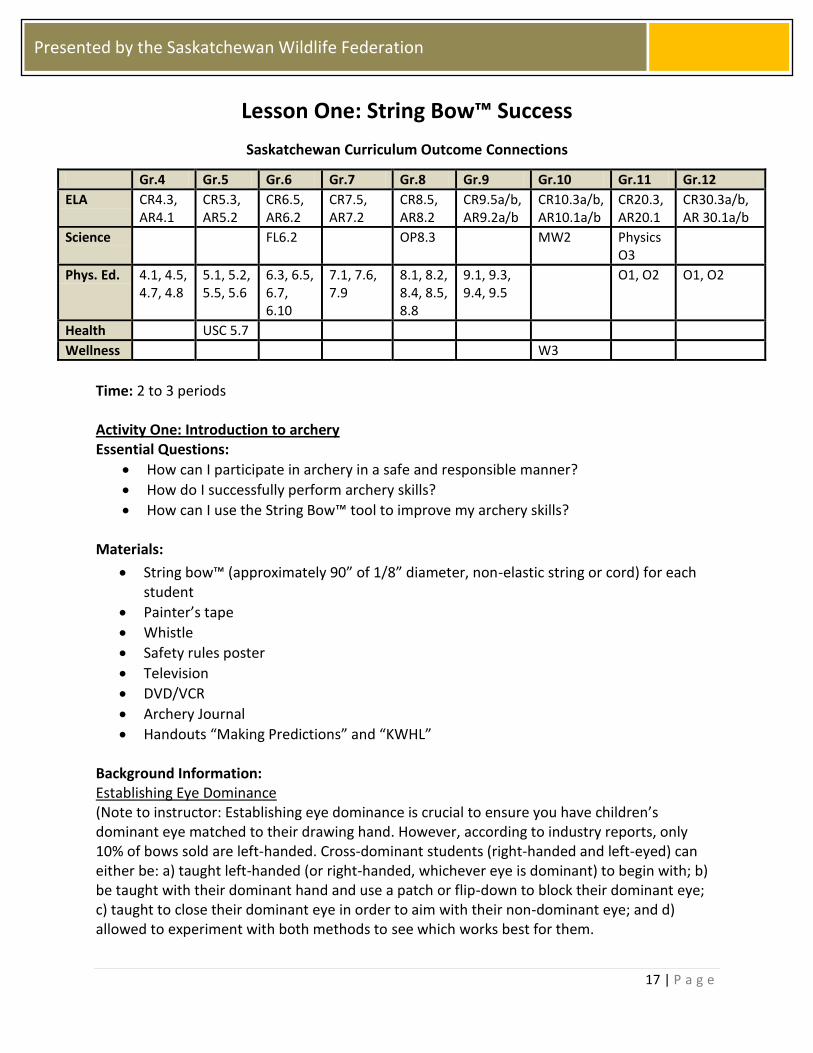
Lesson One: String Bow™ Success
Saskatchewan Curriculum Outcome Connections
Gr.4 Gr.5 Gr.6 Gr.7 Gr.8 Gr.9 Gr.10 Gr.11 Gr.12
ELA CR4.3, AR4.1
CR5.3, AR5.2
CR6.5, AR6.2
CR7.5, AR7.2
CR8.5, AR8.2
CR9.5a/b, AR9.2a/b
CR10.3a/b, AR10.1a/b
CR20.3, AR20.1
CR30.3a/b, AR 30.1a/b
Science FL6.2 OP8.3 MW2 Physics O3
Phys. Ed. 4.1, 4.5, 4.7, 4.8
5.1, 5.2, 5.5, 5.6
6.3, 6.5, 6.7, 6.10
7.1, 7.6, 7.9
8.1, 8.2, 8.4, 8.5, 8.8
9.1, 9.3, 9.4, 9.5
O1, O2 O1, O2
Health USC 5.7
Wellness W3
Time: 2 to 3 periods Activity One: Introduction to archery Essential Questions:
How can I participate in archery in a safe and responsible manner?
How do I successfully perform archery skills?
How can I use the String Bow™ tool to improve my archery skills? Materials:
String bow™ (approximately 90” of 1/8” diameter, non-elastic string or cord) for each student
Painter’s tape
Whistle
Safety rules poster
Television
DVD/VCR
Archery Journal
Handouts “Making Predictions” and “KWHL” Background Information: Establishing Eye Dominance (Note to instructor: Establishing eye dominance is crucial to ensure you have children’s dominant eye matched to their drawing hand. However, according to industry reports, only 10% of bows sold are left-handed. Cross-dominant students (right-handed and left-eyed) can either be: a) taught left-handed (or right-handed, whichever eye is dominant) to begin with; b) be taught with their dominant hand and use a patch or flip-down to block their dominant eye; c) taught to close their dominant eye in order to aim with their non-dominant eye; and d) allowed to experiment with both methods to see which works best for them.
18 | P a g e
Presented by the Saskatchewan Wildlife Federation
It is not absolutely necessary that an archer shoot with both eyes open. However, with both eyes open, an archer will have better depth perception (binocular vision), better peripheral vision, and in some cases, improved balance. If an archer shoots a bow that doesn’t match the dominant eye (i.e. left-eye dominant person shooting a right-handed bow), the dominant eye must be closed or masked to achieve proper form and sight picture. For a right-handed shooter with a left dominant eye, if the left eye isn’t closed the archer will either miss very badly (to the left opposite for left-handed/right-eyed persons) or the archer will exhibit improper posture leaning the head over the bow string to aim with the left eye instead of the right. Early in the archery lesson, it is beneficial to help a new archer determine if his/her dominant eye and string and are on the same side. There are various methods for doing this. Before: Activate prior understanding: In groups of three, fill out the KWHL chart for archery. As a group, discuss what is already known about archery, equipment, scoring and benefits. Make predictions: Look at the equipment and, using the Making Predictions chart, make predictions about various aspects of the sport of archery. As this series of lessons progresses, record actual aspects of archery. During: 1) Eye Dominance: Prior to learning to shoot, complete either of the following activities with students: Pointing and Winking: With both eyes open, have the students extend their right or left hand with their index finger pointing at a small, distant object. Next, have the student close one eye at a time. For most people when the dominant eye is closed, the finger will appear to move to the right or left of the object. For example, for a right-eye dominant person, when the left eye is winked the object remains under the index pointer finger. When the right eye is winked the finger moves. OR Pointing at the Instructor: Some students will have trouble or will resist these procedures and force the eye they want to be dominant to pass the “point and wink” test. In these cases, it can be helpful to have the student stand 10-20 feet from the instructor and with both eyes open, have the student point the index finger of either hand toward the instructor’s face. The instructor should be able to see the pointing finger naturally line up under the student’s dominant eye. 2) Building and Using a String Bow™: The use of the String Bow™ enables the instructor to teach the student what is needed to enjoy archery success without interference from the target. It helps to avoid having the student judge performance by where the arrow hits the target during the beginning stages of learning.
Use of the String Bow™ will enable the student to determine personal draw length and bow hand and string hand placement. The student can use the String Bow™ to practice proper
19 | P a g e
Presented by the Saskatchewan Wildlife Federation
archery form. The student can also use the String Bow™ to perform warm-up and warm-down exercises. With the String Bow™ you can teach the new archer proper hand and finger position on the bow’s string. You can guide archers to proper hand placement and knuckle angle alignment on the bow’s grip. Use of the String Bow™ is also used to teach the student how to rotate the elbow to prevent the bow string from hitting the forearm. The String Bow™ can be used to teach proper archery shooting dynamics. Students can learn which muscles they need to activate and how to keep them active so the arrow will clear the bow before the bow moves. Learning the proper way to release the string is very easy with the String Bow™. It will allow you to observe the student’s follow-through and provide instant feedback whether or not the student is keeping her muscles properly active throughout the shot. By using the String Bow™ you can emphasize the importance of working on shot technique and developing a repeatable form. Without the actual bow and arrow in hand, the student can concentrate on learning proper form without the distraction of scoring well on a target. Strive to teach the archer to feel the shot. Introduce the idea of shooting to learn rather than thinking about where the arrows land. (Note to instructor: Please refer to the BAI manual you receive as part of your certification process for more detailed instructions on how to construct and use the String Bow™.) After: Return to the KWHL and Making Predictions sheets to reflect on what was learned. Add new information and ask new questions. Assessment: This lesson is the perfect opportunity to formatively assess and offer feedback on listening, following instructions, individual form and skill development. You should begin to collect observational data to assist in assessment decisions. Refer to rubrics in the appendix for criteria for assessing.

20 | P a g e
Presented by the Saskatchewan Wildlife Federation
KWHL Chart
What do we know?
What do we want to find
out?
How can we find out what we
want to learn?
What did we learn?
21 | P a g e
Presented by the Saskatchewan Wildlife Federation
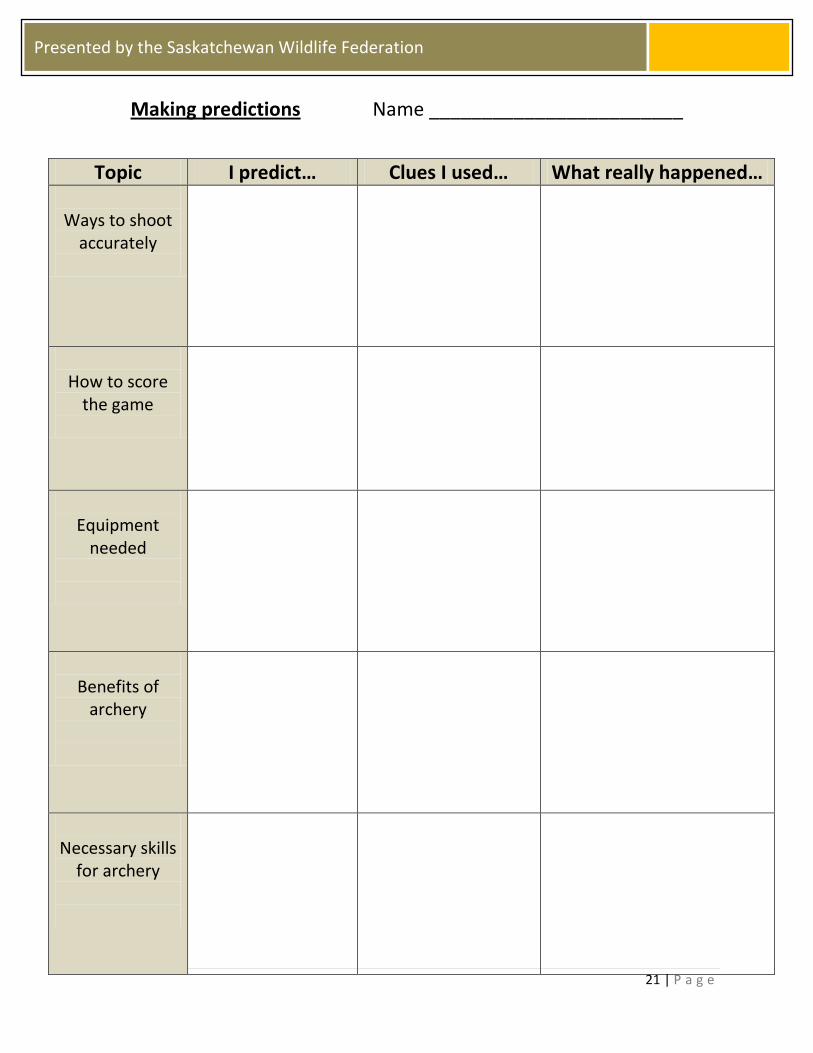
Making predictions Name ________________________
Topic I predict… Clues I used… What really happened…
Ways to shoot accurately
How to score
the game
Equipment
needed
Benefits of
archery
Necessary skills
for archery
22 | P a g e
Presented by the Saskatchewan Wildlife Federation
Activity Two: Eleven Steps to Archery Success Essential Questions:
How do I execute a correct shot?
How can I improve my archery skills?
How can performance cues help me with accuracy and skill development?
Materials:
Each student needs a properly constructed and fitted String Bow™
Archery Journal Classroom Set-Up: No actual shooting will take place during this lesson and this session may be held in a classroom, hallway or gymnasium. However, it is important that there be a waiting and shooting line and target direction for the students to simulate shooting. All students should be behind the waiting line. Background Information: In this activity, student archers will learn 11 steps to perform and execute ideal shooting form (performance cues). There are many keys to enjoying success in archery. It is important that the archer’s equipment fits and that bows, arrows and accessories are well tuned for effective arrow flight. The archer must also execute consistent shooting form from shot to shot. The archer’s shooting form is most effective when it allows the shooter to be stable, relaxed and comfortable to maintain proper muscle activity throughout each shot. During this lesson the archer will learn 11 consecutive steps to follow to achieve life-long archery success. These steps will guide the archer from initial form on the shooting line, through execution and reflection of each shot. This lesson will rely heavily upon the String Bow™ previously constructed. New archers should master these steps using the String Bow™ before moving on to using bows, arrows and targets.
Occasionally, experienced archers will find it helpful to review their performance of these 11 steps, even using the String Bow™, to improve or maintain the level of performance they desire.
Why 3 Fingers? Some experienced archers will question placing three fingers under the arrow nock rather than one finger above and two below. Explain that three fingers under prevents twisting of the bow string and reduces the likelihood that the arrow will fall off the arrow rest. Practicing Turning Elbow to Protect Arm For students who have a difficult time keeping the bow string from hitting the bow arm and who can’t turn the elbow down and to the left (or right for left-handed shooter), have them put their bow hand palm against a wall and turn the elbow under and to the side. It is certainly acceptable for any student to wear an arm guard while shooting.
23 | P a g e
Presented by the Saskatchewan Wildlife Federation
Before: Setting a purpose and identifying key ideas through modeling: The instructor will identify the purpose for the day’s lesson and first show and explain the 11 Steps to Archery Success to the class. The class will stand behind the waiting line while the instructor, using the String Bow™, stands at the shooting line. The goal, for students, is to be able to identify the key steps for archery success through listening and watching. Emphasize effective listening behavior (see rubric).
During:
After the steps have been explained and students have followed the instructor through each step, have the students call them out for the instructor to demonstrate again.
Blow two whistles to move students to the shooting line.
Have the students perform the steps.
Have the class call them out as they do them together. If a student has difficulty with a particular step, refer them to more practice of this step using the String Bow™.
11 Steps to Archery Success
Form
Stance Each student should straddle the shooting line with one foot on either side. If the archer is right-handed, the left foot should be over the shooting line toward the target line. To establish correct foot placement, begin with both feet together and toes even or “closed.” Then move the foot closest to the target (front foot) back so these toes are even with the mid-point of the back foot. Next, while maintaining this mid-point toe placement, move the front foot toward the target so the feet are shoulder-width apart. Turn (open) the front foot toward the target. Imagine the shooter is facing a 12 o’clock position. The toes of the back foot should be pointed to 12 o’clock, parallel to the shooting line. The toes of the front foot should be pointing toward 10 o’clock for a right-handed shooter and 2 o’clock for a left-handed shooter. Stand vertical with your head up and knees firm with slight pressure on the inside of both knees and feet.
Nock Arrow With your bow in your bow hand, withdraw an arrow from the floor quiver by grasping the arrow below the fletching. Keeping your bow as vertical as possible, carry the arrow up and over the top of the bow. With the different colored “index fletching” pointed toward you, snap the arrow’s nock under or between the nock locator(s). The arrow shaft should be placed on the arrow rest.
Drawing Hand Set
With your bow at arm’s length and pointed down, grasp the string immediately under the nock at least to the first joint of the 1st and 3rd finger and slightly inside the joint of the middle finger forming a hook. Keep the back of the hand flat and the thumb down and relaxed. This is done exactly the same for the String Bow™ and the real bow.
Bow Hand Set Place your hand in the bow grip with the meaty part of your thumb inside the grip to the lifeline of your palm. The lifeline should be aligned over the center of the bow’s grip. When set properly, the knuckles of your bow hand should form a 30- to 45-degree angle. At the same time your bow hand is set, rotate your elbow down to the left (for right-handed archer). This hand and elbow position allows for improved string clearance of the bow arm. This is done exactly the same for the String Bow™ and the real bow.
24 | P a g e
Presented by the Saskatchewan Wildlife Federation
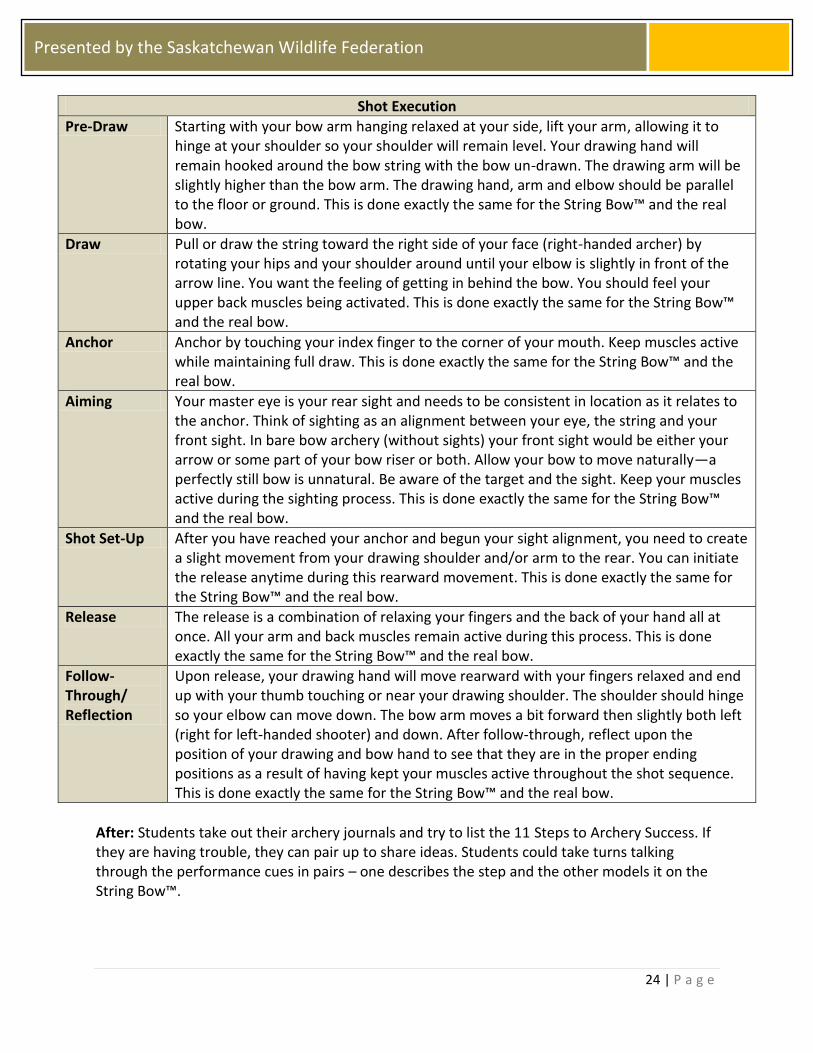
Shot Execution
Pre-Draw Starting with your bow arm hanging relaxed at your side, lift your arm, allowing it to hinge at your shoulder so your shoulder will remain level. Your drawing hand will remain hooked around the bow string with the bow un-drawn. The drawing arm will be slightly higher than the bow arm. The drawing hand, arm and elbow should be parallel to the floor or ground. This is done exactly the same for the String Bow™ and the real bow.
Draw Pull or draw the string toward the right side of your face (right-handed archer) by rotating your hips and your shoulder around until your elbow is slightly in front of the arrow line. You want the feeling of getting in behind the bow. You should feel your upper back muscles being activated. This is done exactly the same for the String Bow™ and the real bow.
Anchor Anchor by touching your index finger to the corner of your mouth. Keep muscles active while maintaining full draw. This is done exactly the same for the String Bow™ and the real bow.
Aiming Your master eye is your rear sight and needs to be consistent in location as it relates to the anchor. Think of sighting as an alignment between your eye, the string and your front sight. In bare bow archery (without sights) your front sight would be either your arrow or some part of your bow riser or both. Allow your bow to move naturally—a perfectly still bow is unnatural. Be aware of the target and the sight. Keep your muscles active during the sighting process. This is done exactly the same for the String Bow™ and the real bow.
Shot Set-Up After you have reached your anchor and begun your sight alignment, you need to create a slight movement from your drawing shoulder and/or arm to the rear. You can initiate the release anytime during this rearward movement. This is done exactly the same for the String Bow™ and the real bow.
Release The release is a combination of relaxing your fingers and the back of your hand all at once. All your arm and back muscles remain active during this process. This is done exactly the same for the String Bow™ and the real bow.
Follow-Through/ Reflection
Upon release, your drawing hand will move rearward with your fingers relaxed and end up with your thumb touching or near your drawing shoulder. The shoulder should hinge so your elbow can move down. The bow arm moves a bit forward then slightly both left (right for left-handed shooter) and down. After follow-through, reflect upon the position of your drawing and bow hand to see that they are in the proper ending positions as a result of having kept your muscles active throughout the shot sequence. This is done exactly the same for the String Bow™ and the real bow.
After: Students take out their archery journals and try to list the 11 Steps to Archery Success. If they are having trouble, they can pair up to share ideas. Students could take turns talking through the performance cues in pairs – one describes the step and the other models it on the String Bow™.
25 | P a g e
Presented by the Saskatchewan Wildlife Federation
Assessment: Formative assessment to adjust instruction – Check student journals to determine success in identifying the 11 steps. Re-teach/ model where needed. Use journal and individual skill development rubrics (in appendix) to structure feedback.
26 | P a g e
Presented by the Saskatchewan Wildlife Federation
Lesson Two: Shoot Straight, Be Safe Saskatchewan Curriculum Outcome Connections
Gr.4 Gr.5 Gr.6 Gr.7 Gr.8 Gr.9 Gr.10 Gr.11 Gr.12
ELA CC4.4, CR4.3, AR4.1, AR4.2
CC5.4, CR5.3, AR5.1, AR5.2
CC6.7, CC6.8, CR6.5, AR6.2
CC7.9, CR7.5, AR7.1, AR7.2
CC8.9, CR8.5, AR8.1, AR8.2
CC9.8, CR9.5, AR9.1, AR9.2
CC10.4a/b, CR10.3a/b, AR10.1a/b
CC20.4, CR20.3, AR20.1
CC30.4a/b, CR30.3a/b, AR30.1a/b
Math N4.1, N4.2, P4.1
SS5.2, N5.1, N5.4, P5.1
SP6.1 P7.1 SP8.1 SP9.2 FP10.3, WA10.3, WA10.4
Science Physics O1, O2, O3, O4, O5, O6
Phys. Ed. 4.5, 4.7, 4.8, 4.10, 4.11, 4.12
5.5, 5.6, 5.7, 5.8, 5.9, 5.10
6.4, 6.5, 6.8, 6.10, 6.13, 6.14
7.5, 7.9, 7.12, 7.13
8.3, 8.4, 8.6, 8.8, 8.13
9.4, 9.5, 9.6, 9.7, 9.12
O1, O2, O3
O1, O2, O3
Health DM4.1, USC 4.3, USC4.4
USC5.7 DM6.8, USC6.2, USC6.6
DM7.8, USC7.1, USC7.4
USC8.1, DM8.8
DM9.11, USC9.2
Wellness W5, W6, W7, W10
Time: 3 to 4 periods Activity One: Safety Procedures Essential Questions:
How do I participate in archery in a safe and responsible manner?
How does my own safety impact the safety of others?
Materials:
Bow rack
Easton 1820 Aluminum arrows
Floor quivers for arrows (e.g., cones)
Genesis Bow
Blue painter’s tape
Targets (covered or blank faces until later in lesson, then use FITA 80cm faces)
Whistle
Safety rules posters
Clearly defined shooting range
Archery Journal
Concept Connections handout
27 | P a g e
Presented by the Saskatchewan Wildlife Federation
Background Information: Instructor note: Refer to the appendix and the beginning of this Instructional Resource or the Basic Archery Instructor Manual for Shooting Range Diagram, Archery Range Rules, Whistle Commands, Archery Safety Procedures and a Glossary of Archery Terms. Before: Activating Prior Knowledge and Making Predictions: Ask students to reflect on the two essential questions. As a group, brainstorm what they feel are important aspects of safety in the sport of archery. Move them toward the idea that the individual can protect the collective group. During:
Describe the boundaries and lines of the shooting range.
Explain archery equipment safety rules and location of equipment.
Explain and demonstrate “whistle commands.” o Two blasts - Archers may walk to the shooting line. o One Blast - Archers may load their bows and begin shooting. o Three Blasts - Archers may walk to the target line to retrieve arrows. o Five or more blasts –EMERGENCY SITUATION – STOP SHOOTING and put your
arrows back in your quivers.
Reflect in Archery Journal - Answer the following Open Response question in your Archery Journal: Archery is a safe and enjoyable lifetime physical activity when safety procedures are followed.
a. Identify four safety procedures you must follow when participating in archery activities. b. Explain why each of these is important and how they protect you as an individual and how they protect the group, as a whole.
After: In small groups, complete the concept connections handout. Check for understanding of the connection between equipment, safety and skills. Assessment: Formative Assessment and Feedback – Invite the students to show their understanding as you progress through the lesson. Offer feedback when appropriate as it relates to safety, equipment storage and care, and listening in general. The Concept Connections sheet can be used as a formative assessment tool and supply information about re-teaching needs. The journal entry and understanding of safety procedures can be assessed formatively or summatively (depending on readiness), using the rubrics in the appendix.
28 | P a g e
Presented by the Saskatchewan Wildlife Federation
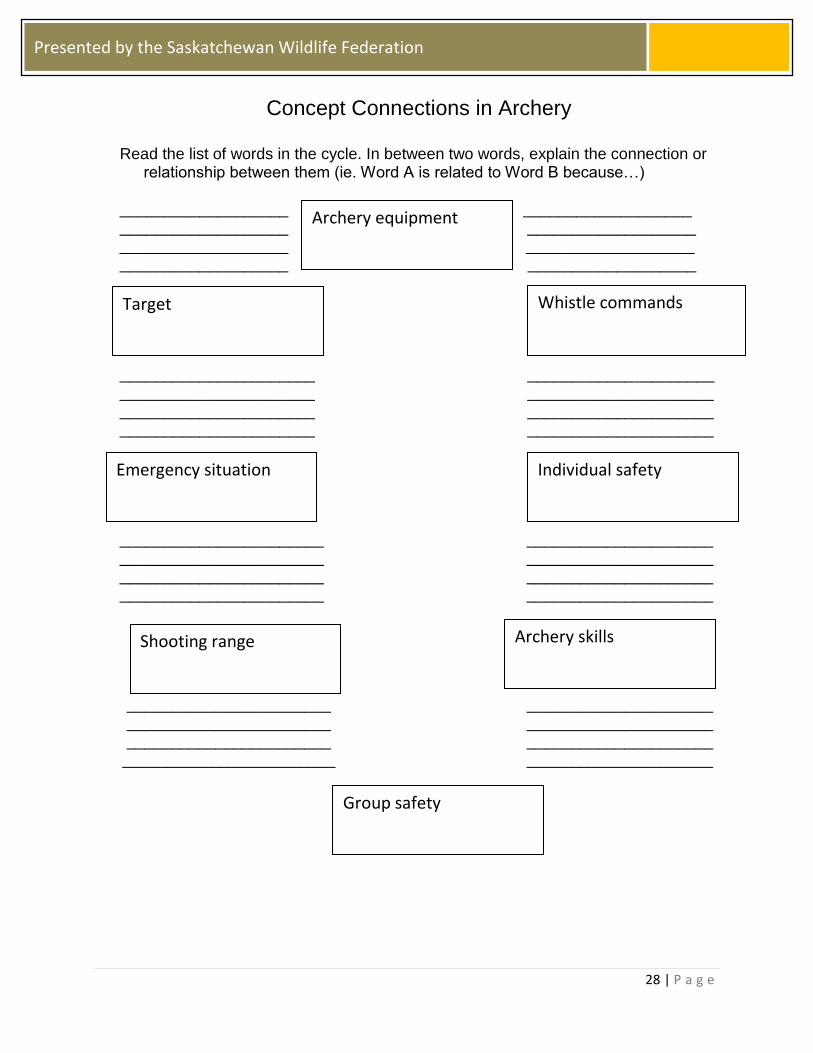
Concept Connections in Archery
Read the list of words in the cycle. In between two words, explain the connection or relationship between them (ie. Word A is related to Word B because…)
___________________ ___________________ ___________________ ___________________ ___________________ ___________________ ___________________ ___________________ ______________________ _____________________ ______________________ _____________________ ______________________ _____________________ ______________________ _____________________ _______________________ _____________________ _______________________ _____________________ _______________________ _____________________ _______________________ _____________________
_______________________ _____________________ _______________________ _____________________ _______________________ _____________________ ________________________ _____________________
Archery equipment
Whistle commands
Individual safety
Archery skills
Target
Emergency situation
Shooting range
Group safety
29 | P a g e
Presented by the Saskatchewan Wildlife Federation
Activity Two: Applying Safety Skills to Practice Time Essential Questions:
How do I successfully perform archery skills?
What is the connection between safety and skillful play? Materials:
Bow rack
Easton 1820 Arrows
Floor quiver for arrows (e.g., cones)
Genesis bows
Blue Painter’s Tape
80 cm FITA faces - Targets
Whistle
Safety rules posters
Clearly defined shooting range
Archery Journal Background Information: You will be striving to develop correct form and technique in your students’ shooting by making helpful suggestions. Students will encourage and assist other students in your group as they shoot. As the classes progress, you will move the targets back based on the ability of the class until you reach the NASP competition distances of 10 and 15 metres. Once students can maintain a proper shooting form, scoring processes may be addressed, using the rings on the target. Before:
Set a purpose for the day and activate prior knowledge: Review safety procedures and whistle commands with the students. Invite students to be responsible for own equipment and remind them (if needed) of how to do so.
During:
Divide students into groups with two or three students.
Begin actual shooting instruction with a target placed at a close distance. Targets will not be moved back until all students have become proficient at each distance.
Observe and correct any form or technique issues that arise through positive reinforcement. For example, if a child is ‘plucking’ the string, comment that you’d like to see a good shot set-up.
Record the scores in Archery Journal for last end (or round) of arrows (5 arrows).
Students also list and define the “11 Steps to Archery Success.” (Differentiation – Students may also record a verbal description.)
30 | P a g e
Presented by the Saskatchewan Wildlife Federation
After:
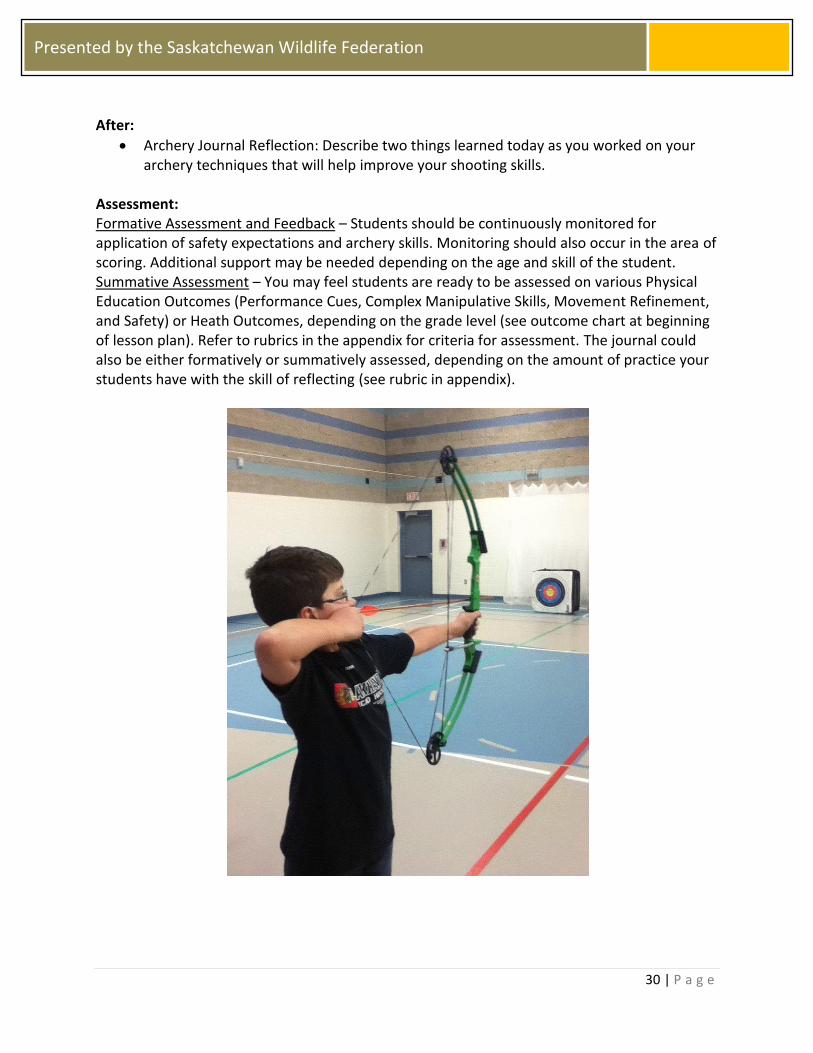
Archery Journal Reflection: Describe two things learned today as you worked on your archery techniques that will help improve your shooting skills.
Assessment: Formative Assessment and Feedback – Students should be continuously monitored for application of safety expectations and archery skills. Monitoring should also occur in the area of scoring. Additional support may be needed depending on the age and skill of the student. Summative Assessment – You may feel students are ready to be assessed on various Physical Education Outcomes (Performance Cues, Complex Manipulative Skills, Movement Refinement, and Safety) or Heath Outcomes, depending on the grade level (see outcome chart at beginning of lesson plan). Refer to rubrics in the appendix for criteria for assessment. The journal could also be either formatively or summatively assessed, depending on the amount of practice your students have with the skill of reflecting (see rubric in appendix).
31 | P a g e
Presented by the Saskatchewan Wildlife Federation
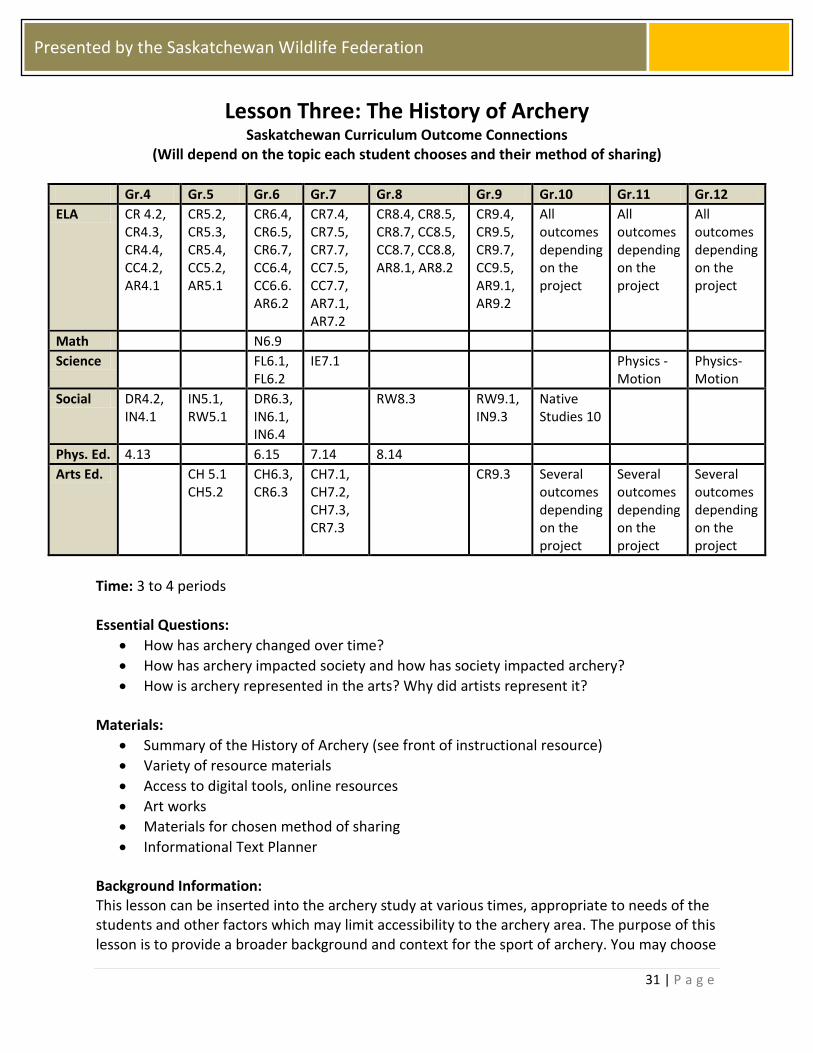
Lesson Three: The History of Archery Saskatchewan Curriculum Outcome Connections
(Will depend on the topic each student chooses and their method of sharing)
Gr.4 Gr.5 Gr.6 Gr.7 Gr.8 Gr.9 Gr.10 Gr.11 Gr.12
ELA CR 4.2, CR4.3, CR4.4, CC4.2, AR4.1
CR5.2, CR5.3, CR5.4, CC5.2, AR5.1
CR6.4, CR6.5, CR6.7, CC6.4, CC6.6. AR6.2
CR7.4, CR7.5, CR7.7, CC7.5, CC7.7, AR7.1, AR7.2
CR8.4, CR8.5, CR8.7, CC8.5, CC8.7, CC8.8, AR8.1, AR8.2
CR9.4, CR9.5, CR9.7, CC9.5, AR9.1, AR9.2
All outcomes depending on the project
All outcomes depending on the project
All outcomes depending on the project
Math N6.9
Science FL6.1, FL6.2
IE7.1 Physics - Motion
Physics- Motion
Social DR4.2, IN4.1
IN5.1, RW5.1
DR6.3, IN6.1, IN6.4
RW8.3 RW9.1, IN9.3
Native Studies 10
Phys. Ed. 4.13 6.15 7.14 8.14
Arts Ed. CH 5.1 CH5.2
CH6.3, CR6.3
CH7.1, CH7.2, CH7.3, CR7.3
CR9.3 Several outcomes depending on the project
Several outcomes depending on the project
Several outcomes depending on the project
Time: 3 to 4 periods Essential Questions:
How has archery changed over time?
How has archery impacted society and how has society impacted archery?
How is archery represented in the arts? Why did artists represent it? Materials:
Summary of the History of Archery (see front of instructional resource)
Variety of resource materials
Access to digital tools, online resources
Art works
Materials for chosen method of sharing
Informational Text Planner
Background Information: This lesson can be inserted into the archery study at various times, appropriate to needs of the students and other factors which may limit accessibility to the archery area. The purpose of this lesson is to provide a broader background and context for the sport of archery. You may choose

32 | P a g e
Presented by the Saskatchewan Wildlife Federation
to have students work individually, in pairs, or in small groups, depending on your class and their interests. Preparation for working in groups may be necessary (this is a chance for them to practice their collaborative skills.) The following list of suggested focus areas is based on curricular expectations. There is much flexibility and all products produced by students will address a number of ELA outcomes, regardless of which focus you choose. However, if you wish to address outcomes in other subject areas, this list may be helpful:
Grade 4 – Create a representation (diagram, graphic organizer, timeline, T-chart) that explains the history and importance of archery for First Nations and Métis people in Saskatchewan (Social Studies, Physical Education and ELA).
Grade 5 - Create a representation (diagram, graphic organizer, timeline, T-chart) that explores and compares Aboriginal and non-Aboriginal hunting rights in Canada (Social Studies and ELA). Another option is to explore archery in popular culture (Hunger Games and Brave movies, etc.) (Arts Education)
Grade 6 – Create a written piece or representation (diagram, graphic organizer, timeline, T-chart), that explores how archery has changed over time and how these changes reflect the identity of the people using archery. This exploration can take a world focus and could explore how archery is represented in art works (Social Studies, Arts Education, Physical Education and ELA). Artists to consider: Ancient Greek statues and images, Ancient Egyptian images, Ancient Japanese images, Paul Kane, David Teniers, George Catlin. Students could also explore careers relating to archery and connect to science outcomes.
Grade 7 – Create a written piece or representation (diagram, graphic organizer, timeline, T-chart) that explores the connection between the people utilizing archery and the place in which they live. You may choose to focus on Northern groups (ELA, Social Studies, Science, Physical Education and Arts Education).
Grade 8 – Create a written piece or a diagram exploring how archery supports stewardship and environmental sustainability. Have students explore hunting using archery and the licenses that guide this practice and how this has changed over time (ELA, Social Studies, and Physical Education).
Grade 9 – Create a written piece that explores the history of archery. In particular, focus on archery in ancient civilizations and explore how the use of archery in different time periods reflects a particular worldview. Students could also explore the history of Olympic archery (Social Studies, ELA)
Grade 10 – 12 – Create a written piece that explores archery in art (Visual Art - Artists to consider: Ancient Greek statues and images, Ancient Egyptian images, Ancient Japanese images, Paul Kane, David Teniers, George Catlin), the connection between archery and the laws of motion (Physics), that compares the compound bow vs. the recurve bow (Physical Education), or the use of archery by First Nations, Métis and Inuit peoples (Native Studies).
33 | P a g e
Presented by the Saskatchewan Wildlife Federation
Before:
Set an audience and purpose for the lessons.
Have students generate questions to guide their research.
Explore places where students can go for information.
Gather information in a graphic organizer and cite sources.
Gather images, charts and other materials to support research presentation. During:
Organize information and create drafts.
Seek feedback and revise.
Create final drafts After:
Share
Reflect
Assessment: Formative Assessment and Feedback – Students should be continuously monitored for timing and ability to engage in brainstorming, research, planning and composition and creation. Various checkpoints should be created in order to ensure that students are on track. Monitoring should also occur in the area of group work, if this project is being done in pairs or small groups. Additional support may be needed depending on the age and skill of the student. Summative Assessment – You may feel students are ready to be assessed on various outcomes, depending on the grade level (see outcome chart at beginning of lesson plan). Refer to rubrics in the appendix for criteria for assessment.
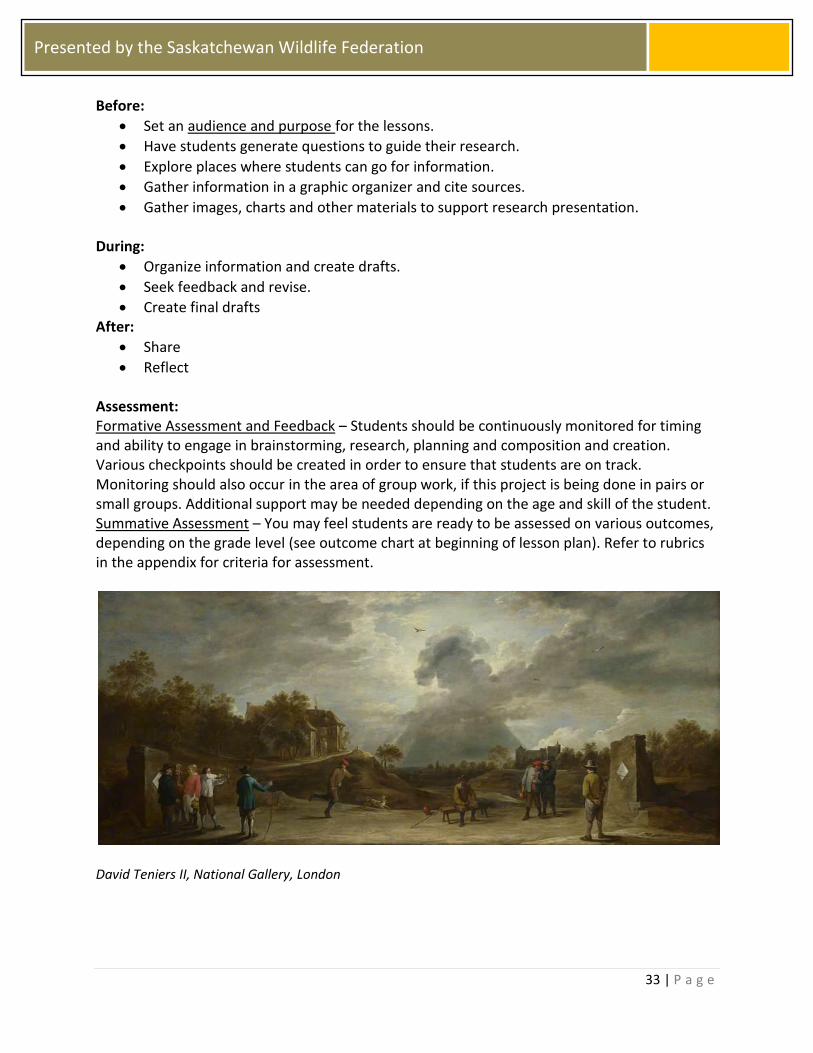
David Teniers II, National Gallery, London
34 | P a g e
Presented by the Saskatchewan Wildlife Federation
History of Archery Project Planner
Name ________________________________ Date __________________
Audience: Purpose: Topic: Format for sharing: What do I already know about this topic?
What questions do I still have?
Where could I go for information?

35 | P a g e
Presented by the Saskatchewan Wildlife Federation
What have I learned?
Where did I actually find this information? (citation)

36 | P a g e
Presented by the Saskatchewan Wildlife Federation
What are my main ideas?
What are my supporting details?
37 | P a g e
Presented by the Saskatchewan Wildlife Federation
Lesson Four: Practice Makes Perfect Saskatchewan Curricular Outcomes Connection
Gr.4 Gr.5 Gr.6 Gr.7 Gr.8 Gr.9 Gr.10 Gr.11 Gr.12
ELA CC4.4, AR4.1
CC5.4, AR5.1
CC6.8, AR6.2
CC7.9, AR7.2
CC8.9, AR8.2
CC9.8, AR9.2
CC10.4a/b, AR10.1a/b
CC20.4, AR20.1
CC30.4a/b, AR30.1a/b
Math N4.2, P4.1 N5.4, P5.1 SP6.1 P7.1 SP8.1 SP9.2 WA10.2
Phys. Ed. 4.1, 4.7, 4.8, 4.9, 4.10, 4.11, 4.12
5.1, 5.2, 5.5, 5.6, 5.7, 5.8, 5.9, 5.10
6.3, 6.4, 6.5, 6.8, 6.9, 6.10, 6.11, 6.13, 6.14
7.1, 7.4, 7.5, 7.8, 7.9, 7.11, 7.12, 7.13
8.1, 8.2, 8.3, 8.4, 8.6, 8.7, 8.8, 8.13
9.1, 9.3, 9.4, 9.5, 9.6, 9.7, 9.8, 9.9, 9.12
1, 2, 4, 6 1, 2, 4, 6
Health DM4.1, AR4.1, USC4.1, USC4.3, USC4.4
USC5.4, USC5.7
DM6.8, USC6.6
DM7.8, DM7.9, USC7.1, USC7.4
DM8.8, DM8.9, USC8.1
USC9.2
Wellness W1, W3, W5, W6, W7, W10
Time: 4 or 5 periods Activity One: Communication, Cooperation, Rules and Respect Essential Questions:
How are communication, cooperation, rules and respect a vital part of the sport of archery?
How do I participate in archery activities in a safe and responsible manner?
How does participation in archery activities promote my character development?
Materials:
Bow rack
Easton 1820 arrows
Floor arrow quiver (e.g., cones)
Genesis bows
Painter’s tape
FITA 80cm faced targets
Whistle
Safety rules posters
Clearly defined shooting range
Score Card
Archery Journal
Concept Exploration sheets and “How Proficient Collaborators Think and Act” sheet
38 | P a g e
Presented by the Saskatchewan Wildlife Federation
Background Information: This lesson focuses on developing the following enduring understandings:
Strategies for archery safety - Using safety strategies (e. g., in archery activities) reduces the possibility of injury.
Character development through archery participation- Physical, emotional, and social benefits can be gained from regular participation in leisure/recreational and/or competitive physical activities.
Communication, cooperation, rules, and respect are important to the effective functioning of groups.
There are behaviors (e.g., constructive communication, fulfilling commitments, and cooperation) that show respect and responsibility to self and others.
Before:
Activate prior knowledge: Small group concept mapping: What do communication, cooperation, rules, and respect mean to you? (See concept maps at end of lesson). Divide students into small groups. Each group can either explore one of the four concepts or each group explores all four concepts and they combine and compare.
Whole group brainstorm: How will these concepts be applied when participating in archery activities?
Share “How Proficient Collaborators Think and Act” sheet.
During:
Depending on the size of your class and the available equipment, place students in a group of three or four students to share the same target.
Following safety procedures and commands, students will repeatedly shoot one end (5 arrows) throughout the class period.
“Non-shooting groups” will rotate through centers to develop core-strength and flexibility and be able to work with their string bows on proper shot execution.
Students record their scores on their scorecard and attach to their archery journal. After:
Archery Journal Reflection: Communication, cooperation, rules, and respect are important to the effective functioning of a group. A) Give two examples of how a person uses communication skills and applies these skills effectively in a group archery activity. B) Provide two examples of opportunities to cooperate with others in a group archery activity and explain how these examples impact the group.
Assessment: Formative Assessment and Feedback – Students should be monitored throughout the class period to ensure that proper safety procedures are being followed. Communication, cooperation, rules and respect are the core concepts being explored and timely and specific feedback to each student about their demonstration of these concepts is essential. Corrections should be made immediately in order to ensure growth and internalization. Further to this,
39 | P a g e
Presented by the Saskatchewan Wildlife Federation
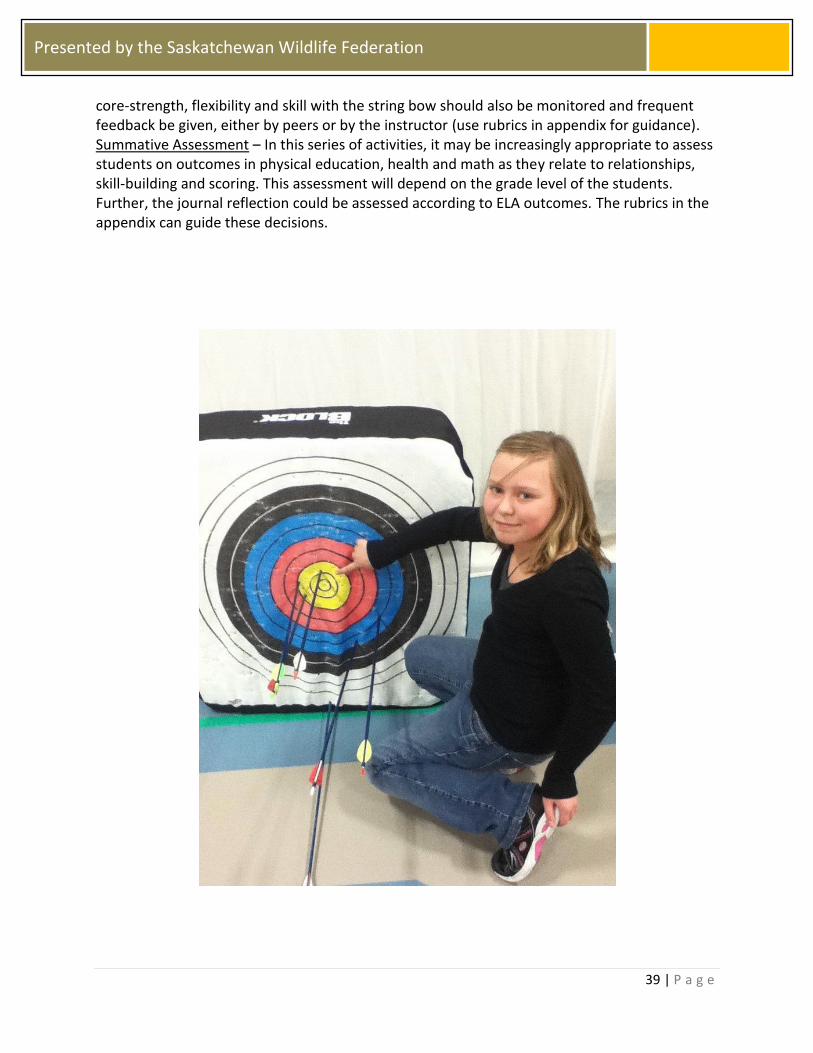
core-strength, flexibility and skill with the string bow should also be monitored and frequent feedback be given, either by peers or by the instructor (use rubrics in appendix for guidance). Summative Assessment – In this series of activities, it may be increasingly appropriate to assess students on outcomes in physical education, health and math as they relate to relationships, skill-building and scoring. This assessment will depend on the grade level of the students. Further, the journal reflection could be assessed according to ELA outcomes. The rubrics in the appendix can guide these decisions.
40 | P a g e
Presented by the Saskatchewan Wildlife Federation
Concept Exploration for Communication
Concept Communication Examples
Characteristics
What is it like? What is it unlike? Can you illustrate it?
Definition

41 | P a g e
Presented by the Saskatchewan Wildlife Federation
Concept Exploration for Cooperation
Concept Cooperation Examples
Characteristics
What is it like? What is it unlike? Can you illustrate it?
Definition
42 | P a g e
Presented by the Saskatchewan Wildlife Federation
Concept Exploration for Respect
Concept Respect Examples
Characteristics
What is it like? What is it unlike? Can you illustrate it?
Definition
43 | P a g e
Presented by the Saskatchewan Wildlife Federation
Concept Exploration for Rules
Concept Rules Examples
Characteristics
What is it like? What is it unlike? Can you illustrate it?
Definition
44 | P a g e
Presented by the Saskatchewan Wildlife Federation
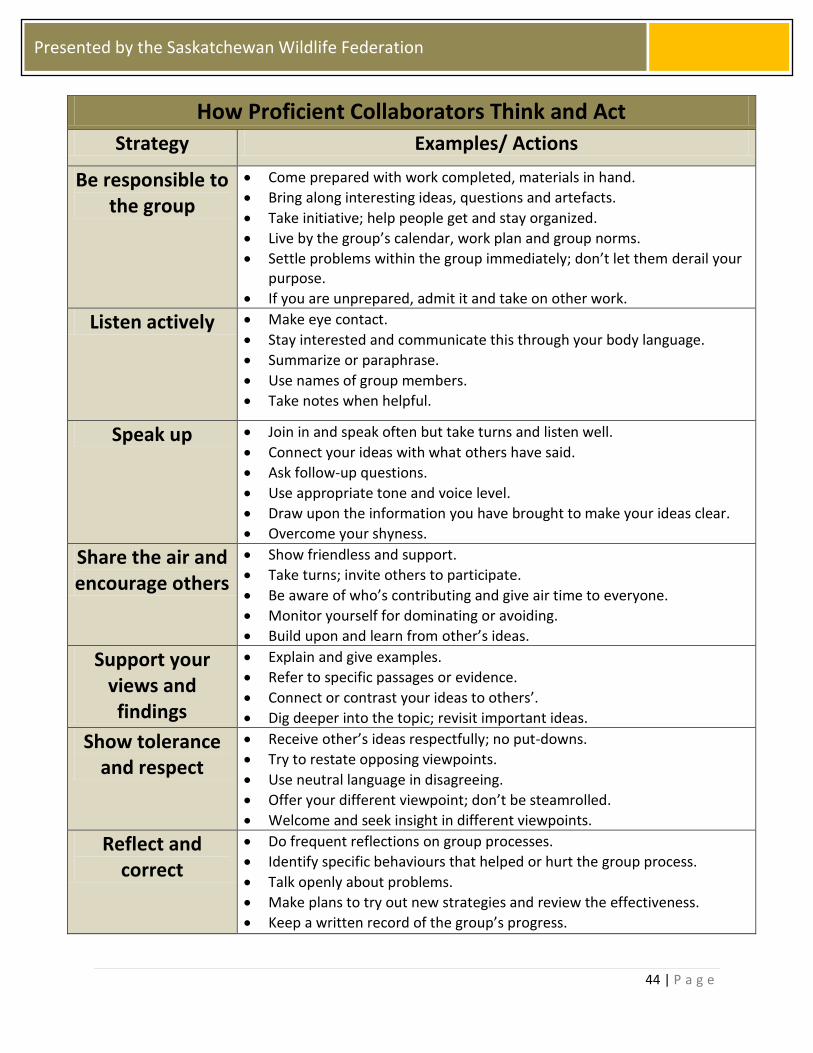
How Proficient Collaborators Think and Act
Strategy Examples/ Actions
Be responsible to the group
Come prepared with work completed, materials in hand.
Bring along interesting ideas, questions and artefacts.
Take initiative; help people get and stay organized.
Live by the group’s calendar, work plan and group norms.
Settle problems within the group immediately; don’t let them derail your purpose.
If you are unprepared, admit it and take on other work.
Listen actively Make eye contact.
Stay interested and communicate this through your body language.
Summarize or paraphrase.
Use names of group members.
Take notes when helpful.
Speak up Join in and speak often but take turns and listen well.
Connect your ideas with what others have said.
Ask follow-up questions.
Use appropriate tone and voice level.
Draw upon the information you have brought to make your ideas clear.
Overcome your shyness.
Share the air and encourage others
Show friendless and support.
Take turns; invite others to participate.
Be aware of who’s contributing and give air time to everyone.
Monitor yourself for dominating or avoiding.
Build upon and learn from other’s ideas.
Support your views and findings
Explain and give examples.
Refer to specific passages or evidence.
Connect or contrast your ideas to others’.
Dig deeper into the topic; revisit important ideas.
Show tolerance and respect
Receive other’s ideas respectfully; no put-downs.
Try to restate opposing viewpoints.
Use neutral language in disagreeing.
Offer your different viewpoint; don’t be steamrolled.
Welcome and seek insight in different viewpoints.
Reflect and correct
Do frequent reflections on group processes.
Identify specific behaviours that helped or hurt the group process.
Talk openly about problems.
Make plans to try out new strategies and review the effectiveness.
Keep a written record of the group’s progress.
45 | P a g e
Presented by the Saskatchewan Wildlife Federation
Activity Two: The Benefits of Practice Essential Questions:
How does participation in archery activities enhance my physical well-being?
Why is practice so important?
How can I get better?
Materials:
Bow rack
Easton 1820 arrows
Floor arrow quiver (e.g., cones)
Genesis bows
Painter’s tape
FITA 80cm faced targets
Whistle
Safety rules posters
Clearly defined shooting range
Score Card
Archery Journal
“Practice Makes Perfect” sheet Background Information: This lesson focuses on developing the following enduring understandings:
Archery skills and techniques - Techniques (e.g., practice, self-evaluation) used to develop skills are related to performance in games and/or sports.
Principles of motor skills refinement (e.g., accuracy, techniques, movement) require a logical and sequential approach.
This activity may need to be repeated more than once, depending on the needs of the students.
Before:
Considering and generating ideas and information: Place students in groups of two or three and invite them to generate a list of ten ways, “Practice makes perfect.”
During:
To enhance their archery skills through practice, they will be allowed to shoot with a group of students of your choice. OR
Allow students to challenge willing classmates to a friendly competition.
All rules and procedures must be followed. Scores will be recorded in Archery Journals.
After:
Archery Journal Reflection: Martha is excited about joining an Archery Club. She wants to be on a competitive team but knows she has to practice in order to improve her shooting skills and reach her goal. A) List two important principles of practice to be
46 | P a g e
Presented by the Saskatchewan Wildlife Federation
considered when practicing any sport. B) How can Martha apply these two principles of practice to improve her skill level in archery?
Assessment: Formative Assessment and Feedback – Students should be monitored throughout the class period to ensure that proper safety procedures and skill development are being demonstrated. Corrections should be made immediately in order to ensure growth and internalization. Core-strength, flexibility and skill with the string bow should also be monitored and frequent feedback be given, either by peers or by the instructor. By this stage, students should be able to conduct a competition independently and score accurately. However, feedback may still be required for some students. Summative Assessment – In this series of activities, it may be increasingly appropriate to assess students on outcomes in physical education, health and math as they relate to relationships, skill-building and scoring. This assessment will depend on the grade level of the students. Further, the journal reflection could be assessed according to ELA outcomes. The rubrics in the appendix can help with these decisions.

47 | P a g e
Presented by the Saskatchewan Wildlife Federation
Practice Makes Perfect!
List ten ways that practice improves skills in any sport or activity. Be specific about the skills and understanding practice improves.
1.
2.
3.
4.
5.
6.
7.
8.
9.
10.
Our group ________________________________________________________
48 | P a g e
Presented by the Saskatchewan Wildlife Federation
Activity Three: Competition and Sportsmanship Essential Questions:
When is it challenging to be a “good sport?” How does good sportsmanship look and sound?
How does participating in archery activities enhance my emotional and social well-being?
How does good sportsmanship apply to spectators? Materials:
Bow rack
Easton 1820 arrows
Floor arrow quiver (e.g., cones)
Genesis bows
Painter’s tape
FITA 80cm faced targets
Whistle
Safety rules posters
Clearly defined shooting range
Score Card
Archery Journal
“Sportsmanship” group sheet Background Information: This activity invites students to experience a tournament as both a participant and as a spectator. Students will continue to develop their archery skills in addition to the social skills expected of athletes. Students will be expected to demonstrate good sportsmanship throughout the tournament. In grades 4-12, there are a variety of physical education and health outcomes that require a demonstration of self-control and strong relationships. Consult the grid at the beginning of this lesson sequence to assist with possible assessment opportunities. Before:
Making connections and generating ideas and information: Place students into groups of three or four. Together, they use the “Sportsmanship” concept sheet to express an understanding of how good sportsmanship looks for athletes and spectators. Discuss results as a class.
During:
Place students in a single elimination seeding based on their previous scores recorded in their Archery Journals.
Review safety procedures and commands.
Give each student five arrows for a practice round.
Allow students to perform in a one-on-one tournament to determine the winner, scoring after each end. Scores are recorded in Archery Journals.

49 | P a g e
Presented by the Saskatchewan Wildlife Federation
After:
Archery Journal Reflection: Ben enjoys participating in sports activities and is a good athlete but he needs to improve his sportsmanship. A) Describe three behaviors Ben can demonstrate as a participant in a team activity to show good sportsmanship. B) Describe three behaviors Ben can demonstrate as a spectator of a team activity to show good sportsmanship.
Assessment: Formative Assessment and Feedback – Students should be monitored throughout the class period to ensure that proper safety procedures and skill development are being demonstrated. Corrections should be made immediately in order to ensure growth and internalization. Core-strength, flexibility and skill with the string bow should also be monitored and frequent feedback be given, either by peers or by the instructor. By this stage, students should be able to conduct a competition independently and score accurately. However, feedback may still be required for some students. Summative Assessment – In this series of activities, it may be increasingly appropriate to assess students on outcomes in physical education, health and math as they relate to relationships, skill-building and scoring. This activity also stresses sportsmanship and, when appropriate for grade level outcomes, this may be assessed as well. This assessment will depend on the grade level of the students. Further, the journal reflection could be assessed according to ELA, health and physical education outcomes. Refer to the rubrics in the appendix.
50 | P a g e
Presented by the Saskatchewan Wildlife Federation
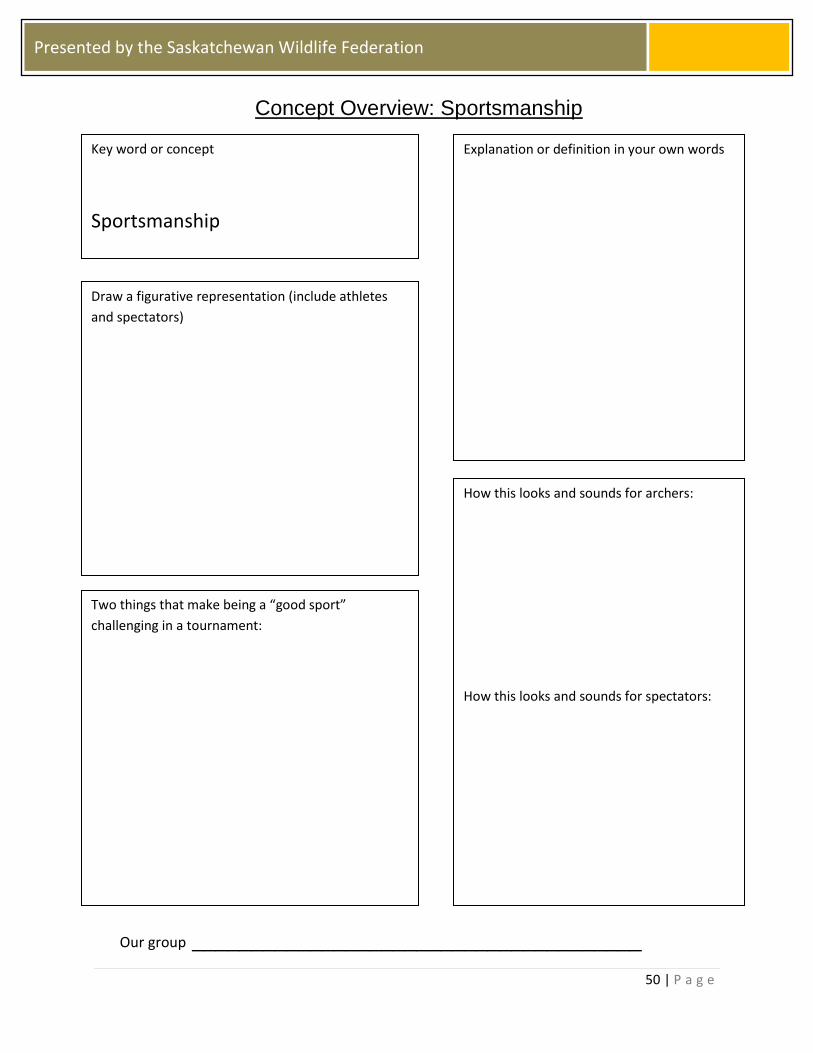
Concept Overview: Sportsmanship
Our group ______________________________________
Key word or concept
Sportsmanship
Draw a figurative representation (include athletes
and spectators)
Two things that make being a “good sport”
challenging in a tournament:
How this looks and sounds for archers:
How this looks and sounds for spectators:
Explanation or definition in your own words
51 | P a g e
Presented by the Saskatchewan Wildlife Federation
Lesson Five: Applying Our Learning Saskatchewan Curricular Outcomes Connection
Gr.4 Gr.5 Gr.6 Gr.7 Gr.8 Gr.9 Gr.10 Gr.11 Gr.12
ELA CC4.4, AR4.1
CC5.4, AR5.1
CC6.7, AR6.2
CC7.8, AR7.2
CC8.8, AR8.2
CC9.8, AR9.2
CC10.4a/b, AR10.1a/b
CC20.4, AR20.1
CC30.4a/b, AR30.1a/b
Phys. Ed. 4.9, 4.10, 4.12
5.7, 5.8 6.9, 6.13 7.8, 7.9, 7.11, 7.12
8.6, 8.7, 8.8
9.6, 9.7, 9.9
1, 3, 4, 6 1, 3, 4, 6
Health USC4.1 USC5.4 USC6.1, USC6.6, DM6.9
DM7.8, DM7.9
USC8.1, DM8.8, DM8.9
USC9.2, DM9.11
Wellness W3, W6, W7, W10
Time: 5 or 6 periods Activity One: Let’s Play! Essential Questions:
How has preparation made me ready to compete?
How did I do today? How did my team do today? How can I/ we do even better tomorrow?
How did the strengths of my opponents affect the decisions I made?
Materials:
Bow rack
Easton 1820 arrows
Floor quivers (e.g., cones)
Genesis bows
Blue painter’s tape
FITA 80cm faced targets
Whistle
Safety rules posters
Clearly defined shooting range
Archery Journal Background Information: This activity provides students with the opportunity to play competitively and practice good sportsmanship. This tournament will take more than one period and guests (parents, other classes, and teachers) are encouraged to be part of the tournament. At many grade levels, in physical education, it is necessary for the students themselves to plan events such as this tournament. When this is the case, invite students to do the thinking and organizing!
52 | P a g e
Presented by the Saskatchewan Wildlife Federation
Before:
Setting a purpose, planning and organizing – Students will need to be placed in teams of three. Each team will have students designated with A, B, and C players, as determined by previous scores. Archery journals will need to be consulted.
Each team will shoot several rounds to determine the seeding for the following day’s tournament.
The tournament should be designed according to double elimination. During:
Once the tournament schedule has been designed, students will participate in the double-elimination tournament.
Two teams will compete at a time. The rest of the class will watch the match and support the competitors.
Continue play until winners have been determined.
After:
Following the tournament, students will reflect on their personal and team performance in their Archery Journals. The three essential questions should be their prompts.
Assessment: Summative Assessment – This tournament serves as the opportunity for students to be assessed on their application of skills and knowledge in a game situation. The teacher should anticipate collecting anecdotal observations regarding skills, scoring and sportsmanship. Assessments will occur in the areas of physical education, health and math (in the younger grades). Rubrics and observation data should be used to assist with summative decisions. Students should use their reflections in their Archery Journals as the basis for goal setting for subsequent archery competitions. Goal setting and action planning are required in ELA, physical education and health.
Image courtesy of Clip Art
53 | P a g e
Presented by the Saskatchewan Wildlife Federation
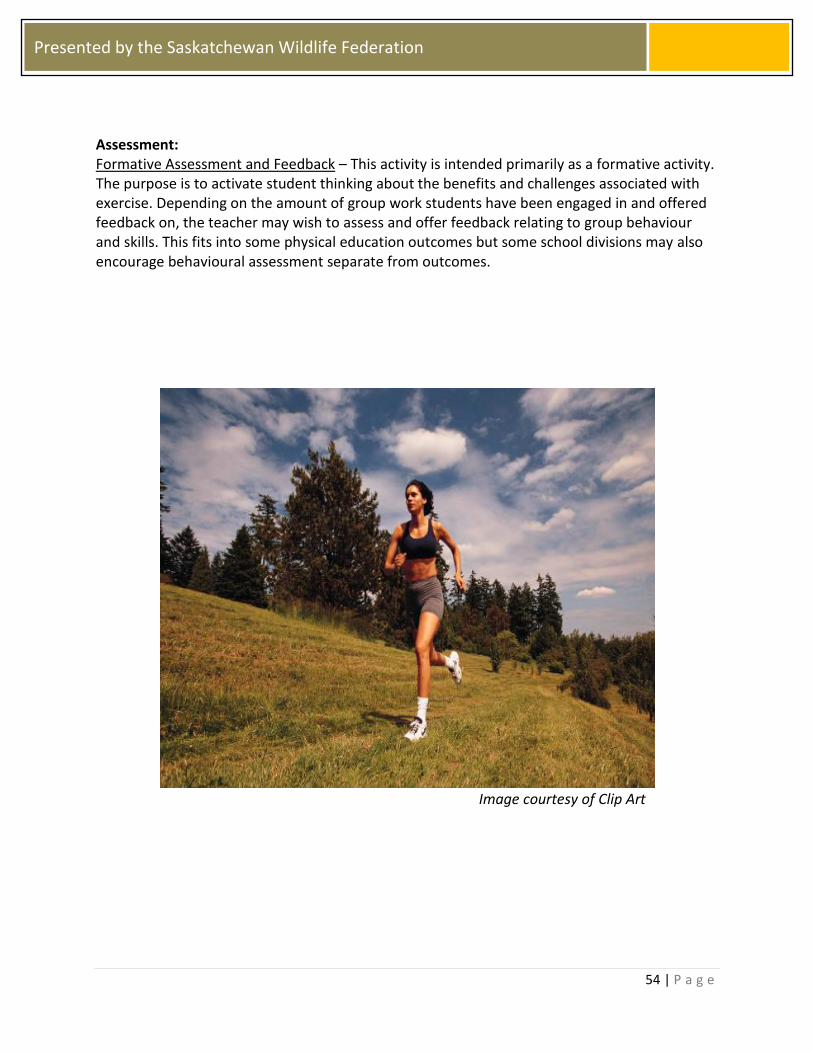
Activity Two: Benefits of Exercise Essential Questions:
How does exercise help me now? How does it help me in the future?
Why do some people not exercise? How can this be changed?
Materials:
Archery Journal
“100 Benefits of Exercise” sheet
“How Proficient Collaborators Think and Act” sheet
Background Information: The purpose of this activity is to have students reflect on the physical, emotional and social benefits of exercise and apply their understanding to the choices they make, personally, everyday. Students also need to reflect on the things that challenge people from exercising regularly. Before:
Review “How Proficient Collaborators Think and Act” sheet. Explain that these skills will need to be applied to group work today.
On their own, students are asked to generate as many short and long-term physical, emotional and social benefits of exercise as they can. This should take no more than ten minutes.
During:
Students are then placed in groups of three and asked to compare and share their lists. They should compile a list that represents the ideas of all three group members. It would be optimal if this list could be shared through Google Docs or a similar sharing tool.
Students then join as a group of six and blend their lists together.
The class, as a whole, then compiles the results of all their thinking into a master list of the benefits of exercise.
Students are then given the “100 Benefits of Exercise” and compare this list to the class lists. What did they miss? What did the class have that this handout does not?
Students then, individually choose ten benefits that have the most meaning for them personally. This list should go into their Archery Journals.
With a partner, students should share one physical, one social and one emotional benefit and explain why these three are important to them.
After:
In their Archery Journals, students answer the two essential questions.
As a class, discuss their theories about the second question.
54 | P a g e
Presented by the Saskatchewan Wildlife Federation
Assessment: Formative Assessment and Feedback – This activity is intended primarily as a formative activity. The purpose is to activate student thinking about the benefits and challenges associated with exercise. Depending on the amount of group work students have been engaged in and offered feedback on, the teacher may wish to assess and offer feedback relating to group behaviour and skills. This fits into some physical education outcomes but some school divisions may also encourage behavioural assessment separate from outcomes.
Image courtesy of Clip Art

55 | P a g e
Presented by the Saskatchewan Wildlife Federation
100 Benefits of Exercise
1. Enhances your immune system. 2. Increases your self-confidence and self-esteem. 3. Improves digestion. 4. Helps you sleep better. 5. Gives you more energy. 6. Adds a sparkle and radiance to your complexion. 7. Improves your body shape. 8. Burns up extra calories. 9. Tones and firms up muscle. 10. Provides a more muscular definition. 11. Improves circulation and helps reduce blood pressure. 12. Lifts your spirits. 13. Reduces tension and stress. 14. Enables you to lose weight and keep it off. 15. Makes you limber. 16. Builds strength. 17. Improves endurance. 18. Increases your body’s lean muscle tissue. 19. Improves your appetite for nutritious foods. 20. Alleviates menstrual cramps. 21. Improves muscle chemistry. 22. Increases metabolic rate. 23. Improves coordination and balance. 24. Improves your posture. 25. Eases and possibly eliminates back problems and pain. 26. Improves your body’s efficiency to use calories. 27. Lowers your resting heart rate. 28. Increases muscle size through an increase in muscle fibers. 29. Enables your body to utilize nutrients more efficiently. 30. Improves the body’s ability to burn fat. 31. Enhances oxygen transport through the body. 32. Improves liver functioning. 33. Strengthens the heart. 34. Improves blood flow through the body.

56 | P a g e
Presented by the Saskatchewan Wildlife Federation
35. Helps to eliminate varicose veins. 36. Increases maximum cardiac output due to an increase in stroke volume. 37. Strengthens your bones. 38. Increases the weight of the heart. 39. Increases heart size. 40. Improves contractile function of the whole heart. 41. Deters heart disease. 42. Decreases cholesterol. 43. Decreases triglycerides. 44. Increases total hemoglobin. 45. Improves the body’s ability to remove lactic acid. 46. Improves the body’s ability to decrease heart rate after exercise. 47. Increases the number of open capillaries. 48. Improves blood flow to the active muscles at the peak of training. 49. Enhances the functioning of the cardiovascular system. 50. Enhances the functioning of the respiratory system. 51. Improves efficiency in breathing. 52. Increases lung capacity. 53. Improves bone metabolism. 54. Decreases the changes of osteoporosis. 55. Improves the development of and the strength of connective tissue. 56. Increases strength of ligaments. 57. Enhances neuromuscular relaxation thus reducing anxiety and tension 58. Enables you to relax more quickly and completely. 59. Alleviates depression. 60. Enhances clarity of the mind. 61. Improves emotional stability. 62. Makes you feel good. 63. Increases efficiency of your sweat glands. 64. Makes you better able to stay warm in cold environments. 65. Helps you respond quicker to heat in that sweating begins at a lower body temperature. 66. Improves your body composition. 67. Increase bone density. 68. Decreases fat tissue more easily. 69. Helps you become more agile. 70. Instills a positive attitude about yourself and about life.
57 | P a g e
Presented by the Saskatchewan Wildlife Federation
71. Alleviates constipation. 72. Increases the efficiency of utilizing oxygen. 73. Enables you to meet new friends and develop fulfilling relationships. 74. Enables you to socialize and get in shape at the same time. 75. Helps you move past self-imposed limitations. 76. Gives you a great appreciation for life as a result of feeling better about yourself. 77. Enables you to better enjoy all types of physical activity. 78. Makes your clothes look better on you. 79. Makes it easier to exercise consistently because you like how you look and feel and don’t want to lose it. 80. Gives you a greater desire to fully participate in life and to take more risks as a result of increased confidence and self-esteem. 81. Improves athletic performance. 82. Improves the whole quality of your life. 83. May add a few years to your life. 84. Is the greatest tune-up for your body. 85. Reduces joint discomfort. 86. Increases your range of motion. 87. Gives you a feeling of control or mastery over your life and a belief that you can create any reality you want. 88. Stimulates and improves concentration. 89. Brings color to your cheeks. 90. Decreases appetite when you work out from 20 minutes to one hour before a meal. 91. Gets your mind off of minor irritations. 92. Stimulates a feeling of well-being and accomplishment. 93. Invigorates the body and mind. 94. Is a wonderful way to enjoy nature and the great outdoors. 95. Increases the body’s awareness of itself. 96. Reduces or precludes boredom. 97. Increases your ability to solve problems more easily. 98. Gives you a clear perspective of ideas, issues, problems and challenges. 99. Releases blockages and limitations in thinking. 100. Helps you to save money on health-related costs.
58 | P a g e
Presented by the Saskatchewan Wildlife Federation
Activity Three: Persuading Others Essential Questions:
Why is archery a great activity?
How can I best persuade others that archery is a great activity? How does my audience affect how I share my message?
Materials:
Variety of resource materials
Access to digital tools, online resources
Materials needed to support text form (dependant on the grade level)
Persuasive text planner Background Information: The purpose of this activity is to explore the physical, emotional and social benefits of participating in archery activities and then share this understanding with a larger audience through persuasive writing. The following list of recommended writing forms and audiences is based on specific curricular outcomes at each grade level:
Grade 4 – News article explaining archery and its physical, emotional and social benefits.
Grade 5 – Letter to a friend or relative explaining archery, its physical, emotional and social benefits and what you enjoy and find challenging about it.
Grade 6 – A short essay taking a viewpoint or stand relating to archery.
Grade 7 – A letter to the School Community Council convincing them that archery is a valuable part of school. Explain the physical, emotional and social benefits of participating in archery activities.
Grade 8 – A mini-debate about whether or not archery should be a school learning experience.
Grade 9 – A letter to the editor of a newspaper, convincing community members that archery is an important way to improve one’s physical, emotional and social health.
Grade 10A – A technical report about archery, including its benefits, the skills needed and the behaviours it develops.
Grade 10B – An essay, short script or fictional journal entry relating to archery and its benefits for both the individual and the community.
Grade 11 – A persuasive essay advocating for archery as part of a school experience for students in grades 4 – 12. Consider the individual benefits as well as the benefits for your community as a whole.
Grade 12A – A letter to a large business or corporation in the community, requesting funding for an archery club in your school. Explain the physical, emotional and social benefits students will experience as a result of participating in the sport of archery. Explain the effect that these benefits will have on the community as a whole.
Grade 12B – A comparative essay, comparing archery to another sport. Before:
Set an audience and purpose for the writing.

59 | P a g e
Presented by the Saskatchewan Wildlife Federation
Have students generate questions to guide their research.
Explore places where students can go for information.
Gather information in a graphic organizer (see appendix) and cite sources.
Gather images, charts and other materials to support persuasive text. During:
Organize information and create drafts.
Seek feedback and revise.
Create final drafts After:
Share
Reflect Assessment: Formative Assessment and Feedback – Students should be continuously monitored for timing and ability to engage in brainstorming, research, planning and composition and creation. Various checkpoints should be created in order to ensure that students are on track. Additional support may be needed depending on the age and skill of the student. Summative Assessment – You may feel students are ready to be assessed on various outcomes, depending on the grade level (see outcome chart at beginning of lesson plan, particularly persuasive writing in ELA). Refer to rubrics in the appendix for criteria for assessment.
Image courtesy of Clip Art
60 | P a g e
Presented by the Saskatchewan Wildlife Federation
Persuasive Text Project Planner
Name ________________________________ Date __________________
Audience: Purpose: Topic: Text form: What do I already know about the benefits of archery?
Physical Emotional Social
What questions do I still have?
Where could I go for more information?

61 | P a g e
Presented by the Saskatchewan Wildlife Federation
What have I learned?
Where did I actually find this information? (citation)

62 | P a g e
Presented by the Saskatchewan Wildlife Federation
What are my main ideas?
What are the details I will use to support my argument? How should I organize my ideas?
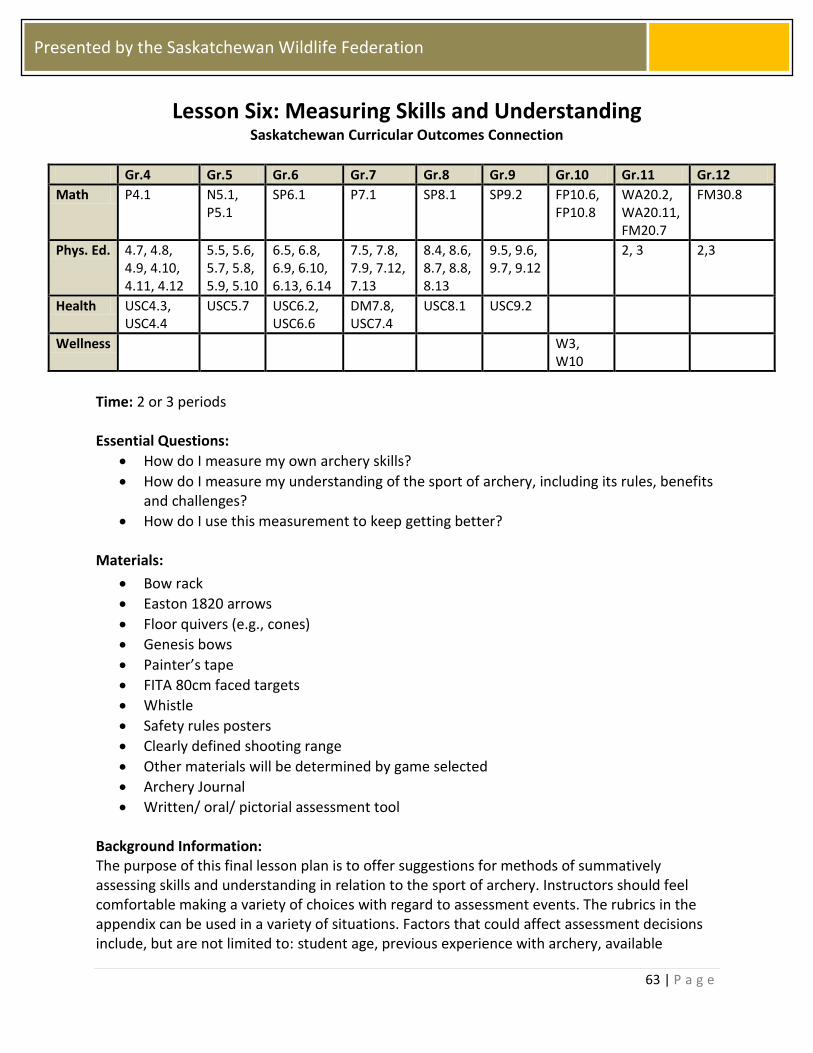
63 | P a g e
Presented by the Saskatchewan Wildlife Federation
Lesson Six: Measuring Skills and Understanding Saskatchewan Curricular Outcomes Connection
Gr.4 Gr.5 Gr.6 Gr.7 Gr.8 Gr.9 Gr.10 Gr.11 Gr.12
Math P4.1 N5.1, P5.1
SP6.1 P7.1 SP8.1 SP9.2 FP10.6, FP10.8
WA20.2, WA20.11, FM20.7
FM30.8
Phys. Ed. 4.7, 4.8, 4.9, 4.10, 4.11, 4.12
5.5, 5.6, 5.7, 5.8, 5.9, 5.10
6.5, 6.8, 6.9, 6.10, 6.13, 6.14
7.5, 7.8, 7.9, 7.12, 7.13
8.4, 8.6, 8.7, 8.8, 8.13
9.5, 9.6, 9.7, 9.12
2, 3 2,3
Health USC4.3, USC4.4
USC5.7 USC6.2, USC6.6
DM7.8, USC7.4
USC8.1 USC9.2
Wellness W3, W10
Time: 2 or 3 periods Essential Questions:
How do I measure my own archery skills?
How do I measure my understanding of the sport of archery, including its rules, benefits and challenges?
How do I use this measurement to keep getting better?
Materials:
Bow rack
Easton 1820 arrows
Floor quivers (e.g., cones)
Genesis bows
Painter’s tape
FITA 80cm faced targets
Whistle
Safety rules posters
Clearly defined shooting range
Other materials will be determined by game selected
Archery Journal
Written/ oral/ pictorial assessment tool Background Information: The purpose of this final lesson plan is to offer suggestions for methods of summatively assessing skills and understanding in relation to the sport of archery. Instructors should feel comfortable making a variety of choices with regard to assessment events. The rubrics in the appendix can be used in a variety of situations. Factors that could affect assessment decisions include, but are not limited to: student age, previous experience with archery, available

64 | P a g e
Presented by the Saskatchewan Wildlife Federation
equipment, student strengths and limitations (ex. ability to write extensively) and time. It is entirely possible that instructors may have gathered enough evidence in this unit already, in order to offer a summative assessment. The options given in this lesson are, by no means, required. Assessment: At several points in this unit, students should be assessed (formative/ summative) on the following topics:
Archery safety
“11 Steps to Archery Success”
Archery range
Targets
Equipment and storage
Scoring
Benefits of archery
Communication, cooperation, respect and rules in archery This assessment could be done through the following assessment methods:
Observation during formal competitions
Talk-alouds – performance cues (could be audio or video-recorded)
Archery Journal reflections
Descriptions of tactics and strategies that apply to the sport of archery (target games)
Creation of graphs documenting developing skill over time, scores over time. (Senior students could apply data analysis outcomes to overall class statistical data.)
Skills demonstrated during various games (see appendix)
Diagrams of aspects of equipment, scoring, range, care
Photo essays documenting the “11 Steps to Archery Success” Assessment results could be applied to outcomes in physical education, health, math and wellness (see outcome chart and rubrics in the appendix). Some students may need more opportunity to demonstrate their understanding while others may demonstrate proficiency early on. It is not necessary to assess every student the same number of times. In the end, all students should be striving for mastery.

65 | P a g e
Presented by the Saskatchewan Wildlife Federation
Appendix of Resources
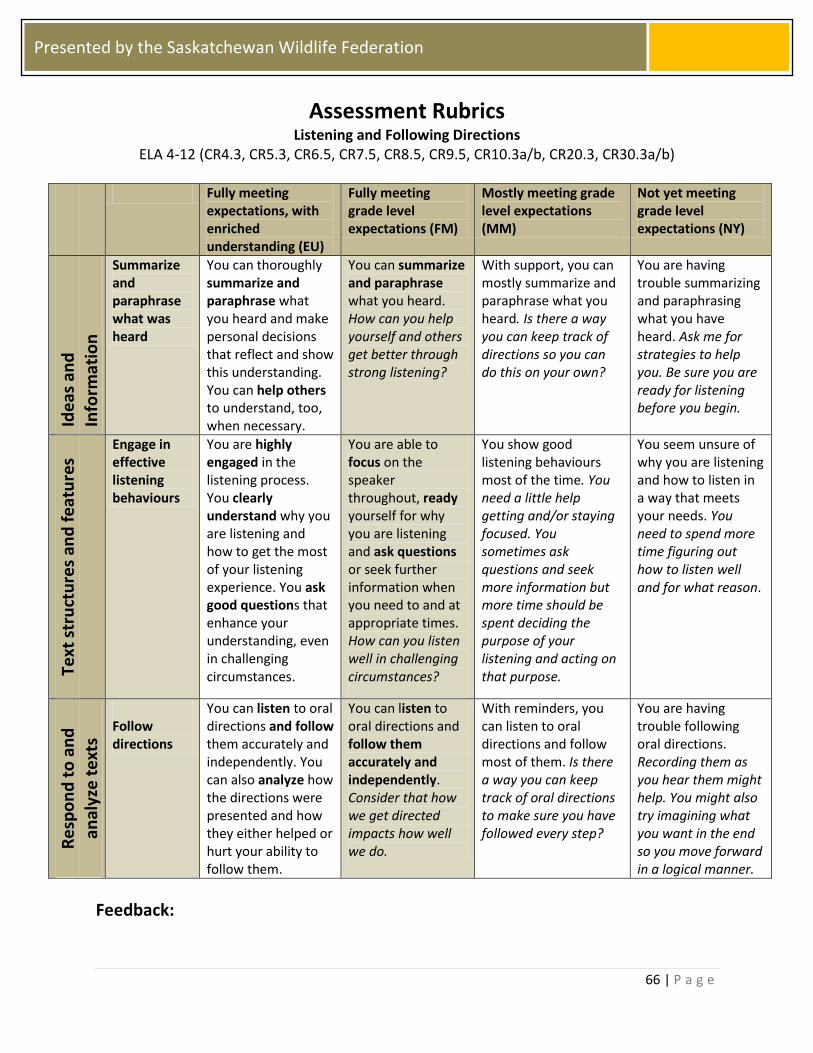
66 | P a g e
Presented by the Saskatchewan Wildlife Federation
Assessment Rubrics Listening and Following Directions
ELA 4-12 (CR4.3, CR5.3, CR6.5, CR7.5, CR8.5, CR9.5, CR10.3a/b, CR20.3, CR30.3a/b)
Fully meeting expectations, with enriched understanding (EU)
Fully meeting grade level expectations (FM)
Mostly meeting grade level expectations (MM)
Not yet meeting grade level expectations (NY)
Ide
as a
nd
In
form
atio
n
Summarize and paraphrase what was heard
You can thoroughly summarize and paraphrase what you heard and make personal decisions that reflect and show this understanding. You can help others to understand, too, when necessary.
You can summarize and paraphrase what you heard. How can you help yourself and others get better through strong listening?
With support, you can mostly summarize and paraphrase what you heard. Is there a way you can keep track of directions so you can do this on your own?
You are having trouble summarizing and paraphrasing what you have heard. Ask me for strategies to help you. Be sure you are ready for listening before you begin.
Text
str
uct
ure
s an
d f
eat
ure
s
Engage in effective listening behaviours
You are highly engaged in the listening process. You clearly understand why you are listening and how to get the most of your listening experience. You ask good questions that enhance your understanding, even in challenging circumstances.
You are able to focus on the speaker throughout, ready yourself for why you are listening and ask questions or seek further information when you need to and at appropriate times. How can you listen well in challenging circumstances?
You show good listening behaviours most of the time. You need a little help getting and/or staying focused. You sometimes ask questions and seek more information but more time should be spent deciding the purpose of your listening and acting on that purpose.
You seem unsure of why you are listening and how to listen in a way that meets your needs. You need to spend more time figuring out how to listen well and for what reason.
Re
spo
nd
to
an
d
anal
yze
te
xts
Follow directions
You can listen to oral directions and follow them accurately and independently. You can also analyze how the directions were presented and how they either helped or hurt your ability to follow them.
You can listen to oral directions and follow them accurately and independently. Consider that how we get directed impacts how well we do.
With reminders, you can listen to oral directions and follow most of them. Is there a way you can keep track of oral directions to make sure you have followed every step?
You are having trouble following oral directions. Recording them as you hear them might help. You might also try imagining what you want in the end so you move forward in a logical manner.
Feedback:
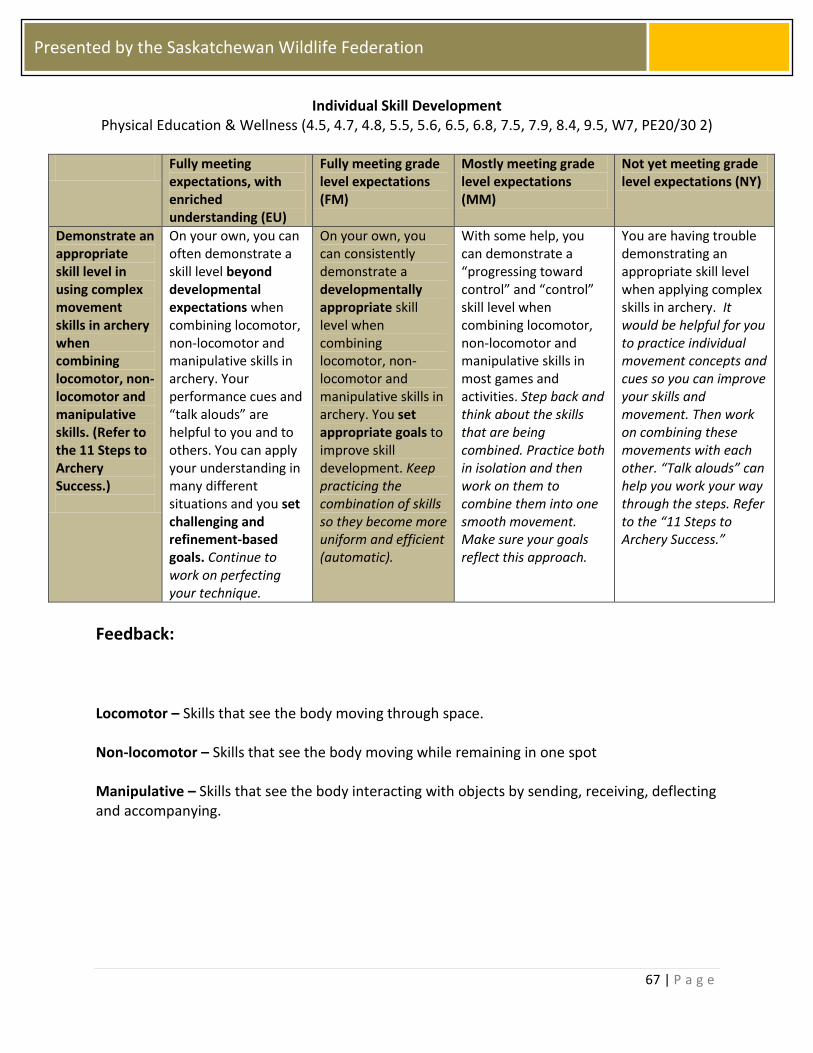
67 | P a g e
Presented by the Saskatchewan Wildlife Federation
Individual Skill Development Physical Education & Wellness (4.5, 4.7, 4.8, 5.5, 5.6, 6.5, 6.8, 7.5, 7.9, 8.4, 9.5, W7, PE20/30 2)
Fully meeting expectations, with enriched understanding (EU)
Fully meeting grade level expectations (FM)
Mostly meeting grade level expectations (MM)
Not yet meeting grade level expectations (NY)
Demonstrate an appropriate skill level in using complex movement skills in archery when combining locomotor, non-locomotor and manipulative skills. (Refer to the 11 Steps to Archery Success.)
On your own, you can often demonstrate a skill level beyond developmental expectations when combining locomotor, non-locomotor and manipulative skills in archery. Your performance cues and “talk alouds” are helpful to you and to others. You can apply your understanding in many different situations and you set challenging and refinement-based goals. Continue to work on perfecting your technique.
On your own, you can consistently demonstrate a developmentally appropriate skill level when combining locomotor, non-locomotor and manipulative skills in archery. You set appropriate goals to improve skill development. Keep practicing the combination of skills so they become more uniform and efficient (automatic).
With some help, you can demonstrate a “progressing toward control” and “control” skill level when combining locomotor, non-locomotor and manipulative skills in most games and activities. Step back and think about the skills that are being combined. Practice both in isolation and then work on them to combine them into one smooth movement. Make sure your goals reflect this approach.
You are having trouble demonstrating an appropriate skill level when applying complex skills in archery. It would be helpful for you to practice individual movement concepts and cues so you can improve your skills and movement. Then work on combining these movements with each other. “Talk alouds” can help you work your way through the steps. Refer to the “11 Steps to Archery Success.”
Feedback: Locomotor – Skills that see the body moving through space. Non-locomotor – Skills that see the body moving while remaining in one spot Manipulative – Skills that see the body interacting with objects by sending, receiving, deflecting and accompanying.
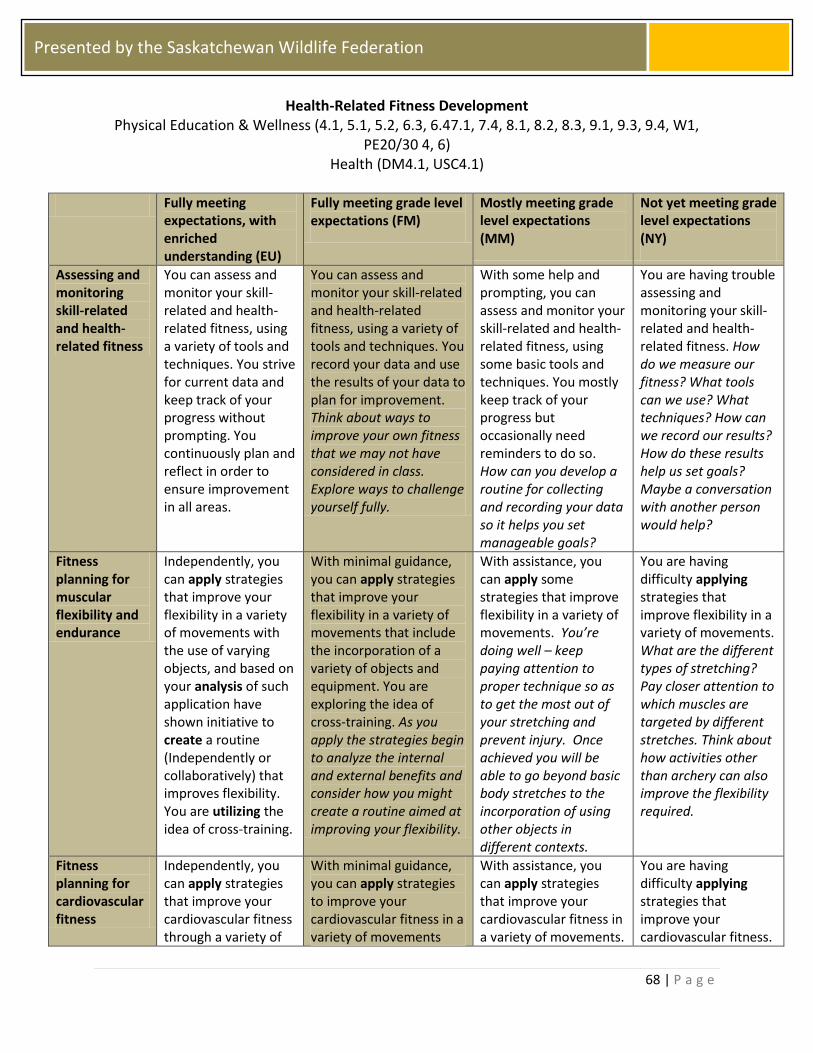
68 | P a g e
Presented by the Saskatchewan Wildlife Federation
Health-Related Fitness Development Physical Education & Wellness (4.1, 5.1, 5.2, 6.3, 6.47.1, 7.4, 8.1, 8.2, 8.3, 9.1, 9.3, 9.4, W1,
PE20/30 4, 6) Health (DM4.1, USC4.1)
Fully meeting expectations, with enriched understanding (EU)
Fully meeting grade level expectations (FM)
Mostly meeting grade level expectations (MM)
Not yet meeting grade level expectations (NY)
Assessing and monitoring skill-related and health-related fitness
You can assess and monitor your skill-related and health-related fitness, using a variety of tools and techniques. You strive for current data and keep track of your progress without prompting. You continuously plan and reflect in order to ensure improvement in all areas.
You can assess and monitor your skill-related and health-related fitness, using a variety of tools and techniques. You record your data and use the results of your data to plan for improvement. Think about ways to improve your own fitness that we may not have considered in class. Explore ways to challenge yourself fully.
With some help and prompting, you can assess and monitor your skill-related and health-related fitness, using some basic tools and techniques. You mostly keep track of your progress but occasionally need reminders to do so. How can you develop a routine for collecting and recording your data so it helps you set manageable goals?
You are having trouble assessing and monitoring your skill-related and health-related fitness. How do we measure our fitness? What tools can we use? What techniques? How can we record our results? How do these results help us set goals? Maybe a conversation with another person would help?
Fitness planning for muscular flexibility and endurance
Independently, you can apply strategies that improve your flexibility in a variety of movements with the use of varying objects, and based on your analysis of such application have shown initiative to create a routine (Independently or collaboratively) that improves flexibility. You are utilizing the idea of cross-training.
With minimal guidance, you can apply strategies that improve your flexibility in a variety of movements that include the incorporation of a variety of objects and equipment. You are exploring the idea of cross-training. As you apply the strategies begin to analyze the internal and external benefits and consider how you might create a routine aimed at improving your flexibility.
With assistance, you can apply some strategies that improve flexibility in a variety of movements. You’re doing well – keep paying attention to proper technique so as to get the most out of your stretching and prevent injury. Once achieved you will be able to go beyond basic body stretches to the incorporation of using other objects in different contexts.
You are having difficulty applying strategies that improve flexibility in a variety of movements. What are the different types of stretching? Pay closer attention to which muscles are targeted by different stretches. Think about how activities other than archery can also improve the flexibility required.
Fitness planning for cardiovascular fitness
Independently, you can apply strategies that improve your cardiovascular fitness through a variety of
With minimal guidance, you can apply strategies to improve your cardiovascular fitness in a variety of movements
With assistance, you can apply strategies that improve your cardiovascular fitness in a variety of movements.
You are having difficulty applying strategies that improve your cardiovascular fitness.
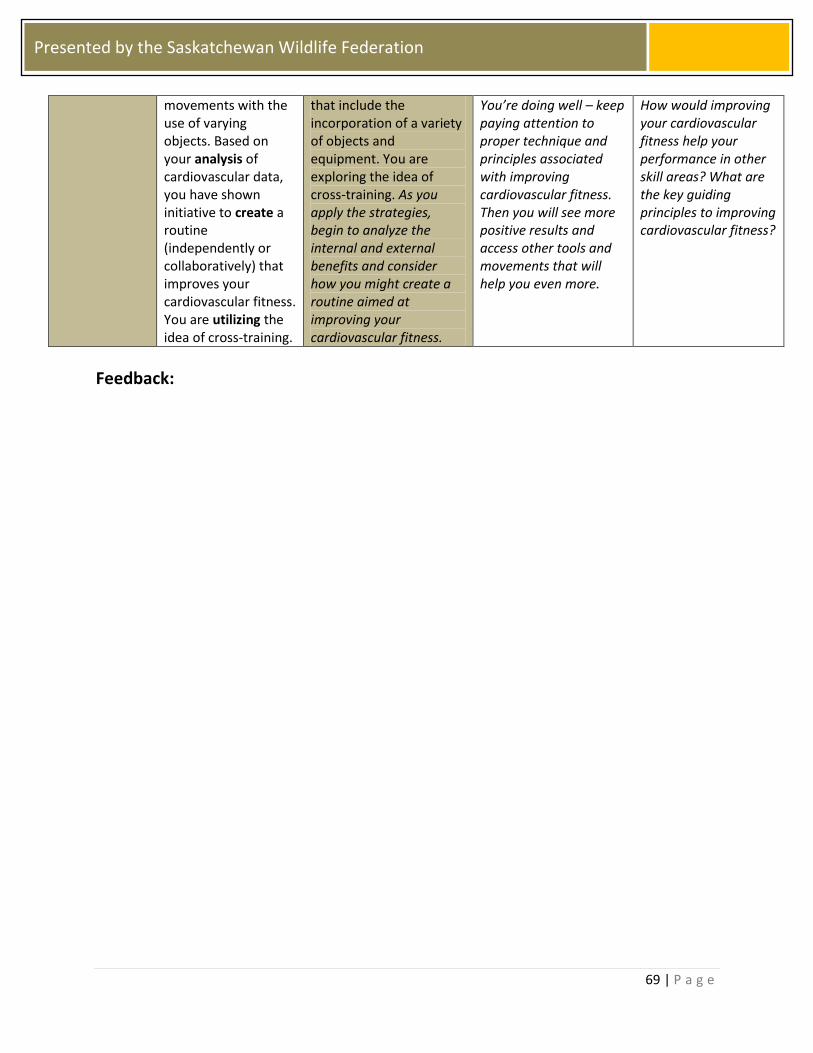
69 | P a g e
Presented by the Saskatchewan Wildlife Federation
movements with the use of varying objects. Based on your analysis of cardiovascular data, you have shown initiative to create a routine (independently or collaboratively) that improves your cardiovascular fitness. You are utilizing the idea of cross-training.
that include the incorporation of a variety of objects and equipment. You are exploring the idea of cross-training. As you apply the strategies, begin to analyze the internal and external benefits and consider how you might create a routine aimed at improving your cardiovascular fitness.
You’re doing well – keep paying attention to proper technique and principles associated with improving cardiovascular fitness. Then you will see more positive results and access other tools and movements that will help you even more.
How would improving your cardiovascular fitness help your performance in other skill areas? What are the key guiding principles to improving cardiovascular fitness?
Feedback:
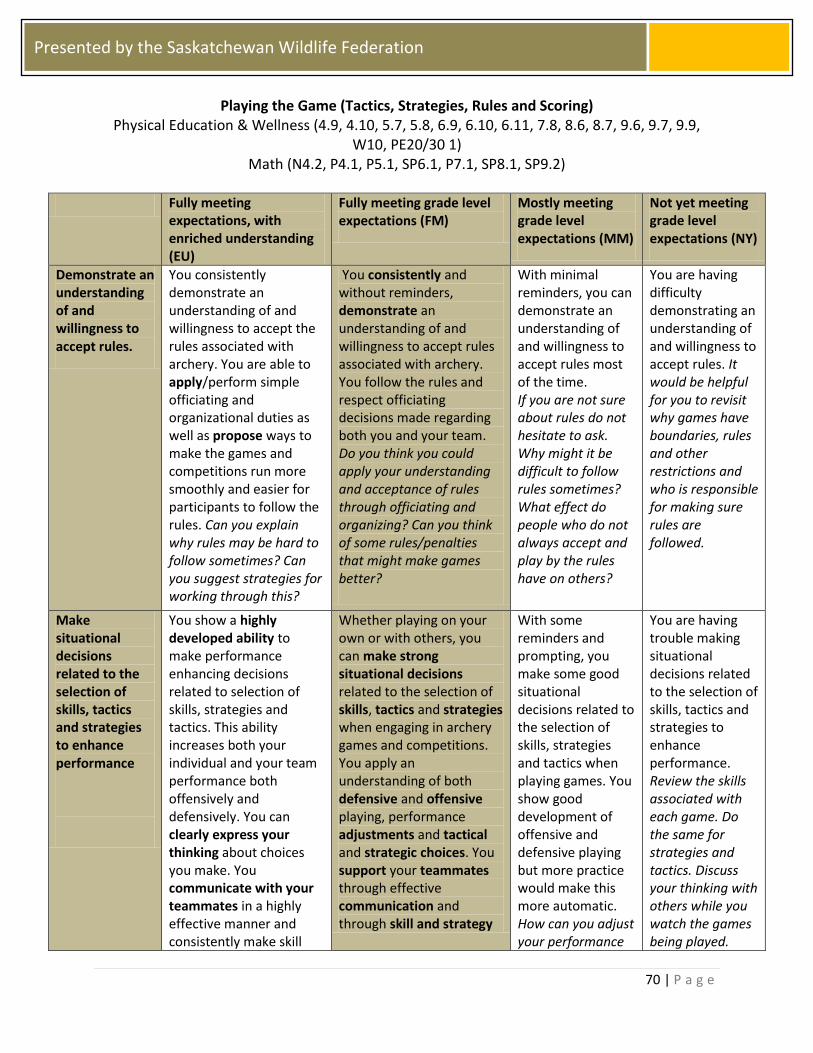
70 | P a g e
Presented by the Saskatchewan Wildlife Federation
Playing the Game (Tactics, Strategies, Rules and Scoring) Physical Education & Wellness (4.9, 4.10, 5.7, 5.8, 6.9, 6.10, 6.11, 7.8, 8.6, 8.7, 9.6, 9.7, 9.9,
W10, PE20/30 1) Math (N4.2, P4.1, P5.1, SP6.1, P7.1, SP8.1, SP9.2)
Fully meeting expectations, with enriched understanding (EU)
Fully meeting grade level expectations (FM)
Mostly meeting grade level expectations (MM)
Not yet meeting grade level expectations (NY)
Demonstrate an understanding of and willingness to accept rules.
You consistently demonstrate an understanding of and willingness to accept the rules associated with archery. You are able to apply/perform simple officiating and organizational duties as well as propose ways to make the games and competitions run more smoothly and easier for participants to follow the rules. Can you explain why rules may be hard to follow sometimes? Can you suggest strategies for working through this?
You consistently and without reminders, demonstrate an understanding of and willingness to accept rules associated with archery. You follow the rules and respect officiating decisions made regarding both you and your team. Do you think you could apply your understanding and acceptance of rules through officiating and organizing? Can you think of some rules/penalties that might make games better?
With minimal reminders, you can demonstrate an understanding of and willingness to accept rules most of the time. If you are not sure about rules do not hesitate to ask. Why might it be difficult to follow rules sometimes? What effect do people who do not always accept and play by the rules have on others?
You are having difficulty demonstrating an understanding of and willingness to accept rules. It would be helpful for you to revisit why games have boundaries, rules and other restrictions and who is responsible for making sure rules are followed.
Make situational decisions related to the selection of skills, tactics and strategies to enhance performance
You show a highly developed ability to make performance enhancing decisions related to selection of skills, strategies and tactics. This ability increases both your individual and your team performance both offensively and defensively. You can clearly express your thinking about choices you make. You communicate with your teammates in a highly effective manner and consistently make skill
Whether playing on your own or with others, you can make strong situational decisions related to the selection of skills, tactics and strategies when engaging in archery games and competitions. You apply an understanding of both defensive and offensive playing, performance adjustments and tactical and strategic choices. You support your teammates through effective communication and through skill and strategy
With some reminders and prompting, you make some good situational decisions related to the selection of skills, strategies and tactics when playing games. You show good development of offensive and defensive playing but more practice would make this more automatic. How can you adjust your performance
You are having trouble making situational decisions related to the selection of skills, tactics and strategies to enhance performance. Review the skills associated with each game. Do the same for strategies and tactics. Discuss your thinking with others while you watch the games being played.
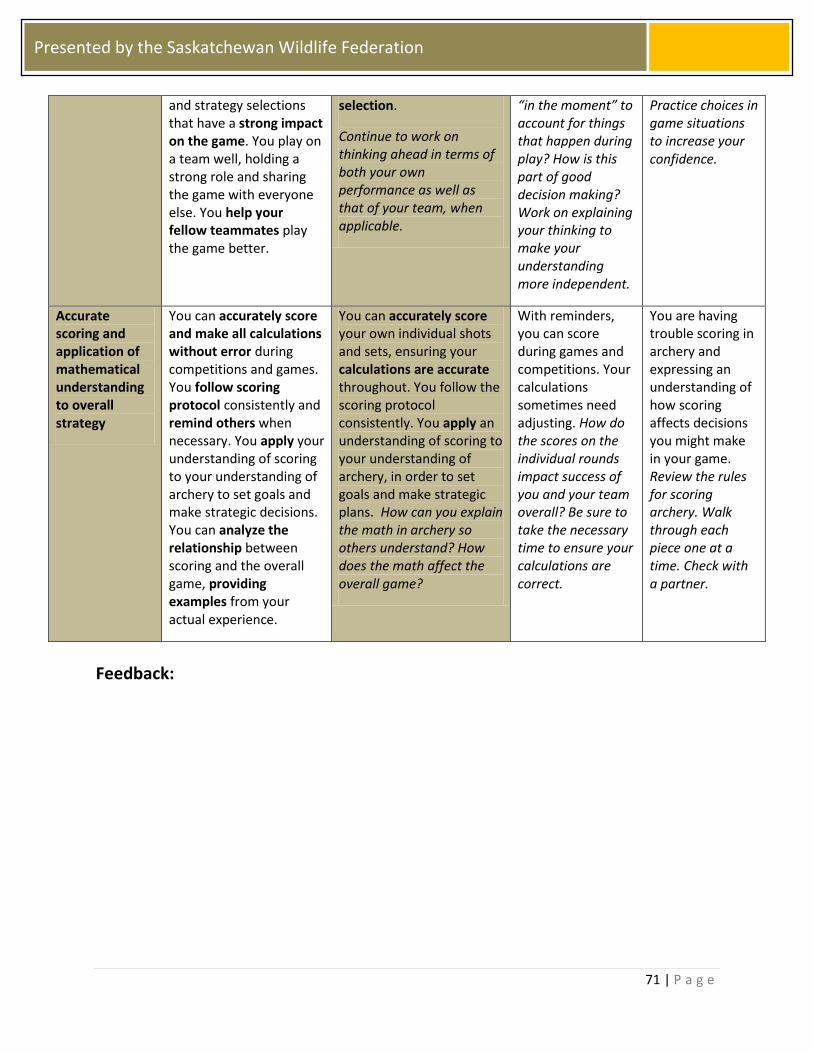
71 | P a g e
Presented by the Saskatchewan Wildlife Federation
and strategy selections that have a strong impact on the game. You play on a team well, holding a strong role and sharing the game with everyone else. You help your fellow teammates play the game better.
selection.
Continue to work on thinking ahead in terms of both your own performance as well as that of your team, when applicable.
“in the moment” to account for things that happen during play? How is this part of good decision making? Work on explaining your thinking to make your understanding more independent.
Practice choices in game situations to increase your confidence.
Accurate scoring and application of mathematical understanding to overall strategy
You can accurately score and make all calculations without error during competitions and games. You follow scoring protocol consistently and remind others when necessary. You apply your understanding of scoring to your understanding of archery to set goals and make strategic decisions. You can analyze the relationship between scoring and the overall game, providing examples from your actual experience.
You can accurately score your own individual shots and sets, ensuring your calculations are accurate throughout. You follow the scoring protocol consistently. You apply an understanding of scoring to your understanding of archery, in order to set goals and make strategic plans. How can you explain the math in archery so others understand? How does the math affect the overall game?
With reminders, you can score during games and competitions. Your calculations sometimes need adjusting. How do the scores on the individual rounds impact success of you and your team overall? Be sure to take the necessary time to ensure your calculations are correct.
You are having trouble scoring in archery and expressing an understanding of how scoring affects decisions you might make in your game. Review the rules for scoring archery. Walk through each piece one at a time. Check with a partner.
Feedback:
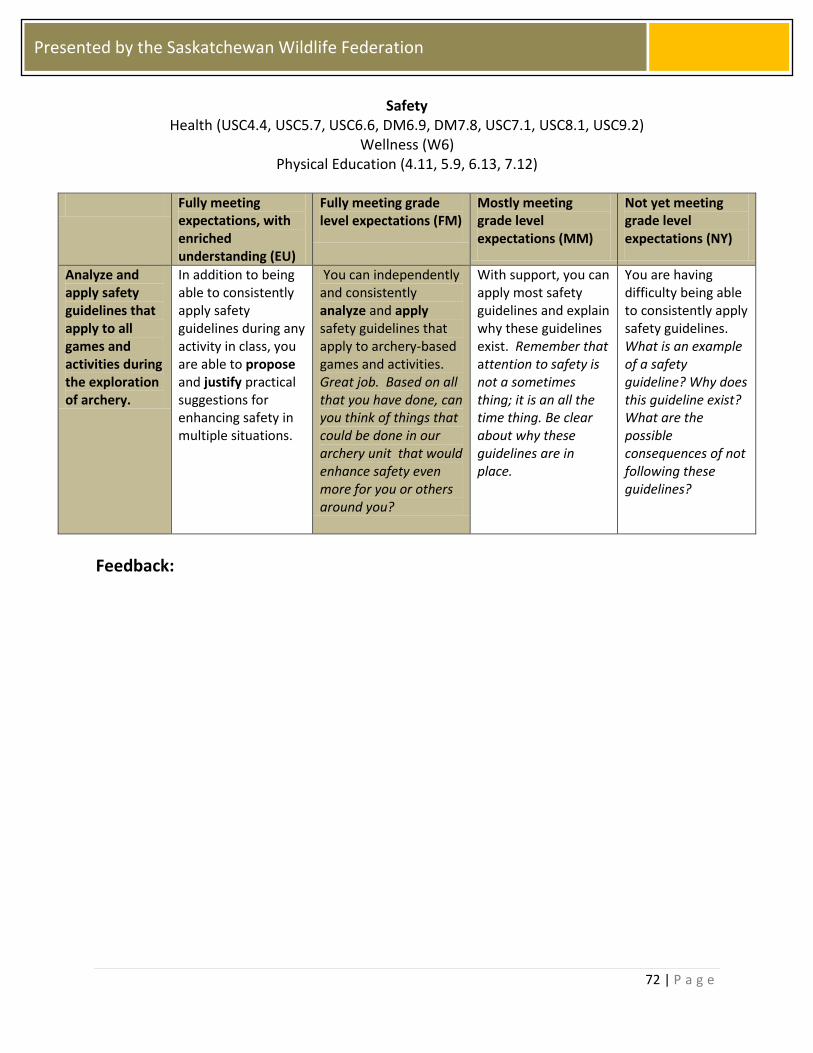
72 | P a g e
Presented by the Saskatchewan Wildlife Federation
Safety Health (USC4.4, USC5.7, USC6.6, DM6.9, DM7.8, USC7.1, USC8.1, USC9.2)
Wellness (W6) Physical Education (4.11, 5.9, 6.13, 7.12)
Fully meeting expectations, with enriched understanding (EU)
Fully meeting grade level expectations (FM)
Mostly meeting grade level expectations (MM)
Not yet meeting grade level expectations (NY)
Analyze and apply safety guidelines that apply to all games and activities during the exploration of archery.
In addition to being able to consistently apply safety guidelines during any activity in class, you are able to propose and justify practical suggestions for enhancing safety in multiple situations.
You can independently and consistently analyze and apply safety guidelines that apply to archery-based games and activities. Great job. Based on all that you have done, can you think of things that could be done in our archery unit that would enhance safety even more for you or others around you?
With support, you can apply most safety guidelines and explain why these guidelines exist. Remember that attention to safety is not a sometimes thing; it is an all the time thing. Be clear about why these guidelines are in place.
You are having difficulty being able to consistently apply safety guidelines. What is an example of a safety guideline? Why does this guideline exist? What are the possible consequences of not following these guidelines?
Feedback:
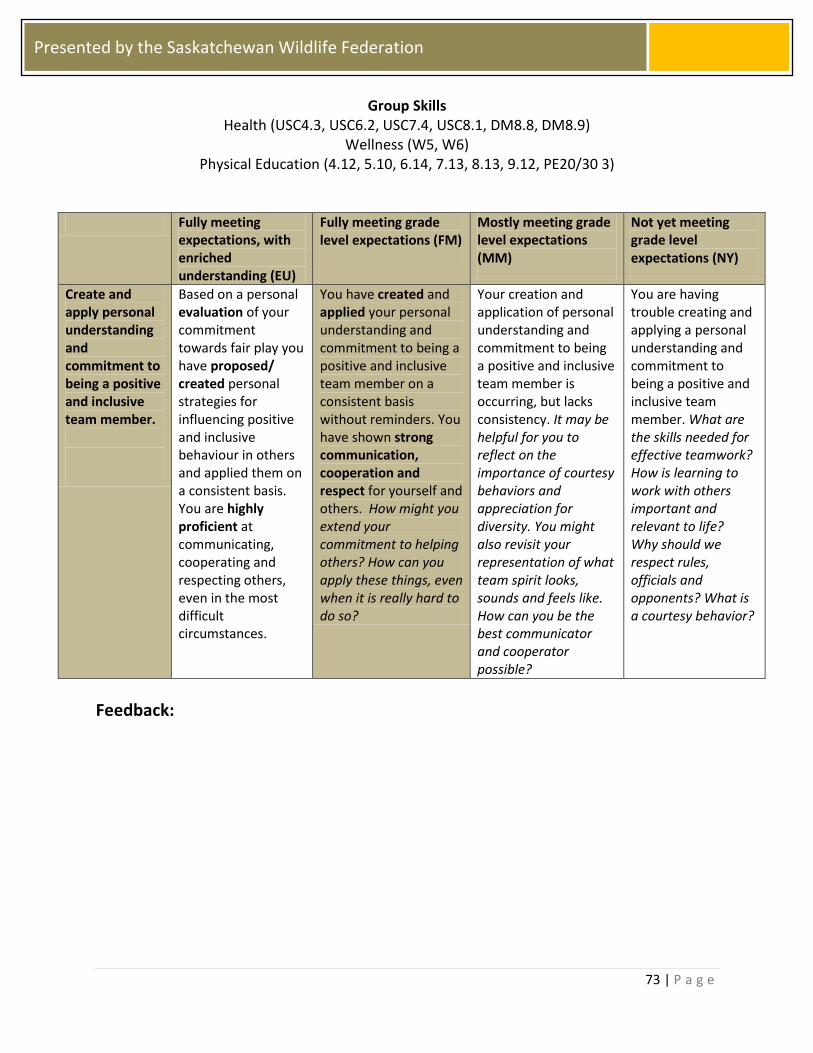
73 | P a g e
Presented by the Saskatchewan Wildlife Federation
Group Skills Health (USC4.3, USC6.2, USC7.4, USC8.1, DM8.8, DM8.9)
Wellness (W5, W6) Physical Education (4.12, 5.10, 6.14, 7.13, 8.13, 9.12, PE20/30 3)
Fully meeting expectations, with enriched understanding (EU)
Fully meeting grade level expectations (FM)
Mostly meeting grade level expectations (MM)
Not yet meeting grade level expectations (NY)
Create and apply personal understanding and commitment to being a positive and inclusive team member.
Based on a personal evaluation of your commitment towards fair play you have proposed/ created personal strategies for influencing positive and inclusive behaviour in others and applied them on a consistent basis. You are highly proficient at communicating, cooperating and respecting others, even in the most difficult circumstances.
You have created and applied your personal understanding and commitment to being a positive and inclusive team member on a consistent basis without reminders. You have shown strong communication, cooperation and respect for yourself and others. How might you extend your commitment to helping others? How can you apply these things, even when it is really hard to do so?
Your creation and application of personal understanding and commitment to being a positive and inclusive team member is occurring, but lacks consistency. It may be helpful for you to reflect on the importance of courtesy behaviors and appreciation for diversity. You might also revisit your representation of what team spirit looks, sounds and feels like. How can you be the best communicator and cooperator possible?
You are having trouble creating and applying a personal understanding and commitment to being a positive and inclusive team member. What are the skills needed for effective teamwork? How is learning to work with others important and relevant to life? Why should we respect rules, officials and opponents? What is a courtesy behavior?
Feedback:
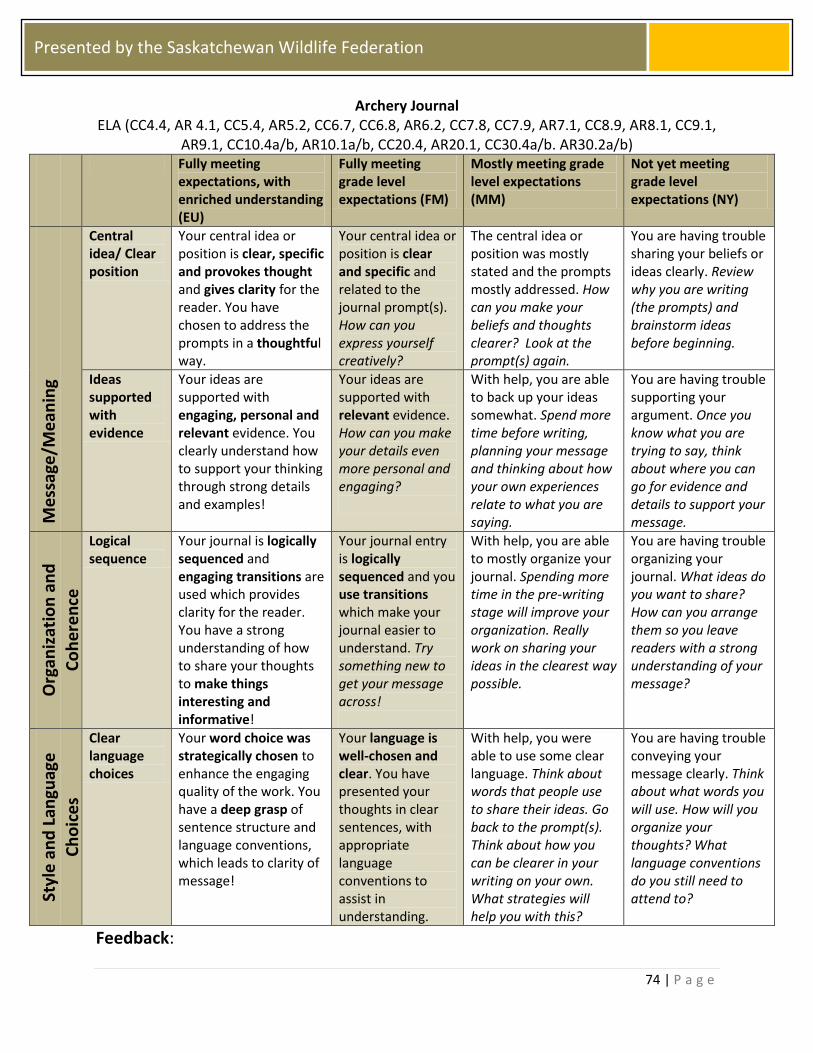
74 | P a g e
Presented by the Saskatchewan Wildlife Federation
Archery Journal ELA (CC4.4, AR 4.1, CC5.4, AR5.2, CC6.7, CC6.8, AR6.2, CC7.8, CC7.9, AR7.1, CC8.9, AR8.1, CC9.1,
AR9.1, CC10.4a/b, AR10.1a/b, CC20.4, AR20.1, CC30.4a/b. AR30.2a/b)
Fully meeting expectations, with enriched understanding (EU)
Fully meeting grade level expectations (FM)
Mostly meeting grade level expectations (MM)
Not yet meeting grade level expectations (NY)
Me
ssag
e/M
ean
ing
Central idea/ Clear position
Your central idea or position is clear, specific and provokes thought and gives clarity for the reader. You have chosen to address the prompts in a thoughtful way.
Your central idea or position is clear and specific and related to the journal prompt(s). How can you express yourself creatively?
The central idea or position was mostly stated and the prompts mostly addressed. How can you make your beliefs and thoughts clearer? Look at the prompt(s) again.
You are having trouble sharing your beliefs or ideas clearly. Review why you are writing (the prompts) and brainstorm ideas before beginning.
Ideas supported with evidence
Your ideas are supported with engaging, personal and relevant evidence. You clearly understand how to support your thinking through strong details and examples!
Your ideas are supported with relevant evidence. How can you make your details even more personal and engaging?
With help, you are able to back up your ideas somewhat. Spend more time before writing, planning your message and thinking about how your own experiences relate to what you are saying.
You are having trouble supporting your argument. Once you know what you are trying to say, think about where you can go for evidence and details to support your message.
Org
aniz
atio
n a
nd
C
oh
ere
nce
Logical sequence
Your journal is logically sequenced and engaging transitions are used which provides clarity for the reader. You have a strong understanding of how to share your thoughts to make things interesting and informative!
Your journal entry is logically sequenced and you use transitions which make your journal easier to understand. Try something new to get your message across!
With help, you are able to mostly organize your journal. Spending more time in the pre-writing stage will improve your organization. Really work on sharing your ideas in the clearest way possible.
You are having trouble organizing your journal. What ideas do you want to share? How can you arrange them so you leave readers with a strong understanding of your message?
Styl
e a
nd
Lan
guag
e
Ch
oic
es
Clear language choices
Your word choice was strategically chosen to enhance the engaging quality of the work. You have a deep grasp of sentence structure and language conventions, which leads to clarity of message!
Your language is well-chosen and clear. You have presented your thoughts in clear sentences, with appropriate language conventions to assist in understanding.
With help, you were able to use some clear language. Think about words that people use to share their ideas. Go back to the prompt(s). Think about how you can be clearer in your writing on your own. What strategies will help you with this?
You are having trouble conveying your message clearly. Think about what words you will use. How will you organize your thoughts? What language conventions do you still need to attend to?
Feedback:
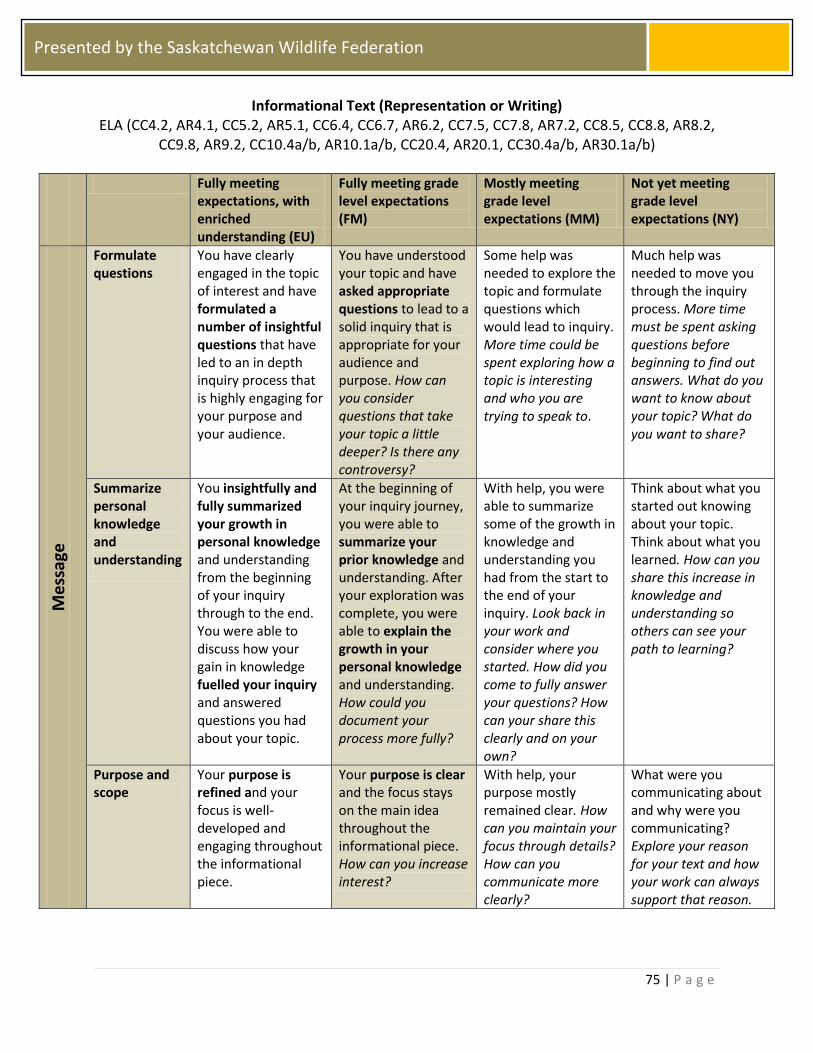
75 | P a g e
Presented by the Saskatchewan Wildlife Federation
Informational Text (Representation or Writing) ELA (CC4.2, AR4.1, CC5.2, AR5.1, CC6.4, CC6.7, AR6.2, CC7.5, CC7.8, AR7.2, CC8.5, CC8.8, AR8.2,
CC9.8, AR9.2, CC10.4a/b, AR10.1a/b, CC20.4, AR20.1, CC30.4a/b, AR30.1a/b)
Fully meeting expectations, with enriched understanding (EU)
Fully meeting grade level expectations (FM)
Mostly meeting grade level expectations (MM)
Not yet meeting grade level expectations (NY)
Me
ssag
e
Formulate questions
You have clearly engaged in the topic of interest and have formulated a number of insightful questions that have led to an in depth inquiry process that is highly engaging for your purpose and your audience.
You have understood your topic and have asked appropriate questions to lead to a solid inquiry that is appropriate for your audience and purpose. How can you consider questions that take your topic a little deeper? Is there any controversy?
Some help was needed to explore the topic and formulate questions which would lead to inquiry. More time could be spent exploring how a topic is interesting and who you are trying to speak to.
Much help was needed to move you through the inquiry process. More time must be spent asking questions before beginning to find out answers. What do you want to know about your topic? What do you want to share?
Summarize personal knowledge and understanding
You insightfully and fully summarized your growth in personal knowledge and understanding from the beginning of your inquiry through to the end. You were able to discuss how your gain in knowledge fuelled your inquiry and answered questions you had about your topic.
At the beginning of your inquiry journey, you were able to summarize your prior knowledge and understanding. After your exploration was complete, you were able to explain the growth in your personal knowledge and understanding. How could you document your process more fully?
With help, you were able to summarize some of the growth in knowledge and understanding you had from the start to the end of your inquiry. Look back in your work and consider where you started. How did you come to fully answer your questions? How can your share this clearly and on your own?
Think about what you started out knowing about your topic. Think about what you learned. How can you share this increase in knowledge and understanding so others can see your path to learning?
Purpose and scope
Your purpose is refined and your focus is well-developed and engaging throughout the informational piece.
Your purpose is clear and the focus stays on the main idea throughout the informational piece. How can you increase interest?
With help, your purpose mostly remained clear. How can you maintain your focus through details? How can you communicate more clearly?
What were you communicating about and why were you communicating? Explore your reason for your text and how your work can always support that reason.
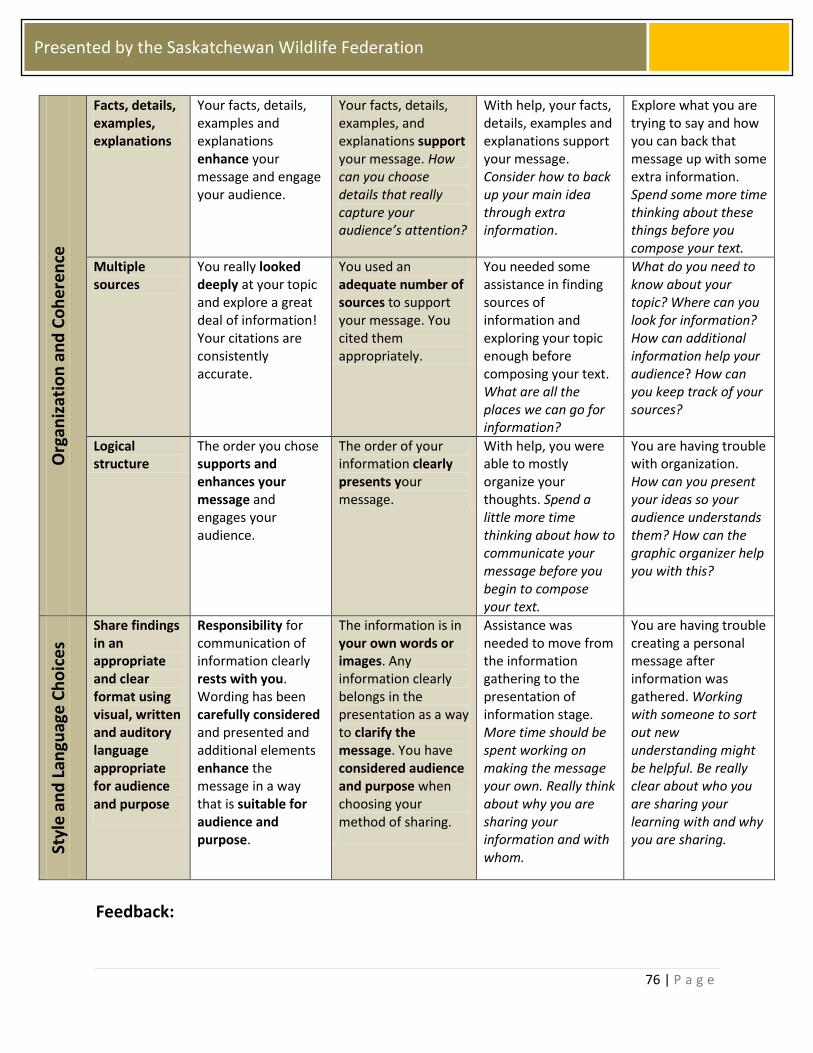
76 | P a g e
Presented by the Saskatchewan Wildlife Federation O
rgan
izat
ion
an
d C
oh
ere
nce
Facts, details, examples, explanations
Your facts, details, examples and explanations enhance your message and engage your audience.
Your facts, details, examples, and explanations support your message. How can you choose details that really capture your audience’s attention?
With help, your facts, details, examples and explanations support your message. Consider how to back up your main idea through extra information.
Explore what you are trying to say and how you can back that message up with some extra information. Spend some more time thinking about these things before you compose your text.
Multiple sources
You really looked deeply at your topic and explore a great deal of information! Your citations are consistently accurate.
You used an adequate number of sources to support your message. You cited them appropriately.
You needed some assistance in finding sources of information and exploring your topic enough before composing your text. What are all the places we can go for information?
What do you need to know about your topic? Where can you look for information? How can additional information help your audience? How can you keep track of your sources?
Logical structure
The order you chose supports and enhances your message and engages your audience.
The order of your information clearly presents your message.
With help, you were able to mostly organize your thoughts. Spend a little more time thinking about how to communicate your message before you begin to compose your text.
You are having trouble with organization. How can you present your ideas so your audience understands them? How can the graphic organizer help you with this?
Styl
e a
nd
Lan
guag
e C
ho
ices
Share findings in an appropriate and clear format using visual, written and auditory language appropriate for audience and purpose
Responsibility for communication of information clearly rests with you. Wording has been carefully considered and presented and additional elements enhance the message in a way that is suitable for audience and purpose.
The information is in your own words or images. Any information clearly belongs in the presentation as a way to clarify the message. You have considered audience and purpose when choosing your method of sharing.
Assistance was needed to move from the information gathering to the presentation of information stage. More time should be spent working on making the message your own. Really think about why you are sharing your information and with whom.
You are having trouble creating a personal message after information was gathered. Working with someone to sort out new understanding might be helpful. Be really clear about who you are sharing your learning with and why you are sharing.
Feedback:
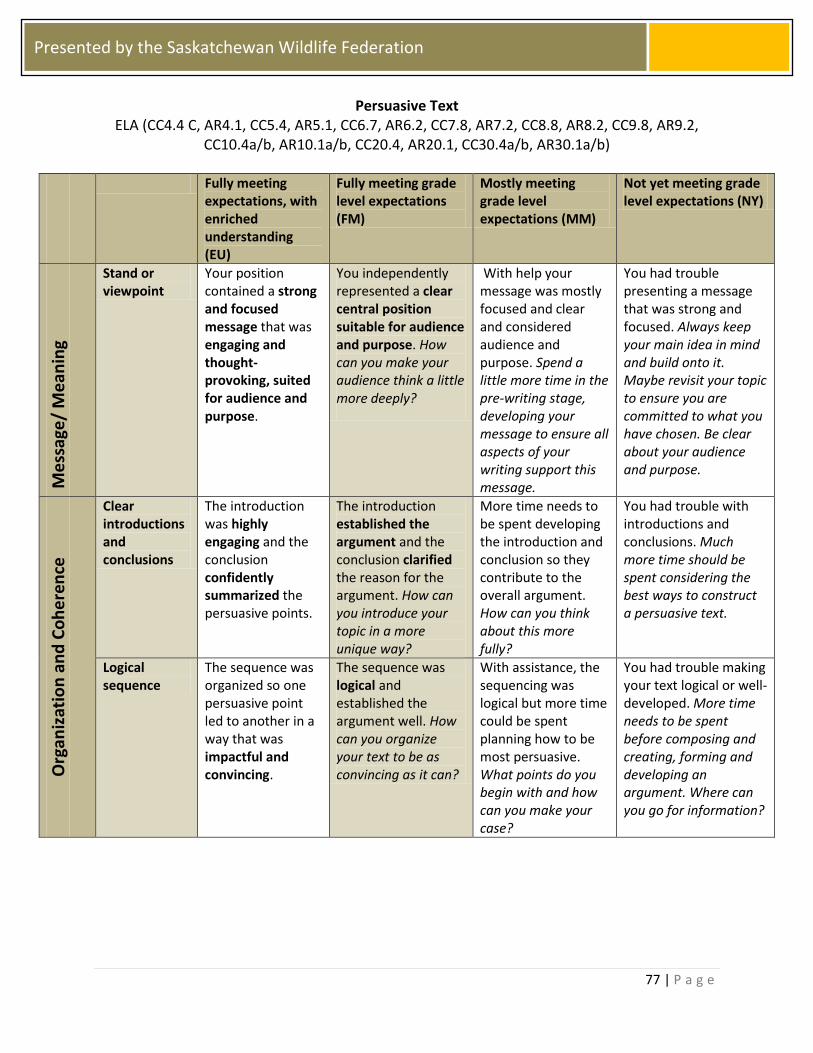
77 | P a g e
Presented by the Saskatchewan Wildlife Federation
Persuasive Text ELA (CC4.4 C, AR4.1, CC5.4, AR5.1, CC6.7, AR6.2, CC7.8, AR7.2, CC8.8, AR8.2, CC9.8, AR9.2,
CC10.4a/b, AR10.1a/b, CC20.4, AR20.1, CC30.4a/b, AR30.1a/b)
Fully meeting expectations, with enriched understanding (EU)
Fully meeting grade level expectations (FM)
Mostly meeting grade level expectations (MM)
Not yet meeting grade level expectations (NY)
Me
ssag
e/
Me
anin
g
Stand or viewpoint
Your position contained a strong and focused message that was engaging and thought-provoking, suited for audience and purpose.
You independently represented a clear central position suitable for audience and purpose. How can you make your audience think a little more deeply?
With help your message was mostly focused and clear and considered audience and purpose. Spend a little more time in the pre-writing stage, developing your message to ensure all aspects of your writing support this message.
You had trouble presenting a message that was strong and focused. Always keep your main idea in mind and build onto it. Maybe revisit your topic to ensure you are committed to what you have chosen. Be clear about your audience and purpose.
Org
aniz
atio
n a
nd
Co
he
ren
ce
Clear introductions and conclusions
The introduction was highly engaging and the conclusion confidently summarized the persuasive points.
The introduction established the argument and the conclusion clarified the reason for the argument. How can you introduce your topic in a more unique way?
More time needs to be spent developing the introduction and conclusion so they contribute to the overall argument. How can you think about this more fully?
You had trouble with introductions and conclusions. Much more time should be spent considering the best ways to construct a persuasive text.
Logical sequence
The sequence was organized so one persuasive point led to another in a way that was impactful and convincing.
The sequence was logical and established the argument well. How can you organize your text to be as convincing as it can?
With assistance, the sequencing was logical but more time could be spent planning how to be most persuasive. What points do you begin with and how can you make your case?
You had trouble making your text logical or well-developed. More time needs to be spent before composing and creating, forming and developing an argument. Where can you go for information?
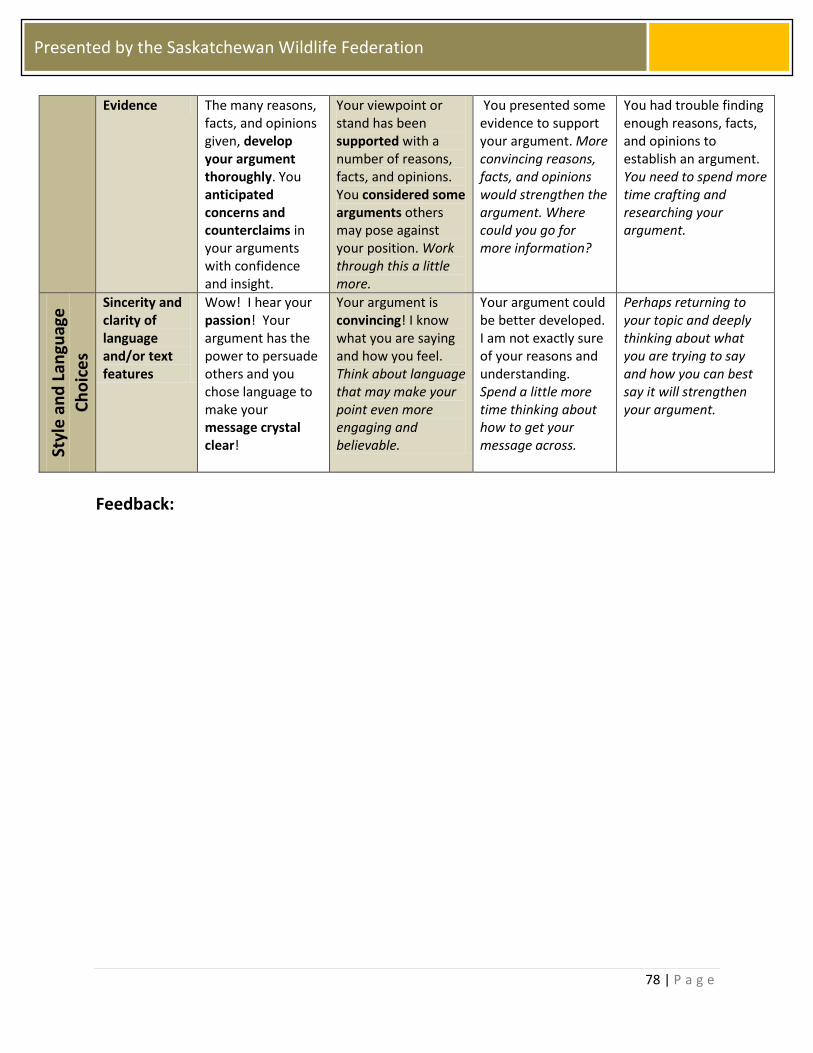
78 | P a g e
Presented by the Saskatchewan Wildlife Federation
Evidence The many reasons, facts, and opinions given, develop your argument thoroughly. You anticipated concerns and counterclaims in your arguments with confidence and insight.
Your viewpoint or stand has been supported with a number of reasons, facts, and opinions. You considered some arguments others may pose against your position. Work through this a little more.
You presented some evidence to support your argument. More convincing reasons, facts, and opinions would strengthen the argument. Where could you go for more information?
You had trouble finding enough reasons, facts, and opinions to establish an argument. You need to spend more time crafting and researching your argument.
Styl
e a
nd
Lan
guag
e
Ch
oic
es
Sincerity and clarity of language and/or text features
Wow! I hear your passion! Your argument has the power to persuade others and you chose language to make your message crystal clear!
Your argument is convincing! I know what you are saying and how you feel. Think about language that may make your point even more engaging and believable.
Your argument could be better developed. I am not exactly sure of your reasons and understanding. Spend a little more time thinking about how to get your message across.
Perhaps returning to your topic and deeply thinking about what you are trying to say and how you can best say it will strengthen your argument.
Feedback:
79 | P a g e
Presented by the Saskatchewan Wildlife Federation
Teaching Archery to Persons with Disabilities
Disability Awareness: Persons with disabilities have the same needs as every other person in the world. Students need to feel the joy of learning, sharing and growing, and to experience new challenges. No matter what the disability, all persons have the potential to become whatever they want to be. Guidelines for Disabilities: Throughout this document are items which may or may not be familiar to you. Many of the items that are familiar may now have a different definition as the information is provided in this section to eliminate any distortions, misconceptions, as well as additional barriers that people with disabilities have faced over the years due to inadequate terminology. In most personal and social relationships, labels are rarely used, except perhaps as a sign of endearment. However, in a legal or professional sense, there is often a need to categorize people to make them eligible for a privilege, such as a student loan, low-income housing, or special educational opportunities. In class, approach a student as an individual and a person, rather than someone with a disability. Words can bring people together, or they can push them apart. The words that have been used interchangeably for many years are “impairment,” “disability,” and “handicap.” The handicap or impairment is that vision may be blurred at long range, or there could be difficulty reading small print. When dealing in plain semantics, it should be remembered that disabilities don’t always create a handicap or impairment in every situation. As far as students with impairments, disabilities and handicaps are concerned, teachers must deal with the handicap or impairment the student’s disability has created. This can be done through modification of the activity or by modifying the environment in which the activity takes place. One example of this is a person who has blurred vision when looking at a target 60 feet away. This handicap can be addressed with prescription glasses thus modifying the activity, or bringing the target closer can modify the environment. First, you must work to identify students’ abilities as well as their disabilities and plan to accommodate them in the group. The goal is to meet the individual student’s needs. Students with disabilities may require additional class time and have special needs, like space for a wheelchair or an interpreter who knows sign language. Plan for those needs before class begins and try to be prepared for student disabilities, which were not discovered before the session began. Once the first class has been conducted, the planning stage will be easier. Alternative teaching methods may or may not be needed. Take charge of the group and the environment. Students with multiple disabilities may require more than one adaptive device or approach. Experiment with different teaching methods. Other items to note include:

80 | P a g e
Presented by the Saskatchewan Wildlife Federation
• Ramps or elevators can be added to the facility to eliminate difficulty. The person is assisted past the barrier, or a new, more accessible location can be obtained for the event; • Narrow doors, poor telephone placement or handles put at levels that are inconsistent with a wheelchair user’s needs, can create problems; • Clearing overhanging branches from outdoor walkways, removing doormats, repositioning furniture and clearing debris from walkways will ease many different handicaps; • Another example of a handicap or impairment is the lack of range accessibility, resulting from any of a long list of disabilities. Steps, high curbs, inclines and improperly designed facilities can all create a handicap or impairment; • Be creative, modify equipment and procedures to allow the students to reach their highest level of performance; • Build each lesson plan on previously learned knowledge; • Use a variety of teaching methods in classes. Alternate between lectures and practical exercises and use visual aids to play to each student’s strengths. Always remember that different students learn differently; • Repeat safety rules, fundamentals and other information frequently; • Encourage students to do things independently using as little adaptive equipment as possible; • Assist minimally, but whenever necessary; • Provide regular feedback whenever something goes right, regardless of level of success; and • Use discreet physical contact to correct positions and help the child maintain the safety of the equipment. Communication: An instructor’s major concern is communication with students. Addressing the impairments or handicaps that some disabilities cause may require modification of communications techniques. Deal with the person, not the disability. Treat adults as adults, and not as children. Talk to the person with the disability and not just to the companion who may be along with them. When offering help, wait until they accept it, as they are the only one who really knows if they need help or not. Take cues from the person with the disability concerning what they can or cannot do, and don’t emphasize any supposed differenced in their abilities. There are a variety of impairments or handicaps, and many ways and levels to communicate with the individual students that address their impairments yet still allow them to feel they are part of the group. Students with Physical Impairments: Because there is such a wide range of causes, definitions, and severities of physical disabilities, there is no recognized system for classifying a disability by degree. Terms referring to physical conditions such as “paraplegia,” “cerebral palsy,” and “muscular dystrophy” are good clinical descriptions but have little functional meaning, since people with the same condition differ greatly in what they can do. The best way to determine what a person can do or not do is to ask them. Knowing the abilities of students is very important. Keep in mind that individuals with the same physical condition will vary in both preferences and abilities to do the same task. Thousands of people have some degree of physical disability. Just because they have disabilities does not mean they can’t do everything required in a shooting sports class.
81 | P a g e
Presented by the Saskatchewan Wildlife Federation
Mobility poses the biggest problem for many students. Fortunately, shooting doesn’t require a great deal of movement. In situations requiring movement, adaptations may be made. Lack of strength poses a problem for some persons with disabilities. Equipment may be modified to alleviate the problem in many cases. When working with people with disabilities: Don’t assume that a person in a wheelchair needs help. If the person requests help, by all means help, but don’t assume they want it. If a person with a disability falls, wait for a request for help in getting up before helping them to their feet. Be patient without being protective or overindulgent. Although a person may be progressing as fast as the rest of the class, it may be very important to them to do it themselves. Crutches, canes, and wheelchairs are necessary pieces of equipment. Do not put them in the closet or roll them out of the way to “tidy up.” Doing so leaves their owner stranded. Allow all students to do all the activities offered. Do not underestimate the capabilities or interests of the individual. Misconceptions and myths have always been the major handicap of persons with disabilities. So often, the person’s perceived handicap exists only in the teachers’ mind, or the minds of other students. Personal aids and devices: People with physical disabilities often depend on tools to increase their functional abilities. Typically, those tools such as a wheelchair-loading device on the top of their car, or a custom made, ultra-lite racing wheelchair, become as personal to that person as clothes do to others. As a result, any handling of a person’s tools should be done carefully and considerately. In most situations, the person has complete mastery of their equipment and will not need help with it. If they do need help it is not only proper, but usually necessary, to ask them how to help. For children, ask a parent or guardian how to assist them. Some pieces of equipment have rules or restrictions regarding what the operator can do while using them. Ask the user what might cause trouble, i.e. vibration, shock, or extremes of temperature. Hearing Impairments: Hearing disabilities are probably the second most common disability in modern society. As far as shooting sports are concerned, this disability will not cause as many difficulties for the participants as other disabilities might. The main teaching tasks will be to assess the degree of the disability and then adjust methods of communication to resolve any handicap. There are two types of hearing disabilities: one is any of a varying degree of hearing loss. Some form of hearing device to amplify sound is needed. Depending on their hearing loss, the student may still need to watch the instructor’s mouth and partially read lips in conjunction with the sounds they are hearing. The other form of hearing disability is deafness, where the person is
82 | P a g e
Presented by the Saskatchewan Wildlife Federation
unable to understand sounds even with amplification. Two-way communication techniques may need to be used such as signing, lip-reading, writing or any of the new keyboard devices now available. As with other disabilities, there are different levels of hearing impairment. People who are “hard of hearing” have difficulty hearing other people’s speech, but can understand it with the help of amplification. People who are “deaf” cannot hear sound well enough to distinguish it, even with amplification. A person who is hearing impaired may also have trouble speaking clearly, since he/she may not be able to hear well enough to correct pronunciation errors in their own speech. People tend to speak the way they hear. Some people with severe hearing impairments may choose not to use their voices. “Lip reading” is a technique learned by some people with hearing impairments. It assists them in understanding the speech of others; Lip-readers watch a speaker’s mouth and identify words by the shape and position of the lips and tongue. This is a difficult skill to master, since less than 35 percent of English words are recognizable solely by mouth positions and movements. Do not expect your hearing- impaired students to read lips. Body language and what the speaker is saying are very important. People with speech impairments as well as hearing impairments often use signing and writing to communicate. For some, writing is the only means of communication available. People with hearing or speech impairments generally find communication to be their main problem, rather than the techniques of a particular activity. Interpreters who translate verbal language are often necessary in order to include people with severe hearing impairments. Often, finding an interpreter can be accomplished by checking with the student’s family to locate a volunteer. Ask other people with hearing impairments for a reference, or call the local department of rehabilitation or social services for suggestions. Check for special education personnel in the school system for interpreters who are teachers or Educational Associates. Contact local technical or community colleges for names of instructors who teach sign language, and check the community service listings in the phone book for agencies that serve people with hearing impairments. Visual Impairments: Visual disabilities vary from the lack of acuity (clearness) and field (the angle of vision) to legally blind and totally blind. The degree of the disability is measured against the “20/20” formula. The formula means that in one eye a person can see at 20 feet what a person with the benchmark 20/20 vision can see at 20 feet. An example of a visual disability is if someone has 20/100 in one eye. That means that at 20 feet that eye can only see what a person with perfect vision can see at 100 feet. Visual disabilities can also encompass difficulty in perceiving colors, or an extreme sensitivity or insensitivity to light. The degree of the disability will govern the
83 | P a g e
Presented by the Saskatchewan Wildlife Federation
amount of the handicap and, in turn, the amount of modification needed either to the environment or the activity. When working with people with visual impairments: If someone seems to need assistance, offer help but don’t give it unless the offer is accepted. If it is accepted, ask for an exact explanation of how to help. Generally a visual impairment has no effect on a person’s hearing or their mental abilities, so don’t shout at, or talk down to, a person with a visual impairment. Talk directly to them and not to others on their behalf. Don’t be afraid to use words such as “see,” “look” or “blind.” Such words are part of everyday vocabulary, and persons with a visual impairment use them, too. When meeting a person who is blind, be sure to identify yourself and remember to let them know when leaving. Do not pet guide dogs, especially without the owner’s permission. A dog in a harness is on duty, and if the dog is distracted the owner may be placed in jeopardy. Use specific, descriptive language when giving directions. Use colors, textures, movements, and directional indicators to make directions more vivid for the person with a visual impairment. Orient the person with the visual impairment to the placement of objects around them. The analogy of using the clock face to pinpoint locations works well for all people, not just those with disabilities. For example: “The bottle of cleaning oil is at nine o’ clock and the patches are at three o’ clock, on your table.” When seating a person who has a visual disability, place their hand on the back of the seat and let them seat themselves. Orient the person to new environments by describing sizes, shapes, distances, and any obstacles or hazards. Minimize noise-high levels of background noise can be very distracting and confusing to a person who relies on their hearing for information about their surroundings. When demonstrating a skill, the person with a visual impairment may want to hold the instructor’s hands as they work. Explain graphically, in concrete terms, what is being done as it is done. Sometimes it’s best to stand behind a person and reach through their arms, so they can follow the exact movements of the instructor. When assisting someone with a visual impairment: If someone with poor vision accepts an offer to guide them, ask, “Would you like to take my arm?” Brush a forearm against theirs so the blind person can grip the arm above the elbow. Children will grip the same way, only at the wrist. Some aged and/or disabled will want to walk arm-in-arm because it offers more support. Important! Don’t attempt to lead someone by taking his or her arm! The instructor’s arm should be relaxed at their side, while the persons’ arm will be bent at the elbow. The instructor should keep the student’s arm close to their body. While using the sighted guide method, the person with the visual impairment should walk a half step behind the guide. The guide must walk at that person’s pace. If the person being guided pulls back or tightens their grip, the guide is probably going too fast. Never try to push or steer
84 | P a g e
Presented by the Saskatchewan Wildlife Federation
any person in front, and always remember to mention ramps, stairs, narrow hallways, doors, etc. Add whether the stairs go up or down, which way the door opens, and when they’ve reached the last step. When opening doors: When approaching a door, say so. Keep the person’s free hand side to the door. Tell them which way the door opens and allow the person to hold the door open. Students with Learning Impairments: People with learning disabilities often have average to above average intelligence. However, they lack a particular skill to complete the learning process. Learning disabilities take many forms and may involve any of an individual’s senses.
Some read, “saw” for “was” and write “71” for “17.”
Some have difficulty with sequential things like yesterday, today, and tomorrow.
Some cannot remember well.
Many have difficulty with specific sources of information. For example, auditory learners retain spoken information well but have great difficulty retaining information they read.
Some have poor coordination or timing. In order to facilitate learning:
Use a variety of formats (verbal, visual, and physical) to communicate information.
Break down skills into smaller parts.
Use colors or symbols to differentiate left from right, front from back, etc. People with what are called “behavior-motor functioning difficulties” may be over active, behave impulsively, or have coordination problems. When instructing, provide clearly defined activity spaces (range, classroom). Complete one activity before starting another, and provide a variety of activities so that everyone’s strengths will shine through. When working with students who are developmentally disabled: Concentrate on the abilities and interests of each individual and don’t underestimate those abilities or interests. Break down directions into small steps that can be learned sequentially, and demonstrate where possible. Speak to students with dignity and respect, regardless of their learning ability level. Keep in mind that some people’s ability to understand speech is much better developed than their ability to create speech. Don’t talk about a person in front of them, a speech problem does not mean they can’t understand. Provide positive feedback for positive experiences, not negative feedback for negative experiences. If the person appears to need help, wait until the offer to help is accepted. It may be very important for them to do something themselves even if they don’t do it perfectly. The structure of the activities is important. If a short attention span is a problem, provide a variety of activities with different tasks. Allow plenty of time for learning and completion of a task and, above all, repetition is extremely important.
85 | P a g e
Presented by the Saskatchewan Wildlife Federation
Before beginning a new activity, review the safety rules. A person with a developmental disability may lack the judgment to understand which situations are dangerous. Persons with developmental disabilities may not be aware of what action is inappropriate or appropriate, so discuss it with them. Provide some non-competitive games and activities, preferably ones that don’t eliminate some players from the action. Students with Mental Impairments: The terms “mental retardation” and “mental handicap” are now outdated. Instructors must refer to students with a slower ability to learn as “developmentally disabled.” There are different levels or categories of developmental disability. The general categories used are mild, moderate, severe, and profound. The range between mild and severe is extremely broad. Many people who are developmentally disabled can easily participate in shooting classes. People who are developmentally disabled may also have accompanying physical disabilities, and may require help with some tasks. Be sure to consider if they need help to participate in an activity. If so, make sure that an instructor, a friend, or volunteer understands how to provide that assistance. Instructor and Student safety: No matter what is done to promote safety, teaching the shooting sports will always hold a certain element of danger. Instructors have given their ideas on how to make the profession a safer one for those on the shooting line. Close adherence to range procedure is, of course, the best way to avoid problems with safety. However, there are a few things instructors can do to protect themselves, their students and keep problems from happening. Range Procedure Tips By dividing the range space into shooting and non-shooting areas, only instructors and the students they are working with are allowed to get close to the shooting line. This keeps people from wandering close to the shooters, distracting them, and potentially having a safety problem. Program Safety The safety of all students in the program begins right in the classroom. By ingraining archery safety into the students’ minds, no one in the class should ever have to worry about another persons’ equipment. Safe handling is when every shooter knows 100% of the time what the status of their bow or arrow is. As an instructor, teach through example. A positive attitude, and total control over the class at all times, will teach the students the same attitude toward total control over their archery equipment. Environmental Safety Many facilities have been made barrier free, while others are still in the process of becoming accessible to all persons with disabilities. It is the class provider’s responsibility to determine if barriers still exist in the class facility or if the accessibility changes that have been made lend themselves to the shooting sports. It can be little things that are not only irritating, but can
86 | P a g e
Presented by the Saskatchewan Wildlife Federation
pose a real danger (i.e. positioning tables too close for wheelchairs, walkers or crutches, or doormats that cause problems for wheelchairs and crutches and others). As people with disabilities are trained and graduate, they can act as critics on access and safety, and can give helpful suggestions. Access for All People: Endeavor only to use facilities that are fully accessible to all students. The following is information that, even if as a last resort, will help utilize facilities that have not been made fully accessible. Wheelchair Pointers: Moving a wheelchair:
Don’t lift or steer with the armrests, as they come off.
Don’t let fingers get between the seat and the frame because they could be crushed.
When lifting, grab the frame, not the wheels. Taking a wheelchair up stairs:
This is a two-person job!
Position the chair against the bottom step, back to the stairs.
Standing on the first step, take a firm grip and lift the chair onto the first step.
The second person must stand below the chair to lift and steady the chair as it goes up the stairs. They must hold the frame, not the wheels.
Make sure the second person is strong enough to hold the weight of the chair and its occupant in case it slips.
Carrying a wheelchair down stairs:
This is a two-person job!
Do not attempt to take an occupied wheelchair downstairs unless the occupant’s weight and the weight of the chair can be lifted repeatedly, and full control can be maintained.
Grasp the handgrips and tip the chair back. With the second person holding the chair from below, slowly move the chair forward to the stairs.
The lifters must use their bodies as a brake starting at the first step. Don’t wait until the chair falls to do so.
Rest between stops. Pushing a wheelchair up a curb:
Tip the chair back and place the front wheels on the top of the curb.
Lift/push the chair onto the curb. Pushing a wheelchair down a curb:
Place your foot on the tipping lever. Take firm hold of the handgrips, and then tip the chair backward.
87 | P a g e
Presented by the Saskatchewan Wildlife Federation
Gently lower the chair down the curb, taking some of the weight yourself and making sure both wheels hit the ground at the same time.
Change of Environment: A change in the program’s environment can accomplish several major goals. It can provide access to certain individuals, it can eliminate a handicap and it can make the activity more enjoyable for all participants. The one idea that educators must constantly reinforce is- don’t create access for one person that will turn into a handicap for another. An example would be if a “guideline” for a person with a visual impairment was improperly placed on the shooting range, making it a barrier for a person with a physical impairment. An example of a proper change is a ramp– an environmental change that can benefit persons with physical impairments and the elderly, without impairing other students. Railings on the ramp can help students with visual impairments. Directional beepers that are activated on the shooting line area direct benefit to the shooter with a visual impairment, and adding a target that shows a hit (balloons, exploding targets, etc.) is of benefit to the shooter with a hearing impairment. In all these cases, the bottom line is that the change in the environment must not handicap any other shooters. Change the Program All people learn differently. Instructors must learn to recognize the different learning styles of students and either modify methods or bring additional teachers in to address different students. Some students may need total “hands-on” learning experiences, or do better with written directions. Others may be very productive using spoken or visual directions. An instructor, teaching to any group of students using only one style, will only reach part of the class. Program changes can run from various forms of special scoring systems to the use of adaptive devices. An example is the “Spot Round” for archery competition. Students shoot two complete rounds at a 40 cm target from 20 yards. By referring to a handicap chart, students are then switched to the proper sized target to fit their skill level. From that point on, the students compete on equal levels with periodic adjustments for improvement in their skill level. Another example of a program change is once again to add a balloon to the center of the target to provide either a visual or auditory alert of a hit. Imagination, modification, and communication are the key elements to bring a shooting sports program into the mainstream, and allow all people to learn and enjoy. To be flexible enough to modify the program or the product where needed and to be able to communicate your needs and understand the needs of others is the goal of both the teacher and the student.

88 | P a g e
Presented by the Saskatchewan Wildlife Federation
Archery Theory & Assistive Devices Theory: By using lightweight compound bows and any of the multitudes of adaptive devices available, most people can be taught to shoot a bow and arrow. The invention and development of the compound bow has literally brought archery to every man, woman and child regardless of their age or physical abilities. In addition, the development and the full scale use of mechanical bowstring releasing devices have also opened many doors to new shooters, eliminating the need for strength or manual dexterity. Research into audible indicators has allowed accessibility to the sport of archery for those persons with visual disabilities. It has advanced to the point of staging tournaments exclusively for those persons with visual impairments, including those people who are totally blind. With the full array of archery products on the market, many easily converted to use as an adaptive aid, the majority of people with varying abilities can now enjoy the sport of archery.
Bows: The compound bow can look complicated to the new shooter, but in reality it is just a system of levers and pulleys. The compound bow could also be included in the next section on assistive devices. So, when speaking about the compound, it must be recognized that what makes this device so unique is that it is not made specifically for persons with disabilities. It is the number one selling bow in the world for all forms of archery. Assistive Devices Assistive Devices for Hand and Wrist Disabilities: Amputees have dozens of mechanical bowstring release aids to use or adapt. The aids come with “T” shaped handles, wrist strap or a concho-style. Their trigger mechanisms can be located on the top, bottom or straight out the back, with a variety of ways to attach them to the bowstring. Many of these devices can be mounted directly to prosthesis with little or no adapting.
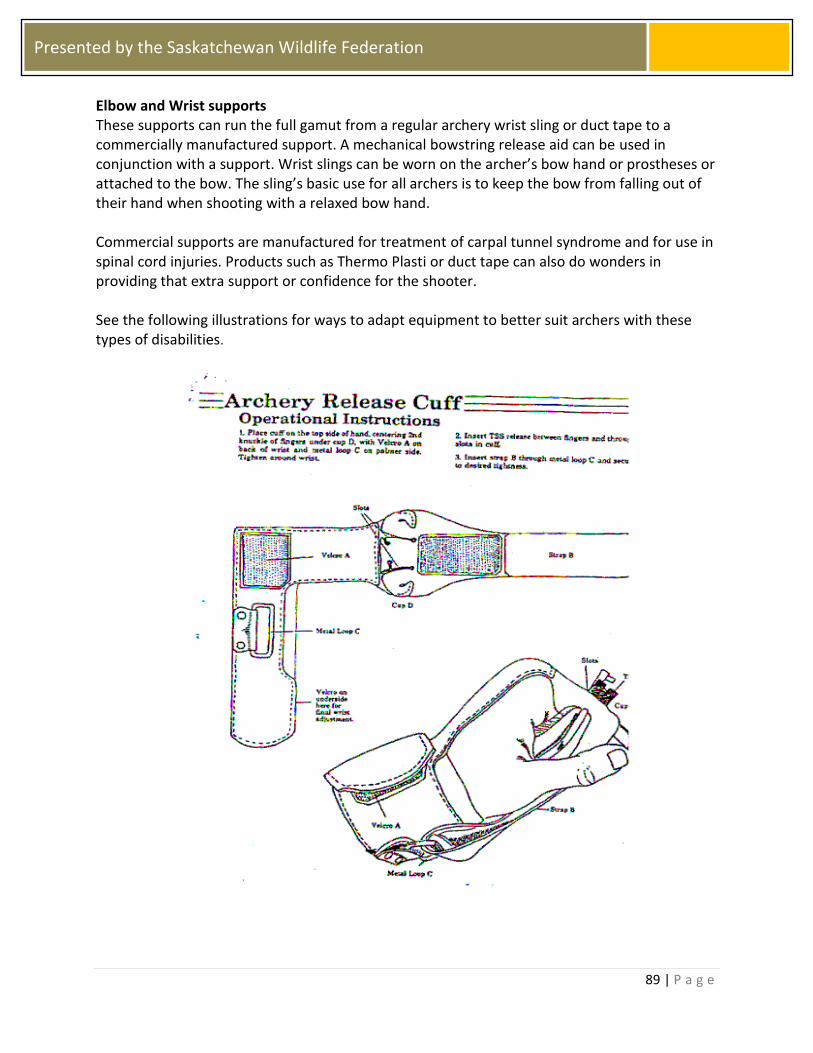
89 | P a g e
Presented by the Saskatchewan Wildlife Federation
Elbow and Wrist supports These supports can run the full gamut from a regular archery wrist sling or duct tape to a commercially manufactured support. A mechanical bowstring release aid can be used in conjunction with a support. Wrist slings can be worn on the archer’s bow hand or prostheses or attached to the bow. The sling’s basic use for all archers is to keep the bow from falling out of their hand when shooting with a relaxed bow hand. Commercial supports are manufactured for treatment of carpal tunnel syndrome and for use in spinal cord injuries. Products such as Thermo Plasti or duct tape can also do wonders in providing that extra support or confidence for the shooter. See the following illustrations for ways to adapt equipment to better suit archers with these types of disabilities.
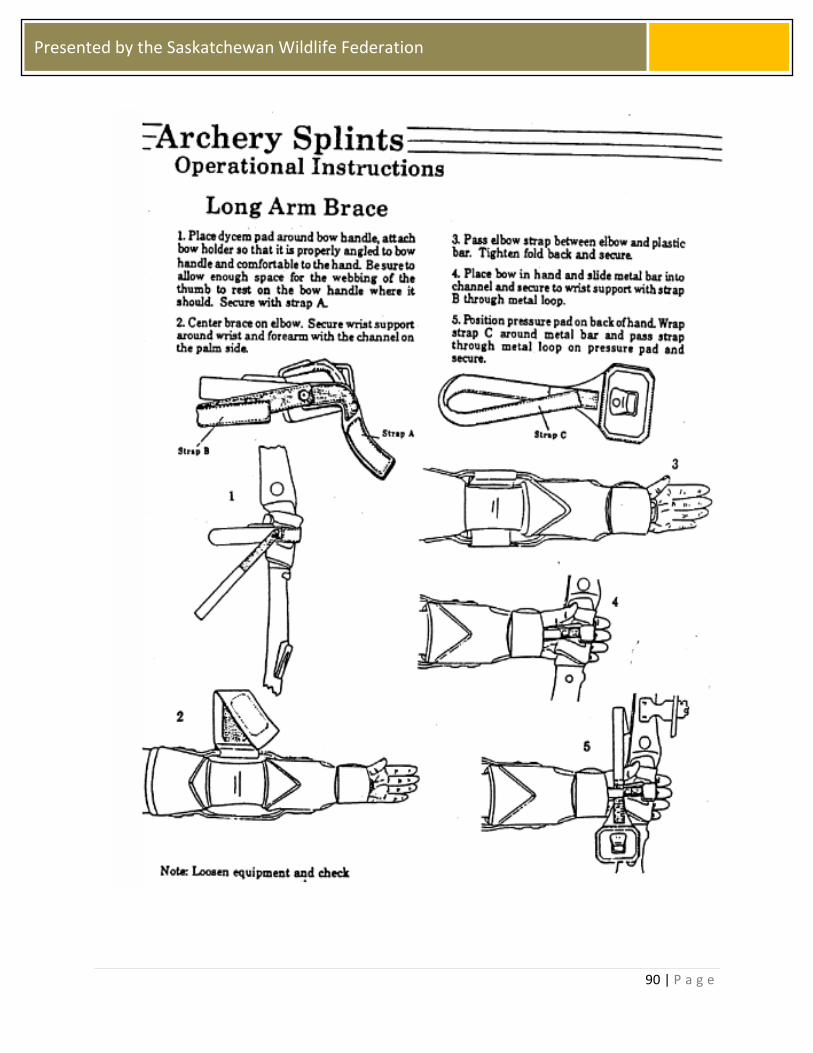
90 | P a g e
Presented by the Saskatchewan Wildlife Federation
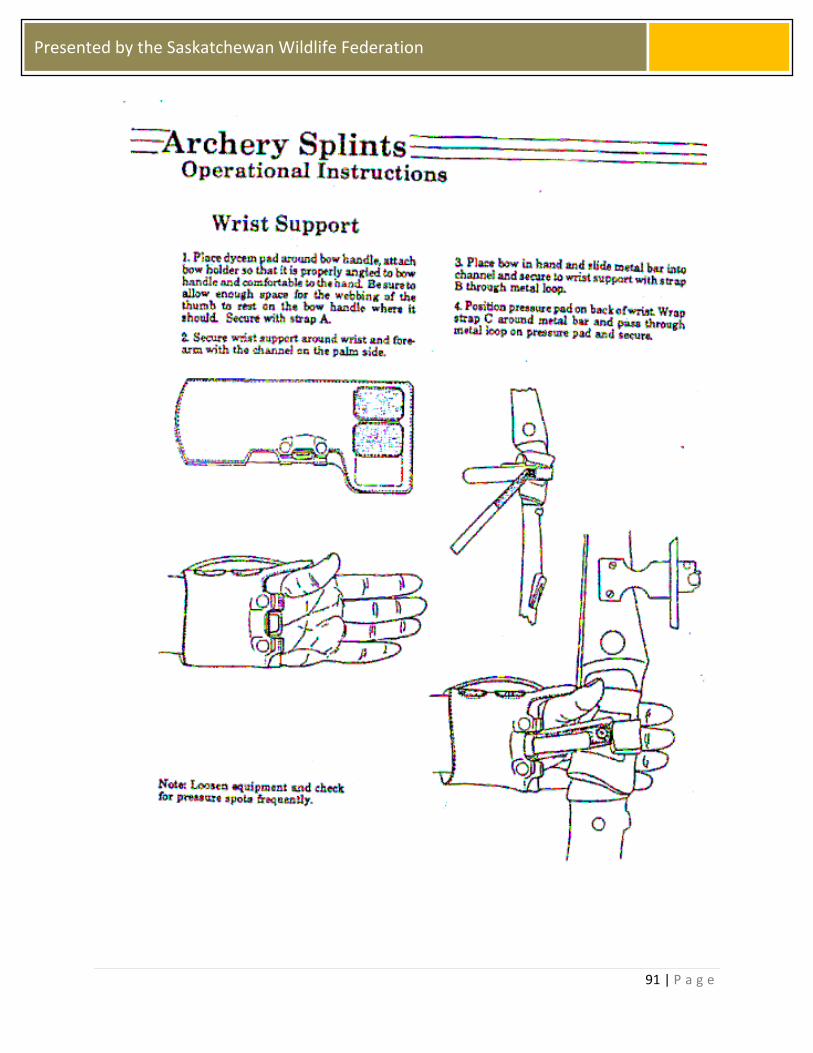
91 | P a g e
Presented by the Saskatchewan Wildlife Federation
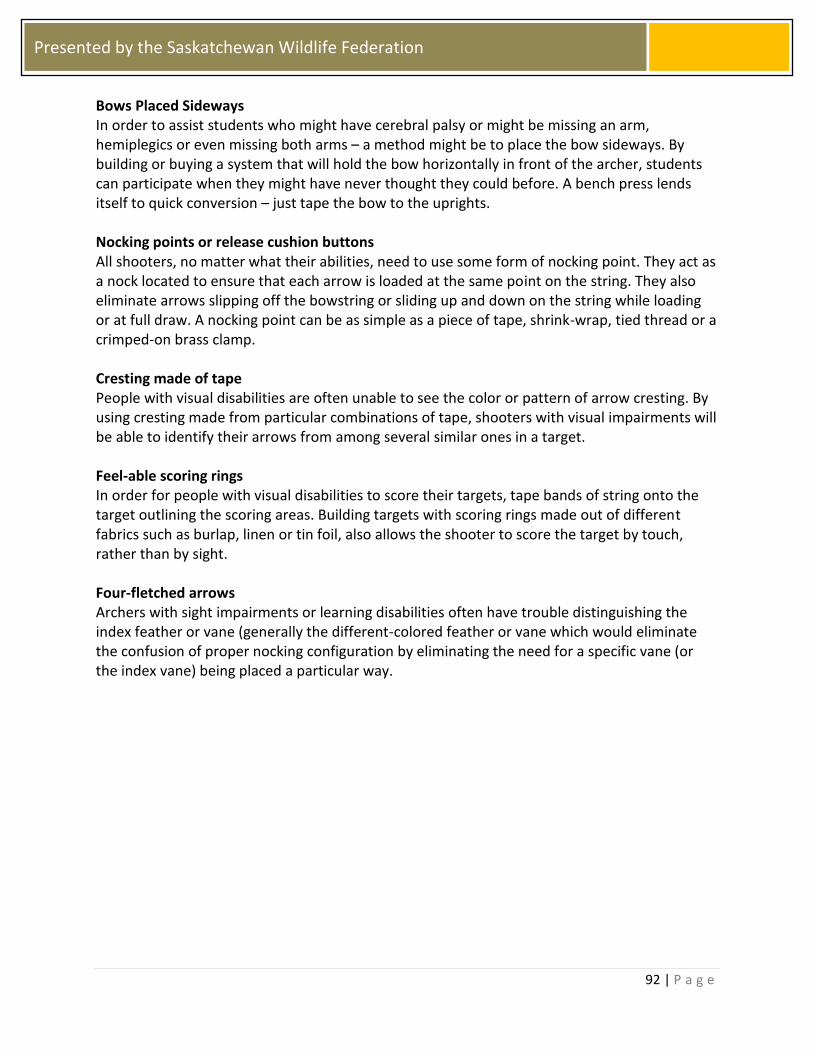
92 | P a g e
Presented by the Saskatchewan Wildlife Federation
Bows Placed Sideways In order to assist students who might have cerebral palsy or might be missing an arm, hemiplegics or even missing both arms – a method might be to place the bow sideways. By building or buying a system that will hold the bow horizontally in front of the archer, students can participate when they might have never thought they could before. A bench press lends itself to quick conversion – just tape the bow to the uprights. Nocking points or release cushion buttons All shooters, no matter what their abilities, need to use some form of nocking point. They act as a nock located to ensure that each arrow is loaded at the same point on the string. They also eliminate arrows slipping off the bowstring or sliding up and down on the string while loading or at full draw. A nocking point can be as simple as a piece of tape, shrink-wrap, tied thread or a crimped-on brass clamp. Cresting made of tape People with visual disabilities are often unable to see the color or pattern of arrow cresting. By using cresting made from particular combinations of tape, shooters with visual impairments will be able to identify their arrows from among several similar ones in a target. Feel-able scoring rings In order for people with visual disabilities to score their targets, tape bands of string onto the target outlining the scoring areas. Building targets with scoring rings made out of different fabrics such as burlap, linen or tin foil, also allows the shooter to score the target by touch, rather than by sight. Four-fletched arrows Archers with sight impairments or learning disabilities often have trouble distinguishing the index feather or vane (generally the different-colored feather or vane which would eliminate the confusion of proper nocking configuration by eliminating the need for a specific vane (or the index vane) being placed a particular way.
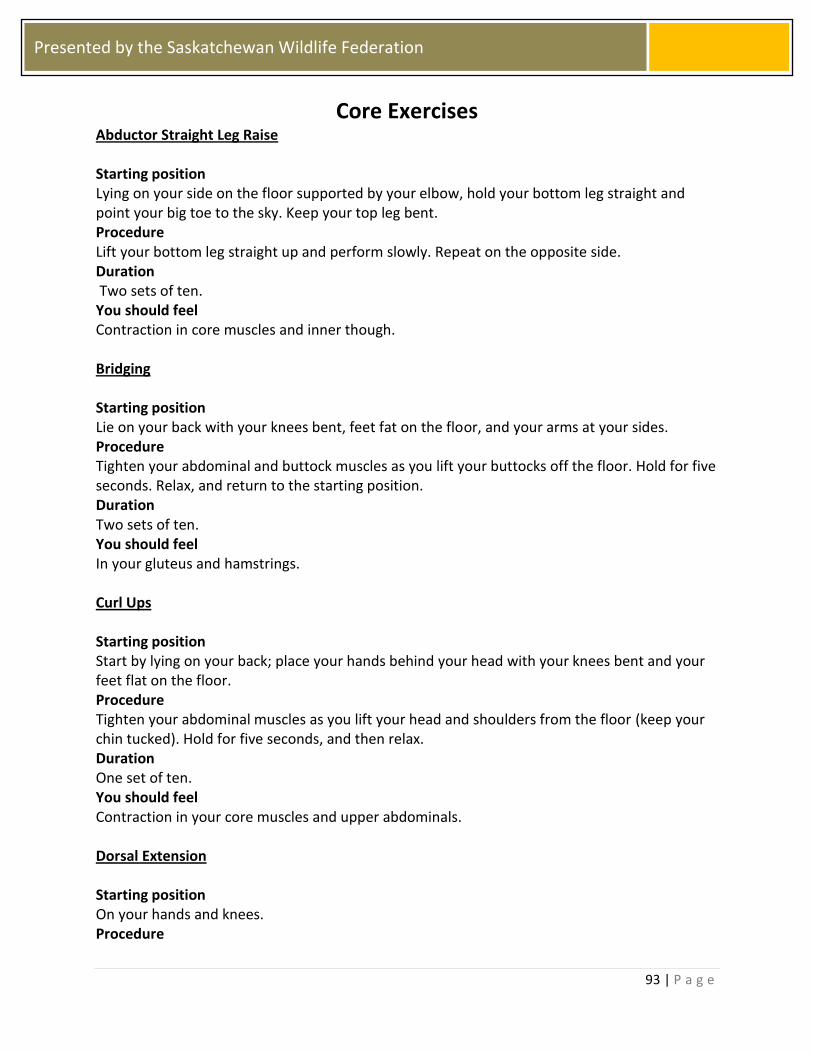
93 | P a g e
Presented by the Saskatchewan Wildlife Federation
Core Exercises Abductor Straight Leg Raise Starting position Lying on your side on the floor supported by your elbow, hold your bottom leg straight and point your big toe to the sky. Keep your top leg bent. Procedure Lift your bottom leg straight up and perform slowly. Repeat on the opposite side. Duration Two sets of ten. You should feel Contraction in core muscles and inner though. Bridging Starting position Lie on your back with your knees bent, feet fat on the floor, and your arms at your sides. Procedure Tighten your abdominal and buttock muscles as you lift your buttocks off the floor. Hold for five seconds. Relax, and return to the starting position. Duration Two sets of ten. You should feel In your gluteus and hamstrings. Curl Ups Starting position Start by lying on your back; place your hands behind your head with your knees bent and your feet flat on the floor. Procedure Tighten your abdominal muscles as you lift your head and shoulders from the floor (keep your chin tucked). Hold for five seconds, and then relax. Duration One set of ten. You should feel Contraction in your core muscles and upper abdominals. Dorsal Extension Starting position On your hands and knees. Procedure
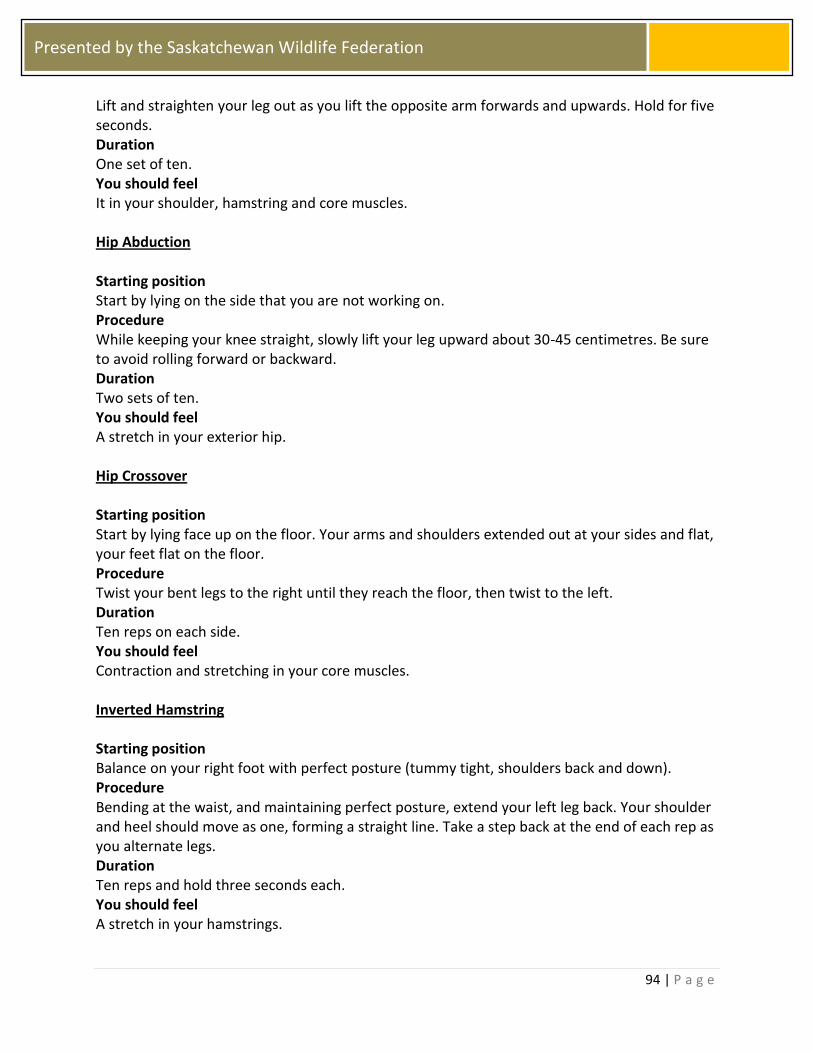
94 | P a g e
Presented by the Saskatchewan Wildlife Federation
Lift and straighten your leg out as you lift the opposite arm forwards and upwards. Hold for five seconds. Duration One set of ten. You should feel It in your shoulder, hamstring and core muscles. Hip Abduction Starting position Start by lying on the side that you are not working on. Procedure While keeping your knee straight, slowly lift your leg upward about 30-45 centimetres. Be sure to avoid rolling forward or backward. Duration Two sets of ten. You should feel A stretch in your exterior hip. Hip Crossover Starting position Start by lying face up on the floor. Your arms and shoulders extended out at your sides and flat, your feet flat on the floor. Procedure Twist your bent legs to the right until they reach the floor, then twist to the left. Duration Ten reps on each side. You should feel Contraction and stretching in your core muscles. Inverted Hamstring Starting position Balance on your right foot with perfect posture (tummy tight, shoulders back and down). Procedure Bending at the waist, and maintaining perfect posture, extend your left leg back. Your shoulder and heel should move as one, forming a straight line. Take a step back at the end of each rep as you alternate legs. Duration Ten reps and hold three seconds each. You should feel A stretch in your hamstrings.
95 | P a g e
Presented by the Saskatchewan Wildlife Federation
Deep Squat Starting position Stand with feet shoulder width apart, arms at shoulder height. Procedure Squat deeply, with your head and chest up. Duration Repeat ten times/set, two sets/session, and one session/day You should feel Contraction of your quad, gluteus and core muscles. Lower Trapezius Starting position Lying on your stomach with arms overhead. Procedure Raise arms up from floor, hold five seconds, and relax. Duration Two sets of ten. You should feel Stretch in shoulders. Middle Trapezius Starting position Lying on your stomach with arms held out to the side. Procedure Raise your arm up from the floor, hold for five seconds and relax. Repeat with opposite arm. Duration Two sets of ten on each arm. You should feel Contractions in shoulders and upper back. Pillar Bridge Front Starting position Lie face down in a prone push up position, with your forearms resting on the floor. Your elbows are under your shoulders and bent 90°. Procedure Push up off your elbows, supporting your weight on your elbows. Tuck your chin so your head is in line with your body, and pull your toes toward your shins. Duration Hold 20 seconds for two times. You should feel
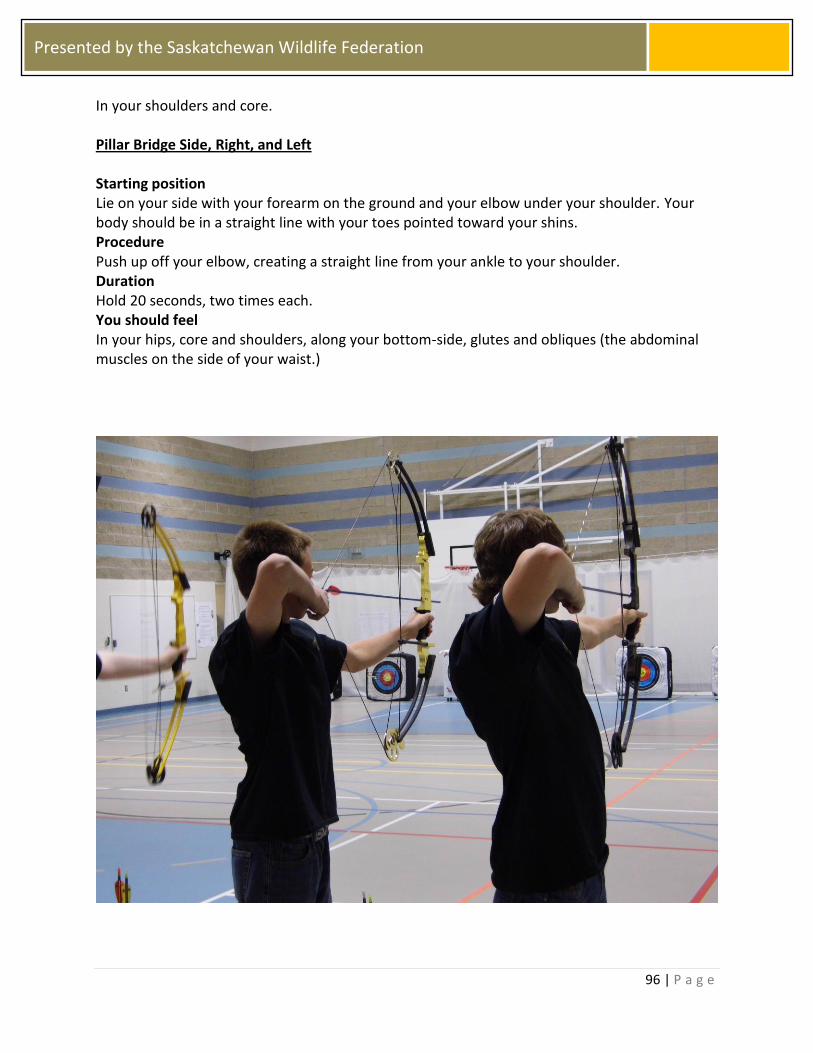
96 | P a g e
Presented by the Saskatchewan Wildlife Federation
In your shoulders and core. Pillar Bridge Side, Right, and Left Starting position Lie on your side with your forearm on the ground and your elbow under your shoulder. Your body should be in a straight line with your toes pointed toward your shins. Procedure Push up off your elbow, creating a straight line from your ankle to your shoulder. Duration Hold 20 seconds, two times each. You should feel In your hips, core and shoulders, along your bottom-side, glutes and obliques (the abdominal muscles on the side of your waist.)
97 | P a g e
Presented by the Saskatchewan Wildlife Federation
Glossary of Archery Terms Aim: Any method used to point the arrow in the directions you want it to go. Anchor: Consistent placement of the drawing hand to a position on the face, mouth or jaw. Arm Guard: A piece of stiff material such as leather used to protect the bow arm of the bowstring upon release. It is worn on the inside of the forearm of the bow arm. Arrow rest: The horizontal projection on the bow upon which the arrow lies. Back: The side of the bow away from the bowstring. Bare bow: A style of shooting – without a bow sight. Blunt tip: An arrow point usually made of rubber and used in some archery activities. Bow: A device made of a piece of flexible material with a string connecting the two ends, used to propel an arrow. Bow sight: A mechanical device placed on the bow, which the archer uses for aiming at the target. Bow square: A “T” shaped device used to measure brace height and for placing nock locaters. Bow stringer: A device used to string a bow safely. Brace height: The distance between the pivot point and the string when the bow is strung. (Also called the string height and once called the fistmele.) Broadhead: A sharp, razor-bladed arrow point used for hunting Butt: Any backstop to which a target face is attached. Cant: To tilt the bow left or right while at full draw. Cast: The ability of a bow to propel an arrow at a given distance. Center serving: The material at the center of the bowstring where the arrow is nocked. It protects the string from wear. Composite bow: A bow made of several materials. Compound bow: A hand-held, hand-drawn bow that uses a pair of cables and wheels to store more energy. Crest: The colored bands around the shaft of an arrow, which aid in its identification. Draw: To pull the bow string back. Also the distance the bowstring is pulled back. Draw weight: The weight, measured in pounds, used to bring the bow to full draw. Also the weight on a bow, using 28 inches to front of bow as the standard draw length. End: A set number of arrows that are shot before going to the target to score and retrieve them. Finger Tab: A flat piece of smooth material, which serves to protect the fingers of the drawing hand. Finger Sling: A small strap that attaches to the thumb and index finger of the bow hand. Fletching/Fletch: The feathers, plastic vanes or other devices attached to the arrow shaft to stabilize the flight of an arrow. Flu-Flu: An arrow with large, untrimmed feathers which restrict the distance the arrow will travel; used for shooting aerial targets. Follow-through: Maintaining the motion of the upper body muscles after releasing the string. Full-draw: The position of the archer when the bowstring has been draw to the anchor point. Group: To shoot arrows in a pattern, or the pattern of the arrows in the target.
98 | P a g e
Presented by the Saskatchewan Wildlife Federation
Laminated bow: A bow made of several layers of material glued together, usually two layers of fiberglass and a hardwood core. Let down: Returning from full draw to the undrawn position with control and not releasing the string. Limb: Upper or lower part of the bow that bends when the string is drawn back and the part of the bow where the energy is stored. Nock: To place the arrow on the string. It is also the attachment to the rear end of an arrow, which is placed on the bowstring and holds the arrow on the string. Nock locator: The mark or device that indicates where the arrow is to be placed on the string. Recurve bow: A bow with limbs that bend away from the archer when the bow is held in the shooting position Serving: The wrapping of material around the loops and center of the bowstring to protect it from wear. Spine: The stiffness or amount and arrow bends, determined by hanging a 2# weight from the center of the arrow and measuring the bend. Stabilizer: A rod attached to the handle riser; Usually has a weight on the end of the rod. It absorbs the vibration of the bow when the string is released. Toxophilite: A lover of the bow: an archer. Tune: To adjust the variables in the bow and arrow system to achieve the best arrow flight and arrow groups. Vane: Any fletching made of a material other than feathers, usually plastic. Windage: The left-right adjustment of the bow sight.
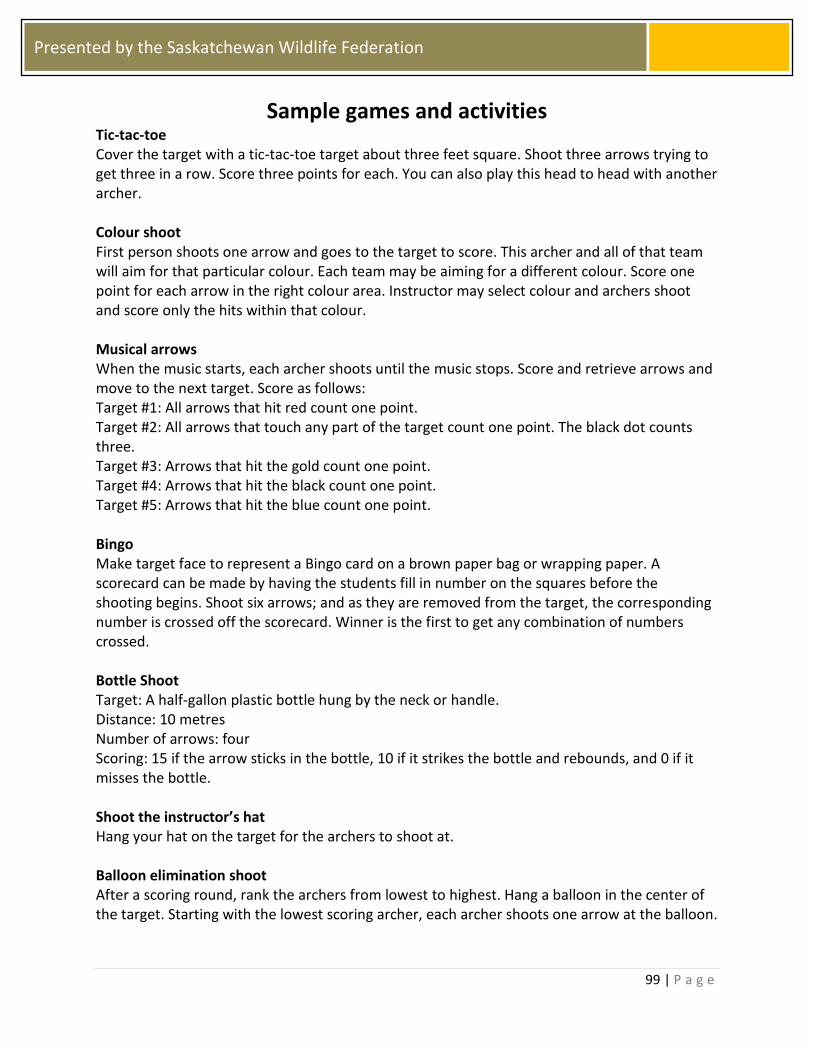
99 | P a g e
Presented by the Saskatchewan Wildlife Federation
Sample games and activities Tic-tac-toe Cover the target with a tic-tac-toe target about three feet square. Shoot three arrows trying to get three in a row. Score three points for each. You can also play this head to head with another archer. Colour shoot First person shoots one arrow and goes to the target to score. This archer and all of that team will aim for that particular colour. Each team may be aiming for a different colour. Score one point for each arrow in the right colour area. Instructor may select colour and archers shoot and score only the hits within that colour. Musical arrows When the music starts, each archer shoots until the music stops. Score and retrieve arrows and move to the next target. Score as follows: Target #1: All arrows that hit red count one point. Target #2: All arrows that touch any part of the target count one point. The black dot counts three. Target #3: Arrows that hit the gold count one point. Target #4: Arrows that hit the black count one point. Target #5: Arrows that hit the blue count one point. Bingo Make target face to represent a Bingo card on a brown paper bag or wrapping paper. A scorecard can be made by having the students fill in number on the squares before the shooting begins. Shoot six arrows; and as they are removed from the target, the corresponding number is crossed off the scorecard. Winner is the first to get any combination of numbers crossed. Bottle Shoot Target: A half-gallon plastic bottle hung by the neck or handle. Distance: 10 metres Number of arrows: four Scoring: 15 if the arrow sticks in the bottle, 10 if it strikes the bottle and rebounds, and 0 if it misses the bottle. Shoot the instructor’s hat Hang your hat on the target for the archers to shoot at. Balloon elimination shoot After a scoring round, rank the archers from lowest to highest. Hang a balloon in the center of the target. Starting with the lowest scoring archer, each archer shoots one arrow at the balloon.
100 | P a g e
Presented by the Saskatchewan Wildlife Federation
If the archer pops the balloon, they move to the winners’ circle until all archers in turn have shot three arrows. Prizes are awarded to the balloon breakers. Holidays If classes are taught as the different holidays approach, it is fun to make special targets in the shape of an item that represents the holiday (as long as it is an inclusive practice and respects all religious beliefs within the classroom.) For example, the students can shoot at pumpkins, witches, and cats at Halloween, a turkey at Thanksgiving, a bell at New Year’s, a shamrock on St. Patrick’s Day, eggs at Easter, and flowers at May Day. The scoring areas can follow the outline of the target, giving higher values as the arrows come nearer whatever “centre” there may be for that shape. At the completion of the event, it might be fun to award silly prizes appropriate to the holiday. Archery Golf Target: A rubber ball four inches in diameter on a wire stand. Distance: 10 metres Number of arrows: four Scoring: 5 points for each hit Tablecloth shoot Target: a regular target covered with a checkered oilcloth with two-inch squares; squares randomly numbered from one to nine. Distance: 15 metres Number of arrows: four Scoring: as marked Wand Shoot Target: a three-inch string of masking tape placed vertically on the target mat Distance: 10 metres Number of arrows: twelve Scoring: 5 points for each hit Battleship Use index cards sized according to the ability of the archers. Draw different ships on the cards and assign points from one to five. You can also include blank cards. Each individual or team will pin the cards up with the blank side showing on the target of their competitor. Archer shoots three to six arrows each or 12-15 as a team. Points are scored by the value of the ship they hit. International Team Round This game requires the use of a standard 10-Ring scoring target and groups archers into equal teams (3 or more per team). Have each team stand in a row behind the waiting line until the whistle is blown. One at a time, an archer from each team goes up to the shooting line to shoot three arrows. When finished, each return to the waiting line to let the next archer from their
101 | P a g e
Presented by the Saskatchewan Wildlife Federation
team go shoot. Limit the shooting time to three minutes each, and let the archers shoot and score three times. The top combined score wins. V Shoot Draw two converging lines in the shape of a large “V” on a large sheet of paper. The student shooting closest to the bottom of the “V”, without going outside, wins. Knockout basis. Match Game This activity is great for pairing novice archers with experienced archers. First, the novice archer shoots five arrows, anywhere on target. Next, the experienced archer has to match the scores hit by the novice archer. For example, the novice archer may score 1, 3, 6, 9, and 10. The advanced archer must get the same: 1, 3, 6, 9, and 10. Teams compete on a knockout basis. Treasure Hunt Draw identical maps of some treasure islands on a large piece of butcher paper. Pin one map on each target. Select one island and tell students they have to shoot for that island. Students hoot one arrow each in teams of four or five. The archer nearest the island wins. Red and White Take a large piece of plain newsprint paper large enough to cover your target. Draw a grid with 3” squares on the newsprint. Paste 3” squares of red poster paper onto every other grid space to form a large chessboard. Archers shoot in two teams using ten arrows with a different colour for each team. Team one shoots at the white squares. Team two shoots at the red squares. Count up the total number of correct “hits” per team to determine the winning team. Hanging Prize Use strips of paper and hang one candy at the end of each strip of paper. Pin the other end of the paper to the target. The goal is for students to shoot at the paper. After enough holes are made, the treat will fall and the person who was the last to shoot gets the treat. You may want to give the paper some tears to start with. Wand Shoot Place a long strip of masking tape vertically on the target mat. Archers aim at the tape and get one point for every hit.

102 | P a g e
Presented by the Saskatchewan Wildlife Federation
References and Additional Resources Basic Archery Instructor. (2007). National Archery in Schools Program. National Archery in the Schools Program Curriculum. (2013). Retrieved from http://archeryintheschools.org/activea.asp?CompID=23&btnSubmit=ByFileCategoryID&cboApplicationID=321&cboFileCategoryID=970 North East School Division. Curriculum Corner. (2013). Retrieved from http://curriculum.nesd.ca/ Saskatchewan Wildlife Federation. Programs. (2009). Retrieved from http://www.swf.sk.ca/7Programs/nasp.html