Embed Size (px)
Citation preview

NI TestStandTM
Using LabVIEWTM with TestStand
Using LabVIEW with TestStand
May 2008373200C-01
Support
Worldwide Technical Support and Product Information
ni.com
National Instruments Corporate Headquarters
11500 North Mopac Expressway Austin, Texas 78759-3504 USA Tel: 512 683 0100
Worldwide Offices
Australia 1800 300 800, Austria 43 662 457990-0, Belgium 32 (0) 2 757 0020, Brazil 55 11 3262 3599, Canada 800 433 3488, China 86 21 5050 9800, Czech Republic 420 224 235 774, Denmark 45 45 76 26 00, Finland 358 (0) 9 725 72511, France 01 57 66 24 24, Germany 49 89 7413130, India 91 80 41190000, Israel 972 3 6393737, Italy 39 02 41309277, Japan 0120-527196, Korea 82 02 3451 3400, Lebanon 961 (0) 1 33 28 28, Malaysia 1800 887710, Mexico 01 800 010 0793, Netherlands 31 (0) 348 433 466, New Zealand 0800 553 322, Norway 47 (0) 66 90 76 60, Poland 48 22 3390150, Portugal 351 210 311 210, Russia 7 495 783 6851, Singapore 1800 226 5886, Slovenia 386 3 425 42 00, South Africa 27 0 11 805 8197, Spain 34 91 640 0085, Sweden 46 (0) 8 587 895 00, Switzerland 41 56 2005151, Taiwan 886 02 2377 2222, Thailand 662 278 6777, Turkey 90 212 279 3031, United Kingdom 44 (0) 1635 523545
For further support information, refer to the Technical Support and Professional Services appendix. To comment on National Instruments documentation, refer to the National Instruments Web site at ni.com/info and enter the info code feedback.
© 2003–2008 National Instruments Corporation. All rights reserved.
Important Information
WarrantyThe media on which you receive National Instruments software are warranted not to fail to execute programming instructions, due to defects in materials and workmanship, for a period of 90 days from date of shipment, as evidenced by receipts or other documentation. National Instruments will, at its option, repair or replace software media that do not execute programming instructions if National Instruments receives notice of such defects during the warranty period. National Instruments does not warrant that the operation of the software shall be uninterrupted or error free.
A Return Material Authorization (RMA) number must be obtained from the factory and clearly marked on the outside of the package before any equipment will be accepted for warranty work. National Instruments will pay the shipping costs of returning to the owner parts which are covered by warranty.
National Instruments believes that the information in this document is accurate. The document has been carefully reviewed for technical accuracy. In the event that technical or typographical errors exist, National Instruments reserves the right to make changes to subsequent editions of this document without prior notice to holders of this edition. The reader should consult National Instruments if errors are suspected. In no event shall National Instruments be liable for any damages arising out of or related to this document or the information contained in it.
EXCEPT AS SPECIFIED HEREIN, NATIONAL INSTRUMENTS MAKES NO WARRANTIES, EXPRESS OR IMPLIED, AND SPECIFICALLY DISCLAIMS ANY WARRANTY OF MERCHANTABILITY OR FITNESS FOR A PARTICULAR PURPOSE. CUSTOMER’S RIGHT TO RECOVER DAMAGES CAUSED BY FAULT OR NEGLIGENCE ON THE PART OF NATIONAL INSTRUMENTS SHALL BE LIMITED TO THE AMOUNT THERETOFORE PAID BY THE CUSTOMER. NATIONAL INSTRUMENTS WILL NOT BE LIABLE FOR DAMAGES RESULTING FROM LOSS OF DATA, PROFITS, USE OF PRODUCTS, OR INCIDENTAL OR CONSEQUENTIAL DAMAGES, EVEN IF ADVISED OF THE POSSIBILITY THEREOF. This limitation of the liability of National Instruments will apply regardless of the form of action, whether in contract or tort, including negligence. Any action against National Instruments must be brought within one year after the cause of action accrues. National Instruments shall not be liable for any delay in performance due to causes beyond its reasonable control. The warranty provided herein does not cover damages, defects, malfunctions, or service failures caused by owner’s failure to follow the National Instruments installation, operation, or maintenance instructions; owner’s modification of the product; owner’s abuse, misuse, or negligent acts; and power failure or surges, fire, flood, accident, actions of third parties, or other events outside reasonable control.
CopyrightUnder the copyright laws, this publication may not be reproduced or transmitted in any form, electronic or mechanical, including photocopying, recording, storing in an information retrieval system, or translating, in whole or in part, without the prior written consent of National Instruments Corporation.
National Instruments respects the intellectual property of others, and we ask our users to do the same. NI software is protected by copyright and other intellectual property laws. Where NI software may be used to reproduce software or other materials belonging to others, you may use NI software only to reproduce materials that you may reproduce in accordance with the terms of any applicable license or other legal restriction.
TrademarksNational Instruments, NI, ni.com, NI TestStand, and LabVIEW are trademarks of National Instruments Corporation. Refer to the Terms of Use section on ni.com/legal for more information about National Instruments trademarks.
Other product and company names mentioned herein are trademarks or trade names of their respective companies.
Members of the National Instruments Alliance Partner Program are business entities independent from National Instruments and have no agency, partnership, or joint-venture relationship with National Instruments.
PatentsFor patents covering National Instruments products, refer to the appropriate location: Help»Patents in your software, the patents.txt file on your media, or ni.com/patents.
WARNING REGARDING USE OF NATIONAL INSTRUMENTS PRODUCTS(1) NATIONAL INSTRUMENTS PRODUCTS ARE NOT DESIGNED WITH COMPONENTS AND TESTING FOR A LEVEL OF RELIABILITY SUITABLE FOR USE IN OR IN CONNECTION WITH SURGICAL IMPLANTS OR AS CRITICAL COMPONENTS IN ANY LIFE SUPPORT SYSTEMS WHOSE FAILURE TO PERFORM CAN REASONABLY BE EXPECTED TO CAUSE SIGNIFICANT INJURY TO A HUMAN.
(2) IN ANY APPLICATION, INCLUDING THE ABOVE, RELIABILITY OF OPERATION OF THE SOFTWARE PRODUCTS CAN BE IMPAIRED BY ADVERSE FACTORS, INCLUDING BUT NOT LIMITED TO FLUCTUATIONS IN ELECTRICAL POWER SUPPLY, COMPUTER HARDWARE MALFUNCTIONS, COMPUTER OPERATING SYSTEM SOFTWARE FITNESS, FITNESS OF COMPILERS AND DEVELOPMENT SOFTWARE USED TO DEVELOP AN APPLICATION, INSTALLATION ERRORS, SOFTWARE AND HARDWARE COMPATIBILITY PROBLEMS, MALFUNCTIONS OR FAILURES OF ELECTRONIC MONITORING OR CONTROL DEVICES, TRANSIENT FAILURES OF ELECTRONIC SYSTEMS (HARDWARE AND/OR SOFTWARE), UNANTICIPATED USES OR MISUSES, OR ERRORS ON THE PART OF THE USER OR APPLICATIONS DESIGNER (ADVERSE FACTORS SUCH AS THESE ARE HEREAFTER COLLECTIVELY TERMED “SYSTEM FAILURES”). ANY APPLICATION WHERE A SYSTEM FAILURE WOULD CREATE A RISK OF HARM TO PROPERTY OR PERSONS (INCLUDING THE RISK OF BODILY INJURY AND DEATH) SHOULD NOT BE RELIANT SOLELY UPON ONE FORM OF ELECTRONIC SYSTEM DUE TO THE RISK OF SYSTEM FAILURE. TO AVOID DAMAGE, INJURY, OR DEATH, THE USER OR APPLICATION DESIGNER MUST TAKE REASONABLY PRUDENT STEPS TO PROTECT AGAINST SYSTEM FAILURES, INCLUDING BUT NOT LIMITED TO BACK-UP OR SHUT DOWN MECHANISMS. BECAUSE EACH END-USER SYSTEM IS CUSTOMIZED AND DIFFERS FROM NATIONAL INSTRUMENTS' TESTING PLATFORMS AND BECAUSE A USER OR APPLICATION DESIGNER MAY USE NATIONAL INSTRUMENTS PRODUCTS IN COMBINATION WITH OTHER PRODUCTS IN A MANNER NOT EVALUATED OR CONTEMPLATED BY NATIONAL INSTRUMENTS, THE USER OR APPLICATION DESIGNER IS ULTIMATELY RESPONSIBLE FOR VERIFYING AND VALIDATING THE SUITABILITY OF NATIONAL INSTRUMENTS PRODUCTS WHENEVER NATIONAL INSTRUMENTS PRODUCTS ARE INCORPORATED IN A SYSTEM OR APPLICATION, INCLUDING, WITHOUT LIMITATION, THE APPROPRIATE DESIGN, PROCESS AND SAFETY LEVEL OF SUCH SYSTEM OR APPLICATION.
Conventions
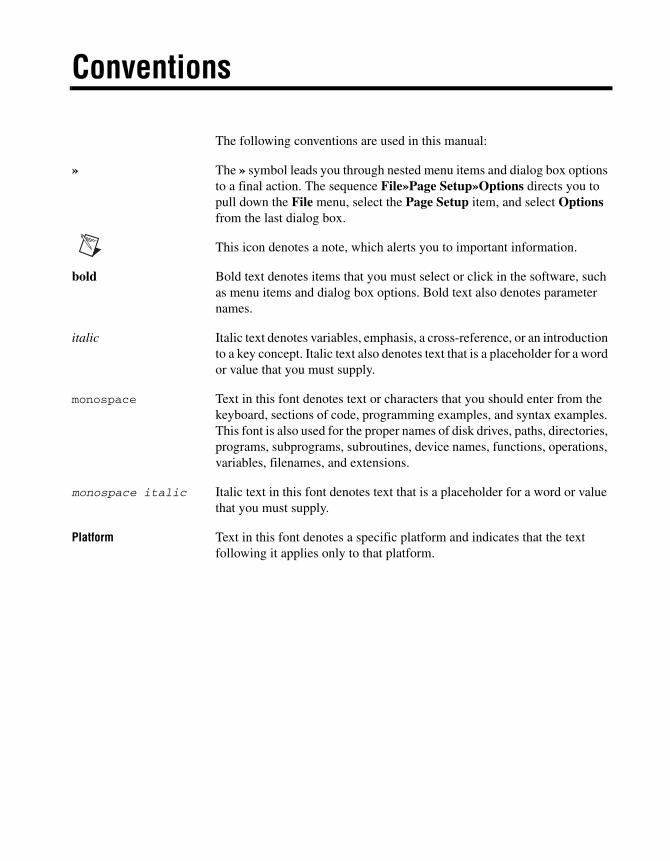
The following conventions are used in this manual:
» The » symbol leads you through nested menu items and dialog box options to a final action. The sequence File»Page Setup»Options directs you to pull down the File menu, select the Page Setup item, and select Options from the last dialog box.
This icon denotes a note, which alerts you to important information.
bold Bold text denotes items that you must select or click in the software, such as menu items and dialog box options. Bold text also denotes parameter names.
italic Italic text denotes variables, emphasis, a cross-reference, or an introduction to a key concept. Italic text also denotes text that is a placeholder for a word or value that you must supply.
monospace Text in this font denotes text or characters that you should enter from the keyboard, sections of code, programming examples, and syntax examples. This font is also used for the proper names of disk drives, paths, directories, programs, subprograms, subroutines, device names, functions, operations, variables, filenames, and extensions.
monospace italic Italic text in this font denotes text that is a placeholder for a word or value that you must supply.
Platform Text in this font denotes a specific platform and indicates that the text following it applies only to that platform.
© National Instruments Corporation v Using LabVIEW with TestStand
Contents
Chapter 1Role of LabVIEW in a TestStand-Based System
Code Modules ................................................................................................................1-1Custom User Interfaces..................................................................................................1-2Custom Step Types ........................................................................................................1-2LabVIEW Adapter .........................................................................................................1-2
Chapter 2Calling LabVIEW VIs from TestStand
Required LabVIEW Settings .........................................................................................2-1LabVIEW Module Tab ..................................................................................................2-2Creating and Configuring a New Step Using the LabVIEW Adapter ...........................2-3
Chapter 3Creating, Editing, and Debugging LabVIEW VIs from TestStand
Creating a New VI from TestStand ...............................................................................3-1Editing an Existing VI from TestStand..........................................................................3-2Debugging a VI..............................................................................................................3-3
Chapter 4Using LabVIEW Data Types with TestStand
Calling VIs with String Parameters ...............................................................................4-4Calling VIs with Cluster Parameters .............................................................................4-5
Specifying Each Cluster Element Individually ...............................................4-5Passing Existing TestStand Container Variables to LabVIEW.......................4-6Creating a New Custom Data Type.................................................................4-7
Creating TestStand Data Types from LabVIEW Clusters.............................................4-8
Chapter 5Configuring the LabVIEW Adapter
Selecting a LabVIEW Server.........................................................................................5-1Using a LabVIEW Run-Time Engine or Other Executable Server.................5-2Using a LabVIEW Development System Later than 8.5 ................................5-3Per-Step Configuration of the LabVIEW Adapter ..........................................5-4
Contents
Using LabVIEW with TestStand vi ni.com
Reserving Loaded VIs for Execution ............................................................................ 5-4Code Template Policy ................................................................................................... 5-5Legacy VI Settings ........................................................................................................ 5-6
Chapter 6Creating Custom User Interfaces in LabVIEW
TestStand User Interface Controls................................................................................. 6-1TestStand VIs and Functions......................................................................................... 6-1Creating Custom User Interfaces................................................................................... 6-2
Configuring the TestStand UI Controls .......................................................... 6-3Enabling Sequence Editing ............................................................................. 6-4Handling Events .............................................................................................. 6-4Starting TestStand ........................................................................................... 6-6Main Event Loop and Shutting Down TestStand ........................................... 6-6Menu Bars and Menu Event Handling............................................................ 6-7Localization..................................................................................................... 6-8
Other User Interface Utilities ........................................................................................ 6-9Making Dialog Boxes Modal to TestStand..................................................... 6-9Checking for Stopped Executions................................................................... 6-9
Running User Interfaces ................................................................................................ 6-10
Appendix AUsing LabVIEW 8.x with TestStand
Using LabVIEW 8.0...................................................................................................... A-1LabVIEW 8.0 Real-Time Module Incompatibility......................................... A-1Projects............................................................................................................ A-1Project Libraries .............................................................................................. A-2Network-Published Shared Variables ............................................................. A-2
Deploying Variables ......................................................................... A-2Using an Aliases File ........................................................................ A-3
NI-DAQmx Tasks, Channels, and Scales in LabVIEW Projects ................... A-3Conditional Disable Structures and Symbols.................................................. A-464-Bit Integer Data Type ................................................................................ A-4XControls ........................................................................................................ A-4Remote Execution ........................................................................................... A-4Building a TestStand Deployment with LabVIEW 8.0 .................................. A-4
Appendix BCalling LabVIEW VIs on Remote Systems
Contents
© National Instruments Corporation vii Using LabVIEW with TestStand
Appendix CUsing the TestStand ActiveX APIs in LabVIEW
Appendix DCalling Legacy LabVIEW VIs
Appendix ETechnical Support and Professional Services
Index
© National Instruments Corporation 1-1 Using LabVIEW with TestStand
1Role of LabVIEW in a TestStand-Based System
NI TestStand is a test management environment you use to organize and execute code modules written in a variety of languages and application development environments (ADEs), including LabVIEW. TestStand handles core test management functionality, including the definition and execution of the overall testing process, user management, report generation, database logging, and more. TestStand can work in a variety of different testing scenarios and environments because it allows extensive customization of components, such as process models, step types, and user interfaces. You can use LabVIEW in the following ways to accomplish much of this customization:
• Create code modules, such as tests and actions, TestStand can call using the LabVIEW Adapter
• Create custom user interfaces for test systems
• Create custom step types
Code ModulesTestStand can call LabVIEW virtual instruments (VIs) with a variety of connector pane configurations. TestStand can call VIs that reside on the same computer as TestStand or on other network computers, including computers running the LabVIEW Real-Time (RT) module.
TestStand can also pass data to the VIs it calls and store the data the VI returns. Additionally, the VIs TestStand calls can access the complete TestStand application programming interface (API) for advanced applications.
Chapter 1 Role of LabVIEW in a TestStand-Based System
Using LabVIEW with TestStand 1-2 ni.com
Custom User InterfacesYou can use the LabVIEW development environment to build custom user interfaces for test systems and for creating custom sequence editors. Typically, custom user interfaces are designed for use in production test systems. With the LabVIEW Full or Professional Development System, you can also create user interfaces using the TestStand User Interface (UI) Controls and the TestStand API. Refer to Chapter 9, Creating Custom User Interfaces, of the NI TestStand Reference Manual for more information about creating custom user interfaces.
Custom Step TypesYou can use LabVIEW to create VIs you call from custom step types. These VIs can implement editable dialog boxes and other features of custom step types. Refer to Chapter 13, Custom Step Types, of the NI TestStand Reference Manual for more information about custom step types.
LabVIEW AdapterThe LabVIEW Adapter offers advanced functionality for calling VIs from TestStand. You can use the LabVIEW Adapter to perform the following tasks:
• Call VIs with arbitrary connector panes
• Call VIs on remote computers
• Run VIs in the LabVIEW Run-Time Engine
• Call TestStand VIs from versions of TestStand earlier than 3.0 and LabVIEW Test Executive VIs
• Create and edit VIs from TestStand
• Debug VIs (step in/step out) from TestStand
• Run VIs using the LabVIEW Development System or a LabVIEW executable
© National Instruments Corporation 2-1 Using LabVIEW with TestStand
2Calling LabVIEW VIs from TestStand
You can call LabVIEW VIs from TestStand using the LabVIEW Adapter.
Required LabVIEW SettingsAll the tutorials in this manual require that you have the LabVIEW Development System and TestStand installed on the same computer. In addition, you must configure the LabVIEW Adapter to run VIs using the LabVIEW Development System. Refer to Chapter 5, Configuring the LabVIEW Adapter, for more information about configuring these settings for the adapter.
Confirm the following settings in LabVIEW:
• To edit or run a VI from TestStand, you must include the VI in the VI Server: Exported VIs list. By default LabVIEW allows access to all VIs. To view the VI Server: Exported VIs list, select Tools»Options and select the VI Server: Exported VIs category in the Options dialog box.
• If you use LabVIEW 8.0.1 or earlier, select Tools»Options»Performance and Disk to confirm the Run with multiple threads checkbox includes a checkmark to avoid errors when running VIs.

Chapter 2 Calling LabVIEW VIs from TestStand
Using LabVIEW with TestStand 2-2 ni.com
LabVIEW Module TabUse the LabVIEW Module tab in the TestStand Sequence Editor to configure calls to LabVIEW VIs. Select a step that uses the LabVIEW Adapter to view the LabVIEW Module tab in the Step Settings pane, as shown in Figure 2-1.
Figure 2-1. LabVIEW Module Tab
Use the LabVIEW Module tab in the TestStand Sequence Editor to specify the VI the step executes and to specify if LabVIEW shows the front panel of the VI when TestStand calls the VI. The Module tab includes Source Code buttons for selecting an Express VI and converting an Express VI to a standard VI.
The LabVIEW Module tab also contains the following specific information about the VI to call.
• VI Parameter Table—Contains the following information about each control and indicator, also called the parameters of the VI, wired to the connector pane of the VI:
– Parameter Name—Contains the caption text for the control or indicator. If no caption exists, this field contains the label text.
– Type—Contains the LabVIEW data type for the control or indicator. Refer to Chapter 4, Using LabVIEW Data Types with TestStand, for more information about how LabVIEW data types map to TestStand data types.
1 VI Parameter Table2 Parameters Table Control3 Express VI Buttons
4 Source Code and Help Buttons5 VI Context Help Image and Description
51
2 3 4
Chapter 2 Calling LabVIEW VIs from TestStand
© National Instruments Corporation 2-3 Using LabVIEW with TestStand
– In/Out—Specifies if the parameter is an input (control) or an output (indicator).
– Default—Specifies if TestStand uses the default value for the parameter, cluster element, or array element. If the terminal on the VI is marked as Required, this option is not available.
– Value—Contains a TestStand expression. For input parameters, TestStand passes the result of this expression to the VI unless you enable the checkbox in the Default column. For output parameters, TestStand stores the data the VI returns in the location this expression specifies.
Note Parameters are listed in the VI Parameter Table according to their order in the VI context help image.
• Source Code and Help Buttons—Use these buttons to create or edit a VI in LabVIEW, refresh the parameter information for the VI, open the LabVIEW Advanced Settings window, display the help associated with the VI if available, and undock the LabVIEW Help.
• VI Context Help Image and Description—Displays the context help image of the VI as shown in the LabVIEW Context Help window and displays the description of the VI from the Documentation page in the LabVIEW VI Properties dialog box. When you click a label or terminal of the VI icon, TestStand highlights the parameter in the VI Parameter Table.
Click the Help or Help Topic button located on the Help toolbar to access the NI TestStand Help, which provides additional information about the LabVIEW Module tab.
Creating and Configuring a New Step Using the LabVIEW Adapter
Complete the following steps to insert a new step that uses the LabVIEW Adapter and configure the step to call a test VI.
1. Launch the TestStand Sequence Editor and select the LabVIEW Adapter on the Insertion Palette.
2. Open a new Sequence File window if one is not already open.
3. Select File»Save As and save the sequence file as <TestStand Public>\Tutorial\Call LabVIEW VI.seq. The <TestStand Public> directory is located at C:\Documents and Settings\
Chapter 2 Calling LabVIEW VIs from TestStand
Using LabVIEW with TestStand 2-4 ni.com
All Users\Documents\National Instruments\
TestStand x.x on Windows 2000/XP and at C:\Users\Public\Documents\National Instruments\TestStand x.x on Windows Vista.
4. Insert a Pass/Fail step in the Main step group of the Sequence File window and rename the new step LabVIEW Pass/Fail Test.
5. On the LabVIEW Module tab of the Step Settings pane, click the Browse for VI button, select <TestStand Public>\Tutorial\LabVIEW Pass-Fail Test.vi, and click Open. TestStand reads the description and connector pane information from the VI and updates the LabVIEW Module tab so you can configure the data to pass to and from the VI.
6. In the VI Parameter Table, enter Step.Result.PassFail in the Value column of the PASS/FAIL Flag output parameter and enter Step.Result.ReportText in the Value column of the Report Text output parameter.
Note All expression fields support type-ahead and auto-completion with drop-down lists and context-sensitive highlighting. At any point while editing an expression, press <Ctrl-Space> to show a drop-down list of valid expression elements.
When TestStand calls the VI, it places the value the VI returns in the PASS/FAIL Flag and Report Text indicators into the Result.PassFail and Result.ReportText properties of the step.
7. Notice that TestStand automatically fills in the Value column of the error out output parameter with the Step.Result.Error property.
Note By default, if a VI uses the standard LabVIEW error out cluster as an output parameter, TestStand automatically passes that value into the Step.Result.Error property for the step. You can also update the value manually.
8. Select File»Save to save the sequence file.
9. Select Execute»Single Pass to run the sequence file using the Single Pass Execution entry point.
When the execution completes, the resulting report indicates the step passed. The VI always returns True as the Pass/Fail output parameter.
10. Close the Execution window.
© National Instruments Corporation 3-1 Using LabVIEW with TestStand
3Creating, Editing, and Debugging LabVIEW VIs from TestStand
You can use the LabVIEW Adapter to create new VIs to call from TestStand and to edit and debug existing VIs.
Creating a New VI from TestStandComplete the following steps to create a new VI from TestStand.
1. Launch the TestStand Sequence Editor and select the LabVIEW Adapter on the Insertion Palette.
2. Open <TestStand Public>\Tutorial\Call LabVIEW VI.seq, if it is not already open. You created this sequence file in the Creating and Configuring a New Step Using the LabVIEW Adapter section of Chapter 2, Calling LabVIEW VIs from TestStand.
3. Insert a Numeric Limit Test step after the LabVIEW Pass/Fail Test step and rename it LabVIEW Numeric Limit Test.
4. Select the LabVIEW Numeric Limit Test step and use the LabVIEW Module tab to complete the following steps.
a. Click the Create VI button to create a new VI.
b. In the File dialog box, browse to the <TestStand Public>\Tutorial directory, enter LabVIEW Numeric Limit Test.vi in the File Name control, and click OK. TestStand creates a new VI based on the available code templates for the TestStand Numeric Limit Test and opens the VI in LabVIEW.
Note The TestStand Numeric Limit Test step type requires code modules to store a measurement value in the Step.Result.Numeric property, and the step type performs a comparison operation to determine if the step passes or fails. Code modules can update step properties by passing step properties as parameters to and from the module or by using the TestStand API in the module. If you use a default code template from National Instruments to create a module, TestStand creates the parameters needed to access the step properties for you.
Chapter 3 Creating, Editing, and Debugging LabVIEW VIs from TestStand
Using LabVIEW with TestStand 3-2 ni.com
c. In LabVIEW, select Window»Show Block Diagram to open the block diagram.
d. Right-click the Numeric Measurement indicator terminal, select Create»Constant from the context menu, and enter 10.0.
e. Save and close the VI.
5. Return to the TestStand Sequence Editor and select the LabVIEW Module tab. Notice that TestStand automatically updates the output parameters for the VI based on the information stored in the code template for the Numeric Limit Test step type.
6. Save the sequence file as <TestStand Public>\Tutorial\Call LabVIEW VI 2.seq.
7. Select Execute»Single Pass to run the sequence file using the Single Pass Execution entry point. When the execution completes, the resulting report indicates the step passed with a numeric measurement of 10.0.
8. Leave the sequence file open so you can use it in the next tutorial.
Refer to Chapter 13, Custom Step Types, of the NI TestStand Reference Manual for more information about step types and code templates.
Editing an Existing VI from TestStandComplete the following steps to edit an existing VI from TestStand.
1. Open <TestStand Public>\Tutorial\Call LabVIEW VI 2.seq, if it is not already open.
2. Right-click the LabVIEW Pass/Fail Test step and select Edit Code from the context menu. LabVIEW becomes the active application.
3. Open the block diagram for the VI.
4. Change the PASS/FAIL Flag Boolean constant to False.
5. Save and close the VI.
6. In the TestStand Sequence Editor, select Execute»Single Pass to run the sequence file using the Single Pass Execution entry point. When the execution completes, the resulting report indicates the step failed, and the VI returns False in the PASS/FAIL Flag indicator.
7. Close the Execution window.
Chapter 3 Creating, Editing, and Debugging LabVIEW VIs from TestStand
© National Instruments Corporation 3-3 Using LabVIEW with TestStand
Debugging a VIComplete the following steps to debug a VI you call from TestStand using the LabVIEW Adapter.
1. Open <TestStand Public>\Tutorial\Call LabVIEW VI.seq.
2. Place a breakpoint on the LabVIEW Pass/Fail Test step.
3. Save the sequence file and select Execute»Run MainSequence to start an execution of MainSequence.
4. When the execution pauses, click the Step Into button on the sequence editor toolbar. LabVIEW becomes the active application, in which the LabVIEW Pass-Fail Test VI is open and in a suspended state.
5. Open the block diagram of the suspended VI.
6. Click the Step Into button or the Step Over button on the LabVIEW toolbar to begin single-stepping through the VI. You can click the Continue button at any time to finish single-stepping through the VI.
7. When you finish single-stepping through the VI, click the Return to Caller button on the LabVIEW toolbar to return to TestStand. The execution pauses at the next step in the sequence.
8. Select Debug»Resume in TestStand to complete the execution.
9. Close the Execution window.
You can run the VI multiple times before returning to TestStand. However, LabVIEW passes the results only from the last run to TestStand when you finish debugging.
© National Instruments Corporation 4-1 Using LabVIEW with TestStand
4Using LabVIEW Data Types with TestStand
TestStand provides number, string, Boolean, and object reference built-in data types. TestStand also provides several standard named data types, including Path, Error, LabVIEWAnalogWaveform, and others. You can create container data types that hold any number of other data types. TestStand container data types are analogous to LabVIEW clusters. You can use references to external objects, such as ActiveX (Microsoft ActiveX) objects or VISA sessions, between different types of code modules.
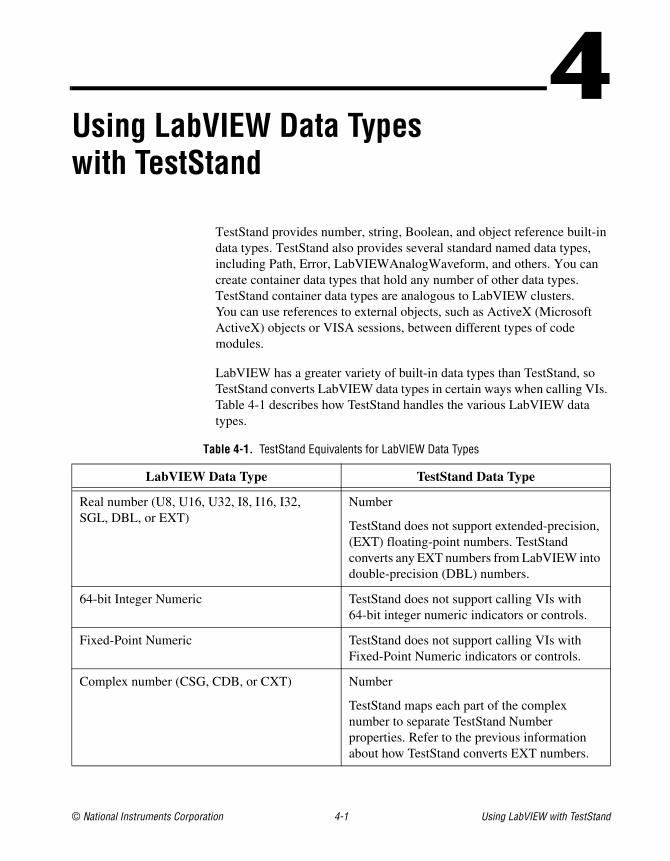
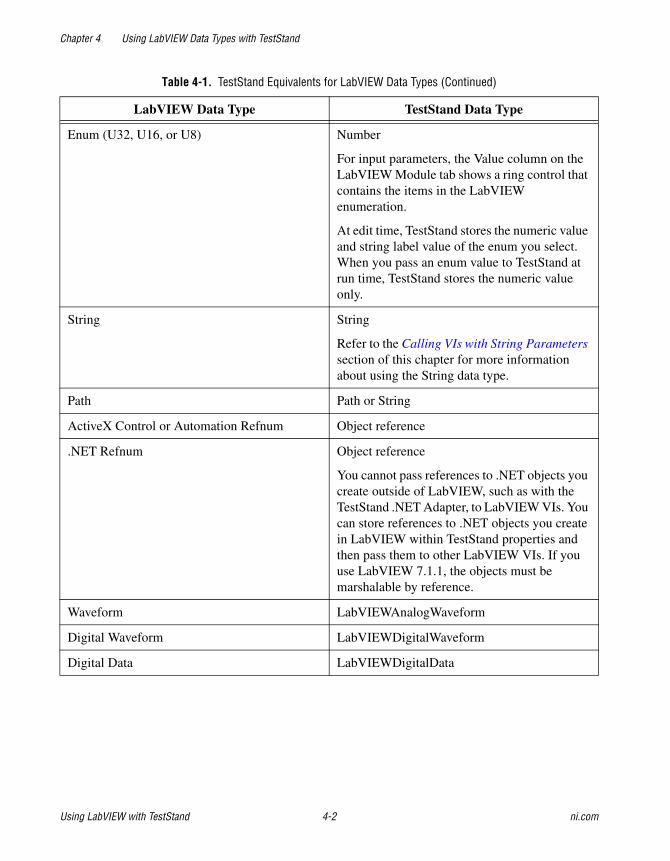
LabVIEW has a greater variety of built-in data types than TestStand, so TestStand converts LabVIEW data types in certain ways when calling VIs. Table 4-1 describes how TestStand handles the various LabVIEW data types.
Table 4-1. TestStand Equivalents for LabVIEW Data Types
LabVIEW Data Type TestStand Data Type
Real number (U8, U16, U32, I8, I16, I32, SGL, DBL, or EXT)
Number
TestStand does not support extended-precision, (EXT) floating-point numbers. TestStand converts any EXT numbers from LabVIEW into double-precision (DBL) numbers.
64-bit Integer Numeric TestStand does not support calling VIs with 64-bit integer numeric indicators or controls.
Fixed-Point Numeric TestStand does not support calling VIs with Fixed-Point Numeric indicators or controls.
Complex number (CSG, CDB, or CXT) Number
TestStand maps each part of the complex number to separate TestStand Number properties. Refer to the previous information about how TestStand converts EXT numbers.
Chapter 4 Using LabVIEW Data Types with TestStand
Using LabVIEW with TestStand 4-2 ni.com
Enum (U32, U16, or U8) Number
For input parameters, the Value column on the LabVIEW Module tab shows a ring control that contains the items in the LabVIEW enumeration.
At edit time, TestStand stores the numeric value and string label value of the enum you select. When you pass an enum value to TestStand at run time, TestStand stores the numeric value only.
String String
Refer to the Calling VIs with String Parameters section of this chapter for more information about using the String data type.
Path Path or String
ActiveX Control or Automation Refnum Object reference
.NET Refnum Object reference
You cannot pass references to .NET objects you create outside of LabVIEW, such as with the TestStand .NET Adapter, to LabVIEW VIs. You can store references to .NET objects you create in LabVIEW within TestStand properties and then pass them to other LabVIEW VIs. If you use LabVIEW 7.1.1, the objects must be marshalable by reference.
Waveform LabVIEWAnalogWaveform
Digital Waveform LabVIEWDigitalWaveform
Digital Data LabVIEWDigitalData
Table 4-1. TestStand Equivalents for LabVIEW Data Types (Continued)
LabVIEW Data Type TestStand Data Type
Chapter 4 Using LabVIEW Data Types with TestStand
© National Instruments Corporation 4-3 Using LabVIEW with TestStand
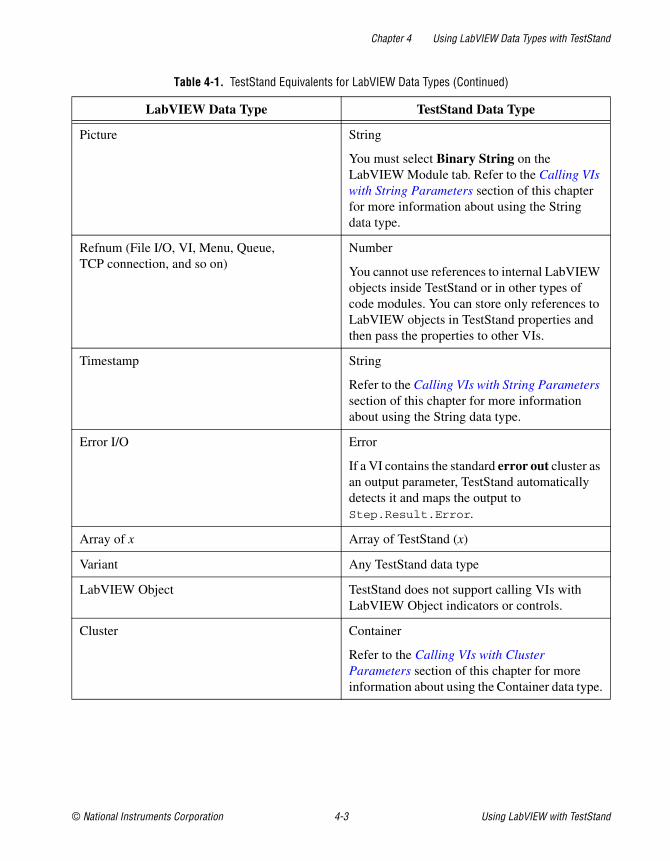
Picture String
You must select Binary String on the LabVIEW Module tab. Refer to the Calling VIs with String Parameters section of this chapter for more information about using the String data type.
Refnum (File I/O, VI, Menu, Queue, TCP connection, and so on)
Number
You cannot use references to internal LabVIEW objects inside TestStand or in other types of code modules. You can store only references to LabVIEW objects in TestStand properties and then pass the properties to other VIs.
Timestamp String
Refer to the Calling VIs with String Parameters section of this chapter for more information about using the String data type.
Error I/O Error
If a VI contains the standard error out cluster as an output parameter, TestStand automatically detects it and maps the output to Step.Result.Error.
Array of x Array of TestStand (x)
Variant Any TestStand data type
LabVIEW Object TestStand does not support calling VIs with LabVIEW Object indicators or controls.
Cluster Container
Refer to the Calling VIs with Cluster Parameters section of this chapter for more information about using the Container data type.
Table 4-1. TestStand Equivalents for LabVIEW Data Types (Continued)
LabVIEW Data Type TestStand Data Type
Chapter 4 Using LabVIEW Data Types with TestStand
Using LabVIEW with TestStand 4-4 ni.com
Calling VIs with String ParametersWhen you configure calls to VIs that use strings as parameters, you can specify if TestStand escapes the string data when reading the data from the VI or unescapes the string data when passing the data to the VI. This option is necessary because LabVIEW strings can contain binary data, including NUL characters, but TestStand strings cannot contain NUL characters.
For String parameters, use the ring control in the Type column of the VI Parameter Table on the LabVIEW Module tab to select ASCII String or Binary String. The default value is ASCII String. TestStand does not modify the values of ASCII strings it passes to or from VIs.
Select Binary String in the Type column to store a LabVIEW string that contains binary data in a TestStand property. TestStand escapes the string before storing it and substitutes hexadecimal codes for the unprintable characters, such as the NUL character, in the string.
To pass a string escaped to a LabVIEW VI, select Binary String in the Type column. TestStand unescapes the string before passing it to the VI and substitutes the correct character values for the hexadecimal values in the escaped string.
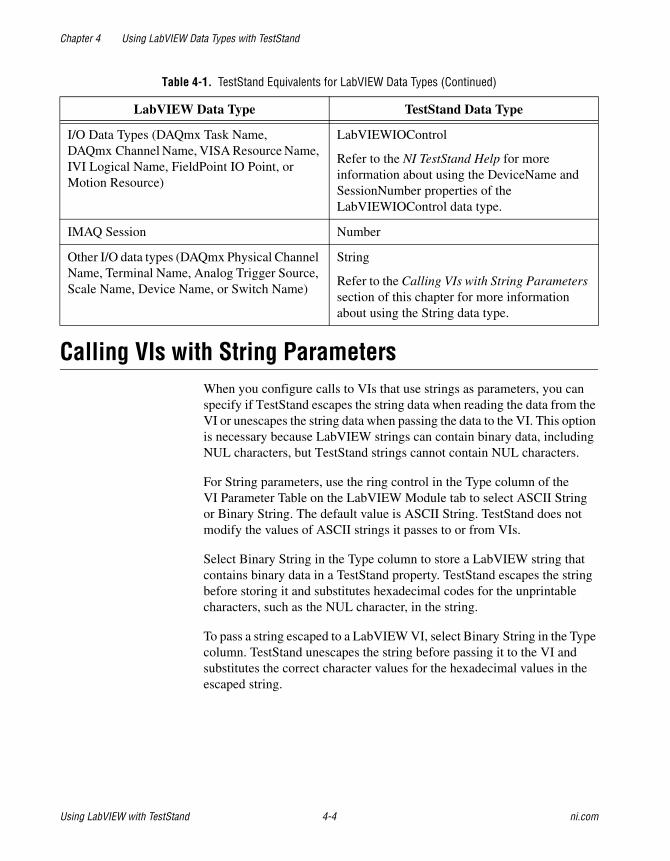
I/O Data Types (DAQmx Task Name, DAQmx Channel Name, VISA Resource Name, IVI Logical Name, FieldPoint IO Point, or Motion Resource)
LabVIEWIOControl
Refer to the NI TestStand Help for more information about using the DeviceName and SessionNumber properties of the LabVIEWIOControl data type.
IMAQ Session Number
Other I/O data types (DAQmx Physical Channel Name, Terminal Name, Analog Trigger Source, Scale Name, Device Name, or Switch Name)
String
Refer to the Calling VIs with String Parameters section of this chapter for more information about using the String data type.
Table 4-1. TestStand Equivalents for LabVIEW Data Types (Continued)
LabVIEW Data Type TestStand Data Type
Chapter 4 Using LabVIEW Data Types with TestStand
© National Instruments Corporation 4-5 Using LabVIEW with TestStand
Calling VIs with Cluster ParametersWhen you configure calls to VIs that use clusters as parameters, you can specify that each cluster element maps to a different TestStand expression or that the entire LabVIEW cluster maps to a TestStand data type.
You can create a custom data type that matches a LabVIEW cluster. For input parameters, you can pass the default value for the entire cluster or the default values for specific elements of the cluster control on the front panel of the VI.
For output parameters, you can optionally specify where TestStand stores the cluster value or specific elements of the cluster value.
If you are using several VIs with a complex array of clusters that is not used in TestStand, you can use the LabVIEWClusterArray data type, which adapts to the array of clusters as needed. First, use the LabVIEWClusterArray data type as an output expression that TestStand uses to adapt the data type to fit the array of clusters. Then, you can pass the data type to the remaining VIs as an input.
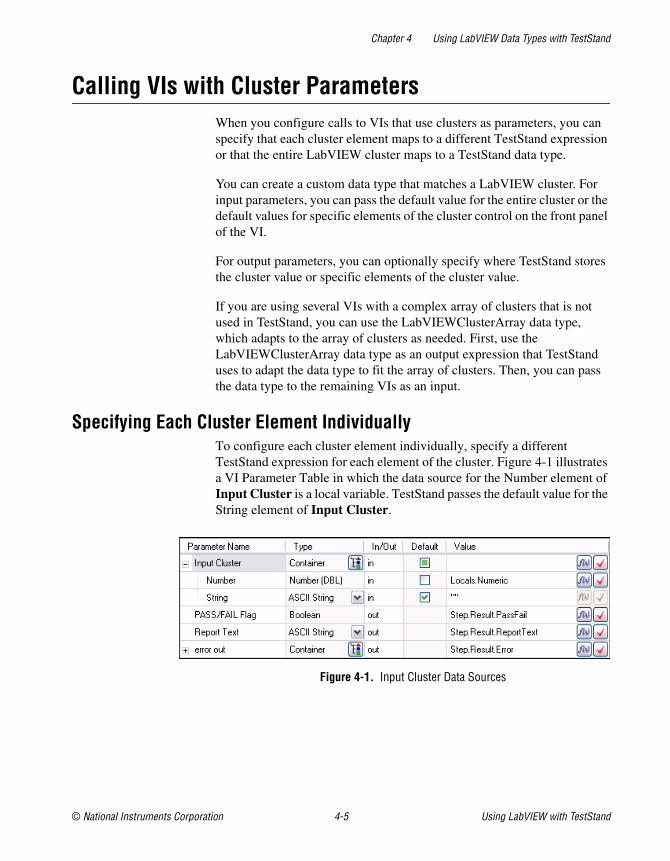
Specifying Each Cluster Element IndividuallyTo configure each cluster element individually, specify a different TestStand expression for each element of the cluster. Figure 4-1 illustrates a VI Parameter Table in which the data source for the Number element of Input Cluster is a local variable. TestStand passes the default value for the String element of Input Cluster.
Figure 4-1. Input Cluster Data Sources
Chapter 4 Using LabVIEW Data Types with TestStand
Using LabVIEW with TestStand 4-6 ni.com
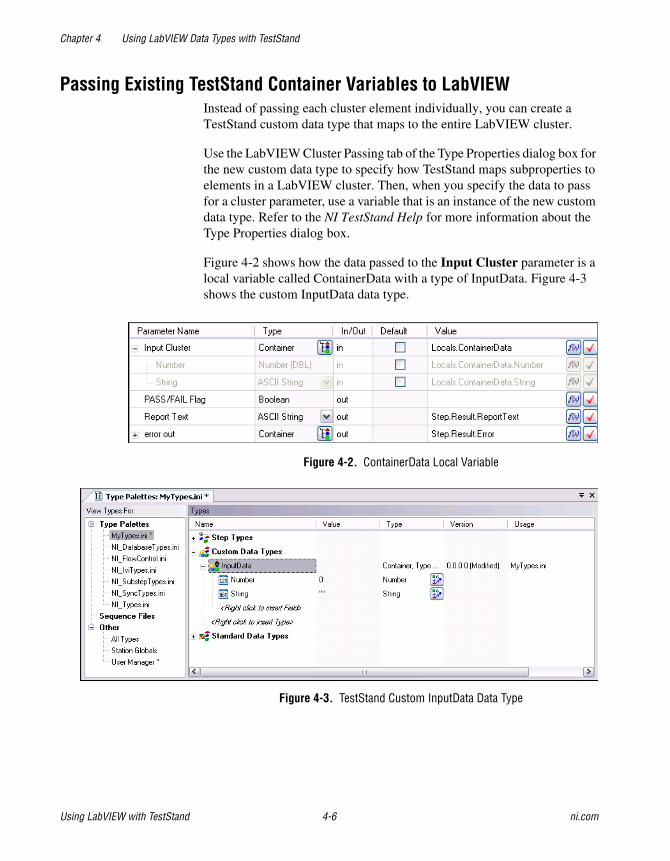
Passing Existing TestStand Container Variables to LabVIEWInstead of passing each cluster element individually, you can create a TestStand custom data type that maps to the entire LabVIEW cluster.
Use the LabVIEW Cluster Passing tab of the Type Properties dialog box for the new custom data type to specify how TestStand maps subproperties to elements in a LabVIEW cluster. Then, when you specify the data to pass for a cluster parameter, use a variable that is an instance of the new custom data type. Refer to the NI TestStand Help for more information about the Type Properties dialog box.
Figure 4-2 shows how the data passed to the Input Cluster parameter is a local variable called ContainerData with a type of InputData. Figure 4-3 shows the custom InputData data type.
Figure 4-2. ContainerData Local Variable
Figure 4-3. TestStand Custom InputData Data Type
Chapter 4 Using LabVIEW Data Types with TestStand
© National Instruments Corporation 4-7 Using LabVIEW with TestStand
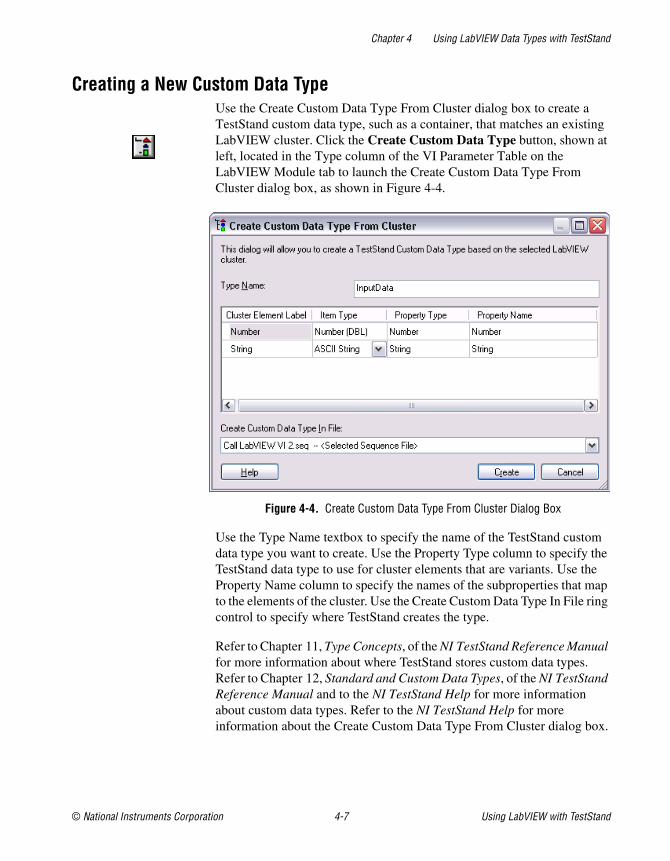
Creating a New Custom Data TypeUse the Create Custom Data Type From Cluster dialog box to create a TestStand custom data type, such as a container, that matches an existing LabVIEW cluster. Click the Create Custom Data Type button, shown at left, located in the Type column of the VI Parameter Table on the LabVIEW Module tab to launch the Create Custom Data Type From Cluster dialog box, as shown in Figure 4-4.
Figure 4-4. Create Custom Data Type From Cluster Dialog Box
Use the Type Name textbox to specify the name of the TestStand custom data type you want to create. Use the Property Type column to specify the TestStand data type to use for cluster elements that are variants. Use the Property Name column to specify the names of the subproperties that map to the elements of the cluster. Use the Create Custom Data Type In File ring control to specify where TestStand creates the type.
Refer to Chapter 11, Type Concepts, of the NI TestStand Reference Manual for more information about where TestStand stores custom data types. Refer to Chapter 12, Standard and Custom Data Types, of the NI TestStand Reference Manual and to the NI TestStand Help for more information about custom data types. Refer to the NI TestStand Help for more information about the Create Custom Data Type From Cluster dialog box.
Chapter 4 Using LabVIEW Data Types with TestStand
Using LabVIEW with TestStand 4-8 ni.com
Creating TestStand Data Types from LabVIEW ClustersComplete the following steps to create a TestStand data type that matches a LabVIEW cluster.
1. Open <TestStand Public>\Tutorial\Call LabVIEW VI 2.seq and select the LabVIEW Adapter on the Insertion Palette.
2. Insert a new Pass/Fail Test step in the Main step group of MainSequence after the LabVIEW Numeric Limit Test step and rename the step Pass Container to VI.
3. On the LabVIEW Module tab, click the Browse for VI button and select <TestStand Public>\Tutorial\VI with Cluster Input.vi. The Report Text output parameter of this VI returns a string that contains the number and string elements of the Input Cluster parameter.
4. Click the Create Custom Data Type button in the Type column of the Input Cluster parameter to launch the Create Custom Data Type From Cluster dialog box. TestStand maps the cluster elements to subproperties in a container called Input_Cluster, which is a new TestStand custom data type. You can rename the data type and subproperties as necessary and specify where TestStand stores the new data type.
5. In the Create Custom Data Type From Cluster dialog box, change the type name to InputData and click the Create button to accept the automatically assigned values and to create the data type in the current sequence file.
6. On the LabVIEW Module tab, remove the checkmark from the Default column for the Input Cluster input parameter, click the Expression Browse button in the Value column to open the Expression Browser dialog box, and complete the following steps.
a. Right-click Locals in the Variables/Properties tab and select Insert Types»InputData to create a local variable of type InputData. Rename the local variable ContainerData.
b. Right-click the Number subproperty of ContainerData and select Properties from the context menu. Enter 23 in the Value field and click OK.
c. Right-click the String subproperty of ContainerData and select Properties from the context menu. Enter My String Data in the Value field and click OK.
Chapter 4 Using LabVIEW Data Types with TestStand
© National Instruments Corporation 4-9 Using LabVIEW with TestStand
d. Enter Locals.ContainerData in the Expression field and click OK. The Value column for the Input Cluster parameter now contains Locals.ContainerData.
7. Enter Step.Result.ReportText in the Value column for the ReportText output parameter. When TestStand calls the VI, it passes the values in the ContainerData local variable to the Input Cluster control on the VI and returns the Number and String elements of the Input Cluster parameter to the ReportText property of the step.
8. Save your changes and select Execute»Single Pass to run the sequence file using the Single Pass Execution entry point. When the execution completes, the resulting report shows the text the VI with Cluster Input VI returns.
Note By default, the Before Saving Modified Types option on the Preferences tab of the Station Options dialog box is set to Prompt to Increment Version Types. This causes TestStand to launch the Modified Types Warning dialog box when you select File»Save and the sequence file or type palette contains types that are marked as modified. Select Increment Type Versions and then click OK to close the dialog box. Refer to the NI TestStand Help for more information about the Modified Types Warning dialog box.
9. Close the Execution window.

© National Instruments Corporation 5-1 Using LabVIEW with TestStand
5Configuring the LabVIEW Adapter
You can configure the TestStand LabVIEW Adapter to select a LabVIEW server, reserve loaded VIs for execution, establish a code template policy, and change legacy VI settings.
Selecting a LabVIEW ServerThe LabVIEW Adapter can run VIs using the LabVIEW Development System, the LabVIEW Run-Time Engine, or a LabVIEW executable built with an ActiveX server enabled.
Select Configure»Adapters to launch the Adapter Configuration dialog box, select LabVIEW in the Adapter column, and click the Configure button to launch the LabVIEW Adapter Configuration dialog box, in which you can select the server you want TestStand to use, as shown in Figure 5-1.
Figure 5-1. LabVIEW Adapter Configuration Dialog Box
Chapter 5 Configuring the LabVIEW Adapter
Using LabVIEW with TestStand 5-2 ni.com
• LabVIEW Run-Time Engine—Provides optimal performance when calling LabVIEW VIs by running VIs in the same process as TestStand. If you select this option, you cannot create or edit VIs from TestStand or debug VIs TestStand calls. You must install and select the LabVIEW Run-Time Engine version that matches the version of the VIs that TestStand executes.
• Development System (Active Version: X.X)—Allows you to create or edit VIs from TestStand and debug VIs TestStand calls in LabVIEW. The VIs execute in the LabVIEW Development System process. You must have the LabVIEW Development System installed on the same computer as TestStand to use this option.
• Other Executable—Uses a LabVIEW executable you build with the Build Executable functionality in LabVIEW 8.0 or later or the Build Application or Shared Library (DLL) functionality in LabVIEW 7.1.1. If you select this option, you cannot create or edit VIs from TestStand or debug VIs TestStand calls. The version of LabVIEW that built the executable must match the version of the VIs that TestStand executes.
To use this option, enter the ActiveX server name associated with the LabVIEW executable. The executable must be installed and registered on the same computer as TestStand. Launch the executable once to register it as an ActiveX server. Refer to the <TestStand Public>\Components\RuntimeServers\LabVIEW directory for an example server VI and application build script for LabVIEW 8.0 or later and for LabVIEW 7.1.1.
Note (Windows Vista) Windows Vista requires you to log in as a user with administrator privileges in order to register a server. LabVIEW cannot register ActiveX servers on Windows Vista when building executables without elevation. If you are using TestStandLVRTS.exe with Windows Vista to run LabVIEW VIs, you receive an error because the server is not registered. You can register the server by running TestStandLVRTS.exe as an administrator.
Using a LabVIEW Run-Time Engine or Other Executable ServerIf you select LabVIEW Run-Time Engine or Other Executable as a server in the LabVIEW Adapter Configuration dialog box, you must ensure that the server can locate the complete hierarchy of VIs, including any subVIs, that TestStand executes. The version of the VIs that TestStand executes must match the version of the LabVIEW Run-Time Engine or the version of LabVIEW that built the executable. Refer to Chapter 14, Deploying TestStand Systems, of the NI TestStand Reference Manual for more
Chapter 5 Configuring the LabVIEW Adapter
© National Instruments Corporation 5-3 Using LabVIEW with TestStand
information about deploying VIs for use with TestStand and about including a LabVIEW Run-Time Engine in a deployment installer. Refer to Appendix A, Using LabVIEW 8.x with TestStand, for more information about calling and deploying LabVIEW 8.x VIs.
If you select the LabVIEW Run-Time Engine as a server on a development system, TestStand might report that it cannot load some VIs in the LabVIEW Run-Time Engine, even though the VIs run using the LabVIEW Development System as the server. This is because TestStand cannot load a subVI that was saved in a different version of LabVIEW than the LabVIEW Run-Time Engine. The most common reason for this discrepancy is when a top-level VI uses a subVI or controls located in the vi.lib\addons\TestStand directory, and that subVI was saved in a different version of LabVIEW than the LabVIEW Run-Time Engine. Mass compiling the vi.lib\addons\TestStand directory usually resolves the discrepancy. You can also mass compile top-level VIs, which in turn compiles any subVIs.
If you use the TestStand Version Selector to activate a different version of TestStand, TestStand copies new versions of the VIs to the vi.lib\addons\TestStand directory. Mass compile the VIs located in this directory after you activate the new version of TestStand.
Using a LabVIEW Development System Later than 8.5If you install a version of LabVIEW later than LabVIEW 8.5 and you want to use that version of LabVIEW with TestStand, you must complete the following steps to update TestStand - Default Values 85.llb to allow the LabVIEW Adapter to retrieve the default parameter values of the VIs.
1. Create a copy of TestStand - Default Values 85.llb.
2. Rename the copy TestStand - Default Values xx.llb, where xx indicates the version of LabVIEW you want to use with TestStand.
3. Mass compile TestStand - Default Values xx.llb using the version of LabVIEW you want to use with TestStand.
Chapter 5 Configuring the LabVIEW Adapter
Using LabVIEW with TestStand 5-4 ni.com
Per-Step Configuration of the LabVIEW AdapterYou can direct TestStand to always use the LabVIEW Run-Time Engine to execute a step. Click the Advanced Settings button on the LabVIEW Module tab and select the Always Run VI in LabVIEW Run-Time Engine option in the Advanced Settings window.
When you enable the Always Run VI in LabVIEW Run-Time Engine option, TestStand selects the appropriate version of the LabVIEW Run-Time Engine according to the version of LabVIEW in which you last compiled the VI. This setting overrides the global setting in the LabVIEW Adapter Configuration dialog box. Use this option when you do not want the global settings for the adapter to affect the tools and step types you create for use with the LabVIEW Adapter.
Reserving Loaded VIs for ExecutionEnable the Reserve Loaded VIs for Execution option in the LabVIEW Adapter Configuration dialog box to reserve any VIs TestStand loads for calling with the LabVIEW Adapter. Enabling this option reduces the amount of time required for TestStand to call the VIs and makes references you create in a VI you call from TestStand—such as I/O, ActiveX, and synchronization references—persist across calls to other VIs. You can store these references in a TestStand property and pass them to subsequent VIs you call from TestStand.
Although reserving VIs with this option reduces the amount of time required for TestStand to call the VIs, it also blocks other applications from using any VIs TestStand loads, including subVIs of the VIs TestStand calls directly.
If you open a reserved VI in LabVIEW, the Run arrow, shown at left, indicates the VI is reserved, and you cannot edit the VI. To edit a VI TestStand has reserved, click the Edit Code button, shown at left, on the LabVIEW Module tab or right-click the step and select Edit Code from the context menu to open the VI in TestStand. You can also select File»Unload All Modules in the sequence editor before you open the VI in LabVIEW.
You must close any references you create to VIs. If TestStand reserves VIs when it loads the VIs, LabVIEW does not automatically close the references until TestStand unloads the VIs that created the references. Failing to close the references could result in a memory leak in the test system.
Chapter 5 Configuring the LabVIEW Adapter
© National Instruments Corporation 5-5 Using LabVIEW with TestStand
Code Template PolicyUse the Code Template Policy section in the LabVIEW Adapter Configuration dialog box to specify if TestStand allows the use of old, or legacy, VI templates when you create new test VIs. The legacy VI templates are VIs you can call from previous versions of TestStand. Refer to Appendix D, Calling Legacy LabVIEW VIs, for more information about legacy TestStand VIs.
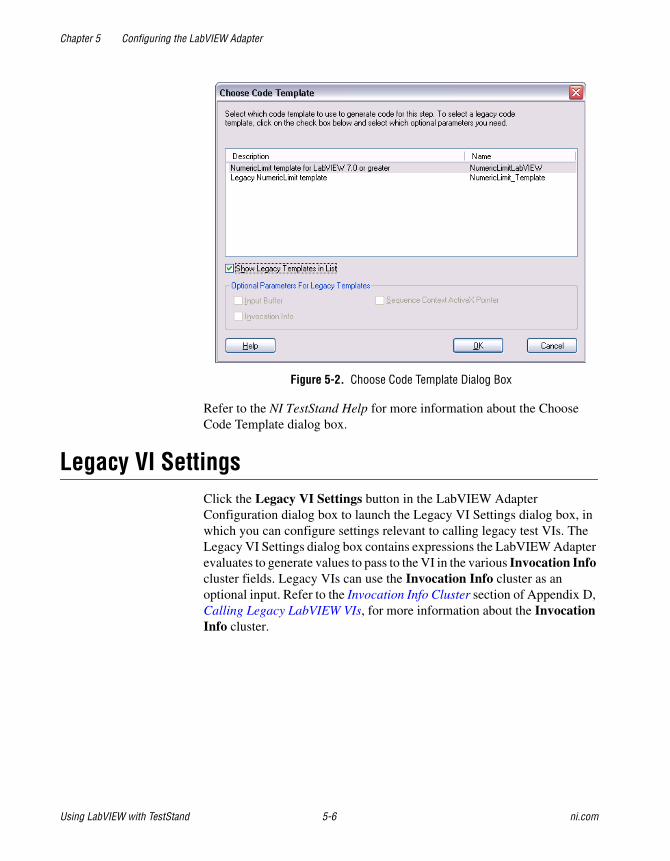
If you enable the Allow Only New Templates option and create a new VI from the LabVIEW Module tab, TestStand creates a new VI based on the code template for the specified step type. If the step type has multiple code templates available, TestStand launches the Choose Code Template dialog box, in which you can select the code template to use for the new VI.
If you enable the Allow Only Legacy Templates option, TestStand launches the Optional Parameters dialog box, in which you select the optional parameters, such as Input Buffer, Invocation Info, or Sequence Context ActiveX Pointer, you want to include as input parameters for the VI.
If you enable the Allow Legacy and New Templates option, TestStand launches the Choose Code Template dialog box, in which you can select a new template from the list of available templates for the step type. Enable the Show Legacy Templates in List option to show the legacy templates. When you select a legacy template, you enable the Optional Parameters for Legacy Templates section of the Choose Code Template dialog box, in which you can select the optional parameters you want to include as input parameters for the VI, as shown in Figure 5-2.
Chapter 5 Configuring the LabVIEW Adapter
Using LabVIEW with TestStand 5-6 ni.com
Figure 5-2. Choose Code Template Dialog Box
Refer to the NI TestStand Help for more information about the Choose Code Template dialog box.
Legacy VI SettingsClick the Legacy VI Settings button in the LabVIEW Adapter Configuration dialog box to launch the Legacy VI Settings dialog box, in which you can configure settings relevant to calling legacy test VIs. The Legacy VI Settings dialog box contains expressions the LabVIEW Adapter evaluates to generate values to pass to the VI in the various Invocation Info cluster fields. Legacy VIs can use the Invocation Info cluster as an optional input. Refer to the Invocation Info Cluster section of Appendix D, Calling Legacy LabVIEW VIs, for more information about the Invocation Info cluster.
© National Instruments Corporation 6-1 Using LabVIEW with TestStand
6Creating Custom User Interfaces in LabVIEW
You can create custom user interfaces and create user interfaces for other components, such as custom step types. Refer to Chapter 9, Creating Custom User Interfaces, of the NI TestStand Reference Manual to for information about the TestStand User Interface (UI) Controls.
TestStand User Interface ControlsUse the TestStand UI Controls, located on the Controls»TestStand palette, to develop a custom user interface application, including custom sequence editors.
When you place the TestStand UI Controls on the front panel of a VI, you can use the LabVIEW ActiveX functionality to program the controls. You can also configure the controls interactively using the LabVIEW Property Browser or control property pages if available. Right-click the control and select Property Browser from the context menu to open the LabVIEW Property Browser. Right-click the control and select Properties from the context menu to open the property page.
Refer to Appendix C, Using the TestStand ActiveX APIs in LabVIEW, for information about programming the TestStand API from LabVIEW.
TestStand VIs and FunctionsThe TestStand VIs and functions, located on the Functions»TestStand palette, are the LabVIEW versions of the functions in the TestStand Utility (TSUtil) Functions Library.
Use the TestStand VIs and functions for the following tasks:
• Inserting menu items that automatically execute commands the TestStand UI Controls provide
• Localizing the strings in a user interface
Chapter 6 Creating Custom User Interfaces in LabVIEW
Using LabVIEW with TestStand 6-2 ni.com
• Making dialog boxes LabVIEW VIs launch modal to TestStand applications
• Checking if an execution that calls a VI has stopped
• Setting and getting the values of TestStand properties and variables
Right-click the VI on the Functions palette or on the block diagram and select Help from the context menu to access the help for the VI.
Creating Custom User InterfacesUser interfaces that use the TestStand UI Controls typically perform the following basic operations:
• Configure connections, commands, and other control settings
• Register to handle events the controls generate
• Start TestStand
• Wait in a main event loop until you close the application
• Shut down TestStand
User interfaces can also include a menu bar that contains non-TestStand items and items that invoke TestStand commands.
Refer to the example user interfaces included with TestStand for more information about creating a TestStand User Interface using the TestStand UI Controls in LabVIEW. Begin with the simple user interface example, <TestStand>\UserInterfaces\Simple\LabVIEW\TestExec.llb\Simple OI - Top-Level VI.vi. The <TestStand> directory is the location where you installed TestStand. Refer to the full-featured example, <TestStand>\UserInterfaces\Full-Featured\LabVIEW\TestExec.llb\
Full UI - Top-Level VI.vi, for a more advanced sequence editor example that includes menus and localization options.
TestStand installs the source code files for the default user interfaces in the <TestStand>\UserInterfaces and <TestStand Public>\UserInterfaces directories. To modify the installed user interfaces or to create new user interfaces, modify the files in the <TestStand Public>\UserInterfaces directory. You can use the read-only source files for the default user interfaces in the <TestStand>\UserInterfaces directory as a reference. When you modify installed files, rename the files after you modify them if you want to create a separate custom component. You do not have to rename the files
Chapter 6 Creating Custom User Interfaces in LabVIEW
© National Instruments Corporation 6-3 Using LabVIEW with TestStand
after you modify them if you only want to modify the behavior of an existing component. If you do not rename the files and you use the files in a future version of TestStand, changes National Instruments makes to the component might not be compatible with the modified version of the component. Storing new and customized files in the <TestStand Public> directory ensures that new installations of the same version of TestStand do not overwrite the customizations and ensures that uninstalling TestStand does not remove the files you customize.
TestStand no longer includes example user interfaces that use the TestStand API. These examples contained a large amount of complex source code, and they provided less functionality than the simpler examples that use the TestStand UI Controls. National Instruments recommends using the examples that use the TestStand UI Controls as a basis for new development.
Note If you place a TestStand UI Control on the front panel of a VI, you must set the Preferred Execution System to user interface for the VI. In addition, National Instruments recommends that if a TestStand User Interface performs ActiveX operations that can process messages or performs TestStand operations that can call back into LabVIEW, the application must perform these operations in a LabVIEW execution system other than user interface, such as standard or other 2. Performing these operations in the user interface execution system can result in hang conditions.
Configuring the TestStand UI ControlsRefer to the following example user interface VIs for examples of configuring connections, commands, and other settings for the TestStand UI Controls:
• Simple OI - Configure Application Manager
• Simple OI - Configure SequenceFileView Manager
• Simple OI - Configure ExecutionView Manager
• Full UI - Configure StatusBar
• Full UI - Configure SequenceFileView Manager
• Full UI - Configure ListBar
• Full UI - Configure ExecutionView Manager
Chapter 6 Creating Custom User Interfaces in LabVIEW
Using LabVIEW with TestStand 6-4 ni.com
Enabling Sequence EditingThe TestStand UI Controls support Operator Mode and Editor Mode. Set the ApplicationMgr.IsEditor property to True for the Application Manager control to allow users to create and edit sequence files. You can also use the /editor command-line flag to set the property.
Handling EventsTestStand UI Controls generate events to notify the application of user input and application events, such as the completion of an execution. To handle an event in LabVIEW, you register a callback VI, which LabVIEW automatically calls when the control generates the event.
Complete the following steps to use the Register Event Callback function, available in the LabVIEW Full or Professional Development System.
1. Wire the reference of the control that sends the event you want to handle to the Event input of the Register Event Callback function.
2. Use the Event input terminal pull-down menu to select the specific event you want to handle.
3. If you want to pass custom data to the callback VI, wire the custom data to the User Parameter input of the Register Event Callback function. The User Parameter input can be any data type.
4. Right-click the VI Ref input of the Register Event Callback function and select Create Callback VI from the context menu. LabVIEW creates an empty callback VI with the correct input parameters for the particular event, including an input parameter for any custom data you wired to the User Parameter input in step 3.
5. Save the new callback VI. The block diagram that contains the Register Event Callback function now shows a Static VI Reference node wired to the VI Ref input of the function. This node returns a strictly typed reference to the new callback VI.
6. Complete the block diagram of the callback VI to perform the operation you specify when the control generates the event.
7. When the application finishes handling events for the control, use the Unregister for Events function to close the event callback refnum output of the Register Event Callback function.
Chapter 6 Creating Custom User Interfaces in LabVIEW
© National Instruments Corporation 6-5 Using LabVIEW with TestStand
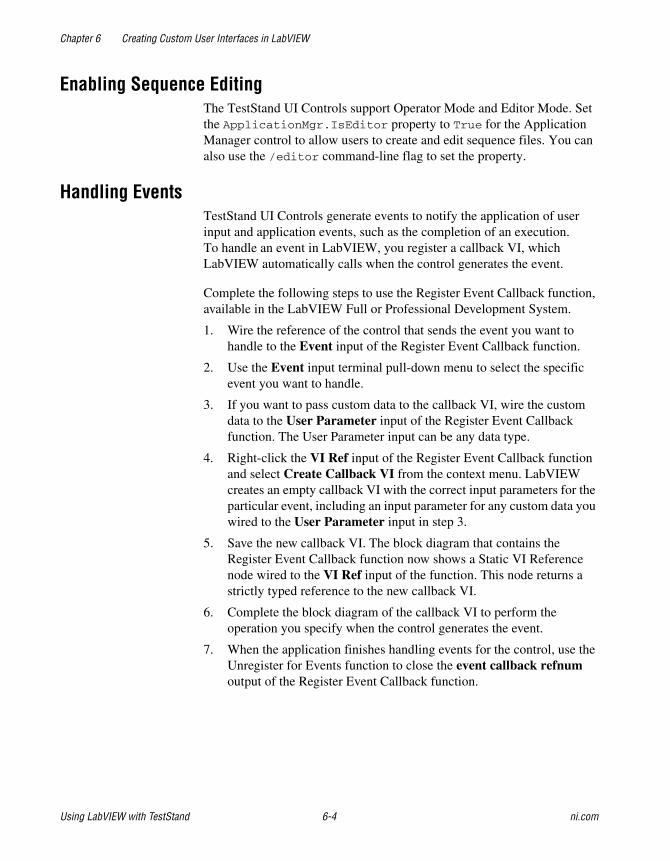
Figure 6-1 shows how to register a callback VI to handle the Break event for the TestStand Application Manager control.
Figure 6-1. Registering a Callback VI for the Break Event
You can resize the Register Event Callback function node to show multiple sets of terminals to handle multiple events. Refer to the following example user interface VIs for examples of registering and handling events from the TestStand UI Controls:
• Simple OI - Configure Event Callbacks
• Full UI - Configure Event Callbacks
You must limit the tasks you perform in a callback VI to ensure that LabVIEW handles the event in a timely manner to allow the front panel to quickly respond to user input and prevent possible hang conditions. If a callback VI performs ActiveX operations that can process messages or performs TestStand operations that can call back into LabVIEW, the application must perform these operations outside of the callback VI. You can define a user event the callback VI generates to defer these types of operations.
The ReDraw user event in the full example user interface shows how callback VIs can defer operations to perform outside of the callback VI. The example user interface performs the following tasks:
• Calls the Full UI - Create LabVIEW Application Events VI to create the ReDraw user event.
• Callback VIs, such as the Full UI - Resized Event Callback VI, generate the ReDraw user event when the user interface must resize and reposition controls on the front panel.
• The ReDraw User Event case in the main event loop of the Full UI - Top-Level VI sets a global variable while processing the current event to prevent callback VIs from generating new ReDraw events. The ReDraw User Event case calls the Full UI - Disable Panel Updates VI
Chapter 6 Creating Custom User Interfaces in LabVIEW
Using LabVIEW with TestStand 6-6 ni.com
to prevent the front panel from updating, calls the Full UI - ArrangeControls VI to update the position and size of controls on the front panel, and calls the Full UI - Re-enable Panel Updates VI to update the front panel.
Starting TestStandStart TestStand by invoking the ApplicationMgr.Start method, as shown in the following example user interfaces:
• Simple OI - Top-Level VI
• Full UI - Top-Level VI
Main Event Loop and Shutting Down TestStandUser interface applications wait in a main event loop after starting TestStand. The main event loop must handle the events that stop the user interface application. The main event loop can also handle other events, such as menu selections and LabVIEW control changes.
Typically, you stop a user interface application by clicking the Close box or by executing the Exit command through a TestStand menu or a Button control.
When you click the Close box, the Event structure in the main event loop handles the Panel Close? event. The block diagram that handles the event invokes the ApplicationMgr.Shutdown method and discards the event. When the ApplicationMgr.Shutdown method returns True to indicate TestStand is ready to shut down, the main event loop stops. When the ApplicationMgr.Shutdown method returns False, the main event loop waits because TestStand cannot shut down until the executions complete or you unload sequence files. When TestStand is ready, the Application Manager control generates the ApplicationMgr.ExitApplication event.
The callback VI for the ApplicationMgr.ExitApplication event generates a LabVIEW Quit Application user event, which the example user interface VIs handle, to inform the main event loop to stop.
Refer to the following example user interface VIs for examples of the main event loop and how to shut down TestStand. These VIs also provide examples of creating, generating, and handling the Quit Application event.
• Simple OI - Top-Level VI
• Simple OI - ExitApplication Event Callback
Chapter 6 Creating Custom User Interfaces in LabVIEW
© National Instruments Corporation 6-7 Using LabVIEW with TestStand
• Full UI - Top-Level VI
• Full UI - Create LabVIEW Application Events
• Full UI - ExitApplication Event Callback
Menu Bars and Menu Event HandlingThe TestStand VIs and functions palette contains the following VIs for creating and handling menu items that execute TestStand UI Control commands:
• TestStand - Insert Commands in Menu
• TestStand - Cleanup Menus
• TestStand - Remove Commands From Menus
• TestStand - Execute Menu Command
Because maintaining the current state of the menu bar can be difficult, National Instruments recommends that you handle the menu bar only when required. The Event structure in a main event loop can include a case to handle the Menu Activation? event to determine when you open a menu or select a shortcut key that might be linked to a menu item. The block diagram that handles this event can then rebuild the menu bar.
The Full UI - Top-Level VI in the example user interface shows how to rebuild the menu bar. The Menu Activation? case in the main event loop of the VI determines which control has focus, if the control is a TestStand UI control, and calls the Full UI - Rebuild Menu Bar VI to rebuild the menu bar. When you click the menu bar, LabVIEW does not automatically return focus to the control after handling a user menu event. The Menu Activation? case in Full UI - Top-Level VI passes a reference for the control with focus to the Menu Selection (User) case so the application can later restore focus to the control.
You can add a Menu Selection (User) case to the Event structure in a main event loop to handle user menu selections but limit the tasks you perform in the Menu Selection (User) case to ensure that LabVIEW handles the menu selection in a timely manner. If the case performs ActiveX operations that can process messages or performs TestStand operations that can call back into LabVIEW, the application must perform these operations in a LabVIEW execution system other than user interface, such as standard or other 2.
Chapter 6 Creating Custom User Interfaces in LabVIEW
Using LabVIEW with TestStand 6-8 ni.com
The Full UI - Top-Level VI in the example user interface shows how to process user menu events. The VI uses the standard LabVIEW execution system. The Menu Selection (User) case in the main event loop calls the Full UI - Add To Menu Queue VI to queue the operation for processing the menu outside of the main event loop. The Full UI - Process Menu Queue VI waits for and processes queued operations. For TestStand menu items, the Full UI - Process Menu Queue VI executes the appropriate TestStand command by calling the TestStand - Execute Menu Command VI. For non-TestStand menu items, the VI calls the Full UI - Process User Menus VI, which you can customize to handle user menu selections.
The LabVIEW application menu items for copy, cut, and paste operate on LabVIEW controls only and do not operate on TestStand UI Controls. In addition, the TestStand menu commands operate on TestStand UI Controls only and not on LabVIEW controls. When you rebuild a LabVIEW menu in the Menu Activation? event case and you call the TestStand - Insert Commands in Menu VI to insert CommandKind_Edit_Copy, CommandKind_Edit_Cut, or CommandKind_Edit_Paste, pass False to the TestStand UI Control Has Focus control and "Edit" to the Top-Level Menu to Insert Into control to insert the corresponding LabVIEW application menu items instead of the TestStand menu command.
LocalizationThe TestStand UI Controls and TestStand VIs and functions provide tools that localize user interfaces based on the TestStand language setting. Use the following VIs to localize the user interface:
• TestStand - Get Resource String
• TestStand - Localize Menu
• TestStand - Localize Front Panel
Refer to the following example user interface VIs for examples of localizing user interfaces:
• Full UI - Localize Operator Interface
• Full UI - About Box

Chapter 6 Creating Custom User Interfaces in LabVIEW
© National Instruments Corporation 6-9 Using LabVIEW with TestStand
Other User Interface UtilitiesYou can also launch dialog boxes modal to TestStand application windows and enable VIs to check for stopped executions.
Making Dialog Boxes Modal to TestStandThe VIs that TestStand calls can launch dialog boxes modal to TestStand application windows, such as the TestStand Sequence Editor or custom user interfaces.
Use the following VIs to make a dialog box modal to TestStand application windows:
• TestStand - Start Modal Dialog
• TestStand - End Modal Dialog
Refer to the <TestStand Public>\Examples\ModalDialogs\LabVIEW directory for examples of how to use these VIs.
Checking for Stopped ExecutionsThe VIs that TestStand calls can launch display dialog boxes or perform other time-consuming operations. In these cases, it can be useful for those VIs to periodically check if TestStand terminated or aborted their parent execution so the VIs can stop gracefully to allow the parent execution to terminate or abort.
Use the following VIs to enable VIs called by TestStand to verify if the execution that called the VI has stopped:
• TestStand - Initialize Termination Monitor
• TestStand - Get Termination Monitor Status
• TestStand - Close Termination Monitor
Refer to the dialog box VIs in the following files to see how to use these VIs:
• <TestStand Public>\Examples\Demo\LabVIEW\Computer
Motherboard Test
• <TestStand Public>\Examples\Demo\LabVIEW\Auto
Chapter 6 Creating Custom User Interfaces in LabVIEW
Using LabVIEW with TestStand 6-10 ni.com
Running User InterfacesConsider the following issues when running user interfaces:
• You must close all running LabVIEW User Interfaces before you exit Windows. If you shut down, restart, or log off of Windows while a user interface is running, the user interface cancels the operation and might exit with an error.
• When you run a LabVIEW User Interface in the LabVIEW Development System, you can call remote VIs only if the VI is the same or earlier version as the LabVIEW Development System.
• By default, you can run only one copy of a LabVIEW built executable at a time, which prevents the TestStand /useexisting command-line option from working. Add the "allowmultipleinstances = TRUE" option to the INI options file in the same directory as the LabVIEW built executable to allow more than one copy to execute at a time.
© National Instruments Corporation A-1 Using LabVIEW with TestStand
AUsing LabVIEW 8.x with TestStand
Refer to the LabVIEW documentation for more information about the LabVIEW features included in this appendix.
Using LabVIEW 8.0LabVIEW 8.0 introduced support for many new features, such as projects, project libraries, and DAQmx tasks. As a result of some of these changes, TestStand 3.1 or earlier is not compatible with LabVIEW 8.0. Use TestStand 3.5 or later to use LabVIEW 8.0 with TestStand.
The following sections include the LabVIEW 8.0 features TestStand supports, limitations of the TestStand support, and additional requirements to build a TestStand deployment system that includes LabVIEW 8.0 VIs.
LabVIEW 8.0 Real-Time Module IncompatibilityTestStand is not compatible with the LabVIEW 8.0 Real-Time (RT) module and cannot download VIs to the LabVIEW 8.0 RT module. Refer to Appendix B, Calling LabVIEW VIs on Remote Systems, for more information about executing VIs in the LabVIEW 8.0 RT module.
ProjectsWhen you run a VI in LabVIEW 8.0, the VI runs inside the application instance for a target in a LabVIEW project or the VI runs without a project in the main application instance. In TestStand, the LabVIEW Adapter always runs a VI in the main application instance, and LabVIEW 8.0 project settings do not apply. TestStand does not support LabVIEW project features or settings unless otherwise noted in the following sections.
Appendix A Using LabVIEW 8.x with TestStand
Using LabVIEW with TestStand A-2 ni.com
Project LibrariesLabVIEW project libraries are collections of VIs, type definitions, palette menu files, and other files, including other project libraries. In TestStand, you can call public VIs in a project library, but you cannot call private VIs. To call a VI in a project library, you must specify the path to the VI file. TestStand does not use qualified paths that include the project library path and name.
Network-Published Shared VariablesLabVIEW 8.0 supports network-published shared variables so VIs on distributed systems can share data across the network. LabVIEW identifies shared variables through a network path that includes the computer name (target name), the project library name(s), and the shared variable name.
Deploying VariablesIn LabVIEW, you must deploy a project library that contains the shared variables to which you want to connect from within a VI. LabVIEW automatically deploys shared variables from a library when you execute a VI that reads or writes shared variables and the project library that contains the shared variables is open in the current LabVIEW project.
Because TestStand executes VIs without a project, LabVIEW cannot automatically deploy shared variables. Therefore, you must deploy shared variables to the local computer in one of the following ways:
• Manually deploy the shared variables in the LabVIEW development environment using a project.
• Use the LabVIEW Utility Deploy Library step type in TestStand to deploy a project library that contains shared variables. The project library can contain only shared variables. The project library cannot contain any VI files. Refer to the NI TestStand Help for more information about the LabVIEW Utility Deploy Library step type.
Note TestStand does not support calling a VI or DLL that programmatically deploys shared variables using the Deploy Library method on a LabVIEW Application reference or using the Deploy Items method on a LabVIEW Project reference. If you programmatically deploy shared variables, the TestStand or LabVIEW application might return an error and terminate. You can use the Deploy Library method from within a standalone executable without adverse effects on TestStand.
Appendix A Using LabVIEW 8.x with TestStand
© National Instruments Corporation A-3 Using LabVIEW with TestStand
Using an Aliases FileWhen you deploy a project library or execute a VI in TestStand that accesses a shared variable, LabVIEW must determine how to resolve the target name stored in the network path for the variable. When you configure a target in a LabVIEW project, LabVIEW stores the IP address for the target in an aliases file located in the same directory as the project. The aliases file uses the same base name as the project and a .aliases file extension.
The server you configured the LabVIEW Adapter to use in the LabVIEW Adapter Configuration dialog box determines the aliases file LabVIEW uses in the following ways:
• LabVIEW Run-Time Engine—LabVIEW looks for an aliases file with the same name and location as the TestStand application. For example, SeqEdit.aliases for the TestStand Sequence Editor and TestExec.aliases for a user interface. You must quit and restart the TestStand application after you copy the aliases file from the project directory to the application directory.
• Development System—LabVIEW looks for an aliases file, LabVIEW.aliases, located in the same directory as the LabVIEW Development System executable. You must quit and restart LabVIEW after you copy the aliases file from the project directory to the LabVIEW directory.
• Other Executable—LabVIEW looks for an aliases file with the same name and location as the LabVIEW executable server. For example, TestStandLVRTS.aliases for TestStandLVRTS.exe and TestExec.aliases for a user interface. You must quit and restart the executable after you copy the aliases file from the project directory to the executable directory.
NI-DAQmx Tasks, Channels, and Scales in LabVIEW ProjectsTestStand does not support VIs that use NI-DAQmx tasks, channels, and scales defined in a project. You must define NI-DAQmx tasks, channels, and scales in Measurement & Automation Explorer (MAX).
Appendix A Using LabVIEW 8.x with TestStand
Using LabVIEW with TestStand A-4 ni.com
Conditional Disable Structures and SymbolsLabVIEW 8.0 includes the Conditional Disable Structure, which contains one or more subdiagrams, or cases. Depending on the configuration, LabVIEW uses one of the subdiagrams for the duration of the execution. You can specify conditions for the structure based on custom symbols defined in a project. Because TestStand executes VIs in the main application instance, any conditions that use custom symbols always evaluate to False.
64-Bit Integer Data TypeTestStand does not support calling VIs that contain terminals connected to 64-bit Integer Numeric indicators or controls.
XControlsTestStand supports calling VIs that use XControls on Windows systems.
Remote ExecutionTo execute VIs on a remote LabVIEW system, TestStand requires Remote Execution Support for NI TestStand for the latest version of LabVIEW on the system. The version of this component must match the version of LabVIEW with which you saved the VIs. LabVIEW installs this component only if TestStand is present. If you install TestStand after you install LabVIEW, TestStand installs a version of the component that might not match the version of LabVIEW on the system. In this case, you might need to rerun the LabVIEW installer.
Building a TestStand Deployment with LabVIEW 8.0TestStand 4.0 or later supports deploying LabVIEW 8.0 VIs and VIs from project libraries. However, the following restrictions exist that do not apply to earlier versions of LabVIEW:
• TestStand does not support deploying duplicate project libraries. You receive an error if you attempt to include two project libraries with the same name.
• TestStand no longer supports including two VIs with the same name in a deployment, unless the VIs are in different project libraries.
• National Instruments does not recommend distributing two VIs with the same name to different locations on a target computer. When a VI with the same name from a different location is in memory, LabVIEW uses the VI in memory when attempting to load a subVI. However,
Appendix A Using LabVIEW 8.x with TestStand
© National Instruments Corporation A-5 Using LabVIEW with TestStand
LabVIEW reports an error if you attempt to load a top-level VI with the same name as a VI in memory even if the similarly named VI in memory is an exact copy of the one you want to load.
• TestStand no longer supports distributing duplicate DLLs that VIs call. TestStand 4.0 or later supports, but National Instruments does not recommend, distributing duplicate DLLs that steps in a sequence file call.
• National Instruments does not recommend editing packaged VIs on a deployed system because unexpected errors can occur. TestStand includes only required VIs from a project library in a deployment. If you attempt to add new VIs from a project library to the deployment image, LabVIEW might not be able to find all the VIs it needs when you run the new VIs. National Instruments recommends rebuilding and redeploying the deployment image in this situation. Analysis and instrument drivers are examples of VIs that use project libraries.
• While processing sequence files, the TestStand Deployment Utility automatically includes project library files in the deployment if a LabVIEW Utility Deploy Library step references the project library.
• When you build a TestStand deployment that calls VIs that use shared variables, you must add an aliases file to the deployment. You must also configure the deployment to install the aliases file to the proper location on the destination system so LabVIEW can properly resolve network paths. In addition, you must include the NI Variable Engine component in the installer to ensure that the destination system can deploy the shared variables.
• National Instruments does not recommend deploying LabVIEW VIs that were previously deployed using the TestStand Deployment Utility. When the TestStand Deployment Utility packages LabVIEW VIs, the utility includes all subVIs and creates partial project libraries that contain only the required VIs from the project libraries.
If you attempt to redeploy VIs, the build in the TestStand Deployment Utility can fail when you attempt to include a partial project library and the original complete project library or when you attempt to include two copies of the same VI on the system. If you deploy custom LabVIEW-based step types to a development system and then attempt to include the step types in a new deployment, the build might fail.
To work around this limitation, you must remove the duplicate VIs and partial project libraries from the system and relink the VIs to the original VIs and complete project libraries on the system before you build a new deployment.
Appendix A Using LabVIEW 8.x with TestStand
Using LabVIEW with TestStand A-6 ni.com
Complete the following steps to resolve any duplicate VIs from previously deployed files.
1. Build the deployment and review the VIs the utility reports as duplicates in the status log.
2. Review the SupportVIs LLB or directory in the previously deployed files to determine which VIs and project libraries conflict with VIs located on the development system. Typically, a SupportVIs LLB or directory contains duplicate VIs and project libraries from vi.lib and user.lib.
3. Remove any duplicate VIs and partial project libraries the Deployment Utility reports and those in a SupportVIs LLB or directory.
4. Load all top-level VIs included in the previously deployed files and resave the VIs. LabVIEW prompts you to browse for any missing subVIs.
5. If the previously deployed files contain sequence files with steps that call Express VIs or any duplicate VI, you must reconfigure the Express VI steps and update the VI pathname for steps that call the VIs.
Select Tools»Update VI Calls to run the Update VI Calls tool to update the Express VIs a LabVIEW step instance calls and to check or update a Standard VI call prototype. Use the Update VI Calls tool when you upgrade the LabVIEW version and you want to run the Express VIs a LabVIEW step instance calls in the new version of the LabVIEW Run-Time Engine. Also, use the Update VI Calls tool to update existing Express VI instances with any changes made to the Express VI. Refer to the NI TestStand Help for more information about the Update VI Calls tool.
6. Repeat step 1 to determine if duplicate VIs still exist.
Appendix A Using LabVIEW 8.x with TestStand
© National Instruments Corporation A-7 Using LabVIEW with TestStand
LabVIEW 8.2 Object-Oriented ProgrammingLabVIEW 8.2 includes support for Object-Oriented Programming. TestStand cannot directly call a VI that wires a LabVIEW object to its connector pane. However, you can wire the LabVIEW object to the Flatten to String function, return the data string to TestStand as a binary string, and store the flattened LabVIEW object in a string property or variable in TestStand.
You cannot access the properties or invoke the methods on the flattened LabVIEW string object in TestStand. To access the properties or invoke the methods on the LabVIEW object, you must pass the flattened LabVIEW object as a binary string to a VI and wire the string to the Unflatten From String function along with the object constant of the correct type to create the LabVIEW object.
© National Instruments Corporation B-1 Using LabVIEW with TestStand
BCalling LabVIEW VIs on Remote Systems
With TestStand, you can directly call LabVIEW VIs on remote computers, including computers that run the LabVIEW Development System or a LabVIEW executable and PXI controllers that run the LabVIEW Real-Time (RT) module. TestStand supports downloading VIs to systems that run the LabVIEW 7.1.1 RT module but does not support downloading VIs to systems that run the LabVIEW 8.0 or later RT module. To use the LabVIEW 8.0 or later RT module, you must call a VI on the local system and the local VI must then call the VI on the LabVIEW RT module, or you must manually download the VI to the LabVIEW RT module and call the VI by remote path or by name if the VI is already in memory.
Because TestStand uses the LabVIEW VI Server to run VIs remotely, the remote computers can use any operating system LabVIEW supports, including Linux, Solaris (LabVIEW 7.1.1 only), and Mac OS.
To call a VI remotely, you must configure the TestStand step to specify that the call occurs on a remote computer. In addition, you must configure the remote computer to allow TestStand to call VIs located on the computer. You must also configure the computer running TestStand to have network access to the remote computer running the LabVIEW VI Server.
Configuring a Step to Run RemotelyComplete the following steps to configure a step to run remotely. The VI must be present on the local computer so TestStand can configure and run the VI.
1. Click the Advanced Settings button on the LabVIEW Module tab to launch the LabVIEW Advanced Settings window, in which you can specify the name, or an expression that evaluates to the name, of the remote computer on which you want to run the VI.
2. If the remote computer is running the LabVIEW Development System or a LabVIEW executable, use the Remote VI Path text box to specify the path to the VI on the remote computer.
Appendix B Calling LabVIEW VIs on Remote Systems
Using LabVIEW with TestStand B-2 ni.com
If the remote computer is a PXI controller running LabVIEW 7.1.1 RT, TestStand downloads the VI to the remote computer or loads the VI using the Remote VI Path you specified in the LabVIEW Advanced Settings window. TestStand skips this step if the VI is already present in memory on the controller at the time TestStand loads the code module for the step.
If the remote computer is a PXI controller running LabVIEW 8.0 RT or later, TestStand does not download the VI to the remote computer. You can use the LabVIEW 8.0 Development System to download VIs to the PXI controller. You can also use the TestStand FTP Files step type to download files from and upload files to a remote system. Refer to the NI TestStand Help for more information about the FTP Files step type.
Note Refer to the Getting Started with the LabVIEW Real-Time Module manual in the <LabVIEW>\manuals directory for more information about downloading VIs to a PXI controller.
You can also use FTP to download VIs to the PXI controller. Use the LabVIEW Development System to create a Source Distribution with all the VIs to ensure that you include all the dependencies of the VIs to transfer to the hard drive of the LabVIEW RT target. Remove the checkmarks from the options to exclude VIs from vi.lib, instr.lib, and user.lib. Then, you can use FTP to transfer the source distribution output to the hard drive of the LabVIEW RT target.
After you download the VIs to the PXI controller running the LabVIEW 8.0 or greater RT module, you can use the Remote VI Path option in the LabVIEW Advanced Settings window to call the VIs.
Configuring the LabVIEW VI Server to Run VIs RemotelyThe LabVIEW Development System or built executable must be running on the remote computer, and you must configure the development system or built executable to allow VI calls through the TCP/IP protocol of the VI Server.
In LabVIEW 7.1.1, select Tools»Options and navigate to the VI Server: Configuration settings to enable the TCP/IP protocol and the VI calls options. You can also specify the TCP/IP port the server uses. The port you specify in LabVIEW must be the same port you specify in TestStand in the LabVIEW Advanced Settings window, which you can access from the LabVIEW Module tab.
Appendix B Calling LabVIEW VIs on Remote Systems
© National Instruments Corporation B-3 Using LabVIEW with TestStand
Use the VI Server: TCP/IP or Machine Access settings to allow specific computers access to the LabVIEW VI Server. You can also specify certain computers or entire domains that can call VIs on the server machine.
Use the VI Server: Exported VIs settings to configure the VIs you want to call through the LabVIEW VI Server. You must export all VIs you want to call remotely from TestStand. The default setting in LabVIEW is to export all VIs, indicated by an asterisk (*).
In LabVIEW 8.0 or later, you can make changes to the LabVIEW VI Server settings using LabVIEW Projects. You must enable TCP/IP Protocol and specify the Machine Access, User Access, and Exported VIs settings.
Refer to the LabVIEW Help for more information about configuring VI Server options.
Configuring the LabVIEW RT Server to Run VIsYou can configure an RT Server to run VIs remotely.
For a LabVIEW 7.1.1 RT Server, launch LabVIEW on the host computer, select the appropriate RT target computer, and select Tools»RT Target <IP Address/Host Name> Options. Configure the VI Server settings to specify which computers and VIs can run remotely.
In addition, you must also configure the RT target computer to allow access to the computer running TestStand if you want TestStand to download VIs to the RT target computer.
For a LabVIEW 8.0 or later RT Server, launch LabVIEW on the host computer, select the appropriate RT target in the project, and select Properties from the context menu to launch the Real-Time PXI Properties dialog box. Configure the VI Server settings to specify which computers and VIs can run remotely.
When you finish configuring the target computer, untarget the PXI controller before you attempt to use TestStand to call VIs on the target computer.
Refer to the Configuring Target Properties section of the Getting Started with the LabVIEW Real-Time Module manual in the <LabVIEW>\manuals directory for more information about configuring VI Server settings on a PXI controller.
Appendix B Calling LabVIEW VIs on Remote Systems
Using LabVIEW with TestStand B-4 ni.com
User Access to VI ServerTestStand does not support user-based VI security for executing VIs on remote systems. You must use the VI Server Machine access list to protect a VI server on a remote system.
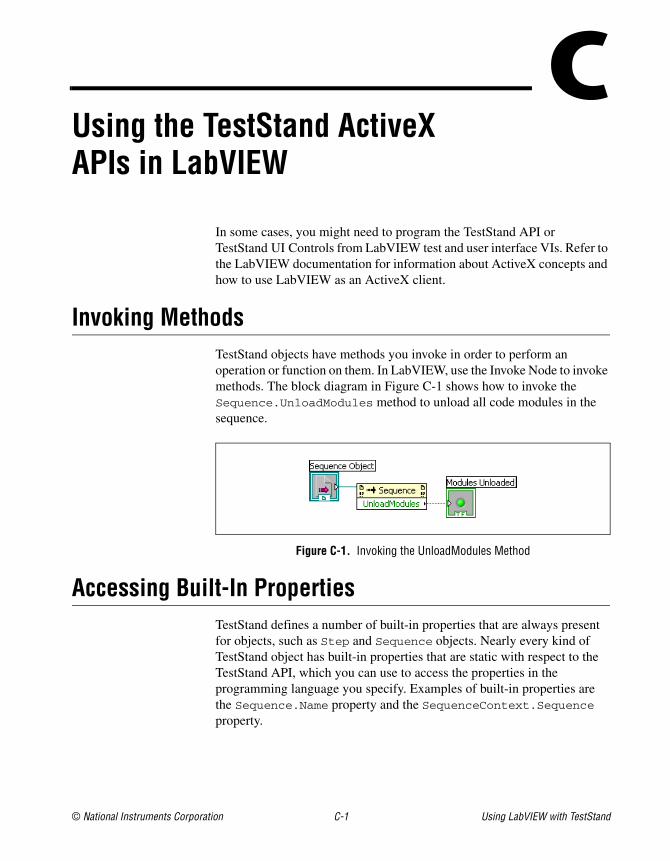
© National Instruments Corporation C-1 Using LabVIEW with TestStand
CUsing the TestStand ActiveX APIs in LabVIEW
In some cases, you might need to program the TestStand API or TestStand UI Controls from LabVIEW test and user interface VIs. Refer to the LabVIEW documentation for information about ActiveX concepts and how to use LabVIEW as an ActiveX client.
Invoking MethodsTestStand objects have methods you invoke in order to perform an operation or function on them. In LabVIEW, use the Invoke Node to invoke methods. The block diagram in Figure C-1 shows how to invoke the Sequence.UnloadModules method to unload all code modules in the sequence.
Figure C-1. Invoking the UnloadModules Method
Accessing Built-In Properties TestStand defines a number of built-in properties that are always present for objects, such as Step and Sequence objects. Nearly every kind of TestStand object has built-in properties that are static with respect to the TestStand API, which you can use to access the properties in the programming language you specify. Examples of built-in properties are the Sequence.Name property and the SequenceContext.Sequence property.

Appendix C Using the TestStand ActiveX APIs in LabVIEW
Using LabVIEW with TestStand C-2 ni.com
In LabVIEW, use the Property Node to access built-in properties. The block diagram in Figure C-2 shows how to obtain the value of the Sequence.Name property.
Figure C-2. Obtaining the Value of the Name Property from a Sequence Object
The block diagram in Figure C-3 shows how to obtain a reference to a step of a sequence that a Sequence object references.
Figure C-3. Obtaining a Reference to a Step of a Sequence that a Sequence Object References
Accessing Dynamic Properties In TestStand, you can define custom step properties, sequence local variables, sequence file global variables, and station global variables. Because the TestStand API is independent of the variables and custom step properties you define, these variables and properties are dynamic with respect to the TestStand API. The TestStand API provides the PropertyObject class so you can access dynamic properties and variables from within code modules. Instead of using defined constants, use lookup strings to identify specific properties by name.
To access dynamic properties of an object, you must first use the AsPropertyObject method of the object to convert the specific object reference to a PropertyObject reference. Then, use the PropertyObject interface to access custom properties of the object by using a lookup string to specify the specific custom property.
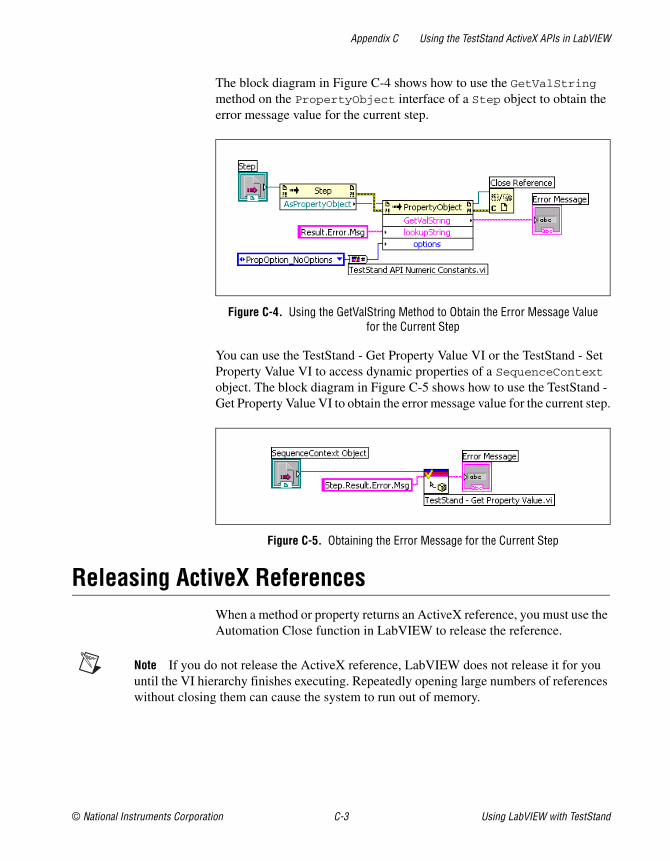
Appendix C Using the TestStand ActiveX APIs in LabVIEW
© National Instruments Corporation C-3 Using LabVIEW with TestStand
The block diagram in Figure C-4 shows how to use the GetValString method on the PropertyObject interface of a Step object to obtain the error message value for the current step.
Figure C-4. Using the GetValString Method to Obtain the Error Message Value for the Current Step
You can use the TestStand - Get Property Value VI or the TestStand - Set Property Value VI to access dynamic properties of a SequenceContext object. The block diagram in Figure C-5 shows how to use the TestStand - Get Property Value VI to obtain the error message value for the current step.
Figure C-5. Obtaining the Error Message for the Current Step
Releasing ActiveX References When a method or property returns an ActiveX reference, you must use the Automation Close function in LabVIEW to release the reference.
Note If you do not release the ActiveX reference, LabVIEW does not release it for you until the VI hierarchy finishes executing. Repeatedly opening large numbers of references without closing them can cause the system to run out of memory.
Appendix C Using the TestStand ActiveX APIs in LabVIEW
Using LabVIEW with TestStand C-4 ni.com
Using TestStand API Constants and EnumerationsSome TestStand API methods require string and numeric constant input arguments. The acceptable values of these arguments are organized into groups that correspond to different properties and methods. For example, the PropertyObject.SetValNumber method has an options input argument that accepts many different numeric constants.
It can be difficult to remember all the available string and numeric constants for the TestStand API properties and methods. To facilitate programming with the TestStand API within LabVIEW VIs, TestStand provides two enumerated constant VIs—the TestStand API String Constants VI and the TestStand API Numeric Constants VI.
Use the TestStand API String Constants VI to locate and select the string constant arguments you can use with TestStand API properties and methods. Use the TestStand API Numeric Constants VI to locate and select the various numeric constant arguments you can use with TestStand API properties and methods. Use both of these VIs in conjunction with the constants that are associated with the TestStand API methods and properties. Refer to the NI TestStand Help for more information about using constants with the TestStand methods and properties.
Use the OR function in LabVIEW to combine more than one of the numeric constants. If you need to combine more than two of the constants, use the Compound Arithmetic function and set the mode to OR.
The block diagram in Figure C-4 shows how to use the TestStand API Numeric Constants VI to obtain the value of the PropOptions_NoOptions constant.
Some methods in the TestStand API require enumeration input arguments. For these methods, right-click the input parameter on the Invoke Node in LabVIEW, select Create»Constant from the context menu to create a LabVIEW ring constant, and select the value you want in the resulting constant.
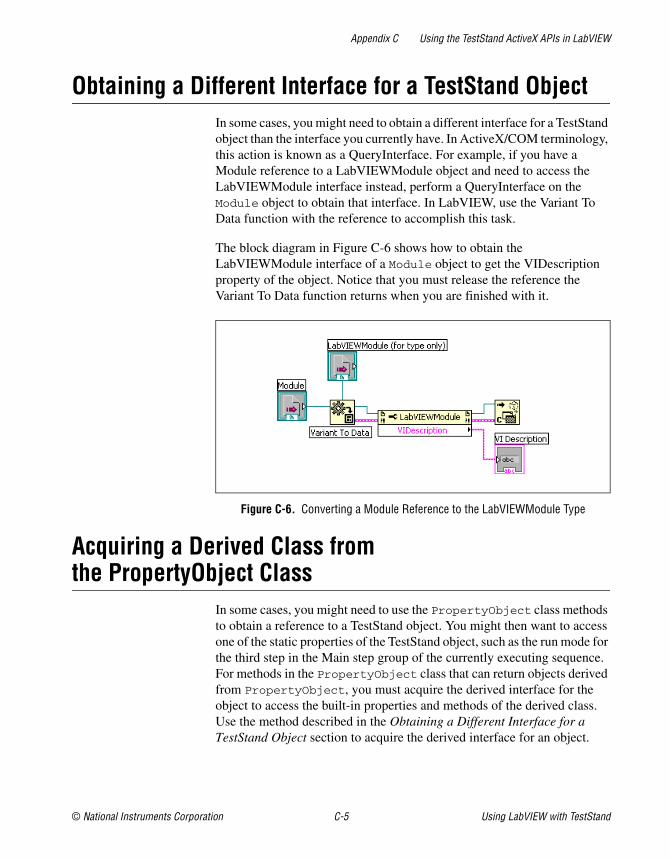
Appendix C Using the TestStand ActiveX APIs in LabVIEW
© National Instruments Corporation C-5 Using LabVIEW with TestStand
Obtaining a Different Interface for a TestStand ObjectIn some cases, you might need to obtain a different interface for a TestStand object than the interface you currently have. In ActiveX/COM terminology, this action is known as a QueryInterface. For example, if you have a Module reference to a LabVIEWModule object and need to access the LabVIEWModule interface instead, perform a QueryInterface on the Module object to obtain that interface. In LabVIEW, use the Variant To Data function with the reference to accomplish this task.
The block diagram in Figure C-6 shows how to obtain the LabVIEWModule interface of a Module object to get the VIDescription property of the object. Notice that you must release the reference the Variant To Data function returns when you are finished with it.
Figure C-6. Converting a Module Reference to the LabVIEWModule Type
Acquiring a Derived Class from the PropertyObject Class
In some cases, you might need to use the PropertyObject class methods to obtain a reference to a TestStand object. You might then want to access one of the static properties of the TestStand object, such as the run mode for the third step in the Main step group of the currently executing sequence. For methods in the PropertyObject class that can return objects derived from PropertyObject, you must acquire the derived interface for the object to access the built-in properties and methods of the derived class. Use the method described in the Obtaining a Different Interface for a TestStand Object section to acquire the derived interface for an object.
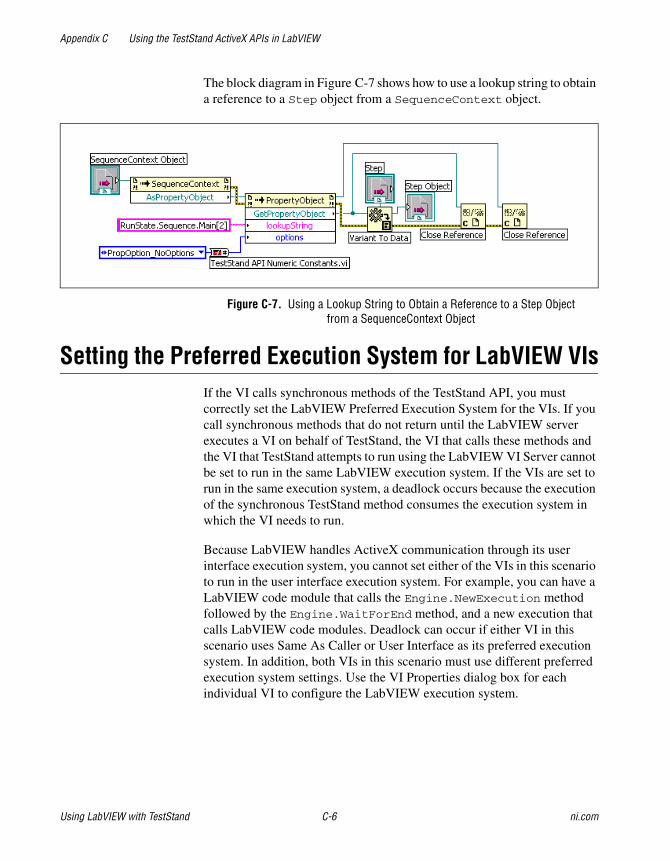
Appendix C Using the TestStand ActiveX APIs in LabVIEW
Using LabVIEW with TestStand C-6 ni.com
The block diagram in Figure C-7 shows how to use a lookup string to obtain a reference to a Step object from a SequenceContext object.
Figure C-7. Using a Lookup String to Obtain a Reference to a Step Object from a SequenceContext Object
Setting the Preferred Execution System for LabVIEW VIsIf the VI calls synchronous methods of the TestStand API, you must correctly set the LabVIEW Preferred Execution System for the VIs. If you call synchronous methods that do not return until the LabVIEW server executes a VI on behalf of TestStand, the VI that calls these methods and the VI that TestStand attempts to run using the LabVIEW VI Server cannot be set to run in the same LabVIEW execution system. If the VIs are set to run in the same execution system, a deadlock occurs because the execution of the synchronous TestStand method consumes the execution system in which the VI needs to run.
Because LabVIEW handles ActiveX communication through its user interface execution system, you cannot set either of the VIs in this scenario to run in the user interface execution system. For example, you can have a LabVIEW code module that calls the Engine.NewExecution method followed by the Engine.WaitForEnd method, and a new execution that calls LabVIEW code modules. Deadlock can occur if either VI in this scenario uses Same As Caller or User Interface as its preferred execution system. In addition, both VIs in this scenario must use different preferred execution system settings. Use the VI Properties dialog box for each individual VI to configure the LabVIEW execution system.
Appendix C Using the TestStand ActiveX APIs in LabVIEW
© National Instruments Corporation C-7 Using LabVIEW with TestStand
Handling EventsTestStand controls can generate events to notify the application of user input and application events, such as the completion of an execution. To handle events in LabVIEW, use the Register Event Callback function to register a callback VI and then use the Unregister for Events function to close the callback before you close the application.
Refer to Chapter 6, Creating Custom User Interfaces in LabVIEW, for more information about handling events that TestStand UI Controls generate.
© National Instruments Corporation D-1 Using LabVIEW with TestStand
DCalling Legacy LabVIEW VIs
In versions of TestStand earlier than 3.0, you could call VIs only with a specific set of controls and indicators. Using TestStand 3.0 or later, you can call VIs with a wide variety of connector panes, including VIs with legacy configurations.
Format of Legacy VIsAll legacy-style VIs must include the Test Data cluster and error out cluster indicators. The Input Buffer, Invocation Info, and Sequence Context controls are optional inputs to legacy VIs, which can contain any combination of these controls.
You must assign each control and indicator of the test VI to a terminal on the connector pane of the test VI. If these assignments do not exist, TestStand returns an error when it attempts to call the test VI. TestStand does not require that you use a particular connector pane pattern, and it does not require that you assign the controls and indicators to specific terminals.
Although you usually create new VIs using the LabVIEW Module tab for steps that use the LabVIEW Adapter, TestStand can also create legacy-style VIs. Refer to Chapter 5, Configuring the LabVIEW Adapter, for information about configuring the LabVIEW Adapter to create new legacy-style VIs.
You can use the following methods to pass data between the code module and TestStand.
• Use the Test Data cluster
• Use the sequence context ActiveX reference, which allows you to call the TestStand ActiveX API functions to set the variables used to store the results of the test, such as Step.Result.PassFail
Note The values the sequence context ActiveX reference sets take precedence over the values the Test Data cluster sets. If you use both methods to set the value of the same variable, TestStand recognizes the values the sequence context ActiveX reference sets and ignores the values the Test Data cluster sets. You can use the sequence context ActiveX reference and the Test Data cluster together in the code module if you do not try to set the
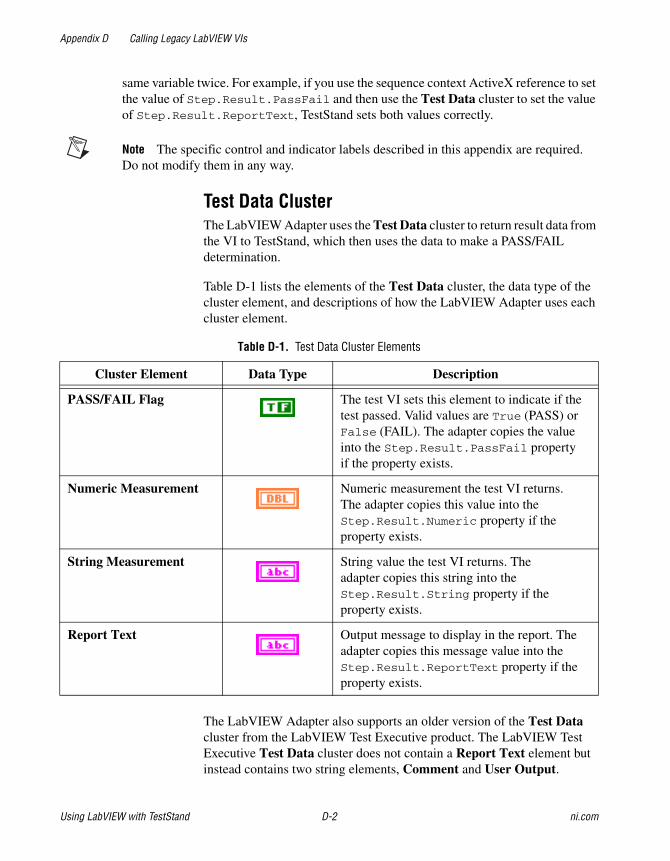
Appendix D Calling Legacy LabVIEW VIs
Using LabVIEW with TestStand D-2 ni.com
same variable twice. For example, if you use the sequence context ActiveX reference to set the value of Step.Result.PassFail and then use the Test Data cluster to set the value of Step.Result.ReportText, TestStand sets both values correctly.
Note The specific control and indicator labels described in this appendix are required. Do not modify them in any way.
Test Data ClusterThe LabVIEW Adapter uses the Test Data cluster to return result data from the VI to TestStand, which then uses the data to make a PASS/FAIL determination.
Table D-1 lists the elements of the Test Data cluster, the data type of the cluster element, and descriptions of how the LabVIEW Adapter uses each cluster element.
The LabVIEW Adapter also supports an older version of the Test Data cluster from the LabVIEW Test Executive product. The LabVIEW Test Executive Test Data cluster does not contain a Report Text element but instead contains two string elements, Comment and User Output.
Table D-1. Test Data Cluster Elements
Cluster Element Data Type Description
PASS/FAIL Flag The test VI sets this element to indicate if the test passed. Valid values are True (PASS) or False (FAIL). The adapter copies the value into the Step.Result.PassFail property if the property exists.
Numeric Measurement Numeric measurement the test VI returns. The adapter copies this value into the Step.Result.Numeric property if the property exists.
String Measurement String value the test VI returns. The adapter copies this string into the Step.Result.String property if the property exists.
Report Text Output message to display in the report. The adapter copies this message value into the Step.Result.ReportText property if the property exists.
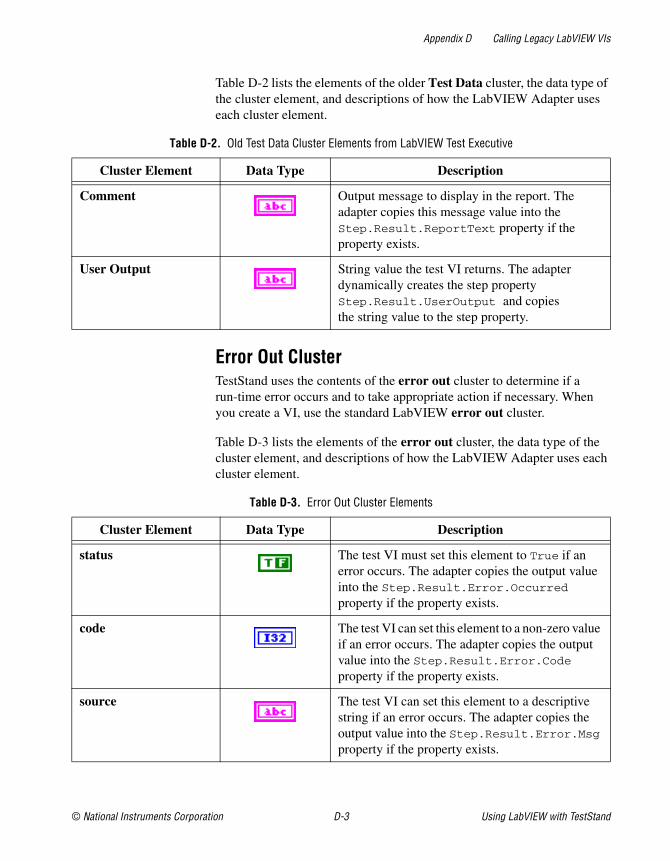
Appendix D Calling Legacy LabVIEW VIs
© National Instruments Corporation D-3 Using LabVIEW with TestStand
Table D-2 lists the elements of the older Test Data cluster, the data type of the cluster element, and descriptions of how the LabVIEW Adapter uses each cluster element.
Error Out ClusterTestStand uses the contents of the error out cluster to determine if a run-time error occurs and to take appropriate action if necessary. When you create a VI, use the standard LabVIEW error out cluster.
Table D-3 lists the elements of the error out cluster, the data type of the cluster element, and descriptions of how the LabVIEW Adapter uses each cluster element.
Table D-2. Old Test Data Cluster Elements from LabVIEW Test Executive
Cluster Element Data Type Description
Comment Output message to display in the report. The adapter copies this message value into the Step.Result.ReportText property if the property exists.
User Output String value the test VI returns. The adapter dynamically creates the step property Step.Result.UserOutput and copies the string value to the step property.
Table D-3. Error Out Cluster Elements
Cluster Element Data Type Description
status The test VI must set this element to True if an error occurs. The adapter copies the output value into the Step.Result.Error.Occurred property if the property exists.
code The test VI can set this element to a non-zero value if an error occurs. The adapter copies the output value into the Step.Result.Error.Code property if the property exists.
source The test VI can set this element to a descriptive string if an error occurs. The adapter copies the output value into the Step.Result.Error.Msg property if the property exists.
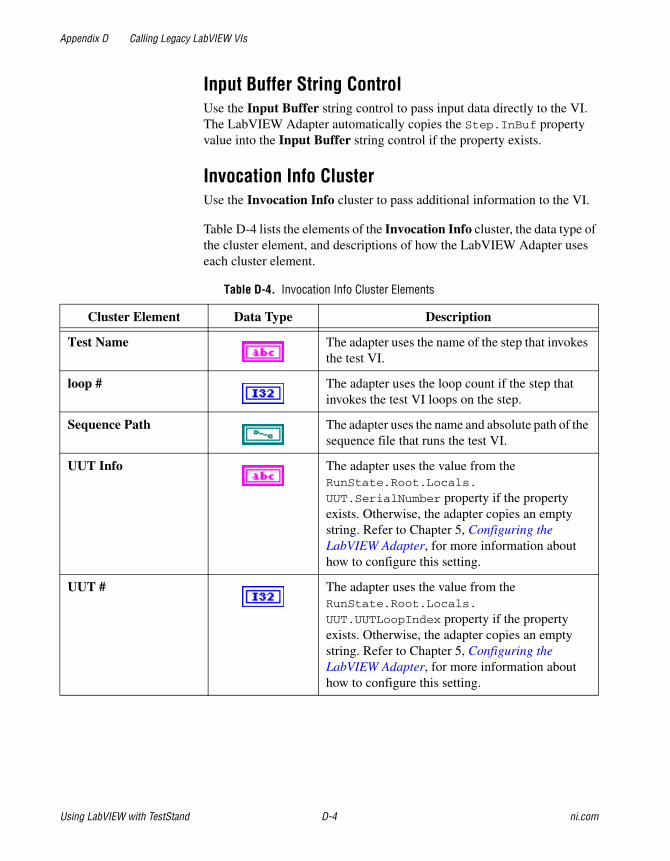
Appendix D Calling Legacy LabVIEW VIs
Using LabVIEW with TestStand D-4 ni.com
Input Buffer String ControlUse the Input Buffer string control to pass input data directly to the VI. The LabVIEW Adapter automatically copies the Step.InBuf property value into the Input Buffer string control if the property exists.
Invocation Info ClusterUse the Invocation Info cluster to pass additional information to the VI.
Table D-4 lists the elements of the Invocation Info cluster, the data type of the cluster element, and descriptions of how the LabVIEW Adapter uses each cluster element.
Table D-4. Invocation Info Cluster Elements
Cluster Element Data Type Description
Test Name The adapter uses the name of the step that invokes the test VI.
loop # The adapter uses the loop count if the step that invokes the test VI loops on the step.
Sequence Path The adapter uses the name and absolute path of the sequence file that runs the test VI.
UUT Info The adapter uses the value from the RunState.Root.Locals.
UUT.SerialNumber property if the property exists. Otherwise, the adapter copies an empty string. Refer to Chapter 5, Configuring the LabVIEW Adapter, for more information about how to configure this setting.
UUT # The adapter uses the value from the RunState.Root.Locals.
UUT.UUTLoopIndex property if the property exists. Otherwise, the adapter copies an empty string. Refer to Chapter 5, Configuring the LabVIEW Adapter, for more information about how to configure this setting.
Appendix D Calling Legacy LabVIEW VIs
© National Instruments Corporation D-5 Using LabVIEW with TestStand
Sequence Context ControlUse the Sequence Context control to obtain a reference to the TestStand SequenceContext object. You can use the sequence context to access all the objects, variables, and properties in the execution. Refer to the NI TestStand Help for more information about using the sequence context from a VI.
© National Instruments Corporation E-1 Using LabVIEW with TestStand
ETechnical Support and Professional Services
Visit the following sections of the award-winning National Instruments Web site at ni.com for technical support and professional services:
• Support—Technical support resources at ni.com/support include the following:
– Self-Help Technical Resources—For answers and solutions, visit ni.com/support for software drivers and updates, a searchable KnowledgeBase, product manuals, step-by-step troubleshooting wizards, thousands of example programs, tutorials, application notes, instrument drivers, and so on. Registered users also receive access to the NI Discussion Forums at ni.com/forums. NI Applications Engineers make sure every question submitted online receives an answer.
– Standard Service Program Membership—This program entitles members to direct access to NI Applications Engineers via phone and email for one-to-one technical support as well as exclusive access to on demand training modules via the Services Resource Center. NI offers complementary membership for a full year after purchase, after which you may renew to continue your benefits.
For information about other technical support options in your area, visit ni.com/services, or contact your local office at ni.com/contact.
• Training and Certification—Visit ni.com/training for self-paced training, eLearning virtual classrooms, interactive CDs, and Certification program information. You also can register for instructor-led, hands-on courses at locations around the world.
• System Integration—If you have time constraints, limited in-house technical resources, or other project challenges, National Instruments Alliance Partner members can help. To learn more, call your local NI office or visit ni.com/alliance.
Appendix E Technical Support and Professional Services
Using LabVIEW with TestStand E-2 ni.com
If you searched ni.com and could not find the answers you need, contact your local office or NI corporate headquarters. Phone numbers for our worldwide offices are listed at the front of this manual. You also can visit the Worldwide Offices section of ni.com/niglobal to access the branch office Web sites, which provide up-to-date contact information, support phone numbers, email addresses, and current events.
© National Instruments Corporation I-1 Using LabVIEW with TestStand
Index
AActiveX
releasing ActiveX references, C-3using the TestStand ActiveX APIs, C-1
adapter. See LabVIEW Adapteraliases file, using, A-3
Ccalling VIs
legacy VIs, D-1on remote systems, B-1with cluster parameters, 4-5with string parameters, 4-4
clustersCluster Passing tab, 4-6Error Out, D-3Invocation Info, D-4LabVIEW, 4-1, 4-6specifying cluster elements
individually, 4-5Test Data, D-2
code modules, 1-1Code Template Policy
Allow Legacy and New Templates option, 5-5
Allow Only Legacy Templates option, 5-5Allow Only New Templates option, 5-5
Conditional Disable Structures, A-4configuring
LabVIEW Adapter, 5-1LabVIEW RT Server, B-3LabVIEW VI Server (tutorial), B-2new steps with LabVIEW Adapter
(tutorial), 2-3
per-step configuration of LabVIEW Adapter, 5-4
remote steps (tutorial), B-1TestStand UI Controls, 6-3
controlsInput Buffer String control, D-4Sequence Context control, D-5TestStand UI controls, 6-3
conventions used in the manual, ivCreate Custom Data Type From Cluster
dialog box, 4-7custom
step types, 1-2user interfaces, 1-2
creating, 6-1
Ddata types
64-bit integer, A-4creating a custom data type, 4-7TestStand data types
built-in, 4-1creating from LabVIEW clusters, 4-8
using LabVIEW data types with TestStand, 4-1
debugging VIs (tutorial), 3-3deploying TestStand
building a deployment with LabVIEW 8.0, A-4
Update VI Calls tool, A-6diagnostic tools (NI resources), E-1dialog box
Create Custom Data Type from Cluster, 4-7
LabVIEW Adapter Configuration, 5-1Code Template Policy, 5-5
making modal to TestStand, 6-9
Index
Using LabVIEW with TestStand I-2 ni.com
directory structureread-only files, copying to modify, 6-2<TestStand> directory, 6-2<TestStand Public> directory, 2-3, 6-2
documentationconventions used in the manual, iv
drivers (NI resources), E-1
Eediting
sequences, 6-4VIs (tutorial), 3-2
Error Out cluster, D-3event handling, 6-4, C-7examples (NI resources), E-1execution
checking for stopped executions, 6-9reserving loaded VIs, 5-4setting preferred execution system for
LabVIEW VIs, C-6
Hhandling
events, 6-4, C-7menu events, 6-7
IInput Buffer string control, D-4instrument drivers (NI resources), E-1interfaces for TestStand objects, C-5Invocation Info cluster, D-4
KKnowledgeBase, E-1
LLabVIEW
Adapter. See LabVIEW Adaptercluster, 4-6configuring the LabVIEW Adapter, 5-1creating custom user interfaces, 6-1deploying variables, A-2Module tab, 2-2, 4-7object-oriented programming, A-7preferred execution system, C-6project libraries, A-2remote execution, A-4required settings, 2-1RT Server, configuring, B-3server, selecting, 5-1TestStand ActiveX APIs, C-1using LabVIEW 8.0, A-1VI Server, configuring (tutorial), B-2VIs. See VIs
LabVIEW 8.0, A-1aliases file, A-3building a TestStand deployment
with, A-4conditional disable structures, A-4network-published shared variables, A-2
aliases file, A-3deploying, A-2
project libraries, A-2projects, A-1real-time module incompatibility, A-1symbols, A-4XControls, A-4
LabVIEW 8.x and TestStand, using, A-1LabVIEW Adapter, 1-2
configuring, 5-1creating and configuring new steps
(tutorial), 2-3LabVIEW Adapter Configuration dialog
boxCode Template Policy, 5-5
Index
© National Instruments Corporation I-3 Using LabVIEW with TestStand
per-step configuration, 5-4setting preferred execution system, C-6
LabVIEW Adapter Configuration dialog box, 5-1
LabVIEW Module tab, 2-2, 4-7source code and help buttons, 2-3VI Context Help Image, 2-3VI Parameter Table, 2-2, 4-4
LabVIEW Utility Deploy Library step type, A-2
legacy VIscalling, D-1format, D-1settings, 5-6
localization, 6-8
Mmenu bars, 6-7menu event handling, 6-7methods, invoking, C-1Modified Types Warning dialog box, 4-9
NNational Instruments support and
services, E-1NI-DAQmx, A-3
Oobject-oriented programming, A-7
Pprogramming examples (NI resources), E-1project libraries, A-2properties, accessing
built-in, C-1dynamic, C-2
PropertyObject classacquiring a derived class, C-5
RRegister Event Callback function, 6-4remote execution, A-4remote systems
calling LabVIEW VIs, B-1configuring a LabVIEW
VI Server (tutorial), B-2configuring a LabVIEW RT Server, B-3configuring a step (tutorial), B-1
SSequence Context control, D-5sequence editing, 6-4software (NI resources), E-1source code and help buttons, 2-3step types, custom, 1-2string parameters, calling VIs, 4-4symbols, A-4
Ttechnical support (NI resources), E-1Test Data cluster, D-2TestStand
ActiveX APIs, C-1constants and enumerations, C-4customizing with LabVIEW, 1-1passing container variables to
LabVIEW, 4-6<TestStand> directory, 6-2<TestStand Public> directory, 2-3, 6-2using LabVIEW data types, 4-1using with LabVIEW 8.x, A-1VIs and functions, 6-1
Index
Using LabVIEW with TestStand I-4 ni.com
VIs, using with TestStandcreating new (tutorial), 3-1debugging (tutorial), 3-3editing (tutorial), 3-2
TestStand User Interface (UI) Controlsconfiguration, 6-3creating custom user interfaces, 6-2editing sequences, 6-4handling events, 6-4introduction, 6-1localization, 6-8main event loop, 6-6menu bars, 6-7menu event handling, 6-7setting the preferred execution
system, 6-3TestStand
shutting down, 6-6starting, 6-6
TestStand Utility Functions Library, 6-1training and certification (NI resources), E-1troubleshooting (NI resources), E-1
UUpdate VI Calls tool, A-6user interfaces
custom, 1-2, 6-1running, 6-10user interface utilities, 6-9
Vvariables
deploying, A-2passing container variables to
LabVIEW, 4-6VI Context Help Image, 2-3VI Parameter Table, 2-2, 4-4VI Server
configuring (tutorial), B-2user access, B-4
VIscalling from TestStand, 2-1calling on remote systems, B-1configuring LabVIEW Adapter to
run, 2-1creating new from TestStand
(tutorial), 3-1debugging in TestStand (tutorial), 3-3editing in TestStand (tutorial), 3-2
WWeb resources (NI resources), E-1
XXControls, A-4