Embed Size (px)
Citation preview

ArcGIS® 9
ArcInfo™ Workstation System Administrator’s Guide—Sun™ Solaris™ 2

Copyright © 1986–2004 ESRIAll rights reserved.Printed in the United States of America.
The information contained in this document is the exclusive property of ESRI. This work is protected under United Statescopyright law and the copyright laws of the given countries of origin and applicable international laws, treaties, and/orconventions. No part of this work may be reproduced or transmitted in any form or by any means, electronic or mechanical,including photocopying and recording, or by any information storage or retrieval system, except as expressly permitted inwriting by ESRI. All requests should be sent to Attention: Contracts Manager, ESRI, 380 New York Street, Redlands, CA92373-8100, USA.
The information contained in this document is subject to change without notice.
U.S. GOVERNMENT RESTRICTED/LIMITED RIGHTSAny software, documentation, and/or data delivered hereunder is subject to the terms of the License Agreement. In no eventshall the U.S. Government acquire greater than RESTRICTED/LIMITED RIGHTS. At a minimum, use, duplication, ordisclosure by the U.S. Government is subject to restrictions as set forth in FAR §52.227-14 Alternates I, II, and III (JUN1987); FAR §52.227-19 (JUN 1987) and/or FAR §12.211/12.212 (Commercial Technical Data/Computer Software); andDFARS §252.227-7015 (NOV 1995) (Technical Data) and/or DFARS §227.7202 (Computer Software), as applicable.Contractor/Manufacturer is ESRI, 380 New York Street, Redlands, CA 92373-8100, USA.
ESRI, ArcInfo, ArcGIS, ArcStorm, ArcEdit, ArcDoc, AML, ArcScan, ArcCOGO, ArcTIN, ArcNetwork, ArcGrid, ArcPlot,ArcPress, ArcExpress, Database Integrator, FormEdit, ArcTools, ArcInfo Librarian, and www.esri.com are trademarks,registered trademarks, or service marks of ESRI in the United States, the European Community, or certain other jurisdictions.
The names of other companies and products herein are trademarks or registered trademarks of their respective trademarkowners.

iii
Contents
Chapter 1—The ArcInfo directory structure 1 ArcInfo directories 1
Chapter 2—Setting up and customizing the ArcInfo environment 15 Xenv directory 15 Sun environment 16 Configuring swap space 16
How much swap space to configure? 16 Login prompt on serial ports 19 tmp directory 20 Running ArcInfo in 24-bit mode 21 Setting shell variables 21
The umask command 21 The limit coredumpsize command 22 The history variable 22
Setting user-defined environment variables 22 Environment variables for ArcInfo windows 22 Environment variables for ArcInfo symbology 23 Environment variables for system integration 24 Environment variables for the online documentation, ArcDoc 30
Modifying widget field types 30
Chapter 3—Setting up and customizing the Plot System 33 Verifying the ArcInfo installation 34 Verifying the plotter connection 34 Setting up plotter definitions 34
Local plotter 35 Remote plotter 35
Defining a filter 36 Creating the plot queue file 39
Destination 39 Mode 40 Queue 41 AML 41
Setting up the printer queue for ArcPress 42 Device name 42

iv ArcInfo Workstation System Administrator’s Guide
Queue name 42 Printing mode 43
Verifying the Plot System 43
Appendix—Troubleshooting DBMS connection problems 45 Error messages associated with DBMS 45
Problems that return DBMS error messages 45 ArcInfo error messages 46
1
C H A P T E R 1
The ArcInfo directory structure
ArcInfo directories The installation directory for ArcInfo™ is composed of 33 subdirectories for UNIX® and 32 subdirectories for Windows NT®/Windows® 2000/Windows XP (hereafter collectively referred to as Windows), each containing further subdirectories, text files, executables, and INFO™ files.
Most of this structure will be restored when installing ArcInfo and the software extensions (ArcExpress™, ArcScan™, ArcStorm™, ArcCOGO™, ArcGrid™, ArcNetwork™, and ArcTIN™). The directories arcstorm, arctools, odetools, and scan require the installation of ArcStorm, ArcTools™, the Open Development Environment (ODE), and ArcScan, respectively. The contents of these directories will vary depending on the extensions and executables you decide to install.
2 ArcInfo Workstation System Administrator’s Guide
Xenv (UNIX only)
Contains sample files that can be copied to your home directory, including cshrc, login, and other system-specific files that set up the window manager and X resources.
Refer to System administration > System setup > Setting up and customizing the ArcInfo environment in the online documentation for more information on setting parameters for ArcInfo on UNIX platforms.
aiclient
Contains the source code, object files, and makefile for a sample client program for ArcInfo. The main program is in arcclient.c. This capability allows you to build your own C program and execute ArcInfo commands by connecting to an ArcInfo server process and passing requests to that process.
aiserver
Contains the shell for writing a server and has it accessible from the ArcInfo ARC Macro Language (AML™)–interapplication communication (IAC) interface. This functionality makes it possible to easily access C functions from AML.
arcstorm
Contains all database definition files created with ArcStorm. It is created when the ArcStorm software is loaded. ArcStorm commands that directly affect this directory are ‘mkdb’ and ‘rmdb’.
arctools
Contains subdirectories of toolsets required to run ArcTools. This directory is created when ArcTools is loaded. Tools for each ArcInfo module under ArcTools are located in a module-specific directory. Refer to Customizing ArcInfo > Programming ArcTools in the online documentation for more details.
atool
Contains ATOOL commands. ATOOL commands are AML commands that can be executed from the command line the same as ArcInfo commands. ATOOL commands accept command line arguments and appear in the list of commands for each module. ATOOL commands are specific to ArcInfo modules and must be located in a module-specific directory. For example, ARC ATOOL commands are located under the $ARCHOME/atool/arc directory.
Chapter 1 The ArcInfo directory structure 3
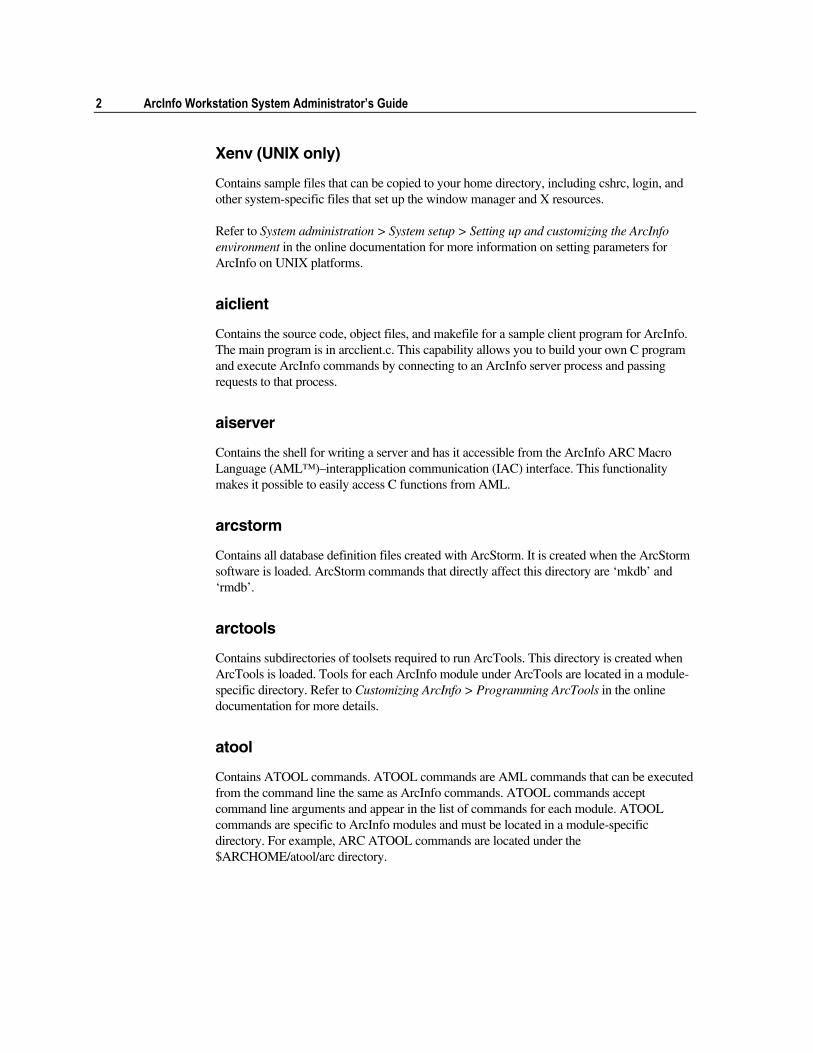
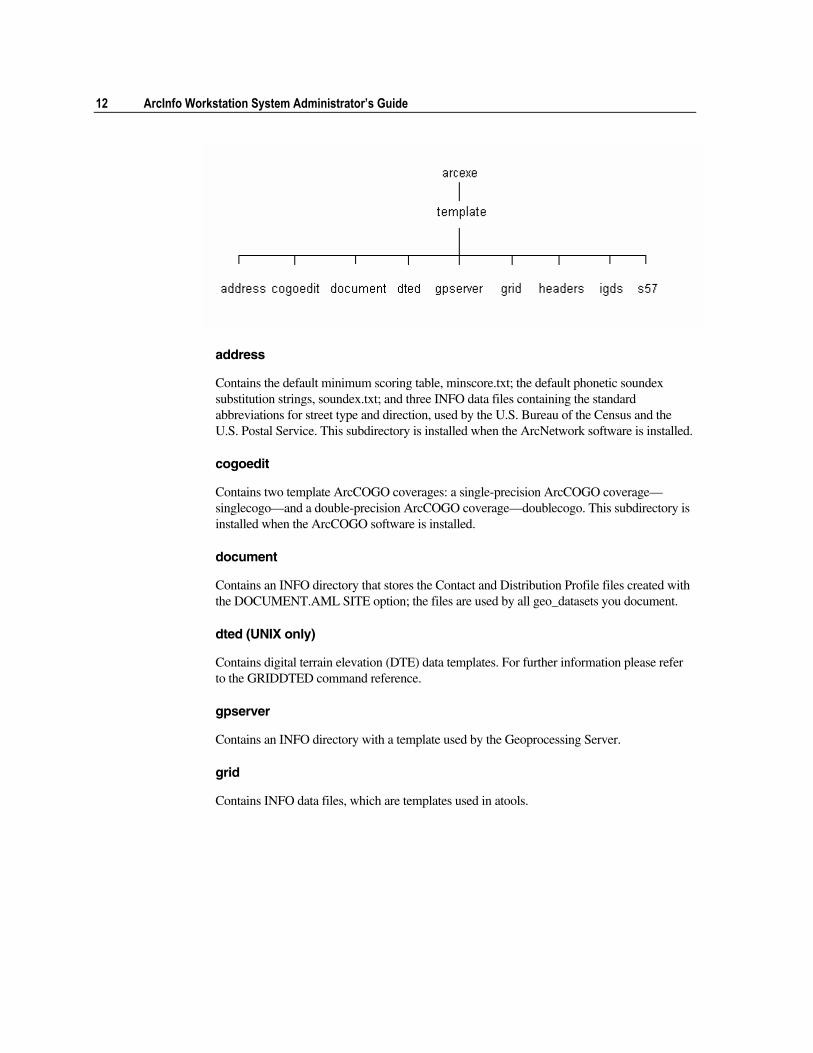
The atool directory has the following structure:
The arc, arcedit, arcplot, grid, and librarian directories contain ATOOL commands specific to each module. Any AML script located in one of these directories will appear on the list of commands for that module (e.g., LIBRARIAN: COMMANDS). The grid directory is installed if the ArcGrid software is installed. ATOOL commands for ArcCOGO and ArcTIN are installed if these modules are installed. The ArcCOGO and ArcTIN ATOOL commands are restored under the directory of the module in which they appear: ArcCOGO ATOOL commands under the arc and arcedit directories and ArcTIN ATOOL commands under the arc and arcplot directories.
The schemaedit and tables directories contain help commands for their specific modules.
Many of the ATOOL commands require supporting AML scripts and menus. The support directory contains AML scripts and menus used by the various ATOOL commands. The support directory is organized as follows:
aesupport, arcsupport, cogomenu, gridsupport, and tinsupport contain supporting AML scripts, menus, and icons for the ArcEdit™, Arc, ArcCOGO, ArcGrid, and ArcTIN ATOOL commands, respectively. The bfsupport directory contains all AML scripts and menus used by the BUGFORM ATOOL in Arc. The fdsupport directory contains files used by the ArcCOGO fielddata collectors. The plotsupport directory contains AML scripts and menus needed by the PLOT command. The symbols directory contains the supporting AML scripts, menus, and icons for the symbol editors.
4 ArcInfo Workstation System Administrator’s Guide
You can add your own ATOOL commands to the $ARCHOME/atool directories. Organize the AML scripts, menus, and other system files needed by the ATOOL command provided with this release. The actual command AML should be added under the directory from which it will be available. Any supporting AML scripts, menus, and other files should be added to the directories under $ARCHOME/atool/support.
bin
Contains all of the ArcInfo executables as well as the INFO executable. The contents of the $ARCHOME/bin directory will vary because the ArcInfo installation procedure lets you selectively install software and extensions. Refer to the installation guide for ArcInfo for more information on the installation procedure.
cgm
Contains the default fonts for the Computer Graphics Metafile (CGM) interpreter.
database
Contains default database definition files used by Database Integrator™. The database definition files contain parameters that the CONNECT command needs to connect to the appropriate database in the database management system (DBMS). Default database definition files for a DBMS are restored when the Database Integrator for this DBMS is installed. Database definition files have the following naming convention:
<database_name>.dbs
Refer to Working with tables > Managing Tabular Data in the online documentation for further details on Database Integrator and database definition files.
datum
Contains files used by the PROJECT command for the NADCON transformation. These files contain reference information essential to the PROJECT command.
digform
Contains digitizer format files that allow ArcInfo to interface with digitizer devices. These files describe the data formats sent by the digitizer, the number of cursor buttons, and the digitizer size. If the $ARCHOME/digform directory does not contain a digitizer format file for your digitizer, you must create one.
Chapter 1 The ArcInfo directory structure 5
The naming convention for digitizer format files is:
dig_<digitizer_name>
The <digitizer_name> is an alphanumeric name used in the ArcInfo DIGITIZER command to reference the digitizer.
Refer to System administration > Interfacing graphics devices in the online documentation for further instructions on how to create a digitizer format file.
documentation
Contains the user guides for ArcInfo. Directories listed will depend on the products you have installed. Those you may see will include the Installation Guide, License Manager’s Reference Guide, and the ArcInfo Workstation System Administrator’s Guide.
In each directory you will find the user guide in PDF format. You will need Adobe® Acrobat® Reader to open them.
etc
Contains help files, customizable parameter files, and customizable drivers for the ArcPress™ software. Each of these subdirectories contains descriptions for site-specific printers or devices:
userenv.dat contains user-customized environment setting files. fonts contains additional PostScript® fonts.
fonts
Contains several typeset-quality typefaces. Six families of fonts are distributed with the release: Univers Medium, Times, Triumvirate, Palacio, Omega, and Courier. Additional typefaces can be licensed and added to the $ARCHOME/fonts directory for customization purposes. A loading executable is provided to help you load new typefaces.
Refer to Cartography > Map display and query using ArcPlot > Fonts provided with ArcInfo in the online documentation for additional information on how to use the typeset-quality typefaces and how to load new typefaces.
gpserver
Contains the support files and directories for the Geoprocessing Server. The files are rqmgr.defs and services.rqm. The aml directory holds the AML scripts created when you send a job to the server. The tmp_results directory holds the results of each job.
6 ArcInfo Workstation System Administrator’s Guide
gridiosdk
Contains sample code, header files and instructions on the use of the ESRI® IO Libraries for the purposes of reading and writing ESRI GRID raster datasets. File descriptions are included in the directory ReadMe file.
help
UNIX platforms contain the formedit subdirectory, composed of 10 help files utilized by FormEdit™ software.
Windows–Intel® platforms contain the help system and a java subdirectory. The java subdirectory contains Java™ help files.
igl63exe
Contains the IGL font file, iglfnt; the IGL error file, iglerr; and special font files, such as fnt021 and fnt023. It is possible to load other IGL font files into this directory for customization purposes.
include
Contains header files used by the Open Development Environment application programming interface (API). These files define the function prototypes and structure definitions for the shared libraries.
infosys
Contains the help files and the required environment for INFO. The INFO executable, distributed with ArcInfo, is located under the $ARCHOME/bin directory.
lib
Contains the shared libraries required to run ArcInfo on certain platforms. On those platforms that do not support shared libraries, this directory will either not exist or be empty.
Refer to the installation guide for ArcInfo for more details on how to set up your environment to run ArcInfo software.
locale
Contains subdirectories for several languages. Each subdirectory may contain codeset files, message translation files, help files, and a fontindex. The FONTINDEX is an ASCII file that
Chapter 1 The ArcInfo directory structure 7
defines the location of fonts available to ArcInfo. ArcInfo has a default set of fonts listed in this file. This file can be customized by adding any names of new fonts installed. The name of the font can be specified by its font number or font name. The FONTINDEX file indexes font numbers to actual names. When the system language variable LC_LANG is set, ArcInfo will look in the appropriate $ARCHOME/locale/<language> directory for language-dependent files.
For information on the FONTINDEX file, refer to Cartography > Map display and query using ArcPlot > Fonts provided with ArcInfo > Updating the fontindex file.
Also refer to System administration > National language support in the online documentation for additional information.
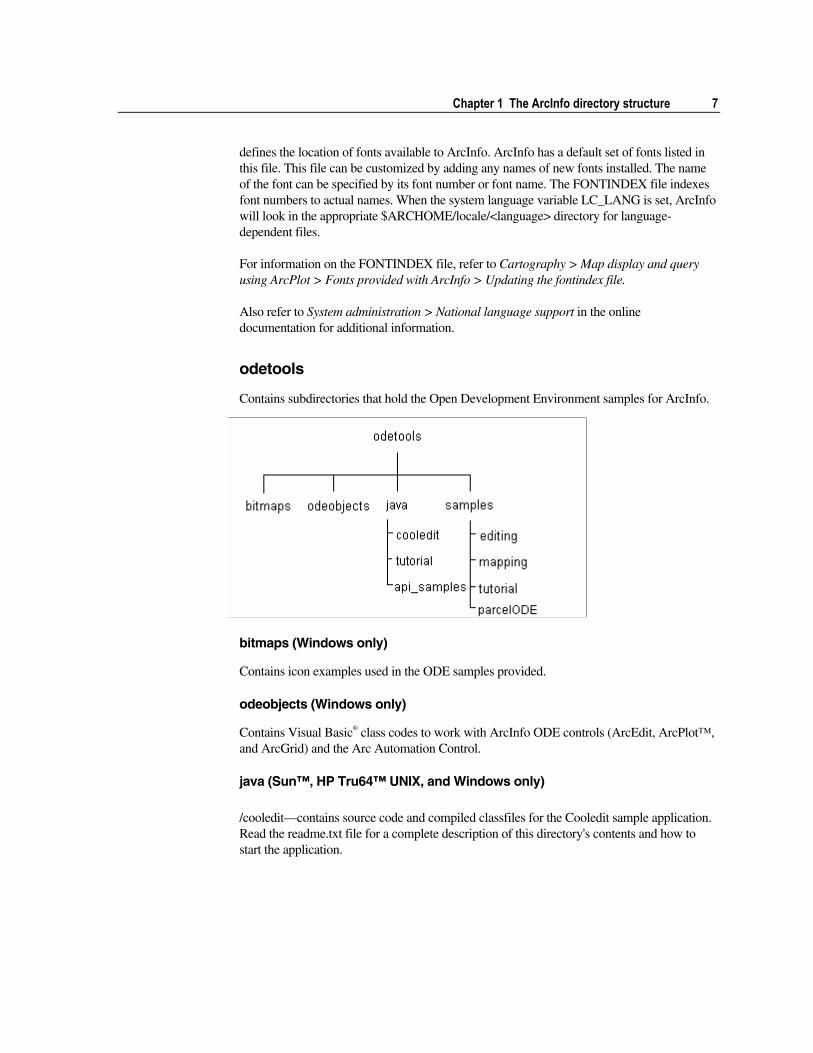
odetools
Contains subdirectories that hold the Open Development Environment samples for ArcInfo.
bitmaps (Windows only)
Contains icon examples used in the ODE samples provided.
odeobjects (Windows only)
Contains Visual Basic® class codes to work with ArcInfo ODE controls (ArcEdit, ArcPlot™, and ArcGrid) and the Arc Automation Control.
java (Sun™, HP Tru64™ UNIX, and Windows only)
/cooledit—contains source code and compiled classfiles for the Cooledit sample application. Read the readme.txt file for a complete description of this directory's contents and how to start the application.
8 ArcInfo Workstation System Administrator’s Guide
/tutorial—contains data and files associated with the tutorial program. You can find the tutorial in the ArcDoc™ index under ODE Java programming, tutorial. /api_samples—contains source code and compiled classfiles for the ODE for Java ArcDoc API references. Each subdirectory has a ‘runme’ script and batch file that you can use to start the application.
samples (Windows only)
Contains an ODE tutorial and sample applications. If you do not have Visual Basic installed on your machine, you can run CoolEdit.exe in the samples\editing directory or MapLite.exe in the samples\mapping directory.
plotters
Contains plotter parameter files and sample graphics files. The parameter files contain plotter-specific parameters, such as x and y dimensions and the number of available colors. These parameters are used by the plotting commands to properly convert the graphics files to a plotter-ready format. The sample graphics files can be used to test your plot system installation.
raster
This directory contains various directories and support files required by the ERDAS® IMAGINE® software components. You will find several subdirectories listed here: defaults, devices, etc, etc/acknowledgements, /etc/gnu, /examples/gnutimelib, and /usr/lib.
/defaults—contains preference definition files.
/devices—contains control files that enumerate the image file types supported under this instance of the IMAGINE software.
/etc—contains additional configuration files and data tables related to image file types supported under this instance of the IMAGINE software.
/etc/acknowledgements—identifies certain third-party software components included in the IMAGINE software package.
/etc/gnu—contains license files governing certain software components developed by the Free Software Foundation and used by the IMAGINE software package.
/examples/gnutimelib—contains the sources necessary to rebuild the gnutime library.
/usr/lib—contains collections of shared libraries that support different aspects of image processing. The three categories are raster format conversion, geometric models, and

Chapter 1 The ArcInfo directory structure 9
resample methods. These shared libraries are loaded on demand at run time. All of these library files have the .dll file extension (under both Windows and UNIX).
scan
Contains parameter files that have a tracing environment. The commands VTrace SAVE and VTrace RESTORE create and read these files. This directory is created when the ArcScan software is installed.
startup
Contains AML scripts called <module>.aml, where ‘module’ is the value of [SHOW PROGRAM]. These AML scripts look first to the current directory for hidden files named <module>, which it runs if it finds it. If not, it then looks in this startup directory for <module>.aml.
The hidden files and startup AML scripts can be used to automatically set up your environment when entering a module. For example, $ARCHOME/startup/arc.aml is used to display the restricted rights notice every time ARC is invoked. Similarly, a $ARCHOME/startup/arcedit.aml could be used to automatically set the editing environment of all the users.
stations
Contains special AML scripts and user-customized AML scripts that are executed with the &STATION directive to specify desired station-specific settings, such as display device, digitizer device, coordinate input device, and terminal device. The naming convention for station files is:
stat_<station_name>
The <station_name> is an alphanumeric name used with the &STATION directive.
symbols
Contains the default ArcPlot and ArcEdit symbolsets. There are four types of symbolsets: line, marker, shade, and text. INFO template files for each of these symbolset types for ArcInfo 5, 6, and 7 are also stored under $ARCHOME/symbols. Customized symbolsets may also be stored under the symbols directory and additional patterns in the stipples subdirectory. The naming convention for symbolset extensions is as follows:
.lin line symbols
.mrk marker symbols
.shd shade symbols
.txt text symbols

10 ArcInfo Workstation System Administrator’s Guide
The symbols directory also contains the COLORFILE file, which is customizable and contains a list of named colors and their CMYK values and the stipples directory, which contains the bitmap stipple patterns that make up the stipple.shd shadeset.
The following is a list of the symbolsets distributed with this release:
50 Version 5.0 hardware color translations for line and shade symbols amfm AM/FM utilities TrueType™ marker symbols arrows Arrowhead TrueType marker symbols bw Monochrome CRT symbolset calcomp CalComp® electrostatic plotter hardware color shadeset calcomp1 CalComp electrostatic plotter shade symbolset, pens 1–999 calcomp2 CalComp electrostatic plotter shade symbolset, pens 1000–1024 (defined as 1–25) carto High-quality cartographic line, shade, and text symbols civic1 Municipal TrueType marker symbols civic2 Municipal TrueType marker symbols cmplotter Metric version of the plotter symbolset color Tektronix® color CRT symbolset colornames Shadeset of the named colors contained in the colorfile colorrange Colorramp of 255 shades of gray contrast Shadeset colorramp of random colors used by ArcGrid crime Crime analysis, TrueType markers edgebw Line and marker symbols for the EDGEMATCH command edgecolor Line and marker symbols for the EDGEMATCH command enviro Environmental TrueType marker symbols font Textset of the AGFA® fonts geology Geologic TrueType markers and line symbols glyph Software Intellifont® glyphs marker symbols hazmat Hazardous materials TrueType marker symbols hp Hewlett–Packard® line and shade hardware symbols hpispp Hewlett–Packard line and shade software symbols mineral Mineral resources marker symbols mineral2 Mineral resources TrueType marker symbols municipal Municipal mapping marker symbols north North arrow marker symbols north2 North arrow TrueType marker symbols oilgas Oil and gas marker and line symbols oilgas2 Oil and gas TrueType marker symbols plotter Pen plotter symbolset rainbow Shadeset colorramp of analogous colors used by ArcGrid realty Real Estate TrueType marker symbols stipple Bitmap (stipple) shade symbols template Default template symbolsets for the symbol editors transit Transportation TrueType marker symbols usgs USGS marker symbols
Chapter 1 The ArcInfo directory structure 11
usgs2 USGS TrueType marker symbols versatec Versatec® electrostatic plotter line and shade symbolsets water USGS Water Resources Division marker symbols water2 USGS Water Resources Division TrueType marker symbols weather Atmospheric TrueType marker and line symbols
sysgen
UNIX platforms contain the license information file, license.dat; the license manager executable, lmutil; the license and application daemons, lmgrd and ESRI; and the plot queue file, pltque, which can be customized. The installation procedure will also restore a sample license file—sample.dat—and sample plot queue file—pltque.sample. The license.boot file, containing instructions on how to automatically start the license manager at boot-up time, is also distributed in $ARCHOME/sysgen.
Windows–Intel platforms contain only the getdate.fmt and pltque.sample files. The license information file, license manager executable, and license and application daemons have all been relocated to the program files\ESRI\license directory.
Refer to the License Manager’s Reference Guide, in the ARCHOME/documentation directory, for a detailed discussion of the license manager.
tables
Contains the ArcInfo 7.x (or higher) library locator files. Site-specific library names and locations are stored in the INFO LIBRARIES file.
Refer to Database management > LIBRARIAN in the online documentation for additional information on the LIBRARIES file.
template
Contains several template INFO files, coverages, and other files for use with various commands. The $ARCHOME/template directory has the following directory structure:
12 ArcInfo Workstation System Administrator’s Guide
address
Contains the default minimum scoring table, minscore.txt; the default phonetic soundex substitution strings, soundex.txt; and three INFO data files containing the standard abbreviations for street type and direction, used by the U.S. Bureau of the Census and the U.S. Postal Service. This subdirectory is installed when the ArcNetwork software is installed.
cogoedit
Contains two template ArcCOGO coverages: a single-precision ArcCOGO coverage—singlecogo—and a double-precision ArcCOGO coverage—doublecogo. This subdirectory is installed when the ArcCOGO software is installed.
document
Contains an INFO directory that stores the Contact and Distribution Profile files created with the DOCUMENT.AML SITE option; the files are used by all geo_datasets you document.
dted (UNIX only)
Contains digital terrain elevation (DTE) data templates. For further information please refer to the GRIDDTED command reference.
gpserver
Contains an INFO directory with a template used by the Geoprocessing Server.
grid
Contains INFO data files, which are templates used in atools.
Chapter 1 The ArcInfo directory structure 13
headers
Contains INFO data file templates to read Tele Atlas (formerly Etak), DIME, and TIGER® data files. It also contains three other files: ADD.DEF and TURNTABLE.DEF, two default definition files, and ADD_CANDIDATE, the file output format of the WRITECANDIDATE command in address reject processing, which contains one record.
igds
Contains three sample Interactive Graphics Design Software files, which can be used as seed files for the ARCIGDS command.
s57
Contains INFO files used by the ARCS57 and the S57ARC commands.
usage
Contains three ASCII text files—arc.usg, schemaedit.usg, and fd.usg—consisting of usages for commands within the Arc, ArcStorm, and ArcCOGO subsystems, respectively.

14 ArcInfo Workstation System Administrator’s Guide
15
C H A P T E R 2
Setting up and customizing the ArcInfo environment
Xenv directory To help you set up and customize your own environment, ESRI has provided an Xenv directory, which contains the sample files: Arcinfo, Formedit, Xdefaults, cshrc, login, dtprofile, openwin-init, and xinitrc. These files should reside in your home directory. The cshrc, login, dtprofile, openwin-init, Xdefaults, and xinitrc files, hidden by default, are called hiddenfiles. By convention, a ‘.’ is the first character in the filename. Follow this guideline if you copy these files from $ARCHOME/Xenv to your home directory. The Arcinfo and Formedit files are not hiddenfiles, so you needn’t change their names if you copy them to your home directory. Following is a brief description of each file.
Arcinfo Allows you to customize the look and feel of ArcInfo. It is read each time an ArcInfo session is initiated.
Formedit Contains settings to customize the FormEdit environment. It is read each time a FormEdit session is initiated.
Xdefaults Used to customize your OpenWindows™ environment when you start the software.
cshrc Contains additional commands and variables that further customize the user’s environment. The .cshrc file is executed whenever a user spawns a subshell.
login A command file that customizes the user’s environment. It is only executed once, at login time.

16 ArcInfo Workstation System Administrator’s Guide
Note The cshrc and login sample files in the $ARCHOME/Xenv directory contain pertinent setup information to run two (or more) $ARCHOMEs concurrently without having to edit or source these files. Refer to the license_and_copyprotection_guide.htm for concurrent setup procedures. You can find this guide located in $ARCHOME/documentation.
dtprofile This file is read each time you log in to the Common Desktop Environment (CDE). This file has been modified to read your .login file at login.
openwin-init Open the Windows initialization script that is updated with the Workspace Utilities ‘Save Workspace’ option.
xinitrc An OpenWindows startup file in your home directory that may contain user-defined options.
Sun environment Your computer is required to meet the minimum requirements to install ArcInfo. For the latest requirements, see the ArcInfo online Web page at http://support.esri.com/. Minimum system requirements
The required Sun environment includes the following:
Operating System SunOS 5.8™ (Solaris 8) or higher Windows System CDE or OpenWindows™ Memory 128 MB minimum (256 MB recommended) Disk Space Up to 453 MB for all ArcInfo software programs Up to 93 MB for all ArcInfo samples Swap Space 256 MB minimum (will vary with your application size) 512 MB recommended
Configuring swap space
How much swap space to configure?
To use ArcInfo your workstation must be configured for an adequate amount of swap space required for program initialization and data processing. The larger the dataset used during processing, the larger the swap space you will need. The following is a sample table that demonstrates how to calculate base swap space for the different ArcInfo modules.
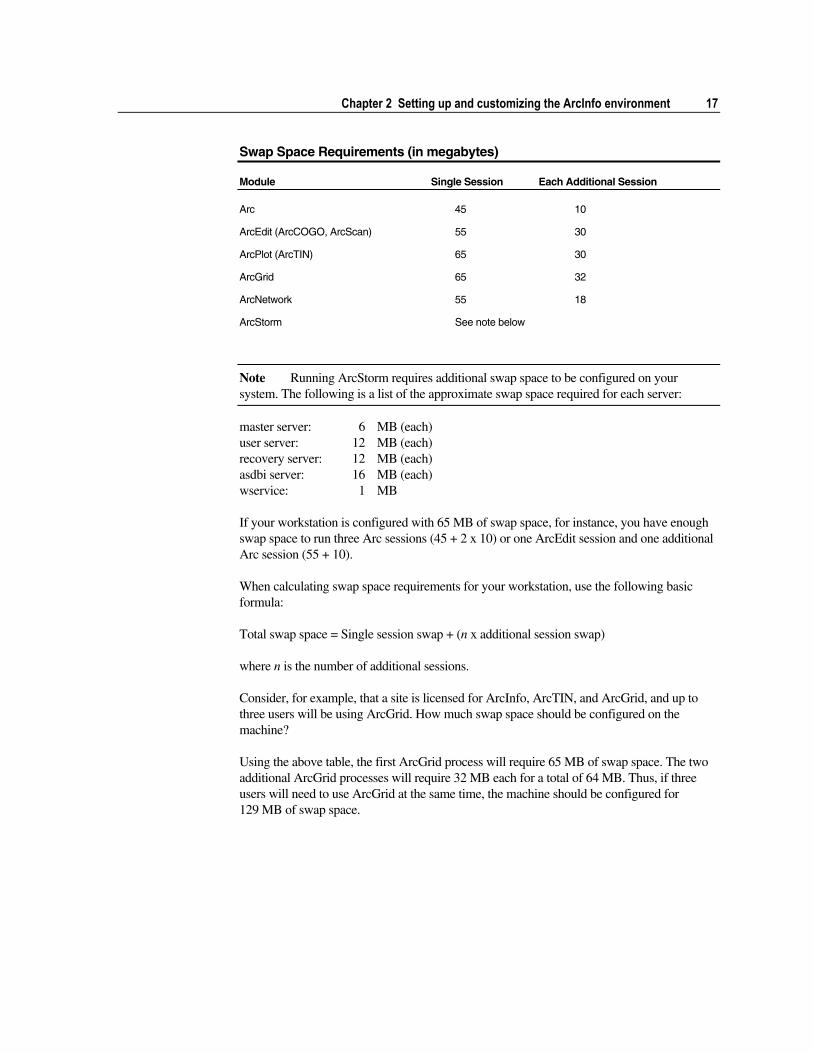
Chapter 2 Setting up and customizing the ArcInfo environment 17
Swap Space Requirements (in megabytes)
Module Single Session Each Additional Session
Arc 45 10
ArcEdit (ArcCOGO, ArcScan) 55 30
ArcPlot (ArcTIN) 65 30
ArcGrid 65 32
ArcNetwork 55 18
ArcStorm See note below
Note Running ArcStorm requires additional swap space to be configured on your system. The following is a list of the approximate swap space required for each server:
master server: 6 MB (each) user server: 12 MB (each) recovery server: 12 MB (each) asdbi server: 16 MB (each) wservice: 1 MB
If your workstation is configured with 65 MB of swap space, for instance, you have enough swap space to run three Arc sessions (45 + 2 x 10) or one ArcEdit session and one additional Arc session (55 + 10).
When calculating swap space requirements for your workstation, use the following basic formula:
Total swap space = Single session swap + (n x additional session swap)
where n is the number of additional sessions.
Consider, for example, that a site is licensed for ArcInfo, ArcTIN, and ArcGrid, and up to three users will be using ArcGrid. How much swap space should be configured on the machine?
Using the above table, the first ArcGrid process will require 65 MB of swap space. The two additional ArcGrid processes will require 32 MB each for a total of 64 MB. Thus, if three users will need to use ArcGrid at the same time, the machine should be configured for 129 MB of swap space.
18 ArcInfo Workstation System Administrator’s Guide
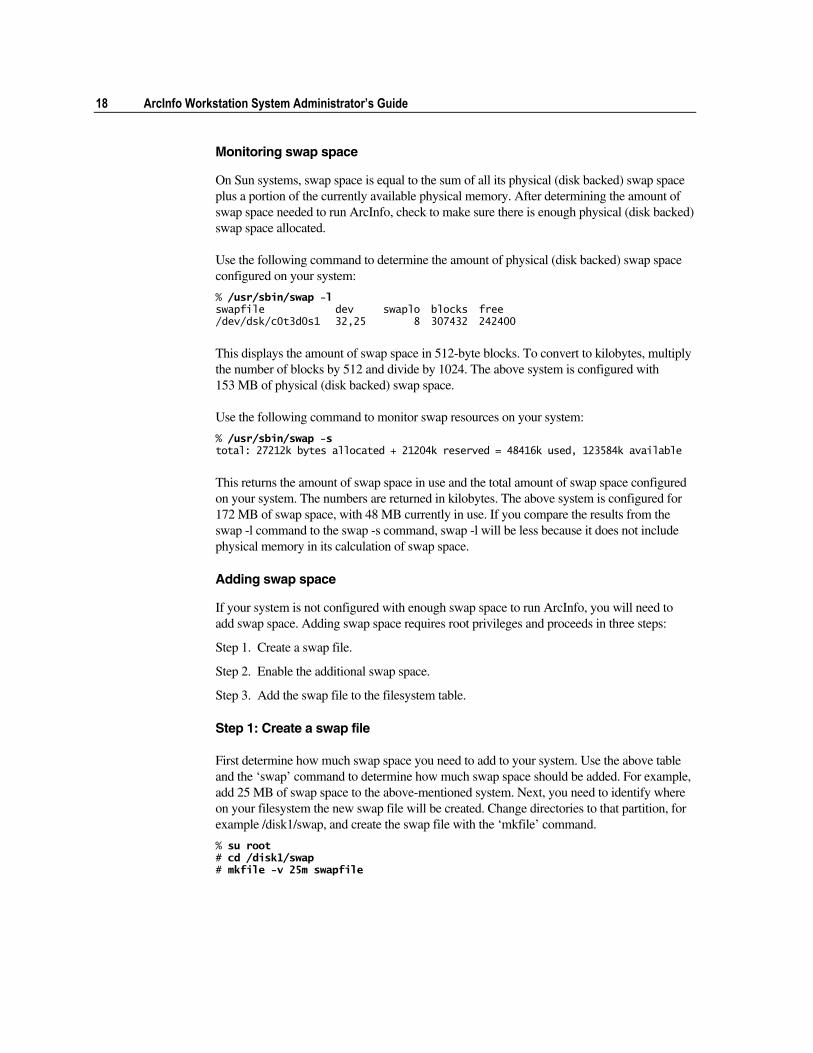
Monitoring swap space
On Sun systems, swap space is equal to the sum of all its physical (disk backed) swap space plus a portion of the currently available physical memory. After determining the amount of swap space needed to run ArcInfo, check to make sure there is enough physical (disk backed) swap space allocated.
Use the following command to determine the amount of physical (disk backed) swap space configured on your system:
% /usr/sbin/swap -l swapfile dev swaplo blocks free /dev/dsk/c0t3d0s1 32,25 8 307432 242400
This displays the amount of swap space in 512-byte blocks. To convert to kilobytes, multiply the number of blocks by 512 and divide by 1024. The above system is configured with 153 MB of physical (disk backed) swap space.
Use the following command to monitor swap resources on your system:
% /usr/sbin/swap -s total: 27212k bytes allocated + 21204k reserved = 48416k used, 123584k available
This returns the amount of swap space in use and the total amount of swap space configured on your system. The numbers are returned in kilobytes. The above system is configured for 172 MB of swap space, with 48 MB currently in use. If you compare the results from the swap -l command to the swap -s command, swap -l will be less because it does not include physical memory in its calculation of swap space.
Adding swap space
If your system is not configured with enough swap space to run ArcInfo, you will need to add swap space. Adding swap space requires root privileges and proceeds in three steps:
Step 1. Create a swap file.
Step 2. Enable the additional swap space.
Step 3. Add the swap file to the filesystem table.
Step 1: Create a swap file
First determine how much swap space you need to add to your system. Use the above table and the ‘swap’ command to determine how much swap space should be added. For example, add 25 MB of swap space to the above-mentioned system. Next, you need to identify where on your filesystem the new swap file will be created. Change directories to that partition, for example /disk1/swap, and create the swap file with the ‘mkfile’ command.
% su root # cd /disk1/swap # mkfile -v 25m swapfile

Chapter 2 Setting up and customizing the ArcInfo environment 19
This will create a 25 MB file named swapfile in the /disk1/swap directory.
Step 2: Enable the additional swap space
To immediately enable the additional swap space, use the ‘/usr/sbin/swap’ command. This command will read the filesystem table and make available all devices of the type swap.
# /usr/sbin/swap -a /disk1/swap/swapfile
The additional swap device has now been added, and the ‘/usr/sbin/swap’ command should reflect it.
# /usr/sbin/swap -l swapfile dev swaplo blocks free swapfs - 0 340684 324804 /dev/dsk/c0t3d0s1 32,25 8 205080 174400 /disk1/swap/swapfile - 8 51180 51180
Note The numbers reported are in 512-kilobyte blocks.
Step 3: Add the swap file to the filesystem table
Once the swap file has been created and is made available, you need to add it as a swap device to the filesystem table /etc/vfstab. The system table vfstab adds the swap file to the list of swap devices so that it will be available the next time the system is booted. Add the following line to the /etc/vfstab table:
/disk1/swap/swapfile - - swap - no -
Login prompt on serial ports Serial ports to which digitizers and plotters are attached must have their login prompt disabled. Serial ports to which terminals are attached must have their login prompt enabled. The Service Access Facility (SAF) controls the status of login prompts on serial ports. For each device, the SAF commands, ‘sacadm’, ‘pmadm’, and ‘ttyadm’, require that you supply arguments to specify one or more of the following items:
• Name of a port monitor
• Baud rate and line discipline
• Device path
• Name of the port in the /dev/term subdirectory
• Comments (optional)
20 ArcInfo Workstation System Administrator’s Guide
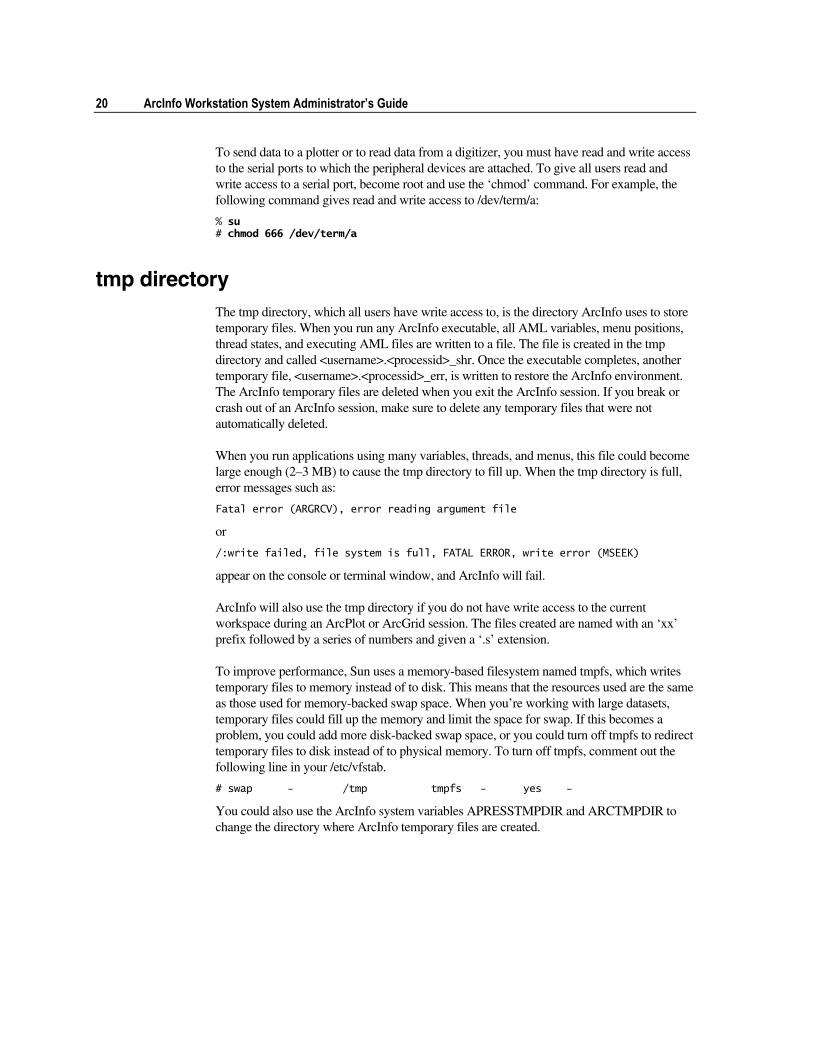
To send data to a plotter or to read data from a digitizer, you must have read and write access to the serial ports to which the peripheral devices are attached. To give all users read and write access to a serial port, become root and use the ‘chmod’ command. For example, the following command gives read and write access to /dev/term/a:
% su # chmod 666 /dev/term/a
tmp directory The tmp directory, which all users have write access to, is the directory ArcInfo uses to store temporary files. When you run any ArcInfo executable, all AML variables, menu positions, thread states, and executing AML files are written to a file. The file is created in the tmp directory and called <username>.<processid>_shr. Once the executable completes, another temporary file, <username>.<processid>_err, is written to restore the ArcInfo environment. The ArcInfo temporary files are deleted when you exit the ArcInfo session. If you break or crash out of an ArcInfo session, make sure to delete any temporary files that were not automatically deleted.
When you run applications using many variables, threads, and menus, this file could become large enough (2–3 MB) to cause the tmp directory to fill up. When the tmp directory is full, error messages such as:
Fatal error (ARGRCV), error reading argument file
or
/:write failed, file system is full, FATAL ERROR, write error (MSEEK)
appear on the console or terminal window, and ArcInfo will fail.
ArcInfo will also use the tmp directory if you do not have write access to the current workspace during an ArcPlot or ArcGrid session. The files created are named with an ‘xx’ prefix followed by a series of numbers and given a ‘.s’ extension.
To improve performance, Sun uses a memory-based filesystem named tmpfs, which writes temporary files to memory instead of to disk. This means that the resources used are the same as those used for memory-backed swap space. When you’re working with large datasets, temporary files could fill up the memory and limit the space for swap. If this becomes a problem, you could add more disk-backed swap space, or you could turn off tmpfs to redirect temporary files to disk instead of to physical memory. To turn off tmpfs, comment out the following line in your /etc/vfstab.
# swap - /tmp tmpfs - yes -
You could also use the ArcInfo system variables APRESSTMPDIR and ARCTMPDIR to change the directory where ArcInfo temporary files are created.
Chapter 2 Setting up and customizing the ArcInfo environment 21
Running ArcInfo in 24-bit mode To run ArcInfo software in 24-bit mode, your workstation must be equipped with a 24-bit graphics board.
At ArcInfo 8, the environment variable CANVASDEPTH controls whether ArcInfo executes in 8-bit or 24-bit mode. If CANVASDEPTH is not set, then ArcInfo 8 will use the default visual used by the windowing system running on the workstation. If CANVASDEPTH is set, then ArcInfo 8 will select a visual for the ArcInfo graphics window using the specified depth.
To set CANVASDEPTH, use the following command at either the system prompt or in your .cshrc file:
setenv CANVASDEPTH 24
The CANVASDEPTH variable only affects the ArcInfo graphics window.
Use the command ‘$OPENWINHOME/bin/xwininfo’ to determine the depth of the ArcInfo display window.
% $OPENWINHOME/bin/xwininfo
Click on the ArcInfo display window. The value of the variable ‘Depth’ will return the depth of the ArcInfo display window.
Please refer to ‘Supported graphics devices’ for a list of the supported 24-bit graphics boards.
Setting shell variables Shell variables and commands can be set in your .login or .cshrc file. By convention, shell variables and commands are given lowercase names.
The umask command
The shell command ‘umask’ sets the permission of files when they are created. ‘umask’ sets permissions for user, group, and universe accounts that do not belong to the user’s group. Permissions are given in octal numbers. Files and directories have read (octal value of 4), write (octal value of 2), and execute (octal value of 1) permissions.
The value for ‘umask’ is given in octal and is XORed with permissions of 666 for files and 777 for directories. To create a file with a permission value of 664, read and write access for the user and its group, but read-only access for the universe, set the value of ‘umask’ to 002. To create files with read and write access to the user only and read access to the group and the universe, set the value of ‘umask’ to 022.
22 ArcInfo Workstation System Administrator’s Guide
‘umask’ should be set in your .cshrc or in your .login file; for example,
umask 002
The limit coredumpsize command
The ‘limit coredumpsize’ command limits the maximum size of a core dump. When a program fails, it often writes out core files, which can be quite large if their maximum size is not limited. To limit the size of a core file, use the following command:
limit coredumpsize size
where ‘size’, expressed in kilobytes, is the maximum size of the core file. For example, the following command limits the size of core files to 1 MB:
limit coredumpsize 1024
The history variable
The ‘history’ variable keeps a list of the commands given at the system prompt. If invoked without an argument, it will display the list of commands with a number. To repeat a command, use the exclamation sign (!) and the number by the command in the history list; for example,
% history 1 cd $HOME 2 ls % !2 ls
To limit the number of commands stored in the ‘history’ variable, use the ‘set’ command. For example, the following command sets the maximum number of commands held in the history list to 30:
set history 30
Setting user-defined environment variables User-defined environment variables can be set in your .login or .cshrc file. By convention, user-defined environment variables are given uppercase names. Environment variables in the C shell are set with the command ‘setenv’.
Environment variables for ArcInfo windows
ARCDYNAMICPAN <OFF | ON>
Controls how the graphic screen will be refreshed during dynamic panning in ArcEdit. For a description of dynamic panning, see the ArcEdit DYNAMICPAN command reference.
Chapter 2 Setting up and customizing the ArcInfo environment 23
ARCPANZOOM <ON | OFF>
Specifies whether the pan/zoom button will appear on the graphic window frame in ArcEdit and ArcPlot. The button will appear by default. The pan/zoom button opens a menu for creating new graphic windows and modifying the display for a given window. See the WINDOWS command reference in ArcEdit or ArcPlot for a description of the menu.
ARCTRANSACTIONSESSION <ON | OFF>
Controls how transactions are defined in ArcEdit. Normally, the TRANSACTION numbers increment based on the current edit coverage. When the variable is set to ON, TRANSACTION numbers increment based on the ArcEdit session. It is recommended that the variable be set to ON for use with MULTIPLESELECT.
ARCWINDOWSTATS <ON | OFF>
Specifies whether to display cursor position information (i.e., the x,y coordinates, distance, area and delta x,y). The default is to display this information on the frame of the main graphic window in ArcEdit and ArcPlot. The coordinate information is not displayed on other graphic windows.
CANVASCOLOR <BLACK | WHITE>
Controls whether the ArcInfo graphics window as set by the command DISPLAY 9999 will have a white background or a black background. By default, the background of the ArcInfo graphics window on black-and-white workstation monitors is white; on color workstations, the background is black. The CANVASCOLOR setting must be in uppercase letters. For example, the following command sets the background to white on a color monitor:
setenv CANVASCOLOR WHITE
CROSSHAIRCOLOR <COLOR>
Sets the color that will be used to draw the cursor crosshairs in the ArcInfo graphics window. By default, the crosshair is white when the window is black and black when the window is white. The crosshair color can be set to any color found in the file named colorfile, located under the $ARCHOME/symbols directory. The CROSSHAIRCOLOR setting must be in uppercase letters. For example, the following command sets the crosshair color to red:
setenv CROSSHAIRCOLOR RED
Environment variables for ArcInfo symbology
AICODESET <path/file_name>
Allows a local codeset file to be recognized in ArcInfo graphic software programs. The codeset file provides a lookup table for the keyboard Extended UNIX Code (EUC) or ASCII
24 ArcInfo Workstation System Administrator’s Guide
Decimal Equivalent (ADE) and the number of the text character pattern or glyph to be displayed.
AICOLORFILE <path/file_name>
Allows a local colorfile file to be recognized in ArcInfo graphic software programs. The colorfile file stores the color name specifications used for symbology.
AIFONTINDEX <path/file_name>
Allows a local fontindex file to be recognized in ArcInfo graphic software programs. The fontindex file is used to initialize the installed fonts when the ArcEdit or ArcPlot program is started.
RJS_ANNO_PRE81 <ON | OFF>
In ArcInfo Workstation 8.0.2 and earlier, stacked two-point annotations created with a text justification of UR, CR, and LR were being placed incorrectly. This was fixed at ArcInfo 8.1. As a result of the fix, right-justified stacked annotations created in version 8.0.2 or prior will display in a slightly different position than in version 8.1 and higher. If you wish to display the stacked two-point right-justified annotation exactly the way it looked in previous versions of ArcInfo, then you will need to set this variable setting to ON.
The RJS_ANNO_PRE81 environment variable does not affect the manner in which the annotation is written out to disk, just how it is displayed. If the variable is set to ON, any annotation you create will be placed correctly.
The default setting for this variable is OFF.
Environment variables for system integration
APRESSTMPDIR <path/directory_name>
Sets the location of the temporary space used with ArcPress. This is the location on the disk where scratch files are created while the rasterization process is running—files the software removes when it’s completed. As a general rule, choose a location that contains at least four times the size of the input file being processed.
ARCBACKINGSTORE <OFF | ON>
Controls whether ArcInfo will maintain a copy of all graphic windows within memory on the client side. The default is OFF. This uses more memory than using the XBACKINGSTORE variable to control copies.
Chapter 2 Setting up and customizing the ArcInfo environment 25
ARCBLOCKEDCHECK <YES>
The ARCBLOCKEDCHECK environment variable controls whether or not ArcInfo checks for access conflicts when updating a coverage. Setting this variable to ‘yes’ reduces the chances of data getting corrupted when access conflicts arise.
On UNIX, this variable can be set by including the following in the .cshrc file.
setenv ARCBLOCKEDCHECK yes
By default this variable is not defined.
Certain ArcInfo commands require exclusive access to the datasets they work with. Arc-level commands include BUILD, CLEAN, GENERATE, INDEX, KILL, RENAME, and RENODE. ArcEdit commands include SAVE and KILL. ArcInfo Librarian™ commands include PUTTILE and INSERT. If another user accesses a coverage while these commands are being executed, the commands may fail and even corrupt the data.
The ARCBLOCKEDCHECK environment variable should be set to ‘yes’ whenever ArcInfo users cannot be ensured exclusive access to the data they are updating.
Under UNIX, setting ARCBLOCKEDCHECK will usually allow the update operation to succeed even if an access conflict occurs. This is because, under UNIX, a directory that is being accessed by another user cannot be deleted, but it can be renamed, allowing the update operation to get the old directory out of the way so it can put the updated coverage into effect.
When ARCBLOCKEDCHECK is set under UNIX, coverage directories to be deleted are first renamed by adding the suffix ‘_DELETE_ME’. Then, if the directory can’t be deleted because someone else is accessing its files, at least the update can still proceed. The .nfsxxx files, which result when the deletion of the renamed coverage directory fails, will be automatically cleaned up by UNIX when the other user finishes their access.
This leaves an empty _DELETE_ME directory that ArcInfo will clean up the next time access conflicts arise with this coverage. If the renamed directory is still not deletable when the next access conflict occurs, a numeric value is added to the normal _DELETE_ME suffix to create a new unique name for the rename operation.
ARCMEMSIZE <value>
Controls how much virtual memory ArcInfo (except for the Arc TOPOGRID command) or ArcStorm allocates per Arc session before switching to ArcInfo swap space. Use the GRIDALLOCSIZE variable for this command. (See the GRIDALLOCSIZE variable reference for more information.)
The default size for virtual memory used by ArcInfo for each Arc session is 36 MB. However, ARCMEMSIZE allows you to increase this limit according to how much virtual

26 ArcInfo Workstation System Administrator’s Guide
memory you have on your system. Setting ARCMEMSIZE to 128 MB, for instance, gives an ArcInfo session up to 128 MB of virtual memory to work with (first RAM, then system swap space) before it will start to use ArcInfo swap space. ArcInfo swap space is temporary scratch files in the local workspace, so it is the slowest performer.
Use ARCMEMSIZE when you have quite a bit of virtual memory available on your system. Typically, this is a server-class machine in the range of 256 MB of RAM or more.
Use the following formula to figure out how much virtual memory is configured:
Windows—virtual memory = RAM + Page File UNIX—virtual memory = RAM + Swap Space
Note that while adding RAM and setting ARCMEMSIZE is the best way to increase your performance, you can expand your Page File (Windows) or Swap Space (UNIX) instead if additional RAM is not available.
The numeric <value> used by the ARCMEMSIZE variable is based on bytes, not kilobytes (KB) or megabytes (MB). Because hardware RAM and system swap space is distributed based on MB, you need to convert MB to bytes. To do this, use the following equation:
n X 1024 X 1024
where n = number of MB of virtual memory you wish to assign to the ARCMEMSIZE variable.
For example, if you want to set the variable equal to 128 MB, the calculation would be as follows:
128 X 1024 X 1024 = 134217728
Set ARCMEMSIZE to 134217728
If you were to set ARCMEMSIZE equal to 128 instead of 134217728, your system would return memory-related errors because you have reduced the amount of ArcInfo software’s usable virtual memory to 128 bytes.
Setting this variable affects each ArcInfo session. Hence, if you were to set this variable equal to 134217728 bytes, each Arc session would take up to 134217728 bytes of virtual memory.
Overcommitting your virtual memory resources with the ARCMEMSIZE variable can severely reduce certain ArcInfo session(s) performance. You may also have to estimate other processes that are running and their needs for virtual memory into your calculations (i.e., Oracle® use, desktop use, etc.). Setting the ARCMEMSIZE variable too high may cause
Chapter 2 Setting up and customizing the ArcInfo environment 27
some ArcInfo session(s) to rely on ArcInfo swap space, thereby slowing performance considerably.
You can set ARCMEMSIZE either to distribute only RAM resources evenly to multiple ArcInfo sessions or to distribute virtual resources evenly to multiple ArcInfo sessions.
The latter will tend to favor the first ArcInfo sessions. Later sessions may end up relying heavily on ArcInfo swap space, slowing the last sessions significantly.
If you use the first option, you must only consider RAM to calculate the ARCMEMSIZE variable. Say that a server machine with 512 MB of RAM will have up to four users of ArcInfo at one time. For the best even distribution of RAM resources for these four users, divide 4 into 512, giving you 128 MB per user.
Considering that you may have other processes and applications for which you would want to use RAM for best performance, you might need to adjust this number as needed for best utilization of RAM for all application processing.
If you use the second option, you have to consider both RAM and system swap space to calculate the ARCMEMSIZE variable. Take a server machine with 512 MB of RAM and 2,048 MB of system swap space and up to four users of ArcInfo at one time. For the best even distribution of virtual memory resources for these four users, divide 4 into 2,560 to get 640 MB, which is larger than the amount of RAM you have on your system. One ArcInfo session could conceivably take up all the RAM usage, forcing the other users to use system swap space, or worse, ArcInfo swap space.
Even though this last situation is unlikely to happen, it’s better to overallocate resources and adjust as necessary than to underallocate. Virtual memory monitors that display both physical RAM memory use and system swap space use can be used for your analysis. You should also close any ArcInfo sessions you aren’t using to free up virtual memory for the ones you are using.
ARCRQSKBYTES <value>
The environment variable ARCRQSKBYTES controls how much virtual memory in kilobytes (KB) ArcInfo allocates for Relate Quick Search (RQS) processing. RQS processing is used to optimize performance when executing ArcEdit SELECT statements with linear relates. The default size for virtual memory potentially used by the RQS process is 1 megabyte (MB). This should be sufficient to handle most typical SELECT queries. ARCRQSKBYTES allows you to increase or decrease this limit according to how much virtual memory may be needed for the SELECT queries you will be executing.
To determine the amount of virtual memory needed to take full advantage of RQS processing, use the equation:
TOTAL_MEMORY_NEEDED = NRECS * RECSIZE

28 ArcInfo Workstation System Administrator’s Guide
NRECS = total number of records in the related INFO table
RECSIZE = size (in bytes) of the related column
To establish RECSIZE, determine the data type of the related column. If the data type is Character, the RECSIZE will be the item width (in bytes). For all other data types (e.g., Integer, Binary, Number, Binary Float, and Date), the RECSIZE will be 8 bytes.
For example, if your related INFO table had 1,000 records and the related column was Integer type (8 bytes), then:
TOTAL_MEMORY_NEEDED = 1,000 (records) x 8 (bytes) = 8,000 bytes = 8 KB.
In this case you would only need 8 KB to take full advantage of RQS processing. The default limit of 1 MB (1,000 KB) virtual memory used for RQS processing is sufficient.
Another example is if your related INFO table has 100,000 records and the related column was Character type with an item width of 32 bytes, then:
TOTAL_MEMORY_NEEDED = 100,000 (records) x 32 (bytes) = 3,200,000 bytes = 3,200 KB.
In the above case you would need 3,200 KB to take full advantage of RQS processing. RQS processing uses 1 MB (1,000 KB) of virtual memory as the default. You would want to increase the amount of virtual memory used by RQS processing to 3.2 MB (3,200 KB). You would do this by setting the ARCRQSKBYTES to the total number of kilobytes desired. For this case, set ARCRQSKBYTES to 3200.
RQS processing can be disabled completely by setting ARCRQSKBYTES to 0.
ARCTMPDIR <scratch_file_directory_path>
Controls where ArcInfo creates temporary scratch files. By default, ArcInfo creates these files in the current workspace. You must have write permission to the current workspace; otherwise, these files are created under the tmp directory of your machine. If your tmp directory is not large enough to accommodate these files, use the ARCTMPDIR variable to set the default location to a directory that you have write permission to. For example, the following command sets ARCTMPDIR to the directory /disk1/ai_temp:
setenv ARCTMPDIR /disk1/ai_temp
CANVASDEPTH <number_of_planes>
Overrides the default number of planes set by the xserver. CANVASDEPTH rarely needs to be set. However, it may be useful on servers that support both 8-bit and 24-bit display and whose default is set to 8-bit in order to support applications that do not run under 24 bit.
Chapter 2 Setting up and customizing the ArcInfo environment 29
ESRI_LOCAL_LOCKMGR <ON | OFF>
Allows users to specify that an ArcInfo session should use a global lock manager versus a local lock manager. By default the variable is set to ON. This means an ArcInfo session will always start a local lock manager process. To avoid starting the local lock manager process, set this variable to OFF. When set to OFF, ArcInfo will automatically utilize an existing global lock manager service. If no global lock manager service is running, ArcInfo will not utilize lock management.
GRIDALLOCSIZE <value>
Allocates virtual memory for the Arc command TOPOGRID. Set this variable to control the amount of memory used by the TOPOGRID command when creating large grids. You can increase the amount to more closely match the available memory on your machine.
<value>—the number of megabytes of virtual memory to be allocated. The required amount of memory can be calculated based on the dimensions of the desired output grid, as nrows*ncolumns*0.000014. For additional information, refer to the TOPOGRID command reference.
OVERLAYALLOCSIZE <value>
Allocates virtual memory for the Arc command AREAQUERY. Set this variable to control the amount of memory used by the AREAQUERY overlay process. You can limit or increase the amount to more closely match the available memory on your machine.
<value>—the number of megabytes of virtual memory to be allocated. The default maximum memory allocation is 200 megabytes. To improve the performance of the overlay process, AREAQUERY will use approximately one-half of the specified maximum (if available).
PRINTER <printer_name>
Determines where to send the results of the INFO SPOOL command. If not set, the INFO SPOOL command will use the system default printer, which is set up by the Printer Manager. The following command determines the system default printer:
% lpstat -d system default destination: <printer_name>
If you want the output of the SPOOL command to print on a different printer, you must set the PRINTER variable. For example, the following command sets the PRINTER to ‘laser’:
setenv PRINTER laser
30 ArcInfo Workstation System Administrator’s Guide
XBACKINGSTORE <ON | OFF>
Controls whether the xserver will maintain a copy of all windows within memory on the server side. The backing store X11 facility is used to perform this operation. The default is ON.
Environment variables for the online documentation, ArcDoc
ADOCHOME <path>
ADOCHOME is the path to the directory where ArcDoc is installed on your system. For example, the following command sets ADOCHOME to the directory arcdoc_81:
setenv ADOCHOME <path to the install directory>/arcdoc_81
HHHOME <path>
HHHOME is the path to the directory where the HyperHelp™ software is installed on your system. For example, the following command sets HHHOME to the directory hh_solaris2:
setenv HHHOME <path to the install directory>/hh_solaris2
Modifying widget field types Just as the X environment can be customized, the look and feel of ArcInfo can also be customized. Here are widget field types that may be modified for ArcInfo:
Widget Name Widget Type
XmRowColumn Sidebar, Pulldown, & Matrix Menus XmLabel Background text, form menu icons XmText Form menu input fields XmPushButton Form menu push buttons XmScrollBar Form menu slider bars XmToggleButton Form menu toggle button XmScrolledWindow Form menu scrolling lists
Here are the properties of widgets:
FontList Font to use Foreground Font color Background Field background color

Chapter 2 Setting up and customizing the ArcInfo environment 31
The following example file contains widgets that can be manipulated to customize your ArcInfo environment. To modify any of these widgets, copy the file named Arcinfo from $ARCHOME/Xenv to your home directory. The file Arcinfo will then be read from your home directory each time you initiate ArcInfo.
Arcinfo*FontList: fixed Arcinfo*Background: MistyRose Arcinfo*Foreground: black Arcinfo*XmText*Background: red Arcinfo*XmLabel*Foreground: red Arcinfo*XmLabel*Background: yellow Arcinfo*XmPushButton*Foreground: black Arcinfo*XmPushButton*Background: wheat Arcinfo*XmScrollBar*Background: green Arcinfo*XmToggleButton*Background: orange Arcinfo*XmScrolledWindow*Background: purple Arcinfo*XmScrolledWindow*Foreground: white
If you want to set all fonts to a specific type and all background and foreground colors to be the same, put the following wildcards in your .Xdefaults file:
*Background: gray *Foreground: black *FontList: 9x16
Available fonts are in /usr/openwin/lib/X11/fonts, and a listing of available colors is in /usr/openwin/lib/X11/rgb.txt. It is important to use fixed-width fonts with AML to avoid spacing and alignment problems in menus.

32 ArcInfo Workstation System Administrator’s Guide

33
C H A P T E R 3
Setting up and customizing the Plot System
The ArcInfo Plot System is composed of three elements:
• PLOT command—ArcInfo printing interface
• Plot queue—ASCII file in ArcInfo, listing available network printers, print modes, print spooling queues, and AML paths that provide an interface for translating your map to a native printer language
• Spooling queue—ASCII file on your workstation, listing available printers on your network
This section explains how to set up and customize these lookup tables so that the PLOT command interface will reflect your current printing environment.
34 ArcInfo Workstation System Administrator’s Guide
Note The words plot and plotter, used throughout this chapter, are synonymous with the words print and printer.
Before setting up the Plot System, verify that the required ArcInfo software programs are installed and the printers are connected to your computer system.
Verifying the ArcInfo installation The Plot System requires the core ArcInfo software—Arc and ArcPlot—to be installed. On UNIX, the plotter drivers must also be installed. Although the Plot System is not licensed separately from ArcInfo (all ArcInfo licenses include a printing feature), the Plot System requires a plotting entry in the $ARCHOME/sysgen/license.dat file. Refer to the ArcInfo install_guide.pdf or to license_and_copyprotection_guide.htm for further details on installing ArcInfo and the license manager. These are under the $ARCHOME/documentation directory.
Verifying the plotter connection Verify that your plotter is connected to the correct port on the workstation and that the communication parameters of your printer or plotter match the settings on the port. If your printer is connected via Ethernet, be sure to check that it is accessible over the network.
For more information on how to connect a plotter to your workstation, refer to ‘Setting up your printer’. For more information on communication parameters, see ‘Data communications’.
Setting up plotter definitions The Sun operating environment does not make a distinction between plotter and printer; only the terms plotter and printer are used interchangeably in this section.
To add a new printer definition, become root, then start up the System Administration Tool, admintool.
% su # admintool &
Next, click and drag the Browse pulldown menu and select Printers. Then, click and drag the Edit pulldown menu and select Add. At this point, you can add either a local or a remote printer.
Chapter 3 Setting up and customizing the Plot System 35
Local plotter
Select Local Printer and fill in the required information.
Printer Name: enter the name for this printer, a unique name, which may contain any combination of 14 alphanumeric characters and underscores.
Printer Port: identifies the name of the serial port, parallel port, or the logical device on the local node to which the plotter is connected (e.g., /dev/term/a, /dev/bpp0).
Printer Type: the plotter type may be in one of the directories located under the /usr/share/lib/terminfo directory. If you find it, enter the name here. If you don’t, enter ‘tty’, a generic printer type that can be used for any plotter. This will set the port characteristics of the plotter to the following:
9600 baud rate cs8 8 data bits -cstopb one stop bit per byte -parity Do not generate parity ixon Enable Xon/Xoff opost Perform following output post-processing -olcuc Do not map lowercase to uppercase onlcr Change line feed to carriage return/line feed -ocrnl Do not change carriage returns to line feeds -onocr Output carriage return even at column 0
If you need to change any of these settings, see the discussion below on ‘Changing plotter port characteristics’.
File Contents: if the plotter is a PostScript device, select Postscript when specifying direct mode for a plotter. Select ‘any’ as the file content option. If using a filter, you may specify any type. If you want to specify a type not listed in the available options, see the discussion on ‘Changing plotter file content type’.
Print Banner: to use filters to plot, you must have the Not required option selected.
When you’re done, click OK.
Click Help for information on setting up the parameters in the Add Local Printer menu.
Remote plotter
Select Access to Printer and fill in the required information.
Printer Name: the name by which the printer is known on its host machine. If the plotter is attached to a host running SunOS 4.x, this name should be the name of its spooling queue as defined in the /etc/printcap file on its host.

36 ArcInfo Workstation System Administrator’s Guide
Printer Server: the name of the remote node on the network to which the plotter is physically attached.
When you’re done, click OK.
Click Help for information on setting up the parameters in the Add Access To Printer menu.
Defining a filter Filters are defined independently of printers and, as such, are not assigned to any printers. Whenever the LP print service receives a request to print a file that cannot be accepted directly, it tries to match the content type of the file to the input type of available filters and the output type of the filter to the content type of the printer. If there is a match, the print request is passed through the filter.
There are three steps to setting up filters. First, define the plotter that will be using this filter. See the discussion on setting up local plotters.
Note At this point, ArcInfo supports filter plotting at 9600 baud only. When you define the plotter for a filter, make sure that the baud rate is set to 9600 (the default for new printers).
Next, define the characteristics of the filter. Then make the filter available to the LP print service. These last two steps are discussed next.
The characteristics of a print filter may be provided as direct input to the ‘lpfilter’ command or may be stored in a file that would then be provided as input to the ‘lpfilter’ command. In either case, the format for specifying these characteristics is:
Command: full pathname to the print filter Input types: the type of input accepted by the filter Output types: the type of output produced by the filter Printer types: types of printers to which it can send jobs Printers: name of printers to which it can send jobs Filter type: fast or slow Options:
Note You must be logged in as root to use the ‘lpfilter’ command.
These options may be specified in any order, and not all the information is required. The four required options for setting up plotters in ArcInfo are:
Command: Input types:
Chapter 3 Setting up and customizing the Plot System 37
Output types: Filter type:
Command: specify the full pathname of the filter script file that you use to invoke the appropriate device driver. For example, to use an input filter script file for a CalComp electrostatic plotter, the entry should read:
Command: $ARCHOME/plotters/calfilter
The script file calfilter has the following format:
#! /usr/bin/csh -f setenv OPENWINHOME <path to the OpenWindows install directory> setenv ARCHOME <path to the ArcInfo install directory> setenv LD_LIBRARY_PATH $ARCHOME/lib:$OPENWINHOME/lib $ARCHOME/bin/<device_driver> $* exit 0
The script file may be installed anywhere on your system.
The script file must be an executable file. To make the script file executable, use ‘chmod’:
% chmod +x script_file
A sample script file for a CalComp electrostatic plotter, $ARCHOME/plotters/calfilter, is provided with the ArcInfo installation. Use this sample file to write an input filter script file for your installation.
Note for CalComp electrostatic plotter users If you are using an input filter script file and want to use the CalComp resource file, set the CCUSERVALS variable to the CalComp resource file in the script file.
With input filters, the ArcInfo metafiles are not sent to the plotter but are directly accessed by the device drivers. For the device drivers to access the ArcInfo metafile, the disk where the ArcInfo metafile is located must be mounted on the workstation to which the plotter is attached.
Note The ArcInfo device drivers accept only ArcInfo metafiles. Attempting to send any other format files through them will produce error messages on most devices, and PostScript devices may hang. If a plotter or printer is used by other software, or if you intend to send a translated ArcInfo metafile to the plotter or printer, define a different plotter type.
Input type: for all the ArcInfo filters, the input type must be defined as arc10xx. Attempting to use any other type will likely generate the following message:
UX:lp: ERROR: There is no filter to convert the file content. TO FIX: Use the lpstat -p -l command to find a printer that can handle the file type directly, or consult with your system administrator.
38 ArcInfo Workstation System Administrator’s Guide
Output type: the output type you specify here should match the content type of the plotter for which you plan to use this filter. The Printer Manager does not allow you to define a new content type for your plotter, so you should define a new content type using the ‘lpadmin’ command. This procedure has been described earlier under the section ‘Changing plotter file content type’.
Note Even though filters need not be explicitly assigned to plotters, the input and output types that you define imply an assignment. Therefore, it is very important that the input type defined for a filter be arc10xx and the output type of a filter be the same as the content type defined for the intended plotter.
Filter type: you may select a filter type of either fast or slow. A fast filter requires direct access to the plotter. This means that files are plotted as they are being converted. Slow filters first convert the file in a background process and then send the file to the plotter. While slow filters do not tie up the plotter during the conversion process, they tend to take a lot more time than fast filters. It is recommended to specify a filter type of fast.
If any of the following characteristics for a filter definition are not specified, their default values are:
Input types: any Output types: any Printer types: any Printers: any Filter type: slow
Now that you have set up the filter descriptor file, you must make the filter available to the LP print service. To do this, you must become root.
% su # lpfilter -f name_of_filter -F name_of_fd_file
To list the characteristics of the filter that you just defined:
# lpfilter -f name_of_filter -l Input types: arc10xx Output types: calhcbs Printer types: any Printers: any Filter type: fast
Chapter 3 Setting up and customizing the Plot System 39
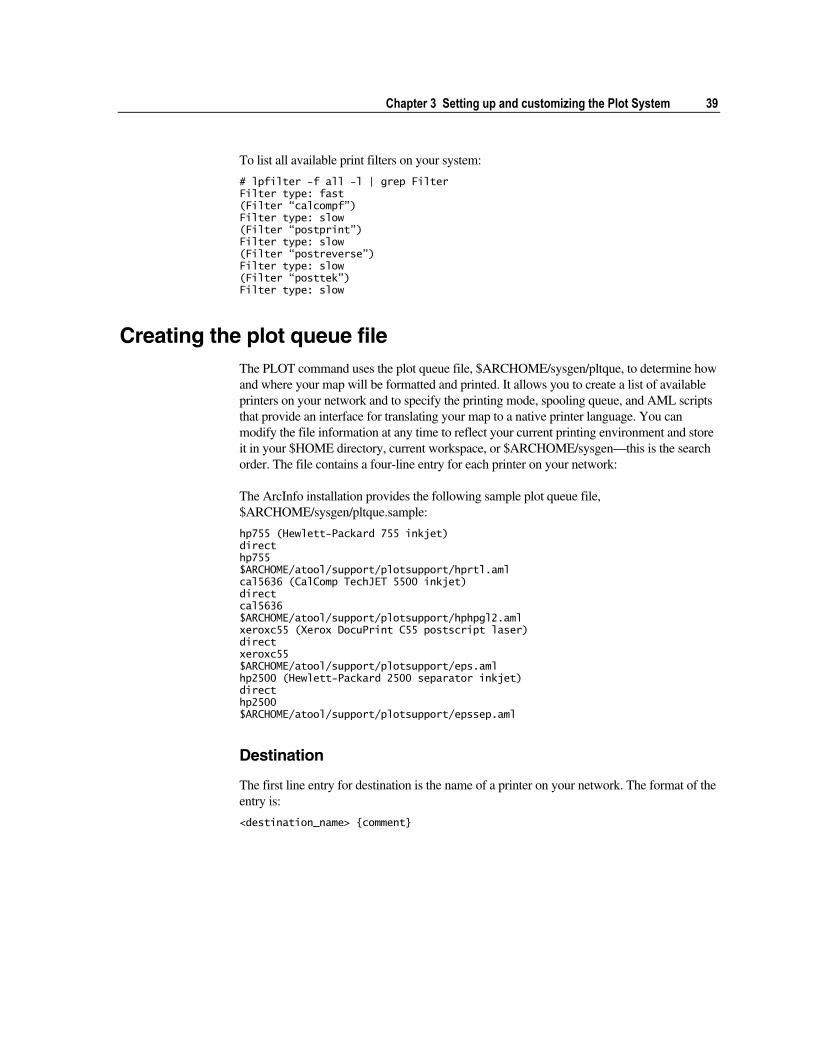
To list all available print filters on your system:
# lpfilter -f all -l | grep Filter Filter type: fast (Filter “calcompf”) Filter type: slow (Filter “postprint”) Filter type: slow (Filter “postreverse”) Filter type: slow (Filter “posttek”) Filter type: slow
Creating the plot queue file The PLOT command uses the plot queue file, $ARCHOME/sysgen/pltque, to determine how and where your map will be formatted and printed. It allows you to create a list of available printers on your network and to specify the printing mode, spooling queue, and AML scripts that provide an interface for translating your map to a native printer language. You can modify the file information at any time to reflect your current printing environment and store it in your $HOME directory, current workspace, or $ARCHOME/sysgen—this is the search order. The file contains a four-line entry for each printer on your network:
The ArcInfo installation provides the following sample plot queue file, $ARCHOME/sysgen/pltque.sample:
hp755 (Hewlett-Packard 755 inkjet) direct hp755 $ARCHOME/atool/support/plotsupport/hprtl.aml cal5636 (CalComp TechJET 5500 inkjet) direct cal5636 $ARCHOME/atool/support/plotsupport/hphpgl2.aml xeroxc55 (Xerox DocuPrint C55 postscript laser) direct xeroxc55 $ARCHOME/atool/support/plotsupport/eps.aml hp2500 (Hewlett-Packard 2500 separator inkjet) direct hp2500 $ARCHOME/atool/support/plotsupport/epssep.aml
Destination
The first line entry for destination is the name of a printer on your network. The format of the entry is:
<destination_name> {comment}
40 ArcInfo Workstation System Administrator’s Guide
In the following example, the <destination_name> is hp755 and the {comment} is Hewlett–Packard 755 inkjet.
hp755 (Hewlett-Packard 755 inkjet) direct hp755 $ARCHOME/atool/support/plotsupport/hprtl.aml
You may define the <destination_name> with any alphanumeric text string up to 32 characters long with no embedded blanks. Any {comment} you add must be separated from the destination name by at least one blank space. The entire entry will appear in the printer list on the PLOT interface.
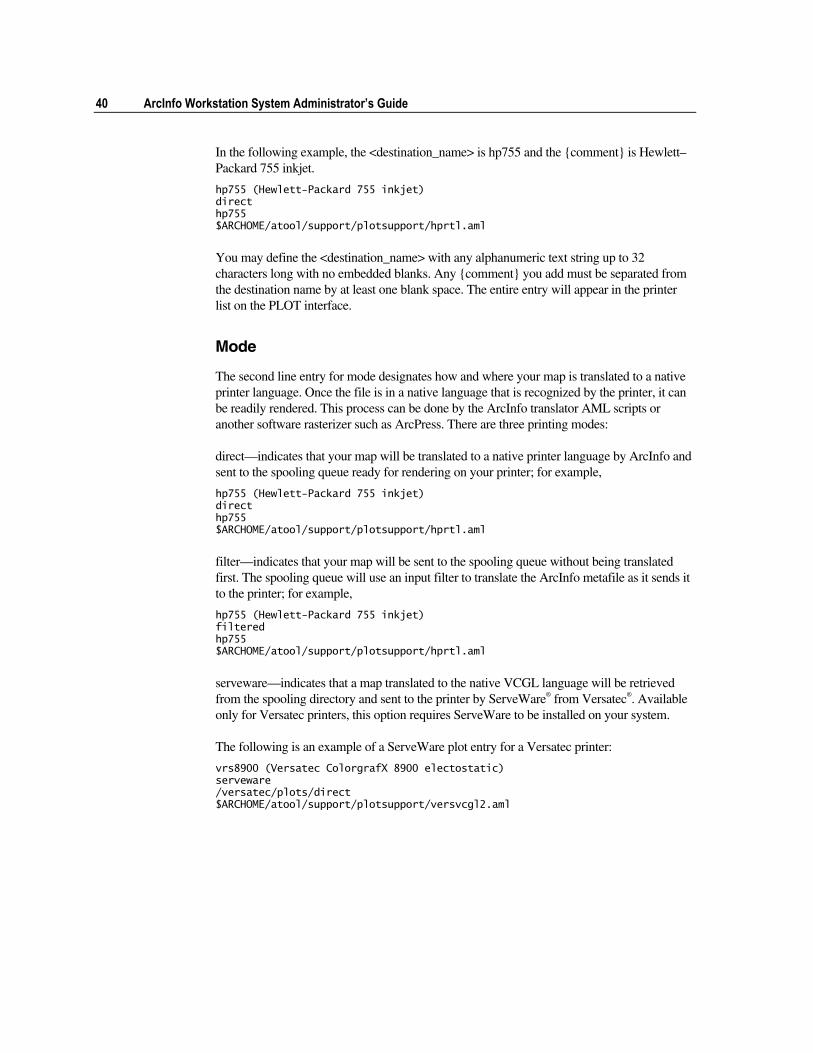
Mode
The second line entry for mode designates how and where your map is translated to a native printer language. Once the file is in a native language that is recognized by the printer, it can be readily rendered. This process can be done by the ArcInfo translator AML scripts or another software rasterizer such as ArcPress. There are three printing modes:
direct—indicates that your map will be translated to a native printer language by ArcInfo and sent to the spooling queue ready for rendering on your printer; for example,
hp755 (Hewlett-Packard 755 inkjet) direct hp755 $ARCHOME/atool/support/plotsupport/hprtl.aml
filter—indicates that your map will be sent to the spooling queue without being translated first. The spooling queue will use an input filter to translate the ArcInfo metafile as it sends it to the printer; for example,
hp755 (Hewlett-Packard 755 inkjet) filtered hp755 $ARCHOME/atool/support/plotsupport/hprtl.aml
serveware—indicates that a map translated to the native VCGL language will be retrieved from the spooling directory and sent to the printer by ServeWare® from Versatec®. Available only for Versatec printers, this option requires ServeWare to be installed on your system.
The following is an example of a ServeWare plot entry for a Versatec printer:
vrs8900 (Versatec ColorgrafX 8900 electostatic) serveware /versatec/plots/direct $ARCHOME/atool/support/plotsupport/versvcgl2.aml
Chapter 3 Setting up and customizing the Plot System 41
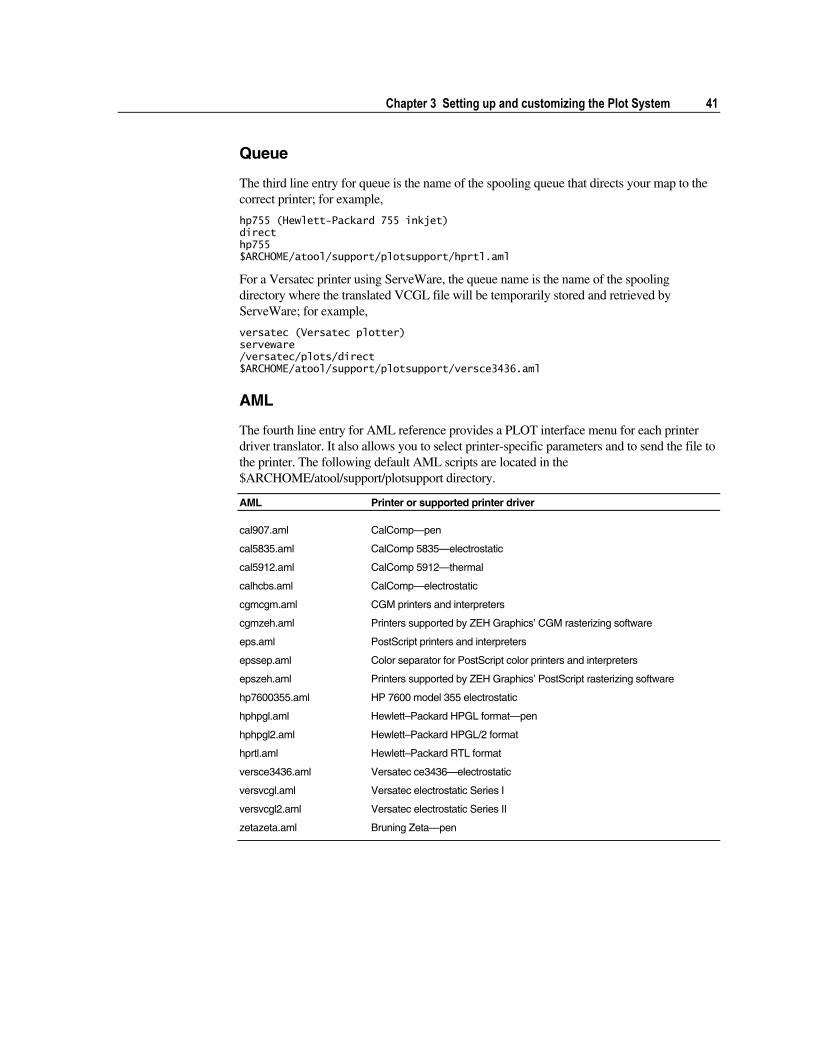
Queue
The third line entry for queue is the name of the spooling queue that directs your map to the correct printer; for example,
hp755 (Hewlett-Packard 755 inkjet) direct hp755 $ARCHOME/atool/support/plotsupport/hprtl.aml
For a Versatec printer using ServeWare, the queue name is the name of the spooling directory where the translated VCGL file will be temporarily stored and retrieved by ServeWare; for example,
versatec (Versatec plotter) serveware /versatec/plots/direct $ARCHOME/atool/support/plotsupport/versce3436.aml
AML
The fourth line entry for AML reference provides a PLOT interface menu for each printer driver translator. It also allows you to select printer-specific parameters and to send the file to the printer. The following default AML scripts are located in the $ARCHOME/atool/support/plotsupport directory.
AML Printer or supported printer driver
cal907.aml CalComp—pen
cal5835.aml CalComp 5835—electrostatic
cal5912.aml CalComp 5912—thermal
calhcbs.aml CalComp—electrostatic
cgmcgm.aml CGM printers and interpreters
cgmzeh.aml Printers supported by ZEH Graphics’ CGM rasterizing software
eps.aml PostScript printers and interpreters
epssep.aml Color separator for PostScript color printers and interpreters
epszeh.aml Printers supported by ZEH Graphics’ PostScript rasterizing software
hp7600355.aml HP 7600 model 355 electrostatic
hphpgl.aml Hewlett–Packard HPGL format—pen
hphpgl2.aml Hewlett–Packard HPGL/2 format
hprtl.aml Hewlett–Packard RTL format
versce3436.aml Versatec ce3436—electrostatic
versvcgl.aml Versatec electrostatic Series I
versvcgl2.aml Versatec electrostatic Series II
zetazeta.aml Bruning Zeta—pen
42 ArcInfo Workstation System Administrator’s Guide
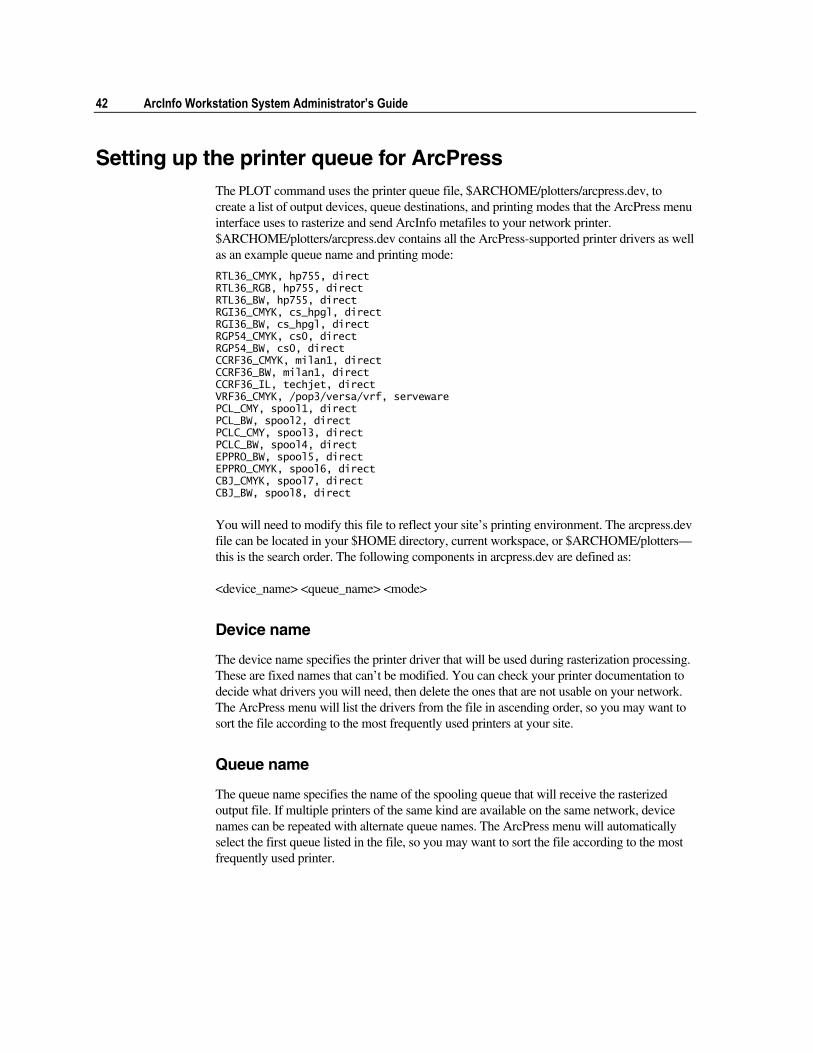
Setting up the printer queue for ArcPress The PLOT command uses the printer queue file, $ARCHOME/plotters/arcpress.dev, to create a list of output devices, queue destinations, and printing modes that the ArcPress menu interface uses to rasterize and send ArcInfo metafiles to your network printer. $ARCHOME/plotters/arcpress.dev contains all the ArcPress-supported printer drivers as well as an example queue name and printing mode:
RTL36_CMYK, hp755, direct RTL36_RGB, hp755, direct RTL36_BW, hp755, direct RGI36_CMYK, cs_hpgl, direct RGI36_BW, cs_hpgl, direct RGP54_CMYK, cs0, direct RGP54_BW, cs0, direct CCRF36_CMYK, milan1, direct CCRF36_BW, milan1, direct CCRF36_IL, techjet, direct VRF36_CMYK, /pop3/versa/vrf, serveware PCL_CMY, spool1, direct PCL_BW, spool2, direct PCLC_CMY, spool3, direct PCLC_BW, spool4, direct EPPRO_BW, spool5, direct EPPRO_CMYK, spool6, direct CBJ_CMYK, spool7, direct CBJ_BW, spool8, direct
You will need to modify this file to reflect your site’s printing environment. The arcpress.dev file can be located in your $HOME directory, current workspace, or $ARCHOME/plotters—this is the search order. The following components in arcpress.dev are defined as:
<device_name> <queue_name> <mode>
Device name
The device name specifies the printer driver that will be used during rasterization processing. These are fixed names that can’t be modified. You can check your printer documentation to decide what drivers you will need, then delete the ones that are not usable on your network. The ArcPress menu will list the drivers from the file in ascending order, so you may want to sort the file according to the most frequently used printers at your site.
Queue name
The queue name specifies the name of the spooling queue that will receive the rasterized output file. If multiple printers of the same kind are available on the same network, device names can be repeated with alternate queue names. The ArcPress menu will automatically select the first queue listed in the file, so you may want to sort the file according to the most frequently used printer.

Chapter 3 Setting up and customizing the Plot System 43
For direct printing mode (see below) the queue name must be the same as the queue name that was specified when the printing environment was set up during the Plot System installation. For serveware mode (see below) the queue name is the pathname to the spooling directory.
Printing mode
The printing mode refers to how the printer will handle the output file. There are two types of supported printing modes:
direct—indicates that the output file will be translated and then sent to the spooling queue.
serveware—indicates that the output file will be retrieved from the spooling directory and sent to the printer by ServeWare from Versatec. Available only for Versatec printers, this option requires that ServeWare be installed on your system.
Verifying the Plot System To verify the Plot System, print a small ArcInfo metafile using the PLOT command:
Arc: plot <filename>
In the ArcPlot program, use the ARC and PLOT commands together along with the name of the metafile:
Arcplot: arc plot <filename>
In ArcTools, use the Plotting utility from the MapTools Map pulldown menu.
For more information about ArcInfo and ArcPress printing, see ArcDoc, the online documentation, under Cartography > Printing and exporting maps with ARC/INFO and Cartography > Printing and exporting maps with ArcPress. Also, refer to the PLOT command reference in Arc.

44 ArcInfo Workstation System Administrator’s Guide
45
A P P E N D I X
Troubleshooting DBMS connection problems
Error messages associated with DBMS When you first attempt to connect to your DBMS after installing ArcInfo software, you may encounter some problems. The following outlines the more likely ones and their solutions. Some solutions require root privileges.
For additional information, refer to Troubleshooting > Frequently asked questions > Database Integration in the online documentation.
Problems that return DBMS error messages
• You have been refused access to the DBMS.
Solution: Contact your DBMS system manager to get access.
• CONNECT fails, or you experience problems when describing or selecting from tables.
Solution: A list of the supported DBMS releases can be found in the installation guide. Compare this list with your DBMS documentation and release notes and contact your DBMS system manager to ensure that the DBMS release you are using is compatible with the ArcInfo DBMS server.
• You can connect from ArcInfo to the DBMS when the DBMS and ArcInfo software are running on the local node, but you cannot connect over the network.
Solution: Before attempting to connect from ArcInfo, ensure that you can attach to the DBMS from a remote node using its own command line interface product. Contact your DBMS system manager to ensure that the DBMS networking module is properly installed.

46 ArcInfo Workstation System Administrator’s Guide
ArcInfo error messages
Potential problems across supported platforms (UNIX and Windows NT)
• Insufficient connection information:
Arc: CONNECT ORACLE SCOTT Insufficient connect info
The combination of the command line, database definition file, and operating system connection information is insufficient to grant access to the DBMS.
Solution: Before attempting to connect from ArcInfo, ensure that you can attach to the DBMS using its own command line interface product with the same connection information. Review the Managing Tabular Data appendix appropriate to your DBMS to ensure that all the required connection information is supplied.
• Segment violation:
Arc: CONNECT INFORMIX IDB INFORMIX server encountered a segment violation
Solution: Before attempting to connect from ArcInfo, ensure that you can attach to the DBMS using its own command line interface product. Contact your DBMS system manager to ensure that the DBMS is properly installed.
Potential problems on UNIX only
• ‘ipcs’ problems:
Arc: CONNECT INFORMIX IDB Semaphore create failed in CsaConnect
The UNIX kernel is incorrectly configured, or the interprocess communication (ipcs) table is full.
Solution: Build the UNIX kernel for the CPU running ArcInfo with ipcs enabled. If you have built a generic kernel, ipcs should be there, but for a smaller customized kernel, it may have been disabled. The following indicates that ipcs is enabled:
% ipcs IPC status from kernel as of Fri Feb 8 08:09:46 1991 T ID KEY MODE OWNER GROUP Message Queues: Shared Memory: Semaphores:
If you get the following results, you will have to rebuild the kernel with ipcs enabled.
% ipcs IPC status from laguna as of Fri Feb 8 08:09:46 1991 Message Queue facility not in system. Shared Memory facility not in system. Semaphore facility not in system.
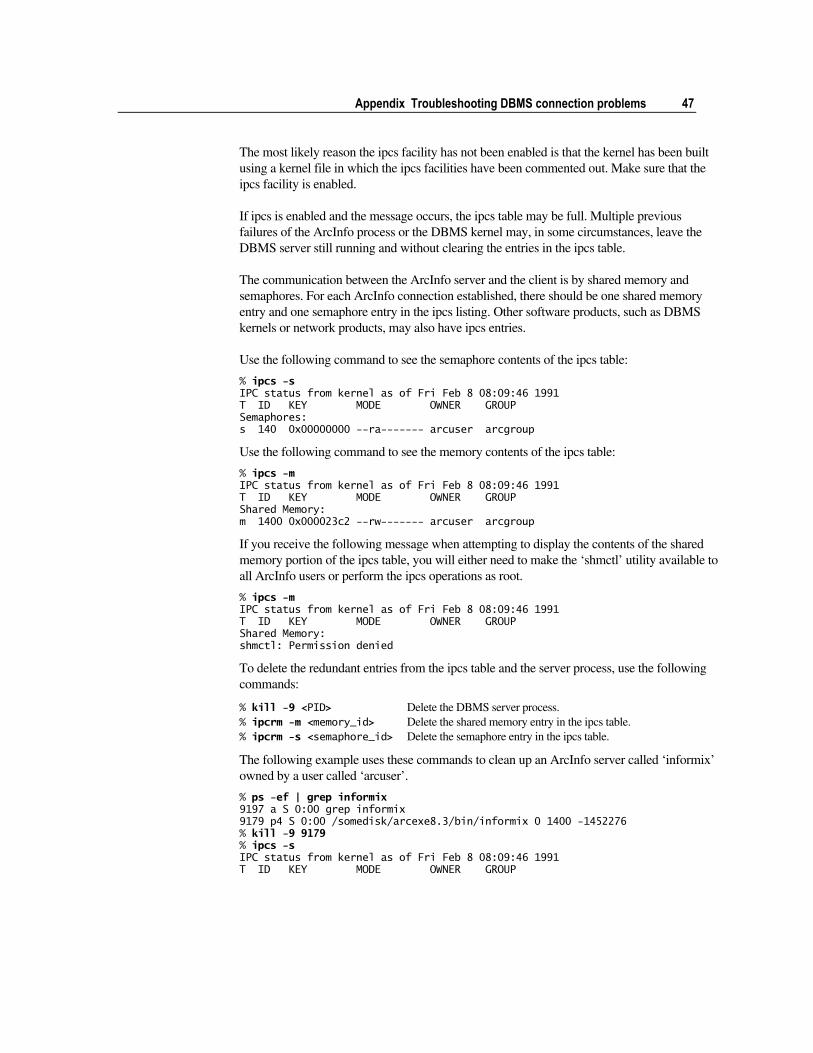
Appendix Troubleshooting DBMS connection problems 47
The most likely reason the ipcs facility has not been enabled is that the kernel has been built using a kernel file in which the ipcs facilities have been commented out. Make sure that the ipcs facility is enabled.
If ipcs is enabled and the message occurs, the ipcs table may be full. Multiple previous failures of the ArcInfo process or the DBMS kernel may, in some circumstances, leave the DBMS server still running and without clearing the entries in the ipcs table.
The communication between the ArcInfo server and the client is by shared memory and semaphores. For each ArcInfo connection established, there should be one shared memory entry and one semaphore entry in the ipcs listing. Other software products, such as DBMS kernels or network products, may also have ipcs entries.
Use the following command to see the semaphore contents of the ipcs table:
% ipcs -s IPC status from kernel as of Fri Feb 8 08:09:46 1991 T ID KEY MODE OWNER GROUP Semaphores: s 140 0x00000000 --ra------- arcuser arcgroup
Use the following command to see the memory contents of the ipcs table:
% ipcs -m IPC status from kernel as of Fri Feb 8 08:09:46 1991 T ID KEY MODE OWNER GROUP Shared Memory: m 1400 0x000023c2 --rw------- arcuser arcgroup
If you receive the following message when attempting to display the contents of the shared memory portion of the ipcs table, you will either need to make the ‘shmctl’ utility available to all ArcInfo users or perform the ipcs operations as root.
% ipcs -m IPC status from kernel as of Fri Feb 8 08:09:46 1991 T ID KEY MODE OWNER GROUP Shared Memory: shmctl: Permission denied
To delete the redundant entries from the ipcs table and the server process, use the following commands:
% kill -9 <PID> Delete the DBMS server process. % ipcrm -m <memory_id> Delete the shared memory entry in the ipcs table. % ipcrm -s <semaphore_id> Delete the semaphore entry in the ipcs table.
The following example uses these commands to clean up an ArcInfo server called ‘informix’ owned by a user called ‘arcuser’.
% ps -ef | grep informix 9197 a S 0:00 grep informix 9179 p4 S 0:00 /somedisk/arcexe8.3/bin/informix 0 1400 -1452276 % kill -9 9179 % ipcs -s IPC status from kernel as of Fri Feb 8 08:09:46 1991 T ID KEY MODE OWNER GROUP
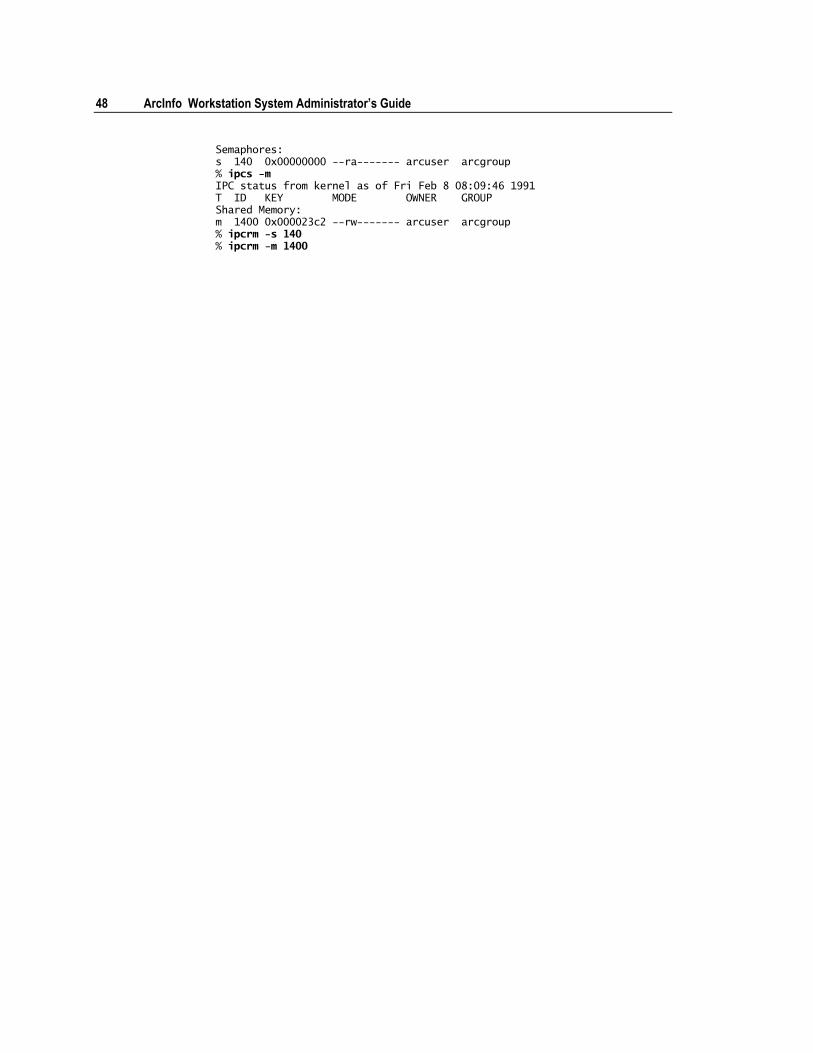
48 ArcInfo Workstation System Administrator’s Guide
Semaphores: s 140 0x00000000 --ra------- arcuser arcgroup % ipcs -m IPC status from kernel as of Fri Feb 8 08:09:46 1991 T ID KEY MODE OWNER GROUP Shared Memory: m 1400 0x000023c2 --rw------- arcuser arcgroup % ipcrm -s 140 % ipcrm -m 1400