Embed Size (px)
Citation preview
Argus argojlex
MODEL E
INSTRUCTION BOOI{
YOUR ARGOFLEX CAMERA
You r Argofl ex camera is a precision in strument o f All-American manufacture. I t is known as a twin- lens refl ex camera because it is equipped with two identica l lenses, one used as a view finder and focusing lens, the other fo r actu a l p icture taking.
The two f4.5 Varex lenses with which your Model E A rgus is equipped a re three element Anastigmat lenses of 75 m m. foca l length. Both the focusing and t he taking lenses are idt:.n tical and a re accurately compounded of a number of pieces o f optica l glass co rrectly chosen and combined to produce crisp sharp negatives. The use of identical lenses fo r both focusing and taking assu res Argofl ex owners of critically exact focus. Color correction is achieved in the Va rex lenses by exact computation and accurate grinding which assures a precision built piece of optica l equipment.
All Argus lenses a re manu fac tured by wel!known American lens manu fac turers and t heir speed ratings, expressed in "f" va lues, are accura te and guaranteed. Althou~h your Argofl ex camera is rug
~ed ly buIlt to stand yea rs of ha rd se rvice, It must be trea ted with the same ca re as any other hIgh qua lity precision instrument.
ever attempt any repa irs yourself and never oil the camera mechanism. The delicate adjustments in any camera demand an experienced repa ir man fo r the work, and ca n be most sa t isfactorily done in our own Service Department.' (See gua rantee and service po li cy on back of t his book. )
INSTRUCTIONS
I. Load the camera as shown on pages 12 and 13.
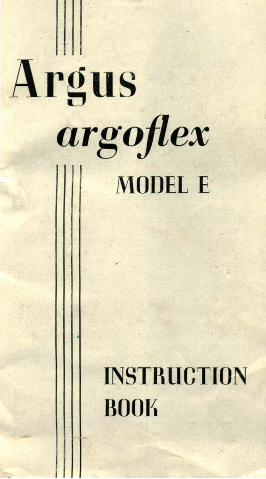
2. Open focusing hood by releasing catch No.8, Figure I.
3. Set shutter speed adjustment No. S and lens opening No. 12.
4. Focus by turning knurled ring No. II.
S. Make exposure by pressing shut. ter release lever No.6, SLOWLY, don't "jab".
6. Advance the film after each exposure.
IMPORTANT
If you a re accustomed to using a ca ndi d type camera, the above brief instru ctions will suffice. I t is st rongly recommended, however, th at the experienced ama teu r as well as the beginner read the step by step instru ct ions which a re give n on the fo ll owing pages.
3

FIGURE I I. Magnifying Glass 2. Back Release Catch 3. Film Winding Knob 4. Depth of Focus Sca le 5. Shutter Speed Adjust
ment 6. Shutter Re lease Lever
7. Cable Release Socket 8. Hood R e lease Catch 9. Direct Vision Finder
10. Focusing Lens 11 . Focusing Ring 12. Stop Lever 13. Taking Lens
LET'S PRACTICE FIRST
A few moments spent with your empty Argoflex camera and thi s in struction book will repay you many times over in improved pictures.
Follow the in structions carefu lly and d~liberately, going through each motion just as though you were making a picture. Practice making imaginary pictures until you have thoroughly mastered the operation of ' each part of the camera.
When you have done this, the operation of the camera becomes more o r less automatic and more time and thought may be devoted to lighting conditions, exposures, composition and many other factors which go to make up a sa ti sFactory picture.
Exploring Your CamElra- Hold the camera with the lens facing you, and refer to Fig. I. The upper lens ( 10) is the focusing lens and reflects its im age by means of a mirror on to the ground glass in the focusing hood . The lower lens (13) is the actual ca mera lens wh ich takes the picture.
On the lower lens are two adjustments. The shutter speed adjustment (5) gives you you r select ion of five shutter speeds from 1/ 10 to 1/ 200 of a second by revolving the outer ring until the scored mark rests opposite the shutter speed requ ired. The aperture or lens opening is adjusted by moving the pointer ( 12) a long the sca le ranging from f4.5 to f iS.
To better understand the operation of this ve ry important p~ rt of your came ra, set the
5
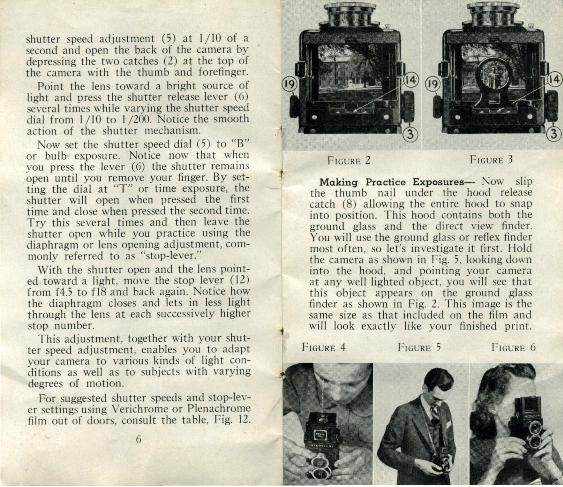
shutter speed adjustment (5) at 1/ 10 of a second and open the back of the ca mera by depressing the two catches (2) at the top of the camera with the thumb and forefinger.
Point the lens toward a bright source of light and press the shutter release lever (6) several times wh ile varyi ng the shutter speed dial from 1/ 10 to 1/200. Notice the smooth ac tion of the shu tter mechanism.
Now set the shutter speed dial (5) to "B" o r bulb· exposure. Notice now that when you press the lever (6) the shutter rem ai ns open until you remove your finger. By setting the d ia l at "T " or time exposure, the shutter wi ll open when pressed the first time and close when pressed the second time. Try this seve ral times and then l e~ve the shutter open wh ile you pract ICe uSlllg the diaphragm or lens open ing adjustment, common ly referred to as "stop-lever."
With the shutter open and the lens poin ted toward a light, move the stop lever ( 12) from f4.5 to f l8 and back agai n. Notice how the diaphragm closes and lets in less light through the lens at each successively higher stop number.
T his adjustment, together with your shutter speed adjustment, enables you to adapt your camera to various kinds of light C~lI1-ditions as well as to subjects with varylllg degrees of motion.
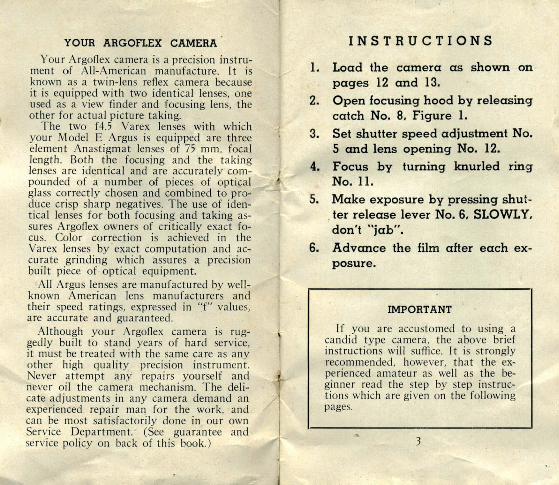
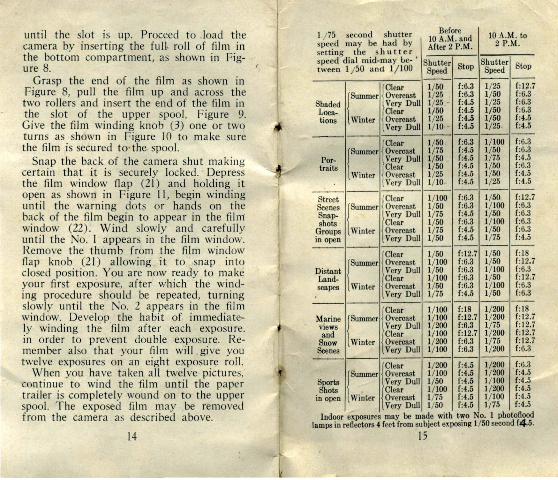
For suggested shutter speeds and stop-Ie\'er sett ings using Verichrome or Plenachrome film ou t of doors, consult the table, Fig. 12.
6
FIGURE 2 FIGURE 3
Making Practice Exposures- Now slip the thumb nai l under the hood release catch (8) a llowing t he entire hood to snap into position . This hood contains both the ground glass and the di rect view finder. You wi ll use the ground glass or refl ex finder most often, so let's investigate it first . I-Iolcl the camera as shown in Fig. 5, looking down into the hood, and pointing your camera a t any well lighted object, you will see that th is object appears on the ground glass finder as shown in Fig. 2. Th is image is the same size as that in clu ded on the film and will look exact ly li ke your finished print.
FIGURE 4 FIGURE 5 FIGURE 6
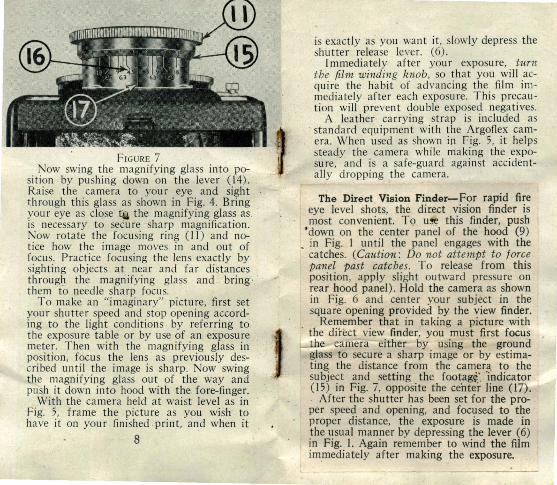
FIGURE 7 Now swing the magnifying glass into po
sItIOn by pushing down on the lever (14). Raise the camera to your eye and sight through this glass as shown in Fig. 4. Bring your eye as close tQ the magnifying glass as .. IS necessa ry to secure sharp magnification. Now rotate the focusing ring (II) and notice how the image moves in and out of focus. Practice focu ing the lens exactly by slghtlllg objects at near and far distances throug~ the magnirying glass and bring · them to need le sharp focus.
To make an "imaginary" picture, first set your shutter speed and stop opening accordIIlg to the light conditions by referring to the exposure table or by use of an exposure meter. Then with the magnifying glass in position, focus the lens as previously described until the image is sharp. low swing the magnifying glass out of the way and push it down into hood with the fore-finger.
WIth the camera held at waist level as in Fig. 5, frame the picture as you wish to have it on your finished print, and when it
8
is exactly as you want it, slowly depress the shutter release lever. (6).
Immediately arter your exposure, turn tbe film winding 'mob, so that you will acquire the habit of advancing the film immediately after each exposure. This precaution will prevent double exposed negatives.
A leather carrying strap is included as . standard equipment with the Argoflex cam
era. When used as shown in Fig. 5, it helps steady the camera while making the exposure, and is a safe-guard against accidenta lly dropping the camera.
The Direct Vision Finder- For rapid fire eye level shots, the dir.ect vision finder is most convenient. To u~ this finder, push
'down on the center panel of the hood (9) , in Fig. I until the panel engages with the
catches. (Caution: Do not attempt to force panel past catcbes. To release from this position, apply slight outward pressure on
. rear hood panel). Hold the camera as shown in Fig. 6 and center your subject in the square opening provided by the view finder.
Remember that in taking a picture with the direct view finder, you must first focus t]!e camera either by using the ground glass to secure a sharp image or by estimating the distance from the camera to the subject a!1d setting the footagf. 'indicator (15) III FIg. 7, opposite the center line (17).
After the shutter has been set for the proper speed and opening, and focused to the proper distance, the exposure is made in the ~sual man!1er by depressing the lever (6) III FIg. I. Agalll remem ber to wind the film immediately after making the exposure.
To fold down the reflex hood for carrying, first be sure that the magnify ing glass is in the "down" position. Then fo ld the right and left hood wings down, fo llowed by the rea r hood plate. T he front hood plate then fo lds into place and holds the entire hood in position.
Time and Bulb Exposures- For taki ng time exposure with either the "T " or "8" settings of the shu tter, you r camera mu st be p laced on a ' firm support such as a tripod or table. The tripod soc ket (20), Fig. II and supporting feet a re built into t he Argu ca mera for this purpose. T o avoid jarring the ca mera during exposure longer than 1/25 of a second, a cable release may, be used. I t may be screwed into the cable release socket (7) F ig. I and the shutter operated without touching the ca mera itself.
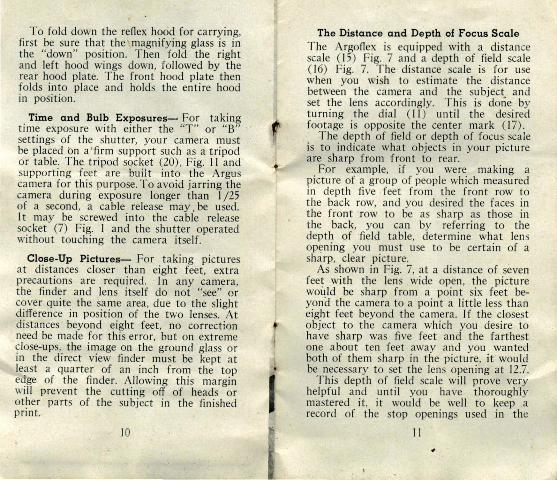
Close-Up Pictures- For taking pictures a t distances closer than eight feet, extra precautions a re required. I n any camera, the finder and lens itself do not "see" or cove r quite the same area, due to the slight d ifference in position of the two lenses. At distances beyond eight feet, no correction need be made for this error, but on extreme close-ups, the image on the ground glass or in t he d irect view finder must be kept at least a quarter of an inch f rom the top edge of the fi nder. Allowing this ma rgin wIll prevent the cutting off of heads o r other parts of the subject in the fini shed print.
10
The Distance and Depth of Focus Scale T he Argoflex is equipped with a distance sca le ( 15 ) Fig. 7 and a depth of field scale ( 16) Fig. 7. T he distance scale is for use when you wish to est imate the distance between the camera and the subject and set the lens accord ingly. T his is done by turning the dia l ( II ) until the desired footage is opposite the center mark ( 17) .
The depth of field or depth of focus sca le is to indicate wha t objects in your picture a re sharp from front to rea r.
For example, if you were making a p icture of a group of people which measured in depth five feet from the fron t row to the back row, and you desired the faces in the f ront row to be as sharp as those in t he back, you can by refer ring to the depth of 'fie ld table, determi ne what lens opening you must use to be certa in of a sha rp, clear picture.
As shown in Fig. 7, at a distance of seven feet with the lens wide open, the picture wou ld be sharp from a point six feet beyono the ca mera to a point a li tt le less than eight feet beyond t he ca mera. If the closest obj ect t o the ca mera wh ich you desire to have sharp was fi ve feet and the farthest one about ten feet away and you wanted both of them sharp in the picture, it would be necessary to set the lens open ing at 12.7.
This depth of fie ld sca le will prove very helpful and until you have thoroughly mastered it, it wou ld be well to keep a record of the stop openings used in the
II

variou s pictures and compare them with your fini shed prints.
LOADING YOUR CAMERA . After. you have followed the foregoing IIlstru ctlOns carefully, you are ready to load your camera with film .
The Argoflex is designed to take either the Eas tman 120 or 620, or the Agfa B2 or PB20 film. These sizes are standard and are easily obtain able. Make sure tbat the film you buy is centeT1narked for 12 exposures . ~ YourArgus camera makes 12 2y,( x Zy,; IIlch pictures on a standard eight exposure roll). There is a wide selection of fi lm speeds available in this size, ranging from the fine grain Eastman Panatomic X or Agfa Finopan film up to the Eastman Plus X or Agfa Superpan Supreme Film. For indoor use o r where high shutter speeds are required outdoors, Eastman Super XX or Agfa UltraSpeed Panchromatic Film are reco mmended. For normal outdoor use, and particularly
FIGURE 8 FIGURE 9
for beginners, Eastman Verichrome or Agfa Plenachrome film will be found most satisfa ctory. (The exposu re table fu rnished in this booklet is des igned for use with Plenachrome or Verichrome film ).
Always load your camera in subdued light. Open the back of the camera by depress ing the two releases (2) and pulling outward on the back. With the camera open, be sure that the empty film spool is in the top compartment. I f it is not, insert it there by pul ling outward on the film windin g knob No.3, giving it a quarter of a tum to lock it in the "out" position. With the left hand, pullout on the spool retaining knob ( 19) and while holding it, in sert the spool with the slotted end to the right. Release the spool retaining knob, allowing it to snap back into position, and turn the film winding knob (3) another quarter of a turn allowing it to snap back into position . Be sure that it returns completely to its original position. Turn the empty film spool
FIGURE 10 FIGURE II
until the slot is up. Proceed to .load the camera by inserting the full· roll o f film in the bottom compa rtment, as shown in Figure 8.
Grasp the end o f the film as shown in F igure 8, pull the film up and across the two ro llers and in se rt the end of the film in the slot of the upper spool, Figure 9. Give the film winding kno b (3) one or two turns as shown in Figure 10 to ma ke sure the film is secu red to· the. spool.
Snap the back o f the camera shut ma king ce rta in th at it is securely locked. Depress the film window flap (21) and holding it open as shown in Figure II , begin winding until the wa rning dots o r hands on the back of the film begin to appear in the fi lni window (22). Wind slowly and ca refully until the No. I appea rs in the fi lm win dow. Remove the thumb from the film win dow fl ap knob (21 ) a llowing it to snap in to closed position. You are now ready to ma ke your first exposure, after which the winding procedure should be repeated, turning slowly until the No.2 appears in the film window. Deve lop the habit of immedi ately winding t he film after each exposure. in o rder to prevent double exposure. Remember also tha t your film will gi ve you twelve exposures on an eight exposure rol l.
When you have taken a ll twel ve pictures, continue to wind the fi lm until the paper t railer is completely wound on to the upper spool. The exposed film may be removed fro m the ca mera as described above.
14
Before 10 A.M. and After 2 P.M.
10 A.M. to 2 P.M.
1/ 75 second shutter speed may be had by setting the shu t t e r speed dia l mid-may l>c- • tween 1/ 50 and 1/ 100
Shutter Stop Shutter Stop Speed Speed
--,---;-:-::::----I--=-::_::___ - - - - - -
l
Clear 1/50 f:6.3 1/ 25 f:lP
{
Summer Overcast 1/ 25 f: 6.3 1/ 50 f:6.3 Shaded Very Dull 1/ 25 - f:4.5 1/ 25 f: 6.3 Loca- Clear 1/ 50 f:4.5 1/ 50 f:6.3 tions Winter Overcast 1/ 25 f:4.5 1/ 50 f:4.5
Very Dull 1/ 10 - f:4.5 1/25 f:4.5 ------- ------------
--- l Clear 1/ 50 f:6.3 1/ 100 f: 6.3
{
Summer Overcast 1/ 75 f:4.5 1/ 50 f: 6.3 Por- Very Dull 1/ 50 f:4.5 1/ 75 f:4.5 traits Clear 1/ 50 f:4.5 1/50 f:6.3
Winter Overcast 1/ 25 f:4.5 1/50 f:4.5 . Very Dull 1/ 10 f:4.5 1/25 f:4.5
- ------------ - - --Street Clear 1/ 100 f:6.3 1/ 50 f:1 2.7 Scenes {summer Overcast 1/50 f: 6.3 1/ 100 f:6.3 Snap- Very Dull 1/ 75 f:4.5 1/50 f:6.3 shots Clear 1/ 50 f: 6.3 1/ 100 f:6.3
Groups Winter Overcast 1/ 75 f:4 .5 1/ 50 f:6.3 in open _ _ _ Very Dull ~ f:4.5 ~ f:4.5
Clear 1/50 f:12.7
{
Summer Overcast 1/ 100 f:6.3 Distant Very Dull 1/50 f:6.3 Land- Clear 1/ 100 f: 6.3 scapes Winter Overcast 1/50 f:6.3
. Very Dull 1/ 75 f:4.5
1/50 1/ 50 1/ 100 1/50 1/ 100 1/50
f:18 f:12.7 f:6.3 f:12.7 f:6.3 f:6.3
---------- ---- - -- l Clear 1/ 100 f:18 1/ 200 f:18 Marine {summer Overcast 1/ 100 f:12.7 1/ 200 f:12.7 views Very Dull 1/ 200 f:6.3 1/ 75 f:12.7 and Clear 1/ 100 f:12.7 1/ 200 f:1 2. 7
Snow Winter Overcast 1/ 200 f:6.3 1/75 f:12.7 Scenes Very Dull 1/ 100 f:6.3 1/200 f:6.3
--- --- -l Clear 1/ 200 f:4.5 1/ 200 f:6.3
{
Summer Overcast 1/ 100 f:4.5 1/ 200 f:4.5 Sports Very Dull 1/50 f:4.5 1/ 100 f:4.5 Shots Clear 1/ 100 f:4.5 1/200 f:4.5
in open Winter Overcast 1/ 75 f:4.5 1/ 100 f:4.5 Very Dull 1/ 50 f:4.5 1/ 75 f:4.5
Indoor exposures may be made with two No. I photoBood lamps in reBectors 4 feet from subject exposing 1/50 second f45 .
15
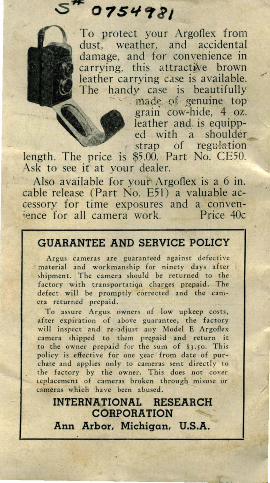
To protect your Argoflex from dust, weather, and accidental damage, and for conven ience in carryi ng, this att ract~ve brown leather carrying case is available. The handy case is beautifu lly
. ntad~ ·Qt ·.senu ine top gra in cow-hide, 4 oz. leather atld is equ ipped with a shoulder strap of regt.;! :; tion
length. The price is 5.00. Part o. CE50. A k to see ir at your dealer.
Also ava ilable for you r Argoflex is a 6 in. cable release (Pa rt o. E5 1) a valuable accessory for ti me exposures and a conven;~nce for a ll camera work. Price 40c
GUARANTEE AND SERVICE POLICY Argus cameras are guaranteed 3gainst defecti ve
:natcrial and workmanship for ninety days after ~ hipment . The camera should be returned to the factory with rransporratiQn charges pre.p.aid. The defect will be promptly corrected :lnd the camcra returned prepaid.
To assure Arg us owners of low upkeep costs, after expirat ion or above guara ntee , the faerar'y wi ll inspect ar.d re-adjust allY Model E Argo£lcx camera shipped to them prepaid and return it to the owner prepaid (or the sum of $J . Jo. This policy is effective for onc };ear from date of purc ha!c and applies on ly to cameras sent direct:i y to the fac tory by the owner. This docs not cover Icplacement of cameras broken througb misuse or (:ameras which ha ve been abused.
INTERNATIONAL RESEARCH CORPORATION
Ann Arbor. Michigan. U.S.A.