Embed Size (px)
Citation preview

Fitting Fixes
28 sew NEWS J U N E / J U L Y 2 0 1 1
Armseye & Sleeve Fitting
{ by Christine Jonson }
Shaping fabric to the body’s
contours is an art form.
When a sleeve fits well, the
arm is free to move, twist
and bend at the elbow and
shoulder. The sleeve must
comfortably accommodate
these motions, which makes
it the most difficult pattern
piece to draft and challeng-
ing to fit. While the list of
sleeve-fitting problems may
be daunting, focusing on
one area at a time saves
time and frustration. Learn
how to troubleshoot the
causes of an ill-fitting sleeve
and manipulate a sleeve
pattern for a better fit.
SEWP-1107-Fit.indd 28SEWP-1107-Fit.indd 28 4/6/11 9:22:25 AM4/6/11 9:22:25 AM

Reference PointThe fit and comfort of the sleeve is determined by the bodice armseye placement and “scye” line (1). The armseye is the bodice edge where the sleeve is stitched. The armseye length is the total length of this edge. A scye line refers to one of the bodice bal-ance lines, including the armseye, chest and bustlines. The armseye scye line is the lowest point of the armhole, 1⁄2” below the underarm when the arm is down at the side. It crosses just above the fullest bust circumference point and across the shoulder blades. To properly fit a sleeve, the syce line placement must be correct.
Fitting SampleMost sleeve patterns require some adjustments for a custom fit. To pract-ice fitting a sleeve, purchase a basic sloper or fitting shell pattern (see “Source”). This is a basic, fitted dress pattern that includes a one-piece sleeve, jewel-neck bodice, narrow skirt and no styling details. Use this pattern to create custom “fitting guide” pat-terns with minimum wearing ease.
Measure Your Arm Take accurate arm measurements to create a properly fitted sleeve. It’s helpful to enlist a friend to assist you. Record the following measurements in a fitting notebook, including the date, for future reference (2):
7 Overarm: With the elbow slightly bent, measure from the shoulder tip to just below the wrist bone.
7 Underarm: Along the inside of the arm, measure from the armpit to the center of the palm at the wrist.
7 Girth or bicep line: Measure around the arm at its widest point, near the armpit, with the tape loose enough that it doesn’t press into the skin. Add 2” to this measurement to account for ease.
7 Cap height: The sleeve cap is the portion above the girth or bicep line. Measure from the girth line to the shoulder tip. The cap height for a dress with a basic armhole generally varies from 53⁄8” to 61⁄4”. Add 1⁄2” to 1” when inserting shoulder pads or for a sleeve that will be set into an armhole slightly deeper than average.
7 Elbow: Measure around the elbow point with the arm sharply bent.
7 Wrist: Measure around the wrist joint, and then add 1” for ease.
7 Armhole: Measure around the arm, beginning under the armpit and over the shoulder. The tape should be snug but not pressing into the skin.
Measure the Pattern To determine the bodice armseye length, measure the front- and back-bodice pattern armseye stitching lines (3). Add these measurements together, omitting the shoulder line and side-seam allowances, to determine the total bodice armseye measurement.
To determine the sleeve armseye measurement, measure the sleeve pattern armseye stitching line from the front seamline, across the upper-
Tip: To obtain accurate pattern measurements, stand the tape measure on its edge to follow the stitching line curves.
S E W N E W S . C O M 29
Scye Line
Width
Scye Line
Leng
th
Leng
th
CF CB
Wrist
Elbow
ArmholeOverarm
Girth
Underarm
Measure.
1
2
3
SEWP-1107-Fit.indd 29SEWP-1107-Fit.indd 29 4/6/11 9:22:26 AM4/6/11 9:22:26 AM

edge center, to the back underarm seamline (4).
Compare the sleeve armseye mea-surement to the bodice armseye measurement to determine the amount of ease in the sleeve pattern. The greater the difference between the two measurements, the more ease you’ll have when sewing the sleeve.
To find the wearing ease, subtract the body armhole measurement from the bodice armseye pattern measurement. This measurement is the amount of extra room in the armseye to accom-modate movement and comfort.
Compare your body measurements to the pattern measurements to deter-mine if the selected pattern size is a good starting point. If you’re between pattern sizes, use the larger size.
Add Reference Lines Commercial patterns offer some, but not all, of the fitting information needed to successfully fit the sleeve. Use a T-square ruler to add addition-al balance reference lines to the pattern piece.
30 sew NEWS J U N E / J U L Y 2 0 1 1
Fitting Fixes
LARGE UPPER ARM The reference lines are in the correct position, but there’s a tight feeling across the girth line and the fabric displays horizontal stress wrinkles (A). To correct the sample sleeve, slash the sleeve along the lengthwise grain-line and girth line to allow the fabric to spread until there’s enough ease for a comfortable fit. Pin fabric strips along the opening edges to stabilize the sleeve for fitting. To correct the pattern, add extra width to the girth line without altering the cap height. Slash the sleeve along the lengthwise grainline from the girth line to the cap upper edge and from the girth line to the wrist. Leave small hinges intact at the sleeve upper and lower edges. Slash horizontally along the girth line from the center to allow the sleeve to widen to the needed amount. This allows the original wrist and cap size to remain the same. Redraw the armseye upper edge to equal the original cap height (B).
FORWARD ARM TILTThere are diagonal wrinkles beginning at the front shoulder ball and radiat-ing at an angle toward the back of the arm (C). To correct the problem, add more height to the sleeve cap front. Open the sleeve cap armseye seam allowance in front of the shoulder until the cap fits over the prominent bone and allows the sleeve to drop, leveling the girth line and straightening the lengthwise grainline.Transfer the muslin changes to the pattern and true the lines (D).
TOO-SHORT BACK SLEEVE CAPSquare, erect shoulders pull the cap back, creating folds radiating at an angle toward the front of the arm (E).To correct the problem, open the sleeve-cap armseye seam allowance in back of the shoulder until the cap drops, leveling the girth line and straightening the lengthwise grainline.Transfer the muslin changes onto the pattern and true the lines (F). If additional height is needed to accommodate the shoulder after the pull is eliminated, slash the pattern horizontally at the girth line and spread it open to the needed amount.
TOO-SHORT SLEEVE CAPThe lengthwise grainline is straight and level, but the girth line rises at the center. There are diagonal wrinkles pointing from the shoulder seam toward the armhole front and back (G). To correct the pattern, open the seam allowance over the upper half of the sleeve armseye until the girth line is level. If there isn’t enough seam allowance to accommodate the needed alteration, lower the sleeve armseye underarm curve, making sure that the sleeve cap width doesn’t become too narrow. Transfer the muslin changes to the pattern and true the lines (H).
Too-Long Sleeve Cap When the arm is raised, the sleeve is too tight across the upper arm. The sleeve cap is too long, allowing the width, rather than the girth, to bind across the arm (I). To correct the problem, let out the armseye seam allowance at the cap sides; pin. You may need to raise the cap height by raising the curve of the sleeve underarm seams. Transfer the muslin changes onto the pattern and true the lines (J).
Sleeve Setbacks
When trying on your sample sleeve, evaluate the fit for these common fitting problems. Make simple pattern alterations for a proper fit.
Measure.
Girth Line
Cap Height
4
SEWP-1107-Fit.indd 30SEWP-1107-Fit.indd 30 4/6/11 9:22:27 AM4/6/11 9:22:27 AM

S E W N E W S . C O M 31
Draw the girth and cap-height lines on the sleeve pattern, using the straight lengthwise grainline as a reference (5). When fitting the pattern, it will be easy to see when these lines are being pulled or distorted.
Cut out the sleeve and bodice from muslin. Transfer the reference lines and pattern markings onto the muslin sleeve and bodice, using chalk or marker.
Ease The Sleeve CapStitch the sleeve underarm seam. Stitch the bodice shoulder line and side seam.
Stitch rows of gathering or easing stitches to distribute the sleeve-cap ease before the sleeve is attached to the bodice. Using the sleeve pattern markings for reference, stitch two easing stitch rows on the sleeve cap, leaving long thread tails. When working with a slippery or difficult-to-handle fabric, stitch three rows for additional ease control.
Carefully pull the thread tails to evenly distribute the ease between the pattern markings, making sure
Cap Height
Girth Width
WidthCap
WidthElbow
Unde
rarm
Leg
th
Ove
rarm
Leg
th
Wrist Width
Depth
Fron
t Arm
seye
Back Armseye
Tip: Enlist the help of a sewing friend to help take accurate measurements and fit the muslin sleeve pattern.
Large Upper Arm
Forward Arm Tilt
Overlap Overlap
Restore Cap Height
Added height
Grai
n
Back Sleeve Too Tight
Added height
Grai
n
Sleeve Cap Too Short
Added height
Grai
n
Arm Raised Tight Across Upper Arm
Added height
5
A
D
G
J
B
E
H
C
F
I
SEWP-1107-Fit.indd 31SEWP-1107-Fit.indd 31 4/6/11 9:22:27 AM4/6/11 9:22:27 AM
there are no puckers between the stitches. Take your time to ensure a smooth sleeve cap.
With right sides together, align the sleeve and bodice notches, dots, upper-edge center and seamlines; pin generously. Baste the sleeve into the armhole.
Try on the SamplePut on the sample garment and stand in front of a mirror.
Study the sleeve reference lines. The horizontal reference lines should be parallel to the floor and the vertical lines should be straight and level.
Look for folds and wrinkles and determine where they radiate from. Move your arm up and down, reach forward and bend your elbow to assess the comfort and mobility of the sleeve and armseye.
Focus on one area at a time to make simple sketches and notes about fitting problems in a notebook (see “Sleeve Setbacks” on page 30). Keep these notes for reference to recognize the sleeve shape, cap height and ease that fit your body.
Make the needed alterations to the sleeve pattern, and then refit the sample until the fitting problems are corrected. Z
SOURCE
Butterick carries 5627, a basic fitting shell pattern: butterick.com.
32 sew NEWS J U N E / J U L Y 2 0 1 1
Fitting Fixes
Tip: Measure the armseye from dot to dot and the sleeve
cap from dot to dot (before stitching the ease stitches) to
give an idea of exactly how much you’ll need to ease in.
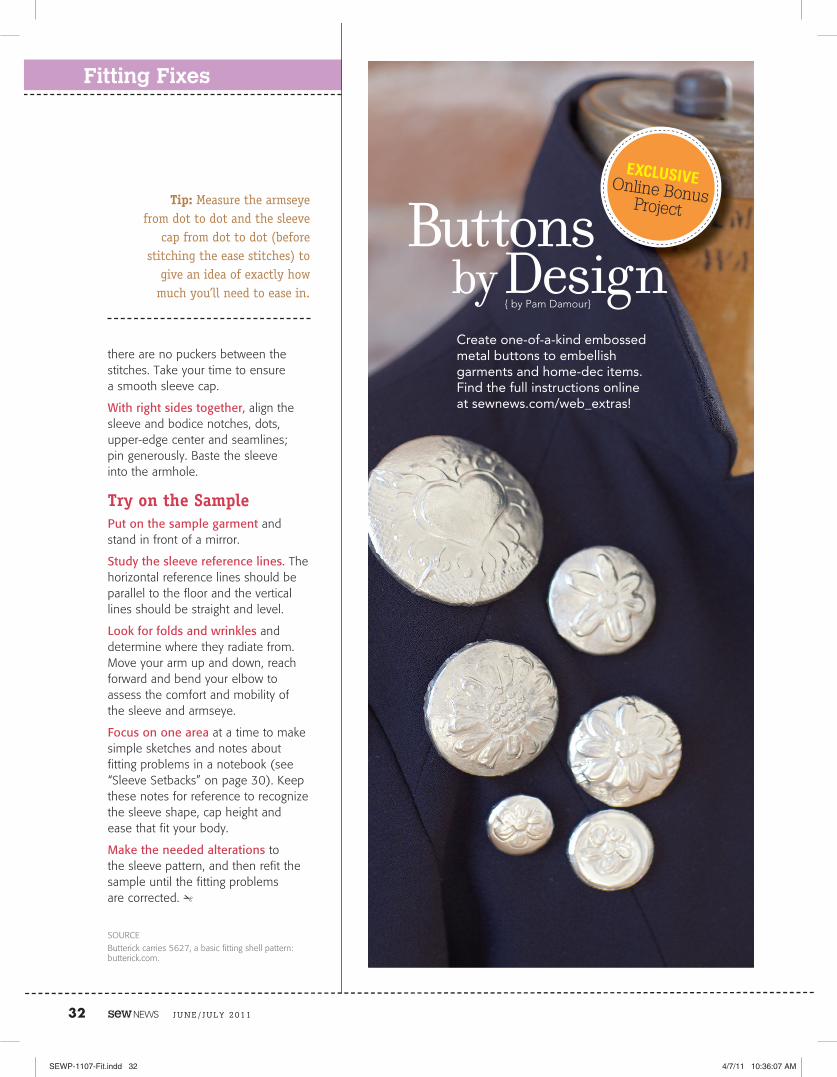
Create one-of-a-kind embossed metal buttons to embellish garments and home-dec items. Find the full instructions online at sewnews.com/web_extras!
Buttons by Design
{ by Pam Damour}
EXCLUSIVEOnline BonusProject
SEWP-1107-Fit.indd 32SEWP-1107-Fit.indd 32 4/7/11 10:36:07 AM4/7/11 10:36:07 AM