Embed Size (px)
Citation preview

Lesson 2 Explore
AT A GLANCE Overview In Lesson 2, students add to their awareness of the mouth as an environment. First, students use their fingers to “take a trek” in their mouths. They explore the overall environment of the mouth and the various structures inside. Next, students explore the different types, shapes, and functions of the teeth and estimate and confirm the number of teeth in their mouths. Then, students create records and graphs to illustrate the number of teeth among the students in the class. As an extension, students recognize the importance of teeth, lips, and tongue to the formation of speech as they try to say “funny” ABCs. Students also practice recognizing the structures of the mouth while they play a matching game.
Purpose In this lesson, students will
• have the opportunity to explore and describe the mouth as an environment and to describe the structures within the mouth;
• focus on the importance of teeth, the types of teeth, and their functions; and
• reinforce their counting and graphing skills.
Objectives After completing this activity, students will
• recognize that the oral cavity (the mouth) is an environment made up of many physical structures; some of the structures can be seen and felt, and others cannot be seen without the use of special tools such as x-rays;
• become aware that saliva is an important component of a healthy mouth;
• identify the different types of human teeth and the functions of each;
39
Open Wide! What’s Inside?

• estimate and confirm the number of teeth in their mouths; and • keep a record of their teeth, both primary and permanent, and the
incidence of loss of primary teeth.
BACKGROUND INFORMATION Mouth The mouth, or oral cavity, is a gateway to the entire body. It allows us to talk, smile, eat and drink, digest food, and helps protect us from disease. The mouth can reveal signs of diseases (vitamin deficiencies, immune diseases) and provide physical clues to illness (a fever). The tissues of the mouth can serve as an early warning system. For example, the mouth can show the effects of tobacco use, providing perhaps the only visible evidence of its harmful effects. These relationships between the mouth and the rest of the body reinforce the importance of maintaining good oral health. Currently, researchers are exploring whether or not there is a link between chronic oral infections and other diseases such as heart disease, stroke, diabetes, and premature births.1
The mouth is an amazing environment made up of many physical structures. We can see and feel some of the structures, such as the crowns of the teeth, tongue, gums, lips, cheeks, and roof of the mouth. Other structures are invisible to the naked eye because they are covered by bone or skin tis-sue, such as the roots of the teeth, salivary glands, and the developing permanent teeth in young children.
Teeth Did you know that the outer layer of our teeth, the enamel, is the hardest substance in the body? Although some children, and even some adults, may think that teeth are merely hard, rocklike structures, teeth are composed of living tissue. Each tooth has a crown, the visible portion of the tooth, and a root (or roots) embedded in the bone. The enamel consists of many tiny, long, thin rods made of minerals. Directly under the enamel is
40 Lesson 2

dentin, a mineral material somewhat like bone but stronger. The innermost part of the tooth, the pulp, is a chamber containing nerves and blood vessels that carry nutrients and oxygen to the tooth.2 The root is covered and protected by a thin layer of cementum, a bonelike tissue that helps attach the tooth to its bony socket via elastic fibers (a ligament).
Humans have two sets of teeth: primary and permanent teeth. The two sets of teeth are similar in structure, although primary teeth have thinner enamel and larger pulp chambers. Humans have 20 primary, or deciduous, teeth that begin to emerge at around six months of age but develop well before birth.3 Expectant mothers need to eat a nutritious diet containing adequate calcium to ensure the proper development of their baby’s teeth. Primary teeth play a key role in the development of children by:
• helping digest food once a baby starts eating solid food; • helping develop the shape of the face and; • maintaining space for and guiding the permanent teeth (which
develop underneath) into proper position.
Keeping primary teeth healthy is just as important as keeping permanent teeth healthy. Children who develop tooth decay in their primary teeth are more prone to decay in their permanent teeth. Also, if a primary tooth is lost prematurely, the adjacent teeth may drift into the open space, leaving insufficient room for the permanent teeth that follow.4 This tooth movement may result in crowded or misaligned permanent teeth (dental malocclusion). These types of malocclusions may not necessarily affect oral health or function but can compromise aesthetics and self-image.
The loss of a child’s first primary tooth is a noticeable and memorable event, a rite of passage that typically starts at about five or six years of age. Much less celebrated but extremely important is the appearance of a child’s permanent molars. The initial permanent molars to erupt are the first (or 6-year) molars followed by the second (or 12-year) molars. The permanent molars erupt in the space behind the primary molars. Because a primary
Open Wide! What’s Inside? 41

tooth is not lost before these molars appear in the mouth, the growth of the molars is often unnoticed. Care of these new molars is crucial, however. The biting surfaces of molars have many grooves and pits that make them prone to decay. Fortunately, good dental care and dental sealants can keep them healthy. (See Lessons 4 and 5 for more information on the causes and prevention of decay.)
Repr
inte
d w
ith p
erm
issio
n fro
m M
oss,
Gro
win
g U
p C
avity
Fre
e: A
Par
ent’s
Gui
de to
Pre
vent
ion,
Chi
cago
, 199
3, Q
uint
esse
nce
Publ
ishin
g C
o.
Primary teeth are shaded in this drawing. Unshaded areas indicate permanent teeth.
When the permanent teeth are ready to erupt, the bone around them pushes them into the mouth through the gums. Have you ever noticed that brand new permanent incisors have small projections or bumps on their edges? These projections, called mamelons, help the tooth rise through the tissues and into the mouth; they usually wear out with normal chewing and biting to leave a smooth edge. When all their permanent teeth have emerged, humans have 32 teeth—16 in each jaw. For most people, 28 permanent teeth have emerged by age 14, while the last four third molars, the wisdom teeth, erupt only if the jaw allows space for them.3
All teeth have similar structure, with a crown and root(s), but they have different shapes to help them perform unique functions. For instance, the incisors are chisel-shaped to cut or incise food, while the canines have
42 Lesson 2

stronger, deeper roots and single-pointed cusps for tearing and ripping food apart. The premolars (or bicuspids) and molars are shaped to crush and finally grind food for easier digestion.3
incisors canines premolars molars
Humans, similar to other mammals, including cats and dogs, have a primary set and a permanent set of teeth. Others, like most rodents, sharks, and other fish, have only one set of teeth that keeps growing throughout their lifetime. Animals eat different types of foods, so they have teeth that are specialized to help break down the food in their diet so that they can swallow it. For example, meat-eating animals have well-formed, pointed canines for holding and tearing food while plant-eating animals, such as cows and horses, have well-formed incisors for cutting grassy foods and flat molars for grinding it.2
Gingiva (Gums) The gingiva, commonly known as gums, is a dense, soft tissue that surrounds the teeth. It covers the bone that surrounds the roots of the teeth and anchors them in place. If plaque is allowed to build up along and under the gum line, through lack of oral hygiene, oral bacteria release harmful enzymes and toxins that cause the gums to become red, swollen, and tender and to bleed easily during tooth brushing or flossing. This inflammatory process is called gingivitis. If the bacterial infection reaches the bone and supporting tissues around a tooth, it may lead to loss of sup-port of the tooth and, in some cases, tooth loss. The vast majority of gum disease can be prevented by careful daily plaque removal with a toothbrush and floss and through regular dental office visits.
Tongue The tongue is a strong and flexible muscle in the mouth. It extends from the back of the mouth and is attached to the floor of the mouth. The great range of movement of the tongue helps it move food around the mouth so that a person can chew and swallow.2 The tongue is a sensory organ, allowing humans to taste using the taste buds that are scattered on its surface and sides. The human tongue twists and turns, allowing us to form specific sounds and words that make up speech.
Palate Another visible structure in the oral cavity is the palate, or roof of the mouth. Humans have a hard palate made of bone covered by a tissue called
Did You Know? Grown dogs have 42 permanent teeth. Adult humans have 32 permanent teeth. (Puppies have 28 primary teeth while children have 20 primary teeth.)
The front teeth of beavers can grow up to 4 feet per year. When they chip or wear their teeth down, the teeth continue to grow. Human teeth do not keep growing; if we wear or chip our teeth, the damage is permanent.
Open Wide! What’s Inside? 43
a mucous membrane. Behind the hard palate is the soft palate, which is a movable fold of mucous membrane that encloses muscle tissue. The soft palate prevents food or drinks from going into the nasal passages by pressing against the back of the throat during swallowing. If, during fetal development, the two sides of the palate do not fuse, a cleft palate occurs, leaving an opening in the roof of the mouth. This developmental defect occurs very early in pregnancy due to a combination of genetic and environmental factors.2
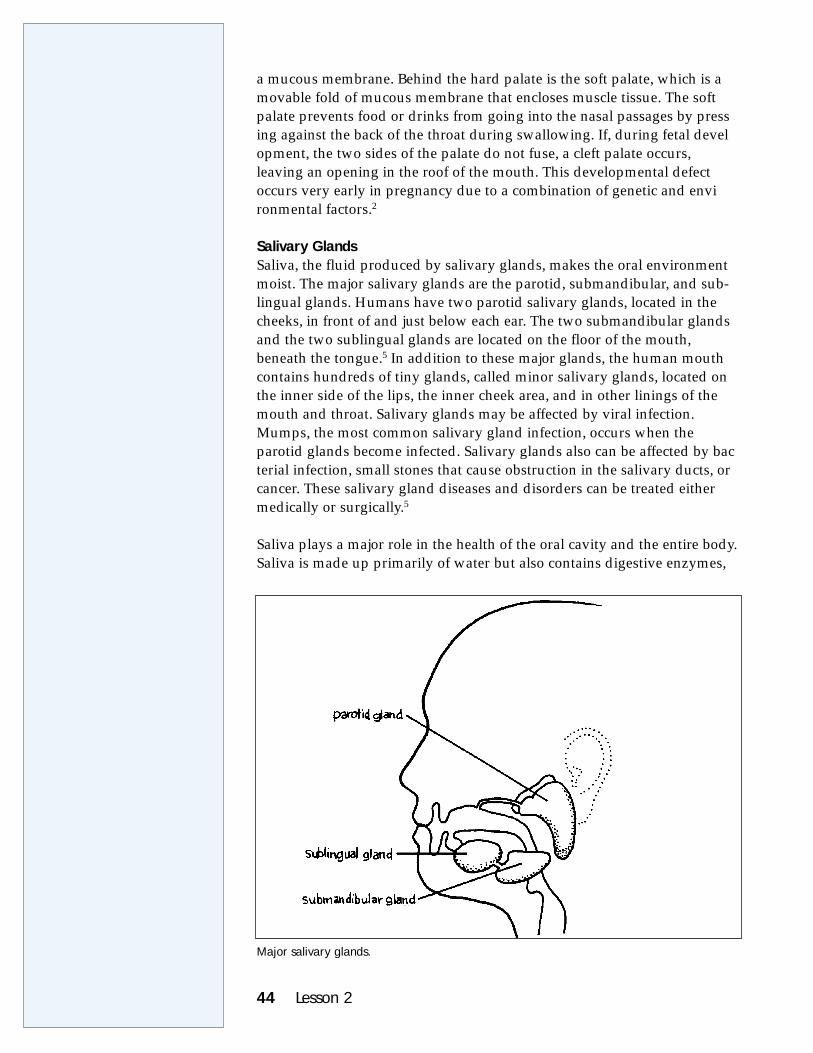
Salivary Glands Saliva, the fluid produced by salivary glands, makes the oral environment moist. The major salivary glands are the parotid, submandibular, and sub-lingual glands. Humans have two parotid salivary glands, located in the cheeks, in front of and just below each ear. The two submandibular glands and the two sublingual glands are located on the floor of the mouth, beneath the tongue.5 In addition to these major glands, the human mouth contains hundreds of tiny glands, called minor salivary glands, located on the inner side of the lips, the inner cheek area, and in other linings of the mouth and throat. Salivary glands may be affected by viral infection. Mumps, the most common salivary gland infection, occurs when the parotid glands become infected. Salivary glands also can be affected by bacterial infection, small stones that cause obstruction in the salivary ducts, or cancer. These salivary gland diseases and disorders can be treated either medically or surgically.5
Saliva plays a major role in the health of the oral cavity and the entire body. Saliva is made up primarily of water but also contains digestive enzymes,
Major salivary glands.
44 Lesson 2

such as amylase, and minerals. The flow of saliva helps to wash off microorganisms from the teeth and soft tissues of the mouth that cause bacterial, viral, and yeast infections. Saliva does more than simply cleanse materials from the teeth. Saliva contains molecules that can kill or inhibit microorganisms; it is the body’s own antibiotic. Saliva also helps preserve the teeth by bathing them with protective minerals, such as calcium, phosphate, and fluoride, that make the enamel on the surface of the tooth stronger. These minerals can aid in the early repair of tooth decay through the process of remineralization.3 (See Lesson 5 for more information about remineralization.)
Saliva also contributes to digestion by breaking down food chemically as the teeth break down the food physically. Together, saliva and teeth initiate the digestive process by breaking down food into smaller particles that pass to the back of the mouth where they are swallowed. Saliva helps clear the mouth by turning starches that we eat into sugars, which then dissolve and leave the mouth. It also enhances the taste of food by allowing the food to interact with the taste buds. The salivary glands also help indicate if the body is hydrated; a dry mouth gives us the signal to take fluids.
Another special quality of saliva is its ability to neutralize acids. Acids are produced in the mouth when certain oral bacteria break down food particles. (See Lesson 4 for more information about the actions of oral bacteria.) These acids, when held onto the tooth surface, destroy enamel and cause tooth decay. However, saliva neutralizes the acids produced by plaque bacteria. Thus, saliva protects the teeth from demineralization and tooth decay.4, 6
IN ADVANCE
Activities that include the CD-ROM Activity Number CD-ROM
Activity 1 no
Activity 2 yes
Take-home Activity no
Activity 3 yes
Extension Activity 1 no
Extension Activity 2 optional
Open Wide! What’s Inside? 45

Photocopies Activity Number
Master Number Number of Copies
Activity 1 Master 2.1, The Parts of the Mouth 1 transparency (optional)
Activity 2 none none
Take-home Activity
Master 2.3, Take-home Activity 1: My Tooth Record
1 copy for each student
Activity 3 none
Extension Activity 1
none
none none
Extension Activity 2 Master 2.4, The Parts of My Mouth
at least 3 sets* for the class (optional)
*A set consists of game cards mounted or copied onto thick paper or card stock.
Materials Activity 1
For the class: • overhead projector (optional) • transparency of Master 1.2, The Parts of the Mouth (optional) • Master 2.2, Mouth X-Ray • The Parts of My Mouth chart from Lesson 1 • tissues or paper towels • sheets of flip chart paper • markers
Activity 2 For the class:
• CD-ROM • computers • Popsicle stick
For each student: • 1 tissue or paper towel • 1 cracker or other snack food (optional)
Take-home Activity For each student:
• 1 copy of Master 2.3, Take-home Activity 1: My Tooth Record
For the class: • CD-ROM • computers • 1 sheet of flip chart paper • markers
Activity 3
For each student: • 1 tissue or paper towel
Extension Activity 1
For the class: • CD-ROM (optional) • computers (optional) • 1 set of Master 2.4, The Par
My Mouth Game Cards (opt
Extension Activity 2
• scissors • glue
ts of • thick paper or card stock ional)
46 Lesson 2

Preparation • Arrange for students to have access to computers. • Check students’ health records for students with food allergies and
make sure that all students can eat the crackers (or the alternate snack you bring to class).
• Gather the materials needed for the activities.Ä• Make a transparency of Master 2.1, The Parts of the Mouth, if you thinkÄ
it will help students visualize the parts of their mouths. • Have Master 2.2, Mouth X-Ray, available to hold up for students. • Duplicate Master 2.3, Take-home Activity 1: Tooth Record, 1 for each
student. • Have students’ Mouth Journals (prepared in Lesson 1) available for the
Wrap-up exercise. • Before introducing Master 2.3, Take-home Activity 1: My Tooth Record,
inform parents or guardians that you will be sending home an activity and that you would like them to do the activity with their child. Indicate when you would like the Certificate of Completion returned to school.
• If you choose to use the print version of the Extension Activity 2, copy the game cards from Master 2.4, The Parts of My Mouth Game Cards, onto thick paper or card stock so that students cannot see through the cards when they are turned over. (Alternatively, copy the game cards on regular copy paper and glue them to card stock.) Make enough sets of cards for several groups of students to play the game at the same time.
PROCEDUREActivity 1: Mouth Trek The purpose of this activity is to give students the opportunity to explore and describe the mouth as an environment and to describe the structures within the mouth.
1. Briefly review what students learned about the mouth in Lesson 1.
Review both the structures and the functions of the mouth that you listed on the chart paper.
2. Begin the activity by asking the students, “What does the inside of your mouth feel like?” and “How could you find out?” Tell students that today they will use their fingers to “take a trek” inside their own mouths and find out more about what is there. Provide tissues or paper towels for students to dry off their fingers, if necessary.
Make sure that students wash their hands with soap and water before they begin their “mouth trek.”
Open Wide! What’s Inside? 47

ES NS
Content Standard A: Abilities necessary to do scientific inquiry. 3. Instruct students to use an index finger to feel the inside of their
mouths. Encourage them to describe what they feel. Use the board or flip chart paper to list their describing words. Remind students that this is what scientists do when they are exploring something new: they describe what they encounter. (Note: Save this chart for use in Lesson 4.)
4. Review the list by asking students to connect specific structures with their descriptive words. To remind the students of the structures of the mouth, display the chart, The Parts of My Mouth, from Lesson 1.
48 Lesson 2
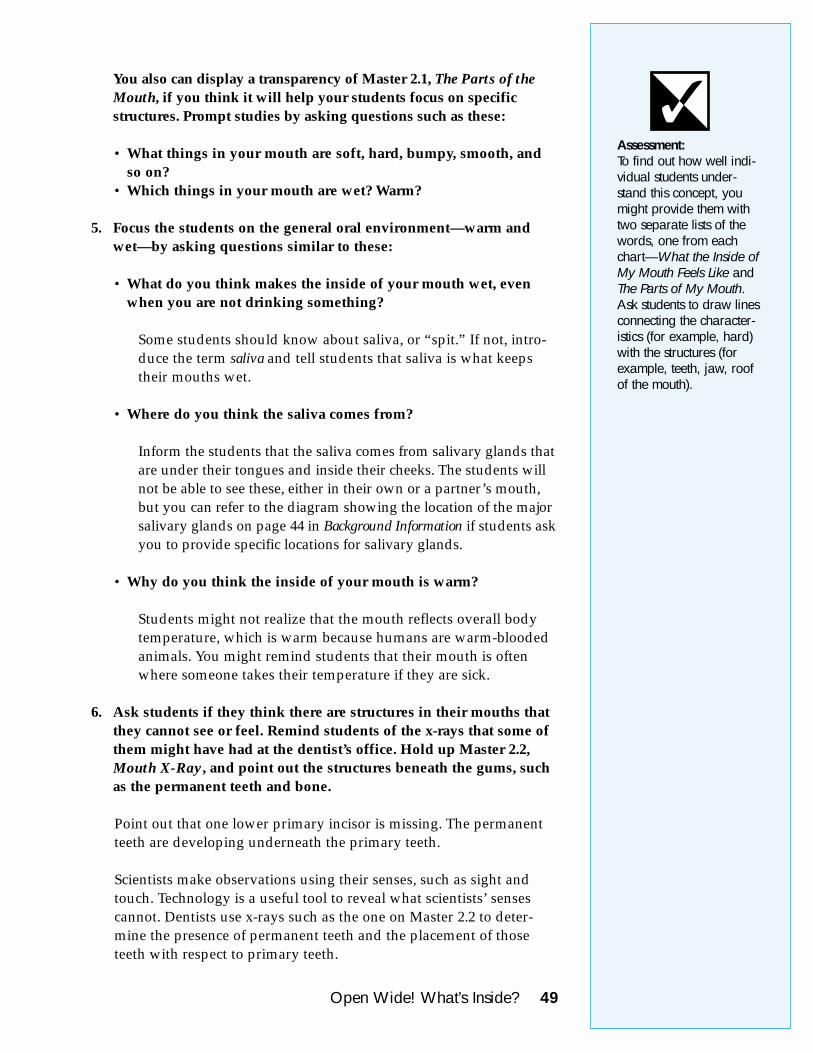
You also can display a transparency of Master 2.1, The Parts of the Mouth, if you think it will help your students focus on specific structures. Prompt studies by asking questions such as these:
• What things in your mouth are soft, hard, bumpy, smooth, and so on?
• Which things in your mouth are wet? Warm?
5. Focus the students on the general oral environment—warm and wet—by asking questions similar to these:
• What do you think makes the inside of your mouth wet, even when you are not drinking something?
Some students should know about saliva, or “spit.” If not, introduce the term saliva and tell students that saliva is what keeps their mouths wet.
• Where do you think the saliva comes from?
Inform the students that the saliva comes from salivary glands that are under their tongues and inside their cheeks. The students will not be able to see these, either in their own or a partner’s mouth, but you can refer to the diagram showing the location of the major salivary glands on page 44 in Background Information if students ask you to provide specific locations for salivary glands.
• Why do you think the inside of your mouth is warm?
Students might not realize that the mouth reflects overall body temperature, which is warm because humans are warm-blooded animals. You might remind students that their mouth is often where someone takes their temperature if they are sick.
6. Ask students if they think there are structures in their mouths that they cannot see or feel. Remind students of the x-rays that some of them might have had at the dentist’s office. Hold up Master 2.2, Mouth X-Ray, and point out the structures beneath the gums, such as the permanent teeth and bone.
Point out that one lower primary incisor is missing. The permanent teeth are developing underneath the primary teeth.
Scientists make observations using their senses, such as sight and touch. Technology is a useful tool to reveal what scientists’ senses cannot. Dentists use x-rays such as the one on Master 2.2 to deter-mine the presence of permanent teeth and the placement of those teeth with respect to primary teeth.
Assessment: To find out how well individual students under-stand this concept, you might provide them with two separate lists of the words, one from each chart—What the Inside of My Mouth Feels Like and The Parts of My Mouth. Ask students to draw lines connecting the characteristics (for example, hard) with the structures (for example, teeth, jaw, roof of the mouth).
Open Wide! What’s Inside? 49

ES NS
Content Standard A: Abilities necessary to do scientific inquiry.
Activity 2: Cut, Tear, and Grind The purpose of this activity is to focus students on the importance of teeth as well as the types of teeth and their functions.
1. Ask students to wash their hands. Then, remind them of the mouth trek they took during the previous activity. Direct them to take another mouth trek. This time, focus students on the shapes of their teeth by asking questions similar to these:
• Do all your teeth feel the same? • Which teeth feel bigger? • Which teeth feel sharper? • Which teeth feel flatter? • Which teeth feel smoother? • Which teeth have lots of edges? • Which teeth only have one edge?
As students compare and contrast their teeth, ask them why they think their teeth are different sizes and shapes.
2. Remind students what their teeth did when they ate the cracker in Lesson 1. (Optional: Distribute another cracker to students and ask them to pay attention to how their teeth help them eat the cracker.)
Focus students on the actions of first biting and then grinding or crushing the cracker. Ask them to describe which teeth do which action. Ask them again why they think their teeth are shaped differently. Encourage them to relate their answer to the job each tooth does in helping them eat food.
During this activity, focus mainly on the teeth; however, if students bring it up, review the role of saliva in making food soft and easy to swallow.
3. Tell students that incisors bite or cut into food. Help students find the incisors in their mouths.
Help them pay attention to where the incisors are located in their mouths. Talk about why their incisors might be at the front of the mouth rather than at the back.
Tell students that canine teeth tear food. Help students locate their canine teeth.
50 Lesson 2

Help them pay attention to where the canines are located in their mouths. Talk about why their canine teeth might be toward the middle of the mouth rather than at the front or back.
Tell students that molars crush and grind food. Ask students to find their molars.
Help them pay attention to where the molars are located in their mouths. Talk about why their molars might be in the back of the mouth rather than at the front.
4. Ask students to estimate how many teeth they have in their mouths.
Remind students that an estimate is an approximate calculation based on information they already have. In this activity, students have identified three kinds of teeth in their mouths. They can use their tongue to roughly count how many molars they have, how many canines they have, and how many incisors they have. Or, they can try to count how many teeth they have on the top and estimate that the total number of teeth in their mouth is double that number. Encourage students to estimate carefully, not just guess.
5. Ask for a student volunteer to come to the front of the room for an exact tooth count. Make sure your hands are clean and use a clean Popsicle stick to point to each tooth as you count it. Record on the board the number of teeth the student volunteer has. Based on the count of the volunteer’s teeth, ask students to adjust their estimate from Step 4 if necessary.
Note any missing or extra teeth that the student volunteer has. Help students see that they can estimate the number of teeth they have based on the volunteer’s tooth count and how their teeth match the volunteer’s teeth. For example, if the volunteer is missing a front tooth and the student is not, the student would have one more tooth and would increase his or her tooth count by one.
6. Tell students that you would like them to confirm their tooth count at home, with help from their parents or guardians. Follow the steps for the take-home activity (see page 52).
7. Allow time for students to complete the activity on the CD-ROM about the structures in the mouth.
Load the CD-ROM into the computer. Select Open Wide! What’s Inside? from the main menu. Then click on Inside Your Mouth!
ES NS
Content Standard C: The characteristics of organisms.
Open Wide! What’s Inside? 51

Take-home Activity: Tooth Record This is the first of three take-home activities. Thetake-home activities are designed to engage children and their parents or guardians in oralhealth activities at home. One side of the pageexplains the procedure, and the other side contains important background information for theparent.
If you know of a situation in which a studentwill not be able to complete a take-home activity,offer to help that student complete the activity at school.
1. Introduce the activity to students and review the directions. Tell students to fill out the tooth record and bring it back to the next class.
2. Point out the Certificate of Completion and inform students you would like their parent or guardian to send the completed form back to the school. The parent and child should keep the activity pages at home.
3. Send 1 copy of Master 2.3, Take-home Activity 1: My Tooth Record, home with each student and wait for results.
Activity 3: Graphing and Record Keeping The purpose of this activity is to reinforce graphing and record-keeping skills.
1. Give students time to view the segment on the CD-ROM that describes the pattern of tooth loss and the development of permanent teeth. Help students recognize that primary teeth are important place holders for permanent teeth.
Insert the CD-ROM into the drive. From the main menu, select Open Wide! What’s Inside? Then click on How Teeth Grow.
2. Tell students that the class is going to make a graph to represent the different tooth counts the students made when they did their take-home activity. Ask students to tell you why it is possible that not all students have the same number of teeth.
Loss of primary teeth is an exciting stage of development for primary students. Students will realize that they might have different numbers of teeth because they each might have lost a different number of primary teeth or have had a different number of permanent teeth erupt.
52 Lesson 2

3. To begin, make the following data table on the board. If necessary, adjust the range of tooth counts to include all counts made by your students.
Tooth Counts 16
Teeth 17
Teeth 18
Teeth 19
Teeth 20
Teeth 21
Teeth 22
Teeth 23
Teeth 24
Teeth
4. Ask students to go up to the board and put a mark in the box below the number of teeth they counted in their mouth.
5. With the students’ help, tally the number of students who put marks in each of the boxes. Record the number in the box with the marks.
6. On a large sheet of chart paper, make a bar graph representing the information from the data table. Title the graph How Many Teeth Do We Have?
7. Help students interpret the graph by asking questions such as these:
• What is the smallest number of teeth a student in this class has? • What is the largest number of teeth a student in this class has? • What number of teeth is the most common among students in
this class?
ES NS
Content Standard A: Abilities necessary to do scientific inquiry.
Open Wide! What’s Inside? 53

Assessment: You can assess your students’ ability to create and interpret bar graphs using one of these additional graphing exercises.
8. (Optional) Create additional class bar graphs that illustrate the number of students who have • loose teeth, • missing teeth, or • teeth coming in.
9. (Optional) Keep a class chart or graph as students lose their primary teeth.
• You could make an outline of a mouth with top and bottom teeth and allow a child who loses a tooth to write his or her name on that tooth.
• You could record, graph, and compare the number of specific teeth that the children lose, such as bottom incisors, top incisors, and primary molars.
Extension Activity 1: Funny ABCs The purpose of this activity is to explore and recognize the different mouth structures that help us speak.
1. Remind students that talking is one way they use their mouths. Introduce the idea that different parts of the mouth work together by trying the following activities:
Ask students to hold the end of their tongues between their fingers and to say the alphabet while they hold their tongue. Provide tis-sues or paper towels to dry off their fingers, if necessary.
Phot
o: C
orel
54 Lesson 2

Make sure students wash their hands with soap and water before they touch anything inside their mouth.
Ask students to cover their teeth with their lips and say the alphabet.
2. Help students think about the structures in the mouth—in this case, the teeth and tongue—that help them make different sounds when they talk by asking questions such as these:
• Why was it difficult to hold your tongue still? • Why was it difficult to say the alphabet when your tongue could
not move? • Why did it sound funny when you pretended to have no teeth?
3. Explain to students that their lips, teeth, and tongue work together to make sounds when they talk. Tell them they will observe how the parts of their mouths help them talk by doing these things with a partner:
• One student slowly says each letter of the alphabet, pausing after each letter to allow time for the partner to repeat the letter.
• Both students look carefully at their partner’s mouth, observing the positions of the lips, teeth, and tongue as they say each letter.
• Challenge students to discover which letters are spoken by butting the lips together, by touching the tongue to the roof of the mouth, or by touching the bottom lip with the top teeth.
• Challenge students to include the “sh,” “th,” and “ch” sounds as well.
Extension Activity 2:Matching Game: The Parts of My Mouth The purpose of this activity is to help students review the names of the structures in the oral cavity.
This activity makes an excellent center activity. Students can play the game in teams of two, three, or four, using either the CD-ROM or sets of cards copied from Master 2.4, The Parts of My Mouth Game Cards. Make sure that students keep each set of the 20 game cards separate.
Open Wide! What’s Inside? 55
Assessment: At the end of each lesson, there will be a wrap-up exercise during which students tell Exee what they have learned. You can collect students’ journals after each lesson to assess their progress or wait until the end of the curriculum supplement to do a final assessment.
1. Review the structures in the mouth that students explored previously. Hold up pictures from Master 2.4, The Parts of My Mouth Game Cards, or have someone model the structure as you review the vocabulary. Students have learned the following structures: • lips • gums • tongue • saliva • roof of mouth • teeth (incisor and molar) • uvula • cheeks • missing tooth
2. Explain to students that they are about to play a matching game that is similar to the game Memory or Concentration. (Some students may have played a version of this game before.) The object of the game is to match as many pairs of cards as they can. Review the rules of the game, as follows:
CD-ROM version: Select Open Wide! What’s Inside? from the main menu and then click on Matching Game.
The pictures in the Matching Game will be in different positions for each play of the game.
Card game version: Mix up the game cards and then lay each of the 20 cards face down in a separate space. One student turns over two cards in an attempt to find a match. (Encourage the student to name the part of the mouth pictured on each card as she or he turns it over.) If the two cards do not match, the student turns the cards face down in the same spot. If the cards match, then the student removes the matching cards and makes a pile of “matches.” That student gets to take another turn until he or she does not make a match. The students take turns turning over two cards at a time to match the objects shown on the cards. The game continues until all cards have been matched and collected. The student with the most matches wins the game.
Wrap-up Instruct students to use their Mouth Journals to write or draw about what they learned in this lesson. Help them decide what to include by suggesting that they answer the question, What would you tell Exee about the mouth now?
56 Lesson 2