Embed Size (px)
Citation preview

APPLICATION NOTE
AT05436: BitCloud ZigBee Home Automation (ZHA) – Hands-on
Atmel MCU Wireless
Features
• Running existing ZigBee® Home Automation demo application
• Application development on BitCloud®
• Extending clusters
• Adding New clusters
• Adding New device types
Prerequisites
• Hardware • Four pcs. RCB256RFR2 • One/two pcs: Breakout Board • Two/four AAA batteries • Four pcs. Sensor Terminal Board • JTAGICE3 or JTAGICE mkII • RF231USB-RD
• Software • IAR™ EWAVR 6.21.2 • Atmel® Studio 6.1 SP2 [10] • BitCloud_MEGARF_3_0_0
• Reference Documents • Atmel AVR®10004: RCB256RFR2 – Hardware User Guide [7] • Atmel AVR2052: BitCloud SDK Quick Start Guide [8] • Atmel AVR2050: BitCloud Developer Guide [5]
Note: Supported development IDEs and versions can be found in AVR2052 BitCloud Quick Start Guide [8] section Supported Platforms and IDEs.
Atmel-42288A-BitCloud-ZigBee-Home-Automation-ZHA-Hands-on_AT05436_ApplicationNote_062014
AT05436: BitCloud ZigBee Home Automation (ZHA) – Hands-on [APPLICATION NOTE] Atmel-42288A-BitCloud-ZigBee-Home-Automation-ZHA-Hands-on_AT05436_ApplicationNote_062014
2
1 Description This training module will help users to extend the Home Automation wireless network reference application in BitCloud SDK to add new logical Home Automation device support and cluster support easily. This training is divided into various tasks in order to describe in a step-by-step procedure.
• Task 1: This will be to use the standard BitCloud SDK HA application, compile and program the devices, to form a ZigBee home automation network. This application will help users in understanding the structure of the BitCloud stack and the standard demonstration scenario, which will be used as a basis for the rest of the tasks. In this task they will also learn to use the ZigBee packet sniffer tool.
• Task 2: The second task will provide the user experience in using the BitCloud SDK and extending application functionality.
• Task 3: The third task is the extension of the first and second task where the user will add a new attribute to the existing HA device and adapt the newly developed application to use this attribute.
• Task 4: The fourth will be a more complex one, which will include adding a new cluster from scratch. This includes going through the ZigBee Cluster specification of the cluster, understanding the attributes and commands for the cluster.
• Task 5: The fifth task is to add this newly developed cluster to an HA existing device and also add a new HA device type that uses this cluster. All these tasks will help users gain familiarity with developing ZigBee Applications, specifically for Home Automation.
This training material also provides an optional bonus task, which will include completing the cluster implementation and creatively develop a new application scenario to use this newly created cluster.
AT05436: BitCloud ZigBee Home Automation (ZHA) – Hands-on [APPLICATION NOTE] Atmel-42288A-BitCloud-ZigBee-Home-Automation-ZHA-Hands-on_AT05436_ApplicationNote_062014
3
2 Hardware Setup
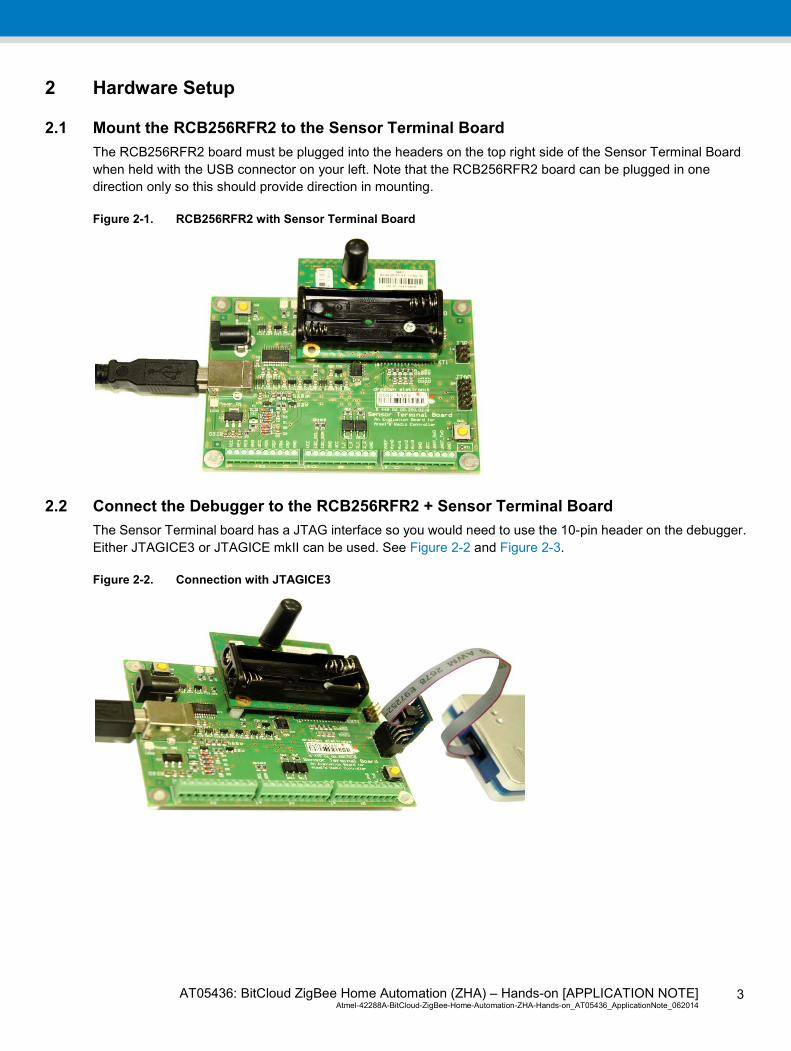
2.1 Mount the RCB256RFR2 to the Sensor Terminal Board The RCB256RFR2 board must be plugged into the headers on the top right side of the Sensor Terminal Board when held with the USB connector on your left. Note that the RCB256RFR2 board can be plugged in one direction only so this should provide direction in mounting.
Figure 2-1. RCB256RFR2 with Sensor Terminal Board
2.2 Connect the Debugger to the RCB256RFR2 + Sensor Terminal Board The Sensor Terminal board has a JTAG interface so you would need to use the 10-pin header on the debugger. Either JTAGICE3 or JTAGICE mkII can be used. See Figure 2-2 and Figure 2-3.
Figure 2-2. Connection with JTAGICE3

AT05436: BitCloud ZigBee Home Automation (ZHA) – Hands-on [APPLICATION NOTE] Atmel-42288A-BitCloud-ZigBee-Home-Automation-ZHA-Hands-on_AT05436_ApplicationNote_062014
4
Figure 2-3. Connection with JTAGICE mkII
2.3 STB Driver Installation
2.3.1 Installing Sensor Terminal Board Driver (STB) Once the STB is connected the Found New Hardware wizard will pop up. If this does not happen, update the driver manually by going to Device Manager -> on the right panel select New Device -> right click Update Driver.
Select the radio button for Install from a list or specific location (Advanced).
After connecting the STB board to PC, the driver needs to be installed. Download the STB USB driver (deRFusb Driver V1_05) for your operating system and specify the downloaded STB USB driver path for installation.
In the Hardware Installation dialog click Continue Anyway and the installation will proceed.
After the installation is completed, a second installation for the virtual serial port will happen.
Figure 2-4. Driver Path Selection
AT05436: BitCloud ZigBee Home Automation (ZHA) – Hands-on [APPLICATION NOTE] Atmel-42288A-BitCloud-ZigBee-Home-Automation-ZHA-Hands-on_AT05436_ApplicationNote_062014
5
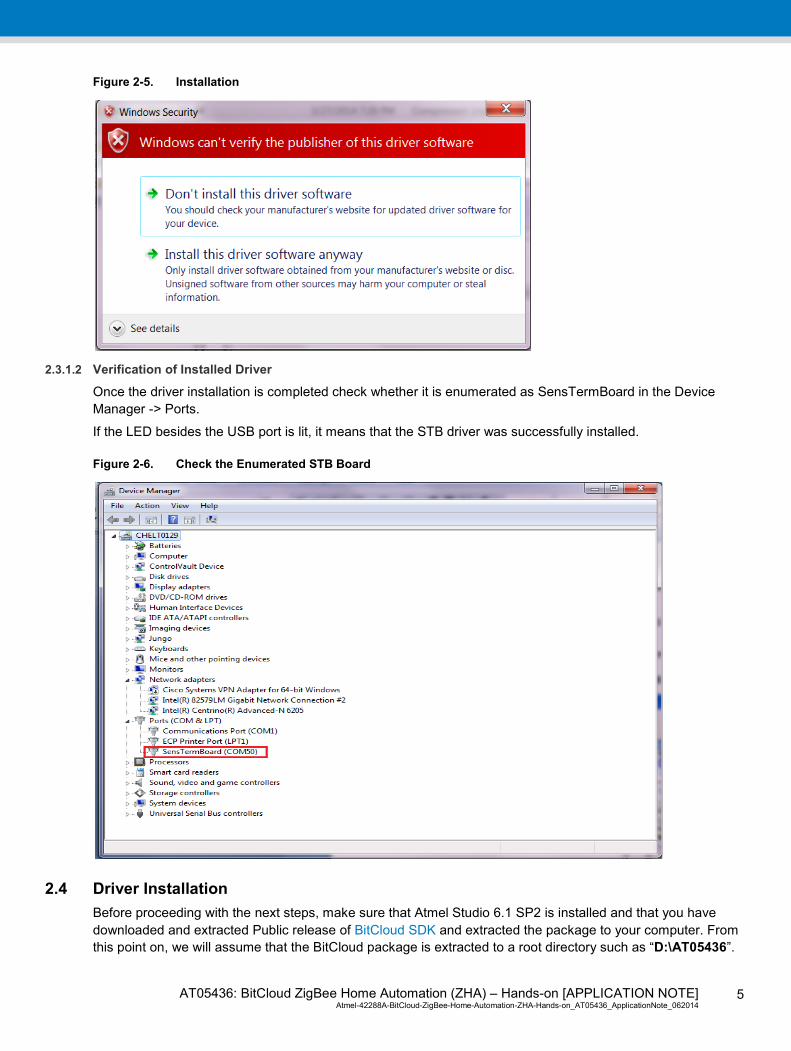
Figure 2-5. Installation
2.3.1.2 Verification of Installed Driver
Once the driver installation is completed check whether it is enumerated as SensTermBoard in the Device Manager -> Ports.
If the LED besides the USB port is lit, it means that the STB driver was successfully installed.
Figure 2-6. Check the Enumerated STB Board
2.4 Driver Installation Before proceeding with the next steps, make sure that Atmel Studio 6.1 SP2 is installed and that you have downloaded and extracted Public release of BitCloud SDK and extracted the package to your computer. From this point on, we will assume that the BitCloud package is extracted to a root directory such as “D:\AT05436”.
AT05436: BitCloud ZigBee Home Automation (ZHA) – Hands-on [APPLICATION NOTE] Atmel-42288A-BitCloud-ZigBee-Home-Automation-ZHA-Hands-on_AT05436_ApplicationNote_062014
6
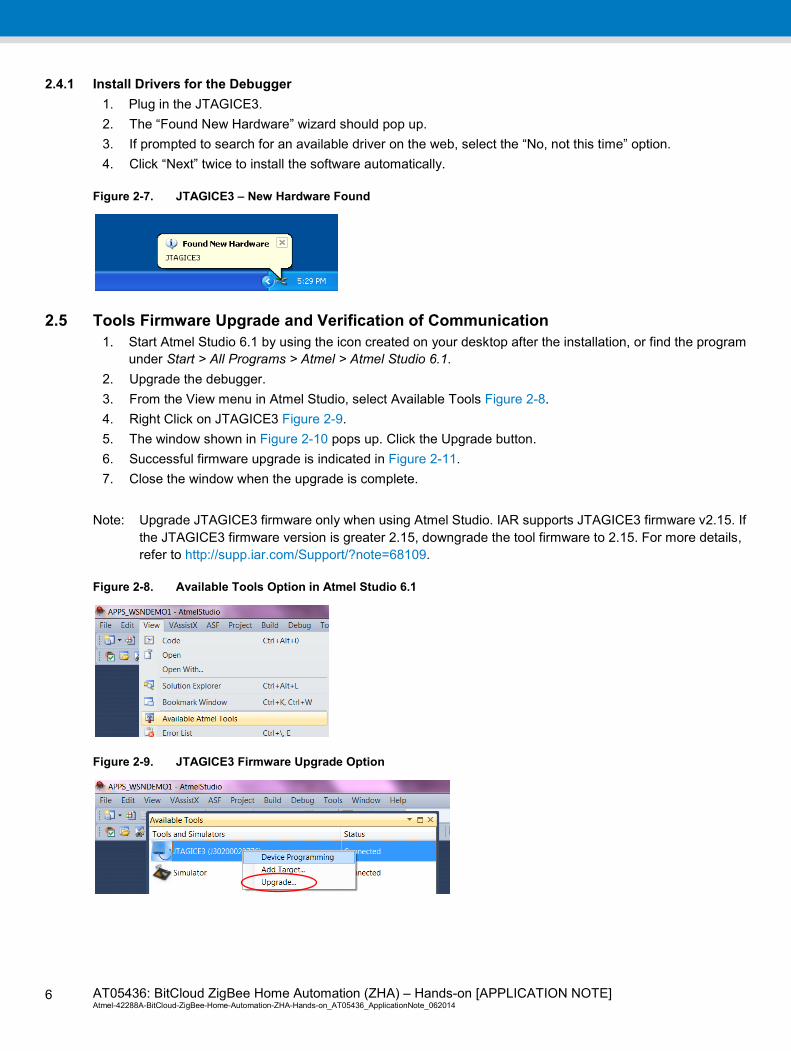
2.4.1 Install Drivers for the Debugger 1. Plug in the JTAGICE3. 2. The “Found New Hardware” wizard should pop up. 3. If prompted to search for an available driver on the web, select the “No, not this time” option. 4. Click “Next” twice to install the software automatically.
Figure 2-7. JTAGICE3 – New Hardware Found
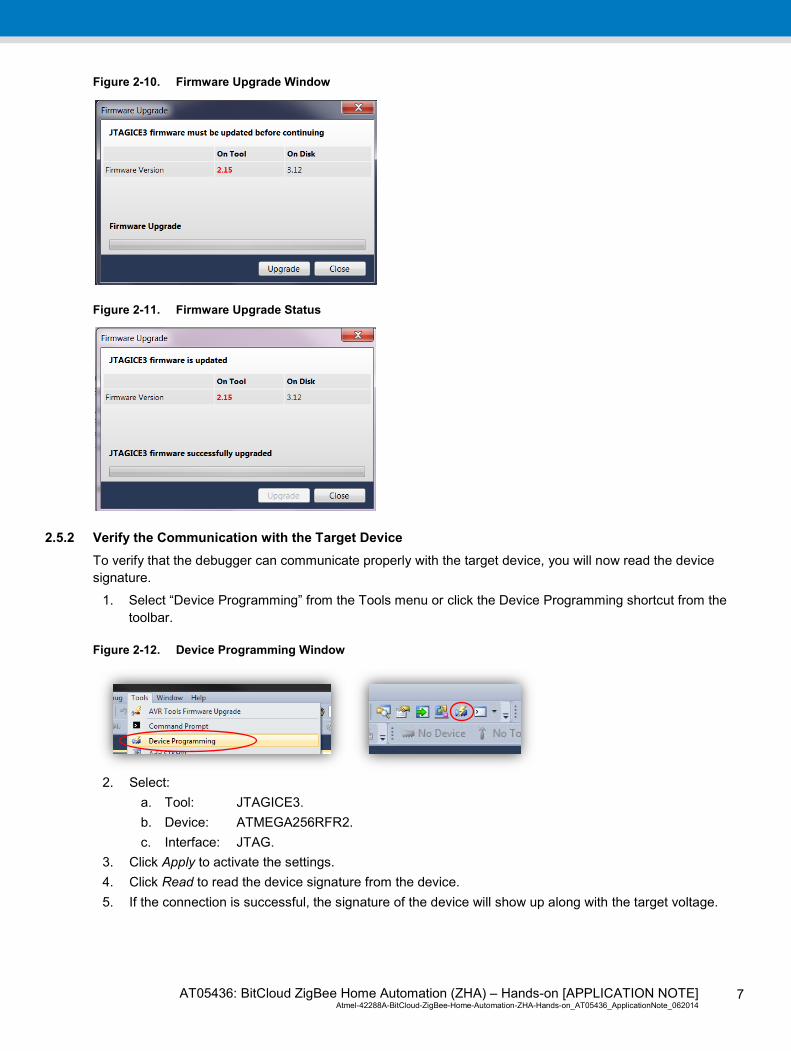
2.5 Tools Firmware Upgrade and Verification of Communication 1. Start Atmel Studio 6.1 by using the icon created on your desktop after the installation, or find the program
under Start > All Programs > Atmel > Atmel Studio 6.1. 2. Upgrade the debugger. 3. From the View menu in Atmel Studio, select Available Tools Figure 2-8. 4. Right Click on JTAGICE3 Figure 2-9. 5. The window shown in Figure 2-10 pops up. Click the Upgrade button. 6. Successful firmware upgrade is indicated in Figure 2-11. 7. Close the window when the upgrade is complete.
Note: Upgrade JTAGICE3 firmware only when using Atmel Studio. IAR supports JTAGICE3 firmware v2.15. If the JTAGICE3 firmware version is greater 2.15, downgrade the tool firmware to 2.15. For more details, refer to http://supp.iar.com/Support/?note=68109.
Figure 2-8. Available Tools Option in Atmel Studio 6.1
Figure 2-9. JTAGICE3 Firmware Upgrade Option
AT05436: BitCloud ZigBee Home Automation (ZHA) – Hands-on [APPLICATION NOTE] Atmel-42288A-BitCloud-ZigBee-Home-Automation-ZHA-Hands-on_AT05436_ApplicationNote_062014
7
Figure 2-10. Firmware Upgrade Window
Figure 2-11. Firmware Upgrade Status
2.5.2 Verify the Communication with the Target Device To verify that the debugger can communicate properly with the target device, you will now read the device signature.
1. Select “Device Programming” from the Tools menu or click the Device Programming shortcut from the toolbar.
Figure 2-12. Device Programming Window
2. Select:
a. Tool: JTAGICE3. b. Device: ATMEGA256RFR2. c. Interface: JTAG.
3. Click Apply to activate the settings. 4. Click Read to read the device signature from the device. 5. If the connection is successful, the signature of the device will show up along with the target voltage.
AT05436: BitCloud ZigBee Home Automation (ZHA) – Hands-on [APPLICATION NOTE] Atmel-42288A-BitCloud-ZigBee-Home-Automation-ZHA-Hands-on_AT05436_ApplicationNote_062014
8
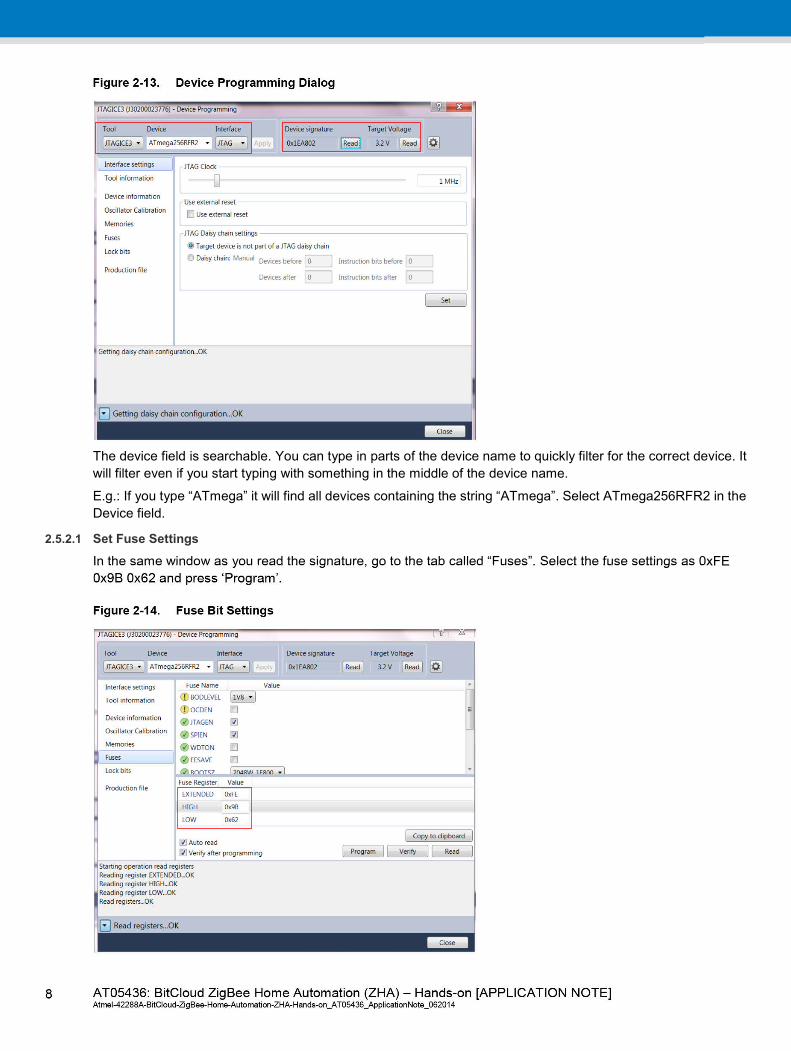
Figure 2-13. Device Programming Dialog
The device field is searchable. You can type in parts of the device name to quickly filter for the correct device. It will filter even if you start typing with something in the middle of the device name.
E.g.: If you type “ATmega” it will find all devices containing the string “ATmega”. Select ATmega256RFR2 in the Device field.
2.5.2.1 Set Fuse Settings
In the same window as you read the signature, go to the tab called “Fuses”. Select the fuse settings as 0xFE 0x9B 0x62 and press ‘Program’.
Figure 2-14. Fuse Bit Settings
AT05436: BitCloud ZigBee Home Automation (ZHA) – Hands-on [APPLICATION NOTE] Atmel-42288A-BitCloud-ZigBee-Home-Automation-ZHA-Hands-on_AT05436_ApplicationNote_062014
9
3 Using Standard BitCloud SDK Home Automation Devices
3.1 Objectives This is the first task to get started with the BitCloud HA application. This task provides exposure to the BitCloud stack components and in configuring the application for different HA devices and network related parameters. This task also provides exposure to using Atmel Studio/IAR Embedded Workbench®, compile and download the code.
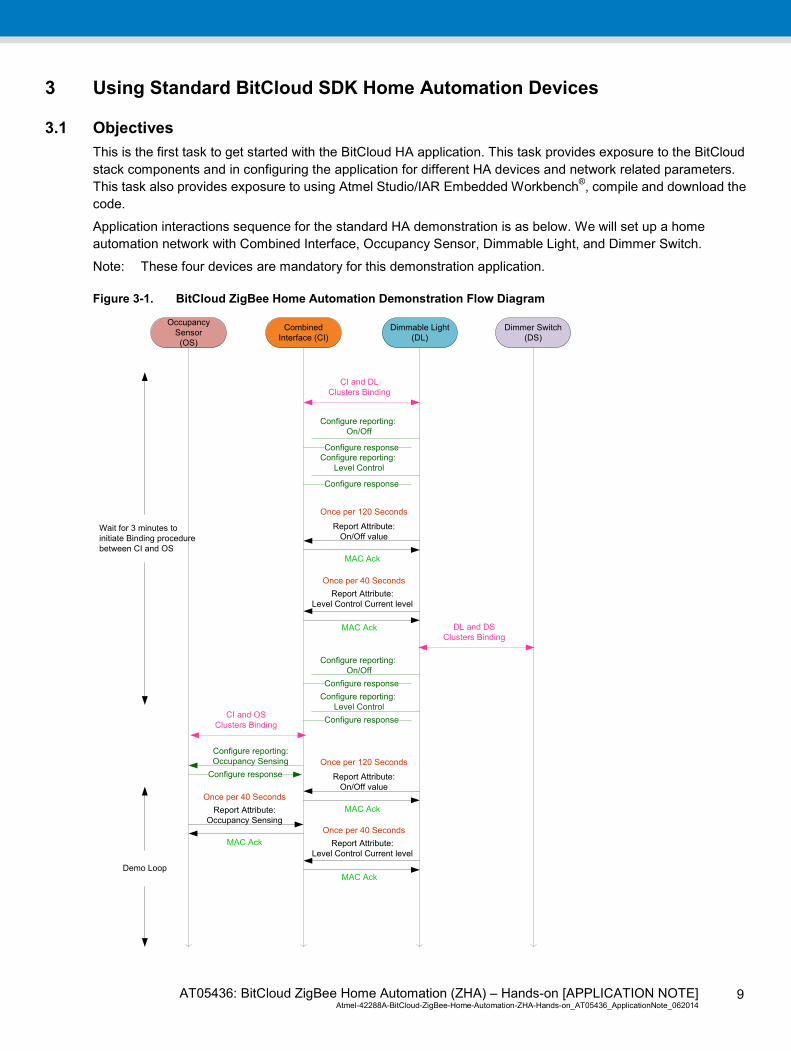
Application interactions sequence for the standard HA demonstration is as below. We will set up a home automation network with Combined Interface, Occupancy Sensor, Dimmable Light, and Dimmer Switch.
Note: These four devices are mandatory for this demonstration application.
Figure 3-1. BitCloud ZigBee Home Automation Demonstration Flow Diagram
Combined Interface (CI)
Dimmable Light(DL)
Dimmer Switch(DS)
Occupancy Sensor(OS)
Report Attribute:Occupancy Sensing
MAC Ack
Once per 40 Seconds
CI and DL Clusters Binding
DL and DS Clusters Binding
Wait for 3 minutes to initiate Binding procedure between CI and OS
CI and OS Clusters Binding
Configure reporting:Occupancy Sensing
Configure response
Configure reporting: On/Off
Configure reporting: Level Control
Configure response
Configure response
Configure reporting: On/Off
Configure reporting: Level Control
Configure response
Configure response
Demo Loop
Report Attribute:On/Off value
MAC Ack
Once per 120 Seconds
Report Attribute:Level Control Current level
MAC Ack
Once per 40 Seconds
Report Attribute:Level Control Current level
MAC Ack
Once per 40 Seconds
Report Attribute:On/Off value
MAC Ack
Once per 120 Seconds
AT05436: BitCloud ZigBee Home Automation (ZHA) – Hands-on [APPLICATION NOTE] Atmel-42288A-BitCloud-ZigBee-Home-Automation-ZHA-Hands-on_AT05436_ApplicationNote_062014
10
At this stage, you can also try programming the precompiled .hex files (..\BitCloud_MEGARF_3_X_X \Evaluation Tools\HADevice) using Atmel Studio 6.1.
Report attribute period is being configured through configure reporting and is equal to <report attribute>_VAL_MAX_REPORT_PERIOD * 2.
(E.g.: ONOFF_VAL_MAX_REPORT_PERIOD * 2)
3.2 Building Standard BitCloud ZigBee Home Automation Demonstration
3.2.1 Create Three Devices using Atmel Studio / IAR 1. Launch Atmel Studio 6.1 / IAR EWAVR 6.21.2. 2. Open ..\BitCloud_MEGARF_3_X_X\Applications\HADevice\atmelStudio_projects\ Atmega256rfr2.alsln
using Open Project menu from Atmel Studio.
Or
3. Open ..\BitCloud_MEGARF_3_0_0\Applications\HADevice\iar_projects\ HADevice.eww using Open Workspace menu from IAR.
You should now have an opened project. The IDE displays all the files included in the project. Take a few minutes and look through the project structure.
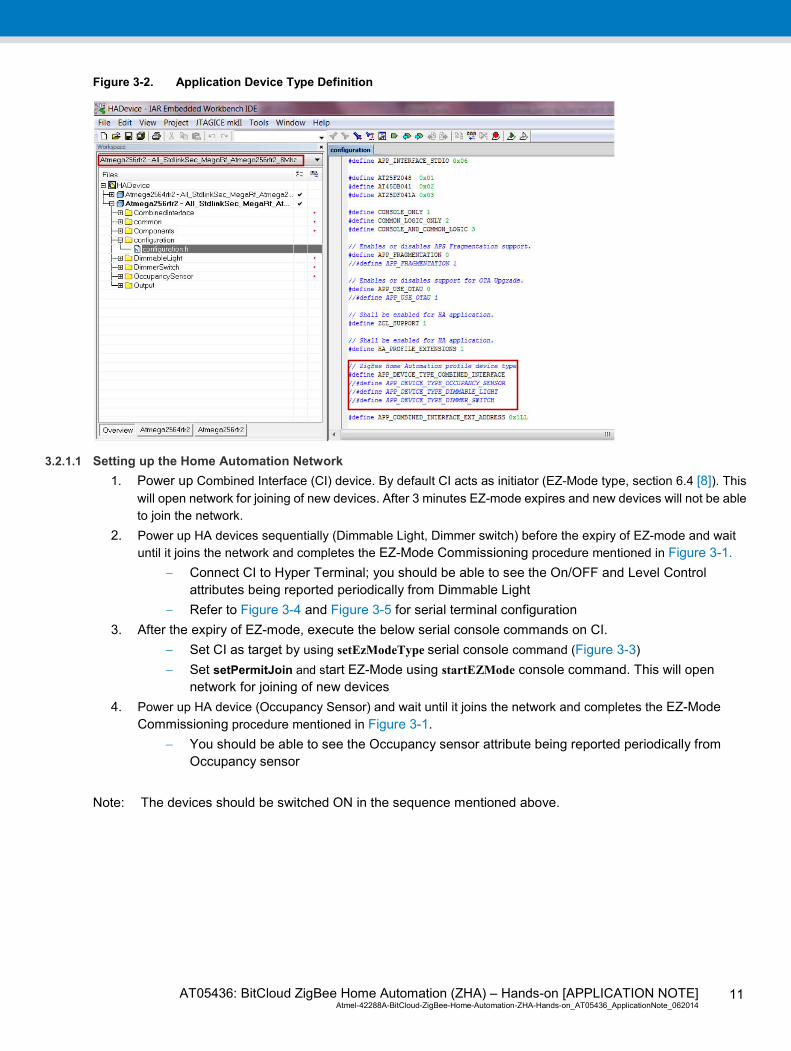
4. Open application configuration.h file and search for “ZigBee Home Automation profile device type”. 5. Uncomment #define APP_DEVICE_TYPE_COMBINED_INTERFACE. 6. Comment the other defines in the section for other device types. 7. Set APP_ENABLE_CONSOLE = 1, APP_INTERFACE=APP_INTERFACE_USBFIFO and
BSP_ENABLE_RS232_CONTROL=0 (these settings are required for enabling HA device Console). 8. Check #define CS_CHANNEL_MASK and modify the value according to your channel number. 9. Compile the project, Download and Debug.
− Note: If using IAR, select proper JTAG tool under debugger options 10. The program will hit the main. Stop debugging. 11. Program other boards by changing the device types appropriately as mentioned in step 5. You should now have four RCBs programmed as Combined Interface, Dimmable Light, Dimmer Switch, and Occupancy Sensor respectively.
Notes: 1. Make sure to have the debugger is ON and connected to the STB. 2. Make sure you have the correct project configuration chosen.
AT05436: BitCloud ZigBee Home Automation (ZHA) – Hands-on [APPLICATION NOTE] Atmel-42288A-BitCloud-ZigBee-Home-Automation-ZHA-Hands-on_AT05436_ApplicationNote_062014
11
Figure 3-2. Application Device Type Definition
3.2.1.1 Setting up the Home Automation Network 1. Power up Combined Interface (CI) device. By default CI acts as initiator (EZ-Mode type, section 6.4 [8]). This
will open network for joining of new devices. After 3 minutes EZ-mode expires and new devices will not be able to join the network.
2. Power up HA devices sequentially (Dimmable Light, Dimmer switch) before the expiry of EZ-mode and wait until it joins the network and completes the EZ-Mode Commissioning procedure mentioned in Figure 3-1.
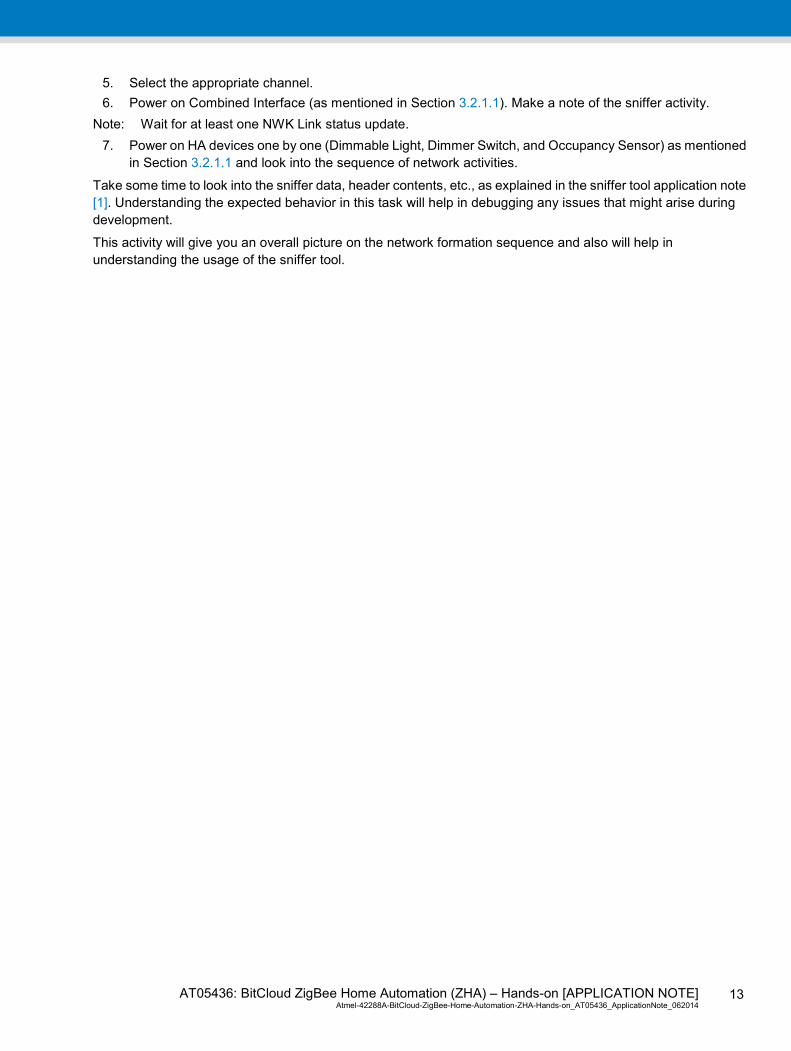
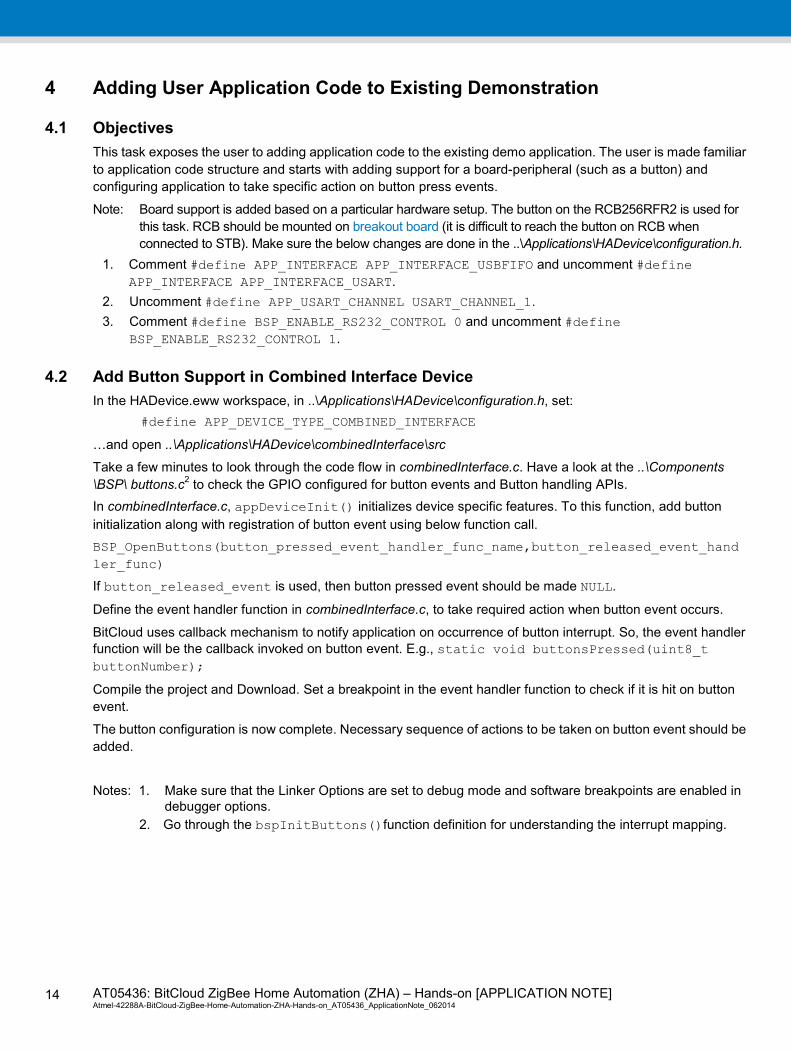
− Connect CI to Hyper Terminal; you should be able to see the On/OFF and Level Control attributes being reported periodically from Dimmable Light
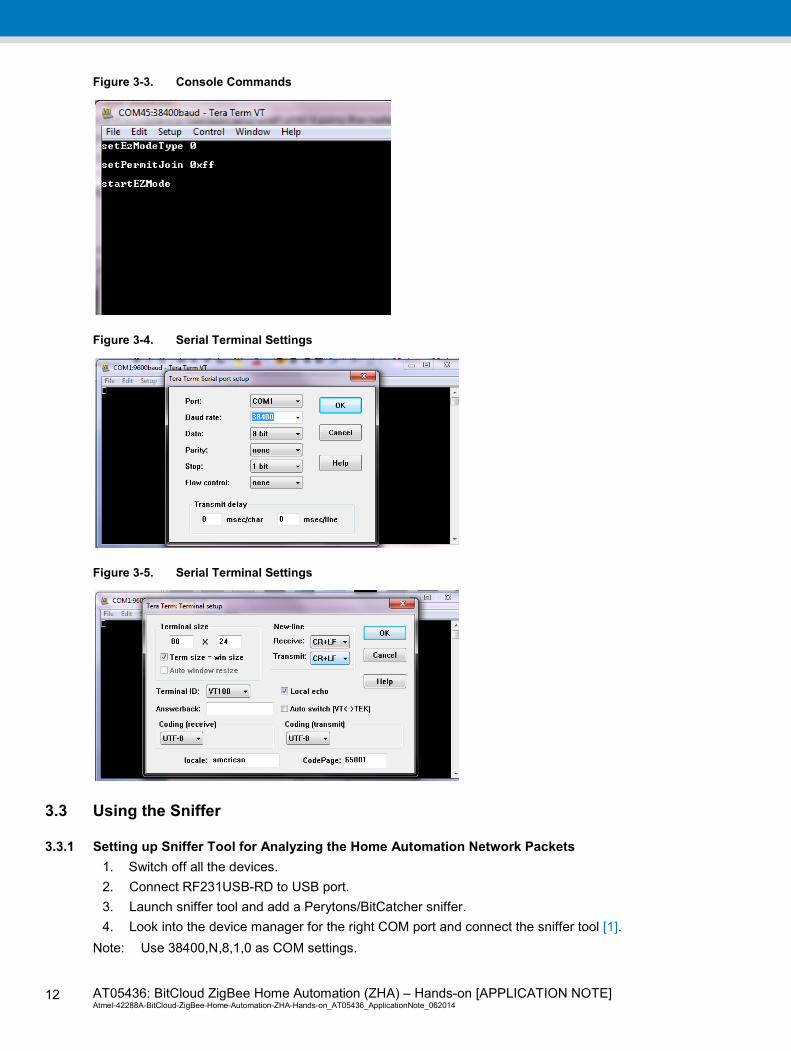
− Refer to Figure 3-4 and Figure 3-5 for serial terminal configuration 3. After the expiry of EZ-mode, execute the below serial console commands on CI.
− Set CI as target by using setEzModeType serial console command (Figure 3-3) − Set setPermitJoin and start EZ-Mode using startEZMode console command. This will open
network for joining of new devices 4. Power up HA device (Occupancy Sensor) and wait until it joins the network and completes the EZ-Mode
Commissioning procedure mentioned in Figure 3-1. − You should be able to see the Occupancy sensor attribute being reported periodically from
Occupancy sensor
Note: The devices should be switched ON in the sequence mentioned above.
AT05436: BitCloud ZigBee Home Automation (ZHA) – Hands-on [APPLICATION NOTE] Atmel-42288A-BitCloud-ZigBee-Home-Automation-ZHA-Hands-on_AT05436_ApplicationNote_062014
12
Figure 3-3. Console Commands
Figure 3-4. Serial Terminal Settings
Figure 3-5. Serial Terminal Settings
3.3 Using the Sniffer
3.3.1 Setting up Sniffer Tool for Analyzing the Home Automation Network Packets 1. Switch off all the devices. 2. Connect RF231USB-RD to USB port. 3. Launch sniffer tool and add a Perytons/BitCatcher sniffer. 4. Look into the device manager for the right COM port and connect the sniffer tool [1].
Note: Use 38400,N,8,1,0 as COM settings.
AT05436: BitCloud ZigBee Home Automation (ZHA) – Hands-on [APPLICATION NOTE] Atmel-42288A-BitCloud-ZigBee-Home-Automation-ZHA-Hands-on_AT05436_ApplicationNote_062014
13
5. Select the appropriate channel. 6. Power on Combined Interface (as mentioned in Section 3.2.1.1). Make a note of the sniffer activity.
Note: Wait for at least one NWK Link status update. 7. Power on HA devices one by one (Dimmable Light, Dimmer Switch, and Occupancy Sensor) as mentioned
in Section 3.2.1.1 and look into the sequence of network activities.
Take some time to look into the sniffer data, header contents, etc., as explained in the sniffer tool application note [1]. Understanding the expected behavior in this task will help in debugging any issues that might arise during development.
This activity will give you an overall picture on the network formation sequence and also will help in understanding the usage of the sniffer tool.
AT05436: BitCloud ZigBee Home Automation (ZHA) – Hands-on [APPLICATION NOTE] Atmel-42288A-BitCloud-ZigBee-Home-Automation-ZHA-Hands-on_AT05436_ApplicationNote_062014
14
4 Adding User Application Code to Existing Demonstration
4.1 Objectives This task exposes the user to adding application code to the existing demo application. The user is made familiar to application code structure and starts with adding support for a board-peripheral (such as a button) and configuring application to take specific action on button press events.
Note: Board support is added based on a particular hardware setup. The button on the RCB256RFR2 is used for this task. RCB should be mounted on breakout board (it is difficult to reach the button on RCB when connected to STB). Make sure the below changes are done in the ..\Applications\HADevice\configuration.h.
1. Comment #define APP_INTERFACE APP_INTERFACE_USBFIFO and uncomment #define APP_INTERFACE APP_INTERFACE_USART.
2. Uncomment #define APP_USART_CHANNEL USART_CHANNEL_1. 3. Comment #define BSP_ENABLE_RS232_CONTROL 0 and uncomment #define
BSP_ENABLE_RS232_CONTROL 1.
4.2 Add Button Support in Combined Interface Device In the HADevice.eww workspace, in ..\Applications\HADevice\configuration.h, set:
#define APP_DEVICE_TYPE_COMBINED_INTERFACE
…and open ..\Applications\HADevice\combinedInterface\src
Take a few minutes to look through the code flow in combinedInterface.c. Have a look at the ..\Components \BSP\ buttons.c2 to check the GPIO configured for button events and Button handling APIs. In combinedInterface.c, appDeviceInit() initializes device specific features. To this function, add button initialization along with registration of button event using below function call. BSP_OpenButtons(button_pressed_event_handler_func_name,button_released_event_handler_func)
If button_released_event is used, then button pressed event should be made NULL.
Define the event handler function in combinedInterface.c, to take required action when button event occurs.
BitCloud uses callback mechanism to notify application on occurrence of button interrupt. So, the event handler function will be the callback invoked on button event. E.g., static void buttonsPressed(uint8_t buttonNumber);
Compile the project and Download. Set a breakpoint in the event handler function to check if it is hit on button event.
The button configuration is now complete. Necessary sequence of actions to be taken on button event should be added.
Notes: 1. Make sure that the Linker Options are set to debug mode and software breakpoints are enabled in
debugger options. 2. Go through the bspInitButtons()function definition for understanding the interrupt mapping.
AT05436: BitCloud ZigBee Home Automation (ZHA) – Hands-on [APPLICATION NOTE] Atmel-42288A-BitCloud-ZigBee-Home-Automation-ZHA-Hands-on_AT05436_ApplicationNote_062014
15
5 Adding New Attribute to an Existing Cluster
5.1 Objective The objective of this task is to understand available cluster structure and learn to extend the same by adding new attributes to an existing cluster. In this task, the user shall add a new attribute, LastConfiguredBy, to the Scenes cluster, as per ZCL specification [3].
Table 5-1. Scenes Cluster Attribute List
Identifier Name Type Range Access Defaults Mandatory/optional
0x0000 SceneCount Unsigned 8-bit integer
0x00-0xff (see 3.7.2.3.1 [3])
Read only 0x00 M
0x0001 CurrentScene Unsigned 8-bit integer
0x00-0xff (see 3.7.2.3.1 [3])
Read only 0x00 M
0x0002 CurrentGroup Unsigned 16-bit integer
0x0000-0xfff7 Read only 0x00 M
0x0003 SceneValid Boolean 0x00-0x01 Read only 0x00 M
0x0004 NameSupport 8-bit bitmap X00000 Read only - M
0x0005 LastConfiguredBy IEEE® Address - Read only - O
5.2 Adding a New Attribute to ZCL In ..\Components\ZCL\include, identify appropriate cluster header file for Scenes cluster (zclScenesCluster.h). In this file, increase the value of the below define by 1 ZCL_<ClusterName>_CLUSTER_SERVER_ATTRIBUTES_AMOUNT
Define a constant for the attribute identifier ZCL_<ClusterName>_CLUSTER_SERVER_<AttributeName>_ATTRIBUTE_ID
Example: ZCL_SCENES_CLUSTER_LAST_CONFIGURED_BY_SERVER_ATTRIBUTE_ID
Note: You must convert the attribute id value to little endian. For example: CCPU_TO_LE16(0x0005).
Extend the attributes type definition in ZCL_SceneClusterServerAttributes_t to support LastConfiguredBy attribute as given below
typedef struct PACK { . . . struct PACK { ZCL_AttributeId_t id; uint8_t type; uint8_t properties; uint64_t value; } lastConfiguredBy; } ZCL_SceneClusterServerAttributes_t;
AT05436: BitCloud ZigBee Home Automation (ZHA) – Hands-on [APPLICATION NOTE] Atmel-42288A-BitCloud-ZigBee-Home-Automation-ZHA-Hands-on_AT05436_ApplicationNote_062014
16
Extend the macro used to define attributes instance1. Change as: #define ZCL_DEFINE_<ClusterName>_CLUSTER_SERVER_ATTRIBUTES() / DEFINE_ATTRIBUTE(<AttrName>, <properties>,<AttrID> <Attrdatatype>)
• <AttrName> name of the corresponding attribute type field2 • <properties> read/write/RW access2 • <AttrId> attribute identifier2 • <AttrType> attribute type2
Available attribute types are wrapped in the ZCL_AttributeType_t enumeration defined in the ..\Components\ZCL\include\zcl.h file.
By changing ZCL header file, it is not necessary to rebuild BitCloud core stack, application rebuild is sufficient to incorporate the cluster header file changes.
Notes: 1. To understand the naming convention, refer to the attribute instance defined under macro
ZCL_DEFINE_SCENES_CLUSTER_SERVER_ATTRIBUTES in zclScenesCluster.h. 2. Refer to Table 5-1 for the parameter value.
5.3 Extending the Application to use the Newly Added Attribute (attribute management)
5.3.1 Attribute Value Read from Application In the demo application, Dimmable Light device is the server for the Scenes Cluster and the Combined Interface device is the client. As this cluster support is already present in application in Dimmable Light and Combined Interface, the user needs to add code to send a Read Attribute Request from Combined Interface to Dimmable Light.
1. Read Attribute request of type ZCL_Request_t, is to be formed. The request payload shall contain an element of type ZCL_ReadAttributeReq_t with attribute ID set to lastConfiguredBy attribute ID (defined in scenes cluster header file).
2. Initialize the newly added attribute inside the function scenesClusterInit() in ..\ Applications\HADevice\dimmableLight\dlScenesCluster.c.
3. Compile Dimmable Light and Combined Interface applications by changing device type appropriately in configuration.h.
4. The Combined Interface sends out the Read Attribute Request and the Dimmable Light sends the Read Attribute Response packet from the ZCL layer directly. The application on the Dimmable Light is notified that the attribute has been read.
5. The application on the Combined Interface gets the read attributes response with the status of the request transaction and the attribute value if the read is successful.
Note: The ZCL Read Attribute Request can be tested by sending it on button press as added in Chapter 4 or using application timer callback Section 8.3.
Refer to the below code snippet for performing attribute read from Combined Interface device. Below code snippet can be reused in ..\ Applications\HADevice\combinedInterface\src\combinedInterface.c):
1. ZCL Read Attribute Request: readLastConfiguredBy(). 2. Notification call back: ZCL_readLastConfiguredByResponse(ZCL_Notify_t *). 3. Response variable awaitingResponse to track the response of the ZCL_AttributeReq().
AT05436: BitCloud ZigBee Home Automation (ZHA) – Hands-on [APPLICATION NOTE] Atmel-42288A-BitCloud-ZigBee-Home-Automation-ZHA-Hands-on_AT05436_ApplicationNote_062014
17
Add the below function prototypes and variable declaration to avoid compilation errors. • static void ZCL_readLastConfiguredByResponse(ZCL_Notify_t *ntfy);
• static void readLastConfiguredBy(void);
• static bool awaitingResponse = false;
Notification callback for ZCL_AttributeReq() in combinedInterface.c
static void ZCL_readLastConfiguredByResponse(ZCL_Notify_t *ntfy) { awaitingResponse= false; if(ntfy->status != ZCL_SUCCESS_STATUS) { appSnprintf("<- read lastConfiguredBy attribute failed\n"); return; } ZCL_ReadAttributeResp_t *attribute = (ZCL_ReadAttributeResp_t *)ntfy->responsePayload; u64Packed_t *ieee_address; if (ZCL_SUCCESS_STATUS ==attribute->status) { ieee_address = (u64Packed_t *)attribute->value; appSnprintf("<- Scenes lastConfiguredBy response IEEE address %x\n", (int)LE64_TO_CPU(ieee_address->val)); } attribute = (ZCL_ReadAttributeResp_t *) ((uint8_t *)attribute + offsetof(ZCL_ReadAttributeResp_t, value) + sizeof(u64Packed_t)) }
Function for sending ZCL_AttributeReq() to read lastConfiguredBy attribute from Combined Interface to Dimmable Light device in combinedInterface.c.
static void readLastConfiguredBy(void) { static ZCL_ReadAttributeReq_t attrList[] = { {ZCL_SCENES_CLUSTER_LAST_CONFIGURED_BY_SERVER_ATTRIBUTE_ID}, }; static ZCL_Request_t req = { .ZCL_Notify = ZCL_readLastConfiguredByResponse, .dstAddressing = { .addrMode = APS_NO_ADDRESS, .profileId = PROFILE_ID_HOME_AUTOMATION, .clusterId = SCENES_CLUSTER_ID, .clusterSide = ZCL_CLUSTER_SIDE_SERVER,
AT05436: BitCloud ZigBee Home Automation (ZHA) – Hands-on [APPLICATION NOTE] Atmel-42288A-BitCloud-ZigBee-Home-Automation-ZHA-Hands-on_AT05436_ApplicationNote_062014
18
}, .id = ZCL_READ_ATTRIBUTES_COMMAND_ID, .defaultResponse = ZCL_FRAME_CONTROL_ENABLE_DEFAULT_RESPONSE, .endpointId = APP_SRC_ENDPOINT_ID, .requestLength = sizeof(attrList), .requestPayload = (uint8_t*)&attrList, }; /* Send next command, only if previous one have been responded */ if (awaitingResponse) return; ZCL_AttributeReq(&req); awaitingResponse = true; }
AT05436: BitCloud ZigBee Home Automation (ZHA) – Hands-on [APPLICATION NOTE] Atmel-42288A-BitCloud-ZigBee-Home-Automation-ZHA-Hands-on_AT05436_ApplicationNote_062014
19
6 Adding a New Cluster
6.1 Objective This chapter will describe in detail how to add a cluster from scratch. This will include understanding the cluster information from the specification documents, adding attributes and supported commands for this cluster. In this chapter we will choose to add Door Lock Cluster to our existing HA application. The specification for this cluster is summarized in Chapter 9.
6.2 Adding a New Cluster to ZCL 1. Create a new zcl<ClusterName>Cluster.h file in ..\Components\ZCL\include.
− E.g. zclDoorLockCluster.h − Existing cluster header file can be used for reference E.g. zclOnOffCluster.h
2. Add it to the ZCL component to the project. 3. Add cluster ID to the enumeration in ..\ ZCL\include\clusters.h. The cluster ID should be a 16-bit value in
the little endian format. The ID can be obtained from the ZCL specification, provided in Chapter 9. E.g. <NAME>_CLUSTER_ID = CCPU_TO_LE16(<ID>).
4. Include general ZCL headers: #include <zcl.h> #include <clusters.h>
5. Define constants for amounts of client and server attributes and commands. At first you may assign zero values to the constants increasing them when adding attributes and commands: #define ZCL_<Name>_CLUSTER_SERVER_ATTRIBUTES_AMOUNT 0 #define ZCL_<Name>_CLUSTER_CLIENT_ATTRIBUTES_AMOUNT 0 #define ZCL_<Name>_CLUSTER_COMMANDS_AMOUNT 0
6. Define macros that will be used to initialize the cluster in the application. These macros fill an instance of the ZCL_Cluster_t type, which will represent the cluster in the application. Two macros are required for a client and a server and one another macro that will switch between first two. E.g.: The macro defining the client cluster type:
#define <Name>_CLUSTER_ZCL_CLIENT_CLUSTER_TYPE(clattributes, clcommands) \ { \ .id = <Name>_CLUSTER_ID, \ .options = {.type = ZCL_CLIENT_CLUSTER_TYPE, \ .security = <Security>}, \ .attributesAmount = ZCL_<Name>_CLUSTER_CLIENT_ATTRIBUTES_AMOUNT, \ .attributes = (uint8_t *)clattributes, \ .commandsAmount = ZCL_<Name>_CLUSTER_COMMANDS_AMOUNT, \ .commands = (uint8_t *)clcommands \ }
E.g.: The macro defining the Sever cluster type: #define <Name>_CLUSTER_ZCL_SERVER_CLUSTER_TYPE(clattributes, clcommands) \ { \ .id = <Name>_CLUSTER_ID, \ .options = {.type = ZCL_SERVER_CLUSTER_TYPE, \ .security = <Security>, \ .ackRequest = 1}, \ .attributesAmount = ZCL_<Name>_CLUSTER_SERVER_ATTRIBUTES_AMOUNT, \ .attributes = (uint8_t *)clattributes, \ .commandsAmount = ZCL_<Name>_CLUSTER_COMMANDS_AMOUNT, \ .commands = (uint8_t *)clcommands \ }
AT05436: BitCloud ZigBee Home Automation (ZHA) – Hands-on [APPLICATION NOTE] Atmel-42288A-BitCloud-ZigBee-Home-Automation-ZHA-Hands-on_AT05436_ApplicationNote_062014
20
7. The macro that will be used to initialize the cluster in the application: #define DEFINE_<Name>_CLUSTER(cltype, clattributes, clcommands) <Name>_CLUSTER_##cltype(clattributes, clcommands)
Notes: 1. <Name> DOOR_LOCK. 2. <Security> ZCL_NETWORK_KEY_CLUSTER_SECURITY. 3. <cltype> ZCL_CLIENT_CLUSTER_TYPE or ZCL_SERVER_CLUSTER_TYPE.
Only cluster-specific commands should be defined for the cluster. General commands are supported in BitCloud for all clusters by default.
6.3 Add Attributes to the Cluster 1. Increase attributes server attribute amount by one which was defined in Section 6.2:
ZCL_DOOR_LOCK_CLUSTER_SERVER_ATTRIBUTES_AMOUNT 1
2. Define a constant for attribute identifiers given in Table 9-1: ZCL_DOOR_LOCK_CLUSTER_SERVER_<AttributeName>_ATTRIBUTE_ID
Notes: 1. Attributes specified as mandatory (M) in Table 9-1 must be defined in the cluster header file. 2. You must convert the attribute ID value to Little Endian. For example: CCPU_TO_LE16(0x0000). 3. Attribute Identifier value can be found from Table 9-1.
3. Create an attribute type definition for server: typedef struct PACK { struct PACK { ZCL_AttributeId_t id; uint8_t type; uint8_t properties; uint8_t value; ZCL_ReportTime_t reportCounter; ZCL_ReportTime_t minReportInterval; ZCL_ReportTime_t maxReportInterval; bool reportableChange; ZCL_ReportTime_t timeoutPeriod; bool lastReportedValue; } <reportable_attribute>; . . struct PACK { ZCL_AttributeId_t id; uint8_t type; uint8_t properties; uint8_t value; } <attribute_n>; } ZCL_<ClusterName>ClusterAttributes_t;
Notes: 1. Reportable attribute structure should be defined as given for <reportable_attribute>. 2. Non reportable attribute structure should be defined as given for <attribute_n>. 3. Attribute .value data type should same as Type given in Table 9-1.
4. Create an attribute instance:
#define ZCL_DEFINE_<ClusterName>_CLUSTER_SERVER_ATTRIBUTES(<min>, <max>) \
AT05436: BitCloud ZigBee Home Automation (ZHA) – Hands-on [APPLICATION NOTE] Atmel-42288A-BitCloud-ZigBee-Home-Automation-ZHA-Hands-on_AT05436_ApplicationNote_062014
21
DEFINE_REPORTABLE_ATTRIBUTE(<AttrName>, <AttrProps>,<AttrId>, <AttrType>, <min>, <max>), \ DEFINE_ATTRIBUTE(<AttrName>, <AttrProps>,<AttrId>, <AttrType>), \
Notes: 1. DEFINE_REPORTABLE_ATTRIBUTE() Can be referred for defining reportable attributes.
2. DEFINE_ATTRIBUTE() Can be referred for defining non-reportable attributes. 3. <ClusterName> DOOR_LOCK. 4. <AttrName> lockState. 5. <AttrProps> Look under /* Bits for declaring properties bitmask of attribute */ in
clusters.h. 6. <AttrId> 0x0000. 7. <AttrType> Available attribute types are wrapped in the ZCL_AttributeType_t
enumeration defined in the zcl.h file. 8. <min> Minimum reportable duration. 9. <max> Maximum reportable duration.
6.4 Add Commands to the Cluster 1. Increase the amount of cluster commands by one.
#define <ClusterName>_CLUSTER_COMMANDS_AMOUNT
2. Define a constant for the command ID. #define ZCL_<Clustername>_Cluster_<CommandName>_COMMAND_ID <value>
Note: You must convert the command ID value to little endian. E.g.: CCPU_TO_LE16(0x0000). 3. Define the command payload format.
typedef struct PACK { ... } ZCL_<CommandName>_t;
Command payload is fully command-specific. The PACK macro ensures that the fields will be located in memory one-by-one without gaps.
4. Extend the commands type definition or create one. The commands type usually is named as follows: typedef struct PACK { struct PACK { ZCL_CommandId_t id; ZclCommandOptions_t options;
ZCL_Status_t (*commandname)( ZCL_Addressing_t *addressing, uint8_t payloadLength, <payload type> *payload);
} <Clcommand>; } ZCL_<ClusterName>ClusterCommands_t;
Notes: 1. <ClusterName> DoorLock. 2. <Clcommand> Structure name is same as the command name (Section 9.1.1). 3. <payload type> Refer to command description for payload parameters in Section 9.1.1.
5. Create Command instance: #define ZCL_DEFINE_<ClusterName>_<ClusterType>_CLUSTER_COMMANDS(<indications>) \ DEFINE_COMMAND(<Name>, <ID>, <Options>, <Indication>)
AT05436: BitCloud ZigBee Home Automation (ZHA) – Hands-on [APPLICATION NOTE] Atmel-42288A-BitCloud-ZigBee-Home-Automation-ZHA-Hands-on_AT05436_ApplicationNote_062014
22
Notes: 1. <indications> Macro argument, which consists of indication handlers for each command. 2. <ID> Command ID. 3. <Options> Configure command options with the help of the COMMAND_OPTIONS macro,
e.g.: COMMAND_OPTIONS (CLIENT_TO_SERVER, ZCL_THERE_IS_RELEVANT_RESPONSE, ZCL_COMMAND_ACK).
4. <Name> Must equal the name of the corresponding field in the commands structure defined in step 4.
5. <Indication> Must equal the name of the indication handler given in the macro argument.
The ZCL_COMMAND_ACK flag indicates that the receiver of the command will send an acknowledgement frame on the APS level upon receiving the command. If the flag is not set, APS acknowledgement will not be sent.
This completely defines a new cluster command.
AT05436: BitCloud ZigBee Home Automation (ZHA) – Hands-on [APPLICATION NOTE] Atmel-42288A-BitCloud-ZigBee-Home-Automation-ZHA-Hands-on_AT05436_ApplicationNote_062014
23
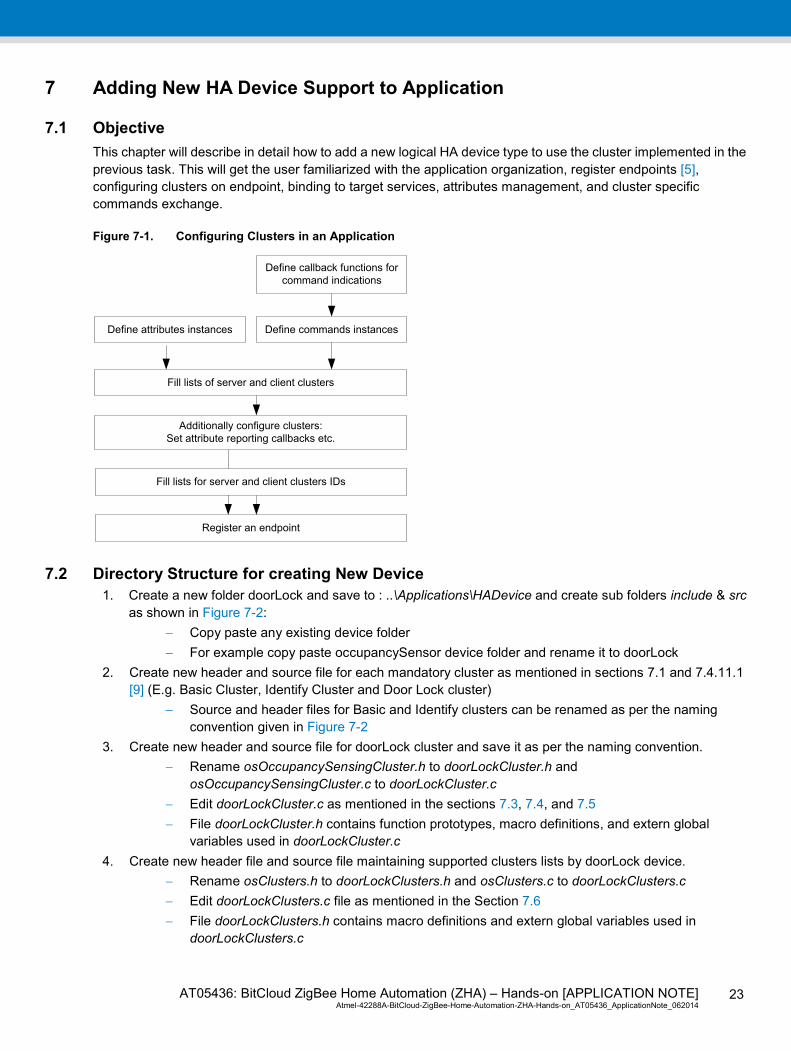
7 Adding New HA Device Support to Application
7.1 Objective This chapter will describe in detail how to add a new logical HA device type to use the cluster implemented in the previous task. This will get the user familiarized with the application organization, register endpoints [5], configuring clusters on endpoint, binding to target services, attributes management, and cluster specific commands exchange.
Figure 7-1. Configuring Clusters in an Application
Define callback functions for command indications
Define attributes instances
Additionally configure clusters:Set attribute reporting callbacks etc.
Fill lists of server and client clusters
Define commands instances
Fill lists for server and client clusters IDs
Register an endpoint
7.2 Directory Structure for creating New Device 1. Create a new folder doorLock and save to : ..\Applications\HADevice and create sub folders include & src
as shown in Figure 7-2: − Copy paste any existing device folder − For example copy paste occupancySensor device folder and rename it to doorLock
2. Create new header and source file for each mandatory cluster as mentioned in sections 7.1 and 7.4.11.1 [9] (E.g. Basic Cluster, Identify Cluster and Door Lock cluster)
− Source and header files for Basic and Identify clusters can be renamed as per the naming convention given in Figure 7-2
3. Create new header and source file for doorLock cluster and save it as per the naming convention. − Rename osOccupancySensingCluster.h to doorLockCluster.h and
osOccupancySensingCluster.c to doorLockCluster.c − Edit doorLockCluster.c as mentioned in the sections 7.3, 7.4, and 7.5 − File doorLockCluster.h contains function prototypes, macro definitions, and extern global
variables used in doorLockCluster.c 4. Create new header file and source file maintaining supported clusters lists by doorLock device.
− Rename osClusters.h to doorLockClusters.h and osClusters.c to doorLockClusters.c − Edit doorLockClusters.c file as mentioned in the Section 7.6 − File doorLockClusters.h contains macro definitions and extern global variables used in
doorLockClusters.c

AT05436: BitCloud ZigBee Home Automation (ZHA) – Hands-on [APPLICATION NOTE] Atmel-42288A-BitCloud-ZigBee-Home-Automation-ZHA-Hands-on_AT05436_ApplicationNote_062014
24
5. Create new source file with device name (E.g.: doorLock.c). This file contains end point registration,
initialization etc. − Rename occupancySensor.c to doorLock.c and edit as specified in Section 7.7
6. File osConsole.c can be renamed to doorLockConsole.c. This file can be edited for adding console commands for doorLock device. This is not in the scope of this application note.
− Unwanted files can be deleted or can be commented out − Delete Level Control and Occupancy Senor cluster related header and source files
Figure 7-2. Folder Structure for creating Door Lock Device
DoorLock
include
src
doorLockBasicCluster.hdoorLockIdentifyCluster.hdoorLockCluster.hdoorLockClusters.h
doorLockBasicCluster.cdoorLockIdentifyCluster.cdoorLockDoorLockCluster.cdoorLockClusters.c
FolderSub FolderFile
Legend
Folder Structure for Creating new device
doorLock.cdoorLockConsole.c
7.3 Set Indication Functions for Clusters 1. Open doorLockCluster.c and add server command indication functions for e.g.
− static ZCL_Status_t lockInd(ZCL_Addressing_t *addressing, uint8_t payloadLength, uint8_t *payload);
− static ZCL_Status_t unlockInd(ZCL_Addressing_t *addressing, uint8_t payloadLength, uint8_t *payload);
− Provide function definitions for the above indication functions 2. Add function for initializing the cluster for e.g.:
− void doorlockClusterInit(void);
− Initialize the server attributes (Section 7.4) to default values (refer to Table 9-1) Note: If the cluster does not receive cluster-specific commands the step described in this section is skipped. In
this case the commands parameter of the macro that initializes the cluster shall be set to NULL.
7.4 Define an Attributes Instance 1. Define an instance of cluster attributes for the selected cluster side in doorLockCluster.c. For e.g.:
static ZCL_<ClusterName>ClusterServerAttributes_t doorLockClusterServerAttributes = { ZCL_DEFINE_<ClusterName>_CLUSTER_<SERVER or CLIENT>_ATTRIBUTES(MIN, MAX) };
AT05436: BitCloud ZigBee Home Automation (ZHA) – Hands-on [APPLICATION NOTE] Atmel-42288A-BitCloud-ZigBee-Home-Automation-ZHA-Hands-on_AT05436_ApplicationNote_062014
25
…where the ZCL_<ClusterName>ClusterServerAttributes_t type and the ZCL_DEFINE_<ClusterName>_CLUSTER_<SERVER or CLIENT>_ATTRIBUTES() macro are defined in the zclDoorLockCluster.h file, that we created. MIN and MAX macros can be defined in the doorLockCluster.h file.
7.5 Define a Commands Instance 1. Define an instance of cluster-specific commands for the selected cluster side. E.g.
static ZCL_<ClusterName>ClusterCommands_t doorLockClusterServerCommands = { DEFINE_<ClusterName>_CLUSTER_COMMANDS(<indications>) };
…where the ZCL_<ClusterName>ClusterCommands_t type and the DEFINE_<ClusterName>_CLUSTER_COMMANDS(<indications>) macro is defined in the zclDoorLockCluster.h file, which we created.
Note: Indication passed as arguments should be same as that we defined in Section 7.3. For e.g.: ZCL_DEFINE_DOOR_LOCK_CLUSTER_COMMANDS(lockInd, unLockInd, NULL, NULL)
7.6 Fill a List of Supported Cluster IDs 1. Open file doorLockClusters.c. 2. Define the cluster instance (as mentioned in point 4) for each cluster mention in the below list (as
mentioned in point 5), linking it with defined instances of commands and attributes and add the cluster instance to the list of client or server clusters for the target endpoint.
− Attribute instances for Basic and Identify clusters should be renamed in doorLockBasicCluster.c and doorLockIdentifyCluster.c files respectively. Update the header files for the same.
3. List elements must have the ZCL_Cluster_t type and should be defined with the help of special macros. A macro name may look like DEFINE_<ClusterName>_CLUSTER(). The macro takes three parameters:
− Indication of whether the cluster is server or client (Basic cluster takes only attributes instance as given below)
− A pointer to attributes instance (NULL if the cluster does not have attributes) − A pointer to commands instance (NULL if the cluster does not have commands)
4. For e.g.: static ZCL_Cluster_t doorLockServerClusters[] = { ZCL_DEFINE_BASIC_CLUSTER_SERVER(&doorLockBasicClusterServerAttributes), DEFINE_IDENTIFY_CLUSTER(ZCL_SERVER_CLUSTER_TYPE, &doorLockIdentifyClusterServerAttributes, &doorLockIdentifyCommands), DEFINE_DOOR_LOCK_CLUSTER(ZCL_SERVER_CLUSTER_TYPE, &dlDoorLockClusterServerAttributes, &doorLockClusterServerCommands) };
5. Add the cluster ID to the list of client or server cluster IDs for the target endpoint. For e.g.: static ClusterId_t doorLockServerClusterIds[] = { BASIC_CLUSTER_ID, IDENTIFY_CLUSTER_ID, DOOR_LOCK_CLUSTER_ID };
Notes: 1. Cluster identifiers can be observed in the ..\Components\ZCL\include\clusters.h file. Elements in the list should have the ClusterId_t type.

AT05436: BitCloud ZigBee Home Automation (ZHA) – Hands-on [APPLICATION NOTE] Atmel-42288A-BitCloud-ZigBee-Home-Automation-ZHA-Hands-on_AT05436_ApplicationNote_062014
26
2. As there are no mandatory client clusters for Door Lock device (refer to Table 10-1), Client clusters list is not defined. If there are any mandatory client clusters, clusters list for the same must be implemented.
3. Extern global variables used in doorLockClusters.c inside doorLockClusters.h.
7.7 Configure Clusters on Endpoint 1. Open file doorLock.c and modify the header file names accordingly. For e.g.:
− #include <osOccupancySensingCluster.h> to #include <doorLockCluster.h> − #include <osClusters.h> to #include <doorLockClusters.h>
2. To register an application endpoint, configure a global instance of the ZCL_DeviceEndpoint_t type. 3. Fill the simple descriptor fields of the instance and provide lists of server and client clusters. Inside the
simple descriptor (the simpleDescriptor field), specify the endpoint number, the profile ID, the profile device ID, amount and lists of server and client clusters IDs.
− For e.g.: static ZCL_DeviceEndpoint_t dlckEndpoint =
{
.simpleDescriptor =
{
.endpoint = APP_SRC_ENDPOINT_ID,
.AppProfileId = PROFILE_ID_HOME_AUTOMATION,
.AppDeviceId = HA_DOOR_LOCK_DEVICE_ID,
.AppInClustersCount = ARRAY_SIZE(doorLockServerClusterIds),
.AppInClustersList = doorLockServerClusterIds,
.AppOutClustersCount = NULL,
.AppOutClustersList = NULL,
},
.serverCluster = doorLockServerClusters,
.clientCluster = NULL,
};
Note: Define HA_DOOR_LOCK_DEVICE_ID in ../Components/ZCL/include/zcl.h file.
7.8 Endpoint Registration and Device initialization 1. Edit appDeviceInitAfterPowerFailure() in doorLock.c file, pass the dlckEndpoint instance
address to ZCL_RegisterEndpoint() function. − When an endpoint is registered via the ZCL function frame reception will be indicated only by
callback functions registered for the cluster commands 2. Call doorlockClusterInit()inside appDeviceInitAfterPowerFailure() for initializing the
Door Lock cluster attributes. − And also Call Basic and Identify Cluster init functions
3. Edit appEzModeDone(), for configuring lockState attribute reporting. − Specify the cluster ID, attribute ID and Max value (reporting timeout) accordingly
AT05436: BitCloud ZigBee Home Automation (ZHA) – Hands-on [APPLICATION NOTE] Atmel-42288A-BitCloud-ZigBee-Home-Automation-ZHA-Hands-on_AT05436_ApplicationNote_062014
27
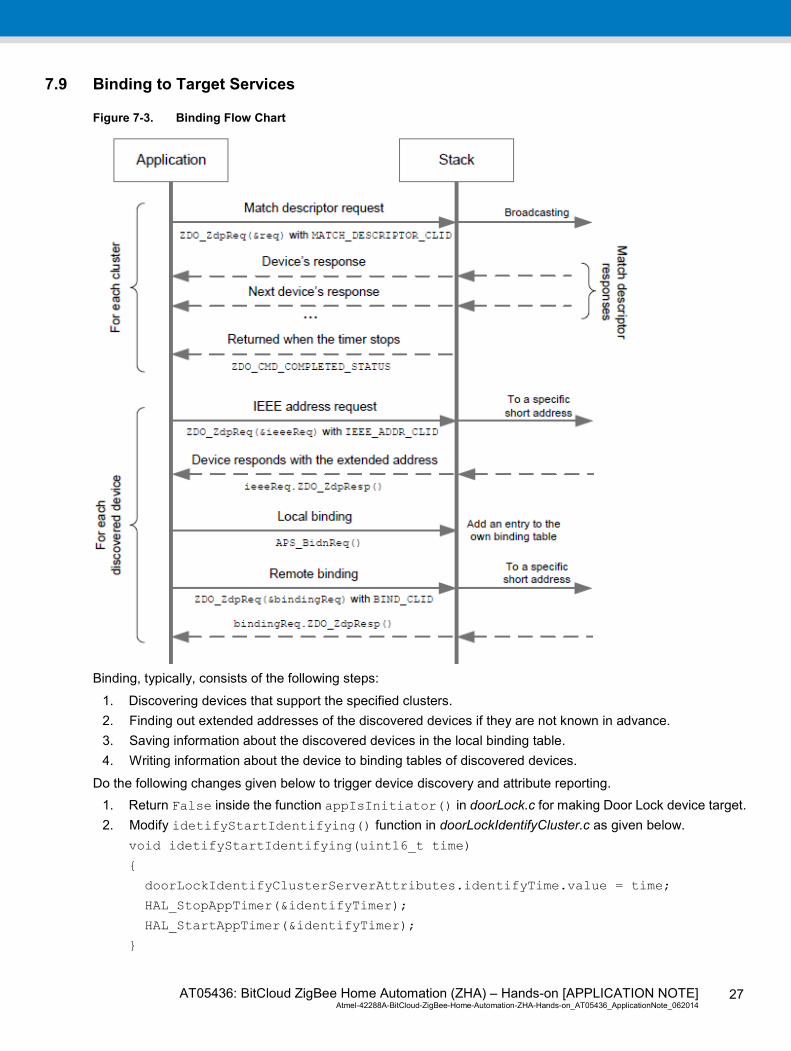
7.9 Binding to Target Services
Figure 7-3. Binding Flow Chart
Binding, typically, consists of the following steps:
1. Discovering devices that support the specified clusters. 2. Finding out extended addresses of the discovered devices if they are not known in advance. 3. Saving information about the discovered devices in the local binding table. 4. Writing information about the device to binding tables of discovered devices.
Do the following changes given below to trigger device discovery and attribute reporting. 1. Return False inside the function appIsInitiator() in doorLock.c for making Door Lock device target. 2. Modify idetifyStartIdentifying() function in doorLockIdentifyCluster.c as given below.
void idetifyStartIdentifying(uint16_t time)
{
doorLockIdentifyClusterServerAttributes.identifyTime.value = time;
HAL_StopAppTimer(&identifyTimer);
HAL_StartAppTimer(&identifyTimer);
}
AT05436: BitCloud ZigBee Home Automation (ZHA) – Hands-on [APPLICATION NOTE] Atmel-42288A-BitCloud-ZigBee-Home-Automation-ZHA-Hands-on_AT05436_ApplicationNote_062014
28
3. Subscribe updateCommissioningState using below code snippet in doorLock.c for configuring attribute reporting at the end of binding procedure.
static void updateCommissioningStateCb(ZCL_Addressing_t *addressing, ZCL_UpdateCommissioningState_t *payload)
{
sendConfigureReportingToNotify(APP_ENDPOINT_COMBINED_INTERFACE, DOOR_LOCK_CLUSTER_ID,
ZCL_DOOR_LOCK_CLUSTER_LOCK_STATE_SERVER_ATTRIBUTE_ID, DOOR_LOCK_VAL_MAX_REPORT_PERIOD * 2);
ZCL_StartReporting();
(void)addressing, (void)payload;
}
static IdentifySubscriber_t subcriber =
{
.updateCommissioningState = updateCommissioningStateCb
};
4. Call the below function to subscribe the above declared subcriber inside appDeviceInit() function in doorLock.c file.
− identifySubscribe(&subcriber);
Notes: 1. Add the below Macro definition in configuration.h and appConsts.h:
• #define APP_DOOR_LOCK_EXT_ADDRESS 0x5LL
• #define APP_ENDPOINT_DOOR_LOCK 0x15
• #define APP_DEVICE_TYPE_DOOR_LOCK
2. Extend the #if check under the below comment in appConsts.h for Door Lock device: • // Organize device-related definitions and check device type setting.
7.10 Attributes Management All clusters support general commands for discovering, reading, writing, and reporting attributes. General cluster commands are supported by all clusters. General cluster commands (for example, read/write/report/discover attributes) are sent via the ZCL_AttributeReq() function, Cluster-specific commands are sent via the ZCL_CommandReq().
To send a cluster specific command the ZCL_CommandReq() function is used with the pointer to an instance of the ZCL_Request_t type as an argument.
Argument’s fields include command ID, source endpoint, destination addressing information, command payload and command payload’s length, pointers to a confirmation callback function and a field configuring default response. Within the destination addressing dstAddressing structure for cluster-specific commands, the application should set the sequenceNumber field. For a direct command the application shall use the ZCL_GetNextSeqNumber() function to obtain the value for this field.
AT05436: BitCloud ZigBee Home Automation (ZHA) – Hands-on [APPLICATION NOTE] Atmel-42288A-BitCloud-ZigBee-Home-Automation-ZHA-Hands-on_AT05436_ApplicationNote_062014
29
An example in our case will be: lockCommandResp.ZCL_Notify = NULL; lockCommandResp.dstAddressing.addrMode = APS_NO_ADDRESS; lockCommandResp.dstAddressing.profileId = PROFILE_ID_HOME_AUTOMATION; lockCommandResp.dstAddressing.clusterId = DOOR_LOCK_CLUSTER_ID; lockCommandResp.dstAddressing.clusterSide = ZCL_CLUSTER_SIDE_CLIENT; lockCommandResp.dstAddressing.sequenceNumber = ZCL_GetNextSeqNumber(); lockCommandResp.endpointId = APP_SRC_ENDPOINT_ID; lockCommandResp.requestPayload = NULL; lockCommandResp.id = ZCL_DOOR_LOCK_CLUSTER_LOCK_RESP_COMMAND_ID; lockCommandResp.requestLength = 0;
Then send the command by ZCL_CommandReq(&lockCommandResp);
Make a note that door lock device sends lock response command to the lock command from the client and unlock command response for unlock command.
We have so far implemented a new device, which will be the server for the door lock cluster implemented.
7.11 Implementing a Client In our example, Combined Interface will be the client for door lock cluster.
1. Add ciDoorLockCluster.c file inside ..\Applications\HADevice\combinedInterface\src. 2. Open ciDoorLockCluster.c file and add cluster command instance, e.g.:
static ZCL_DoorLockClusterCommands_t doorLockClientCommands = { ZCL_DEFINE_DOOR_LOCK_CLIENT_CLUSTER_COMMANDS(LockCmdRespInd,UnLockCmdRespInd) };
3. Add door lock cluster in Client clusters inside ..\combinedInterface\src\ciClusters.c. − E.g., in “static ZCL_Cluster_t ciClientClusters [] =”
4. Add DEFINE_DOOR_LOCK_CLUSTER(ZCL_CLIENT_CLUSTER_TYPE,NULL,&doorLockClientCommands).
5. Add Door lock cluster ID to static ClusterId_t ciClientClusterIds[]. 6. Create an application event to form and send cluster command. E.g., on a button press event send Lock
command. 7. Command formation using ZCL_CommandReq to send commands are similar to the server side as
mentioned in Attributes management. Have a close look at the source and destination information.
With this we have completed implementing a new cluster, adding a new device that will be the server side, adding the cluster to a client, and implementing an application to use the cluster and devices. Look into the sniffer and make a note of the communication between the Client and Server.
AT05436: BitCloud ZigBee Home Automation (ZHA) – Hands-on [APPLICATION NOTE] Atmel-42288A-BitCloud-ZigBee-Home-Automation-ZHA-Hands-on_AT05436_ApplicationNote_062014
30
8 Handling ZDP Requests This is an optional task. This task will demonstrate usage of ZDP requests, by implementing network leave and rejoin functionality for a device based on an application event. We will reuse the button event that we implemented in task 2 (Chapter 4) for this.
8.1 Adding Required Application Sequence on Button Event This task demonstrates adding application code in button event to make the device leave the current network using ZDP Request.
1. In ..\doorLock.c, form the ZDP request packet that will cause the node to leave the network in the button_event_handler_func.
2. To add the ZDP request, the steps below must be followed: − Add static ZDO_ZdpReq_t leaveReq; in ..\doorLock.c − Every ZDP request will contain a ZDP frame, of type from ZDO_ZdpReqFrame_t
Search for files in the solution or workspace, or look directly into ..\ Components\ZDO\include\zdo.h. 3. Fill the other required parameters of the ZDO_ZdpReq_t, as seen in zdo.h.
E.g.: In the button event handler, add: ZDO_MgmtLeaveReq_t *zdpLeaveReq = &leaveReq.req.reqPayload.mgmtLeaveReq; //Fill ZDO_MgmtLeaveReq_t struct elements zdpLeaveReq->deviceAddr = 0; zdpLeaveReq->rejoin = 0; zdpLeaveReq->removeChildren = 0; zdpLeaveReq->reserved = 0; //Fill ZDO_ZdpReq_t struct elements leaveReq.ZDO_ZdpResp = appZdpLeaveResp; leaveReq.reqCluster = MGMT_LEAVE_CLID; leaveReq.dstAddrMode = APS_EXT_ADDRESS; leaveReq.dstExtAddr.extAddress = 0; //Send ZDP request over air. ZDO_ZdpReq(&leaveReq);
This request will cause the Door Lock device node to leave the current network, as observed in the sniffer. • leaveReq variable should be declared as global variable • leaveReq.dstExtAddr.extAddress assigned to Zero, initiates self network leave. For initiating
remote leave specify the remote device extended address Note: Make sure to add the necessary function definitions for appZdpLeaveResp.
The NWK leave procedure is now complete. It is possible for application to get notified of leave status when the stack has completed this process. By this task, we have now learnt to add an application scenario as well understand using the ZDP request.
8.2 Subscribing to Event Notification Application Application can subscribe to various events occurring in stack as well as application, to get notifications on subscribed events.
1. In ..\doorLock.c, include header files, sysEvents.h. 2. Define a function pointer to a callback that is to be called on occurrence of the event, as shown below:
AT05436: BitCloud ZigBee Home Automation (ZHA) – Hands-on [APPLICATION NOTE] Atmel-42288A-BitCloud-ZigBee-Home-Automation-ZHA-Hands-on_AT05436_ApplicationNote_062014
31
− static SYS_EventReceiver_t deviceExampleEventReceiver = { .func = deviceExampleEventObserver}; as static to that file
3. Subscribe to the Network leave event using SYS_SubscribeToEvent(BC_EVENT_example, &deviceExampleEventReceiver);
Look into the events specified in BcEvents_t in sysEvents.h, for understanding the usage of appropriate BC_EVENT_example.
This subscription API can be called once during device initialization. On occurrence of the event (in this case, BC_EVENT_NETWORK_LEFT), the function deviceExampleEventObserver(SYS_EventId_t eventId, SYS_EventData_t data); will be called.
Note: Check that the device has left the network by observing NWK leave packet from the device in sniffer.
Device leave of Door Lock device, on button event is now complete. The status of the event can be verified and further action taken, as necessary.
8.3 Adding Application Timer Functionality Application can use timers to specify a timeout after which a user callback is invoked. Application timers can be periodically repetitive or one-shot.
The stack provides a high-level application timer interface, which uses a low-level hardware timer. This task uses a one minute timeout on which device shall rejoin the network that it left. This shall not be a periodic timer.
In ..\doorLock.c, define a timer as shown below: //timer to control network rejoin
static HAL_AppTimer_t timerExample =
{
.mode = x, //set mode as defined in TimerMode_t in bcTimer.h
.interval = x, //takes value in milliseconds, set to one second
.callback = rejoinNetwork, //define callback to rejoin network on timer expiry
};
Use HAL_StartAppTimer(&timerExample); to start the timer. This shall be done as required by the application.
For current task, the timer shall be started when the application receives event notification of successful device leave.
Compile the project and Download. Set a breakpoint in the timer callback function to check if it is hit on expiry of timer period. Note: Timers, when not used, shall be stopped using HAL_StopAppTimer(&timerExample). This can
typically be done in the Timer callback, in case of one-shot timers.
Timer callback shall be utilized to perform application specific actions. In this case, let’s try network rejoin.
8.4 Rejoining Network Door Lock device network rejoin sequence is described below:
1. When the Door Lock device is powered on, it joins the network. 2. Door Lock device binds and communicates with Combined Interface device. 3. On button press, Door Lock device leaves network (implemented in Section 8.1).

AT05436: BitCloud ZigBee Home Automation (ZHA) – Hands-on [APPLICATION NOTE] Atmel-42288A-BitCloud-ZigBee-Home-Automation-ZHA-Hands-on_AT05436_ApplicationNote_062014
32
4. On event notification of proper leave (implemented in Section 8.2), application starts timer, at the expiry of which, Door Lock device re-joins the network.
5. This sequence can be observed using sniffer.
Follow the below given steps to implement the device network rejoin using Application timer callback. 1. In the Timer callback, the CS Parameter for Join Control, CS_JOIN_CONTROL_ID shall be set as per
application requirement. 2. It is possible to configure the node to join the network via MAC Association or network rejoin with/without
security as per NWK_JoinControl_t in nwkCommon.h.
Look into ..\BitCloud\Components\NWK\include. 3. Define a local variable in the timer callback of type NWK_JoinControl_t and fill it as per requirement (as
mentioned in the previous point). 4. Use CS_WriteParameter() to set CS_JOIN_CONTROL_ID.
E.g. NWK_JoinControl_t nwkJoinCtrl;
nwkJoinCtrl.method = NWK_JOIN_VIA_REJOIN;
nwkJoinCtrl.secured = false;
nwkJoinCtrl.discoverNetworks = true;
nwkJoinCtrl.annce = true;
CS_WriteParameter(CS_JOIN_CONTROL_ID, &nwkJoinCtrl);
5. In the Timer callback set appState to APP_NETWORK_JOINING_STATE as device has left network and needs to rejoin.
6. BitCloud uses a Task manager to process tasks based on priority with the PHY having the highest priority and the application, the lowest priority.
− Whenever application process is complete, it should use SYS_PostTask(APL_TASK_ID) to post the task to the task manager so that it is invoked again based on list of pending tasks and priority
E.g.: appState = APP_START_NETWORK_STATE; SYS_PostTask(APL_TASK_ID);
The result is that the device rejoins network on Application Timer callback.
Notes: 1. The first argument in CS_WriteParameter() shall be of format CS_example_ID_ID. See
csVarTable.h. 2. In zclDevice.c, ZDO_MgmtNwkUpdateNotf() is called every time there is a change in the network
on remote node as well as self. When a node leaves the network, ZDO_MgmtNwkUpdateNotf() gets called with status ZDO_NETWORK_LEFT_STATUS. By default, in this case, appState = APP_START_NETWORK_STATE; but this task requires appState to change to APP_START_NETWORK_STATE only on expiry of application timer callback and not immediately after network leave. Hence ensure that this appState change is removed or commented out in ZDO_MgmtNwkUpdateNotf() for case ZDO_NETWORK_LEFT_STATUS.
AT05436: BitCloud ZigBee Home Automation (ZHA) – Hands-on [APPLICATION NOTE] Atmel-42288A-BitCloud-ZigBee-Home-Automation-ZHA-Hands-on_AT05436_ApplicationNote_062014
33
9 Door Lock Cluster Specification The door lock cluster (section 7.3 [3]) provides an interface into a generic way to secure a door. The physical object that provides the locking functionality is abstracted from the cluster. The cluster has a small list of mandatory attributes and functions and a list of optional features.
Note: This Cluster is provisionary and not certifiable. This feature set may change before reaching certifiable status in a future revision of this specification.
9.1 Server
Table 9-1. Server Attributes
Attribute identifier Description Type Read/write Mandatory/Optional Reportable Default
0x0000 Lock State 0x00: Not fully locked 0x01: Locked 0x02: Unlocked
Enum8 Read Only M Yes 0
0x0001 Lock Type 0 = dead bolt 1 = magnetic 2 = other 3 – 0xff reserved
Enum8 Read Only M No 0
0x0002 Actuator Enabled Boole-an
Read Only M No 0
0x0003 Door State 0 = Open 1 = Closed 2 = Error (Jammed) 3 = Error (Forced Open) 4 = Error (Unspecified) 5 – 0xff reserved
Enum8 Read Only O Yes 0
0x0004 Number of Door Open Events Int32u Read/Write O No 0
0x0005 Number of Door Closed Events Int32u Read/Write O No 0
0x0006 Number of minutes door has been open since this last time it transitioned from close to open
Int16u Read/Write O No 0
9.1.1 Commands
Table 9-2. Commands Received by the Server Cluster
Command ID Description Mandatory/optional
0x00 Lock door M
0x01 Unlock door M
9.1.1.1 Lock Door Command
This command (sent by the client to the server) causes the lock device to lock the door. It has no payload.
AT05436: BitCloud ZigBee Home Automation (ZHA) – Hands-on [APPLICATION NOTE] Atmel-42288A-BitCloud-ZigBee-Home-Automation-ZHA-Hands-on_AT05436_ApplicationNote_062014
34
9.1.1.2 Unlock Door Command
This command causes the lock device to unlock the door. It has no payload.
9.1.1.3 Scene Table Extension
If the Scene server cluster is implemented, the following extension field is added to the Scene table:
Lock State:
When the Lock State attribute is part of a Scene table, the attribute is treated as a writeable command, that is, setting the Lock State to lock will command the lock to lock, and setting the Lock State to "unlocked" will command the lock to unlock. Setting the Lock State attribute to “not fully locked” is not supported. The transition time field in the Scene table will be treated as a delay before setting the Lock State attribute, that it is possible to activate a scene with the lock actuation some seconds later.
Locks that do not have an actuation mechanism should not support the Scene table extension.
9.2 Client
9.2.1 Attributes The client has no attributes.
9.2.2 Commands
Table 9-3. Commands Received by the Client Cluster
Command ID Description Mandatory/optional
0x00 Lock Response M
0x01 Unlock Door Response M
9.2.2.1 Lock Response
This command is sent in response to a Lock command. It returns command ID byte and one status byte.
0 = ZCL_SUCCESS
1 = ZCL_FAILURE
9.2.2.2 Unlock Door Response
This command is sent in response to an Unlock door command. It returns command ID byte and one status byte.
0 = ZCL_SUCCESS
1 = ZCL_FAILURE
AT05436: BitCloud ZigBee Home Automation (ZHA) – Hands-on [APPLICATION NOTE] Atmel-42288A-BitCloud-ZigBee-Home-Automation-ZHA-Hands-on_AT05436_ApplicationNote_062014
35
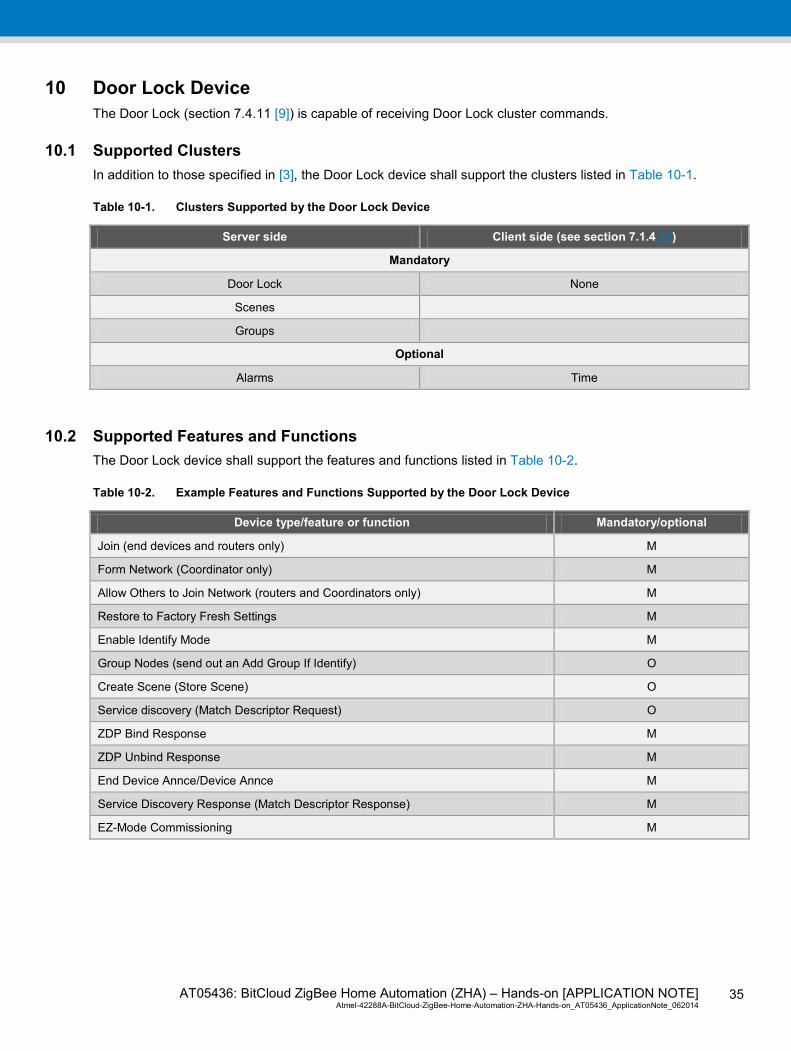
10 Door Lock Device The Door Lock (section 7.4.11 [9]) is capable of receiving Door Lock cluster commands.
10.1 Supported Clusters In addition to those specified in [3], the Door Lock device shall support the clusters listed in Table 10-1.
Table 10-1. Clusters Supported by the Door Lock Device
Server side Client side (see section 7.1.4 [9])
Mandatory
Door Lock None
Scenes
Groups
Optional
Alarms Time
10.2 Supported Features and Functions The Door Lock device shall support the features and functions listed in Table 10-2.
Table 10-2. Example Features and Functions Supported by the Door Lock Device
Device type/feature or function Mandatory/optional
Join (end devices and routers only) M
Form Network (Coordinator only) M
Allow Others to Join Network (routers and Coordinators only) M
Restore to Factory Fresh Settings M
Enable Identify Mode M
Group Nodes (send out an Add Group If Identify) O
Create Scene (Store Scene) O
Service discovery (Match Descriptor Request) O
ZDP Bind Response M
ZDP Unbind Response M
End Device Annce/Device Annce M
Service Discovery Response (Match Descriptor Response) M
EZ-Mode Commissioning M

AT05436: BitCloud ZigBee Home Automation (ZHA) – Hands-on [APPLICATION NOTE] Atmel-42288A-BitCloud-ZigBee-Home-Automation-ZHA-Hands-on_AT05436_ApplicationNote_062014
36
11 References [1] Atmel AT02597: ZigBee PRO Packet Analysis with Sniffer.
[2] AT86RF233 Datasheet.
[3] 075366r02ZB_AFG-ZigBee_Cluster_Library_Public_download_version.
[4] Atmel Software Framework.
[5] Atmel AVR2050: BitCloud Developers Guide.
[6] AT86RF230 Datasheet.
[7] Atmel AVR10004: RCB256RFR2 – Hardware User Guide.
[8] Atmel AVR2052: BitCloud SDK Quick Start Guide.
[9] 075367r03ZB_AFG-Home_Automation_Profile_for_Public_Download.
[10] http://www.atmel.com/tools/studioarchive.aspx.
12 Atmel Technical Support Center Atmel has several support channels available:
1. All Atmel microcontrollers. Web portal: http://support.atmel.no/. 2. All AVR products. Email: [email protected]. 3. All training related inquiries. Email: [email protected].
Register on the web portal to gain access to the following services:
1. Access to a rich FAQ database. 2. Easy submission of technical support requests. 3. History of all your past support requests. 4. Register to receive Atmel microcontrollers’ newsletters. 5. Get information about available trainings and training material.
AT05436: BitCloud ZigBee Home Automation (ZHA) – Hands-on [APPLICATION NOTE] Atmel-42288A-BitCloud-ZigBee-Home-Automation-ZHA-Hands-on_AT05436_ApplicationNote_062014
37
13 Revision History Doc Rev. Date Comments
42288A 06/2014 Initial document release.
AT05436: BitCloud ZigBee Home Automation (ZHA) – Hands-on [APPLICATION NOTE] Atmel-42288A-BitCloud-ZigBee-Home-Automation-ZHA-Hands-on_AT05436_ApplicationNote_062014
38
Atmel Corporation 1600 Technology Drive, San Jose, CA 95110 USA T: (+1)(408) 441.0311 F: (+1)(408) 436.4200 │ www.atmel.com © 2014 Atmel Corporation. / Rev.:Atmel-42288A-BitCloud-ZigBee-Home-Automation-ZHA-Hands-on_AT05436_ApplicationNote_062014. Atmel®, Atmel logo and combinations thereof, AVR®, BitCloud®, Enabling Unlimited Possibilities®, and others are registered trademarks or trademarks of Atmel Corporation in U.S. and other countries. Other terms and product names may be trademarks of others. DISCLAIMER: The information in this document is provided in connection with Atmel products. No license, express or implied, by estoppel or otherwise, to any intellectual property right is granted by this document or in connection with the sale of Atmel products. EXCEPT AS SET FORTH IN THE ATMEL TERMS AND CONDITIONS OF SALES LOCATED ON THE ATMEL WEBSITE, ATMEL ASSUMES NO LIABILITY WHATSOEVER AND DISCLAIMS ANY EXPRESS, IMPLIED OR STATUTORY WARRANTY RELATING TO ITS PRODUCTS INCLUDING, BUT NOT LIMITED TO, THE IMPLIED WARRANTY OF MERCHANTABILITY, FITNESS FOR A PARTICULAR PURPOSE, OR NON-INFRINGEMENT. IN NO EVENT SHALL ATMEL BE LIABLE FOR ANY DIRECT, INDIRECT, CONSEQUENTIAL, PUNITIVE, SPECIAL OR INCIDENTAL DAMAGES (INCLUDING, WITHOUT LIMITATION, DAMAGES FOR LOSS AND PROFITS, BUSINESS INTERRUPTION, OR LOSS OF INFORMATION) ARISING OUT OF THE USE OR INABILITY TO USE THIS DOCUMENT, EVEN IF ATMEL HAS BEEN ADVISED OF THE POSSIBILITY OF SUCH DAMAGES. Atmel makes no representations or warranties with respect to the accuracy or completeness of the contents of this document and reserves the right to make changes to specifications and products descriptions at any time without notice. Atmel does not make any commitment to update the information contained herein. Unless specifically provided otherwise, Atmel products are not suitable for, and shall not be used in, automotive applications. Atmel products are not intended, authorized, or warranted for use as components in applications intended to support or sustain life.
SAFETY-CRITICAL, MILITARY, AND AUTOMOTIVE APPLICATIONS DISCLAIMER: Atmel products are not designed for and will not be used in connection with any applications where the failure of such products would reasonably be expected to result in significant personal injury or death (“Safety-Critical Applications”) without an Atmel officer's specific written consent. Safety-Critical Applications include, without limitation, life support devices and systems, equipment or systems for the operation of nuclear facilities and weapons systems. Atmel products are not designed nor intended for use in military or aerospace applications or environments unless specifically designated by Atmel as military-grade. Atmel products are not designed nor intended for use in automotive applications unless specifically designated by Atmel as automotive-grade.


![Atmel ATSHA204 - SparkFun Electronicscdn.sparkfun.com/.../Atmel-8740-CryptoAuth-ATSHA204-Datasheet.pdf · Atmel ATSHA204 [DATASHEET] 5 Atmel–8740E–CryptoAuth–ATSHA204–Datasheet–022013](https://img.pdfslide.net/doc/110x75/5e25fe64d9a5567efa4c5ccc/atmel-atsha204-sparkfun-atmel-atsha204-datasheet-5-atmela8740eacryptoauthaatsha204adatasheeta022013.jpg)