Embed Size (px)
Citation preview
Auto Attendant User Guide
IP COMMUNICATIONS PLATFORM FOR THE SMALL BUSINESS
Opera Flexicom Auto-Attendant User Guide
2
Specifications subject to change without notice. Facilities described may or may not be supported by
your network. Opera Flexicom is the registered trademark MDS Gateways. This documentation refers to software version 53.708 Revision 1. DM 851
eircom advantage Auto-Attendant User Guide
3
Table of Contents
8. Auto-Attendant User Guide................................... 4 8.1 Auto-Attendant Overview.........................................................................4
8.1.1 Attendant Message Name ......................................................................................5 8.1.2 Attendant Message Code .......................................................................................5 8.1.3 Delay Timer.............................................................................................................6 8.1.4 Ringing During Message ........................................................................................7 8.1.5 Digit Assignment .....................................................................................................7
8.2 Access the Auto-Attendant Messages..................................................10 8.3 Record an Auto-Attendant Message.....................................................11 8.4 Play an auto-attendant Message ..........................................................12 8.5 Delete an Auto-attendant message ......................................................13 8.6 Change Automated Attendant messages via the voice mail menu.......14
Opera Flexicom Auto-Attendant User Guide
4
8. Auto-Attendant User Guide The Opera 4 IP / 20 IP and the Opera 412em and Opera Flexicom systems offer an Auto-attendant feature that allows incoming calls to be automatically answered by the voicemail system and then processed in a number of different ways that are programmable by the system administrator. By using the Auto-Attendant feature, calls can be automatically answered by the system and dealt with in a professional manner without the need for supervision by an operator. The Auto-Attendant feature on the Opera 4.12em and Opera Flexicom requires an Applications Card.
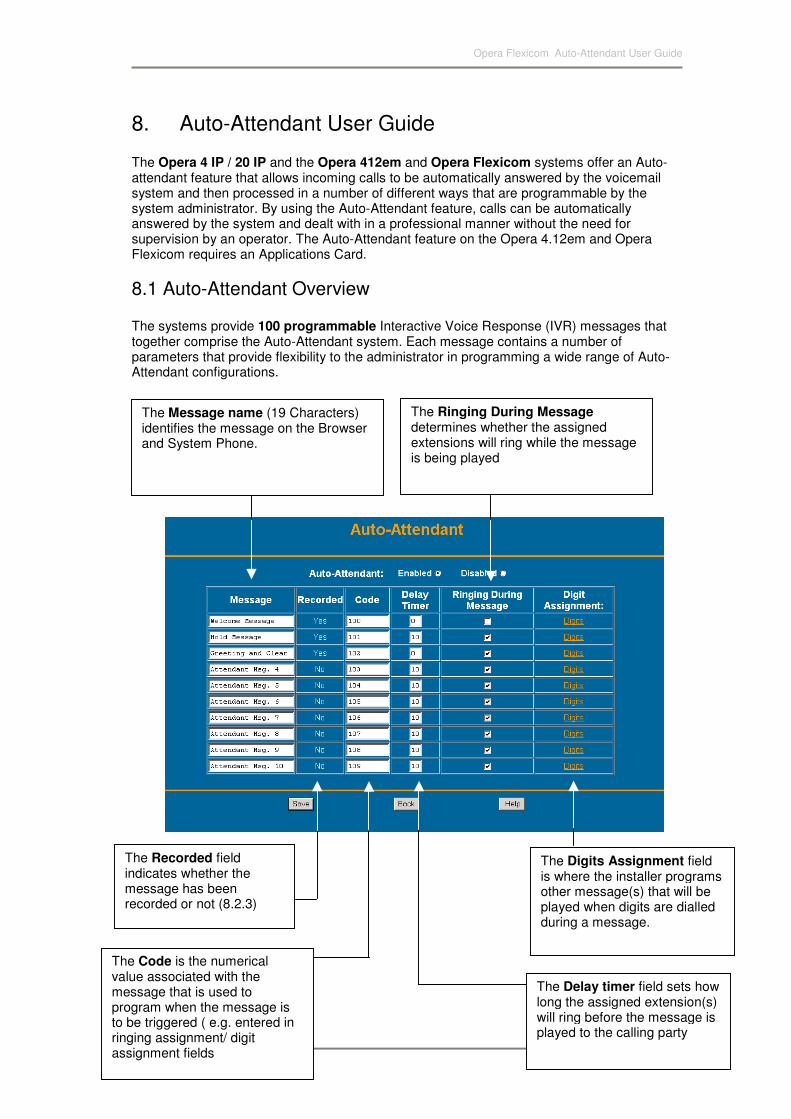
8.1 Auto-Attendant Overview The systems provide 100 programmable Interactive Voice Response (IVR) messages that together comprise the Auto-Attendant system. Each message contains a number of parameters that provide flexibility to the administrator in programming a wide range of Auto-Attendant configurations.
The Message name (19 Characters) identifies the message on the Browser and System Phone.
The Recorded field indicates whether the message has been recorded or not (8.2.3)
The Ringing During Message determines whether the assigned extensions will ring while the message is being played
The Code is the numerical value associated with the message that is used to program when the message is to be triggered ( e.g. entered in ringing assignment/ digit assignment fields
The Delay timer field sets how long the assigned extension(s) will ring before the message is played to the calling party
The Digits Assignment field is where the installer programs other message(s) that will be played when digits are dialled during a message.
eircom advantage Auto-Attendant User Guide
5
8.1.1 Attendant Message Name The message name is used to identify the attendant message in the browser and in the system phone. The installer can program up to 19 characters in each message name.
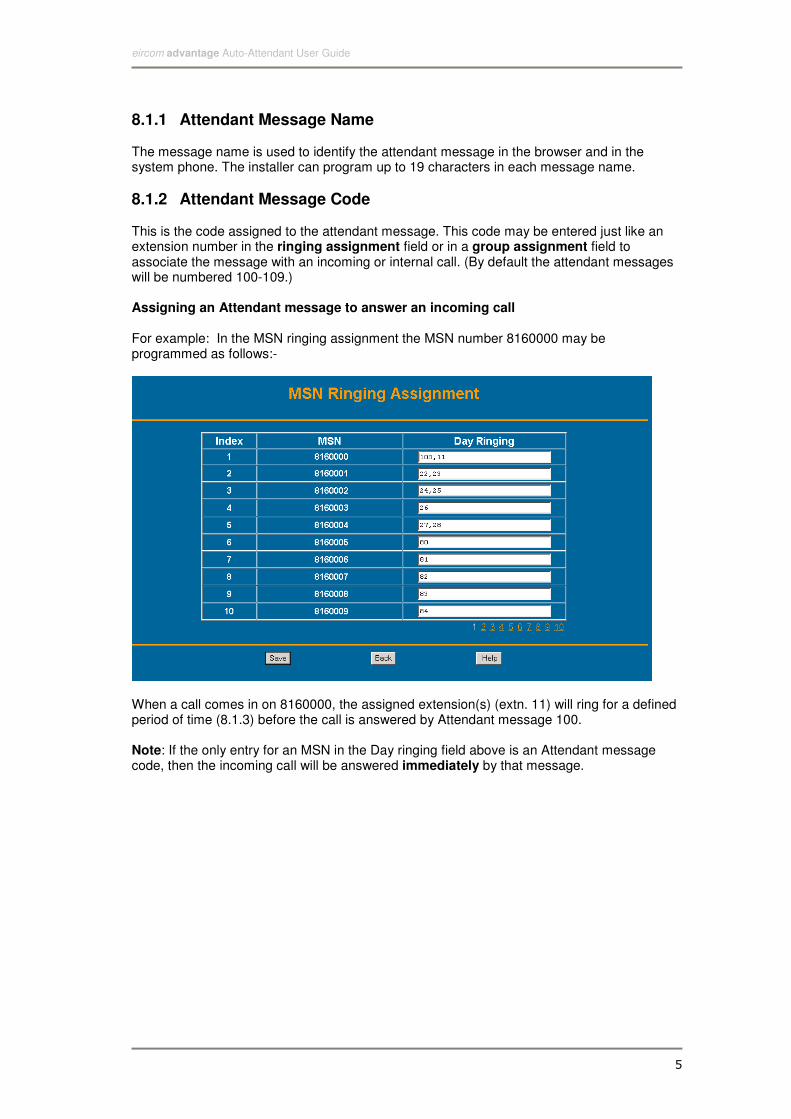
8.1.2 Attendant Message Code This is the code assigned to the attendant message. This code may be entered just like an extension number in the ringing assignment field or in a group assignment field to associate the message with an incoming or internal call. (By default the attendant messages will be numbered 100-109.) Assigning an Attendant message to answer an incoming call For example: In the MSN ringing assignment the MSN number 8160000 may be programmed as follows:-
When a call comes in on 8160000, the assigned extension(s) (extn. 11) will ring for a defined period of time (8.1.3) before the call is answered by Attendant message 100. Note: If the only entry for an MSN in the Day ringing field above is an Attendant message code, then the incoming call will be answered immediately by that message.
Opera Flexicom Auto-Attendant User Guide
6
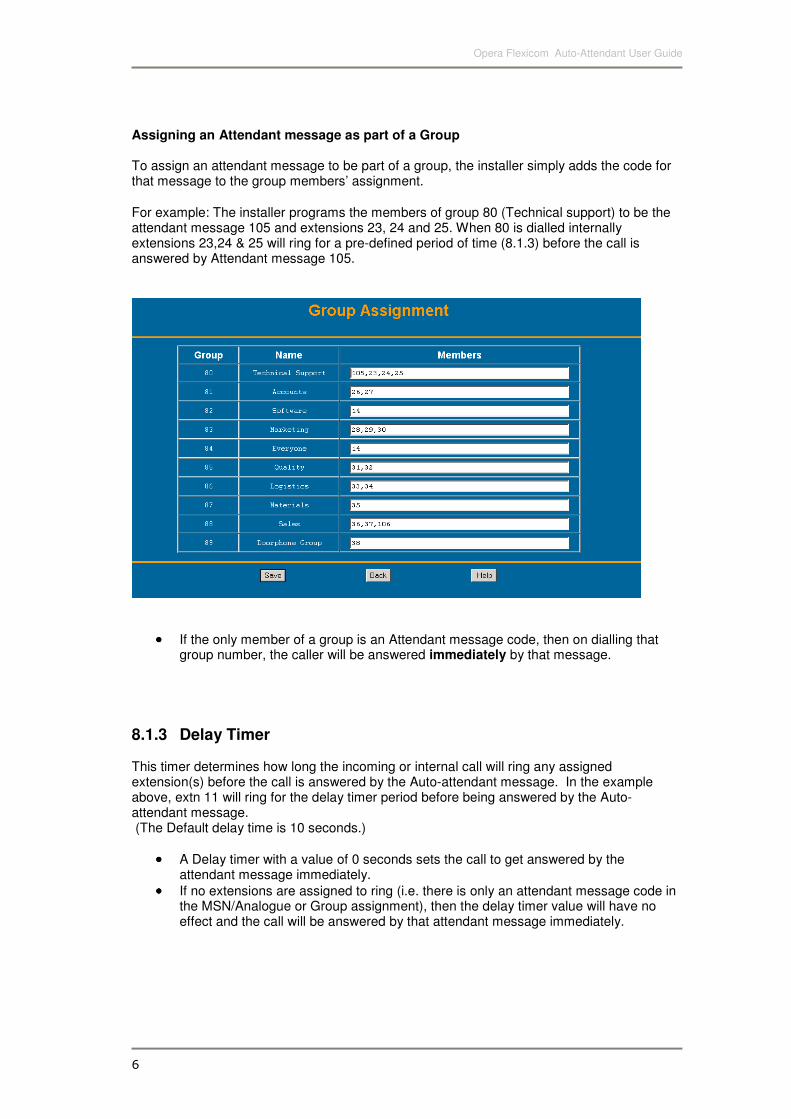
Assigning an Attendant message as part of a Group To assign an attendant message to be part of a group, the installer simply adds the code for that message to the group members’ assignment.
For example: The installer programs the members of group 80 (Technical support) to be the attendant message 105 and extensions 23, 24 and 25. When 80 is dialled internally extensions 23,24 & 25 will ring for a pre-defined period of time (8.1.3) before the call is answered by Attendant message 105.
•••• If the only member of a group is an Attendant message code, then on dialling that group number, the caller will be answered immediately by that message.
8.1.3 Delay Timer This timer determines how long the incoming or internal call will ring any assigned extension(s) before the call is answered by the Auto-attendant message. In the example above, extn 11 will ring for the delay timer period before being answered by the Auto-attendant message. (The Default delay time is 10 seconds.)
•••• A Delay timer with a value of 0 seconds sets the call to get answered by the attendant message immediately.
•••• If no extensions are assigned to ring (i.e. there is only an attendant message code in the MSN/Analogue or Group assignment), then the delay timer value will have no effect and the call will be answered by that attendant message immediately.
eircom advantage Auto-Attendant User Guide
7
8.1.4 Ringing During Message This field determines whether any assigned extension(s) will ring while the message is being played. The installer may need to present to a calling party an attendant message that contains information that should not be interrupted by the call suddenly being answered. In this case, disabling this option will ensure that only the calling party can interrupt the message.
•••• If there are no extensions assigned to ring whlle the attendant message is being played then this option will have no effect.
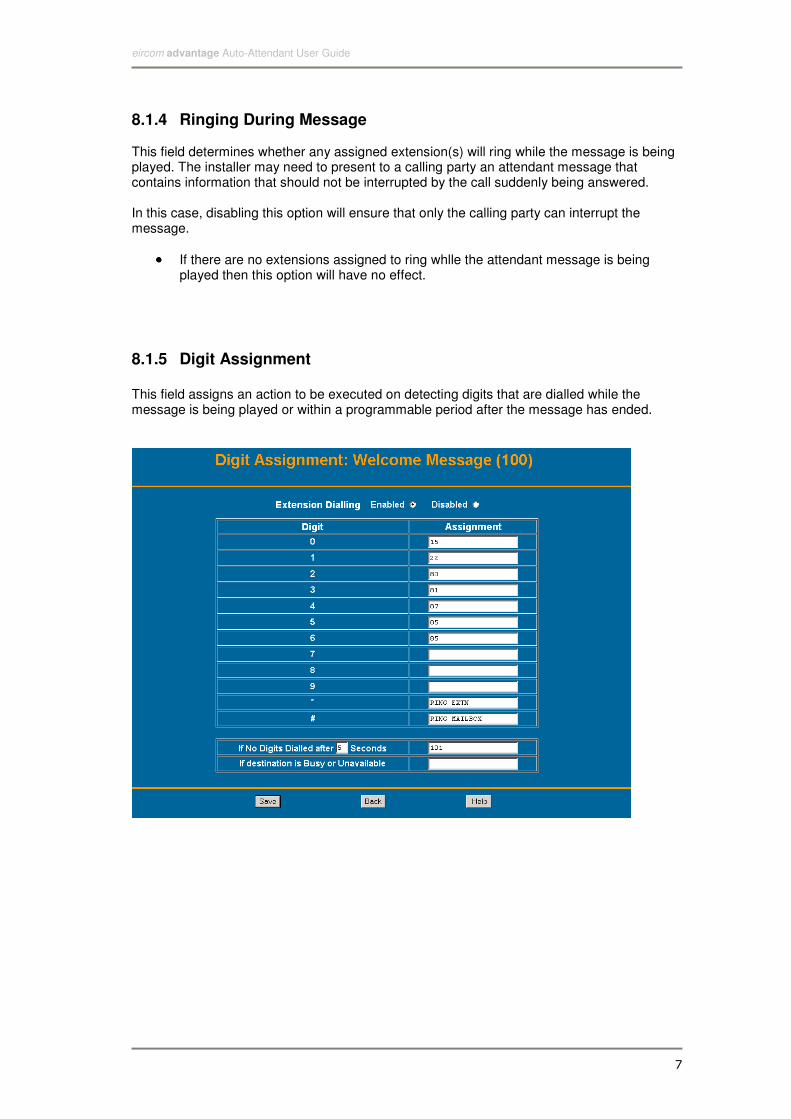
8.1.5 Digit Assignment This field assigns an action to be executed on detecting digits that are dialled while the message is being played or within a programmable period after the message has ended.
Opera Flexicom Auto-Attendant User Guide
8
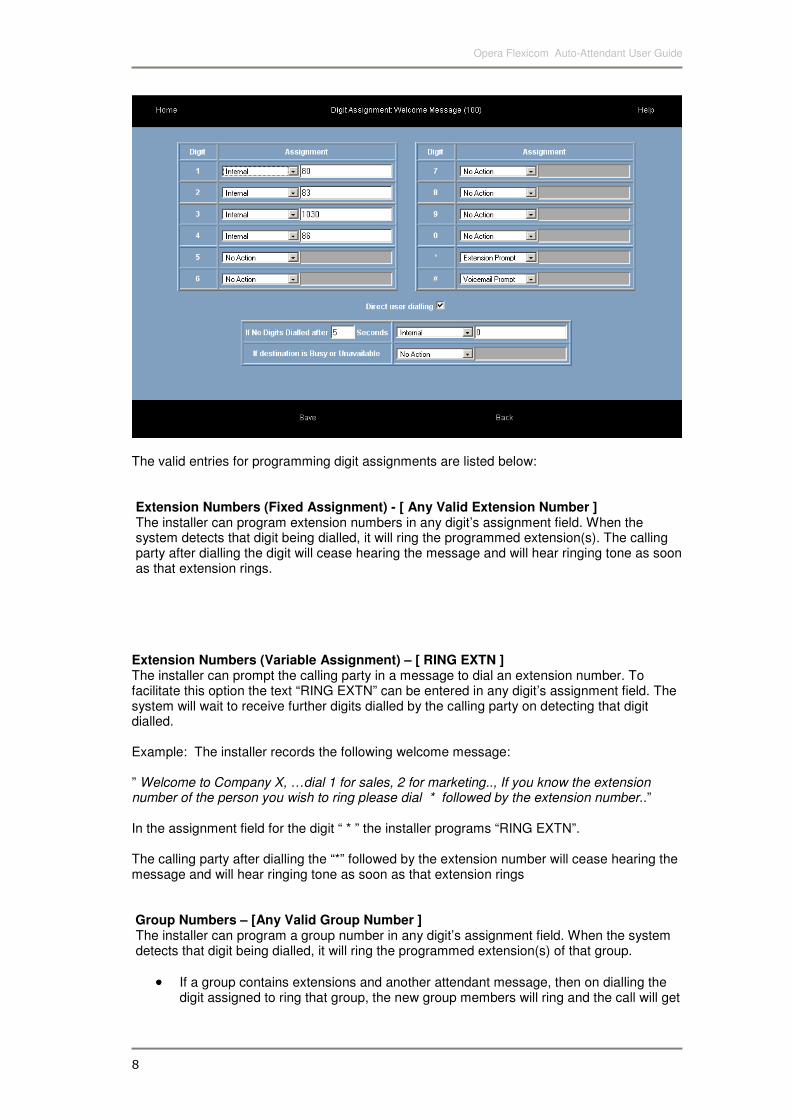
The valid entries for programming digit assignments are listed below: Extension Numbers (Fixed Assignment) - [ Any Valid Extension Number ] The installer can program extension numbers in any digit’s assignment field. When the system detects that digit being dialled, it will ring the programmed extension(s). The calling party after dialling the digit will cease hearing the message and will hear ringing tone as soon as that extension rings.
Extension Numbers (Variable Assignment) – [ RING EXTN ] The installer can prompt the calling party in a message to dial an extension number. To facilitate this option the text “RING EXTN” can be entered in any digit’s assignment field. The system will wait to receive further digits dialled by the calling party on detecting that digit dialled. Example: The installer records the following welcome message: ” Welcome to Company X, …dial 1 for sales, 2 for marketing.., If you know the extension number of the person you wish to ring please dial * followed by the extension number..” In the assignment field for the digit “ * ” the installer programs “RING EXTN”. The calling party after dialling the “*” followed by the extension number will cease hearing the message and will hear ringing tone as soon as that extension rings Group Numbers – [Any Valid Group Number ] The installer can program a group number in any digit’s assignment field. When the system detects that digit being dialled, it will ring the programmed extension(s) of that group.
•••• If a group contains extensions and another attendant message, then on dialling the digit assigned to ring that group, the new group members will ring and the call will get
eircom advantage Auto-Attendant User Guide
9
answered by the other attendant message after the delay timer period associated with that message has expired.
•••• If a group consists only of an attendant message with no extensions, then on dialling the digit assigned to ring that group, the caller will be answered by that attendant message immediately.
Ring Mailbox – [RING MAILBOX] The installer can prompt the calling party to ring the mailbox of an extension. To facilitate this option the text “RING MAILBOX” can be entered in any digit’s assignment field. The system will wait to receive further digits dialled by the calling party on detecting that digit dialled. Example: The installer records the following welcome message: ” Welcome to Company X, …dial 1 for sales, 2 for marketing.., If you wish to leave a message in the mailbox of an extension please dial * followed by the extension number..” In the assignment field for the digit “ * ” the installer programs “RING MAILBOX”. The calling party after dialling the “*” followed by the extension number will cease hearing the message and will hear the welcome message for that extension’s mailbox. External Number – [Line seize code + external number ] On programming a line seize code (0, *9X ..) followed by an external number in any digit’s assignment field, the system on detecting that digit, will breakout and make an external call to that external number. End The Call – [END CALL] The installer may wish to end the call when the calling party dials a digit during the attendant message. Assigning the text “END CALL” to a digit will cleardown the call if that digit is dialled. Action on No Digits dialled The installer can assign an action to be performed if the calling party does not dial a digit within a programmed time period after the message has been played. During this time period [ Default 5 Sec ] the calling party will hear silence and the system will continue to monitor for digits dialled. When the time period has elapsed the system will perform the action programmed in the assignment field.
•••• The valid entries for this field are the same as those for the digit assignment.
•••• If the timer is set to 0, then the assigned action will be performed as soon as the attendant message has been played.
Destination Busy or Unavailable The installer can assign an action to be performed if the calling party dials a destination that is busy or unavailable.

Opera Flexicom Auto-Attendant User Guide
10
8.2 Access the Auto-Attendant Messages Auto-Attendant programming can only be carried out at an Operafone Executive System Phone that has Operator Functionality enabled.
1 0 : 0 0 F r i 0 3 . 1 1 . 0 2
E x t e n s i o n 1 1
M e n u s ↑↑↑↑ ↓↓↓↓ P h o n e B k
C a l l D i v e r s i o n
M a i l b o x S e t t i n g s ► A u t o - A t t e n d a n t S e t u
S e l e c t ↑↑↑↑ ↓↓↓↓ B a c k
A u t o - A t t e n d a n t S e t u p ► W e l c o m e M e s s a g e
H o l d M e s s a g e
S e l e c t ↑↑↑↑ ↓↓↓↓ E x i t
The user can simply use the up & down arrow Keys to scroll to the desired message and then press the <Select> Key.
From the idle screen -
• Press the <Menus> key
• Use the ↑↑↑↑↓↓↓↓ keys to scroll through the list of options
• When the cursor is alongside the Auto-Attendant Setup option, press the <Select> key
The 10 Auto-Attendant messages available to select are listed below:
− Welcome message
− Hold Message
− Greeting and Clear
− Attendant Msg. 4
− Attendant Msg. 5
− Attendant Msg. 6
− Attendant Msg. 7
− Attendant Msg. 8
− Attendant Msg. 9
− Attendant Msg. 10
eircom advantage Auto-Attendant User Guide
11
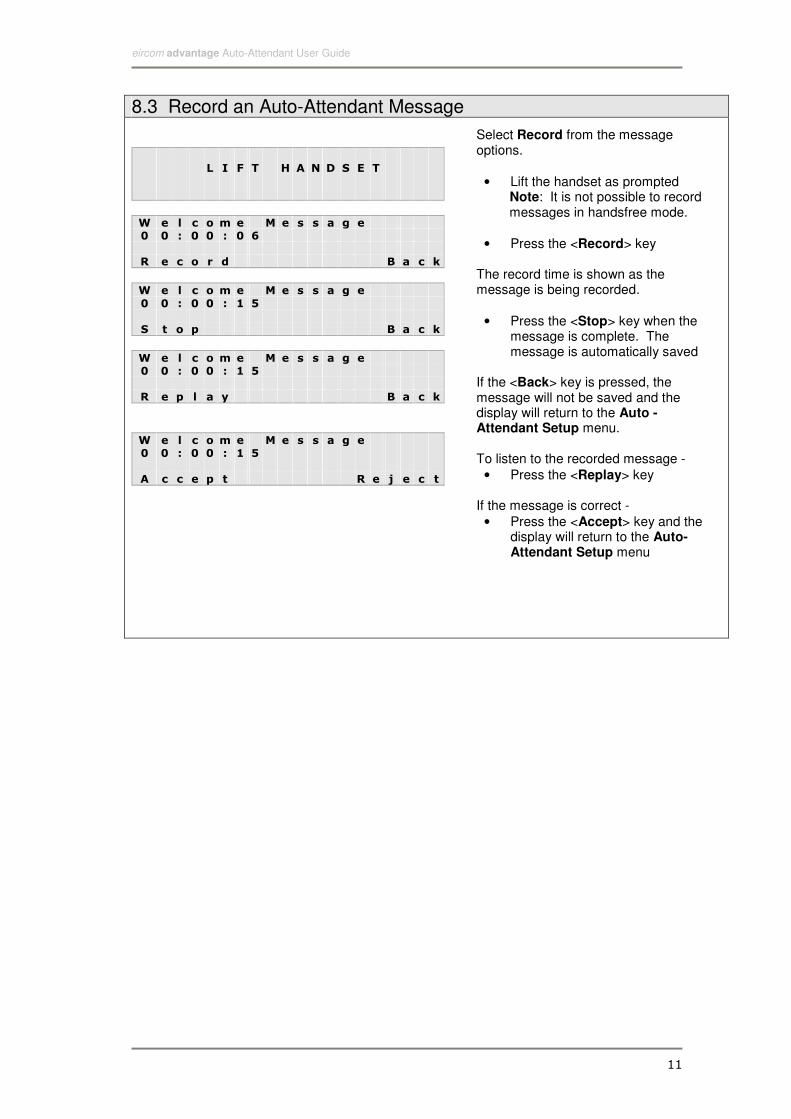
8.3 Record an Auto-Attendant Message
L I F T H A N D S E T
W e l c o m e M e s s a g e
0 0 : 0 0 : 0 6
R e c o r d B a c k
W e l c o m e M e s s a g e
0 0 : 0 0 : 1 5
S t o p B a c k
W e l c o m e M e s s a g e
0 0 : 0 0 : 1 5
R e p l a y B a c k
W e l c o m e M e s s a g e
0 0 : 0 0 : 1 5
A c c e p t R e j e c t
Select Record from the message options.
• Lift the handset as prompted Note: It is not possible to record messages in handsfree mode.
• Press the <Record> key The record time is shown as the message is being recorded.
• Press the <Stop> key when the message is complete. The message is automatically saved
If the <Back> key is pressed, the message will not be saved and the display will return to the Auto -Attendant Setup menu. To listen to the recorded message -
• Press the <Replay> key If the message is correct -
• Press the <Accept> key and the display will return to the Auto- Attendant Setup menu

Opera Flexicom Auto-Attendant User Guide
12
8.4 Play an auto-attendant Message
► P l a y
R e c o r d
D e l e t e
S e l e c t ↑↑↑↑ ↓↓↓↓ B a c k
W e l c o m e M e s s a g e
0 0 : 0 0 : 0 6
P a u s e B a c k
W e l c o m e M e s s a g e
0 0 : 0 0 0 6
R e s u m e B a c k
W e l c o m e M e s s a g e
0 0 : 0 0 : 0 6
R e p l a y B a c k
As shown on the display opposite, with the cursor alongside the Play option -
• Press the <Select> key Note: The Play and Delete options will only appear if a message has been recorded. If the handset is on-hook, handsfree mode will be activated and the selected message will be played. (The handset can be lifted at any time during the message). The length of the message is shown and counts down while it is being played. To pause a message -
• Press the <Pause> key (the function of the key changes to <Resume>)
To resume a message -
• Press the <Resume> key When the message has finished, to replay -
• Press the <Replay> key To return to the message options -
• Press the <Back> key
eircom advantage Auto-Attendant User Guide
13
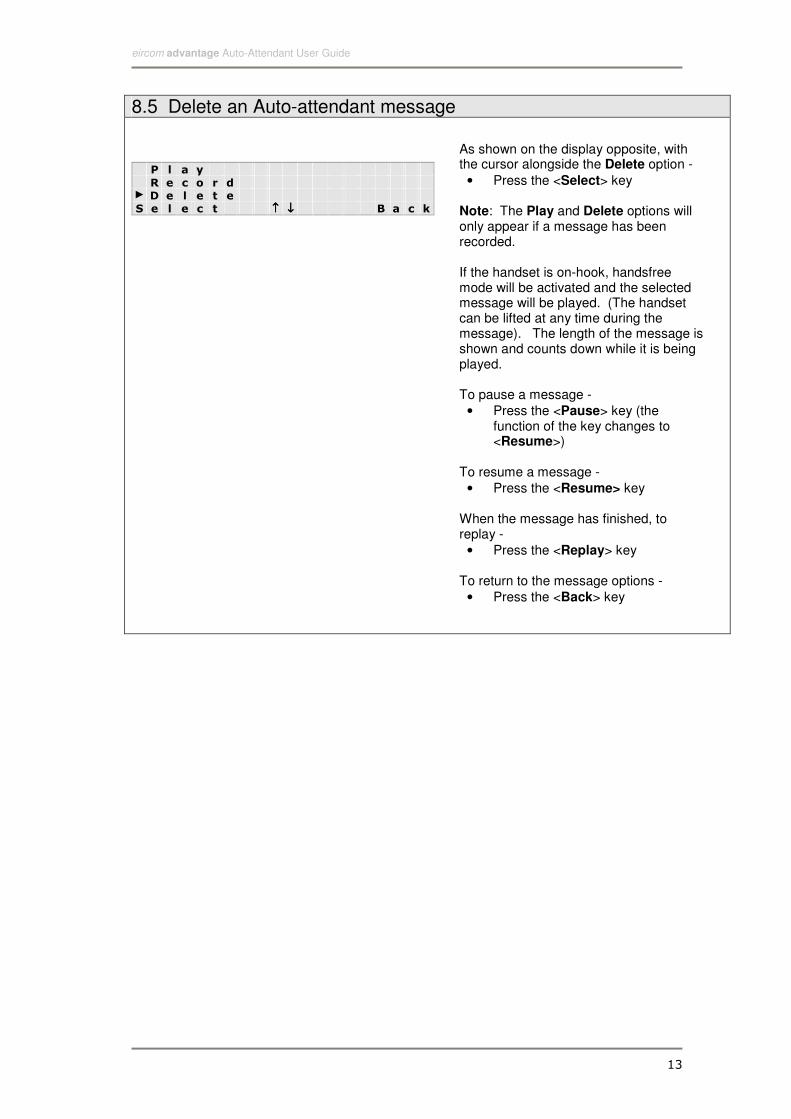
8.5 Delete an Auto-attendant message
P l a y
R e c o r d ► D e l e t e
S e l e c t ↑↑↑↑ ↓↓↓↓ B a c k
As shown on the display opposite, with the cursor alongside the Delete option -
• Press the <Select> key Note: The Play and Delete options will only appear if a message has been recorded. If the handset is on-hook, handsfree mode will be activated and the selected message will be played. (The handset can be lifted at any time during the message). The length of the message is shown and counts down while it is being played. To pause a message -
• Press the <Pause> key (the function of the key changes to <Resume>)
To resume a message -
• Press the <Resume> key When the message has finished, to replay -
• Press the <Replay> key To return to the message options -
• Press the <Back> key
Opera Flexicom Auto-Attendant User Guide
14
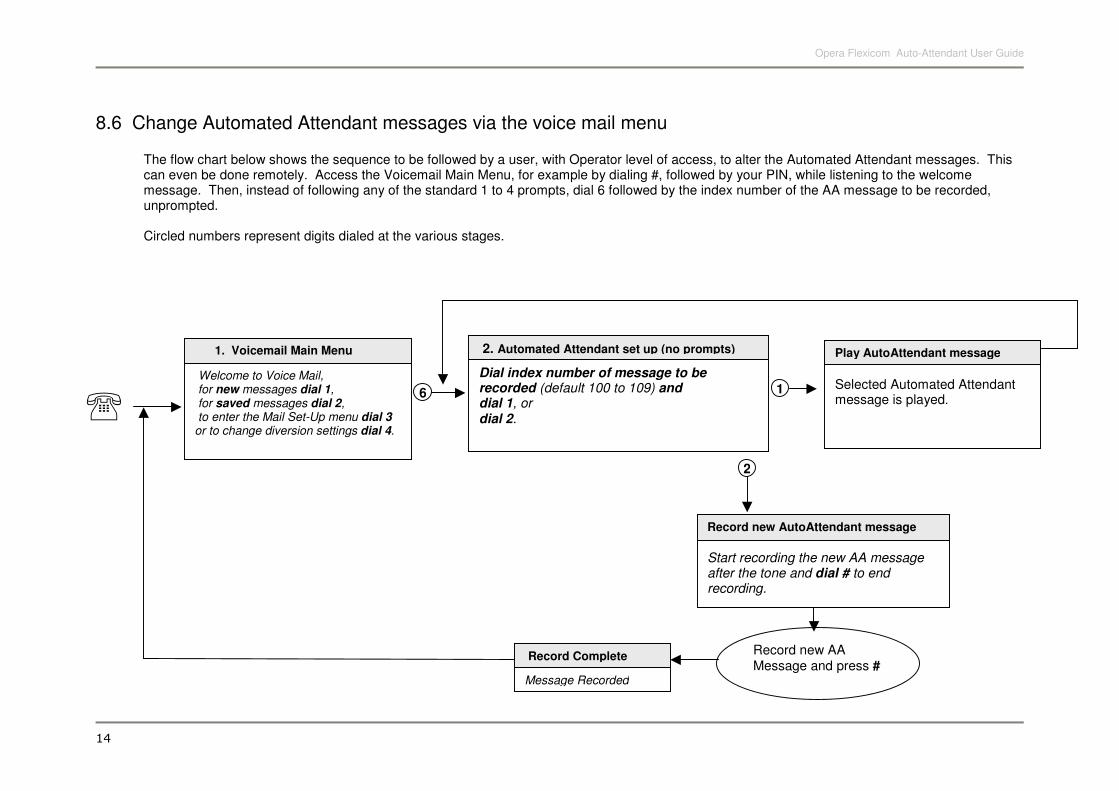
8.6 Change Automated Attendant messages via the voice mail menu
The flow chart below shows the sequence to be followed by a user, with Operator level of access, to alter the Automated Attendant messages. This can even be done remotely. Access the Voicemail Main Menu, for example by dialing #, followed by your PIN, while listening to the welcome message. Then, instead of following any of the standard 1 to 4 prompts, dial 6 followed by the index number of the AA message to be recorded, unprompted. Circled numbers represent digits dialed at the various stages.
℡
Welcome to Voice Mail, for new messages dial 1, for saved messages dial 2, to enter the Mail Set-Up menu dial 3 or to change diversion settings dial 4.
1. Voicemail Main Menu
Dial index number of message to be recorded (default 100 to 109) and dial 1, or dial 2.
2. Automated Attendant set up (no prompts)
6
Selected Automated Attendant message is played.
Play AutoAttendant message
1
Start recording the new AA message after the tone and dial # to end recording.
Record new AutoAttendant message
2
Record new AA Message and press #
Message Recorded
Record Complete