Embed Size (px)
Citation preview
AWS Quick StartWeb App Deployment
AWS Quick Start Web App Deployment
AWS Quick Start: Web App DeploymentCopyright © 2018 Amazon Web Services, Inc. and/or its affiliates. All rights reserved.
Amazon's trademarks and trade dress may not be used in connection with any product or service that is not Amazon's, in any mannerthat is likely to cause confusion among customers, or in any manner that disparages or discredits Amazon. All other trademarks notowned by Amazon are the property of their respective owners, who may or may not be affiliated with, connected to, or sponsored byAmazon.
AWS Quick Start Web App Deployment
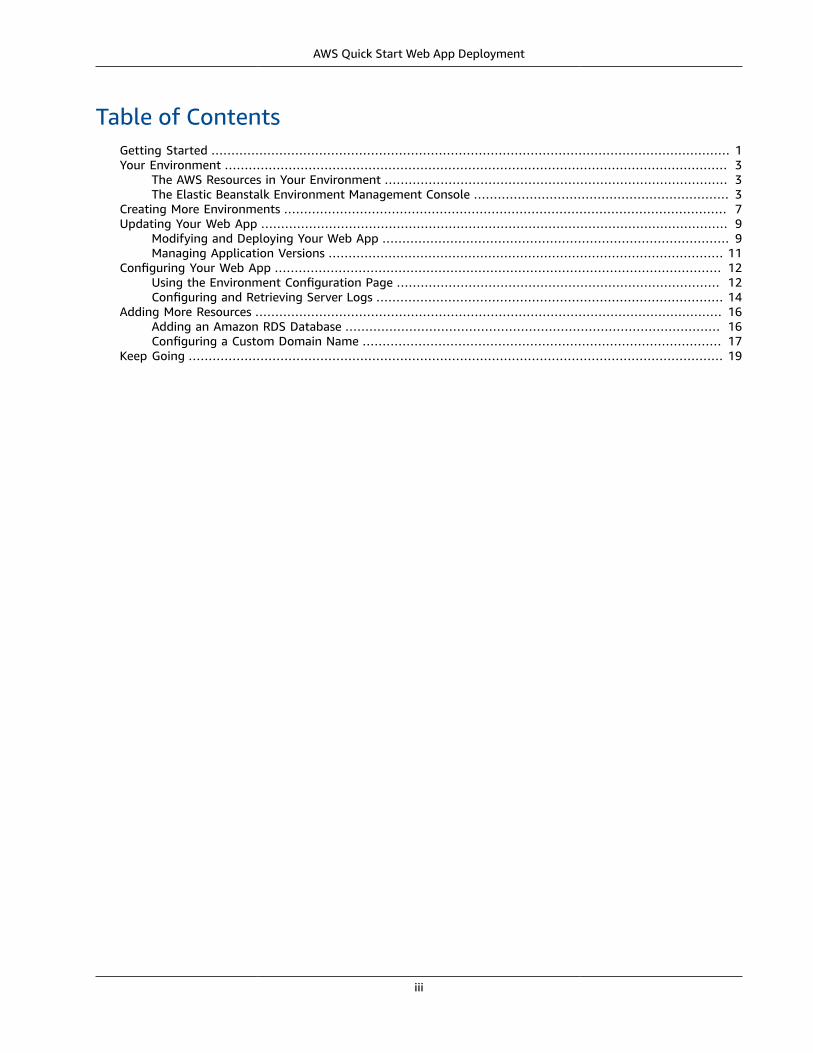
Table of ContentsGetting Started .... . . . . . . . . . . . . . . . . . . . . . . . . . . . . . . . . . . . . . . . . . . . . . . . . . . . . . . . . . . . . . . . . . . . . . . . . . . . . . . . . . . . . . . . . . . . . . . . . . . . . . . . . . . . . . . . . . . . . . . . . . . . . . . 1Your Environment .... . . . . . . . . . . . . . . . . . . . . . . . . . . . . . . . . . . . . . . . . . . . . . . . . . . . . . . . . . . . . . . . . . . . . . . . . . . . . . . . . . . . . . . . . . . . . . . . . . . . . . . . . . . . . . . . . . . . . . . . . . . 3
The AWS Resources in Your Environment .... . . . . . . . . . . . . . . . . . . . . . . . . . . . . . . . . . . . . . . . . . . . . . . . . . . . . . . . . . . . . . . . . . . . . . . . . . . . . . . . . . . 3The Elastic Beanstalk Environment Management Console .... . . . . . . . . . . . . . . . . . . . . . . . . . . . . . . . . . . . . . . . . . . . . . . . . . . . . . . . . . . . . 3
Creating More Environments .... . . . . . . . . . . . . . . . . . . . . . . . . . . . . . . . . . . . . . . . . . . . . . . . . . . . . . . . . . . . . . . . . . . . . . . . . . . . . . . . . . . . . . . . . . . . . . . . . . . . . . . . . . . . 7Updating Your Web App .... . . . . . . . . . . . . . . . . . . . . . . . . . . . . . . . . . . . . . . . . . . . . . . . . . . . . . . . . . . . . . . . . . . . . . . . . . . . . . . . . . . . . . . . . . . . . . . . . . . . . . . . . . . . . . . . . . 9
Modifying and Deploying Your Web App .... . . . . . . . . . . . . . . . . . . . . . . . . . . . . . . . . . . . . . . . . . . . . . . . . . . . . . . . . . . . . . . . . . . . . . . . . . . . . . . . . . . . 9Managing Application Versions .... . . . . . . . . . . . . . . . . . . . . . . . . . . . . . . . . . . . . . . . . . . . . . . . . . . . . . . . . . . . . . . . . . . . . . . . . . . . . . . . . . . . . . . . . . . . . . . . 11
Configuring Your Web App .... . . . . . . . . . . . . . . . . . . . . . . . . . . . . . . . . . . . . . . . . . . . . . . . . . . . . . . . . . . . . . . . . . . . . . . . . . . . . . . . . . . . . . . . . . . . . . . . . . . . . . . . . . . . . 12Using the Environment Configuration Page .... . . . . . . . . . . . . . . . . . . . . . . . . . . . . . . . . . . . . . . . . . . . . . . . . . . . . . . . . . . . . . . . . . . . . . . . . . . . . . 12Configuring and Retrieving Server Logs .... . . . . . . . . . . . . . . . . . . . . . . . . . . . . . . . . . . . . . . . . . . . . . . . . . . . . . . . . . . . . . . . . . . . . . . . . . . . . . . . . . . . 14
Adding More Resources .... . . . . . . . . . . . . . . . . . . . . . . . . . . . . . . . . . . . . . . . . . . . . . . . . . . . . . . . . . . . . . . . . . . . . . . . . . . . . . . . . . . . . . . . . . . . . . . . . . . . . . . . . . . . . . . . . . 16Adding an Amazon RDS Database .... . . . . . . . . . . . . . . . . . . . . . . . . . . . . . . . . . . . . . . . . . . . . . . . . . . . . . . . . . . . . . . . . . . . . . . . . . . . . . . . . . . . . . . . . . . 16Configuring a Custom Domain Name .... . . . . . . . . . . . . . . . . . . . . . . . . . . . . . . . . . . . . . . . . . . . . . . . . . . . . . . . . . . . . . . . . . . . . . . . . . . . . . . . . . . . . . . 17
Keep Going .... . . . . . . . . . . . . . . . . . . . . . . . . . . . . . . . . . . . . . . . . . . . . . . . . . . . . . . . . . . . . . . . . . . . . . . . . . . . . . . . . . . . . . . . . . . . . . . . . . . . . . . . . . . . . . . . . . . . . . . . . . . . . . . . . . . 19
iii
AWS Quick Start Web App Deployment
Getting Started with Web AppDeployment on Elastic Beanstalk
Welcome to the AWS Quick Start Guide: Web App Deployment. This guide explains how to deploy a webapp using a new, preview version of the AWS Elastic Beanstalk management console. The new consoleis available only to a selected group of new AWS users. If you are part of that group, you will see a newversion of the AWS Management Console home page that includes the following image:
If you don't see this image, use the following links to find the right guide for you:
• Getting Started with AWS: Deploying a Web App – This guide walks you through deploying a web appwith the current version of the Elastic Beanstalk console.
• AWS Elastic Beanstalk Developer Guide – The full developer guide for Elastic Beanstalk.
This guide provides sample Tomcat web apps that you can deploy to an Elastic Beanstalk environment tosee how Elastic Beanstalk works.
• Basic Tomcat Web App - java-tomcat-v1.zip
Before you begin, you need to sign up for an AWS account. Go to Getting Started With AWS and followthe instructions to create an account.
If you haven't already created an Elastic Beanstalk environment, or want to create a new environment todeploy the sample Tomcat web apps, as described in this guide, create one now.
Create a new Elastic Beanstalk web app environment
1. Open the Elastic Beanstalk Management Console.
2. If the Create a web app wizard is not shown automatically, choose Create New Application.
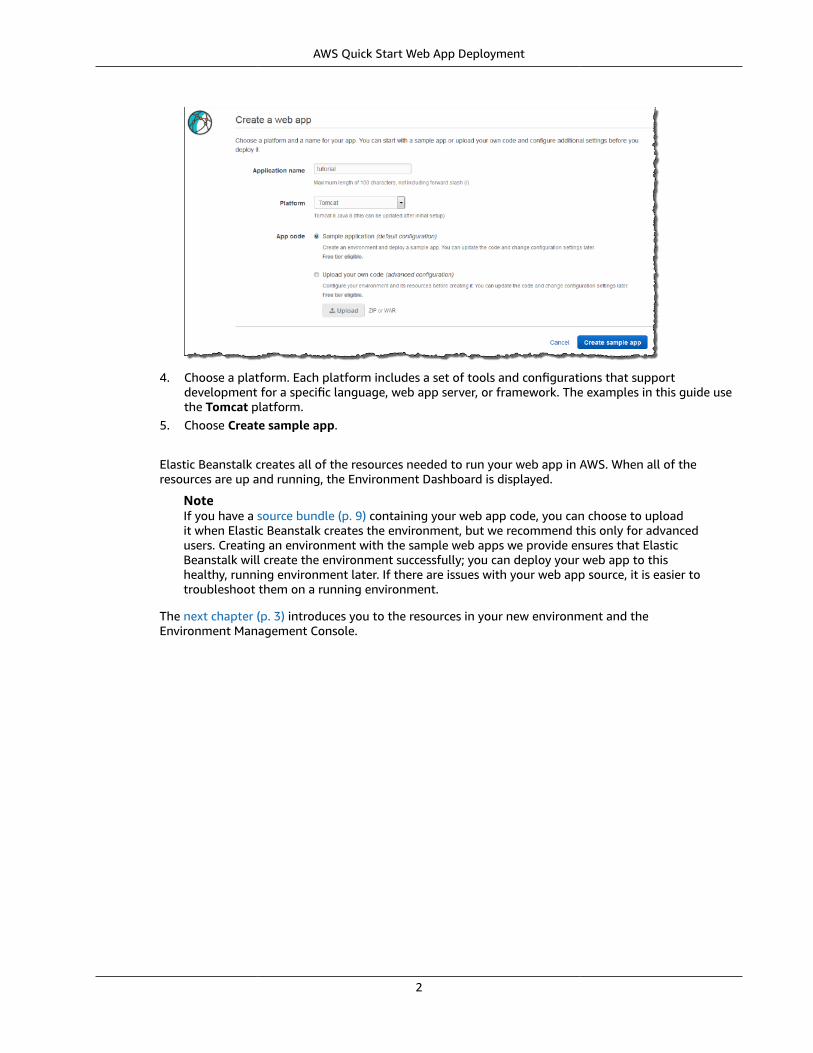
3. Enter a name for your application (for example, tutorial)
1
AWS Quick Start Web App Deployment
4. Choose a platform. Each platform includes a set of tools and configurations that supportdevelopment for a specific language, web app server, or framework. The examples in this guide usethe Tomcat platform.
5. Choose Create sample app.
Elastic Beanstalk creates all of the resources needed to run your web app in AWS. When all of theresources are up and running, the Environment Dashboard is displayed.
NoteIf you have a source bundle (p. 9) containing your web app code, you can choose to uploadit when Elastic Beanstalk creates the environment, but we recommend this only for advancedusers. Creating an environment with the sample web apps we provide ensures that ElasticBeanstalk will create the environment successfully; you can deploy your web app to thishealthy, running environment later. If there are issues with your web app source, it is easier totroubleshoot them on a running environment.
The next chapter (p. 3) introduces you to the resources in your new environment and theEnvironment Management Console.
2
AWS Quick Start Web App DeploymentThe AWS Resources in Your Environment
Your Elastic Beanstalk Web AppEnvironment
Now you have a web app running in AWS Elastic Beanstalk. As Elastic Beanstalk creates yourenvironment, it interacts with several other AWS services to create the resources required to run yourweb app securely and resiliently.
As Elastic Beanstalk creates these resources, it displays event messages that show the resource namesand alert you to errors that occur. You can view events and other information about your environment inthe Elastic Beanstalk Environment Management Console.
The AWS Resources in Your EnvironmentWhen you deploy a sample web app for the first time, Elastic Beanstalk creates a standard environmentwith the following resources:
• EC2 instance – A virtual machine that runs Amazon Linux or Microsoft Windows Server and that isconfigured to run web apps on the platform that you choose.
Each platform runs a different set of software, configuration files, and scripts to support a specificlanguage version, framework, web container, or combination thereof. Most platforms use eitherApache or nginx as a reverse proxy that sits in front of your web app, forwards requests to it, servesstatic assets, and generates access and error logs.
• Security group – An Amazon Elastic Compute Cloud (Amazon EC2) security group configured to allowingress on port 80. This resource lets HTTP traffic from the Internet reach the EC2 instance runningyour web app. By default, traffic is not allowed on other ports.
• Auto Scaling group – An Auto Scaling group configured to replace an instance if it is terminated orbecomes unavailable.
• Amazon S3 bucket – A storage location for your source code, logs, and other artifacts that are createdwhen you use Elastic Beanstalk.
• Amazon CloudWatch alarms – Two Amazon CloudWatch alarms that monitor the load on theinstances in your environment and trigger if the load is too high or too low. When an alarm istriggered, your Auto Scaling group scales up or down in response.
• Domain name – A domain name that routes to your web app in the formsubdomain.region.elasticbeanstalk.com.
All of the AWS resources that Elastic Beanstalk creates for a standard environment are eligible for theAWS Free Tier. To stay within the Free Tier limits, use t2.micro instances and a single environment. Formore information, see aws.amazon.com/free.
The Elastic Beanstalk Environment ManagementConsole
The management console for your environment lets you easily monitor your environment, manage yourweb app configuration, and retrieve logs.
3
AWS Quick Start Web App DeploymentThe Elastic Beanstalk Environment Management Console
To access the Environment Management Console
1. Open the Elastic Beanstalk Management Console.
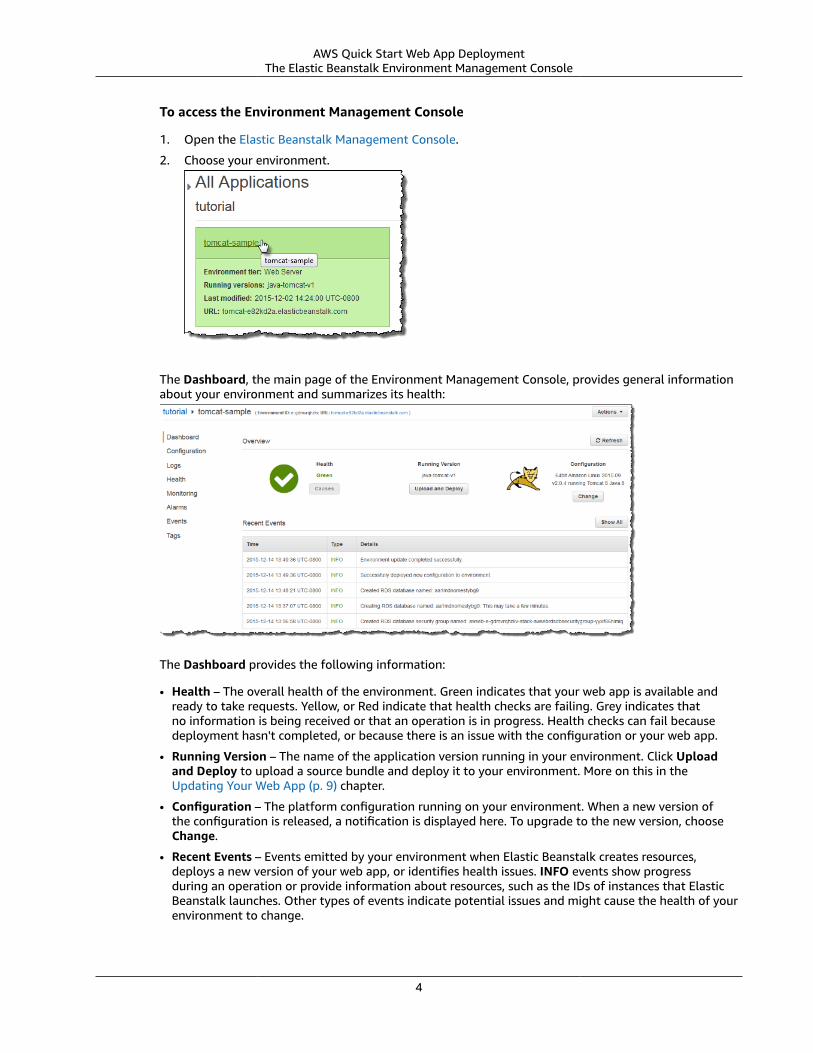
2. Choose your environment.
The Dashboard, the main page of the Environment Management Console, provides general informationabout your environment and summarizes its health:
The Dashboard provides the following information:
• Health – The overall health of the environment. Green indicates that your web app is available andready to take requests. Yellow, or Red indicate that health checks are failing. Grey indicates thatno information is being received or that an operation is in progress. Health checks can fail becausedeployment hasn't completed, or because there is an issue with the configuration or your web app.
• Running Version – The name of the application version running in your environment. Click Uploadand Deploy to upload a source bundle and deploy it to your environment. More on this in theUpdating Your Web App (p. 9) chapter.
• Configuration – The platform configuration running on your environment. When a new version ofthe configuration is released, a notification is displayed here. To upgrade to the new version, chooseChange.
• Recent Events – Events emitted by your environment when Elastic Beanstalk creates resources,deploys a new version of your web app, or identifies health issues. INFO events show progressduring an operation or provide information about resources, such as the IDs of instances that ElasticBeanstalk launches. Other types of events indicate potential issues and might cause the health of yourenvironment to change.
4

AWS Quick Start Web App DeploymentThe Elastic Beanstalk Environment Management Console
The navigation panel on the left side of the console links to several other pages that you can use tomonitor and manage your environment. Choose Logs to display the Logs page.
The Logs page lets you request logs from the EC2 instances in your environment.
To view logs
1. Open the Elastic Beanstalk Management Console.
2. Choose your environment to view the environment dashboard.
3. Choose Logs.
4. Choose Request logs, and then choose Last 100 lines. Elastic Beanstalk sends a request to theinstances in your environment to compile a log file, and then upload it to Amazon Simple StorageService (Amazon S3).
5. Choose Download to open the log file. This file contains the last 100 lines of several log files,including access and errors logs from the Apache proxy, Elastic Beanstalk activity logs, andcatalina.out, the primary log for your Tomcat web app.
Elastic Beanstalk automatically deletes logs generated from this page are after 15 minutes. We'll seehow to rotate logs to Amazon S3 for permanent storage in Configuring Your Web App (p. 12).
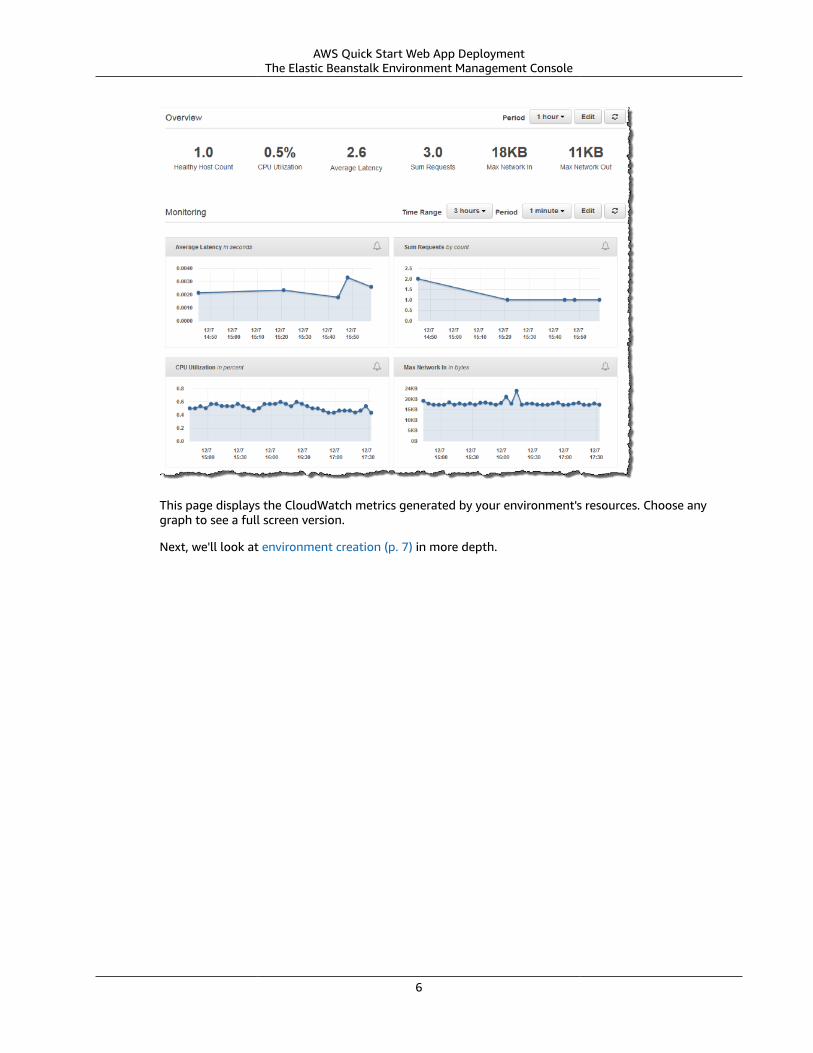
Let's check out one more page before we move on. Choose Monitoring in the navigation panel to openthe monitoring page.
5
AWS Quick Start Web App DeploymentThe Elastic Beanstalk Environment Management Console
This page displays the CloudWatch metrics generated by your environment's resources. Choose anygraph to see a full screen version.
Next, we'll look at environment creation (p. 7) in more depth.
6

AWS Quick Start Web App Deployment
Creating More Environments
Now you have an Elastic Beanstalk environment running a sample web app with a set of supporting AWSresources with default settings. But what if you want to customize the resources in your environment?
You can always change your environment's configuration settings later, except for the environment nameand platform.
Changing some settings can take time. For example, if you want to change the instance type of the webservers in your environment, Elastic Beanstalk must terminate all running instances and bring up a newset. Setting the instance type when you create an environment can save you time later. For these types ofsettings, it's more efficient to change them when you create the instance.
Let's take a look at the configuration options available in the Create App Wizard and how to customizethem when you create the environment. Download this sample web app to use with the followingprocedure: java-tomcat-v1.zip
To customize your web app's configuration during environment creation
1. Open the Elastic Beanstalk Management Console.
2. Choose Create New Application.
3. For Application name, enter tutorial.
4. Set Platform to Tomcat.
5. Select Upload your own code.
6. Choose Upload and upload the java-tomcat-v1.zip file.
7. Choose Configure App to continue to the Advanced Configuration page.
8. Under Environment, choose Modify.
9. Change the Name to tomcat-sample.
10. For Domain, type a unique subdomain name for your environment. Your environment will beavailable at subdomain.region.elasticbeanstalk.com.
11. For Description, type Test environment.
12. Choose Save.
13. Choose Create App.
Every environment that you create consumes hours towards your monthly AWS Free Tier limit. As youread through this guide, you can continue to use the same environment.
If you've created several environments, or don't plan on returning to this guide soon, terminateunneeded environments now.
To terminate an environment
1. Open the Elastic Beanstalk Management Console.
2. Environments are organized by application name. Choose an environment name to open theEnvironment's Management Console Dashboard.
7
AWS Quick Start Web App Deployment
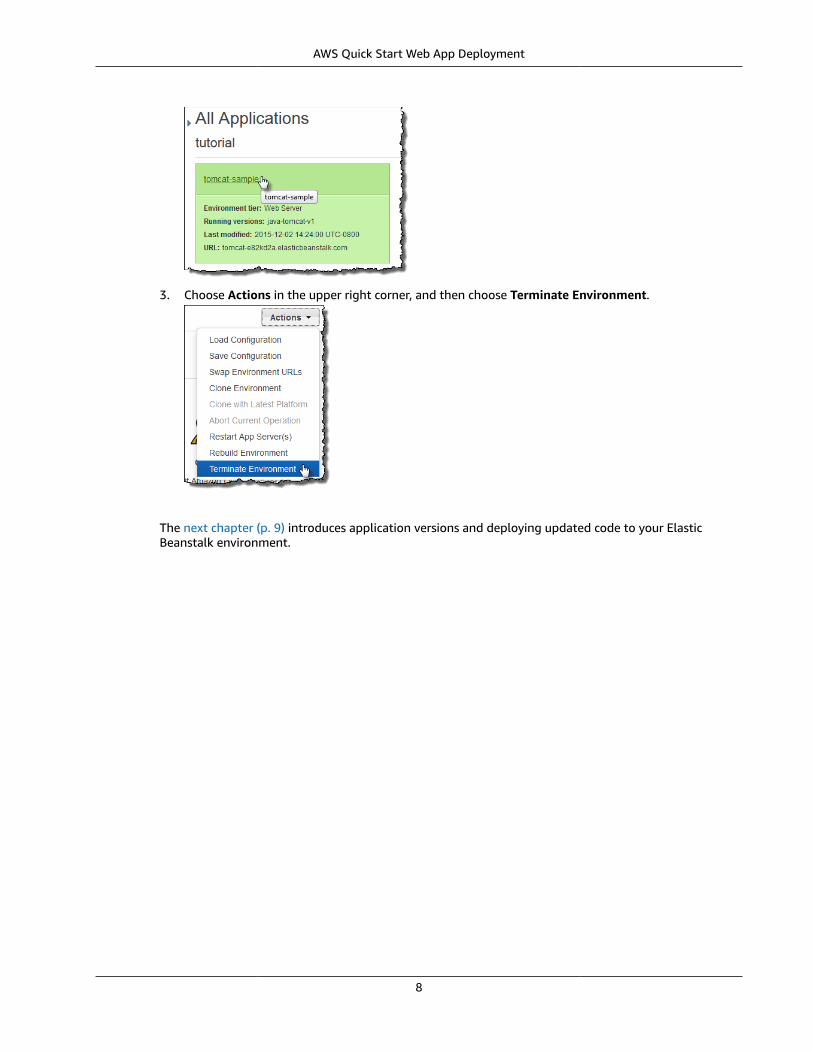
3. Choose Actions in the upper right corner, and then choose Terminate Environment.
The next chapter (p. 9) introduces application versions and deploying updated code to your ElasticBeanstalk environment.
8

AWS Quick Start Web App DeploymentModifying and Deploying Your Web App
Updating Your Web AppAfter creating an AWS Elastic Beanstalk environment (p. 7), you can deploy a new version of your webapp to it at any time. The deployment process is very quick, and doesn't require you to restart theinstances in your environment.
To update your web app, you upload a source bundle to Elastic Beanstalk and deploy it to anenvironment. Usually this is done in one step, but you can also manage versions of your web appindependent from the deployment process.
A source bundle is usually a ZIP archive that contains your application source code, but other formatsare supported for some platforms. The Tomcat platform supports WAR files for source bundles, and thesingle-container Docker platform accepts Dockerfile files in addition to ZIP archives.
Modifying and Deploying Your Web AppIn this procedure, you will extract the sample web app to a local directory, make a change, upload thenew version to Elastic Beanstalk, and deploy it to your web app environment.
First, create a project folder on your local machine in any location to which you have write permission.For this tutorial, we will use a folder named tutorial in the user directory.
To create a project folder (Windows)
1. Open the Start menu, and type Windows Explorer in the search box.2. Press Enter to open Windows Explorer.3. To open your user folder, in the navigation bar, type %USERPROFILE%, and then press Enter.4. In the Search bar, choose New Folder.5. Rename the new folder tutorial.6. Open tutorial and note the location of the folder in the navigation bar. You will need this
information later.
Extract the sample Tomcat web app.
To extract the sample app source bundle (Windows)
1. Right-click the source bundle, java-tomcat-v1.zip, and choose Save As to save it to a local folder.2. In Windows Explorer, locate the saved file.3. Open the context (right-click) menu for the ZIP file, choose Open With, and then choose Windows
Explorer.4. Choose Extract all files.5. Choose Browse, and then select your project folder.6. Choose Extract.
The source bundle is organized as follows:
~/tutorial|-- META-INF| |-- LICENSE.txt| |-- MANIFEST.MF| `-- NOTICE.txt|-- WEB-INF
9

AWS Quick Start Web App DeploymentModifying and Deploying Your Web App
| `-- web.xml|-- cron.yaml|-- index.jsp|-- robots.txt`-- scheduled.jsp
The only file that we're concerned about right now is index.jsp, which contains all of the content andstyles used in the sample web app. Open index.jsp and replace the content of the <body> tag withsome of your own HTML. For example:
<div class="textColumn"> <h1>Tutorial</h1> <p>This is content I added during the Elastic Beanstalk quick start tutorial.</p> </div>
Create a new source bundle with the updated file by making a ZIP archive file that contains the samefiles as the sample app. Do not include the containing folder in the ZIP file.
To create a source bundle (Windows)
1. In Windows Explorer, navigate to your project folder.2. Select all of the source files and folders, including index.jsp.3. Open the context (right-click) menu for the selected files, choose Send to, and then choose
Compressed (zipped) folder.
Upload the source bundle to Elastic Beanstalk and deploy it to your environment.
To upload and deploy the updated version of your application
1. Open the Elastic Beanstalk Management Console.2. Choose your environment to view the environment Dashboard.3. Choose Upload and Deploy.4. Choose Browse, and upload your source bundle.5. Type a label for the new version. For example: Update index.jsp6. Choose Deploy.
Deployment should take less than 30 seconds. When the deployment is complete, open the URL at thetop of the environment Dashboard to view your web app. It should look similar to the following:
10
AWS Quick Start Web App DeploymentManaging Application Versions
Managing Application VersionsEach source bundle is tied to an application version that represents a version of your web app. Anapplication version includes a unique version label, a source bundle, and an optional description.
You manage application versions and deploy previous versions of your application to a runningenvironment from the Application Versions page of the Elastic Beanstalk Environment ManagementConsole.
To deploy a previous version
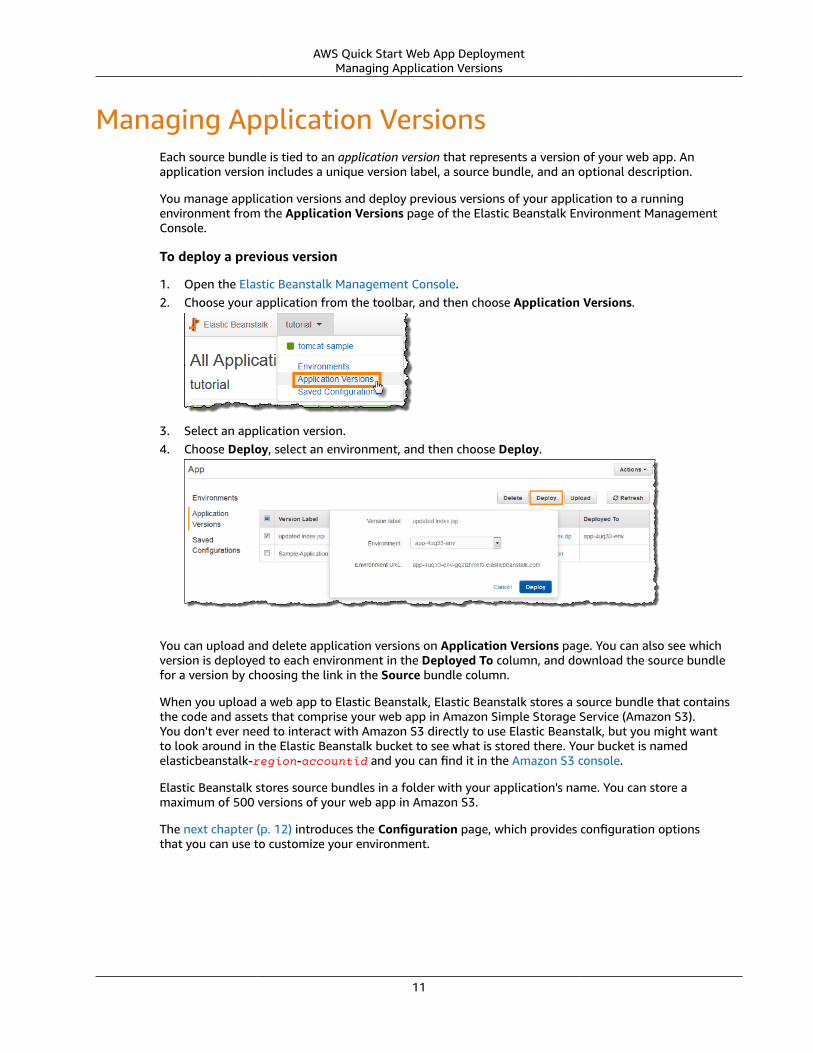
1. Open the Elastic Beanstalk Management Console.2. Choose your application from the toolbar, and then choose Application Versions.
3. Select an application version.4. Choose Deploy, select an environment, and then choose Deploy.
You can upload and delete application versions on Application Versions page. You can also see whichversion is deployed to each environment in the Deployed To column, and download the source bundlefor a version by choosing the link in the Source bundle column.
When you upload a web app to Elastic Beanstalk, Elastic Beanstalk stores a source bundle that containsthe code and assets that comprise your web app in Amazon Simple Storage Service (Amazon S3).You don't ever need to interact with Amazon S3 directly to use Elastic Beanstalk, but you might wantto look around in the Elastic Beanstalk bucket to see what is stored there. Your bucket is namedelasticbeanstalk-region-accountid and you can find it in the Amazon S3 console.
Elastic Beanstalk stores source bundles in a folder with your application's name. You can store amaximum of 500 versions of your web app in Amazon S3.
The next chapter (p. 12) introduces the Configuration page, which provides configuration optionsthat you can use to customize your environment.
11

AWS Quick Start Web App DeploymentUsing the Environment Configuration Page
Configuring Your Web AppAWS Elastic Beanstalk provides many configuration options for customizing the AWS resources in yourenvironments. You can set configuration options when you create an environment or modify the settingson a running environment. You do not need to redeploy your web app when you change configurationsettings.
In addition to configuring the resources that run and support your web app, you can also configure thebehavior of the environment itself, including how deployment and update policies, health reporting, andAmazon Simple Notification Service ( Amazon SNS) notifications work.
You can apply most setting changes with minimal downtime. Unless you make a change that requires theEC2 instances in your environment to be replaced, such as changing the instance type or key pair, ElasticBeanstalk can apply changes immediately. When you apply a change in the AWS Management Console,Elastic Beanstalk notifies you if the change requires replacing instances.
Using the Environment Configuration PageTo modify the settings that Elastic Beanstalk applied to your environment when you created it, use theenvironment Configuration page.
The options on the Configuration page are organized on cards, and apply to either a specific resource inyour environment, or a feature of Elastic Beanstalk. Use the cards as follows:
• Scaling – Configure your environment's Auto Scaling group and add or remove an ELB load balancer.
• Instances – Configure the launch configuration for the EC2 instances in your environment, includinginstance type, key pair, and instance profile.
• Notifications – Configure Amazon SNS notifications to receive an email when your environment'shealth changes.
• Software Configuration – Configure logging, environment properties, and platform-specific softwaresettings.
12
AWS Quick Start Web App DeploymentUsing the Environment Configuration Page
• Updates and Deployments – Configure how Elastic Beanstalk applies configuration changes anddeployments.
• Health – Configure a health check URL, service role, and enhanced health reporting.
Your sample environment does not contain a load balancer; it is a single-instance environment. With loadbalancing enabled, your environment can use Auto Scaling to provision more EC2 instances in responseto increased load. When more than one instance is available, the load balancer distributes traffic amongthe instances.
You can use the Configuration page to switch between single-instance and load-balancedconfigurations. When you add a load balancer, Elastic Beanstalk configures the Auto Scaling groupto scale from 1to 4 instances depending on how close your environment is to minimum or maximumcapacity.
To add an ELB load balancer to your web app
1. Open the Elastic Beanstalk Management Console.
2. Choose your environment to open the environment Dashboard.
3. In the navigation pane, choose Configuration.
4.On the Scaling card, choose the cog icon ( ) to open the Configuration page.
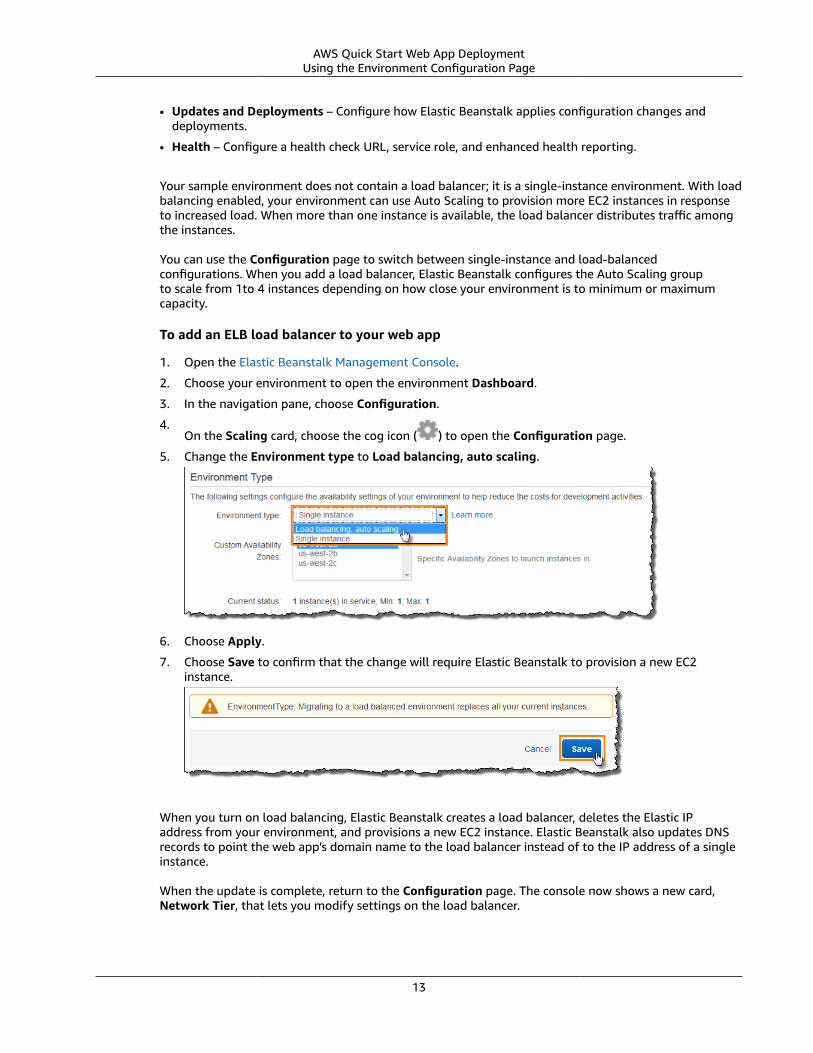
5. Change the Environment type to Load balancing, auto scaling.
6. Choose Apply.
7. Choose Save to confirm that the change will require Elastic Beanstalk to provision a new EC2instance.
When you turn on load balancing, Elastic Beanstalk creates a load balancer, deletes the Elastic IPaddress from your environment, and provisions a new EC2 instance. Elastic Beanstalk also updates DNSrecords to point the web app's domain name to the load balancer instead of to the IP address of a singleinstance.
When the update is complete, return to the Configuration page. The console now shows a new card,Network Tier, that lets you modify settings on the load balancer.
13

AWS Quick Start Web App DeploymentConfiguring and Retrieving Server Logs
When you use load balancing with your web app, you also need to be aware of the Auto Scaling settingsthat are applied to your environment. The Auto Scaling group is currently set to scale between 1 and4 EC2 instances depending on network load. Let's change the settings to trigger scaling based on CPUutilization, and have a maximum of 2 instances.
To modify Auto Scaling settings
1. Open the Elastic Beanstalk Management Console.2. Choose your environment name to open the environment Dashboard.3. In the navigation pane, choose Configuration.4.
On the Scaling card, choose the cog icon ( ) to open the Configuration page.5. Expand the Auto Scaling section, and then change Maximum instance count to 2.6. Expand the Scaling Trigger section.7. Set Trigger measurement to CPUUtilization.8. Set Unit of measurement to Percent.9. Set Upper threshold to 90.10. Set Lower threshold to 30.11. Choose Apply.
Configuring and Retrieving Server LogsThe web server instances in your Elastic Beanstalk environment generate several log files when yourun a web app. Each Elastic Beanstalk platform is configured to upload tail (recent) or bundle (full) logsto Amazon Simple Storage Service (Amazon S3) when you request them from the Logs page in theElastic Beanstalk Environment Management Console. Additionally, you can configure your web app toperiodically upload logs to Amazon S3 for long-term storage.
To upload logs, the instances in your Elastic Beanstalk environment must have permission to write toAmazon S3. You can grant API permissions to your EC2 instances by modifying the AWS Identity andAccess Management (IAM) instance profile that Elastic Beanstalk assigned to the instance at launch. Bydefault, this is an IAM role named aws-elasticbeanstalk-ec2-role that Elastic Beanstalk createswhen you create your first environment.
To update your environment's permissions
1. Open the IAM console at https://console.aws.amazon.com/iam/.2. Choose Roles.3. Choose aws-elasticbeanstalk-ec2-role.
14

AWS Quick Start Web App DeploymentConfiguring and Retrieving Server Logs
4. Choose Attach Policy.5. Choose Custom Policy.6. Select AmazonS3FullAccess, and then choose Attach Policy.
Your instances now have permission to upload files to Amazon S3. Permissions are evaluated everytime your an instance attempts to use AWS APIs so you don't need to restart instances or create a newenvironment.
Return to the Configuration page for your web app environment and enable log rotation.
To add log file rotation to Amazon S3 to your web app
1. Open the Elastic Beanstalk Management Console.2. Choose your environment name to open the environment Dashboard.3. In the Navigation pane, choose Configuration.4.
On the Software Configuration card, choose the cog icon ( ) to open the Configuration page.5. Under log options, select the box next to Enable log file rotation to Amazon S3.6. Choose Apply.
Logs are uploaded to Amazon S3 only after they are rotated locally. Your instances attempt to rotatelogs once an hour. To view logs immediately, open the Logs page.
To request logs from an EC2 instance
1. Open the Elastic Beanstalk Management Console.2. Choose your environment name to open the environment Dashboard.3. In the navigation pane, choose Logs.4. Choose Request Logs, and then choose Last 100 Lines.
Instances typically compile and upload requested logs within 10 seconds. To open the log file in a newwindow, choose Download.
Elastic Beanstalk stores logs in your Elastic Beanstalk bucket in Amazon S3. Elastic Beanstalk createsa bucket named elasticbeanstalk-region-account-id for each region in which you createenvironments. Within this bucket, Elastic Beanstalk stores logs in the resources/environments/logs/logtype/environment-id/instance-id path. You can find your environment's ID in theenvironment Dashboard (p. 3).
The next chapter (p. 16) introduces some of the AWS resources that you can add to your environmentfor additional functionality.
15

AWS Quick Start Web App DeploymentAdding an Amazon RDS Database
Adding More AWS Resources to YourWeb App
Your AWS Elastic Beanstalk environment contains a default set of resources (p. 3) that you can expandupon to support additional functionality in your web app. Elastic Beanstalk has features to facilitate afew common use cases, like adding an Amazon Relational Database Service (Amazon RDS) database oran Elastic Load Balancing load balancer.
Any resources that you add to your environment are tied to the environment's lifecycle and will beterminated when you terminate your environment. This is fine for development and testing, but fora production environment, you will probably want to create database resources independently andconfigure a security group for your environment that allows your web app to connect to them.
Adding an Amazon RDS DatabaseAs your web app development progresses, you will typically need a database to store user information orstate. Elastic Beanstalk makes it easy to add an RDS DB instance to your environment and connect it toyour web app.
You can use the AWS Management Console to add an RDS DB instance to your environment. When youadd a database to your environment with this method, Elastic Beanstalk sets variables that your web appcan access to construct a connection string.
To add an RDS DB instance to your environment
1. Open the Elastic Beanstalk Management Console.2. Choose your environment name to open the environment Dashboard.3. Choose Configuration.4. In the Data Tier section, choose Create a new RDS database.5. Choose the DB engine and Engine version used by your web app.6. Choose an Instance class. Choose db.t2.micro to stay within the Free Tier limit.7. Type in a Master username and Master password.8. Choose Apply.
Provisioning a database instance takes about 10 minutes. Your web app is still available while ElasticBeanstalk makes the changes to your environment.
When Elastic Beanstalk finishes updating the environment, your web app can access connectioninformation by reading the following environment variables:
• RDS_DB_NAME – The name of the database. Elastic Beanstalk sets this to ebdb.• RDS_USERNAME – The username that you enter when you add the database to your environment.• RDS_PASSWORD – The password that you enter when you add the database to your environment.• RDS_HOSTNAME – The DNS name of the DB instance.• RDS_PORT – The port used by the database engine that you select when you add the database to your
environment.
16

AWS Quick Start Web App DeploymentConfiguring a Custom Domain Name
ImportantAdding a DB instance to your environment ties the database to your environment's lifecycle.If you terminate the environment, Elastic Beanstalk terminates the DB instance, too. For aproduction web app where you are using blue/green deployments, you can decouple your webapp environments from the production database by creating the database in the Amazon RDSconsole and configuring your environment with a security group that allows it to connect to thedatabase.
You can then provide connection information to your web app in environment properties or in aconfiguration file stored securely in Amazon S3 that only instances in your Elastic Beanstalk environmentcan access. For more information on this process, see Using Elastic Beanstalk with Amazon RDS in theAWS Elastic Beanstalk Developer Guide.
Configuring a Custom Domain NameCurrently your environment is available to users at a subdomain of elasticbeanstalk.com. You can choosea subdomain for your web app when you create an environment (p. 7).
If you own a domain name, you can use it for your web app. You can purchase a domain name withAmazon Route 53, or use one that you purchase from another provider. To purchase a domain name withRoute 53, see Registering a New Domain in the Route 53 Developer Guide.
To use a custom domain name, first create a hosted zone for your domain. A hosted zone contains thename server and start of authority (SOA) records that specify the DNS hosts that will resolve requests foryour domain name.
To create a hosted zone in Route 53
1. Open the Route 53 management console.2. Choose Hosted Zones.3. Choose Create Hosted Zone.4. For Domain Name, type the domain name that you own. For example: example.com.5. Choose Create.
Next, add a CNAME record to the hosted zone. A CNAME record registers a domain name that you own asan alias of your web app environment's elasticbeanstalk.com subdomain.
When an Route 53 DNS server receives a name request for your custom domain name, it resolves to theelasticbeanstalk.com subdomain, which resolves to the public DNS name of your Elastic Load Balancingload balancer, which resolves to your web app's IP address.
NoteIn a single-instance environment, the elasticbeanstalk.com subdomain resolves to an Elastic IPaddress attached to the instance running your web app.
To add a CNAME record in Route 53
1. Open the Route 53 management console.2. Choose Hosted Zones.3. Choose your hosted zone's name.4. Choose Create Record Set.5. For Name, type the subdomain that will redirect to your Elastic Beanstalk web app. For example:
www.6. For Type, choose CNAME - Canonical Name.
17
AWS Quick Start Web App DeploymentConfiguring a Custom Domain Name
7. For Value, type the domain name of your Elastic Beanstalk environment. For example:example.elasticbeanstalk.com.
8. Choose Create.
DNS records take up to 24 hours to propagate worldwide.
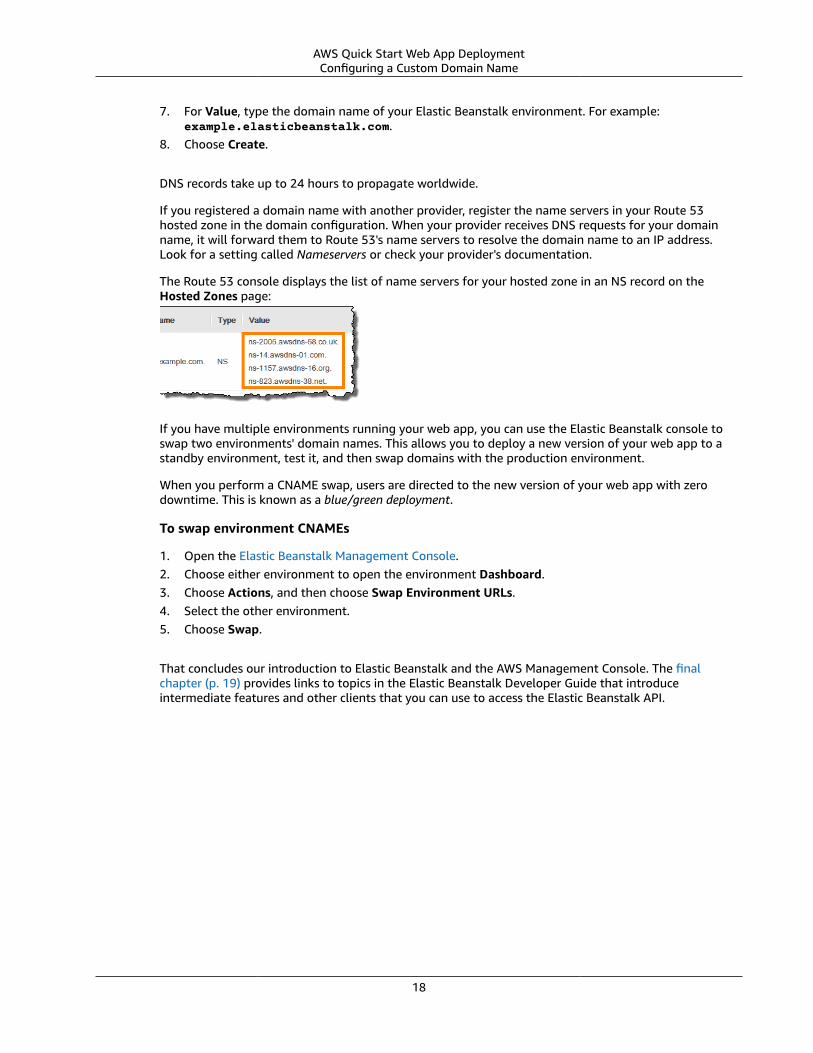
If you registered a domain name with another provider, register the name servers in your Route 53hosted zone in the domain configuration. When your provider receives DNS requests for your domainname, it will forward them to Route 53's name servers to resolve the domain name to an IP address.Look for a setting called Nameservers or check your provider's documentation.
The Route 53 console displays the list of name servers for your hosted zone in an NS record on theHosted Zones page:
If you have multiple environments running your web app, you can use the Elastic Beanstalk console toswap two environments' domain names. This allows you to deploy a new version of your web app to astandby environment, test it, and then swap domains with the production environment.
When you perform a CNAME swap, users are directed to the new version of your web app with zerodowntime. This is known as a blue/green deployment.
To swap environment CNAMEs
1. Open the Elastic Beanstalk Management Console.2. Choose either environment to open the environment Dashboard.3. Choose Actions, and then choose Swap Environment URLs.4. Select the other environment.5. Choose Swap.
That concludes our introduction to Elastic Beanstalk and the AWS Management Console. The finalchapter (p. 19) provides links to topics in the Elastic Beanstalk Developer Guide that introduceintermediate features and other clients that you can use to access the Elastic Beanstalk API.
18
AWS Quick Start Web App Deployment
Keep GoingThis guide covers the basics of using AWS Elastic Beanstalk with the AWS Management Console. Nowthat you are comfortable creating and configuring basic environments in Elastic Beanstalk, check out thefull developer guide to learn how to use the EB CLI (command line interface), to use configuration files(.ebextensions), and to add more resources to your environment.
The Elastic Beanstalk app that you created in the console is an organizational structure that you use togroup versions of your web app, environments that run your web app, and saved configurations. Learnhow to create more applications, manage application versions, and create a valid source bundle in theManaging Applications chapter.
An Elastic Beanstalk environment runs your web app using standard AWS resources. Your environmentsbelong to an application and have a lifecycle that defines when resources are created, updated, andterminated. You can deploy any version of your application to any of its environments.
Elastic Beanstalk provides many configuration options, organized into namespaces, that let youcustomize resources in your environment simply and quickly. You can also link environments together torun multiple components of a single web app in a service-oriented architecture.
When you move from development and testing to running high-availability production environmentsfor publically available or line-of-business web apps, monitoring quickly becomes very important. ElasticBeanstalk provides features such as enhanced health monitoring, alarm configuration, and logging thathelp you avoid outages and troubleshoot issues.
You can store your web app's configuration option settings, extend your Elastic Beanstalk environmentwith additional resources that aren't included in the configuration presets, and customize resourcesbeyond the functionality provided by Elastic Beanstalk configuration options by using configurationfiles (.ebextensions). With configuration files, you can add any resource that is supported by AWSCloudFormation, including Amazon DynamoDB tables, Amazon ElastiCache clusters, Amazon SimpleQueue Service (Amazon SQS) queues, and Amazon Redshift clusters.
The Elastic Beanstalk Command Line Interface (EB CLI) provides an interactive command line interfacefor managing Elastic Beanstalk environments. You configure the EB CLI in your project folder similar tohow you would configure a Git repository, and then run commands from that folder to create, update,configure, upgrade, and terminate environments. The EB CLI also provides additional functionality forconnecting to instances in your environment with SSH, pulling logs, setting environment variables, andrunning Docker containers locally.
Your environment is tied to a platform. You can update your environment to a newer version or roll backto an older version of the same platform, but you cannot switch to a different platform. Learn moreabout Elastic Beanstalk's supported platforms and try out a new one with the following chapters:
• Docker - Single-container, multicontainer, and preconfigured Docker platforms• Go - Golang platform• Java - Tomcat and Java SE platforms• .NET - Windows Server running IIS with .NET platform• Node.js - Node.js platform• PHP - PHP 5.5, 5.6, and 5.7 platforms• Python - Python 2.6, 2.7, and 3.4 platforms• Ruby - Passenger-based and Puma-based platforms for Ruby 1.9, 2.0, 2.1, and 2.2
19