Embed Size (px)
Citation preview
BareosBackup Archiving REcovery Open Sourced
Main Reference
Bareos GmbH & Co KG
This manual documents Bareos version master (July 29, 2015)
Copyright © 1999-2012, Free Software Foundation Europe e.V.Copyright © 2010-2012, Planets Communications B.V.
Copyright © 2013-2015, Bareos GmbH & Co. KGBareos® is a registered trademark of Bareos GmbH & Co KG.
Bacula ® is a registered trademark of Kern Sibbald.
Permission is granted to copy, distribute and/or modify this document under the terms ofthe GNU Free Documentation License, Version 1.2 published by the Free Software
Foundation; with no Invariant Sections, no Front-Cover Texts, and no Back-Cover Texts. Acopy of the license is included in the section entitled ”GNU Free Documentation License”.
Contents
I Introduction and Tutorial 1
1 What is Bareos? 3
1.1 History . . . . . . . . . . . . . . . . . . . . . . . . . . . . . . . . . . . . . . . . . . . . . . . . 3
1.2 Who Needs Bareos? . . . . . . . . . . . . . . . . . . . . . . . . . . . . . . . . . . . . . . . . 3
1.3 Bareos Components or Services . . . . . . . . . . . . . . . . . . . . . . . . . . . . . . . . . . 3
1.4 Bareos Packages . . . . . . . . . . . . . . . . . . . . . . . . . . . . . . . . . . . . . . . . . . . 4
1.5 Bareos Configuration . . . . . . . . . . . . . . . . . . . . . . . . . . . . . . . . . . . . . . . . 5
1.6 Conventions Used in this Document . . . . . . . . . . . . . . . . . . . . . . . . . . . . . . . 5
1.7 Quick Start . . . . . . . . . . . . . . . . . . . . . . . . . . . . . . . . . . . . . . . . . . . . . 6
1.8 Terminology . . . . . . . . . . . . . . . . . . . . . . . . . . . . . . . . . . . . . . . . . . . . . 6
1.9 What Bareos is Not . . . . . . . . . . . . . . . . . . . . . . . . . . . . . . . . . . . . . . . . 8
1.10 Interactions Between the Bareos Services . . . . . . . . . . . . . . . . . . . . . . . . . . . . . 8
1.11 The Current State of Bareos . . . . . . . . . . . . . . . . . . . . . . . . . . . . . . . . . . . . 9
1.11.1 What is Implemented . . . . . . . . . . . . . . . . . . . . . . . . . . . . . . . . . . 9
1.11.2 Advantages Over Other Backup Programs . . . . . . . . . . . . . . . . . . . . . . . 10
1.11.3 Current Implementation Restrictions . . . . . . . . . . . . . . . . . . . . . . . . . . 11
1.11.4 Design Limitations or Restrictions . . . . . . . . . . . . . . . . . . . . . . . . . . . 11
1.11.5 Items to Note . . . . . . . . . . . . . . . . . . . . . . . . . . . . . . . . . . . . . . . 11
2 Installing Bareos 13
2.1 Decide about the Bareos release to use . . . . . . . . . . . . . . . . . . . . . . . . . . . . . . 13
2.2 Decide about the Database Backend . . . . . . . . . . . . . . . . . . . . . . . . . . . . . . . 13
2.3 Install the Bareos Software Packages . . . . . . . . . . . . . . . . . . . . . . . . . . . . . . . 14
2.3.1 Install on RedHat based Linux Distributions . . . . . . . . . . . . . . . . . . . . . 14
2.3.2 Install on SUSE based Linux Distributions . . . . . . . . . . . . . . . . . . . . . . . 15
2.3.3 Install on Debian based Linux Distributions . . . . . . . . . . . . . . . . . . . . . . 15
2.4 Prepare Bareos database . . . . . . . . . . . . . . . . . . . . . . . . . . . . . . . . . . . . . . 15
2.4.1 Debian based Linux Distributions . . . . . . . . . . . . . . . . . . . . . . . . . . . . 16
2.4.2 Other Platforms . . . . . . . . . . . . . . . . . . . . . . . . . . . . . . . . . . . . . 16
2.5 Start the daemons . . . . . . . . . . . . . . . . . . . . . . . . . . . . . . . . . . . . . . . . . 16
3 Updating Bareos 17
3.1 Updating the database schema . . . . . . . . . . . . . . . . . . . . . . . . . . . . . . . . . . 17
3.1.1 Debian based Linux Distributions . . . . . . . . . . . . . . . . . . . . . . . . . . . . 17
3.1.2 Other Platforms . . . . . . . . . . . . . . . . . . . . . . . . . . . . . . . . . . . . . 17
4 Getting Started with Bareos 19
4.1 Understanding Jobs and Schedules . . . . . . . . . . . . . . . . . . . . . . . . . . . . . . . . 19
4.2 Understanding Pools, Volumes and Labels . . . . . . . . . . . . . . . . . . . . . . . . . . . . 19
4.3 Setting Up Bareos Configuration Files . . . . . . . . . . . . . . . . . . . . . . . . . . . . . . 20
4.3.1 Configuring the Console Program . . . . . . . . . . . . . . . . . . . . . . . . . . . . 20
4.3.2 Configuring the File daemon . . . . . . . . . . . . . . . . . . . . . . . . . . . . . . 20
4.3.3 Configuring the Director . . . . . . . . . . . . . . . . . . . . . . . . . . . . . . . . . 20
4.3.4 Configuring the Storage daemon . . . . . . . . . . . . . . . . . . . . . . . . . . . . 20
4.4 Testing your Configuration Files . . . . . . . . . . . . . . . . . . . . . . . . . . . . . . . . . 21
4.5 Testing Compatibility with Your Tape Drive . . . . . . . . . . . . . . . . . . . . . . . . . . . 21
4.6 Running Bareos . . . . . . . . . . . . . . . . . . . . . . . . . . . . . . . . . . . . . . . . . . . 21
i
ii CONTENTS
5 Tutorial 23
5.1 Installing Bareos . . . . . . . . . . . . . . . . . . . . . . . . . . . . . . . . . . . . . . . . . . 23
5.2 Starting the Database . . . . . . . . . . . . . . . . . . . . . . . . . . . . . . . . . . . . . . . 23
5.3 Starting the Daemons . . . . . . . . . . . . . . . . . . . . . . . . . . . . . . . . . . . . . . . 23
5.4 Using the Director to Query and Start Jobs . . . . . . . . . . . . . . . . . . . . . . . . . . . 24
5.5 Running a Job . . . . . . . . . . . . . . . . . . . . . . . . . . . . . . . . . . . . . . . . . . . 25
5.6 Restoring Your Files . . . . . . . . . . . . . . . . . . . . . . . . . . . . . . . . . . . . . . . . 29
5.7 Quitting the Console Program . . . . . . . . . . . . . . . . . . . . . . . . . . . . . . . . . . . 31
5.8 Adding a Second Client . . . . . . . . . . . . . . . . . . . . . . . . . . . . . . . . . . . . . . 31
5.9 When The Tape Fills . . . . . . . . . . . . . . . . . . . . . . . . . . . . . . . . . . . . . . . . 32
5.10 Other Useful Console Commands . . . . . . . . . . . . . . . . . . . . . . . . . . . . . . . . . 33
5.11 Patience When Starting Daemons or Mounting Blank Tapes . . . . . . . . . . . . . . . . . . 34
5.12 Difficulties Connecting from the FD to the SD . . . . . . . . . . . . . . . . . . . . . . . . . . 34
5.13 Creating a Pool . . . . . . . . . . . . . . . . . . . . . . . . . . . . . . . . . . . . . . . . . . . 34
5.14 Labeling Your Volumes . . . . . . . . . . . . . . . . . . . . . . . . . . . . . . . . . . . . . . . 35
6 Critical Items to Implement Before Production 37
6.1 Critical Items . . . . . . . . . . . . . . . . . . . . . . . . . . . . . . . . . . . . . . . . . . . . 37
6.2 Recommended Items . . . . . . . . . . . . . . . . . . . . . . . . . . . . . . . . . . . . . . . . 38
II Configuration Files 39
7 Customizing the Configuration Files 41
7.1 Character Sets . . . . . . . . . . . . . . . . . . . . . . . . . . . . . . . . . . . . . . . . . . . 41
7.2 Resource Directive Format . . . . . . . . . . . . . . . . . . . . . . . . . . . . . . . . . . . . . 41
7.2.1 Quotes . . . . . . . . . . . . . . . . . . . . . . . . . . . . . . . . . . . . . . . . . . . 42
7.2.2 Comments . . . . . . . . . . . . . . . . . . . . . . . . . . . . . . . . . . . . . . . . . 42
7.2.3 Upper and Lower Case and Spaces . . . . . . . . . . . . . . . . . . . . . . . . . . . 42
7.2.4 Including other Configuration Files . . . . . . . . . . . . . . . . . . . . . . . . . . . 42
7.2.5 Data Types . . . . . . . . . . . . . . . . . . . . . . . . . . . . . . . . . . . . . . . . 43
7.2.6 Variable Expansion . . . . . . . . . . . . . . . . . . . . . . . . . . . . . . . . . . . . 45
7.3 Resource Types . . . . . . . . . . . . . . . . . . . . . . . . . . . . . . . . . . . . . . . . . . . 46
7.4 Names, Passwords and Authorization . . . . . . . . . . . . . . . . . . . . . . . . . . . . . . . 47
8 Director Configuration 49
8.1 Director Resource . . . . . . . . . . . . . . . . . . . . . . . . . . . . . . . . . . . . . . . . . . 50
8.2 Job Resource . . . . . . . . . . . . . . . . . . . . . . . . . . . . . . . . . . . . . . . . . . . . 55
8.3 JobDefs Resource . . . . . . . . . . . . . . . . . . . . . . . . . . . . . . . . . . . . . . . . . . 76
8.4 Schedule Resource . . . . . . . . . . . . . . . . . . . . . . . . . . . . . . . . . . . . . . . . . 76
8.4.1 Technical Notes on Schedules . . . . . . . . . . . . . . . . . . . . . . . . . . . . . . 78
8.5 FileSet Resource . . . . . . . . . . . . . . . . . . . . . . . . . . . . . . . . . . . . . . . . . . 79
8.5.1 FileSet Include Ressource . . . . . . . . . . . . . . . . . . . . . . . . . . . . . . . . 80
8.5.2 FileSet Exclude Ressource . . . . . . . . . . . . . . . . . . . . . . . . . . . . . . . . 93
8.5.3 FileSet Examples . . . . . . . . . . . . . . . . . . . . . . . . . . . . . . . . . . . . . 93
8.5.4 Windows FileSets . . . . . . . . . . . . . . . . . . . . . . . . . . . . . . . . . . . . . 97
8.5.5 Testing Your FileSet . . . . . . . . . . . . . . . . . . . . . . . . . . . . . . . . . . . 98
8.6 Client Resource . . . . . . . . . . . . . . . . . . . . . . . . . . . . . . . . . . . . . . . . . . . 98
8.7 Storage Resource . . . . . . . . . . . . . . . . . . . . . . . . . . . . . . . . . . . . . . . . . . 103
8.8 Pool Resource . . . . . . . . . . . . . . . . . . . . . . . . . . . . . . . . . . . . . . . . . . . . 107
8.8.1 Scratch Pool . . . . . . . . . . . . . . . . . . . . . . . . . . . . . . . . . . . . . . . 115
8.9 Catalog Resource . . . . . . . . . . . . . . . . . . . . . . . . . . . . . . . . . . . . . . . . . . 115
8.10 Messages Resource . . . . . . . . . . . . . . . . . . . . . . . . . . . . . . . . . . . . . . . . . 118
8.11 Console Resource . . . . . . . . . . . . . . . . . . . . . . . . . . . . . . . . . . . . . . . . . . 118
8.12 Profile Resource . . . . . . . . . . . . . . . . . . . . . . . . . . . . . . . . . . . . . . . . . . . 122
8.13 Counter Resource . . . . . . . . . . . . . . . . . . . . . . . . . . . . . . . . . . . . . . . . . . 124
8.14 Example Director Configuration File . . . . . . . . . . . . . . . . . . . . . . . . . . . . . . . 124
CONTENTS iii
9 Storage Daemon Configuration 131
9.1 Storage Resource . . . . . . . . . . . . . . . . . . . . . . . . . . . . . . . . . . . . . . . . . . 131
9.2 Director Resource . . . . . . . . . . . . . . . . . . . . . . . . . . . . . . . . . . . . . . . . . . 136
9.3 NDMP Resource . . . . . . . . . . . . . . . . . . . . . . . . . . . . . . . . . . . . . . . . . . 138
9.4 Device Resource . . . . . . . . . . . . . . . . . . . . . . . . . . . . . . . . . . . . . . . . . . . 139
9.4.1 Edit Codes for Mount and Unmount Directives . . . . . . . . . . . . . . . . . . . . 151
9.4.2 Devices that require a mount (USB) . . . . . . . . . . . . . . . . . . . . . . . . . . 151
9.5 Autochanger Resource . . . . . . . . . . . . . . . . . . . . . . . . . . . . . . . . . . . . . . . 152
9.6 Messages Resource . . . . . . . . . . . . . . . . . . . . . . . . . . . . . . . . . . . . . . . . . 153
9.7 Example Storage Daemon Configuration File . . . . . . . . . . . . . . . . . . . . . . . . . . 153
10 Client/File Daemon Configuration 157
10.1 Client Resource . . . . . . . . . . . . . . . . . . . . . . . . . . . . . . . . . . . . . . . . . . . 157
10.2 Director Resource . . . . . . . . . . . . . . . . . . . . . . . . . . . . . . . . . . . . . . . . . . 162
10.3 Messages Resource . . . . . . . . . . . . . . . . . . . . . . . . . . . . . . . . . . . . . . . . . 164
10.4 Example Client Configuration File . . . . . . . . . . . . . . . . . . . . . . . . . . . . . . . . 164
11 Messages Resource 167
11.1 Message Types . . . . . . . . . . . . . . . . . . . . . . . . . . . . . . . . . . . . . . . . . . . 170
12 Console Configuration 173
12.1 Director Resource . . . . . . . . . . . . . . . . . . . . . . . . . . . . . . . . . . . . . . . . . . 173
12.2 Console Resource . . . . . . . . . . . . . . . . . . . . . . . . . . . . . . . . . . . . . . . . . . 175
12.3 Console Commands . . . . . . . . . . . . . . . . . . . . . . . . . . . . . . . . . . . . . . . . . 178
12.4 Example Console Configuration File . . . . . . . . . . . . . . . . . . . . . . . . . . . . . . . 178
13 Monitor Configuration 179
13.1 Monitor Resource . . . . . . . . . . . . . . . . . . . . . . . . . . . . . . . . . . . . . . . . . . 179
13.2 Director Resource . . . . . . . . . . . . . . . . . . . . . . . . . . . . . . . . . . . . . . . . . . 180
13.3 Client Resource . . . . . . . . . . . . . . . . . . . . . . . . . . . . . . . . . . . . . . . . . . . 181
13.4 Storage Resource . . . . . . . . . . . . . . . . . . . . . . . . . . . . . . . . . . . . . . . . . . 181
13.5 Tray Monitor . . . . . . . . . . . . . . . . . . . . . . . . . . . . . . . . . . . . . . . . . . . . 182
III Tasks and Concepts 185
14 Bareos Console 187
14.1 Console Configuration . . . . . . . . . . . . . . . . . . . . . . . . . . . . . . . . . . . . . . . 187
14.2 Running the Console Program . . . . . . . . . . . . . . . . . . . . . . . . . . . . . . . . . . . 187
14.2.1 Exit the Console Program . . . . . . . . . . . . . . . . . . . . . . . . . . . . . . . . 188
14.2.2 Running the Console from a Shell Script . . . . . . . . . . . . . . . . . . . . . . . . 188
14.3 Console Keywords . . . . . . . . . . . . . . . . . . . . . . . . . . . . . . . . . . . . . . . . . 189
14.4 Console Commands . . . . . . . . . . . . . . . . . . . . . . . . . . . . . . . . . . . . . . . . . 190
14.4.1 Special dot (.) Commands . . . . . . . . . . . . . . . . . . . . . . . . . . . . . . . . 206
14.4.2 Special At (@) Commands . . . . . . . . . . . . . . . . . . . . . . . . . . . . . . . . 206
14.5 Adding Volumes to a Pool . . . . . . . . . . . . . . . . . . . . . . . . . . . . . . . . . . . . . 207
15 The Restore Command 209
15.1 General . . . . . . . . . . . . . . . . . . . . . . . . . . . . . . . . . . . . . . . . . . . . . . . 209
15.2 The Restore Command . . . . . . . . . . . . . . . . . . . . . . . . . . . . . . . . . . . . . . . 209
15.3 Selecting Files by Filename . . . . . . . . . . . . . . . . . . . . . . . . . . . . . . . . . . . . 213
15.4 Replace Options . . . . . . . . . . . . . . . . . . . . . . . . . . . . . . . . . . . . . . . . . . 214
15.5 Command Line Arguments . . . . . . . . . . . . . . . . . . . . . . . . . . . . . . . . . . . . 214
15.6 Using File Relocation . . . . . . . . . . . . . . . . . . . . . . . . . . . . . . . . . . . . . . . . 215
15.7 Restoring Directory Attributes . . . . . . . . . . . . . . . . . . . . . . . . . . . . . . . . . . 216
15.8 Restoring on Windows . . . . . . . . . . . . . . . . . . . . . . . . . . . . . . . . . . . . . . . 217
15.9 Restore Errors . . . . . . . . . . . . . . . . . . . . . . . . . . . . . . . . . . . . . . . . . . . . 217
15.10 Example Restore Job Resource . . . . . . . . . . . . . . . . . . . . . . . . . . . . . . . . . . 217
15.11 File Selection Commands . . . . . . . . . . . . . . . . . . . . . . . . . . . . . . . . . . . . . 218
iv CONTENTS
16 Volume Management 22116.1 Key Concepts and Resource Records . . . . . . . . . . . . . . . . . . . . . . . . . . . . . . . 222
16.1.1 Pool Options to Limit the Volume Usage . . . . . . . . . . . . . . . . . . . . . . . 22216.1.2 Automatic Volume Labeling . . . . . . . . . . . . . . . . . . . . . . . . . . . . . . . 22316.1.3 Restricting the Number of Volumes and Recycling . . . . . . . . . . . . . . . . . . 224
16.2 Concurrent Disk Jobs . . . . . . . . . . . . . . . . . . . . . . . . . . . . . . . . . . . . . . . 22516.2.1 An Example . . . . . . . . . . . . . . . . . . . . . . . . . . . . . . . . . . . . . . . . 225
16.3 Backing up to Multiple Disks . . . . . . . . . . . . . . . . . . . . . . . . . . . . . . . . . . . 22716.4 Considerations for Multiple Clients . . . . . . . . . . . . . . . . . . . . . . . . . . . . . . . . 22816.5 Automatic Volume Recycling . . . . . . . . . . . . . . . . . . . . . . . . . . . . . . . . . . . 231
16.5.1 Automatic Pruning . . . . . . . . . . . . . . . . . . . . . . . . . . . . . . . . . . . . 23216.5.2 Pruning Directives . . . . . . . . . . . . . . . . . . . . . . . . . . . . . . . . . . . . 23216.5.3 Recycling Algorithm . . . . . . . . . . . . . . . . . . . . . . . . . . . . . . . . . . . 23316.5.4 Recycle Status . . . . . . . . . . . . . . . . . . . . . . . . . . . . . . . . . . . . . . 23416.5.5 Making Bareos Use a Single Tape . . . . . . . . . . . . . . . . . . . . . . . . . . . . 23516.5.6 Daily, Weekly, Monthly Tape Usage Example . . . . . . . . . . . . . . . . . . . . . 23516.5.7 Automatic Pruning and Recycling Example . . . . . . . . . . . . . . . . . . . . . . 23716.5.8 Manually Recycling Volumes . . . . . . . . . . . . . . . . . . . . . . . . . . . . . . 238
17 Automated Disk Backup 23917.1 Overall Design . . . . . . . . . . . . . . . . . . . . . . . . . . . . . . . . . . . . . . . . . . . 239
17.1.1 Full Pool . . . . . . . . . . . . . . . . . . . . . . . . . . . . . . . . . . . . . . . . . 24017.1.2 Differential Pool . . . . . . . . . . . . . . . . . . . . . . . . . . . . . . . . . . . . . 24017.1.3 Incremental Pool . . . . . . . . . . . . . . . . . . . . . . . . . . . . . . . . . . . . . 240
17.2 Configuration Files . . . . . . . . . . . . . . . . . . . . . . . . . . . . . . . . . . . . . . . . . 241
18 Autochanger Support 24518.1 Knowing What SCSI Devices You Have . . . . . . . . . . . . . . . . . . . . . . . . . . . . . 246
18.1.1 Linux . . . . . . . . . . . . . . . . . . . . . . . . . . . . . . . . . . . . . . . . . . . 24618.1.2 FreeBSD . . . . . . . . . . . . . . . . . . . . . . . . . . . . . . . . . . . . . . . . . . 246
18.2 Slots . . . . . . . . . . . . . . . . . . . . . . . . . . . . . . . . . . . . . . . . . . . . . . . . . 24618.3 Multiple Devices . . . . . . . . . . . . . . . . . . . . . . . . . . . . . . . . . . . . . . . . . . 24718.4 Device Configuration Records . . . . . . . . . . . . . . . . . . . . . . . . . . . . . . . . . . . 24718.5 An Example Configuration File . . . . . . . . . . . . . . . . . . . . . . . . . . . . . . . . . . 24818.6 A Multi-drive Example Configuration File . . . . . . . . . . . . . . . . . . . . . . . . . . . . 24818.7 Specifying Slots When Labeling . . . . . . . . . . . . . . . . . . . . . . . . . . . . . . . . . . 24918.8 Changing Cartridges . . . . . . . . . . . . . . . . . . . . . . . . . . . . . . . . . . . . . . . . 24918.9 Dealing with Multiple Magazines . . . . . . . . . . . . . . . . . . . . . . . . . . . . . . . . . 24918.10 Update Slots Command . . . . . . . . . . . . . . . . . . . . . . . . . . . . . . . . . . . . . . 25018.11 Using the Autochanger . . . . . . . . . . . . . . . . . . . . . . . . . . . . . . . . . . . . . . . 25018.12 Barcode Support . . . . . . . . . . . . . . . . . . . . . . . . . . . . . . . . . . . . . . . . . . 25118.13 Use bconsole to display Autochanger content . . . . . . . . . . . . . . . . . . . . . . . . . . 25218.14 Bareos Autochanger Interface . . . . . . . . . . . . . . . . . . . . . . . . . . . . . . . . . . . 25218.15 Tapespeed and blocksizes . . . . . . . . . . . . . . . . . . . . . . . . . . . . . . . . . . . . . 252
19 Using Tape Drives without Autochanger 25719.1 Simple One Tape Backup . . . . . . . . . . . . . . . . . . . . . . . . . . . . . . . . . . . . . 257
19.1.1 Advantages . . . . . . . . . . . . . . . . . . . . . . . . . . . . . . . . . . . . . . . . 25719.1.2 Disadvantages . . . . . . . . . . . . . . . . . . . . . . . . . . . . . . . . . . . . . . . 25719.1.3 Practical Details . . . . . . . . . . . . . . . . . . . . . . . . . . . . . . . . . . . . . 257
19.2 Manually Changing Tapes . . . . . . . . . . . . . . . . . . . . . . . . . . . . . . . . . . . . . 25719.3 Daily Tape Rotation . . . . . . . . . . . . . . . . . . . . . . . . . . . . . . . . . . . . . . . . 258
19.3.1 Advantages . . . . . . . . . . . . . . . . . . . . . . . . . . . . . . . . . . . . . . . . 25819.3.2 Disadvantages . . . . . . . . . . . . . . . . . . . . . . . . . . . . . . . . . . . . . . . 25819.3.3 Practical Details . . . . . . . . . . . . . . . . . . . . . . . . . . . . . . . . . . . . . 259
20 Data Spooling 26320.1 Data Spooling Directives . . . . . . . . . . . . . . . . . . . . . . . . . . . . . . . . . . . . . . 263
20.1.1 Additional Notes . . . . . . . . . . . . . . . . . . . . . . . . . . . . . . . . . . . . . 264
CONTENTS v
21 Migration and Copy 26521.1 Important Migration Considerations . . . . . . . . . . . . . . . . . . . . . . . . . . . . . . . 26621.2 Configure Copy or Migration Jobs . . . . . . . . . . . . . . . . . . . . . . . . . . . . . . . . 267
21.2.1 Example Migration Jobs . . . . . . . . . . . . . . . . . . . . . . . . . . . . . . . . . 267
22 File Deduplication using Base Jobs 271
23 Plugins 27323.1 File Daemon Plugins . . . . . . . . . . . . . . . . . . . . . . . . . . . . . . . . . . . . . . . . 273
23.1.1 bpipe Plugin . . . . . . . . . . . . . . . . . . . . . . . . . . . . . . . . . . . . . . . 27323.1.2 PGSQL Plugin . . . . . . . . . . . . . . . . . . . . . . . . . . . . . . . . . . . . . . 27423.1.3 MSSQL Plugin . . . . . . . . . . . . . . . . . . . . . . . . . . . . . . . . . . . . . . 27423.1.4 python-fd Plugin . . . . . . . . . . . . . . . . . . . . . . . . . . . . . . . . . . . . . 27423.1.5 VMware Plugin . . . . . . . . . . . . . . . . . . . . . . . . . . . . . . . . . . . . . . 275
23.2 Storage Daemon Plugins . . . . . . . . . . . . . . . . . . . . . . . . . . . . . . . . . . . . . . 27723.2.1 autoxflate-sd . . . . . . . . . . . . . . . . . . . . . . . . . . . . . . . . . . . . . . . 27723.2.2 scsicrypto-sd . . . . . . . . . . . . . . . . . . . . . . . . . . . . . . . . . . . . . . . 27823.2.3 scsitapealert-sd . . . . . . . . . . . . . . . . . . . . . . . . . . . . . . . . . . . . . . 27823.2.4 python-sd Plugin . . . . . . . . . . . . . . . . . . . . . . . . . . . . . . . . . . . . . 278
23.3 Director Plugins . . . . . . . . . . . . . . . . . . . . . . . . . . . . . . . . . . . . . . . . . . 27823.3.1 python-dir Plugin . . . . . . . . . . . . . . . . . . . . . . . . . . . . . . . . . . . . . 278
24 The Windows Version of Bareos 28124.1 Windows Installation . . . . . . . . . . . . . . . . . . . . . . . . . . . . . . . . . . . . . . . . 281
24.1.1 Graphical Installation . . . . . . . . . . . . . . . . . . . . . . . . . . . . . . . . . . 28124.1.2 Command Line (Silent) Installation . . . . . . . . . . . . . . . . . . . . . . . . . . 283
24.2 Dealing with Windows Problems . . . . . . . . . . . . . . . . . . . . . . . . . . . . . . . . . 28424.3 Windows Compatibility Considerations . . . . . . . . . . . . . . . . . . . . . . . . . . . . . . 284
24.3.1 Exclusivly Opened Filed . . . . . . . . . . . . . . . . . . . . . . . . . . . . . . . . . 28424.3.2 Registry . . . . . . . . . . . . . . . . . . . . . . . . . . . . . . . . . . . . . . . . . . 28524.3.3 Windows Reparse Points . . . . . . . . . . . . . . . . . . . . . . . . . . . . . . . . . 28524.3.4 Hard Links . . . . . . . . . . . . . . . . . . . . . . . . . . . . . . . . . . . . . . . . 28624.3.5 FilesNotToBackup Registry Key . . . . . . . . . . . . . . . . . . . . . . . . . . . . 28624.3.6 Windows dedup support . . . . . . . . . . . . . . . . . . . . . . . . . . . . . . . . . 28624.3.7 Store all file attributes . . . . . . . . . . . . . . . . . . . . . . . . . . . . . . . . . . 28724.3.8 Support for Windows EFS filesystems . . . . . . . . . . . . . . . . . . . . . . . . . 287
24.4 Volume Shadow Copy Service (VSS) . . . . . . . . . . . . . . . . . . . . . . . . . . . . . . . 28724.4.1 VSS Problems . . . . . . . . . . . . . . . . . . . . . . . . . . . . . . . . . . . . . . . 288
24.5 Windows Firewalls . . . . . . . . . . . . . . . . . . . . . . . . . . . . . . . . . . . . . . . . . 28824.5.1 Network TCP Port . . . . . . . . . . . . . . . . . . . . . . . . . . . . . . . . . . . . 288
24.6 Windows Restore Problems . . . . . . . . . . . . . . . . . . . . . . . . . . . . . . . . . . . . 28824.7 Windows Backup Problems . . . . . . . . . . . . . . . . . . . . . . . . . . . . . . . . . . . . 28824.8 Windows Ownership and Permissions Problems . . . . . . . . . . . . . . . . . . . . . . . . . 28924.9 Fixing the Windows Boot Record . . . . . . . . . . . . . . . . . . . . . . . . . . . . . . . . . 28924.10 File Daemon: Windows Specific Command Line Options . . . . . . . . . . . . . . . . . . . . 289
25 Network setup 29125.1 Passive Clients . . . . . . . . . . . . . . . . . . . . . . . . . . . . . . . . . . . . . . . . . . . 292
25.1.1 Usage . . . . . . . . . . . . . . . . . . . . . . . . . . . . . . . . . . . . . . . . . . . 292
26 Transport Encryption 29326.1 TLS Configuration Directives . . . . . . . . . . . . . . . . . . . . . . . . . . . . . . . . . . . 29326.2 Creating a Self-signed Certificate . . . . . . . . . . . . . . . . . . . . . . . . . . . . . . . . . 29426.3 Example TLS Configuration Files . . . . . . . . . . . . . . . . . . . . . . . . . . . . . . . . . 294
27 Data Encryption 29727.1 Encryption Technical Details . . . . . . . . . . . . . . . . . . . . . . . . . . . . . . . . . . . 29727.2 Generating Private/Public Encryption Keys . . . . . . . . . . . . . . . . . . . . . . . . . . . 29827.3 Example Data Encryption Configuration . . . . . . . . . . . . . . . . . . . . . . . . . . . . . 29827.4 Decrypting with a Master Key . . . . . . . . . . . . . . . . . . . . . . . . . . . . . . . . . . 298

vi CONTENTS
28 Catalog Maintenance 29928.1 Catalog Database . . . . . . . . . . . . . . . . . . . . . . . . . . . . . . . . . . . . . . . . . . 299
28.1.1 dbconfig-common (Debian) . . . . . . . . . . . . . . . . . . . . . . . . . . . . . . . 29928.1.2 Manual Configuration . . . . . . . . . . . . . . . . . . . . . . . . . . . . . . . . . . 300
28.2 Retention Periods . . . . . . . . . . . . . . . . . . . . . . . . . . . . . . . . . . . . . . . . . . 30528.3 PostgreSQL . . . . . . . . . . . . . . . . . . . . . . . . . . . . . . . . . . . . . . . . . . . . . 307
28.3.1 Compacting Your PostgreSQL Database . . . . . . . . . . . . . . . . . . . . . . . . 30728.3.2 Repairing Your PostgreSQL Database . . . . . . . . . . . . . . . . . . . . . . . . . 309
28.4 MySQL . . . . . . . . . . . . . . . . . . . . . . . . . . . . . . . . . . . . . . . . . . . . . . . 31028.4.1 Compacting Your MySQL Database . . . . . . . . . . . . . . . . . . . . . . . . . . 31028.4.2 Repairing Your MySQL Database . . . . . . . . . . . . . . . . . . . . . . . . . . . . 31028.4.3 MySQL Table is Full . . . . . . . . . . . . . . . . . . . . . . . . . . . . . . . . . . . 31028.4.4 MySQL Server Has Gone Away . . . . . . . . . . . . . . . . . . . . . . . . . . . . . 31028.4.5 MySQL Temporary Tables . . . . . . . . . . . . . . . . . . . . . . . . . . . . . . . . 311
28.5 Performance Issues Indexes . . . . . . . . . . . . . . . . . . . . . . . . . . . . . . . . . . . . 31128.5.1 PostgreSQL Indexes . . . . . . . . . . . . . . . . . . . . . . . . . . . . . . . . . . . 31128.5.2 MySQL Indexes . . . . . . . . . . . . . . . . . . . . . . . . . . . . . . . . . . . . . . 31128.5.3 SQLite Indexes . . . . . . . . . . . . . . . . . . . . . . . . . . . . . . . . . . . . . . 312
28.6 Backing Up Your Bareos Database . . . . . . . . . . . . . . . . . . . . . . . . . . . . . . . . 31228.7 Database Size . . . . . . . . . . . . . . . . . . . . . . . . . . . . . . . . . . . . . . . . . . . . 313
29 Bareos Security Issues 31529.1 Configuring and Testing TCP Wrappers . . . . . . . . . . . . . . . . . . . . . . . . . . . . . 315
IV Appendix 317
A System Requirements 319
B Operating Systems 321B.1 . . . . . . . . . . . . . . . . . . . . . . . . . . . . . . . . . . . . . . . . . . . . . . . . . . . . 321
B.1.1 Univention Corporte Server . . . . . . . . . . . . . . . . . . . . . . . . . . . . . . . 321B.1.2 Debian.org / Ubuntu Universe . . . . . . . . . . . . . . . . . . . . . . . . . . . . . 322
C Bareos Programs 323C.1 Parameter . . . . . . . . . . . . . . . . . . . . . . . . . . . . . . . . . . . . . . . . . . . . . . 323
C.1.1 Specifying the Configuration File . . . . . . . . . . . . . . . . . . . . . . . . . . . . 323C.1.2 Specifying a Device Name For a Tape . . . . . . . . . . . . . . . . . . . . . . . . . 323C.1.3 Specifying a Device Name For a File . . . . . . . . . . . . . . . . . . . . . . . . . . 323C.1.4 Specifying Volumes . . . . . . . . . . . . . . . . . . . . . . . . . . . . . . . . . . . . 323
C.2 Bareos Daemons . . . . . . . . . . . . . . . . . . . . . . . . . . . . . . . . . . . . . . . . . . 324C.2.1 Daemon Command Line Options . . . . . . . . . . . . . . . . . . . . . . . . . . . . 324C.2.2 bareos-dir . . . . . . . . . . . . . . . . . . . . . . . . . . . . . . . . . . . . . . . . . 324C.2.3 bareos-sd . . . . . . . . . . . . . . . . . . . . . . . . . . . . . . . . . . . . . . . . . 324C.2.4 bareos-fd . . . . . . . . . . . . . . . . . . . . . . . . . . . . . . . . . . . . . . . . . 324
C.3 Interactive Programs . . . . . . . . . . . . . . . . . . . . . . . . . . . . . . . . . . . . . . . . 324C.3.1 bconsole . . . . . . . . . . . . . . . . . . . . . . . . . . . . . . . . . . . . . . . . . . 324C.3.2 bat . . . . . . . . . . . . . . . . . . . . . . . . . . . . . . . . . . . . . . . . . . . . . 324
C.4 Volume Utility Commands . . . . . . . . . . . . . . . . . . . . . . . . . . . . . . . . . . . . . 324C.4.1 bls . . . . . . . . . . . . . . . . . . . . . . . . . . . . . . . . . . . . . . . . . . . . . 325C.4.2 bextract . . . . . . . . . . . . . . . . . . . . . . . . . . . . . . . . . . . . . . . . . . 327C.4.3 bscan . . . . . . . . . . . . . . . . . . . . . . . . . . . . . . . . . . . . . . . . . . . 329C.4.4 bcopy . . . . . . . . . . . . . . . . . . . . . . . . . . . . . . . . . . . . . . . . . . . 332C.4.5 btape . . . . . . . . . . . . . . . . . . . . . . . . . . . . . . . . . . . . . . . . . . . 333
C.5 Other Programs . . . . . . . . . . . . . . . . . . . . . . . . . . . . . . . . . . . . . . . . . . . 334C.5.1 bsmtp . . . . . . . . . . . . . . . . . . . . . . . . . . . . . . . . . . . . . . . . . . . 335C.5.2 bareos-dbcheck . . . . . . . . . . . . . . . . . . . . . . . . . . . . . . . . . . . . . . 335C.5.3 bregex . . . . . . . . . . . . . . . . . . . . . . . . . . . . . . . . . . . . . . . . . . . 338C.5.4 bwild . . . . . . . . . . . . . . . . . . . . . . . . . . . . . . . . . . . . . . . . . . . . 338C.5.5 bpluginfo . . . . . . . . . . . . . . . . . . . . . . . . . . . . . . . . . . . . . . . . . 338
CONTENTS vii
D The Bootstrap File 339
D.1 Bootstrap File Format . . . . . . . . . . . . . . . . . . . . . . . . . . . . . . . . . . . . . . . 339
D.2 Automatic Generation of Bootstrap Files . . . . . . . . . . . . . . . . . . . . . . . . . . . . . 342
D.3 Bootstrap for bscan . . . . . . . . . . . . . . . . . . . . . . . . . . . . . . . . . . . . . . . . . 342
D.4 Bootstrap Example . . . . . . . . . . . . . . . . . . . . . . . . . . . . . . . . . . . . . . . . . 342
E Verify File Integrity with Bareos 343
E.1 The Details . . . . . . . . . . . . . . . . . . . . . . . . . . . . . . . . . . . . . . . . . . . . . 343
E.2 Running the Verify . . . . . . . . . . . . . . . . . . . . . . . . . . . . . . . . . . . . . . . . . 344
E.3 What To Do When Differences Are Found . . . . . . . . . . . . . . . . . . . . . . . . . . . . 345
E.4 A Verify Configuration Example . . . . . . . . . . . . . . . . . . . . . . . . . . . . . . . . . 346
F Backward Compatibility 349
F.1 Tape Formats . . . . . . . . . . . . . . . . . . . . . . . . . . . . . . . . . . . . . . . . . . . . 349
F.2 Compatibility between Bareos and Bacula . . . . . . . . . . . . . . . . . . . . . . . . . . . . 349
G Catalog Tables 351
G.1 Job . . . . . . . . . . . . . . . . . . . . . . . . . . . . . . . . . . . . . . . . . . . . . . . . . . 351
G.1.1 JobStatus . . . . . . . . . . . . . . . . . . . . . . . . . . . . . . . . . . . . . . . . . 351
H Howtos 353
H.1 Use a dummy device to test the backup . . . . . . . . . . . . . . . . . . . . . . . . . . . . . 353
H.2 Backup Of Third Party Databases . . . . . . . . . . . . . . . . . . . . . . . . . . . . . . . . 353
H.2.1 Backup of MSSQL Databases with Bareos Plugin . . . . . . . . . . . . . . . . . . . 353
H.2.2 Backup of a PostgreSQL Database . . . . . . . . . . . . . . . . . . . . . . . . . . . 362
H.2.3 Backup of a MySQL Database . . . . . . . . . . . . . . . . . . . . . . . . . . . . . 363
I Disaster Recovery Using Bareos 367
I.1 General . . . . . . . . . . . . . . . . . . . . . . . . . . . . . . . . . . . . . . . . . . . . . . . 367
I.1.1 Important Considerations . . . . . . . . . . . . . . . . . . . . . . . . . . . . . . . . 367
I.2 Steps to Take Before Disaster Strikes . . . . . . . . . . . . . . . . . . . . . . . . . . . . . . . 367
I.3 Bare Metal Recovery of Bareos Clients . . . . . . . . . . . . . . . . . . . . . . . . . . . . . . 368
I.3.1 Linux . . . . . . . . . . . . . . . . . . . . . . . . . . . . . . . . . . . . . . . . . . . 368
I.4 Restoring a Bareos Server . . . . . . . . . . . . . . . . . . . . . . . . . . . . . . . . . . . . . 369
J Troubleshooting 371
J.1 Client Access Problems . . . . . . . . . . . . . . . . . . . . . . . . . . . . . . . . . . . . . . . 371
J.1.1 Authorization Errors . . . . . . . . . . . . . . . . . . . . . . . . . . . . . . . . . . . 371
J.2 Concurrent Jobs . . . . . . . . . . . . . . . . . . . . . . . . . . . . . . . . . . . . . . . . . . 372
J.3 Tape Labels: ANSI or IBM . . . . . . . . . . . . . . . . . . . . . . . . . . . . . . . . . . . . 373
J.3.1 Reading . . . . . . . . . . . . . . . . . . . . . . . . . . . . . . . . . . . . . . . . . . 373
J.3.2 Writing . . . . . . . . . . . . . . . . . . . . . . . . . . . . . . . . . . . . . . . . . . 373
J.4 Tape Drive . . . . . . . . . . . . . . . . . . . . . . . . . . . . . . . . . . . . . . . . . . . . . 374
J.4.1 Get Your Tape Drive Working . . . . . . . . . . . . . . . . . . . . . . . . . . . . . 374
J.5 Autochanger . . . . . . . . . . . . . . . . . . . . . . . . . . . . . . . . . . . . . . . . . . . . . 375
J.5.1 Testing Autochanger and Adapting mtx-changer script . . . . . . . . . . . . . . . . 375
J.6 Restore . . . . . . . . . . . . . . . . . . . . . . . . . . . . . . . . . . . . . . . . . . . . . . . 376
J.6.1 Restore a pruned job using a pattern . . . . . . . . . . . . . . . . . . . . . . . . . . 376
J.6.2 Problems Restoring Files . . . . . . . . . . . . . . . . . . . . . . . . . . . . . . . . 376
J.6.3 Restoring Files Can Be Slow . . . . . . . . . . . . . . . . . . . . . . . . . . . . . . 377
J.6.4 Restoring When Things Go Wrong . . . . . . . . . . . . . . . . . . . . . . . . . . . 377
K Debugging 383
K.1 Traceback . . . . . . . . . . . . . . . . . . . . . . . . . . . . . . . . . . . . . . . . . . . . . . 383
K.2 Testing The Traceback . . . . . . . . . . . . . . . . . . . . . . . . . . . . . . . . . . . . . . . 383
K.2.1 Getting A Traceback On Other Systems . . . . . . . . . . . . . . . . . . . . . . . . 384
K.3 Manually Running Bareos Under The Debugger . . . . . . . . . . . . . . . . . . . . . . . . . 384
L Release Notes 385
viii CONTENTS
M Bareos Copyright, Trademark, and Licenses 389M.1 Licenses Overview . . . . . . . . . . . . . . . . . . . . . . . . . . . . . . . . . . . . . . . . . 389M.2 GNU Free Documentation License . . . . . . . . . . . . . . . . . . . . . . . . . . . . . . . . 391M.3 GNU Affero Gerneral Public License . . . . . . . . . . . . . . . . . . . . . . . . . . . . . . . 399M.4 GNU Lesser Gerneral Public License . . . . . . . . . . . . . . . . . . . . . . . . . . . . . . . 411
V Index 415
General 417
Director 426
Storage Daemon 430
File Daemon 432
Console 433
Part I
Introduction and Tutorial
1

Chapter 1
What is Bareos?
Bareos is a set of computer programs that permits the system administrator to manage backup, recovery,and verification of computer data across a network of computers of different kinds. Bareos can also runentirely upon a single computer and can backup to various types of media, including tape and disk.
In technical terms, it is a network Client/Server based backup program. Bareos is relatively easy to use andefficient, while offering many advanced storage management features that make it easy to find and recoverlost or damaged files. Due to its modular design, Bareos is scalable from small single computer systems tosystems consisting of hundreds of computers located over a large network.
1.1 History
Bareos is a fork of the open source project Bacula version 5.2. In 2010 the Bacula community developerMarco van Wieringen started to collect rejected or neglected community contributions in his own branch.This branch was later on the base of Bareos and since then was enriched by a lot of new features.
This documentation also bases on the original Bacula documentation, it is technically also a fork of thedocumenation created following the rules of the GNU Free Documentation License.
Original author of Bacula and it’s documentation is Kern Sibbald. We thank Kern and all contributors toBacula and it’s documentation. We maintain a list of contributors to Bacula (until the time we’ve startedthe fork) and Bareos in our AUTHORS file.
1.2 Who Needs Bareos?
If you are currently using a program such as tar, dump, or bru to backup your computer data, and you wouldlike a network solution, more flexibility, or catalog services, Bareos will most likely provide the additionalfeatures you want. However, if you are new to Unix systems or do not have offsetting experience with asophisticated backup package, the Bareos project does not recommend using Bareos as it is much moredifficult to setup and use than tar or dump.
If you want Bareos to behave like the above mentioned simple programs and write over any tape that youput in the drive, then you will find working with Bareos difficult. Bareos is designed to protect your datafollowing the rules you specify, and this means reusing a tape only as the last resort. It is possible to ”force”Bareos to write over any tape in the drive, but it is easier and more efficient to use a simpler program forthat kind of operation.
If you would like a backup program that can write to multiple volumes (i.e. is not limited by your tape drivecapacity), Bareos can most likely fill your needs.
If you are currently using a sophisticated commercial package such as Legato Networker, ARCserveIT, Arkeia,IBM Tivoli Storage Manager or PerfectBackup+, you may be interested in Bareos, which provides many ofthe same features and is free software available under the GNU AGPLv3 software license.
1.3 Bareos Components or Services
Bareos is made up of the following five major components or services: Director, Console, File, Storage, andMonitor services.
3
4
Bareos Director
The Bareos Director service is the program that supervises all the backup, restore, verify and archive op-erations. The system administrator uses the Bareos Director to schedule backups and to recover files. TheDirector runs as a daemon (or service) in the background.
Bareos Console
The Bareos Console service is the program that allows the administrator or user to communicate with theBareos Director. Currently, the Bareos Console is available in two versions: a text-based console and aQT-based GUI interface. The first and simplest is to run the Console program in a shell window (i.e. TTYinterface). Most system administrators will find this completely adequate. The second version is a GUIinterface that is far from complete, but quite functional as it has most the capabilities of the shell Console.For more details see the Bareos Console.
Bareos File Daemon
The Bareos File service (also known as the Client program) is the software program that is installed onthe machine to be backed up. It is specific to the operating system on which it runs and is responsible forproviding the file attributes and data when requested by the Director. The File services are also responsiblefor the file system dependent part of restoring the file attributes and data during a recovery operation. Thisprogram runs as a daemon on the machine to be backed up.
Bareos Storage Daemon
The Bareos Storage services consist of the software programs that perform the storage and recovery of thefile attributes and data to the physical backup media or volumes. In other words, the Storage daemon isresponsible for reading and writing your tapes (or other storage media, e.g. files). The Storage services runsas a daemon on the machine that has the backup device (such as a tape drive).
Catalog
The Catalog services are comprised of the software programs responsible for maintaining the file indexesand volume databases for all files backed up. The Catalog services permit the system administrator or userto quickly locate and restore any desired file. The Catalog services sets Bareos apart from simple backupprograms like tar and bru, because the catalog maintains a record of all Volumes used, all Jobs run, andall Files saved, permitting efficient restoration and Volume management. Bareos currently supports threedifferent databases, MySQL, PostgreSQL, and SQLite, one of which must be chosen when building Bareos.
The three SQL databases currently supported (MySQL, PostgreSQL or SQLite) provide quite a number offeatures, including rapid indexing, arbitrary queries, and security. Although the Bareos project plans to sup-port other major SQL databases, the current Bareos implementation interfaces only to MySQL, PostgreSQLand SQLite.
To perform a successful save or restore, the following four daemons must be configured and running: theDirector daemon, the File daemon, the Storage daemon, and the Catalog service (MySQL, PostgreSQL orSQLite).
1.4 Bareos Packages
Following Bareos Linux packages are available (release 14.2):
5
Package Name Descriptionbareos Backup Archiving REcovery Open Sourced - metapackagebareos-bat Bareos Admin Tool (GUI)bareos-bconsole Bareos administration console (CLI)bareos-client Bareos client Meta-All-In-One packagebareos-common Common files, required by multiple Bareos packagesbareos-database-common Generic abstration libs and tools for the sql catalogbareos-database-mysql Libs and tools for mysql catalogbareos-database-postgresql Libs and tools for postgresql catalogbareos-database-sqlite3 Libs and tools for sqlite3 catalogbareos-database-tools Bareos CLI tools with database dependencies (bareos-dbcheck, bscan)bareos-devel Devel headersbareos-director Bareos Director daemonbareos-director-python-plugin Python plugin for Bareos Director daemonbareos-filedaemon Bareos File daemon (backup and restore client)bareos-filedaemon-python-plugin Python plugin for Bareos File daemonbareos-storage Bareos Storage daemonbareos-storage-ceph Ceph object store support for the Bareos Storage daemonbareos-storage-fifo FIFO support for the Bareos Storage backendbareos-storage-glusterfs GlusterFS support for the Bareos Storage daemonbareos-storage-python-plugin Python plugin for Bareos Storage daemonbareos-storage-tape Tape support for the Bareos Storage daemonbareos-tools Bareos CLI tools (bcopy, bextract, bls, bregex, bwild)bareos-traymonitor Bareos Tray Monitor (QT)
Not all packages (especially optional backends and plugins) are available on all platforms.Additionally, packages containing debug information are available. These are named differently dependingon the distribution (bareos-debuginfo or bareos-dbg or . . .).Not all packages are required to run Bareos.
� For the Bareos Director, the package bareos-director and one of bareos-database-mysql,bareos-database-postgresql or bareos-database-sqlite3 are required (usebareos-database-sqlite3 only for testing).
� For the Bareos Storage Daemon, the package bareos-storage is required. If you plan to connect tapedrives to the storage director, also install the package bareos-storage-tape. This is kept separately,because it has additional dependencies for tape tools.
� On a client, only the package bareos-filedaemon is required. If you run it on a workstation, thepackages bareos-traymonitor gives the user information about running backups.
� On a Backup Administration system you need to install at least bareos-bconsole to have an interac-tive console to the Bareos Director.
1.5 Bareos Configuration
In order for Bareos to understand your system, what clients you want backed up and how, you must createa number of configuration files containing resources (or objects).TODO: add overview picture
1.6 Conventions Used in this Document
Bareos is in a state of evolution, and as a consequence, this manual will not always agree with the code. If anitem in this manual is preceded by an asterisk (*), it indicates that the particular feature is not implemented.If it is preceded by a plus sign (+), it indicates that the feature may be partially implemented.If you are reading this manual as supplied in a released version of the software, the above paragraph holdstrue. If you are reading the online version of the manual, http://www.bareos.org, please bear in mindthat this version describes the current version in development that may contain features not in the releasedversion. Just the same, it generally lags behind the code a bit.The source of this document is available at https://github.com/bareos/bareos-docs. As with the rest of theBareos project, you are welcome to participate and improve it.
6
1.7 Quick Start
To get Bareos up and running quickly, the author recommends that you first scan the Terminology sectionbelow, then quickly review the next chapter entitled The Current State of Bareos, then the Installing Bareos,the Getting Started with Bareos, which will give you a quick overview of getting Bareos running. After which,you should proceed to the chapter How to Configure Bareos, and finally the chapter on Running Bareos.
1.8 Terminology
Administrator The person or persons responsible for administrating the Bareos system.
Backup The term Backup refers to a Bareos Job that saves files.
Bootstrap File The bootstrap file is an ASCII file containing a compact form of commands that allowBareos or the stand-alone file extraction utility (bextract) to restore the contents of one or moreVolumes, for example, the current state of a system just backed up. With a bootstrap file, Bareos canrestore your system without a Catalog. You can create a bootstrap file from a Catalog to extract anyfile or files you wish.
Catalog The Catalog is used to store summary information about the Jobs, Clients, and Files that werebacked up and on what Volume or Volumes. The information saved in the Catalog permits the admin-istrator or user to determine what jobs were run, their status as well as the important characteristicsof each file that was backed up, and most importantly, it permits you to choose what files to restore.The Catalog is an online resource, but does not contain the data for the files backed up. Most of theinformation stored in the catalog is also stored on the backup volumes (i.e. tapes). Of course, thetapes will also have a copy of the file data in addition to the File Attributes (see below).
The catalog feature is one part of Bareos that distinguishes it from simple backup and archive programssuch as dump and tar.
Client In Bareos’s terminology, the word Client refers to the machine being backed up, and it is synonymouswith the File services or File daemon, and quite often, it is referred to it as the FD. A Client is definedin a configuration file resource.
Console The program that interfaces to the Director allowing the user or system administrator to controlBareos.
Daemon Unix terminology for a program that is always present in the background to carry out a designatedtask. On Windows systems, as well as some Unix systems, daemons are called Services.
Directive The term directive is used to refer to a statement or a record within a Resource in a configurationfile that defines one specific setting. For example, the Name directive defines the name of the Resource.
Director The main Bareos server daemon that schedules and directs all Bareos operations. Occasionally,the project refers to the Director as DIR.
Differential A backup that includes all files changed since the last Full save started. Note, other backupprograms may define this differently.
File Attributes The File Attributes are all the information necessary about a file to identify it and all itsproperties such as size, creation date, modification date, permissions, etc. Normally, the attributes arehandled entirely by Bareos so that the user never needs to be concerned about them. The attributesdo not include the file’s data.
File Daemon The daemon running on the client computer to be backed up. This is also referred to as theFile services, and sometimes as the Client services or the FD.
FileSet A FileSet is a Resource contained in a configuration file that defines the files to be backed up. Itconsists of a list of included files or directories, a list of excluded files, and how the file is to be stored(compression, encryption, signatures). For more details, see the FileSet Resource in the Directorchapter of this document.
Incremental A backup that includes all files changed since the last Full, Differential, or Incremental backupstarted. It is normally specified on the Level directive within the Job resource definition, or in aSchedule resource.
7
Job A Bareos Job is a configuration resource that defines the work that Bareos must perform to backupor restore a particular Client. It consists of the Type (backup, restore, verify, etc), the Level (full,differential, incremental, etc.), the FileSet, and Storage the files are to be backed up (Storage device,Media Pool). For more details, see the Job Resource in the Director chapter of this document.
Monitor The program that interfaces to all the daemons allowing the user or system administrator tomonitor Bareos status.
Resource A resource is a part of a configuration file that defines a specific unit of information that isavailable to Bareos. It consists of several directives (individual configuration statements). For example,the Job resource defines all the properties of a specific Job: name, schedule, Volume pool, backup type,backup level, ...
Restore A restore is a configuration resource that describes the operation of recovering a file from backupmedia. It is the inverse of a save, except that in most cases, a restore will normally have a small setof files to restore, while normally a Save backs up all the files on the system. Of course, after a diskcrash, Bareos can be called upon to do a full Restore of all files that were on the system.
Schedule A Schedule is a configuration resource that defines when the Bareos Job will be scheduled forexecution. To use the Schedule, the Job resource will refer to the name of the Schedule. For moredetails, see the Schedule Resource in the Director chapter of this document.
Service This is a program that remains permanently in memory awaiting instructions. In Unix environ-ments, services are also known as daemons.
Storage Coordinates The information returned from the Storage Services that uniquely locates a fileon a backup medium. It consists of two parts: one part pertains to each file saved, and the otherpart pertains to the whole Job. Normally, this information is saved in the Catalog so that the userdoesn’t need specific knowledge of the Storage Coordinates. The Storage Coordinates include the FileAttributes (see above) plus the unique location of the information on the backup Volume.
Storage Daemon The Storage daemon, sometimes referred to as the SD, is the code that writes theattributes and data to a storage Volume (usually a tape or disk).
Session Normally refers to the internal conversation between the File daemon and the Storage daemon.The File daemon opens a session with the Storage daemon to save a FileSet or to restore it. A sessionhas a one-to-one correspondence to a Bareos Job (see above).
Verify A verify is a job that compares the current file attributes to the attributes that have previously beenstored in the Bareos Catalog. This feature can be used for detecting changes to critical system filessimilar to what a file integrity checker like Tripwire does. One of the major advantages of using Bareosto do this is that on the machine you want protected such as a server, you can run just the File daemon,and the Director, Storage daemon, and Catalog reside on a different machine. As a consequence, ifyour server is ever compromised, it is unlikely that your verification database will be tampered with.
Verify can also be used to check that the most recent Job data written to a Volume agrees with whatis stored in the Catalog (i.e. it compares the file attributes), *or it can check the Volume contentsagainst the original files on disk.
Retention Period There are various kinds of retention periods that Bareos recognizes. The most importantare the File Retention Period, Job Retention Period, and the Volume Retention Period. Each ofthese retention periods applies to the time that specific records will be kept in the Catalog database.This should not be confused with the time that the data saved to a Volume is valid.
The File Retention Period determines the time that File records are kept in the catalog database. Thisperiod is important for two reasons: the first is that as long as File records remain in the database,you can ”browse” the database with a console program and restore any individual file. Once the Filerecords are removed or pruned from the database, the individual files of a backup job can no longer be”browsed”. The second reason for carefully choosing the File Retention Period is because the volumeof the database File records use the most storage space in the database. As a consequence, you mustensure that regular ”pruning” of the database file records is done to keep your database from growingtoo large. (See the Console prune command for more details on this subject).
The Job Retention Period is the length of time that Job records will be kept in the database. Note,all the File records are tied to the Job that saved those files. The File records can be purged leavingthe Job records. In this case, information will be available about the jobs that ran, but not the details
8
of the files that were backed up. Normally, when a Job record is purged, all its File records will alsobe purged.
The Volume Retention Period is the minimum of time that a Volume will be kept before it is reused.Bareos will normally never overwrite a Volume that contains the only backup copy of a file. Underideal conditions, the Catalog would retain entries for all files backed up for all current Volumes. Oncea Volume is overwritten, the files that were backed up on that Volume are automatically removedfrom the Catalog. However, if there is a very large pool of Volumes or a Volume is never overwritten,the Catalog database may become enormous. To keep the Catalog to a manageable size, the backupinformation should be removed from the Catalog after the defined File Retention Period. Bareosprovides the mechanisms for the catalog to be automatically pruned according to the retention periodsdefined.
Scan A Scan operation causes the contents of a Volume or a series of Volumes to be scanned. TheseVolumes with the information on which files they contain are restored to the Bareos Catalog. Oncethe information is restored to the Catalog, the files contained on those Volumes may be easily restored.This function is particularly useful if certain Volumes or Jobs have exceeded their retention period andhave been pruned or purged from the Catalog. Scanning data from Volumes into the Catalog is doneby using the bscan program. See the bscan section of the Bareos Utilities chapter of this manual formore details.
Volume A Volume is an archive unit, normally a tape or a named disk file where Bareos stores the datafrom one or more backup jobs. All Bareos Volumes have a software label written to the Volume byBareos so that it identifies what Volume it is really reading. (Normally there should be no confusionwith disk files, but with tapes, it is easy to mount the wrong one.)
1.9 What Bareos is Not
Bareos is a backup, restore and verification program and is not a complete disaster recovery system in itself,but it can be a key part of one if you plan carefully and follow the instructions included in the DisasterRecovery chapter of this manual.
1.10 Interactions Between the Bareos Services
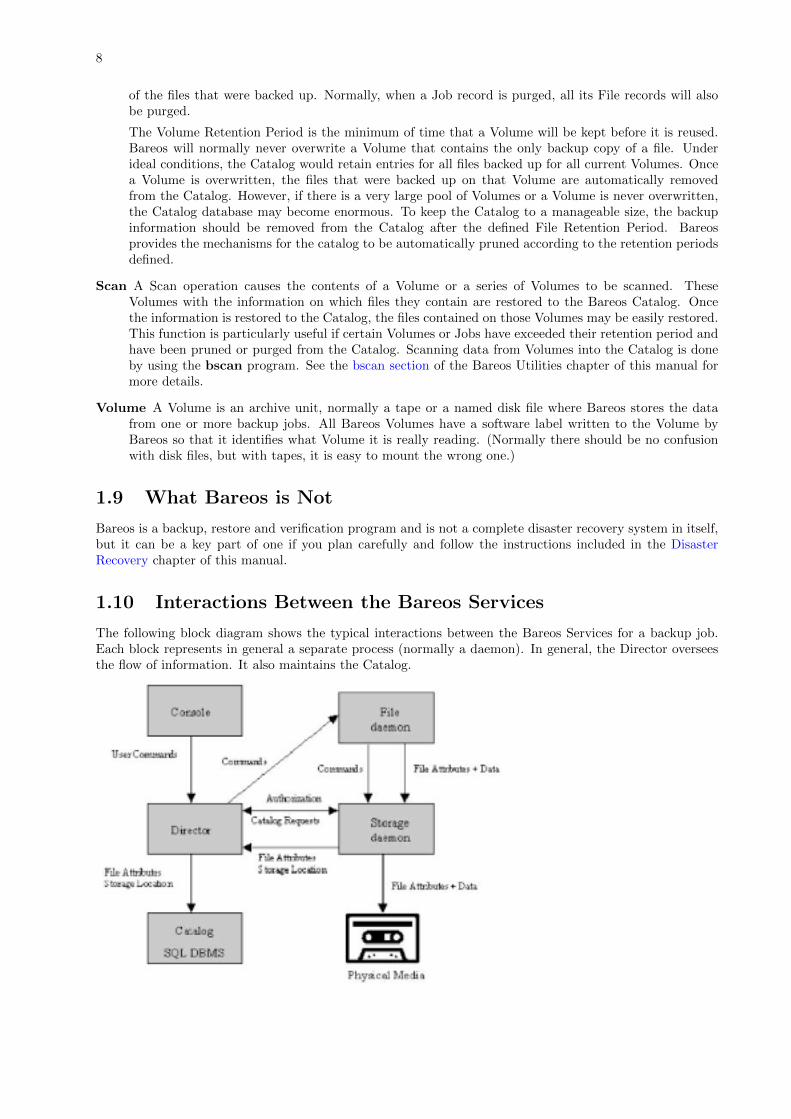
The following block diagram shows the typical interactions between the Bareos Services for a backup job.Each block represents in general a separate process (normally a daemon). In general, the Director overseesthe flow of information. It also maintains the Catalog.

9
1.11 The Current State of Bareos
1.11.1 What is Implemented
� Job Control
– Network backup/restore with centralized Director.
– Internal scheduler for automatic Job execution.
– Scheduling of multiple Jobs at the same time.
– You may run one Job at a time or multiple simultaneous Jobs (sometimes called multiplexing).
– Job sequencing using priorities.
– Console interface to the Director allowing complete control. Same GUIs are also available.
� Security
– Verification of files previously cataloged, permitting a Tripwire like capability (system break-indetection).
– CRAM-MD5 password authentication between each component (daemon).
– Configurable TLS (SSL) communications encryption between each component.
– Configurable Data (on Volume) encryption on a Client by Client basis.
– Computation of MD5 or SHA1 signatures of the file data if requested.
� Restore Features
– Restore of one or more files selected interactively either for the current backup or a backup priorto a specified time and date.
– Listing and Restoration of files using stand-alone bls and bextract tool programs. Among otherthings, this permits extraction of files when Bareos and/or the catalog are not available. Note, therecommended way to restore files is using the restore command in the Console. These programsare designed for use as a last resort.
– Ability to restore the catalog database rapidly by using bootstrap files (previously saved).
– Ability to recreate the catalog database by scanning backup Volumes using the bscan program.
� SQL Catalog
– Catalog database facility for remembering Volumes, Pools, Jobs, and Files backed up.
– Support for MySQL, PostgreSQL, and SQLite Catalog databases.
– User extensible queries to the MySQL, PostgreSQL and SQLite databases.
� Advanced Volume and Pool Management
– Labeled Volumes, preventing accidental overwriting (at least by Bareos).
– Any number of Jobs and Clients can be backed up to a single Volume. That is, you can backupand restore Linux, Unix and Windows machines to the same Volume.
– Multi-volume saves. When a Volume is full, Bareos automatically requests the next Volume andcontinues the backup.
– Pool and Volume library management providing Volume flexibility (e.g. monthly, weekly, dailyVolume sets, Volume sets segregated by Client, ...).
– Machine independent Volume data format. Linux, Solaris, and Windows clients can all be backedup to the same Volume if desired.
– The Volume data format is upwards compatible so that old Volumes can always be read.
– A flexible message handler including routing of messages from any daemon back to the Directorand automatic email reporting.
– Data spooling to disk during backup with subsequent write to tape from the spooled disk files.This prevents tape ”shoe shine” during Incremental/Differential backups.
� Advanced Support for most Storage Devices
10
– Autochanger support using a simple shell interface that can interface to virtually any autoloaderprogram. A script for mtx is provided.
– Support for autochanger barcodes – automatic tape labeling from barcodes.
– Automatic support for multiple autochanger magazines either using barcodes or by reading thetapes.
– Support for multiple drive autochangers.
– Raw device backup/restore. Restore must be to the same device.
– All Volume blocks contain a data checksum.
– Migration support – move data from one Pool to another or one Volume to another.
� Multi-Operating System Support
– Programmed to handle arbitrarily long filenames and messages.
– Compression on a file by file basis done by the Client program if requested before network transit.
– Saves and restores POSIX ACLs and Extended Attributes on most OSes if enabled.
– Access control lists for Consoles that permit restricting user access to only their data.
– Support for save/restore of files larger than 2GB.
– Support ANSI and IBM tape labels.
– Support for Unicode filenames (e.g. Chinese) on Win32 machines
– Consistent backup of open files on Win32 systems using Volume Shadow Copy (VSS).
– Support for path/filename lengths of up to 64K on Win32 machines (unlimited on Unix/Linuxmachines).
� Miscellaneous
– Multi-threaded implementation.
– A comprehensive and extensible configuration file for each daemon.
1.11.2 Advantages Over Other Backup Programs
� Since there is a client for each machine, you can backup and restore clients of any type ensuring thatall attributes of files are properly saved and restored.
� It is also possible to backup clients without any client software by using NFS or CIFS. However, ifpossible, we recommend running a Client File daemon on each machine to be backed up.
� Bareos handles multi-volume backups.
� A full comprehensive SQL standard database of all files backed up. This permits online viewing of filessaved on any particular Volume.
� Automatic pruning of the database (removal of old records) thus simplifying database administration.
� Any SQL database engine can be used making Bareos very flexible. Drivers currently exist for MySQL,PostgreSQL, and SQLite.
� The modular but integrated design makes Bareos very scalable.
� Since Bareos uses client file servers, any database or other application can be properly shutdown byBareos using the native tools of the system, backed up, then restarted (all within a Bareos Job).
� Bareos has a built-in Job scheduler.
� The Volume format is documented and there are simple C programs to read/write it.
� Bareos uses well defined (IANA registered) TCP/IP ports – no rpcs, no shared memory.
� Bareos installation and configuration is relatively simple compared to other comparable products.
� Aside from several GUI administrative interfaces, Bareos has a comprehensive shell administrativeinterface, which allows the administrator to use tools such as ssh to administrate any part of Bareosfrom anywhere.
11
1.11.3 Current Implementation Restrictions
� It is possible to configure the Bareos Director to use multiple Catalogs. However, this is neither adviced,nor supported. Multiple catalogs require more management because in general you must know whatcatalog contains what data, e.g. currently, all Pools are defined in each catalog.
� Bareos can generally restore any backup made from one client to any other client. However, if thearchitecture is significantly different (i.e. 32 bit architecture to 64 bit or Win32 to Unix), somerestrictions may apply (e.g. Solaris door files do not exist on other Unix/Linux machines; there arereports that Zlib compression written with 64 bit machines does not always read correctly on a 32 bitmachine).
1.11.4 Design Limitations or Restrictions
� Names (resource names, volume names, and such) defined in Bareos configuration files are limited to afixed number of characters. Currently the limit is defined as 127 characters. Note, this does not applyto filenames, which may be arbitrarily long.
� Command line input to some of the stand alone tools – e.g. btape, bconsole is restricted to severalhundred characters maximum. Normally, this is not a restriction, except in the case of listing multipleVolume names for programs such as bscan. To avoid this command line length restriction, please usea .bsr file to specify the Volume names.
� Bareos configuration files for each of the components can be any length. However, the length of anindividual line is limited to 500 characters after which it is truncated. If you need lines longer than 500characters for directives such as ACLs where they permit a list of names are character strings simplyspecify multiple short lines repeating the directive on each line but with different list values.
1.11.5 Items to Note
� Bareos’s Differential and Incremental normal backups are based on time stamps. Consequently, if youmove files into an existing directory or move a whole directory into the backup fileset after a Fullbackup, those files will probably not be backed up by an Incremental save because they will haveold dates. This problem is corrected by using Accurate mode backups or by explicitly updating thedate/time stamp on all moved files.
� In non Accurate mode, files deleted after a Full save will be included in a restoration. This is typicalfor most similar backup programs. To avoid this, use Accurate mode backup.

12
Chapter 2
Installing Bareos
If you are like me, you want to get Bareos running immediately to get a feel for it, then later you want to goback and read about all the details. This chapter attempts to accomplish just that: get you going quicklywithout all the details.Bareos comes prepackaged for a number of Linux distributions. So the easiest way to get to a running Bareosinstallation, is to use a platform where prepacked Bareos packages are available. Additional information canbe found in the chapter Operating Systems.If Bareos is available as a package, only 5 steps are required to get to a running Bareos System:
1. Decide about the Bareos release to use
2. Decide about the Database Backend
3. Install the Bareos Software Packages
4. Prepare Bareos database
5. Start the daemons
This will start a very basic Bareos installation which will regularly backup a directory to disk. In order tofit it to your needs, you’ll have to adapt the configuration and might want to backup other clients.
2.1 Decide about the Bareos release to use
� http://download.bareos.org/bareos/release/latest/
You’ll find Bareos binary package repositories at http://download.bareos.org/. The lastet stable releasedversion is available at http://download.bareos.org/bareos/release/latest/.The public key to verify the repository is also in repository directory (Release.key for Debian based distri-butions, repodata/repomd.xml.key for RPM based distributions).Section Install the Bareos Software Packages describes how to add the software repository to your system.
2.2 Decide about the Database Backend
Next you have to decide, what database backend you want to use. Bareos supports following databasebackends:
� PostgreSQL by package bareos-database-postgresql
� MySQL by package bareos-database-mysql
� Sqlite by package bareos-database-sqlite3
Please note! The Sqlite backend is only intended for testing, not for productive use.
The PostgreSQL backend is the default. However, the MySQL backend is also supported, while the Sqlitebackend is intended for testing purposes only.The Bareos database packages have there dependencies only to the database client packages, therefore thedatabase itself must be installed manually.
13
14
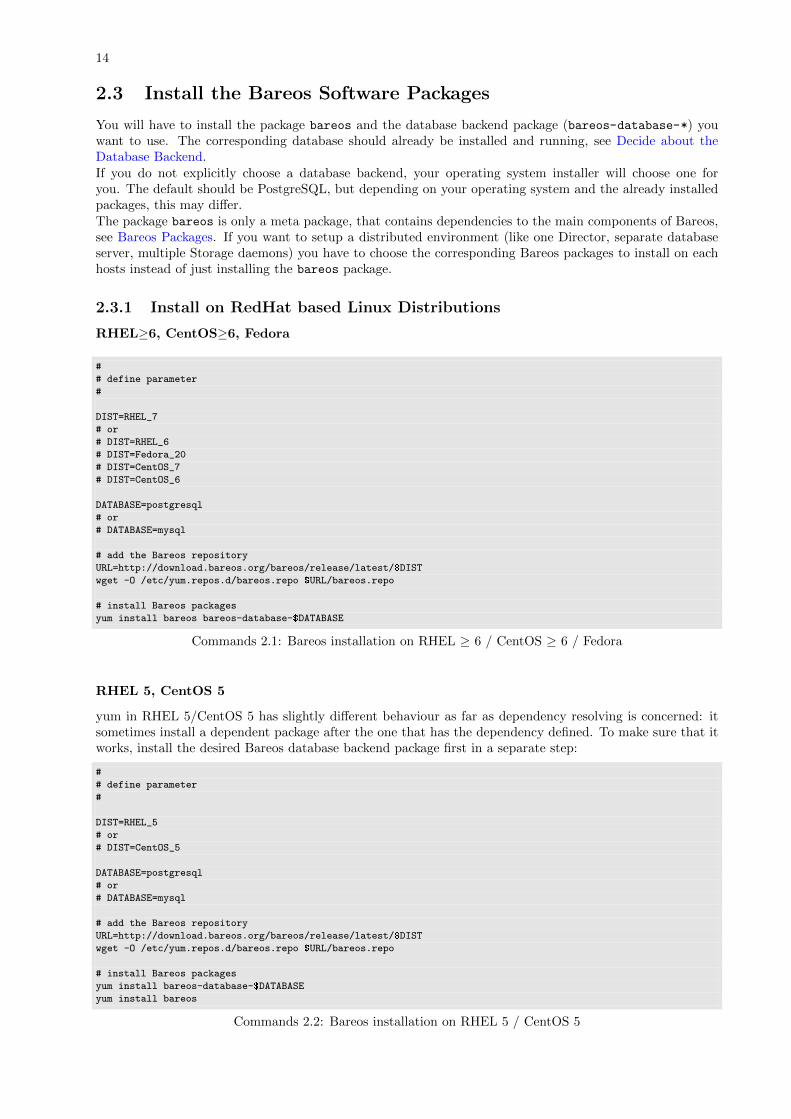
2.3 Install the Bareos Software Packages
You will have to install the package bareos and the database backend package (bareos-database-*) youwant to use. The corresponding database should already be installed and running, see Decide about theDatabase Backend.If you do not explicitly choose a database backend, your operating system installer will choose one foryou. The default should be PostgreSQL, but depending on your operating system and the already installedpackages, this may differ.The package bareos is only a meta package, that contains dependencies to the main components of Bareos,see Bareos Packages. If you want to setup a distributed environment (like one Director, separate databaseserver, multiple Storage daemons) you have to choose the corresponding Bareos packages to install on eachhosts instead of just installing the bareos package.
2.3.1 Install on RedHat based Linux Distributions
RHEL≥6, CentOS≥6, Fedora
#
# define parameter
#
DIST=RHEL_7
# or
# DIST=RHEL_6
# DIST=Fedora_20
# DIST=CentOS_7
# DIST=CentOS_6
DATABASE=postgresql
# or
# DATABASE=mysql
# add the Bareos repository
URL=http://download.bareos.org/bareos/release/latest/$DIST
wget -O /etc/yum.repos.d/bareos.repo $URL/bareos.repo
# install Bareos packages
yum install bareos bareos-database-$DATABASE
Commands 2.1: Bareos installation on RHEL ≥ 6 / CentOS ≥ 6 / Fedora
RHEL 5, CentOS 5
yum in RHEL 5/CentOS 5 has slightly different behaviour as far as dependency resolving is concerned: itsometimes install a dependent package after the one that has the dependency defined. To make sure that itworks, install the desired Bareos database backend package first in a separate step:
#
# define parameter
#
DIST=RHEL_5
# or
# DIST=CentOS_5
DATABASE=postgresql
# or
# DATABASE=mysql
# add the Bareos repository
URL=http://download.bareos.org/bareos/release/latest/$DIST
wget -O /etc/yum.repos.d/bareos.repo $URL/bareos.repo
# install Bareos packages
yum install bareos-database-$DATABASE
yum install bareos
Commands 2.2: Bareos installation on RHEL 5 / CentOS 5
15
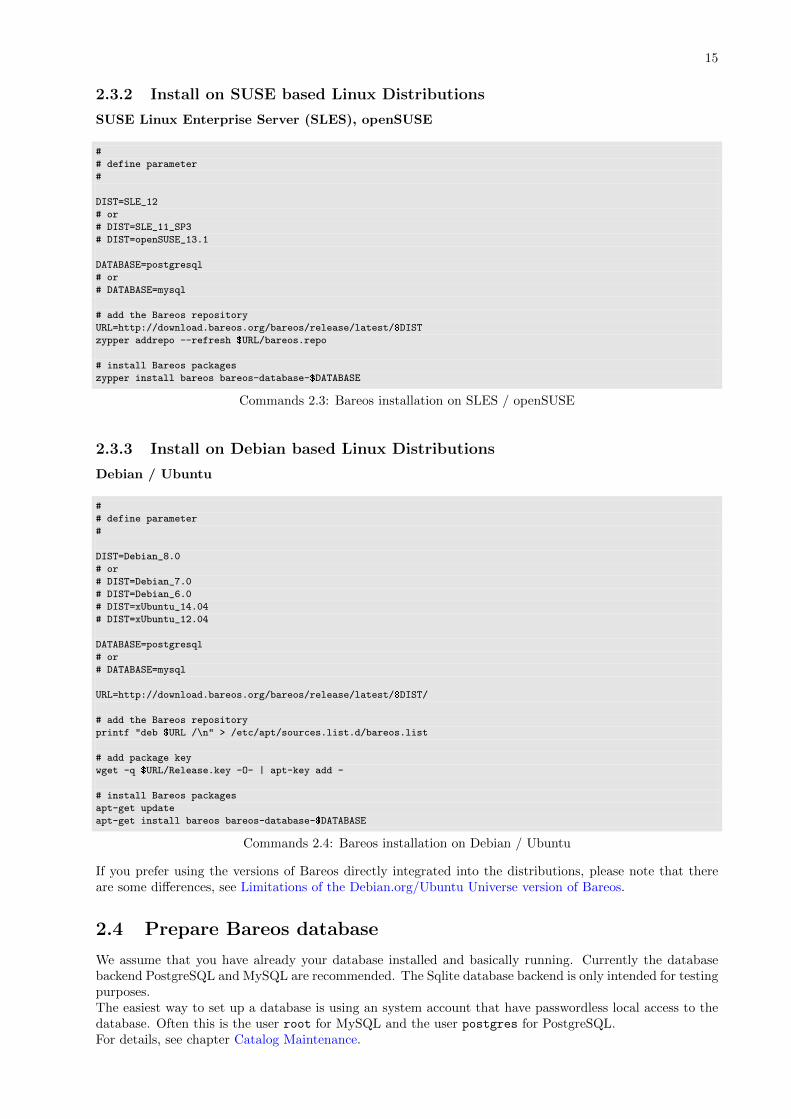
2.3.2 Install on SUSE based Linux Distributions
SUSE Linux Enterprise Server (SLES), openSUSE
#
# define parameter
#
DIST=SLE_12
# or
# DIST=SLE_11_SP3
# DIST=openSUSE_13.1
DATABASE=postgresql
# or
# DATABASE=mysql
# add the Bareos repository
URL=http://download.bareos.org/bareos/release/latest/$DIST
zypper addrepo --refresh $URL/bareos.repo
# install Bareos packages
zypper install bareos bareos-database-$DATABASE
Commands 2.3: Bareos installation on SLES / openSUSE
2.3.3 Install on Debian based Linux Distributions
Debian / Ubuntu
#
# define parameter
#
DIST=Debian_8.0
# or
# DIST=Debian_7.0
# DIST=Debian_6.0
# DIST=xUbuntu_14.04
# DIST=xUbuntu_12.04
DATABASE=postgresql
# or
# DATABASE=mysql
URL=http://download.bareos.org/bareos/release/latest/$DIST/
# add the Bareos repository
printf "deb $URL /\n" > /etc/apt/sources.list.d/bareos.list
# add package key
wget -q $URL/Release.key -O- | apt-key add -
# install Bareos packages
apt-get update
apt-get install bareos bareos-database-$DATABASE
Commands 2.4: Bareos installation on Debian / Ubuntu
If you prefer using the versions of Bareos directly integrated into the distributions, please note that thereare some differences, see Limitations of the Debian.org/Ubuntu Universe version of Bareos.
2.4 Prepare Bareos database
We assume that you have already your database installed and basically running. Currently the databasebackend PostgreSQL and MySQL are recommended. The Sqlite database backend is only intended for testingpurposes.The easiest way to set up a database is using an system account that have passwordless local access to thedatabase. Often this is the user root for MySQL and the user postgres for PostgreSQL.For details, see chapter Catalog Maintenance.
16
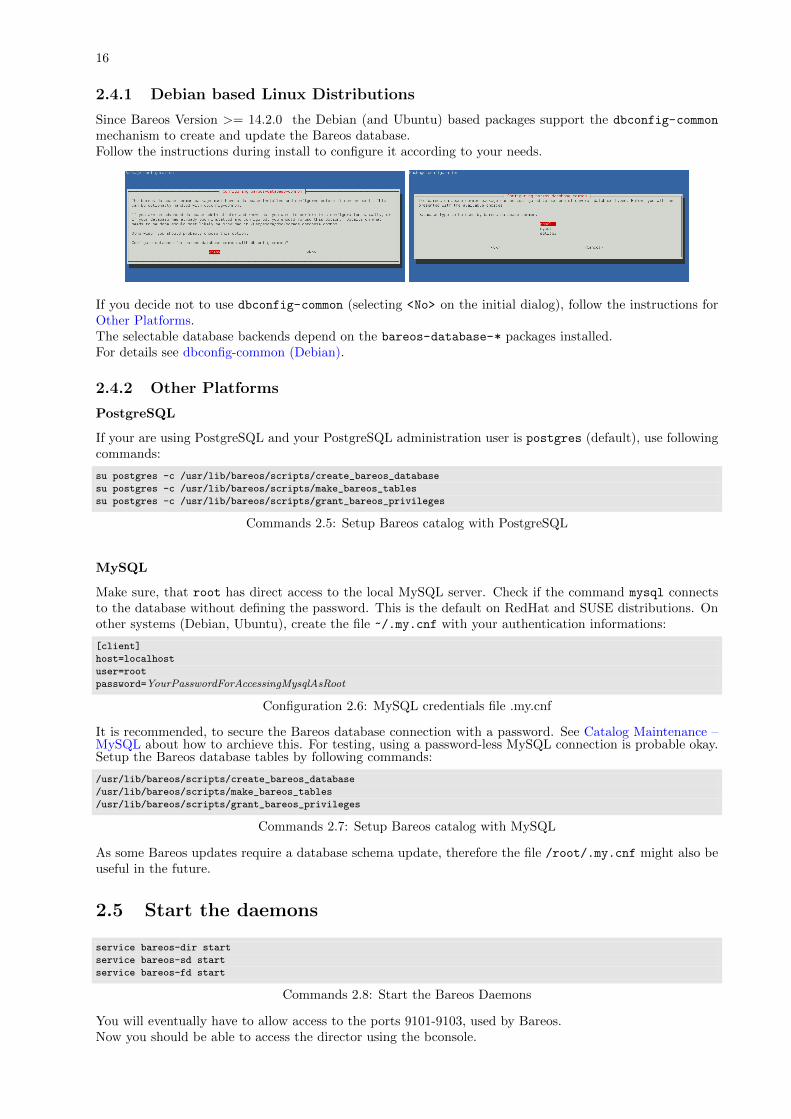
2.4.1 Debian based Linux Distributions
Since Bareos Version >= 14.2.0 the Debian (and Ubuntu) based packages support the dbconfig-common
mechanism to create and update the Bareos database.Follow the instructions during install to configure it according to your needs.
If you decide not to use dbconfig-common (selecting <No> on the initial dialog), follow the instructions forOther Platforms.The selectable database backends depend on the bareos-database-* packages installed.For details see dbconfig-common (Debian).
2.4.2 Other Platforms
PostgreSQL
If your are using PostgreSQL and your PostgreSQL administration user is postgres (default), use followingcommands:
su postgres -c /usr/lib/bareos/scripts/create_bareos_database
su postgres -c /usr/lib/bareos/scripts/make_bareos_tables
su postgres -c /usr/lib/bareos/scripts/grant_bareos_privileges
Commands 2.5: Setup Bareos catalog with PostgreSQL
MySQL
Make sure, that root has direct access to the local MySQL server. Check if the command mysql connectsto the database without defining the password. This is the default on RedHat and SUSE distributions. Onother systems (Debian, Ubuntu), create the file ~/.my.cnf with your authentication informations:
[client]
host=localhost
user=root
password=YourPasswordForAccessingMysqlAsRoot
Configuration 2.6: MySQL credentials file .my.cnf
It is recommended, to secure the Bareos database connection with a password. See Catalog Maintenance –MySQL about how to archieve this. For testing, using a password-less MySQL connection is probable okay.Setup the Bareos database tables by following commands:
/usr/lib/bareos/scripts/create_bareos_database
/usr/lib/bareos/scripts/make_bareos_tables
/usr/lib/bareos/scripts/grant_bareos_privileges
Commands 2.7: Setup Bareos catalog with MySQL
As some Bareos updates require a database schema update, therefore the file /root/.my.cnf might also beuseful in the future.
2.5 Start the daemons
service bareos-dir start
service bareos-sd start
service bareos-fd start
Commands 2.8: Start the Bareos Daemons
You will eventually have to allow access to the ports 9101-9103, used by Bareos.Now you should be able to access the director using the bconsole.
Chapter 3
Updating Bareos
In most cases, a Bareos update is simply done by a package update of the distribution. Please remind, thatBareos Director and Bareos Storage Daemon must always have the same version. The version of the FileDaemon may differ, see chapter about backward compatibility.
3.1 Updating the database schema
Sometimes improvements in Bareos make it neccessary to update the database scheme.Please note! If the Bareos catalog database has not the current schema, the Bareos Director refuses to start.Detailed information can than be found in the log file /var/log/bareos/bareos.log.Take a look in the Release Notes to see, what Bareos updates to require a database schema update.
3.1.1 Debian based Linux Distributions
Since Bareos Version >= 14.2.0 the Debian (and Ubuntu) based packages support the dbconfig-common
mechanism to create and update the Bareos database. If this is properly configured, the database schemawill be automatically adapted by the Bareos packages.Please note! When using the PostgreSQL backend and updating to Bareos < 14.2.3, it is necessary tomanually grant database permissions, normally by
root@linux:~# su − postgres −c /usr/lib/bareos/scripts/grant bareos privileges
For details see dbconfig-common (Debian).If you disabled the usage of dbconfig-common, follow the instructions for Other Platforms.
3.1.2 Other Platforms
This has to be done as database administrator. On most platforms Bareos knows only about the credentialsto access the Bareos database, but not about the database administrator to modify the database schema.The task of updating the database schema is done by the script /usr/lib/bareos/scripts/update_bareos_tables.However, this script requires administration access to the database. Depending on your distribution and yourdatabase, this requires different preparations. More details can be found in chapter Catalog Maitenance.Please note! If you’re updating to Bareos <= 13.2.3 and had configured the Bareos database during installusing Bareos environment variables (db_ name , db_ user or db_ password , see Catalog Maintenance), makesure to have these variables definied in the same way when calling the update and grant scripts. Newerversions of Bareos read this variables from the Director configuration file /etc/ bareos/ bareos-dir. conf .However, make sure, the user running the database scripts has read access to this file (or set the environmentvariables). The postgres user normally does not have the required permissions.
PostgreSQL
If your are using PostgreSQL and your PostgreSQL administrator is postgres (default), use followingcommands:
su postgres -c /usr/lib/bareos/scripts/update_bareos_tables
su postgres -c /usr/lib/bareos/scripts/grant_bareos_privileges
Commands 3.1: Update PostgreSQL database schema
17
18
The grant_bareos_privileges command is required, if new databases tables are introduced. It does nothurt to run it multiple times.After this, restart the Bareos Director and verify it starts without problems.
MySQL
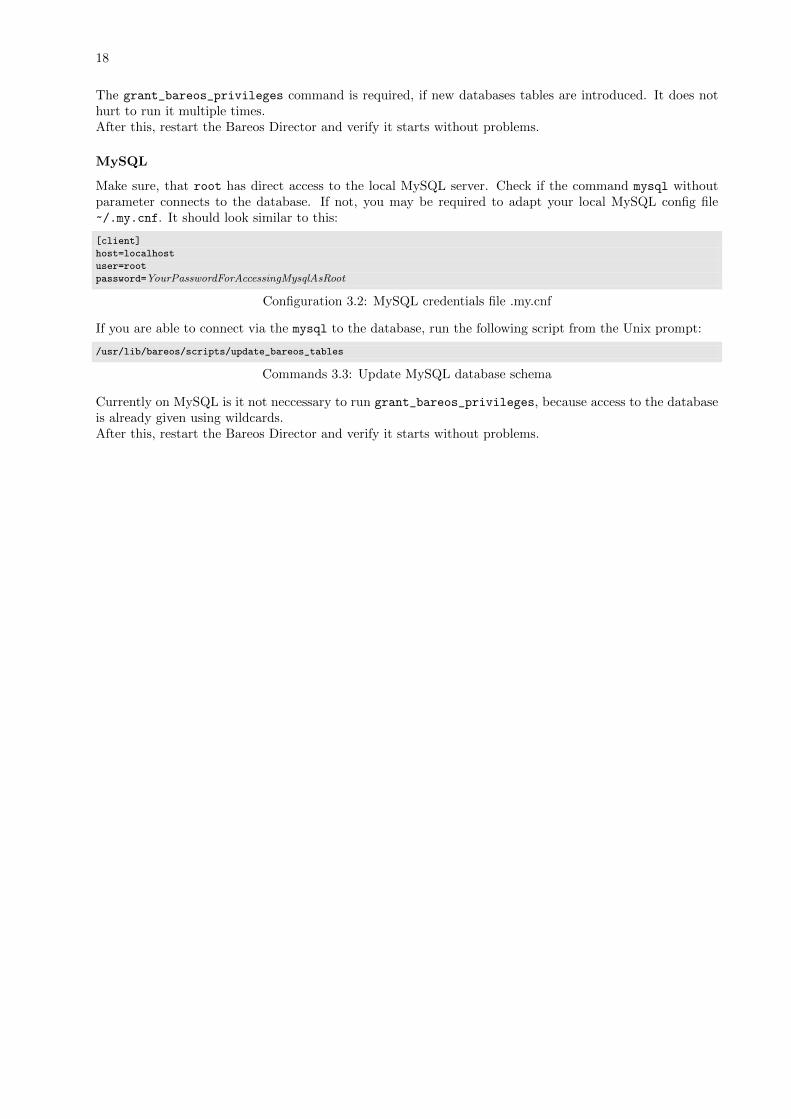
Make sure, that root has direct access to the local MySQL server. Check if the command mysql withoutparameter connects to the database. If not, you may be required to adapt your local MySQL config file
~/.my.cnf. It should look similar to this:
[client]
host=localhost
user=root
password=YourPasswordForAccessingMysqlAsRoot
Configuration 3.2: MySQL credentials file .my.cnf
If you are able to connect via the mysql to the database, run the following script from the Unix prompt:
/usr/lib/bareos/scripts/update_bareos_tables
Commands 3.3: Update MySQL database schema
Currently on MySQL is it not neccessary to run grant_bareos_privileges, because access to the databaseis already given using wildcards.After this, restart the Bareos Director and verify it starts without problems.
Chapter 4
Getting Started with Bareos
4.1 Understanding Jobs and Schedules
In order to make Bareos as flexible as possible, the directions given to Bareos are specified in several pieces.The main instruction is the job resource, which defines a job. A backup job generally consists of a FileSet,a Client, a Schedule for one or several levels or times of backups, a Pool, as well as additional instructions.Another way of looking at it is the FileSet is what to backup; the Client is who to backup; the Scheduledefines when, and the Pool defines where (i.e. what Volume).
Typically one FileSet/Client combination will have one corresponding job. Most of the directives, such asFileSets, Pools, Schedules, can be mixed and matched among the jobs. So you might have two different Jobdefinitions (resources) backing up different servers using the same Schedule, the same Fileset (backing upthe same directories on two machines) and maybe even the same Pools. The Schedule will define what typeof backup will run when (e.g. Full on Monday, incremental the rest of the week), and when more than onejob uses the same schedule, the job priority determines which actually runs first. If you have a lot of jobs,you might want to use JobDefs, where you can set defaults for the jobs, which can then be changed in thejob resource, but this saves rewriting the identical parameters for each job. In addition to the FileSets youwant to back up, you should also have a job that backs up your catalog.
Finally, be aware that in addition to the backup jobs there are restore, verify, and admin jobs, which havedifferent requirements.
4.2 Understanding Pools, Volumes and Labels
If you have been using a program such as tar to backup your system, Pools, Volumes, and labeling may bea bit confusing at first. A Volume is a single physical tape (or possibly a single file) on which Bareos willwrite your backup data. Pools group together Volumes so that a backup is not restricted to the length of asingle Volume (tape). Consequently, rather than explicitly naming Volumes in your Job, you specify a Pool,and Bareos will select the next appendable Volume from the Pool and request you to mount it.
Although the basic Pool options are specified in the Director’s Pool resource, the real Pool is maintainedin the Bareos Catalog. It contains information taken from the Pool resource (bareos-dir.conf) as well asinformation on all the Volumes that have been added to the Pool. Adding Volumes to a Pool is usually donemanually with the Console program using the label command.
For each Volume, Bareos maintains a fair amount of catalog information such as the first write date/time,the last write date/time, the number of files on the Volume, the number of bytes on the Volume, the numberof Mounts, etc.
Before Bareos will read or write a Volume, the physical Volume must have a Bareos software label so thatBareos can be sure the correct Volume is mounted. This is usually done using the label command in theConsole program.
The steps for creating a Pool, adding Volumes to it, and writing software labels to the Volumes, may seemtedious at first, but in fact, they are quite simple to do, and they allow you to use multiple Volumes (ratherthan being limited to the size of a single tape). Pools also give you significant flexibility in your backupprocess. For example, you can have a ”Daily” Pool of Volumes for Incremental backups and a ”Weekly”Pool of Volumes for Full backups. By specifying the appropriate Pool in the daily and weekly backup Jobs,you thereby insure that no daily Job ever writes to a Volume in the Weekly Pool and vice versa, and Bareoswill tell you what tape is needed and when.
19
20
For more on Pools, see the Pool Resource section of the Director Configuration chapter, or simply read on,and we will come back to this subject later.
4.3 Setting Up Bareos Configuration Files
On Unix, Bareos configuration files are usualy location in the /etc/bareos/ directory and are namedaccordingly to the programs that use it: bareos-fd.conf, bareos-sd.conf, bareos-dir.conf, bconsole.conf, etc.
For information about Windows configuration files, see the Windows chapter.
4.3.1 Configuring the Console Program
The Console program is used by the administrator to interact with the Director and to manually start/stopJobs or to obtain Job status information.
The Console configuration file is named bconsole.conf.
Normally, for first time users, no change is needed to these files. Reasonable defaults are set.
Further details are in the Console configuration chapter.
4.3.2 Configuring the File daemon
The File daemon is a program that runs on each (Client) machine. At the request of the Director, finds thefiles to be backed up and sends them (their data) to the Storage daemon.
The File daemon configuration file is named bareos-fd.conf. Normally, for first time users, no change isneeded to this file. Reasonable defaults are set. However, if you are going to back up more than one machine,you will need to install the File daemon with a unique configuration file on each machine to be backed up.The information about each File daemon must appear in the Director’s configuration file.
Further details are in the File daemon configuration chapter.
4.3.3 Configuring the Director
The Director is the central control program for all the other daemons. It schedules and monitors all jobs tobe backed up.
The Director configuration file is named bareos-dir.conf.
In general, the only change you must make is modify the FileSet resource so that the Include configurationdirective contains at least one line with a valid name of a directory (or file) to be saved.
You may also want to change the email address for notification from the default root to your email address.
Finally, if you have multiple systems to be backed up, you will need a separate File daemon or Clientspecification for each system, specifying its name, address, and password. We have found that giving yourdaemons the same name as your system but post fixed with -fd helps a lot in debugging. That is, if yoursystem name is foobaz, you would give the File daemon the name foobaz-fd. For the Director, you shoulduse foobaz-dir, and for the storage daemon, you might use foobaz-sd. Each of your Bareos componentsmust have a unique name. If you make them all the same, aside from the fact that you will not knowwhat daemon is sending what message, if they share the same working directory, the daemons temporaryfile names will not be unique, and you will get many strange failures.
More information is in the Director Configuration chapter.
4.3.4 Configuring the Storage daemon
The Storage daemon is responsible, at the Director’s request, for accepting data from a File daemon andplacing it on Storage media, or in the case of a restore request, to find the data and send it to the Filedaemon.
The Storage daemon’s configuration file is named bareos-sd.conf. The default configuration comes withbackup to disk only, so the Archive device points to a directory in which the Volumes will be created asfiles when you label the Volume. These Storage resource name and Media Type must be the same as thecorresponding ones in the Director’s configuration file bareos-dir.conf.
Further information is in the Storage daemon configuration chapter.
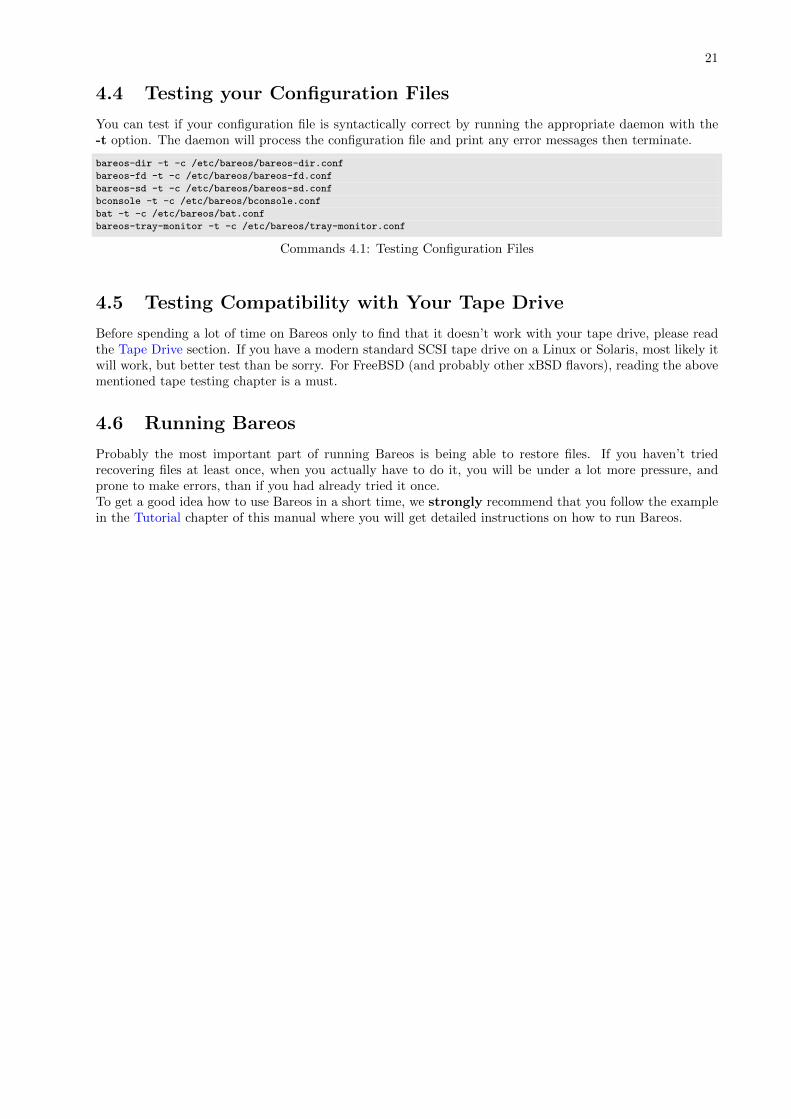
21
4.4 Testing your Configuration Files
You can test if your configuration file is syntactically correct by running the appropriate daemon with the-t option. The daemon will process the configuration file and print any error messages then terminate.
bareos-dir -t -c /etc/bareos/bareos-dir.conf
bareos-fd -t -c /etc/bareos/bareos-fd.conf
bareos-sd -t -c /etc/bareos/bareos-sd.conf
bconsole -t -c /etc/bareos/bconsole.conf
bat -t -c /etc/bareos/bat.conf
bareos-tray-monitor -t -c /etc/bareos/tray-monitor.conf
Commands 4.1: Testing Configuration Files
4.5 Testing Compatibility with Your Tape Drive
Before spending a lot of time on Bareos only to find that it doesn’t work with your tape drive, please readthe Tape Drive section. If you have a modern standard SCSI tape drive on a Linux or Solaris, most likely itwill work, but better test than be sorry. For FreeBSD (and probably other xBSD flavors), reading the abovementioned tape testing chapter is a must.
4.6 Running Bareos
Probably the most important part of running Bareos is being able to restore files. If you haven’t triedrecovering files at least once, when you actually have to do it, you will be under a lot more pressure, andprone to make errors, than if you had already tried it once.To get a good idea how to use Bareos in a short time, we strongly recommend that you follow the examplein the Tutorial chapter of this manual where you will get detailed instructions on how to run Bareos.

22
Chapter 5
Tutorial
This chapter will guide you through running Bareos. To do so, we assume you have installed Bareos. However,we assume that you have not changed the .conf files. If you have modified the .conf files, please go backand uninstall Bareos, then reinstall it, but do not make any changes. The examples in this chapter use thedefault configuration files, and will write the volumes to disk in your /var/lib/bareos/storage/ directory,in addition, the data backed up will be the source directory where you built Bareos. As a consequence, youcan run all the Bareos daemons for these tests as non-root. Please note, in production, your File daemon(s)must run as root. See the Security chapter for more information on this subject.The general flow of running Bareos is:
1. Start the Database (if using MySQL or PostgreSQL)
2. Start the Bareos Daemons
3. Start the Console program to interact with the Director
4. Run a job
5. When the Volume fills, unmount the Volume, if it is a tape, label a new one, and continue running. Inthis chapter, we will write only to disk files so you won’t need to worry about tapes for the moment.
6. Test recovering some files from the Volume just written to ensure the backup is good and that youknow how to recover. Better test before disaster strikes
7. Add a second client.
Each of these steps is described in more detail below.
5.1 Installing Bareos
For installing Bareos, follow the instructions from the Installing Bareos chapter.
5.2 Starting the Database
If you are using MySQL or PostgreSQL as the Bareos database, you should start it before you attempt torun a job to avoid getting error messages from Bareos when it starts. If you are using SQLite you need donothing. SQLite is automatically started by Bareos.
5.3 Starting the Daemons
Assuming you have installed the packages, to start the three daemons, from your installation directory,simply enter:
service bareos-dir start
service bareos-sd start
service bareos-fd start
23
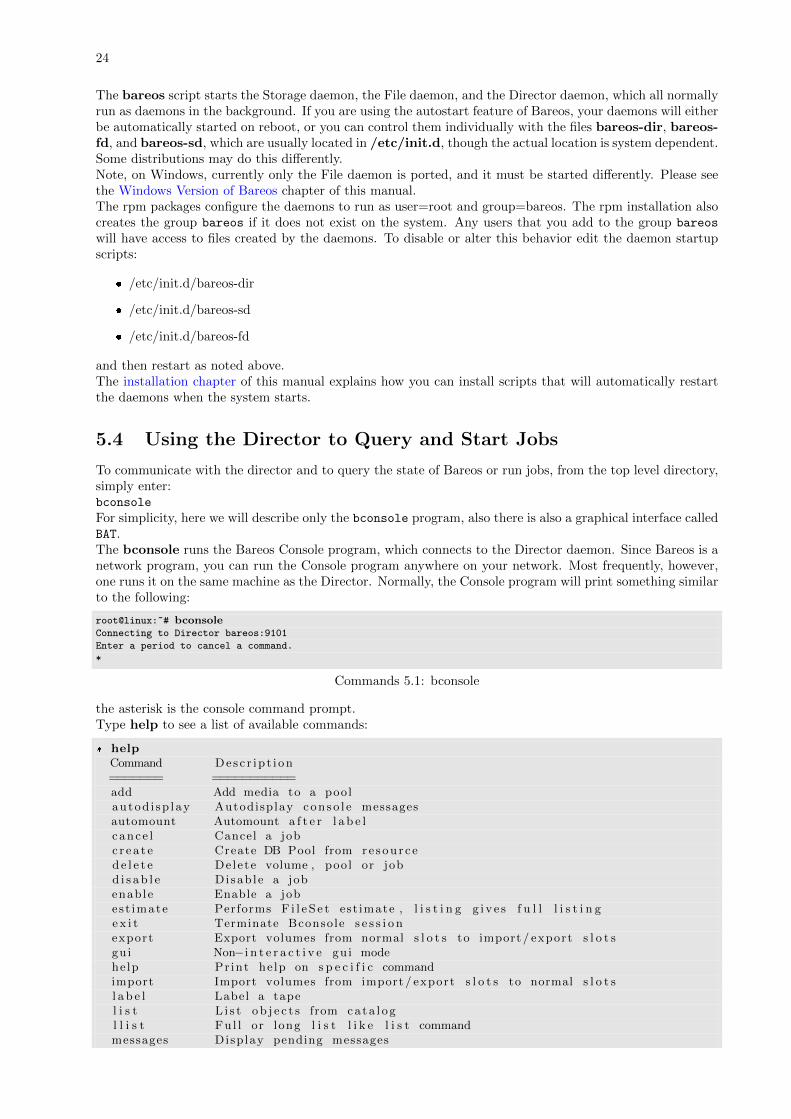
24
The bareos script starts the Storage daemon, the File daemon, and the Director daemon, which all normallyrun as daemons in the background. If you are using the autostart feature of Bareos, your daemons will eitherbe automatically started on reboot, or you can control them individually with the files bareos-dir, bareos-fd, and bareos-sd, which are usually located in /etc/init.d, though the actual location is system dependent.Some distributions may do this differently.Note, on Windows, currently only the File daemon is ported, and it must be started differently. Please seethe Windows Version of Bareos chapter of this manual.The rpm packages configure the daemons to run as user=root and group=bareos. The rpm installation alsocreates the group bareos if it does not exist on the system. Any users that you add to the group bareos
will have access to files created by the daemons. To disable or alter this behavior edit the daemon startupscripts:
� /etc/init.d/bareos-dir
� /etc/init.d/bareos-sd
� /etc/init.d/bareos-fd
and then restart as noted above.The installation chapter of this manual explains how you can install scripts that will automatically restartthe daemons when the system starts.
5.4 Using the Director to Query and Start Jobs
To communicate with the director and to query the state of Bareos or run jobs, from the top level directory,simply enter:bconsole
For simplicity, here we will describe only the bconsole program, also there is also a graphical interface calledBAT.The bconsole runs the Bareos Console program, which connects to the Director daemon. Since Bareos is anetwork program, you can run the Console program anywhere on your network. Most frequently, however,one runs it on the same machine as the Director. Normally, the Console program will print something similarto the following:
root@linux:~# bconsoleConnecting to Director bareos:9101
Enter a period to cancel a command.
*
Commands 5.1: bconsole
the asterisk is the console command prompt.Type help to see a list of available commands:
* helpCommand Desc r ip t i on======= ===========add Add media to a poolautod i sp lay Autodisplay conso l e messagesautomount Automount a f t e r l a b e lcance l Cancel a jobc r e a t e Create DB Pool from re sou r c ed e l e t e Delete volume , pool or jobd i s ab l e Disab le a jobenable Enable a jobes t imate Performs F i l e S e t est imate , l i s t i n g g i v e s f u l l l i s t i n ge x i t Terminate Bconsole s e s s i o nexport Export volumes from normal s l o t s to import / export s l o t sgui Non−i n t e r a c t i v e gui modehelp Pr int he lp on s p e c i f i c commandimport Import volumes from import / export s l o t s to normal s l o t sl a b e l Label a tapel i s t L i s t ob j e c t s from cata l ogl l i s t Fu l l or long l i s t l i k e l i s t commandmessages Display pending messages
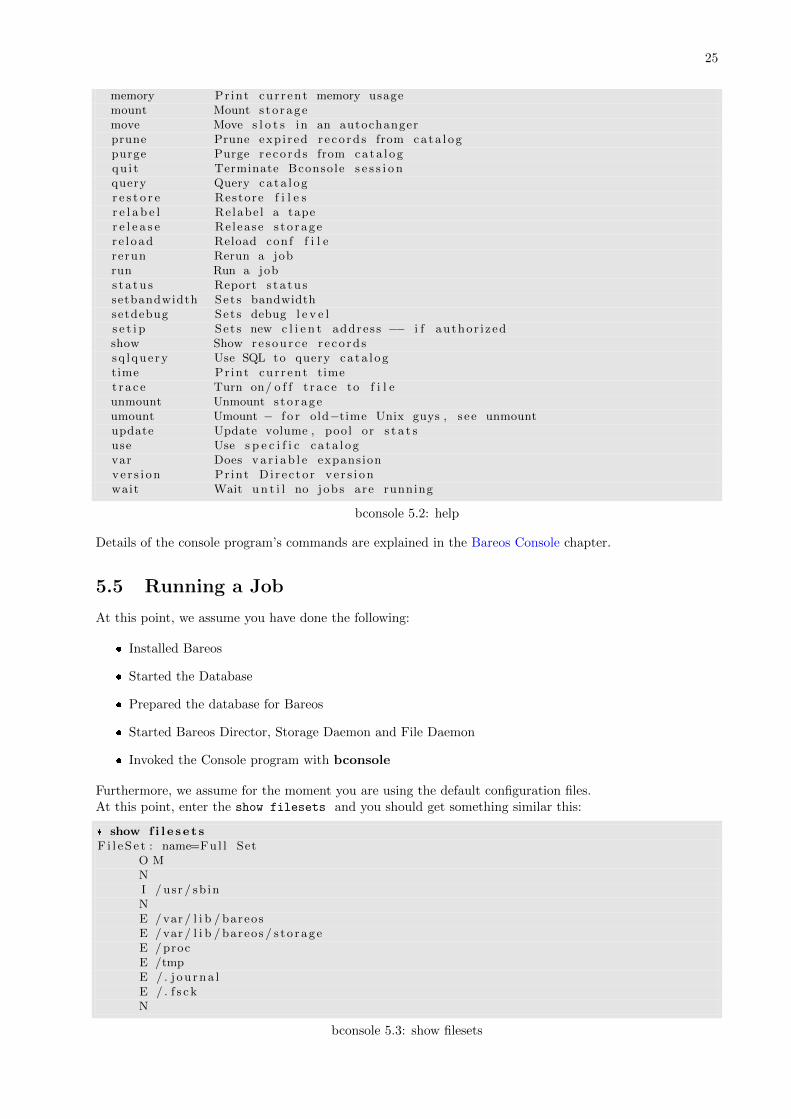
25
memory Pr int cur rent memory usagemount Mount s to ragemove Move s l o t s in an autochangerprune Prune exp i red r e co rd s from cata l ogpurge Purge r e co rd s from cata l ogqu i t Terminate Bconsole s e s s i o nquery Query ca ta l ogr e s t o r e Restore f i l e sr e l a b e l Re labe l a taper e l e a s e Re lease s to rager e l oad Reload conf f i l ererun Rerun a jobrun Run a jobs t a tu s Report s t a tu ssetbandwidth Sets bandwidthsetdebug Sets debug l e v e ls e t i p Sets new c l i e n t address −− i f author i zedshow Show re sou r c e r e co rd ssq lquery Use SQL to query ca ta l ogtime Pr int cur rent timet r a c e Turn on/ o f f t r a c e to f i l eunmount Unmount s to rageumount Umount − f o r old−time Unix guys , s ee unmountupdate Update volume , pool or s t a t suse Use s p e c i f i c ca ta l ogvar Does va r i ab l e expansionve r s i on Pr int D i r e c to r v e r s i onwait Wait u n t i l no jobs are running
bconsole 5.2: help
Details of the console program’s commands are explained in the Bareos Console chapter.
5.5 Running a Job
At this point, we assume you have done the following:
� Installed Bareos
� Started the Database
� Prepared the database for Bareos
� Started Bareos Director, Storage Daemon and File Daemon
� Invoked the Console program with bconsole
Furthermore, we assume for the moment you are using the default configuration files.At this point, enter the show filesets and you should get something similar this:
* show f i l e s e t sF i l e S e t : name=Ful l Set
O MNI / usr / sb inNE /var / l i b / bareosE /var / l i b / bareos / s to rageE /procE /tmpE / . j ou rna lE / . f s c kN
bconsole 5.3: show filesets
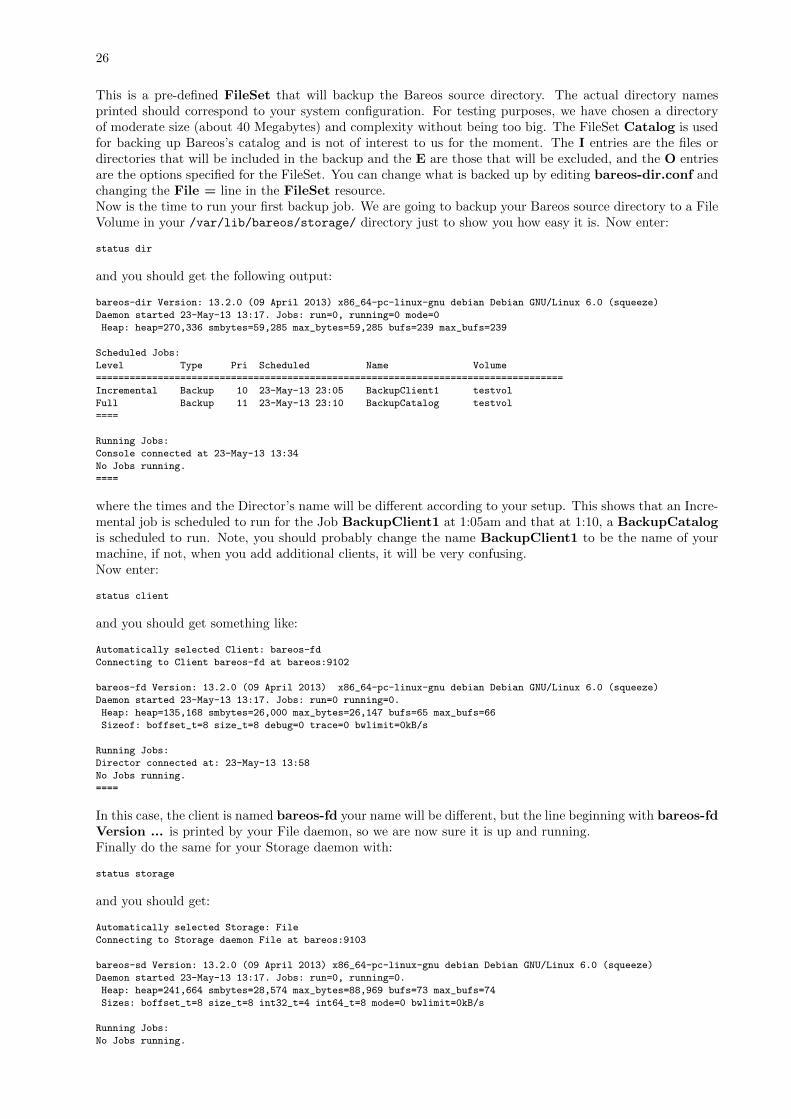
26
This is a pre-defined FileSet that will backup the Bareos source directory. The actual directory namesprinted should correspond to your system configuration. For testing purposes, we have chosen a directoryof moderate size (about 40 Megabytes) and complexity without being too big. The FileSet Catalog is usedfor backing up Bareos’s catalog and is not of interest to us for the moment. The I entries are the files ordirectories that will be included in the backup and the E are those that will be excluded, and the O entriesare the options specified for the FileSet. You can change what is backed up by editing bareos-dir.conf andchanging the File = line in the FileSet resource.Now is the time to run your first backup job. We are going to backup your Bareos source directory to a FileVolume in your /var/lib/bareos/storage/ directory just to show you how easy it is. Now enter:
status dir
and you should get the following output:
bareos-dir Version: 13.2.0 (09 April 2013) x86_64-pc-linux-gnu debian Debian GNU/Linux 6.0 (squeeze)
Daemon started 23-May-13 13:17. Jobs: run=0, running=0 mode=0
Heap: heap=270,336 smbytes=59,285 max_bytes=59,285 bufs=239 max_bufs=239
Scheduled Jobs:
Level Type Pri Scheduled Name Volume
===================================================================================
Incremental Backup 10 23-May-13 23:05 BackupClient1 testvol
Full Backup 11 23-May-13 23:10 BackupCatalog testvol
====
Running Jobs:
Console connected at 23-May-13 13:34
No Jobs running.
====
where the times and the Director’s name will be different according to your setup. This shows that an Incre-mental job is scheduled to run for the Job BackupClient1 at 1:05am and that at 1:10, a BackupCatalogis scheduled to run. Note, you should probably change the name BackupClient1 to be the name of yourmachine, if not, when you add additional clients, it will be very confusing.Now enter:
status client
and you should get something like:
Automatically selected Client: bareos-fd
Connecting to Client bareos-fd at bareos:9102
bareos-fd Version: 13.2.0 (09 April 2013) x86_64-pc-linux-gnu debian Debian GNU/Linux 6.0 (squeeze)
Daemon started 23-May-13 13:17. Jobs: run=0 running=0.
Heap: heap=135,168 smbytes=26,000 max_bytes=26,147 bufs=65 max_bufs=66
Sizeof: boffset_t=8 size_t=8 debug=0 trace=0 bwlimit=0kB/s
Running Jobs:
Director connected at: 23-May-13 13:58
No Jobs running.
====
In this case, the client is named bareos-fd your name will be different, but the line beginning with bareos-fdVersion ... is printed by your File daemon, so we are now sure it is up and running.Finally do the same for your Storage daemon with:
status storage
and you should get:
Automatically selected Storage: File
Connecting to Storage daemon File at bareos:9103
bareos-sd Version: 13.2.0 (09 April 2013) x86_64-pc-linux-gnu debian Debian GNU/Linux 6.0 (squeeze)
Daemon started 23-May-13 13:17. Jobs: run=0, running=0.
Heap: heap=241,664 smbytes=28,574 max_bytes=88,969 bufs=73 max_bufs=74
Sizes: boffset_t=8 size_t=8 int32_t=4 int64_t=8 mode=0 bwlimit=0kB/s
Running Jobs:
No Jobs running.
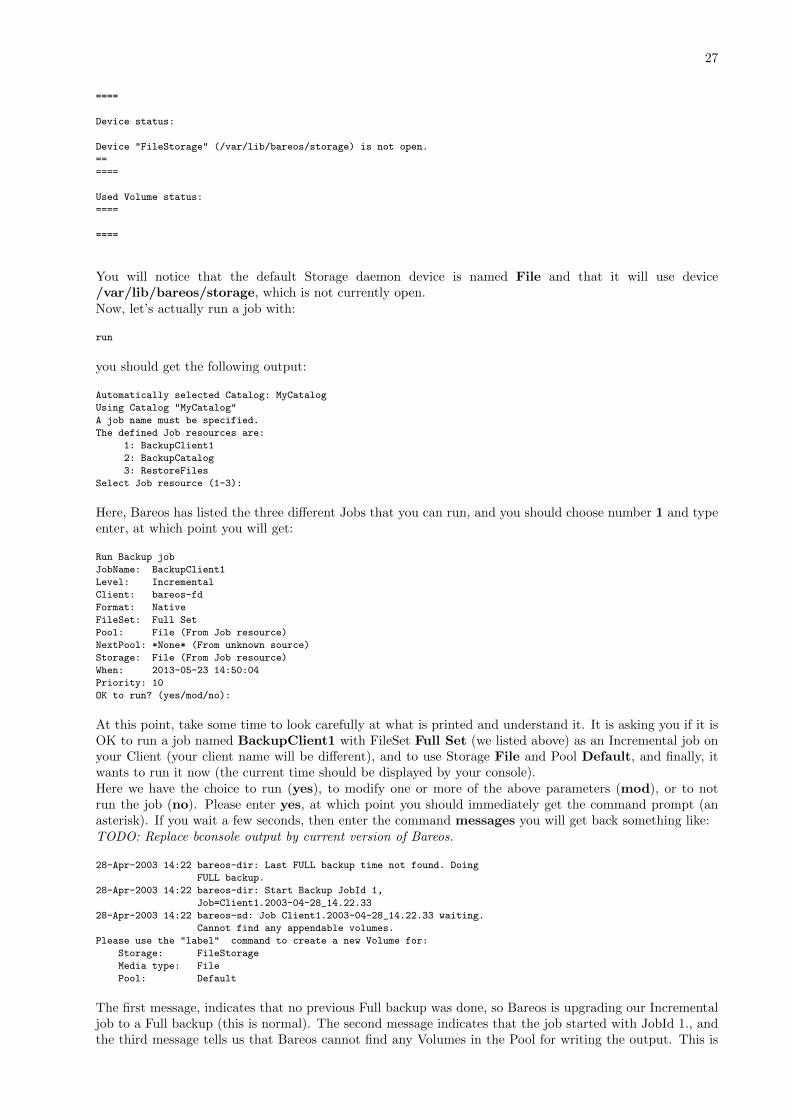
27
====
Device status:
Device "FileStorage" (/var/lib/bareos/storage) is not open.
==
====
Used Volume status:
====
====
You will notice that the default Storage daemon device is named File and that it will use device/var/lib/bareos/storage, which is not currently open.Now, let’s actually run a job with:
run
you should get the following output:
Automatically selected Catalog: MyCatalog
Using Catalog "MyCatalog"
A job name must be specified.
The defined Job resources are:
1: BackupClient1
2: BackupCatalog
3: RestoreFiles
Select Job resource (1-3):
Here, Bareos has listed the three different Jobs that you can run, and you should choose number 1 and typeenter, at which point you will get:
Run Backup job
JobName: BackupClient1
Level: Incremental
Client: bareos-fd
Format: Native
FileSet: Full Set
Pool: File (From Job resource)
NextPool: *None* (From unknown source)
Storage: File (From Job resource)
When: 2013-05-23 14:50:04
Priority: 10
OK to run? (yes/mod/no):
At this point, take some time to look carefully at what is printed and understand it. It is asking you if it isOK to run a job named BackupClient1 with FileSet Full Set (we listed above) as an Incremental job onyour Client (your client name will be different), and to use Storage File and Pool Default, and finally, itwants to run it now (the current time should be displayed by your console).Here we have the choice to run (yes), to modify one or more of the above parameters (mod), or to notrun the job (no). Please enter yes, at which point you should immediately get the command prompt (anasterisk). If you wait a few seconds, then enter the command messages you will get back something like:TODO: Replace bconsole output by current version of Bareos.
28-Apr-2003 14:22 bareos-dir: Last FULL backup time not found. Doing
FULL backup.
28-Apr-2003 14:22 bareos-dir: Start Backup JobId 1,
Job=Client1.2003-04-28_14.22.33
28-Apr-2003 14:22 bareos-sd: Job Client1.2003-04-28_14.22.33 waiting.
Cannot find any appendable volumes.
Please use the "label" command to create a new Volume for:
Storage: FileStorage
Media type: File
Pool: Default
The first message, indicates that no previous Full backup was done, so Bareos is upgrading our Incrementaljob to a Full backup (this is normal). The second message indicates that the job started with JobId 1., andthe third message tells us that Bareos cannot find any Volumes in the Pool for writing the output. This is

28
normal because we have not yet created (labeled) any Volumes. Bareos indicates to you all the details ofthe volume it needs.At this point, the job is BLOCKED waiting for a Volume. You can check this if you want by doing a statusdir. In order to continue, we must create a Volume that Bareos can write on. We do so with:
label
and Bareos will print:
The defined Storage resources are:
1: File
Item 1 selected automatically.
Enter new Volume name:
at which point, you should enter some name beginning with a letter and containing only letters and numbers(period, hyphen, and underscore) are also permitted. For example, enter TestVolume001, and you shouldget back:
Defined Pools:
1: Default
Item 1 selected automatically.
Connecting to Storage daemon File at bareos:8103 ...
Sending label command for Volume "TestVolume001" Slot 0 ...
3000 OK label. Volume=TestVolume001 Device=/var/lib/bareos/storage
Catalog record for Volume "TestVolume002", Slot 0 successfully created.
Requesting mount FileStorage ...
3001 OK mount. Device=/var/lib/bareos/storage
Finally, enter messages and you should get something like:
28-Apr-2003 14:30 bareos-sd: Wrote label to prelabeled Volume
"TestVolume001" on device /var/lib/bareos/storage
28-Apr-2003 14:30 rufus-dir: Bareos 1.30 (28Apr03): 28-Apr-2003 14:30
JobId: 1
Job: BackupClient1.2003-04-28_14.22.33
FileSet: Full Set
Backup Level: Full
Client: bareos-fd
Start time: 28-Apr-2003 14:22
End time: 28-Apr-2003 14:30
Files Written: 1,444
Bytes Written: 38,988,877
Rate: 81.2 KB/s
Software Compression: None
Volume names(s): TestVolume001
Volume Session Id: 1
Volume Session Time: 1051531381
Last Volume Bytes: 39,072,359
FD termination status: OK
SD termination status: OK
Termination: Backup OK
28-Apr-2003 14:30 rufus-dir: Begin pruning Jobs.
28-Apr-2003 14:30 rufus-dir: No Jobs found to prune.
28-Apr-2003 14:30 rufus-dir: Begin pruning Files.
28-Apr-2003 14:30 rufus-dir: No Files found to prune.
28-Apr-2003 14:30 rufus-dir: End auto prune.
If you don’t see the output immediately, you can keep entering messages until the job terminates.Instead of typing messages multiple times, you can also ask bconsole to wait, until a specific job is finished:
wait jobid=1
or just wait, which waits for all running jobs to finish.Another useful command is autodisplay on. With autodisplay activated, messages will automatically bedisplayed as soon as they are ready.If you do an ls -l of your /var/lib/bareos/storage directory, you will see that you have the following item:
-rw-r----- 1 bareos bareos 39072153 Apr 28 14:30 TestVolume001
This is the file Volume that you just wrote and it contains all the data of the job just run. If you runadditional jobs, they will be appended to this Volume unless you specify otherwise.You might ask yourself if you have to label all the Volumes that Bareos is going to use. The answer for diskVolumes, like the one we used, is no. It is possible to have Bareos automatically label volumes. For tapeVolumes, you will most likely have to label each of the Volumes you want to use.If you would like to stop here, you can simply enter quit in the Console program.If you would like to try restoring the files that you just backed up, read the following section.
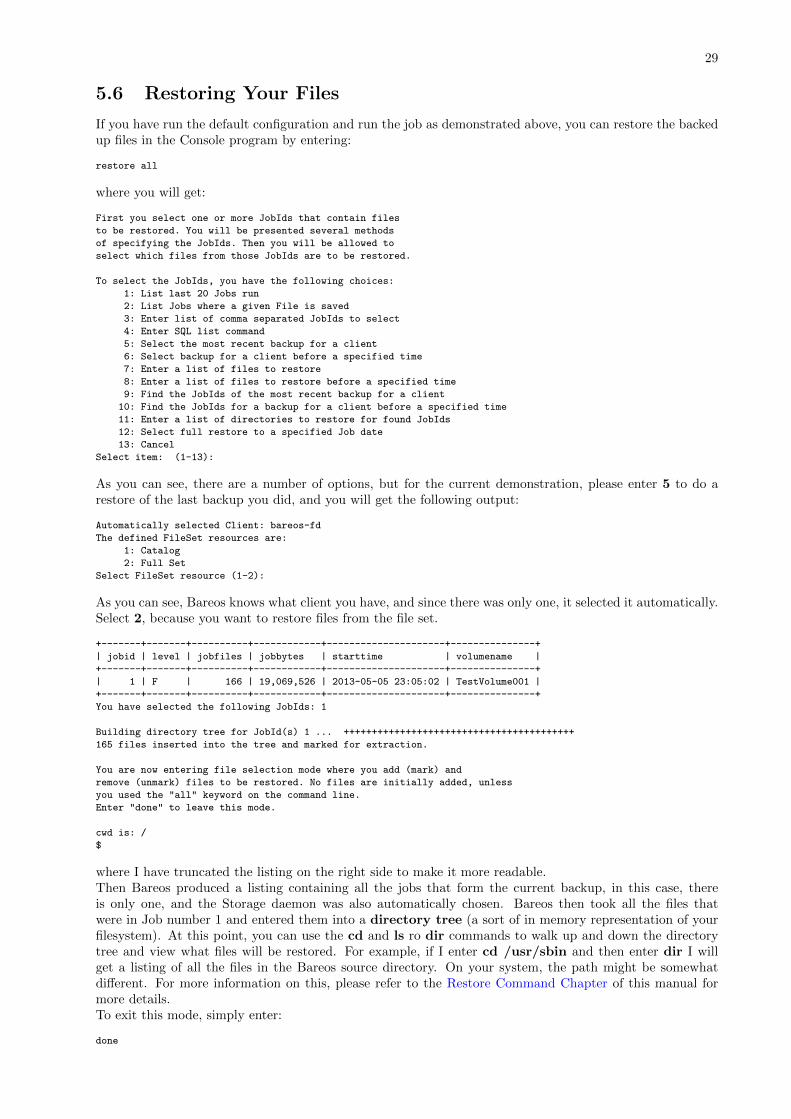
29
5.6 Restoring Your Files
If you have run the default configuration and run the job as demonstrated above, you can restore the backedup files in the Console program by entering:
restore all
where you will get:
First you select one or more JobIds that contain files
to be restored. You will be presented several methods
of specifying the JobIds. Then you will be allowed to
select which files from those JobIds are to be restored.
To select the JobIds, you have the following choices:
1: List last 20 Jobs run
2: List Jobs where a given File is saved
3: Enter list of comma separated JobIds to select
4: Enter SQL list command
5: Select the most recent backup for a client
6: Select backup for a client before a specified time
7: Enter a list of files to restore
8: Enter a list of files to restore before a specified time
9: Find the JobIds of the most recent backup for a client
10: Find the JobIds for a backup for a client before a specified time
11: Enter a list of directories to restore for found JobIds
12: Select full restore to a specified Job date
13: Cancel
Select item: (1-13):
As you can see, there are a number of options, but for the current demonstration, please enter 5 to do arestore of the last backup you did, and you will get the following output:
Automatically selected Client: bareos-fd
The defined FileSet resources are:
1: Catalog
2: Full Set
Select FileSet resource (1-2):
As you can see, Bareos knows what client you have, and since there was only one, it selected it automatically.Select 2, because you want to restore files from the file set.
+-------+-------+----------+------------+---------------------+---------------+
| jobid | level | jobfiles | jobbytes | starttime | volumename |
+-------+-------+----------+------------+---------------------+---------------+
| 1 | F | 166 | 19,069,526 | 2013-05-05 23:05:02 | TestVolume001 |
+-------+-------+----------+------------+---------------------+---------------+
You have selected the following JobIds: 1
Building directory tree for JobId(s) 1 ... +++++++++++++++++++++++++++++++++++++++++
165 files inserted into the tree and marked for extraction.
You are now entering file selection mode where you add (mark) and
remove (unmark) files to be restored. No files are initially added, unless
you used the "all" keyword on the command line.
Enter "done" to leave this mode.
cwd is: /
$
where I have truncated the listing on the right side to make it more readable.Then Bareos produced a listing containing all the jobs that form the current backup, in this case, thereis only one, and the Storage daemon was also automatically chosen. Bareos then took all the files thatwere in Job number 1 and entered them into a directory tree (a sort of in memory representation of yourfilesystem). At this point, you can use the cd and ls ro dir commands to walk up and down the directorytree and view what files will be restored. For example, if I enter cd /usr/sbin and then enter dir I willget a listing of all the files in the Bareos source directory. On your system, the path might be somewhatdifferent. For more information on this, please refer to the Restore Command Chapter of this manual formore details.To exit this mode, simply enter:
done
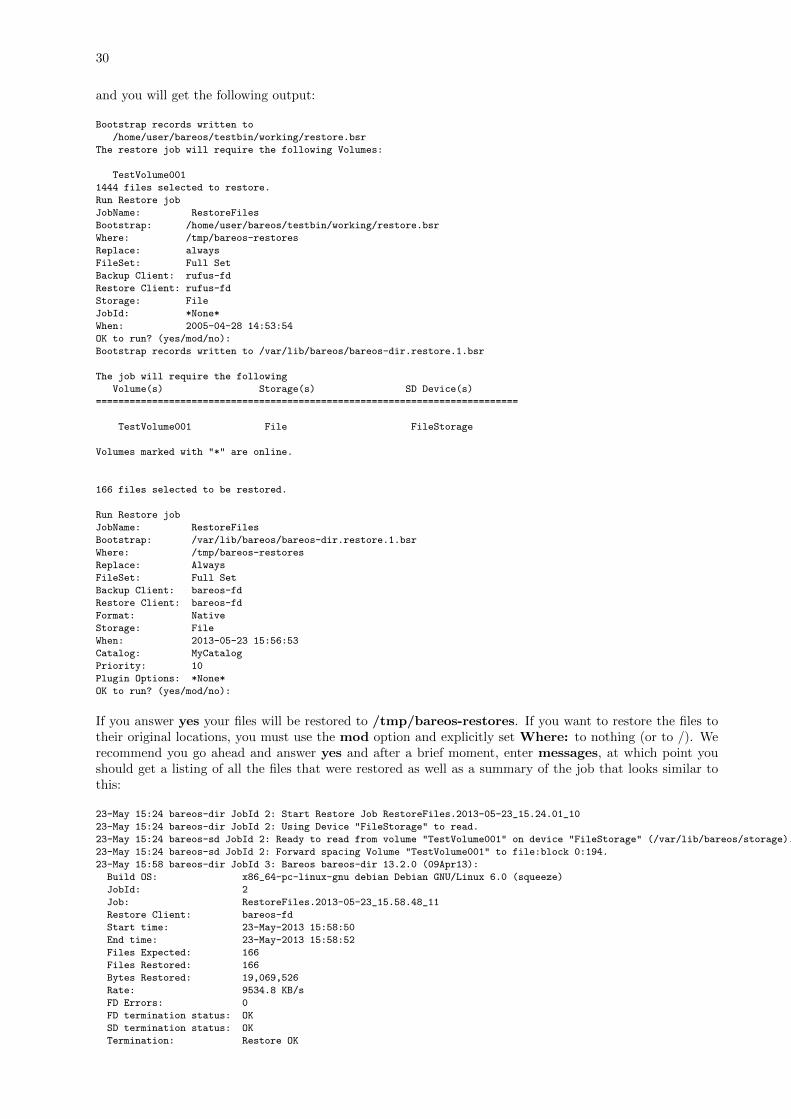
30
and you will get the following output:
Bootstrap records written to
/home/user/bareos/testbin/working/restore.bsr
The restore job will require the following Volumes:
TestVolume001
1444 files selected to restore.
Run Restore job
JobName: RestoreFiles
Bootstrap: /home/user/bareos/testbin/working/restore.bsr
Where: /tmp/bareos-restores
Replace: always
FileSet: Full Set
Backup Client: rufus-fd
Restore Client: rufus-fd
Storage: File
JobId: *None*
When: 2005-04-28 14:53:54
OK to run? (yes/mod/no):
Bootstrap records written to /var/lib/bareos/bareos-dir.restore.1.bsr
The job will require the following
Volume(s) Storage(s) SD Device(s)
===========================================================================
TestVolume001 File FileStorage
Volumes marked with "*" are online.
166 files selected to be restored.
Run Restore job
JobName: RestoreFiles
Bootstrap: /var/lib/bareos/bareos-dir.restore.1.bsr
Where: /tmp/bareos-restores
Replace: Always
FileSet: Full Set
Backup Client: bareos-fd
Restore Client: bareos-fd
Format: Native
Storage: File
When: 2013-05-23 15:56:53
Catalog: MyCatalog
Priority: 10
Plugin Options: *None*
OK to run? (yes/mod/no):
If you answer yes your files will be restored to /tmp/bareos-restores. If you want to restore the files totheir original locations, you must use the mod option and explicitly set Where: to nothing (or to /). Werecommend you go ahead and answer yes and after a brief moment, enter messages, at which point youshould get a listing of all the files that were restored as well as a summary of the job that looks similar tothis:
23-May 15:24 bareos-dir JobId 2: Start Restore Job RestoreFiles.2013-05-23_15.24.01_10
23-May 15:24 bareos-dir JobId 2: Using Device "FileStorage" to read.
23-May 15:24 bareos-sd JobId 2: Ready to read from volume "TestVolume001" on device "FileStorage" (/var/lib/bareos/storage).
23-May 15:24 bareos-sd JobId 2: Forward spacing Volume "TestVolume001" to file:block 0:194.
23-May 15:58 bareos-dir JobId 3: Bareos bareos-dir 13.2.0 (09Apr13):
Build OS: x86_64-pc-linux-gnu debian Debian GNU/Linux 6.0 (squeeze)
JobId: 2
Job: RestoreFiles.2013-05-23_15.58.48_11
Restore Client: bareos-fd
Start time: 23-May-2013 15:58:50
End time: 23-May-2013 15:58:52
Files Expected: 166
Files Restored: 166
Bytes Restored: 19,069,526
Rate: 9534.8 KB/s
FD Errors: 0
FD termination status: OK
SD termination status: OK
Termination: Restore OK
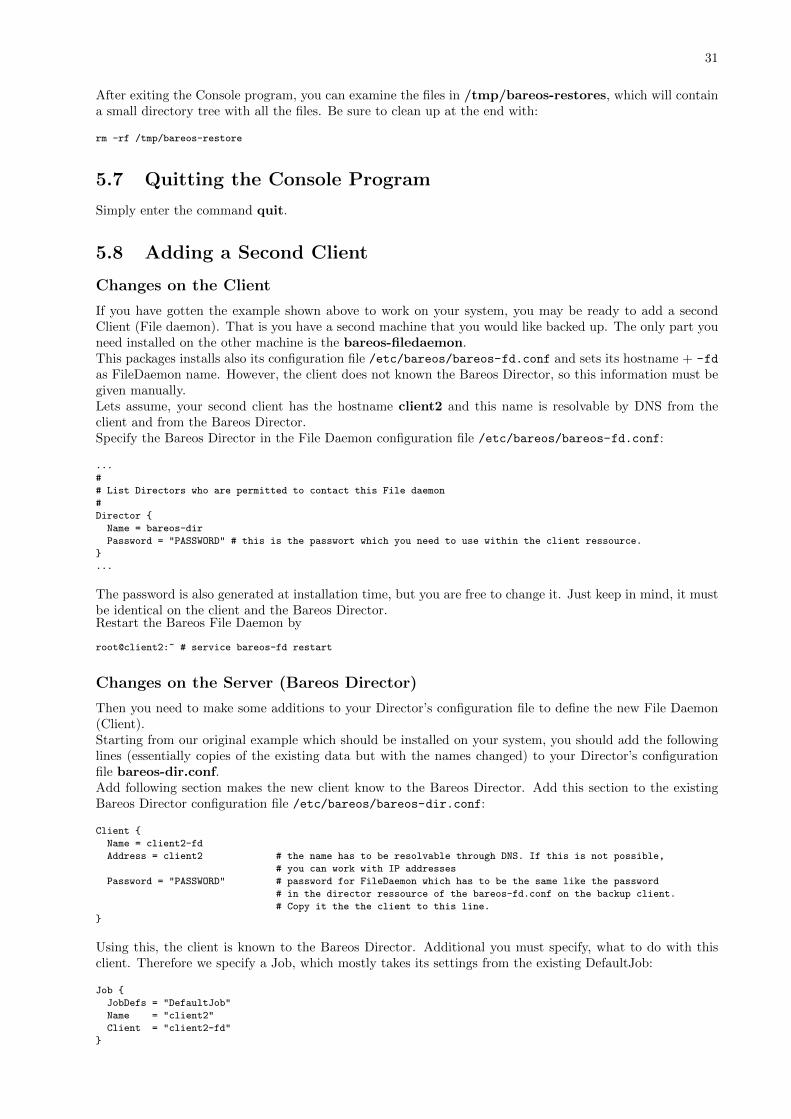
31
After exiting the Console program, you can examine the files in /tmp/bareos-restores, which will containa small directory tree with all the files. Be sure to clean up at the end with:
rm -rf /tmp/bareos-restore
5.7 Quitting the Console Program
Simply enter the command quit.
5.8 Adding a Second Client
Changes on the Client
If you have gotten the example shown above to work on your system, you may be ready to add a secondClient (File daemon). That is you have a second machine that you would like backed up. The only part youneed installed on the other machine is the bareos-filedaemon.This packages installs also its configuration file /etc/bareos/bareos-fd.conf and sets its hostname + -fd
as FileDaemon name. However, the client does not known the Bareos Director, so this information must begiven manually.Lets assume, your second client has the hostname client2 and this name is resolvable by DNS from theclient and from the Bareos Director.Specify the Bareos Director in the File Daemon configuration file /etc/bareos/bareos-fd.conf:
...
#
# List Directors who are permitted to contact this File daemon
#
Director {
Name = bareos-dir
Password = "PASSWORD" # this is the passwort which you need to use within the client ressource.
}
...
The password is also generated at installation time, but you are free to change it. Just keep in mind, it mustbe identical on the client and the Bareos Director.Restart the Bareos File Daemon by
root@client2:~ # service bareos-fd restart
Changes on the Server (Bareos Director)
Then you need to make some additions to your Director’s configuration file to define the new File Daemon(Client).Starting from our original example which should be installed on your system, you should add the followinglines (essentially copies of the existing data but with the names changed) to your Director’s configurationfile bareos-dir.conf.Add following section makes the new client know to the Bareos Director. Add this section to the existingBareos Director configuration file /etc/bareos/bareos-dir.conf:
Client {
Name = client2-fd
Address = client2 # the name has to be resolvable through DNS. If this is not possible,
# you can work with IP addresses
Password = "PASSWORD" # password for FileDaemon which has to be the same like the password
# in the director ressource of the bareos-fd.conf on the backup client.
# Copy it the the client to this line.
}
Using this, the client is known to the Bareos Director. Additional you must specify, what to do with thisclient. Therefore we specify a Job, which mostly takes its settings from the existing DefaultJob:
Job {
JobDefs = "DefaultJob"
Name = "client2"
Client = "client2-fd"
}
32
Check if the configuration file is correct by
root@bareos:~ # bareos-dir -t -c /etc/bareos/bareos-dir.conf
If everything is okay, reload the Bareos Director:
root@bareos:~ # service bareos-dir reload
Now the setup for the second client should be ready.To test the functionality, you can run a backup and restore job like in the example with the first attachedFileDaemon. However, there is an even earier way to check if a connection to a File Daemon is working.This is the estimate listing command in bconsole. Using this, the Bareos Director immediately connectsto a client and returns all files that will be included in the next backup.Start bconsole and follow the instructions:
* estimate listing
The result should appear immediately.To make this a real production installation, you will possibly want to use different Pool, or a differentschedule. It is up to you to customize.
5.9 When The Tape Fills
If you have scheduled your job, typically nightly, there will come a time when the tape fills up and Bareoscannot continue. In this case, Bareos will send you a message similar to the following:
bareos-sd: block.c:337 === Write error errno=28: ERR=No space left on device
This indicates that Bareos got a write error because the tape is full. Bareos will then search the Pool specifiedfor your Job looking for an appendable volume. In the best of all cases, you will have properly set yourRetention Periods and you will have all your tapes marked to be Recycled, and Bareos will automaticallyrecycle the tapes in your pool requesting and overwriting old Volumes. For more information on recycling,please see the Recycling chapter of this manual. If you find that your Volumes were not properly recycled(usually because of a configuration error), please see the Manually Recycling Volumes section of the Recyclingchapter.If like me, you have a very large set of Volumes and you label them with the date the Volume was firstwriting, or you have not set up your Retention periods, Bareos will not find a tape in the pool, and it willsend you a message similar to the following:
bareos-sd: Job usersave.2002-09-19.10:50:48 waiting. Cannot find any
appendable volumes.
Please use the "label" command to create a new Volume for:
Storage: SDT-10000
Media type: DDS-4
Pool: Default
Until you create a new Volume, this message will be repeated an hour later, then two hours later, and so ondoubling the interval each time up to a maximum interval of one day.The obvious question at this point is: What do I do now?The answer is simple: first, using the Console program, close the tape drive using the unmount command.If you only have a single drive, it will be automatically selected, otherwise, make sure you release the onespecified on the message (in this case STD-10000).Next, you remove the tape from the drive and insert a new blank tape. Note, on some older tape drives, youmay need to write an end of file mark (mt -f /dev/nst0 weof) to prevent the drive from running awaywhen Bareos attempts to read the label.Finally, you use the label command in the Console to write a label to the new Volume. The label commandwill contact the Storage daemon to write the software label, if it is successful, it will add the new Volumeto the Pool, then issue a mount command to the Storage daemon. See the previous sections of this chapterfor more details on labeling tapes.The result is that Bareos will continue the previous Job writing the backup to the new Volume.If you have a Pool of volumes and Bareos is cycling through them, instead of the above message ”Cannotfind any appendable volumes.”, Bareos may ask you to mount a specific volume. In that case, you shouldattempt to do just that. If you do not have the volume any more (for any of a number of reasons), you cansimply mount another volume from the same Pool, providing it is appendable, and Bareos will use it. You
33
can use the list volumes command in the console program to determine which volumes are appendable andwhich are not.If like me, you have your Volume retention periods set correctly, but you have no more free Volumes, youcan relabel and reuse a Volume as follows:
� Do a list volumes in the Console and select the oldest Volume for relabeling.
� If you have setup your Retention periods correctly, the Volume should have VolStatus Purged.
� If the VolStatus is not set to Purged, you will need to purge the database of Jobs that are written onthat Volume. Do so by using the command purge jobs volume in the Console. If you have multiplePools, you will be prompted for the Pool then enter the VolumeName (or MediaId) when requested.
� Then simply use the relabel command to relabel the Volume.
To manually relabel the Volume use the following additional steps:
� To delete the Volume from the catalog use the delete volume command in the Console and selectthe VolumeName (or MediaId) to be deleted.
� Use the unmount command in the Console to unmount the old tape.
� Physically relabel the old Volume that you deleted so that it can be reused.
� Insert the old Volume in the tape drive.
� From a command line do: mt -f /dev/st0 rewind and mt -f /dev/st0 weof, where you needto use the proper tape drive name for your system in place of /dev/st0.
� Use the label command in the Console to write a new Bareos label on your tape.
� Use the mount command in the Console if it is not automatically done, so that Bareos starts usingyour newly labeled tape.
5.10 Other Useful Console Commands
status dir Print a status of all running jobs and jobs scheduled in the next 24 hours.
status The console program will prompt you to select a daemon type, then will request the daemon’s status.
status jobid=nn Print a status of JobId nn if it is running. The Storage daemon is contacted and requestedto print a current status of the job as well.
list pools List the pools defined in the Catalog (normally only Default is used).
list media Lists all the media defined in the Catalog.
list jobs Lists all jobs in the Catalog that have run.
list jobid=nn Lists JobId nn from the Catalog.
list jobtotals Lists totals for all jobs in the Catalog.
list files jobid=nn List the files that were saved for JobId nn.
list jobmedia List the media information for each Job run.
messages Prints any messages that have been directed to the console.
unmount storage=storage-name Unmounts the drive associated with the storage device with the namestorage-name if the drive is not currently being used. This command is used if you wish Bareos tofree the drive so that you can use it to label a tape.
mount storage=storage-name Causes the drive associated with the storage device to be mounted again.When Bareos reaches the end of a volume and requests you to mount a new volume, you must issuethis command after you have placed the new volume in the drive. In effect, it is the signal needed byBareos to know to start reading or writing the new volume.
quit Exit or quit the console program.
Most of the commands given above, with the exception of list, will prompt you for the necessary argumentsif you simply enter the command name.
34
5.11 Patience When Starting Daemons or Mounting Blank Tapes
When you start the Bareos daemons, the Storage daemon attempts to open all defined storage devices andverify the currently mounted Volume (if configured). Until all the storage devices are verified, the Storagedaemon will not accept connections from the Console program. If a tape was previously used, it will berewound, and on some devices this can take several minutes. As a consequence, you may need to have a bitof patience when first contacting the Storage daemon after starting the daemons. If you can see your tapedrive, once the lights stop flashing, the drive will be ready to be used.The same considerations apply if you have just mounted a blank tape in a drive such as an HP DLT. It cantake a minute or two before the drive properly recognizes that the tape is blank. If you attempt to mountthe tape with the Console program during this recognition period, it is quite possible that you will hangyour SCSI driver (at least on my Red Hat Linux system). As a consequence, you are again urged to havepatience when inserting blank tapes. Let the device settle down before attempting to access it.
5.12 Difficulties Connecting from the FD to the SD
If you are having difficulties getting one or more of your File daemons to connect to the Storage daemon,it is most likely because you have not used a fully qualified domain name on the Address directive in theDirector’s Storage resource. That is the resolver on the File daemon’s machine (not on the Director’s) mustbe able to resolve the name you supply into an IP address. An example of an address that is guaranteednot to work: localhost. An example that may work: megalon. An example that is more likely to work:magalon.mydomain.com. On Win32 if you don’t have a good resolver (often true on older Windowssystems), you might try using an IP address in place of a name.If your address is correct, then make sure that no other program is using the port 9103 on the Storagedaemon’s machine. The Bacula project has reserved these port numbers are by IANA, therefore they shouldonly be used by Bacula and its replacements like Bareos. However, apparently some HP printers do usethese port numbers. A netstat -a on the Storage daemon’s machine can determine who is using the 9103port (used for FD to SD communications in Bareos).
5.13 Creating a Pool
Creating the Pool is automatically done when Bareos starts, so if you understand Pools, you can skip tothe next section.When you run a job, one of the things that Bareos must know is what Volumes to use to backup the FileSet.Instead of specifying a Volume (tape) directly, you specify which Pool of Volumes you want Bareos to consultwhen it wants a tape for writing backups. Bareos will select the first available Volume from the Pool thatis appropriate for the Storage device you have specified for the Job being run. When a volume has filledup with data, Bareos will change its VolStatus from Append to Full, and then Bareos will use the nextvolume and so on. If no appendable Volume exists in the Pool, the Director will attempt to recycle anold Volume, if there are still no appendable Volumes available, Bareos will send a message requesting theoperator to create an appropriate Volume.Bareos keeps track of the Pool name, the volumes contained in the Pool, and a number of attributes of eachof those Volumes.When Bareos starts, it ensures that all Pool resource definitions have been recorded in the catalog. You canverify this by entering:
list pools
to the console program, which should print something like the following:
*list pools
Using default Catalog name=MySQL DB=bareos
+--------+---------+---------+---------+----------+-------------+
| PoolId | Name | NumVols | MaxVols | PoolType | LabelFormat |
+--------+---------+---------+---------+----------+-------------+
| 1 | Default | 3 | 0 | Backup | * |
| 2 | File | 12 | 12 | Backup | File |
+--------+---------+---------+---------+----------+-------------+
*
If you attempt to create the same Pool name a second time, Bareos will print:
Error: Pool Default already exists.
Once created, you may use the update command to
modify many of the values in the Pool record.
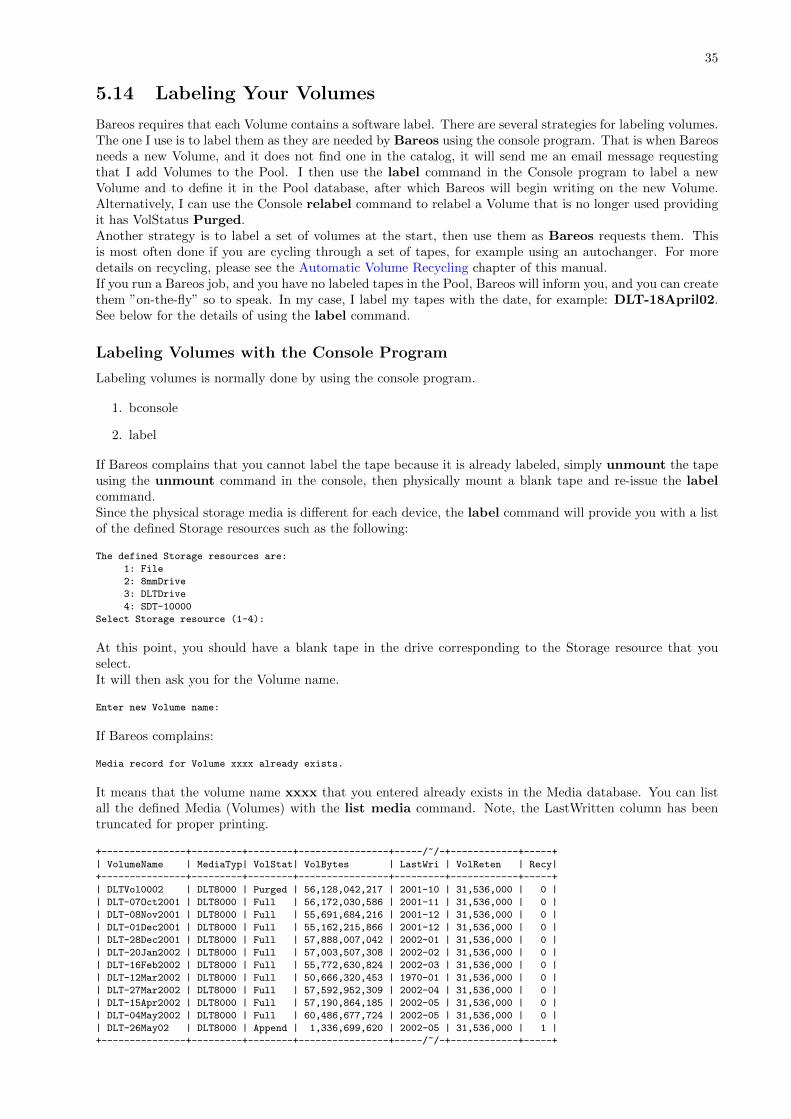
35
5.14 Labeling Your Volumes
Bareos requires that each Volume contains a software label. There are several strategies for labeling volumes.The one I use is to label them as they are needed by Bareos using the console program. That is when Bareosneeds a new Volume, and it does not find one in the catalog, it will send me an email message requestingthat I add Volumes to the Pool. I then use the label command in the Console program to label a newVolume and to define it in the Pool database, after which Bareos will begin writing on the new Volume.Alternatively, I can use the Console relabel command to relabel a Volume that is no longer used providingit has VolStatus Purged.Another strategy is to label a set of volumes at the start, then use them as Bareos requests them. Thisis most often done if you are cycling through a set of tapes, for example using an autochanger. For moredetails on recycling, please see the Automatic Volume Recycling chapter of this manual.If you run a Bareos job, and you have no labeled tapes in the Pool, Bareos will inform you, and you can createthem ”on-the-fly” so to speak. In my case, I label my tapes with the date, for example: DLT-18April02.See below for the details of using the label command.
Labeling Volumes with the Console Program
Labeling volumes is normally done by using the console program.
1. bconsole
2. label
If Bareos complains that you cannot label the tape because it is already labeled, simply unmount the tapeusing the unmount command in the console, then physically mount a blank tape and re-issue the labelcommand.Since the physical storage media is different for each device, the label command will provide you with a listof the defined Storage resources such as the following:
The defined Storage resources are:
1: File
2: 8mmDrive
3: DLTDrive
4: SDT-10000
Select Storage resource (1-4):
At this point, you should have a blank tape in the drive corresponding to the Storage resource that youselect.It will then ask you for the Volume name.
Enter new Volume name:
If Bareos complains:
Media record for Volume xxxx already exists.
It means that the volume name xxxx that you entered already exists in the Media database. You can listall the defined Media (Volumes) with the list media command. Note, the LastWritten column has beentruncated for proper printing.
+---------------+---------+--------+----------------+-----/~/-+------------+-----+
| VolumeName | MediaTyp| VolStat| VolBytes | LastWri | VolReten | Recy|
+---------------+---------+--------+----------------+---------+------------+-----+
| DLTVol0002 | DLT8000 | Purged | 56,128,042,217 | 2001-10 | 31,536,000 | 0 |
| DLT-07Oct2001 | DLT8000 | Full | 56,172,030,586 | 2001-11 | 31,536,000 | 0 |
| DLT-08Nov2001 | DLT8000 | Full | 55,691,684,216 | 2001-12 | 31,536,000 | 0 |
| DLT-01Dec2001 | DLT8000 | Full | 55,162,215,866 | 2001-12 | 31,536,000 | 0 |
| DLT-28Dec2001 | DLT8000 | Full | 57,888,007,042 | 2002-01 | 31,536,000 | 0 |
| DLT-20Jan2002 | DLT8000 | Full | 57,003,507,308 | 2002-02 | 31,536,000 | 0 |
| DLT-16Feb2002 | DLT8000 | Full | 55,772,630,824 | 2002-03 | 31,536,000 | 0 |
| DLT-12Mar2002 | DLT8000 | Full | 50,666,320,453 | 1970-01 | 31,536,000 | 0 |
| DLT-27Mar2002 | DLT8000 | Full | 57,592,952,309 | 2002-04 | 31,536,000 | 0 |
| DLT-15Apr2002 | DLT8000 | Full | 57,190,864,185 | 2002-05 | 31,536,000 | 0 |
| DLT-04May2002 | DLT8000 | Full | 60,486,677,724 | 2002-05 | 31,536,000 | 0 |
| DLT-26May02 | DLT8000 | Append | 1,336,699,620 | 2002-05 | 31,536,000 | 1 |
+---------------+---------+--------+----------------+-----/~/-+------------+-----+

36
Once Bareos has verified that the volume does not already exist, it will prompt you for the name of the Poolin which the Volume (tape) is to be created. If there is only one Pool (Default), it will be automaticallyselected.If the tape is successfully labeled, a Volume record will also be created in the Pool. That is the Volume nameand all its other attributes will appear when you list the Pool. In addition, that Volume will be available forbackup if the MediaType matches what is requested by the Storage daemon.When you labeled the tape, you answered very few questions about it – principally the Volume name, andperhaps the Slot. However, a Volume record in the catalog database (internally known as a Media record)contains quite a few attributes. Most of these attributes will be filled in from the default values that weredefined in the Pool (i.e. the Pool holds most of the default attributes used when creating a Volume).It is also possible to add media to the pool without physically labeling the Volumes. This can be done withthe add command. For more information, please see the Bareos Console chapter.
Chapter 6
Critical Items to Implement BeforeProduction
We recommend you take your time before implementing a production a Bareos backup system since Bareosis a rather complex program, and if you make a mistake, you may suddenly find that you cannot restore yourfiles in case of a disaster. This is especially true if you have not previously used a major backup product.If you follow the instructions in this chapter, you will have covered most of the major problems that canoccur. It goes without saying that if you ever find that we have left out an important point, please informus, so that we can document it to the benefit of everyone.
6.1 Critical Items
The following assumes that you have installed Bareos, you more or less understand it, you have at leastworked through the tutorial or have equivalent experience, and that you have set up a basic productionconfiguration. If you haven’t done the above, please do so and then come back here. The following is a sortof checklist that points with perhaps a brief explanation of why you should do it. In most cases, you willfind the details elsewhere in the manual. The order is more or less the order you would use in setting up aproduction system (if you already are in production, use the checklist anyway).
� Test your tape drive for compatibility with Bareos by using the test command in the btape program.
� Test the end of tape handling of your tape drive by using the fill command in the btape program.
� Do at least one restore of files. If you backup multiple OS types (Linux, Solaris, HP, MacOS, FreeBSD,Win32, ...), restore files from each system type. The Restoring Files chapter shows you how.
� Write a bootstrap file to a separate system for each backup job. See Write Bootstrap DirJob directive
and more details are available in the The Bootstrap File chapter. Also, the default bareos-dir.confcomes with a Write Bootstrap directive defined. This allows you to recover the state of your systemas of the last backup.
� Backup your catalog. An example of this is found in the default bareos-dir.conf file. The backup scriptis installed by default and should handle any database, though you may want to make your own localmodifications. See also Backing Up Your Bareos Database for more information.
� Write a bootstrap file for the catalog. An example of this is found in the default bareos-dir.conf file.This will allow you to quickly restore your catalog in the event it is wiped out – otherwise it is manyexcruciating hours of work.
� Make a copy of the bareos-dir.conf, bareos-sd.conf, and bareos-fd.conf files that you are using on yourserver. Put it in a safe place (on another machine) as these files can be difficult to reconstruct if yourserver dies.
� Bareos assumes all filenames are in UTF-8 format. This is important when saving the filenames to thecatalog. For Win32 machine, Bareos will automatically convert from Unicode to UTF-8, but on Unix,Linux, *BSD, and MacOS X machines, you must explicitly ensure that your locale is set properly.Typically this means that the LANG environment variable must end in .UTF-8. A full example is
37
38
en US.UTF-8. The exact syntax may vary a bit from OS to OS, and exactly how you define it willalso vary.
On most modern Win32 machines, you can edit the conf files with notepad and choose output encodingUTF-8.
6.2 Recommended Items
Although these items may not be critical, they are recommended and will help you avoid problems.
� Read the Getting Started with Bareos chapter
� After installing and experimenting with Bareos, read and work carefully through the examples in theTutorial chapter of this manual.
� Learn what each of the Bareos Programs does.
� Set up reasonable retention periods so that your catalog does not grow to be too big. See the followingthree chapters:Automatic Volume Recycling,Volume Management,Automated Disk Backup.
If you absolutely must implement a system where you write a different tape each night and take it offsite inthe morning. We recommend that you do several things:
� Write a bootstrap file of your backed up data and a bootstrap file of your catalog backup to a externalmedia like CDROM or USB stick, and take that with the tape. If this is not possible, try to writethose files to another computer or offsite computer, or send them as email to a friend. If none of thatis possible, at least print the bootstrap files and take that offsite with the tape. Having the bootstrapfiles will make recovery much easier.
� It is better not to force Bareos to load a particular tape each day. Instead, let Bareos choose the tape.If you need to know what tape to mount, you can print a list of recycled and appendable tapes daily,and select any tape from that list. Bareos may propose a particular tape for use that it considersoptimal, but it will accept any valid tape from the correct pool.
Part II
Configuration Files
39

Chapter 7
Customizing the Configuration Files
When each of the Bareos programs starts, it reads a configuration file specified on the command line or thedefault bareos-dir.conf, bareos-fd.conf, bareos-sd.conf, or console.conf for the Director daemon,the File daemon, the Storage daemon, and the Console program respectively.Each service (Director, Client, Storage, Console) has its own configuration file containing a set of Resourcedefinitions. These resources are very similar from one service to another, but may contain different directives(records) depending on the service. For example, in the Director’s resource file, the Director resource definesthe name of the Director, a number of global Director parameters and his password. In the File daemonconfiguration file, the Director resource specifies which Directors are permitted to use the File daemon.If you install a full Bareos system (Director, Storage and File Daemon) to one system, the Bareos packagestries there best to generate a working configuration. However, this configuration is very limited and beforeyou will use Bareos in production, it will be required, that you customize the configuration.The details of each Resource and the directives permitted therein are described in the following chapters.The following configuration files must be defined:
� Console Configuration – to define the resources for the Console program (user interface to the Director).It defines which Directors are available so that you may interact with them.
� Director Configuration – to define the resources necessary for the Director. You define all the Clientsand Storage daemons that you use in this configuration file.
� Client/File Daemon Configuration – to define the resources for each client to be backed up. That is,you will have a separate Client resource file on each machine that runs a File daemon.
� Storage Daemon Configuration – to define the resources to be used by each Storage daemon. Normally,you will have a single Storage daemon that controls your tape drive or tape drives. However, if youhave tape drives on several machines, you will have at least one Storage daemon per machine.
7.1 Character Sets
Bareos is designed to handle most character sets of the world, US ASCII, German, French, Chinese, ...However, it does this by encoding everything in UTF-8, and it expects all configuration files (including thoseread on Win32 machines) to be in UTF-8 format. UTF-8 is typically the default on Linux machines, butnot on all Unix machines, nor on Windows, so you must take some care to ensure that your locale is setproperly before starting Bareos.To ensure that Bareos configuration files can be correctly read including foreign characters the LANGenvironment variable must end in .UTF-8. A full example is en US.UTF-8. The exact syntax may varya bit from OS to OS, and exactly how you define it will also vary. On most newer Win32 machines, you canuse notepad to edit the conf files, then choose output encoding UTF-8.Bareos assumes that all filenames are in UTF-8 format on Linux and Unix machines. On Win32 they are inUnicode (UTF-16), and will be automatically converted to UTF-8 format.
7.2 Resource Directive Format
Although, you won’t need to know the details of all the directives a basic knowledge of Bareos resourcedirectives is essential. Each directive contained within the resource (within the braces) is composed of a
41
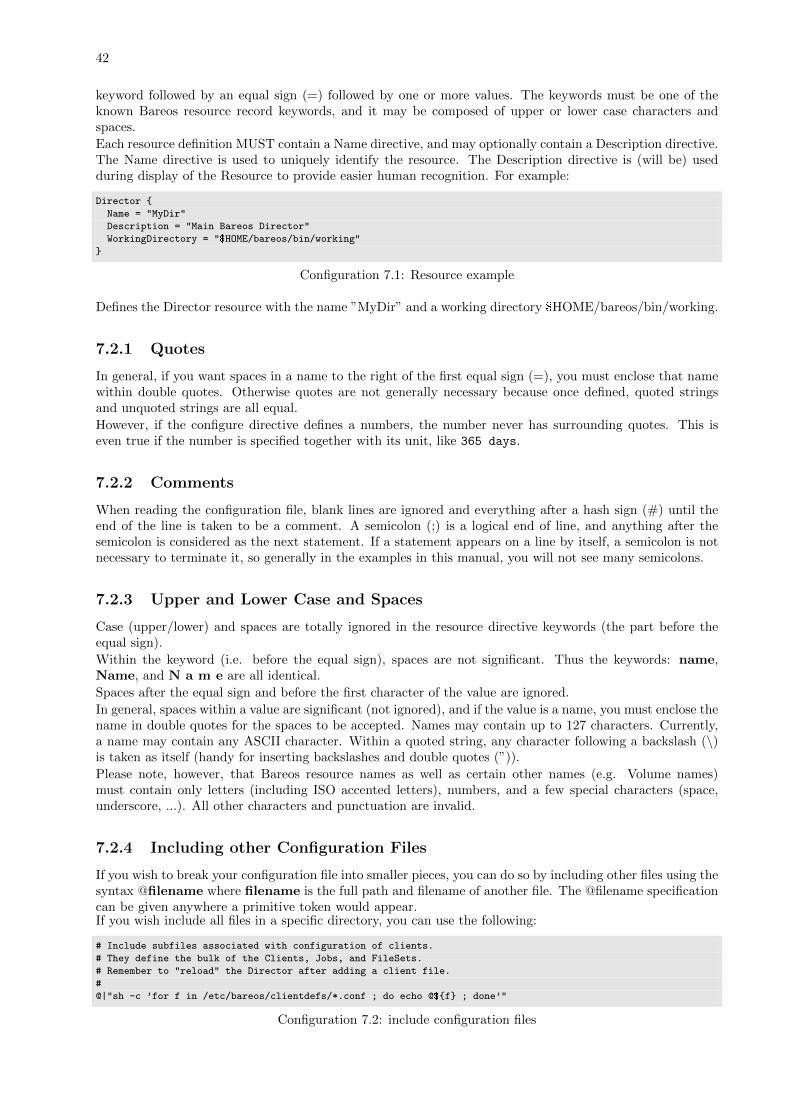
42
keyword followed by an equal sign (=) followed by one or more values. The keywords must be one of theknown Bareos resource record keywords, and it may be composed of upper or lower case characters andspaces.
Each resource definition MUST contain a Name directive, and may optionally contain a Description directive.The Name directive is used to uniquely identify the resource. The Description directive is (will be) usedduring display of the Resource to provide easier human recognition. For example:
Director {
Name = "MyDir"
Description = "Main Bareos Director"
WorkingDirectory = "$HOME/bareos/bin/working"
}
Configuration 7.1: Resource example
Defines the Director resource with the name ”MyDir” and a working directory $HOME/bareos/bin/working.
7.2.1 Quotes
In general, if you want spaces in a name to the right of the first equal sign (=), you must enclose that namewithin double quotes. Otherwise quotes are not generally necessary because once defined, quoted stringsand unquoted strings are all equal.
However, if the configure directive defines a numbers, the number never has surrounding quotes. This iseven true if the number is specified together with its unit, like 365 days.
7.2.2 Comments
When reading the configuration file, blank lines are ignored and everything after a hash sign (#) until theend of the line is taken to be a comment. A semicolon (;) is a logical end of line, and anything after thesemicolon is considered as the next statement. If a statement appears on a line by itself, a semicolon is notnecessary to terminate it, so generally in the examples in this manual, you will not see many semicolons.
7.2.3 Upper and Lower Case and Spaces
Case (upper/lower) and spaces are totally ignored in the resource directive keywords (the part before theequal sign).
Within the keyword (i.e. before the equal sign), spaces are not significant. Thus the keywords: name,Name, and N a m e are all identical.
Spaces after the equal sign and before the first character of the value are ignored.
In general, spaces within a value are significant (not ignored), and if the value is a name, you must enclose thename in double quotes for the spaces to be accepted. Names may contain up to 127 characters. Currently,a name may contain any ASCII character. Within a quoted string, any character following a backslash (\)is taken as itself (handy for inserting backslashes and double quotes (”)).
Please note, however, that Bareos resource names as well as certain other names (e.g. Volume names)must contain only letters (including ISO accented letters), numbers, and a few special characters (space,underscore, ...). All other characters and punctuation are invalid.
7.2.4 Including other Configuration Files
If you wish to break your configuration file into smaller pieces, you can do so by including other files using thesyntax @filename where filename is the full path and filename of another file. The @filename specificationcan be given anywhere a primitive token would appear.If you wish include all files in a specific directory, you can use the following:
# Include subfiles associated with configuration of clients.
# They define the bulk of the Clients, Jobs, and FileSets.
# Remember to "reload" the Director after adding a client file.
#
@|"sh -c ’for f in /etc/bareos/clientdefs/*.conf ; do echo @${f} ; done’"
Configuration 7.2: include configuration files
43
7.2.5 Data Types
When parsing the resource directives, Bareos classifies the data according to the types listed below. The firsttime you read this, it may appear a bit overwhelming, but in reality, it is all pretty logical and straightforward.
acl This directive defines what is permitted to access. It does this by a list of strings, separated by ,.
The special keyword *all* allows unrestricted access.
Depending on the type of the ACL, the strings can by either resource names, paths or bconsolecommands.
auth-type Specifies the authentication type that must be supplied when connecting to a backup protocolthat uses a specific authentication type. Currently only used for NDMP Resource.
The following values are allowed:
1. None - Use no password
2. Clear - Use clear text password
3. MD5 - Use MD5 hashing
directory A directory is either a quoted or non-quoted string. A directory will be passed to your standardshell for expansion when it is scanned. Thus constructs such as $HOME are interpreted to be theircorrect values.
integer A 32 bit integer value. It may be positive or negative.
Don’t use quotes around the number, see Quotes.
long integer A 64 bit integer value. Typically these are values such as bytes that can exceed 4 billion andthus require a 64 bit value.
Don’t use quotes around the number, see Quotes.
name A keyword or name consisting of alphanumeric characters, including the hyphen, underscore, anddollar characters. The first character of a name must be a letter. A name has a maximum lengthcurrently set to 127 bytes. Typically keywords appear on the left side of an equal (i.e. they are Bareoskeywords – i.e. Resource names or directive names). Keywords may not be quoted.
name-string A name-string is similar to a name, except that the name may be quoted and can thus containadditional characters including spaces. Name strings are limited to 127 characters in length. Namestrings are typically used on the right side of an equal (i.e. they are values to be associated with akeyword).
password This is a Bareos password and it is stored internally in MD5 hashed format.
path File name, including path.
positive integer A 32 bit positive integer value.
Don’t use quotes around the number, see Quotes.
speed The speed parameter can be specified as k/s, kb/s, m/s or mb/s.
Don’t use quotes around the parameter, see Quotes.
string A quoted string containing virtually any character including spaces, or a non-quoted string. A stringmay be of any length. Strings are typically values that correspond to filenames, directories, or systemcommand names. A backslash (\) turns the next character into itself, so to include a double quote ina string, you precede the double quote with a backslash. Likewise to include a backslash.
string-list Multiple strings, specified in multiple directives, or in a single directive, separated by ,.
net-address Netaddress is either a domain name or an IP address specified as a dotted quadruple instring or quoted string format. This directive only permits a single address to be specified. The net-portmust be specific separate. If multiple net-addresses are needed, check if it also possible to specifynet-addresses(plural).
net-addresses Specify a set of net-addresses and net-ports. Probably the simplest way to explain this isto show an example:
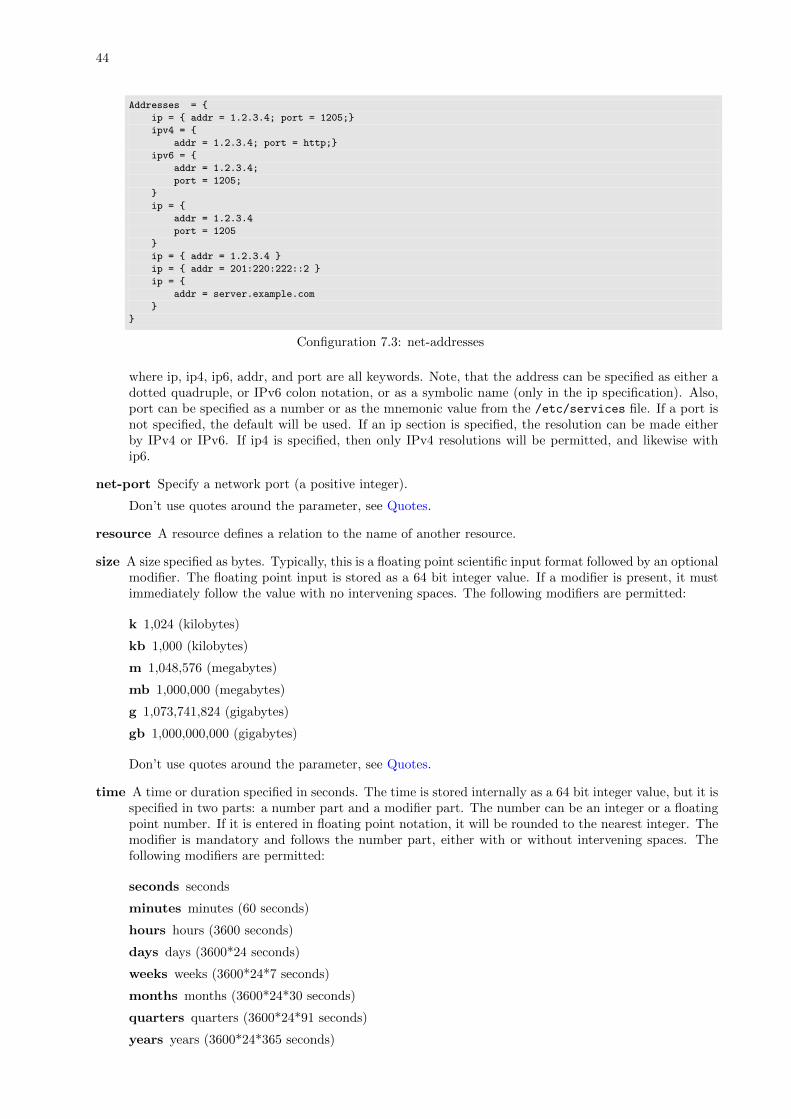
44
Addresses = {
ip = { addr = 1.2.3.4; port = 1205;}
ipv4 = {
addr = 1.2.3.4; port = http;}
ipv6 = {
addr = 1.2.3.4;
port = 1205;
}
ip = {
addr = 1.2.3.4
port = 1205
}
ip = { addr = 1.2.3.4 }
ip = { addr = 201:220:222::2 }
ip = {
addr = server.example.com
}
}
Configuration 7.3: net-addresses
where ip, ip4, ip6, addr, and port are all keywords. Note, that the address can be specified as either adotted quadruple, or IPv6 colon notation, or as a symbolic name (only in the ip specification). Also,port can be specified as a number or as the mnemonic value from the /etc/services file. If a port isnot specified, the default will be used. If an ip section is specified, the resolution can be made eitherby IPv4 or IPv6. If ip4 is specified, then only IPv4 resolutions will be permitted, and likewise withip6.
net-port Specify a network port (a positive integer).
Don’t use quotes around the parameter, see Quotes.
resource A resource defines a relation to the name of another resource.
size A size specified as bytes. Typically, this is a floating point scientific input format followed by an optionalmodifier. The floating point input is stored as a 64 bit integer value. If a modifier is present, it mustimmediately follow the value with no intervening spaces. The following modifiers are permitted:
k 1,024 (kilobytes)
kb 1,000 (kilobytes)
m 1,048,576 (megabytes)
mb 1,000,000 (megabytes)
g 1,073,741,824 (gigabytes)
gb 1,000,000,000 (gigabytes)
Don’t use quotes around the parameter, see Quotes.
time A time or duration specified in seconds. The time is stored internally as a 64 bit integer value, but it isspecified in two parts: a number part and a modifier part. The number can be an integer or a floatingpoint number. If it is entered in floating point notation, it will be rounded to the nearest integer. Themodifier is mandatory and follows the number part, either with or without intervening spaces. Thefollowing modifiers are permitted:
seconds seconds
minutes minutes (60 seconds)
hours hours (3600 seconds)
days days (3600*24 seconds)
weeks weeks (3600*24*7 seconds)
months months (3600*24*30 seconds)
quarters quarters (3600*24*91 seconds)
years years (3600*24*365 seconds)
45
Any abbreviation of these modifiers is also permitted (i.e. seconds may be specified as sec or s). Aspecification of m will be taken as months.
The specification of a time may have as many number/modifier parts as you wish. For example:
1 week 2 days 3 hours 10 mins
1 month 2 days 30 sec
are valid date specifications.
Don’t use quotes around the parameter, see Quotes.
audit-command-list Specifies the commands that should be logged on execution (audited). E.g.
Audit Events = label
Audit Events = restore
Based on the type string-list.
yes|no Either a yes or a no (or true or false).
7.2.6 Variable Expansion
Depending on the type of directive, Bareos will expand following variables:
Variable Expansion on Media Labels When labeling a new media, following Bareos internal variablescan be used:
InternalVariable
Description
Year YearMonth Month: 1-12Day Day: 1-31Hour Hour: 0-24Minute Minute: 0-59Second Second: 0-59WeekDay Day of the week: 0-6, using 0 for SundayJob Name of the JobDir Name of the DirectorLevel Job LevelType Job TypeJobId JobIdJobName unique name of a jobStorage Name of the Storage DaemonClient Name of the ClientsNumVols Numbers of volumes in the poolPool Name of the PoolCatalog Name of the CatalogMediaType Type of the media
Additional, normal environment variables can be used, e.g. HOME oder HOSTNAME.
Variable Expansion on RunScripts At the configuration of RunScripts following variables can be used:
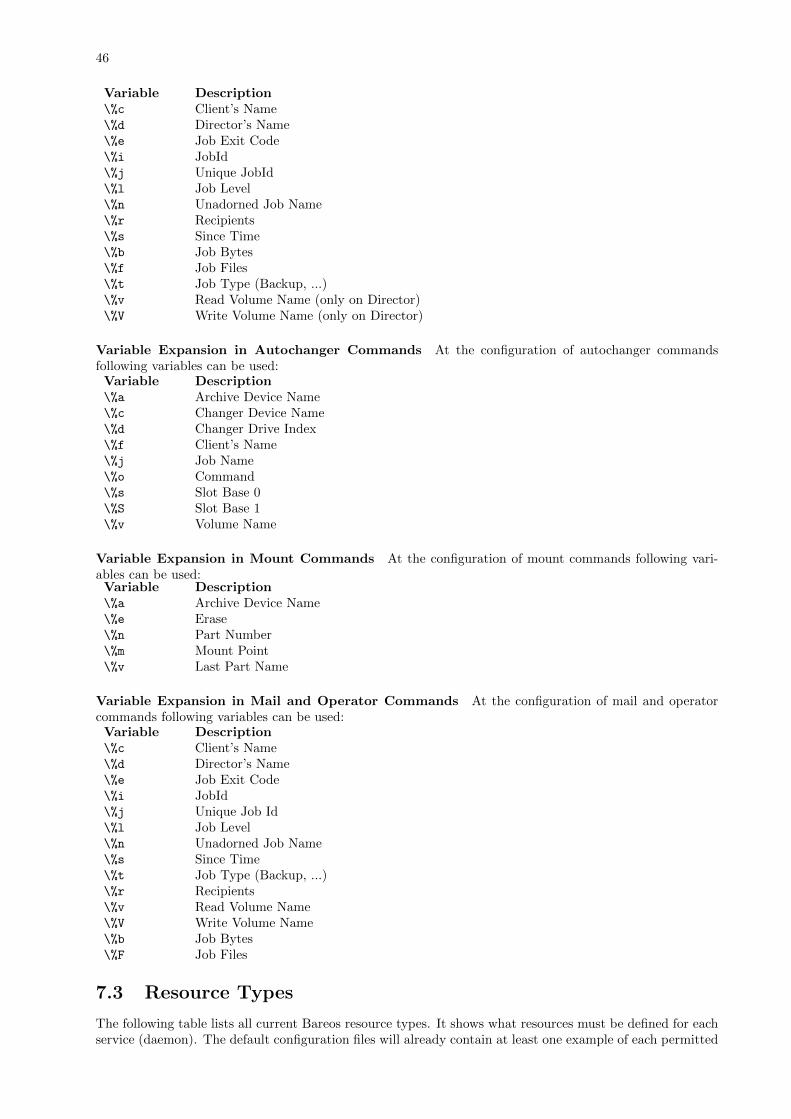
46
Variable Description\%c Client’s Name\%d Director’s Name\%e Job Exit Code\%i JobId\%j Unique JobId\%l Job Level\%n Unadorned Job Name\%r Recipients\%s Since Time\%b Job Bytes\%f Job Files\%t Job Type (Backup, ...)\%v Read Volume Name (only on Director)\%V Write Volume Name (only on Director)
Variable Expansion in Autochanger Commands At the configuration of autochanger commandsfollowing variables can be used:Variable Description\%a Archive Device Name\%c Changer Device Name\%d Changer Drive Index\%f Client’s Name\%j Job Name\%o Command\%s Slot Base 0\%S Slot Base 1\%v Volume Name
Variable Expansion in Mount Commands At the configuration of mount commands following vari-ables can be used:Variable Description\%a Archive Device Name\%e Erase\%n Part Number\%m Mount Point\%v Last Part Name
Variable Expansion in Mail and Operator Commands At the configuration of mail and operatorcommands following variables can be used:Variable Description\%c Client’s Name\%d Director’s Name\%e Job Exit Code\%i JobId\%j Unique Job Id\%l Job Level\%n Unadorned Job Name\%s Since Time\%t Job Type (Backup, ...)\%r Recipients\%v Read Volume Name\%V Write Volume Name\%b Job Bytes\%F Job Files
7.3 Resource Types
The following table lists all current Bareos resource types. It shows what resources must be defined for eachservice (daemon). The default configuration files will already contain at least one example of each permitted

47
resource, so you need not worry about creating all these kinds of resources from scratch.
Resource Director Client Storage ConsoleAutochanger xCatalog xClient x xConsole x xDevice xDirector x x x xFileSet xJob xJobDefs xMessage x x xNDMP xPool xSchedule xStorage x x
7.4 Names, Passwords and Authorization
In order for one daemon to contact another daemon, it must authorize itself with a password. In mostcases, the password corresponds to a particular name, so both the name and the password must match tobe authorized. Passwords are plain text, any text. They are not generated by any special process; just userandom text.
The default configuration files are automatically defined for correct authorization with random passwords.If you add to or modify these files, you will need to take care to keep them consistent.
Here is sort of a picture of what names/passwords in which files/Resources must match up:
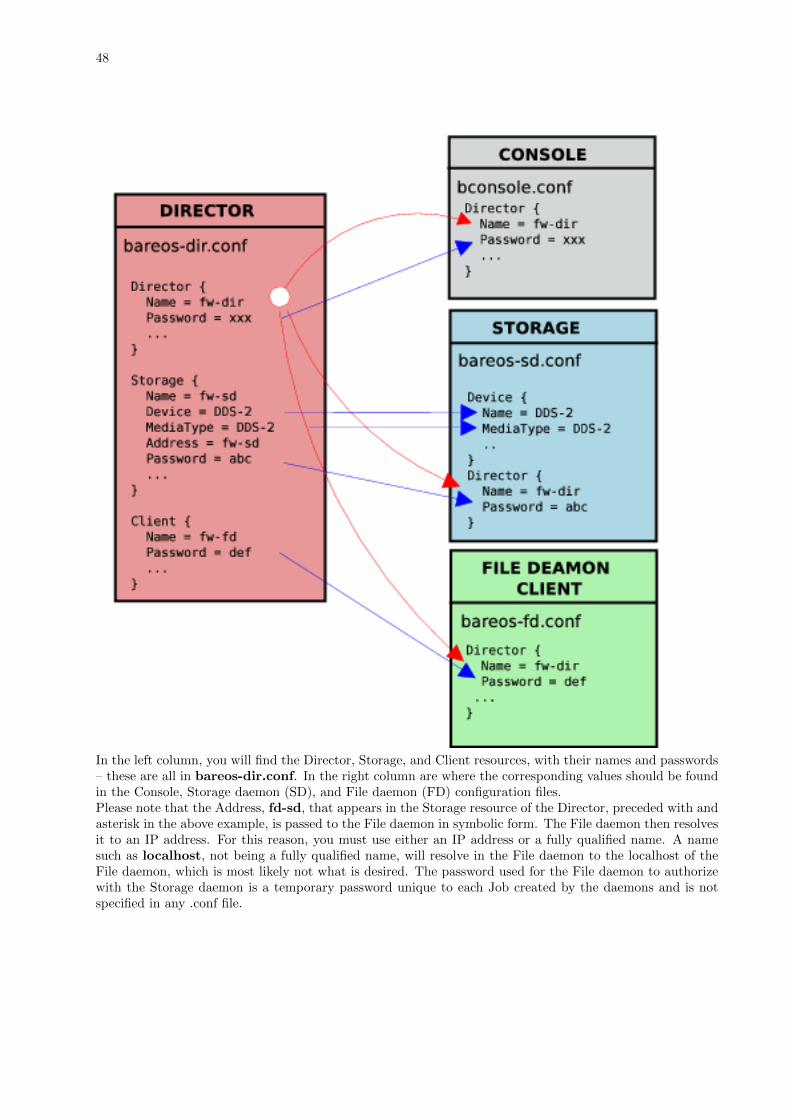
48
In the left column, you will find the Director, Storage, and Client resources, with their names and passwords– these are all in bareos-dir.conf. In the right column are where the corresponding values should be foundin the Console, Storage daemon (SD), and File daemon (FD) configuration files.Please note that the Address, fd-sd, that appears in the Storage resource of the Director, preceded with andasterisk in the above example, is passed to the File daemon in symbolic form. The File daemon then resolvesit to an IP address. For this reason, you must use either an IP address or a fully qualified name. A namesuch as localhost, not being a fully qualified name, will resolve in the File daemon to the localhost of theFile daemon, which is most likely not what is desired. The password used for the File daemon to authorizewith the Storage daemon is a temporary password unique to each Job created by the daemons and is notspecified in any .conf file.
Chapter 8
Director Configuration
Of all the configuration files needed to run Bareos, the Director’s is the most complicated, and the one thatyou will need to modify the most often as you add clients or modify the FileSets.For a general discussion of configuration files and resources including the data types recognized by Bareos.Please see the Configuration chapter of this manual.Director resource type may be one of the following:Job, JobDefs, Client, Storage, Catalog, Schedule, FileSet, Pool, Director, or Messages. We present themhere in the most logical order for defining them:Note, everything revolves around a job and is tied to a job in one way or another.
� Director Resource – to define the Director’s name and its access password used for authenticating theConsole program. Only a single Director resource definition may appear in the Director’s configurationfile. If you have either /dev/random or bc on your machine, Bareos will generate a random passwordduring the configuration process, otherwise it will be left blank.
� Job Resource – to define the backup/restore Jobs and to tie together the Client, FileSet and Scheduleresources to be used for each Job. Normally, you will Jobs of different names corresponding to eachclient (i.e. one Job per client, but a different one with a different name for each client).
� JobDefs Resource – optional resource for providing defaults for Job resources.
� Schedule Resource – to define when a Job has to run. You may have any number of Schedules, buteach job will reference only one.
� FileSet Resource – to define the set of files to be backed up for each Client. You may have any numberof FileSets but each Job will reference only one.
� Client Resource – to define what Client is to be backed up. You will generally have multiple Clientdefinitions. Each Job will reference only a single client.
� Storage Resource – to define on what physical device the Volumes should be mounted. You may haveone or more Storage definitions.
� Pool Resource – to define the pool of Volumes that can be used for a particular Job. Most people usea single default Pool. However, if you have a large number of clients or volumes, you may want to havemultiple Pools. Pools allow you to restrict a Job (or a Client) to use only a particular set of Volumes.
� Catalog Resource – to define in what database to keep the list of files and the Volume names wherethey are backed up. Most people only use a single catalog. It is possible, however not adviced and notsupported to use multiple catalogs, see Current Implementation Restrictions.
� Messages Resource – to define where error and information messages are to be sent or logged. You maydefine multiple different message resources and hence direct particular classes of messages to differentusers or locations (files, ...).
8.1 Director Resource
The Director resource defines the attributes of the Directors running on the network. Only a single Directorresource is allowed.The following is an example of a valid Director resource definition:
49

50
Director {
Name = baroes-dir
Password = secretpassword
QueryFile = "/etc/bareos/query.sql"
Maximum Concurrent Jobs = 10
Messages = Daemon
}
Configuration 8.1: Director Ressource example
configuration directive name type of data default value remark
Absolute Job Timeout = positive-integerAudit Events = audit-command-listAuditing = yes|no noBackend Directory = DirectoryList /usr/lib/bareos/backends (platform specific)
Description = stringDir Address = net-address 9101Dir Addresses = net-addresses 9101Dir Port = net-port 9101Dir Source Address = net-address 0FD Connect Timeout = time 180Heartbeat Interval = time 0Key Encryption Key = passwordMaximum Concurrent Jobs = positive-integer 1Maximum Connections = positive-integer 30Maximum Console Connections = positive-integer 20Messages = resource-nameName = name requiredNDMP Log Level = positive-integer 4NDMP Snooping = yes|noOmit Defaults = yes|no yesOptimize For Size = yes|no noOptimize For Speed = yes|no noPassword = password requiredPid Directory = directory /var/lib/bareos (platform specific)
Plugin Directory = directoryPlugin Names = PluginNames
Query File = directory requiredScripts Directory = directorySD Connect Timeout = time 1800Statistics Collect Interval = positive-integer 150Statistics Retention = time 160704000Sub Sys Directory = directory deprecatedSubscriptions = positive-integer 0TLS Allowed CN = string-listTLS Authenticate = yes|noTLS CA Certificate Dir = directoryTLS CA Certificate File = directoryTLS Certificate = directoryTLS Certificate Revocation List = directoryTLS Cipher List = stringTLS DH File = directoryTLS Enable = yes|noTLS Key = directoryTLS Require = yes|noTLS Verify Peer = yes|no yesVer Id = stringWorking Directory = directory /var/lib/bareos (platform specific)
51
Absolute Job Timeout = <positive-integer>
Version >= 14.2.0
Audit Events = <audit-command-list>Specify which commands (see Console Commands) will be audited. If nothing is specified (and AuditingDirDirector is enabled), all commands will be audited.Version >= 14.2.0
Auditing = <yes|no> (default: no)This directive allows to en- or disable auditing of interaction with the Bareos Director. If enabled,audit messages will be generated. The messages resource configured in Messages Dir
Director defines, howthese messages are handled.Version >= 14.2.0
Backend Directory = <DirectoryList> (default: /usr/lib/bareos/backends (platform specific))This directive specifies a directory from where the Bareos Director loads his dynamic backends.
Description = <string>The text field contains a description of the Director that will be displayed in the graphical userinterface. This directive is optional.
Dir Address = <net-address> (default: 9101)This directive is optional, but if it is specified, it will cause the Director server (for the Consoleprogram) to bind to the specified address. If this and the Dir Addresses Dir
Director directives are notspecified, the Director will bind to any available address (the default).
Dir Addresses = <net-addresses> (default: 9101)Specify the ports and addresses on which the Director daemon will listen for Bareos Console connec-tions.
Please note that if you use the Dir Addresses DirDirector directive, you must not use either a Dir Port
DirDirector or a Dir Address Dir
Director directive in the same resource.
Dir Port = <net-port> (default: 9101)Specify the port on which the Director daemon will listen for Bareos Console connections. This sameport number must be specified in the Director resource of the Console configuration file. The defaultis 9101, so normally this directive need not be specified. This directive should not be used if youspecify Dir Addresses Dir
Director (N.B plural) directive.
Dir Source Address = <net-address> (default: 0)This record is optional, and if it is specified, it will cause the Director server (when initiatingconnections to a storage or file daemon) to source its connections from the specified address. Only asingle IP address may be specified. If this record is not specified, the Director server will source itsoutgoing connections according to the system routing table (the default).
FD Connect Timeout = <time> (default: 180)where time is the time that the Director should continue attempting to contact the File daemon tostart a job, and after which the Director will cancel the job. The default is 3 minutes.
Heartbeat Interval = <time> (default: 0)This directive is optional and if specified will cause the Director to set a keepalive interval (heartbeat)in seconds on each of the sockets it opens for the Client resource. This value will override anyspecified at the Director level. It is implemented only on systems that provide the setsockoptTCP KEEPIDLE function (Linux, ...). The default value is zero, which means no change is made tothe socket.
52
Key Encryption Key = <password>This key is used to encrypt the Security Key that is exchanged between the Director and the StorageDaemon for supporting Application Managed Encryption (AME). For security reasons each Directorshould have a different Key Encryption Key.
Maximum Concurrent Jobs = <positive-integer> (default: 1)where <number> is the maximum number of total Director Jobs that should run concurrently. Thedefault is set to 1, but you may set it to a larger number.
The Volume format becomes more complicated with multiple simultaneous jobs, consequently, restoresmay take longer if Bareos must sort through interleaved volume blocks from multiple simultaneousjobs. This can be avoided by having each simultaneous job write to a different volume or by using dataspooling, which will first spool the data to disk simultaneously, then write one spool file at a time tothe volume thus avoiding excessive interleaving of the different job blocks.
See also the section about Concurrent Jobs.
Maximum Connections = <positive-integer> (default: 30)
Maximum Console Connections = <positive-integer> (default: 20)where number is the maximum number of Console Connections that could run concurrently. Thedefault is set to 20, but you may set it to a larger number.
Messages = <resource-name>The messages resource specifies where to deliver Director messages that are not associated with aspecific Job. Most messages are specific to a job and will be directed to the Messages resource specifiedby the job. However, there are a messages that can occur when no job is running.
Name = <name> (required)The name of the resource.
The director name used by the system administrator.
NDMP Log Level = <positive-integer> (default: 4)This directive sets the loglevel for the NDMP protocol library.Version >= 13.2.0
NDMP Snooping = <yes|no>This directive enables the Snooping and pretty printing of NDMP protocol information in debuggingmode.Version >= 13.2.0
Omit Defaults = <yes|no> (default: yes)When showing the configuration, omit those parameter that have there default value assigned.
Optimize For Size = <yes|no> (default: no)If set to yes this directive will use the optimizations for memory size over speed. So it will try touse less memory which may lead to a somewhat lower speed. Its currently mostly used for keeping allhardlinks in memory.
If none of Optimize For Size DirDirector and Optimize For Speed Dir
Director is enabled, Optimize For Size DirDirector
is enabled by default.
Optimize For Speed = <yes|no> (default: no)If set to yes this directive will use the optimizations for speed over the memory size. So it will try touse more memory which lead to a somewhat higher speed. Its currently mostly used for keeping allhardlinks in memory. Its relates to the Optimize For Size Dir
Director option set either one to yes as theyare mutually exclusive.
53
Password = <password> (required)Specifies the password that must be supplied for the default Bareos Console to be authorized. Thesame password must appear in the Director resource of the Console configuration file. For addedsecurity, the password is never passed across the network but instead a challenge response hash codecreated with the password. Bareos tries to generate a random password during the configurationprocess, otherwise it will be left blank and you must manually supply it.
The password is plain text.
Pid Directory = <directory> (default: /var/lib/bareos (platform specific))This directive is optional and specifies a directory in which the Director may put its process Id file.The process Id file is used to shutdown Bareos and to prevent multiple copies of Bareos from runningsimultaneously. Standard shell expansion of the Directory is done when the configuration file is readso that values such as $HOME will be properly expanded.
The PID directory specified must already exist and be readable and writable by the Bareos daemonreferencing it.
Typically on Linux systems, you will set this to: /var/run. If you are not installing Bareos in thesystem directories, you can use the Working Directory as defined above.
Plugin Directory = <directory>Plugins are loaded from this directory. To load only specific plugins, use ’Plugin Names’.
Version >= 14.2.0
Plugin Names = <PluginNames>List of plugins, that should get loaded from ’Plugin Directory’ (only basenames, ’-dir.so’ is addedautomatically). If empty, all plugins will get loaded.
If a Plugin Directory DirDirector is specified Plugin Names defines, which Director plugins get loaded.
If Plugin Names is not defined, all plugins get loaded, otherwise the defined ones.Version >= 14.2.0
Query File = <directory> (required)This directive is required and specifies a directory and file in which the Director can find the cannedSQL statements for the Query command of the Console.
Scripts Directory = <directory>This directive is currently unused.
SD Connect Timeout = <time> (default: 1800)where time is the time that the Director should continue attempting to contact the Storage daemonto start a job, and after which the Director will cancel the job. The default is 30 minutes.
Statistics Collect Interval = <positive-integer> (default: 150)Bareos offers the possibilty to collect statistic information from its connected devices. To do so, CollectStatistics Dir
Storage must be enabled. This interval defines, how often the Director connects to the attachedStorage Daemons to collect the statistic information.Version >= 14.2.0
Statistics Retention = <time> (default: 160704000)The Statistics Retention directive defines the length of time that Bareos will keep statistics jobrecords in the Catalog database after the Job End time (in JobHistory table). When this time periodexpires, and if user runs prune stats command, Bareos will prune (remove) Job records that are olderthan the specified period.
Theses statistics records aren’t use for restore purpose, but mainly for capacity planning, billings, etc.See chapter about how to extract information from the catalog for additional information.
54
See the Configuration chapter of this manual for additional details of time specification.
Sub Sys Directory = <directory>Please note! This directive is deprecated.
Subscriptions = <positive-integer> (default: 0)In case you want check that the number of active clients don’t exceed a specific number, you can definethis number here and check with the status subscriptions command.
However, this is only indended to give a hint. No active limiting is implemented.Version >= 12.4.4
TLS Allowed CN = <string-list>
TLS Authenticate = <yes|no>
TLS CA Certificate Dir = <directory>
TLS CA Certificate File = <directory>
TLS Certificate = <directory>
TLS Certificate Revocation List = <directory>
TLS Cipher List = <string>
TLS DH File = <directory>
TLS Enable = <yes|no>Bareos can be configured to encrypt all its network traffic. See chapter TLS Configuration Directivesto see, how the Bareos Director (and the other components) must be configured to use TLS.
TLS Key = <directory>
TLS Require = <yes|no>
TLS Verify Peer = <yes|no> (default: yes)
55
Ver Id = <string>where string is an identifier which can be used for support purpose. This string is displayed usingthe version command.
Working Directory = <directory> (default: /var/lib/bareos (platform specific))This directive is optional and specifies a directory in which the Director may put its status files. Thisdirectory should be used only by Bareos but may be shared by other Bareos daemons. Standard shellexpansion of the directory is done when the configuration file is read so that values such as $HOMEwill be properly expanded.
The working directory specified must already exist and be readable and writable by the Bareosdaemon referencing it.
8.2 Job Resource
The Job resource defines a Job (Backup, Restore, ...) that Bareos must perform. Each Job resource definitioncontains the name of a Client and a FileSet to backup, the Schedule for the Job, where the data are to bestored, and what media Pool can be used. In effect, each Job resource must specify What, Where, How,and When or FileSet, Storage, Backup/Restore/Level, and Schedule respectively. Note, the FileSet must bespecified for a restore job for historical reasons, but it is no longer used.Only a single type (Backup, Restore, ...) can be specified for any job. If you want to backup multipleFileSets on the same Client or multiple Clients, you must define a Job for each one.Note, you define only a single Job to do the Full, Differential, and Incremental backups since the differentbackup levels are tied together by a unique Job name. Normally, you will have only one Job per Client, butif a client has a really huge number of files (more than several million), you might want to split it into toJobs each with a different FileSet covering only part of the total files.Multiple Storage daemons are not currently supported for Jobs, so if you do want to use multiple storagedaemons, you will need to create a different Job and ensure that for each Job that the combination of Clientand FileSet are unique. The Client and FileSet are what Bareos uses to restore a client, so if there aremultiple Jobs with the same Client and FileSet or multiple Storage daemons that are used, the restore willnot work. This problem can be resolved by defining multiple FileSet definitions (the names must be different,but the contents of the FileSets may be the same).
configuration directive name type of data default value remark
Accurate = yes|no noAdd Prefix = stringAdd Suffix = stringAllow Duplicate Jobs = yes|no yesAllow Higher Duplicates = yes|no yesAllow Mixed Priority = yes|no noBackup Format = string NativeBase = ResourceList
Bootstrap = directoryCancel Lower Level Duplicates = yes|no noCancel Queued Duplicates = yes|no noCancel Running Duplicates = yes|no noCatalog = resource-nameClient = resource-nameClient Run After Job = RunscriptShort
Client Run Before Job = RunscriptShort
Description = stringDifferential Backup Pool = resource-nameDifferential Max Runtime = timeDifferential Max Wait Time = time deprecatedDir Plugin Options = string-listEnabled = yes|no yesFD Plugin Options = string-listFile Set = resource-name

56
Full Backup Pool = resource-nameFull Max Runtime = timeFull Max Wait Time = time deprecatedIncremental Backup Pool = resource-nameIncremental Max Runtime = timeIncremental Max Wait Time = time deprecatedJob Defs = resource-nameJob To Verify = resource-nameLevel = BackupLevel
Max Concurrent Copies = positive-integer 100Max Diff Interval = timeMax Full Interval = timeMax Run Time = timeMax Start Delay = timeMax Virtual Full Interval = timeMax Wait Time = timeMaximum Bandwidth = speedMaximum Concurrent Jobs = positive-integer 1Maxrun Sched Time = timeMessages = resource-name requiredName = name requiredNext Pool = resource-namePlugin Options = string-list alias, deprecatedPool = resource-name requiredPrefer Mounted Volumes = yes|no yesPrefix Links = yes|no noPriority = positive-integer 10Protocol = ProtocolType NativePrune Files = yes|no noPrune Jobs = yes|no noPrune Volumes = yes|no noPurge Migration Job = yes|no noRegex Where = stringReplace = ReplaceOption AlwaysRerun Failed Levels = yes|no noReschedule Interval = time 1800Reschedule On Error = yes|no noReschedule Times = positive-integer 5Run = string-listRun After Failed Job = RunscriptShort
Run After Job = RunscriptShort
Run Before Job = RunscriptShort
Run Script { Runscript }Save File History = yes|no yesSchedule = resource-nameSD Plugin Options = string-listSelection Pattern = stringSelection Type = MigrationType
Spool Attributes = yes|no noSpool Data = yes|no noSpool Size = Size64
Storage = ResourceList
Strip Prefix = stringType = JobType requiredVerify Job = resource-name aliasVirtual Full Backup Pool = resource-nameWhere = directoryWrite Bootstrap = directoryWrite Part After Job = yes|no deprecatedWrite Verify List = directory
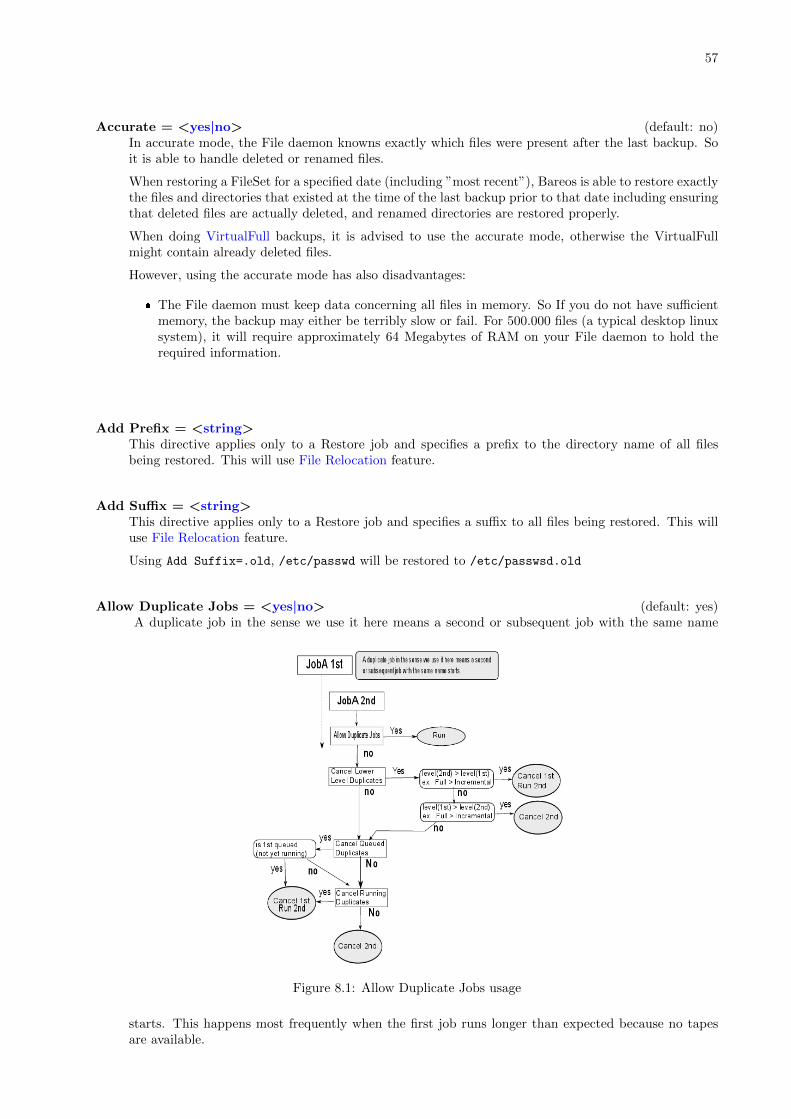
57
Accurate = <yes|no> (default: no)In accurate mode, the File daemon knowns exactly which files were present after the last backup. Soit is able to handle deleted or renamed files.
When restoring a FileSet for a specified date (including ”most recent”), Bareos is able to restore exactlythe files and directories that existed at the time of the last backup prior to that date including ensuringthat deleted files are actually deleted, and renamed directories are restored properly.
When doing VirtualFull backups, it is advised to use the accurate mode, otherwise the VirtualFullmight contain already deleted files.
However, using the accurate mode has also disadvantages:
� The File daemon must keep data concerning all files in memory. So If you do not have sufficientmemory, the backup may either be terribly slow or fail. For 500.000 files (a typical desktop linuxsystem), it will require approximately 64 Megabytes of RAM on your File daemon to hold therequired information.
Add Prefix = <string>This directive applies only to a Restore job and specifies a prefix to the directory name of all filesbeing restored. This will use File Relocation feature.
Add Suffix = <string>This directive applies only to a Restore job and specifies a suffix to all files being restored. This willuse File Relocation feature.
Using Add Suffix=.old, /etc/passwd will be restored to /etc/passwsd.old
Allow Duplicate Jobs = <yes|no> (default: yes)A duplicate job in the sense we use it here means a second or subsequent job with the same name
Figure 8.1: Allow Duplicate Jobs usage
starts. This happens most frequently when the first job runs longer than expected because no tapesare available.
58
If this directive is enabled duplicate jobs will be run. If the directive is set to no then only one jobof a given name may run at one time, and the action that Bareos takes to ensure only one job runs isdetermined by the other directives (see below).
If Allow Duplicate Jobs is set to no and two jobs are present and none of the three directives givenbelow permit cancelling a job, then the current job (the second one started) will be cancelled.
Allow Higher Duplicates = <yes|no> (default: yes)
Allow Mixed Priority = <yes|no> (default: no)When set to yes (default no), this job may run even if lower priority jobs are already running. Thismeans a high priority job will not have to wait for other jobs to finish before starting. The schedulerwill only mix priorities when all running jobs have this set to true.
Note that only higher priority jobs will start early. Suppose the director will allow two concurrentjobs, and that two jobs with priority 10 are running, with two more in the queue. If a job with priority5 is added to the queue, it will be run as soon as one of the running jobs finishes. However, newpriority 10 jobs will not be run until the priority 5 job has finished.
Backup Format = <string> (default: Native)The backup format used for protocols which support multiple formats. By default, it uses the BareosNative Backup format. Other protocols, like NDMP supports different backup formats for instance:
� Dump
� Tar
� SMTape
Base = <ResourceList>The Base directive permits to specify the list of jobs that will be used during Full backup as base.This directive is optional. See the Base Job chapter for more information.
Bootstrap = <directory>The Bootstrap directive specifies a bootstrap file that, if provided, will be used during Restore Jobsand is ignored in other Job types. The bootstrap file contains the list of tapes to be used in a restoreJob as well as which files are to be restored. Specification of this directive is optional, and if specified,it is used only for a restore job. In addition, when running a Restore job from the console, this valuecan be changed.
If you use the restore command in the Console program, to start a restore job, the bootstrap file willbe created automatically from the files you select to be restored.
For additional details see The Bootstrap File chapter.
Cancel Lower Level Duplicates = <yes|no> (default: no)If Allow Duplicate Jobs Dir
Job is set to no and this directive is set to yes, Bareos will choose betweenduplicated jobs the one with the highest level. For example, it will cancel a previous Incremental torun a Full backup. It works only for Backup jobs. If the levels of the duplicated jobs are the same,nothing is done and the directives Cancel Queued Duplicates Dir
Job and Cancel Running Duplicates DirJob
will be examined.
Cancel Queued Duplicates = <yes|no> (default: no)If Allow Duplicate Jobs Dir
Job is set to no and if this directive is set to yes any job that is already queuedto run but not yet running will be canceled.
59
Cancel Running Duplicates = <yes|no> (default: no)If Allow Duplicate Jobs Dir
Job is set to no and if this directive is set to yes any job that is alreadyrunning will be canceled.
Catalog = <resource-name>This specifies the name of the catalog resource to be used for this Job. When a catalog is defined in aJob it will override the definition in the client.Version >= 13.4.0
Client = <resource-name>The Client directive specifies the Client (File daemon) that will be used in the current Job. Onlya single Client may be specified in any one Job. The Client runs on the machine to be backed up,and sends the requested files to the Storage daemon for backup, or receives them when restoring.For additional details, see the Client Resource of this chapter. This directive is required For versionsbefore 13.3.0, this directive is required for all Jobtypes. For Version >= 13.3.0 it is required for allJobtypes but Copy or Migrate jobs.
Client Run After Job = <RunscriptShort>This is a shortcut for the Run Script Dir
Job resource, that run on the client after a backup job.
Client Run Before Job = <RunscriptShort>This is basically a shortcut for the Run Script Dir
Job resource, that run on the client before the backupjob.
Please note! For compatibility reasons, with this shortcut, the command is executed directly when theclient receive it. And if the command is in error, other remote runscripts will be discarded. To be surethat all commands will be sent and executed, you have to use Run Script Dir
Job syntax.
Description = <string>
Differential Backup Pool = <resource-name>The Differential Backup Pool specifies a Pool to be used for Differential backups. It will override anyPool Dir
Job specification during a Differential backup.
Differential Max Runtime = <time>The time specifies the maximum allowed time that a Differential backup job may run, counted fromwhen the job starts (not necessarily the same as when the job was scheduled).
Differential Max Wait Time = <time>Please note! This directive is deprecated.This directive has been deprecated in favor of Differential Max Runtime Dir
Job.
Dir Plugin Options = <string-list>These settings are plugin specific, see Director Plugins.
Enabled = <yes|no> (default: yes)En- or disable this resource.
This directive allows you to enable or disable automatic execution via the scheduler of a Job.
FD Plugin Options = <string-list>These settings are plugin specific, see File Daemon Plugins.
60
File Set = <resource-name>The FileSet directive specifies the FileSet that will be used in the current Job. The FileSet specifieswhich directories (or files) are to be backed up, and what options to use (e.g. compression, ...). Onlya single FileSet resource may be specified in any one Job. For additional details, see the FileSetResource section of this chapter. This directive is required (For versions before 13.3.0 for all Jobtypesand for versions after that for all Jobtypes but Copy and Migrate).
Full Backup Pool = <resource-name>The Full Backup Pool specifies a Pool to be used for Full backups. It will override any Pool Dir
Job
specification during a Full backup.
Full Max Runtime = <time>The time specifies the maximum allowed time that a Full backup job may run, counted from whenthe job starts (not necessarily the same as when the job was scheduled).
Full Max Wait Time = <time>Please note! This directive is deprecated.This directive has been deprecated in favor of Full Max Runtime Dir
Job.
Incremental Backup Pool = <resource-name>The Incremental Backup Pool specifies a Pool to be used for Incremental backups. It will overrideany Pool Dir
Job specification during an Incremental backup.
Incremental Max Runtime = <time>The time specifies the maximum allowed time that an Incremental backup job may run, counted fromwhen the job starts, (not necessarily the same as when the job was scheduled).
Incremental Max Wait Time = <time>Please note! This directive is deprecated.This directive has been deprecated in favor of Incremental Max Runtime Dir
Job
Job Defs = <resource-name>If a Job Defs resource name is specified, all the values contained in the named JobDefs resource will
be used as the defaults for the current Job. Any value that you explicitly define in the current Jobresource, will override any defaults specified in the JobDefs resource. The use of this directive permitswriting much more compact Job resources where the bulk of the directives are defined in one or moreJobDefs. This is particularly useful if you have many similar Jobs but with minor variations such asdifferent Clients.
Job To Verify = <resource-name>
Level = <BackupLevel>The Level directive specifies the default Job level to be run. Each different Job Type (Backup, Restore,Verify, ...) has a different set of Levels that can be specified. The Level is normally overridden by adifferent value that is specified in the Schedule resource. This directive is not required, but must bespecified either by a Level directive or as an override specified in the Schedule resource.
BackupFor a Backup Job, the Level may be one of the following:
FullWhen the Level is set to Full all files in the FileSet whether or not they have changed will
be backed up.
61
IncrementalWhen the Level is set to Incremental all files specified in the FileSet that have changed
since the last successful backup of the the same Job using the same FileSet and Client, willbe backed up. If the Director cannot find a previous valid Full backup then the job will beupgraded into a Full backup. When the Director looks for a valid backup record in the catalogdatabase, it looks for a previous Job with:
� The same Job name.
� The same Client name.
� The same FileSet (any change to the definition of the FileSet such as adding or deletinga file in the Include or Exclude sections constitutes a different FileSet.
� The Job was a Full, Differential, or Incremental backup.
� The Job terminated normally (i.e. did not fail or was not canceled).
� The Job started no longer ago than Max Full Interval.
If all the above conditions do not hold, the Director will upgrade the Incremental to a Fullsave. Otherwise, the Incremental backup will be performed as requested.The File daemon (Client) decides which files to backup for an Incremental backup by com-paring start time of the prior Job (Full, Differential, or Incremental) against the time eachfile was last ”modified” (st mtime) and the time its attributes were last ”changed”(st ctime).If the file was modified or its attributes changed on or after this start time, it will then bebacked up.Some virus scanning software may change st ctime while doing the scan. For example, if thevirus scanning program attempts to reset the access time (st atime), which Bareos does notuse, it will cause st ctime to change and hence Bareos will backup the file during an Incremen-tal or Differential backup. In the case of Sophos virus scanning, you can prevent it from reset-ting the access time (st atime) and hence changing st ctime by using the --no-reset-atime
option. For other software, please see their manual.When Bareos does an Incremental backup, all modified files that are still on the system arebacked up. However, any file that has been deleted since the last Full backup remains inthe Bareos catalog, which means that if between a Full save and the time you do a restore,some files are deleted, those deleted files will also be restored. The deleted files will no longerappear in the catalog after doing another Full save.In addition, if you move a directory rather than copy it, the files in it do not have theirmodification time (st mtime) or their attribute change time (st ctime) changed. As a conse-quence, those files will probably not be backed up by an Incremental or Differential backupwhich depend solely on these time stamps. If you move a directory, and wish it to be properlybacked up, it is generally preferable to copy it, then delete the original.However, to manage deleted files or directories changes in the catalog during an Incrementalbackup you can use Job Resource. This is quite memory consuming process.
DifferentialWhen the Level is set to Differential all files specified in the FileSet that have changed since
the last successful Full backup of the same Job will be backed up. If the Director cannotfind a valid previous Full backup for the same Job, FileSet, and Client, backup, then theDifferential job will be upgraded into a Full backup. When the Director looks for a valid Fullbackup record in the catalog database, it looks for a previous Job with:
� The same Job name.
� The same Client name.
� The same FileSet (any change to the definition of the FileSet such as adding or deletinga file in the Include or Exclude sections constitutes a different FileSet.
� The Job was a FULL backup.
� The Job terminated normally (i.e. did not fail or was not canceled).
� The Job started no longer ago than Max Full Interval.
If all the above conditions do not hold, the Director will upgrade the Differential to a Fullsave. Otherwise, the Differential backup will be performed as requested.The File daemon (Client) decides which files to backup for a differential backup by comparingthe start time of the prior Full backup Job against the time each file was last ”modified”(st mtime) and the time its attributes were last ”changed” (st ctime). If the file was modifiedor its attributes were changed on or after this start time, it will then be backed up. The starttime used is displayed after the Since on the Job report. In rare cases, using the start time

62
of the prior backup may cause some files to be backed up twice, but it ensures that no changeis missed.When Bareos does a Differential backup, all modified files that are still on the system arebacked up. However, any file that has been deleted since the last Full backup remains inthe Bareos catalog, which means that if between a Full save and the time you do a restore,some files are deleted, those deleted files will also be restored. The deleted files will no longerappear in the catalog after doing another Full save. However, to remove deleted files fromthe catalog during a Differential backup is quite a time consuming process and not currentlyimplemented in Bareos. It is, however, a planned future feature.As noted above, if you move a directory rather than copy it, the files in it do not havetheir modification time (st mtime) or their attribute change time (st ctime) changed. As aconsequence, those files will probably not be backed up by an Incremental or Differentialbackup which depend solely on these time stamps. If you move a directory, and wish it to beproperly backed up, it is generally preferable to copy it, then delete the original. Alternatively,you can move the directory, then use the touch program to update the timestamps.However, to manage deleted files or directories changes in the catalog during an Differentialbackup you can use accurate mode. This is quite memory consuming process. See for moredetails.Every once and a while, someone asks why we need Differential backups as long as Incrementalbackups pickup all changed files. There are possibly many answers to this question, but theone that is the most important for me is that a Differential backup effectively merges allthe Incremental and Differential backups since the last Full backup into a single Differentialbackup. This has two effects: 1. It gives some redundancy since the old backups could beused if the merged backup cannot be read. 2. More importantly, it reduces the numberof Volumes that are needed to do a restore effectively eliminating the need to read all thevolumes on which the preceding Incremental and Differential backups since the last Full aredone.
VirtualFullWhen the Level is set to VirtualFull, a new Full backup is generated from the last existingFull backup and the matching Differential- and Incremental-Backups. It matches this ac-cording the Name Dir
Client and Name DirFileSet. This means, a new Full backup get created without
transfering all the data from the client to the backup server again. The new Full backup willbe stored in the pool defined in Next Pool Dir
Pool.Please note! Opposite to the offer backup levels, VirtualFull may require read and write accessto multiple volumes. In most cases you have to make sure, that Bareos does not try to readand write to the same Volume.
RestoreFor a Restore Job, no level needs to be specified.
VerifyFor a Verify Job, the Level may be one of the following:
InitCatalogdoes a scan of the specified FileSet and stores the file attributes in the Catalog database.Since no file data is saved, you might ask why you would want to do this. It turns out to bea very simple and easy way to have a Tripwire like feature using Bareos. In other words,it allows you to save the state of a set of files defined by the FileSet and later check to see ifthose files have been modified or deleted and if any new files have been added. This can beused to detect system intrusion. Typically you would specify a FileSet that contains the setof system files that should not change (e.g. /sbin, /boot, /lib, /bin, ...). Normally, you runthe InitCatalog level verify one time when your system is first setup, and then once againafter each modification (upgrade) to your system. Thereafter, when your want to check thestate of your system files, you use a Verify level = Catalog. This compares the results ofyour InitCatalog with the current state of the files.
CatalogCompares the current state of the files against the state previously saved during an Init-Catalog. Any discrepancies are reported. The items reported are determined by the verifyoptions specified on the Include directive in the specified FileSet (see the FileSet resourcebelow for more details). Typically this command will be run once a day (or night) to checkfor any changes to your system files.Please note! If you run two Verify Catalog jobs on the same client at the same time, the results
63
will certainly be incorrect. This is because Verify Catalog modifies the Catalog database whilerunning in order to track new files.
VolumeToCatalogThis level causes Bareos to read the file attribute data written to the Volume from the lastbackup Job for the job specified on the VerifyJob directive. The file attribute data arecompared to the values saved in the Catalog database and any differences are reported. Thisis similar to the DiskToCatalog level except that instead of comparing the disk file attributesto the catalog database, the attribute data written to the Volume is read and compared tothe catalog database. Although the attribute data including the signatures (MD5 or SHA1)are compared, the actual file data is not compared (it is not in the catalog).VolumeToCatalog jobs need a client to extract the metadata, but this client does not have tobe the original client. We suggest to use the client on the backup server itself for maximumperformance.Please note! If you run two Verify VolumeToCatalog jobs on the same client at the same time,the results will certainly be incorrect. This is because the Verify VolumeToCatalog modifiesthe Catalog database while running.
DiskToCatalogThis level causes Bareos to read the files as they currently are on disk, and to compare thecurrent file attributes with the attributes saved in the catalog from the last backup for thejob specified on the VerifyJob directive. This level differs from the VolumeToCataloglevel described above by the fact that it doesn’t compare against a previous Verify job butagainst a previous backup. When you run this level, you must supply the verify options onyour Include statements. Those options determine what attribute fields are compared.This command can be very useful if you have disk problems because it will compare thecurrent state of your disk against the last successful backup, which may be several jobs.Note, the current implementation does not identify files that have been deleted.
Max Concurrent Copies = <positive-integer> (default: 100)
Max Diff Interval = <time>The time specifies the maximum allowed age (counting from start time) of the most recent successfulDifferential backup that is required in order to run Incremental backup jobs. If the most recentDifferential backup is older than this interval, Incremental backups will be upgraded to Differentialbackups automatically. If this directive is not present, or specified as 0, then the age of the previousDifferential backup is not considered.
Max Full Interval = <time>The time specifies the maximum allowed age (counting from start time) of the most recent successfulFull backup that is required in order to run Incremental or Differential backup jobs. If the most recentFull backup is older than this interval, Incremental and Differential backups will be upgraded to Fullbackups automatically. If this directive is not present, or specified as 0, then the age of the previousFull backup is not considered.
Max Run Time = <time>The time specifies the maximum allowed time that a job may run, counted from when the job starts,(not necessarily the same as when the job was scheduled).
By default, the the watchdog thread will kill any Job that has run more than 6 days. The maximumwatchdog timeout is independent of MaxRunTime and cannot be changed.
Max Start Delay = <time>The time specifies the maximum delay between the scheduled time and the actual start time for theJob. For example, a job can be scheduled to run at 1:00am, but because other jobs are running, itmay wait to run. If the delay is set to 3600 (one hour) and the job has not begun to run by 2:00am,
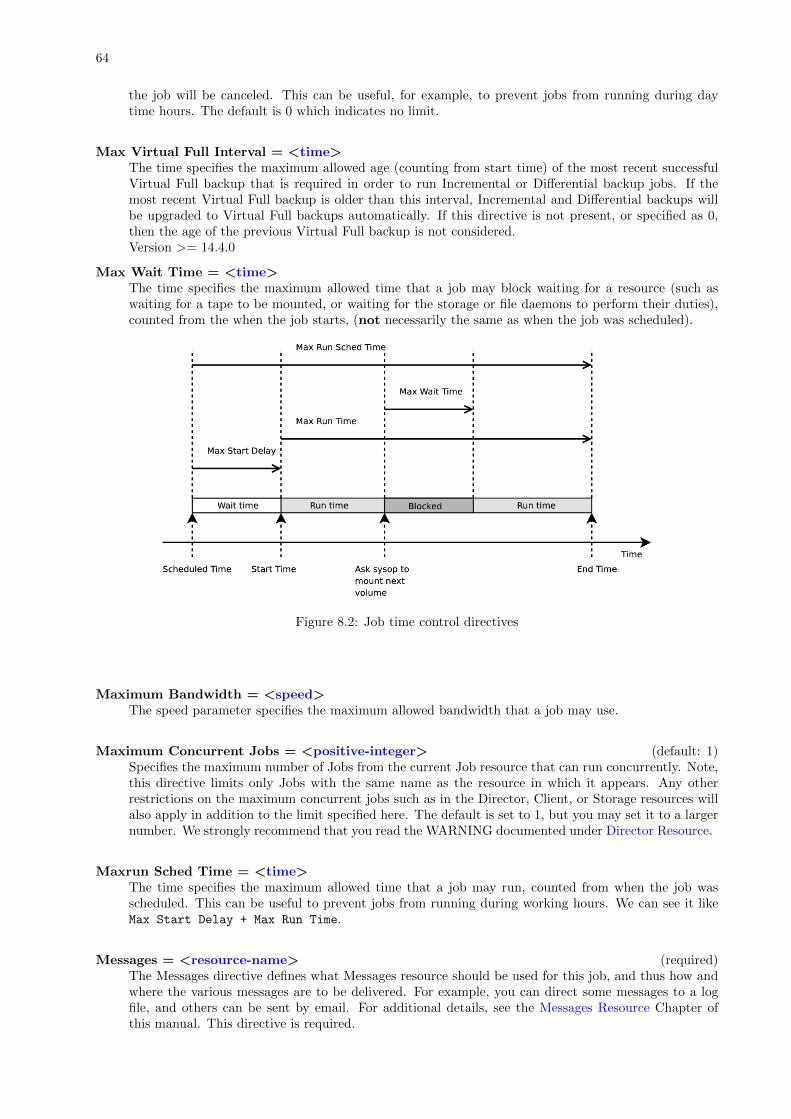
64
the job will be canceled. This can be useful, for example, to prevent jobs from running during daytime hours. The default is 0 which indicates no limit.
Max Virtual Full Interval = <time>The time specifies the maximum allowed age (counting from start time) of the most recent successfulVirtual Full backup that is required in order to run Incremental or Differential backup jobs. If themost recent Virtual Full backup is older than this interval, Incremental and Differential backups willbe upgraded to Virtual Full backups automatically. If this directive is not present, or specified as 0,then the age of the previous Virtual Full backup is not considered.Version >= 14.4.0
Max Wait Time = <time>The time specifies the maximum allowed time that a job may block waiting for a resource (such aswaiting for a tape to be mounted, or waiting for the storage or file daemons to perform their duties),counted from the when the job starts, (not necessarily the same as when the job was scheduled).
Figure 8.2: Job time control directives
Maximum Bandwidth = <speed>The speed parameter specifies the maximum allowed bandwidth that a job may use.
Maximum Concurrent Jobs = <positive-integer> (default: 1)Specifies the maximum number of Jobs from the current Job resource that can run concurrently. Note,this directive limits only Jobs with the same name as the resource in which it appears. Any otherrestrictions on the maximum concurrent jobs such as in the Director, Client, or Storage resources willalso apply in addition to the limit specified here. The default is set to 1, but you may set it to a largernumber. We strongly recommend that you read the WARNING documented under Director Resource.
Maxrun Sched Time = <time>The time specifies the maximum allowed time that a job may run, counted from when the job wasscheduled. This can be useful to prevent jobs from running during working hours. We can see it likeMax Start Delay + Max Run Time.
Messages = <resource-name> (required)The Messages directive defines what Messages resource should be used for this job, and thus how andwhere the various messages are to be delivered. For example, you can direct some messages to a logfile, and others can be sent by email. For additional details, see the Messages Resource Chapter ofthis manual. This directive is required.
65
Name = <name> (required)The name of the resource.
The Job name. This name can be specified on the Run command in the console program to start ajob. If the name contains spaces, it must be specified between quotes. It is generally a good idea togive your job the same name as the Client that it will backup. This permits easy identification of jobs.
When the job actually runs, the unique Job Name will consist of the name you specify here followedby the date and time the job was scheduled for execution. This directive is required.
Next Pool = <resource-name>A Next Pool override used for Migration/Copy and Virtual Backup Jobs.
Plugin Options = <string-list>Please note! This directive is deprecated.This directive is an alias.
Pool = <resource-name> (required)The Pool directive defines the pool of Volumes where your data can be backed up. Many Bareosinstallations will use only the Default pool. However, if you want to specify a different set of Volumesfor different Clients or different Jobs, you will probably want to use Pools. For additional details, seethe Pool Resource of this chapter. This directive is required.
In case of a Copy or Migration job, this setting determines what Pool will be examined for findingJobIds to migrate. The exception to this is when Selection Type Dir
Job = SQLQuery, and although aPool directive must still be specified, no Pool is used, unless you specifically include it in the SQLquery. Note, in any case, the Pool resource defined by the Pool directive must contain a Next PoolDirPool = ... directive to define the Pool to which the data will be migrated.
Prefer Mounted Volumes = <yes|no> (default: yes)If the Prefer Mounted Volumes directive is set to yes, the Storage daemon is requested to select eitheran Autochanger or a drive with a valid Volume already mounted in preference to a drive that is notready. This means that all jobs will attempt to append to the same Volume (providing the Volumeis appropriate – right Pool, ... for that job), unless you are using multiple pools. If no drive with asuitable Volume is available, it will select the first available drive. Note, any Volume that has beenrequested to be mounted, will be considered valid as a mounted volume by another job. This if multiplejobs start at the same time and they all prefer mounted volumes, the first job will request the mount,and the other jobs will use the same volume.
If the directive is set to no, the Storage daemon will prefer finding an unused drive, otherwise, each jobstarted will append to the same Volume (assuming the Pool is the same for all jobs). Setting PreferMounted Volumes to no can be useful for those sites with multiple drive autochangers that prefer tomaximize backup throughput at the expense of using additional drives and Volumes. This means thatthe job will prefer to use an unused drive rather than use a drive that is already in use.
Despite the above, we recommend against setting this directive to no since it tends to add a lot ofswapping of Volumes between the different drives and can easily lead to deadlock situations in theStorage daemon. We will accept bug reports against it, but we cannot guarantee that we will be ableto fix the problem in a reasonable time.
A better alternative for using multiple drives is to use multiple pools so that Bareos will be forced tomount Volumes from those Pools on different drives.
Prefix Links = <yes|no> (default: no)If a Where path prefix is specified for a recovery job, apply it to absolute links as well. The defaultis No. When set to Yes then while restoring files to an alternate directory, any absolute soft linkswill also be modified to point to the new alternate directory. Normally this is what is desired – i.e.everything is self consistent. However, if you wish to later move the files to their original locations, all

66
files linked with absolute names will be broken.
Priority = <positive-integer> (default: 10)This directive permits you to control the order in which your jobs will be run by specifying a positivenon-zero number. The higher the number, the lower the job priority. Assuming you are not runningconcurrent jobs, all queued jobs of priority 1 will run before queued jobs of priority 2 and so on,regardless of the original scheduling order.
The priority only affects waiting jobs that are queued to run, not jobs that are already running. If oneor more jobs of priority 2 are already running, and a new job is scheduled with priority 1, the currentlyrunning priority 2 jobs must complete before the priority 1 job is run, unless Allow Mixed Priority isset.
If you want to run concurrent jobs you should keep these points in mind:
� See Concurrent Jobs on how to setup concurrent jobs.
� Bareos concurrently runs jobs of only one priority at a time. It will not simultaneously run apriority 1 and a priority 2 job.
� If Bareos is running a priority 2 job and a new priority 1 job is scheduled, it will wait until therunning priority 2 job terminates even if the Maximum Concurrent Jobs settings would otherwiseallow two jobs to run simultaneously.
� Suppose that bareos is running a priority 2 job and a new priority 1 job is scheduled and queuedwaiting for the running priority 2 job to terminate. If you then start a second priority 2 job,the waiting priority 1 job will prevent the new priority 2 job from running concurrently with therunning priority 2 job. That is: as long as there is a higher priority job waiting to run, no newlower priority jobs will start even if the Maximum Concurrent Jobs settings would normally allowthem to run. This ensures that higher priority jobs will be run as soon as possible.
If you have several jobs of different priority, it may not best to start them at exactly the sametime, because Bareos must examine them one at a time. If by Bareos starts a lower priority jobfirst, then it will run before your high priority jobs. If you experience this problem, you mayavoid it by starting any higher priority jobs a few seconds before lower priority ones. This insuresthat Bareos will examine the jobs in the correct order, and that your priority scheme will be respected.
Protocol = <ProtocolType> (default: Native)The backup protocol to use to run the Job. If not set it will default to Native currently the directorunderstand the following protocols:
1. Native - The native Bareos protocol
2. NDMP - The NDMP protocol
Prune Files = <yes|no> (default: no)Normally, pruning of Files from the Catalog is specified on a Client by Client basis in the Clientresource with the AutoPrune directive. If this directive is specified (not normally) and the value isyes, it will override the value specified in the Client resource.
Prune Jobs = <yes|no> (default: no)Normally, pruning of Jobs from the Catalog is specified on a Client by Client basis in the Clientresource with the AutoPrune directive. If this directive is specified (not normally) and the value isyes, it will override the value specified in the Client resource.
Prune Volumes = <yes|no> (default: no)Normally, pruning of Volumes from the Catalog is specified on a Pool by Pool basis in the Poolresource with the AutoPrune directive. Note, this is different from File and Job pruning which isdone on a Client by Client basis. If this directive is specified (not normally) and the value is yes, itwill override the value specified in the Pool resource.
67
Purge Migration Job = <yes|no> (default: no)This directive may be added to the Migration Job definition in the Director configuration file to purgethe job migrated at the end of a migration.
Regex Where = <string>This directive applies only to a Restore job and specifies a regex filename manipulation of all files beingrestored. This will use File Relocation feature.
For more informations about how use this option, see RegexWhere Format.
Replace = <ReplaceOption> (default: Always)This directive applies only to a Restore job and specifies what happens when Bareos wants to restorea file or directory that already exists. You have the following options for replace-option:
always when the file to be restored already exists, it is deleted and then replaced by the copy thatwas backed up. This is the default value.
ifnewer if the backed up file (on tape) is newer than the existing file, the existing file is deleted andreplaced by the back up.
ifolder if the backed up file (on tape) is older than the existing file, the existing file is deleted andreplaced by the back up.
never if the backed up file already exists, Bareos skips restoring this file.
Rerun Failed Levels = <yes|no> (default: no)If this directive is set to yes (default no), and Bareos detects that a previous job at a higher level(i.e. Full or Differential) has failed, the current job level will be upgraded to the higher level. Thisis particularly useful for Laptops where they may often be unreachable, and if a prior Full save hasfailed, you wish the very next backup to be a Full save rather than whatever level it is started as.
There are several points that must be taken into account when using this directive: first, a failed jobis defined as one that has not terminated normally, which includes any running job of the same name(you need to ensure that two jobs of the same name do not run simultaneously); secondly, the IgnoreFileSet Changes directive is not considered when checking for failed levels, which means that anyFileSet change will trigger a rerun.
Reschedule Interval = <time> (default: 1800)If you have specified Reschedule On Error = yes and the job terminates in error, it will berescheduled after the interval of time specified by time-specification. See the time specificationformats in the Configure chapter for details of time specifications. If no interval is specified, the jobwill not be rescheduled on error.
Reschedule On Error = <yes|no> (default: no)If this directive is enabled, and the job terminates in error, the job will be rescheduled as determinedby the Reschedule Interval and Reschedule Times directives. If you cancel the job, it will not berescheduled. The default is no (i.e. the job will not be rescheduled).
This specification can be useful for portables, laptops, or other machines that are not always connectedto the network or switched on.
Reschedule Times = <positive-integer> (default: 5)This directive specifies the maximum number of times to reschedule the job. If it is set to zero (thedefault) the job will be rescheduled an indefinite number of times.
Run = <string-list>The Run directive (not to be confused with the Run option in a Schedule) allows you to start otherjobs or to clone jobs. By using the cloning keywords (see below), you can backup the same data (or
68
almost the same data) to two or more drives at the same time. The job-name is normally the samename as the current Job resource (thus creating a clone). However, it may be any Job name, so onejob may start other related jobs.
The part after the equal sign must be enclosed in double quotes, and can contain any string or setof options (overrides) that you can specify when entering the Run command from the console. Forexample storage=DDS-4 .... In addition, there are two special keywords that permit you to clonethe current job. They are level=%l and since=%s. The %l in the level keyword permits enteringthe actual level of the current job and the %s in the since keyword permits putting the same time forcomparison as used on the current job. Note, in the case of the since keyword, the %s must be enclosedin double quotes, and thus they must be preceded by a backslash since they are already inside quotes.For example:
run = "Nightly-backup level=%l since=\"%s\" storage=DDS-4"
A cloned job will not start additional clones, so it is not possible to recurse.
Please note that all cloned jobs, as specified in the Run directives are submitted for running beforethe original job is run (while it is being initialized). This means that any clone job will actually startbefore the original job, and may even block the original job from starting until the original job finishesunless you allow multiple simultaneous jobs. Even if you set a lower priority on the clone job, if noother jobs are running, it will start before the original job.
If you are trying to prioritize jobs by using the clone feature (Run directive), you will find it mucheasier to do using a Run Script Dir
Job resource, or a Run Before Job DirJob directive.
Run After Failed Job = <RunscriptShort>This is a shortcut for the Run Script Dir
Job resource, that runs a command after a failed job.
If the exit code of the program run is non-zero, Bareos will print a warning message.
Run Script {
Command = "echo test"
Runs When = After
Runs On Failure = yes
Runs On Client = no
Runs On Success = yes # default, you can drop this line
}
Run After Job = <RunscriptShort>This is a shortcut for the Run Script Dir
Job resource, that runs a command after a successful job (withouterror or without being canceled).
If the exit code of the program run is non-zero, Bareos will print a warning message.
Run Before Job = <RunscriptShort>This is a shortcut for the Run Script Dir
Job resource, that runs a command before a job.
If the exit code of the program run is non-zero, the current Bareos job will be canceled.
Run Before Job = "echo test"
is equivalent to:
Run Script {
Command = "echo test"
Runs On Client = No
Runs When = Before
}
69
Run Script = <Runscript>The RunScript directive behaves like a resource in that it requires opening and closing braces around
a number of directives that make up the body of the runscript.
The specified Command (see below for details) is run as an external program prior or after the currentJob. This is optional. By default, the program is executed on the Client side like in ClientRunXXXJob.
Console options are special commands that are sent to the director instead of the OS. At this time,console command ouputs are redirected to log with the jobid 0.
You can use following console command: delete, disable, enable, estimate, list, llist, memory,prune, purge, reload, status, setdebug, show, time, trace, update, version, .client, .jobs,.pool, .storage. See Bareos Console for more information. You need to specify needed informationon command line, nothing will be prompted. Example:
Console = "prune files client=\%c"
Console = "update stats age=3"
You can specify more than one Command/Console option per RunScript.
You can use following options may be specified in the body of the runscript:
Options Value Information
Runs On Success Yes | No run if JobStatus is successfulRuns On Failure Yes | No run if JobStatus isn’t successfulRuns On Client Yes | No run command on clientRuns When Never | Before |
After | Always |AfterVSS
When to run
Fail Job On Error Yes | No Fail job if script returns something differentfrom 0
Command External commandConsole Console command
Any output sent by the command to standard output will be included in the Bareos job report. Thecommand string must be a valid program name or name of a shell script.
Please note! The command string is parsed then fed to the OS, which means that the path will besearched to execute your specified command, but there is no shell interpretation. As a consequence, ifyou invoke complicated commands or want any shell features such as redirection or piping, you mustcall a shell script and do it inside that script. Alternatively, it is possible to use sh -c ’.. .’ in thecommand definition to force shell interpretation, see example below.
Before executing the specified command, Bareos performs character substitution of the following char-acters:
%% %%b Job Bytes%c Client’s name%d Daemon’s name (Such as host-dir or host-fd)%D Director’s name (Also valid on file daemon)%e Job Exit Status%f Job FileSet (Only on director side)%F Job Files%h Client address%i Job Id%j Unique Job Id%l Job Level%n Job name%p Pool name (Only on director side)%P Daemon PID%s Since time%t Job type (Backup, ...)%v Read Volume name(s) (Only on director side)%V Write Volume name(s) (Only on director side)%w Storage name (Only on director side)%x Spooling enabled? (”yes” or ”no”)
70
Some character substitutions are not available in all situations. The Job Exit Status code %e edits thefollowing values:
� OK
� Error
� Fatal Error
� Canceled
� Differences
� Unknown term code
Thus if you edit it on a command line, you will need to enclose it within some sort of quotes.
You can use these following shortcuts:
Keyword RunsOnSuccess RunsOnFailure FailJobOnError Runs On Client RunsWhen
Run Before Job DirJob Yes No Before
Run After Job DirJob Yes No No After
Run After Failed Job DirJob No Yes No After
Client Run Before Job DirJob Yes Yes Before
Client Run After Job DirJob Yes No Yes After
Examples:
Run Script {
RunsWhen = Before
FailJobOnError = No
Command = "/etc/init.d/apache stop"
}
RunScript {
RunsWhen = After
RunsOnFailure = Yes
Command = "/etc/init.d/apache start"
}
RunScript {
RunsWhen = Before
FailJobOnError = Yes
Command = "sh -c ’top -b -n 1 > /var/backup/top.out’"
}
Special Windows Considerations
You can run scripts just after snapshots initializations with AfterVSS keyword.
In addition, for a Windows client, please take note that you must ensure a correct path to your script.The script or program can be a .com, .exe or a .bat file. If you just put the program name in thenBareos will search using the same rules that cmd.exe uses (current directory, Bareos bin directory, andPATH). It will even try the different extensions in the same order as cmd.exe. The command can beanything that cmd.exe or command.com will recognize as an executable file.
However, if you have slashes in the program name then Bareos figures you are fully specifying thename, so you must also explicitly add the three character extension.
The command is run in a Win32 environment, so Unix like commands will not work unless you haveinstalled and properly configured Cygwin in addition to and separately from Bareos.
The System %Path% will be searched for the command. (under the environment variable dialogyou have have both System Environment and User Environment, we believe that only the Systemenvironment will be available to bareos-fd, if it is running as a service.)
System environment variables can be referenced with %var% and used as either part of the commandname or arguments.
So if you have a script in the Bareosbin directory then the following lines should work fine:
71
Client Run Before Job = "systemstate"
or
Client Run Before Job = "systemstate.bat"
or
Client Run Before Job = "\"C:/Program Files/Bareos/systemstate.bat\""
The outer set of quotes is removed when the configuration file is parsed. You need to escape the innerquotes so that they are there when the code that parses the command line for execution runs so it cantell what the program name is.
The special characters &<>()@^| will need to be quoted, if they are part of a filename or argument.
If someone is logged in, a blank ”command” window running the commands will be present during theexecution of the command.
Some Suggestions from Phil Stracchino for running on Win32 machines with the native Win32 Filedaemon:
1. You might want the ClientRunBeforeJob directive to specify a .bat file which runs the actualclient-side commands, rather than trying to run (for example) regedit /e directly.
2. The batch file should explicitly ’exit 0’ on successful completion.
3. The path to the batch file should be specified in Unix form:
Client Run Before Job = "c:/bareos/bin/systemstate.bat"
rather than DOS/Windows form:
INCORRECT: Client Run Before Job = "c:\bareos \bin \systemstate .bat"
For Win32, please note that there are certain limitations:
Client Run Before Job = "C:/Program Files/Bareos/bin/pre-exec.bat"
Lines like the above do not work because there are limitations of cmd.exe that is used to execute thecommand. Bareos prefixes the string you supply with cmd.exe /c. To test that your command worksyou should type cmd /c "C:/Program Files/test.exe" at a cmd prompt and see what happens.Once the command is correct insert a backslash (\) before each double quote (”), and then put quotesaround the whole thing when putting it in the director’s .conf file. You either need to have only oneset of quotes or else use the short name and don’t put quotes around the command path.
Below is the output from cmd’s help as it relates to the command line passed to the /c option.
If /C or /K is specified, then the remainder of the command line after the switch is processed as acommand line, where the following logic is used to process quote (”) characters:
1. If all of the following conditions are met, then quote characters on the command line are preserved:
� no /S switch.
� exactly two quote characters.
� no special characters between the two quote characters, where special is one of: &<>()@^|� there are one or more whitespace characters between the the two quote characters.
� the string between the two quote characters is the name of an executable file.
2. Otherwise, old behavior is to see if the first character is a quote character and if so, strip theleading character and remove the last quote character on the command line, preserving any textafter the last quote character.
Save File History = <yes|no> (default: yes)Allow disabling storing the file history, as this causes problems problems with some implementationsof NDMP (out-of-order metadata).Version >= 14.2.0
Schedule = <resource-name>The Schedule directive defines what schedule is to be used for the Job. The schedule in turn determineswhen the Job will be automatically started and what Job level (i.e. Full, Incremental, ...) is to berun. This directive is optional, and if left out, the Job can only be started manually using the Console
72
program. Although you may specify only a single Schedule resource for any one job, the Scheduleresource may contain multiple Run directives, which allow you to run the Job at many differenttimes, and each run directive permits overriding the default Job Level Pool, Storage, and Messagesresources. This gives considerable flexibility in what can be done with a single Job. For additionaldetails, see Schedule Resource.
SD Plugin Options = <string-list>These settings are plugin specific, see Storage Daemon Plugins.
Selection Pattern = <string>Selection Patterns is only used for Copy and Migration jobs, see Migration and Copy. The interpreta-tion of its value depends on the selected Selection Type Dir
Job.
For the OldestVolume and SmallestVolume, this Selection pattern is not used (ignored).
For the Client, Volume, and Job keywords, this pattern must be a valid regular expression that willfilter the appropriate item names found in the Pool.
For the SQLQuery keyword, this pattern must be a valid SELECT SQL statement that returns JobIds.
Selection Type = <MigrationType>Selection Type is only used for Copy and Migration jobs, see Migration and Copy. It determines howa migration job will go about selecting what JobIds to migrate. In most cases, it is used in conjunctionwith a Selection Pattern Dir
Job to give you fine control over exactly what JobIds are selected. The possiblevalues are:
SmallestVolume This selection keyword selects the volume with the fewest bytes from the Pool tobe migrated. The Pool to be migrated is the Pool defined in the Migration Job resource. Themigration control job will then start and run one migration backup job for each of the Jobs foundon this Volume. The Selection Pattern, if specified, is not used.
OldestVolume This selection keyword selects the volume with the oldest last write time in the Poolto be migrated. The Pool to be migrated is the Pool defined in the Migration Job resource. Themigration control job will then start and run one migration backup job for each of the Jobs foundon this Volume. The Selection Pattern, if specified, is not used.
Client The Client selection type, first selects all the Clients that have been backed up in the Poolspecified by the Migration Job resource, then it applies the Selection Pattern Dir
Job as a regularexpression to the list of Client names, giving a filtered Client name list. All jobs that were backedup for those filtered (regexed) Clients will be migrated. The migration control job will then startand run one migration backup job for each of the JobIds found for those filtered Clients.
Volume The Volume selection type, first selects all the Volumes that have been backed up in thePool specified by the Migration Job resource, then it applies the Selection Pattern Dir
Job as a regularexpression to the list of Volume names, giving a filtered Volume list. All JobIds that were backedup for those filtered (regexed) Volumes will be migrated. The migration control job will thenstart and run one migration backup job for each of the JobIds found on those filtered Volumes.
Job The Job selection type, first selects all the Jobs (as defined on the Name DirJob directive in a Job
resource) that have been backed up in the Pool specified by the Migration Job resource, then itapplies the Selection Pattern Dir
Job as a regular expression to the list of Job names, giving a filteredJob name list. All JobIds that were run for those filtered (regexed) Job names will be migrated.Note, for a given Job named, they can be many jobs (JobIds) that ran. The migration controljob will then start and run one migration backup job for each of the Jobs found.
SQLQuery The SQLQuery selection type, used the Selection Pattern DirJob as an SQL query to obtain
the JobIds to be migrated. The Selection Pattern must be a valid SELECT SQL statement foryour SQL engine, and it must return the JobId as the first field of the SELECT.
PoolOccupancy This selection type will cause the Migration job to compute the total size of thespecified pool for all Media Types combined. If it exceeds the Migration High Bytes Dir
Pool definedin the Pool, the Migration job will migrate all JobIds beginning with the oldest Volume in thepool (determined by Last Write time) until the Pool bytes drop below the Migration Low BytesDirPool defined in the Pool. This calculation should be consider rather approximative because it ismade once by the Migration job before migration is begun, and thus does not take into account
73
additional data written into the Pool during the migration. In addition, the calculation of thetotal Pool byte size is based on the Volume bytes saved in the Volume (Media) database entries.The bytes calculate for Migration is based on the value stored in the Job records of the Jobs tobe migrated. These do not include the Storage daemon overhead as is in the total Pool size. Asa consequence, normally, the migration will migrate more bytes than strictly necessary.
PoolTime The PoolTime selection type will cause the Migration job to look at the time each JobIdhas been in the Pool since the job ended. All Jobs in the Pool longer than the time specified onMigration Time Dir
Pool directive in the Pool resource will be migrated.
PoolUncopiedJobs This selection which copies all jobs from a pool to an other pool which were notcopied before is available only for copy Jobs.
Spool Attributes = <yes|no> (default: no)Is Spool Attributes is disabled, the File attributes are sent by the Storage daemon to the Director asthey are stored on tape. However, if you want to avoid the possibility that database updates will slowdown writing to the tape, you may want to set the value to yes, in which case the Storage daemonwill buffer the File attributes and Storage coordinates to a temporary file in the Working Directory,then when writing the Job data to the tape is completed, the attributes and storage coordinates willbe sent to the Director.
NOTE: When Spool Data DirJob is set to yes, Spool Attributes is also automatically set to yes.
For details, see Data Spooling.
Spool Data = <yes|no> (default: no)If this directive is set to yes, the Storage daemon will be requested to spool the data for this Job todisk rather than write it directly to the Volume (normally a tape).
Thus the data is written in large blocks to the Volume rather than small blocks. This directive isparticularly useful when running multiple simultaneous backups to tape. Once all the data arrives orthe spool files’ maximum sizes are reached, the data will be despooled and written to tape.
Spooling data prevents interleaving data from several job and reduces or eliminates tape drive stopand start commonly known as ”shoe-shine”.
We don’t recommend using this option if you are writing to a disk file using this option will probablyjust slow down the backup jobs.
NOTE: When this directive is set to yes, Spool Attributes DirJob is also automatically set to yes.
For details, see Data Spooling.
Spool Size = <Size64>This specifies the maximum spool size for this job. The default is taken from Maximum Spool SizeSdDevice limit.
Storage = <ResourceList>The Storage directive defines the name of the storage services where you want to backup the FileSetdata. For additional details, see the Storage Resource of this manual. The Storage resource may alsobe specified in the Job’s Pool resource, in which case the value in the Pool resource overrides anyvalue in the Job. This Storage resource definition is not required by either the Job resource or in thePool, but it must be specified in one or the other, if not an error will result.
Strip Prefix = <string>This directive applies only to a Restore job and specifies a prefix to remove from the directory name
of all files being restored. This will use the File Relocation feature.
Using Strip Prefix=/etc, /etc/passwd will be restored to /passwd
Under Windows, if you want to restore c:/files to d:/files, you can use:
Strip Prefix = c:
Add Prefix = d:
74
Type = <JobType> (required)The Type directive specifies the Job type, which may be one of the following: Backup, Restore,Verify, or Admin. This directive is required. Within a particular Job Type, there are also Levels asdiscussed in the next item.
BackupRun a backup Job. Normally you will have at least one Backup job for each client you want
to save. Normally, unless you turn off cataloging, most all the important statistics and dataconcerning files backed up will be placed in the catalog.
RestoreRun a restore Job. Normally, you will specify only one Restore job which acts as a sort of
prototype that you will modify using the console program in order to perform restores. Althoughcertain basic information from a Restore job is saved in the catalog, it is very minimal comparedto the information stored for a Backup job – for example, no File database entries are generatedsince no Files are saved.
Restore jobs cannot be automatically started by the scheduler as is the case for Backup, Verifyand Admin jobs. To restore files, you must use the restore command in the console.
VerifyRun a verify Job. In general, verify jobs permit you to compare the contents of the catalog to
the file system, or to what was backed up. In addition, to verifying that a tape that was writtencan be read, you can also use verify as a sort of tripwire intrusion detection.
AdminRun an admin Job. An Admin job can be used to periodically run catalog pruning, if you do
not want to do it at the end of each Backup Job. Although an Admin job is recorded in thecatalog, very little data is saved.
Migrate defines the job that is run as being a Migration Job. A Migration Job is a sort of controljob and does not have any Files associated with it, and in that sense they are more or less like anAdmin job. Migration jobs simply check to see if there is anything to Migrate then possibly startand control new Backup jobs to migrate the data from the specified Pool to another Pool. Note,any original JobId that is migrated will be marked as having been migrated, and the originalJobId can nolonger be used for restores; all restores will be done from the new migrated Job.
Copy defines the job that is run as being a Copy Job. A Copy Job is a sort of control job and doesnot have any Files associated with it, and in that sense they are more or less like an Admin job.Copy jobs simply check to see if there is anything to Copy then possibly start and control newBackup jobs to copy the data from the specified Pool to another Pool. Note that when a copyis made, the original JobIds are left unchanged. The new copies can not be used for restorationunless you specifically choose them by JobId. If you subsequently delete a JobId that has a copy,the copy will be automatically upgraded to a Backup rather than a Copy, and it will subsequentlybe used for restoration.
Verify Job = <resource-name>This directive is an alias.
If you run a verify job without this directive, the last job run will be compared with the catalog, whichmeans that you must immediately follow a backup by a verify command. If you specify a Verify JobBareos will find the last job with that name that ran. This permits you to run all your backups, thenrun Verify jobs on those that you wish to be verified (most often a VolumeToCatalog) so that thetape just written is re-read.
Virtual Full Backup Pool = <resource-name>
75
Where = <directory>This directive applies only to a Restore job and specifies a prefix to the directory name of all filesbeing restored. This permits files to be restored in a different location from which they were saved. IfWhere is not specified or is set to backslash (/), the files will be restored to their original location.By default, we have set Where in the example configuration files to be /tmp/bareos-restores.This is to prevent accidental overwriting of your files.
Write Bootstrap = <directory>The writebootstrap directive specifies a file name where Bareos will write a bootstrap file for eachBackup job run. This directive applies only to Backup Jobs. If the Backup job is a Full save, Bareoswill erase any current contents of the specified file before writing the bootstrap records. If the Job isan Incremental or Differential save, Bareos will append the current bootstrap record to the end of thefile.
Using this feature, permits you to constantly have a bootstrap file that can recover the current stateof your system. Normally, the file specified should be a mounted drive on another machine, so thatif your hard disk is lost, you will immediately have a bootstrap record available. Alternatively, youshould copy the bootstrap file to another machine after it is updated. Note, it is a good idea to write aseparate bootstrap file for each Job backed up including the job that backs up your catalog database.
If the bootstrap-file-specification begins with a vertical bar (|), Bareos will use the specification asthe name of a program to which it will pipe the bootstrap record. It could for example be a shell scriptthat emails you the bootstrap record.
Before opening the file or executing the specified command, Bareos performs character substitutionlike in RunScript directive. To automatically manage your bootstrap files, you can use this in yourJobDefs resources:
Job Defs {
...
Write Bootstrap = "%c_%n.bsr"
...
}
For more details on using this file, please see chapter The Bootstrap File.
Write Part After Job = <yes|no>Please note! This directive is deprecated.
Write Verify List = <directory>
The following is an example of a valid Job resource definition:
Job {
Name = "Minou"
Type = Backup
Level = Incremental # default
Client = Minou
FileSet="Minou Full Set"
Storage = DLTDrive
Pool = Default
Schedule = "MinouWeeklyCycle"
Messages = Standard
}
Configuration 8.2: Job Resource Example
8.3 JobDefs Resource
The JobDefs resource permits all the same directives that can appear in a Job resource. However, a JobDefsresource does not create a Job, rather it can be referenced within a Job to provide defaults for that Job.This permits you to concisely define several nearly identical Jobs, each one referencing a JobDefs resourcewhich contains the defaults. Only the changes from the defaults need to be mentioned in each Job.
76
8.4 Schedule Resource
The Schedule resource provides a means of automatically scheduling a Job as well as the ability to overridethe default Level, Pool, Storage and Messages resources. If a Schedule resource is not referenced in a Job,the Job can only be run manually. In general, you specify an action to be taken and when.
configuration directive name type of data default value remark
Description = stringEnabled = yes|no yesName = name requiredRun = job-overrides> <date-time-specification
Description = <string>
Enabled = <yes|no> (default: yes)En- or disable this resource.
Name = <name> (required)The name of the resource.
The name of the schedule being defined.
Run = <job-overrides> <date-time-specification>The Run directive defines when a Job is to be run, and what overrides if any to apply. You may specifymultiple run directives within a Schedule resource. If you do, they will all be applied (i.e. multipleschedules). If you have two Run directives that start at the same time, two Jobs will start at the sametime (well, within one second of each other).
The Job-overrides permit overriding the Level, the Storage, the Messages, and the Pool specificationsprovided in the Job resource. In addition, the FullPool, the IncrementalPool, and the DifferentialPoolspecifications permit overriding the Pool specification according to what backup Job Level is in effect.
By the use of overrides, you may customize a particular Job. For example, you may specify a Messagesoverride for your Incremental backups that outputs messages to a log file, but for your weekly ormonthly Full backups, you may send the output by email by using a different Messages override.
Job-overrides are specified as: keyword=value where the keyword is Level, Storage, Messages,Pool, FullPool, DifferentialPool, or IncrementalPool, and the value is as defined on the respectivedirective formats for the Job resource. You may specify multiple Job-overrides on one Run directiveby separating them with one or more spaces or by separating them with a trailing comma. For example:
Level=Full is all files in the FileSet whether or not they have changed.
Level=Incremental is all files that have changed since the last backup.
Pool=Weekly specifies to use the Pool named Weekly.
Storage=DLT Drive specifies to use DLT Drive for the storage device.
Messages=Verbose specifies to use the Verbose message resource for the Job.
FullPool=Full specifies to use the Pool named Full if the job is a full backup, or is upgraded fromanother type to a full backup.
DifferentialPool=Differential specifies to use the Pool named Differential if the job is a differen-tial backup.
IncrementalPool=Incremental specifies to use the Pool named Incremental if the job is an in-cremental backup.
Accurate=yes|no tells Bareos to use or not the Accurate code for the specific job. It can allow youto save memory and and CPU resources on the catalog server in some cases.
77
Date-time-specification determines when the Job is to be run. The specification is a repetition,and as a default Bareos is set to run a job at the beginning of the hour of every hour of every day ofevery week of every month of every year. This is not normally what you want, so you must specify orlimit when you want the job to run. Any specification given is assumed to be repetitive in nature andwill serve to override or limit the default repetition. This is done by specifying masks or times for thehour, day of the month, day of the week, week of the month, week of the year, and month when youwant the job to run. By specifying one or more of the above, you can define a schedule to repeat atalmost any frequency you want.
Basically, you must supply a month, day, hour, and minute the Job is to be run. Of these fouritems to be specified, day is special in that you may either specify a day of the month such as 1, 2, ...31, or you may specify a day of the week such as Monday, Tuesday, ... Sunday. Finally, you may alsospecify a week qualifier to restrict the schedule to the first, second, third, fourth, or fifth week of themonth.
For example, if you specify only a day of the week, such as Tuesday the Job will be run every hourof every Tuesday of every Month. That is the month and hour remain set to the defaults of everymonth and all hours.
Note, by default with no other specification, your job will run at the beginning of every hour. Ifyou wish your job to run more than once in any given hour, you will need to specify multiple runspecifications each with a different minute.
The date/time to run the Job can be specified in the following way in pseudo-BNF:
<week-keyword> ::= 1st | 2nd | 3rd | 4th | 5th | first | second | third | fourth| fifth
<wday-keyword> ::= sun | mon | tue | wed | thu | fri | sat | sunday | monday| tuesday | wednesday | thursday | friday | saturday
<week-of-year-keyword> ::= w00 | w01 | ... w52 | w53<month-keyword> ::= jan | feb | mar | apr | may | jun | jul | aug | sep | oct |
nov | dec | january | february | ... | december<digit> ::= 1 | 2 | 3 | 4 | 5 | 6 | 7 | 8 | 9 | 0<number> ::= <digit> | <digit><number><12hour> ::= 0 | 1 | 2 | ... 12<hour> ::= 0 | 1 | 2 | ... 23<minute> ::= 0 | 1 | 2 | ... 59<day> ::= 1 | 2 | ... 31<time> ::= <hour>:<minute> | <12hour>:<minute>am |
<12hour>:<minute>pm<time-spec> ::= at <time> | hourly<day-range> ::= <day>-<day><month-range> ::= <month-keyword>-<month-keyword><wday-range> ::= <wday-keyword>-<wday-keyword><range> ::= <day-range> | <month-range> | <wday-range><date> ::= <date-keyword> | <day> | <range><date-spec> ::= <date> | <date-spec><day-spec> ::= <day> | <wday-keyword> | <day> | <wday-
range> |<week-keyword><wday-keyword> |<week-keyword> <wday-range> | daily
<month-spec> ::= <month-keyword> | <month-range> | monthly<date-time-spec> ::= <month-spec> <day-spec> <time-spec>
Note, the Week of Year specification wnn follows the ISO standard definition of the week of the year, whereWeek 1 is the week in which the first Thursday of the year occurs, or alternatively, the week which containsthe 4th of January. Weeks are numbered w01 to w53. w00 for Bareos is the week that precedes the first ISOweek (i.e. has the first few days of the year if any occur before Thursday). w00 is not defined by the ISOspecification. A week starts with Monday and ends with Sunday.According to the NIST (US National Institute of Standards and Technology), 12am and 12pm are ambiguousand can be defined to anything. However, 12:01am is the same as 00:01 and 12:01pm is the same as 12:01, so

78
Bareos defines 12am as 00:00 (midnight) and 12pm as 12:00 (noon). You can avoid this abiguity (confusion)by using 24 hour time specifications (i.e. no am/pm).An example schedule resource that is named WeeklyCycle and runs a job with level full each Sunday at2:05am and an incremental job Monday through Saturday at 2:05am is:
Schedule {
Name = "WeeklyCycle"
Run = Level=Full sun at 2:05
Run = Level=Incremental mon-sat at 2:05
}
Configuration 8.3: Schedule Example
An example of a possible monthly cycle is as follows:
Schedule {
Name = "MonthlyCycle"
Run = Level=Full Pool=Monthly 1st sun at 2:05
Run = Level=Differential 2nd-5th sun at 2:05
Run = Level=Incremental Pool=Daily mon-sat at 2:05
}
The first of every month:
Schedule {
Name = "First"
Run = Level=Full on 1 at 2:05
Run = Level=Incremental on 2-31 at 2:05
}
Every 10 minutes:
Schedule {
Name = "TenMinutes"
Run = Level=Full hourly at 0:05
Run = Level=Full hourly at 0:15
Run = Level=Full hourly at 0:25
Run = Level=Full hourly at 0:35
Run = Level=Full hourly at 0:45
Run = Level=Full hourly at 0:55
}
8.4.1 Technical Notes on Schedules
Internally Bareos keeps a schedule as a bit mask. There are six masks and a minute field to each schedule.The masks are hour, day of the month (mday), month, day of the week (wday), week of the month (wom),and week of the year (woy). The schedule is initialized to have the bits of each of these masks set, whichmeans that at the beginning of every hour, the job will run. When you specify a month for the first time,the mask will be cleared and the bit corresponding to your selected month will be selected. If you specifya second month, the bit corresponding to it will also be added to the mask. Thus when Bareos checks themasks to see if the bits are set corresponding to the current time, your job will run only in the two monthsyou have set. Likewise, if you set a time (hour), the hour mask will be cleared, and the hour you specify willbe set in the bit mask and the minutes will be stored in the minute field.For any schedule you have defined, you can see how these bits are set by doing a show schedules commandin the Console program. Please note that the bit mask is zero based, and Sunday is the first day of the week(bit zero).
8.5 FileSet Resource
The FileSet resource defines what files are to be included or excluded in a backup job. A FileSet resourceis required for each backup Job. It consists of a list of files or directories to be included, a list of files ordirectories to be excluded and the various backup options such as compression, encryption, and signaturesthat are to be applied to each file.Any change to the list of the included files will cause Bareos to automatically create a new FileSet (definedby the name and an MD5 checksum of the Include/Exclude contents). Each time a new FileSet is created,Bareos will ensure that the next backup is always a Full save.
79
configuration directive name type of data default value remark
Description = stringEnable VSS = yes|no yesExclude { IncludeExcludeItem }Ignore File Set Changes = yes|no noInclude { IncludeExcludeItem }Name = name required
Description = <string>Information only.
Enable VSS = <yes|no> (default: yes)Windows!Enable VSSIf this directive is set to yes the File daemon will be notified that the user wantsto use a Volume Shadow Copy Service (VSS) backup for this job. This directive is effective only onthe Windows File Daemon. It permits a consistent copy of open files to be made for cooperatingwriter applications, and for applications that are not VSS away, Bareos can at least copy open files.The Volume Shadow Copy will only be done on Windows drives where the drive (e.g. C:, D:, ...) isexplicitly mentioned in a File directive. For more information, please see the Windows chapter of thismanual.
Exclude = <IncludeExcludeItem>Describe the files, that should get excluded from a backup, see section about the FileSet ExcludeRessource.
Ignore File Set Changes = <yes|no> (default: no)Normally, if you modify the FileSet Include or Exclude lists, the next backup will be forced to a Fullso that Bareos can guarantee that any additions or deletions are properly saved.
We strongly recommend against setting this directive to yes, since doing so may cause you to have anincomplete set of backups.
If this directive is set to yes, any changes you make to the FileSet Include or Exclude lists, will notforce a Full during subsequent backups.
The default is no, in which case, if you change the Include or Exclude, Bareos will force a Full backupto ensure that everything is properly backed up.
Include = <IncludeExcludeItem>Describe the files, that should get included to a backup, see section about the FileSet IncludeRessource.
Name = <name> (required)The name of the resource.
The name of the FileSet resource.
8.5.1 FileSet Include Ressource
The Include resource must contain a list of directories and/or files to be processed in the backup job.Normally, all files found in all subdirectories of any directory in the Include File list will be backed up.Note, see below for the definition of <file-list>. The Include resource may also contain one or more Optionsresources that specify options such as compression to be applied to all or any subset of the files found whenprocessing the file-list for backup. Please see below for more details concerning Options resources.There can be any number of Include resources within the FileSet, each having its own list of directories orfiles to be backed up and the backup options defined by one or more Options resources.Please take note of the following items in the FileSet syntax:
80
1. There is no equal sign (=) after the Include and before the opening brace ({). The same is true forthe Exclude.
2. Each directory (or filename) to be included or excluded is preceded by a File =. Previously they weresimply listed on separate lines.
3. The Exclude resource does not accept Options.
4. When using wild-cards or regular expressions, directory names are always terminated with a slash (/)and filenames have no trailing slash.
File = < filename | dirname | |command | \<includefile-client | <includefile-server >The file list consists of one file or directory name per line. Directory names should be specified withouta trailing slash with Unix path notation.
Windows users, please take note to specify directories (even c:/...) in Unix path notation. If you useWindows conventions, you will most likely not be able to restore your files due to the fact that theWindows path separator was defined as an escape character long before Windows existed, and Bareosadheres to that convention (i.e. means the next character appears as itself).
You should always specify a full path for every directory and file that you list in the FileSet. Inaddition, on Windows machines, you should always prefix the directory or filename with the drivespecification (e.g. c:/xxx) using Unix directory name separators (forward slash). The drive letteritself can be upper or lower case (e.g. c:/xxx or C:/xxx).
Bareos’s default for processing directories is to recursively descend in the directory saving all files andsubdirectories. Bareos will not by default cross filesystems (or mount points in Unix parlance). Thismeans that if you specify the root partition (e.g. /), Bareos will save only the root partition and notany of the other mounted filesystems. Similarly on Windows systems, you must explicitly specify eachof the drives you want saved (e.g. c:/ and d:/ ...). In addition, at least for Windows systems, youwill most likely want to enclose each specification within double quotes particularly if the directory (orfile) name contains spaces. The df command on Unix systems will show you which mount points youmust specify to save everything. See below for an example.
Take special care not to include a directory twice or Bareos will backup the same files two times wastinga lot of space on your archive device. Including a directory twice is very easy to do. For example:
Include {
Options {
compression=GZIP
}
File = /
File = /usr
}
Configuration 8.4: File Set
on a Unix system where /usr is a subdirectory (rather than a mounted filesystem) will cause /usr tobe backed up twice.
<file-list> is a list of directory and/or filename names specified with a File = directive. To includenames containing spaces, enclose the name between double-quotes. Wild-cards are not interpreted infile-lists. They can only be specified in Options resources.
There are a number of special cases when specifying directories and files in a file-list. They are:
� Any name preceded by an at-sign (@) is assumed to be the name of a file, which contains a listof files each preceded by a ”File =”. The named file is read once when the configuration file isparsed during the Director startup. Note, that the file is read on the Director’s machine and noton the Client’s. In fact, the @filename can appear anywhere within the conf file where a tokenwould be read, and the contents of the named file will be logically inserted in the place of the@filename. What must be in the file depends on the location the @filename is specified in theconf file. For example:
Include {
Options {
compression=GZIP
}
@/home/files/my-files
}
81
Configuration 8.5: File Set with Include File
� Any name beginning with a vertical bar (|) is assumed to be the name of a program. This programwill be executed on the Director’s machine at the time the Job starts (not when the Director readsthe configuration file), and any output from that program will be assumed to be a list of files ordirectories, one per line, to be included. Before submitting the specified command Bareos willperforme character substitution.
This allows you to have a job that, for example, includes all the local partitions even if you changethe partitioning by adding a disk. The examples below show you how to do this. However, pleasenote two things:1. if you want the local filesystems, you probably should be using the fstype directive and setonefs=no.
2. the exact syntax of the command needed in the examples below is very system dependent. Forexample, on recent Linux systems, you may need to add the -P option, on FreeBSD systems, theoptions will be different as well.
In general, you will need to prefix your command or commands with a sh -c so that they areinvoked by a shell. This will not be the case if you are invoking a script as in the second examplebelow. Also, you must take care to escape (precede with a \) wild-cards, shell character, andto ensure that any spaces in your command are escaped as well. If you use a single quotes (’)within a double quote (”), Bareos will treat everything between the single quotes as one field so itwill not be necessary to escape the spaces. In general, getting all the quotes and escapes correctis a real pain as you can see by the next example. As a consequence, it is often easier to puteverything in a file and simply use the file name within Bareos. In that case the sh -c will notbe necessary providing the first line of the file is #!/bin/sh.
As an example:
Include {
Options {
signature = SHA1
}
File = "|sh -c ’df -l | grep \"^/dev/hd[ab]\" | grep -v \".*/tmp\" | awk \"{print \\$6}\"’"
}
Configuration 8.6: File Set with inline script
will produce a list of all the local partitions on a Linux system. Quoting is a real problem becauseyou must quote for Bareos which consists of preceding every \ and every ” with a \, and you mustalso quote for the shell command. In the end, it is probably easier just to execute a script filewith:
Include {
Options {
signature=MD5
}
File = "|my_partitions"
}
Configuration 8.7: File Set with external script
where my_partitions has:
#!/bin/sh
df -l | grep "^/dev/hd[ab]" | grep -v ".*/tmp" \
| awk "{print \$6}"
If the vertical bar (|) in front of my_partitions is preceded by a backslash as in \|, the programwill be executed on the Client’s machine instead of on the Director’s machine. Please note thatif the filename is given within quotes, you will need to use two slashes. An example, provided byJohn Donagher, that backs up all the local UFS partitions on a remote system is:
FileSet {
Name = "All local partitions"
Include {
Options {
signature=SHA1
82
onefs=yes
}
File = "\\|bash -c \"df -klF ufs | tail +2 | awk ’{print \$6}’\""
}
}
Configuration 8.8: File Set with inline script in quotes
The above requires two backslash characters after the double quote (one preserves the next one).If you are a Linux user, just change the ufs to ext3 (or your preferred filesystem type), and youwill be in business.
If you know what filesystems you have mounted on your system, e.g. for Linux only using ext2,ext3 or ext4, you can backup all local filesystems using something like:
Include {
Options {
signature = SHA1
onfs=no
fstype=ext2
}
File = /
}
Configuration 8.9: File Set to backup all extfs partions
� Any file-list item preceded by a less-than sign (<) will be taken to be a file. This file will beread on the Director’s machine (see below for doing it on the Client machine) at the time the Jobstarts, and the data will be assumed to be a list of directories or files, one per line, to be included.The names should start in column 1 and should not be quoted even if they contain spaces. Thisfeature allows you to modify the external file and change what will be saved without stoppingand restarting Bareos as would be necessary if using the @ modifier noted above. For example:
Include {
Options {
signature = SHA1
}
File = "</home/files/local-filelist"
}
If you precede the less-than sign (<) with a backslash as in \<, the file-list will be read on theClient machine instead of on the Director’s machine. Please note that if the filename is givenwithin quotes, you will need to use two slashes.
Include {
Options {
signature = SHA1
}
File = "\\</home/xxx/filelist-on-client"
}
� If you explicitly specify a block device such as /dev/hda1, then Bareos will assume that this isa raw partition to be backed up. In this case, you are strongly urged to specify a sparse=yesinclude option, otherwise, you will save the whole partition rather than just the actual data thatthe partition contains. For example:
Include {
Options {
signature=MD5
sparse=yes
}
File = /dev/hd6
}
Configuration 8.10: Backup Raw Partitions
will backup the data in device /dev/hd6. Note, the bf /dev/hd6 must be the raw partition itself.Bareos will not back it up as a raw device if you specify a symbolic link to a raw device such asmy be created by the LVM Snapshot utilities.
� A file-list may not contain wild-cards. Use directives in the Options resource if you wish to specifywild-cards or regular expression matching.
83
Exclude Dir Containing = <filename>This directive can be added to the Include section of the FileSet resource. If the specified filename
(filename-string) is found on the Client in any directory to be backed up, the whole directory willbe ignored (not backed up). We recommend to use the filename .nobackup, as it is a hidden file onunix systems, and explains what is the purpose of the file.
For example:
# List of files to be backed up
FileSet {
Name = "MyFileSet"
Include {
Options {
signature = MD5
}
File = /home
Exclude Dir Containing = .nobackup
}
}
Configuration 8.11: Exlude Directories containing the file .nobackup
But in /home, there may be hundreds of directories of users and some people want to indicate thatthey don’t want to have certain directories backed up. For example, with the above FileSet, if the useror sysadmin creates a file named .nobackup in specific directories, such as
/home/user/www/cache/.nobackup
/home/user/temp/.nobackup
then Bareos will not backup the two directories named:
/home/user/www/cache
/home/user/temp
NOTE: subdirectories will not be backed up. That is, the directive applies to the two directories inquestion and any children (be they files, directories, etc).
Plugin = <plugin-name:plugin-parameter1:plugin-parameter2:. . .>Instead of only specifying files, a file set can also use plugins. Plugins are additional libraries that
handle specific requirements. The purpose of plugins is to provide an interface to any system programfor backup and restore. That allows you, for example, to do database backups without a local dump.
The syntax and semantics of the Plugin directive require the first part of the string up to the colon tobe the name of the plugin. Everything after the first colon is ignored by the File daemon but is passedto the plugin. Thus the plugin writer may define the meaning of the rest of the string as he wishes.
The program bpluginfo can be used, to retreive information about a specific plugin.
Examples about the bpipe- and the mssql-plugin can be found in the sections about the bpipe Pluginand the Backup of MSSQL Databases with Bareos Plugin.
Note: It is also possible to define more than one plugin directive in a FileSet to do several databasedumps at once.
Options = <. . .>See the FileSet Options Ressource section.
FileSet Options Ressource
The Options resource is optional, but when specified, it will contain a list of keyword=value options to beapplied to the file-list. See below for the definition of file-list. Multiple Options resources may be specifiedone after another. As the files are found in the specified directories, the Options will applied to the filenamesto determine if and how the file should be backed up. The wildcard and regular expression pattern matchingparts of the Options resources are checked in the order they are specified in the FileSet until the first one
84
that matches. Once one matches, the compression and other flags within the Options specification will applyto the pattern matched.
A key point is that in the absence of an Option or no other Option is matched, every file is accepted forbacking up. This means that if you want to exclude something, you must explicitly specify an Option withan exclude = yes and some pattern matching.
Once Bareos determines that the Options resource matches the file under consideration, that file will besaved without looking at any other Options resources that may be present. This means that any wild cardsmust appear before an Options resource without wild cards.
If for some reason, Bareos checks all the Options resources to a file under consideration for backup, but thereare no matches (generally because of wild cards that don’t match), Bareos as a default will then backup thefile. This is quite logical if you consider the case of no Options clause is specified, where you want everythingto be backed up, and it is important to keep in mind when excluding as mentioned above.
However, one additional point is that in the case that no match was found, Bareos will use the options foundin the last Options resource. As a consequence, if you want a particular set of ”default” options, you shouldput them in an Options resource after any other Options.
It is a good idea to put all your wild-card and regex expressions inside double quotes to prevent conf filescanning problems.
This is perhaps a bit overwhelming, so there are a number of examples included below to illustrate how thisworks.
You find yourself using a lot of Regex statements, which will cost quite a lot of CPU time, we recommendyou simplify them if you can, or better yet convert them to Wild statements which are much more efficient.
The directives within an Options resource may be one of the following:
AutoExclude = <yes|no> (default: yes)Automatically exclude files not intended for backup. Currently only used for Windows, to excludefiles defined in the registry key HKEY_LOCAL_MACHINE\SYSTEM \CurrentControlSet \Control \
BackupRestore \FilesNotToBackup , see section FilesNotToBackup Registry Key.Version >= 14.2.2
compression=<GZIP|LZO|LZFAST|LZ4|LZ4HC>
compression=GZIPAll files saved will be software compressed using the GNU ZIP compression format. The com-
pression is done on a file by file basis by the File daemon. If there is a problem reading the tapein a single record of a file, it will at most affect that file and none of the other files on the tape.Normally this option is not needed if you have a modern tape drive as the drive will do its owncompression. In fact, if you specify software compression at the same time you have hardwarecompression turned on, your files may actually take more space on the volume.
Software compression is very important if you are writing your Volumes to a file, and it can alsobe helpful if you have a fast computer but a slow network, otherwise it is generally better to relyyour tape drive’s hardware compression. As noted above, it is not generally a good idea to doboth software and hardware compression.
Specifying GZIP uses the default compression level 6 (i.e. GZIP is identical to GZIP6). Ifyou want a different compression level (1 through 9), you can specify it by appending the levelnumber with no intervening spaces to GZIP. Thus compression=GZIP1 would give minimumcompression but the fastest algorithm, and compression=GZIP9 would give the highest level ofcompression, but requires more computation. According to the GZIP documentation, compressionlevels greater than six generally give very little extra compression and are rather CPU intensive.
You can overwrite this option per Storage resource with AllowCompression option.
compression=LZOAll files saved will be software compressed using the LZO compression format. The compression
is done on a file by file basis by the File daemon. Everything else about GZIP is true for LZO.
LZO provides much faster compression and decompression speed but lower compression ratio thanGZIP. If your CPU is fast enough you should be able to compress your data without making thebackup duration longer.
Note that Bareos only use one compression level LZO1X-1 specified by LZO.
You can overwrite this option per Storage resource with AllowCompression option.
85
compression=LZFASTAll files saved will be software compressed using the LZFAST compression format. The compres-
sion is done on a file by file basis by the File daemon. Everything else about GZIP is true forLZFAST.
LZFAST provides much faster compression and decompression speed but lower compression ratiothan GZIP. If your CPU is fast enough you should be able to compress your data without makingthe backup duration longer.
You can overwrite this option per Storage resource with AllowCompression option.
compression=LZ4All files saved will be software compressed using the LZ4 compression format. The compression
is done on a file by file basis by the File daemon. Everything else about GZIP is true for LZ4.
LZ4 provides much faster compression and decompression speed but lower compression ratio thanGZIP. If your CPU is fast enough you should be able to compress your data without making thebackup duration longer.
Both LZ4 and LZ4HC have the same decompression speed which is about twice the speed of theLZO compression. So for a restore both LZ4 and LZ4HC are good candidates.
You can overwrite this option per Storage resource with AllowCompression option.
compression=LZ4HCAll files saved will be software compressed using the LZ4HC compression format. The compressionis done on a file by file basis by the File daemon. Everything else about GZIP is true for LZ4.
LZ4HC is the High Compression version of the LZ4 compression. It has a higher compressionratio than LZ4 and is more comparable to GZIP-6 in both compression rate and cpu usage.
Both LZ4 and LZ4HC have the same decompression speed which is about twice the speed of theLZO compression. So for a restore both LZ4 and LZ4HC are good candidates.
You can overwrite this option per Storage resource with AllowCompression option.
signature=<SHA1|MD5>
signature=SHA1An SHA1 signature will be computed for all The SHA1 algorithm is purported to be some what
slower than the MD5 algorithm, but at the same time is significantly better from a cryptographicpoint of view (i.e. much fewer collisions, much lower probability of being hacked.) It adds fourmore bytes than the MD5 signature. We strongly recommend that either this option or MD5be specified as a default for all files. Note, only one of the two options MD5 or SHA1 can becomputed for any file.
signature=MD5An MD5 signature will be computed for all files saved. Adding this option generates about 5%
extra overhead for each file saved. In addition to the additional CPU time, the MD5 signatureadds 16 more bytes per file to your catalog. We strongly recommend that this option or the SHA1option be specified as a default for all files.
basejob=<options> The options letters specified are used when running a Backup Level=Full withBaseJobs. The options letters are the same than in the verify= option below.
accurate=<options> The options letters specified are used when running a BackupLevel=Incremental/Differential in Accurate mode. The options letters are the same thanin the verify= option below.
verify=<options>The options letters specified are used when running a Verify Level=Catalog as well as the Disk-
ToCatalog level job. The options letters may be any combination of the following:
i compare the inodes
p compare the permission bits
n compare the number of links
u compare the user id
g compare the group id
86
s compare the size
a compare the access time
m compare the modification time (st mtime)
c compare the change time (st ctime)
d report file size decreases
5 compare the MD5 signature
1 compare the SHA1 signature
A Only for Accurate option, it allows to always backup the file
A useful set of general options on the Level=Catalog or Level=DiskToCatalog verify is pins5 i.e.compare permission bits, inodes, number of links, size, and MD5 changes.
onefs=yes|noIf set to yes (the default), Bareos will remain on a single file system. That is it will not backup file
systems that are mounted on a subdirectory. If you are using a *nix system, you may not even beaware that there are several different filesystems as they are often automatically mounted by the OS(e.g. /dev, /net, /sys, /proc, ...). Bareos will inform you when it decides not to traverse into anotherfilesystem. This can be very useful if you forgot to backup a particular partition. An example of theinformational message in the job report is:
rufus-fd: /misc is a different filesystem. Will not descend from / into /misc
rufus-fd: /net is a different filesystem. Will not descend from / into /net
rufus-fd: /var/lib/nfs/rpc_pipefs is a different filesystem. Will not descend from /var/lib/nfs into /var/lib/nfs/rpc_pipefs
rufus-fd: /selinux is a different filesystem. Will not descend from / into /selinux
rufus-fd: /sys is a different filesystem. Will not descend from / into /sys
rufus-fd: /dev is a different filesystem. Will not descend from / into /dev
rufus-fd: /home is a different filesystem. Will not descend from / into /home
If you wish to backup multiple filesystems, you can explicitly list each filesystem you want saved.Otherwise, if you set the onefs option to no, Bareos will backup all mounted file systems (i.e. traversemount points) that are found within the FileSet. Thus if you have NFS or Samba file systemsmounted on a directory listed in your FileSet, they will also be backed up. Normally, it is preferableto set onefs=yes and to explicitly name each filesystem you want backed up. Explicitly naming thefilesystems you want backed up avoids the possibility of getting into a infinite loop recursing filesystems.Another possibility is to use onefs=no and to set fstype=ext2, .... See the example below for moredetails.
If you think that Bareos should be backing up a particular directory and it is not, and you haveonefs=no set, before you complain, please do:
stat /
stat <filesystem>
where you replace filesystem with the one in question. If the Device: number is different for / andfor your filesystem, then they are on different filesystems. E.g.
stat /
File: ‘/’
Size: 4096 Blocks: 16 IO Block: 4096 directory
Device: 302h/770d Inode: 2 Links: 26
Access: (0755/drwxr-xr-x) Uid: ( 0/ root) Gid: ( 0/ root)
Access: 2005-11-10 12:28:01.000000000 +0100
Modify: 2005-09-27 17:52:32.000000000 +0200
Change: 2005-09-27 17:52:32.000000000 +0200
stat /net
File: ‘/home’
Size: 4096 Blocks: 16 IO Block: 4096 directory
Device: 308h/776d Inode: 2 Links: 7
Access: (0755/drwxr-xr-x) Uid: ( 0/ root) Gid: ( 0/ root)
Access: 2005-11-10 12:28:02.000000000 +0100
Modify: 2005-11-06 12:36:48.000000000 +0100
Change: 2005-11-06 12:36:48.000000000 +0100
87
Also be aware that even if you include /home in your list of files to backup, as you most likely should,you will get the informational message that ”/home is a different filesystem” when Bareos is processingthe / directory. This message does not indicate an error. This message means that while examiningthe File = referred to in the second part of the message, Bareos will not descend into the directorymentioned in the first part of the message. However, it is possible that the separate filesystem will bebacked up despite the message. For example, consider the following FileSet:
File = /
File = /var
where /var is a separate filesystem. In this example, you will get a message saying that Bareos willnot decend from / into /var. But it is important to realise that Bareos will descend into /var fromthe second File directive shown above. In effect, the warning is bogus, but it is supplied to alert youto possible omissions from your FileSet. In this example, /var will be backed up. If you changed theFileSet such that it did not specify /var, then /var will not be backed up.
honor nodump flag=<yes|no>If your file system supports the nodump flag (e. g. most BSD-derived systems) Bareos will honor
the setting of the flag when this option is set to yes. Files having this flag set will not be included inthe backup and will not show up in the catalog. For directories with the nodump flag set recursionis turned off and the directory will be listed in the catalog. If the honor nodump flag option is notdefined or set to no every file and directory will be eligible for backup.
portable=yes|noIf set to yes (default is no), the Bareos File daemon will backup Win32 files in a portable format,
but not all Win32 file attributes will be saved and restored. By default, this option is set to no,which means that on Win32 systems, the data will be backed up using Windows API calls and onWinNT/2K/XP, all the security and ownership attributes will be properly backed up (and restored).However this format is not portable to other systems – e.g. Unix, Win95/98/Me. When backing upUnix systems, this option is ignored, and unless you have a specific need to have portable backups, werecommend accept the default (no) so that the maximum information concerning your files is saved.
recurse=yes|noIf set to yes (the default), Bareos will recurse (or descend) into all subdirectories found unless the
directory is explicitly excluded using an exclude definition. If you set recurse=no, Bareos will savethe subdirectory entries, but not descend into the subdirectories, and thus will not save the files ordirectories contained in the subdirectories. Normally, you will want the default (yes).
sparse=yes|noEnable special code that checks for sparse files such as created by ndbm. The default is no, so no
checks are made for sparse files. You may specify sparse=yes even on files that are not sparse file.No harm will be done, but there will be a small additional overhead to check for buffers of all zero,and if there is a 32K block of all zeros (see below), that block will become a hole in the file, which maynot be desirable if the original file was not a sparse file.
Restrictions: Bareos reads files in 32K buffers. If the whole buffer is zero, it will be treated as asparse block and not written to tape. However, if any part of the buffer is non-zero, the whole bufferwill be written to tape, possibly including some disk sectors (generally 4098 bytes) that are all zero. Asa consequence, Bareos’s detection of sparse blocks is in 32K increments rather than the system blocksize. If anyone considers this to be a real problem, please send in a request for change with the reason.
If you are not familiar with sparse files, an example is say a file where you wrote 512 bytes at addresszero, then 512 bytes at address 1 million. The operating system will allocate only two blocks, and theempty space or hole will have nothing allocated. However, when you read the sparse file and read theaddresses where nothing was written, the OS will return all zeros as if the space were allocated, and ifyou backup such a file, a lot of space will be used to write zeros to the volume. Worse yet, when yourestore the file, all the previously empty space will now be allocated using much more disk space. Byturning on the sparse option, Bareos will specifically look for empty space in the file, and any emptyspace will not be written to the Volume, nor will it be restored. The price to pay for this is that Bareosmust search each block it reads before writing it. On a slow system, this may be important. If yoususpect you have sparse files, you should benchmark the difference or set sparse for only those filesthat are really sparse.
You probably should not use this option on files or raw disk devices that are not really sparse files (i.e.have holes in them).
88
readfifo=yes|noIf enabled, tells the Client to read the data on a backup and write the data on a restore to any
FIFO (pipe) that is explicitly mentioned in the FileSet. In this case, you must have a program alreadyrunning that writes into the FIFO for a backup or reads from the FIFO on a restore. This can beaccomplished with the RunBeforeJob directive. If this is not the case, Bareos will hang indefinitelyon reading/writing the FIFO. When this is not enabled (default), the Client simply saves the directoryentry for the FIFO.
Normally, when Bareos runs a RunBeforeJob, it waits until that script terminates, and if the scriptaccesses the FIFO to write into it, the Bareos job will block and everything will stall. However, VladimirStavrinov as supplied tip that allows this feature to work correctly. He simply adds the following tothe beginning of the RunBeforeJob script:
exec > /dev/null
Include {
Options {
signature=SHA1
readfifo=yes
}
File = /home/abc/fifo
}
Configuration 8.12: FileSet with Fifo
This feature can be used to do a ”hot” database backup. You can use the RunBeforeJob to createthe fifo and to start a program that dynamically reads your database and writes it to the fifo. Bareoswill then write it to the Volume.
During the restore operation, the inverse is true, after Bareos creates the fifo if there was any datastored with it (no need to explicitly list it or add any options), that data will be written back to thefifo. As a consequence, if any such FIFOs exist in the fileset to be restored, you must ensure that thereis a reader program or Bareos will block, and after one minute, Bareos will time out the write to thefifo and move on to the next file.
If you are planing to use a Fifo for backup, better take a look to the bpipe Plugin section.
noatime=yes|noIf enabled, and if your Operating System supports the O NOATIME file open flag, Bareos will open
all files to be backed up with this option. It makes it possible to read a file without updating the inodeatime (and also without the inode ctime update which happens if you try to set the atime back to itsprevious value). It also prevents a race condition when two programs are reading the same file, butonly one does not want to change the atime. It’s most useful for backup programs and file integritycheckers (and Bareos can fit on both categories).
This option is particularly useful for sites where users are sensitive to their MailBox file access time.It replaces both the keepatime option without the inconveniences of that option (see below).
If your Operating System does not support this option, it will be silently ignored by Bareos.
mtimeonly=yes|noIf enabled, tells the Client that the selection of files during Incremental and Differential backups shouldbased only on the st mtime value in the stat() packet. The default is no which means that the selectionof files to be backed up will be based on both the st mtime and the st ctime values. In general, it isnot recommended to use this option.
keepatime=yes|noThe default is no. When enabled, Bareos will reset the st atime (access time) field of files that it
backs up to their value prior to the backup. This option is not generally recommended as there arevery few programs that use st atime, and the backup overhead is increased because of the additionalsystem call necessary to reset the times. However, for some files, such as mailboxes, when Bareos backsup the file, the user will notice that someone (Bareos) has accessed the file. In this, case keepatimecan be useful. (I’m not sure this works on Win32).
Note, if you use this feature, when Bareos resets the access time, the change time (st ctime) willautomatically be modified by the system, so on the next incremental job, the file will be backed upeven if it has not changed. As a consequence, you will probably also want to use mtimeonly = yesas well as keepatime (thanks to Rudolf Cejka for this tip).
89
checkfilechanges=yes|noIf enabled, the Client will check size, age of each file after their backup to see if they have changed
during backup. If time or size mismatch, an error will raise.
zog-fd: Client1.2007-03-31_09.46.21 Error: /tmp/test mtime changed during backup.
In general, it is recommended to use this option.
hardlinks=yes|noWhen enabled (default), this directive will cause hard links to be backed up. However, the File daemonkeeps track of hard linked files and will backup the data only once. The process of keeping track of thehard links can be quite expensive if you have lots of them (tens of thousands or more). This doesn’toccur on normal Unix systems, but if you use a program like BackupPC, it can create hundreds ofthousands, or even millions of hard links. Backups become very long and the File daemon will consumea lot of CPU power checking hard links. In such a case, set hardlinks=no and hard links will not bebacked up. Note, using this option will most likely backup more data and on a restore the file systemwill not be restored identically to the original.
wild=<string>Specifies a wild-card string to be applied to the filenames and directory names. Note, if Exclude is
not enabled, the wild-card will select which files are to be included. If Exclude=yes is specified, thewild-card will select which files are to be excluded. Multiple wild-card directives may be specified, andthey will be applied in turn until the first one that matches. Note, if you exclude a directory, no filesor directories below it will be matched.
You may want to test your expressions prior to running your backup by using the bwild program.Please see the Utilities chapter of this manual for more. You can also test your full FileSet definitionby using the estimate command in the Console chapter of this manual. It is recommended to enclosethe string in double quotes.
wilddir=<string>Specifies a wild-card string to be applied to directory names only. No filenames will be matched by
this directive. Note, if Exclude is not enabled, the wild-card will select directories to be included.If Exclude=yes is specified, the wild-card will select which directories are to be excluded. Multiplewild-card directives may be specified, and they will be applied in turn until the first one that matches.Note, if you exclude a directory, no files or directories below it will be matched.
It is recommended to enclose the string in double quotes.
You may want to test your expressions prior to running your backup by using the bwild program.Please see the Utilities chapter of this manual for more. You can also test your full FileSet definitionby using the estimate command in the Console chapter of this manual. An example of excluding withthe WildDir option on Win32 machines is presented below.
wildfile=<string>Specifies a wild-card string to be applied to non-directories. That is no directory entries will be
matched by this directive. However, note that the match is done against the full path and filename, soyour wild-card string must take into account that filenames are preceded by the full path. If Excludeis not enabled, the wild-card will select which files are to be included. If Exclude=yes is specified,the wild-card will select which files are to be excluded. Multiple wild-card directives may be specified,and they will be applied in turn until the first one that matches.
It is recommended to enclose the string in double quotes.
You may want to test your expressions prior to running your backup by using the bwild program.Please see the Utilities chapter of this manual for more. You can also test your full FileSet definitionby using the estimate command in the Console chapter of this manual. An example of excluding withthe WildFile option on Win32 machines is presented below.
regex=<string>
Specifies a POSIX extended regular expression to be applied to the filenames and directory names,which include the full path. If Exclude is not enabled, the regex will select which files are to beincluded. If Exclude=yes is specified, the regex will select which files are to be excluded. Multiple
90
regex directives may be specified within an Options resource, and they will be applied in turn until thefirst one that matches. Note, if you exclude a directory, no files or directories below it will be matched.
It is recommended to enclose the string in double quotes.
The regex libraries differ from one operating system to another, and in addition, regular expressionsare complicated, so you may want to test your expressions prior to running your backup by using thebregex program. Please see the Utilities chapter of this manual for more. You can also test your fullFileSet definition by using the estimate command in the Console chapter of this manual.
You find yourself using a lot of Regex statements, which will cost quite a lot of CPU time, we recommendyou simplify them if you can, or better yet convert them to Wild statements which are much moreefficient.
regexfile=<string>Specifies a POSIX extended regular expression to be applied to non-directories. No directories will be
matched by this directive. However, note that the match is done against the full path and filename,so your regex string must take into account that filenames are preceded by the full path. If Excludeis not enabled, the regex will select which files are to be included. If Exclude=yes is specified, theregex will select which files are to be excluded. Multiple regex directives may be specified, and theywill be applied in turn until the first one that matches.
It is recommended to enclose the string in double quotes.
The regex libraries differ from one operating system to another, and in addition, regular expressionsare complicated, so you may want to test your expressions prior to running your backup by using thebregex program. Please see the Utilities chapter of this manual for more.
regexdir=<string>Specifies a POSIX extended regular expression to be applied to directory names only. No filenames
will be matched by this directive. Note, if Exclude is not enabled, the regex will select directories filesare to be included. If Exclude=yes is specified, the regex will select which files are to be excluded.Multiple regex directives may be specified, and they will be applied in turn until the first one thatmatches. Note, if you exclude a directory, no files or directories below it will be matched.
It is recommended to enclose the string in double quotes.
The regex libraries differ from one operating system to another, and in addition, regular expressionsare complicated, so you may want to test your expressions prior to running your backup by using thebregex program. Please see the Utilities chapter of this manual for more.
Exclude = <yes|no> (default: no)When enabled, any files matched within the Options will be excluded from the backup.
aclsupport=yes|noThe default is no. If this option is set to yes, and you have the POSIX libacl installed on your Linux
system, Bareos will backup the file and directory Unix Access Control Lists (ACL) as defined in IEEEStd 1003.1e draft 17 and ”POSIX.1e” (abandoned). This feature is available on Unix systems onlyand requires the Linux ACL library. Bareos is automatically compiled with ACL support if the libacllibrary is installed on your Linux system (shown in config.out). While restoring the files Bareos willtry to restore the ACLs, if there is no ACL support available on the system, Bareos restores the filesand directories but not the ACL information. Please note, if you backup an EXT3 or XFS filesystemwith ACLs, then you restore them to a different filesystem (perhaps reiserfs) that does not have ACLs,the ACLs will be ignored.
For other operating systems there is support for either POSIX ACLs or the more extensible NFSv4ACLs.
The ACL stream format between Operation Systems is not compatible so for example an ACL savedon Linux cannot be restored on Solaris.
The following Operating Systems are currently supported:
1. AIX (pre-5.3 (POSIX) and post 5.3 (POSIX and NFSv4) ACLs)
2. Darwin
3. FreeBSD (POSIX and NFSv4/ZFS ACLs)
4. HPUX

91
5. IRIX
6. Linux
7. Solaris (POSIX and NFSv4/ZFS ACLs)
8. Tru64
xattrsupport=yes|noThe default is no. If this option is set to yes, and your operating system support either so called
Extended Attributes or Extensible Attributes Bareos will backup the file and directory XATTR data.This feature is available on UNIX only and depends on support of some specific library calls in libc.
The XATTR stream format between Operating Systems is not compatible so an XATTR saved onLinux cannot for example be restored on Solaris.
On some operating systems ACLs are also stored as Extended Attributes (Linux, Darwin, FreeBSD)Bareos checks if you have the aclsupport option enabled and if so will not save the same info whensaving extended attribute information. Thus ACLs are only saved once.
The following Operating Systems are currently supported:
1. AIX (Extended Attributes)
2. Darwin (Extended Attributes)
3. FreeBSD (Extended Attributes)
4. IRIX (Extended Attributes)
5. Linux (Extended Attributes)
6. NetBSD (Extended Attributes)
7. Solaris (Extended Attributes and Extensible Attributes)
8. Tru64 (Extended Attributes)
ignore case=yes|noThe default is no. On Windows systems, you will almost surely want to set this to yes. When this
directive is set to yes all the case of character will be ignored in wild-card and regex comparisons.That is an uppercase A will match a lowercase a.
fstype=filesystem-typeThis option allows you to select files and directories by the filesystem type. The permitted filesystem-
type names are:
ext2, jfs, ntfs, proc, reiserfs, xfs, usbdevfs, sysfs, smbfs, iso9660.
You may have multiple Fstype directives, and thus permit matching of multiple filesystem types withina single Options resource. If the type specified on the fstype directive does not match the filesystemfor a particular directive, that directory will not be backed up. This directive can be used to preventbacking up non-local filesystems. Normally, when you use this directive, you would also set onefs=noso that Bareos will traverse filesystems.
This option is not implemented in Win32 systems.
DriveType=Windows-drive-typeThis option is effective only on Windows machines and is somewhat similar to the Unix/Linux fstype
described above, except that it allows you to select what Windows drive types you want to allow. Bydefault all drive types are accepted.
The permitted drivetype names are:
removable, fixed, remote, cdrom, ramdisk
You may have multiple Driveype directives, and thus permit matching of multiple drive types within asingle Options resource. If the type specified on the drivetype directive does not match the filesystemfor a particular directive, that directory will not be backed up. This directive can be used to preventbacking up non-local filesystems. Normally, when you use this directive, you would also set onefs=noso that Bareos will traverse filesystems.
This option is not implemented in Unix/Linux systems.
hfsplussupport=yes|noThis option allows you to turn on support for Mac OSX HFS plus finder information.
92
strippath=<integer>This option will cause integer paths to be stripped from the front of the full path/filename being
backed up. This can be useful if you are migrating data from another vendor or if you have taken asnapshot into some subdirectory. This directive can cause your filenames to be overlayed with regularbackup data, so should be used only by experts and with great care.
size=sizeoptionThis option will allow you to select files by their actual size. You can select either files smaller than
a certain size or bigger then a certain size, files of a size in a certain range or files of a size which iswithin 1 % of its actual size.
The following settings can be used:
1. <size>-<size> - Select file in range size - size.
2. <size - Select files smaller than size.
3. >size - Select files bigger than size.
4. size - Select files which are within 1 % of size.
shadowing=none|localwarn|localremove|globalwarn|globalremoveThe default is none. This option performs a check within the fileset for any file-list entries which are
shadowing each other. Lets say you specify / and /usr but /usr is not a seperate filesystem then inthe normal situation both / and /usr would lead to data being backuped twice.
The following settings can be used:
1. none - Do NO shadowing check
2. localwarn - Do shadowing check within one include block and warn
3. localremove - Do shadowing check within one include block and remove duplicates
4. globalwarn - Do shadowing check between all include blocks and warn
5. globalremove - Do shadowing check between all include blocks and remove duplicates
The local and global part of the setting relate to the fact if the check should be performed only withinone include block (local) or between multiple include blocks of the same fileset (global). The warn andremove part of the keyword sets the action e.g. warn the user about shadowing or remove the entryshadowing the other.
meta=tagThis option will add a meta tag to a fileset. These meta tags are used by the Native NDMP protocol
to pass NDMP backup or restore environment variables via the Data Management Agent (DMA) inBareos to the remote NDMP Data Agent. You can have zero or more metatags which are all passedto the remote NDMP Data Agent.
8.5.2 FileSet Exclude Ressource
FileSet Exclude-Ressources very similar to Include-Ressources, except that they only allow following direc-tives:
File = < filename | directory | |command | \<includefile-client | <includefile-server >Files to exclude are descripted in the same way as at the FileSet Include Ressource.
For example:
FileSet {
Name = Exclusion_example
Include {
Options {
Signature = SHA1
}
File = /
File = /boot
File = /home
File = /rescue
File = /usr
93
}
Exclude {
File = /proc
File = /tmp # Don’t add trailing /
File = .journal
File = .autofsck
}
}
Configuration 8.13: FileSet using Exclude
Another way to exclude files and directories is to use the Exclude option from the Include section.
8.5.3 FileSet Examples
The following is an example of a valid FileSet resource definition. Note, the first Include pulls in the contentsof the file /etc/backup.list when Bareos is started (i.e. the @), and that file must have each filename tobe backed up preceded by a File = and on a separate line.
FileSet {
Name = "Full Set"
Include {
Options {
Compression=GZIP
signature=SHA1
Sparse = yes
}
@/etc/backup.list
}
Include {
Options {
wildfile = "*.o"
wildfile = "*.exe"
Exclude = yes
}
File = /root/myfile
File = /usr/lib/another_file
}
}
Configuration 8.14: FileSet using import
In the above example, all the files contained in /etc/backup.list will be compressed with GZIP compres-sion, an SHA1 signature will be computed on the file’s contents (its data), and sparse file handling willapply.The two directories /root/myfile and /usr/lib/another_file will also be saved without any options, butall files in those directories with the extensions .o and .exe will be excluded.Let’s say that you now want to exclude the directory /tmp. The simplest way to do so is to add an excludedirective that lists /tmp. The example above would then become:
FileSet {
Name = "Full Set"
Include {
Options {
Compression=GZIP
signature=SHA1
Sparse = yes
}
@/etc/backup.list
}
Include {
Options {
wildfile = "*.o"
wildfile = "*.exe"
Exclude = yes
}
File = /root/myfile
File = /usr/lib/another_file
}
Exclude {
File = /tmp # don’t add trailing /
}
}
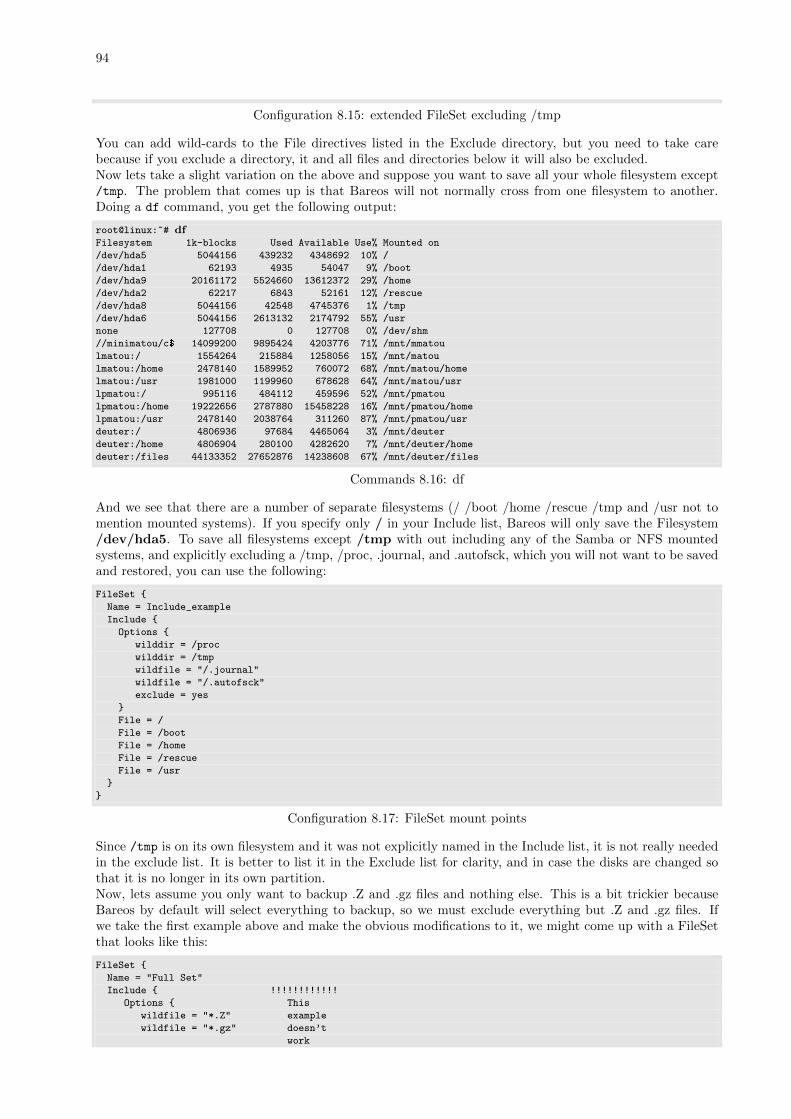
94
Configuration 8.15: extended FileSet excluding /tmp
You can add wild-cards to the File directives listed in the Exclude directory, but you need to take carebecause if you exclude a directory, it and all files and directories below it will also be excluded.Now lets take a slight variation on the above and suppose you want to save all your whole filesystem except/tmp. The problem that comes up is that Bareos will not normally cross from one filesystem to another.Doing a df command, you get the following output:
root@linux:~# dfFilesystem 1k-blocks Used Available Use% Mounted on
/dev/hda5 5044156 439232 4348692 10% /
/dev/hda1 62193 4935 54047 9% /boot
/dev/hda9 20161172 5524660 13612372 29% /home
/dev/hda2 62217 6843 52161 12% /rescue
/dev/hda8 5044156 42548 4745376 1% /tmp
/dev/hda6 5044156 2613132 2174792 55% /usr
none 127708 0 127708 0% /dev/shm
//minimatou/c$ 14099200 9895424 4203776 71% /mnt/mmatou
lmatou:/ 1554264 215884 1258056 15% /mnt/matou
lmatou:/home 2478140 1589952 760072 68% /mnt/matou/home
lmatou:/usr 1981000 1199960 678628 64% /mnt/matou/usr
lpmatou:/ 995116 484112 459596 52% /mnt/pmatou
lpmatou:/home 19222656 2787880 15458228 16% /mnt/pmatou/home
lpmatou:/usr 2478140 2038764 311260 87% /mnt/pmatou/usr
deuter:/ 4806936 97684 4465064 3% /mnt/deuter
deuter:/home 4806904 280100 4282620 7% /mnt/deuter/home
deuter:/files 44133352 27652876 14238608 67% /mnt/deuter/files
Commands 8.16: df
And we see that there are a number of separate filesystems (/ /boot /home /rescue /tmp and /usr not tomention mounted systems). If you specify only / in your Include list, Bareos will only save the Filesystem/dev/hda5. To save all filesystems except /tmp with out including any of the Samba or NFS mountedsystems, and explicitly excluding a /tmp, /proc, .journal, and .autofsck, which you will not want to be savedand restored, you can use the following:
FileSet {
Name = Include_example
Include {
Options {
wilddir = /proc
wilddir = /tmp
wildfile = "/.journal"
wildfile = "/.autofsck"
exclude = yes
}
File = /
File = /boot
File = /home
File = /rescue
File = /usr
}
}
Configuration 8.17: FileSet mount points
Since /tmp is on its own filesystem and it was not explicitly named in the Include list, it is not really neededin the exclude list. It is better to list it in the Exclude list for clarity, and in case the disks are changed sothat it is no longer in its own partition.Now, lets assume you only want to backup .Z and .gz files and nothing else. This is a bit trickier becauseBareos by default will select everything to backup, so we must exclude everything but .Z and .gz files. Ifwe take the first example above and make the obvious modifications to it, we might come up with a FileSetthat looks like this:
FileSet {
Name = "Full Set"
Include { !!!!!!!!!!!!
Options { This
wildfile = "*.Z" example
wildfile = "*.gz" doesn’t
work
95
} !!!!!!!!!!!!
File = /myfile
}
}
Configuration 8.18: Non-working example
The *.Z and *.gz files will indeed be backed up, but all other files that are not matched by the Optionsdirectives will automatically be backed up too (i.e. that is the default rule).To accomplish what we want, we must explicitly exclude all other files. We do this with the following:
FileSet {
Name = "Full Set"
Include {
Options {
wildfile = "*.Z"
wildfile = "*.gz"
}
Options {
Exclude = yes
RegexFile = ".*"
}
File = /myfile
}
}
Configuration 8.19: Exclude all except specific wildcards
The ”trick” here was to add a RegexFile expression that matches all files. It does not match directory names,so all directories in /myfile will be backed up (the directory entry) and any *.Z and *.gz files contained inthem. If you know that certain directories do not contain any *.Z or *.gz files and you do not want thedirectory entries backed up, you will need to explicitly exclude those directories. Backing up a directoryentries is not very expensive.Bareos uses the system regex library and some of them are different on different OSes. The above hasbeen reported not to work on FreeBSD. This can be tested by using the estimate job=job-name listingcommand in the console and adapting the RegexFile expression appropriately.Please be aware that allowing Bareos to traverse or change file systems can be very dangerous. For example,with the following:
FileSet {
Name = "Bad example"
Include {
Options {
onefs=no
}
File = /mnt/matou
}
}
Configuration 8.20: backup all filesystem below /mnt/matou (use with care)
you will be backing up an NFS mounted partition (/mnt/matou), and since onefs is set to no, Bareos willtraverse file systems. Now if /mnt/matou has the current machine’s file systems mounted, as is often thecase, you will get yourself into a recursive loop and the backup will never end.As a final example, let’s say that you have only one or two subdirectories of /home that you want to backup.For example, you want to backup only subdirectories beginning with the letter a and the letter b – i.e./home/a* and /home/b*. Now, you might first try:
FileSet {
Name = "Full Set"
Include {
Options {
wilddir = "/home/a*"
wilddir = "/home/b*"
}
File = /home
}
}
Configuration 8.21: Non-working example
The problem is that the above will include everything in /home. To get things to work correctly, you needto start with the idea of exclusion instead of inclusion. So, you could simply exclude all directories exceptthe two you want to use:
96
FileSet {
Name = "Full Set"
Include {
Options {
RegexDir = "^/home/[c-z]"
exclude = yes
}
File = /home
}
}
Configuration 8.22: Exclude by regex
And assuming that all subdirectories start with a lowercase letter, this would work.An alternative would be to include the two subdirectories desired and exclude everything else:
FileSet {
Name = "Full Set"
Include {
Options {
wilddir = "/home/a*"
wilddir = "/home/b*"
}
Options {
RegexDir = ".*"
exclude = yes
}
File = /home
}
}
Configuration 8.23: Include and Exclude
The following example shows how to back up only the My Pictures directory inside the My Documentsdirectory for all users in C:/Documents and Settings, i.e. everything matching the pattern:C:/Documents and Settings/*/My Documents/My Pictures/*
To understand how this can be achieved, there are two important points to remember:Firstly, Bareos walks over the filesystem depth-first starting from the File = lines. It stops descending whena directory is excluded, so you must include all ancestor directories of each directory containing files to beincluded.Secondly, each directory and file is compared to the Options clauses in the order they appear in the FileSet.When a match is found, no further clauses are compared and the directory or file is either included orexcluded.The FileSet resource definition below implements this by including specifc directories and files and excludingeverything else.
FileSet {
Name = "AllPictures"
Include {
File = "C:/Documents and Settings"
Options {
signature = SHA1
verify = s1
IgnoreCase = yes
# Include all users’ directories so we reach the inner ones. Unlike a
# WildDir pattern ending in *, this RegExDir only matches the top-level
# directories and not any inner ones.
RegExDir = "^C:/Documents and Settings/[^/]+$"
# Ditto all users’ My Documents directories.
WildDir = "C:/Documents and Settings/*/My Documents"
# Ditto all users’ My Documents/My Pictures directories.
WildDir = "C:/Documents and Settings/*/My Documents/My Pictures"
# Include the contents of the My Documents/My Pictures directories and
# any subdirectories.
Wild = "C:/Documents and Settings/*/My Documents/My Pictures/*"
}
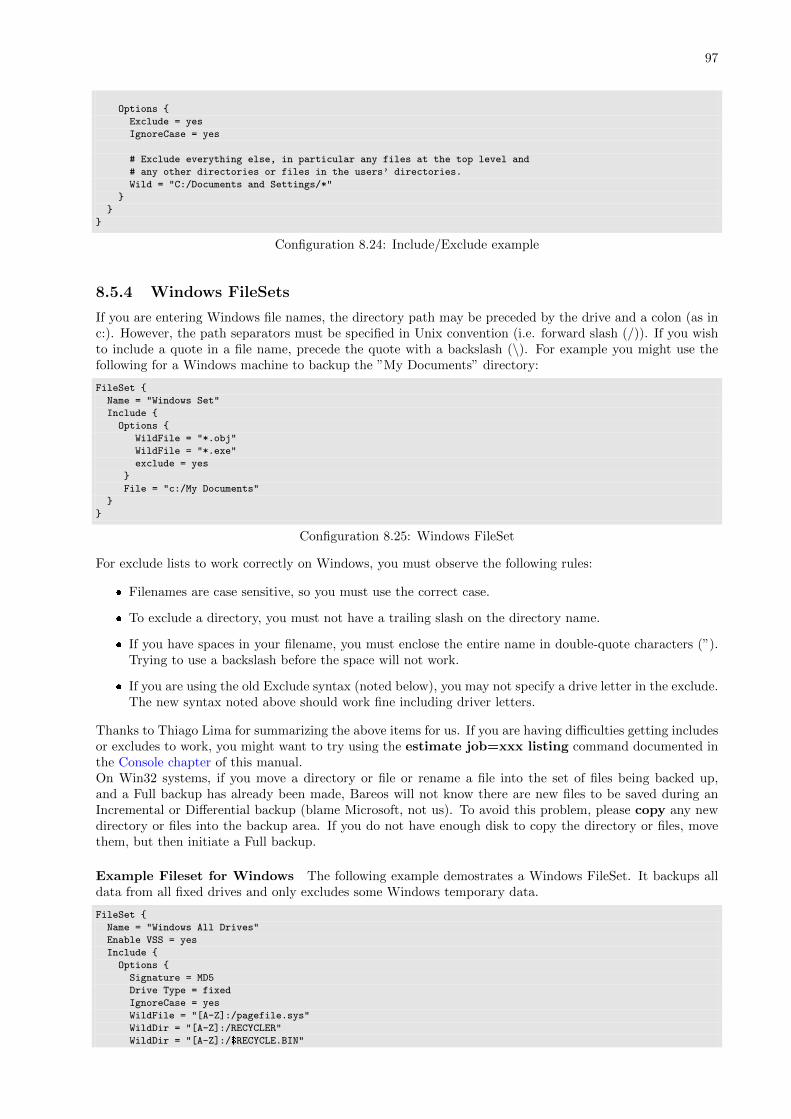
97
Options {
Exclude = yes
IgnoreCase = yes
# Exclude everything else, in particular any files at the top level and
# any other directories or files in the users’ directories.
Wild = "C:/Documents and Settings/*"
}
}
}
Configuration 8.24: Include/Exclude example
8.5.4 Windows FileSets
If you are entering Windows file names, the directory path may be preceded by the drive and a colon (as inc:). However, the path separators must be specified in Unix convention (i.e. forward slash (/)). If you wishto include a quote in a file name, precede the quote with a backslash (\). For example you might use thefollowing for a Windows machine to backup the ”My Documents” directory:
FileSet {
Name = "Windows Set"
Include {
Options {
WildFile = "*.obj"
WildFile = "*.exe"
exclude = yes
}
File = "c:/My Documents"
}
}
Configuration 8.25: Windows FileSet
For exclude lists to work correctly on Windows, you must observe the following rules:
� Filenames are case sensitive, so you must use the correct case.
� To exclude a directory, you must not have a trailing slash on the directory name.
� If you have spaces in your filename, you must enclose the entire name in double-quote characters (”).Trying to use a backslash before the space will not work.
� If you are using the old Exclude syntax (noted below), you may not specify a drive letter in the exclude.The new syntax noted above should work fine including driver letters.
Thanks to Thiago Lima for summarizing the above items for us. If you are having difficulties getting includesor excludes to work, you might want to try using the estimate job=xxx listing command documented inthe Console chapter of this manual.On Win32 systems, if you move a directory or file or rename a file into the set of files being backed up,and a Full backup has already been made, Bareos will not know there are new files to be saved during anIncremental or Differential backup (blame Microsoft, not us). To avoid this problem, please copy any newdirectory or files into the backup area. If you do not have enough disk to copy the directory or files, movethem, but then initiate a Full backup.
Example Fileset for Windows The following example demostrates a Windows FileSet. It backups alldata from all fixed drives and only excludes some Windows temporary data.
FileSet {
Name = "Windows All Drives"
Enable VSS = yes
Include {
Options {
Signature = MD5
Drive Type = fixed
IgnoreCase = yes
WildFile = "[A-Z]:/pagefile.sys"
WildDir = "[A-Z]:/RECYCLER"
WildDir = "[A-Z]:/$RECYCLE.BIN"
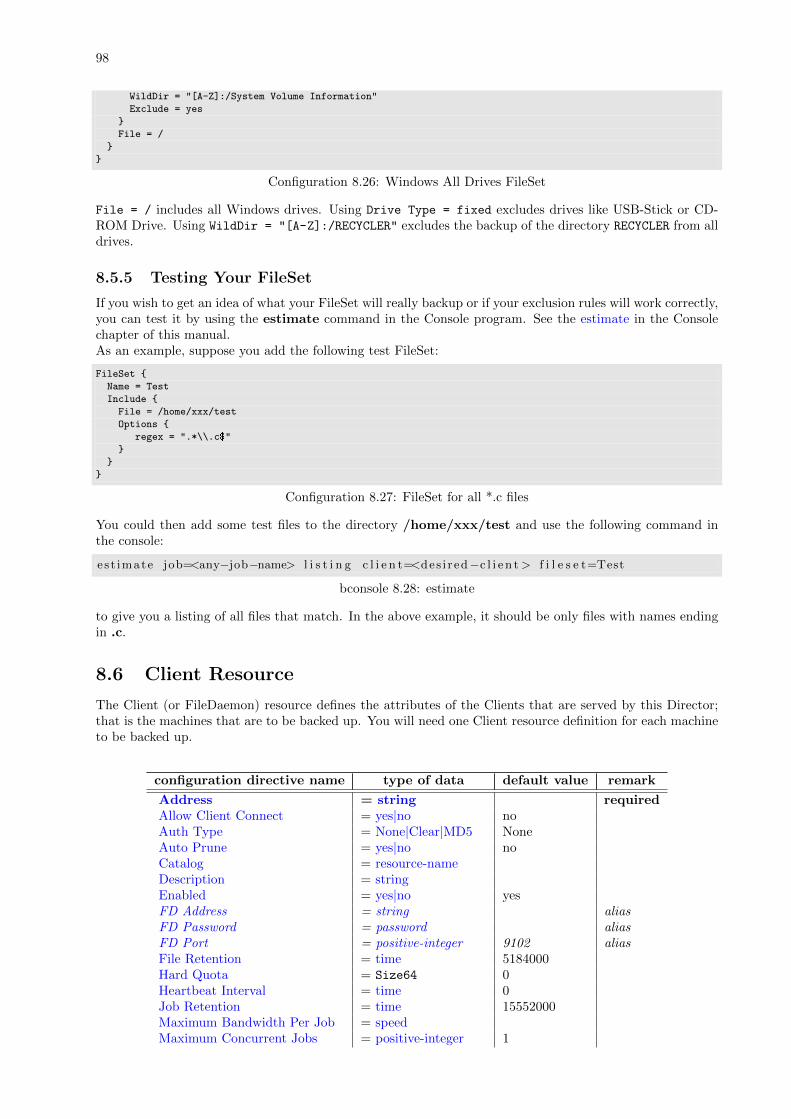
98
WildDir = "[A-Z]:/System Volume Information"
Exclude = yes
}
File = /
}
}
Configuration 8.26: Windows All Drives FileSet
File = / includes all Windows drives. Using Drive Type = fixed excludes drives like USB-Stick or CD-ROM Drive. Using WildDir = "[A-Z]:/RECYCLER" excludes the backup of the directory RECYCLER from alldrives.
8.5.5 Testing Your FileSet
If you wish to get an idea of what your FileSet will really backup or if your exclusion rules will work correctly,you can test it by using the estimate command in the Console program. See the estimate in the Consolechapter of this manual.As an example, suppose you add the following test FileSet:
FileSet {
Name = Test
Include {
File = /home/xxx/test
Options {
regex = ".*\\.c$"
}
}
}
Configuration 8.27: FileSet for all *.c files
You could then add some test files to the directory /home/xxx/test and use the following command inthe console:
es t imate job=<any−job−name> l i s t i n g c l i e n t=<des i r ed−c l i e n t> f i l e s e t=Test
bconsole 8.28: estimate
to give you a listing of all files that match. In the above example, it should be only files with names endingin .c.
8.6 Client Resource
The Client (or FileDaemon) resource defines the attributes of the Clients that are served by this Director;that is the machines that are to be backed up. You will need one Client resource definition for each machineto be backed up.
configuration directive name type of data default value remark
Address = string requiredAllow Client Connect = yes|no noAuth Type = None|Clear|MD5 NoneAuto Prune = yes|no noCatalog = resource-nameDescription = stringEnabled = yes|no yesFD Address = string aliasFD Password = password aliasFD Port = positive-integer 9102 aliasFile Retention = time 5184000Hard Quota = Size64 0Heartbeat Interval = time 0Job Retention = time 15552000Maximum Bandwidth Per Job = speedMaximum Concurrent Jobs = positive-integer 1
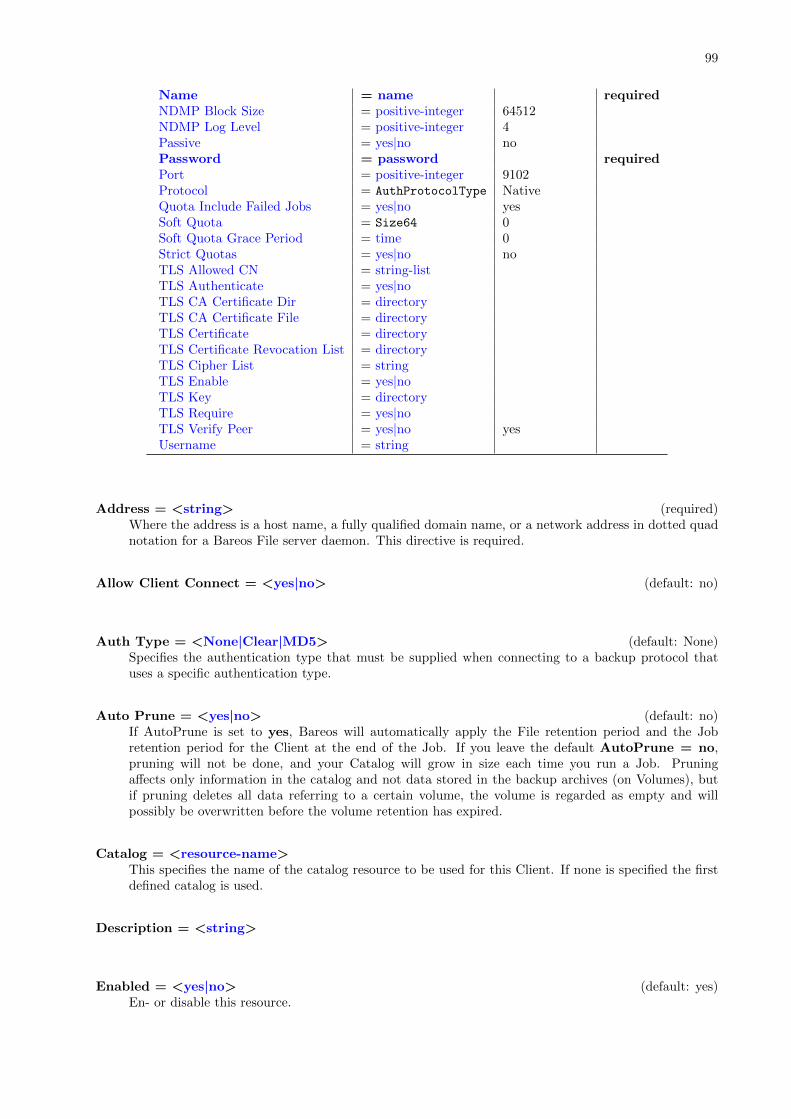
99
Name = name requiredNDMP Block Size = positive-integer 64512NDMP Log Level = positive-integer 4Passive = yes|no noPassword = password requiredPort = positive-integer 9102Protocol = AuthProtocolType NativeQuota Include Failed Jobs = yes|no yesSoft Quota = Size64 0Soft Quota Grace Period = time 0Strict Quotas = yes|no noTLS Allowed CN = string-listTLS Authenticate = yes|noTLS CA Certificate Dir = directoryTLS CA Certificate File = directoryTLS Certificate = directoryTLS Certificate Revocation List = directoryTLS Cipher List = stringTLS Enable = yes|noTLS Key = directoryTLS Require = yes|noTLS Verify Peer = yes|no yesUsername = string
Address = <string> (required)Where the address is a host name, a fully qualified domain name, or a network address in dotted quadnotation for a Bareos File server daemon. This directive is required.
Allow Client Connect = <yes|no> (default: no)
Auth Type = <None|Clear|MD5> (default: None)Specifies the authentication type that must be supplied when connecting to a backup protocol thatuses a specific authentication type.
Auto Prune = <yes|no> (default: no)If AutoPrune is set to yes, Bareos will automatically apply the File retention period and the Jobretention period for the Client at the end of the Job. If you leave the default AutoPrune = no,pruning will not be done, and your Catalog will grow in size each time you run a Job. Pruningaffects only information in the catalog and not data stored in the backup archives (on Volumes), butif pruning deletes all data referring to a certain volume, the volume is regarded as empty and willpossibly be overwritten before the volume retention has expired.
Catalog = <resource-name>This specifies the name of the catalog resource to be used for this Client. If none is specified the firstdefined catalog is used.
Description = <string>
Enabled = <yes|no> (default: yes)En- or disable this resource.
100
FD Address = <string>Alias for Address.
FD Password = <password>This directive is an alias.
FD Port = <positive-integer> (default: 9102)This directive is an alias.
Where the port is a port number at which the Bareos File server daemon can be contacted. Thedefault is 9102. For NDMP backups set this to 10000.
File Retention = <time> (default: 5184000)The File Retention directive defines the length of time that Bareos will keep File records in the Catalogdatabase after the End time of the Job corresponding to the File records. When this time periodexpires, and if AutoPrune is set to yes Bareos will prune (remove) File records that are older thanthe specified File Retention period. Note, this affects only records in the catalog database. It does notaffect your archive backups.
File records may actually be retained for a shorter period than you specify on this directive if youspecify either a shorter Job Retention Dir
Client or a shorter Volume Retention DirPool period. The shortest
retention period of the three takes precedence. The time may be expressed in seconds, minutes, hours,days, weeks, months, quarters, or years. See the Configuration chapter of this manual for additionaldetails of time specification.
The default is 60 days.
Hard Quota = <Size64> (default: 0)This is the maximal amount this client can backup before any backup Job will be aborted.
Heartbeat Interval = <time> (default: 0)This directive is optional and if specified will cause the Director to set a keepalive interval (heartbeat)in seconds on each of the sockets it opens for the Storage resource. This value will override anyspecified at the Director level. It is implemented only on systems (Linux, ...) that provide thesetsockopt TCP KEEPIDLE function. The default value is zero, which means no change is made tothe socket.
Job Retention = <time> (default: 15552000)The Job Retention directive defines the length of time that Bareos will keep Job records in the Catalogdatabase after the Job End time. When this time period expires, and if AutoPrune is set to yesBareos will prune (remove) Job records that are older than the specified File Retention period. Aswith the other retention periods, this affects only records in the catalog and not data in your archivebackup.
If a Job record is selected for pruning, all associated File and JobMedia records will also be prunedregardless of the File Retention period set. As a consequence, you normally will set the File retentionperiod to be less than the Job retention period. The Job retention period can actually be less than thevalue you specify here if you set the Volume Retention directive in the Pool resource to a smallerduration. This is because the Job retention period and the Volume retention period are independentlyapplied, so the smaller of the two takes precedence.
The Job retention period is specified as seconds, minutes, hours, days, weeks, months, quarters, oryears. See the Configuration chapter of this manual for additional details of time specification.
The default is 180 days.
101
Maximum Bandwidth Per Job = <speed>The speed parameter specifies the maximum allowed bandwidth that a job may use when started forthis Client. The speed parameter should be specified in k/s, Kb/s, m/s or Mb/s.
Maximum Concurrent Jobs = <positive-integer> (default: 1)where <number> is the maximum number of Jobs with the current Client that can run concurrently.Note, this directive limits only Jobs for Clients with the same name as the resource in which itappears. Any other restrictions on the maximum concurrent jobs such as in the Director, Job, orStorage resources will also apply in addition to any limit specified here. The default is set to 1, butyou may set it to a larger number.
Name = <name> (required)The name of the resource.
The client name which will be used in the Job resource directive or in the console run command.
NDMP Block Size = <positive-integer> (default: 64512)This directive sets the default NDMP blocksize for this client.
NDMP Log Level = <positive-integer> (default: 4)This directive sets the loglevel for the NDMP protocol library.
Passive = <yes|no> (default: no)The normal way of initializing the data channel (the channel where the backup data itself is transported)is done by the file daemon (client) that connects to the storage daemon.
By using the client passive mode, the initialization of the datachannel is reversed, so that the storagedaemon connects to the filedaemon.
See chapter Passive Client.Version >= 13.2.0
Password = <password> (required)This is the password to be used when establishing a connection with the File services, so the Clientconfiguration file on the machine to be backed up must have the same password defined for this Director.If you have either /dev/random or bc on your machine, Bareos will generate a random password duringthe configuration process, otherwise it will be left blank.
The password is plain text. It is not generated through any special process, but it is preferable forsecurity reasons to make the text random.
Port = <positive-integer> (default: 9102)
Protocol = <Native|NDMP> (default: Native)The backup protocol to use to run the Job.
Currently the director understand the following protocols:
1. Native - The native Bareos protocol
2. NDMP - The NDMP protocol
Version >= 13.2.0
Quota Include Failed Jobs = <yes|no> (default: yes)When calculating the amount a client used take into consideration any failed Jobs. Default Yes.
102
Soft Quota = <Size64> (default: 0)This is the amount after which there will be a warning issued that a client is over his softquota. Aclient can keep doing backups until it hits the hardquota or when the Soft Quota Graceperiod isexpired.
Soft Quota Grace Period = <time> (default: 0)Time allowed for a client to be over its softquota before it will be enforced.
Strict Quotas = <yes|no> (default: no)The directive Strict Quotas determines, if after the Grace Time Period is over, the Burst Limit isenforced (Strict Quotas = No) or the Soft Limit is enforced (Strict Quotas = Yes).
TLS Allowed CN = <string-list>
TLS Authenticate = <yes|no>
TLS CA Certificate Dir = <directory>
TLS CA Certificate File = <directory>
TLS Certificate = <directory>
TLS Certificate Revocation List = <directory>
TLS Cipher List = <string>
TLS Enable = <yes|no>Bareos can be configured to encrypt all its network traffic. See chapter TLS Configuration Directivesto see, how the Bareos Director (and the other components) must be configured to use TLS.
TLS Key = <directory>
TLS Require = <yes|no>
TLS Verify Peer = <yes|no> (default: yes)
Username = <string>Specifies the username that must be supplied when authenticating. Only used for the non Nativeprotocols at the moment.
103
The following is an example of a valid Client resource definition:
Client {
Name = client1-fd
Address = client1.example.com
Password = "secret"
}
Configuration 8.29: Minimal client resource definition in bareos-dir.conf
8.7 Storage Resource
The Storage resource defines which Storage daemons are available for use by the Director.
configuration directive name type of data default value remark
Address = string requiredAllow Compression = yes|no yesAuth Type = None|Clear|MD5 NoneAuto Changer = yes|no noCollect Statistics = yes|no noDescription = stringDevice = Device requiredEnabled = yes|no yesHeartbeat Interval = time 0Maximum Bandwidth Per Job = speedMaximum Concurrent Jobs = positive-integer 1Maximum Concurrent Read Jobs = positive-integer 0Media Type = Strname requiredName = name requiredPaired Storage = resource-namePassword = password requiredPort = positive-integer 9103Protocol = AuthProtocolType NativeSD Address = string aliasSD Password = password aliasSD Port = positive-integer 9103 aliasSdd Port = positive-integer deprecatedTLS Authenticate = yes|noTLS CA Certificate File = directoryTLS Cacertificate Dir = directoryTLS Certificate = directoryTLS Certificate Revocation List = directoryTLS Cipher List = stringTLS Enable = yes|noTLS Key = directoryTLS Require = yes|noTLS Verify Peer = yes|no yesUsername = string
Address = <string> (required)Where the address is a host name, a fully qualified domain name, or an IP address. Please notethat the <address> as specified here will be transmitted to the File daemon who will then use it tocontact the Storage daemon. Hence, it is not, a good idea to use localhost as the name but rather afully qualified machine name or an IP address. This directive is required.
Allow Compression = <yes|no> (default: yes)This directive is optional, and if you specify No, it will cause backups jobs running on this storage
104
resource to run without client File Daemon compression. This effectively overrides compressionoptions in FileSets used by jobs which use this storage resource.
Auth Type = <None|Clear|MD5> (default: None)Specifies the authentication type that must be supplied when connecting to a backup protocol thatuses a specific authentication type.
Auto Changer = <yes|no> (default: no)If you specify yes for this command, when you use the label command or the add command tocreate a new Volume, Bareos will also request the Autochanger Slot number. This simplifies creatingdatabase entries for Volumes in an autochanger. If you forget to specify the Slot, the autochanger willnot be used. However, you may modify the Slot associated with a Volume at any time by using theupdate volume or update slots command in the console program. When autochanger is enabled,the algorithm used by Bareos to search for available volumes will be modified to consider only Volumesthat are known to be in the autochanger’s magazine. If no in changer volume is found, Bareos willattempt recycling, pruning, ..., and if still no volume is found, Bareos will search for any volumewhether or not in the magazine. By privileging in changer volumes, this procedure minimizes operatorintervention.
For the autochanger to be used, you must also specify Autochanger = yes in the Autochanger SdDevice
in the Storage daemon’s configuration file as well as other important Storage daemon configurationinformation. Please consult the Autochanger Support chapter for the details of using autochangers.
Collect Statistics = <yes|no> (default: no)Collect statistic information. These information will be collected by the Director (see Statistics CollectInterval Dir
Director) and stored in the Catalog.
Description = <string>Information.
Device = <Device> (required)This directive specifies the Storage daemon’s name of the device resource to be used for the storage.If you are using an Autochanger, the name specified here should be the name of the Storage daemon’sAutochanger resource rather than the name of an individual device. This name is not the physicaldevice name, but the logical device name as defined on the Name directive contained in the Device orthe Autochanger resource definition of the Storage daemon configuration file. You can specify anyname you would like (even the device name if you prefer) up to a maximum of 127 characters in length.The physical device name associated with this device is specified in the Storage daemon configurationfile (as Archive Device). Please take care not to define two different Storage resource directives in theDirector that point to the same Device in the Storage daemon. Doing so may cause the Storage daemonto block (or hang) attempting to open the same device that is already open. This directive is required.
Enabled = <yes|no> (default: yes)En- or disable this resource.
Heartbeat Interval = <time> (default: 0)This directive is optional and if specified will cause the Director to set a keepalive interval (heartbeat)in seconds on each of the sockets it opens for the Storage resource. This value will override anyspecified at the Director level. It is implemented only on systems (Linux, ...) that provide thesetsockopt TCP KEEPIDLE function. The default value is zero, which means no change is made tothe socket.
Maximum Bandwidth Per Job = <speed>
105
Maximum Concurrent Jobs = <positive-integer> (default: 1)where <number> is the maximum number of Jobs with the current Storage resource that can runconcurrently. Note, this directive limits only Jobs for Jobs using this Storage daemon. Any otherrestrictions on the maximum concurrent jobs such as in the Director, Job, or Client resources will alsoapply in addition to any limit specified here. The default is set to 1, but you may set it to a largernumber. However, if you set the Storage daemon’s number of concurrent jobs greater than one, werecommend that you read the waring documented under Maximum Concurrent Jobs in the Director’sresource or simply turn data spooling on as documented in the Data Spooling chapter of this manual.
Maximum Concurrent Read Jobs = <positive-integer> (default: 0)where <number> is the maximum number of Jobs with the current Storage resource that can readconcurrently.
Media Type = <Strname> (required)This directive specifies the Media Type to be used to store the data. This is an arbitrary string ofcharacters up to 127 maximum that you define. It can be anything you want. However, it is best tomake it descriptive of the storage media (e.g. File, DAT, ”HP DLT8000”, 8mm, ...). In addition, itis essential that you make the Media Type specification unique for each storage media type. If youhave two DDS-4 drives that have incompatible formats, or if you have a DDS-4 drive and a DDS-4autochanger, you almost certainly should specify different Media Types. During a restore, assuminga DDS-4 Media Type is associated with the Job, Bareos can decide to use any Storage daemon thatsupports Media Type DDS-4 and on any drive that supports it.
If you are writing to disk Volumes, you must make doubly sure that each Device resource defined inthe Storage daemon (and hence in the Director’s conf file) has a unique media type. Otherwise Bareosmay assume, these Volumes can be mounted and read by any Storage daemon File device.
Currently Bareos permits only a single Media Type per Storage Device definition. Consequently, ifyou have a drive that supports more than one Media Type, you can give a unique string to Volumeswith different intrinsic Media Type (Media Type = DDS-3-4 for DDS-3 and DDS-4 types), but thenthose volumes will only be mounted on drives indicated with the dual type (DDS-3-4).
If you want to tie Bareos to using a single Storage daemon or drive, you must specify a unique MediaType for that drive. This is an important point that should be carefully understood. Note, this appliesequally to Disk Volumes. If you define more than one disk Device resource in your Storage daemon’sconf file, the Volumes on those two devices are in fact incompatible because one can not be mountedon the other device since they are found in different directories. For this reason, you probably shoulduse two different Media Types for your two disk Devices (even though you might think of them as bothbeing File types). You can find more on this subject in the Basic Volume Management chapter of thismanual.
The MediaType specified in the Director’s Storage resource, must correspond to the Media Typespecified in the Device resource of the Storage daemon configuration file. This directive is required,and it is used by the Director and the Storage daemon to ensure that a Volume automatically selectedfrom the Pool corresponds to the physical device. If a Storage daemon handles multiple devices (e.g.will write to various file Volumes on different partitions), this directive allows you to specify exactlywhich device.
As mentioned above, the value specified in the Director’s Storage resource must agree with the valuespecified in the Device resource in the Storage daemon’s configuration file. It is also an additionalcheck so that you don’t try to write data for a DLT onto an 8mm device.
Name = <name> (required)The name of the resource.
The name of the storage resource. This name appears on the Storage directive specified in the Jobresource and is required.
Paired Storage = <resource-name>For NDMP backups this points to the definition of the Native Storage that is accesses via the NDMPprotocol. For now we only support NDMP backups and restores to access Native Storage Daemonsvia the NDMP protocol. In the future we might allow to use Native NDMP storage which is not
106
bound to a Bareos Storage Daemon.
Password = <password> (required)This is the password to be used when establishing a connection with the Storage services. This samepassword also must appear in the Director resource of the Storage daemon’s configuration file. Thisdirective is required.
The password is plain text.
Port = <positive-integer> (default: 9103)Where port is the port to use to contact the storage daemon for information and to start jobs. Thissame port number must appear in the Storage resource of the Storage daemon’s configuration file.
Protocol = <AuthProtocolType> (default: Native)
SD Address = <string>Alias for Address.
SD Password = <password>Alias for Password.
SD Port = <positive-integer> (default: 9103)Alias for Port.
Sdd Port = <positive-integer>Please note! This directive is deprecated.
TLS Authenticate = <yes|no>
TLS CA Certificate File = <directory>
TLS Cacertificate Dir = <directory>
TLS Certificate = <directory>
TLS Certificate Revocation List = <directory>
TLS Cipher List = <string>
107
TLS Enable = <yes|no>Bareos can be configured to encrypt all its network traffic. See chapter TLS Configuration Directivesto see, how the Bareos Director (and the other components) must be configured to use TLS.
TLS Key = <directory>
TLS Require = <yes|no>
TLS Verify Peer = <yes|no> (default: yes)
Username = <string>
The following is an example of a valid Storage resource definition:
Storage {
Name = DLTDrive
Address = lpmatou
Password = storage_password # password for Storage daemon
Device = "HP DLT 80" # same as Device in Storage daemon
Media Type = DLT8000 # same as MediaType in Storage daemon
}
Configuration 8.30: Storage resource (tape) example
8.8 Pool Resource
The Pool resource defines the set of storage Volumes (tapes or files) to be used by Bareos to write the data.By configuring different Pools, you can determine which set of Volumes (media) receives the backup data.This permits, for example, to store all full backup data on one set of Volumes and all incremental backupson another set of Volumes. Alternatively, you could assign a different set of Volumes to each machine thatyou backup. This is most easily done by defining multiple Pools.Another important aspect of a Pool is that it contains the default attributes (Maximum Jobs, RetentionPeriod, Recycle flag, ...) that will be given to a Volume when it is created. This avoids the need for youto answer a large number of questions when labeling a new Volume. Each of these attributes can later bechanged on a Volume by Volume basis using the update command in the console program. Note that youmust explicitly specify which Pool Bareos is to use with each Job. Bareos will not automatically search forthe correct Pool.Most often in Bareos installations all backups for all machines (Clients) go to a single set of Volumes. Inthis case, you will probably only use the Default Pool. If your backup strategy calls for you to mount adifferent tape each day, you will probably want to define a separate Pool for each day. For more informationon this subject, please see the Backup Strategies chapter of this manual.To use a Pool, there are three distinct steps. First the Pool must be defined in the Director’s configurationfile. Then the Pool must be written to the Catalog database. This is done automatically by the Directoreach time that it starts, or alternatively can be done using the create command in the console program.Finally, if you change the Pool definition in the Director’s configuration file and restart Bareos, the pool willbe updated alternatively you can use the update pool console command to refresh the database image. It isthis database image rather than the Director’s resource image that is used for the default Volume attributes.Note, for the pool to be automatically created or updated, it must be explicitly referenced by a Job resource.Next the physical media must be labeled. The labeling can either be done with the label command in theconsole program or using the btape program. The preferred method is to use the label command in theconsole program.Finally, you must add Volume names (and their attributes) to the Pool. For Volumes to be used by Bareosthey must be of the same Media Type as the archive device specified for the job (i.e. if you are going toback up to a DLT device, the Pool must have DLT volumes defined since 8mm volumes cannot be mounted
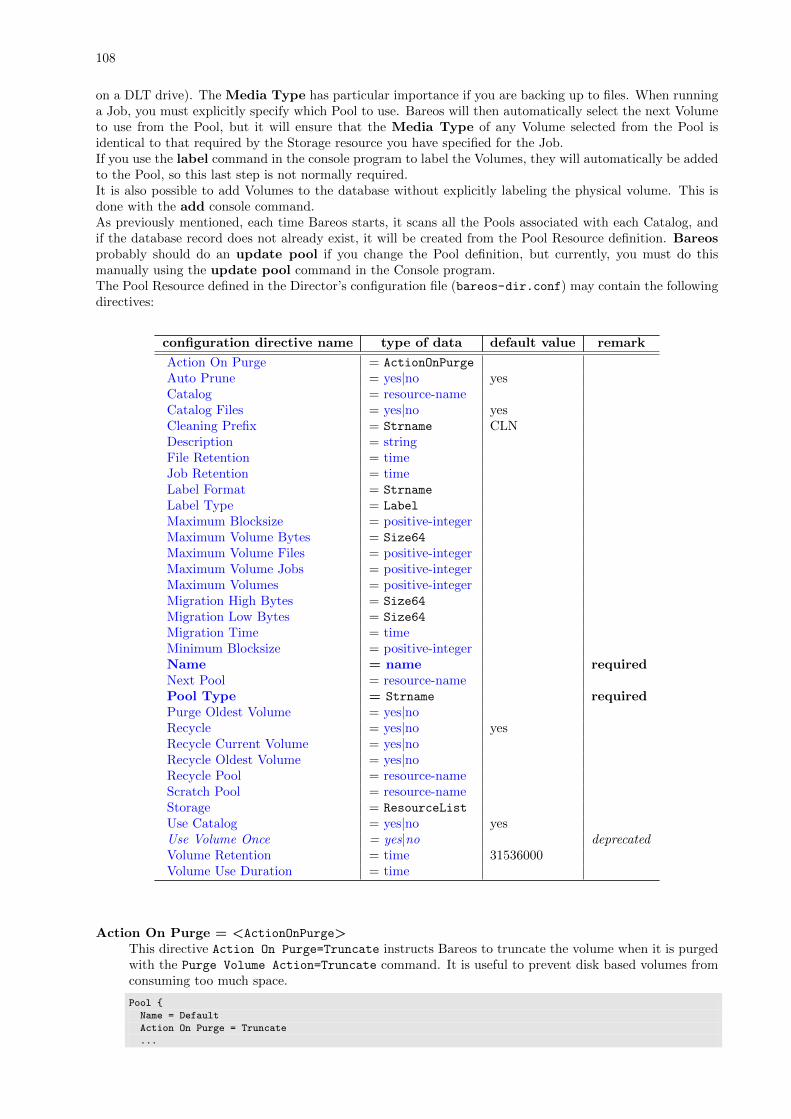
108
on a DLT drive). The Media Type has particular importance if you are backing up to files. When runninga Job, you must explicitly specify which Pool to use. Bareos will then automatically select the next Volumeto use from the Pool, but it will ensure that the Media Type of any Volume selected from the Pool isidentical to that required by the Storage resource you have specified for the Job.If you use the label command in the console program to label the Volumes, they will automatically be addedto the Pool, so this last step is not normally required.It is also possible to add Volumes to the database without explicitly labeling the physical volume. This isdone with the add console command.As previously mentioned, each time Bareos starts, it scans all the Pools associated with each Catalog, andif the database record does not already exist, it will be created from the Pool Resource definition. Bareosprobably should do an update pool if you change the Pool definition, but currently, you must do thismanually using the update pool command in the Console program.The Pool Resource defined in the Director’s configuration file (bareos-dir.conf) may contain the followingdirectives:
configuration directive name type of data default value remark
Action On Purge = ActionOnPurge
Auto Prune = yes|no yesCatalog = resource-nameCatalog Files = yes|no yesCleaning Prefix = Strname CLNDescription = stringFile Retention = timeJob Retention = timeLabel Format = Strname
Label Type = Label
Maximum Blocksize = positive-integerMaximum Volume Bytes = Size64
Maximum Volume Files = positive-integerMaximum Volume Jobs = positive-integerMaximum Volumes = positive-integerMigration High Bytes = Size64
Migration Low Bytes = Size64
Migration Time = timeMinimum Blocksize = positive-integerName = name requiredNext Pool = resource-namePool Type = Strname requiredPurge Oldest Volume = yes|noRecycle = yes|no yesRecycle Current Volume = yes|noRecycle Oldest Volume = yes|noRecycle Pool = resource-nameScratch Pool = resource-nameStorage = ResourceList
Use Catalog = yes|no yesUse Volume Once = yes|no deprecatedVolume Retention = time 31536000Volume Use Duration = time
Action On Purge = <ActionOnPurge>This directive Action On Purge=Truncate instructs Bareos to truncate the volume when it is purgedwith the Purge Volume Action=Truncate command. It is useful to prevent disk based volumes fromconsuming too much space.
Pool {
Name = Default
Action On Purge = Truncate
...
109
}
You can schedule the truncate operation at the end of your CatalogBackup job like in this example:
Job {
Name = CatalogBackup
...
RunScript {
RunsWhen=After
RunsOnClient=No
Console = "purge volume action=all allpools storage=File"
}
}
Auto Prune = <yes|no> (default: yes)If AutoPrune is set to yes, Bareos will automatically apply the Volume Retention period when newVolume is needed and no appendable Volumes exist in the Pool. Volume pruning causes expired Jobs(older than the Volume Retention period) to be deleted from the Catalog and permits possiblerecycling of the Volume.
Catalog = <resource-name>This specifies the name of the catalog resource to be used for this Pool. When a catalog is defined ina Pool it will override the definition in the client (and the Catalog definition in a Job since Version>= 13.4.0 ). e.g. this catalog setting takes precedence over any other definition.
Catalog Files = <yes|no> (default: yes)This directive defines whether or not you want the names of the files that were saved to be put into thecatalog. The default is yes. The advantage of specifying Catalog Files = No is that you will havea significantly smaller Catalog database. The disadvantage is that you will not be able to produce aCatalog listing of the files backed up for each Job (this is often called Browsing). Also, without theFile entries in the catalog, you will not be able to use the Console restore command nor any othercommand that references File entries.
Cleaning Prefix = <Strname> (default: CLN)This directive defines a prefix string, which if it matches the beginning of a Volume name duringlabeling of a Volume, the Volume will be defined with the VolStatus set to Cleaning and thus Bareoswill never attempt to use this tape. This is primarily for use with autochangers that accept barcodeswhere the convention is that barcodes beginning with CLN are treated as cleaning tapes.
The default value for this directive is consequently set to CLN, so that in most cases the cleaningtapes are automatically recognized without configuration. If you use another prefix for your cleaningtapes, you can set this directive accordingly.
Description = <string>
File Retention = <time>The File Retention directive defines the length of time that Bareos will keep File records in the Catalogdatabase after the End time of the Job corresponding to the File records.
This directive takes precedence over Client directives of the same name. For example, you can decideto increase Retention times for Archive or OffSite Pool.
Note, this affects only records in the catalog database. It does not affect your archive backups.
For more information see Client documentation about File Retention DirClient

110
Job Retention = <time>The Job Retention directive defines the length of time that Bareos will keep Job records in the Catalogdatabase after the Job End time. As with the other retention periods, this affects only records in thecatalog and not data in your archive backup.
This directive takes precedence over Client directives of the same name. For example, you can decideto increase Retention times for Archive or OffSite Pool.
For more information see Client side documentation Job Retention DirClient
Label Format = <Strname>This directive specifies the format of the labels contained in this pool. The format directive is used asa sort of template to create new Volume names during automatic Volume labeling.
The format should be specified in double quotes, and consists of letters, numbers and the specialcharacters hyphen (-), underscore ( ), colon (:), and period (.), which are the legal characters for aVolume name. The format should be enclosed in double quotes (”).
In addition, the format may contain a number of variable expansion characters which will be expandedby a complex algorithm allowing you to create Volume names of many different formats. In all cases,the expansion process must resolve to the set of characters noted above that are legal Volume names.Generally, these variable expansion characters begin with a dollar sign ($) or a left bracket ([). Ifyou specify variable expansion characters, you should always enclose the format with double quotecharacters (”). For more details on variable expansion, please see the Variable Expansion Chapter ofthis manual.
If no variable expansion characters are found in the string, the Volume name will be formed from theformat string appended with the a unique number that increases. If you do not remove volumes fromthe pool, this number should be the number of volumes plus one, but this is not guaranteed. Theunique number will be edited as four digits with leading zeros. For example, with a Label Format =”File-”, the first volumes will be named File-0001, File-0002, ...
With the exception of Job specific variables, you can test your LabelFormat by using the var commandthe Console Chapter of this manual.
In almost all cases, you should enclose the format specification (part after the equal sign) in doublequotes.
Label Type = <ANSI|IBM|Bareos>This directive is implemented in the Director Pool resource and in the SD Device resource (LabelType Sd
Device). If it is specified in the SD Device resource, it will take precedence over the value passedfrom the Director to the SD.
Maximum Blocksize = <positive-integer>The Maximum Block Size can be defined here or at Maximum Block Size Sd
Device. If not defined,its default is 63 KB. Increasing this value could improve the throughput of writing to tapes a lot, seeSetting Block Sizes chapter.Version >= 14.2.0
Maximum Volume Bytes = <Size64>This directive specifies the maximum number of bytes that can be written to the Volume. If youspecify zero (the default), there is no limit except the physical size of the Volume. Otherwise, whenthe number of bytes written to the Volume equals size the Volume will be marked Used. When theVolume is marked Used it can no longer be used for appending Jobs, much like the Full status but itcan be recycled if recycling is enabled, and thus the Volume can be re-used after recycling. This valueis checked and the Used status set while the job is writing to the particular volume.
This directive is particularly useful for restricting the size of disk volumes, and will work correctly evenin the case of multiple simultaneous jobs writing to the volume.
The value defined by this directive in the bareos-dir.conf file is the default value used when a Volumeis created. Once the volume is created, changing the value in the bareos-dir.conf file will not changewhat is stored for the Volume. To change the value for an existing Volume you must use the updatecommand in the Console.
111
Maximum Volume Files = <positive-integer>This directive specifies the maximum number of files that can be written to the Volume. If you specifyzero (the default), there is no limit. Otherwise, when the number of files written to the Volume equalspositive-integer the Volume will be marked Used. When the Volume is marked Used it can nolonger be used for appending Jobs, much like the Full status but it can be recycled if recycling isenabled and thus used again. This value is checked and the Used status is set only at the end of a jobthat writes to the particular volume.
The value defined by this directive in the bareos-dir.conf file is the default value used when a Volumeis created. Once the volume is created, changing the value in the bareos-dir.conf file will not changewhat is stored for the Volume. To change the value for an existing Volume you must use the updatecommand in the Console.
Maximum Volume Jobs = <positive-integer>This directive specifies the maximum number of Jobs that can be written to the Volume. If you specifyzero (the default), there is no limit. Otherwise, when the number of Jobs backed up to the Volumeequals positive-integer the Volume will be marked Used. When the Volume is marked Used it canno longer be used for appending Jobs, much like the Full status but it can be recycled if recycling isenabled, and thus used again. By setting MaximumVolumeJobs to one, you get the same effect assetting UseVolumeOnce = yes.
The value defined by this directive in the bareos-dir.conf file is the default value used when a Volumeis created. Once the volume is created, changing the value in the bareos-dir.conf file will not changewhat is stored for the Volume. To change the value for an existing Volume you must use the updatecommand in the Console.
If you are running multiple simultaneous jobs, this directive may not work correctly because when adrive is reserved for a job, this directive is not taken into account, so multiple jobs may try to startwriting to the Volume. At some point, when the Media record is updated, multiple simultaneous jobsmay fail since the Volume can no longer be written.
Maximum Volumes = <positive-integer>This directive specifies the maximum number of volumes (tapes or files) contained in the pool. Thisdirective is optional, if omitted or set to zero, any number of volumes will be permitted. In general,this directive is useful for Autochangers where there is a fixed number of Volumes, or for File storagewhere you wish to ensure that the backups made to disk files do not become too numerous or consumetoo much space.
Migration High Bytes = <Size64>This directive specifies the number of bytes in the Pool which will trigger a migration if Selection TypeDirJob = PoolOccupancy has been specified. The fact that the Pool usage goes above this level does notautomatically trigger a migration job. However, if a migration job runs and has the PoolOccupancyselection type set, the Migration High Bytes will be applied. Bareos does not currently restrict a poolto have only a single Media Type Dir
Storage, so you must keep in mind that if you mix Media Types in aPool, the results may not be what you want, as the Pool count of all bytes will be for all Media Typescombined.
Migration Low Bytes = <Size64>This directive specifies the number of bytes in the Pool which will stop a migration if Selection TypeDirJob = PoolOccupancy has been specified and triggered by more than Migration High Bytes Dir
Pool beingin the pool. In other words, once a migration job is started with PoolOccupancy migration selectionand it determines that there are more than Migration High Bytes, the migration job will continue torun jobs until the number of bytes in the Pool drop to or below Migration Low Bytes.
Migration Time = <time>If Selection Type Dir
Job = PoolTime, the time specified here will be used. If the previous Backup Job orJobs selected have been in the Pool longer than the specified time, then they will be migrated.
112
Minimum Blocksize = <positive-integer>The Minimum Block Size can be defined here or at Minimum Block Size Sd
Device. For details, seechapter Setting Block Sizes.
Name = <name> (required)The name of the resource.
The name of the pool.
Next Pool = <resource-name>This directive specifies the pool a Migration or Copy Job and a Virtual Backup Job will write theirdata too. This directive is required to define the Pool into which the data will be migrated. Withoutthis directive, the migration job will terminate in error.
Pool Type = <Strname> (required)This directive defines the pool type, which corresponds to the type of Job being run. It is requiredand may be one of the following:
Backup
*Archive
*Cloned
*Migration
*Copy
*Save
Note, only Backup is currently implemented.
Purge Oldest Volume = <yes|no>This directive instructs the Director to search for the oldest used Volume in the Pool when anotherVolume is requested by the Storage daemon and none are available. The catalog is then purgedirrespective of retention periods of all Files and Jobs written to this Volume. The Volume is thenrecycled and will be used as the next Volume to be written. This directive overrides any Job, File, orVolume retention periods that you may have specified.
This directive can be useful if you have a fixed number of Volumes in the Pool and you want to cyclethrough them and reusing the oldest one when all Volumes are full, but you don’t want to worry aboutsetting proper retention periods. However, by using this option you risk losing valuable data.
Please be aware that Purge Oldest Volume disregards all retention periods. If you have only a singleVolume defined and you turn this variable on, that Volume will always be immediately overwrittenwhen it fills! So at a minimum, ensure that you have a decent number of Volumes in your Pool beforerunning any jobs. If you want retention periods to apply do not use this directive. To specify aretention period, use the Volume Retention directive (see above).
We highly recommend against using this directive, because it is sure that some day, Bareos willrecycle a Volume that contains current data. The default is no.
Recycle = <yes|no> (default: yes)This directive specifies whether or not Purged Volumes may be recycled. If it is set to yes (default)and Bareos needs a volume but finds none that are appendable, it will search for and recycle (reuse)Purged Volumes (i.e. volumes with all the Jobs and Files expired and thus deleted from the Catalog).If the Volume is recycled, all previous data written to that Volume will be overwritten. If Recycle isset to no, the Volume will not be recycled, and hence, the data will remain valid. If you want to reuse(re-write) the Volume, and the recycle flag is no (0 in the catalog), you may manually set the recycleflag (update command) for a Volume to be reused.
Please note that the value defined by this directive in the bareos-dir.conf file is the default value usedwhen a Volume is created. Once the volume is created, changing the value in the bareos-dir.conf file
113
will not change what is stored for the Volume. To change the value for an existing Volume you mustuse the update command in the Console.
When all Job and File records have been pruned or purged from the catalog for a particular Volume,if that Volume is marked as Append, Full, Used, or Error, it will then be marked as Purged. OnlyVolumes marked as Purged will be considered to be converted to the Recycled state if the Recycledirective is set to yes.
Recycle Current Volume = <yes|no>If Bareos needs a new Volume, this directive instructs Bareos to Prune the volume respecting the Joband File retention periods. If all Jobs are pruned (i.e. the volume is Purged), then the Volume isrecycled and will be used as the next Volume to be written. This directive respects any Job, File, orVolume retention periods that you may have specified, and thus it is much better to use it rather thanthe Purge Oldest Volume directive.
This directive can be useful if you have: a fixed number of Volumes in the Pool, you want to cyclethrough them, and you have specified retention periods that prune Volumes before you have cycledthrough the Volume in the Pool.
However, if you use this directive and have only one Volume in the Pool, you will immediately recycleyour Volume if you fill it and Bareos needs another one. Thus your backup will be totally invalid.Please use this directive with care. The default is no.
Recycle Oldest Volume = <yes|no>This directive instructs the Director to search for the oldest used Volume in the Pool when anotherVolume is requested by the Storage daemon and none are available. The catalog is then prunedrespecting the retention periods of all Files and Jobs written to this Volume. If all Jobs are pruned(i.e. the volume is Purged), then the Volume is recycled and will be used as the next Volume to bewritten. This directive respects any Job, File, or Volume retention periods that you may have specified,and as such it is much better to use this directive than the Purge Oldest Volume.
This directive can be useful if you have a fixed number of Volumes in the Pool and you want to cyclethrough them and you have specified the correct retention periods.
However, if you use this directive and have only one Volume in the Pool, you will immediately recycleyour Volume if you fill it and Bareos needs another one. Thus your backup will be totally invalid.Please use this directive with care. The default is no.
Recycle Pool = <resource-name>This directive defines to which pool the Volume will be placed (moved) when it is recycled. Withoutthis directive, a Volume will remain in the same pool when it is recycled. With this directive, it canbe moved automatically to any existing pool during a recycle. This directive is probably most usefulwhen defined in the Scratch pool, so that volumes will be recycled back into the Scratch pool. Formore on the see the Scratch Pool section of this manual.
Although this directive is called RecyclePool, the Volume in question is actually moved from itscurrent pool to the one you specify on this directive when Bareos prunes the Volume and discoversthat there are no records left in the catalog and hence marks it as Purged.
Scratch Pool = <resource-name>This directive permits to specify a dedicate Scratch for the current pool. This pool will replace thespecial pool named Scrach for volume selection. For more information about Scratch see Scratch Poolsection of this manual. This is useful when using multiple storage sharing the same mediatype orwhen you want to dedicate volumes to a particular set of pool.
Storage = <ResourceList>The Storage directive defines the name of the storage services where you want to backup the FileSetdata. For additional details, see the Storage Resource of this manual. The Storage resource may alsobe specified in the Job resource, but the value, if any, in the Pool resource overrides any value in theJob. This Storage resource definition is not required by either the Job resource or in the Pool, but itmust be specified in one or the other. If not configuration error will result. We highly recommend that
114
you define the Storage resource to be used in the Pool rather than elsewhere (job, schedule run, ...).
Use Catalog = <yes|no> (default: yes)Store information into Catalog. In all pratical use cases, leave this value to its defaults.
Use Volume Once = <yes|no>Please note! This directive is deprecated.Use Maximum Volume Jobs Dir
Pool = 1 instead.
Volume Retention = <time> (default: 31536000)The Volume Retention directive defines the length of time that Bareos will keep records associatedwith the Volume in the Catalog database after the End time of each Job written to the Volume. Whenthis time period expires, and if AutoPrune is set to yes Bareos may prune (remove) Job records thatare older than the specified Volume Retention period if it is necessary to free up a Volume. Recyclingwill not occur until it is absolutely necessary to free up a volume (i.e. no other writable volumeexists). All File records associated with pruned Jobs are also pruned. The time may be specified asseconds, minutes, hours, days, weeks, months, quarters, or years. The Volume Retention is appliedindependently of the Job Retention and the File Retention periods defined in the Client resource.This means that all the retentions periods are applied in turn and that the shorter period is the onethat effectively takes precedence. Note, that when the Volume Retention period has been reached,and it is necessary to obtain a new volume, Bareos will prune both the Job and the File records. Thispruning could also occur during a status dir command because it uses similar algorithms for findingthe next available Volume.
It is important to know that when the Volume Retention period expires, Bareos does not automaticallyrecycle a Volume. It attempts to keep the Volume data intact as long as possible before over writingthe Volume.
By defining multiple Pools with different Volume Retention periods, you may effectively have a set oftapes that is recycled weekly, another Pool of tapes that is recycled monthly and so on. However, onemust keep in mind that if your Volume Retention period is too short, it may prune the last validFull backup, and hence until the next Full backup is done, you will not have a complete backup ofyour system, and in addition, the next Incremental or Differential backup will be promoted to a Fullbackup. As a consequence, the minimum Volume Retention period should be at twice the intervalof your Full backups. This means that if you do a Full backup once a month, the minimum Volumeretention period should be two months.
The default Volume retention period is 365 days, and either the default or the value defined by thisdirective in the bareos-dir.conf file is the default value used when a Volume is created. Once thevolume is created, changing the value in the bareos-dir.conf file will not change what is stored forthe Volume. To change the value for an existing Volume you must use the update command in theConsole.
Volume Use Duration = <time>The Volume Use Duration directive defines the time period that the Volume can be written beginningfrom the time of first data write to the Volume. If the time-period specified is zero (the default), theVolume can be written indefinitely. Otherwise, the next time a job runs that wants to access thisVolume, and the time period from the first write to the volume (the first Job written) exceeds thetime-period-specification, the Volume will be marked Used, which means that no more Jobs can beappended to the Volume, but it may be recycled if recycling is enabled. Once the Volume is recycled,it will be available for use again.
You might use this directive, for example, if you have a Volume used for Incremental backups, andVolumes used for Weekly Full backups. Once the Full backup is done, you will want to use a differentIncremental Volume. This can be accomplished by setting the Volume Use Duration for the IncrementalVolume to six days. I.e. it will be used for the 6 days following a Full save, then a different Incrementalvolume will be used. Be careful about setting the duration to short periods such as 23 hours, or youmight experience problems of Bareos waiting for a tape over the weekend only to complete the backupsMonday morning when an operator mounts a new tape.
115
Please note that the value defined by this directive in the bareos-dir.conf file is the default value usedwhen a Volume is created. Once the volume is created, changing the value in the bareos-dir.conf filewill not change what is stored for the Volume. To change the value for an existing Volume you mustuse the update volume command in the Console.
In order for a Pool to be used during a Backup Job, the Pool must have at least one Volume associated withit. Volumes are created for a Pool using the label or the add commands in the Bareos Console, program.In addition to adding Volumes to the Pool (i.e. putting the Volume names in the Catalog database), thephysical Volume must be labeled with a valid Bareos software volume label before Bareos will accept theVolume. This will be automatically done if you use the label command. Bareos can automatically labelVolumes if instructed to do so, but this feature is not yet fully implemented.The following is an example of a valid Pool resource definition:
Pool {
Name = Default
Pool Type = Backup
}
Configuration 8.31: Pool resource example
8.8.1 Scratch Pool
In general, you can give your Pools any name you wish, but there is one important restriction: the Poolnamed Scratch, if it exists behaves like a scratch pool of Volumes in that when Bareos needs a new Volumefor writing and it cannot find one, it will look in the Scratch pool, and if it finds an available Volume, it willmove it out of the Scratch pool into the Pool currently being used by the job.
8.9 Catalog Resource
The Catalog Resource defines what catalog to use for the current job. Currently, Bareos can only handle asingle database server (SQLite, MySQL, PostgreSQL) that is defined when configuring Bareos. However,there may be as many Catalogs (databases) defined as you wish. For example, you may want each Client tohave its own Catalog database, or you may want backup jobs to use one database and verify or restore jobsto use another database.Since SQLite is compiled in, it always runs on the same machine as the Director and the database mustbe directly accessible (mounted) from the Director. However, since both MySQL and PostgreSQL arenetworked databases, they may reside either on the same machine as the Director or on a different machineon the network. See below for more details.
configuration directive name type of data default value remark
Address = string aliasDB Address = stringDB Driver = string requiredDB Name = string requiredDB Password = passwordDB Port = positive-integerDB Socket = stringDB User = stringDescription = stringDisable Batch Insert = yes|no noExit On Fatal = yes|no noIdle Timeout = positive-integer 30Inc Connections = positive-integer 1Max Connections = positive-integer 5Min Connections = positive-integer 1Multiple Connections = yes|noName = name requiredPassword = password aliasReconnect = yes|no no
116
User = string aliasValidate Timeout = positive-integer 120
Address = <string>This directive is an alias.
Alias for DB Address DirCatalog.
DB Address = <string>This is the host address of the database server. Normally, you would specify this instead of DB SocketDirCatalog if the database server is on another machine. In that case, you will also specify DB Port Dir
Catalog.This directive is used only by MySQL and PostgreSQL and is ignored by SQLite if provided.
DB Driver = <postgresql | mysql | sqlite> (required)Selects the database type to use.
DB Name = <string> (required)This specifies the name of the database.
DB Password = <password>This specifies the password to use when login into the database.
DB Port = <positive-integer>This defines the port to be used in conjunction with DB Address Dir
Catalog to access the database if it ison another machine. This directive is used only by MySQL and PostgreSQL and is ignored by SQLiteif provided.
DB Socket = <string>This is the name of a socket to use on the local host to connect to the database. This directive is usedonly by MySQL and is ignored by SQLite. Normally, if neither DB Socket Dir
Catalog or DB Address DirCatalog
are specified, MySQL will use the default socket. If the DB Socket is specified, the MySQL servermust reside on the same machine as the Director.
DB User = <string>This specifies what user name to use to log into the database.
Description = <string>
Disable Batch Insert = <yes|no> (default: no)This directive allows you to override at runtime if the Batch insert should be enabled or disabled.Normally this is determined by querying the database library if it is thread-safe. If you think thatdisabling Batch insert will make your backup run faster you may disable it using this option and setit to Yes.
Exit On Fatal = <yes|no> (default: no)Make any fatal error in the connection to the database exit the program
Version >= 15.1.0
Idle Timeout = <positive-integer> (default: 30)This directive is used by the experimental database pooling functionality. Only use this for nonproduction sites. This sets the idle time after which a database pool should be shrinked.
117
Inc Connections = <positive-integer> (default: 1)This directive is used by the experimental database pooling functionality. Only use this for nonproduction sites. This sets the number of connections to add to a database pool when not enoughconnections are available on the pool anymore.
Max Connections = <positive-integer> (default: 5)This directive is used by the experimental database pooling functionality. Only use this for nonproduction sites. This sets the maximum number of connections to a database to keep in this databasepool.
Min Connections = <positive-integer> (default: 1)This directive is used by the experimental database pooling functionality. Only use this for nonproduction sites. This sets the minimum number of connections to a database to keep in this databasepool.
Multiple Connections = <yes|no>Not yet implemented.
Name = <name> (required)The name of the resource.
The name of the Catalog. No necessary relation to the database server name. This name will bespecified in the Client resource directive indicating that all catalog data for that Client is maintainedin this Catalog.
Password = <password>This directive is an alias.
Alias for DB Password DirCatalog.
Reconnect = <yes|no> (default: no)Try to reconnect a database connection when its dropped
Version >= 15.1.0
User = <string>This directive is an alias.
Alias for DB User DirCatalog.
Validate Timeout = <positive-integer> (default: 120)This directive is used by the experimental database pooling functionality. Only use this for nonproduction sites. This sets the validation timeout after which the database connection is polled to seeif its still alive.
The following is an example of a valid Catalog resource definition:
Catalog
{
Name = SQLite
DB Driver = sqlite
DB Name = bareos;
DB User = bareos;
DB Password = ""
}
Configuration 8.32: Catalog Resource for Sqlite
or for a Catalog on another machine:
118
Catalog
{
Name = MySQL
DB Driver = mysql
DB Name = bareos
DB User = bareos
DB Password = "secret"
DB Address = remote.example.com
DB Port = 1234
}
Configuration 8.33: Catalog Resource for remote MySQL
8.10 Messages Resource
For the details of the Messages Resource, please see the Messages Resource of this manual.
8.11 Console Resource
There are three different kinds of consoles, which the administrator or user can use to interact with theDirector. These three kinds of consoles comprise three different security levels.
� The first console type is an anonymous or default console, which has full privileges. There is noconsole resource necessary for this type since the password is specified in the Director’s resource andconsequently such consoles do not have a name as defined on a Name = directive. Typically youwould use it only for administrators.
� The second type of console, is a ”named” console defined within a Console resource in both theDirector’s configuration file and in the Console’s configuration file. Both the names and the passwordsin these two entries must match much as is the case for Client programs.
This second type of console begins with absolutely no privileges except those explicitly specified in theDirector’s Console resource. Thus you can have multiple Consoles with different names and passwords,sort of like multiple users, each with different privileges. As a default, these consoles can do absolutelynothing – no commands whatsoever. You give them privileges or rather access to commands andresources by specifying access control lists in the Director’s Console resource. The ACLs are specifiedby a directive followed by a list of access names. Examples of this are shown below.
� The third type of console is similar to the above mentioned one in that it requires a Console resourcedefinition in both the Director and the Console. In addition, if the console name, provided on theName = directive, is the same as a Client name, that console is permitted to use the SetIP commandto change the Address directive in the Director’s client resource to the IP address of the Console. Thispermits portables or other machines using DHCP (non-fixed IP addresses) to ”notify” the Director oftheir current IP address.
The Console resource is optional and need not be specified. The following directives are permitted withinthe Director’s configuration resource:
configuration directive name type of data default value remark
Catalog ACL = aclClient ACL = aclCommand ACL = aclDescription = stringFile Set ACL = aclJob ACL = aclName = name requiredPassword = password requiredPlugin Options ACL = aclPool ACL = aclProfile = ResourceList
Run ACL = acl
119
Schedule ACL = aclStorage ACL = aclTLS Allowed CN = string-listTLS Authenticate = yes|noTLS CA Certificate Dir = directoryTLS CA Certificate File = directoryTLS Certificate = directoryTLS Certificate Revocation List = directoryTLS Cipher List = stringTLS DH File = directoryTLS Enable = yes|noTLS Key = directoryTLS Require = yes|noTLS Verify Peer = yes|no yesWhere ACL = acl
Catalog ACL = <acl>This directive is used to specify a list of Catalog resource names that can be accessed by the console.
Client ACL = <acl>This directive is used to specify a list of Client resource names that can be accessed by the console.
Command ACL = <acl>This directive is used to specify a list of of console commands that can be executed by the console.
Description = <string>
File Set ACL = <acl>This directive is used to specify a list of FileSet resource names that can be accessed by the console.
Job ACL = <acl>This directive is used to specify a list of Job resource names that can be accessed by the console.Without this directive, the console cannot access any of the Director’s Job resources. Multiple Jobresource names may be specified by separating them with commas, and/or by specifying multipleJobACL directives. For example, the directive may be specified as:
JobACL = "Backup client 1", "Backup client 2"
JobACL = "RestoreFiles"
With the above specification, the console can access the Director’s resources for the four jobs namedon the JobACL directives, but for no others.
Name = <name> (required)The name of the console. This name must match the name specified in the Console’s configurationresource (much as is the case with Client definitions).
Password = <password> (required)Specifies the password that must be supplied for a named Bareos Console to be authorized. The samepassword must appear in the Console resource of the Console configuration file. For added security,the password is never actually passed across the network but rather a challenge response hash codecreated with the password. This directive is required.
The password is plain text. It is preferable for security reasons to choose random text.
120
Plugin Options ACL = <acl>
Pool ACL = <acl>This directive is used to specify a list of Pool resource names that can be accessed by the console.
Profile = <ResourceList>Profiles can be assigned to a Console. ACL are checked until either a deny ACL is found or an allowACL. First the console ACL is checked then any profile the console is linked to.
One or more Profile names can be assigned to a Console. If an ACL is not defined in the Console, theprofiles of the Console will be checked in the order as specified here. The first found ACL will be used.See Profile Resource.Version >= 14.2.3
Run ACL = <acl>
Schedule ACL = <acl>This directive is used to specify a list of Schedule resource names that can be accessed by the console.
Storage ACL = <acl>This directive is used to specify a list of Storage resource names that can be accessed by the console.
TLS Allowed CN = <string-list>
TLS Authenticate = <yes|no>
TLS CA Certificate Dir = <directory>
TLS CA Certificate File = <directory>
TLS Certificate = <directory>
TLS Certificate Revocation List = <directory>
TLS Cipher List = <string>
TLS DH File = <directory>
TLS Enable = <yes|no>Bareos can be configured to encrypt all its network traffic. See chapter TLS Configuration Directivesto see, how the Bareos Director (and the other components) must be configured to use TLS.
121
TLS Key = <directory>
TLS Require = <yes|no>
TLS Verify Peer = <yes|no> (default: yes)
Where ACL = <acl>This directive permits you to specify where a restricted console can restore files. If this directive is notspecified, only the default restore location is permitted (normally /tmp/bareos-restores. If all isspecified any path the user enters will be accepted (not very secure), any other value specified (theremay be multiple WhereACL directives) will restrict the user to use that path. For example, on a Unixsystem, if you specify ”/”, the file will be restored to the original location. This directive is untested.
Aside from Director resource names and console command names, the special keyword all can be specified inany of the above access control lists. When this keyword is present, any resource or command name (whichever is appropriate) will be accepted. For an example configuration file, please see the Console Configurationchapter of this manual.
8.12 Profile Resource
The Profile Resource defines a set of ACLs. Console Resources can be tight to one or more profiles (ProfileDirConsole), making it easier to use a common set of ACLs.
configuration directive name type of data default value remark
Catalog ACL = aclClient ACL = aclCommand ACL = aclDescription = stringFile Set ACL = aclJob ACL = aclName = name requiredPlugin Options ACL = aclPool ACL = aclSchedule ACL = aclStorage ACL = aclWhere ACL = acl
Catalog ACL = <acl>Lists the Catalog resources, this resource has access to. The special keyword *all* allows access to allCatalog resources.
Client ACL = <acl>Lists the Client resources, this resource has access to. The special keyword *all* allows access to allClient resources.
Command ACL = <acl>Lists the commands, this resource has access to. The special keyword *all* allows using commands.
122
Description = <string>Additional information about the resource. Only used for UIs.
File Set ACL = <acl>Lists the File Set resources, this resource has access to. The special keyword *all* allows access to allFile Set resources.
Job ACL = <acl>Lists the Job resources, this resource has access to. The special keyword *all* allows access to all Jobresources.
Name = <name> (required)The name of the resource.
Plugin Options ACL = <acl>Specifies the allowed plugin options. An empty strings allows all Plugin Options.
Pool ACL = <acl>Lists the Pool resources, this resource has access to. The special keyword *all* allows access to allPool resources.
Schedule ACL = <acl>Lists the Schedule resources, this resource has access to. The special keyword *all* allows access to allSchedule resources.
Storage ACL = <acl>Lists the Storage resources, this resource has access to. The special keyword *all* allows access to allStorage resources.
Where ACL = <acl>Specifies the base directories, where files could be restored. An empty string allows restores to alldirectories.
8.13 Counter Resource
The Counter Resource defines a counter variable that can be accessed by variable expansion used for creatingVolume labels with the Label Format Dir
Pool directive.
123
configuration directive name type of data default value remark
Catalog = resource-nameDescription = stringMaximum = positive-integer 2147483647Minimum = Int32 0Name = name requiredWrap Counter = resource-name
Catalog = <resource-name>If this directive is specified, the counter and its values will be saved in the specified catalog. If thisdirective is not present, the counter will be redefined each time that Bareos is started.
Description = <string>
Maximum = <positive-integer> (default: 2147483647)This is the maximum value value that the counter can have. If not specified or set to zero, the countercan have a maximum value of 2,147,483,648 (2 to the 31 power). When the counter is incrementedpast this value, it is reset to the Minimum.
Minimum = <Int32> (default: 0)This specifies the minimum value that the counter can have. It also becomes the default. If notsupplied, zero is assumed.
Name = <name> (required)The name of the resource.
The name of the Counter. This is the name you will use in the variable expansion to reference thecounter value.
Wrap Counter = <resource-name>If this value is specified, when the counter is incremented past the maximum and thus reset to theminimum, the counter specified on the Wrap Counter Dir
Counter is incremented. (This is currently notimplemented).
8.14 Example Director Configuration File
See below an example of a full Director configuration file:
#
# Default Bareos Director configuration file for disk-only backup
# (C) 2013 Bareos GmbH & Co.KG
#
# Each configuration item has a reference number that shows
# where this property can be changed in the configuration file.
# Search for the number to find the correct line.
#
# You have to configure the following accoring to your environment:
#
# (#01)Email Address for bareos disaster recovery.
# Specify a mailaddress outside of your backupserver.
# There will be one mail per day.
#
# (#02)Email Address for bareos reports. (Mail Command)
# This mail address will recieve a report about each backup job.
# It will be sent after the backupjob is complete.
# Has to be configured twice ("Standard" and "Daemon" Message Ressources)
124
#
# (#03)Email Address for bareos operator. (Operator Command)
# This mail address will recieve a mail immediately when the
# bareos system needs an operator intervention.
# May be the same address as in (#02)
#
#
# This disk-only setup stores all data into @archivedir@
#
# The preconfigured backup scheme is as follows:
#
# Full Backups are done on first Saturday at 21:00 (#04)
# Full Backups are written into the "Full" Pool (#05)
# Full Backups are kept for 365 Days (#06)
#
# Differential Backups are done on 2nd to 5th Saturday at 21:00 (#07)
# Differential Backups are written into the "Differential" Pool (#08)
# Differential Backups are kept for 90 Days (#09)
#
# Incremental Backups are done monday to friday at 21:00 (#10)
# Incremental Backups are written into the "Incremental" Pool (#11)
# Incremental Backups are kept for 30 Days (#12)
#
# What you also have to do is to change the default fileset (#13)
# to either one of the demo filesets given or create our own fileset.
#
#
#
# For Bareos release @VERSION@ (@DATE@) -- @DISTNAME@ @DISTVER@
#
#
Director { # define myself
Name = @basename@-dir
QueryFile = "@scriptdir@/query.sql"
Maximum Concurrent Jobs = 10
Password = "@dir_password@" # Console password
Messages = Daemon
# remove comment in next line to load plugins from specified directory
# Plugin Directory = @plugindir@
}
JobDefs {
Name = "DefaultJob"
Type = Backup
Level = Incremental
Client = @basename@-fd
FileSet = "SelfTest" # selftest fileset (#13)
Schedule = "WeeklyCycle"
Storage = File
Messages = Standard
Pool = Incremental
Priority = 10
Write Bootstrap = "@working_dir@/%c.bsr"
Full Backup Pool = Full # write Full Backups into "Full" Pool (#05)
Differential Backup Pool = Differential # write Diff Backups into "Differential" Pool (#08)
Incremental Backup Pool = Incremental # write Incr Backups into "Incremental" Pool (#11)
}
#
# Define the main nightly save backup job
# By default, this job will back up to disk in @archivedir@
Job {
Name = "BackupClient1"
JobDefs = "DefaultJob"
}
#
# Backup the catalog database (after the nightly save)
#
Job {
Name = "BackupCatalog"
JobDefs = "DefaultJob"
Level = Full
FileSet="Catalog"
Schedule = "WeeklyCycleAfterBackup"
125
# This creates an ASCII copy of the catalog
# Arguments to make_catalog_backup.pl are:
# make_catalog_backup.pl <catalog-name>
RunBeforeJob = "@scriptdir@/make_catalog_backup.pl MyCatalog"
# This deletes the copy of the catalog
RunAfterJob = "@scriptdir@/delete_catalog_backup"
# This sends the bootstrap via mail for disaster recovery.
# Should be sent to another system, please change recipient accordingly
Write Bootstrap = "|@sbindir@/bsmtp -h @smtp_host@ -f \"\(Bareos\) \" -s \"Bootstrap for Job %j\" @job_email@" # (#01)
Priority = 11 # run after main backup
}
#
# Standard Restore template, to be changed by Console program
# Only one such job is needed for all Jobs/Clients/Storage ...
#
Job {
Name = "RestoreFiles"
Type = Restore
Client=@basename@-fd
FileSet = "Linux All"
Storage = File
Pool = Incremental
Messages = Standard
Where = /tmp/bareos-restores
}
FileSet {
Name = "Windows All Drives"
Enable VSS = yes
Include {
Options {
Signature = MD5
Drive Type = fixed
IgnoreCase = yes
WildFile = "[A-Z]:/pagefile.sys"
WildDir = "[A-Z]:/RECYCLER"
WildDir = "[A-Z]:/$RECYCLE.BIN"
WildDir = "[A-Z]:/System Volume Information"
Exclude = yes
}
File = /
}
}
FileSet {
Name = "Linux All"
Include {
Options {
Signature = MD5 # calculate md5 checksum per file
One FS = No # change into other filessytems
FS Type = ext2 # filesystems of given types will be backed up
FS Type = ext3 # others will be ignored
FS Type = ext4
FS Type = xfs
FS Type = reiserfs
FS Type = jfs
FS Type = btrfs
}
File = /
}
# Things that usually have to be excluded
# You have to exclude @archivedir@
# on your bareos server
Exclude {
File = @working_dir@
File = @archivedir@
File = /proc
File = /tmp
File = /.journal
File = /.fsck
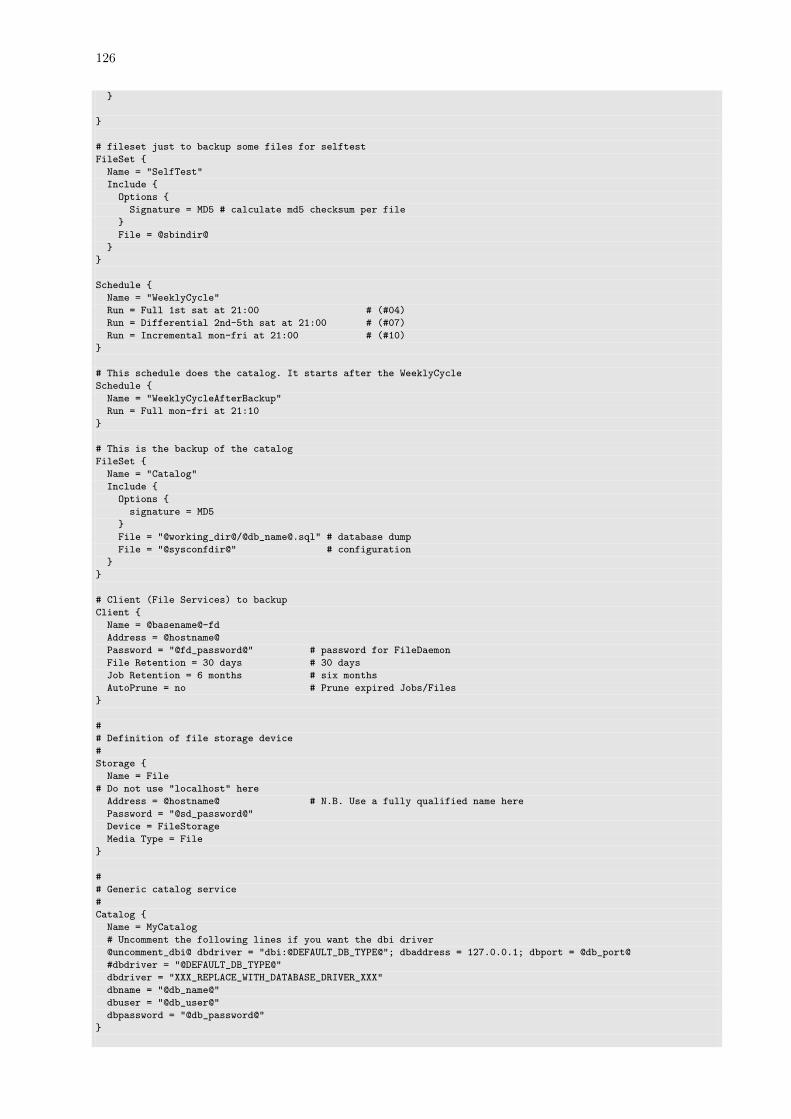
126
}
}
# fileset just to backup some files for selftest
FileSet {
Name = "SelfTest"
Include {
Options {
Signature = MD5 # calculate md5 checksum per file
}
File = @sbindir@
}
}
Schedule {
Name = "WeeklyCycle"
Run = Full 1st sat at 21:00 # (#04)
Run = Differential 2nd-5th sat at 21:00 # (#07)
Run = Incremental mon-fri at 21:00 # (#10)
}
# This schedule does the catalog. It starts after the WeeklyCycle
Schedule {
Name = "WeeklyCycleAfterBackup"
Run = Full mon-fri at 21:10
}
# This is the backup of the catalog
FileSet {
Name = "Catalog"
Include {
Options {
signature = MD5
}
File = "@working_dir@/@[email protected]" # database dump
File = "@sysconfdir@" # configuration
}
}
# Client (File Services) to backup
Client {
Name = @basename@-fd
Address = @hostname@
Password = "@fd_password@" # password for FileDaemon
File Retention = 30 days # 30 days
Job Retention = 6 months # six months
AutoPrune = no # Prune expired Jobs/Files
}
#
# Definition of file storage device
#
Storage {
Name = File
# Do not use "localhost" here
Address = @hostname@ # N.B. Use a fully qualified name here
Password = "@sd_password@"
Device = FileStorage
Media Type = File
}
#
# Generic catalog service
#
Catalog {
Name = MyCatalog
# Uncomment the following lines if you want the dbi driver
@uncomment_dbi@ dbdriver = "dbi:@DEFAULT_DB_TYPE@"; dbaddress = 127.0.0.1; dbport = @db_port@
#dbdriver = "@DEFAULT_DB_TYPE@"
dbdriver = "XXX_REPLACE_WITH_DATABASE_DRIVER_XXX"
dbname = "@db_name@"
dbuser = "@db_user@"
dbpassword = "@db_password@"
}
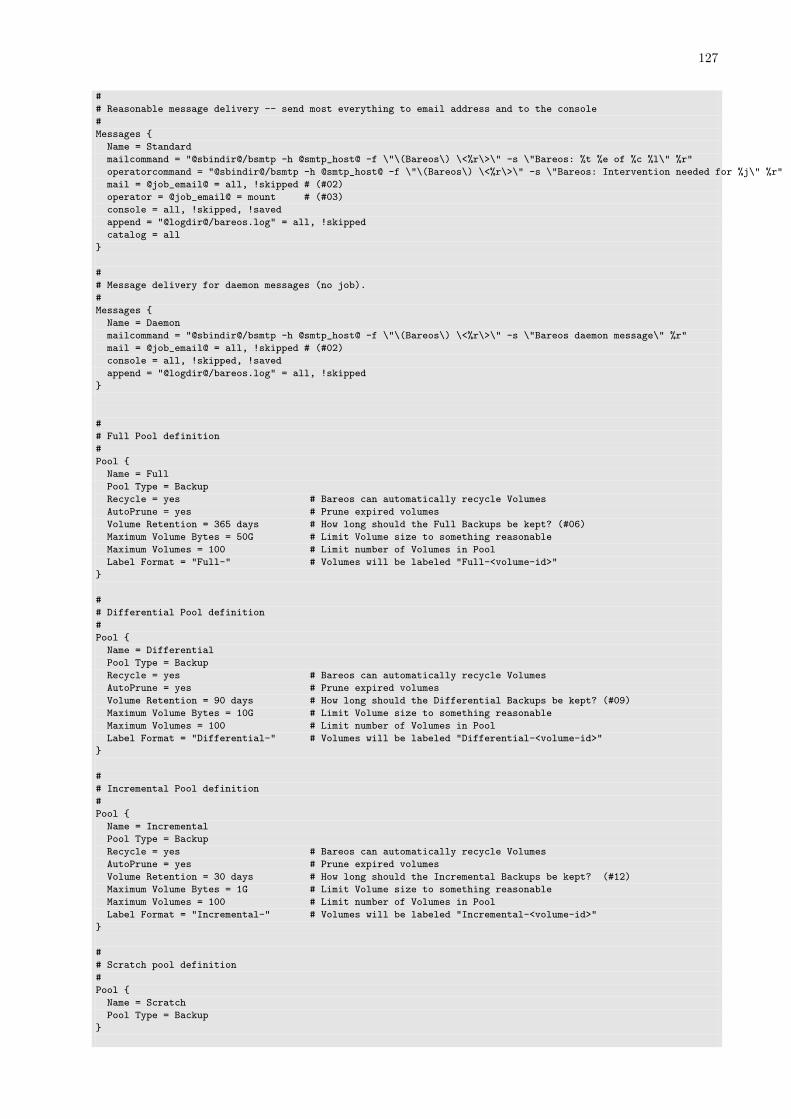
127
#
# Reasonable message delivery -- send most everything to email address and to the console
#
Messages {
Name = Standard
mailcommand = "@sbindir@/bsmtp -h @smtp_host@ -f \"\(Bareos\) \<%r\>\" -s \"Bareos: %t %e of %c %l\" %r"
operatorcommand = "@sbindir@/bsmtp -h @smtp_host@ -f \"\(Bareos\) \<%r\>\" -s \"Bareos: Intervention needed for %j\" %r"
mail = @job_email@ = all, !skipped # (#02)
operator = @job_email@ = mount # (#03)
console = all, !skipped, !saved
append = "@logdir@/bareos.log" = all, !skipped
catalog = all
}
#
# Message delivery for daemon messages (no job).
#
Messages {
Name = Daemon
mailcommand = "@sbindir@/bsmtp -h @smtp_host@ -f \"\(Bareos\) \<%r\>\" -s \"Bareos daemon message\" %r"
mail = @job_email@ = all, !skipped # (#02)
console = all, !skipped, !saved
append = "@logdir@/bareos.log" = all, !skipped
}
#
# Full Pool definition
#
Pool {
Name = Full
Pool Type = Backup
Recycle = yes # Bareos can automatically recycle Volumes
AutoPrune = yes # Prune expired volumes
Volume Retention = 365 days # How long should the Full Backups be kept? (#06)
Maximum Volume Bytes = 50G # Limit Volume size to something reasonable
Maximum Volumes = 100 # Limit number of Volumes in Pool
Label Format = "Full-" # Volumes will be labeled "Full-<volume-id>"
}
#
# Differential Pool definition
#
Pool {
Name = Differential
Pool Type = Backup
Recycle = yes # Bareos can automatically recycle Volumes
AutoPrune = yes # Prune expired volumes
Volume Retention = 90 days # How long should the Differential Backups be kept? (#09)
Maximum Volume Bytes = 10G # Limit Volume size to something reasonable
Maximum Volumes = 100 # Limit number of Volumes in Pool
Label Format = "Differential-" # Volumes will be labeled "Differential-<volume-id>"
}
#
# Incremental Pool definition
#
Pool {
Name = Incremental
Pool Type = Backup
Recycle = yes # Bareos can automatically recycle Volumes
AutoPrune = yes # Prune expired volumes
Volume Retention = 30 days # How long should the Incremental Backups be kept? (#12)
Maximum Volume Bytes = 1G # Limit Volume size to something reasonable
Maximum Volumes = 100 # Limit number of Volumes in Pool
Label Format = "Incremental-" # Volumes will be labeled "Incremental-<volume-id>"
}
#
# Scratch pool definition
#
Pool {
Name = Scratch
Pool Type = Backup
}

128
#
# Restricted console used by tray-monitor to get the status of the director
#
Console {
Name = @basename@-mon
Password = "@mon_dir_password@"
CommandACL = status, .status
}
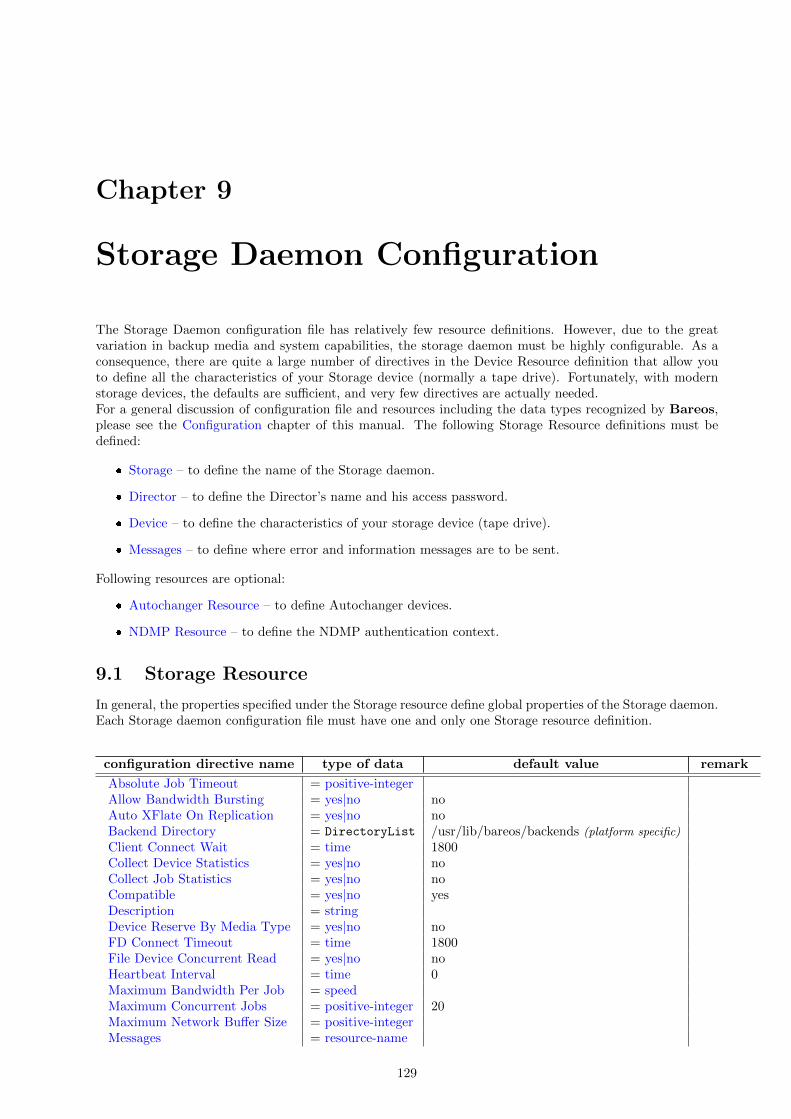
Chapter 9
Storage Daemon Configuration
The Storage Daemon configuration file has relatively few resource definitions. However, due to the greatvariation in backup media and system capabilities, the storage daemon must be highly configurable. As aconsequence, there are quite a large number of directives in the Device Resource definition that allow youto define all the characteristics of your Storage device (normally a tape drive). Fortunately, with modernstorage devices, the defaults are sufficient, and very few directives are actually needed.For a general discussion of configuration file and resources including the data types recognized by Bareos,please see the Configuration chapter of this manual. The following Storage Resource definitions must bedefined:
� Storage – to define the name of the Storage daemon.
� Director – to define the Director’s name and his access password.
� Device – to define the characteristics of your storage device (tape drive).
� Messages – to define where error and information messages are to be sent.
Following resources are optional:
� Autochanger Resource – to define Autochanger devices.
� NDMP Resource – to define the NDMP authentication context.
9.1 Storage Resource
In general, the properties specified under the Storage resource define global properties of the Storage daemon.Each Storage daemon configuration file must have one and only one Storage resource definition.
configuration directive name type of data default value remark
Absolute Job Timeout = positive-integerAllow Bandwidth Bursting = yes|no noAuto XFlate On Replication = yes|no noBackend Directory = DirectoryList /usr/lib/bareos/backends (platform specific)
Client Connect Wait = time 1800Collect Device Statistics = yes|no noCollect Job Statistics = yes|no noCompatible = yes|no yesDescription = stringDevice Reserve By Media Type = yes|no noFD Connect Timeout = time 1800File Device Concurrent Read = yes|no noHeartbeat Interval = time 0Maximum Bandwidth Per Job = speedMaximum Concurrent Jobs = positive-integer 20Maximum Network Buffer Size = positive-integerMessages = resource-name
129
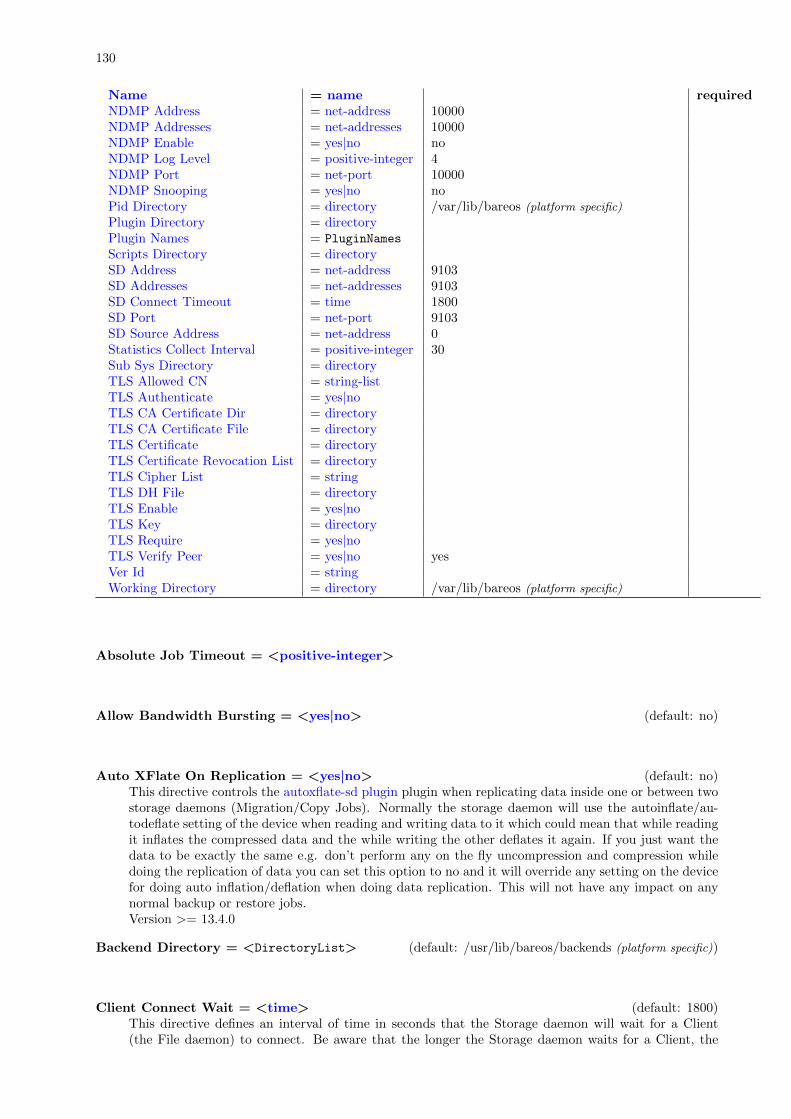
130
Name = name requiredNDMP Address = net-address 10000NDMP Addresses = net-addresses 10000NDMP Enable = yes|no noNDMP Log Level = positive-integer 4NDMP Port = net-port 10000NDMP Snooping = yes|no noPid Directory = directory /var/lib/bareos (platform specific)
Plugin Directory = directoryPlugin Names = PluginNames
Scripts Directory = directorySD Address = net-address 9103SD Addresses = net-addresses 9103SD Connect Timeout = time 1800SD Port = net-port 9103SD Source Address = net-address 0Statistics Collect Interval = positive-integer 30Sub Sys Directory = directoryTLS Allowed CN = string-listTLS Authenticate = yes|noTLS CA Certificate Dir = directoryTLS CA Certificate File = directoryTLS Certificate = directoryTLS Certificate Revocation List = directoryTLS Cipher List = stringTLS DH File = directoryTLS Enable = yes|noTLS Key = directoryTLS Require = yes|noTLS Verify Peer = yes|no yesVer Id = stringWorking Directory = directory /var/lib/bareos (platform specific)
Absolute Job Timeout = <positive-integer>
Allow Bandwidth Bursting = <yes|no> (default: no)
Auto XFlate On Replication = <yes|no> (default: no)This directive controls the autoxflate-sd plugin plugin when replicating data inside one or between twostorage daemons (Migration/Copy Jobs). Normally the storage daemon will use the autoinflate/au-todeflate setting of the device when reading and writing data to it which could mean that while readingit inflates the compressed data and the while writing the other deflates it again. If you just want thedata to be exactly the same e.g. don’t perform any on the fly uncompression and compression whiledoing the replication of data you can set this option to no and it will override any setting on the devicefor doing auto inflation/deflation when doing data replication. This will not have any impact on anynormal backup or restore jobs.Version >= 13.4.0
Backend Directory = <DirectoryList> (default: /usr/lib/bareos/backends (platform specific))
Client Connect Wait = <time> (default: 1800)This directive defines an interval of time in seconds that the Storage daemon will wait for a Client(the File daemon) to connect. Be aware that the longer the Storage daemon waits for a Client, the
131
more resources will be tied up.
Collect Device Statistics = <yes|no> (default: no)
Collect Job Statistics = <yes|no> (default: no)
Compatible = <yes|no> (default: yes)This directive enables the compatible mode of the storage daemon. In this mode the storage daemonwill try to write the storage data in a compatible way with Bacula of which Bareos is a fork. This onlyworks for the data streams both share and not for any new datastreams which are Bareos specific.Which may be read when used by a Bareos storage daemon but might not be understood by any ofthe Bacula components (dir/sd/fd).
Description = <string>
Device Reserve By Media Type = <yes|no> (default: no)
FD Connect Timeout = <time> (default: 1800)
File Device Concurrent Read = <yes|no> (default: no)
Heartbeat Interval = <time> (default: 0)This directive defines an interval of time in seconds. When the Storage daemon is waiting for theoperator to mount a tape, each time interval, it will send a heartbeat signal to the File daemon.The default interval is zero which disables the heartbeat. This feature is particularly useful if youhave a router that does not follow Internet standards and times out an valid connection after ashort duration despite the fact that keepalive is set. This usually results in a broken pipe error message.
Maximum Bandwidth Per Job = <speed>
Maximum Concurrent Jobs = <positive-integer> (default: 20)where <number> is the maximum number of Jobs that may run concurrently. The default is set to10, but you may set it to a larger number. Each contact from the Director (e.g. status request, jobstart request) is considered as a Job, so if you want to be able to do a status request in the console atthe same time as a Job is running, you will need to set this value greater than 1. To run simultaneousJobs, you will need to set a number of other directives in the Director’s configuration file. Whichones you set depend on what you want, but you will almost certainly need to set the MaximumConcurrent Jobs in the Storage resource in the Director’s configuration file and possibly those inthe Job and Client resources.
Maximum Network Buffer Size = <positive-integer>
Messages = <resource-name>
132
Name = <name> (required)Specifies the Name of the Storage daemon.
NDMP Address = <net-address> (default: 10000)This directive is optional, and if it is specified, it will cause the Storage daemon server (for NDMPTape Server connections) to bind to the specified IP-Address, which is either a domain name or anIP address specified as a dotted quadruple. If this directive is not specified, the Storage daemon willbind to any available address (the default).
NDMP Addresses = <net-addresses> (default: 10000)Specify the ports and addresses on which the Storage daemon will listen for NDMP Tape Serverconnections. Normally, the default is sufficient and you do not need to specify this directive.
NDMP Enable = <yes|no> (default: no)This directive enables the Native NDMP Tape Agent.
NDMP Log Level = <positive-integer> (default: 4)This directive sets the loglevel for the NDMP protocol library.
NDMP Port = <net-port> (default: 10000)Specifies port number on which the Storage daemon listens for NDMP Tape Server connections.
NDMP Snooping = <yes|no> (default: no)This directive enables the Snooping and pretty printing of NDMP protocol information in debuggingmode.
Pid Directory = <directory> (default: /var/lib/bareos (platform specific))This directive specifies a directory in which the Storage Daemon may put its process Id file files. Theprocess Id file is used to shutdown Bareos and to prevent multiple copies of Bareos from runningsimultaneously. Standard shell expansion of the directory is done when the configuration file is readso that values such as $HOME will be properly expanded.
Plugin Directory = <directory>This directive specifies a directory in which the Storage Daemon searches for plugins with the name<pluginname>-sd.so which it will load at startup.
Plugin Names = <PluginNames>
Scripts Directory = <directory>This directive is currently unused.
SD Address = <net-address> (default: 9103)This directive is optional, and if it is specified, it will cause the Storage daemon server (for Directorand File daemon connections) to bind to the specified IP-Address, which is either a domain name oran IP address specified as a dotted quadruple. If this and the SD Addresses Sd
Storage directives are notspecified, the Storage daemon will bind to any available address (the default).
SD Addresses = <net-addresses> (default: 9103)Specify the ports and addresses on which the Storage daemon will listen for Director connections.Using this directive, you can replace both the SD Port Sd
Storage and SD Address SdStorage directives.
133
SD Connect Timeout = <time> (default: 1800)
SD Port = <net-port> (default: 9103)Specifies port number on which the Storage daemon listens for Director connections.
SD Source Address = <net-address> (default: 0)
Statistics Collect Interval = <positive-integer> (default: 30)
Sub Sys Directory = <directory>
TLS Allowed CN = <string-list>
TLS Authenticate = <yes|no>
TLS CA Certificate Dir = <directory>
TLS CA Certificate File = <directory>
TLS Certificate = <directory>
TLS Certificate Revocation List = <directory>
TLS Cipher List = <string>
TLS DH File = <directory>
TLS Enable = <yes|no>Bareos can be configured to encrypt all its network traffic. Chapter TLS Configuration Directivesexplains how the Bareos components must be configured to use TLS.
TLS Key = <directory>
TLS Require = <yes|no>
134
TLS Verify Peer = <yes|no> (default: yes)
Ver Id = <string>
Working Directory = <directory> (default: /var/lib/bareos (platform specific))This directive specifies a directory in which the Storage daemon may put its status files. This directoryshould be used only by Bareos, but may be shared by other Bareos daemons provided the namesgiven to each daemon are unique.
The following is a typical Storage daemon storage resource definition.
#
# "Global" Storage daemon configuration specifications appear
# under the Storage resource.
#
Storage {
Name = "Storage daemon"
Address = localhost
}
Configuration 9.1: Storage daemon storage definition
9.2 Director Resource
The Director resource specifies the Name of the Director which is permitted to use the services of theStorage daemon. There may be multiple Director resources. The Director Name and Password must matchthe corresponding values in the Director’s configuration file.
configuration directive name type of data default value remark
Description = stringKey Encryption Key = passwordMaximum Bandwidth Per Job = speedMonitor = yes|noName = name requiredPassword = password requiredTLS Allowed CN = string-listTLS Authenticate = yes|noTLS CA Certificate Dir = directoryTLS CA Certificate File = directoryTLS Certificate = directoryTLS Certificate Revocation List = directoryTLS Cipher List = stringTLS DH File = directoryTLS Enable = yes|noTLS Key = directoryTLS Require = yes|noTLS Verify Peer = yes|no yes
Description = <string>
Key Encryption Key = <password>This key is used to encrypt the Security Key that is exchanged between the Director and the StorageDaemon for supporting Application Managed Encryption (AME). For security reasons each Director
135
should have a different Key Encryption Key.
Maximum Bandwidth Per Job = <speed>
Monitor = <yes|no>If Monitor is set to no (default), this director will have full access to this Storage daemon. If Monitoris set to yes, this director will only be able to fetch the current status of this Storage daemon.
Please note that if this director is being used by a Monitor, we highly recommend to set this directiveto yes to avoid serious security problems.
Name = <name> (required)Specifies the Name of the Director allowed to connect to the Storage daemon. This directive isrequired.
Password = <password> (required)Specifies the password that must be supplied by the above named Director. This directive is required.
TLS Allowed CN = <string-list>
TLS Authenticate = <yes|no>
TLS CA Certificate Dir = <directory>
TLS CA Certificate File = <directory>
TLS Certificate = <directory>
TLS Certificate Revocation List = <directory>
TLS Cipher List = <string>
TLS DH File = <directory>
TLS Enable = <yes|no>Bareos can be configured to encrypt all its network traffic. Chapter TLS Configuration Directivesexplains how the Bareos components must be configured to use TLS.
TLS Key = <directory>
136
TLS Require = <yes|no>
TLS Verify Peer = <yes|no> (default: yes)
The following is an example of a valid Director resource definition:
Director {
Name = MainDirector
Password = my_secret_password
}
Configuration 9.2: Storage daemon Director definition
9.3 NDMP Resource
The NDMP Resource specifies the authentication details of each NDMP client. There may be multiple NDMPresources for a single Storage daemon. In general, the properties specified within the NDMP resource arespecific to one client.
configuration directive name type of data default value remark
Auth Type = None|Clear|MD5 NoneDescription = stringLog Level = positive-integer 4Name = name requiredPassword = password requiredUsername = string required
Auth Type = <None|Clear|MD5> (default: None)Specifies the authentication type that must be supplied by the above named NDMP Client. Thisdirective is required.
The following values are allowed:
1. None - Use no password
2. Clear - Use clear text password
3. MD5 - Use MD5 hashing
Description = <string>
Log Level = <positive-integer> (default: 4)Specifies the NDMP Loglevel which overrides the global NDMP loglevel for this client.
Name = <name> (required)Specifies the name of the NDMP Client allowed to connect to the Storage daemon. This directive isrequired.
Password = <password> (required)Specifies the password that must be supplied by the above named NDMP Client. This directive isrequired.
137
Username = <string> (required)Specifies the username that must be supplied by the above named NDMP Client. This directive isrequired.
9.4 Device Resource
The Device Resource specifies the details of each device (normally a tape drive) that can be used by theStorage daemon. There may be multiple Device resources for a single Storage daemon. In general, theproperties specified within the Device resource are specific to the Device.
configuration directive name type of data default value remark
Alert Command = Strname
Always Open = yes|no yesArchive Device = Strname requiredAuto Deflate = IoDirection
Auto Deflate Algorithm = CompressionAlgorithm
Auto Deflate Level = positive-integer 6Auto Inflate = IoDirection
Auto Select = yes|no yesAutochanger = yes|no noAutomatic Mount = yes|no noBackward Space File = yes|no yesBackward Space Record = yes|no yesBlock Checksum = yes|no yesBlock Positioning = yes|no yesBsf At Eom = yes|no noChanger Command = Strname
Changer Device = Strname
Check Labels = yes|no noClose On Poll = yes|no noCollect Statistics = yes|no yesDescription = stringDevice Options = stringDevice Type = DeviceType
Diagnostic Device = Strname
Drive Crypto Enabled = yes|noDrive Index = positive-integerDrive Tape Alert Enabled = yes|noFast Forward Space File = yes|no yesForward Space File = yes|no yesForward Space Record = yes|no yesFree Space Command = Strname deprecatedHardware End Of File = yes|no yesHardware End Of Medium = yes|no yesLabel Block Size = positive-integer 64512Label Media = yes|no noLabel Type = Label
Maximum Block Size = MaxBlocksize
Maximum Changer Wait = time 300Maximum Concurrent Jobs = positive-integerMaximum File Size = Size64 1000000000Maximum Job Spool Size = Size64
Maximum Network Buffer Size = positive-integerMaximum Open Volumes = positive-integer 1Maximum Open Wait = time 300Maximum Part Size = Size64 deprecatedMaximum Rewind Wait = time 300Maximum Spool Size = Size64
138
Maximum Volume Size = Size64 deprecatedMedia Type = Strname requiredMinimum Block Size = positive-integerMount Command = Strname
Mount Point = Strname
Name = name requiredNo Rewind On Close = yes|no yesOffline On Unmount = yes|no noQuery Crypto Status = yes|noRandom Access = yes|no noRemovable Media = yes|no yesRequires Mount = yes|no noSpool Directory = directoryTwo Eof = yes|no noUnmount Command = Strname
Use Mtiocget = yes|no yesVolume Capacity = Size64
Volume Poll Interval = time 300Write Part Command = Strname deprecated
Alert Command = <Strname>The name-string specifies an external program to be called at the completion of each Job after thedevice is released. The purpose of this command is to check for Tape Alerts, which are present whensomething is wrong with your tape drive (at least for most modern tape drives). The same substitutioncharacters that may be specified in the Changer Command may also be used in this string. For moreinformation, please see the Autochangers chapter of this manual.
Note, it is not necessary to have an autochanger to use this command. The example below uses thetapeinfo program that comes with the mtx package, but it can be used on any tape drive. However,you will need to specify a Changer Device directive in your Device resource (see above) so that thegeneric SCSI device name can be edited into the command (with the %c).
An example of the use of this command to print Tape Alerts in the Job report is:
Alert Command = "sh -c ’tapeinfo -f %c | grep TapeAlert’"
and an example output when there is a problem could be:
bareos-sd Alert: TapeAlert[32]: Interface: Problem with SCSI interface
between tape drive and initiator.
Always Open = <yes|no> (default: yes)If Yes, Bareos will always keep the device open unless specifically unmounted by the Console program.This permits Bareos to ensure that the tape drive is always available, and properly positioned. If youset AlwaysOpen to no Bareos will only open the drive when necessary, and at the end of the Job ifno other Jobs are using the drive, it will be freed. The next time Bareos wants to append to a tape ona drive that was freed, Bareos will rewind the tape and position it to the end. To avoid unnecessarytape positioning and to minimize unnecessary operator intervention, it is highly recommended thatAlways Open = yes. This also ensures that the drive is available when Bareos needs it.
If you have Always Open = yes (recommended) and you want to use the drive for something else,simply use the unmount command in the Console program to release the drive. However, don’t forgetto remount the drive with mount when the drive is available or the next Bareos job will block.
For File storage, this directive is ignored. For a FIFO storage device, you must set this to No.
Please note that if you set this directive to No Bareos will release the tape drive between eachjob, and thus the next job will rewind the tape and position it to the end of the data. Thiscan be a very time consuming operation. In addition, with this directive set to no, certain mul-tiple drive autochanger operations will fail. We strongly recommend to keep Always Open set to Yes
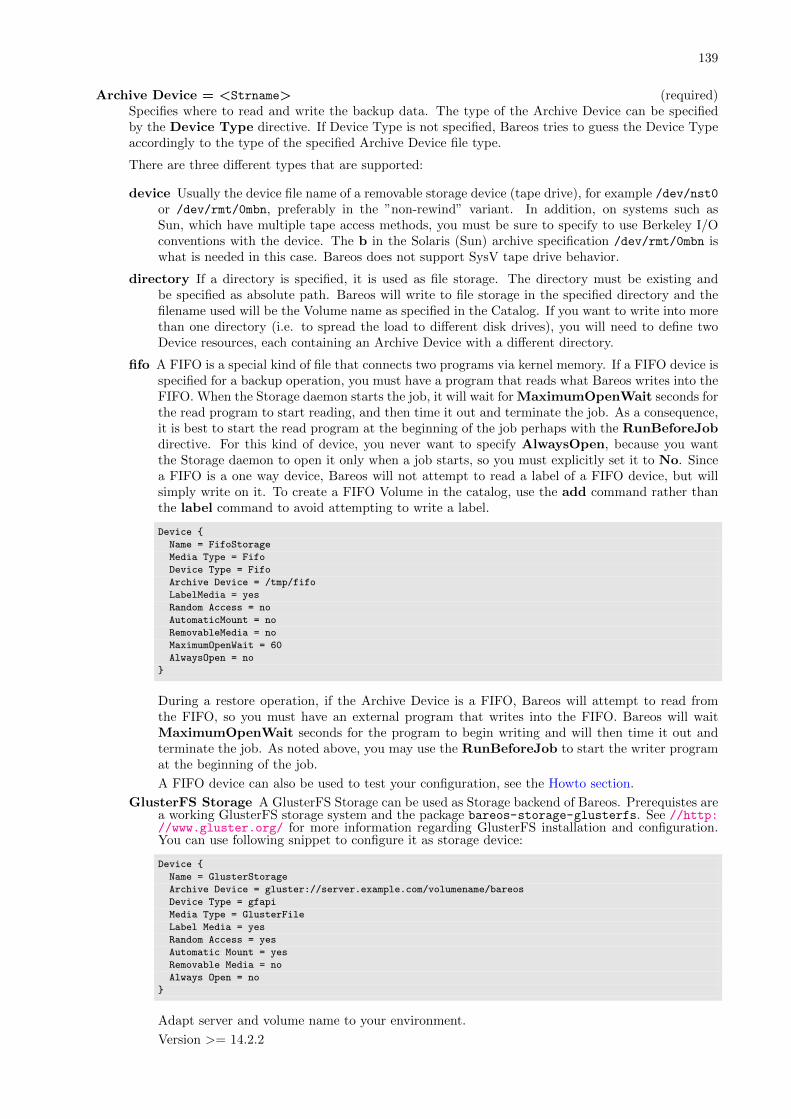
139
Archive Device = <Strname> (required)Specifies where to read and write the backup data. The type of the Archive Device can be specifiedby the Device Type directive. If Device Type is not specified, Bareos tries to guess the Device Typeaccordingly to the type of the specified Archive Device file type.
There are three different types that are supported:
device Usually the device file name of a removable storage device (tape drive), for example /dev/nst0or /dev/rmt/0mbn, preferably in the ”non-rewind” variant. In addition, on systems such asSun, which have multiple tape access methods, you must be sure to specify to use Berkeley I/Oconventions with the device. The b in the Solaris (Sun) archive specification /dev/rmt/0mbn iswhat is needed in this case. Bareos does not support SysV tape drive behavior.
directory If a directory is specified, it is used as file storage. The directory must be existing andbe specified as absolute path. Bareos will write to file storage in the specified directory and thefilename used will be the Volume name as specified in the Catalog. If you want to write into morethan one directory (i.e. to spread the load to different disk drives), you will need to define twoDevice resources, each containing an Archive Device with a different directory.
fifo A FIFO is a special kind of file that connects two programs via kernel memory. If a FIFO device isspecified for a backup operation, you must have a program that reads what Bareos writes into theFIFO. When the Storage daemon starts the job, it will wait for MaximumOpenWait seconds forthe read program to start reading, and then time it out and terminate the job. As a consequence,it is best to start the read program at the beginning of the job perhaps with the RunBeforeJobdirective. For this kind of device, you never want to specify AlwaysOpen, because you wantthe Storage daemon to open it only when a job starts, so you must explicitly set it to No. Sincea FIFO is a one way device, Bareos will not attempt to read a label of a FIFO device, but willsimply write on it. To create a FIFO Volume in the catalog, use the add command rather thanthe label command to avoid attempting to write a label.
Device {
Name = FifoStorage
Media Type = Fifo
Device Type = Fifo
Archive Device = /tmp/fifo
LabelMedia = yes
Random Access = no
AutomaticMount = no
RemovableMedia = no
MaximumOpenWait = 60
AlwaysOpen = no
}
During a restore operation, if the Archive Device is a FIFO, Bareos will attempt to read fromthe FIFO, so you must have an external program that writes into the FIFO. Bareos will waitMaximumOpenWait seconds for the program to begin writing and will then time it out andterminate the job. As noted above, you may use the RunBeforeJob to start the writer programat the beginning of the job.
A FIFO device can also be used to test your configuration, see the Howto section.
GlusterFS Storage A GlusterFS Storage can be used as Storage backend of Bareos. Prerequistes area working GlusterFS storage system and the package bareos-storage-glusterfs. See //http://www.gluster.org/ for more information regarding GlusterFS installation and configuration.You can use following snippet to configure it as storage device:
Device {
Name = GlusterStorage
Archive Device = gluster://server.example.com/volumename/bareos
Device Type = gfapi
Media Type = GlusterFile
Label Media = yes
Random Access = yes
Automatic Mount = yes
Removable Media = no
Always Open = no
}
Adapt server and volume name to your environment.
Version >= 14.2.2
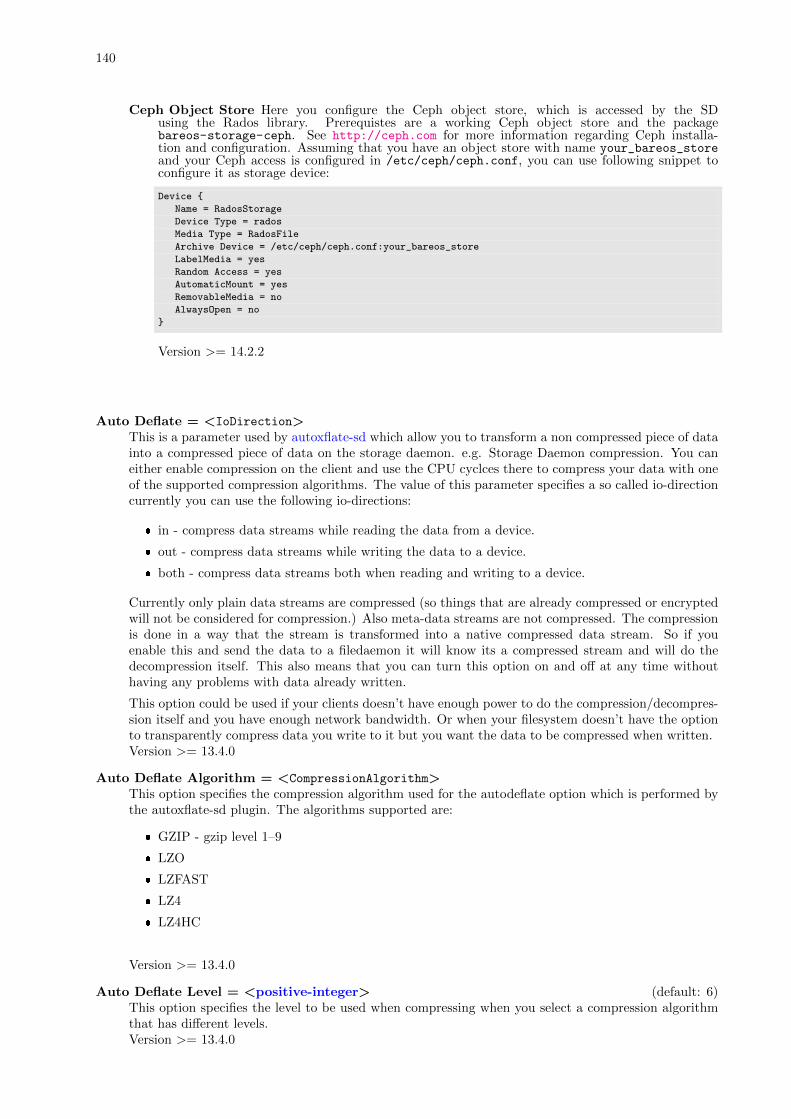
140
Ceph Object Store Here you configure the Ceph object store, which is accessed by the SDusing the Rados library. Prerequistes are a working Ceph object store and the packagebareos-storage-ceph. See http://ceph.com for more information regarding Ceph installa-tion and configuration. Assuming that you have an object store with name your_bareos_storeand your Ceph access is configured in /etc/ceph/ceph.conf, you can use following snippet toconfigure it as storage device:
Device {
Name = RadosStorage
Device Type = rados
Media Type = RadosFile
Archive Device = /etc/ceph/ceph.conf:your_bareos_store
LabelMedia = yes
Random Access = yes
AutomaticMount = yes
RemovableMedia = no
AlwaysOpen = no
}
Version >= 14.2.2
Auto Deflate = <IoDirection>This is a parameter used by autoxflate-sd which allow you to transform a non compressed piece of datainto a compressed piece of data on the storage daemon. e.g. Storage Daemon compression. You caneither enable compression on the client and use the CPU cyclces there to compress your data with oneof the supported compression algorithms. The value of this parameter specifies a so called io-directioncurrently you can use the following io-directions:
� in - compress data streams while reading the data from a device.
� out - compress data streams while writing the data to a device.
� both - compress data streams both when reading and writing to a device.
Currently only plain data streams are compressed (so things that are already compressed or encryptedwill not be considered for compression.) Also meta-data streams are not compressed. The compressionis done in a way that the stream is transformed into a native compressed data stream. So if youenable this and send the data to a filedaemon it will know its a compressed stream and will do thedecompression itself. This also means that you can turn this option on and off at any time withouthaving any problems with data already written.
This option could be used if your clients doesn’t have enough power to do the compression/decompres-sion itself and you have enough network bandwidth. Or when your filesystem doesn’t have the optionto transparently compress data you write to it but you want the data to be compressed when written.Version >= 13.4.0
Auto Deflate Algorithm = <CompressionAlgorithm>This option specifies the compression algorithm used for the autodeflate option which is performed bythe autoxflate-sd plugin. The algorithms supported are:
� GZIP - gzip level 1–9
� LZO
� LZFAST
� LZ4
� LZ4HC
Version >= 13.4.0
Auto Deflate Level = <positive-integer> (default: 6)This option specifies the level to be used when compressing when you select a compression algorithmthat has different levels.Version >= 13.4.0
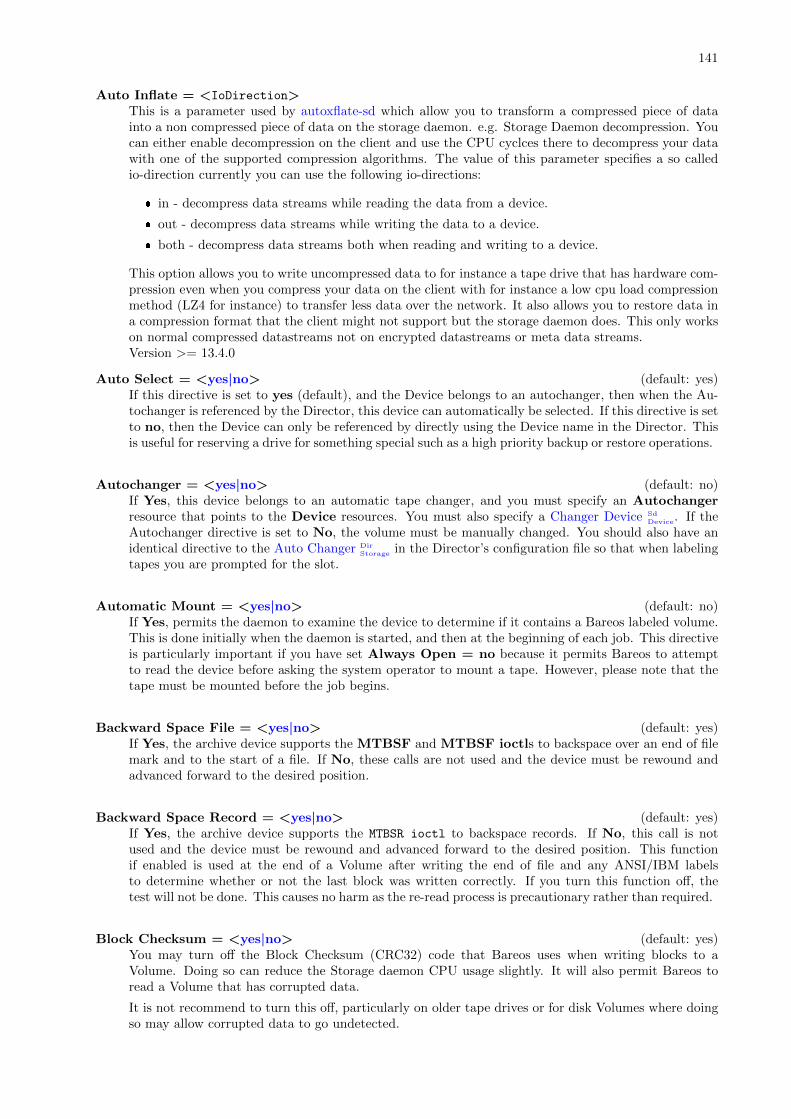
141
Auto Inflate = <IoDirection>This is a parameter used by autoxflate-sd which allow you to transform a compressed piece of datainto a non compressed piece of data on the storage daemon. e.g. Storage Daemon decompression. Youcan either enable decompression on the client and use the CPU cyclces there to decompress your datawith one of the supported compression algorithms. The value of this parameter specifies a so calledio-direction currently you can use the following io-directions:
� in - decompress data streams while reading the data from a device.
� out - decompress data streams while writing the data to a device.
� both - decompress data streams both when reading and writing to a device.
This option allows you to write uncompressed data to for instance a tape drive that has hardware com-pression even when you compress your data on the client with for instance a low cpu load compressionmethod (LZ4 for instance) to transfer less data over the network. It also allows you to restore data ina compression format that the client might not support but the storage daemon does. This only workson normal compressed datastreams not on encrypted datastreams or meta data streams.Version >= 13.4.0
Auto Select = <yes|no> (default: yes)If this directive is set to yes (default), and the Device belongs to an autochanger, then when the Au-tochanger is referenced by the Director, this device can automatically be selected. If this directive is setto no, then the Device can only be referenced by directly using the Device name in the Director. Thisis useful for reserving a drive for something special such as a high priority backup or restore operations.
Autochanger = <yes|no> (default: no)If Yes, this device belongs to an automatic tape changer, and you must specify an Autochangerresource that points to the Device resources. You must also specify a Changer Device Sd
Device. If theAutochanger directive is set to No, the volume must be manually changed. You should also have anidentical directive to the Auto Changer Dir
Storage in the Director’s configuration file so that when labelingtapes you are prompted for the slot.
Automatic Mount = <yes|no> (default: no)If Yes, permits the daemon to examine the device to determine if it contains a Bareos labeled volume.This is done initially when the daemon is started, and then at the beginning of each job. This directiveis particularly important if you have set Always Open = no because it permits Bareos to attemptto read the device before asking the system operator to mount a tape. However, please note that thetape must be mounted before the job begins.
Backward Space File = <yes|no> (default: yes)If Yes, the archive device supports the MTBSF and MTBSF ioctls to backspace over an end of filemark and to the start of a file. If No, these calls are not used and the device must be rewound andadvanced forward to the desired position.
Backward Space Record = <yes|no> (default: yes)If Yes, the archive device supports the MTBSR ioctl to backspace records. If No, this call is notused and the device must be rewound and advanced forward to the desired position. This functionif enabled is used at the end of a Volume after writing the end of file and any ANSI/IBM labelsto determine whether or not the last block was written correctly. If you turn this function off, thetest will not be done. This causes no harm as the re-read process is precautionary rather than required.
Block Checksum = <yes|no> (default: yes)You may turn off the Block Checksum (CRC32) code that Bareos uses when writing blocks to aVolume. Doing so can reduce the Storage daemon CPU usage slightly. It will also permit Bareos toread a Volume that has corrupted data.
It is not recommend to turn this off, particularly on older tape drives or for disk Volumes where doingso may allow corrupted data to go undetected.
142
Block Positioning = <yes|no> (default: yes)This directive tells Bareos not to use block positioning when doing restores. Turning this directive offcan cause Bareos to be extremely slow when restoring files. You might use this directive if you wroteyour tapes with Bareos in variable block mode (the default), but your drive was in fixed block mode.
Bsf At Eom = <yes|no> (default: no)If No, no special action is taken by Bareos with the End of Medium (end of tape) is reached becausethe tape will be positioned after the last EOF tape mark, and Bareos can append to the tape asdesired. However, on some systems, such as FreeBSD, when Bareos reads the End of Medium (endof tape), the tape will be positioned after the second EOF tape mark (two successive EOF marksindicated End of Medium). If Bareos appends from that point, all the appended data will be lost.The solution for such systems is to specify BSF at EOM which causes Bareos to backspace over thesecond EOF mark. Determination of whether or not you need this directive is done using the testcommand in the btape program.
Changer Command = <Strname>The name-string specifies an external program to be called that will automatically change volumesas required by Bareos. Normally, this directive will be specified only in the AutoChanger resource,which is then used for all devices. However, you may also specify the different Changer Commandin each Device resource. Most frequently, you will specify the Bareos supplied mtx-changer script asfollows:
Changer Command = "/usr/lib/bareos/scripts/mtx-changer %c %o %S %a %d"
and you will install the mtx on your system. An example of this command is in the defaultbareos-sd.conf file. For more details on the substitution characters that may be specified toconfigure your autochanger please see the Autochanger Support chapter of this manual.
Changer Device = <Strname>The specified name-string must be the generic SCSI device name of the autochanger thatcorresponds to the normal read/write Archive Device specified in the Device resource. This genericSCSI device name should be specified if you have an autochanger or if you have a standard tape driveand want to use the Alert Command (see below). For example, on Linux systems, for an ArchiveDevice name of /dev/nst0, you would specify /dev/sg0 for the Changer Device name. Dependingon your exact configuration, and the number of autochangers or the type of autochanger, what youspecify here can vary. This directive is optional. See the Using Autochangers chapter of this manualfor more details of using this and the following autochanger directives.
Check Labels = <yes|no> (default: no)If you intend to read ANSI or IBM labels, this must be set. Even if the volume is not ANSI labeled,you can set this to yes, and Bareos will check the label type. Without this directive set to yes, Bareoswill assume that labels are of Bareos type and will not check for ANSI or IBM labels. In other words,if there is a possibility of Bareos encountering an ANSI/IBM label, you must set this to yes.
Close On Poll = <yes|no> (default: no)If Yes, Bareos close the device (equivalent to an unmount except no mount is required) and reopenit at each poll. Normally this is not too useful unless you have the Offline on Unmount directiveset, in which case the drive will be taken offline preventing wear on the tape during any futurepolling. Once the operator inserts a new tape, Bareos will recognize the drive on the next poll andautomatically continue with the backup. Please see above for more details.
Collect Statistics = <yes|no> (default: yes)
Description = <string>
143
Device Options = <string>
Device Type = <DeviceType>The Device Type specification allows you to explicitly tell Bareos what kind of device you are defining.It the type-specification may be one of the following:
Tape The device is a tape device and thus is sequential access. Tape devices are controlled usingioctl() calls.
File Tells Bareos that the device is a file. It may either be a file defined on fixed medium or a removablefilesystem such as USB. All files must be random access devices.
Fifo The device is a first-in-first-out sequential access read-only or write-only device.
GFAPI The gfapi device is used to access a GlusterFS storage. Version >= 14.2.2
Rados The Rados device is used to access a Ceph object store. Version >= 14.2.2
The Device Type directive is not required, and if not specified, Bareos will attempt to guess what kindof device has been specified using the Archive Device specification supplied. There are several advan-tages to explicitly specifying the Device Type. First, on some systems, block and character deviceshave the same type. Secondly, if you explicitly specify the Device Type, the mount point need not bedefined until the device is opened. This is the case with most removable devices such as USB. If the De-vice Type is not explicitly specified, then the mount point must exist when the Storage daemon starts.
Diagnostic Device = <Strname>
Drive Crypto Enabled = <yes|no>The default for this directive is No. If Yes the storage daemon can perform so called ApplicationManaged Encryption (AME) using a special Storage Daemon plugin which loads and clears theEncryption key using the SCSI SPIN/SPOUT protocol.
Drive Index = <positive-integer>The Drive Index that you specify is passed to the mtx-changer script and is thus passed to themtx program. By default, the Drive Index is zero, so if you have only one drive in your autochanger,everything will work normally. However, if you have multiple drives, you must specify multiple BareosDevice resources (one for each drive). The first Device should have the Drive Index set to 0, and thesecond Device Resource should contain a Drive Index set to 1, and so on. This will then permit youto use two or more drives in your autochanger.
Drive Tape Alert Enabled = <yes|no>
Fast Forward Space File = <yes|no> (default: yes)If No, the archive device is not required to support keeping track of the file number (MTIOCGETioctl) during forward space file. If Yes, the archive device must support the ioctl MTFSF call, whichvirtually all drivers support, but in addition, your SCSI driver must keep track of the file numberon the tape and report it back correctly by the MTIOCGET ioctl. Note, some SCSI drivers willcorrectly forward space, but they do not keep track of the file number or more seriously, they do notreport end of medium.
Forward Space File = <yes|no> (default: yes)If Yes, the archive device must support the MTFSF ioctl to forward space by file marks. If No, datamust be read to advance the position on the device.
144
Forward Space Record = <yes|no> (default: yes)If Yes, the archive device must support the MTFSR ioctl to forward space over records. If No,data must be read in order to advance the position on the device.
Free Space Command = <Strname>Please note! This directive is deprecated.
Hardware End Of File = <yes|no> (default: yes)
Hardware End Of Medium = <yes|no> (default: yes)All modern (after 1998) tape drives should support this feature. In doubt, use the btape program totest your drive to see whether or not it supports this function. If the archive device does not supportthe end of medium ioctl request MTEOM, set this parameter to No. The storage daemon will then usethe forward space file function to find the end of the recorded data. In addition, your SCSI drivermust keep track of the file number on the tape and report it back correctly by the MTIOCGETioctl. Note, some SCSI drivers will correctly forward space to the end of the recorded data, but theydo not keep track of the file number. On Linux machines, the SCSI driver has a fast-eod option,which if set will cause the driver to lose track of the file number. You should ensure that this optionis always turned off using the mt program.
Label Block Size = <64512> (default: 64512)The storage daemon will write the label blocks with the size configured here. Usually, you will notneed to change this directive.
For more information on this directive, please see Tapespeed and blocksizes.Version >= 14.2.0
Label Media = <yes|no> (default: no)If Yes, permits this device to automatically label blank media without an explicit operator command.It does so by using an internal algorithm as defined on the Label Format Dir
Pool record in each Poolresource. If this is No as by default, Bareos will label tapes only by specific operator command (labelin the Console) or when the tape has been recycled. The automatic labeling feature is most usefulwhen writing to disk rather than tape volumes.
Label Type = <Label>Defines the label type to use, see section Tape Labels: ANSI or IBM. This directive is implementedin the Director Pool resource (Label Type Dir
Pool) and in the SD Device resource. If it is specified in thethe SD Device resource, it will take precedence over the value passed from the Director to the SD. Ifit is set to a non-default value, make sure to also enable Check Labels Sd
Device.
Maximum Block Size = <64512>The Storage daemon will always attempt to write blocks of the specified size (in-bytes) to the archivedevice. As a consequence, this statement specifies both the default block size and the maximum blocksize. The size written never exceed the given size. If adding data to a block would cause it to exceedthe given maximum size, the block will be written to the archive device, and the new data will begina new block.
If no value is specified or zero is specified, the Storage daemon will use a default block size of 64,512bytes (126 * 512).
Please note! If your are using LTO drives, changing the block size after labeling the tape will resultinto unreadable tapes.
Please read chapter Tapespeed and blocksizes, to see how to tune this value in a safe manner.
145
Maximum Changer Wait = <time> (default: 300)This directive specifies the maximum time in seconds for Bareos to wait for an autochanger to changethe volume. If this time is exceeded, Bareos will invalidate the Volume slot number stored in thecatalog and try again. If no additional changer volumes exist, Bareos will ask the operator to intervene.
Maximum Concurrent Jobs = <positive-integer>where <number> is the maximum number of Jobs that can run concurrently on a specified Device.Using this directive, it is possible to have different Jobs using multiple drives, because when theMaximum Concurrent Jobs limit is reached, the Storage Daemon will start new Jobs on any otheravailable compatible drive. This facilitates writing to multiple drives with multiple Jobs that all usethe same Pool.
Maximum File Size = <Size64> (default: 1000000000)No more than size bytes will be written into a given logical file on the volume. Once this size isreached, an end of file mark is written on the volume and subsequent data are written into the nextfile. Breaking long sequences of data blocks with file marks permits quicker positioning to the start ofa given stream of data and can improve recovery from read errors on the volume. The default is oneGigabyte. This directive creates EOF marks only on tape media. However, regardless of the mediumtype (tape, disk, USB ...) each time a the Maximum File Size is exceeded, a record is put into thecatalog database that permits seeking to that position on the medium for restore operations. If youset this to a small value (e.g. 1MB), you will generate lots of database records (JobMedia) and maysignificantly increase CPU/disk overhead.
If you are configuring an modern drive like LTO-4 or newer, you probably will want to set the Maxi-mum File Size to 20GB or bigger to avoid making the drive stop to write an EOF mark.
For more info regarding this parameter, read the tape speed whitepaper: http://www.bareos.org/
en/Whitepapers/articles/Speed_Tuning_of_Tape_Drives.html
Note, this directive does not limit the size of Volumes that Bareos will create regardless of whetherthey are tape or disk volumes. It changes only the number of EOF marks on a tape and the number ofblock positioning records (see below) that are generated. If you want to limit the size of all Volumesfor a particular device, use the Maximum Volume Size directive (above), or use the MaximumVolume Bytes directive in the Director’s Pool resource, which does the same thing but on a Pool(Volume) basis.
Maximum Job Spool Size = <Size64>where the bytes specify the maximum spool size for any one job that is running. The default is no limit.
Maximum Network Buffer Size = <positive-integer>where bytes specifies the initial network buffer size to use with the File daemon. This size will beadjusted down if it is too large until it is accepted by the OS. Please use care in setting this value sinceif it is too large, it will be trimmed by 512 bytes until the OS is happy, which may require a largenumber of system calls. The default value is 32,768 bytes.
The default size was chosen to be relatively large but not too big in the case that you are transmittingdata over Internet. It is clear that on a high speed local network, you can increase this number andimprove performance. For example, some users have found that if you use a value of 65,536 bytes theyget five to ten times the throughput. Larger values for most users don’t seem to improve performance.If you are interested in improving your backup speeds, this is definitely a place to experiment. Youwill probably also want to make the corresponding change in each of your File daemons conf files.
Maximum Open Volumes = <positive-integer> (default: 1)
Maximum Open Wait = <time> (default: 300)This directive specifies the maximum amount of time that Bareos will wait for a device that is busy.If the device cannot be obtained, the current Job will be terminated in error. Bareos will re-attemptto open the drive the next time a Job starts that needs the the drive.
146
Maximum Part Size = <Size64>Please note! This directive is deprecated.
Maximum Rewind Wait = <time> (default: 300)This directive specifies the maximum time in seconds for Bareos to wait for a rewind before timingout. If this time is exceeded, Bareos will cancel the job.
Maximum Spool Size = <Size64>where the bytes specify the maximum spool size for all jobs that are running. The default is no limit.
Maximum Volume Size = <Size64>Please note! This directive is deprecated.No more than size bytes will be written onto a given volume on the archive device. This directive isused mainly in testing Bareos to simulate a small Volume. It can also be useful if you wish to limit thesize of a File Volume to say less than 2GB of data. In some rare cases of really antiquated tape drivesthat do not properly indicate when the end of a tape is reached during writing (though I have read aboutsuch drives, I have never personally encountered one). Please note, this directive is deprecated (be-ing phased out) in favor of the Maximum Volume Bytes defined in the Director’s configuration file.
Media Type = <Strname> (required)The specified name-string names the type of media supported by this device, for example, ”DLT7000”.Media type names are arbitrary in that you set them to anything you want, but they must be known tothe volume database to keep track of which storage daemons can read which volumes. In general, eachdifferent storage type should have a unique Media Type associated with it. The same name-stringmust appear in the appropriate Storage resource definition in the Director’s configuration file.
Even though the names you assign are arbitrary (i.e. you choose the name you want), you should takecare in specifying them because the Media Type is used to determine which storage device Bareos willselect during restore. Thus you should probably use the same Media Type specification for all driveswhere the Media can be freely interchanged. This is not generally an issue if you have a single Storagedaemon, but it is with multiple Storage daemons, especially if they have incompatible media.
For example, if you specify a Media Type of ”DDS-4” then during the restore, Bareos will be able tochoose any Storage Daemon that handles ”DDS-4”. If you have an autochanger, you might want toname the Media Type in a way that is unique to the autochanger, unless you wish to possibly use theVolumes in other drives. You should also ensure to have unique Media Type names if the Media is notcompatible between drives. This specification is required for all devices.
In addition, if you are using disk storage, each Device resource will generally have a different mountpoint or directory. In order for Bareos to select the correct Device resource, each one must have aunique Media Type.
Minimum Block Size = <positive-integer>This statement applies only to non-random access devices (e.g. tape drives). Blocks written by thestorage daemon to a non-random archive device will never be smaller than the given size. The Storagedaemon will attempt to efficiently fill blocks with data received from active sessions but will, if necessary,add padding to a block to achieve the required minimum size.
To force the block size to be fixed, as is the case for some non-random access devices (tape drives),set the Minimum block size and the Maximum block size to the same value. The default is thatboth the minimum and maximum block size are zero and the default block size is 64,512 bytes.
For example, suppose you want a fixed block size of 100K bytes, then you would specify:
Minimum block size = 100K
Maximum block size = 100K
Please note that if you specify a fixed block size as shown above, the tape drive must either be invariable block size mode, or if it is in fixed block size mode, the block size (generally defined by mt)
147
must be identical to the size specified in Bareos – otherwise when you attempt to re-read your Volumes,you will get an error.
If you want the block size to be variable but with a 63K minimum and 200K maximum (and defaultas well), you would specify:
Minimum block size = 63K
Maximum block size = 200K
Mount Command = <Strname>This directive specifies the command that must be executed to mount devices such as many USBdevices. Before the command is executed, %a is replaced with the Archive Device, and %m with theMount Point.
See the Edit Codes for Mount and Unmount Directives section below for more details of the editingcodes that can be used in this directive.
If you need to specify multiple commands, create a shell script.
Mount Point = <Strname>Directory where the device can be mounted. This directive is used only for devices that have RequiresMount enabled such as USB file devices.
Name = <name> (required)Specifies the Name that the Director will use when asking to backup or restore to or from to thisdevice. This is the logical Device name, and may be any string up to 127 characters in length.It is generally a good idea to make it correspond to the English name of the backup device. Thephysical name of the device is specified on the Archive Device directive described below. The nameyou specify here is also used in your Director’s conf file on the Storage Resource in its Storage resource.
No Rewind On Close = <yes|no> (default: yes)If Yes the storage daemon will not try to rewind the device on closing the device e.g. when shuttingdown the Storage daemon. This allows you to do an emergency shutdown of the Daemon withoutthe need to wait for the device to rewind. On restarting and opening the device it will get a rewindanyhow and this way services don’t have to wait forever for a tape to spool back.
Offline On Unmount = <yes|no> (default: no)If Yes the archive device must support the MTOFFL ioctl to rewind and take the volume offline. Inthis case, Bareos will issue the offline (eject) request before closing the device during the unmountcommand. If No Bareos will not attempt to offline the device before unmounting it. After an offline isissued, the cassette will be ejected thus requiring operator intervention to continue, and on somesystems require an explicit load command to be issued (mt -f /dev/xxx load) before the system willrecognize the tape. If you are using an autochanger, some devices require an offline to be issued priorto changing the volume. However, most devices do not and may get very confused.
If you are using a Linux 2.6 kernel or other OSes such as FreeBSD or Solaris, the Offline On Unmountwill leave the drive with no tape, and Bareos will not be able to properly open the drive and may failthe job.
Query Crypto Status = <yes|no>The default for this directive is No. If Yes the storage daemon may query the tape devicefor it security status. This only makes sense when Drive Crypto Enabled is also set to yes as theactual query is performed by the same Storage Daemon plugin and using the same SCSI SPIN protocol.
Random Access = <yes|no> (default: no)If Yes, the archive device is assumed to be a random access medium which supports the lseek (orlseek64 if Largefile is enabled during configuration) facility. This should be set to Yes for all file
148
systems such as USB, and fixed files. It should be set to No for non-random access devices such astapes and named pipes.
Removable Media = <yes|no> (default: yes)If Yes, this device supports removable media (for example tapes). If No, media cannot be removed(for example, an intermediate backup area on a hard disk). If Removable media is enabled on aFile device (as opposed to a tape) the Storage daemon will assume that device may be something likea USB device that can be removed or a simply a removable harddisk. When attempting to open sucha device, if the Volume is not found (for File devices, the Volume name is the same as the Filename),then the Storage daemon will search the entire device looking for likely Volume names, and for eachone found, it will ask the Director if the Volume can be used. If so, the Storage daemon will use thefirst such Volume found. Thus it acts somewhat like a tape drive – if the correct Volume is not found,it looks at what actually is found, and if it is an appendable Volume, it will use it.
If the removable medium is not automatically mounted (e.g. udev), then you might consider usingadditional Storage daemon device directives such as Requires Mount, Mount Point, Mount Com-mand, and Unmount Command, all of which can be used in conjunction with Removable Media.
Requires Mount = <yes|no> (default: no)When this directive is enabled, the Storage daemon will submit a Mount Command beforeattempting to open the device. You must set this directive to yes for removable file systems such asUSB devices that are not automatically mounted by the operating system when plugged in or openedby Bareos. It should be set to no for all other devices such as tapes and fixed filesystems. It should alsobe set to no for any removable device that is automatically mounted by the operating system whenopened (e.g. USB devices mounted by udev or hotplug). This directive indicates if the device requiresto be mounted using the Mount Command. To be able to write devices need a mount, the follow-ing directives must also be defined: Mount Point, Mount Command, and Unmount Command.
Spool Directory = <directory>specifies the name of the directory to be used to store the spool files for this device. This directoryis also used to store temporary part files when writing to a device that requires mount (USB). Thedefault is to use the working directory.
Two Eof = <yes|no> (default: no)If Yes, Bareos will write two end of file marks when terminating a tape – i.e. after the last job or atthe end of the medium. If No, Bareos will only write one end of file to terminate the tape.
Unmount Command = <Strname>This directive specifies the command that must be executed to unmount devices such as many USBdevices. Before the command is executed, %a is replaced with the Archive Device, and %m with theMount Point.
Most frequently, you will define it as follows:
Unmount Command = "/bin/umount %m"
See the Edit Codes for Mount and Unmount Directives section below for more details of the editingcodes that can be used in this directive.
If you need to specify multiple commands, create a shell script.
Use Mtiocget = <yes|no> (default: yes)If No, the operating system is not required to support keeping track of the file number and reportingit in the (MTIOCGET ioctl). If you must set this to No, Bareos will do the proper file positiondetermination, but it is very unfortunate because it means that tape movement is very inefficient.Fortunately, this operation system deficiency seems to be the case only on a few *BSD systems.Operating systems known to work correctly are Solaris, Linux and FreeBSD.
149
Volume Capacity = <Size64>
Volume Poll Interval = <time> (default: 300)If the time specified on this directive is non-zero, Bareos will periodically poll (or read) the drive atthe specified interval to see if a new volume has been mounted. If the time interval is zero, no pollingwill occur. This directive can be useful if you want to avoid operator intervention via the console.Instead, the operator can simply remove the old volume and insert the requested one, and Bareos onthe next poll will recognize the new tape and continue. Please be aware that if you set this intervaltoo small, you may excessively wear your tape drive if the old tape remains in the drive, since Bareoswill read it on each poll.
Write Part Command = <Strname>Please note! This directive is deprecated.
9.4.1 Edit Codes for Mount and Unmount Directives
Before submitting the Mount Command, or Unmount Command directives to the operating system,Bareos performs character substitution of the following characters:
%% = %
%a = Archive device name
%e = erase (set if cannot mount and first part)
%n = part number
%m = mount point
%v = last part name (i.e. filename)
9.4.2 Devices that require a mount (USB)
Requires Mount SdDevice You must set this directive to yes for removable devices such as USB unless they
are automounted, and to no for all other devices (tapes/files). This directive indicates if the devicerequires to be mounted to be read, and if it must be written in a special way. If it set, Mount PointSdDevice, Mount Command Sd
Device and Unmount Command SdDevice directives must also be defined.
Mount Point SdDevice Directory where the device can be mounted.
Mount Command SdDevice Command that must be executed to mount the device. Before the command is
executed, %a is replaced with the Archive Device, and %m with the Mount Point.
Most frequently, you will define it as follows:
Mount Command = "/bin/mount -t iso9660 -o ro %a %m"
For some media, you may need multiple commands. If so, it is recommended that you use a shell scriptinstead of putting them all into the Mount Command. For example, instead of this:
Mount Command = "/usr/local/bin/mymount"
Where that script contains:
#!/bin/sh
ndasadmin enable -s 1 -o w
sleep 2
mount /dev/ndas-00323794-0p1 /backup
Similar consideration should be given to all other Command parameters.
Unmount Command SdDevice Command that must be executed to unmount the device. Before the command
is executed, %a is replaced with the Archive Device, and %m with the Mount Point.
Most frequently, you will define it as follows:
Unmount Command = "/bin/umount %m"
If you need to specify multiple commands, create a shell script.

150
9.5 Autochanger Resource
The Autochanger resource supports single or multiple drive autochangers by grouping one or more Deviceresources into one unit called an autochanger in Bareos (often referred to as a ”tape library” by autochangermanufacturers).If you have an Autochanger, and you want it to function correctly, you must have an Autochanger resourcein your Storage conf file, and your Director’s Storage directives that want to use an Autochanger must referto the Autochanger resource name.
configuration directive name type of data default value remark
Changer Command = Strname requiredChanger Device = Strname requiredDescription = stringDevice = ResourceList requiredName = name required
Changer Command = <Strname> (required)This command specifies an external program to be called that will automatically change volumesas required by Bareos. Most frequently, you will specify the Bareos supplied mtx-changer script asfollows. If it is specified here, it needs not to be specified in the Device resource. If it is also spec-ified in the Device resource, it will take precedence over the one specified in the Autochanger resource.
Changer Device = <Strname> (required)The specified name-string gives the system file name of the autochanger device name. If specifiedin this resource, the Changer Device name is not needed in the Device resource. If it is specified inthe Device resource (see above), it will take precedence over one specified in the Autochanger resource.
Description = <string>
Device = <ResourceList> (required)Specifies the names of the Device resource or resources that correspond to the autochanger drive. Ifyou have a multiple drive autochanger, you must specify multiple Device names, each one referringto a separate Device resource that contains a Drive Index specification that corresponds to the drivenumber base zero. You may specify multiple device names on a single line separated by commas,and/or you may specify multiple Device directives.
Name = <name> (required)Specifies the Name of the Autochanger. This name is used in the Director’s Storage definition to referto the autochanger.
The following is an example of a valid Autochanger resource definition:
Autochanger {
Name = "DDS-4-changer"
Device = DDS-4-1, DDS-4-2, DDS-4-3
Changer Device = /dev/sg0
Changer Command = "/usr/lib/bareos/scripts/mtx-changer %c %o %S %a %d"
}
Device {
Name = "DDS-4-1"
Drive Index = 0
Autochanger = yes
...
}
Device {
Name = "DDS-4-2"
151
Drive Index = 1
Autochanger = yes
...
Device {
Name = "DDS-4-3"
Drive Index = 2
Autochanger = yes
Autoselect = no
...
}
Please note that it is important to include the Autochanger = yes directive in each Device definition thatbelongs to an Autochanger. A device definition should not belong to more than one Autochanger resource.Also, your Device directive in the Storage resource of the Director’s conf file should have the Autochanger’sresource name rather than a name of one of the Devices.If you have a drive that physically belongs to an Autochanger but you don’t want to have it automaticallyused when Bareos references the Autochanger for backups, for example, you want to reserve it for restores,you can add the directive:
Autoselect = no
to the Device resource for that drive. In that case, Bareos will not automatically select that drive whenaccessing the Autochanger. You can still use the drive by referencing it by the Device name directly ratherthan the Autochanger name. An example of such a definition is shown above for the Device DDS-4-3, whichwill not be selected when the name DDS-4-changer is used in a Storage definition, but will be used if DDS-4-3is used.
9.6 Messages Resource
For a description of the Messages Resource, please see the Messages Resource chapter of this manual.
9.7 Example Storage Daemon Configuration File
A example Storage Daemon configuration file might be the following:
#
# Default Bareos Storage Daemon Configuration file
#
# For Bareos release 12.4.4 (12 June 2013) -- suse SUSE Linux Enterprise Server 11 (x86_64)
#
# You may need to change the name of your tape drive
# on the "Archive Device" directive in the Device
# resource. If you change the Name and/or the
# "Media Type" in the Device resource, please ensure
# that dird.conf has corresponding changes.
#
Storage { # definition of myself
Name = bareos-storage-sd
Maximum Concurrent Jobs = 20
# remove comment in next line to load plugins from specified directory
# Plugin Directory = /usr/lib64/bareos/plugins
}
#
# List Directors who are permitted to contact Storage daemon
#
Director {
Name = bareos-dir
Password = "XXX_REPLACE_WITH_STORAGE_PASSWORD_XXX"
}
#
# Restricted Director, used by tray-monitor to get the
# status of the storage daemon
#
Director {
Name = bareos-storage-mon
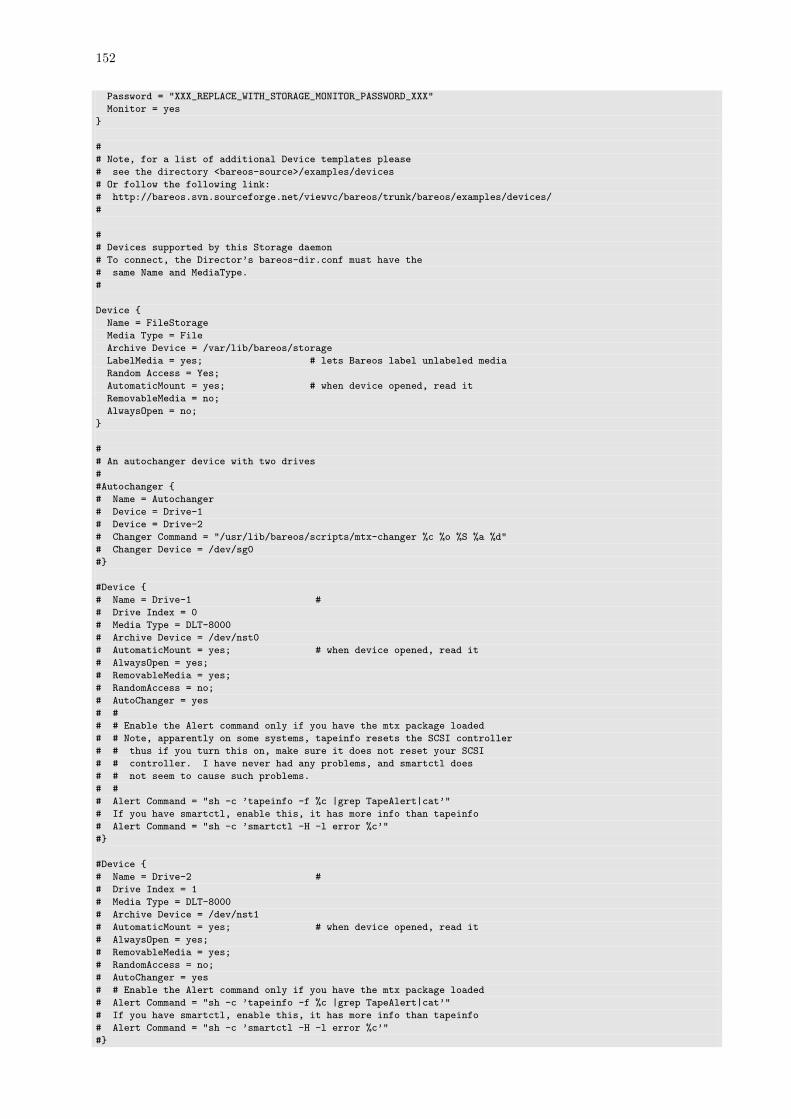
152
Password = "XXX_REPLACE_WITH_STORAGE_MONITOR_PASSWORD_XXX"
Monitor = yes
}
#
# Note, for a list of additional Device templates please
# see the directory <bareos-source>/examples/devices
# Or follow the following link:
# http://bareos.svn.sourceforge.net/viewvc/bareos/trunk/bareos/examples/devices/
#
#
# Devices supported by this Storage daemon
# To connect, the Director’s bareos-dir.conf must have the
# same Name and MediaType.
#
Device {
Name = FileStorage
Media Type = File
Archive Device = /var/lib/bareos/storage
LabelMedia = yes; # lets Bareos label unlabeled media
Random Access = Yes;
AutomaticMount = yes; # when device opened, read it
RemovableMedia = no;
AlwaysOpen = no;
}
#
# An autochanger device with two drives
#
#Autochanger {
# Name = Autochanger
# Device = Drive-1
# Device = Drive-2
# Changer Command = "/usr/lib/bareos/scripts/mtx-changer %c %o %S %a %d"
# Changer Device = /dev/sg0
#}
#Device {
# Name = Drive-1 #
# Drive Index = 0
# Media Type = DLT-8000
# Archive Device = /dev/nst0
# AutomaticMount = yes; # when device opened, read it
# AlwaysOpen = yes;
# RemovableMedia = yes;
# RandomAccess = no;
# AutoChanger = yes
# #
# # Enable the Alert command only if you have the mtx package loaded
# # Note, apparently on some systems, tapeinfo resets the SCSI controller
# # thus if you turn this on, make sure it does not reset your SCSI
# # controller. I have never had any problems, and smartctl does
# # not seem to cause such problems.
# #
# Alert Command = "sh -c ’tapeinfo -f %c |grep TapeAlert|cat’"
# If you have smartctl, enable this, it has more info than tapeinfo
# Alert Command = "sh -c ’smartctl -H -l error %c’"
#}
#Device {
# Name = Drive-2 #
# Drive Index = 1
# Media Type = DLT-8000
# Archive Device = /dev/nst1
# AutomaticMount = yes; # when device opened, read it
# AlwaysOpen = yes;
# RemovableMedia = yes;
# RandomAccess = no;
# AutoChanger = yes
# # Enable the Alert command only if you have the mtx package loaded
# Alert Command = "sh -c ’tapeinfo -f %c |grep TapeAlert|cat’"
# If you have smartctl, enable this, it has more info than tapeinfo
# Alert Command = "sh -c ’smartctl -H -l error %c’"
#}
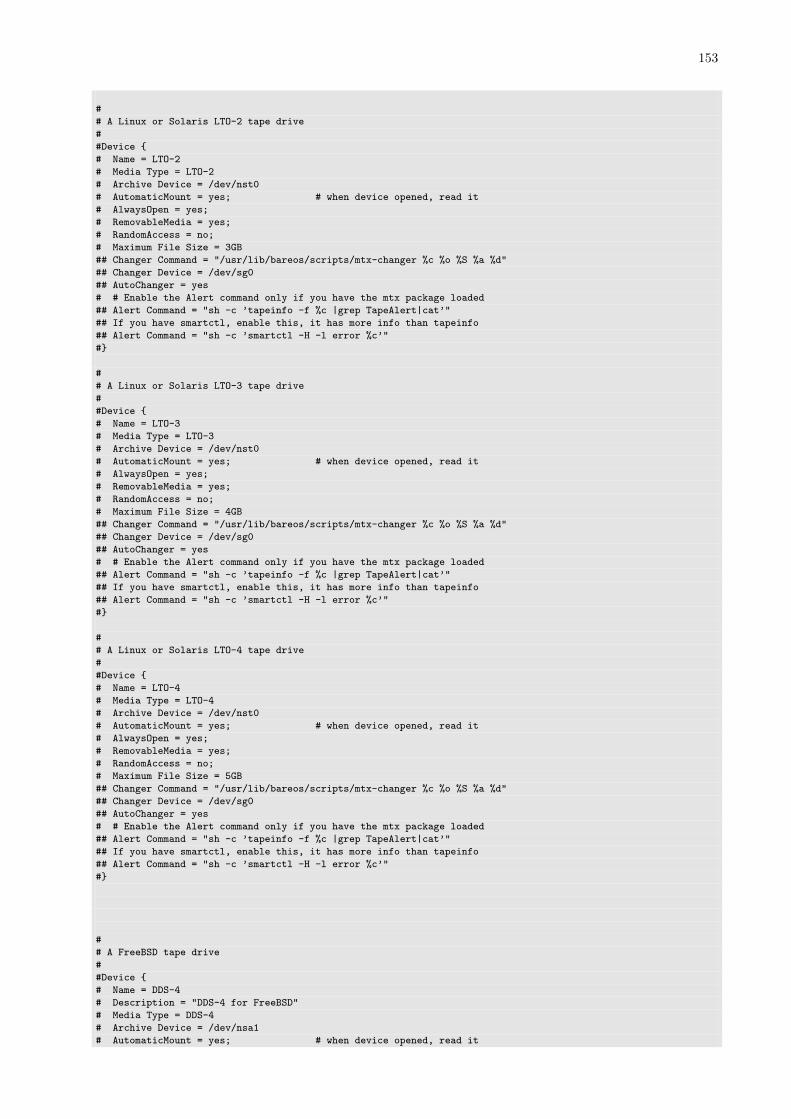
153
#
# A Linux or Solaris LTO-2 tape drive
#
#Device {
# Name = LTO-2
# Media Type = LTO-2
# Archive Device = /dev/nst0
# AutomaticMount = yes; # when device opened, read it
# AlwaysOpen = yes;
# RemovableMedia = yes;
# RandomAccess = no;
# Maximum File Size = 3GB
## Changer Command = "/usr/lib/bareos/scripts/mtx-changer %c %o %S %a %d"
## Changer Device = /dev/sg0
## AutoChanger = yes
# # Enable the Alert command only if you have the mtx package loaded
## Alert Command = "sh -c ’tapeinfo -f %c |grep TapeAlert|cat’"
## If you have smartctl, enable this, it has more info than tapeinfo
## Alert Command = "sh -c ’smartctl -H -l error %c’"
#}
#
# A Linux or Solaris LTO-3 tape drive
#
#Device {
# Name = LTO-3
# Media Type = LTO-3
# Archive Device = /dev/nst0
# AutomaticMount = yes; # when device opened, read it
# AlwaysOpen = yes;
# RemovableMedia = yes;
# RandomAccess = no;
# Maximum File Size = 4GB
## Changer Command = "/usr/lib/bareos/scripts/mtx-changer %c %o %S %a %d"
## Changer Device = /dev/sg0
## AutoChanger = yes
# # Enable the Alert command only if you have the mtx package loaded
## Alert Command = "sh -c ’tapeinfo -f %c |grep TapeAlert|cat’"
## If you have smartctl, enable this, it has more info than tapeinfo
## Alert Command = "sh -c ’smartctl -H -l error %c’"
#}
#
# A Linux or Solaris LTO-4 tape drive
#
#Device {
# Name = LTO-4
# Media Type = LTO-4
# Archive Device = /dev/nst0
# AutomaticMount = yes; # when device opened, read it
# AlwaysOpen = yes;
# RemovableMedia = yes;
# RandomAccess = no;
# Maximum File Size = 5GB
## Changer Command = "/usr/lib/bareos/scripts/mtx-changer %c %o %S %a %d"
## Changer Device = /dev/sg0
## AutoChanger = yes
# # Enable the Alert command only if you have the mtx package loaded
## Alert Command = "sh -c ’tapeinfo -f %c |grep TapeAlert|cat’"
## If you have smartctl, enable this, it has more info than tapeinfo
## Alert Command = "sh -c ’smartctl -H -l error %c’"
#}
#
# A FreeBSD tape drive
#
#Device {
# Name = DDS-4
# Description = "DDS-4 for FreeBSD"
# Media Type = DDS-4
# Archive Device = /dev/nsa1
# AutomaticMount = yes; # when device opened, read it
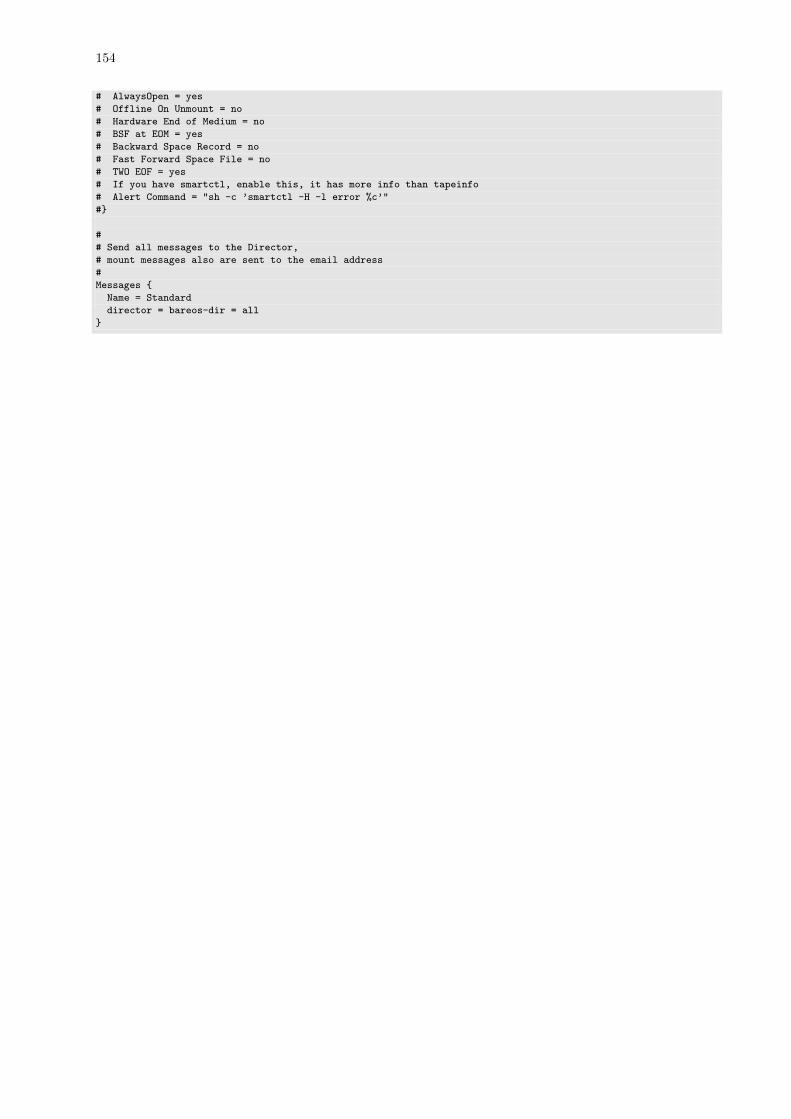
154
# AlwaysOpen = yes
# Offline On Unmount = no
# Hardware End of Medium = no
# BSF at EOM = yes
# Backward Space Record = no
# Fast Forward Space File = no
# TWO EOF = yes
# If you have smartctl, enable this, it has more info than tapeinfo
# Alert Command = "sh -c ’smartctl -H -l error %c’"
#}
#
# Send all messages to the Director,
# mount messages also are sent to the email address
#
Messages {
Name = Standard
director = bareos-dir = all
}

Chapter 10
Client/File Daemon Configuration
The Client (or File Daemon) Configuration is one of the simpler ones to specify. Generally, other thanchanging the Client name so that error messages are easily identified, you will not need to modify the defaultClient configuration file.For a general discussion of configuration file and resources including the data types recognized by Bareos,please see the Configuration chapter of this manual. The following Client Resource definitions must bedefined:
� Client – to define what Clients are to be backed up.
� Director – to define the Director’s name and its access password.
� Messages – to define where error and information messages are to be sent.
10.1 Client Resource
The Client Resource (or FileDaemon) resource defines the name of the Client (as used by the Director) aswell as the port on which the Client listens for Director connections.Start of the Client records. There must be one and only one Client resource in the configuration file, sinceit defines the properties of the current client program.
configuration directive name type of data default value remark
Absolute Job Timeout = positive-integerAllow Bandwidth Bursting = yes|no noAllowed Job Command = string-listAllowed Script Dir = DirectoryList
Always Use LMDB = yes|no noCompatible = yes|no yesDescription = stringFD Address = net-address 9102FD Addresses = net-addresses 9102FD Port = net-port 9102FD Source Address = net-address 0Heartbeat Interval = time 0LMDB Threshold = positive-integerMaximum Bandwidth Per Job = speedMaximum Concurrent Jobs = positive-integer 20Maximum Network Buffer Size = positive-integerMessages = resource-nameName = name requiredPid Directory = directory /var/lib/bareos (platform specific)
Pki Cipher = EncryptionCipher aes128Pki Encryption = yes|no noPki Key Pair = directoryPki Master Key = DirectoryList
Pki Signatures = yes|no no
155
156
Pki Signer = DirectoryList
Plugin Directory = directoryPlugin Names = PluginNames
Scripts Directory = directorySD Connect Timeout = time 1800Sub Sys Directory = directory deprecatedTLS Allowed CN = string-listTLS Authenticate = yes|noTLS CA Certificate Dir = directoryTLS CA Certificate File = directoryTLS Certificate = directoryTLS Certificate Revocation List = directoryTLS Cipher List = stringTLS Enable = yes|noTLS Key = directoryTLS Require = yes|noTLS Verify Peer = yes|no yesVer Id = stringWorking Directory = directory /var/lib/bareos (platform specific)
Absolute Job Timeout = <positive-integer>
Allow Bandwidth Bursting = <yes|no> (default: no)This option sets if there is Bandwidth Limiting in effect if the limiting code can use bursting e.g. whenfrom a certain timeslice not all bandwidth is used this bandwidth can be used in a next timeslice.Which mean you will get a smoother limiting which will be much closer to the actual limit set but italso means that sometimes the bandwidth will be above the setting here.
Allowed Job Command = <string-list>
Allowed Script Dir = <DirectoryList>
Always Use LMDB = <yes|no> (default: no)
Compatible = <yes|no> (default: yes)This directive enables the compatible mode of the file daemon. In this mode the file daemon will try tobe as compatible to a native Bacula file daemon as possible. Enabling this option means that certainnew options available in Bareos cannot be used as they would lead to data not being able to be restoredby a Native Bareos file daemon. When you want to use bareos-only features, you have to set it to false.
Description = <string>
FD Address = <net-address> (default: 9102)This record is optional, and if it is specified, it will cause the File daemon server (for Directorconnections) to bind to the specified IP-Address, which is either a domain name or an IP addressspecified as a dotted quadruple.
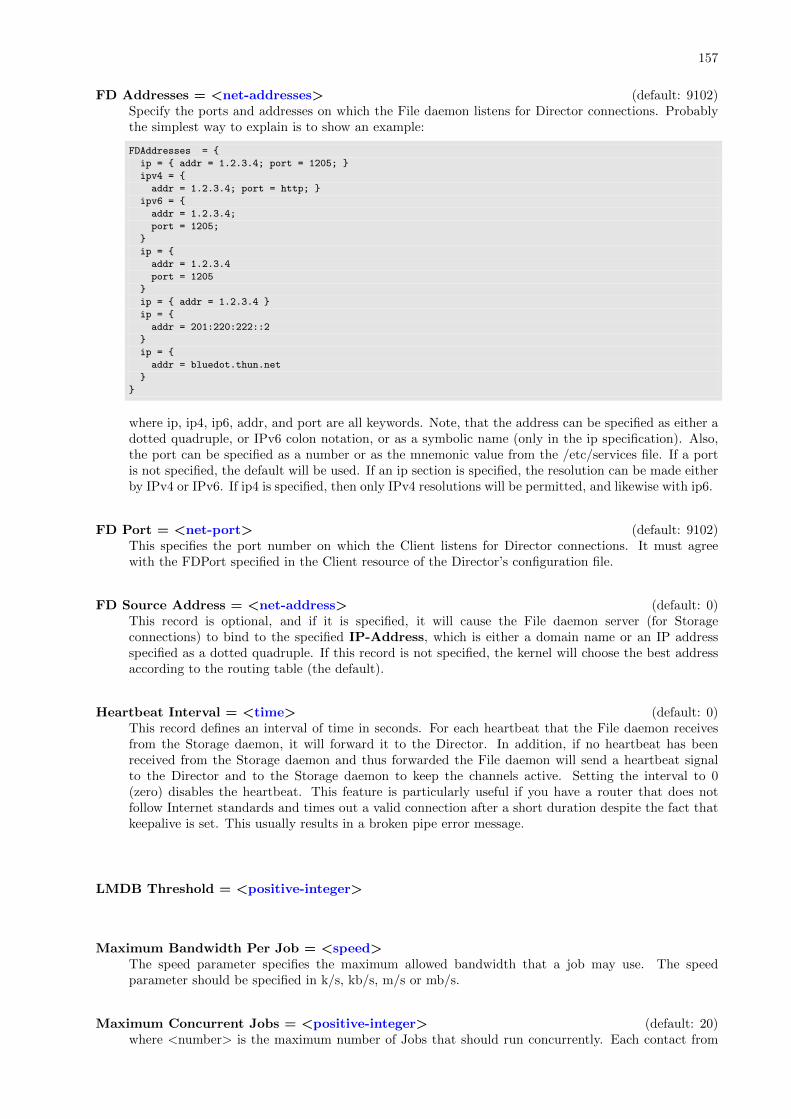
157
FD Addresses = <net-addresses> (default: 9102)Specify the ports and addresses on which the File daemon listens for Director connections. Probablythe simplest way to explain is to show an example:
FDAddresses = {
ip = { addr = 1.2.3.4; port = 1205; }
ipv4 = {
addr = 1.2.3.4; port = http; }
ipv6 = {
addr = 1.2.3.4;
port = 1205;
}
ip = {
addr = 1.2.3.4
port = 1205
}
ip = { addr = 1.2.3.4 }
ip = {
addr = 201:220:222::2
}
ip = {
addr = bluedot.thun.net
}
}
where ip, ip4, ip6, addr, and port are all keywords. Note, that the address can be specified as either adotted quadruple, or IPv6 colon notation, or as a symbolic name (only in the ip specification). Also,the port can be specified as a number or as the mnemonic value from the /etc/services file. If a portis not specified, the default will be used. If an ip section is specified, the resolution can be made eitherby IPv4 or IPv6. If ip4 is specified, then only IPv4 resolutions will be permitted, and likewise with ip6.
FD Port = <net-port> (default: 9102)This specifies the port number on which the Client listens for Director connections. It must agreewith the FDPort specified in the Client resource of the Director’s configuration file.
FD Source Address = <net-address> (default: 0)This record is optional, and if it is specified, it will cause the File daemon server (for Storageconnections) to bind to the specified IP-Address, which is either a domain name or an IP addressspecified as a dotted quadruple. If this record is not specified, the kernel will choose the best addressaccording to the routing table (the default).
Heartbeat Interval = <time> (default: 0)This record defines an interval of time in seconds. For each heartbeat that the File daemon receivesfrom the Storage daemon, it will forward it to the Director. In addition, if no heartbeat has beenreceived from the Storage daemon and thus forwarded the File daemon will send a heartbeat signalto the Director and to the Storage daemon to keep the channels active. Setting the interval to 0(zero) disables the heartbeat. This feature is particularly useful if you have a router that does notfollow Internet standards and times out a valid connection after a short duration despite the fact thatkeepalive is set. This usually results in a broken pipe error message.
LMDB Threshold = <positive-integer>
Maximum Bandwidth Per Job = <speed>The speed parameter specifies the maximum allowed bandwidth that a job may use. The speedparameter should be specified in k/s, kb/s, m/s or mb/s.
Maximum Concurrent Jobs = <positive-integer> (default: 20)where <number> is the maximum number of Jobs that should run concurrently. Each contact from
158
the Director (e.g. status request, job start request) is considered as a Job, so if you want to be ableto do a status request in the console at the same time as a Job is running, you will need to set thisvalue greater than 1.
Maximum Network Buffer Size = <positive-integer>where <bytes> specifies the initial network buffer size to use with the File daemon. This size will beadjusted down if it is too large until it is accepted by the OS. Please use care in setting this value sinceif it is too large, it will be trimmed by 512 bytes until the OS is happy, which may require a largenumber of system calls. The default value is 65,536 bytes.
Note, on certain Windows machines, there are reports that the transfer rates are very slow and thisseems to be related to the default 65,536 size. On systems where the transfer rates seem abnormallyslow compared to other systems, you might try setting the Maximum Network Buffer Size to 32,768in both the File daemon and in the Storage daemon.
Messages = <resource-name>
Name = <name> (required)The name of this resource. It is used to reference to it.
The client name that must be used by the Director when connecting. Generally, it is a good idea touse a name related to the machine so that error messages can be easily identified if you have multipleClients. This directive is required.
Pid Directory = <directory> (default: /var/lib/bareos (platform specific))This directive specifies a directory in which the File Daemon may put its process Id file files. Theprocess Id file is used to shutdown Bareos and to prevent multiple copies of Bareos from runningsimultaneously.
The Bareos file daemon uses a platform specific default value, that is defined at compile time.Typically on Linux systems, it is set to /var/lib/bareos/ or /var/run/.
Pki Cipher = <EncryptionCipher> (default: aes128)See the Data Encryption chapter of this manual.
Pki Encryption = <yes|no> (default: no)See the Data Encryption chapter of this manual.
Pki Key Pair = <directory>See the Data Encryption chapter of this manual.
Pki Master Key = <DirectoryList>See the Data Encryption chapter of this manual.
Pki Signatures = <yes|no> (default: no)See the Data Encryption chapter of this manual.
Pki Signer = <DirectoryList>See the Data Encryption chapter of this manual.
Plugin Directory = <directory>This directive specifies a directory in which the File Daemon searches for plugins with the name<pluginname>-fd.so which it will load at startup. Typically on Linux systems, it is set to/usr/lib/bareos/plugins/ or /usr/lib64/bareos/plugins/.
159
Plugin Names = <PluginNames>
Scripts Directory = <directory>
SD Connect Timeout = <time> (default: 1800)This record defines an interval of time that the File daemon will try to connect to the Storage daemon.If no connection is made in the specified time interval, the File daemon cancels the Job.
Sub Sys Directory = <directory>Please note! This directive is deprecated.
TLS Allowed CN = <string-list>
TLS Authenticate = <yes|no>
TLS CA Certificate Dir = <directory>
TLS CA Certificate File = <directory>
TLS Certificate = <directory>
TLS Certificate Revocation List = <directory>
TLS Cipher List = <string>
TLS Enable = <yes|no>
TLS Key = <directory>
TLS Require = <yes|no>
TLS Verify Peer = <yes|no> (default: yes)
Ver Id = <string>
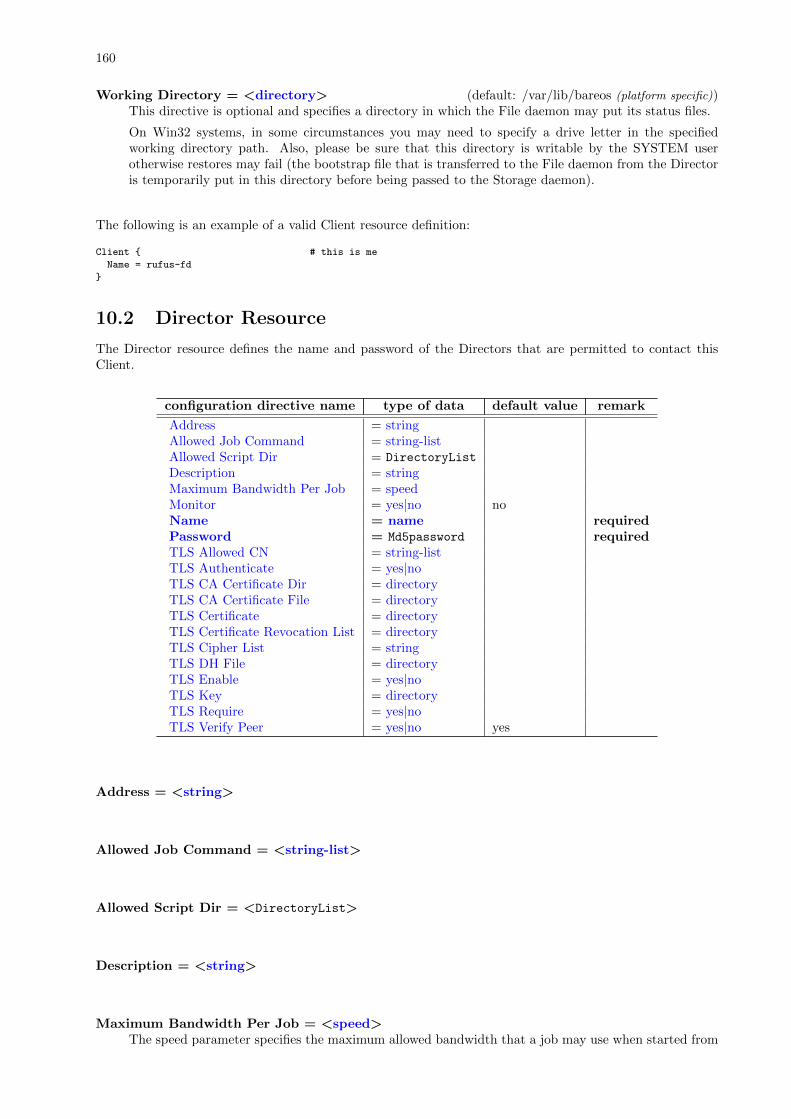
160
Working Directory = <directory> (default: /var/lib/bareos (platform specific))This directive is optional and specifies a directory in which the File daemon may put its status files.
On Win32 systems, in some circumstances you may need to specify a drive letter in the specifiedworking directory path. Also, please be sure that this directory is writable by the SYSTEM userotherwise restores may fail (the bootstrap file that is transferred to the File daemon from the Directoris temporarily put in this directory before being passed to the Storage daemon).
The following is an example of a valid Client resource definition:
Client { # this is me
Name = rufus-fd
}
10.2 Director Resource
The Director resource defines the name and password of the Directors that are permitted to contact thisClient.
configuration directive name type of data default value remark
Address = stringAllowed Job Command = string-listAllowed Script Dir = DirectoryList
Description = stringMaximum Bandwidth Per Job = speedMonitor = yes|no noName = name requiredPassword = Md5password requiredTLS Allowed CN = string-listTLS Authenticate = yes|noTLS CA Certificate Dir = directoryTLS CA Certificate File = directoryTLS Certificate = directoryTLS Certificate Revocation List = directoryTLS Cipher List = stringTLS DH File = directoryTLS Enable = yes|noTLS Key = directoryTLS Require = yes|noTLS Verify Peer = yes|no yes
Address = <string>
Allowed Job Command = <string-list>
Allowed Script Dir = <DirectoryList>
Description = <string>
Maximum Bandwidth Per Job = <speed>The speed parameter specifies the maximum allowed bandwidth that a job may use when started from
161
this Director. The speed parameter should be specified in k/s, Kb/s, m/s or Mb/s.
Monitor = <yes|no> (default: no)If Monitor is set to no, this director will have full access to this Client. If Monitor is set to yes, thisdirector will only be able to fetch the current status of this Client.
Please note that if this director is being used by a Monitor, we highly recommend to set this directiveto yes to avoid serious security problems.
Name = <name> (required)The name of the Director that may contact this Client. This name must be the same as the namespecified on the Director resource in the Director’s configuration file. Note, the case (upper/lower) ofthe characters in the name are significant (i.e. S is not the same as s). This directive is required.
Password = <Md5password> (required)Specifies the password that must be supplied for a Director to be authorized. This password must bethe same as the password specified in the Client resource in the Director’s configuration file. Thisdirective is required.
TLS Allowed CN = <string-list>
TLS Authenticate = <yes|no>
TLS CA Certificate Dir = <directory>
TLS CA Certificate File = <directory>
TLS Certificate = <directory>
TLS Certificate Revocation List = <directory>
TLS Cipher List = <string>
TLS DH File = <directory>
TLS Enable = <yes|no>
TLS Key = <directory>
TLS Require = <yes|no>

162
TLS Verify Peer = <yes|no> (default: yes)
Thus multiple Directors may be authorized to use this Client’s services. Each Director will have a differentname, and normally a different password as well.The following is an example of a valid Director resource definition:
#
# List Directors who are permitted to contact the File daemon
#
Director {
Name = HeadMan
Password = very_good # password HeadMan must supply
}
Director {
Name = Worker
Password = not_as_good
Monitor = Yes
}
10.3 Messages Resource
Please see the Messages Resource Chapter of this manual for the details of the Messages Resource.There must be at least one Message resource in the Client configuration file.
10.4 Example Client Configuration File
An example File Daemon configuration file might be the following:
#
# Default Bareos File Daemon Configuration file
#
# For Bareos release 12.4.4 (12 June 2013)
#
# There is not much to change here except perhaps the
# File daemon Name to
#
#
# List Directors who are permitted to contact this File daemon
#
Director {
Name = bareos-dir
Password = "aEODFz89JgUbWpuG6hP4OTuAoMvfM1PaJwO+ShXGqXsP"
}
#
# Restricted Director, used by tray-monitor to get the
# status of the file daemon
#
Director {
Name = client1-mon
Password = "8BoVwTju2TQlafdHFExRIJmUcHUMoIyIqPJjbvcSO61P"
Monitor = yes
}
#
# "Global" File daemon configuration specifications
#
FileDaemon { # this is me
Name = client1-fd
Maximum Concurrent Jobs = 20
# remove comment in next line to load plugins from specified directory
# Plugin Directory = /usr/lib64/bareos/plugins
}
# Send all messages except skipped files back to Director
Messages {
Name = Standard

163
director = client1-dir = all, !skipped, !restored
}

164
Chapter 11
Messages Resource
The Messages resource defines how messages are to be handled and destinations to which they should besent.Even though each daemon has a full message handler, within the File daemon and the Storage daemon,you will normally choose to send all the appropriate messages back to the Director. This permits all themessages associated with a single Job to be combined in the Director and sent as a single email message tothe user, or logged together in a single file.Each message that Bareos generates (i.e. that each daemon generates) has an associated type such as INFO,WARNING, ERROR, FATAL, etc. Using the message resource, you can specify which message types youwish to see and where they should be sent. In addition, a message may be sent to multiple destinations.For example, you may want all error messages both logged as well as sent to you in an email. By definingmultiple messages resources, you can have different message handling for each type of Job (e.g. Full backupsversus Incremental backups).In general, messages are attached to a Job and are included in the Job report. There are some rare cases,where this is not possible, e.g. when no job is running, or if a communications error occurs between a daemonand the director. In those cases, the message may remain in the system, and should be flushed at the end ofthe next Job. However, since such messages are not attached to a Job, any that are mailed will be sent to/usr/lib/sendmail. On some systems, such as FreeBSD, if your sendmail is in a different place, you maywant to link it to the the above location.The records contained in a Messages resource consist of a destination specification followed by a list ofmessage-types in the format:
destination = message-type1, message-type2, message-type3, ...
or for those destinations that need and address specification (e.g. email):
destination = address = message-type1, message-type2, message-type3, ...
where
destination is one of a predefined set of keywords that define where the message is to be sent (AppendDirMessages, Console Dir
Messages, File DirMessages, Mail Dir
Messages, ...),
address varies according to the destination keyword, but is typically an email address or a filename,
message-type is one of a predefined set of keywords that define the type of message generated byBareos: ERROR, WARNING, FATAL, ...
configuration directive name type of data default value remark
Append = [ address = ] message-type [ , message-type ]*Catalog = [ address = ] message-type [ , message-type ]*Console = [ address = ] message-type [ , message-type ]*Description = stringDirector = [ address = ] message-type [ , message-type ]*File = [ address = ] message-type [ , message-type ]*Mail = [ address = ] message-type [ , message-type ]*Mail Command = string
165
166
Mail On Error = [ address = ] message-type [ , message-type ]*Mail On Success = [ address = ] message-type [ , message-type ]*Name = nameOperator = [ address = ] message-type [ , message-type ]*Operator Command = stringStderr = [ address = ] message-type [ , message-type ]*Stdout = [ address = ] message-type [ , message-type ]*Syslog = [ address = ] message-type [ , message-type ]*
Append = <[ address = ] message-type [ , message-type ]* >Append the message to the filename given in the address field. If the file already exists, it will beappended to. If the file does not exist, it will be created.
Catalog = <[ address = ] message-type [ , message-type ]* >Send the message to the Catalog database. The message will be written to the table named Log anda timestamp field will also be added. This permits Job Reports and other messages to be recorded inthe Catalog so that they can be accessed by reporting software. Bareos will prune the Log recordsassociated with a Job when the Job records are pruned. Otherwise, Bareos never uses these recordsinternally, so this destination is only used for special purpose programs (e.g. frontend programs).
Console = <[ address = ] message-type [ , message-type ]* >Send the message to the Bareos console. These messages are held until the console program connectsto the Director.
Description = <string>
Director = <[ address = ] message-type [ , message-type ]* >Send the message to the Director whose name is given in the address field. Note, in the current imple-mentation, the Director Name is ignored, and the message is sent to the Director that started the Job.
File = <[ address = ] message-type [ , message-type ]* >Send the message to the filename given in the address field. If the file already exists, it will beoverwritten.
Mail = <[ address = ] message-type [ , message-type ]* >Send the message to the email addresses that are given as a comma separated list in the addressfield. Mail messages are grouped together during a job and then sent as a single email message whenthe job terminates. The advantage of this destination is that you are notified about every Job thatruns. However, if you backup mutliple machines every night, the number of email messages can beannoying. Some users use filter programs such as procmail to automatically file this email based onthe Job termination code (see Mail Command Dir
Messages).
Mail Command = <string>In the absence of this resource, Bareos will send all mail using the following command:
mail -s ”Bareos Message” <recipients>
In many cases, depending on your machine, this command may not work. However, by using the MailCommand, you can specify exactly how to send the mail. During the processing of the commandpart, normally specified as a quoted string, the following substitutions will be used:
� %% = %
� %c = Client’s name
� %d = Director’s name
167
� %e = Job Exit code (OK, Error, ...)
� %h = Client address
� %i = Job Id
� %j = Unique Job name
� %l = Job level
� %n = Job name
� %r = Recipients
� %s = Since time
� %t = Job type (e.g. Backup, ...)
� %v = Read Volume name (Only on director side)
� %V = Write Volume name (Only on director side)
Please note: any Mail Command directive must be specified in the Messages resource before thedesired Mail Dir
Messages, Mail On Success DirMessages or Mail On Error Dir
Messages directive. In fact, each of thosedirectives may be preceded by a different Mail Command.
A default installation will use the program bsmtp as Mail Command. The program bsmtp isprovided by Bareos and unifies the usage of a mail client to a certain degree:
Mail Command = "/usr/sbin/bsmtp -h mail.example.com -f \"\(Bareos\) \%r\" -s \"Bareos: \%t \%e of \%c \%l\" \%r"
The bsmtp program is provided as part of Bareos. For additional details, please see the bsmtpsection. Please test any Mail Command that you use to ensure that your smtp gateway accepts theaddressing form that you use. Certain programs such as Exim can be very selective as to what formsare permitted particularly in the from part.
Mail On Error = <[ address = ] message-type [ , message-type ]* >Send the message to the email addresses that are given as a comma separated list in the addressfield if the Job terminates with an error condition. Mail On Error messages are grouped togetherduring a job and then sent as a single email message when the job terminates. This destination differsfrom the mail destination in that if the Job terminates normally, the message is totally discarded (forthis destination). If the Job terminates in error, it is emailed. By using other destinations such asappend you can ensure that even if the Job terminates normally, the output information is saved.
Mail On Success = <[ address = ] message-type [ , message-type ]* >Send the message to the email addresses that are given as a comma separated list in the address fieldif the Job terminates normally (no error condition). Mail On Success messages are grouped togetherduring a job and then sent as a single email message when the job terminates. This destination differsfrom the mail destination in that if the Job terminates abnormally, the message is totally discarded(for this destination). If the Job terminates normally, it is emailed.
Name = <name>The name of the Messages resource. The name you specify here will be used to tie this Messagesresource to a Job and/or to the daemon.
Operator = <[ address = ] message-type [ , message-type ]* >Send the message to the email addresses that are specified as a comma separated list in the addressfield. This is similar to mail above, except that each message is sent as received. Thus there is oneemail per message. This is most useful for mount messages (see below).
Operator Command = <string>This resource specification is similar to the Mail Command Dir
Messages except that it is used for Operatormessages. The substitutions performed for the Mail Command Dir
Messages are also done for this command.Normally, you will set this command to the same value as specified for the Mail Command Dir
Messages.The Operator Command directive must appear in the Messages resource before the OperatorDirMessages directive.
168
Stderr = <[ address = ] message-type [ , message-type ]* >Send the message to the standard error output (normally not used).
Stdout = <[ address = ] message-type [ , message-type ]* >Send the message to the standard output (normally not used).
Syslog = <[ address = ] message-type [ , message-type ]* >Send the message to the system log (syslog).
Since Version >= 14.4.0 the facility can be specified in the address field and the loglevel correspondto the Bareos Message Types. The defaults are DAEMON and LOG_ERR.
Although the syslog destination is not used in the default Bareos config files, in certain cases whereBareos encounters errors in trying to deliver a message, as a last resort, it will send it to the systemsyslog to prevent loss of the message, so you might occassionally check the syslog for Bareos output.
11.1 Message Types
For any destination, the message-type field is a comma separated list of the following types or classes ofmessages:
infoGeneral information messages.
warningWarning messages. Generally this is some unusual condition but not expected to be serious.
errorNon-fatal error messages. The job continues running. Any error message should be investigated as it
means that something went wrong.
fatalFatal error messages. Fatal errors cause the job to terminate.
terminateMessage generated when the daemon shuts down.
notsavedFiles not saved because of some error. Usually because the file cannot be accessed (i.e. it does not
exist or is not mounted).
skippedFiles that were skipped because of a user supplied option such as an incremental backup or a file that
matches an exclusion pattern. This is not considered an error condition such as the files listed for thenotsaved type because the configuration file explicitly requests these types of files to be skipped. Forexample, any unchanged file during an incremental backup, or any subdirectory if the no recursionoption is specified.
mountVolume mount or intervention requests from the Storage daemon. These requests require a specific
operator intervention for the job to continue.
restoredThe ls style listing generated for each file restored is sent to this message class.
allAll message types.
securitySecurity info/warning messages principally from unauthorized connection attempts.
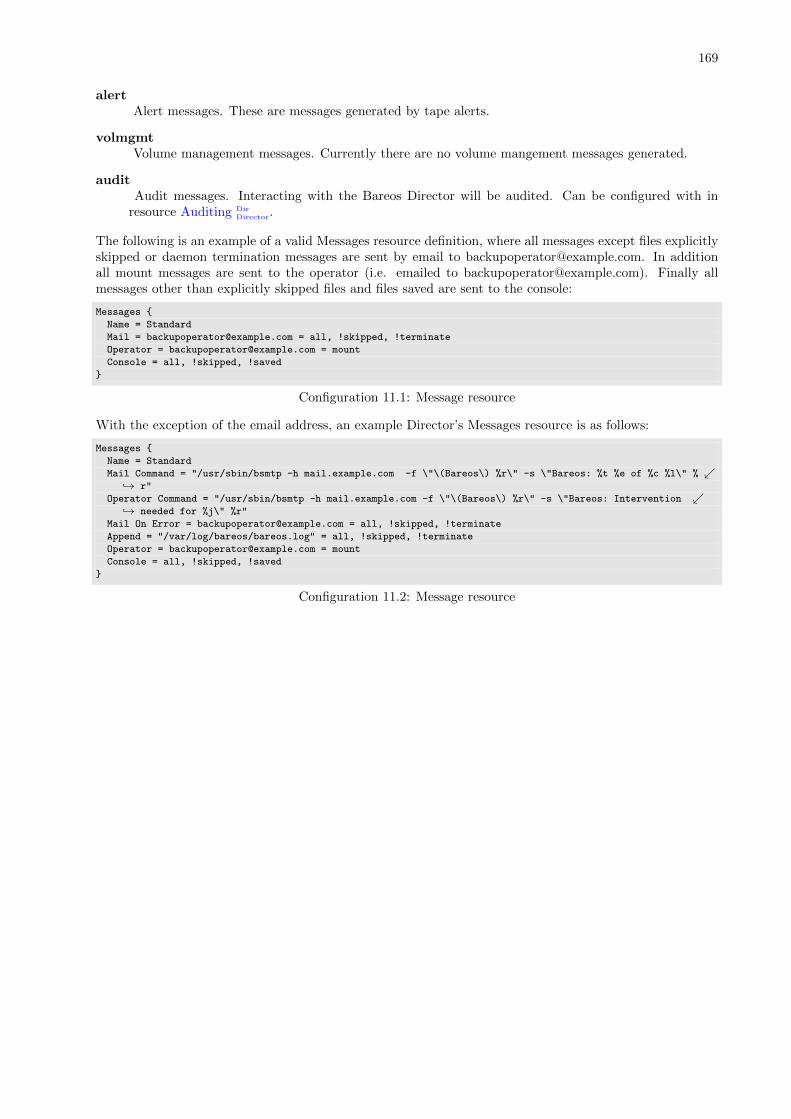
169
alertAlert messages. These are messages generated by tape alerts.
volmgmtVolume management messages. Currently there are no volume mangement messages generated.
auditAudit messages. Interacting with the Bareos Director will be audited. Can be configured with in
resource Auditing DirDirector.
The following is an example of a valid Messages resource definition, where all messages except files explicitlyskipped or daemon termination messages are sent by email to [email protected]. In additionall mount messages are sent to the operator (i.e. emailed to [email protected]). Finally allmessages other than explicitly skipped files and files saved are sent to the console:
Messages {
Name = Standard
Mail = [email protected] = all, !skipped, !terminate
Operator = [email protected] = mount
Console = all, !skipped, !saved
}
Configuration 11.1: Message resource
With the exception of the email address, an example Director’s Messages resource is as follows:
Messages {
Name = Standard
Mail Command = "/usr/sbin/bsmtp -h mail.example.com -f \"\(Bareos\) %r\" -s \"Bareos: %t %e of %c %l\" % ↙↪→ r"
Operator Command = "/usr/sbin/bsmtp -h mail.example.com -f \"\(Bareos\) %r\" -s \"Bareos: Intervention ↙↪→ needed for %j\" %r"
Mail On Error = [email protected] = all, !skipped, !terminate
Append = "/var/log/bareos/bareos.log" = all, !skipped, !terminate
Operator = [email protected] = mount
Console = all, !skipped, !saved
}
Configuration 11.2: Message resource

170
Chapter 12
Console Configuration
The Console configuration file is the simplest of all the configuration files, and in general, you should not needto change it except for the password. It simply contains the information necessary to contact the Directoror Directors.For a general discussion of the syntax of configuration files and their resources including the data typesrecognized by Bareos, please see the Configuration chapter of this manual.The following Console Resource definition must be defined:
12.1 Director Resource
The Director resource defines the attributes of the Director running on the network. You may have multipleDirector resource specifications in a single Console configuration file. If you have more than one, you will beprompted to choose one when you start the Console program.
configuration directive name type of data default value remark
Address = stringDescription = stringDir Port = positive-integer 9101Heartbeat Interval = time 0Name = name requiredPassword = Md5password requiredTLS Allowed CN = string-listTLS Authenticate = yes|noTLS CA Certificate Dir = directoryTLS CA Certificate File = directoryTLS Certificate = directoryTLS Certificate Revocation List = directoryTLS Cipher List = stringTLS Enable = yes|noTLS Key = directoryTLS Require = yes|noTLS Verify Peer = yes|no yes
Address = <string>Where the address is a host name, a fully qualified domain name, or a network address used to connectto the Director.
Description = <string>
Dir Port = <positive-integer> (default: 9101)This port must be identical to the Dir Port Dir
Director specified in the Director resource of the Director
171
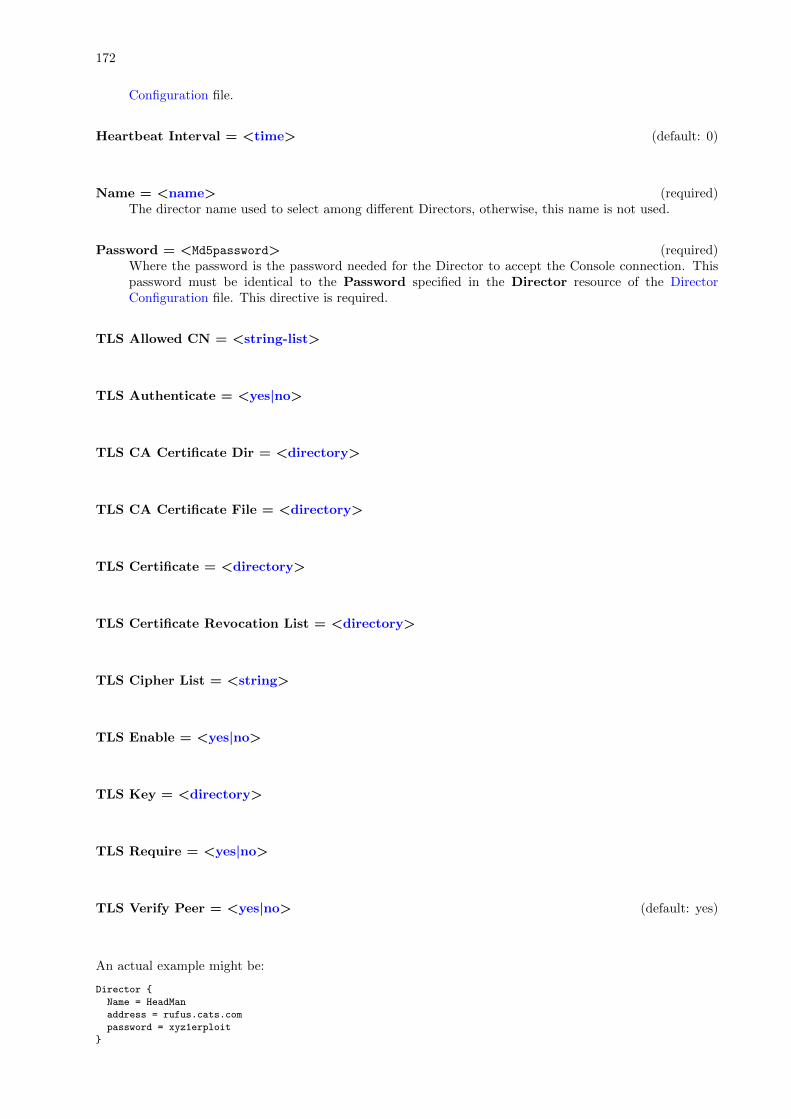
172
Configuration file.
Heartbeat Interval = <time> (default: 0)
Name = <name> (required)The director name used to select among different Directors, otherwise, this name is not used.
Password = <Md5password> (required)Where the password is the password needed for the Director to accept the Console connection. Thispassword must be identical to the Password specified in the Director resource of the DirectorConfiguration file. This directive is required.
TLS Allowed CN = <string-list>
TLS Authenticate = <yes|no>
TLS CA Certificate Dir = <directory>
TLS CA Certificate File = <directory>
TLS Certificate = <directory>
TLS Certificate Revocation List = <directory>
TLS Cipher List = <string>
TLS Enable = <yes|no>
TLS Key = <directory>
TLS Require = <yes|no>
TLS Verify Peer = <yes|no> (default: yes)
An actual example might be:
Director {
Name = HeadMan
address = rufus.cats.com
password = xyz1erploit
}

173
12.2 Console Resource
There are three different kinds of consoles, which the administrator or user can use to interact with theDirector. These three kinds of consoles comprise three different security levels.
� The first console type is an anonymous or default console, which has full privileges. There isno console resource necessary for this type since the password is specified in the Director resource.Typically you would use this anonymous console only for administrators.
� The second type of console is a ”named” or ”restricted” console defined within a Console resource inboth the Director’s configuration file and in the Console’s configuration file. Both the names and thepasswords in these two entries must match much as is the case for Client programs.
This second type of console begins with absolutely no privileges except those explicitly specified in theDirector’s Console resource. Note, the definition of what these restricted consoles can do is determinedby the Director’s conf file.
Thus you may define within the Director’s conf file multiple Consoles with different names and pass-words, sort of like multiple users, each with different privileges. As a default, these consoles can doabsolutely nothing – no commands what so ever. You give them privileges or rather access to com-mands and resources by specifying access control lists in the Director’s Console resource. This givesthe administrator fine grained control over what particular consoles (or users) can do.
� The third type of console is similar to the above mentioned restricted console in that it requires aConsole resource definition in both the Director and the Console. In addition, if the console name,provided on the Name = directive, is the same as a Client name, the user of that console is permittedto use the SetIP command to change the Address directive in the Director’s client resource to the IPaddress of the Console. This permits portables or other machines using DHCP (non-fixed IP addresses)to ”notify” the Director of their current IP address.
The Console resource is optional and need not be specified. However, if it is specified, you can use ACLs(Access Control Lists) in the Director’s configuration file to restrict the particular console (or user) to seeonly information pertaining to his jobs or client machine.You may specify as many Console resources in the console’s conf file. If you do so, generally the first Consoleresource will be used. However, if you have multiple Director resources (i.e. you want to connect to differentdirectors), you can bind one of your Console resources to a particular Director resource, and thus when youchoose a particular Director, the appropriate Console configuration resource will be used. See the ”Director”directive in the Console resource described below for more information.Note, the Console resource is optional, but can be useful for restricted consoles as noted above.
configuration directive name type of data default value remark
Description = stringDirector = stringHeartbeat Interval = time 0History File = directoryHistory Length = positive-integer 100Name = name requiredPassword = Md5password requiredRc File = directoryTLS Allowed CN = string-listTLS Authenticate = yes|noTLS CA Certificate Dir = directoryTLS CA Certificate File = directoryTLS Certificate = directoryTLS Certificate Revocation List = directoryTLS Cipher List = stringTLS Enable = yes|noTLS Key = directoryTLS Require = yes|noTLS Verify Peer = yes|no yes
174
Description = <string>
Director = <string>If this directive is specified, this Console resource will be used by bconsole when that particulardirector is selected when first starting bconsole. I.e. it binds a particular console resource with itsname and password to a particular director.
Heartbeat Interval = <time> (default: 0)This directive is optional and if specified will cause the Console to set a keepalive interval (heartbeat)in seconds on each of the sockets to communicate with the Director. It is implemented only on systems(Linux, ...) that provide the setsockopt TCP KEEPIDLE function. If the value is set to 0 (zero), nochange is made to the socket.
History File = <directory>If this directive is specified and the console is compiled with readline support, it will use the givenfilename as history file. If not specified, the history file will be named ~/.bconsole_history
History Length = <positive-integer> (default: 100)If this directive is specified the history file will be truncated after HistoryLength entries.
Name = <name> (required)The name of this resource.
The Console name used to allow a restricted console to change its IP address using the SetIPcommand. The SetIP command must also be defined in the Director’s conf CommandACL list.
Password = <Md5password> (required)If this password is supplied, then the password specified in the Director resource of you Console confwill be ignored. See below for more details.
Rc File = <directory>
TLS Allowed CN = <string-list>
TLS Authenticate = <yes|no>
TLS CA Certificate Dir = <directory>
TLS CA Certificate File = <directory>
TLS Certificate = <directory>
TLS Certificate Revocation List = <directory>
175
TLS Cipher List = <string>
TLS Enable = <yes|no>
TLS Key = <directory>
TLS Require = <yes|no>
TLS Verify Peer = <yes|no> (default: yes)
The following configuration files were supplied by Phil Stracchino. For example, if we define the followingin the user’s bconsole.conf file (or perhaps the bwx-console.conf file):
Director {
Name = MyDirector
DIRport = 9101
Address = myserver
Password = "XXXXXXXXXXX" # no, really. this is not obfuscation.
}
Console {
Name = restricted-user
Password = "UntrustedUser"
}
Where the Password in the Director section is deliberately incorrect, and the Console resource is given aname, in this case restricted-user. Then in the Director’s bareos-dir.conf file (not directly accessible bythe user), we define:
Console {
Name = restricted-user
Password = "UntrustedUser"
JobACL = "Restricted Client Save"
ClientACL = restricted-client
StorageACL = main-storage
ScheduleACL = *all*
PoolACL = *all*
FileSetACL = "Restricted Client’s FileSet"
CatalogACL = DefaultCatalog
CommandACL = run
}
the user logging into the Director from his Console will get logged in as restricted-user, and he will only beable to see or access a Job with the name Restricted Client Save a Client with the name restricted-client,a Storage device main-storage, any Schedule or Pool, a FileSet named Restricted Client’s FileSet, aCatalog named DefaultCatalog, and the only command he can use in the Console is the run command.In other words, this user is rather limited in what he can see and do with Bareos.The following is an example of a bconsole.conf file that can access several Directors and has different Consolesdepending on the director:
Director {
Name = MyDirector
DIRport = 9101
Address = myserver
Password = "XXXXXXXXXXX" # no, really. this is not obfuscation.
}
Director {
Name = SecondDirector
176
DIRport = 9101
Address = secondserver
Password = "XXXXXXXXXXX" # no, really. this is not obfuscation.
}
Console {
Name = restricted-user
Password = "UntrustedUser"
Director = MyDirector
}
Console {
Name = restricted-user
Password = "A different UntrustedUser"
Director = SecondDirector
}
The second Director referenced at ”secondserver” might look like the following:
Console {
Name = restricted-user
Password = "A different UntrustedUser"
JobACL = "Restricted Client Save"
ClientACL = restricted-client
StorageACL = second-storage
ScheduleACL = *all*
PoolACL = *all*
FileSetACL = "Restricted Client’s FileSet"
CatalogACL = RestrictedCatalog
CommandACL = run, restore
WhereACL = "/"
}
12.3 Console Commands
For more details on running the console and its commands, please see the Bareos Console chapter of thismanual.
12.4 Example Console Configuration File
An example Console configuration file might be the following:
#
# Bareos Console Configuration File
#
Director {
Name = HeadMan
address = "my_machine.my_domain.com"
Password = Console_password
}
Chapter 13
Monitor Configuration
The Monitor configuration file is a stripped down version of the Director configuration file, mixed with aConsole configuration file. It simply contains the information necessary to contact Directors, Clients, andStorage daemons you want to monitor.For a general discussion of configuration file and resources including the data types recognized by Bareos,please see the Configuration chapter of this manual.The following Monitor Resource definition must be defined:
� Monitor – to define the Monitor’s name used to connect to all the daemons and the password used toconnect to the Directors. Note, you must not define more than one Monitor resource in the Monitorconfiguration file.
� At least one Client, Storage or Director resource, to define the daemons to monitor.
13.1 Monitor Resource
The Monitor resource defines the attributes of the Monitor running on the network. The parameters youdefine here must be configured as a Director resource in Clients and Storages configuration files, and as aConsole resource in Directors configuration files.
configuration directive name type of data default value remark
Description = stringDir Connect Timeout = time 10FD Connect Timeout = time 10Name = name requiredPassword = Md5password requiredRefresh Interval = time 60Require SSL = yes|no noSD Connect Timeout = time 10
Description = <string>
Dir Connect Timeout = <time> (default: 10)
FD Connect Timeout = <time> (default: 10)
Name = <name> (required)Specifies the Director name used to connect to Client and Storage, and the Console name used to
177
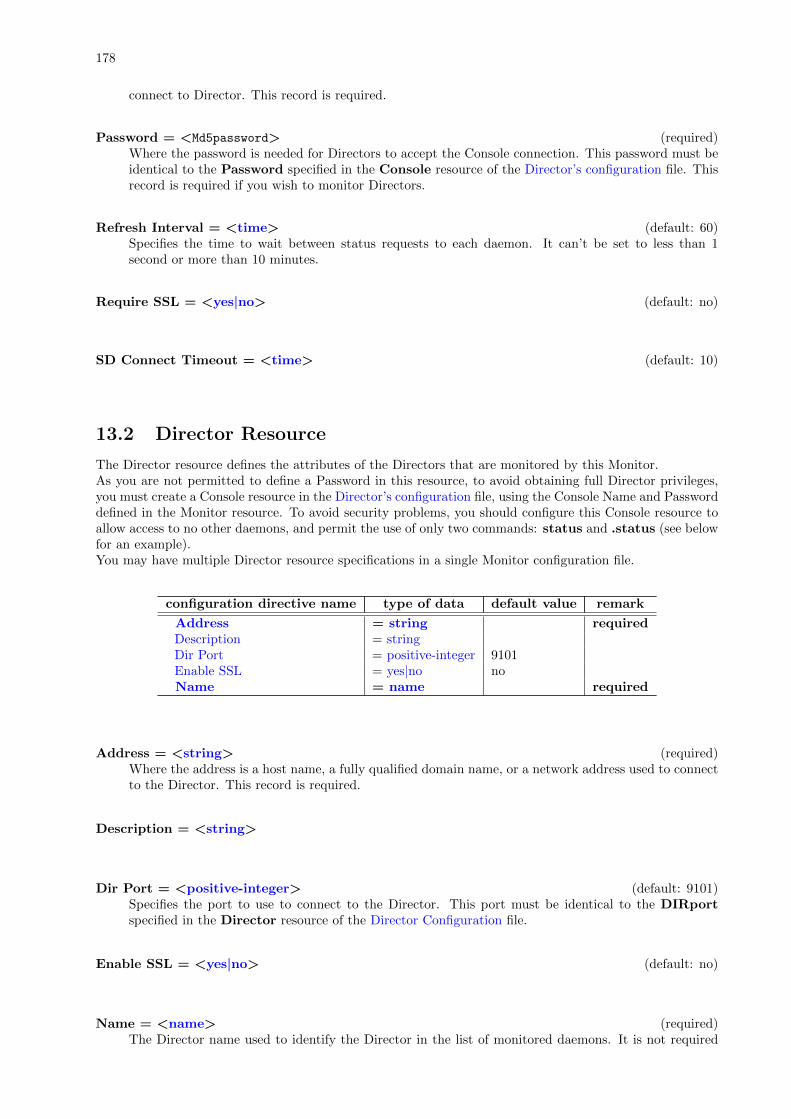
178
connect to Director. This record is required.
Password = <Md5password> (required)Where the password is needed for Directors to accept the Console connection. This password must beidentical to the Password specified in the Console resource of the Director’s configuration file. Thisrecord is required if you wish to monitor Directors.
Refresh Interval = <time> (default: 60)Specifies the time to wait between status requests to each daemon. It can’t be set to less than 1second or more than 10 minutes.
Require SSL = <yes|no> (default: no)
SD Connect Timeout = <time> (default: 10)
13.2 Director Resource
The Director resource defines the attributes of the Directors that are monitored by this Monitor.As you are not permitted to define a Password in this resource, to avoid obtaining full Director privileges,you must create a Console resource in the Director’s configuration file, using the Console Name and Passworddefined in the Monitor resource. To avoid security problems, you should configure this Console resource toallow access to no other daemons, and permit the use of only two commands: status and .status (see belowfor an example).You may have multiple Director resource specifications in a single Monitor configuration file.
configuration directive name type of data default value remark
Address = string requiredDescription = stringDir Port = positive-integer 9101Enable SSL = yes|no noName = name required
Address = <string> (required)Where the address is a host name, a fully qualified domain name, or a network address used to connectto the Director. This record is required.
Description = <string>
Dir Port = <positive-integer> (default: 9101)Specifies the port to use to connect to the Director. This port must be identical to the DIRportspecified in the Director resource of the Director Configuration file.
Enable SSL = <yes|no> (default: no)
Name = <name> (required)The Director name used to identify the Director in the list of monitored daemons. It is not required
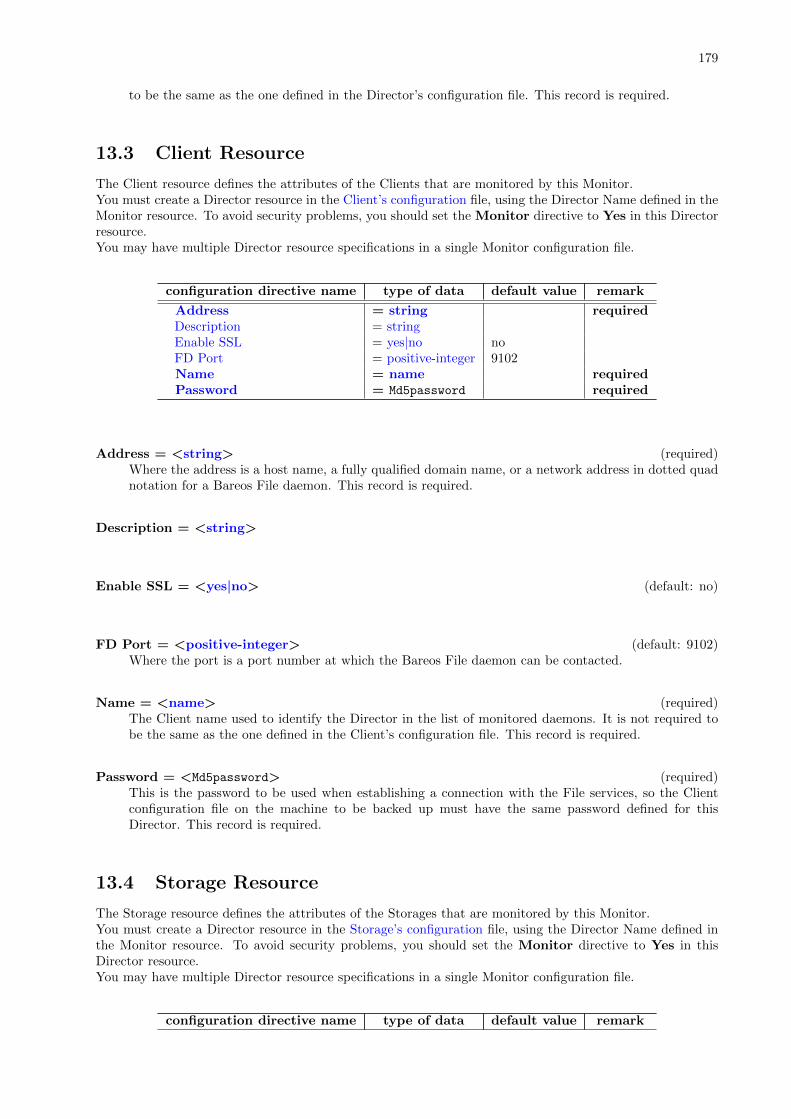
179
to be the same as the one defined in the Director’s configuration file. This record is required.
13.3 Client Resource
The Client resource defines the attributes of the Clients that are monitored by this Monitor.You must create a Director resource in the Client’s configuration file, using the Director Name defined in theMonitor resource. To avoid security problems, you should set the Monitor directive to Yes in this Directorresource.You may have multiple Director resource specifications in a single Monitor configuration file.
configuration directive name type of data default value remark
Address = string requiredDescription = stringEnable SSL = yes|no noFD Port = positive-integer 9102Name = name requiredPassword = Md5password required
Address = <string> (required)Where the address is a host name, a fully qualified domain name, or a network address in dotted quadnotation for a Bareos File daemon. This record is required.
Description = <string>
Enable SSL = <yes|no> (default: no)
FD Port = <positive-integer> (default: 9102)Where the port is a port number at which the Bareos File daemon can be contacted.
Name = <name> (required)The Client name used to identify the Director in the list of monitored daemons. It is not required tobe the same as the one defined in the Client’s configuration file. This record is required.
Password = <Md5password> (required)This is the password to be used when establishing a connection with the File services, so the Clientconfiguration file on the machine to be backed up must have the same password defined for thisDirector. This record is required.
13.4 Storage Resource
The Storage resource defines the attributes of the Storages that are monitored by this Monitor.You must create a Director resource in the Storage’s configuration file, using the Director Name defined inthe Monitor resource. To avoid security problems, you should set the Monitor directive to Yes in thisDirector resource.You may have multiple Director resource specifications in a single Monitor configuration file.
configuration directive name type of data default value remark
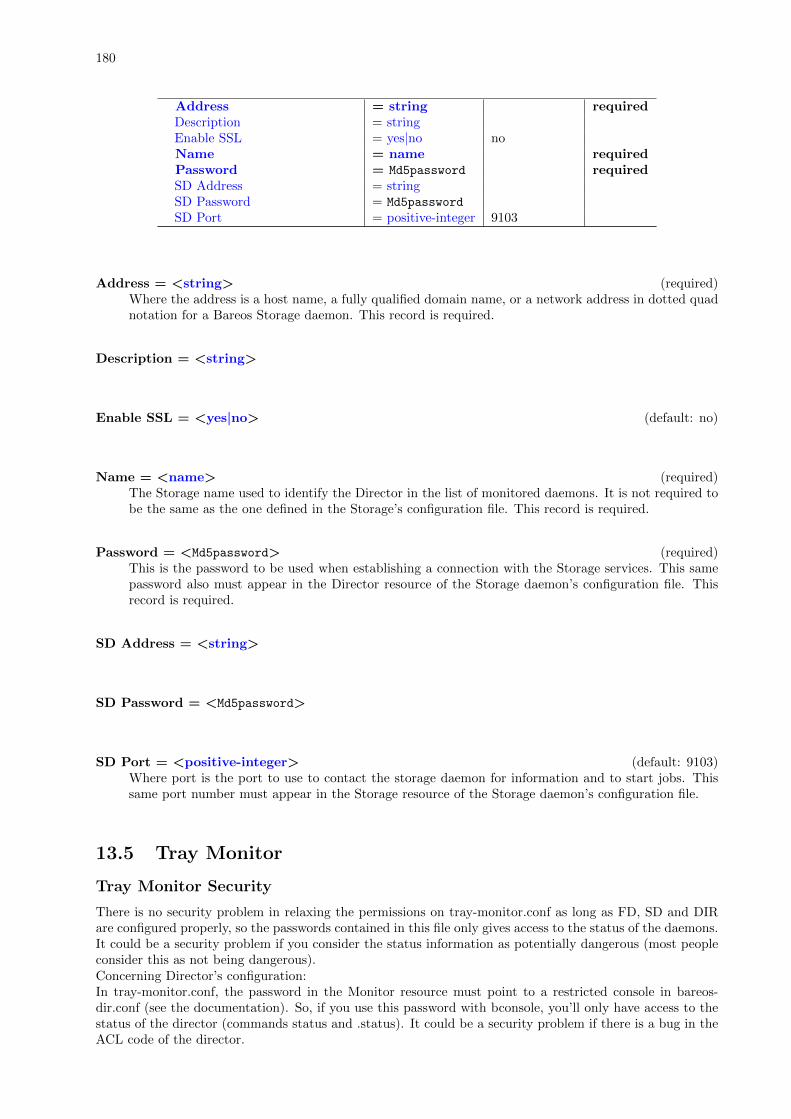
180
Address = string requiredDescription = stringEnable SSL = yes|no noName = name requiredPassword = Md5password requiredSD Address = stringSD Password = Md5password
SD Port = positive-integer 9103
Address = <string> (required)Where the address is a host name, a fully qualified domain name, or a network address in dotted quadnotation for a Bareos Storage daemon. This record is required.
Description = <string>
Enable SSL = <yes|no> (default: no)
Name = <name> (required)The Storage name used to identify the Director in the list of monitored daemons. It is not required tobe the same as the one defined in the Storage’s configuration file. This record is required.
Password = <Md5password> (required)This is the password to be used when establishing a connection with the Storage services. This samepassword also must appear in the Director resource of the Storage daemon’s configuration file. Thisrecord is required.
SD Address = <string>
SD Password = <Md5password>
SD Port = <positive-integer> (default: 9103)Where port is the port to use to contact the storage daemon for information and to start jobs. Thissame port number must appear in the Storage resource of the Storage daemon’s configuration file.
13.5 Tray Monitor
Tray Monitor Security
There is no security problem in relaxing the permissions on tray-monitor.conf as long as FD, SD and DIRare configured properly, so the passwords contained in this file only gives access to the status of the daemons.It could be a security problem if you consider the status information as potentially dangerous (most peopleconsider this as not being dangerous).Concerning Director’s configuration:In tray-monitor.conf, the password in the Monitor resource must point to a restricted console in bareos-dir.conf (see the documentation). So, if you use this password with bconsole, you’ll only have access to thestatus of the director (commands status and .status). It could be a security problem if there is a bug in theACL code of the director.
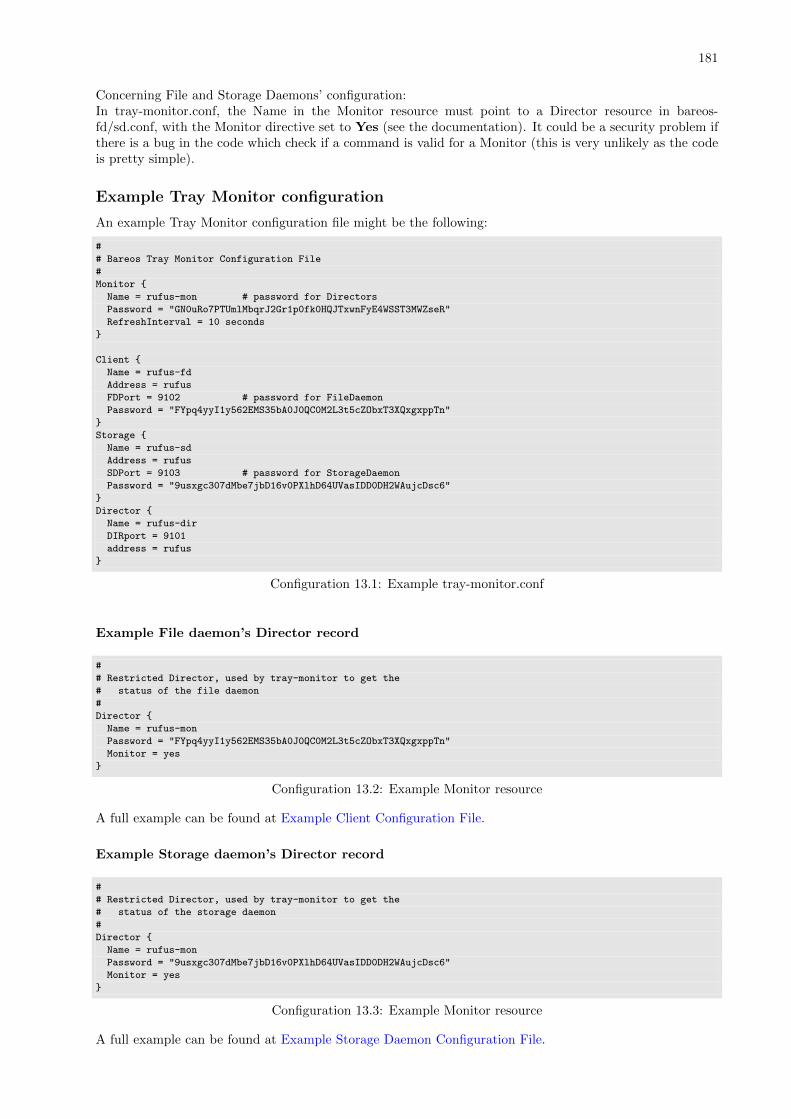
181
Concerning File and Storage Daemons’ configuration:In tray-monitor.conf, the Name in the Monitor resource must point to a Director resource in bareos-fd/sd.conf, with the Monitor directive set to Yes (see the documentation). It could be a security problem ifthere is a bug in the code which check if a command is valid for a Monitor (this is very unlikely as the codeis pretty simple).
Example Tray Monitor configuration
An example Tray Monitor configuration file might be the following:
#
# Bareos Tray Monitor Configuration File
#
Monitor {
Name = rufus-mon # password for Directors
Password = "GN0uRo7PTUmlMbqrJ2Gr1p0fk0HQJTxwnFyE4WSST3MWZseR"
RefreshInterval = 10 seconds
}
Client {
Name = rufus-fd
Address = rufus
FDPort = 9102 # password for FileDaemon
Password = "FYpq4yyI1y562EMS35bA0J0QC0M2L3t5cZObxT3XQxgxppTn"
}
Storage {
Name = rufus-sd
Address = rufus
SDPort = 9103 # password for StorageDaemon
Password = "9usxgc307dMbe7jbD16v0PXlhD64UVasIDD0DH2WAujcDsc6"
}
Director {
Name = rufus-dir
DIRport = 9101
address = rufus
}
Configuration 13.1: Example tray-monitor.conf
Example File daemon’s Director record
#
# Restricted Director, used by tray-monitor to get the
# status of the file daemon
#
Director {
Name = rufus-mon
Password = "FYpq4yyI1y562EMS35bA0J0QC0M2L3t5cZObxT3XQxgxppTn"
Monitor = yes
}
Configuration 13.2: Example Monitor resource
A full example can be found at Example Client Configuration File.
Example Storage daemon’s Director record
#
# Restricted Director, used by tray-monitor to get the
# status of the storage daemon
#
Director {
Name = rufus-mon
Password = "9usxgc307dMbe7jbD16v0PXlhD64UVasIDD0DH2WAujcDsc6"
Monitor = yes
}
Configuration 13.3: Example Monitor resource
A full example can be found at Example Storage Daemon Configuration File.
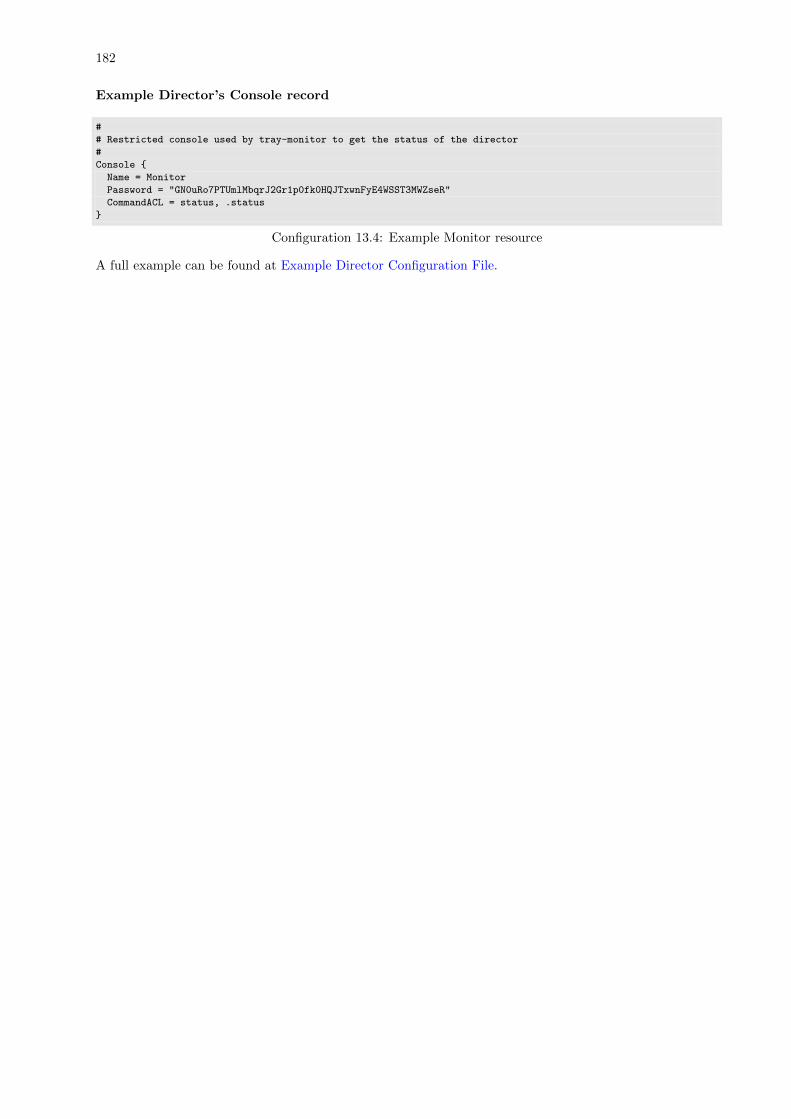
182
Example Director’s Console record
#
# Restricted console used by tray-monitor to get the status of the director
#
Console {
Name = Monitor
Password = "GN0uRo7PTUmlMbqrJ2Gr1p0fk0HQJTxwnFyE4WSST3MWZseR"
CommandACL = status, .status
}
Configuration 13.4: Example Monitor resource
A full example can be found at Example Director Configuration File.
Part III
Tasks and Concepts
183

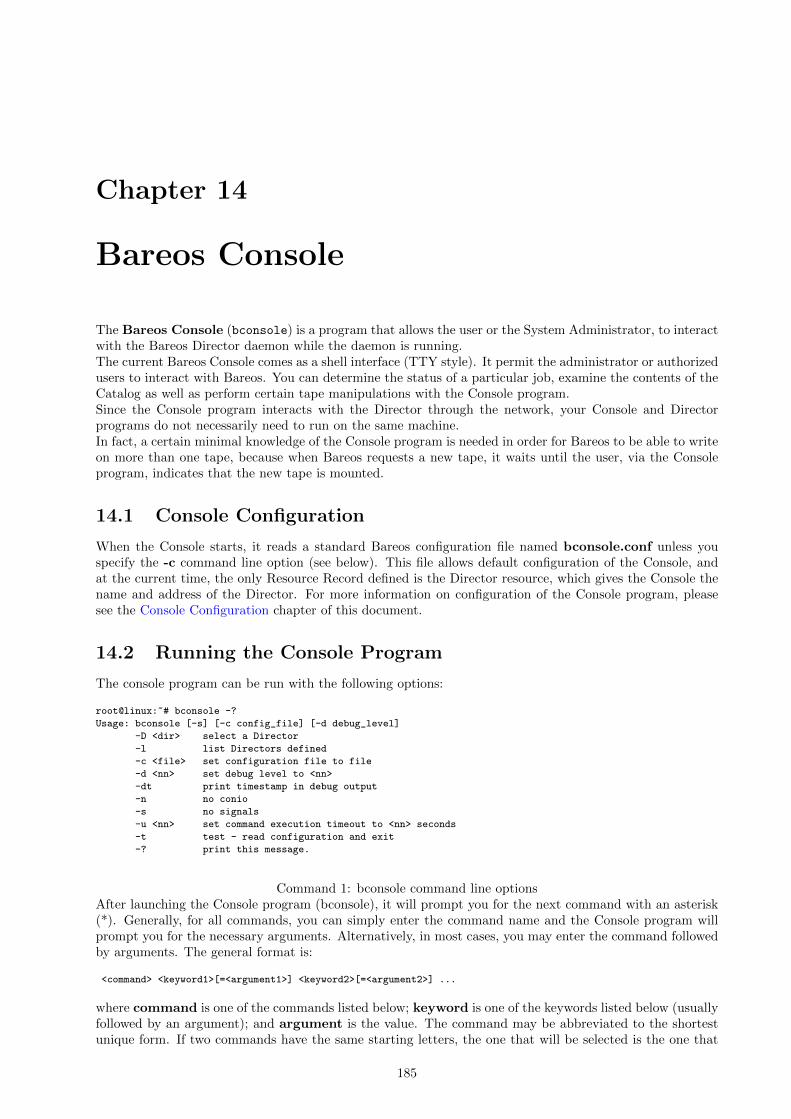
Chapter 14
Bareos Console
The Bareos Console (bconsole) is a program that allows the user or the System Administrator, to interactwith the Bareos Director daemon while the daemon is running.The current Bareos Console comes as a shell interface (TTY style). It permit the administrator or authorizedusers to interact with Bareos. You can determine the status of a particular job, examine the contents of theCatalog as well as perform certain tape manipulations with the Console program.Since the Console program interacts with the Director through the network, your Console and Directorprograms do not necessarily need to run on the same machine.In fact, a certain minimal knowledge of the Console program is needed in order for Bareos to be able to writeon more than one tape, because when Bareos requests a new tape, it waits until the user, via the Consoleprogram, indicates that the new tape is mounted.
14.1 Console Configuration
When the Console starts, it reads a standard Bareos configuration file named bconsole.conf unless youspecify the -c command line option (see below). This file allows default configuration of the Console, andat the current time, the only Resource Record defined is the Director resource, which gives the Console thename and address of the Director. For more information on configuration of the Console program, pleasesee the Console Configuration chapter of this document.
14.2 Running the Console Program
The console program can be run with the following options:
root@linux:~# bconsole -?
Usage: bconsole [-s] [-c config_file] [-d debug_level]
-D <dir> select a Director
-l list Directors defined
-c <file> set configuration file to file
-d <nn> set debug level to <nn>
-dt print timestamp in debug output
-n no conio
-s no signals
-u <nn> set command execution timeout to <nn> seconds
-t test - read configuration and exit
-? print this message.
Command 1: bconsole command line optionsAfter launching the Console program (bconsole), it will prompt you for the next command with an asterisk(*). Generally, for all commands, you can simply enter the command name and the Console program willprompt you for the necessary arguments. Alternatively, in most cases, you may enter the command followedby arguments. The general format is:
<command> <keyword1>[=<argument1>] <keyword2>[=<argument2>] ...
where command is one of the commands listed below; keyword is one of the keywords listed below (usuallyfollowed by an argument); and argument is the value. The command may be abbreviated to the shortestunique form. If two commands have the same starting letters, the one that will be selected is the one that
185
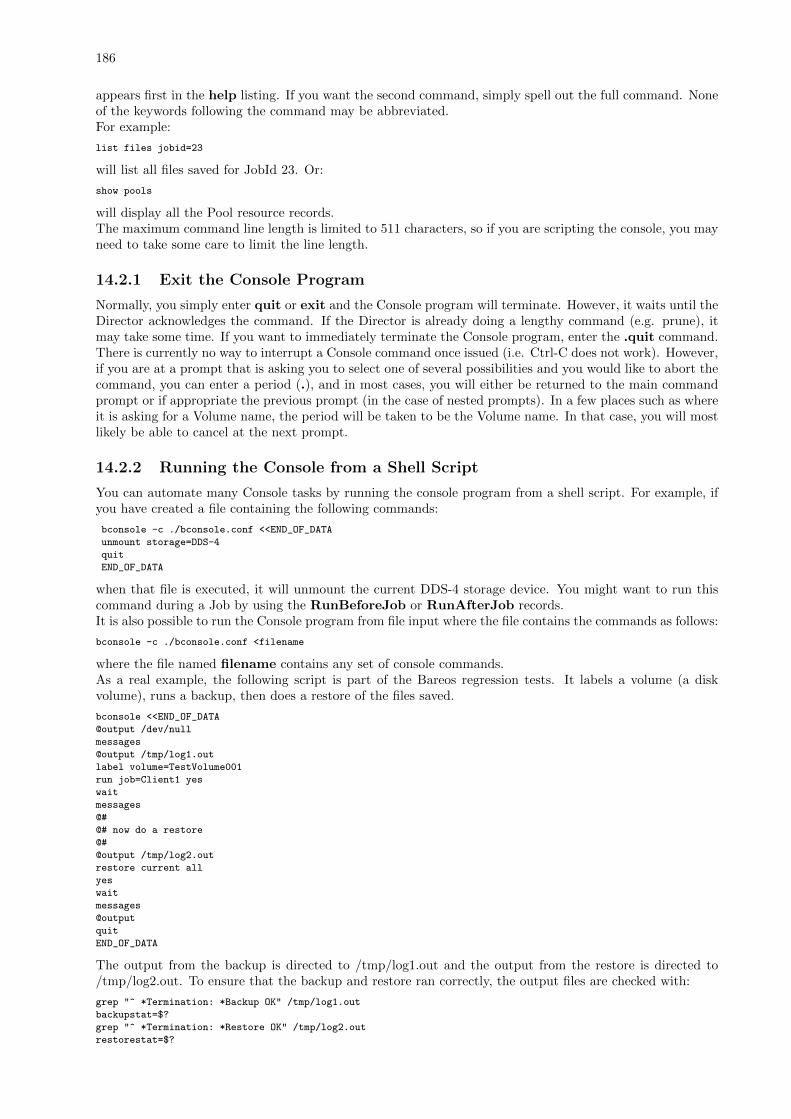
186
appears first in the help listing. If you want the second command, simply spell out the full command. Noneof the keywords following the command may be abbreviated.For example:
list files jobid=23
will list all files saved for JobId 23. Or:
show pools
will display all the Pool resource records.The maximum command line length is limited to 511 characters, so if you are scripting the console, you mayneed to take some care to limit the line length.
14.2.1 Exit the Console Program
Normally, you simply enter quit or exit and the Console program will terminate. However, it waits until theDirector acknowledges the command. If the Director is already doing a lengthy command (e.g. prune), itmay take some time. If you want to immediately terminate the Console program, enter the .quit command.There is currently no way to interrupt a Console command once issued (i.e. Ctrl-C does not work). However,if you are at a prompt that is asking you to select one of several possibilities and you would like to abort thecommand, you can enter a period (.), and in most cases, you will either be returned to the main commandprompt or if appropriate the previous prompt (in the case of nested prompts). In a few places such as whereit is asking for a Volume name, the period will be taken to be the Volume name. In that case, you will mostlikely be able to cancel at the next prompt.
14.2.2 Running the Console from a Shell Script
You can automate many Console tasks by running the console program from a shell script. For example, ifyou have created a file containing the following commands:
bconsole -c ./bconsole.conf <<END_OF_DATA
unmount storage=DDS-4
quit
END_OF_DATA
when that file is executed, it will unmount the current DDS-4 storage device. You might want to run thiscommand during a Job by using the RunBeforeJob or RunAfterJob records.It is also possible to run the Console program from file input where the file contains the commands as follows:
bconsole -c ./bconsole.conf <filename
where the file named filename contains any set of console commands.As a real example, the following script is part of the Bareos regression tests. It labels a volume (a diskvolume), runs a backup, then does a restore of the files saved.
bconsole <<END_OF_DATA
@output /dev/null
messages
@output /tmp/log1.out
label volume=TestVolume001
run job=Client1 yes
wait
messages
@#
@# now do a restore
@#
@output /tmp/log2.out
restore current all
yes
wait
messages
@output
quit
END_OF_DATA
The output from the backup is directed to /tmp/log1.out and the output from the restore is directed to/tmp/log2.out. To ensure that the backup and restore ran correctly, the output files are checked with:
grep "^ *Termination: *Backup OK" /tmp/log1.out
backupstat=$?
grep "^ *Termination: *Restore OK" /tmp/log2.out
restorestat=$?
187
14.3 Console Keywords
Unless otherwise specified, each of the following keywords takes an argument, which is specified after thekeyword following an equal sign. For example:
jobid=536
Please note, this list is incomplete.TODO: create bconsole keywords automatically
all Permitted on the status and show commands to specify all components or resources respectively.
allfrompool Permitted on the update command to specify that all Volumes in the pool (specified on thecommand line) should be updated.
allfrompools Permitted on the update command to specify that all Volumes in all pools should be updated.
before Used in the restore command.
bootstrap Used in the restore command.
catalog Allowed in the use command to specify the catalog name to be used.
catalogs Used in the show command. Takes no arguments.
client | fd
clients Used in the show, list, and llist commands. Takes no arguments.
counters Used in the show command. Takes no arguments.
current Used in the restore command. Takes no argument.
days Used to define the number of days the ”list nextvol” command should consider when looking for jobsto be run. The days keyword can also be used on the ”status dir” command so that it will display jobsscheduled for the number of days you want.
devices Used in the show command. Takes no arguments.
director | dir
directors Used in the show command. Takes no arguments.
directory Used in the restore command. Its argument specifies the directory to be restored.
enabled This keyword can appear on the update volume as well as the update slots commands, andcan allows one of the following arguments: yes, true, no, false, archived, 0, 1, 2. Where 0 correspondsto no or false, 1 corresponds to yes or true, and 2 corresponds to archived. Archived volumes will notbe used, nor will the Media record in the catalog be pruned. Volumes that are not enabled, will notbe used for backup or restore.
done Used in the restore command. Takes no argument.
file Used in the restore command.
files Used in the list and llist commands. Takes no arguments.
fileset
filesets Used in the show command. Takes no arguments.
help Used in the show command. Takes no arguments.
jobs Used in the show, list and llist commands. Takes no arguments.
jobmedia Used in the list and llist commands. Takes no arguments.
jobtotals Used in the list and llist commands. Takes no arguments.
188
jobid The JobId is the numeric jobid that is printed in the Job Report output. It is the index of thedatabase record for the given job. While it is unique for all the existing Job records in the catalogdatabase, the same JobId can be reused once a Job is removed from the catalog. Probably you willrefer specific Jobs that ran using their numeric JobId.
job | jobname The Job or Jobname keyword refers to the name you specified in the Job resource, andhence it refers to any number of Jobs that ran. It is typically useful if you want to list all jobs of aparticular name.
level
listing Permitted on the estimate command. Takes no argument.
limit
messages Used in the show command. Takes no arguments.
media Used in the list and llist commands. Takes no arguments.
nextvolume | nextvol Used in the list and llist commands. Takes no arguments.
on Takes no keyword.
off Takes no keyword.
pool
pools Used in the show, list, and llist commands. Takes no arguments.
select Used in the restore command. Takes no argument.
limit Used in the setbandwidth command. Takes integer in KB/s unit.
storages Used in the show command. Takes no arguments.
schedules Used in the show command. Takes no arguments.
storage | store | sd
ujobid The ujobid is a unique job identification that is printed in the Job Report output. At the currenttime, it consists of the Job name (from the Name directive for the job) appended with the date andtime the job was run. This keyword is useful if you want to completely identify the Job instance run.
volume
volumes Used in the list and llist commands. Takes no arguments.
where Used in the restore command.
yes Used in the restore command. Takes no argument.
14.4 Console Commands
The following commands are currently implemented:
add This command is used to add Volumes to an existing Pool. That is, it creates the Volume name in thecatalog and inserts into the Pool in the catalog, but does not attempt to access the physical Volume.Once added, Bareos expects that Volume to exist and to be labeled. This command is not normallyused since Bareos will automatically do the equivalent when Volumes are labeled. However, there maybe times when you have removed a Volume from the catalog and want to later add it back.
The full form of this command is:
add [ pool=<pool−name> s t o rage=<s torage> j ob id=<JobId>
bconsole 14.1: add
189
Normally, the label command is used rather than this command because the label command labelsthe physical media (tape, disk, DVD, ...) and does the equivalent of the add command. The addcommand affects only the Catalog and not the physical media (data on Volumes). The physical mediamust exist and be labeled before use (usually with the label command). This command can, however,be useful if you wish to add a number of Volumes to the Pool that will be physically labeled at alater time. It can also be useful if you are importing a tape from another site. Please see the labelcommand below for the list of legal characters in a Volume name.
autodisplay This command accepts on or off as an argument, and turns auto-display of messages on or offrespectively. The default for the console program is off, which means that you will be notified whenthere are console messages pending, but they will not automatically be displayed.
When autodisplay is turned off, you must explicitly retrieve the messages with the messages command.When autodisplay is turned on, the messages will be displayed on the console as they are received.
automount This command accepts on or off as the argument, and turns auto-mounting of the Volumeafter a label command on or off respectively. The default is on. If automount is turned off, youmust explicitly mount tape Volumes after a label command to use it.
cancel This command is used to cancel a job and accepts jobid=nnn or job=xxx as an argument wherennn is replaced by the JobId and xxx is replaced by the job name. If you do not specify a keyword,the Console program will prompt you with the names of all the active jobs allowing you to choose one.
The full form of this command is:
cance l [ j ob id=<number> job=<job−name> ujob id=<unique−job id >]
bconsole 14.2: cancel
Once a Job is marked to be canceled, it may take a bit of time (generally within a minute but up totwo hours) before the Job actually terminates, depending on what operations it is doing. Don’t besurprised that you receive a Job not found message. That just means that one of the three daemonshad already canceled the job. Messages numbered in the 1000’s are from the Director, 2000’s are fromthe File daemon and 3000’s from the Storage daemon.
create This command is not normally used as the Pool records are automatically created by the Directorwhen it starts based on what it finds in the conf file. If needed, this command can be to create a Poolrecord in the database using the Pool resource record defined in the Director’s configuration file. Soin a sense, this command simply transfers the information from the Pool resource in the configurationfile into the Catalog. Normally this command is done automatically for you when the Director startsproviding the Pool is referenced within a Job resource. If you use this command on an existing Pool,it will automatically update the Catalog to have the same information as the Pool resource. Aftercreating a Pool, you will most likely use the label command to label one or more volumes and addtheir names to the Media database.
The full form of this command is:
c r e a t e [ pool=<pool−name>]
bconsole 14.3: create
When starting a Job, if Bareos determines that there is no Pool record in the database, but there is aPool resource of the appropriate name, it will create it for you. If you want the Pool record to appearin the database immediately, simply use this command to force it to be created.
delete The delete command is used to delete a Volume, Pool or Job record from the Catalog as well asall associated catalog Volume records that were created. This command operates only on the Catalogdatabase and has no effect on the actual data written to a Volume. This command can be dangerousand we strongly recommend that you do not use it unless you know what you are doing.
If the keyword Volume appears on the command line, the named Volume will be deleted from thecatalog, if the keyword Pool appears on the command line, a Pool will be deleted, and if the keywordJob appears on the command line, a Job and all its associated records (File and JobMedia) will bedeleted from the catalog.
The full form of this command is:
190
de l e t e pool=<pool−name>de l e t e volume=<volume−name> pool=<pool−name>de l e t e JobId=<job−id> JobId=<job−id2> . . .d e l e t e Job JobId=n ,m, o−r , t . . .
bconsole 14.4: delete
The first form deletes a Pool record from the catalog database. The second form deletes a Volumerecord from the specified pool in the catalog database. The third form deletes the specified Job recordfrom the catalog database. The last form deletes JobId records for JobIds n, m, o, p, q, r, and t.Where each one of the n,m,... is, of course, a number. That is a ”delete jobid” accepts lists and rangesof jobids.
disable This command permits you to disable a Job for automatic scheduling. The job may have beenpreviously enabled with the Job resource Enabled directive or using the console enable command.The next time the Director is restarted or the conf file is reloaded, the Enable/Disable state will beset to the value in the Job resource (default enabled) as defined in the bareos-dir.conf file.
The full form of this command is:
d i s ab l e job=<job−name>
bconsole 14.5: disable
enable This command permits you to enable a Job for automatic scheduling. The job may have beenpreviously disabled with the Job resource Enabled directive or using the console disable command.The next time the Director is restarted or the conf file is reloaded, the Enable/Disable state will beset to the value in the Job resource (default enabled) as defined in the bareos-dir.conf file.
The full form of this command is:
enable job=<job−name>
bconsole 14.6: enable
estimate Using this command, you can get an idea how many files will be backed up, or if you are unsureabout your Include statements in your FileSet, you can test them without doing an actual backup. Thedefault is to assume a Full backup. However, you can override this by specifying a level=Incrementalor level=Differential on the command line. A Job name must be specified or you will be promptedfor one, and optionally a Client and FileSet may be specified on the command line. It then contactsthe client which computes the number of files and bytes that would be backed up. Please note thatthis is an estimate calculated from the number of blocks in the file rather than by reading the actualbytes. As such, the estimated backup size will generally be larger than an actual backup.
The estimate command can use the accurate code to detect changes and give a better estimation.You can set the accurate behavior on command line using accurate=yes/no or use the Job setting asdefault value.
Optionally you may specify the keyword listing in which case, all the files to be backed up will belisted. Note, it could take quite some time to display them if the backup is large. The full form is:
The full form of this command is:
es t imate job=<job−name> l i s t i n g c l i e n t=<c l i e n t−name> accurate=<yes | no> ↙↪→ f i l e s e t=< f i l e s e t −name> l e v e l=<l e v e l−name>
bconsole 14.7: estimate
Specification of the job is sufficient, but you can also override the client, fileset, accurate and/or levelby specifying them on the estimate command line.
As an example, you might do:
@output /tmp/ l i s t i n ges t imate job=NightlySave l i s t i n g l e v e l=Incrementa l@output
bconsole 14.8: estimate: redirected output
191
which will do a full listing of all files to be backed up for the Job NightlySave during an Incrementalsave and put it in the file /tmp/listing. Note, the byte estimate provided by this command is basedon the file size contained in the directory item. This can give wildly incorrect estimates of the actualstorage used if there are sparse files on your systems. Sparse files are often found on 64 bit systems forcertain system files. The size that is returned is the size Bareos will backup if the sparse option is notspecified in the FileSet. There is currently no way to get an estimate of the real file size that would befound should the sparse option be enabled.
exit This command terminates the console program.
export The export command is used to export tapes from an autochanger. Most Automatic Tapechangersoffer special slots for importing new tape cartridges or exporting written tape cartridges. This canhappen without having to set the device offline.
The full form of this command is:
export s t o rage=<s torage−name> s r c s l o t s=<s l o t−s e l e c t i o n> ↙↪→ [ d s t s l o t s=<s l o t−s e l e c t i o n> volume=<volume−name> scan ]
bconsole 14.9: export
The export command does exactly the opposite of the import command. You can specify which slotsshould be transferred to import/export slots. The most usefull application of the export command isthe possibility to automatically transfer the volumes of a certain backup into the import/export slotsfor external storage.
To be able to to this, the export command also accepts a list of volume names to be exported.
Example:
export volume=A00020L4 |A00007L4 |A00005L4
bconsole 14.10: export volume
Instead of exporting volumes by names you can also select a number of slots via the srcslots keywordand export those to the slots you specify in dstslots. The export command will check if the slots havecontent (e.g. otherwise there is not much to export) and if there are enough export slots and if thoseare really import/export slots.
Example:
export s r c s l o t s=1−2 d s t s l o t s=37−38
bconsole 14.11: export slots
gui Invoke the non-interactive gui mode. This command is only used when bconsole is commanded by anexternal program.
help This command displays the list of commands available.
import The import command is used to import tapes into an autochanger. Most Automatic Tapechangersoffer special slots for importing new tape cartridges or exporting written tape cartridges. This canhappen without having to set the device offline.
The full form of this command is:
import s t o rage=<s torage−name> [ s r c s l o t s=<s l o t−s e l e c t i o n> ↙↪→ d s t s l o t s=<s l o t−s e l e c t i o n> volume=<volume−name> scan ]
bconsole 14.12: import
To import new tapes into the autochanger, you only have to load the new tapes into the import/exportslots and call import from the cmdline.
The import command will automatically transfer the new tapes into free slots of the autochanger. Theslots are filled in order of the slot numbers. To import all tapes, there have to be enough free slots toload all tapes.
Example with a Library with 36 Slots and 3 Import/Export Slots:
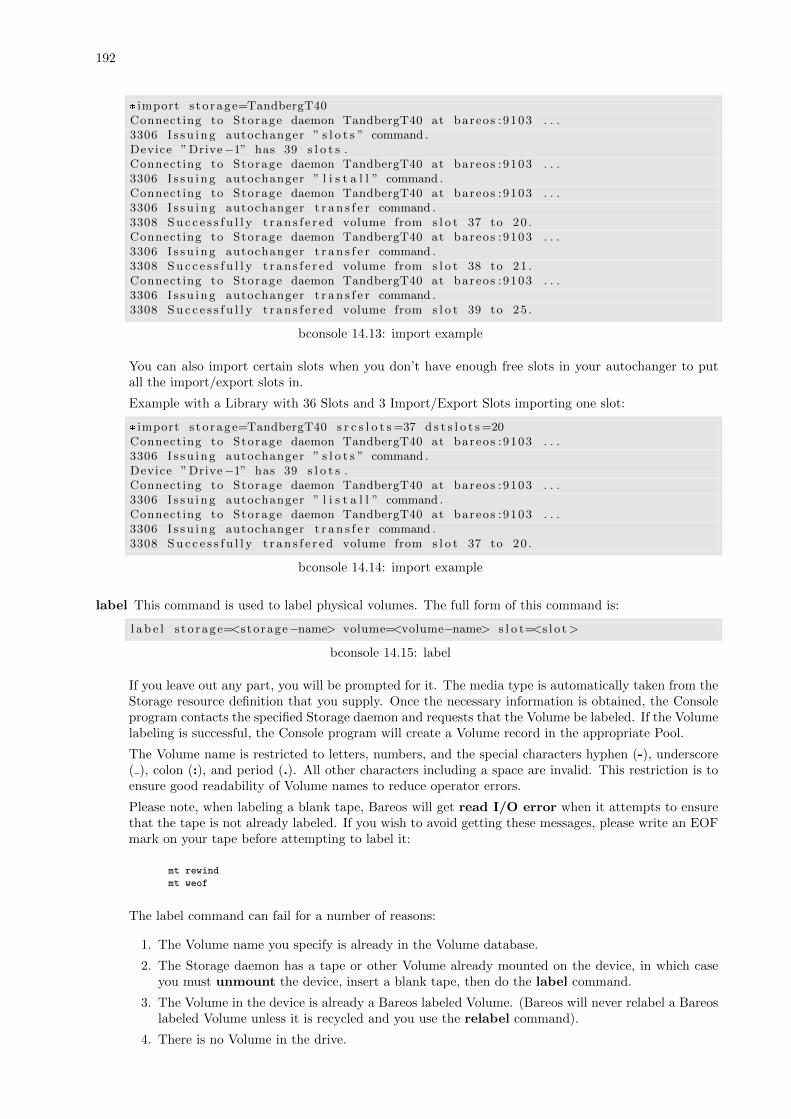
192
* import s t o rage=TandbergT40Connecting to Storage daemon TandbergT40 at bareos :9103 . . .3306 I s s u i ng autochanger ” s l o t s ” command .Device ”Drive−1” has 39 s l o t s .Connecting to Storage daemon TandbergT40 at bareos :9103 . . .3306 I s s u i ng autochanger ” l i s t a l l ” command .Connecting to Storage daemon TandbergT40 at bareos :9103 . . .3306 I s s u i ng autochanger t r a n s f e r command .3308 Su c c e s s f u l l y t r an s f e r e d volume from s l o t 37 to 20 .Connecting to Storage daemon TandbergT40 at bareos :9103 . . .3306 I s s u i ng autochanger t r a n s f e r command .3308 Su c c e s s f u l l y t r an s f e r e d volume from s l o t 38 to 21 .Connecting to Storage daemon TandbergT40 at bareos :9103 . . .3306 I s s u i ng autochanger t r a n s f e r command .3308 Su c c e s s f u l l y t r an s f e r e d volume from s l o t 39 to 25 .
bconsole 14.13: import example
You can also import certain slots when you don’t have enough free slots in your autochanger to putall the import/export slots in.
Example with a Library with 36 Slots and 3 Import/Export Slots importing one slot:
* import s t o rage=TandbergT40 s r c s l o t s =37 d s t s l o t s=20Connecting to Storage daemon TandbergT40 at bareos :9103 . . .3306 I s s u i ng autochanger ” s l o t s ” command .Device ”Drive−1” has 39 s l o t s .Connecting to Storage daemon TandbergT40 at bareos :9103 . . .3306 I s s u i ng autochanger ” l i s t a l l ” command .Connecting to Storage daemon TandbergT40 at bareos :9103 . . .3306 I s s u i ng autochanger t r a n s f e r command .3308 Su c c e s s f u l l y t r an s f e r e d volume from s l o t 37 to 20 .
bconsole 14.14: import example
label This command is used to label physical volumes. The full form of this command is:
l a b e l s t o rage=<s torage−name> volume=<volume−name> s l o t=<s l o t>
bconsole 14.15: label
If you leave out any part, you will be prompted for it. The media type is automatically taken from theStorage resource definition that you supply. Once the necessary information is obtained, the Consoleprogram contacts the specified Storage daemon and requests that the Volume be labeled. If the Volumelabeling is successful, the Console program will create a Volume record in the appropriate Pool.
The Volume name is restricted to letters, numbers, and the special characters hyphen (-), underscore( ), colon (:), and period (.). All other characters including a space are invalid. This restriction is toensure good readability of Volume names to reduce operator errors.
Please note, when labeling a blank tape, Bareos will get read I/O error when it attempts to ensurethat the tape is not already labeled. If you wish to avoid getting these messages, please write an EOFmark on your tape before attempting to label it:
mt rewind
mt weof
The label command can fail for a number of reasons:
1. The Volume name you specify is already in the Volume database.
2. The Storage daemon has a tape or other Volume already mounted on the device, in which caseyou must unmount the device, insert a blank tape, then do the label command.
3. The Volume in the device is already a Bareos labeled Volume. (Bareos will never relabel a Bareoslabeled Volume unless it is recycled and you use the relabel command).
4. There is no Volume in the drive.
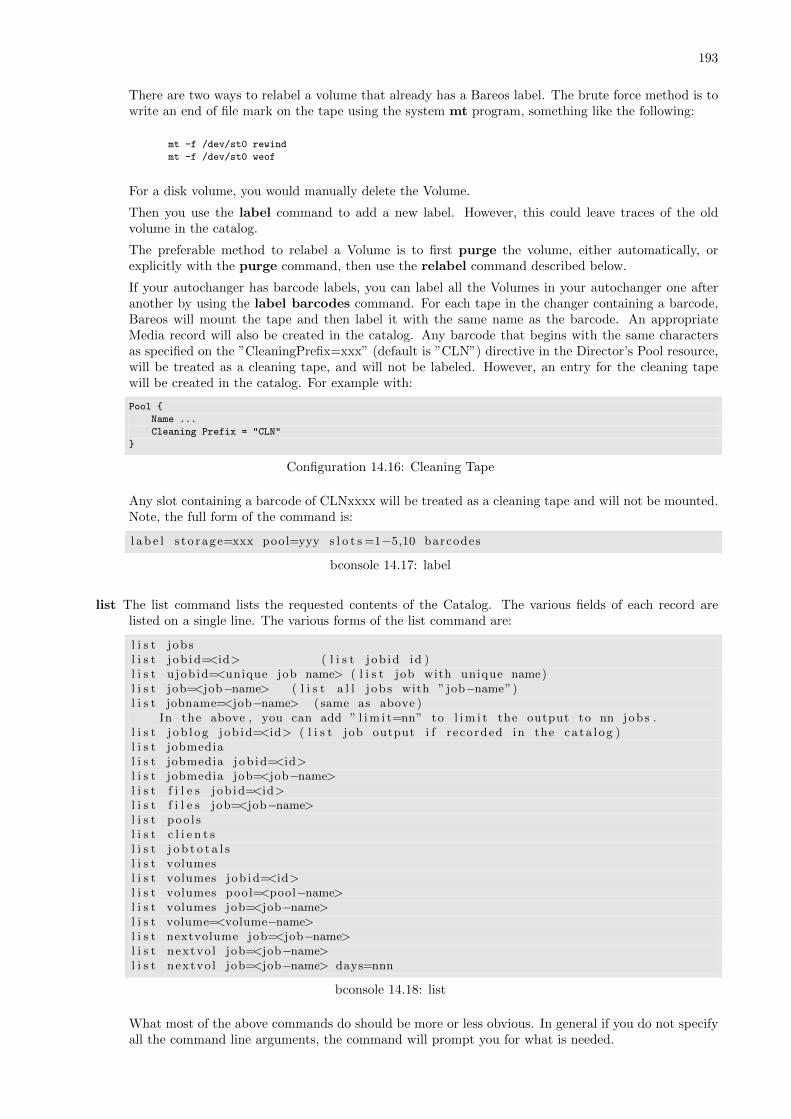
193
There are two ways to relabel a volume that already has a Bareos label. The brute force method is towrite an end of file mark on the tape using the system mt program, something like the following:
mt -f /dev/st0 rewind
mt -f /dev/st0 weof
For a disk volume, you would manually delete the Volume.
Then you use the label command to add a new label. However, this could leave traces of the oldvolume in the catalog.
The preferable method to relabel a Volume is to first purge the volume, either automatically, orexplicitly with the purge command, then use the relabel command described below.
If your autochanger has barcode labels, you can label all the Volumes in your autochanger one afteranother by using the label barcodes command. For each tape in the changer containing a barcode,Bareos will mount the tape and then label it with the same name as the barcode. An appropriateMedia record will also be created in the catalog. Any barcode that begins with the same charactersas specified on the ”CleaningPrefix=xxx” (default is ”CLN”) directive in the Director’s Pool resource,will be treated as a cleaning tape, and will not be labeled. However, an entry for the cleaning tapewill be created in the catalog. For example with:
Pool {
Name ...
Cleaning Prefix = "CLN"
}
Configuration 14.16: Cleaning Tape
Any slot containing a barcode of CLNxxxx will be treated as a cleaning tape and will not be mounted.Note, the full form of the command is:
l a b e l s t o rage=xxx pool=yyy s l o t s =1−5,10 barcodes
bconsole 14.17: label
list The list command lists the requested contents of the Catalog. The various fields of each record arelisted on a single line. The various forms of the list command are:
l i s t j obsl i s t j ob id=<id> ( l i s t j ob id id )l i s t u job id=<unique job name> ( l i s t job with unique name)l i s t job=<job−name> ( l i s t a l l j obs with ” job−name”)l i s t jobname=<job−name> ( same as above )
In the above , you can add ” l im i t=nn” to l im i t the output to nn jobs .l i s t j ob l og j ob id=<id> ( l i s t job output i f recorded in the ca ta l og )l i s t jobmedial i s t jobmedia j ob id=<id>l i s t jobmedia job=<job−name>l i s t f i l e s j ob id=<id>l i s t f i l e s job=<job−name>l i s t poo l sl i s t c l i e n t sl i s t j o b t o t a l sl i s t volumesl i s t volumes j ob id=<id>l i s t volumes pool=<pool−name>l i s t volumes job=<job−name>l i s t volume=<volume−name>l i s t nextvolume job=<job−name>l i s t nextvo l job=<job−name>l i s t nextvo l job=<job−name> days=nnn
bconsole 14.18: list
What most of the above commands do should be more or less obvious. In general if you do not specifyall the command line arguments, the command will prompt you for what is needed.
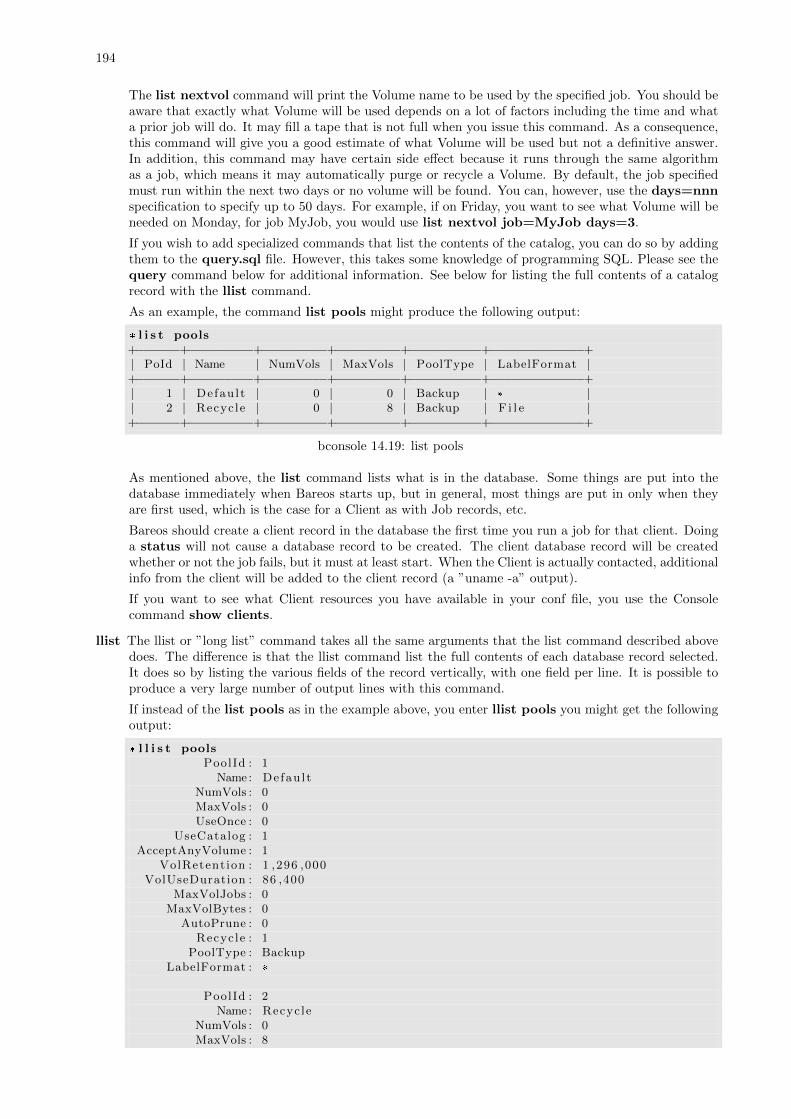
194
The list nextvol command will print the Volume name to be used by the specified job. You should beaware that exactly what Volume will be used depends on a lot of factors including the time and whata prior job will do. It may fill a tape that is not full when you issue this command. As a consequence,this command will give you a good estimate of what Volume will be used but not a definitive answer.In addition, this command may have certain side effect because it runs through the same algorithmas a job, which means it may automatically purge or recycle a Volume. By default, the job specifiedmust run within the next two days or no volume will be found. You can, however, use the days=nnnspecification to specify up to 50 days. For example, if on Friday, you want to see what Volume will beneeded on Monday, for job MyJob, you would use list nextvol job=MyJob days=3.
If you wish to add specialized commands that list the contents of the catalog, you can do so by addingthem to the query.sql file. However, this takes some knowledge of programming SQL. Please see thequery command below for additional information. See below for listing the full contents of a catalogrecord with the llist command.
As an example, the command list pools might produce the following output:
* l i s t pools+−−−−−−+−−−−−−−−−+−−−−−−−−−+−−−−−−−−−+−−−−−−−−−−+−−−−−−−−−−−−−+| PoId | Name | NumVols | MaxVols | PoolType | LabelFormat |+−−−−−−+−−−−−−−−−+−−−−−−−−−+−−−−−−−−−+−−−−−−−−−−+−−−−−−−−−−−−−+| 1 | Defau l t | 0 | 0 | Backup | * || 2 | Recycle | 0 | 8 | Backup | F i l e |+−−−−−−+−−−−−−−−−+−−−−−−−−−+−−−−−−−−−+−−−−−−−−−−+−−−−−−−−−−−−−+
bconsole 14.19: list pools
As mentioned above, the list command lists what is in the database. Some things are put into thedatabase immediately when Bareos starts up, but in general, most things are put in only when theyare first used, which is the case for a Client as with Job records, etc.
Bareos should create a client record in the database the first time you run a job for that client. Doinga status will not cause a database record to be created. The client database record will be createdwhether or not the job fails, but it must at least start. When the Client is actually contacted, additionalinfo from the client will be added to the client record (a ”uname -a” output).
If you want to see what Client resources you have available in your conf file, you use the Consolecommand show clients.
llist The llist or ”long list” command takes all the same arguments that the list command described abovedoes. The difference is that the llist command list the full contents of each database record selected.It does so by listing the various fields of the record vertically, with one field per line. It is possible toproduce a very large number of output lines with this command.
If instead of the list pools as in the example above, you enter llist pools you might get the followingoutput:
* l l i s t poolsPoolId : 1
Name : Defau l tNumVols : 0MaxVols : 0UseOnce : 0
UseCatalog : 1AcceptAnyVolume : 1
VolRetention : 1 ,296 ,000VolUseDuration : 86 ,400
MaxVolJobs : 0MaxVolBytes : 0
AutoPrune : 0Recycle : 1
PoolType : BackupLabelFormat : *
PoolId : 2Name : Recycle
NumVols : 0MaxVols : 8
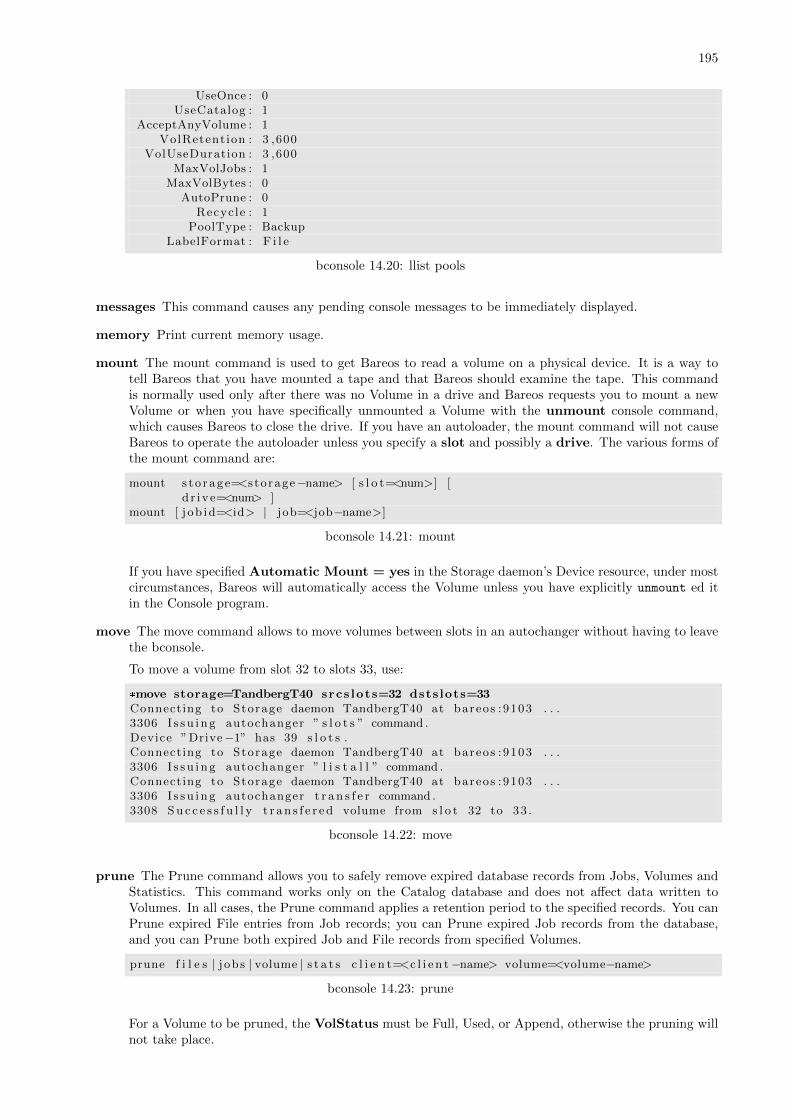
195
UseOnce : 0UseCatalog : 1
AcceptAnyVolume : 1VolRetention : 3 ,600
VolUseDuration : 3 ,600MaxVolJobs : 1
MaxVolBytes : 0AutoPrune : 0
Recycle : 1PoolType : Backup
LabelFormat : F i l e
bconsole 14.20: llist pools
messages This command causes any pending console messages to be immediately displayed.
memory Print current memory usage.
mount The mount command is used to get Bareos to read a volume on a physical device. It is a way totell Bareos that you have mounted a tape and that Bareos should examine the tape. This commandis normally used only after there was no Volume in a drive and Bareos requests you to mount a newVolume or when you have specifically unmounted a Volume with the unmount console command,which causes Bareos to close the drive. If you have an autoloader, the mount command will not causeBareos to operate the autoloader unless you specify a slot and possibly a drive. The various forms ofthe mount command are:
mount s to rage=<s torage−name> [ s l o t=<num>] [d r i v e=<num> ]
mount [ j ob id=<id> | job=<job−name>]
bconsole 14.21: mount
If you have specified Automatic Mount = yes in the Storage daemon’s Device resource, under mostcircumstances, Bareos will automatically access the Volume unless you have explicitly unmount ed itin the Console program.
move The move command allows to move volumes between slots in an autochanger without having to leavethe bconsole.
To move a volume from slot 32 to slots 33, use:
*move storage=TandbergT40 srcs lots=32 dstslots=33Connecting to Storage daemon TandbergT40 at bareos :9103 . . .3306 I s s u i ng autochanger ” s l o t s ” command .Device ”Drive−1” has 39 s l o t s .Connecting to Storage daemon TandbergT40 at bareos :9103 . . .3306 I s s u i ng autochanger ” l i s t a l l ” command .Connecting to Storage daemon TandbergT40 at bareos :9103 . . .3306 I s s u i ng autochanger t r a n s f e r command .3308 Su c c e s s f u l l y t r an s f e r e d volume from s l o t 32 to 33 .
bconsole 14.22: move
prune The Prune command allows you to safely remove expired database records from Jobs, Volumes andStatistics. This command works only on the Catalog database and does not affect data written toVolumes. In all cases, the Prune command applies a retention period to the specified records. You canPrune expired File entries from Job records; you can Prune expired Job records from the database,and you can Prune both expired Job and File records from specified Volumes.
prune f i l e s | j obs | volume | s t a t s c l i e n t=<c l i e n t−name> volume=<volume−name>
bconsole 14.23: prune
For a Volume to be pruned, the VolStatus must be Full, Used, or Append, otherwise the pruning willnot take place.

196
purge The Purge command will delete associated Catalog database records from Jobs and Volumes withoutconsidering the retention period. Purge works only on the Catalog database and does not affect datawritten to Volumes. This command can be dangerous because you can delete catalog records associatedwith current backups of files, and we recommend that you do not use it unless you know what you aredoing. The permitted forms of purge are:
purge f i l e s j ob id=<job id >| job=<job−name> | c l i e n t=<c l i e n t−name>purge jobs c l i e n t=<c l i e n t−name> ( o f a l l j obs )purge volume | volume=<vol−name> ( o f a l l j obs )
bconsole 14.24: purge
For the purge command to work on Volume Catalog database records the VolStatus must be Append,Full, Used, or Error.
The actual data written to the Volume will be unaffected by this command unless you are using theActionOnPurge=Truncate option on those Media.
To ask Bareos to truncate your Purged volumes, you need to use the following command in interactivemode or in a RunScript:
*purge volume action=truncate storage=File al lpools# or by de fau l t , a c t i on=a l l*purge volume action storage=File pool=Default
bconsole 14.25: purge example
This is possible to specify the volume name, the media type, the pool, the storage, etc. . . (see help
purge) Be sure that your storage device is idle when you decide to run this command.
resolve In the configuration files, Addresses can (and normally should) be specified as DNS names. Asthe different components of Bareos will establish network connections to other Bareos components, itis important that DNS name resolution works on involved components and delivers the same results.The resolve command can be used to test DNS resolution of a given hostname on director, storagedaemonm or client.
*resolve www. bareos .combareos−d i r r e s o l v e s www. bareos . com to host [ ipv4 : 8 4 . 4 4 . 1 6 6 . 2 4 2 ]
*resolve cl ient=client1−fd www. bareos .comc l i e n t 1−fd r e s o l v e s www. bareos . com to host [ ipv4 : 8 4 . 4 4 . 1 6 6 . 2 4 2 ]
*resolve storage=File www. bareos .combareos−sd r e s o l v e s www. bareos . com to host [ ipv4 : 8 4 . 4 4 . 1 6 6 . 2 4 2 ]
bconsole 14.26: resolve example
query This command reads a predefined SQL query from the query file (the name and location of thequery file is defined with the QueryFile resource record in the Director’s configuration file). You areprompted to select a query from the file, and possibly enter one or more parameters, then the commandis submitted to the Catalog database SQL engine.
quit This command terminates the console program. The console program sends the quit request to theDirector and waits for acknowledgment. If the Director is busy doing a previous command for you thathas not terminated, it may take some time. You may quit immediately by issuing the .quit command(i.e. quit preceded by a period).
relabel This command is used to label physical volumes.
The full form of this command is:
r e l a b e l s t o rage=<s torage−name> oldvolume=<old−volume−name> ↙↪→ volume=<newvolume−name>}
bconsole 14.27: relabel
197
If you leave out any part, you will be prompted for it. In order for the Volume (old-volume-name) tobe relabeled, it must be in the catalog, and the volume status must be marked Purged or Recycle.This happens automatically as a result of applying retention periods, or you may explicitly purge thevolume using the purge command.
Once the volume is physically relabeled, the old data previously written on the Volume is lost andcannot be recovered.
release This command is used to cause the Storage daemon to release (and rewind) the current tape in thedrive, and to re-read the Volume label the next time the tape is used.
r e l e a s e s t o rage=<s torage−name>
bconsole 14.28: release
After a release command, the device is still kept open by Bareos (unless Always Open SdDevice=No) so
it cannot be used by another program. However, with some tape drives, the operator can remove thecurrent tape and to insert a different one, and when the next Job starts, Bareos will know to re-readthe tape label to find out what tape is mounted. If you want to be able to use the drive with anotherprogram (e.g. mt), you must use the unmount command to cause Bareos to completely release (close)the device.
reload The reload command causes the Director to re-read its configuration file and apply the new values.The new values will take effect immediately for all new jobs. However, if you change schedules, beaware that the scheduler pre-schedules jobs up to two hours in advance, so any changes that are totake place during the next two hours may be delayed. Jobs that have already been scheduled to run(i.e. surpassed their requested start time) will continue with the old values. New jobs will use thenew values. Each time you issue a reload command while jobs are running, the prior config valueswill queued until all jobs that were running before issuing the reload terminate, at which time theold config values will be released from memory. The Directory permits keeping up to ten prior set ofconfigurations before it will refuse a reload command. Once at least one old set of config values hasbeen released it will again accept new reload commands.
While it is possible to reload the Director’s configuration on the fly, even while jobs are executing, thisis a complex operation and not without side effects. Accordingly, if you have to reload the Director’sconfiguration while Bareos is running, it is advisable to restart the Director at the next convenientopportunity.
rerun The rerun command allows you to re-run a Job with exactly the same setting as the original Job. InBareos, the job configuration is often altered by job overrides. These overrides alter the configurationof the job just for one job run. If because of any reason, a job with overrides fails, it is not easy torestart a new job that is exactly configured as the job that failed. The whole job configuration isautomatically set to the defaults and it is hard to configure everything like it was.
By using the rerun command, it is much easier to rerun a jobs exactly as it was configured. You onlyhave to specify the JobId of the failed job.
rerun job id=<job id> s i n c e j o b i d=<job id> days=<nr days> hours=<nr hours> yes
bconsole 14.29: rerun
You can select the jobid(s) to rerun by using one of the selection criteria.
restore The restore command allows you to select one or more Jobs (JobIds) to be restored using variousmethods. Once the JobIds are selected, the File records for those Jobs are placed in an internal Bareosdirectory tree, and the restore enters a file selection mode that allows you to interactively walk upand down the file tree selecting individual files to be restored. This mode is somewhat similar to thestandard Unix restore program’s interactive file selection mode.
r e s t o r e s to rage=<s torage−name> c l i e n t=<backup−c l i e n t−name>where=<path> pool=<pool−name> f i l e s e t=< f i l e s e t −name>r e s t o r e c l i e n t=<r e s t o r e−c l i e n t−name>r e s t o r e j o b=<job−name>s e l e c t cur rent a l l done
bconsole 14.30: restore
198
Where current, if specified, tells the restore command to automatically select a restore to the mostcurrent backup. If not specified, you will be prompted. The all specification tells the restore commandto restore all files. If it is not specified, you will be prompted for the files to restore. For details of therestore command, please see the Restore Chapter of this manual.
The client keyword initially specifies the client from which the backup was made and the client towhich the restore will be make. However, if the restoreclient keyword is specified, then the restore iswritten to that client.
The restore job rarely needs to be specified, as bareos installations commonly only have a single restorejob configured. However, for certain cases, such as a varying list of RunScript specifications, multiplerestore jobs may be configured. The restorejob argument allows the selection of one of these jobs.
For more details, see the Restore chapter.
run This command allows you to schedule jobs to be run immediately.
The full form of the command is:
run job=<job−name> c l i e n t=<c l i e n t−name>f i l e s e t=<Fi l eSe t−name> l e v e l=<l e v e l−keyword>s t o rage=<s torage−name> where=<d i r e c to ry−pre f i x>when=<un ive r sa l−time−s p e c i f i c a t i o n > spoo ldata=yes | no yes
bconsole 14.31: run
Any information that is needed but not specified will be listed for selection, and before starting thejob, you will be prompted to accept, reject, or modify the parameters of the job to be run, unless youhave specified yes, in which case the job will be immediately sent to the scheduler.
If you wish to start a job at a later time, you can do so by setting the When time. Use the mod optionand select When (no. 6). Then enter the desired start time in YYYY-MM-DD HH:MM:SS format.
The spooldata argument of the run command cannot be modified through the menu and is onlyaccessible by setting its value on the intial command line. If no spooldata flag is set, the job, storageor schedule flag is used.
setbandwidth This command (Version >= 12.4.1 ) is used to limit the bandwidth of a running job or aclient.
setbandwidth l im i t=<nb> [ j ob id=<id> | c l i e n t=<c l i >]
bconsole 14.32: setbandwidth
setdebug This command is used to set the debug level in each daemon. The form of this command is:
setdebug l e v e l=nnn [ t r a c e=0/1 c l i e n t=<c l i e n t−name> | d i r | d i r e c t o r | ↙↪→ s t o rage=<s torage−name> | a l l ]
bconsole 14.33: setdebug
Each of the daemons normally has debug compiled into the program, but disabled. There are two waysto enable the debug output.
One is to add the -d nnn option on the command line when starting the daemon. The nnn is thedebug level, and generally anything between 50 and 200 is reasonable. The higher the number, themore output is produced. The output is written to standard output.
The second way of getting debug output is to dynamically turn it on using the Console using thesetdebug level=nnn command. If none of the options are given, the command will prompt you. Youcan selectively turn on/off debugging in any or all the daemons (i.e. it is not necessary to specify allthe components of the above command).
If trace=1 is set, then tracing will be enabled, and the daemon will be placed in trace mode, whichmeans that all debug output as set by the debug level will be directed to the file bareos.trace inthe current directory of the daemon. Normally, tracing is needed only for Windows clients where thedebug output cannot be written to a terminal or redirected to a file. When tracing, each debug outputmessage is appended to the trace file. You must explicitly delete the file when you are done.
199
setip Sets new client address – if authorized.
A console is authorized to use the SetIP command only if it has a Console resource definition in boththe Director and the Console. In addition, if the console name, provided on the Name = directive,must be the same as a Client name, the user of that console is permitted to use the SetIP commandto change the Address directive in the Director’s client resource to the IP address of the Console. Thispermits portables or other machines using DHCP (non-fixed IP addresses) to ”notify” the Director oftheir current IP address.
show The show command will list the Director’s resource records as defined in the Director’s configurationfile (normally bareos-dir.conf). This command is used mainly for debugging purposes by developers.The following keywords are accepted on the show command line: catalogs, clients, counters, devices, di-rectors, filesets, jobs, messages, pools, schedules, storages, all, help. Please don’t confuse this commandwith the list, which displays the contents of the catalog.
sqlquery The sqlquery command puts the Console program into SQL query mode where each line youenter is concatenated to the previous line until a semicolon (;) is seen. The semicolon terminates thecommand, which is then passed directly to the SQL database engine. When the output from the SQLengine is displayed, the formation of a new SQL command begins. To terminate SQL query mode andreturn to the Console command prompt, you enter a period (.) in column 1.
Using this command, you can query the SQL catalog database directly. Note you should really knowwhat you are doing otherwise you could damage the catalog database. See the query command belowfor simpler and safer way of entering SQL queries.
Depending on what database engine you are using (MySQL, PostgreSQL or SQLite), you will havesomewhat different SQL commands available. For more detailed information, please refer to theMySQL, PostgreSQL or SQLite documentation.
status This command will display the status of all components. For the director, it will display the nextjobs that are scheduled during the next 24 hours as well as the status of currently running jobs. Forthe Storage Daemon, you will have drive status or autochanger content. The File Daemon will give youinformation about current jobs like average speed or file accounting. The full form of this command is:
s t a tu s [ a l l | d i r=<dir−name> | d i r e c t o r | s chedu l e r | ↙↪→ schedu le=<schedule−name> |
c l i e n t=<c l i e n t−name> | s t o rage=<s torage−name> s l o t s | s ub s c r i p t i o n s ]
bconsole 14.34: status
If you do a status dir, the console will list any currently running jobs, a summary of all jobs scheduledto be run in the next 24 hours, and a listing of the last ten terminated jobs with their statuses. Thescheduled jobs summary will include the Volume name to be used. You should be aware of two things:1. to obtain the volume name, the code goes through the same code that will be used when the jobruns, but it does not do pruning nor recycling of Volumes; 2. The Volume listed is at best a guess.The Volume actually used may be different because of the time difference (more durations may expirewhen the job runs) and another job could completely fill the Volume requiring a new one.
In the Running Jobs listing, you may find the following types of information:
2507 Catalog MatouVerify .2004−03−13 05 . 0 5 . 0 2 i s wa i t ing execut ion5349 Fu l l CatalogBackup .2004−03−13 01 . 1 0 . 0 0 i s wa i t ing f o r h igher
p r i o r i t y jobs to f i n i s h5348 D i f f e r e Minou.2004−03−13 01 . 0 5 . 0 9 i s wa i t ing on max Storage jobs5343 Fu l l Rufus .2004−03−13 01 . 0 5 . 0 4 i s running
Looking at the above listing from bottom to top, obviously JobId 5343 (Rufus) is running. JobId 5348(Minou) is waiting for JobId 5343 to finish because it is using the Storage resource, hence the ”waitingon max Storage jobs”. JobId 5349 has a lower priority than all the other jobs so it is waiting for higherpriority jobs to finish, and finally, JobId 2507 (MatouVerify) is waiting because only one job can runat a time, hence it is simply ”waiting execution”
If you do a status dir, it will by default list the first occurrence of all jobs that are scheduled todayand tomorrow. If you wish to see the jobs that are scheduled in the next three days (e.g. on Fridayyou want to see the first occurrence of what tapes are scheduled to be used on Friday, the weekend,and Monday), you can add the days=3 option. Note, a days=0 shows the first occurrence of jobs
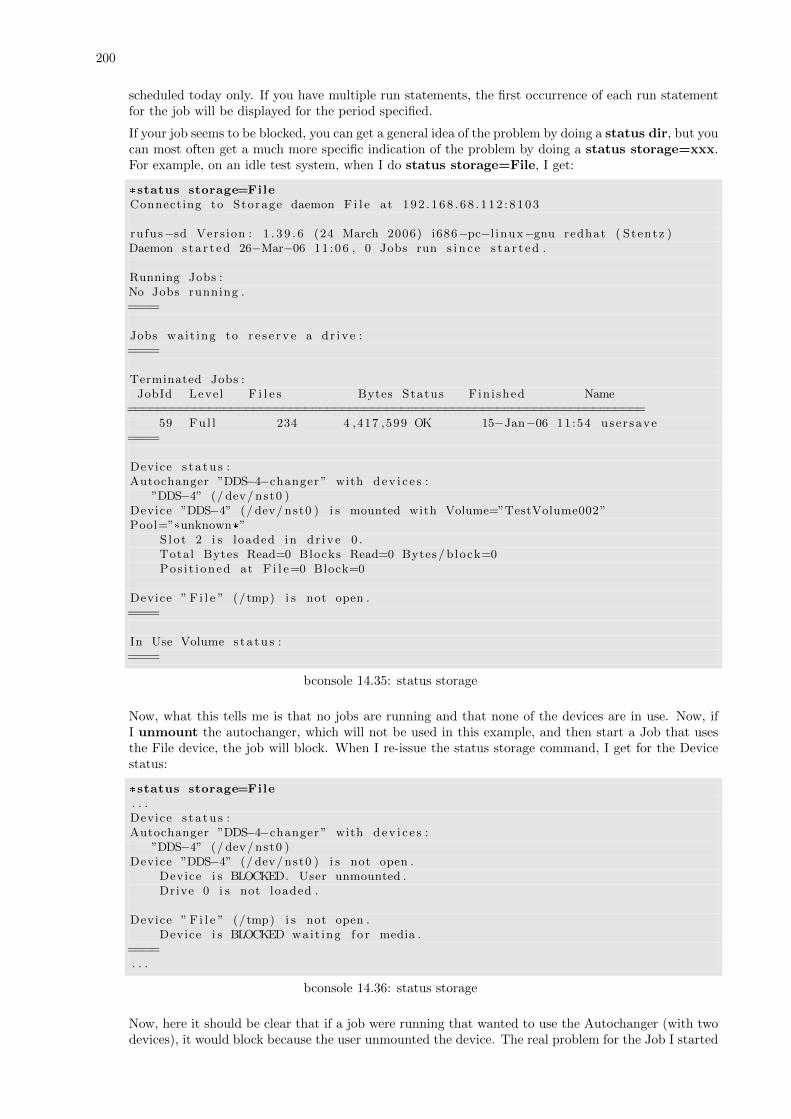
200
scheduled today only. If you have multiple run statements, the first occurrence of each run statementfor the job will be displayed for the period specified.
If your job seems to be blocked, you can get a general idea of the problem by doing a status dir, but youcan most often get a much more specific indication of the problem by doing a status storage=xxx.For example, on an idle test system, when I do status storage=File, I get:
*status storage=FileConnecting to Storage daemon F i l e at 192 . 168 . 68 . 112 : 8103
rufus−sd Vers ion : 1 . 3 9 . 6 (24 March 2006) i686−pc−l inux−gnu redhat ( Stentz )Daemon s t a r t ed 26−Mar−06 11 :06 , 0 Jobs run s i n c e s t a r t ed .
Running Jobs :No Jobs running .====
Jobs wai t ing to r e s e r v e a dr i ve :====
Terminated Jobs :JobId Leve l F i l e s Bytes Status Fin i shed Name
======================================================================59 Ful l 234 4 ,417 ,599 OK 15−Jan−06 11 :54 use r save
====
Device s t a tu s :Autochanger ”DDS−4−changer ” with dev i c e s :
”DDS−4” (/ dev/ nst0 )Device ”DDS−4” (/ dev/ nst0 ) i s mounted with Volume=”TestVolume002”Pool=”*unknown*”
S l o t 2 i s loaded in dr iv e 0 .Total Bytes Read=0 Blocks Read=0 Bytes/ block=0Pos i t i oned at F i l e=0 Block=0
Device ” F i l e ” (/tmp) i s not open .====
In Use Volume s t a tu s :====
bconsole 14.35: status storage
Now, what this tells me is that no jobs are running and that none of the devices are in use. Now, ifI unmount the autochanger, which will not be used in this example, and then start a Job that usesthe File device, the job will block. When I re-issue the status storage command, I get for the Devicestatus:
*status storage=File. . .Device s t a tu s :Autochanger ”DDS−4−changer ” with dev i c e s :
”DDS−4” (/ dev/ nst0 )Device ”DDS−4” (/ dev/ nst0 ) i s not open .
Device i s BLOCKED. User unmounted .Drive 0 i s not loaded .
Device ” F i l e ” (/tmp) i s not open .Device i s BLOCKED wait ing f o r media .
====. . .
bconsole 14.36: status storage
Now, here it should be clear that if a job were running that wanted to use the Autochanger (with twodevices), it would block because the user unmounted the device. The real problem for the Job I started
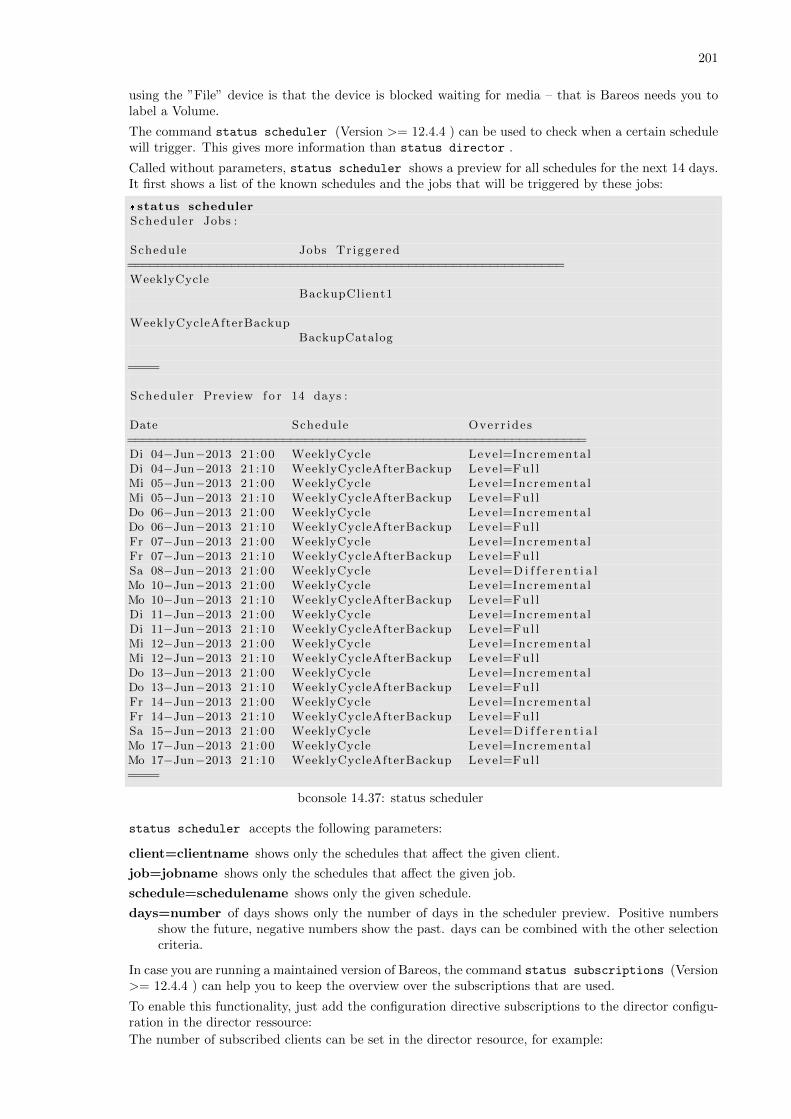
201
using the ”File” device is that the device is blocked waiting for media – that is Bareos needs you tolabel a Volume.
The command status scheduler (Version >= 12.4.4 ) can be used to check when a certain schedulewill trigger. This gives more information than status director .
Called without parameters, status scheduler shows a preview for all schedules for the next 14 days.It first shows a list of the known schedules and the jobs that will be triggered by these jobs:
*status schedulerScheduler Jobs :
Schedule Jobs Tr iggered===========================================================WeeklyCycle
BackupClient1
WeeklyCycleAfterBackupBackupCatalog
====
Scheduler Preview f o r 14 days :
Date Schedule Overr ides==============================================================Di 04−Jun−2013 21 :00 WeeklyCycle Leve l=Incrementa lDi 04−Jun−2013 21 :10 WeeklyCycleAfterBackup Level=Ful lMi 05−Jun−2013 21 :00 WeeklyCycle Leve l=Incrementa lMi 05−Jun−2013 21 :10 WeeklyCycleAfterBackup Level=Ful lDo 06−Jun−2013 21 :00 WeeklyCycle Leve l=Incrementa lDo 06−Jun−2013 21 :10 WeeklyCycleAfterBackup Level=Ful lFr 07−Jun−2013 21 :00 WeeklyCycle Leve l=Incrementa lFr 07−Jun−2013 21 :10 WeeklyCycleAfterBackup Level=Ful lSa 08−Jun−2013 21 :00 WeeklyCycle Leve l=D i f f e r e n t i a lMo 10−Jun−2013 21 :00 WeeklyCycle Leve l=Incrementa lMo 10−Jun−2013 21 :10 WeeklyCycleAfterBackup Level=Ful lDi 11−Jun−2013 21 :00 WeeklyCycle Leve l=Incrementa lDi 11−Jun−2013 21 :10 WeeklyCycleAfterBackup Level=Ful lMi 12−Jun−2013 21 :00 WeeklyCycle Leve l=Incrementa lMi 12−Jun−2013 21 :10 WeeklyCycleAfterBackup Level=Ful lDo 13−Jun−2013 21 :00 WeeklyCycle Leve l=Incrementa lDo 13−Jun−2013 21 :10 WeeklyCycleAfterBackup Level=Ful lFr 14−Jun−2013 21 :00 WeeklyCycle Leve l=Incrementa lFr 14−Jun−2013 21 :10 WeeklyCycleAfterBackup Level=Ful lSa 15−Jun−2013 21 :00 WeeklyCycle Leve l=D i f f e r e n t i a lMo 17−Jun−2013 21 :00 WeeklyCycle Leve l=Incrementa lMo 17−Jun−2013 21 :10 WeeklyCycleAfterBackup Level=Ful l====
bconsole 14.37: status scheduler
status scheduler accepts the following parameters:
client=clientname shows only the schedules that affect the given client.
job=jobname shows only the schedules that affect the given job.
schedule=schedulename shows only the given schedule.
days=number of days shows only the number of days in the scheduler preview. Positive numbersshow the future, negative numbers show the past. days can be combined with the other selectioncriteria.
In case you are running a maintained version of Bareos, the command status subscriptions (Version>= 12.4.4 ) can help you to keep the overview over the subscriptions that are used.
To enable this functionality, just add the configuration directive subscriptions to the director configu-ration in the director ressource:
The number of subscribed clients can be set in the director resource, for example:

202
Director {
...
Subscriptions = 50
}
Configuration 14.38: enable subscription check
Using the console command status subscriptions , the status of the subscriptions can be checkedany time interactively:
*status subscriptionsOk: a v a i l a b l e s ub s c r i p t i o n s : 8 (42/50) ( used/ t o t a l )
bconsole 14.39: status subscriptions
Also, the number of subscriptions is checked after every job. If the number of clients is bigger than theconfigured limit, a Job warning is created a message like this:
JobId 7 : Warning : Subs c r i p t i on s exceeded : ( used/ t o t a l ) (51/50)
bconsole 14.40: subscriptions warning
Please note: Nothing else than the warning is issued, no enforcement on backup, restore or any otheroperation will happen.
Setting the value for Subscriptions to 0 disables this functionality:
Director {
...
Subscriptions = 0
}
Configuration 14.41: disable subscription check
time Prints the current time.
trace Turn on/off trace to file.
umount Alias for unmount .
unmount This command causes the indicated Bareos Storage daemon to unmount the specified device.The forms of the command are the same as the mount command:
unmount s to rage=<s torage−name> [ d r i v e=<num>]unmount [ j ob id=<id> | job=<job−name>]
bconsole 14.42: unmount
Once you unmount a storage device, Bareos will no longer be able to use it until you issue a mountcommand for that device. If Bareos needs to access that device, it will block and issue mount requestsperiodically to the operator.
If the device you are unmounting is an autochanger, it will unload the drive you have specified on thecommand line. If no drive is specified, it will assume drive 1.
In most cases, it is preferable to use the release instead.
update This command will update the catalog for either a specific Pool record, a Volume record, or the Slotsin an autochanger with barcode capability. In the case of updating a Pool record, the new informationwill be automatically taken from the corresponding Director’s configuration resource record. It can beused to increase the maximum number of volumes permitted or to set a maximum number of volumes.The following main keywords may be specified:
media, volume, pool, slots, stats
In the case of updating a Volume, you will be prompted for which value you wish to change. Thefollowing Volume parameters may be changed:
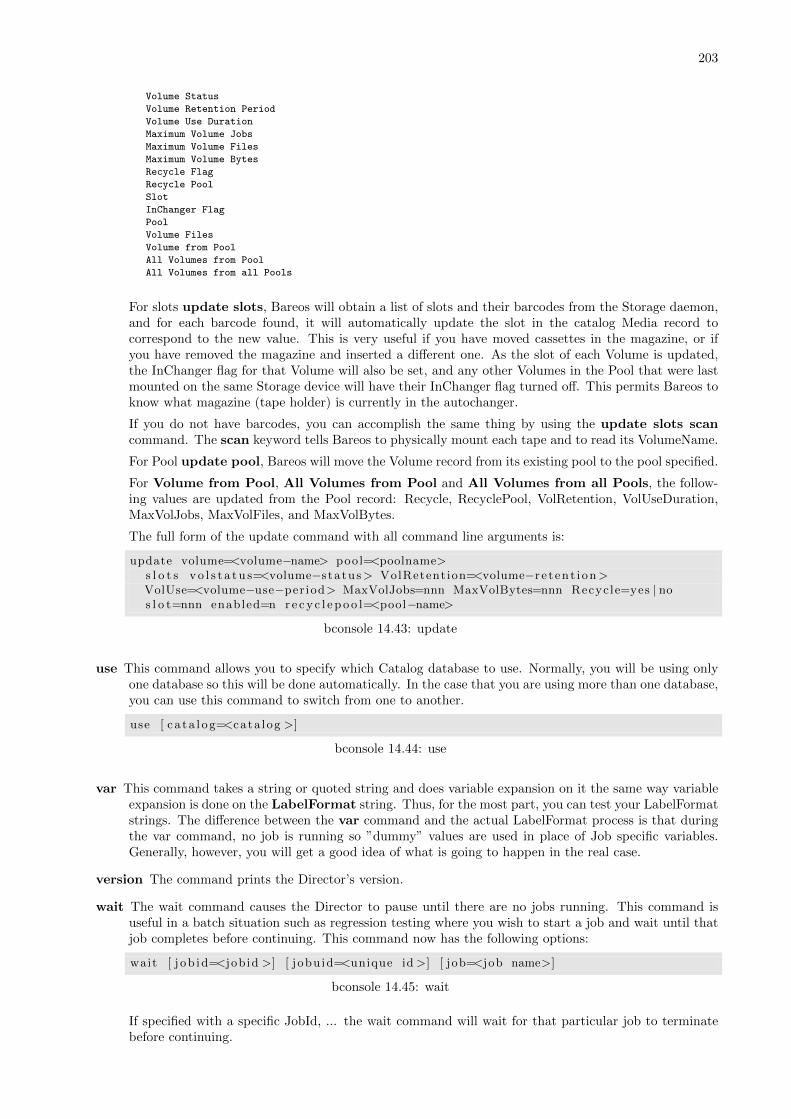
203
Volume Status
Volume Retention Period
Volume Use Duration
Maximum Volume Jobs
Maximum Volume Files
Maximum Volume Bytes
Recycle Flag
Recycle Pool
Slot
InChanger Flag
Pool
Volume Files
Volume from Pool
All Volumes from Pool
All Volumes from all Pools
For slots update slots, Bareos will obtain a list of slots and their barcodes from the Storage daemon,and for each barcode found, it will automatically update the slot in the catalog Media record tocorrespond to the new value. This is very useful if you have moved cassettes in the magazine, or ifyou have removed the magazine and inserted a different one. As the slot of each Volume is updated,the InChanger flag for that Volume will also be set, and any other Volumes in the Pool that were lastmounted on the same Storage device will have their InChanger flag turned off. This permits Bareos toknow what magazine (tape holder) is currently in the autochanger.
If you do not have barcodes, you can accomplish the same thing by using the update slots scancommand. The scan keyword tells Bareos to physically mount each tape and to read its VolumeName.
For Pool update pool, Bareos will move the Volume record from its existing pool to the pool specified.
For Volume from Pool, All Volumes from Pool and All Volumes from all Pools, the follow-ing values are updated from the Pool record: Recycle, RecyclePool, VolRetention, VolUseDuration,MaxVolJobs, MaxVolFiles, and MaxVolBytes.
The full form of the update command with all command line arguments is:
update volume=<volume−name> pool=<poolname>s l o t s v o l s t a t u s=<volume−s tatus> VolRetention=<volume−r e t en t i on>VolUse=<volume−use−per iod> MaxVolJobs=nnn MaxVolBytes=nnn Recycle=yes | nos l o t=nnn enabled=n r e c y c l e p o o l=<pool−name>
bconsole 14.43: update
use This command allows you to specify which Catalog database to use. Normally, you will be using onlyone database so this will be done automatically. In the case that you are using more than one database,you can use this command to switch from one to another.
use [ c a ta l og=<cata log >]
bconsole 14.44: use
var This command takes a string or quoted string and does variable expansion on it the same way variableexpansion is done on the LabelFormat string. Thus, for the most part, you can test your LabelFormatstrings. The difference between the var command and the actual LabelFormat process is that duringthe var command, no job is running so ”dummy” values are used in place of Job specific variables.Generally, however, you will get a good idea of what is going to happen in the real case.
version The command prints the Director’s version.
wait The wait command causes the Director to pause until there are no jobs running. This command isuseful in a batch situation such as regression testing where you wish to start a job and wait until thatjob completes before continuing. This command now has the following options:
wait [ j ob id=<job id >] [ j obu id=<unique id>] [ job=<job name>]
bconsole 14.45: wait
If specified with a specific JobId, ... the wait command will wait for that particular job to terminatebefore continuing.
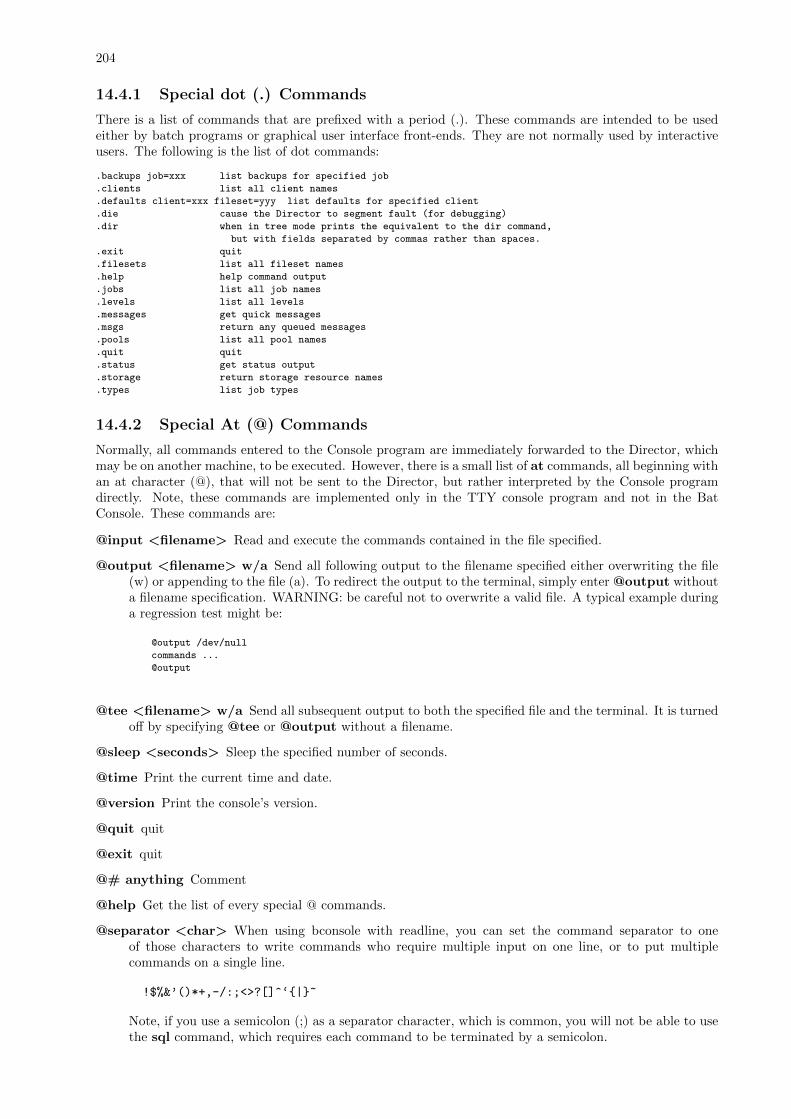
204
14.4.1 Special dot (.) Commands
There is a list of commands that are prefixed with a period (.). These commands are intended to be usedeither by batch programs or graphical user interface front-ends. They are not normally used by interactiveusers. The following is the list of dot commands:
.backups job=xxx list backups for specified job
.clients list all client names
.defaults client=xxx fileset=yyy list defaults for specified client
.die cause the Director to segment fault (for debugging)
.dir when in tree mode prints the equivalent to the dir command,
but with fields separated by commas rather than spaces.
.exit quit
.filesets list all fileset names
.help help command output
.jobs list all job names
.levels list all levels
.messages get quick messages
.msgs return any queued messages
.pools list all pool names
.quit quit
.status get status output
.storage return storage resource names
.types list job types
14.4.2 Special At (@) Commands
Normally, all commands entered to the Console program are immediately forwarded to the Director, whichmay be on another machine, to be executed. However, there is a small list of at commands, all beginning withan at character (@), that will not be sent to the Director, but rather interpreted by the Console programdirectly. Note, these commands are implemented only in the TTY console program and not in the BatConsole. These commands are:
@input <filename> Read and execute the commands contained in the file specified.
@output <filename> w/a Send all following output to the filename specified either overwriting the file(w) or appending to the file (a). To redirect the output to the terminal, simply enter @output withouta filename specification. WARNING: be careful not to overwrite a valid file. A typical example duringa regression test might be:
@output /dev/null
commands ...
@output
@tee <filename> w/a Send all subsequent output to both the specified file and the terminal. It is turnedoff by specifying @tee or @output without a filename.
@sleep <seconds> Sleep the specified number of seconds.
@time Print the current time and date.
@version Print the console’s version.
@quit quit
@exit quit
@# anything Comment
@help Get the list of every special @ commands.
@separator <char> When using bconsole with readline, you can set the command separator to oneof those characters to write commands who require multiple input on one line, or to put multiplecommands on a single line.
!$%&’()*+,-/:;<>?[]^‘{|}~
Note, if you use a semicolon (;) as a separator character, which is common, you will not be able to usethe sql command, which requires each command to be terminated by a semicolon.
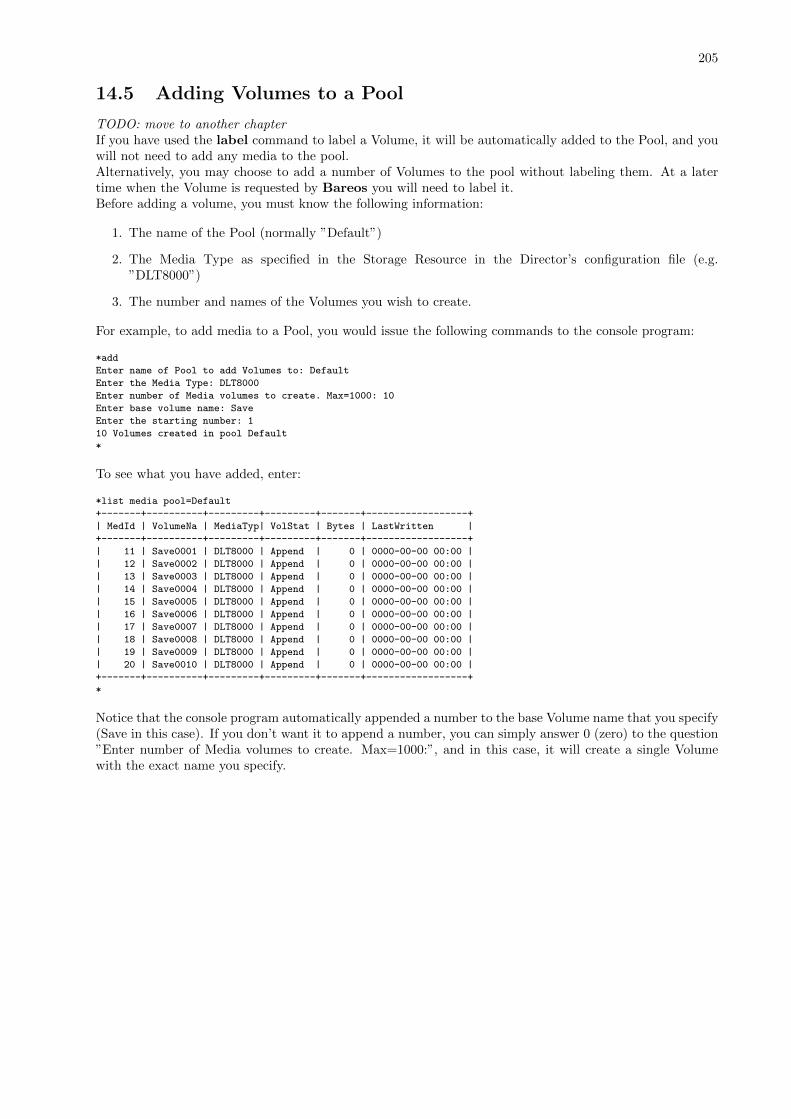
205
14.5 Adding Volumes to a Pool
TODO: move to another chapterIf you have used the label command to label a Volume, it will be automatically added to the Pool, and youwill not need to add any media to the pool.Alternatively, you may choose to add a number of Volumes to the pool without labeling them. At a latertime when the Volume is requested by Bareos you will need to label it.Before adding a volume, you must know the following information:
1. The name of the Pool (normally ”Default”)
2. The Media Type as specified in the Storage Resource in the Director’s configuration file (e.g.”DLT8000”)
3. The number and names of the Volumes you wish to create.
For example, to add media to a Pool, you would issue the following commands to the console program:
*add
Enter name of Pool to add Volumes to: Default
Enter the Media Type: DLT8000
Enter number of Media volumes to create. Max=1000: 10
Enter base volume name: Save
Enter the starting number: 1
10 Volumes created in pool Default
*
To see what you have added, enter:
*list media pool=Default
+-------+----------+---------+---------+-------+------------------+
| MedId | VolumeNa | MediaTyp| VolStat | Bytes | LastWritten |
+-------+----------+---------+---------+-------+------------------+
| 11 | Save0001 | DLT8000 | Append | 0 | 0000-00-00 00:00 |
| 12 | Save0002 | DLT8000 | Append | 0 | 0000-00-00 00:00 |
| 13 | Save0003 | DLT8000 | Append | 0 | 0000-00-00 00:00 |
| 14 | Save0004 | DLT8000 | Append | 0 | 0000-00-00 00:00 |
| 15 | Save0005 | DLT8000 | Append | 0 | 0000-00-00 00:00 |
| 16 | Save0006 | DLT8000 | Append | 0 | 0000-00-00 00:00 |
| 17 | Save0007 | DLT8000 | Append | 0 | 0000-00-00 00:00 |
| 18 | Save0008 | DLT8000 | Append | 0 | 0000-00-00 00:00 |
| 19 | Save0009 | DLT8000 | Append | 0 | 0000-00-00 00:00 |
| 20 | Save0010 | DLT8000 | Append | 0 | 0000-00-00 00:00 |
+-------+----------+---------+---------+-------+------------------+
*
Notice that the console program automatically appended a number to the base Volume name that you specify(Save in this case). If you don’t want it to append a number, you can simply answer 0 (zero) to the question”Enter number of Media volumes to create. Max=1000:”, and in this case, it will create a single Volumewith the exact name you specify.

206
Chapter 15
The Restore Command
15.1 General
Below, we will discuss restoring files with the Console restore command, which is the recommended way ofdoing restoring files. It is not possible to restore files by automatically starting a job as you do with Backup,Verify, ... jobs. However, in addition to the console restore command, there is a standalone program namedbextract, which also permits restoring files. For more information on this program, please see the BareosUtility Programs chapter of this manual. We don’t particularly recommend the bextract program becauseit lacks many of the features of the normal Bareos restore, such as the ability to restore Win32 files to Unixsystems, and the ability to restore access control lists (ACL). As a consequence, we recommend, whereverpossible to use Bareos itself for restores as described below.You may also want to look at the bls program in the same chapter, which allows you to list the contentsof your Volumes. Finally, if you have an old Volume that is no longer in the catalog, you can restore thecatalog entries using the program named bscan, documented in the same Bareos Utility Programs chapter.In general, to restore a file or a set of files, you must run a restore job. That is a job with Type =Restore. As a consequence, you will need a predefined restore job in your bareos-dir.conf (Director’sconfig) file. The exact parameters (Client, FileSet, ...) that you define are not important as you can eithermodify them manually before running the job or if you use the restore command, explained below, Bareoswill automatically set them for you. In fact, you can no longer simply run a restore job. You must use therestore command.Since Bareos is a network backup program, you must be aware that when you restore files, it is up to you toensure that you or Bareos have selected the correct Client and the correct hard disk location for restoringthose files. Bareos will quite willingly backup client A, and restore it by sending the files to a differentdirectory on client B. Normally, you will want to avoid this, but assuming the operating systems are not toodifferent in their file structures, this should work perfectly well, if so desired. By default, Bareos will restoredata to the same Client that was backed up, and those data will be restored not to the original places butto /tmp/bareos-restores. This is configured in the default restore command ressource in bareos-dir.conf.You may modify any of these defaults when the restore command prompts you to run the job by selectingthe mod option.
15.2 The Restore Command
Since Bareos maintains a catalog of your files and on which Volumes (disk or tape), they are stored, it cando most of the bookkeeping work, allowing you simply to specify what kind of restore you want (current,before a particular date), and what files to restore. Bareos will then do the rest.This is accomplished using the restore command in the Console. First you select the kind of restore youwant, then the JobIds are selected, the File records for those Jobs are placed in an internal Bareos directorytree, and the restore enters a file selection mode that allows you to interactively walk up and down the filetree selecting individual files to be restored. This mode is somewhat similar to the standard Unix restoreprogram’s interactive file selection mode.If a Job’s file records have been pruned from the catalog, the restore command will be unable to find anyfiles to restore. Bareos will ask if you want to restore all of them or if you want to use a regular expressionto restore only a selection while reading media. See FileRegex option and below for more details on this.Within the Console program, after entering the restore command, you are presented with the followingselection prompt:
207
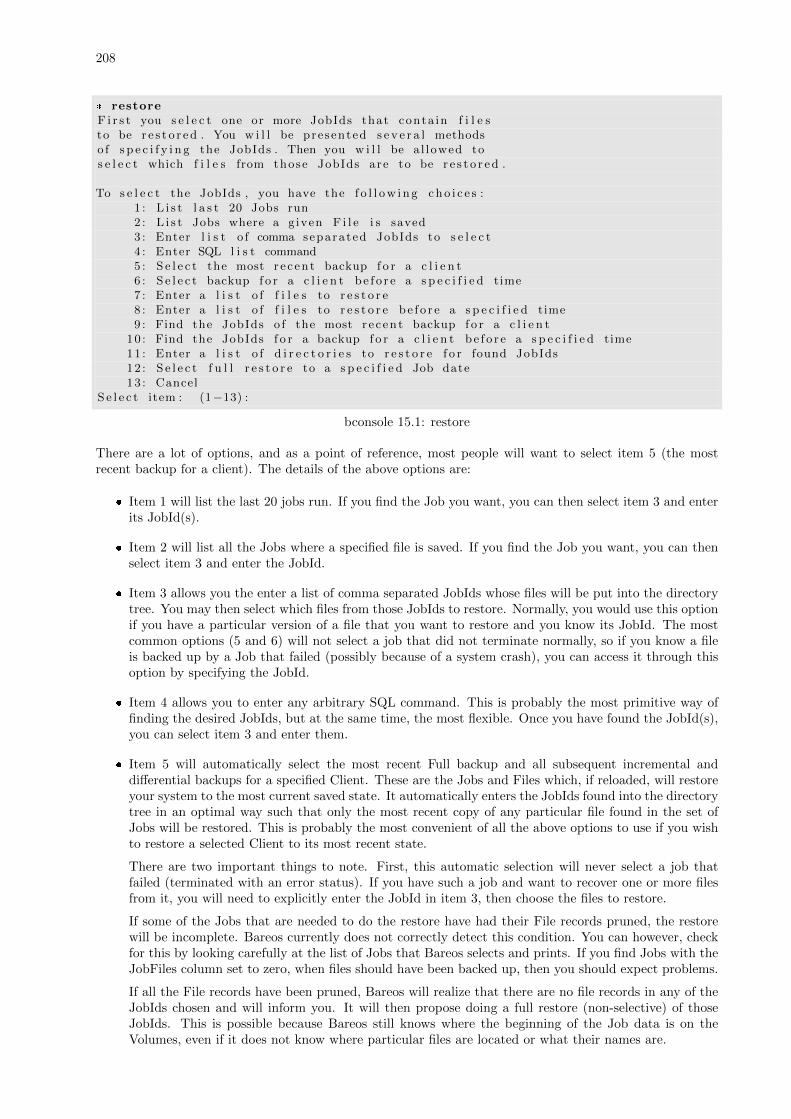
208
* restoreF i r s t you s e l e c t one or more JobIds that conta in f i l e sto be r e s t o r ed . You w i l l be presented s e v e r a l methodso f s p e c i f y i n g the JobIds . Then you w i l l be a l lowed tos e l e c t which f i l e s from those JobIds are to be r e s t o r ed .
To s e l e c t the JobIds , you have the f o l l ow i n g cho i c e s :1 : L i s t l a s t 20 Jobs run2 : L i s t Jobs where a g iven F i l e i s saved3 : Enter l i s t o f comma separated JobIds to s e l e c t4 : Enter SQL l i s t command5 : S e l e c t the most r e c ent backup f o r a c l i e n t6 : S e l e c t backup f o r a c l i e n t be f o r e a s p e c i f i e d time7 : Enter a l i s t o f f i l e s to r e s t o r e8 : Enter a l i s t o f f i l e s to r e s t o r e be f o r e a s p e c i f i e d time9 : Find the JobIds o f the most r e c ent backup f o r a c l i e n t
10 : Find the JobIds f o r a backup f o r a c l i e n t be f o r e a s p e c i f i e d time11 : Enter a l i s t o f d i r e c t o r i e s to r e s t o r e f o r found JobIds12 : S e l e c t f u l l r e s t o r e to a s p e c i f i e d Job date13 : Cancel
S e l e c t item : (1−13) :
bconsole 15.1: restore
There are a lot of options, and as a point of reference, most people will want to select item 5 (the mostrecent backup for a client). The details of the above options are:
� Item 1 will list the last 20 jobs run. If you find the Job you want, you can then select item 3 and enterits JobId(s).
� Item 2 will list all the Jobs where a specified file is saved. If you find the Job you want, you can thenselect item 3 and enter the JobId.
� Item 3 allows you the enter a list of comma separated JobIds whose files will be put into the directorytree. You may then select which files from those JobIds to restore. Normally, you would use this optionif you have a particular version of a file that you want to restore and you know its JobId. The mostcommon options (5 and 6) will not select a job that did not terminate normally, so if you know a fileis backed up by a Job that failed (possibly because of a system crash), you can access it through thisoption by specifying the JobId.
� Item 4 allows you to enter any arbitrary SQL command. This is probably the most primitive way offinding the desired JobIds, but at the same time, the most flexible. Once you have found the JobId(s),you can select item 3 and enter them.
� Item 5 will automatically select the most recent Full backup and all subsequent incremental anddifferential backups for a specified Client. These are the Jobs and Files which, if reloaded, will restoreyour system to the most current saved state. It automatically enters the JobIds found into the directorytree in an optimal way such that only the most recent copy of any particular file found in the set ofJobs will be restored. This is probably the most convenient of all the above options to use if you wishto restore a selected Client to its most recent state.
There are two important things to note. First, this automatic selection will never select a job thatfailed (terminated with an error status). If you have such a job and want to recover one or more filesfrom it, you will need to explicitly enter the JobId in item 3, then choose the files to restore.
If some of the Jobs that are needed to do the restore have had their File records pruned, the restorewill be incomplete. Bareos currently does not correctly detect this condition. You can however, checkfor this by looking carefully at the list of Jobs that Bareos selects and prints. If you find Jobs with theJobFiles column set to zero, when files should have been backed up, then you should expect problems.
If all the File records have been pruned, Bareos will realize that there are no file records in any of theJobIds chosen and will inform you. It will then propose doing a full restore (non-selective) of thoseJobIds. This is possible because Bareos still knows where the beginning of the Job data is on theVolumes, even if it does not know where particular files are located or what their names are.
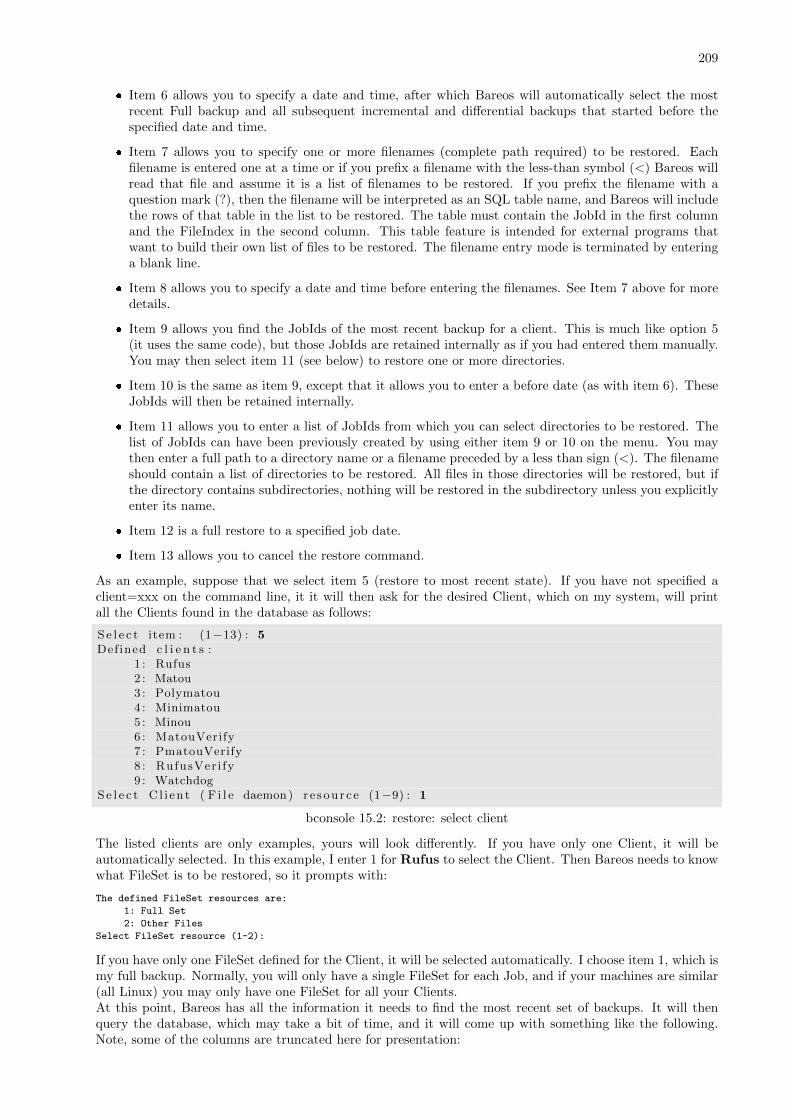
209
� Item 6 allows you to specify a date and time, after which Bareos will automatically select the mostrecent Full backup and all subsequent incremental and differential backups that started before thespecified date and time.
� Item 7 allows you to specify one or more filenames (complete path required) to be restored. Eachfilename is entered one at a time or if you prefix a filename with the less-than symbol (<) Bareos willread that file and assume it is a list of filenames to be restored. If you prefix the filename with aquestion mark (?), then the filename will be interpreted as an SQL table name, and Bareos will includethe rows of that table in the list to be restored. The table must contain the JobId in the first columnand the FileIndex in the second column. This table feature is intended for external programs thatwant to build their own list of files to be restored. The filename entry mode is terminated by enteringa blank line.
� Item 8 allows you to specify a date and time before entering the filenames. See Item 7 above for moredetails.
� Item 9 allows you find the JobIds of the most recent backup for a client. This is much like option 5(it uses the same code), but those JobIds are retained internally as if you had entered them manually.You may then select item 11 (see below) to restore one or more directories.
� Item 10 is the same as item 9, except that it allows you to enter a before date (as with item 6). TheseJobIds will then be retained internally.
� Item 11 allows you to enter a list of JobIds from which you can select directories to be restored. Thelist of JobIds can have been previously created by using either item 9 or 10 on the menu. You maythen enter a full path to a directory name or a filename preceded by a less than sign (<). The filenameshould contain a list of directories to be restored. All files in those directories will be restored, but ifthe directory contains subdirectories, nothing will be restored in the subdirectory unless you explicitlyenter its name.
� Item 12 is a full restore to a specified job date.
� Item 13 allows you to cancel the restore command.
As an example, suppose that we select item 5 (restore to most recent state). If you have not specified aclient=xxx on the command line, it it will then ask for the desired Client, which on my system, will printall the Clients found in the database as follows:
Se l e c t item : (1−13) : 5Defined c l i e n t s :
1 : Rufus2 : Matou3 : Polymatou4 : Minimatou5 : Minou6 : MatouVerify7 : PmatouVerify8 : RufusVer i fy9 : Watchdog
S e l e c t C l i en t ( F i l e daemon) r e sou r c e (1−9) : 1
bconsole 15.2: restore: select client
The listed clients are only examples, yours will look differently. If you have only one Client, it will beautomatically selected. In this example, I enter 1 for Rufus to select the Client. Then Bareos needs to knowwhat FileSet is to be restored, so it prompts with:
The defined FileSet resources are:
1: Full Set
2: Other Files
Select FileSet resource (1-2):
If you have only one FileSet defined for the Client, it will be selected automatically. I choose item 1, which ismy full backup. Normally, you will only have a single FileSet for each Job, and if your machines are similar(all Linux) you may only have one FileSet for all your Clients.At this point, Bareos has all the information it needs to find the most recent set of backups. It will thenquery the database, which may take a bit of time, and it will come up with something like the following.Note, some of the columns are truncated here for presentation:
210
+-------+------+----------+-------------+-------------+------+-------+------------+
| JobId | Levl | JobFiles | StartTime | VolumeName | File | SesId |VolSesTime |
+-------+------+----------+-------------+-------------+------+-------+------------+
| 1,792 | F | 128,374 | 08-03 01:58 | DLT-19Jul02 | 67 | 18 | 1028042998 |
| 1,792 | F | 128,374 | 08-03 01:58 | DLT-04Aug02 | 0 | 18 | 1028042998 |
| 1,797 | I | 254 | 08-04 13:53 | DLT-04Aug02 | 5 | 23 | 1028042998 |
| 1,798 | I | 15 | 08-05 01:05 | DLT-04Aug02 | 6 | 24 | 1028042998 |
+-------+------+----------+-------------+-------------+------+-------+------------+
You have selected the following JobId: 1792,1792,1797
Building directory tree for JobId 1792 ...
Building directory tree for JobId 1797 ...
Building directory tree for JobId 1798 ...
cwd is: /
$
Depending on the number of JobFiles for each JobId, the Building directory tree ...” can take a bit oftime. If you notice ath all the JobFiles are zero, your Files have probably been pruned and you will not beable to select any individual files – it will be restore everything or nothing.In our example, Bareos found four Jobs that comprise the most recent backup of the specified Client andFileSet. Two of the Jobs have the same JobId because that Job wrote on two different Volumes. The thirdJob was an incremental backup to the previous Full backup, and it only saved 254 Files compared to 128,374for the Full backup. The fourth Job was also an incremental backup that saved 15 files.Next Bareos entered those Jobs into the directory tree, with no files marked to be restored as a default, tellsyou how many files are in the tree, and tells you that the current working directory (cwd) is /. Finally,Bareos prompts with the dollar sign ($) to indicate that you may enter commands to move around thedirectory tree and to select files.If you want all the files to automatically be marked when the directory tree is built, you could have enteredthe command restore all, or at the $ prompt, you can simply enter mark *.Instead of choosing item 5 on the first menu (Select the most recent backup for a client), if we had chosenitem 3 (Enter list of JobIds to select) and we had entered the JobIds 1792,1797,1798 we would have arrivedat the same point.One point to note, if you are manually entering JobIds, is that you must enter them in the order they wererun (generally in increasing JobId order). If you enter them out of order and the same file was saved in twoor more of the Jobs, you may end up with an old version of that file (i.e. not the most recent).Directly entering the JobIds can also permit you to recover data from a Job that wrote files to tape but thatterminated with an error status.While in file selection mode, you can enter help or a question mark (?) to produce a summary of theavailable commands:
Command Description
======= ===========
cd change current directory
count count marked files in and below the cd
dir long list current directory, wildcards allowed
done leave file selection mode
estimate estimate restore size
exit same as done command
find find files, wildcards allowed
help print help
ls list current directory, wildcards allowed
lsmark list the marked files in and below the cd
mark mark dir/file to be restored recursively in dirs
markdir mark directory name to be restored (no files)
pwd print current working directory
unmark unmark dir/file to be restored recursively in dir
unmarkdir unmark directory name only no recursion
quit quit and do not do restore
? print help
As a default no files have been selected for restore (unless you added all to the command line. If you wantto restore everything, at this point, you should enter mark *, and then done and Bareos will write thebootstrap records to a file and request your approval to start a restore job.If you do not enter the above mentioned mark * command, you will start with an empty state. Now youcan simply start looking at the tree and mark particular files or directories you want restored. It is easy tomake a mistake in specifying a file to mark or unmark, and Bareos’s error handling is not perfect, so pleasecheck your work by using the ls or dir commands to see what files are actually selected. Any selected filehas its name preceded by an asterisk.To check what is marked or not marked, enter the count command, which displays:
211
128401 total files. 128401 marked to be restored.
Each of the above commands will be described in more detail in the next section. We continue with theabove example, having accepted to restore all files as Bareos set by default. On entering the done command,Bareos prints:
Run Restore job
JobName: RestoreFiles
Bootstrap: /var/lib/bareos/client1.restore.3.bsr
Where: /tmp/bareos-restores
Replace: Always
FileSet: Full Set
Backup Client: client1
Restore Client: client1
Format: Native
Storage: File
When: 2013-06-28 13:30:08
Catalog: MyCatalog
Priority: 10
Plugin Options: *None*
OK to run? (yes/mod/no):
Please examine each of the items very carefully to make sure that they are correct. In particular, look atWhere, which tells you where in the directory structure the files will be restored, and Client, which tellsyou which client will receive the files. Note that by default the Client which will receive the files is the Clientthat was backed up. These items will not always be completed with the correct values depending on whichof the restore options you chose. You can change any of these default items by entering mod and respondingto the prompts.The above assumes that you have defined a Restore Job resource in your Director’s configuration file.Normally, you will only need one Restore Job resource definition because by its nature, restoring is a manualoperation, and using the Console interface, you will be able to modify the Restore Job to do what you want.An example Restore Job resource definition is given below.Returning to the above example, you should verify that the Client name is correct before running the Job.However, you may want to modify some of the parameters of the restore job. For example, in addition tochecking the Client it is wise to check that the Storage device chosen by Bareos is indeed correct. Althoughthe FileSet is shown, it will be ignored in restore. The restore will choose the files to be restored either byreading the Bootstrap file, or if not specified, it will restore all files associated with the specified backupJobId (i.e. the JobId of the Job that originally backed up the files).Finally before running the job, please note that the default location for restoring files is not their originallocations, but rather the directory /tmp/bareos-restores. You can change this default by modifying yourbareos-dir.conf file, or you can modify it using the mod option. If you want to restore the files to theiroriginal location, you must have Where set to nothing or to the root, i.e. /.If you now enter yes, Bareos will run the restore Job.
15.3 Selecting Files by Filename
If you have a small number of files to restore, and you know the filenames, you can either put the list offilenames in a file to be read by Bareos, or you can enter the names one at a time. The filenames mustinclude the full path and filename. No wild cards are used.To enter the files, after the restore, you select item number 7 from the prompt list:
* restoreF i r s t you s e l e c t one or more JobIds that conta in f i l e sto be r e s t o r ed . You w i l l be presented s e v e r a l methodso f s p e c i f y i n g the JobIds . Then you w i l l be a l lowed tos e l e c t which f i l e s from those JobIds are to be r e s t o r ed .
To s e l e c t the JobIds , you have the f o l l ow i n g cho i c e s :1 : L i s t l a s t 20 Jobs run2 : L i s t Jobs where a g iven F i l e i s saved3 : Enter l i s t o f comma separated JobIds to s e l e c t4 : Enter SQL l i s t command5 : S e l e c t the most r e c ent backup f o r a c l i e n t6 : S e l e c t backup f o r a c l i e n t be f o r e a s p e c i f i e d time
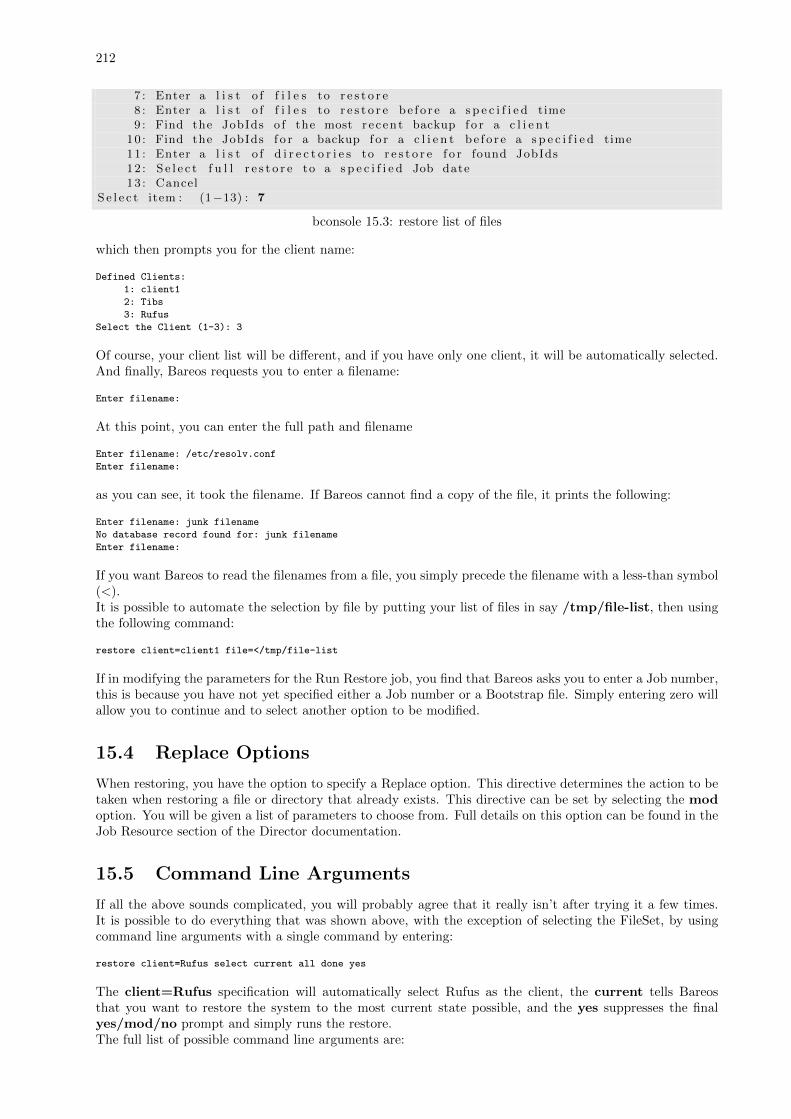
212
7 : Enter a l i s t o f f i l e s to r e s t o r e8 : Enter a l i s t o f f i l e s to r e s t o r e be f o r e a s p e c i f i e d time9 : Find the JobIds o f the most r e c ent backup f o r a c l i e n t
10 : Find the JobIds f o r a backup f o r a c l i e n t be f o r e a s p e c i f i e d time11 : Enter a l i s t o f d i r e c t o r i e s to r e s t o r e f o r found JobIds12 : S e l e c t f u l l r e s t o r e to a s p e c i f i e d Job date13 : Cancel
S e l e c t item : (1−13) : 7
bconsole 15.3: restore list of files
which then prompts you for the client name:
Defined Clients:
1: client1
2: Tibs
3: Rufus
Select the Client (1-3): 3
Of course, your client list will be different, and if you have only one client, it will be automatically selected.And finally, Bareos requests you to enter a filename:
Enter filename:
At this point, you can enter the full path and filename
Enter filename: /etc/resolv.conf
Enter filename:
as you can see, it took the filename. If Bareos cannot find a copy of the file, it prints the following:
Enter filename: junk filename
No database record found for: junk filename
Enter filename:
If you want Bareos to read the filenames from a file, you simply precede the filename with a less-than symbol(<).It is possible to automate the selection by file by putting your list of files in say /tmp/file-list, then usingthe following command:
restore client=client1 file=</tmp/file-list
If in modifying the parameters for the Run Restore job, you find that Bareos asks you to enter a Job number,this is because you have not yet specified either a Job number or a Bootstrap file. Simply entering zero willallow you to continue and to select another option to be modified.
15.4 Replace Options
When restoring, you have the option to specify a Replace option. This directive determines the action to betaken when restoring a file or directory that already exists. This directive can be set by selecting the modoption. You will be given a list of parameters to choose from. Full details on this option can be found in theJob Resource section of the Director documentation.
15.5 Command Line Arguments
If all the above sounds complicated, you will probably agree that it really isn’t after trying it a few times.It is possible to do everything that was shown above, with the exception of selecting the FileSet, by usingcommand line arguments with a single command by entering:
restore client=Rufus select current all done yes
The client=Rufus specification will automatically select Rufus as the client, the current tells Bareosthat you want to restore the system to the most current state possible, and the yes suppresses the finalyes/mod/no prompt and simply runs the restore.The full list of possible command line arguments are:
213
� all – select all Files to be restored.
� select – use the tree selection method.
� done – do not prompt the user in tree mode.
� copies – instead of using the actual backup jobs for restoring use the copies which were made of thesebackup Jobs. This could mean that on restore the client will contact a remote storage daemon if thedata is copied to a remote storage daemon as part of your copy Job scheme.
� current – automatically select the most current set of backups for the specified client.
� client=xxxx – initially specifies the client from which the backup was made and the client to whichthe restore will be make. See also ”restoreclient” keyword.
� restoreclient=xxxx – if the keyword is specified, then the restore is written to that client.
� jobid=nnn – specify a JobId or comma separated list of JobIds to be restored.
� before=YYYY-MM-DD HH:MM:SS – specify a date and time to which the system should berestored. Only Jobs started before the specified date/time will be selected, and as is the case for cur-rent Bareos will automatically find the most recent prior Full save and all Differential and Incrementalsaves run before the date you specify. Note, this command is not too user friendly in that you mustspecify the date/time exactly as shown.
� file=filename – specify a filename to be restored. You must specify the full path and filename.Prefixing the entry with a less-than sign (<) will cause Bareos to assume that the filename is on yoursystem and contains a list of files to be restored. Bareos will thus read the list from that file. Multiplefile=xxx specifications may be specified on the command line.
� jobid=nnn – specify a JobId to be restored.
� pool=pool-name – specify a Pool name to be used for selection of Volumes when specifying options5 and 6 (restore current system, and restore current system before given date). This permits you tohave several Pools, possibly one offsite, and to select the Pool to be used for restoring.
� where=/tmp/bareos-restore – restore files in where directory.
� yes – automatically run the restore without prompting for modifications (most useful in batch scripts).
� strip prefix=/prod – remove a part of the filename when restoring.
� add prefix=/test – add a prefix to all files when restoring (like where) (can’t be used with where=).
� add suffix=.old – add a suffix to all your files.
� regexwhere=!a.pdf!a.bkp.pdf! – do complex filename manipulation like with sed unix command.Will overwrite other filename manipulation. For details, see the regexwhere section.
� restorejob=jobname – Pre-chooses a restore job. Bareos can be configured with multiple restore jobs(”Type = Restore” in the job definition). This allows the specification of different restore properties,including a set of RunScripts. When more than one job of this type is configured, during restore,Bareos will ask for a user selection interactively, or use the given restorejob.
15.6 Using File Relocation
Introduction
The where= option is simple, but not very powerful. With file relocation, Bareos can restore a file to thesame directory, but with a different name, or in an other directory without recreating the full path.You can also do filename and path manipulations, such as adding a suffix to all your files, renaming files ordirectories, etc. Theses options will overwrite where= option.For example, many users use OS snapshot features so that file /home/eric/mbox will be backed up from thedirectory /.snap/home/eric/mbox, which can complicate restores. If you use where=/tmp, the file willbe restored to /tmp/.snap/home/eric/mbox and you will have to move the file to /home/eric/mbox.bkp
by hand.
214
However, case, you could use the strip prefix=/.snap and add suffix=.bkp options and Bareos willrestore the file to its original location – that is /home/eric/mbox.To use this feature, there are command line options as described in the restore section of this manual; youcan modify your restore job before running it; or you can add options to your restore job in as described inStrip Prefix Dir
Job and Add Prefix DirJob.
Parameters to modify:
1: Level
2: Storage
...
10: File Relocation
...
Select parameter to modify (1-12):
This will replace your current Where value
1: Strip prefix
2: Add prefix
3: Add file suffix
4: Enter a regexp
5: Test filename manipulation
6: Use this ?
Select parameter to modify (1-6):
RegexWhere Format
The format is very close to that used by sed or Perl (s/replace this/by that/) operator. A validregexwhere expression has three fields :
� a search expression (with optional submatch)
� a replacement expression (with optionnal back references $1 to $9)
� a set of search options (only case-insensitive “i” at this time)
Each field is delimited by a separator specified by the user as the first character of the expression. Theseparator can be one of the following:
<separator-keyword> = / ! ; % : , ~ # = &
You can use several expressions separated by a commas.
Examples
Orignal filename New filename RegexWhere Comments
c:/system.ini c:/system.old.ini /.ini$/.old.ini/ $ matches end of name/prod/u01/pdata/ /rect/u01/rdata /prod/rect/,/pdata/rdata/ uses two regexp/prod/u01/pdata/ /rect/u01/rdata !/prod/!/rect/!,/pdata/rdata/ use ! as separator
C:/WINNT d:/WINNT /c:/d:/i case insensitive pattern match
15.7 Restoring Directory Attributes
Depending how you do the restore, you may or may not get the directory entries back to their original state.Here are a few of the problems you can encounter, and for same machine restores, how to avoid them.
� You backed up on one machine and are restoring to another that is either a different OS or doesn’thave the same users/groups defined. Bareos does the best it can in these situations. Note, Bareos hassaved the user/groups in numeric form, which means on a different machine, they may map to differentuser/group names.
� You are restoring into a directory that is already created and has file creation restrictions. Bareos triesto reset everything but without walking up the full chain of directories and modifying them all duringthe restore, which Bareos does and will not do, getting permissions back correctly in this situationdepends to a large extent on your OS.
215
� You are doing a recursive restore of a directory tree. In this case Bareos will restore a file beforerestoring the file’s parent directory entry. In the process of restoring the file Bareos will create theparent directory with open permissions and ownership of the file being restored. Then when Bareos triesto restore the parent directory Bareos sees that it already exists (Similar to the previous situation). Ifyou had set the Restore job’s ”Replace” property to ”never” then Bareos will not change the directory’spermissions and ownerships to match what it backed up, you should also notice that the actual numberof files restored is less then the expected number. If you had set the Restore job’s ”Replace” property to”always” then Bareos will change the Directory’s ownership and permissions to match what it backedup, also the actual number of files restored should be equal to the expected number.
� You selected one or more files in a directory, but did not select the directory entry to be restored.In that case, if the directory is not on disk Bareos simply creates the directory with some defaultattributes which may not be the same as the original. If you do not select a directory and all itscontents to be restored, you can still select items within the directory to be restored by individuallymarking those files, but in that case, you should individually use the ”markdir” command to select allhigher level directory entries (one at a time) to be restored if you want the directory entries properlyrestored.
15.8 Restoring on Windows
If you are restoring on Windows systems, Bareos will restore the files with the original ownerships andpermissions as would be expected. This is also true if you are restoring those files to an alternate directory(using the Where option in restore). However, if the alternate directory does not already exist, the BareosFile daemon (Client) will try to create it. In some cases, it may not create the directories, and if it does sincethe File daemon runs under the SYSTEM account, the directory will be created with SYSTEM ownershipand permissions. In this case, you may have problems accessing the newly restored files.To avoid this problem, you should create any alternate directory before doing the restore. Bareos will notchange the ownership and permissions of the directory if it is already created as long as it is not one of thedirectories being restored (i.e. written to tape).The default restore location is /tmp/bareos-restores/ and if you are restoring from drive E:, the defaultwill be /tmp/bareos-restores/e/, so you should ensure that this directory exists before doing the restore,or use the mod option to select a different where directory that does exist.Some users have experienced problems restoring files that participate in the Active Directory. They alsoreport that changing the userid under which Bareos (bareos-fd.exe) runs, from SYSTEM to a Domain Adminuserid, resolves the problem.
15.9 Restore Errors
There are a number of reasons why there may be restore errors or warning messages. Some of the morecommon ones are:
file count mismatch This can occur for the following reasons:
� You requested Bareos not to overwrite existing or newer files.
� A Bareos miscount of files/directories. This is an on-going problem due to the complications ofdirectories, soft/hard link, and such. Simply check that all the files you wanted were actuallyrestored.
file size error When Bareos restores files, it checks that the size of the restored file is the same as the filestatus data it saved when starting the backup of the file. If the sizes do not agree, Bareos will printan error message. This size mismatch most often occurs because the file was being written as Bareosbacked up the file. In this case, the size that Bareos restored will be greater than the status size. Thisoften happens with log files.
If the restored size is smaller, then you should be concerned about a possible tape error and check theBareos output as well as your system logs.
15.10 Example Restore Job Resource
Job {
216
Name = "RestoreFiles"
Type = Restore
Client = Any-client
FileSet = "Any-FileSet"
Storage = Any-storage
Where = /tmp/bareos-restores
Messages = Standard
Pool = Default
}
If Where is not specified, the default location for restoring files will be their original locations.
15.11 File Selection Commands
After you have selected the Jobs to be restored and Bareos has created the in-memory directory tree, youwill enter file selection mode as indicated by the dollar sign ($) prompt. While in this mode, you may usethe commands listed above. The basic idea is to move up and down the in memory directory structure withthe cd command much as you normally do on the system. Once you are in a directory, you may select thefiles that you want restored. As a default no files are marked to be restored. If you wish to start with allfiles, simply enter: cd / and mark *. Otherwise proceed to select the files you wish to restore by markingthem with the mark command. The available commands are:
cd The cd command changes the current directory to the argument specified. It operates much like theUnix cd command. Wildcard specifications are not permitted.
Note, on Windows systems, the various drives (c:, d:, ...) are treated like a directory within the filetree while in the file selection mode. As a consequence, you must do a cd c: or possibly in some casesa cd C: (note upper case) to get down to the first directory.
dir The dir command is similar to the ls command, except that it prints it in long format (all details).This command can be a bit slower than the ls command because it must access the catalog databasefor the detailed information for each file.
estimate The estimate command prints a summary of the total files in the tree, how many are marked tobe restored, and an estimate of the number of bytes to be restored. This can be useful if you are shorton disk space on the machine where the files will be restored.
find The find command accepts one or more arguments and displays all files in the tree that match thatargument. The argument may have wildcards. It is somewhat similar to the Unix command find /-name arg.
ls The ls command produces a listing of all the files contained in the current directory much like the Unixls command. You may specify an argument containing wildcards, in which case only those files will belisted.
Any file that is marked to be restored will have its name preceded by an asterisk (*). Directory nameswill be terminated with a forward slash (/) to distinguish them from filenames.
lsmark The lsmark command is the same as the ls except that it will print only those files marked forextraction. The other distinction is that it will recursively descend into any directory selected.
mark The mark command allows you to mark files to be restored. It takes a single argument which is thefilename or directory name in the current directory to be marked for extraction. The argument maybe a wildcard specification, in which case all files that match in the current directory are marked tobe restored. If the argument matches a directory rather than a file, then the directory and all the filescontained in that directory (recursively) are marked to be restored. Any marked file will have its namepreceded with an asterisk (*) in the output produced by the ls or dir commands. Note, supplying afull path on the mark command does not work as expected to select a file or directory in the currentdirectory. Also, the mark command works on the current and lower directories but does not touchhigher level directories.
After executing the mark command, it will print a brief summary:
No files marked.
217
If no files were marked, or:
nn files marked.
if some files are marked.
unmark The unmark is identical to the mark command, except that it unmarks the specified file or filesso that they will not be restored. Note: the unmark command works from the current directory, soit does not unmark any files at a higher level. First do a cd / before the unmark * command if youwant to unmark everything.
pwd The pwd command prints the current working directory. It accepts no arguments.
count The count command prints the total files in the directory tree and the number of files marked to berestored.
done This command terminates file selection mode.
exit This command terminates file selection mode (the same as done).
quit This command terminates the file selection and does not run the restore job.
help This command prints a summary of the commands available.
? This command is the same as the help command.
If your filename contains some weird caracters, you can use ?, * or \\. For example, if your filename containsa \, you can use \\\\.
* mark weird_file\\\\with-backslash

218

Chapter 16
Volume Management
219
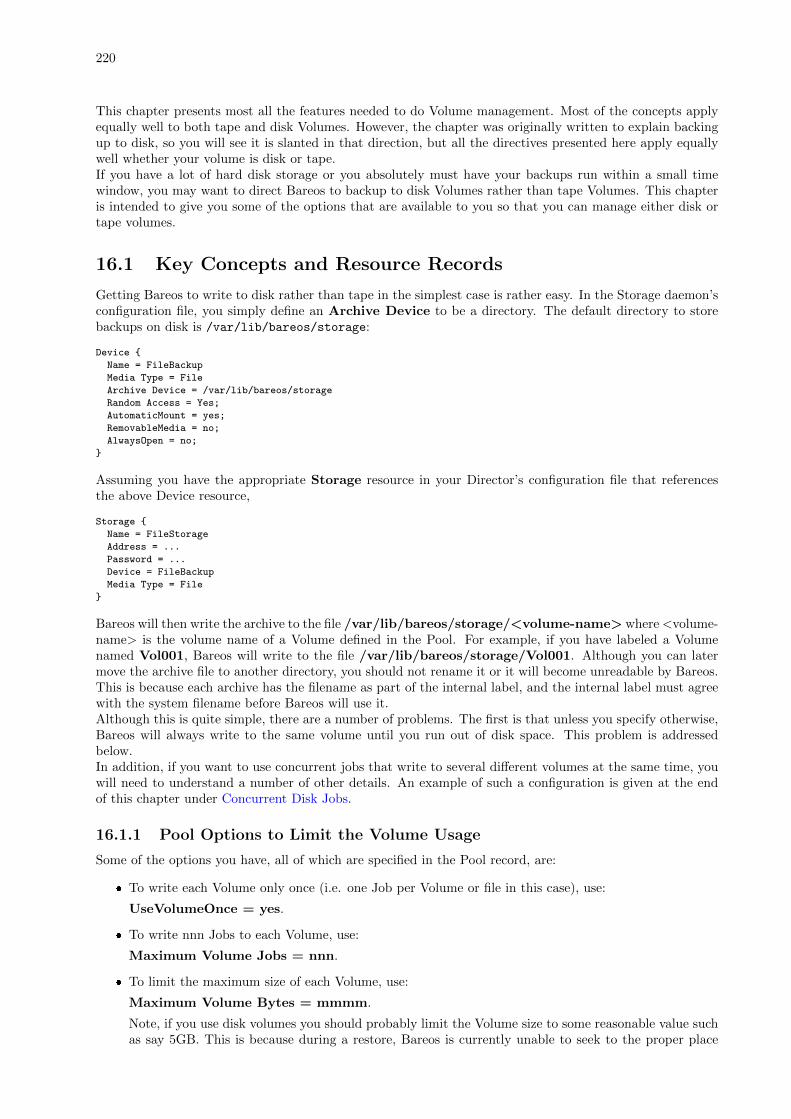
220
This chapter presents most all the features needed to do Volume management. Most of the concepts applyequally well to both tape and disk Volumes. However, the chapter was originally written to explain backingup to disk, so you will see it is slanted in that direction, but all the directives presented here apply equallywell whether your volume is disk or tape.If you have a lot of hard disk storage or you absolutely must have your backups run within a small timewindow, you may want to direct Bareos to backup to disk Volumes rather than tape Volumes. This chapteris intended to give you some of the options that are available to you so that you can manage either disk ortape volumes.
16.1 Key Concepts and Resource Records
Getting Bareos to write to disk rather than tape in the simplest case is rather easy. In the Storage daemon’sconfiguration file, you simply define an Archive Device to be a directory. The default directory to storebackups on disk is /var/lib/bareos/storage:
Device {
Name = FileBackup
Media Type = File
Archive Device = /var/lib/bareos/storage
Random Access = Yes;
AutomaticMount = yes;
RemovableMedia = no;
AlwaysOpen = no;
}
Assuming you have the appropriate Storage resource in your Director’s configuration file that referencesthe above Device resource,
Storage {
Name = FileStorage
Address = ...
Password = ...
Device = FileBackup
Media Type = File
}
Bareos will then write the archive to the file /var/lib/bareos/storage/<volume-name> where <volume-name> is the volume name of a Volume defined in the Pool. For example, if you have labeled a Volumenamed Vol001, Bareos will write to the file /var/lib/bareos/storage/Vol001. Although you can latermove the archive file to another directory, you should not rename it or it will become unreadable by Bareos.This is because each archive has the filename as part of the internal label, and the internal label must agreewith the system filename before Bareos will use it.Although this is quite simple, there are a number of problems. The first is that unless you specify otherwise,Bareos will always write to the same volume until you run out of disk space. This problem is addressedbelow.In addition, if you want to use concurrent jobs that write to several different volumes at the same time, youwill need to understand a number of other details. An example of such a configuration is given at the endof this chapter under Concurrent Disk Jobs.
16.1.1 Pool Options to Limit the Volume Usage
Some of the options you have, all of which are specified in the Pool record, are:
� To write each Volume only once (i.e. one Job per Volume or file in this case), use:
UseVolumeOnce = yes.
� To write nnn Jobs to each Volume, use:
Maximum Volume Jobs = nnn.
� To limit the maximum size of each Volume, use:
Maximum Volume Bytes = mmmm.
Note, if you use disk volumes you should probably limit the Volume size to some reasonable value suchas say 5GB. This is because during a restore, Bareos is currently unable to seek to the proper place
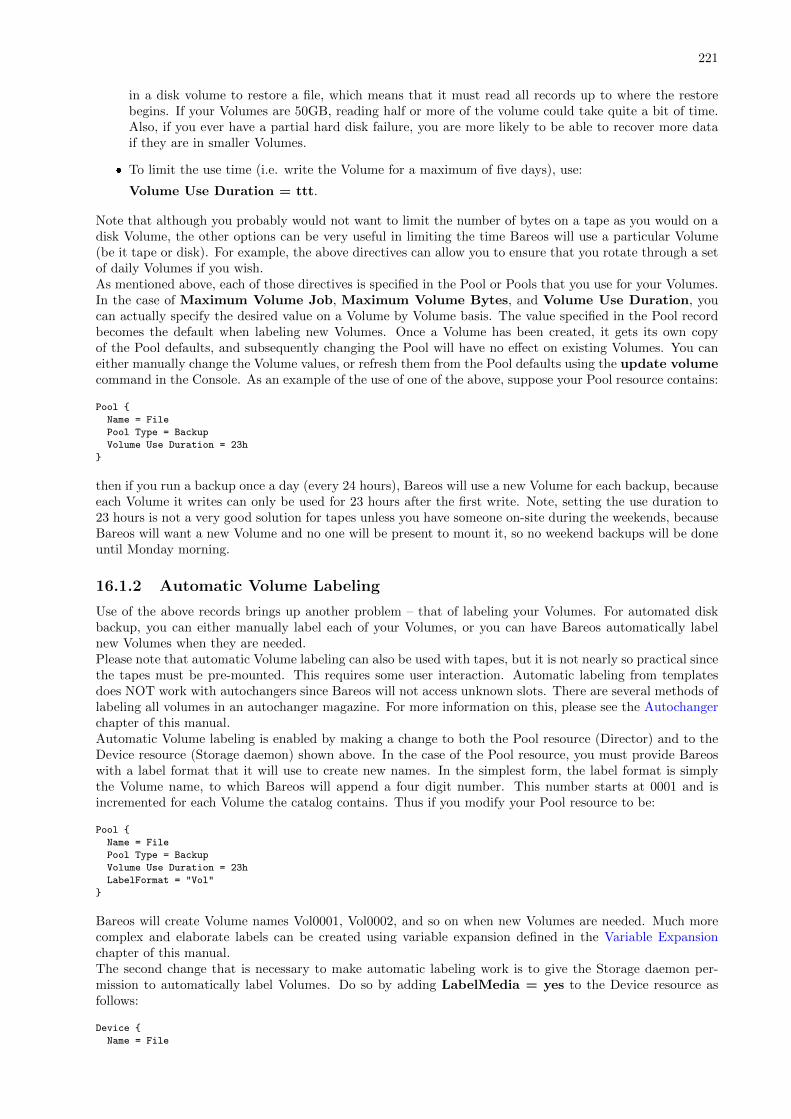
221
in a disk volume to restore a file, which means that it must read all records up to where the restorebegins. If your Volumes are 50GB, reading half or more of the volume could take quite a bit of time.Also, if you ever have a partial hard disk failure, you are more likely to be able to recover more dataif they are in smaller Volumes.
� To limit the use time (i.e. write the Volume for a maximum of five days), use:
Volume Use Duration = ttt.
Note that although you probably would not want to limit the number of bytes on a tape as you would on adisk Volume, the other options can be very useful in limiting the time Bareos will use a particular Volume(be it tape or disk). For example, the above directives can allow you to ensure that you rotate through a setof daily Volumes if you wish.As mentioned above, each of those directives is specified in the Pool or Pools that you use for your Volumes.In the case of Maximum Volume Job, Maximum Volume Bytes, and Volume Use Duration, youcan actually specify the desired value on a Volume by Volume basis. The value specified in the Pool recordbecomes the default when labeling new Volumes. Once a Volume has been created, it gets its own copyof the Pool defaults, and subsequently changing the Pool will have no effect on existing Volumes. You caneither manually change the Volume values, or refresh them from the Pool defaults using the update volumecommand in the Console. As an example of the use of one of the above, suppose your Pool resource contains:
Pool {
Name = File
Pool Type = Backup
Volume Use Duration = 23h
}
then if you run a backup once a day (every 24 hours), Bareos will use a new Volume for each backup, becauseeach Volume it writes can only be used for 23 hours after the first write. Note, setting the use duration to23 hours is not a very good solution for tapes unless you have someone on-site during the weekends, becauseBareos will want a new Volume and no one will be present to mount it, so no weekend backups will be doneuntil Monday morning.
16.1.2 Automatic Volume Labeling
Use of the above records brings up another problem – that of labeling your Volumes. For automated diskbackup, you can either manually label each of your Volumes, or you can have Bareos automatically labelnew Volumes when they are needed.Please note that automatic Volume labeling can also be used with tapes, but it is not nearly so practical sincethe tapes must be pre-mounted. This requires some user interaction. Automatic labeling from templatesdoes NOT work with autochangers since Bareos will not access unknown slots. There are several methods oflabeling all volumes in an autochanger magazine. For more information on this, please see the Autochangerchapter of this manual.Automatic Volume labeling is enabled by making a change to both the Pool resource (Director) and to theDevice resource (Storage daemon) shown above. In the case of the Pool resource, you must provide Bareoswith a label format that it will use to create new names. In the simplest form, the label format is simplythe Volume name, to which Bareos will append a four digit number. This number starts at 0001 and isincremented for each Volume the catalog contains. Thus if you modify your Pool resource to be:
Pool {
Name = File
Pool Type = Backup
Volume Use Duration = 23h
LabelFormat = "Vol"
}
Bareos will create Volume names Vol0001, Vol0002, and so on when new Volumes are needed. Much morecomplex and elaborate labels can be created using variable expansion defined in the Variable Expansionchapter of this manual.The second change that is necessary to make automatic labeling work is to give the Storage daemon per-mission to automatically label Volumes. Do so by adding LabelMedia = yes to the Device resource asfollows:
Device {
Name = File
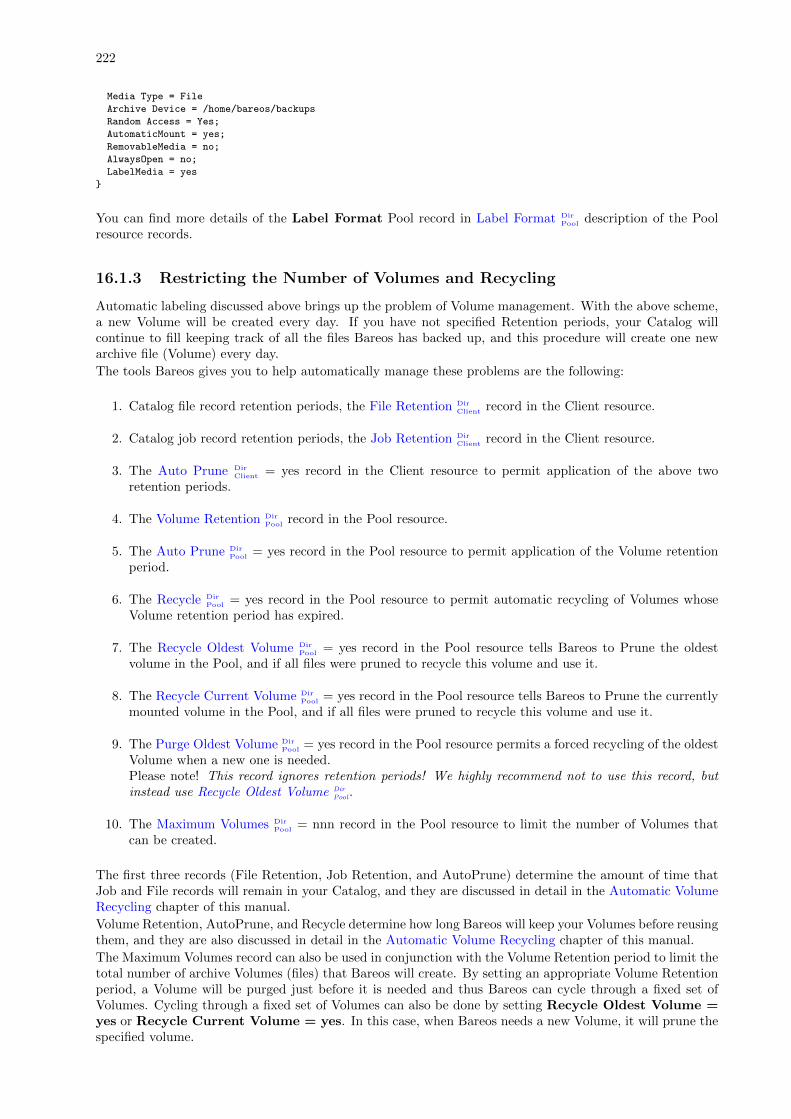
222
Media Type = File
Archive Device = /home/bareos/backups
Random Access = Yes;
AutomaticMount = yes;
RemovableMedia = no;
AlwaysOpen = no;
LabelMedia = yes
}
You can find more details of the Label Format Pool record in Label Format DirPool description of the Pool
resource records.
16.1.3 Restricting the Number of Volumes and Recycling
Automatic labeling discussed above brings up the problem of Volume management. With the above scheme,a new Volume will be created every day. If you have not specified Retention periods, your Catalog willcontinue to fill keeping track of all the files Bareos has backed up, and this procedure will create one newarchive file (Volume) every day.
The tools Bareos gives you to help automatically manage these problems are the following:
1. Catalog file record retention periods, the File Retention DirClient record in the Client resource.
2. Catalog job record retention periods, the Job Retention DirClient record in the Client resource.
3. The Auto Prune DirClient = yes record in the Client resource to permit application of the above two
retention periods.
4. The Volume Retention DirPool record in the Pool resource.
5. The Auto Prune DirPool = yes record in the Pool resource to permit application of the Volume retention
period.
6. The Recycle DirPool = yes record in the Pool resource to permit automatic recycling of Volumes whose
Volume retention period has expired.
7. The Recycle Oldest Volume DirPool = yes record in the Pool resource tells Bareos to Prune the oldest
volume in the Pool, and if all files were pruned to recycle this volume and use it.
8. The Recycle Current Volume DirPool = yes record in the Pool resource tells Bareos to Prune the currently
mounted volume in the Pool, and if all files were pruned to recycle this volume and use it.
9. The Purge Oldest Volume DirPool = yes record in the Pool resource permits a forced recycling of the oldest
Volume when a new one is needed.Please note! This record ignores retention periods! We highly recommend not to use this record, butinstead use Recycle Oldest Volume Dir
Pool.
10. The Maximum Volumes DirPool = nnn record in the Pool resource to limit the number of Volumes that
can be created.
The first three records (File Retention, Job Retention, and AutoPrune) determine the amount of time thatJob and File records will remain in your Catalog, and they are discussed in detail in the Automatic VolumeRecycling chapter of this manual.
Volume Retention, AutoPrune, and Recycle determine how long Bareos will keep your Volumes before reusingthem, and they are also discussed in detail in the Automatic Volume Recycling chapter of this manual.
The Maximum Volumes record can also be used in conjunction with the Volume Retention period to limit thetotal number of archive Volumes (files) that Bareos will create. By setting an appropriate Volume Retentionperiod, a Volume will be purged just before it is needed and thus Bareos can cycle through a fixed set ofVolumes. Cycling through a fixed set of Volumes can also be done by setting Recycle Oldest Volume =yes or Recycle Current Volume = yes. In this case, when Bareos needs a new Volume, it will prune thespecified volume.

223
16.2 Concurrent Disk Jobs
Above, we discussed how you could have a single device named FileBackup that writes to volumes in/home/bareos/backups. You can, in fact, run multiple concurrent jobs using the Storage definition givenwith this example, and all the jobs will simultaneously write into the Volume that is being written.Now suppose you want to use multiple Pools, which means multiple Volumes, or suppose you want eachclient to have its own Volume and perhaps its own directory such as /home/bareos/client1 and /home-/bareos/client2 ... With the single Storage and Device definition above, neither of these two is possible.Why? Because Bareos disk storage follows the same rules as tape devices. Only one Volume can be mountedon any Device at any time. If you want to simultaneously write multiple Volumes, you will need multipleDevice resources in your bareos-sd.conf file, and thus multiple Storage resources in your bareos-dir.conf.OK, so now you should understand that you need multiple Device definitions in the case of different directoriesor different Pools, but you also need to know that the catalog data that Bareos keeps contains only the MediaType and not the specific storage device. This permits a tape for example to be re-read on any compatibletape drive. The compatibility being determined by the Media Type. The same applies to disk storage. Sincea volume that is written by a Device in say directory /home/bareos/backups cannot be read by a Devicewith an Archive Device definition of /home/bareos/client1, you will not be able to restore all your filesif you give both those devices Media Type = File. During the restore, Bareos will simply choose the firstavailable device, which may not be the correct one. If this is confusing, just remember that the Directoryhas only the Media Type and the Volume name. It does not know the Archive Device (or the full path)that is specified in the Storage daemon. Thus you must explicitly tie your Volumes to the correct Device byusing the Media Type.The example shown below shows a case where there are two clients, each using its own Pool and storingtheir Volumes in different directories.
16.2.1 An Example
The following example is not very practical, but can be used to demonstrate the proof of concept in arelatively short period of time. The example consists of a two clients that are backed up to a set of 12archive files (Volumes) for each client into different directories on the Storage machine. Each Volume is used(written) only once, and there are four Full saves done every hour (so the whole thing cycles around afterthree hours).What is key here is that each physical device on the Storage daemon has a different Media Type. This allowsthe Director to choose the correct device for restores ...The Director’s configuration file is as follows:
Director {
Name = my-dir
QueryFile = "~/bareos/bin/query.sql"
PidDirectory = "~/bareos/working"
WorkingDirectory = "~/bareos/working"
Password = dir_password
}
Schedule {
Name = "FourPerHour"
Run = Level=Full hourly at 0:05
Run = Level=Full hourly at 0:20
Run = Level=Full hourly at 0:35
Run = Level=Full hourly at 0:50
}
Job {
Name = "RecycleExample"
Type = Backup
Level = Full
Client = Rufus
FileSet= "Example FileSet"
Messages = Standard
Storage = FileStorage
Pool = Recycle
Schedule = FourPerHour
}
Job {
Name = "RecycleExample2"
Type = Backup
Level = Full
Client = Roxie
224
FileSet= "Example FileSet"
Messages = Standard
Storage = FileStorage1
Pool = Recycle1
Schedule = FourPerHour
}
FileSet {
Name = "Example FileSet"
Include {
Options {
compression=GZIP
signature=SHA1
}
File = /home/user/bareos/bin
}
}
Client {
Name = Rufus
Address = rufus
Catalog = BackupDB
Password = client_password
}
Client {
Name = Roxie
Address = roxie
Catalog = BackupDB
Password = client1_password
}
Storage {
Name = FileStorage
Address = rufus
Password = local_storage_password
Device = RecycleDir
Media Type = File
}
Storage {
Name = FileStorage1
Address = rufus
Password = local_storage_password
Device = RecycleDir1
Media Type = File1
}
Catalog {
Name = BackupDB
dbname = bareos; user = bareos; password = ""
}
Messages {
Name = Standard
...
}
Pool {
Name = Recycle
Use Volume Once = yes
Pool Type = Backup
LabelFormat = "Recycle-"
AutoPrune = yes
VolumeRetention = 2h
Maximum Volumes = 12
Recycle = yes
}
Pool {
Name = Recycle1
Use Volume Once = yes
Pool Type = Backup
LabelFormat = "Recycle1-"
AutoPrune = yes
VolumeRetention = 2h
Maximum Volumes = 12
Recycle = yes
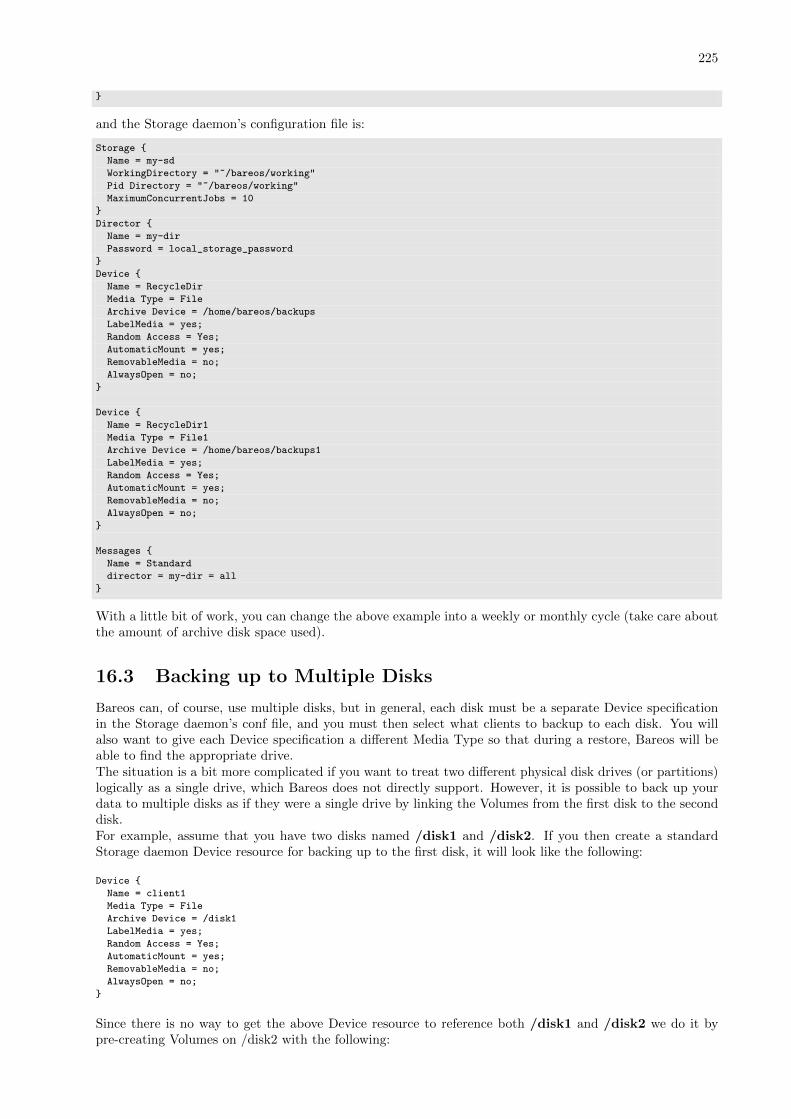
225
}
and the Storage daemon’s configuration file is:
Storage {
Name = my-sd
WorkingDirectory = "~/bareos/working"
Pid Directory = "~/bareos/working"
MaximumConcurrentJobs = 10
}
Director {
Name = my-dir
Password = local_storage_password
}
Device {
Name = RecycleDir
Media Type = File
Archive Device = /home/bareos/backups
LabelMedia = yes;
Random Access = Yes;
AutomaticMount = yes;
RemovableMedia = no;
AlwaysOpen = no;
}
Device {
Name = RecycleDir1
Media Type = File1
Archive Device = /home/bareos/backups1
LabelMedia = yes;
Random Access = Yes;
AutomaticMount = yes;
RemovableMedia = no;
AlwaysOpen = no;
}
Messages {
Name = Standard
director = my-dir = all
}
With a little bit of work, you can change the above example into a weekly or monthly cycle (take care aboutthe amount of archive disk space used).
16.3 Backing up to Multiple Disks
Bareos can, of course, use multiple disks, but in general, each disk must be a separate Device specificationin the Storage daemon’s conf file, and you must then select what clients to backup to each disk. You willalso want to give each Device specification a different Media Type so that during a restore, Bareos will beable to find the appropriate drive.The situation is a bit more complicated if you want to treat two different physical disk drives (or partitions)logically as a single drive, which Bareos does not directly support. However, it is possible to back up yourdata to multiple disks as if they were a single drive by linking the Volumes from the first disk to the seconddisk.For example, assume that you have two disks named /disk1 and /disk2. If you then create a standardStorage daemon Device resource for backing up to the first disk, it will look like the following:
Device {
Name = client1
Media Type = File
Archive Device = /disk1
LabelMedia = yes;
Random Access = Yes;
AutomaticMount = yes;
RemovableMedia = no;
AlwaysOpen = no;
}
Since there is no way to get the above Device resource to reference both /disk1 and /disk2 we do it bypre-creating Volumes on /disk2 with the following:
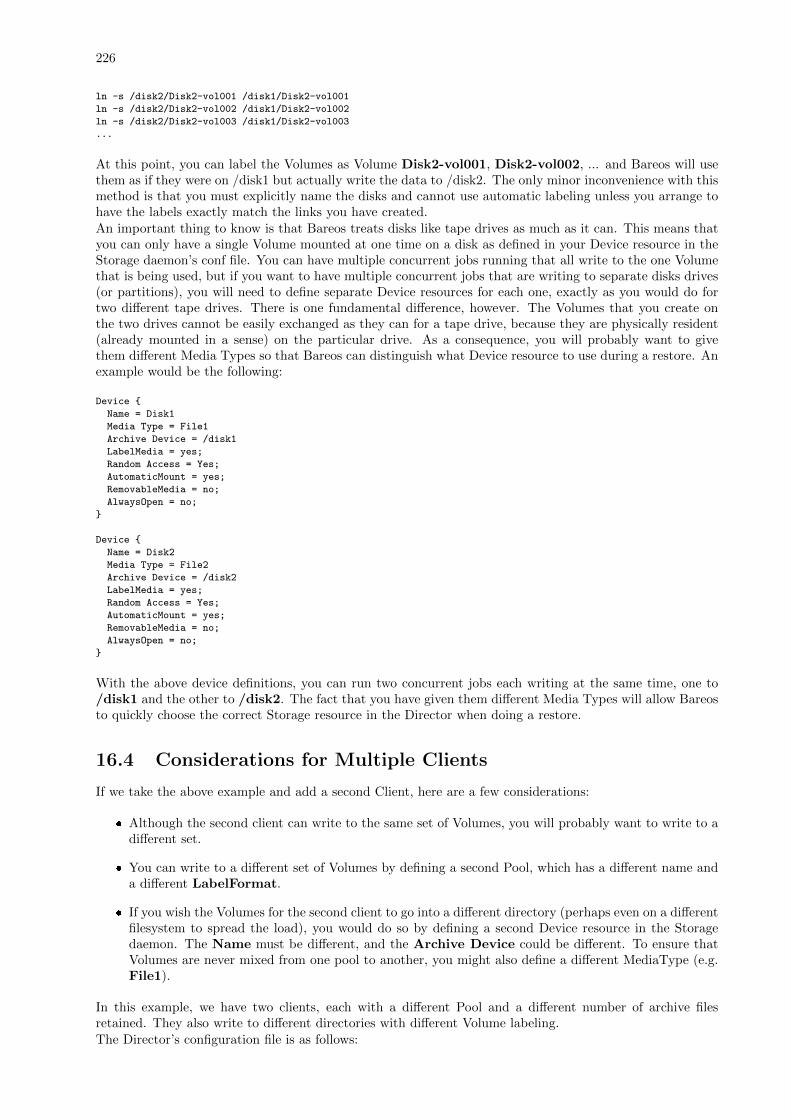
226
ln -s /disk2/Disk2-vol001 /disk1/Disk2-vol001
ln -s /disk2/Disk2-vol002 /disk1/Disk2-vol002
ln -s /disk2/Disk2-vol003 /disk1/Disk2-vol003
...
At this point, you can label the Volumes as Volume Disk2-vol001, Disk2-vol002, ... and Bareos will usethem as if they were on /disk1 but actually write the data to /disk2. The only minor inconvenience with thismethod is that you must explicitly name the disks and cannot use automatic labeling unless you arrange tohave the labels exactly match the links you have created.An important thing to know is that Bareos treats disks like tape drives as much as it can. This means thatyou can only have a single Volume mounted at one time on a disk as defined in your Device resource in theStorage daemon’s conf file. You can have multiple concurrent jobs running that all write to the one Volumethat is being used, but if you want to have multiple concurrent jobs that are writing to separate disks drives(or partitions), you will need to define separate Device resources for each one, exactly as you would do fortwo different tape drives. There is one fundamental difference, however. The Volumes that you create onthe two drives cannot be easily exchanged as they can for a tape drive, because they are physically resident(already mounted in a sense) on the particular drive. As a consequence, you will probably want to givethem different Media Types so that Bareos can distinguish what Device resource to use during a restore. Anexample would be the following:
Device {
Name = Disk1
Media Type = File1
Archive Device = /disk1
LabelMedia = yes;
Random Access = Yes;
AutomaticMount = yes;
RemovableMedia = no;
AlwaysOpen = no;
}
Device {
Name = Disk2
Media Type = File2
Archive Device = /disk2
LabelMedia = yes;
Random Access = Yes;
AutomaticMount = yes;
RemovableMedia = no;
AlwaysOpen = no;
}
With the above device definitions, you can run two concurrent jobs each writing at the same time, one to/disk1 and the other to /disk2. The fact that you have given them different Media Types will allow Bareosto quickly choose the correct Storage resource in the Director when doing a restore.
16.4 Considerations for Multiple Clients
If we take the above example and add a second Client, here are a few considerations:
� Although the second client can write to the same set of Volumes, you will probably want to write to adifferent set.
� You can write to a different set of Volumes by defining a second Pool, which has a different name anda different LabelFormat.
� If you wish the Volumes for the second client to go into a different directory (perhaps even on a differentfilesystem to spread the load), you would do so by defining a second Device resource in the Storagedaemon. The Name must be different, and the Archive Device could be different. To ensure thatVolumes are never mixed from one pool to another, you might also define a different MediaType (e.g.File1).
In this example, we have two clients, each with a different Pool and a different number of archive filesretained. They also write to different directories with different Volume labeling.The Director’s configuration file is as follows:

227
Director {
Name = my-dir
QueryFile = "~/bareos/bin/query.sql"
PidDirectory = "~/bareos/working"
WorkingDirectory = "~/bareos/working"
Password = dir_password
}
# Basic weekly schedule
Schedule {
Name = "WeeklySchedule"
Run = Level=Full fri at 1:30
Run = Level=Incremental sat-thu at 1:30
}
FileSet {
Name = "Example FileSet"
Include {
Options {
compression=GZIP
signature=SHA1
}
File = /home/user/bareos/bin
}
}
Job {
Name = "Backup-client1"
Type = Backup
Level = Full
Client = client1
FileSet= "Example FileSet"
Messages = Standard
Storage = File1
Pool = client1
Schedule = "WeeklySchedule"
}
Job {
Name = "Backup-client2"
Type = Backup
Level = Full
Client = client2
FileSet= "Example FileSet"
Messages = Standard
Storage = File2
Pool = client2
Schedule = "WeeklySchedule"
}
Client {
Name = client1
Address = client1
Catalog = BackupDB
Password = client1_password
File Retention = 7d
}
Client {
Name = client2
Address = client2
Catalog = BackupDB
Password = client2_password
}
# Two Storage definitions with different Media Types
# permits different directories
Storage {
Name = File1
Address = rufus
Password = local_storage_password
Device = client1
Media Type = File1
}
Storage {
Name = File2
Address = rufus
Password = local_storage_password
Device = client2
Media Type = File2
}
Catalog {
Name = BackupDB
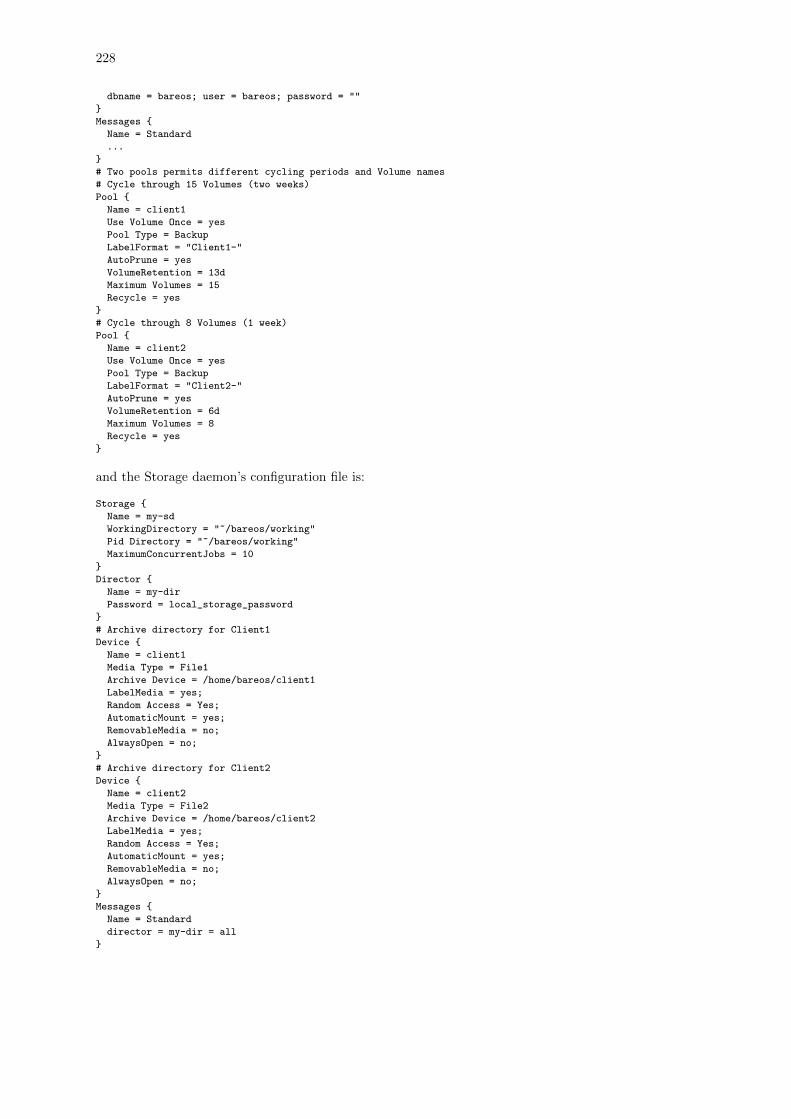
228
dbname = bareos; user = bareos; password = ""
}
Messages {
Name = Standard
...
}
# Two pools permits different cycling periods and Volume names
# Cycle through 15 Volumes (two weeks)
Pool {
Name = client1
Use Volume Once = yes
Pool Type = Backup
LabelFormat = "Client1-"
AutoPrune = yes
VolumeRetention = 13d
Maximum Volumes = 15
Recycle = yes
}
# Cycle through 8 Volumes (1 week)
Pool {
Name = client2
Use Volume Once = yes
Pool Type = Backup
LabelFormat = "Client2-"
AutoPrune = yes
VolumeRetention = 6d
Maximum Volumes = 8
Recycle = yes
}
and the Storage daemon’s configuration file is:
Storage {
Name = my-sd
WorkingDirectory = "~/bareos/working"
Pid Directory = "~/bareos/working"
MaximumConcurrentJobs = 10
}
Director {
Name = my-dir
Password = local_storage_password
}
# Archive directory for Client1
Device {
Name = client1
Media Type = File1
Archive Device = /home/bareos/client1
LabelMedia = yes;
Random Access = Yes;
AutomaticMount = yes;
RemovableMedia = no;
AlwaysOpen = no;
}
# Archive directory for Client2
Device {
Name = client2
Media Type = File2
Archive Device = /home/bareos/client2
LabelMedia = yes;
Random Access = Yes;
AutomaticMount = yes;
RemovableMedia = no;
AlwaysOpen = no;
}
Messages {
Name = Standard
director = my-dir = all
}
229
16.5 Automatic Volume Recycling
By default, once Bareos starts writing a Volume, it can append to the volume, but it will not overwrite theexisting data thus destroying it. However when Bareos recycles a Volume, the Volume becomes availablefor being reused, and Bareos can at some later time overwrite the previous contents of that Volume. Thusall previous data will be lost. If the Volume is a tape, the tape will be rewritten from the beginning. If theVolume is a disk file, the file will be truncated before being rewritten.
You may not want Bareos to automatically recycle (reuse) tapes. This would require a large number of tapesthough, and in such a case, it is possible to manually recycle tapes. For more on manual recycling, see thesection entitled Manually Recycling Volumes below in this chapter.
Most people prefer to have a Pool of tapes that are used for daily backups and recycled once a week, anotherPool of tapes that are used for Full backups once a week and recycled monthly, and finally a Pool of tapesthat are used once a month and recycled after a year or two. With a scheme like this, the number of tapesin your pool or pools remains constant.
By properly defining your Volume Pools with appropriate Retention periods, Bareos can manage the recycling(such as defined above) automatically.
Automatic recycling of Volumes is controlled by four records in the Pool resource definition in the Director’sconfiguration file. These four records are:
� AutoPrune = yes
� VolumeRetention = <time>
� Recycle = yes
� RecyclePool = <APool>
The above three directives are all you need assuming that you fill each of your Volumes then wait the VolumeRetention period before reusing them. If you want Bareos to stop using a Volume and recycle it before it isfull, you will need to use one or more additional directives such as:
� Use Volume Once = yes
� Volume Use Duration = ttt
� Maximum Volume Jobs = nnn
� Maximum Volume Bytes = mmm
Please see below and the Basic Volume Management chapter of this manual for more complete examples.
Automatic recycling of Volumes is performed by Bareos only when it wants a new Volume and no appendableVolumes are available in the Pool. It will then search the Pool for any Volumes with the Recycle flag setand the Volume Status is Purged. At that point, it will choose the oldest purged volume and recycle it.
If there are no volumes with Status Purged, then the recycling occurs in two steps: The first is that theCatalog for a Volume must be pruned of all Jobs (i.e. Purged). Files contained on that Volume, and thesecond step is the actual recycling of the Volume. Only Volumes marked Full or Used will be considerd forpruning. The Volume will be purged if the VolumeRetention period has expired. When a Volume is markedas Purged, it means that no Catalog records reference that Volume, and the Volume can be recycled. Untilrecycling actually occurs, the Volume data remains intact. If no Volumes can be found for recycling for anyof the reasons stated above, Bareos will request operator intervention (i.e. it will ask you to label a newvolume).
A key point mentioned above, that can be a source of frustration, is that Bareos will only recycle purgedVolumes if there is no other appendable Volume available, otherwise, it will always write to an appendableVolume before recycling even if there are Volume marked as Purged. This preserves your data as long aspossible. So, if you wish to ”force” Bareos to use a purged Volume, you must first ensure that no otherVolume in the Pool is marked Append. If necessary, you can manually set a volume to Full. The reasonfor this is that Bareos wants to preserve the data on your old tapes (even though purged from the catalog)as long as absolutely possible before overwriting it. There are also a number of directives such as VolumeUse Duration that will automatically mark a volume as Used and thus no longer appendable.
230
16.5.1 Automatic Pruning
As Bareos writes files to tape, it keeps a list of files, jobs, and volumes in a database called the catalog. Amongother things, the database helps Bareos to decide which files to back up in an incremental or differentialbackup, and helps you locate files on past backups when you want to restore something. However, the catalogwill grow larger and larger as time goes on, and eventually it can become unacceptably large.Bareos’s process for removing entries from the catalog is called Pruning. The default is Automatic Pruning,which means that once an entry reaches a certain age (e.g. 30 days old) it is removed from the catalog.Note that Job records that are required for current restore won’t be removed automatically, and File recordsare needed for VirtualFull and Accurate backups. Once a job has been pruned, you can still restore it fromthe backup tape, but one additional step is required: scanning the volume with bscan. The alternative toAutomatic Pruning is Manual Pruning, in which you explicitly tell Bareos to erase the catalog entries for avolume. You’d usually do this when you want to reuse a Bareos volume, because there’s no point in keepinga list of files that USED TO BE on a tape. Or, if the catalog is starting to get too big, you could prune theoldest jobs to save space. Manual pruning is done with the prune command in the console.
16.5.2 Pruning Directives
There are three pruning durations. All apply to catalog database records and not to the actual data in aVolume. The pruning (or retention) durations are for: Volumes (Media records), Jobs (Job records), andFiles (File records). The durations inter-depend a bit because if Bareos prunes a Volume, it automaticallyremoves all the Job records, and all the File records. Also when a Job record is pruned, all the File recordsfor that Job are also pruned (deleted) from the catalog.Having the File records in the database means that you can examine all the files backed up for a particularJob. They take the most space in the catalog (probably 90-95% of the total). When the File records arepruned, the Job records can remain, and you can still examine what Jobs ran, but not the details of the Filesbacked up. In addition, without the File records, you cannot use the Console restore command to restorethe files.When a Job record is pruned, the Volume (Media record) for that Job can still remain in the database, andif you do a ”list volumes”, you will see the volume information, but the Job records (and its File records)will no longer be available.In each case, pruning removes information about where older files are, but it also prevents the catalog fromgrowing to be too large. You choose the retention periods in function of how many files you are backing upand the time periods you want to keep those records online, and the size of the database. You can alwaysre-insert the records (with 98% of the original data) by using ”bscan” to scan in a whole Volume or any partof the volume that you want.By setting AutoPrune to yes you will permit Bareos to automatically prune all Volumes in the Pool whena Job needs another Volume. Volume pruning means removing records from the catalog. It does not shrinkthe size of the Volume or affect the Volume data until the Volume gets overwritten. When a Job requestsanother volume and there are no Volumes with Volume Status Append available, Bareos will begin volumepruning. This means that all Jobs that are older than the VolumeRetention period will be pruned fromevery Volume that has Volume Status Full or Used and has Recycle set to yes. Pruning consists of deletingthe corresponding Job, File, and JobMedia records from the catalog database. No change to the physicaldata on the Volume occurs during the pruning process. When all files are pruned from a Volume (i.e. norecords in the catalog), the Volume will be marked as Purged implying that no Jobs remain on the volume.The Pool records that control the pruning are described below.
AutoPrune = <yes—no> If AutoPrune is set to yes (default), Bareos will automatically apply theVolume retention period when running a Job and it needs a new Volume but no appendable volumesare available. At that point, Bareos will prune all Volumes that can be pruned (i.e. AutoPrune set)in an attempt to find a usable volume. If during the autoprune, all files are pruned from the Volume,it will be marked with VolStatus Purged. The default is yes. Note, that although the File andJob records may be pruned from the catalog, a Volume will be marked Purged (and hence ready forrecycling) if the Volume status is Append, Full, Used, or Error. If the Volume has another status, suchas Archive, Read-Only, Disabled, Busy, or Cleaning, the Volume status will not be changed to Purged.
Volume Retention = <time-period-specification> The Volume Retention record defines the lengthof time that Bareos will guarantee that the Volume is not reused counting from the time the last jobstored on the Volume terminated. A key point is that this time period is not even considered as longat the Volume remains appendable. The Volume Retention period count down begins only when theAppend status has been changed to some othe status (Full, Used, Purged, ...).
231
When this time period expires, and if AutoPrune is set to yes, and a new Volume is needed, butno appendable Volume is available, Bareos will prune (remove) Job records that are older than thespecified Volume Retention period.
The Volume Retention period takes precedence over any Job Retention period you have specified in theClient resource. It should also be noted, that the Volume Retention period is obtained by reading theCatalog Database Media record rather than the Pool resource record. This means that if you changethe VolumeRetention in the Pool resource record, you must ensure that the corresponding change ismade in the catalog by using the update pool command. Doing so will insure that any new Volumeswill be created with the changed Volume Retention period. Any existing Volumes will have their owncopy of the Volume Retention period that can only be changed on a Volume by Volume basis usingthe update volume command.
When all file catalog entries are removed from the volume, its VolStatus is set to Purged. The filesremain physically on the Volume until the volume is overwritten.
Retention periods are specified in seconds, minutes, hours, days, weeks, months, quarters, or years onthe record. See the Configuration chapter of this manual for additional details of time specification.
The default is 1 year.
Recycle = <yes—no> This statement tells Bareos whether or not the particular Volume can be recycled(i.e. rewritten). If Recycle is set to no (the default), then even if Bareos prunes all the Jobs on thevolume and it is marked Purged, it will not consider the tape for recycling. If Recycle is set to yesand all Jobs have been pruned, the volume status will be set to Purged and the volume may then bereused when another volume is needed. If the volume is reused, it is relabeled with the same VolumeName, however all previous data will be lost.
It is also possible to ”force” pruning of all Volumes in the Pool associated with a Job by adding PruneFiles = yes to the Job resource.
16.5.3 Recycling Algorithm
After all Volumes of a Pool have been pruned (as mentioned above, this happens when a Job needs a newVolume and no appendable Volumes are available), Bareos will look for the oldest Volume that is Purged (allJobs and Files expired), and if the Recycle flag is on (Recycle=yes) for that Volume, Bareos will relabel itand write new data on it.As mentioned above, there are two key points for getting a Volume to be recycled. First, the Volume mustno longer be marked Append (there are a number of directives to automatically make this change), andsecond since the last write on the Volume, one or more of the Retention periods must have expired so thatthere are no more catalog backup job records that reference that Volume. Once both those conditions aresatisfied, the volume can be marked Purged and hence recycled.The full algorithm that Bareos uses when it needs a new Volume is:The algorithm described below assumes that AutoPrune is enabled, that Recycling is turned on, and thatyou have defined appropriate Retention periods, or used the defaults for all these items.
� If the request is for an Autochanger device, look only for Volumes in the Autochanger (i.e. withInChanger set and that have the correct Storage device).
� Search the Pool for a Volume with VolStatus=Append (if there is more than one, the Volume with theoldest date last written is chosen. If two have the same date then the one with the lowest MediaId ischosen).
� Search the Pool for a Volume with VolStatus=Recycle and the InChanger flag is set true (if there ismore than one, the Volume with the oldest date last written is chosen. If two have the same date thenthe one with the lowest MediaId is chosen).
� Try recycling any purged Volumes.
� Prune volumes applying Volume retention period (Volumes with VolStatus Full, Used, or Append arepruned). Note, even if all the File and Job records are pruned from a Volume, the Volume will not bemarked Purged until the Volume retention period expires.
� Search the Pool for a Volume with VolStatus=Purged
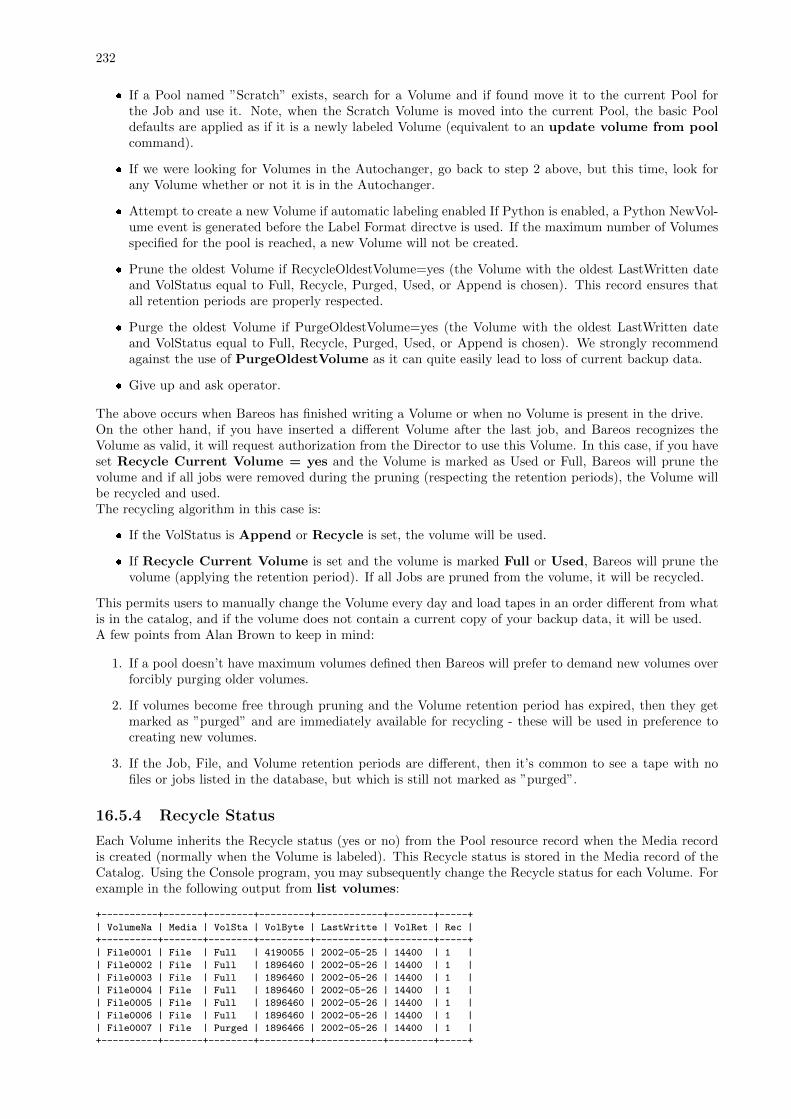
232
� If a Pool named ”Scratch” exists, search for a Volume and if found move it to the current Pool forthe Job and use it. Note, when the Scratch Volume is moved into the current Pool, the basic Pooldefaults are applied as if it is a newly labeled Volume (equivalent to an update volume from poolcommand).
� If we were looking for Volumes in the Autochanger, go back to step 2 above, but this time, look forany Volume whether or not it is in the Autochanger.
� Attempt to create a new Volume if automatic labeling enabled If Python is enabled, a Python NewVol-ume event is generated before the Label Format directve is used. If the maximum number of Volumesspecified for the pool is reached, a new Volume will not be created.
� Prune the oldest Volume if RecycleOldestVolume=yes (the Volume with the oldest LastWritten dateand VolStatus equal to Full, Recycle, Purged, Used, or Append is chosen). This record ensures thatall retention periods are properly respected.
� Purge the oldest Volume if PurgeOldestVolume=yes (the Volume with the oldest LastWritten dateand VolStatus equal to Full, Recycle, Purged, Used, or Append is chosen). We strongly recommendagainst the use of PurgeOldestVolume as it can quite easily lead to loss of current backup data.
� Give up and ask operator.
The above occurs when Bareos has finished writing a Volume or when no Volume is present in the drive.On the other hand, if you have inserted a different Volume after the last job, and Bareos recognizes theVolume as valid, it will request authorization from the Director to use this Volume. In this case, if you haveset Recycle Current Volume = yes and the Volume is marked as Used or Full, Bareos will prune thevolume and if all jobs were removed during the pruning (respecting the retention periods), the Volume willbe recycled and used.The recycling algorithm in this case is:
� If the VolStatus is Append or Recycle is set, the volume will be used.
� If Recycle Current Volume is set and the volume is marked Full or Used, Bareos will prune thevolume (applying the retention period). If all Jobs are pruned from the volume, it will be recycled.
This permits users to manually change the Volume every day and load tapes in an order different from whatis in the catalog, and if the volume does not contain a current copy of your backup data, it will be used.A few points from Alan Brown to keep in mind:
1. If a pool doesn’t have maximum volumes defined then Bareos will prefer to demand new volumes overforcibly purging older volumes.
2. If volumes become free through pruning and the Volume retention period has expired, then they getmarked as ”purged” and are immediately available for recycling - these will be used in preference tocreating new volumes.
3. If the Job, File, and Volume retention periods are different, then it’s common to see a tape with nofiles or jobs listed in the database, but which is still not marked as ”purged”.
16.5.4 Recycle Status
Each Volume inherits the Recycle status (yes or no) from the Pool resource record when the Media recordis created (normally when the Volume is labeled). This Recycle status is stored in the Media record of theCatalog. Using the Console program, you may subsequently change the Recycle status for each Volume. Forexample in the following output from list volumes:
+----------+-------+--------+---------+------------+--------+-----+
| VolumeNa | Media | VolSta | VolByte | LastWritte | VolRet | Rec |
+----------+-------+--------+---------+------------+--------+-----+
| File0001 | File | Full | 4190055 | 2002-05-25 | 14400 | 1 |
| File0002 | File | Full | 1896460 | 2002-05-26 | 14400 | 1 |
| File0003 | File | Full | 1896460 | 2002-05-26 | 14400 | 1 |
| File0004 | File | Full | 1896460 | 2002-05-26 | 14400 | 1 |
| File0005 | File | Full | 1896460 | 2002-05-26 | 14400 | 1 |
| File0006 | File | Full | 1896460 | 2002-05-26 | 14400 | 1 |
| File0007 | File | Purged | 1896466 | 2002-05-26 | 14400 | 1 |
+----------+-------+--------+---------+------------+--------+-----+
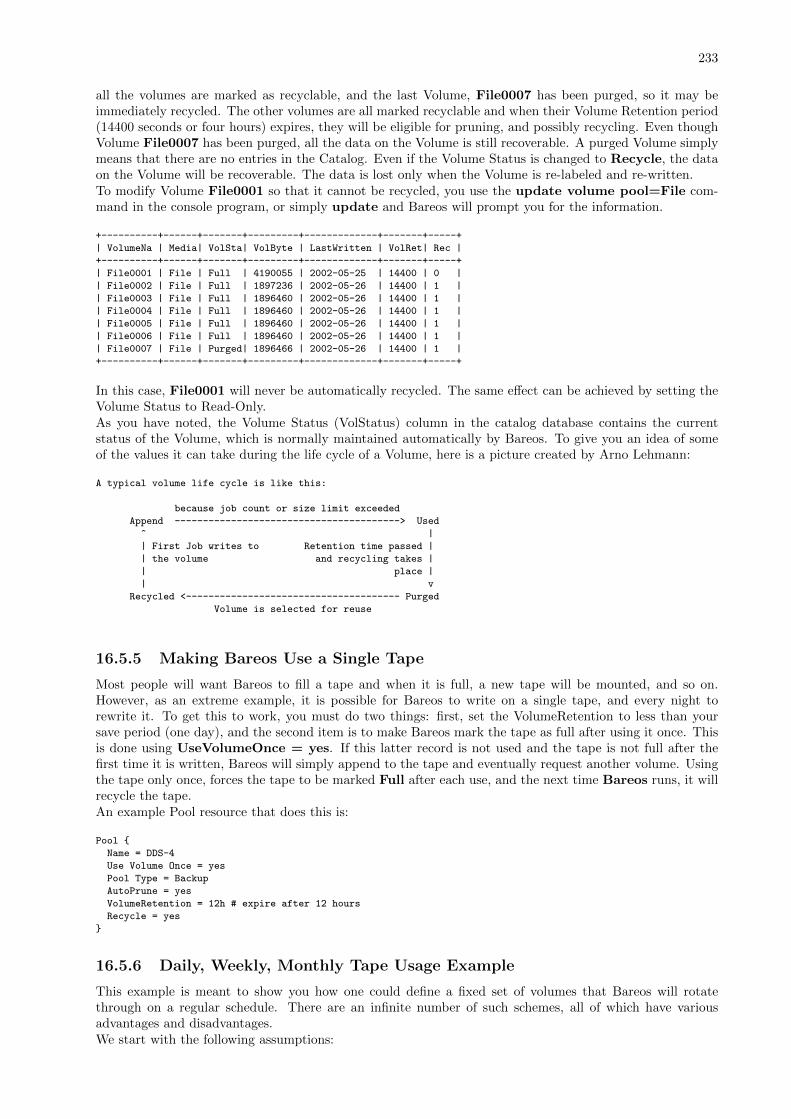
233
all the volumes are marked as recyclable, and the last Volume, File0007 has been purged, so it may beimmediately recycled. The other volumes are all marked recyclable and when their Volume Retention period(14400 seconds or four hours) expires, they will be eligible for pruning, and possibly recycling. Even thoughVolume File0007 has been purged, all the data on the Volume is still recoverable. A purged Volume simplymeans that there are no entries in the Catalog. Even if the Volume Status is changed to Recycle, the dataon the Volume will be recoverable. The data is lost only when the Volume is re-labeled and re-written.To modify Volume File0001 so that it cannot be recycled, you use the update volume pool=File com-mand in the console program, or simply update and Bareos will prompt you for the information.
+----------+------+-------+---------+-------------+-------+-----+
| VolumeNa | Media| VolSta| VolByte | LastWritten | VolRet| Rec |
+----------+------+-------+---------+-------------+-------+-----+
| File0001 | File | Full | 4190055 | 2002-05-25 | 14400 | 0 |
| File0002 | File | Full | 1897236 | 2002-05-26 | 14400 | 1 |
| File0003 | File | Full | 1896460 | 2002-05-26 | 14400 | 1 |
| File0004 | File | Full | 1896460 | 2002-05-26 | 14400 | 1 |
| File0005 | File | Full | 1896460 | 2002-05-26 | 14400 | 1 |
| File0006 | File | Full | 1896460 | 2002-05-26 | 14400 | 1 |
| File0007 | File | Purged| 1896466 | 2002-05-26 | 14400 | 1 |
+----------+------+-------+---------+-------------+-------+-----+
In this case, File0001 will never be automatically recycled. The same effect can be achieved by setting theVolume Status to Read-Only.As you have noted, the Volume Status (VolStatus) column in the catalog database contains the currentstatus of the Volume, which is normally maintained automatically by Bareos. To give you an idea of someof the values it can take during the life cycle of a Volume, here is a picture created by Arno Lehmann:
A typical volume life cycle is like this:
because job count or size limit exceeded
Append ----------------------------------------> Used
^ |
| First Job writes to Retention time passed |
| the volume and recycling takes |
| place |
| v
Recycled <-------------------------------------- Purged
Volume is selected for reuse
16.5.5 Making Bareos Use a Single Tape
Most people will want Bareos to fill a tape and when it is full, a new tape will be mounted, and so on.However, as an extreme example, it is possible for Bareos to write on a single tape, and every night torewrite it. To get this to work, you must do two things: first, set the VolumeRetention to less than yoursave period (one day), and the second item is to make Bareos mark the tape as full after using it once. Thisis done using UseVolumeOnce = yes. If this latter record is not used and the tape is not full after thefirst time it is written, Bareos will simply append to the tape and eventually request another volume. Usingthe tape only once, forces the tape to be marked Full after each use, and the next time Bareos runs, it willrecycle the tape.An example Pool resource that does this is:
Pool {
Name = DDS-4
Use Volume Once = yes
Pool Type = Backup
AutoPrune = yes
VolumeRetention = 12h # expire after 12 hours
Recycle = yes
}
16.5.6 Daily, Weekly, Monthly Tape Usage Example
This example is meant to show you how one could define a fixed set of volumes that Bareos will rotatethrough on a regular schedule. There are an infinite number of such schemes, all of which have variousadvantages and disadvantages.We start with the following assumptions:

234
� A single tape has more than enough capacity to do a full save.
� There are ten tapes that are used on a daily basis for incremental backups. They are prelabeled Daily1... Daily10.
� There are four tapes that are used on a weekly basis for full backups. They are labeled Week1 ...Week4.
� There are 12 tapes that are used on a monthly basis for full backups. They are numbered Month1 ...Month12
� A full backup is done every Saturday evening (tape inserted Friday evening before leaving work).
� No backups are done over the weekend (this is easy to change).
� The first Friday of each month, a Monthly tape is used for the Full backup.
� Incremental backups are done Monday - Friday (actually Tue-Fri mornings).
We start the system by doing a Full save to one of the weekly volumes or one of the monthly volumes. Thenext morning, we remove the tape and insert a Daily tape. Friday evening, we remove the Daily tape andinsert the next tape in the Weekly series. Monday, we remove the Weekly tape and re-insert the Daily tape.On the first Friday of the next month, we insert the next Monthly tape in the series rather than a Weeklytape, then continue. When a Daily tape finally fills up, Bareos will request the next one in the series, andthe next day when you notice the email message, you will mount it and Bareos will finish the unfinishedincremental backup.What does this give? Well, at any point, you will have the last complete Full save plus several Incrementalsaves. For any given file you want to recover (or your whole system), you will have a copy of that file everyday for at least the last 14 days. For older versions, you will have at least three and probably four Fridayfull saves of that file, and going back further, you will have a copy of that file made on the beginning of themonth for at least a year.So you have copies of any file (or your whole system) for at least a year, but as you go back in time, thetime between copies increases from daily to weekly to monthly.What would the Bareos configuration look like to implement such a scheme?
Schedule {
Name = "NightlySave"
Run = Level=Full Pool=Monthly 1st sat at 03:05
Run = Level=Full Pool=Weekly 2nd-5th sat at 03:05
Run = Level=Incremental Pool=Daily tue-fri at 03:05
}
Job {
Name = "NightlySave"
Type = Backup
Level = Full
Client = LocalMachine
FileSet = "File Set"
Messages = Standard
Storage = DDS-4
Pool = Daily
Schedule = "NightlySave"
}
# Definition of file storage device
Storage {
Name = DDS-4
Address = localhost
SDPort = 9103
Password = XXXXXXXXXXXXX
Device = FileStorage
Media Type = 8mm
}
FileSet {
Name = "File Set"
Include {
Options {
signature=MD5
}
File = fffffffffffffffff
}
Exclude { File=*.o }

235
}
Pool {
Name = Daily
Pool Type = Backup
AutoPrune = yes
VolumeRetention = 10d # recycle in 10 days
Maximum Volumes = 10
Recycle = yes
}
Pool {
Name = Weekly
Use Volume Once = yes
Pool Type = Backup
AutoPrune = yes
VolumeRetention = 30d # recycle in 30 days (default)
Recycle = yes
}
Pool {
Name = Monthly
Use Volume Once = yes
Pool Type = Backup
AutoPrune = yes
VolumeRetention = 365d # recycle in 1 year
Recycle = yes
}
16.5.7 Automatic Pruning and Recycling Example
Perhaps the best way to understand the various resource records that come into play during automaticpruning and recycling is to run a Job that goes through the whole cycle. If you add the following resourcesto your Director’s configuration file:
Schedule {
Name = "30 minute cycle"
Run = Level=Full Pool=File Messages=Standard Storage=File
hourly at 0:05
Run = Level=Full Pool=File Messages=Standard Storage=File
hourly at 0:35
}
Job {
Name = "Filetest"
Type = Backup
Level = Full
Client=XXXXXXXXXX
FileSet="Test Files"
Messages = Standard
Storage = File
Pool = File
Schedule = "30 minute cycle"
}
# Definition of file storage device
Storage {
Name = File
Address = XXXXXXXXXXX
SDPort = 9103
Password = XXXXXXXXXXXXX
Device = FileStorage
Media Type = File
}
FileSet {
Name = "File Set"
Include {
Options {
signature=MD5
}
File = fffffffffffffffff
}
Exclude { File=*.o }
}
Pool {
Name = File
Use Volume Once = yes
Pool Type = Backup
LabelFormat = "File"
236
AutoPrune = yes
VolumeRetention = 4h
Maximum Volumes = 12
Recycle = yes
}
Where you will need to replace the ffffffffff’s by the appropriate files to be saved for your configuration. Forthe FileSet Include, choose a directory that has one or two megabytes maximum since there will probablybe approximately eight copies of the directory that Bareos will cycle through.In addition, you will need to add the following to your Storage daemon’s configuration file:
Device {
Name = FileStorage
Media Type = File
Archive Device = /tmp
LabelMedia = yes;
Random Access = Yes;
AutomaticMount = yes;
RemovableMedia = no;
AlwaysOpen = no;
}
With the above resources, Bareos will start a Job every half hour that saves a copy of the directory youchose to /tmp/File0001 ... /tmp/File0012. After 4 hours, Bareos will start recycling the backup Volumes(/tmp/File0001 ...). You should see this happening in the output produced. Bareos will automatically createthe Volumes (Files) the first time it uses them.To turn it off, either delete all the resources you’ve added, or simply comment out the Schedule record inthe Job resource.
16.5.8 Manually Recycling Volumes
Although automatic recycling of Volumes is implemented (see the Automatic Volume Recycling chapter ofthis manual), you may want to manually force reuse (recycling) of a Volume.Assuming that you want to keep the Volume name, but you simply want to write new data on the tape, thesteps to take are:
� Use the update volume command in the Console to ensure that the Recycle field is set to 1
� Use the purge jobs volume command in the Console to mark the Volume as Purged. Check byusing list volumes.
Once the Volume is marked Purged, it will be recycled the next time a Volume is needed.If you wish to reuse the tape by giving it a new name, follow the following steps:
� Use the purge jobs volume command in the Console to mark the Volume as Purged. Check byusing list volumes .
� Use the Console relabel command to relabel the Volume.
Please note that the relabel command applies only to tape Volumes.For Bareos versions prior to 1.30 or to manually relabel the Volume, use the instructions below:
� Use the delete volume command in the Console to delete the Volume from the Catalog.
� If a different tape is mounted, use the unmount command, remove the tape, and insert the tape tobe renamed.
� Write an EOF mark in the tape using the following commands:
mt -f /dev/nst0 rewind
mt -f /dev/nst0 weof
where you replace /dev/nst0 with the appropriate device name on your system.
� Use the label command to write a new label to the tape and to enter it in the catalog.
Please be aware that the delete command can be dangerous. Once it is done, to recover the File records, youmust either restore your database as it was before the delete command, or use the bscan utility programto scan the tape and recreate the database entries.
Chapter 17
Automated Disk Backup
If you manage five or ten machines and have a nice tape backup, you don’t need Pools, and you may wonderwhat they are good for. In this chapter, you will see that Pools can help you optimize disk storage space.The same techniques can be applied to a shop that has multiple tape drives, or that wants to mount variousdifferent Volumes to meet their needs.
The rest of this chapter will give an example involving backup to disk Volumes, but most of the informationapplies equally well to tape Volumes.
Given is a scenario, where the size of a full backup is about 15GB.
It is required, that backup data is available for six months. Old files should be available on a daily basisfor a week, a weekly basis for a month, then monthly for six months. In addition, offsite capability is notneeded. The daily changes amount to about 300MB on the average, or about 2GB per week.
As a consequence, the total volume of data they need to keep to meet their needs is about 100GB (15GB x6 + 2GB x 5 + 0.3 x 7) = 102.1GB.
The chosen solution was to use a 120GB hard disk – far less than 1/10th the price of a tape drive and thecassettes to handle the same amount of data, and to have the backup software write to disk files.
The rest of this chapter will explain how to setup Bareos so that it would automatically manage a set ofdisk files with the minimum sysadmin intervention.
17.1 Overall Design
Getting Bareos to write to disk rather than tape in the simplest case is rather easy.
One needs to consider about what happens if we have only a single large Bareos Volume defined on ourhard disk. Everything works fine until the Volume fills, then Bareos will ask you to mount a new Volume.This same problem applies to the use of tape Volumes if your tape fills. Being a hard disk and the only oneyou have, this will be a bit of a problem. It should be obvious that it is better to use a number of smallerVolumes and arrange for Bareos to automatically recycle them so that the disk storage space can be reused.
As mentioned, the solution is to have multiple Volumes, or files on the disk. To do so, we need to limit theuse and thus the size of a single Volume, by time, by number of jobs, or by size. Any of these would work,but we chose to limit the use of a single Volume by putting a single job in each Volume with the exceptionof Volumes containing Incremental backup where there will be 6 jobs (a week’s worth of data) per volume.The details of this will be discussed shortly. This is a single client backup, so if you have multiple clientsyou will need to multiply those numbers by the number of clients, or use a different system for switchingvolumes, such as limiting the volume size.
TODO: This chapter will get rewritten. Instead of limiting a Volume to one job, we will utilizeMax Use Duration = 24 hours . This prevents problems when adding more clients, because otherwiseeach job has to run seperat.
The next problem to resolve is recycling of Volumes. As you noted from above, the requirements are to beable to restore monthly for 6 months, weekly for a month, and daily for a week. So to simplify things, whynot do a Full save once a month, a Differential save once a week, and Incremental saves daily. Now sinceeach of these different kinds of saves needs to remain valid for differing periods, the simplest way to do this(and possibly the only) is to have a separate Pool for each backup type.
The decision was to use three Pools: one for Full saves, one for Differential saves, and one for Incrementalsaves, and each would have a different number of volumes and a different Retention period to accomplishthe requirements.
237

238
17.1.1 Full Pool
Putting a single Full backup on each Volume, will require six Full save Volumes, and a retention period ofsix months. The Pool needed to do that is:
Pool {
Name = Full-Pool
Pool Type = Backup
Recycle = yes
AutoPrune = yes
Volume Retention = 6 months
Maximum Volume Jobs = 1
Label Format = Full-
Maximum Volumes = 9
}
Configuration 17.1: Full-Pool
Since these are disk Volumes, no space is lost by having separate Volumes for each backup (done once amonth in this case). The items to note are the retention period of six months (i.e. they are recycled aftersix months), that there is one job per volume (Maximum Volume Jobs = 1), the volumes will be labeledFull-0001, ... Full-0006 automatically. One could have labeled these manually from the start, but why notuse the features of Bareos.Six months after the first volume is used, it will be subject to pruning and thus recycling, so with a maximumof 9 volumes, there should always be 3 volumes available (note, they may all be marked used, but they willbe marked purged and recycled as needed).If you have two clients, you would want to set Maximum Volume Jobs to 2 instead of one, or set a limiton the size of the Volumes, and possibly increase the maximum number of Volumes.
17.1.2 Differential Pool
For the Differential backup Pool, we choose a retention period of a bit longer than a month and ensure thatthere is at least one Volume for each of the maximum of five weeks in a month. So the following works:
Pool {
Name = Diff-Pool
Pool Type = Backup
Recycle = yes
AutoPrune = yes
Volume Retention = 40 days
Maximum Volume Jobs = 1
Label Format = Diff-
Maximum Volumes = 10
}
Configuration 17.2: Differential Pool
As you can see, the Differential Pool can grow to a maximum of 9 volumes, and the Volumes are retained40 days and thereafter they can be recycled. Finally there is one job per volume. This, of course, could betightened up a lot, but the expense here is a few GB which is not too serious.If a new volume is used every week, after 40 days, one will have used 7 volumes, and there should thenalways be 3 volumes that can be purged and recycled.See the discussion above concering the Full pool for how to handle multiple clients.
17.1.3 Incremental Pool
Finally, here is the resource for the Incremental Pool:
Pool {
Name = Inc-Pool
Pool Type = Backup
Recycle = yes
AutoPrune = yes
Volume Retention = 20 days
Maximum Volume Jobs = 6
Label Format = Inc-
Maximum Volumes = 7
}
Configuration 17.3: Incremental Pool
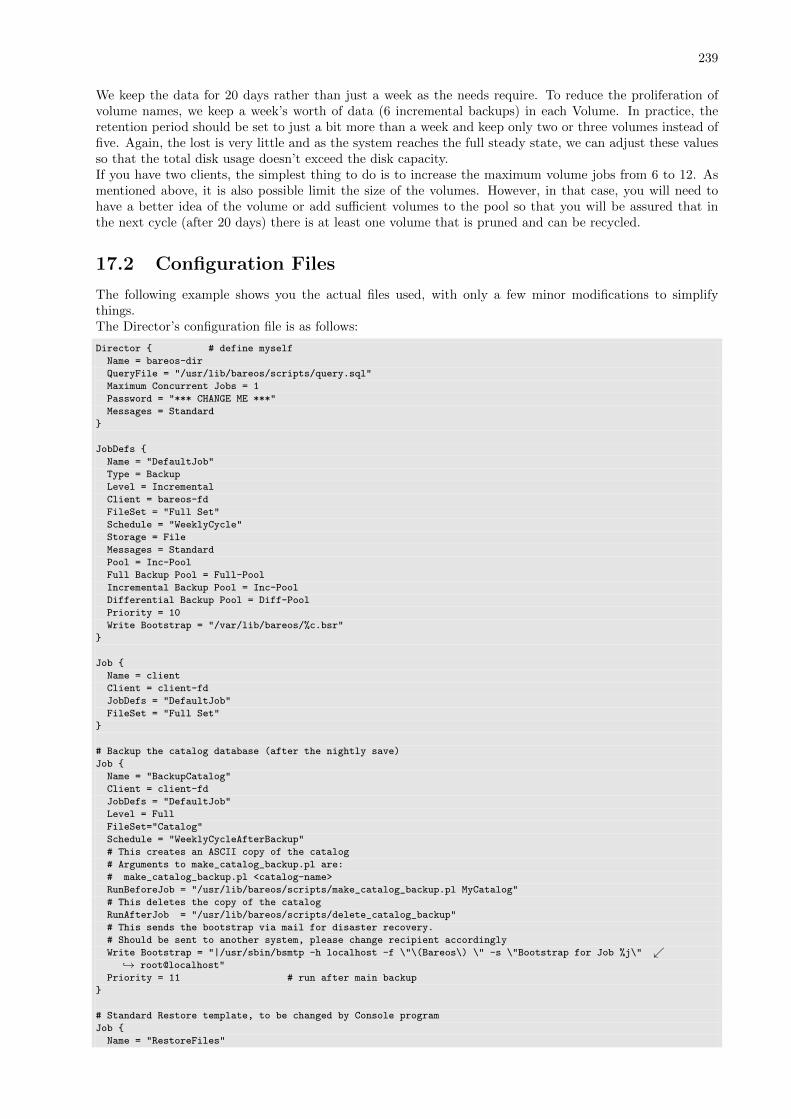
239
We keep the data for 20 days rather than just a week as the needs require. To reduce the proliferation ofvolume names, we keep a week’s worth of data (6 incremental backups) in each Volume. In practice, theretention period should be set to just a bit more than a week and keep only two or three volumes instead offive. Again, the lost is very little and as the system reaches the full steady state, we can adjust these valuesso that the total disk usage doesn’t exceed the disk capacity.If you have two clients, the simplest thing to do is to increase the maximum volume jobs from 6 to 12. Asmentioned above, it is also possible limit the size of the volumes. However, in that case, you will need tohave a better idea of the volume or add sufficient volumes to the pool so that you will be assured that inthe next cycle (after 20 days) there is at least one volume that is pruned and can be recycled.
17.2 Configuration Files
The following example shows you the actual files used, with only a few minor modifications to simplifythings.The Director’s configuration file is as follows:
Director { # define myself
Name = bareos-dir
QueryFile = "/usr/lib/bareos/scripts/query.sql"
Maximum Concurrent Jobs = 1
Password = "*** CHANGE ME ***"
Messages = Standard
}
JobDefs {
Name = "DefaultJob"
Type = Backup
Level = Incremental
Client = bareos-fd
FileSet = "Full Set"
Schedule = "WeeklyCycle"
Storage = File
Messages = Standard
Pool = Inc-Pool
Full Backup Pool = Full-Pool
Incremental Backup Pool = Inc-Pool
Differential Backup Pool = Diff-Pool
Priority = 10
Write Bootstrap = "/var/lib/bareos/%c.bsr"
}
Job {
Name = client
Client = client-fd
JobDefs = "DefaultJob"
FileSet = "Full Set"
}
# Backup the catalog database (after the nightly save)
Job {
Name = "BackupCatalog"
Client = client-fd
JobDefs = "DefaultJob"
Level = Full
FileSet="Catalog"
Schedule = "WeeklyCycleAfterBackup"
# This creates an ASCII copy of the catalog
# Arguments to make_catalog_backup.pl are:
# make_catalog_backup.pl <catalog-name>
RunBeforeJob = "/usr/lib/bareos/scripts/make_catalog_backup.pl MyCatalog"
# This deletes the copy of the catalog
RunAfterJob = "/usr/lib/bareos/scripts/delete_catalog_backup"
# This sends the bootstrap via mail for disaster recovery.
# Should be sent to another system, please change recipient accordingly
Write Bootstrap = "|/usr/sbin/bsmtp -h localhost -f \"\(Bareos\) \" -s \"Bootstrap for Job %j\" ↙↪→ root@localhost"
Priority = 11 # run after main backup
}
# Standard Restore template, to be changed by Console program
Job {
Name = "RestoreFiles"
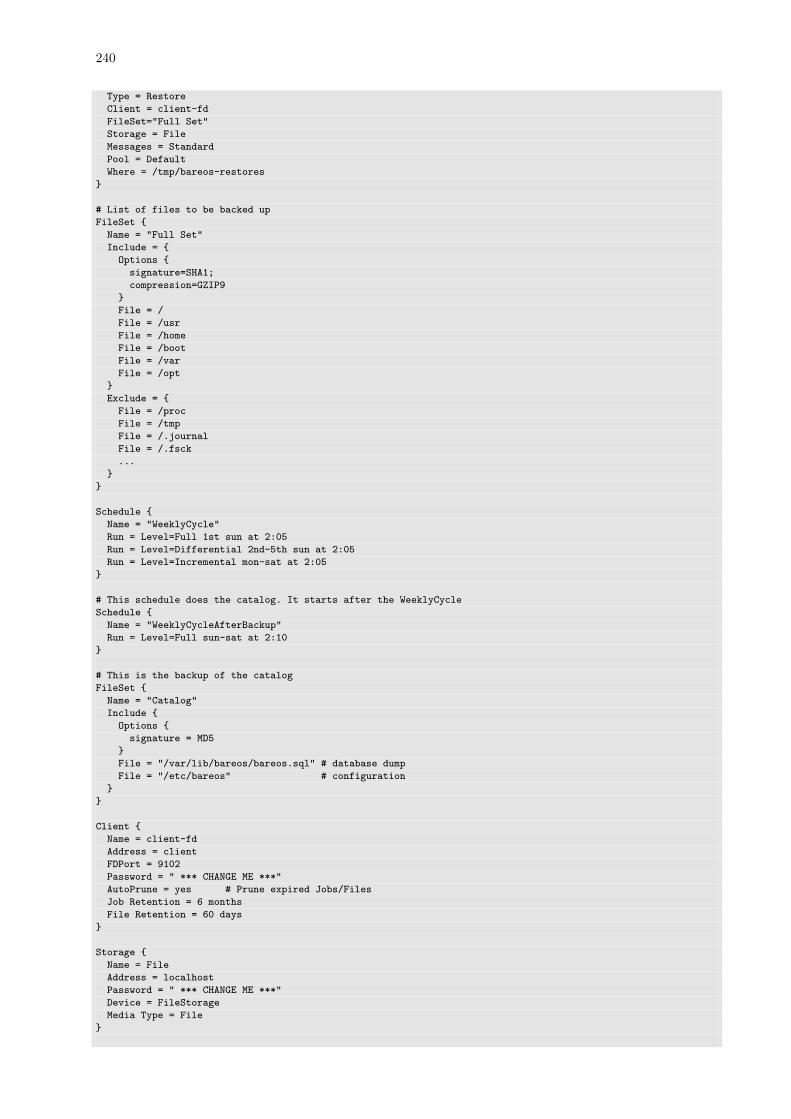
240
Type = Restore
Client = client-fd
FileSet="Full Set"
Storage = File
Messages = Standard
Pool = Default
Where = /tmp/bareos-restores
}
# List of files to be backed up
FileSet {
Name = "Full Set"
Include = {
Options {
signature=SHA1;
compression=GZIP9
}
File = /
File = /usr
File = /home
File = /boot
File = /var
File = /opt
}
Exclude = {
File = /proc
File = /tmp
File = /.journal
File = /.fsck
...
}
}
Schedule {
Name = "WeeklyCycle"
Run = Level=Full 1st sun at 2:05
Run = Level=Differential 2nd-5th sun at 2:05
Run = Level=Incremental mon-sat at 2:05
}
# This schedule does the catalog. It starts after the WeeklyCycle
Schedule {
Name = "WeeklyCycleAfterBackup"
Run = Level=Full sun-sat at 2:10
}
# This is the backup of the catalog
FileSet {
Name = "Catalog"
Include {
Options {
signature = MD5
}
File = "/var/lib/bareos/bareos.sql" # database dump
File = "/etc/bareos" # configuration
}
}
Client {
Name = client-fd
Address = client
FDPort = 9102
Password = " *** CHANGE ME ***"
AutoPrune = yes # Prune expired Jobs/Files
Job Retention = 6 months
File Retention = 60 days
}
Storage {
Name = File
Address = localhost
Password = " *** CHANGE ME ***"
Device = FileStorage
Media Type = File
}
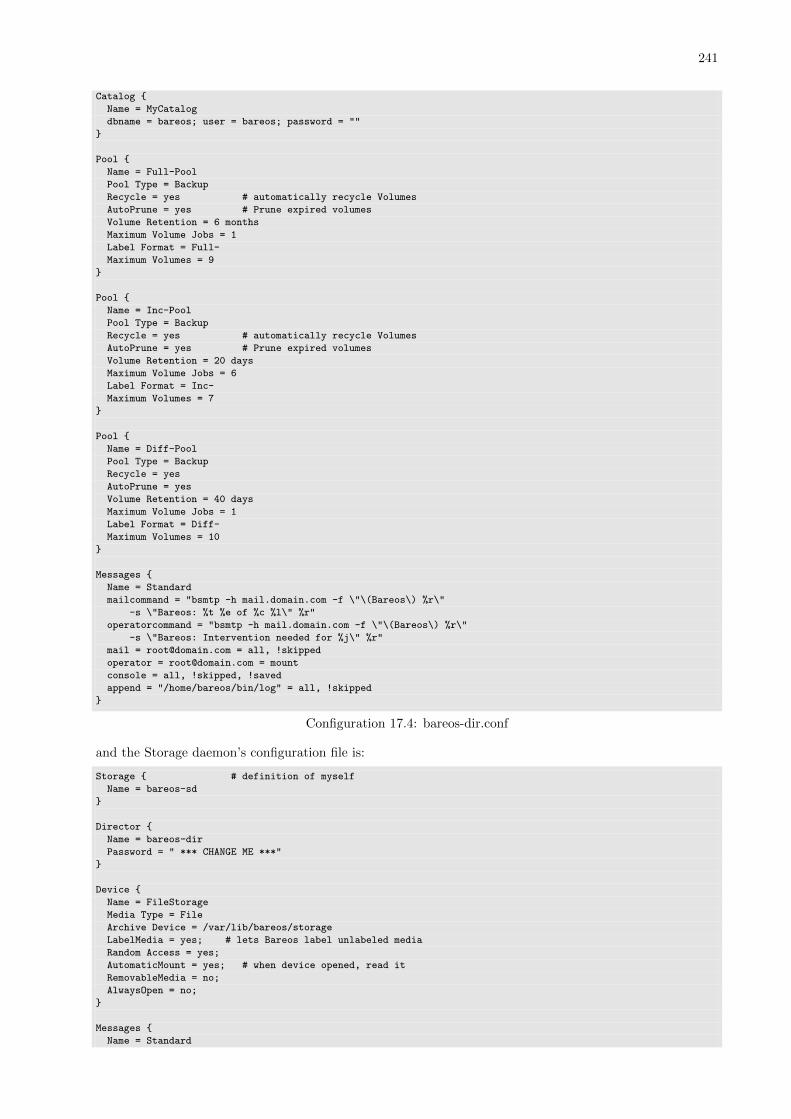
241
Catalog {
Name = MyCatalog
dbname = bareos; user = bareos; password = ""
}
Pool {
Name = Full-Pool
Pool Type = Backup
Recycle = yes # automatically recycle Volumes
AutoPrune = yes # Prune expired volumes
Volume Retention = 6 months
Maximum Volume Jobs = 1
Label Format = Full-
Maximum Volumes = 9
}
Pool {
Name = Inc-Pool
Pool Type = Backup
Recycle = yes # automatically recycle Volumes
AutoPrune = yes # Prune expired volumes
Volume Retention = 20 days
Maximum Volume Jobs = 6
Label Format = Inc-
Maximum Volumes = 7
}
Pool {
Name = Diff-Pool
Pool Type = Backup
Recycle = yes
AutoPrune = yes
Volume Retention = 40 days
Maximum Volume Jobs = 1
Label Format = Diff-
Maximum Volumes = 10
}
Messages {
Name = Standard
mailcommand = "bsmtp -h mail.domain.com -f \"\(Bareos\) %r\"
-s \"Bareos: %t %e of %c %l\" %r"
operatorcommand = "bsmtp -h mail.domain.com -f \"\(Bareos\) %r\"
-s \"Bareos: Intervention needed for %j\" %r"
mail = [email protected] = all, !skipped
operator = [email protected] = mount
console = all, !skipped, !saved
append = "/home/bareos/bin/log" = all, !skipped
}
Configuration 17.4: bareos-dir.conf
and the Storage daemon’s configuration file is:
Storage { # definition of myself
Name = bareos-sd
}
Director {
Name = bareos-dir
Password = " *** CHANGE ME ***"
}
Device {
Name = FileStorage
Media Type = File
Archive Device = /var/lib/bareos/storage
LabelMedia = yes; # lets Bareos label unlabeled media
Random Access = yes;
AutomaticMount = yes; # when device opened, read it
RemovableMedia = no;
AlwaysOpen = no;
}
Messages {
Name = Standard

242
director = bareos-dir = all
}
Configuration 17.5: bareos-sd.conf
Chapter 18
Autochanger Support
Bareos provides autochanger support for reading and writing tapes. In order to work with an autochanger,Bareos requires a number of things, each of which is explained in more detail after this list:
� The package bareos-storage-tape must be installed.
� A script that actually controls the autochanger according to commands sent by Bareos. Bareos containsthe script mtx-changer, that utilize the command mtx. It’s config file is normally located at /etc/
bareos/mtx-changer.conf
� That each Volume (tape) to be used must be defined in the Catalog and have a Slot number assignedto it so that Bareos knows where the Volume is in the autochanger. This is generally done with thelabel command, but can also done after the tape is labeled using the update slots command. Seebelow for more details. You must pre-label the tapes manually before using them.
� Modifications to your Storage daemon’s Device configuration resource to identify that the device is achanger, as well as a few other parameters.
� You should also modify your Storage resource definition in the Director’s configuration file so that youare automatically prompted for the Slot when labeling a Volume.
� You need to ensure that your Storage daemon has access permissions to both the tape drive and thecontrol device. On Linux, the system user bareos is added to the groups disk and tape, so that itshould have the permission to access the library.
� You need to have Autochanger = yes in your Storage resource in your bareos-dir.conf file so thatyou will be prompted for the slot number when you label Volumes.
Bareos uses its own mtx-changer script to interface with a program that actually does the tape changing.Thus in principle, mtx-changer can be adapted to function with any autochanger program, or you can callany other script or program. The current version of mtx-changer works with the mtx program. FreeBSDusers might need to adapt this script to use chio. For more details, refer to the Testing Autochanger chapter.Bareos also supports autochangers with barcode readers. This support includes two Console commands:label barcodes and update slots. For more details on these commands, see the chapter about BarcodeSupport.Current Bareos autochanger support does not include cleaning, stackers, or silos. Stackers and silos are notsupported because Bareos expects to be able to access the Slots randomly. However, if you are very carefulto setup Bareos to access the Volumes in the autochanger sequentially, you may be able to make Bareoswork with stackers (gravity feed and such).In principle, if mtx will operate your changer correctly, then it is just a question of adapting the mtx-changer script (or selecting one already adapted) for proper interfacing.If you are having troubles, please use the auto command in the btape program to test the functioning ofyour autochanger with Bareos. Please remember, that on most distributions, the Storage daemon runs asuser bareos and not as root. You will need to ensure that the Storage daemon has sufficient permissionsto access the autochanger.Some users have reported that the the Storage daemon blocks under certain circumstances in trying to mounta volume on a drive that has a different volume loaded. As best we can determine, this is simply a matterof waiting a bit. The drive was previously in use writing a Volume, and sometimes the drive will remainBLOCKED for a good deal of time (up to 7 minutes on a slow drive) waiting for the cassette to rewind andto unload before the drive can be used with a different Volume.
243
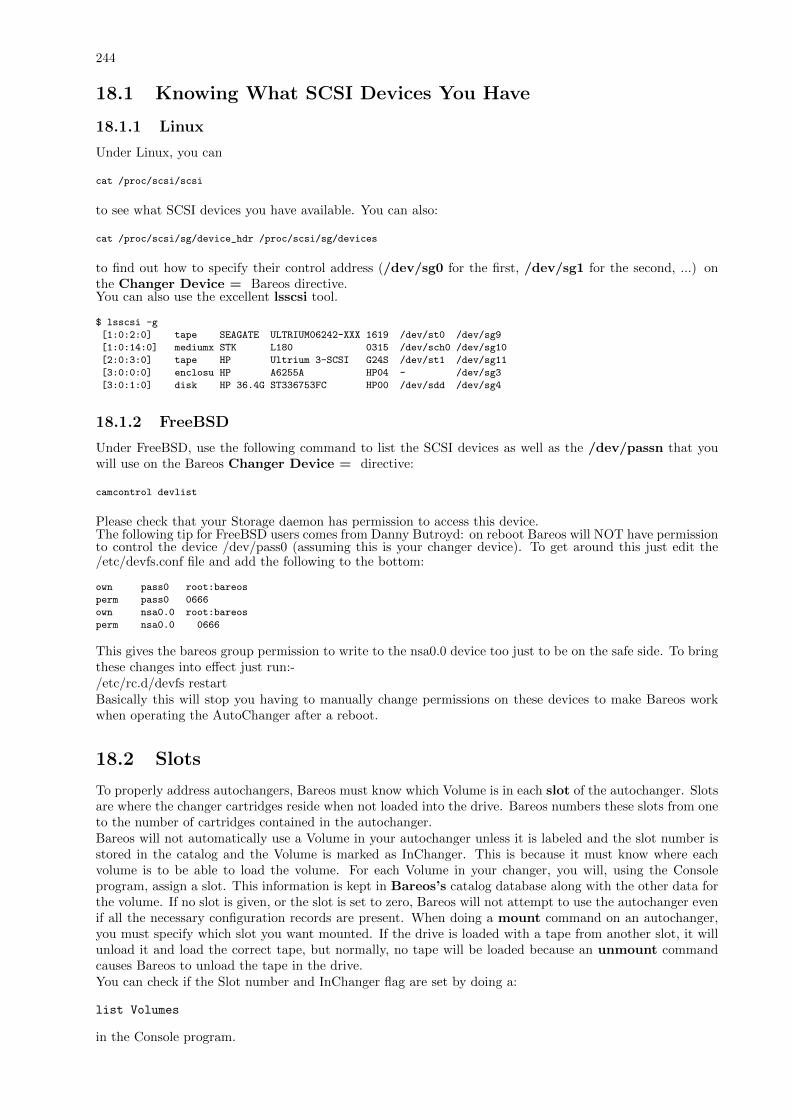
244
18.1 Knowing What SCSI Devices You Have
18.1.1 Linux
Under Linux, you can
cat /proc/scsi/scsi
to see what SCSI devices you have available. You can also:
cat /proc/scsi/sg/device_hdr /proc/scsi/sg/devices
to find out how to specify their control address (/dev/sg0 for the first, /dev/sg1 for the second, ...) onthe Changer Device = Bareos directive.You can also use the excellent lsscsi tool.
$ lsscsi -g
[1:0:2:0] tape SEAGATE ULTRIUM06242-XXX 1619 /dev/st0 /dev/sg9
[1:0:14:0] mediumx STK L180 0315 /dev/sch0 /dev/sg10
[2:0:3:0] tape HP Ultrium 3-SCSI G24S /dev/st1 /dev/sg11
[3:0:0:0] enclosu HP A6255A HP04 - /dev/sg3
[3:0:1:0] disk HP 36.4G ST336753FC HP00 /dev/sdd /dev/sg4
18.1.2 FreeBSD
Under FreeBSD, use the following command to list the SCSI devices as well as the /dev/passn that youwill use on the Bareos Changer Device = directive:
camcontrol devlist
Please check that your Storage daemon has permission to access this device.The following tip for FreeBSD users comes from Danny Butroyd: on reboot Bareos will NOT have permissionto control the device /dev/pass0 (assuming this is your changer device). To get around this just edit the/etc/devfs.conf file and add the following to the bottom:
own pass0 root:bareos
perm pass0 0666
own nsa0.0 root:bareos
perm nsa0.0 0666
This gives the bareos group permission to write to the nsa0.0 device too just to be on the safe side. To bringthese changes into effect just run:-/etc/rc.d/devfs restartBasically this will stop you having to manually change permissions on these devices to make Bareos workwhen operating the AutoChanger after a reboot.
18.2 Slots
To properly address autochangers, Bareos must know which Volume is in each slot of the autochanger. Slotsare where the changer cartridges reside when not loaded into the drive. Bareos numbers these slots from oneto the number of cartridges contained in the autochanger.Bareos will not automatically use a Volume in your autochanger unless it is labeled and the slot number isstored in the catalog and the Volume is marked as InChanger. This is because it must know where eachvolume is to be able to load the volume. For each Volume in your changer, you will, using the Consoleprogram, assign a slot. This information is kept in Bareos’s catalog database along with the other data forthe volume. If no slot is given, or the slot is set to zero, Bareos will not attempt to use the autochanger evenif all the necessary configuration records are present. When doing a mount command on an autochanger,you must specify which slot you want mounted. If the drive is loaded with a tape from another slot, it willunload it and load the correct tape, but normally, no tape will be loaded because an unmount commandcauses Bareos to unload the tape in the drive.You can check if the Slot number and InChanger flag are set by doing a:
list Volumes
in the Console program.
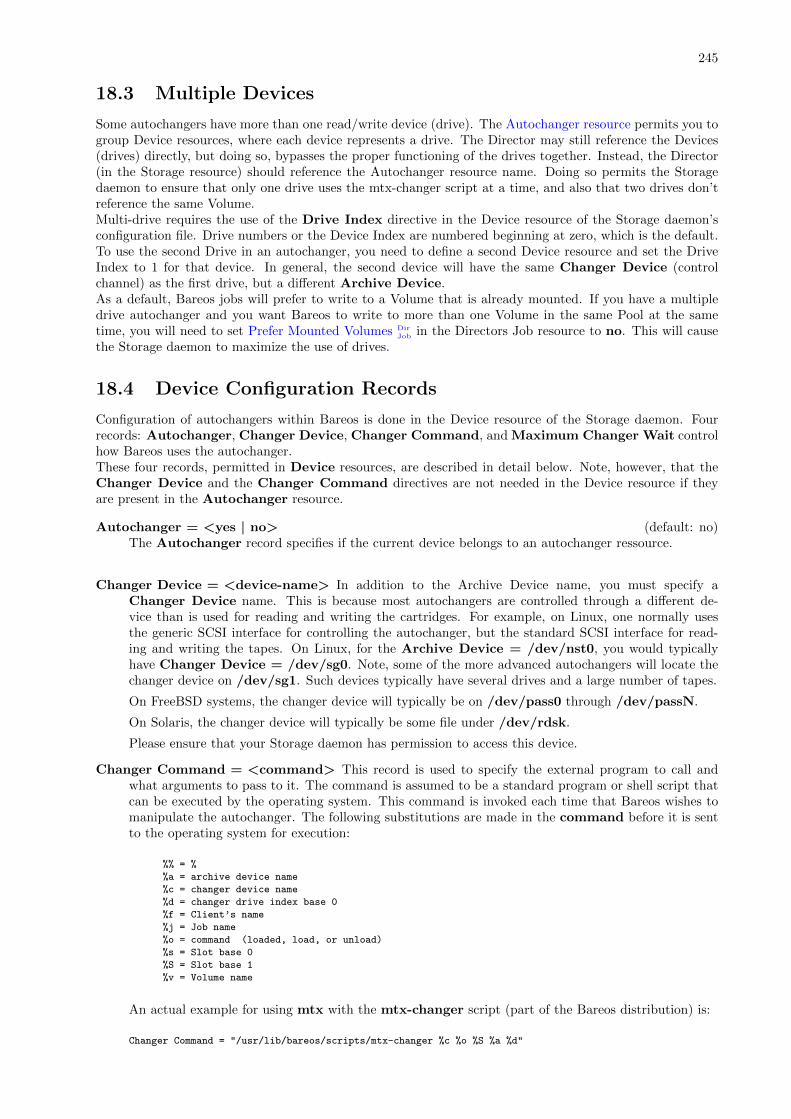
245
18.3 Multiple Devices
Some autochangers have more than one read/write device (drive). The Autochanger resource permits you togroup Device resources, where each device represents a drive. The Director may still reference the Devices(drives) directly, but doing so, bypasses the proper functioning of the drives together. Instead, the Director(in the Storage resource) should reference the Autochanger resource name. Doing so permits the Storagedaemon to ensure that only one drive uses the mtx-changer script at a time, and also that two drives don’treference the same Volume.Multi-drive requires the use of the Drive Index directive in the Device resource of the Storage daemon’sconfiguration file. Drive numbers or the Device Index are numbered beginning at zero, which is the default.To use the second Drive in an autochanger, you need to define a second Device resource and set the DriveIndex to 1 for that device. In general, the second device will have the same Changer Device (controlchannel) as the first drive, but a different Archive Device.As a default, Bareos jobs will prefer to write to a Volume that is already mounted. If you have a multipledrive autochanger and you want Bareos to write to more than one Volume in the same Pool at the sametime, you will need to set Prefer Mounted Volumes Dir
Job in the Directors Job resource to no. This will causethe Storage daemon to maximize the use of drives.
18.4 Device Configuration Records
Configuration of autochangers within Bareos is done in the Device resource of the Storage daemon. Fourrecords: Autochanger, Changer Device, Changer Command, and Maximum Changer Wait controlhow Bareos uses the autochanger.These four records, permitted in Device resources, are described in detail below. Note, however, that theChanger Device and the Changer Command directives are not needed in the Device resource if theyare present in the Autochanger resource.
Autochanger = <yes | no> (default: no)The Autochanger record specifies if the current device belongs to an autochanger ressource.
Changer Device = <device-name> In addition to the Archive Device name, you must specify aChanger Device name. This is because most autochangers are controlled through a different de-vice than is used for reading and writing the cartridges. For example, on Linux, one normally usesthe generic SCSI interface for controlling the autochanger, but the standard SCSI interface for read-ing and writing the tapes. On Linux, for the Archive Device = /dev/nst0, you would typicallyhave Changer Device = /dev/sg0. Note, some of the more advanced autochangers will locate thechanger device on /dev/sg1. Such devices typically have several drives and a large number of tapes.
On FreeBSD systems, the changer device will typically be on /dev/pass0 through /dev/passN.
On Solaris, the changer device will typically be some file under /dev/rdsk.
Please ensure that your Storage daemon has permission to access this device.
Changer Command = <command> This record is used to specify the external program to call andwhat arguments to pass to it. The command is assumed to be a standard program or shell script thatcan be executed by the operating system. This command is invoked each time that Bareos wishes tomanipulate the autochanger. The following substitutions are made in the command before it is sentto the operating system for execution:
%% = %
%a = archive device name
%c = changer device name
%d = changer drive index base 0
%f = Client’s name
%j = Job name
%o = command (loaded, load, or unload)
%s = Slot base 0
%S = Slot base 1
%v = Volume name
An actual example for using mtx with the mtx-changer script (part of the Bareos distribution) is:
Changer Command = "/usr/lib/bareos/scripts/mtx-changer %c %o %S %a %d"
246
Details of the three commands currently used by Bareos (loaded, load, unload) as well as the outputexpected by Bareos are given in the Bareos Autochanger Interface section.
Maximum Changer Wait = <time> This record is used to define the maximum amount of time thatBareos will wait for an autoloader to respond to a command (e.g. load). The default is set to 120seconds. If you have a slow autoloader you may want to set it longer.
If the autoloader program fails to respond in this time, it will be killed and Bareos will request operatorintervention.
Drive Index = <number> This record allows you to tell Bareos to use the second or subsequent drivein an autochanger with multiple drives. Since the drives are numbered from zero, the second drive isdefined by
Device Index = 1
To use the second drive, you need a second Device resource definition in the Bareos configuration file.See the Multiple Drive section above in this chapter for more information.
In addition, for proper functioning of the Autochanger, you must define an Autochanger resource.
18.5 An Example Configuration File
The following two resources implement an autochanger:
Autochanger {
Name = Autochanger
Device = DDS-4
Changer Command = "/usr/lib/bareos/scripts/mtx-changer %c %o %S %a %d"
Changer Device = /dev/sg0
}
Device {
Name = DDS-4
Media Type = DDS-4
Archive Device = /dev/nst0 # Normal archive device
Autochanger = yes
LabelMedia = no;
AutomaticMount = yes;
AlwaysOpen = yes;
}
where you will adapt the Archive Device, the Changer Device, and the path to the Changer Commandto correspond to the values used on your system.
18.6 A Multi-drive Example Configuration File
The following resources implement a multi-drive autochanger:
Autochanger {
Name = Autochanger
Device = Drive-0
Device = Drive-1
Changer Command = "/usr/lib/bareos/scripts/mtx-changer %c %o %S %a %d"
Changer Device = /dev/sg0
}
Device {
Name = Drive-0
Drive Index = 0
Media Type = DDS-4
Archive Device = /dev/nst0 # Normal archive device
Autochanger = yes
LabelMedia = no;
AutomaticMount = yes;
AlwaysOpen = yes;
}
247
Device {
Name = Drive-1
Drive Index = 1
Media Type = DDS-4
Archive Device = /dev/nst1 # Normal archive device
Autochanger = yes
LabelMedia = no;
AutomaticMount = yes;
AlwaysOpen = yes;
}
where you will adapt the Archive Device and the Changer Device to correspond to the values used onyour system.
18.7 Specifying Slots When Labeling
If you add an Autochanger = yes record to the Storage resource in your Director’s configuration file, theBareos Console will automatically prompt you for the slot number when the Volume is in the changer whenyou add or label tapes for that Storage device. If your mtx-changer script is properly installed, Bareoswill automatically load the correct tape during the label command.
You must also set Autochanger = yes in the Storage daemon’s Device resource as we have described abovein order for the autochanger to be used. Please see the Auto Changer Dir
Storage in the Director’s chapter andthe Autochanger Sd
Device in the Storage daemon chapter for more details on these records.
Thus all stages of dealing with tapes can be totally automated. It is also possible to set or change the Slotusing the update command in the Console and selecting Volume Parameters to update.
Even though all the above configuration statements are specified and correct, Bareos will attempt to accessthe autochanger only if a slot is non-zero in the catalog Volume record (with the Volume name).If your autochanger has barcode labels, you can label all the Volumes in your autochanger one after anotherby using the label barcodes command. For each tape in the changer containing a barcode, Bareos willmount the tape and then label it with the same name as the barcode. An appropriate Media record willalso be created in the catalog. Any barcode that begins with the same characters as specified on the”CleaningPrefix=xxx” command, will be treated as a cleaning tape, and will not be labeled. For examplewith:
Pool {
Name ...
Cleaning Prefix = "CLN"
}
Any slot containing a barcode of CLNxxxx will be treated as a cleaning tape and will not be mounted.
18.8 Changing Cartridges
If you wish to insert or remove cartridges in your autochanger or you manually run the mtx program, youmust first tell Bareos to release the autochanger by doing:
unmount
(change cartridges and/or run mtx)
mount
If you do not do the unmount before making such a change, Bareos will become completely confused aboutwhat is in the autochanger and may stop function because it expects to have exclusive use of the autochangerwhile it has the drive mounted.
18.9 Dealing with Multiple Magazines
If you have several magazines or if you insert or remove cartridges from a magazine, you should notify Bareosof this. By doing so, Bareos will as a preference, use Volumes that it knows to be in the autochanger beforeaccessing Volumes that are not in the autochanger. This prevents unneeded operator intervention.
If your autochanger has barcodes (machine readable tape labels), the task of informing Bareos is simple.Every time, you change a magazine, or add or remove a cartridge from the magazine, simply use followingcommands in the Console program:
248
unmount
(remove magazine)
(insert new magazine)
update slots
mount
This will cause Bareos to request the autochanger to return the current Volume names in the magazine. Thiswill be done without actually accessing or reading the Volumes because the barcode reader does this duringinventory when the autochanger is first turned on. Bareos will ensure that any Volumes that are currentlymarked as being in the magazine are marked as no longer in the magazine, and the new list of Volumeswill be marked as being in the magazine. In addition, the Slot numbers of the Volumes will be corrected inBareos’s catalog if they are incorrect (added or moved).If you do not have a barcode reader on your autochanger, you have several alternatives.
1. You can manually set the Slot and InChanger flag using the update volume command in the Console(quite painful).
2. You can issue a
update slots scan
command that will cause Bareos to read the label on each of the cartridges in the magazine in turnand update the information (Slot, InChanger flag) in the catalog. This is quite effective but does taketime to load each cartridge into the drive in turn and read the Volume label.
18.10 Update Slots Command
If you change only one cartridge in the magazine, you may not want to scan all Volumes, so the updateslots command (as well as the update slots scan command) has the additional form:
update slots=n1,n2,n3-n4, ...
where the keyword scan can be appended or not. The n1,n2, ... represent Slot numbers to be updated andthe form n3-n4 represents a range of Slot numbers to be updated (e.g. 4-7 will update Slots 4,5,6, and 7).This form is particularly useful if you want to do a scan (time expensive) and restrict the update to one ortwo slots.For example, the command:
update slots=1,6 scan
will cause Bareos to load the Volume in Slot 1, read its Volume label and update the Catalog. It will do thesame for the Volume in Slot 6. The command:
update slots=1-3,6
will read the barcoded Volume names for slots 1,2,3 and 6 and make the appropriate updates in the Catalog.If you don’t have a barcode reader the above command will not find any Volume names so will do nothing.
18.11 Using the Autochanger
Let’s assume that you have properly defined the necessary Storage daemon Device records, and you haveadded the Autochanger = yes record to the Storage resource in your Director’s configuration file.Now you fill your autochanger with say six blank tapes.What do you do to make Bareos access those tapes?One strategy is to prelabel each of the tapes. Do so by starting Bareos, then with the Console program,enter the label command:
./bconsole
Connecting to Director rufus:8101
1000 OK: rufus-dir Version: 1.26 (4 October 2002)
*label
it will then print something like:

249
Using default Catalog name=BackupDB DB=bareos
The defined Storage resources are:
1: Autochanger
2: File
Select Storage resource (1-2): 1
I select the autochanger (1), and it prints:
Enter new Volume name: TestVolume1
Enter slot (0 for none): 1
where I entered TestVolume1 for the tape name, and slot 1 for the slot. It then asks:
Defined Pools:
1: Default
2: File
Select the Pool (1-2): 1
I select the Default pool. This will be automatically done if you only have a single pool, then Bareos willproceed to unload any loaded volume, load the volume in slot 1 and label it. In this example, nothing wasin the drive, so it printed:
Connecting to Storage daemon Autochanger at localhost:9103 ...
Sending label command ...
3903 Issuing autochanger "load slot 1" command.
3000 OK label. Volume=TestVolume1 Device=/dev/nst0
Media record for Volume=TestVolume1 successfully created.
Requesting mount Autochanger ...
3001 Device /dev/nst0 is mounted with Volume TestVolume1
You have messages.
*
You may then proceed to label the other volumes. The messages will change slightly because Bareos willunload the volume (just labeled TestVolume1) before loading the next volume to be labeled.Once all your Volumes are labeled, Bareos will automatically load them as they are needed.To ”see” how you have labeled your Volumes, simply enter the list volumes command from the Consoleprogram, which should print something like the following:
*{\bf list volumes}
Using default Catalog name=BackupDB DB=bareos
Defined Pools:
1: Default
2: File
Select the Pool (1-2): 1
+-------+----------+--------+---------+-------+--------+----------+-------+------+
| MedId | VolName | MedTyp | VolStat | Bites | LstWrt | VolReten | Recyc | Slot |
+-------+----------+--------+---------+-------+--------+----------+-------+------+
| 1 | TestVol1 | DDS-4 | Append | 0 | 0 | 30672000 | 0 | 1 |
| 2 | TestVol2 | DDS-4 | Append | 0 | 0 | 30672000 | 0 | 2 |
| 3 | TestVol3 | DDS-4 | Append | 0 | 0 | 30672000 | 0 | 3 |
| ... |
+-------+----------+--------+---------+-------+--------+----------+-------+------+
18.12 Barcode Support
Bareos provides barcode support with two Console commands, label barcodes and update slots.The label barcodes will cause Bareos to read the barcodes of all the cassettes that are currently installedin the magazine (cassette holder) using the mtx-changer list command. Each cassette is mounted in turnand labeled with the same Volume name as the barcode.The update slots command will first obtain the list of cassettes and their barcodes from mtx-changer.Then it will find each volume in turn in the catalog database corresponding to the barcodes and set its Slotto correspond to the value just read. If the Volume is not in the catalog, then nothing will be done. Thiscommand is useful for synchronizing Bareos with the current magazine in case you have changed magazinesor in case you have moved cassettes from one slot to another. If the autochanger is empty, nothing will bedone.The Cleaning Prefix statement can be used in the Pool resource to define a Volume name prefix, which ifit matches that of the Volume (barcode) will cause that Volume to be marked with a VolStatus of Cleaning.This will prevent Bareos from attempting to write on the Volume.
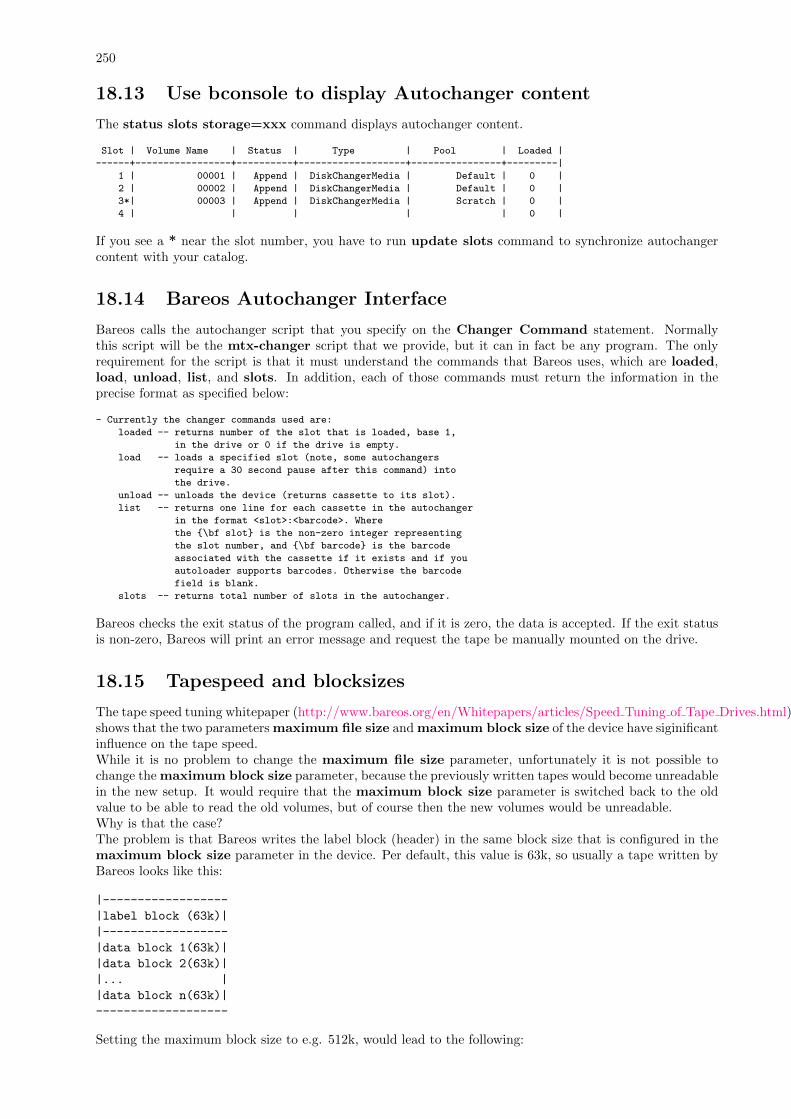
250
18.13 Use bconsole to display Autochanger content
The status slots storage=xxx command displays autochanger content.
Slot | Volume Name | Status | Type | Pool | Loaded |
------+-----------------+----------+-------------------+----------------+---------|
1 | 00001 | Append | DiskChangerMedia | Default | 0 |
2 | 00002 | Append | DiskChangerMedia | Default | 0 |
3*| 00003 | Append | DiskChangerMedia | Scratch | 0 |
4 | | | | | 0 |
If you see a * near the slot number, you have to run update slots command to synchronize autochangercontent with your catalog.
18.14 Bareos Autochanger Interface
Bareos calls the autochanger script that you specify on the Changer Command statement. Normallythis script will be the mtx-changer script that we provide, but it can in fact be any program. The onlyrequirement for the script is that it must understand the commands that Bareos uses, which are loaded,load, unload, list, and slots. In addition, each of those commands must return the information in theprecise format as specified below:
- Currently the changer commands used are:
loaded -- returns number of the slot that is loaded, base 1,
in the drive or 0 if the drive is empty.
load -- loads a specified slot (note, some autochangers
require a 30 second pause after this command) into
the drive.
unload -- unloads the device (returns cassette to its slot).
list -- returns one line for each cassette in the autochanger
in the format <slot>:<barcode>. Where
the {\bf slot} is the non-zero integer representing
the slot number, and {\bf barcode} is the barcode
associated with the cassette if it exists and if you
autoloader supports barcodes. Otherwise the barcode
field is blank.
slots -- returns total number of slots in the autochanger.
Bareos checks the exit status of the program called, and if it is zero, the data is accepted. If the exit statusis non-zero, Bareos will print an error message and request the tape be manually mounted on the drive.
18.15 Tapespeed and blocksizes
The tape speed tuning whitepaper (http://www.bareos.org/en/Whitepapers/articles/Speed Tuning of Tape Drives.html)shows that the two parameters maximum file size and maximum block size of the device have siginificantinfluence on the tape speed.While it is no problem to change the maximum file size parameter, unfortunately it is not possible tochange the maximum block size parameter, because the previously written tapes would become unreadablein the new setup. It would require that the maximum block size parameter is switched back to the oldvalue to be able to read the old volumes, but of course then the new volumes would be unreadable.Why is that the case?The problem is that Bareos writes the label block (header) in the same block size that is configured in themaximum block size parameter in the device. Per default, this value is 63k, so usually a tape written byBareos looks like this:
|------------------
|label block (63k)|
|------------------
|data block 1(63k)|
|data block 2(63k)|
|... |
|data block n(63k)|
-------------------
Setting the maximum block size to e.g. 512k, would lead to the following:
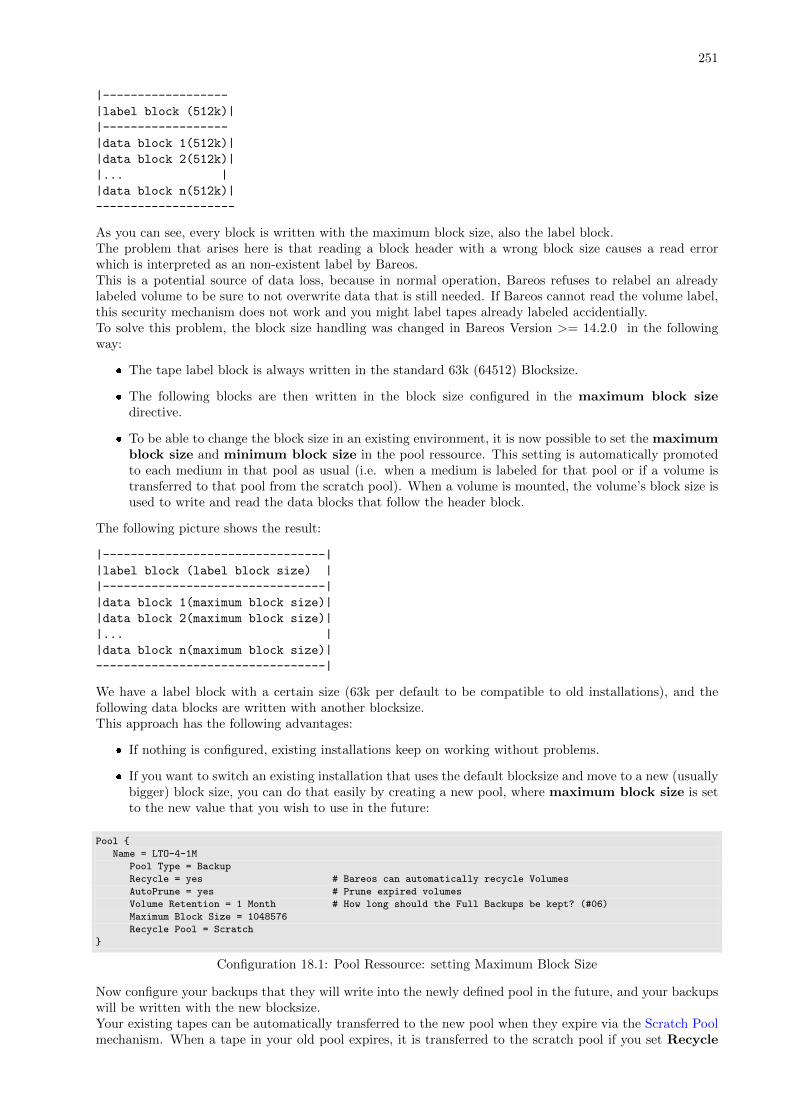
251
|------------------
|label block (512k)|
|------------------
|data block 1(512k)|
|data block 2(512k)|
|... |
|data block n(512k)|
--------------------
As you can see, every block is written with the maximum block size, also the label block.The problem that arises here is that reading a block header with a wrong block size causes a read errorwhich is interpreted as an non-existent label by Bareos.This is a potential source of data loss, because in normal operation, Bareos refuses to relabel an alreadylabeled volume to be sure to not overwrite data that is still needed. If Bareos cannot read the volume label,this security mechanism does not work and you might label tapes already labeled accidentially.To solve this problem, the block size handling was changed in Bareos Version >= 14.2.0 in the followingway:
� The tape label block is always written in the standard 63k (64512) Blocksize.
� The following blocks are then written in the block size configured in the maximum block sizedirective.
� To be able to change the block size in an existing environment, it is now possible to set the maximumblock size and minimum block size in the pool ressource. This setting is automatically promotedto each medium in that pool as usual (i.e. when a medium is labeled for that pool or if a volume istransferred to that pool from the scratch pool). When a volume is mounted, the volume’s block size isused to write and read the data blocks that follow the header block.
The following picture shows the result:
|--------------------------------|
|label block (label block size) |
|--------------------------------|
|data block 1(maximum block size)|
|data block 2(maximum block size)|
|... |
|data block n(maximum block size)|
---------------------------------|
We have a label block with a certain size (63k per default to be compatible to old installations), and thefollowing data blocks are written with another blocksize.This approach has the following advantages:
� If nothing is configured, existing installations keep on working without problems.
� If you want to switch an existing installation that uses the default blocksize and move to a new (usuallybigger) block size, you can do that easily by creating a new pool, where maximum block size is setto the new value that you wish to use in the future:
Pool {
Name = LTO-4-1M
Pool Type = Backup
Recycle = yes # Bareos can automatically recycle Volumes
AutoPrune = yes # Prune expired volumes
Volume Retention = 1 Month # How long should the Full Backups be kept? (#06)
Maximum Block Size = 1048576
Recycle Pool = Scratch
}
Configuration 18.1: Pool Ressource: setting Maximum Block Size
Now configure your backups that they will write into the newly defined pool in the future, and your backupswill be written with the new blocksize.Your existing tapes can be automatically transferred to the new pool when they expire via the Scratch Poolmechanism. When a tape in your old pool expires, it is transferred to the scratch pool if you set Recycle

252
Pool = Scratch. When your new pool needs a new volume, it will get it from the scratch pool and applythe new pool’s properties to that tape which also include maximum block size and minimum blocksize.This way you can smoothly switch your tapes to a new block size while you can still restore the data onyour old tapes at any time.
Possible Problems
There is only one case where the new block handling will cause problems, and this is if you have used biggerblock sizes already in your setup. As we now defined the label block to always be 63k, all labels will not bereadable.To also solve this problem, the directive label block size can be used to define a different label block size.That way, everything should work smoothly as all label blocks will be readable again.
How can I find out which blocksize was used when the tape was written?
At least on Linux, you can see if Bareos tries to read the blocks with the wrong block size. In that case, youget a kernel message like the following in your system’s messages:
[542132.410170] st1: Failed to read 1048576 byte block with 64512 byte transfer.
Here, the block was written with 1M block size but we only read 64k.
Direct access to Volumes with with non-default blocksizes
bls and bextract can directly access Bareos volumes without catalog database. This means that theseprograms don’t have information about the used block size.To be able to read a volume written with an arbitrary blocksize, you need to set the label block size (to beable to to read the label block) and the maximum block size (to be able to read the data blocks) settingin the device definition used by those tools to be able to open the medium.Example using bls with a tape that was written with another blocksize than the DEFAULT_BLOCK_SIZE(63k), but with the default label block size of 63k:
root@linux:~# bls FC−Drive−1 −V A00007L4bls: butil.c:289-0 Using device: "FC-Drive-1" for reading.
25-Feb 12:47 bls JobId 0: No slot defined in catalog (slot=0) for Volume "A00007L4" on "FC-Drive-1" ↙↪→ (/dev/tape/by-id/scsi-350011d00018a5f03-nst).
25-Feb 12:47 bls JobId 0: Cartridge change or "update slots" may be required.
25-Feb 12:47 bls JobId 0: Ready to read from volume "A00007L4" on device "FC-Drive-1" ↙↪→ (/dev/tape/by-id/scsi-350011d00018a5f03-nst).
25-Feb 12:47 bls JobId 0: Error: block.c:1004 Read error on fd=3 at file:blk 0:1 on device "FC-Drive-1" ↙↪→ (/dev/tape/by-id/scsi-350011d00018a5f03-nst). ERR=Cannot allocate memory.
Bareos status: file=0 block=1
Device status: ONLINE IM_REP_EN file=0 block=2
0 files found.
Commands 18.2: bls with non-default block size
As can be seen, bls manages to read the label block as it knows what volume is mounted (Ready to readfrom volume A00007L4), but fails to read the data blocks.
root@linux:~# dmesg[...]
st2: Failed to read 131072 byte block with 64512 byte transfer.
[...]
Commands 18.3: dmesg
This shows that the blocksize for the data blocks that we need is 131072.Now we have to set this blocksize in the bareos-sd.conf, device resource as Maximum Block Size:
Device {
Name = FC-Drive-1
Drive Index = 0
Media Type = LTO-4
Archive Device = /dev/tape/by-id/scsi-350011d00018a5f03-nst
AutomaticMount = yes
AlwaysOpen = yes
RemovableMedia = yes
RandomAccess = no
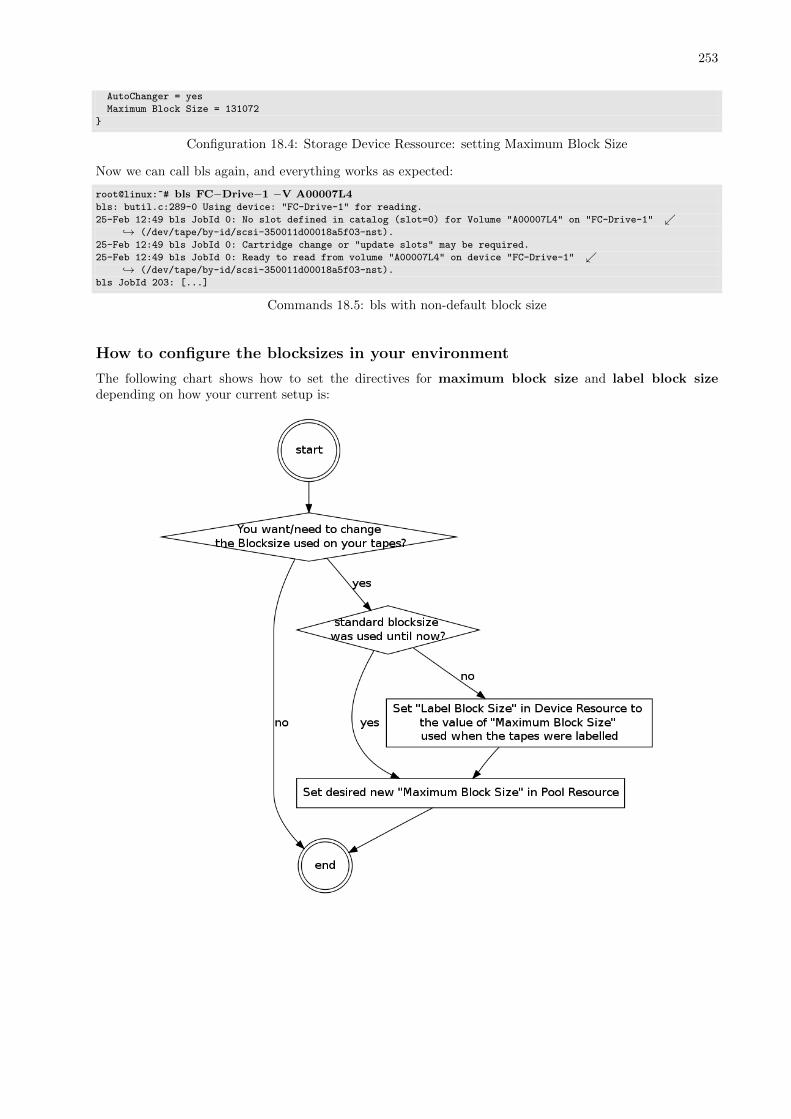
253
AutoChanger = yes
Maximum Block Size = 131072
}
Configuration 18.4: Storage Device Ressource: setting Maximum Block Size
Now we can call bls again, and everything works as expected:
root@linux:~# bls FC−Drive−1 −V A00007L4bls: butil.c:289-0 Using device: "FC-Drive-1" for reading.
25-Feb 12:49 bls JobId 0: No slot defined in catalog (slot=0) for Volume "A00007L4" on "FC-Drive-1" ↙↪→ (/dev/tape/by-id/scsi-350011d00018a5f03-nst).
25-Feb 12:49 bls JobId 0: Cartridge change or "update slots" may be required.
25-Feb 12:49 bls JobId 0: Ready to read from volume "A00007L4" on device "FC-Drive-1" ↙↪→ (/dev/tape/by-id/scsi-350011d00018a5f03-nst).
bls JobId 203: [...]
Commands 18.5: bls with non-default block size
How to configure the blocksizes in your environment
The following chart shows how to set the directives for maximum block size and label block sizedepending on how your current setup is:

254
Chapter 19
Using Tape Drives withoutAutochanger
Although Recycling and Backing Up to Disk Volume have been discussed in previous chapters, this chapteris meant to give you an overall view of possible backup strategies and to explain their advantages anddisadvantages.
19.1 Simple One Tape Backup
Probably the simplest strategy is to back everything up to a single tape and insert a new (or recycled) tapewhen it fills and Bareos requests a new one.
19.1.1 Advantages
� The operator intervenes only when a tape change is needed (e.g. once a month).
� There is little chance of operator error because the tape is not changed daily.
� A minimum number of tapes will be needed for a full restore. Typically the best case will be one tapeand worst two.
� You can easily arrange for the Full backup to occur a different night of the month for each system,thus load balancing and shortening the backup time.
19.1.2 Disadvantages
� If your site burns down, you will lose your current backups
� After a tape fills and you have put in a blank tape, the backup will continue, and this will generallyhappen during working hours.
19.1.3 Practical Details
This system is very simple. When the tape fills and Bareos requests a new tape, you unmount the tape fromthe Console program, insert a new tape and label it. In most cases after the label, Bareos will automaticallymount the tape and resume the backup. Otherwise, you simply mount the tape.Using this strategy, one typically does a Full backup once a week followed by daily Incremental backups.To minimize the amount of data written to the tape, one can do a Full backup once a month on the firstSunday of the month, a Differential backup on the 2nd-5th Sunday of the month, and incremental backupsthe rest of the week.
19.2 Manually Changing Tapes
If you use the strategy presented above, Bareos will ask you to change the tape, and you will unmount itand then remount it when you have inserted the new tape.If you do not wish to interact with Bareos to change each tape, there are several ways to get Bareos torelease the tape:
255
256
� In your Storage daemon’s Device resource, set AlwaysOpen = no. In this case, Bareos will releasethe tape after every job. If you run several jobs, the tape will be rewound and repositioned to the endat the beginning of every job. This is not very efficient, but does let you change the tape wheneveryou want.
� Use a RunAfterJob statement to run a script after your last job. This could also be an Admin jobthat runs after all your backup jobs. The script could be something like:
#!/bin/sh
bconsole <<END_OF_DATA
release storage=your-storage-name
END_OF_DATA
In this example, you would have AlwaysOpen=yes, but the release command would tell Bareos torewind the tape and on the next job assume the tape has changed. This strategy may not work onsome systems, or on autochangers because Bareos will still keep the drive open.
� The final strategy is similar to the previous case except that you would use the unmount command toforce Bareos to release the drive. Then you would eject the tape, and remount it as follows:
#!/bin/sh
bconsole <<END_OF_DATA
unmount storage=your-storage-name
END_OF_DATA
# the following is a shell command
mt eject
bconsole <<END_OF_DATA
mount storage=your-storage-name
END_OF_DATA
19.3 Daily Tape Rotation
This scheme is quite different from the one mentioned above in that a Full backup is done to a differenttape every day of the week. Generally, the backup will cycle continuously through five or six tapes eachweek. Variations are to use a different tape each Friday, and possibly at the beginning of the month. Thusif backups are done Monday through Friday only, you need only five tapes, and by having two Friday tapes,you need a total of six tapes. Many sites run this way, or using modifications of it based on two week cyclesor longer.
19.3.1 Advantages
� All the data is stored on a single tape, so recoveries are simple and faster.
� Assuming the previous day’s tape is taken offsite each day, a maximum of one days data will be lost ifthe site burns down.
19.3.2 Disadvantages
� The tape must be changed every day requiring a lot of operator intervention.
� More errors will occur because of human mistakes.
� If the wrong tape is inadvertently mounted, the Backup for that day will not occur exposing the systemto data loss.
� There is much more movement of the tape each day (rewinds) leading to shorter tape drive life time.
� Initial setup of Bareos to run in this mode is more complicated than the Single tape system describedabove.
� Depending on the number of systems you have and their data capacity, it may not be possible to do aFull backup every night for time reasons or reasons of tape capacity.
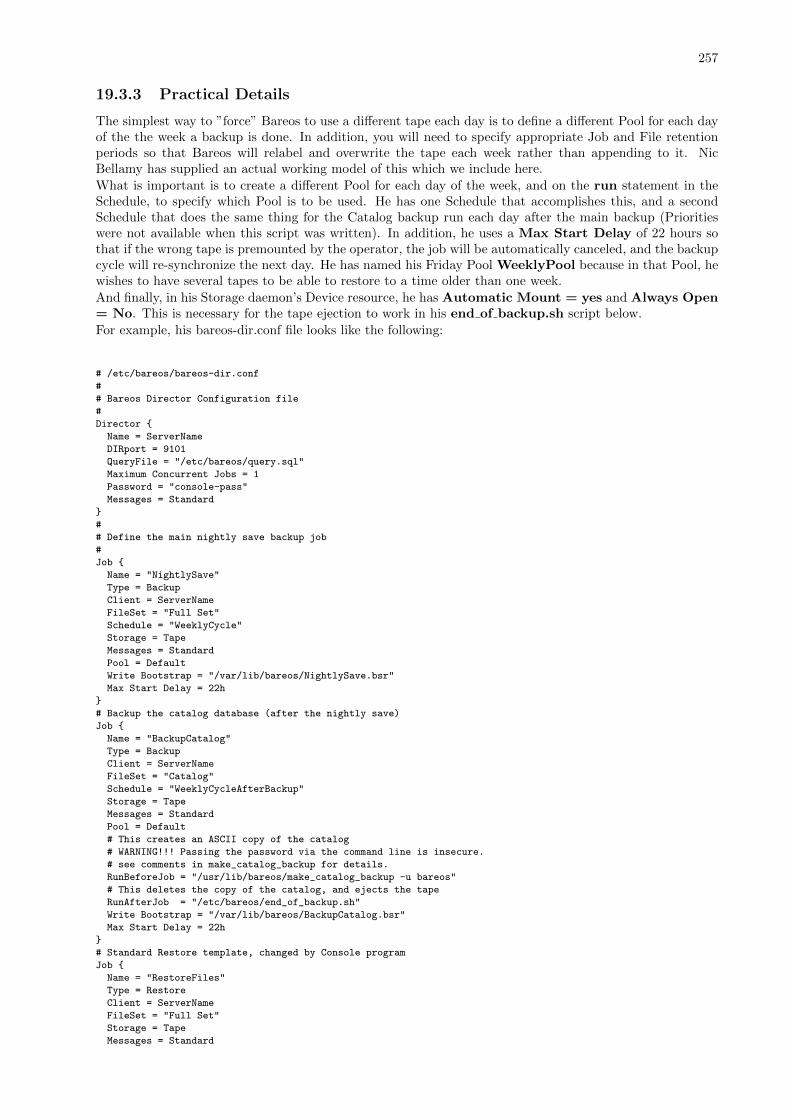
257
19.3.3 Practical Details
The simplest way to ”force” Bareos to use a different tape each day is to define a different Pool for each dayof the the week a backup is done. In addition, you will need to specify appropriate Job and File retentionperiods so that Bareos will relabel and overwrite the tape each week rather than appending to it. NicBellamy has supplied an actual working model of this which we include here.
What is important is to create a different Pool for each day of the week, and on the run statement in theSchedule, to specify which Pool is to be used. He has one Schedule that accomplishes this, and a secondSchedule that does the same thing for the Catalog backup run each day after the main backup (Prioritieswere not available when this script was written). In addition, he uses a Max Start Delay of 22 hours sothat if the wrong tape is premounted by the operator, the job will be automatically canceled, and the backupcycle will re-synchronize the next day. He has named his Friday Pool WeeklyPool because in that Pool, hewishes to have several tapes to be able to restore to a time older than one week.
And finally, in his Storage daemon’s Device resource, he has Automatic Mount = yes and Always Open= No. This is necessary for the tape ejection to work in his end of backup.sh script below.
For example, his bareos-dir.conf file looks like the following:
# /etc/bareos/bareos-dir.conf
#
# Bareos Director Configuration file
#
Director {
Name = ServerName
DIRport = 9101
QueryFile = "/etc/bareos/query.sql"
Maximum Concurrent Jobs = 1
Password = "console-pass"
Messages = Standard
}
#
# Define the main nightly save backup job
#
Job {
Name = "NightlySave"
Type = Backup
Client = ServerName
FileSet = "Full Set"
Schedule = "WeeklyCycle"
Storage = Tape
Messages = Standard
Pool = Default
Write Bootstrap = "/var/lib/bareos/NightlySave.bsr"
Max Start Delay = 22h
}
# Backup the catalog database (after the nightly save)
Job {
Name = "BackupCatalog"
Type = Backup
Client = ServerName
FileSet = "Catalog"
Schedule = "WeeklyCycleAfterBackup"
Storage = Tape
Messages = Standard
Pool = Default
# This creates an ASCII copy of the catalog
# WARNING!!! Passing the password via the command line is insecure.
# see comments in make_catalog_backup for details.
RunBeforeJob = "/usr/lib/bareos/make_catalog_backup -u bareos"
# This deletes the copy of the catalog, and ejects the tape
RunAfterJob = "/etc/bareos/end_of_backup.sh"
Write Bootstrap = "/var/lib/bareos/BackupCatalog.bsr"
Max Start Delay = 22h
}
# Standard Restore template, changed by Console program
Job {
Name = "RestoreFiles"
Type = Restore
Client = ServerName
FileSet = "Full Set"
Storage = Tape
Messages = Standard
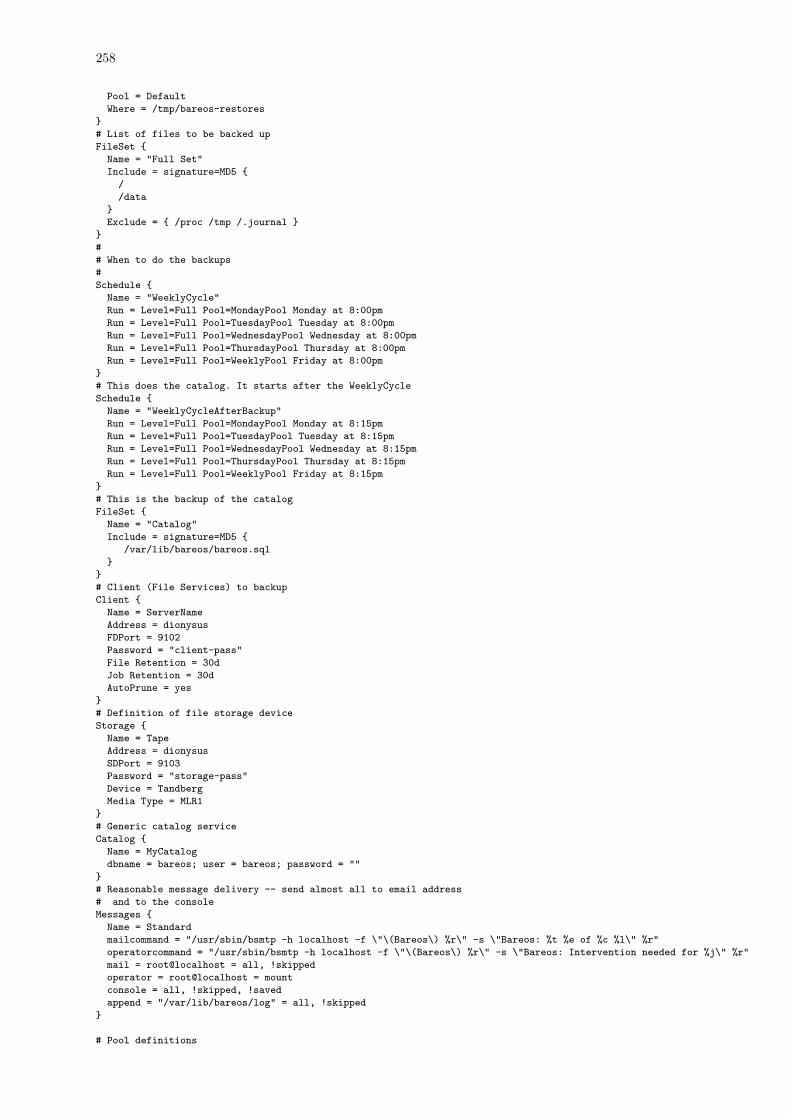
258
Pool = Default
Where = /tmp/bareos-restores
}
# List of files to be backed up
FileSet {
Name = "Full Set"
Include = signature=MD5 {
/
/data
}
Exclude = { /proc /tmp /.journal }
}
#
# When to do the backups
#
Schedule {
Name = "WeeklyCycle"
Run = Level=Full Pool=MondayPool Monday at 8:00pm
Run = Level=Full Pool=TuesdayPool Tuesday at 8:00pm
Run = Level=Full Pool=WednesdayPool Wednesday at 8:00pm
Run = Level=Full Pool=ThursdayPool Thursday at 8:00pm
Run = Level=Full Pool=WeeklyPool Friday at 8:00pm
}
# This does the catalog. It starts after the WeeklyCycle
Schedule {
Name = "WeeklyCycleAfterBackup"
Run = Level=Full Pool=MondayPool Monday at 8:15pm
Run = Level=Full Pool=TuesdayPool Tuesday at 8:15pm
Run = Level=Full Pool=WednesdayPool Wednesday at 8:15pm
Run = Level=Full Pool=ThursdayPool Thursday at 8:15pm
Run = Level=Full Pool=WeeklyPool Friday at 8:15pm
}
# This is the backup of the catalog
FileSet {
Name = "Catalog"
Include = signature=MD5 {
/var/lib/bareos/bareos.sql
}
}
# Client (File Services) to backup
Client {
Name = ServerName
Address = dionysus
FDPort = 9102
Password = "client-pass"
File Retention = 30d
Job Retention = 30d
AutoPrune = yes
}
# Definition of file storage device
Storage {
Name = Tape
Address = dionysus
SDPort = 9103
Password = "storage-pass"
Device = Tandberg
Media Type = MLR1
}
# Generic catalog service
Catalog {
Name = MyCatalog
dbname = bareos; user = bareos; password = ""
}
# Reasonable message delivery -- send almost all to email address
# and to the console
Messages {
Name = Standard
mailcommand = "/usr/sbin/bsmtp -h localhost -f \"\(Bareos\) %r\" -s \"Bareos: %t %e of %c %l\" %r"
operatorcommand = "/usr/sbin/bsmtp -h localhost -f \"\(Bareos\) %r\" -s \"Bareos: Intervention needed for %j\" %r"
mail = root@localhost = all, !skipped
operator = root@localhost = mount
console = all, !skipped, !saved
append = "/var/lib/bareos/log" = all, !skipped
}
# Pool definitions
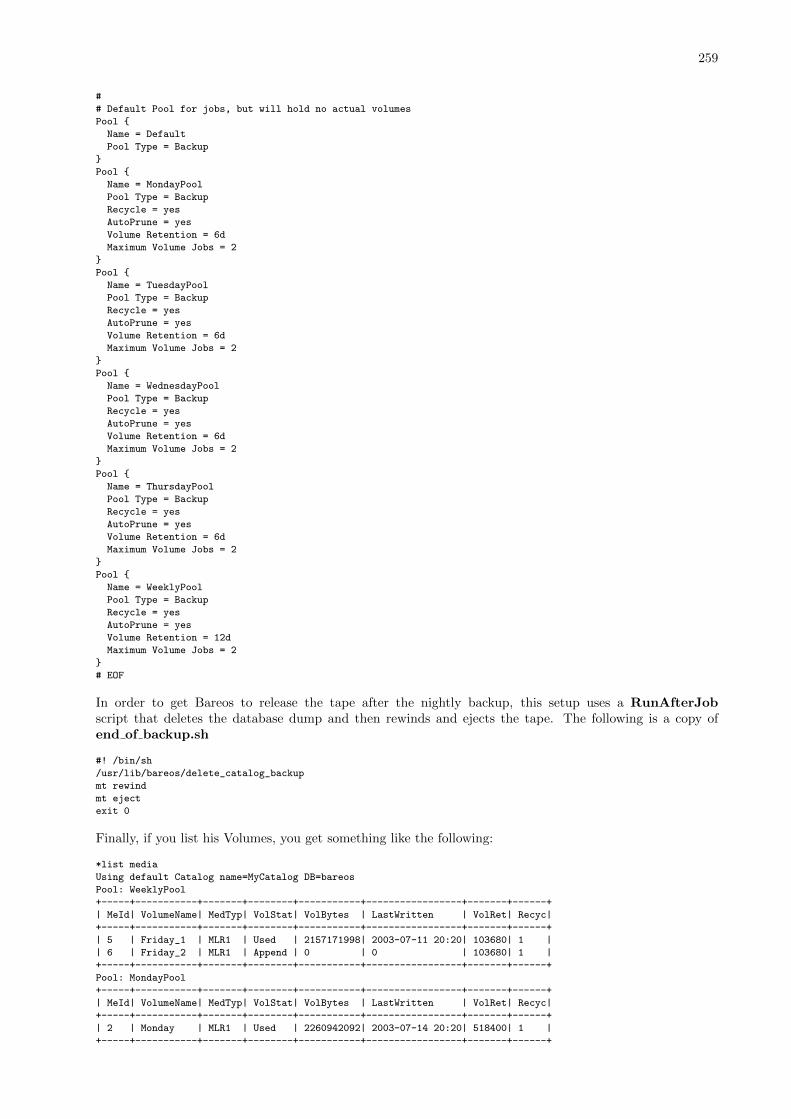
259
#
# Default Pool for jobs, but will hold no actual volumes
Pool {
Name = Default
Pool Type = Backup
}
Pool {
Name = MondayPool
Pool Type = Backup
Recycle = yes
AutoPrune = yes
Volume Retention = 6d
Maximum Volume Jobs = 2
}
Pool {
Name = TuesdayPool
Pool Type = Backup
Recycle = yes
AutoPrune = yes
Volume Retention = 6d
Maximum Volume Jobs = 2
}
Pool {
Name = WednesdayPool
Pool Type = Backup
Recycle = yes
AutoPrune = yes
Volume Retention = 6d
Maximum Volume Jobs = 2
}
Pool {
Name = ThursdayPool
Pool Type = Backup
Recycle = yes
AutoPrune = yes
Volume Retention = 6d
Maximum Volume Jobs = 2
}
Pool {
Name = WeeklyPool
Pool Type = Backup
Recycle = yes
AutoPrune = yes
Volume Retention = 12d
Maximum Volume Jobs = 2
}
# EOF
In order to get Bareos to release the tape after the nightly backup, this setup uses a RunAfterJobscript that deletes the database dump and then rewinds and ejects the tape. The following is a copy ofend of backup.sh
#! /bin/sh
/usr/lib/bareos/delete_catalog_backup
mt rewind
mt eject
exit 0
Finally, if you list his Volumes, you get something like the following:
*list media
Using default Catalog name=MyCatalog DB=bareos
Pool: WeeklyPool
+-----+-----------+-------+--------+-----------+-----------------+-------+------+
| MeId| VolumeName| MedTyp| VolStat| VolBytes | LastWritten | VolRet| Recyc|
+-----+-----------+-------+--------+-----------+-----------------+-------+------+
| 5 | Friday_1 | MLR1 | Used | 2157171998| 2003-07-11 20:20| 103680| 1 |
| 6 | Friday_2 | MLR1 | Append | 0 | 0 | 103680| 1 |
+-----+-----------+-------+--------+-----------+-----------------+-------+------+
Pool: MondayPool
+-----+-----------+-------+--------+-----------+-----------------+-------+------+
| MeId| VolumeName| MedTyp| VolStat| VolBytes | LastWritten | VolRet| Recyc|
+-----+-----------+-------+--------+-----------+-----------------+-------+------+
| 2 | Monday | MLR1 | Used | 2260942092| 2003-07-14 20:20| 518400| 1 |
+-----+-----------+-------+--------+-----------+-----------------+-------+------+
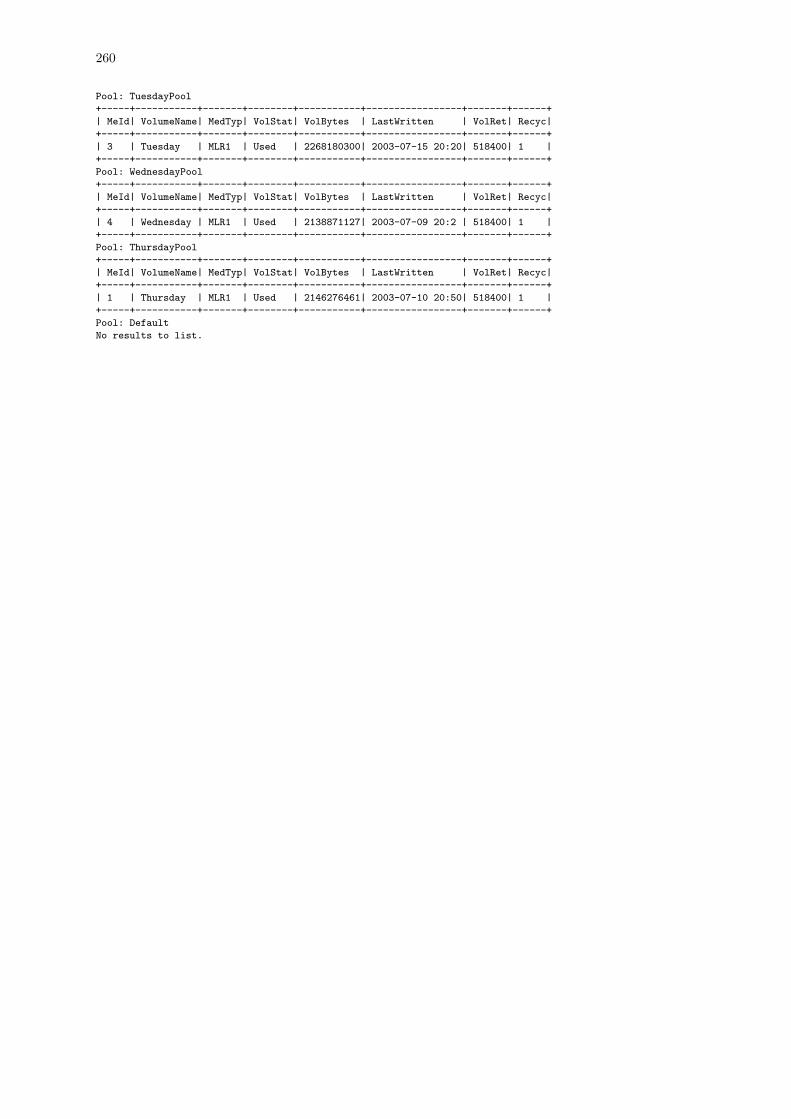
260
Pool: TuesdayPool
+-----+-----------+-------+--------+-----------+-----------------+-------+------+
| MeId| VolumeName| MedTyp| VolStat| VolBytes | LastWritten | VolRet| Recyc|
+-----+-----------+-------+--------+-----------+-----------------+-------+------+
| 3 | Tuesday | MLR1 | Used | 2268180300| 2003-07-15 20:20| 518400| 1 |
+-----+-----------+-------+--------+-----------+-----------------+-------+------+
Pool: WednesdayPool
+-----+-----------+-------+--------+-----------+-----------------+-------+------+
| MeId| VolumeName| MedTyp| VolStat| VolBytes | LastWritten | VolRet| Recyc|
+-----+-----------+-------+--------+-----------+-----------------+-------+------+
| 4 | Wednesday | MLR1 | Used | 2138871127| 2003-07-09 20:2 | 518400| 1 |
+-----+-----------+-------+--------+-----------+-----------------+-------+------+
Pool: ThursdayPool
+-----+-----------+-------+--------+-----------+-----------------+-------+------+
| MeId| VolumeName| MedTyp| VolStat| VolBytes | LastWritten | VolRet| Recyc|
+-----+-----------+-------+--------+-----------+-----------------+-------+------+
| 1 | Thursday | MLR1 | Used | 2146276461| 2003-07-10 20:50| 518400| 1 |
+-----+-----------+-------+--------+-----------+-----------------+-------+------+
Pool: Default
No results to list.
Chapter 20
Data Spooling
Bareos allows you to specify that you want the Storage daemon to initially write your data to disk and thensubsequently to tape. This serves several important purposes.
� It takes a long time for data to come in from the File daemon during an Incremental backup. If it isdirectly written to tape, the tape will start and stop or shoe-shine as it is often called causing tapewear. By first writing the data to disk, then writing it to tape, the tape can be kept in continualmotion.
� While the spooled data is being written to the tape, the despooling process has exclusive use ofthe tape. This means that you can spool multiple simultaneous jobs to disk, then have them veryefficiently despooled one at a time without having the data blocks from several jobs intermingled, thussubstantially improving the time needed to restore files. While despooling, all jobs spooling continuerunning.
� Writing to a tape can be slow. By first spooling your data to disk, you can often reduce the timethe File daemon is running on a system, thus reducing downtime, and/or interference with users. Ofcourse, if your spool device is not large enough to hold all the data from your File daemon, you mayactually slow down the overall backup.
Data spooling is exactly that ”spooling”. It is not a way to first write a ”backup” to a disk file and then toa tape. When the backup has only been spooled to disk, it is not complete yet and cannot be restored untilit is written to tape.Bareos also supports writing a backup to disk then later migrating or moving it to a tape (or any othermedium). For details on this, please see the Migration and Copy chapter of this manual for more details.The remainder of this chapter explains the various directives that you can use in the spooling process.
20.1 Data Spooling Directives
The following directives can be used to control data spooling.
� Turn data spooling on/off at the Job level: Spool Data DirJob = yes|no
� This setting can be overwritten in a Schedule Run DirSchedule directive: SpoolData=yes|no
� To override the Job specification in a bconsole session using the run command: SpoolData=yes|no
Please note that this does not refer to a configuration statement, but to an argument for the runcommand.
� To limit the the maximum spool file size for a particular job: Spool Size DirJob
� To limit the maximum total size of the spooled data for a particular device: Maximum Spool Size SdDevice
� To limit the maximum total size of the spooled data for a particular device for a single job: MaximumJob Spool Size Sd
Device
� To specify the spool directory for a particular device: Spool Directory SdDevice
261
262
20.1.1 Additional Notes
� Please note! Exclude your the spool directory from any backup, otherwise, your job will write enormousamounts of data to the Volume, and most probably terminate in error. This is because in attemptingto backup the spool file, the backup data will be written a second time to the spool file, and so on adinfinitum.
� Another advice is to always specify the Maximum Spool Size SdDevice so that your disk doesn’t completely
fill up. In principle, data spooling will properly detect a full disk, and despool data allowing the jobto continue. However, attribute spooling is not so kind to the user. If the disk on which attributesare being spooled fills, the job will be canceled. In addition, if your working directory is on the samepartition as the spool directory, then Bareos jobs will fail possibly in bizarre ways when the spool fills.
� When data spooling is enabled, Bareos automatically turns on attribute spooling. In other words, italso spools the catalog entries to disk. This is done so that in case the job fails, there will be no catalogentries pointing to non-existent tape backups.
� Attribute despooling occurs near the end of a job. The Storage daemon accumulates file attributesduring the backup and sends them to the Director at the end of the job. The Director then inserts thefile attributes into the catalog. During this insertion, the tape drive may be inactive. When the fileattribute insertion is completed, the job terminates.
� Attribute spool files are always placed in the working directory of the Storage daemon.
� When Bareos begins despooling data spooled to disk, it takes exclusive use of the tape. This has themajor advantage that in running multiple simultaneous jobs at the same time, the blocks of severaljobs will not be intermingled.
� It is probably best to provide as large a spool file as possible to avoid repeatedly spooling/despooling.Also, while a job is despooling to tape, the File daemon must wait (i.e. spooling stops for the job whileit is despooling).
� If you are running multiple simultaneous jobs, Bareos will continue spooling other jobs while one isdespooling to tape, provided there is sufficient spool file space.
Chapter 21
Migration and Copy
The term Migration, as used in the context of Bareos, means moving data from one Volume to another. Inparticular it refers to a Job (similar to a backup job) that reads data that was previously backed up to aVolume and writes it to another Volume. As part of this process, the File catalog records associated with thefirst backup job are purged. In other words, Migration moves Bareos Job data from one Volume to anotherby reading the Job data from the Volume it is stored on, writing it to a different Volume in a different Pool,and then purging the database records for the first Job.The Copy process is essentially identical to the Migration feature with the exception that the Job that iscopied is left unchanged. This essentially creates two identical copies of the same backup. However, the copyis treated as a copy rather than a backup job, and hence is not directly available for restore. If Bareos foundsa copy when a job record is purged (deleted) from the catalog, it will promote the copy as real backup andwill make it available for automatic restore.The Copy and the Migration jobs run without using the File daemon by copying the data from the oldbackup Volume to a different Volume in a different Pool.The selection process for which Job or Jobs are migrated can be based on quite a number of different criteriasuch as:
� a single previous Job
� a Volume
� a Client
� a regular expression matching a Job, Volume, or Client name
� the time a Job has been on a Volume
� high and low water marks (usage or occupation) of a Pool
� Volume size
The details of these selection criteria will be defined below.To run a Migration job, you must first define a Job resource very similar to a Backup Job but with TypeDirJob = Migrate instead of Type Dir
Job = Backup. One of the key points to remember is that the Pool that isspecified for the migration job is the only pool from which jobs will be migrated, with one exception notedbelow. In addition, the Pool to which the selected Job or Jobs will be migrated is defined by the Next PoolDirPool = ... in the Pool resource specified for the Migration Job.Bareos permits Pools to contain Volumes with different Media Types. However, when doing migration, this isa very undesirable condition. For migration to work properly, you should use Pools containing only Volumesof the same Media Type for all migration jobs.The migration job normally is either manually started or starts from a Schedule much like a backup job. Itsearches for a previous backup Job or Jobs that match the parameters you have specified in the migrationJob resource, primarily a Selection Type Dir
Job. Then for each previous backup JobId found, the MigrationJob will run a new Job which copies the old Job data from the previous Volume to a new Volume in theMigration Pool. It is possible that no prior Jobs are found for migration, in which case, the Migration jobwill simply terminate having done nothing, but normally at a minimum, three jobs are involved during amigration:
� The currently running Migration control Job. This is only a control job for starting the migration childjobs.
263
264
� The previous Backup Job (already run). The File records for this Job are purged if the Migration jobsuccessfully terminates. The original data remains on the Volume until it is recycled and rewritten.
� A new Migration Backup Job that moves the data from the previous Backup job to the new Volume.If you subsequently do a restore, the data will be read from this Job.
If the Migration control job finds a number of JobIds to migrate (e.g. it is asked to migrate one or moreVolumes), it will start one new migration backup job for each JobId found on the specified Volumes. Pleasenote that Migration doesn’t scale too well since Migrations are done on a Job by Job basis. This if you selecta very large volume or a number of volumes for migration, you may have a large number of Jobs that start.Because each job must read the same Volume, they will run consecutively (not simultaneously).
21.1 Important Migration Considerations
� Each Pool into which you migrate Jobs or Volumes must contain Volumes of only one Media TypeDirStorage.
� Migration takes place on a JobId by JobId basis. That is each JobId is migrated in its entirety andindependently of other JobIds. Once the Job is migrated, it will be on the new medium in the new Pool,but for the most part, aside from having a new JobId, it will appear with all the same characteristics ofthe original job (start, end time, ...). The column RealEndTime in the catalog Job table will containthe time and date that the Migration terminated, and by comparing it with the EndTime column youcan tell whether or not the job was migrated. The original job is purged of its File records, and itsType field is changed from ”B” to ”M” to indicate that the job was migrated.
� Jobs on Volumes will be Migration only if the Volume is marked, Full, Used, or Error. Volumes thatare still marked Append will not be considered for migration. This prevents Bareos from attemptingto read the Volume at the same time it is writing it. It also reduces other deadlock situations, as wellas avoids the problem that you migrate a Volume and later find new files appended to that Volume.
� As noted above, for the Migration High Bytes, the calculation of the bytes to migrate is somewhatapproximate.
� If you keep Volumes of different Media Types in the same Pool, it is not clear how well migration willwork. We recommend only one Media Type Dir
Storage per pool.
� It is possible to get into a resource deadlock where Bareos does not find enough drives to simultaneouslyread and write all the Volumes needed to do Migrations. For the moment, you must take care as allthe resource deadlock algorithms are not yet implemented.
� Migration is done only when you run a Migration job. If you set a Migration High Bytes and thatnumber of bytes is exceeded in the Pool no migration job will automatically start. You must schedulethe migration jobs, and they must run for any migration to take place.
� If you migrate a number of Volumes, a very large number of Migration jobs may start.
� Figuring out what jobs will actually be migrated can be a bit complicated due to the flexibility providedby the regex patterns and the number of different options. Turning on a debug level of 100 or morewill provide a limited amount of debug information about the migration selection process.
� Bareos currently does only minimal Storage conflict resolution, so you must take care to ensure thatyou don’t try to read and write to the same device or Bareos may block waiting to reserve a drive thatit will never find. In general, ensure that all your migration pools contain only one Media Type Dir
Storage,and that you always migrate to pools with different Media Types.
� The Next Pool DirPool = ... directive must be defined in the Pool referenced in the Migration Job to define
the Pool into which the data will be migrated.
� Pay particular attention to the fact that data is migrated on a Job by Job basis, and for any particularVolume, only one Job can read that Volume at a time (no simultaneous read), so migration jobs thatall reference the same Volume will run sequentially. This can be a potential bottle neck and does notscale very well to large numbers of jobs.
� Only migration of Selection Types of Job and Volume have been carefully tested. All the othermigration methods (time, occupancy, smallest, oldest, ...) need additional testing.

265
21.2 Configure Copy or Migration Jobs
The following directives can be used to define a Copy or Migration job:
Job Resource
� Type DirJob = Migrate|Copy
� Selection Type DirJob
� Selection Pattern DirJob
� Pool DirJob
For Selection Type DirJob other than SQLQuery, this defines what Pool will be examined for finding JobIds
to migrate
� Purge Migration Job DirJob
Pool Resource
� Next Pool DirPool
to what pool Jobs will be migrated
� Migration Time DirPool
if Selection Type DirJob = PoolTime
� Migration High Bytes DirPool
if Selection Type DirJob = PoolOccupancy
� Migration Low Bytes DirPool
optional if Selection Type DirJob = PoolOccupancy is used
� Storage DirPool
if Copy/Migration involves multiple Storage Daemon, see Multiple Storage Daemons
21.2.1 Example Migration Jobs
When you specify a Migration Job, you must specify all the standard directives as for a Job. However,certain such as the Level, Client, and FileSet, though they must be defined, are ignored by the Migrationjob because the values from the original job used instead.As an example, suppose you have the following Job that you run every night. To note: there is no Storagedirective in the Job resource; there is a Storage directive in each of the Pool resources; the Pool to bemigrated (File) contains a Next Pool directive that defines the output Pool (where the data is written bythe migration job).
# Define the backup Job
Job {
Name = "NightlySave"
Type = Backup
Level = Incremental # default
Client=rufus-fd
FileSet="Full Set"
Schedule = "WeeklyCycle"
Messages = Standard
Pool = Default
}
# Default pool definition
Pool {
Name = Default
Pool Type = Backup
AutoPrune = yes
Recycle = yes
Next Pool = Tape
Storage = File
LabelFormat = "File"
}
# Tape pool definition
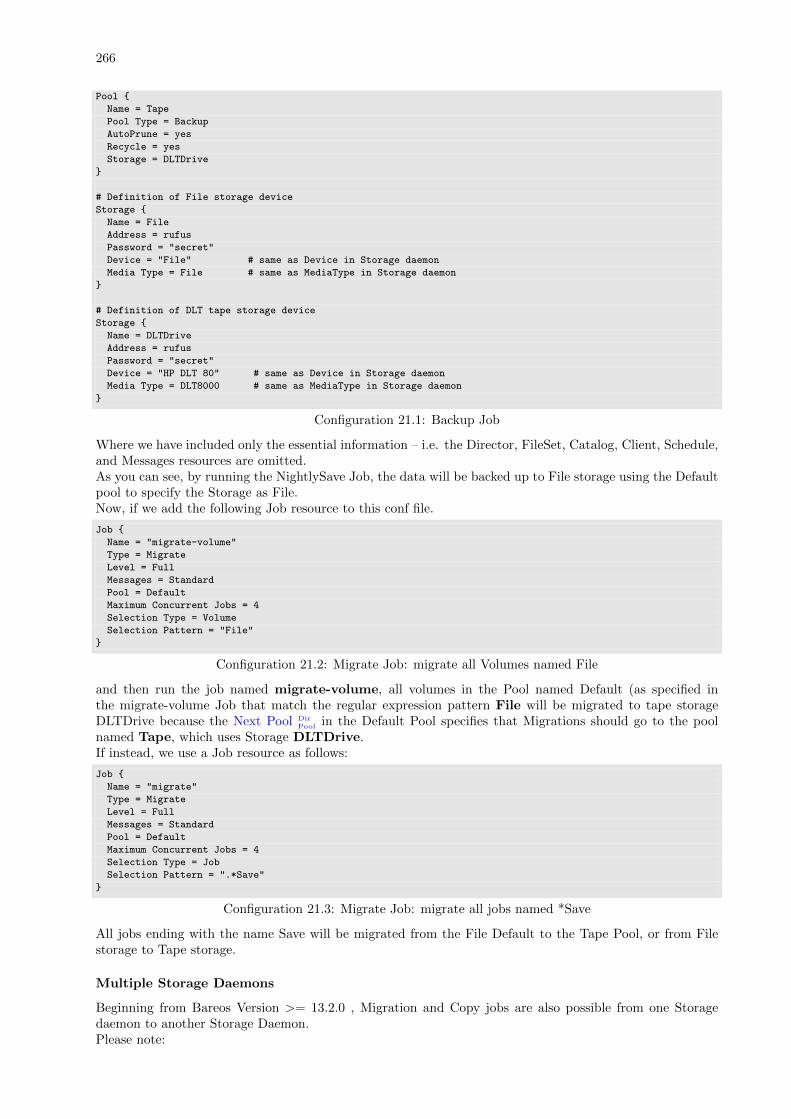
266
Pool {
Name = Tape
Pool Type = Backup
AutoPrune = yes
Recycle = yes
Storage = DLTDrive
}
# Definition of File storage device
Storage {
Name = File
Address = rufus
Password = "secret"
Device = "File" # same as Device in Storage daemon
Media Type = File # same as MediaType in Storage daemon
}
# Definition of DLT tape storage device
Storage {
Name = DLTDrive
Address = rufus
Password = "secret"
Device = "HP DLT 80" # same as Device in Storage daemon
Media Type = DLT8000 # same as MediaType in Storage daemon
}
Configuration 21.1: Backup Job
Where we have included only the essential information – i.e. the Director, FileSet, Catalog, Client, Schedule,and Messages resources are omitted.As you can see, by running the NightlySave Job, the data will be backed up to File storage using the Defaultpool to specify the Storage as File.Now, if we add the following Job resource to this conf file.
Job {
Name = "migrate-volume"
Type = Migrate
Level = Full
Messages = Standard
Pool = Default
Maximum Concurrent Jobs = 4
Selection Type = Volume
Selection Pattern = "File"
}
Configuration 21.2: Migrate Job: migrate all Volumes named File
and then run the job named migrate-volume, all volumes in the Pool named Default (as specified inthe migrate-volume Job that match the regular expression pattern File will be migrated to tape storageDLTDrive because the Next Pool Dir
Pool in the Default Pool specifies that Migrations should go to the poolnamed Tape, which uses Storage DLTDrive.If instead, we use a Job resource as follows:
Job {
Name = "migrate"
Type = Migrate
Level = Full
Messages = Standard
Pool = Default
Maximum Concurrent Jobs = 4
Selection Type = Job
Selection Pattern = ".*Save"
}
Configuration 21.3: Migrate Job: migrate all jobs named *Save
All jobs ending with the name Save will be migrated from the File Default to the Tape Pool, or from Filestorage to Tape storage.
Multiple Storage Daemons
Beginning from Bareos Version >= 13.2.0 , Migration and Copy jobs are also possible from one Storagedaemon to another Storage Daemon.Please note:
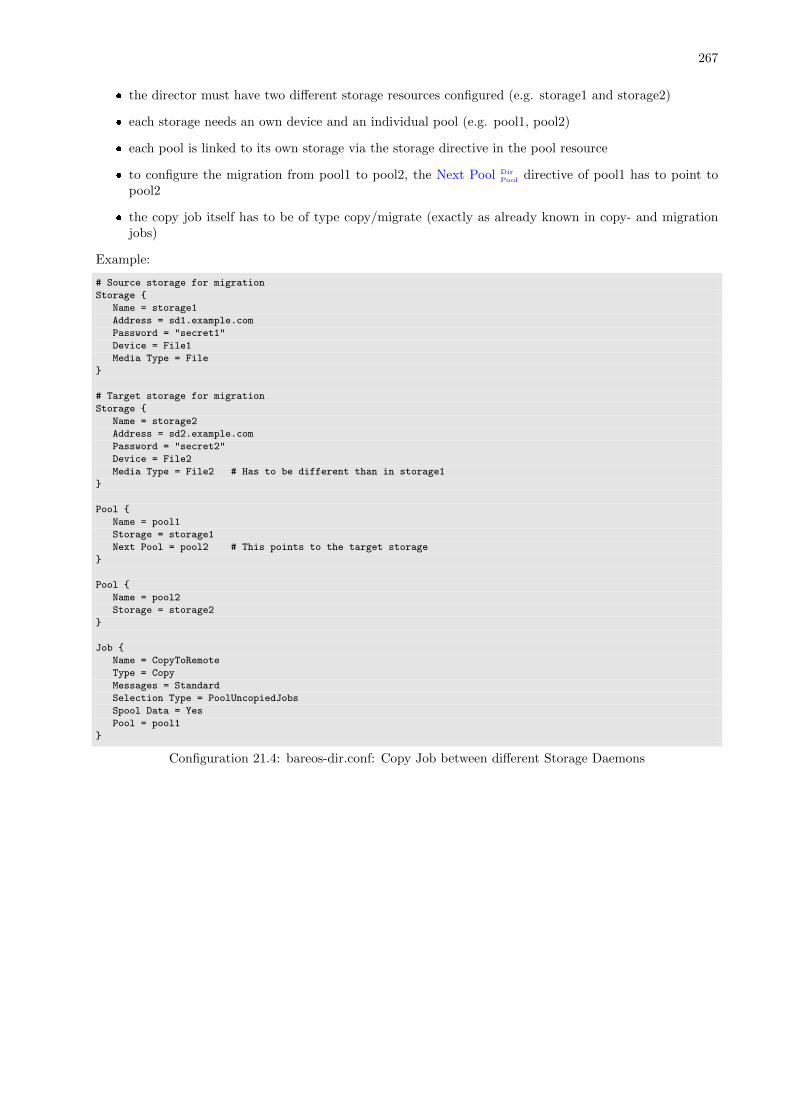
267
� the director must have two different storage resources configured (e.g. storage1 and storage2)
� each storage needs an own device and an individual pool (e.g. pool1, pool2)
� each pool is linked to its own storage via the storage directive in the pool resource
� to configure the migration from pool1 to pool2, the Next Pool DirPool directive of pool1 has to point to
pool2
� the copy job itself has to be of type copy/migrate (exactly as already known in copy- and migrationjobs)
Example:
# Source storage for migration
Storage {
Name = storage1
Address = sd1.example.com
Password = "secret1"
Device = File1
Media Type = File
}
# Target storage for migration
Storage {
Name = storage2
Address = sd2.example.com
Password = "secret2"
Device = File2
Media Type = File2 # Has to be different than in storage1
}
Pool {
Name = pool1
Storage = storage1
Next Pool = pool2 # This points to the target storage
}
Pool {
Name = pool2
Storage = storage2
}
Job {
Name = CopyToRemote
Type = Copy
Messages = Standard
Selection Type = PoolUncopiedJobs
Spool Data = Yes
Pool = pool1
}
Configuration 21.4: bareos-dir.conf: Copy Job between different Storage Daemons

268
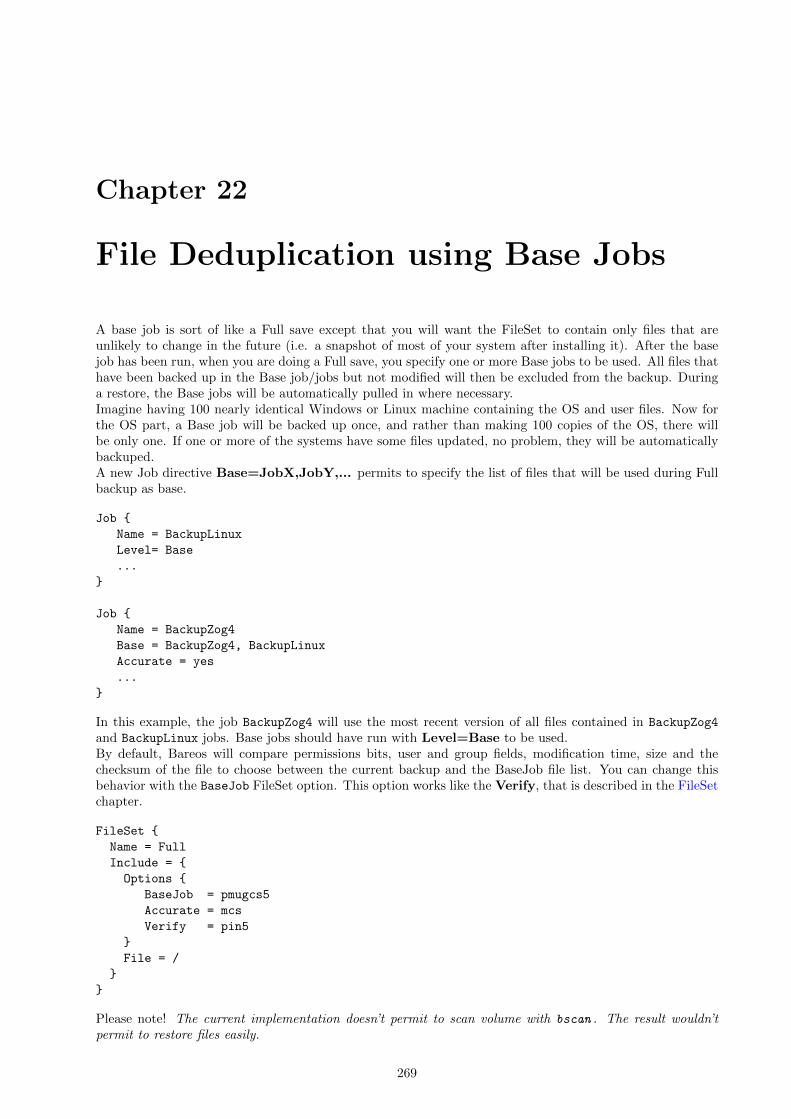
Chapter 22
File Deduplication using Base Jobs
A base job is sort of like a Full save except that you will want the FileSet to contain only files that areunlikely to change in the future (i.e. a snapshot of most of your system after installing it). After the basejob has been run, when you are doing a Full save, you specify one or more Base jobs to be used. All files thathave been backed up in the Base job/jobs but not modified will then be excluded from the backup. Duringa restore, the Base jobs will be automatically pulled in where necessary.Imagine having 100 nearly identical Windows or Linux machine containing the OS and user files. Now forthe OS part, a Base job will be backed up once, and rather than making 100 copies of the OS, there willbe only one. If one or more of the systems have some files updated, no problem, they will be automaticallybackuped.A new Job directive Base=JobX,JobY,... permits to specify the list of files that will be used during Fullbackup as base.
Job {
Name = BackupLinux
Level= Base
...
}
Job {
Name = BackupZog4
Base = BackupZog4, BackupLinux
Accurate = yes
...
}
In this example, the job BackupZog4 will use the most recent version of all files contained in BackupZog4
and BackupLinux jobs. Base jobs should have run with Level=Base to be used.By default, Bareos will compare permissions bits, user and group fields, modification time, size and thechecksum of the file to choose between the current backup and the BaseJob file list. You can change thisbehavior with the BaseJob FileSet option. This option works like the Verify, that is described in the FileSetchapter.
FileSet {
Name = Full
Include = {
Options {
BaseJob = pmugcs5
Accurate = mcs
Verify = pin5
}
File = /
}
}
Please note! The current implementation doesn’t permit to scan volume with bscan . The result wouldn’tpermit to restore files easily.
269

270
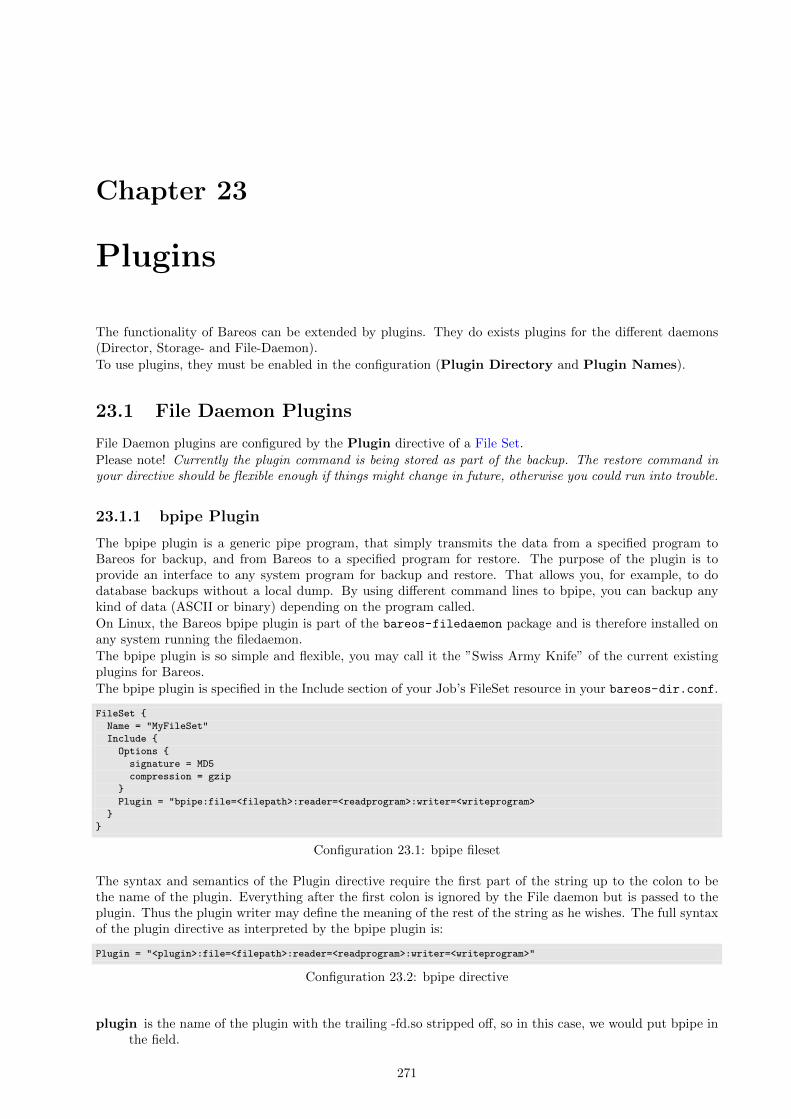
Chapter 23
Plugins
The functionality of Bareos can be extended by plugins. They do exists plugins for the different daemons(Director, Storage- and File-Daemon).
To use plugins, they must be enabled in the configuration (Plugin Directory and Plugin Names).
23.1 File Daemon Plugins
File Daemon plugins are configured by the Plugin directive of a File Set.
Please note! Currently the plugin command is being stored as part of the backup. The restore command inyour directive should be flexible enough if things might change in future, otherwise you could run into trouble.
23.1.1 bpipe Plugin
The bpipe plugin is a generic pipe program, that simply transmits the data from a specified program toBareos for backup, and from Bareos to a specified program for restore. The purpose of the plugin is toprovide an interface to any system program for backup and restore. That allows you, for example, to dodatabase backups without a local dump. By using different command lines to bpipe, you can backup anykind of data (ASCII or binary) depending on the program called.
On Linux, the Bareos bpipe plugin is part of the bareos-filedaemon package and is therefore installed onany system running the filedaemon.
The bpipe plugin is so simple and flexible, you may call it the ”Swiss Army Knife” of the current existingplugins for Bareos.
The bpipe plugin is specified in the Include section of your Job’s FileSet resource in your bareos-dir.conf.
FileSet {
Name = "MyFileSet"
Include {
Options {
signature = MD5
compression = gzip
}
Plugin = "bpipe:file=<filepath>:reader=<readprogram>:writer=<writeprogram>
}
}
Configuration 23.1: bpipe fileset
The syntax and semantics of the Plugin directive require the first part of the string up to the colon to bethe name of the plugin. Everything after the first colon is ignored by the File daemon but is passed to theplugin. Thus the plugin writer may define the meaning of the rest of the string as he wishes. The full syntaxof the plugin directive as interpreted by the bpipe plugin is:
Plugin = "<plugin>:file=<filepath>:reader=<readprogram>:writer=<writeprogram>"
Configuration 23.2: bpipe directive
plugin is the name of the plugin with the trailing -fd.so stripped off, so in this case, we would put bpipe inthe field.
271
272
filepath specifies the namespace, which for bpipe is the pseudo path and filename under which the backupwill be saved. This pseudo path and filename will be seen by the user in the restore file tree. Forexample, if the value is /MySQL/mydump.sql, the data backed up by the plugin will be put underthat ”pseudo” path and filename. You must be careful to choose a naming convention that is uniqueto avoid a conflict with a path and filename that actually exists on your system.
readprogram for the bpipe plugin specifies the ”reader” program that is called by the plugin during backupto read the data. bpipe will call this program by doing a popen on it.
writeprogram for the bpipe plugin specifies the ”writer” program that is called by the plugin during restoreto write the data back to the filesystem.
Please note that the two items above describing the ”reader” and ”writer”, these programs are ”executed”by Bareos, which means there is no shell inerpretation of any command line arguments you might use. Ifyou want to use shell characters (redirection of input or output, ...), then we recommend that you put yourcommand or commands in a shell script and execute the script. In addition if you backup a file with readerprogram, when running the writer program during the restore, Bareos will not automatically create the pathto the file. Either the path must exist, or you must explicitly do so with your command or in a shell script.See the examples about Backup of a PostgreSQL Database and Backup of a MySQL Database.
23.1.2 PGSQL Plugin
See chapter Backup of a PostgreSQL Databases by using the PGSQL-Plugin.
23.1.3 MSSQL Plugin
See chapter Backup of MSSQL Databases with Bareos Plugin.
23.1.4 python-fd Plugin
The python-fd plugin behaves similar to the python-dir Plugin. Base plugins and an example get installedvia the package bareos-filedaemon-python-plugin. Configuration is done in the FileSet Resource on thedirector.We basically distinguish between command-plugin and option-plugins.
Command Plugins
Command plugins are used to replace or extend the FileSet definition in the File Section. If you have acommand-plugin, you can use it like in this example:
FileSet {
Name = "mysql"
Include {
Options {
Signature = MD5 # calculate md5 checksum per file
}
File = "/etc"
Plugin = "python:module_path=/usr/lib/bareos/plugins:module_name=bareos-fd-mysql"
}
}
Configuration 23.3: bareos-dir.conf: Python FD command plugins
This example uses the MySQL plugin from https://github.com/bareos/bareos-contrib/tree/master/
fd-plugins/mysql-python to backup MySQL dumps in addition to /etc.
Option Plugins
Option plugins are activated in the Options resource of a FileSet definition.Example:
FileSet {
Name = "option"
Include {
Options {
Signature = MD5 # calculate md5 checksum per file
Plugin = "python:module_path=/usr/lib/bareos/plugins:module_name=bareos-fd-file-interact"
273
}
File = "/etc"
File = "/usr/lib/bareos/plugins"
}
}
Configuration 23.4: bareos-dir.conf: Python FD option plugins
This plugin bareos-fd-file-interact from https://github.com/bareos/bareos-contrib/tree/master/
fd-plugins/options-plugin-sample has a method that is called before and after each file that goes intothe backup, it can be used as a template for whatever plugin wants to interact with files before or afterbackup.
23.1.5 VMware Plugin
The VMware®
Plugin can be used for agentless backups of virtual machines running on VMware vSphere®
.It makes use of CBT (Changed Block Tracking) to do space efficient full and incremental backups, see belowfor mandatory requirements.
Status
The current development status of the VMware®
plugin is experimental.
The Plugin can do full, differential and incremental backup and restore of VM disks.
Current limitations amongst others are:
� it is not yet possible to exclude VM disks from backups
� the VM configuration is not yet backed up, so that it is not yet possible to recreate a completely deletedVM
� the above implies that restore is still only possible to the same existing VM with exising virtual disks
Requirements
As the Plugin is based on the VMware vSphere®
Storage APIs for Data Protection, which requires at least
a VMware vSphere®
Essentials License. It does not work with standalone unlicensed VMware ESXi�
.
Installation
Install the package bareos-vmware-plugin including its requirments by using an appropriate package man-agement tool (eg. yum, zypper, apt)
Configuration
First add a user account in vCenter that has full privileges by assigning the account to an administrator roleor by adding the account to a group that is assigned to an administrator role. While any user account withfull privileges could be used, it is better practice to create a separate user account, so that the actions bythis account logged in vSphere are clearly distinguishable. In the future a more detailed set of required roleprivilges may be defined.
When using the vCenter appliance with embedded SSO, a user account usually has the structure <username>@vsphere.local, it may be different when using Active Directory as SSO in vCenter. For the exampleshere, we will use [email protected] with the password Bak.Adm-1234.
For more details regarding users and permissions in vSphere see http://pubs.vmware.com/vsphere-55/
topic/com.vmware.vsphere.security.doc/GUID-72BFF98C-C530-4C50-BF31-B5779D2A4BBB.
html and http://pubs.vmware.com/vsphere-55/topic/com.vmware.vsphere.security.doc/
GUID-5372F580-5C23-4E9C-8A4E-EF1B4DD9033E.html
Make sure to add or enable the following settings in
To define the backup of a VM in Bareos, a job definition and a fileset resource must be added to the Bareosdirector confguration. In vCenter, VMs are usually organized in datacenters and folders. The followingexample shows how to configure the backup of the VM named websrv1 in the datacenter mydc1 folderwebservers on the vCenter server vcenter.example.org:
274
Job {
Name = "vm-websrv1"
JobDefs = "DefaultJob"
FileSet = "vm-websrv1_fileset"
}
FileSet {
Name = "vm-websrv1_fileset"
Include {
Options {
signature = MD5
Compression = GZIP
}
Plugin = "python:module_path=/usr/lib64/bareos/plugins/vmware_plugin:module_name=bareos-fd-vmware:dc= ↙↪→ mydc1:folder=/webservers:vmname=websrv1:vcserver=vcenter.example.org:[email protected]: ↙↪→ vcpass=Bak.Adm-1234"
}
}
Configuration 23.5: bareos-dir.conf: VMware Plugin Job and FileSet definition
For VMs defined in the root-folder, folder=/ must be specified in the Plugin definition.
Backup
Before running the first backup, CBT (Changed Block Tracking) must be enabled for the VMs to be backedup.
As of http://kb.vmware.com/kb/2075984 manually enabling CBT is currently not working properly. TheAPI however works properly. To enable CBT use the Script vmware_cbt_tool.py, it is packaged in thebareos-vmware-plugin package:
# vmware cbt tool.py −−helpusage: vmware_cbt_tool.py [-h] -s HOST [-o PORT] -u USER [-p PASSWORD] -d
DATACENTER -f FOLDER -v VMNAME [--enablecbt]
[--disablecbt] [--resetcbt] [--info]
Process args for enabling/disabling/resetting CBT
optional arguments:
-h, --help show this help message and exit
-s HOST, --host HOST Remote host to connect to
-o PORT, --port PORT Port to connect on
-u USER, --user USER User name to use when connecting to host
-p PASSWORD, --password PASSWORD
Password to use when connecting to host
-d DATACENTER, --datacenter DATACENTER
DataCenter Name
-f FOLDER, --folder FOLDER
Folder Name
-v VMNAME, --vmname VMNAME
Names of the Virtual Machines
--enablecbt Enable CBT
--disablecbt Disable CBT
--resetcbt Reset CBT (disable, then enable)
--info Show information (CBT supported and enabled or
disabled)
Commands 23.6: usage of vmware cbt tool.py
For the above configuration example, the command to enable CBT would be
# vmware cbt tool.py −s vcenter.example.org −u [email protected] −p Bak.Adm−1234 −d mydc1 −f ↙↪→ /webservers −v websrv1 −−enablecbt
Commands 23.7: Example using vmware cbt tool.py
Note: CBT does not work if the virtual hardware version is 6 or earlier.
After enabling CBT, Backup Jobs can be run or scheduled as usual, for example in bconsole:
run job=vm-websrv1 level=Full
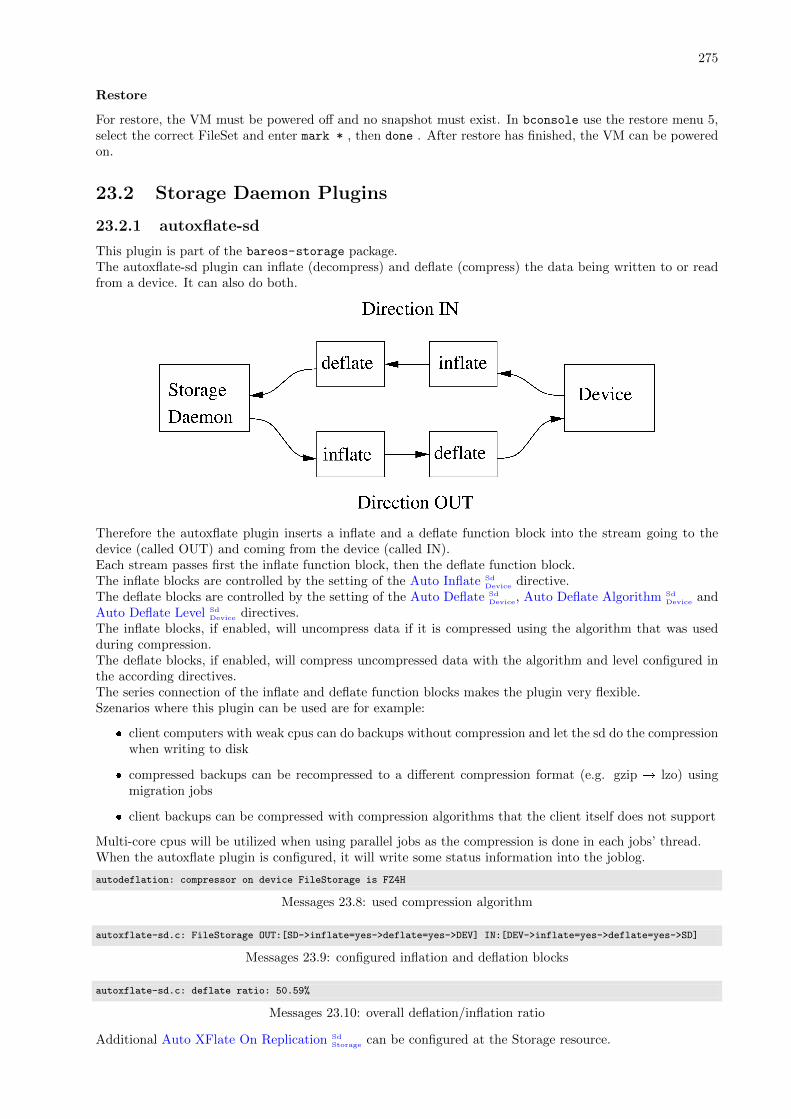
275
Restore
For restore, the VM must be powered off and no snapshot must exist. In bconsole use the restore menu 5,select the correct FileSet and enter mark * , then done . After restore has finished, the VM can be poweredon.
23.2 Storage Daemon Plugins
23.2.1 autoxflate-sd
This plugin is part of the bareos-storage package.The autoxflate-sd plugin can inflate (decompress) and deflate (compress) the data being written to or readfrom a device. It can also do both.
Therefore the autoxflate plugin inserts a inflate and a deflate function block into the stream going to thedevice (called OUT) and coming from the device (called IN).Each stream passes first the inflate function block, then the deflate function block.The inflate blocks are controlled by the setting of the Auto Inflate Sd
Device directive.The deflate blocks are controlled by the setting of the Auto Deflate Sd
Device, Auto Deflate Algorithm SdDevice and
Auto Deflate Level SdDevice directives.
The inflate blocks, if enabled, will uncompress data if it is compressed using the algorithm that was usedduring compression.The deflate blocks, if enabled, will compress uncompressed data with the algorithm and level configured inthe according directives.The series connection of the inflate and deflate function blocks makes the plugin very flexible.Szenarios where this plugin can be used are for example:
� client computers with weak cpus can do backups without compression and let the sd do the compressionwhen writing to disk
� compressed backups can be recompressed to a different compression format (e.g. gzip � lzo) usingmigration jobs
� client backups can be compressed with compression algorithms that the client itself does not support
Multi-core cpus will be utilized when using parallel jobs as the compression is done in each jobs’ thread.When the autoxflate plugin is configured, it will write some status information into the joblog.
autodeflation: compressor on device FileStorage is FZ4H
Messages 23.8: used compression algorithm
autoxflate-sd.c: FileStorage OUT:[SD->inflate=yes->deflate=yes->DEV] IN:[DEV->inflate=yes->deflate=yes->SD]
Messages 23.9: configured inflation and deflation blocks
autoxflate-sd.c: deflate ratio: 50.59%
Messages 23.10: overall deflation/inflation ratio
Additional Auto XFlate On Replication SdStorage can be configured at the Storage resource.
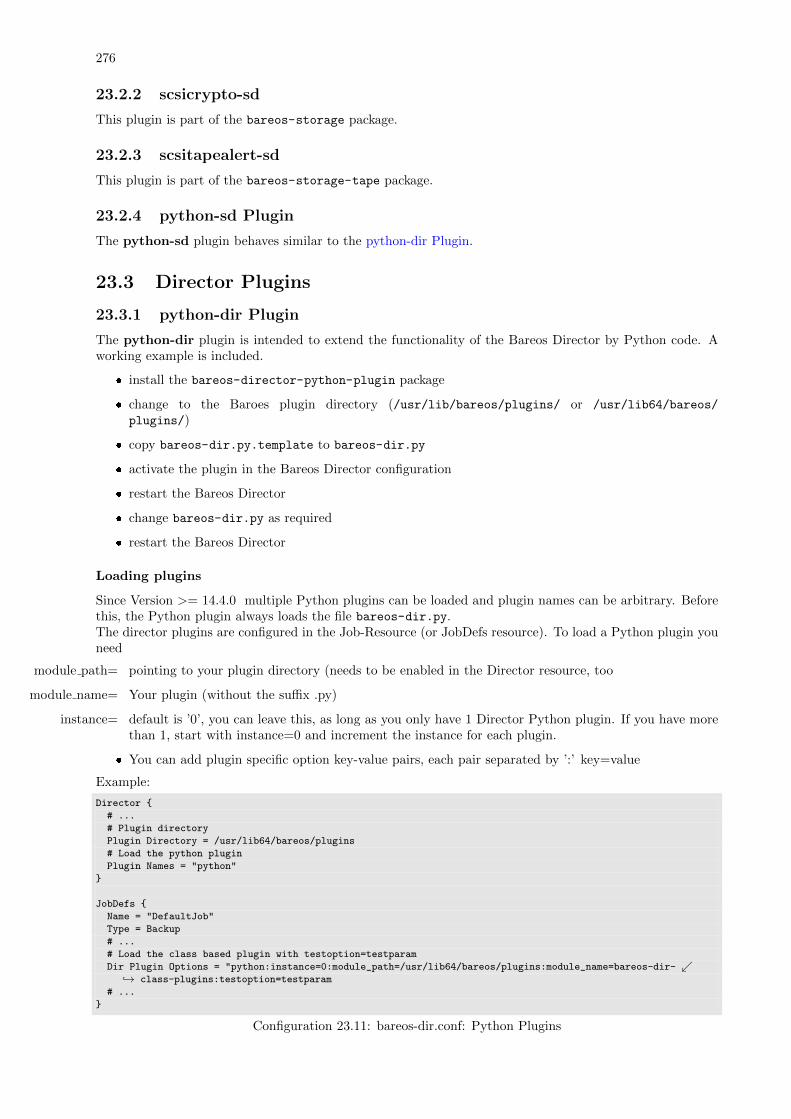
276
23.2.2 scsicrypto-sd
This plugin is part of the bareos-storage package.
23.2.3 scsitapealert-sd
This plugin is part of the bareos-storage-tape package.
23.2.4 python-sd Plugin
The python-sd plugin behaves similar to the python-dir Plugin.
23.3 Director Plugins
23.3.1 python-dir Plugin
The python-dir plugin is intended to extend the functionality of the Bareos Director by Python code. Aworking example is included.
� install the bareos-director-python-plugin package
� change to the Baroes plugin directory (/usr/lib/bareos/plugins/ or /usr/lib64/bareos/
plugins/)
� copy bareos-dir.py.template to bareos-dir.py
� activate the plugin in the Bareos Director configuration
� restart the Bareos Director
� change bareos-dir.py as required
� restart the Bareos Director
Loading plugins
Since Version >= 14.4.0 multiple Python plugins can be loaded and plugin names can be arbitrary. Beforethis, the Python plugin always loads the file bareos-dir.py.The director plugins are configured in the Job-Resource (or JobDefs resource). To load a Python plugin youneed
module path= pointing to your plugin directory (needs to be enabled in the Director resource, too
module name= Your plugin (without the suffix .py)
instance= default is ’0’, you can leave this, as long as you only have 1 Director Python plugin. If you have morethan 1, start with instance=0 and increment the instance for each plugin.
� You can add plugin specific option key-value pairs, each pair separated by ’:’ key=value
Example:
Director {
# ...
# Plugin directory
Plugin Directory = /usr/lib64/bareos/plugins
# Load the python plugin
Plugin Names = "python"
}
JobDefs {
Name = "DefaultJob"
Type = Backup
# ...
# Load the class based plugin with testoption=testparam
Dir Plugin Options = "python:instance=0:module_path=/usr/lib64/bareos/plugins:module_name=bareos-dir- ↙↪→ class-plugins:testoption=testparam
# ...
}
Configuration 23.11: bareos-dir.conf: Python Plugins

277
Write your own Python Plugin
Some plugin examples are available on https://github.com/bareos/bareos-contrib. The class-basedapproach lets you easily reuse stuff already defined in the baseclass BareosDirPluginBaseclass, which shipswith the bareos-director-python-plugin package. The examples contain the plugin bareos-dir-nsca-sender, that submits the results and performance data of a backup job directly to Icinga or Nagios using theNSCA protocol.

278
Chapter 24
The Windows Version of Bareos
The Windows version of Bareos is a native Win32 port, but there are very few source code changes to theUnix code, which means that the Windows version is for the most part running code that has long provedstable on Unix systems. Chapter Operating Systems show, what Windows versions are supported.
The Bareos component that is most often used in Windows is the File daemon or Client program. As aconsequence, when we speak of the Windows version of Bareos below, we are mostly referring to the Filedaemon (client).
Once installed Bareos normally runs as a system service. This means that it is immediately started by theoperating system when the system is booted, and runs in the background even if there is no user logged intothe system.
24.1 Windows Installation
Normally, you will install the Windows version of Bareos from the binaries. The winbareos binarypackages are provided under http://download.bareos.org/bareos/release/latest/windows. Addition-ally, there are OPSI packages available under http://download.bareos.org/bareos/release/latest/
windows/opsi.
This install is standard Windows .exe that runs an install wizard using the NSIS Free Software installer, so ifyou have already installed Windows software, it should be very familiar to you. Providing you do not alreadyhave Bareos installed, the installer installs the binaries and dlls in C:\Program Files\Bareos and the con-figuration files in C:\ProgramData \Bareos (for Windows XP and older: C:\Documents and Settings\
All Users\Application Data\Bareos ).
In addition, the Start>All Programs>Bareos menu item will be created during the installation, and onthat menu, you will find items for editing the configuration files, displaying the document, and starting BAT
or bconsole.
24.1.1 Graphical Installation
Here are the important steps.
� You must be logged in as an Administrator to the local machine to do a correct installation, if not,please do so before continuing.
� For a standard installation you may only select the ”Tray-Monitor” and the ”Open Firewall for Client”as additional optional components.
279
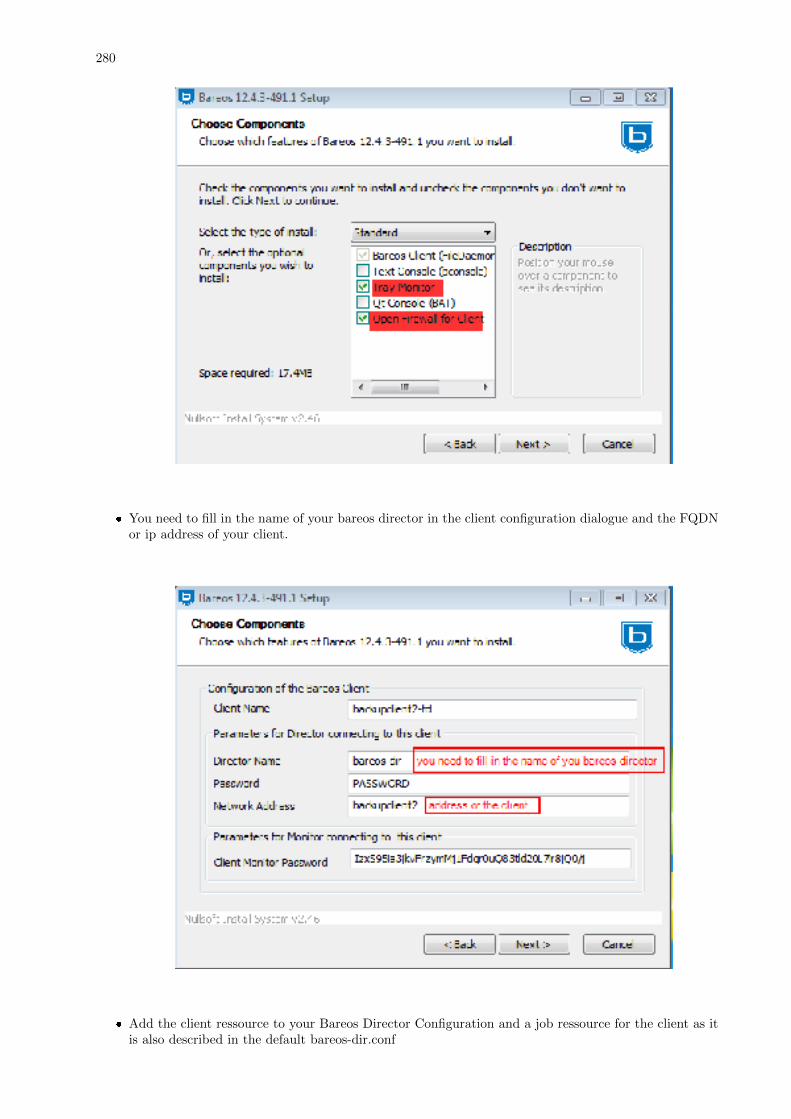
280
� You need to fill in the name of your bareos director in the client configuration dialogue and the FQDNor ip address of your client.
� Add the client ressource to your Bareos Director Configuration and a job ressource for the client as itis also described in the default bareos-dir.conf
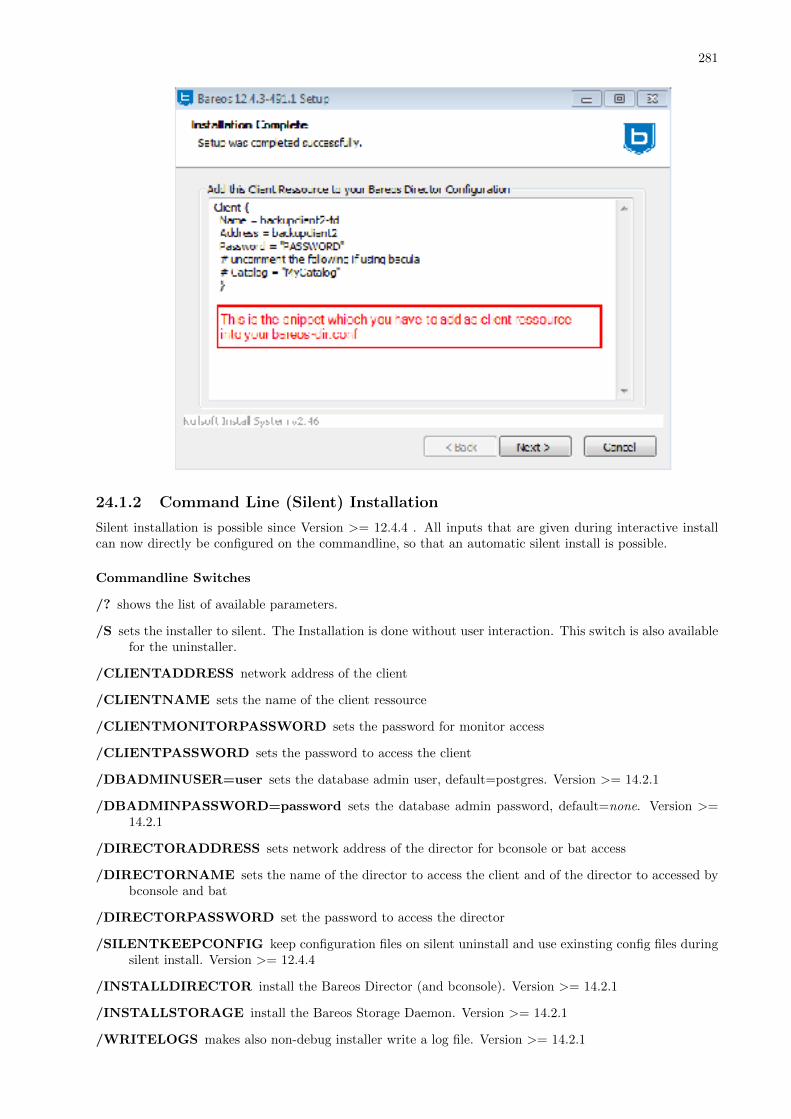
281
24.1.2 Command Line (Silent) Installation
Silent installation is possible since Version >= 12.4.4 . All inputs that are given during interactive installcan now directly be configured on the commandline, so that an automatic silent install is possible.
Commandline Switches
/? shows the list of available parameters.
/S sets the installer to silent. The Installation is done without user interaction. This switch is also availablefor the uninstaller.
/CLIENTADDRESS network address of the client
/CLIENTNAME sets the name of the client ressource
/CLIENTMONITORPASSWORD sets the password for monitor access
/CLIENTPASSWORD sets the password to access the client
/DBADMINUSER=user sets the database admin user, default=postgres. Version >= 14.2.1
/DBADMINPASSWORD=password sets the database admin password, default=none. Version >=14.2.1
/DIRECTORADDRESS sets network address of the director for bconsole or bat access
/DIRECTORNAME sets the name of the director to access the client and of the director to accessed bybconsole and bat
/DIRECTORPASSWORD set the password to access the director
/SILENTKEEPCONFIG keep configuration files on silent uninstall and use exinsting config files duringsilent install. Version >= 12.4.4
/INSTALLDIRECTOR install the Bareos Director (and bconsole). Version >= 14.2.1
/INSTALLSTORAGE install the Bareos Storage Daemon. Version >= 14.2.1
/WRITELOGS makes also non-debug installer write a log file. Version >= 14.2.1
282
/D=C:\specify \installation \directory (Important: It has to be the last option!)
By setting the Installation Parameters via commandline and using the silent installer, you can install thebareos client without having to do any configuration after the installation e.g. as follows:
c:\winbareos.exe /S /CLIENTNAME=hostname-fd /CLIENTPASSWORD="verysecretpassword" /DIRECTORNAME=bareos-dir
DBADMINUSER and DBADMINPASSWORD are used to create the bareos databases. If login is notpossible silent installer will abort
24.2 Dealing with Windows Problems
If you are not using the portable option, and you have VSS (Volume Shadow Copy) enabled in the Director,and you experience problems with Bareos not being able to open files, it is most likely that you are runningan antivirus program that blocks Bareos from doing certain operations. In this case, disable the antivirusprogram and try another backup. If it succeeds, either get a different (better) antivirus program or usesomething like RunClientJobBefore/After to turn off the antivirus program while the backup is running.If turning off anti-virus software does not resolve your VSS problems, you might have to turn on VSSdebugging. The following link describes how to do this: http://support.microsoft.com/kb/887013/
en-us.In Microsoft Windows Small Business Server 2003 the VSS Writer for Exchange is turned off by default. Toturn it on, please see the following link: http://support.microsoft.com/default.aspx?scid=kb;EN-US;Q838183
The most likely source of problems is authentication when the Director attempts to connect to the Filedaemon that you installed. This can occur if the names and the passwords defined in the File daemon’sconfiguration file bareos-fd.conf file on the Windows machine do not match with the names and thepasswords in the Director’s configuration file bareos-dir.conf located on your Unix/Linux server.More specifically, the password found in the Client resource in the Director’s configuration file must be thesame as the password in the Director resource of the File daemon’s configuration file. In addition, thename of the Director resource in the File daemon’s configuration file must be the same as the name in theDirector resource of the Director’s configuration file.It is a bit hard to explain in words, but if you understand that a Director normally has multiple Clientsand a Client (or File daemon) may permit access by multiple Directors, you can see that the names and thepasswords on both sides must match for proper authentication.To get proper debug output of the daemons running on windows, please do the following: (The followingexample shows how to to it with the bareos filedaemon).Use regedit and open the registry in
Computer\HKEY_LOCAL_MACHINE\SYSTEM\CurrentControlSet\services\Bareos-fd
and set the ImagePath setting from
"C:\Program Files\Bareos\bareos-fd.exe" /service -c "C:\ProgramData\Bareos\bareos-fd.conf"
to
"C:\Program Files\Bareos\bareos-fd.exe" /service -d200 -c "C:\ProgramData\Bareos\bareos-fd.conf"
After restarting the service, you will find a file called C:\bareos -fd.trace which will contain the debugoutput created by the daemon.The same can be done for the Director (replace bareos-fd by bareos-dir) and for the Storage Daemon (replacebareos-fd by bareos-sd).
24.3 Windows Compatibility Considerations
24.3.1 Exclusivly Opened Filed
If you are not using the Volume Shadow Copy Service (VSS) option and if any applications are runningduring the backup and they have files opened exclusively, Bareos will not be able to backup those files, so besure you close your applications (or tell your users to close their applications) before the backup. Fortunately,most Microsoft applications do not open files exclusively so that they can be backed up. However, you willneed to experiment. In any case, if Bareos cannot open the file, it will print an error message, so you willalways know which files were not backed up. If Volume Shadow Copy Service is enabled, Bareos is able tobacking up any file.
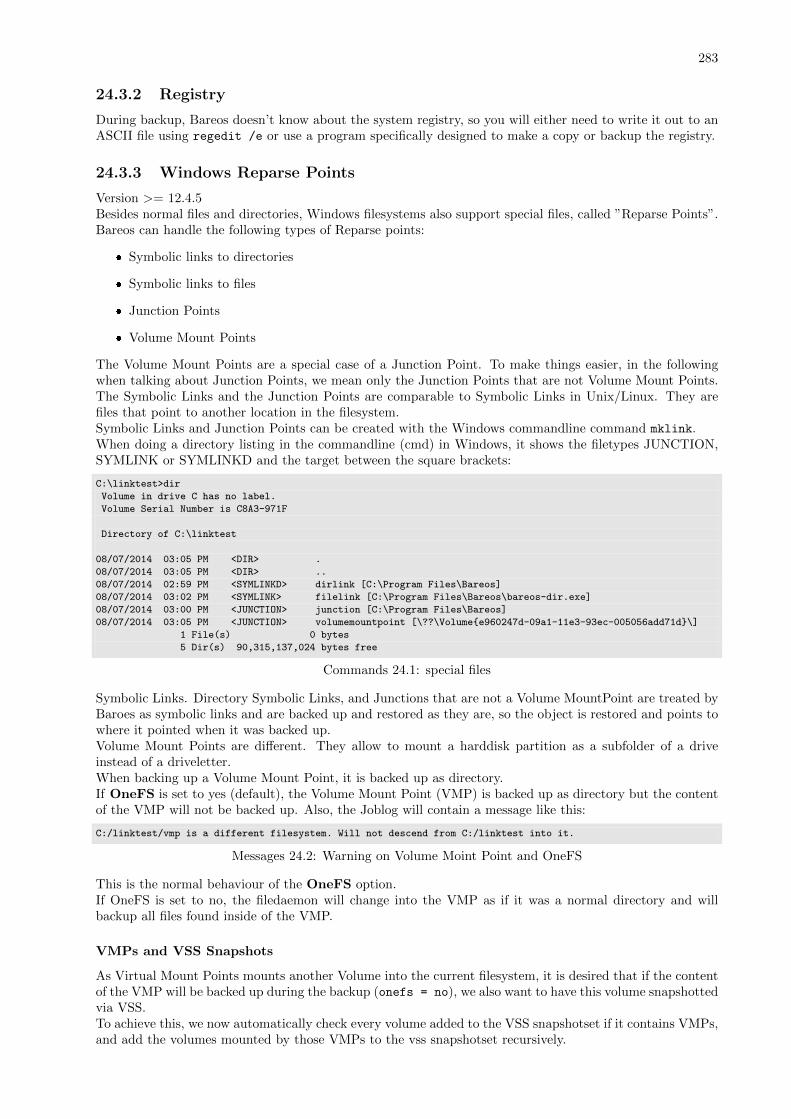
283
24.3.2 Registry
During backup, Bareos doesn’t know about the system registry, so you will either need to write it out to anASCII file using regedit /e or use a program specifically designed to make a copy or backup the registry.
24.3.3 Windows Reparse Points
Version >= 12.4.5Besides normal files and directories, Windows filesystems also support special files, called ”Reparse Points”.Bareos can handle the following types of Reparse points:
� Symbolic links to directories
� Symbolic links to files
� Junction Points
� Volume Mount Points
The Volume Mount Points are a special case of a Junction Point. To make things easier, in the followingwhen talking about Junction Points, we mean only the Junction Points that are not Volume Mount Points.The Symbolic Links and the Junction Points are comparable to Symbolic Links in Unix/Linux. They arefiles that point to another location in the filesystem.Symbolic Links and Junction Points can be created with the Windows commandline command mklink.When doing a directory listing in the commandline (cmd) in Windows, it shows the filetypes JUNCTION,SYMLINK or SYMLINKD and the target between the square brackets:
C:\linktest>dir
Volume in drive C has no label.
Volume Serial Number is C8A3-971F
Directory of C:\linktest
08/07/2014 03:05 PM <DIR> .
08/07/2014 03:05 PM <DIR> ..
08/07/2014 02:59 PM <SYMLINKD> dirlink [C:\Program Files\Bareos]
08/07/2014 03:02 PM <SYMLINK> filelink [C:\Program Files\Bareos\bareos-dir.exe]
08/07/2014 03:00 PM <JUNCTION> junction [C:\Program Files\Bareos]
08/07/2014 03:05 PM <JUNCTION> volumemountpoint [\??\Volume{e960247d-09a1-11e3-93ec-005056add71d}\]
1 File(s) 0 bytes
5 Dir(s) 90,315,137,024 bytes free
Commands 24.1: special files
Symbolic Links. Directory Symbolic Links, and Junctions that are not a Volume MountPoint are treated byBaroes as symbolic links and are backed up and restored as they are, so the object is restored and points towhere it pointed when it was backed up.Volume Mount Points are different. They allow to mount a harddisk partition as a subfolder of a driveinstead of a driveletter.When backing up a Volume Mount Point, it is backed up as directory.If OneFS is set to yes (default), the Volume Mount Point (VMP) is backed up as directory but the contentof the VMP will not be backed up. Also, the Joblog will contain a message like this:
C:/linktest/vmp is a different filesystem. Will not descend from C:/linktest into it.
Messages 24.2: Warning on Volume Moint Point and OneFS
This is the normal behaviour of the OneFS option.If OneFS is set to no, the filedaemon will change into the VMP as if it was a normal directory and willbackup all files found inside of the VMP.
VMPs and VSS Snapshots
As Virtual Mount Points mounts another Volume into the current filesystem, it is desired that if the contentof the VMP will be backed up during the backup (onefs = no), we also want to have this volume snapshottedvia VSS.To achieve this, we now automatically check every volume added to the VSS snapshotset if it contains VMPs,and add the volumes mounted by those VMPs to the vss snapshotset recursively.
284
Volumes can be mounted nested and multiple times, but can only be added to the snapshotset once. This isthe reason why the number of vmps can be greater than the number of volumes added for the volume mountpoints.The Job Log will show how many VMPs were found like this:
Volume Mount Points found: 7, added to snapshotset: 5
Messages 24.3: Volume Mount Points are added automatically to VSS snapshots (if onefs
Accordingly, if OneFS is set to yes, we do not need to handle Volume Mount Points this way. If OneFS isset to yes (default), the joblog will contain the following information:
VolumeMountpoints are not processed as onefs = yes.
Messages 24.4: Volume Mount Points are ignored on VSS snapshots (if onefs
24.3.4 Hard Links
Windows also supports hard links, even so they are seldom used. These are treated as normal files and willbe restored as individual files (which will not be hardlinks again)
24.3.5 FilesNotToBackup Registry Key
Version >= 14.2.0Windows supports a special Registry Key that specifies the names of the files and directories that backupapplications should not backup or restore.The full path to this registry key is HKEY_LOCAL_MACHINE\SYSTEM \CurrentControlSet \Control \
BackupRestore \FilesNotToBackup
Bareos automatically converts these entries to wildcards which will be automatically excluded from backup.The backup log shows a short information about the creation of the exludes like this:
Created 28 wildcard excludes from FilesNotToBackup Registry key
Messages 24.5: Excludes according to the FilesNotToBackup registry key
More details can be found if the filedaemon is run in debug mode inside of the bareos-fd.trace logfile.Each entry and the resulting wildcard are logged.
client-win-fd: win32.c:465-0 (1) "WER" :
client-win-fd: win32.c:482-0 "C:\ProgramData\Microsoft\Windows\WER\* /s"
client-win-fd: win32.c:527-0 -> "C:/ProgramData/Microsoft/Windows/WER/*"
client-win-fd: win32.c:465-0 (2) "Kernel Dumps" :
client-win-fd: win32.c:482-0 "C:\Windows\Minidump\* /s"
client-win-fd: win32.c:527-0 -> "C:/Windows/Minidump/*"
client-win-fd: win32.c:482-0 "C:\Windows\memory.dmp"
client-win-fd: win32.c:527-0 -> "C:/Windows/memory.dmp"
client-win-fd: win32.c:465-0 (3) "Power Management" :
client-win-fd: win32.c:482-0 "\hiberfil.sys"
client-win-fd: win32.c:527-0 -> "[A-Z]:/hiberfil.sys"
client-win-fd: win32.c:465-0 (4) "MS Distributed Transaction Coordinator" :
client-win-fd: win32.c:482-0 "C:\Windows\system32\MSDtc\MSDTC.LOG"
client-win-fd: win32.c:527-0 -> "C:/Windows/system32/MSDtc/MSDTC.LOG"
client-win-fd: win32.c:482-0 "C:\Windows\system32\MSDtc\trace\dtctrace.log"
client-win-fd: win32.c:527-0 -> "C:/Windows/system32/MSDtc/trace/dtctrace.log"
Messages 24.6: translation between registry key FilesNotToBackup and Bareos Exclude FileSet
It is possible to disable this functionality by setting the FileSet option AutoExclude to no.The JobLog will then show the following informational line:
Fileset has autoexclude disabled, ignoring FilesNotToBackup Registry key
Messages 24.7: AutoExclude disabled
For more details about the Windows registry key see http://msdn.microsoft.com/en-us/library/
windows/desktop/bb891959%28v=vs.85%29.aspx#filesnottobackup.
24.3.6 Windows dedup support
Version >= 12.4.5Windows 2012 has dedup support which needs handling.
285
24.3.7 Store all file attributes
Version >= 12.4.5Windows has gathered quite some special specific file flags over the years but not all are saved during backupso some are never restored by the restore process. The most important ones are the ARCHIVE flag whichis ”misused” by some programs for storing some special information. Others that are known not to bestored are the COMPRESSED flag which means that a restored file looses it and will be restored as anuncompressed file.
24.3.8 Support for Windows EFS filesystems
Version >= 12.4.5Windows has support for a so called EFS filesystem. This is an encrypted filesystem, to be able to backupthe data and to restore it we need to use a special API. With this API you in essence export the data onbackup and import it on restore. This way you never have access to the unencrypted data but just importand export the encrypted data. This is the cleanest way of handling encryption by just seeing the data assome opaque data and not try to do anything special with it.
24.4 Volume Shadow Copy Service (VSS)
VSS is available since Windows XP. From the perspective of a backup-solution for Windows, this is anextremely important step. VSS allows Bareos to backup open files and even to interact with applicationslike RDBMS to produce consistent file copies. VSS aware applications are called VSS Writers, they registerwith the OS so that when Bareos wants to do a Snapshot, the OS will notify the register Writer programs,which may then create a consistent state in their application, which will be backed up. Examples for thesewriters are ”MSDE” (Microsoft database engine), ”Event Log Writer”, ”Registry Writer” plus 3rd party-writers. If you have a non-vss aware application a shadow copy is still generated and the open files can bebacked up, but there is no guarantee that the file is consistent.Bareos produces a message from each of the registered writer programs when it is doing a VSS backup soyou know which ones are correctly backed up.Technically Bareos creates a shadow copy as soon as the backup process starts. It does then backup all filesfrom the shadow copy and destroys the shadow copy after the backup process. Please have in mind, thatVSS creates a snapshot and thus backs up the system at the state it had when starting the backup. It willdisregard file changes which occur during the backup process.VSS can be turned on by placing an
Enable VSS = yes
in your FileSet resource.The VSS aware File daemon has the letters VSS on the signon line that it produces when contacted by theconsole. For example:
Tibs-fd Version: 1.37.32 (22 July 2005) VSS Windows XP MVS NT 5.1.2600
the VSS is shown in the line above. This only means that the File daemon is capable of doing VSS not thatVSS is turned on for a particular backup. There are two ways of telling if VSS is actually turned on duringa backup. The first is to look at the status output for a job, e.g.:
Running Jobs:
JobId 1 Job NightlySave.2005-07-23_13.25.45 is running.
VSS Backup Job started: 23-Jul-05 13:25
Files=70,113 Bytes=3,987,180,650 Bytes/sec=3,244,247
Files Examined=75,021
Processing file: c:/Documents and Settings/user/My Documents/My Pictures/Misc1/Sans titre - 39.pdd
SDReadSeqNo=5 fd=352
Here, you see under Running Jobs that JobId 1 is ”VSS Backup Job started ...” This means that VSS isenabled for that job. If VSS is not enabled, it will simply show ”Backup Job started ...” without the lettersVSS.The second way to know that the job was backed up with VSS is to look at the Job Report, which will looksomething like the following:
23-Jul 13:25 rufus-dir: Start Backup JobId 1, Job=NightlySave.2005-07-23_13.25.45
23-Jul 13:26 rufus-sd: Wrote label to prelabeled Volume "TestVolume001" on device "DDS-4" (/dev/nst0)
23-Jul 13:26 rufus-sd: Spooling data ...
23-Jul 13:26 Tibs: Generate VSS snapshots. Driver="VSS WinXP", Drive(s)="C"
286
23-Jul 13:26 Tibs: VSS Writer: "MSDEWriter", State: 1 (VSS_WS_STABLE)
23-Jul 13:26 Tibs: VSS Writer: "Microsoft Writer (Bootable State)", State: 1 (VSS_WS_STABLE)
23-Jul 13:26 Tibs: VSS Writer: "WMI Writer", State: 1 (VSS_WS_STABLE)
23-Jul 13:26 Tibs: VSS Writer: "Microsoft Writer (Service State)", State: 1 (VSS_WS_STABLE)
In the above Job Report listing, you see that the VSS snapshot was generated for drive C (if other drivesare backed up, they will be listed on the Drive(s)=”C”. You also see the reports from each of the writerprogram. Here they all report VSS WS STABLE, which means that you will get a consistent snapshot ofthe data handled by that writer.
24.4.1 VSS Problems
If you are experiencing problems such as VSS hanging on MSDE, first try running vssadmin to check forproblems, then try running ntbackup which also uses VSS to see if it has similar problems. If so, you knowthat the problem is in your Windows machine and not with Bareos.The FD hang problems were reported with MSDEwriter when:
� a local firewall locked local access to the MSDE TCP port (MSDEwriter seems to use TCP/IP andnot Named Pipes).
� msdtcs was installed to run under ”localsystem”: try running msdtcs under networking account (insteadof local system) (com+ seems to work better with this configuration).
24.5 Windows Firewalls
The Windows buildin Firewall is enabled since Windows version WinXP SP2. The Bareos installer opens therequired network ports for Bareos. However, if you are using another Firewall, you might need to manuallyopen the Bareos network port 9102/TCP.
24.5.1 Network TCP Port
If you want to see if the File daemon has properly opened the port and is listening, you can enter thefollowing command in a shell window:
netstat -an | findstr 910[123]
24.6 Windows Restore Problems
Please see the Restore Chapter of this manual for problems that you might encounter doing a restore.
24.7 Windows Backup Problems
If during a Backup, you get the message: ERR=Access is denied and you are using the portable option,you should try both adding both the non-portable (backup API) and the Volume Shadow Copy options toyour Director’s conf file.In the Options resource:
portable = no
In the FileSet resource:
enablevss = yes
In general, specifying these two options should allow you to backup any file on a Windows system. However,in some cases, if users have allowed to have full control of their folders, even system programs such a Bareoscan be locked out. In this case, you must identify which folders or files are creating the problem and do thefollowing:
1. Grant ownership of the file/folder to the Administrators group, with the option to replace the owneron all child objects.
2. Grant full control permissions to the Administrators group, and change the user’s group to only haveModify permission to the file/folder and all child objects.
Thanks to Georger Araujo for the above information.
287
24.8 Windows Ownership and Permissions Problems
If you restore files backed up from Windows to an alternate directory, Bareos may need to create somehigher level directories that were not saved (or restored). In this case, the File daemon will create themunder the SYSTEM account because that is the account that Bareos runs under as a service and with fullaccess permission. However, there may be cases where you have problems accessing those files even if yourun as administrator. In principle, Microsoft supplies you with the way to cease the ownership of those filesand thus change the permissions. However, a much better solution to working with and changing Win32permissions is the program SetACL, which can be found at http://setacl.sourceforge.net/.If you have not installed Bareos while running as Administrator and if Bareos is not running as a Processwith the userid (User Name) SYSTEM, then it is very unlikely that it will have sufficient permission toaccess all your files.Some users have experienced problems restoring files that participate in the Active Directory. They alsoreport that changing the userid under which Bareos (bareos-fd.exe) runs, from SYSTEM to a Domain Adminuserid, resolves the problem.
24.9 Fixing the Windows Boot Record
An effective way to restore a Windows backup is to install Windows on a different hard drive and restorethe backup. Then run the recovery CD and run
diskpart
select disk 0
select part 1
active
exit
bootrec /rebuldbcd
bootrec /fixboot
bootrec /fixmbr
24.10 File Daemon: Windows Specific Command Line Options
These options are not normally seen or used by the user, and are documented here only for informationpurposes. At the current time, to change the default options, you must either manually run Bareos or youmust manually edit the system registry and modify the appropriate entries.In order to avoid option clashes between the options necessary for Bareos to run on Windows and thestandard Bareos options, all Windows specific options are signaled with a forward slash character (/), whileas usual, the standard Bareos options are signaled with a minus (-), or a minus minus (--). All the standardBareos options can be used on the Windows version. In addition, the following Windows only options areimplemented:
/service Start Bareos as a service
/run Run the Bareos application
/install Install Bareos as a service in the system registry
/remove Uninstall Bareos from the system registry
/about Show the Bareos about dialogue box
/status Show the Bareos status dialogue box
/events Show the Bareos events dialogue box (not yet implemented)
/kill Stop any running Bareos
/help Show the Bareos help dialogue box
It is important to note that under normal circumstances the user should never need to use these options asthey are normally handled by the system automatically once Bareos is installed. However, you may notethese options in some of the .bat files that have been created for your use.

288

Chapter 25
Network setup
289
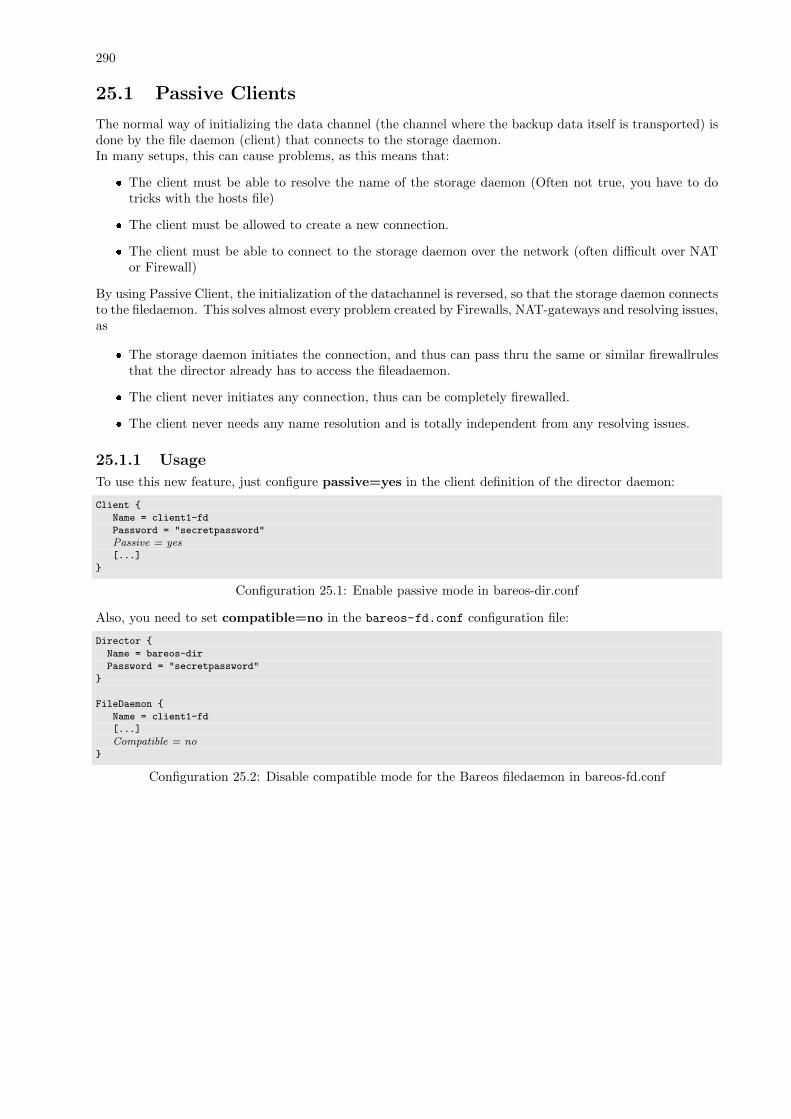
290
25.1 Passive Clients
The normal way of initializing the data channel (the channel where the backup data itself is transported) isdone by the file daemon (client) that connects to the storage daemon.In many setups, this can cause problems, as this means that:
� The client must be able to resolve the name of the storage daemon (Often not true, you have to dotricks with the hosts file)
� The client must be allowed to create a new connection.
� The client must be able to connect to the storage daemon over the network (often difficult over NATor Firewall)
By using Passive Client, the initialization of the datachannel is reversed, so that the storage daemon connectsto the filedaemon. This solves almost every problem created by Firewalls, NAT-gateways and resolving issues,as
� The storage daemon initiates the connection, and thus can pass thru the same or similar firewallrulesthat the director already has to access the fileadaemon.
� The client never initiates any connection, thus can be completely firewalled.
� The client never needs any name resolution and is totally independent from any resolving issues.
25.1.1 Usage
To use this new feature, just configure passive=yes in the client definition of the director daemon:
Client {
Name = client1-fd
Password = "secretpassword"
Passive = yes[...]
}
Configuration 25.1: Enable passive mode in bareos-dir.conf
Also, you need to set compatible=no in the bareos-fd.conf configuration file:
Director {
Name = bareos-dir
Password = "secretpassword"
}
FileDaemon {
Name = client1-fd
[...]
Compatible = no}
Configuration 25.2: Disable compatible mode for the Bareos filedaemon in bareos-fd.conf
Chapter 26
Transport Encryption
Bareos TLS (Transport Layer Security) is built-in network encryption code to provide secure network trans-port similar to that offered by stunnel or ssh. The data written to Volumes by the Storage daemon is notencrypted by this code. For data encryption, please see the Data Encryption Chapter of this manual.The Bareos encryption implementations were written by Landon Fuller.Supported features of this code include:
� Client/Server TLS Requirement Negotiation
� TLSv1 Connections with Server and Client Certificate Validation
� Forward Secrecy Support via Diffie-Hellman Ephemeral Keying
This document will refer to both ”server” and ”client” contexts. These terms refer to the accepting andinitiating peer, respectively.Diffie-Hellman anonymous ciphers are not supported by this code. The use of DH anonymous ciphersincreases the code complexity and places explicit trust upon the two-way CRAM-MD5 implementation.CRAM-MD5 is subject to known plaintext attacks, and it should be considered considerably less secure thanPKI certificate-based authentication.
26.1 TLS Configuration Directives
Additional configuration directives have been added to all the daemons (Director, File daemon, and Storagedaemon) as well as the various different Console programs. These new directives are defined as follows:
TLS Enable = <yes|no> (default: no)Enable TLS support. If TLS is not enabled, none of the other TLS directives have any effect. In other
words, even if you set TLS Require = yes you need to have TLS enabled or TLS will not be used.
TLS Require = <yes|no> (default: no)Require TLS connections. This directive is ignored unless TLS Enable is set to yes. If TLS is not
required, and TLS is enabled, then Bareos will connect with other daemons either with or without TLSdepending on what the other daemon requests. If TLS is enabled and TLS is required, then Bareoswill refuse any connection that does not use TLS.
TLS Certificate = <filename>The full path and filename of a PEM encoded TLS certificate. It can be used as either a client or servercertificate. PEM stands for Privacy Enhanced Mail, but in this context refers to how the certificatesare encoded. It is used because PEM files are base64 encoded and hence ASCII text based rather thanbinary. They may also contain encrypted information.
TLS Key = <filename>The full path and filename of a PEM encoded TLS private key. It must correspond to the TLS
certificate.
TLS Verify Peer = <yes|no>Verify peer certificate. Instructs server to request and verify the client’s x509 certificate. Any client
certificate signed by a known-CA will be accepted unless the TLS Allowed CN configuration directiveis used, in which case the client certificate must correspond to the Allowed Common Name specified.This directive is valid only for a server and not in a client context.
291
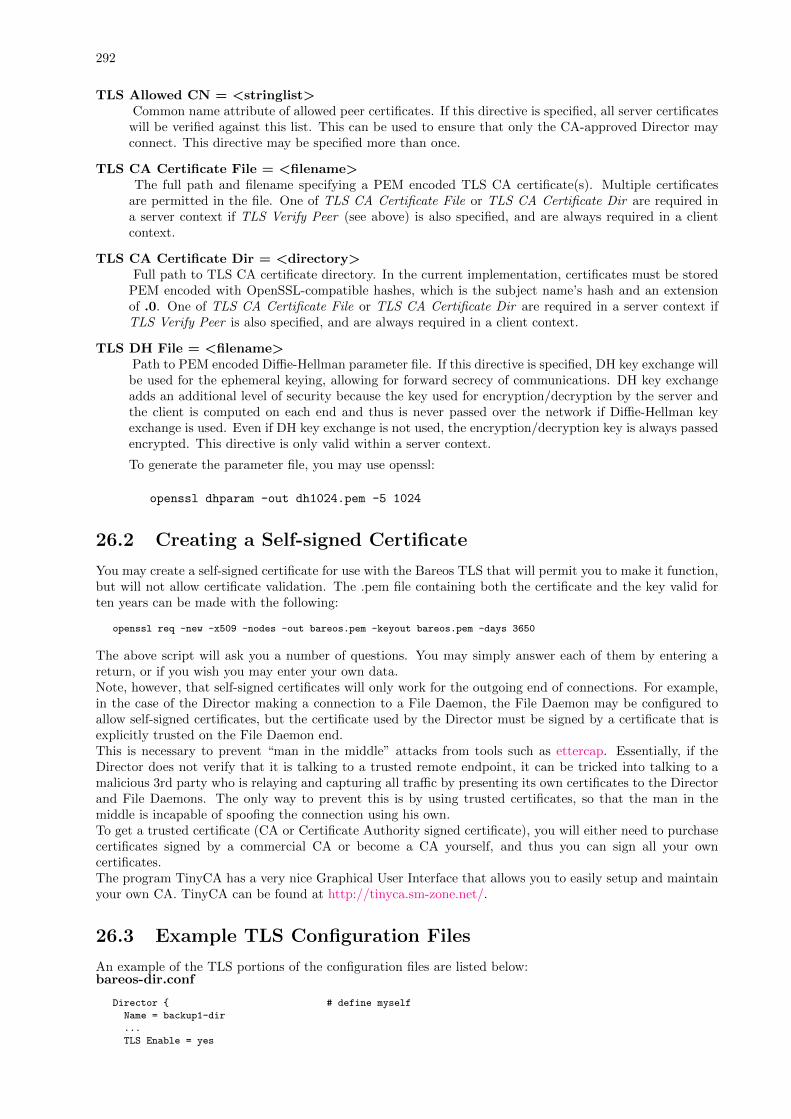
292
TLS Allowed CN = <stringlist>Common name attribute of allowed peer certificates. If this directive is specified, all server certificates
will be verified against this list. This can be used to ensure that only the CA-approved Director mayconnect. This directive may be specified more than once.
TLS CA Certificate File = <filename>The full path and filename specifying a PEM encoded TLS CA certificate(s). Multiple certificates
are permitted in the file. One of TLS CA Certificate File or TLS CA Certificate Dir are required ina server context if TLS Verify Peer (see above) is also specified, and are always required in a clientcontext.
TLS CA Certificate Dir = <directory>Full path to TLS CA certificate directory. In the current implementation, certificates must be stored
PEM encoded with OpenSSL-compatible hashes, which is the subject name’s hash and an extensionof .0. One of TLS CA Certificate File or TLS CA Certificate Dir are required in a server context ifTLS Verify Peer is also specified, and are always required in a client context.
TLS DH File = <filename>Path to PEM encoded Diffie-Hellman parameter file. If this directive is specified, DH key exchange willbe used for the ephemeral keying, allowing for forward secrecy of communications. DH key exchangeadds an additional level of security because the key used for encryption/decryption by the server andthe client is computed on each end and thus is never passed over the network if Diffie-Hellman keyexchange is used. Even if DH key exchange is not used, the encryption/decryption key is always passedencrypted. This directive is only valid within a server context.
To generate the parameter file, you may use openssl:
openssl dhparam -out dh1024.pem -5 1024
26.2 Creating a Self-signed Certificate
You may create a self-signed certificate for use with the Bareos TLS that will permit you to make it function,but will not allow certificate validation. The .pem file containing both the certificate and the key valid forten years can be made with the following:
openssl req -new -x509 -nodes -out bareos.pem -keyout bareos.pem -days 3650
The above script will ask you a number of questions. You may simply answer each of them by entering areturn, or if you wish you may enter your own data.Note, however, that self-signed certificates will only work for the outgoing end of connections. For example,in the case of the Director making a connection to a File Daemon, the File Daemon may be configured toallow self-signed certificates, but the certificate used by the Director must be signed by a certificate that isexplicitly trusted on the File Daemon end.This is necessary to prevent “man in the middle” attacks from tools such as ettercap. Essentially, if theDirector does not verify that it is talking to a trusted remote endpoint, it can be tricked into talking to amalicious 3rd party who is relaying and capturing all traffic by presenting its own certificates to the Directorand File Daemons. The only way to prevent this is by using trusted certificates, so that the man in themiddle is incapable of spoofing the connection using his own.To get a trusted certificate (CA or Certificate Authority signed certificate), you will either need to purchasecertificates signed by a commercial CA or become a CA yourself, and thus you can sign all your owncertificates.The program TinyCA has a very nice Graphical User Interface that allows you to easily setup and maintainyour own CA. TinyCA can be found at http://tinyca.sm-zone.net/.
26.3 Example TLS Configuration Files
An example of the TLS portions of the configuration files are listed below:bareos-dir.conf
Director { # define myself
Name = backup1-dir
...
TLS Enable = yes
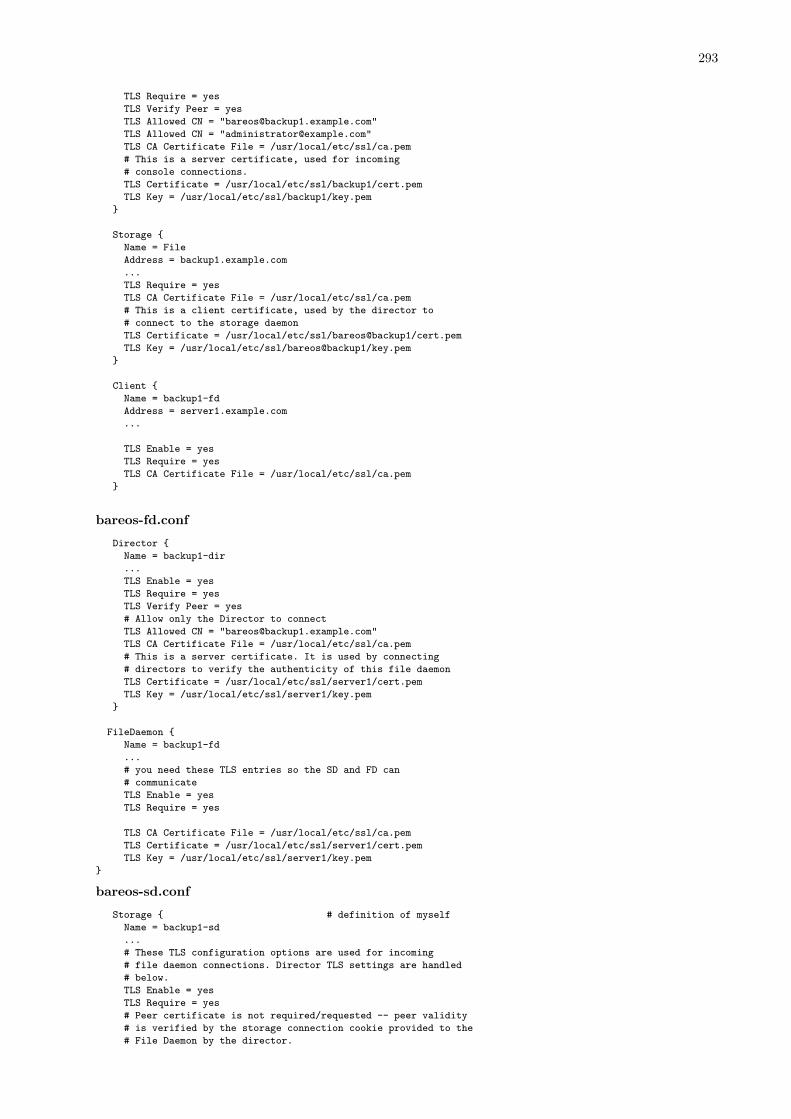
293
TLS Require = yes
TLS Verify Peer = yes
TLS Allowed CN = "[email protected]"
TLS Allowed CN = "[email protected]"
TLS CA Certificate File = /usr/local/etc/ssl/ca.pem
# This is a server certificate, used for incoming
# console connections.
TLS Certificate = /usr/local/etc/ssl/backup1/cert.pem
TLS Key = /usr/local/etc/ssl/backup1/key.pem
}
Storage {
Name = File
Address = backup1.example.com
...
TLS Require = yes
TLS CA Certificate File = /usr/local/etc/ssl/ca.pem
# This is a client certificate, used by the director to
# connect to the storage daemon
TLS Certificate = /usr/local/etc/ssl/bareos@backup1/cert.pem
TLS Key = /usr/local/etc/ssl/bareos@backup1/key.pem
}
Client {
Name = backup1-fd
Address = server1.example.com
...
TLS Enable = yes
TLS Require = yes
TLS CA Certificate File = /usr/local/etc/ssl/ca.pem
}
bareos-fd.conf
Director {
Name = backup1-dir
...
TLS Enable = yes
TLS Require = yes
TLS Verify Peer = yes
# Allow only the Director to connect
TLS Allowed CN = "[email protected]"
TLS CA Certificate File = /usr/local/etc/ssl/ca.pem
# This is a server certificate. It is used by connecting
# directors to verify the authenticity of this file daemon
TLS Certificate = /usr/local/etc/ssl/server1/cert.pem
TLS Key = /usr/local/etc/ssl/server1/key.pem
}
FileDaemon {
Name = backup1-fd
...
# you need these TLS entries so the SD and FD can
# communicate
TLS Enable = yes
TLS Require = yes
TLS CA Certificate File = /usr/local/etc/ssl/ca.pem
TLS Certificate = /usr/local/etc/ssl/server1/cert.pem
TLS Key = /usr/local/etc/ssl/server1/key.pem
}
bareos-sd.conf
Storage { # definition of myself
Name = backup1-sd
...
# These TLS configuration options are used for incoming
# file daemon connections. Director TLS settings are handled
# below.
TLS Enable = yes
TLS Require = yes
# Peer certificate is not required/requested -- peer validity
# is verified by the storage connection cookie provided to the
# File Daemon by the director.
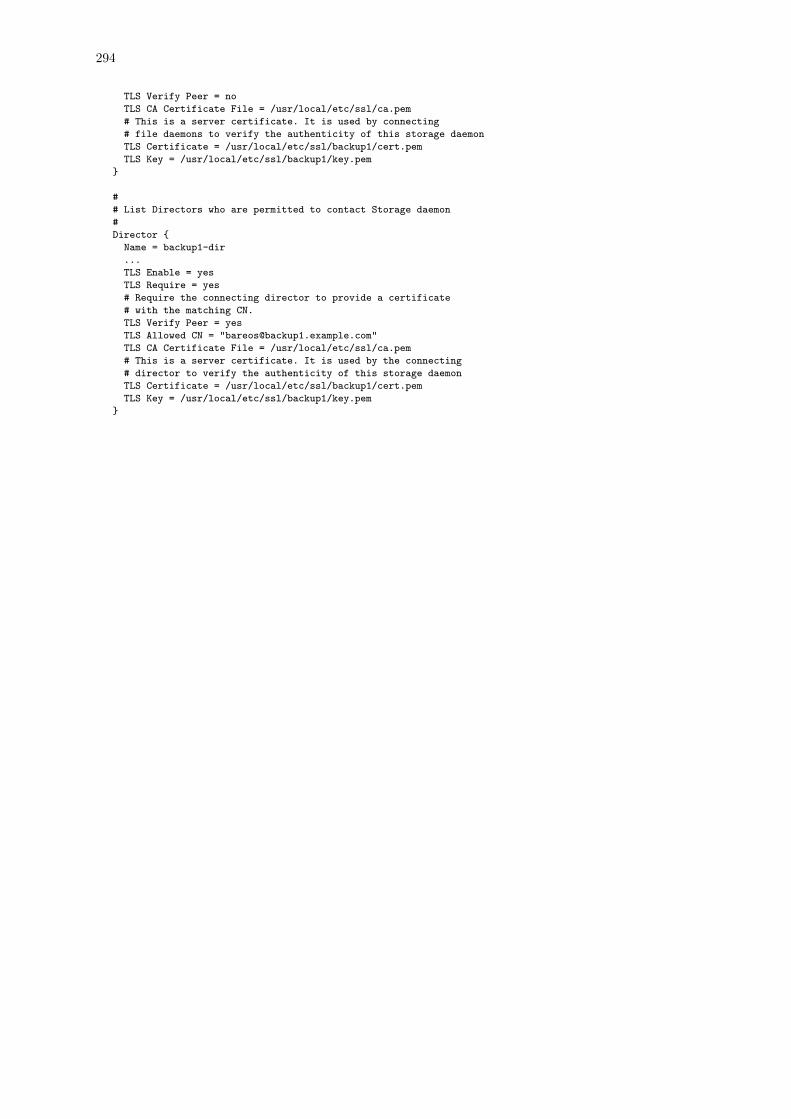
294
TLS Verify Peer = no
TLS CA Certificate File = /usr/local/etc/ssl/ca.pem
# This is a server certificate. It is used by connecting
# file daemons to verify the authenticity of this storage daemon
TLS Certificate = /usr/local/etc/ssl/backup1/cert.pem
TLS Key = /usr/local/etc/ssl/backup1/key.pem
}
#
# List Directors who are permitted to contact Storage daemon
#
Director {
Name = backup1-dir
...
TLS Enable = yes
TLS Require = yes
# Require the connecting director to provide a certificate
# with the matching CN.
TLS Verify Peer = yes
TLS Allowed CN = "[email protected]"
TLS CA Certificate File = /usr/local/etc/ssl/ca.pem
# This is a server certificate. It is used by the connecting
# director to verify the authenticity of this storage daemon
TLS Certificate = /usr/local/etc/ssl/backup1/cert.pem
TLS Key = /usr/local/etc/ssl/backup1/key.pem
}
Chapter 27
Data Encryption
Bareos permits file data encryption and signing within the File Daemon (or Client) prior to sending data tothe Storage Daemon. Upon restoration, file signatures are validated and any mismatches are reported. Atno time does the Director or the Storage Daemon have access to unencrypted file contents.Please note! These feature is only available, if Bareos is builed against OpenSSL.It is very important to specify what this implementation does NOT do:
� The implementation does not encrypt file metadata such as file path names, permissions, ownershipand extended attributes. However, Mac OS X resource forks are encrypted.
Encryption and signing are implemented using RSA private keys coupled with self-signed x509 public cer-tificates. This is also sometimes known as PKI or Public Key Infrastructure.Each File Daemon should be given its own unique private/public key pair. In addition to this key pair, anynumber of ”Master Keys” may be specified – these are key pairs that may be used to decrypt any backupsshould the File Daemon key be lost. Only the Master Key’s public certificate should be made available tothe File Daemon. Under no circumstances should the Master Private Key be shared or stored on the Clientmachine.The Master Keys should be backed up to a secure location, such as a CD placed in a in a fire-proof safe orbank safety deposit box. The Master Keys should never be kept on the same machine as the Storage Daemonor Director if you are worried about an unauthorized party compromising either machine and accessing yourencrypted backups.While less critical than the Master Keys, File Daemon Keys are also a prime candidate for off-site backups;burn the key pair to a CD and send the CD home with the owner of the machine.Please note! If you lose your encryption keys, backups will be unrecoverable. always store a copy of yourmaster keys in a secure, off-site location.The basic algorithm used for each backup session (Job) is:
1. The File daemon generates a session key.
2. The FD encrypts that session key via PKE for all recipients (the file daemon, any master keys).
3. The FD uses that session key to perform symmetric encryption on the data.
27.1 Encryption Technical Details
The implementation uses 128bit AES-CBC, with RSA encrypted symmetric session keys. The RSA key isuser supplied. If you are running OpenSSL >= 0.9.8, the signed file hash uses SHA-256, otherwise SHA-1is used.End-user configuration settings for the algorithms are not currently exposed, only the algorithms listedabove are used. However, the data written to Volume supports arbitrary symmetric, asymmetric, and digestalgorithms for future extensibility, and the back-end implementation currently supports:
Symmetric Encryption:
- 128, 192, and 256-bit AES-CBC
- Blowfish-CBC
Asymmetric Encryption (used to encrypt symmetric session keys):
- RSA
295
296
Digest Algorithms:
- MD5
- SHA1
- SHA256
- SHA512
The various algorithms are exposed via an entirely re-usable, OpenSSL-agnostic API (ie, it is possible to dropin a new encryption backend). The Volume format is DER-encoded ASN.1, modeled after the CryptographicMessage Syntax from RFC 3852. Unfortunately, using CMS directly was not possible, as at the time of codinga free software streaming DER decoder/encoder was not available.
27.2 Generating Private/Public Encryption Keys
Generate a Master Key Pair with:
openssl genrsa -out master.key 2048
openssl req -new -key master.key -x509 -out master.cert
Generate a File Daemon Key Pair for each FD:
openssl genrsa -out fd-example.key 2048
openssl req -new -key fd-example.key -x509 -out fd-example.cert
cat fd-example.key fd-example.cert >fd-example.pem
Note, there seems to be a lot of confusion around the file extensions given to these keys. For example, a.pem file can contain all the following: private keys (RSA and DSA), public keys (RSA and DSA) and (x509)certificates. It is the default format for OpenSSL. It stores data Base64 encoded DER format, surrounded byASCII headers, so is suitable for text mode transfers between systems. A .pem file may contain any numberof keys either public or private. We use it in cases where there is both a public and a private key.Above we have used the .cert extension to refer to X509 certificate encoding that contains only a singlepublic key.
27.3 Example Data Encryption Configuration
bareos-fd.conf
FileDaemon {
Name = example-fd
FDport = 9102 # where we listen for the director
PKI Signatures = Yes # Enable Data Signing
PKI Encryption = Yes # Enable Data Encryption
PKI Keypair = "/etc/bareos/fd-example.pem" # Public and Private Keys
PKI Master Key = "/etc/bareos/master.cert" # ONLY the Public Key
}
27.4 Decrypting with a Master Key
It is preferable to retain a secure, non-encrypted copy of the client’s own encryption keypair. However,should you lose the client’s keypair, recovery with the master keypair is possible.You must:
� Concatenate the master private and public key into a single keypair file, ie:
cat master.key master.cert > master.keypair
� Set the PKI Keypair statement in your bareos configuration file:
PKI Keypair = master.keypair
� Start the restore. The master keypair will be used to decrypt the file data.
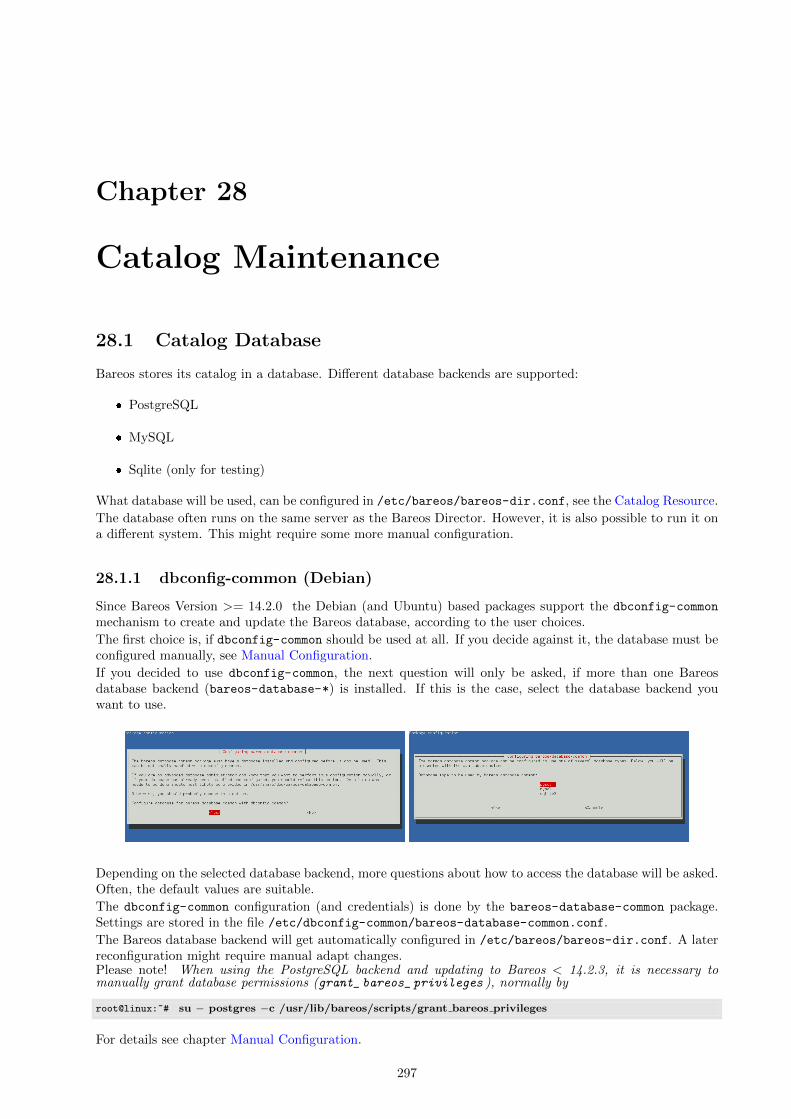
Chapter 28
Catalog Maintenance
28.1 Catalog Database
Bareos stores its catalog in a database. Different database backends are supported:
� PostgreSQL
� MySQL
� Sqlite (only for testing)
What database will be used, can be configured in /etc/bareos/bareos-dir.conf, see the Catalog Resource.
The database often runs on the same server as the Bareos Director. However, it is also possible to run it ona different system. This might require some more manual configuration.
28.1.1 dbconfig-common (Debian)
Since Bareos Version >= 14.2.0 the Debian (and Ubuntu) based packages support the dbconfig-common
mechanism to create and update the Bareos database, according to the user choices.
The first choice is, if dbconfig-common should be used at all. If you decide against it, the database must beconfigured manually, see Manual Configuration.
If you decided to use dbconfig-common, the next question will only be asked, if more than one Bareosdatabase backend (bareos-database-*) is installed. If this is the case, select the database backend youwant to use.
Depending on the selected database backend, more questions about how to access the database will be asked.Often, the default values are suitable.
The dbconfig-common configuration (and credentials) is done by the bareos-database-common package.Settings are stored in the file /etc/dbconfig-common/bareos-database-common.conf.
The Bareos database backend will get automatically configured in /etc/bareos/bareos-dir.conf. A laterreconfiguration might require manual adapt changes.Please note! When using the PostgreSQL backend and updating to Bareos < 14.2.3, it is necessary tomanually grant database permissions (grant_ bareos_ privileges ), normally by
root@linux:~# su − postgres −c /usr/lib/bareos/scripts/grant bareos privileges
For details see chapter Manual Configuration.
297
298
28.1.2 Manual Configuration
Bareos comes with a number of scripts to prepare and update the databases. All these scripts are locatedin the Bareos script directory, normally at /usr/lib/bareos/scripts/.
Script Stage Description
create_bareos_database installation create Bareos databasemake_bareos_tables installation create Bareos tablesgrant_bareos_privileges installation grant database access privilegesupdate_bareos_tables update update the database schemadrop_bareos_tables deinstallation remove Bareos database tablesdrop_bareos_database deinstallation create Bareos databasemake_catalog_backup.pl backup backup the Bareos database, default on Linuxmake_catalog_backup backup backup the Bareos database for systems without Perldelete_catalog_backup backup helper remove the temporary Bareos database backup file
The database preparation scripts have following configuration options:
db type
� command line parameter $1
� config file /etc/bareos/bareos-dir.conf: catalog.MyCatalog.dbdriver
� installed database backends
� fallback: postgresql
db name
� environment variable db_name
� config file /etc/bareos/bareos-dir.conf: catalog.MyCatalog.dbname
� default: bareos
db user
� environment variable db_user
� config file /etc/bareos/bareos-dir.conf: catalog.MyCatalog.dbuser
� default: bareos
db password
� environment variable db_password
� config file /etc/bareos/bareos-dir.conf: catalog.MyCatalog.dbpassword
� default: none
Reading the settings from the configuration file /etc/bareos/bareos-dir.confis of course only possible,if the current user have read access to this file. The normal PostgreSQL administrator user (postgres)don’t have these permissions. So if you plan to use non-default database settings, you might add the userpostgres to the group bareos.The database preparation scripts need to have password-less administrator access to the database. Dependingon the distribution you’re using, this require additional configuration. See the following section about howtoachieve this for the different database systems.To view and test the currently configured settings, use following commands:
root@linux:~# /usr/sbin/bareos−dbcheck −B −c /etc/bareos/bareos−dir.confcatalog=MyCatalog
db_name=bareos
db_driver=mysql
db_user=bareos
db_password=YourPassword
db_address=
db_port=0
db_socket=
db_type=MySQL
working_dir=/var/lib/bareos
Commands 28.1: Show current database configuration
299
root@linux:~# /usr/sbin/bareos−dir −t −f −d 500[...]
bareos-dir: mysql.c:204-0 Error 1045 (28000): Access denied for user ’bareos’@’localhost’ (using password: ↙↪→ YES)
bareos-dir: dird.c:1114-0 Could not open Catalog "MyCatalog", database "bareos".
bareos-dir: dird.c:1119-0 mysql.c:200 Unable to connect to MySQL server.
Database=bareos User=bareos
MySQL connect failed either server not running or your authorization is incorrect.
bareos-dir: mysql.c:239-0 closedb ref=0 connected=0 db=0
25-Apr 16:25 bareos-dir ERROR TERMINATION
Please correct configuration file: bareos-dir.conf
Commands 28.2: Test the database connection. Example: wrong password
PostgreSQL
On most distributions, PostgreSQL uses ident to allow access to the database system. The database admin-istrator account is the Unix user postgres. Normally, this user can access the database without password,as the ident mechanism is used to identify the user.If this works on your system can be verified by
su - postgres
psql
Commands 28.3: Access the local PostgreSQL database
If your database is configured to to require a password, this must be definied in the file ~/.pgpass in thefollowing syntax: HOST:PORT:DATABASE:USER:PASSWORD, e.g.
localhost:*:bareos:bareos:secret
Configuration 28.4: PostgreSQL access credentials
The permission of this file must be 0600 (chmod 0600 ~/.pgpass).Again, verify that you have specified the correct settings by calling the psql command. If this connectsyou to the database, your credentials are good. Exit the PostgreSQL client and run the Bareos databasepreparation scripts:
su - postgres
/usr/lib/bareos/scripts/create_bareos_database
/usr/lib/bareos/scripts/make_bareos_tables
/usr/lib/bareos/scripts/grant_bareos_privileges
Commands 28.5: Setup Bareos catalog database
The encoding of the bareos database must be SQL_ASCII. The command create_bareos_database auto-matically creates the database with this encoding. This can be verified by the command psql -l, whichshows information about existing databases:
root@linux:~# psql −lList of databases
Name | Owner | Encoding
-----------+----------+-----------
bareos | postgres | SQL_ASCII
postgres | postgres | UTF8
template0 | postgres | UTF8
template1 | postgres | UTF8
(4 rows)
Commands 28.6: List existing databases
The owner of the database may vary. The Bareos database maintance scripts don’t change the default ownerof the Bareos database, so it stays at the PostgreSQL administration user. The grant_bareos_privileges
script grant the required permissions to the Bareos database user. In contrast, when installing (not updating)using dbconfig, the database owner will be identical with the Bareos database user.By default, using PostgreSQL ident, a Unix user can access a database of the same name. Therefore theuser bareos can access the database bareos.
root@linux:~# su − bareos −s /bin/shbareos@linux:~# psqlWelcome to psql 8.3.23, the PostgreSQL interactive terminal.
Type: \copyright for distribution terms
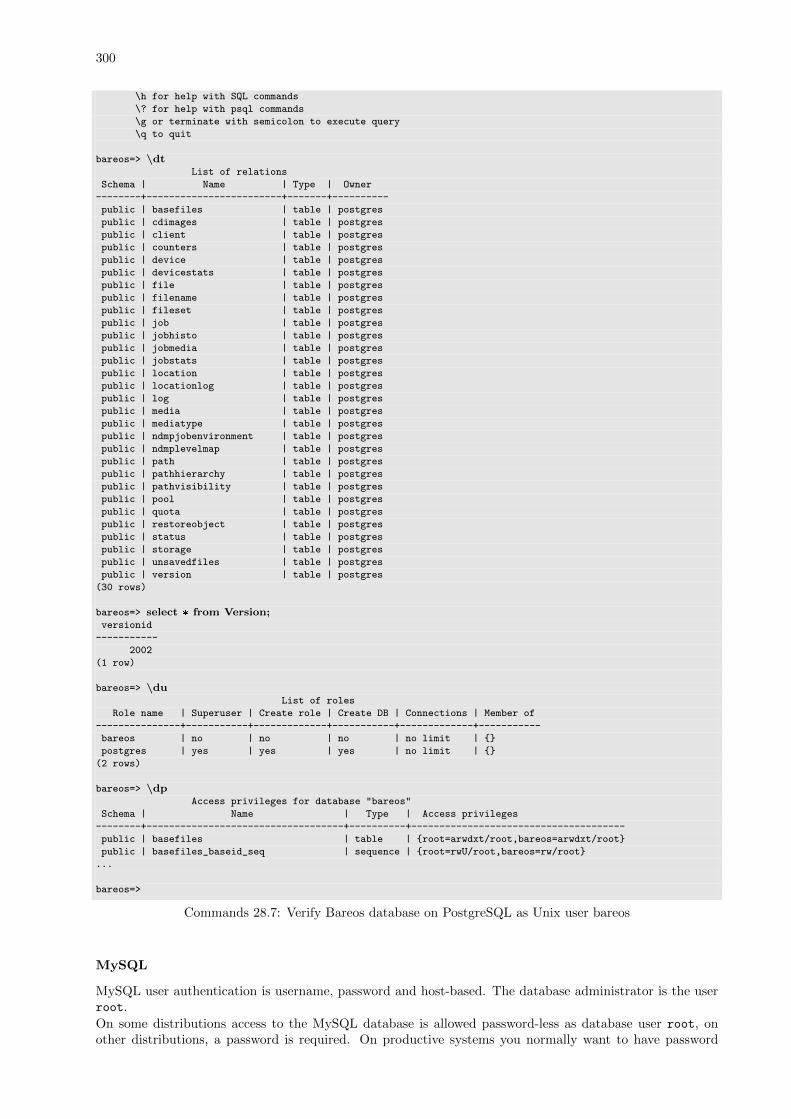
300
\h for help with SQL commands
\? for help with psql commands
\g or terminate with semicolon to execute query
\q to quit
bareos=> \dtList of relations
Schema | Name | Type | Owner
--------+------------------------+-------+----------
public | basefiles | table | postgres
public | cdimages | table | postgres
public | client | table | postgres
public | counters | table | postgres
public | device | table | postgres
public | devicestats | table | postgres
public | file | table | postgres
public | filename | table | postgres
public | fileset | table | postgres
public | job | table | postgres
public | jobhisto | table | postgres
public | jobmedia | table | postgres
public | jobstats | table | postgres
public | location | table | postgres
public | locationlog | table | postgres
public | log | table | postgres
public | media | table | postgres
public | mediatype | table | postgres
public | ndmpjobenvironment | table | postgres
public | ndmplevelmap | table | postgres
public | path | table | postgres
public | pathhierarchy | table | postgres
public | pathvisibility | table | postgres
public | pool | table | postgres
public | quota | table | postgres
public | restoreobject | table | postgres
public | status | table | postgres
public | storage | table | postgres
public | unsavedfiles | table | postgres
public | version | table | postgres
(30 rows)
bareos=> select * from Version;versionid
-----------
2002
(1 row)
bareos=> \duList of roles
Role name | Superuser | Create role | Create DB | Connections | Member of
---------------+-----------+-------------+-----------+-------------+-----------
bareos | no | no | no | no limit | {}
postgres | yes | yes | yes | no limit | {}
(2 rows)
bareos=> \dpAccess privileges for database "bareos"
Schema | Name | Type | Access privileges
--------+-----------------------------------+----------+--------------------------------------
public | basefiles | table | {root=arwdxt/root,bareos=arwdxt/root}
public | basefiles_baseid_seq | sequence | {root=rwU/root,bareos=rw/root}
...
bareos=>
Commands 28.7: Verify Bareos database on PostgreSQL as Unix user bareos
MySQL
MySQL user authentication is username, password and host-based. The database administrator is the userroot.
On some distributions access to the MySQL database is allowed password-less as database user root, onother distributions, a password is required. On productive systems you normally want to have password
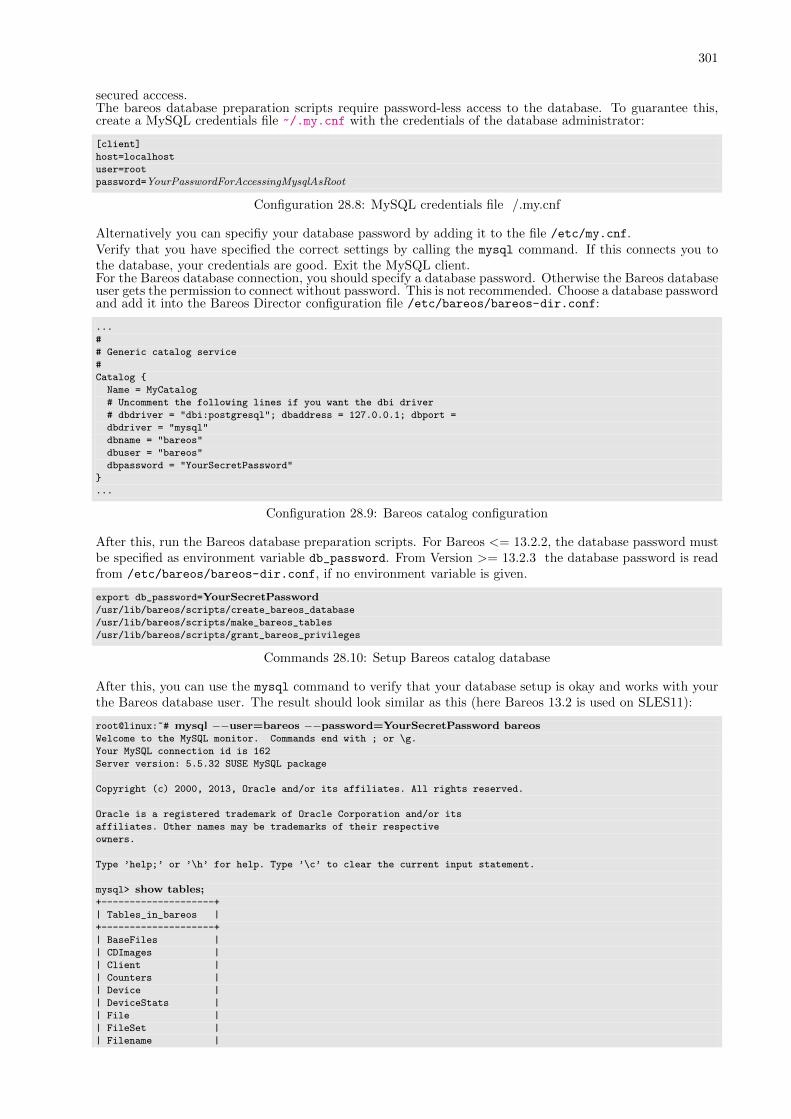
301
secured acccess.The bareos database preparation scripts require password-less access to the database. To guarantee this,create a MySQL credentials file ~/.my.cnf with the credentials of the database administrator:
[client]
host=localhost
user=root
password=YourPasswordForAccessingMysqlAsRoot
Configuration 28.8: MySQL credentials file /.my.cnf
Alternatively you can specifiy your database password by adding it to the file /etc/my.cnf.Verify that you have specified the correct settings by calling the mysql command. If this connects you tothe database, your credentials are good. Exit the MySQL client.For the Bareos database connection, you should specify a database password. Otherwise the Bareos databaseuser gets the permission to connect without password. This is not recommended. Choose a database passwordand add it into the Bareos Director configuration file /etc/bareos/bareos-dir.conf:
...
#
# Generic catalog service
#
Catalog {
Name = MyCatalog
# Uncomment the following lines if you want the dbi driver
# dbdriver = "dbi:postgresql"; dbaddress = 127.0.0.1; dbport =
dbdriver = "mysql"
dbname = "bareos"
dbuser = "bareos"
dbpassword = "YourSecretPassword"
}
...
Configuration 28.9: Bareos catalog configuration
After this, run the Bareos database preparation scripts. For Bareos <= 13.2.2, the database password mustbe specified as environment variable db_password. From Version >= 13.2.3 the database password is readfrom /etc/bareos/bareos-dir.conf, if no environment variable is given.
export db_password=YourSecretPassword/usr/lib/bareos/scripts/create_bareos_database
/usr/lib/bareos/scripts/make_bareos_tables
/usr/lib/bareos/scripts/grant_bareos_privileges
Commands 28.10: Setup Bareos catalog database
After this, you can use the mysql command to verify that your database setup is okay and works with yourthe Bareos database user. The result should look similar as this (here Bareos 13.2 is used on SLES11):
root@linux:~# mysql −−user=bareos −−password=YourSecretPassword bareosWelcome to the MySQL monitor. Commands end with ; or \g.
Your MySQL connection id is 162
Server version: 5.5.32 SUSE MySQL package
Copyright (c) 2000, 2013, Oracle and/or its affiliates. All rights reserved.
Oracle is a registered trademark of Oracle Corporation and/or its
affiliates. Other names may be trademarks of their respective
owners.
Type ’help;’ or ’\h’ for help. Type ’\c’ to clear the current input statement.
mysql> show tables;+--------------------+
| Tables_in_bareos |
+--------------------+
| BaseFiles |
| CDImages |
| Client |
| Counters |
| Device |
| DeviceStats |
| File |
| FileSet |
| Filename |
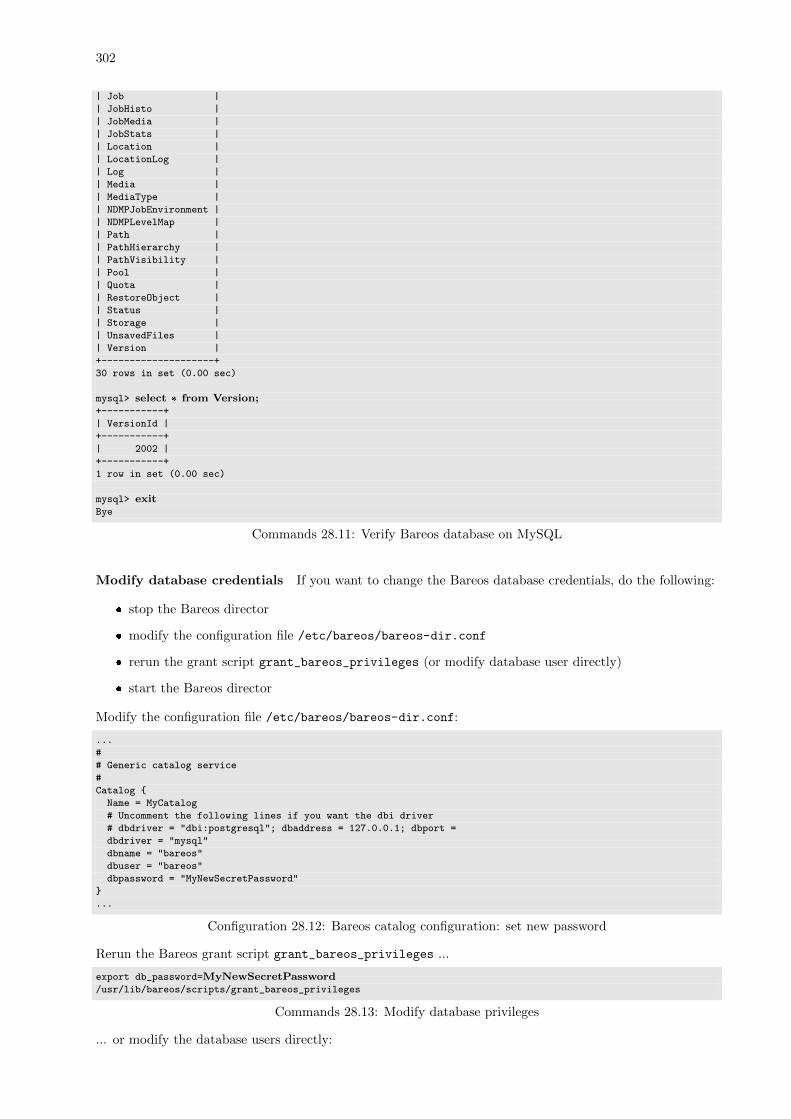
302
| Job |
| JobHisto |
| JobMedia |
| JobStats |
| Location |
| LocationLog |
| Log |
| Media |
| MediaType |
| NDMPJobEnvironment |
| NDMPLevelMap |
| Path |
| PathHierarchy |
| PathVisibility |
| Pool |
| Quota |
| RestoreObject |
| Status |
| Storage |
| UnsavedFiles |
| Version |
+--------------------+
30 rows in set (0.00 sec)
mysql> select * from Version;+-----------+
| VersionId |
+-----------+
| 2002 |
+-----------+
1 row in set (0.00 sec)
mysql> exitBye
Commands 28.11: Verify Bareos database on MySQL
Modify database credentials If you want to change the Bareos database credentials, do the following:
� stop the Bareos director
� modify the configuration file /etc/bareos/bareos-dir.conf
� rerun the grant script grant_bareos_privileges (or modify database user directly)
� start the Bareos director
Modify the configuration file /etc/bareos/bareos-dir.conf:
...
#
# Generic catalog service
#
Catalog {
Name = MyCatalog
# Uncomment the following lines if you want the dbi driver
# dbdriver = "dbi:postgresql"; dbaddress = 127.0.0.1; dbport =
dbdriver = "mysql"
dbname = "bareos"
dbuser = "bareos"
dbpassword = "MyNewSecretPassword"
}
...
Configuration 28.12: Bareos catalog configuration: set new password
Rerun the Bareos grant script grant_bareos_privileges ...
export db_password=MyNewSecretPassword/usr/lib/bareos/scripts/grant_bareos_privileges
Commands 28.13: Modify database privileges
... or modify the database users directly:
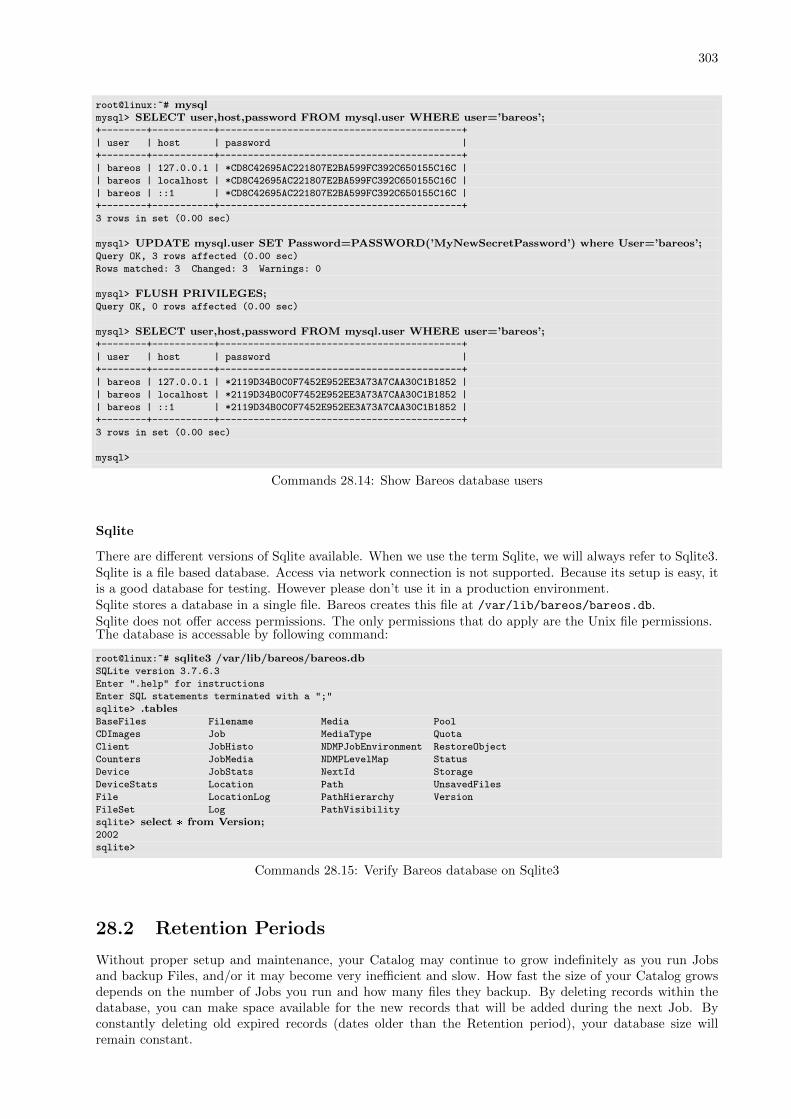
303
root@linux:~# mysqlmysql> SELECT user,host,password FROM mysql.user WHERE user=’bareos’;+--------+-----------+-------------------------------------------+
| user | host | password |
+--------+-----------+-------------------------------------------+
| bareos | 127.0.0.1 | *CD8C42695AC221807E2BA599FC392C650155C16C |
| bareos | localhost | *CD8C42695AC221807E2BA599FC392C650155C16C |
| bareos | ::1 | *CD8C42695AC221807E2BA599FC392C650155C16C |
+--------+-----------+-------------------------------------------+
3 rows in set (0.00 sec)
mysql> UPDATE mysql.user SET Password=PASSWORD(’MyNewSecretPassword’) where User=’bareos’;Query OK, 3 rows affected (0.00 sec)
Rows matched: 3 Changed: 3 Warnings: 0
mysql> FLUSH PRIVILEGES;Query OK, 0 rows affected (0.00 sec)
mysql> SELECT user,host,password FROM mysql.user WHERE user=’bareos’;+--------+-----------+-------------------------------------------+
| user | host | password |
+--------+-----------+-------------------------------------------+
| bareos | 127.0.0.1 | *2119D34B0C0F7452E952EE3A73A7CAA30C1B1852 |
| bareos | localhost | *2119D34B0C0F7452E952EE3A73A7CAA30C1B1852 |
| bareos | ::1 | *2119D34B0C0F7452E952EE3A73A7CAA30C1B1852 |
+--------+-----------+-------------------------------------------+
3 rows in set (0.00 sec)
mysql>
Commands 28.14: Show Bareos database users
Sqlite
There are different versions of Sqlite available. When we use the term Sqlite, we will always refer to Sqlite3.Sqlite is a file based database. Access via network connection is not supported. Because its setup is easy, itis a good database for testing. However please don’t use it in a production environment.Sqlite stores a database in a single file. Bareos creates this file at /var/lib/bareos/bareos.db.Sqlite does not offer access permissions. The only permissions that do apply are the Unix file permissions.The database is accessable by following command:
root@linux:~# sqlite3 /var/lib/bareos/bareos.dbSQLite version 3.7.6.3
Enter ".help" for instructions
Enter SQL statements terminated with a ";"
sqlite> .tablesBaseFiles Filename Media Pool
CDImages Job MediaType Quota
Client JobHisto NDMPJobEnvironment RestoreObject
Counters JobMedia NDMPLevelMap Status
Device JobStats NextId Storage
DeviceStats Location Path UnsavedFiles
File LocationLog PathHierarchy Version
FileSet Log PathVisibility
sqlite> select * from Version;2002
sqlite>
Commands 28.15: Verify Bareos database on Sqlite3
28.2 Retention Periods
Without proper setup and maintenance, your Catalog may continue to grow indefinitely as you run Jobsand backup Files, and/or it may become very inefficient and slow. How fast the size of your Catalog growsdepends on the number of Jobs you run and how many files they backup. By deleting records within thedatabase, you can make space available for the new records that will be added during the next Job. Byconstantly deleting old expired records (dates older than the Retention period), your database size willremain constant.
304
Setting Retention Periods
Bareos uses three Retention periods: the File Retention period, the Job Retention period, and theVolume Retention period. Of these three, the File Retention period is by far the most important indetermining how large your database will become.The File Retention and the Job Retention are specified in each Client resource as is shown below. TheVolume Retention period is specified in the Pool resource, and the details are given in the next chapterof this manual.
File Retention = <time-period-specification> The File Retention record defines the length of timethat Bareos will keep File records in the Catalog database. When this time period expires, and ifAutoPrune is set to yes, Bareos will prune (remove) File records that are older than the specifiedFile Retention period. The pruning will occur at the end of a backup Job for the given Client. Notethat the Client database record contains a copy of the File and Job retention periods, but Bareos usesthe current values found in the Director’s Client resource to do the pruning.
Since File records in the database account for probably 80 percent of the size of the database, youshould carefully determine exactly what File Retention period you need. Once the File records havebeen removed from the database, you will no longer be able to restore individual files in a Job. However,as long as the Job record still exists, you will be able to restore all files in the job.
Retention periods are specified in seconds, but as a convenience, there are a number of modifiers thatpermit easy specification in terms of minutes, hours, days, weeks, months, quarters, or years on therecord. See the Configuration chapter of this manual for additional details of modifier specification.
The default File retention period is 60 days.
Job Retention = <time-period-specification> The Job Retention record defines the length of timethat Bareos will keep Job records in the Catalog database. When this time period expires, and ifAutoPrune is set to yes Bareos will prune (remove) Job records that are older than the specifiedJob Retention period. Note, if a Job record is selected for pruning, all associated File and JobMediarecords will also be pruned regardless of the File Retention period set. As a consequence, you normallywill set the File retention period to be less than the Job retention period.
As mentioned above, once the File records are removed from the database, you will no longer be ableto restore individual files from the Job. However, as long as the Job record remains in the database,you will be able to restore all the files backuped for the Job. As a consequence, it is generally a goodidea to retain the Job records much longer than the File records.
The retention period is specified in seconds, but as a convenience, there are a number of modifiers thatpermit easy specification in terms of minutes, hours, days, weeks, months, quarters, or years. See theConfiguration chapter of this manual for additional details of modifier specification.
The default Job Retention period is 180 days.
AutoPrune = <yes/no> If AutoPrune is set to yes (default), Bareos will automatically apply the Fileretention period and the Job retention period for the Client at the end of the Job. If you turn this offby setting it to no, your Catalog will grow each time you run a Job.
Job statistics
Bareos catalog contains lot of information about your IT infrastructure, how many files, their size, thenumber of video or music files etc. Using Bareos catalog during the day to get them permit to save resourceson your servers.In this chapter, you will find tips and information to measure Bareos efficiency and report statistics.If you want to have statistics on your backups to provide some Service Level Agreement indicators, you coulduse a few SQL queries on the Job table to report how many:
� jobs have run
� jobs have been successful
� files have been backed up
� ...
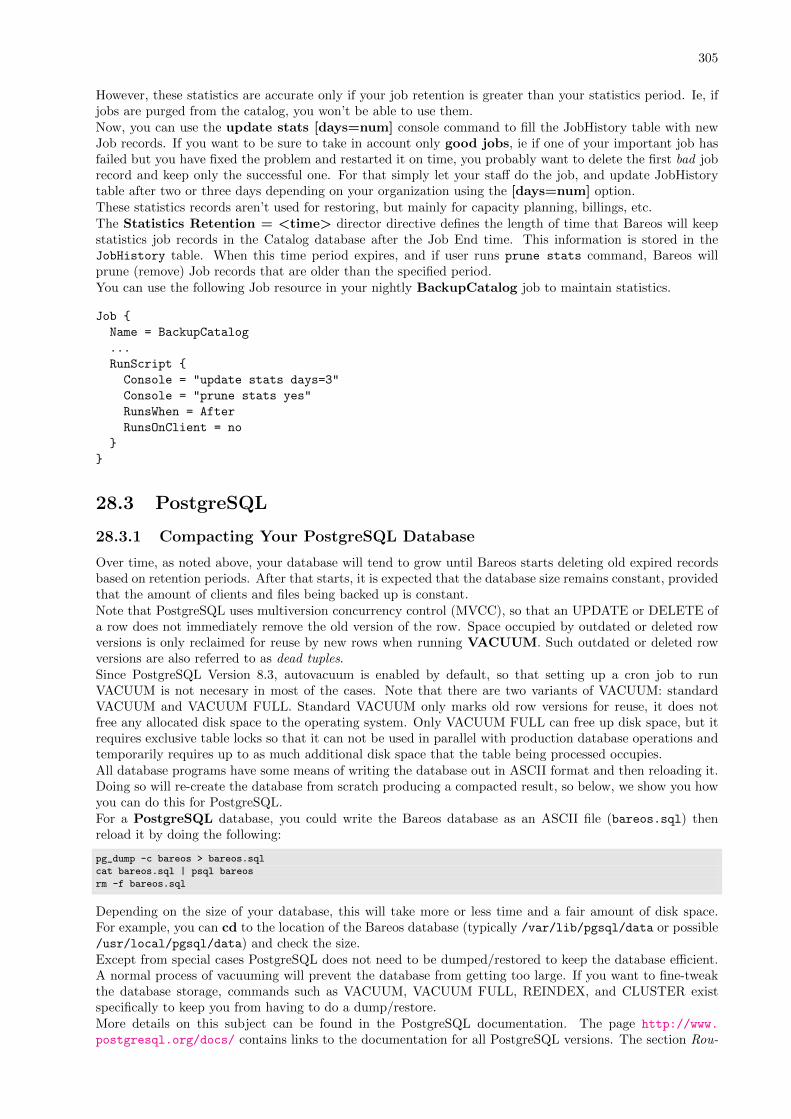
305
However, these statistics are accurate only if your job retention is greater than your statistics period. Ie, ifjobs are purged from the catalog, you won’t be able to use them.Now, you can use the update stats [days=num] console command to fill the JobHistory table with newJob records. If you want to be sure to take in account only good jobs, ie if one of your important job hasfailed but you have fixed the problem and restarted it on time, you probably want to delete the first bad jobrecord and keep only the successful one. For that simply let your staff do the job, and update JobHistorytable after two or three days depending on your organization using the [days=num] option.These statistics records aren’t used for restoring, but mainly for capacity planning, billings, etc.The Statistics Retention = <time> director directive defines the length of time that Bareos will keepstatistics job records in the Catalog database after the Job End time. This information is stored in theJobHistory table. When this time period expires, and if user runs prune stats command, Bareos willprune (remove) Job records that are older than the specified period.You can use the following Job resource in your nightly BackupCatalog job to maintain statistics.
Job {
Name = BackupCatalog
...
RunScript {
Console = "update stats days=3"
Console = "prune stats yes"
RunsWhen = After
RunsOnClient = no
}
}
28.3 PostgreSQL
28.3.1 Compacting Your PostgreSQL Database
Over time, as noted above, your database will tend to grow until Bareos starts deleting old expired recordsbased on retention periods. After that starts, it is expected that the database size remains constant, providedthat the amount of clients and files being backed up is constant.Note that PostgreSQL uses multiversion concurrency control (MVCC), so that an UPDATE or DELETE ofa row does not immediately remove the old version of the row. Space occupied by outdated or deleted rowversions is only reclaimed for reuse by new rows when running VACUUM. Such outdated or deleted rowversions are also referred to as dead tuples.Since PostgreSQL Version 8.3, autovacuum is enabled by default, so that setting up a cron job to runVACUUM is not necesary in most of the cases. Note that there are two variants of VACUUM: standardVACUUM and VACUUM FULL. Standard VACUUM only marks old row versions for reuse, it does notfree any allocated disk space to the operating system. Only VACUUM FULL can free up disk space, but itrequires exclusive table locks so that it can not be used in parallel with production database operations andtemporarily requires up to as much additional disk space that the table being processed occupies.All database programs have some means of writing the database out in ASCII format and then reloading it.Doing so will re-create the database from scratch producing a compacted result, so below, we show you howyou can do this for PostgreSQL.For a PostgreSQL database, you could write the Bareos database as an ASCII file (bareos.sql) thenreload it by doing the following:
pg_dump -c bareos > bareos.sql
cat bareos.sql | psql bareos
rm -f bareos.sql
Depending on the size of your database, this will take more or less time and a fair amount of disk space.For example, you can cd to the location of the Bareos database (typically /var/lib/pgsql/data or possible/usr/local/pgsql/data) and check the size.Except from special cases PostgreSQL does not need to be dumped/restored to keep the database efficient.A normal process of vacuuming will prevent the database from getting too large. If you want to fine-tweakthe database storage, commands such as VACUUM, VACUUM FULL, REINDEX, and CLUSTER existspecifically to keep you from having to do a dump/restore.More details on this subject can be found in the PostgreSQL documentation. The page http://www.
postgresql.org/docs/ contains links to the documentation for all PostgreSQL versions. The section Rou-
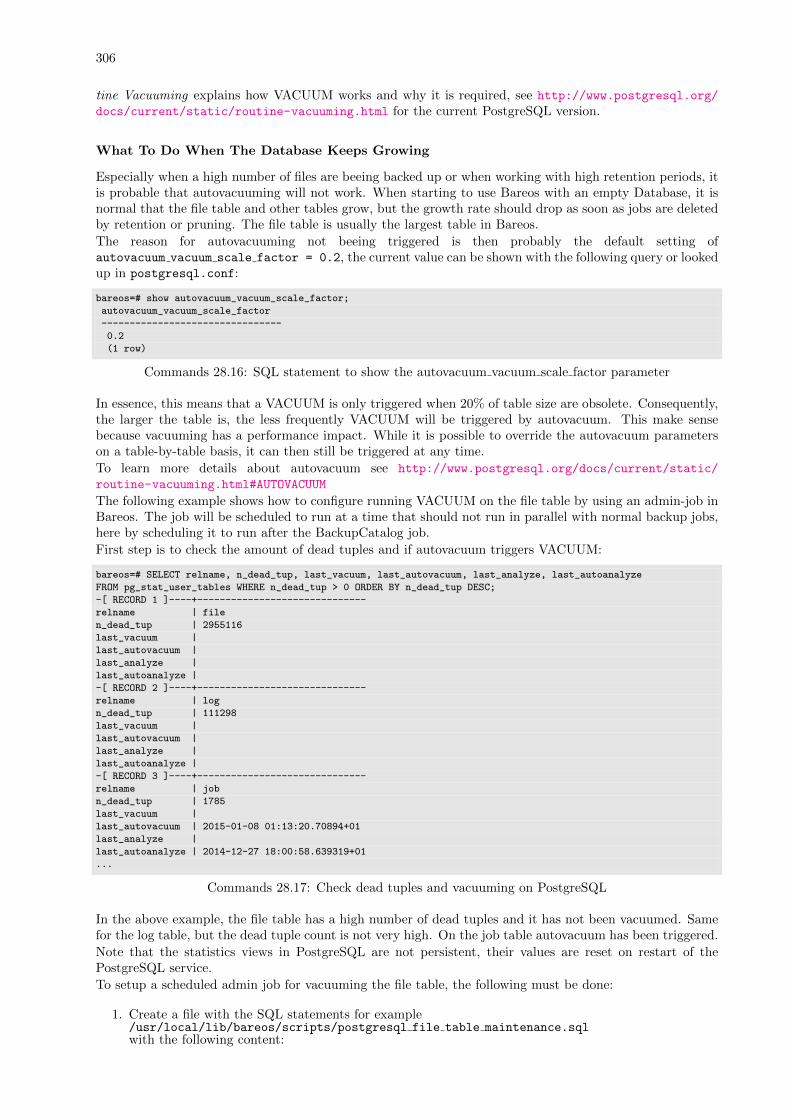
306
tine Vacuuming explains how VACUUM works and why it is required, see http://www.postgresql.org/
docs/current/static/routine-vacuuming.html for the current PostgreSQL version.
What To Do When The Database Keeps Growing
Especially when a high number of files are beeing backed up or when working with high retention periods, itis probable that autovacuuming will not work. When starting to use Bareos with an empty Database, it isnormal that the file table and other tables grow, but the growth rate should drop as soon as jobs are deletedby retention or pruning. The file table is usually the largest table in Bareos.
The reason for autovacuuming not beeing triggered is then probably the default setting ofautovacuum vacuum scale factor = 0.2, the current value can be shown with the following query or lookedup in postgresql.conf:
bareos=# show autovacuum_vacuum_scale_factor;
autovacuum_vacuum_scale_factor
--------------------------------
0.2
(1 row)
Commands 28.16: SQL statement to show the autovacuum vacuum scale factor parameter
In essence, this means that a VACUUM is only triggered when 20% of table size are obsolete. Consequently,the larger the table is, the less frequently VACUUM will be triggered by autovacuum. This make sensebecause vacuuming has a performance impact. While it is possible to override the autovacuum parameterson a table-by-table basis, it can then still be triggered at any time.
To learn more details about autovacuum see http://www.postgresql.org/docs/current/static/
routine-vacuuming.html#AUTOVACUUM
The following example shows how to configure running VACUUM on the file table by using an admin-job inBareos. The job will be scheduled to run at a time that should not run in parallel with normal backup jobs,here by scheduling it to run after the BackupCatalog job.
First step is to check the amount of dead tuples and if autovacuum triggers VACUUM:
bareos=# SELECT relname, n_dead_tup, last_vacuum, last_autovacuum, last_analyze, last_autoanalyze
FROM pg_stat_user_tables WHERE n_dead_tup > 0 ORDER BY n_dead_tup DESC;
-[ RECORD 1 ]----+------------------------------
relname | file
n_dead_tup | 2955116
last_vacuum |
last_autovacuum |
last_analyze |
last_autoanalyze |
-[ RECORD 2 ]----+------------------------------
relname | log
n_dead_tup | 111298
last_vacuum |
last_autovacuum |
last_analyze |
last_autoanalyze |
-[ RECORD 3 ]----+------------------------------
relname | job
n_dead_tup | 1785
last_vacuum |
last_autovacuum | 2015-01-08 01:13:20.70894+01
last_analyze |
last_autoanalyze | 2014-12-27 18:00:58.639319+01
...
Commands 28.17: Check dead tuples and vacuuming on PostgreSQL
In the above example, the file table has a high number of dead tuples and it has not been vacuumed. Samefor the log table, but the dead tuple count is not very high. On the job table autovacuum has been triggered.
Note that the statistics views in PostgreSQL are not persistent, their values are reset on restart of thePostgreSQL service.
To setup a scheduled admin job for vacuuming the file table, the following must be done:
1. Create a file with the SQL statements for example/usr/local/lib/bareos/scripts/postgresql file table maintenance.sqlwith the following content:

307
\t \x
SELECT relname, n_dead_tup, last_vacuum, last_autovacuum, last_analyze, last_autoanalyze
FROM pg_stat_user_tables WHERE relname=’file’;
VACUUM VERBOSE ANALYZE file;
SELECT relname, n_dead_tup, last_vacuum, last_autovacuum, last_analyze, last_autoanalyze
FROM pg_stat_user_tables WHERE relname=’file’;
\t \x
SELECT table_name,
pg_size_pretty(pg_total_relation_size(table_name)) AS total_sz,
pg_size_pretty(pg_total_relation_size(table_name) - pg_relation_size(table_name)) AS idx_sz
FROM ( SELECT (’"’ || relname || ’"’ ) AS table_name
FROM pg_stat_user_tables WHERE relname != ’batch’ ) AS all_tables
ORDER BY pg_total_relation_size(table_name) DESC LIMIT 5;
Commands 28.18: SQL Script for vacuuming the file table on PostgreSQL
The SELECT statements are for informational purposes only, the final statement shows the total andindex disk usage of the 5 largest tables.
2. Create a shell script that runs the SQL statements, for example/usr/local/lib/bareos/scripts/postgresql file table maintenance.shwith the following content:
#!/bin/sh
psql bareos < /usr/local/lib/bareos/scripts/postgresql_file_table_maintenance.sql
Commands 28.19: SQL Script for vacuuming the file table on PostgreSQL
3. As in PostgreSQL only the database owner or a database superuser is allowed to run VACUUM, thescript will be run as the postgres user. To permit the bareos user to run the script via sudo, write thefollowing sudo rule to a file by executing visudo -f /etc/sudoers.d/bareos postgres vacuum:
bareos ALL = (postgres) NOPASSWD: /usr/local/lib/bareos/scripts/postgresql_file_table_maintenance.sh
Commands 28.20: sudo rule for allowing bareos to run a script as postgres
and make sure that /etc/sudoers includes it, usually by the line
#includedir /etc/sudoers.d
4. Create the following admin job in the director configuration
# PostgreSQL file table maintenance job
Job {
Name = FileTableMaintJob
JobDefs = DefaultJob
Schedule = "WeeklyCycleAfterBackup"
Type = Admin
Priority = 20
RunScript {
RunsWhen = Before
RunsOnClient = no
Fail Job On Error = yes
Command = "sudo -u postgres /usr/local/lib/bareos/scripts/postgresql_file_table_maintenance.sh"
}
}
Commands 28.21: SQL Script for vacuuming the file table on PostgreSQL
In this example the job will be run by the schedule WeeklyCycleAfterBackup, the Priority should beset to a higher value than Priority in the BackupCatalog job.
28.3.2 Repairing Your PostgreSQL Database
The same considerations apply as for Repairing Your MySQL Database. Consult the PostgreSQL documentsfor how to repair the database.
For Bareos specific problems, consider using bareos-dbcheck program .
308
28.4 MySQL
28.4.1 Compacting Your MySQL Database
Over time, as noted above, your database will tend to grow. Even though Bareos regularly prunes files,MySQL does not automatically reuse the space, and instead continues growing.
It is assumed that you are using the InnoDB database engine (which is the default since MySQL Version5.5).
It is recommended that you use the OPTIMIZE TABLE and ANALYZE TABLE statements regularly.This is to make sure that all indices are up to date and to recycle space inside the database files.You can do this via the mysqlcheck command:
mysqlcheck -a -o -A
Please note that the database files are never shrunk by MySQL. If you really need to shrink the databasefiles, you need to recreate the database. This only works if you use per-table tablespaces by setting the inn-odb file per table configuration option. See http://dev.mysql.com/doc/refman/5.5/en/innodb-multiple-tablespaces.html for details.
mysqldump -f --opt bareos > bareos.sql
mysql bareos < bareos.sql
rm -f bareos.sql
Depending on the size of your database, this will take more or less time and a fair amount of disk space.
28.4.2 Repairing Your MySQL Database
If you find that you are getting errors writing to your MySQL database, or Bareos hangs each time it triesto access the database, you should consider running MySQL’s database check and repair routines.This can be done by running the mysqlcheck command:
mysqlcheck --all-databases
If the errors you are getting are simply SQL warnings, then you might try running bareos-dbcheck before(or possibly after) using the MySQL database repair program. It can clean up many of the orphaned recordproblems, and certain other inconsistencies in the Bareos database.
A typical cause of MySQL database problems is if your partition fills. In such a case, you will need to createadditional space on the partition.
28.4.3 MySQL Table is Full
If you are running into the error The table ’File’ is full ..., it is probably because on version 4.x MySQL,the table is limited by default to a maximum size of 4 GB and you have probably run into the limit. Thesolution can be found at: http://dev.mysql.com/doc/refman/5.0/en/full-table.html
You can display the maximum length of your table with:
mysql bareos
SHOW TABLE STATUS FROM bareos like "File";
If the column labeled ”Max data length” is around 4Gb, this is likely to be the source of your problem, andyou can modify it with:
mysql bareos
ALTER TABLE File MAX_ROWS=281474976710656;
28.4.4 MySQL Server Has Gone Away
If you are having problems with the MySQL server disconnecting or with messages saying that your MySQLserver has gone away, then please read the MySQL documentation, which can be found at:
http://dev.mysql.com/doc/refman/5.0/en/gone-away.html
309
28.4.5 MySQL Temporary Tables
When doing backups with large numbers of files, MySQL creates some temporary tables. When these tablesare small they can be held in system memory, but as they approach some size, they spool off to disk. Thedefault location for these temp tables is /tmp. Once that space fills up, Bareos daemons such as the Storagedaemon doing spooling can get strange errors. E.g.
Fatal error: spool.c:402 Spool data read error.
Fatal error: backup.c:892 Network send error to SD. ERR=Connection reset by
peer
What you need to do is setup MySQL to use a different (larger) temp directory, which can be set in the/etc/my.cnf with these variables set:
tmpdir=/path/to/larger/tmpdir
bdb_tmpdir=/path/to/larger/tmpdir
28.5 Performance Issues Indexes
TODO: This chapter needs verification/updating.One of the most important considerations for improving performance on the Bareos database is to ensurethat it has all the appropriate indexes. Several users have reported finding that their database did nothave all the indexes in the default configuration. In addition, you may find that because of your own usagepatterns, you need additional indexes.The most important indexes for performance are the two indexes on the File table. The first index is onFileId and is automatically made because it is the unique key used to access the table. The other one isthe (JobId, PathId, Filename) index. If these Indexes are not present, your performance may suffer a lot.
28.5.1 PostgreSQL Indexes
On PostgreSQL, you can check to see if you have the proper indexes using the following commands:
psql bareos
select * from pg_indexes where tablename=’file’;
If you do not see output that indicates that all three indexes are created, you can create the two additionalindexes using:
psql bareos
CREATE INDEX file_jobid_idx on file (jobid);
CREATE INDEX file_jpf_idx on file (jobid, pathid, filenameid);
Make sure that you doesn’t have an index on File (filenameid, pathid).
28.5.2 MySQL Indexes
On MySQL, you can check if you have the proper indexes by:
mysql bareos
show index from File;
If the indexes are not present, especially the JobId index, you can create them with the following commands:
mysql bareos
CREATE INDEX file_jobid_idx on File (JobId);
CREATE INDEX file_jpf_idx on File (JobId, FilenameId, PathId);
Though normally not a problem, you should ensure that the indexes defined for Filename and Path areboth set to 255 characters. Some users reported performance problems when their indexes were set to 50characters. To check, do:
mysql bareos
show index from Filename;
show index from Path;
and what is important is that for Filename, you have an index with Key name ”Name” and Sub part ”255”.For Path, you should have a Key name ”Path” and Sub part ”255”. If one or the other does not exist orthe Sub part is less that 255, you can drop and recreate the appropriate index with:
310
mysql bareos
DROP INDEX Path on Path;
CREATE INDEX Path on Path (Path(255));
DROP INDEX Name on Filename;
CREATE INDEX Name on Filename (Name(255));
28.5.3 SQLite Indexes
On SQLite, you can check if you have the proper indexes by:
sqlite <path>/bareos.db
select * from sqlite_master where type=’index’ and tbl_name=’File’;
If the indexes are not present, especially the JobId index, you can create them with the following commands:
sqlite <path>/bareos.db
CREATE INDEX file_jobid_idx on File (JobId);
CREATE INDEX file_jfp_idx on File (JobId, PathId, FilenameId);
28.6 Backing Up Your Bareos Database
If ever the machine on which your Bareos database crashes, and you need to restore from backup tapes, oneof your first priorities will probably be to recover the database. Although Bareos will happily backup yourcatalog database if it is specified in the FileSet, this is not a very good way to do it, because the databasewill be saved while Bareos is modifying it. Thus the database may be in an instable state. Worse yet, youwill backup the database before all the Bareos updates have been applied.To resolve these problems, you need to backup the database after all the backup jobs have been run. Inaddition, you will want to make a copy while Bareos is not modifying it. To do so, you can use twoscripts provided in the release make catalog backup and delete catalog backup. These files will beautomatically generated along with all the other Bareos scripts. The first script will make an ASCII copy ofyour Bareos database into bareos.sql in the working directory you specified in your configuration, and thesecond will delete the bareos.sql file.The basic sequence of events to make this work correctly is as follows:
� Run all your nightly backups
� After running your nightly backups, run a Catalog backup Job
� The Catalog backup job must be scheduled after your last nightly backup
� You use RunBeforeJob to create the ASCII backup file and RunAfterJob to clean up
Assuming that you start all your nightly backup jobs at 1:05 am (and that they run one after another), youcan do the catalog backup with the following additional Director configuration statements:
# Backup the catalog database (after the nightly save)
Job {
Name = "BackupCatalog"
Type = Backup
Client=rufus-fd
FileSet="Catalog"
Schedule = "WeeklyCycleAfterBackup"
Storage = DLTDrive
Messages = Standard
Pool = Default
# This creates an ASCII copy of the catalog
# Arguments to make_catalog_backup.pl are:
# make_catalog_backup.pl <catalog-name>
RunBeforeJob = "/usr/lib/bareos/scripts/make_catalog_backup.pl MyCatalog"
# This deletes the copy of the catalog
RunAfterJob = "/usr/lib/bareos/scripts/delete_catalog_backup"
# This sends the bootstrap via mail for disaster recovery.
# Should be sent to another system, please change recipient accordingly
Write Bootstrap = "|/usr/sbin/bsmtp -h localhost -f \"\(Bareos\) \" -s \"Bootstrap for Job %j\" ↙↪→ root@localhost"
}
# This schedule does the catalog. It starts after the WeeklyCycle
311
Schedule {
Name = "WeeklyCycleAfterBackup
Run = Level=Full sun-sat at 1:10
}
# This is the backup of the catalog
FileSet {
Name = "Catalog"
Include {
Options {
signature=MD5
}
File = "/var/lib/bareos/bareos.sql" # database dump
File = "/etc/bareos" # configuration
}
}
Configuration 28.22: Bareos Catalog Backup Job
It is preferable to write/send the bootstrap file to another computer. It will allow you to quickly recover thedatabase backup should that be necessary. If you do not have a bootstrap file, it is still possible to recoveryour database backup, but it will be more work and take longer.
28.7 Database Size
As mentioned above, if you do not do automatic pruning, your Catalog will grow each time you run a Job.Normally, you should decide how long you want File records to be maintained in the Catalog and set theFile Retention period to that time. Then you can either wait and see how big your Catalog gets or makea calculation assuming approximately 154 bytes for each File saved and knowing the number of Files thatare saved during each backup and the number of Clients you backup.For example, suppose you do a backup of two systems, each with 100,000 files. Suppose further that you doa Full backup weekly and an Incremental every day, and that the Incremental backup typically saves 4,000files. The size of your database after a month can roughly be calculated as:
Size = 154 * No. Systems * (100,000 * 4 + 10,000 * 26)
where we have assumed four weeks in a month and 26 incremental backups per month. This would give thefollowing:
Size = 154 * 2 * (100,000 * 4 + 10,000 * 26)
or
Size = 308 * (400,000 + 260,000)
or
Size = 203,280,000 bytes
So for the above two systems, we should expect to have a database size of approximately 200 Megabytes. Ofcourse, this will vary according to how many files are actually backed up.Below are some statistics for a MySQL database containing Job records for five Clients beginning September2001 through May 2002 (8.5 months) and File records for the last 80 days. (Older File records have beenpruned). For these systems, only the user files and system files that change are backed up. The core part ofthe system is assumed to be easily reloaded from the Red Hat rpms.In the list below, the files (corresponding to Bareos Tables) with the extension .MYD contain the datarecords whereas files with the extension .MYI contain indexes.You will note that the File records (containing the file attributes) make up the large bulk of the numberof records as well as the space used (459 Mega Bytes including the indexes). As a consequence, the mostimportant Retention period will be the File Retention period. A quick calculation shows that for each Filethat is saved, the database grows by approximately 150 bytes.
Size in
Bytes Records File
============ ========= ===========
168 5 Client.MYD
3,072 Client.MYI
344,394,684 3,080,191 File.MYD
115,280,896 File.MYI
2,590,316 106,902 Filename.MYD
3,026,944 Filename.MYI
184 4 FileSet.MYD
2,048 FileSet.MYI

312
49,062 1,326 JobMedia.MYD
30,720 JobMedia.MYI
141,752 1,378 Job.MYD
13,312 Job.MYI
1,004 11 Media.MYD
3,072 Media.MYI
1,299,512 22,233 Path.MYD
581,632 Path.MYI
36 1 Pool.MYD
3,072 Pool.MYI
5 1 Version.MYD
1,024 Version.MYI
This database has a total size of approximately 450 Megabytes.
Chapter 29
Bareos Security Issues
� Security means being able to restore your files, so read the Critical Items Chapter of this manual.
� The clients (bareos-fd) must run as root to be able to access all the system files.
� It is not necessary to run the Director as root.
� It is not necessary to run the Storage daemon as root, but you must ensure that it can open the tapedrives, which are often restricted to root access by default. In addition, if you do not run the Storagedaemon as root, it will not be able to automatically set your tape drive parameters on most OSes sincethese functions, unfortunately require root access.
� You should restrict access to the Bareos configuration files, so that the passwords are not world-readable. The Bareos daemons are password protected using CRAM-MD5 (i.e. the password is notsent across the network). This will ensure that not everyone can access the daemons. It is a reasonablygood protection, but can be cracked by experts.
� If you are using the recommended ports 9101, 9102, and 9103, you will probably want to protect theseports from external access using a firewall and/or using tcp wrappers (etc/hosts.allow).
� By default, all data that is sent across the network is unencrypted. However, Bareos does support TLS(transport layer security) and can encrypt transmitted data. Please read the TLS (SSL) Communica-tions Encryption section of this manual.
� You should ensure that the Bareos working directories are readable and writable only by the Bareosdaemons.
� The default Bareos grant_bareos_privileges script grants all permissions to use the MySQL (andPostgreSQL) database without a password. If you want security, please tighten this up!
� Don’t forget that Bareos is a network program, so anyone anywhere on the network with the consoleprogram and the Director’s password can access Bareos and the backed up data.
� You can restrict what IP addresses Bareos will bind to by using the appropriate DirAddress, FDAd-dress, or SDAddress records in the respective daemon configuration files.
29.1 Configuring and Testing TCP Wrappers
The TCP wrapper functionality is available on different plattforms. Be default, it is activated on Bareos forLinux. With this enabled, you may control who may access your daemons. This control is done by modifyingthe file: /etc/hosts.allow. The program name that Bareos uses when applying these access restrictions isthe name you specify in the daemon configuration file (see below for examples). You must not use the twistoption in your /etc/hosts.allow or it will terminate the Bareos daemon when a connection is refused.
313

314

Part IV
Appendix
315

Appendix A
System Requirements
� The minimum versions for each of the databases supported by Bareos are:
– MySQL 4.1
– PostgreSQL 8.4 (since Bareos 13.2.3)
– SQLite 3
� Windows release is cross-compiled on Linux
� Bareos requires a good implementation of pthreads to work. This is not the case on some of the BSDsystems.
� The source code has been written with portability in mind and is mostly POSIX compatible. Thusporting to any POSIX compatible operating system should be relatively easy.
317

318
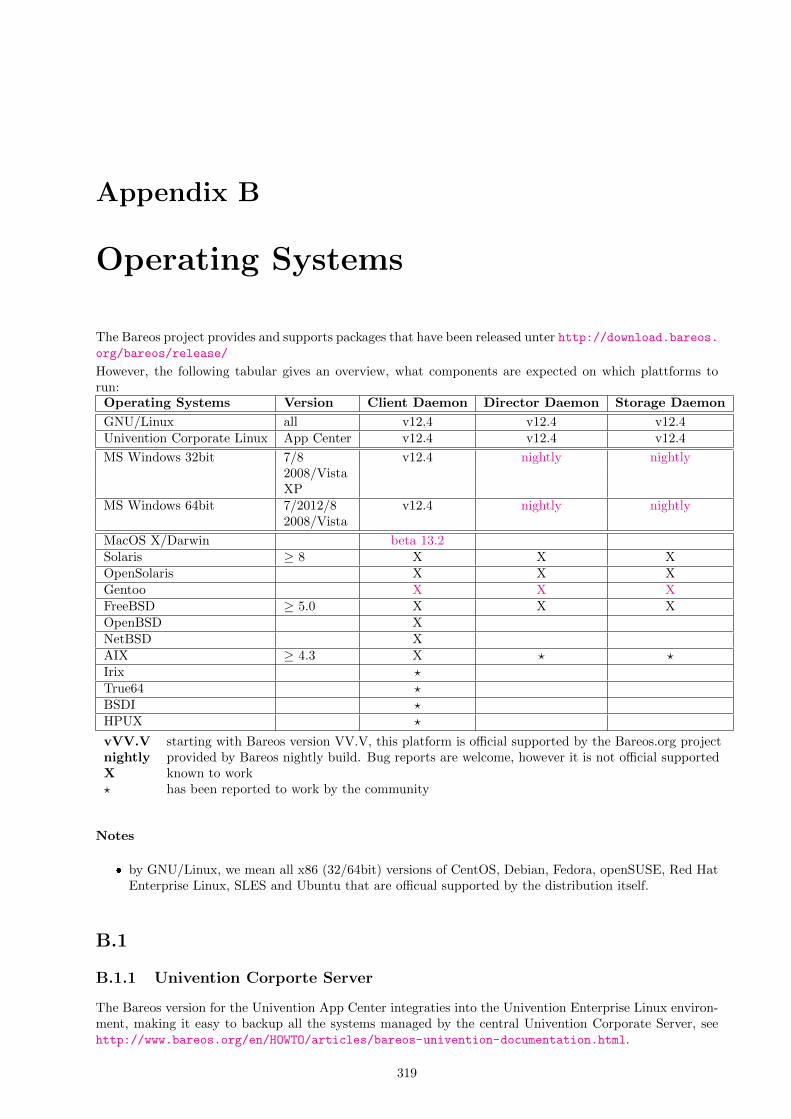
Appendix B
Operating Systems
The Bareos project provides and supports packages that have been released unter http://download.bareos.org/bareos/release/
However, the following tabular gives an overview, what components are expected on which plattforms torun:Operating Systems Version Client Daemon Director Daemon Storage Daemon
GNU/Linux all v12.4 v12.4 v12.4Univention Corporate Linux App Center v12.4 v12.4 v12.4
MS Windows 32bit 7/8 v12.4 nightly nightly2008/VistaXP
MS Windows 64bit 7/2012/8 v12.4 nightly nightly2008/Vista
MacOS X/Darwin beta 13.2Solaris ≥ 8 X X XOpenSolaris X X XGentoo X X XFreeBSD ≥ 5.0 X X XOpenBSD XNetBSD XAIX ≥ 4.3 X ? ?Irix ?True64 ?BSDI ?HPUX ?
vVV.V starting with Bareos version VV.V, this platform is official supported by the Bareos.org projectnightly provided by Bareos nightly build. Bug reports are welcome, however it is not official supportedX known to work? has been reported to work by the community
Notes
� by GNU/Linux, we mean all x86 (32/64bit) versions of CentOS, Debian, Fedora, openSUSE, Red HatEnterprise Linux, SLES and Ubuntu that are officual supported by the distribution itself.
B.1
B.1.1 Univention Corporte Server
The Bareos version for the Univention App Center integraties into the Univention Enterprise Linux environ-ment, making it easy to backup all the systems managed by the central Univention Corporate Server, seehttp://www.bareos.org/en/HOWTO/articles/bareos-univention-documentation.html.
319
320
B.1.2 Debian.org / Ubuntu Universe
The distribution Debian >= 8 do include a version of Bareos. Ubuntu Universe >= 15.04 does also includethese packages.In the further text, these version will be named Bareos (Debian.org) (also for the Ubuntu Universe version,as this is based on the Debian version).The source of these packages come from a seperate branch. For the release bareos-14.2 this is https://
github.com/bareos/bareos/tree/bareos-14.2-debian instead of the standard branch https://github.
com/bareos/bareos/tree/bareos-14.2.The Bareos project tries to limit the differences between these branches to a minimum.
Limitations of the Debian.org/Ubuntu Universe version of Bareos
� Debian.org does not include the libfastlz compression library and thesefore the Bareos (Debian.org)packages do not offer the fileset options compression=LZFAST, compression=LZ4 and compression=
LZ4HC.
� Debian.org prefers that Bareos (Debian.org) is linked against GnuTLS instead of OpenSSL. Therefore,the Bareos (Debian.org) package only support Transport Encryption but no Data Encryption.
Appendix C
Bareos Programs
This document describes the utility programs written to aid Bareos users and developers in dealing withVolumes external to Bareos adn to perform other useful tasks.
C.1 Parameter
C.1.1 Specifying the Configuration File
Each of the utilities that deal with Volumes require a valid Storage daemon configuration file bareos-sd.conf(actually, the only part of the configuration file that these programs need is the Device resource definitions).This permits the programs to find the configuration parameters for your archive device (generally a tapedrive). Using the -c option a custom storage daemon configuration file can be selected.
C.1.2 Specifying a Device Name For a Tape
Each of these programs require a device-name where the Volume can be found. In the case of a tape, thisis the physical device name such as /dev/nst0 or /dev/rmt/0ubn depending on your system. For theprogram to work, it must find the identical name in the Device resource of the configuration file. See belowfor specifying Volume names.Please note that if you have Bareos running and you want to use one of these programs, you will either needto stop the Storage daemon, or unmount any tape drive you want to use, otherwise the drive will busybecause Bareos is using it.
C.1.3 Specifying a Device Name For a File
If you are attempting to read or write an archive file rather than a tape, the device-name should be thefull path to the archive location including the filename. The filename (last part of the specification) will bestripped and used as the Volume name, and the path (first part before the filename) must have the sameentry in the configuration file. So, the path is equivalent to the archive device name, and the filename isequivalent to the volume name. The default file storage path is /var/lib/bareos/storage/.
C.1.4 Specifying Volumes
Often you must specify the Volume name to the programs below. The best method to do so is to specify abootstrap file on the command line with the -b option. As part of the bootstrap file, you will then specifythe Volume name or Volume names if more than one volume is needed. For example, suppose you want toread tapes tape1 and tape2. First construct a bootstrap file named say, list.bsr which contains:
Volume=test1|test2
where each Volume is separated by a vertical bar. Then simply use:
bls -b list.bsr /dev/nst0
In the case of Bareos Volumes that are on files, you may simply append volumes as follows:
bls /tmp/test1\|test2
321
322
where the backslash (\) was necessary as a shell escape to permit entering the vertical bar (—).And finally, if you feel that specifying a Volume name is a bit complicated with a bootstrap file, you canuse the -V option (on all programs except bcopy) to specify one or more Volume names separated by thevertical bar (—). For example,
bls -V Vol001 /dev/nst0
You may also specify an asterisk (*) to indicate that the program should accept any volume. For example:
bls -V* /dev/nst0
C.2 Bareos Daemons
C.2.1 Daemon Command Line Options
Each of the three daemons (Director, File, Storage) accepts a small set of options on the command line. Ingeneral, each of the daemons as well as the Console program accepts the following options:
-c <file> Define the file to use as a configuration file. The default is the daemon name followed by .confi.e. bareos-dir.conf for the Director, bareos-fd.conf for the File daemon, and bareos-sd for theStorage daemon.
-d nnn Set the debug level to nnn. Generally anything between 50 and 200 is reasonable. The higher thenumber, the more output is produced. The output is written to standard output. The debug level canalso be set during runtime, see section bconsole: setdebug.
-f Run the daemon in the foreground. This option is needed to run the daemon under the debugger.
-g <group> Run the daemon under this group. This must be a group name, not a GID.
-s Do not trap signals. This option is needed to run the daemon under the debugger.
-t Read the configuration file and print any error messages, then immediately exit. Useful for syntax testingof new configuration files.
-u <user> Run the daemon as this user. This must be a user name, not a UID.
-v Be more verbose or more complete in printing error and informational messages. Recommended.
-? Print the version and list of options.
C.2.2 bareos-dir
Bareos Director. TODO: Bareos Director describe command line arguments
C.2.3 bareos-sd
Baroes Storage Daemon TODO: Bareos Storage Daemon describe command line arguments
C.2.4 bareos-fd
Baroes File Daemon TODO: Bareos File Daemon describe command line arguments
C.3 Interactive Programs
C.3.1 bconsole
There is an own chapter on bconsole. Please refer to chapter Bareos Console.
C.3.2 bat
C.4 Volume Utility Commands
Please note! If you using Bareos with non-default block sizes defined in the pools, it might be neccessary tospecifiy the maximum block level also in the storage device ressource, see Direct access to Volumes withnon-default blocksizes.
323
C.4.1 bls
bls can be used to do an ls type listing of a Bareos tape or file. It is called:
Usage: bls [options] <device-name>
-b <file> specify a bootstrap file
-c <file> specify a Storage configuration file
-D <director> specify a director name specified in the Storage
configuration file for the Key Encryption Key selection
-d <nn> set debug level to <nn>
-dt print timestamp in debug output
-e <file> exclude list
-i <file> include list
-j list jobs
-k list blocks
(no j or k option) list saved files
-L dump label
-p proceed inspite of errors
-v be verbose
-V specify Volume names (separated by |)
-? print this message
For example, to list the contents of a tape:
bls -V Volume-name /dev/nst0
Or to list the contents of a file:
bls /var/lib/bareos/storage/testvol
or
bls -V testvol /var/lib/bareos/storage
Note that, in the case of a file, the Volume name becomes the filename, so in the above example, you willreplace the Volume-name with the name of the volume (file) you wrote.Normally if no options are specified, bls will produce the equivalent output to the ls -l command for eachfile on the tape. Using other options listed above, it is possible to display only the Job records, only thetape blocks, etc. For example:
bls: butil.c:282-0 Using device: "/var/lib/bareos/storage" for reading.
12-Sep 18:30 bls JobId 0: Ready to read from volume "testvol" on device "FileStorage" (/var/lib/bareos/storage).
bls JobId 1: -rwxr-xr-x 1 root root 4614 2013-01-22 22:24:11 /usr/sbin/service
bls JobId 1: -rwxr-xr-x 1 root root 13992 2013-01-22 22:24:12 /usr/sbin/rtcwake
bls JobId 1: -rwxr-xr-x 1 root root 6243 2013-02-06 11:01:29 /usr/sbin/update-fonts-scale
bls JobId 1: -rwxr-xr-x 1 root root 43240 2013-01-22 22:24:10 /usr/sbin/grpck
bls JobId 1: -rwxr-xr-x 1 root root 16894 2013-01-22 22:24:11 /usr/sbin/update-rc.d
bls JobId 1: -rwxr-xr-x 1 root root 9480 2013-01-22 22:47:43 /usr/sbin/gss_clnt_send_err
...
bls JobId 456: -rw-r----- 1 root bareos 1008 2013-05-23 13:17:45 /etc/bareos/bareos-fd.conf
bls JobId 456: -rw-r----- 1 bareos bareos 6026 2013-04-22 12:00:33 /etc/bareos/bareos-sd.conf.dpkg-dist
bls JobId 456: drwxr-xr-x 2 root root 4096 2013-07-04 17:40:21 /etc/bareos/
12-Sep 18:30 bls JobId 0: End of Volume at file 0 on device "FileStorage" (/var/lib/bareos/storage), Volume "testvol"
12-Sep 18:30 bls JobId 0: End of all volumes.
2972 files found.
Show Label Information
Using the -L the label information of a Volume is shown:
root@linux:~# bls -L /var/lib/bareos/storage/testvol
bls: butil.c:282-0 Using device: "/var/lib/bareos/storage" for reading.
12-Sep 18:41 bls JobId 0: Ready to read from volume "testvol" on device "FileStorage" (/var/lib/bareos/storage).
Volume Label:
Id : Bareos 0.9 mortal
VerNo : 10
VolName : File002
PrevVolName :
VolFile : 0
LabelType : VOL_LABEL
LabelSize : 147
PoolName : Default
MediaType : File
PoolType : Backup
HostName : debian6
Date label written: 06-Mar-2013 17:21
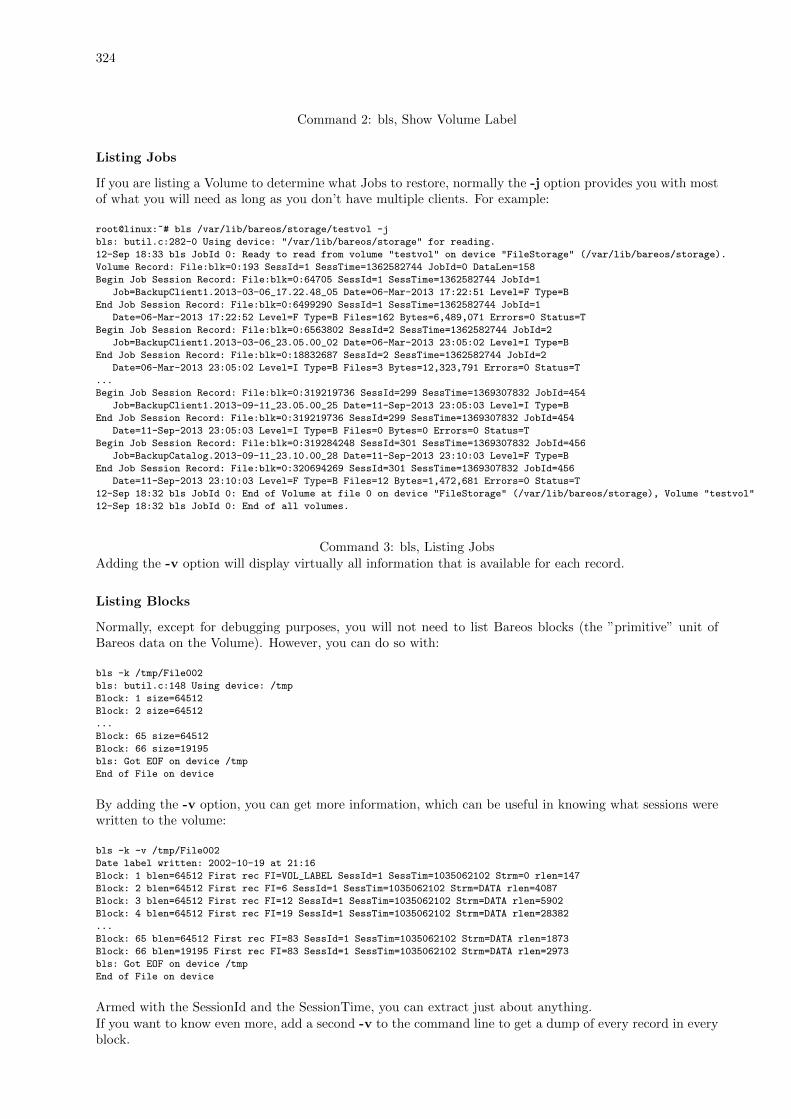
324
Command 2: bls, Show Volume Label
Listing Jobs
If you are listing a Volume to determine what Jobs to restore, normally the -j option provides you with mostof what you will need as long as you don’t have multiple clients. For example:
root@linux:~# bls /var/lib/bareos/storage/testvol -j
bls: butil.c:282-0 Using device: "/var/lib/bareos/storage" for reading.
12-Sep 18:33 bls JobId 0: Ready to read from volume "testvol" on device "FileStorage" (/var/lib/bareos/storage).
Volume Record: File:blk=0:193 SessId=1 SessTime=1362582744 JobId=0 DataLen=158
Begin Job Session Record: File:blk=0:64705 SessId=1 SessTime=1362582744 JobId=1
Job=BackupClient1.2013-03-06_17.22.48_05 Date=06-Mar-2013 17:22:51 Level=F Type=B
End Job Session Record: File:blk=0:6499290 SessId=1 SessTime=1362582744 JobId=1
Date=06-Mar-2013 17:22:52 Level=F Type=B Files=162 Bytes=6,489,071 Errors=0 Status=T
Begin Job Session Record: File:blk=0:6563802 SessId=2 SessTime=1362582744 JobId=2
Job=BackupClient1.2013-03-06_23.05.00_02 Date=06-Mar-2013 23:05:02 Level=I Type=B
End Job Session Record: File:blk=0:18832687 SessId=2 SessTime=1362582744 JobId=2
Date=06-Mar-2013 23:05:02 Level=I Type=B Files=3 Bytes=12,323,791 Errors=0 Status=T
...
Begin Job Session Record: File:blk=0:319219736 SessId=299 SessTime=1369307832 JobId=454
Job=BackupClient1.2013-09-11_23.05.00_25 Date=11-Sep-2013 23:05:03 Level=I Type=B
End Job Session Record: File:blk=0:319219736 SessId=299 SessTime=1369307832 JobId=454
Date=11-Sep-2013 23:05:03 Level=I Type=B Files=0 Bytes=0 Errors=0 Status=T
Begin Job Session Record: File:blk=0:319284248 SessId=301 SessTime=1369307832 JobId=456
Job=BackupCatalog.2013-09-11_23.10.00_28 Date=11-Sep-2013 23:10:03 Level=F Type=B
End Job Session Record: File:blk=0:320694269 SessId=301 SessTime=1369307832 JobId=456
Date=11-Sep-2013 23:10:03 Level=F Type=B Files=12 Bytes=1,472,681 Errors=0 Status=T
12-Sep 18:32 bls JobId 0: End of Volume at file 0 on device "FileStorage" (/var/lib/bareos/storage), Volume "testvol"
12-Sep 18:32 bls JobId 0: End of all volumes.
Command 3: bls, Listing JobsAdding the -v option will display virtually all information that is available for each record.
Listing Blocks
Normally, except for debugging purposes, you will not need to list Bareos blocks (the ”primitive” unit ofBareos data on the Volume). However, you can do so with:
bls -k /tmp/File002
bls: butil.c:148 Using device: /tmp
Block: 1 size=64512
Block: 2 size=64512
...
Block: 65 size=64512
Block: 66 size=19195
bls: Got EOF on device /tmp
End of File on device
By adding the -v option, you can get more information, which can be useful in knowing what sessions werewritten to the volume:
bls -k -v /tmp/File002
Date label written: 2002-10-19 at 21:16
Block: 1 blen=64512 First rec FI=VOL_LABEL SessId=1 SessTim=1035062102 Strm=0 rlen=147
Block: 2 blen=64512 First rec FI=6 SessId=1 SessTim=1035062102 Strm=DATA rlen=4087
Block: 3 blen=64512 First rec FI=12 SessId=1 SessTim=1035062102 Strm=DATA rlen=5902
Block: 4 blen=64512 First rec FI=19 SessId=1 SessTim=1035062102 Strm=DATA rlen=28382
...
Block: 65 blen=64512 First rec FI=83 SessId=1 SessTim=1035062102 Strm=DATA rlen=1873
Block: 66 blen=19195 First rec FI=83 SessId=1 SessTim=1035062102 Strm=DATA rlen=2973
bls: Got EOF on device /tmp
End of File on device
Armed with the SessionId and the SessionTime, you can extract just about anything.If you want to know even more, add a second -v to the command line to get a dump of every record in everyblock.
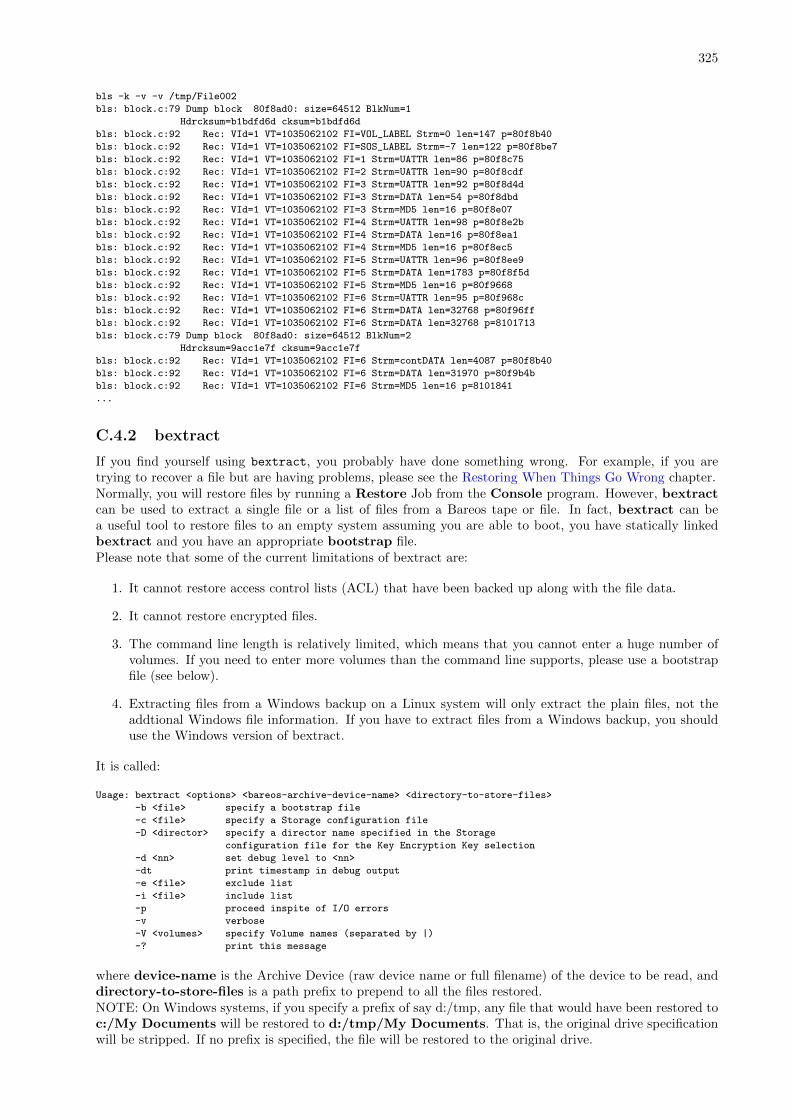
325
bls -k -v -v /tmp/File002
bls: block.c:79 Dump block 80f8ad0: size=64512 BlkNum=1
Hdrcksum=b1bdfd6d cksum=b1bdfd6d
bls: block.c:92 Rec: VId=1 VT=1035062102 FI=VOL_LABEL Strm=0 len=147 p=80f8b40
bls: block.c:92 Rec: VId=1 VT=1035062102 FI=SOS_LABEL Strm=-7 len=122 p=80f8be7
bls: block.c:92 Rec: VId=1 VT=1035062102 FI=1 Strm=UATTR len=86 p=80f8c75
bls: block.c:92 Rec: VId=1 VT=1035062102 FI=2 Strm=UATTR len=90 p=80f8cdf
bls: block.c:92 Rec: VId=1 VT=1035062102 FI=3 Strm=UATTR len=92 p=80f8d4d
bls: block.c:92 Rec: VId=1 VT=1035062102 FI=3 Strm=DATA len=54 p=80f8dbd
bls: block.c:92 Rec: VId=1 VT=1035062102 FI=3 Strm=MD5 len=16 p=80f8e07
bls: block.c:92 Rec: VId=1 VT=1035062102 FI=4 Strm=UATTR len=98 p=80f8e2b
bls: block.c:92 Rec: VId=1 VT=1035062102 FI=4 Strm=DATA len=16 p=80f8ea1
bls: block.c:92 Rec: VId=1 VT=1035062102 FI=4 Strm=MD5 len=16 p=80f8ec5
bls: block.c:92 Rec: VId=1 VT=1035062102 FI=5 Strm=UATTR len=96 p=80f8ee9
bls: block.c:92 Rec: VId=1 VT=1035062102 FI=5 Strm=DATA len=1783 p=80f8f5d
bls: block.c:92 Rec: VId=1 VT=1035062102 FI=5 Strm=MD5 len=16 p=80f9668
bls: block.c:92 Rec: VId=1 VT=1035062102 FI=6 Strm=UATTR len=95 p=80f968c
bls: block.c:92 Rec: VId=1 VT=1035062102 FI=6 Strm=DATA len=32768 p=80f96ff
bls: block.c:92 Rec: VId=1 VT=1035062102 FI=6 Strm=DATA len=32768 p=8101713
bls: block.c:79 Dump block 80f8ad0: size=64512 BlkNum=2
Hdrcksum=9acc1e7f cksum=9acc1e7f
bls: block.c:92 Rec: VId=1 VT=1035062102 FI=6 Strm=contDATA len=4087 p=80f8b40
bls: block.c:92 Rec: VId=1 VT=1035062102 FI=6 Strm=DATA len=31970 p=80f9b4b
bls: block.c:92 Rec: VId=1 VT=1035062102 FI=6 Strm=MD5 len=16 p=8101841
...
C.4.2 bextract
If you find yourself using bextract, you probably have done something wrong. For example, if you aretrying to recover a file but are having problems, please see the Restoring When Things Go Wrong chapter.Normally, you will restore files by running a Restore Job from the Console program. However, bextractcan be used to extract a single file or a list of files from a Bareos tape or file. In fact, bextract can bea useful tool to restore files to an empty system assuming you are able to boot, you have statically linkedbextract and you have an appropriate bootstrap file.Please note that some of the current limitations of bextract are:
1. It cannot restore access control lists (ACL) that have been backed up along with the file data.
2. It cannot restore encrypted files.
3. The command line length is relatively limited, which means that you cannot enter a huge number ofvolumes. If you need to enter more volumes than the command line supports, please use a bootstrapfile (see below).
4. Extracting files from a Windows backup on a Linux system will only extract the plain files, not theaddtional Windows file information. If you have to extract files from a Windows backup, you shoulduse the Windows version of bextract.
It is called:
Usage: bextract <options> <bareos-archive-device-name> <directory-to-store-files>
-b <file> specify a bootstrap file
-c <file> specify a Storage configuration file
-D <director> specify a director name specified in the Storage
configuration file for the Key Encryption Key selection
-d <nn> set debug level to <nn>
-dt print timestamp in debug output
-e <file> exclude list
-i <file> include list
-p proceed inspite of I/O errors
-v verbose
-V <volumes> specify Volume names (separated by |)
-? print this message
where device-name is the Archive Device (raw device name or full filename) of the device to be read, anddirectory-to-store-files is a path prefix to prepend to all the files restored.NOTE: On Windows systems, if you specify a prefix of say d:/tmp, any file that would have been restored toc:/My Documents will be restored to d:/tmp/My Documents. That is, the original drive specificationwill be stripped. If no prefix is specified, the file will be restored to the original drive.
326
Extracting with Include or Exclude Lists
Using the -e option, you can specify a file containing a list of files to be excluded. Wildcards can be usedin the exclusion list. This option will normally be used in conjunction with the -i option (see below). Boththe -e and the -i options may be specified at the same time as the -b option. The bootstrap filters will beapplied first, then the include list, then the exclude list.Likewise, and probably more importantly, with the -i option, you can specify a file that contains a list (onefile per line) of files and directories to include to be restored. The list must contain the full filename withthe path. If you specify a path name only, all files and subdirectories of that path will be restored. If youspecify a line containing only the filename (e.g. my-file.txt) it probably will not be extracted because youhave not specified the full path.For example, if the file include-list contains:
/etc/bareos
/usr/sbin
Then the command:
bextract -i include-list -V Volume /dev/nst0 /tmp
will restore from the Bareos archive /dev/nst0 all files and directories in the backup from /etc/bareosand from /usr/sbin. The restored files will be placed in a file of the original name under the directory/tmp (i.e. /tmp/etc/bareos/... and /tmp/usr/sbin/...).
Extracting With a Bootstrap File
The -b option is used to specify a bootstrap file containing the information needed to restore preciselythe files you want. Specifying a bootstrap file is optional but recommended because it gives you the mostcontrol over which files will be restored. For more details on the bootstrap file, please see Restoring Fileswith the Bootstrap File chapter of this document. Note, you may also use a bootstrap file produced by therestore command. For example:
bextract -b bootstrap-file /dev/nst0 /tmp
The bootstrap file allows detailed specification of what files you want restored (extracted). You may specifya bootstrap file and include and/or exclude files at the same time. The bootstrap conditions will first beapplied, and then each file record seen will be compared to the include and exclude lists.
Extracting From Multiple Volumes
If you wish to extract files that span several Volumes, you can specify the Volume names in the bootstrap fileor you may specify the Volume names on the command line by separating them with a vertical bar. See thesection above under the bls program entitled Listing Multiple Volumes for more information. The sametechniques apply equally well to the bextract program or read the Bootstrap chapter of this document.
Extracting Under Windows
Please note! If you use bextract under Windows, the ordering of the parameters is essential.To use bextract, the Bareos Storage Daemon must be installed. As bextract works on tapes or disk volumes,these must be configured in the Storage Daemon configuration file, normally found at C:\ProgrammData \
Bareos \bareos -sd.conf. However, it is not required to start the Bareos Storage Daemon. Normally, ifthe Storage Daemon would be able to run, bextract would not be required.After installing, bextract can be called via command line:
C:\Program Files\Bareos .\bextract.exe -c "C:\ProgrammData\Bareos\bareos-sd.conf" -V <Volume> ↙↪→ <YourStorage> <YourDestination>
Commands C.1: Call of bextract
If you want to use exclude or include files you need to write them like you do on Linux. That means eachpath begins with a ”/” and not with ”yourdrive:/”. You need to specify the parameter -e exclude.list asfirst parameter. For example:
/Program Files/Bareos/bareos-dir.exe
/ProgramData/
Configuration C.2: Example exclude.list
327
C:\Program Files\Bareos .\bextract.exe -e exclude.list -c "C:\ProgrammData\Bareos\bareos-sd.conf" -V ↙↪→ <Volume> <YourStorage> <YourDestination>
Commands C.3: Call bextract with exclude list
C.4.3 bscan
If you find yourself using this program, you have probably done something wrong. For example, the bestway to recover a lost or damaged Bareos database is to reload the database by using the bootstrap file thatwas written when you saved it (default Bareos-dir.conf file).The bscan program can be used to re-create a database (catalog) records from the backup informationwritten to one or more Volumes. This is normally needed only if one or more Volumes have been prunedor purged from your catalog so that the records on the Volume are no longer in the catalog, or for Volumesthat you have archived. Note, if you scan in Volumes that were previously purged, you will be able to dorestores from those Volumes. However, unless you modify the Job and File retention times for the Jobs thatwere added by scanning, the next time you run any backup Job with the same name, the records will bepruned again. Since it takes a long time to scan Volumes this can be very frustrating.With some care, bscan can also be used to synchronize your existing catalog with a Volume. Although wehave never seen a case of bscan damaging a catalog, since bscan modifies your catalog, we recommend thatyou do a simple ASCII backup of your database before running bscan just to be sure. See Compacting YourDatabase for the details of making a copy of your database.bscan can also be useful in a disaster recovery situation, after the loss of a hard disk, if you do not have avalid bootstrap file for reloading your system, or if a Volume has been recycled but not overwritten, youcan use bscan to re-create your database, which can then be used to restore your system or a file to itsprevious state.It is called:
Usage: bscan [options] <Bareos-archive>
-B <driver name> specify the database driver name (default NULL) <postgresql|mysql|sqlite>
-b bootstrap specify a bootstrap file
-c <file> specify configuration file
-d <nn> set debug level to nn
-dt print timestamp in debug output
-m update media info in database
-D <director> specify a director name specified in the Storage
configuration file for the Key Encryption Key selection
-n <name> specify the database name (default Bareos)
-u <user> specify database user name (default Bareos)
-P <password> specify database password (default none)
-h <host> specify database host (default NULL)
-t <port> specify database port (default 0)
-p proceed inspite of I/O errors
-r list records
-s synchronize or store in database
-S show scan progress periodically
-v verbose
-V <Volumes> specify Volume names (separated by |)
-w <dir> specify working directory (default from conf file)
-? print this message
As Bareos supports loading its database backend dynamically you need to specify the right database driverto use using the -B option.If you are using MySQL or PostgreSQL, there is no need to supply a working directory since in that case,bscan knows where the databases are. However, if you have provided security on your database, you mayneed to supply either the database name (-b option), the user name (-u option), and/or the password (-p)options.NOTE: before bscan can work, it needs at least a bare bones valid database. If your database exists butsome records are missing because they were pruned, then you are all set. If your database was lost ordestroyed, then you must first ensure that you have the SQL program running (MySQL or PostgreSQL),then you must create the Bareos database (normally named bareos), and you must create the Bareos tables.This is explained in Prepare Bareos database chapter of the manual. Finally, before scanning into an emptydatabase, you must start and stop the Director with the appropriate Bareos-dir.conf file so that it can createthe Client and Storage records which are not stored on the Volumes. Without these records, scanning isunable to connect the Job records to the proper client.
328
Forgetting for the moment the extra complications of a full rebuild of your catalog, let’s suppose that you dida backup to Volumes ”Vol001” and ”Vol002”, then sometime later all records of one or both those Volumeswere pruned or purged from the database. By using bscan you can recreate the catalog entries for thoseVolumes and then use the restore command in the Console to restore whatever you want. A commandsomething like:
bscan -v -V Vol001\|Vol002 /dev/nst0
will give you an idea of what is going to happen without changing your catalog. Of course, you may need tochange the path to the Storage daemon’s conf file, the Volume name, and your tape (or disk) device name.This command must read the entire tape, so if it has a lot of data, it may take a long time, and thus youmight want to immediately use the command listed below. Note, if you are writing to a disk file, replace thedevice name with the path to the directory that contains the Volumes. This must correspond to the ArchiveDevice in the conf file.Then to actually write or store the records in the catalog, add the -s option as follows:
bscan -s -m -v -V Vol001\|Vol002 /dev/nst0
When writing to the database, if bscan finds existing records, it will generally either update them if somethingis wrong or leave them alone. Thus if the Volumes you are scanning are all or partially in the catalog already,no harm will be done to that existing data. Any missing data will simply be added.If you have multiple tapes, you should scan them with:
bscan -s -m -v -V Vol001\|Vol002\|Vol003 /dev/nst0
Since there is a limit on the command line length (511 bytes) accepted by bscan, if you have too manyVolumes, you will need to manually create a bootstrap file. See the Bootstrap chapter of this manual formore details, in particular the section entitled Bootstrap for bscan. Basically, the .bsr file for the aboveexample might look like:
Volume=Vol001
Volume=Vol002
Volume=Vol003
Note: bscan does not support supplying Volume names on the command line and at the same time in abootstrap file. Please use only one or the other.You should, always try to specify the tapes in the order they are written. If you do not, any Jobs that spana volume may not be fully or properly restored. However, bscan can handle scanning tapes that are notsequential. Any incomplete records at the end of the tape will simply be ignored in that case. If you aresimply repairing an existing catalog, this may be OK, but if you are creating a new catalog from scratch, itwill leave your database in an incorrect state. If you do not specify all necessary Volumes on a single bscancommand, bscan will not be able to correctly restore the records that span two volumes. In other words, itis much better to specify two or three volumes on a single bscan command (or in a .bsr file) rather than runbscan two or three times, each with a single volume.Note, the restoration process using bscan is not identical to the original creation of the catalog data. Thisis because certain data such as Client records and other non-essential data such as volume reads, volumemounts, etc is not stored on the Volume, and thus is not restored by bscan. The results of bscanning are,however, perfectly valid, and will permit restoration of any or all the files in the catalog using the normalBareos console commands. If you are starting with an empty catalog and expecting bscan to reconstructit, you may be a bit disappointed, but at a minimum, you must ensure that your Bareos-dir.conf file is thesame as what it previously was – that is, it must contain all the appropriate Client resources so that theywill be recreated in your new database before running bscan. Normally when the Director starts, it willrecreate any missing Client records in the catalog. Another problem you will have is that even if the Volumes(Media records) are recreated in the database, they will not have their autochanger status and slots properlyset. As a result, you will need to repair that by using the update slots command. There may be otherconsiderations as well. Rather than bscanning, you should always attempt to recover you previous catalogbackup.
Using bscan to Compare a Volume to an existing Catalog
If you wish to compare the contents of a Volume to an existing catalog without changing the catalog, youcan safely do so if and only if you do not specify either the -m or the -s options. However, the comparisonroutines are not as good or as thorough as they should be, so we don’t particularly recommend this modeother than for testing.
329
Using bscan to Recreate a Catalog from a Volume
This is the mode for which bscan is most useful. You can either bscan into a freshly created catalog, ordirectly into your existing catalog (after having made an ASCII copy as described above). Normally, youshould start with a freshly created catalog that contains no data.Starting with a single Volume named TestVolume1, you run a command such as:
bscan -V TestVolume1 -v -s -m /dev/nst0
If there is more than one volume, simply append it to the first one separating it with a vertical bar. You mayneed to precede the vertical bar with a forward slash escape the shell – e.g. TestVolume1\—TestVolume2.The -v option was added for verbose output (this can be omitted if desired). The -s option that tells bscanto store information in the database. The physical device name /dev/nst0 is specified after all the options.For example, after having done a full backup of a directory, then two incrementals, I reinitialized the SQLitedatabase as described above, and using the bootstrap.bsr file noted above, I entered the following command:
bscan -b bootstrap.bsr -v -s /dev/nst0
which produced the following output:
bscan: bscan.c:182 Using Database: Bareos, User: bacula
bscan: bscan.c:673 Created Pool record for Pool: Default
bscan: bscan.c:271 Pool type "Backup" is OK.
bscan: bscan.c:632 Created Media record for Volume: TestVolume1
bscan: bscan.c:298 Media type "DDS-4" is OK.
bscan: bscan.c:307 VOL_LABEL: OK for Volume: TestVolume1
bscan: bscan.c:693 Created Client record for Client: Rufus
bscan: bscan.c:769 Created new JobId=1 record for original JobId=2
bscan: bscan.c:717 Created FileSet record "Users Files"
bscan: bscan.c:819 Updated Job termination record for new JobId=1
bscan: bscan.c:905 Created JobMedia record JobId 1, MediaId 1
bscan: Got EOF on device /dev/nst0
bscan: bscan.c:693 Created Client record for Client: Rufus
bscan: bscan.c:769 Created new JobId=2 record for original JobId=3
bscan: bscan.c:708 Fileset "Users Files" already exists.
bscan: bscan.c:819 Updated Job termination record for new JobId=2
bscan: bscan.c:905 Created JobMedia record JobId 2, MediaId 1
bscan: Got EOF on device /dev/nst0
bscan: bscan.c:693 Created Client record for Client: Rufus
bscan: bscan.c:769 Created new JobId=3 record for original JobId=4
bscan: bscan.c:708 Fileset "Users Files" already exists.
bscan: bscan.c:819 Updated Job termination record for new JobId=3
bscan: bscan.c:905 Created JobMedia record JobId 3, MediaId 1
bscan: Got EOF on device /dev/nst0
bscan: bscan.c:652 Updated Media record at end of Volume: TestVolume1
bscan: bscan.c:428 End of Volume. VolFiles=3 VolBlocks=57 VolBytes=10,027,437
The key points to note are that bscan prints a line when each major record is created. Due to the volumeof output, it does not print a line for each file record unless you supply the -v option twice or more on thecommand line.In the case of a Job record, the new JobId will not normally be the same as the original Jobid. For example,for the first JobId above, the new JobId is 1, but the original JobId is 2. This is nothing to be concernedabout as it is the normal nature of databases. bscan will keep everything straight.Although bscan claims that it created a Client record for Client: Rufus three times, it was actually onlycreated the first time. This is normal.You will also notice that it read an end of file after each Job (Got EOF on device ...). Finally the last linegives the total statistics for the bscan.If you had added a second -v option to the command line, Bareos would have been even more verbose,dumping virtually all the details of each Job record it encountered.Now if you start Bareos and enter a list jobs command to the console program, you will get:
+-------+----------+------------------+------+-----+----------+----------+---------+
| JobId | Name | StartTime | Type | Lvl | JobFiles | JobBytes | JobStat |
+-------+----------+------------------+------+-----+----------+----------+---------+
| 1 | usersave | 2002-10-07 14:59 | B | F | 84 | 4180207 | T |
| 2 | usersave | 2002-10-07 15:00 | B | I | 15 | 2170314 | T |
| 3 | usersave | 2002-10-07 15:01 | B | I | 33 | 3662184 | T |
+-------+----------+------------------+------+-----+----------+----------+---------+
330
which corresponds virtually identically with what the database contained before it was re-initialized andrestored with bscan. All the Jobs and Files found on the tape are restored including most of the Mediarecord. The Volume (Media) records restored will be marked as Full so that they cannot be rewrittenwithout operator intervention.It should be noted that bscan cannot restore a database to the exact condition it was in previously becausea lot of the less important information contained in the database is not saved to the tape. Nevertheless, thereconstruction is sufficiently complete, that you can run restore against it and get valid results.An interesting aspect of restoring a catalog backup using bscan is that the backup was made while Bareoswas running and writing to a tape. At the point the backup of the catalog is made, the tape Bareos iswriting to will have say 10 files on it, but after the catalog backup is made, there will be 11 files on thetape Bareos is writing. This there is a difference between what is contained in the backed up catalog andwhat is actually on the tape. If after restoring a catalog, you attempt to write on the same tape that wasused to backup the catalog, Bareos will detect the difference in the number of files registered in the catalogcompared to what is on the tape, and will mark the tape in error.There are two solutions to this problem. The first is possibly the simplest and is to mark the volume asUsed before doing any backups. The second is to manually correct the number of files listed in the Mediarecord of the catalog. This procedure is documented elsewhere in the manual and involves using the updatevolume command in bconsole.
Using bscan to Correct the Volume File Count
If the Storage daemon crashes during a backup Job, the catalog will not be properly updated for the Volumebeing used at the time of the crash. This means that the Storage daemon will have written say 20 files onthe tape, but the catalog record for the Volume indicates only 19 files.Bareos refuses to write on a tape that contains a different number of files from what is in the catalog. Tocorrect this situation, you may run a bscan with the -m option (but without the -s option) to update onlythe final Media record for the Volumes read.
After bscan
If you use bscan to enter the contents of the Volume into an existing catalog, you should be aware that therecords you entered may be immediately pruned during the next job, particularly if the Volume is very oldor had been previously purged. To avoid this, after running bscan, you can manually set the volume status(VolStatus) to Read-Only by using the update command in the catalog. This will allow you to restorefrom the volume without having it immediately purged. When you have restored and backed up the data,you can reset the VolStatus to Used and the Volume will be purged from the catalog.
C.4.4 bcopy
The bcopy program can be used to copy one Bareos archive file to another. For example, you may copy atape to a file, a file to a tape, a file to a file, or a tape to a tape. For tape to tape, you will need two tapedrives. In the process of making the copy, no record of the information written to the new Volume is storedin the catalog. This means that the new Volume, though it contains valid backup data, cannot be accesseddirectly from existing catalog entries. If you wish to be able to use the Volume with the Console restorecommand, for example, you must first bscan the new Volume into the catalog.
Usage: bcopy [-d debug_level] <input-archive> <output-archive>
-b bootstrap specify a bootstrap file
-c <file> specify configuration file
-D <director> specify a director name specified in the Storage
configuration file for the Key Encryption Key selection
-dnn set debug level to nn
-dt print timestamp in debug output
-i specify input Volume names (separated by |)
-o specify output Volume names (separated by |)
-p proceed inspite of I/O errors
-v verbose
-w dir specify working directory (default /tmp)
-? print this message
By using a bootstrap file, you can copy parts of a Bareos archive file to another archive.One of the objectives of this program is to be able to recover as much data as possible from a damaged tape.However, the current version does not yet have this feature.As this is a new program, any feedback on its use would be appreciated. In addition, I only have a singletape drive, so I have never been able to test this program with two tape drives.
331
C.4.5 btape
This program permits a number of elementary tape operations via a tty command interface. It works onlywith tapes and not with other kinds of Bareos storage media (DVD, File, ...). The test command, describedbelow, can be very useful for testing older tape drive compatibility problems. Aside from initial testing oftape drive compatibility with Bareos, btape will be mostly used by developers writing new tape drivers.btape can be dangerous to use with existing Bareos tapes because it will relabel a tape or write on thetape if so requested regardless that the tape may contain valuable data, so please be careful and use it onlyon blank tapes.To work properly, btape needs to read the Storage daemon’s configuration file. As a default, it will look forBareos-sd.conf in the current directory. If your configuration file is elsewhere, please use the -c option tospecify where.The physical device name must be specified on the command line, and this same device name must be presentin the Storage daemon’s configuration file read by btape
Usage: btape <options> <device_name>
-b <file> specify bootstrap file
-c <file> set configuration file to file
-D <director> specify a director name specified in the Storage
configuration file for the Key Encryption Key selection
-d <nn> set debug level to nn
-dt print timestamp in debug output
-p proceed inspite of I/O errors
-s turn off signals
-v be verbose
-? print this message.
Using btape to Verify your Tape Drive
An important reason for this program is to ensure that a Storage daemon configuration file is defined so thatBareos will correctly read and write tapes.It is highly recommended that you run the test command before running your first Bareos job to ensurethat the parameters you have defined for your storage device (tape drive) will permit Bareos to functionproperly. You only need to mount a blank tape, enter the command, and the output should be reasonablyself explanatory. Please see the Tape Testing Chapter of this manual for the details.
btape Commands
The full list of commands are:
Command Description
======= ===========
autochanger test autochanger
bsf backspace file
bsr backspace record
cap list device capabilities
clear clear tape errors
eod go to end of Bareos data for append
eom go to the physical end of medium
fill fill tape, write onto second volume
unfill read filled tape
fsf forward space a file
fsr forward space a record
help print this command
label write a Bareos label to the tape
load load a tape
quit quit btape
rawfill use write() to fill tape
readlabel read and print the Bareos tape label
rectest test record handling functions
rewind rewind the tape
scan read() tape block by block to EOT and report
scanblocks Bareos read block by block to EOT and report
speed report drive speed
status print tape status
test General test Bareos tape functions
weof write an EOF on the tape
wr write a single Bareos block
rr read a single record
qfill quick fill command
332
The most useful commands are:
� test – test writing records and EOF marks and reading them back.
� fill – completely fill a volume with records, then write a few records on a second volume, and finally,both volumes will be read back. This command writes blocks containing random data, so your drivewill not be able to compress the data, and thus it is a good test of the real physical capacity of yourtapes.
� readlabel – read and dump the label on a Bareos tape.
� cap – list the device capabilities as defined in the configuration file and as perceived by the Storagedaemon.
The readlabel command can be used to display the details of a Bareos tape label. This can be useful if thephysical tape label was lost or damaged.In the event that you want to relabel a Bareos volume, you can simply use the label command which willwrite over any existing label. However, please note for labeling tapes, we recommend that you use the labelcommand in the Console program since it will never overwrite a valid Bareos tape.
Testing your Tape Drive To determine the best configuration of your tape drive, you can run the newspeed command available in the btape program.This command can have the following arguments:
file size=n Specify the Maximum File Size for this test (between 1 and 5GB). This counter is in GB.
nb file=n Specify the number of file to be written. The amount of data should be greater than your memory(file size ∗ nb file).
skip zero This flag permits to skip tests with constant data.
skip random This flag permits to skip tests with random data.
skip raw This flag permits to skip tests with raw access.
skip block This flag permits to skip tests with Bareos block access.
*speed file_size=3 skip_raw
btape.c:1078 Test with zero data and Bareos block structure.
btape.c:956 Begin writing 3 files of 3.221 GB with blocks of 129024 bytes.
++++++++++++++++++++++++++++++++++++++++++
btape.c:604 Wrote 1 EOF to "Drive-0" (/dev/nst0)
btape.c:406 Volume bytes=3.221 GB. Write rate = 44.128 MB/s
...
btape.c:383 Total Volume bytes=9.664 GB. Total Write rate = 43.531 MB/s
btape.c:1090 Test with random data, should give the minimum throughput.
btape.c:956 Begin writing 3 files of 3.221 GB with blocks of 129024 bytes.
+++++++++++++++++++++++++++++++++++++++++++
btape.c:604 Wrote 1 EOF to "Drive-0" (/dev/nst0)
btape.c:406 Volume bytes=3.221 GB. Write rate = 7.271 MB/s
+++++++++++++++++++++++++++++++++++++++++++
...
btape.c:383 Total Volume bytes=9.664 GB. Total Write rate = 7.365 MB/s
When using compression, the random test will give your the minimum throughput of your drive . The testusing constant string will give you the maximum speed of your hardware chain. (cpu, memory, scsi card,cable, drive, tape).You can change the block size in the Storage Daemon configuration file.
C.5 Other Programs
The following programs are general utility programs and in general do not need a configuration file nor adevice name.
333
C.5.1 bsmtp
bsmtp is a simple mail transport program that permits more flexibility than the standard mail programstypically found on Unix systems. It can even be used on Windows machines.It is called:
Usage: bsmtp [-f from] [-h mailhost] [-s subject] [-c copy] [recipient ...t
-4 forces bsmtp to use IPv4 addresses only.
-6 forces bsmtp to use IPv6 addresses only.
-8 set charset to UTF-8
-a use any ip protocol for address resolution
-c set the Cc: field
-d <nn> set debug level to <nn>
-dt print a timestamp in debug output
-f set the From: field
-h use mailhost:port as the SMTP server
-s set the Subject: field
-r set the Reply-To: field
-l set the maximum number of lines to send (default: unlimited)
-? print this message.
Commands C.4: bsmtp
If the -f option is not specified, bsmtp will use your userid. If the option -h is not specified bsmtp will usethe value in the environment variable bsmtpSERVER or if there is none localhost. By default port 25 isused.If a line count limit is set with the -l option, bsmtp will not send an email with a body text exceeding thatnumber of lines. This is especially useful for large restore job reports where the list of files restored mightproduce very long mails your mail-server would refuse or crash. However, be aware that you will probablysuppress the job report and any error messages unless you check the log file written by the Director (see themessages resource in this manual for details).recipients is a space separated list of email recipients.The body of the email message is read from standard input.An example of the use of bsmtp would be to put the following statement in the Messages resource of yourbareos-dir.conf file.
Mail Command = "bsmtp -h mail.example.com -f \"\(Bareos\) %r\" -s \"Bareos: %t %e of %c %l\" %r"
Operator Command = "bsmtp -h mail.example.com -f \"\(Bareos\) %r\" -s \"Bareos: Intervention needed for %j ↙↪→ \" %r"
Configuration C.5: bsmtp in Message resource
You have to replace mail.example.com with the fully qualified name of your SMTP (email) server, whichnormally listens on port 25. For more details on the substitution characters (e.g. %r) used in the above line,please see the documentation of the MailCommand in the Messages Resource chapter of this manual.It is HIGHLY recommended that you test one or two cases by hand to make sure that the mailhost that youspecified is correct and that it will accept your email requests. Since bsmtp always uses a TCP connectionrather than writing in the spool file, you may find that your from address is being rejected because itdoes not contain a valid domain, or because your message is caught in your spam filtering rules. Generally,you should specify a fully qualified domain name in the from field, and depending on whether your bsmtpgateway is Exim or Sendmail, you may need to modify the syntax of the from part of the message. Pleasetest.When running bsmtp by hand, you will need to terminate the message by entering a ctrl-d in column 1 ofthe last line.If you are getting incorrect dates (e.g. 1970) and you are running with a non-English language setting, youmight try adding a LANG=C immediately before the bsmtp call.In general, bsmtp attempts to cleanup email addresses that you specify in the from, copy, mailhost, andrecipient fields, by adding the necessary < and > characters around the address part. However, if you includea display-name (see RFC 5332), some SMTP servers such as Exchange may not accept the message if thedisplay-name is also included in < and >. As mentioned above, you must test, and if you run into thissituation, you may manually add the < and > to the Bareos Mail Command Dir
Messages or Operator CommandDirMessages and when bsmtp is formatting an address if it already contains a < or > character, it will leave theaddress unchanged.
C.5.2 bareos-dbcheck
bareos-dbcheck is a simple program that will search for logical inconsistencies in the Bareos tables in yourdatabase, and optionally fix them. It is a database maintenance routine, in the sense that it can detect and
334
remove unused rows, but it is not a database repair routine. To repair a database, see the tools furnishedby the database vendor. Normally bareos-dbcheck should never need to be run, but if Bareos has crashedor you have a lot of Clients, Pools, or Jobs that you have removed, it could be useful.
It is called:
Usage: dbcheck [-c config ] [-B] [-C catalog name] [-d debug level] [-D driver name] <working-directory> <bareos-database> <user> <password> [<dbhost>] [<dbport>]
-b batch mode
-C catalog name in the director conf file
-c Director conf filename
-B print catalog configuration and exit
-d <nn> set debug level to <nn>
-dt print a timestamp in debug output
-D <driver name> specify the database driver name (default NULL) <postgresql|mysql|sqlite>
-f fix inconsistencies
-v verbose
-? print this message
As Bareos supports loading its database backend dynamically you need to specify the right database driverto use using the -D option.
If the -B option is specified, bareos-dbcheck will print out catalog information in a simple text based format.This is useful to backup it in a secure way.
$ bareos-dbcheck -B
catalog=MyCatalog
db_type=SQLite
db_name=regress
db_driver=
db_user=regress
db_password=
db_address=
db_port=0
db_socket=
If the -c option is given with the Director’s conf file, there is no need to enter any of the command linearguments, in particular the working directory as dbcheck will read them from the file.
If the -f option is specified, bareos-dbcheck will repair (fix) the inconsistencies it finds. Otherwise, it willreport only.
If the -b option is specified, bareos-dbcheck will run in batch mode, and it will proceed to examine andfix (if -f is set) all programmed inconsistency checks. If the -b option is not specified, bareos-dbcheck willenter interactive mode and prompt with the following:
Hello, this is the database check/correct program.
Please select the function you want to perform.
1) Toggle modify database flag
2) Toggle verbose flag
3) Repair bad Filename records
4) Repair bad Path records
5) Eliminate duplicate Filename records
6) Eliminate duplicate Path records
7) Eliminate orphaned Jobmedia records
8) Eliminate orphaned File records
9) Eliminate orphaned Path records
10) Eliminate orphaned Filename records
11) Eliminate orphaned FileSet records
12) Eliminate orphaned Client records
13) Eliminate orphaned Job records
14) Eliminate all Admin records
15) Eliminate all Restore records
16) All (3-15)
17) Quit
Select function number:
By entering 1 or 2, you can toggle the modify database flag (-f option) and the verbose flag (-v). It can behelpful and reassuring to turn off the modify database flag, then select one or more of the consistency checks(items 3 through 9) to see what will be done, then toggle the modify flag on and re-run the check.
The inconsistencies examined are the following:
335
� Duplicate filename records. This can happen if you accidentally run two copies of Bareos at the sametime, and they are both adding filenames simultaneously. It is a rare occurrence, but will createan inconsistent database. If this is the case, you will receive error messages during Jobs warning ofduplicate database records. If you are not getting these error messages, there is no reason to run thischeck.
� Repair bad Filename records. This checks and corrects filenames that have a trailing slash. Theyshould not.
� Repair bad Path records. This checks and corrects path names that do not have a trailing slash. Theyshould.
� Duplicate path records. This can happen if you accidentally run two copies of Bareos at the sametime, and they are both adding filenames simultaneously. It is a rare occurrence, but will create aninconsistent database. See the item above for why this occurs and how you know it is happening.
� Orphaned JobMedia records. This happens when a Job record is deleted (perhaps by a user issuedSQL statement), but the corresponding JobMedia record (one for each Volume used in the Job) wasnot deleted. Normally, this should not happen, and even if it does, these records generally do not takemuch space in your database. However, by running this check, you can eliminate any such orphans.
� Orphaned File records. This happens when a Job record is deleted (perhaps by a user issued SQLstatement), but the corresponding File record (one for each Volume used in the Job) was not deleted.Note, searching for these records can be very time consuming (i.e. it may take hours) for a largedatabase. Normally this should not happen as Bareos takes care to prevent it. Just the same, thischeck can remove any orphaned File records. It is recommended that you run this once a year sinceorphaned File records can take a large amount of space in your database. You might want to ensurethat you have indexes on JobId, FilenameId, and PathId for the File table in your catalog beforerunning this command.
� Orphaned Path records. This condition happens any time a directory is deleted from your system andall associated Job records have been purged. During standard purging (or pruning) of Job records,Bareos does not check for orphaned Path records. As a consequence, over a period of time, old unusedPath records will tend to accumulate and use space in your database. This check will eliminate them.It is recommended that you run this check at least once a year.
� Orphaned Filename records. This condition happens any time a file is deleted from your system and allassociated Job records have been purged. This can happen quite frequently as there are quite a largenumber of files that are created and then deleted. In addition, if you do a system update or delete anentire directory, there can be a very large number of Filename records that remain in the catalog butare no longer used.
During standard purging (or pruning) of Job records, Bareos does not check for orphaned Filenamerecords. As a consequence, over a period of time, old unused Filename records will accumulate and usespace in your database. This check will eliminate them. It is strongly recommended that you run thischeck at least once a year, and for large database (more than 200 Megabytes), it is probably better torun this once every 6 months.
� Orphaned Client records. These records can remain in the database long after you have removed aclient.
� Orphaned Job records. If no client is defined for a job or you do not run a job for a long time, you canaccumulate old job records. This option allow you to remove jobs that are not attached to any client(and thus useless).
� All Admin records. This command will remove all Admin records, regardless of their age.
� All Restore records. This command will remove all Restore records, regardless of their age.
If you are using Mysql, bareos-dbcheck will ask you if you want to create temporary indexes to speed uporphaned Path and Filename elimination.If you are using bvfs (e.g. used by BAT), don’t eliminate orphaned path, else you will have to rebuildbrestore_pathvisibility and brestore_pathhierarchy indexes. TODO: verify if orphaned paths arestill in use by BareosNormally you should never need to run bareos-dbcheck in spite of the recommendations given above, whichare given so that users don’t waste their time running bareos-dbcheck too often.
336
C.5.3 bregex
bregex is a simple program that will allow you to test regular expressions against a file of data. Thiscan be useful because the regex libraries on most systems differ, and in addition, regex expressions can becomplicated.bregex is found in the src/tools directory and it is normally installed with your system binaries. To run it,use:
Usage: bregex [-d debug_level] -f <data-file>
-f specify file of data to be matched
-l suppress line numbers
-n print lines that do not match
-? print this message.
The <data-file> is a filename that contains lines of data to be matched (or not) against one or more patterns.When the program is run, it will prompt you for a regular expression pattern, then apply it one line at atime against the data in the file. Each line that matches will be printed preceded by its line number. Youwill then be prompted again for another pattern.Enter an empty line for a pattern to terminate the program. You can print only lines that do not match byusing the -n option, and you can suppress printing of line numbers with the -l option.This program can be useful for testing regex expressions to be applied against a list of filenames.
C.5.4 bwild
bwild is a simple program that will allow you to test wild-card expressions against a file of data.bwild is found in the src/tools directory and it is normally installed with your system binaries. To run it,use:
Usage: bwild [-d debug_level] -f <data-file>
-f specify file of data to be matched
-l suppress line numbers
-n print lines that do not match
-? print this message.
The <data-file> is a filename that contains lines of data to be matched (or not) against one or more patterns.When the program is run, it will prompt you for a wild-card pattern, then apply it one line at a time againstthe data in the file. Each line that matches will be printed preceded by its line number. You will then beprompted again for another pattern.Enter an empty line for a pattern to terminate the program. You can print only lines that do not match byusing the -n option, and you can suppress printing of line numbers with the -l option.This program can be useful for testing wild expressions to be applied against a list of filenames.
C.5.5 bpluginfo
The main purpose of bpluginfo is to display different information about Bareos plugin. You can use it tocheck a plugin name, author, license and short description. You can use -f option to display API implementedby the plugin. Some plugins may require additional ’-a’ option for val- idating a Bareos Daemons API. Inmost cases it is not required.
Appendix D
The Bootstrap File
TODO: This chapter is going to be rewritten (by Philipp).The information in this chapter is provided so that you may either create your own bootstrap files, or so thatyou can edit a bootstrap file produced by Bareos. However, normally the bootstrap file will be automaticallycreated for you during the restore in the Console program, or by using a Write Bootstrap Dir
Job record inyour Backup Jobs, and thus you will never need to know the details of this file.The bootstrap file contains ASCII information that permits precise specification of what files should berestored, what volume they are on, and where they are on the volume. It is a relatively compact form ofspecifying the information, is human readable, and can be edited with any text editor.
D.1 Bootstrap File Format
The general format of a bootstrap file is:<keyword>= <value>Where each keyword and the value specify which files to restore. More precisely the keyword and theirvalues serve to limit which files will be restored and thus act as a filter. The absence of a keyword meansthat all records will be accepted.Blank lines and lines beginning with a pound sign (#) in the bootstrap file are ignored.There are keywords which permit filtering by Volume, Client, Job, FileIndex, Session Id, Session Time, ...The more keywords that are specified, the more selective the specification of which files to restore will be.In fact, each keyword is ANDed with other keywords that may be present.For example,
Volume = Test-001
VolSessionId = 1
VolSessionTime = 108927638
directs the Storage daemon (or the bextract program) to restore only those files on Volume Test-001 ANDhaving VolumeSessionId equal to one AND having VolumeSession time equal to 108927638.The full set of permitted keywords presented in the order in which they are matched against the Volumerecords are:
Volume The value field specifies what Volume the following commands apply to. Each Volume specificationbecomes the current Volume, to which all the following commands apply until a new current Volume(if any) is specified. If the Volume name contains spaces, it should be enclosed in quotes. At lease oneVolume specification is required.
Count The value is the total number of files that will be restored for this Volume. This allows the Storagedaemon to know when to stop reading the Volume. This value is optional.
VolFile The value is a file number, a list of file numbers, or a range of file numbers to match on the currentVolume. The file number represents the physical file on the Volume where the data is stored. For atape volume, this record is used to position to the correct starting file, and once the tape is past thelast specified file, reading will stop.
VolBlock The value is a block number, a list of block numbers, or a range of block numbers to match onthe current Volume. The block number represents the physical block within the file on the Volumewhere the data is stored.
337
338
VolSessionTime The value specifies a Volume Session Time to be matched from the current volume.
VolSessionId The value specifies a VolSessionId, a list of volume session ids, or a range of volume sessionids to be matched from the current Volume. Each VolSessionId and VolSessionTime pair correspondsto a unique Job that is backed up on the Volume.
JobId The value specifies a JobId, list of JobIds, or range of JobIds to be selected from the current Volume.Note, the JobId may not be unique if you have multiple Directors, or if you have reinitialized yourdatabase. The JobId filter works only if you do not run multiple simultaneous jobs. This value isoptional and not used by Bareos to restore files.
Job The value specifies a Job name or list of Job names to be matched on the current Volume. The Jobcorresponds to a unique VolSessionId and VolSessionTime pair. However, the Job is perhaps a bitmore readable by humans. Standard regular expressions (wildcards) may be used to match Job names.The Job filter works only if you do not run multiple simultaneous jobs. This value is optional and notused by Bareos to restore files.
Client The value specifies a Client name or list of Clients to will be matched on the current Volume.Standard regular expressions (wildcards) may be used to match Client names. The Client filter worksonly if you do not run multiple simultaneous jobs. This value is optional and not used by Bareos torestore files.
FileIndex The value specifies a FileIndex, list of FileIndexes, or range of FileIndexes to be selected fromthe current Volume. Each file (data) stored on a Volume within a Session has a unique FileIndex.For each Session, the first file written is assigned FileIndex equal to one and incremented for each filebacked up.
This for a given Volume, the triple VolSessionId, VolSessionTime, and FileIndex uniquely identifies afile stored on the Volume. Multiple copies of the same file may be stored on the same Volume, but foreach file, the triple VolSessionId, VolSessionTime, and FileIndex will be unique. This triple is storedin the Catalog database for each file.
To restore a particular file, this value (or a range of FileIndexes) is required.
FileRegex The value is a regular expression. When specified, only matching filenames will be restored.
FileRegex=^/etc/passwd(.old)?
Slot The value specifies the autochanger slot. There may be only a single Slot specification for each Volume.
Stream The value specifies a Stream, a list of Streams, or a range of Streams to be selected from the currentVolume. Unless you really know what you are doing (the internals of Bareos), you should avoid thisspecification. This value is optional and not used by Bareos to restore files.
The Volume record is a bit special in that it must be the first record. The other keyword records mayappear in any order and any number following a Volume record.Multiple Volume records may be specified in the same bootstrap file, but each one starts a new set of filtercriteria for the Volume.In processing the bootstrap file within the current Volume, each filter specified by a keyword is ANDedwith the next. Thus,
Volume = Test-01
Client = "My machine"
FileIndex = 1
will match records on Volume Test-01 AND Client records for My machine AND FileIndex equal toone.Multiple occurrences of the same record are ORed together. Thus,
Volume = Test-01
Client = "My machine"
Client = "Backup machine"
FileIndex = 1
will match records on Volume Test-01 AND (Client records for My machine OR Backup machine)AND FileIndex equal to one.For integer values, you may supply a range or a list, and for all other values except Volumes, you may specifya list. A list is equivalent to multiple records of the same keyword. For example,
339
Volume = Test-01
Client = "My machine", "Backup machine"
FileIndex = 1-20, 35
will match records on Volume Test-01 AND (Client records for My machine OR Backup machine)AND (FileIndex 1 OR 2 OR 3 ... OR 20 OR 35).As previously mentioned above, there may be multiple Volume records in the same bootstrap file. Each newVolume definition begins a new set of filter conditions that apply to that Volume and will be ORed withany other Volume definitions.As an example, suppose we query for the current set of tapes to restore all files on Client Rufus using thequery command in the console program:
Using default Catalog name=MySQL DB=bareos
*query
Available queries:
1: List Job totals:
2: List where a file is saved:
3: List where the most recent copies of a file are saved:
4: List total files/bytes by Job:
5: List total files/bytes by Volume:
6: List last 10 Full Backups for a Client:
7: List Volumes used by selected JobId:
8: List Volumes to Restore All Files:
Choose a query (1-8): 8
Enter Client Name: Rufus
+-------+------------------+------------+-----------+----------+------------+
| JobId | StartTime | VolumeName | StartFile | VolSesId | VolSesTime |
+-------+------------------+------------+-----------+----------+------------+
| 154 | 2002-05-30 12:08 | test-02 | 0 | 1 | 1022753312 |
| 202 | 2002-06-15 10:16 | test-02 | 0 | 2 | 1024128917 |
| 203 | 2002-06-15 11:12 | test-02 | 3 | 1 | 1024132350 |
| 204 | 2002-06-18 08:11 | test-02 | 4 | 1 | 1024380678 |
+-------+------------------+------------+-----------+----------+------------+
The output shows us that there are four Jobs that must be restored. The first one is a Full backup, and thefollowing three are all Incremental backups.The following bootstrap file will restore those files:
Volume=test-02
VolSessionId=1
VolSessionTime=1022753312
Volume=test-02
VolSessionId=2
VolSessionTime=1024128917
Volume=test-02
VolSessionId=1
VolSessionTime=1024132350
Volume=test-02
VolSessionId=1
VolSessionTime=1024380678
As a final example, assume that the initial Full save spanned two Volumes. The output from query mightlook like:
+-------+------------------+------------+-----------+----------+------------+
| JobId | StartTime | VolumeName | StartFile | VolSesId | VolSesTime |
+-------+------------------+------------+-----------+----------+------------+
| 242 | 2002-06-25 16:50 | File0003 | 0 | 1 | 1025016612 |
| 242 | 2002-06-25 16:50 | File0004 | 0 | 1 | 1025016612 |
| 243 | 2002-06-25 16:52 | File0005 | 0 | 2 | 1025016612 |
| 246 | 2002-06-25 19:19 | File0006 | 0 | 2 | 1025025494 |
+-------+------------------+------------+-----------+----------+------------+
and the following bootstrap file would restore those files:
Volume=File0003
VolSessionId=1
VolSessionTime=1025016612
Volume=File0004
VolSessionId=1
VolSessionTime=1025016612
Volume=File0005
340
VolSessionId=2
VolSessionTime=1025016612
Volume=File0006
VolSessionId=2
VolSessionTime=1025025494
D.2 Automatic Generation of Bootstrap Files
One thing that is probably worth knowing: the bootstrap files that are generated automatically at the end ofthe job are not as optimized as those generated by the restore command. This is because during Incrementaland Differential jobs, the records pertaining to the files written for the Job are appended to the end of thebootstrap file. As consequence, all the files saved to an Incremental or Differential job will be restored firstby the Full save, then by any Incremental or Differential saves.When the bootstrap file is generated for the restore command, only one copy (the most recent) of each fileis restored.So if you have spare cycles on your machine, you could optimize the bootstrap files by doing the following:
bconsole
restore client=xxx select all
done
no
quit
Backup bootstrap file.
The above will not work if you have multiple FileSets because that will be an extra prompt. However, therestore client=xxx select all builds the in-memory tree, selecting everything and creates the bootstrapfile.The no answers the Do you want to run this (yes/mod/no) question.
D.3 Bootstrap for bscan
If you have a very large number of Volumes to scan with bscan, you may exceed the command line limit(511 characters). In that case, you can create a simple bootstrap file that consists of only the volume names.An example might be:
Volume="Vol001"
Volume="Vol002"
Volume="Vol003"
Volume="Vol004"
Volume="Vol005"
D.4 Bootstrap Example
If you want to extract or copy a single Job, you can do it by selecting by JobId (code not tested) or betteryet, if you know the VolSessionTime and the VolSessionId (printed on Job report and in Catalog), specifyingthis is by far the best. Using the VolSessionTime and VolSessionId is the way Bareos does restores. A bsrfile might look like the following:
Volume="Vol001"
VolSessionId=10
VolSessionTime=1080847820
If you know how many files are backed up (on the job report), you can enormously speed up the selectionby adding (let’s assume there are 157 files):
FileIndex=1-157
Count=157
Finally, if you know the File number where the Job starts, you can also cause bcopy to forward space to theright file without reading every record:
VolFile=20
There is nothing magic or complicated about a BSR file. Parsing it and properly applying it within Bareos*is* magic, but you don’t need to worry about that.If you want to see a *real* bsr file, simply fire up the restore command in the console program, selectsomething, then answer no when it prompts to run the job. Then look at the file restore.bsr in yourworking directory.
Appendix E
Verify File Integrity with Bareos
Since Bareos maintains a catalog of files, their attributes, and either SHA1 or MD5 signatures, it can be anideal tool for improving computer security. This is done by making a snapshot of your system files with aVerify Job and then checking the current state of your system against the snapshot, on a regular basis (e.g.nightly).The first step is to set up a Verify Job and to run it with:
Level = InitCatalog
The InitCatalog level tells Bareos simply to get the information on the specified files and to put it intothe catalog. That is your database is initialized and no comparison is done. The InitCatalog is normallyrun one time manually.Thereafter, you will run a Verify Job on a daily (or whatever) basis with:
Level = Catalog
The Level = Catalog level tells Bareos to compare the current state of the files on the Client to the lastInitCatalog that is stored in the catalog and to report any differences. See the example below for theformat of the output.You decide what files you want to form your ”snapshot” by specifying them in a FileSet resource, andnormally, they will be system files that do not change, or that only certain features change.Then you decide what attributes of each file you want compared by specifying comparison options on theInclude statements that you use in the FileSet resource of your Catalog Jobs.
E.1 The Details
In the discussion that follows, we will make reference to the Verify Configuration Example that is includedbelow in the A Verify Configuration Example section. You might want to look it over now to get anidea of what it does.The main elements consist of adding a schedule, which will normally be run daily, or perhaps more often.This is provided by the VerifyCycle Schedule, which runs at 5:05 in the morning every day.Then you must define a Job, much as is done below. We recommend that the Job name contain the nameof your machine as well as the word Verify or Check. In our example, we named it MatouVerify. Thiswill permit you to easily identify your job when running it from the Console.You will notice that most records of the Job are quite standard, but that the FileSet resource containsverify=pins1 option in addition to the standard signature=SHA1 option. If you don’t want SHA1signature comparison, and we cannot imagine why not, you can drop the signature=SHA1 and none willbe computed nor stored in the catalog. Or alternatively, you can use verify=pins5 and signature=MD5,which will use the MD5 hash algorithm. The MD5 hash computes faster than SHA1, but is cryptographicallyless secure.The verify=pins1 is ignored during the InitCatalog Job, but is used during the subsequent CatalogJobs to specify what attributes of the files should be compared to those found in the catalog. pins1 is areasonable set to begin with, but you may want to look at the details of these and other options. They canbe found in the FileSet Resource section of this manual. Briefly, however, the p of the pins1 tells Verify tocompare the permissions bits, the i is to compare inodes, the n causes comparison of the number of links,the s compares the file size, and the 1 compares the SHA1 checksums (this requires the signature=SHA1option to have been set also).
341
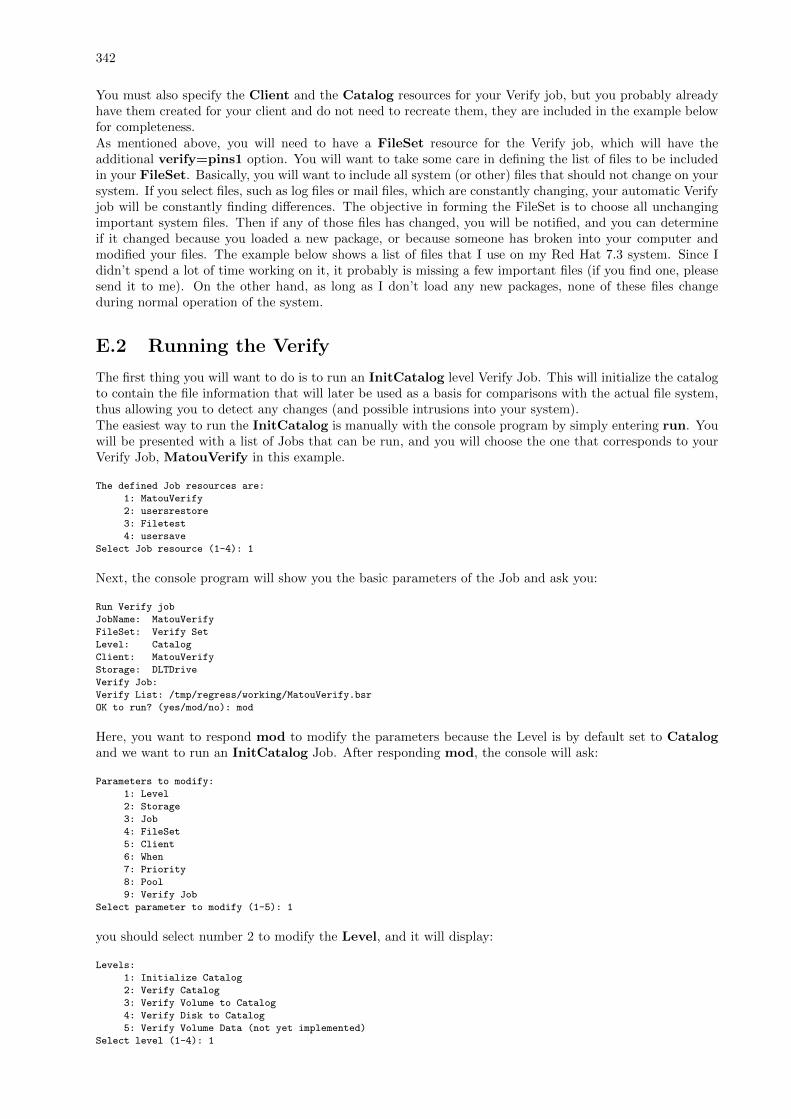
342
You must also specify the Client and the Catalog resources for your Verify job, but you probably alreadyhave them created for your client and do not need to recreate them, they are included in the example belowfor completeness.As mentioned above, you will need to have a FileSet resource for the Verify job, which will have theadditional verify=pins1 option. You will want to take some care in defining the list of files to be includedin your FileSet. Basically, you will want to include all system (or other) files that should not change on yoursystem. If you select files, such as log files or mail files, which are constantly changing, your automatic Verifyjob will be constantly finding differences. The objective in forming the FileSet is to choose all unchangingimportant system files. Then if any of those files has changed, you will be notified, and you can determineif it changed because you loaded a new package, or because someone has broken into your computer andmodified your files. The example below shows a list of files that I use on my Red Hat 7.3 system. Since Ididn’t spend a lot of time working on it, it probably is missing a few important files (if you find one, pleasesend it to me). On the other hand, as long as I don’t load any new packages, none of these files changeduring normal operation of the system.
E.2 Running the Verify
The first thing you will want to do is to run an InitCatalog level Verify Job. This will initialize the catalogto contain the file information that will later be used as a basis for comparisons with the actual file system,thus allowing you to detect any changes (and possible intrusions into your system).The easiest way to run the InitCatalog is manually with the console program by simply entering run. Youwill be presented with a list of Jobs that can be run, and you will choose the one that corresponds to yourVerify Job, MatouVerify in this example.
The defined Job resources are:
1: MatouVerify
2: usersrestore
3: Filetest
4: usersave
Select Job resource (1-4): 1
Next, the console program will show you the basic parameters of the Job and ask you:
Run Verify job
JobName: MatouVerify
FileSet: Verify Set
Level: Catalog
Client: MatouVerify
Storage: DLTDrive
Verify Job:
Verify List: /tmp/regress/working/MatouVerify.bsr
OK to run? (yes/mod/no): mod
Here, you want to respond mod to modify the parameters because the Level is by default set to Catalogand we want to run an InitCatalog Job. After responding mod, the console will ask:
Parameters to modify:
1: Level
2: Storage
3: Job
4: FileSet
5: Client
6: When
7: Priority
8: Pool
9: Verify Job
Select parameter to modify (1-5): 1
you should select number 2 to modify the Level, and it will display:
Levels:
1: Initialize Catalog
2: Verify Catalog
3: Verify Volume to Catalog
4: Verify Disk to Catalog
5: Verify Volume Data (not yet implemented)
Select level (1-4): 1
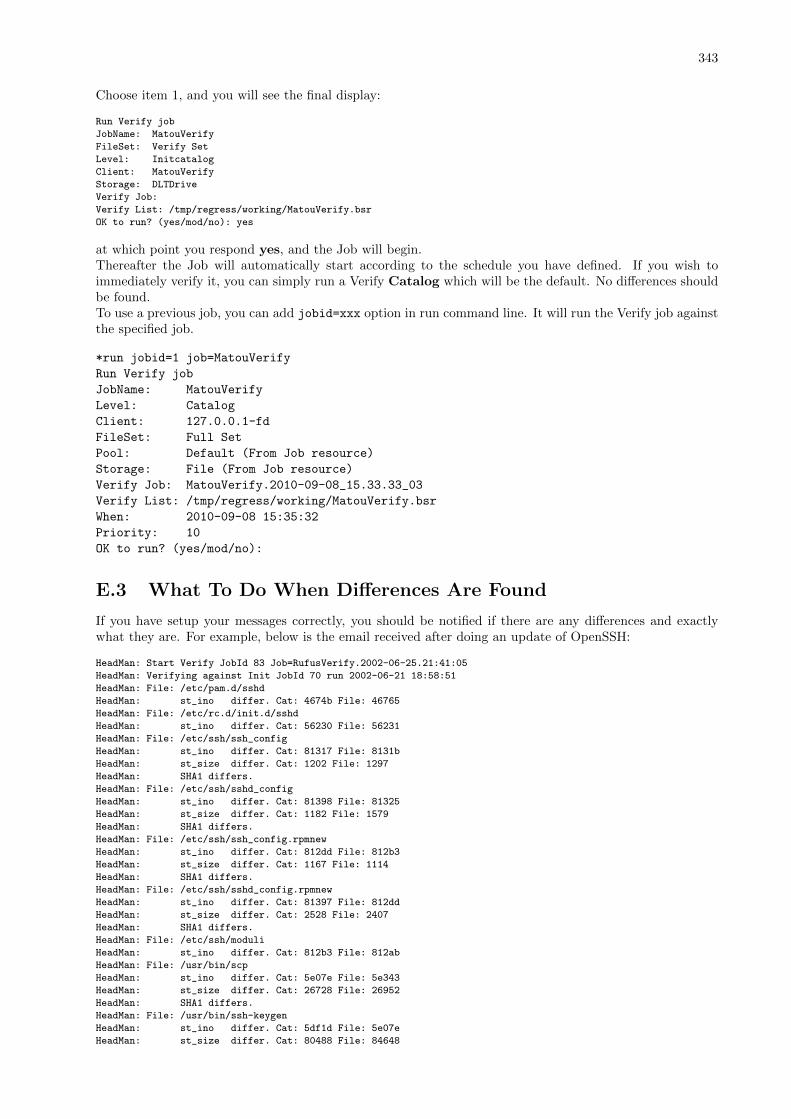
343
Choose item 1, and you will see the final display:
Run Verify job
JobName: MatouVerify
FileSet: Verify Set
Level: Initcatalog
Client: MatouVerify
Storage: DLTDrive
Verify Job:
Verify List: /tmp/regress/working/MatouVerify.bsr
OK to run? (yes/mod/no): yes
at which point you respond yes, and the Job will begin.Thereafter the Job will automatically start according to the schedule you have defined. If you wish toimmediately verify it, you can simply run a Verify Catalog which will be the default. No differences shouldbe found.To use a previous job, you can add jobid=xxx option in run command line. It will run the Verify job againstthe specified job.
*run jobid=1 job=MatouVerify
Run Verify job
JobName: MatouVerify
Level: Catalog
Client: 127.0.0.1-fd
FileSet: Full Set
Pool: Default (From Job resource)
Storage: File (From Job resource)
Verify Job: MatouVerify.2010-09-08_15.33.33_03
Verify List: /tmp/regress/working/MatouVerify.bsr
When: 2010-09-08 15:35:32
Priority: 10
OK to run? (yes/mod/no):
E.3 What To Do When Differences Are Found
If you have setup your messages correctly, you should be notified if there are any differences and exactlywhat they are. For example, below is the email received after doing an update of OpenSSH:
HeadMan: Start Verify JobId 83 Job=RufusVerify.2002-06-25.21:41:05
HeadMan: Verifying against Init JobId 70 run 2002-06-21 18:58:51
HeadMan: File: /etc/pam.d/sshd
HeadMan: st_ino differ. Cat: 4674b File: 46765
HeadMan: File: /etc/rc.d/init.d/sshd
HeadMan: st_ino differ. Cat: 56230 File: 56231
HeadMan: File: /etc/ssh/ssh_config
HeadMan: st_ino differ. Cat: 81317 File: 8131b
HeadMan: st_size differ. Cat: 1202 File: 1297
HeadMan: SHA1 differs.
HeadMan: File: /etc/ssh/sshd_config
HeadMan: st_ino differ. Cat: 81398 File: 81325
HeadMan: st_size differ. Cat: 1182 File: 1579
HeadMan: SHA1 differs.
HeadMan: File: /etc/ssh/ssh_config.rpmnew
HeadMan: st_ino differ. Cat: 812dd File: 812b3
HeadMan: st_size differ. Cat: 1167 File: 1114
HeadMan: SHA1 differs.
HeadMan: File: /etc/ssh/sshd_config.rpmnew
HeadMan: st_ino differ. Cat: 81397 File: 812dd
HeadMan: st_size differ. Cat: 2528 File: 2407
HeadMan: SHA1 differs.
HeadMan: File: /etc/ssh/moduli
HeadMan: st_ino differ. Cat: 812b3 File: 812ab
HeadMan: File: /usr/bin/scp
HeadMan: st_ino differ. Cat: 5e07e File: 5e343
HeadMan: st_size differ. Cat: 26728 File: 26952
HeadMan: SHA1 differs.
HeadMan: File: /usr/bin/ssh-keygen
HeadMan: st_ino differ. Cat: 5df1d File: 5e07e
HeadMan: st_size differ. Cat: 80488 File: 84648
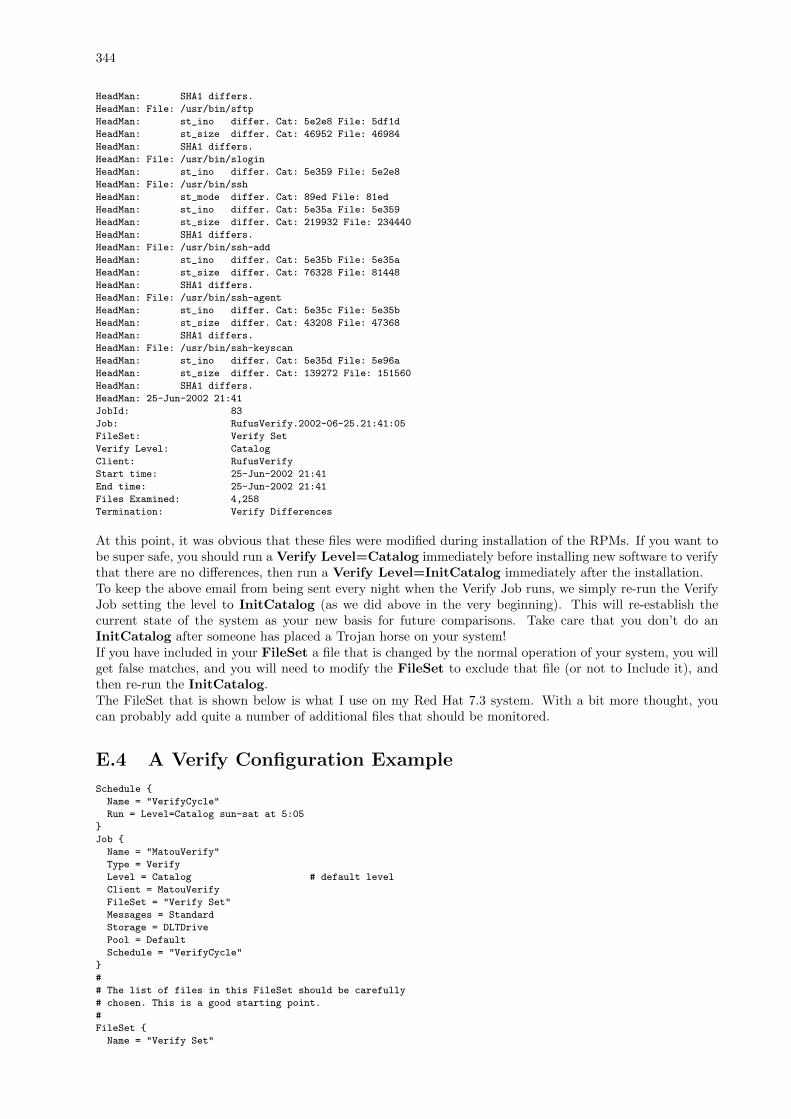
344
HeadMan: SHA1 differs.
HeadMan: File: /usr/bin/sftp
HeadMan: st_ino differ. Cat: 5e2e8 File: 5df1d
HeadMan: st_size differ. Cat: 46952 File: 46984
HeadMan: SHA1 differs.
HeadMan: File: /usr/bin/slogin
HeadMan: st_ino differ. Cat: 5e359 File: 5e2e8
HeadMan: File: /usr/bin/ssh
HeadMan: st_mode differ. Cat: 89ed File: 81ed
HeadMan: st_ino differ. Cat: 5e35a File: 5e359
HeadMan: st_size differ. Cat: 219932 File: 234440
HeadMan: SHA1 differs.
HeadMan: File: /usr/bin/ssh-add
HeadMan: st_ino differ. Cat: 5e35b File: 5e35a
HeadMan: st_size differ. Cat: 76328 File: 81448
HeadMan: SHA1 differs.
HeadMan: File: /usr/bin/ssh-agent
HeadMan: st_ino differ. Cat: 5e35c File: 5e35b
HeadMan: st_size differ. Cat: 43208 File: 47368
HeadMan: SHA1 differs.
HeadMan: File: /usr/bin/ssh-keyscan
HeadMan: st_ino differ. Cat: 5e35d File: 5e96a
HeadMan: st_size differ. Cat: 139272 File: 151560
HeadMan: SHA1 differs.
HeadMan: 25-Jun-2002 21:41
JobId: 83
Job: RufusVerify.2002-06-25.21:41:05
FileSet: Verify Set
Verify Level: Catalog
Client: RufusVerify
Start time: 25-Jun-2002 21:41
End time: 25-Jun-2002 21:41
Files Examined: 4,258
Termination: Verify Differences
At this point, it was obvious that these files were modified during installation of the RPMs. If you want tobe super safe, you should run a Verify Level=Catalog immediately before installing new software to verifythat there are no differences, then run a Verify Level=InitCatalog immediately after the installation.To keep the above email from being sent every night when the Verify Job runs, we simply re-run the VerifyJob setting the level to InitCatalog (as we did above in the very beginning). This will re-establish thecurrent state of the system as your new basis for future comparisons. Take care that you don’t do anInitCatalog after someone has placed a Trojan horse on your system!If you have included in your FileSet a file that is changed by the normal operation of your system, you willget false matches, and you will need to modify the FileSet to exclude that file (or not to Include it), andthen re-run the InitCatalog.The FileSet that is shown below is what I use on my Red Hat 7.3 system. With a bit more thought, youcan probably add quite a number of additional files that should be monitored.
E.4 A Verify Configuration Example
Schedule {
Name = "VerifyCycle"
Run = Level=Catalog sun-sat at 5:05
}
Job {
Name = "MatouVerify"
Type = Verify
Level = Catalog # default level
Client = MatouVerify
FileSet = "Verify Set"
Messages = Standard
Storage = DLTDrive
Pool = Default
Schedule = "VerifyCycle"
}
#
# The list of files in this FileSet should be carefully
# chosen. This is a good starting point.
#
FileSet {
Name = "Verify Set"
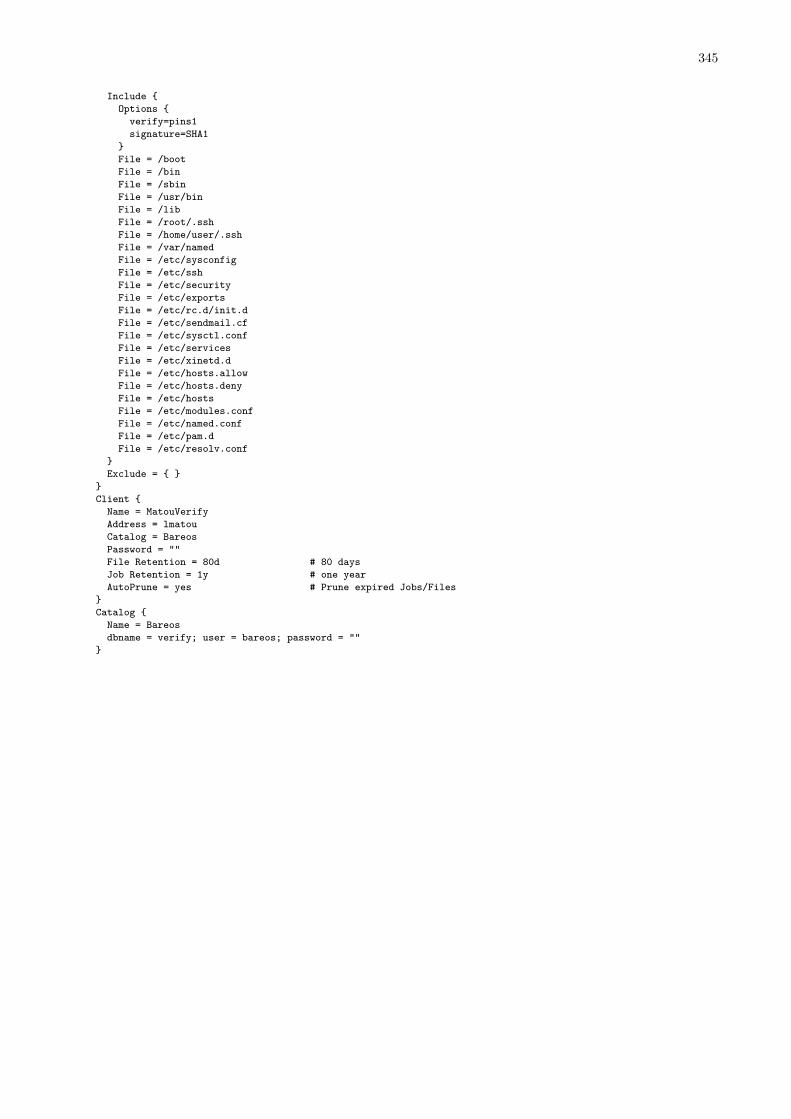
345
Include {
Options {
verify=pins1
signature=SHA1
}
File = /boot
File = /bin
File = /sbin
File = /usr/bin
File = /lib
File = /root/.ssh
File = /home/user/.ssh
File = /var/named
File = /etc/sysconfig
File = /etc/ssh
File = /etc/security
File = /etc/exports
File = /etc/rc.d/init.d
File = /etc/sendmail.cf
File = /etc/sysctl.conf
File = /etc/services
File = /etc/xinetd.d
File = /etc/hosts.allow
File = /etc/hosts.deny
File = /etc/hosts
File = /etc/modules.conf
File = /etc/named.conf
File = /etc/pam.d
File = /etc/resolv.conf
}
Exclude = { }
}
Client {
Name = MatouVerify
Address = lmatou
Catalog = Bareos
Password = ""
File Retention = 80d # 80 days
Job Retention = 1y # one year
AutoPrune = yes # Prune expired Jobs/Files
}
Catalog {
Name = Bareos
dbname = verify; user = bareos; password = ""
}

346
Appendix F
Backward Compatibility
F.1 Tape Formats
One of the major goals of Backup softare is to ensure that you can restore tapes (the word tape should alsoinclude disk volumes) that you wrote years ago. This means that each new version of the software should beable to read old format tapes. The first problem you will have is to ensure that the hardware is still workingsome years down the road, and the second problem will be to ensure that the media will still be good, thenyour OS must be able to interface to the device, and finally Bareos must be able to recognize old formats.All the problems except the last are ones that we cannot solve, but by careful planning you can.Since the very beginning of Bacula (January 2000) until today (2015), there have been three major Bac-ula/Bareos tape formats. The second format was introduced in Bacula version 1.27 in November of 2002.Bareos has been required to adapt the tape format to avoid potential trademark issues, but is able to readalso the old Bacula tape formats.Though the tape format is basically fixed, the kinds of data that we can put on the tapes are extensible,and that is how we added new features such as ACLs, Win32 data, encrypted data, ... Obviously, an olderversion of Bacula/Bareos would not know how to read these newer data streams, but each newer version ofBareos should know how to read all the older streams.
F.2 Compatibility between Bareos and Bacula
A Director and a Storage Daemon should (must) always run at the same version. This is true for Baroesas well as for Bacula. It is not possible to mix these components. This is because the protocol betweenDirector and Storage Daemon itself is not versioned (also true for Bareos and Bacula). If you want to beable to switch back from Bareos to Bacula after using a Bareos director and storage daemon you have toenable the compatible mode in the Bareos storage daemon (which is currently the default) to have it writethe data in the same format as the Bacula storage daemon.The Bareos File Daemon is compatible with all version of the Bacula director when you enable the compatiblemode in the config of the file daemon. Currently the compatible option is on by default but that may changein the future. To be sure this is enabled you can explicitly set the compatible option by putting the followingin the bareos-fd.conf:
compatible=true
Configuration F.1: Compatibility directive
A Bareos director can only talk to Bacula file daemons of version 2.0 or higher.These combinations of Bareos and Bacula are know to work together:Director Storage Daemon File Daemon Remarks
Bareos Bareos BareosBareos Bareos Bacula ≥ 2.0Bacula Bacula BaculaBacula Bacula Bareos (compatibe mode)
Other combinations like Bacula director (dir) with Bareos storage daemon (sd) will not work. However thiswasn’t even possible with different versions of bacula-dir and bacula-sd.
347

348

Appendix G
Catalog Tables
Bareos stores its information in a database, named Catalog. It is configured by Catalog Resource.
G.1 Job
G.1.1 JobStatus
The status of a Bareos job is stored as abbreviation in the Catalog database table Job. It is also displayedby some bconsole commands, eg. list jobs.This table lists the abbreviations together with its description and weight. The weight is used, when multiplestates are applicable for a job. In this case, only the status with the highest weight/priority is applied.
Abbr. Description Weight
C Created, not yet running 15R Running 15B Blocked 15T Completed successfully 10E Terminated with errors 25e Non-fatal error 20f Fatal error 100D Verify found differences 15A Canceled by user 90I Incomplete job 15L Committing data 15W Terminated with warnings 20l Doing data despooling 15q Queued waiting for device 15F Waiting for Client 15S Waiting for Storage daemon 15m Waiting for new media 15M Waiting for media mount 15s Waiting for storage resource 15j Waiting for job resource 15c Waiting for client resource 15d Waiting on maximum jobs 15t Waiting on start time 15p Waiting on higher priority jobs 15i Doing batch insert file records 15a SD despooling attributes 15
349

350
Appendix H
Howtos
H.1 Use a dummy device to test the backup
If your are testing your configuration, but don’t want to store the backup data, it is possible to use a dummyFIFO device to test your configuration, see Stored configuration.
Obviously, it can not be used to do a restore.
Device {
Name = NULL
Media Type = NULL
Device Type = Fifo
Archive Device = /dev/null
LabelMedia = yes
Random Access = no
AutomaticMount = no
RemovableMedia = no
MaximumOpenWait = 60
AlwaysOpen = no
}
Configuration H.1: FIFO Storage Device Configuration
H.2 Backup Of Third Party Databases
If you are running a database in production mode on your machine, Bareos will happily backup the files,but if the database is in use while Bareos is reading it, you may back it up in an unstable state.
The best solution is to shutdown your database before backing it up, or use some tool specific to yourdatabase to make a valid live copy perhaps by dumping the database in ASCII format.
H.2.1 Backup of MSSQL Databases with Bareos Plugin
Version >= 13.2.0
Preparation
If you like to use the MSSQL-Plugin to backing up your Databases you need to consider some things:
� Database ModeThe database need to run in Full Recovery Mode. Otherwise you are not able to use differentialand incremental backups or to use point in time recovery.Please note! If you set the databases into the mentionend mode you have to consider some maintancefacts. The database doesn’t shrink or delete the logs unanttended, so you have to shrink them manualonce a week and you have to truncate the logs once in a month.
� Security and AccessFor connections you can use a SQL-User or a integrated systemaccount (Windows NT user). Bothconnection types are supported.
351
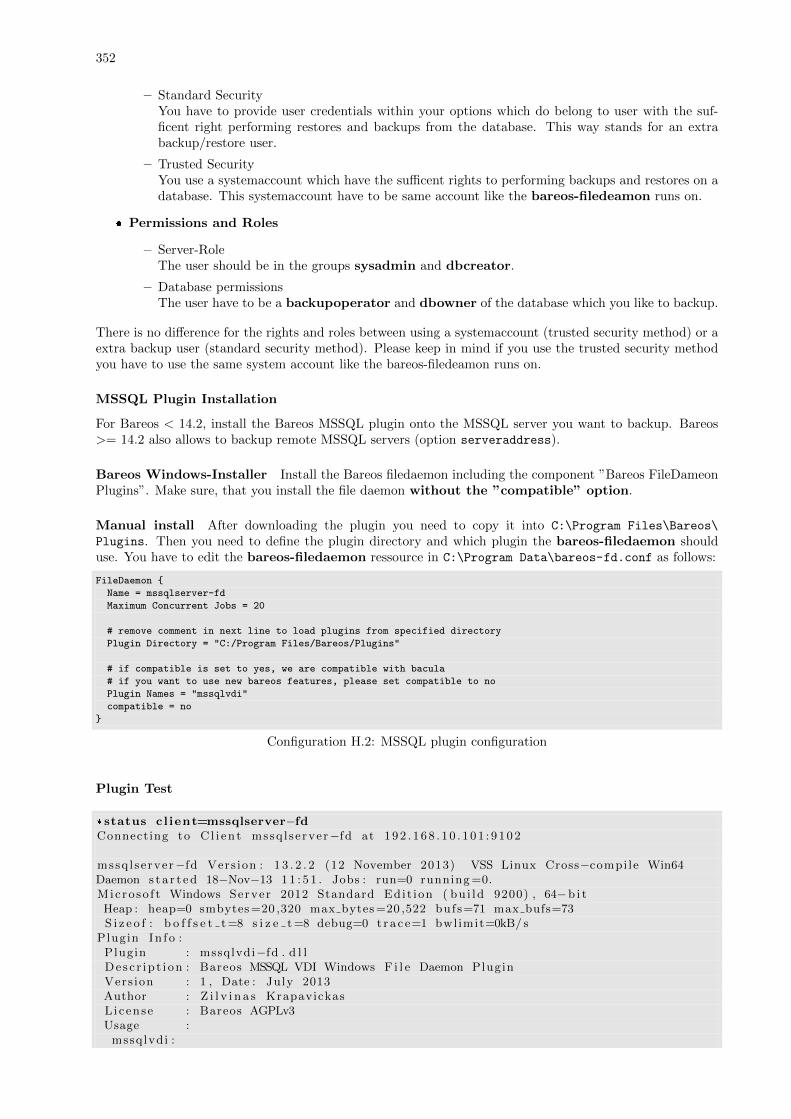
352
– Standard SecurityYou have to provide user credentials within your options which do belong to user with the suf-ficent right performing restores and backups from the database. This way stands for an extrabackup/restore user.
– Trusted SecurityYou use a systemaccount which have the sufficent rights to performing backups and restores on adatabase. This systemaccount have to be same account like the bareos-filedeamon runs on.
� Permissions and Roles
– Server-RoleThe user should be in the groups sysadmin and dbcreator.
– Database permissionsThe user have to be a backupoperator and dbowner of the database which you like to backup.
There is no difference for the rights and roles between using a systemaccount (trusted security method) or aextra backup user (standard security method). Please keep in mind if you use the trusted security methodyou have to use the same system account like the bareos-filedeamon runs on.
MSSQL Plugin Installation
For Bareos < 14.2, install the Bareos MSSQL plugin onto the MSSQL server you want to backup. Bareos>= 14.2 also allows to backup remote MSSQL servers (option serveraddress).
Bareos Windows-Installer Install the Bareos filedaemon including the component ”Bareos FileDameonPlugins”. Make sure, that you install the file daemon without the ”compatible” option.
Manual install After downloading the plugin you need to copy it into C:\Program Files\Bareos\
Plugins. Then you need to define the plugin directory and which plugin the bareos-filedaemon shoulduse. You have to edit the bareos-filedaemon ressource in C:\Program Data\bareos-fd.conf as follows:
FileDaemon {
Name = mssqlserver-fd
Maximum Concurrent Jobs = 20
# remove comment in next line to load plugins from specified directory
Plugin Directory = "C:/Program Files/Bareos/Plugins"
# if compatible is set to yes, we are compatible with bacula
# if you want to use new bareos features, please set compatible to no
Plugin Names = "mssqlvdi"
compatible = no
}
Configuration H.2: MSSQL plugin configuration
Plugin Test
*status cl ient=mssqlserver−fdConnecting to C l i en t mssq l server−fd at 192 . 168 . 10 . 101 : 9102
mssq l server−fd Vers ion : 1 3 . 2 . 2 (12 November 2013) VSS Linux Cross−compi le Win64Daemon s t a r t ed 18−Nov−13 11 : 5 1 . Jobs : run=0 running=0.Mic roso f t Windows Server 2012 Standard Edit ion ( bu i ld 9200) , 64−b i tHeap : heap=0 smbytes=20 ,320 max bytes=20 ,522 bufs=71 max bufs=73S i z e o f : b o f f s e t t=8 s i z e t=8 debug=0 t ra c e=1 bwlimit=0kB/ s
Plugin In f o :Plugin : mssqlvdi−fd . d l lDe s c r ip t i on : Bareos MSSQL VDI Windows F i l e Daemon PluginVers ion : 1 , Date : July 2013Author : Z i l v i n a s KrapavickasL icense : Bareos AGPLv3Usage :mssqlvdi :
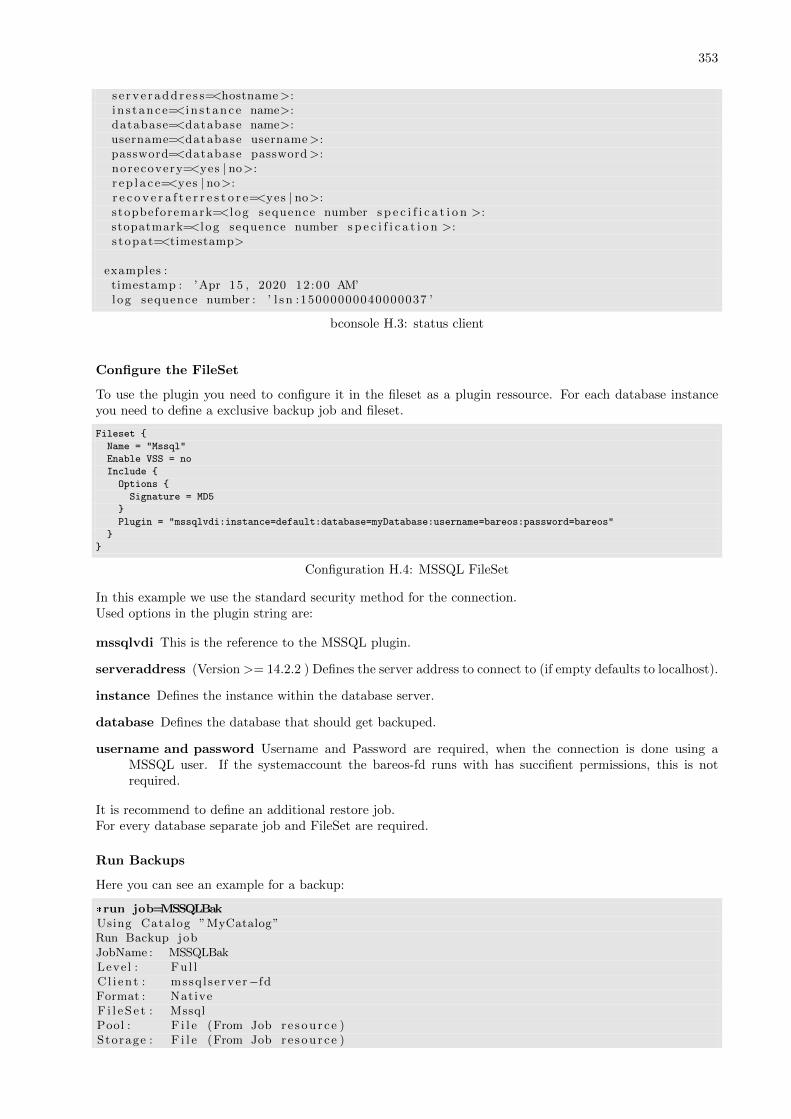
353
s e r v e r add r e s s=<hostname>:i n s t ance=<i n s t ance name>:database=<database name>:username=<database username>:password=<database password>:norecovery=<yes | no>:r e p l a c e=<yes | no>:r e c o v e r a f t e r r e s t o r e=<yes | no>:s topbeforemark=<l og sequence number s p e c i f i c a t i o n >:stopatmark=<l og sequence number s p e c i f i c a t i o n >:s topat=<timestamp>
examples :timestamp : ’Apr 15 , 2020 12 :00 AM’log sequence number : ’ l s n :15000000040000037 ’
bconsole H.3: status client
Configure the FileSet
To use the plugin you need to configure it in the fileset as a plugin ressource. For each database instanceyou need to define a exclusive backup job and fileset.
Fileset {
Name = "Mssql"
Enable VSS = no
Include {
Options {
Signature = MD5
}
Plugin = "mssqlvdi:instance=default:database=myDatabase:username=bareos:password=bareos"
}
}
Configuration H.4: MSSQL FileSet
In this example we use the standard security method for the connection.Used options in the plugin string are:
mssqlvdi This is the reference to the MSSQL plugin.
serveraddress (Version >= 14.2.2 ) Defines the server address to connect to (if empty defaults to localhost).
instance Defines the instance within the database server.
database Defines the database that should get backuped.
username and password Username and Password are required, when the connection is done using aMSSQL user. If the systemaccount the bareos-fd runs with has succifient permissions, this is notrequired.
It is recommend to define an additional restore job.For every database separate job and FileSet are required.
Run Backups
Here you can see an example for a backup:
*run job=MSSQLBakUsing Catalog ”MyCatalog”Run Backup jobJobName : MSSQLBakLevel : Fu l lC l i en t : mssq l se rver−fdFormat : NativeF i l e S e t : MssqlPool : F i l e (From Job re sou r c e )Storage : F i l e (From Job re sou r c e )
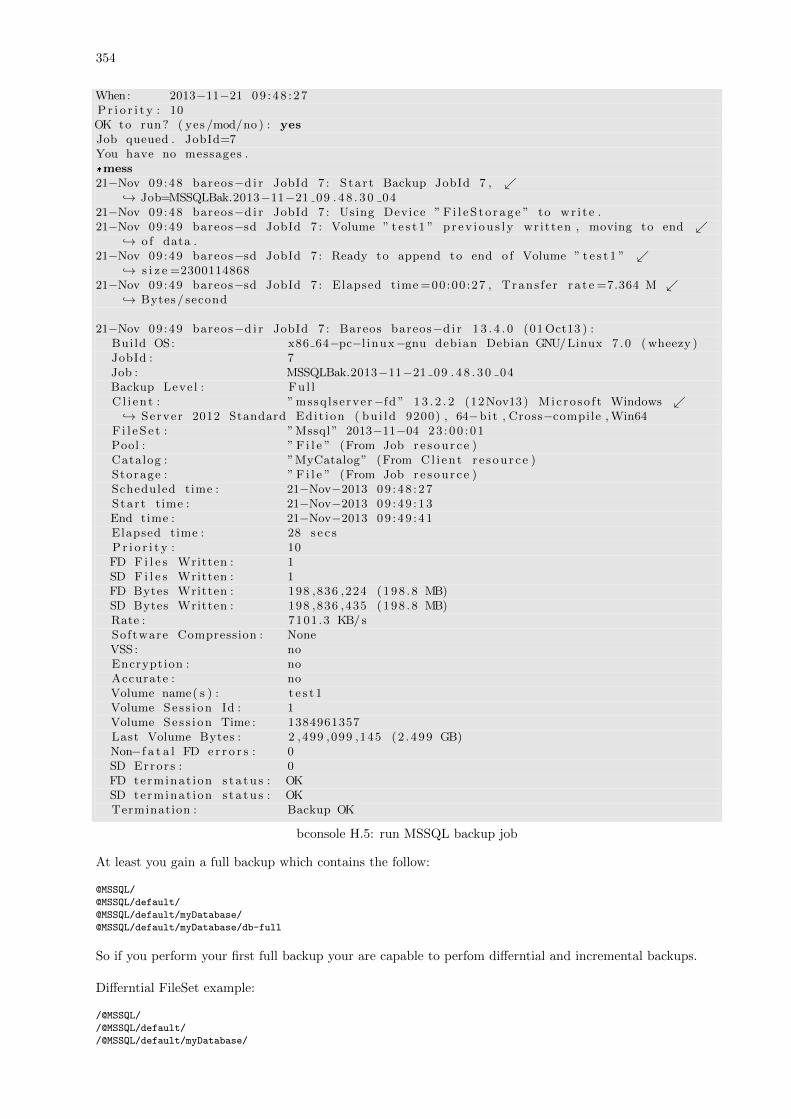
354
When: 2013−11−21 09 : 48 : 27P r i o r i t y : 10OK to run? ( yes /mod/no ) : yesJob queued . JobId=7You have no messages .*mess21−Nov 09 :48 bareos−d i r JobId 7 : S ta r t Backup JobId 7 , ↙
↪→ Job=MSSQLBak.2013−11−21 09 . 4 8 . 3 0 0421−Nov 09 :48 bareos−d i r JobId 7 : Using Device ” F i l eS to rag e ” to wr i t e .21−Nov 09 :49 bareos−sd JobId 7 : Volume ” t e s t 1 ” p r ev i ou s l y wr itten , moving to end ↙
↪→ o f data .21−Nov 09 :49 bareos−sd JobId 7 : Ready to append to end o f Volume ” t e s t 1 ” ↙
↪→ s i z e =230011486821−Nov 09 :49 bareos−sd JobId 7 : Elapsed time =00:00 :27 , Trans fe r r a t e =7.364 M ↙
↪→ Bytes/ second
21−Nov 09 :49 bareos−d i r JobId 7 : Bareos bareos−d i r 1 3 . 4 . 0 (01Oct13 ) :Bui ld OS: x86 64−pc−l inux−gnu debian Debian GNU/Linux 7 .0 ( wheezy )JobId : 7Job : MSSQLBak.2013−11−21 09 . 4 8 . 3 0 04Backup Level : Fu l lC l i en t : ”mssq l se rver−fd ” 1 3 . 2 . 2 (12Nov13 ) Mic roso f t Windows ↙↪→ Server 2012 Standard Edit ion ( bu i ld 9200) , 64−bit , Cross−compile ,Win64
F i l e S e t : ”Mssql” 2013−11−04 23 : 00 : 01Pool : ” F i l e ” (From Job re sou r c e )Catalog : ”MyCatalog” (From Cl i en t r e s ou r c e )Storage : ” F i l e ” (From Job re sou r c e )Scheduled time : 21−Nov−2013 09 : 48 : 27Star t time : 21−Nov−2013 09 : 49 : 13End time : 21−Nov−2013 09 : 49 : 41Elapsed time : 28 s e c sP r i o r i t y : 10FD F i l e s Written : 1SD F i l e s Written : 1FD Bytes Written : 198 ,836 ,224 (198 . 8 MB)SD Bytes Written : 198 ,836 ,435 (198 . 8 MB)Rate : 7101 .3 KB/ sSoftware Compression : NoneVSS : noEncryption : noAccurate : noVolume name( s ) : t e s t 1Volume Se s s i on Id : 1Volume Se s s i on Time : 1384961357Last Volume Bytes : 2 ,499 ,099 ,145 (2 . 499 GB)Non−f a t a l FD e r r o r s : 0SD Errors : 0FD terminat ion s t a tu s : OKSD terminat ion s t a tu s : OKTermination : Backup OK
bconsole H.5: run MSSQL backup job
At least you gain a full backup which contains the follow:
@MSSQL/
@MSSQL/default/
@MSSQL/default/myDatabase/
@MSSQL/default/myDatabase/db-full
So if you perform your first full backup your are capable to perfom differntial and incremental backups.
Differntial FileSet example:
/@MSSQL/
/@MSSQL/default/
/@MSSQL/default/myDatabase/
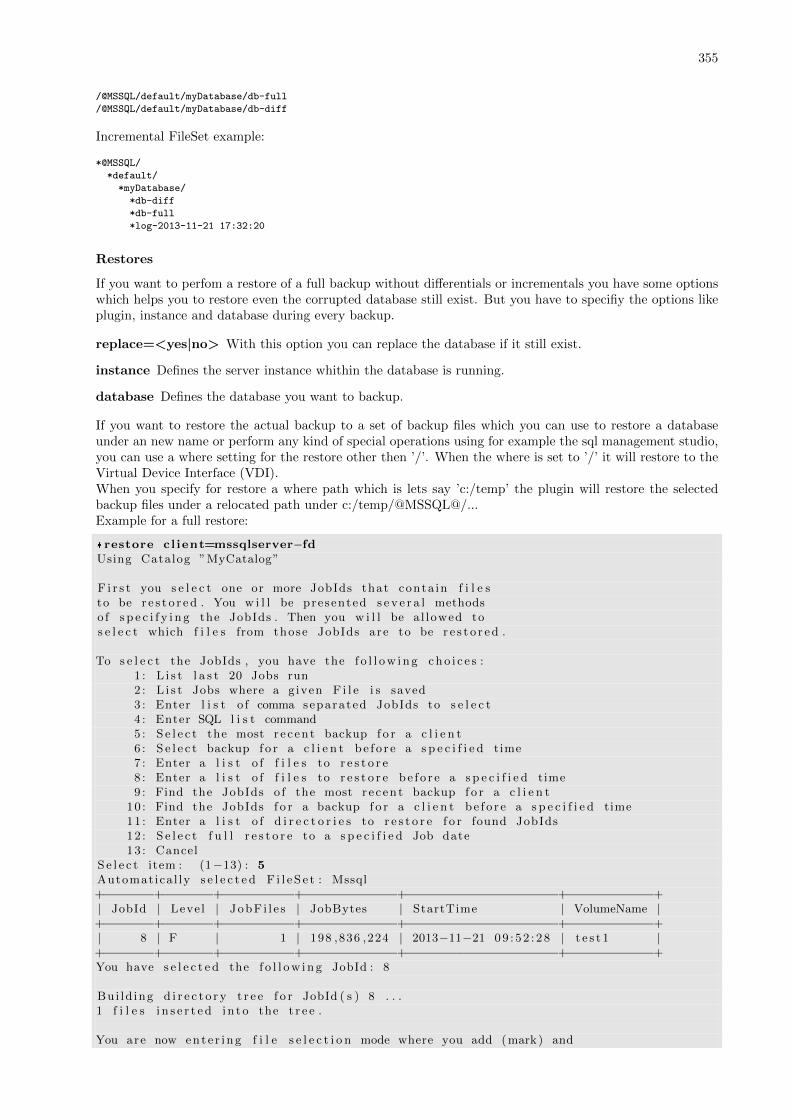
355
/@MSSQL/default/myDatabase/db-full
/@MSSQL/default/myDatabase/db-diff
Incremental FileSet example:
*@MSSQL/
*default/
*myDatabase/
*db-diff
*db-full
*log-2013-11-21 17:32:20
Restores
If you want to perfom a restore of a full backup without differentials or incrementals you have some optionswhich helps you to restore even the corrupted database still exist. But you have to specifiy the options likeplugin, instance and database during every backup.
replace=<yes|no> With this option you can replace the database if it still exist.
instance Defines the server instance whithin the database is running.
database Defines the database you want to backup.
If you want to restore the actual backup to a set of backup files which you can use to restore a databaseunder an new name or perform any kind of special operations using for example the sql management studio,you can use a where setting for the restore other then ’/’. When the where is set to ’/’ it will restore to theVirtual Device Interface (VDI).When you specify for restore a where path which is lets say ’c:/temp’ the plugin will restore the selectedbackup files under a relocated path under c:/temp/@MSSQL@/...Example for a full restore:
*restore cl ient=mssqlserver−fdUsing Catalog ”MyCatalog”
F i r s t you s e l e c t one or more JobIds that conta in f i l e sto be r e s t o r ed . You w i l l be presented s e v e r a l methodso f s p e c i f y i n g the JobIds . Then you w i l l be a l lowed tos e l e c t which f i l e s from those JobIds are to be r e s t o r ed .
To s e l e c t the JobIds , you have the f o l l ow i n g cho i c e s :1 : L i s t l a s t 20 Jobs run2 : L i s t Jobs where a g iven F i l e i s saved3 : Enter l i s t o f comma separated JobIds to s e l e c t4 : Enter SQL l i s t command5 : S e l e c t the most r e c ent backup f o r a c l i e n t6 : S e l e c t backup f o r a c l i e n t be f o r e a s p e c i f i e d time7 : Enter a l i s t o f f i l e s to r e s t o r e8 : Enter a l i s t o f f i l e s to r e s t o r e be f o r e a s p e c i f i e d time9 : Find the JobIds o f the most r e c ent backup f o r a c l i e n t
10 : Find the JobIds f o r a backup f o r a c l i e n t be f o r e a s p e c i f i e d time11 : Enter a l i s t o f d i r e c t o r i e s to r e s t o r e f o r found JobIds12 : S e l e c t f u l l r e s t o r e to a s p e c i f i e d Job date13 : Cancel
S e l e c t item : (1−13) : 5Automatica l ly s e l e c t e d F i l e S e t : Mssql+−−−−−−−+−−−−−−−+−−−−−−−−−−+−−−−−−−−−−−−−+−−−−−−−−−−−−−−−−−−−−−+−−−−−−−−−−−−+| JobId | Level | JobF i l e s | JobBytes | StartTime | VolumeName |+−−−−−−−+−−−−−−−+−−−−−−−−−−+−−−−−−−−−−−−−+−−−−−−−−−−−−−−−−−−−−−+−−−−−−−−−−−−+| 8 | F | 1 | 198 ,836 ,224 | 2013−11−21 09 : 52 : 28 | t e s t 1 |+−−−−−−−+−−−−−−−+−−−−−−−−−−+−−−−−−−−−−−−−+−−−−−−−−−−−−−−−−−−−−−+−−−−−−−−−−−−+You have s e l e c t e d the f o l l ow i ng JobId : 8
Bui ld ing d i r e c t o r y t r e e f o r JobId ( s ) 8 . . .1 f i l e s i n s e r t e d in to the t r e e .
You are now ent e r i ng f i l e s e l e c t i o n mode where you add (mark ) and
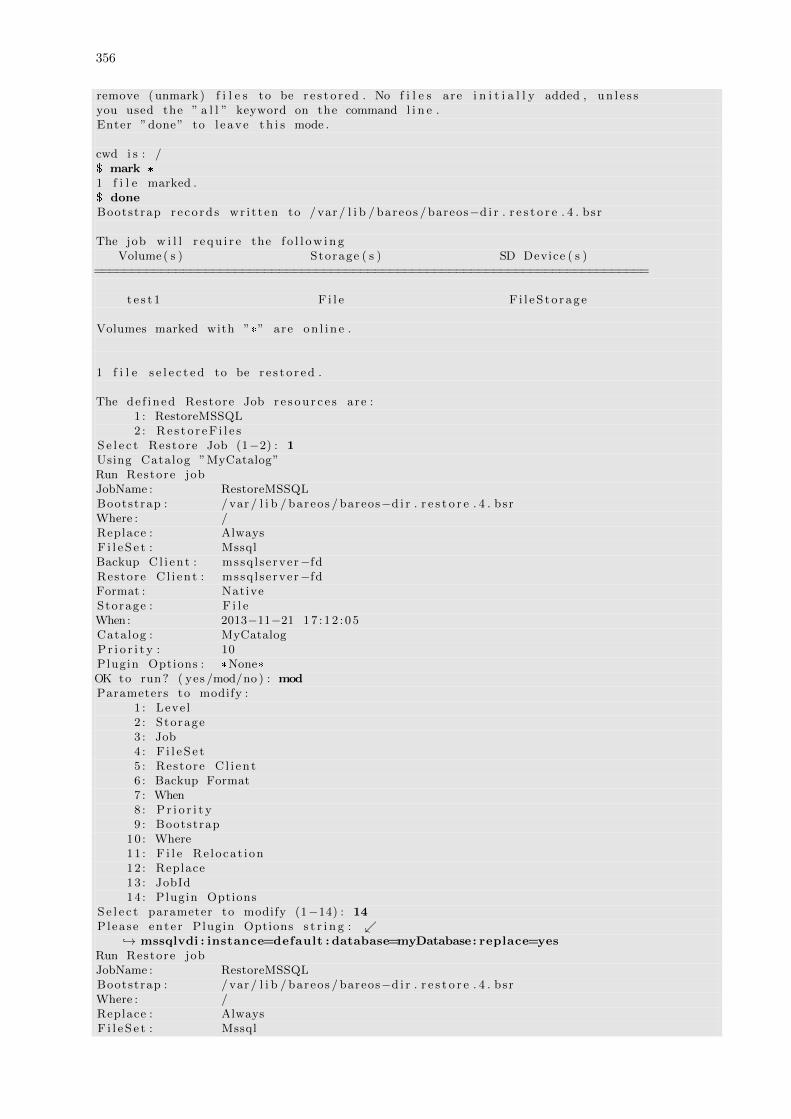
356
remove (unmark ) f i l e s to be r e s t o r ed . No f i l e s are i n i t i a l l y added , un l e s syou used the ” a l l ” keyword on the command l i n e .Enter ”done” to l eave t h i s mode .
cwd i s : /$ mark *
1 f i l e marked .$ doneBootstrap r e co rd s wr i t t en to /var / l i b / bareos /bareos−d i r . r e s t o r e . 4 . bsr
The job w i l l r e qu i r e the f o l l ow i n gVolume( s ) Storage ( s ) SD Device ( s )
===========================================================================
te s t 1 F i l e F i l eS to rag e
Volumes marked with ”*” are on l i n e .
1 f i l e s e l e c t e d to be r e s t o r ed .
The de f ined Restore Job r e s ou r c e s are :1 : RestoreMSSQL2 : Re s t o r eF i l e s
S e l e c t Restore Job (1−2) : 1Using Catalog ”MyCatalog”Run Restore jobJobName : RestoreMSSQLBootstrap : /var / l i b / bareos /bareos−d i r . r e s t o r e . 4 . bsrWhere : /Replace : AlwaysF i l e S e t : MssqlBackup Cl i en t : mssq l server−fdRestore C l i en t : mssq l se rver−fdFormat : NativeStorage : F i l eWhen : 2013−11−21 17 : 12 : 05Catalog : MyCatalogP r i o r i t y : 10Plugin Options : *None*OK to run? ( yes /mod/no ) : modParameters to modify :
1 : Leve l2 : Storage3 : Job4 : F i l e S e t5 : Restore C l i en t6 : Backup Format7 : When8 : P r i o r i t y9 : Bootstrap
10 : Where11 : F i l e Re locat ion12 : Replace13 : JobId14 : Plugin Options
S e l e c t parameter to modify (1−14) : 14Please ente r Plugin Options s t r i n g : ↙
↪→ mssqlvdi : instance=default : database=myDatabase: replace=yesRun Restore jobJobName : RestoreMSSQLBootstrap : /var / l i b / bareos /bareos−d i r . r e s t o r e . 4 . bsrWhere : /Replace : AlwaysF i l e S e t : Mssql
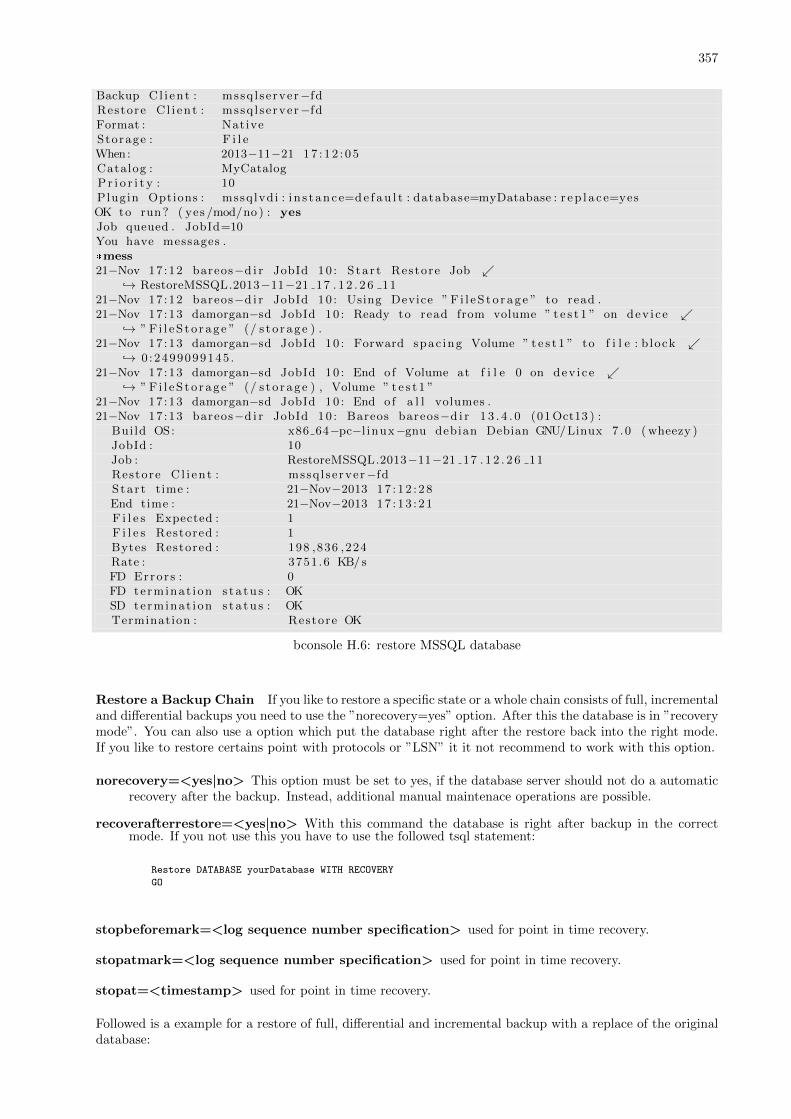
357
Backup Cl i en t : mssq l server−fdRestore C l i en t : mssq l se rver−fdFormat : NativeStorage : F i l eWhen : 2013−11−21 17 : 12 : 05Catalog : MyCatalogP r i o r i t y : 10Plugin Options : mssqlvdi : i n s t ance=de f au l t : database=myDatabase : r ep l a c e=yesOK to run? ( yes /mod/no ) : yesJob queued . JobId=10You have messages .*mess21−Nov 17 :12 bareos−d i r JobId 10 : S ta r t Restore Job ↙
↪→ RestoreMSSQL.2013−11−21 17 . 1 2 . 2 6 1121−Nov 17 :12 bareos−d i r JobId 10 : Using Device ” F i l eS to rag e ” to read .21−Nov 17 :13 damorgan−sd JobId 10 : Ready to read from volume ” t e s t 1 ” on dev i ce ↙
↪→ ” F i l eS to rage ” (/ s to rage ) .21−Nov 17 :13 damorgan−sd JobId 10 : Forward spac ing Volume ” t e s t 1 ” to f i l e : b lock ↙
↪→ 0 :2499099145 .21−Nov 17 :13 damorgan−sd JobId 10 : End o f Volume at f i l e 0 on dev i ce ↙
↪→ ” F i l eS to rage ” (/ s to rage ) , Volume ” t e s t 1 ”21−Nov 17 :13 damorgan−sd JobId 10 : End o f a l l volumes .21−Nov 17 :13 bareos−d i r JobId 10 : Bareos bareos−d i r 1 3 . 4 . 0 (01Oct13 ) :
Bui ld OS: x86 64−pc−l inux−gnu debian Debian GNU/Linux 7 .0 ( wheezy )JobId : 10Job : RestoreMSSQL.2013−11−21 17 . 1 2 . 2 6 11Restore C l i en t : mssq l se rver−fdStar t time : 21−Nov−2013 17 : 12 : 28End time : 21−Nov−2013 17 : 13 : 21F i l e s Expected : 1F i l e s Restored : 1Bytes Restored : 198 ,836 ,224Rate : 3751 .6 KB/ sFD Errors : 0FD terminat ion s t a tu s : OKSD terminat ion s t a tu s : OKTermination : Restore OK
bconsole H.6: restore MSSQL database
Restore a Backup Chain If you like to restore a specific state or a whole chain consists of full, incrementaland differential backups you need to use the ”norecovery=yes” option. After this the database is in ”recoverymode”. You can also use a option which put the database right after the restore back into the right mode.If you like to restore certains point with protocols or ”LSN” it it not recommend to work with this option.
norecovery=<yes|no> This option must be set to yes, if the database server should not do a automaticrecovery after the backup. Instead, additional manual maintenace operations are possible.
recoverafterrestore=<yes|no> With this command the database is right after backup in the correctmode. If you not use this you have to use the followed tsql statement:
Restore DATABASE yourDatabase WITH RECOVERY
GO
stopbeforemark=<log sequence number specification> used for point in time recovery.
stopatmark=<log sequence number specification> used for point in time recovery.
stopat=<timestamp> used for point in time recovery.
Followed is a example for a restore of full, differential and incremental backup with a replace of the originaldatabase:
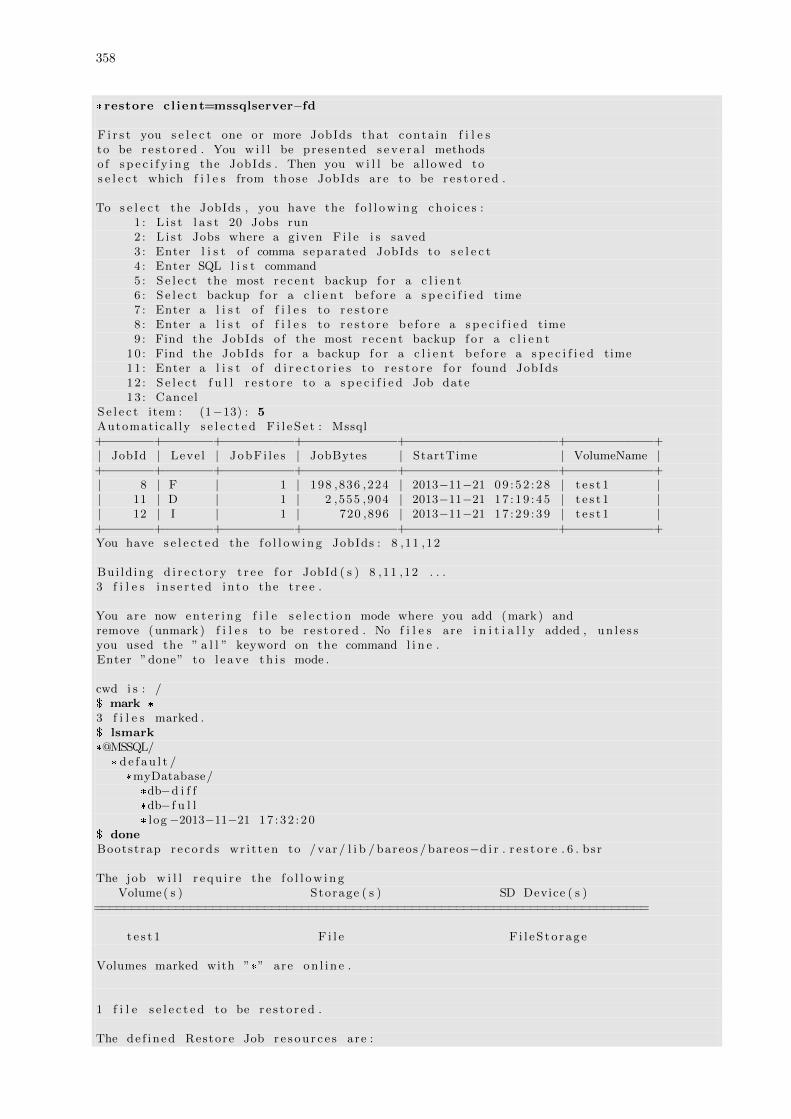
358
*restore cl ient=mssqlserver−fd
F i r s t you s e l e c t one or more JobIds that conta in f i l e sto be r e s t o r ed . You w i l l be presented s e v e r a l methodso f s p e c i f y i n g the JobIds . Then you w i l l be a l lowed tos e l e c t which f i l e s from those JobIds are to be r e s t o r ed .
To s e l e c t the JobIds , you have the f o l l ow i n g cho i c e s :1 : L i s t l a s t 20 Jobs run2 : L i s t Jobs where a g iven F i l e i s saved3 : Enter l i s t o f comma separated JobIds to s e l e c t4 : Enter SQL l i s t command5 : S e l e c t the most r e c ent backup f o r a c l i e n t6 : S e l e c t backup f o r a c l i e n t be f o r e a s p e c i f i e d time7 : Enter a l i s t o f f i l e s to r e s t o r e8 : Enter a l i s t o f f i l e s to r e s t o r e be f o r e a s p e c i f i e d time9 : Find the JobIds o f the most r e c ent backup f o r a c l i e n t
10 : Find the JobIds f o r a backup f o r a c l i e n t be f o r e a s p e c i f i e d time11 : Enter a l i s t o f d i r e c t o r i e s to r e s t o r e f o r found JobIds12 : S e l e c t f u l l r e s t o r e to a s p e c i f i e d Job date13 : Cancel
S e l e c t item : (1−13) : 5Automatica l ly s e l e c t e d F i l e S e t : Mssql+−−−−−−−+−−−−−−−+−−−−−−−−−−+−−−−−−−−−−−−−+−−−−−−−−−−−−−−−−−−−−−+−−−−−−−−−−−−+| JobId | Level | JobF i l e s | JobBytes | StartTime | VolumeName |+−−−−−−−+−−−−−−−+−−−−−−−−−−+−−−−−−−−−−−−−+−−−−−−−−−−−−−−−−−−−−−+−−−−−−−−−−−−+| 8 | F | 1 | 198 ,836 ,224 | 2013−11−21 09 : 52 : 28 | t e s t 1 || 11 | D | 1 | 2 ,555 ,904 | 2013−11−21 17 : 19 : 45 | t e s t 1 || 12 | I | 1 | 720 ,896 | 2013−11−21 17 : 29 : 39 | t e s t 1 |+−−−−−−−+−−−−−−−+−−−−−−−−−−+−−−−−−−−−−−−−+−−−−−−−−−−−−−−−−−−−−−+−−−−−−−−−−−−+You have s e l e c t e d the f o l l ow i ng JobIds : 8 ,11 ,12
Bui ld ing d i r e c t o r y t r e e f o r JobId ( s ) 8 ,11 ,12 . . .3 f i l e s i n s e r t e d in to the t r e e .
You are now ent e r i ng f i l e s e l e c t i o n mode where you add (mark ) andremove (unmark ) f i l e s to be r e s t o r ed . No f i l e s are i n i t i a l l y added , un l e s syou used the ” a l l ” keyword on the command l i n e .Enter ”done” to l eave t h i s mode .
cwd i s : /$ mark *
3 f i l e s marked .$ lsmark*@MSSQL/
* de f au l t /*myDatabase/
*db−d i f f*db− f u l l* log−2013−11−21 17 : 32 : 20
$ doneBootstrap r e co rd s wr i t t en to /var / l i b / bareos /bareos−d i r . r e s t o r e . 6 . bsr
The job w i l l r e qu i r e the f o l l ow i n gVolume( s ) Storage ( s ) SD Device ( s )
===========================================================================
te s t 1 F i l e F i l eS to rag e
Volumes marked with ”*” are on l i n e .
1 f i l e s e l e c t e d to be r e s t o r ed .
The de f ined Restore Job r e s ou r c e s are :
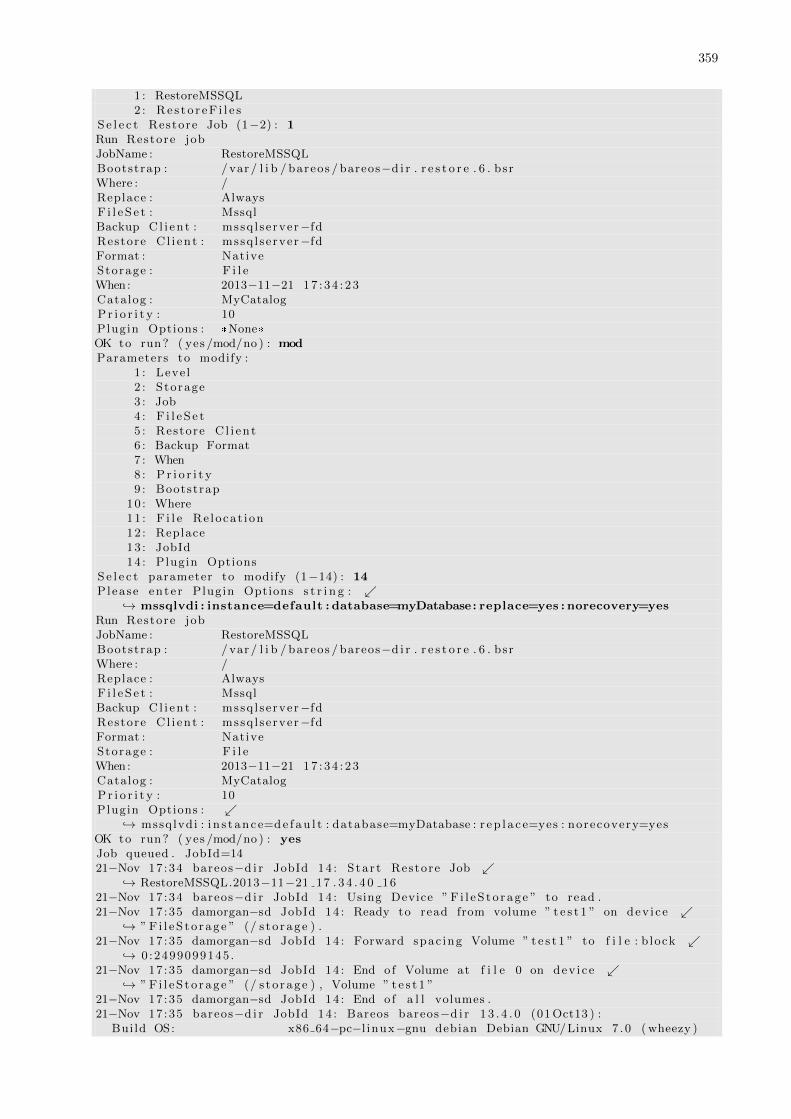
359
1 : RestoreMSSQL2 : Re s t o r eF i l e s
S e l e c t Restore Job (1−2) : 1Run Restore jobJobName : RestoreMSSQLBootstrap : /var / l i b / bareos /bareos−d i r . r e s t o r e . 6 . bsrWhere : /Replace : AlwaysF i l e S e t : MssqlBackup Cl i en t : mssq l server−fdRestore C l i en t : mssq l se rver−fdFormat : NativeStorage : F i l eWhen : 2013−11−21 17 : 34 : 23Catalog : MyCatalogP r i o r i t y : 10Plugin Options : *None*OK to run? ( yes /mod/no ) : modParameters to modify :
1 : Leve l2 : Storage3 : Job4 : F i l e S e t5 : Restore C l i en t6 : Backup Format7 : When8 : P r i o r i t y9 : Bootstrap
10 : Where11 : F i l e Re locat ion12 : Replace13 : JobId14 : Plugin Options
S e l e c t parameter to modify (1−14) : 14Please ente r Plugin Options s t r i n g : ↙
↪→ mssqlvdi : instance=default : database=myDatabase: replace=yes : norecovery=yesRun Restore jobJobName : RestoreMSSQLBootstrap : /var / l i b / bareos /bareos−d i r . r e s t o r e . 6 . bsrWhere : /Replace : AlwaysF i l e S e t : MssqlBackup Cl i en t : mssq l server−fdRestore C l i en t : mssq l se rver−fdFormat : NativeStorage : F i l eWhen : 2013−11−21 17 : 34 : 23Catalog : MyCatalogP r i o r i t y : 10Plugin Options : ↙
↪→ mssqlvdi : i n s t ance=de f au l t : database=myDatabase : r ep l a c e=yes : norecovery=yesOK to run? ( yes /mod/no ) : yesJob queued . JobId=1421−Nov 17 :34 bareos−d i r JobId 14 : S ta r t Restore Job ↙
↪→ RestoreMSSQL.2013−11−21 17 . 3 4 . 4 0 1621−Nov 17 :34 bareos−d i r JobId 14 : Using Device ” F i l eS to rag e ” to read .21−Nov 17 :35 damorgan−sd JobId 14 : Ready to read from volume ” t e s t 1 ” on dev i ce ↙
↪→ ” F i l eS to rage ” (/ s to rage ) .21−Nov 17 :35 damorgan−sd JobId 14 : Forward spac ing Volume ” t e s t 1 ” to f i l e : b lock ↙
↪→ 0 :2499099145 .21−Nov 17 :35 damorgan−sd JobId 14 : End o f Volume at f i l e 0 on dev i ce ↙
↪→ ” F i l eS to rage ” (/ s to rage ) , Volume ” t e s t 1 ”21−Nov 17 :35 damorgan−sd JobId 14 : End o f a l l volumes .21−Nov 17 :35 bareos−d i r JobId 14 : Bareos bareos−d i r 1 3 . 4 . 0 (01Oct13 ) :
Bui ld OS: x86 64−pc−l inux−gnu debian Debian GNU/Linux 7 .0 ( wheezy )

360
JobId : 14Job : RestoreMSSQL.2013−11−21 17 . 3 4 . 4 0 16Restore C l i en t : mssq l se rver−fdStar t time : 21−Nov−2013 17 : 34 : 42End time : 21−Nov−2013 17 : 35 : 36F i l e s Expected : 1F i l e s Restored : 3Bytes Restored : 202 ,113 ,024Rate : 3742 .8 KB/ sFD Errors : 0FD terminat ion s t a tu s : OKSD terminat ion s t a tu s : OKTermination : Restore OK
bconsole H.7: restore MSSQL database chain
H.2.2 Backup of a PostgreSQL Database
In this section, we describe different methods how to do backups of the PostgreSQL databases.
Backup of a PostgreSQL Database by using the RunScript directive
One method to backup a PostgreSQL database is to use the pg_dumpall tool to dump the database into afile and then backup it as a normal file. After the backup, the file can be removed. It may also be an optionnot to remove it, so that the latest version is always available immediately. On the next job run it will beoverwritten anyway.This can be done by using RunScript directives inside a Job Resource, for example:
Job {
Name = "BackupDatabase"
JobDefs = "DefaultJob"
Client = dbserver-fd
Level = Full
FileSet="Database"
# This creates a dump of our database in the local filesystem on the client
RunScript {
FailJobOnError = Yes
RunsOnClient = Yes
RunsWhen = Before
Command = "sh -c ’pg_dumpall -U postgres > /var/lib/bareos/postgresql_dump.sql’"
}
# This deletes the dump in our local filesystem on the client
RunScript {
RunsOnSuccess = Yes
RunsOnClient = Yes
RunsWhen = After
Command = "rm /var/lib/bareos/postgresql_dump.sql"
}
}
Configuration H.8: RunScript job resource for a PostgreSQL backup
Note that redirecting the pg_dumpall output to a file requires to run the whole command line through ashell, otherwise the pg_dumpall would not know what do with the > character and the job would fail. As noshell features like redirection or piping are used for the rm, the sh -c is not needed there. See Run ScriptDirJob for more details.The corresponding FileSet configuration should look something like this, e.g.:
FileSet {
Name = "Database"
Include {
Options {
signature = MD5
compression = gzip
}
# database dump file
File = "/var/lib/bareos/postgresql_dump.sql"
}
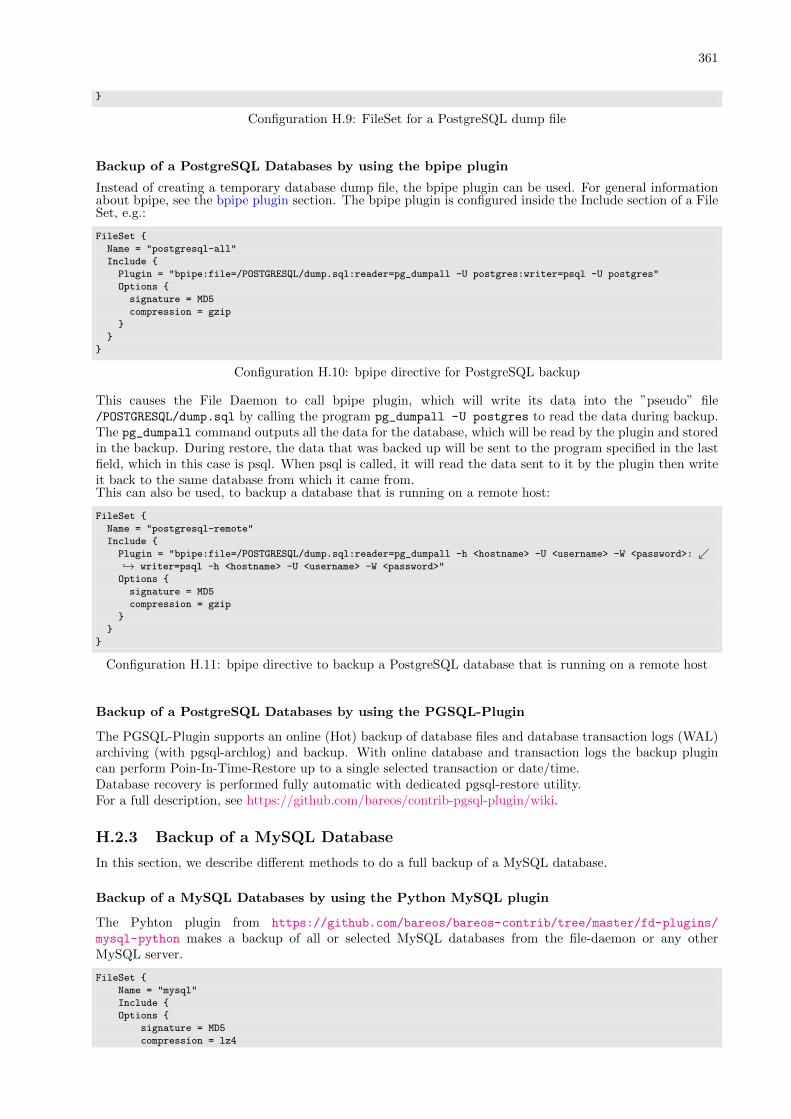
361
}
Configuration H.9: FileSet for a PostgreSQL dump file
Backup of a PostgreSQL Databases by using the bpipe plugin
Instead of creating a temporary database dump file, the bpipe plugin can be used. For general informationabout bpipe, see the bpipe plugin section. The bpipe plugin is configured inside the Include section of a FileSet, e.g.:
FileSet {
Name = "postgresql-all"
Include {
Plugin = "bpipe:file=/POSTGRESQL/dump.sql:reader=pg_dumpall -U postgres:writer=psql -U postgres"
Options {
signature = MD5
compression = gzip
}
}
}
Configuration H.10: bpipe directive for PostgreSQL backup
This causes the File Daemon to call bpipe plugin, which will write its data into the ”pseudo” file/POSTGRESQL/dump.sql by calling the program pg_dumpall -U postgres to read the data during backup.The pg_dumpall command outputs all the data for the database, which will be read by the plugin and storedin the backup. During restore, the data that was backed up will be sent to the program specified in the lastfield, which in this case is psql. When psql is called, it will read the data sent to it by the plugin then writeit back to the same database from which it came from.This can also be used, to backup a database that is running on a remote host:
FileSet {
Name = "postgresql-remote"
Include {
Plugin = "bpipe:file=/POSTGRESQL/dump.sql:reader=pg_dumpall -h <hostname> -U <username> -W <password>: ↙↪→ writer=psql -h <hostname> -U <username> -W <password>"
Options {
signature = MD5
compression = gzip
}
}
}
Configuration H.11: bpipe directive to backup a PostgreSQL database that is running on a remote host
Backup of a PostgreSQL Databases by using the PGSQL-Plugin
The PGSQL-Plugin supports an online (Hot) backup of database files and database transaction logs (WAL)archiving (with pgsql-archlog) and backup. With online database and transaction logs the backup plugincan perform Poin-In-Time-Restore up to a single selected transaction or date/time.Database recovery is performed fully automatic with dedicated pgsql-restore utility.For a full description, see https://github.com/bareos/contrib-pgsql-plugin/wiki.
H.2.3 Backup of a MySQL Database
In this section, we describe different methods to do a full backup of a MySQL database.
Backup of a MySQL Databases by using the Python MySQL plugin
The Pyhton plugin from https://github.com/bareos/bareos-contrib/tree/master/fd-plugins/
mysql-python makes a backup of all or selected MySQL databases from the file-daemon or any otherMySQL server.
FileSet {
Name = "mysql"
Include {
Options {
signature = MD5
compression = lz4
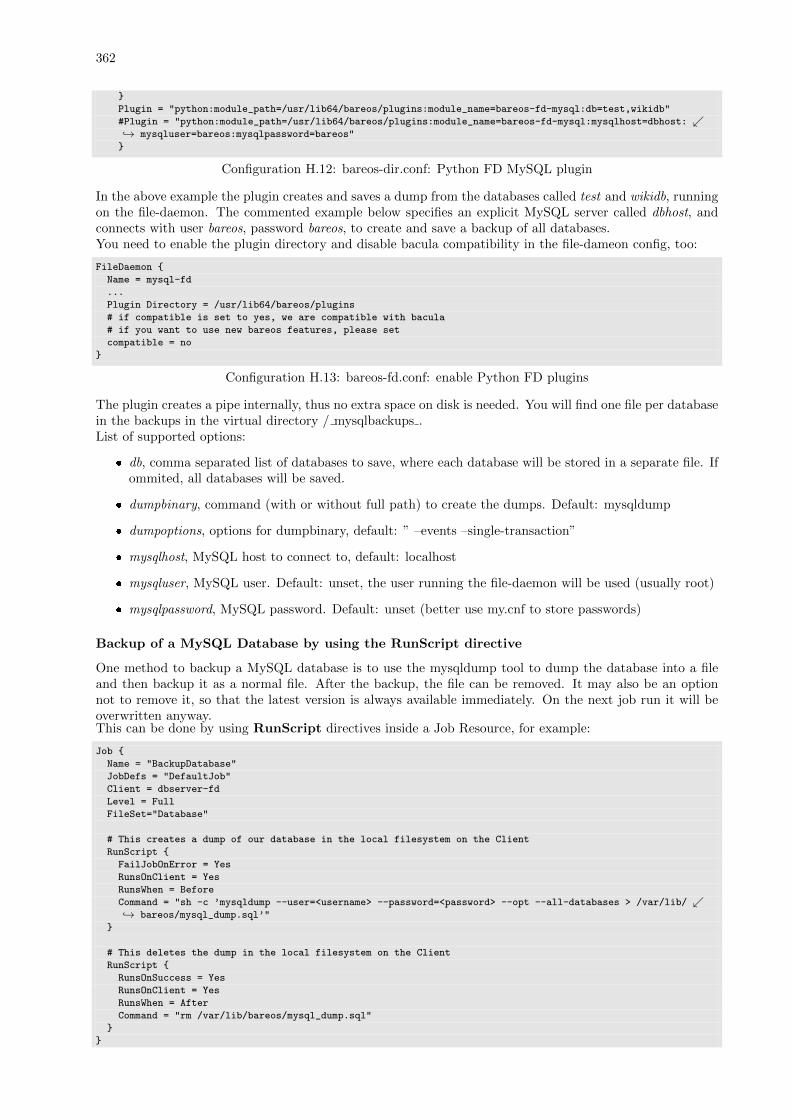
362
}
Plugin = "python:module_path=/usr/lib64/bareos/plugins:module_name=bareos-fd-mysql:db=test,wikidb"
#Plugin = "python:module_path=/usr/lib64/bareos/plugins:module_name=bareos-fd-mysql:mysqlhost=dbhost: ↙↪→ mysqluser=bareos:mysqlpassword=bareos"
}
Configuration H.12: bareos-dir.conf: Python FD MySQL plugin
In the above example the plugin creates and saves a dump from the databases called test and wikidb, runningon the file-daemon. The commented example below specifies an explicit MySQL server called dbhost, andconnects with user bareos, password bareos, to create and save a backup of all databases.You need to enable the plugin directory and disable bacula compatibility in the file-dameon config, too:
FileDaemon {
Name = mysql-fd
...
Plugin Directory = /usr/lib64/bareos/plugins
# if compatible is set to yes, we are compatible with bacula
# if you want to use new bareos features, please set
compatible = no
}
Configuration H.13: bareos-fd.conf: enable Python FD plugins
The plugin creates a pipe internally, thus no extra space on disk is needed. You will find one file per databasein the backups in the virtual directory / mysqlbackups .List of supported options:
� db, comma separated list of databases to save, where each database will be stored in a separate file. Ifommited, all databases will be saved.
� dumpbinary, command (with or without full path) to create the dumps. Default: mysqldump
� dumpoptions, options for dumpbinary, default: ” –events –single-transaction”
� mysqlhost, MySQL host to connect to, default: localhost
� mysqluser, MySQL user. Default: unset, the user running the file-daemon will be used (usually root)
� mysqlpassword, MySQL password. Default: unset (better use my.cnf to store passwords)
Backup of a MySQL Database by using the RunScript directive
One method to backup a MySQL database is to use the mysqldump tool to dump the database into a fileand then backup it as a normal file. After the backup, the file can be removed. It may also be an optionnot to remove it, so that the latest version is always available immediately. On the next job run it will beoverwritten anyway.This can be done by using RunScript directives inside a Job Resource, for example:
Job {
Name = "BackupDatabase"
JobDefs = "DefaultJob"
Client = dbserver-fd
Level = Full
FileSet="Database"
# This creates a dump of our database in the local filesystem on the Client
RunScript {
FailJobOnError = Yes
RunsOnClient = Yes
RunsWhen = Before
Command = "sh -c ’mysqldump --user=<username> --password=<password> --opt --all-databases > /var/lib/ ↙↪→ bareos/mysql_dump.sql’"
}
# This deletes the dump in the local filesystem on the Client
RunScript {
RunsOnSuccess = Yes
RunsOnClient = Yes
RunsWhen = After
Command = "rm /var/lib/bareos/mysql_dump.sql"
}
}
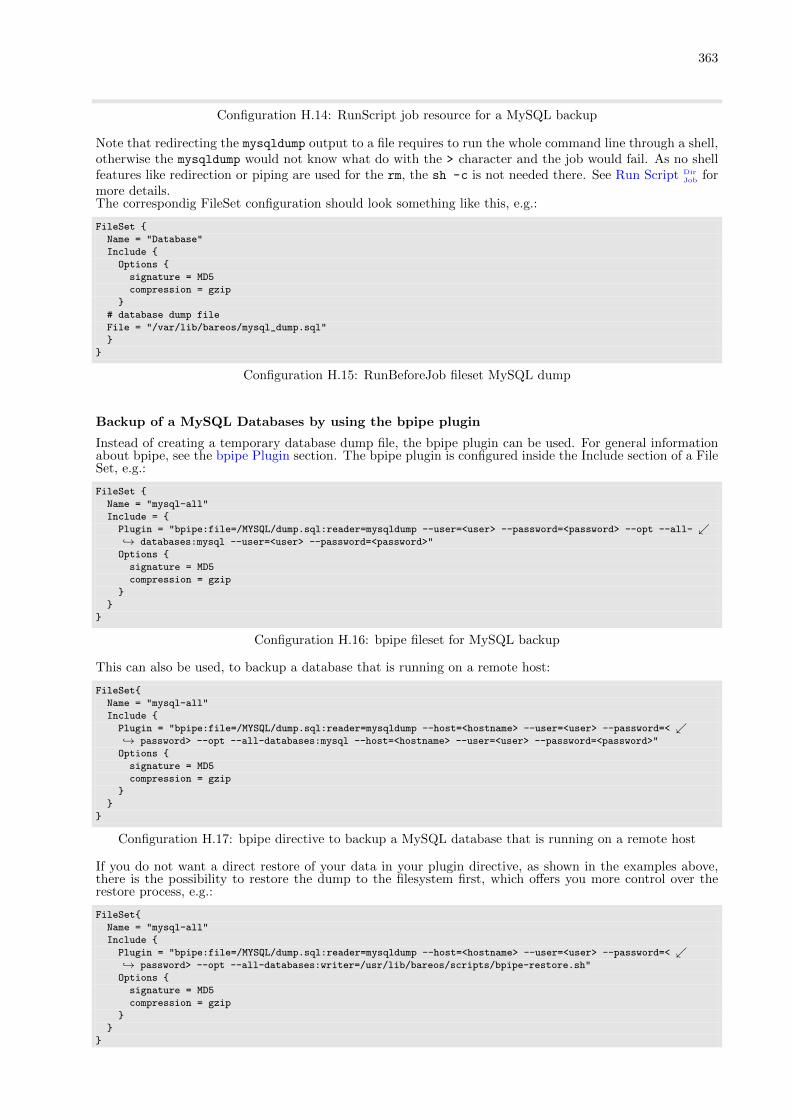
363
Configuration H.14: RunScript job resource for a MySQL backup
Note that redirecting the mysqldump output to a file requires to run the whole command line through a shell,otherwise the mysqldump would not know what do with the > character and the job would fail. As no shellfeatures like redirection or piping are used for the rm, the sh -c is not needed there. See Run Script Dir
Job formore details.The correspondig FileSet configuration should look something like this, e.g.:
FileSet {
Name = "Database"
Include {
Options {
signature = MD5
compression = gzip
}
# database dump file
File = "/var/lib/bareos/mysql_dump.sql"
}
}
Configuration H.15: RunBeforeJob fileset MySQL dump
Backup of a MySQL Databases by using the bpipe plugin
Instead of creating a temporary database dump file, the bpipe plugin can be used. For general informationabout bpipe, see the bpipe Plugin section. The bpipe plugin is configured inside the Include section of a FileSet, e.g.:
FileSet {
Name = "mysql-all"
Include = {
Plugin = "bpipe:file=/MYSQL/dump.sql:reader=mysqldump --user=<user> --password=<password> --opt --all- ↙↪→ databases:mysql --user=<user> --password=<password>"
Options {
signature = MD5
compression = gzip
}
}
}
Configuration H.16: bpipe fileset for MySQL backup
This can also be used, to backup a database that is running on a remote host:
FileSet{
Name = "mysql-all"
Include {
Plugin = "bpipe:file=/MYSQL/dump.sql:reader=mysqldump --host=<hostname> --user=<user> --password=< ↙↪→ password> --opt --all-databases:mysql --host=<hostname> --user=<user> --password=<password>"
Options {
signature = MD5
compression = gzip
}
}
}
Configuration H.17: bpipe directive to backup a MySQL database that is running on a remote host
If you do not want a direct restore of your data in your plugin directive, as shown in the examples above,there is the possibility to restore the dump to the filesystem first, which offers you more control over therestore process, e.g.:
FileSet{
Name = "mysql-all"
Include {
Plugin = "bpipe:file=/MYSQL/dump.sql:reader=mysqldump --host=<hostname> --user=<user> --password=< ↙↪→ password> --opt --all-databases:writer=/usr/lib/bareos/scripts/bpipe-restore.sh"
Options {
signature = MD5
compression = gzip
}
}
}

364
Configuration H.18: bpipe directive to backup a MySQL database and restore the dump to the filesystemfirst
A very simple corresponding shell script (bpipe-restore.sh) to the method above might look like the followingone:
#!/bin/bash
cat - > /tmp/dump.sql
exit 0
Configuration H.19: bpipe shell script for a restore to filesystem
Appendix I
Disaster Recovery Using Bareos
I.1 General
When disaster strikes, you must have a plan, and you must have prepared in advance, otherwise the work ofrecovering your system and your files will be considerably greater. For example, if you have not previouslysaved the partitioning information for your hard disk, how can you properly rebuild it if the disk must bereplaced?
Unfortunately, many of the steps one must take before and immediately after a disaster are very muchdependent on the operating system in use. As a consequence, this chapter will discuss in detail disasterrecovery only for selected operating systems.
I.1.1 Important Considerations
Here are a few important considerations concerning disaster recovery that you should take into accountbefore a disaster strikes.
� If the building which houses your computers burns down or is otherwise destroyed, do you have off-sitebackup data?
� Disaster recovery is much easier if you have several machines. If you have a single machine, how willyou handle unforeseen events if your only machine is down?
� Do you want to protect your whole system and use Bareos to recover everything? Or do you wantto try to restore your system from the original installation disks, apply any other updates and onlyrestore the user files?
I.2 Steps to Take Before Disaster Strikes
� Create a rescue or CDROM for your systems. Generally, they are offered by each distribution, andthere are many good rescue disks on the Web
� Ensure that you always have a valid bootstrap file for your backup and that it is saved to an alternatemachine. This will permit you to easily do a full restore of your system.
� If possible copy your catalog nightly to an alternate machine. If you have a valid bootstrap file, this isnot necessary, but can be very useful if you do not want to reload everything.
� Ensure that you always have a valid bootstrap file for your catalog backup that is saved to an alternatemachine. This will permit you to restore your catalog more easily if needed.
� Try out how to use the Rescue CDROM before you are forced to use it in an emergency situation.
� Make a copy of your Bareos .conf files, particularly your bareos-dir.conf, and your bareos-sd.conf files,because if your server goes down, these files will be needed to get it back up and running, and theycan be difficult to rebuild from memory.
365
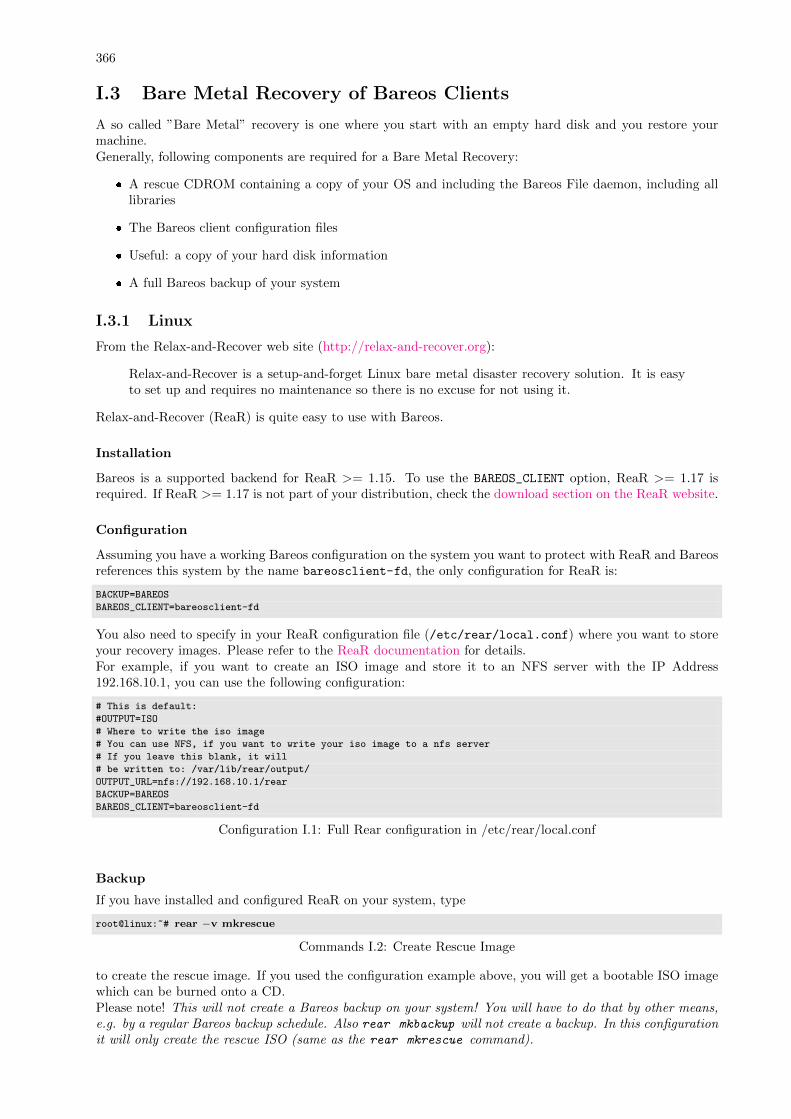
366
I.3 Bare Metal Recovery of Bareos Clients
A so called ”Bare Metal” recovery is one where you start with an empty hard disk and you restore yourmachine.Generally, following components are required for a Bare Metal Recovery:
� A rescue CDROM containing a copy of your OS and including the Bareos File daemon, including alllibraries
� The Bareos client configuration files
� Useful: a copy of your hard disk information
� A full Bareos backup of your system
I.3.1 Linux
From the Relax-and-Recover web site (http://relax-and-recover.org):
Relax-and-Recover is a setup-and-forget Linux bare metal disaster recovery solution. It is easyto set up and requires no maintenance so there is no excuse for not using it.
Relax-and-Recover (ReaR) is quite easy to use with Bareos.
Installation
Bareos is a supported backend for ReaR >= 1.15. To use the BAREOS_CLIENT option, ReaR >= 1.17 isrequired. If ReaR >= 1.17 is not part of your distribution, check the download section on the ReaR website.
Configuration
Assuming you have a working Bareos configuration on the system you want to protect with ReaR and Bareosreferences this system by the name bareosclient-fd, the only configuration for ReaR is:
BACKUP=BAREOS
BAREOS_CLIENT=bareosclient-fd
You also need to specify in your ReaR configuration file (/etc/rear/local.conf) where you want to storeyour recovery images. Please refer to the ReaR documentation for details.For example, if you want to create an ISO image and store it to an NFS server with the IP Address192.168.10.1, you can use the following configuration:
# This is default:
#OUTPUT=ISO
# Where to write the iso image
# You can use NFS, if you want to write your iso image to a nfs server
# If you leave this blank, it will
# be written to: /var/lib/rear/output/
OUTPUT_URL=nfs://192.168.10.1/rear
BACKUP=BAREOS
BAREOS_CLIENT=bareosclient-fd
Configuration I.1: Full Rear configuration in /etc/rear/local.conf
Backup
If you have installed and configured ReaR on your system, type
root@linux:~# rear −v mkrescue
Commands I.2: Create Rescue Image
to create the rescue image. If you used the configuration example above, you will get a bootable ISO imagewhich can be burned onto a CD.Please note! This will not create a Bareos backup on your system! You will have to do that by other means,e.g. by a regular Bareos backup schedule. Also rear mkbackup will not create a backup. In this configurationit will only create the rescue ISO (same as the rear mkrescue command).
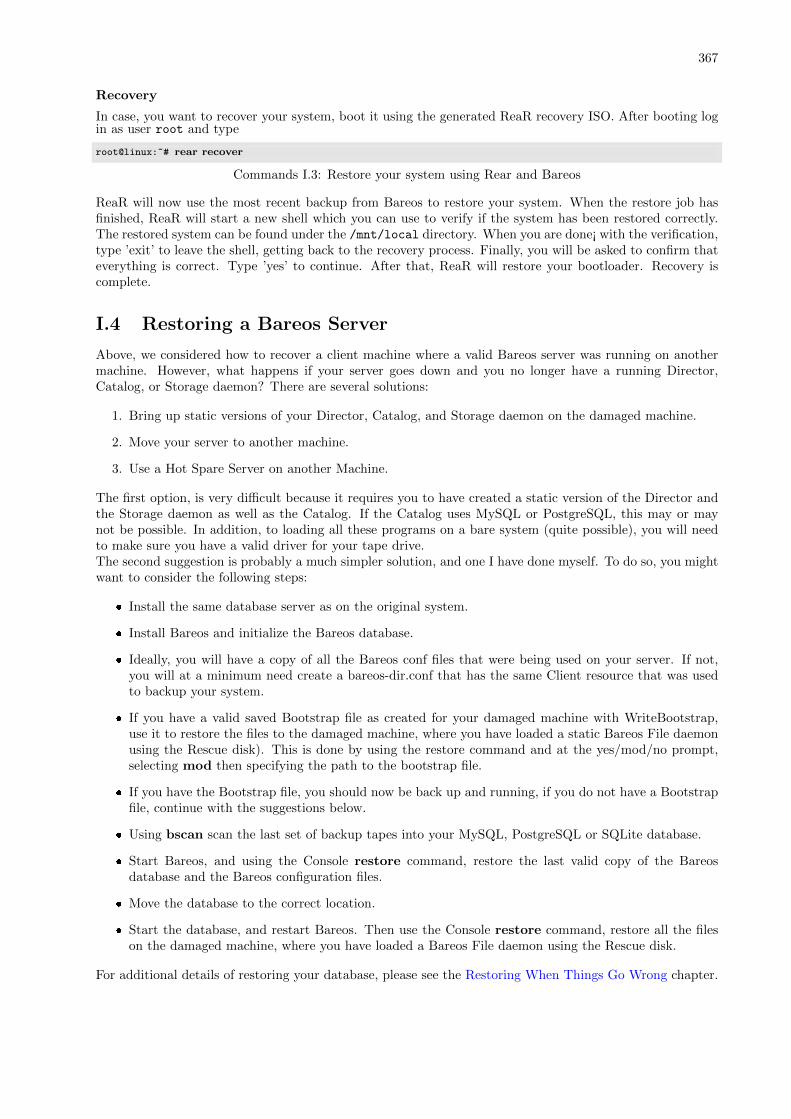
367
Recovery
In case, you want to recover your system, boot it using the generated ReaR recovery ISO. After booting login as user root and type
root@linux:~# rear recover
Commands I.3: Restore your system using Rear and Bareos
ReaR will now use the most recent backup from Bareos to restore your system. When the restore job hasfinished, ReaR will start a new shell which you can use to verify if the system has been restored correctly.The restored system can be found under the /mnt/local directory. When you are done¡ with the verification,type ’exit’ to leave the shell, getting back to the recovery process. Finally, you will be asked to confirm thateverything is correct. Type ’yes’ to continue. After that, ReaR will restore your bootloader. Recovery iscomplete.
I.4 Restoring a Bareos Server
Above, we considered how to recover a client machine where a valid Bareos server was running on anothermachine. However, what happens if your server goes down and you no longer have a running Director,Catalog, or Storage daemon? There are several solutions:
1. Bring up static versions of your Director, Catalog, and Storage daemon on the damaged machine.
2. Move your server to another machine.
3. Use a Hot Spare Server on another Machine.
The first option, is very difficult because it requires you to have created a static version of the Director andthe Storage daemon as well as the Catalog. If the Catalog uses MySQL or PostgreSQL, this may or maynot be possible. In addition, to loading all these programs on a bare system (quite possible), you will needto make sure you have a valid driver for your tape drive.The second suggestion is probably a much simpler solution, and one I have done myself. To do so, you mightwant to consider the following steps:
� Install the same database server as on the original system.
� Install Bareos and initialize the Bareos database.
� Ideally, you will have a copy of all the Bareos conf files that were being used on your server. If not,you will at a minimum need create a bareos-dir.conf that has the same Client resource that was usedto backup your system.
� If you have a valid saved Bootstrap file as created for your damaged machine with WriteBootstrap,use it to restore the files to the damaged machine, where you have loaded a static Bareos File daemonusing the Rescue disk). This is done by using the restore command and at the yes/mod/no prompt,selecting mod then specifying the path to the bootstrap file.
� If you have the Bootstrap file, you should now be back up and running, if you do not have a Bootstrapfile, continue with the suggestions below.
� Using bscan scan the last set of backup tapes into your MySQL, PostgreSQL or SQLite database.
� Start Bareos, and using the Console restore command, restore the last valid copy of the Bareosdatabase and the Bareos configuration files.
� Move the database to the correct location.
� Start the database, and restart Bareos. Then use the Console restore command, restore all the fileson the damaged machine, where you have loaded a Bareos File daemon using the Rescue disk.
For additional details of restoring your database, please see the Restoring When Things Go Wrong chapter.

368
Appendix J
Troubleshooting
J.1 Client Access Problems
There are several reasons why Bareos could not contact a client on a different machine. They are:
� Check if the client file daemon is really running.
� The Client address or port is incorrect or not resolved by DNS. See if you can ping the client machineusing the same address as in the Client record.
� You have a firewall, and it is blocking traffic on port 9102 between the Director’s machine and theClient’s machine (or on port 9103 between the Client and the Storage daemon machines).
� If your system is using Tcpwrapper (hosts.allow or hosts.deny file), verify that is permitting access.
� Your password or names are not correct in both the Director and the Client machine. Try configuringeverything identical to how you run the client on the same machine as the Director, but just changethe address. If that works, make the other changes one step at a time until it works.
� You may also be having problems between your File daemon and your Storage daemon. The name youuse in the Storage resource of your Director’s conf file must be known (resolvable) by the File daemon,because it is passed symbolically to the File daemon, which then resolves it to get an IP address usedto contact the Storage daemon.
Some of the DNS and Firewall problems can be circumvented by configuring clients in network passive mode,see the section about Passive Clients.
J.1.1 Authorization Errors
For security reasons, Bareos requires that both the File daemon and the Storage daemon know the name ofthe Director as well as its password. As a consequence, if you change the Director’s name or password, youmust make the corresponding change in the Storage daemon’s and in the File daemon’s configuration files.During the authorization process, the Storage daemon and File daemon also require that the Directorauthenticates itself, so both ends require the other to have the correct name and password.If you have edited the configuration files and modified any name or any password, and you are gettingauthentication errors, then your best bet is to go back to the original configuration files generated by theBareos installation process. Make only the absolutely necessary modifications to these files – e.g. add thecorrect email address. Then follow the instructions in the Running Bareos chapter of this manual. Youwill run a backup to disk and a restore. Only when that works, should you begin customization of theconfiguration files.Another reason that you can get authentication errors is if you are running Multiple Concurrent Jobs in theDirector, but you have not set them in the File daemon or the Storage daemon. Once you reach their limit,they will reject the connection producing authentication (or connection) errors.Some users report that authentication fails if there is not a proper reverse DNS lookup entry for the machine.This seems to be a requirement of gethostbyname(), which is what Bareos uses to translate names into IPaddresses. If you cannot add a reverse DNS entry, or you don’t know how to do so, you can avoid theproblem by specifying an IP address rather than a machine name in the appropriate Bareos configurationfile.
369
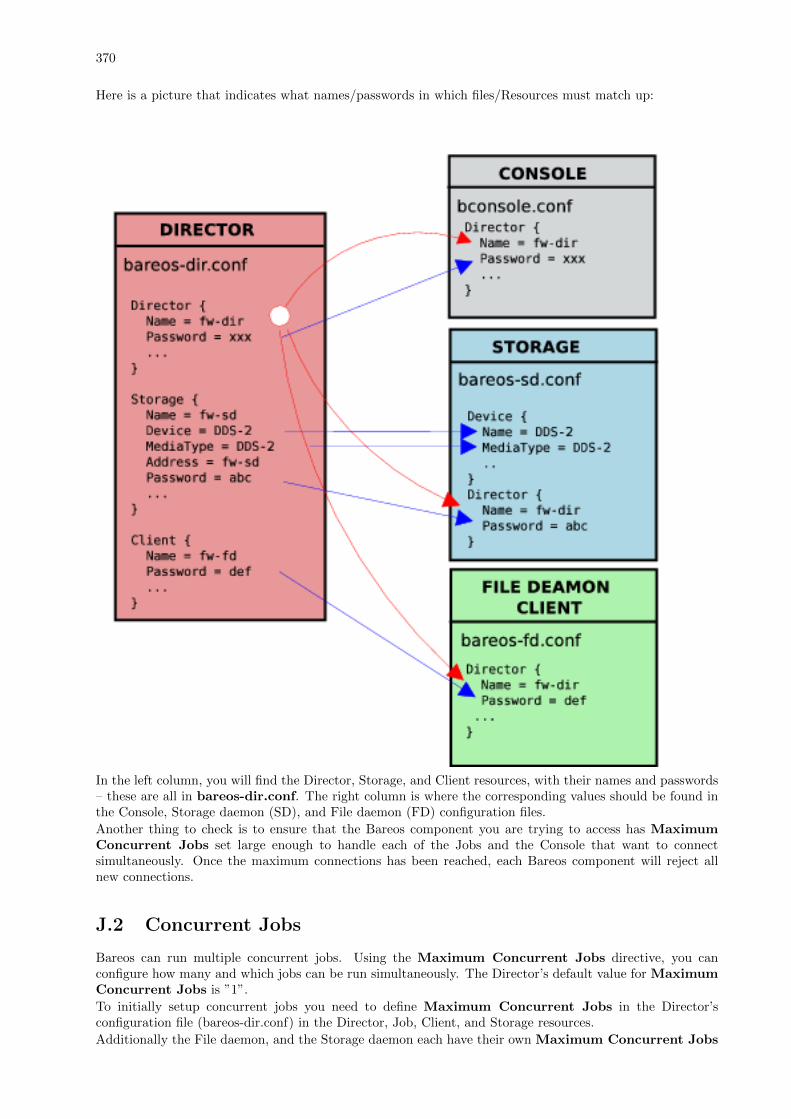
370
Here is a picture that indicates what names/passwords in which files/Resources must match up:
In the left column, you will find the Director, Storage, and Client resources, with their names and passwords– these are all in bareos-dir.conf. The right column is where the corresponding values should be found inthe Console, Storage daemon (SD), and File daemon (FD) configuration files.
Another thing to check is to ensure that the Bareos component you are trying to access has MaximumConcurrent Jobs set large enough to handle each of the Jobs and the Console that want to connectsimultaneously. Once the maximum connections has been reached, each Bareos component will reject allnew connections.
J.2 Concurrent Jobs
Bareos can run multiple concurrent jobs. Using the Maximum Concurrent Jobs directive, you canconfigure how many and which jobs can be run simultaneously. The Director’s default value for MaximumConcurrent Jobs is ”1”.
To initially setup concurrent jobs you need to define Maximum Concurrent Jobs in the Director’sconfiguration file (bareos-dir.conf) in the Director, Job, Client, and Storage resources.
Additionally the File daemon, and the Storage daemon each have their own Maximum Concurrent Jobs
371
directive that sets the overall maximum number of concurrent jobs the daemon will run. The default forboth the File daemon and the Storage daemon is ”20”.
For example, if you want two different jobs to run simultaneously backing up the same Client to the sameStorage device, they will run concurrently only if you have set Maximum Concurrent Jobs greater thanone in the Director resource, the Client resource, and the Storage resource in bareos-dir.conf.
We recommend that you read the Data Spooling of this manual first, then test your multiple concurrentbackup including restore testing before you put it into production.
Below is a super stripped down bareos-dir.conf file showing you the four places where the the file must bemodified to allow the same job NightlySave to run up to four times concurrently. The change to the Jobresource is not necessary if you want different Jobs to run at the same time, which is the normal case.
#
# Bareos Director Configuration file -- bareos-dir.conf
#
Director {
Name = rufus-dir
Maximum Concurrent Jobs = 4
...
}
Job {
Name = "NightlySave"
Maximum Concurrent Jobs = 4
Client = rufus-fd
Storage = File
...
}
Client {
Name = rufus-fd
Maximum Concurrent Jobs = 4
...
}
Storage {
Name = File
Maximum Concurrent Jobs = 4
...
}
Configuration J.1: Concurrent Jobs Example
J.3 Tape Labels: ANSI or IBM
By default, Bareos uses its own tape label (see Tape Formats and Label Type DirPool). However, Bareos also
supports reading and write ANSI and IBM tape labels.
J.3.1 Reading
Reading ANSI/IBM labels is important, if some of your tapes are used by other programs that also supportANSI/IBM labels. For example, LTFS tapes are indicated by an ANSI label.
If your are running Bareos in such an environment, you must set Check Labels SdDevice to yes, otherwise Bareos
will not recognize that these tapes are already in use.
J.3.2 Writing
To configure Bareos to also write ANSI/IBM tape labels, use Label Type DirPool or Label Type Sd
Device. With theproper configuration, you can force Bareos to require ANSI or IBM labels.
Even though Bareos will recognize and write ANSI and IBM labels, it always writes its own tape labels aswell.
If you have labeled your volumes outside of Bareos, then the ANSI/IBM label will be recognized by Bareosonly if you have created the HDR1 label with BAREOS.DATA in the filename field (starting with character5). If Bareos writes the labels, it will use this information to recognize the tape as a Bareos tape. Thisallows ANSI/IBM labeled tapes to be used at sites with multiple machines and multiple backup programs.
372
J.4 Tape Drive
This chapter is concerned with testing and configuring your tape drive to make sure that it will work properlywith Bareos using the btape program.
J.4.1 Get Your Tape Drive Working
In general, you should follow the following steps to get your tape drive to work with Bareos. Start with atape mounted in your drive. If you have an autochanger, load a tape into the drive. We use /dev/nst0 asthe tape drive name, you will need to adapt it according to your system.Do not proceed to the next item until you have succeeded with the previous one.
1. Make sure that Bareos (the Storage daemon) is not running or that you have unmounted the driveyou will use for testing.
2. Use tar to write to, then read from your drive:
mt -f /dev/nst0 rewind
tar cvf /dev/nst0 .
mt -f /dev/nst0 rewind
tar tvf /dev/nst0
3. Make sure you have a valid and correct Device resource corresponding to your drive. For Linux users,generally, the default one works. For FreeBSD users, there are two possible Device configurations (seebelow). For other drives and/or OSes, you will need to first ensure that your system tape modes areproperly setup (see below), then possibly modify you Device resource depending on the output from thebtape program (next item). When doing this, you should consult the Storage Daemon Configurationof this manual.
4. If you are using a Fibre Channel to connect your tape drive to Bareos, please be sure to disable anycaching in the NSR (network storage router, which is a Fibre Channel to SCSI converter).
5. Run the btape test command:
btape /dev/nst0
test
It isn’t necessary to run the autochanger part of the test at this time, but do not go past this pointuntil the basic test succeeds. If you do have an autochanger, please be sure to read the Autochangerchapter of this manual.
6. Run the btape fill command, preferably with two volumes. This can take a long time. If you have anautochanger and it is configured, Bareos will automatically use it. If you do not have it configured,you can manually issue the appropriate mtx command, or press the autochanger buttons to changethe tape when requested to do so.
7. Run Bareos, and backup a reasonably small directory, say 60 Megabytes. Do three successive backupsof this directory.
8. Stop Bareos, then restart it. Do another full backup of the same directory. Then stop and restartBareos.
9. Do a restore of the directory backed up, by entering the following restore command, being careful torestore it to an alternate location:
restore select all done
yes
Do a diff on the restored directory to ensure it is identical to the original directory. If you are goingto backup multiple different systems (Linux, Windows, Mac, Solaris, FreeBSD, ...), be sure you testthe restore on each system type.
373
10. If you have an autochanger, you should now go back to the btape program and run the autochangertest:
btape /dev/nst0
auto
Adjust your autochanger as necessary to ensure that it works correctly. See the Autochanger chapterof this manual for a complete discussion of testing your autochanger.
J.5 Autochanger
J.5.1 Testing Autochanger and Adapting mtx-changer script
In case, Bareos does not work well with the Autochanger, it is preferable to ”hand-test” that the changerworks. To do so, we suggest you do the following commands:Make sure Bareos is not running./usr/lib/bareos/scripts/mtx-changer /dev/sg0 list 0 /dev/nst0 0
This command should print:
1:
2:
3:
...
or one number per line for each slot that is occupied in your changer, and the number should be terminatedby a colon (:). If your changer has barcodes, the barcode will follow the colon. If an error message is printed,you must resolve the problem (e.g. try a different SCSI control device name if /dev/sg0 is incorrect). Forexample, on FreeBSD systems, the autochanger SCSI control device is generally /dev/pass2./usr/lib/bareos/scripts/mtx-changer /dev/sg0 listall 0 /dev/nst0 0
This command should print:
Drive content: D:Drive num:F:Slot loaded:Volume Name
D:0:F:2:vol2 or D:Drive num:E
D:1:F:42:vol42
D:3:E
Slot content:
S:1:F:vol1 S:Slot num:F:Volume Name
S:2:E or S:Slot num:E
S:3:F:vol4
Import/Export tray slots:
I:10:F:vol10 I:Slot num:F:Volume Name
I:11:E or I:Slot num:E
I:12:F:vol40
/usr/lib/bareos/scripts/mtx-changer /dev/sg0 transfer 1 2
This command should transfer a volume from source (1) to destination (2)/usr/lib/bareos/scripts/mtx-changer /dev/sg0 slots
This command should return the number of slots in your autochanger./usr/lib/bareos/scripts/mtx-changer /dev/sg0 unload 1 /dev/nst0 0
If a tape is loaded from slot 1, this should cause it to be unloaded./usr/lib/bareos/scripts/mtx-changer /dev/sg0 load 3 /dev/nst0 0
Assuming you have a tape in slot 3, it will be loaded into drive (0)./usr/lib/bareos/scripts/mtx-changer /dev/sg0 loaded 0 /dev/nst0 0
It should print ”3” Note, we have used an ”illegal” slot number 0. In this case, it is simply ignored becausethe slot number is not used. However, it must be specified because the drive parameter at the end of thecommand is needed to select the correct drive./usr/lib/bareos/scripts/mtx-changer /dev/sg0 unload 3 /dev/nst0 0
will unload the tape into slot 3.Once all the above commands work correctly, assuming that you have the right Changer Command inyour configuration, Bareos should be able to operate the changer. The only remaining area of problemswill be if your autoloader needs some time to get the tape loaded after issuing the command. After the
374
mtx-changer script returns, Bareos will immediately rewind and read the tape. If Bareos gets rewind I/Oerrors after a tape change, you will probably need to configure the load_sleep paramenter in the config file/etc/bareos/mtx-changer.conf. You can test whether or not you need a sleep by putting the followingcommands into a file and running it as a script:
#!/bin/sh
/usr/lib/bareos/scripts/mtx-changer /dev/sg0 unload 1 /dev/nst0 0
/usr/lib/bareos/scripts/mtx-changer /dev/sg0 load 3 /dev/nst0 0
mt -f /dev/st0 rewind
mt -f /dev/st0 weof
If the above script runs, you probably have no timing problems. If it does not run, start by putting asleep 30 or possibly a sleep 60 in the script just after the mtx-changer load command. If that works, thenyou should configure the load_sleep paramenter in the config file /etc/bareos/mtx-changer.conf to thespecified value so that it will be effective when Bareos runs.A second problem that comes up with a small number of autochangers is that they need to have the cartridgeejected before it can be removed. If this is the case, the load 3 will never succeed regardless of how longyou wait. If this seems to be your problem, you can insert an eject just after the unload so that the scriptlooks like:
#!/bin/sh
/usr/lib/bareos/scripts/mtx-changer /dev/sg0 unload 1 /dev/nst0 0
mt -f /dev/st0 offline
/usr/lib/bareos/scripts/mtx-changer /dev/sg0 load 3 /dev/nst0 0
mt -f /dev/st0 rewind
mt -f /dev/st0 weof
If this solves your problems, set the parameter offline in the config file /etc/bareos/mtx-changer.conf
to ”1”.
J.6 Restore
J.6.1 Restore a pruned job using a pattern
It is possible to configure Bareos in a way, that job information are still stored in the Bareos catalog, whilethe individual file information are already pruned.If all File records are pruned from the catalog for a Job, normally Bareos can restore only all files saved.That is there is no way using the catalog to select individual files. With this new feature, Bareos will ask ifyou want to specify a Regex expression for extracting only a part of the full backup.
Building directory tree for JobId(s) 1,3 ...
There were no files inserted into the tree, so file selection
is not possible.Most likely your retention policy pruned the files
Do you want to restore all the files? (yes|no): no
Regexp matching files to restore? (empty to abort): /etc/.*
Bootstrap records written to /tmp/regress/working/zog4-dir.restore.1.bsr
See also FileRegex bsr option for more information.
J.6.2 Problems Restoring Files
The most frequent problems users have restoring files are error messages such as:
04-Jan 00:33 z217-sd: RestoreFiles.2005-01-04_00.31.04 Error:
block.c:868 Volume data error at 20:0! Short block of 512 bytes on
device /dev/tape discarded.
or
04-Jan 00:33 z217-sd: RestoreFiles.2005-01-04_00.31.04 Error:
block.c:264 Volume data error at 20:0! Wanted ID: "BB02", got ".".
Buffer discarded.
375
Both these kinds of messages indicate that you were probably running your tape drive in fixed block moderather than variable block mode. Fixed block mode will work with any program that reads tapes sequentiallysuch as tar, but Bareos repositions the tape on a block basis when restoring files because this will speed upthe restore by orders of magnitude when only a few files are being restored. There are several ways that youcan attempt to recover from this unfortunate situation.Try the following things, each separately, and reset your Device resource to what it is now after eachindividual test:
1. Set ”Block Positioning = no” in your Device resource and try the restore. This is a new directive anduntested.
2. Set ”Minimum Block Size = 512” and ”Maximum Block Size = 512” and try the restore. If you areable to determine the block size your drive was previously using, you should try that size if 512 doesnot work. This is a really horrible solution, and it is not at all recommended to continue backing upyour data without correcting this condition. Please see the Tape Drive section for more on this.
3. Try editing the restore.bsr file at the Run xxx yes/mod/no prompt before starting the restore job andremove all the VolBlock statements. These are what causes Bareos to reposition the tape, and whereproblems occur if you have a fixed block size set for your drive. The VolFile commands also causerepositioning, but this will work regardless of the block size.
4. Use bextract to extract the files you want – it reads the Volume sequentially if you use the include listfeature, or if you use a .bsr file, but remove all the VolBlock statements after the .bsr file is created(at the Run yes/mod/no) prompt but before you start the restore.
J.6.3 Restoring Files Can Be Slow
Restoring files is generally much slower than backing them up for several reasons. The first is that during abackup the tape is normally already positioned and Bareos only needs to write. On the other hand, becauserestoring files is done so rarely, Bareos keeps only the start file and block on the tape for the whole job ratherthan on a file by file basis which would use quite a lot of space in the catalog.Bareos will forward space to the correct file mark on the tape for the Job, then forward space to the correctblock, and finally sequentially read each record until it gets to the correct one(s) for the file or files you wantto restore. Once the desired files are restored, Bareos will stop reading the tape.Finally, instead of just reading a file for backup, during the restore, Bareos must create the file, and theoperating system must allocate disk space for the file as Bareos is restoring it.For all the above reasons the restore process is generally much slower than backing up (sometimes it takesthree times as long).
J.6.4 Restoring When Things Go Wrong
This and the following sections will try to present a few of the kinds of problems that can come up makingrestoring more difficult. We will try to provide a few ideas how to get out of these problem situations. Inaddition to what is presented here, there is more specific information on restoring a Client and your Serverin the Disaster Recovery Using Bareos chapter of this manual.
Problem My database is broken.
Solution For SQLite, use the vacuum command to try to fix the database. For either MySQL or Post-greSQL, see the vendor’s documentation. They have specific tools that check and repair databases, seethe Catalog Maintenance sections of this manual for links to vendor information.
Assuming the above does not resolve the problem, you will need to restore or rebuild your catalog.Note, if it is a matter of some inconsistencies in the Bareos tables rather than a broken database,then running bareos-dbcheck might help, but you will need to ensure that your database indexes areproperly setup.
Problem How do I restore my catalog?
Solution with a Catalog backup If you have backed up your database nightly (as you should) and youhave made a bootstrap file, you can immediately load back your database (or the ASCII SQL output).Make a copy of your current database, then re-initialize it, by running the following scripts:
376
./drop_bareos_tables
./make_bareos_tables
After re-initializing the database, you should be able to run Bareos. If you now try to use the restorecommand, it will not work because the database will be empty. However, you can manually run arestore job and specify your bootstrap file. You do so by entering the run command in the consoleand selecting the restore job. If you are using the default bareos-dir.conf, this Job will be namedRestoreFiles. Most likely it will prompt you with something such as:
Run Restore job
JobName: RestoreFiles
Bootstrap: /home/user/bareos/working/restore.bsr
Where: /tmp/bareos-restores
Replace: always
FileSet: Full Set
Client: rufus-fd
Storage: File
When: 2005-07-10 17:33:40
Catalog: MyCatalog
Priority: 10
OK to run? (yes/mod/no):
A number of the items will be different in your case. What you want to do is: to use the mod optionto change the Bootstrap to point to your saved bootstrap file; and to make sure all the other itemssuch as Client, Storage, Catalog, and Where are correct. The FileSet is not used when you specify abootstrap file. Once you have set all the correct values, run the Job and it will restore the backup ofyour database, which is most likely an ASCII dump.
You will then need to follow the instructions for your database type to recreate the database from theASCII backup file. See the Catalog Maintenance chapter of this manual for examples of the commandneeded to restore a database from an ASCII dump (they are shown in the Compacting Your XXXDatabase sections).
Also, please note that after you restore your database from an ASCII backup, you do NOT want to doa make bareos tables command, or you will probably erase your newly restored database tables.
Solution with a Job listing If you did save your database but did not make a bootstrap file, then recover-ing the database is more difficult. You will probably need to use bextract to extract the backup copy.First you should locate the listing of the job report from the last catalog backup. It has importantinformation that will allow you to quickly find your database file. For example, in the job report forthe CatalogBackup shown below, the critical items are the Volume name(s), the Volume Session Idand the Volume Session Time. If you know those, you can easily restore your Catalog.
22-Apr 10:22 HeadMan: Start Backup JobId 7510,
Job=CatalogBackup.2005-04-22_01.10.0
22-Apr 10:23 HeadMan: Bareos 1.37.14 (21Apr05): 22-Apr-2005 10:23:06
JobId: 7510
Job: CatalogBackup.2005-04-22_01.10.00
Backup Level: Full
Client: Polymatou
FileSet: "CatalogFile" 2003-04-10 01:24:01
Pool: "Default"
Storage: "DLTDrive"
Start time: 22-Apr-2005 10:21:00
End time: 22-Apr-2005 10:23:06
FD Files Written: 1
SD Files Written: 1
FD Bytes Written: 210,739,395
SD Bytes Written: 210,739,521
Rate: 1672.5 KB/s
Software Compression: None
Volume name(s): DLT-22Apr05
Volume Session Id: 11
Volume Session Time: 1114075126
Last Volume Bytes: 1,428,240,465
Non-fatal FD errors: 0
SD Errors: 0
FD termination status: OK
SD termination status: OK
Termination: Backup OK
377
From the above information, you can manually create a bootstrap file, and then follow the instructionsgiven above for restoring your database. A reconstructed bootstrap file for the above backup Job wouldlook like the following:
Volume="DLT-22Apr05"
VolSessionId=11
VolSessionTime=1114075126
FileIndex=1-1
Where we have inserted the Volume name, Volume Session Id, and Volume Session Time that corre-spond to the values in the job report. We’ve also used a FileIndex of one, which will always be thecase providing that there was only one file backed up in the job.
The disadvantage of this bootstrap file compared to what is created when you ask for one to be written,is that there is no File and Block specified, so the restore code must search all data in the Volumeto find the requested file. A fully specified bootstrap file would have the File and Blocks specified asfollows:
Volume="DLT-22Apr05"
VolSessionId=11
VolSessionTime=1114075126
VolFile=118-118
VolBlock=0-4053
FileIndex=1-1
Once you have restored the ASCII dump of the database, you will then to follow the instructions foryour database type to recreate the database from the ASCII backup file. See the Catalog Maintenancechapter of this manual for examples of the command needed to restore a database from an ASCIIdump (they are shown in the Compacting Your XXX Database sections).
Also, please note that after you restore your database from an ASCII backup, you do NOT want to doa make bareos tables command, or you will probably erase your newly restored database tables.
Solution without a Job Listing If you do not have a job listing, then it is a bit more difficult. Eitheryou use the bscan program to scan the contents of your tape into a database, which can be very timeconsuming depending on the size of the tape, or you can use the bls program to list everything on thetape, and reconstruct a bootstrap file from the bls listing for the file or files you want following theinstructions given above.
There is a specific example of how to use bls below.
Problem Trying to restore the last known good full backup by specifying item 3 on the restore menu thenthe JobId to restore, but Bareos then reports:
1 Job 0 Files
and restores nothing.
Solution Most likely the File records were pruned from the database either due to the File Retention periodexpiring or by explicitly purging the Job. By using the ”llist jobid=nn” command, you can obtain allthe important information about the job:
llist jobid=120
JobId: 120
Job: save.2005-12-05_18.27.33
Job.Name: save
PurgedFiles: 0
Type: B
Level: F
Job.ClientId: 1
Client.Name: Rufus
JobStatus: T
SchedTime: 2005-12-05 18:27:32
StartTime: 2005-12-05 18:27:35
EndTime: 2005-12-05 18:27:37
JobTDate: 1133803657
VolSessionId: 1
VolSessionTime: 1133803624
378
JobFiles: 236
JobErrors: 0
JobMissingFiles: 0
Job.PoolId: 4
Pool.Name: Full
Job.FileSetId: 1
FileSet.FileSet: BackupSet
Then you can find the Volume(s) used by doing:
sql
select VolumeName from JobMedia,Media where JobId=1 and JobMedia.MediaId=Media.MediaId;
Finally, you can create a bootstrap file as described in the previous problem above using this informa-tion.
Bareos will ask you if you would like to restore all the files in the job, and it will collect the aboveinformation and write the bootstrap file for you.
Problem You don’t have a bootstrap file, and you don’t have the Job report for the backup of your database,but you did backup the database, and you know the Volume to which it was backed up.
Solution Either bscan the tape (see below for bscanning), or better use bls to find where it is on the tape,then use bextract to restore the database. For example,
./bls -j -V DLT-22Apr05 /dev/nst0
Might produce the following output:
bls: butil.c:258 Using device: "/dev/nst0" for reading.
21-Jul 18:34 bls: Ready to read from volume "DLT-22Apr05" on device "DLTDrive"
(/dev/nst0).
Volume Record: File:blk=0:0 SessId=11 SessTime=1114075126 JobId=0 DataLen=164
...
Begin Job Session Record: File:blk=118:0 SessId=11 SessTime=1114075126
JobId=7510
Job=CatalogBackup.2005-04-22_01.10.0 Date=22-Apr-2005 10:21:00 Level=F Type=B
End Job Session Record: File:blk=118:4053 SessId=11 SessTime=1114075126
JobId=7510
Date=22-Apr-2005 10:23:06 Level=F Type=B Files=1 Bytes=210,739,395 Errors=0
Status=T
...
21-Jul 18:34 bls: End of Volume at file 201 on device "DLTDrive" (/dev/nst0),
Volume "DLT-22Apr05"
21-Jul 18:34 bls: End of all volumes.
Of course, there will be many more records printed, but we have indicated the essential lines of output.From the information on the Begin Job and End Job Session Records, you can reconstruct a bootstrapfile such as the one shown above.
Problem How can I find where a file is stored?
Solution Normally, it is not necessary, you just use the restore command to restore the most recentlysaved version (menu option 5), or a version saved before a given date (menu option 8). If you knowthe JobId of the job in which it was saved, you can use menu option 3 to enter that JobId.
If you would like to know the JobId where a file was saved, select restore menu option 2.
You can also use the query command to find information such as:
*query
Available queries:
1: List up to 20 places where a File is saved regardless of the
directory
2: List where the most recent copies of a file are saved
3: List last 20 Full Backups for a Client
4: List all backups for a Client after a specified time
5: List all backups for a Client
6: List Volume Attributes for a selected Volume
7: List Volumes used by selected JobId
8: List Volumes to Restore All Files
379
9: List Pool Attributes for a selected Pool
10: List total files/bytes by Job
11: List total files/bytes by Volume
12: List Files for a selected JobId
13: List Jobs stored on a selected MediaId
14: List Jobs stored for a given Volume name
15: List Volumes Bareos thinks are in changer
16: List Volumes likely to need replacement from age or errors
Choose a query (1-16):
Problem I didn’t backup my database. What do I do now?
Solution This is probably the worst of all cases, and you will probably have to re-create your database fromscratch and then bscan in all your volumes, which is a very long, painful, and inexact process.
There are basically three steps to take:
1. Ensure that your SQL server is running (MySQL or PostgreSQL) and that the Bareos database(normally bareos) exists. See the Prepare Bareos database chapter of the manual.
2. Ensure that the Bareos databases are created. This is also described at the above link.
3. Start and stop the Bareos Director using the propriate bareos-dir.conf file so that it can create theClient and Storage records which are not stored on the Volumes. Without these records, scanningis unable to connect the Job records to the proper client.
When the above is complete, you can begin bscanning your Volumes. Please see the bscan section ofthe Volume Utility Tools of this chapter for more details.
TODO: add the debug chapter?

380
Appendix K
Debugging
If you are running on a Linux system, and you have a set of working configuration files, it is very unlikelythat Bareos will crash. As with all software, however, it is inevitable that someday, it may crash.This chapter explains what you should do if one of the three Bareos daemons (Director, File, Storage)crashes. When we speak of crashing, we mean that the daemon terminates abnormally because of an error.There are many cases where Bareos detects errors (such as PIPE errors) and will fail a job. These are notconsidered crashes. In addition, under certain conditions, Bareos will detect a fatal in the configuration,such as lack of permission to read/write the working directory. In that case, Bareos will force itself to crashwith a SEGFAULT. However, before crashing, Bareos will normally display a message indicating why. Formore details, please read on.
K.1 Traceback
Each of the three Bareos daemons has a built-in exception handler which, in case of an error, will attemptto produce a traceback. If successful the traceback will be emailed to you.For this to work, you need to ensure that a few things are setup correctly on your system:
1. You must have a version of Bareos with debug information and not stripped of debugging sym-bols. When using a packaged version of Bareos, this requires to install the Bareos debug packages(bareos-debug on RPM based systems, bareos-dbg on Debian based systems).
2. On Linux, gdb (the GNU debugger) must be installed. On some systems such as Solaris, gdb may bereplaced by dbx.
3. By default, btraceback uses bsmtp to send the traceback via email. Therefore it expects a local mailtransfer daemon running. It send the traceback to root@localhost via localhost.
4. Some Linux distributions, e.g. Ubuntu, disable the possibility to examine the memory of other pro-cesses. While this is a good idea for hardening a system, our debug mechanismen will fail. To disablethis feature, run (as root):
root@linux:~#test −e /proc/sys/kernel/yama/ptrace scope && echo 0 > /proc/sys/kernel/yama/ptrace scope
Commands K.1: disable ptrace protection to enable debugging (required on Ubuntu Linux)
If all the above conditions are met, the daemon that crashes will produce a traceback report and email it.If the above conditions are not true, you can run the debugger by hand as described below.
K.2 Testing The Traceback
To ”manually” test the traceback feature, you simply start Bareos then obtain the PID of the main daemonthread (there are multiple threads). The output produced here will look different depending on what OSand what version of the kernel you are running.
root@linux:~# ps fax | grep bareos−dir2103 ? S 0:00 /usr/sbin/bareos-dir
Commands K.2: get the process ID of a running Bareos daemon
381
382
which in this case is 2103. Then while Bareos is running, you call the program giving it the path to theBareos executable and the PID. In this case, it is:
root@linux:~# btraceback /usr/sbin/bareos−dir 2103
Commands K.3: get traceback of running Bareos director daemon
It should produce an email showing you the current state of the daemon (in this case the Director), andthen exit leaving Bareos running as if nothing happened. If this is not the case, you will need to correctthe problem by modifying the btraceback script.
K.2.1 Getting A Traceback On Other Systems
It should be possible to produce a similar traceback on systems other than Linux, either using gdb or someother debugger. Solaris with dbx loaded works quite fine. On other systems, you will need to modify thebtraceback program to invoke the correct debugger, and possibly correct the btraceback.gdb script tohave appropriate commands for your debugger. Please keep in mind that for any debugger to work, it willmost likely need to run as root.
K.3 Manually Running Bareos Under The Debugger
If for some reason you cannot get the automatic traceback, or if you want to interactively examine thevariable contents after a crash, you can run Bareos under the debugger. Assuming you want to run theStorage daemon under the debugger (the technique is the same for the other daemons, only the namechanges), you would do the following:
1. The Director and the File daemon should be running but the Storage daemon should not.
2. Start the Storage daemon under the debugger:
root@linux:~# gdb /usr/sbin/bareos−sd(gdb) run −f −s −d 200
Commands K.4: run the Bareos Storage daemon in the debugger
Parameter:
-f foreground
-s no signals
-d nnn debug level
See section daemon command line options for a detailed list of options.
3. At this point, Bareos will be fully operational.
4. In another shell command window, start the Console program and do what is necessary to cause Bareosto die.
5. When Bareos crashes, the gdb shell window will become active and gdb will show you the error thatoccurred.
6. To get a general traceback of all threads, issue the following command:
(gdb) thread apply all bt
Commands K.5: run the Bareos Storage daemon in the debugger
After that you can issue any debugging command.
Appendix L
Release Notes
The technical changelog is automatically generated from the Bareos bug tracking system, see http://bugs.
bareos.org/changelog_page.php.Please note, that some of the subreleases are only internal development releases.Open issues for a specific version are shown at http://bugs.bareos.org/roadmap_page.php.The overview about new feature of a release are shown at https://github.com/bareos/bareos and in theindex of this document.This chapter concentrates on things to do when updating an existing Baroes installation.Please note! While all the source code is published on GitHub, the releases of packages on http:
// download. baroes. org is limited to the initial versions of a major release. Later maintenance releasesare only published on https: // download. bareos. com .
Bareos-14.2
It is known, that drop_database scripts will not longer work on PostgreSQL < 8.4. However, as drop_
database scripts are very seldom needed, package dependencies do not yet enforce PostgreSQL >= 8.4. Weplan to ensure this in future version of Bareos.
bareos-14.2.5
Code Release 2015-06-01Database Version 2003 (unchanged)Release Ticket Ticket #447Url https://download.bareos.com/bareos/release/14.2/
This release contains several bugfixes and added the platforms Debian 8 and Fedora 21.
bareos-14.2.4
Code Release 2015-03-23Database Version 2003 (unchanged)Release Ticket Ticket #420Url https://download.bareos.com/bareos/release/14.2/
This release contains several bugfixes, including one major bugfix (Ticket #437), relevant for those of youusing backup to disk with autolabeling enabled.It can lead to loss of a 64k block of data when all of this conditions apply:
� backups are written to disk (tape backups are not affected)
� autolabelling is enabled
� a backup spans over multiple volumes
� the additional volumes are newly created and labeled during the backup
If existing volumes are used for backups spanning over multiple volumes, the problem does not occur.We recommend to update to the latest packages as soon as possible.If an update is not possible immediately, autolabeling should be disabled and volumes should be labelledmanually until the update can be installed.
383
384
If you are affected by the 64k bug, we recommend that you schedule a full backup after fixing the problemin order to get a proper full backup of all files.
bareos-14.2.3
Code Release 2015-02-02Database Version 2003 (unchanged)Release Ticket Ticket #393Url https://download.bareos.com/bareos/release/14.2/
bareos-14.2.2
Code Release 2014-12-12Database Version 2003 (unchanged)
Database update required if updating from version < 14.2.See the Updating Bareos section for details.
Url http://download.bareos.org/bareos/release/14.2/
https://download.bareos.com/bareos/release/14.2/First stable release of the Bareos 14.2 branch.
bareos-14.2.1
Code Release 2014-09-22Database Version 2003
Database update required, see the Updating Bareos section.Url http://download.bareos.org/bareos/release/14.2/
Beta release.
Bareos-13.2
bareos-13.2.4
Code Release 2014-11-05Database Version 2002 (unchanged)Url https://download.bareos.com/bareos/release/13.2/
bareos-13.2.3
Code Release 2014-03-11Database Version 2002
Database update required, see the Updating Bareos section.Url https://download.bareos.com/bareos/release/13.2/
It is known, that drop_database scripts will not longer work on PostgreSQL < 8.4. However, as drop_
database scripts are very seldom needed, package dependencies do not yet enforce PostgreSQL >= 8.4. Weplan to ensure this in future version of Bareos.
bareos-13.2.2
Code Release 2013-11-19Database Version 2001 (unchanged)Url http://download.bareos.org/bareos/release/13.2/
https://download.bareos.com/bareos/release/13.2/
Bareos-12.4
bareos-12.4.6
Code Release 2013-11-19Database Version 2001 (unchanged)Url http://download.bareos.org/bareos/release/12.4/
https://download.bareos.com/bareos/release/12.4/
385
bareos-12.4.5
Code Release 2013-09-10Database Version 2001 (unchanged)Url https://download.bareos.com/bareos/release/12.4/
bareos-12.4.4
Code Release 2013-06-17Database Version 2001 (unchanged)Url http://download.bareos.org/bareos/release/12.4/
https://download.bareos.com/bareos/release/12.4/
bareos-12.4.3
Code Release 2013-04-15Database Version 2001 (unchanged)Url http://download.bareos.org/bareos/release/12.4/
https://download.bareos.com/bareos/release/12.4/
bareos-12.4.2
Code Release 2013-03-03Database Version 2001 (unchanged)
bareos-12.4.1
Code Release 2013-02-06Database Version 2001 (initial)
This have been the initial release of Bareos.Information about migrating from Bacula to Bareos are available at Howto upgrade from Bacula to Bareosand in section Compatibility between Bareos and Bacula.

386

Appendix M
Bareos Copyright, Trademark, andLicenses
M.1 Licenses Overview
There are a number of different licenses that are used in Bareos.
FDL
The GNU Free Documentation License (FDL) is used for this manual, which is a free and open license. Thismeans that you may freely reproduce it and even make changes to it.
AGPL
The vast bulk of the source code is released under the GNU Affero General Public License (AGPL) version3.
Most of this code is copyrighted: Copyright ©2000-2012 Free Software Foundation Europe e.V.
All new code is copyrighted: Copyright ©2013-2013 Bareos GmbH & Co. KG
Portions may be copyrighted by other people. These files are released under different licenses which arecompatible with the AGPL license.
LGPL
Some of the Bareos library source code is released under the GNU Lesser General Public License (LGPL).This permits third parties to use these parts of our code in their proprietary programs to interface to Bareos.
Public Domain
Some of the Bareos code, or code that Bareos references, has been released to the public domain. E.g. md5.c,SQLite.
Trademark
Bareos®
is a registered trademark of Bareos GmbH & Co. KG.
Bacula®
is a registered trademark of Kern Sibbald.
Disclaimer
NO WARRANTY
BECAUSE THE PROGRAM IS LICENSED FREE OF CHARGE, THERE IS NO WARRANTY FOR THEPROGRAM, TO THE EXTENT PERMITTED BY APPLICABLE LAW. EXCEPT WHEN OTHERWISESTATED IN WRITING THE COPYRIGHT HOLDERS AND/OR OTHER PARTIES PROVIDE THEPROGRAM ”AS IS” WITHOUT WARRANTY OF ANY KIND, EITHER EXPRESSED OR IMPLIED,INCLUDING, BUT NOT LIMITED TO, THE IMPLIED WARRANTIES OF MERCHANTABILITY AND
387
388
FITNESS FOR A PARTICULAR PURPOSE. THE ENTIRE RISK AS TO THE QUALITY AND PER-FORMANCE OF THE PROGRAM IS WITH YOU. SHOULD THE PROGRAM PROVE DEFECTIVE,YOU ASSUME THE COST OF ALL NECESSARY SERVICING, REPAIR OR CORRECTION.
IN NO EVENT UNLESS REQUIRED BY APPLICABLE LAW OR AGREED TO IN WRITING WILLANY COPYRIGHT HOLDER, OR ANY OTHER PARTY WHO MAY MODIFY AND/OR REDIS-TRIBUTE THE PROGRAM AS PERMITTED ABOVE, BE LIABLE TO YOU FOR DAMAGES, IN-CLUDING ANY GENERAL, SPECIAL, INCIDENTAL OR CONSEQUENTIAL DAMAGES ARISINGOUT OF THE USE OR INABILITY TO USE THE PROGRAM (INCLUDING BUT NOT LIMITED TOLOSS OF DATA OR DATA BEING RENDERED INACCURATE OR LOSSES SUSTAINED BY YOUOR THIRD PARTIES OR A FAILURE OF THE PROGRAM TO OPERATE WITH ANY OTHER PRO-GRAMS), EVEN IF SUCH HOLDER OR OTHER PARTY HAS BEEN ADVISED OF THE POSSIBILITYOF SUCH DAMAGES.
Other Copyrights and Trademarks
Certain words and/or products are Copyrighted or Trademarked such as Windows (by Microsoft). Sincethey are numerous, and we are not necessarily aware of the details of each, we dont try to list them here.However, we acknowledge all such Copyrights and Trademarks, and if any copyright or trademark holderwishes a specific acknowledgment, notify us, and we will be happy to add it where appropriate.
389
M.2 GNU Free Documentation License
GNU Free Documentation License
Version 1.3, 3 November 2008
Copyright (C) 2000, 2001, 2002, 2007, 2008 Free Software Foundation, Inc.
<http://fsf.org/>
Everyone is permitted to copy and distribute verbatim copies
of this license document, but changing it is not allowed.
0. PREAMBLE
The purpose of this License is to make a manual, textbook, or other
functional and useful document "free" in the sense of freedom: to
assure everyone the effective freedom to copy and redistribute it,
with or without modifying it, either commercially or noncommercially.
Secondarily, this License preserves for the author and publisher a way
to get credit for their work, while not being considered responsible
for modifications made by others.
This License is a kind of "copyleft", which means that derivative
works of the document must themselves be free in the same sense. It
complements the GNU General Public License, which is a copyleft
license designed for free software.
We have designed this License in order to use it for manuals for free
software, because free software needs free documentation: a free
program should come with manuals providing the same freedoms that the
software does. But this License is not limited to software manuals;
it can be used for any textual work, regardless of subject matter or
whether it is published as a printed book. We recommend this License
principally for works whose purpose is instruction or reference.
1. APPLICABILITY AND DEFINITIONS
This License applies to any manual or other work, in any medium, that
contains a notice placed by the copyright holder saying it can be
distributed under the terms of this License. Such a notice grants a
world-wide, royalty-free license, unlimited in duration, to use that
work under the conditions stated herein. The "Document", below,
refers to any such manual or work. Any member of the public is a
licensee, and is addressed as "you". You accept the license if you
copy, modify or distribute the work in a way requiring permission
under copyright law.
A "Modified Version" of the Document means any work containing the
Document or a portion of it, either copied verbatim, or with
modifications and/or translated into another language.
A "Secondary Section" is a named appendix or a front-matter section of
the Document that deals exclusively with the relationship of the
publishers or authors of the Document to the Document’s overall
subject (or to related matters) and contains nothing that could fall
directly within that overall subject. (Thus, if the Document is in
part a textbook of mathematics, a Secondary Section may not explain
any mathematics.) The relationship could be a matter of historical
connection with the subject or with related matters, or of legal,

390
commercial, philosophical, ethical or political position regarding
them.
The "Invariant Sections" are certain Secondary Sections whose titles
are designated, as being those of Invariant Sections, in the notice
that says that the Document is released under this License. If a
section does not fit the above definition of Secondary then it is not
allowed to be designated as Invariant. The Document may contain zero
Invariant Sections. If the Document does not identify any Invariant
Sections then there are none.
The "Cover Texts" are certain short passages of text that are listed,
as Front-Cover Texts or Back-Cover Texts, in the notice that says that
the Document is released under this License. A Front-Cover Text may
be at most 5 words, and a Back-Cover Text may be at most 25 words.
A "Transparent" copy of the Document means a machine-readable copy,
represented in a format whose specification is available to the
general public, that is suitable for revising the document
straightforwardly with generic text editors or (for images composed of
pixels) generic paint programs or (for drawings) some widely available
drawing editor, and that is suitable for input to text formatters or
for automatic translation to a variety of formats suitable for input
to text formatters. A copy made in an otherwise Transparent file
format whose markup, or absence of markup, has been arranged to thwart
or discourage subsequent modification by readers is not Transparent.
An image format is not Transparent if used for any substantial amount
of text. A copy that is not "Transparent" is called "Opaque".
Examples of suitable formats for Transparent copies include plain
ASCII without markup, Texinfo input format, LaTeX input format, SGML
or XML using a publicly available DTD, and standard-conforming simple
HTML, PostScript or PDF designed for human modification. Examples of
transparent image formats include PNG, XCF and JPG. Opaque formats
include proprietary formats that can be read and edited only by
proprietary word processors, SGML or XML for which the DTD and/or
processing tools are not generally available, and the
machine-generated HTML, PostScript or PDF produced by some word
processors for output purposes only.
The "Title Page" means, for a printed book, the title page itself,
plus such following pages as are needed to hold, legibly, the material
this License requires to appear in the title page. For works in
formats which do not have any title page as such, "Title Page" means
the text near the most prominent appearance of the work’s title,
preceding the beginning of the body of the text.
The "publisher" means any person or entity that distributes copies of
the Document to the public.
A section "Entitled XYZ" means a named subunit of the Document whose
title either is precisely XYZ or contains XYZ in parentheses following
text that translates XYZ in another language. (Here XYZ stands for a
specific section name mentioned below, such as "Acknowledgements",
"Dedications", "Endorsements", or "History".) To "Preserve the Title"
of such a section when you modify the Document means that it remains a
section "Entitled XYZ" according to this definition.
The Document may include Warranty Disclaimers next to the notice which
states that this License applies to the Document. These Warranty
391
Disclaimers are considered to be included by reference in this
License, but only as regards disclaiming warranties: any other
implication that these Warranty Disclaimers may have is void and has
no effect on the meaning of this License.
2. VERBATIM COPYING
You may copy and distribute the Document in any medium, either
commercially or noncommercially, provided that this License, the
copyright notices, and the license notice saying this License applies
to the Document are reproduced in all copies, and that you add no
other conditions whatsoever to those of this License. You may not use
technical measures to obstruct or control the reading or further
copying of the copies you make or distribute. However, you may accept
compensation in exchange for copies. If you distribute a large enough
number of copies you must also follow the conditions in section 3.
You may also lend copies, under the same conditions stated above, and
you may publicly display copies.
3. COPYING IN QUANTITY
If you publish printed copies (or copies in media that commonly have
printed covers) of the Document, numbering more than 100, and the
Document’s license notice requires Cover Texts, you must enclose the
copies in covers that carry, clearly and legibly, all these Cover
Texts: Front-Cover Texts on the front cover, and Back-Cover Texts on
the back cover. Both covers must also clearly and legibly identify
you as the publisher of these copies. The front cover must present
the full title with all words of the title equally prominent and
visible. You may add other material on the covers in addition.
Copying with changes limited to the covers, as long as they preserve
the title of the Document and satisfy these conditions, can be treated
as verbatim copying in other respects.
If the required texts for either cover are too voluminous to fit
legibly, you should put the first ones listed (as many as fit
reasonably) on the actual cover, and continue the rest onto adjacent
pages.
If you publish or distribute Opaque copies of the Document numbering
more than 100, you must either include a machine-readable Transparent
copy along with each Opaque copy, or state in or with each Opaque copy
a computer-network location from which the general network-using
public has access to download using public-standard network protocols
a complete Transparent copy of the Document, free of added material.
If you use the latter option, you must take reasonably prudent steps,
when you begin distribution of Opaque copies in quantity, to ensure
that this Transparent copy will remain thus accessible at the stated
location until at least one year after the last time you distribute an
Opaque copy (directly or through your agents or retailers) of that
edition to the public.
It is requested, but not required, that you contact the authors of the
Document well before redistributing any large number of copies, to
give them a chance to provide you with an updated version of the
Document.
392
4. MODIFICATIONS
You may copy and distribute a Modified Version of the Document under
the conditions of sections 2 and 3 above, provided that you release
the Modified Version under precisely this License, with the Modified
Version filling the role of the Document, thus licensing distribution
and modification of the Modified Version to whoever possesses a copy
of it. In addition, you must do these things in the Modified Version:
A. Use in the Title Page (and on the covers, if any) a title distinct
from that of the Document, and from those of previous versions
(which should, if there were any, be listed in the History section
of the Document). You may use the same title as a previous version
if the original publisher of that version gives permission.
B. List on the Title Page, as authors, one or more persons or entities
responsible for authorship of the modifications in the Modified
Version, together with at least five of the principal authors of the
Document (all of its principal authors, if it has fewer than five),
unless they release you from this requirement.
C. State on the Title page the name of the publisher of the
Modified Version, as the publisher.
D. Preserve all the copyright notices of the Document.
E. Add an appropriate copyright notice for your modifications
adjacent to the other copyright notices.
F. Include, immediately after the copyright notices, a license notice
giving the public permission to use the Modified Version under the
terms of this License, in the form shown in the Addendum below.
G. Preserve in that license notice the full lists of Invariant Sections
and required Cover Texts given in the Document’s license notice.
H. Include an unaltered copy of this License.
I. Preserve the section Entitled "History", Preserve its Title, and add
to it an item stating at least the title, year, new authors, and
publisher of the Modified Version as given on the Title Page. If
there is no section Entitled "History" in the Document, create one
stating the title, year, authors, and publisher of the Document as
given on its Title Page, then add an item describing the Modified
Version as stated in the previous sentence.
J. Preserve the network location, if any, given in the Document for
public access to a Transparent copy of the Document, and likewise
the network locations given in the Document for previous versions
it was based on. These may be placed in the "History" section.
You may omit a network location for a work that was published at
least four years before the Document itself, or if the original
publisher of the version it refers to gives permission.
K. For any section Entitled "Acknowledgements" or "Dedications",
Preserve the Title of the section, and preserve in the section all
the substance and tone of each of the contributor acknowledgements
and/or dedications given therein.
L. Preserve all the Invariant Sections of the Document,
unaltered in their text and in their titles. Section numbers
or the equivalent are not considered part of the section titles.
M. Delete any section Entitled "Endorsements". Such a section
may not be included in the Modified Version.
N. Do not retitle any existing section to be Entitled "Endorsements"
or to conflict in title with any Invariant Section.
O. Preserve any Warranty Disclaimers.
If the Modified Version includes new front-matter sections or
appendices that qualify as Secondary Sections and contain no material
copied from the Document, you may at your option designate some or all
393
of these sections as invariant. To do this, add their titles to the
list of Invariant Sections in the Modified Version’s license notice.
These titles must be distinct from any other section titles.
You may add a section Entitled "Endorsements", provided it contains
nothing but endorsements of your Modified Version by various
parties--for example, statements of peer review or that the text has
been approved by an organization as the authoritative definition of a
standard.
You may add a passage of up to five words as a Front-Cover Text, and a
passage of up to 25 words as a Back-Cover Text, to the end of the list
of Cover Texts in the Modified Version. Only one passage of
Front-Cover Text and one of Back-Cover Text may be added by (or
through arrangements made by) any one entity. If the Document already
includes a cover text for the same cover, previously added by you or
by arrangement made by the same entity you are acting on behalf of,
you may not add another; but you may replace the old one, on explicit
permission from the previous publisher that added the old one.
The author(s) and publisher(s) of the Document do not by this License
give permission to use their names for publicity for or to assert or
imply endorsement of any Modified Version.
5. COMBINING DOCUMENTS
You may combine the Document with other documents released under this
License, under the terms defined in section 4 above for modified
versions, provided that you include in the combination all of the
Invariant Sections of all of the original documents, unmodified, and
list them all as Invariant Sections of your combined work in its
license notice, and that you preserve all their Warranty Disclaimers.
The combined work need only contain one copy of this License, and
multiple identical Invariant Sections may be replaced with a single
copy. If there are multiple Invariant Sections with the same name but
different contents, make the title of each such section unique by
adding at the end of it, in parentheses, the name of the original
author or publisher of that section if known, or else a unique number.
Make the same adjustment to the section titles in the list of
Invariant Sections in the license notice of the combined work.
In the combination, you must combine any sections Entitled "History"
in the various original documents, forming one section Entitled
"History"; likewise combine any sections Entitled "Acknowledgements",
and any sections Entitled "Dedications". You must delete all sections
Entitled "Endorsements".
6. COLLECTIONS OF DOCUMENTS
You may make a collection consisting of the Document and other
documents released under this License, and replace the individual
copies of this License in the various documents with a single copy
that is included in the collection, provided that you follow the rules
of this License for verbatim copying of each of the documents in all
other respects.
You may extract a single document from such a collection, and

394
distribute it individually under this License, provided you insert a
copy of this License into the extracted document, and follow this
License in all other respects regarding verbatim copying of that
document.
7. AGGREGATION WITH INDEPENDENT WORKS
A compilation of the Document or its derivatives with other separate
and independent documents or works, in or on a volume of a storage or
distribution medium, is called an "aggregate" if the copyright
resulting from the compilation is not used to limit the legal rights
of the compilation’s users beyond what the individual works permit.
When the Document is included in an aggregate, this License does not
apply to the other works in the aggregate which are not themselves
derivative works of the Document.
If the Cover Text requirement of section 3 is applicable to these
copies of the Document, then if the Document is less than one half of
the entire aggregate, the Document’s Cover Texts may be placed on
covers that bracket the Document within the aggregate, or the
electronic equivalent of covers if the Document is in electronic form.
Otherwise they must appear on printed covers that bracket the whole
aggregate.
8. TRANSLATION
Translation is considered a kind of modification, so you may
distribute translations of the Document under the terms of section 4.
Replacing Invariant Sections with translations requires special
permission from their copyright holders, but you may include
translations of some or all Invariant Sections in addition to the
original versions of these Invariant Sections. You may include a
translation of this License, and all the license notices in the
Document, and any Warranty Disclaimers, provided that you also include
the original English version of this License and the original versions
of those notices and disclaimers. In case of a disagreement between
the translation and the original version of this License or a notice
or disclaimer, the original version will prevail.
If a section in the Document is Entitled "Acknowledgements",
"Dedications", or "History", the requirement (section 4) to Preserve
its Title (section 1) will typically require changing the actual
title.
9. TERMINATION
You may not copy, modify, sublicense, or distribute the Document
except as expressly provided under this License. Any attempt
otherwise to copy, modify, sublicense, or distribute it is void, and
will automatically terminate your rights under this License.
However, if you cease all violation of this License, then your license
from a particular copyright holder is reinstated (a) provisionally,
unless and until the copyright holder explicitly and finally
terminates your license, and (b) permanently, if the copyright holder
fails to notify you of the violation by some reasonable means prior to
60 days after the cessation.
395
Moreover, your license from a particular copyright holder is
reinstated permanently if the copyright holder notifies you of the
violation by some reasonable means, this is the first time you have
received notice of violation of this License (for any work) from that
copyright holder, and you cure the violation prior to 30 days after
your receipt of the notice.
Termination of your rights under this section does not terminate the
licenses of parties who have received copies or rights from you under
this License. If your rights have been terminated and not permanently
reinstated, receipt of a copy of some or all of the same material does
not give you any rights to use it.
10. FUTURE REVISIONS OF THIS LICENSE
The Free Software Foundation may publish new, revised versions of the
GNU Free Documentation License from time to time. Such new versions
will be similar in spirit to the present version, but may differ in
detail to address new problems or concerns. See
http://www.gnu.org/copyleft/.
Each version of the License is given a distinguishing version number.
If the Document specifies that a particular numbered version of this
License "or any later version" applies to it, you have the option of
following the terms and conditions either of that specified version or
of any later version that has been published (not as a draft) by the
Free Software Foundation. If the Document does not specify a version
number of this License, you may choose any version ever published (not
as a draft) by the Free Software Foundation. If the Document
specifies that a proxy can decide which future versions of this
License can be used, that proxy’s public statement of acceptance of a
version permanently authorizes you to choose that version for the
Document.
11. RELICENSING
"Massive Multiauthor Collaboration Site" (or "MMC Site") means any
World Wide Web server that publishes copyrightable works and also
provides prominent facilities for anybody to edit those works. A
public wiki that anybody can edit is an example of such a server. A
"Massive Multiauthor Collaboration" (or "MMC") contained in the site
means any set of copyrightable works thus published on the MMC site.
"CC-BY-SA" means the Creative Commons Attribution-Share Alike 3.0
license published by Creative Commons Corporation, a not-for-profit
corporation with a principal place of business in San Francisco,
California, as well as future copyleft versions of that license
published by that same organization.
"Incorporate" means to publish or republish a Document, in whole or in
part, as part of another Document.
An MMC is "eligible for relicensing" if it is licensed under this
License, and if all works that were first published under this License
somewhere other than this MMC, and subsequently incorporated in whole or
in part into the MMC, (1) had no cover texts or invariant sections, and
(2) were thus incorporated prior to November 1, 2008.
396
The operator of an MMC Site may republish an MMC contained in the site
under CC-BY-SA on the same site at any time before August 1, 2009,
provided the MMC is eligible for relicensing.
ADDENDUM: How to use this License for your documents
To use this License in a document you have written, include a copy of
the License in the document and put the following copyright and
license notices just after the title page:
Copyright (c) YEAR YOUR NAME.
Permission is granted to copy, distribute and/or modify this document
under the terms of the GNU Free Documentation License, Version 1.3
or any later version published by the Free Software Foundation;
with no Invariant Sections, no Front-Cover Texts, and no Back-Cover Texts.
A copy of the license is included in the section entitled "GNU
Free Documentation License".
If you have Invariant Sections, Front-Cover Texts and Back-Cover Texts,
replace the "with...Texts." line with this:
with the Invariant Sections being LIST THEIR TITLES, with the
Front-Cover Texts being LIST, and with the Back-Cover Texts being LIST.
If you have Invariant Sections without Cover Texts, or some other
combination of the three, merge those two alternatives to suit the
situation.
If your document contains nontrivial examples of program code, we
recommend releasing these examples in parallel under your choice of
free software license, such as the GNU General Public License,
to permit their use in free software.
397
M.3 GNU Affero Gerneral Public License
GNU AFFERO GENERAL PUBLIC LICENSE
Version 3, 19 November 2007
Copyright (C) 2007 Free Software Foundation, Inc. <http://fsf.org/>
Everyone is permitted to copy and distribute verbatim copies
of this license document, but changing it is not allowed.
Preamble
The GNU Affero General Public License is a free, copyleft license for
software and other kinds of works, specifically designed to ensure
cooperation with the community in the case of network server software.
The licenses for most software and other practical works are designed
to take away your freedom to share and change the works. By contrast,
our General Public Licenses are intended to guarantee your freedom to
share and change all versions of a program--to make sure it remains free
software for all its users.
When we speak of free software, we are referring to freedom, not
price. Our General Public Licenses are designed to make sure that you
have the freedom to distribute copies of free software (and charge for
them if you wish), that you receive source code or can get it if you
want it, that you can change the software or use pieces of it in new
free programs, and that you know you can do these things.
Developers that use our General Public Licenses protect your rights
with two steps: (1) assert copyright on the software, and (2) offer
you this License which gives you legal permission to copy, distribute
and/or modify the software.
A secondary benefit of defending all users’ freedom is that
improvements made in alternate versions of the program, if they
receive widespread use, become available for other developers to
incorporate. Many developers of free software are heartened and
encouraged by the resulting cooperation. However, in the case of
software used on network servers, this result may fail to come about.
The GNU General Public License permits making a modified version and
letting the public access it on a server without ever releasing its
source code to the public.
The GNU Affero General Public License is designed specifically to
ensure that, in such cases, the modified source code becomes available
to the community. It requires the operator of a network server to
provide the source code of the modified version running there to the
users of that server. Therefore, public use of a modified version, on
a publicly accessible server, gives the public access to the source
code of the modified version.
An older license, called the Affero General Public License and
published by Affero, was designed to accomplish similar goals. This is
a different license, not a version of the Affero GPL, but Affero has
released a new version of the Affero GPL which permits relicensing under
this license.
The precise terms and conditions for copying, distribution and
modification follow.
398
TERMS AND CONDITIONS
0. Definitions.
"This License" refers to version 3 of the GNU Affero General Public License.
"Copyright" also means copyright-like laws that apply to other kinds of
works, such as semiconductor masks.
"The Program" refers to any copyrightable work licensed under this
License. Each licensee is addressed as "you". "Licensees" and
"recipients" may be individuals or organizations.
To "modify" a work means to copy from or adapt all or part of the work
in a fashion requiring copyright permission, other than the making of an
exact copy. The resulting work is called a "modified version" of the
earlier work or a work "based on" the earlier work.
A "covered work" means either the unmodified Program or a work based
on the Program.
To "propagate" a work means to do anything with it that, without
permission, would make you directly or secondarily liable for
infringement under applicable copyright law, except executing it on a
computer or modifying a private copy. Propagation includes copying,
distribution (with or without modification), making available to the
public, and in some countries other activities as well.
To "convey" a work means any kind of propagation that enables other
parties to make or receive copies. Mere interaction with a user through
a computer network, with no transfer of a copy, is not conveying.
An interactive user interface displays "Appropriate Legal Notices"
to the extent that it includes a convenient and prominently visible
feature that (1) displays an appropriate copyright notice, and (2)
tells the user that there is no warranty for the work (except to the
extent that warranties are provided), that licensees may convey the
work under this License, and how to view a copy of this License. If
the interface presents a list of user commands or options, such as a
menu, a prominent item in the list meets this criterion.
1. Source Code.
The "source code" for a work means the preferred form of the work
for making modifications to it. "Object code" means any non-source
form of a work.
A "Standard Interface" means an interface that either is an official
standard defined by a recognized standards body, or, in the case of
interfaces specified for a particular programming language, one that
is widely used among developers working in that language.
The "System Libraries" of an executable work include anything, other
than the work as a whole, that (a) is included in the normal form of
packaging a Major Component, but which is not part of that Major
Component, and (b) serves only to enable use of the work with that
Major Component, or to implement a Standard Interface for which an
implementation is available to the public in source code form. A
"Major Component", in this context, means a major essential component
(kernel, window system, and so on) of the specific operating system
399
(if any) on which the executable work runs, or a compiler used to
produce the work, or an object code interpreter used to run it.
The "Corresponding Source" for a work in object code form means all
the source code needed to generate, install, and (for an executable
work) run the object code and to modify the work, including scripts to
control those activities. However, it does not include the work’s
System Libraries, or general-purpose tools or generally available free
programs which are used unmodified in performing those activities but
which are not part of the work. For example, Corresponding Source
includes interface definition files associated with source files for
the work, and the source code for shared libraries and dynamically
linked subprograms that the work is specifically designed to require,
such as by intimate data communication or control flow between those
subprograms and other parts of the work.
The Corresponding Source need not include anything that users
can regenerate automatically from other parts of the Corresponding
Source.
The Corresponding Source for a work in source code form is that
same work.
2. Basic Permissions.
All rights granted under this License are granted for the term of
copyright on the Program, and are irrevocable provided the stated
conditions are met. This License explicitly affirms your unlimited
permission to run the unmodified Program. The output from running a
covered work is covered by this License only if the output, given its
content, constitutes a covered work. This License acknowledges your
rights of fair use or other equivalent, as provided by copyright law.
You may make, run and propagate covered works that you do not
convey, without conditions so long as your license otherwise remains
in force. You may convey covered works to others for the sole purpose
of having them make modifications exclusively for you, or provide you
with facilities for running those works, provided that you comply with
the terms of this License in conveying all material for which you do
not control copyright. Those thus making or running the covered works
for you must do so exclusively on your behalf, under your direction
and control, on terms that prohibit them from making any copies of
your copyrighted material outside their relationship with you.
Conveying under any other circumstances is permitted solely under
the conditions stated below. Sublicensing is not allowed; section 10
makes it unnecessary.
3. Protecting Users’ Legal Rights From Anti-Circumvention Law.
No covered work shall be deemed part of an effective technological
measure under any applicable law fulfilling obligations under article
11 of the WIPO copyright treaty adopted on 20 December 1996, or
similar laws prohibiting or restricting circumvention of such
measures.
When you convey a covered work, you waive any legal power to forbid
circumvention of technological measures to the extent such circumvention
is effected by exercising rights under this License with respect to
the covered work, and you disclaim any intention to limit operation or
400
modification of the work as a means of enforcing, against the work’s
users, your or third parties’ legal rights to forbid circumvention of
technological measures.
4. Conveying Verbatim Copies.
You may convey verbatim copies of the Program’s source code as you
receive it, in any medium, provided that you conspicuously and
appropriately publish on each copy an appropriate copyright notice;
keep intact all notices stating that this License and any
non-permissive terms added in accord with section 7 apply to the code;
keep intact all notices of the absence of any warranty; and give all
recipients a copy of this License along with the Program.
You may charge any price or no price for each copy that you convey,
and you may offer support or warranty protection for a fee.
5. Conveying Modified Source Versions.
You may convey a work based on the Program, or the modifications to
produce it from the Program, in the form of source code under the
terms of section 4, provided that you also meet all of these conditions:
a) The work must carry prominent notices stating that you modified
it, and giving a relevant date.
b) The work must carry prominent notices stating that it is
released under this License and any conditions added under section
7. This requirement modifies the requirement in section 4 to
"keep intact all notices".
c) You must license the entire work, as a whole, under this
License to anyone who comes into possession of a copy. This
License will therefore apply, along with any applicable section 7
additional terms, to the whole of the work, and all its parts,
regardless of how they are packaged. This License gives no
permission to license the work in any other way, but it does not
invalidate such permission if you have separately received it.
d) If the work has interactive user interfaces, each must display
Appropriate Legal Notices; however, if the Program has interactive
interfaces that do not display Appropriate Legal Notices, your
work need not make them do so.
A compilation of a covered work with other separate and independent
works, which are not by their nature extensions of the covered work,
and which are not combined with it such as to form a larger program,
in or on a volume of a storage or distribution medium, is called an
"aggregate" if the compilation and its resulting copyright are not
used to limit the access or legal rights of the compilation’s users
beyond what the individual works permit. Inclusion of a covered work
in an aggregate does not cause this License to apply to the other
parts of the aggregate.
6. Conveying Non-Source Forms.
You may convey a covered work in object code form under the terms
of sections 4 and 5, provided that you also convey the
machine-readable Corresponding Source under the terms of this License,
in one of these ways:
401
a) Convey the object code in, or embodied in, a physical product
(including a physical distribution medium), accompanied by the
Corresponding Source fixed on a durable physical medium
customarily used for software interchange.
b) Convey the object code in, or embodied in, a physical product
(including a physical distribution medium), accompanied by a
written offer, valid for at least three years and valid for as
long as you offer spare parts or customer support for that product
model, to give anyone who possesses the object code either (1) a
copy of the Corresponding Source for all the software in the
product that is covered by this License, on a durable physical
medium customarily used for software interchange, for a price no
more than your reasonable cost of physically performing this
conveying of source, or (2) access to copy the
Corresponding Source from a network server at no charge.
c) Convey individual copies of the object code with a copy of the
written offer to provide the Corresponding Source. This
alternative is allowed only occasionally and noncommercially, and
only if you received the object code with such an offer, in accord
with subsection 6b.
d) Convey the object code by offering access from a designated
place (gratis or for a charge), and offer equivalent access to the
Corresponding Source in the same way through the same place at no
further charge. You need not require recipients to copy the
Corresponding Source along with the object code. If the place to
copy the object code is a network server, the Corresponding Source
may be on a different server (operated by you or a third party)
that supports equivalent copying facilities, provided you maintain
clear directions next to the object code saying where to find the
Corresponding Source. Regardless of what server hosts the
Corresponding Source, you remain obligated to ensure that it is
available for as long as needed to satisfy these requirements.
e) Convey the object code using peer-to-peer transmission, provided
you inform other peers where the object code and Corresponding
Source of the work are being offered to the general public at no
charge under subsection 6d.
A separable portion of the object code, whose source code is excluded
from the Corresponding Source as a System Library, need not be
included in conveying the object code work.
A "User Product" is either (1) a "consumer product", which means any
tangible personal property which is normally used for personal, family,
or household purposes, or (2) anything designed or sold for incorporation
into a dwelling. In determining whether a product is a consumer product,
doubtful cases shall be resolved in favor of coverage. For a particular
product received by a particular user, "normally used" refers to a
typical or common use of that class of product, regardless of the status
of the particular user or of the way in which the particular user
actually uses, or expects or is expected to use, the product. A product
is a consumer product regardless of whether the product has substantial
commercial, industrial or non-consumer uses, unless such uses represent
the only significant mode of use of the product.
"Installation Information" for a User Product means any methods,
402
procedures, authorization keys, or other information required to install
and execute modified versions of a covered work in that User Product from
a modified version of its Corresponding Source. The information must
suffice to ensure that the continued functioning of the modified object
code is in no case prevented or interfered with solely because
modification has been made.
If you convey an object code work under this section in, or with, or
specifically for use in, a User Product, and the conveying occurs as
part of a transaction in which the right of possession and use of the
User Product is transferred to the recipient in perpetuity or for a
fixed term (regardless of how the transaction is characterized), the
Corresponding Source conveyed under this section must be accompanied
by the Installation Information. But this requirement does not apply
if neither you nor any third party retains the ability to install
modified object code on the User Product (for example, the work has
been installed in ROM).
The requirement to provide Installation Information does not include a
requirement to continue to provide support service, warranty, or updates
for a work that has been modified or installed by the recipient, or for
the User Product in which it has been modified or installed. Access to a
network may be denied when the modification itself materially and
adversely affects the operation of the network or violates the rules and
protocols for communication across the network.
Corresponding Source conveyed, and Installation Information provided,
in accord with this section must be in a format that is publicly
documented (and with an implementation available to the public in
source code form), and must require no special password or key for
unpacking, reading or copying.
7. Additional Terms.
"Additional permissions" are terms that supplement the terms of this
License by making exceptions from one or more of its conditions.
Additional permissions that are applicable to the entire Program shall
be treated as though they were included in this License, to the extent
that they are valid under applicable law. If additional permissions
apply only to part of the Program, that part may be used separately
under those permissions, but the entire Program remains governed by
this License without regard to the additional permissions.
When you convey a copy of a covered work, you may at your option
remove any additional permissions from that copy, or from any part of
it. (Additional permissions may be written to require their own
removal in certain cases when you modify the work.) You may place
additional permissions on material, added by you to a covered work,
for which you have or can give appropriate copyright permission.
Notwithstanding any other provision of this License, for material you
add to a covered work, you may (if authorized by the copyright holders of
that material) supplement the terms of this License with terms:
a) Disclaiming warranty or limiting liability differently from the
terms of sections 15 and 16 of this License; or
b) Requiring preservation of specified reasonable legal notices or
author attributions in that material or in the Appropriate Legal
Notices displayed by works containing it; or
403
c) Prohibiting misrepresentation of the origin of that material, or
requiring that modified versions of such material be marked in
reasonable ways as different from the original version; or
d) Limiting the use for publicity purposes of names of licensors or
authors of the material; or
e) Declining to grant rights under trademark law for use of some
trade names, trademarks, or service marks; or
f) Requiring indemnification of licensors and authors of that
material by anyone who conveys the material (or modified versions of
it) with contractual assumptions of liability to the recipient, for
any liability that these contractual assumptions directly impose on
those licensors and authors.
All other non-permissive additional terms are considered "further
restrictions" within the meaning of section 10. If the Program as you
received it, or any part of it, contains a notice stating that it is
governed by this License along with a term that is a further
restriction, you may remove that term. If a license document contains
a further restriction but permits relicensing or conveying under this
License, you may add to a covered work material governed by the terms
of that license document, provided that the further restriction does
not survive such relicensing or conveying.
If you add terms to a covered work in accord with this section, you
must place, in the relevant source files, a statement of the
additional terms that apply to those files, or a notice indicating
where to find the applicable terms.
Additional terms, permissive or non-permissive, may be stated in the
form of a separately written license, or stated as exceptions;
the above requirements apply either way.
8. Termination.
You may not propagate or modify a covered work except as expressly
provided under this License. Any attempt otherwise to propagate or
modify it is void, and will automatically terminate your rights under
this License (including any patent licenses granted under the third
paragraph of section 11).
However, if you cease all violation of this License, then your
license from a particular copyright holder is reinstated (a)
provisionally, unless and until the copyright holder explicitly and
finally terminates your license, and (b) permanently, if the copyright
holder fails to notify you of the violation by some reasonable means
prior to 60 days after the cessation.
Moreover, your license from a particular copyright holder is
reinstated permanently if the copyright holder notifies you of the
violation by some reasonable means, this is the first time you have
received notice of violation of this License (for any work) from that
copyright holder, and you cure the violation prior to 30 days after
your receipt of the notice.
Termination of your rights under this section does not terminate the
licenses of parties who have received copies or rights from you under
404
this License. If your rights have been terminated and not permanently
reinstated, you do not qualify to receive new licenses for the same
material under section 10.
9. Acceptance Not Required for Having Copies.
You are not required to accept this License in order to receive or
run a copy of the Program. Ancillary propagation of a covered work
occurring solely as a consequence of using peer-to-peer transmission
to receive a copy likewise does not require acceptance. However,
nothing other than this License grants you permission to propagate or
modify any covered work. These actions infringe copyright if you do
not accept this License. Therefore, by modifying or propagating a
covered work, you indicate your acceptance of this License to do so.
10. Automatic Licensing of Downstream Recipients.
Each time you convey a covered work, the recipient automatically
receives a license from the original licensors, to run, modify and
propagate that work, subject to this License. You are not responsible
for enforcing compliance by third parties with this License.
An "entity transaction" is a transaction transferring control of an
organization, or substantially all assets of one, or subdividing an
organization, or merging organizations. If propagation of a covered
work results from an entity transaction, each party to that
transaction who receives a copy of the work also receives whatever
licenses to the work the party’s predecessor in interest had or could
give under the previous paragraph, plus a right to possession of the
Corresponding Source of the work from the predecessor in interest, if
the predecessor has it or can get it with reasonable efforts.
You may not impose any further restrictions on the exercise of the
rights granted or affirmed under this License. For example, you may
not impose a license fee, royalty, or other charge for exercise of
rights granted under this License, and you may not initiate litigation
(including a cross-claim or counterclaim in a lawsuit) alleging that
any patent claim is infringed by making, using, selling, offering for
sale, or importing the Program or any portion of it.
11. Patents.
A "contributor" is a copyright holder who authorizes use under this
License of the Program or a work on which the Program is based. The
work thus licensed is called the contributor’s "contributor version".
A contributor’s "essential patent claims" are all patent claims
owned or controlled by the contributor, whether already acquired or
hereafter acquired, that would be infringed by some manner, permitted
by this License, of making, using, or selling its contributor version,
but do not include claims that would be infringed only as a
consequence of further modification of the contributor version. For
purposes of this definition, "control" includes the right to grant
patent sublicenses in a manner consistent with the requirements of
this License.
Each contributor grants you a non-exclusive, worldwide, royalty-free
patent license under the contributor’s essential patent claims, to
make, use, sell, offer for sale, import and otherwise run, modify and
propagate the contents of its contributor version.
405
In the following three paragraphs, a "patent license" is any express
agreement or commitment, however denominated, not to enforce a patent
(such as an express permission to practice a patent or covenant not to
sue for patent infringement). To "grant" such a patent license to a
party means to make such an agreement or commitment not to enforce a
patent against the party.
If you convey a covered work, knowingly relying on a patent license,
and the Corresponding Source of the work is not available for anyone
to copy, free of charge and under the terms of this License, through a
publicly available network server or other readily accessible means,
then you must either (1) cause the Corresponding Source to be so
available, or (2) arrange to deprive yourself of the benefit of the
patent license for this particular work, or (3) arrange, in a manner
consistent with the requirements of this License, to extend the patent
license to downstream recipients. "Knowingly relying" means you have
actual knowledge that, but for the patent license, your conveying the
covered work in a country, or your recipient’s use of the covered work
in a country, would infringe one or more identifiable patents in that
country that you have reason to believe are valid.
If, pursuant to or in connection with a single transaction or
arrangement, you convey, or propagate by procuring conveyance of, a
covered work, and grant a patent license to some of the parties
receiving the covered work authorizing them to use, propagate, modify
or convey a specific copy of the covered work, then the patent license
you grant is automatically extended to all recipients of the covered
work and works based on it.
A patent license is "discriminatory" if it does not include within
the scope of its coverage, prohibits the exercise of, or is
conditioned on the non-exercise of one or more of the rights that are
specifically granted under this License. You may not convey a covered
work if you are a party to an arrangement with a third party that is
in the business of distributing software, under which you make payment
to the third party based on the extent of your activity of conveying
the work, and under which the third party grants, to any of the
parties who would receive the covered work from you, a discriminatory
patent license (a) in connection with copies of the covered work
conveyed by you (or copies made from those copies), or (b) primarily
for and in connection with specific products or compilations that
contain the covered work, unless you entered into that arrangement,
or that patent license was granted, prior to 28 March 2007.
Nothing in this License shall be construed as excluding or limiting
any implied license or other defenses to infringement that may
otherwise be available to you under applicable patent law.
12. No Surrender of Others’ Freedom.
If conditions are imposed on you (whether by court order, agreement or
otherwise) that contradict the conditions of this License, they do not
excuse you from the conditions of this License. If you cannot convey a
covered work so as to satisfy simultaneously your obligations under this
License and any other pertinent obligations, then as a consequence you may
not convey it at all. For example, if you agree to terms that obligate you
to collect a royalty for further conveying from those to whom you convey
the Program, the only way you could satisfy both those terms and this
License would be to refrain entirely from conveying the Program.
406
13. Remote Network Interaction; Use with the GNU General Public License.
Notwithstanding any other provision of this License, if you modify the
Program, your modified version must prominently offer all users
interacting with it remotely through a computer network (if your version
supports such interaction) an opportunity to receive the Corresponding
Source of your version by providing access to the Corresponding Source
from a network server at no charge, through some standard or customary
means of facilitating copying of software. This Corresponding Source
shall include the Corresponding Source for any work covered by version 3
of the GNU General Public License that is incorporated pursuant to the
following paragraph.
Notwithstanding any other provision of this License, you have
permission to link or combine any covered work with a work licensed
under version 3 of the GNU General Public License into a single
combined work, and to convey the resulting work. The terms of this
License will continue to apply to the part which is the covered work,
but the work with which it is combined will remain governed by version
3 of the GNU General Public License.
14. Revised Versions of this License.
The Free Software Foundation may publish revised and/or new versions of
the GNU Affero General Public License from time to time. Such new versions
will be similar in spirit to the present version, but may differ in detail to
address new problems or concerns.
Each version is given a distinguishing version number. If the
Program specifies that a certain numbered version of the GNU Affero General
Public License "or any later version" applies to it, you have the
option of following the terms and conditions either of that numbered
version or of any later version published by the Free Software
Foundation. If the Program does not specify a version number of the
GNU Affero General Public License, you may choose any version ever published
by the Free Software Foundation.
If the Program specifies that a proxy can decide which future
versions of the GNU Affero General Public License can be used, that proxy’s
public statement of acceptance of a version permanently authorizes you
to choose that version for the Program.
Later license versions may give you additional or different
permissions. However, no additional obligations are imposed on any
author or copyright holder as a result of your choosing to follow a
later version.
15. Disclaimer of Warranty.
THERE IS NO WARRANTY FOR THE PROGRAM, TO THE EXTENT PERMITTED BY
APPLICABLE LAW. EXCEPT WHEN OTHERWISE STATED IN WRITING THE COPYRIGHT
HOLDERS AND/OR OTHER PARTIES PROVIDE THE PROGRAM "AS IS" WITHOUT WARRANTY
OF ANY KIND, EITHER EXPRESSED OR IMPLIED, INCLUDING, BUT NOT LIMITED TO,
THE IMPLIED WARRANTIES OF MERCHANTABILITY AND FITNESS FOR A PARTICULAR
PURPOSE. THE ENTIRE RISK AS TO THE QUALITY AND PERFORMANCE OF THE PROGRAM
IS WITH YOU. SHOULD THE PROGRAM PROVE DEFECTIVE, YOU ASSUME THE COST OF
ALL NECESSARY SERVICING, REPAIR OR CORRECTION.
16. Limitation of Liability.
407
IN NO EVENT UNLESS REQUIRED BY APPLICABLE LAW OR AGREED TO IN WRITING
WILL ANY COPYRIGHT HOLDER, OR ANY OTHER PARTY WHO MODIFIES AND/OR CONVEYS
THE PROGRAM AS PERMITTED ABOVE, BE LIABLE TO YOU FOR DAMAGES, INCLUDING ANY
GENERAL, SPECIAL, INCIDENTAL OR CONSEQUENTIAL DAMAGES ARISING OUT OF THE
USE OR INABILITY TO USE THE PROGRAM (INCLUDING BUT NOT LIMITED TO LOSS OF
DATA OR DATA BEING RENDERED INACCURATE OR LOSSES SUSTAINED BY YOU OR THIRD
PARTIES OR A FAILURE OF THE PROGRAM TO OPERATE WITH ANY OTHER PROGRAMS),
EVEN IF SUCH HOLDER OR OTHER PARTY HAS BEEN ADVISED OF THE POSSIBILITY OF
SUCH DAMAGES.
17. Interpretation of Sections 15 and 16.
If the disclaimer of warranty and limitation of liability provided
above cannot be given local legal effect according to their terms,
reviewing courts shall apply local law that most closely approximates
an absolute waiver of all civil liability in connection with the
Program, unless a warranty or assumption of liability accompanies a
copy of the Program in return for a fee.
END OF TERMS AND CONDITIONS
How to Apply These Terms to Your New Programs
If you develop a new program, and you want it to be of the greatest
possible use to the public, the best way to achieve this is to make it
free software which everyone can redistribute and change under these terms.
To do so, attach the following notices to the program. It is safest
to attach them to the start of each source file to most effectively
state the exclusion of warranty; and each file should have at least
the "copyright" line and a pointer to where the full notice is found.
<one line to give the program’s name and a brief idea of what it does.>
Copyright (C) <year> <name of author>
This program is free software: you can redistribute it and/or modify
it under the terms of the GNU Affero General Public License as published by
the Free Software Foundation, either version 3 of the License, or
(at your option) any later version.
This program is distributed in the hope that it will be useful,
but WITHOUT ANY WARRANTY; without even the implied warranty of
MERCHANTABILITY or FITNESS FOR A PARTICULAR PURPOSE. See the
GNU Affero General Public License for more details.
You should have received a copy of the GNU Affero General Public License
along with this program. If not, see <http://www.gnu.org/licenses/>.
Also add information on how to contact you by electronic and paper mail.
If your software can interact with users remotely through a computer
network, you should also make sure that it provides a way for users to
get its source. For example, if your program is a web application, its
interface could display a "Source" link that leads users to an archive
of the code. There are many ways you could offer source, and different
solutions will be better for different programs; see section 13 for the
specific requirements.
You should also get your employer (if you work as a programmer) or school,

408
if any, to sign a "copyright disclaimer" for the program, if necessary.
For more information on this, and how to apply and follow the GNU AGPL, see
<http://www.gnu.org/licenses/>.
409
M.4 GNU Lesser Gerneral Public License
GNU LESSER GENERAL PUBLIC LICENSE
Version 3, 29 June 2007
Copyright (C) 2007 Free Software Foundation, Inc. <http://fsf.org/>
Everyone is permitted to copy and distribute verbatim copies
of this license document, but changing it is not allowed.
This version of the GNU Lesser General Public License incorporates
the terms and conditions of version 3 of the GNU General Public
License, supplemented by the additional permissions listed below.
0. Additional Definitions.
As used herein, "this License" refers to version 3 of the GNU Lesser
General Public License, and the "GNU GPL" refers to version 3 of the GNU
General Public License.
"The Library" refers to a covered work governed by this License,
other than an Application or a Combined Work as defined below.
An "Application" is any work that makes use of an interface provided
by the Library, but which is not otherwise based on the Library.
Defining a subclass of a class defined by the Library is deemed a mode
of using an interface provided by the Library.
A "Combined Work" is a work produced by combining or linking an
Application with the Library. The particular version of the Library
with which the Combined Work was made is also called the "Linked
Version".
The "Minimal Corresponding Source" for a Combined Work means the
Corresponding Source for the Combined Work, excluding any source code
for portions of the Combined Work that, considered in isolation, are
based on the Application, and not on the Linked Version.
The "Corresponding Application Code" for a Combined Work means the
object code and/or source code for the Application, including any data
and utility programs needed for reproducing the Combined Work from the
Application, but excluding the System Libraries of the Combined Work.
1. Exception to Section 3 of the GNU GPL.
You may convey a covered work under sections 3 and 4 of this License
without being bound by section 3 of the GNU GPL.
2. Conveying Modified Versions.
If you modify a copy of the Library, and, in your modifications, a
facility refers to a function or data to be supplied by an Application
that uses the facility (other than as an argument passed when the
facility is invoked), then you may convey a copy of the modified
version:
a) under this License, provided that you make a good faith effort to
ensure that, in the event an Application does not supply the
function or data, the facility still operates, and performs
whatever part of its purpose remains meaningful, or
410
b) under the GNU GPL, with none of the additional permissions of
this License applicable to that copy.
3. Object Code Incorporating Material from Library Header Files.
The object code form of an Application may incorporate material from
a header file that is part of the Library. You may convey such object
code under terms of your choice, provided that, if the incorporated
material is not limited to numerical parameters, data structure
layouts and accessors, or small macros, inline functions and templates
(ten or fewer lines in length), you do both of the following:
a) Give prominent notice with each copy of the object code that the
Library is used in it and that the Library and its use are
covered by this License.
b) Accompany the object code with a copy of the GNU GPL and this license
document.
4. Combined Works.
You may convey a Combined Work under terms of your choice that,
taken together, effectively do not restrict modification of the
portions of the Library contained in the Combined Work and reverse
engineering for debugging such modifications, if you also do each of
the following:
a) Give prominent notice with each copy of the Combined Work that
the Library is used in it and that the Library and its use are
covered by this License.
b) Accompany the Combined Work with a copy of the GNU GPL and this license
document.
c) For a Combined Work that displays copyright notices during
execution, include the copyright notice for the Library among
these notices, as well as a reference directing the user to the
copies of the GNU GPL and this license document.
d) Do one of the following:
0) Convey the Minimal Corresponding Source under the terms of this
License, and the Corresponding Application Code in a form
suitable for, and under terms that permit, the user to
recombine or relink the Application with a modified version of
the Linked Version to produce a modified Combined Work, in the
manner specified by section 6 of the GNU GPL for conveying
Corresponding Source.
1) Use a suitable shared library mechanism for linking with the
Library. A suitable mechanism is one that (a) uses at run time
a copy of the Library already present on the user’s computer
system, and (b) will operate properly with a modified version
of the Library that is interface-compatible with the Linked
Version.
e) Provide Installation Information, but only if you would otherwise
be required to provide such information under section 6 of the
GNU GPL, and only to the extent that such information is
411
necessary to install and execute a modified version of the
Combined Work produced by recombining or relinking the
Application with a modified version of the Linked Version. (If
you use option 4d0, the Installation Information must accompany
the Minimal Corresponding Source and Corresponding Application
Code. If you use option 4d1, you must provide the Installation
Information in the manner specified by section 6 of the GNU GPL
for conveying Corresponding Source.)
5. Combined Libraries.
You may place library facilities that are a work based on the
Library side by side in a single library together with other library
facilities that are not Applications and are not covered by this
License, and convey such a combined library under terms of your
choice, if you do both of the following:
a) Accompany the combined library with a copy of the same work based
on the Library, uncombined with any other library facilities,
conveyed under the terms of this License.
b) Give prominent notice with the combined library that part of it
is a work based on the Library, and explaining where to find the
accompanying uncombined form of the same work.
6. Revised Versions of the GNU Lesser General Public License.
The Free Software Foundation may publish revised and/or new versions
of the GNU Lesser General Public License from time to time. Such new
versions will be similar in spirit to the present version, but may
differ in detail to address new problems or concerns.
Each version is given a distinguishing version number. If the
Library as you received it specifies that a certain numbered version
of the GNU Lesser General Public License "or any later version"
applies to it, you have the option of following the terms and
conditions either of that published version or of any later version
published by the Free Software Foundation. If the Library as you
received it does not specify a version number of the GNU Lesser
General Public License, you may choose any version of the GNU Lesser
General Public License ever published by the Free Software Foundation.
If the Library as you received it specifies that a proxy can decide
whether future versions of the GNU Lesser General Public License shall
apply, that proxy’s public statement of acceptance of any version is
permanent authorization for you to choose that version for the
Library.

412

Part V
Index
413


415
General Index
Adding a Second Client, 31Administrator, 6Algorithm
New Volume, 231Recycling, 231
AttributesRestoring Directory, 214
auditing, 169Authorization
Names and Passwords, 47Authorization Errors, 369Autochanger
mtx-changer, 373Testing, 373Using the, 248
Autochanger Interface, 250Autochanger Support, 243Automated Disk Backup, 237Automatic Pruning, 230Automatic Pruning and Recycling Example, 235Automatic Volume Labeling, 221Automatic Volume Recycling, 229AutoPrune, 304
Backing upPartitions, 82
Backing up Raw Partitions, 82Backing up to Multiple Disks, 225Backing Up Your Bareos Database, 310Backup, 6
One Tape, 255Backup Of Third Party Databases, 351Backup Strategies, 255Bacula, 347Barcode Support, 249Bareos
Installing, 13Running, 21
Bareos Components or Services, 3Bareos Configuration, 5Bareos Console, 185Bareos Copyright, Trademark, and Licenses, 387bareos-12.4.1
Release Notes, 385setbandwidth, 198
bareos-12.4.2Release Notes, 385
bareos-12.4.3Release Notes, 385
bareos-12.4.4
Release Notes, 385status scheduler, 201status subscriptions, 201Subscriptions, 54Windows
silent installation, 281Windows Installation
SILENTKEEPCONFIG, 281bareos-12.4.5
Release Notes, 385Windows
dedupclication, 284Encrypted Filesystems (EFS), 285file attributes, 285Reparse points, 283
bareos-12.4.6Release Notes, 384
bareos-13.2.0Copy and Migration Jobs between different
Storage Daemons, 266MSSQL, 351NDMP Log Level, 52NDMP Snooping, 52Passive, 101Protocol, 101
bareos-13.2.2Release Notes, 384
bareos-13.2.3MySQL password from configuration file, 301Release Notes, 384
bareos-13.2.4Release Notes, 384
bareos-13.3.0Director Job Resource isn’t required for Copy
or Migrate jobs, 59bareos-13.4.0
Auto Deflate, 140Auto Deflate Algorithm, 140Auto Deflate Level, 140Auto Inflate, 141Auto XFlate On Replication, 130Catalog, 59Job catalog overwriten by Pool catalog, 109
bareos-14.2.0Absolute Job Timeout, 51Audit Events, 51Auditing, 51dbconfig-common (Debian), 16, 17, 297Label Block Size, 144Maximum Blocksize, 110, 251
416
417
Plugin Directory, 53Plugin Names, 53Save File History, 71Statistics Collect Interval, 53Windows
FilesNotToBackup, 284bareos-14.2.1
Release Notes, 384Windows Installation
DBADMINPASSWORD, 281DBADMINUSER, 281INSTALLDIRECTOR, 281INSTALLSTORAGE, 281WRITELOGS, 281
bareos-14.2.2AutoExclude, 84Ceph (Rados), 143Ceph Storage, 140GlusterFS (gfapi), 143GlusterFS Storage, 139MSSQL: serveraddress, 353Release Notes, 384
bareos-14.2.3Profile, 120Release Notes, 384
bareos-14.2.4Release Notes, 383
bareos-14.2.5Release Notes, 383
bareos-14.4.0Max Virtual Full Interval, 64multiple Python plugins, 276Syslog Level, 168
bareos-15.1.0Exit On Fatal, 116Reconnect, 117
bareos-dbcheck, 333Base Jobs, 269bconsole, 185bcopy, 330bextract, 325
block size, 252Blocksize
optimize, 250bls, 323
block size, 252Label, 323Listing Blocks, 324Listing Jobs, 324
Bootstrap, 321Automatic Generation, 340bscan, 340Client, 338Count, 337Example, 340File, 337File Format, 337FileIndex, 338FileRegex, 338Job, 338
JobId, 338Slot, 338Stream, 338VolBlock, 337VolFile, 337VolSessionId, 338VolSessionTime, 338Volume, 337
Bootstrap File, 6bpipe
MySQL backup, 363PostgreSQL backup, 361
bpluginfo, 336bregex, 336Broken pipe, 131bscan, 327, 340
after, 330bootstrap, 340Correct Volume File Count, 330Recreate Catalog, 329
bsmtp, 333btape, 331bwild, 336
Cannot Access a Client, 369Catalog, 6, 349
database check, 333Job, 349
JobStatus, 349Recreate Using bscan, 329Restore, 375Using bscan to Compare a Volume to an ex-
isting, 328Catalog Maintenance, 297Catalog Resource, 115Certificate
Creating a Self-signed, 292Changing Cartridges, 247Character Sets, 41Client, 6
Adding a Second, 31Client Resource, 98, 155, 179Client/File daemon Configuration, 155Clients
Considerations for Multiple, 226Command
bareos-dbcheck, 333bareos-dir, 322bareos-fd, 322bareos-sd, 322bat, 322bconsole, 185
exit, 186bcopy, 330bextract, 325
block size, 252bls, 323
block size, 252bpluginfo, 336bregex, 336
418
bscan, 327, 340bsmtp, 333btape, 331bwild, 336mtx-changer, 373
Command Line OptionsDaemon, 322
CommandsConsole, 176
Comments, 42Communications Encryption, 291Compacting Your MySQL Database, 307Compacting Your PostgreSQL Database, 305Compatibility
Backward, 347Bacula, 347
Concurrent Disk Jobs, 223Concurrent Jobs, 52, 369, 370Configuration
Bareos, 5bconsole, 176, 185Client/File daemon, 155Console, 171, 185Data Types, 43Director
Example, 123Files, 20Including Files, 42Monitor, 177Storage Daemon, 129, 151Tray Monitor, 181
ConfigureConsole, 20
Configuring and Testing TCP Wrappers, 313Configuring the Console Program, 20Configuring the Director, 20, 49Configuring the File daemon, 20Configuring the Storage daemon, 20Console, 6
Adding a Volume to a Pool, 205Command
. Commands, 204@# anything, 204@exit, 204@help, 204@input <filename>, 204@output <filename> w/a, 204@quit, 204@separator, 204@sleep <seconds>, 204@tee <filename> w/a, 204@time, 204@version, 204add, 188autodisplay on/off, 189automount on/off, 189cancel jobid, 189create pool, 189delete, 189disable, 190
enable, 190estimate, 190exit, 191export, 191gui, 191help, 191import, 191label, 35, 192list, 193list files jobid, 33list jobid, 33list jobmedia, 33list jobs, 33list jobtotals, 33list media, 33list pools, 33llist, 194memory, 195messages, 33, 195mount, 195mount storage, 33move, 195prune, 195purge, 196query, 196quit, 33relabel, 192, 196release, 197reload, 197rerun, 197resolve, 196restore, 197, 207run, 198setbandwidth, 198setdebug, 198setip, 199show, 199Special ., 204sqlquery, 199status, 33, 199status dir, 33status jobid, 33time, 202trace, 202umount, 202unmount, 202unmount storage, 33update, 202update slots, 248use, 203var name, 203version, 203wait, 203
Commands, 188Useful, 33
Configure, 20File Selection, 197, 216
?, 217cd, 216count, 217
419
dir, 216done, 217estimate, 216exit, 217find, 216help, 217ls, 216lsmark, 216mark, 216pwd, 217quit, 217unmark, 217
Keywords, 187Running from a Shell, 186
Console Commands, 176Console Configuration, 171Console Resource, 118, 173Conventions Used in this Document, 5Copy, 263Counter Resource, 123Crash, 381Creating a Pool, 34Creating a Self-signed Certificate, 292Critical Items, 37Critical Items to Implement Before Production, 37Customizing the Configuration Files, 41
Daemon, 6Command Line Options, 322Configuring the File, 20Configuring the Storage, 20Detailed Information for each, 41Start, 23
Daily Tape Rotation, 256Daily, Weekly, Monthly Tape Usage Example, 233Data Encryption, 295Data Spooling, 261
Directives, 261Data Type, 43
yes|no, 45acl, 43audit command list, 45auth-type, 43boolean, 45directory, 43integer, 43long integer, 43name, 43name-string, 43net-address, 43net-addresses, 43net-port, 44password, 43path, 43positive integer, 43resource, 44size, 44speed, 43string, 43string list, 43
time, 44
Database
Backing Up Your Bareos, 310
Backup Of Third Party, 351
Compacting Your MySQL, 307
Compacting Your PostgreSQL, 305
MSSQL, 351
MySQL
Backup, 361
MySQL Server Has Gone Away, 308
MySQL Table is Full, 308
PostgreSQL
Backup, 360
Repairing Your MySQL, 308
Repairing Your PostgreSQL, 307
Database Performance Issues Indexes, 309
Database Size, 311
Debug
crash, 381
setdebug, 198
Windows, 198
Decrypting with a Master Key, 296
Design
Limitations, 11
Detailed Information for each Daemon, 41
Device Configuration Records, 245
Device Resource, 137
Devices
Detecting, 244
Multiple, 245
SCSI, 244
Devices that require a mount (USB), 149
Differential, 6
Differential Pool, 238
Directive, 6
Directives
Pruning, 230
Director, 6
Configuring the, 20, 49
Resource Types, 49
Director Resource, 49, 134, 160, 171, 178
Disaster
Before, 365
Recovery, 365
bextract, 325
Catalog, 375
Linux, 366
Disclaimer, 387
Disk
Automated Backup, 237
Disk Volumes, 220
Disks
Backing up to Multiple, 225
Document
Conventions Used in this, 5
Drive
Testing Compatibility with Your Tape, 21
Verify using btape, 331
420
Edit Codes for Mount and Unmount Directives,149
Enable VSS, 285Encryption
Communications, 291Data, 295Technical Details, 295Transport, 291
ErrorsRestore, 215
ExampleAutomatic Pruning and Recycling, 235Bootstrap, 340Daily Weekly Monthly Tape Usage, 233Data Encryption Configuration File, 296File Daemon Configuration File, 296FileSet, 93Migration Jobs, 265TLS Configuration Files, 292
Example Client Configuration File, 162Example Configuration File, 246Example Data Encryption Configuration, 296Excluding Files and Directories, 92
FileBootstrap, 337Device Name, 321Example Client Configuration, 162Example Configuration, 246Example Console Configuration, 176Example Storage Daemon Configuration, 151
File Attributes, 6File Daemon, 6File Deduplication, 269File Relocation
using, 213File Retention, 304File Selection Commands, 216Files
Automatic Generation of Bootstrap, 340Customizing the Configuration, 41Including other Configuration, 42Restoring Your, 29
FileSetExample, 93Resource, 78Testing Your, 98Windows, 97Windows Example, 97
FirewallWindows, 286
FormatBootstrap, 337Resource Directive, 41
Full Pool, 238
Generating Private/Public Encryption Keypairs,296
Getting Started with Bareos, 19
Icinga, 277
ImplementedWhat, 9
Important Migration Considerations, 264Including other Configuration Files, 42Incremental, 6Incremental Pool, 238Installation
Windows, 279Installing Bareos, 13Interface
Autochanger, 250Items
Critical, 37Recommended, 38
Items to Note, 11
Job, 7Catalog, 349Running a, 25Statistics, 304
Job Resource, 55Job Retention, 304JobDefs Resource, 75Jobs
Concurrent, 370Understanding, 19
JobStatus, 349
Key Concepts and Resource Records, 220
Label Media, 144Labeling
Automatic Volume, 221Specifying Slots When, 247
Labeling Volumes with the Console Program, 35Labeling Your Volumes, 35Labels
Tape, 371Understanding, 19
libwrappers, 313License
AGPL, 387FDL, 387LGPL, 387Public Domain, 387
LicensesBareos Copyright Trademark, 387
Listing Blocks with bls, 324Listing Jobs with bls, 324
MagazinesDealing with Multiple, 247
MaintenanceCatalog, 297
ManagementVolume, 220
Manually Recycling Volumes, 236Messages
typealert, 169all, 168
421
audit, 169error, 168fatal, 168info, 168mount, 168notsaved, 168restored, 168security, 168skipped, 168terminate, 168volmgmt, 169warning, 168
Messages Resource, 118, 151, 162, 165Migration, 263Monitor, 7Monitor Configuration, 177Monitor Resource, 177Mount and Unmount: use variables in directives,
149MSSQL Backup, 351Multi-drive Example Configuration File, 246Multiple Clients, 226Multiple Devices, 245MySQL
Backup, 272MySQL Backup, 361MySQL Server Has Gone Away, 308MySQL Table is Full, 308
Nagios, see IcingaNDMP Resource, 136New Volume Algorithm, 231
One Tape Backup, 255Other Programs, 332
Passwords, 47Performance
Database, 309Periods
Setting Retention, 304Platform
CentOS, 145, 14
Debian, 158, 320, 383dbconfig-common, 297Debian.org, 320
Fedora, 1421, 383
Gentoo, 319openSUSE, 15RHEL, 14
5, 14SLES, 15Solaris
Debug, 382Ubuntu, 15
dbconfig-common, 297Debug, 381Universe, 320
Univention Corporte Server, 319Windows, 279
Plugin, 271autoxflate-sd, 275bpipe, 271MSSQL backup, 351PostgreSQL Backup, 361Python
Director, 276File Daemon, 272MySQL Backup, 361Storage Daemon, 276
scsicrypto-sd, 275scsitapealert-sd, 276VMware, 273
Pool, 237Creating a, 34Differential, 238Full, 238Incremental, 238Scratch, 115
Pool Options to Limit the Volume Usage, 220Pool Resource, 107Pools
Understanding, 19PostgreSQL Backup, 360Problem
Autochanger, 373Connecting from the FD to the SD, 34mtx-changer, 373Repair Catalog, 375Restore
pruned job, 374slow, 375
Restoring Files, 374Tape, 372
fixed mode, 374variable mode, 374
Tape Full, 32Windows, 282
VSS, 286Windows Backup, 286Windows Ownership and Permissions, 287Windows Restore, 286
ProductionCritical Items to Implement Before, 37
Profile Resource, 121Program
Quitting the Console, 31Programs
Other, 332Pruning
Automatic, 230Example, 235
Directives, 230
quit, 196Quitting the Console Program, 31
Recommended Items, 38
422
RecordsDevice Configuration, 245Key Concepts and Resource, 220
RecoveryDisaster Recovery, 365
RecycleAutomatic
Example, 235Automatic Volume, 229Manual, 236
Recycle Status, 232Recycling
Restricting the Number of Volumes and Re-cycling, 222
Recycling Algorithm, 231Regex, 374Repairing Your MySQL Database, 308Repairing Your PostgreSQL Database, 307Requirements
System, 317Resource, 7
Catalog, 115Client, 98, 155, 179Console, 118, 173Counter, 123Device, 137Director, 49, 134, 160, 171, 178Example Restore Job, 215FileSet, 78Job, 55JobDefs, 75Messages, 118, 151, 162, 165Monitor, 177NDMP, 136Pool, 107Profile, 121Schedule, 76Storage, 103, 129, 179
Resource Directive Format, 41Resource Types, 46Restore, 7, 197, 207
Baroes Server, 367by filename, 211Catalog, 375Files
Problem, 374pruned job, 374slow, 375
Restore Directories, 209Restore Errors, 215Restoring Directory Attributes, 214Restoring on Windows, 215Restoring Your Files, 29Restricting the Number of Volumes and Recycling,
222Restrictions
Current Implementation, 11Design Limitations, 11
Retention Period, 7Rotation
Daily Tape, 256Running a Job, 25Running Bareos, 21Running Concurrent Jobs, 370RunScript
Example, 360, 362
Scan, 8Schedule, 7Schedule Resource, 76Schedules
Technical Notes, 78Understanding, 19
Scratch Pool, 115SCSI devices, 244Security, 313
Tray Monitor, 180Using Bareos to Improve Computer, 341
Service, 7Session, 7Setting Retention Periods, 304Simultaneous Jobs, 52Size
Database, 311Slots, 244Spaces
Upper/Lower Case, 42Specifying a Device Name For a File, 321Specifying a Device Name For a Tape, 321Specifying Slots When Labeling, 247Specifying the Configuration File, 321Specifying Volumes, 321Spooling
Data, 261Starting the Daemons, 23Statistics, 304Storage Coordinates, 7Storage Daemon, 7Storage Daemon Configuration, 129Storage Resource, 103, 129, 179Strategy
Backup, 255Support
Autochanger, 243Barcode, 249Operating Systems, 319
System Requirements, 317Systems
Supported Operating, 319
TapeDevice Name, 321Format, 347Full, 32Label
ANSI, 371IBM, 371
LTFS, 371Making Bareos Use a Single, 233Manually Changing, 255
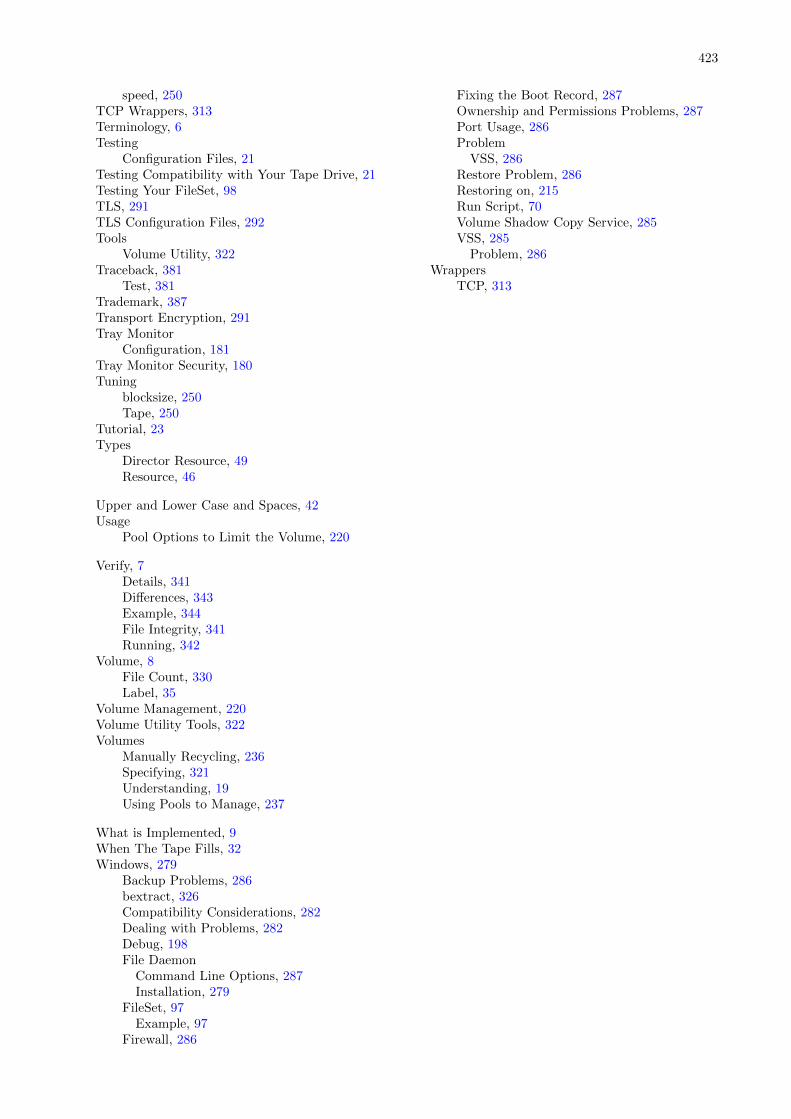
423
speed, 250TCP Wrappers, 313Terminology, 6Testing
Configuration Files, 21Testing Compatibility with Your Tape Drive, 21Testing Your FileSet, 98TLS, 291TLS Configuration Files, 292Tools
Volume Utility, 322Traceback, 381
Test, 381Trademark, 387Transport Encryption, 291Tray Monitor
Configuration, 181Tray Monitor Security, 180Tuning
blocksize, 250Tape, 250
Tutorial, 23Types
Director Resource, 49Resource, 46
Upper and Lower Case and Spaces, 42Usage
Pool Options to Limit the Volume, 220
Verify, 7Details, 341Differences, 343Example, 344File Integrity, 341Running, 342
Volume, 8File Count, 330Label, 35
Volume Management, 220Volume Utility Tools, 322Volumes
Manually Recycling, 236Specifying, 321Understanding, 19Using Pools to Manage, 237
What is Implemented, 9When The Tape Fills, 32Windows, 279
Backup Problems, 286bextract, 326Compatibility Considerations, 282Dealing with Problems, 282Debug, 198File Daemon
Command Line Options, 287Installation, 279
FileSet, 97Example, 97
Firewall, 286
Fixing the Boot Record, 287Ownership and Permissions Problems, 287Port Usage, 286Problem
VSS, 286Restore Problem, 286Restoring on, 215Run Script, 70Volume Shadow Copy Service, 285VSS, 285
Problem, 286Wrappers
TCP, 313
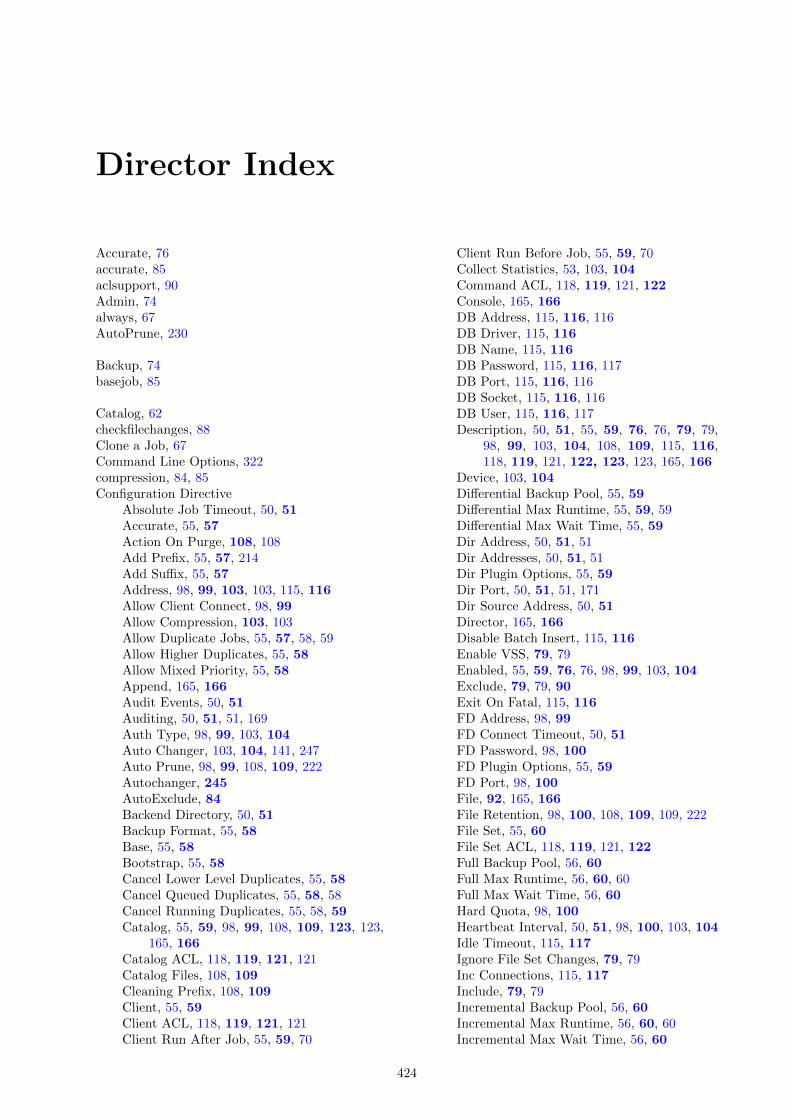
Director Index
Accurate, 76accurate, 85aclsupport, 90Admin, 74always, 67AutoPrune, 230
Backup, 74basejob, 85
Catalog, 62checkfilechanges, 88Clone a Job, 67Command Line Options, 322compression, 84, 85Configuration Directive
Absolute Job Timeout, 50, 51Accurate, 55, 57Action On Purge, 108, 108Add Prefix, 55, 57, 214Add Suffix, 55, 57Address, 98, 99, 103, 103, 115, 116Allow Client Connect, 98, 99Allow Compression, 103, 103Allow Duplicate Jobs, 55, 57, 58, 59Allow Higher Duplicates, 55, 58Allow Mixed Priority, 55, 58Append, 165, 166Audit Events, 50, 51Auditing, 50, 51, 51, 169Auth Type, 98, 99, 103, 104Auto Changer, 103, 104, 141, 247Auto Prune, 98, 99, 108, 109, 222Autochanger, 245AutoExclude, 84Backend Directory, 50, 51Backup Format, 55, 58Base, 55, 58Bootstrap, 55, 58Cancel Lower Level Duplicates, 55, 58Cancel Queued Duplicates, 55, 58, 58Cancel Running Duplicates, 55, 58, 59Catalog, 55, 59, 98, 99, 108, 109, 123, 123,
165, 166Catalog ACL, 118, 119, 121, 121Catalog Files, 108, 109Cleaning Prefix, 108, 109Client, 55, 59Client ACL, 118, 119, 121, 121Client Run After Job, 55, 59, 70
Client Run Before Job, 55, 59, 70Collect Statistics, 53, 103, 104Command ACL, 118, 119, 121, 122Console, 165, 166DB Address, 115, 116, 116DB Driver, 115, 116DB Name, 115, 116DB Password, 115, 116, 117DB Port, 115, 116, 116DB Socket, 115, 116, 116DB User, 115, 116, 117Description, 50, 51, 55, 59, 76, 76, 79, 79,
98, 99, 103, 104, 108, 109, 115, 116,118, 119, 121, 122, 123, 123, 165, 166
Device, 103, 104Differential Backup Pool, 55, 59Differential Max Runtime, 55, 59, 59Differential Max Wait Time, 55, 59Dir Address, 50, 51, 51Dir Addresses, 50, 51, 51Dir Plugin Options, 55, 59Dir Port, 50, 51, 51, 171Dir Source Address, 50, 51Director, 165, 166Disable Batch Insert, 115, 116Enable VSS, 79, 79Enabled, 55, 59, 76, 76, 98, 99, 103, 104Exclude, 79, 79, 90Exit On Fatal, 115, 116FD Address, 98, 99FD Connect Timeout, 50, 51FD Password, 98, 100FD Plugin Options, 55, 59FD Port, 98, 100File, 92, 165, 166File Retention, 98, 100, 108, 109, 109, 222File Set, 55, 60File Set ACL, 118, 119, 121, 122Full Backup Pool, 56, 60Full Max Runtime, 56, 60, 60Full Max Wait Time, 56, 60Hard Quota, 98, 100Heartbeat Interval, 50, 51, 98, 100, 103, 104Idle Timeout, 115, 117Ignore File Set Changes, 79, 79Inc Connections, 115, 117Include, 79, 79Incremental Backup Pool, 56, 60Incremental Max Runtime, 56, 60, 60Incremental Max Wait Time, 56, 60
424
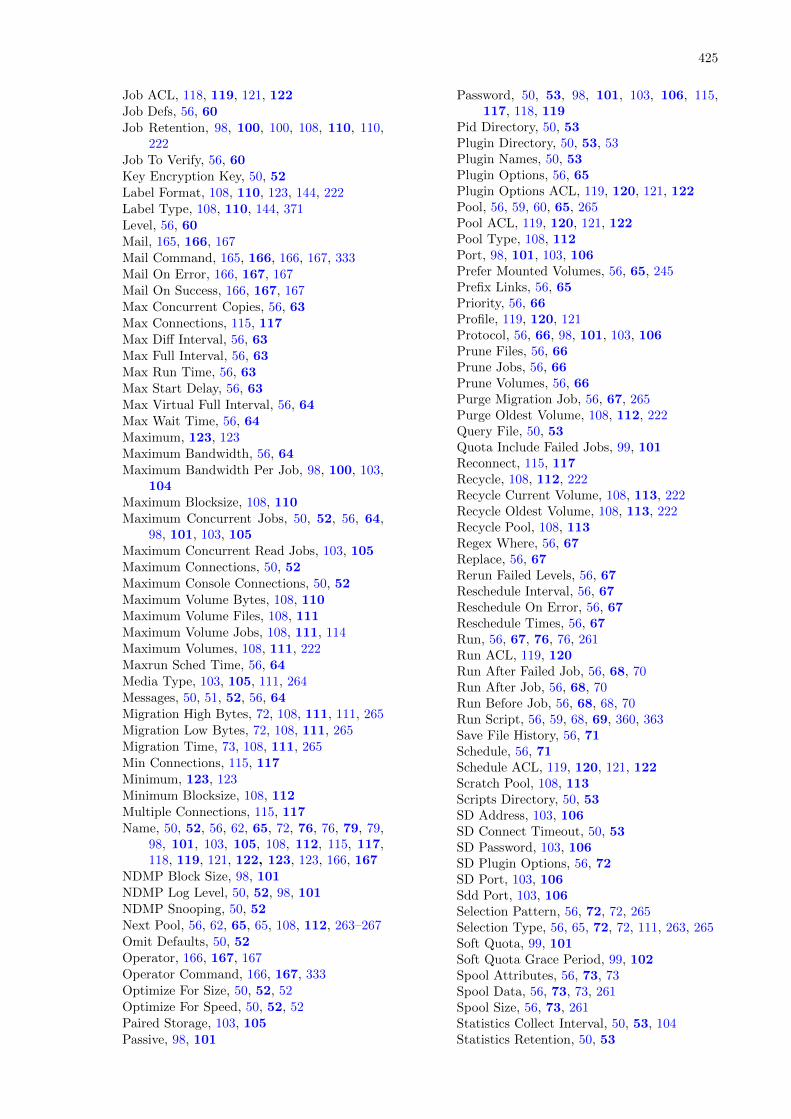
425
Job ACL, 118, 119, 121, 122Job Defs, 56, 60Job Retention, 98, 100, 100, 108, 110, 110,
222Job To Verify, 56, 60Key Encryption Key, 50, 52Label Format, 108, 110, 123, 144, 222Label Type, 108, 110, 144, 371Level, 56, 60Mail, 165, 166, 167Mail Command, 165, 166, 166, 167, 333Mail On Error, 166, 167, 167Mail On Success, 166, 167, 167Max Concurrent Copies, 56, 63Max Connections, 115, 117Max Diff Interval, 56, 63Max Full Interval, 56, 63Max Run Time, 56, 63Max Start Delay, 56, 63Max Virtual Full Interval, 56, 64Max Wait Time, 56, 64Maximum, 123, 123Maximum Bandwidth, 56, 64Maximum Bandwidth Per Job, 98, 100, 103,
104Maximum Blocksize, 108, 110Maximum Concurrent Jobs, 50, 52, 56, 64,
98, 101, 103, 105Maximum Concurrent Read Jobs, 103, 105Maximum Connections, 50, 52Maximum Console Connections, 50, 52Maximum Volume Bytes, 108, 110Maximum Volume Files, 108, 111Maximum Volume Jobs, 108, 111, 114Maximum Volumes, 108, 111, 222Maxrun Sched Time, 56, 64Media Type, 103, 105, 111, 264Messages, 50, 51, 52, 56, 64Migration High Bytes, 72, 108, 111, 111, 265Migration Low Bytes, 72, 108, 111, 265Migration Time, 73, 108, 111, 265Min Connections, 115, 117Minimum, 123, 123Minimum Blocksize, 108, 112Multiple Connections, 115, 117Name, 50, 52, 56, 62, 65, 72, 76, 76, 79, 79,
98, 101, 103, 105, 108, 112, 115, 117,118, 119, 121, 122, 123, 123, 166, 167
NDMP Block Size, 98, 101NDMP Log Level, 50, 52, 98, 101NDMP Snooping, 50, 52Next Pool, 56, 62, 65, 65, 108, 112, 263–267Omit Defaults, 50, 52Operator, 166, 167, 167Operator Command, 166, 167, 333Optimize For Size, 50, 52, 52Optimize For Speed, 50, 52, 52Paired Storage, 103, 105Passive, 98, 101
Password, 50, 53, 98, 101, 103, 106, 115,117, 118, 119
Pid Directory, 50, 53Plugin Directory, 50, 53, 53Plugin Names, 50, 53Plugin Options, 56, 65Plugin Options ACL, 119, 120, 121, 122Pool, 56, 59, 60, 65, 265Pool ACL, 119, 120, 121, 122Pool Type, 108, 112Port, 98, 101, 103, 106Prefer Mounted Volumes, 56, 65, 245Prefix Links, 56, 65Priority, 56, 66Profile, 119, 120, 121Protocol, 56, 66, 98, 101, 103, 106Prune Files, 56, 66Prune Jobs, 56, 66Prune Volumes, 56, 66Purge Migration Job, 56, 67, 265Purge Oldest Volume, 108, 112, 222Query File, 50, 53Quota Include Failed Jobs, 99, 101Reconnect, 115, 117Recycle, 108, 112, 222Recycle Current Volume, 108, 113, 222Recycle Oldest Volume, 108, 113, 222Recycle Pool, 108, 113Regex Where, 56, 67Replace, 56, 67Rerun Failed Levels, 56, 67Reschedule Interval, 56, 67Reschedule On Error, 56, 67Reschedule Times, 56, 67Run, 56, 67, 76, 76, 261Run ACL, 119, 120Run After Failed Job, 56, 68, 70Run After Job, 56, 68, 70Run Before Job, 56, 68, 68, 70Run Script, 56, 59, 68, 69, 360, 363Save File History, 56, 71Schedule, 56, 71Schedule ACL, 119, 120, 121, 122Scratch Pool, 108, 113Scripts Directory, 50, 53SD Address, 103, 106SD Connect Timeout, 50, 53SD Password, 103, 106SD Plugin Options, 56, 72SD Port, 103, 106Sdd Port, 103, 106Selection Pattern, 56, 72, 72, 265Selection Type, 56, 65, 72, 72, 111, 263, 265Soft Quota, 99, 101Soft Quota Grace Period, 99, 102Spool Attributes, 56, 73, 73Spool Data, 56, 73, 73, 261Spool Size, 56, 73, 261Statistics Collect Interval, 50, 53, 104Statistics Retention, 50, 53
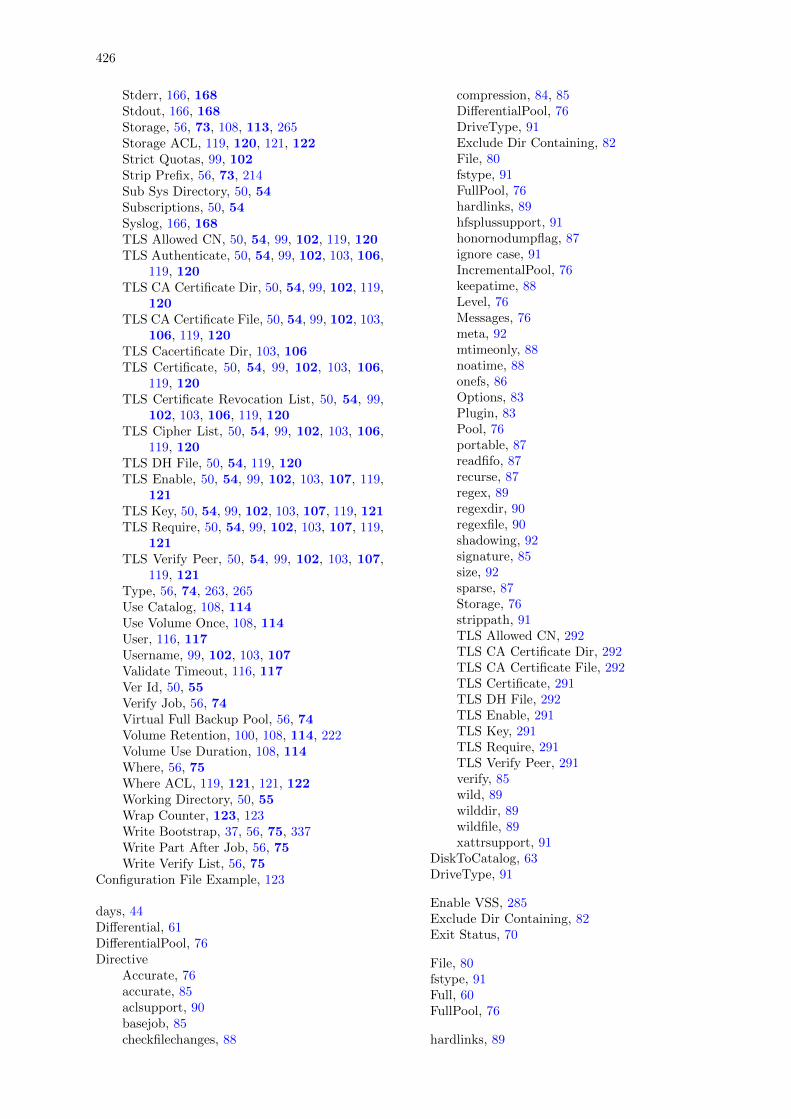
426
Stderr, 166, 168Stdout, 166, 168Storage, 56, 73, 108, 113, 265Storage ACL, 119, 120, 121, 122Strict Quotas, 99, 102Strip Prefix, 56, 73, 214Sub Sys Directory, 50, 54Subscriptions, 50, 54Syslog, 166, 168TLS Allowed CN, 50, 54, 99, 102, 119, 120TLS Authenticate, 50, 54, 99, 102, 103, 106,
119, 120TLS CA Certificate Dir, 50, 54, 99, 102, 119,
120TLS CA Certificate File, 50, 54, 99, 102, 103,
106, 119, 120TLS Cacertificate Dir, 103, 106TLS Certificate, 50, 54, 99, 102, 103, 106,
119, 120TLS Certificate Revocation List, 50, 54, 99,
102, 103, 106, 119, 120TLS Cipher List, 50, 54, 99, 102, 103, 106,
119, 120TLS DH File, 50, 54, 119, 120TLS Enable, 50, 54, 99, 102, 103, 107, 119,
121TLS Key, 50, 54, 99, 102, 103, 107, 119, 121TLS Require, 50, 54, 99, 102, 103, 107, 119,
121TLS Verify Peer, 50, 54, 99, 102, 103, 107,
119, 121Type, 56, 74, 263, 265Use Catalog, 108, 114Use Volume Once, 108, 114User, 116, 117Username, 99, 102, 103, 107Validate Timeout, 116, 117Ver Id, 50, 55Verify Job, 56, 74Virtual Full Backup Pool, 56, 74Volume Retention, 100, 108, 114, 222Volume Use Duration, 108, 114Where, 56, 75Where ACL, 119, 121, 121, 122Working Directory, 50, 55Wrap Counter, 123, 123Write Bootstrap, 37, 56, 75, 337Write Part After Job, 56, 75Write Verify List, 56, 75
Configuration File Example, 123
days, 44Differential, 61DifferentialPool, 76Directive
Accurate, 76accurate, 85aclsupport, 90basejob, 85checkfilechanges, 88
compression, 84, 85DifferentialPool, 76DriveType, 91Exclude Dir Containing, 82File, 80fstype, 91FullPool, 76hardlinks, 89hfsplussupport, 91honornodumpflag, 87ignore case, 91IncrementalPool, 76keepatime, 88Level, 76Messages, 76meta, 92mtimeonly, 88noatime, 88onefs, 86Options, 83Plugin, 83Pool, 76portable, 87readfifo, 87recurse, 87regex, 89regexdir, 90regexfile, 90shadowing, 92signature, 85size, 92sparse, 87Storage, 76strippath, 91TLS Allowed CN, 292TLS CA Certificate Dir, 292TLS CA Certificate File, 292TLS Certificate, 291TLS DH File, 292TLS Enable, 291TLS Key, 291TLS Require, 291TLS Verify Peer, 291verify, 85wild, 89wilddir, 89wildfile, 89xattrsupport, 91
DiskToCatalog, 63DriveType, 91
Enable VSS, 285Exclude Dir Containing, 82Exit Status, 70
File, 80fstype, 91Full, 60FullPool, 76
hardlinks, 89

427
hfsplussupport, 91honornodumpflag, 87hours, 44
ifnewer, 67ifolder, 67ignore case, 91Incremental, 61IncrementalPool, 76InitCatalog, 62
keepatime, 88
Level, 76
MD5, 85Messages, 76
destination, 165meta, 92minutes, 44months, 44mtimeonly, 88
NDMPFile History, 71
never, 67noatime, 88
onefs, 86Options, 83
Plugin, 83Pool, 76portable, 87
quarters, 44
readfifo, 87recurse, 87Recycle, 231regex, 89regexdir, 90regexfile, 90Resource Types, 49Restore, 74
seconds, 44SHA1, 85shadowing, 92signature, 85size, 92sparse, 87Storage, 76strippath, 91
TLS Allowed CN, 292TLS CA Certificate Dir, 292TLS CA Certificate File, 292TLS Certificate, 291TLS DH File, 292TLS Enable, 291TLS Key, 291
TLS Require, 291TLS Verify Peer, 291
Verify, 74verify, 85VirtualFull Backup, 62Volume Retention, 230VolumeToCatalog, 63
weeks, 44wild, 89wilddir, 89wildfile, 89
xattrsupport, 91
years, 44
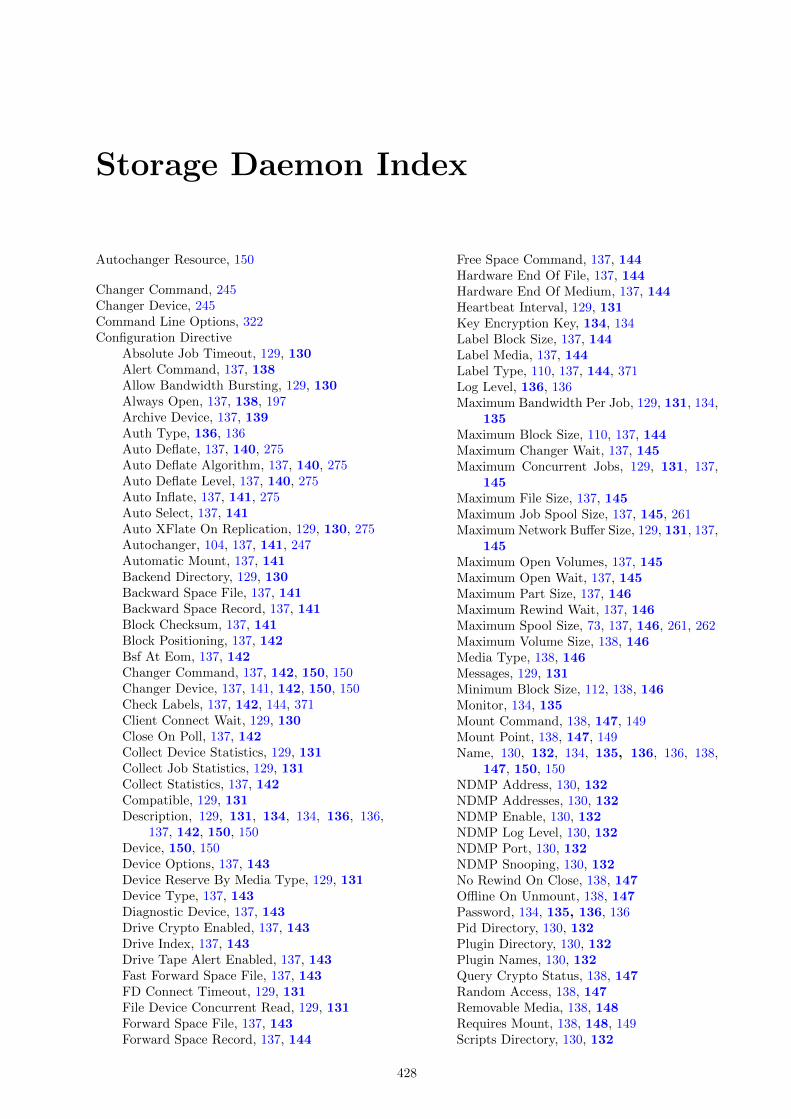
Storage Daemon Index
Autochanger Resource, 150
Changer Command, 245Changer Device, 245Command Line Options, 322Configuration Directive
Absolute Job Timeout, 129, 130Alert Command, 137, 138Allow Bandwidth Bursting, 129, 130Always Open, 137, 138, 197Archive Device, 137, 139Auth Type, 136, 136Auto Deflate, 137, 140, 275Auto Deflate Algorithm, 137, 140, 275Auto Deflate Level, 137, 140, 275Auto Inflate, 137, 141, 275Auto Select, 137, 141Auto XFlate On Replication, 129, 130, 275Autochanger, 104, 137, 141, 247Automatic Mount, 137, 141Backend Directory, 129, 130Backward Space File, 137, 141Backward Space Record, 137, 141Block Checksum, 137, 141Block Positioning, 137, 142Bsf At Eom, 137, 142Changer Command, 137, 142, 150, 150Changer Device, 137, 141, 142, 150, 150Check Labels, 137, 142, 144, 371Client Connect Wait, 129, 130Close On Poll, 137, 142Collect Device Statistics, 129, 131Collect Job Statistics, 129, 131Collect Statistics, 137, 142Compatible, 129, 131Description, 129, 131, 134, 134, 136, 136,
137, 142, 150, 150Device, 150, 150Device Options, 137, 143Device Reserve By Media Type, 129, 131Device Type, 137, 143Diagnostic Device, 137, 143Drive Crypto Enabled, 137, 143Drive Index, 137, 143Drive Tape Alert Enabled, 137, 143Fast Forward Space File, 137, 143FD Connect Timeout, 129, 131File Device Concurrent Read, 129, 131Forward Space File, 137, 143Forward Space Record, 137, 144
Free Space Command, 137, 144Hardware End Of File, 137, 144Hardware End Of Medium, 137, 144Heartbeat Interval, 129, 131Key Encryption Key, 134, 134Label Block Size, 137, 144Label Media, 137, 144Label Type, 110, 137, 144, 371Log Level, 136, 136Maximum Bandwidth Per Job, 129, 131, 134,
135Maximum Block Size, 110, 137, 144Maximum Changer Wait, 137, 145Maximum Concurrent Jobs, 129, 131, 137,
145Maximum File Size, 137, 145Maximum Job Spool Size, 137, 145, 261Maximum Network Buffer Size, 129, 131, 137,
145Maximum Open Volumes, 137, 145Maximum Open Wait, 137, 145Maximum Part Size, 137, 146Maximum Rewind Wait, 137, 146Maximum Spool Size, 73, 137, 146, 261, 262Maximum Volume Size, 138, 146Media Type, 138, 146Messages, 129, 131Minimum Block Size, 112, 138, 146Monitor, 134, 135Mount Command, 138, 147, 149Mount Point, 138, 147, 149Name, 130, 132, 134, 135, 136, 136, 138,
147, 150, 150NDMP Address, 130, 132NDMP Addresses, 130, 132NDMP Enable, 130, 132NDMP Log Level, 130, 132NDMP Port, 130, 132NDMP Snooping, 130, 132No Rewind On Close, 138, 147Offline On Unmount, 138, 147Password, 134, 135, 136, 136Pid Directory, 130, 132Plugin Directory, 130, 132Plugin Names, 130, 132Query Crypto Status, 138, 147Random Access, 138, 147Removable Media, 138, 148Requires Mount, 138, 148, 149Scripts Directory, 130, 132
428
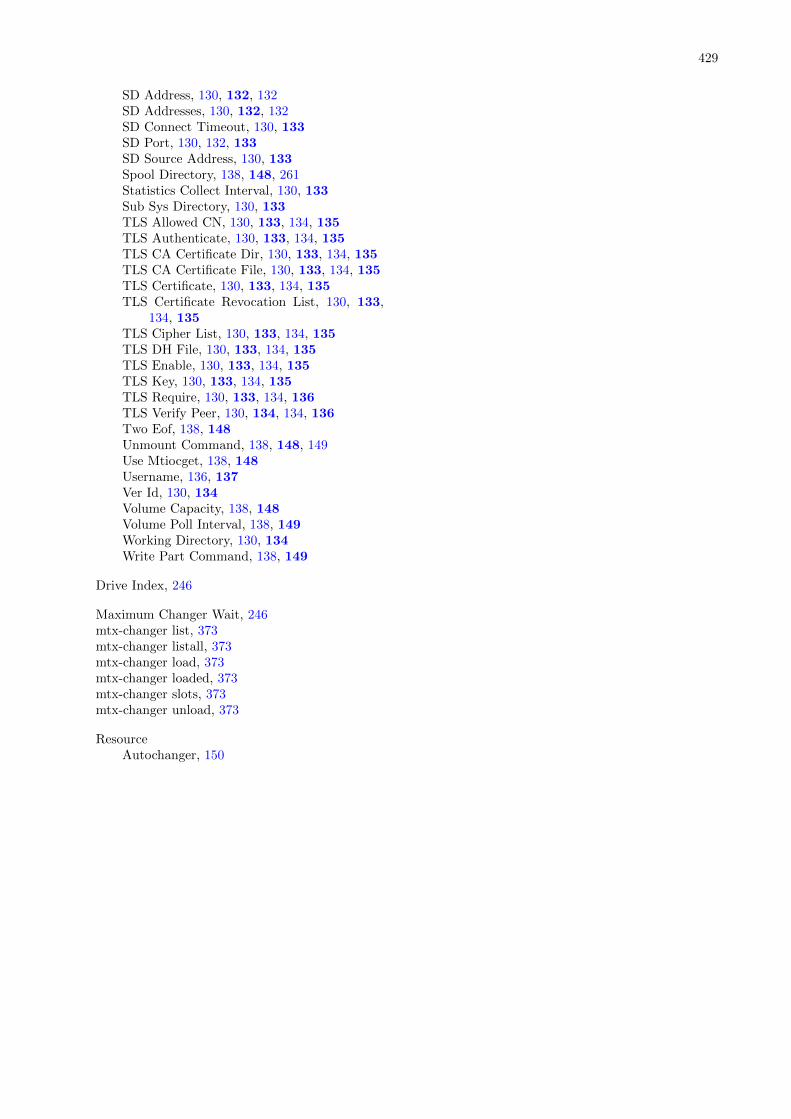
429
SD Address, 130, 132, 132SD Addresses, 130, 132, 132SD Connect Timeout, 130, 133SD Port, 130, 132, 133SD Source Address, 130, 133Spool Directory, 138, 148, 261Statistics Collect Interval, 130, 133Sub Sys Directory, 130, 133TLS Allowed CN, 130, 133, 134, 135TLS Authenticate, 130, 133, 134, 135TLS CA Certificate Dir, 130, 133, 134, 135TLS CA Certificate File, 130, 133, 134, 135TLS Certificate, 130, 133, 134, 135TLS Certificate Revocation List, 130, 133,
134, 135TLS Cipher List, 130, 133, 134, 135TLS DH File, 130, 133, 134, 135TLS Enable, 130, 133, 134, 135TLS Key, 130, 133, 134, 135TLS Require, 130, 133, 134, 136TLS Verify Peer, 130, 134, 134, 136Two Eof, 138, 148Unmount Command, 138, 148, 149Use Mtiocget, 138, 148Username, 136, 137Ver Id, 130, 134Volume Capacity, 138, 148Volume Poll Interval, 138, 149Working Directory, 130, 134Write Part Command, 138, 149
Drive Index, 246
Maximum Changer Wait, 246mtx-changer list, 373mtx-changer listall, 373mtx-changer load, 373mtx-changer loaded, 373mtx-changer slots, 373mtx-changer unload, 373
ResourceAutochanger, 150
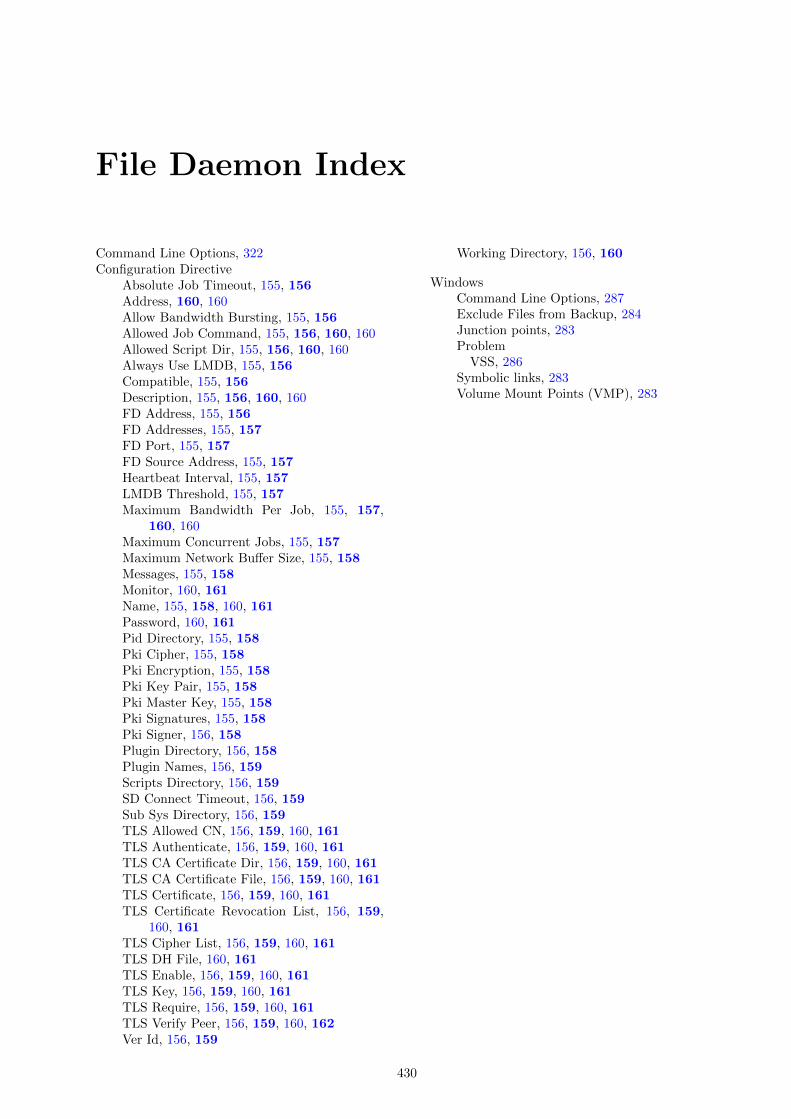
File Daemon Index
Command Line Options, 322Configuration Directive
Absolute Job Timeout, 155, 156Address, 160, 160Allow Bandwidth Bursting, 155, 156Allowed Job Command, 155, 156, 160, 160Allowed Script Dir, 155, 156, 160, 160Always Use LMDB, 155, 156Compatible, 155, 156Description, 155, 156, 160, 160FD Address, 155, 156FD Addresses, 155, 157FD Port, 155, 157FD Source Address, 155, 157Heartbeat Interval, 155, 157LMDB Threshold, 155, 157Maximum Bandwidth Per Job, 155, 157,
160, 160Maximum Concurrent Jobs, 155, 157Maximum Network Buffer Size, 155, 158Messages, 155, 158Monitor, 160, 161Name, 155, 158, 160, 161Password, 160, 161Pid Directory, 155, 158Pki Cipher, 155, 158Pki Encryption, 155, 158Pki Key Pair, 155, 158Pki Master Key, 155, 158Pki Signatures, 155, 158Pki Signer, 156, 158Plugin Directory, 156, 158Plugin Names, 156, 159Scripts Directory, 156, 159SD Connect Timeout, 156, 159Sub Sys Directory, 156, 159TLS Allowed CN, 156, 159, 160, 161TLS Authenticate, 156, 159, 160, 161TLS CA Certificate Dir, 156, 159, 160, 161TLS CA Certificate File, 156, 159, 160, 161TLS Certificate, 156, 159, 160, 161TLS Certificate Revocation List, 156, 159,
160, 161TLS Cipher List, 156, 159, 160, 161TLS DH File, 160, 161TLS Enable, 156, 159, 160, 161TLS Key, 156, 159, 160, 161TLS Require, 156, 159, 160, 161TLS Verify Peer, 156, 159, 160, 162Ver Id, 156, 159
Working Directory, 156, 160
WindowsCommand Line Options, 287Exclude Files from Backup, 284Junction points, 283Problem
VSS, 286Symbolic links, 283Volume Mount Points (VMP), 283
430
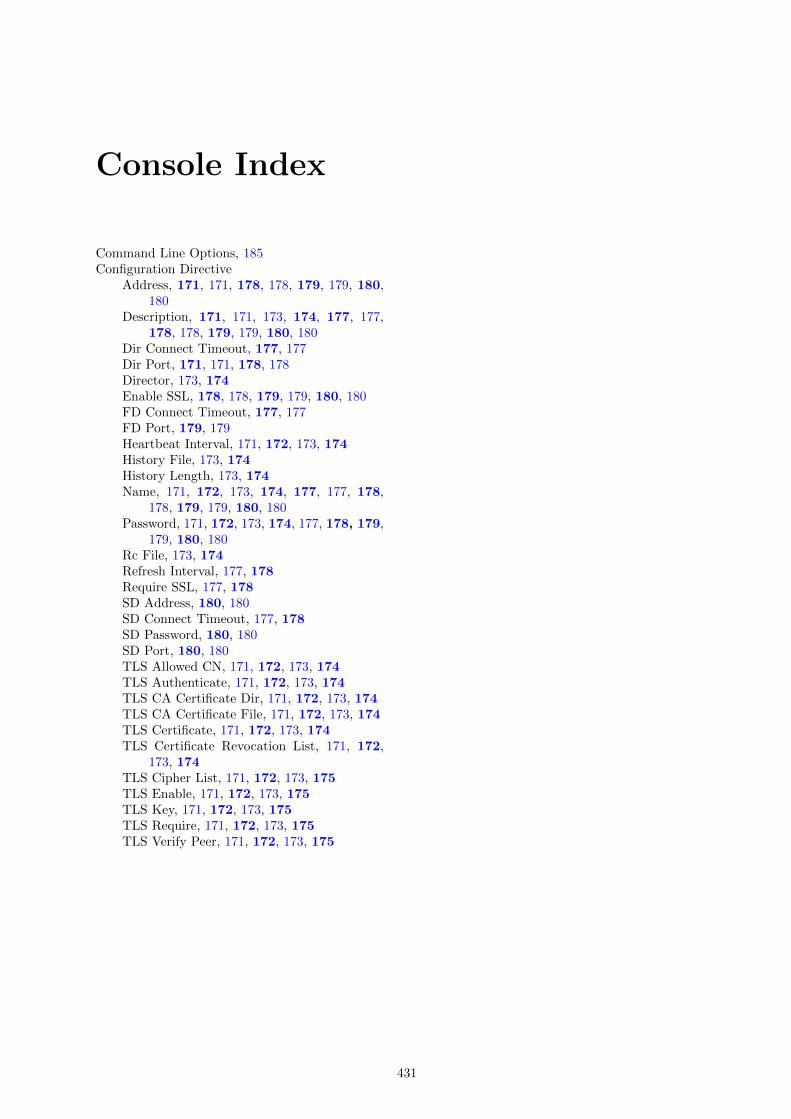
Console Index
Command Line Options, 185Configuration Directive
Address, 171, 171, 178, 178, 179, 179, 180,180
Description, 171, 171, 173, 174, 177, 177,178, 178, 179, 179, 180, 180
Dir Connect Timeout, 177, 177Dir Port, 171, 171, 178, 178Director, 173, 174Enable SSL, 178, 178, 179, 179, 180, 180FD Connect Timeout, 177, 177FD Port, 179, 179Heartbeat Interval, 171, 172, 173, 174History File, 173, 174History Length, 173, 174Name, 171, 172, 173, 174, 177, 177, 178,
178, 179, 179, 180, 180Password, 171, 172, 173, 174, 177, 178, 179,
179, 180, 180Rc File, 173, 174Refresh Interval, 177, 178Require SSL, 177, 178SD Address, 180, 180SD Connect Timeout, 177, 178SD Password, 180, 180SD Port, 180, 180TLS Allowed CN, 171, 172, 173, 174TLS Authenticate, 171, 172, 173, 174TLS CA Certificate Dir, 171, 172, 173, 174TLS CA Certificate File, 171, 172, 173, 174TLS Certificate, 171, 172, 173, 174TLS Certificate Revocation List, 171, 172,
173, 174TLS Cipher List, 171, 172, 173, 175TLS Enable, 171, 172, 173, 175TLS Key, 171, 172, 173, 175TLS Require, 171, 172, 173, 175TLS Verify Peer, 171, 172, 173, 175
431