Embed Size (px)
Citation preview

7/14/2019 BC480 - PDF-Based Print Forms
http://slidepdf.com/reader/full/bc480-pdf-based-print-forms 1/317
BC480PDF-Based Print Forms
SAP NetWeaver
Date
Training Center
Instructors
Education Website
Participant HandbookCourse Version: 2006 Q2Course Duration: 3 Day(s)
Material Number: 50080101
An SAP course - use it to learn, reference it for work

7/14/2019 BC480 - PDF-Based Print Forms
http://slidepdf.com/reader/full/bc480-pdf-based-print-forms 2/317
Copyright
Copyright © 2006 SAP AG. All rights reserved.
No part of this publication may be reproduced or transmitted in any form or for any purpose
without the express permission of SAP AG. The information contained herein may be changed
without prior notice.
Some software products marketed by SAP AG and its distributors contain proprietary software
components of other software vendors.
Trademarks
• Microsoft®, WINDOWS®, NT®, EXCEL®, Word®, PowerPoint® and SQL Server® are
registered trademarks of Microsoft Corporation.
• IBM®, DB2®, OS/2®, DB2/6000®, Parallel Sysplex®, MVS/ESA®, RS/6000®, AIX®,
S/390®, AS/400®, OS/390®, and OS/400® are registered trademarks of IBM Corporation.
• ORACLE® is a registered trademark of ORACLE Corporation.
• INFORMIX®-OnLine for SAP and INFORMIX® Dynamic ServerTM are registered
trademarks of Informix Software Incorporated.
• UNIX®, X/Open®, OSF/1®, and Motif® are registered trademarks of the Open Group.
• Citrix®, the Citrix logo, ICA®, Program Neighborhood®, MetaFrame®, WinFrame®,
VideoFrame®, MultiWin® and other Citrix product names referenced herein are trademarks
of Citrix Systems, Inc.
• HTML, DHTML, XML, XHTML are trademarks or registered trademarks of W3C®, World
Wide Web Consortium, Massachusetts Institute of Technology.
• JAVA® is a registered trademark of Sun Microsystems, Inc.
• JAVASCRIPT® is a registered trademark of Sun Microsystems, Inc., used under license for
technology invented and implemented by Netscape.
• SAP, SAP Logo, R/2, RIVA, R/3, SAP ArchiveLink, SAP Business Workflow, WebFlow, SAP
EarlyWatch, BAPI, SAPPHIRE, Management Cockpit, mySAP.com Logo and mySAP.com
are trademarks or registered trademarks of SAP AG in Germany and in several other countries
all over the world. All other products mentioned are trademarks or registered trademarks of
their respective companies.
Disclaimer
THESE MATERIALS ARE PROVIDED BY SAP ON AN "AS IS" BASIS, AND SAP EXPRESSLY
DISCLAIMS ANY AND ALL WARRANTIES, EXPRESS OR APPLIED, INCLUDING
WITHOUT LIMITATION WARRANTIES OF MERCHANTABILITY AND FITNESS FOR A
PARTICULAR PURPOSE, WITH RESPECT TO THESE MATERIALS AND THE SERVICE,
INFORMATION, TEXT, GRAPHICS, LINKS, OR ANY OTHER MATERIALS AND PRODUCTSCONTAINED HEREIN. IN NO EVENT SHALL SAP BE LIABLE FOR ANY DIRECT,
INDIRECT, SPECIAL, INCIDENTAL, CONSEQUENTIAL, OR PUNITIVE DAMAGES OF ANY
KIND WHATSOEVER, INCLUDING WITHOUT LIMITATION LOST REVENUES OR LOST
PROFITS, WHICH MAY RESULT FROM THE USE OF THESE MATERIALS OR INCLUDED
SOFTWARE COMPONENTS.
7/14/2019 BC480 - PDF-Based Print Forms
http://slidepdf.com/reader/full/bc480-pdf-based-print-forms 3/317
About This Handbook
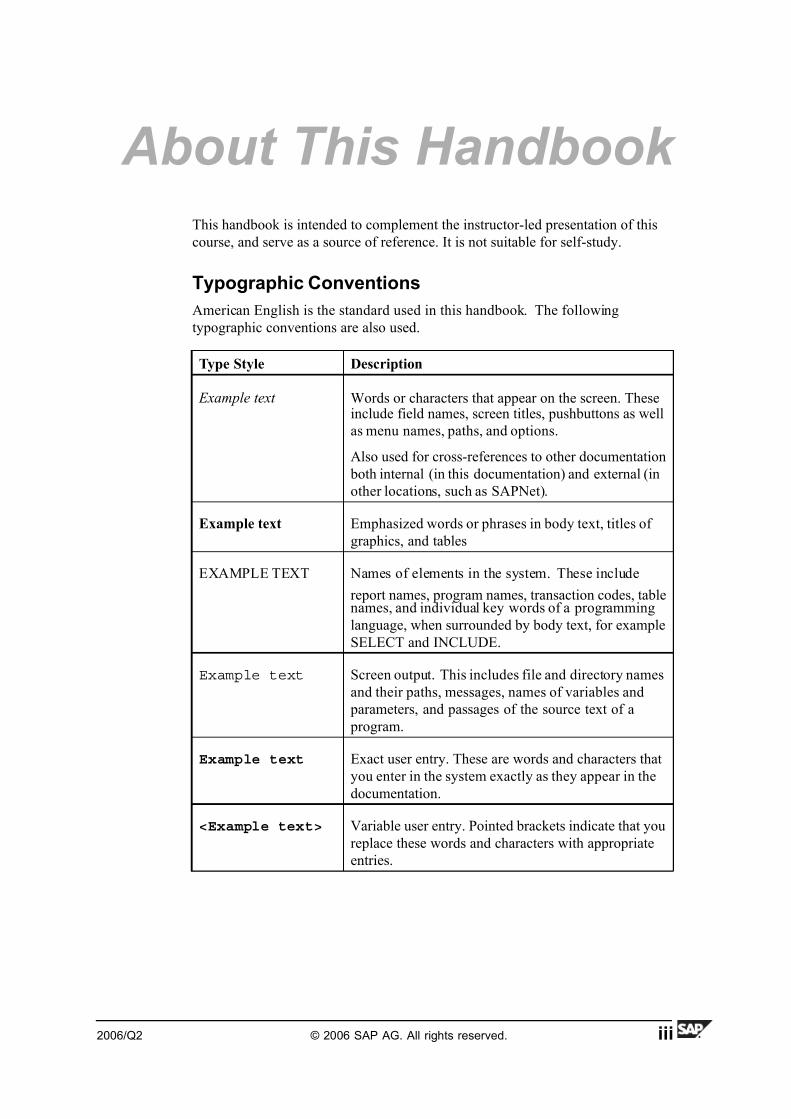
This handbook is intended to complement the instructor-led presentation of this
course, and serve as a source of reference. It is not suitable for self-study.
Typographic Conventions
American English is the standard used in this handbook. The following
typographic conventions are also used.
Type Style Description
Example text Words or characters that appear on the screen. Theseinclude field names, screen titles, pushbuttons as well
as menu names, paths, and options.
Also used for cross-references to other documentation
both internal (in this documentation) and external (in
other locations, such as SAPNet).
Example text Emphasized words or phrases in body text, titles of
graphics, and tables
EXAMPLE TEXT Names of elements in the system. These include
report names, program names, transaction codes, tablenames, and individual key words of a programming
language, when surrounded by body text, for example
SELECT and INCLUDE.
Example text Screen output. This includes file and directory names
and their paths, messages, names of variables and
parameters, and passages of the source text of a
program.
Example text Exact user entry. These are words and characters that
you enter in the system exactly as they appear in the
documentation.
<Example text> Variable user entry. Pointed brackets indicate that you
replace these words and characters with appropriate
entries.
2006/Q2 © 2006 SAP AG. All rights reserved. iii
7/14/2019 BC480 - PDF-Based Print Forms
http://slidepdf.com/reader/full/bc480-pdf-based-print-forms 4/317
About This Handbook BC480
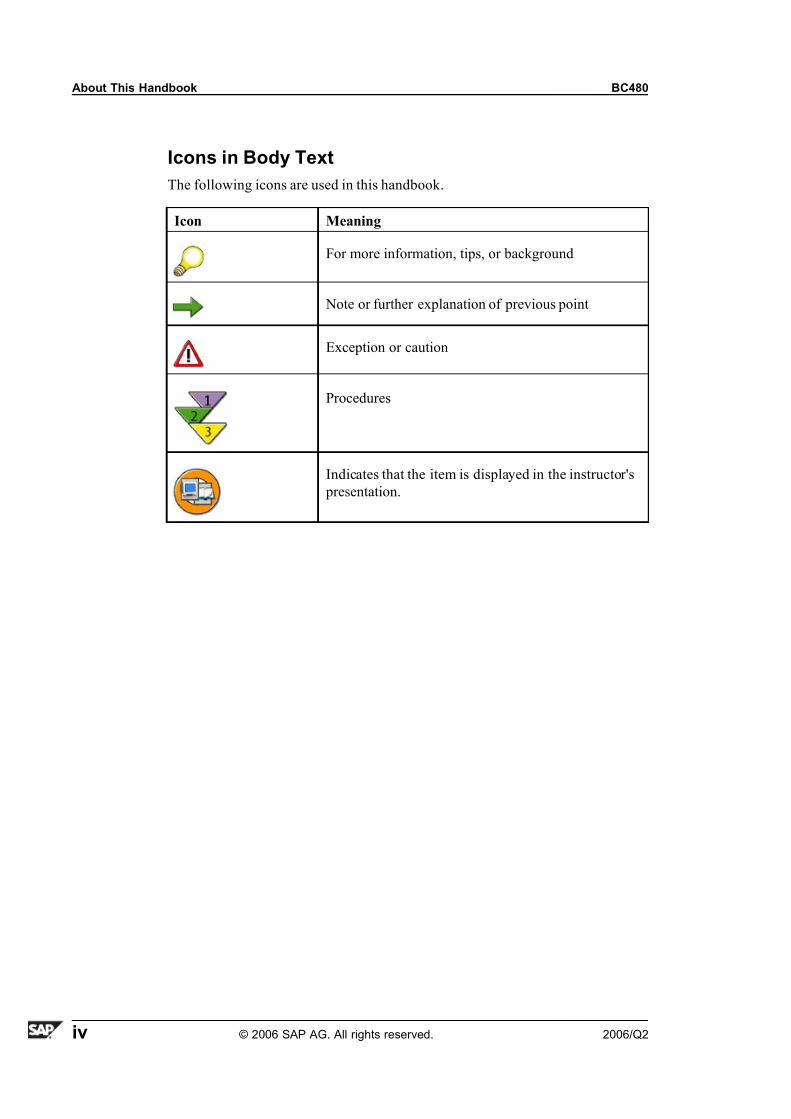
Icons in Body Text
The following icons are used in this handbook.
Icon Meaning
For more information, tips, or background
Note or further explanation of previous point
Exception or caution
Procedures
Indicates that the item is displayed in the instructor's
presentation.
iv © 2006 SAP AG. All rights reserved. 2006/Q2
7/14/2019 BC480 - PDF-Based Print Forms
http://slidepdf.com/reader/full/bc480-pdf-based-print-forms 5/317
Contents
Course Overview ....... ....... ....... ....... ....... ...... ....... ....... .. vii
Course Goals ....... ........ ........ ........ ........ ....... ........ .....vii
Course Objectives ... .... ... .... .... .... .... .... .... ... .... ... .... .... .vii
Unit 1: Overview........... ....... ....... ....... ....... ....... ....... ....... 1
Overview: Architecture. ... .... .... .... .... .... .... ... .... .... .... .... ..2
Unit 2: Interface ....... ....... ...... ....... ....... ....... ....... ....... ... 13
The Interface as the Link Between Program and Form ... .. . . . .. 14
Unit 3: Context............ ....... ....... ....... ....... ....... ....... ...... 35
Form Context: Using and Extending a Form Interface.. . . . .. . . .. 36
Unit 4: Designer ....... ....... ...... ....... ....... ....... ....... ....... ... 79
Adobe LiveCycle Designer: Overview . . .. . . .. . . . .. . . .. . . .. . . . . .. .. 80
Adobe LiveCycle Designer: Structuring a Form .. . .. . . . .. . . . . .. .108
Unit 5: Layout.... ....... ....... ....... ....... ....... ...... ....... ....... . 127
Static Form Elements.... ... .... .... .... .... .... .... ... .... ... .... ... 129Dynamic Form Elements............................................143Tables............. ........ ........ ........ ....... ........ ........ ...... 171
Unit 6: Scripting in the Form ... .... ... .... ... .... ... .... ... .... ... ... 193
Scripting for Form Elements... .. .. ... ... .. ... .. ... ... .. ... .. ... ... .194
Unit 7: Integration into ABAP Programs .......................... 217
Integration of Forms into ABAP Programs........................218
Unit 8: Tips and Tricks.. .... ... ... .... ... .... ... .... ... .... ... .... ... .. 233
Download/Upload and Import .. .. ... ... .. ... .. ... ... .. .. ... ... .. ... 234
Accessibility Aspects . .. . . . . .. . . .. . . .. . . . .. . .. . . . .. . . . . .. . .. . . . .. . . . .240
Unit 9: Appendix . ....... ....... ....... ....... ....... ....... ....... ...... 249
Styles.................................................................. 251
ABAP Exception Handling ... .. . . . . .. . . .. . . .. . . . .. . . .. . . . .. . . . .. . .. .261
Customizing ........ ........ ........ ........ ........ ....... ........ ...266Basic Administration. .... ... .... .... .... .... .... .... ... .... ... .... ... 270
Tables in Adobe LiveCycle Designer 6.0 or 7.0.. .. .. .. .. .. .. .. .. 275
2006/Q2 © 2006 SAP AG. All rights reserved. v

7/14/2019 BC480 - PDF-Based Print Forms
http://slidepdf.com/reader/full/bc480-pdf-based-print-forms 6/317
Contents BC480
Migration ....... ........ ........ ....... ........ ........ ....... ........ .281
Index ....................................................................... 303
vi © 2006 SAP AG. All rights reserved. 2006/Q2

7/14/2019 BC480 - PDF-Based Print Forms
http://slidepdf.com/reader/full/bc480-pdf-based-print-forms 7/317
Course Overview
In this course, you will learn about the tool “SAP Interactive Forms by Adobe”
and its key capabilities. You will learn how to design forms and how to integrate
them into ABAP print scenarios.
Target Audience
This course is intended for the following audiences:
• Project team members, developers and consultants who are responsible for
form printing
Course Prerequisites
Required Knowledge
• Programming experience with ABAP
Recommended Knowledge
• Experience with SAPscript or Smart Forms strongly recommended, but
not compulsory
Course GoalsThis course will prepare you to:
• Create print forms with the tool “SAP Interactive Forms by Adobe”
• Integrate forms into ABAP application programs
Course Objectives
After completing this course, you will be able to:
• Use transaction SFP
• Create and model form contexts
• Create and model form interfaces
• Use Adobe LiveCycle Designer
• Create and design complex forms for printing with the tool “Interactive
Forms”
• Integrate forms into ABAP programs
2006/Q2 © 2006 SAP AG. All rights reserved. vii

7/14/2019 BC480 - PDF-Based Print Forms
http://slidepdf.com/reader/full/bc480-pdf-based-print-forms 8/317
Course Overview BC480
SAP Software Component Information
The information in this course pertains to the following SAP Software Componentsand releases:
• ECC 6.0
viii © 2006 SAP AG. All rights reserved. 2006/Q2

7/14/2019 BC480 - PDF-Based Print Forms
http://slidepdf.com/reader/full/bc480-pdf-based-print-forms 9/317
Unit 1Overview
Unit Overview
This unit gives an overview of the transactions and tools involved at design time.
It also provides a brief overview of the technology that is actually used at runtime.
Unit Objectives
After completing this unit, you will be able to:
• Name relevant parts of the architecture of the tool “Interactive Forms”
• Name the steps to create a printing scenario with the tool “Interactive Forms”
Unit Contents
Lesson: Overview: Architecture .................................................2
2006/Q2 © 2006 SAP AG. All rights reserved. 1
7/14/2019 BC480 - PDF-Based Print Forms
http://slidepdf.com/reader/full/bc480-pdf-based-print-forms 10/317
Unit 1: Overview BC480
Lesson: Overview: Architecture
Lesson Overview
This lesson will show you the components of the tool “SAP Interactive Forms
by Adobe” that are required for a printing scenario, and how they interact with
the SAP system.
Lesson Objectives
After completing this lesson, you will be able to:
• Name relevant parts of the architecture of the tool “Interactive Forms”
• Name the steps to create a printing scenario with the tool “Interactive Forms”
Business Example
A travel agency wants to print invoices for their customers' flight bookings using
the tool “Interactive Forms”. In the project planning phase, an overview of the
architecture and some basic technical background is required.
Parts involved in a printing scenario
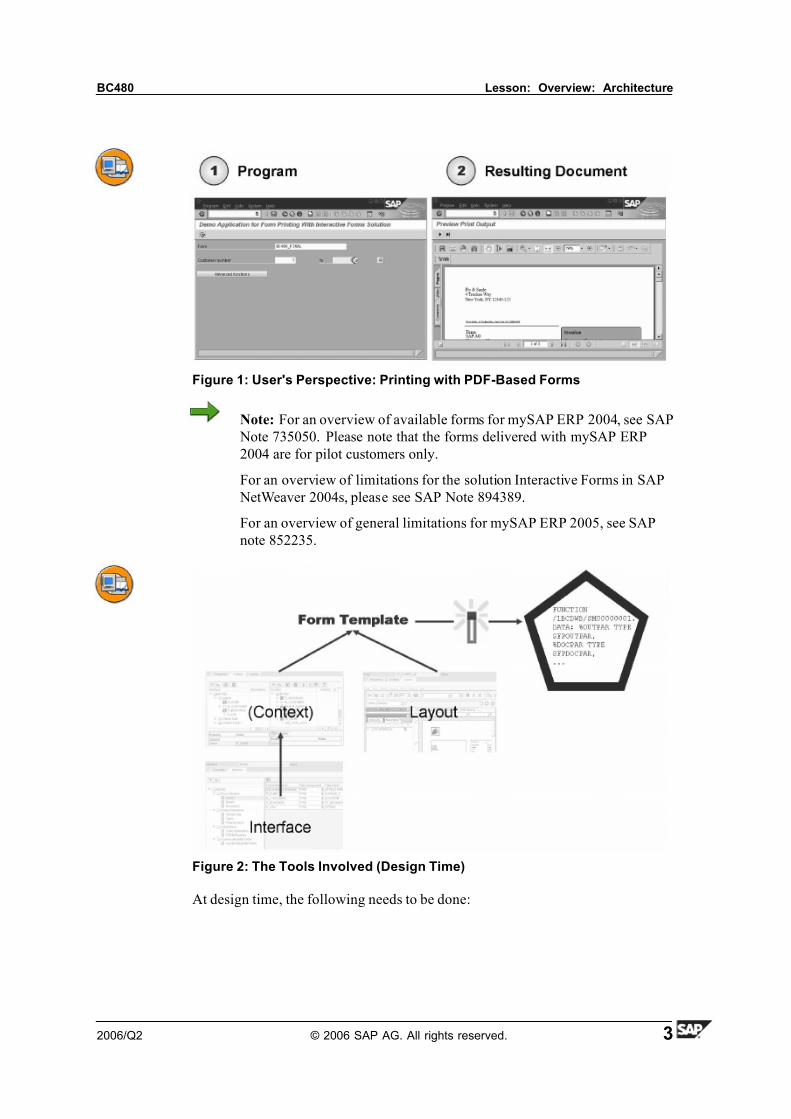
How does creating a document work from the user's perspective?
• The user starts the application, for example using a transaction code.
• The user enters the data required on the screen and triggers the business
process.
• Several print scenarios are possible. One is previewing the PDF document in
Adobe Reader, which is automatically loaded into the SAP GUI. From here
it is possible to trigger a printout so that a spool request is created, which can
be administered in transaction SP01.
2 © 2006 SAP AG. All rights reserved. 2006/Q2
7/14/2019 BC480 - PDF-Based Print Forms
http://slidepdf.com/reader/full/bc480-pdf-based-print-forms 11/317
BC480 Lesson: Overview: Architecture
Figure 1: User's Perspective: Printing with PDF-Based Forms
Note: For an overview of available forms for mySAP ERP 2004, see SAP
Note 735050. Please note that the forms delivered with mySAP ERP
2004 are for pilot customers only.
For an overview of limitations for the solution Interactive Forms in SAP
NetWeaver 2004s, please see SAP Note 894389.
For an overview of general limitations for mySAP ERP 2005, see SAP
note 852235.
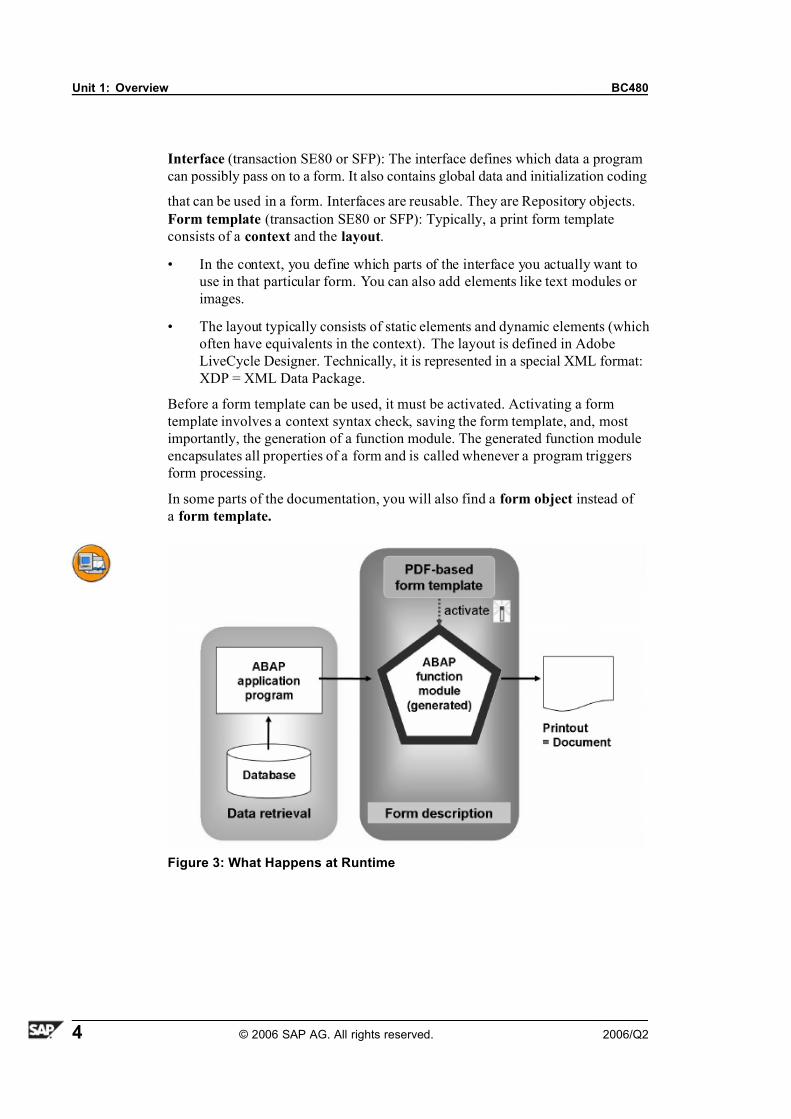
Figure 2: The Tools Involved (Design Time)
At design time, the following needs to be done:
2006/Q2 © 2006 SAP AG. All rights reserved. 3
7/14/2019 BC480 - PDF-Based Print Forms
http://slidepdf.com/reader/full/bc480-pdf-based-print-forms 12/317
Unit 1: Overview BC480
Interface (transaction SE80 or SFP): The interface defines which data a program
can possibly pass on to a form. It also contains global data and initialization coding
that can be used in a form. Interfaces are reusable. They are Repository objects.
Form template (transaction SE80 or SFP): Typically, a print form template
consists of a context and the layout.
• In the context, you define which parts of the interface you actually want to
use in that particular form. You can also add elements like text modules or
images.
• The layout typically consists of static elements and dynamic elements (which
often have equivalents in the context). The layout is defined in Adobe
LiveCycle Designer. Technically, it is represented in a special XML format:
XDP = XML Data Package.
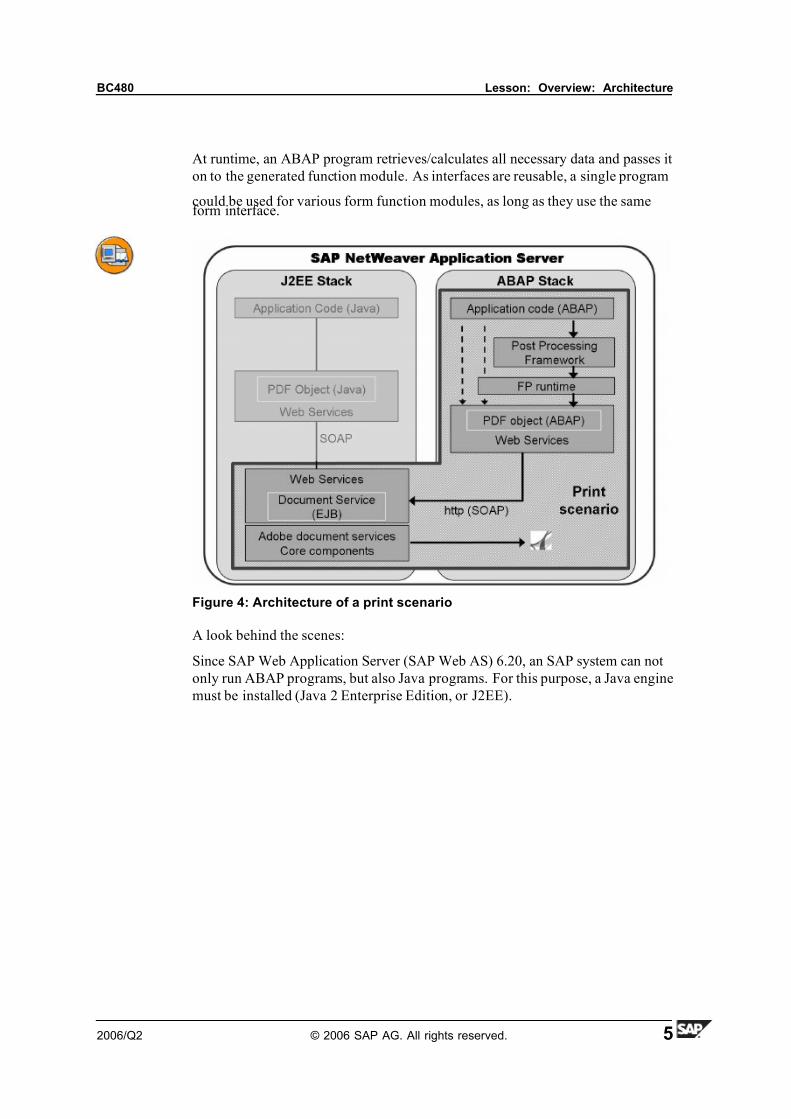
Before a form template can be used, it must be activated. Activating a form
template involves a context syntax check, saving the form template, and, most
importantly, the generation of a function module. The generated function module
encapsulates all properties of a form and is called whenever a program triggers
form processing.
In some parts of the documentation, you will also find a form object instead of
a form template.
Figure 3: What Happens at Runtime
4 © 2006 SAP AG. All rights reserved. 2006/Q2
7/14/2019 BC480 - PDF-Based Print Forms
http://slidepdf.com/reader/full/bc480-pdf-based-print-forms 13/317
BC480 Lesson: Overview: Architecture
At runtime, an ABAP program retrieves/calculates all necessary data and passes it
on to the generated function module. As interfaces are reusable, a single program
could be used for various form function modules, as long as they use the sameform interface.
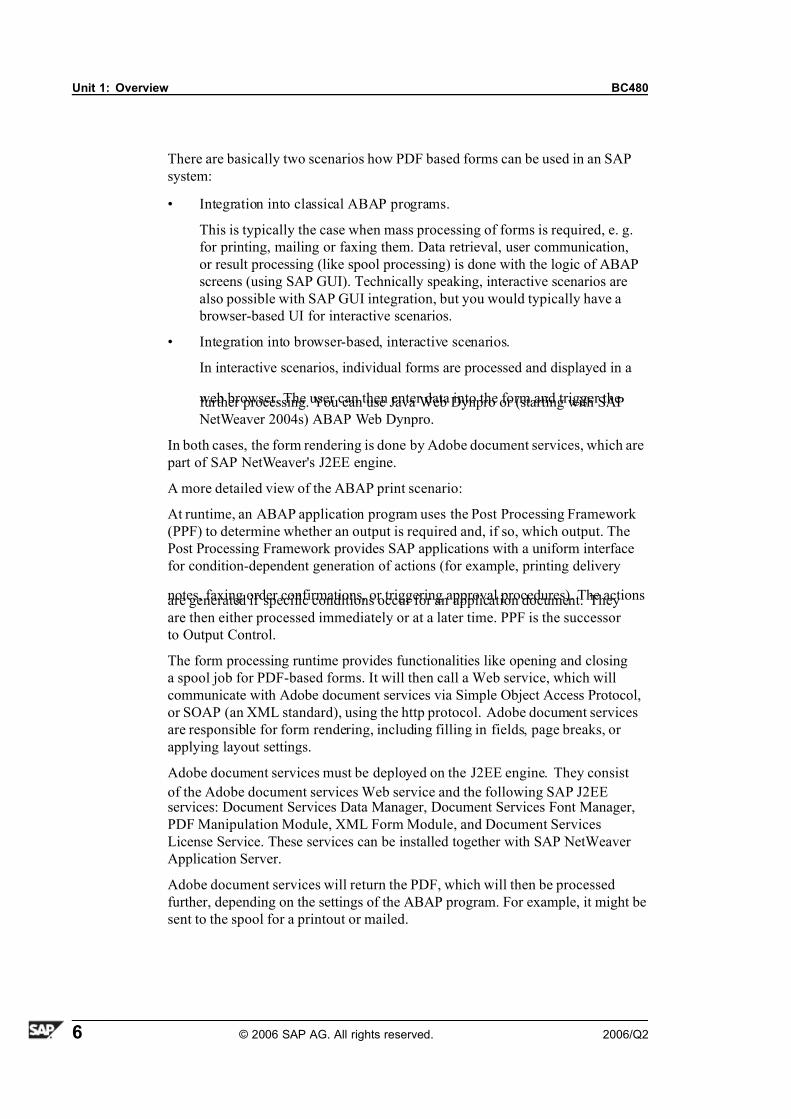
Figure 4: Architecture of a print scenario
A look behind the scenes:
Since SAP Web Application Server (SAP Web AS) 6.20, an SAP system can not
only run ABAP programs, but also Java programs. For this purpose, a Java engine
must be installed (Java 2 Enterprise Edition, or J2EE).
2006/Q2 © 2006 SAP AG. All rights reserved. 5
7/14/2019 BC480 - PDF-Based Print Forms
http://slidepdf.com/reader/full/bc480-pdf-based-print-forms 14/317
Unit 1: Overview BC480
There are basically two scenarios how PDF based forms can be used in an SAP
system:
• Integration into classical ABAP programs.
This is typically the case when mass processing of forms is required, e. g.
for printing, mailing or faxing them. Data retrieval, user communication,
or result processing (like spool processing) is done with the logic of ABAP
screens (using SAP GUI). Technically speaking, interactive scenarios are
also possible with SAP GUI integration, but you would typically have a
browser-based UI for interactive scenarios.
• Integration into browser-based, interactive scenarios.
In interactive scenarios, individual forms are processed and displayed in a
web browser. The user can then enter data into the form and trigger thefurther processing. You can use Java Web Dynpro or (starting with SAP
NetWeaver 2004s) ABAP Web Dynpro.
In both cases, the form rendering is done by Adobe document services, which are
part of SAP NetWeaver's J2EE engine.
A more detailed view of the ABAP print scenario:
At runtime, an ABAP application program uses the Post Processing Framework
(PPF) to determine whether an output is required and, if so, which output. The
Post Processing Framework provides SAP applications with a uniform interface
for condition-dependent generation of actions (for example, printing delivery
notes, faxing order confirmations, or triggering approval procedures). The actionsare generated if specific conditions occur for an application document. They
are then either processed immediately or at a later time. PPF is the successor
to Output Control.
The form processing runtime provides functionalities like opening and closing
a spool job for PDF-based forms. It will then call a Web service, which will
communicate with Adobe document services via Simple Object Access Protocol,
or SOAP (an XML standard), using the http protocol. Adobe document services
are responsible for form rendering, including filling in fields, page breaks, or
applying layout settings.
Adobe document services must be deployed on the J2EE engine. They consist
of the Adobe document services Web service and the following SAP J2EEservices: Document Services Data Manager, Document Services Font Manager,
PDF Manipulation Module, XML Form Module, and Document Services
License Service. These services can be installed together with SAP NetWeaver
Application Server.
Adobe document services will return the PDF, which will then be processed
further, depending on the settings of the ABAP program. For example, it might be
sent to the spool for a printout or mailed.
6 © 2006 SAP AG. All rights reserved. 2006/Q2
7/14/2019 BC480 - PDF-Based Print Forms
http://slidepdf.com/reader/full/bc480-pdf-based-print-forms 15/317
BC480 Lesson: Overview: Architecture
In some parts of the documentation, Adobe document services might be
abbreviated as ADS.
Advantages over Smart Forms/SAPscript
• PDF is a de-facto standard for forms in the Web
• Adobe LiveCycle Designer as an easy to use, flexible tool for designing
forms
• Adobe LiveCycle Designer is fully integrated into the SAP's IDEs: SAP
NetWeaver Development Studio (Java) and ABAP Workbench
• Graphics (BMP, JPEG, GIF, PNG, EXIF) can be included into forms directly
– no conversion required
• Objects (including texts) can be rotated
• Different page orientations (landscape, portrait) are possible within one form
• Graphical elements can be included in forms
• Forms can be created so that they conform to accessibility standards
• Complex layout elements can be shared between form developers
• Existing PDF or Word documents can be imported
• TrueType Fonts can be used; installation requires no upload
• Barcodes can be printed on all printers of types Postscript, PCL, PDF, or
Zebra
• Mailing and faxing is easier
• Forms are regular Repository objects with standard transport and versioning• Interactive scenarios and integration into browser-based applications are
possible (Web Dynpro for Java or ABAP)
2006/Q2 © 2006 SAP AG. All rights reserved. 7

7/14/2019 BC480 - PDF-Based Print Forms
http://slidepdf.com/reader/full/bc480-pdf-based-print-forms 16/317
Unit 1: Overview BC480
Lesson Summary
You should now be able to:• Name relevant parts of the architecture of the tool “Interactive Forms”
• Name the steps to create a printing scenario with the tool “Interactive Forms”
8 © 2006 SAP AG. All rights reserved. 2006/Q2

7/14/2019 BC480 - PDF-Based Print Forms
http://slidepdf.com/reader/full/bc480-pdf-based-print-forms 17/317
BC480 Unit Summary
Unit Summary
You should now be able to:
• Name relevant parts of the architecture of the tool “Interactive Forms”
• Name the steps to create a printing scenario with the tool “Interactive Forms”
2006/Q2 © 2006 SAP AG. All rights reserved. 9

7/14/2019 BC480 - PDF-Based Print Forms
http://slidepdf.com/reader/full/bc480-pdf-based-print-forms 18/317
Unit Summary BC480
10 © 2006 SAP AG. All rights reserved. 2006/Q2

7/14/2019 BC480 - PDF-Based Print Forms
http://slidepdf.com/reader/full/bc480-pdf-based-print-forms 19/317
BC480 Test Your Knowledge
Test Your Knowledge
1. An interface can exist without a form. Determine whether this statement is true or false.
□ True
□ False
2. A context can exist without a form.
Determine whether this statement is true or false.
□ True
□ False
3. The form layout can include elements from the context.
Determine whether this statement is true or false.
□ True
□ False
4. A J2EE engine is required for interactive scenarios only.
Determine whether this statement is true or false.
□ True
□ False
5. A function module is generated whenever a PDF-based form is printed.
Determine whether this statement is true or false.
□ True
□ False
2006/Q2 © 2006 SAP AG. All rights reserved. 11

7/14/2019 BC480 - PDF-Based Print Forms
http://slidepdf.com/reader/full/bc480-pdf-based-print-forms 20/317
Test Your Knowledge BC480
Answers
1. An interface can exist without a form.
Answer: True
An interface is an independent Repository object and, as such, can exist
without a form that makes use of it.
2. A context can exist without a form.
Answer: False
A context is always part of a form.
3. The form layout can include elements from the context.
Answer: True
Most of the dynamic elements of a form typically come from the context.
4. A J2EE engine is required for interactive scenarios only.
Answer: False
A J2EE engine is also needed for print scenarios, as Adobe document
services need to be deployed on the J2EE engine.
5. A function module is generated whenever a PDF-based form is printed.
Answer: False
A function module is generated only when a PDF-based form is activated.
This function module is called whenever a PDF-based form is processed.
12 © 2006 SAP AG. All rights reserved. 2006/Q2

7/14/2019 BC480 - PDF-Based Print Forms
http://slidepdf.com/reader/full/bc480-pdf-based-print-forms 21/317
Unit 2 Interface
Unit Overview
Every PDF-based form needs to have an interface; it is the link between the ABAP
program and the form. The program can pass data to the form only if it is defined
in the interface, and (most of) the dynamic data used in the form layout will bedefined in the interface. This unit walks you through the process of creating an
interface that can then be used in any number of forms.
Unit Objectives
After completing this unit, you will be able to:
• List the components of an interface
• Create and design an interface for a form
Unit Contents
Lesson: The Interface as the Link Between Program and Form . . . .. . . . .. 14
Exercise 1: The Interface as the Link Between Program and Form .. 23
2006/Q2 © 2006 SAP AG. All rights reserved. 13
7/14/2019 BC480 - PDF-Based Print Forms
http://slidepdf.com/reader/full/bc480-pdf-based-print-forms 22/317
Unit 2: Interface BC480
Lesson: The Interface as the Link Between Program and
Form
Lesson Overview
When you create a PDF based form, you must first start with the interface, as it
determines which fields are available in the form. This lesson will show you
how to create interfaces.
Lesson Objectives
After completing this lesson, you will be able to:
• List the components of an interface• Create and design an interface for a form
Business Example
A travel agency wants to print invoices for their customers' flight bookings, using
the tool “Interactive Forms”. An application program is available, but not the
form with its interface.
Types of an Interface
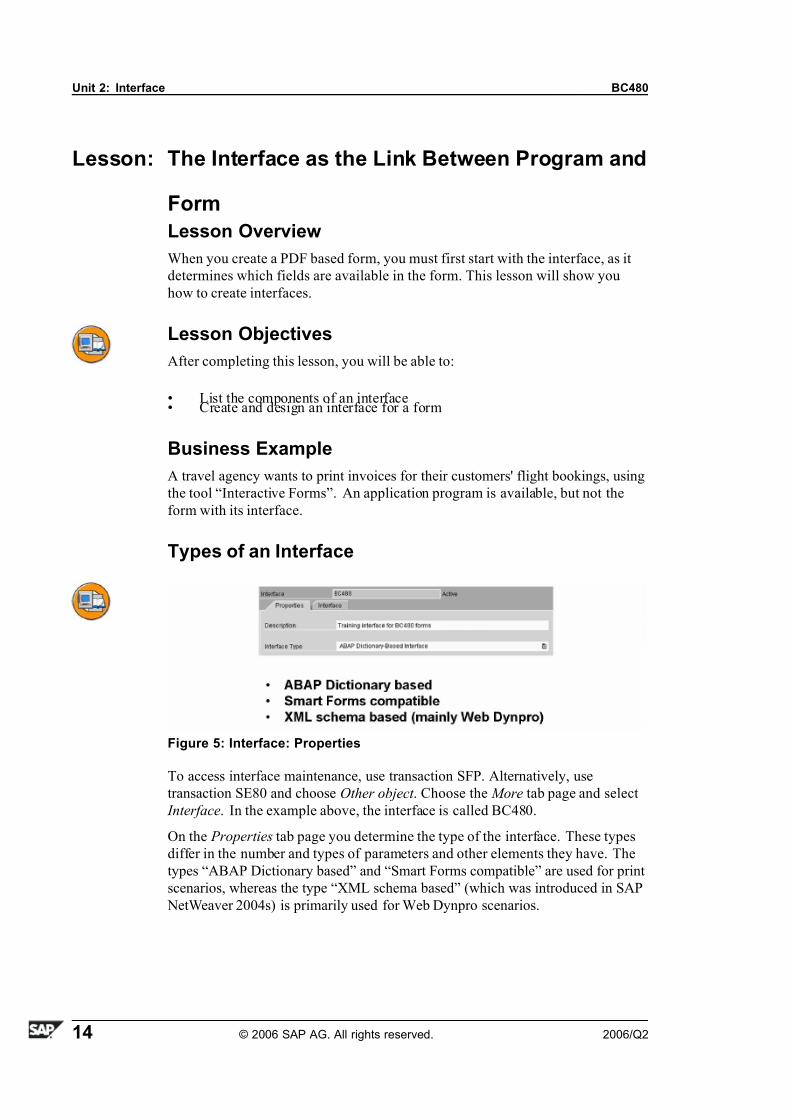
Figure 5: Interface: Properties
To access interface maintenance, use transaction SFP. Alternatively, use
transaction SE80 and choose Other object . Choose the More tab page and select
Interface. In the example above, the interface is called BC480.
On the Properties tab page you determine the type of the interface. These types
differ in the number and types of parameters and other elements they have. The
types “ABAP Dictionary based” and “Smart Forms compatible” are used for print
scenarios, whereas the type “XML schema based” (which was introduced in SAP
NetWeaver 2004s) is primarily used for Web Dynpro scenarios.
14 © 2006 SAP AG. All rights reserved. 2006/Q2
7/14/2019 BC480 - PDF-Based Print Forms
http://slidepdf.com/reader/full/bc480-pdf-based-print-forms 23/317
BC480 Lesson: The Interface as the Link Between Program and Form
If you create an interface to be used in an ABAP print program, you should choose
“ABAP Dictionary based”. While it is possible to use the Smart Forms compatible
interface type (for the sake of keeping an old print program without changes), itis not recommended to do so because:
• You will get wrong print parameters (for example, for the cover page) and
XSF/XDF parameters that cannot be used any more.
• If the spool job contains several PDF documents, you will get only one back.
• Only the “ABAP Dictionary” interface will allow you to determine settings
for the Business Communication Service.
Parts of an Interface: Types “ABAP Dictionary” or “Smart Forms”
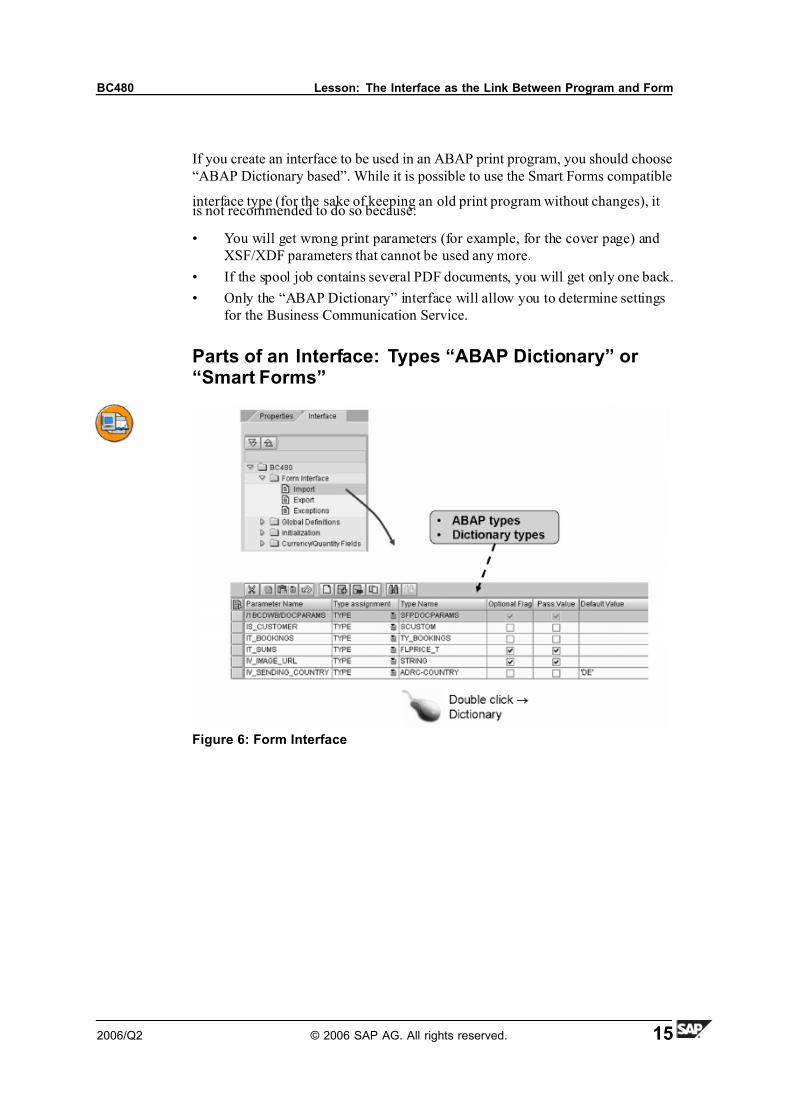
Figure 6: Form Interface
2006/Q2 © 2006 SAP AG. All rights reserved. 15
7/14/2019 BC480 - PDF-Based Print Forms
http://slidepdf.com/reader/full/bc480-pdf-based-print-forms 24/317
Unit 2: Interface BC480
By double-clicking on one of the nodes in the interface tree on the left-hand side
of the screen, an area opens up in the right-hand side that lets you enter details.
What you can enter here is what you would enter for an ordinary function modulein the Function Builder (transaction SE37):
• Parameter name
• For type assignment, TYPE is the only option (in interfaces that result from a
Smart Form migration, you might also use LIKE.)
• Type name: You can enter ABAP types here (c, i, n, etc.) and
Dictionary types (like data elements or tables).
• As several forms can use the same interface, you should think about
including optional parameters that might not always be needed in all forms.
This will help you to keep the number of interfaces small.
• If you set the Pass Value flag, a copy of the parameter will actually be passedfrom the program to the form (not just the address). Such parameters can
be changed in the interface coding; the original value remains untouched.
Parameters with this option checked will slow down performance,
particularly in the case of large parameters (such as internal tables).
• For non-structured parameters, you can also specify a default value, which
will be used if the program does not pass on a value for that parameter. All
parameters with default values are implicitly optional.
The import parameters defined in the interface can be passed from the application
program to the form at runtime, and vice versa for export parameters.
A form interface of the type “ABAP Dictionary” has only one default import parameter ( /1bcdwb/docparams of type sfpdocparams). It is used to determine
a form's locale (language and country) and whether the form will allow
interactive features. The default export parameter is /1bcdwb/formoutput of type
fpformoutput . This parameter has to be evaluated in the calling program if the
resulting document needs to be handled by the program itself. Export parameters
can be added only for those interfaces that are compatible with Smart Forms.
If an interface is compatible with Smart Forms, you might also have tables
parameters. You should use them only if you have an internal table that needs to
be changed with ABAP coding within the form.
Exceptions that you declare in an interface can be raised in ABAP coding of a
form. They are based on the traditional exception concept (not the class-based
concept that was introduced in SAP Web Application Server 6.10).
You raise an exception as such:
RAISE <exception>.
(Alternative:
MESSAGE <message_type><message>(<message_class>) RAISING <exception>
16 © 2006 SAP AG. All rights reserved. 2006/Q2
7/14/2019 BC480 - PDF-Based Print Forms
http://slidepdf.com/reader/full/bc480-pdf-based-print-forms 25/317
BC480 Lesson: The Interface as the Link Between Program and Form
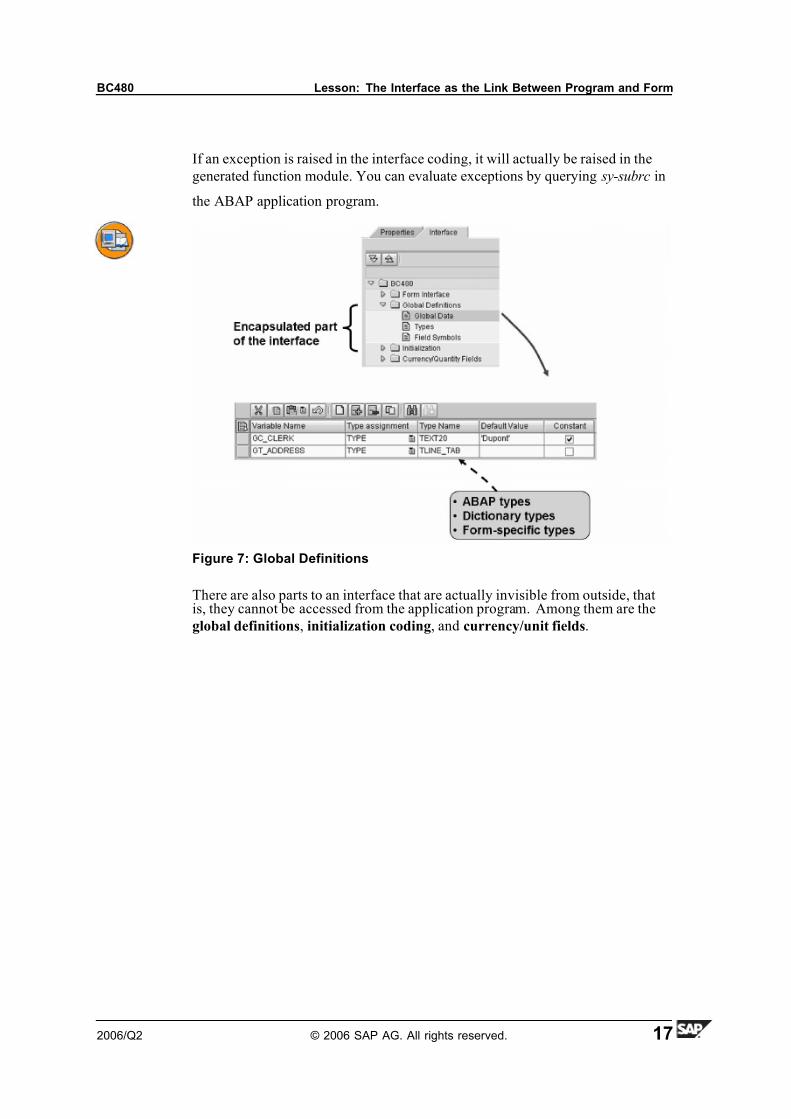
If an exception is raised in the interface coding, it will actually be raised in the
generated function module. You can evaluate exceptions by querying sy-subrc in
the ABAP application program.
Figure 7: Global Definitions
There are also parts to an interface that are actually invisible from outside, thatis, they cannot be accessed from the application program. Among them are the
global definitions, initialization coding, and currency/unit fields.
2006/Q2 © 2006 SAP AG. All rights reserved. 17
7/14/2019 BC480 - PDF-Based Print Forms
http://slidepdf.com/reader/full/bc480-pdf-based-print-forms 26/317
Unit 2: Interface BC480
In the global definitions, you have the following nodes:
• Global fields: You can set the values of global fields by specifying a default
value or by using initial ABAP coding. In migrated Smart Forms, you can
also use them in program line (ABAP) nodes. Global fields can be integrated
in the form layout.
• Field symbols: Field symbols might act as placeholders for variables. They
are useful in dynamic programming and for speeding up the processing of
internal tables. In the form, they can be used in the same places as global
fields, although the coding differs.
In PDF based forms, values can be assigned to field symbols in ABAP
coding.
For details on how to use field symbols in ABAP coding, check the ABAP
documentation, keyword FIELD-SYMBOLS.
• Global types: If your global fields (or any fields that you might declare
within ABAP coding) need types other than ABAP types (i, n, f, c,p, and so on) or Dictionary types, you can create local types in the editor
that opens when you choose Types. For details on how to create local types,
check the ABAP documentation, keyword TYPES.
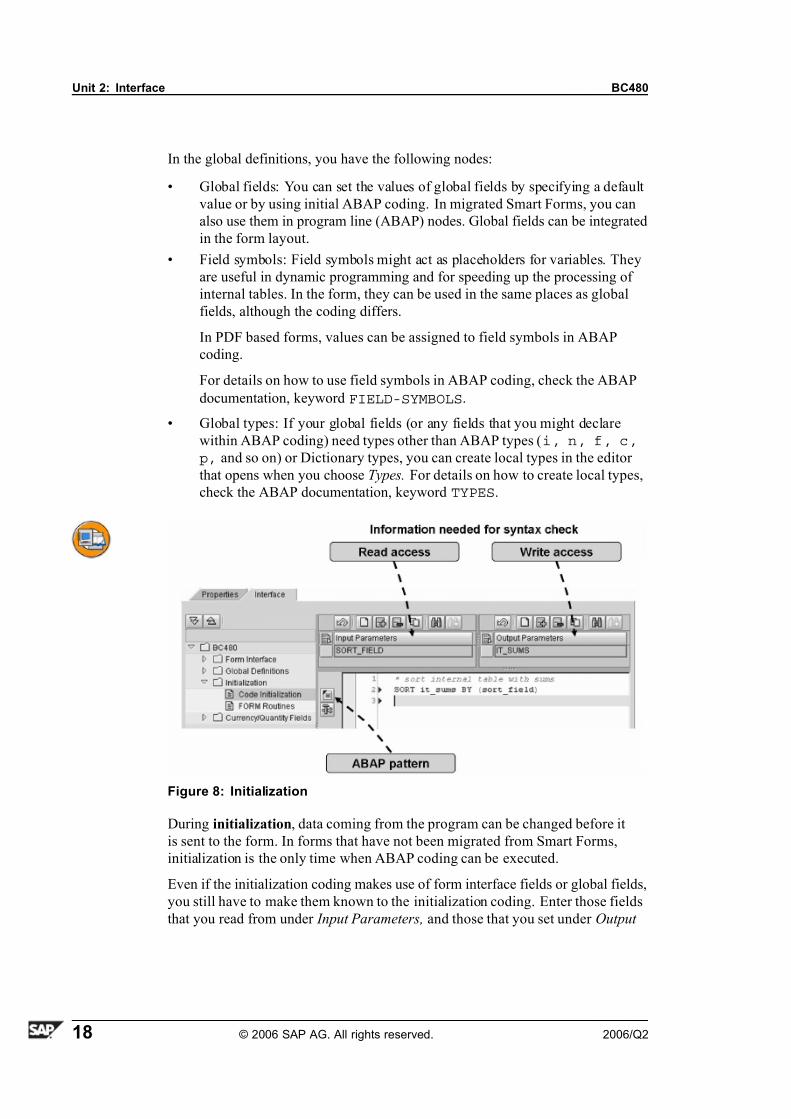
Figure 8: Initialization
During initialization, data coming from the program can be changed before it
is sent to the form. In forms that have not been migrated from Smart Forms,
initialization is the only time when ABAP coding can be executed.
Even if the initialization coding makes use of form interface fields or global fields,
you still have to make them known to the initialization coding. Enter those fields
that you read from under Input Parameters, and those that you set under Output
18 © 2006 SAP AG. All rights reserved. 2006/Q2

7/14/2019 BC480 - PDF-Based Print Forms
http://slidepdf.com/reader/full/bc480-pdf-based-print-forms 27/317
BC480 Lesson: The Interface as the Link Between Program and Form
Parameters. You can also work with local variables that you create with the DATAstatement. Note, however, that these local variables are not known outside the
initialization coding. In particular, they cannot be used in the form layout.
The distinction between input parameters and output parameters is made only for
structuring purposes. It has no effect on the potential for modifying parameters,
as both input and output parameters are passed to the initialization coding by
reference. As a consequence, changes of input parameters are permanent.
System fields of the ABAP system structure SYST (sy-...) do not need to be
declared, but can be used directly in the coding. System fields should not be
changed.
In the initialization coding, you can call form routines that you have created in the
interface: PERFORM ... Form routines make sense for coding that needs to be
executed several times. You define form routines by using the ordinary ABAPsyntax FORM xyz... ENDFORM.
Figure 9: Currency and Quantity Fields
ABAP distinguishes between internal and external representations of currencies
and quantities. Whether or not decimals are included in the output format depends
on the reference field of the amount. For example, the internal digit of 1000might be 10.00 USD or 1000 JPY when printed. For structures or table types,
these references are typically described in the ABAP Dictionary and evaluated
automatically on screens. (To be more precise: information on decimals of
currencies and quantities can be found in tables TCURX and T006. These tables
are automatically evaluated whenever Dictionary reference fields are used.)
2006/Q2 © 2006 SAP AG. All rights reserved. 19
7/14/2019 BC480 - PDF-Based Print Forms
http://slidepdf.com/reader/full/bc480-pdf-based-print-forms 28/317
Unit 2: Interface BC480
As of SAP NetWeaver 2004, this information – even if it is available in the
Dictionary – cannot be evaluated for any fields from the form interface. You must
explicitly give a reference field for all currency and quantity fields that you wantto print in your form. Only then will you have correct decimals.
Use the value help (F4) to enter the relevant currency and quantity fields. Then
continue to select appropriate reference fields. This will frequently, but not
necessarily, be a field of the same structure. Finally, determine for every field
whether it is a currency or a quantity field.
As of SAP NetWeaver 2004s, the currency and quantity information will be
evaluated automatically. You can still set reference fields for your interface fields
if you want to override the Dictionary settings.
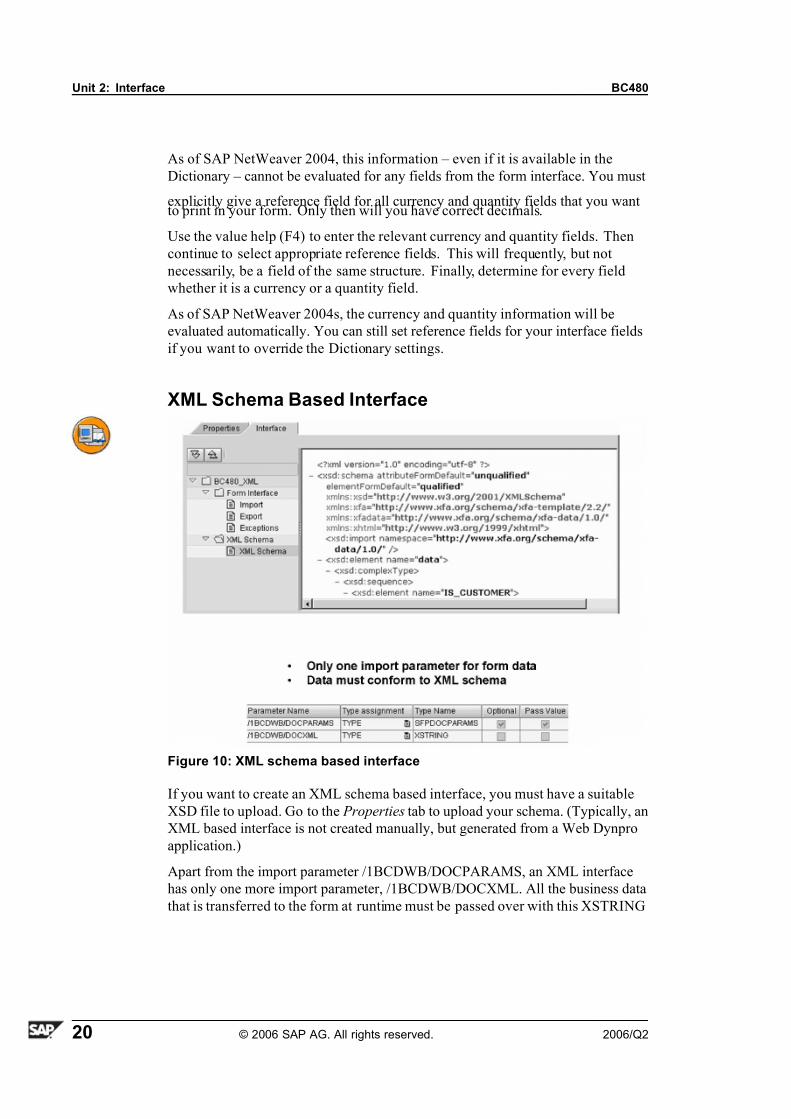
XML Schema Based Interface
Figure 10: XML schema based interface
If you want to create an XML schema based interface, you must have a suitable
XSD file to upload. Go to the Properties tab to upload your schema. (Typically, an
XML based interface is not created manually, but generated from a Web Dynpro
application.)
Apart from the import parameter /1BCDWB/DOCPARAMS, an XML interface
has only one more import parameter, /1BCDWB/DOCXML. All the business data
that is transferred to the form at runtime must be passed over with this XSTRING
20 © 2006 SAP AG. All rights reserved. 2006/Q2

7/14/2019 BC480 - PDF-Based Print Forms
http://slidepdf.com/reader/full/bc480-pdf-based-print-forms 29/317
BC480 Lesson: The Interface as the Link Between Program and Form
parameter. It is not possible to add further parameters to an XML form interface.
As you cannot have ABAP initialization coding either, you cannot create global
data, types, field-symbols, or form routines.
2006/Q2 © 2006 SAP AG. All rights reserved. 21

7/14/2019 BC480 - PDF-Based Print Forms
http://slidepdf.com/reader/full/bc480-pdf-based-print-forms 30/317
Unit 2: Interface BC480
22 © 2006 SAP AG. All rights reserved. 2006/Q2
7/14/2019 BC480 - PDF-Based Print Forms
http://slidepdf.com/reader/full/bc480-pdf-based-print-forms 31/317
BC480 Lesson: The Interface as the Link Between Program and Form
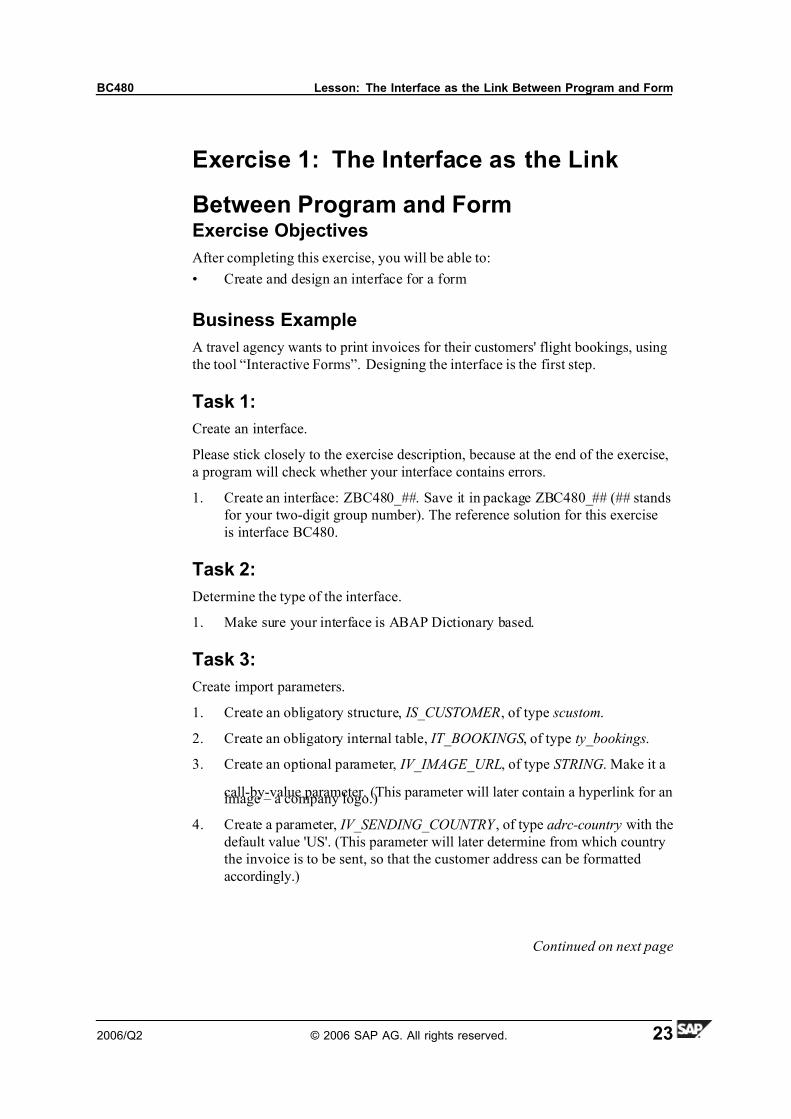
Exercise 1: The Interface as the Link
Between Program and FormExercise Objectives
After completing this exercise, you will be able to:
• Create and design an interface for a form
Business Example
A travel agency wants to print invoices for their customers' flight bookings, using
the tool “Interactive Forms”. Designing the interface is the first step.
Task 1:
Create an interface.
Please stick closely to the exercise description, because at the end of the exercise,
a program will check whether your interface contains errors.
1. Create an interface: ZBC480_##. Save it in package ZBC480_## (## stands
for your two-digit group number). The reference solution for this exercise
is interface BC480.
Task 2:
Determine the type of the interface.
1. Make sure your interface is ABAP Dictionary based.
Task 3:
Create import parameters.
1. Create an obligatory structure, IS_CUSTOMER, of type scustom.
2. Create an obligatory internal table, IT_BOOKINGS , of type ty_bookings.
3. Create an optional parameter, IV_IMAGE_URL, of type STRING. Make it a
call-by-value parameter. (This parameter will later contain a hyperlink for animage – a company logo.)
4. Create a parameter, IV_SENDING_COUNTRY , of type adrc-country with the
default value 'US'. (This parameter will later determine from which country
the invoice is to be sent, so that the customer address can be formatted
accordingly.)
Continued on next page
2006/Q2 © 2006 SAP AG. All rights reserved. 23

7/14/2019 BC480 - PDF-Based Print Forms
http://slidepdf.com/reader/full/bc480-pdf-based-print-forms 32/317
Unit 2: Interface BC480
Task 4:
Create global data.
1. Create the constant GC_CLERK of type text20. Assign the value Dupont.
2. Create the variable GT_ADDRESS of type tline_tab.
Task 5:
Create initialization coding.
1. Determine the URL for the company logo. If IV_IMAGE_URL has no value,
assign the address http://wts.wdf.sap.corp:1080/portal/Image/sap_logo.gif .
2. The global field GT_ADDRESS should contain the formatted
customer's address. To achieve this, call function moduleCUSTOMER_ADDRESS_TO_ITF and set the parameters appropriately.
Task 6:
Check your interface for correctness.
1. Activate your interface.
2. Run report SAPBC480_CHECK. Green, yellow, and red indicators will
show you which of your fields are correct, not quite correct, or wrong.
Note: The coding will not be examined.
24 © 2006 SAP AG. All rights reserved. 2006/Q2
7/14/2019 BC480 - PDF-Based Print Forms
http://slidepdf.com/reader/full/bc480-pdf-based-print-forms 33/317
BC480 Lesson: The Interface as the Link Between Program and Form
Solution 1: The Interface as the Link
Between Program and FormTask 1:
Create an interface.
Please stick closely to the exercise description, because at the end of the exercise,
a program will check whether your interface contains errors.
1. Create an interface: ZBC480_##. Save it in package ZBC480_## (## stands
for your two-digit group number). The reference solution for this exercise
is interface BC480.
a) Start transaction SFP.
b) Select Interface. Enter the name ZBC480_## and choose Create.
c) In the following window, enter a description and press Enter .
d) In the following window, enter ZBC480_## as the package and press
Enter .
e) In the following window, press F4 to select the workbench request
the instructor has created for you.
f) Continue by pressing Enter.
Task 2:Determine the type of the interface.
1. Make sure your interface is ABAP Dictionary based.
a) This is automatically the case when you create an interface. Go to the
Properties tab to check.
Task 3:
Create import parameters.
1. Create an obligatory structure, IS_CUSTOMER, of type scustom.
a) Choose the Interface tab. On the left side, double-click Import . On the
right side, choose the icon with the white sheet to append a new row.
b) In the column Parameter name, enter IS_CUSTOMER.
c) In the column Type assignment , select TYPE . In the column Type name,
enter SCUSTOM . Leave the remaining columns empty.
Continued on next page
2006/Q2 © 2006 SAP AG. All rights reserved. 25

7/14/2019 BC480 - PDF-Based Print Forms
http://slidepdf.com/reader/full/bc480-pdf-based-print-forms 34/317
Unit 2: Interface BC480
2. Create an obligatory internal table, IT_BOOKINGS , of type ty_bookings.
a) See previous task.
3. Create an optional parameter, IV_IMAGE_URL, of type STRING. Make it a
call-by-value parameter. (This parameter will later contain a hyperlink for an
image – a company logo.)
a) See previous task.
4. Create a parameter, IV_SENDING_COUNTRY , of type adrc-country with the
default value 'US'. (This parameter will later determine from which country
the invoice is to be sent, so that the customer address can be formatted
accordingly.)
a) See previous task, but deselect the Pass Valueoption. Also, enter 'US'
(with single quotes!) in the Default Value column.
Task 4:
Create global data.
1. Create the constant GC_CLERK of type text20. Assign the value Dupont.
a) Go to the Interface tab. On the left side, double-click on Global Data.
On the right side, choose the icon with the white sheet to append
a new row.
b) In the Variable name column, enter GC_CLERK . In the column Type
assignment , select TYPE . In the column Type name, enter text20. Enter 'Dupont' (with single quotes!) in the column Default Value. Check
the option Constant .
2. Create the variable GT_ADDRESS of type tline_tab.
a) See previous task, but deselect the Constant option and leave the
Default value column empty.
Continued on next page
26 © 2006 SAP AG. All rights reserved. 2006/Q2

7/14/2019 BC480 - PDF-Based Print Forms
http://slidepdf.com/reader/full/bc480-pdf-based-print-forms 35/317
BC480 Lesson: The Interface as the Link Between Program and Form
Task 5:
Create initialization coding.
1. Determine the URL for the company logo. If IV_IMAGE_URL has no value,
assign the address http://wts.wdf.sa p.corp:1080/portal/Image/sa p_logo.gif .
a) Go to the Output parameters and choose the icon with the white sheet
to append a new row. Enter IV_IMAGE_URL.
b) In the ABAP editor, enter the following coding:
IF iv_image_url IS INITIAL.iv_image_url ='http://wts.wdf.sap.corp:1080/portal/Image/sap_logo.gif'
ENDIF.
2. The global field GT_ADDRESS should contain the formatted
customer's address. To achieve this, call function module
CUSTOMER_ADDRESS_TO_ITF and set the parameters appropriately.
a) Go to the Input parameters and click twice on the icon with the
white sheet to append two new rows. Enter IS_CUSTOMER and
IV_SENDING_COUNTRY.
b) Go to the Output parameters and click on the icon with the white sheet
to append a new row. Enter GT_ADDRESS.
c) In the ABAP editor, enter the following coding:
CALL FUNCTION 'CUSTOMER_ADDRESS_TO_ITF'EXPORTING
is_customer = is_customeriv_sending_country = iv_sending_country
IMPORTINGet_address = gt_address.
Task 6:
Check your interface for correctness.
1. Activate your interface.
a) Press Ctrl+F3.
2. Run report SAPBC480_CHECK. Green, yellow, and red indicators will
show you which of your fields are correct, not quite correct, or wrong.
Note: The coding will not be examined.
a) Call transaction SA38 and enter SAPBC480_CHECK. Press F8 to
start the report.
2006/Q2 © 2006 SAP AG. All rights reserved. 27

7/14/2019 BC480 - PDF-Based Print Forms
http://slidepdf.com/reader/full/bc480-pdf-based-print-forms 36/317
Unit 2: Interface BC480
Lesson Summary
You should now be able to:• List the components of an interface
• Create and design an interface for a form
28 © 2006 SAP AG. All rights reserved. 2006/Q2

7/14/2019 BC480 - PDF-Based Print Forms
http://slidepdf.com/reader/full/bc480-pdf-based-print-forms 37/317
BC480 Unit Summary
Unit Summary
You should now be able to:
• List the components of an interface
• Create and design an interface for a form
2006/Q2 © 2006 SAP AG. All rights reserved. 29

7/14/2019 BC480 - PDF-Based Print Forms
http://slidepdf.com/reader/full/bc480-pdf-based-print-forms 38/317
Unit Summary BC480
30 © 2006 SAP AG. All rights reserved. 2006/Q2
7/14/2019 BC480 - PDF-Based Print Forms
http://slidepdf.com/reader/full/bc480-pdf-based-print-forms 39/317
BC480 Test Your Knowledge
Test Your Knowledge
1. Every form interface is compatible with Smart Forms.
Determine whether this statement is true or false.
□ True
□ False
2. The values of import parameters can always be changed in the initialization
coding of a form interface.
Determine whether this statement is true or false.
□ True
□
False
3. Interfaces can be maintained with transaction SE80.
Determine whether this statement is true or false.
□ True
□ False
4. You can define your own local types for the import parameters of a form
interface.
Determine whether this statement is true or false.
□ True
□ False
5. You can define your own local types for the global data of a form interface.
Determine whether this statement is true or false.
□ True
□ False
6. Import parameters of a form interface are always optional.
Determine whether this statement is true or false.□ True
□ False
7. Initialization coding is executed by Adobe document services.
Determine whether this statement is true or false.
□ True
□ False
2006/Q2 © 2006 SAP AG. All rights reserved. 31
7/14/2019 BC480 - PDF-Based Print Forms
http://slidepdf.com/reader/full/bc480-pdf-based-print-forms 40/317
Test Your Knowledge BC480
Answers
1. Every form interface is compatible with Smart Forms.
Answer: False
You can decide whether a form interface should be compatible with Smart
Forms. You do this on the Properties tab.
2. The values of import parameters can always be changed in the initialization
coding of a form interface.
Answer: False
Only those parameters with the Pass Value option selected can be changed.
3. Interfaces can be maintained with transaction SE80.
Answer: True
You can either use the standalone Form Builder (transaction SFP) or the
version that is integrated into the ABAP Workbench (transaction SE80).
4. You can define your own local types for the import parameters of a form
interface.
Answer: False
As the interface contains those parts of a form that are accessible from an
ABAP program, you can use only Dictionary types or ABAP types.
5. You can define your own local types for the global data of a form interface.
Answer: True
You define your own local types with the ABAP command TYPES.
6. Import parameters of a form interface are always optional.
Answer: False
Import parameters of a form interface are optional only if explicitly marked
as optional or if they have a default value.
32 © 2006 SAP AG. All rights reserved. 2006/Q2

7/14/2019 BC480 - PDF-Based Print Forms
http://slidepdf.com/reader/full/bc480-pdf-based-print-forms 41/317
BC480 Test Your Knowledge
7. Initialization coding is executed by Adobe document services.
Answer: FalseInitialization coding is executed by the ABAP processor, before the XML
data stream is passed on to Adobe document services.
2006/Q2 © 2006 SAP AG. All rights reserved. 33

7/14/2019 BC480 - PDF-Based Print Forms
http://slidepdf.com/reader/full/bc480-pdf-based-print-forms 42/317
Unit 2: Interface BC480
34 © 2006 SAP AG. All rights reserved. 2006/Q2
7/14/2019 BC480 - PDF-Based Print Forms
http://slidepdf.com/reader/full/bc480-pdf-based-print-forms 43/317
Unit 3 Context
Unit Overview
The context is essential, as it provides the source for data for a form. Apart from
static elements, only those texts, fields, images, and so on can be included in the
layout of a form that have been integrated into the form's context. However, thecontext should not be overloaded, as this will have a negative impact on printing
performance.
This unit will teach you all the details of a form context, including how to create
and maintain it.
Unit Objectives
After completing this unit, you will be able to:
• Effectively use transaction SFP to create a form context
• Create a form context using an existing interface
• Integrate folders, alternatives, graphics, and addresses into a form context
• Create and integrate long texts into a form context
Unit Contents
Lesson: Form Context: Using and Extending a Form Interface . .. . .. . . . .. 36
Exercise 2: Form Context: Using and Extending a Form Interface... 61
2006/Q2 © 2006 SAP AG. All rights reserved. 35
7/14/2019 BC480 - PDF-Based Print Forms
http://slidepdf.com/reader/full/bc480-pdf-based-print-forms 44/317
Unit 3: Context BC480
Lesson: Form Context: Using and Extending a Form
Interface
Lesson Overview
Once you have created an interface, you can use it in a form. More precisely, the
form's context makes use of the interface. It can be seen as a subset of the interface
enriched with some form specific information. The form context contains the
concrete data for the form. (If you use an XML-based interface - typically within a
Web Dynpro form scenario - the form does not contain a context. In that case, all
data from the interface is available in the form directly.)
This lessons shows you how to create a form context, use an existing form
interface, choose the elements that are needed in the form, and add additionalelements like texts or graphics.
Lesson Objectives
After completing this lesson, you will be able to:
• Effectively use transaction SFP to create a form context
• Create a form context using an existing interface
• Integrate folders, alternatives, graphics, and addresses into a form context
• Create and integrate long texts into a form context
Business Example
A travel agency wants to print invoices for their customers' flight bookings,
using the tool “SAP Interactive Forms by Adobe”. A program and interface are
available, but no form yet.
Form Properties
To access the Form Builder, use transaction SFP. Alternatively, use transaction
SE80 and choose Other object . Then choose the More tab page and select Form.
36 © 2006 SAP AG. All rights reserved. 2006/Q2

7/14/2019 BC480 - PDF-Based Print Forms
http://slidepdf.com/reader/full/bc480-pdf-based-print-forms 45/317
BC480 Lesson: Form Context: Using and Extending a Form Interface
Figure 11: Form Properties
The following details are entered on the Properties tab:
• The description of the form
• The layout type. This is relevant only if you create forms with scripting
for interactive scenarios. You can choose between the Active Component
Framework (ACF), which requires additional software installation (see
SAP Note 766191) on the user's PC, and the newer version, Zero Client
Installation (ZCI), which requires no extra installation, but a recent Adobe
Reader. See SAP Note 955795 for details.
• The name of the interface to be used: Double-click on its name to display
or change it. Be careful when you change a form interface that is used in
a form; you will not get a warning if you do so, even though you might
corrupt the form.
The name of the package will automatically be added to the form properties when
you first save the form. If you want to change the package assignment later,
choose Go to→ Object directory entry.
Note: As a form with an XML-based interface does not contain a context,
all of the following information pertains to forms with ABAP Dictionary
or Smart Forms compatible interfaces.
2006/Q2 © 2006 SAP AG. All rights reserved. 37
7/14/2019 BC480 - PDF-Based Print Forms
http://slidepdf.com/reader/full/bc480-pdf-based-print-forms 46/317
Unit 3: Context BC480
General Handling of the Context
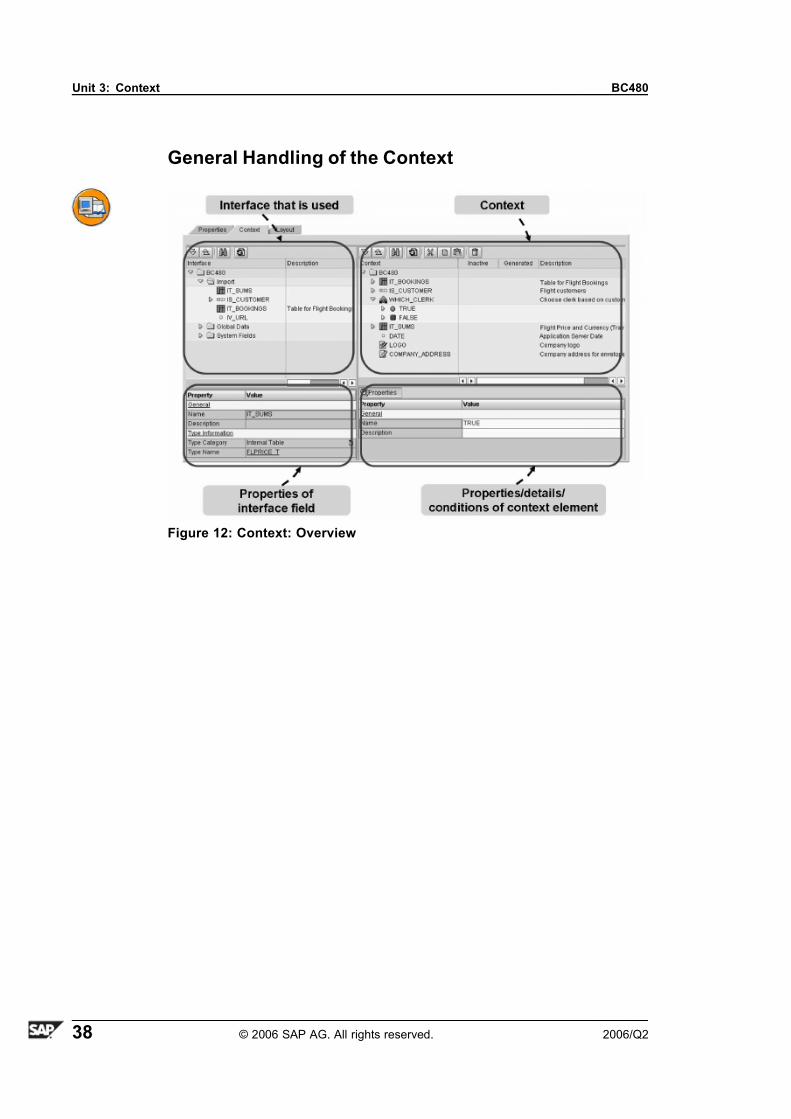
Figure 12: Context: Overview
38 © 2006 SAP AG. All rights reserved. 2006/Q2
7/14/2019 BC480 - PDF-Based Print Forms
http://slidepdf.com/reader/full/bc480-pdf-based-print-forms 47/317
BC480 Lesson: Form Context: Using and Extending a Form Interface
The screen on the Context tab of transaction SFP is split into four areas:
• Interface
All fields that are displayed in the Interface area (all interface fields plus
the system fields sfpsy-date, sfpsy-time, sfpsy-username, sfpsy-subrc) can
be selected for the context by dragging and dropping them there. If your
interface is compatible with Smart Forms, you will have the Smart Forms
system fields (SFSY-...) instead.
• Context
The context area contains those elements that will be available in the
form layout. These fields are a subset of the interface, and include
additional elements like graphics or texts. You can create new elements by
right-clicking on the context.• Properties of interface field
Double-clicking on a field from the interface will display its details in the
bottom left area.
• Properties/details/conditions of context element
Double-clicking on an element from the context will display its details in the
bottom right area. For example, you would set the source for an image or
the name of an external text here.
From NetWeaver 2004s on, for fields with Dictionary reference, their texts
can automatically be integrated into the form layout to be used as captions.As the Dictionary (or more precisely: the data element) offers four different
kinds of texts, you can choose which one to use
2006/Q2 © 2006 SAP AG. All rights reserved. 39
7/14/2019 BC480 - PDF-Based Print Forms
http://slidepdf.com/reader/full/bc480-pdf-based-print-forms 48/317
Unit 3: Context BC480
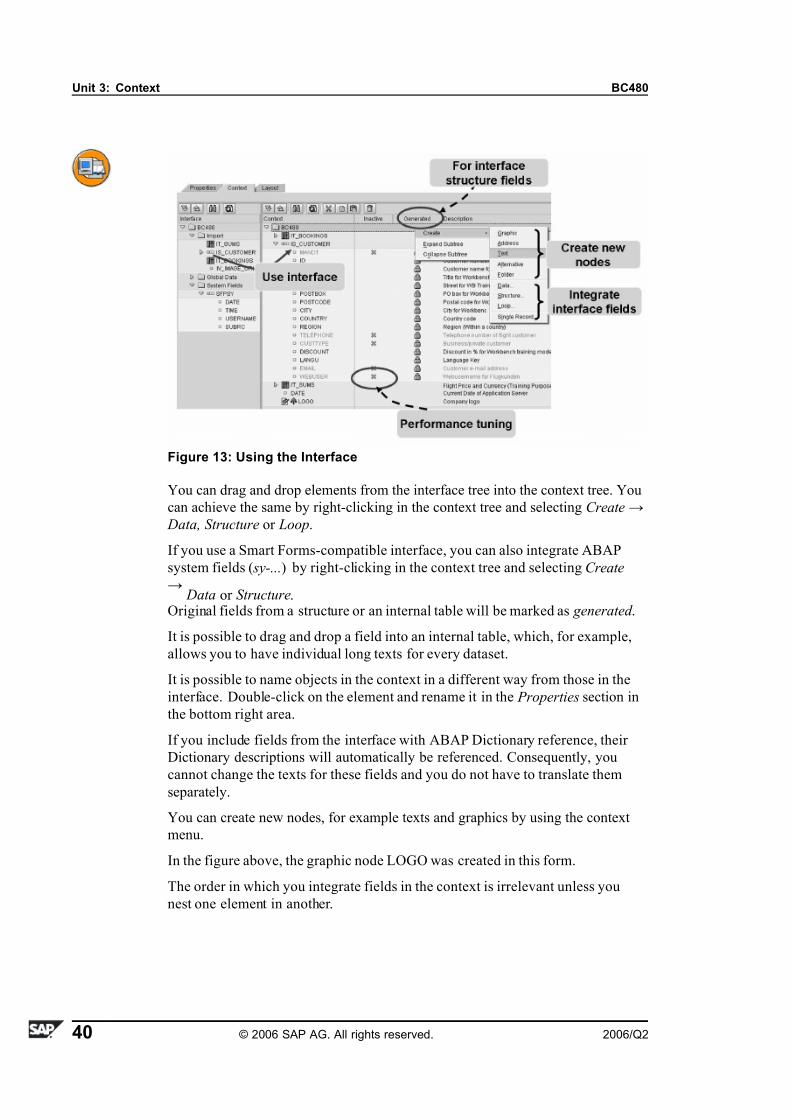
Figure 13: Using the Interface
You can drag and drop elements from the interface tree into the context tree. You
can achieve the same by right-clicking in the context tree and selecting Create→
Data, Structure or Loop.
If you use a Smart Forms-compatible interface, you can also integrate ABAP
system fields ( sy-...) by right-clicking in the context tree and selecting Create
→
Data or Structure.Original fields from a structure or an internal table will be marked as generated .
It is possible to drag and drop a field into an internal table, which, for example,
allows you to have individual long texts for every dataset.
It is possible to name objects in the context in a different way from those in the
interface. Double-click on the element and rename it in the Properties section in
the bottom right area.
If you include fields from the interface with ABAP Dictionary reference, their
Dictionary descriptions will automatically be referenced. Consequently, you
cannot change the texts for these fields and you do not have to translate them
separately.
You can create new nodes, for example texts and graphics by using the context
menu.
In the figure above, the graphic node LOGO was created in this form.
The order in which you integrate fields in the context is irrelevant unless you
nest one element in another.
40 © 2006 SAP AG. All rights reserved. 2006/Q2
7/14/2019 BC480 - PDF-Based Print Forms
http://slidepdf.com/reader/full/bc480-pdf-based-print-forms 49/317
BC480 Lesson: Form Context: Using and Extending a Form Interface
Fields that are not required can be set to inactive (using the right mouse button).
They will have a cross in the Inactive column. Deactivating a field in the context
means that it will not be part of the XML data stream (XFD). Thus, performancecan be improved. Note, however, that deactivating parts of the context does not
turn mandatory interface fields into optional fields; that is, the print program will
nonetheless have to pass them to the form's interface. Setting fields that do not
come from the interface (that you define in the context) to inactive makes sense
for testing scenarios.
Tables
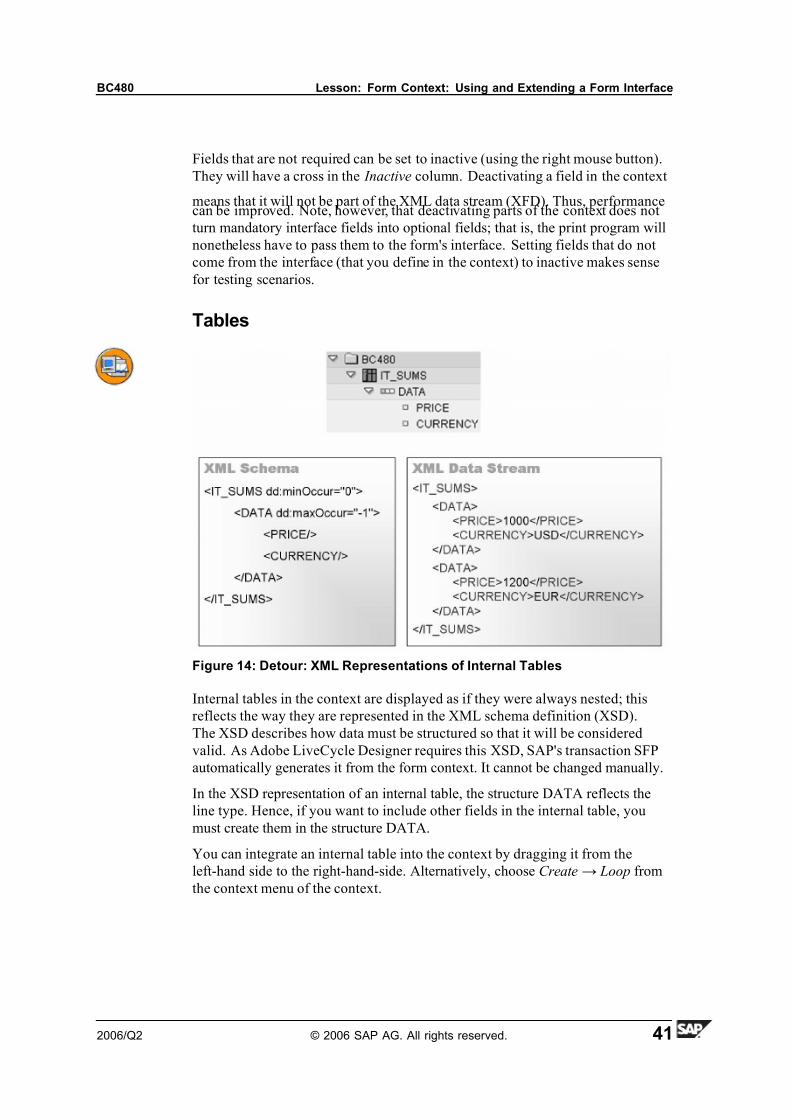
Figure 14: Detour: XML Representations of Internal Tables
Internal tables in the context are displayed as if they were always nested; this
reflects the way they are represented in the XML schema definition (XSD).
The XSD describes how data must be structured so that it will be considered
valid. As Adobe LiveCycle Designer requires this XSD, SAP's transaction SFP
automatically generates it from the form context. It cannot be changed manually.
In the XSD representation of an internal table, the structure DATA reflects the
line type. Hence, if you want to include other fields in the internal table, you
must create them in the structure DATA.
You can integrate an internal table into the context by dragging it from the
left-hand side to the right-hand-side. Alternatively, choose Create→ Loop from
the context menu of the context.
2006/Q2 © 2006 SAP AG. All rights reserved. 41
7/14/2019 BC480 - PDF-Based Print Forms
http://slidepdf.com/reader/full/bc480-pdf-based-print-forms 50/317
Unit 3: Context BC480
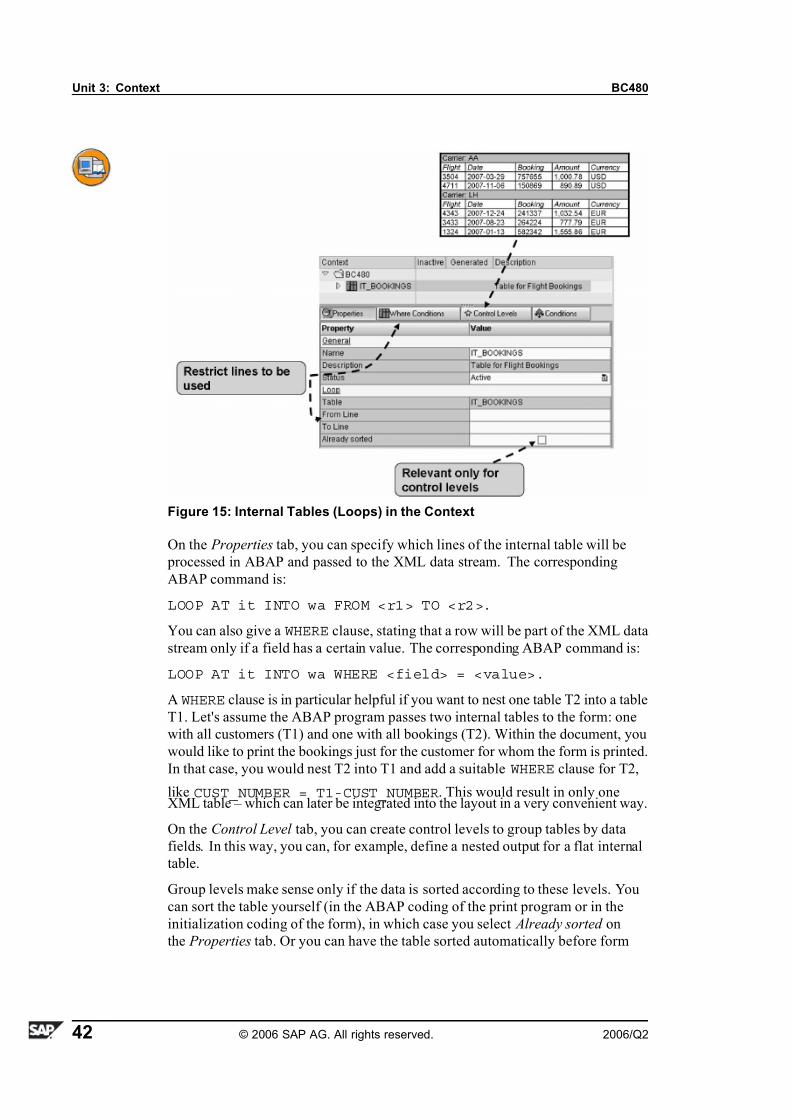
Figure 15: Internal Tables (Loops) in the Context
On the Properties tab, you can specify which lines of the internal table will be
processed in ABAP and passed to the XML data stream. The corresponding
ABAP command is:
LOOP AT it INTO wa FROM <r1> TO <r2>.
You can also give a WHERE clause, stating that a row will be part of the XML data
stream only if a field has a certain value. The corresponding ABAP command is:
LOOP AT it INTO wa WHERE <field> = <value>.
A WHERE clause is in particular helpful if you want to nest one table T2 into a table
T1. Let's assume the ABAP program passes two internal tables to the form: one
with all customers (T1) and one with all bookings (T2). Within the document, you
would like to print the bookings just for the customer for whom the form is printed.
In that case, you would nest T2 into T1 and add a suitable WHERE clause for T2,
like CUST_NUMBER = T1-CUST_NUMBER. This would result in only oneXML table – which can later be integrated into the layout in a very convenient way.
On the Control Level tab, you can create control levels to group tables by data
fields. In this way, you can, for example, define a nested output for a flat internal
table.
Group levels make sense only if the data is sorted according to these levels. You
can sort the table yourself (in the ABAP coding of the print program or in the
initialization coding of the form), in which case you select Already sorted on
the Properties tab. Or you can have the table sorted automatically before form
42 © 2006 SAP AG. All rights reserved. 2006/Q2

7/14/2019 BC480 - PDF-Based Print Forms
http://slidepdf.com/reader/full/bc480-pdf-based-print-forms 51/317
BC480 Lesson: Form Context: Using and Extending a Form Interface
rendering. Mind, however, that the latter option is possible only if the table is
either defined as a global interface field or as a call-by-value import parameter. (A
call-by-reference import parameter is read-only.) Please note that control levelswere introduced in SAP NetWeaver 2004s.)
If you want to have only one specific row of an internal table, you should not use
the entire internal table with a WHERE clause or an index. Instead: right-click on
the context, choose Create→ Single Record , specify the internal table to use and
set either the row number or the key to identify the row. This way, the handling
in Designer will be easier, as the result will be treated as a structure rather than
an internal table. (You need at least SAP NetWeaver 2004s for single records.)
The equivalent ABAP command is READ TABLE. You can query the result of
this single record access with the help of the field SFPSY-SUBRC , which is
a copy of SY-SUBRC .
Conditions and Alternatives
Figure 16: Conditions for Context Elements
You can enter conditions for most node types of the context. If a condition for a
context element fails to be correct at runtime, the element field will not be part
of the data stream. Conditions are also possible for more complex elements that
have “children” in the context tree (structures, internal tables, or folders). If such
a condition fails at runtime, none of the subordinate elements will be part of the
data stream.
Conditions help to reduce data traffic. They also help in hiding fields from the
layout.
All of the fields from the interface (even those that you do not drag and drop to the
context) are known to all context fields and can be used in conditions. You cannot
refer to other context fields or to ABAP system fields.
2006/Q2 © 2006 SAP AG. All rights reserved. 43
7/14/2019 BC480 - PDF-Based Print Forms
http://slidepdf.com/reader/full/bc480-pdf-based-print-forms 52/317
Unit 3: Context BC480
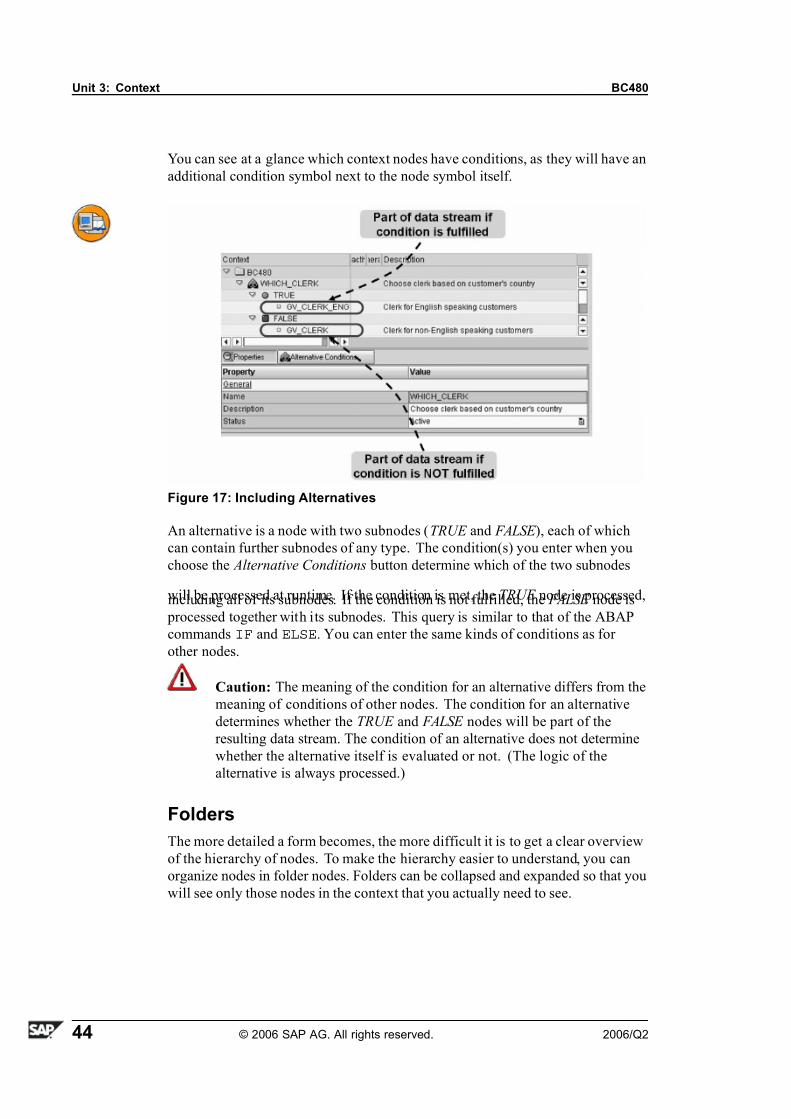
You can see at a glance which context nodes have conditions, as they will have an
additional condition symbol next to the node symbol itself.
Figure 17: Including Alternatives
An alternative is a node with two subnodes (TRUE and FALSE ), each of which
can contain further subnodes of any type. The condition(s) you enter when you
choose the Alternative Conditions button determine which of the two subnodes
will be processed at runtime. If the condition is met, the TRUE node is processed,including all of its subnodes. If the condition is not fulfilled, the FALSE node is
processed together with its subnodes. This query is similar to that of the ABAP
commands IF and ELSE. You can enter the same kinds of conditions as for
other nodes.
Caution: The meaning of the condition for an alternative differs from the
meaning of conditions of other nodes. The condition for an alternative
determines whether the TRUE and FALSE nodes will be part of the
resulting data stream. The condition of an alternative does not determine
whether the alternative itself is evaluated or not. (The logic of the
alternative is always processed.)
Folders
The more detailed a form becomes, the more difficult it is to get a clear overview
of the hierarchy of nodes. To make the hierarchy easier to understand, you can
organize nodes in folder nodes. Folders can be collapsed and expanded so that you
will see only those nodes in the context that you actually need to see.
44 © 2006 SAP AG. All rights reserved. 2006/Q2
7/14/2019 BC480 - PDF-Based Print Forms
http://slidepdf.com/reader/full/bc480-pdf-based-print-forms 53/317
BC480 Lesson: Form Context: Using and Extending a Form Interface
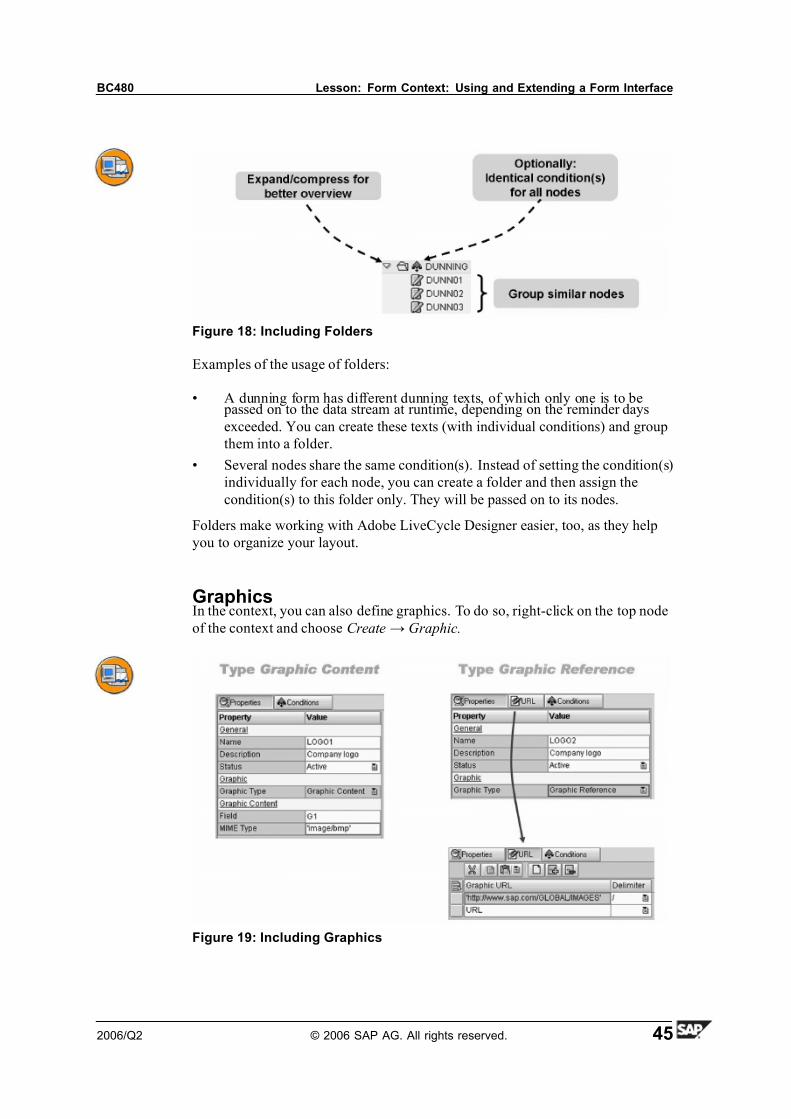
Figure 18: Including Folders
Examples of the usage of folders:
• A dunning form has different dunning texts, of which only one is to be passed on to the data stream at runtime, depending on the reminder days
exceeded. You can create these texts (with individual conditions) and group
them into a folder.
• Several nodes share the same condition(s). Instead of setting the condition(s)
individually for each node, you can create a folder and then assign the
condition(s) to this folder only. They will be passed on to its nodes.
Folders make working with Adobe LiveCycle Designer easier, too, as they help
you to organize your layout.
GraphicsIn the context, you can also define graphics. To do so, right-click on the top node
of the context and choose Create→ Graphic.
Figure 19: Including Graphics
2006/Q2 © 2006 SAP AG. All rights reserved. 45
7/14/2019 BC480 - PDF-Based Print Forms
http://slidepdf.com/reader/full/bc480-pdf-based-print-forms 54/317
Unit 3: Context BC480
In the attributes section of the lower right part of the screen, specify details of the
graphic. In particular, specify the graphic type:
• Graphic Content : If you select this type, you must specify a field name from
the context that will contain the data of the graphic at runtime. Permissible
types are STRING (graphical data is Base64-coded) or XSTRING (for
binary-coded graphical data). You must also enter a valid MIME type, such
as such as 'image/bmp' or 'image/jpeg'.
• Graphic Reference: This type allows you to specify the graphic's
address dynamically. You must enter the details by choosing the
URL button. You can split the URL into dynamic parts (which are
represented by individual STRING variables from the interface) and
static parts (literals), which must be enclosed in single quotes. The
different parts of the graphic URL can be separated by a delimiter,
which you can set. In the above example, possible locations of theimage at runtime would be http://www.sap.com/IMAGES/logo1.bmp or
http://www.sap.com/IMAGES/logo2.gif.
You can include images of the most popular types: Windows Bitmaps (*.bmp),
JPEGs (*.jpg), TIFFs (*.TIF), PNGs (*.png), and GIFs (*.gif – animated GIFs
are not supported). Adobe LiveCycle Designer 7.0 or higher lets you include
graphics of type EXIF, too.
Including Texts
In a form context, four types of long texts can be included:
• Addresses from the Business Address Services
• Text modules (Smart Forms texts)
• Include texts (SAPscript texts)
• Dynamic texts
All these texts will automatically be converted by transaction SFP into a special
format that can be evaluated by Adobe document services: XHTML.
Note: XHTML is an XML standard that extends HTML 4. (HTML =
Hypertext Markup Language – commonly seen as the standard publishing
language of the World Wide Web.) XHTML can be viewed in most Web(HTML) browsers.
46 © 2006 SAP AG. All rights reserved. 2006/Q2
7/14/2019 BC480 - PDF-Based Print Forms
http://slidepdf.com/reader/full/bc480-pdf-based-print-forms 55/317
BC480 Lesson: Form Context: Using and Extending a Form Interface
Addresses
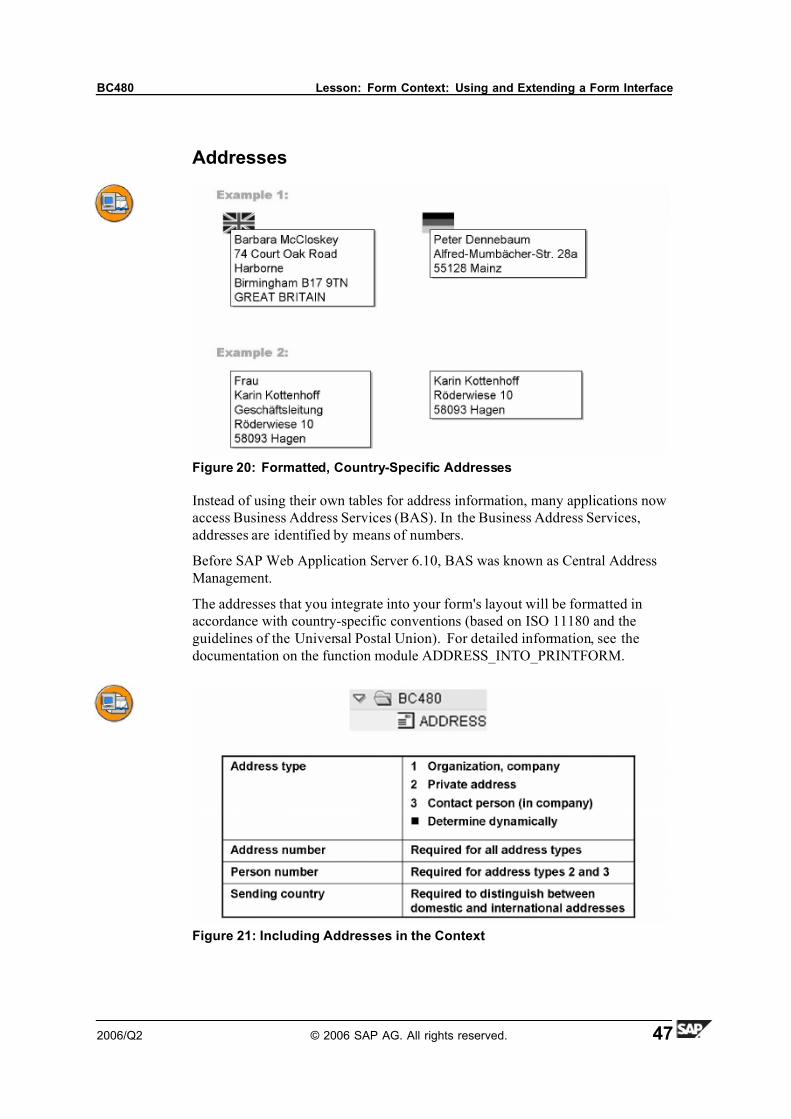
Figure 20: Formatted, Country-Specific Addresses
Instead of using their own tables for address information, many applications now
access Business Address Services (BAS). In the Business Address Services,
addresses are identified by means of numbers.
Before SAP Web Application Server 6.10, BAS was known as Central Address
Management.
The addresses that you integrate into your form's layout will be formatted in
accordance with country-specific conventions (based on ISO 11180 and the
guidelines of the Universal Postal Union). For detailed information, see the
documentation on the function module ADDRESS_INTO_PRINTFORM.
Figure 21: Including Addresses in the Context
2006/Q2 © 2006 SAP AG. All rights reserved. 47

7/14/2019 BC480 - PDF-Based Print Forms
http://slidepdf.com/reader/full/bc480-pdf-based-print-forms 56/317
Unit 3: Context BC480
In the context, you can create nodes that make use of Business Address Services.
You do not need to know the technical details of Business Address Services, or
worry about the correct formatting of the addresses.
Address nodes will be rendered as regular texts in the form.
Some of the relevant fields in Business Address Services include:
Address type:
• Company addresses: Typical examples are delivery addresses or company
codes. These addresses are uniquely identified by their address numbers. In
the context, you must specify the value of the address number. It must be a
ten-digit character field. Typically, this is an interface parameter.
• Private addresses: Addresses of this type are assigned to one natural person,
along with other associated attributes, such as the form of address. Because a person can have more than one address, enter both the address number and
the person number for identification. Both must be ten-digit character fields,
and both are usually interface parameters.
• Contact person in company: These are personal addresses in companies,
which means they have additional attributes, such as the department or the
room number. You identify such an address by means of the address number
and the person number. Both must be ten-digit character fields, and both are
usually interface parameters.
• Define Dynamically: If you want to determine the address type at runtime,
enter the name of an appropriate interface parameter. At runtime, this
parameter must be filled with 1, 2, or 3.
You must specify the sending country. If you enter an interface parameter here,
the country can be determined dynamically at runtime. If, at runtime, the address
is found to be domestic, the addressee's country will not show.
If the system does not find an address with the numbers specified in Business
Address Services at runtime, the generated function module of the form terminates
with an error message.
For addresses that have both a post office box number and a street address, use
the drop-down list to determine which one to use. You can also choose Define
dynamically, in which case you must also enter the name of a field, which at
runtime contains X (street) or a space (post office box).
In the Priority of Lines field, you can determine which part of the address
is first suppressed if there is not enough space for the address node. For
example, A stands for form of address, P for an obligatory empty line, and D for
department. For more information, see the documentation for the function module
ADDRESS_INTO_PRINTFORM.
48 © 2006 SAP AG. All rights reserved. 2006/Q2

7/14/2019 BC480 - PDF-Based Print Forms
http://slidepdf.com/reader/full/bc480-pdf-based-print-forms 57/317
BC480 Lesson: Form Context: Using and Extending a Form Interface
Text Modules and SAPscript Texts
Figure 22: Long Texts from the Database
In some cases, it makes sense to store texts not in the form itself, but centrally in the
database. The form then contains only a reference indicating which text should be
used at application program runtime. This method has the following advantages:
• You need to create the texts only once and can then reuse them as required.
• You make changes centrally only once without having to modify the actual
forms. (The reference in the form remains unchanged.) Typical examples
include headers (company address), footers (company information like
board members and so on), and whole pages containing introductions or
terms of trade.
You can use text modules of Smart Forms and also include texts (that is, SAPscript
texts). Run transaction SMARTFORMS (for text modules) orSO10 (for include
texts).
With regards to PDF-based forms, the main difference between the two text types
is that text modules are client-independent and have an automatic link to the
Transport Organizer, whereas SAPscript texts are client-dependent and must be
manually included in a transport request.
2006/Q2 © 2006 SAP AG. All rights reserved. 49
7/14/2019 BC480 - PDF-Based Print Forms
http://slidepdf.com/reader/full/bc480-pdf-based-print-forms 58/317
Unit 3: Context BC480
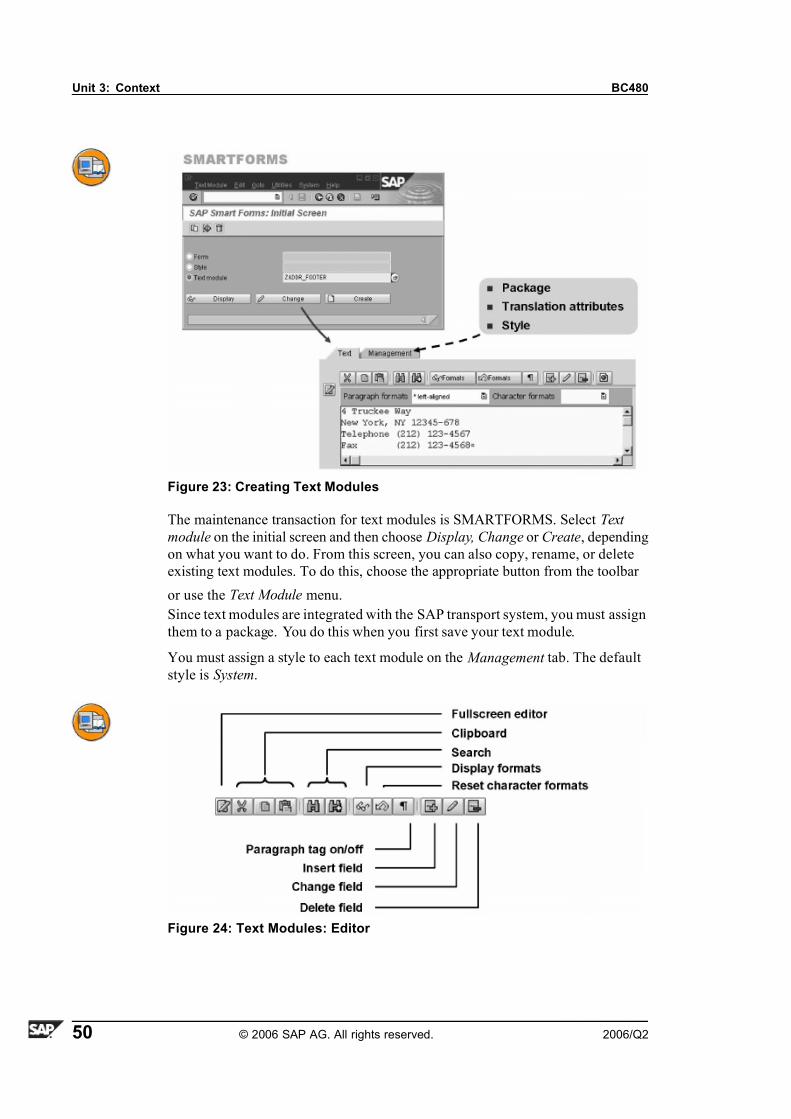
Figure 23: Creating Text Modules
The maintenance transaction for text modules is SMARTFORMS. Select Text
module on the initial screen and then choose Display, Change or Create, depending
on what you want to do. From this screen, you can also copy, rename, or delete
existing text modules. To do this, choose the appropriate button from the toolbar
or use the Text Module menu.
Since text modules are integrated with the SAP transport system, you must assign
them to a package. You do this when you first save your text module.
You must assign a style to each text module on the Management tab. The default
style is System.
Figure 24: Text Modules: Editor
50 © 2006 SAP AG. All rights reserved. 2006/Q2
7/14/2019 BC480 - PDF-Based Print Forms
http://slidepdf.com/reader/full/bc480-pdf-based-print-forms 59/317
BC480 Lesson: Form Context: Using and Extending a Form Interface
You can enter text in the same way as you would in any common word-processing
system. Alternately, you can switch to full-screen mode by choosing the
appropriate button.
You can use the clipboard by selecting text blocks with the mouse and then
choosing the Cut , Copy, or Paste buttons. This way, you can copy text sections
between different text modules.
Lines in text modules are broken automatically at runtime depending on the
width of the form element where they are included. The editor assumes a certain
standard width and breaks your text as you type it in, but this does not influence
line breaks in the output.
If you want to determine line breaks manually, you have two options:
• You can use the Enter key to create a new paragraph, which may then have adifferent format than the preceding one.
• Shift+Enter allows you to create a line break within a paragraph.
The Paragraph mark on/off button allows you to determine whether you want
to display nonprinting characters (blanks, tabulators, paragraph marks, and line
breaks).
Though technically it is possible to include hyperlinks in a text module, they
will not show in the resulting PDF that includes the text module. (This is true as
of SAP Web Application Server 6.40.)
The full-screen editor also allows you to switch to the old line editor used by
SAPscript, which technically enables you to type in SAPscript commands.However, all SAPscript commands will be ignored at runtime, so it is best not
to use this option.
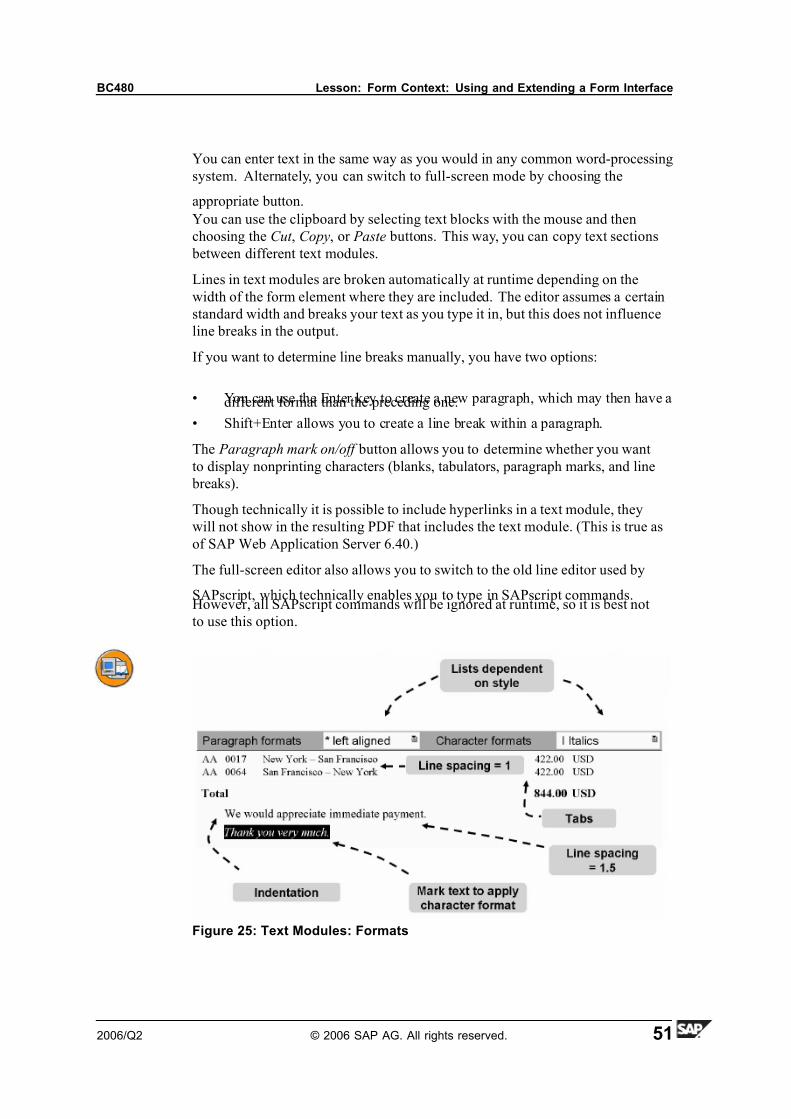
Figure 25: Text Modules: Formats
2006/Q2 © 2006 SAP AG. All rights reserved. 51
7/14/2019 BC480 - PDF-Based Print Forms
http://slidepdf.com/reader/full/bc480-pdf-based-print-forms 60/317
Unit 3: Context BC480
You can format selected text sections. These text sections are then displayed in
the editor as they will appear when printed (WYSIWYG = What You See Is
What You Get).
For each paragraph, you can choose a paragraph format from the selection list in
the editor. A paragraph format is a collection of format settings, such as tabs, type
of justification, and so on. The paragraph formats available for selection in the list
depend on the style you have chosen.
All formats have a one- or two-digit name, which is defined in the style. An
asterisk (*) indicates the default format.
The system automatically displays the set format at the current cursor position in
the paragraph and character format list. You therefore only need the Display
formats function if you want to obtain detailed information on the format, or if
text has been formatted using several character formats.
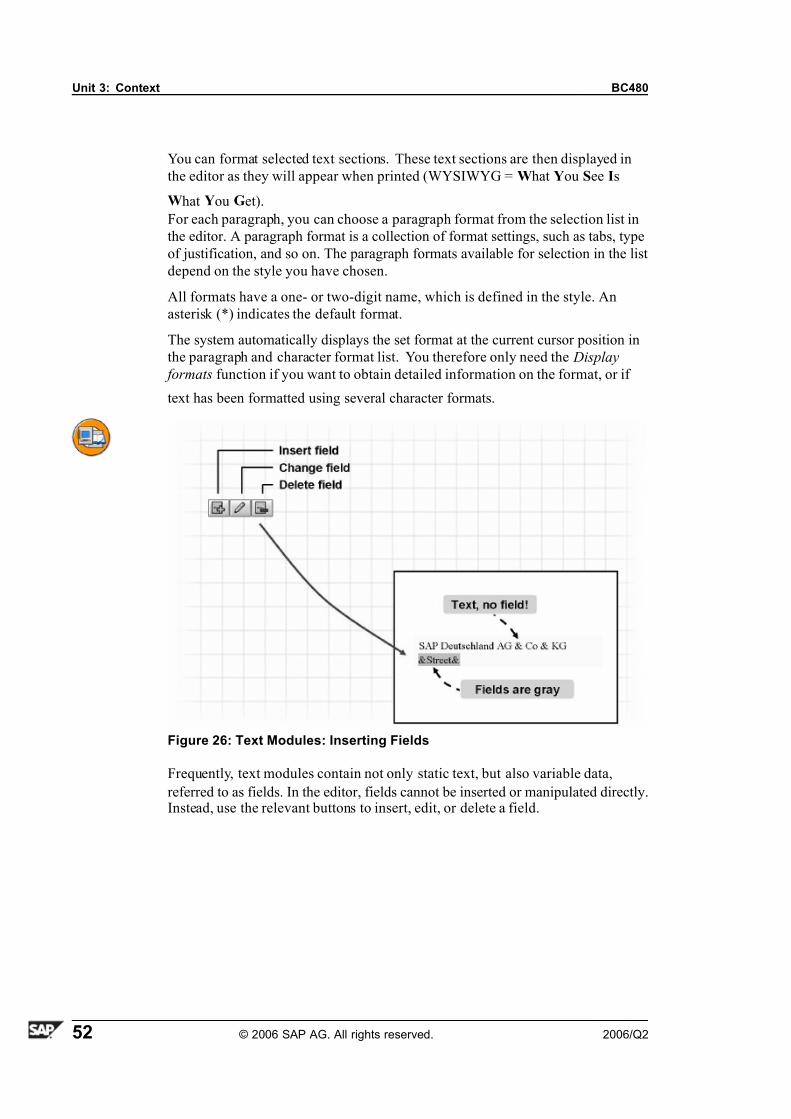
Figure 26: Text Modules: Inserting Fields
Frequently, text modules contain not only static text, but also variable data,
referred to as fields. In the editor, fields cannot be inserted or manipulated directly.Instead, use the relevant buttons to insert, edit, or delete a field.
52 © 2006 SAP AG. All rights reserved. 2006/Q2
7/14/2019 BC480 - PDF-Based Print Forms
http://slidepdf.com/reader/full/bc480-pdf-based-print-forms 61/317
BC480 Lesson: Form Context: Using and Extending a Form Interface
All fields start and end with an ampersand, such as &SFPSY-DATE&. You can
enter the following fields:
• Fields that are used in a form interface (typically containing business data)
• sfpsy fields
• Fields from Dictionary structure syst , such as sy-mandt (client) or sy-sysid
(system ID): Note that not all fields make sense. In particular, fields used
in list processing, like sy-pagno, are not filled by the system and should
not be used.
Field names are case-insensitive.
Formatting options as they can be used in SAPscript or Smart Forms (like offsets
or the “no zeroes” option) will be ignored in texts when included in PDF-based
forms.
Be sure to include only those fields into your text that are actually known at form
processing time, that is, those that are defined in the form interface that is actually
used. If, at runtime, a field turns out not to be defined, the program execution will
terminate. SFPSY fields can always be used in text modules, even if they have not
been included in the context. The syntax check of the context includes a syntax
check of the referenced text module only as of SAP NetWeaver 2004s.
Figure 27: Including Text Modules
If you want to include a text module into a context, right-click somewhere in the
context tree and choose Create→ Text .
To determine which text module should actually be taken, specify the name and
the language. Both of these can be determined with fixed values or dynamically.
In the first case, enter the name and language in single quotes. In the second
case, enter the names of interface fields.
2006/Q2 © 2006 SAP AG. All rights reserved. 53
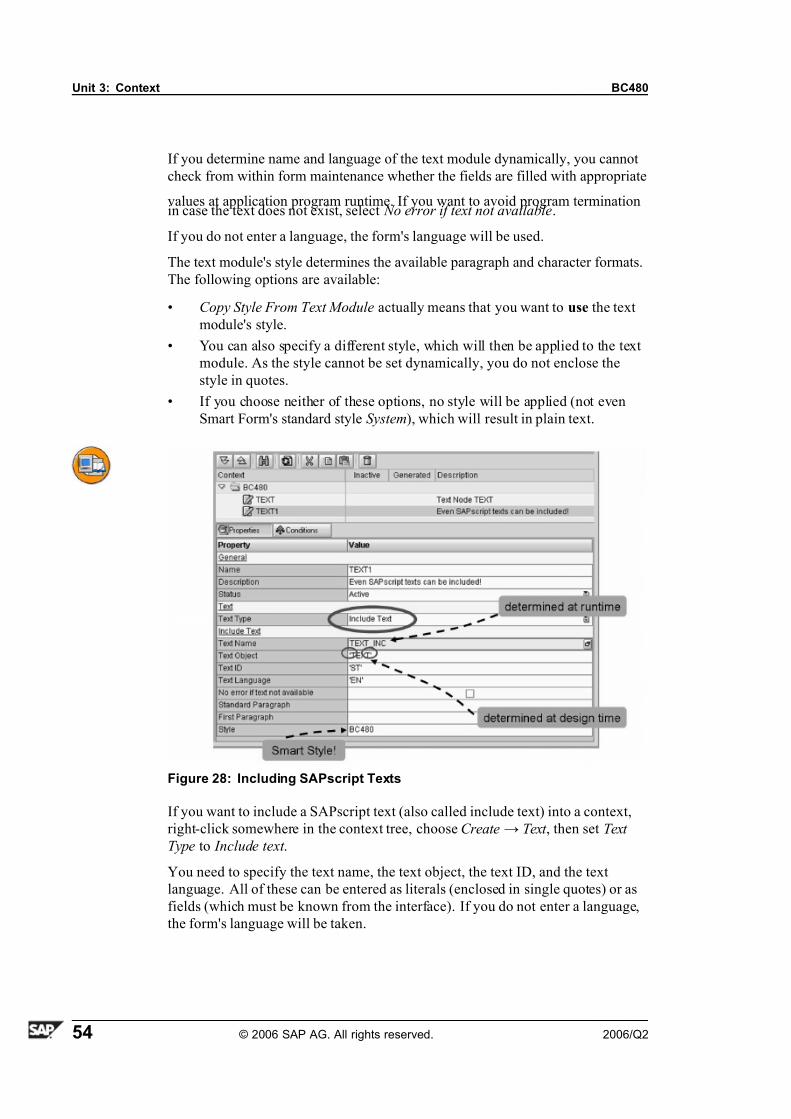
7/14/2019 BC480 - PDF-Based Print Forms
http://slidepdf.com/reader/full/bc480-pdf-based-print-forms 62/317
Unit 3: Context BC480
If you determine name and language of the text module dynamically, you cannot
check from within form maintenance whether the fields are filled with appropriate
values at application program runtime. If you want to avoid program terminationin case the text does not exist, select No error if text not available.
If you do not enter a language, the form's language will be used.
The text module's style determines the available paragraph and character formats.
The following options are available:
• Copy Style From Text Module actually means that you want to use the text
module's style.
• You can also specify a different style, which will then be applied to the text
module. As the style cannot be set dynamically, you do not enclose the
style in quotes.
• If you choose neither of these options, no style will be applied (not even
Smart Form's standard style System), which will result in plain text.
Figure 28: Including SAPscript Texts
If you want to include a SAPscript text (also called include text) into a context,
right-click somewhere in the context tree, choose Create→ Text , then set Text
Type to Include text .
You need to specify the text name, the text object, the text ID, and the text
language. All of these can be entered as literals (enclosed in single quotes) or as
fields (which must be known from the interface). If you do not enter a language,
the form's language will be taken.
54 © 2006 SAP AG. All rights reserved. 2006/Q2
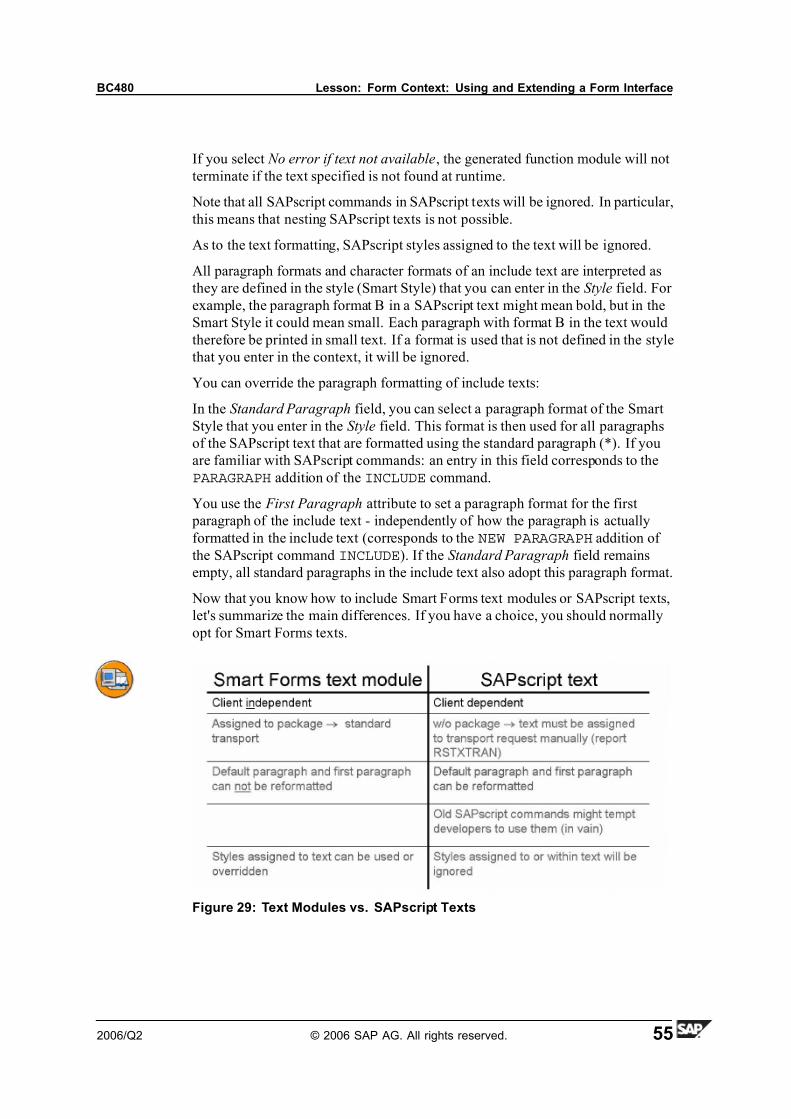
7/14/2019 BC480 - PDF-Based Print Forms
http://slidepdf.com/reader/full/bc480-pdf-based-print-forms 63/317
BC480 Lesson: Form Context: Using and Extending a Form Interface
If you select No error if text not available, the generated function module will not
terminate if the text specified is not found at runtime.
Note that all SAPscript commands in SAPscript texts will be ignored. In particular,
this means that nesting SAPscript texts is not possible.
As to the text formatting, SAPscript styles assigned to the text will be ignored.
All paragraph formats and character formats of an include text are interpreted as
they are defined in the style (Smart Style) that you can enter in the Style field. For
example, the paragraph format B in a SAPscript text might mean bold, but in the
Smart Style it could mean small. Each paragraph with format B in the text would
therefore be printed in small text. If a format is used that is not defined in the style
that you enter in the context, it will be ignored.
You can override the paragraph formatting of include texts:
In the Standard Paragraph field, you can select a paragraph format of the Smart
Style that you enter in the Style field. This format is then used for all paragraphs
of the SAPscript text that are formatted using the standard paragraph (*). If you
are familiar with SAPscript commands: an entry in this field corresponds to the
PARAGRAPH addition of the INCLUDE command.
You use the First Paragraph attribute to set a paragraph format for the first
paragraph of the include text - independently of how the paragraph is actually
formatted in the include text (corresponds to the NEW PARAGRAPH addition of
the SAPscript command INCLUDE). If the Standard Paragraph field remains
empty, all standard paragraphs in the include text also adopt this paragraph format.
Now that you know how to include Smart Forms text modules or SAPscript texts,
let's summarize the main differences. If you have a choice, you should normally
opt for Smart Forms texts.
Figure 29: Text Modules vs. SAPscript Texts
2006/Q2 © 2006 SAP AG. All rights reserved. 55

7/14/2019 BC480 - PDF-Based Print Forms
http://slidepdf.com/reader/full/bc480-pdf-based-print-forms 64/317
Unit 3: Context BC480
Dynamic Texts
Apart from addresses, text modules, and SAPscript texts, you can include a fourth
type of long texts into the context: dynamic texts. In this case, you must specify
an internal table with line type tline that will contain the text in ITF format at
runtime. tline consists of two columns: column tdformat contains the name of the
paragraph format, and tdline the content of the line. (In other words, a dynamic
text looks exactly like a text module or a SAPscript text in the line editor.)
Figure 30: Dynamic Texts
If you enter an astersik (*) as the paragraph, the default paragraph will be taken
from the style (Smart Style) that you specify in the context.If you want to have continuous text, make sure to enter a paragraph format only
for the first line. You can then add as many lines to the internal table as you like,
using only the tdline column. tdline can contain up to 132 characters. Independent
of how many characters you enter, the resulting text in the form will have one
paragraph.
If you want to apply character formats to some parts of the text, look up the
name of a suitable format in the style to be used (it will always have a one- or
two-digit name). Put this name in angle brackets, then write the text that needs to
be formatted, and close the formatting with </>. For example, if a style contains
the character format AB, you might format parts of a text like this: irrelevant
<AB>formatted</> irrelevant.
56 © 2006 SAP AG. All rights reserved. 2006/Q2
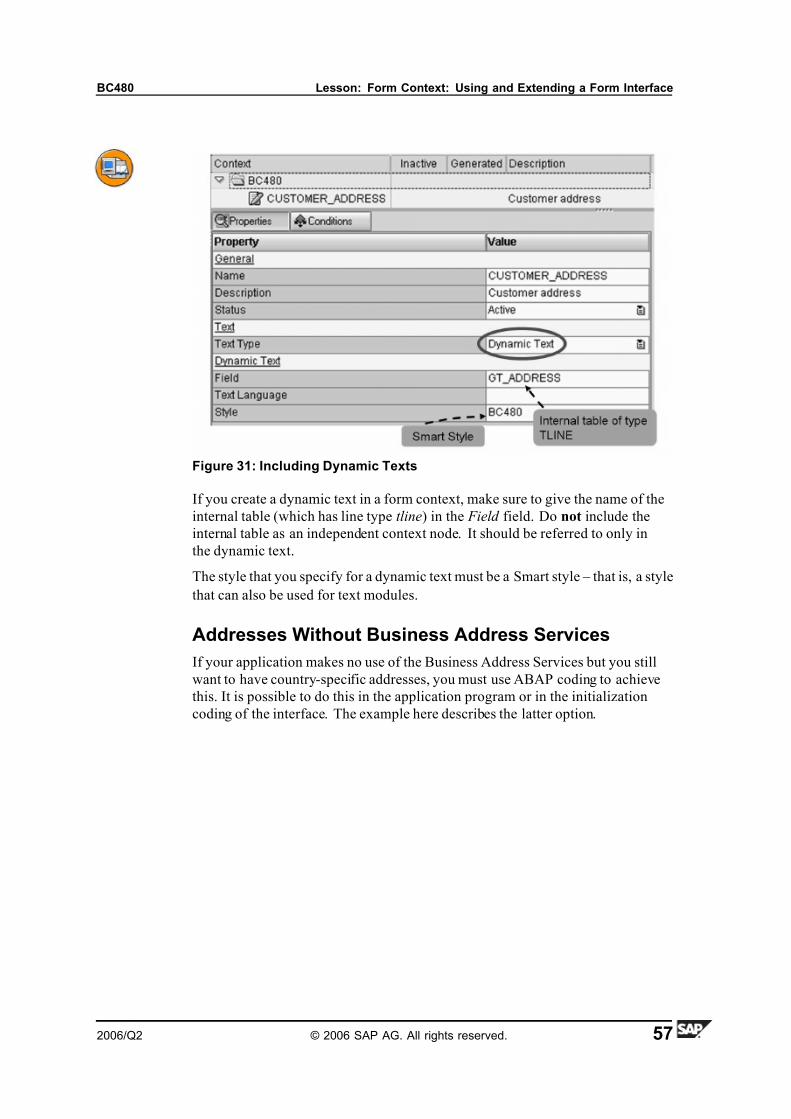
7/14/2019 BC480 - PDF-Based Print Forms
http://slidepdf.com/reader/full/bc480-pdf-based-print-forms 65/317
BC480 Lesson: Form Context: Using and Extending a Form Interface
Figure 31: Including Dynamic Texts
If you create a dynamic text in a form context, make sure to give the name of the
internal table (which has line type tline) in the Field field. Do not include the
internal table as an independent context node. It should be referred to only in
the dynamic text.
The style that you specify for a dynamic text must be a Smart style – that is, a style
that can also be used for text modules.
Addresses Without Business Address Services
If your application makes no use of the Business Address Services but you still
want to have country-specific addresses, you must use ABAP coding to achieve
this. It is possible to do this in the application program or in the initialization
coding of the interface. The example here describes the latter option.
2006/Q2 © 2006 SAP AG. All rights reserved. 57
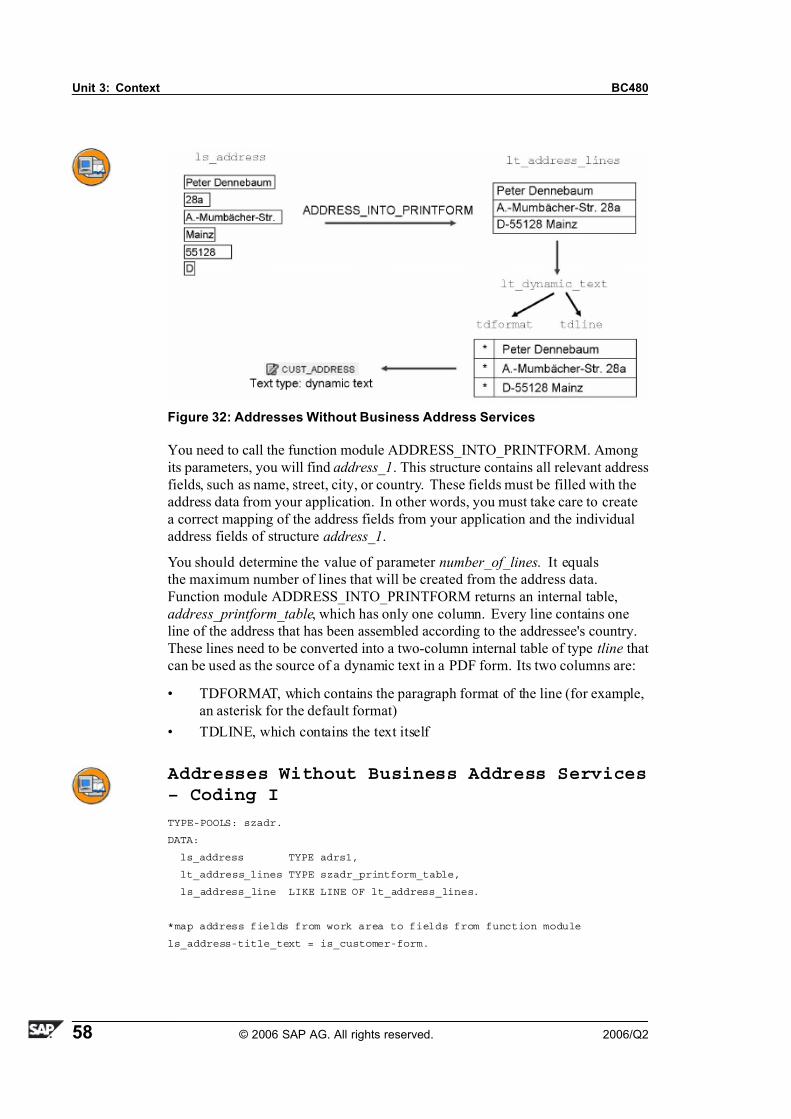
7/14/2019 BC480 - PDF-Based Print Forms
http://slidepdf.com/reader/full/bc480-pdf-based-print-forms 66/317
Unit 3: Context BC480
Figure 32: Addresses Without Business Address Services
You need to call the function module ADDRESS_INTO_PRINTFORM. Among
its parameters, you will find address_1. This structure contains all relevant address
fields, such as name, street, city, or country. These fields must be filled with the
address data from your application. In other words, you must take care to create
a correct mapping of the address fields from your application and the individual
address fields of structure address_1.
You should determine the value of parameter number_of_lines. It equals
the maximum number of lines that will be created from the address data.
Function module ADDRESS_INTO_PRINTFORM returns an internal table,
address_printform_table, which has only one column. Every line contains one
line of the address that has been assembled according to the addressee's country.
These lines need to be converted into a two-column internal table of type tline that
can be used as the source of a dynamic text in a PDF form. Its two columns are:
• TDFORMAT, which contains the paragraph format of the line (for example,
an asterisk for the default format)
• TDLINE, which contains the text itself
Addresses Without Business Address Services– Coding I
TYPE-POOLS: szadr.
DATA:
ls_address TYPE adrs1,
lt_address_lines TYPE szadr_printform_table,
ls_address_line LIKE LINE OF lt_address_lines.
*map address fields from work area to fields from function module
ls_address-title_text = is_customer-form.
58 © 2006 SAP AG. All rights reserved. 2006/Q2
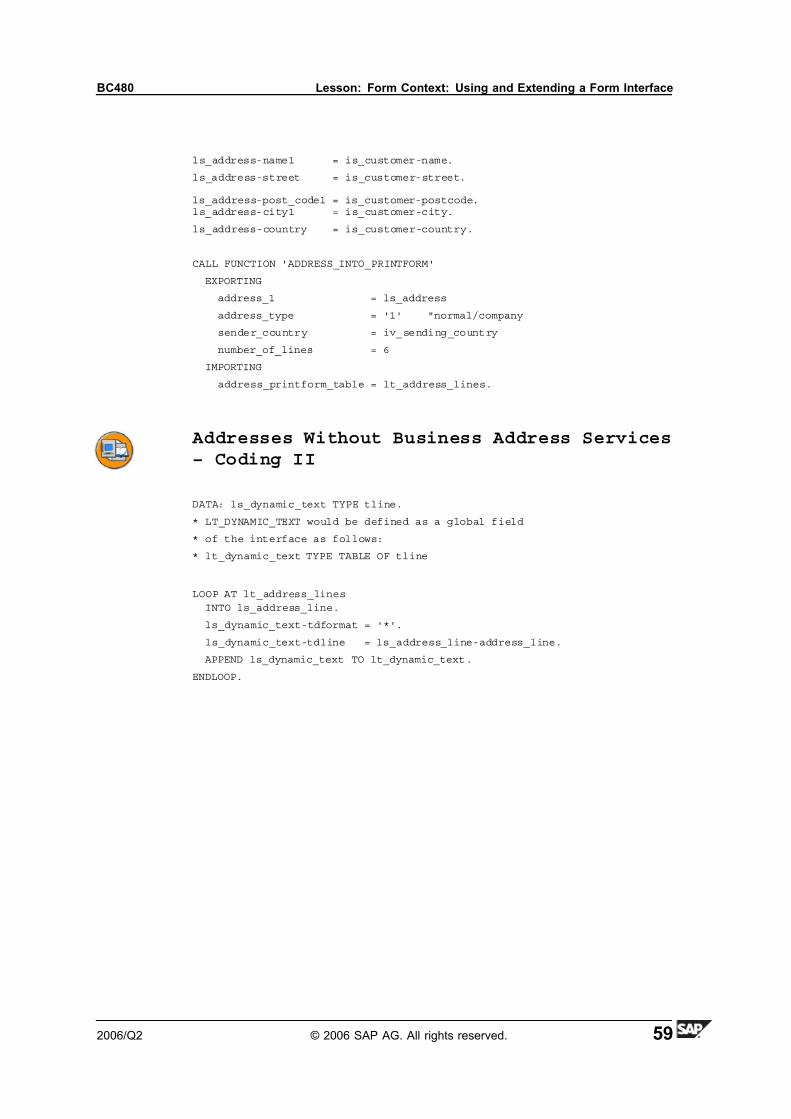
7/14/2019 BC480 - PDF-Based Print Forms
http://slidepdf.com/reader/full/bc480-pdf-based-print-forms 67/317
BC480 Lesson: Form Context: Using and Extending a Form Interface
ls_address-name1 = is_customer-name.
ls_address-street = is_customer-street.
ls_address-post_code1 = is_customer-postcode.ls_address-city1 = is_customer-city.
ls_address-country = is_customer-country.
CALL FUNCTION 'ADDRESS_INTO_PRINTFORM'
EXPORTING
address_1 = ls_address
address_type = '1' "normal/company
sender_country = iv_sending_country
number_of_lines = 6
IMPORTING
address_printform_table = lt_address_lines.
Addresses Without Business Address Services– Coding II
DATA: ls_dynamic_text TYPE tline.
* LT_DYNAMIC_TEXT would be defined as a global field
* of the interface as follows:
* lt_dynamic_text TYPE TABLE OF tline
LOOP AT lt_address_lines
INTO ls_address_line.
ls_dynamic_text-tdformat = '*'.
ls_dynamic_text-tdline = ls_address_line-address_line.
APPEND ls_dynamic_text TO lt_dynamic_text.
ENDLOOP.
2006/Q2 © 2006 SAP AG. All rights reserved. 59

7/14/2019 BC480 - PDF-Based Print Forms
http://slidepdf.com/reader/full/bc480-pdf-based-print-forms 68/317
Unit 3: Context BC480
60 © 2006 SAP AG. All rights reserved. 2006/Q2

7/14/2019 BC480 - PDF-Based Print Forms
http://slidepdf.com/reader/full/bc480-pdf-based-print-forms 69/317
BC480 Lesson: Form Context: Using and Extending a Form Interface
Exercise 2: Form Context: Using and
Extending a Form InterfaceExercise Objectives
After completing this exercise, you will be able to:
• Create a form context, using an existing interface
• Integrate alternatives and graphics into a form context
• Create and integrate long texts into a form context
Business Example
A travel agency wants to print invoices for their customers' flight bookings usingthe tool “Interactive Forms”. The interface has been designed already, but there is
no form yet. Designing the form context is the next step.
Task 1:
Create a form with a context.
Please stick closely to the exercise description, because at the end of the exercise,
a program will add a layout to your form context and show the resulting PDF. (You
will use this context for later exercises.)
1. Create a PDF-based form, ZBC480_##, which uses your interface,
ZBC480_##, from the last exercise. ## stands for your two-digit groupnumber (monitor number).
If you have not finished the previous exercise, you can use the solution
interface BC480 instead.
Save the form in package ZBC480_##.
The reference solution for this exercise is form BC480_CONTEXT_ONLY.
Task 2:
Integrate interface fields into the context.
1. From the interface, drag structure IS_CUSTOMER into your context.
Deactivate the fields MANDT , TELEPHONE , CUSTTYPE , LANGU , EMAIL,
and WEBUSER.
2. Integrate the internal table IT_BOOKINGS into your context.
Deactivate all fields except for CARRID, CONNID, FLDATE , BOOKID,
FORCURAM , and FORCURKEY .
Continued on next page
2006/Q2 © 2006 SAP AG. All rights reserved. 61
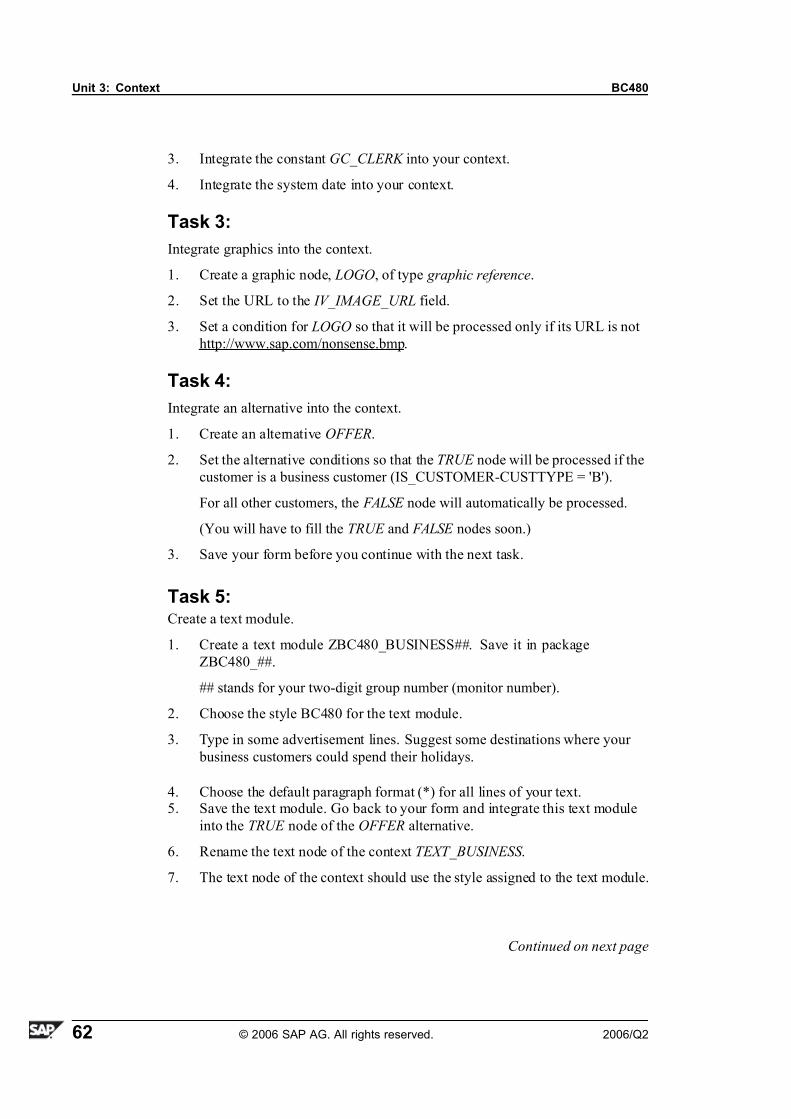
7/14/2019 BC480 - PDF-Based Print Forms
http://slidepdf.com/reader/full/bc480-pdf-based-print-forms 70/317
Unit 3: Context BC480
3. Integrate the constant GC_CLERK into your context.
4. Integrate the system date into your context.
Task 3:
Integrate graphics into the context.
1. Create a graphic node, LOGO, of type graphic reference.
2. Set the URL to the IV_IMAGE_URL field.
3. Set a condition for LOGO so that it will be processed only if its URL is not
http://www.sap.com/nonsense.bmp.
Task 4:
Integrate an alternative into the context.
1. Create an alternative OFFER.
2. Set the alternative conditions so that the TRUE node will be processed if the
customer is a business customer (IS_CUSTOMER-CUSTTYPE = 'B').
For all other customers, the FALSE node will automatically be processed.
(You will have to fill the TRUE and FALSE nodes soon.)
3. Save your form before you continue with the next task.
Task 5:Create a text module.
1. Create a text module ZBC480_BUSINESS##. Save it in package
ZBC480_##.
## stands for your two-digit group number (monitor number).
2. Choose the style BC480 for the text module.
3. Type in some advertisement lines. Suggest some destinations where your
business customers could spend their holidays.
4. Choose the default paragraph format (*) for all lines of your text.5. Save the text module. Go back to your form and integrate this text module
into the TRUE node of the OFFER alternative.
6. Rename the text node of the context TEXT_BUSINESS .
7. The text node of the context should use the style assigned to the text module.
Continued on next page
62 © 2006 SAP AG. All rights reserved. 2006/Q2
7/14/2019 BC480 - PDF-Based Print Forms
http://slidepdf.com/reader/full/bc480-pdf-based-print-forms 71/317
BC480 Lesson: Form Context: Using and Extending a Form Interface
Task 6:
Create a second text module.
1. Create a second text module, ZBC480_OTHER##. Save it in package
ZBC480_##.
## stands for your two-digit group number (monitor number).
2. Choose the style SAPADRS for the text module.
3. Type in some advertisement lines for those customers that are non business
customers.
4. Choose the default paragraph format (*) for all lines of your text.
5. Save the text module. Go back to your form and integrate this text module
into the FALSE node of the OFFER alternative.
6. Rename the text node of the context TEXT .
7. The text node of the context should use the style assigned to the text module.
Task 7:
Integrate a SAPscript text into the form context.
1. In your form context, create a text node ENVELOPE_ADDRESS (It will
contain the travel agency's address in small print that is visible in the window
of the envelope.) Choose type Include text (that is, SAPscript text) and refer
to include text FLY_AND_SMILE_SMALL, object TEXT, ID ADRS.Assign style SAPADRS.
Task 8:
Integrate a dynamic text into the form context.
1. In your form context, create a text node CUSTOMER_ADDRESS . Choose
type Dynamic text and refer to the interface variable GT_ADDRESS .
(Note: GT_ADDRESS is filled with the formatted customer address in the
initialisation coding of the interface.)
Assign style BC480.
Task 9:
Test the form context.
1. Check the syntax of your form. If errors are found, correct them.
Ignore the error message that your form has no layout yet. You will design
the layout soon.
Continued on next page
2006/Q2 © 2006 SAP AG. All rights reserved. 63
7/14/2019 BC480 - PDF-Based Print Forms
http://slidepdf.com/reader/full/bc480-pdf-based-print-forms 72/317
Unit 3: Context BC480
2. Save your form and leave the maintenance mode.
3. Execute report SAPBC480_ADD_LAYOUT. It will try to add a test layout
to your form, activate the form, and fill it with test data.
When you run the report, you should get two PDF documents: One for a
German business customer, and one for a British private customer. Check
that you see different texts.
On the selection screen, you can enter the country that will be taken as the
sending country. Run the report once with 'DE' and a second time with 'GB'.
The customer's country in the address field should appear in one case, but not
in the other. (It should appear for international mail, but not for domestic.)
The layout elements will have a green color if the corresponding context
elements are OK, red if not. In case you get errors, go back to the context
and try to fix the error. In particular, make sure you name your context
elements exactly as described in the tasks.
Task 10:
Optional: Create a SAPscript text.
1. With transaction SO10, create a SAPscript text: ZBC480_ENVELOPE##,
ID ADRS. (The invisible key field OBJECT will automatically be filled
with the value 'TEXT'.)
2. Use style SAPADRS.
3. Type in the address line for your travel agency in paragraph format SD.
4. In the context node ENVELOPE_ADDRESS , use your newly created
SAPscript text instead of FLY_AND_SMILE_SMALL.
5. Test your form again as described before, using report
SAPBC480_ADD_LAYOUT.
64 © 2006 SAP AG. All rights reserved. 2006/Q2
7/14/2019 BC480 - PDF-Based Print Forms
http://slidepdf.com/reader/full/bc480-pdf-based-print-forms 73/317
BC480 Lesson: Form Context: Using and Extending a Form Interface
Solution 2: Form Context: Using and
Extending a Form InterfaceTask 1:
Create a form with a context.
Please stick closely to the exercise description, because at the end of the exercise,
a program will add a layout to your form context and show the resulting PDF. (You
will use this context for later exercises.)
1. Create a PDF-based form, ZBC480_##, which uses your interface,
ZBC480_##, from the last exercise. ## stands for your two-digit group
number (monitor number).
If you have not finished the previous exercise, you can use the solution
interface BC480 instead.
Save the form in package ZBC480_##.
The reference solution for this exercise is form BC480_CONTEXT_ONLY.
a) Start the Form Builder (transaction SFP). Select Form.
b) Enter the name ZBC480_## and choose Create.
c) In the following window, enter a description and the name of the
interface you want to use (ZBC480_##). Press Enter.
d) In the following window, enter ZBC480_## as the package and pressEnter.
e) In the next window, press F4 to select the workbench request the
instructor has created for you. Continue by pressing Enter.
Task 2:
Integrate interface fields into the context.
1. From the interface, drag structure IS_CUSTOMER into your context.
Deactivate the fields MANDT , TELEPHONE , CUSTTYPE , LANGU , EMAIL,
and WEBUSER.
a) Go to the Context tab. On the left side of the Form Builder, open the
Import folder. Select IS_CUSTOMER and drag it over to the right
side. Drop it on folder ZBC480_## .
b) Keep the CTRL key pressed down. On the right side of the Form
Builder, select the fields MANDT , TELEPHONE , CUSTTYPE , LANGU ,
EMAIL, and WEBUSER. Right-click on any of the fields and select
Deactivate.
Continued on next page
2006/Q2 © 2006 SAP AG. All rights reserved. 65

7/14/2019 BC480 - PDF-Based Print Forms
http://slidepdf.com/reader/full/bc480-pdf-based-print-forms 74/317
Unit 3: Context BC480
2. Integrate the internal table IT_BOOKINGS into your context.
Deactivate all fields except for CARRID, CONNID, FLDATE , BOOKID,
FORCURAM , and FORCURKEY .
a) See previous step. Make sure not to drop IT_BOOKINGS on
IS_CUSTOMER. Drop it on folder ZBC480_## .
3. Integrate the constant GC_CLERK into your context.
a) Go to the Context tab. On the left side of the Form Builder, open the
Global Data folder.
b) Select GC_CLERK and drag it over to the right side. Drop it on folder
ZBC480_## .
4. Integrate the system date into your context.
a) Go to the Context tab. On the left side of the Form Builder, open the
folder System Fields. Then open the structure SFPSY .
b) Select DATE and drag it over to the right side. Drop it on folder
ZBC480_## .
Task 3:
Integrate graphics into the context.
1. Create a graphic node, LOGO, of type graphic reference.
a) Go to the Context tab. On the right side of the Form Builder, right-click on the folder ZBC480_## . Choose Create→ Graphic. This will
automatically create a graphic of type graphic reference.
b) Rename the graphic node. In the bottom right area of the Form Builder,
enter LOGO in the Name field.
2. Set the URL to the IV_IMAGE_URL field.
a) In the bottom right area of the Form Builder, choose the URL button.
b) In the Graphic URL column, enter IV_IMAGE_URL. Leave the
Delimiter column empty.
Continued on next page
66 © 2006 SAP AG. All rights reserved. 2006/Q2
7/14/2019 BC480 - PDF-Based Print Forms
http://slidepdf.com/reader/full/bc480-pdf-based-print-forms 75/317
BC480 Lesson: Form Context: Using and Extending a Form Interface
3. Set a condition for LOGO so that it will be processed only if its URL is not
http://www.sa p.com/nonsense.bm p.
a) In the bottom right area of the Form Builder, choose the Conditions
button. Leave the Operator column empty (it is required only if you
have several conditions).
b) In the Operand column, enter IV_IMAGE_URL.
c) Set the Relational Operator field to ≠. Set the Operand field to
'http://www.sap.com/nonsense.bmp' (with single quotes).
Task 4:
Integrate an alternative into the context.
1. Create an alternative OFFER.
a) Go to the Context tab. On the right side of the Form Builder, right-click
on the folder ZBC480_## . Choose Create - Alternative. This will create
an alternative node with two subnodes: TRUE and FALSE .
b) Rename the alternative. In the bottom right area of the Form Builder,
enter OFFER in the Name field.
2. Set the alternative conditions so that the TRUE node will be processed if the
customer is a business customer (IS_CUSTOMER-CUSTTYPE = 'B').
For all other customers, the FALSE node will automatically be processed.
(You will have to fill the TRUE and FALSE nodes soon.)
a) In the bottom right area of the Form Builder, choose the Alternative
Conditions button. Add one row.
b) In the row, leave the Operator column empty. Enter
IS_CUSTOMER-CUSTTYPE in the Operand column, = in the
Relational Operator column, and 'B' (with single quotes) in the
Operand column.
3. Save your form before you continue with the next task.
a) Press CTRL+S.
Task 5:
Create a text module.
1. Create a text module ZBC480_BUSINESS##. Save it in package
ZBC480_##.
Continued on next page
2006/Q2 © 2006 SAP AG. All rights reserved. 67
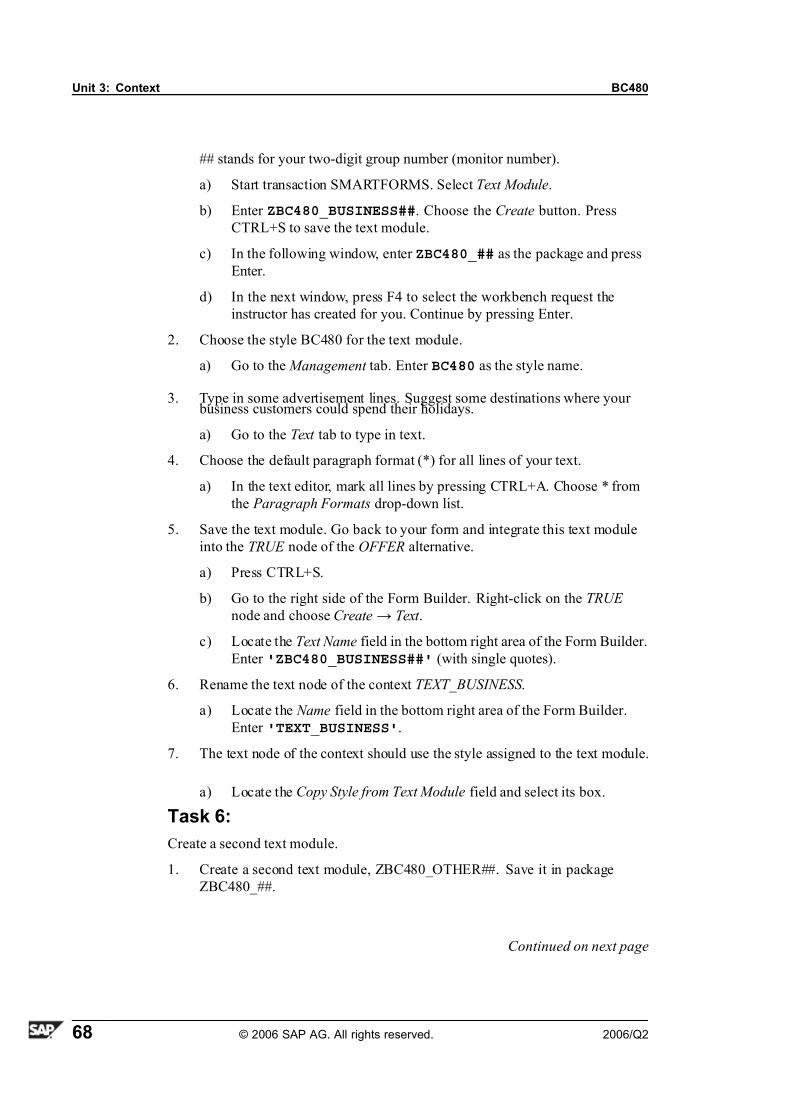
7/14/2019 BC480 - PDF-Based Print Forms
http://slidepdf.com/reader/full/bc480-pdf-based-print-forms 76/317
Unit 3: Context BC480
## stands for your two-digit group number (monitor number).
a) Start transaction SMARTFORMS. Select Text Module.
b) Enter ZBC480_BUSINESS##. Choose the Create button. Press
CTRL+S to save the text module.
c) In the following window, enter ZBC480_## as the package and press
Enter.
d) In the next window, press F4 to select the workbench request the
instructor has created for you. Continue by pressing Enter.
2. Choose the style BC480 for the text module.
a) Go to the Management tab. Enter BC480 as the style name.
3. Type in some advertisement lines. Suggest some destinations where your business customers could spend their holidays.
a) Go to the Text tab to type in text.
4. Choose the default paragraph format (*) for all lines of your text.
a) In the text editor, mark all lines by pressing CTRL+A. Choose * from
the Paragraph Formats drop-down list.
5. Save the text module. Go back to your form and integrate this text module
into the TRUE node of the OFFER alternative.
a) Press CTRL+S.
b) Go to the right side of the Form Builder. Right-click on the TRUE
node and choose Create→ Text .
c) Locate the Text Name field in the bottom right area of the Form Builder.
Enter 'ZBC480_BUSINESS##' (with single quotes).
6. Rename the text node of the context TEXT_BUSINESS .
a) Locate the Name field in the bottom right area of the Form Builder.
Enter 'TEXT_BUSINESS'.
7. The text node of the context should use the style assigned to the text module.
a) Locate the Copy Style from Text Module field and select its box.
Task 6:
Create a second text module.
1. Create a second text module, ZBC480_OTHER##. Save it in package
ZBC480_##.
Continued on next page
68 © 2006 SAP AG. All rights reserved. 2006/Q2
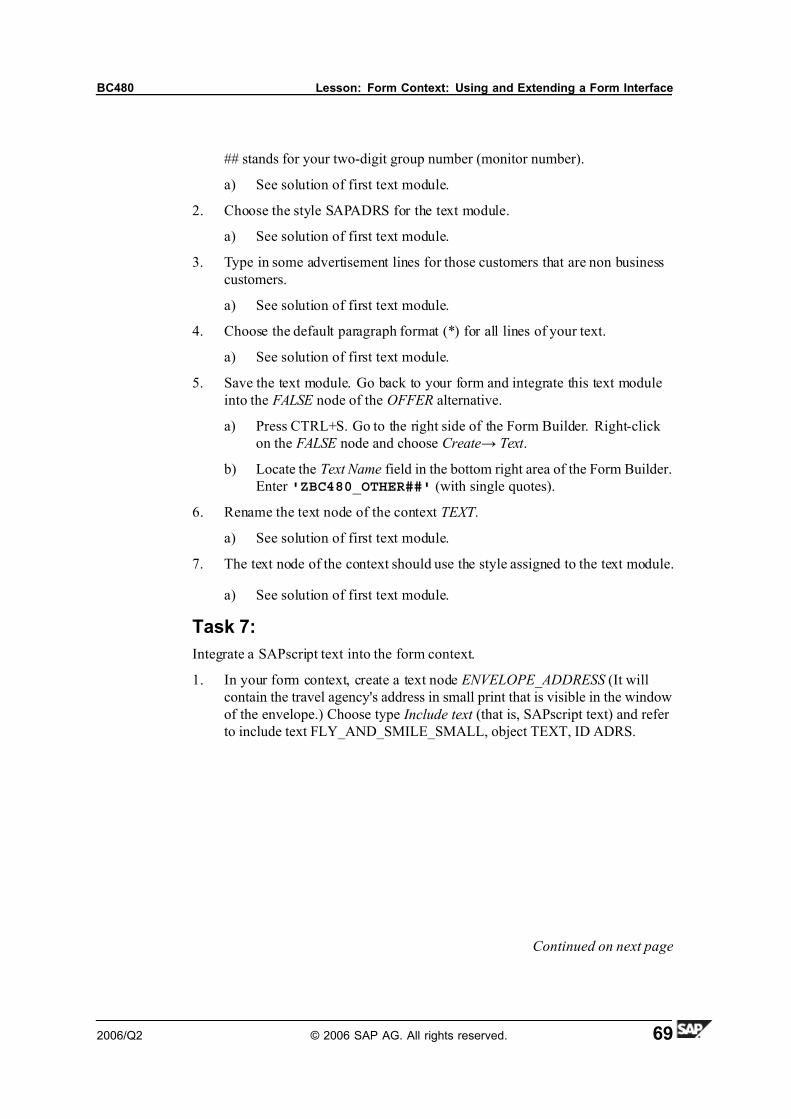
7/14/2019 BC480 - PDF-Based Print Forms
http://slidepdf.com/reader/full/bc480-pdf-based-print-forms 77/317
BC480 Lesson: Form Context: Using and Extending a Form Interface
## stands for your two-digit group number (monitor number).
a) See solution of first text module.
2. Choose the style SAPADRS for the text module.
a) See solution of first text module.
3. Type in some advertisement lines for those customers that are non business
customers.
a) See solution of first text module.
4. Choose the default paragraph format (*) for all lines of your text.
a) See solution of first text module.
5. Save the text module. Go back to your form and integrate this text module
into the FALSE node of the OFFER alternative.
a) Press CTRL+S. Go to the right side of the Form Builder. Right-click
on the FALSE node and choose Create→ Text .
b) Locate the Text Name field in the bottom right area of the Form Builder.
Enter 'ZBC480_OTHER##' (with single quotes).
6. Rename the text node of the context TEXT .
a) See solution of first text module.
7. The text node of the context should use the style assigned to the text module.
a) See solution of first text module.
Task 7:
Integrate a SAPscript text into the form context.
1. In your form context, create a text node ENVELOPE_ADDRESS (It will
contain the travel agency's address in small print that is visible in the window
of the envelope.) Choose type Include text (that is, SAPscript text) and refer
to include text FLY_AND_SMILE_SMALL, object TEXT, ID ADRS.
Continued on next page
2006/Q2 © 2006 SAP AG. All rights reserved. 69
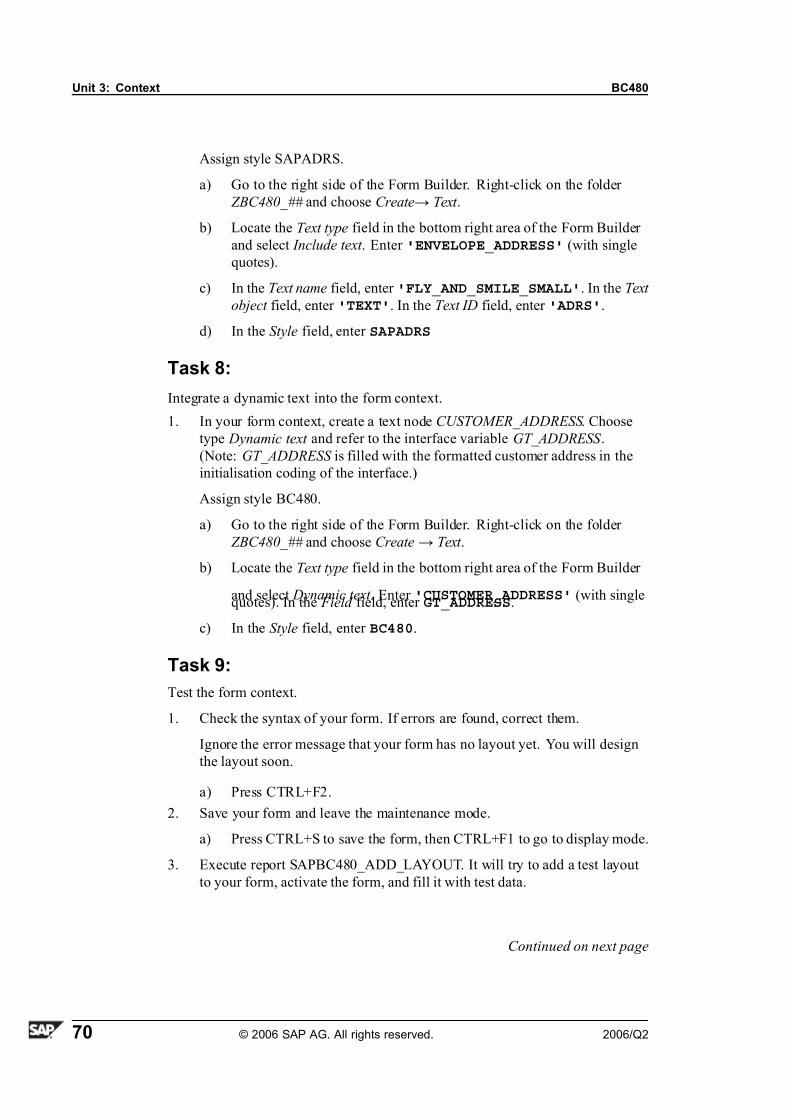
7/14/2019 BC480 - PDF-Based Print Forms
http://slidepdf.com/reader/full/bc480-pdf-based-print-forms 78/317
Unit 3: Context BC480
Assign style SAPADRS.
a) Go to the right side of the Form Builder. Right-click on the folder
ZBC480_## and choose Create→ Text .
b) Locate the Text type field in the bottom right area of the Form Builder
and select Include text . Enter 'ENVELOPE_ADDRESS' (with single
quotes).
c) In the Text name field, enter 'FLY_AND_SMILE_SMALL'. In the Text
object field, enter 'TEXT'. In the Text ID field, enter 'ADRS'.
d) In the Style field, enter SAPADRS
Task 8:
Integrate a dynamic text into the form context.
1. In your form context, create a text node CUSTOMER_ADDRESS . Choose
type Dynamic text and refer to the interface variable GT_ADDRESS .
(Note: GT_ADDRESS is filled with the formatted customer address in the
initialisation coding of the interface.)
Assign style BC480.
a) Go to the right side of the Form Builder. Right-click on the folder
ZBC480_## and choose Create→ Text .
b) Locate the Text type field in the bottom right area of the Form Builder
and select Dynamic text . Enter 'CUSTOMER_ADDRESS' (with singlequotes). In the Field field, enter GT_ADDRESS.
c) In the Style field, enter BC480.
Task 9:
Test the form context.
1. Check the syntax of your form. If errors are found, correct them.
Ignore the error message that your form has no layout yet. You will design
the layout soon.
a) Press CTRL+F2.
2. Save your form and leave the maintenance mode.
a) Press CTRL+S to save the form, then CTRL+F1 to go to display mode.
3. Execute report SAPBC480_ADD_LAYOUT. It will try to add a test layout
to your form, activate the form, and fill it with test data.
Continued on next page
70 © 2006 SAP AG. All rights reserved. 2006/Q2
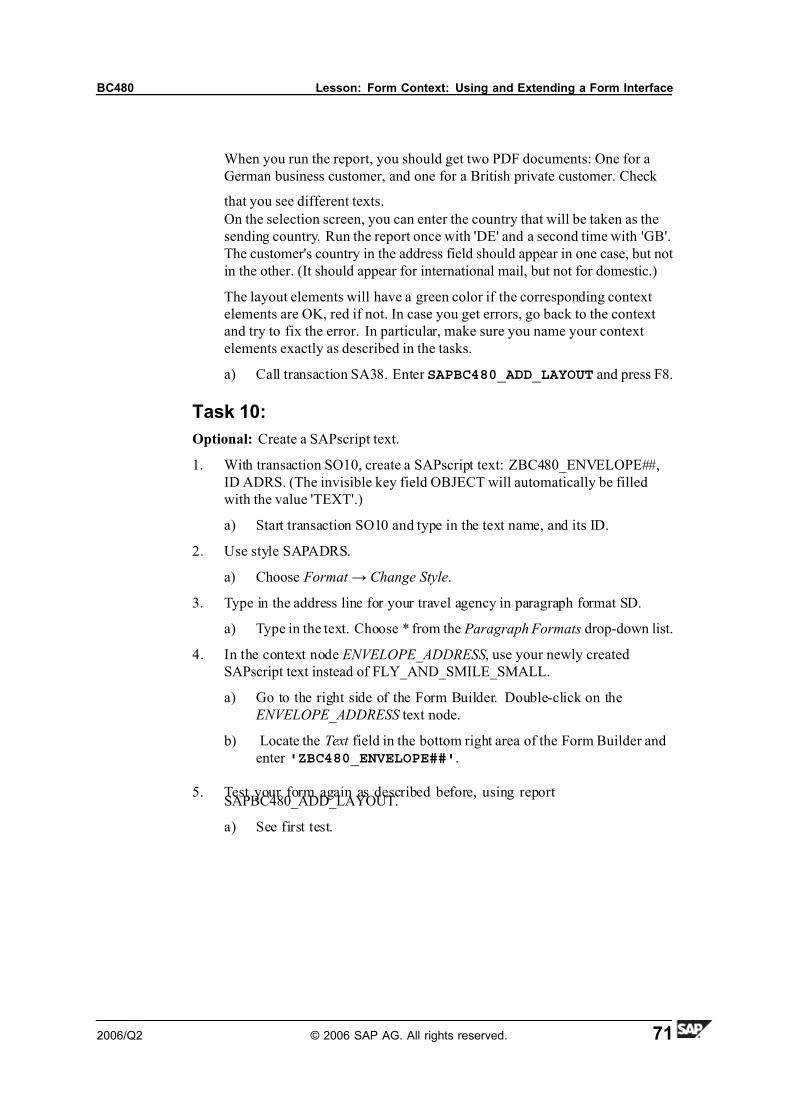
7/14/2019 BC480 - PDF-Based Print Forms
http://slidepdf.com/reader/full/bc480-pdf-based-print-forms 79/317
BC480 Lesson: Form Context: Using and Extending a Form Interface
When you run the report, you should get two PDF documents: One for a
German business customer, and one for a British private customer. Check
that you see different texts.
On the selection screen, you can enter the country that will be taken as the
sending country. Run the report once with 'DE' and a second time with 'GB'.
The customer's country in the address field should appear in one case, but not
in the other. (It should appear for international mail, but not for domestic.)
The layout elements will have a green color if the corresponding context
elements are OK, red if not. In case you get errors, go back to the context
and try to fix the error. In particular, make sure you name your context
elements exactly as described in the tasks.
a) Call transaction SA38. Enter SAPBC480_ADD_LAYOUT and press F8.
Task 10:
Optional: Create a SAPscript text.
1. With transaction SO10, create a SAPscript text: ZBC480_ENVELOPE##,
ID ADRS. (The invisible key field OBJECT will automatically be filled
with the value 'TEXT'.)
a) Start transaction SO10 and type in the text name, and its ID.
2. Use style SAPADRS.
a) Choose Format → Change Style.
3. Type in the address line for your travel agency in paragraph format SD.
a) Type in the text. Choose * from the Paragraph Formats drop-down list.
4. In the context node ENVELOPE_ADDRESS , use your newly created
SAPscript text instead of FLY_AND_SMILE_SMALL.
a) Go to the right side of the Form Builder. Double-click on the
ENVELOPE_ADDRESS text node.
b) Locate the Text field in the bottom right area of the Form Builder and
enter 'ZBC480_ENVELOPE##'.
5. Test your form again as described before, using reportSAPBC480_ADD_LAYOUT.
a) See first test.
2006/Q2 © 2006 SAP AG. All rights reserved. 71

7/14/2019 BC480 - PDF-Based Print Forms
http://slidepdf.com/reader/full/bc480-pdf-based-print-forms 80/317
Unit 3: Context BC480
Lesson Summary
You should now be able to:• Effectively use transaction SFP to create a form context
• Create a form context using an existing interface
• Integrate folders, alternatives, graphics, and addresses into a form context
• Create and integrate long texts into a form context
72 © 2006 SAP AG. All rights reserved. 2006/Q2

7/14/2019 BC480 - PDF-Based Print Forms
http://slidepdf.com/reader/full/bc480-pdf-based-print-forms 81/317
BC480 Unit Summary
Unit Summary
You should now be able to:
• Effectively use transaction SFP to create a form context
• Create a form context using an existing interface
• Integrate folders, alternatives, graphics, and addresses into a form context
• Create and integrate long texts into a form context
2006/Q2 © 2006 SAP AG. All rights reserved. 73

7/14/2019 BC480 - PDF-Based Print Forms
http://slidepdf.com/reader/full/bc480-pdf-based-print-forms 82/317
Unit Summary BC480
74 © 2006 SAP AG. All rights reserved. 2006/Q2
7/14/2019 BC480 - PDF-Based Print Forms
http://slidepdf.com/reader/full/bc480-pdf-based-print-forms 83/317
BC480 Test Your Knowledge
Test Your Knowledge
1. A context contains all fields of an interface. Determine whether this statement is true or false.
□ True
□ False
2. A context must use exactly one interface.
Determine whether this statement is true or false.
□ True
□ False
3. Deactivating fields makes sense for testing only. Active forms should have
active context fields only.
Determine whether this statement is true or false.
□ True
□ False
4. Addresses from Business Address Services are automatically formatted
when included in a PDF-based form.
Determine whether this statement is true or false.
□ True□ False
5. URLs of images are static.
Determine whether this statement is true or false.
□ True
□ False
6. Text modules can be created with transaction SFP.
Determine whether this statement is true or false.
□ True
□ False
7. The style used in a text module can be overridden when this text module is
integrated into a PDF-based form.
Determine whether this statement is true or false.
□ True
□ False
2006/Q2 © 2006 SAP AG. All rights reserved. 75

7/14/2019 BC480 - PDF-Based Print Forms
http://slidepdf.com/reader/full/bc480-pdf-based-print-forms 84/317
Test Your Knowledge BC480
Answers
1. A context contains all fields of an interface.
Answer: False
It is up to you to decide which of the interface fields should be integrated
into the context.
2. A context must use exactly one interface.
Answer: True
You determine which interface to use on the Properties tab.
3. Deactivating fields makes sense for testing only. Active forms should have
active context fields only.
Answer: False
Deactivating fields reduces the XML data stream that is sent to Adobe
document services. Thus, performance can be improved.
4. Addresses from Business Address Services are automatically formatted
when included in a PDF-based form.
Answer: True
The responsible function module that is automatically called is
ADDRESS_INTO_PRINTFORM.
5. URLs of images are static.
Answer: False
You can dynamically determine a URL, or parts of it, by using fields of
type STRING.
6. Text modules can be created with transaction SFP.
Answer: False
Text modules are created with transaction SMARTFORMS. They can be
integrated into PDF-based forms using transaction SFP.
76 © 2006 SAP AG. All rights reserved. 2006/Q2

7/14/2019 BC480 - PDF-Based Print Forms
http://slidepdf.com/reader/full/bc480-pdf-based-print-forms 85/317
BC480 Test Your Knowledge
7. The style used in a text module can be overridden when this text module is
integrated into a PDF-based form.
Answer: True
Deselect Copy Style from Text Module and set a different style.
2006/Q2 © 2006 SAP AG. All rights reserved. 77

7/14/2019 BC480 - PDF-Based Print Forms
http://slidepdf.com/reader/full/bc480-pdf-based-print-forms 86/317
Unit 3: Context BC480
78 © 2006 SAP AG. All rights reserved. 2006/Q2

7/14/2019 BC480 - PDF-Based Print Forms
http://slidepdf.com/reader/full/bc480-pdf-based-print-forms 87/317
Unit 4 Designer
Unit Overview
Adobe LiveCycle Designer is a powerful tool that lets you define both layout and
logic of a form. This unit will explain the key functionalities of the tool itself,
without yet going into details of a form design.
Unit Objectives
After completing this unit, you will be able to:
• List the various functions of Adobe LiveCycle Designer
• Use Adobe LiveCycle Designer as a graphical tool for designing forms
• Create a simple form layout with various objects
• Distinguish between master pages, content areas, body pages, and subforms
• Describe typical contents of master pages, content areas, body pages, andsubforms
Unit Contents
Lesson: Adobe LiveCycle Designer: Overview .. .. .. .. .. .. .. .. .. .. .. .. .. .. .. 80
Exercise 3: Adobe LiveCycle Designer: Overview.. .. .. .. .. .. .. .. .. .. .. 99
Lesson: Adobe LiveCycle Designer: Structuring a Form..................108Exercise 4: Adobe LiveCycle Designer: Structuring a Form.......... 115
2006/Q2 © 2006 SAP AG. All rights reserved. 79
7/14/2019 BC480 - PDF-Based Print Forms
http://slidepdf.com/reader/full/bc480-pdf-based-print-forms 88/317
Unit 4: Designer BC480
Lesson: Adobe LiveCycle Designer: Overview
Lesson Overview
Once you have created the context of a form, you can continue to create the layout.
Adobe LiveCycle Designer is the tool that supports you here. It is fully integrated
into transaction SFP and lets you create and edit pages and their contents (like
text or images). This lesson gives a general overview how Adobe LiveCycle
Designer works.
Lesson Objectives
After completing this lesson, you will be able to:
• List the various functions of Adobe LiveCycle Designer • Use Adobe LiveCycle Designer as a graphical tool for designing forms
• Create a simple form layout with various objects
Business Example
A travel agency wants to print invoices for their customers' flight bookings using
the tool “Interactive Forms”. The form designers first need to get an overview of
how the graphical tool (Adobe LiveCycle Designer) works.
Designer: Basic Handling
If you want to work with Adobe LiveCycle Designer, the following software
must be installed on your PC:
• SAP GUI for Windows. Make sure that during installation Adobe LiveCycle
Designer gets installed. You can check in the Windows directory C:\Program
Files\Adobe\Designer 7.1 (for SAP NetWeaver 2004s).
• Adobe Reader. The most current version should always be used, in particular
for interactive features. Check SAP Note 834573 for details.
• If you want to use interactive features, you will need - dependent on the
layout type of your forms, the release of SAP NetWeaver and its Support
Packages - an additional component installed on your PC, the ActiveComponent Framework (ACF). See SAP Note 766191 for details. If your
forms are of layout type ZCI (Zero Client Installation), no ACF installation
is required.
• Microsoft Windows 2000 or higher
80 © 2006 SAP AG. All rights reserved. 2006/Q2
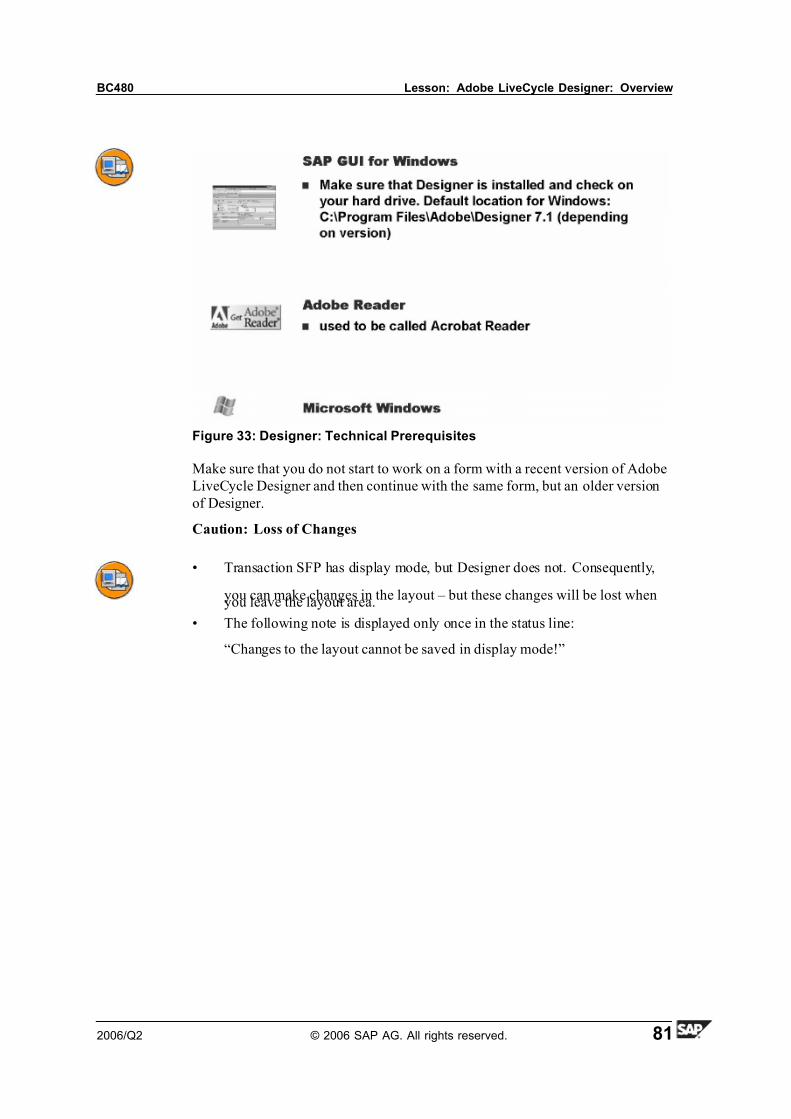
7/14/2019 BC480 - PDF-Based Print Forms
http://slidepdf.com/reader/full/bc480-pdf-based-print-forms 89/317
BC480 Lesson: Adobe LiveCycle Designer: Overview
Figure 33: Designer: Technical Prerequisites
Make sure that you do not start to work on a form with a recent version of Adobe
LiveCycle Designer and then continue with the same form, but an older version
of Designer.
Caution: Loss of Changes
• Transaction SFP has display mode, but Designer does not. Consequently,
you can make changes in the layout – but these changes will be lost whenyou leave the layout area.
• The following note is displayed only once in the status line:
“Changes to the layout cannot be saved in display mode!”
2006/Q2 © 2006 SAP AG. All rights reserved. 81
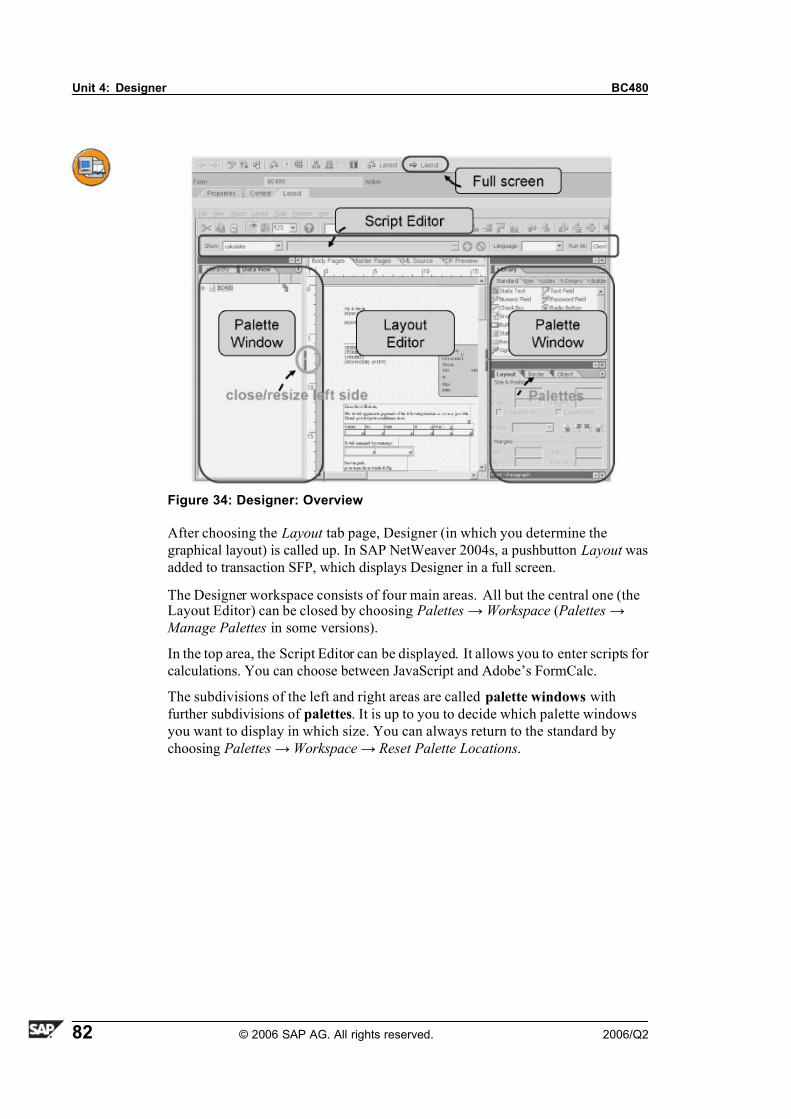
7/14/2019 BC480 - PDF-Based Print Forms
http://slidepdf.com/reader/full/bc480-pdf-based-print-forms 90/317
Unit 4: Designer BC480
Figure 34: Designer: Overview
After choosing the Layout tab page, Designer (in which you determine the
graphical layout) is called up. In SAP NetWeaver 2004s, a pushbutton Layout was
added to transaction SFP, which displays Designer in a full screen.
The Designer workspace consists of four main areas. All but the central one (theLayout Editor) can be closed by choosing Palettes→Workspace ( Palettes→
Manage Palettes in some versions).
In the top area, the Script Editor can be displayed. It allows you to enter scripts for
calculations. You can choose between JavaScript and Adobe’s FormCalc.
The subdivisions of the left and right areas are called palette windows with
further subdivisions of palettes. It is up to you to decide which palette windows
you want to display in which size. You can always return to the standard by
choosing Palettes→Workspace→ Reset Palette Locations.
82 © 2006 SAP AG. All rights reserved. 2006/Q2

7/14/2019 BC480 - PDF-Based Print Forms
http://slidepdf.com/reader/full/bc480-pdf-based-print-forms 91/317
BC480 Lesson: Adobe LiveCycle Designer: Overview
Figure 35: Designer: Toolbars
Designer has one menu toolbar and five button toolbars (Standard, Font,
Paragraph, Layout and - since Adobe Live Cycle Designer 7.1 - Table).
You can move a toolbar by dragging its title bar. If you drop it, it will be docked
to another toolbar, the Layout Editor window, or to a palette window. Holding
CTRL while dragging a toolbar lets you freely move the toolbar anywhere in
the workspace.
If you select Tools→ Customize Toolbars, you can determine which of the
toolbars you want to see or hide. Here, it is also possible to move individual items
to different positions or to reset toolbars to the standard settings.
2006/Q2 © 2006 SAP AG. All rights reserved. 83
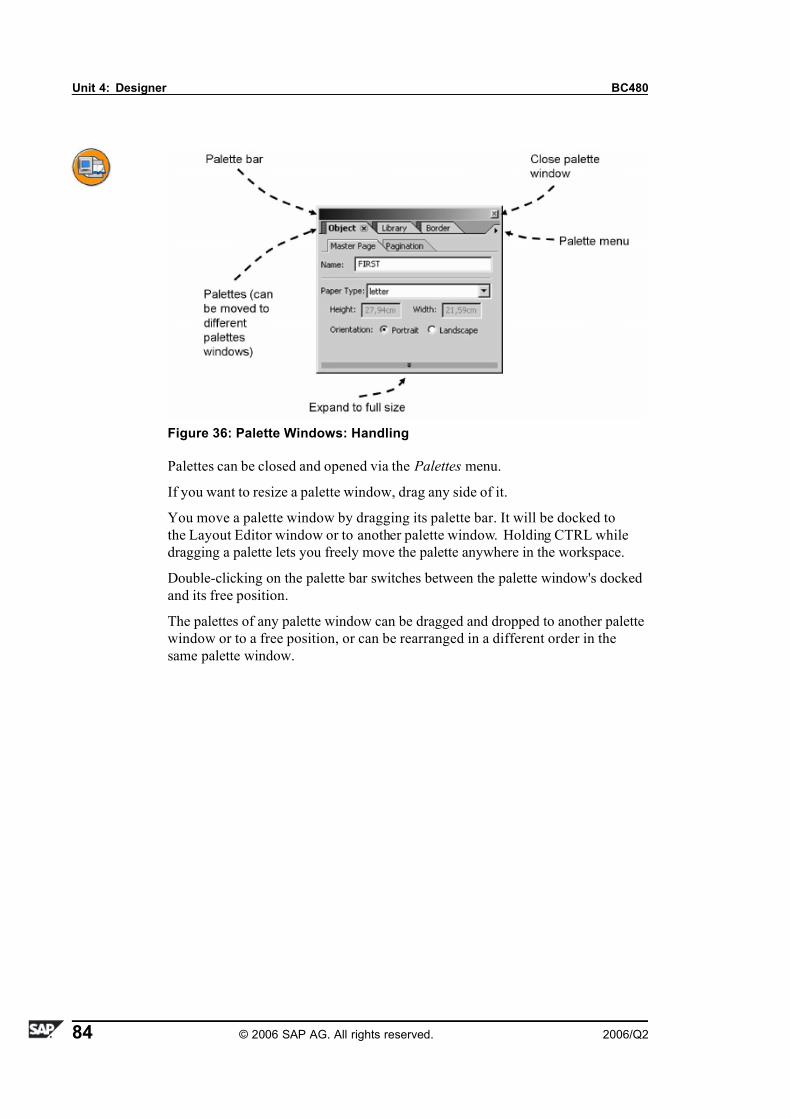
7/14/2019 BC480 - PDF-Based Print Forms
http://slidepdf.com/reader/full/bc480-pdf-based-print-forms 92/317
Unit 4: Designer BC480
Figure 36: Palette Windows: Handling
Palettes can be closed and opened via the Palettes menu.
If you want to resize a palette window, drag any side of it.
You move a palette window by dragging its palette bar. It will be docked to
the Layout Editor window or to another palette window. Holding CTRL while
dragging a palette lets you freely move the palette anywhere in the workspace.
Double-clicking on the palette bar switches between the palette window's docked
and its free position.
The palettes of any palette window can be dragged and dropped to another palette
window or to a free position, or can be rearranged in a different order in the
same palette window.
84 © 2006 SAP AG. All rights reserved. 2006/Q2
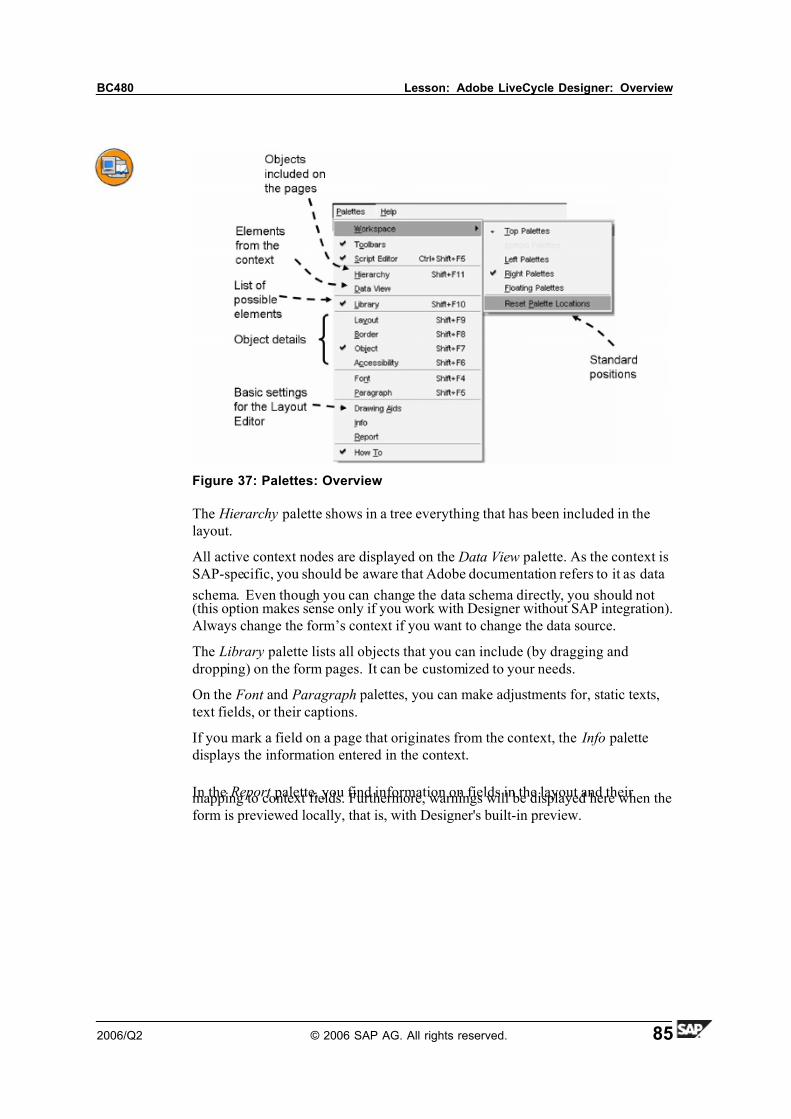
7/14/2019 BC480 - PDF-Based Print Forms
http://slidepdf.com/reader/full/bc480-pdf-based-print-forms 93/317
BC480 Lesson: Adobe LiveCycle Designer: Overview
Figure 37: Palettes: Overview
The Hierarchy palette shows in a tree everything that has been included in the
layout.
All active context nodes are displayed on the Data View palette. As the context is
SAP-specific, you should be aware that Adobe documentation refers to it as data
schema. Even though you can change the data schema directly, you should not(this option makes sense only if you work with Designer without SAP integration).
Always change the form’s context if you want to change the data source.
The Library palette lists all objects that you can include (by dragging and
dropping) on the form pages. It can be customized to your needs.
On the Font and Paragraph palettes, you can make adjustments for, static texts,
text fields, or their captions.
If you mark a field on a page that originates from the context, the Info palette
displays the information entered in the context.
In the Report palette, you find information on fields in the layout and their mapping to context fields. Furthermore, warnings will be displayed here when the
form is previewed locally, that is, with Designer's built-in preview.
2006/Q2 © 2006 SAP AG. All rights reserved. 85
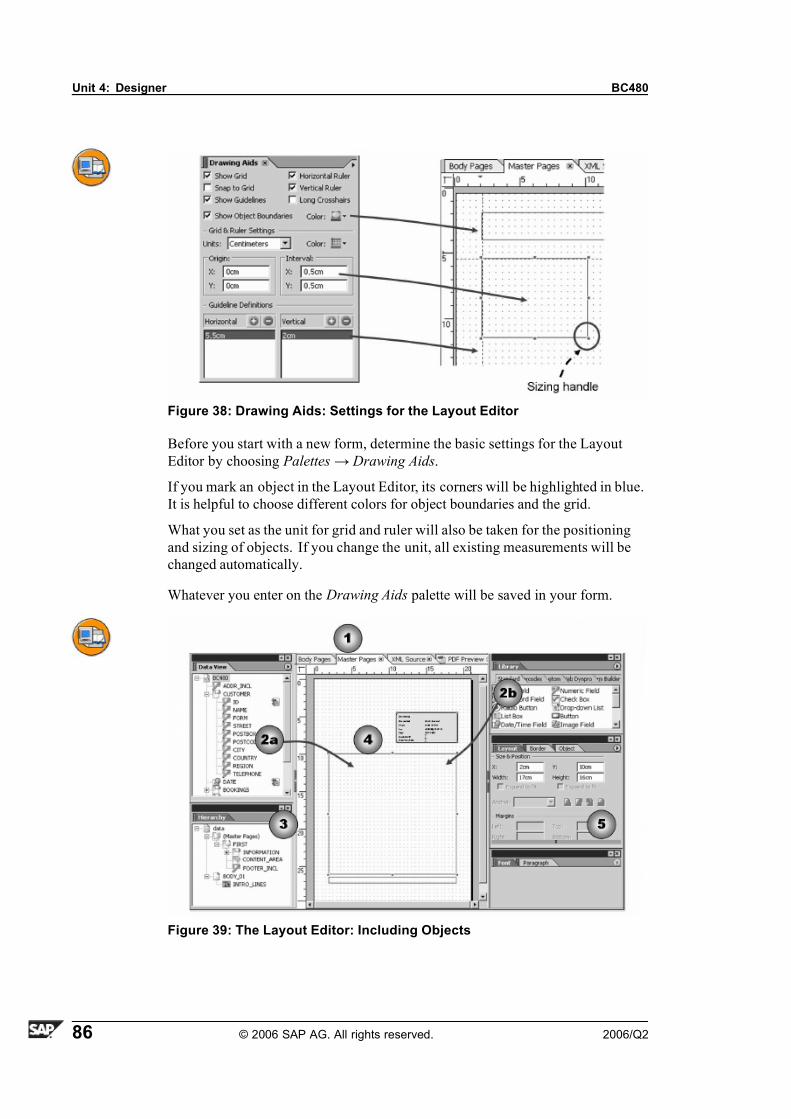
7/14/2019 BC480 - PDF-Based Print Forms
http://slidepdf.com/reader/full/bc480-pdf-based-print-forms 94/317
Unit 4: Designer BC480
Figure 38: Drawing Aids: Settings for the Layout Editor
Before you start with a new form, determine the basic settings for the Layout
Editor by choosing Palettes→ Drawing Aids.
If you mark an object in the Layout Editor, its corners will be highlighted in blue.
It is helpful to choose different colors for object boundaries and the grid.
What you set as the unit for grid and ruler will also be taken for the positioning
and sizing of objects. If you change the unit, all existing measurements will be
changed automatically.
Whatever you enter on the Drawing Aids palette will be saved in your form.
Figure 39: The Layout Editor: Including Objects
86 © 2006 SAP AG. All rights reserved. 2006/Q2
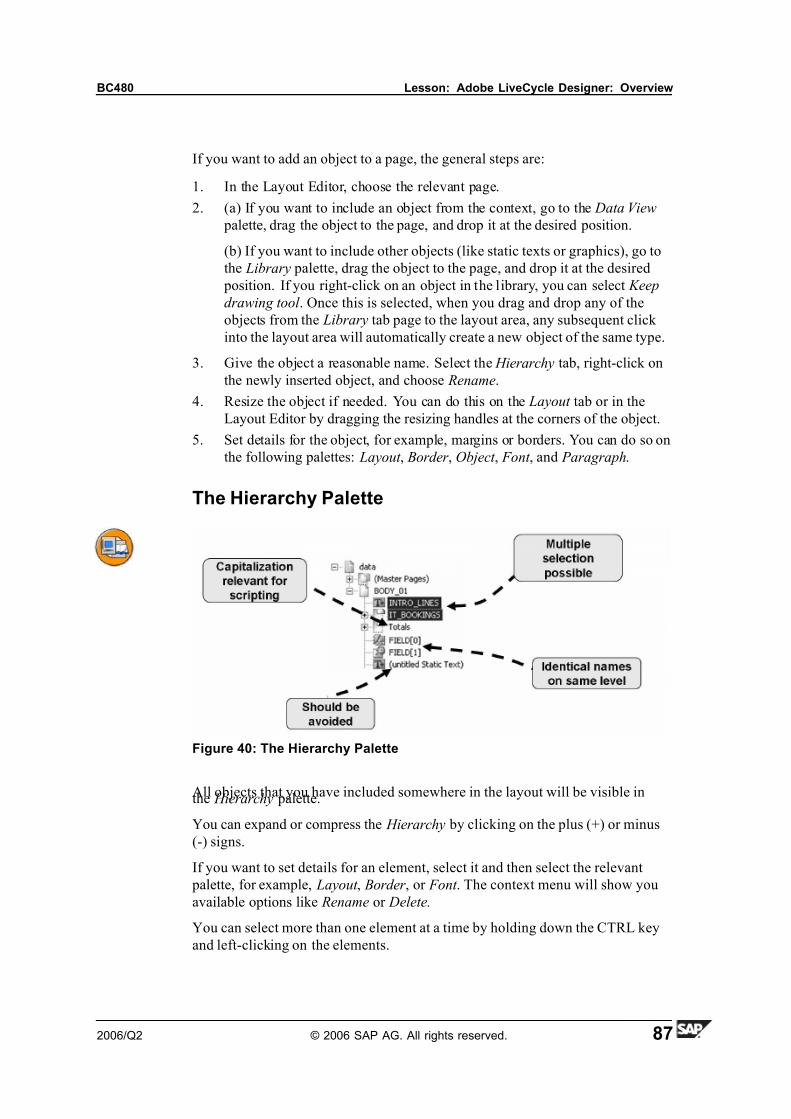
7/14/2019 BC480 - PDF-Based Print Forms
http://slidepdf.com/reader/full/bc480-pdf-based-print-forms 95/317
BC480 Lesson: Adobe LiveCycle Designer: Overview
If you want to add an object to a page, the general steps are:
1. In the Layout Editor, choose the relevant page.
2. (a) If you want to include an object from the context, go to the Data View
palette, drag the object to the page, and drop it at the desired position.
(b) If you want to include other objects (like static texts or graphics), go to
the Library palette, drag the object to the page, and drop it at the desired
position. If you right-click on an object in the library, you can select Keep
drawing tool . Once this is selected, when you drag and drop any of the
objects from the Library tab page to the layout area, any subsequent click
into the layout area will automatically create a new object of the same type.
3. Give the object a reasonable name. Select the Hierarchy tab, right-click on
the newly inserted object, and choose Rename.
4. Resize the object if needed. You can do this on the Layout tab or in the
Layout Editor by dragging the resizing handles at the corners of the object.
5. Set details for the object, for example, margins or borders. You can do so on
the following palettes: Layout , Border , Object , Font , and Paragraph.
The Hierarchy Palette
Figure 40: The Hierarchy Palette
All objects that you have included somewhere in the layout will be visible inthe Hierarchy palette.
You can expand or compress the Hierarchy by clicking on the plus (+) or minus
(-) signs.
If you want to set details for an element, select it and then select the relevant
palette, for example, Layout , Border , or Font . The context menu will show you
available options like Rename or Delete.
You can select more than one element at a time by holding down the CTRL key
and left-clicking on the elements.
2006/Q2 © 2006 SAP AG. All rights reserved. 87
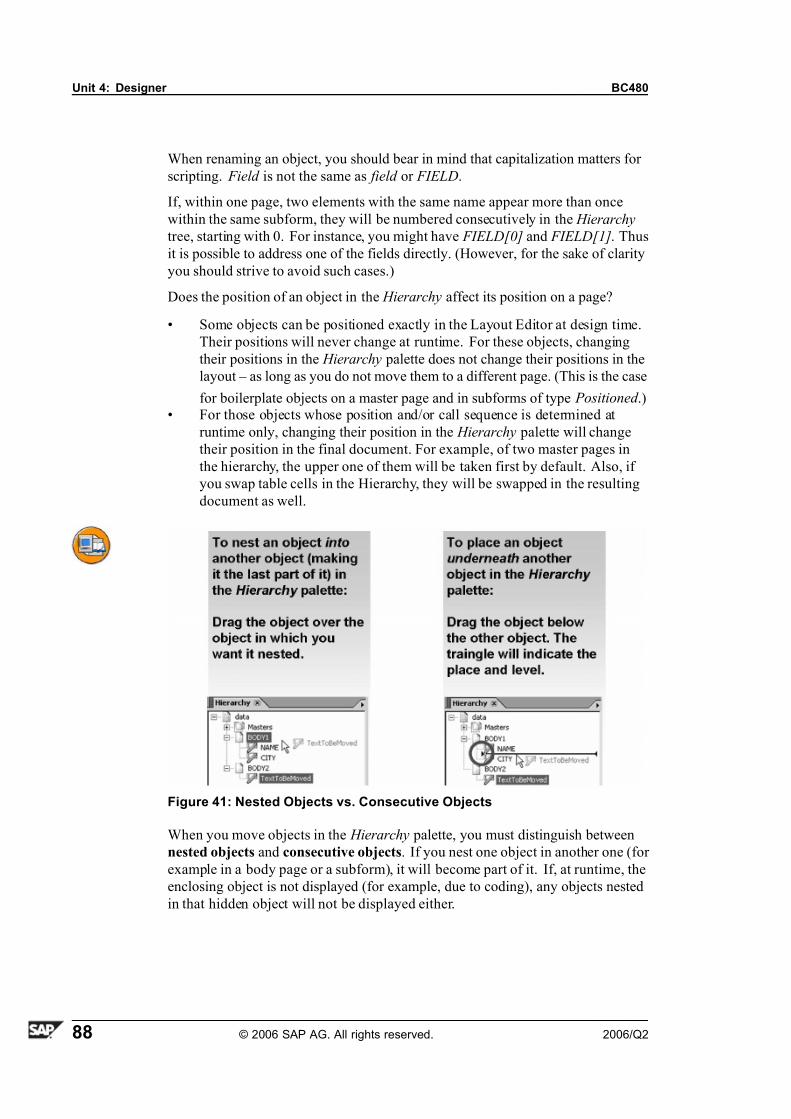
7/14/2019 BC480 - PDF-Based Print Forms
http://slidepdf.com/reader/full/bc480-pdf-based-print-forms 96/317
Unit 4: Designer BC480
When renaming an object, you should bear in mind that capitalization matters for
scripting. Field is not the same as field or FIELD.
If, within one page, two elements with the same name appear more than once
within the same subform, they will be numbered consecutively in the Hierarchy
tree, starting with 0. For instance, you might have FIELD[0] and FIELD[1]. Thus
it is possible to address one of the fields directly. (However, for the sake of clarity
you should strive to avoid such cases.)
Does the position of an object in the Hierarchy affect its position on a page?
• Some objects can be positioned exactly in the Layout Editor at design time.
Their positions will never change at runtime. For these objects, changing
their positions in the Hierarchy palette does not change their positions in the
layout – as long as you do not move them to a different page. (This is the case
for boilerplate objects on a master page and in subforms of type Positioned .)• For those objects whose position and/or call sequence is determined at
runtime only, changing their position in the Hierarchy palette will change
their position in the final document. For example, of two master pages in
the hierarchy, the upper one of them will be taken first by default. Also, if
you swap table cells in the Hierarchy, they will be swapped in the resulting
document as well.
Figure 41: Nested Objects vs. Consecutive Objects
When you move objects in the Hierarchy palette, you must distinguish between
nested objects and consecutive objects. If you nest one object in another one (for
example in a body page or a subform), it will become part of it. If, at runtime, the
enclosing object is not displayed (for example, due to coding), any objects nested
in that hidden object will not be displayed either.
88 © 2006 SAP AG. All rights reserved. 2006/Q2
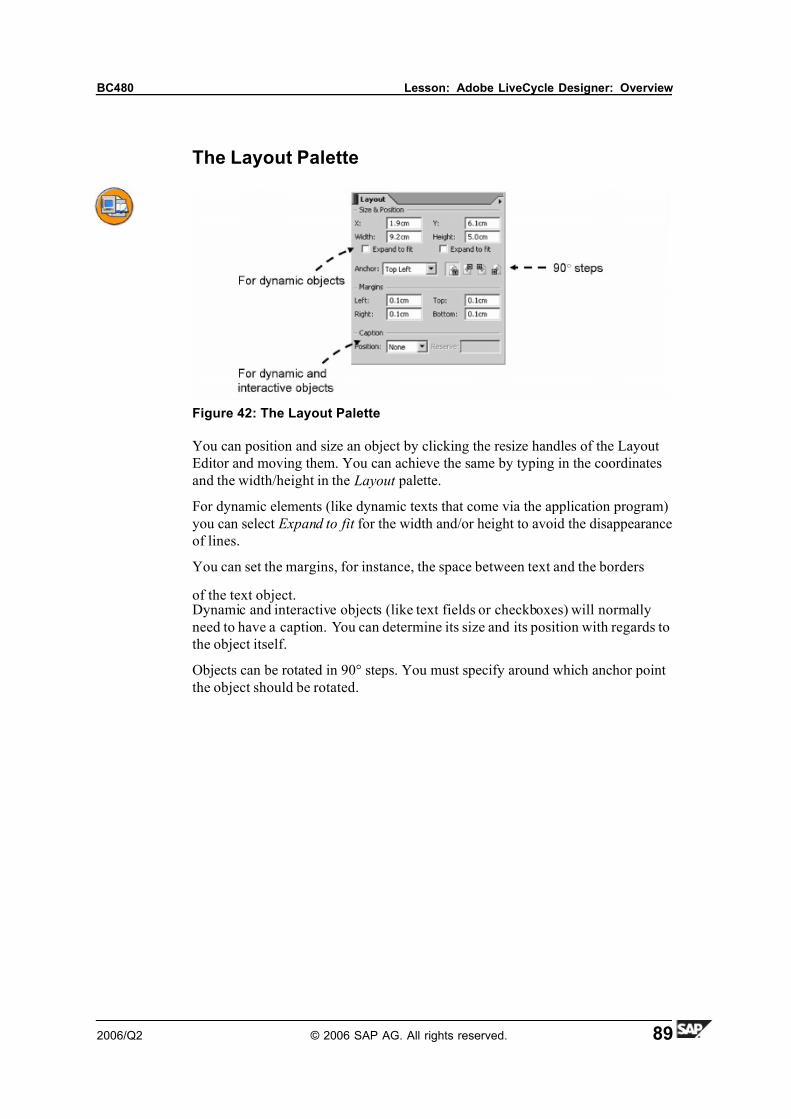
7/14/2019 BC480 - PDF-Based Print Forms
http://slidepdf.com/reader/full/bc480-pdf-based-print-forms 97/317
BC480 Lesson: Adobe LiveCycle Designer: Overview
The Layout Palette
Figure 42: The Layout Palette
You can position and size an object by clicking the resize handles of the Layout
Editor and moving them. You can achieve the same by typing in the coordinates
and the width/height in the Layout palette.
For dynamic elements (like dynamic texts that come via the application program)
you can select Expand to fit for the width and/or height to avoid the disappearance
of lines.
You can set the margins, for instance, the space between text and the borders
of the text object.Dynamic and interactive objects (like text fields or checkboxes) will normally
need to have a caption. You can determine its size and its position with regards to
the object itself.
Objects can be rotated in 90° steps. You must specify around which anchor point
the object should be rotated.
2006/Q2 © 2006 SAP AG. All rights reserved. 89

7/14/2019 BC480 - PDF-Based Print Forms
http://slidepdf.com/reader/full/bc480-pdf-based-print-forms 98/317
Unit 4: Designer BC480
The Border Palette
Figure 43: Borders and Background Colors
On the Border palette, you can determine edges and/or background fills.
Edges can be edited together or individually.
For a background fill, you can choose between none, solid (one color) and various
patterns for two colors.
For objects that are non-static (like a text field), you can also specify the border
properties of the fillable areas. For example, you might choose to have a
background color for a text field that differs from its caption color. To achieve
this, select the object. In the Object palette, choose the Field tab. From the
Appearance list, select Custom.
90 © 2006 SAP AG. All rights reserved. 2006/Q2
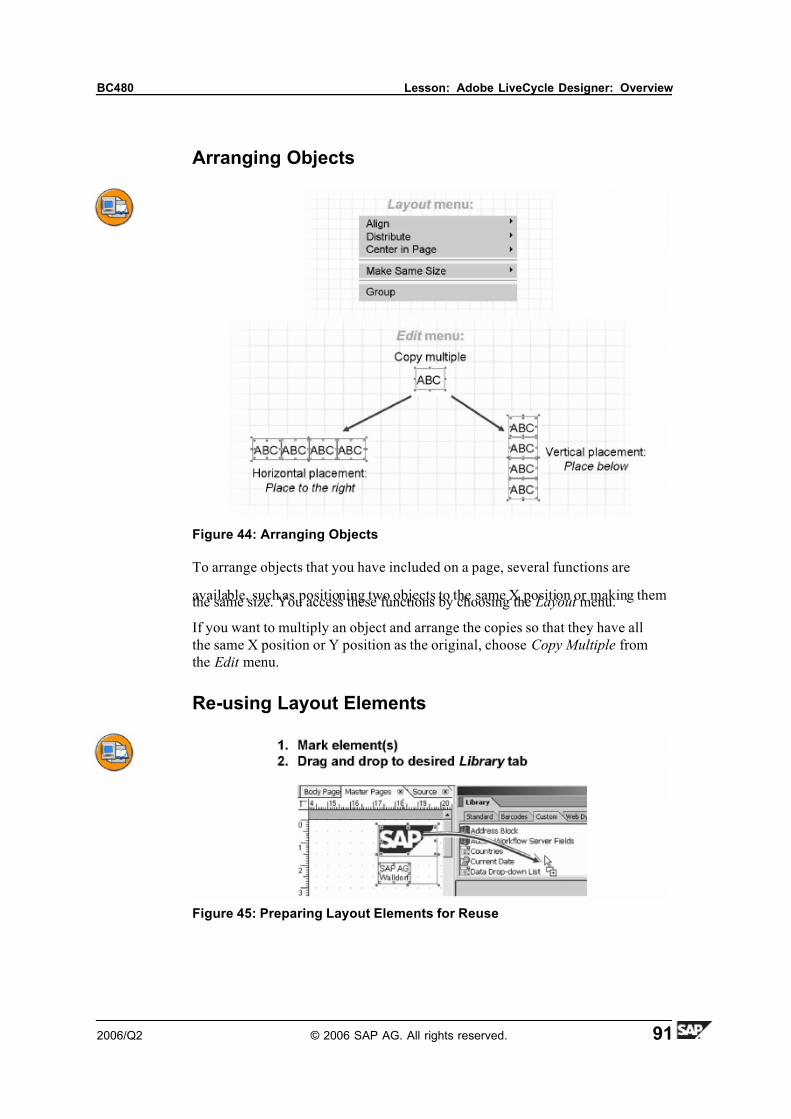
7/14/2019 BC480 - PDF-Based Print Forms
http://slidepdf.com/reader/full/bc480-pdf-based-print-forms 99/317
BC480 Lesson: Adobe LiveCycle Designer: Overview
Arranging Objects
Figure 44: Arranging Objects
To arrange objects that you have included on a page, several functions are
available, such as positioning two objects to the same X position or making themthe same size. You access these functions by choosing the Layout menu.
If you want to multiply an object and arrange the copies so that they have all
the same X position or Y position as the original, choose Copy Multiple from
the Edit menu.
Re-using Layout Elements
Figure 45: Preparing Layout Elements for Reuse
2006/Q2 © 2006 SAP AG. All rights reserved. 91
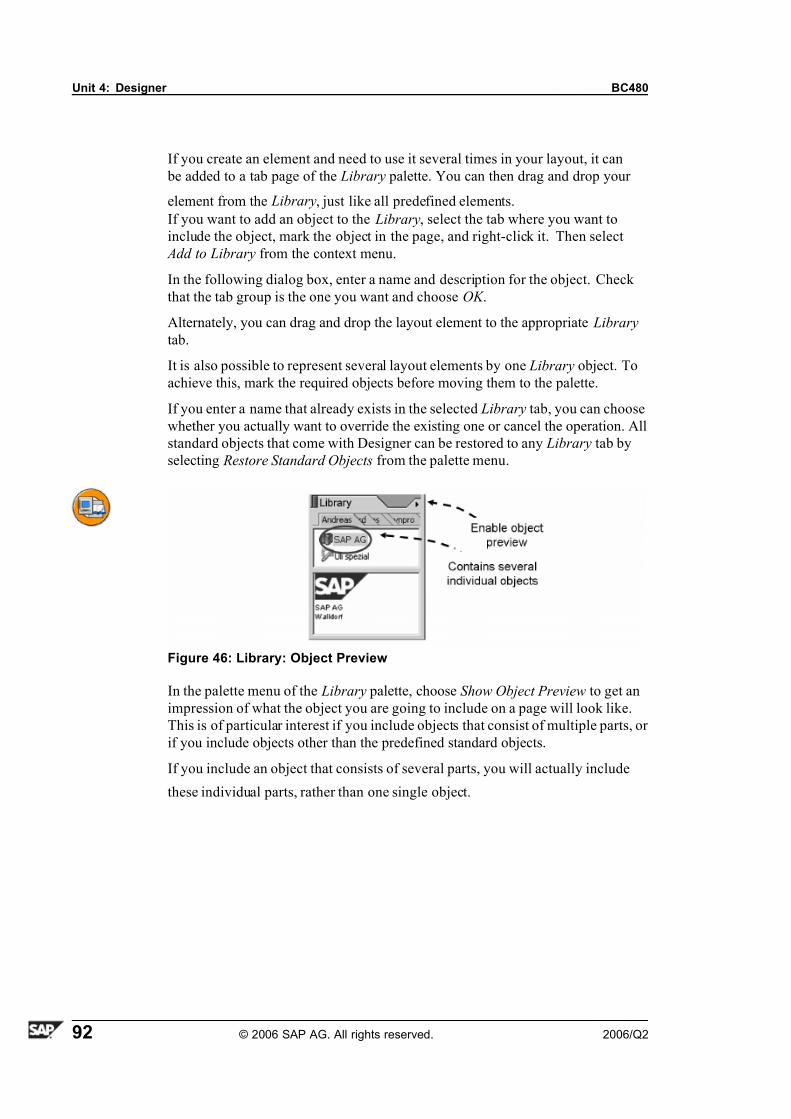
7/14/2019 BC480 - PDF-Based Print Forms
http://slidepdf.com/reader/full/bc480-pdf-based-print-forms 100/317
Unit 4: Designer BC480
If you create an element and need to use it several times in your layout, it can
be added to a tab page of the Library palette. You can then drag and drop your
element from the Library, just like all predefined elements.
If you want to add an object to the Library, select the tab where you want to
include the object, mark the object in the page, and right-click it. Then select
Add to Library from the context menu.
In the following dialog box, enter a name and description for the object. Check
that the tab group is the one you want and choose OK .
Alternately, you can drag and drop the layout element to the appropriate Library
tab.
It is also possible to represent several layout elements by one Library object. To
achieve this, mark the required objects before moving them to the palette.
If you enter a name that already exists in the selected Library tab, you can choose
whether you actually want to override the existing one or cancel the operation. All
standard objects that come with Designer can be restored to any Library tab by
selecting Restore Standard Objects from the palette menu.
Figure 46: Library: Object Preview
In the palette menu of the Library palette, choose Show Object Preview to get an
impression of what the object you are going to include on a page will look like.
This is of particular interest if you include objects that consist of multiple parts, or
if you include objects other than the predefined standard objects.
If you include an object that consists of several parts, you will actually include
these individual parts, rather than one single object.
92 © 2006 SAP AG. All rights reserved. 2006/Q2
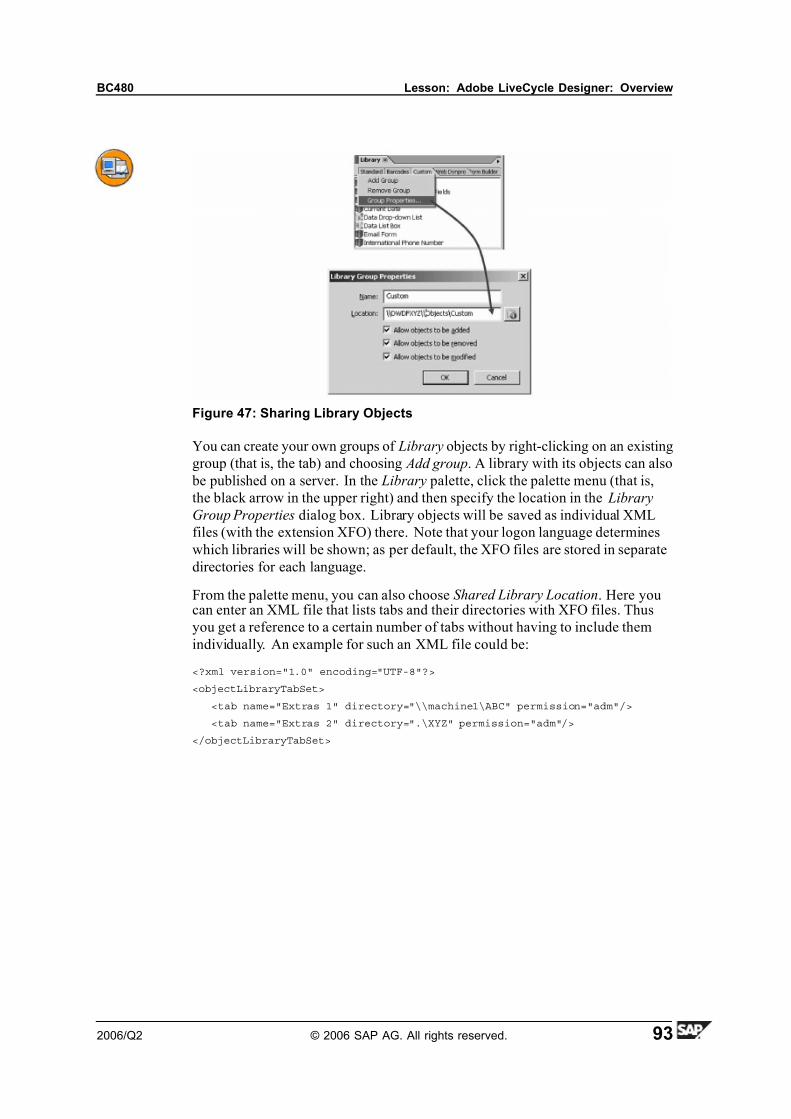
7/14/2019 BC480 - PDF-Based Print Forms
http://slidepdf.com/reader/full/bc480-pdf-based-print-forms 101/317
BC480 Lesson: Adobe LiveCycle Designer: Overview
Figure 47: Sharing Library Objects
You can create your own groups of Library objects by right-clicking on an existing
group (that is, the tab) and choosing Add group. A library with its objects can also
be published on a server. In the Library palette, click the palette menu (that is,
the black arrow in the upper right) and then specify the location in the Library
Group Properties dialog box. Library objects will be saved as individual XML
files (with the extension XFO) there. Note that your logon language determines
which libraries will be shown; as per default, the XFO files are stored in separate
directories for each language.
From the palette menu, you can also choose Shared Library Location. Here youcan enter an XML file that lists tabs and their directories with XFO files. Thus
you get a reference to a certain number of tabs without having to include them
individually. An example for such an XML file could be:
<?xml version="1.0" encoding="UTF-8"?>
<objectLibraryTabSet>
<tab name="Extras 1" directory="\\machine1\ABC" permission="adm"/>
<tab name="Extras 2" directory=".\XYZ" permission="adm"/>
</objectLibraryTabSet>
2006/Q2 © 2006 SAP AG. All rights reserved. 93
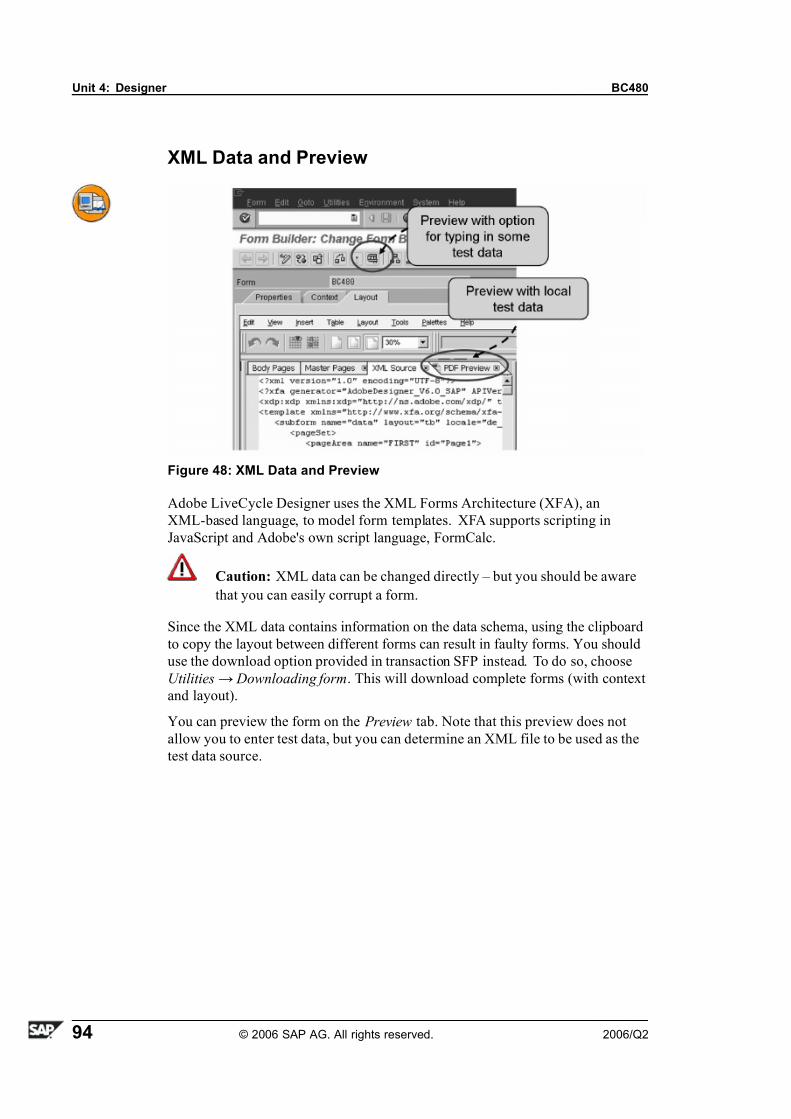
7/14/2019 BC480 - PDF-Based Print Forms
http://slidepdf.com/reader/full/bc480-pdf-based-print-forms 102/317
Unit 4: Designer BC480
XML Data and Preview
Figure 48: XML Data and Preview
Adobe LiveCycle Designer uses the XML Forms Architecture (XFA), an
XML-based language, to model form templates. XFA supports scripting in
JavaScript and Adobe's own script language, FormCalc.
Caution: XML data can be changed directly – but you should be aware
that you can easily corrupt a form.
Since the XML data contains information on the data schema, using the clipboard
to copy the layout between different forms can result in faulty forms. You should
use the download option provided in transaction SFP instead. To do so, choose
Utilities→ Downloading form. This will download complete forms (with context
and layout).
You can preview the form on the Preview tab. Note that this preview does not
allow you to enter test data, but you can determine an XML file to be used as the
test data source.
94 © 2006 SAP AG. All rights reserved. 2006/Q2
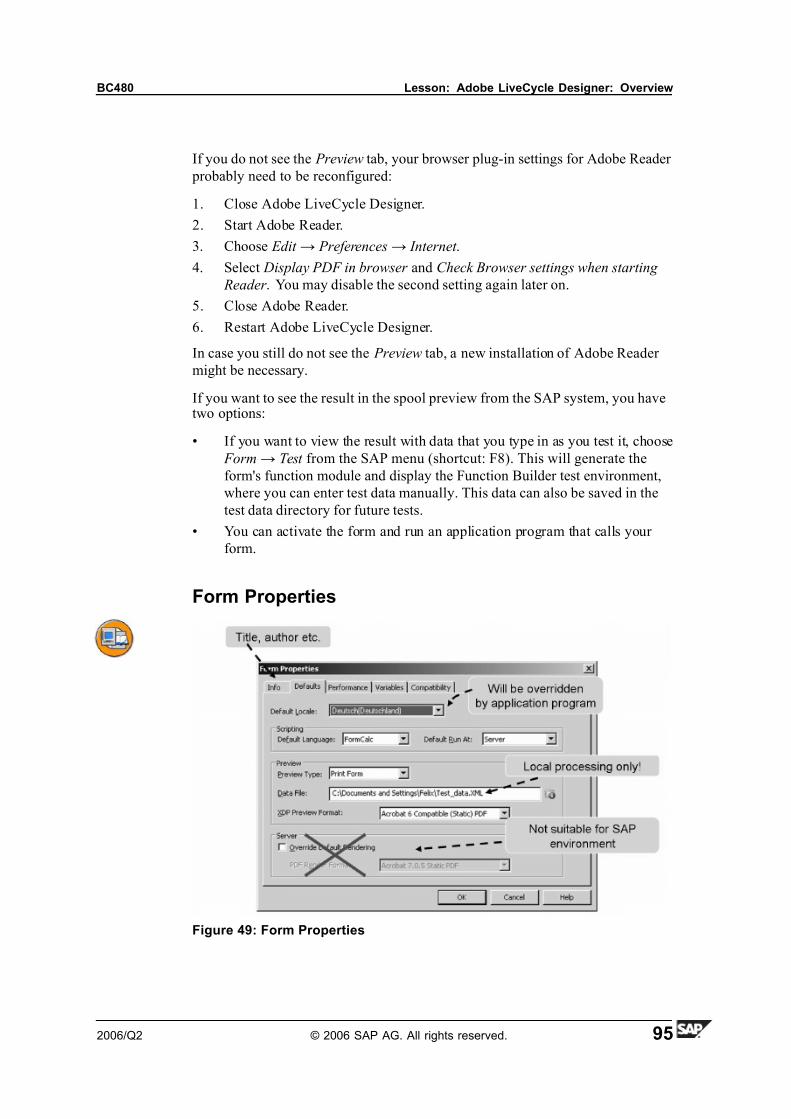
7/14/2019 BC480 - PDF-Based Print Forms
http://slidepdf.com/reader/full/bc480-pdf-based-print-forms 103/317
BC480 Lesson: Adobe LiveCycle Designer: Overview
If you do not see the Preview tab, your browser plug-in settings for Adobe Reader
probably need to be reconfigured:
1. Close Adobe LiveCycle Designer.
2. Start Adobe Reader.
3. Choose Edit → Preferences→ Internet .
4. Select Display PDF in browser and Check Browser settings when starting
Reader . You may disable the second setting again later on.
5. Close Adobe Reader.
6. Restart Adobe LiveCycle Designer.
In case you still do not see the Preview tab, a new installation of Adobe Reader
might be necessary.
If you want to see the result in the spool preview from the SAP system, you havetwo options:
• If you want to view the result with data that you type in as you test it, choose
Form→ Test from the SAP menu (shortcut: F8). This will generate the
form's function module and display the Function Builder test environment,
where you can enter test data manually. This data can also be saved in the
test data directory for future tests.
• You can activate the form and run an application program that calls your
form.
Form Properties
Figure 49: Form Properties
2006/Q2 © 2006 SAP AG. All rights reserved. 95
7/14/2019 BC480 - PDF-Based Print Forms
http://slidepdf.com/reader/full/bc480-pdf-based-print-forms 104/317
Unit 4: Designer BC480
When you start designing your form, you might want to begin with setting the
form properties (however, you could also do it any time, as the form properties do
not interfere with the layout). To set the form properties, choose Edit → Form properties from Designer's menu.
A locale is a combination of a language and country, for example English and
United Kingdom. For a PDF-based form in an SAP application, you would
typically set the locale dynamically in the ABAP program. However, for testing
purposes you should choose a locale for your form.
A locale that you set will have implications on the time and date formats and on
decimals formats.
All data retrieval for the form must be done with ABAP coding, either (most
typically) in the application program, or within coding in the interface. However,
you can also use scripting for calculations within the form. This scripting will beexecuted at runtime, triggered by Adobe document services. For this scripting,
two programming languages are available: JavaScript (preferable for interactive
scenarios) and Adobe's FormCalc (preferable for printing scenarios). In the form
properties, you can set one of these two scripting languages as the default, but it
is possible to change this for individual scriptings.
The preview type affects Designer's preview only, not SAP spool's preview, which
is always non-interactive (unless, in the ABAP program, you set the fillable
parameter of function module FP_JOB_OPEN to X or N).
The setting Override Default Rendering is not for the use of LiveCycle Designer
within an SAP environment.
Entering a data file for the preview makes sense if you want to test your form with
some data but you don't want to activate the form or type in the data every time.
A file that you enter here will be used by Designer's preview. Be aware that this
testing is done locally, that is, without invoking Adobe document services. Fonts
might look different from what they will look like in a preview or printout when
rendered by Adobe document services. Also, you might or might not have access
to files or URLs that you will or will not have in a real scenario.
Local Test Data File
<data>
<IS_CUSTOMER>
<MANDT>800</MANDT>
<NAME>Rahn</NAME>
<FORM>Frau</FORM>
<STREET>NG Road 1</STREET>
<POSTBOX/>
<CITY>Walldorf</CITY>
</IS_CUSTOMER>
96 © 2006 SAP AG. All rights reserved. 2006/Q2
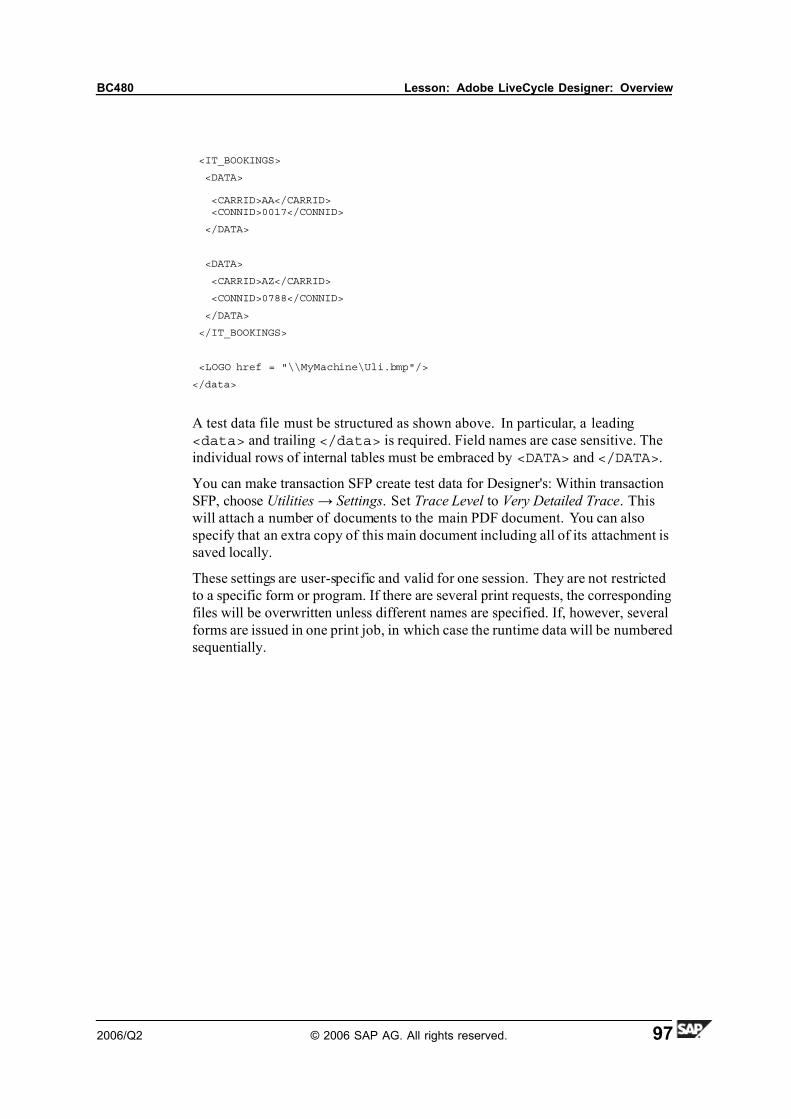
7/14/2019 BC480 - PDF-Based Print Forms
http://slidepdf.com/reader/full/bc480-pdf-based-print-forms 105/317
BC480 Lesson: Adobe LiveCycle Designer: Overview
<IT_BOOKINGS>
<DATA>
<CARRID>AA</CARRID><CONNID>0017</CONNID>
</DATA>
<DATA>
<CARRID>AZ</CARRID>
<CONNID>0788</CONNID>
</DATA>
</IT_BOOKINGS>
<LOGO href = "\\MyMachine\Uli.bmp"/>
</data>
A test data file must be structured as shown above. In particular, a leading
<data> and trailing </data> is required. Field names are case sensitive. The
individual rows of internal tables must be embraced by <DATA> and </DATA>.
You can make transaction SFP create test data for Designer's: Within transaction
SFP, choose Utilities→ Settings. Set Trace Level to Very Detailed Trace. This
will attach a number of documents to the main PDF document. You can also
specify that an extra copy of this main document including all of its attachment is
saved locally.
These settings are user-specific and valid for one session. They are not restricted
to a specific form or program. If there are several print requests, the corresponding
files will be overwritten unless different names are specified. If, however, several
forms are issued in one print job, in which case the runtime data will be numbered
sequentially.
2006/Q2 © 2006 SAP AG. All rights reserved. 97

7/14/2019 BC480 - PDF-Based Print Forms
http://slidepdf.com/reader/full/bc480-pdf-based-print-forms 106/317
Unit 4: Designer BC480
Figure 50: Creating Test Data Automatically
For the download and trace functionality, the user must have authorization for
debugging. During background processing, only Very Detailed Trace works.
With Web Application Server 6.40, at least Support Package 10, proceed as
follows: Within transaction SFP, choose Utilities→ Settings. Check Save Runtime
Data and enter the destination file (preferably with extension XML). See SAP
Note 779319 for details.
98 © 2006 SAP AG. All rights reserved. 2006/Q2

7/14/2019 BC480 - PDF-Based Print Forms
http://slidepdf.com/reader/full/bc480-pdf-based-print-forms 107/317
BC480 Lesson: Adobe LiveCycle Designer: Overview
Exercise 3: Adobe LiveCycle Designer:
OverviewExercise Objectives
After completing this exercise, you will be able to:
• Add a simple layout to a form context
• Use various functionalities of Adobe LiveCycle Designer to include and
manipulate form objects
Business Example
A travel agency wants to print invoices for their customers' flight bookings usingthe tool “Interactive Forms”. The interface and the form context have been
designed already, but there is no form layout yet. The form designers first need to
get an overview of how Adobe LiveCycle Designer works.
Task 1:
Set up the workspace.
This exercise makes some suggestions on how to get to know Adobe LiveCycle
Designer. Basically, you should play around with the tool. Feel free to invent your
own tasks. Use your form, ZBC480_##, to integrate some dummy elements.
Note: At the end of the exercise, your form will not yet have a proper
layout.
1. Try out both the integrated and the full screen version of Designer
2. Display and hide the areas for the palette windows. Resize them.
3. Undock some palettes and move them away from their starting position.
4. Examine the menus of various palette menus.
5. Set centimeters (or inches, if you prefer) as the unit for the ruler.
Task 2:Integrate and manipulate layout elements.
1. Switch between body pages and master pages.
2. Integrate various kinds of layout elements into the form layout, using the
Data View and Library palettes. Include at least one static text.
3. Rename objects that you have integrated into the layout.
Continued on next page
2006/Q2 © 2006 SAP AG. All rights reserved. 99
7/14/2019 BC480 - PDF-Based Print Forms
http://slidepdf.com/reader/full/bc480-pdf-based-print-forms 108/317
Unit 4: Designer BC480
4. Move objects in the Hierarchy palette. Observe the difference between
nested and consecutive objects.
5. Change the content of a static text and set some details (for example, the
justification or the font).
6. Rotate a static text.
7. Change the background color and the border of a static text.
8. Copy a static text four times, so that all five texts are arranged horizontally.
9. Mark several elements at a time.
10. Undo some changes.
Task 3:Reuse elements (templates).
1. Create a new tab for the Library.
2. Add the rotated static text to the new tab.
3. Drag and drop the template object from your tab into the layout.
Task 4:
Use the XML view and test data.
1. Mark a text in the layout. Have a look at its XML representation. Carefully
(!) change its value (within the <value> </value> tags).
2. If in this class, you are working with a Windows Terminal Server, you
should find an XML test data file in the BC480 directory with suitable test
data. Its name: Test_data.xml. Locate this file with Windows Explorer and
have a look at its content.
If you cannot locate the file, or if you want to try to create it yourself, do
the following:
In the SFP settings, set the trace level to Very Detailed Trace. Once set,
every SAP program that creates a PDF document (with the help of Adobe
document services) will attach a number of files to the PDF, includingan XML file with an XML data stream. (These settings are valid for the
current session.) To create a test file suitable for your forms, run report
SAPBC480_DEMO for form BC480_FINAL.
3. Set the XML test data file provided or the newly created XML file as the test
data file of your form, ZBC480_##.
Continued on next page
100 © 2006 SAP AG. All rights reserved. 2006/Q2

7/14/2019 BC480 - PDF-Based Print Forms
http://slidepdf.com/reader/full/bc480-pdf-based-print-forms 109/317
BC480 Lesson: Adobe LiveCycle Designer: Overview
4. From the Data View, integrate at least one context field into the layout.
This field should also be in the XML file just created. Test your form in
Designer's preview. The field should be populated with data.
Task 5:
Set form properties.
1. Set English (US) as the Default Locale, FormCalc as the default scripting
language, Server as the default place for the execution of scripting, and Print
Form as the Preview Type.
2. From the Data View, integrate the field DATE into a page. Go to the PDF
preview of the Layout editor. If you now change the default locale to a
different country/language and rerun the PDF preview, the date format
should different.
2006/Q2 © 2006 SAP AG. All rights reserved. 101
7/14/2019 BC480 - PDF-Based Print Forms
http://slidepdf.com/reader/full/bc480-pdf-based-print-forms 110/317
Unit 4: Designer BC480
Solution 3: Adobe LiveCycle Designer:
OverviewTask 1:
Set up the workspace.
This exercise makes some suggestions on how to get to know Adobe LiveCycle
Designer. Basically, you should play around with the tool. Feel free to invent your
own tasks. Use your form, ZBC480_##, to integrate some dummy elements.
Note: At the end of the exercise, your form will not yet have a proper
layout.
1. Try out both the integrated and the full screen version of Designer
a) In transaction SFP, choose the Layout tab to get to the integrated view
of Designer.
b) For the full screen version, click on the Layout pushbutton in the SAP
GUI or press Ctrl-F12.
2. Display and hide the areas for the palette windows. Resize them.
a) Palette windows are to the left and the right side of the Layout Editor. In
the middle of each of the two borders, between the areas and the Layout
Editor, you will find a small vertical bar with a triangle. Click on it to
open or close an area for palette windows. Click on it (or anywhere onthe border) and drag it to the left or right side to resize the area.
3. Undock some palettes and move them away from their starting position.
a) Press the CTRL key, click on a palette or a palette bar (which is
typically blue, depending on your Windows settings), and drag it to a
new place.
4. Examine the menus of various palette menus.
a) Click on the small tritangle in the upper-right corner of the palette.
5. Set centimeters (or inches, if you prefer) as the unit for the ruler.
a) Locate the Drawing Aids palette. Choose the Palettes menu and select
Drawing Aids.
b) In the Grid and Ruler Settings, enter centimeters (or inches) as the unit.
Continued on next page
102 © 2006 SAP AG. All rights reserved. 2006/Q2
7/14/2019 BC480 - PDF-Based Print Forms
http://slidepdf.com/reader/full/bc480-pdf-based-print-forms 111/317
BC480 Lesson: Adobe LiveCycle Designer: Overview
Task 2:
Integrate and manipulate layout elements.
1. Switch between body pages and master pages.
a) If the Master Pages tab does not showat the top of the Layout Editor,
right click on the tab Body Pages and select Master Pages.
2. Integrate various kinds of layout elements into the form layout, using the
Data View and Library palettes. Include at least one static text.
a) Integrate the elements by dragging and dropping them to the layout.
b) Static texts can be found on the Standard tab of the Library palette.
3. Rename objects that you have integrated into the layout.
a) In the Hierarchy palette, set the cursor on the element. Press F2 and
enter a new name.
4. Move objects in the Hierarchy palette. Observe the difference between
nested and consecutive objects.
a) Click and drag the object with the left mouse button. You can nest
a text in a body page, and you can create two texts as consecutive
elements. Nesting one text into another is not possible.
5. Change the content of a static text and set some details (for example, the
justification or the font).
a) Static texts can be changed only in the Layout Editor. Set the cursor onthe element and type in your text. You can set the text justification on
the Paragraph palette and the font on the Font palette.
6. Rotate a static text.
a) The rotation of an object (for example, a static text) is achieved on the
Layout palette, in the Size & Position area. You can select the anchor
(fulcrum) and then set a rotation angle of 90 degrees, 180 degrees,
or 270 degrees.
7. Change the background color and the border of a static text.
a) Use the Border palette.8. Copy a static text four times, so that all five texts are arranged horizontally.
a) Choose Edit → Copy Multiple.
Continued on next page
2006/Q2 © 2006 SAP AG. All rights reserved. 103
7/14/2019 BC480 - PDF-Based Print Forms
http://slidepdf.com/reader/full/bc480-pdf-based-print-forms 112/317
Unit 4: Designer BC480
9. Mark several elements at a time.
a) Within the Hierarchy palette:
To mark random objects, press the CTRL key and click on the elements.
To mark an uninterrupted range of objects, set the cursor on the first
element, keep the SHIFT key pressed, and click on the last element.
b) Alternatively, within the Layout Editor, keep the left mouse button
pressed and draw a rectangle around the objects.
10. Undo some changes.
a) Press CTRL+Z. In some cases, you might have to unmark a marked
object first.
Task 3:
Reuse elements (templates).
1. Create a new tab for the Library.
a) Right-click on an existing tab (for example, Standard ) and choose Add
Group. Enter the name of the new tab in the next window.
2. Add the rotated static text to the new tab.
a) Mark the text in the Layout Editor and drag it over to the new tab in the
Library palette. Enter a suitable name and a description.
3. Drag and drop the template object from your tab into the layout.
a) Check that it is an exact copy of the original static text.
Task 4:
Use the XML view and test data.
1. Mark a text in the layout. Have a look at its XML representation. Carefully
(!) change its value (within the <value> </value> tags).
a) Set the cursor on the element. Go to Designer's XML tab in the Layout
Editor. If the XML tab does not show, right click on the tab Body Pages
and select XML.
You will find a tag similar to <drawname="StaticText1" y="70.00mm" x="120.50mm">,
which marks the beginning of the static text.
Some lines further down, you will find something similar to
<value><text>Static Text</text></value>.
Continued on next page
104 © 2006 SAP AG. All rights reserved. 2006/Q2
7/14/2019 BC480 - PDF-Based Print Forms
http://slidepdf.com/reader/full/bc480-pdf-based-print-forms 113/317
BC480 Lesson: Adobe LiveCycle Designer: Overview
2. If in this class, you are working with a Windows Terminal Server, you
should find an XML test data file in the BC480 directory with suitable test
data. Its name: Test_data.xml. Locate this file with Windows Explorer andhave a look at its content.
If you cannot locate the file, or if you want to try to create it yourself, do
the following:
In the SFP settings, set the trace level to Very Detailed Trace. Once set,
every SAP program that creates a PDF document (with the help of Adobe
document services) will attach a number of files to the PDF, including
an XML file with an XML data stream. (These settings are valid for the
current session.) To create a test file suitable for your forms, run report
SAPBC480_DEMO for form BC480_FINAL.
a) By double-clicking on the XML file in Windows Explorer, theassociated viewer will open.
b) To create your own XML test data, start transaction SFP.
c) Choose Utilities→ Settings.
d) Set the trace level to Very Detailed Trace
e) Start transaction SA38 to run report SAPBC480_DEMO. On the
selection screen of this report, enter the form BC480_FINAL. Execute
the report (press F8). The resulting PDF will be displayed in the SAP
GUI.
f) From Adobe reader (which is integrated into the SAP GUI), click onthe tab Attachments on the left-hand side. You will find a document
with the name XFD. Right click on it and choose Save Attachment .
Choose a suitable location where to save the file. Name it Mytest.XML
and press Save.
3. Set the XML test data file provided or the newly created XML file as the test
data file of your form, ZBC480_##.
a) In Designer, choose Edit → Form Properties, choose the Defaults tab
and the Data File field.
4. From the Data View, integrate at least one context field into the layout.
This field should also be in the XML file just created. Test your form inDesigner's preview. The field should be populated with data.
a) As the form BC480_FINAL has the same context fields as your form,
everything that you drag from the Data View of your form to the layout
will have a test file entry.
Continued on next page
2006/Q2 © 2006 SAP AG. All rights reserved. 105
7/14/2019 BC480 - PDF-Based Print Forms
http://slidepdf.com/reader/full/bc480-pdf-based-print-forms 114/317
Unit 4: Designer BC480
Task 5:
Set form properties.
1. Set English (US) as the Default Locale, FormCalc as the default scripting
language, Server as the default place for the execution of scripting, and Print
Form as the Preview Type.
a) Choose Edit → Form Properties.
2. From the Data View, integrate the field DATE into a page. Go to the PDF
preview of the Layout editor. If you now change the default locale to a
different country/language and rerun the PDF preview, the date format
should different.
a) See previous step.
106 © 2006 SAP AG. All rights reserved. 2006/Q2

7/14/2019 BC480 - PDF-Based Print Forms
http://slidepdf.com/reader/full/bc480-pdf-based-print-forms 115/317
BC480 Lesson: Adobe LiveCycle Designer: Overview
Lesson Summary
You should now be able to:• List the various functions of Adobe LiveCycle Designer
• Use Adobe LiveCycle Designer as a graphical tool for designing forms
• Create a simple form layout with various objects
2006/Q2 © 2006 SAP AG. All rights reserved. 107
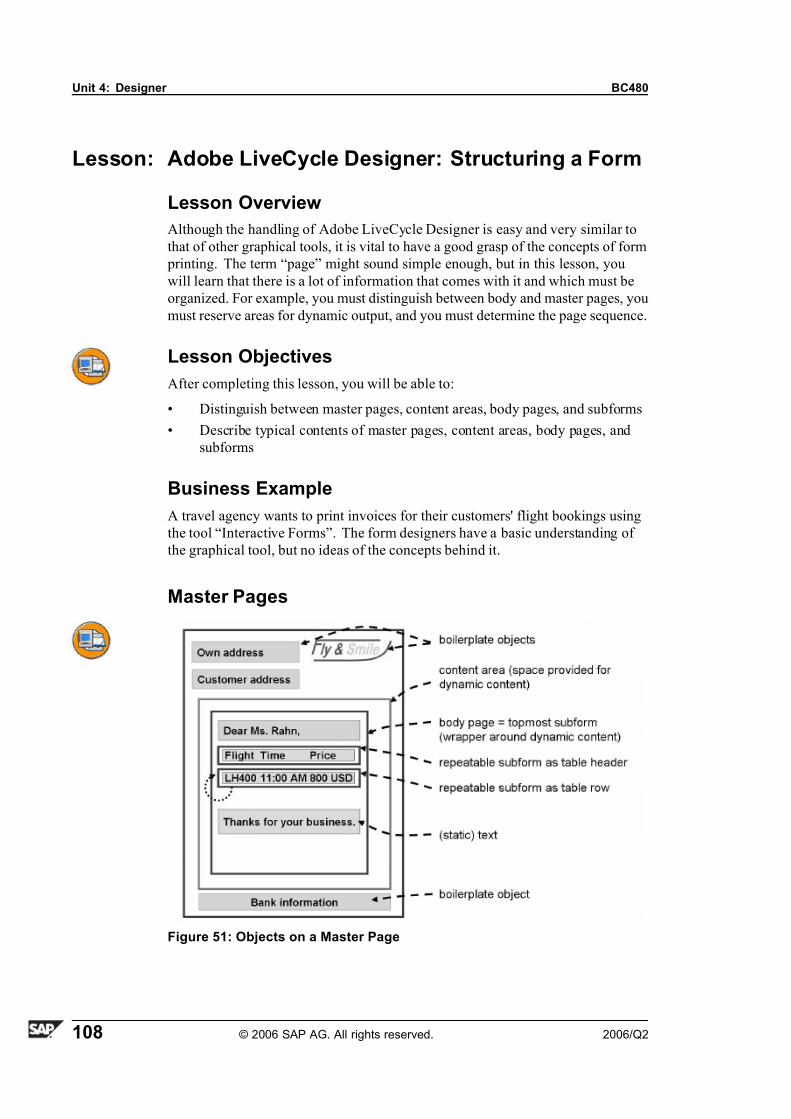
7/14/2019 BC480 - PDF-Based Print Forms
http://slidepdf.com/reader/full/bc480-pdf-based-print-forms 116/317
Unit 4: Designer BC480
Lesson: Adobe LiveCycle Designer: Structuring a Form
Lesson Overview
Although the handling of Adobe LiveCycle Designer is easy and very similar to
that of other graphical tools, it is vital to have a good grasp of the concepts of form
printing. The term “page” might sound simple enough, but in this lesson, you
will learn that there is a lot of information that comes with it and which must be
organized. For example, you must distinguish between body and master pages, you
must reserve areas for dynamic output, and you must determine the page sequence.
Lesson Objectives
After completing this lesson, you will be able to:
• Distinguish between master pages, content areas, body pages, and subforms
• Describe typical contents of master pages, content areas, body pages, and
subforms
Business Example
A travel agency wants to print invoices for their customers' flight bookings using
the tool “Interactive Forms”. The form designers have a basic understanding of
the graphical tool, but no ideas of the concepts behind it.
Master Pages
Figure 51: Objects on a Master Page
108 © 2006 SAP AG. All rights reserved. 2006/Q2

7/14/2019 BC480 - PDF-Based Print Forms
http://slidepdf.com/reader/full/bc480-pdf-based-print-forms 117/317
BC480 Lesson: Adobe LiveCycle Designer: Structuring a Form
Every form design contains at least one master page that Adobe LiveCycle
Designer creates automatically. You can put objects on a master page that will
appear on any resulting page at runtime, for example, your company logo. Suchobjects that never change are called boilerplate objects.
Everything that is on an (abstract) master page will reappear on every (concrete)
body page. To some extent, the boilerplate objects of a master page could be
compared to secondary windows in SAPscript or Smart Forms.
On a master page, you must include at least one content area. This defines the
size to be used for dynamic output. Content areas can be included only on master
pages.
Dynamic content is wrapped up in body pages. A body page will use the space
provided by a content area. If, at runtime, this happens not to be sufficient due to
a large amount of data, the body page will look for the next content area (whichmight involve an automatic page break).
You should think of a body page as nothing more than a wrapper or a container for
dynamic content. So you might have one single body page in a form with lots of
items at runtime; consequently, the printout would have many pages.
To some extent, the combination of a content area and a body page included there
could be compared to the main window in SAPscript or Smart Forms. (Note,
however, that this is only a very rough equivalent!)
For further organising body pages (or, though rarely, master pages), they can
contain subforms.
It is a good idea to always start out with the static part of a form: the master pages.
Figure 52: Inserting Several Master Pages
2006/Q2 © 2006 SAP AG. All rights reserved. 109
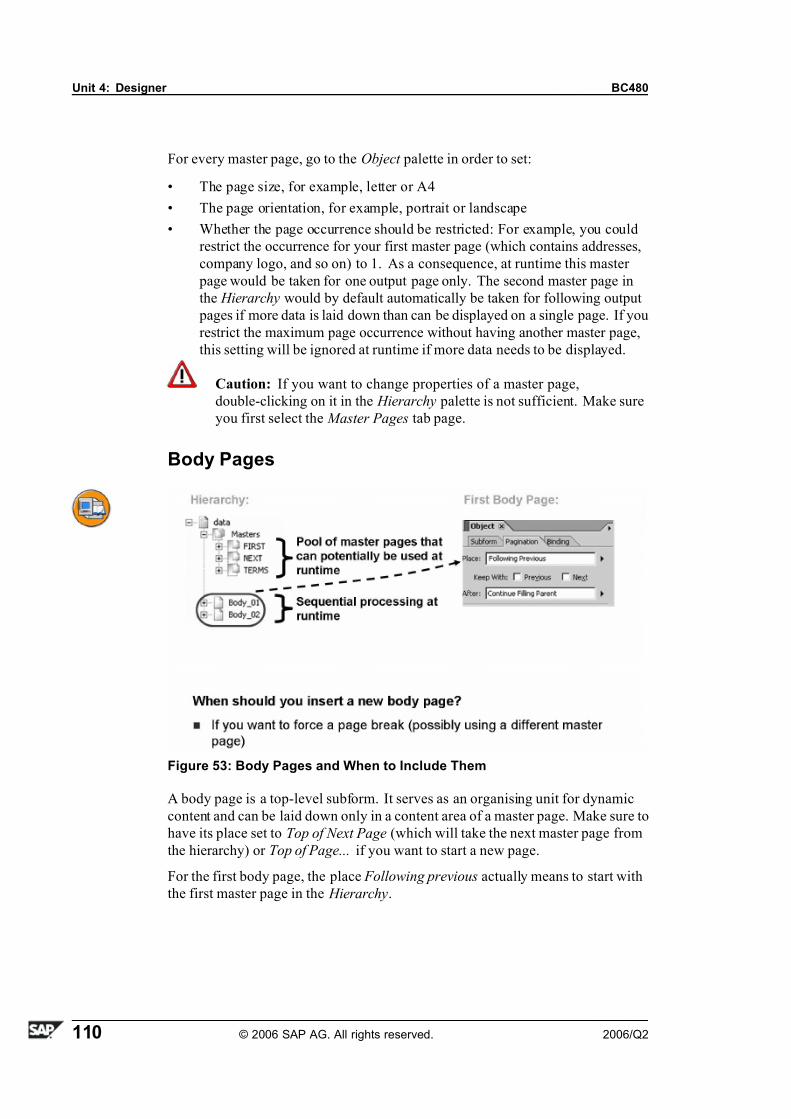
7/14/2019 BC480 - PDF-Based Print Forms
http://slidepdf.com/reader/full/bc480-pdf-based-print-forms 118/317
Unit 4: Designer BC480
For every master page, go to the Object palette in order to set:
• The page size, for example, letter or A4
• The page orientation, for example, portrait or landscape
• Whether the page occurrence should be restricted: For example, you could
restrict the occurrence for your first master page (which contains addresses,
company logo, and so on) to 1. As a consequence, at runtime this master
page would be taken for one output page only. The second master page in
the Hierarchy would by default automatically be taken for following output
pages if more data is laid down than can be displayed on a single page. If you
restrict the maximum page occurrence without having another master page,
this setting will be ignored at runtime if more data needs to be displayed.
Caution: If you want to change properties of a master page,
double-clicking on it in the Hierarchy palette is not sufficient. Make sure
you first select the Master Pages tab page.
Body Pages
Figure 53: Body Pages and When to Include Them
A body page is a top-level subform. It serves as an organising unit for dynamic
content and can be laid down only in a content area of a master page. Make sure to
have its place set to Top of Next Page (which will take the next master page from
the hierarchy) or Top of Page... if you want to start a new page.
For the first body page, the place Following previous actually means to start with
the first master page in the Hierarchy.
110 © 2006 SAP AG. All rights reserved. 2006/Q2
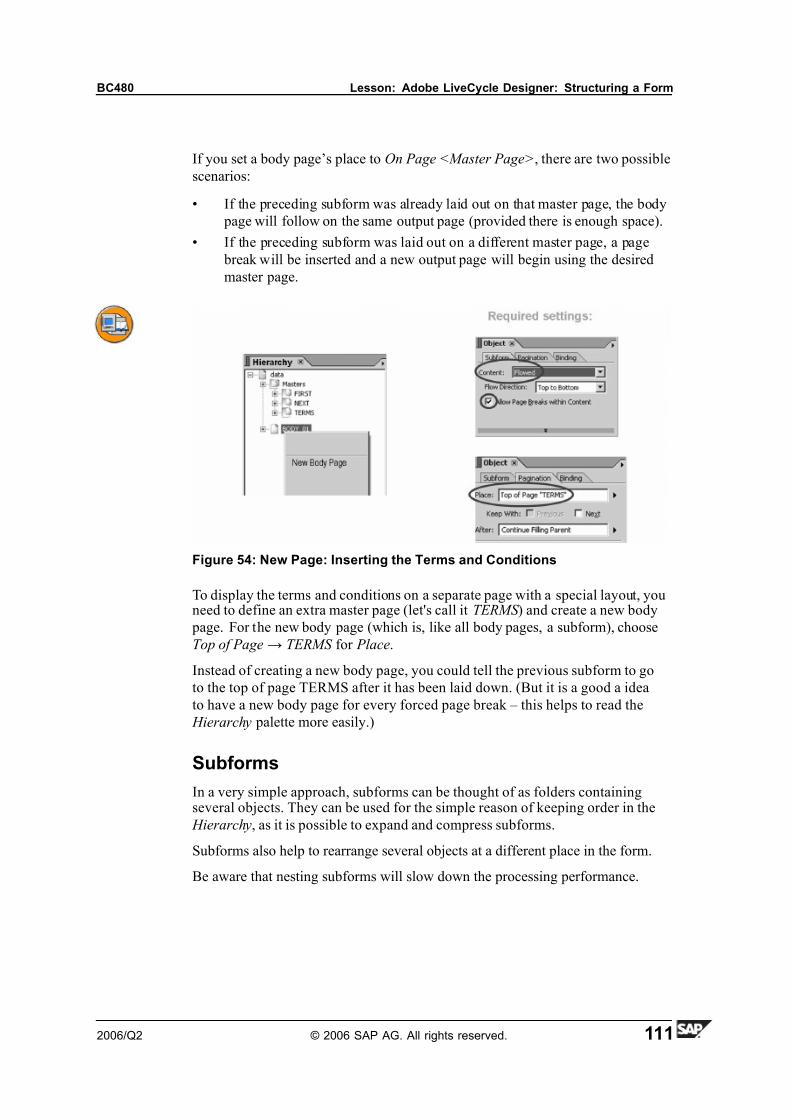
7/14/2019 BC480 - PDF-Based Print Forms
http://slidepdf.com/reader/full/bc480-pdf-based-print-forms 119/317
BC480 Lesson: Adobe LiveCycle Designer: Structuring a Form
If you set a body page’s place to On Page <Master Page>, there are two possible
scenarios:
• If the preceding subform was already laid out on that master page, the body
page will follow on the same output page (provided there is enough space).
• If the preceding subform was laid out on a different master page, a page
break will be inserted and a new output page will begin using the desired
master page.
Figure 54: New Page: Inserting the Terms and Conditions
To display the terms and conditions on a separate page with a special layout, youneed to define an extra master page (let's call it TERMS ) and create a new body
page. For the new body page (which is, like all body pages, a subform), choose
Top of Page→ TERMS for Place.
Instead of creating a new body page, you could tell the previous subform to go
to the top of page TERMS after it has been laid down. (But it is a good a idea
to have a new body page for every forced page break – this helps to read the
Hierarchy palette more easily.)
Subforms
In a very simple approach, subforms can be thought of as folders containingseveral objects. They can be used for the simple reason of keeping order in the
Hierarchy, as it is possible to expand and compress subforms.
Subforms also help to rearrange several objects at a different place in the form.
Be aware that nesting subforms will slow down the processing performance.
2006/Q2 © 2006 SAP AG. All rights reserved. 111

7/14/2019 BC480 - PDF-Based Print Forms
http://slidepdf.com/reader/full/bc480-pdf-based-print-forms 120/317
Unit 4: Designer BC480
Figure 55: When to Include Subforms
There are two types of subforms:
• If of type Positioned , objects of subforms can be laid down at their exact
position at runtime, relative to the subform. For example, if a text field has
been positioned at the top left corner of a subform of type Positioned , it will
always be positioned at the top left corner of the subform, independent where
on a page this subform is included. (The Hierarchy position of an object
within a subform of type Positioned is irrelevant for its layout position.)
• If of type Flowed , the objects will follow each other, depending on the space
they require at runtime. A body page (as the topmost subform) is typically
of this type.
Figure 56: Types of Subforms
112 © 2006 SAP AG. All rights reserved. 2006/Q2

7/14/2019 BC480 - PDF-Based Print Forms
http://slidepdf.com/reader/full/bc480-pdf-based-print-forms 121/317
BC480 Lesson: Adobe LiveCycle Designer: Structuring a Form
Figure 57: Preventing Page Breaks
If you want to make sure that certain objects appear on one page, proceed asfollows:
1. Mark the objects.
2. In the Hierarchy, choose Wrap in subform from the context menu.
3. Disallow a page break for this subform. You do this on the Object palette,
Subform tab. Deselect Allow Page Breaks within Content .
This option is not available on a master page or if the subform itself is included in
another subform of type Positioned .
You can also prevent a page break between several subsequent subforms. On the
Object palette, Pagination tab, select Keep w/ith Previous and/or Keep with Next .
• Keep with Previous: Keeps the subform on the same page as the previous
subform, content area, or body page, depending on which one is selected
in the Place box.
• Keep with Next : Keeps the subform on the same page as the next subform,
content area, or body page, depending on which one is selected in the Place
box.
2006/Q2 © 2006 SAP AG. All rights reserved. 113

7/14/2019 BC480 - PDF-Based Print Forms
http://slidepdf.com/reader/full/bc480-pdf-based-print-forms 122/317
Unit 4: Designer BC480
Some hints that might help to create readable forms:
• Even though you could have no body pages at all and manage everything
from master pages, it is strongly recommended not to do so.
• You should not nest a subform B in subform A if you want B to be on a
different master page. If you do, the hierarchy tends to become unreadable.
• Although it is possible to select Go to Next Page or Go to Page... in the
After field of an ordinary subform, for the sake of clarity you should not, as
you would essentially force a page break. If you need a page break, you
should create a new body page (which is also a subform), as this will make
the hierarchy easier to understand.
• Keep with Previous or Keep with Next (to prevent a page break between
two subforms) does not make sense for body pages. It should be used for
normal subforms only.
114 © 2006 SAP AG. All rights reserved. 2006/Q2
7/14/2019 BC480 - PDF-Based Print Forms
http://slidepdf.com/reader/full/bc480-pdf-based-print-forms 123/317
BC480 Lesson: Adobe LiveCycle Designer: Structuring a Form
Exercise 4: Adobe LiveCycle Designer:
Structuring a FormExercise Objectives
After completing this exercise, you will be able to:
• Create master pages and include elements on them
• Create body pages and use master pages
• Set different flow directions for the body pages
Business Example
A travel agency wants to print invoices for their customers' flight bookings usingthe tool “Interactive Forms”. The interface and the form context have been
designed already, but there is no form layout yet. The first step for the form
designers will be to create the structure of the form, namely the master pages
and body pages.
Task 1:
Prepare the form for further enhancements.
Continue to work with your own form, ZBC480_##. ## stands for your two-digit
group number (monitor number).
It might be a good idea to create a local safety copy of the form every now andthen by choosing Utilities→ Downloading form.
If you have not finished one of the previous exercises, you can copy the template
form BC480_CONTEXT_ONLY.
The reference solution of this exercise is form BC480_STRUCTURE.
1. Remove everything from your form layout except the bare minimum: one
master page with its content area.
Task 2:
Define master pages.
Your form should have three master pages.
1. FIRST: page size A4; orientation: vertical.
Make sure FIRST is used only once per form. The content area on this page
should cover approximately two thirds of the page so that there is enough
space for the address fields above and for the bank details below.
2. NEXT: page size A4; orientation: vertical.
Continued on next page
2006/Q2 © 2006 SAP AG. All rights reserved. 115
7/14/2019 BC480 - PDF-Based Print Forms
http://slidepdf.com/reader/full/bc480-pdf-based-print-forms 124/317
Unit 4: Designer BC480
NEXT should be processed as many times as needed.
3. TERMS: page size A4; orientation: horizontal.
Task 3:
Define body pages.
Make sure your form has two body pages.
1. Call the first one BODY_01. Define Following Previous as its place.
2. Call the second body page BODY_TERMS. Define Top of Page TERMS as
its place. Make sure it fits into the content area of the master page.
Task 4:
Explore subform types.
1. Try out both subform types for BODY_01. Integrate dummy elements (for
example, static texts) and observe how their placements change.
2. In the end, select Flowed for BODY_01, Flow Direction = Top to Bottom.
Delete all elements that you have included in the body page.
Task 5:
Test the result.
1. Activate the form and then test it by running report SAPBC480_DEMO. Youshould get two empty pages: one in portrait and one in landscape orientation.
116 © 2006 SAP AG. All rights reserved. 2006/Q2
7/14/2019 BC480 - PDF-Based Print Forms
http://slidepdf.com/reader/full/bc480-pdf-based-print-forms 125/317
BC480 Lesson: Adobe LiveCycle Designer: Structuring a Form
Solution 4: Adobe LiveCycle Designer:
Structuring a FormTask 1:
Prepare the form for further enhancements.
Continue to work with your own form, ZBC480_##. ## stands for your two-digit
group number (monitor number).
It might be a good idea to create a local safety copy of the form every now and
then by choosing Utilities→ Downloading form.
If you have not finished one of the previous exercises, you can copy the template
form BC480_CONTEXT_ONLY.
The reference solution of this exercise is form BC480_STRUCTURE.
1. Remove everything from your form layout except the bare minimum: one
master page with its content area.
a) The easiest way to reduce the form layout to the minimum is to go
to the Hierarchy palette and remove everything but one master page
with its content area.
Task 2:
Define master pages.
Your form should have three master pages.
1. FIRST: page size A4; orientation: vertical.
Make sure FIRST is used only once per form. The content area on this page
should cover approximately two thirds of the page so that there is enough
space for the address fields above and for the bank details below.
a) Go to the Hierarchy palette and set the cursor on the master page.
Press F2 to rename it.
b) Go to the Object palette and select the page size and orientation. Also,
select the Restrict Page Occurrence option and set Max Count to 1.
c) In the Layout Editor, select the Master Pages tab. Resize the content
area by clicking and dragging its upper and lower borders to suitable
heights.
2. NEXT: page size A4; orientation: vertical.
Continued on next page
2006/Q2 © 2006 SAP AG. All rights reserved. 117
7/14/2019 BC480 - PDF-Based Print Forms
http://slidepdf.com/reader/full/bc480-pdf-based-print-forms 126/317
Unit 4: Designer BC480
NEXT should be processed as many times as needed.
a) Go to the Hierarchy palette and set the cursor on the master page
FIRST. Right-click on it and choose Insert Master Page. See previous
step for further details.
3. TERMS: page size A4; orientation: horizontal.
a) See previous step.
Task 3:
Define body pages.
Make sure your form has two body pages.
1. Call the first one BODY_01. Define Following Previous as its place.a) Go to the Hierarchy palette and set the cursor on the top node.
Right-click on it and choose Insert Body Page.
b) Set your cursor on the newly created body page and go to the Object
palette, Pagination tab (every body page is actually a subform). Choose
Following Previous as its place.
2. Call the second body page BODY_TERMS. Define Top of Page TERMS as
its place. Make sure it fits into the content area of the master page.
a) See previous step.
b) Go to the Body Pages palette to check the size. Resize the body page by clicking and dragging its bottom right corner so that it fits into
the content area.
Task 4:
Explore subform types.
1. Try out both subform types for BODY_01. Integrate dummy elements (for
example, static texts) and observe how their placements change.
a) In the Hierarchy palette, set your cursor on the body page and go to
the Object palette, Subform tab.
2. In the end, select Flowed for BODY_01, Flow Direction = Top to Bottom.
Delete all elements that you have included in the body page.
a) See previous step.
Continued on next page
118 © 2006 SAP AG. All rights reserved. 2006/Q2

7/14/2019 BC480 - PDF-Based Print Forms
http://slidepdf.com/reader/full/bc480-pdf-based-print-forms 127/317
BC480 Lesson: Adobe LiveCycle Designer: Structuring a Form
Task 5:
Test the result.
1. Activate the form and then test it by running report SAPBC480_DEMO. You
should get two empty pages: one in portrait and one in landscape orientation.
a) Start transaction SA38.
b) Enter SAPBC480_DEMO as the report.
c) Press F8 to execute.
2006/Q2 © 2006 SAP AG. All rights reserved. 119

7/14/2019 BC480 - PDF-Based Print Forms
http://slidepdf.com/reader/full/bc480-pdf-based-print-forms 128/317
Unit 4: Designer BC480
Lesson Summary
You should now be able to:• Distinguish between master pages, content areas, body pages, and subforms
• Describe typical contents of master pages, content areas, body pages, and
subforms
120 © 2006 SAP AG. All rights reserved. 2006/Q2

7/14/2019 BC480 - PDF-Based Print Forms
http://slidepdf.com/reader/full/bc480-pdf-based-print-forms 129/317
BC480 Unit Summary
Unit Summary
You should now be able to:
• List the various functions of Adobe LiveCycle Designer
• Use Adobe LiveCycle Designer as a graphical tool for designing forms
• Create a simple form layout with various objects
• Distinguish between master pages, content areas, body pages, and subforms
• Describe typical contents of master pages, content areas, body pages, and
subforms
2006/Q2 © 2006 SAP AG. All rights reserved. 121

7/14/2019 BC480 - PDF-Based Print Forms
http://slidepdf.com/reader/full/bc480-pdf-based-print-forms 130/317
Unit Summary BC480
122 © 2006 SAP AG. All rights reserved. 2006/Q2
7/14/2019 BC480 - PDF-Based Print Forms
http://slidepdf.com/reader/full/bc480-pdf-based-print-forms 131/317
BC480 Test Your Knowledge
Test Your Knowledge
1. Which of the following statements about Adobe LiveCycle Designer are true?
Choose the correct answer(s).
□ A Toolbars can be moved around freely.
□ B Double-clicking on a palette will undock it.
□ C Every palette has a menu of its own.
□ D Changing the grid units will change the element positions.
2. Do you agree with the following statements on palettes?
Choose the correct answer(s).
□ A The Hierarchy palette displays those objects that have been
included somewhere in the layout.
□ B The Data View palette displays elements from the form context.
□ C You can add elements to the Data View by right-clicking on it.
□ D The settings in the Drawing Aids palette are per form only. They
are stored for every form individually.
3. Which of the following statements about form properties are true?
Choose the correct answer(s).
□ A You can select ABAP, JavaScript, or FormCalc as the default
scripting language.
□ B The default locale will typically be overridden in the ABAP
program.
□ C The XML data file will be taken for the local preview of Adobe
Reader.
□ D The XML data file contains the definition of the form layout.
4. At runtime, every master page of a form is processed once.
Determine whether this statement is true or false.
□ True
□ False
5. Every master page must have exactly one content area.
Determine whether this statement is true or false.
□ True
□ False
2006/Q2 © 2006 SAP AG. All rights reserved. 123

7/14/2019 BC480 - PDF-Based Print Forms
http://slidepdf.com/reader/full/bc480-pdf-based-print-forms 132/317
Test Your Knowledge BC480
6. A body page can be laid down anywhere on a master page.
Determine whether this statement is true or false.
□ True
□ False
7. Dynamic content that can "grow" (like tables) should be included in body
pages.
Determine whether this statement is true or false.
□ True
□ False
8. To prevent elements from being split by a page break, wrap them in asubform and uncheck Allow Page Breaks within Content .
Determine whether this statement is true or false.
□ True
□ False
124 © 2006 SAP AG. All rights reserved. 2006/Q2
7/14/2019 BC480 - PDF-Based Print Forms
http://slidepdf.com/reader/full/bc480-pdf-based-print-forms 133/317
BC480 Test Your Knowledge
Answers
1. Which of the following statements about Adobe LiveCycle Designer are true?
Answer: A, B, C
See relevant passages in lesson "Designer: Overview"
2. Do you agree with the following statements on palettes?
Answer: A, B, D
See relevant passages in lesson "Designer: Overview".
3. Which of the following statements about form properties are true?
Answer: B, C
See relevant passages in lesson “Designer: Overview”.
4. At runtime, every master page of a form is processed once.
Answer: False
Master pages can be processed from zero to an indefinite number of times.
5. Every master page must have exactly one content area.
Answer: False
Every master page must have at least one content area, or there would be no
room for dynamic content.
6. A body page can be laid down anywhere on a master page.
Answer: False
Body pages can be laid down only in content areas (which, in turn, are onmaster pages).
7. Dynamic content that can "grow" (like tables) should be included in body
pages.
Answer: True
Only in body pages can page breaks be processed.
2006/Q2 © 2006 SAP AG. All rights reserved. 125

7/14/2019 BC480 - PDF-Based Print Forms
http://slidepdf.com/reader/full/bc480-pdf-based-print-forms 134/317
Test Your Knowledge BC480
8. To prevent elements from being split by a page break, wrap them in a
subform and uncheck Allow Page Breaks within Content .
Answer: True
This subform must be of type Flowed .
126 © 2006 SAP AG. All rights reserved. 2006/Q2
7/14/2019 BC480 - PDF-Based Print Forms
http://slidepdf.com/reader/full/bc480-pdf-based-print-forms 135/317
Unit 5 Layout
Unit Overview
Once you know how to find your way around in Adobe LiveCycle Designer, you
can start to actually design a form. We will start out with simple static elements,
like static texts or static images. Their contents are determined by you at designtime.
We will next continue with dynamic elements, like business data as represented in
fields or texts. The dunning level or a recipient's address, for example, belong to
this group, as their values can be determined at runtime only. Typically (though
not exclusively), the values of dynamic form elements will be calculated in the
ABAP application program.
Finally, we will look at tables, which are special dynamic elements.
Unit Objectives
After completing this unit, you will be able to:
• Insert static elements into a form: images, texts, and graphical objects
• Set object properties for static form elements
• Insert dynamic elements into a form: text fields, image fields, date/time
fields, floating fields
• Set the data binding (the connection between the layout fields and the
business data)
• Apply patterns (picture clauses) to influence field output
• Insert tables into a form
• Format tables
• Set a header for a table
• Create data-driven page breaks
• Create control levels
• Create nested tables
Unit Contents
Lesson: Static Form Elements ... .. .. ... ... .. ... .. ... ... .. ... .. ... ... .. ... .. ..129
2006/Q2 © 2006 SAP AG. All rights reserved. 127

7/14/2019 BC480 - PDF-Based Print Forms
http://slidepdf.com/reader/full/bc480-pdf-based-print-forms 136/317
Unit 5: Layout BC480
Exercise 5: Static Form Elements.. .. ... ... .. ... .. ... ... .. ... ... .. ... .. ..135
Lesson: Dynamic Form Elements .. ... ... .. ... .. ... ... .. ... .. ... ... .. .. ... ... 143
Exercise 6: Dynamic Form Elements. ... .. ... ... .. .. ... ... .. ... .. ... ... .161Lesson: Tables .... ... .... .... .... .... .... ... .... .... .... .... .... .... ... .... .... .171
Exercise 7: Tables.. .... .... ... .... ... .... .... .... ... .... ... .... ... .... ... ..181
128 © 2006 SAP AG. All rights reserved. 2006/Q2

7/14/2019 BC480 - PDF-Based Print Forms
http://slidepdf.com/reader/full/bc480-pdf-based-print-forms 137/317
BC480 Lesson: Static Form Elements
Lesson: Static Form Elements
Lesson Overview
It is hard to imagine a form without static elements that are always processed
independent of the business data. This lesson will introduce you to the static
elements available in Adobe LiveCycle Designer, including images (for example
for company logos or signatures that have been scanned in), text (like your
company's address), and geometric objects.
Lesson Objectives
After completing this lesson, you will be able to:
• Insert static elements into a form: images, texts, and graphical objects• Set object properties for static form elements
Business Example
A travel agency wants to print invoices for their customers' flight bookings using
the tool “Interactive Forms”. The form needs to be refined. For example, the
company's logo and address need to be included.
Static Images
Figure 58: Inserting Static Images
As with all objects, you must first choose the page where you want to include the
object. In our scenario, the company logo is to appear on all pages. Such objects
are called boilerplate objects.
2006/Q2 © 2006 SAP AG. All rights reserved. 129

7/14/2019 BC480 - PDF-Based Print Forms
http://slidepdf.com/reader/full/bc480-pdf-based-print-forms 138/317
Unit 5: Layout BC480
You include objects from the Library palette on a page by dragging and dropping
them.
You can include images of the most popular types: Windows Bitmaps (*.bmp),
JPEGs (*.jpg), TIFFs (*.TIF), PNGs (*.png), GIFs (*.gif – animated GIFs are not
supported), and (with Adobe LiveCycle Designer 7.1 or higher) EXIF.
For a static image, you must specify its location via a valid URL. This address can
be a file name on a file server or in the intranet or Internet (as of SAP NetWeaver
2004, you cannot access the MIME Repository via a URL).
If the image file is located on a file server, you can browse your file system by
clicking on the folder icon to the right of the URL address. After selecting an
image, make sure to specify the complete path so that it will be found at runtime.
Addresses like C:\image.gif might work if you test them in Designer’s preview,
but as soon as you test the form with an application program, you will see that C:\refers to the file system of the server where Adobe document services are located
– which in almost all cases is not the computer that you use for designing a form.
Also, make sure that you enter a publicly accessible file location.
When you specify a URL, you must prefix the address with http:// or https://.
Make sure this address is accessible for Adobe document services.
To avoid incorrect image addresses at runtime, you might select Embed image.
This way you can include an image which, at its original location, is accessible
to you only.
Caution: Even if you choose this option, you still have to leave the URLthat you have typed in. It will not be evaluated any more; it merely
serves as a reference to where the image was found originally. If you
change the URL after having embedded a picture, the picture will actually
be reloaded!
You have three options for the size of an image:
• Use image size – The original size of the image will be taken. Sizing handles
cannot be used.
• Scale image to fit – If you resize the placeholder for the image, the image will
automatically be resized to the maximum size possible in the placeholder.
The image proportions will be preserved.
• Stretch image to fit – You can determine the image size yourself. Please note
that image proportions will not be preserved.
130 © 2006 SAP AG. All rights reserved. 2006/Q2
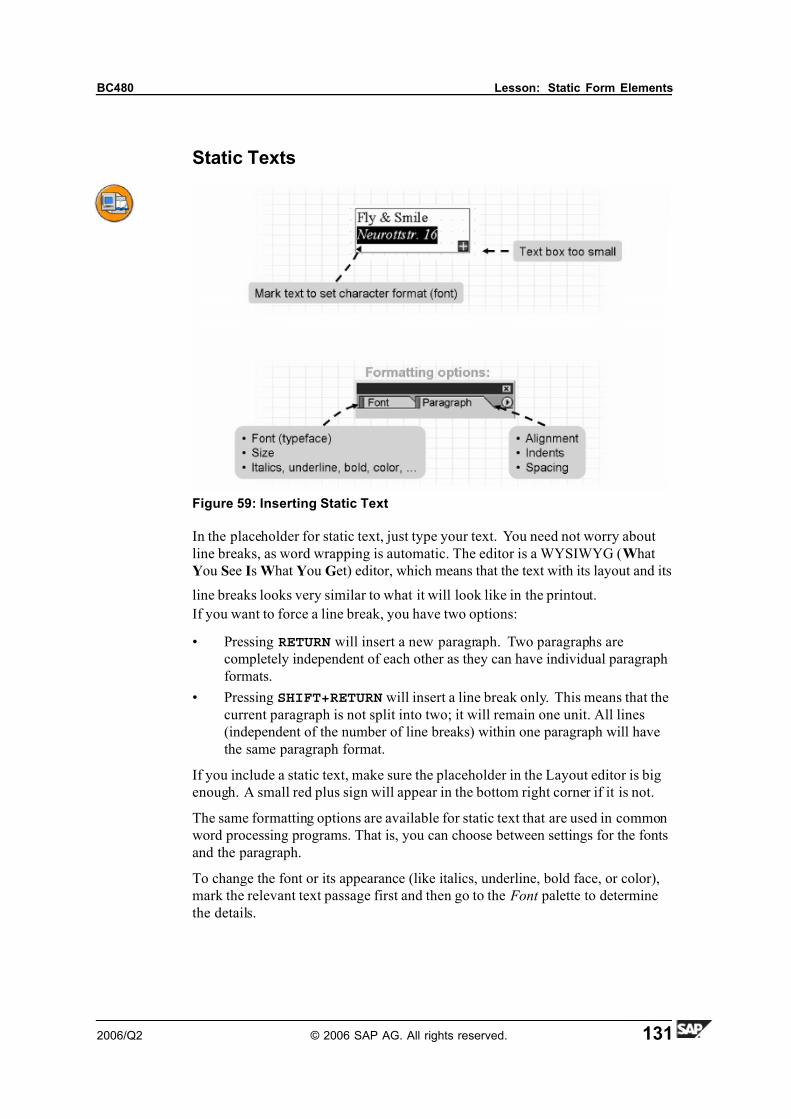
7/14/2019 BC480 - PDF-Based Print Forms
http://slidepdf.com/reader/full/bc480-pdf-based-print-forms 139/317
BC480 Lesson: Static Form Elements
Static Texts
Figure 59: Inserting Static Text
In the placeholder for static text, just type your text. You need not worry about
line breaks, as word wrapping is automatic. The editor is a WYSIWYG (What
You See Is What You Get) editor, which means that the text with its layout and its
line breaks looks very similar to what it will look like in the printout.
If you want to force a line break, you have two options:
• Pressing RETURN will insert a new paragraph. Two paragraphs are
completely independent of each other as they can have individual paragraph
formats.
• Pressing SHIFT+RETURN will insert a line break only. This means that the
current paragraph is not split into two; it will remain one unit. All lines
(independent of the number of line breaks) within one paragraph will have
the same paragraph format.
If you include a static text, make sure the placeholder in the Layout editor is big
enough. A small red plus sign will appear in the bottom right corner if it is not.
The same formatting options are available for static text that are used in common
word processing programs. That is, you can choose between settings for the fonts
and the paragraph.
To change the font or its appearance (like italics, underline, bold face, or color),
mark the relevant text passage first and then go to the Font palette to determine
the details.
2006/Q2 © 2006 SAP AG. All rights reserved. 131
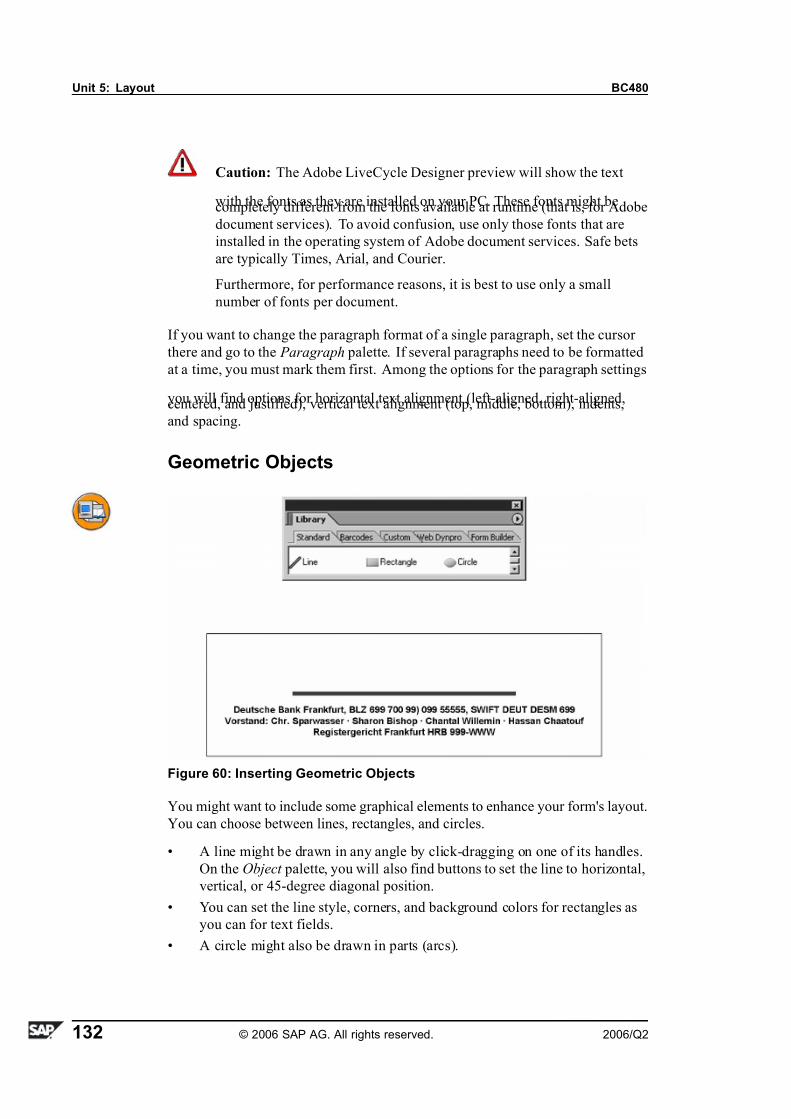
7/14/2019 BC480 - PDF-Based Print Forms
http://slidepdf.com/reader/full/bc480-pdf-based-print-forms 140/317
Unit 5: Layout BC480
Caution: The Adobe LiveCycle Designer preview will show the text
with the fonts as they are installed on your PC. These fonts might becompletely different from the fonts available at runtime (that is, for Adobe
document services). To avoid confusion, use only those fonts that are
installed in the operating system of Adobe document services. Safe bets
are typically Times, Arial, and Courier.
Furthermore, for performance reasons, it is best to use only a small
number of fonts per document.
If you want to change the paragraph format of a single paragraph, set the cursor
there and go to the Paragraph palette. If several paragraphs need to be formatted
at a time, you must mark them first. Among the options for the paragraph settings
you will find options for horizontal text alignment (left-aligned, right-aligned,centered, and justified), vertical text alignment (top, middle, bottom), indents,
and spacing.
Geometric Objects
Figure 60: Inserting Geometric Objects
You might want to include some graphical elements to enhance your form's layout.
You can choose between lines, rectangles, and circles.
• A line might be drawn in any angle by click-dragging on one of its handles.
On the Object palette, you will also find buttons to set the line to horizontal,
vertical, or 45-degree diagonal position.
• You can set the line style, corners, and background colors for rectangles as
you can for text fields.
• A circle might also be drawn in parts (arcs).
132 © 2006 SAP AG. All rights reserved. 2006/Q2

7/14/2019 BC480 - PDF-Based Print Forms
http://slidepdf.com/reader/full/bc480-pdf-based-print-forms 141/317
BC480 Lesson: Static Form Elements
Typically, but not necessarily, these graphical elements are placed on a master
page, so they act as boilerplate objects.
2006/Q2 © 2006 SAP AG. All rights reserved. 133

7/14/2019 BC480 - PDF-Based Print Forms
http://slidepdf.com/reader/full/bc480-pdf-based-print-forms 142/317
Unit 5: Layout BC480
134 © 2006 SAP AG. All rights reserved. 2006/Q2
7/14/2019 BC480 - PDF-Based Print Forms
http://slidepdf.com/reader/full/bc480-pdf-based-print-forms 143/317
BC480 Lesson: Static Form Elements
Exercise 5: Static Form Elements
Exercise Objectives
After completing this exercise, you will be able to:
• Insert static elements into a form: images, texts, and graphical objects
• Set object properties for static form elements
Business Example
A travel agency wants to print invoices for their customers' flight bookings using
the tool “Interactive Forms”. The form layout has been structured to comprise
master pages and body pages, but it needs to be refined. For example, the
company's logo and address need to be included.
Task 1:
Continue to work with your own form, ZBC480_##. ## stands for your two-digit
group number (monitor number).
It might be a good idea to create a local safety copy of the form every now and
then. To do so, choose Utilities→ Downloading form from SFP's initial screen.
If you have not finished one of the previous exercises, you can copy the template
form, BC480_STRUCTURE.
The reference solution of this exercise is form BC480_STATIC.
1. Include a company logo as a static image so that it appears in the top right
area of the first print page. On which page and in which area of the form
would be the best place to include the image? You can search the Internet for
an image you like and save it locally. If you are using a Windows Terminal
Server, you will find some graphics in the BC480 directory. Name the image
LOGO.
2. Try out different settings for the sizing.
3. Embed the image and look at the resulting XML data.
Task 2:Integrate the sender address as a static text on master page FIRST.
1. Create a static address, SENDER_ADDRESS , as the address of the travel
agency. Position it to the left of the company logo. Enter an address. (For
perfectionists: This address should be the same as the small one that will
later be displayed in the envelope. In the context, you selected SAPscript
Continued on next page
2006/Q2 © 2006 SAP AG. All rights reserved. 135
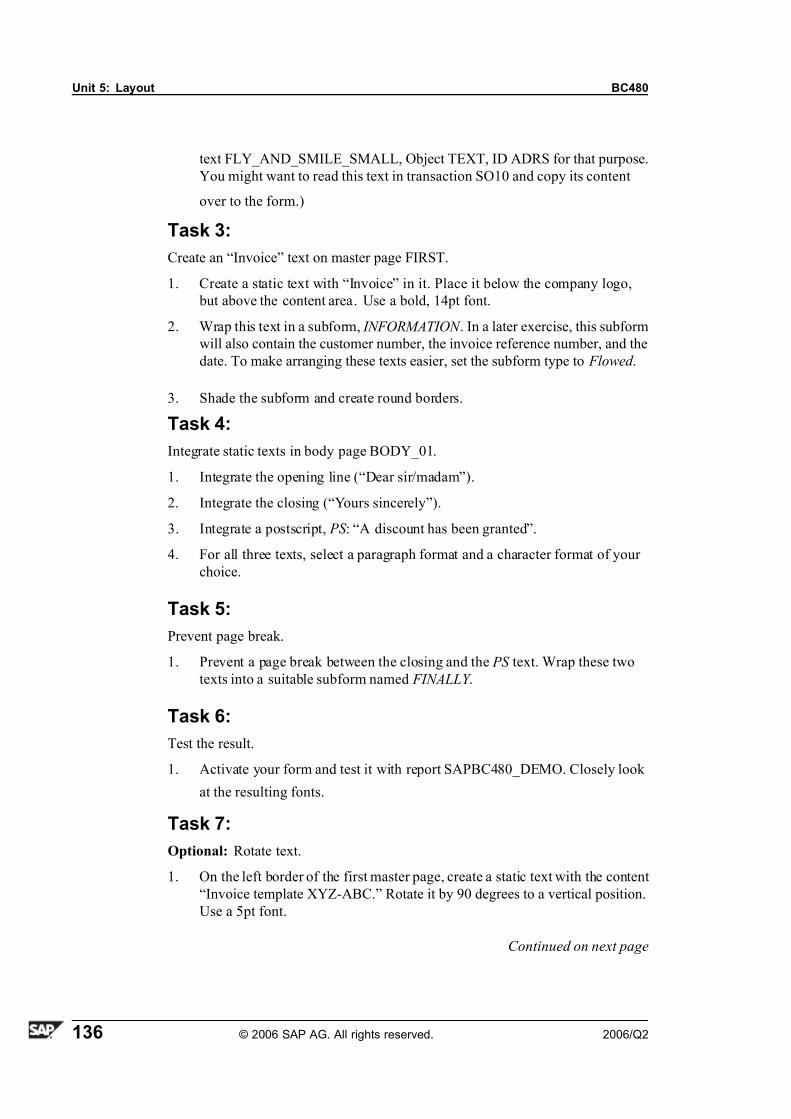
7/14/2019 BC480 - PDF-Based Print Forms
http://slidepdf.com/reader/full/bc480-pdf-based-print-forms 144/317
Unit 5: Layout BC480
text FLY_AND_SMILE_SMALL, Object TEXT, ID ADRS for that purpose.
You might want to read this text in transaction SO10 and copy its content
over to the form.)
Task 3:
Create an “Invoice” text on master page FIRST.
1. Create a static text with “Invoice” in it. Place it below the company logo,
but above the content area. Use a bold, 14pt font.
2. Wrap this text in a subform, INFORMATION . In a later exercise, this subform
will also contain the customer number, the invoice reference number, and the
date. To make arranging these texts easier, set the subform type to Flowed .
3. Shade the subform and create round borders.
Task 4:
Integrate static texts in body page BODY_01.
1. Integrate the opening line (“Dear sir/madam”).
2. Integrate the closing (“Yours sincerely”).
3. Integrate a postscript, PS : “A discount has been granted”.
4. For all three texts, select a paragraph format and a character format of your
choice.
Task 5:
Prevent page break.
1. Prevent a page break between the closing and the PS text. Wrap these two
texts into a suitable subform named FINALLY .
Task 6:
Test the result.
1. Activate your form and test it with report SAPBC480_DEMO. Closely look
at the resulting fonts.
Task 7:
Optional: Rotate text.
1. On the left border of the first master page, create a static text with the content
“Invoice template XYZ-ABC.” Rotate it by 90 degrees to a vertical position.
Use a 5pt font.
Continued on next page
136 © 2006 SAP AG. All rights reserved. 2006/Q2

7/14/2019 BC480 - PDF-Based Print Forms
http://slidepdf.com/reader/full/bc480-pdf-based-print-forms 145/317
BC480 Lesson: Static Form Elements
Task 8:
Optional: Create terms and conditions.
1. On the last master page, create a static text with the terms and conditions.
Task 9:
Optional: Include geometric objects.
1. Integrate some additional geometric objects to enhance the visual design of
the invoice.
2006/Q2 © 2006 SAP AG. All rights reserved. 137
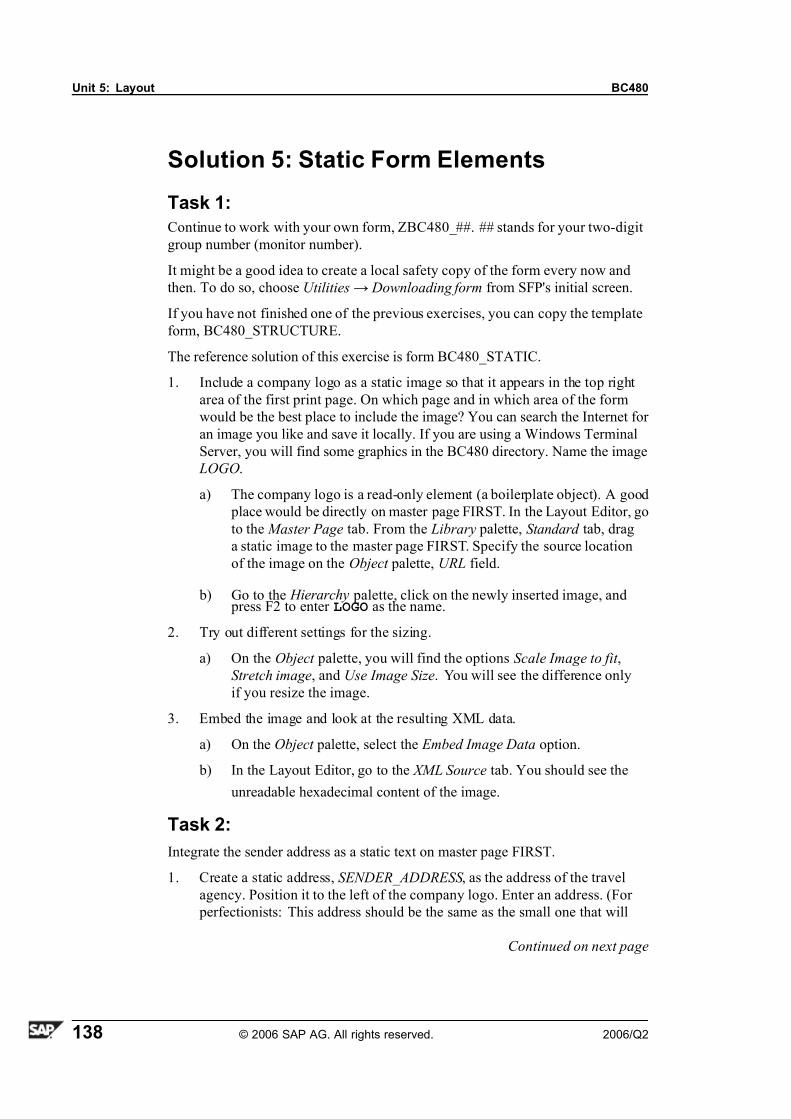
7/14/2019 BC480 - PDF-Based Print Forms
http://slidepdf.com/reader/full/bc480-pdf-based-print-forms 146/317
Unit 5: Layout BC480
Solution 5: Static Form Elements
Task 1:
Continue to work with your own form, ZBC480_##. ## stands for your two-digit
group number (monitor number).
It might be a good idea to create a local safety copy of the form every now and
then. To do so, choose Utilities→ Downloading form from SFP's initial screen.
If you have not finished one of the previous exercises, you can copy the template
form, BC480_STRUCTURE.
The reference solution of this exercise is form BC480_STATIC.
1. Include a company logo as a static image so that it appears in the top right
area of the first print page. On which page and in which area of the form
would be the best place to include the image? You can search the Internet for
an image you like and save it locally. If you are using a Windows Terminal
Server, you will find some graphics in the BC480 directory. Name the image
LOGO.
a) The company logo is a read-only element (a boilerplate object). A good
place would be directly on master page FIRST. In the Layout Editor, go
to the Master Page tab. From the Library palette, Standard tab, drag
a static image to the master page FIRST. Specify the source location
of the image on the Object palette, URL field.
b) Go to the Hierarchy palette, click on the newly inserted image, and press F2 to enter LOGO as the name.
2. Try out different settings for the sizing.
a) On the Object palette, you will find the options Scale Image to fit ,
Stretch image, and Use Image Size. You will see the difference only
if you resize the image.
3. Embed the image and look at the resulting XML data.
a) On the Object palette, select the Embed Image Data option.
b) In the Layout Editor, go to the XML Source tab. You should see the
unreadable hexadecimal content of the image.
Task 2:
Integrate the sender address as a static text on master page FIRST.
1. Create a static address, SENDER_ADDRESS , as the address of the travel
agency. Position it to the left of the company logo. Enter an address. (For
perfectionists: This address should be the same as the small one that will
Continued on next page
138 © 2006 SAP AG. All rights reserved. 2006/Q2
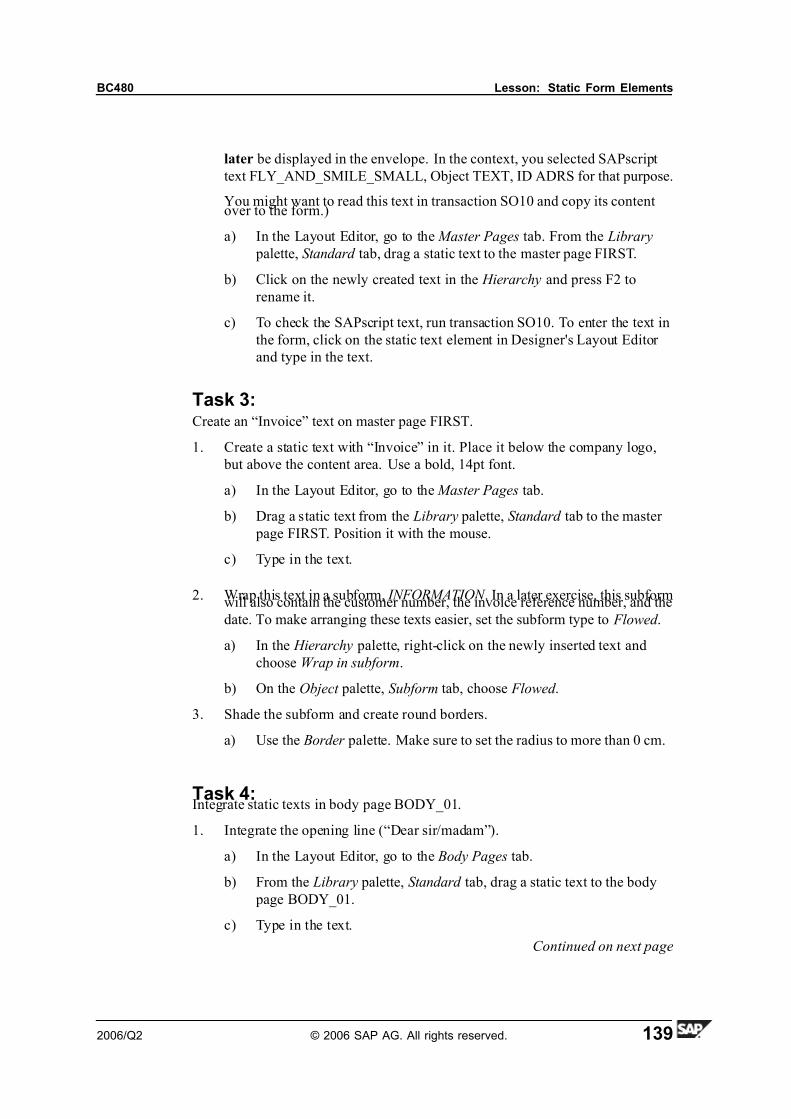
7/14/2019 BC480 - PDF-Based Print Forms
http://slidepdf.com/reader/full/bc480-pdf-based-print-forms 147/317
BC480 Lesson: Static Form Elements
later be displayed in the envelope. In the context, you selected SAPscript
text FLY_AND_SMILE_SMALL, Object TEXT, ID ADRS for that purpose.
You might want to read this text in transaction SO10 and copy its contentover to the form.)
a) In the Layout Editor, go to the Master Pages tab. From the Library
palette, Standard tab, drag a static text to the master page FIRST.
b) Click on the newly created text in the Hierarchy and press F2 to
rename it.
c) To check the SAPscript text, run transaction SO10. To enter the text in
the form, click on the static text element in Designer's Layout Editor
and type in the text.
Task 3:Create an “Invoice” text on master page FIRST.
1. Create a static text with “Invoice” in it. Place it below the company logo,
but above the content area. Use a bold, 14pt font.
a) In the Layout Editor, go to the Master Pages tab.
b) Drag a static text from the Library palette, Standard tab to the master
page FIRST. Position it with the mouse.
c) Type in the text.
2. Wrap this text in a subform, INFORMATION . In a later exercise, this subformwill also contain the customer number, the invoice reference number, and the
date. To make arranging these texts easier, set the subform type to Flowed .
a) In the Hierarchy palette, right-click on the newly inserted text and
choose Wrap in subform.
b) On the Object palette, Subform tab, choose Flowed .
3. Shade the subform and create round borders.
a) Use the Border palette. Make sure to set the radius to more than 0 cm.
Task 4:Integrate static texts in body page BODY_01.
1. Integrate the opening line (“Dear sir/madam”).
a) In the Layout Editor, go to the Body Pages tab.
b) From the Library palette, Standard tab, drag a static text to the body
page BODY_01.
c) Type in the text.
Continued on next page
2006/Q2 © 2006 SAP AG. All rights reserved. 139

7/14/2019 BC480 - PDF-Based Print Forms
http://slidepdf.com/reader/full/bc480-pdf-based-print-forms 148/317
Unit 5: Layout BC480
2. Integrate the closing (“Yours sincerely”).
a) See previous steps.
3. Integrate a postscript, PS : “A discount has been granted”.
a) See previous steps.
4. For all three texts, select a paragraph format and a character format of your
choice.
a) Mark the text to be formatted. Set the formatting details on the
Paragraph and Font palettes.
Task 5:
Prevent page break.1. Prevent a page break between the closing and the PS text. Wrap these two
texts into a suitable subform named FINALLY .
a) Mark both texts. Right-click on them in the Hierarchy. Select Wrap
in Subform.
b) In the Hierarchy, click on the newly created subform. Go to the Object
palette, Subform tab and deselect the Allow Page Break within Content
option.
Task 6:
Test the result.
1. Activate your form and test it with report SAPBC480_DEMO. Closely look
at the resulting fonts.
a) Press CTRL_F3. In a second SAP GUI mode, run transaction SA38.
Enter SAPBC480_DEMO as the name of the report. Press F8 to execute.
b) Enter ZBC480_## on the selection screen and press F8 again.
c) Exotic fonts are most likely not installed on Adobe document services.
They will look okay in Designer, but will be replaced by normal fonts
when handled by Adobe document services.
Continued on next page
140 © 2006 SAP AG. All rights reserved. 2006/Q2

7/14/2019 BC480 - PDF-Based Print Forms
http://slidepdf.com/reader/full/bc480-pdf-based-print-forms 149/317
BC480 Lesson: Static Form Elements
Task 7:
Optional: Rotate text.
1. On the left border of the first master page, create a static text with the content
“Invoice template XYZ-ABC.” Rotate it by 90 degrees to a vertical position.
Use a 5pt font.
a) Create a static text like you did before.
b) Go to the Layout palette, Size & Position area. You can select the
anchor (fulcrum) and then set the rotation angle of 90 degrees.
Task 8:
Optional: Create terms and conditions.
1. On the last master page, create a static text with the terms and conditions.
a) Proceed as before.
Task 9:
Optional: Include geometric objects.
1. Integrate some additional geometric objects to enhance the visual design of
the invoice.
a) Geometrical objects are read-only boilerplate objects. They are
typically included on master pages.
b) From the Library palette, Standard tab, drag a line, a circle, or a
rectangle to a page.
2006/Q2 © 2006 SAP AG. All rights reserved. 141

7/14/2019 BC480 - PDF-Based Print Forms
http://slidepdf.com/reader/full/bc480-pdf-based-print-forms 150/317
Unit 5: Layout BC480
Lesson Summary
You should now be able to:• Insert static elements into a form: images, texts, and graphical objects
• Set object properties for static form elements
142 © 2006 SAP AG. All rights reserved. 2006/Q2
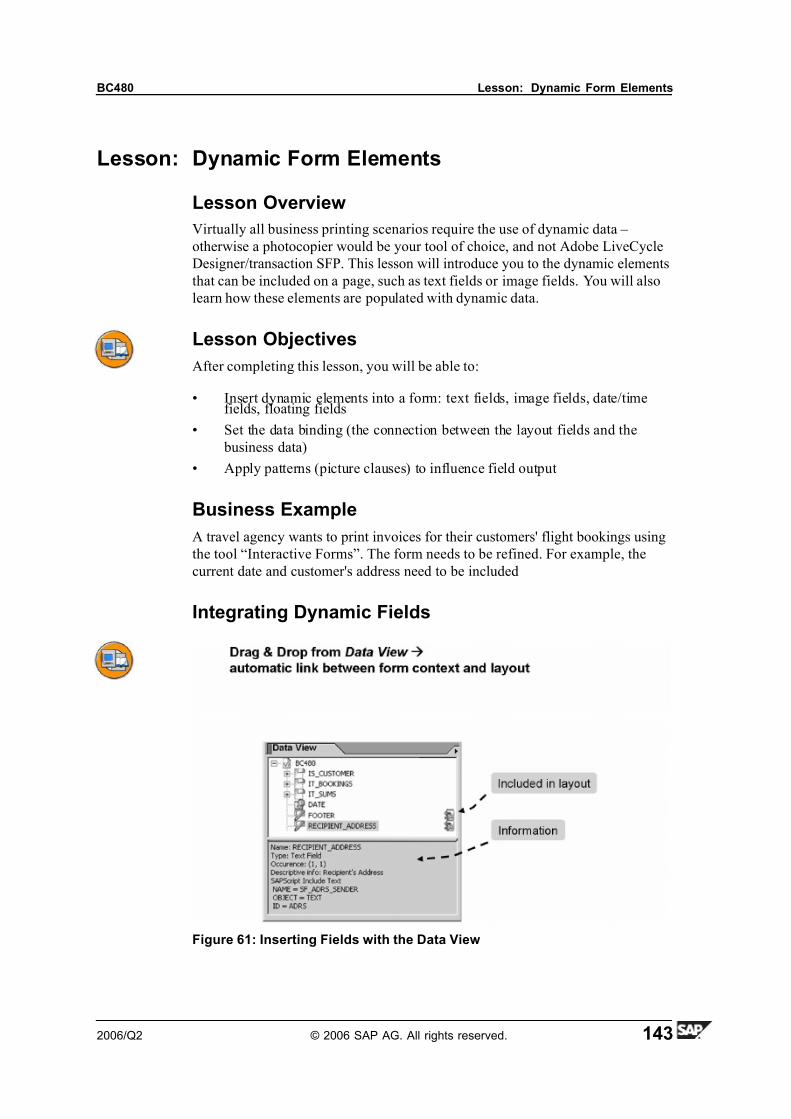
7/14/2019 BC480 - PDF-Based Print Forms
http://slidepdf.com/reader/full/bc480-pdf-based-print-forms 151/317
BC480 Lesson: Dynamic Form Elements
Lesson: Dynamic Form Elements
Lesson Overview
Virtually all business printing scenarios require the use of dynamic data –
otherwise a photocopier would be your tool of choice, and not Adobe LiveCycle
Designer/transaction SFP. This lesson will introduce you to the dynamic elements
that can be included on a page, such as text fields or image fields. You will also
learn how these elements are populated with dynamic data.
Lesson Objectives
After completing this lesson, you will be able to:
• Insert dynamic elements into a form: text fields, image fields, date/timefields, floating fields
• Set the data binding (the connection between the layout fields and the
business data)
• Apply patterns (picture clauses) to influence field output
Business Example
A travel agency wants to print invoices for their customers' flight bookings using
the tool “Interactive Forms”. The form needs to be refined. For example, the
current date and customer's address need to be included
Integrating Dynamic Fields
Figure 61: Inserting Fields with the Data View
2006/Q2 © 2006 SAP AG. All rights reserved. 143
7/14/2019 BC480 - PDF-Based Print Forms
http://slidepdf.com/reader/full/bc480-pdf-based-print-forms 152/317
Unit 5: Layout BC480
There are two ways to insert a dynamic field:
1. Go to the Data View (which results from the form context), and drag a field
to the desired position in the Layout Editor.
2. Drag a field from the Standard library to the desired position.
Dynamic elements can correspond to a number of elements from the context. For
example, an image field can refer to a field of type graphic content or graphic
reference. That is why it is best to use the first method, as this will automatically
create the appropriate link between the context element and the layout element:
the so-called data binding.
An element from the context that has been included somewhere in the layout will
be displayed in the Data View with a special symbol to the right of its name. Note,
however, that it is possible to include a field in the layout several times.
If you select an element in the Data View that has been included somewhere in
the layout, its details will be shown in the Layout , Border , and Object palettes
(provided you have opened these palettes). For some types of fields, the Font and
Paragraph settings will also be displayed. If an element has been included several
times, you might find the entry mixed in some fields.
You can display detail information for fields from the Data View by right-clicking
on them and selecting Show info. For example, descriptive texts will be displayed
for context fields with reference to the ABAP Dictionary. For external texts, their
types (SAPscript, text module, ...) and their key identifiers will be shown.
You set details for the dynamic element on the Object palette. What you can
actually enter there depends on the type of the element.
144 © 2006 SAP AG. All rights reserved. 2006/Q2
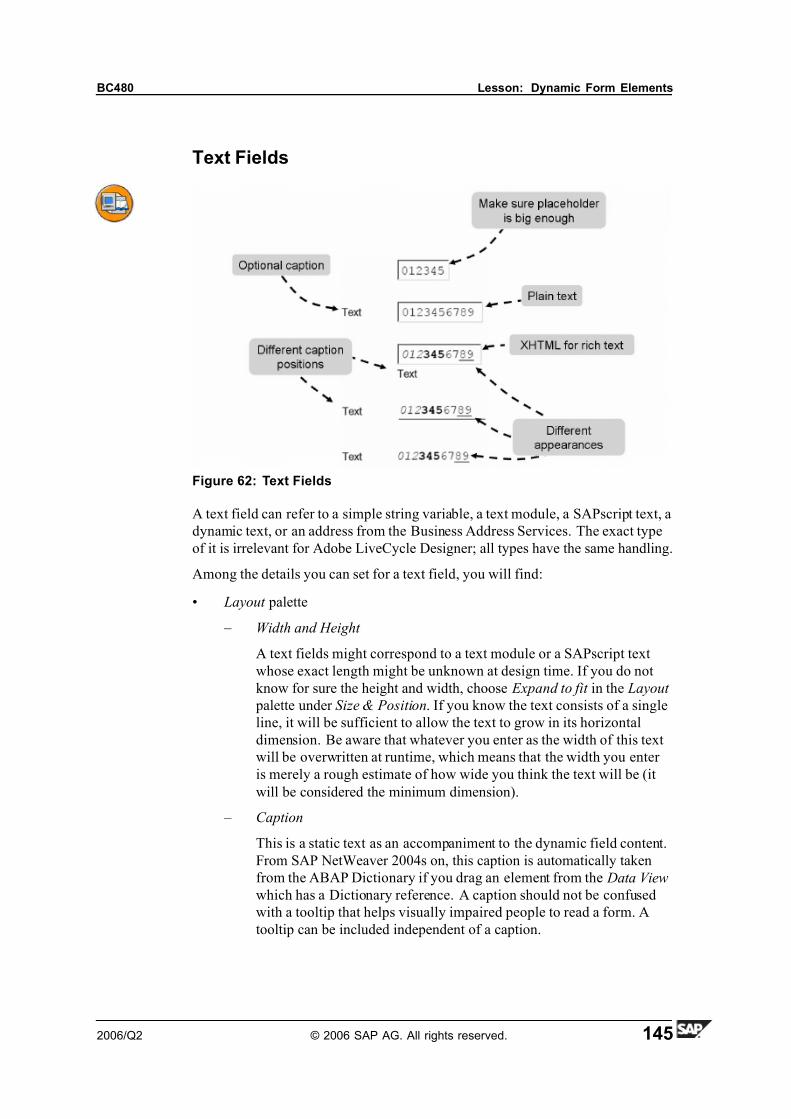
7/14/2019 BC480 - PDF-Based Print Forms
http://slidepdf.com/reader/full/bc480-pdf-based-print-forms 153/317
BC480 Lesson: Dynamic Form Elements
Text Fields
Figure 62: Text Fields
A text field can refer to a simple string variable, a text module, a SAPscript text, a
dynamic text, or an address from the Business Address Services. The exact type
of it is irrelevant for Adobe LiveCycle Designer; all types have the same handling.
Among the details you can set for a text field, you will find:
• Layout palette
– Width and Height
A text fields might correspond to a text module or a SAPscript text
whose exact length might be unknown at design time. If you do not
know for sure the height and width, choose Expand to fit in the Layout
palette under Size & Position. If you know the text consists of a single
line, it will be sufficient to allow the text to grow in its horizontal
dimension. Be aware that whatever you enter as the width of this text
will be overwritten at runtime, which means that the width you enter
is merely a rough estimate of how wide you think the text will be (it
will be considered the minimum dimension).
– Caption
This is a static text as an accompaniment to the dynamic field content.
From SAP NetWeaver 2004s on, this caption is automatically taken
from the ABAP Dictionary if you drag an element from the Data View
which has a Dictionary reference. A caption should not be confused
with a tooltip that helps visually impaired people to read a form. A
tooltip can be included independent of a caption.
2006/Q2 © 2006 SAP AG. All rights reserved. 145

7/14/2019 BC480 - PDF-Based Print Forms
http://slidepdf.com/reader/full/bc480-pdf-based-print-forms 154/317
Unit 5: Layout BC480
If you set a caption, you must choose one of four positions with regard
to the text field: top, bottom, left, and right. You must also determine
how much space should be reserved for the caption.
• Object palette
– Field tab
– Appearance
You would typically choose a specific appearance in interactive
forms only, so that the user of the form can distinguish more
easily whether text is ready for input or static. This distinction is
usually irrelevant for print forms.
– Allow multiple lines
If selected, make sure to provide enough space. You might want
to set the size properties to Expand to fit .
– Allow plain text only
Irrelevant
– Limit length
Relevant only if XHTML is deselected on the Binding tab. This
allows you to determine the maximum length of the resulting text.
If you integrate fields form the context with reference to the
ABAP Dictionary, you might find that the length specified there
will be taken over.
If you are acquainted with output options from SAPscript
or Smart Forms, the Limit lengthsetting is the equivalent of
(OutputLength), like &symbol(8)&.
– Value tab
– The Type is relevant for interactive scenarios only.
– The default value will be taken for fields with no or corrupt data
binding. It does not work for empty fields; they will remain empty.
– Binding tab
– Default binding
You determine the link to the Data View (that is, the form context)
here.
– Data format
146 © 2006 SAP AG. All rights reserved. 2006/Q2

7/14/2019 BC480 - PDF-Based Print Forms
http://slidepdf.com/reader/full/bc480-pdf-based-print-forms 155/317
BC480 Lesson: Dynamic Form Elements
Select XHTML for Data Format if you want to preserve the
formatting of your text, including line breaks or font settings. If
you drag a text field from the Data View that is a formatted text(address node, Smart Forms text, SAPscript text, or dynamic
text), this option will automatically be selected.
If XHTML is selected, you can override only those fonts and
paragraph formats that have not been explicitly set in the text. For
example, if you have set the font color in a text module, you
cannot override the color.
You should not choose XHTML if the text contains no formatting.
Otherwise, the text will look right, but performance will be poorer.
If you want to set the font or paragraph for the caption and the field separately,
you must click on the small triangle on the Font or Paragraph palette and selectthe Edit Caption or Edit Value option. The default is Edit Caption and Value.
Figure 63: Editing Text Caption and Text Value
Data Binding
Figure 64: Data Binding
All dynamic fields (such as text fields or image fields) must have a data binding.
This determines the link between the field in the layout and the field from the
Data View (that is, the form context). In other words, it makes sure the proper
data is displayed at runtime.
2006/Q2 © 2006 SAP AG. All rights reserved. 147
7/14/2019 BC480 - PDF-Based Print Forms
http://slidepdf.com/reader/full/bc480-pdf-based-print-forms 156/317
Unit 5: Layout BC480
Data Binding
• Link between objects and data connection (= SFP context)
• Created automatically when field is dropped to layout from the Data View
• Can be set manually: in the Object palette, Binding tab
• Binding is case sensitive
• Absolute names must start with $record.
• Relative names are possible for elements of subforms
If you integrate dynamic fields into your layout by dragging them from the Data
View, the correct data binding will be inserted automatically. However, there are
cases when you have to set the data binding manually:
• If you insert a dynamic field from the Library palette• If you copy and paste an existing element (the binding will not be duplicated)
• If you include elements in subforms and later move them to another subform
or unwrap the subform.
The easiest way to set the data binding manually is to click on the small triangle
to the right of the Data binding input field and then select the appropriate field
from the context.
For data binding, absolute names are possible for all elements, and relative names
are possible for those elements that are included in subforms. Absolute names
start with $record . $record represents the current record of a collection of data (for
example, the customer for whom the form is being printed).
If you set the binding to Normal (also called the implicit data binding), the name
of the object must correspond to a field from the Data View (that is, the context).
Be careful when renaming objects with binding Normal . Unless the corresponding
element from the Data View (hat is, the form context) is renamed as well, you
will corrupt the data binding.
For elements from the Data View that you want to include several times in your
layout, the data binding must be set to Global .
A faulty data binding or binding set to None will lead to wrong or empty data.
Let us assume there is a top-level structure called SUB1 in the Data View (context)with one field of name OBJ1. If, in the Hierarchy, a subform is called SUB1 and
an object that is included in that subform is called OBJ1, all of the following data
bindings would be possible:
- SUB1: normal OBJ1: normal
- SUB1: normal OBJ1: OBJ1
- SUB1: $record.SUB1 OBJ1: OBJ1
- SUB1: $record.SUB1 OBJ1: $record.SUB1.OBJ1
148 © 2006 SAP AG. All rights reserved. 2006/Q2
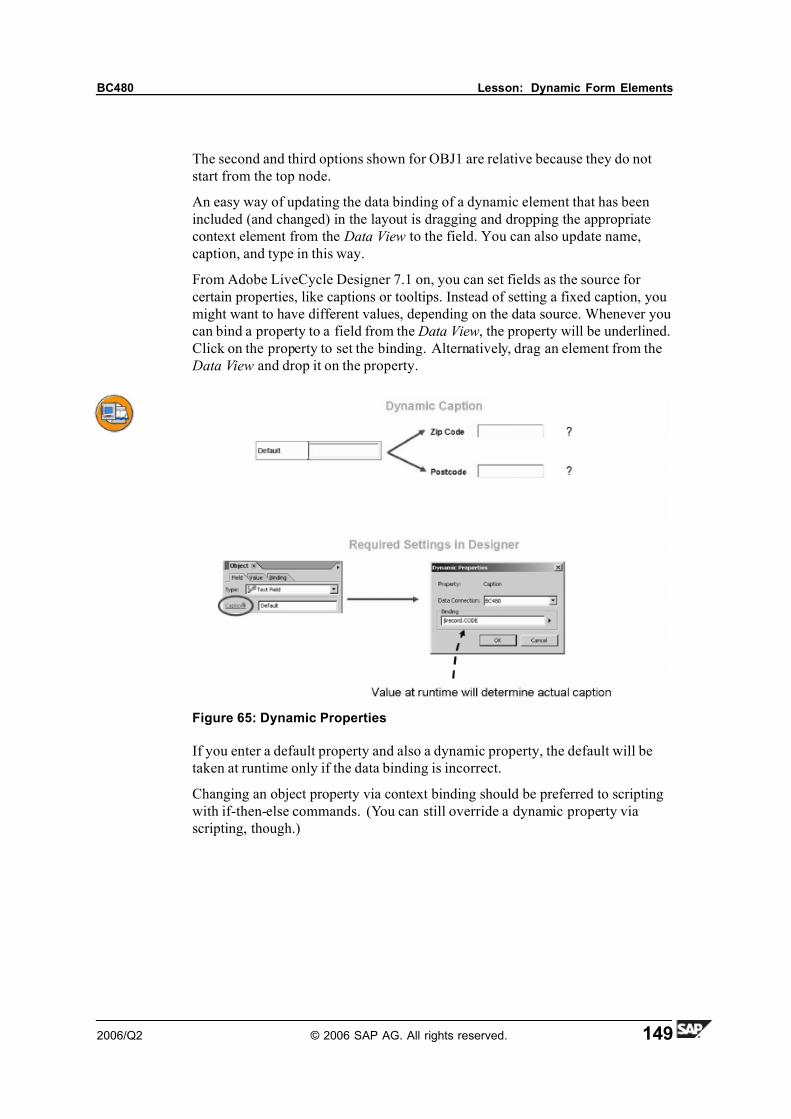
7/14/2019 BC480 - PDF-Based Print Forms
http://slidepdf.com/reader/full/bc480-pdf-based-print-forms 157/317
BC480 Lesson: Dynamic Form Elements
The second and third options shown for OBJ1 are relative because they do not
start from the top node.
An easy way of updating the data binding of a dynamic element that has been
included (and changed) in the layout is dragging and dropping the appropriate
context element from the Data View to the field. You can also update name,
caption, and type in this way.
From Adobe LiveCycle Designer 7.1 on, you can set fields as the source for
certain properties, like captions or tooltips. Instead of setting a fixed caption, you
might want to have different values, depending on the data source. Whenever you
can bind a property to a field from the Data View, the property will be underlined.
Click on the property to set the binding. Alternatively, drag an element from the
Data View and drop it on the property.
Figure 65: Dynamic Properties
If you enter a default property and also a dynamic property, the default will be
taken at runtime only if the data binding is incorrect.
Changing an object property via context binding should be preferred to scripting
with if-then-else commands. (You can still override a dynamic property via
scripting, though.)
2006/Q2 © 2006 SAP AG. All rights reserved. 149
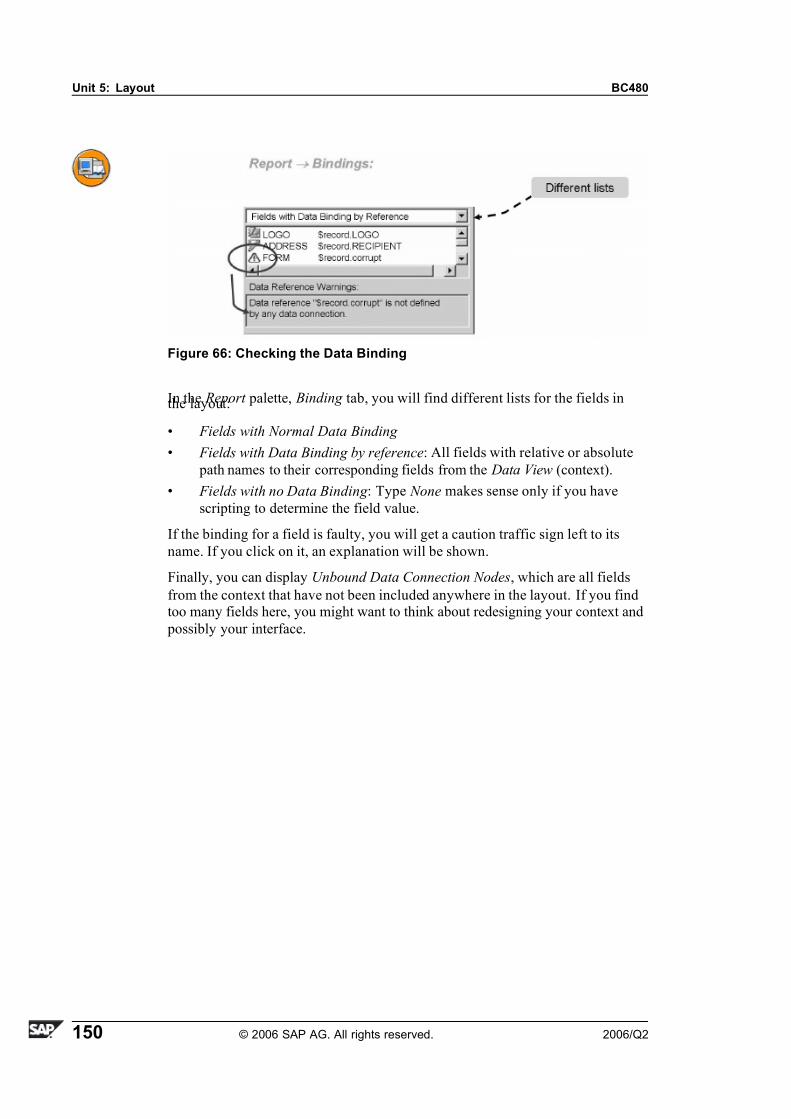
7/14/2019 BC480 - PDF-Based Print Forms
http://slidepdf.com/reader/full/bc480-pdf-based-print-forms 158/317
Unit 5: Layout BC480
Figure 66: Checking the Data Binding
In the Report palette, Binding tab, you will find different lists for the fields inthe layout:
• Fields with Normal Data Binding
• Fields with Data Binding by reference: All fields with relative or absolute
path names to their corresponding fields from the Data View (context).
• Fields with no Data Binding : Type None makes sense only if you have
scripting to determine the field value.
If the binding for a field is faulty, you will get a caution traffic sign left to its
name. If you click on it, an explanation will be shown.
Finally, you can display Unbound Data Connection Nodes, which are all fields
from the context that have not been included anywhere in the layout. If you findtoo many fields here, you might want to think about redesigning your context and
possibly your interface.
150 © 2006 SAP AG. All rights reserved. 2006/Q2
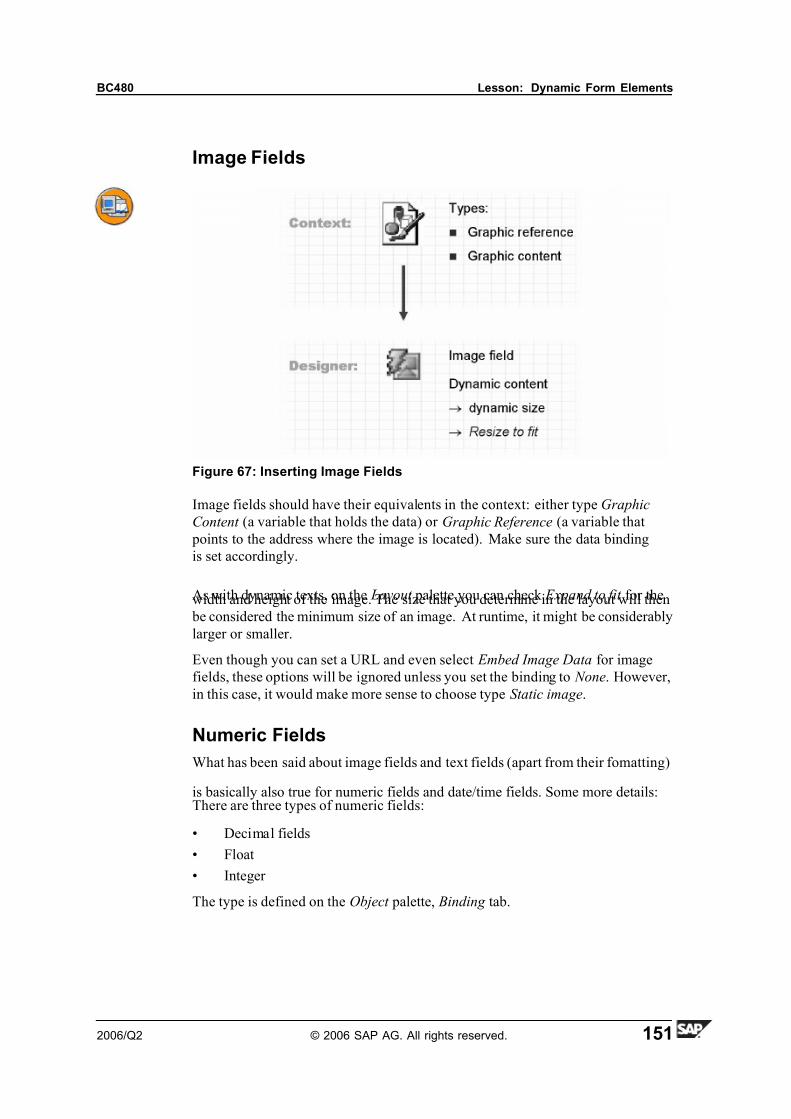
7/14/2019 BC480 - PDF-Based Print Forms
http://slidepdf.com/reader/full/bc480-pdf-based-print-forms 159/317
BC480 Lesson: Dynamic Form Elements
Image Fields
Figure 67: Inserting Image Fields
Image fields should have their equivalents in the context: either type Graphic
Content (a variable that holds the data) or Graphic Reference (a variable that
points to the address where the image is located). Make sure the data binding
is set accordingly.
As with dynamic texts, on the Layout palette you can check Expand to fit for thewidth and height of the image. The size that you determine in the layout will then
be considered the minimum size of an image. At runtime, it might be considerably
larger or smaller.
Even though you can set a URL and even select Embed Image Data for image
fields, these options will be ignored unless you set the binding to None. However,
in this case, it would make more sense to choose type Static image.
Numeric Fields
What has been said about image fields and text fields (apart from their fomatting)
is basically also true for numeric fields and date/time fields. Some more details:There are three types of numeric fields:
• Decimal fields
• Float
• Integer
The type is defined on the Object palette, Binding tab.
2006/Q2 © 2006 SAP AG. All rights reserved. 151
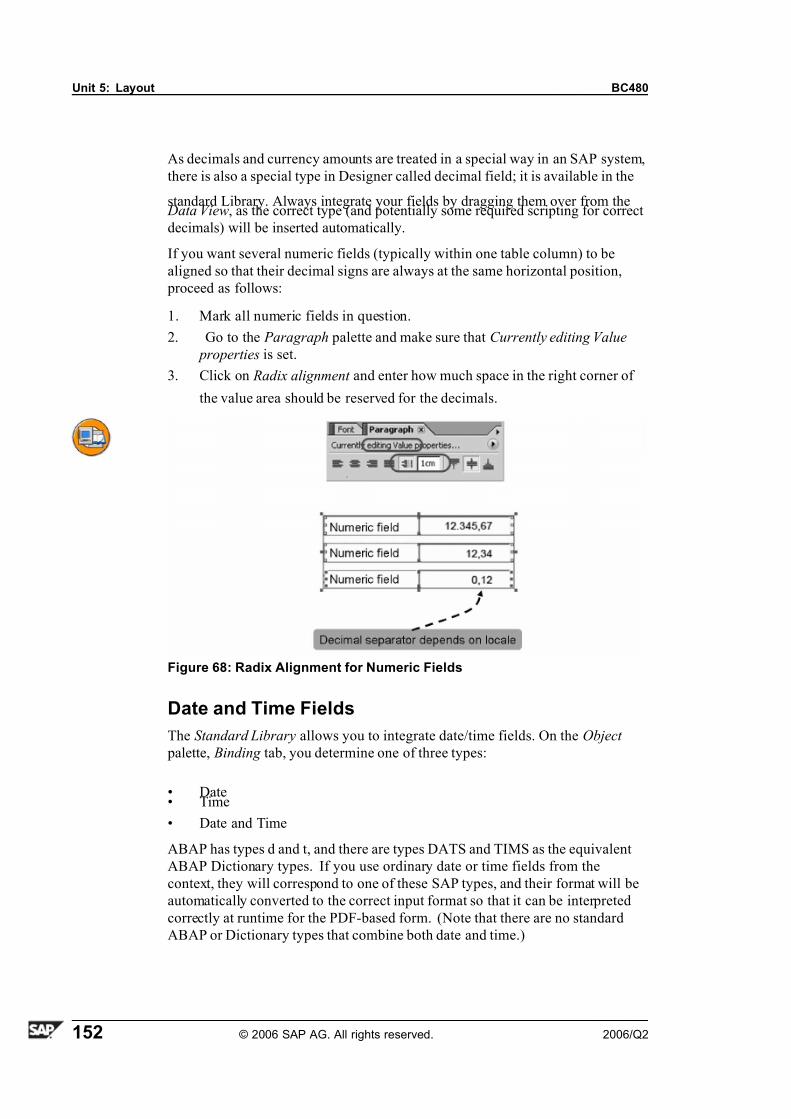
7/14/2019 BC480 - PDF-Based Print Forms
http://slidepdf.com/reader/full/bc480-pdf-based-print-forms 160/317
Unit 5: Layout BC480
As decimals and currency amounts are treated in a special way in an SAP system,
there is also a special type in Designer called decimal field; it is available in the
standard Library. Always integrate your fields by dragging them over from the Data View, as the correct type (and potentially some required scripting for correct
decimals) will be inserted automatically.
If you want several numeric fields (typically within one table column) to be
aligned so that their decimal signs are always at the same horizontal position,
proceed as follows:
1. Mark all numeric fields in question.
2. Go to the Paragraph palette and make sure that Currently editing Value
properties is set.
3. Click on Radix alignment and enter how much space in the right corner of
the value area should be reserved for the decimals.
Figure 68: Radix Alignment for Numeric Fields
Date and Time Fields
The Standard Library allows you to integrate date/time fields. On the Object
palette, Binding tab, you determine one of three types:
• Date• Time
• Date and Time
ABAP has types d and t, and there are types DATS and TIMS as the equivalent
ABAP Dictionary types. If you use ordinary date or time fields from the
context, they will correspond to one of these SAP types, and their format will be
automatically converted to the correct input format so that it can be interpreted
correctly at runtime for the PDF-based form. (Note that there are no standard
ABAP or Dictionary types that combine both date and time.)
152 © 2006 SAP AG. All rights reserved. 2006/Q2
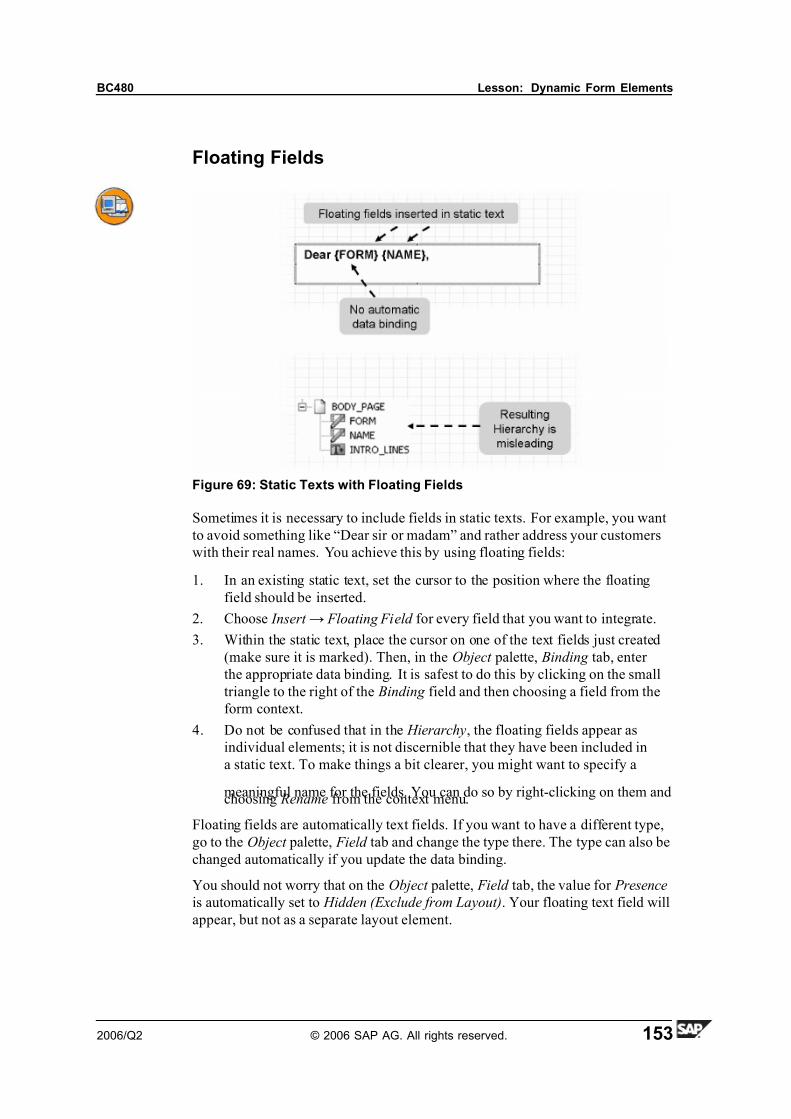
7/14/2019 BC480 - PDF-Based Print Forms
http://slidepdf.com/reader/full/bc480-pdf-based-print-forms 161/317
BC480 Lesson: Dynamic Form Elements
Floating Fields
Figure 69: Static Texts with Floating Fields
Sometimes it is necessary to include fields in static texts. For example, you want
to avoid something like “Dear sir or madam” and rather address your customers
with their real names. You achieve this by using floating fields:
1. In an existing static text, set the cursor to the position where the floating
field should be inserted.
2. Choose Insert → Floating Field for every field that you want to integrate.
3. Within the static text, place the cursor on one of the text fields just created
(make sure it is marked). Then, in the Object palette, Binding tab, enter
the appropriate data binding. It is safest to do this by clicking on the small
triangle to the right of the Binding field and then choosing a field from the
form context.
4. Do not be confused that in the Hierarchy, the floating fields appear as
individual elements; it is not discernible that they have been included in
a static text. To make things a bit clearer, you might want to specify a
meaningful name for the fields. You can do so by right-clicking on them andchoosing Rename from the context menu.
Floating fields are automatically text fields. If you want to have a different type,
go to the Object palette, Field tab and change the type there. The type can also be
changed automatically if you update the data binding.
You should not worry that on the Object palette, Field tab, the value for Presence
is automatically set to Hidden (Exclude from Layout). Your floating text field will
appear, but not as a separate layout element.
2006/Q2 © 2006 SAP AG. All rights reserved. 153
7/14/2019 BC480 - PDF-Based Print Forms
http://slidepdf.com/reader/full/bc480-pdf-based-print-forms 162/317
Unit 5: Layout BC480
Page numbers are also inserted as floating fields, together with some scripting.
Set the cursor into a static text, then choose Insert → Current Page Number or
Number of Pages.
Manipulating the Output Format
Formatting Options
• Formatting output of fields can be performed:
– With patterns (date formats, omitting of leading zeros, ...)
– Via checking Limit length on the Field tab of the Object palette (output
length)
– In the ABAP program (offsets, compression of blanks)You cannot use output options for character fields as you might know them from
SAPscript or Smart Forms, like specifying an offset (name+5). Instead, use the
ABAP program and/or ABAP coding at the form's initialization to format your
fields according to your needs.
Figure 70: Display Patterns
The display pattern describes how data at runtime will be displayed in the
document. There is a set of rules-based specifications to govern the formatting
and parsing of date, time, numeric data, and text data.
For example, the current date (which in ABAP is represented in the form
YYYYMMDD, for instance 20101215) might be represented as “2010-12-15”,
“Sonntag, den 15. Dezember 2010”, or “Sunday, December 15, 2010”.
154 © 2006 SAP AG. All rights reserved. 2006/Q2
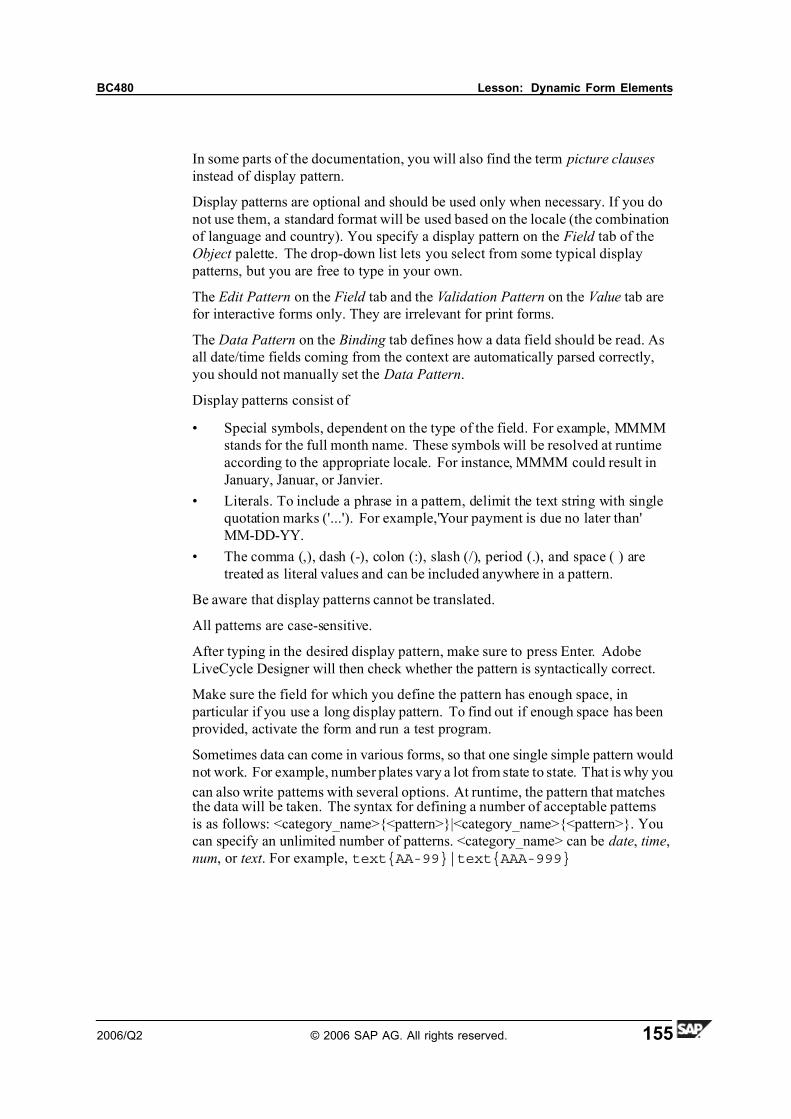
7/14/2019 BC480 - PDF-Based Print Forms
http://slidepdf.com/reader/full/bc480-pdf-based-print-forms 163/317
BC480 Lesson: Dynamic Form Elements
In some parts of the documentation, you will also find the term picture clauses
instead of display pattern.
Display patterns are optional and should be used only when necessary. If you do
not use them, a standard format will be used based on the locale (the combination
of language and country). You specify a display pattern on the Field tab of the
Object palette. The drop-down list lets you select from some typical display
patterns, but you are free to type in your own.
The Edit Pattern on the Field tab and the Validation Pattern on the Value tab are
for interactive forms only. They are irrelevant for print forms.
The Data Pattern on the Binding tab defines how a data field should be read. As
all date/time fields coming from the context are automatically parsed correctly,
you should not manually set the Data Pattern.
Display patterns consist of
• Special symbols, dependent on the type of the field. For example, MMMM
stands for the full month name. These symbols will be resolved at runtime
according to the appropriate locale. For instance, MMMM could result in
January, Januar, or Janvier.
• Literals. To include a phrase in a pattern, delimit the text string with single
quotation marks ('...'). For example,'Your payment is due no later than'
MM-DD-YY.
• The comma (,), dash (-), colon (:), slash (/), period (.), and space ( ) are
treated as literal values and can be included anywhere in a pattern.
Be aware that display patterns cannot be translated.
All patterns are case-sensitive.
After typing in the desired display pattern, make sure to press Enter. Adobe
LiveCycle Designer will then check whether the pattern is syntactically correct.
Make sure the field for which you define the pattern has enough space, in
particular if you use a long display pattern. To find out if enough space has been
provided, activate the form and run a test program.
Sometimes data can come in various forms, so that one single simple pattern would
not work. For example, number plates vary a lot from state to state. That is why you
can also write patterns with several options. At runtime, the pattern that matchesthe data will be taken. The syntax for defining a number of acceptable patterns
is as follows: <category_name>{<pattern>}|<category_name>{<pattern>}. You
can specify an unlimited number of patterns. <category_name> can be date, time,
num, or text . For example, text{AA-99}|text{AAA-999}
2006/Q2 © 2006 SAP AG. All rights reserved. 155

7/14/2019 BC480 - PDF-Based Print Forms
http://slidepdf.com/reader/full/bc480-pdf-based-print-forms 164/317
Unit 5: Layout BC480
Date Pattern Symbols
D One- or two-digit (1-31) day of the month
DD Zero-padded two-digit (01-31) day of the month
M One- or two-digit (1-12) month of the year
MM Zero-padded two-digit (01-12) month of the year
MMM Abbreviated month name
MMMM Full month name
EEE Abbreviated weekday name
EEEE Full weekday name
YY Two-digit year
YYYY Four-digit year
The above table shows some date pattern symbols. For a full list, consult the
Adobe LiveCycle Designer online manual.
Time Pattern Symbols
h One- or two-digit (1-12) hour of the meridian (AM/PM)
hh Zero-padded two-digit (01-12) hour of the meridian (AM/PM)
H One- or two-digit (0-23) hour of the day
HH Zero-padded two-digit (0-23) hour of the day
M One- or two-digit (0-59) minute of the hour
MM Zero-padded two-digit (00-59) minute of the hour
S One- or two-digit (0-59) second of the minute
SS Zero-padded two-digit (00-59) second of the minute
A Meridian (AM or PM)
Z Abbreviated time-zone name, for example, GMT, GMT+05:00,
GMT-00:30, EST, PDT
The above table shows some time pattern symbols. For a full list, consult the
Adobe LiveCycle Designer online manual.
156 © 2006 SAP AG. All rights reserved. 2006/Q2
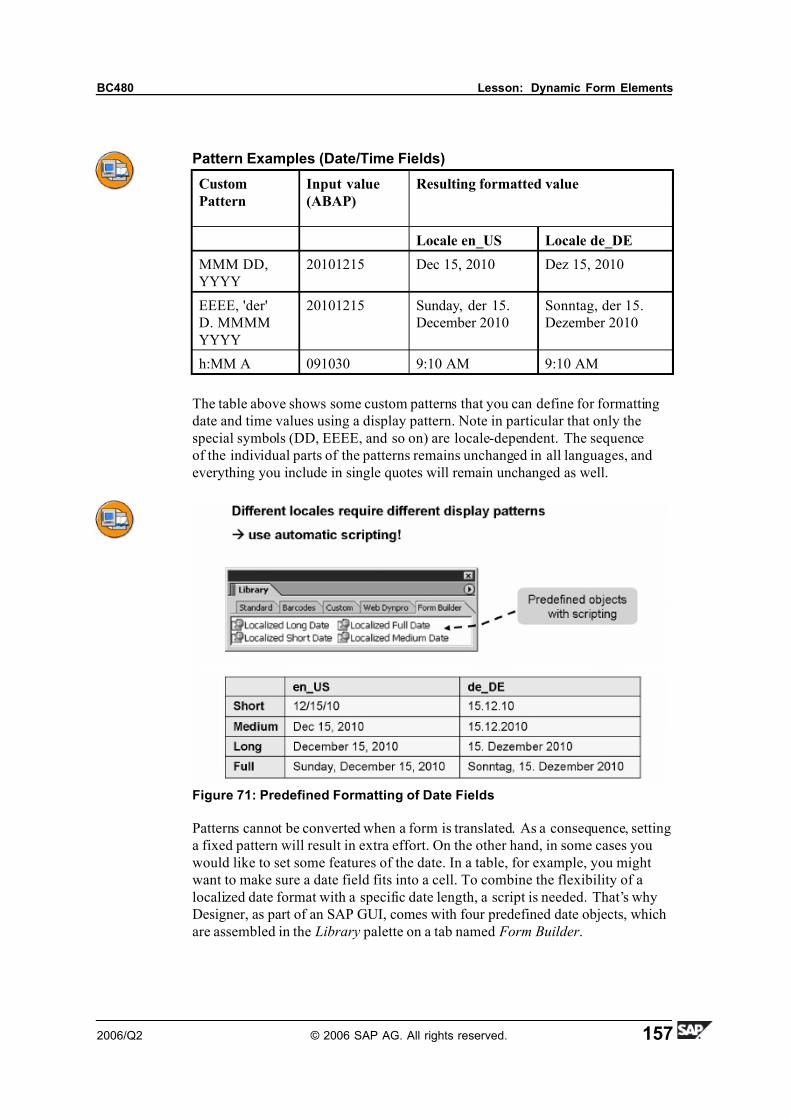
7/14/2019 BC480 - PDF-Based Print Forms
http://slidepdf.com/reader/full/bc480-pdf-based-print-forms 165/317
BC480 Lesson: Dynamic Form Elements
Pattern Examples (Date/Time Fields)
Custom
Pattern
Input value
(ABAP)
Resulting formatted value
Locale en_US Locale de_DE
MMM DD,
YYYY
20101215 Dec 15, 2010 Dez 15, 2010
EEEE, 'der'
D. MMMM
YYYY
20101215 Sunday, der 15.
December 2010
Sonntag, der 15.
Dezember 2010
h:MM A 091030 9:10 AM 9:10 AM
The table above shows some custom patterns that you can define for formatting
date and time values using a display pattern. Note in particular that only the
special symbols (DD, EEEE, and so on) are locale-dependent. The sequence
of the individual parts of the patterns remains unchanged in all languages, and
everything you include in single quotes will remain unchanged as well.
Figure 71: Predefined Formatting of Date Fields
Patterns cannot be converted when a form is translated. As a consequence, setting
a fixed pattern will result in extra effort. On the other hand, in some cases you
would like to set some features of the date. In a table, for example, you might
want to make sure a date field fits into a cell. To combine the flexibility of a
localized date format with a specific date length, a script is needed. That’s why
Designer, as part of an SAP GUI, comes with four predefined date objects, which
are assembled in the Library palette on a tab named Form Builder .
2006/Q2 © 2006 SAP AG. All rights reserved. 157
7/14/2019 BC480 - PDF-Based Print Forms
http://slidepdf.com/reader/full/bc480-pdf-based-print-forms 166/317
Unit 5: Layout BC480
You insert a predefined date object just as you would insert a standard object
or one of your own custom objects: by dragging and dropping it to its position
on any page.
The FormCalc scripting that is executed at event initialize is as follows:
$.format.picture = DateFmt(1, $.locale); // for display
$.ui.picture = DateFmt(1, $.locale); // for user input
Instead of digit 1 for short format, you would have 2 for medium, 3 for long,
and 4 for full.
Hint: A pattern that you might use in addition to the coding will be
overridden by the scripting.
Country-Specific Formatting with No Patterns
• If you use neither display patterns nor coding, medium format will be used
for dates.
• If there are no pattern entries, data is formatted according to the specified
locale.
• Prerequisite: The locale is specified in the function module's interface and/or
by the ABAP command SET COUNTRY.
A locale is a combination of a country and a language. Be sure to set it in your
ABAP program (even though there are various places in Designer where youcould set it for the form or parts of it). For example, you have customers in
various countries and you would like to print a date on an invoice according to
the rules of your customer’s country.
The way you determine a locale depends on the interface type used:
• ABAP Dictionary interface type:
Set the langu and country fields of structure
/1bcdwb/docparams. This structure is an import parameter of the form’s
generated function module.
• Smart Forms compatible interface type):
Use ABAP command SET COUNTRY to determine thecountry version of the form.
Use the langu field of structure control_parameters to determine the
language. This structure is an import parameter of a form’s generated
function module if a Smart Forms-compatible interface is used.
158 © 2006 SAP AG. All rights reserved. 2006/Q2
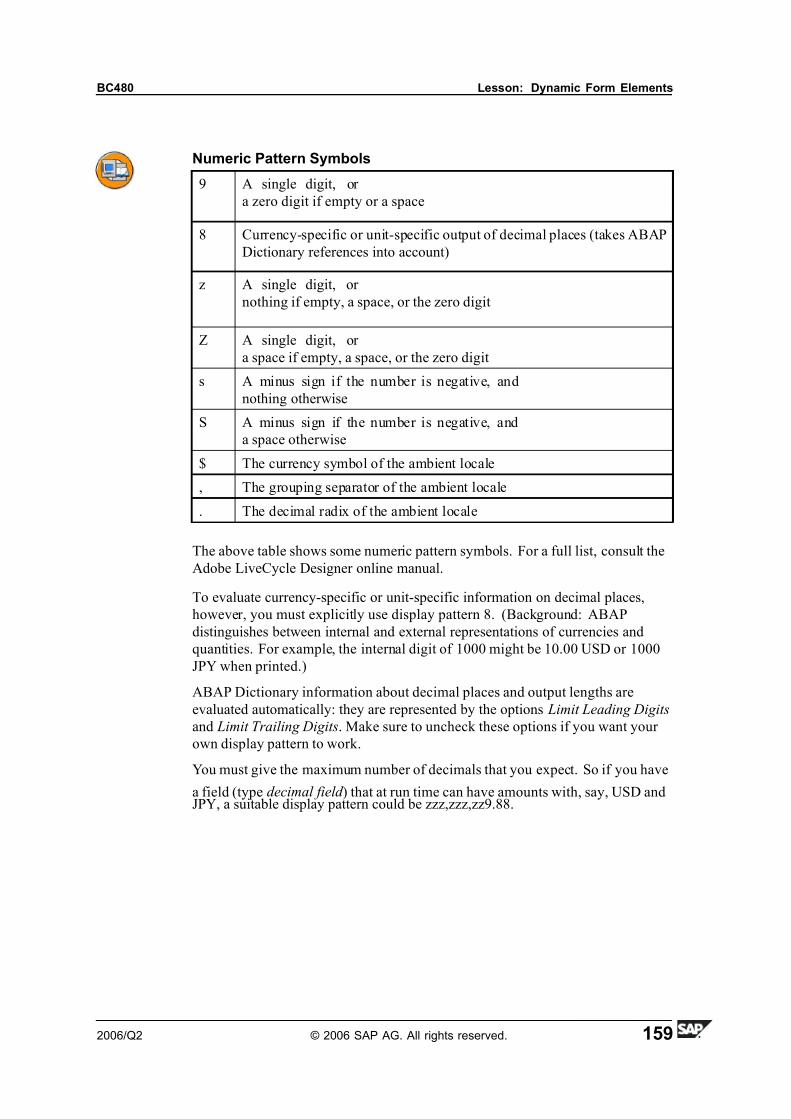
7/14/2019 BC480 - PDF-Based Print Forms
http://slidepdf.com/reader/full/bc480-pdf-based-print-forms 167/317
BC480 Lesson: Dynamic Form Elements
Numeric Pattern Symbols
9 A single digit, or
a zero digit if empty or a space
8 Currency-specific or unit-specific output of decimal places (takes ABAP
Dictionary references into account)
z A single digit, or
nothing if empty, a space, or the zero digit
Z A single digit, or
a space if empty, a space, or the zero digit
s A minus sign if the number is negative, and
nothing otherwise
S A minus sign if the number is negative, and
a space otherwise
$ The currency symbol of the ambient locale
, The grouping separator of the ambient locale
. The decimal radix of the ambient locale
The above table shows some numeric pattern symbols. For a full list, consult the
Adobe LiveCycle Designer online manual.
To evaluate currency-specific or unit-specific information on decimal places,
however, you must explicitly use display pattern 8. (Background: ABAP
distinguishes between internal and external representations of currencies and
quantities. For example, the internal digit of 1000 might be 10.00 USD or 1000
JPY when printed.)
ABAP Dictionary information about decimal places and output lengths are
evaluated automatically: they are represented by the options Limit Leading Digits
and Limit Trailing Digits. Make sure to uncheck these options if you want your
own display pattern to work.
You must give the maximum number of decimals that you expect. So if you have
a field (type decimal field ) that at run time can have amounts with, say, USD andJPY, a suitable display pattern could be zzz,zzz,zz9.88.
2006/Q2 © 2006 SAP AG. All rights reserved. 159
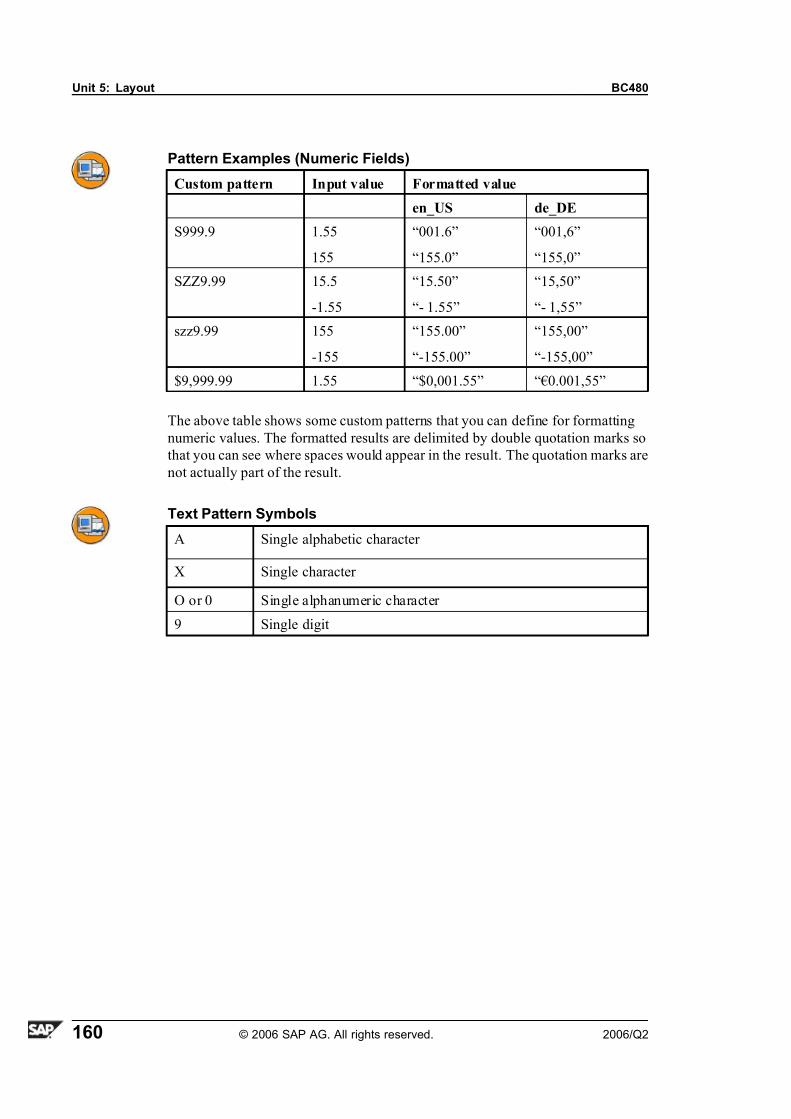
7/14/2019 BC480 - PDF-Based Print Forms
http://slidepdf.com/reader/full/bc480-pdf-based-print-forms 168/317
Unit 5: Layout BC480
Pattern Examples (Numeric Fields)
Custom pattern Input value Formatted value
en_US de_DE
S999.9 1.55
155
“001.6”
“155.0”
“001,6”
“155,0”
SZZ9.99 15.5
-1.55
“15.50”
“- 1.55”
“15,50”
“- 1,55”
szz9.99 155
-155
“155.00”
“-155.00”
“155,00”
“-155,00”
$9,999.99 1.55 “$0,001.55” “€0.001,55”
The above table shows some custom patterns that you can define for formatting
numeric values. The formatted results are delimited by double quotation marks so
that you can see where spaces would appear in the result. The quotation marks are
not actually part of the result.
Text Pattern Symbols
A Single alphabetic character
X Single character
O or 0 Single alphanumeric character
9 Single digit
160 © 2006 SAP AG. All rights reserved. 2006/Q2
7/14/2019 BC480 - PDF-Based Print Forms
http://slidepdf.com/reader/full/bc480-pdf-based-print-forms 169/317
BC480 Lesson: Dynamic Form Elements
Exercise 6: Dynamic Form Elements
Exercise Objectives
After completing this exercise, you will be able to:
• Insert dynamic elements, including text fields, image fields, date fields, and
floating fields, into a form
• Set the data binding
• Apply patterns
Business Example
A travel agency wants to print invoices for their customer's flight bookings using
the tool “Interactive Forms”. The form has been set up, but it lacks all data that isrelevant for the business process. The form designers will now have to integrate
dynamic content, such as the customer’s address or the date.
Task 1:
Change the image type of the company logo.
Continue to work with your own form, ZBC480_##. ## stands for your two-digit
group number (monitor number).
It might be a good idea to create a local safety copy of the form every now and then.
To do so, choose Utilities→
Downloading form object from SFP's initial screen.If you have not finished one of the previous exercises, you can copy the
template form BC480_STATIC. The reference solution of this exercise is form
BC480_DYNAMIC.
In between the steps of this exercise, you might want to activate your form and
test it with report SAPBC480_DEMO (or with Designer's preview, provided you
have set an XML test data file in the form properties).
You will find a detailed testing scenario at the end of this exercise.
1. Change the type of the image LOGO (which so far was static). Set it to
Image field . Create the correct data binding to the context variable LOGO.
Task 2:
Fill the INFORMATION box on master page FIRST .
Integrate the following elements (vertically arranged and left-aligned). Make sure
the subform is wide enough.
1. The customer number as a text field with caption, but without a frame. Refer
to the context field IS_CUSTOMER-ID.
Continued on next page
2006/Q2 © 2006 SAP AG. All rights reserved. 161

7/14/2019 BC480 - PDF-Based Print Forms
http://slidepdf.com/reader/full/bc480-pdf-based-print-forms 170/317
Unit 5: Layout BC480
2. “Our reference” as a text field REFERENCE with caption, but without a
frame. Set a default value of your choice.
3. The date. Refer to the DATE field of the context.
Task 3:
Integrate the customer address.
1. In the top left area of master page FIRST , below the travel agency's address,
include the customer's address. (Reminder: this address – formatted
according to the rules of the customer's country – should be in the context
field CUSTOMER_ADDRESS .)
Task 4:
Integrate the clerk's name.
1. Below the closing lines of the invoice, insert the clerk's name. You will find
it in the context constant GC_CLERK .
Task 5:
Optional: Integrate travel agency's small address for the envelope window.
1. On master page FIRST , between the travel agency's full address and the
customer address, include the travel agency's small address intended for the
envelope window. Refer to context field ENVELOPE_ADDRESS . Make
sure space is sufficient.
Task 6:
Display page numbers.
1. On the top right margin of master page NEXT , create a static text PAGE with
the content “Page of”. Integrate the current page number and the total number
of pages, so that at runtime, the result will look similar to “Page 2 of 3”.
Note: You can view the result with report SAPBC480_DEMO only
once you have integrated the bookings (which you will do later).
Until now, no page break will be processed.
Task 7:
Personalize the discount note.
1. Up until now, always the same sentence was printed for the discount (element
PS ). With the help of a floating field, include the actual discount rate. (The
relevant context field is IS_CUSTOMER-DISCOUNT .)
Continued on next page
162 © 2006 SAP AG. All rights reserved. 2006/Q2
7/14/2019 BC480 - PDF-Based Print Forms
http://slidepdf.com/reader/full/bc480-pdf-based-print-forms 171/317
BC480 Lesson: Dynamic Form Elements
Take care to integrate a numeric field.
Make sure leading zeros are omitted (with the help of a display pattern).
Task 8:
Optional: Personalize the introductory greeting.
1. Change your existing introductory greeting (“Dear sir/madam”) in body page
BODY_01 so that the customer is personally addressed with form and name.
To achieve this, integrate two floating fields and refer to the context fields
IS_CUSTOMER-FORM and IS_CUSTOMER-NAME from the context. It is
up to you to set the data binding manually.
Task 9:
Integrate texts with vacation suggestions.
1. Integrate the alternative OFFER into the layout as the last field of body page
BODY_01, so that the travel agency's customers get some hints on where
they should spend their next vacations.
2. Make sure the closing, the clerk's name, the text PS (discount note) and the
alternative OFFER are protected against page break.
Task 10:
Make sure the date is displayed in a country-specific format.
1. From the INFORMATION subform on master page FIRST , remove the
“plain” date field included in a previous task.
2. Use one of the special objects in the Library palette, Form Builder tab
(which consists of a neutral date field plus scripting) to display the date in
localized medium format.
Task 11:
Perform a final test.
You have finally come to the point where you can harvest the fruits from the
preceding lessons and evaluate the output.
1. Activate your form and test it with report SAPBC480_DEMO.
Is all the customer information printed correctly? In particular, have the form
and the name been integrated correctly? Are the page breaks OK?
Test with a German customer (e.g. number 1) and an English customer (e.g.
number 5). You should get different vacation tips.
Continued on next page
2006/Q2 © 2006 SAP AG. All rights reserved. 163

7/14/2019 BC480 - PDF-Based Print Forms
http://slidepdf.com/reader/full/bc480-pdf-based-print-forms 172/317
Unit 5: Layout BC480
Test with customers with different discounts, e.g. numbers 2 and 3. You
should get different PS texts.
2. On the selection screen of the report, enable the advanced functions (via the
button). On the Data source tab, you can select a URL for the company
logo. Try both choices.
On the Language/Country tab, you can set the sending country. You might
choose DE and GB, for instance. Your invoices for customers 1 and 5 should
be mailed as domestic mail in one case, and as international mail in the other.
(You can evaluate this in the customer address field.)
164 © 2006 SAP AG. All rights reserved. 2006/Q2

7/14/2019 BC480 - PDF-Based Print Forms
http://slidepdf.com/reader/full/bc480-pdf-based-print-forms 173/317
BC480 Lesson: Dynamic Form Elements
Solution 6: Dynamic Form Elements
Task 1:
Change the image type of the company logo.
Continue to work with your own form, ZBC480_##. ## stands for your two-digit
group number (monitor number).
It might be a good idea to create a local safety copy of the form every now and then.
To do so, choose Utilities→ Downloading form object from SFP's initial screen.
If you have not finished one of the previous exercises, you can copy the
template form BC480_STATIC. The reference solution of this exercise is form
BC480_DYNAMIC.
In between the steps of this exercise, you might want to activate your form and
test it with report SAPBC480_DEMO (or with Designer's preview, provided you
have set an XML test data file in the form properties).
You will find a detailed testing scenario at the end of this exercise.
1. Change the type of the image LOGO (which so far was static). Set it to
Image field . Create the correct data binding to the context variable LOGO.
a) On the Object palette, tab Field .
b) On the Object palette, tab Binding .
Task 2:
Fill the INFORMATION box on master page FIRST .
Integrate the following elements (vertically arranged and left-aligned). Make sure
the subform is wide enough.
1. The customer number as a text field with caption, but without a frame. Refer
to the context field IS_CUSTOMER-ID.
a) Drag the field from the Data View. On the Object palette, Field tab, set
the appearance to None.
2. “Our reference” as a text field REFERENCE with caption, but without a
frame. Set a default value of your choice.
a) See previous step. You determine the default value on the Object
palette, Value tab.
3. The date. Refer to the DATE field of the context.
a) Drag the field from the Data View. On the Object palette, Field tab, set
the appearance to None.
Continued on next page
2006/Q2 © 2006 SAP AG. All rights reserved. 165
7/14/2019 BC480 - PDF-Based Print Forms
http://slidepdf.com/reader/full/bc480-pdf-based-print-forms 174/317
Unit 5: Layout BC480
Task 3:
Integrate the customer address.
1. In the top left area of master page FIRST , below the travel agency's address,
include the customer's address. (Reminder: this address – formatted
according to the rules of the customer's country – should be in the context
field CUSTOMER_ADDRESS .)
a) From the Data View, drag the CUSTOMER_ADDRESS field over to the
master page FIRST in the layout.
b) On the Object palette, Field tab, set the appearance to None. On the
Layout palette, set the caption to None.
c) Resize the field, either in the Layout Editor or on the Layout palette.
Task 4:
Integrate the clerk's name.
1. Below the closing lines of the invoice, insert the clerk's name. You will find
it in the context constant GC_CLERK .
a) From the Data View, drag the GC_CLERK field over to the body page
BODY_01.
Task 5:
Optional: Integrate travel agency's small address for the envelope window.
1. On master page FIRST , between the travel agency's full address and the
customer address, include the travel agency's small address intended for the
envelope window. Refer to context field ENVELOPE_ADDRESS . Make
sure space is sufficient.
a) From the Data View, drag the ENVELOPE_ADDRESS field to the
layout.
Continued on next page
166 © 2006 SAP AG. All rights reserved. 2006/Q2
7/14/2019 BC480 - PDF-Based Print Forms
http://slidepdf.com/reader/full/bc480-pdf-based-print-forms 175/317
BC480 Lesson: Dynamic Form Elements
Task 6:
Display page numbers.
1. On the top right margin of master page NEXT , create a static text PAGE with
the content “Page of”. Integrate the current page number and the total number
of pages, so that at runtime, the result will look similar to “Page 2 of 3”.
Note: You can view the result with report SAPBC480_DEMO only
once you have integrated the bookings (which you will do later).
Until now, no page break will be processed.
a) Create a static text with the help of the Library. To integrate the page
numbers, set the cursor in the static text and choose Insert → Current
Page Number or Number of Pages.
Task 7:
Personalize the discount note.
1. Up until now, always the same sentence was printed for the discount (element
PS ). With the help of a floating field, include the actual discount rate. (The
relevant context field is IS_CUSTOMER-DISCOUNT .)
Take care to integrate a numeric field.
Make sure leading zeros are omitted (with the help of a display pattern).
a) Set the cursor into the static text PS . From the Insert menu, choose Floating field .
b) To set the data binding, mark the filed in the Hierarchy, then go to the
Object palette, Binding tab. From the input help for the default binding,
select IS_CUSTOMER.DISCOUNT . To change the type of the field, go
to the Object palette, Field tab.
c) The display pattern is “zz”. You set it on the Object palette, Field tab.
Continued on next page
2006/Q2 © 2006 SAP AG. All rights reserved. 167
7/14/2019 BC480 - PDF-Based Print Forms
http://slidepdf.com/reader/full/bc480-pdf-based-print-forms 176/317
Unit 5: Layout BC480
Task 8:
Optional: Personalize the introductory greeting.
1. Change your existing introductory greeting (“Dear sir/madam”) in body page
BODY_01 so that the customer is personally addressed with form and name.
To achieve this, integrate two floating fields and refer to the context fields
IS_CUSTOMER-FORM and IS_CUSTOMER-NAME from the context. It is
up to you to set the data binding manually.
a) Set the cursor into the static text. From the Insert menu, choose
Floating field .
b) Determine the data binding on the Object palette,
Binding tab: enter $record.IS_CUSTOMER.FORM and
$record.IS_CUSTOMER.NAME . If you enter it manually, make sure
not to write $record.IS_CUSTOMER–FORM (with a hyphen).
Task 9:
Integrate texts with vacation suggestions.
1. Integrate the alternative OFFER into the layout as the last field of body page
BODY_01, so that the travel agency's customers get some hints on where
they should spend their next vacations.
a) Drag the OFFER field from the Data View to the layout.
2. Make sure the closing, the clerk's name, the text PS (discount note) and the
alternative OFFER are protected against page break.
a) You should already have a subform that contains the closing and the PS .
Both the clerk and the alternative should now also be in this subform.
Task 10:
Make sure the date is displayed in a country-specific format.
1. From the INFORMATION subform on master page FIRST , remove the
“plain” date field included in a previous task.
a) Locate the field DATE in the INFORMATION subform on master page
FIRST and delete.
Continued on next page
168 © 2006 SAP AG. All rights reserved. 2006/Q2
7/14/2019 BC480 - PDF-Based Print Forms
http://slidepdf.com/reader/full/bc480-pdf-based-print-forms 177/317
BC480 Lesson: Dynamic Form Elements
2. Use one of the special objects in the Library palette, Form Builder tab
(which consists of a neutral date field plus scripting) to display the date in
localized medium format.
a) Drag the element from the Library, Form Builder tab to the
INFORMATION box.
b) Make sure the field (including its caption) is long enough. Resize
the field if needed.
c) On the Object palette, Field tab, set the appearance to None.
d) On the Object palette, Binding tab, set the default binding to
$record.DATE .
Task 11:Perform a final test.
You have finally come to the point where you can harvest the fruits from the
preceding lessons and evaluate the output.
1. Activate your form and test it with report SAPBC480_DEMO.
Is all the customer information printed correctly? In particular, have the form
and the name been integrated correctly? Are the page breaks OK?
Test with a German customer (e.g. number 1) and an English customer (e.g.
number 5). You should get different vacation tips.
Test with customers with different discounts, e.g. numbers 2 and 3. Youshould get different PS texts.
a) Press CTRL+F3, then open a second mode and start transaction SA38
to run the report. Press F8 to execute.
2. On the selection screen of the report, enable the advanced functions (via the
button). On the Data source tab, you can select a URL for the company
logo. Try both choices.
On the Language/Country tab, you can set the sending country. You might
choose DE and GB, for instance. Your invoices for customers 1 and 5 should
be mailed as domestic mail in one case, and as international mail in the other.
(You can evaluate this in the customer address field.)
a) ...
2006/Q2 © 2006 SAP AG. All rights reserved. 169

7/14/2019 BC480 - PDF-Based Print Forms
http://slidepdf.com/reader/full/bc480-pdf-based-print-forms 178/317
Unit 5: Layout BC480
Lesson Summary
You should now be able to:• Insert dynamic elements into a form: text fields, image fields, date/time
fields, floating fields
• Set the data binding (the connection between the layout fields and the
business data)
• Apply patterns (picture clauses) to influence field output
170 © 2006 SAP AG. All rights reserved. 2006/Q2
7/14/2019 BC480 - PDF-Based Print Forms
http://slidepdf.com/reader/full/bc480-pdf-based-print-forms 179/317
BC480 Lesson: Tables
Lesson: Tables
Lesson Overview
In many scenarios, you will have data that is structured in rows and columns. For
example, it is hard to imagine invoices or order confirmations without table-like
presentations of data. In a printing scenario with PDF-based forms, the data
would typically be collected in internal tables and then passed on to the generated
function module of the form. The line-by-line processing is then done by Adobe
document services.
This lesson will show you how to create tables and set details such as headers or
borders.
Note: The kinds of tables described in this lesson require AdobeLiveCycle Designer with at least version 7.1.
Lesson Objectives
After completing this lesson, you will be able to:
• Insert tables into a form
• Format tables
• Set a header for a table
• Create data-driven page breaks
• Create control levels• Create nested tables
Business Example
A travel agency wants to print invoices for their customers' flight bookings using
the tool “Interactive Forms”. The form needs to be able to print a list of items.
Table Types
Basically, tables are special types of subforms that are nested. Every table consists
of at least one subform for the table and one subform for a row. The individual
cells are ordinary layout elements, most frequently static texts or in particular
text/date/numeric fields. If a row subform can be repeated at runtime, the table
will grow vertically. Such a table is called a dynamic table. If the number of rows
is determined at design time, the resulting table is called a static table.
2006/Q2 © 2006 SAP AG. All rights reserved. 171
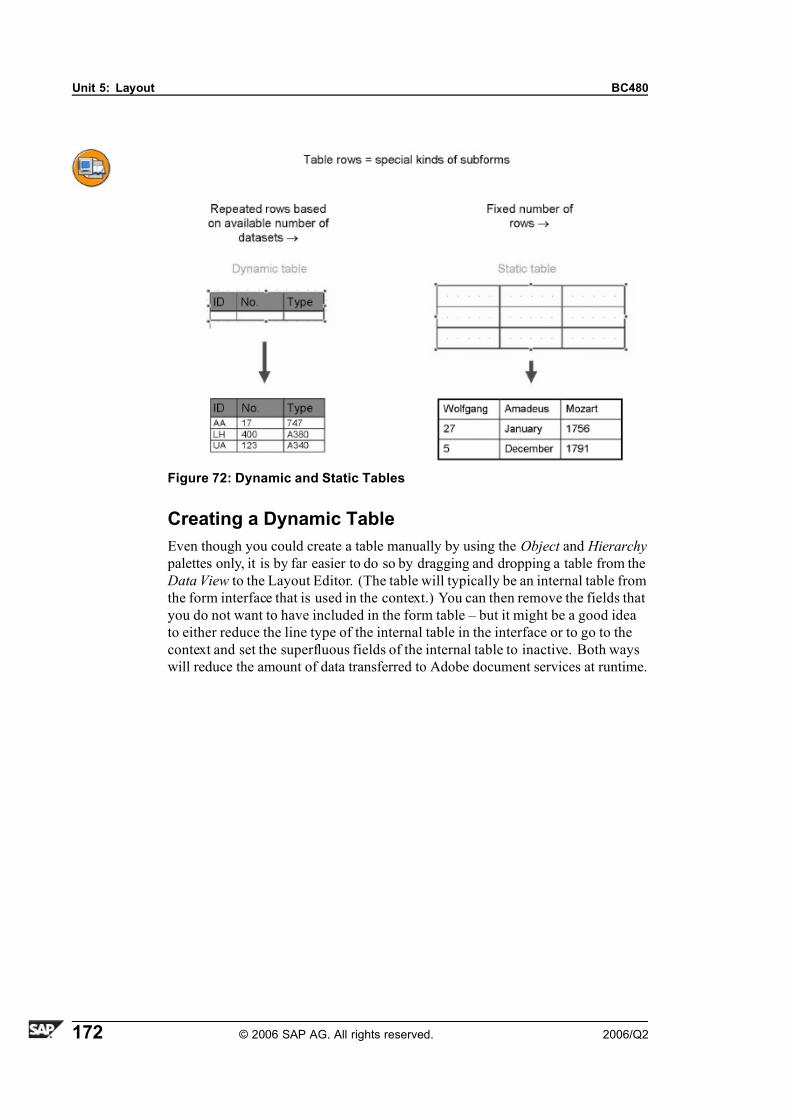
7/14/2019 BC480 - PDF-Based Print Forms
http://slidepdf.com/reader/full/bc480-pdf-based-print-forms 180/317
Unit 5: Layout BC480
Figure 72: Dynamic and Static Tables
Creating a Dynamic Table
Even though you could create a table manually by using the Object and Hierarchy
palettes only, it is by far easier to do so by dragging and dropping a table from the
Data View to the Layout Editor. (The table will typically be an internal table from
the form interface that is used in the context.) You can then remove the fields that
you do not want to have included in the form table – but it might be a good idea
to either reduce the line type of the internal table in the interface or to go to the
context and set the superfluous fields of the internal table to inactive. Both ways
will reduce the amount of data transferred to Adobe document services at runtime.
172 © 2006 SAP AG. All rights reserved. 2006/Q2
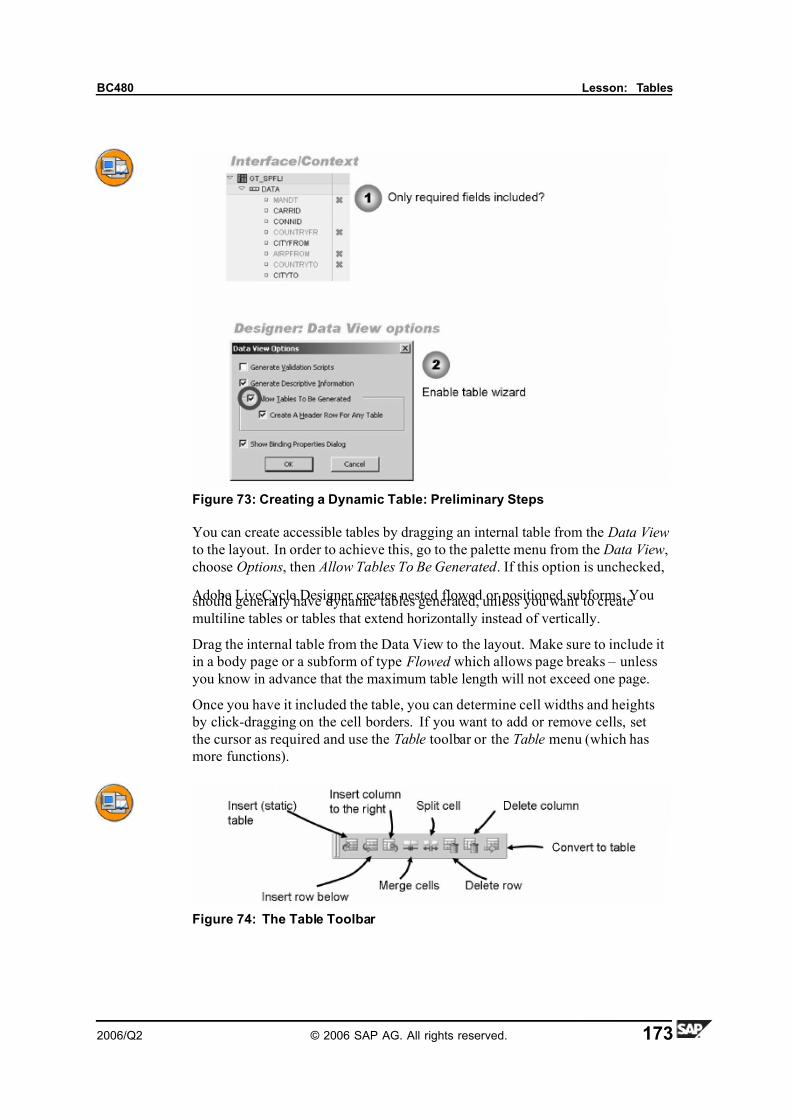
7/14/2019 BC480 - PDF-Based Print Forms
http://slidepdf.com/reader/full/bc480-pdf-based-print-forms 181/317
BC480 Lesson: Tables
Figure 73: Creating a Dynamic Table: Preliminary Steps
You can create accessible tables by dragging an internal table from the Data View
to the layout. In order to achieve this, go to the palette menu from the Data View,
choose Options, then Allow Tables To Be Generated . If this option is unchecked,
Adobe LiveCycle Designer creates nested flowed or positioned subforms. Youshould generally have dynamic tables generated, unless you want to create
multiline tables or tables that extend horizontally instead of vertically.
Drag the internal table from the Data View to the layout. Make sure to include it
in a body page or a subform of type Flowed which allows page breaks – unless
you know in advance that the maximum table length will not exceed one page.
Once you have it included the table, you can determine cell widths and heights
by click-dragging on the cell borders. If you want to add or remove cells, set
the cursor as required and use the Table toolbar or the Table menu (which has
more functions).
Figure 74: The Table Toolbar
2006/Q2 © 2006 SAP AG. All rights reserved. 173
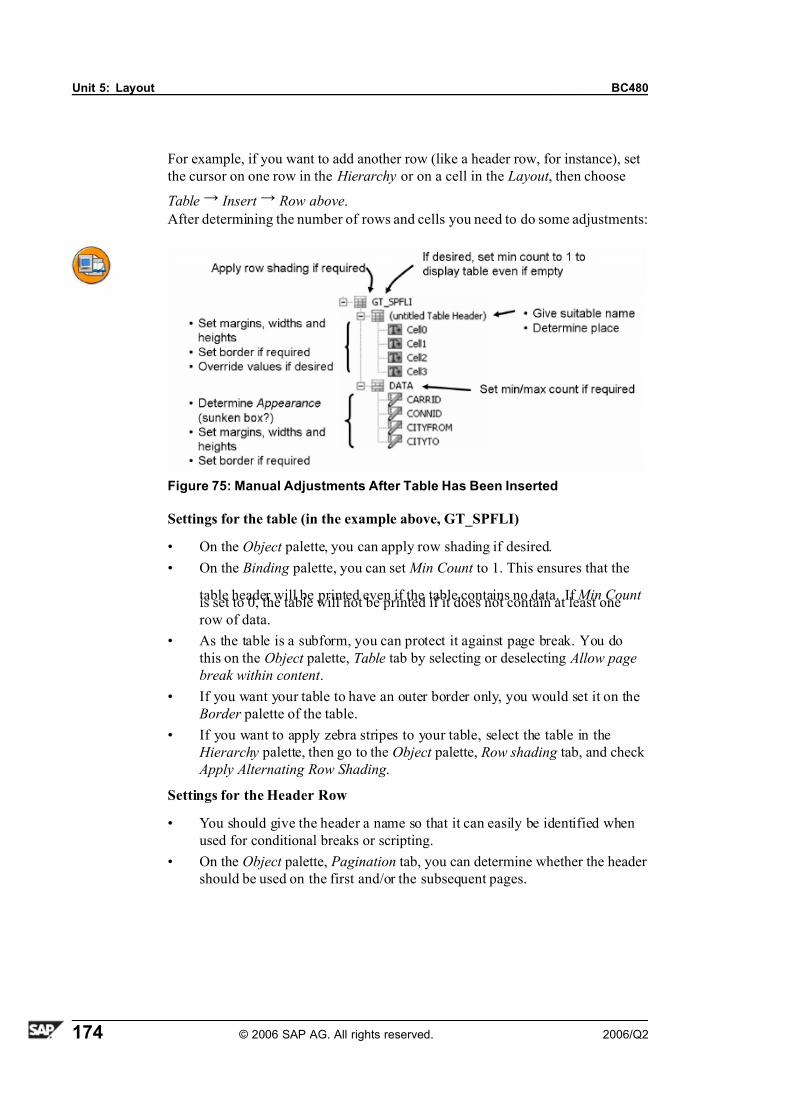
7/14/2019 BC480 - PDF-Based Print Forms
http://slidepdf.com/reader/full/bc480-pdf-based-print-forms 182/317
Unit 5: Layout BC480
For example, if you want to add another row (like a header row, for instance), set
the cursor on one row in the Hierarchy or on a cell in the Layout , then choose
Table→ Insert → Row above.
After determining the number of rows and cells you need to do some adjustments:
Figure 75: Manual Adjustments After Table Has Been Inserted
Settings for the table (in the example above, GT_SPFLI)
• On the Object palette, you can apply row shading if desired.
• On the Binding palette, you can set Min Count to 1. This ensures that the
table header will be printed even if the table contains no data. If Min Count is set to 0, the table will not be printed if it does not contain at least one
row of data.
• As the table is a subform, you can protect it against page break. You do
this on the Object palette, Table tab by selecting or deselecting Allow page
break within content .
• If you want your table to have an outer border only, you would set it on the
Border palette of the table.
• If you want to apply zebra stripes to your table, select the table in the
Hierarchy palette, then go to the Object palette, Row shading tab, and check
Apply Alternating Row Shading .
Settings for the Header Row
• You should give the header a name so that it can easily be identified when
used for conditional breaks or scripting.
• On the Object palette, Pagination tab, you can determine whether the header
should be used on the first and/or the subsequent pages.
174 © 2006 SAP AG. All rights reserved. 2006/Q2
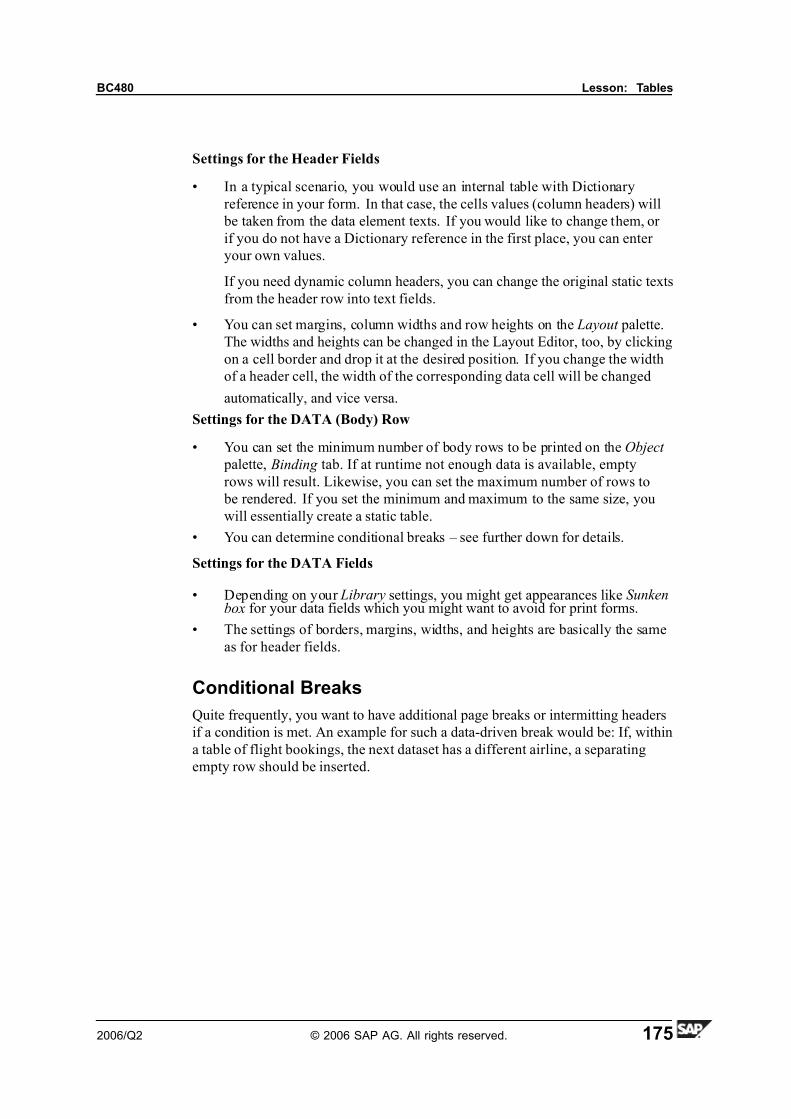
7/14/2019 BC480 - PDF-Based Print Forms
http://slidepdf.com/reader/full/bc480-pdf-based-print-forms 183/317
BC480 Lesson: Tables
Settings for the Header Fields
• In a typical scenario, you would use an internal table with Dictionary
reference in your form. In that case, the cells values (column headers) will
be taken from the data element texts. If you would like to change them, or
if you do not have a Dictionary reference in the first place, you can enter
your own values.
If you need dynamic column headers, you can change the original static texts
from the header row into text fields.
• You can set margins, column widths and row heights on the Layout palette.
The widths and heights can be changed in the Layout Editor, too, by clicking
on a cell border and drop it at the desired position. If you change the width
of a header cell, the width of the corresponding data cell will be changed
automatically, and vice versa.
Settings for the DATA (Body) Row
• You can set the minimum number of body rows to be printed on the Object
palette, Binding tab. If at runtime not enough data is available, empty
rows will result. Likewise, you can set the maximum number of rows to
be rendered. If you set the minimum and maximum to the same size, you
will essentially create a static table.
• You can determine conditional breaks – see further down for details.
Settings for the DATA Fields
• Depending on your Library settings, you might get appearances like Sunkenbox for your data fields which you might want to avoid for print forms.
• The settings of borders, margins, widths, and heights are basically the same
as for header fields.
Conditional Breaks
Quite frequently, you want to have additional page breaks or intermitting headers
if a condition is met. An example for such a data-driven break would be: If, within
a table of flight bookings, the next dataset has a different airline, a separating
empty row should be inserted.
2006/Q2 © 2006 SAP AG. All rights reserved. 175
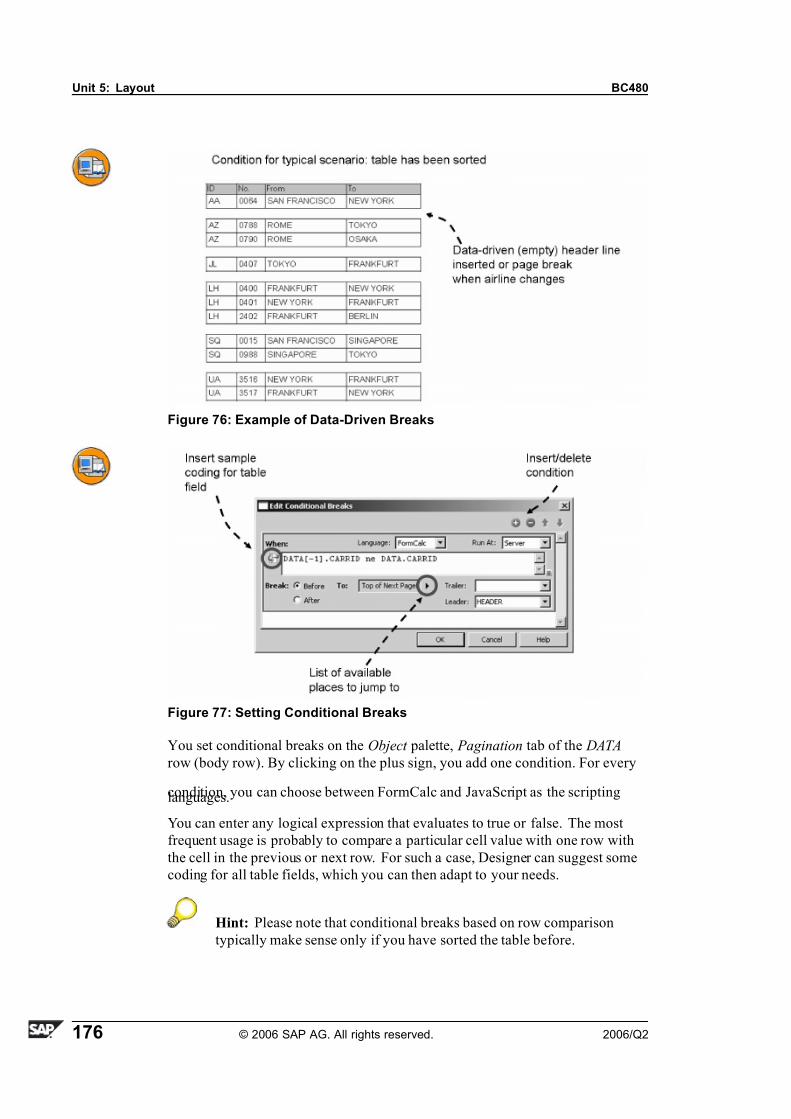
7/14/2019 BC480 - PDF-Based Print Forms
http://slidepdf.com/reader/full/bc480-pdf-based-print-forms 184/317
Unit 5: Layout BC480
Figure 76: Example of Data-Driven Breaks
Figure 77: Setting Conditional Breaks
You set conditional breaks on the Object palette, Pagination tab of the DATA
row (body row). By clicking on the plus sign, you add one condition. For every
condition, you can choose between FormCalc and JavaScript as the scriptinglanguages.
You can enter any logical expression that evaluates to true or false. The most
frequent usage is probably to compare a particular cell value with one row with
the cell in the previous or next row. For such a case, Designer can suggest some
coding for all table fields, which you can then adapt to your needs.
Hint: Please note that conditional breaks based on row comparison
typically make sense only if you have sorted the table before.
176 © 2006 SAP AG. All rights reserved. 2006/Q2
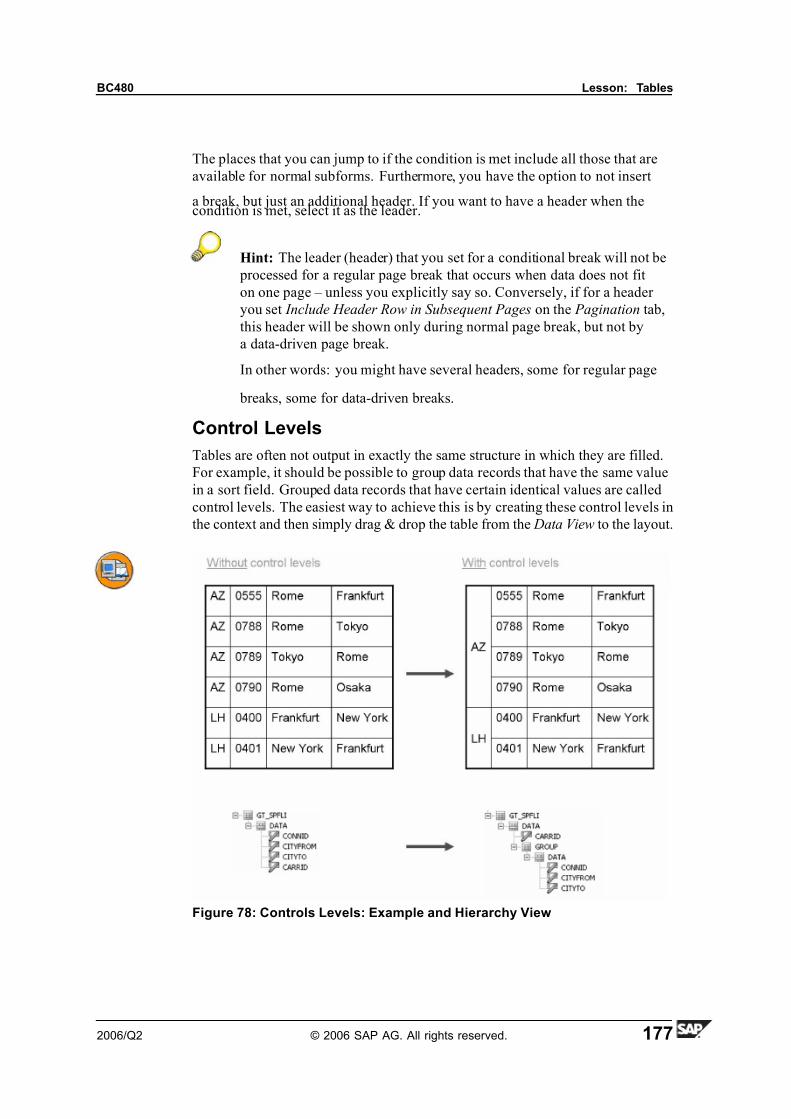
7/14/2019 BC480 - PDF-Based Print Forms
http://slidepdf.com/reader/full/bc480-pdf-based-print-forms 185/317
BC480 Lesson: Tables
The places that you can jump to if the condition is met include all those that are
available for normal subforms. Furthermore, you have the option to not insert
a break, but just an additional header. If you want to have a header when thecondition is met, select it as the leader.
Hint: The leader (header) that you set for a conditional break will not be
processed for a regular page break that occurs when data does not fit
on one page – unless you explicitly say so. Conversely, if for a header
you set Include Header Row in Subsequent Pages on the Pagination tab,
this header will be shown only during normal page break, but not by
a data-driven page break.
In other words: you might have several headers, some for regular page
breaks, some for data-driven breaks.
Control Levels
Tables are often not output in exactly the same structure in which they are filled.
For example, it should be possible to group data records that have the same value
in a sort field. Grouped data records that have certain identical values are called
control levels. The easiest way to achieve this is by creating these control levels in
the context and then simply drag & drop the table from the Data View to the layout.
Figure 78: Controls Levels: Example and Hierarchy View
2006/Q2 © 2006 SAP AG. All rights reserved. 177
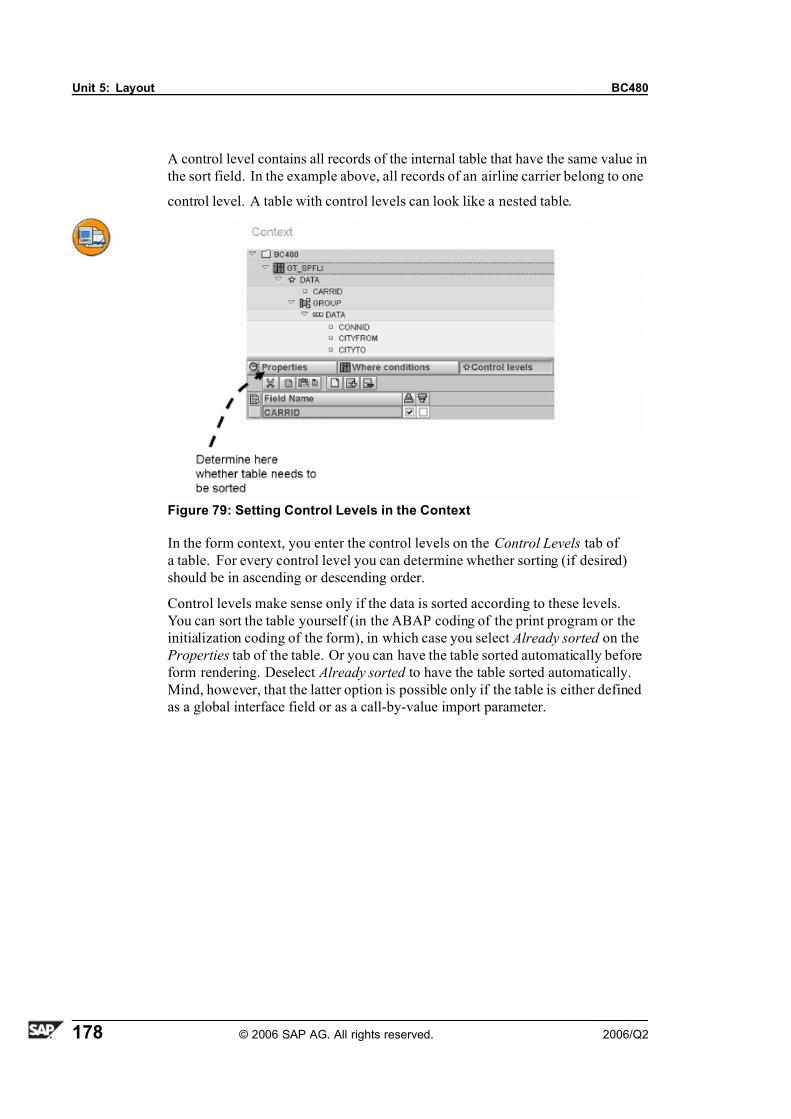
7/14/2019 BC480 - PDF-Based Print Forms
http://slidepdf.com/reader/full/bc480-pdf-based-print-forms 186/317
Unit 5: Layout BC480
A control level contains all records of the internal table that have the same value in
the sort field. In the example above, all records of an airline carrier belong to one
control level. A table with control levels can look like a nested table.
Figure 79: Setting Control Levels in the Context
In the form context, you enter the control levels on the Control Levels tab of
a table. For every control level you can determine whether sorting (if desired)
should be in ascending or descending order.
Control levels make sense only if the data is sorted according to these levels.
You can sort the table yourself (in the ABAP coding of the print program or the
initialization coding of the form), in which case you select Already sorted on the
Properties tab of the table. Or you can have the table sorted automatically before
form rendering. Deselect Already sorted to have the table sorted automatically.
Mind, however, that the latter option is possible only if the table is either defined
as a global interface field or as a call-by-value import parameter.
178 © 2006 SAP AG. All rights reserved. 2006/Q2
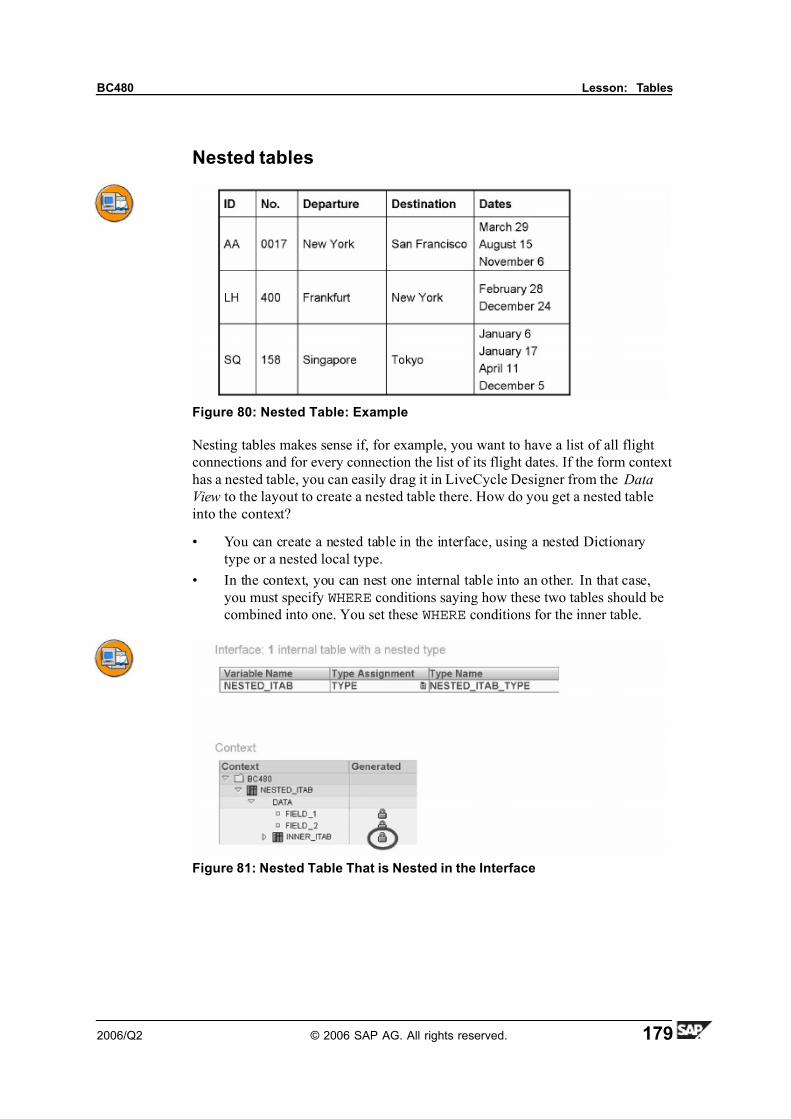
7/14/2019 BC480 - PDF-Based Print Forms
http://slidepdf.com/reader/full/bc480-pdf-based-print-forms 187/317
BC480 Lesson: Tables
Nested tables
Figure 80: Nested Table: Example
Nesting tables makes sense if, for example, you want to have a list of all flight
connections and for every connection the list of its flight dates. If the form context
has a nested table, you can easily drag it in LiveCycle Designer from the Data
View to the layout to create a nested table there. How do you get a nested table
into the context?
• You can create a nested table in the interface, using a nested Dictionary
type or a nested local type.
• In the context, you can nest one internal table into an other. In that case,
you must specify WHERE conditions saying how these two tables should be
combined into one. You set these WHERE conditions for the inner table.
Figure 81: Nested Table That is Nested in the Interface
2006/Q2 © 2006 SAP AG. All rights reserved. 179

7/14/2019 BC480 - PDF-Based Print Forms
http://slidepdf.com/reader/full/bc480-pdf-based-print-forms 188/317
Unit 5: Layout BC480
Figure 82: Combining Two Internal Tables Into One Nested Table
180 © 2006 SAP AG. All rights reserved. 2006/Q2
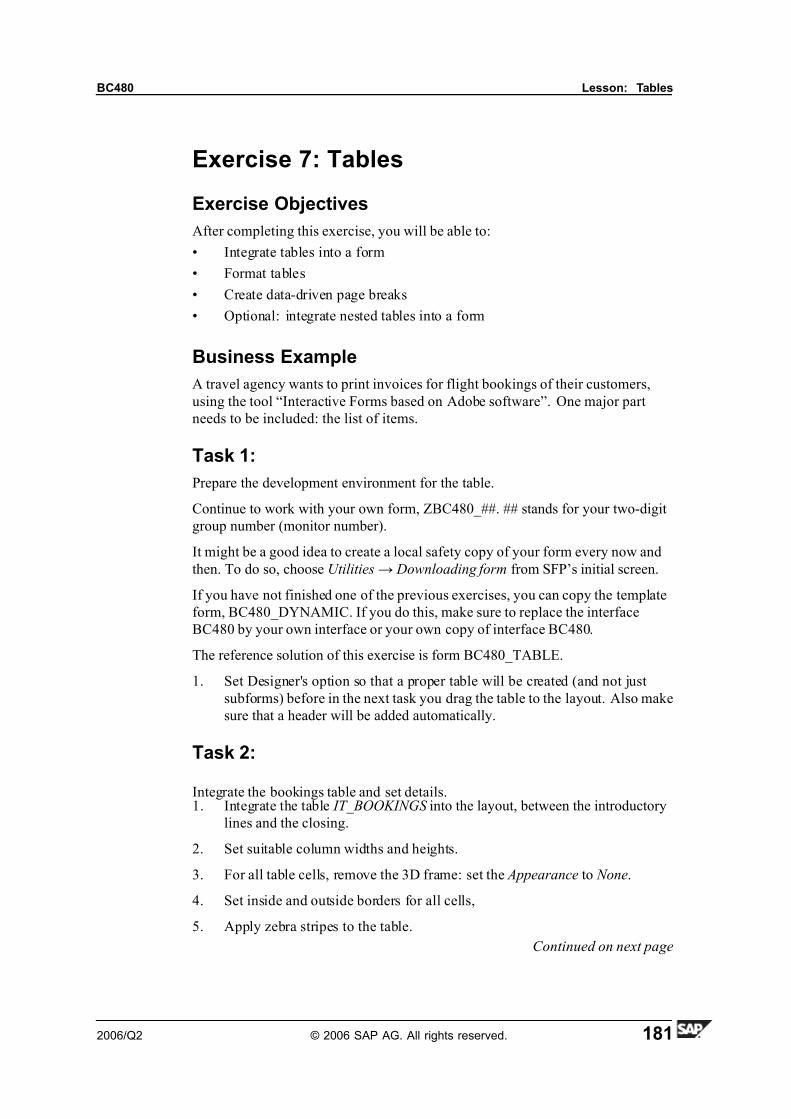
7/14/2019 BC480 - PDF-Based Print Forms
http://slidepdf.com/reader/full/bc480-pdf-based-print-forms 189/317
BC480 Lesson: Tables
Exercise 7: Tables
Exercise Objectives
After completing this exercise, you will be able to:
• Integrate tables into a form
• Format tables
• Create data-driven page breaks
• Optional: integrate nested tables into a form
Business Example
A travel agency wants to print invoices for flight bookings of their customers,
using the tool “Interactive Forms based on Adobe software”. One major part
needs to be included: the list of items.
Task 1:
Prepare the development environment for the table.
Continue to work with your own form, ZBC480_##. ## stands for your two-digit
group number (monitor number).
It might be a good idea to create a local safety copy of your form every now and
then. To do so, choose Utilities→ Downloading form from SFP’s initial screen.
If you have not finished one of the previous exercises, you can copy the template
form, BC480_DYNAMIC. If you do this, make sure to replace the interface
BC480 by your own interface or your own copy of interface BC480.
The reference solution of this exercise is form BC480_TABLE.
1. Set Designer's option so that a proper table will be created (and not just
subforms) before in the next task you drag the table to the layout. Also make
sure that a header will be added automatically.
Task 2:
Integrate the bookings table and set details.1. Integrate the table IT_BOOKINGS into the layout, between the introductory
lines and the closing.
2. Set suitable column widths and heights.
3. For all table cells, remove the 3D frame: set the Appearance to None.
4. Set inside and outside borders for all cells,
5. Apply zebra stripes to the table.
Continued on next page
2006/Q2 © 2006 SAP AG. All rights reserved. 181
7/14/2019 BC480 - PDF-Based Print Forms
http://slidepdf.com/reader/full/bc480-pdf-based-print-forms 190/317
Unit 5: Layout BC480
6. Set the header so that it will appear at each page break.
7. Insert a page break when the airline changes.
Task 3:
Test the result
1. Activate your form and test it with report SAPBC480_DEMO.
Task 4:
Optional: Add PS with nested table.
Compose a second PS, advertising some of your airlines connections. You will
need a nested table for that.
1. In the interface, create a global field GT_SCARR of type TABLE OFSCARR and another one, GT_SPFLI of type TABLE OF SPFLI.
2. In the initialization, fill the new internal table GT_SCARR with the datasets
of U. S. American airlines (AA, DL, NW, UA). Use database table SCARR.
Fill the internal table GT_SPFLI with all datasets from the database table
SPFLI.
3. Activate the interface.
4. Integrate the two internal tables as one nested table into the context of your
form. The connecting field is CARRID.
5. From GT_SCARR, deactivate all fields except for CARRID and CARRNAME .
From GT_SPFLI , deactivate all fields except for CONNID, CITYFROM
and CITYTO.
6. Integrate the table GT_SCARR into the layout (below the discount PS).
7. Set table details like cell widths, heights, borders, headers, etc.
8. Prefix this PS with a static text like “We would like to draw your attention
to the following interesting flight connections:”
9. Protect the text and the table against a page break.
182 © 2006 SAP AG. All rights reserved. 2006/Q2
7/14/2019 BC480 - PDF-Based Print Forms
http://slidepdf.com/reader/full/bc480-pdf-based-print-forms 191/317
BC480 Lesson: Tables
Solution 7: Tables
Task 1:
Prepare the development environment for the table.
Continue to work with your own form, ZBC480_##. ## stands for your two-digit
group number (monitor number).
It might be a good idea to create a local safety copy of your form every now and
then. To do so, choose Utilities→ Downloading form from SFP’s initial screen.
If you have not finished one of the previous exercises, you can copy the template
form, BC480_DYNAMIC. If you do this, make sure to replace the interface
BC480 by your own interface or your own copy of interface BC480.
The reference solution of this exercise is form BC480_TABLE.
1. Set Designer's option so that a proper table will be created (and not just
subforms) before in the next task you drag the table to the layout. Also make
sure that a header will be added automatically.
a) Go to the palette menu of the Data View palette and choose Options.
Check Allow tables to be generated and Create a header row for any
table.
Task 2:
Integrate the bookings table and set details.1. Integrate the table IT_BOOKINGS into the layout, between the introductory
lines and the closing.
a) From the Data View palette, drag the table to the body page layout. If
necessary, reposition the table in the Hierarchy by drag & drop.
2. Set suitable column widths and heights.
a) To determine the column widths, click with your mouse on a cell border
and drag it to the left or right. Alternatively, select a cell and enter the
cell width manually on the Layout palette.
Check that the overall width of the table does not exceed the width of the surrounding body page.
b) To set row heights, mark all subnodes of DATA in the Hierarchy. Go
to the Layout palette and set a minimum height, for example 0.3cm.
Make sure to check Expand to fit . Furthermore, remove the top and
bottom margins on the Layout palette.
Continued on next page
2006/Q2 © 2006 SAP AG. All rights reserved. 183
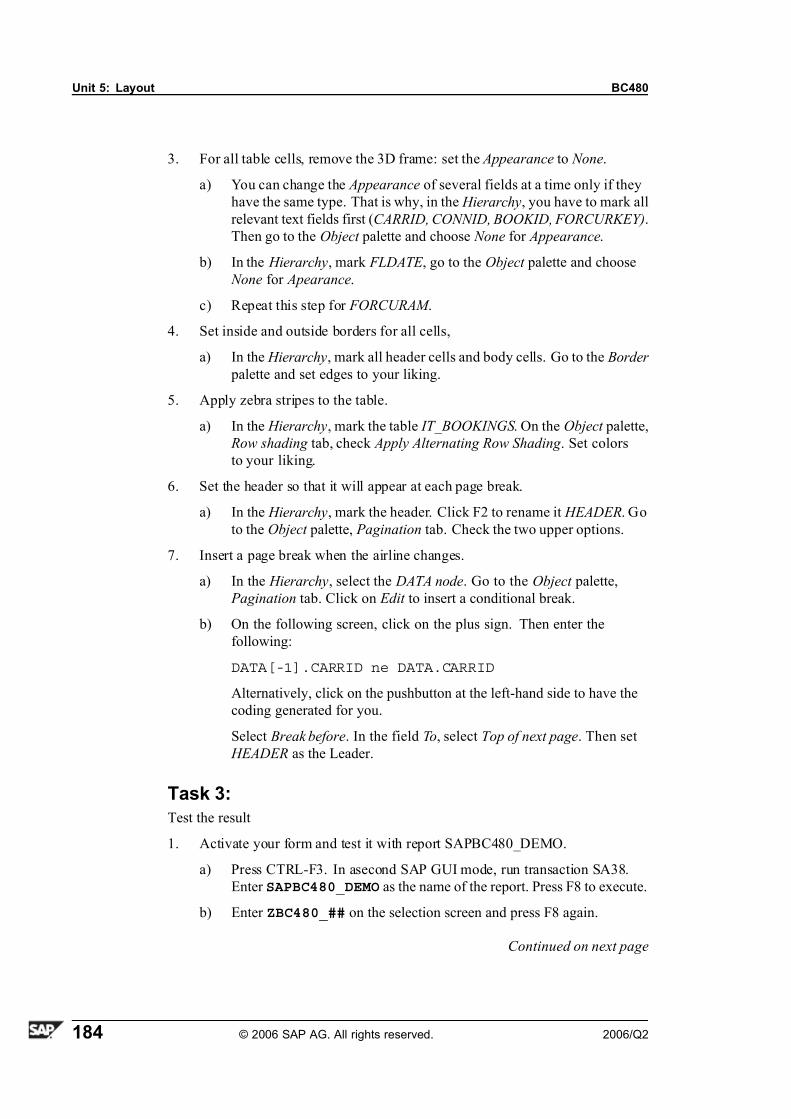
7/14/2019 BC480 - PDF-Based Print Forms
http://slidepdf.com/reader/full/bc480-pdf-based-print-forms 192/317
Unit 5: Layout BC480
3. For all table cells, remove the 3D frame: set the Appearance to None.
a) You can change the Appearance of several fields at a time only if they
have the same type. That is why, in the Hierarchy, you have to mark all
relevant text fields first (CARRID, CONNID, BOOKID, FORCURKEY).
Then go to the Object palette and choose None for Appearance.
b) In the Hierarchy, mark FLDATE , go to the Object palette and choose
None for Apearance.
c) Repeat this step for FORCURAM .
4. Set inside and outside borders for all cells,
a) In the Hierarchy, mark all header cells and body cells. Go to the Border
palette and set edges to your liking.
5. Apply zebra stripes to the table.
a) In the Hierarchy, mark the table IT_BOOKINGS . On the Object palette,
Row shading tab, check Apply Alternating Row Shading . Set colors
to your liking.
6. Set the header so that it will appear at each page break.
a) In the Hierarchy, mark the header. Click F2 to rename it HEADER. Go
to the Object palette, Pagination tab. Check the two upper options.
7. Insert a page break when the airline changes.
a) In the Hierarchy, select the DATA node. Go to the Object palette,
Pagination tab. Click on Edit to insert a conditional break.
b) On the following screen, click on the plus sign. Then enter the
following:
DATA[-1].CARRID ne DATA.CARRID
Alternatively, click on the pushbutton at the left-hand side to have the
coding generated for you.
Select Break before. In the field To, select Top of next page. Then set
HEADER as the Leader.
Task 3:
Test the result
1. Activate your form and test it with report SAPBC480_DEMO.
a) Press CTRL-F3. In asecond SAP GUI mode, run transaction SA38.
Enter SAPBC480_DEMO as the name of the report. Press F8 to execute.
b) Enter ZBC480_## on the selection screen and press F8 again.
Continued on next page
184 © 2006 SAP AG. All rights reserved. 2006/Q2
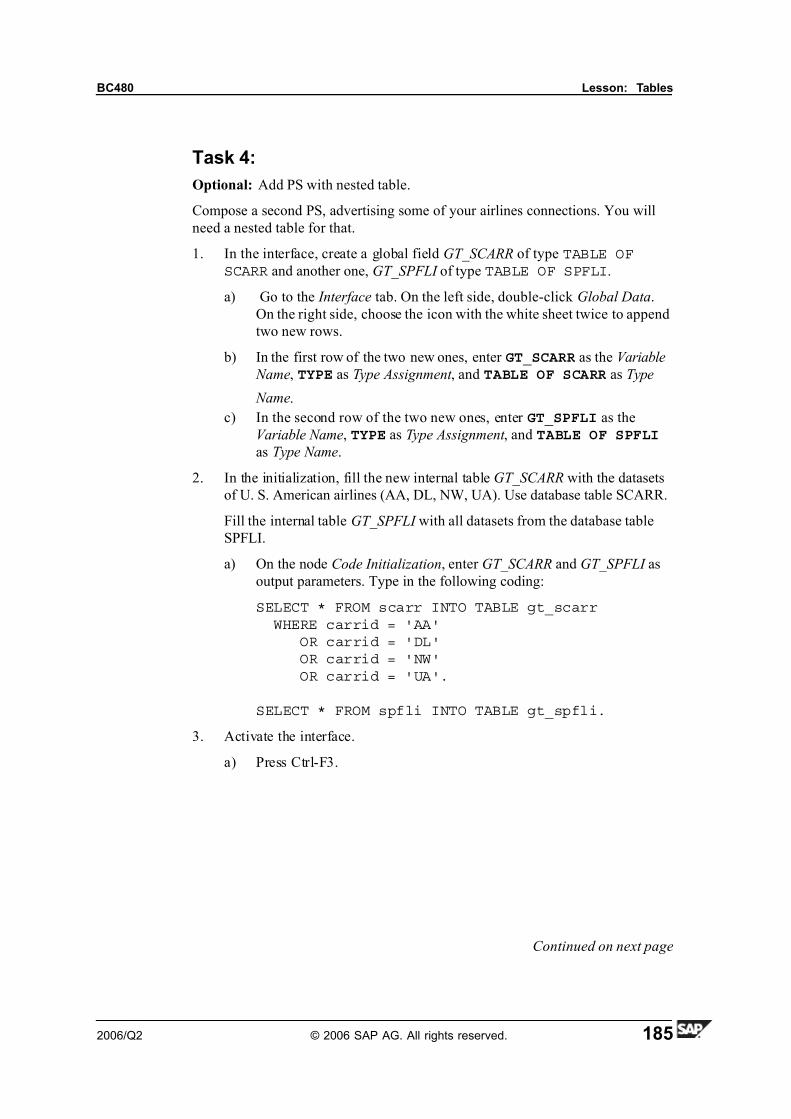
7/14/2019 BC480 - PDF-Based Print Forms
http://slidepdf.com/reader/full/bc480-pdf-based-print-forms 193/317
BC480 Lesson: Tables
Task 4:
Optional: Add PS with nested table.
Compose a second PS, advertising some of your airlines connections. You will
need a nested table for that.
1. In the interface, create a global field GT_SCARR of type TABLE OFSCARR and another one, GT_SPFLI of type TABLE OF SPFLI.
a) Go to the Interface tab. On the left side, double-click Global Data.
On the right side, choose the icon with the white sheet twice to append
two new rows.
b) In the first row of the two new ones, enter GT_SCARR as the Variable
Name, TYPE as Type Assignment , and TABLE OF SCARR as Type
Name.
c) In the second row of the two new ones, enter GT_SPFLI as the
Variable Name, TYPE as Type Assignment , and TABLE OF SPFLI
as Type Name.
2. In the initialization, fill the new internal table GT_SCARR with the datasets
of U. S. American airlines (AA, DL, NW, UA). Use database table SCARR.
Fill the internal table GT_SPFLI with all datasets from the database table
SPFLI.
a) On the node Code Initialization, enter GT_SCARR and GT_SPFLI as
output parameters. Type in the following coding:
SELECT * FROM scarr INTO TABLE gt_scarrWHERE carrid = 'AA'
OR carrid = 'DL'OR carrid = 'NW'OR carrid = 'UA'.
SELECT * FROM spfli INTO TABLE gt_spfli.
3. Activate the interface.
a) Press Ctrl-F3.
Continued on next page
2006/Q2 © 2006 SAP AG. All rights reserved. 185

7/14/2019 BC480 - PDF-Based Print Forms
http://slidepdf.com/reader/full/bc480-pdf-based-print-forms 194/317
Unit 5: Layout BC480
4. Integrate the two internal tables as one nested table into the context of your
form. The connecting field is CARRID.
a) From the left side of the context editor, open the node Global Data.
Drag GT_SCARR over to the right side.
b) Drag GT_SPFLI and drop it on the DATA structure of GT_SCARR on
the right-hand side.
c) As a Where condition for GT_SPFLI , enter CARRID =GT_SCARR-CARRID.
5. From GT_SCARR, deactivate all fields except for CARRID and CARRNAME .
From GT_SPFLI , deactivate all fields except for CONNID, CITYFROM
and CITYTO.
a) Mark the fields on the right-hand side, then right-click and choose Deactivate.
6. Integrate the table GT_SCARR into the layout (below the discount PS).
a) Drag it from the Hierarchy to the layout.
7. Set table details like cell widths, heights, borders, headers, etc.
a) See previous tasks.
8. Prefix this PS with a static text like “We would like to draw your attention
to the following interesting flight connections:”
a) Drag a static text from the Library palette to the layout and change its
content there.
9. Protect the text and the table against a page break.
a) In the Hierarchy, mark the text and the table GT_SCARR. Right-click
and choose Wrap in subform. Press F2 and rename it PS2_WRAPPER.
On the Object palette, Subform tab, disallow page breaks.
186 © 2006 SAP AG. All rights reserved. 2006/Q2

7/14/2019 BC480 - PDF-Based Print Forms
http://slidepdf.com/reader/full/bc480-pdf-based-print-forms 195/317
BC480 Lesson: Tables
Lesson Summary
You should now be able to:• Insert tables into a form
• Format tables
• Set a header for a table
• Create data-driven page breaks
• Create control levels
• Create nested tables
2006/Q2 © 2006 SAP AG. All rights reserved. 187
7/14/2019 BC480 - PDF-Based Print Forms
http://slidepdf.com/reader/full/bc480-pdf-based-print-forms 196/317
Unit Summary BC480
Unit Summary
You should now be able to:
• Insert static elements into a form: images, texts, and graphical objects
• Set object properties for static form elements
• Insert dynamic elements into a form: text fields, image fields, date/time
fields, floating fields
• Set the data binding (the connection between the layout fields and the
business data)
• Apply patterns (picture clauses) to influence field output
• Insert tables into a form
• Format tables
• Set a header for a table• Create data-driven page breaks
• Create control levels
• Create nested tables
188 © 2006 SAP AG. All rights reserved. 2006/Q2

7/14/2019 BC480 - PDF-Based Print Forms
http://slidepdf.com/reader/full/bc480-pdf-based-print-forms 197/317
BC480 Test Your Knowledge
Test Your Knowledge
1. Static texts are filled in the ABAP program.
Determine whether this statement is true or false.
□ True
□ False
2. Static images must be located on the computer where Adobe LiveCycle
Designer is located.
Determine whether this statement is true or false.
□ True
□
False
3. Text fields always correspond to character variables from the ABAP program.
Determine whether this statement is true or false.
□ True
□ False
4. The handling of Smart Form texts (= text modules) and SAPscript texts
differs in Adobe LiveCycle Designer.
Determine whether this statement is true or false.
□ True
□ False
5. The size of an image field is always dynamic.
Determine whether this statement is true or false.
□ True
□ False
6. If you include a field from the context by dragging it from the Data View to
the layout, you do not have to worry about the correct binding.
Determine whether this statement is true or false.
□ True
□ False
7. Floating fields can be inserted anywhere on a body page.
Determine whether this statement is true or false.
□ True
□ False
2006/Q2 © 2006 SAP AG. All rights reserved. 189

7/14/2019 BC480 - PDF-Based Print Forms
http://slidepdf.com/reader/full/bc480-pdf-based-print-forms 198/317
Test Your Knowledge BC480
8. A display pattern is defined independent of the locale.
Determine whether this statement is true or false.
□ True
□ False
190 © 2006 SAP AG. All rights reserved. 2006/Q2
7/14/2019 BC480 - PDF-Based Print Forms
http://slidepdf.com/reader/full/bc480-pdf-based-print-forms 199/317
BC480 Test Your Knowledge
Answers
1. Static texts are filled in the ABAP program.
Answer: False
The form developer needs to type in the static text in the layout.
2. Static images must be located on the computer where Adobe LiveCycle
Designer is located.
Answer: False
Static images must be located so that Adobe document services can access
them, for example in your intranet or on a file server. If you embed them in
your form, they can be located anywhere.
3. Text fields always correspond to character variables from the ABAP program.
Answer: False
A text field can refer to a simple string variable, a text module, a SAPscript
text, a dynamic text, or an address from the Business Address Services.
4. The handling of Smart Form texts (= text modules) and SAPscript texts
differs in Adobe LiveCycle Designer.
Answer: False
Designer does not evaluate any information about the origin of the text. The
ABAP program passes on the correct data at runtime.
5. The size of an image field is always dynamic.
Answer: False
You determine whether or not the size should be dynamic by selecting or
deselecting the Expand to fit option.
6. If you include a field from the context by dragging it from the Data View to
the layout, you do not have to worry about the correct binding.
Answer: True
You have to manually set the binding if you drag the element from the
Library.
2006/Q2 © 2006 SAP AG. All rights reserved. 191

7/14/2019 BC480 - PDF-Based Print Forms
http://slidepdf.com/reader/full/bc480-pdf-based-print-forms 200/317
Test Your Knowledge BC480
7. Floating fields can be inserted anywhere on a body page.
Answer: FalseFloating fields can be inserted only in static text.
8. A display pattern is defined independent of the locale.
Answer: False
A display pattern may have standard pattern symbols (such as $, 9, or Z), but
it also possible to include literals, like 'Monday.'
192 © 2006 SAP AG. All rights reserved. 2006/Q2
7/14/2019 BC480 - PDF-Based Print Forms
http://slidepdf.com/reader/full/bc480-pdf-based-print-forms 201/317
Unit 6 Scripting in the Form
Unit Overview
Although most of the data retrieval and calculation for PDF-based forms is done
with ABAP coding (in the application program and in initialization of the form
interface), some coding must be written that is executed during form rendering.This unit will introduce you to the principles of scripting and to Adobe's own
scripting language, FormCalc.
Unit Objectives
After completing this unit, you will be able to:
• Name different events and what they can be used for
• Use the Script Editor
• Create scripting with FormCalc
• Access form objects, their values, and their properties
Unit Contents
Lesson: Scripting for Form Elements . ... .. ... ... .. ... .. ... ... .. .. ... .. ... ... 194Exercise 8: Scripting for Form Elements .. .. .. .. .. .. .. .. .. .. .. .. .. .. .. .. 207
2006/Q2 © 2006 SAP AG. All rights reserved. 193
7/14/2019 BC480 - PDF-Based Print Forms
http://slidepdf.com/reader/full/bc480-pdf-based-print-forms 202/317
Unit 6: Scripting in the Form BC480
Lesson: Scripting for Form Elements
Lesson Overview
Form printing with PDF-based forms means:
• Data is collected in an ABAP program (technically speaking, on the SAP
Web Application Server ABAP).
• Data is passed to Adobe document services, which reside on the J2EE engine.
• Data is merged with form layout and logic.
• The PDF document is returned to the ABAP application program.
During form rendering, no communication with the SAP Web Application Server
ABAP is possible. As a consequence, no ABAP coding can be written for the
form itself. However, you can write scripting for all dynamic elements, using
either Adobe's FormCalc or JavaScript.
This lesson will show you how you write scripting and introduce you to the basics
of FormCalc syntax.
Lesson Objectives
After completing this lesson, you will be able to:
• Name different events and what they can be used for
• Use the Script Editor
• Create scripting with FormCalc
• Access form objects, their values, and their properties
Business Example
A travel agency wants to print invoices for their customers' flight bookings using
the tool “Interactive Forms”. The form needs to be refined.
Scripting – an Introduction
You can attach scripts to all kinds of non-static objects, that is, for all objects
apart from content areas, static texts, static images, and graphical elements (lines,circles, rectangles). However, scripting that is attached to a non-static object can
access all other objects of the form, including the static ones.
194 © 2006 SAP AG. All rights reserved. 2006/Q2
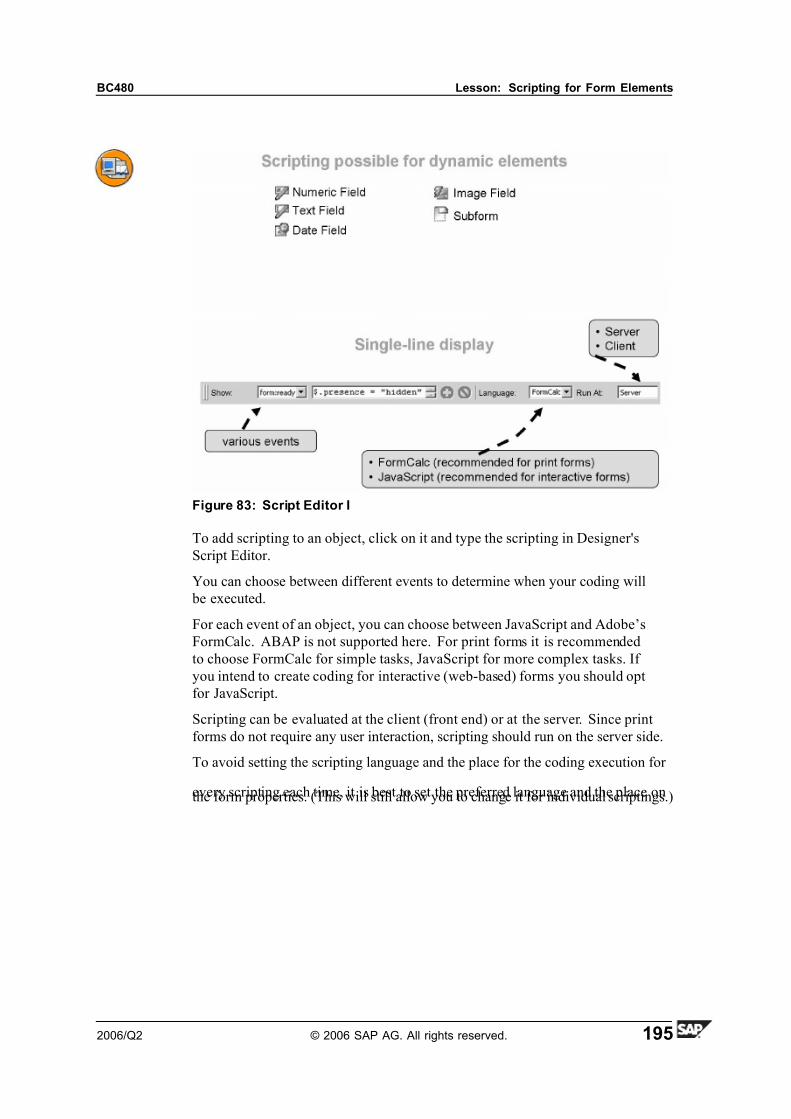
7/14/2019 BC480 - PDF-Based Print Forms
http://slidepdf.com/reader/full/bc480-pdf-based-print-forms 203/317
BC480 Lesson: Scripting for Form Elements
Figure 83: Script Editor I
To add scripting to an object, click on it and type the scripting in Designer's
Script Editor.
You can choose between different events to determine when your coding will
be executed.
For each event of an object, you can choose between JavaScript and Adobe’s
FormCalc. ABAP is not supported here. For print forms it is recommended
to choose FormCalc for simple tasks, JavaScript for more complex tasks. If
you intend to create coding for interactive (web-based) forms you should opt
for JavaScript.
Scripting can be evaluated at the client (front end) or at the server. Since print
forms do not require any user interaction, scripting should run on the server side.
To avoid setting the scripting language and the place for the coding execution for
every scripting each time, it is best to set the preferred language and the place onthe form properties. (This will still allow you to change it for individual scriptings.)
2006/Q2 © 2006 SAP AG. All rights reserved. 195
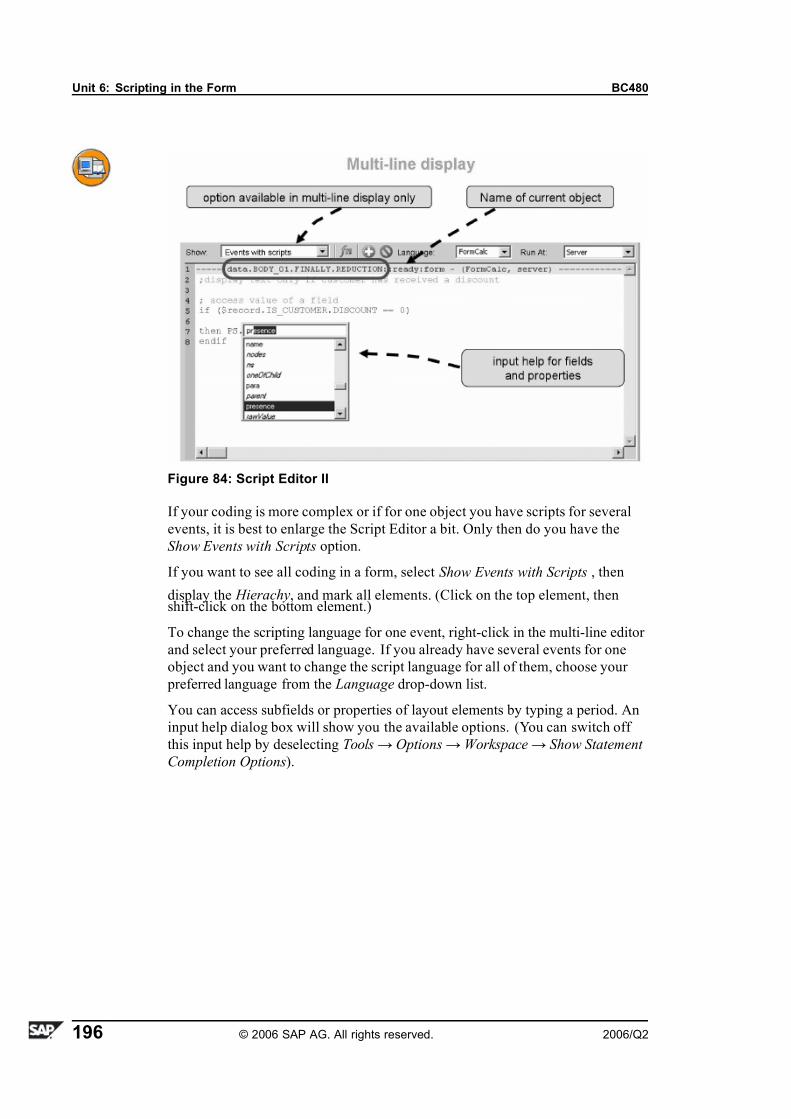
7/14/2019 BC480 - PDF-Based Print Forms
http://slidepdf.com/reader/full/bc480-pdf-based-print-forms 204/317
Unit 6: Scripting in the Form BC480
Figure 84: Script Editor II
If your coding is more complex or if for one object you have scripts for several
events, it is best to enlarge the Script Editor a bit. Only then do you have the
Show Events with Scripts option.
If you want to see all coding in a form, select Show Events with Scripts , then
display the Hierachy, and mark all elements. (Click on the top element, thenshift-click on the bottom element.)
To change the scripting language for one event, right-click in the multi-line editor
and select your preferred language. If you already have several events for one
object and you want to change the script language for all of them, choose your
preferred language from the Language drop-down list.
You can access subfields or properties of layout elements by typing a period. An
input help dialog box will show you the available options. (You can switch off
this input help by deselecting Tools→ Options→Workspace→ Show Statement
Completion Options).
196 © 2006 SAP AG. All rights reserved. 2006/Q2
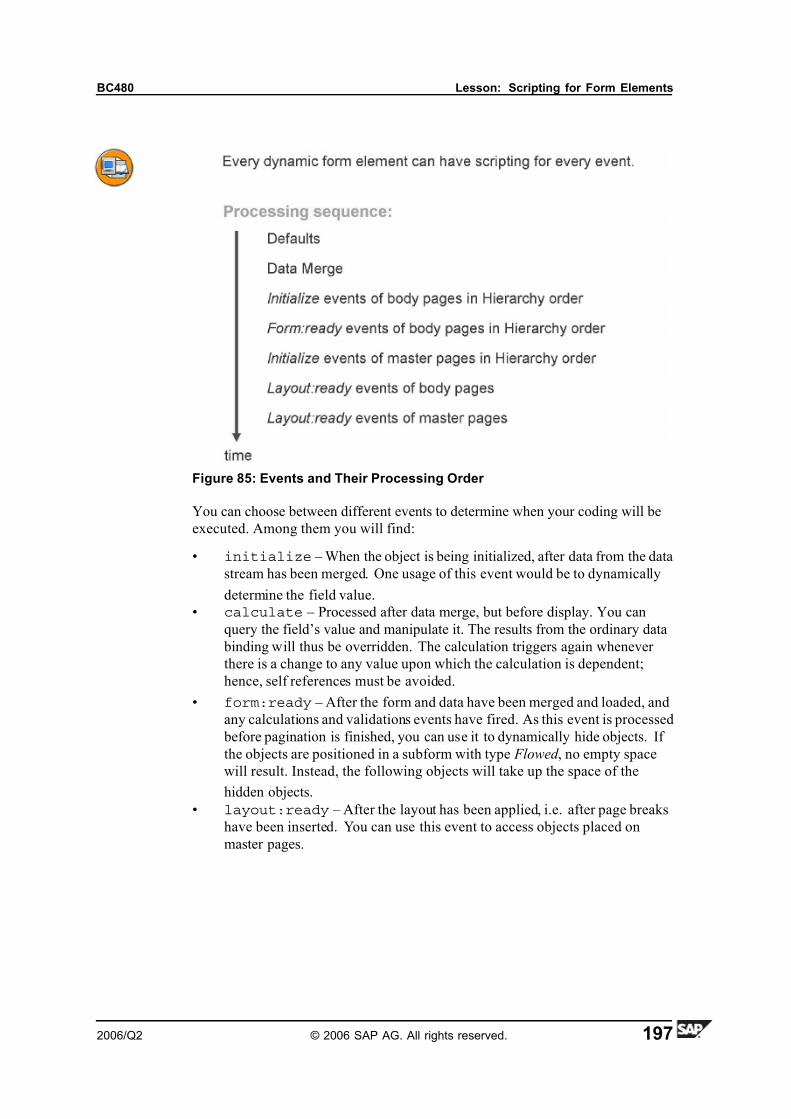
7/14/2019 BC480 - PDF-Based Print Forms
http://slidepdf.com/reader/full/bc480-pdf-based-print-forms 205/317
BC480 Lesson: Scripting for Form Elements
Figure 85: Events and Their Processing Order
You can choose between different events to determine when your coding will be
executed. Among them you will find:
• initialize – When the object is being initialized, after data from the data
stream has been merged. One usage of this event would be to dynamically
determine the field value.• calculate – Processed after data merge, but before display. You can
query the field’s value and manipulate it. The results from the ordinary data
binding will thus be overridden. The calculation triggers again whenever
there is a change to any value upon which the calculation is dependent;
hence, self references must be avoided.
• form:ready – After the form and data have been merged and loaded, and
any calculations and validations events have fired. As this event is processed
before pagination is finished, you can use it to dynamically hide objects. If
the objects are positioned in a subform with type Flowed , no empty space
will result. Instead, the following objects will take up the space of the
hidden objects.
• layout:ready – After the layout has been applied, i.e. after page breaks
have been inserted. You can use this event to access objects placed on
master pages.
2006/Q2 © 2006 SAP AG. All rights reserved. 197

7/14/2019 BC480 - PDF-Based Print Forms
http://slidepdf.com/reader/full/bc480-pdf-based-print-forms 206/317
Unit 6: Scripting in the Form BC480
Scripting – Syntax Elements
Figure 86: FormCalc Basics
A comment starts with a semicolon (;) or two slashes (//). It implicitly ends with
the next line of coding.
Commands may stretch over several lines.
FormCalc has approx. 37 keywords (such as if, do, or). They are
case-insensitive.
FormCalc has the usual calculation operators +, -, *, / and the comparison operators
==, <>, <, >, <=, >=. You can also use the English short forms for the comparison
operators: eq, ne, lt, gt, le, ge. Programmers who are used to ABAP should take
care not to confuse the assignment operator (=) with the equals operator (= =).
Variables are case-sensitive.
Accessors
Elements from the form that you can use as fields in the coding are called
accessors. More precisely: an accessor allows you to query and/or manipulate afield value or an object property.
To access a field value from the form context ( Data View), prefix the name with
$record . Give all parts of the name as they appear in the Data View, separated by a
period. The original ABAP representation is irrelevant!
198 © 2006 SAP AG. All rights reserved. 2006/Q2
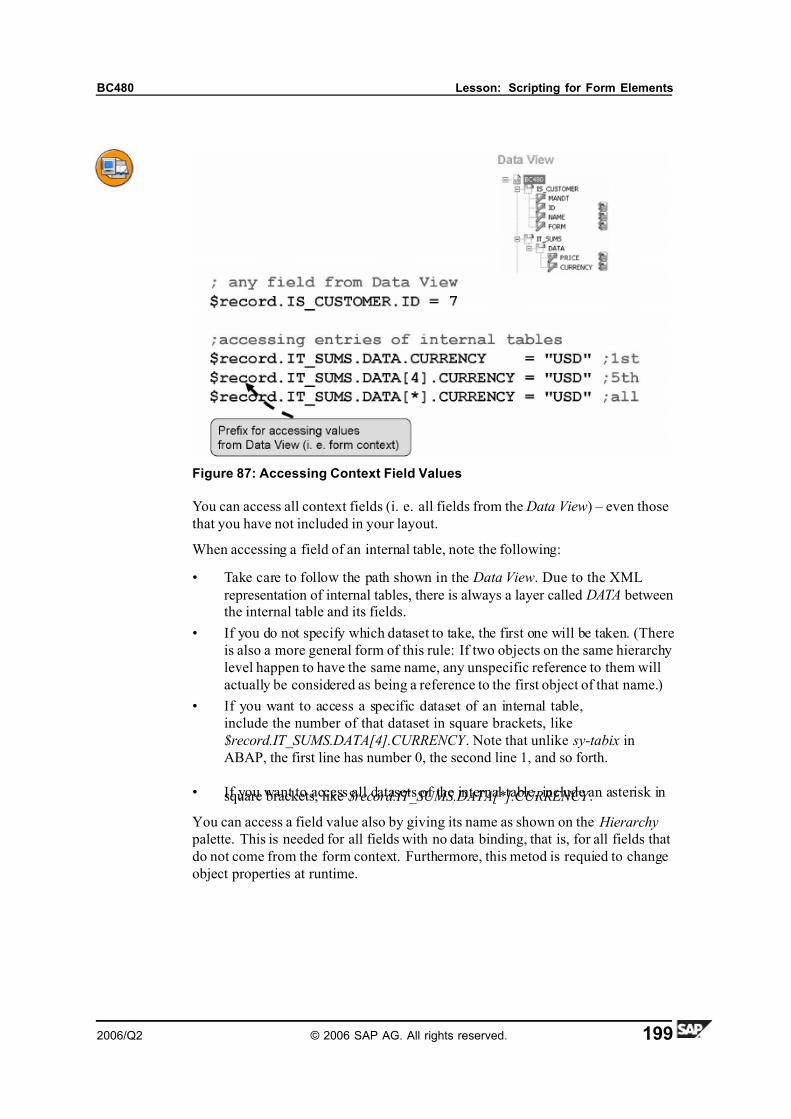
7/14/2019 BC480 - PDF-Based Print Forms
http://slidepdf.com/reader/full/bc480-pdf-based-print-forms 207/317
BC480 Lesson: Scripting for Form Elements
Figure 87: Accessing Context Field Values
You can access all context fields (i. e. all fields from the Data View) – even those
that you have not included in your layout.
When accessing a field of an internal table, note the following:
• Take care to follow the path shown in the Data View. Due to the XML
representation of internal tables, there is always a layer called DATA betweenthe internal table and its fields.
• If you do not specify which dataset to take, the first one will be taken. (There
is also a more general form of this rule: If two objects on the same hierarchy
level happen to have the same name, any unspecific reference to them will
actually be considered as being a reference to the first object of that name.)
• If you want to access a specific dataset of an internal table,
include the number of that dataset in square brackets, like
$record.IT_SUMS.DATA[4].CURRENCY . Note that unlike sy-tabix in
ABAP, the first line has number 0, the second line 1, and so forth.
• If you want to access all datasets of the internal table, include an asterisk insquare brackets, like $record.IT_SUMS.DATA[*].CURRENCY .
You can access a field value also by giving its name as shown on the Hierarchy
palette. This is needed for all fields with no data binding, that is, for all fields that
do not come from the form context. Furthermore, this metod is requied to change
object properties at runtime.
2006/Q2 © 2006 SAP AG. All rights reserved. 199
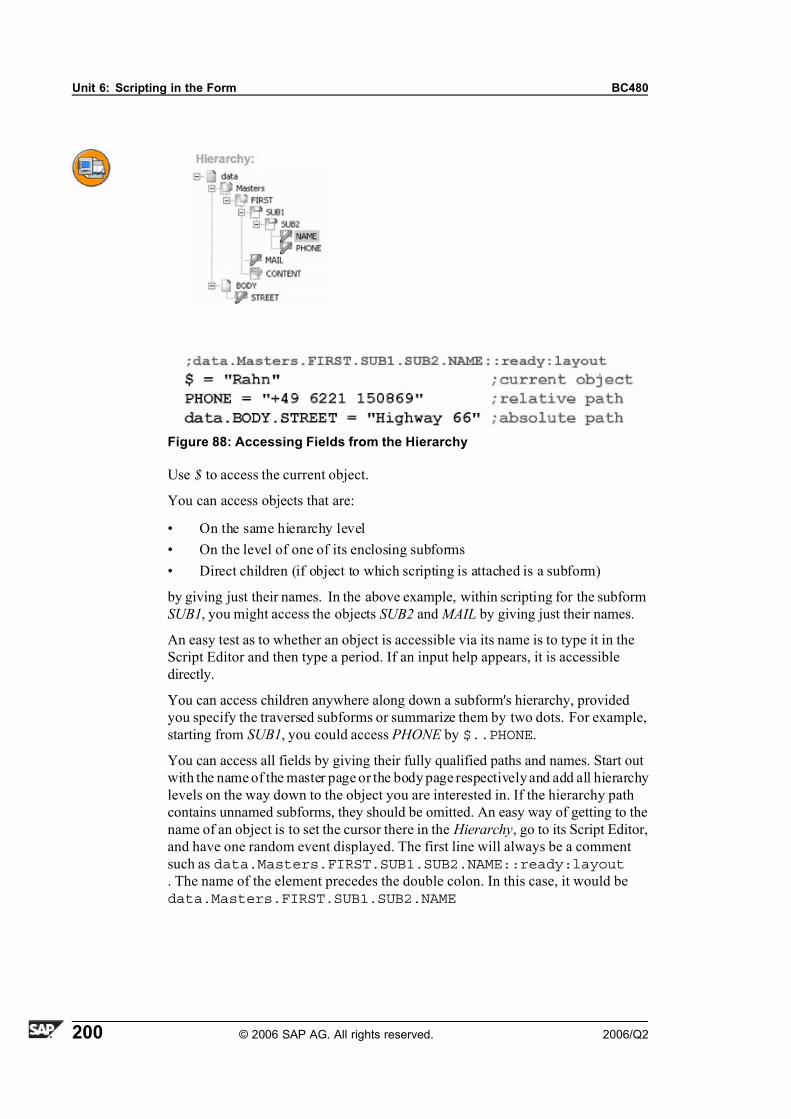
7/14/2019 BC480 - PDF-Based Print Forms
http://slidepdf.com/reader/full/bc480-pdf-based-print-forms 208/317
Unit 6: Scripting in the Form BC480
Figure 88: Accessing Fields from the Hierarchy
Use $ to access the current object.
You can access objects that are:
• On the same hierarchy level
• On the level of one of its enclosing subforms
• Direct children (if object to which scripting is attached is a subform)
by giving just their names. In the above example, within scripting for the subform
SUB1, you might access the objects SUB2 and MAIL by giving just their names.
An easy test as to whether an object is accessible via its name is to type it in the
Script Editor and then type a period. If an input help appears, it is accessible
directly.
You can access children anywhere along down a subform's hierarchy, provided
you specify the traversed subforms or summarize them by two dots. For example,
starting from SUB1, you could access PHONE by $..PHONE.
You can access all fields by giving their fully qualified paths and names. Start out
with the name of the master page or the body page respectively and add all hierarchy
levels on the way down to the object you are interested in. If the hierarchy path
contains unnamed subforms, they should be omitted. An easy way of getting to the
name of an object is to set the cursor there in the Hierarchy, go to its Script Editor,
and have one random event displayed. The first line will always be a comment
such as data.Masters.FIRST.SUB1.SUB2.NAME::ready:layout. The name of the element precedes the double colon. In this case, it would be
data.Masters.FIRST.SUB1.SUB2.NAME
200 © 2006 SAP AG. All rights reserved. 2006/Q2
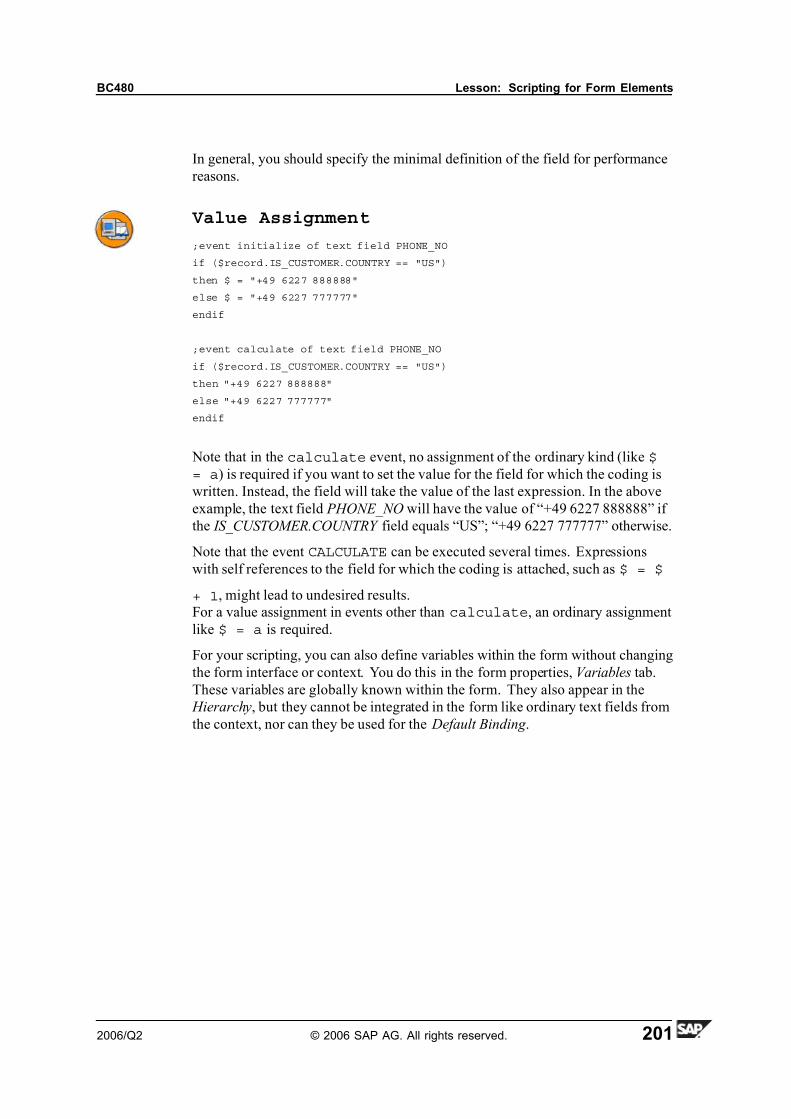
7/14/2019 BC480 - PDF-Based Print Forms
http://slidepdf.com/reader/full/bc480-pdf-based-print-forms 209/317
BC480 Lesson: Scripting for Form Elements
In general, you should specify the minimal definition of the field for performance
reasons.
Value Assignment
;event initialize of text field PHONE_NO
if ($record.IS_CUSTOMER.COUNTRY == "US")
then $ = "+49 6227 888888"
else $ = "+49 6227 777777"
endif
;event calculate of text field PHONE_NO
if ($record.IS_CUSTOMER.COUNTRY == "US")
then "+49 6227 888888"
else "+49 6227 777777"
endif
Note that in the calculate event, no assignment of the ordinary kind (like $= a) is required if you want to set the value for the field for which the coding is
written. Instead, the field will take the value of the last expression. In the above
example, the text field PHONE_NO will have the value of “+49 6227 888888” if
the IS_CUSTOMER.COUNTRY field equals “US”; “+49 6227 777777” otherwise.
Note that the event CALCULATE can be executed several times. Expressions
with self references to the field for which the coding is attached, such as $ = $
+ 1, might lead to undesired results.For a value assignment in events other than calculate, an ordinary assignment
like $ = a is required.
For your scripting, you can also define variables within the form without changing
the form interface or context. You do this in the form properties, Variables tab.
These variables are globally known within the form. They also appear in the
Hierarchy, but they cannot be integrated in the form like ordinary text fields from
the context, nor can they be used for the Default Binding .
2006/Q2 © 2006 SAP AG. All rights reserved. 201

7/14/2019 BC480 - PDF-Based Print Forms
http://slidepdf.com/reader/full/bc480-pdf-based-print-forms 210/317
Unit 6: Scripting in the Form BC480
Figure 89: Variables
These variables can be text variables (with several lines) or numbers. Variable
names are not case-sensitive.
Examples of Changing Object Properties
FOOTER.presence = "hidden"
StaticImage1.rotate = "90"
StaticText1.x = "12cm"
StaticText1.caption.font.fill.color.value = "200,0,0" ;RGB values
TextField1.caption.value.text = "Dynamic caption"
TextField1.assist.toolTip = "Better explanation"
$.break.after = "contentArea" ;page break after current subform
;can be processed only for subforms
Please note that to access the properties of a static object, you need to attach the
relevant scripting to a non-static object, as static objects do not have events and
hence no scripting.
If the values you want to set contain units, they must be enclosed in quotation
marks, like “12cm”.
If you hide a subform, all of its content will be hidden as well.
Some properties include RGB values, which are combinations of three digits
between 0 and 255 that specify how strong the red, green, or blue parts should be.
For example, 0,0,0 represents black; 255,0,0 red; and 255,255,255 white.
202 © 2006 SAP AG. All rights reserved. 2006/Q2

7/14/2019 BC480 - PDF-Based Print Forms
http://slidepdf.com/reader/full/bc480-pdf-based-print-forms 211/317
BC480 Lesson: Scripting for Form Elements
For details, check the Object Reference of Designer's online help. Also, to find out
what a suitable scripting command might be, it is quite helpful to create a dummy
object with the desired settings and look at the XML presentation. For example,the caption of a text field TextField1 might look like that:
<caption reserve="35mm">
<font typeface="Arial" size="12pt"/>
<para vAlign="middle"/>
<value>
<text>Here is the caption</text>
</value>
</caption>
So you can dynamically assign a caption like this:
TextField1.caption.value.text = "Dynamic caption"
If you wanted to change the caption's font dynamically, you would write:
TextField1.caption.font.typeface = "Times New Roman"
For more complicated calculations, JavaScript might prove easier to write than
FormCalc. You need to know that accessing fields, their values, and properties
differs between FormCalc and JavaScript:
Figure 90: Accessors in JavaScript Compared to FormCalc
2006/Q2 © 2006 SAP AG. All rights reserved. 203
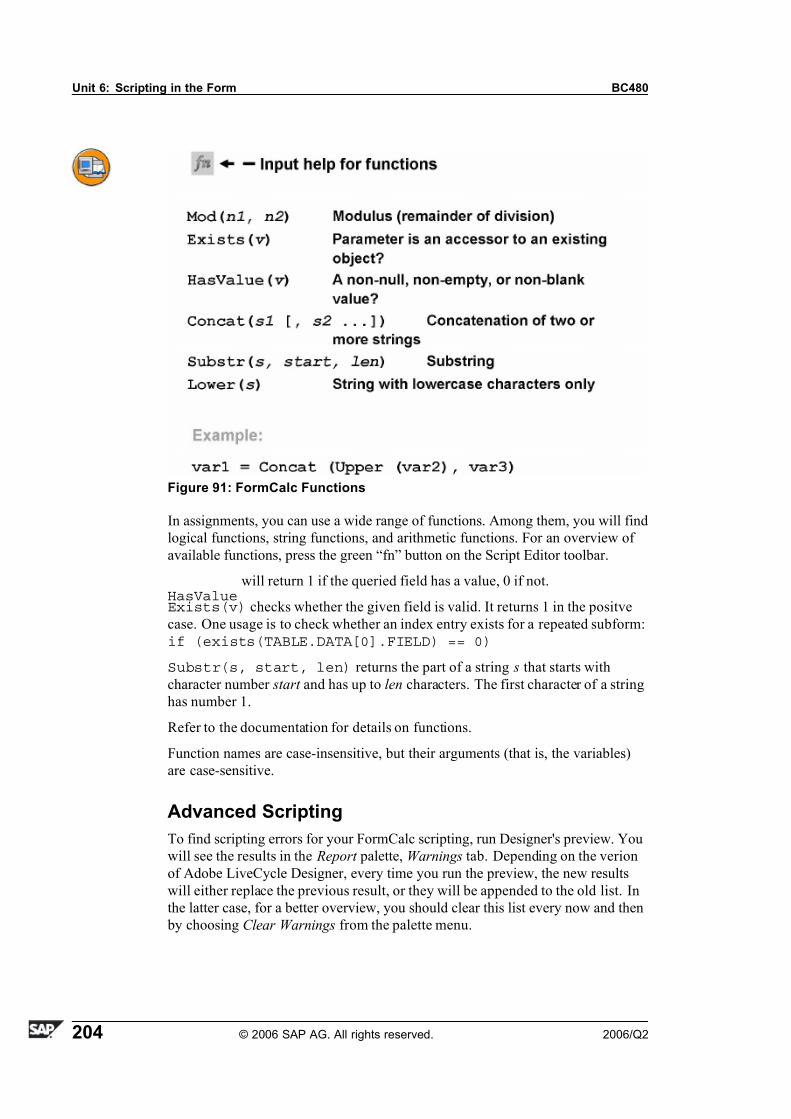
7/14/2019 BC480 - PDF-Based Print Forms
http://slidepdf.com/reader/full/bc480-pdf-based-print-forms 212/317
Unit 6: Scripting in the Form BC480
Figure 91: FormCalc Functions
In assignments, you can use a wide range of functions. Among them, you will find
logical functions, string functions, and arithmetic functions. For an overview of
available functions, press the green “fn” button on the Script Editor toolbar.
HasValuewill return 1 if the queried field has a value, 0 if not.
Exists(v) checks whether the given field is valid. It returns 1 in the positve
case. One usage is to check whether an index entry exists for a repeated subform:
if (exists(TABLE.DATA[0].FIELD) == 0)
Substr(s, start, len) returns the part of a string s that starts with
character number start and has up to len characters. The first character of a string
has number 1.
Refer to the documentation for details on functions.
Function names are case-insensitive, but their arguments (that is, the variables)
are case-sensitive.
Advanced Scripting
To find scripting errors for your FormCalc scripting, run Designer's preview. You
will see the results in the Report palette, Warnings tab. Depending on the verion
of Adobe LiveCycle Designer, every time you run the preview, the new results
will either replace the previous result, or they will be appended to the old list. In
the latter case, for a better overview, you should clear this list every now and then
by choosing Clear Warnings from the palette menu.
204 © 2006 SAP AG. All rights reserved. 2006/Q2

7/14/2019 BC480 - PDF-Based Print Forms
http://slidepdf.com/reader/full/bc480-pdf-based-print-forms 213/317
BC480 Lesson: Scripting for Form Elements
Figure 92: Finding Syntax Errors
Caution: The SAP syntax check (CTRL+F2) or the activation of the form
(CTRL+F3) does not check the form and its scripting. It makes sure only
that the interface and context are okay.
Testing with local test data (an XML file) is never enough. It is acceptable
for quickly seeing what things look like, but (in particular with scripting
that should be executed on the server) you might get wrong results. You
must always run proper tests with an ABAP program.
If your scripting for one event contains more than one command, all commands
that follow a syntax error will be ignored for that event. Any correct commands
that precede this error will be executed normally.
For a more permanent control of errors, you could also use the trace functionality.
A settings dialog is provided with the Form Builder (SFP, Utilities→ Settings).Here, you can determine whether a trace file should be produced, in which depth,
and in which directory of the user's PC it should be saved. Trace level 1 ( Short
Trace) is sufficient for tracking scripting errros. If you choose Very detailed , the
trace will contain detailed rendering information from Adobe document services,
too, and it will be attached to the resulting PDF. The trace settings are user-specific
and valid for one session. If there are several print requests, the corresponding
files will be overwritten unless different names are specified. This is not valid if
several forms are issued in one print job, in which case the runtime data will be
numbered sequentially.
For the trace functionality, the user must have the authorization for debugging. If
you want to create a trace during background processing, you must choose levelmVery detailed to have the trace information attached to the spool document. (The
download functionality is not available during background processing.)
2006/Q2 © 2006 SAP AG. All rights reserved. 205
7/14/2019 BC480 - PDF-Based Print Forms
http://slidepdf.com/reader/full/bc480-pdf-based-print-forms 214/317
Unit 6: Scripting in the Form BC480
Scripting: Performance Aspects
• Avoid scripting if possible
– Use ABAP coding in the program or the initialization node of the
interface.
– Use static object properties instead of setting them dynamically.
– Use dynamic properties instead of scripting, if possible.
– Use simple (relative) names instead of long names.
– Use subforms for hiding elements without scripting.
As scripting tends to slow down the performance, try to avoid it if possible. For
example, do not calculate the sums of an items list within the form, but in the
ABAP program. Define the interface in such a way that the internal table with theitems is passed on to the form along with a parameter that contains the sums.
If you want to hide some form elements if a field has no value, proceed as follows
(no coding required):
1. Wrap the elements in a subform. This is best done by marking them in the
Hierarchy and selecting Wrap in Subform from the context menu.
2. Set the subform's data binding to the field that has or has not a value.
3. On the Object palette, Binding tab, select the Repeat Subform for Each Data
Item option, but deselect Min Count and Max.
206 © 2006 SAP AG. All rights reserved. 2006/Q2

7/14/2019 BC480 - PDF-Based Print Forms
http://slidepdf.com/reader/full/bc480-pdf-based-print-forms 215/317
BC480 Lesson: Scripting for Form Elements
Exercise 8: Scripting for Form Elements
Exercise Objectives
After completing this exercise, you will be able to:
• Use the Script Editor
• Create scripting with FormCalc, using different events
• Access form objects, their values, and their properties
Business Example
A travel agency wants to print invoices for their customers' flight bookings using
the tool “Interactive Forms”. The form has been assembled, but lacks some final
adjustments. Scripting is needed to achieve the final result.
Task:
Extend your PDF-based form, ZBC480_##.
If you have not finished one of the previous exercises, you can copy the template
form BC480_TABLE instead.
The reference solution of this exercise is form BC480_FINAL.
You can check your results with report SAPBC480_DEMO.
1. Calculate field value.The REFERENCE field (which so far has had a standard value) should
contain a combination of the first three letters of the clerk, the first three
letters of the customer name, and the string “Demo”. (You can locate the
field on master page FIRST , in the subform INFORMATION .)
2. Hide field dynamically dependent on condition.
The PS text with the discount should appear only if the customer has actually
received a discount.
Take into consideration that PS is a static text, which cannot have scripting
attached to it. You can write the scripting for the DISCOUNT field, for
example.
To test the result of your scripting, you can run report SAPBC480_DEMO
and enter customer numbers 2 and 3 on the selection screen. One has a
discount, the other one does not.
3. Change field properties dynamically.
Continued on next page
2006/Q2 © 2006 SAP AG. All rights reserved. 207

7/14/2019 BC480 - PDF-Based Print Forms
http://slidepdf.com/reader/full/bc480-pdf-based-print-forms 216/317
Unit 6: Scripting in the Form BC480
The subform INFORMATION (which contains the heading “Invoice”, the
customer number, the reference number, and the date) should be colored if
the customer number equals 1.
4. Optional: Hide airline if no connections are available.
In the (optional) nested table, every airline gets an entry, even if it does
not have any connections. Change this design flaw and hide the entire row
if there are no connections.
208 © 2006 SAP AG. All rights reserved. 2006/Q2

7/14/2019 BC480 - PDF-Based Print Forms
http://slidepdf.com/reader/full/bc480-pdf-based-print-forms 217/317
BC480 Lesson: Scripting for Form Elements
Solution 8: Scripting for Form Elements
Task:
Extend your PDF-based form, ZBC480_##.
If you have not finished one of the previous exercises, you can copy the template
form BC480_TABLE instead.
The reference solution of this exercise is form BC480_FINAL.
You can check your results with report SAPBC480_DEMO.
1. Calculate field value.
The REFERENCE field (which so far has had a standard value) should
contain a combination of the first three letters of the clerk, the first threeletters of the customer name, and the string “Demo”. (You can locate the
field on master page FIRST , in the subform INFORMATION .)
a) FIRST.INFORMATION.REFERENCE::initialize
$ = Concat (Substr ($record.GC_CLERK, 1, 3),Substr($record.IS_CUSTOMER.NAME, 1, 3), "Demo")
2. Hide field dynamically dependent on condition.
The PS text with the discount should appear only if the customer has actually
received a discount.
Take into consideration that PS is a static text, which cannot have scriptingattached to it. You can write the scripting for the DISCOUNT field, for
example.
To test the result of your scripting, you can run report SAPBC480_DEMO
and enter customer numbers 2 and 3 on the selection screen. One has a
discount, the other one does not.
a) BODY_01.FINALLY.REDUCTION::ready:form
if ($record.IS_CUSTOMER.DISCOUNT == 0)then PS.presence = "hidden"endif
3. Change field properties dynamically.
Continued on next page
2006/Q2 © 2006 SAP AG. All rights reserved. 209
7/14/2019 BC480 - PDF-Based Print Forms
http://slidepdf.com/reader/full/bc480-pdf-based-print-forms 218/317
Unit 6: Scripting in the Form BC480
The subform INFORMATION (which contains the heading “Invoice”, the
customer number, the reference number, and the date) should be colored if
the customer number equals 1.
a) FIRST.INFORMATION::ready:layout
if ($record.IS_CUSTOMER.ID == 1)then $.border.fill.color.value = "240,160,0"endif
4. Optional: Hide airline if no connections are available.
In the (optional) nested table, every airline gets an entry, even if it does
not have any connections. Change this design flaw and hide the entire row
if there are no connections.
a) BODY_01.FINALLY.PS2.PS2_WRAPPER.GT_SCARR.DATA:ready:form
if (exists(GT_SPFLI.DATA[0].CONNID) == 0)then $.presence = "hidden"
endif
210 © 2006 SAP AG. All rights reserved. 2006/Q2

7/14/2019 BC480 - PDF-Based Print Forms
http://slidepdf.com/reader/full/bc480-pdf-based-print-forms 219/317
BC480 Lesson: Scripting for Form Elements
Lesson Summary
You should now be able to:• Name different events and what they can be used for
• Use the Script Editor
• Create scripting with FormCalc
• Access form objects, their values, and their properties
2006/Q2 © 2006 SAP AG. All rights reserved. 211

7/14/2019 BC480 - PDF-Based Print Forms
http://slidepdf.com/reader/full/bc480-pdf-based-print-forms 220/317
Unit Summary BC480
Unit Summary
You should now be able to:
• Name different events and what they can be used for
• Use the Script Editor
• Create scripting with FormCalc
• Access form objects, their values, and their properties
212 © 2006 SAP AG. All rights reserved. 2006/Q2

7/14/2019 BC480 - PDF-Based Print Forms
http://slidepdf.com/reader/full/bc480-pdf-based-print-forms 221/317
BC480 Test Your Knowledge
Test Your Knowledge
1. The initialize event is triggered once per form.
Determine whether this statement is true or false.
□ True
□ False
2. Accessing values or properties of master page elements is posssible at event
layout:ready.
Determine whether this statement is true or false.
□ True
□
False
3. You can mix both JavaScript and FormCalc in one form.
Determine whether this statement is true or false.
□ True
□ False
4. FormCalc's fields are case-sensitive.
Determine whether this statement is true or false.
□ True
□ False
5. What would scripting (attached to the field FIELD1) look like that at the
event initialization sets the value of field FIELD1 to 7?
Choose the correct answer(s).
□ A FIELD1 = 7
□ B FIELD1 = 7;
□ C FIELD1 == 7
□ D 7
6. What would scripting (attached to the field FIELD1) look like that at the
event initialization sets the value of field FIELD2 to 7?
Choose the correct answer(s).
□ A FIELD2 = 7
□ B $record.FIELD2 = 7
□ C $.record.FIELD2 = 7;
□ D Not possible.
2006/Q2 © 2006 SAP AG. All rights reserved. 213

7/14/2019 BC480 - PDF-Based Print Forms
http://slidepdf.com/reader/full/bc480-pdf-based-print-forms 222/317
Test Your Knowledge BC480
7. A subform has three integer fields, named A, B, and C. Is the following
scripting correct?
i f A = Bthen C = 7
Determine whether this statement is true or false.
□ True
□ False
214 © 2006 SAP AG. All rights reserved. 2006/Q2
7/14/2019 BC480 - PDF-Based Print Forms
http://slidepdf.com/reader/full/bc480-pdf-based-print-forms 223/317
BC480 Test Your Knowledge
Answers
1. The initialize event is triggered once per form.
Answer: False
The initialize event can be triggered for every dynamic element on any body
page or master page.
2. Accessing values or properties of master page elements is posssible at event
layout:ready.
Answer: True
Do not confuse layout:ready with form:ready. The latter is processed before
master pages are applied.
3. You can mix both JavaScript and FormCalc in one form.
Answer: True
You can set the default scripting language on the form properties, but you
can override them for every event.
4. FormCalc's fields are case-sensitive.
Answer: True
Fields are case-sensitive, keywords are not.
5. What would scripting (attached to the field FIELD1) look like that at the
event initialization sets the value of field FIELD1 to 7?
Answer: A, B
A semicolon starts a comment.
Two consecutive equal signs are needed for comparisons, not for
assignments.
A direct assignment, as in answer D, is possible in the calculate event only.
6. What would scripting (attached to the field FIELD1) look like that at the
event initialization sets the value of field FIELD2 to 7?
Answer: A, B
In answer A, FIELD2 is taken as the Hierachy name. Answer B would refer
to the Data View name.
2006/Q2 © 2006 SAP AG. All rights reserved. 215

7/14/2019 BC480 - PDF-Based Print Forms
http://slidepdf.com/reader/full/bc480-pdf-based-print-forms 224/317
Test Your Knowledge BC480
7. A subform has three integer fields, named A, B, and C. Is the following
scripting correct?
i f A = Bthen C = 7
Answer: False
The correct scripting would be:
if (A == B)then C = 7endif
216 © 2006 SAP AG. All rights reserved. 2006/Q2

7/14/2019 BC480 - PDF-Based Print Forms
http://slidepdf.com/reader/full/bc480-pdf-based-print-forms 225/317
Unit 7 Integration into ABAP Programs
Unit Overview
Designing the layout of a form is the most time-consuming part of administering a
printing scenario. However, a form itself cannot be run; it can only be previewed
with test data. An ABAP program is required to process it. This unit will walk youthrough the details of writing an ABAP application that integrates a PDF-based
form.
Unit Objectives
After completing this unit, you will be able to:
• Make use of a form's interface
• Write an ABAP program for a simple printing scenario using the tool
“Interactive Forms”
Unit Contents
Lesson: Integration of Forms into ABAP Programs .. .. .. .. .. .. .. .. .. .. .. .. 218Exercise 9: Integration of PDF-Based Forms Into ABAP Programs
(optional).....................................................................227
2006/Q2 © 2006 SAP AG. All rights reserved. 217
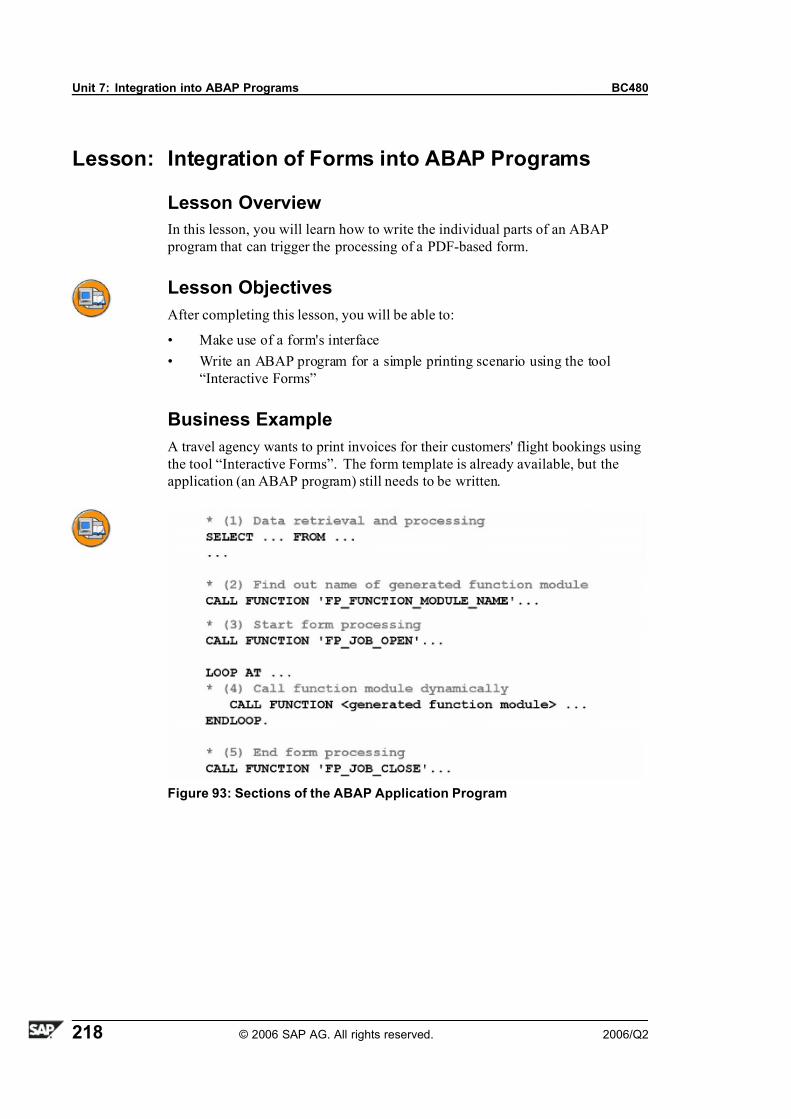
7/14/2019 BC480 - PDF-Based Print Forms
http://slidepdf.com/reader/full/bc480-pdf-based-print-forms 226/317
Unit 7: Integration into ABAP Programs BC480
Lesson: Integration of Forms into ABAP Programs
Lesson Overview
In this lesson, you will learn how to write the individual parts of an ABAP
program that can trigger the processing of a PDF-based form.
Lesson Objectives
After completing this lesson, you will be able to:
• Make use of a form's interface
• Write an ABAP program for a simple printing scenario using the tool
“Interactive Forms”
Business Example
A travel agency wants to print invoices for their customers' flight bookings using
the tool “Interactive Forms”. The form template is already available, but the
application (an ABAP program) still needs to be written.
Figure 93: Sections of the ABAP Application Program
218 © 2006 SAP AG. All rights reserved. 2006/Q2
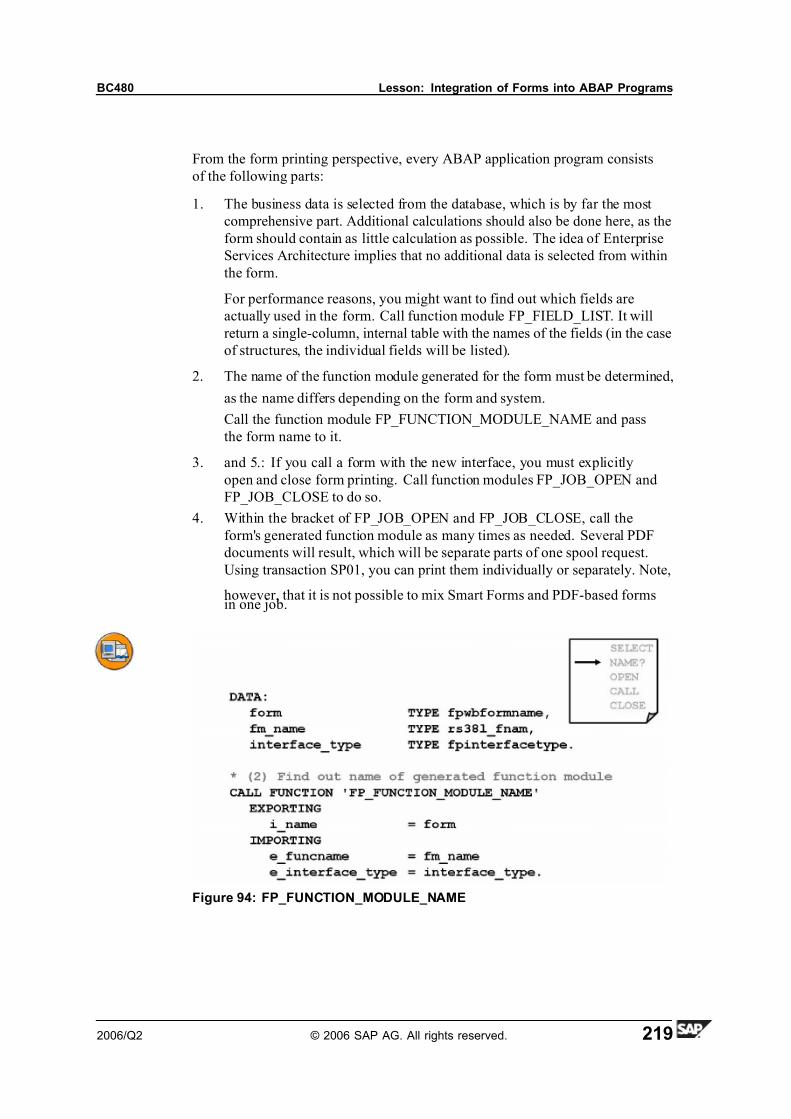
7/14/2019 BC480 - PDF-Based Print Forms
http://slidepdf.com/reader/full/bc480-pdf-based-print-forms 227/317
BC480 Lesson: Integration of Forms into ABAP Programs
From the form printing perspective, every ABAP application program consists
of the following parts:
1. The business data is selected from the database, which is by far the most
comprehensive part. Additional calculations should also be done here, as the
form should contain as little calculation as possible. The idea of Enterprise
Services Architecture implies that no additional data is selected from within
the form.
For performance reasons, you might want to find out which fields are
actually used in the form. Call function module FP_FIELD_LIST. It will
return a single-column, internal table with the names of the fields (in the case
of structures, the individual fields will be listed).
2. The name of the function module generated for the form must be determined,
as the name differs depending on the form and system.
Call the function module FP_FUNCTION_MODULE_NAME and pass
the form name to it.
3. and 5.: If you call a form with the new interface, you must explicitly
open and close form printing. Call function modules FP_JOB_OPEN and
FP_JOB_CLOSE to do so.
4. Within the bracket of FP_JOB_OPEN and FP_JOB_CLOSE, call the
form's generated function module as many times as needed. Several PDF
documents will result, which will be separate parts of one spool request.
Using transaction SP01, you can print them individually or separately. Note,
however, that it is not possible to mix Smart Forms and PDF-based formsin one job.
Figure 94: FP_FUNCTION_MODULE_NAME
2006/Q2 © 2006 SAP AG. All rights reserved. 219

7/14/2019 BC480 - PDF-Based Print Forms
http://slidepdf.com/reader/full/bc480-pdf-based-print-forms 228/317
Unit 7: Integration into ABAP Programs BC480
Call function module FP_FUNCTION_MODULE_NAME and pass the form
name to it. You will receive parameter e_funcname, which will contain the name
of the generated function module.
For interfaces, different types exist: those that are Smart Forms-compatible and
those that are not (the latter offer more options). If you do not want to restrict
yourself to using forms with the new interface type only, you should check which
kind of interface is implemented in the specific form. Parameter e_interface_type
will have a value of 'S' if the Smart Forms-compatible interface is used, and a
space otherwise.
Note that FP_FUNCTION_MODULE_NAME makes use of the class -based
exception concept. This means that you cannot query sy-subrc. Use TRY -CATCH - ENDTRY instead.
Figure 95: Starting and Ending Form Processing
If you call a form with the new interface, you must explicitly open and close form
printing. Call function modules FP_JOB_OPEN and FP_JOB_CLOSE to do so.
If you call a form with the old (Smart Forms-compatible) interface, these two
function modules must not be called. (Otherwise, the program will terminate with
an error.) Starting and ending is implicitly achieved by calling the generatedfunction module that uses the old interface type.
FP_JOB_OPEN has only one parameter: ie_outputparams of structure type
sfpoutputparams. It allows you to determine printer settings.
FP_JOB_CLOSE will tell you whether the output was produced successfully. It is
also possible to query the spool IDs.
If you are acquainted with SAPscript, FP_JOB_OPEN and FP_JOB_CLOSE are
roughly the equivalents of function modules OPEN_FORM and CLOSE_FORM.
220 © 2006 SAP AG. All rights reserved. 2006/Q2

7/14/2019 BC480 - PDF-Based Print Forms
http://slidepdf.com/reader/full/bc480-pdf-based-print-forms 229/317
BC480 Lesson: Integration of Forms into ABAP Programs
Figure 96: Parameters of FP_JOB_OPEN
2006/Q2 © 2006 SAP AG. All rights reserved. 221

7/14/2019 BC480 - PDF-Based Print Forms
http://slidepdf.com/reader/full/bc480-pdf-based-print-forms 230/317
Unit 7: Integration into ABAP Programs BC480
Structure type SFPOUTPUTPARAMS, which is used for changing parameter
ie_outputparams, has many fields that allow you to determine printer settings,
spool settings, settings for Adobe document services, and so on. They include:
• nodialog : If set to 'X', the printer dialog box will be suppressed.
• noprint : No backend printing. Printing from Adobe Reader preview will
still be possible.
• nopdf : If set to 'X', no PDF document will be created, just the print file
(PDL = Printer Definition Language). This improves print performance, but
prevents you from viewing the result in transaction SP01 (Output Controller).
By default, both a PDF document and print data (PDL) will be created. PDL
can be used for PostScript, PCL, and Zebra printers.
• getpdf : If set to 'X', the /1bcdwb/formoutput-pdf field of the form's generated
function module will contain the PDF data in hexadecimal form. This ishelpful for further processing the PDF file. A preview will not be possible if
getpdf = 'X'
• dest : The output device
• copies: Number of copies to be printed
• reqnew: If set to 'X', a new spool job will be started. If not set (default),
the system will try to use an existing spool request. See SAP Note 85318
for details.
• reqfinal : If set to 'X', the spool job will be closed so that no other documents
can use it.
• connection: Determine the RFC destination (http/https connection) for
Adobe document services.
• XFP : If set, external applications outside the SAP system can access and
process the contents of forms. The XFP output contains all form data in
XML format, but does not contain any layout information about the form.
XFP output corresponds to XSF output for Smart Forms and RDI output for
SAPscript.
222 © 2006 SAP AG. All rights reserved. 2006/Q2
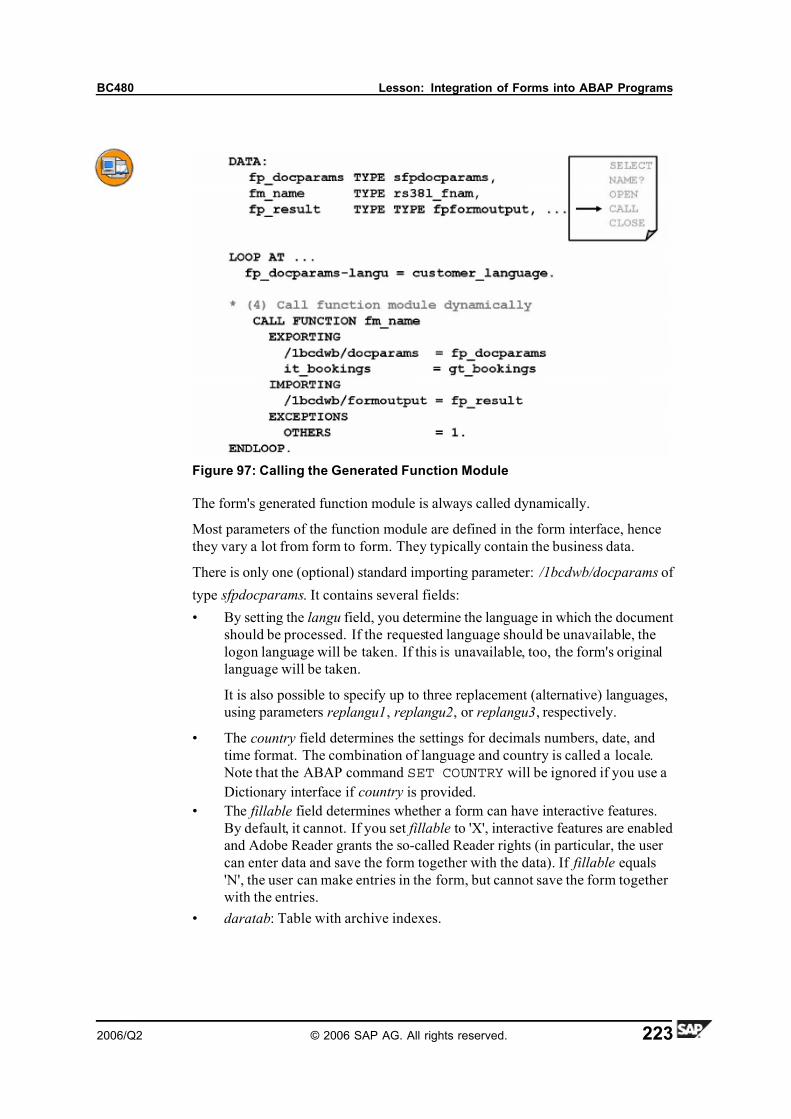
7/14/2019 BC480 - PDF-Based Print Forms
http://slidepdf.com/reader/full/bc480-pdf-based-print-forms 231/317
BC480 Lesson: Integration of Forms into ABAP Programs
Figure 97: Calling the Generated Function Module
The form's generated function module is always called dynamically.
Most parameters of the function module are defined in the form interface, hence
they vary a lot from form to form. They typically contain the business data.
There is only one (optional) standard importing parameter: /1bcdwb/docparams of
type sfpdocparams. It contains several fields:
• By setting the langu field, you determine the language in which the document
should be processed. If the requested language should be unavailable, the
logon language will be taken. If this is unavailable, too, the form's original
language will be taken.
It is also possible to specify up to three replacement (alternative) languages,
using parameters replangu1, replangu2, or replangu3, respectively.
• The country field determines the settings for decimals numbers, date, and
time format. The combination of language and country is called a locale.
Note that the ABAP command SET COUNTRY will be ignored if you use a
Dictionary interface if country is provided.
• The fillable field determines whether a form can have interactive features.
By default, it cannot. If you set fillable to 'X', interactive features are enabled
and Adobe Reader grants the so-called Reader rights (in particular, the user
can enter data and save the form together with the data). If fillable equals
'N', the user can make entries in the form, but cannot save the form together
with the entries.
• daratab: Table with archive indexes.
2006/Q2 © 2006 SAP AG. All rights reserved. 223
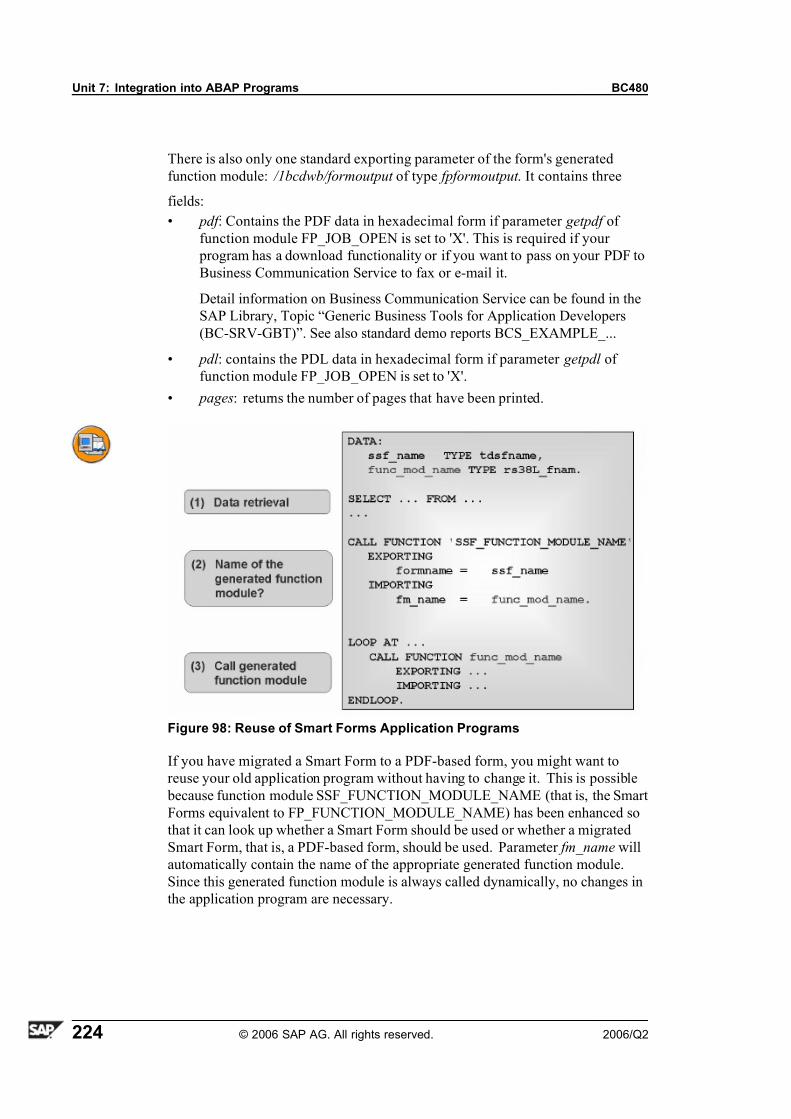
7/14/2019 BC480 - PDF-Based Print Forms
http://slidepdf.com/reader/full/bc480-pdf-based-print-forms 232/317
Unit 7: Integration into ABAP Programs BC480
There is also only one standard exporting parameter of the form's generated
function module: /1bcdwb/formoutput of type fpformoutput . It contains three
fields:
• pdf : Contains the PDF data in hexadecimal form if parameter getpdf of
function module FP_JOB_OPEN is set to 'X'. This is required if your
program has a download functionality or if you want to pass on your PDF to
Business Communication Service to fax or e-mail it.
Detail information on Business Communication Service can be found in the
SAP Library, Topic “Generic Business Tools for Application Developers
(BC-SRV-GBT)”. See also standard demo reports BCS_EXAMPLE_...
• pdl : contains the PDL data in hexadecimal form if parameter getpdl of
function module FP_JOB_OPEN is set to 'X'.
• pages: returns the number of pages that have been printed.
Figure 98: Reuse of Smart Forms Application Programs
If you have migrated a Smart Form to a PDF-based form, you might want to
reuse your old application program without having to change it. This is possible
because function module SSF_FUNCTION_MODULE_NAME (that is, the Smart
Forms equivalent to FP_FUNCTION_MODULE_NAME) has been enhanced so
that it can look up whether a Smart Form should be used or whether a migrated
Smart Form, that is, a PDF-based form, should be used. Parameter fm_name will
automatically contain the name of the appropriate generated function module.
Since this generated function module is always called dynamically, no changes in
the application program are necessary.
224 © 2006 SAP AG. All rights reserved. 2006/Q2

7/14/2019 BC480 - PDF-Based Print Forms
http://slidepdf.com/reader/full/bc480-pdf-based-print-forms 233/317
BC480 Lesson: Integration of Forms into ABAP Programs
How do you tell SSF_FUNCTION_MODULE_NAME which function module
to return? After migrating a Smart Form to a PDF-based form, run transaction
SMARTFORMS and choose Utilities→ Migration→ PDF-based Form→ Switch Runtime. This will create an entry in an administration table (STXFPCUST) with
the name of the old Smart Form and its new PDF-based replacement. This entry
will automatically be evaluated by SSF_FUNCTION_MODULE_NAME.
You could also create new PDF-based forms (with Smart Forms-compatible
interfaces), and use them in old application programs. However, it is recommended
to use the new technology for both form and application program.
If your form uses a Smart Form-compatible interface, the generated function
module will have different parameters. Here are some of the import parameters:
• control_parameters: A mixture of /1bcdwb/docparams and of the equivalent
of FP_JOB_OPEN's ie_outputparams.• output_options: Spool settings
• user_settings: If 'X', the user's default settings will be taken for the spool.
Please note that some parameters that are possible in a Smart Forms-compatible
interface can no longer be used in a meaningful way.
For details, see the Smart Forms documentation.
Figure 99: PDF Documents in the Print Preview
2006/Q2 © 2006 SAP AG. All rights reserved. 225
7/14/2019 BC480 - PDF-Based Print Forms
http://slidepdf.com/reader/full/bc480-pdf-based-print-forms 234/317
Unit 7: Integration into ABAP Programs BC480
The print preview (of transactions SP01 and SFP) displays the PDF document
in Adobe Reader.
Note: The SAP GUI print preview makes use of a so-called HTML
control, which in turn calls an Internet browser. Adobe Reader is
displayed in the SAP GUI only if you have enabled Adobe Reader to be
displayed in your browser. You do this in the Adobe Reader settings. If
this feature is not enabled, the SAP GUI print preview will remain empty,
but an extra window will open with Adobe Reader.
If, within one spool request, there are several PDF documents (results of several
calls of the generated function module), they are kept separately as parts.
The individual parts within the print preview (of transactions SP01 and SFP) are
accessible via arrows. You can go to the first, previous, next, or last part.
226 © 2006 SAP AG. All rights reserved. 2006/Q2

7/14/2019 BC480 - PDF-Based Print Forms
http://slidepdf.com/reader/full/bc480-pdf-based-print-forms 235/317
BC480 Lesson: Integration of Forms into ABAP Programs
Exercise 9: Integration of PDF-Based
Forms Into ABAP Programs (optional)Exercise Objectives
After completing this exercise, you will be able to:
• Write an ABAP program for a simple printing scenario using the tool
“Interactive Forms based on Adobe software”
Business Example
A travel agency wants to print invoices for their customers' flight bookings using
the tool “Interactive Forms”. As the form has been designed from scratch (without
an SAP template), there is no application program yet to run the form; it needs
to be written.
Task:
Create an ABAP program that can print your own PDF-based form.
1. In the ABAP Workbench (transaction SE80), copy the program
SAPBC480_TEMPLATE with all includes to ZBC480_##. Save it in
package ZBC480_##. ## stands for your two-digit group number (monitor
number).
The reference solution for this exercise is report SAPBC480_SOLUTION.2. The template has a selection-screen and data selection. The relevant parts in
the coding where you have to insert your own coding are marked
*>>>>>>>>>>>>>>>>>>>>>
Generally, you might treat the exception handling lightly, as it is not the
focus of this exercise.
At the suitable places, integrate the four required function modules. In
particular, take care to create a correct mapping of the interface parameters
of the generated function module. Use fields gs_customer , gt_bookings,
gt_sums, gv_image_url , and pa_send .
The locale can be entered on the selection-screen. It is transferred to the
relevant fields of gs_docparams (coding has been implemented for you), but
you have to pass gs_docparams to the generated function module.
3. Optional: Determine some details for the spool processing. For example,
you might want to prevent the print dialog.
4. Activate and test your program.
2006/Q2 © 2006 SAP AG. All rights reserved. 227
7/14/2019 BC480 - PDF-Based Print Forms
http://slidepdf.com/reader/full/bc480-pdf-based-print-forms 236/317
Unit 7: Integration into ABAP Programs BC480
Solution 9: Integration of PDF-Based
Forms Into ABAP Programs (optional)Task:
Create an ABAP program that can print your own PDF-based form.
1. In the ABAP Workbench (transaction SE80), copy the program
SAPBC480_TEMPLATE with all includes to ZBC480_##. Save it in
package ZBC480_##. ## stands for your two-digit group number (monitor
number).
The reference solution for this exercise is report SAPBC480_SOLUTION.
a) Start transaction SE80. In the left area (the navigation area), display
report SAPBC480_TEMPLATE.
b) Right-click on it to copy it.
2. The template has a selection-screen and data selection. The relevant parts in
the coding where you have to insert your own coding are marked
*>>>>>>>>>>>>>>>>>>>>>
Generally, you might treat the exception handling lightly, as it is not the
focus of this exercise.
At the suitable places, integrate the four required function modules. In
particular, take care to create a correct mapping of the interface parametersof the generated function module. Use fields gs_customer , gt_bookings,
gt_sums, gv_image_url , and pa_send .
The locale can be entered on the selection-screen. It is transferred to the
relevant fields of gs_docparams (coding has been implemented for you), but
you have to pass gs_docparams to the generated function module.
a) See coding.
3. Optional: Determine some details for the spool processing. For example,
you might want to prevent the print dialog.
a) See coding.
4. Activate and test your program.
a) Press CTRL+F3, then F8.
Your coding should look similar to the following:
Excerpt from the TOP-Include:
DATA:
gt_customers TYPE TABLE OF scustom,
Continued on next page
228 © 2006 SAP AG. All rights reserved. 2006/Q2

7/14/2019 BC480 - PDF-Based Print Forms
http://slidepdf.com/reader/full/bc480-pdf-based-print-forms 237/317
BC480 Lesson: Integration of Forms into ABAP Programs
gs_customer LIKE LINE OF gt_customers,
gt_bookings TYPE ty_bookings, "table of sbook
gt_sums TYPE flprice_t,gv_image_url TYPE string,
gv_fm_name TYPE rs38l_fnam,
* parameters for calling the generated function module
gs_docparams TYPE sfpdocparams,
gs_outputparams TYPE sfpoutputparams,
Event START-OF-SELECTION:
* Please note that the error handling implemented here is very
* rudimentary!
*>>>>>>>>>>>>>>>>>>>>>>>>>>>>>>>>>>>>>>>>>>>>>>>>>>>>>>>
* Get name of the generated function module
TRY.
CALL FUNCTION 'FP_FUNCTION_MODULE_NAME'
EXPORTING
i_name = pa_form
IMPORTING
e_funcname = gv_fm_name.
CATCH cx_root.
MESSAGE e004 WITH pa_form.
* No active form &1 available
ENDTRY.
*>>>>>>>>>>>>>>>>>>>>>>>>>>>>>>>>>>>>>>>>>>>>>>>>>>>>>>
* Optional: Set output parameters
gs_outputparams-nodialog = space.
gs_outputparams-preview = 'X'.
gs_outputparams-dest = pa_prnt.
*>>>>>>>>>>>>>>>>>>>>>>>>>>>>>>>>>>>>>>>>>>>>>>>>>>>>>>* Open print job
CALL FUNCTION 'FP_JOB_OPEN'
CHANGING
ie_outputparams = gs_outputparams
EXCEPTIONS
OTHERS = 1.
IF sy-subrc <> 0.
MESSAGE e020.
Continued on next page
2006/Q2 © 2006 SAP AG. All rights reserved. 229
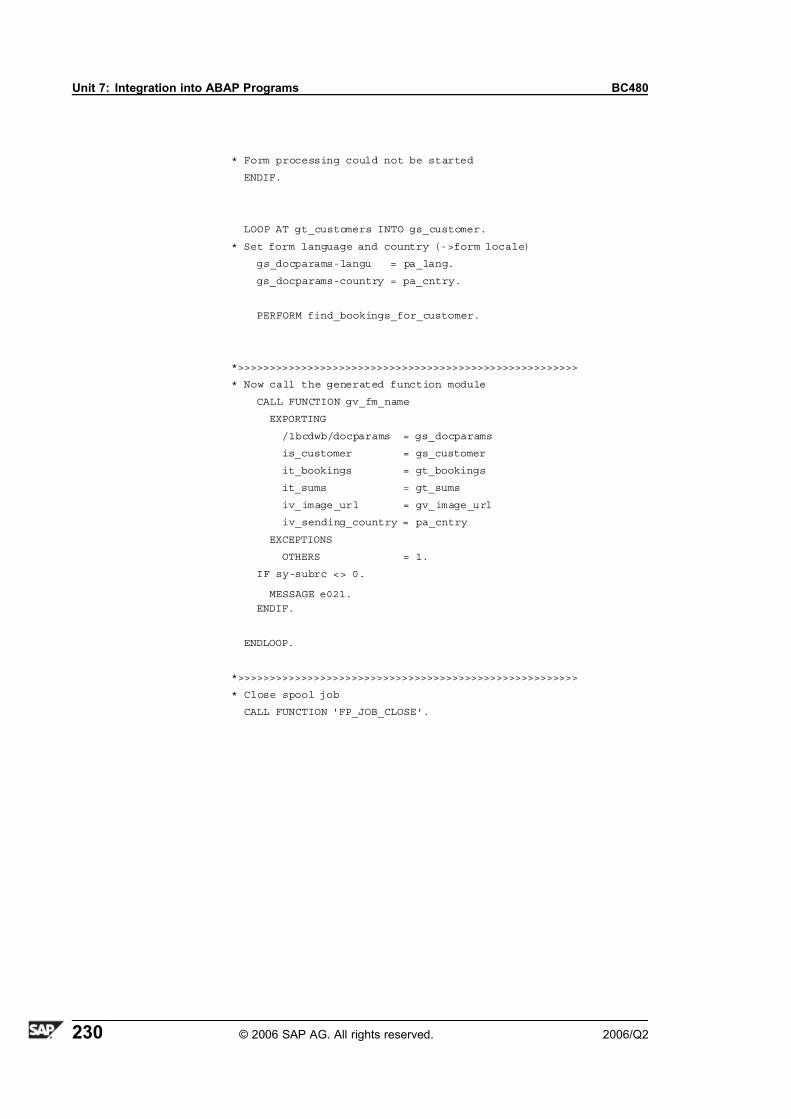
7/14/2019 BC480 - PDF-Based Print Forms
http://slidepdf.com/reader/full/bc480-pdf-based-print-forms 238/317
Unit 7: Integration into ABAP Programs BC480
* Form processing could not be started
ENDIF.
LOOP AT gt_customers INTO gs_customer.
* Set form language and country (->form locale)
gs_docparams-langu = pa_lang.
gs_docparams-country = pa_cntry.
PERFORM find_bookings_for_customer.
*>>>>>>>>>>>>>>>>>>>>>>>>>>>>>>>>>>>>>>>>>>>>>>>>>>>>>>
* Now call the generated function module
CALL FUNCTION gv_fm_name
EXPORTING
/1bcdwb/docparams = gs_docparams
is_customer = gs_customer
it_bookings = gt_bookings
it_sums = gt_sums
iv_image_url = gv_image_url
iv_sending_country = pa_cntry
EXCEPTIONS
OTHERS = 1.
IF sy-subrc <> 0.
MESSAGE e021.
ENDIF.
ENDLOOP.
*>>>>>>>>>>>>>>>>>>>>>>>>>>>>>>>>>>>>>>>>>>>>>>>>>>>>>>
* Close spool job
CALL FUNCTION 'FP_JOB_CLOSE'.
230 © 2006 SAP AG. All rights reserved. 2006/Q2

7/14/2019 BC480 - PDF-Based Print Forms
http://slidepdf.com/reader/full/bc480-pdf-based-print-forms 239/317
BC480 Lesson: Integration of Forms into ABAP Programs
Lesson Summary
You should now be able to:• Make use of a form's interface
• Write an ABAP program for a simple printing scenario using the tool
“Interactive Forms”
2006/Q2 © 2006 SAP AG. All rights reserved. 231

7/14/2019 BC480 - PDF-Based Print Forms
http://slidepdf.com/reader/full/bc480-pdf-based-print-forms 240/317
Unit Summary BC480
Unit Summary
You should now be able to:
• Make use of a form's interface
• Write an ABAP program for a simple printing scenario using the tool
“Interactive Forms”
232 © 2006 SAP AG. All rights reserved. 2006/Q2
7/14/2019 BC480 - PDF-Based Print Forms
http://slidepdf.com/reader/full/bc480-pdf-based-print-forms 241/317
Unit 8 Tips and Tricks
Unit Overview
This unit will show you how to download and upload form objects, as well as how
to import PDF documents. Furthermore, it gives information on how to create
forms that are accessible for mobility impaired, visually challenged, or visuallyimpaired persons.
Unit Objectives
After completing this unit, you will be able to:
• Download and upload a form
• Import a PDF file
• Name issues that are relevant in an accessible form
Unit Contents
Lesson: Download/Upload and Import.......................................234
Lesson: Accessibility Aspects.................................................240
2006/Q2 © 2006 SAP AG. All rights reserved. 233
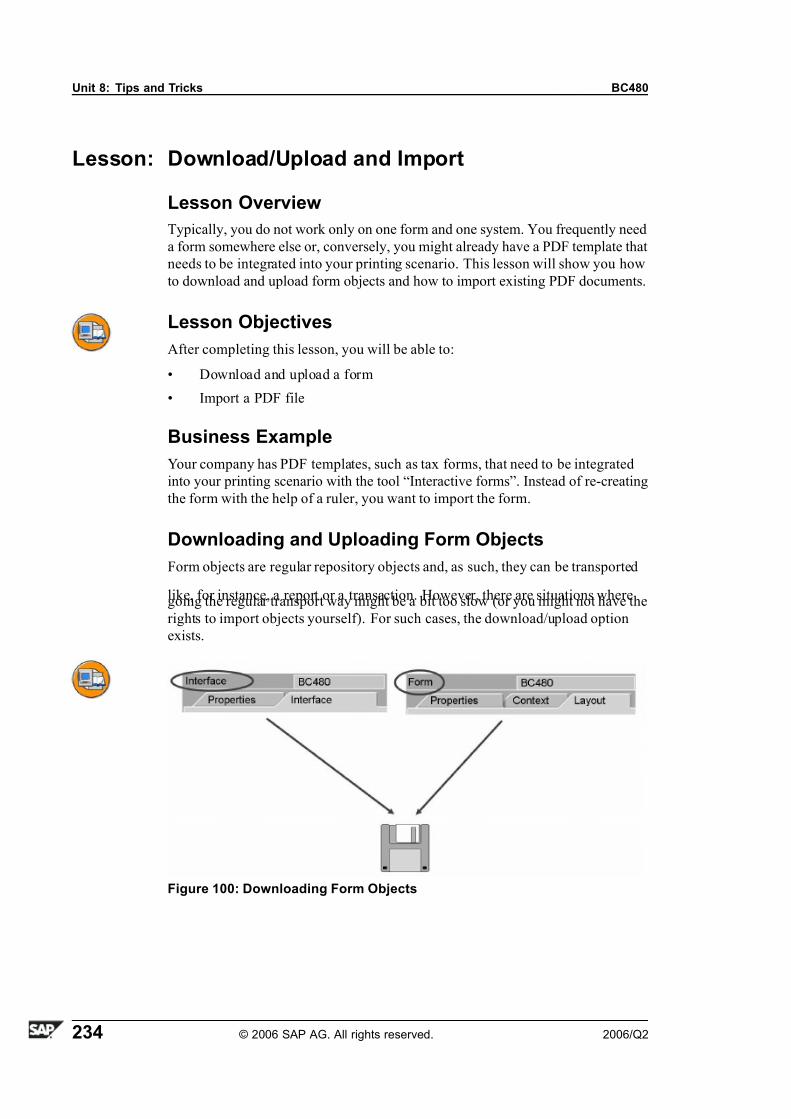
7/14/2019 BC480 - PDF-Based Print Forms
http://slidepdf.com/reader/full/bc480-pdf-based-print-forms 242/317
Unit 8: Tips and Tricks BC480
Lesson: Download/Upload and Import
Lesson Overview
Typically, you do not work only on one form and one system. You frequently need
a form somewhere else or, conversely, you might already have a PDF template that
needs to be integrated into your printing scenario. This lesson will show you how
to download and upload form objects and how to import existing PDF documents.
Lesson Objectives
After completing this lesson, you will be able to:
• Download and upload a form
• Import a PDF file
Business Example
Your company has PDF templates, such as tax forms, that need to be integrated
into your printing scenario with the tool “Interactive forms”. Instead of re-creating
the form with the help of a ruler, you want to import the form.
Downloading and Uploading Form Objects
Form objects are regular repository objects and, as such, they can be transported
like, for instance, a report or a transaction. However, there are situations wheregoing the regular transport way might be a bit too slow (or you might not have the
rights to import objects yourself). For such cases, the download/upload option
exists.
Figure 100: Downloading Form Objects
234 © 2006 SAP AG. All rights reserved. 2006/Q2
7/14/2019 BC480 - PDF-Based Print Forms
http://slidepdf.com/reader/full/bc480-pdf-based-print-forms 243/317
BC480 Lesson: Download/Upload and Import
You can download interfaces and forms to your local PC and upload them from
there. From transaction SFP, choose Utilities→ Downloading form object or
Uploading form object .
If you download a form, make sure to also download the interface used.
If you download a form, the current version (including all its languages) will be
downloaded. Saving or activating the form before downloading it is not required.
It is also possible to download parts of a context only. Mark the relevant node
(mulitple selection is not possible) and chose Utilities→ Downloading subtree.
You can also download the PDF document. You have two options:
• Within transaction SFP, go to the Layout tab, then to the Layout Editor,
and select the PDF Preview tab. This will display the PDF form, but with
no data merged. (Unless you have specified an XML test data file in the Form Properties.)To save this version, press CTRL+SHIFT+S and specify
where you want to save the document.
• From the spool print view, either select Form→ Test (shortcut: F8) in
transaction SFP or run a print program. The result will be displayed in Adobe
Reader. Press CTRL+SHIFT+S or select File→ Save a Copy and specify
where you want to save the document.
Be cautious when manually copying the XML source from within Designer. This
method does not copy the context, so you will probably get a faulty form.
2006/Q2 © 2006 SAP AG. All rights reserved. 235
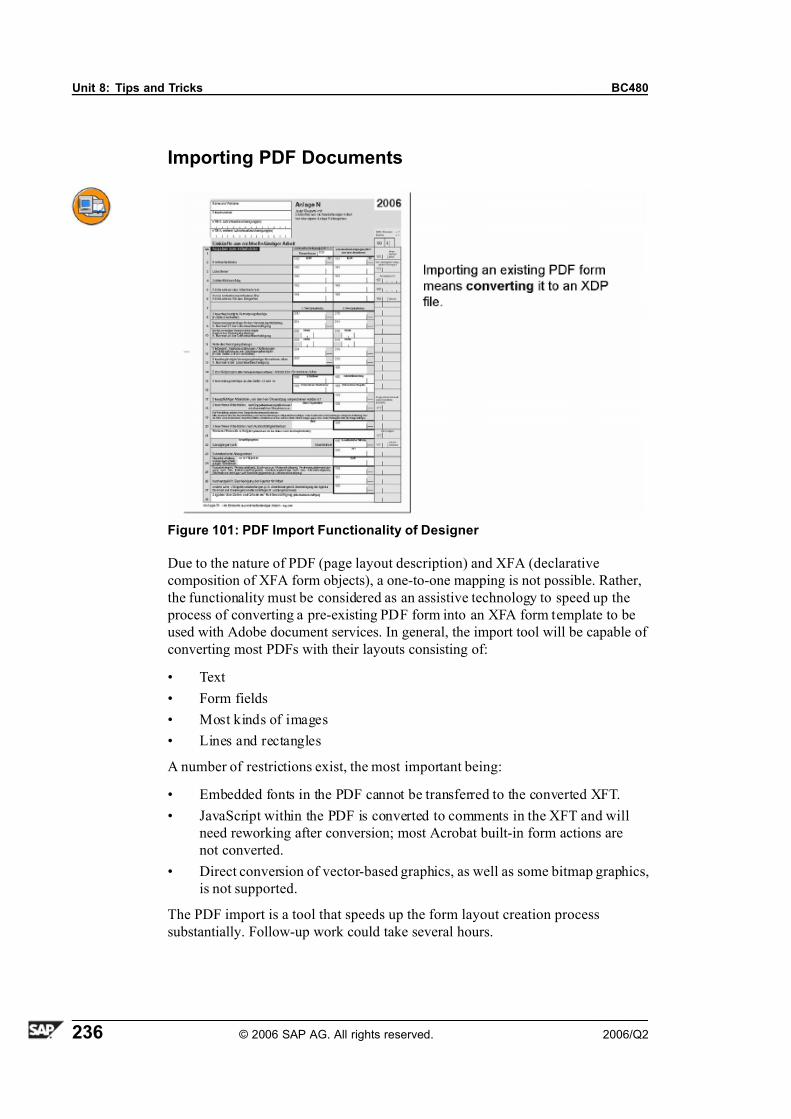
7/14/2019 BC480 - PDF-Based Print Forms
http://slidepdf.com/reader/full/bc480-pdf-based-print-forms 244/317
Unit 8: Tips and Tricks BC480
Importing PDF Documents
Figure 101: PDF Import Functionality of Designer
Due to the nature of PDF (page layout description) and XFA (declarative
composition of XFA form objects), a one-to-one mapping is not possible. Rather,
the functionality must be considered as an assistive technology to speed up the
process of converting a pre-existing PDF form into an XFA form template to be
used with Adobe document services. In general, the import tool will be capable of
converting most PDFs with their layouts consisting of:
• Text
• Form fields
• Most kinds of images
• Lines and rectangles
A number of restrictions exist, the most important being:
• Embedded fonts in the PDF cannot be transferred to the converted XFT.
• JavaScript within the PDF is converted to comments in the XFT and will
need reworking after conversion; most Acrobat built-in form actions are
not converted.
• Direct conversion of vector-based graphics, as well as some bitmap graphics,
is not supported.
The PDF import is a tool that speeds up the form layout creation process
substantially. Follow-up work could take several hours.
236 © 2006 SAP AG. All rights reserved. 2006/Q2
7/14/2019 BC480 - PDF-Based Print Forms
http://slidepdf.com/reader/full/bc480-pdf-based-print-forms 245/317
BC480 Lesson: Download/Upload and Import
To import a PDF file in the Form Builder:
• In transaction SFP, choose the Layout tab.
• Choose Tools→ Import .
• In the dialog box for opening files, from the Files of type drop-down list,
select Adobe Acrobat files (*.pdf).
• Navigate to the file that you want to open, select the file, and choose Open.
On the window that opens up when you start the import, a number of options can
be set. Typically, the import works best with the default options.
Some details:
Conversion Type: You should always choose the Optimize for editing option.
Join text as:
• Paragraph: This setting makes it easy to maintain the converted form. Text
that is close together on a line or in multiple lines is combined to create one
text block with text that will re-wrap itself.
• Text Block : This is the same as Paragraph, but without the text wrapping.
• Line by line: This is the same as Text Block , but will produce a single block
for each line of text.
• Single Words, Single Characters: Not recommended (this mode will generate
a conversion that most closely matches the original document, but it is hard
to maintain, as each “visual” section of text may be composed of multiple
text objects).As for the Tolerance for joining text , lines, and paragraphs, a common setting of
High should give good results in most cases. However, depending on the form,
in special cases a lower tolerance may be needed to avoid combining text that
should not be joined.
Page Range: If the form consists of several pages, of which only some are
relevant for you, only select these pages.
Image conversion: In general, you should select this option to have images in the
source PDF embedded into the result document.
Summary report: Select this box to get a summary report shown right after the
import conversion is finished. The report can help you to identify problems in theresult, for example, unknown fonts, encodings, and so on.
Trace information inclusion: The trace information is hardly readable for
non-PDF experts, but blows up the size of the resulting XFT substantially. It is
recommended you always set this to none.
2006/Q2 © 2006 SAP AG. All rights reserved. 237

7/14/2019 BC480 - PDF-Based Print Forms
http://slidepdf.com/reader/full/bc480-pdf-based-print-forms 246/317
Unit 8: Tips and Tricks BC480
It is also possible to import Microsft Word documents and RTF (Rich Text
Format) documents.
Hint: You can find more information in the Adobe LiveCycle Designer
Online Help at Importing Documents from Other Applications →
Importing PDF documents.
238 © 2006 SAP AG. All rights reserved. 2006/Q2

7/14/2019 BC480 - PDF-Based Print Forms
http://slidepdf.com/reader/full/bc480-pdf-based-print-forms 247/317
BC480 Lesson: Download/Upload and Import
Lesson Summary
You should now be able to:• Download and upload a form
• Import a PDF file
2006/Q2 © 2006 SAP AG. All rights reserved. 239
7/14/2019 BC480 - PDF-Based Print Forms
http://slidepdf.com/reader/full/bc480-pdf-based-print-forms 248/317
Unit 8: Tips and Tricks BC480
Lesson: Accessibility Aspects
Lesson Overview
Accessibility has been a very important topic in the software development of
recent years. It aims at helping people that cannot use pointing devices, or whose
eye vision is limited, or who are even blind. This lesson focuses on the third group.
Note: The following information does not represent any promise or
obligation on SAP's part to make any aspect of the software accessible.
Lesson Objectives
After completing this lesson, you will be able to:
• Name issues that are relevant in an accessible form
Business Example
A travel agency wants to print invoices for their customers' flight bookings using
the tool “Interactive Forms”. The form should be accessible.
Accessibility: Definition
• Accessibility target groups are mobility impaired, visually challenged, and
visually impaired persons.
• Adobe Reader provides several techniques for supporting accessibility target
groups when “reading” PDF documents.
When you are sure the forms in your scenario get printed and never need to be
accessed in an electronic form, you might want to choose to produce untagged
PDFs since they are considerably smaller. You can set the field PDFTAGGED
of structure SFPOUTPUTPARAMS (which is used in the function module
FP_JOB_OPEN) to
• 'X' if you want to have tagged PDFs
• '-' if you do want to have untagged PDFs
• space if you want to take the user (GUI) settings
Note: You can find the document “Creating Accessible Forms” in the
Adobe LiveCycle Designer online help. However, this document mainly
applies to interactive forms.
Here are some additional considerations for creating read-only PDF documents
that provide as much help as possible for screen reader applications.
Basic principles
240 © 2006 SAP AG. All rights reserved. 2006/Q2
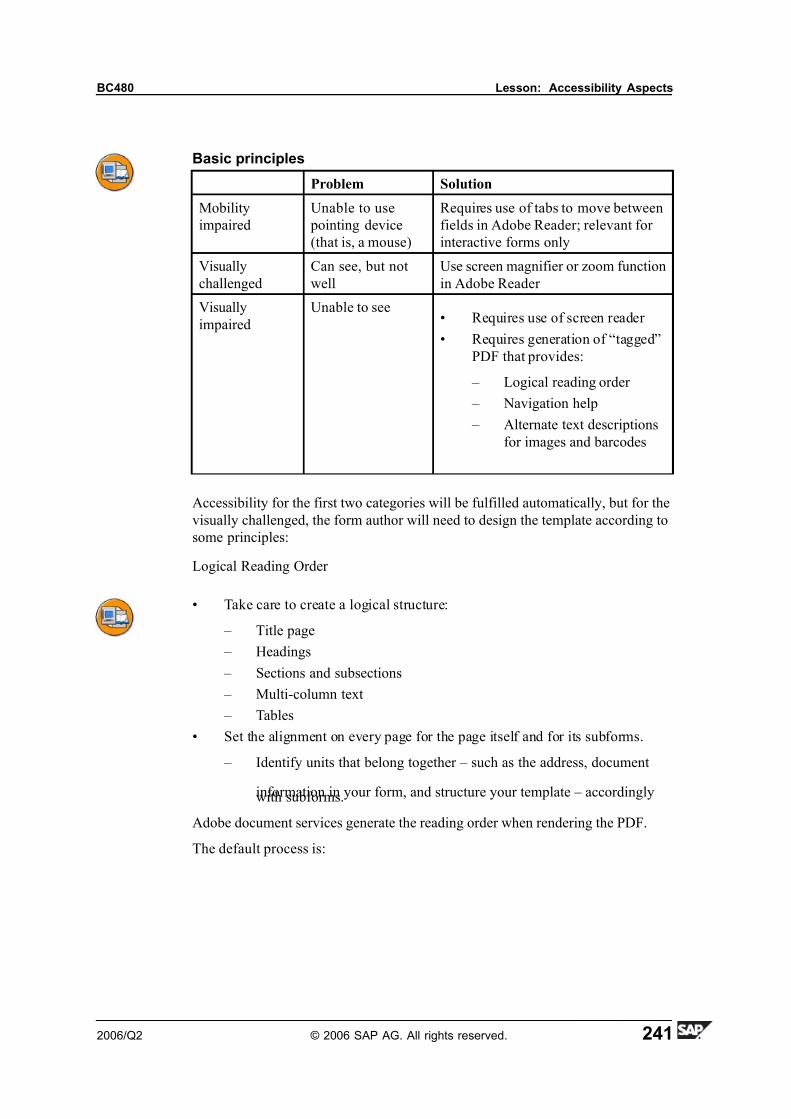
7/14/2019 BC480 - PDF-Based Print Forms
http://slidepdf.com/reader/full/bc480-pdf-based-print-forms 249/317
BC480 Lesson: Accessibility Aspects
Basic principles
Problem Solution
Mobility
impaired
Unable to use
pointing device
(that is, a mouse)
Requires use of tabs to move between
fields in Adobe Reader; relevant for
interactive forms only
Visually
challenged
Can see, but not
well
Use screen magnifier or zoom function
in Adobe Reader
Visually
impaired
Unable to see• Requires use of screen reader
• Requires generation of “tagged”
PDF that provides:
– Logical reading order
– Navigation help
– Alternate text descriptions
for images and barcodes
Accessibility for the first two categories will be fulfilled automatically, but for the
visually challenged, the form author will need to design the template according to
some principles:
Logical Reading Order
• Take care to create a logical structure:
– Title page
– Headings
– Sections and subsections
– Multi-column text
– Tables
• Set the alignment on every page for the page itself and for its subforms.
– Identify units that belong together – such as the address, document
information in your form, and structure your template – accordinglywith subforms.
Adobe document services generate the reading order when rendering the PDF.
The default process is:
2006/Q2 © 2006 SAP AG. All rights reserved. 241

7/14/2019 BC480 - PDF-Based Print Forms
http://slidepdf.com/reader/full/bc480-pdf-based-print-forms 250/317
Unit 8: Tips and Tricks BC480
On each page:
• Subforms top to bottom, left to right
• Internal to each subform, top to bottom, left to right (subforms have a
attribute that controls the layout order of their contents, but is set to top
to bottom, left to right by default)
– You can override the default layout ordering by wrapping logical sections
in subforms.
Figure 102: Reading Order
In this example, there are three textual objects (labels Field1, StaticText1, and
Field2 are not part of the template, but have been inserted for better explanation):
Field1 with position X = 13cm and Y = 0.7cm
Field2 with position X = 18cm and Y = 0.65cm
StaticText1 with position X = 13.2cm and Y = 1.55cm
A screen reader would read out: “E A Payment block”.
242 © 2006 SAP AG. All rights reserved. 2006/Q2
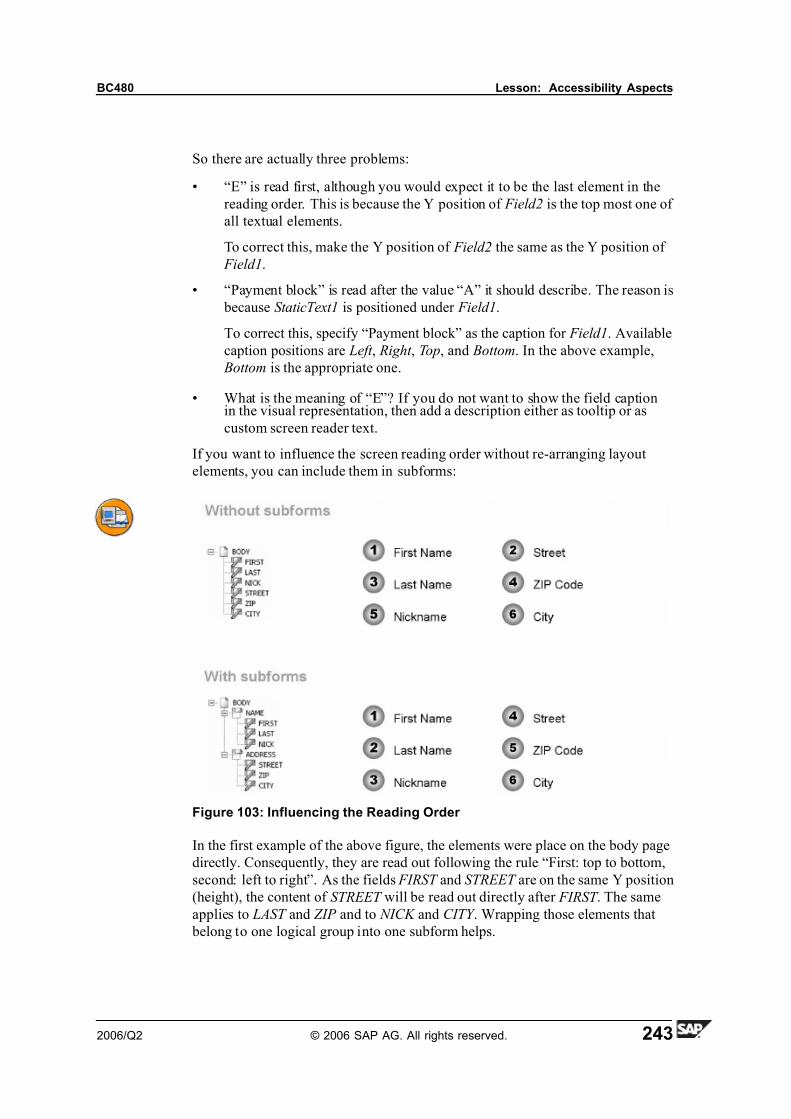
7/14/2019 BC480 - PDF-Based Print Forms
http://slidepdf.com/reader/full/bc480-pdf-based-print-forms 251/317
BC480 Lesson: Accessibility Aspects
So there are actually three problems:
• “E” is read first, although you would expect it to be the last element in the
reading order. This is because the Y position of Field2 is the top most one of
all textual elements.
To correct this, make the Y position of Field2 the same as the Y position of
Field1.
• “Payment block” is read after the value “A” it should describe. The reason is
because StaticText1 is positioned under Field1.
To correct this, specify “Payment block” as the caption for Field1. Available
caption positions are Left , Right , Top, and Bottom. In the above example,
Bottom is the appropriate one.
• What is the meaning of “E”? If you do not want to show the field captionin the visual representation, then add a description either as tooltip or as
custom screen reader text.
If you want to influence the screen reading order without re-arranging layout
elements, you can include them in subforms:
Figure 103: Influencing the Reading Order
In the first example of the above figure, the elements were place on the body page
directly. Consequently, they are read out following the rule “First: top to bottom,
second: left to right”. As the fields FIRST and STREET are on the same Y position
(height), the content of STREET will be read out directly after FIRST . The same
applies to LAST and ZIP and to NICK and CITY . Wrapping those elements that
belong to one logical group into one subform helps.
2006/Q2 © 2006 SAP AG. All rights reserved. 243
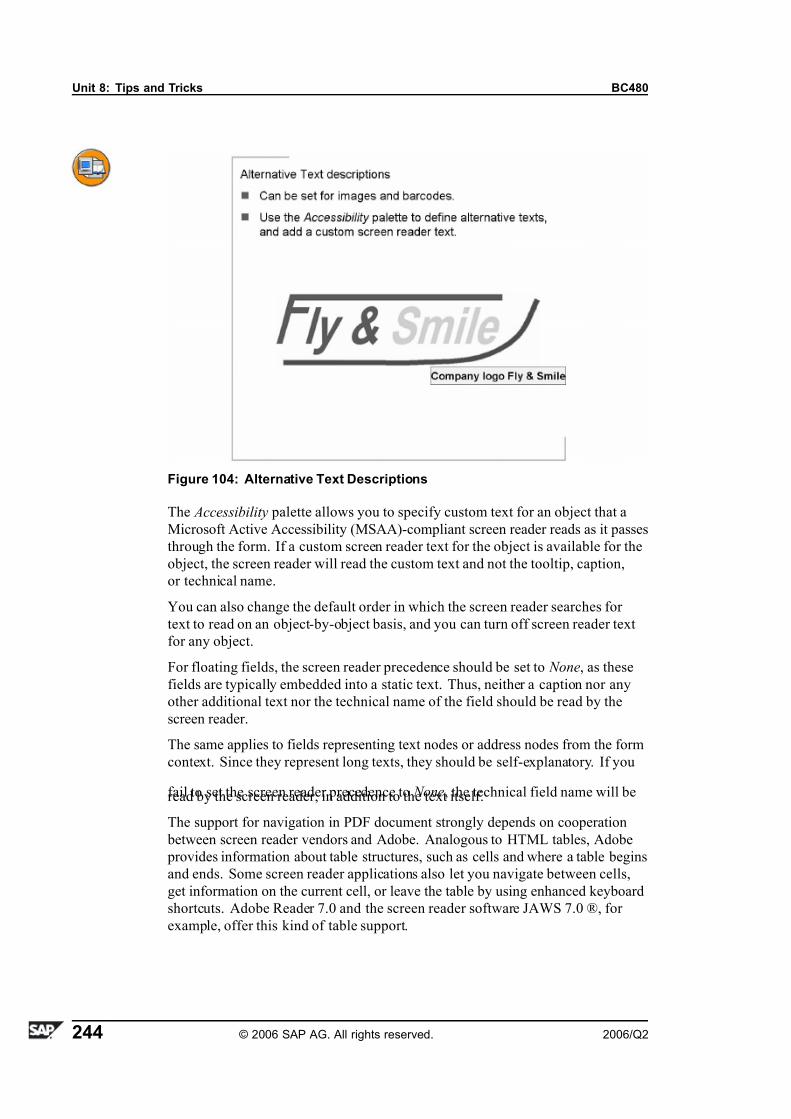
7/14/2019 BC480 - PDF-Based Print Forms
http://slidepdf.com/reader/full/bc480-pdf-based-print-forms 252/317
Unit 8: Tips and Tricks BC480
Figure 104: Alternative Text Descriptions
The Accessibility palette allows you to specify custom text for an object that a
Microsoft Active Accessibility (MSAA)-compliant screen reader reads as it passes
through the form. If a custom screen reader text for the object is available for the
object, the screen reader will read the custom text and not the tooltip, caption,
or technical name.
You can also change the default order in which the screen reader searches for
text to read on an object-by-object basis, and you can turn off screen reader text
for any object.
For floating fields, the screen reader precedence should be set to None, as these
fields are typically embedded into a static text. Thus, neither a caption nor any
other additional text nor the technical name of the field should be read by the
screen reader.
The same applies to fields representing text nodes or address nodes from the form
context. Since they represent long texts, they should be self-explanatory. If you
fail to set the screen reader precedence to None, the technical field name will beread by the screen reader, in addition to the text itself.
The support for navigation in PDF document strongly depends on cooperation
between screen reader vendors and Adobe. Analogous to HTML tables, Adobe
provides information about table structures, such as cells and where a table begins
and ends. Some screen reader applications also let you navigate between cells,
get information on the current cell, or leave the table by using enhanced keyboard
shortcuts. Adobe Reader 7.0 and the screen reader software JAWS 7.0 ®, for
example, offer this kind of table support.
244 © 2006 SAP AG. All rights reserved. 2006/Q2

7/14/2019 BC480 - PDF-Based Print Forms
http://slidepdf.com/reader/full/bc480-pdf-based-print-forms 253/317
BC480 Lesson: Accessibility Aspects
Figure 105: Setting the Tab Order
Users with vision or mobility impairments typically do not use a mouse to navigate
through the form; they depend on the keyboard keys and a good tabbing order
sequence to ensure that they have full access to all the fields on the form.
The default tabbing order for objects in a form is from left to right, top to bottom,
starting from the upper-left corner. Tabbing order respects the existence of
subforms, radio buttons, and content areas. For example, if two subforms exist
side-by-side, and each subform contains a number of field objects, the tabbing
sequence will go through the fields in the first subform before moving on to thenext.
Tabbing order is also determined by the vertical position of the master page and
the main subform on the body page. Whichever is highest receives the tab order
first. That is, all objects contained within the content area on the master page or the
main subform will be accessed first. Access then moves to the next highest object.
You can change the default tabbing order if you require a different sequence in
your form. For example, you may want to change the tabbing order to move
through objects in a column, from top to bottom, and then left to right.
Choose View→ Tab Order and click the objects in the sequence in which you
want them to be accessed by tabbing.
2006/Q2 © 2006 SAP AG. All rights reserved. 245

7/14/2019 BC480 - PDF-Based Print Forms
http://slidepdf.com/reader/full/bc480-pdf-based-print-forms 254/317
Unit 8: Tips and Tricks BC480
Lesson Summary
You should now be able to:• Name issues that are relevant in an accessible form
246 © 2006 SAP AG. All rights reserved. 2006/Q2

7/14/2019 BC480 - PDF-Based Print Forms
http://slidepdf.com/reader/full/bc480-pdf-based-print-forms 255/317
BC480 Unit Summary
Unit Summary
You should now be able to:
• Download and upload a form
• Import a PDF file
• Name issues that are relevant in an accessible form
2006/Q2 © 2006 SAP AG. All rights reserved. 247

7/14/2019 BC480 - PDF-Based Print Forms
http://slidepdf.com/reader/full/bc480-pdf-based-print-forms 256/317
Unit Summary BC480
248 © 2006 SAP AG. All rights reserved. 2006/Q2
7/14/2019 BC480 - PDF-Based Print Forms
http://slidepdf.com/reader/full/bc480-pdf-based-print-forms 257/317
Unit 9Appendix
Unit Overview
In the appendix, you will find some information on side issues, like styles,
class-based exception handling (relevant for the ABAP application program),
Customizing settings, fonts, and the reuse of SAPscript forms and Smart Forms.
Unit Objectives
After completing this unit, you will be able to:
• Describe the formatting concept used for text modules
• Name relevants parts of Smart Styles
• Create and maintain styles
• Explain the mechanims involved in catching and thowing object-oriented
exceptions
• Catch exceptions that might be raised within a program that calls PDF-basedforms
• Explain the principles of how customizing works for PDF-based forms
• Customize one example transaction in mySAP ERP so that PDF-based forms
are used for a printing scenario
• Set up an http connection for Adobe document services
• Name basic steps needed to install new fonts
• use tables in Adobe LiveCycle Designer versions 6.0 and 7.0
• Describe the basic concepts of form processing with SAPscript and Smart
Forms
• Name steps required to reuse or migrate existing form objects from
SAPscript and Smart Forms
Unit Contents
Lesson: Styles............ ........ ........ ....... ........ ....... ........ ........ .251Lesson: ABAP Exception Handling.. ... .. .. ... .. ... ... .. ... .. ... .. ... .. ... ... 261
Lesson: Customizing .... .... .... .... .... ... .... ... .... ... .... ... .... .... .... ...266
Lesson: Basic Administration .................................................270Lesson: Tables in Adobe LiveCycle Designer 6.0 or 7.0 ..................275
2006/Q2 © 2006 SAP AG. All rights reserved. 249

7/14/2019 BC480 - PDF-Based Print Forms
http://slidepdf.com/reader/full/bc480-pdf-based-print-forms 258/317
Unit 9: Appendix BC480
Lesson: Migration...............................................................281
250 © 2006 SAP AG. All rights reserved. 2006/Q2
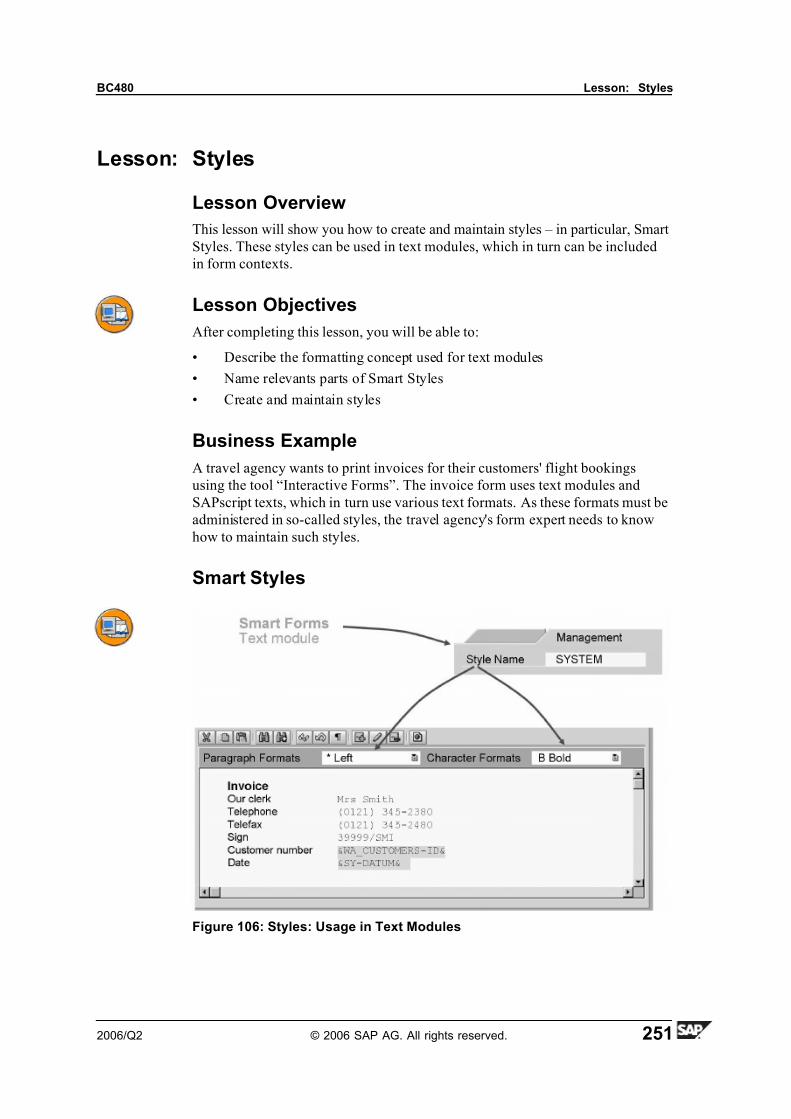
7/14/2019 BC480 - PDF-Based Print Forms
http://slidepdf.com/reader/full/bc480-pdf-based-print-forms 259/317
BC480 Lesson: Styles
Lesson: Styles
Lesson Overview
This lesson will show you how to create and maintain styles – in particular, Smart
Styles. These styles can be used in text modules, which in turn can be included
in form contexts.
Lesson Objectives
After completing this lesson, you will be able to:
• Describe the formatting concept used for text modules
• Name relevants parts of Smart Styles
• Create and maintain styles
Business Example
A travel agency wants to print invoices for their customers' flight bookings
using the tool “Interactive Forms”. The invoice form uses text modules and
SAPscript texts, which in turn use various text formats. As these formats must be
administered in so-called styles, the travel agency's form expert needs to know
how to maintain such styles.
Smart Styles
Figure 106: Styles: Usage in Text Modules
2006/Q2 © 2006 SAP AG. All rights reserved. 251
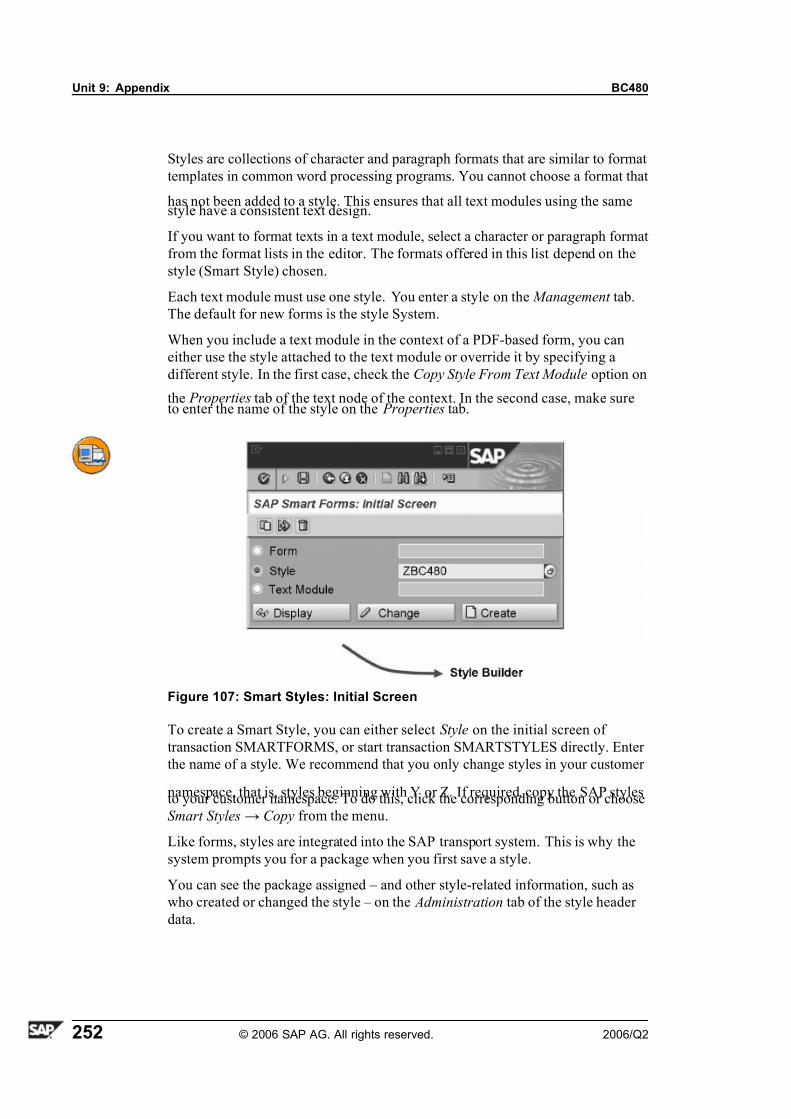
7/14/2019 BC480 - PDF-Based Print Forms
http://slidepdf.com/reader/full/bc480-pdf-based-print-forms 260/317
Unit 9: Appendix BC480
Styles are collections of character and paragraph formats that are similar to format
templates in common word processing programs. You cannot choose a format that
has not been added to a style. This ensures that all text modules using the samestyle have a consistent text design.
If you want to format texts in a text module, select a character or paragraph format
from the format lists in the editor. The formats offered in this list depend on the
style (Smart Style) chosen.
Each text module must use one style. You enter a style on the Management tab.
The default for new forms is the style System.
When you include a text module in the context of a PDF-based form, you can
either use the style attached to the text module or override it by specifying a
different style. In the first case, check the Copy Style From Text Module option on
the Properties tab of the text node of the context. In the second case, make sureto enter the name of the style on the Properties tab.
Figure 107: Smart Styles: Initial Screen
To create a Smart Style, you can either select Style on the initial screen of
transaction SMARTFORMS, or start transaction SMARTSTYLES directly. Enter
the name of a style. We recommend that you only change styles in your customer
namespace, that is, styles beginning with Y or Z. If required, copy the SAP stylesto your customer namespace. To do this, click the corresponding button or choose
Smart Styles→ Copy from the menu.
Like forms, styles are integrated into the SAP transport system. This is why the
system prompts you for a package when you first save a style.
You can see the package assigned – and other style-related information, such as
who created or changed the style – on the Administration tab of the style header
data.
252 © 2006 SAP AG. All rights reserved. 2006/Q2
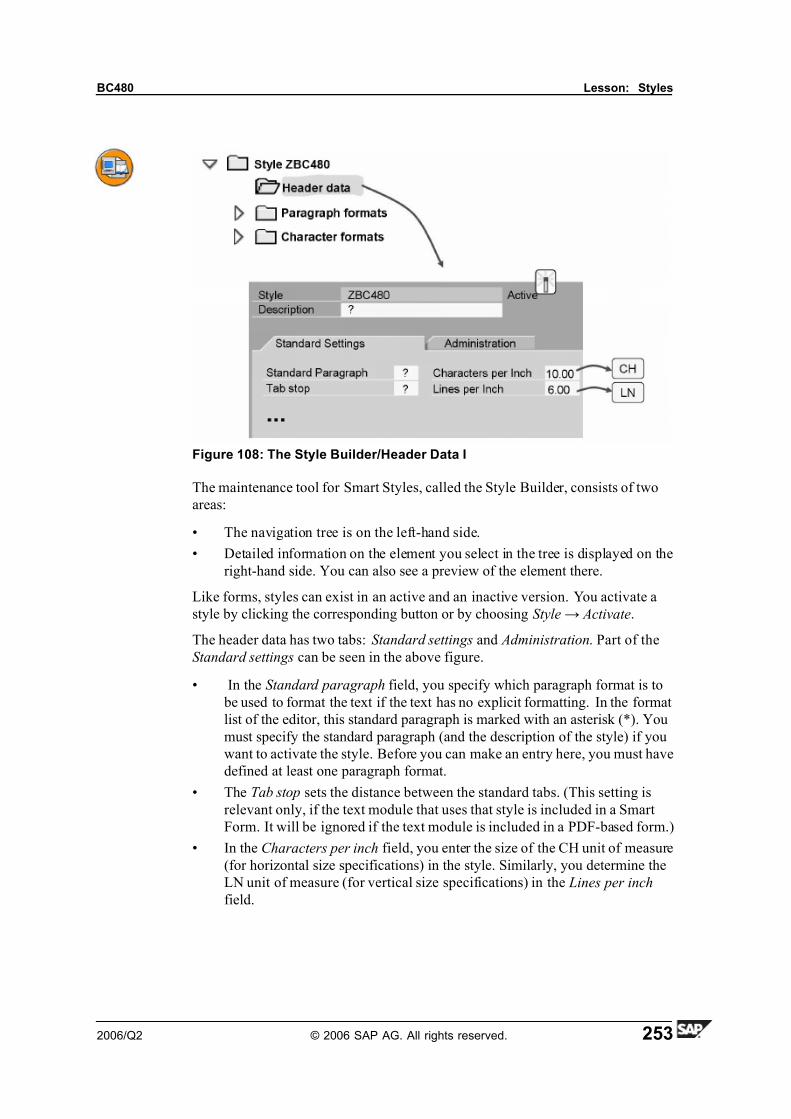
7/14/2019 BC480 - PDF-Based Print Forms
http://slidepdf.com/reader/full/bc480-pdf-based-print-forms 261/317
BC480 Lesson: Styles
Figure 108: The Style Builder/Header Data I
The maintenance tool for Smart Styles, called the Style Builder, consists of two
areas:
• The navigation tree is on the left-hand side.
• Detailed information on the element you select in the tree is displayed on the
right-hand side. You can also see a preview of the element there.
Like forms, styles can exist in an active and an inactive version. You activate a
style by clicking the corresponding button or by choosing Style→ Activate.
The header data has two tabs: Standard settings and Administration. Part of the
Standard settings can be seen in the above figure.
• In the Standard paragraph field, you specify which paragraph format is to
be used to format the text if the text has no explicit formatting. In the format
list of the editor, this standard paragraph is marked with an asterisk (*). You
must specify the standard paragraph (and the description of the style) if you
want to activate the style. Before you can make an entry here, you must have
defined at least one paragraph format.
• The Tab stop sets the distance between the standard tabs. (This setting is
relevant only, if the text module that uses that style is included in a Smart
Form. It will be ignored if the text module is included in a PDF-based form.)
• In the Characters per inch field, you enter the size of the CH unit of measure
(for horizontal size specifications) in the style. Similarly, you determine the
LN unit of measure (for vertical size specifications) in the Lines per inch
field.
2006/Q2 © 2006 SAP AG. All rights reserved. 253
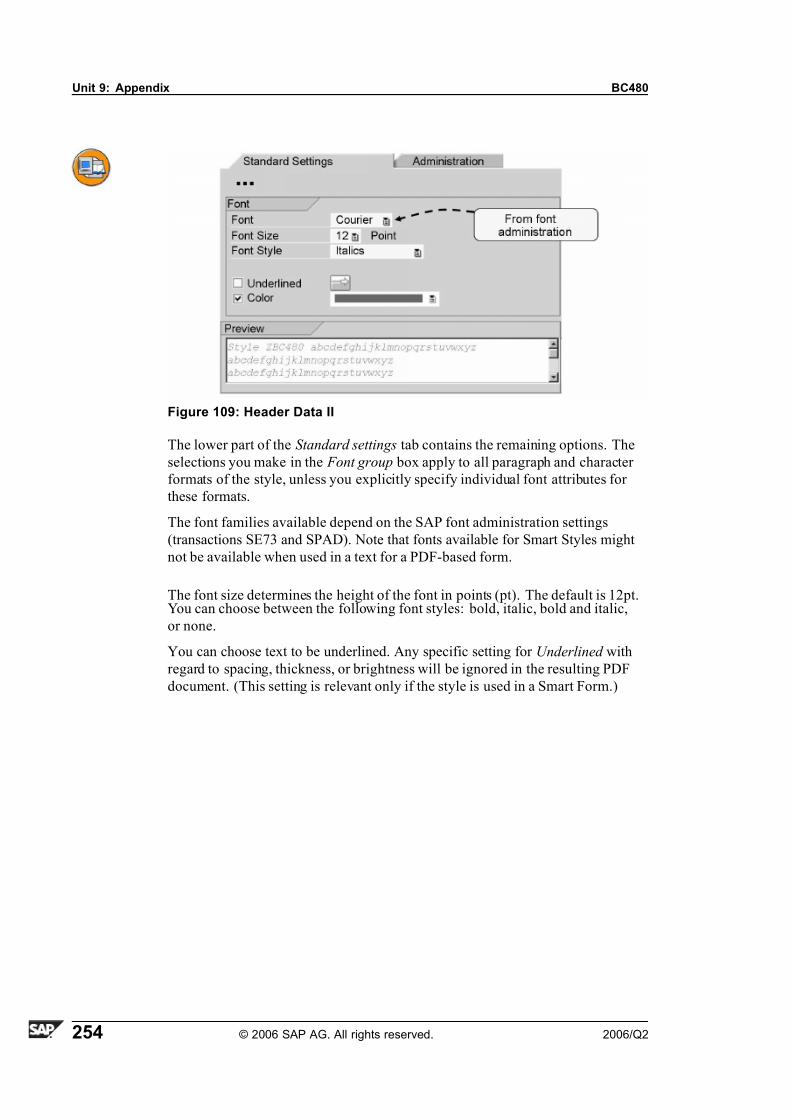
7/14/2019 BC480 - PDF-Based Print Forms
http://slidepdf.com/reader/full/bc480-pdf-based-print-forms 262/317
Unit 9: Appendix BC480
Figure 109: Header Data II
The lower part of the Standard settings tab contains the remaining options. The
selections you make in the Font group box apply to all paragraph and character
formats of the style, unless you explicitly specify individual font attributes for
these formats.
The font families available depend on the SAP font administration settings
(transactions SE73 and SPAD). Note that fonts available for Smart Styles might
not be available when used in a text for a PDF-based form.
The font size determines the height of the font in points (pt). The default is 12pt.You can choose between the following font styles: bold, italic, bold and italic,
or none.
You can choose text to be underlined. Any specific setting for Underlined with
regard to spacing, thickness, or brightness will be ignored in the resulting PDF
document. (This setting is relevant only if the style is used in a Smart Form.)
254 © 2006 SAP AG. All rights reserved. 2006/Q2
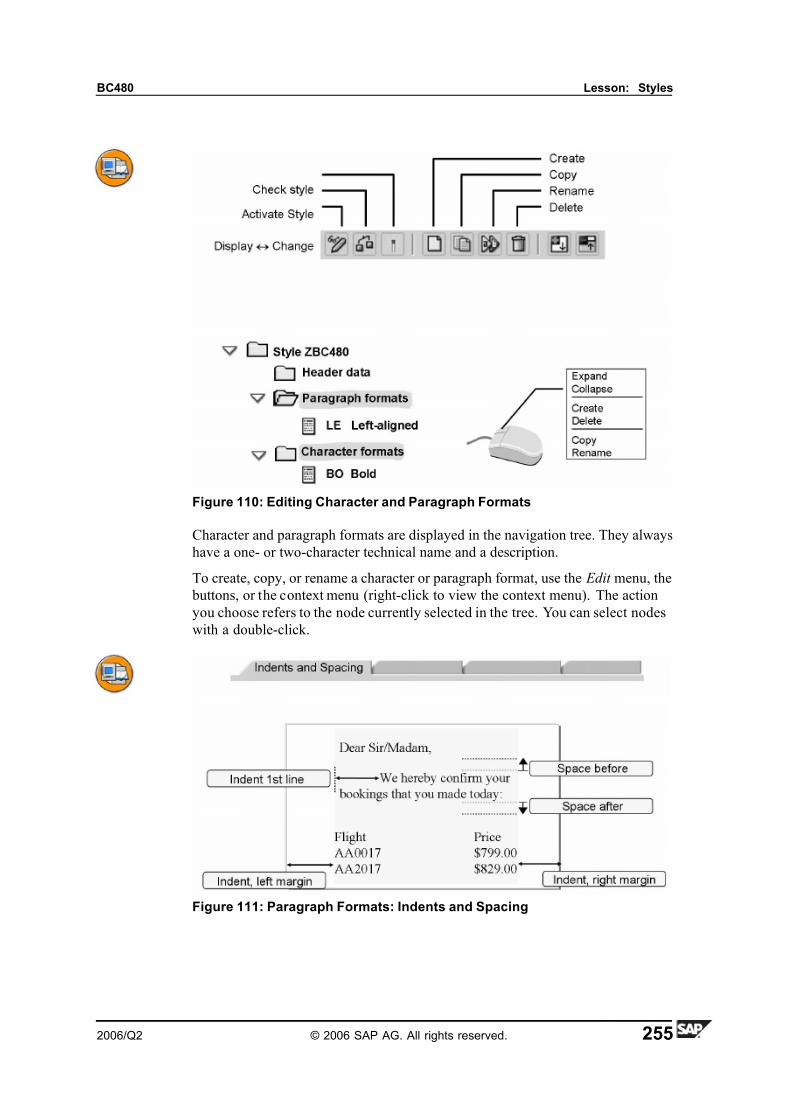
7/14/2019 BC480 - PDF-Based Print Forms
http://slidepdf.com/reader/full/bc480-pdf-based-print-forms 263/317
BC480 Lesson: Styles
Figure 110: Editing Character and Paragraph Formats
Character and paragraph formats are displayed in the navigation tree. They always
have a one- or two-character technical name and a description.
To create, copy, or rename a character or paragraph format, use the Edit menu, the
buttons, or the context menu (right-click to view the context menu). The action
you choose refers to the node currently selected in the tree. You can select nodes
with a double-click.
Figure 111: Paragraph Formats: Indents and Spacing
2006/Q2 © 2006 SAP AG. All rights reserved. 255

7/14/2019 BC480 - PDF-Based Print Forms
http://slidepdf.com/reader/full/bc480-pdf-based-print-forms 264/317
Unit 9: Appendix BC480
On the Indents and spacing tab of a paragraph format, you can make the following
entries:
• Indent :
– Left/right margin of indent : Amount of space between the window
and the text margin.
– In addition to the left margin, you can determine a greater indent for the
first line of a paragraph.
• Spacing
– Space before: This is the space that is inserted before the first line
of all paragraphs that make use of this paragraph format. Similarly,
Space after defines the space that is left empty after the last line of all
paragraphs that make use of this paragraph format.
– Line spacing : The line spacing is not adjusted automatically if you
use a larger font size. To avoid overlappings, you must change the
line spacing if required.
• Text flow
These settings will be ignored if a text module is inserted into a PDF-based
form.
Figure 112: Paragraph Formats: Tabs
The Font tab has the same fields as the Standard settings tab of the style. If you do
not make any settings, the system uses the settings of the header data, including
the font family, Font size, Font style, Underlined , and Color . You can override the
header data entries by specifying a different font. Standard settings, such as the
color or the font family, are not displayed in the preview of a paragraph format.
256 © 2006 SAP AG. All rights reserved. 2006/Q2

7/14/2019 BC480 - PDF-Based Print Forms
http://slidepdf.com/reader/full/bc480-pdf-based-print-forms 265/317
BC480 Lesson: Styles
On the Tabs tab page, you define individual tab stops for the paragraph format:
• The Alignment with decimal character alignment type lets you align digits
with decimal points printed at the tab stop position.
• The Sign alignment type works for Smart Forms only. In a PDF-based
document, it will be a right-aligned tab.
Figure 113: Paragraph Formats: Numbering and Outline I
You can define paragraphs that have outline characters (for example °) or are
numbered automatically. To do this, go to the Numbering and Outline tab.
If you want to use multilevel numbering or outline (such as 1, 1.1, 1.2, 1.2.1, and
so on), you must create a separate paragraph format for each level (we recommend
that you use the Copy function to do this). As the Top outline paragraph, enter
the top paragraph in the hierarchy that controls all other outline or numbering
levels. The individual levels are inserted into the navigation tree as subnodes of
the top outline paragraph, and the outline level is automatically entered in the
corresponding field on the tab.
Choose a numbering type:
• List character : The list character printed at the beginning of the paragraph is
the one that you enter in the Characters field. You can use up to eight digits.
• Arabic numbers, Roman numerals (lowercase or uppercase), or letters
(lowercase or uppercase). You can also specify a left and a right delimiter ,
such as an angle bracket to define numberings of the form "a), b), c)," and so
on.
In the Position field, you enter the space between the numbering/outline character
and the left window margin. Make sure that the paragraph margin is not affected
by the numerator margin. To avoid overlappings, define a paragraph margin that is
large enough.
2006/Q2 © 2006 SAP AG. All rights reserved. 257
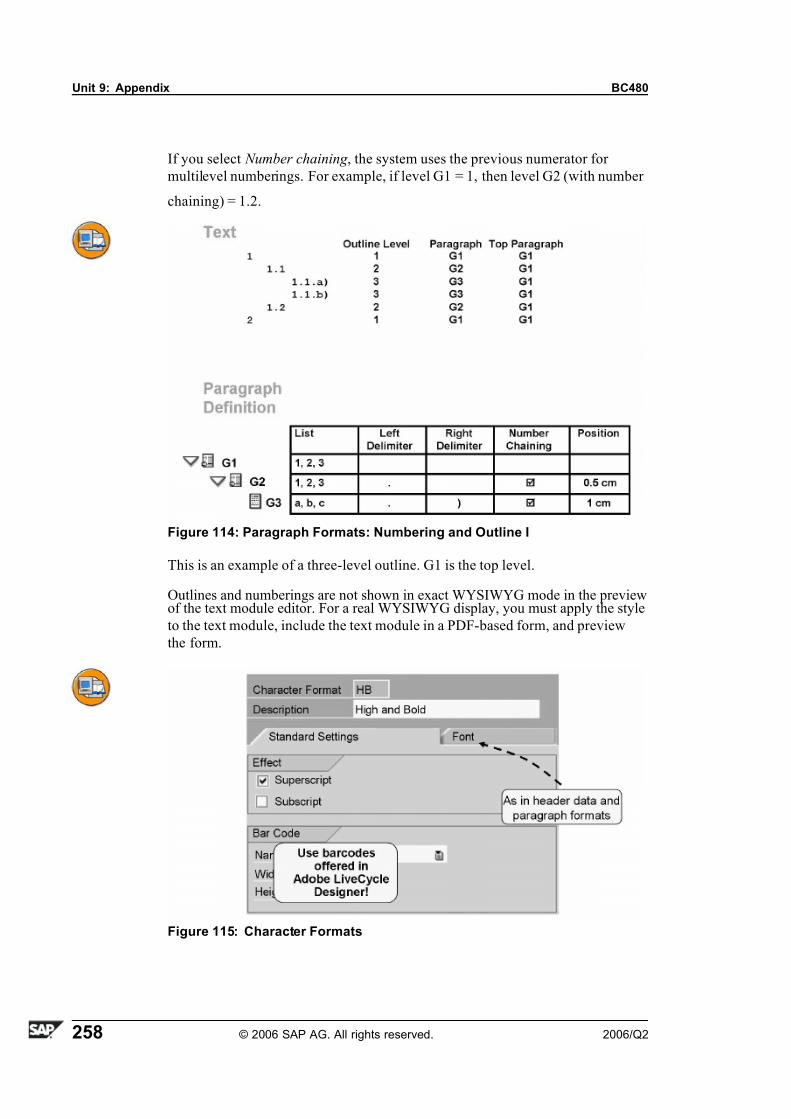
7/14/2019 BC480 - PDF-Based Print Forms
http://slidepdf.com/reader/full/bc480-pdf-based-print-forms 266/317
Unit 9: Appendix BC480
If you select Number chaining , the system uses the previous numerator for
multilevel numberings. For example, if level G1 = 1, then level G2 (with number
chaining) = 1.2.
Figure 114: Paragraph Formats: Numbering and Outline I
This is an example of a three-level outline. G1 is the top level.
Outlines and numberings are not shown in exact WYSIWYG mode in the previewof the text module editor. For a real WYSIWYG display, you must apply the style
to the text module, include the text module in a PDF-based form, and preview
the form.
Figure 115: Character Formats
258 © 2006 SAP AG. All rights reserved. 2006/Q2

7/14/2019 BC480 - PDF-Based Print Forms
http://slidepdf.com/reader/full/bc480-pdf-based-print-forms 267/317
BC480 Lesson: Styles
A character format has two tabs: Standard settings and Font . The Font tab has the
same fields as the Standard settings tab of the style or the Font tab of a paragraph.
The entries you make here override the settings of the header data or the paragraphformat used in the text, including Font family, Font size, Font style, Underlined ,
and Color . Note that font-related settings made in the standard settings or a
paragraph format are not displayed in the preview of a character format.
On the Standard settings tab, you can set the attributes Superscript and Subscript .
Barcodes must be printed using the Adobe LiveCycle Designer barcode feature –
it is much more flexible than the traditional barcode technology implemented in
transactions SE73/SPAD. (These barcodes will be simulated as parallel bars only.)
SAPscript Texts and Styles
For SAPscript texts, SAPscript styles can be assigned statically for the entire
text, or dynamically using the /:style command. All style assignments for
a SAPscript text will be ignored when it is included in a PDF-based form. If
you want to include a SAPscript text with a special style into the context of a
PDF-based form, make sure to enter the name of the style on the Properties tab.
Hint: If you include SAPscript texts in PDF-based forms, you can use
only Smart Styles.
2006/Q2 © 2006 SAP AG. All rights reserved. 259

7/14/2019 BC480 - PDF-Based Print Forms
http://slidepdf.com/reader/full/bc480-pdf-based-print-forms 268/317
Unit 9: Appendix BC480
Lesson Summary
You should now be able to:• Describe the formatting concept used for text modules
• Name relevants parts of Smart Styles
• Create and maintain styles
260 © 2006 SAP AG. All rights reserved. 2006/Q2
7/14/2019 BC480 - PDF-Based Print Forms
http://slidepdf.com/reader/full/bc480-pdf-based-print-forms 269/317
BC480 Lesson: ABAP Exception Handling
Lesson: ABAP Exception Handling
Lesson Overview
In a typical ABAP program for a print scenario with PDF-based forms, function
modules make use of two exception concepts: the old one (with system field
sy-subrc) and the new one, which is object-oriented. This lesson will show you the
basics of these class-based exceptions.
Lesson Objectives
After completing this lesson, you will be able to:
• Explain the mechanims involved in catching and thowing object-oriented
exceptions• Catch exceptions that might be raised within a program that calls PDF-based
forms
Business Example
A travel agency wants to print invoices for their customers' flight bookings using
the tool “Interactive Forms”. The form template is already available, but the
application (an ABAP program) still needs to be written. One of the function
modules that are required for the program uses the class-based exception concept.
The programmer wants to learn about its basics.
In SAP Web Application Server 6.10, a new exception concept was introduced.Coding (typically function modules, subroutines, and methods) that makes use
of this concept does not set sy-subrc any more. Instead, an object is created that
can contain any kind of information. Typically, it contains an error text plus
information on which a message should be displayed.
The programmer of a function module chooses either the old or the new exception
concept.
2006/Q2 © 2006 SAP AG. All rights reserved. 261
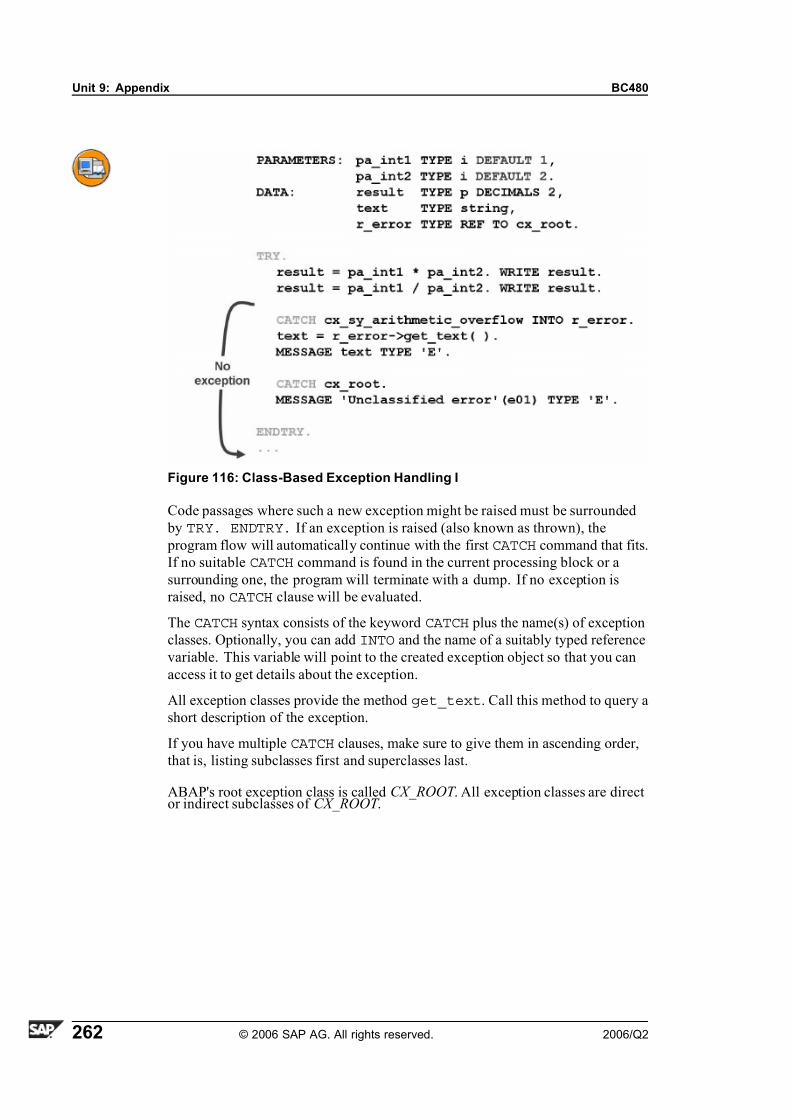
7/14/2019 BC480 - PDF-Based Print Forms
http://slidepdf.com/reader/full/bc480-pdf-based-print-forms 270/317
Unit 9: Appendix BC480
Figure 116: Class-Based Exception Handling I
Code passages where such a new exception might be raised must be surrounded
by TRY. ENDTRY. If an exception is raised (also known as thrown), the
program flow will automatically continue with the first CATCH command that fits.
If no suitable CATCH command is found in the current processing block or a
surrounding one, the program will terminate with a dump. If no exception is
raised, no CATCH clause will be evaluated.
The CATCH syntax consists of the keyword CATCH plus the name(s) of exception
classes. Optionally, you can add INTO and the name of a suitably typed reference
variable. This variable will point to the created exception object so that you can
access it to get details about the exception.
All exception classes provide the method get_text. Call this method to query a
short description of the exception.
If you have multiple CATCH clauses, make sure to give them in ascending order,
that is, listing subclasses first and superclasses last.
ABAP's root exception class is called CX_ROOT . All exception classes are director indirect subclasses of CX_ROOT .
262 © 2006 SAP AG. All rights reserved. 2006/Q2

7/14/2019 BC480 - PDF-Based Print Forms
http://slidepdf.com/reader/full/bc480-pdf-based-print-forms 271/317
BC480 Lesson: ABAP Exception Handling
Figure 117: Class-Based Exception Handling II
If in the above example, the calculation of pa_int1 * pa_int2 leads to an
arithmetic overflow; an exception of class CX_SY_ARITHMETIC_ERROR will be
raised. Hence, the program will jump to the first CATCH clause and execute it.
Figure 118: Class-Based Exception Handling III
2006/Q2 © 2006 SAP AG. All rights reserved. 263

7/14/2019 BC480 - PDF-Based Print Forms
http://slidepdf.com/reader/full/bc480-pdf-based-print-forms 272/317
Unit 9: Appendix BC480
If in the above example, the calculation of pa_int1 / pa_int2 fails because
pa_int2 equals zero; an exception of class CX_SY_ZERODIVIDE will be raised.
As no CATCH clause for that exception class exists, the program will jump to thefirst CATCH clause that is available for a superclass of CX_SY_ZERODIVIDE . In
this case, the program will jump to the second CATCH clause, as CX_ROOT is the
superclass of all exception classes – in particular of CX_SY_ZERODIVIDE .
Figure 119: Exceptions: FP_FUNCTION_MODULE_NAME
When calling a global method or a function module, check whether the old
exception concept is used ( sy-subrc) or the new one (class-based exceptions). In
the latter case, surround the call of that method or function module with a suitable
TRY. CATCH... ENDTRY. coding.
In the case of function module FP_FUNCTION_MODULE_NAME,
exceptions of classes CX_FP_API_REPOSITORY, CX_FP_API_USAGE and
CX_FP_API_INTERNAL are possible. They have these superclasses: CX_ROOT
> CX_STATIC_CHECK > CX_FP_EXCEPTION > CX_FP_API . If you do not
need to be specific about exactly which exception is raised, one CATCH clause for
any of these superclasses would be fine.
All exception classes specific to the processing of PDF-based forms are subclasses
of CX_FP_EXCEPTION .
264 © 2006 SAP AG. All rights reserved. 2006/Q2

7/14/2019 BC480 - PDF-Based Print Forms
http://slidepdf.com/reader/full/bc480-pdf-based-print-forms 273/317
BC480 Lesson: ABAP Exception Handling
Lesson Summary
You should now be able to:• Explain the mechanims involved in catching and thowing object-oriented
exceptions
• Catch exceptions that might be raised within a program that calls PDF-based
forms
2006/Q2 © 2006 SAP AG. All rights reserved. 265
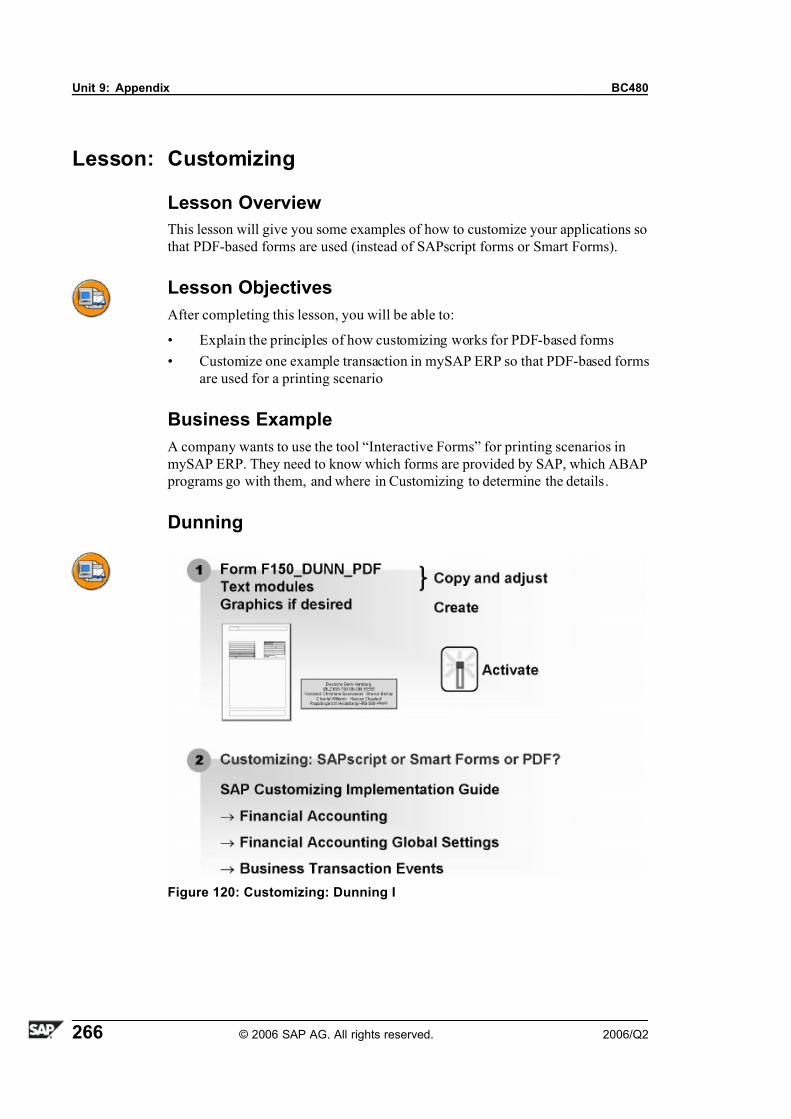
7/14/2019 BC480 - PDF-Based Print Forms
http://slidepdf.com/reader/full/bc480-pdf-based-print-forms 274/317
Unit 9: Appendix BC480
Lesson: Customizing
Lesson Overview
This lesson will give you some examples of how to customize your applications so
that PDF-based forms are used (instead of SAPscript forms or Smart Forms).
Lesson Objectives
After completing this lesson, you will be able to:
• Explain the principles of how customizing works for PDF-based forms
• Customize one example transaction in mySAP ERP so that PDF-based forms
are used for a printing scenario
Business Example
A company wants to use the tool “Interactive Forms” for printing scenarios in
mySAP ERP. They need to know which forms are provided by SAP, which ABAP
programs go with them, and where in Customizing to determine the details.
Dunning
Figure 120: Customizing: Dunning I
266 © 2006 SAP AG. All rights reserved. 2006/Q2
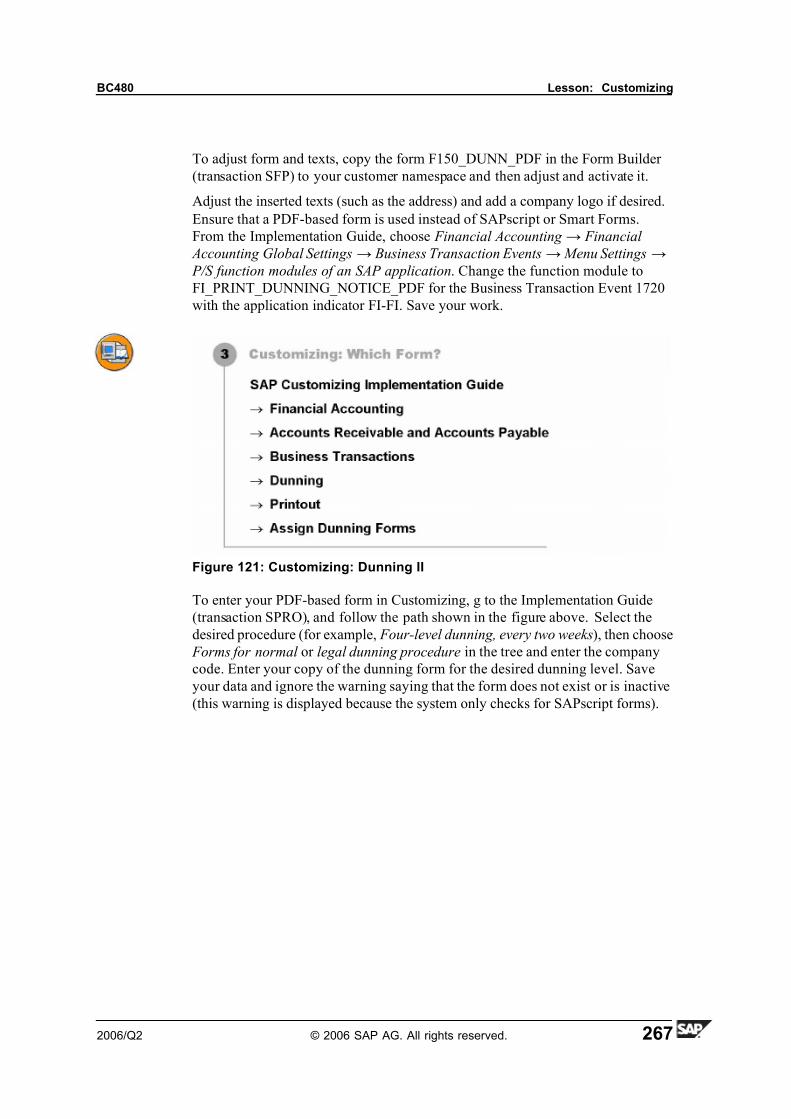
7/14/2019 BC480 - PDF-Based Print Forms
http://slidepdf.com/reader/full/bc480-pdf-based-print-forms 275/317
BC480 Lesson: Customizing
To adjust form and texts, copy the form F150_DUNN_PDF in the Form Builder
(transaction SFP) to your customer namespace and then adjust and activate it.
Adjust the inserted texts (such as the address) and add a company logo if desired.
Ensure that a PDF-based form is used instead of SAPscript or Smart Forms.
From the Implementation Guide, choose Financial Accounting → Financial
Accounting Global Settings → Business Transaction Events→ Menu Settings →
P/S function modules of an SAP application. Change the function module to
FI_PRINT_DUNNING_NOTICE_PDF for the Business Transaction Event 1720
with the application indicator FI-FI. Save your work.
Figure 121: Customizing: Dunning II
To enter your PDF-based form in Customizing, g to the Implementation Guide
(transaction SPRO), and follow the path shown in the figure above. Select the
desired procedure (for example, Four-level dunning, every two weeks), then choose
Forms for normal or legal dunning procedure in the tree and enter the company
code. Enter your copy of the dunning form for the desired dunning level. Save
your data and ignore the warning saying that the form does not exist or is inactive
(this warning is displayed because the system only checks for SAPscript forms).
2006/Q2 © 2006 SAP AG. All rights reserved. 267
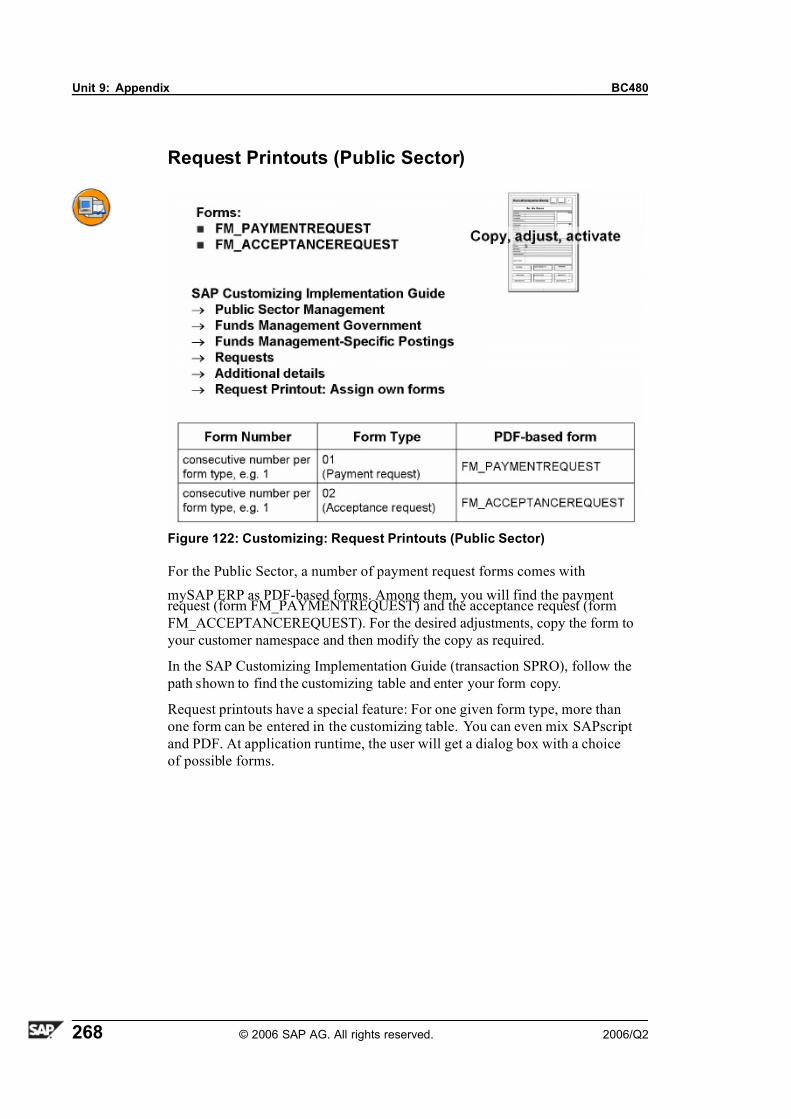
7/14/2019 BC480 - PDF-Based Print Forms
http://slidepdf.com/reader/full/bc480-pdf-based-print-forms 276/317
Unit 9: Appendix BC480
Request Printouts (Public Sector)
Figure 122: Customizing: Request Printouts (Public Sector)
For the Public Sector, a number of payment request forms comes with
mySAP ERP as PDF-based forms. Among them, you will find the paymentrequest (form FM_PAYMENTREQUEST) and the acceptance request (form
FM_ACCEPTANCEREQUEST). For the desired adjustments, copy the form to
your customer namespace and then modify the copy as required.
In the SAP Customizing Implementation Guide (transaction SPRO), follow the
path shown to find the customizing table and enter your form copy.
Request printouts have a special feature: For one given form type, more than
one form can be entered in the customizing table. You can even mix SAPscript
and PDF. At application runtime, the user will get a dialog box with a choice
of possible forms.
268 © 2006 SAP AG. All rights reserved. 2006/Q2

7/14/2019 BC480 - PDF-Based Print Forms
http://slidepdf.com/reader/full/bc480-pdf-based-print-forms 277/317
BC480 Lesson: Customizing
Lesson Summary
You should now be able to:• Explain the principles of how customizing works for PDF-based forms
• Customize one example transaction in mySAP ERP so that PDF-based forms
are used for a printing scenario
2006/Q2 © 2006 SAP AG. All rights reserved. 269
7/14/2019 BC480 - PDF-Based Print Forms
http://slidepdf.com/reader/full/bc480-pdf-based-print-forms 278/317
Unit 9: Appendix BC480
Lesson: Basic Administration
Lesson Overview
This lesson will teach you how to handle basic installation issues connected with
printing scenarios with PDF-based forms. See the ADS Installation Guide and the
Configuration Guide for details. See http://service.sa p.com/instguides.
Lesson Objectives
After completing this lesson, you will be able to:
• Set up an http connection for Adobe document services
• Name basic steps needed to install new fonts
Business Example
A travel agency wants to print invoices for their customers' flight bookings
using the tool “Interactive Forms”. The installation of the technology required
(SAP Web Application Server with ABAP, J2EE engine, and Adobe document
services) is done by Basis administration experts, but the form designers and
application programmers involved with the tool want to have at least a rudimentary
understanding of the technology.
270 © 2006 SAP AG. All rights reserved. 2006/Q2
7/14/2019 BC480 - PDF-Based Print Forms
http://slidepdf.com/reader/full/bc480-pdf-based-print-forms 279/317
BC480 Lesson: Basic Administration
Setting up an http Connection for Adobe DocumentServices
For a printing scenario with PDF-based forms, you must have installed Adobe
document services on an SAP NetWeaver Application Server with ABAP and
J2EE. To call Adobe document services from an ABAP application, an http
connection must be created as follows:
1. Log on to your SAP Web AS central instance host.
2. Call transaction SM59.
3. Choose Create and name the connection ADS.
You can also create several http connections with random names, but these
must be specified explicitly in the ABAP program: Field connection of
changing parameter ie_outputparams of function module FP_JOB_OPEN.4. Enter at least the following:
• RFC destination: ADS
• Connection type: G
• Description: <your description>
5. Choose ENTER.
6. Choose the Technical settings tab and enter at least the following:
• Target Host : Enter the host name where your SAP J2EE engine is
located.
• Service No: Enter the SAP J2EE http port number. The followingnaming convention applies: 5<J2EE_instance_number>00 (50000, for
example, if your J2EE instance is 00).
• Path Prefix: Enter exactly the string /AdobeDocumentSer-
vices/Config?style=rpc or /AdobeDocumentSer-
vicesSec/Config?style=rpc if you want to use SSL
• When you press ENTER, a warning is displayed: “Query String Not
Allowed”. Ignore this warning.
7. Choose the Logon/Security tab and configure the security account to your
security requirements.
8. Save your settings.
9. Choose Test Connection.
10. A screen is displayed. The field status_reason should have the value OK if
the test is successful.
2006/Q2 © 2006 SAP AG. All rights reserved. 271
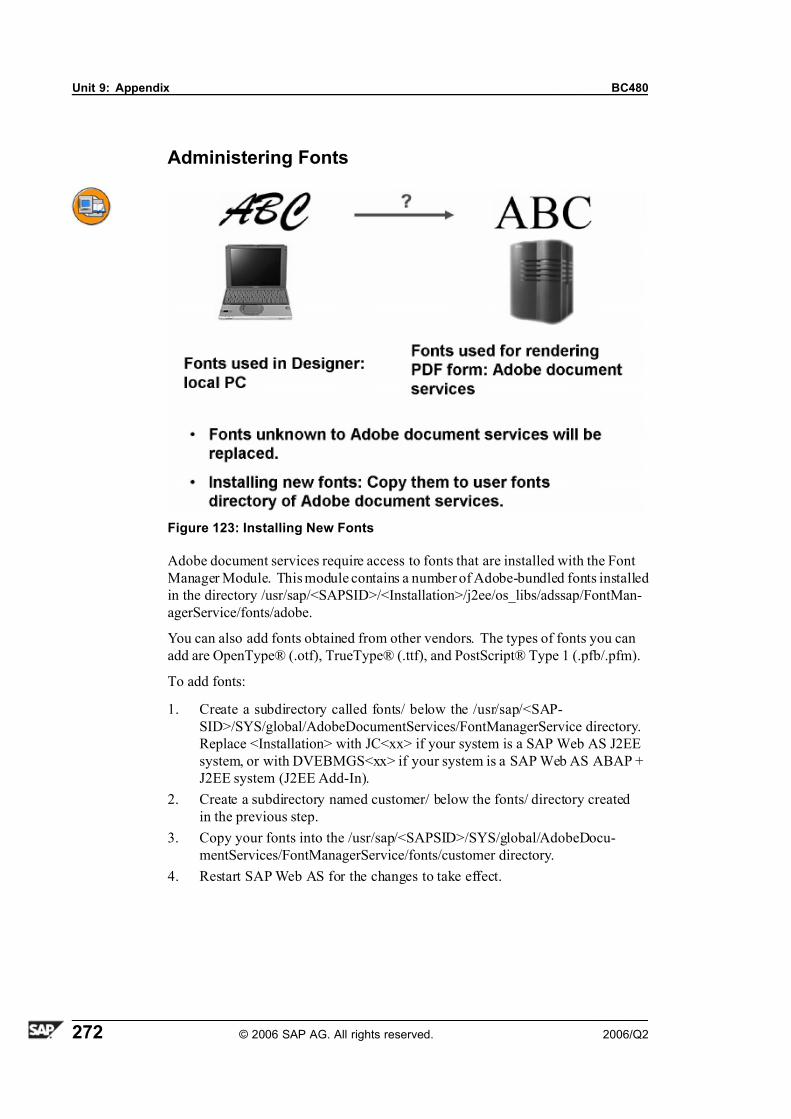
7/14/2019 BC480 - PDF-Based Print Forms
http://slidepdf.com/reader/full/bc480-pdf-based-print-forms 280/317
Unit 9: Appendix BC480
Administering Fonts
Figure 123: Installing New Fonts
Adobe document services require access to fonts that are installed with the Font
Manager Module. This module contains a number of Adobe-bundled fonts installed
in the directory /usr/sap/<SAPSID>/<Installation>/j2ee/os_libs/adssap/FontMan-
agerService/fonts/adobe.
You can also add fonts obtained from other vendors. The types of fonts you can
add are OpenType® (.otf), TrueType® (.ttf), and PostScript® Type 1 (.pfb/.pfm).
To add fonts:
1. Create a subdirectory called fonts/ below the /usr/sap/<SAP-
SID>/SYS/global/AdobeDocumentServices/FontManagerService directory.
Replace <Installation> with JC<xx> if your system is a SAP Web AS J2EE
system, or with DVEBMGS<xx> if your system is a SAP Web AS ABAP +
J2EE system (J2EE Add-In).
2. Create a subdirectory named customer/ below the fonts/ directory created
in the previous step.
3. Copy your fonts into the /usr/sap/<SAPSID>/SYS/global/AdobeDocu-
mentServices/FontManagerService/fonts/customer directory.
4. Restart SAP Web AS for the changes to take effect.
272 © 2006 SAP AG. All rights reserved. 2006/Q2

7/14/2019 BC480 - PDF-Based Print Forms
http://slidepdf.com/reader/full/bc480-pdf-based-print-forms 281/317
BC480 Lesson: Basic Administration
An important file for the administration of fonts is /usr/sap/<SAP-
SID>/SYS/global/AdobeDocumentServices/lib/xfa.xci. Here you can determine
for the different printer types (PS, PCL, PDF, Zebra) whether fonts will beembedded. The following fonts are never embedded: Courier, Helvetica, Times,
Arial, Times New Roman.
Fonts that at render time are not available for Adobe document
services will be replaced according to the substitution rules in the file
usr/sap/<SAPSID>/SYS/global/AdobeDocumentServices/lib/xfa.xci. At runtime,
a different file to be used can be specified with the help of the field XDCNAME
of parameter IE_OUTPUTPARAMS of function module FP_JOB_OPEN.
Furthermore, in table FPFONTREPL, you can specify replacement fonts for
specific forms and languages.
Font replacement at render time is not to be confused with font replacement as
design time. Adobe LiveCycle Designer has its own font replacement mechanism.
You can set the rules by choosing Tools→ Options→ Document Handling →
Modify Font Substitutions.
2006/Q2 © 2006 SAP AG. All rights reserved. 273

7/14/2019 BC480 - PDF-Based Print Forms
http://slidepdf.com/reader/full/bc480-pdf-based-print-forms 282/317
Unit 9: Appendix BC480
Lesson Summary
You should now be able to:• Set up an http connection for Adobe document services
• Name basic steps needed to install new fonts
274 © 2006 SAP AG. All rights reserved. 2006/Q2
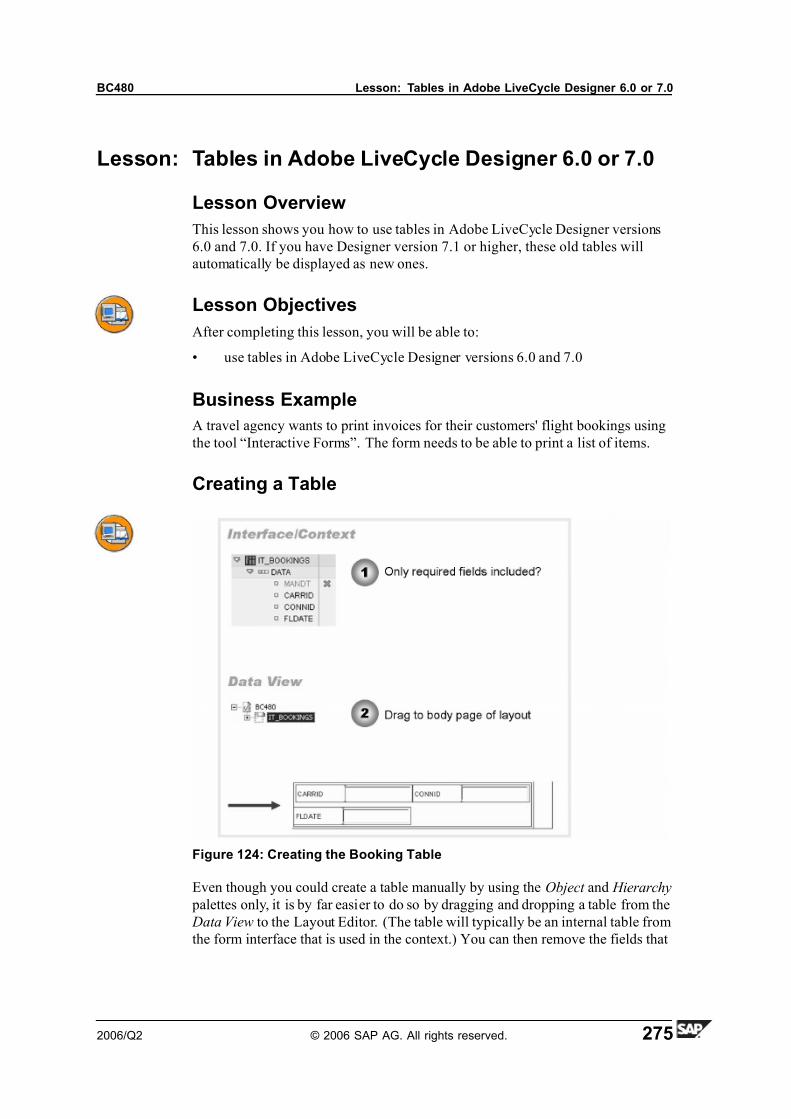
7/14/2019 BC480 - PDF-Based Print Forms
http://slidepdf.com/reader/full/bc480-pdf-based-print-forms 283/317
BC480 Lesson: Tables in Adobe LiveCycle Designer 6.0 or 7.0
Lesson: Tables in Adobe LiveCycle Designer 6.0 or 7.0
Lesson Overview
This lesson shows you how to use tables in Adobe LiveCycle Designer versions
6.0 and 7.0. If you have Designer version 7.1 or higher, these old tables will
automatically be displayed as new ones.
Lesson Objectives
After completing this lesson, you will be able to:
• use tables in Adobe LiveCycle Designer versions 6.0 and 7.0
Business Example
A travel agency wants to print invoices for their customers' flight bookings using
the tool “Interactive Forms”. The form needs to be able to print a list of items.
Creating a Table
Figure 124: Creating the Booking Table
Even though you could create a table manually by using the Object and Hierarchy
palettes only, it is by far easier to do so by dragging and dropping a table from the
Data View to the Layout Editor. (The table will typically be an internal table from
the form interface that is used in the context.) You can then remove the fields that
2006/Q2 © 2006 SAP AG. All rights reserved. 275

7/14/2019 BC480 - PDF-Based Print Forms
http://slidepdf.com/reader/full/bc480-pdf-based-print-forms 284/317
Unit 9: Appendix BC480
you do not want to have included in the form table – but it might be a good idea to
either reduce the line type of the table in the interface or to go to the context and
set the superfluous fields of the internal table to inactive. Both ways will reducethe amount of data transferred to Adobe document services at runtime.
Figure 125: Creating the Booking Table: Cells
By dragging and dropping an internal table from the Data View to the layout,
Adobe LiveCycle Designer will actually create one subform (called like the
internal table it represents), a second subform nested in the first one, and the
individual fields. This is due to the XML representation of the data.
Here are the necessary steps to make sure the internal table is printed as a form
table:
• Check that the outer subform ( IT_BOOKINGS in the example above) is of
type Flow Content with Flow Direction set to Table. (This specific option is
not available in the standalone version of Adobe LiveCycle Designer.)
Deselect Repeat subform for each Data Item.
If all of the content should be printed on one page, deselect the Allow Page
Breaks within Content option. If, at runtime, only little data needs to be
processed, this flag will be ignored. If, however, more data is available than
fits on the current page, an automatic page break will be inserted, and the
table will start on the following page.
If you want your table to have an outer border only, you would set it on the
Border palette of the outer subform.
276 © 2006 SAP AG. All rights reserved. 2006/Q2
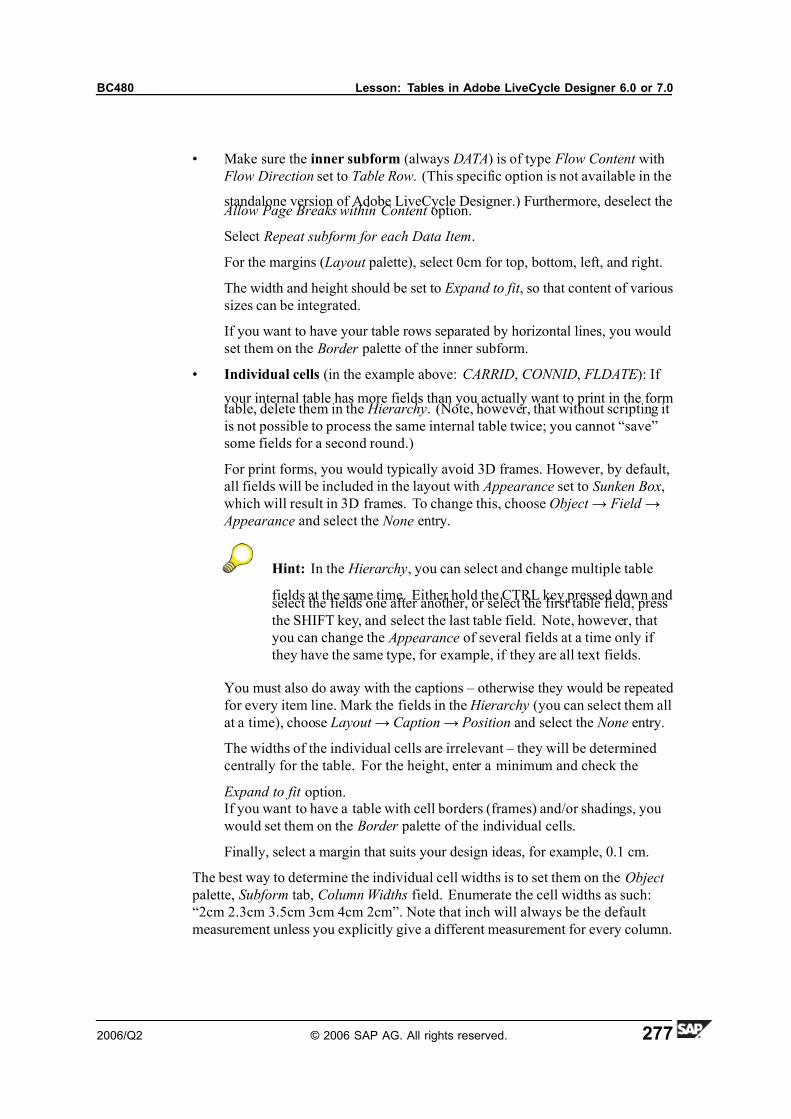
7/14/2019 BC480 - PDF-Based Print Forms
http://slidepdf.com/reader/full/bc480-pdf-based-print-forms 285/317
BC480 Lesson: Tables in Adobe LiveCycle Designer 6.0 or 7.0
• Make sure the inner subform (always DATA) is of type Flow Content with
Flow Direction set to Table Row. (This specific option is not available in the
standalone version of Adobe LiveCycle Designer.) Furthermore, deselect the Allow Page Breaks within Content option.
Select Repeat subform for each Data Item.
For the margins ( Layout palette), select 0cm for top, bottom, left, and right.
The width and height should be set to Expand to fit , so that content of various
sizes can be integrated.
If you want to have your table rows separated by horizontal lines, you would
set them on the Border palette of the inner subform.
• Individual cells (in the example above: CARRID, CONNID, FLDATE ): If
your internal table has more fields than you actually want to print in the formtable, delete them in the Hierarchy. (Note, however, that without scripting it
is not possible to process the same internal table twice; you cannot “save”
some fields for a second round.)
For print forms, you would typically avoid 3D frames. However, by default,
all fields will be included in the layout with Appearance set to Sunken Box,
which will result in 3D frames. To change this, choose Object → Field →
Appearance and select the None entry.
Hint: In the Hierarchy, you can select and change multiple table
fields at the same time. Either hold the CTRL key pressed down andselect the fields one after another, or select the first table field, press
the SHIFT key, and select the last table field. Note, however, that
you can change the Appearance of several fields at a time only if
they have the same type, for example, if they are all text fields.
You must also do away with the captions – otherwise they would be repeated
for every item line. Mark the fields in the Hierarchy (you can select them all
at a time), choose Layout → Caption→ Position and select the None entry.
The widths of the individual cells are irrelevant – they will be determined
centrally for the table. For the height, enter a minimum and check the
Expand to fit option.If you want to have a table with cell borders (frames) and/or shadings, you
would set them on the Border palette of the individual cells.
Finally, select a margin that suits your design ideas, for example, 0.1 cm.
The best way to determine the individual cell widths is to set them on the Object
palette, Subform tab, Column Widths field. Enumerate the cell widths as such:
“2cm 2.3cm 3.5cm 3cm 4cm 2cm”. Note that inch will always be the default
measurement unless you explicitly give a different measurement for every column.
2006/Q2 © 2006 SAP AG. All rights reserved. 277

7/14/2019 BC480 - PDF-Based Print Forms
http://slidepdf.com/reader/full/bc480-pdf-based-print-forms 286/317
Unit 9: Appendix BC480
The unit that you might have specified on the Drawing Aids palette is used for
rulers and guidelines only. Give a value for every cell in the row. Make sure you
do not insert spaces between the values and the units. (You could also go to theindividual fields and change their widths on the Layout palette, but this will make
inserting the heading more complicated.)
Test your form with data to find out whether cells are wide enough.
Creating Headers for Tables
Figure 126: Booking Table: Creating Subform for Header
To create headers for the table, the following steps are required:
1. In the Hierarchy, mark the outer subform ( IT_BOOKINGS in the example
above) and choose Insert subform from the context menu. Give it a
meaningful name, for example, HEADER. To do so, click the subform in the
Hierarchy and then press F2; the name field is now ready for input. Change
the name and press RETURN.
Make sure the new subform is positioned above the DATA subform.
2. Set the subform type to Flow Content , and set the Flow Direction to Header .
3. Insert one static text into the subform for every column. Enter the texts and
set details like height, shading, or frames.
Be sure to set the same margins that you have set for the table fields.
278 © 2006 SAP AG. All rights reserved. 2006/Q2
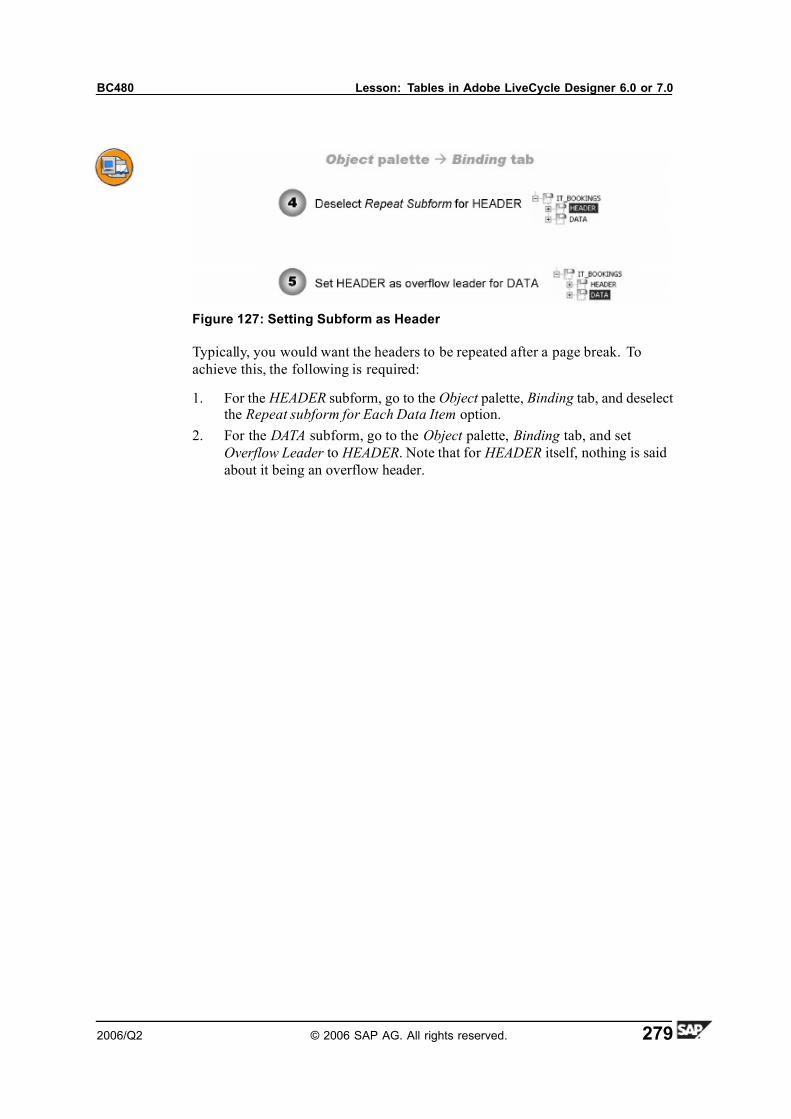
7/14/2019 BC480 - PDF-Based Print Forms
http://slidepdf.com/reader/full/bc480-pdf-based-print-forms 287/317
BC480 Lesson: Tables in Adobe LiveCycle Designer 6.0 or 7.0
Figure 127: Setting Subform as Header
Typically, you would want the headers to be repeated after a page break. To
achieve this, the following is required:
1. For the HEADER subform, go to the Object palette, Binding tab, and deselectthe Repeat subform for Each Data Item option.
2. For the DATA subform, go to the Object palette, Binding tab, and set
Overflow Leader to HEADER. Note that for HEADER itself, nothing is said
about it being an overflow header.
2006/Q2 © 2006 SAP AG. All rights reserved. 279

7/14/2019 BC480 - PDF-Based Print Forms
http://slidepdf.com/reader/full/bc480-pdf-based-print-forms 288/317
Unit 9: Appendix BC480
Lesson Summary
You should now be able to:• use tables in Adobe LiveCycle Designer versions 6.0 and 7.0
280 © 2006 SAP AG. All rights reserved. 2006/Q2

7/14/2019 BC480 - PDF-Based Print Forms
http://slidepdf.com/reader/full/bc480-pdf-based-print-forms 289/317
BC480 Lesson: Migration
Lesson: Migration
Lesson Overview
This lesson will show you which parts of SAP's traditional form tools (SAPscript
and Smart Forms) can be reused in a printing scenario with “InteractiveForms”. It
will also show you which steps are necessary if you want to migrate from one of
these solutions to the new one.
Lesson Objectives
After completing this lesson, you will be able to:
• Describe the basic concepts of form processing with SAPscript and Smart
Forms• Name steps required to reuse or migrate existing form objects from
SAPscript and Smart Forms
Business Example
A travel agency has SAPscript forms and Smart Forms and is wondering which of
these components can be re-used, which could be converted, and which must be
migrated and manually adapted.
Re-using SAPscript and Smart Forms – Overview
The reuse of SAPscript forms as PDF-based forms is quite difficult because their
concepts differ greatly. In particular, SAPscript has no clear separation between
the form logic and the ABAP program. For example, printing a table of items
requires you to call a function module (WRITE_FORM) several times, which will
then trigger data output in the form. If, within the form, you want to perform
ABAP calculations, you actually have to do this outside of the form (in special
form routines). That is why there is so much communication between form and
program.
2006/Q2 © 2006 SAP AG. All rights reserved. 281

7/14/2019 BC480 - PDF-Based Print Forms
http://slidepdf.com/reader/full/bc480-pdf-based-print-forms 290/317
Unit 9: Appendix BC480
Figure 128: Forms Generation Process Without Adobe
Smart Forms have had a clear separation of form logic and program from the
beginning. The program's task is basically to collect the data and then pass it on to
the interface of the Smart Form. All form logic is done within the form. As this
idea of an interface has been taken up for PDF-based forms, it is much easier toreuse Smart Forms and their programs than it is to reuse SAPscript components.
282 © 2006 SAP AG. All rights reserved. 2006/Q2
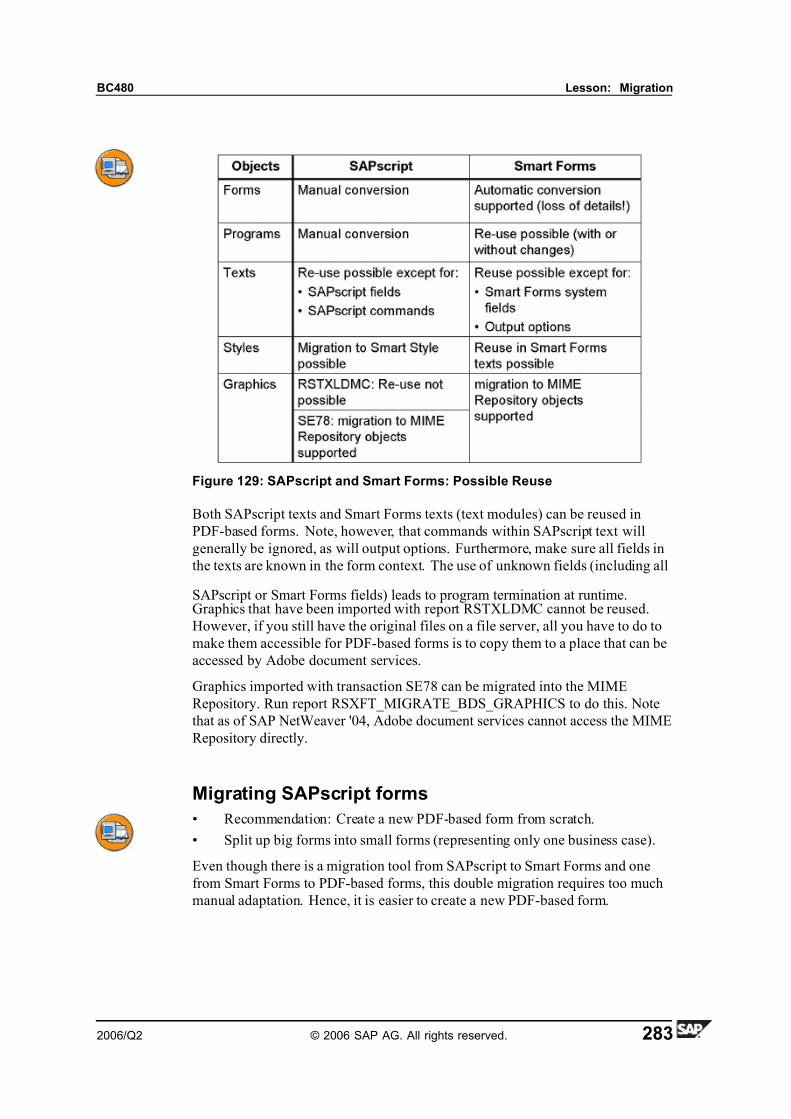
7/14/2019 BC480 - PDF-Based Print Forms
http://slidepdf.com/reader/full/bc480-pdf-based-print-forms 291/317
BC480 Lesson: Migration
Figure 129: SAPscript and Smart Forms: Possible Reuse
Both SAPscript texts and Smart Forms texts (text modules) can be reused in
PDF-based forms. Note, however, that commands within SAPscript text will
generally be ignored, as will output options. Furthermore, make sure all fields in
the texts are known in the form context. The use of unknown fields (including all
SAPscript or Smart Forms fields) leads to program termination at runtime.Graphics that have been imported with report RSTXLDMC cannot be reused.
However, if you still have the original files on a file server, all you have to do to
make them accessible for PDF-based forms is to copy them to a place that can be
accessed by Adobe document services.
Graphics imported with transaction SE78 can be migrated into the MIME
Repository. Run report RSXFT_MIGRATE_BDS_GRAPHICS to do this. Note
that as of SAP NetWeaver '04, Adobe document services cannot access the MIME
Repository directly.
Migrating SAPscript forms
• Recommendation: Create a new PDF-based form from scratch.
• Split up big forms into small forms (representing only one business case).
Even though there is a migration tool from SAPscript to Smart Forms and one
from Smart Forms to PDF-based forms, this double migration requires too much
manual adaptation. Hence, it is easier to create a new PDF-based form.
2006/Q2 © 2006 SAP AG. All rights reserved. 283
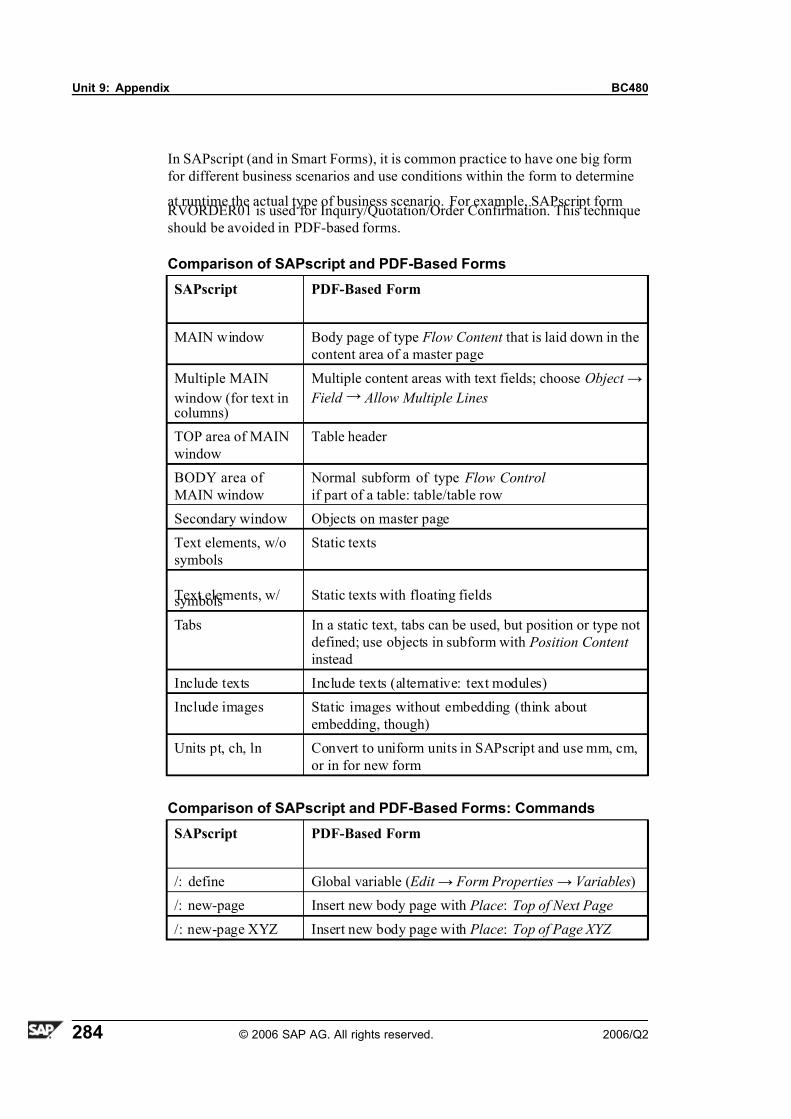
7/14/2019 BC480 - PDF-Based Print Forms
http://slidepdf.com/reader/full/bc480-pdf-based-print-forms 292/317
Unit 9: Appendix BC480
In SAPscript (and in Smart Forms), it is common practice to have one big form
for different business scenarios and use conditions within the form to determine
at runtime the actual type of business scenario. For example, SAPscript formRVORDER01 is used for Inquiry/Quotation/Order Confirmation. This technique
should be avoided in PDF-based forms.
Comparison of SAPscript and PDF-Based Forms
SAPscript PDF-Based Form
MAIN window Body page of type Flow Content that is laid down in the
content area of a master page
Multiple MAIN
window (for text incolumns)
Multiple content areas with text fields; choose Object →
Field → Allow Multiple Lines
TOP area of MAIN
window
Table header
BODY area of
MAIN window
Normal subform of type Flow Control
if part of a table: table/table row
Secondary window Objects on master page
Text elements, w/o
symbols
Static texts
Text elements, w/symbols Static texts with floating fields
Tabs In a static text, tabs can be used, but position or type not
defined; use objects in subform with Position Content
instead
Include texts Include texts (alternative: text modules)
Include images Static images without embedding (think about
embedding, though)
Units pt, ch, ln Convert to uniform units in SAPscript and use mm, cm,
or in for new form
Comparison of SAPscript and PDF-Based Forms: Commands
SAPscript PDF-Based Form
/: define Global variable ( Edit → Form Properties→ Variables)
/: new-page Insert new body page with Place: Top of Next Page
/: new-page XYZ Insert new body page with Place: Top of Page XYZ
284 © 2006 SAP AG. All rights reserved. 2006/Q2
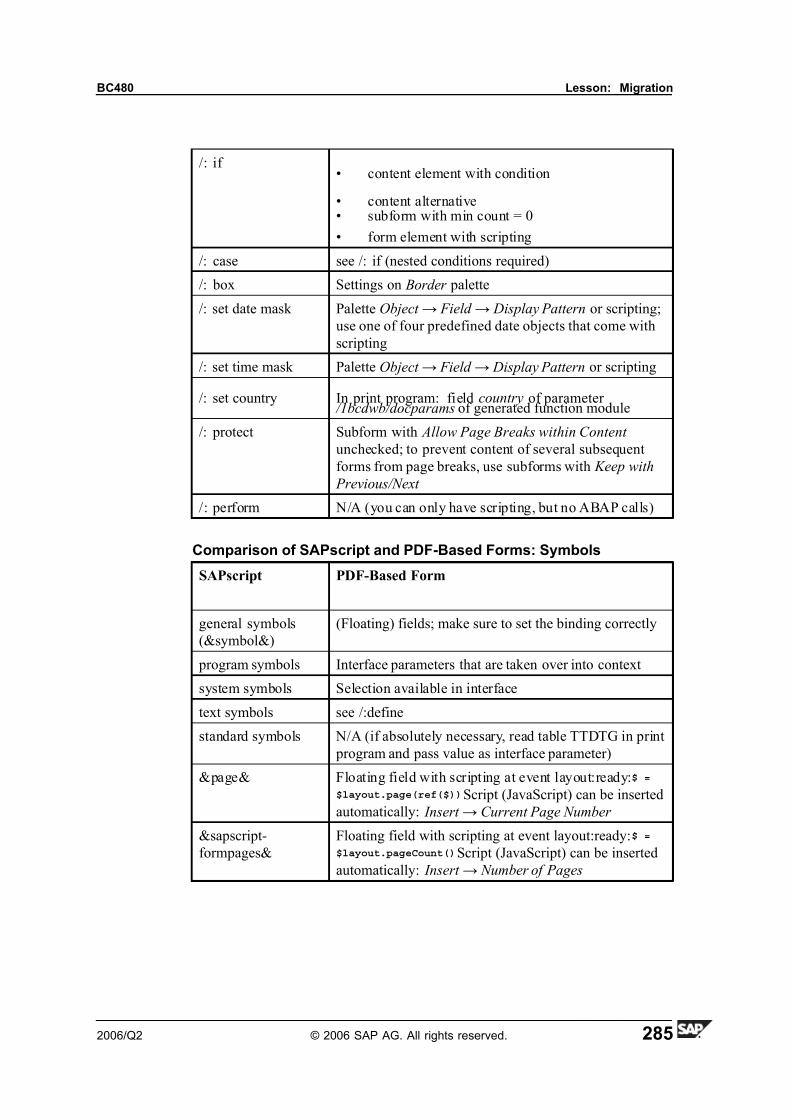
7/14/2019 BC480 - PDF-Based Print Forms
http://slidepdf.com/reader/full/bc480-pdf-based-print-forms 293/317
BC480 Lesson: Migration
/: if • content element with condition
• content alternative• subform with min count = 0
• form element with scripting
/: case see /: if (nested conditions required)
/: box Settings on Border palette
/: set date mask Palette Object → Field → Display Pattern or scripting;
use one of four predefined date objects that come with
scripting
/: set time mask Palette Object → Field → Display Pattern or scripting
/: set country In print program: field country of parameter /1bcdwb/docparams of generated function module
/: protect Subform with Allow Page Breaks within Content
unchecked; to prevent content of several subsequent
forms from page breaks, use subforms with Keep with
Previous/Next
/: perform N/A (you can only have scripting, but no ABAP calls)
Comparison of SAPscript and PDF-Based Forms: Symbols
SAPscript PDF-Based Form
general symbols
(&symbol&)
(Floating) fields; make sure to set the binding correctly
program symbols Interface parameters that are taken over into context
system symbols Selection available in interface
text symbols see /:define
standard symbols N/A (if absolutely necessary, read table TTDTG in print
program and pass value as interface parameter)
&page& Floating field with scripting at event layout:ready:$ =
$layout.page(ref($)) Script (JavaScript) can be inserted
automatically: Insert → Current Page Number
&sapscript-
formpages&
Floating field with scripting at event layout:ready:$ =
$layout.pageCount() Script (JavaScript) can be inserted
automatically: Insert → Number of Pages
2006/Q2 © 2006 SAP AG. All rights reserved. 285
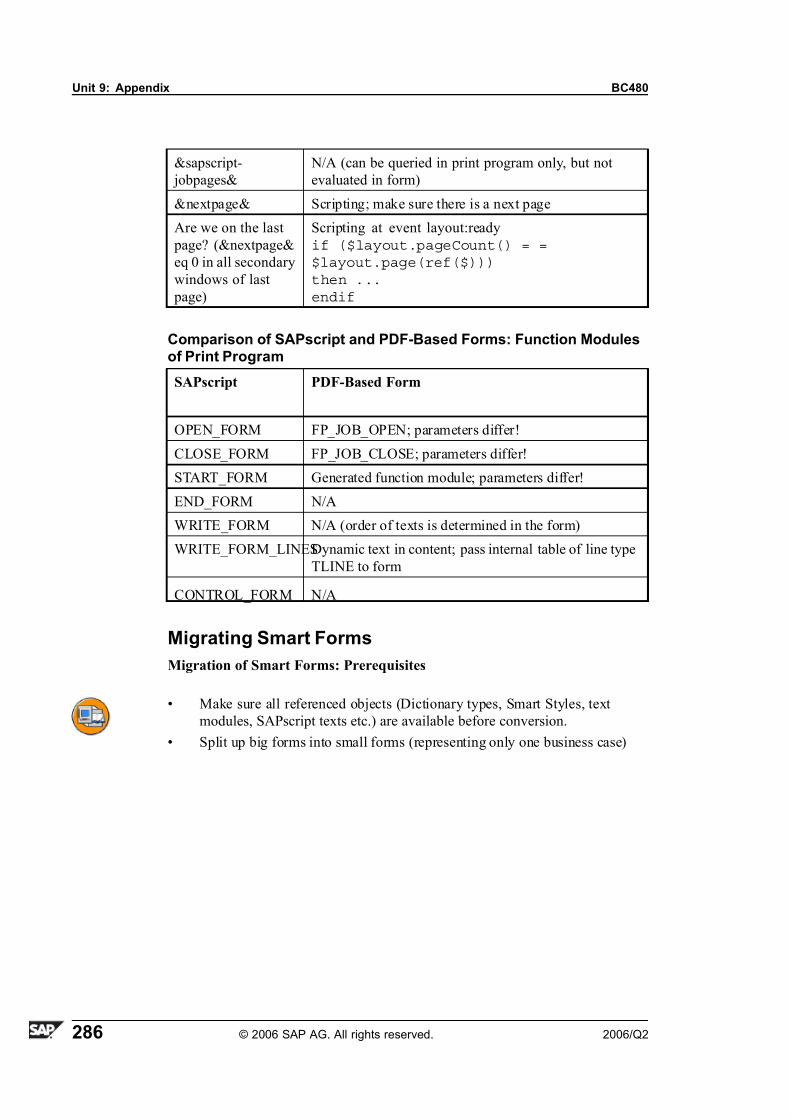
7/14/2019 BC480 - PDF-Based Print Forms
http://slidepdf.com/reader/full/bc480-pdf-based-print-forms 294/317
Unit 9: Appendix BC480
&sapscript-
jobpages&
N/A (can be queried in print program only, but not
evaluated in form)
&nextpage& Scripting; make sure there is a next page
Are we on the last
page? (&nextpage&
eq 0 in all secondary
windows of last
page)
Scripting at event layout:ready
if ($layout.pageCount() = =$layout.page(ref($)))then ...endif
Comparison of SAPscript and PDF-Based Forms: Function Modulesof Print Program
SAPscript PDF-Based Form
OPEN_FORM FP_JOB_OPEN; parameters differ!
CLOSE_FORM FP_JOB_CLOSE; parameters differ!
START_FORM Generated function module; parameters differ!
END_FORM N/A
WRITE_FORM N/A (order of texts is determined in the form)
WRITE_FORM_LINESDynamic text in content; pass internal table of line type
TLINE to form
CONTROL_FORM N/A
Migrating Smart Forms
Migration of Smart Forms: Prerequisites
• Make sure all referenced objects (Dictionary types, Smart Styles, text
modules, SAPscript texts etc.) are available before conversion.
• Split up big forms into small forms (representing only one business case)
286 © 2006 SAP AG. All rights reserved. 2006/Q2
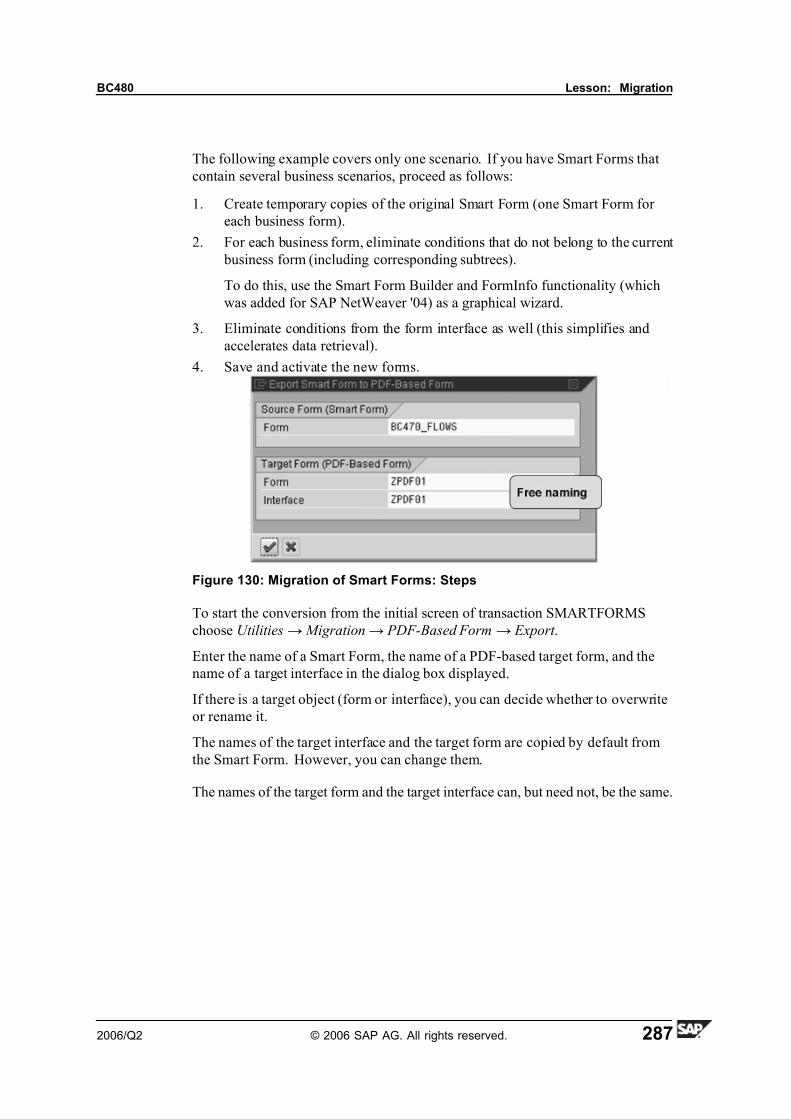
7/14/2019 BC480 - PDF-Based Print Forms
http://slidepdf.com/reader/full/bc480-pdf-based-print-forms 295/317
BC480 Lesson: Migration
The following example covers only one scenario. If you have Smart Forms that
contain several business scenarios, proceed as follows:
1. Create temporary copies of the original Smart Form (one Smart Form for
each business form).
2. For each business form, eliminate conditions that do not belong to the current
business form (including corresponding subtrees).
To do this, use the Smart Form Builder and FormInfo functionality (which
was added for SAP NetWeaver '04) as a graphical wizard.
3. Eliminate conditions from the form interface as well (this simplifies and
accelerates data retrieval).
4. Save and activate the new forms.
Figure 130: Migration of Smart Forms: Steps
To start the conversion from the initial screen of transaction SMARTFORMS
choose Utilities→ Migration→ PDF-Based Form → Export .
Enter the name of a Smart Form, the name of a PDF-based target form, and the
name of a target interface in the dialog box displayed.
If there is a target object (form or interface), you can decide whether to overwrite
or rename it.
The names of the target interface and the target form are copied by default from
the Smart Form. However, you can change them.
The names of the target form and the target interface can, but need not, be the same.
2006/Q2 © 2006 SAP AG. All rights reserved. 287

7/14/2019 BC480 - PDF-Based Print Forms
http://slidepdf.com/reader/full/bc480-pdf-based-print-forms 296/317
Unit 9: Appendix BC480
Figure 131: Migration of Smart Forms: Settings
The conversion tool is highly configurable and offers a range of conversion
options. Online Help describes each option in detail.
Generate Interface: If this option is selected, the interface object is created or
overwritten (after confirmation).
If you do not want to migrate the interface object (if it has already been migratedand was modified manually, for example), the field can be reset.
Text : If this option is selected, all text nodes (text elements, text modules, and
SAPscript texts) of the Smart Form are migrated. Depending on the layout setting,
the nodes are copied to the layout.
Text elements are displayed as static texts in the layout. The text elements are
converted from ITF format to XHTML.
Text modules are displayed as fields (XFA element <field>) in the layout that
refers to the context elements.
Information about the text module is stored in the context. The text modules are
converted at runtime from ITF format to XHTML.
SAPscript texts are displayed as fields (XFA element <field>) in the layout that
refer to the context elements. Information about the SAPscript text is stored In the
context. The SAPscript texts are converted at runtime from ITF format to XHTML.
Append mode: If this option is selected, the append modes of the texts are
reproduced in the layout. Since this feature is not currently supported by Adobe
document services, it is reproduced by means of scripting.
288 © 2006 SAP AG. All rights reserved. 2006/Q2
7/14/2019 BC480 - PDF-Based Print Forms
http://slidepdf.com/reader/full/bc480-pdf-based-print-forms 297/317
BC480 Lesson: Migration
Each text is packed into a <subform>, into which a special field, append_mode__ ,
is also packed.
The value of the field is analyzed in the generated scripting at runtime, and the
text is appended to the previous text, depending on the mode. The following
append modes exist:
• A – Append directly
• N – New line
• P – New paragraph
Since the append mode is a special feature of Smart Forms that is supported
neither by the Adobe LiveCycle Designer nor by Adobe document services, we
recommend that you perform the migration without the append mode.
Data Binding or Placeholder:
Generate Data Binding for the Context
If fields appear in a text, they receive the values from the data stream whose
structure describes the form context. The mechanism that is used to link the
fields from the layout with the nodes from the context is called data binding. If
this option is selected, all fields of the static texts (text elements) are linked with
context nodes.
Exceptions are sfsy fields (Smart Forms system fields such as sfsy-page and
sfsy-formpages) and some sy fields (such as sy-datum and sy-uzeit ). They
are analyzed in the layout directly by Adobe document services (without
link to context). Since the syntax for fields in Smart Forms differs from thesyntax in the XFA template (layout), the field names are renamed if necessary
(&mystruct-myfields& becomes mystruct.myfield , for example).
Display Fields as Placeholder
This option is used if you do not want automatic data binding. The fields from
text elements are not linked with context nodes. Instead, they are displayed as
placeholders ({MYSTRUCT-MYFIELD}). The field name remains unconverted
and is enclosed in curly brackets.
After the migration, you must replace these placeholders with fields that are
linked to the context.
Addresses are displayed as fields in the layout that are linked to an address node in
the context. At runtime, the addresses are read from the SAP system and copied to
the form as plain text. For this reason, format the layout manually after migration.
Folder : If this option is selected, folder nodes of a Smart Form are displayed as
folder nodes in the context and as XFA <subform> in the layout.
2006/Q2 © 2006 SAP AG. All rights reserved. 289
7/14/2019 BC480 - PDF-Based Print Forms
http://slidepdf.com/reader/full/bc480-pdf-based-print-forms 298/317
Unit 9: Appendix BC480
If this option is deactivated, the folder nodes from the Smart Form are ignored, but
the subnodes of the folder are not affected (which means that a subnode is migrated
if the corresponding migration flag allows this). Texts of a folder are migrated, for example, if the Texts option is set, even if the Folder option is deactivated.
Templates: If this option is selected, template nodes of a Smart Form are displayed
as folder nodes in the context, and as subforms with the underlying cells in the
layout.
If this option is deactivated, the template nodes (with the whole cell distribution)
from the Smart Form are ignored, but the subnodes of a template are not affected
(which means that a subnode is migrated if the corresponding migration option
allows this). Texts of a template cell, for example, are migrated if the Texts option
is set, even if the Templates option is deactivated.
Tables and Loops: If this option is selected, table or loop nodes of a Smart Formare displayed in the context as loop node, and in the layout as XFA <subform>. In
the context, the work area of the table/loop from the Smart Form is copied over.
Output options: If this option is deactivated, the tables, rows, cells, and loop
nodes from the Smart Form are ignored, but the subnodes are not affected (which
means that a subnode is migrated if the corresponding migration option allows
this). Texts of a loop, for example, are migrated if the Texts option is set, even if
the Tables and Loops option is deactivated.
If this is activated, the output options of every Smart Form node are migrated
into the layout. The output options affect borders, shading, and page protection
(apart from tables and templates).
Exception: Output options of Window Nodes are always migrated, regardless
of whether they are set or not.
Header/footer events: If this option is selected, header and footer nodes of a Smart
Form are displayed in the layout as XFA leader/trailer subforms.
If this option is deactivated, these nodes from the Smart Form are ignored, but
the subnodes are not affected (which means that a subnode is migrated if the
corresponding migration option allows this). Texts of a header/footer event are
migrated, for example, if the Texts option is set, even if the Header/Footer Events
option is deactivated.
Conditions: Smart Forms conditions can be defined on every node except windowand event nodes.
Conditions can be split into two groups:
• Layout-driven: conditions that are dependent on the current layout
information (Only on First Page, for example)
• Data-driven: conditions that are dependent on data values (CARRIER
= 'LH', for example)
290 © 2006 SAP AG. All rights reserved. 2006/Q2
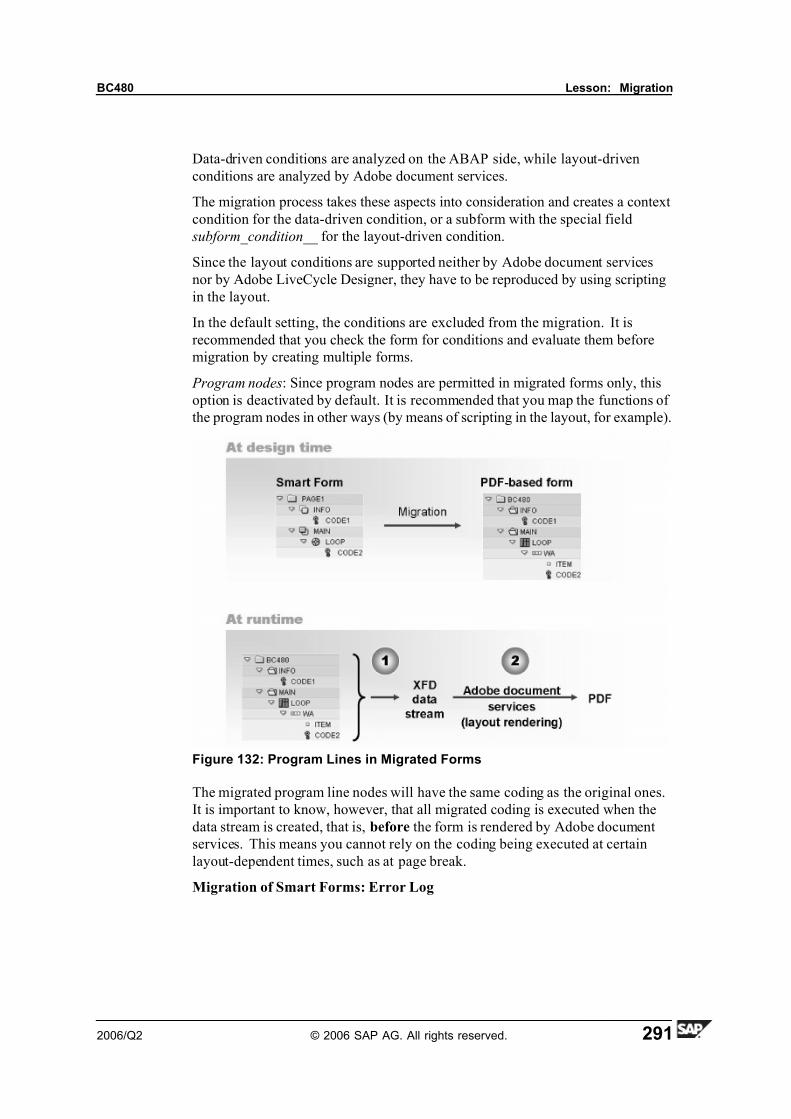
7/14/2019 BC480 - PDF-Based Print Forms
http://slidepdf.com/reader/full/bc480-pdf-based-print-forms 299/317
BC480 Lesson: Migration
Data-driven conditions are analyzed on the ABAP side, while layout-driven
conditions are analyzed by Adobe document services.
The migration process takes these aspects into consideration and creates a context
condition for the data-driven condition, or a subform with the special field
subform_condition__ for the layout-driven condition.
Since the layout conditions are supported neither by Adobe document services
nor by Adobe LiveCycle Designer, they have to be reproduced by using scripting
in the layout.
In the default setting, the conditions are excluded from the migration. It is
recommended that you check the form for conditions and evaluate them before
migration by creating multiple forms.
Program nodes: Since program nodes are permitted in migrated forms only, this
option is deactivated by default. It is recommended that you map the functions of
the program nodes in other ways (by means of scripting in the layout, for example).
Figure 132: Program Lines in Migrated Forms
The migrated program line nodes will have the same coding as the original ones.
It is important to know, however, that all migrated coding is executed when the
data stream is created, that is, before the form is rendered by Adobe document
services. This means you cannot rely on the coding being executed at certain
layout-dependent times, such as at page break.
Migration of Smart Forms: Error Log
2006/Q2 © 2006 SAP AG. All rights reserved. 291
7/14/2019 BC480 - PDF-Based Print Forms
http://slidepdf.com/reader/full/bc480-pdf-based-print-forms 300/317
Unit 9: Appendix BC480
First, run the conversion. Then analyze the conversion protocol by choosing
Utilities→ Migration→ PDF-Based Form → Display Log .
Note: If there are no errors, no error log is displayed.
After you have migrated the Smart Form to the PDF based form, finish the form
in Designer. To access Designer, choose Utilities→ Migration→ PDF-Based
Form→ Edit .
Do not underestimate the time it might take to achieve the result you have in mind.
Then activate the new form and the interface.
Avoid using the following elements in Smart Forms because you must adapt them
manually in the conversion process:
Pain Points in Smart Forms
• Using SAP signs (<123>)
• Program line nodes in flow logic
• Formatting in text nodes that diverge from the XHTML subset defined by
Adobe (formatting that cannot be converted is lost during migration)
• Combination of data-specific output conditions (table control on conditions
tab) and conditions with times (for example, only after the main window is
closed)
• Obsolete SAP R/3 4.6C tables
• Template cells whose layout is interrupted by the layout of other cells (for example, text1 in cell 1-1, text2 in cell 1-2, text3 in cell 1-1)
• Table and export parameters:
– The new interface optimized for processing with Adobe does not
support table or export parameters.
– Tables should be created as import parameters (TYPE
<TABLETYPE>).
• Export parameters should not be created for application data; export
parameters that refer to document output are generally provided.
• Combinations of output-related conditions (for example, SFSY-PAGE > 10)
and data-related output conditions with the link OR to text modules includegraphics, addresses, loops.
• Program lines that depend on a layout condition (current page = 1) or a
layout-related event (page break). For example, changing a global variable
that depends on the current number of pages.
• Using the output formats XDF or HTML.
292 © 2006 SAP AG. All rights reserved. 2006/Q2

7/14/2019 BC480 - PDF-Based Print Forms
http://slidepdf.com/reader/full/bc480-pdf-based-print-forms 301/317
BC480 Lesson: Migration
Lesson Summary
You should now be able to:• Describe the basic concepts of form processing with SAPscript and Smart
Forms
• Name steps required to reuse or migrate existing form objects from
SAPscript and Smart Forms
2006/Q2 © 2006 SAP AG. All rights reserved. 293
7/14/2019 BC480 - PDF-Based Print Forms
http://slidepdf.com/reader/full/bc480-pdf-based-print-forms 302/317
Unit Summary BC480
Unit Summary
You should now be able to:
• Describe the formatting concept used for text modules
• Name relevants parts of Smart Styles
• Create and maintain styles
• Explain the mechanims involved in catching and thowing object-oriented
exceptions
• Catch exceptions that might be raised within a program that calls PDF-based
forms
• Explain the principles of how customizing works for PDF-based forms
• Customize one example transaction in mySAP ERP so that PDF-based forms
are used for a printing scenario• Set up an http connection for Adobe document services
• Name basic steps needed to install new fonts
• use tables in Adobe LiveCycle Designer versions 6.0 and 7.0
• Describe the basic concepts of form processing with SAPscript and Smart
Forms
• Name steps required to reuse or migrate existing form objects from
SAPscript and Smart Forms
294 © 2006 SAP AG. All rights reserved. 2006/Q2

7/14/2019 BC480 - PDF-Based Print Forms
http://slidepdf.com/reader/full/bc480-pdf-based-print-forms 303/317
BC480 Test Your Knowledge
Test Your Knowledge
1. In a form context, you can override the style of a text module.
Determine whether this statement is true or false.
□ True
□ False
2. Text in a text module can have any combination of the typical formats, such
as italics, bold, or underlined.
Determine whether this statement is true or false.
□ True
□
False
3. All tabs in a style are left-aligned.
Determine whether this statement is true or false.
□ True
□ False
4. Which of the following statements on the class-based exception concept
are true?
Choose the correct answer(s).
□ A TRY. ... ENDTRY. is sufficient to prevent a dump.□ B A programmer can always choose whether to use sy-subrc or
exception objects when dealing with exceptions raised by a
method.
□ C Class-based exceptions can be raised in classes only.
□ D Multiple CATCH clauses are possible to react on different
exceptions.
2006/Q2 © 2006 SAP AG. All rights reserved. 295
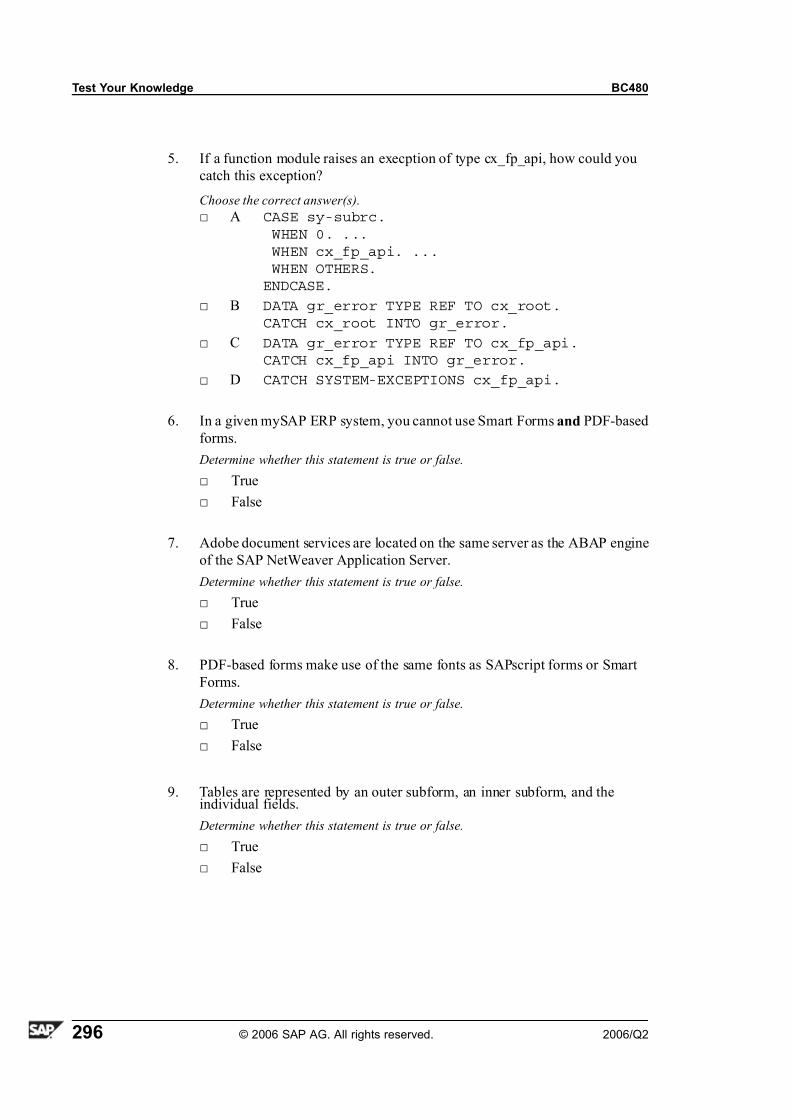
7/14/2019 BC480 - PDF-Based Print Forms
http://slidepdf.com/reader/full/bc480-pdf-based-print-forms 304/317
Test Your Knowledge BC480
5. If a function module raises an execption of type cx_fp_api, how could you
catch this exception?
Choose the correct answer(s).
□ A CASE sy-subrc.WHEN 0. ...WHEN cx_fp_api. ...WHEN OTHERS.
ENDCASE.
□ B DATA gr_error TYPE REF TO cx_root.CATCH cx_root INTO gr_error.
□ C DATA gr_error TYPE REF TO cx_fp_api.CATCH cx_fp_api INTO gr_error.
□ D CATCH SYSTEM-EXCEPTIONS cx_fp_api.
6. In a given mySAP ERP system, you cannot use Smart Forms and PDF-based
forms.
Determine whether this statement is true or false.
□ True
□ False
7. Adobe document services are located on the same server as the ABAP engine
of the SAP NetWeaver Application Server.
Determine whether this statement is true or false.
□ True
□ False
8. PDF-based forms make use of the same fonts as SAPscript forms or Smart
Forms.
Determine whether this statement is true or false.
□ True
□ False
9. Tables are represented by an outer subform, an inner subform, and theindividual fields.
Determine whether this statement is true or false.
□ True
□ False
296 © 2006 SAP AG. All rights reserved. 2006/Q2

7/14/2019 BC480 - PDF-Based Print Forms
http://slidepdf.com/reader/full/bc480-pdf-based-print-forms 305/317
BC480 Test Your Knowledge
10. For row lines in a table, the table's outer subform must have borders.
Determine whether this statement is true or false.
□ True
□ False
11. The captions of the table fields can be used as headers.
Determine whether this statement is true or false.
□ True
□ False
12. Once you have created a subform for the table header (let us call it
HEADER), you set it as the overflow header for the outer subform. Determine whether this statement is true or false.
□ True
□ False
13. Smart Forms can be converted to PDF-based forms without loss.
Determine whether this statement is true or false.
□ True
□ False
14. Smart Forms text modules can directly be integrated into PDF-based forms.
Determine whether this statement is true or false.
□ True
□ False
2006/Q2 © 2006 SAP AG. All rights reserved. 297

7/14/2019 BC480 - PDF-Based Print Forms
http://slidepdf.com/reader/full/bc480-pdf-based-print-forms 306/317
Test Your Knowledge BC480
Answers
1. In a form context, you can override the style of a text module.
Answer: True
If you leave the Copy Style From Text Module option unchecked, you can
specify a style that differs from the one used in the text module.
2. Text in a text module can have any combination of the typical formats, such
as italics, bold, or underlined.
Answer: False
Only those formats can be applied that are available in the style used for
the text module.
3. All tabs in a style are left-aligned.
Answer: False
The tabs that you define on the Tabs tab can be left-aligned, right-aligned,
centered, or they can be decimal tabs.
4. Which of the following statements on the class-based exception concept
are true?
Answer: D
TRY. ... ENDTRY. is required to write a CATCH clause, but itself is not
sufficient to prevent a dump.
The programmer of a method or a function module determines one of the
two ways of raising exceptions. If you use this method or function module,
you have no choice but to use the specific type of exception concept.
Class-based exceptions can be raised in all programming blocks (methods,
subforms, function modules, ...).
298 © 2006 SAP AG. All rights reserved. 2006/Q2
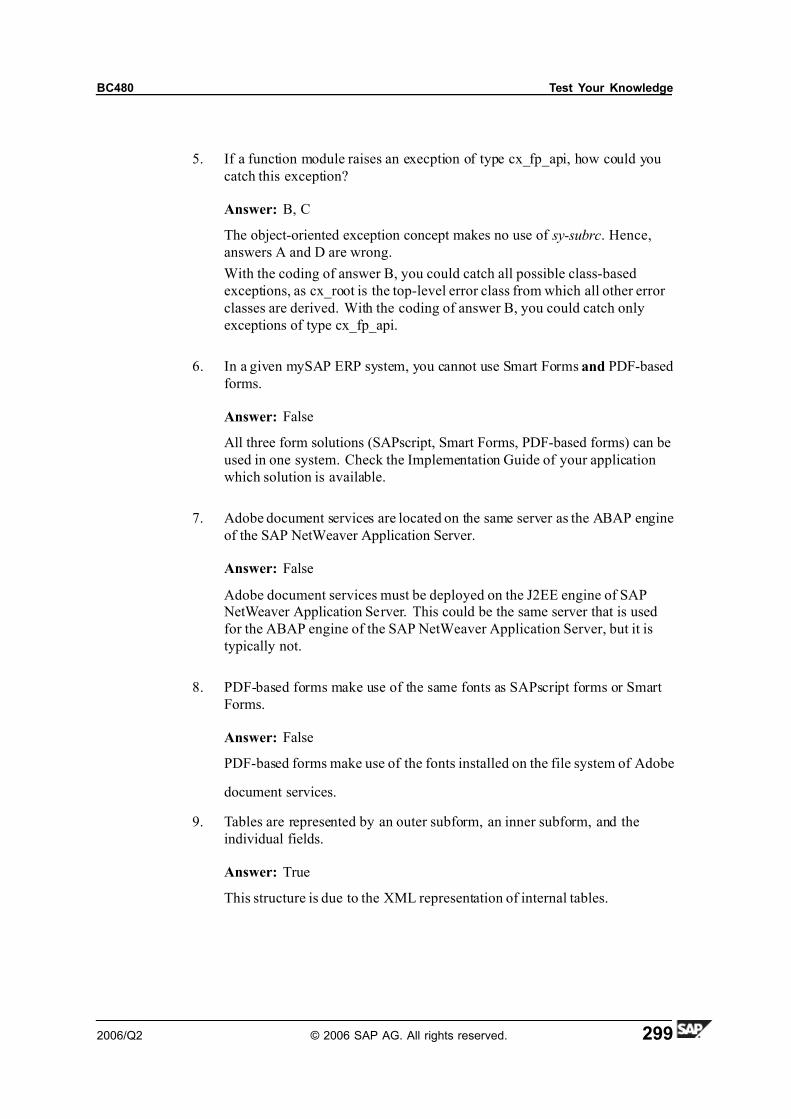
7/14/2019 BC480 - PDF-Based Print Forms
http://slidepdf.com/reader/full/bc480-pdf-based-print-forms 307/317
BC480 Test Your Knowledge
5. If a function module raises an execption of type cx_fp_api, how could you
catch this exception?
Answer: B, C
The object-oriented exception concept makes no use of sy-subrc. Hence,
answers A and D are wrong.
With the coding of answer B, you could catch all possible class-based
exceptions, as cx_root is the top-level error class from which all other error
classes are derived. With the coding of answer B, you could catch only
exceptions of type cx_fp_api.
6. In a given mySAP ERP system, you cannot use Smart Forms and PDF-based
forms.
Answer: False
All three form solutions (SAPscript, Smart Forms, PDF-based forms) can be
used in one system. Check the Implementation Guide of your application
which solution is available.
7. Adobe document services are located on the same server as the ABAP engine
of the SAP NetWeaver Application Server.
Answer: False
Adobe document services must be deployed on the J2EE engine of SAP NetWeaver Application Server. This could be the same server that is used
for the ABAP engine of the SAP NetWeaver Application Server, but it is
typically not.
8. PDF-based forms make use of the same fonts as SAPscript forms or Smart
Forms.
Answer: False
PDF-based forms make use of the fonts installed on the file system of Adobe
document services.
9. Tables are represented by an outer subform, an inner subform, and the
individual fields.
Answer: True
This structure is due to the XML representation of internal tables.
2006/Q2 © 2006 SAP AG. All rights reserved. 299
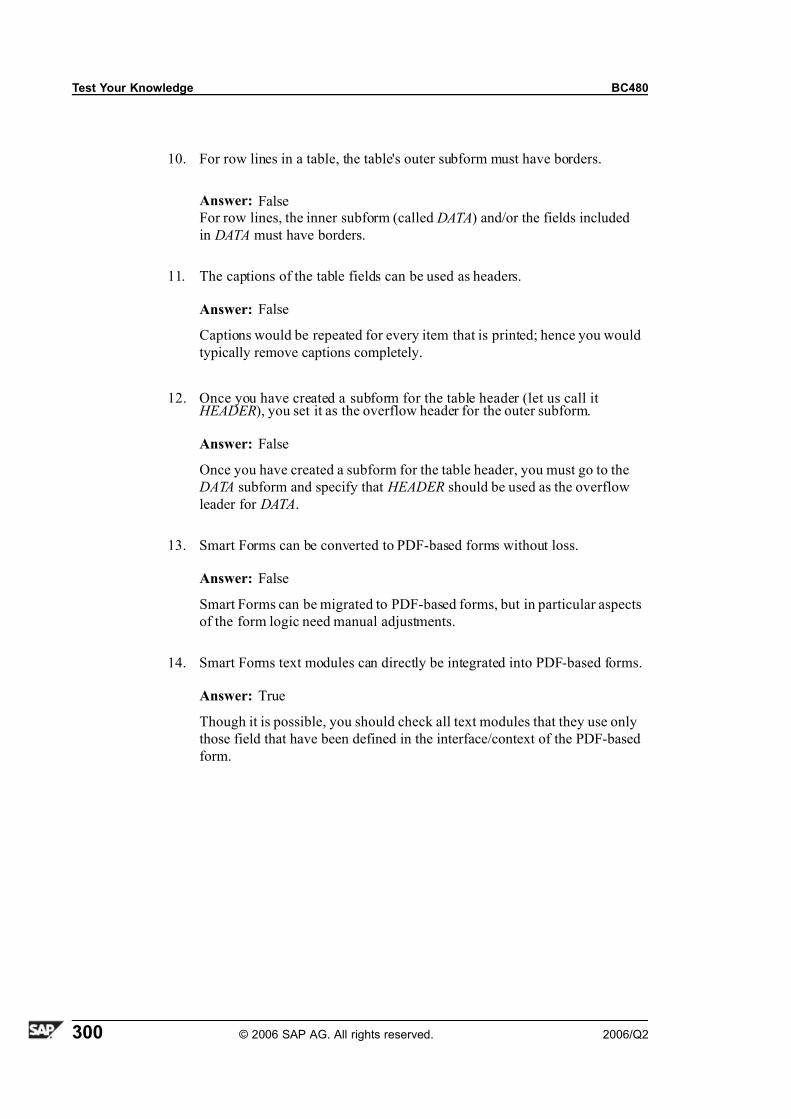
7/14/2019 BC480 - PDF-Based Print Forms
http://slidepdf.com/reader/full/bc480-pdf-based-print-forms 308/317
Test Your Knowledge BC480
10. For row lines in a table, the table's outer subform must have borders.
Answer: FalseFor row lines, the inner subform (called DATA) and/or the fields included
in DATA must have borders.
11. The captions of the table fields can be used as headers.
Answer: False
Captions would be repeated for every item that is printed; hence you would
typically remove captions completely.
12. Once you have created a subform for the table header (let us call it HEADER), you set it as the overflow header for the outer subform.
Answer: False
Once you have created a subform for the table header, you must go to the
DATA subform and specify that HEADER should be used as the overflow
leader for DATA.
13. Smart Forms can be converted to PDF-based forms without loss.
Answer: False
Smart Forms can be migrated to PDF-based forms, but in particular aspects
of the form logic need manual adjustments.
14. Smart Forms text modules can directly be integrated into PDF-based forms.
Answer: True
Though it is possible, you should check all text modules that they use only
those field that have been defined in the interface/context of the PDF-based
form.
300 © 2006 SAP AG. All rights reserved. 2006/Q2

7/14/2019 BC480 - PDF-Based Print Forms
http://slidepdf.com/reader/full/bc480-pdf-based-print-forms 309/317
BC480 Course Summary
Course Summary
You should now be able to:
• Use transaction SFP
• Create and model form contexts
• Create and model form interfaces
• Use Adobe LiveCycle Designer
• Create and design complex forms for printing with the tool “Interactive
Forms”
• Integrate forms into ABAP programs
2006/Q2 © 2006 SAP AG. All rights reserved. 301

7/14/2019 BC480 - PDF-Based Print Forms
http://slidepdf.com/reader/full/bc480-pdf-based-print-forms 310/317
Course Summary BC480
302 © 2006 SAP AG. All rights reserved. 2006/Q2
7/14/2019 BC480 - PDF-Based Print Forms
http://slidepdf.com/reader/full/bc480-pdf-based-print-forms 311/317
Index
Numerics/Symbols
*, 56, 253* (asterisk), 52
AABAP, 206, 219ABAP Dictionary, 19, 152,
159Acceptance Request, 268Accessibility, 240Accessors, 198ACF , see Active Component
Framework
Activating a form, 4, 205Active Component
Framework, 37, 80ADDRESS_INTO_PRINT-
FORM, 47 – 48, 57
Addresses, 48, 57Adobe document services, 6,
130, 132, 222, 271 – 272Adobe LiveCyle Designer , see
Designer
Adobe Reader, 2, 80ADS , see Adobe document
services
Alignment, 152Alternative, 44Application program , see
Program
Archive, 223Authorization, 98, 205
BBackground color , 90Barcodes, 259BCS , see Business
Communication Service
Bitmaps, 46, 130Blanks, 154
Body pages, 109 – 110Boilerplate objects, 109, 129,
133Borders, 90BTE, 267Business Address Services, 47Business Communication
Service, 224Business Communication
Services, 15Business Transaction Event,
267
Ccalculate, 197Captions, 39, 89, 145, 243Case sensitivity, 155CATCH, 262
Central Address Management,47CH, 253Circles, 132CLOSE_FORM, 220Column width, 277Commands, 198, 284Conditional break , 175Conditions, 43, 45Content areas, 109Control levels, 42, 177Country, 158
Courier , 132Currencies, 19, 152, 159Customizing, 267CX_FP_EXCEPTION, 264CX_ROOT, 262
DData binding, 147Data pattern, 155Data pattern symbols, 156
2006/Q2 © 2006 SAP AG. All rights reserved. 303
7/14/2019 BC480 - PDF-Based Print Forms
http://slidepdf.com/reader/full/bc480-pdf-based-print-forms 312/317
Index BC480
Data schema, 85Data View, 87, 144, 149
Date fields, 152Decimal fields, 151 – 152Decimals, 152Default format, 52Default values, 146Designer , 45
Toolbars, 83Workspace, 82
Dictionary, 14, 145 , see ABAP Dictionary
Display pattern, 154Dowloading PDF file, 235Downloading form objects,
94, 234Dynamic elements, 143Dynamic properties, 149Dynamic texts, 56
EEdit pattern, 155ENDTRY, 262Events, 197Exceptions, 16, 220, 261
EXIF, 46, 130Exists, 204
FFax, 224Field symbols, 18Floating fields, 153Folders, 44, 289Font, 131Font size, 254Fonts, embedding, 273Fonts, installing new, 272
Fonts, replacing, 273Form object, 4Form properties, 96Form routines, 19Form template, 4form:ready, 197Formats
Text modules, 52Formatting options, 53, 154FormCalc, 96, 195
FP_FIELD_LIST, 219FP_FUNCTION_MOD-
ULE_NAME, 219 – 220,224, 264
FP_JOB_CLOSE, 219 – 220FP_JOB_OPEN, 96, 219 – 220,
273FPFONTREPL, 273Frames, 277Function Builder , 95Function module, 4
GGeometrical objects, 132
GIF, 46, 130Global fields, 18Graphic content, 151Graphic reference, 151Graphics, 45Grid, 86Group levels , see Control levels
HHasValue, 204Header , 278Headers, 174
Hiding elements, 206Hiding fields, 43Hierarchy palette, 85, 87HTML, 46http, 6http connections, 222, 271
IIF THEN ELSE, 149, 198Images
Size, 130 , see Graphics
Implementation Guide, 267Importing PDF documents,
236Include texts, 49Indents, 256Info palette, 85Initialization, 18initialize, 197Interactive forms, 6, 96, 223
304 © 2006 SAP AG. All rights reserved. 2006/Q2
7/14/2019 BC480 - PDF-Based Print Forms
http://slidepdf.com/reader/full/bc480-pdf-based-print-forms 313/317
BC480 Index
Interface type, 220Interfaces, 4, 13
Internal tables, 41ITF, 56
JJ2EE, 5Java, 5JavaScript, 96, 195, 203JPG, 46, 130
LLanguage, 54, 158, 223Layout Ppalette, 89
layout:ready, 197Library, 85Library objects, 93Line breaks, 51, 131Lines, 132LN, 253Locales, 96, 155, 158Loops, 41
MMail, 224Margins, 89
Master pages, 109Migration, 16, 224, 283MIME Repository, 130, 283MS Word, 238MSAA, 244Multiple lines, 146mySAP ERP, 3, 268
N Nested objects, 88 Nested tables, 42, 179 Numbering, auomatic, 257
Numeric fields, 151 Numeric pattern symbols, 159
OOffset, 154OPEN_FORM, 220Output Control, 6
PPackage, 37, 50Page breaks, 109, 111, 113
Page numbers, 154Pages
Orientation, 110Size, 110
Palette windows, 82Palettes, 82, 84Paragraph, 131Payment request, 268PCL, 222PDL, 222, 224Performance, 147, 206Picture clause, 155PNG, 46, 130Post Processing Framework , 5PostScript, 222, 272PPF, 5Print preview, 95 – 96, 226Printer Definition Language,
222Program, 219Public Sector , 268
QQuantities, 19
R
Radix alignment, 152RDI, 222Reader rights, 223$record, 148, 198Rectangles, 132Report palette, 85Request printouts, 268RFC destination, 222Rotating objects, 89RSTXLDMC, 283RTF, 238
RVORDER01, 284SSAP GUI, 2, 6, 80SAP NetWeaver Application
Server, 5SAP Web Application Server ,
272 , see SAP NetWeaver
Application Server
2006/Q2 © 2006 SAP AG. All rights reserved. 305
7/14/2019 BC480 - PDF-Based Print Forms
http://slidepdf.com/reader/full/bc480-pdf-based-print-forms 314/317
Index BC480
SAPscript, 109, 154, 220,267 – 268, 281
SAPscript commands, 51SAPscript texts, 49, 54Script Editor, 82, 195SE78, 283Server scripting, 195SET COUNTRY, 158, 223SFP, 4, 36SFPOUTPUTPARAMS, 240SFPSY, 39, 43, 53SM59, 271Smart Forms, 14, 16, 49, 109,
154, 219, 224, 267, 282Smart Styles, 55, 252SOAP, 6Sorting tables, 178SP01, 2, 219, 226Spacing, 132Spool job, 15, 222SSF_FUNCTION_MOD-
ULE_NAME, 224SSL, 271Standard paragraph, 253Static text, 131
STXFPCUST, 225Style Builder , 253Styles, 50, 52, 54 – 55, 252Subforms, 109, 111Substrings, 204SY-..., 19sy-subrc, 261Syntax check , 204SYST, 53
TT006, 19
Table cells, 277Table headers, 174Table row, 277Tables, 171 – 172, 275Tables, nested, 179Tabs, 256Tagged PDF, 240TCURX, 19Text
Alignment, 132
Format, 131Static, 131
Text modules, 49, 52TIF, 46Time fields, 152Time pattern symbols, 156Times, 132TLINE, 56Trace, 205Transport, 234Transport Organizer , 49True Type, 272TRY, 262TTF, 272
UUnderlined, 254Units, 86URL, 130
VValidation pattern, 155Variables, 201
WWAS , see SAP NetWeaver
Application Server Web Dynpro, 6Web Dynpros, 5WHERE clause, 42Where conditions, 179WRITE_FORM, 281WYSIWYG, 131
XXDF, 15XDP, 4XFA, 94
XFD, 41XFO, 93XFP, 222XHTML, 147XML, 4XML Data Package, 4XML data stream, 41, 44XML schema, 14, 20XSD, 20, 41XSF, 15
306 © 2006 SAP AG. All rights reserved. 2006/Q2

7/14/2019 BC480 - PDF-Based Print Forms
http://slidepdf.com/reader/full/bc480-pdf-based-print-forms 315/317
BC480 Index
ZZCI, 80
, see Zero Client InstallationZebra printers, 222
Zebra stripes, 174Zero Client Installation, 37
Zeros (omitting), 154
2006/Q2 © 2006 SAP AG. All rights reserved. 307

7/14/2019 BC480 - PDF-Based Print Forms
http://slidepdf.com/reader/full/bc480-pdf-based-print-forms 316/317
Index BC480
308 © 2006 SAP AG. All rights reserved. 2006/Q2

7/14/2019 BC480 - PDF-Based Print Forms
http://slidepdf.com/reader/full/bc480-pdf-based-print-forms 317/317


![BC480 en Col62 FV Part A4[1] - PDF Based Print Forms](https://img.pdfslide.net/doc/110x75/5477dc37b4af9f4d108b4a2e/bc480-en-col62-fv-part-a41-pdf-based-print-forms.jpg)