Embed Size (px)
Citation preview
Fully alig
ned
with th
e Australian
Curriculum
ISBN 978-0-85847-310-2
9
780858 473102
PC:6:B1
Marvellous m
icro-organisms Year 6 B
iological sciences
PrimaryConnections: Linking science with literacy is an innovative program linking
the teaching of science with the teaching
of literacy in primary schools.
The program combines a sophisticated
professional learning component with
exemplary curriculum resources.
PrimaryConnections features an inquiry-
based approach, embedded assessment
and incorporates Indigenous perspectives.
The PrimaryConnections curriculum
resources span Years F–6 of primary school.
Marvellous micro-organismsYear 6Biological sciences
The PrimaryConnections program is supported by astronomer, Professor Brian Schmidt, Nobel Laureate
www.primaryconnections.org.au
Australian
Curriculum
Professional learning program
PrimaryConnections comprises a professional learning program supported with exemplary curriculum resources to enhance teaching and learning in science and literacy. Research shows that this combination is more effective than using each in isolation.
Professional Learning Facilitators are available throughout Australia to conduct workshops on the underpinning principles of the program: the PrimaryConnections 5Es teaching and learning model, linking science with literacy, investigating, embedded assessment and collaborative learning.
The PrimaryConnections website has contact details for state and territory Professional Learning Coordinators, as well as additional resources for this unit. Visit the website at: www.primaryconnections.org.au
PrimaryConnections projectDirector Ms Shelley Peers (Australian Academy of Science)Reference Group Professor Jenny Graves, AO FAA (Australian Academy of Science) [Chair] Ms Shelley Peers (Australian Academy of Science) ACT Department of Education and Training Australian Council of Deans of Education Australian Curriculum Assessment and Reporting Authority (ACARA) Australian Government Department of Education, Employment and Workplace Relations Australian Literacy Educators’ Association Australian Primary Principals Association Australian Science Teachers Association QLD Department of Education, Training and Employment Independent Schools Council of Australia Indigenous Education Consultative Body National Catholic Education Commission NSW Department of Education and Communities NT Department of Education and Training Primary English Teaching Association Australia SA Department for Education and Child Development TAS Department of Education VIC Department of Education and Early Childhood Development WA Department of Education
Lesson Lesson 1 Change detectives
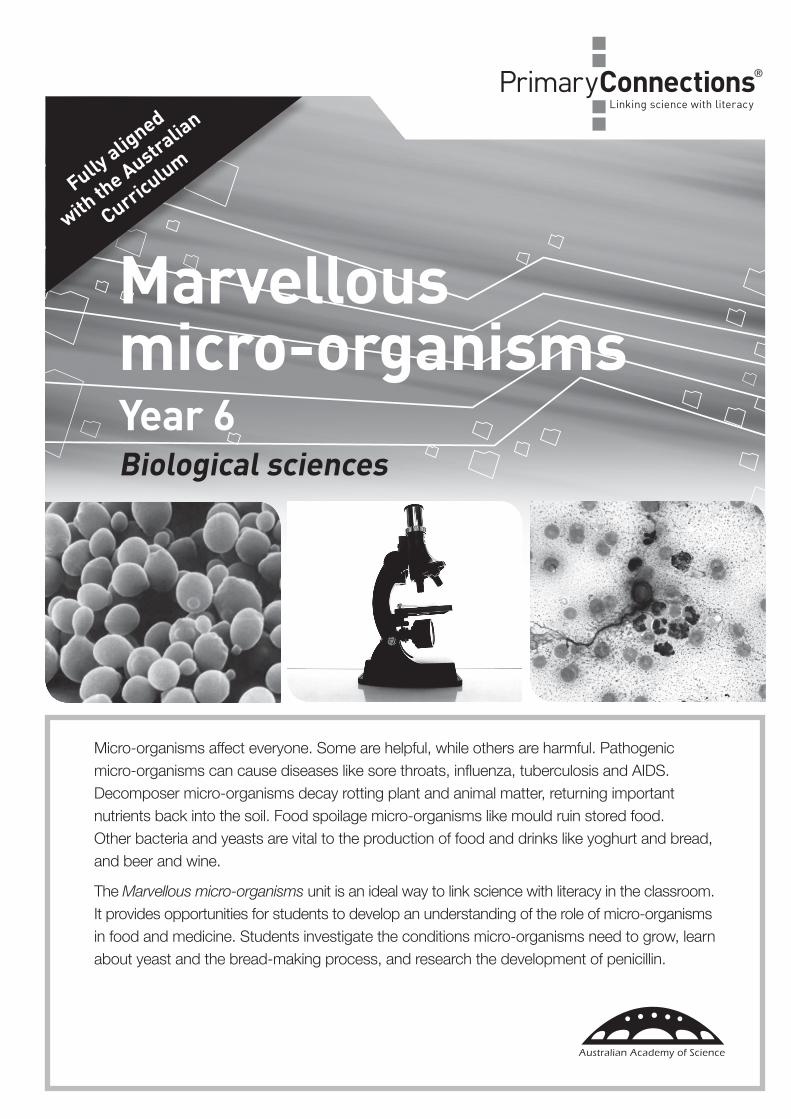
Micro-organisms affect everyone. Some are helpful, while others are harmful. Pathogenic micro-organisms can cause diseases like sore throats, influenza, tuberculosis and AIDS. Decomposer micro-organisms decay rotting plant and animal matter, returning important nutrients back into the soil. Food spoilage micro-organisms like mould ruin stored food. Other bacteria and yeasts are vital to the production of food and drinks like yoghurt and bread, and beer and wine.
The Marvellous micro-organisms unit is an ideal way to link science with literacy in the classroom. It provides opportunities for students to develop an understanding of the role of micro-organisms in food and medicine. Students investigate the conditions micro-organisms need to grow, learn about yeast and the bread-making process, and research the development of penicillin.
Marvellous micro-organisms
Fully alig
ned
with th
e Australian
Curriculum
Year 6 Biological sciences
ii
© Australian Academy of Science, September 2012.
Copyright for Education
Educators, academics and students in Australia, people working in associated organisations (such as education authorities, Education Services Australia, the Australian Curriculum, Assessment and Reporting Authority and the Australian Institute for Teaching and School Leadership) and people teaching, studying and learning in schools overseas where the Australian curriculum is taught, may freely use this material for non-commercial educational purposes.
Except as allowed under copyright law or as set out above, you may not reproduce, communicate or otherwise use any of this publication in any of the ways reserved to the copyright owner without the written permission of the Australian Academy of Science.
For permissions, contact the Business Manager, Primary Connections (Australian Academy of Science).
Published by the Australian Academy of Science.GPO Box 783 Canberra ACT 2601 Telephone: (02) 9386 4544 Fax: (02) 9387 7755 Email: [email protected] www.primaryconnections.org.au
Typesetter: Sharyn Raggett Font: Helvetica Neue, DIN Print house: Daniels Printing Craftsmen
ISBN 978 0 85847 310 2
Acknowledgments
The PrimaryConnections – Linking Science with Literacy project is supported by the Australian Government.
Thanks to the trial teachers and students of the trial schools Australia-wide and Fellows of the Australian Academy of Science who contributed to this unit.
All material identified by is material subject to copyright under the Copyright Act 1968 (Cth) and is owned by the Australian Curriculum, Assessment and Reporting Authority 2014.
For all Australian Curriculum material except elaborations: This is an extract from the Australian Curriculum.
Elaborations: This may be a modified extract from the Australian Curriculum and may include the work of other authors.
Disclaimer: ACARA neither endorses nor verifies the accuracy of the information provided and accepts no responsibility for incomplete or inaccurate information. In particular, ACARA does not endorse or verify that:
• The content descriptions are solely for a particular year and subject;
• All the content descriptions for that year and subject have been used; and
• The author’s material aligns with the Australian Curriculum content descriptions for the relevant year and subject.
You can find the unaltered and most up to date version of this material at http://www.australiancurriculum.edu.au This material is reproduced with the permission of ACARA.
DisclaimersThe views expressed here are those of the author and do not necessarily represent the views of the Australian Government.
These materials are intended for education and training only. Every effort is made to ensure the accuracy of the information presented in these materials. We do not assume any liability for the accuracy or completeness of the information contained within. The Australian Academy of Science accepts no liability or responsibility for any loss or damage whatsoever suffered as a result of direct or indirect use or application of any of these training materials.
iii
The PrimaryConnections program v
Unit at a glance 1
Alignment with the Australian Curriculum: Science 2
Alignment with the Australian Curriculum: English and Mathematics 7
Teacher background information 9
Introduction to micro-organisms 9
Lesson 1 The Y factor 11
Lesson 2 Yeast feast 23
Lesson 3 Putting the heat on yeast 29
Lesson 4 Knead the loaf 34
Lesson 5 Food observations 38
Lesson 6 Mystery moulds 41
Lesson 7 Medical micro-organisms 52
Lesson 8 Micro-organisms experts 58
Appendix 1 How to organise collaborative learning teams (Year 3–Year 6) 61
Appendix 2 How to use a science journal 65
Appendix 3 How to use a word wall 67
Appendix 4 How to use a TWLH chart 69
Appendix 5 How to facilitate evidence-based discussions 70
Appendix 6 How to write questions for investigations 72
Appendix 7 How to conduct a fair test 74
Appendix 8 Marvellous micro-organisms equipment list 75
Appendix 9 Marvellous micro-organisms unit overview 79
Contents
PrimaryConnections
iv
ForewordThe Australian Academy of Science is proud of its long tradition of supporting and informing science education in Australia. ‘PrimaryConnections: linking science with literacy’ is its flagship primary school science program, and it is making a real difference to the teaching and learning of science in Australian schools.
The PrimaryConnections approach has been embraced by schools since its inception in 2004, and there is substantial evidence of its effectiveness in helping teachers transform their practice. It builds teacher confidence and competence in this important area, and helps teachers use their professional skills to incorporate elements of the approach into other areas of the curriculum. Beginning and pre-service teachers find the approach doable and sustainable. PrimaryConnections students enjoy science more than in comparison classes, and Indigenous students, in particular, show significant increases in learning using the approach.
The project has several components: professional learning, curriculum resources, research and evaluation, and Indigenous perspectives. With the development of an Australian curriculum in the sciences by ACARA in December 2010, it is an exciting time for schools to engage with science, and to raise the profile of primary science education.
Students are naturally curious. PrimaryConnections provides an inquiry-based approach that helps students develop deep learning, and guides them to find scientific ways to answer their questions. The lessons include key science background information, and further science information is included on the PrimaryConnections website (www.primaryconnections.org.au).
Science education provides a foundation for a scientifically literate society, which is so important for engagement in key community debates, such as climate change, carbon emissions and immunisation, as well as for personal decisions about health and well-being. The inquiry approach in PrimaryConnections prepares students well to participate in evidence-based discussions of these and other issues.
PrimaryConnections has been developed with the financial support of the Australian Government and has been endorsed by education authorities across the country. The Steering Committee, comprised of Department of Education, Employment and Workplace Relations and Academy representatives, and the Reference Group, which includes representatives from all stakeholder bodies including states and territories, have provided invaluable guidance and support. Before publication, the science teacher background information on science is reviewed by a Fellow of the Academy of Science. All these inputs have ensured an award-winning, quality program.
The Fellows of the Academy are committed to ongoing support for teachers of science at all levels. I commend PrimaryConnections to you and wish you well in your teaching.
Professor Suzanne Cory, AC PresAA FRSPresident (2010–2013)Australian Academy of Science
v
PrimaryConnections Marvellous micro-organisms
The PrimaryConnections programPrimaryConnections is an innovative program that links the teaching of science and literacy in the primary years of schooling. It is an exciting and rewarding approach for teachers and students, with a professional learning program and supporting curriculum resources. Further information about professional learning and other curriculum support can be found on the PrimaryConnections website (www.primaryconnections.org.au).
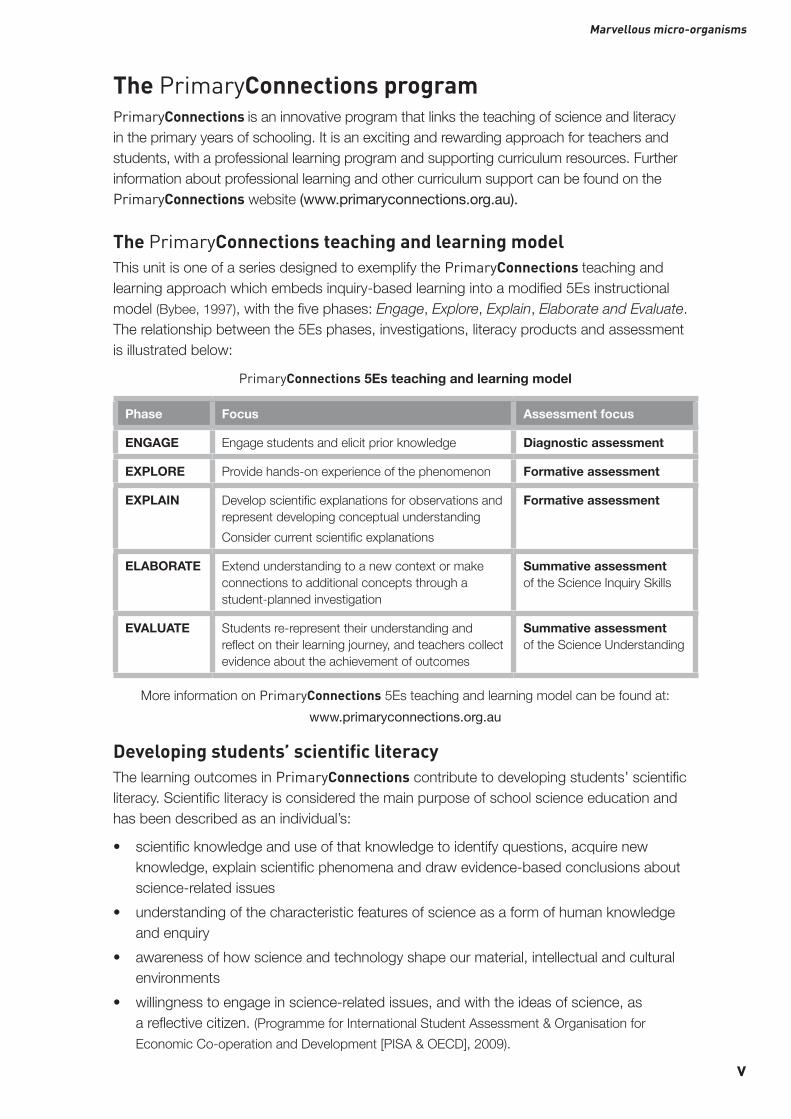
The PrimaryConnections teaching and learning modelThis unit is one of a series designed to exemplify the PrimaryConnections teaching and learning approach which embeds inquiry-based learning into a modified 5Es instructional model (Bybee, 1997), with the five phases: Engage, Explore, Explain, Elaborate and Evaluate. The relationship between the 5Es phases, investigations, literacy products and assessment is illustrated below:
PrimaryConnections 5Es teaching and learning model
Phase Focus Assessment focus
ENGAGE Engage students and elicit prior knowledge Diagnostic assessment
EXPLORE Provide hands-on experience of the phenomenon Formative assessment
EXPLAIN Develop scientific explanations for observations and represent developing conceptual understandingConsider current scientific explanations
Formative assessment
ELABORATE Extend understanding to a new context or make connections to additional concepts through a student-planned investigation
Summative assessment of the Science Inquiry Skills
EVALUATE Students re-represent their understanding and reflect on their learning journey, and teachers collect evidence about the achievement of outcomes
Summative assessment of the Science Understanding
More information on PrimaryConnections 5Es teaching and learning model can be found at: www.primaryconnections.org.au
Developing students’ scientific literacyThe learning outcomes in PrimaryConnections contribute to developing students’ scientific literacy. Scientific literacy is considered the main purpose of school science education and has been described as an individual’s:
• scientific knowledge and use of that knowledge to identify questions, acquire new knowledge, explain scientific phenomena and draw evidence-based conclusions about science-related issues
• understanding of the characteristic features of science as a form of human knowledge and enquiry
• awareness of how science and technology shape our material, intellectual and cultural environments
• willingness to engage in science-related issues, and with the ideas of science, as a reflective citizen. (Programme for International Student Assessment & Organisation for Economic Co-operation and Development [PISA & OECD], 2009).
PrimaryConnections
vi
Linking science with literacyPrimaryConnections has an explicit focus on developing students’ knowledge, skills, understanding and capacities in science and literacy. Units employ a range of strategies to encourage students to think about and to represent science.
PrimaryConnections develops the literacies of science that students need to learn and to represent their understanding of science concepts, processes and skills. Representations in PrimaryConnections are multi-modal and include text, tables, graphs, models, drawings and embodied forms, such as gesture and role-play. Students use their everyday literacies to learn the new literacies of science. Science provides authentic contexts and meaningful purposes for literacy learning, and also provides opportunities to develop a wider range of literacies. Teaching science with literacy improves learning outcomes in both areas.
AssessmentAssessment against the year level Achievement standards of the Australian Curriculum: Science (ACARA, 2014) is ongoing and embedded in PrimaryConnections units. Assessment is linked to the development of literacy practices and products. Relevant understandings and skills for each lesson are highlighted at the beginning of each lesson. Different types of assessment are emphasised in different phases:
Diagnostic assessment occurs in the Engage phase. This assessment is to elicit students’ prior knowledge so that the teacher can take account of this when planning how the Explore and Explain lessons will be implemented.
Formative assessment occurs in the Explore and Explain phases. This enables the teacher to monitor students’ developing understanding and provide feedback that can extend and deepen students’ learning.
Summative assessment of the students’ achievement developed throughout the unit occurs in the Elaborate phase of the Science Inquiry Skills and in the Evaluate phase for the Science Understanding.

vii
PrimaryConnections Marvellous micro-organisms
Alignment with the Australian Curriculum: ScienceThe Australian Curriculum: Science has three interrelated strands—Science Understanding, Science as a Human Endeavour and Science Inquiry Skills—that together ‘provide students with understanding, knowledge and skills through which they can develop a scientific view of the world’ (ACARA, 2014).
The content of these strands is described by the Australian Curriculum as:
Science Understanding
Biological sciences Understanding living things
Chemical sciences Understanding the composition and behaviour of substances
Earth and space sciences Understanding Earth’s dynamic structure and its place in the cosmos
Physical sciences Understanding the nature of forces and motion, and matter and energy
Science as a Human Endeavour
Nature and development of science
An appreciation of the unique nature of science and scientific knowledge
Use and influence of science
How science knowledge and applications affect people’s lives and how science is influenced by society and can be used to inform decisions and actions
Science Inquiry Skills
Questioning and predicting
Identifying and constructing questions, proposing hypotheses and suggesting possible outcomes
Planning and conducting Making decisions regarding how to investigate or solve a problem and carrying out an investigation, including the collection of data
Processing and analysing data and information
Representing data in meaningful and useful ways, identifying trends, patterns and relationships in data, and using evidence to justify conclusions
Evaluating Considering the quality of available evidence and the merit or significance of a claim, proposition or conclusion with reference to that evidence
Communicating Conveying information or ideas to others through appropriate representations, text types and modes
All the material in this table is sourced from the Australian Curriculum.
There will be a minimum of four PrimaryConnections units for each year of primary school from Foundation to Year 6—at least one for each Science Understanding sub-strand of the Australian Curriculum. Each unit contains detailed information about its alignment with all aspects of the Australian Curriculum: Science and its links to the Australian Curriculum: English and Mathematics.

PrimaryConnections
viii
SafetyLearning to use materials and equipment safely is central to working scientifically. It is important, however, for teachers to review each lesson before teaching to identify and manage safety issues specific to a group of students. A safety icon is included in lessons where there is a need to pay particular attention to potential safety hazards. The following guidelines will help minimise risks:
• Be aware of the school’s policy on safety in the classroom and for excursions.• Check students’ health records for allergies or other health issues.• Be aware of potential dangers by trying out activities before students do them.• Caution students about potential dangers before they begin an activity.• Clean up spills immediately as slippery floors are dangerous.• Instruct students never to taste, smell or eat anything unless they are given permission.• Discuss and display a list of safe practices for science activities.
ReferencesAustralian Curriculum Assessment and Reporting Authority (ACARA). (2010). Australian Curriculum: Science. www.australiancurriculum.edu.au
Bybee, R.W. (1997). Achieving scientific literacy: from purposes to practical action. Portsmouth, NH: Heinemann.
Programme for International Student Assessment & Organisation for Economic Co-operation and Development. (2009). PISA 2009 assessment framework: key competencies in reading, mathematics and science. Paris: OECD Publishing.
1
PrimaryConnections Marvellous micro-organisms
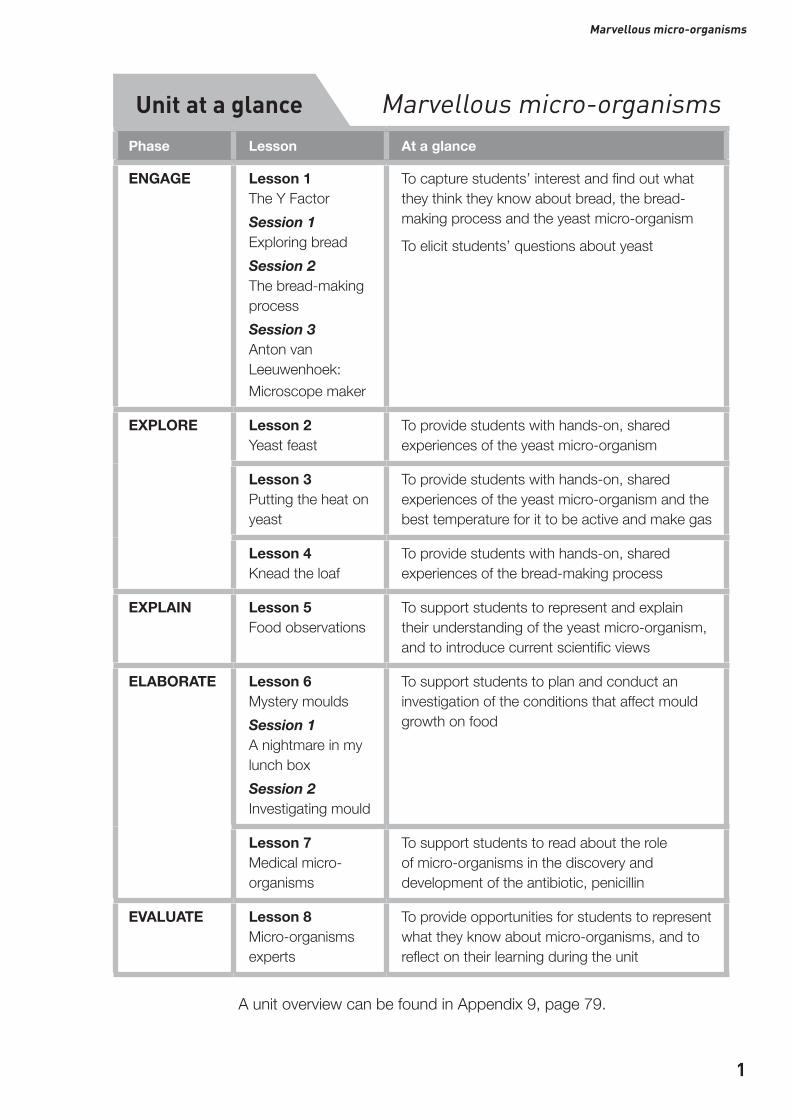
Unit at a glance Marvellous micro-organismsPhase Lesson At a glance
ENGAGE Lesson 1The Y FactorSession 1Exploring breadSession 2The bread-making processSession 3Anton van Leeuwenhoek:Microscope maker
To capture students’ interest and find out what they think they know about bread, the bread-making process and the yeast micro-organism
To elicit students’ questions about yeast
EXPLORE Lesson 2Yeast feast
To provide students with hands-on, shared experiences of the yeast micro-organism
Lesson 3Putting the heat on yeast
To provide students with hands-on, shared experiences of the yeast micro-organism and the best temperature for it to be active and make gas
Lesson 4Knead the loaf
To provide students with hands-on, shared experiences of the bread-making process
EXPLAIN Lesson 5Food observations
To support students to represent and explain their understanding of the yeast micro-organism, and to introduce current scientific views
ELABORATE Lesson 6Mystery mouldsSession 1A nightmare in my lunch boxSession 2Investigating mould
To support students to plan and conduct an investigation of the conditions that affect mould growth on food
Lesson 7Medical micro-organisms
To support students to read about the role of micro-organisms in the discovery and development of the antibiotic, penicillin
EVALUATE Lesson 8Micro-organisms experts
To provide opportunities for students to represent what they know about micro-organisms, and to reflect on their learning during the unit
A unit overview can be found in Appendix 9, page 79.
PrimaryConnections
2
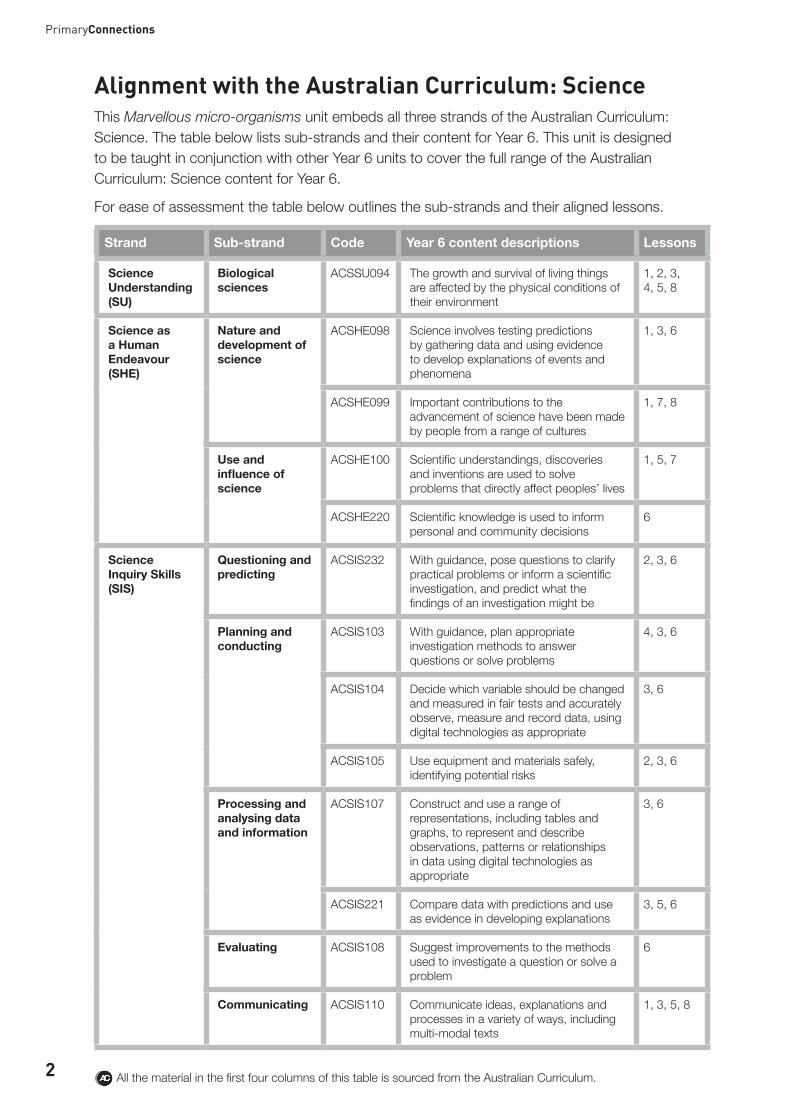
Alignment with the Australian Curriculum: ScienceThis Marvellous micro-organisms unit embeds all three strands of the Australian Curriculum: Science. The table below lists sub-strands and their content for Year 6. This unit is designed to be taught in conjunction with other Year 6 units to cover the full range of the Australian Curriculum: Science content for Year 6.
For ease of assessment the table below outlines the sub-strands and their aligned lessons.
Strand Sub-strand Code Year 6 content descriptions Lessons
Science Understanding (SU)
Biological sciences
ACSSU094 The growth and survival of living things are affected by the physical conditions of their environment
1, 2, 3, 4, 5, 8
Science as a Human Endeavour (SHE)
Nature and development of science
ACSHE098 Science involves testing predictions by gathering data and using evidence to develop explanations of events and phenomena
1, 3, 6
ACSHE099 Important contributions to the advancement of science have been made by people from a range of cultures
1, 7, 8
Use and influence of science
ACSHE100 Scientific understandings, discoveries and inventions are used to solve problems that directly affect peoples’ lives
1, 5, 7
ACSHE220 Scientific knowledge is used to inform personal and community decisions
6
Science Inquiry Skills (SIS)
Questioning and predicting
ACSIS232 With guidance, pose questions to clarify practical problems or inform a scientific investigation, and predict what the findings of an investigation might be
2, 3, 6
Planning and conducting
ACSIS103 With guidance, plan appropriate investigation methods to answer questions or solve problems
4, 3, 6
ACSIS104 Decide which variable should be changed and measured in fair tests and accurately observe, measure and record data, using digital technologies as appropriate
3, 6
ACSIS105 Use equipment and materials safely, identifying potential risks
2, 3, 6
Processing and analysing data and information
ACSIS107 Construct and use a range of representations, including tables and graphs, to represent and describe observations, patterns or relationships in data using digital technologies as appropriate
3, 6
ACSIS221 Compare data with predictions and use as evidence in developing explanations
3, 5, 6
Evaluating ACSIS108 Suggest improvements to the methods used to investigate a question or solve a problem
6
Communicating ACSIS110 Communicate ideas, explanations and processes in a variety of ways, including multi-modal texts
1, 3, 5, 8
All the material in the first four columns of this table is sourced from the Australian Curriculum.
3
PrimaryConnections Marvellous micro-organisms
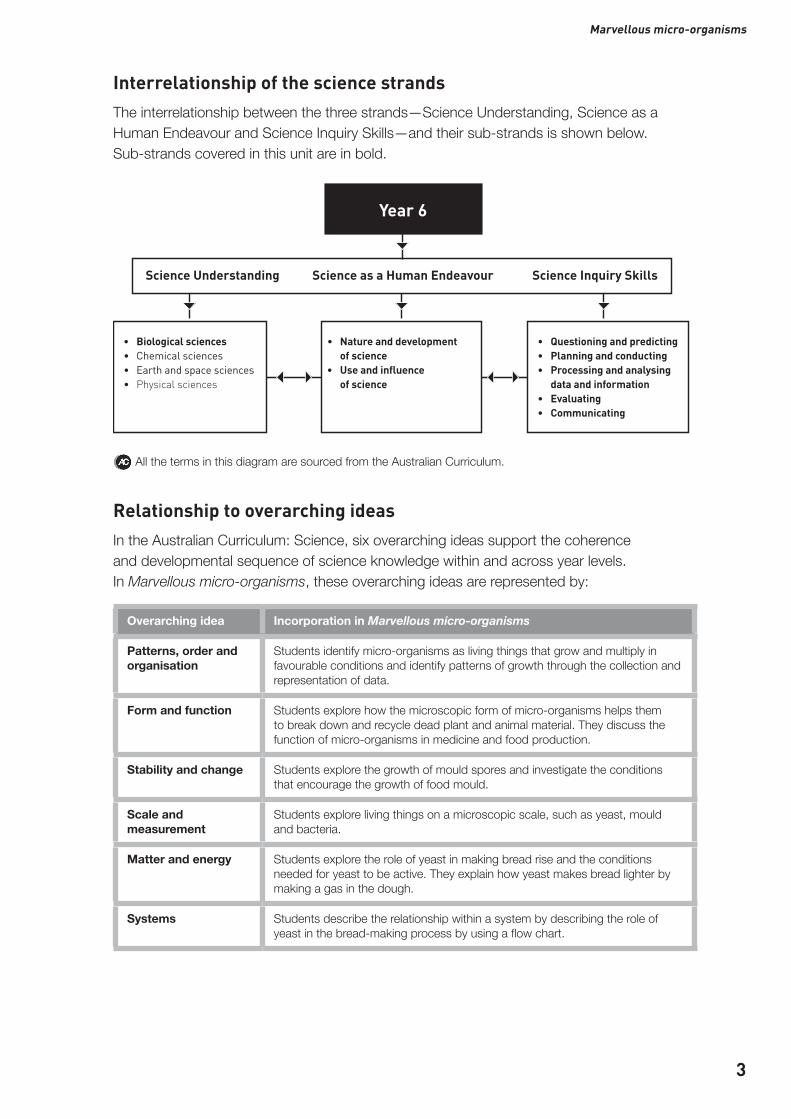
Interrelationship of the science strandsThe interrelationship between the three strands—Science Understanding, Science as a Human Endeavour and Science Inquiry Skills—and their sub-strands is shown below. Sub-strands covered in this unit are in bold.
• Biological sciences• Chemical sciences• Earth and space sciences• Physical sciences
• Nature and development of science • Use and influence of science
• Questioning and predicting• Planning and conducting• Processing and analysing data and information • Evaluating• Communicating
Science Understanding Science as a Human Endeavour Science Inquiry Skills
Year 6
All the terms in this diagram are sourced from the Australian Curriculum.
Relationship to overarching ideasIn the Australian Curriculum: Science, six overarching ideas support the coherence and developmental sequence of science knowledge within and across year levels. In Marvellous micro-organisms, these overarching ideas are represented by:
Overarching idea Incorporation in Marvellous micro-organisms
Patterns, order and organisation
Students identify micro-organisms as living things that grow and multiply in favourable conditions and identify patterns of growth through the collection and representation of data.
Form and function Students explore how the microscopic form of micro-organisms helps them to break down and recycle dead plant and animal material. They discuss the function of micro-organisms in medicine and food production.
Stability and change Students explore the growth of mould spores and investigate the conditions that encourage the growth of food mould.
Scale and measurement
Students explore living things on a microscopic scale, such as yeast, mould and bacteria.
Matter and energy Students explore the role of yeast in making bread rise and the conditions needed for yeast to be active. They explain how yeast makes bread lighter by making a gas in the dough.
Systems Students describe the relationship within a system by describing the role of yeast in the bread-making process by using a flow chart.
PrimaryConnections
4
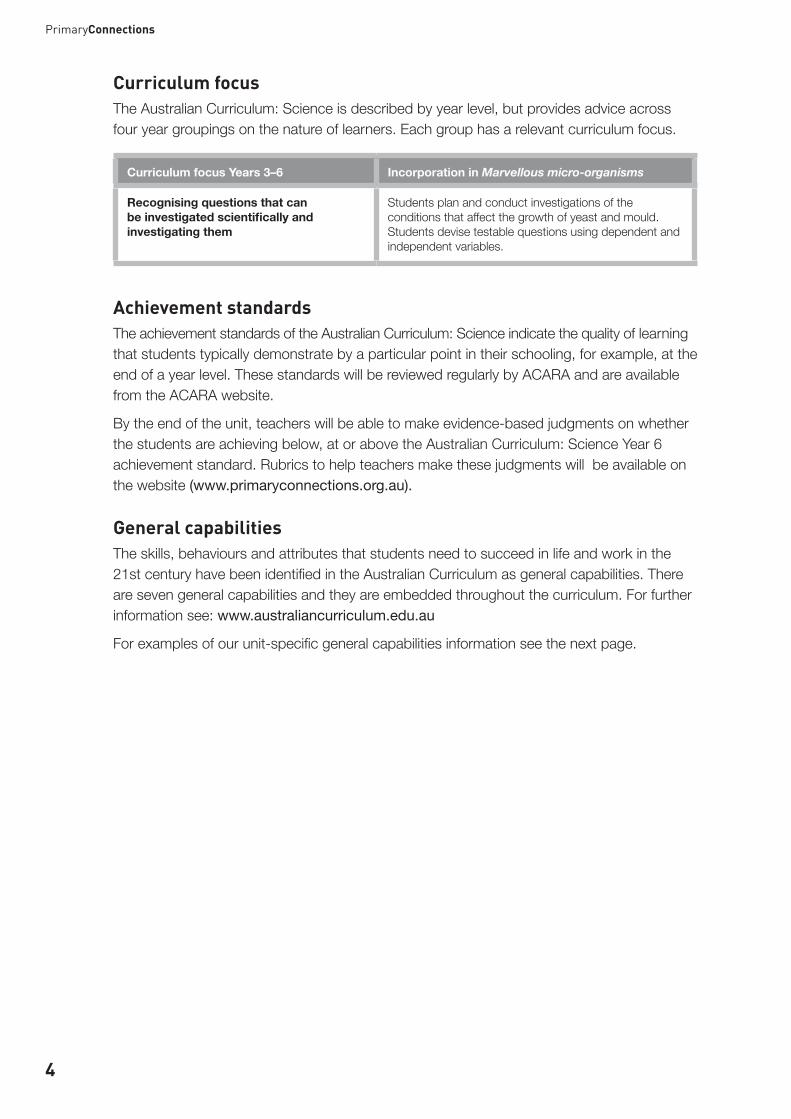
Curriculum focus The Australian Curriculum: Science is described by year level, but provides advice across four year groupings on the nature of learners. Each group has a relevant curriculum focus.
Curriculum focus Years 3–6 Incorporation in Marvellous micro-organisms
Recognising questions that can be investigated scientifically and investigating them
Students plan and conduct investigations of the conditions that affect the growth of yeast and mould. Students devise testable questions using dependent and independent variables.
Achievement standardsThe achievement standards of the Australian Curriculum: Science indicate the quality of learning that students typically demonstrate by a particular point in their schooling, for example, at the end of a year level. These standards will be reviewed regularly by ACARA and are available from the ACARA website.
By the end of the unit, teachers will be able to make evidence-based judgments on whether the students are achieving below, at or above the Australian Curriculum: Science Year 6 achievement standard. Rubrics to help teachers make these judgments will be available on the website (www.primaryconnections.org.au).
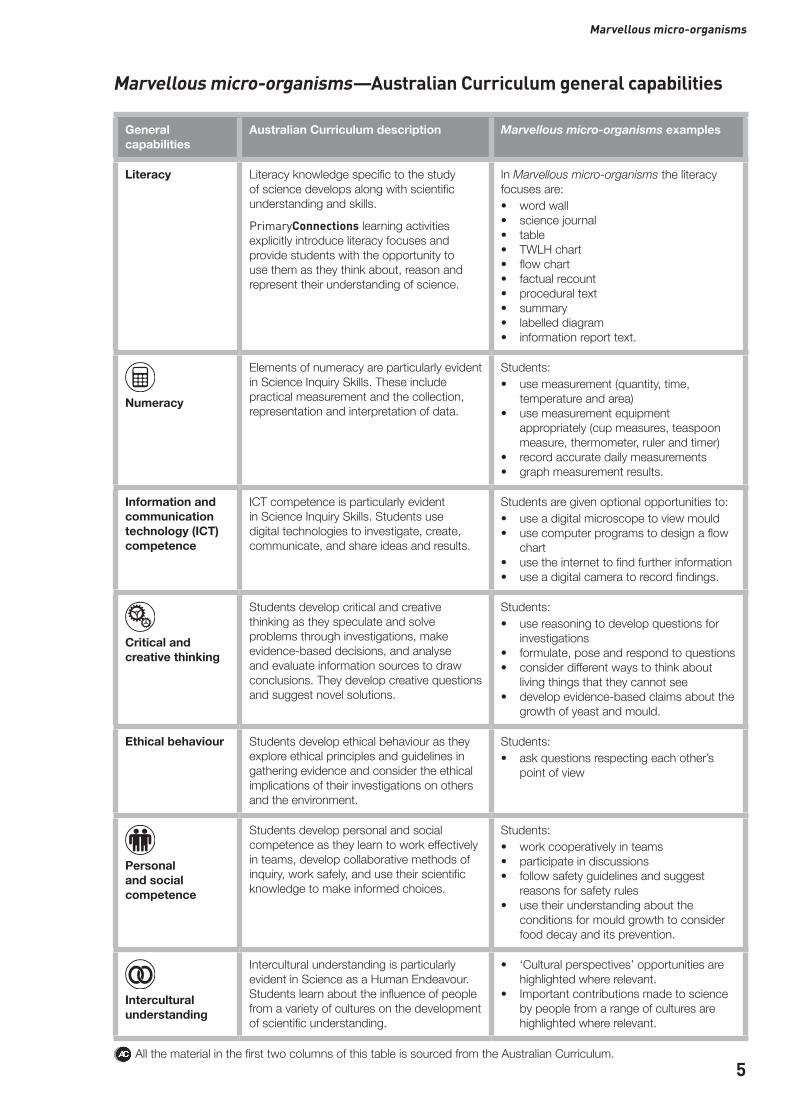
General capabilitiesThe skills, behaviours and attributes that students need to succeed in life and work in the 21st century have been identified in the Australian Curriculum as general capabilities. There are seven general capabilities and they are embedded throughout the curriculum. For further information see: www.australiancurriculum.edu.au
For examples of our unit-specific general capabilities information see the next page.
5
PrimaryConnections Marvellous micro-organisms
Marvellous micro-organisms—Australian Curriculum general capabilities
General capabilities
Australian Curriculum description Marvellous micro-organisms examples
Literacy Literacy knowledge specific to the study of science develops along with scientific understanding and skills.
PrimaryConnections learning activities explicitly introduce literacy focuses and provide students with the opportunity to use them as they think about, reason and represent their understanding of science.
In Marvellous micro-organisms the literacy focuses are:• word wall• science journal• table• TWLH chart• flow chart• factual recount• procedural text• summary• labelled diagram• information report text.
Numeracy
Elements of numeracy are particularly evident in Science Inquiry Skills. These include practical measurement and the collection, representation and interpretation of data.
Students:• use measurement (quantity, time,
temperature and area)• use measurement equipment
appropriately (cup measures, teaspoon measure, thermometer, ruler and timer)
• record accurate daily measurements• graph measurement results.
Information and communication technology (ICT) competence
ICT competence is particularly evident in Science Inquiry Skills. Students use digital technologies to investigate, create, communicate, and share ideas and results.
Students are given optional opportunities to:• use a digital microscope to view mould• use computer programs to design a flow
chart• use the internet to find further information• use a digital camera to record findings.
Critical and creative thinking
Students develop critical and creative thinking as they speculate and solve problems through investigations, make evidence-based decisions, and analyse and evaluate information sources to draw conclusions. They develop creative questions and suggest novel solutions.
Students:• use reasoning to develop questions for
investigations• formulate, pose and respond to questions• consider different ways to think about
living things that they cannot see• develop evidence-based claims about the
growth of yeast and mould.
Ethical behaviour Students develop ethical behaviour as they explore ethical principles and guidelines in gathering evidence and consider the ethical implications of their investigations on others and the environment.
Students:• ask questions respecting each other’s
point of view
Personal and social competence
Students develop personal and social competence as they learn to work effectively in teams, develop collaborative methods of inquiry, work safely, and use their scientific knowledge to make informed choices.
Students:• work cooperatively in teams• participate in discussions• follow safety guidelines and suggest
reasons for safety rules• use their understanding about the
conditions for mould growth to consider food decay and its prevention.
Intercultural understanding
Intercultural understanding is particularly evident in Science as a Human Endeavour. Students learn about the influence of people from a variety of cultures on the development of scientific understanding.
• ‘Cultural perspectives’ opportunities are highlighted where relevant.
• Important contributions made to science by people from a range of cultures are highlighted where relevant.
All the material in the first two columns of this table is sourced from the Australian Curriculum.

PrimaryConnections
6
Cross-curriculum prioritiesThere are three cross-curriculum priorities identified by the Australian Curriculum:
• Aboriginal and Torres Strait Islander histories and cultures• Asia and Australia’s engagement with Asia• Sustainability.
For further information see: www.australiancurriculum.edu.au
Aboriginal and Torres Strait Islander histories and culturesThe PrimaryConnections Indigenous perspectives framework supports teachers’ implementation of Aboriginal and Torres Strait Islander histories and cultures in science. The framework can be accessed at: www.primaryconnections.org.au
Marvellous micro-organisms focuses on the Western science way of making evidence-based claims about micro-organisms and their impact on people and the environment.
Aboriginal and Torres Strait Islander Peoples might have other explanations for the existence of micro-organisms and how they can be both beneficial and harmful. Indigenous knowledge encompasses dealing with disease and ways of cooking that are different to the Western understandings depicted in Marvellous micro-organisms.
PrimaryConnections recommends working with Aboriginal and Torres Strait Islander community members to access local and relevant cultural perspectives. Protocols for engaging with Aboriginal and Torres Strait Islander community members are provided in state and territory education guidelines. Links to these are provided on the PrimaryConnections website.
SustainabilityThe Marvellous micro-organisms unit provides opportunities for students to develop an understanding of how the growth of some living things can be impacted by environmental conditions, including changes due to human impact. This can assist them to develop knowledge, skills and values for making decisions about individual and community actions that contribute to sustainable patterns of use of the Earth’s natural resources.
In Marvellous micro-organisms students consider their social environment when they explore the social impact of scientific discoveries. They learn about research into penicillin and the impact it had on the recovery of sick people in post World War II society. They also explore their ecological and economic environments when they read about the history of the microscope from its humble beginnings as a hobby to a common scientific tool in the world’s laboratories, providing scientists with valuable information that has changed our understanding of ecology.
7
PrimaryConnections Marvellous micro-organisms
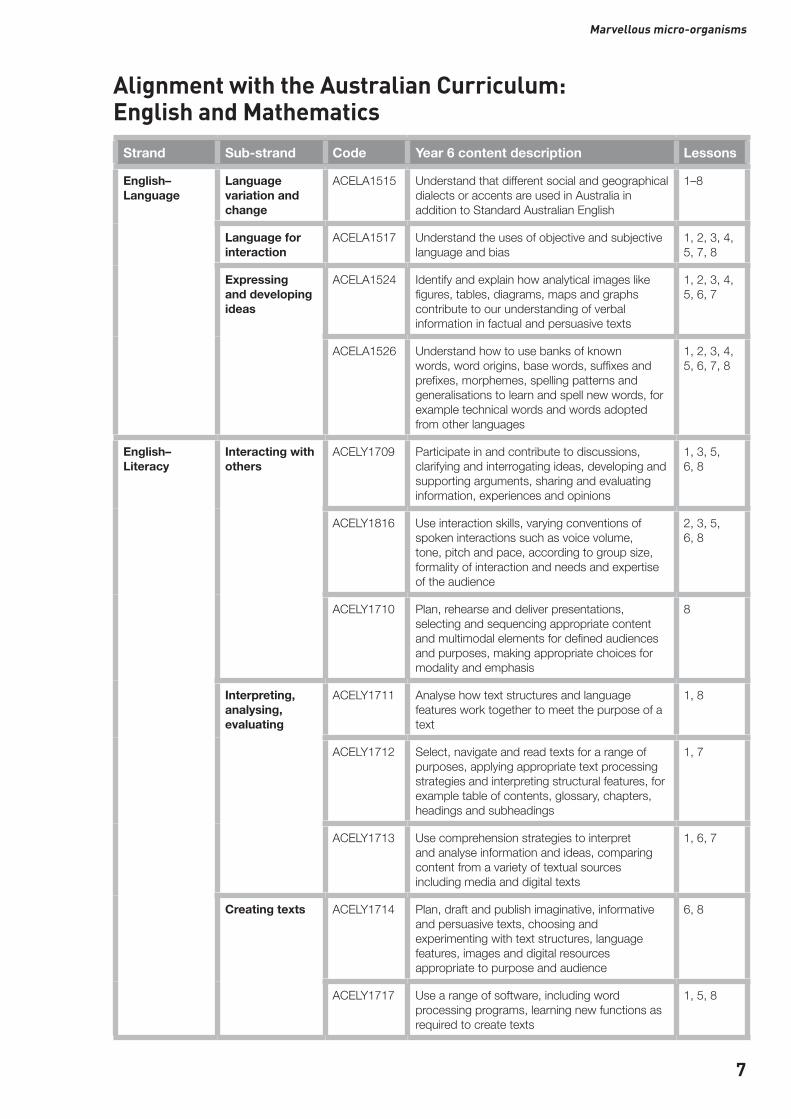
Alignment with the Australian Curriculum: English and Mathematics
Strand Sub-strand Code Year 6 content description Lessons
English–Language
Language variation and change
ACELA1515 Understand that different social and geographical dialects or accents are used in Australia in addition to Standard Australian English
1–8
Language for interaction
ACELA1517 Understand the uses of objective and subjective language and bias
1, 2, 3, 4, 5, 7, 8
Expressing and developing ideas
ACELA1524 Identify and explain how analytical images like figures, tables, diagrams, maps and graphs contribute to our understanding of verbal information in factual and persuasive texts
1, 2, 3, 4, 5, 6, 7
ACELA1526 Understand how to use banks of known words, word origins, base words, suffixes and prefixes, morphemes, spelling patterns and generalisations to learn and spell new words, for example technical words and words adopted from other languages
1, 2, 3, 4, 5, 6, 7, 8
English–Literacy
Interacting with others
ACELY1709 Participate in and contribute to discussions, clarifying and interrogating ideas, developing and supporting arguments, sharing and evaluating information, experiences and opinions
1, 3, 5, 6, 8
ACELY1816 Use interaction skills, varying conventions of spoken interactions such as voice volume, tone, pitch and pace, according to group size, formality of interaction and needs and expertise of the audience
2, 3, 5, 6, 8
ACELY1710 Plan, rehearse and deliver presentations, selecting and sequencing appropriate content and multimodal elements for defined audiences and purposes, making appropriate choices for modality and emphasis
8
Interpreting, analysing, evaluating
ACELY1711 Analyse how text structures and language features work together to meet the purpose of a text
1, 8
ACELY1712 Select, navigate and read texts for a range of purposes, applying appropriate text processing strategies and interpreting structural features, for example table of contents, glossary, chapters, headings and subheadings
1, 7
ACELY1713 Use comprehension strategies to interpret and analyse information and ideas, comparing content from a variety of textual sources including media and digital texts
1, 6, 7
Creating texts ACELY1714 Plan, draft and publish imaginative, informative and persuasive texts, choosing and experimenting with text structures, language features, images and digital resources appropriate to purpose and audience
6, 8
ACELY1717 Use a range of software, including word processing programs, learning new functions as required to create texts
1, 5, 8
PrimaryConnections
8
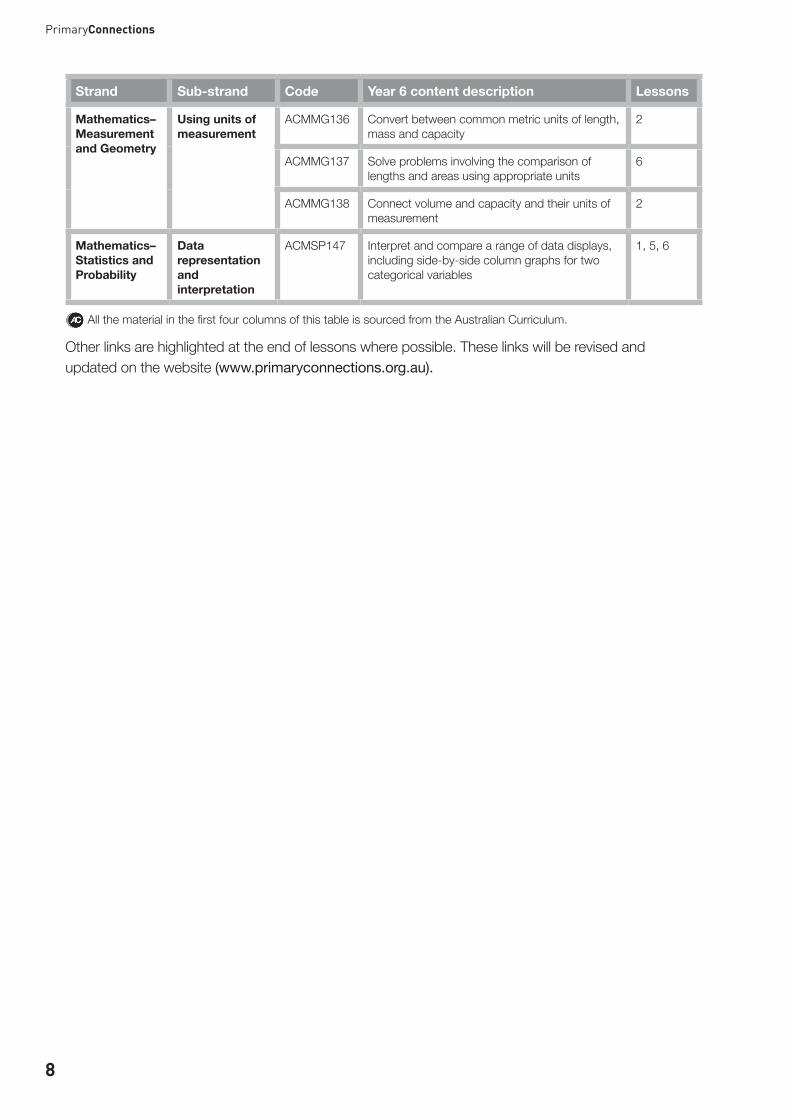
Strand Sub-strand Code Year 6 content description Lessons
Mathematics–Measurement and Geometry
Using units of measurement
ACMMG136 Convert between common metric units of length, mass and capacity
2
ACMMG137 Solve problems involving the comparison of lengths and areas using appropriate units
6
ACMMG138 Connect volume and capacity and their units of measurement
2
Mathematics–Statistics and Probability
Data representation and interpretation
ACMSP147 Interpret and compare a range of data displays, including side-by-side column graphs for two categorical variables
1, 5, 6
All the material in the first four columns of this table is sourced from the Australian Curriculum.
Other links are highlighted at the end of lessons where possible. These links will be revised and updated on the website (www.primaryconnections.org.au).
9
PrimaryConnections Marvellous micro-organisms
Teacher background information
Introduction to micro-organismsMicro-organisms are organisms (living things) so small that as individual cells they are impossible to see with the naked eye. They are much simpler than larger organisms, such as animals and plants. Many micro-organisms, for example, bacteria and yeast, are made up of only a single living cell. When individual cells grow and multiply in number they can be seen as bacterial or yeast colonies which contain millions of cells.
While they are simple, micro-organisms are incredibly successful survivors. They live and thrive in virtually every environment on Earth, including deep oceans, steaming-hot geysers, the freezing poles and the driest deserts. Micro-organisms even live inside larger creatures, including humans, where they often carry out important functions for their host, for example, aiding digestion. However, some micro-organisms can also cause illness and disease in their hosts. Such organisms are known as pathogens.
Like larger organisms, micro-organisms feed, grow and reproduce. Most micro-organisms reproduce asexually, that is, without sex. One way they do this is by doubling everything in the cell and then splitting equally into two genetically identical ‘daughter cells’. Both bacteria and yeasts (which are a kind of single-celled fungus) reproduce this way. Other kinds of fungus can reproduce asexually by producing spores which grow when they land in an environment with a food supply and the right levels of warmth and moisture.
Humans have used micro-organisms for thousands of years in food production. Foods that are made using micro-organisms include bread, yoghurt, cheese, sauerkraut, pickles, salami, beer, wine and spirits. Baker’s yeast, for example, is used to make bread rise and to give it flavour. Yeast breaks down sugars for energy and produces carbon dioxide gas and alcohol as waste products. The carbon dioxide is trapped in the dough and makes it rise; the alcohol is burnt off in the baking process but contributes to the flavour of the final loaf.
While they are important to food production, micro-organisms are also responsible for making food decay or ‘go off’. Mould, which grows on bread and other foods, is a kind of fungus. Bacteria can grow on and in meat that is improperly stored or handled, causing it to spoil and become unfit to eat. Bacteria can also spoil milk, causing it to curdle and become sour by making it more acidic. Sometimes micro-organisms growing undetected in food give us food infections or food poisoning. This is one reason why we cook food or wash it before eating it.
Micro-organisms are very important in medicine. Many diseases in humans are caused by micro-organisms (for example, bacteria cause cholera, tetanus, tuberculosis and food poisoning, while fungi cause ringworm and tinea). However, micro-organisms are also useful in treating diseases. Penicillin, the first antibiotic, is produced naturally by the Penicillium mould. Before antibiotics were discovered, people died from bacterial infections of wounds and from food infections.
In 1928 British researcher Dr Alexander Fleming observed that Penicillium mould contaminated a bacterial culture he was studying and inhibited the bacterial growth. Penicillin was developed into a usable drug by Australian Dr Howard Florey and his co-worker, Dr Ernst Chain, in the 1940s. In 1945 Howard Florey, Alexander Fleming and Ernst Chain were awarded the Nobel Prize in Medicine in recognition of their discovery.
PrimaryConnections
10
Students’ conceptionsTaking account of students’ existing ideas is important in planning effective teaching approaches which help students learn science. Students develop their own ideas during their experiences in everyday life and might hold more than one idea about an event or phenomenon.
To access more in-depth science information in the form of text, diagrams and animations, refer to the PrimaryConnections Science Background Resource which has now been loaded on the PrimaryConnections website (www.primaryconnections.org.au).
Note: This background information is intended for the teacher only.
11
PrimaryConnections
Lesson 1 The Y factor
Lesson 1 The Y factor
AT A GLANCE
To capture students’ interest and find out what they think they know about bread, the bread-making process and the yeast micro-organism.
To elicit students’ questions about yeast.
Session 1 Exploring bread
Students:• observe, taste and record information about different types of bread• share and discuss observations.
Session 2 The bread-making process
Students:• use a flow chart to represent what they think they know about the
bread-making process.
Session 3 Anton van Leeuwenhoek: Microscope maker
Students:• read and discuss a factual recount about Anton van Leeuwenhoek• discuss the words ‘microscope’ and ‘micro-organism’• reflect on the lesson.
Lesson focusThe focus of the Engage phase is to spark students’ interest, stimulate their curiosity, raise questions for inquiry and elicit their existing beliefs about the topic. These existing ideas can then be taken account of in future lessons.
Assessment focusDiagnostic assessment is an important aspect of the Engage phase. In this lesson you will elicit what students already know and understand about:
• the growth and survival of yeast, and how it is affected by the physical conditions of its environment. How scientific understandings about micro-organisms and inventions, such as the microscope, are used to solve problems that directly affect people’s lives, and how to communicate their existing ideas about what they know of the bread-making process in a flow chart.
EN
GA
GE
Lesson 1 The Y factor12
PrimaryConnections E
NG
AG
E
Key lesson outcomesScienceStudents will be able to represent their current understanding as they:
• use their senses of sight, touch, smell and taste to make observations
• represent what they think they know about the bread-making process as a flow chart
• explain that yeast is an ingredient in some breads
• describe Anton van Leeuwenhoek’s contribution to the study of micro-organisms.
LiteracyStudents will be able to:
• contribute to discussions about different types of bread
• use bread labels to locate ingredient information and synthesise understanding of bread ingredients
• record information in a table to help develop an explanation of the role of yeast in bread
• represent what they think they know about the bread-making process as a flow chart
• understand the purpose, structure and features of a factual recount
• read a factual recount about Anton van Leeuwenhoek and identify the key points.
This lesson also provides opportunities to monitor the development of students’ general capabilities (highlighted through icons, see page 5).
Session 1 Exploring bread
Teacher background informationBread can be ‘leavened’ (risen) or ‘unleavened’ (flat). The basic ingredients of leavened bread are flour, water, yeast and salt. Yeast is added to make the bread rise. A common form of bread eaten in Australia is white bread, containing baker’s yeast and flour made by grinding grains of wheat (a cereal seed), but many other kinds of bread are also eaten. Different kinds of flour can be used, including wholemeal wheat flours and flour from corn, rye and other cereals. Whole grains, other seeds or herbs can also be added to bread to alter its flavour, texture and appearance.
Various kinds of flatbread are made by cooking a mixture of flour, water and salt. After people discovered that adding yeast to the bread dough would make it rise, they began making leavened bread. This is softer and less dense than flatbreads. Sourdough breads, common in Europe, are prepared using both yeast and a species of the Lactobacillus bacteria. The bacteria produces lactic acid as a waste product, which acidifies the bread and gives it a sour flavour. The acidity of the bread also makes it hard for other micro-organisms to grow, helping the bread to resist spoilage from mould and bacteria.
13Lesson 1 The Y factor
PrimaryConnections Marvellous micro-organisms
EN
GA
GE
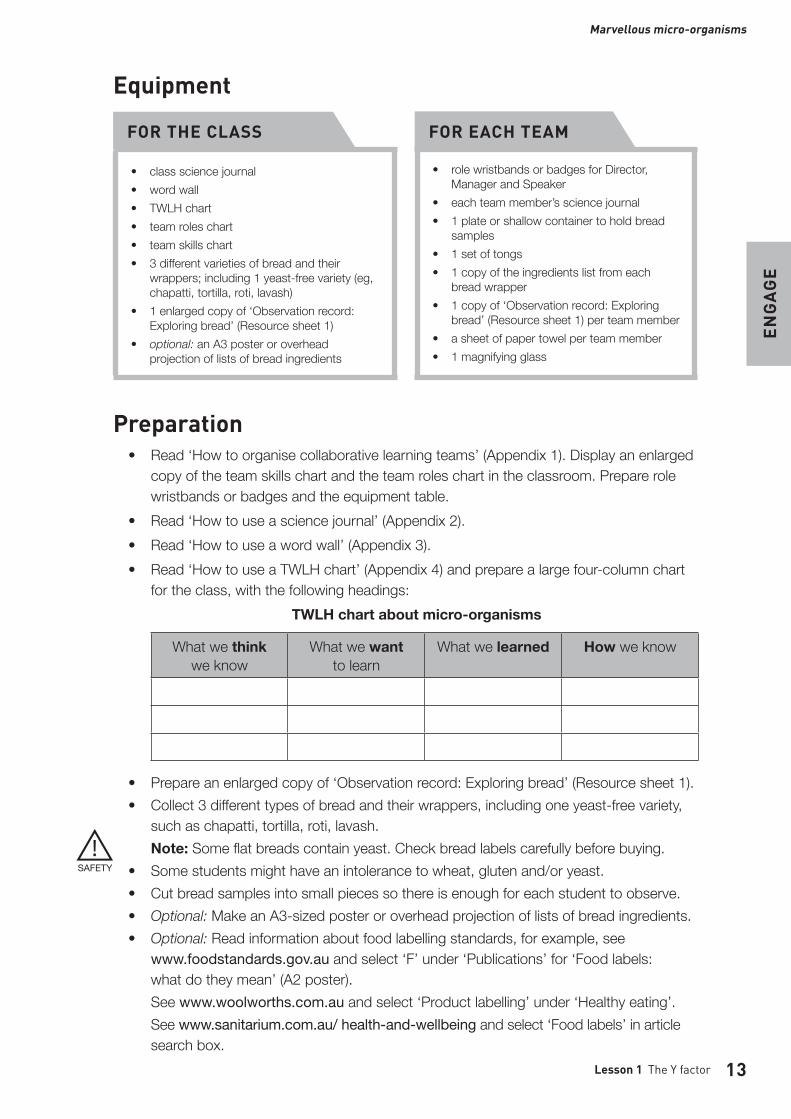
Equipment
FOR THE CLASS FOR EACH TEAM
• class science journal• word wall• TWLH chart• team roles chart• team skills chart• 3 different varieties of bread and their
wrappers; including 1 yeast-free variety (eg, chapatti, tortilla, roti, lavash)
• 1 enlarged copy of ‘Observation record: Exploring bread’ (Resource sheet 1)
• optional: an A3 poster or overhead projection of lists of bread ingredients
• role wristbands or badges for Director, Manager and Speaker
• each team member’s science journal• 1 plate or shallow container to hold bread
samples• 1 set of tongs• 1 copy of the ingredients list from each
bread wrapper• 1 copy of ‘Observation record: Exploring
bread’ (Resource sheet 1) per team member• a sheet of paper towel per team member• 1 magnifying glass
Preparation• Read ‘How to organise collaborative learning teams’ (Appendix 1). Display an enlarged
copy of the team skills chart and the team roles chart in the classroom. Prepare role wristbands or badges and the equipment table.
• Read ‘How to use a science journal’ (Appendix 2).• Read ‘How to use a word wall’ (Appendix 3).• Read ‘How to use a TWLH chart’ (Appendix 4) and prepare a large four-column chart
for the class, with the following headings:TWLH chart about micro-organisms
What we think we know
What we want to learn
What we learned How we know
• Prepare an enlarged copy of ‘Observation record: Exploring bread’ (Resource sheet 1).• Collect 3 different types of bread and their wrappers, including one yeast-free variety,
such as chapatti, tortilla, roti, lavash.Note: Some flat breads contain yeast. Check bread labels carefully before buying.
• Some students might have an intolerance to wheat, gluten and/or yeast.• Cut bread samples into small pieces so there is enough for each student to observe.• Optional: Make an A3-sized poster or overhead projection of lists of bread ingredients.• Optional: Read information about food labelling standards, for example, see
www.foodstandards.gov.au and select ‘F’ under ‘Publications’ for ‘Food labels: what do they mean’ (A2 poster).See www.woolworths.com.au and select ‘Product labelling’ under ‘Healthy eating’.See www.sanitarium.com.au/ health-and-wellbeing and select ‘Food labels’ in article search box.
Lesson 1 The Y factor14
PrimaryConnections E
NG
AG
E
Lesson steps 1 Show students the different types of bread you have been collecting. Keep the breads
with their wrappers so that students can easily read the names on the labels. Ask students if they have ever eaten any of the breads before. Ask them to share the names of breads they like to eat.
2 Record students’ responses on cards or paper strips. Commence a word wall. Invite students to add words from different languages to the word wall, reminding them that Standard Australian English is only one of many languages, dialects or accents found in Australia.
Literacy focus
Why do we use a word wall?We use a word wall to record words we know or learn about a topic. We display the word wall in the classroom so that we can look up words we are learning about and see how they are spelled.
What does a word wall include?A word wall includes a topic title or picture and words that we have seen or heard about the topic.
Discuss a heading for this collection of words, for example, types of bread. 3 Draw students’ attention to the difference between a flat bread and a high-rise loaf.
Use questioning and discussion to support students in sharing their ideas about the reason for the difference with questions, such as:• What differences do you notice about these two breads?• What do you think caused the difference?Lead a discussion to elicit students’ prior knowledge about bread and the bread-making process, without providing any formal definitions or answers at this stage.Note: Avoid introducing the word ‘yeast’ during this phase because the activity is used for diagnostic assessment. Ask students to record their ideas in their science journals.
Literacy focus
Why do we use a science journal?We use a science journal to record what we see, hear, feel and think so that we can look at it later to help us with our claims and evidence.
What does a science journal include?A science journal includes dates and times. It might include written text, drawings, measurements, labelled diagrams, photographs, tables and graphs.
15Lesson 1 The Y factor
PrimaryConnections Marvellous micro-organisms
EN
GA
GE
4 Explain that students will be working in collaborative learning teams to explore different types of bread. If students are using collaborative learning teams for the first time, introduce and explain the team skills chart and the team roles chart. Explain that students will wear role wristbands or badges to help them (and you) know which role each team member has.
5 Draw students’ attention to the equipment table and discuss its use. Explain that this table is where Managers will collect and return equipment.
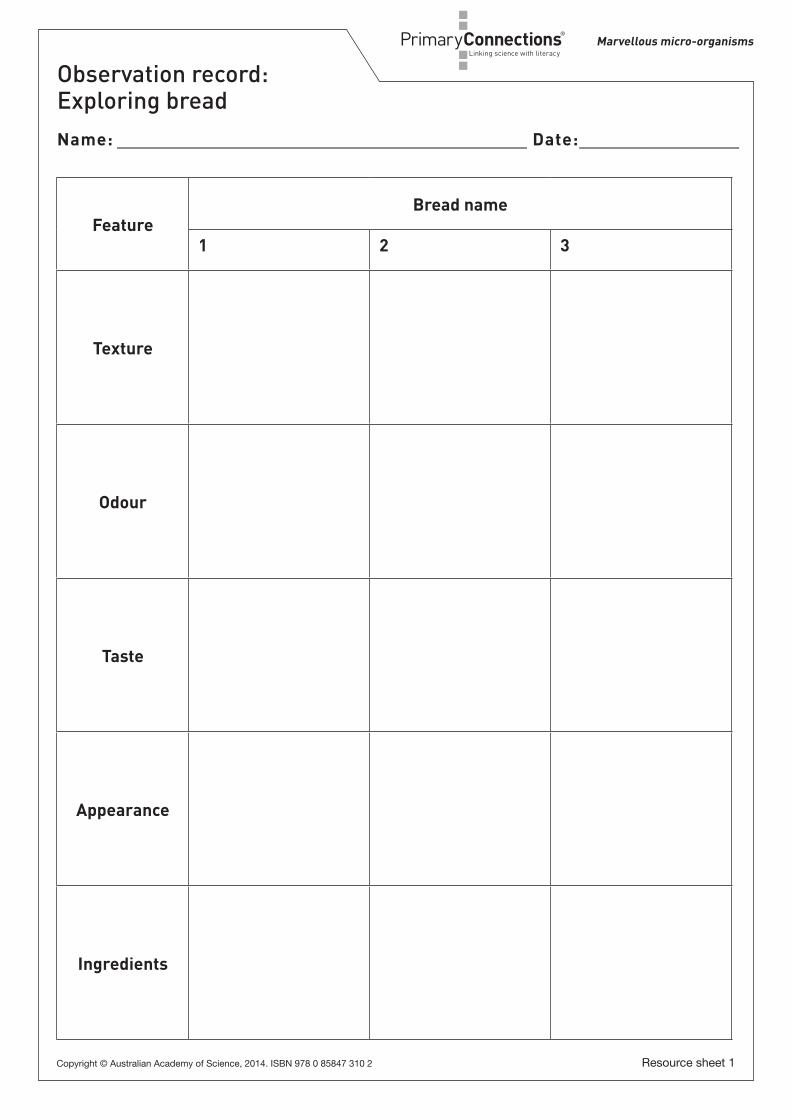
6 Explain that students will record their findings in a table. Show an enlarged copy of the ‘Observation record: Exploring bread’ (Resource sheet 1), and discuss the purpose and features of a table to record information.
Literacy focus
Why do we use a table?We use a table to organise information so that we can understand it more easily.
What does a table include?A table includes a title, columns with headings and information organised under each heading.
Explain to students that they will be using their senses of sight, touch, smell and taste in making their observations. Ask the students why they think it is important to get evidence from real observations. Explain that they will also be looking at bread labels to find out more about the key ingredients in bread. Discuss the various parts of a food label, such as the name of the food, nutrition information, date marking, country of origin and ingredients list. Explain that Australian food standards require ingredients to be listed in descending order of weight, so the major ingredient always comes first on the label. Discuss why this information is important, for example, some people have food intolerances, allergies or special dietary requirements as followers of certain religions.
7 Form teams and allocate roles. Ask Managers to collect team equipment. 8 Ask teams to observe bread samples and bread labels.
Note: If ingredient lists are particularly long, suggest students record the first six ingredients only. This should include yeast.
9 When students have completed their ‘Observation record: Exploring bread’ (Resource sheet 1), discuss their findings. Focus attention on the differences between bread containing yeast and yeast-free breads.
Lesson 1 The Y factor16
PrimaryConnections E
NG
AG
E
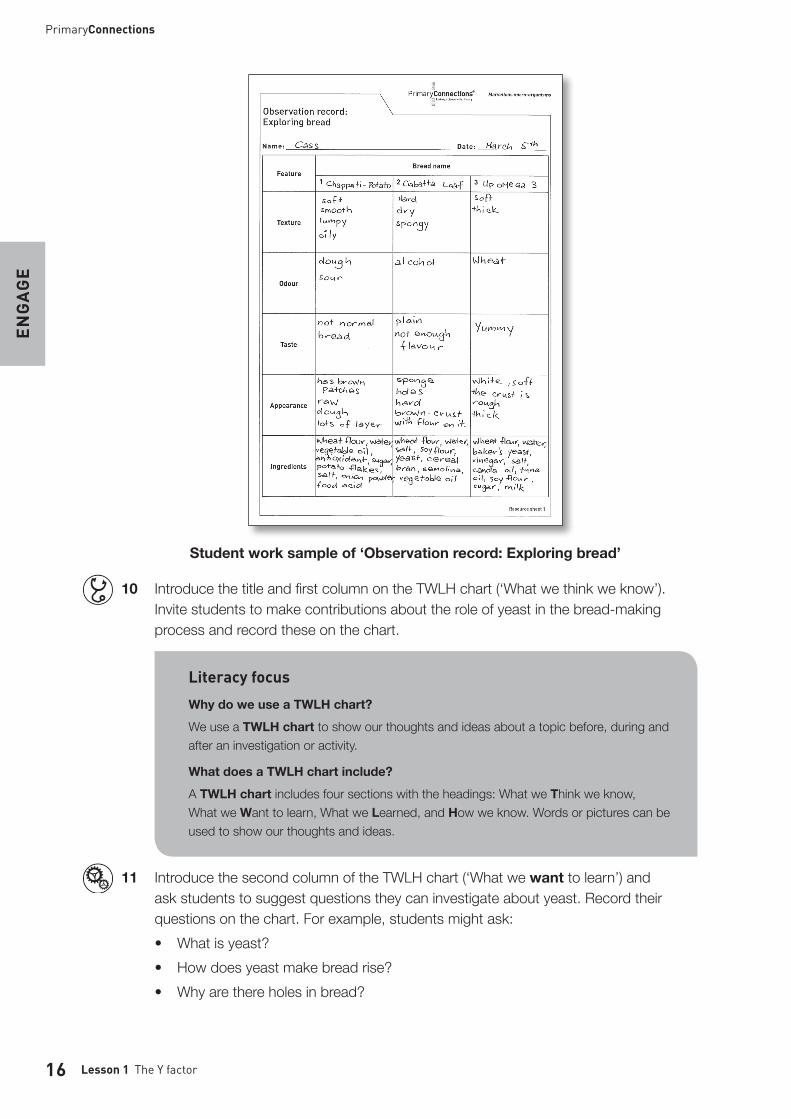
Student work sample of ‘Observation record: Exploring bread’
10 Introduce the title and first column on the TWLH chart (‘What we think we know’). Invite students to make contributions about the role of yeast in the bread-making process and record these on the chart.
Literacy focus
Why do we use a TWLH chart?We use a TWLH chart to show our thoughts and ideas about a topic before, during and after an investigation or activity.
What does a TWLH chart include?A TWLH chart includes four sections with the headings: What we Think we know, What we Want to learn, What we Learned, and How we know. Words or pictures can be used to show our thoughts and ideas.
11 Introduce the second column of the TWLH chart (‘What we want to learn’) and ask students to suggest questions they can investigate about yeast. Record their questions on the chart. For example, students might ask: • What is yeast?• How does yeast make bread rise?• Why are there holes in bread?
Resource sheet 1
Marvellous micro-organisms
Name:___________________________________________Date:________________
Copyright © Australian Academy of Science, 2014. ISBN 978 0 85847 310 2
PrimaryConnections _
Observation record: Exploring bread
FeatureBread name
1 2 3
Texture
Odour
Taste
Appearance
Ingredients
Lesson 1 The Y factor18
PrimaryConnections E
NG
AG
E
Session 2 The bread-making process
Equipment
FOR THE CLASS FOR EACH STUDENT
• class science journal• word wall• TWLH chart
• student science journal
Lesson steps 1 Review the previous session, referring to the word wall and TWLH chart. Ask students
whether they have ever made bread or watched bread being made. Explain that they are going to use a flow chart to communicate their ideas about how a loaf of bread is made.
Literacy focus
Why do we use a flow chart?We use a flow chart to show a sequence of events or the stages in a process.
What does a flow chart include?A linear flow chart organises events or stages in a line. Arrows are used to indicate the sequence in which they occur.
2 Introduce students to flow charts by constructing an example as a group activity using another topic, for example, how to make a piece of toast.Brainstorm the steps involved and record these on separate sheets of paper using words and symbols. Discuss with students the best way to organise the steps. Paste the final sequence into the class science journal and model the use of arrows between the boxes (stages) to show direction in the flow chart.
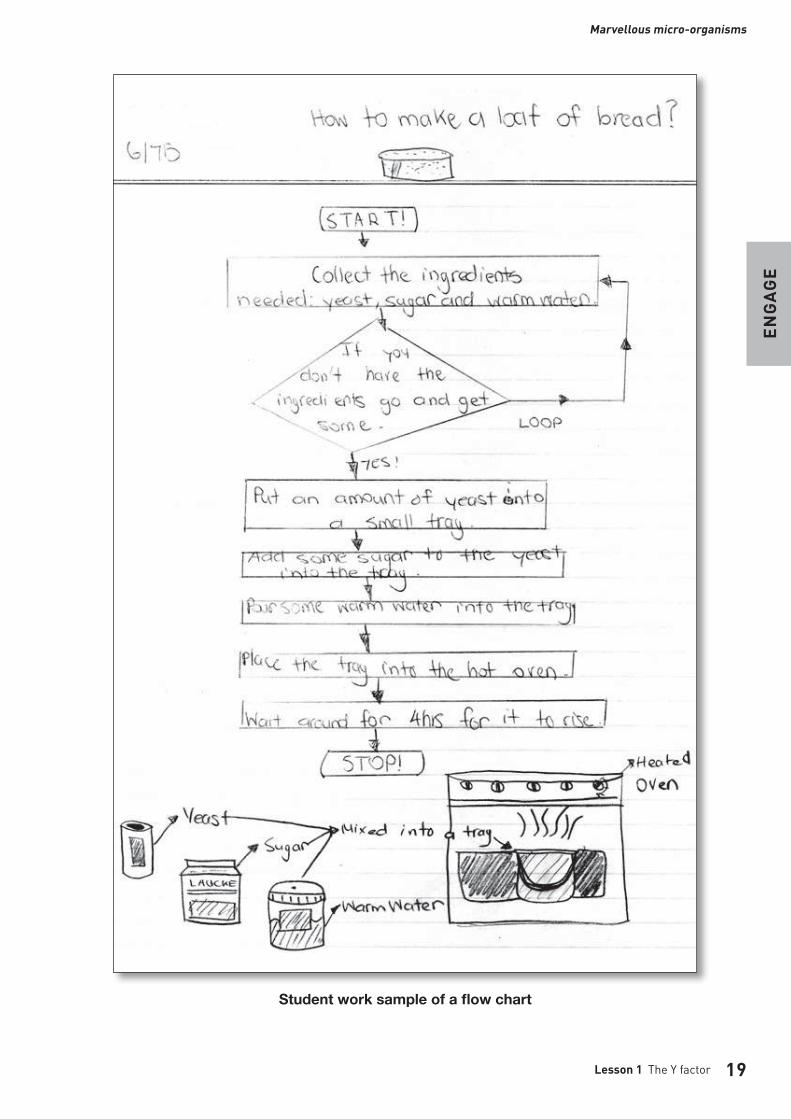
3 Provide students with time to create a flow chart in their science journals about how bread is made. Reassure students that they need not be anxious if they are unsure about the process. Encourage them to make a good attempt and explain that as the unit progresses, they will learn more about the bread-making process.
19Lesson 1 The Y factor
PrimaryConnections Marvellous micro-organisms
EN
GA
GE
Student work sample of a flow chart
Lesson 1 The Y factor20
PrimaryConnections E
NG
AG
E
Session 3 Anton van Leeuwenhoek: Microscope maker
Equipment
FOR THE CLASS FOR EACH STUDENT
• class science journal• word wall• TWLH chart
• student science journal• 1 copy of ‘Anton van Leeuwenhoek:
Microscope maker’ (Resource sheet 2)
Preparation• Read ‘Anton van Leeuwenhoek: Microscope maker’ (Resource sheet 2) and decide
how you will use it with your class. It might be used as an independent reading task, in teams or in guided reading groups.
Lesson steps 1 Explain that students are going to read a factual recount about a person who was
born more than 350 years ago and is still known today because of his hobby. Discuss the purpose and features of a factual recount.
Literacy focus
Why do we use a factual recount?We use a factual recount to describe experiences we have had. We can read a factual recount to find out about things that have happened to someone else.
What does a factual recount include?A factual recount might include descriptions of personal feelings and other people who were part of the events. It is often written in past tense.
2 Arrange for students to read ‘Anton van Leeuwenhoek: Microscope maker’ (Resource sheet 2) individually, in teams or in guided reading groups (see ‘Preparation’).
3 After students have read the text, ask them to brainstorm the key points and record them in their science journals.
4 Ask students the name of the instrument that Anton van Leeuwenhoek made. Write the word ‘microscope’ on the board, and ask students to identify parts of the word (‘micro’ and ‘scope’). Discuss the meaning of each part.
5 Ask students to recall what things Anton van Leeuwenhoek saw under the microscope and what he called them. Ask students whether they know what name we call those things today. Tell them ‘micro’ is a clue. Write ‘micro-organism’ on the board along with any other words that students suggest.

21Lesson 1 The Y factor
PrimaryConnections Marvellous micro-organisms
EN
GA
GE
Discuss what the word ‘organism’ means and create a class definition for the word ‘micro-organism’.Optional: Students might like to look up a dictionary to see how words such as ‘micro’, ‘organism’ and ‘micro-organism’ are defined.
6 Explain to students that in this unit they are going to be learning about micro-organisms, especially those used to make bread (yeast) and in medicine (in this case, penicillin).
7 Direct students’ attention to the word wall and add any new vocabulary. 8 Ask students to reflect on Sessions 1–3, including their observations of bread,
ingredients and the information about Anton van Leeuwenhoek. 9 Re-form teams. Ask students to share with their team something new they learned
and something they found interesting from this lesson. Encourage them to consider how micro-organisms and inventions such as the microscope have changed people’s lives. Ask students to write a short reflection in their science journals.
Curriculum linksScience
• Students research bacteria.Mathematics
• Establish conventions for designing flow charts.Studies of Society and Environment
• Students research the role of bread and food in other cultures.• Students research the process of farming, including wheat farming, and rural lifestyles.
Information and Communication Technology (ICT)• Use computer programs to brainstorm and chart the steps involved in bread-making.
Indigenous perspectivesIndigenous people have been making damper for thousands of years. High in protein and carbohydrates, the damper was made from seeds ground into a flour on millstones. The flour was then mixed with water to make a dough and placed into hot ashes for baking. Yeast, commonly used in modern breads, was not an ingredient of traditional Indigenous damper.
• To watch an elder making and cooking traditional bread see: www.australianscreen.com.au/titles/bush-tucker-is-everywhere/clip2/
• PrimaryConnections recommends working with Aboriginal and Torres Strait Islander community members to access local and relevant cultural perspectives. Protocols for engaging with Aboriginal and Torres Strait Islander community members are provided in state and territory education guidelines. Links to these are provided on the PrimaryConnections website (www.primaryconnections.org.au).
Marvellous micro-organisms
Copyright © Australian Academy of Science, 2014. ISBN 978 0 85847 310 2 Resource sheet 2
Name: _________________________________________ Date:________________
Anton van Leeuwenhoek (Layu–un–hook): Microscope maker
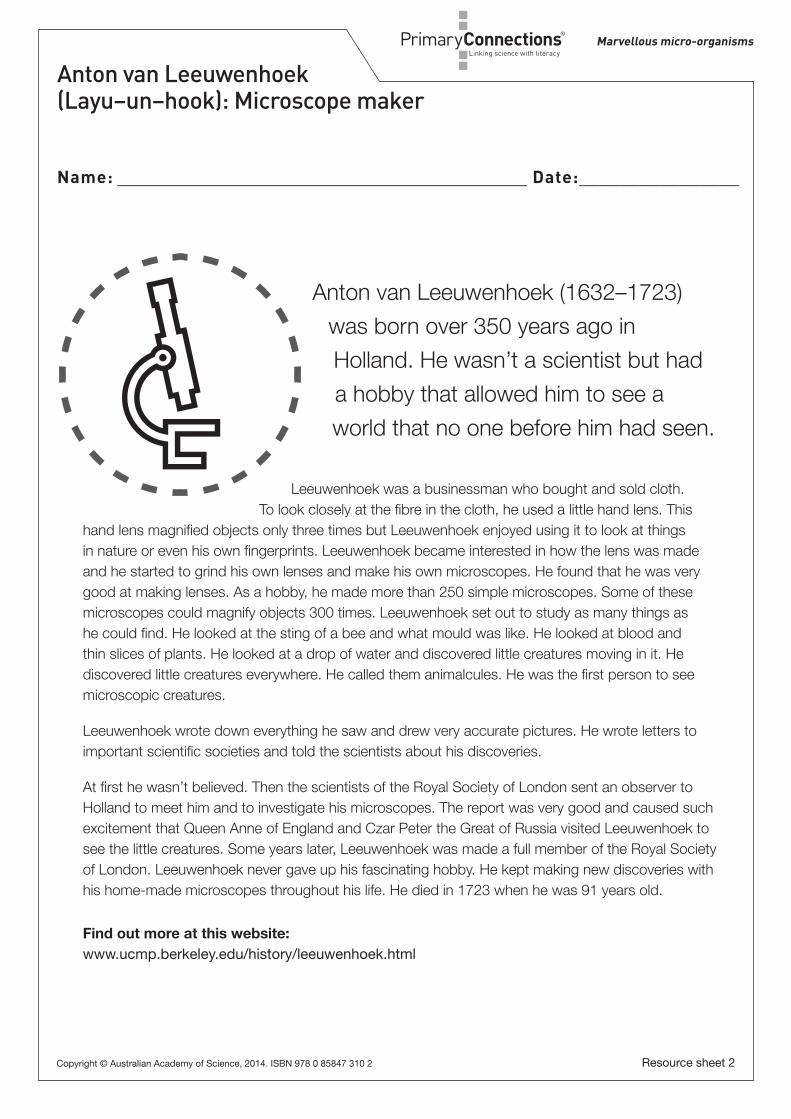
Anton van Leeuwenhoek (1632–1723) was born over 350 years ago in Holland. He wasn’t a scientist but had a hobby that allowed him to see a world that no one before him had seen.
Leeuwenhoek was a businessman who bought and sold cloth. To look closely at the fibre in the cloth, he used a little hand lens. This hand lens magnified objects only three times but Leeuwenhoek enjoyed using it to look at things in nature or even his own fingerprints. Leeuwenhoek became interested in how the lens was made and he started to grind his own lenses and make his own microscopes. He found that he was very good at making lenses. As a hobby, he made more than 250 simple microscopes. Some of these microscopes could magnify objects 300 times. Leeuwenhoek set out to study as many things as he could find. He looked at the sting of a bee and what mould was like. He looked at blood and thin slices of plants. He looked at a drop of water and discovered little creatures moving in it. He discovered little creatures everywhere. He called them animalcules. He was the first person to see microscopic creatures.
Leeuwenhoek wrote down everything he saw and drew very accurate pictures. He wrote letters to important scientific societies and told the scientists about his discoveries.
At first he wasn’t believed. Then the scientists of the Royal Society of London sent an observer to Holland to meet him and to investigate his microscopes. The report was very good and caused such excitement that Queen Anne of England and Czar Peter the Great of Russia visited Leeuwenhoek to see the little creatures. Some years later, Leeuwenhoek was made a full member of the Royal Society of London. Leeuwenhoek never gave up his fascinating hobby. He kept making new discoveries with his home-made microscopes throughout his life. He died in 1723 when he was 91 years old.
Find out more at this website: www.ucmp.berkeley.edu/history/leeuwenhoek.html
23Lesson 2 Yeast feast
AT A GLANCE
To provide students with hands-on, shared experiences of the yeast micro-organism.
Students:
• review what they think they know about yeast• read and discuss a procedural text• observe, record and deduce that yeast produces a gas when mixed with some
ingredients.
Lesson focusThe Explore phase is designed to provide students with hands-on experiences of the science phenomenon. Students explore ideas, collect evidence, discuss their observations and keep records such as science journal entries. The Explore phase ensures all students have a shared experience that can be discussed and explained in the Explain phase.
Assessment focusFormative assessment is an ongoing aspect of the Explore phase. It involves monitoring students’ developing understanding and giving feedback that extends their learning. In this lesson you will monitor students’ developing understanding of:
• the growth and survival of yeast, and how it is affected by the physical conditions of its environment. You will also monitor their developing science inquiry skills (see page 2).
Lesson 2 Yeast feast
EX
PLO
RE
Lesson 2 Yeast feast24
PrimaryConnections E
XP
LOR
E
Key lesson outcomesScienceStudents will be able:
• follow directions to investigate some ingredients that make yeast produce gas (carbon dioxide)
• make a prediction, observe, record and interpret the results of their investigation
• follow safety procedures• identify the features that made their
investigation a fair test• explain that when water and sugar are
added to yeast it produces a gas.
LiteracyStudents will be able to:
• follow a procedural text to complete an investigation
• use oral, written and visual language to record and discuss investigation results
• engage in discussion to compare ideas, and relate evidence from an investigation to explanations about yeast
• demonstrate understanding of the effect of sugar and water on yeast activity through science journal entries.
This lesson also provides opportunities to monitor the development of students’ general capabilities (highlighted through icons, see page 5).
Teacher background informationThe yeast used in bread-making is a micro-organism that requires food and the right temperature and conditions in which to grow. Yeast is activated by liquids, such as milk and water. It breaks down sugars for energy and produces carbon dioxide gas and alcohol as waste products. Yeast can also use enzymes to break down complex carbohydrates, for example, starch (like the starches found in flour) into sugars, ready for it to be used as an energy source. This is why sugar doesn’t have to be added when making bread, though it sometimes is because it makes the process faster.
Carbon dioxide gets trapped in the dough, creating pockets of gas which make the bread rise. When the dough is heated during baking, the heat causes the pockets of gas to expand, making large spaces in the bread. The bread rises and becomes lighter. The alcohol is evaporated or burnt off during baking, which is why people don’t get tipsy after eating a sandwich.
25Lesson 2 Yeast feast
PrimaryConnections Marvellous micro-organisms
EX
PLO
RE
Equipment
FOR THE CLASS FOR EACH TEAM
• class science journal• word wall• TWLH chart• team roles chart• team skills chart• 1 thermometer• 1 kettle• 3 x ½ tsp measure• 3 x ¼ cup measure• 3 x ½ cup measure• water• 1 funnel• 1 jug• 1 timer• a ‘safety zone’• 1 enlarged copy of ‘What happens when
yeast is mixed with sugar and water?’ (Resource sheet 3)
• optional: digital camera to record students’ findings
• role wristbands or badges for Director, Manager and Speaker
• each team member’s science journal• 1 copy of ‘What happens when yeast is
mixed with sugar and water?’ (Resource sheet 3)
• 4 small plastic bottles (350–400 ml), all the same size
• 4 balloons• 1 funnel• self-adhesive tape• marking pen• 3 x ½ tsp rapid rise active dry yeast• 3 x ¼ cup sugar• 3 x ½ cup warm water (37˚C)
Preparation• Prepare an enlarged copy of ‘What happens when yeast is mixed with sugar and
water?’ (Resource sheet 3)• Set up a ‘safety zone’ where you can prepare warm water. The water needs to be
neither hot nor cold, about 37˚C. Work out a safety procedure for students to collect warm water.
• Find a warm area to place the mixture of yeast, sugar and water. A sunny window is fine, but cool weather might mean setting up a blow heater in a corner of the classroom. An overhead projector, a lamp or a heat pad might be other sources of warmth.
• Purchase active dry yeast from the supermarket.Note: Yeast is available in boxes that usually contain 7 g or 8 g sachets, or in a 280 g bulk container. The 7 g sachets yield four to five ½ teaspoons. You will need two to three sachets per team for this and Lesson 3.
• Read ‘How to conduct a fair test’ (Appendix 7).
Lesson 2 Yeast feast26
PrimaryConnections E
XP
LOR
E
Lesson steps 1 Review Lesson 1 and invite students to make further contributions to the first column
of the TWLH chart (‘What we think we know’). Review the second column of the TWLH chart (‘What we want to learn’) and add any suggestions to the chart.
2 Review students’ understanding of micro-organisms and the fact that yeast is a living micro-organism. Discuss what students think yeast needs if it is to stay alive. Ask students to record their ideas in their science journals.
3 Explain that students will be working in collaborative learning teams to investigate what happens when yeast is mixed with other substances, including sugar and water. Read through an enlarged copy of ‘What happens when yeast is mixed with sugar and water?’ (Resource sheet 3). Discuss the purpose and features of procedural texts.
Literacy focus
Why do we use a procedural text?We use a procedural text to describe how something is done. We can read a procedural text to find out how to do things.
What does a procedural text include?A procedural text includes a list of materials needed to do the task and a description of the sequence of steps used. It might include annotated diagrams.
4 Discuss all the different combinations that are listed for the bottles, asking why such a variety is needed. Introduce the idea of a fair test and the need for a control. Explain that when you want to test what happens in the bottle with yeast, water and sugar you need something to compare it to, such as a bottle without yeast, a bottle without water and a bottle without sugar.Draw students’ attention to the fact that they are using the same-sized bottles and the same amount of ingredients in each bottle. Discuss why this is important to ensure a fair test.
5 Outline your procedure for collecting warm water. For example:• Each team has a number and they come to the safety zone when you call the
number.• The Manager of each team comes to a designated waiting area when they are
ready to collect the water.This procedure will also be used in the next activity using hot water. Ask students to share why they think it is important to have a process for distributing the warm water.
6 Form teams and allocate roles. Ask Managers to collect team equipment. 7 After teams have set up their investigations, set a timer for one hour. When students
have written their predictions in their science journals, discuss and record them in the class science journal.
8 After an hour, check the bottles and balloons. Discuss the inflation of the balloon on bottle 2. Ask students whether they know what has inflated the balloon. Explain that it is a gas called carbon dioxide and discuss what students might already know about carbon dioxide, for example, humans breathe out carbon dioxide.
27Lesson 2 Yeast feast
PrimaryConnections Marvellous micro-organisms
EX
PLO
RE
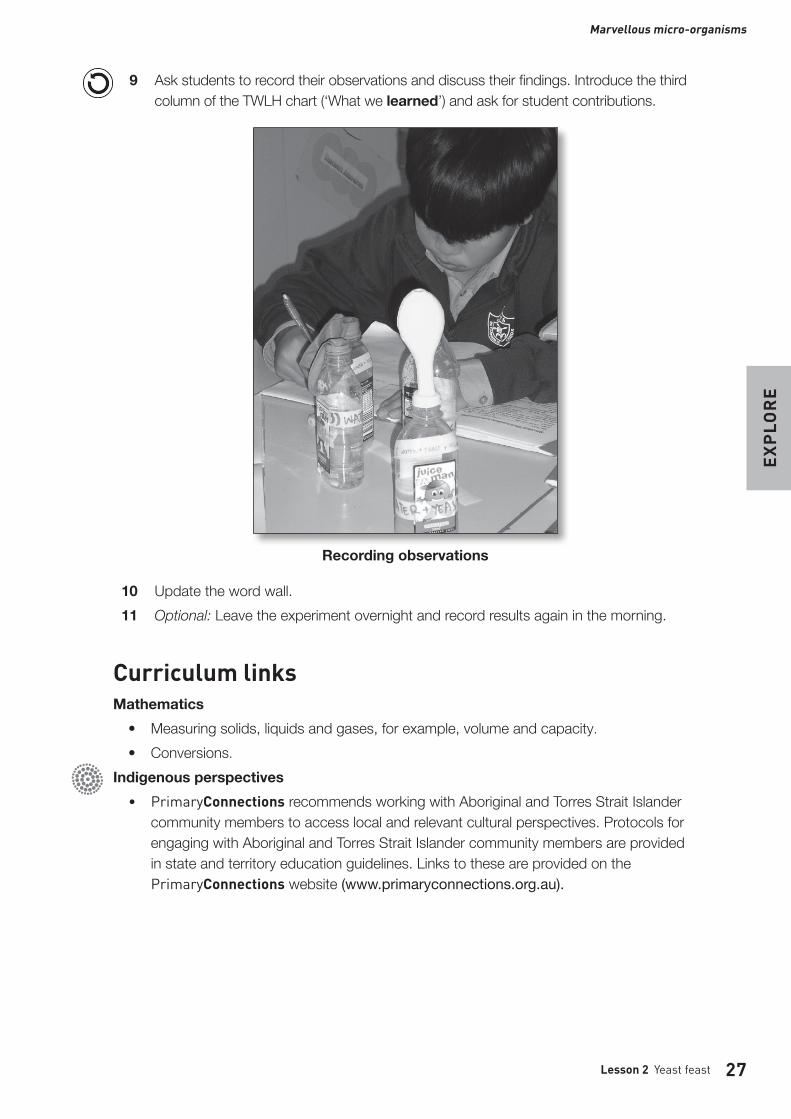
9 Ask students to record their observations and discuss their findings. Introduce the third column of the TWLH chart (‘What we learned’) and ask for student contributions.
Recording observations
10 Update the word wall. 11 Optional: Leave the experiment overnight and record results again in the morning.
Curriculum linksMathematics
• Measuring solids, liquids and gases, for example, volume and capacity.
• Conversions.
Indigenous perspectives• PrimaryConnections recommends working with Aboriginal and Torres Strait Islander
community members to access local and relevant cultural perspectives. Protocols for engaging with Aboriginal and Torres Strait Islander community members are provided in state and territory education guidelines. Links to these are provided on the PrimaryConnections website (www.primaryconnections.org.au).
Marvellous micro-organisms
Copyright © Australian Academy of Science, 2014. ISBN 978 0 85847 310 2 Resource sheet 3
Name: _________________________________________ Date:________________
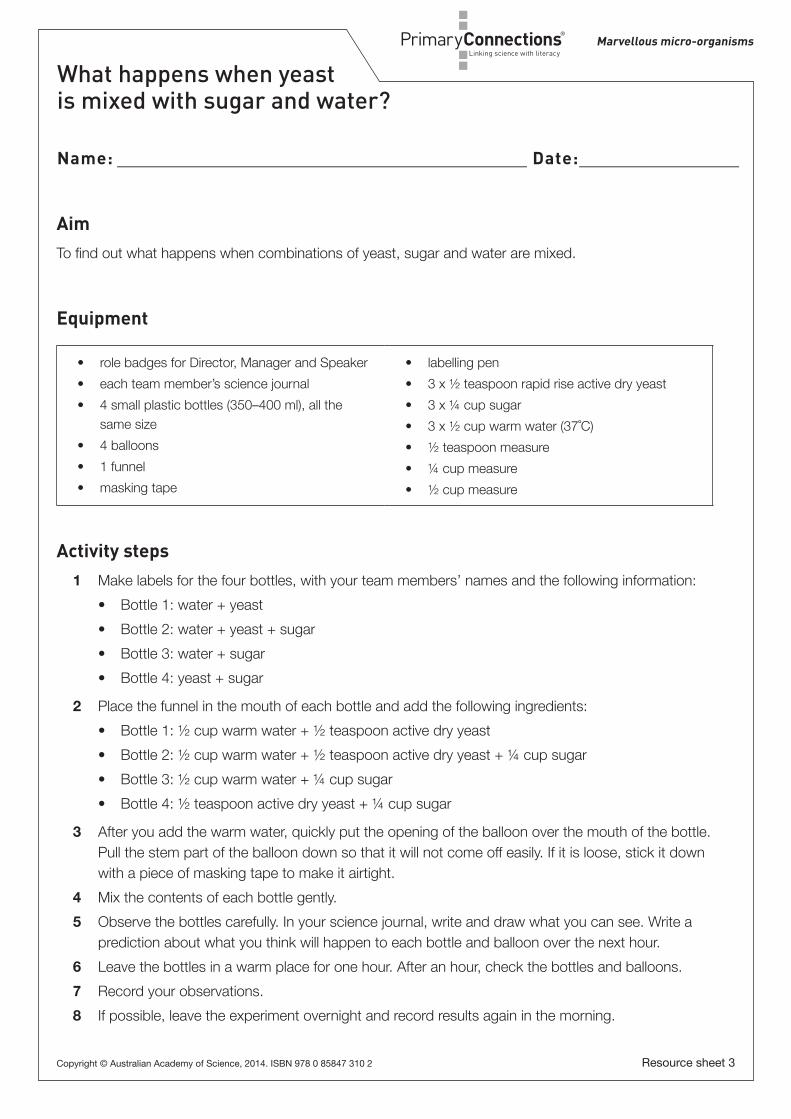
What happens when yeast is mixed with sugar and water?
Aim To find out what happens when combinations of yeast, sugar and water are mixed.
Equipment
• role badges for Director, Manager and Speaker• each team member’s science journal• 4 small plastic bottles (350–400 ml), all the
same size• 4 balloons• 1 funnel• masking tape
• labelling pen• 3 x ½ teaspoon rapid rise active dry yeast• 3 x ¼ cup sugar• 3 x ½ cup warm water (37˚C)• ½ teaspoon measure• ¼ cup measure• ½ cup measure
Activity steps 1 Make labels for the four bottles, with your team members’ names and the following information:
• Bottle 1: water + yeast• Bottle 2: water + yeast + sugar• Bottle 3: water + sugar• Bottle 4: yeast + sugar
2 Place the funnel in the mouth of each bottle and add the following ingredients: • Bottle 1: ½ cup warm water + ½ teaspoon active dry yeast • Bottle 2: ½ cup warm water + ½ teaspoon active dry yeast + ¼ cup sugar• Bottle 3: ½ cup warm water + ¼ cup sugar • Bottle 4: ½ teaspoon active dry yeast + ¼ cup sugar
3 After you add the warm water, quickly put the opening of the balloon over the mouth of the bottle. Pull the stem part of the balloon down so that it will not come off easily. If it is loose, stick it down with a piece of masking tape to make it airtight.
4 Mix the contents of each bottle gently. 5 Observe the bottles carefully. In your science journal, write and draw what you can see. Write a
prediction about what you think will happen to each bottle and balloon over the next hour. 6 Leave the bottles in a warm place for one hour. After an hour, check the bottles and balloons. 7 Record your observations. 8 If possible, leave the experiment overnight and record results again in the morning.
29Lesson 3 Putting the heat on yeast
Lesson 3 Putting the heat on yeast
AT A GLANCE
To provide students with hands-on, shared experiences of the yeast micro-organism and the best temperature for it to be active and make gas.
Students:
• discuss conditions that promote yeast activity• read and discuss a procedural text• work in collaborative learning teams to investigate the best temperature to support
yeast activity.
Lesson focusThe Explore phase is designed to provide students with hands-on experiences of the science phenomenon. Students explore ideas, collect evidence, discuss their observations and keep records such as science journal entries. The Explore phase ensures all students have a shared experience that can be discussed and explained in the Explain phase.
Assessment focusFormative assessment is an ongoing aspect of the Explore phase. It involves monitoring students’ developing understanding and giving feedback that extends their learning. In this lesson you will monitor students’ developing understanding of:
• the growth and survival of yeast, and how it is affected by the physical conditions of its environment. You will also monitor their developing science inquiry skills (see page 2).
EX
PLO
RE
Lesson 3 Putting the heat on yeast30
PrimaryConnections E
XP
LOR
E
Key lesson outcomesScienceStudents will be able to:
• plan an investigation, with teacher support, of the effect of temperature on the activity of yeast
• predict, observe, record and interpret the results of their investigation
• follow safety procedures• identify the features that made their
investigation a fair test• describe the effect of temperature on gas
production by yeast.
LiteracyStudents will be able to:
• follow a procedural text to complete an investigation
• use oral, written and visual language to record and discuss investigation results
• engage in discussion to compare ideas, and use evidence from an investigation to explain how temperature affects the activity of yeast
• demonstrate understanding of the effect of temperature on yeast activity through science journal entries.
This lesson also provides opportunities to monitor the development of students’ general capabilities (highlighted through icons, see page 5).
Teacher background informationYeast is a micro-organism that thrives best at certain temperatures, which is why dough is put in a warm place to rise. If it were put in a cold place, the yeast would be too cold to grow properly. Similarly, hot water is never used in bread-making, because it would kill the yeast and the bread would not rise. Yeast prefers to live in a comfortably warm environment, neither too hot nor too cold. The heat from the baking process kills the yeast, but by then it has done its job of producing a loaf of bread.
31Lesson 3 Putting the heat on yeast
PrimaryConnections Marvellous micro-organisms
EX
PLO
RE
Equipment
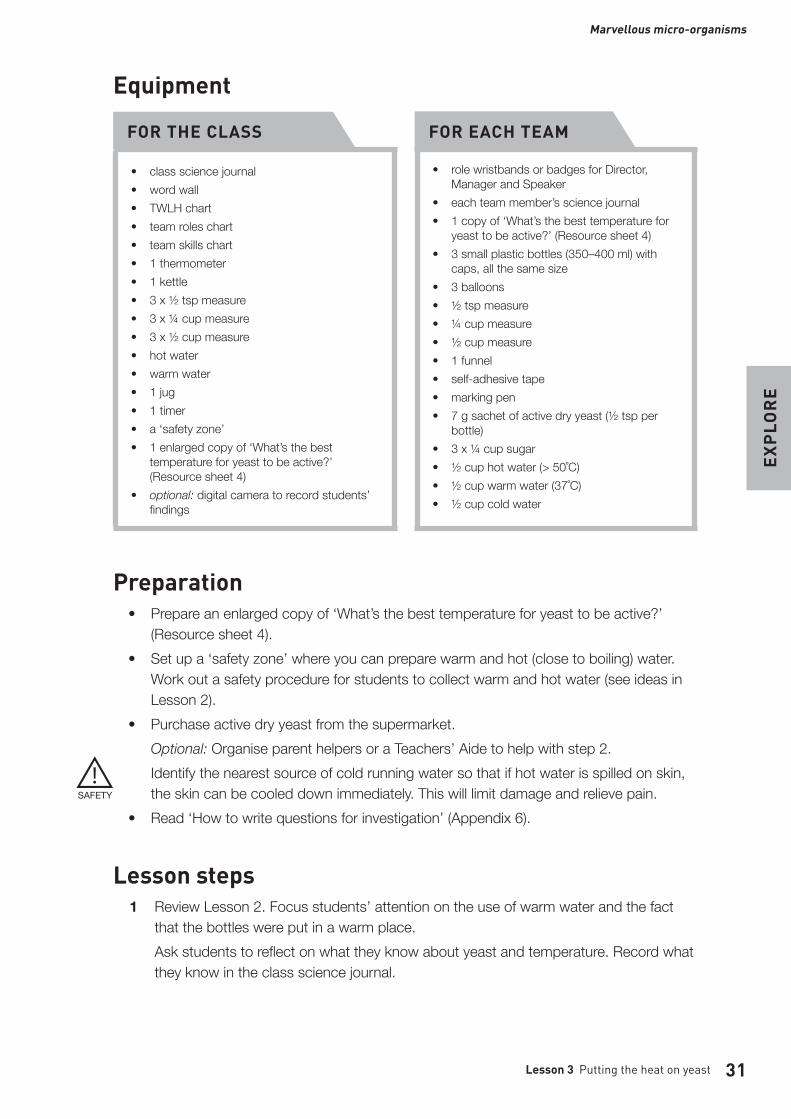
FOR THE CLASS FOR EACH TEAM
• class science journal• word wall• TWLH chart• team roles chart• team skills chart• 1 thermometer• 1 kettle• 3 x ½ tsp measure• 3 x ¼ cup measure• 3 x ½ cup measure• hot water• warm water• 1 jug• 1 timer• a ‘safety zone’• 1 enlarged copy of ‘What’s the best
temperature for yeast to be active?’ (Resource sheet 4)
• optional: digital camera to record students’ findings
• role wristbands or badges for Director, Manager and Speaker
• each team member’s science journal• 1 copy of ‘What’s the best temperature for
yeast to be active?’ (Resource sheet 4)• 3 small plastic bottles (350–400 ml) with
caps, all the same size• 3 balloons• ½ tsp measure• ¼ cup measure• ½ cup measure• 1 funnel• self-adhesive tape• marking pen• 7 g sachet of active dry yeast (½ tsp per
bottle)• 3 x ¼ cup sugar• ½ cup hot water (> 50˚C)• ½ cup warm water (37˚C)• ½ cup cold water
Preparation• Prepare an enlarged copy of ‘What’s the best temperature for yeast to be active?’
(Resource sheet 4).• Set up a ‘safety zone’ where you can prepare warm and hot (close to boiling) water.
Work out a safety procedure for students to collect warm and hot water (see ideas in Lesson 2).
• Purchase active dry yeast from the supermarket.Optional: Organise parent helpers or a Teachers’ Aide to help with step 2.Identify the nearest source of cold running water so that if hot water is spilled on skin, the skin can be cooled down immediately. This will limit damage and relieve pain.
• Read ‘How to write questions for investigation’ (Appendix 6).
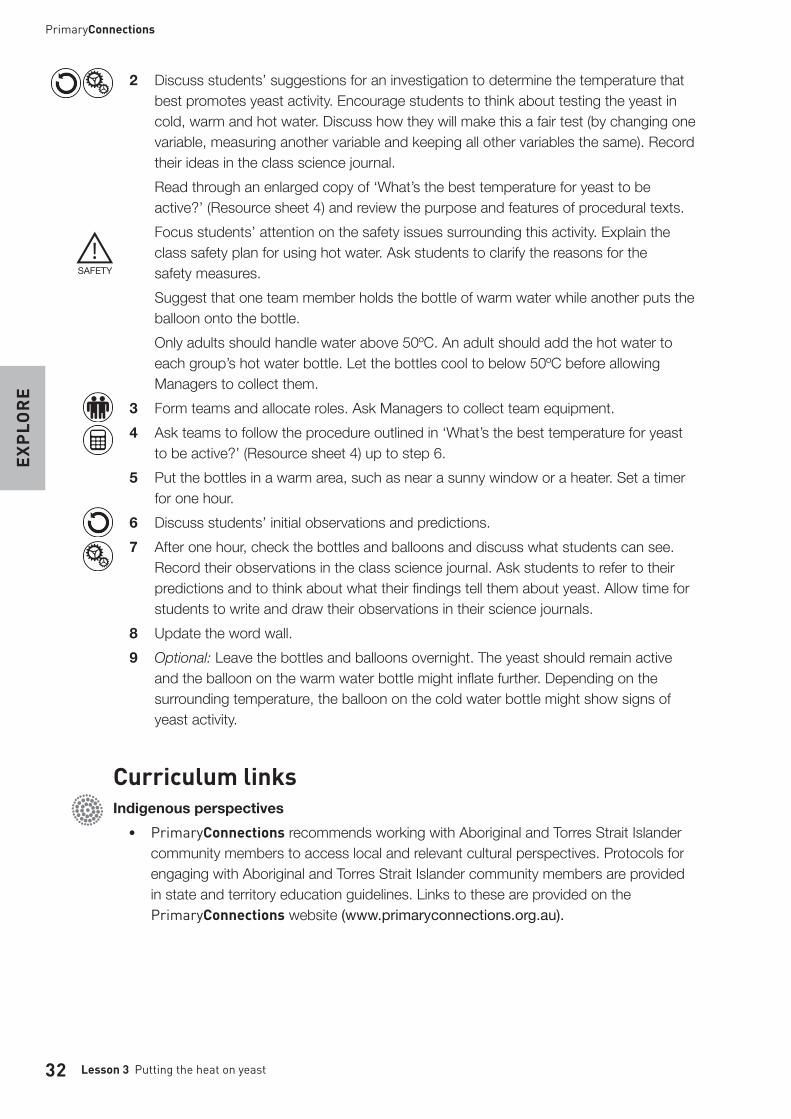
Lesson steps 1 Review Lesson 2. Focus students’ attention on the use of warm water and the fact
that the bottles were put in a warm place.Ask students to reflect on what they know about yeast and temperature. Record what they know in the class science journal.
Lesson 3 Putting the heat on yeast32
PrimaryConnections E
XP
LOR
E
2 Discuss students’ suggestions for an investigation to determine the temperature that best promotes yeast activity. Encourage students to think about testing the yeast in cold, warm and hot water. Discuss how they will make this a fair test (by changing one variable, measuring another variable and keeping all other variables the same). Record their ideas in the class science journal. Read through an enlarged copy of ‘What’s the best temperature for yeast to be active?’ (Resource sheet 4) and review the purpose and features of procedural texts.Focus students’ attention on the safety issues surrounding this activity. Explain the class safety plan for using hot water. Ask students to clarify the reasons for the safety measures.Suggest that one team member holds the bottle of warm water while another puts the balloon onto the bottle.Only adults should handle water above 50ºC. An adult should add the hot water to each group’s hot water bottle. Let the bottles cool to below 50ºC before allowing Managers to collect them.
3 Form teams and allocate roles. Ask Managers to collect team equipment. 4 Ask teams to follow the procedure outlined in ‘What’s the best temperature for yeast
to be active?’ (Resource sheet 4) up to step 6. 5 Put the bottles in a warm area, such as near a sunny window or a heater. Set a timer
for one hour. 6 Discuss students’ initial observations and predictions. 7 After one hour, check the bottles and balloons and discuss what students can see.
Record their observations in the class science journal. Ask students to refer to their predictions and to think about what their findings tell them about yeast. Allow time for students to write and draw their observations in their science journals.
8 Update the word wall. 9 Optional: Leave the bottles and balloons overnight. The yeast should remain active
and the balloon on the warm water bottle might inflate further. Depending on the surrounding temperature, the balloon on the cold water bottle might show signs of yeast activity.
Curriculum linksIndigenous perspectives
• PrimaryConnections recommends working with Aboriginal and Torres Strait Islander community members to access local and relevant cultural perspectives. Protocols for engaging with Aboriginal and Torres Strait Islander community members are provided in state and territory education guidelines. Links to these are provided on the PrimaryConnections website (www.primaryconnections.org.au).
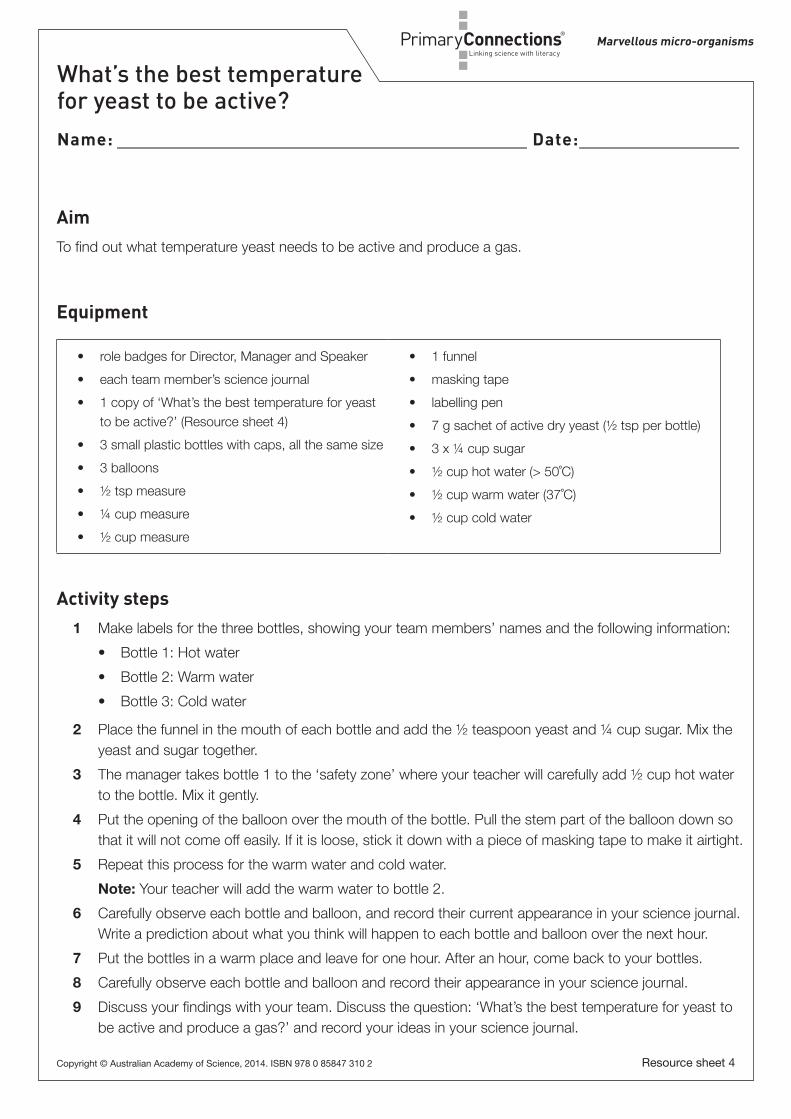
Marvellous micro-organisms
Name:___________________________________________Date:________________
Copyright © Australian Academy of Science, 2014. ISBN 978 0 85847 310 2
PrimaryConnections _
What’s the best temperature for yeast to be active?
Resource sheet 4
Aim To find out what temperature yeast needs to be active and produce a gas.
Equipment
• role badges for Director, Manager and Speaker• each team member’s science journal• 1 copy of ‘What’s the best temperature for yeast
to be active?’ (Resource sheet 4)• 3 small plastic bottles with caps, all the same size• 3 balloons• ½ tsp measure• ¼ cup measure• ½ cup measure
• 1 funnel• masking tape• labelling pen• 7 g sachet of active dry yeast (½ tsp per bottle) • 3 x ¼ cup sugar• ½ cup hot water (> 50˚C)• ½ cup warm water (37˚C) • ½ cup cold water
Activity steps 1 Make labels for the three bottles, showing your team members’ names and the following information:
• Bottle 1: Hot water • Bottle 2: Warm water • Bottle 3: Cold water
2 Place the funnel in the mouth of each bottle and add the ½ teaspoon yeast and ¼ cup sugar. Mix the yeast and sugar together.
3 The manager takes bottle 1 to the ‘safety zone’ where your teacher will carefully add ½ cup hot water to the bottle. Mix it gently.
4 Put the opening of the balloon over the mouth of the bottle. Pull the stem part of the balloon down so that it will not come off easily. If it is loose, stick it down with a piece of masking tape to make it airtight.
5 Repeat this process for the warm water and cold water. Note: Your teacher will add the warm water to bottle 2. 6 Carefully observe each bottle and balloon, and record their current appearance in your science journal.
Write a prediction about what you think will happen to each bottle and balloon over the next hour. 7 Put the bottles in a warm place and leave for one hour. After an hour, come back to your bottles. 8 Carefully observe each bottle and balloon and record their appearance in your science journal. 9 Discuss your findings with your team. Discuss the question: ‘What’s the best temperature for yeast to
be active and produce a gas?’ and record your ideas in your science journal.
PrimaryConnections
34 Lesson 4 Knead the loaf
Lesson 4 Knead the loaf
AT A GLANCE
To provide students with hands-on, shared experiences of the bread-making process.
Students:
• review what they know about yeast• discuss the role of yeast in the bread-making process• observe the bread-making process using a bread machine.
Lesson focusThe Explore phase is designed to provide students with hands-on experiences of the science phenomenon. Students explore ideas, collect evidence, discuss their observations and keep records such as science journal entries. The Explore phase ensures all students have a shared experience that can be discussed and explained in the Explain phase.
Assessment focusFormative assessment is an ongoing aspect of the Explore phase. It involves monitoring students’ developing understanding and giving feedback that extends their learning. In this lesson you will monitor students’ developing understanding of:
• the growth and survival of yeast, and how it is affected by the physical conditions of its environment. You will also monitor their developing science inquiry skills (see page 2).
Key lesson outcomesScienceStudents will be able to:
• identify steps in the bread-making process
• suggest ways to investigate the role of yeast in bread-making
• observe and describe the role of yeast in making bread rise.
LiteracyStudents will be able to:
• use oral, written and visual language to clarify their understanding of yeast
• use writing and drawing to clarify their ideas and explanations of the role of yeast in the bread-making process.
This lesson also provides opportunities to monitor the development of students’ general capabilities (highlighted through icons, see page 5).
EX
PLO
RE
35Lesson 4 Knead the loaf
PrimaryConnections Marvellous micro-organisms
EX
PLO
RE
Teacher background informationMost leavened bread is made using a process similar to the following. Firstly, the yeast and water are combined, added to the flour and salt, and mixed together. Enzymes from the yeast break down the carbohydrates in the flour to form sugars which the yeast uses as food, producing carbon dioxide. The dough is then kneaded until it reaches the proper elasticity. The dough is put in a warm place and allowed to double or triple in size. This process is called the ‘first rise’ or ‘proving’. The dough is then usually punched down to remove some of the gas and shaped into loaves. It is allowed to rise a second time—this double rise improves its flavour and texture. The dough is then baked, creating fresh bread. This whole process takes several hours.
Kneading is very important in bread-making. Flour contains wheat proteins called glutens. During the kneading process, the glutens in the dough join together to form long, stretchy cables that give the dough strength and elasticity. This elasticity allows it to catch the bubbles of carbon dioxide produced by the yeast, causing it to rise. The stretchy glutens and the bubbles they catch also give the bread a pleasant texture and appearance.
Equipment
FOR THE CLASS FOR EACH TEAM
• class science journal• word wall• TWLH chart• 2 bread-making machines, or 1 machine
used over 2 days• 2 packets of bread mix• active dry yeast• warm water• 1 jug• 1 timer• optional: digital camera to record students’
findings
• student science journal
Preparation• Organise identical bread-making machines for the bread-making demonstration.• Purchase bread-making mix.• Read instructions in the bread-making machine manual to check the list of ingredients,
time taken and cycles.• Optional: make bread using an oven (in addition to or instead of using a
bread-making machine).• Optional: invite a bread-maker, for example, an enthusiastic parent or baker to
demonstrate the bread-making process to the class.• Optional: talk to the local bakery and arrange a visit and tour of the bakery for the
students to see the steps involved in bread-making.
Lesson 4 Knead the loaf36
PrimaryConnections E
XP
LOR
E
Planning ahead• Read Lesson 6. Mould samples for this lesson need to be grown well in advance.
Lesson steps 1 Review what students have already learned about yeast. For example, yeast produces
carbon dioxide gas when mixed with sugar and water, temperature affects the activity of yeast.Discuss students’ ideas about the role of yeast in the bread-making process. Ask students to suggest how they could investigate the role of yeast, for example, make a loaf of bread using yeast, and one without yeast.
2 Explain that students are going to observe the process of making bread using a bread machine. If possible, discuss the instructions for making bread using the instruction manual. Discuss students’ questions about the bread-making process. You might like to provide students with prompts, such as: • What happens in the machine before the baking process begins?• Why does it take over three hours for the machine to make a loaf of bread?• How does the (carbon dioxide) gas that the yeast makes stay trapped in
the bread?• What might happen when yeast is left out of the bread recipe?
3 Organise students to observe what is happening in the machines during the bread-making process and record their observations in their science journals.Discuss what is happening inside the machine and how this could be done by hand, for example, mixing the ingredients, kneading, allowing the dough to rise and baking the bread in the oven.
4 After the bread is baked allow it to cool and then slice it. Organise students to observe the slices of bread. Discuss the differences between the loaf made with yeast and the one made without yeast.
5 Ask students to write and draw about the differences in the yeast and yeast-free breads in their science journals. Revisit the questions asked in step 2 and ask students to consider what they now know about the role of yeast in the bread-making process.
6 Update the TWLH chart, and add bread-making vocabulary to the word wall.
37Lesson 4 Knead the loaf
PrimaryConnections Marvellous micro-organisms
EX
PLO
RE
Curriculum linksStudies of Society and Environment
• Students research the history of yeast and bread (www.dakotayeast.com/home.html)
Information and Communication Technology (ICT)• Bread-making can be considered as a technology process.
Indigenous perspectives• Make bush damper.
See http://www.rangerroo.com.au/uploads/file/makedamper.pdf
• See Waterlilies for a description of how waterlily seeds are ground and made into damper in the traditional way in Kakadu. (Lucas, D. & Campbell, C. (2007). Waterlilies. Palmerston, NT: Waterlily Publications.)
• PrimaryConnections recommends working with Aboriginal and Torres Strait Islander community members to access local and relevant cultural perspectives. Protocols for engaging with Aboriginal and Torres Strait Islander community members are provided in state and territory education guidelines. Links to these are provided on the PrimaryConnections website (www.primaryconnections.org.au).
PrimaryConnections
38 Lesson 5 Food observations38
Lesson 5 Food observations
AT A GLANCE
To support students to represent and explain their understanding of the yeast micro-organism, and to introduce current scientific views.
Students:
• work in teams to create summaries of their yeast investigations• review their flow chart from Lesson 1• work in teams to generate a flow chart that represents their current understanding
of the bread-making process• share their current understanding in teams.
Lesson focusIn the Explain phase students develop a literacy product to represent their developing understanding. They discuss and identify patterns and relationships within their observations. Students consider the current views of scientists and deepen their own understanding.
Assessment focusFormative assessment is an ongoing aspect of the Explain phase. It involves monitoring students’ developing understanding and giving feedback that extends their learning. In this lesson you will monitor students’ developing understanding of:
• the growth and survival of yeast, and how it is affected by the physical conditions of its environment, and how scientific knowledge of micro-organisms affect people’s lives. You will also monitor their developing science inquiry skills (see page 2).
You are also able to look for evidence of students’ use of appropriate ways to represent what they know and understand about how living things, for example, yeast, are affected by the physical conditions of the environment, and give them feedback on how they can improve their representations.
EX
PLA
IN
39Lesson 5 Food observations
PrimaryConnections Marvellous micro-organisms
EX
PLA
IN
Key lesson outcomesScienceStudents will be able to:
• describe the conditions needed for yeast to be active
• explain that yeast makes a gas in the dough, which makes the bread lighter
• use a flow chart to show the steps in the bread-making process
• consider how their lives would be different without knowledge of the yeast micro-organism.
LiteracyStudents will be able to:
• use oral, written and visual language to summarise their understanding of yeast
• present a brief explanation or summary to peers
• compare explanations and engage in argument
• demonstrate understanding of how bread is made by revising their flow charts (from Lesson 1).
This lesson also provides opportunities to monitor the development of students’ general capabilities (highlighted through icons, see page 5).
Equipment
FOR THE CLASS FOR EACH TEAM
• class science journal• word wall• TWLH chart• team roles chart• team skills chart
• role wristbands or badges for Director, Manager and Speaker
• each team member’s science journal, including flow chart developed in Lesson 1
• 1 sheet of A3 paper
Lesson steps 1 Review the purpose of the yeast investigations with questions, such as:
• What have we been investigating about yeast?• What does it mean when we say yeast is a micro-organism?• Is yeast a living thing? How do you know?• What conditions does yeast need to be active and make carbon dioxide gas?
How do you know?• What conditions cause yeast to be inactive? How do you know?
2 Explain that students will use their investigation findings to summarise what they know about yeast and its role in the bread-making process. Explain that they will write and draw a summary based on the answers to questions, such as: • What do we know about yeast?• What part does yeast play in bread-making?• What are the main steps in bread-making?
PrimaryConnections
Lesson 5 Food observations40
PrimaryConnections E
XP
LAIN
3 Discuss the purpose and features of a summary.
Literacy focus
Why do we use a summary?We use a summary to present the main points of a topic or text.
What does a summary include?A summary includes a concise description of the main points of a topic or text.
4 Provide time for students to develop a summary in their science journals. Remind them to use the word wall and TWLH chart for background information.
5 When students have completed their written summaries, bring the class together. Invite students to share their summaries. Encourage other students to agree or disagree with the contributions.
6 Ask students to review the flow chart they began in Lesson 1 about how bread is made. Invite them to use a different-coloured pen to make additions and alterations to the flow chart based on what they have learned so far in the unit. This will allow students to demonstrate their new knowledge about yeast and the bread-making process.
7 Re-form teams. Ask students to share with their team something new they have learned and something they found interesting. Ask them to consider how our lives would be different if we did not know about the yeast micro-organism. Ask students to record a short reflection in their science journals.
8 Bring the class together. Complete the TWLH chart. Share reflections about the unit so far and record in the class science journal.
Curriculum linksInformation and Communication Technology (ICT)
• Use computer programs to design a flow chart that includes pictures.Indigenous perspectives
• Contact the local Indigenous Land Council or cultural heritage centre to make contact with local Indigenous community members to share their knowledge of making damper and, if possible, make damper with the students using traditional methods.
• Use a flow chart to show the steps completed in the damper-making process by Indigenous people.
• PrimaryConnections recommends working with Aboriginal and Torres Strait Islander community members to access local and relevant cultural perspectives. Protocols for engaging with Aboriginal and Torres Strait Islander community members are provided in state and territory education guidelines. Links to these are provided on the PrimaryConnections website (www.primaryconnections.org.au).

41
PrimaryConnections PrimaryConnections
Lesson 6 Mystery moulds
Lesson 6 Mystery moulds
AT A GLANCE
To support students to plan and conduct an investigation of the conditions that affect mould growth on food.
Session 1 A nightmare in my lunch box
Students:
• observe samples of mould• read and discuss an information report about mould.
Session 2 Investigating mould
Students:
• work in teams to plan and set up an investigation to determine factors that affect mould growth on food
• observe and record the results of their investigations.
Lesson focusIn the Elaborate phase students plan and conduct an open investigation to apply and extend their new conceptual understanding in a new context. It is designed to challenge and extend students’ science understanding and science inquiry skills.
Assessment focusSummative assessment of the Science Inquiry Skills is an important focus of the Elaborate phase (see page 2). Rubrics will be available on the website to help you monitor students’ inquiry skills.
ELA
BO
RAT
E
Lesson 6 Mystery moulds42
PrimaryConnections E
LAB
OR
ATE
Key lesson outcomesScienceStudents will be able to:
• plan an investigation that is a fair test• identify safety procedures• conduct an investigation, make and
record observations• interpret their observations and make a
conclusion that answers their research question
• suggest improvements to their investigation methods
• describe the conditions that encourage the growth of food mould
• reflect on how science informs our understanding of micro-organisms and how mould growth on food can be prevented.
LiteracyStudents will be able to:
• understand the purpose, structure and features of an information report
• read an information report about mould and identify the main ideas
• engage in discussion to compare ideas and develop an understanding about conditions that affect the growth of food mould
• use oral, written and visual language to design, implement and report on an investigation about food mould
• use investigation results to help develop an explanation of food mould through science journal entries.
This lesson also provides opportunities to monitor the development of students’ general capabilities (highlighted through icons, see page 5).
Teacher background informationThe term ‘mould’ is used to refer to several kinds of fungi that grow on various surfaces. Moulds reproduce by producing spores. Mould spores are commonly found in the air and soil, but will grow into mould only when they land somewhere with the right conditions for growth. Spores are very small and don’t contain a supply of food to help them begin to grow like seeds do. They use whatever they land on as food.
Moulds grow best away from direct sunlight in moist, cool-to-warm conditions where there is plenty of plant and animal (organic) matter for them to use as an energy source. A soggy sandwich left in a lunch box over the summer holidays is a mould’s delight. Moulds love bathrooms and sweaty old shoes. They will even grow on books and papers that have not been stored in the right conditions. Direct ultraviolet light (including sunlight) tends to kill moulds and they don’t grow well in dry environments, or in very cold or hot conditions.
When mould spores ‘germinate’ they produce long thin strands called ‘hyphae’, which give moulds their fluffy appearance. Moulds play an important role in the ecosystem, helping decompose and recycle dead organic materials.
43Lesson 6 Mystery moulds
PrimaryConnections Marvellous micro-organisms
ELA
BO
RAT
E
Session 1 A nightmare in my lunch box
Equipment
FOR THE CLASS FOR EACH TEAM
• class science journal• word wall• TWLH chart• team roles chart• team skills chart• 1 enlarged copy of ‘Moulds’ (Resource
sheet 5)• optional: overhead projector • optional: binocular microscope or video
camera microscope connected to TV or computer
• role wristbands or badges for Director, Manager and Speaker
• each team member’s science journal• 1 copy of ‘Moulds’ (Resource sheet 5) for
each student• 1 highlighter or coloured pen for each
student• 1 sample of mouldy bread or fruit in 2 clear,
sealed plastic bags• 1 magnifying glass
Preparation• Prepare an enlarged copy of ‘Moulds’ (Resource sheet 5).• Prepare samples of mould using bread products, or fruits, such as a lemon or a
strawberry as follows: – Purchase bread or fruit 7 to 10 days before you begin the lesson. (It might be useful
to use the bread made in the bread-making machine for this, as it should contain less preservatives than store-bought bread.)
– Cut open the fruit or lay out the slices of bread, and leave in the open air overnight so that mould spores can land on the bread or fruit.
Note: Some people are allergic to moulds and therefore careful preparation of the mould sample is required.
– Prepare half a slice of mouldy bread or a piece of fruit for each team by lightly moistening each piece with water. Seal the bread or fruit inside one plastic bag leaving some air in the bag.
– Tape the top of the bag with self-adhesive tape.
– Place this bagged bread inside a second plastic bag and seal the bag by taping the top of the bag. This is referred to as double bagging.
– Store in a warm place. Mould should begin to grow in about four to seven days, depending on your location and the temperature.

Lesson 6 Mystery moulds44
PrimaryConnections E
LAB
OR
ATE
Lesson steps 1 Tell students that you have found a nightmare in your lunch box. Show them a sealed
bag of mouldy food that has been double bagged and ask them if they know what it is and how it might have happened. Discuss students’ experiences with mould and ask them what they know about mould, recording responses in the class science journal.
2 Explain that mould is a fungus micro-organism and that students will be working in collaborative learning teams to investigate moulds and that they will be growing mould on food sealed using the double bag method. Emphasise that the plastic bags are not to be opened after they have been sealed because some people are allergic to moulds.
3 Explain that in the first part of the investigation, students are going to observe mouldy food and describe what it looks like in their science journals. This includes making a drawing of the sample. Show students how to draw a labelled diagram. Discuss the purpose and features of such a diagram.
Literacy focus
Why do we use a labelled diagram?We use a labelled diagram to show the shape, size and features of an object.
What does a labelled diagram include?A labelled diagram might include a title, an accurate drawing, a scale to show the object’s size and labels showing the main features. A line or arrow connects the label to the feature.
Demonstrate how to use a magnifying glass to look closely at the mouldy food sealed inside the double bags.Optional: Moulds look great when viewed under a binocular microscope or video microscope connected to a TV or a computer.
4 Form teams and allocate roles. Ask Managers to collect team equipment. 5 Provide time for students to discuss, observe and record their observations in their
science journals. 6 When teams have recorded their observations, collect the mould samples and place
them in a large plastic or paper bag ready for disposal. 7 Bring the teams together and discuss questions, such as:
• What did the mould look like?• What colours did you see in the mould?
8 Tell students that they are going to read some information about mould. You might like to explain that the information is in the form of an information report, and discuss the purpose and features of an information report before reading the text. Alternatively, you might like to share the text with students and, after reading, discuss the type of text, its purpose and features. For example, ‘Was it a procedure? A narrative? How do you know? What were the clues in the text?’.
45Lesson 6 Mystery moulds
PrimaryConnections Marvellous micro-organisms
ELA
BO
RAT
E
Literacy focus
Why do we use an information report?We use an information report to record factual information about a topic. We can read an information report to collect information.
What does an information report include?An information report includes an introduction, a series of paragraphs describing the topic and a summary paragraph.
9 Provide each student with a copy of ‘Moulds’ (Resource sheet 5) and a highlighter or coloured pen. Explain that as the class reads the text, they will use their highlighters to mark any new and unfamiliar or technical terms. Using the enlarged copy of ‘Moulds’, model how to use a highlighter to mark unfamiliar and technical vocabulary, for example:Moulds are a type of fungus. They are micro-organisms and are so small that we can only see them with the naked eye when they multiply in numbers. There are many different kinds of mould.Discuss the highlighted vocabulary and explain the words by referring to students’ earlier work in the unit. Continue reading the text, stopping wherever necessary to highlight and explain technical vocabulary.Review the fact that mould is a micro-organism.
10 Optional: Focus on the language in the report by asking students to make a list of all the highlighted words and place a definition beside them, for example:
Technical term Definition
multiply make more of
Students might like to record a definition from the dictionary and an everyday explanation for the technical vocabulary.
11 Optional: Focus on the structure of the report by identifying and labelling the content of the paragraphs, such as ‘opening statement or definition’, ‘appearance’, ‘function’ and ‘reproduction’. Discuss how the opening statement introduces the topic of the report and how the information is organised into a series of paragraphs.
12 Ask students to discuss mould with their families and find out where they have seen mould growing.
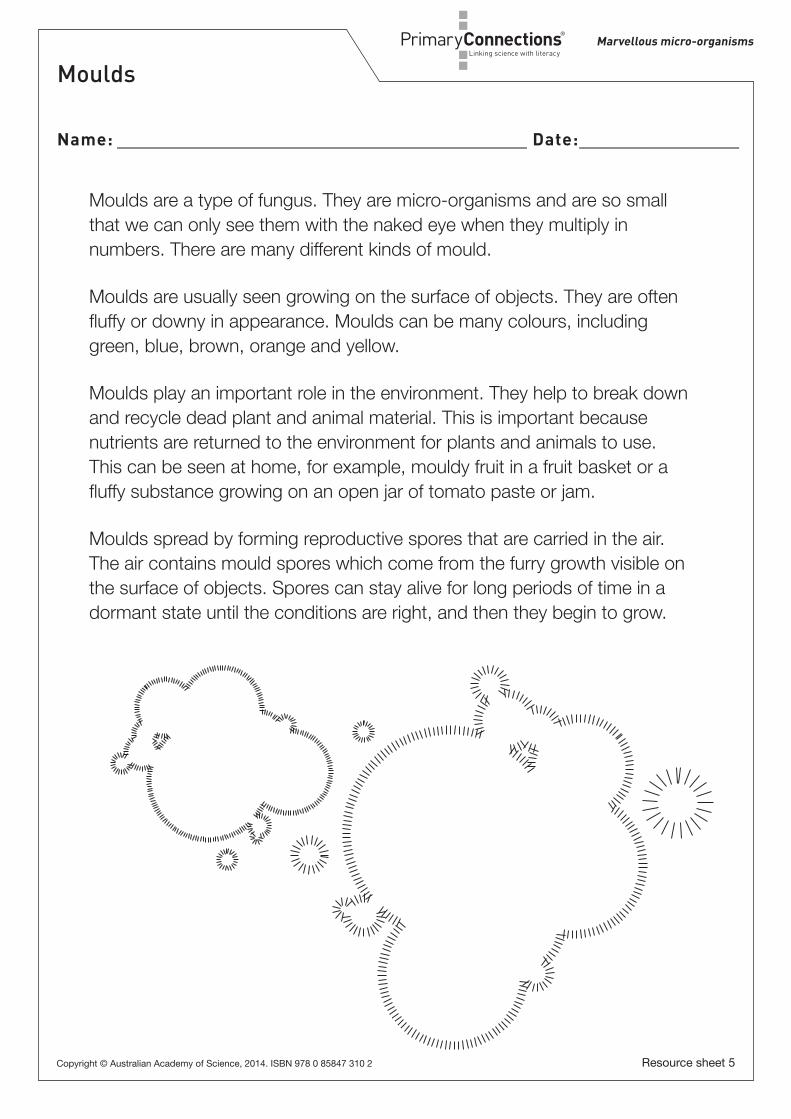
Marvellous micro-organisms
Name:___________________________________________Date:________________
Copyright © Australian Academy of Science, 2014. ISBN 978 0 85847 310 2
Moulds
Resource sheet 5
Moulds are a type of fungus. They are micro-organisms and are so small that we can only see them with the naked eye when they multiply in numbers. There are many different kinds of mould.
Moulds are usually seen growing on the surface of objects. They are often fluffy or downy in appearance. Moulds can be many colours, including green, blue, brown, orange and yellow.
Moulds play an important role in the environment. They help to break down and recycle dead plant and animal material. This is important because nutrients are returned to the environment for plants and animals to use. This can be seen at home, for example, mouldy fruit in a fruit basket or a fluffy substance growing on an open jar of tomato paste or jam.
Moulds spread by forming reproductive spores that are carried in the air. The air contains mould spores which come from the furry growth visible on the surface of objects. Spores can stay alive for long periods of time in a dormant state until the conditions are right, and then they begin to grow.
47Lesson 6 Mystery moulds
Marvellous micro-organisms
ELA
BO
RAT
E
Session 2 Investigating mould
Equipment
FOR THE CLASS FOR EACH TEAM
• class science journal• word wall• TWLH chart• team roles chart• team skills chart• 1 plastic spray-gun bottle filled with water• 1 large plastic or paper bag• boxes or opaque bags
• role wristbands or badges for Director, Manager and Speaker
• each team member’s science journal• 1 copy of ‘Mould growth investigation
planner’ (Resource sheet 6) for each student• 2 slices of bread or fruit• 4 clear resealable plastic bags• 1 thermometer• self-adhesive tape• marking pen
Preparation• Review ‘How to facilitate evidence-based discussions’ (Appendix 5).• Review ‘How to write questions for investigation’ (Appendix 6).• Cut open the fruit or lay out the slices of bread and leave in the open air overnight so
that mould spores can land on the bread or fruit. Moulds produce tiny spores which are released into the air. Some students are allergic to these spores. It is important to ensure that moulds are grown in double bags using the double bag method and that students do not open the bags.
Lesson steps 1 Review the previous session and ask students about their family discussions about
mould. Pose questions, such as: • In what places have you or your family observed mould growing?• What things might help mould to grow?• How could we find out?
2 Use students’ answers to make a list of things that might affect mould growth, such as moisture, temperature and amount of light. Introduce the term ‘variables’ as things that can be changed, measured or kept the same in an investigation. Explain that when a variable is kept the same it is said to be ‘controlled’. Explain that the focus of the team investigation is to determine what effect one of these variables has on mould growth.
3 Introduce students to the process of writing questions for investigation.Model the development of a question, for example:• What happens to mould growth when we change the amount of moisture?• What happens to mould growth when we change the temperature?• What happens to mould growth when we change the amount of light?
Lesson 6 Mystery moulds48
PrimaryConnections E
LAB
OR
ATE
4 Explain how to use the ‘Mould growth investigation planner’ (Resource sheet 6). For example, students might choose to investigate: ‘What happens to mould growth when we change the amount of moisture?’ For this investigation, students determine what they will: • Change: the amount of moisture• Measure/observe: for example, the amount of food area covered by mould• Keep the same: temperature, the amount of light.
5 Ask students: • How could you test whether moisture is needed for mould growth?
(By taking away moisture and comparing mould growth on dry food samples with mould growth on moist food samples.)
• How could you test whether warmth is needed for mould growth? (By taking away warmth and comparing mould growth on food samples kept in a cool place with mould growth on food samples kept in a warm place.)
• How could you test whether light is needed for mould growth? (By taking away light and comparing mould growth on food samples kept in a dark place with mould growth on food samples kept in a light place.)
6 Ask students how they will know if changing a variable, such as temperature, light or moisture has affected mould growth. Discuss the need to record the observations in an organised way and ask why this is an important part of the scientific investigation process. Ask students to suggest the types of things they could measure or observe, such as the size of moulds or the proportion of food area covered by mould).
7 Re-form teams and allocate roles. Ask Managers to collect team equipment. 8 Ask each team to decide which question they are going to investigate. Arrange for
each team member to complete the first page of the ‘Mould growth investigation planner’ (Resource sheet 6). When all team members have completed the planner, ask them to begin setting up their team investigation.
9 Write a checklist on the board with key reminders for the teams, such as:• Leave some air in the first bag before sealing it. (Ask students why they need to
leave some air in the bag with the food. Refer to ‘Moulds’ (Resource sheet 5), noting that moulds are living things and need oxygen from air to live and grow.)
• Place the bag inside a second plastic bag and seal the top of this bag with tape.• Make sure bags are labelled with your names (or team name) and the contents.• Use a thermometer to check the temperature of the location where your food
samples will be stored. 10 Ask students to use their science journals to record their observations using words,
measurements and diagrams. Organise daily observation, team discussion and recording time.
11 When sufficient mould has grown on the food samples, ask teams to complete their ‘Mould growth investigation planner’ (Resource sheet 6).
12 Discuss the class findings from the investigation and ask students what this has shown them about the role of micro-organisms in food decay and ways they can prevent food decay. Ask students to reflect on why scientists predict and investigate and gather data about scientific phenomenon such as mould growth.
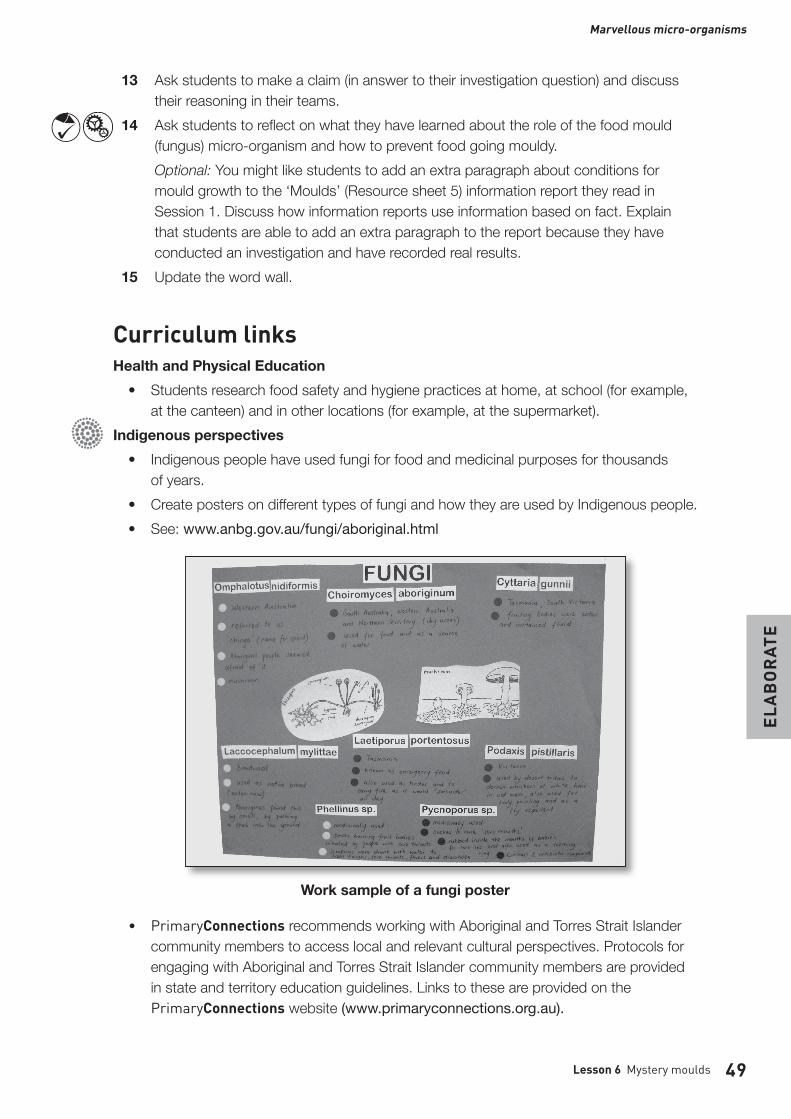
49Lesson 6 Mystery moulds
PrimaryConnections Marvellous micro-organisms
ELA
BO
RAT
E
13 Ask students to make a claim (in answer to their investigation question) and discuss their reasoning in their teams.
14 Ask students to reflect on what they have learned about the role of the food mould (fungus) micro-organism and how to prevent food going mouldy. Optional: You might like students to add an extra paragraph about conditions for mould growth to the ‘Moulds’ (Resource sheet 5) information report they read in Session 1. Discuss how information reports use information based on fact. Explain that students are able to add an extra paragraph to the report because they have conducted an investigation and have recorded real results.
15 Update the word wall.
Curriculum linksHealth and Physical Education
• Students research food safety and hygiene practices at home, at school (for example, at the canteen) and in other locations (for example, at the supermarket).
Indigenous perspectives• Indigenous people have used fungi for food and medicinal purposes for thousands
of years.• Create posters on different types of fungi and how they are used by Indigenous people.• See: www.anbg.gov.au/fungi/aboriginal.html
Work sample of a fungi poster
• PrimaryConnections recommends working with Aboriginal and Torres Strait Islander community members to access local and relevant cultural perspectives. Protocols for engaging with Aboriginal and Torres Strait Islander community members are provided in state and territory education guidelines. Links to these are provided on the PrimaryConnections website (www.primaryconnections.org.au).
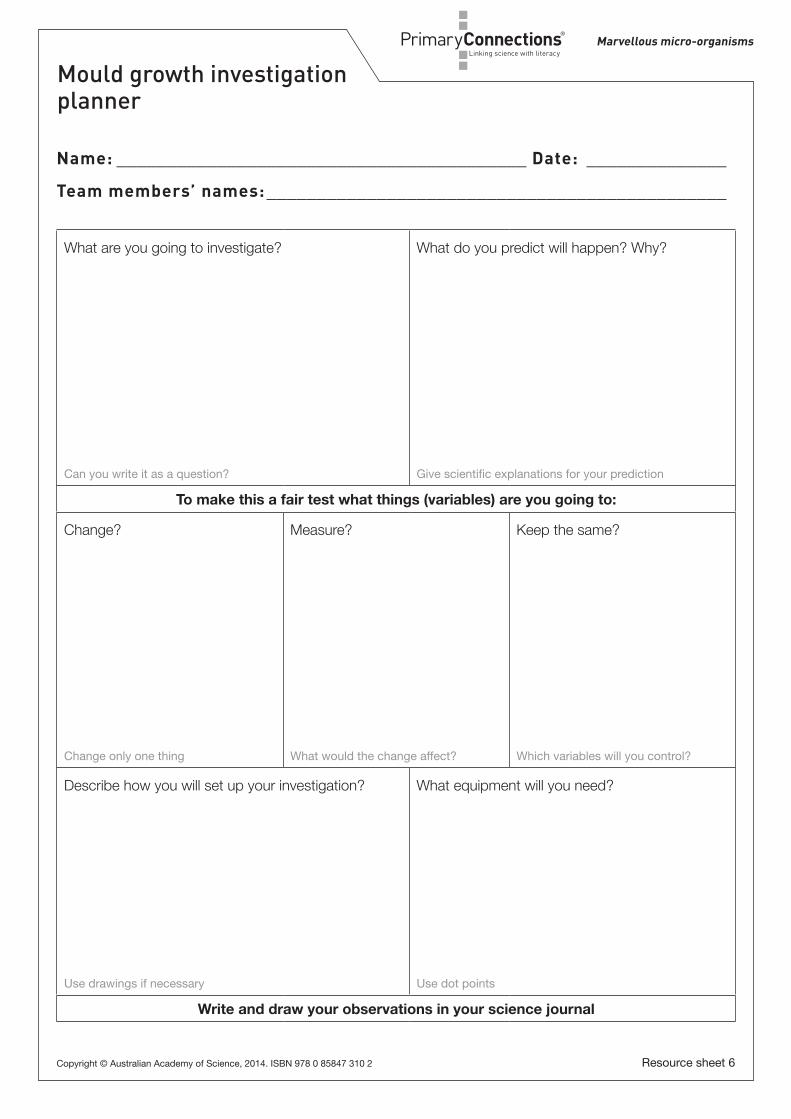
Marvellous micro-organisms
Copyright © Australian Academy of Science, 2014. ISBN 978 0 85847 310 2 Resource sheet 6
Mould growth investigation planner
Name: _________________________________________ Date: ______________
Team members’ names: ______________________________________________
What are you going to investigate?
Can you write it as a question?
What do you predict will happen? Why?
Give scientific explanations for your prediction
To make this a fair test what things (variables) are you going to:
Change?
Change only one thing
Measure?
What would the change affect?
Keep the same?
Which variables will you control?
Describe how you will set up your investigation?
Use drawings if necessary
What equipment will you need?
Use dot points
Write and draw your observations in your science journal

Marvellous micro-organisms
Copyright © Australian Academy of Science, 2014. ISBN 978 0 85847 310 2 Resource sheet 6
Presenting results
Can you show your results in a graph?
Explaining results
When you changed ………………………......... what happened to mould growth?
Why did this happen? Was your prediction accurate?
Evaluating the investigation
What problems did you have in doing this investigation?
How could you improve this investigation (fairness, accuracy)?
PrimaryConnections
52 Lesson 7 Medical micro-organisms
Lesson 7 Medical micro-organisms
AT A GLANCE
To support students to read about the role of micro-organisms in the discovery and development of the antibiotic, penicillin.
Students
• review their food mould investigation• read a factual recount of the role of Fleming and Florey in the discovery and
development of penicillin.
Lesson focusIn the Elaborate phase students plan and conduct an open investigation to apply and extend their new conceptual understanding in a new context. It is designed to challenge students’ Science Understanding and Science Inquiry Skills.
Assessment focusSummative assessment of the Science Inquiry Skills is an important focus of the Elaborate phase (see page 2). Rubrics will be available on the website to help you monitor students’ inquiry skills.
Key lesson outcomesScienceStudents will be able to:
• explain that penicillin is made by a mould and is used to treat infections
• describe the role of Fleming and Florey in the discovery and development of penicillin
• discuss how sometimes scientific discoveries happen by chance.
LiteracyStudents will be able to:
• understand the purpose, structure and features of a factual recount
• read a factual recount about the history of penicillin and identify the main ideas
• use oral, written and visual language to develop understanding and clarify ideas and explanations of medical micro-organisms
• use textual sources to locate information and compare ideas.
This lesson also provides opportunities to monitor the development of students’ general capabilities (highlighted through icons, see page 5).
ELA
BO
RAT
E
53Lesson 7 Medical micro-organisms
PrimaryConnections Marvellous micro-organisms
ELA
BO
RAT
E
Teacher background informationMicro-organisms are very important in medicine. Many diseases in humans are caused by micro-organisms (for example, bacteria cause cholera, tetanus, tuberculosis and food poisoning, while fungi cause ringworm and tinea). However, micro-organisms are also useful in treating diseases. Penicillin, the first antibiotic, is produced naturally by the Penicillium mould. Before antibiotics were discovered, people died from bacterial infections of wounds and from food infections.
In 1928 British researcher Dr Alexander Fleming observed that Penicillium mould contaminated a bacterial culture he was studying and inhibited the bacterial growth. Penicillin was developed into a usable drug by Australian Dr Howard Florey and his co-worker, Dr Ernst Chain, in the 1940s. In 1945 Howard Florey, Alexander Fleming and Ernst Chain were awarded the Nobel Prize in Medicine in recognition of their discovery.
The Nobel Prize was established by Swedish scientist Alfred Nobel (1833–1896), the inventor of dynamite. Nobel was shocked to see how his invention was being used for destructive purposes and wanted the prizes to be awarded to people who served mankind well.
Nobel prizes have been awarded annually since 1901 in the areas of physics, chemistry, medicine, literature and peace. Prizes are awarded to people and organisations that have made outstanding contributions. Award winners might have invented a ground-breaking medical or scientific technique, developed a new piece of equipment or made an outstanding contribution to society. The actual prize includes a medal, a certificate and a sum of money.
Equipment
FOR THE CLASS FOR EACH TEAM
• class science journal• word wall• TWLH chart• team roles chart• team skills chart• optional: access to the internet to research
Howard Florey and penicillin: www.tallpoppies.net.au/florey/index.html www.abc.net.au/science/slab/florey/story.htm
• role wristbands or badges for Director, Manager and Speaker
• each team member’s science journal, including ‘Mould growth investigation planner’ (Resource sheet 6) from Lesson 6
• 1 copy of ‘Penicillin—the miracle mould’ (Resource sheet 7) for each student
Preparation• Decide how students will use ‘Penicillin—the miracle mould’ (Resource sheet 7).
For example, read as a whole class in collaborative learning teams or with guided reading groups.
• Select one or more of the options below to use ‘Penicillin—the miracle mould’ (Resource sheet 7) with your class, for example: – Students draw up a table in their science journals and transform the text into a table:
Lesson 7 Medical micro-organisms54
PrimaryConnections E
LAB
OR
ATE
The penicillin story
Who are the main
characters?What did they
do?Where did it
happen?When did it happen?
Why was it important?
– Students present an oral account from the perspective of one of the major characters: Who am I? What did I do? How did that make me feel, and why?
– Students work with a partner or in a team to role-play an interview with one of the main characters, with student(s) in character and the other asking questions.
• Optional: arrange for a guest speaker to visit to talk about antibiotics, such as a scientist, a doctor, a nurse, a health worker or a pharmacist.
Lesson steps 1 Review students’ investigation from the previous lesson. Ask them to recall the
technical terms for the fluffy substance they have observed growing on food, and elicit the terms ‘mould’ and ‘micro-organism’.
2 Explain that in this lesson students will be reading about an important discovery involving a mould micro-organism.
3 Ask students if they have ever had to take antibiotics when they have been ill. Invite a few students to share information and draw a link between the infection and the antibiotics.
4 Explain that the text they will be reading is a factual recount that shows how an investigation of a mould led to the development of today’s antibiotics. Review the purpose and features of factual recounts.
5 Optional: To support students to read the text, you might like them to complete these before and after reading activities:• Before reading, identify the key vocabulary in the text, such as ‘bacteria’, ‘mould’,
‘antibiotics’, ‘contaminated’, ‘micro-organism’, and provide students (or groups of students) with one of the words. Ask them to use this word to create a sentence that they might find in a text about ‘Penicillin—the miracle mould’.
• After reading the text, ask students to locate their word in the text and discuss how it compares with their original sentence.
6 Organise students to read ‘Penicillin—the miracle mould’ (Resource sheet 7) (see suggestions under ‘Preparation’).
7 Organise students to complete one or more of the suggestions for using ‘Penicillin— the miracle mould’ (Resource sheet 7) factual recount (see suggestions under ‘Preparation’).

55Lesson 7 Medical micro-organisms
PrimaryConnections Marvellous micro-organisms
ELA
BO
RAT
E
8 Ask students to reflect in their science journals on the information contained in ‘Penicillin—the miracle mould’ (Resource sheet 7) and the role of micro-organisms. Ask them to consider how different the world would be without the discovery of penicillin and antibiotics. Optional: Study biographies of scientists who have made a contribution to health, especially viral and bacterial infections.
Curriculum linksStudies of Society and Environment
• Students research the Nobel Prize (www.nobelprize.org), for example, the history of the award and the medals, or research other Nobel Prize winners like Australia’s Professor Barry Marshall and Dr Robin Warren (www.science.org.au/nobel).
• Students draw a timeline of the development of penicillin.
Health and Physical Education• Students investigate vaccines and research the benefits or otherwise of bacteria.
Indigenous perspectives• PrimaryConnections recommends working with Aboriginal and Torres Strait Islander
community members to access local and relevant cultural perspectives. Protocols for engaging with Aboriginal and Torres Strait Islander community members are provided in state and territory education guidelines. Links to these are provided on the PrimaryConnections website (www.primaryconnections.org.au).

Marvellous micro-organisms
Name:___________________________________________Date:________________
Copyright © Australian Academy of Science, 2014. ISBN 978 0 85847 310 2
Penicillin—the miracle mould
Resource sheet 7
Substances that prevent the growth of germs (bacteria) are called antibiotics. Today, many antibiotics from different micro-organisms are used to treat a variety of infections. The first antibiotic used for medical purposes was penicillin, which is made from a fluffy, blue-green coloured mould called ‘Penicillium’.
In 1928 British scientist Dr Alexander Fleming was working at St Mary’s Hospital Medical School in London, England. He noticed that a mould had contaminated a dish containing a sample of bacteria he was studying. Dr Fleming observed that the bacteria could not grow in the area around the mould, and published a journal article on his observations in 1929. However, he was unable to isolate the substance that prevented bacteria from growing, and he moved on to other research.
Ten years later, Australian researcher Dr Howard Florey, biochemist Dr Ernst Chain and their team began to look for the substance that Dr Fleming had observed. In 1940 Dr Florey and his team at Oxford University in England infected eight mice with Streptococcus bacteria. Four of the mice were treated with injections of penicillin, while the other four were untreated. The next day, the treated mice had recovered while the untreated mice were dead. This experiment demonstrated the potential of penicillin as a treatment for bacterial illnesses.
(Image courtesy of CSIRO, www.csiro.au)
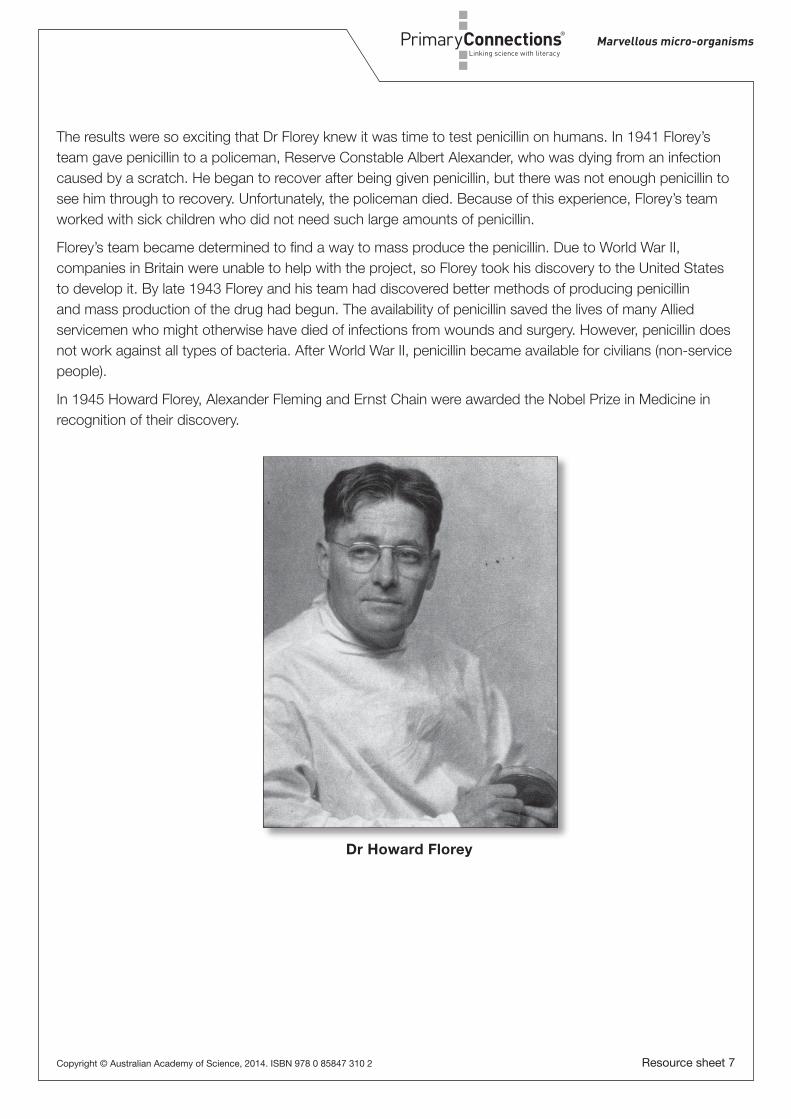
Marvellous micro-organisms
Copyright © Australian Academy of Science, 2014. ISBN 978 0 85847 310 2 Resource sheet 7
The results were so exciting that Dr Florey knew it was time to test penicillin on humans. In 1941 Florey’s team gave penicillin to a policeman, Reserve Constable Albert Alexander, who was dying from an infection caused by a scratch. He began to recover after being given penicillin, but there was not enough penicillin to see him through to recovery. Unfortunately, the policeman died. Because of this experience, Florey’s team worked with sick children who did not need such large amounts of penicillin.
Florey’s team became determined to find a way to mass produce the penicillin. Due to World War II, companies in Britain were unable to help with the project, so Florey took his discovery to the United States to develop it. By late 1943 Florey and his team had discovered better methods of producing penicillin and mass production of the drug had begun. The availability of penicillin saved the lives of many Allied servicemen who might otherwise have died of infections from wounds and surgery. However, penicillin does not work against all types of bacteria. After World War II, penicillin became available for civilians (non-service people).
In 1945 Howard Florey, Alexander Fleming and Ernst Chain were awarded the Nobel Prize in Medicine in recognition of their discovery.
Dr Howard Florey
PrimaryConnections
58 Lesson 8 Micro-organisms experts
Lesson 8 Micro-organisms experts
AT A GLANCE
To provide opportunities for students to represent what they know about micro-organisms, and to reflect on their learning during the unit.
Students
• work in collaborative teams to prepare a presentation on the role of micro-organisms in their lives
• make presentations to an audience.
Lesson focusIn the Evaluate phase students reflect on their learning journey and create a literacy product to re-represent their conceptual understanding.
Assessment focusSummative assessment of the Science Understanding descriptions is an important aspect of the Evaluate phase. In this lesson you will be looking for evidence of the extent to which students understand:
• that the growth and survival of micro-organisms, such as yeast and mould, is affected by the physical conditions of its environment.
Literacy products in this lesson provide useful work samples for assessment using the rubrics provided on the PrimaryConnections website.
EVA
LUAT
E
59Lesson 8 Micro-organisms experts
PrimaryConnections Marvellous micro-organisms
EVA
LUAT
E
Key lesson outcomesScienceStudents will be able to:
• explain that yeast obtains energy when it breaks down sugars, a process that releases a gas (carbon dioxide)
• explain that yeast grows faster at warm temperatures than when it is cold or hot
• explain that the gas produced by yeast forms pockets of gas in the dough and this makes bread rise
• describe the conditions that affect the growth of mould on food.
LiteracyStudents will be able to:
• engage in discussion to compare ideas and generate explanations
• demonstrate understanding of micro-organisms by representing ideas in a presentation
• make a presentation to an audience about their understanding of micro-organisms.
This lesson also provides opportunities to monitor the development of students’ general capabilities (highlighted through icons, see page 5).
Equipment
FOR THE CLASS FOR EACH TEAM
• class science journal• word wall• TWLH chart• team roles chart• team skills chart
• role wristbands or badges for Director, Manager and Speaker
• each team member’s science journal, including flow charts developed in Lesson 1 and the ‘Mould growth investigation planner’ (Resource sheet 6) from Lesson 6
• other resources identified by the team (eg, information communication technology equipment, paper or cardboard, costumes)
Lesson steps 1 Explain that students will be working in collaborative learning teams to develop a
presentation about the role of micro-organisms in their lives. Review the micro-organisms that students have learned about in the unit: yeast and moulds. Discuss what type of information students could include in their presentations, for example: • What are micro-organisms?• What conditions do micro-organisms like yeast and mould need to grow?• What role does yeast play in bread-making?• How do micro-organisms affect our lives?
2 Remind students to use the word wall, the TWLH chart and their science journals for background information. They might also like to do further research on micro-organisms to develop their presentations.
PrimaryConnections
Lesson 8 Micro-organisms experts60
PrimaryConnections E
VALU
ATE
3 Brainstorm presentation ideas, such as a speech, a multimedia presentation, a poster, a poem, a play or an interview and record ideas in the class science journal.
4 Explain the information that you will be looking for to assess students’ presentations:• well-organised information• evidence of research into the topic (optional, see step 2)• evidence of knowledge of the topic• clear oral communication• evidence of collaborative team work• creative presentation.
5 Form teams and allocate roles. Ask Managers to collect whatever team equipment they need.
6 Provide teams with time to plan, prepare and practise their presentations. 7 Invite an audience, such as another class, parents or a baker to view presentations. 8 Optional: Students use their understanding and experience of micro-organisms to
participate in whole-class, small group or individual construction of a narrative text about micro-organisms, for example, ‘The mystery of the multiplying mould’.
9 Optional: Students write questions and answers from their information reports for a game show. Collate the questions and play a quiz game, for example, a quiz called ‘The micro-organism factor’.
Curriculum linksIndigenous perspectives
• Prepare an oral presentation to an audience on the beliefs about and uses of fungi by Indigenous people.
• PrimaryConnections recommends working with Aboriginal and Torres Strait Islander community members to access local and relevant cultural perspectives. Protocols for engaging with Aboriginal and Torres Strait Islander community members are provided in state and territory education guidelines. Links to these are provided on the PrimaryConnections website (www.primaryconnections.org.au).
61Appendix 1
PrimaryConnections Marvellous micro-organismsPrimaryConnections
Appendix 1
How to organise collaborative learning teams (Year 3–Year 6)
IntroductionStudents working in collaborative teams is a key feature of the PrimaryConnections inquiry-based program. By working in collaborative teams students are able to:
• communicate and compare their ideas with one another• build on one another’s ideas• discuss and debate these ideas• revise and rethink their reasoning • present their final team understanding through multi-modal representations.
Opportunities for working in collaborative learning teams are highlighted throughout the unit.
Students need to be taught how to work collaboratively. They need to work together regularly to develop effective group learning skills.
The development of these team skills aligns to descriptions in the Australian Curriculum: English. See page 7.
Team structureThe first step towards teaching students to work collaboratively is to organise the team composition, roles and skills. Use the following ideas when planning collaborative learning with your class:
• Assign students to teams rather than allowing them to choose partners.• Vary the composition of each team. Give students opportunities to work with others
who might be of a different ability level, gender or cultural background.• Keep teams together for two or more lessons so that students have enough time to
learn to work together successfully.• If you cannot divide the students in your class into teams of three, form two teams of
two students rather than one team of four. It is difficult for students to work together effectively in larger groups.
• Keep a record of the students who have worked together as a team so that by the end of the year each student has worked with as many others as possible.
Team rolesStudents are assigned roles within their team (see below). Each team member has a specific role but all members share leadership responsibilities. Each member is accountable for the performance of the team and should be able to explain how the team obtained its results. Students must therefore be concerned with the performance of all team members. It is important to rotate team jobs each time a team works together so that all students have an opportunity to perform different roles.
For Year 3–Year 6, the teams consist of three students: Director, Manager and Speaker. (For Foundation–Year 2, teams consist of two students: Manager and Speaker.) Each member of the team should wear something that identifies them as belonging to that role,
Appendix 162
PrimaryConnections
such as a wristband, badge, or colour-coded peg. This makes it easier for you to identify which role each student is doing and it is easier for the students to remember what they and their team mates should be doing.
ManagerThe Manager is responsible for collecting and returning the team’s equipment. The Manager also tells the teacher if any equipment is damaged or broken. All team members are responsible for clearing up after an activity and getting the equipment ready to return to the equipment table.
SpeakerThe Speaker is responsible for asking the teacher or another team’s Speaker for help. If the team cannot resolve a question or decide how to follow a procedure, the Speaker is the only person who may leave the team and seek help. The Speaker shares any information they obtain with team members. The teacher may speak to all team members, not just to the Speaker. The Speaker is not the only person who reports to the class; each team member should be able to report on the team’s results.
Director (Year 3–Year 6)The Director is responsible for making sure that the team understands the team investigation and helps team members focus on each step. The Director is also responsible for offering encouragement and support. When the team has finished, the Director helps team members check that they have accomplished the investigation successfully. The Director provides guidance but is not the team leader.
Team skillsPrimaryConnections focuses on social skills that will help students work in collaborative teams and communicate more effectively.
Students will practise the following team skills throughout the year:• Move into your teams quickly and quietly.• Speak softly.• Stay with your team.• Take turns.• Perform your role.
To help reinforce these skills, display enlarged copies of the team skills chart (see the end of this Appendix) in a prominent place in the classroom.
Supporting equityIn science lessons, there can be a tendency for boys to manipulate materials and girls to record results. PrimaryConnections tries to avoid traditional social stereotyping by encouraging all students, irrespective of their gender, to maximise their learning potential. Collaborative learning encourages each student to participate in all aspects of team activities, including handling the equipment and taking intellectual risks.
Observe students when they are working in their collaborative teams and ensure that both girls and boys are participating in the hands-on activities.

PrimaryConnections PrimaryConnections
TEAM ROLES
Manager Collects and returns all materials the team needs
Speaker Asks the teacher and other team speakers for help
Director Makes sure that the team understands the team investigation and completes each step
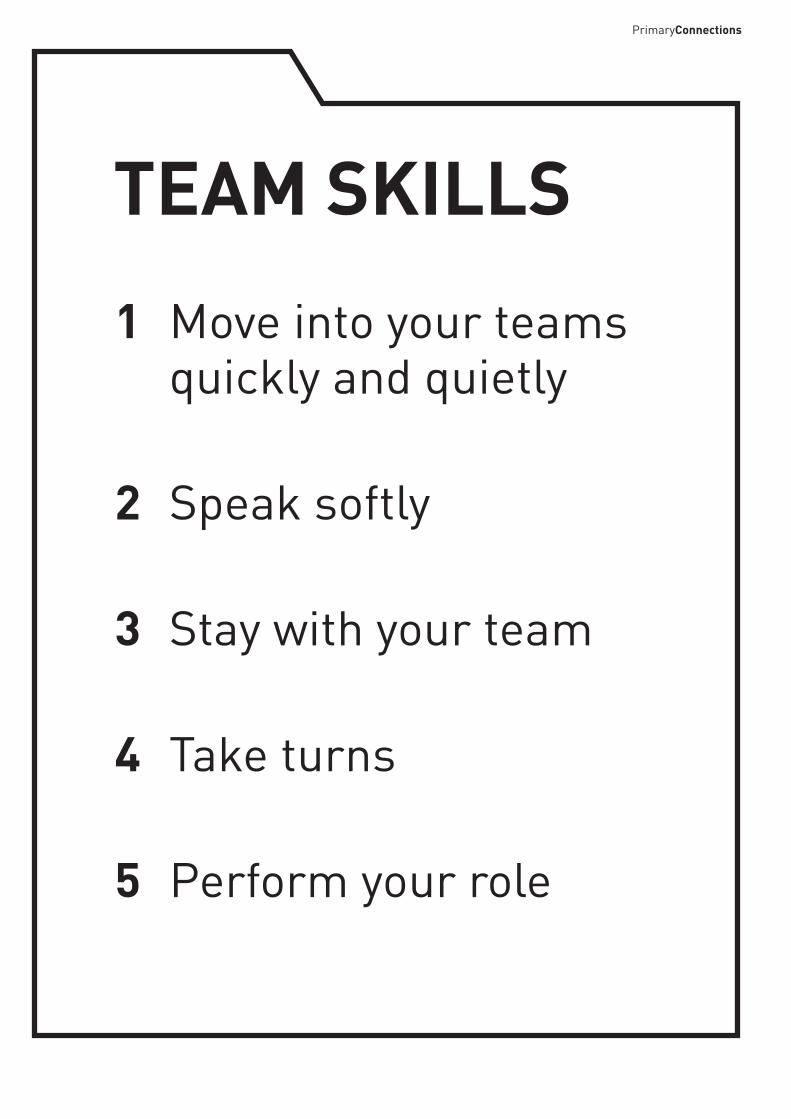
TEAM SKILLS
1 Move into your teams quickly and quietly
2 Speak softly
3 Stay with your team
4 Take turns
5 Perform your role
PrimaryConnections
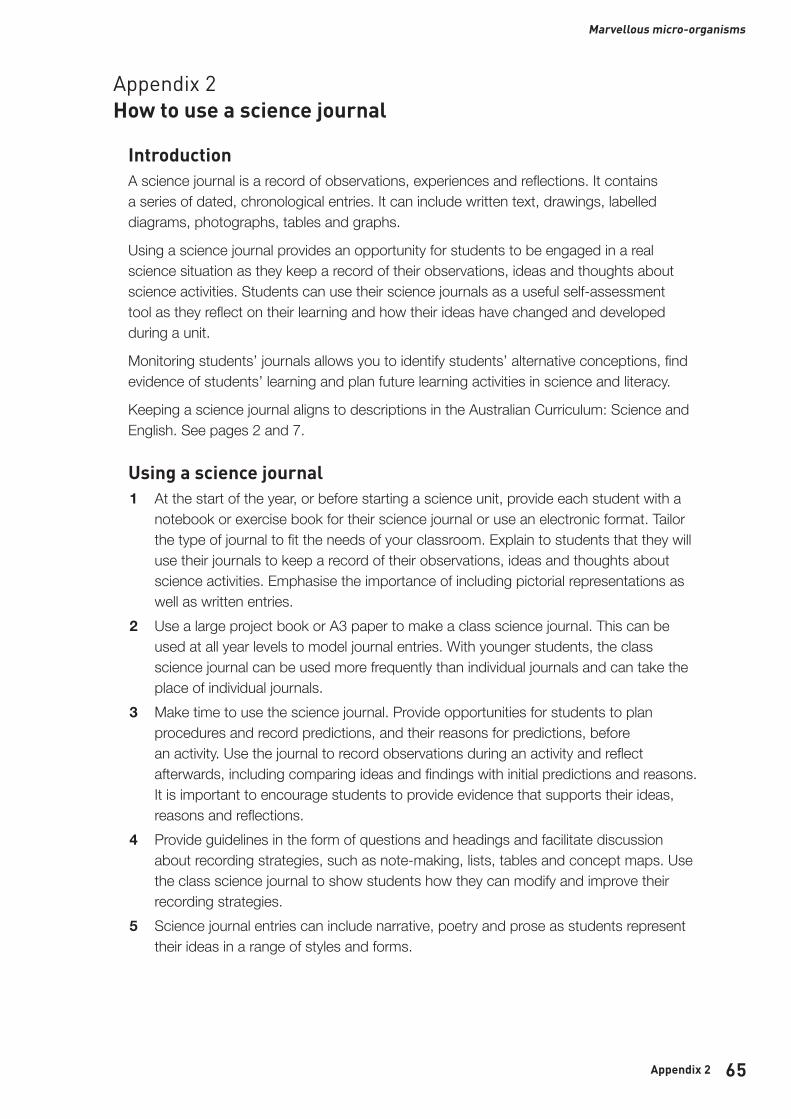
65
Marvellous micro-organisms
Appendix 2
Appendix 2 How to use a science journal
IntroductionA science journal is a record of observations, experiences and reflections. It contains a series of dated, chronological entries. It can include written text, drawings, labelled diagrams, photographs, tables and graphs.
Using a science journal provides an opportunity for students to be engaged in a real science situation as they keep a record of their observations, ideas and thoughts about science activities. Students can use their science journals as a useful self-assessment tool as they reflect on their learning and how their ideas have changed and developed during a unit.
Monitoring students’ journals allows you to identify students’ alternative conceptions, find evidence of students’ learning and plan future learning activities in science and literacy.
Keeping a science journal aligns to descriptions in the Australian Curriculum: Science and English. See pages 2 and 7.
Using a science journal 1 At the start of the year, or before starting a science unit, provide each student with a
notebook or exercise book for their science journal or use an electronic format. Tailor the type of journal to fit the needs of your classroom. Explain to students that they will use their journals to keep a record of their observations, ideas and thoughts about science activities. Emphasise the importance of including pictorial representations as well as written entries.
2 Use a large project book or A3 paper to make a class science journal. This can be used at all year levels to model journal entries. With younger students, the class science journal can be used more frequently than individual journals and can take the place of individual journals.
3 Make time to use the science journal. Provide opportunities for students to plan procedures and record predictions, and their reasons for predictions, before an activity. Use the journal to record observations during an activity and reflect afterwards, including comparing ideas and findings with initial predictions and reasons. It is important to encourage students to provide evidence that supports their ideas, reasons and reflections.
4 Provide guidelines in the form of questions and headings and facilitate discussion about recording strategies, such as note-making, lists, tables and concept maps. Use the class science journal to show students how they can modify and improve their recording strategies.
5 Science journal entries can include narrative, poetry and prose as students represent their ideas in a range of styles and forms.
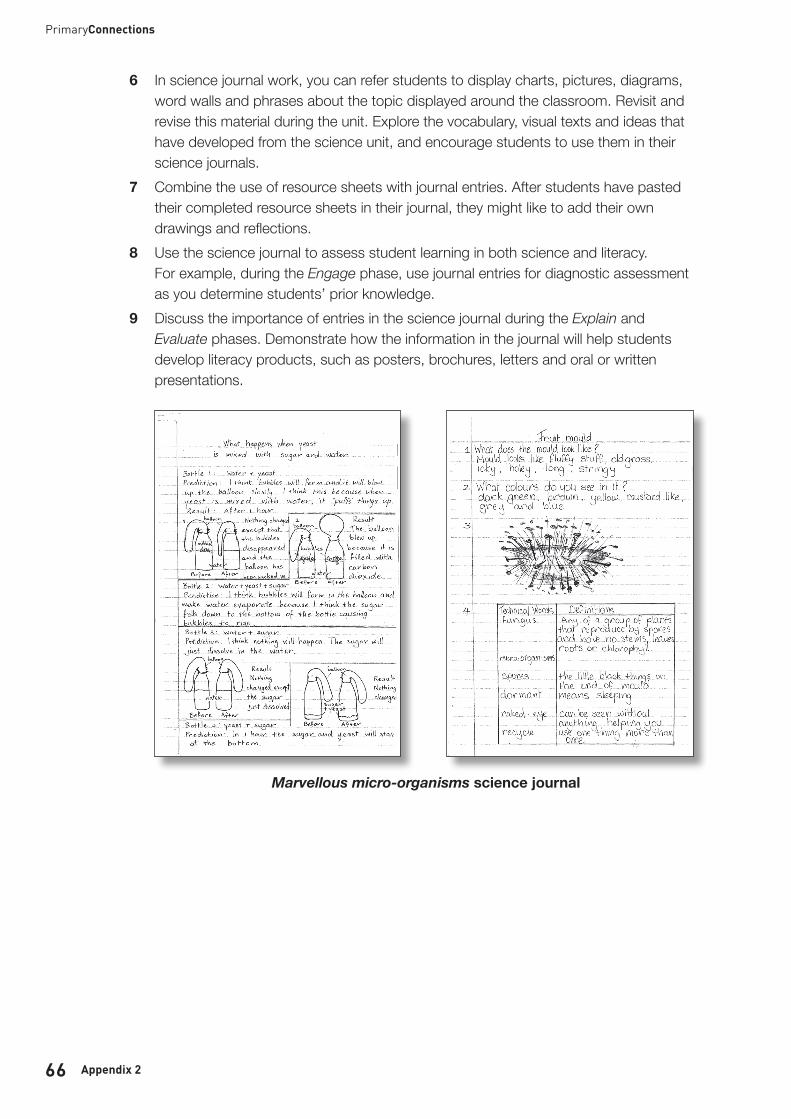
66
PrimaryConnections
Appendix 2
6 In science journal work, you can refer students to display charts, pictures, diagrams, word walls and phrases about the topic displayed around the classroom. Revisit and revise this material during the unit. Explore the vocabulary, visual texts and ideas that have developed from the science unit, and encourage students to use them in their science journals.
7 Combine the use of resource sheets with journal entries. After students have pasted their completed resource sheets in their journal, they might like to add their own drawings and reflections.
8 Use the science journal to assess student learning in both science and literacy. For example, during the Engage phase, use journal entries for diagnostic assessment as you determine students’ prior knowledge.
9 Discuss the importance of entries in the science journal during the Explain and Evaluate phases. Demonstrate how the information in the journal will help students develop literacy products, such as posters, brochures, letters and oral or written presentations.
Marvellous micro-organisms science journal
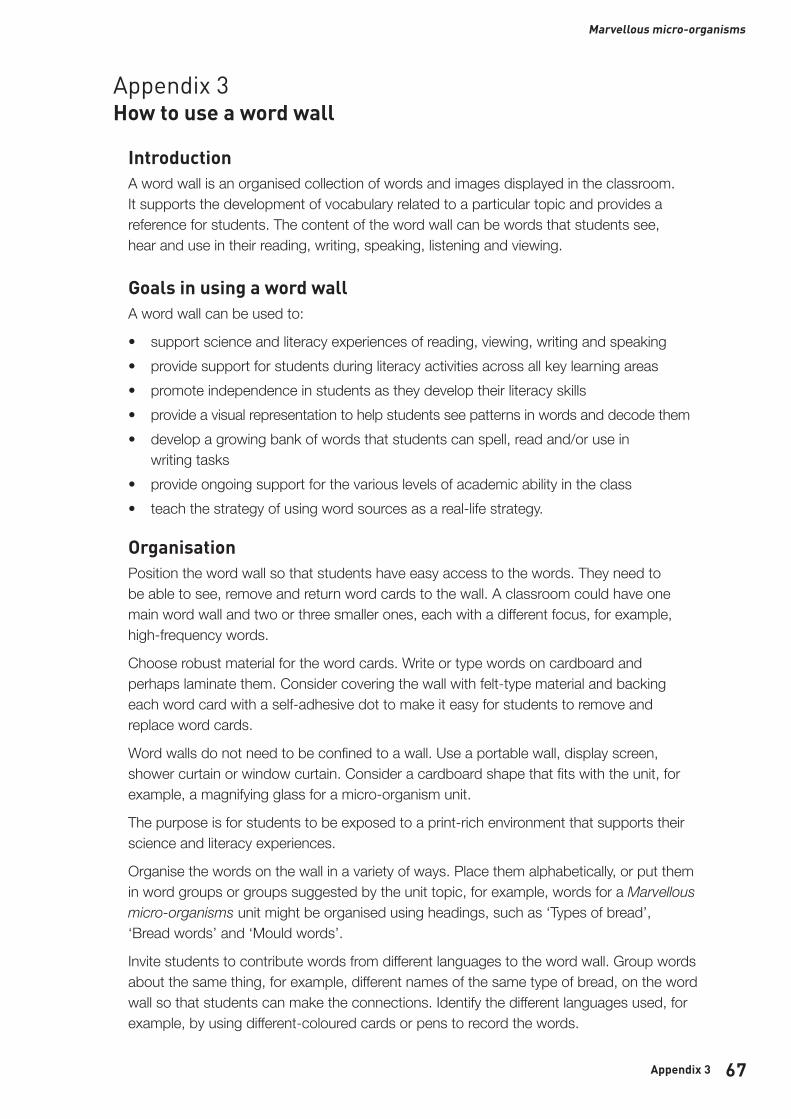
67
PrimaryConnections Marvellous micro-organisms
Appendix 3
Appendix 3 How to use a word wall
IntroductionA word wall is an organised collection of words and images displayed in the classroom. It supports the development of vocabulary related to a particular topic and provides a reference for students. The content of the word wall can be words that students see, hear and use in their reading, writing, speaking, listening and viewing.
Goals in using a word wallA word wall can be used to:
• support science and literacy experiences of reading, viewing, writing and speaking• provide support for students during literacy activities across all key learning areas• promote independence in students as they develop their literacy skills• provide a visual representation to help students see patterns in words and decode them• develop a growing bank of words that students can spell, read and/or use in
writing tasks• provide ongoing support for the various levels of academic ability in the class• teach the strategy of using word sources as a real-life strategy.
OrganisationPosition the word wall so that students have easy access to the words. They need to be able to see, remove and return word cards to the wall. A classroom could have one main word wall and two or three smaller ones, each with a different focus, for example, high-frequency words.
Choose robust material for the word cards. Write or type words on cardboard and perhaps laminate them. Consider covering the wall with felt-type material and backing each word card with a self-adhesive dot to make it easy for students to remove and replace word cards.
Word walls do not need to be confined to a wall. Use a portable wall, display screen, shower curtain or window curtain. Consider a cardboard shape that fits with the unit, for example, a magnifying glass for a micro-organism unit.
The purpose is for students to be exposed to a print-rich environment that supports their science and literacy experiences.
Organise the words on the wall in a variety of ways. Place them alphabetically, or put them in word groups or groups suggested by the unit topic, for example, words for a Marvellous micro-organisms unit might be organised using headings, such as ‘Types of bread’, ‘Bread words’ and ‘Mould words’.
Invite students to contribute words from different languages to the word wall. Group words about the same thing, for example, different names of the same type of bread, on the word wall so that students can make the connections. Identify the different languages used, for example, by using different-coloured cards or pens to record the words.
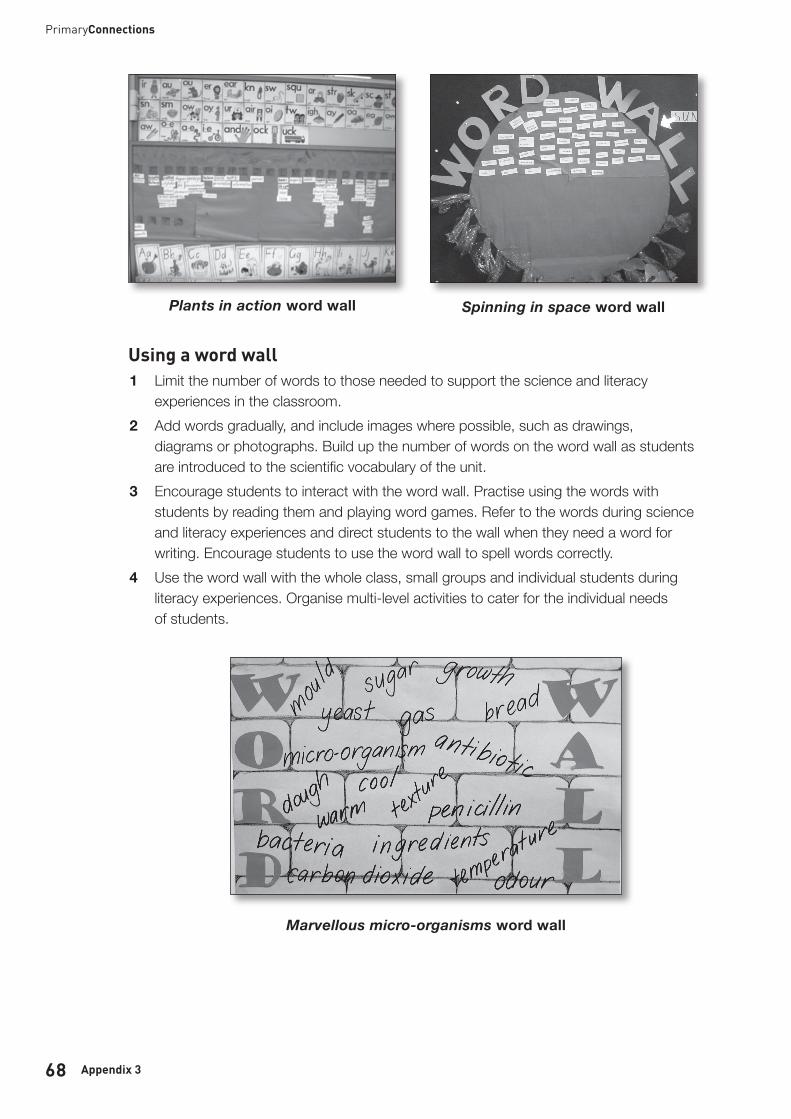
68
PrimaryConnections
Appendix 3
Plants in action word wall Spinning in space word wall
Using a word wall 1 Limit the number of words to those needed to support the science and literacy
experiences in the classroom. 2 Add words gradually, and include images where possible, such as drawings,
diagrams or photographs. Build up the number of words on the word wall as students are introduced to the scientific vocabulary of the unit.
3 Encourage students to interact with the word wall. Practise using the words with students by reading them and playing word games. Refer to the words during science and literacy experiences and direct students to the wall when they need a word for writing. Encourage students to use the word wall to spell words correctly.
4 Use the word wall with the whole class, small groups and individual students during literacy experiences. Organise multi-level activities to cater for the individual needs of students.
Marvellous micro-organisms word wall
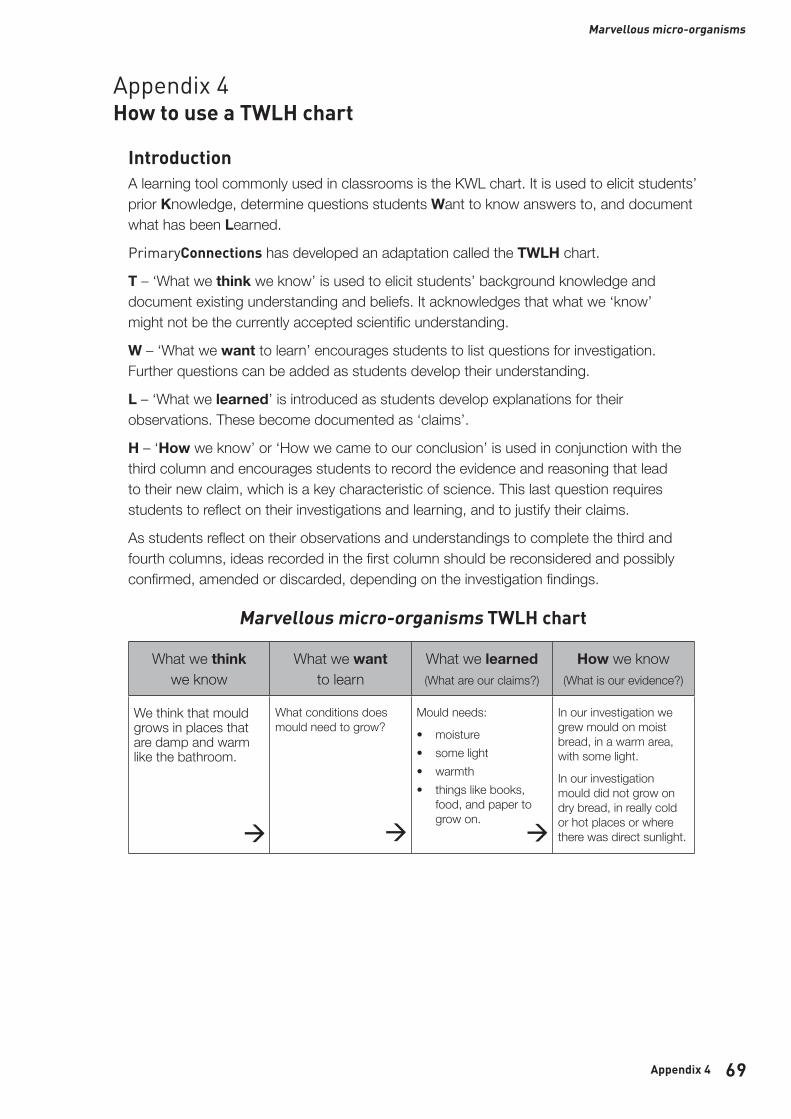
69
PrimaryConnections Marvellous micro-organisms
Appendix 4
Appendix 4 How to use a TWLH chart
IntroductionA learning tool commonly used in classrooms is the KWL chart. It is used to elicit students’ prior Knowledge, determine questions students Want to know answers to, and document what has been Learned.
PrimaryConnections has developed an adaptation called the TWLH chart.
T – ‘What we think we know’ is used to elicit students’ background knowledge and document existing understanding and beliefs. It acknowledges that what we ‘know’ might not be the currently accepted scientific understanding.
W – ‘What we want to learn’ encourages students to list questions for investigation. Further questions can be added as students develop their understanding.
L – ‘What we learned’ is introduced as students develop explanations for their observations. These become documented as ‘claims’.
H – ‘How we know’ or ‘How we came to our conclusion’ is used in conjunction with the third column and encourages students to record the evidence and reasoning that lead to their new claim, which is a key characteristic of science. This last question requires students to reflect on their investigations and learning, and to justify their claims.
As students reflect on their observations and understandings to complete the third and fourth columns, ideas recorded in the first column should be reconsidered and possibly confirmed, amended or discarded, depending on the investigation findings.
Marvellous micro-organisms TWLH chart
What we think we know
What we want to learn
What we learned (What are our claims?)
How we know (What is our evidence?)
We think that mould grows in places that are damp and warm like the bathroom.
What conditions does mould need to grow?
Mould needs:
• moisture• some light• warmth • things like books,
food, and paper to grow on.
In our investigation we grew mould on moist bread, in a warm area, with some light.
In our investigation mould did not grow on dry bread, in really cold or hot places or where there was direct sunlight.
70
PrimaryConnections
Appendix 5
Appendix 5
How to facilitate evidence-based discussions
IntroductionArgumentation is at the heart of what scientists do; they pose questions, make claims, collect evidence, debate with other scientists and compare their ideas with others in the field.
In the primary science classroom, argumentation is about students:
• articulating and communicating their thinking and understanding to others• sharing information and insights• presenting their ideas and evidence • receiving feedback (and giving feedback to others) • finding flaws in their own and others’ reasoning• reflecting on how their ideas have changed.It is through articulating, communicating and debating their ideas and arguments that students are able to develop a deep understanding of science content.
Establish normsIntroduce norms before starting a science discussion activity. For example,
• Listen when others speak.• Ask questions of each other.• Criticise ideas not people.• Listen to and discuss all ideas before selecting one.
Claim, Evidence and ReasoningIn science, arguments that make claims are supported by evidence. Sophisticated arguments follow the QCER process:
Q What question are you trying to answer? For example, ‘What happens to mould growth when we change the amount of moisture?’
C The claim, for example, ‘Mould growth increases in moist conditions.’
E The evidence, for example, ‘We tested two samples of food. One was moist and one was dry. The moist food sample grew more mould.’
R The reasoning: saying how the evidence supports the claim, for example, ‘Since the only thing that changed in the test was the amount of moisture, the increase in mould growth is due to the food sample being moist. This evidence is also consistent with other scientific evidence and claims, for example, the claim that mould spores are commonly found in the air but will only grow in the right conditions.’
Students need to be encouraged to move from making claims only, to citing evidence to support their claims. Older students develop full conclusions that include a claim, evidence and reasoning. This is an important characteristic of the nature of science and an aspect of scientific literacy. Using science question starters (see next section) helps to promote evidence-based discussion in the classroom.
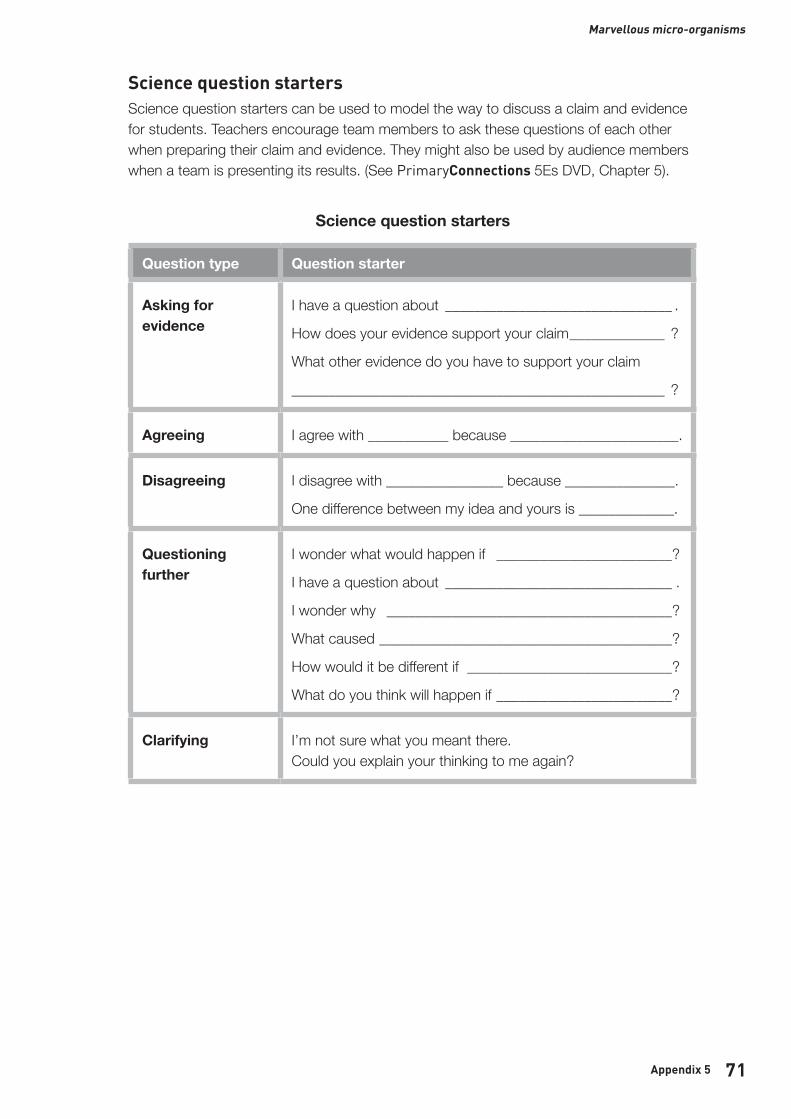
71
PrimaryConnections Marvellous micro-organisms
Appendix 5
Science question startersScience question starters can be used to model the way to discuss a claim and evidence for students. Teachers encourage team members to ask these questions of each other when preparing their claim and evidence. They might also be used by audience members when a team is presenting its results. (See PrimaryConnections 5Es DVD, Chapter 5).
Science question starters
Question type Question starter
Asking for evidence
I have a question about _______________________________ .
How does your evidence support your claim _____________ ?
What other evidence do you have to support your claim
___________________________________________________ ?
Agreeing I agree with ___________ because _______________________.
Disagreeing I disagree with ________________ because _______________.
One difference between my idea and yours is _____________.
Questioning further
I wonder what would happen if ________________________?
I have a question about _______________________________ .
I wonder why _______________________________________?
What caused ________________________________________?
How would it be different if ____________________________?
What do you think will happen if ________________________?
Clarifying I’m not sure what you meant there. Could you explain your thinking to me again?
72
PrimaryConnections
Appendix 6
Appendix 6 How to write questions for investigation
IntroductionScientific inquiry and investigation are focused on and driven by questions. Some questions are open to scientific investigation, while others are not. Students often experience difficulty in developing their own questions for investigation.
This appendix explains the structure of questions and how they are related to variables in a scientific investigation. It describes an approach to developing questions for investigation and provides a guide for constructing investigable questions with your students. Developing their own questions for investigation helps students to have ownership of their investigation and is an important component of scientific literacy.
The structure of questions for investigationThe way that a question is posed in a scientific investigation affects the type of investigation that is carried out and the way information is collected. Examples of different types of questions for investigation include:
• How does/do…?• What effect does…? • Which type of…?• What happens to…?
All science investigations involve variables. Variables are things that can be changed, measured or kept the same (controlled) in an investigation.
• The independent variable is the thing that is changed during the investigation. • The dependent variable is the thing that is affected by the independent variable, and
is measured or observed. • Controlled variables are all the other things in an investigation that could change but
are kept the same to make it a fair test.
An example of the way students can structure questions for investigation is:
What happens to ______________________when we change _______________________? dependent variable independent variable
The type of question for investigation in Marvellous micro-organisms refers to two variables and the relationship between them, for example, an investigation of the variables that affect mould growth might consider the effect of moisture or temperature. The question for investigation might be:
Q1: What happens to mould growth when we change the amount of moisture?
In this question, mould growth depends on moisture. The amount of moisture is the thing that is changed (independent variable) and mould growth is the thing that is measured or observed (dependent variable).
73
PrimaryConnections Marvellous micro-organisms
Appendix 6
Q2: What happens to mould growth when we change the temperature?
In this question, mould growth depends on temperature. Temperature is the thing that is changed (independent variable) and mould growth is the thing that is measured or observed (dependent variable).
Developing questions for investigation The process of developing questions for investigation in Marvellous micro-organisms is to:
• Provide a context and reason for investigating.• Pose a general focus question in the form of: ‘What things might affect _____________
(dependent variable)?’.For example, ‘What things might affect mould growth?’
• Use questioning to elicit the things (independent variables) students think could affect the dependent variable variable (for example, the amount of moisture, the temperature, the amount of light).By using questions, elicit the things that students can investigate, such as the amount of moisture. These are the things that could be changed (independent variables), which students predict will affect the thing that is observed or measured (dependent variable).
Each of the independent variables can be developed into a question for investigation.
• Use the scaffold ‘What happens to _____________ when we change the __________?’ to help students develop specific questions for their investigation.For example, ‘What happens to the mould growth when we change the amount of moisture?’
• Ask students to review their question for investigation after they have conducted their investigation and collected and analysed their information.
• Encouraging students to review their question will help them to understand the relationship between what was changed and what was measured in their investigation. It also helps students to see how the information they collected relates to their prediction.
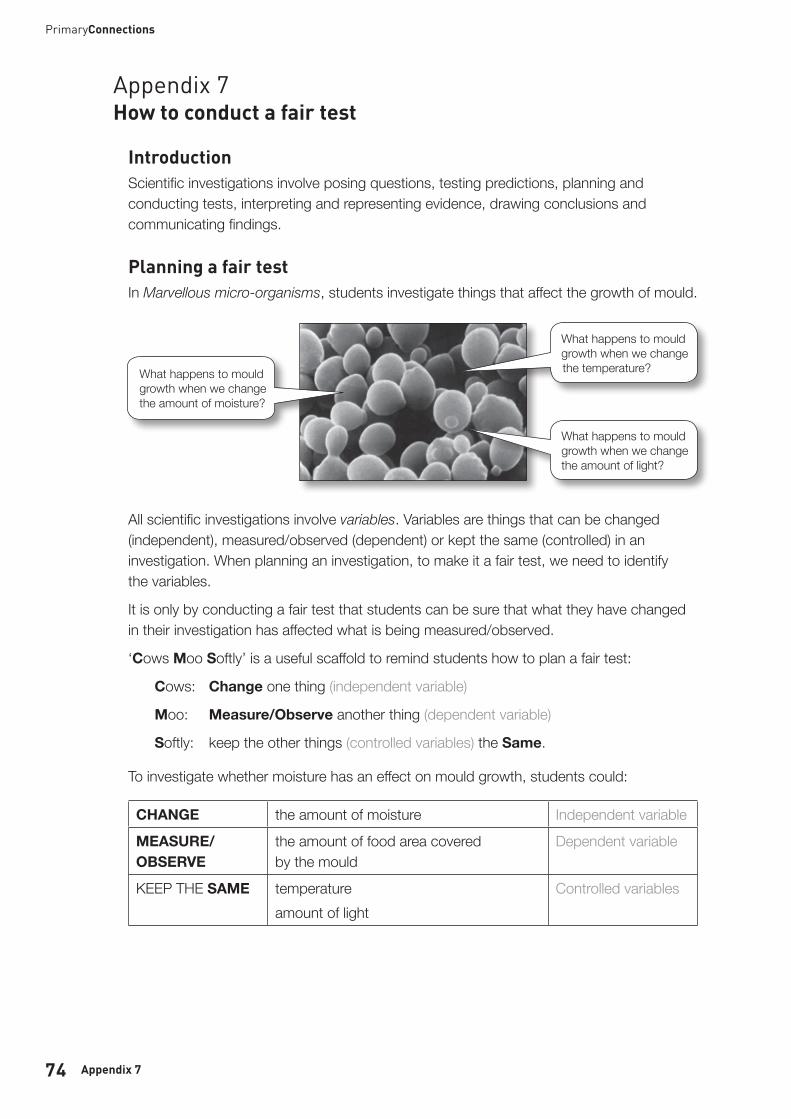
74
PrimaryConnections
Appendix 7
Appendix 7 How to conduct a fair test
IntroductionScientific investigations involve posing questions, testing predictions, planning and conducting tests, interpreting and representing evidence, drawing conclusions and communicating findings.
Planning a fair testIn Marvellous micro-organisms, students investigate things that affect the growth of mould.
All scientific investigations involve variables. Variables are things that can be changed (independent), measured/observed (dependent) or kept the same (controlled) in an investigation. When planning an investigation, to make it a fair test, we need to identify the variables.
It is only by conducting a fair test that students can be sure that what they have changed in their investigation has affected what is being measured/observed.
‘Cows Moo Softly’ is a useful scaffold to remind students how to plan a fair test:
Cows: Change one thing (independent variable)
Moo: Measure/Observe another thing (dependent variable)
Softly: keep the other things (controlled variables) the Same.
To investigate whether moisture has an effect on mould growth, students could:
CHANGE the amount of moisture Independent variable
MEASURE/OBSERVE
the amount of food area covered by the mould
Dependent variable
KEEP THE SAME temperatureamount of light
Controlled variables
What happens to mould growth when we change the amount of light?
What happens to mould growth when we change the temperature?What happens to mould
growth when we change the amount of moisture?
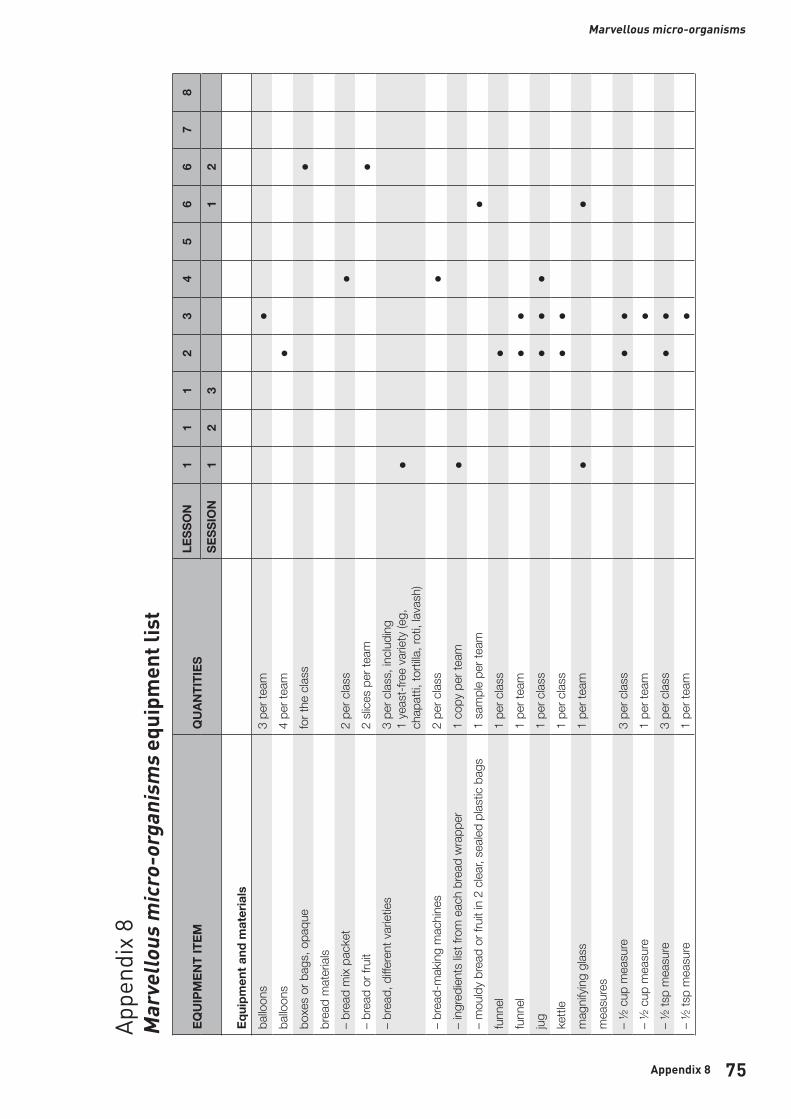
75
PrimaryConnections Marvellous micro-organisms
Appendix 8
App
endi
x 8
Mar
vello
us m
icro
-org
anis
ms
equi
pmen
t lis
t
EQU
IPM
ENT
ITEM
QU
ANTI
TIES
LESS
ON
11
12
34
56
67
8
SESS
ION
12
31
2
Equi
pmen
t and
mat
eria
lsba
lloon
s3
per t
eam
ballo
ons
4 pe
r tea
mbo
xes
or b
ags,
opa
que
for t
he c
lass
brea
d m
ater
ials
– br
ead
mix
pack
et2
per c
lass
– br
ead
or fr
uit
2 sli
ces
per t
eam
– br
ead,
diffe
rent
var
ieties
3
per c
lass,
inclu
ding
1
yeas
t-fre
e va
riety
(eg,
ch
apat
ti, to
rtilla
, rot
i, lav
ash)
– br
ead-
mak
ing
mac
hine
s2
per c
lass
– in
gred
ients
list f
rom
eac
h br
ead
wra
pper
1 co
py p
er te
am–
mou
ldy
brea
d or
frui
t in
2 cle
ar, s
ealed
plas
tic b
ags
1 sa
mpl
e pe
r tea
mfu
nnel
1 pe
r clas
sfu
nnel
1 pe
r tea
mju
g1
per c
lass
kettl
e1
per c
lass
mag
nify
ing
glas
s1
per t
eam
mea
sure
s–
½ c
up m
easu
re3
per c
lass
– ½
cup
mea
sure
1 pe
r tea
m–
½ ts
p m
easu
re3
per c
lass
– ½
tsp
mea
sure
1 pe
r tea
m
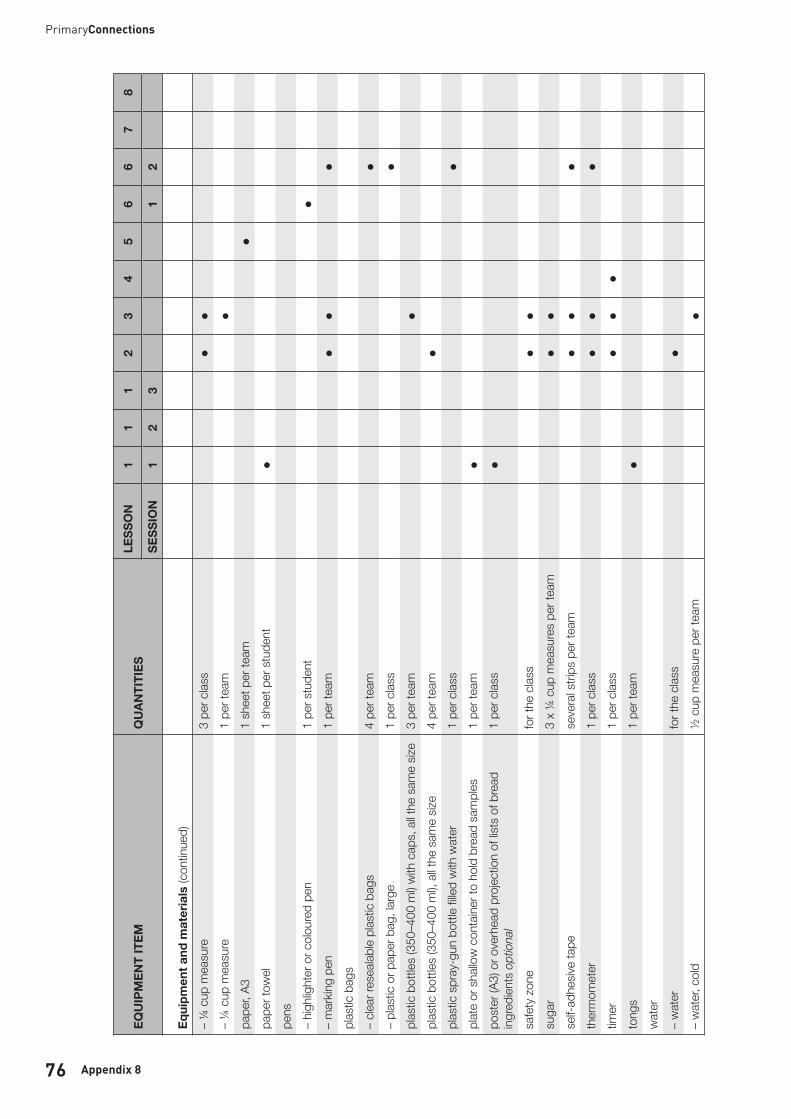
76
PrimaryConnections
Appendix 8
EQU
IPM
ENT
ITEM
QU
ANTI
TIES
LESS
ON
11
12
34
56
67
8
SESS
ION
12
31
2
Equi
pmen
t and
mat
eria
ls (c
ontin
ued)
– ¼
cup
mea
sure
3 pe
r clas
s–
¼ c
up m
easu
re1
per t
eam
pape
r, A3
1 sh
eet p
er te
ampa
per t
owel
1 sh
eet p
er s
tude
ntpe
ns–
high
light
er o
r col
oure
d pe
n1
per s
tude
nt–
mar
king
pen
1 pe
r tea
mpl
astic
bag
s–
clear
rese
alabl
e pl
astic
bag
s4
per t
eam
– pl
astic
or p
aper
bag
, lar
ge1
per c
lass
plas
tic b
ottle
s (3
50–4
00 m
l) with
cap
s, a
ll the
sam
e siz
e3
per t
eam
plas
tic b
ottle
s (3
50–4
00 m
l), all
the
sam
e siz
e4
per t
eam
plas
tic s
pray
-gun
bot
tle fi
lled
with
wat
er1
per c
lass
plat
e or
sha
llow
con
tain
er to
hol
d br
ead
sam
ples
1 pe
r tea
mpo
ster
(A3)
or o
verh
ead
proj
ectio
n of
lists
of b
read
in
gred
ients
opt
iona
l1
per c
lass
safe
ty z
one
for t
he c
lass
suga
r3
x ¼
cup
mea
sure
s pe
r tea
mse
lf-ad
hesiv
e ta
pese
vera
l stri
ps p
er te
amth
erm
omet
er1
per c
lass
timer
1 pe
r clas
sto
ngs
1 pe
r tea
mw
ater
– w
ater
for t
he c
lass
– w
ater
, col
d½
cup
mea
sure
per
team
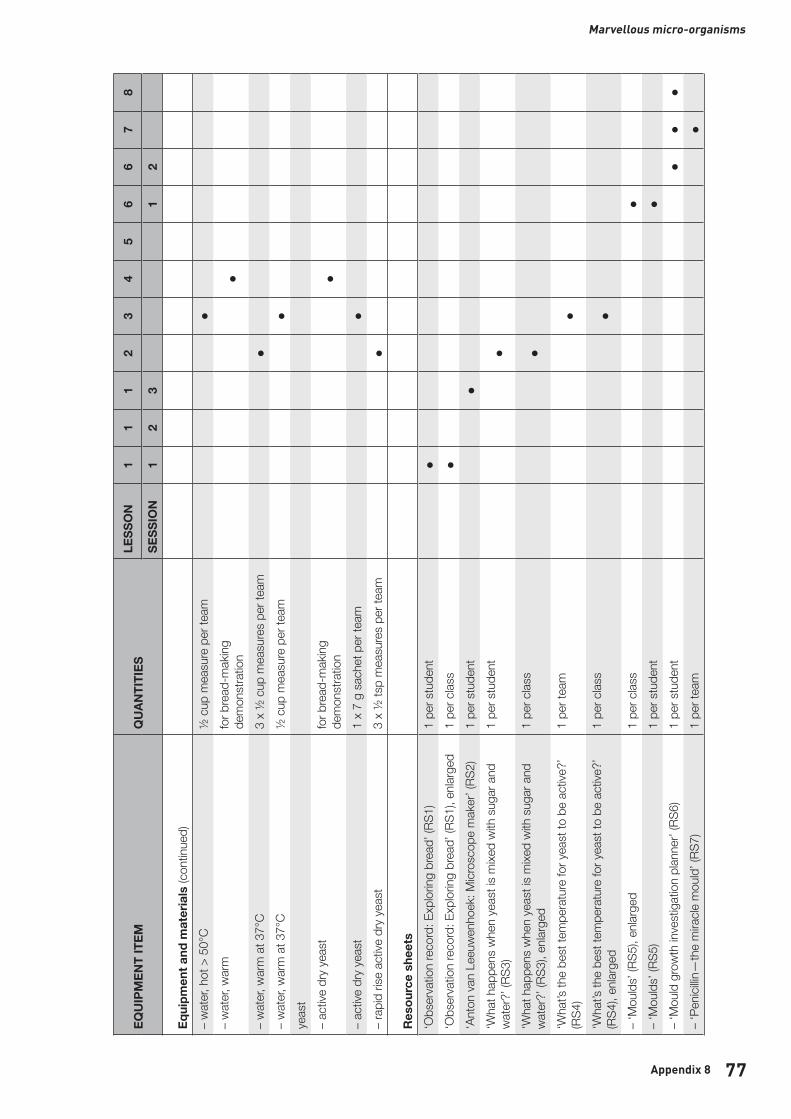
77
PrimaryConnections Marvellous micro-organisms
Appendix 8
EQU
IPM
ENT
ITEM
QU
ANTI
TIES
LESS
ON
11
12
34
56
67
8
SESS
ION
12
31
2
Equi
pmen
t and
mat
eria
ls (c
ontin
ued)
– w
ater
, hot
> 5
0°C
½ c
up m
easu
re p
er te
am–
wat
er, w
arm
for b
read
-mak
ing
dem
onst
ratio
n–
wat
er, w
arm
at 3
7°C
3 x
½ c
up m
easu
res
per t
eam
– w
ater
, war
m a
t 37°
C½
cup
mea
sure
per
team
yeas
t–
activ
e dr
y ye
ast
for b
read
-mak
ing
dem
onst
ratio
n–
activ
e dr
y ye
ast
1 x
7 g
sach
et p
er te
am–
rapi
d ris
e ac
tive
dry
yeas
t3
x ½
tsp
mea
sure
s pe
r tea
m
Res
ourc
e sh
eets
‘Obs
erva
tion
reco
rd: E
xplo
ring
brea
d’ (R
S1)
1 pe
r stu
dent
‘Obs
erva
tion
reco
rd: E
xplo
ring
brea
d’ (R
S1),
enlar
ged
1 pe
r clas
s‘A
nton
van
Lee
uwen
hoek
: Micr
osco
pe m
aker
’ (RS
2)1
per s
tude
nt‘W
hat h
appe
ns w
hen
yeas
t is
mixe
d w
ith s
ugar
and
w
ater
?’ (R
S3)
1 pe
r stu
dent
‘Wha
t hap
pens
whe
n ye
ast i
s m
ixed
with
sug
ar a
nd
wat
er?’
(RS3
), en
large
d1
per c
lass
‘Wha
t’s th
e be
st te
mpe
ratu
re fo
r yea
st to
be
activ
e?’
(RS4
)1
per t
eam
‘Wha
t’s th
e be
st te
mpe
ratu
re fo
r yea
st to
be
activ
e?’
(RS4
), en
large
d1
per c
lass
– ‘M
ould
s’ (R
S5),
enlar
ged
1 pe
r clas
s–
‘Mou
lds’
(RS5
)1
per s
tude
nt–
‘Mou
ld g
row
th in
vest
igat
ion
plan
ner’
(RS6
)1
per s
tude
nt–
‘Pen
icillin
—th
e m
iracle
mou
ld’ (
RS7)
1 pe
r tea
m
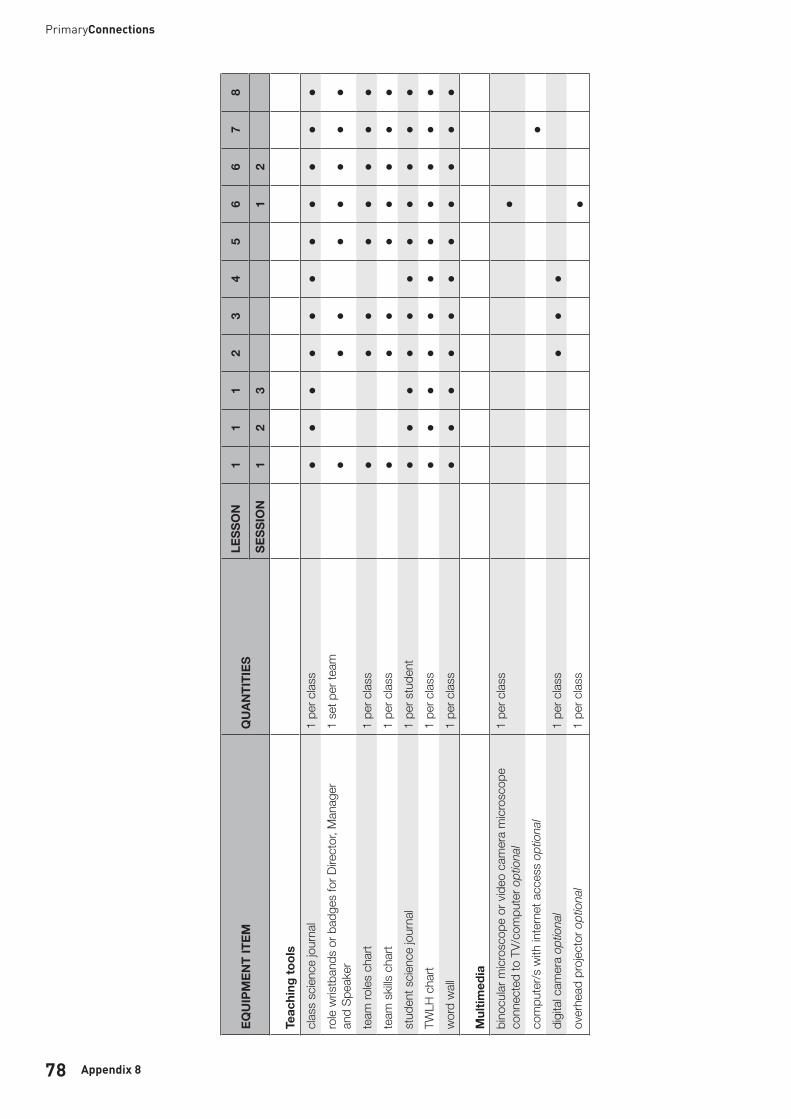
78
PrimaryConnections
Appendix 8
EQU
IPM
ENT
ITEM
QU
ANTI
TIES
LESS
ON
11
12
34
56
67
8
SESS
ION
12
31
2
Teac
hing
tool
scla
ss s
cienc
e jo
urna
l1
per c
lass
role
wris
tban
ds o
r bad
ges
for D
irect
or, M
anag
er
and
Spea
ker
1 se
t per
team
team
roles
cha
rt1
per c
lass
team
skil
ls ch
art
1 pe
r clas
sst
uden
t scie
nce
jour
nal
1 pe
r stu
dent
TWLH
cha
rt1
per c
lass
wor
d w
all1
per c
lass
Mul
timed
iabi
nocu
lar m
icros
cope
or v
ideo
cam
era
micr
osco
pe
conn
ecte
d to
TV/
com
pute
r opt
iona
l1
per c
lass
com
pute
r/s w
ith in
tern
et a
cces
s op
tiona
ldi
gita
l cam
era
optio
nal
1 pe
r clas
sov
erhe
ad p
rojec
tor o
ptio
nal
1 pe
r clas
s

79
PrimaryConnections Marvellous micro-organisms
Appendix 9
App
endi
x 9
Mar
vello
us m
icro
-org
anis
ms
unit
over
view
SC
IEN
CE
OU
TCO
ME
S*
LITE
RA
CY
OU
TCO
ME
S*
LES
SO
N S
UM
MA
RY
AS
SE
SS
ME
NT
OP
PO
RTU
NIT
IES
Stud
ents
will
be a
ble
to
repr
esen
t the
ir cu
rrent
un
ders
tand
ings
as
they
:St
uden
ts w
ill be
abl
e to
:St
uden
ts:
ENGAGE
Less
on 1
The
Y fa
ctor
Sess
ion
1Ex
plor
ing
brea
d
Sess
ion
2Th
e br
ead-
mak
ing
proc
ess
Sess
ion
3An
ton
van
Leeu
wen
hoek
: M
icros
cope
m
aker
• us
e th
eir s
ense
s of
sig
ht, t
ouch
, sm
ell
and
tast
e to
mak
e ob
serv
atio
ns•
repr
esen
t wha
t the
y th
ink
they
kno
w a
bout
th
e br
ead-
mak
ing
proc
ess
as a
flow
cha
rt•
expl
ain th
at y
east
is
an in
gred
ient i
n so
me
brea
ds•
desc
ribe
Anto
n va
n Le
euw
enho
ek’s
cont
ribut
ion
to th
e st
udy
of m
icro-
orga
nism
s.
• co
ntrib
ute
to d
iscus
sions
ab
out d
iffere
nt ty
pes
of
brea
d•
use
brea
d lab
els to
loca
te
ingr
edien
t inf
orm
atio
n an
d sy
nthe
sise
unde
rsta
ndin
g of
bre
ad in
gred
ients
• re
cord
info
rmat
ion
in a
ta
ble
to h
elp d
evelo
p an
ex
plan
atio
n of
the
role
of
yeas
t in
brea
d•
repr
esen
t wha
t the
y th
ink
they
kno
w a
bout
the
brea
d-m
akin
g pr
oces
s as
a
flow
cha
rt•
unde
rsta
nd th
e pu
rpos
e,
stru
ctur
e an
d fe
atur
es o
f a
fact
ual r
ecou
nt
• re
ad a
fact
ual r
ecou
nt
abou
t Ant
on v
an
Leeu
wen
hoek
and
iden
tify
the
key
poin
ts.
Sess
ion
1Ex
plor
ing
brea
d•
obse
rve,
tast
e an
d re
cord
in
form
atio
n ab
out d
iffere
nt
type
s of
bre
ad•
shar
e an
d di
scus
s ob
serv
atio
ns.
Sess
ion
2Th
e br
ead-
mak
ing
proc
ess
• us
e a
flow
cha
rt to
re
pres
ent w
hat t
hey
thin
k th
ey k
now
abo
ut th
e br
ead-
mak
ing
proc
ess.
Sess
ion
3An
ton
van
Leeu
wen
hoek
: M
icro
scop
e m
aker
• re
ad a
nd d
iscus
s a
fact
ual
reco
unt a
bout
Ant
on v
an
Leeu
wen
hoek
• di
scus
s th
e w
ords
‘m
icros
cope
’ and
‘m
icro-
orga
nism
’•
refle
ct o
n th
e les
son
Dia
gnos
tic a
sses
smen
t •
‘Obs
erva
tion
reco
rd:
Expl
orin
g br
ead’
(R
esou
rce
shee
t 1)
• Fl
ow c
hart
• Sc
ience
jour
nal e
ntrie
s •
TWLH
cha
rt an
d di
scus
sion
* The
se le
sson
out
com
es a
re a
ligne
d to
relev
ant d
escr
iptio
ns o
f the
Aus
tralia
n Cu
rricu
lum
. See
pag
e 2
for S
cienc
e an
d pa
ge 7
for E
nglis
h an
d M
athe
mat
ics.

80
PrimaryConnections
Appendix 9
SC
IEN
CE
OU
TCO
ME
S*
LITE
RA
CY
OU
TCO
ME
S*
LES
SO
N S
UM
MA
RY
AS
SE
SS
ME
NT
OP
PO
RTU
NIT
IES
Stud
ents
will
be a
ble
to:
Stud
ents
will
be a
ble
to:
Stud
ents
:
EXPLORE
Less
on 2
Yeas
t fea
st•
follo
w d
irect
ions
to
inve
stig
ate
som
e in
gred
ients
that
mak
e ye
ast p
rodu
ce g
as
(car
bon
diox
ide)
• m
ake
a pr
edict
ion,
ob
serv
e, re
cord
and
in
terp
ret t
he re
sults
of
their
inve
stig
atio
n•
follo
w s
afet
y pr
oced
ures
• id
entif
y th
e fe
atur
es th
at
mad
e th
eir in
vest
igat
ion
a fa
ir te
st•
expl
ain th
at w
hen
wat
er
and
suga
r are
add
ed to
ye
ast i
t pro
duce
s a
gas.
• fo
llow
a p
roce
dura
l tex
t to
com
plet
e an
inve
stig
atio
n•
use
oral,
writ
ten
and
visua
l lang
uage
to re
cord
an
d di
scus
s in
vest
igat
ion
resu
lts•
enga
ge in
disc
ussio
n to
com
pare
idea
s, a
nd
relat
e ev
iden
ce fr
om
an in
vest
igat
ion
to
expl
anat
ions
abo
ut y
east
• de
mon
stra
te
unde
rsta
ndin
g of
the
effe
ct o
f sug
ar a
nd w
ater
on
yea
st a
ctivi
ty th
roug
h sc
ience
jour
nal e
ntrie
s.
• re
view
wha
t the
y th
ink
they
kn
ow a
bout
yea
st•
read
and
disc
uss
a pr
oced
ural
text
• ob
serv
e, re
cord
and
de
duce
that
yea
st
prod
uces
a g
as w
hen
mixe
d w
ith s
ome
ingr
edien
ts.
Form
ativ
e as
sess
men
t •
TWLH
cha
rt•
Disc
ussio
n ab
out s
afet
y•
Scien
ce jo
urna
l ent
ries
* The
se le
sson
out
com
es a
re a
ligne
d to
relev
ant d
escr
iptio
ns o
f the
Aus
tralia
n Cu
rricu
lum
. See
pag
e 2
for S
cienc
e an
d pa
ge 7
for E
nglis
h an
d M
athe
mat
ics.
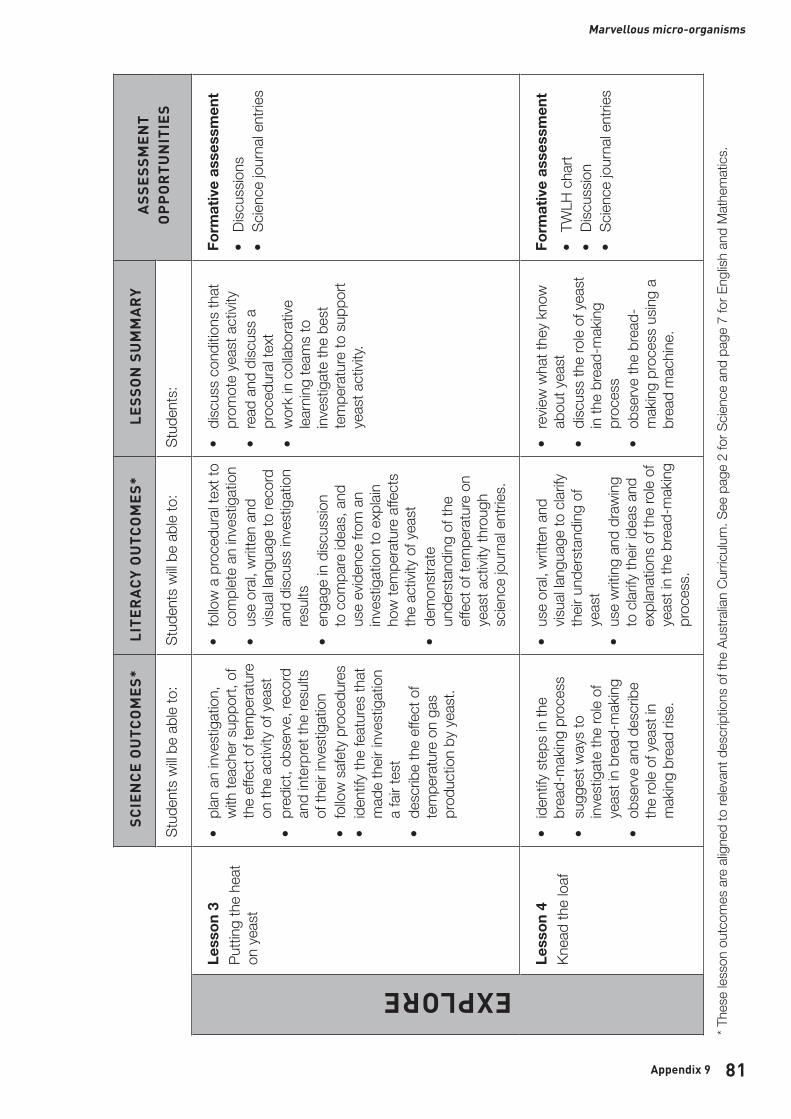
81
PrimaryConnections Marvellous micro-organisms
Appendix 9
SC
IEN
CE
OU
TCO
ME
S*
LITE
RA
CY
OU
TCO
ME
S*
LES
SO
N S
UM
MA
RY
AS
SE
SS
ME
NT
OP
PO
RTU
NIT
IES
Stud
ents
will
be a
ble
to:
Stud
ents
will
be a
ble
to:
Stud
ents
:
EXPLORE
Less
on 3
Putti
ng th
e he
at
on y
east
• pl
an a
n in
vest
igat
ion,
w
ith te
ache
r sup
port,
of
the
effe
ct o
f tem
pera
ture
on
the
activ
ity o
f yea
st•
pred
ict, o
bser
ve, r
ecor
d an
d in
terp
ret t
he re
sults
of
their
inve
stig
atio
n•
follo
w s
afet
y pr
oced
ures
• id
entif
y th
e fe
atur
es th
at
mad
e th
eir in
vest
igat
ion
a fa
ir te
st•
desc
ribe
the
effe
ct o
f te
mpe
ratu
re o
n ga
s pr
oduc
tion
by y
east
.
• fo
llow
a p
roce
dura
l tex
t to
com
plet
e an
inve
stig
atio
n•
use
oral,
writ
ten
and
visua
l lang
uage
to re
cord
an
d di
scus
s in
vest
igat
ion
resu
lts•
enga
ge in
disc
ussio
n to
com
pare
idea
s, a
nd
use
evid
ence
from
an
inve
stig
atio
n to
exp
lain
how
tem
pera
ture
affe
cts
the
activ
ity o
f yea
st•
dem
onst
rate
un
ders
tand
ing
of th
e ef
fect
of t
empe
ratu
re o
n ye
ast a
ctivi
ty th
roug
h sc
ience
jour
nal e
ntrie
s.
• di
scus
s co
nditio
ns th
at
prom
ote
yeas
t act
ivity
• re
ad a
nd d
iscus
s a
proc
edur
al te
xt•
wor
k in
col
labor
ative
lea
rnin
g te
ams
to
inve
stig
ate
the
best
te
mpe
ratu
re to
sup
port
yeas
t act
ivity.
Form
ativ
e as
sess
men
t •
Disc
ussio
ns•
Scien
ce jo
urna
l ent
ries
Less
on 4
Knea
d th
e lo
af•
iden
tify
step
s in
the
brea
d-m
akin
g pr
oces
s•
sugg
est w
ays
to
inve
stig
ate
the
role
of
yeas
t in
brea
d-m
akin
g•
obse
rve
and
desc
ribe
the
role
of y
east
in
mak
ing
brea
d ris
e.
• us
e or
al, w
ritte
n an
d vis
ual la
ngua
ge to
clar
ify
their
und
erst
andi
ng o
f ye
ast
• us
e w
ritin
g an
d dr
awin
g to
clar
ify th
eir id
eas
and
expl
anat
ions
of t
he ro
le of
ye
ast i
n th
e br
ead-
mak
ing
proc
ess.
• re
view
wha
t the
y kn
ow
abou
t yea
st•
disc
uss
the
role
of y
east
in
the
brea
d-m
akin
g pr
oces
s•
obse
rve
the
brea
d-m
akin
g pr
oces
s us
ing
a br
ead
mac
hine
.
Form
ativ
e as
sess
men
t •
TWLH
cha
rt•
Disc
ussio
n•
Scien
ce jo
urna
l ent
ries
* The
se le
sson
out
com
es a
re a
ligne
d to
relev
ant d
escr
iptio
ns o
f the
Aus
tralia
n Cu
rricu
lum
. See
pag
e 2
for S
cienc
e an
d pa
ge 7
for E
nglis
h an
d M
athe
mat
ics.
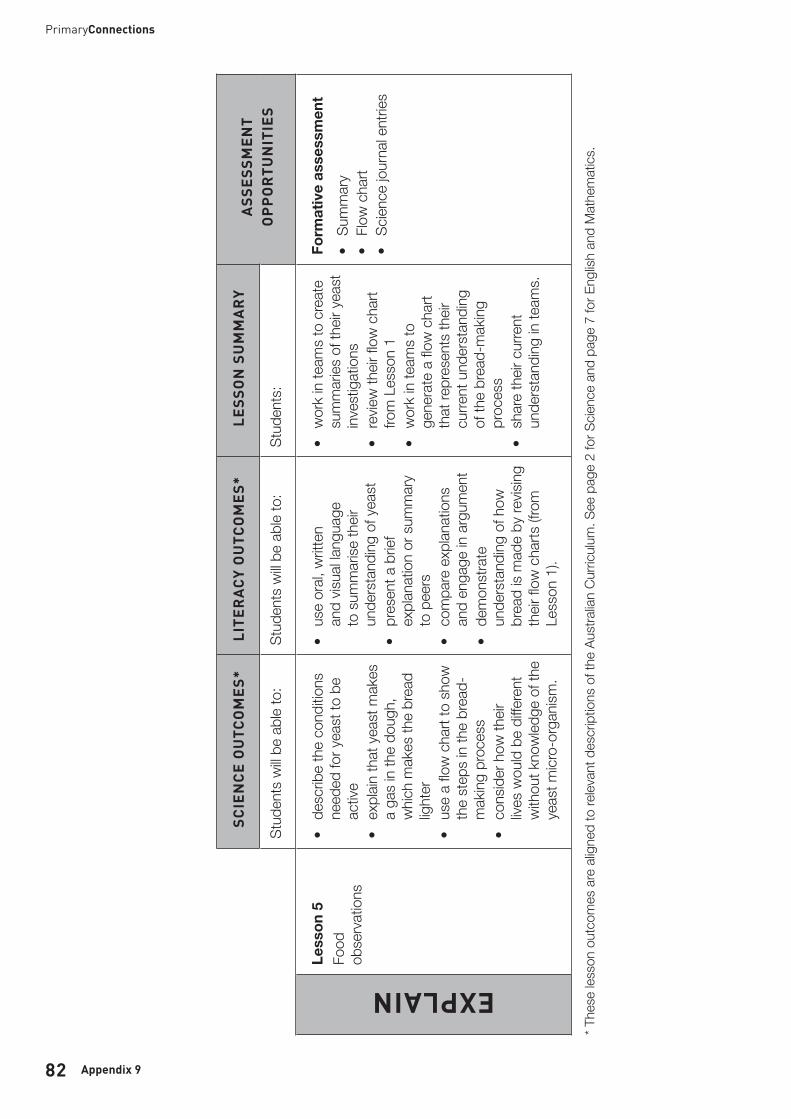
82
PrimaryConnections
Appendix 9
SC
IEN
CE
OU
TCO
ME
S*
LITE
RA
CY
OU
TCO
ME
S*
LES
SO
N S
UM
MA
RY
AS
SE
SS
ME
NT
OP
PO
RTU
NIT
IES
Stud
ents
will
be a
ble
to:
Stud
ents
will
be a
ble
to:
Stud
ents
:
EXPLAIN
Less
on 5
Food
ob
serv
atio
ns
• de
scrib
e th
e co
nditio
ns
need
ed fo
r yea
st to
be
activ
e•
expl
ain th
at y
east
mak
es
a ga
s in
the
doug
h,
whi
ch m
akes
the
brea
d lig
hter
• us
e a
flow
cha
rt to
sho
w
the
step
s in
the
brea
d-m
akin
g pr
oces
s•
cons
ider
how
their
liv
es w
ould
be
diffe
rent
w
ithou
t kno
wled
ge o
f the
ye
ast m
icro-
orga
nism
.
• us
e or
al, w
ritte
n an
d vis
ual la
ngua
ge
to s
umm
arise
their
un
ders
tand
ing
of y
east
• pr
esen
t a b
rief
expl
anat
ion
or s
umm
ary
to p
eers
• co
mpa
re e
xplan
atio
ns
and
enga
ge in
arg
umen
t•
dem
onst
rate
un
ders
tand
ing
of h
ow
brea
d is
mad
e by
revis
ing
their
flow
cha
rts (f
rom
Le
sson
1).
• w
ork
in te
ams
to c
reat
e su
mm
aries
of t
heir
yeas
t in
vest
igat
ions
• re
view
their
flow
cha
rt fro
m L
esso
n 1
• w
ork
in te
ams
to
gene
rate
a fl
ow c
hart
that
repr
esen
ts th
eir
curre
nt u
nder
stan
ding
of
the
brea
d-m
akin
g pr
oces
s•
shar
e th
eir c
urre
nt
unde
rsta
ndin
g in
team
s.
Form
ativ
e as
sess
men
t •
Sum
mar
y•
Flow
cha
rt•
Scien
ce jo
urna
l ent
ries
* The
se le
sson
out
com
es a
re a
ligne
d to
relev
ant d
escr
iptio
ns o
f the
Aus
tralia
n Cu
rricu
lum
. See
pag
e 2
for S
cienc
e an
d pa
ge 7
for E
nglis
h an
d M
athe
mat
ics.
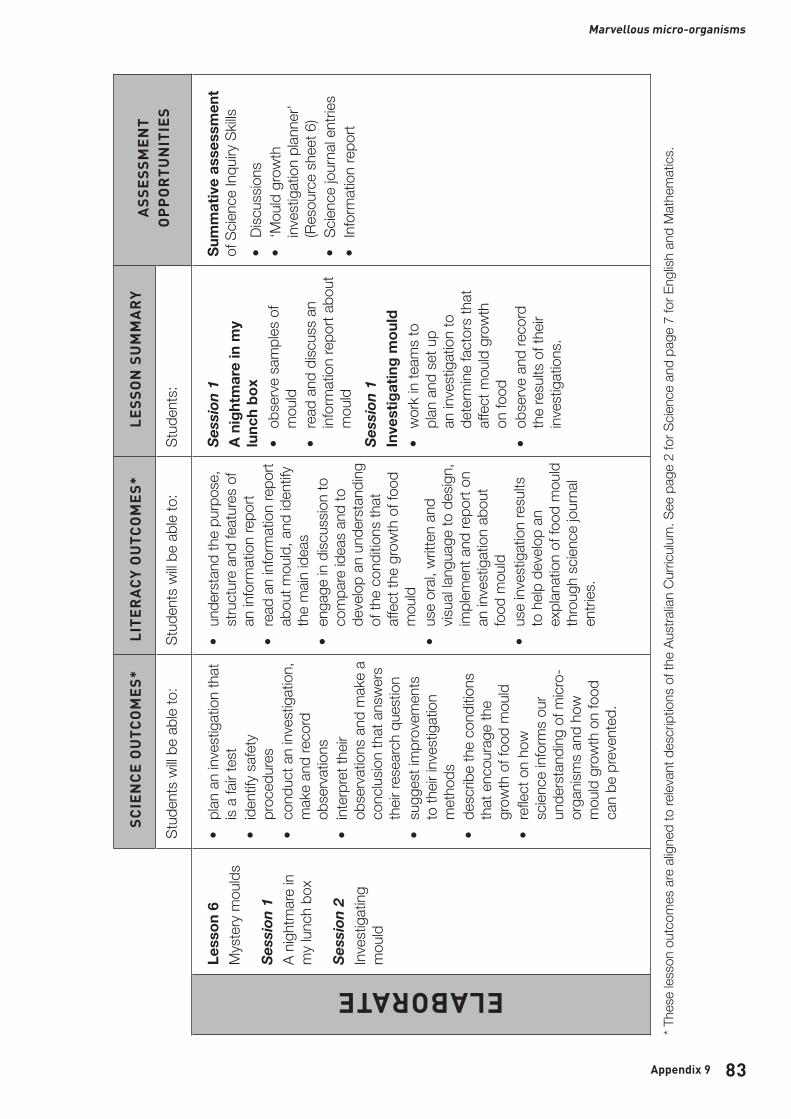
83
PrimaryConnections Marvellous micro-organisms
Appendix 9
SC
IEN
CE
OU
TCO
ME
S*
LITE
RA
CY
OU
TCO
ME
S*
LES
SO
N S
UM
MA
RY
AS
SE
SS
ME
NT
OP
PO
RTU
NIT
IES
Stud
ents
will
be a
ble
to:
Stud
ents
will
be a
ble
to:
Stud
ents
:
ELABORATE
Less
on 6
Mys
tery
mou
lds
Sess
ion
1A
nigh
tmar
e in
m
y lu
nch
box
Sess
ion
2In
vest
igat
ing
mou
ld
• pl
an a
n in
vest
igat
ion
that
is
a fa
ir te
st•
iden
tify
safe
ty
proc
edur
es•
cond
uct a
n in
vest
igat
ion,
m
ake
and
reco
rd
obse
rvat
ions
• in
terp
ret t
heir
obse
rvat
ions
and
mak
e a
conc
lusio
n th
at a
nsw
ers
their
rese
arch
que
stio
n•
sugg
est i
mpr
ovem
ents
to
their
inve
stig
atio
n m
etho
ds•
desc
ribe
the
cond
itions
th
at e
ncou
rage
the
grow
th o
f foo
d m
ould
• re
flect
on
how
sc
ience
info
rms
our
unde
rsta
ndin
g of
micr
o-or
gani
sms
and
how
m
ould
gro
wth
on
food
ca
n be
pre
vent
ed.
• un
ders
tand
the
purp
ose,
st
ruct
ure
and
feat
ures
of
an in
form
atio
n re
port
• re
ad a
n in
form
atio
n re
port
abou
t mou
ld, a
nd id
entif
y th
e m
ain id
eas
• en
gage
in d
iscus
sion
to
com
pare
idea
s an
d to
de
velo
p an
und
erst
andi
ng
of th
e co
nditio
ns th
at
affe
ct th
e gr
owth
of f
ood
mou
ld•
use
oral,
writ
ten
and
visua
l lang
uage
to d
esig
n,
impl
emen
t and
repo
rt on
an
inve
stig
atio
n ab
out
food
mou
ld•
use
inve
stig
atio
n re
sults
to
help
dev
elop
an
expl
anat
ion
of fo
od m
ould
th
roug
h sc
ience
jour
nal
entri
es.
Sess
ion
1A
nigh
tmar
e in
my
lu
nch
box
• ob
serv
e sa
mpl
es o
f m
ould
• re
ad a
nd d
iscus
s an
in
form
atio
n re
port
abou
t m
ould
Sess
ion
1In
vest
igat
ing
mou
ld•
wor
k in
team
s to
pl
an a
nd s
et u
p an
inve
stig
atio
n to
de
term
ine
fact
ors
that
af
fect
mou
ld g
row
th
on fo
od•
obse
rve
and
reco
rd
the
resu
lts o
f the
ir in
vest
igat
ions
.
Sum
mat
ive
asse
ssm
ent
of S
cienc
e In
quiry
Skil
ls •
Disc
ussio
ns•
‘Mou
ld g
row
th
inve
stig
atio
n pl
anne
r’ (R
esou
rce
shee
t 6)
• Sc
ience
jour
nal e
ntrie
s•
Info
rmat
ion
repo
rt
* The
se le
sson
out
com
es a
re a
ligne
d to
relev
ant d
escr
iptio
ns o
f the
Aus
tralia
n Cu
rricu
lum
. See
pag
e 2
for S
cienc
e an
d pa
ge 7
for E
nglis
h an
d M
athe
mat
ics.

84
PrimaryConnections
Appendix 9
SC
IEN
CE
OU
TCO
ME
S*
LITE
RA
CY
OU
TCO
ME
S*
LES
SO
N S
UM
MA
RY
AS
SE
SS
ME
NT
OP
PO
RTU
NIT
IES
Stud
ents
will
be a
ble
to:
Stud
ents
will
be a
ble
to:
Stud
ents
:
ELABORATE
Less
on 7
Med
ical m
icro-
orga
nism
s
• ex
plain
that
pen
icillin
is
mad
e by
a m
ould
and
is
used
to tr
eat i
nfec
tions
• de
scrib
e th
e ro
le of
Fl
emin
g an
d Fl
orey
in
the
disc
over
y an
d de
velo
pmen
t of p
enici
llin•
disc
uss
how
som
etim
es
scien
tific
disc
over
ies
happ
en b
y ch
ance
.
• un
ders
tand
the
purp
ose,
st
ruct
ure
and
feat
ures
of
a fa
ctua
l rec
ount
• re
ad a
fact
ual r
ecou
nt
abou
t the
hist
ory
of
peni
cillin
and
iden
tify
the
main
idea
s•
use
oral,
writ
ten
and
visua
l lang
uage
to
deve
lop
unde
rsta
ndin
g an
d cla
rify
idea
s an
d ex
plan
atio
ns o
f med
ical
micr
o-or
gani
sms
• us
e te
xtua
l sou
rces
to
loca
te in
form
atio
n an
d co
mpa
re id
eas.
• re
view
their
food
mou
ld
inve
stig
atio
n•
read
a fa
ctua
l re
coun
t of t
he ro
le of
Fl
emin
g an
d Fl
orey
in
the
disc
over
y an
d de
velo
pmen
t of
peni
cillin
.
Sum
mat
ive
asse
ssm
ent
of S
cienc
e as
a H
uman
En
deav
our
• Sc
ience
jour
nal e
ntrie
s
* The
se le
sson
out
com
es a
re a
ligne
d to
relev
ant d
escr
iptio
ns o
f the
Aus
tralia
n Cu
rricu
lum
. See
pag
e 2
for S
cienc
e an
d pa
ge 7
for E
nglis
h an
d M
athe
mat
ics.
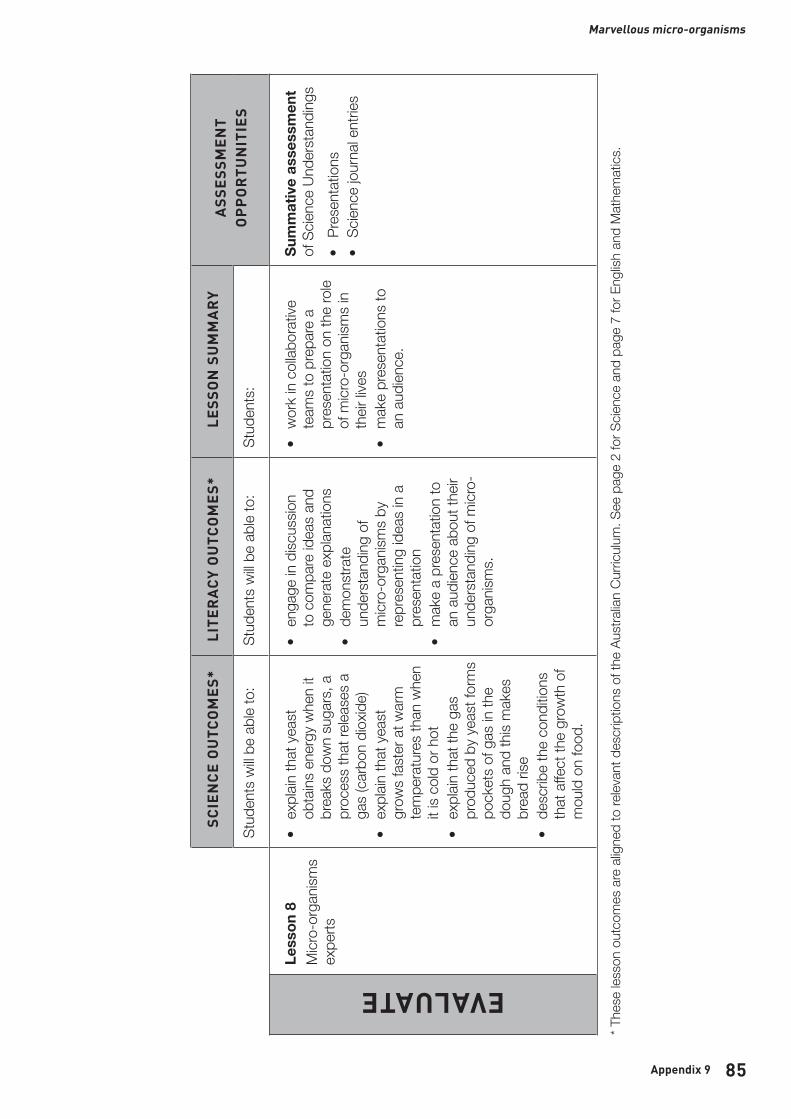
85
PrimaryConnections Marvellous micro-organisms
Appendix 9
SC
IEN
CE
OU
TCO
ME
S*
LITE
RA
CY
OU
TCO
ME
S*
LES
SO
N S
UM
MA
RY
AS
SE
SS
ME
NT
OP
PO
RTU
NIT
IES
Stud
ents
will
be a
ble
to:
Stud
ents
will
be a
ble
to:
Stud
ents
:
EVALUATE
Less
on 8
Micr
o-or
gani
sms
expe
rts
• ex
plain
that
yea
st
obta
ins
ener
gy w
hen
it br
eaks
dow
n su
gars
, a
proc
ess
that
relea
ses
a ga
s (c
arbo
n di
oxid
e)•
expl
ain th
at y
east
gr
ows
fast
er a
t war
m
tem
pera
ture
s th
an w
hen
it is
cold
or h
ot•
expl
ain th
at th
e ga
s pr
oduc
ed b
y ye
ast f
orm
s po
cket
s of
gas
in th
e do
ugh
and
this
mak
es
brea
d ris
e•
desc
ribe
the
cond
itions
th
at a
ffect
the
grow
th o
f m
ould
on
food
.
• en
gage
in d
iscus
sion
to c
ompa
re id
eas
and
gene
rate
exp
lanat
ions
• de
mon
stra
te
unde
rsta
ndin
g of
m
icro-
orga
nism
s by
re
pres
entin
g id
eas
in a
pr
esen
tatio
n•
mak
e a
pres
enta
tion
to
an a
udien
ce a
bout
their
un
ders
tand
ing
of m
icro-
orga
nism
s.
• w
ork
in c
ollab
orat
ive
team
s to
pre
pare
a
pres
enta
tion
on th
e ro
le of
micr
o-or
gani
sms
in
their
lives
• m
ake
pres
enta
tions
to
an a
udien
ce.
Sum
mat
ive
asse
ssm
ent
of S
cienc
e Un
ders
tand
ings
•
Pres
enta
tions
• Sc
ience
jour
nal e
ntrie
s
* The
se le
sson
out
com
es a
re a
ligne
d to
relev
ant d
escr
iptio
ns o
f the
Aus
tralia
n Cu
rricu
lum
. See
pag
e 2
for S
cienc
e an
d pa
ge 7
for E
nglis
h an
d M
athe
mat
ics.
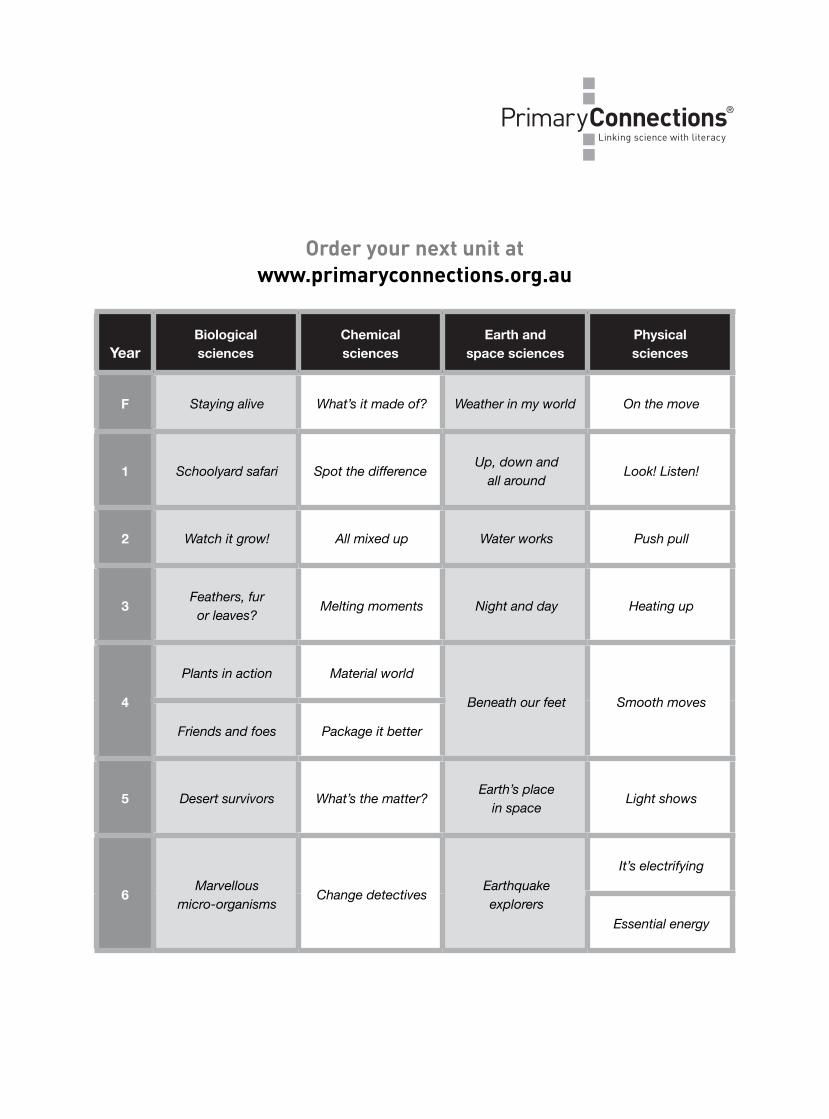
Order your next unit at www.primaryconnections.org.au
YearBiological sciences
Chemical sciences
Earth and space sciences
Physical sciences
F Staying alive What’s it made of? Weather in my world On the move
1 Schoolyard safari Spot the difference Up, down and all around Look! Listen!
2 Watch it grow! All mixed up Water works Push pull
3 Feathers, fur or leaves? Melting moments Night and day Heating up
4
Plants in action Material world
Beneath our feet Smooth moves
Friends and foes Package it better
5 Desert survivors What’s the matter? Earth’s place in space Light shows
6 Marvellous micro-organisms Change detectives Earthquake
explorers
It’s electrifying
Essential energy
Fully alig
ned
with th
e Australian
Curriculum
ISBN 978-0-85847-310-2
9
780858 473102
PC:6:B1
Marvellous m
icro-organisms Year 6 B
iological sciences
PrimaryConnections: Linking science with literacy is an innovative program linking
the teaching of science with the teaching
of literacy in primary schools.
The program combines a sophisticated
professional learning component with
exemplary curriculum resources.
PrimaryConnections features an inquiry-
based approach, embedded assessment
and incorporates Indigenous perspectives.
The PrimaryConnections curriculum
resources span Years F–6 of primary school.
Marvellous micro-organismsYear 6Biological sciences
The PrimaryConnections program is supported by astronomer, Professor Brian Schmidt, Nobel Laureate
www.primaryconnections.org.au
Australian
Curriculum