Embed Size (px)
Citation preview
Business Online Banking
User’s Guide
Published By
FIRST NATIONAL BANK ALASKA This User’s Guide is designed solely to assist
First National Bank Alaska customers in understanding the various functions and features of First National’s Business Online Banking service for
businesses. This User’s Guide is accurate as of the date published however, the functions and features of the bank’s Business
Online Banking service are subject to change at
any time without notification.
(Revised: May 18, 2018)
Revised: 05/2018 i First National Bank Alaska
Contents
Contents ..................................................................................................................................................... i
Welcome to Business Online Banking ...................................................................................................... 5
Introduction ........................................................................................................................................................ 5
Best Practices .............................................................................................................................................. 6
Getting Started .................................................................................................................................................... 7
Logging In ........................................................................................................................................................ 7
Compatibility View Setting .............................................................................................................................. 7
Token Log In .................................................................................................................................................... 9
Change Password .......................................................................................................................................... 11
Change Challenge Questions and Answers ................................................................................................... 11
Change PIN .................................................................................................................................................... 11
Change to Token Log In ................................................................................................................................. 11
Accessing ONEpay ......................................................................................................................................... 13
ONEpay Online Help ...................................................................................................................................... 13
Home Page ........................................................................................................................................................ 13
Menu Bar ....................................................................................................................................................... 14
e-Documents ................................................................................................................................................. 14
Printing .......................................................................................................................................................... 14
Logging Out ................................................................................................................................................... 15
System Administration ........................................................................................................................... 16
First Time Log In ................................................................................................................................................ 16
Non-Token Log In .......................................................................................................................................... 16
Token Log In .................................................................................................................................................. 17
Establish Your Contact Information .................................................................................................................. 19
Grouping Accounts, Employees & Funds Transfers .......................................................................................... 22
Employee Groups .............................................................................................................................................. 22
Adding ........................................................................................................................................................... 22
Viewing .......................................................................................................................................................... 23
Deleting ......................................................................................................................................................... 23
Edit Group Name ........................................................................................................................................... 24
Account Groups ................................................................................................................................................. 24
Adding ........................................................................................................................................................... 24
Viewing .......................................................................................................................................................... 25
Revised: 05/2018 ii First National Bank Alaska
Deleting ......................................................................................................................................................... 25
Edit Group Name ........................................................................................................................................... 25
Fund Transfer Groups ........................................................................................................................................ 26
Adding ........................................................................................................................................................... 26
Viewing .......................................................................................................................................................... 27
Deleting ......................................................................................................................................................... 27
Edit Group Name ........................................................................................................................................... 27
Account Nicknames ........................................................................................................................................... 27
Add or Change ............................................................................................................................................... 27
View ............................................................................................................................................................... 29
Fund Transfer Templates .................................................................................................................................. 29
Add ................................................................................................................................................................ 29
Add Using Existing Template ......................................................................................................................... 31
Change ........................................................................................................................................................... 31
Delete ............................................................................................................................................................ 32
Placing Accounts into a Group .......................................................................................................................... 33
Add New Account .......................................................................................................................................... 33
Change Account Group ................................................................................................................................. 34
Inquire on Accounts in Groups ...................................................................................................................... 34
Setting Up Employees ....................................................................................................................................... 35
Add New Employee ....................................................................................................................................... 35
Add New Employee – Using Another Employee’s Settings ....................................................................... 44
Token Lost or Damaged..................................................................................................................................... 47
Changing Employee PIN or Password ............................................................................................................... 48
Changing Other Employee Settings ................................................................................................................... 48
Inquire Employee Capabilities ....................................................................................................................... 49
Delete Employee ........................................................................................................................................... 49
Employee Accounts (Access) ............................................................................................................................. 50
Assigning Fund Transfer Access ........................................................................................................................ 52
Add or Change Fund Transfer Access ............................................................................................................ 52
Inquire Fund Transfer Access ........................................................................................................................ 53
Home Page (Overview) ........................................................................................................................... 54
Accounts ............................................................................................................................................................ 55
Specific Account option ................................................................................................................................. 55
Details ........................................................................................................................................................ 55
Revised: 05/2018 iii First National Bank Alaska
Transactions Archive ..................................................................................................................................... 57
Stop Payments ........................................................................................................................................ 58
Confirming Check Has Not Paid ......................................................................................................................... 58
Placing New Stop Payment ........................................................................................................................... 59
Viewing List of Stop Payments ...................................................................................................................... 60
Viewing a Specific Stop Payment .................................................................................................................. 62
e-Documents ........................................................................................................................................... 64
Viewing e-Documents ................................................................................................................................... 65
Transfers ................................................................................................................................................. 67
Initiate Fund Transfers .................................................................................................................................. 67
Viewing Fund Transfers ................................................................................................................................. 69
Approving Fund Transfers ............................................................................................................................. 70
Bill Payment Services .............................................................................................................................. 71
Positive Pay ............................................................................................................................................. 73
Positive Payment Overview (Frequently Used Functions) ................................................................................ 73
Reviewing Exception Items ........................................................................................................................... 73
Issued Items .................................................................................................................................................. 75
Inquiry on Issued Item Status .................................................................................................................... 75
Importing Issued Item Files ....................................................................................................................... 76
Adding An Issued Item .................................................................................................................................. 77
Changing (Edit) an Imported Item ............................................................................................................. 78
Deleting An Imported Item ....................................................................................................................... 79
Expense and Income Report ................................................................................................................... 80
Assigning Categories ......................................................................................................................................... 80
Expense Report ............................................................................................................................................. 82
Income Report ............................................................................................................................................... 82
Deposit Advantage (Merchant Deposit Capture) ................................................................................... 83
Image Quality Standards ................................................................................................................................... 83
MICR (Magnetic Ink Character Recognition) Test ..................................................................................... 84
Accessing Deposit Advantage............................................................................................................................ 85
Logging out Of Deposit Advantage .................................................................................................................... 86
Prepare and Scan Checks .................................................................................................................................. 87
Fix Errors (Corrections) & Submit Deposit ........................................................................................................ 92
Fix Errors ........................................................................................................................................................ 92
Revised: 05/2018 iv First National Bank Alaska
Correcting Check Amount ......................................................................................................................... 94
Submit Deposit .......................................................................................................................................... 95
Save or Retrieve Scanned Deposits ................................................................................................................... 97
Retrieve Saved Deposit (Suspended or Ready For Approval Status) ........................................................ 98
View Deposit or Items ..................................................................................................................................... 100
Deposit Status ............................................................................................................................................. 101
Clear Jammed Document ................................................................................................................................ 102
Delete Item from Deposit ................................................................................................................................ 103
Delete (Remove) Deposit ............................................................................................................................ 104
Remove from the Home Window (deposit list): ..................................................................................... 104
Enlarge the Image ........................................................................................................................................... 105
Search Option .................................................................................................................................................. 106
Reports ............................................................................................................................................................ 107
Deposit Report ............................................................................................................................................ 107
Item Query Report ...................................................................................................................................... 108
Deposit Detail Report .................................................................................................................................. 108
Deposit Detail Report – Specific Deposit ..................................................................................................... 109
Scanned Check Storage ............................................................................................................................... 109
Software & Scanner Installation ...................................................................................................................... 110
Internet Explorer Synchronization .............................................................................................................. 110
Installing Drivers and SCO Software For SmartSource Pro Scanner ........................................................... 113
Installing Drivers and SCO Software For SmartSource MicroEx Scanner .................................................... 120
FNBizAPP™ Service (Business Mobile) .................................................................................................. 124
Getting Started ................................................................................................................................................ 124
Viewing Account Information ......................................................................................................................... 126
Transfers .......................................................................................................................................................... 127
Payments ......................................................................................................................................................... 129
Appendix I ............................................................................................................................................. 131
Best Practices .................................................................................................................................................. 131
Security ............................................................................................................................................................ 131
General Password Standards .......................................................................................................................... 131
User Setup Best Practices: ............................................................................................................................... 132
Miscellaneous Operations: .............................................................................................................................. 132
Revised: 05/2018 5 First National Bank Alaska
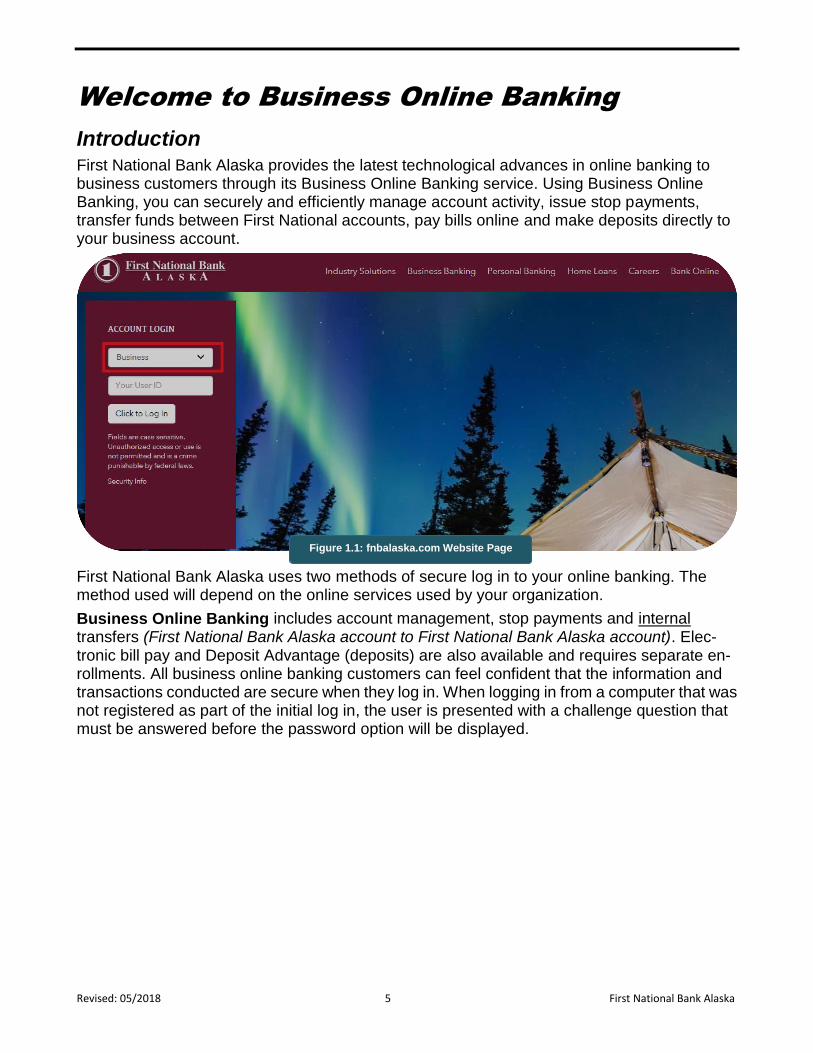
Welcome to Business Online Banking
Introduction First National Bank Alaska provides the latest technological advances in online banking to business customers through its Business Online Banking service. Using Business Online Banking, you can securely and efficiently manage account activity, issue stop payments, transfer funds between First National accounts, pay bills online and make deposits directly to your business account.
First National Bank Alaska uses two methods of secure log in to your online banking. The method used will depend on the online services used by your organization.
Business Online Banking includes account management, stop payments and internal transfers (First National Bank Alaska account to First National Bank Alaska account). Elec-tronic bill pay and Deposit Advantage (deposits) are also available and requires separate en-rollments. All business online banking customers can feel confident that the information and transactions conducted are secure when they log in. When logging in from a computer that was not registered as part of the initial log in, the user is presented with a challenge question that must be answered before the password option will be displayed.
Figure 1.1: fnbalaska.com Website Page
Revised: 05/2018 6 First National Bank Alaska
Business Online Banking includes the ability to:
Check account balances and transfer funds between your accounts.
Receive e-Documents such as bank statements and return item notices. (Enrollment optional)
Issue stop payments.
Pay bills online or make electronic deposits. (Enrollment optional)
Business Online Banking uses a number of different computer browser systems:
Microsoft Windows (10, 7)
Microsoft Internet Explorer
NOTE: Depending on version, customers may need to in the compatibility view
Firefox
Chrome
Safari
Mac OS X Yosemite and OSX Mountain Lion
Firefox
Safari
Chrome
Business Online Banking also allows you to act as the System Administrator over your online banking needs. System Administrators can:
Organize account information to fit specific business needs.
Update account information any time needed.
Set up new users and update current users as changes occur. (Customers enrolled in Deposit Advantage [merchant deposit capture] will need to coordinate adding or deleting users with the bank.)
Increase security by determining access and limits for each user.
Business Online Banking With ONEpay service provides additional online functions in-cluding receipt and issuance of ACH and wire payments, external funds transfers and tax payments. Not all Business Online Banking customers use Advantage services. Business customers can contact the bank to arrange enrollment in ONEpay. Since high-risk transac-tions are conducted using ONEpay services, logging in to the bank’s business online banking site requires the use of a token which provides another layer of security to the customer. A token is a wireless device that generates a one-time password each time the user logs in. The token changes the password every 32 seconds. Once enrolled in ONEpay, all employees that
are given online banking access must log in using a token.
ONEpay replaces the bank’s Business Online Banking With Advantage service. Customers
currently using the Advantage service can contact the bank at (907) 777-3640 or 1 (800) 856-4362 and use options 1, 6, 3, 2 to obtain information on how to change to the ONEpay service.
Best Practices
It will be up to you to set many controls and limits. The Best Practices information at the end of this guide reflects suggestions from First National Bank Alaska on how the System Adminis-trators for your business should set the controls for optimum security and efficiency.
Revised: 05/2018 7 First National Bank Alaska
Getting Started
Logging In
If you’re a System Administrator for your organization, refer to the System Administrator sec-tion for instructions on how to log in to Business Online Banking for the first time.
If you are not a System Administrator for your organization, your System Administrator will provide you with an Access ID and temporary password when he/she provides you access to the bank’s business online banking. The method used to log in to the business online banking website will depend on the online banking services your business uses. When enrolled in Business Online Banking with ONEpay or Advantage services, the Token Log In method is used. Your System Administrator will identify which log in method to use and provide you with a token if a token is to be used.
Compatibility View Setting
To avoid issues using specific features of Business Online Banking, add fnbalaska.com to your Compatibility View Settings in your Internet Explorer browser configuration by completing the following:
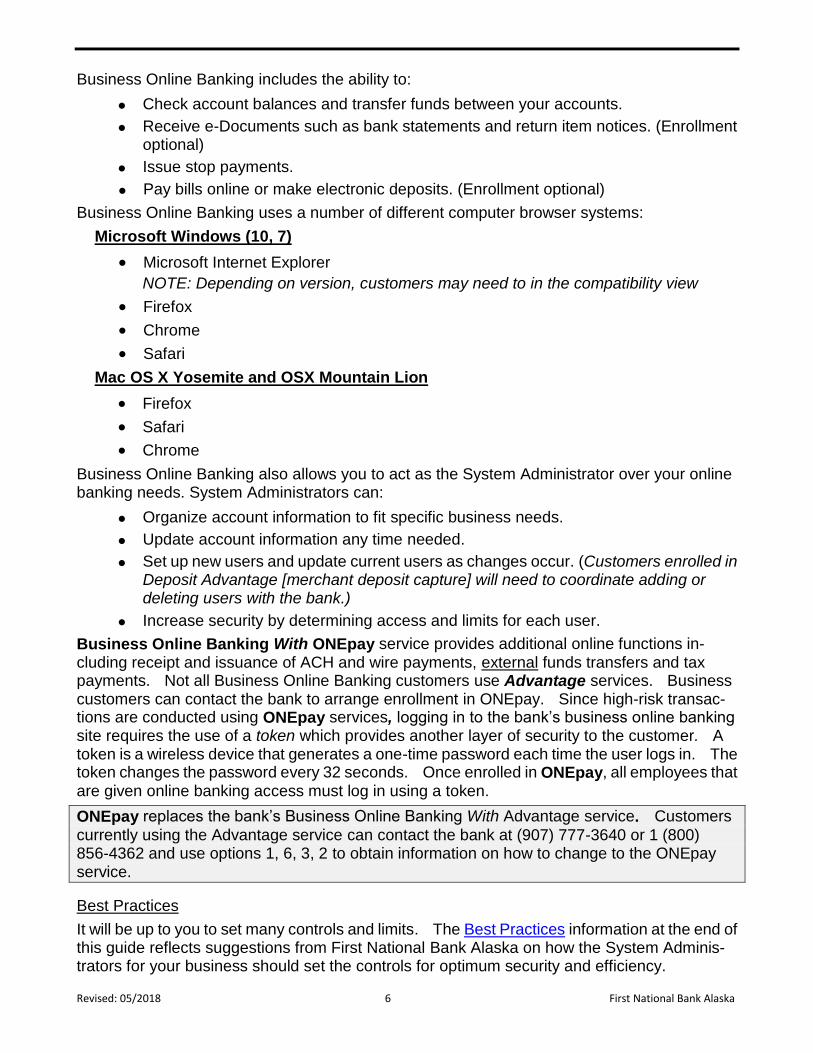
1. Click Tools from the Internet Explorer toolbar. (If the toolbar is hidden, hold the ALT key and press T.)
2. Select “Compatibility View Settings”. (See Figure 2.1)
3. Input fnbalaska.com to the “Add this website” field.
Figure 2.1: Internet Explorer Tools options
Revised: 05/2018 8 First National Bank Alaska
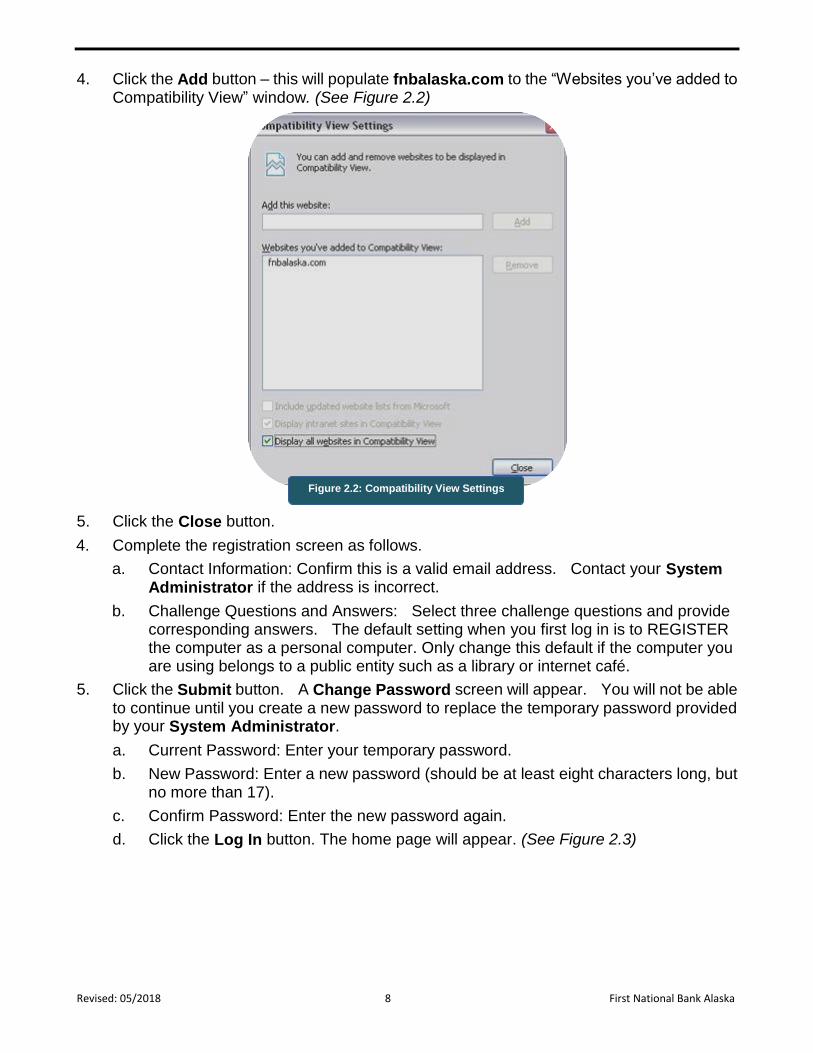
4. Click the Add button – this will populate fnbalaska.com to the “Websites you’ve added to Compatibility View” window. (See Figure 2.2)
5. Click the Close button.
4. Complete the registration screen as follows.
a. Contact Information: Confirm this is a valid email address. Contact your System Administrator if the address is incorrect.
b. Challenge Questions and Answers: Select three challenge questions and provide corresponding answers. The default setting when you first log in is to REGISTER the computer as a personal computer. Only change this default if the computer you are using belongs to a public entity such as a library or internet café.
5. Click the Submit button. A Change Password screen will appear. You will not be able to continue until you create a new password to replace the temporary password provided by your System Administrator.
a. Current Password: Enter your temporary password.
b. New Password: Enter a new password (should be at least eight characters long, but no more than 17).
c. Confirm Password: Enter the new password again.
d. Click the Log In button. The home page will appear. (See Figure 2.3)
Figure 2.2: Compatibility View Settings
Revised: 05/2018 9 First National Bank Alaska
Token Log In
1. Using your Internet browser, go to www.FNBAlaska.com (this might be a good time to bookmark this for later use).
2. At First National Bank Alaska’s home page, click on the Account Login tab. Click the drop-down box for the Account field and select Business.
3. In the Access ID field, enter your unique Access ID and click the Click to Log In button. The Access ID was provided to you by your System Administrator.
a. If you have logged in before with a token, skip to step 7c and then finish the log in process by completing step 8.
b. If this is your first time logging in, continue to step 4.
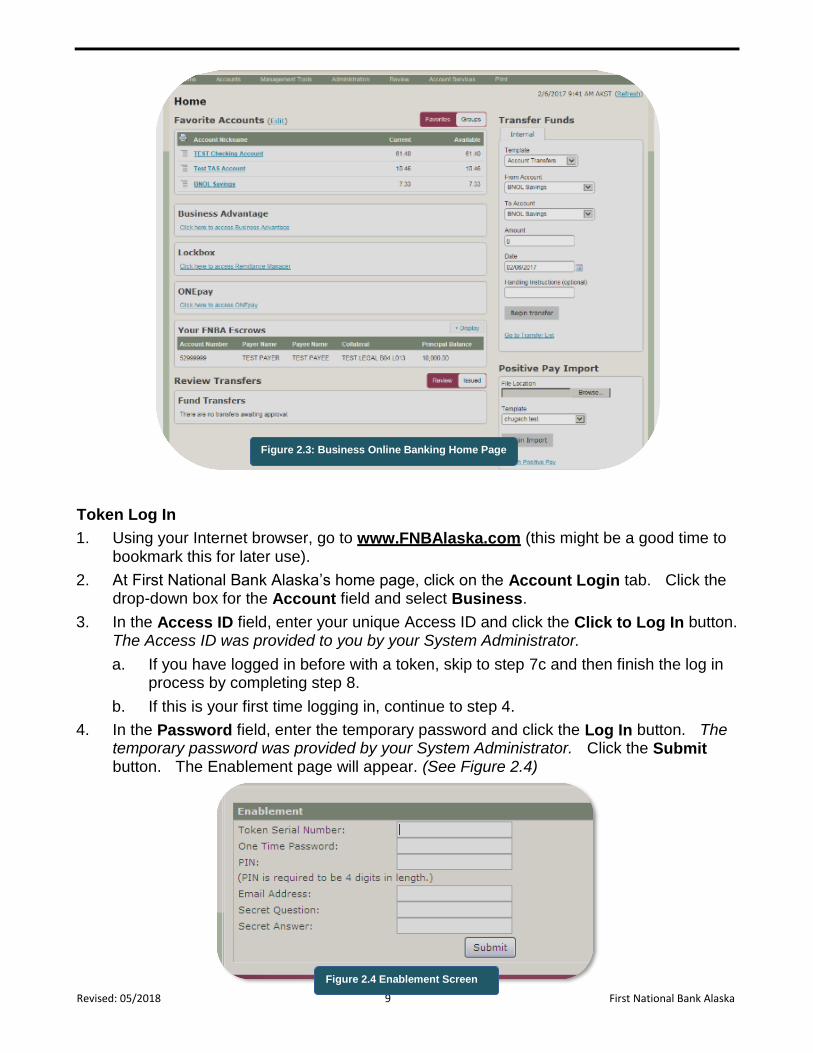
4. In the Password field, enter the temporary password and click the Log In button. The temporary password was provided by your System Administrator. Click the Submit button. The Enablement page will appear. (See Figure 2.4)
Figure 2.3: Business Online Banking Home Page
Figure 2.4 Enablement Screen
Revised: 05/2018 10 First National Bank Alaska
5. Complete the enablement screen as follows:
a. Token Serial Number – enter the serial number reflected on the back of the token that was provided by your System Administrator. Enter only numbers — do not in-clude the dash symbol.
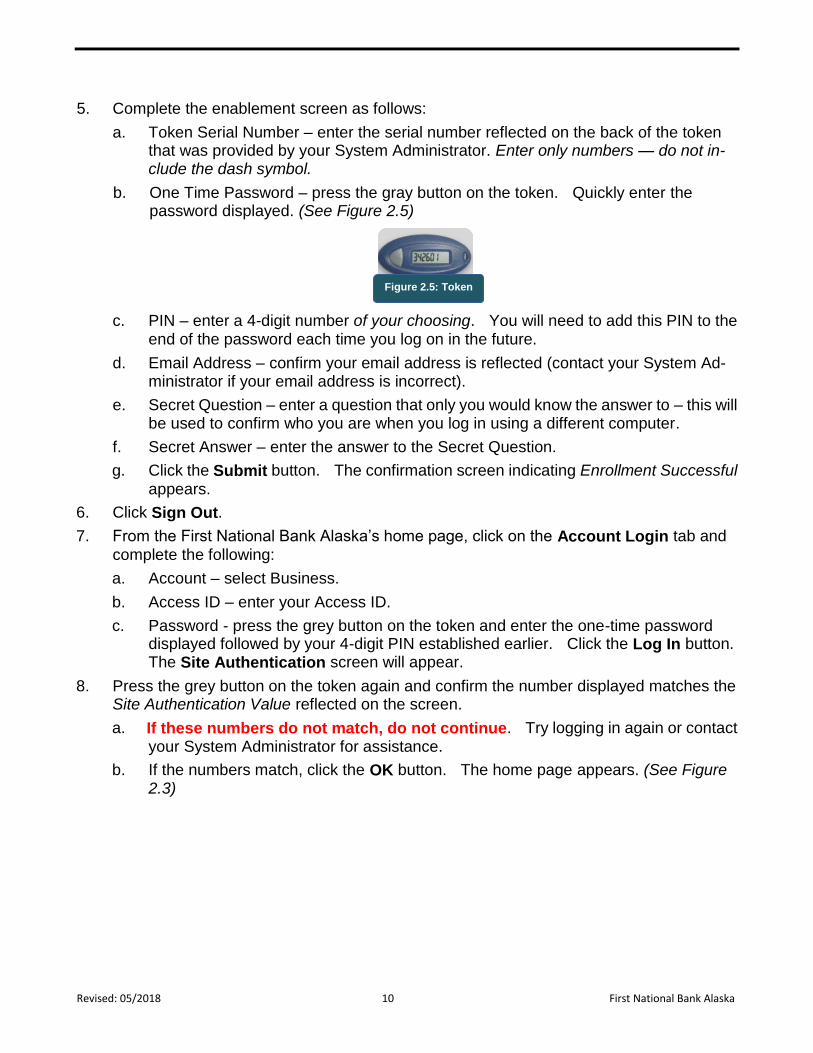
b. One Time Password – press the gray button on the token. Quickly enter the password displayed. (See Figure 2.5)
c. PIN – enter a 4-digit number of your choosing. You will need to add this PIN to the end of the password each time you log on in the future.
d. Email Address – confirm your email address is reflected (contact your System Ad-ministrator if your email address is incorrect).
e. Secret Question – enter a question that only you would know the answer to – this will be used to confirm who you are when you log in using a different computer.
f. Secret Answer – enter the answer to the Secret Question.
g. Click the Submit button. The confirmation screen indicating Enrollment Successful appears.
6. Click Sign Out.
7. From the First National Bank Alaska’s home page, click on the Account Login tab and complete the following:
a. Account – select Business.
b. Access ID – enter your Access ID.
c. Password - press the grey button on the token and enter the one-time password displayed followed by your 4-digit PIN established earlier. Click the Log In button. The Site Authentication screen will appear.
8. Press the grey button on the token again and confirm the number displayed matches the Site Authentication Value reflected on the screen.
a. If these numbers do not match, do not continue. Try logging in again or contact your System Administrator for assistance.
b. If the numbers match, click the OK button. The home page appears. (See Figure 2.3)
Figure 2.5: Token
Revised: 05/2018 11 First National Bank Alaska
Change Password
Complete the following to change your password (non-token users only):
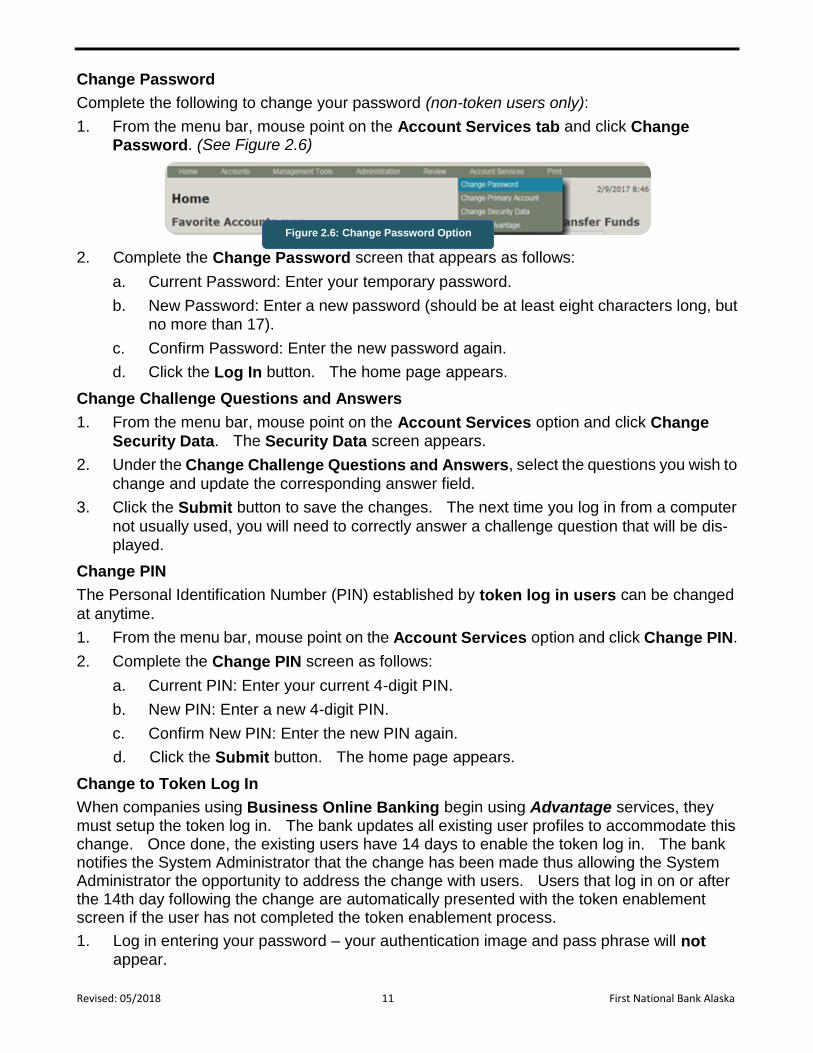
1. From the menu bar, mouse point on the Account Services tab and click Change Password. (See Figure 2.6)
2. Complete the Change Password screen that appears as follows:
a. Current Password: Enter your temporary password.
b. New Password: Enter a new password (should be at least eight characters long, but no more than 17).
c. Confirm Password: Enter the new password again.
d. Click the Log In button. The home page appears.
Change Challenge Questions and Answers
1. From the menu bar, mouse point on the Account Services option and click Change Security Data. The Security Data screen appears.
2. Under the Change Challenge Questions and Answers, select the questions you wish to
change and update the corresponding answer field.
3. Click the Submit button to save the changes. The next time you log in from a computer
not usually used, you will need to correctly answer a challenge question that will be dis-played.
Change PIN
The Personal Identification Number (PIN) established by token log in users can be changed
at anytime.
1. From the menu bar, mouse point on the Account Services option and click Change PIN.
2. Complete the Change PIN screen as follows:
a. Current PIN: Enter your current 4-digit PIN.
b. New PIN: Enter a new 4-digit PIN.
c. Confirm New PIN: Enter the new PIN again.
d. Click the Submit button. The home page appears.
Change to Token Log In
When companies using Business Online Banking begin using Advantage services, they must setup the token log in. The bank updates all existing user profiles to accommodate this change. Once done, the existing users have 14 days to enable the token log in. The bank notifies the System Administrator that the change has been made thus allowing the System Administrator the opportunity to address the change with users. Users that log in on or after the 14th day following the change are automatically presented with the token enablement screen if the user has not completed the token enablement process.
1. Log in entering your password – your authentication image and pass phrase will not appear.
Figure 2.6: Change Password Option
Revised: 05/2018 12 First National Bank Alaska
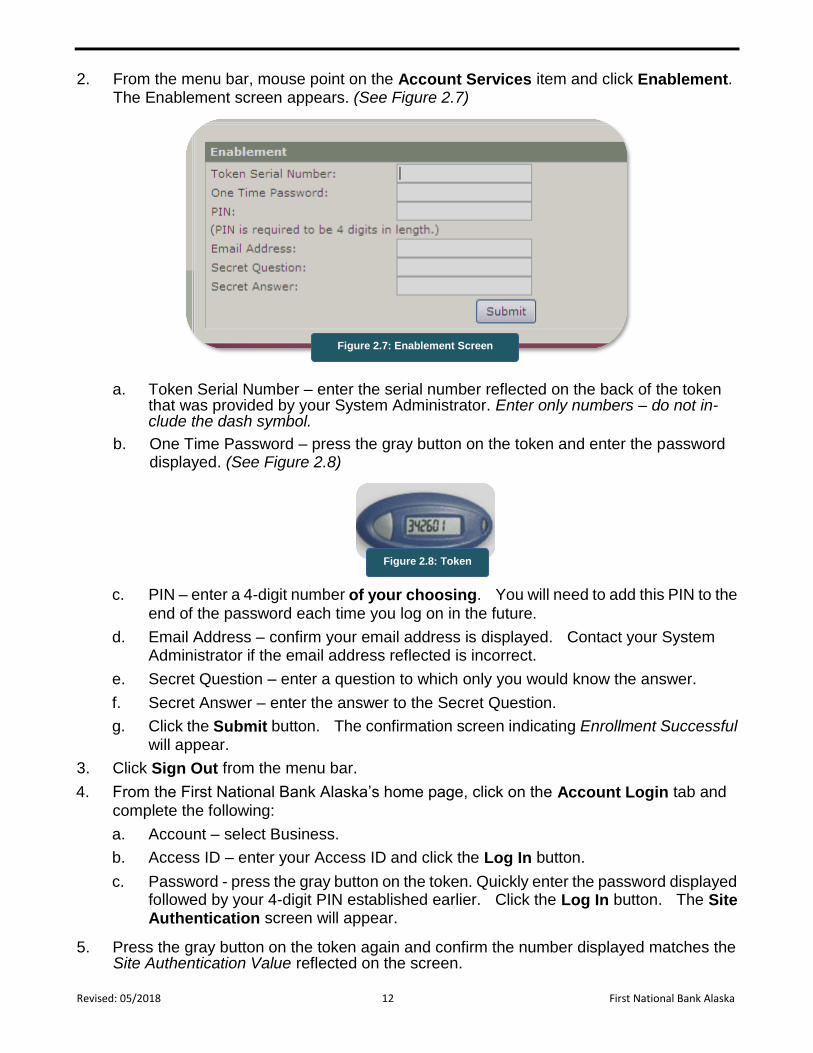
2. From the menu bar, mouse point on the Account Services item and click Enablement. The Enablement screen appears. (See Figure 2.7)
a. Token Serial Number – enter the serial number reflected on the back of the token that was provided by your System Administrator. Enter only numbers – do not in-clude the dash symbol.
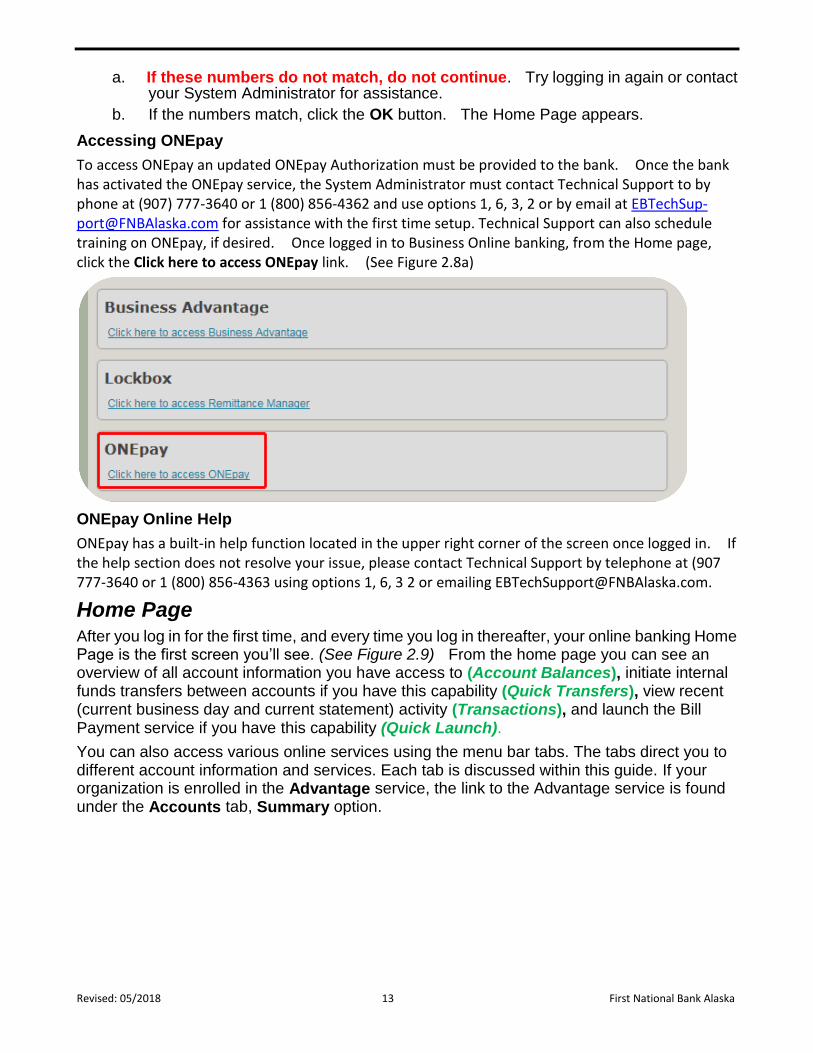
b. One Time Password – press the gray button on the token and enter the password displayed. (See Figure 2.8)
c. PIN – enter a 4-digit number of your choosing. You will need to add this PIN to the
end of the password each time you log on in the future.
d. Email Address – confirm your email address is displayed. Contact your System Administrator if the email address reflected is incorrect.
e. Secret Question – enter a question to which only you would know the answer.
f. Secret Answer – enter the answer to the Secret Question.
g. Click the Submit button. The confirmation screen indicating Enrollment Successful will appear.
3. Click Sign Out from the menu bar.
4. From the First National Bank Alaska’s home page, click on the Account Login tab and complete the following:
a. Account – select Business.
b. Access ID – enter your Access ID and click the Log In button.
c. Password - press the gray button on the token. Quickly enter the password displayed followed by your 4-digit PIN established earlier. Click the Log In button. The Site Authentication screen will appear.
5. Press the gray button on the token again and confirm the number displayed matches the Site Authentication Value reflected on the screen.
Figure 2.7: Enablement Screen
Figure 2.8: Token
Revised: 05/2018 13 First National Bank Alaska
a. If these numbers do not match, do not continue. Try logging in again or contact your System Administrator for assistance.
b. If the numbers match, click the OK button. The Home Page appears.
Accessing ONEpay
To access ONEpay an updated ONEpay Authorization must be provided to the bank. Once the bank has activated the ONEpay service, the System Administrator must contact Technical Support to by phone at (907) 777-3640 or 1 (800) 856-4362 and use options 1, 6, 3, 2 or by email at [email protected] for assistance with the first time setup. Technical Support can also schedule training on ONEpay, if desired. Once logged in to Business Online banking, from the Home page, click the Click here to access ONEpay link. (See Figure 2.8a)
ONEpay Online Help
ONEpay has a built-in help function located in the upper right corner of the screen once logged in. If the help section does not resolve your issue, please contact Technical Support by telephone at (907 777-3640 or 1 (800) 856-4363 using options 1, 6, 3 2 or emailing [email protected].
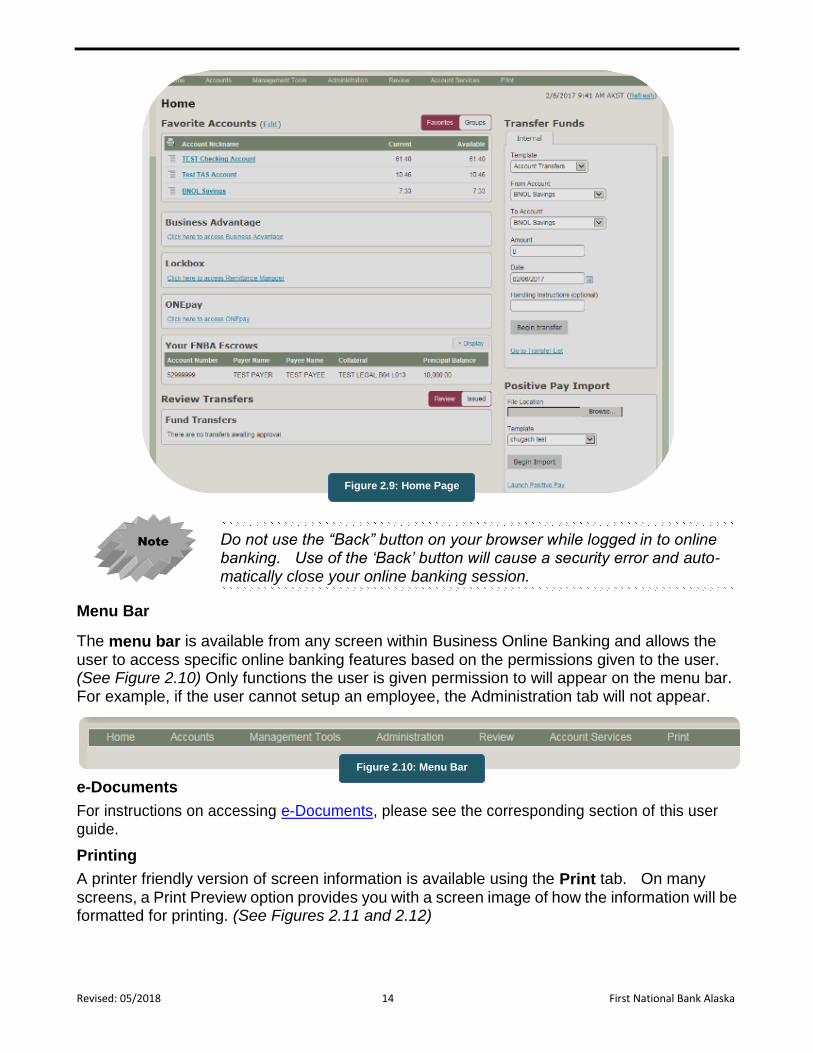
Home Page After you log in for the first time, and every time you log in thereafter, your online banking Home Page is the first screen you’ll see. (See Figure 2.9) From the home page you can see an overview of all account information you have access to (Account Balances), initiate internal funds transfers between accounts if you have this capability (Quick Transfers), view recent (current business day and current statement) activity (Transactions), and launch the Bill Payment service if you have this capability (Quick Launch).
You can also access various online services using the menu bar tabs. The tabs direct you to different account information and services. Each tab is discussed within this guide. If your organization is enrolled in the Advantage service, the link to the Advantage service is found under the Accounts tab, Summary option.
Revised: 05/2018 14 First National Bank Alaska
Do not use the “Back” button on your browser while logged in to online banking. Use of the ‘Back’ button will cause a security error and auto-matically close your online banking session.
Menu Bar
The menu bar is available from any screen within Business Online Banking and allows the user to access specific online banking features based on the permissions given to the user. (See Figure 2.10) Only functions the user is given permission to will appear on the menu bar. For example, if the user cannot setup an employee, the Administration tab will not appear.
e-Documents
For instructions on accessing e-Documents, please see the corresponding section of this user guide.
Printing
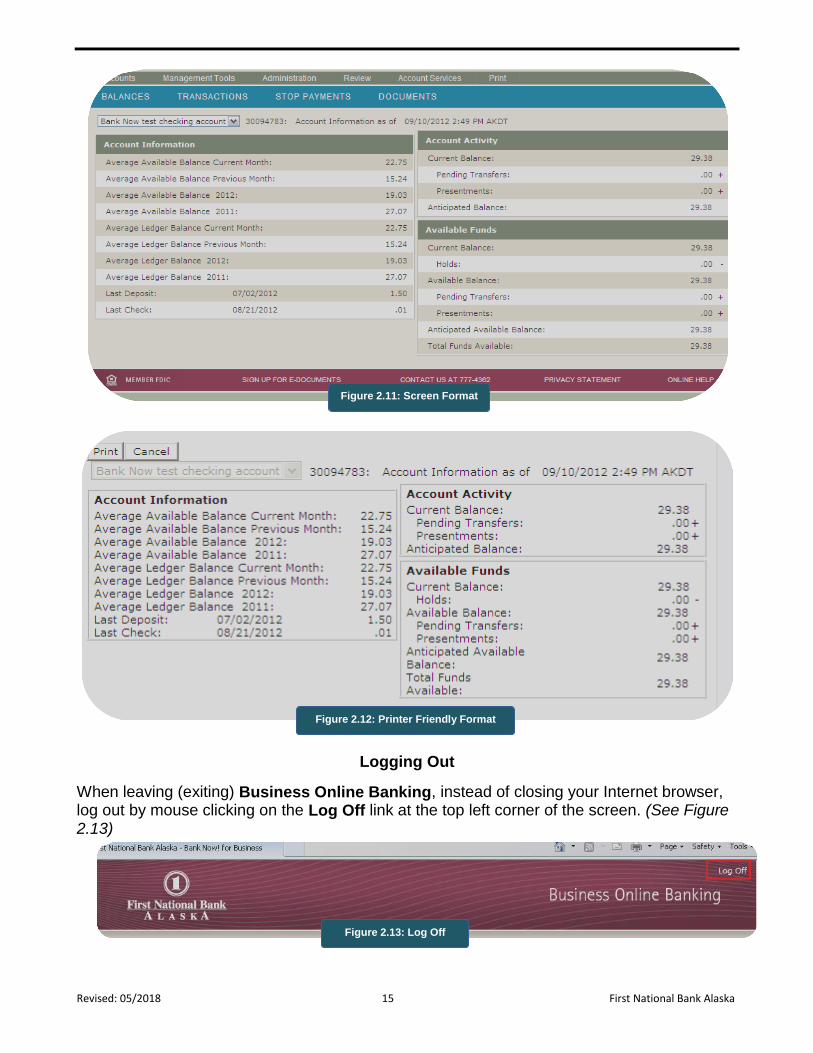
A printer friendly version of screen information is available using the Print tab. On many screens, a Print Preview option provides you with a screen image of how the information will be formatted for printing. (See Figures 2.11 and 2.12)
Note
Figure 2.9: Home Page
Figure 2.10: Menu Bar
Revised: 05/2018 15 First National Bank Alaska
Logging Out
When leaving (exiting) Business Online Banking, instead of closing your Internet browser, log out by mouse clicking on the Log Off link at the top left corner of the screen. (See Figure 2.13)
Figure 2.11: Screen Format
Figure 2.12: Printer Friendly Format
Figure 2.13: Log Off
Revised: 12/17 16 First National Bank Alaska
System Administration
First Time Log In
As a System Administrator, the bank provided you an Access ID and temporary password. The method used to log in to the business online banking service will depend on the type of online banking services your company uses. When the Advantage services are needed, the Token Log In method is used by all users in your organization even if only a few users will be given Advantage access. The information you received from the bank with your temporary password identifies the log in method your organization will use and instructions for logging in.
Non-Token Log In
1. Using your Internet browser, go to www.FNBAlaska.com (this might be a good time to bookmark this for later use).
2. At First National Bank Alaska’s home page. From the homepage, click the drop-down box for the Account field and select Business.
3. In the User ID field, enter your unique User ID and click the Click To Log In button. The User ID was provided to you by letter or email from the bank.
4. In the Password field, enter the temporary password and click the Log In button. A Change Password screen will appear. The temporary password was provided to you by letter or email from the bank.
6. Complete the Change Password screen as indicated below. You will not be able to continue until you create a new password to replace the temporary password that was pro-vided by the bank.
a. Current Password: Enter your temporary password.
b. New Password: Enter a new password (should be at least eight characters long, but no more than 17).
c. Confirm Password: Enter the new password again.
d. Click the Submit button. The Business Online Banking home page appears. (See Figure 3.1)
7. Skip to the Establish Your Contact Information steps.

Revised: 12/17 17 First National Bank Alaska
Token Log In
1. Using your Internet browser, go to www.FNBAlaska.com (this might be a good time to bookmark this for later use).
2. At First National Bank Alaska’s home page, click on the Online Banking Account Login button. Click the drop-down box for the Account field and select Business.
3. In the Access ID field, enter your unique Access ID and click the Click To Log In button. The Access ID was provided to you by letter or email from the bank.
4. In the Password field, enter the temporary password and click the Log In button. The Change Password screen will appear. The temporary password was provided to you by letter or email from the bank.
a. Current Password: Enter your temporary password.
b. New Password: Enter a new password (should be at least eight characters long, but no more than 17).
c. Confirm Password: Enter the new password again.
d. Click the Submit button. The Enablement page will appear. (See Figure 3.2)
5. Complete the enablement screen as follows:
a. Token Serial Number – enter the serial number reflected on the back of the token that was provided by the bank. Enter only numbers – do not include the dash symbol.
b. One Time Password – press the gray button on the token. Quickly enter the password displayed. (See Figure 3.3)
Figure 3.2: Enablement Page
Figure 3.3: Token

Revised: 12/17 18 First National Bank Alaska
c. PIN – enter a 4-digit number of your choosing. You will need to add this PIN to the end of the password each time you log on in the future.
d. Email Address – enter your business email address.
e. Secret Question – enter a question to which only you would know the answer.
f. Secret Answer – enter the answer to the Secret Question.
g. Click the Submit button. The confirmation screen indicating Enrollment Suc-cessful should appear.
6. Click Log Off from the upper right corner of the screen.
7. From the First National Bank Alaska’s home page, click the Online Banking Account Login button again as follows:
a. Account – select Business.
b. Access ID – enter your Access ID and click the Log In button.
c. Password - press the grey button on the token and enter the password displayed followed by your 4-digit PIN established earlier. Click the Log In button. The Site Authentication screen will appear.
8. Press the gray button on the token again and confirm the number displayed matches the Site Authentication Value reflected on the screen.
a. If these numbers do not match, do not continue. Try logging in again or contact the bank for assistance.
b. If the numbers match, click the OK button. The home page appears.
9. Continue to the Establish Your Contact Information steps.
Revised: 12/17 19 First National Bank Alaska
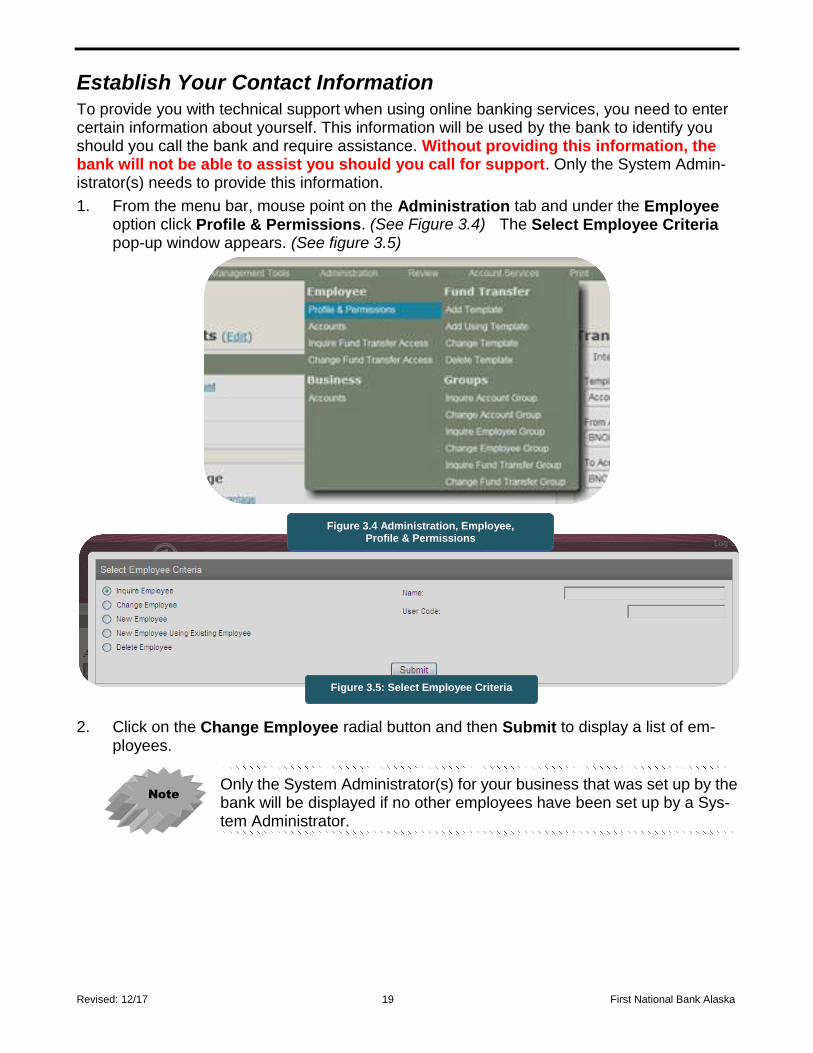
Establish Your Contact Information
To provide you with technical support when using online banking services, you need to enter certain information about yourself. This information will be used by the bank to identify you should you call the bank and require assistance. Without providing this information, the bank will not be able to assist you should you call for support. Only the System Admin-istrator(s) needs to provide this information.
1. From the menu bar, mouse point on the Administration tab and under the Employee option click Profile & Permissions. (See Figure 3.4) The Select Employee Criteria pop-up window appears. (See figure 3.5)
2. Click on the Change Employee radial button and then Submit to display a list of em-ployees.
Only the System Administrator(s) for your business that was set up by the bank will be displayed if no other employees have been set up by a Sys-tem Administrator.
Note
Figure 3.4 Administration, Employee, Profile & Permissions
Figure 3.5: Select Employee Criteria
Revised: 12/17 20 First National Bank Alaska
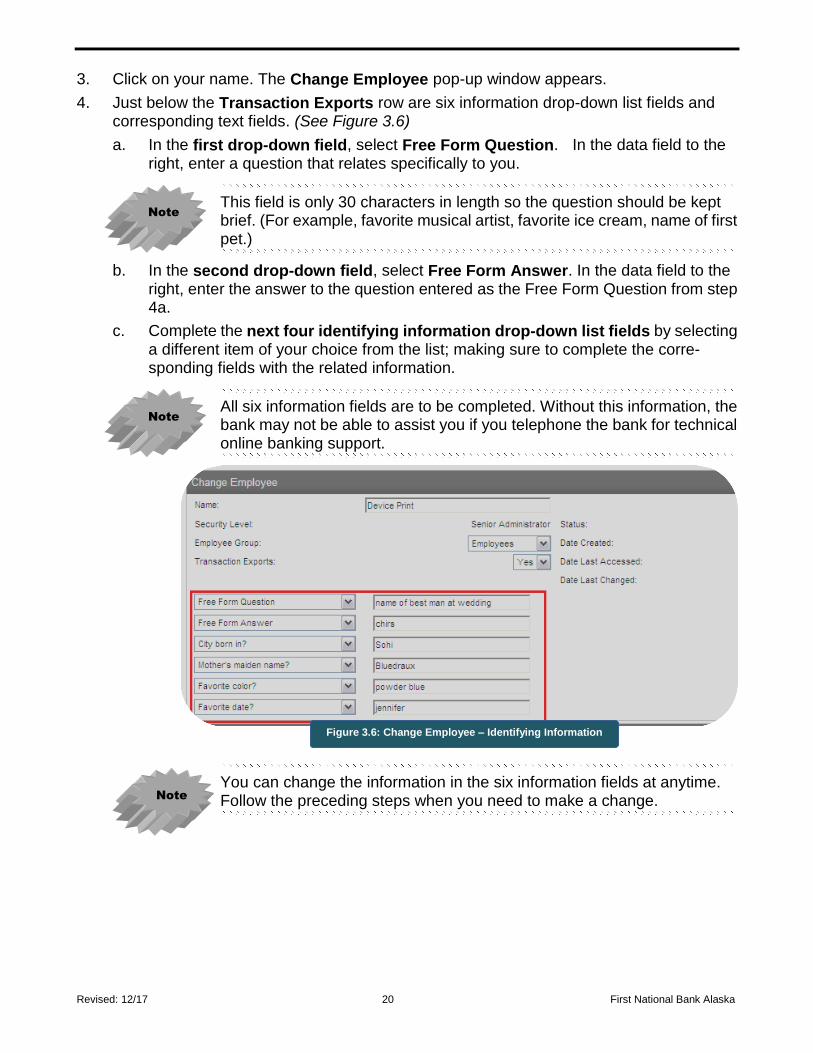
3. Click on your name. The Change Employee pop-up window appears.
4. Just below the Transaction Exports row are six information drop-down list fields and corresponding text fields. (See Figure 3.6)
a. In the first drop-down field, select Free Form Question. In the data field to the right, enter a question that relates specifically to you.
This field is only 30 characters in length so the question should be kept brief. (For example, favorite musical artist, favorite ice cream, name of first pet.)
b. In the second drop-down field, select Free Form Answer. In the data field to the right, enter the answer to the question entered as the Free Form Question from step 4a.
c. Complete the next four identifying information drop-down list fields by selecting a different item of your choice from the list; making sure to complete the corre-sponding fields with the related information.
All six information fields are to be completed. Without this information, the bank may not be able to assist you if you telephone the bank for technical online banking support.
You can change the information in the six information fields at anytime. Follow the preceding steps when you need to make a change.
Note
Note
Note
Figure 3.6: Change Employee – Identifying Information
Revised: 12/17 21 First National Bank Alaska
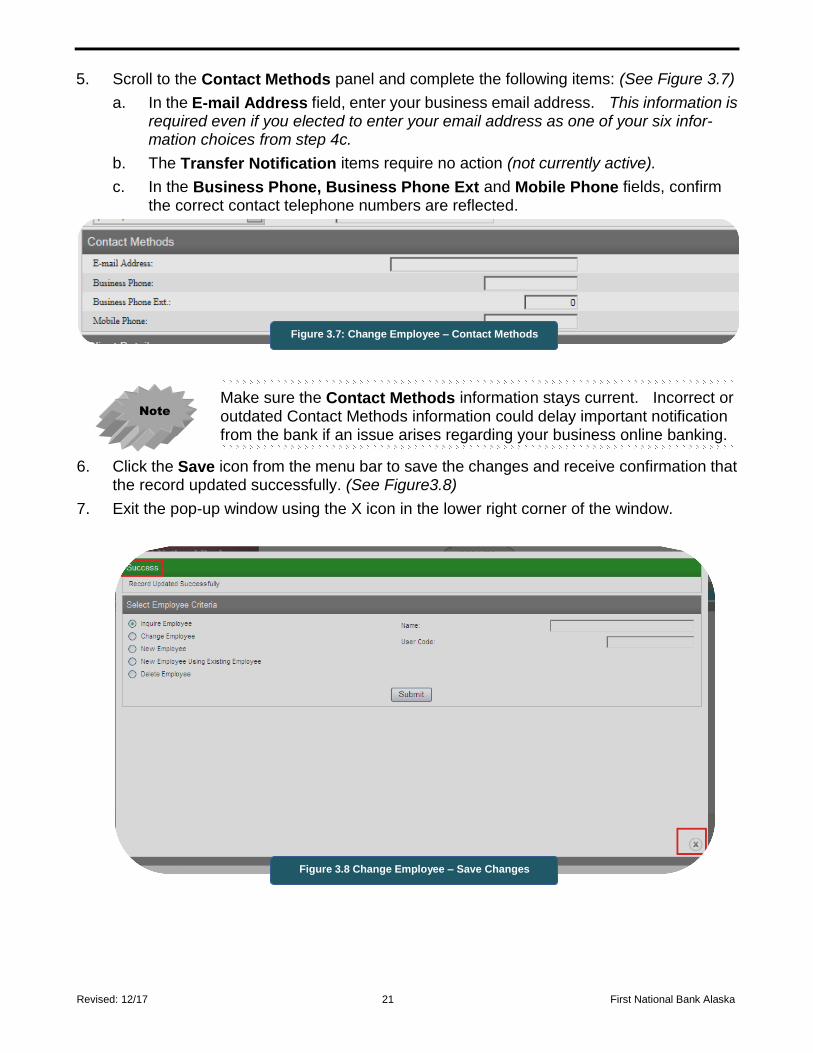
5. Scroll to the Contact Methods panel and complete the following items: (See Figure 3.7)
a. In the E-mail Address field, enter your business email address. This information is required even if you elected to enter your email address as one of your six infor-mation choices from step 4c.
b. The Transfer Notification items require no action (not currently active).
c. In the Business Phone, Business Phone Ext and Mobile Phone fields, confirm the correct contact telephone numbers are reflected.
Make sure the Contact Methods information stays current. Incorrect or outdated Contact Methods information could delay important notification from the bank if an issue arises regarding your business online banking.
6. Click the Save icon from the menu bar to save the changes and receive confirmation that the record updated successfully. (See Figure3.8)
7. Exit the pop-up window using the X icon in the lower right corner of the window.
Figure 3.7: Change Employee – Contact Methods
Note
Figure 3.8 Change Employee – Save Changes
Revised: 12/17 22 First National Bank Alaska
Grouping Accounts, Employees & Funds Transfers You can create groups to organize accounts, employees and fund transfers in Business Online Banking. Creating groups can make searching for and viewing information easier and more efficient.
Groups can be created or changed at any time. However, you’ll find it easier to first create the groups so they already exist when adding/changing employees or fund transfer templates.
The three group types available to you are:
Employee Groups: Employee groups are a way to group employees who have similar functions. (For example, employees who work on payroll could be set up in a payroll group.)
Account Groups: Groups of several accounts with similar or associated purposes. (For example, all accounts associated with payroll could be set up in a payroll account group.)
Fund Transfer Groups: A group of fund transfer templates with similar types of fund transfers. (For example, all fund transfer templates dealing with payroll could be set up in a payroll fund transfer group.)
Anytime a change is made, a confirmation screen will be displayed indicating the change has been made. A unique confirmation number will also be displayed should you wish to print and use the screen for your own internal processes.
Employee Groups
Adding
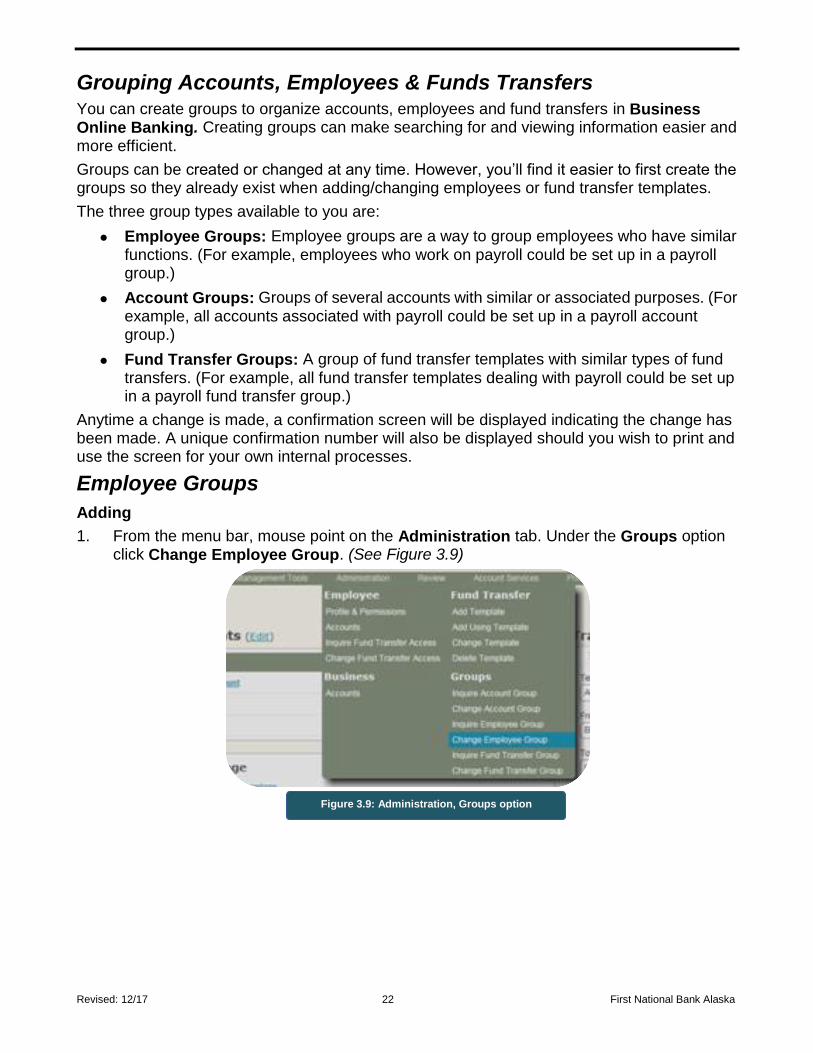
1. From the menu bar, mouse point on the Administration tab. Under the Groups option click Change Employee Group. (See Figure 3.9)
Figure 3.9: Administration, Groups option
Revised: 12/17 23 First National Bank Alaska
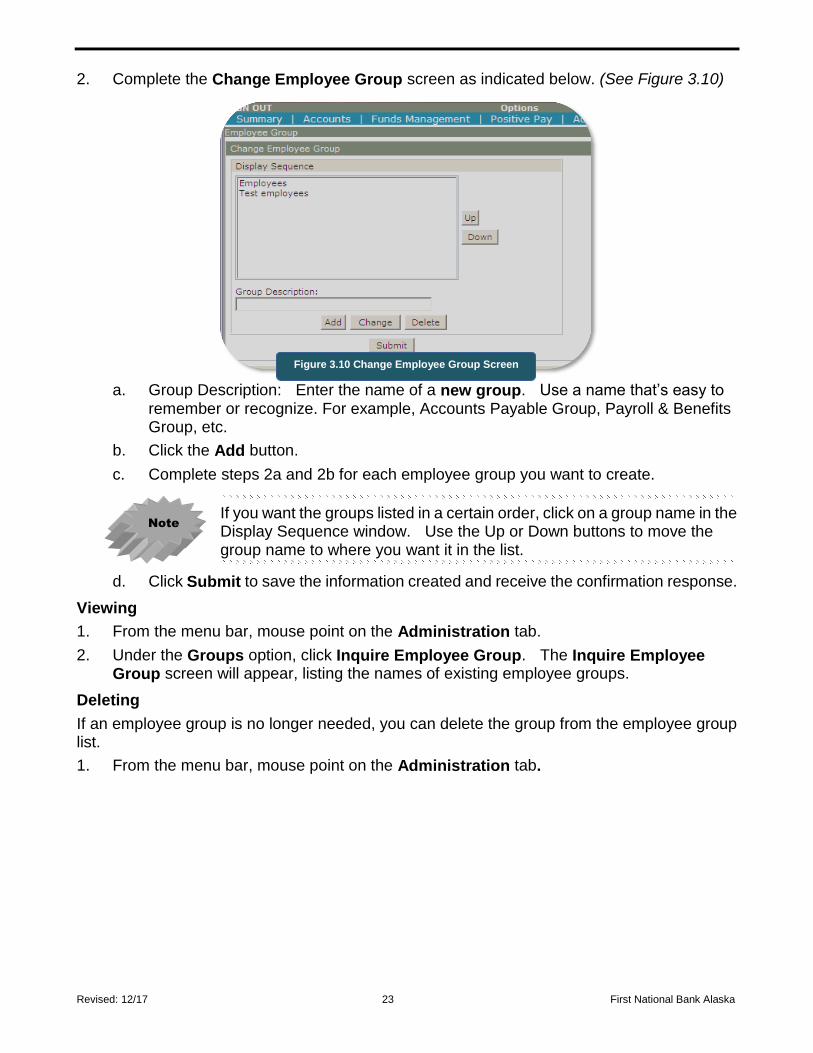
2. Complete the Change Employee Group screen as indicated below. (See Figure 3.10)
a. Group Description: Enter the name of a new group. Use a name that’s easy to remember or recognize. For example, Accounts Payable Group, Payroll & Benefits Group, etc.
b. Click the Add button.
c. Complete steps 2a and 2b for each employee group you want to create.
If you want the groups listed in a certain order, click on a group name in the Display Sequence window. Use the Up or Down buttons to move the group name to where you want it in the list.
d. Click Submit to save the information created and receive the confirmation response.
Viewing
1. From the menu bar, mouse point on the Administration tab.
2. Under the Groups option, click Inquire Employee Group. The Inquire Employee Group screen will appear, listing the names of existing employee groups.
Deleting
If an employee group is no longer needed, you can delete the group from the employee group list.
1. From the menu bar, mouse point on the Administration tab.
Figure 3.10 Change Employee Group Screen
Note
Revised: 12/17 24 First National Bank Alaska
2. Under the Groups option, click Change Employee Group. The Change Employee Group screen will appear.
a. In the Display Sequence window, click on the employee group you want to delete.
b. Click the Delete button.
c. Click Submit to save the change and receive the confirmation response.
Edit Group Name
You can rename an existing employee group at any time.
1. From the menu bar, mouse point on the Administration tab.
2. Under the Groups option, click Change Employee Group from the menu options. The Change Employee Group screen will appear.
a. In the Display Sequence window, click on the employee group you want to edit. This will place the group name in the Group Description field.
b. Click in the Group Description field and edit the group name.
c. Click Change.
d. Click Submit to save the change made and receive the confirmation response.
Account Groups
Adding
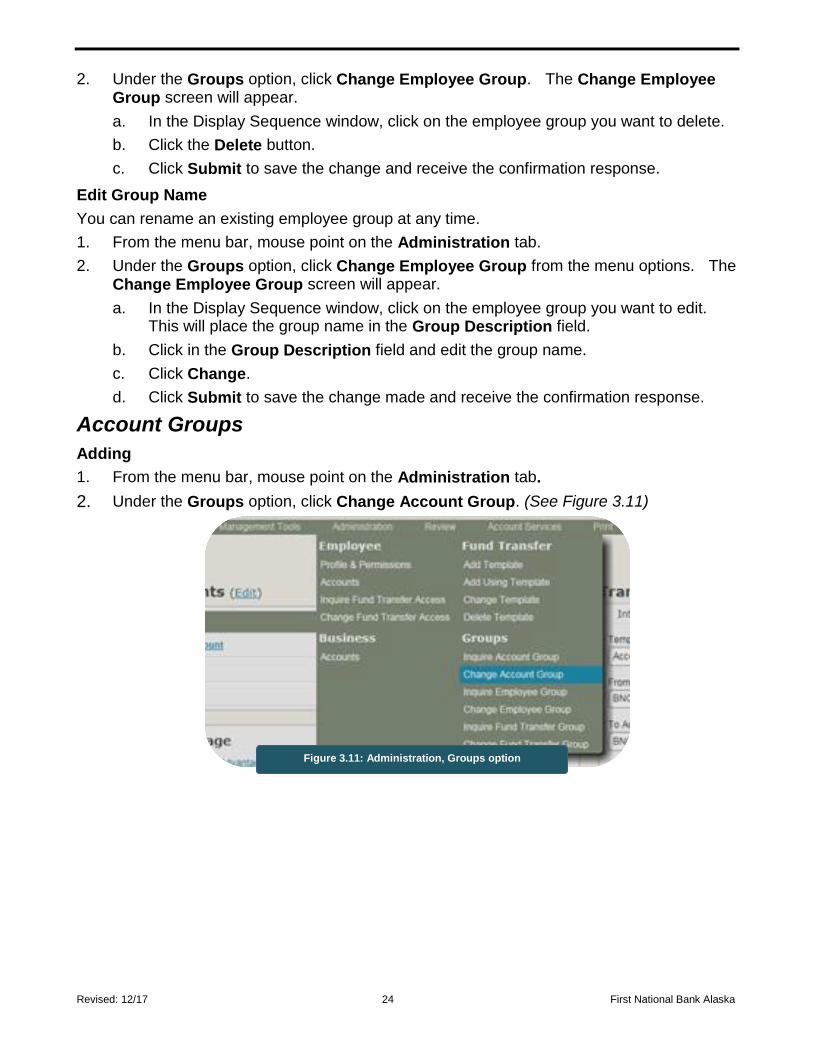
1. From the menu bar, mouse point on the Administration tab.
2. Under the Groups option, click Change Account Group. (See Figure 3.11)
Figure 3.11: Administration, Groups option
Revised: 12/17 25 First National Bank Alaska
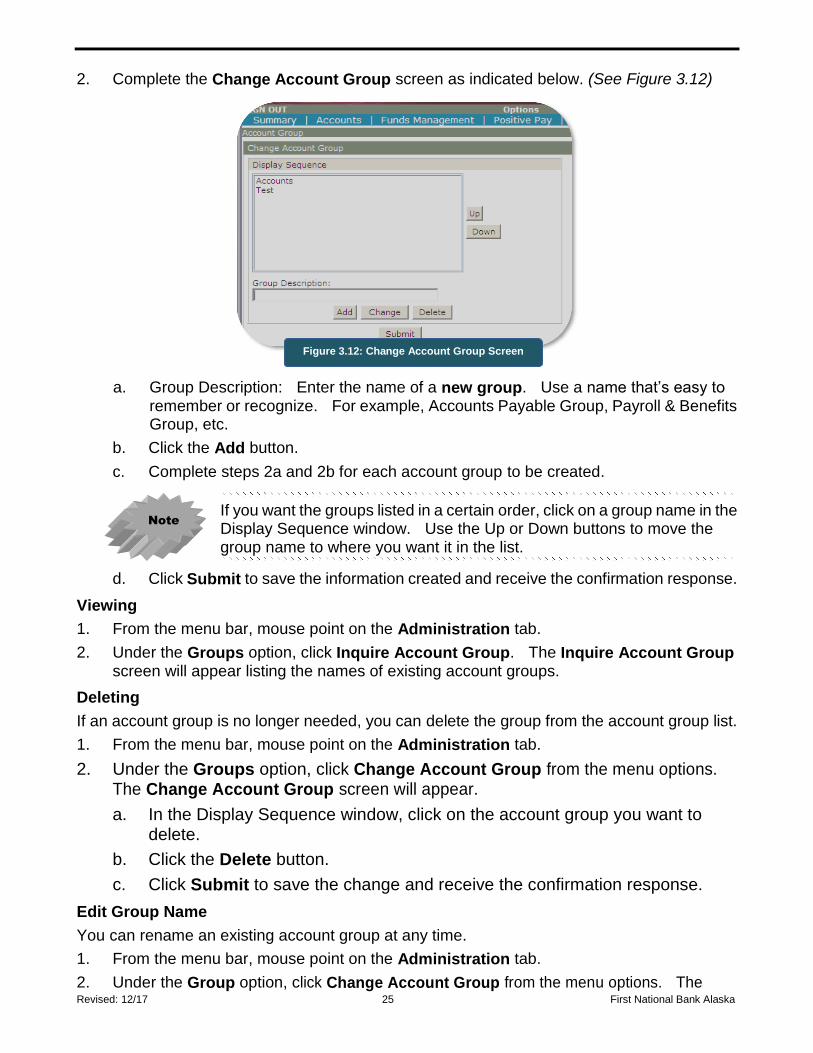
2. Complete the Change Account Group screen as indicated below. (See Figure 3.12)
a. Group Description: Enter the name of a new group. Use a name that’s easy to remember or recognize. For example, Accounts Payable Group, Payroll & Benefits Group, etc.
b. Click the Add button.
c. Complete steps 2a and 2b for each account group to be created.
If you want the groups listed in a certain order, click on a group name in the Display Sequence window. Use the Up or Down buttons to move the group name to where you want it in the list.
d. Click Submit to save the information created and receive the confirmation response.
Viewing
1. From the menu bar, mouse point on the Administration tab.
2. Under the Groups option, click Inquire Account Group. The Inquire Account Group screen will appear listing the names of existing account groups.
Deleting
If an account group is no longer needed, you can delete the group from the account group list.
1. From the menu bar, mouse point on the Administration tab.
2. Under the Groups option, click Change Account Group from the menu options. The Change Account Group screen will appear.
a. In the Display Sequence window, click on the account group you want to delete.
b. Click the Delete button.
c. Click Submit to save the change and receive the confirmation response.
Edit Group Name
You can rename an existing account group at any time.
1. From the menu bar, mouse point on the Administration tab.
2. Under the Group option, click Change Account Group from the menu options. The
Figure 3.12: Change Account Group Screen
Note
Revised: 12/17 26 First National Bank Alaska
Change Account Group screen will appear.
a. In the Display Sequence window, click on the account group name you want to edit. This will place the group name in the Group Description field.
b. Click in the Group Description field and edit the name.
c. Click Change.
d. Click Submit to save the change made and receive a confirmation response.
Fund Transfer Groups
Adding
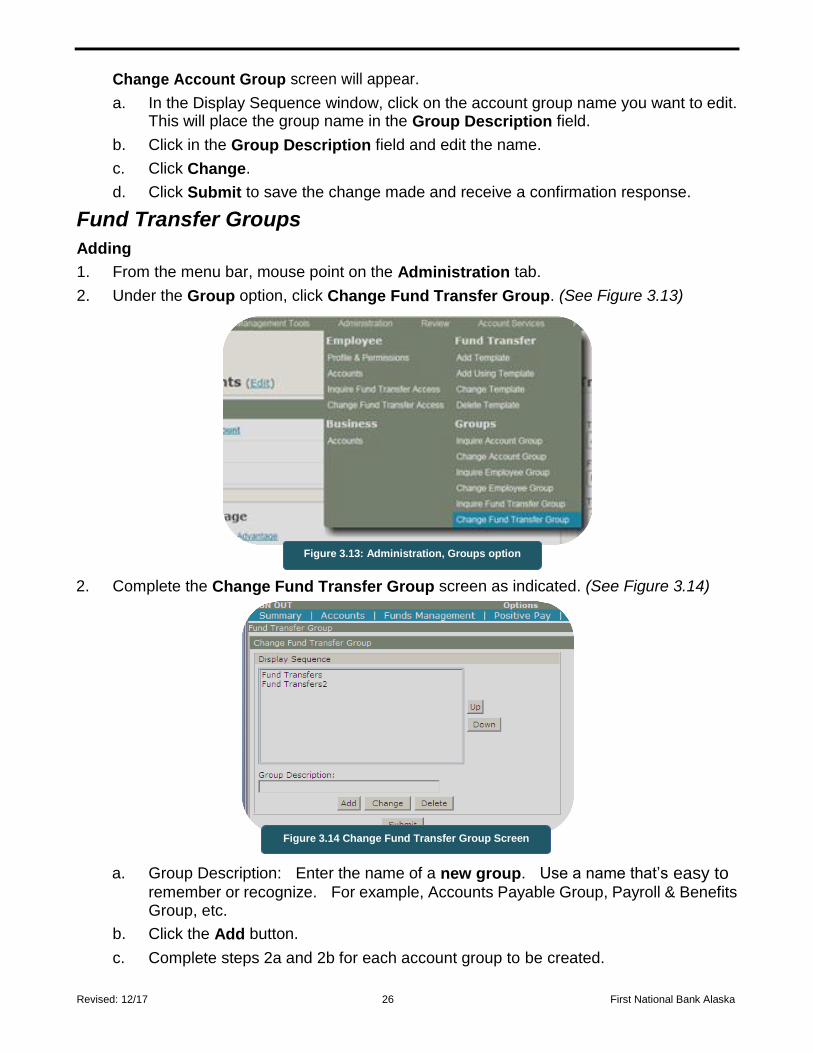
1. From the menu bar, mouse point on the Administration tab.
2. Under the Group option, click Change Fund Transfer Group. (See Figure 3.13)
2. Complete the Change Fund Transfer Group screen as indicated. (See Figure 3.14)
a. Group Description: Enter the name of a new group. Use a name that’s easy to remember or recognize. For example, Accounts Payable Group, Payroll & Benefits Group, etc.
b. Click the Add button.
c. Complete steps 2a and 2b for each account group to be created.
Figure 3.13: Administration, Groups option
Figure 3.14 Change Fund Transfer Group Screen

Revised: 12/17 27 First National Bank Alaska
If you want the groups listed in a certain order, click on a group name in the Display Sequence window. Use the Up or Down buttons to move the group name to where you want it in the list.
d. Click Submit to save the information created and receive the confirmation response.
Viewing
1. From the menu bar, mouse point on the Administration tab.
2. Under the Groups option, click Inquire Fund Transfer Group. The Inquire Fund Transfer Group screen appears listing the names of existing fund transfer groups.
Deleting
If a fund transfer group is no longer needed, you can delete the group from the list.
1. From the menu bar, mouse point on the Administration tab.
2. Under the Groups option, click Change Fund Transfer Group. The Change Fund Transfer Group screen appears.
a. In the Display Sequence window, click on the Fund Transfer group name you want to delete.
b. Click the Delete button.
c. Click Submit to save the change and receive the confirmation response.
Edit Group Name
You can rename an existing account group at any time.
1. From the menu bar, mouse point on the Administration tab.
2. Under the Groups option, click Change Fund Transfer Group from the menu options. The Change Fund Transfer Group screen appears.
a. In the Display Sequence window, click on the fund transfer group name you want to edit. This will place the group name in the Group Description field.
b. Click in the Group Description field and edit the name.
c. Click Change.
d. Click Submit to save the change and receive a confirmation response.
Account Nicknames You can give each account a nickname to make them easier to identify.
Add or Change
1. From the menu bar, mouse point on the Administration tab.
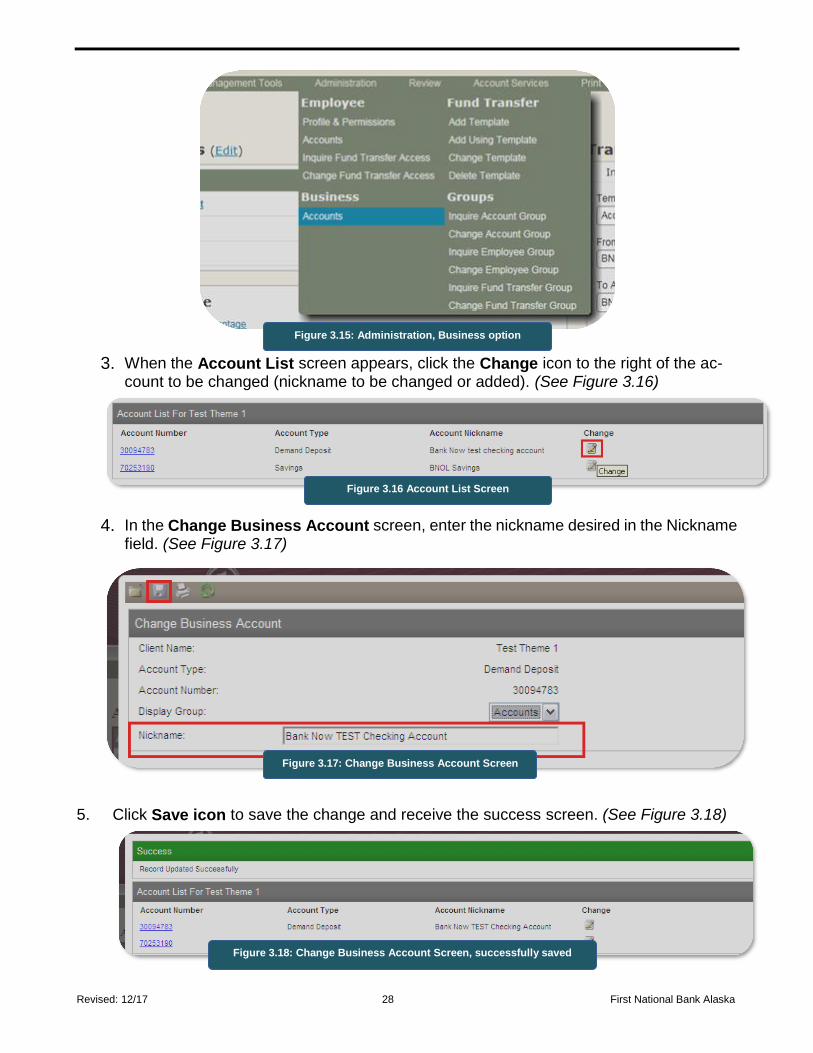
2. Under the Business option, click Accounts. (See Figure 3.15)
Note
Revised: 12/17 28 First National Bank Alaska
3. When the Account List screen appears, click the Change icon to the right of the ac-count to be changed (nickname to be changed or added). (See Figure 3.16)
4. In the Change Business Account screen, enter the nickname desired in the Nickname field. (See Figure 3.17)
5. Click Save icon to save the change and receive the success screen. (See Figure 3.18)
Figure 3.15: Administration, Business option
Figure 3.16 Account List Screen
Figure 3.17: Change Business Account Screen
Figure 3.18: Change Business Account Screen, successfully saved
Revised: 12/17 29 First National Bank Alaska
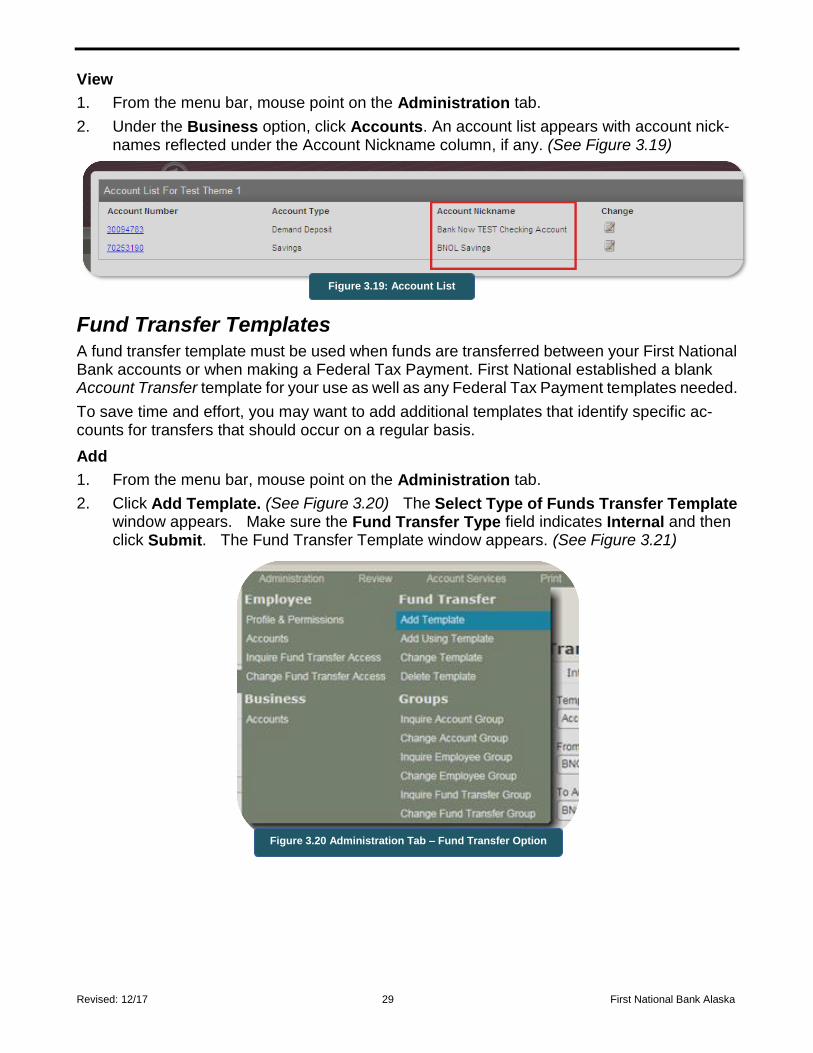
View
1. From the menu bar, mouse point on the Administration tab.
2. Under the Business option, click Accounts. An account list appears with account nick-names reflected under the Account Nickname column, if any. (See Figure 3.19)
Fund Transfer Templates A fund transfer template must be used when funds are transferred between your First National Bank accounts or when making a Federal Tax Payment. First National established a blank Account Transfer template for your use as well as any Federal Tax Payment templates needed.
To save time and effort, you may want to add additional templates that identify specific ac-counts for transfers that should occur on a regular basis.
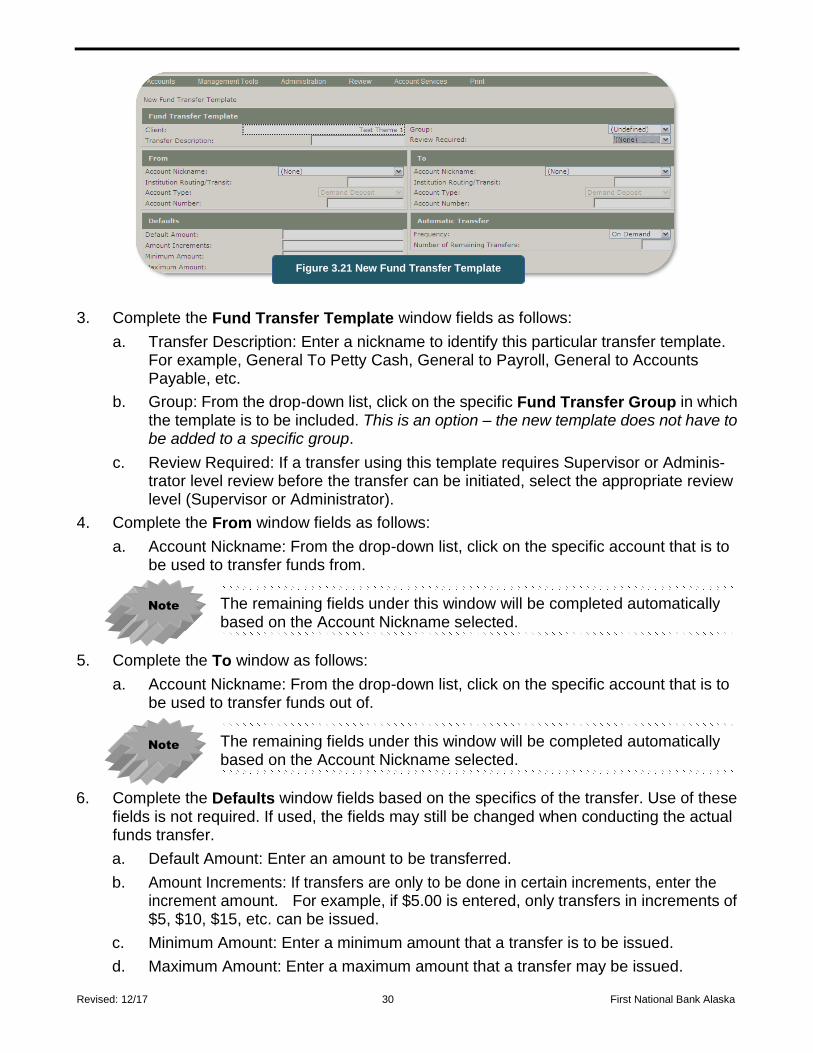
Add
1. From the menu bar, mouse point on the Administration tab.
2. Click Add Template. (See Figure 3.20) The Select Type of Funds Transfer Template window appears. Make sure the Fund Transfer Type field indicates Internal and then click Submit. The Fund Transfer Template window appears. (See Figure 3.21)
Figure 3.20 Administration Tab – Fund Transfer Option
Figure 3.19: Account List
Revised: 12/17 30 First National Bank Alaska
3. Complete the Fund Transfer Template window fields as follows:
a. Transfer Description: Enter a nickname to identify this particular transfer template. For example, General To Petty Cash, General to Payroll, General to Accounts Payable, etc.
b. Group: From the drop-down list, click on the specific Fund Transfer Group in which the template is to be included. This is an option – the new template does not have to be added to a specific group.
c. Review Required: If a transfer using this template requires Supervisor or Adminis-trator level review before the transfer can be initiated, select the appropriate review level (Supervisor or Administrator).
4. Complete the From window fields as follows:
a. Account Nickname: From the drop-down list, click on the specific account that is to be used to transfer funds from.
The remaining fields under this window will be completed automatically based on the Account Nickname selected.
5. Complete the To window as follows:
a. Account Nickname: From the drop-down list, click on the specific account that is to be used to transfer funds out of.
The remaining fields under this window will be completed automatically based on the Account Nickname selected.
6. Complete the Defaults window fields based on the specifics of the transfer. Use of these fields is not required. If used, the fields may still be changed when conducting the actual funds transfer.
a. Default Amount: Enter an amount to be transferred.
b. Amount Increments: If transfers are only to be done in certain increments, enter the increment amount. For example, if $5.00 is entered, only transfers in increments of $5, $10, $15, etc. can be issued.
c. Minimum Amount: Enter a minimum amount that a transfer is to be issued.
d. Maximum Amount: Enter a maximum amount that a transfer may be issued.
Note
Note
Figure 3.21 New Fund Transfer Template
Revised: 12/17 31 First National Bank Alaska
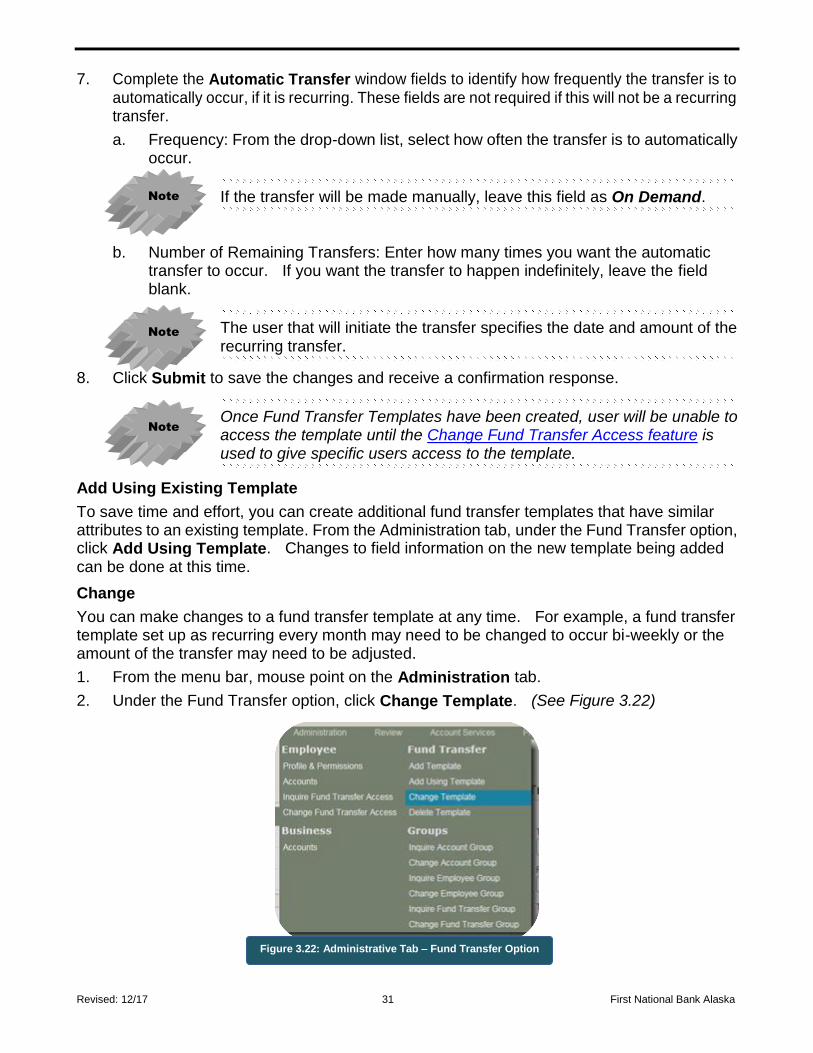
7. Complete the Automatic Transfer window fields to identify how frequently the transfer is to automatically occur, if it is recurring. These fields are not required if this will not be a recurring transfer.
a. Frequency: From the drop-down list, select how often the transfer is to automatically occur.
If the transfer will be made manually, leave this field as On Demand.
b. Number of Remaining Transfers: Enter how many times you want the automatic transfer to occur. If you want the transfer to happen indefinitely, leave the field blank.
The user that will initiate the transfer specifies the date and amount of the recurring transfer.
8. Click Submit to save the changes and receive a confirmation response.
Once Fund Transfer Templates have been created, user will be unable to access the template until the Change Fund Transfer Access feature is used to give specific users access to the template.
Add Using Existing Template
To save time and effort, you can create additional fund transfer templates that have similar attributes to an existing template. From the Administration tab, under the Fund Transfer option, click Add Using Template. Changes to field information on the new template being added can be done at this time.
Change
You can make changes to a fund transfer template at any time. For example, a fund transfer template set up as recurring every month may need to be changed to occur bi-weekly or the amount of the transfer may need to be adjusted.
1. From the menu bar, mouse point on the Administration tab.
2. Under the Fund Transfer option, click Change Template. (See Figure 3.22)
Note
Note
Note
Figure 3.22: Administrative Tab – Fund Transfer Option
Revised: 12/17 32 First National Bank Alaska
3. The Search For Fund Transfer Template screen appears.
a. Select the All or Account Group option.
b. Click Submit. The results screen will appear listing the fund transfer templates.
4. Click on the template name link for the template you want to change. The Change Fund Transfer Template screen will appear.
5. Make changes needed to the applicable fields.
6. Click Submit to save the changes and receive a confirmation response.
Remember, once a fund transfer template is created, you must give users access to the template using the Change Fund Transfer Access feature.
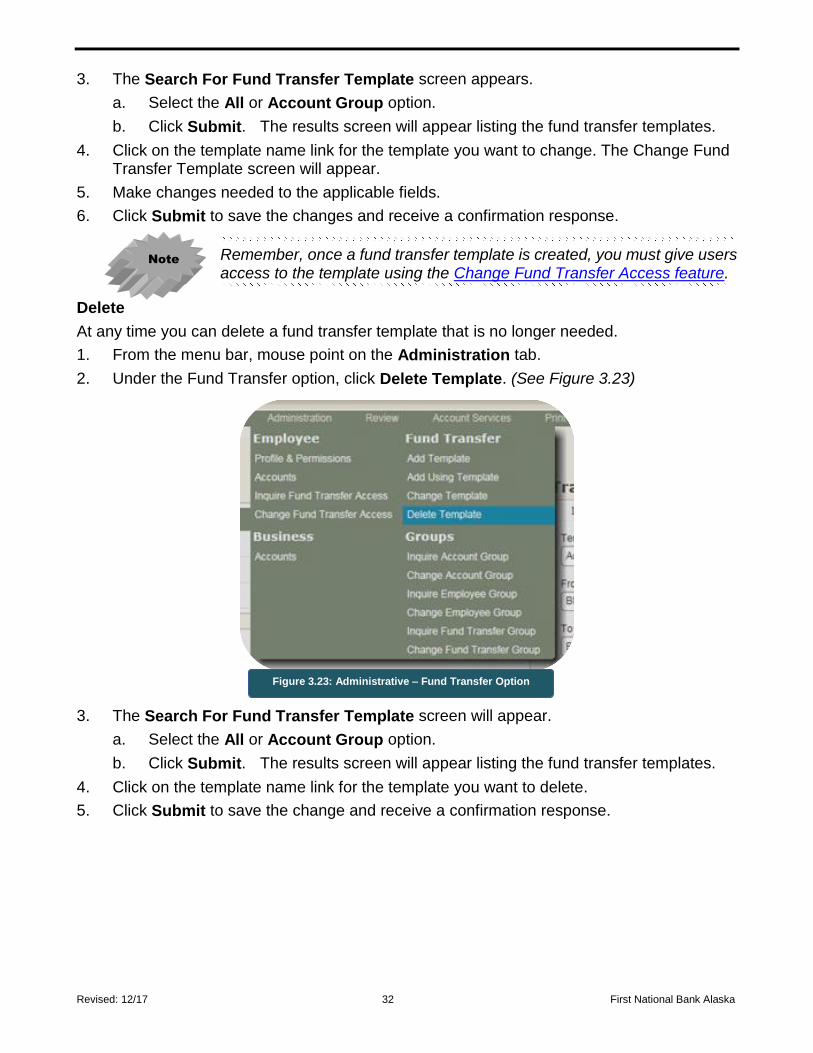
Delete
At any time you can delete a fund transfer template that is no longer needed.
1. From the menu bar, mouse point on the Administration tab.
2. Under the Fund Transfer option, click Delete Template. (See Figure 3.23)
3. The Search For Fund Transfer Template screen will appear.
a. Select the All or Account Group option.
b. Click Submit. The results screen will appear listing the fund transfer templates.
4. Click on the template name link for the template you want to delete.
5. Click Submit to save the change and receive a confirmation response.
Figure 3.23: Administrative – Fund Transfer Option
Note
Revised: 12/17 33 First National Bank Alaska
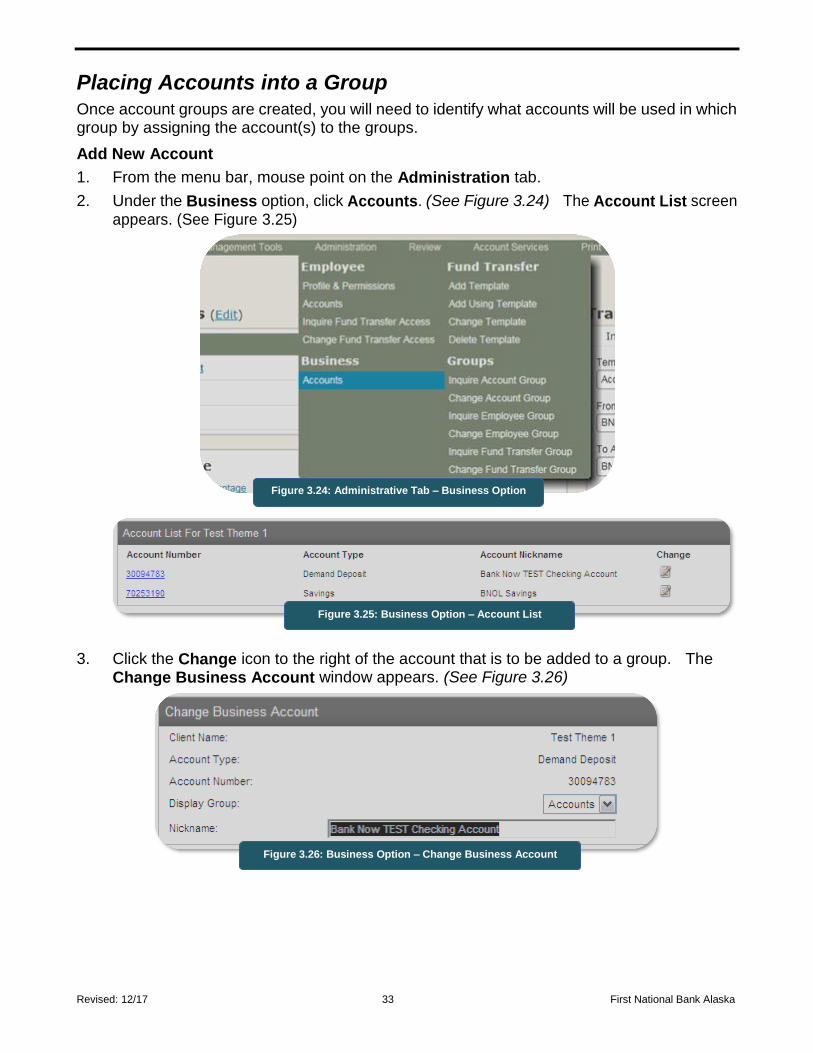
Placing Accounts into a Group
Once account groups are created, you will need to identify what accounts will be used in which group by assigning the account(s) to the groups.
Add New Account
1. From the menu bar, mouse point on the Administration tab.
2. Under the Business option, click Accounts. (See Figure 3.24) The Account List screen appears. (See Figure 3.25)
3. Click the Change icon to the right of the account that is to be added to a group. The Change Business Account window appears. (See Figure 3.26)
Figure 3.24: Administrative Tab – Business Option
Figure 3.25: Business Option – Account List
Figure 3.26: Business Option – Change Business Account

Revised: 12/17 34 First National Bank Alaska
4. In the Display Group field, click the drop-down list and select a group. (See Figure 3.27)
5. Click the Save icon from the menu bar to save the change. Click the Close icon (X) in the lower right corner of the screen to the window.
Change Account Group
1. From the menu bar, mouse point on the Administration tab.
2. Under the Business option, click Account. The Account List screen appears.
3. Click the Change icon to the right of the account that is to be changed. The Change Business Account window appears.
4. Click on the drop-down list for the Display Group and select the group or None if the account will not be linked to any particular group.
5. Click the Save icon from the menu bar to save the change. Click the Close icon (X) in the lower right corner of the screen to the window.
Inquire on Accounts in Groups
You can determine what accounts are assigned to account groups by completing an Inquire Account Group function.
1. From the menu bar, mouse point on the Administration tab.
2. Under Groups, click Inquire Account Group. (See Figure 3.28) The Inquire Client Account screen appears listing the groups.
Figure 3.27: Change Business Account – Add Acct to Group
Figure 3.28: Administration – Groups Option
Revised: 12/17 35 First National Bank Alaska
Setting Up Employees
Any System Administrator, Administrator or Supervisor may set up other employees to use First National’s business online banking services. Before starting, obtain from the employee the name of the city he/she was born in; this information will be needed as part of the employee setup.
The highest access level, System (Senior) Administrator, is limited only by specifications set by First National Bank Alaska. Other users’ privileges cannot exceed the System Administrator’s privileges. For users that will use the Deposit Advantage service, the bank must set the permission once the System Administrator has created the user profile.
The three other access levels are:
Employee: Can be given privileges to view account balance information and initiate account to account transfers. However, this user level does not allow the user to ap-prove or review transfers.
Supervisor: Can be given privileges to view account balance information, initiate ac-count to account fund transfers, and approve account to account fund transfer for others in the same Employee Group. This user level also allows the user to review transfer information from the user’s own Employee Group and can be given privileges to inquire, add, change or delete Employee level users.
Administrator: Can be given privileges to view account balance information, initiate account to account transfers, and review/approve account to account fund transfers for other users. An Administrator level employee can also setup another Administrator level user as well as setup, change or delete Employee and Supervisor level users.
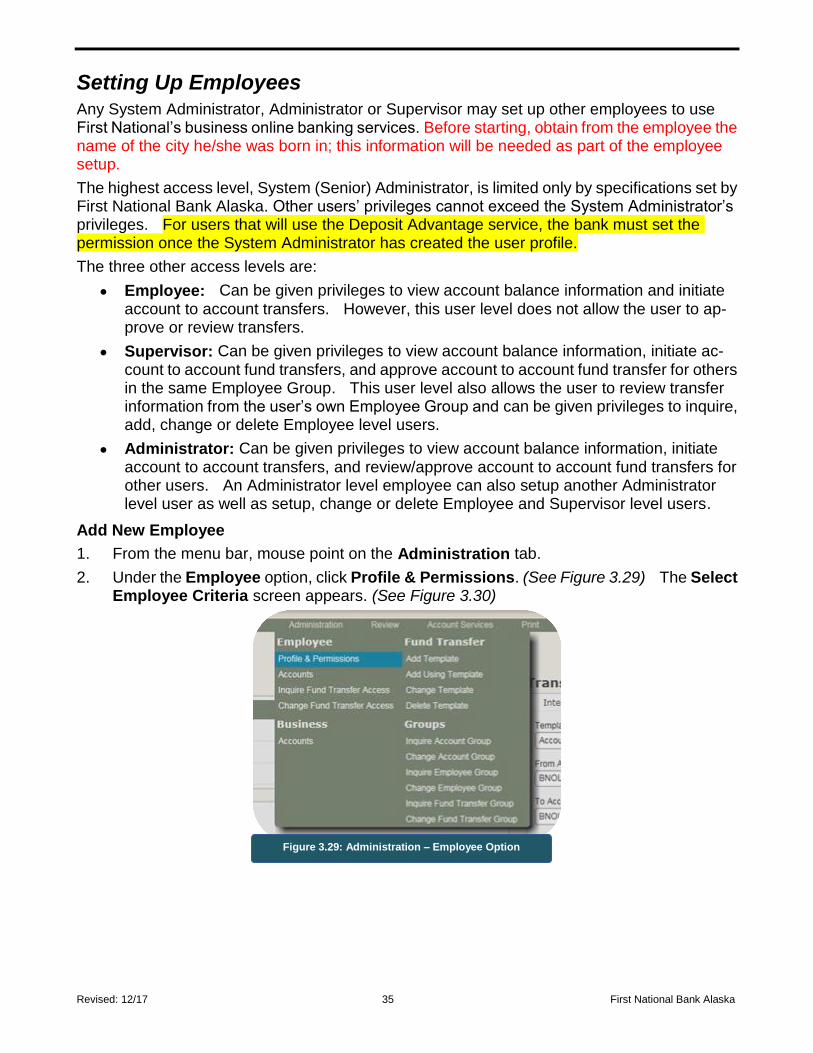
Add New Employee
1. From the menu bar, mouse point on the Administration tab.
2. Under the Employee option, click Profile & Permissions. (See Figure 3.29) The Select Employee Criteria screen appears. (See Figure 3.30)
Figure 3.29: Administration – Employee Option
Revised: 12/17 36 First National Bank Alaska
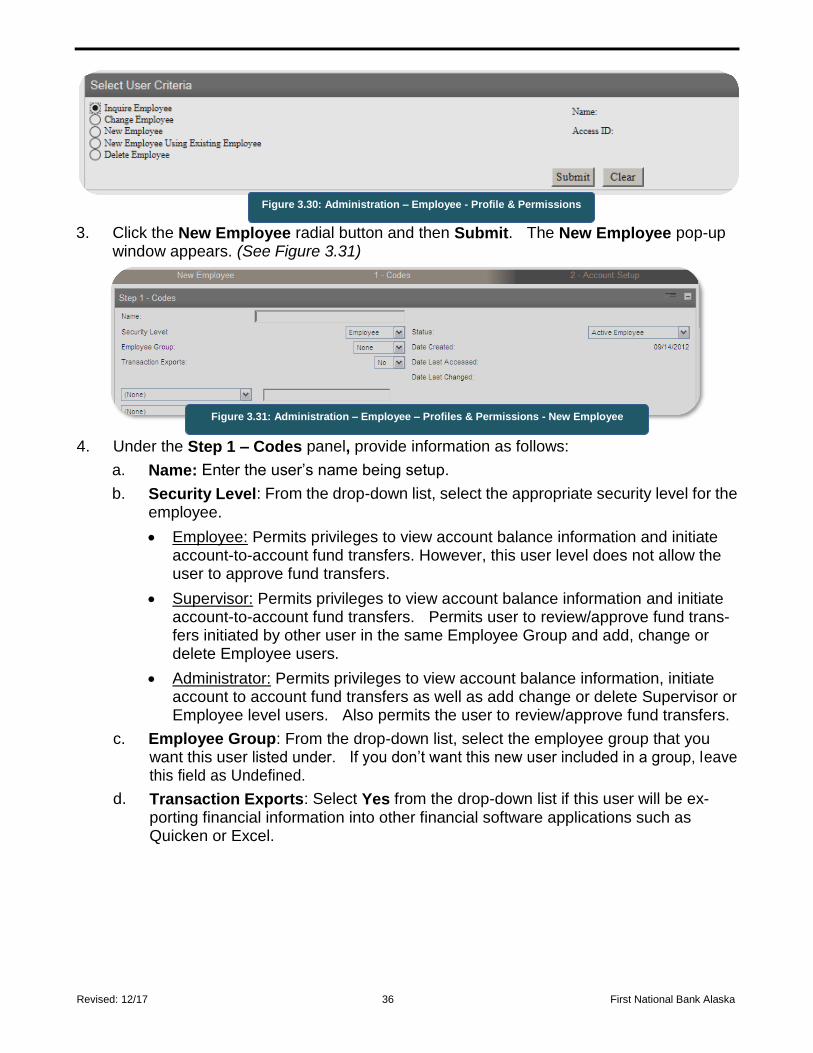
3. Click the New Employee radial button and then Submit. The New Employee pop-up window appears. (See Figure 3.31)
4. Under the Step 1 – Codes panel, provide information as follows:
a. Name: Enter the user’s name being setup.
b. Security Level: From the drop-down list, select the appropriate security level for the employee.
Employee: Permits privileges to view account balance information and initiate account-to-account fund transfers. However, this user level does not allow the user to approve fund transfers.
Supervisor: Permits privileges to view account balance information and initiate account-to-account fund transfers. Permits user to review/approve fund trans-fers initiated by other user in the same Employee Group and add, change or delete Employee users.
Administrator: Permits privileges to view account balance information, initiate account to account fund transfers as well as add change or delete Supervisor or Employee level users. Also permits the user to review/approve fund transfers.
c. Employee Group: From the drop-down list, select the employee group that you want this user listed under. If you don’t want this new user included in a group, leave this field as Undefined.
d. Transaction Exports: Select Yes from the drop-down list if this user will be ex-porting financial information into other financial software applications such as Quicken or Excel.
Figure 3.30: Administration – Employee - Profile & Permissions
Figure 3.31: Administration – Employee – Profiles & Permissions - New Employee
Revised: 12/17 37 First National Bank Alaska
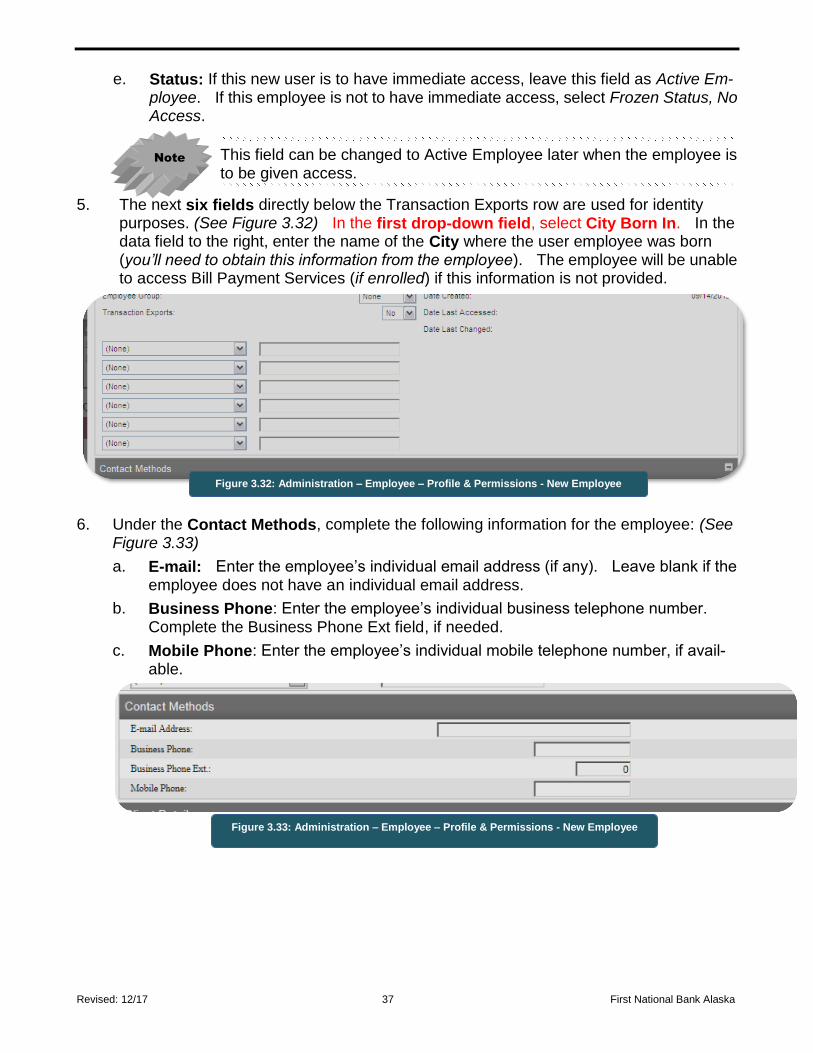
e. Status: If this new user is to have immediate access, leave this field as Active Em-ployee. If this employee is not to have immediate access, select Frozen Status, No Access.
This field can be changed to Active Employee later when the employee is to be given access.
5. The next six fields directly below the Transaction Exports row are used for identity purposes. (See Figure 3.32) In the first drop-down field, select City Born In. In the data field to the right, enter the name of the City where the user employee was born (you’ll need to obtain this information from the employee). The employee will be unable to access Bill Payment Services (if enrolled) if this information is not provided.
6. Under the Contact Methods, complete the following information for the employee: (See Figure 3.33)
a. E-mail: Enter the employee’s individual email address (if any). Leave blank if the employee does not have an individual email address.
b. Business Phone: Enter the employee’s individual business telephone number. Complete the Business Phone Ext field, if needed.
c. Mobile Phone: Enter the employee’s individual mobile telephone number, if avail-able.
Note
Figure 3.32: Administration – Employee – Profile & Permissions - New Employee
Figure 3.33: Administration – Employee – Profile & Permissions - New Employee
Revised: 12/17 38 First National Bank Alaska
7. Review the information displayed under the Client Details panel to confirm it accurately displays the business’ taxpayer identification number. Contact the bank if this number is incorrect. This area will also reflect the specific online banking client number assigned by the bank.
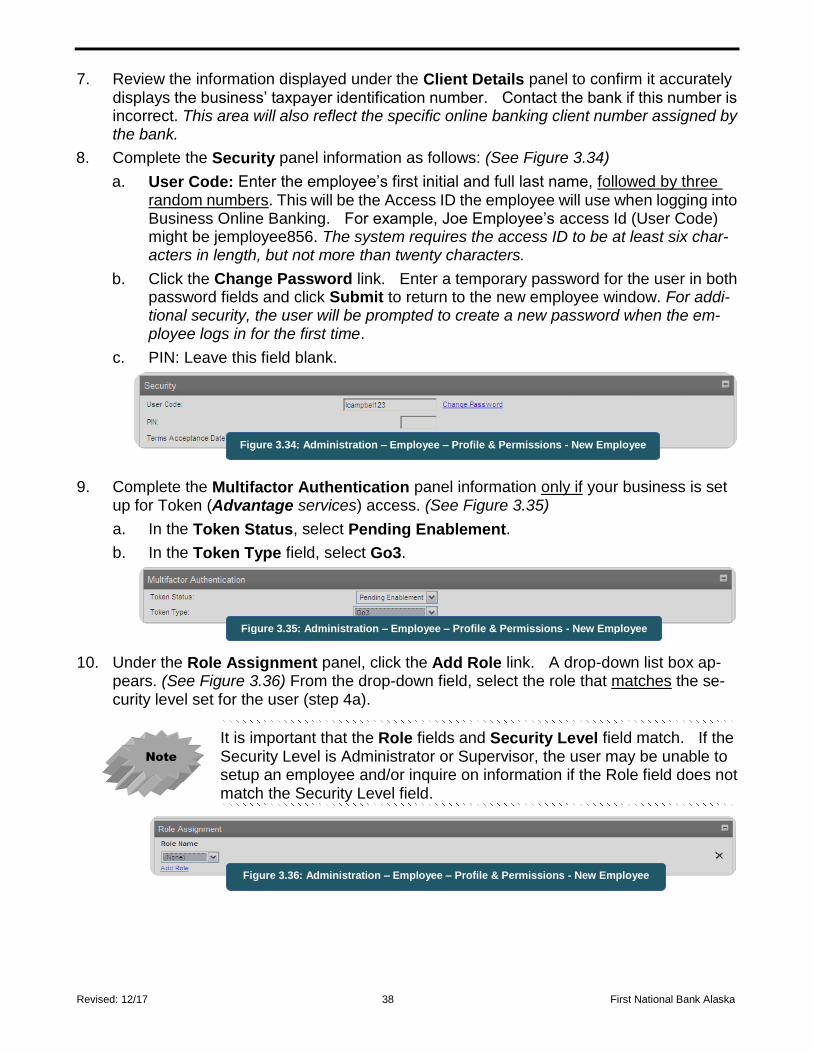
8. Complete the Security panel information as follows: (See Figure 3.34)
a. User Code: Enter the employee’s first initial and full last name, followed by three random numbers. This will be the Access ID the employee will use when logging into Business Online Banking. For example, Joe Employee’s access Id (User Code) might be jemployee856. The system requires the access ID to be at least six char-acters in length, but not more than twenty characters.
b. Click the Change Password link. Enter a temporary password for the user in both password fields and click Submit to return to the new employee window. For addi-tional security, the user will be prompted to create a new password when the em-ployee logs in for the first time.
c. PIN: Leave this field blank.
9. Complete the Multifactor Authentication panel information only if your business is set up for Token (Advantage services) access. (See Figure 3.35)
a. In the Token Status, select Pending Enablement.
b. In the Token Type field, select Go3.
10. Under the Role Assignment panel, click the Add Role link. A drop-down list box ap-pears. (See Figure 3.36) From the drop-down field, select the role that matches the se-curity level set for the user (step 4a).
It is important that the Role fields and Security Level field match. If the Security Level is Administrator or Supervisor, the user may be unable to setup an employee and/or inquire on information if the Role field does not match the Security Level field.
Note
Figure 3.34: Administration – Employee – Profile & Permissions - New Employee
Figure 3.35: Administration – Employee – Profile & Permissions - New Employee
Figure 3.36: Administration – Employee – Profile & Permissions - New Employee
Revised: 12/17 39 First National Bank Alaska
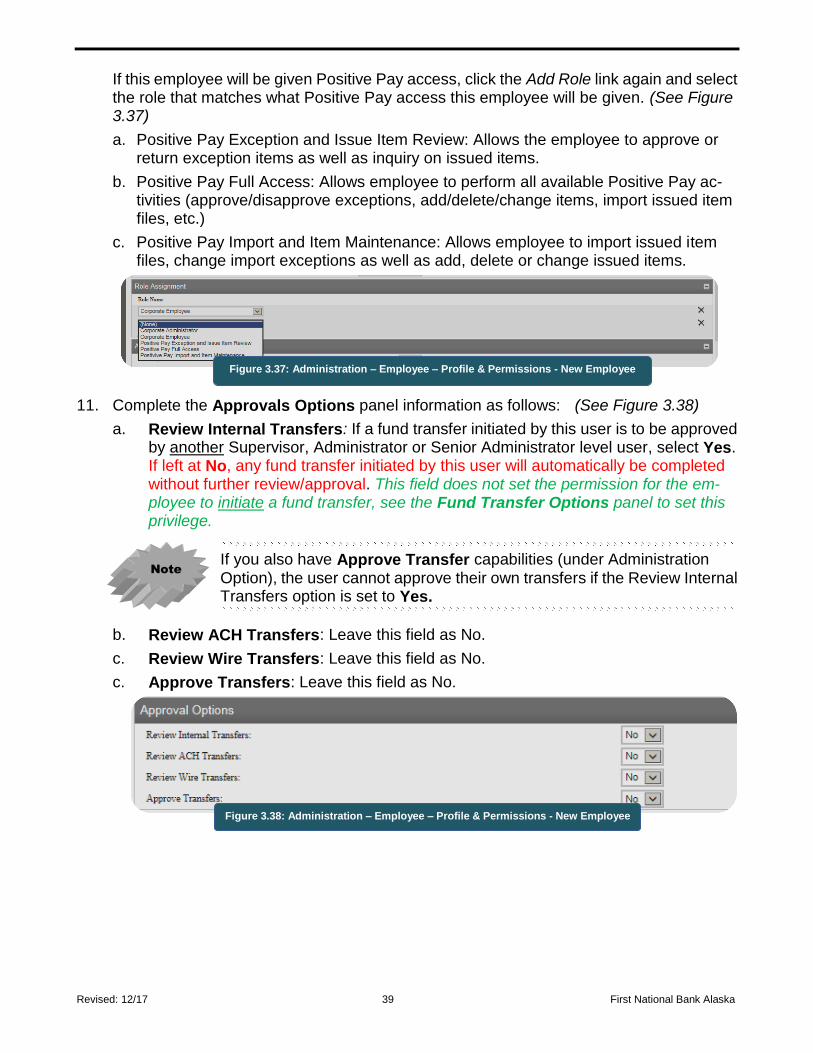
If this employee will be given Positive Pay access, click the Add Role link again and select the role that matches what Positive Pay access this employee will be given. (See Figure 3.37)
a. Positive Pay Exception and Issue Item Review: Allows the employee to approve or return exception items as well as inquiry on issued items.
b. Positive Pay Full Access: Allows employee to perform all available Positive Pay ac-tivities (approve/disapprove exceptions, add/delete/change items, import issued item files, etc.)
c. Positive Pay Import and Item Maintenance: Allows employee to import issued item files, change import exceptions as well as add, delete or change issued items.
11. Complete the Approvals Options panel information as follows: (See Figure 3.38)
a. Review Internal Transfers: If a fund transfer initiated by this user is to be approved by another Supervisor, Administrator or Senior Administrator level user, select Yes. If left at No, any fund transfer initiated by this user will automatically be completed without further review/approval. This field does not set the permission for the em-ployee to initiate a fund transfer, see the Fund Transfer Options panel to set this privilege.
If you also have Approve Transfer capabilities (under Administration Option), the user cannot approve their own transfers if the Review Internal Transfers option is set to Yes.
b. Review ACH Transfers: Leave this field as No.
c. Review Wire Transfers: Leave this field as No.
c. Approve Transfers: Leave this field as No.
Figure 3.38: Administration – Employee – Profile & Permissions - New Employee
Note
Figure 3.37: Administration – Employee – Profile & Permissions - New Employee
Revised: 12/17 40 First National Bank Alaska
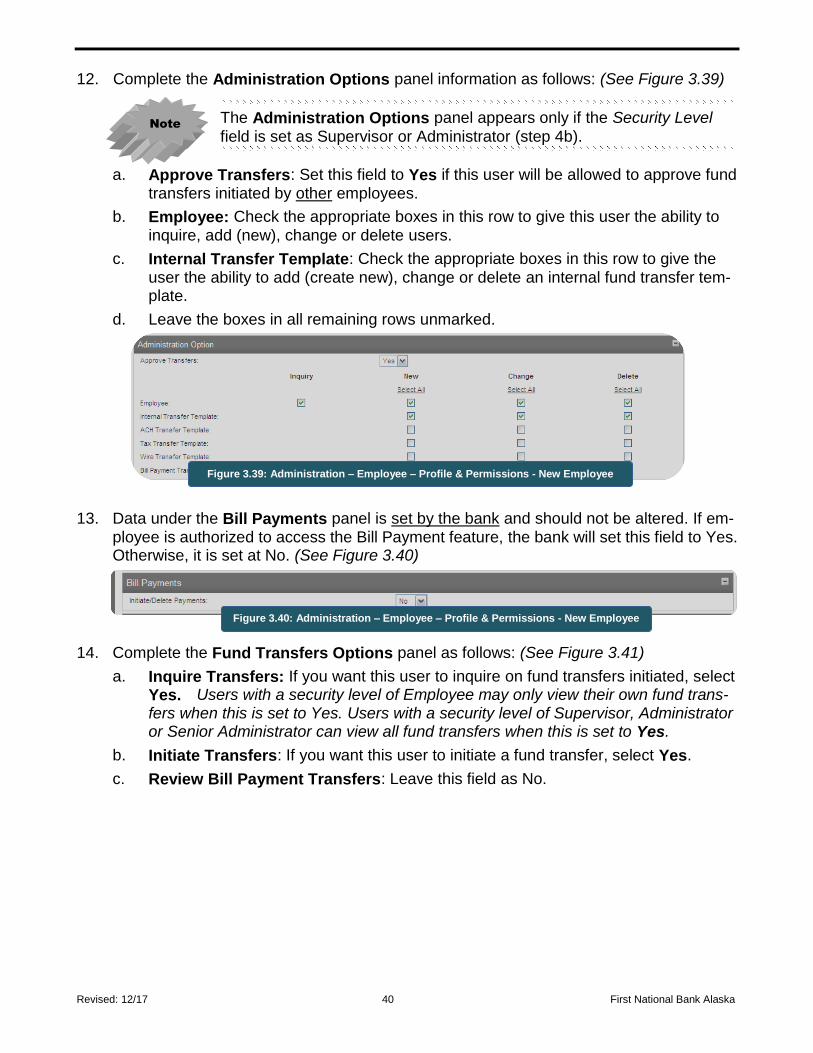
12. Complete the Administration Options panel information as follows: (See Figure 3.39)
The Administration Options panel appears only if the Security Level
field is set as Supervisor or Administrator (step 4b).
a. Approve Transfers: Set this field to Yes if this user will be allowed to approve fund transfers initiated by other employees.
b. Employee: Check the appropriate boxes in this row to give this user the ability to inquire, add (new), change or delete users.
c. Internal Transfer Template: Check the appropriate boxes in this row to give the user the ability to add (create new), change or delete an internal fund transfer tem-plate.
d. Leave the boxes in all remaining rows unmarked.
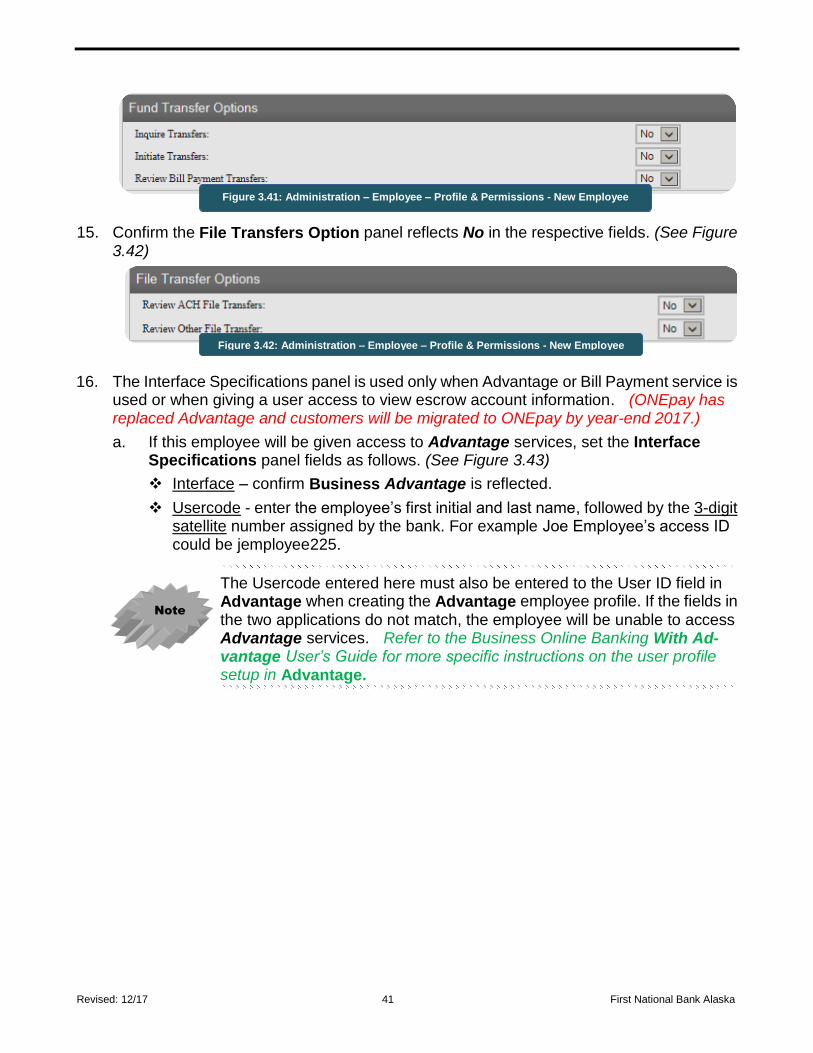
13. Data under the Bill Payments panel is set by the bank and should not be altered. If em-ployee is authorized to access the Bill Payment feature, the bank will set this field to Yes. Otherwise, it is set at No. (See Figure 3.40)
14. Complete the Fund Transfers Options panel as follows: (See Figure 3.41)
a. Inquire Transfers: If you want this user to inquire on fund transfers initiated, select Yes. Users with a security level of Employee may only view their own fund trans-fers when this is set to Yes. Users with a security level of Supervisor, Administrator or Senior Administrator can view all fund transfers when this is set to Yes.
b. Initiate Transfers: If you want this user to initiate a fund transfer, select Yes.
c. Review Bill Payment Transfers: Leave this field as No.
Note
Figure 3.39: Administration – Employee – Profile & Permissions - New Employee
Figure 3.40: Administration – Employee – Profile & Permissions - New Employee
Revised: 12/17 41 First National Bank Alaska
15. Confirm the File Transfers Option panel reflects No in the respective fields. (See Figure 3.42)
16. The Interface Specifications panel is used only when Advantage or Bill Payment service is used or when giving a user access to view escrow account information. (ONEpay has replaced Advantage and customers will be migrated to ONEpay by year-end 2017.)
a. If this employee will be given access to Advantage services, set the Interface Specifications panel fields as follows. (See Figure 3.43)
Interface – confirm Business Advantage is reflected.
Usercode - enter the employee’s first initial and last name, followed by the 3-digit satellite number assigned by the bank. For example Joe Employee’s access ID could be jemployee225.
The Usercode entered here must also be entered to the User ID field in Advantage when creating the Advantage employee profile. If the fields in the two applications do not match, the employee will be unable to access Advantage services. Refer to the Business Online Banking With Ad-vantage User’s Guide for more specific instructions on the user profile setup in Advantage.
Note
Figure 3.41: Administration – Employee – Profile & Permissions - New Employee
Figure 3.42: Administration – Employee – Profile & Permissions - New Employee

Revised: 12/17 42 First National Bank Alaska
Password – leave this field blank. The bank will set this password to establish any needed connection to the Advantage application.
When you have created the employee profile in Advantage, contact the bank between the hours of 8:00 a.m. AST and 5:00 p.m. AST. The bank will establish the connection for the employee user to access Advantage services.
b. If this employee will be given Bill Payment access, the next row will be set by the bank to reflect Corporate CheckFree followed by specific data set in the User Code and Password fields. This information is to remain unchanged when reflected.
c. If this employee will be given escrow account access, set the Interface Specifica-tions panel fields as follows:
Interface – confirm Escrow is reflected.
Usercode – fill this field with 9s (e.g., 9999999999999).
Password – file this field with 9s (e.g., 999999999999).
17. Complete the Electronic Documents panel by checking the boxes to give this user the below privileges: This is only applicable if the System Administrator has enrolled in e-Documents. (See Figure 3.44)
DDA Onus Debits: This user can view checks paid on those accounts where access by this user has been assigned.
DDA Onus Credits: This user can view deposit tickets on those account where ac-cess by this user has been assigned.
SAV Onus Debits: This user can view withdrawal tickets on those accounts where access by this user has been assigned.
SAV Onus Credits: This user can view deposit tickets on those account where ac-cess by this user has been assigned.
Checking Account Statements: This user can view checking account statements on those accounts where access by this user has been assigned. This is only applicable if the business has enrolled for e-Statements service.
Return Deposit Item Notices: This user can view notices on deposited items being returned against those accounts where access by this user has been assigned. This is only applicable if the business has enrolled for e-Notices service.
ACH Advice Notices (Savings or Checking): This user can view notices on ACH debit and credit pending transactions on those accounts where access by this user has been assigned. This is only applicable if the business has enrolled for e-Notices service.
Loan Billing Statement: This user can view loan billing statement on those accounts where access by this user has been assigned.
Saving Account Statements: This user can view savings account statements on
Note
Figure 3.43: Administration – Employee – Profile & Permissions – New Employee
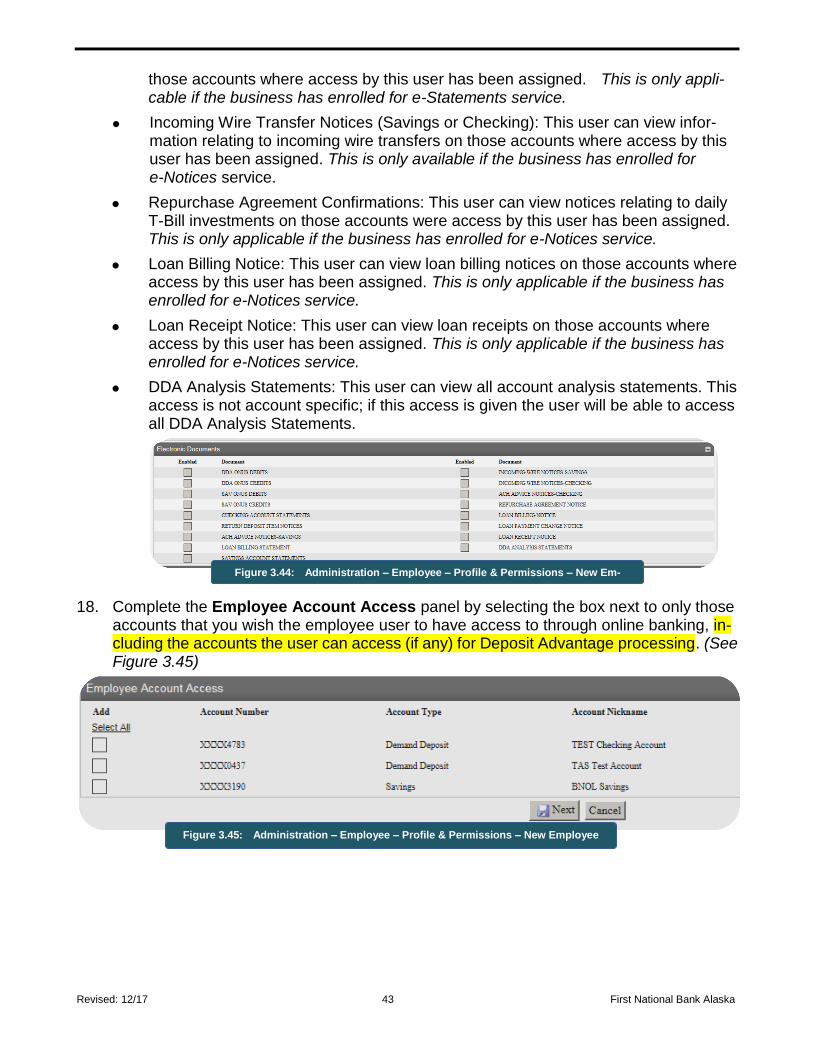
Revised: 12/17 43 First National Bank Alaska
those accounts where access by this user has been assigned. This is only appli-cable if the business has enrolled for e-Statements service.
Incoming Wire Transfer Notices (Savings or Checking): This user can view infor-mation relating to incoming wire transfers on those accounts where access by this user has been assigned. This is only available if the business has enrolled for e-Notices service.
Repurchase Agreement Confirmations: This user can view notices relating to daily T-Bill investments on those accounts were access by this user has been assigned. This is only applicable if the business has enrolled for e-Notices service.
Loan Billing Notice: This user can view loan billing notices on those accounts where access by this user has been assigned. This is only applicable if the business has enrolled for e-Notices service.
Loan Receipt Notice: This user can view loan receipts on those accounts where access by this user has been assigned. This is only applicable if the business has enrolled for e-Notices service.
DDA Analysis Statements: This user can view all account analysis statements. This access is not account specific; if this access is given the user will be able to access all DDA Analysis Statements.
18. Complete the Employee Account Access panel by selecting the box next to only those accounts that you wish the employee user to have access to through online banking, in-cluding the accounts the user can access (if any) for Deposit Advantage processing. (See Figure 3.45)
Figure 3.44: Administration – Employee – Profile & Permissions – New Em-
ployee
Figure 3.45: Administration – Employee – Profile & Permissions – New Employee
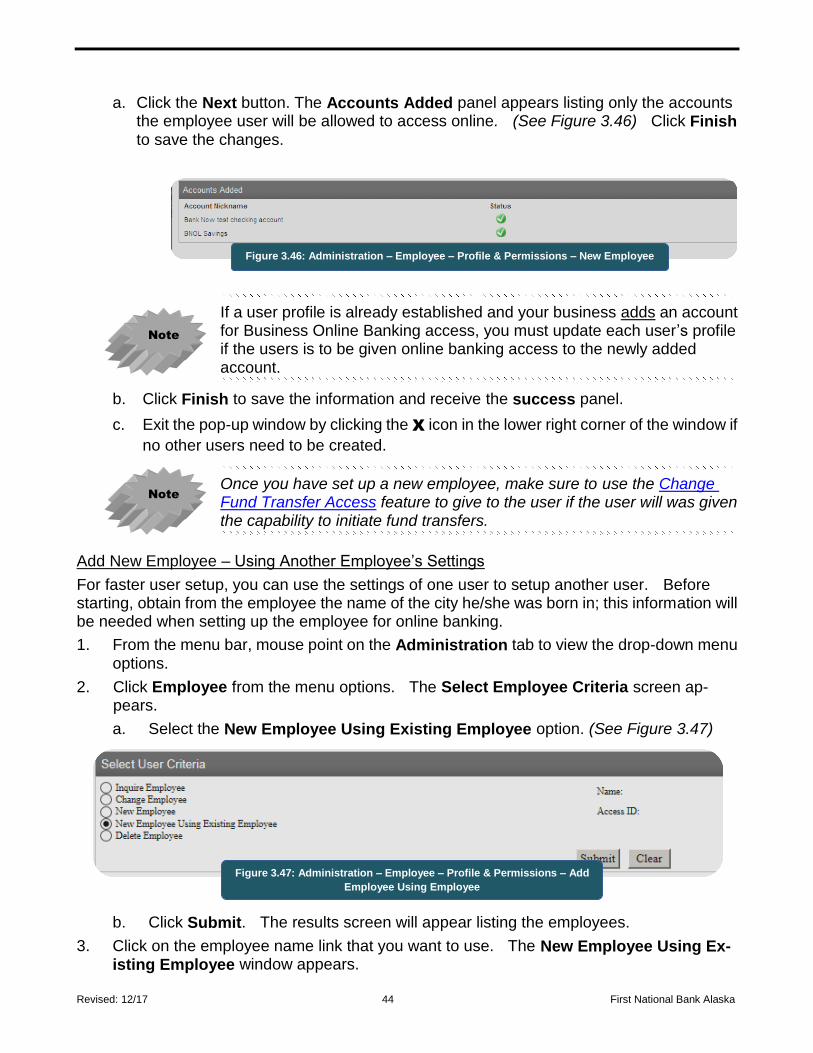
Revised: 12/17 44 First National Bank Alaska
a. Click the Next button. The Accounts Added panel appears listing only the accounts the employee user will be allowed to access online. (See Figure 3.46) Click Finish to save the changes.
If a user profile is already established and your business adds an account for Business Online Banking access, you must update each user’s profile if the users is to be given online banking access to the newly added account.
b. Click Finish to save the information and receive the success panel.
c. Exit the pop-up window by clicking the X icon in the lower right corner of the window if
no other users need to be created.
Once you have set up a new employee, make sure to use the Change Fund Transfer Access feature to give to the user if the user will was given the capability to initiate fund transfers.
Add New Employee – Using Another Employee’s Settings
For faster user setup, you can use the settings of one user to setup another user. Before starting, obtain from the employee the name of the city he/she was born in; this information will be needed when setting up the employee for online banking.
1. From the menu bar, mouse point on the Administration tab to view the drop-down menu options.
2. Click Employee from the menu options. The Select Employee Criteria screen ap-pears.
a. Select the New Employee Using Existing Employee option. (See Figure 3.47)
b. Click Submit. The results screen will appear listing the employees.
3. Click on the employee name link that you want to use. The New Employee Using Ex-isting Employee window appears.
Figure 3.47: Administration – Employee – Profile & Permissions – Add
Employee Using Employee
Figure 3.46: Administration – Employee – Profile & Permissions – New Employee
Note
Note
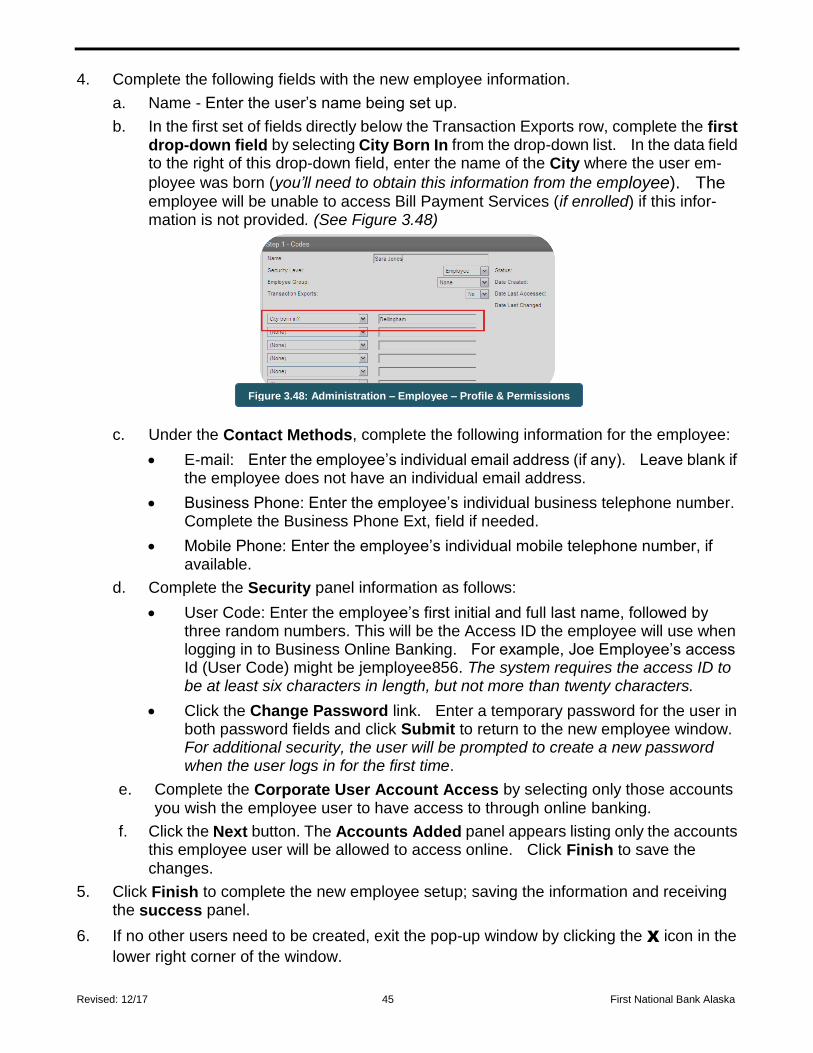
Revised: 12/17 45 First National Bank Alaska
4. Complete the following fields with the new employee information.
a. Name - Enter the user’s name being set up.
b. In the first set of fields directly below the Transaction Exports row, complete the first drop-down field by selecting City Born In from the drop-down list. In the data field to the right of this drop-down field, enter the name of the City where the user em-
ployee was born (you’ll need to obtain this information from the employee). The employee will be unable to access Bill Payment Services (if enrolled) if this infor-mation is not provided. (See Figure 3.48)
c. Under the Contact Methods, complete the following information for the employee:
E-mail: Enter the employee’s individual email address (if any). Leave blank if the employee does not have an individual email address.
Business Phone: Enter the employee’s individual business telephone number. Complete the Business Phone Ext, field if needed.
Mobile Phone: Enter the employee’s individual mobile telephone number, if available.
d. Complete the Security panel information as follows:
User Code: Enter the employee’s first initial and full last name, followed by three random numbers. This will be the Access ID the employee will use when logging in to Business Online Banking. For example, Joe Employee’s access Id (User Code) might be jemployee856. The system requires the access ID to be at least six characters in length, but not more than twenty characters.
Click the Change Password link. Enter a temporary password for the user in both password fields and click Submit to return to the new employee window. For additional security, the user will be prompted to create a new password when the user logs in for the first time.
e. Complete the Corporate User Account Access by selecting only those accounts you wish the employee user to have access to through online banking.
f. Click the Next button. The Accounts Added panel appears listing only the accounts this employee user will be allowed to access online. Click Finish to save the changes.
5. Click Finish to complete the new employee setup; saving the information and receiving the success panel.
6. If no other users need to be created, exit the pop-up window by clicking the X icon in the
lower right corner of the window.
Figure 3.48: Administration – Employee – Profile & Permissions

Revised: 12/17 46 First National Bank Alaska
Information under any panel may be changed for the new employee. For example, if the employee is not to have the same electronic documents as another employee, simply deselect the box next to the document.
Note
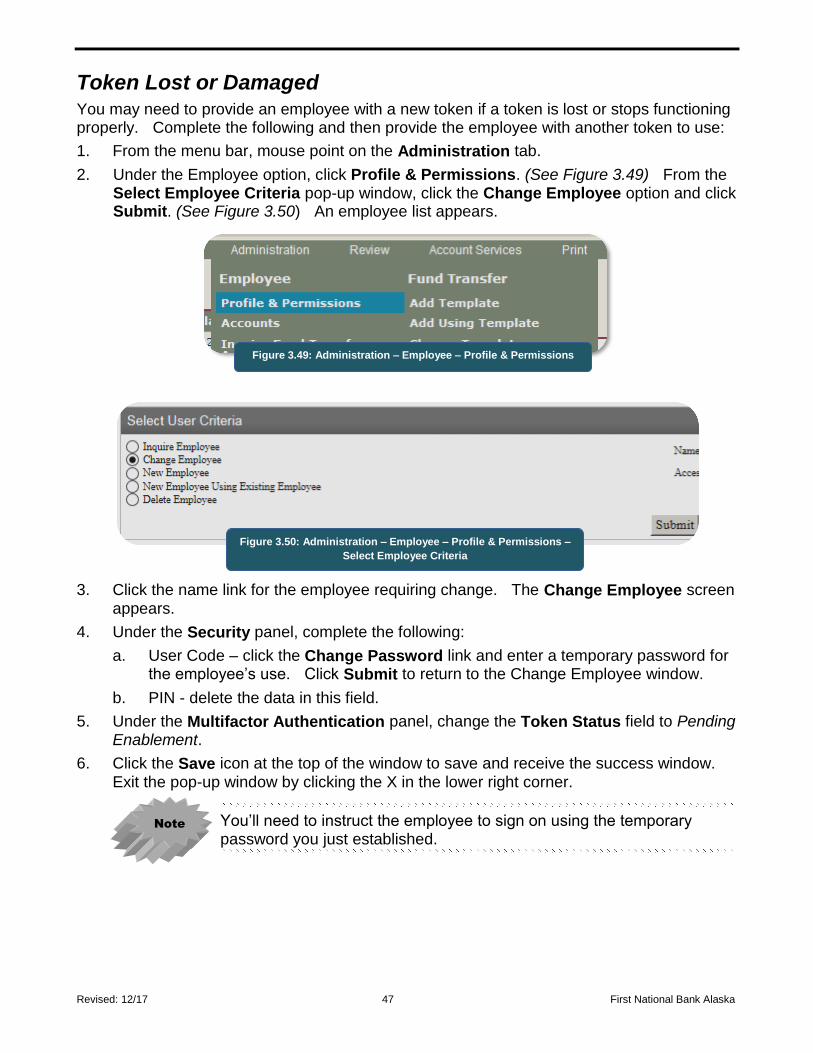
Revised: 12/17 47 First National Bank Alaska
Token Lost or Damaged
You may need to provide an employee with a new token if a token is lost or stops functioning properly. Complete the following and then provide the employee with another token to use:
1. From the menu bar, mouse point on the Administration tab.
2. Under the Employee option, click Profile & Permissions. (See Figure 3.49) From the Select Employee Criteria pop-up window, click the Change Employee option and click Submit. (See Figure 3.50) An employee list appears.
3. Click the name link for the employee requiring change. The Change Employee screen appears.
4. Under the Security panel, complete the following:
a. User Code – click the Change Password link and enter a temporary password for the employee’s use. Click Submit to return to the Change Employee window.
b. PIN - delete the data in this field.
5. Under the Multifactor Authentication panel, change the Token Status field to Pending Enablement.
6. Click the Save icon at the top of the window to save and receive the success window.
Exit the pop-up window by clicking the X in the lower right corner.
You’ll need to instruct the employee to sign on using the temporary password you just established.
Figure 3.49: Administration – Employee – Profile & Permissions
Note
Figure 3.50: Administration – Employee – Profile & Permissions –
Select Employee Criteria
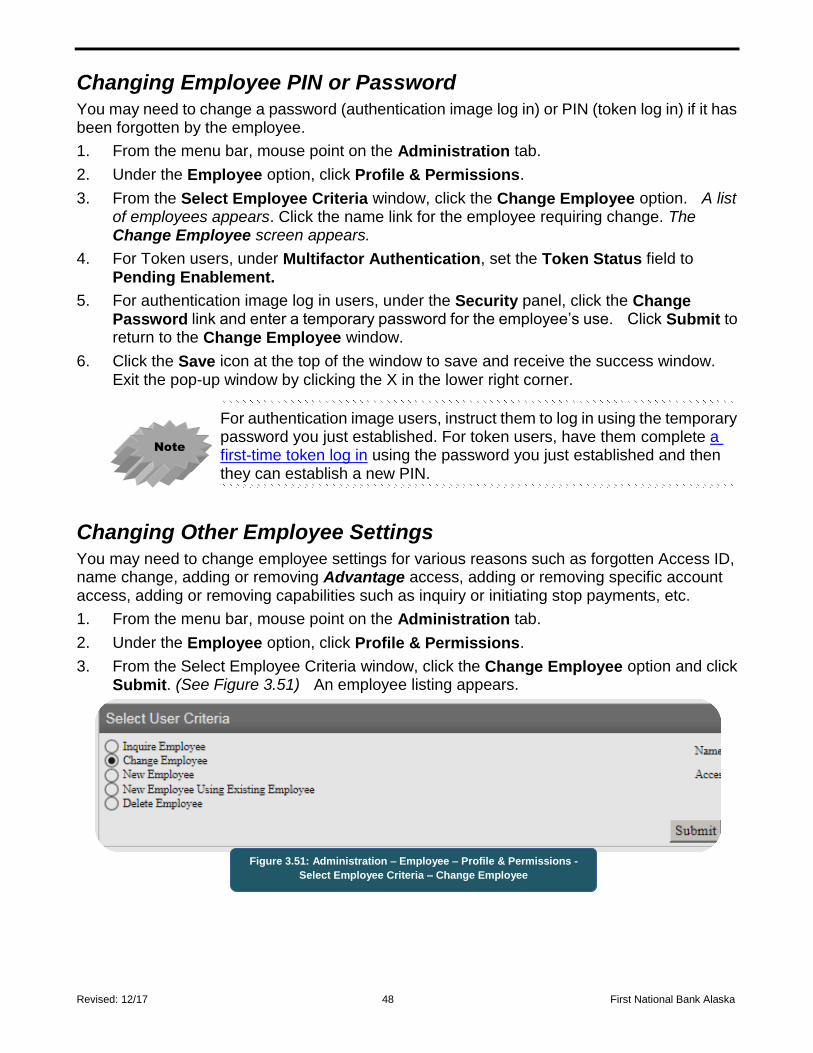
Revised: 12/17 48 First National Bank Alaska
Changing Employee PIN or Password
You may need to change a password (authentication image log in) or PIN (token log in) if it has been forgotten by the employee.
1. From the menu bar, mouse point on the Administration tab.
2. Under the Employee option, click Profile & Permissions.
3. From the Select Employee Criteria window, click the Change Employee option. A list of employees appears. Click the name link for the employee requiring change. The Change Employee screen appears.
4. For Token users, under Multifactor Authentication, set the Token Status field to Pending Enablement.
5. For authentication image log in users, under the Security panel, click the Change Password link and enter a temporary password for the employee’s use. Click Submit to return to the Change Employee window.
6. Click the Save icon at the top of the window to save and receive the success window. Exit the pop-up window by clicking the X in the lower right corner.
For authentication image users, instruct them to log in using the temporary password you just established. For token users, have them complete a first-time token log in using the password you just established and then they can establish a new PIN.
Changing Other Employee Settings
You may need to change employee settings for various reasons such as forgotten Access ID, name change, adding or removing Advantage access, adding or removing specific account access, adding or removing capabilities such as inquiry or initiating stop payments, etc.
1. From the menu bar, mouse point on the Administration tab.
2. Under the Employee option, click Profile & Permissions.
3. From the Select Employee Criteria window, click the Change Employee option and click Submit. (See Figure 3.51) An employee listing appears.
Note
Figure 3.51: Administration – Employee – Profile & Permissions -
Select Employee Criteria – Change Employee

Revised: 12/17 49 First National Bank Alaska
4. Click the name link for the employee requiring change. Edit the fields requiring change.
5. Click the Save icon at the top of the window to save and receive the success window.
Exit the pop-up window by clicking the X in the lower right corner.
Inquire Employee Capabilities
This function is used to view what capabilities an employee has been given. This function should be used before adding another employee using an existing employee’s settings.
1. From the menu bar, mouse point on the Administration tab.
2. Under the Employee options, click Profile & Permissions.
3. From the Select Employee Criteria window, select Inquire Employee and click Submit. (See Figure 3.52) An employee listing appears.
4. Click on the name line for the employee you wish to view. The employee screen appears reflecting the settings given to that employee.
Delete Employee
Users that no longer require access to Business Online Banking should be removed from the system. A System Administrator can only be removed by the bank - contact the bank if this is needed.
1. From the menu bar, mouse point on the Administration tab.
2. Under the Employee options, click Profile & Permissions.
3. From the Select Employee Criteria window, select the Delete Employee and click Submit. (See Figure 3.53) An employee listing appears.
Figure 3.52: Administration – Employee – Profile & Permissions -
Select Employee Criteria – Inquire Employee
Figure 3.53: Administration – Employee – Profile & Permissions -
Select Employee Criteria – Delete Employee

Revised: 12/17 50 First National Bank Alaska
4. Click on the name line of the employee to be deleted. The employee summary screen appears.
5. Confirm the correct employee name is reflected and then click the Delete icon (X) from
menu bar in the upper left area of the window. (See Figure 3.54)
6. Click the OK button when the confirmation window appears to receive the success win-dow.
7. Exit the pop-up window by clicking the X icon in the lower right corner of the pop-up
window.
Employee Accounts (Access)
You can inquire on a user to identify which business accounts the user has been granted ac-cess to by use of the Employee, Accounts feature.
1. From the menu bar, mouse point on the Administration tab.
2. Under the Employee option, click Accounts. (See Figure 3.55)
3. From the Select Corporate Employee Accounts Criteria window, click Submit. An
employee listing appears.
4. Click the name link of the employee you want to view. The account listing for this em-ployee appears. Hyperlinked accounts in the list indicate the employee has access. (See Figure 3.56)
Figure 3.55: Administration Tab – Accounts
Figure 3.54: Delete Employee
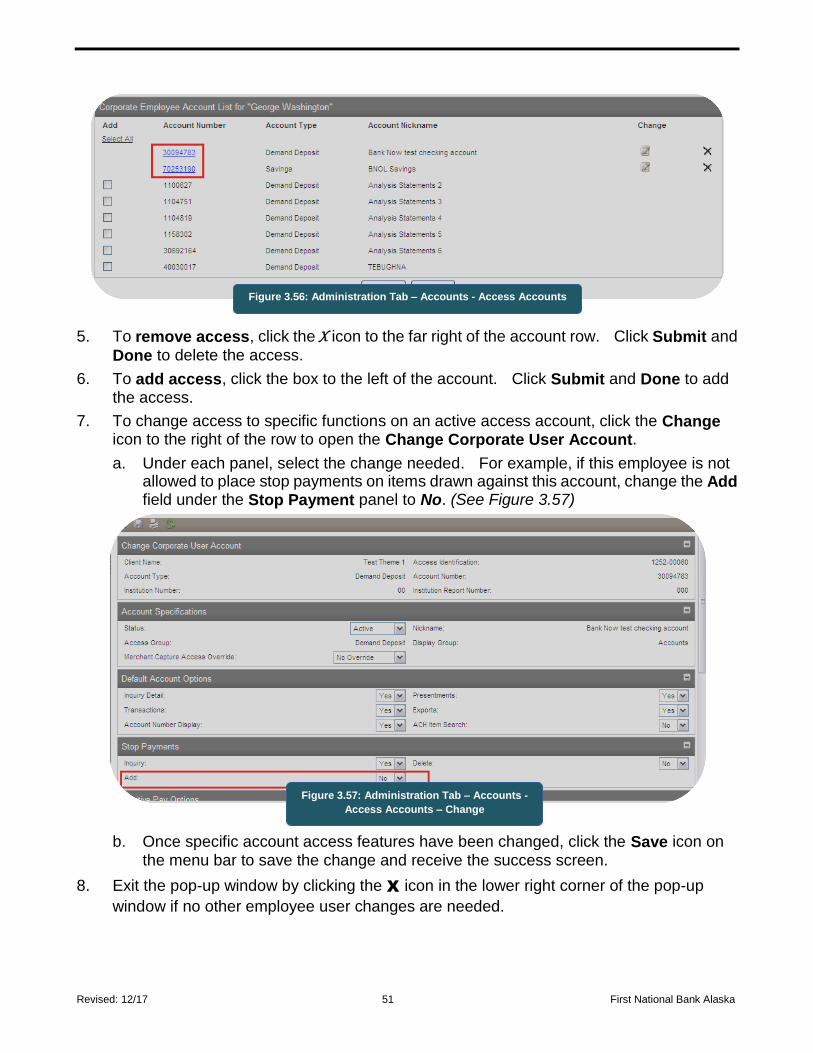
Revised: 12/17 51 First National Bank Alaska
5. To remove access, click the X icon to the far right of the account row. Click Submit and
Done to delete the access.
6. To add access, click the box to the left of the account. Click Submit and Done to add the access.
7. To change access to specific functions on an active access account, click the Change icon to the right of the row to open the Change Corporate User Account.
a. Under each panel, select the change needed. For example, if this employee is not allowed to place stop payments on items drawn against this account, change the Add field under the Stop Payment panel to No. (See Figure 3.57)
b. Once specific account access features have been changed, click the Save icon on the menu bar to save the change and receive the success screen.
8. Exit the pop-up window by clicking the X icon in the lower right corner of the pop-up
window if no other employee user changes are needed.
Figure 3.56: Administration Tab – Accounts - Access Accounts
Figure 3.57: Administration Tab – Accounts -
Access Accounts – Change

Revised: 12/17 52 First National Bank Alaska
Assigning Fund Transfer Access
Any employee that needs to use a Fund Transfer Template must be given access to the tem-plate. One employee may have access to multiple fund transfer templates.
Add or Change Fund Transfer Access
1. From the menu bar, mouse point on the Administration tab.
2. Under the Employee option, click Change Fund Transfer Access. (See Figure 3.58) The Change Employee Fund Transfer Access search screen appears.
a. Select the All or Account Group option.
b. Click Submit. The results screen will appear listing the employees.
3. Click the name link for the employee requiring access change. The Change Employee Fund Transfer Access search screen will appear listing each Fund Transfer Template available.
4. For each template that this employee is to have access to, select Yes from the drop-down list box. For each template this employee is not to have access to, confirm No is reflected in the drop-down list. (See Figure 3.59)
5. Click Submit to save the change and receive the confirmation response screen.
Figure 3.58: Administration Tab – Employee – Change Fund Transfer Access
Figure 3.59: Administration Tab – Employee – Change Fund Transfer Access
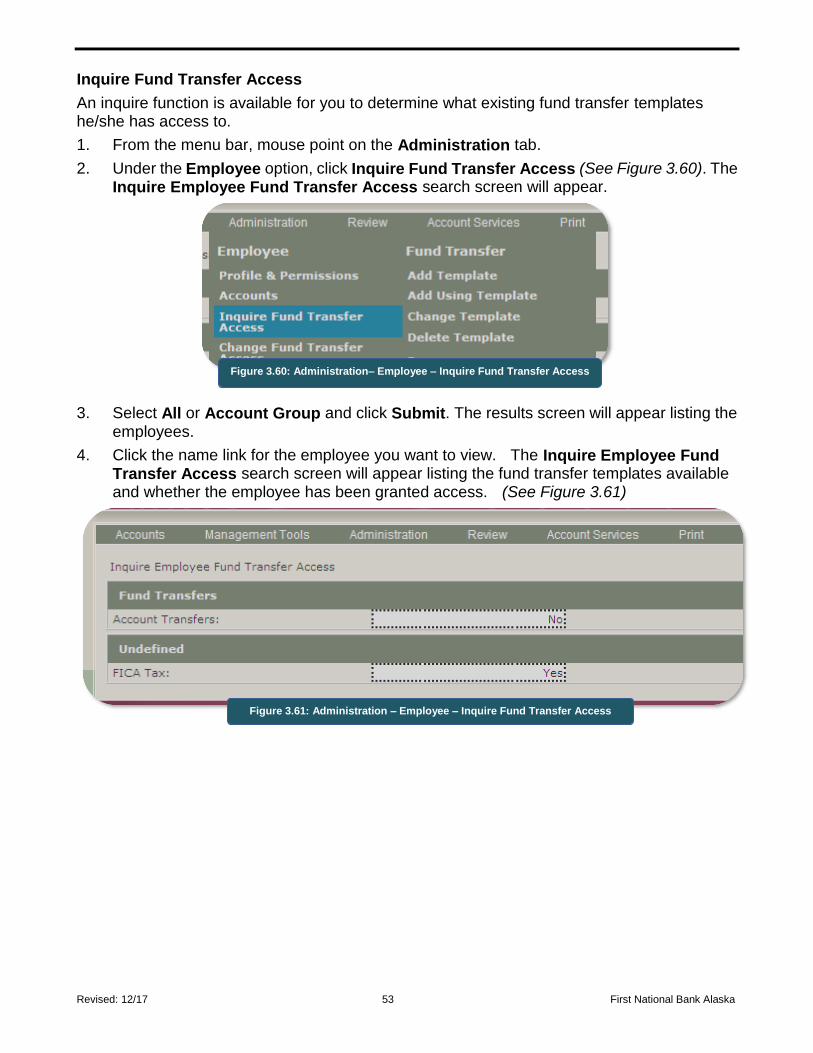
Revised: 12/17 53 First National Bank Alaska
Inquire Fund Transfer Access
An inquire function is available for you to determine what existing fund transfer templates he/she has access to.
1. From the menu bar, mouse point on the Administration tab.
2. Under the Employee option, click Inquire Fund Transfer Access (See Figure 3.60). The Inquire Employee Fund Transfer Access search screen will appear.
3. Select All or Account Group and click Submit. The results screen will appear listing the employees.
4. Click the name link for the employee you want to view. The Inquire Employee Fund Transfer Access search screen will appear listing the fund transfer templates available and whether the employee has been granted access. (See Figure 3.61)
Figure 3.60: Administration– Employee – Inquire Fund Transfer Access
Figure 3.61: Administration – Employee – Inquire Fund Transfer Access
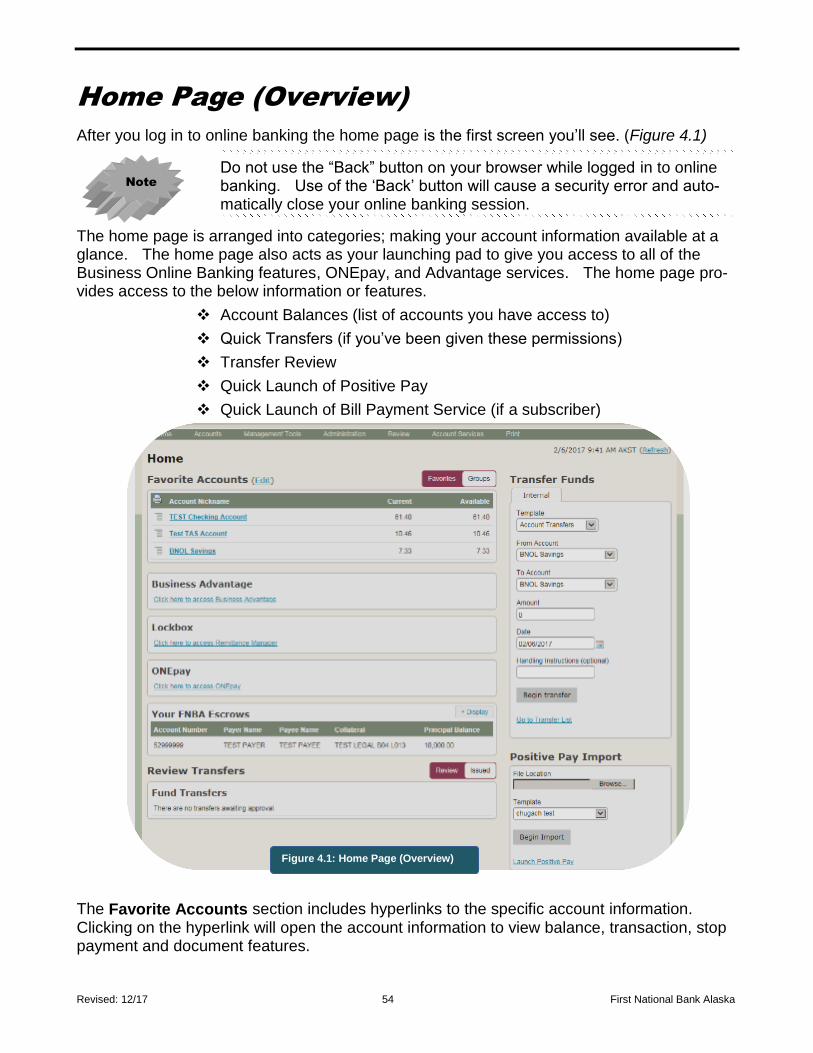
Revised: 12/17 54 First National Bank Alaska
Home Page (Overview)
After you log in to online banking the home page is the first screen you’ll see. (Figure 4.1)
Do not use the “Back” button on your browser while logged in to online banking. Use of the ‘Back’ button will cause a security error and auto-matically close your online banking session.
The home page is arranged into categories; making your account information available at a glance. The home page also acts as your launching pad to give you access to all of the Business Online Banking features, ONEpay, and Advantage services. The home page pro-vides access to the below information or features.
Account Balances (list of accounts you have access to)
Quick Transfers (if you’ve been given these permissions)
Transfer Review
Quick Launch of Positive Pay
Quick Launch of Bill Payment Service (if a subscriber)
The Favorite Accounts section includes hyperlinks to the specific account information. Clicking on the hyperlink will open the account information to view balance, transaction, stop payment and document features.
Figure 4.1: Home Page (Overview)
Note
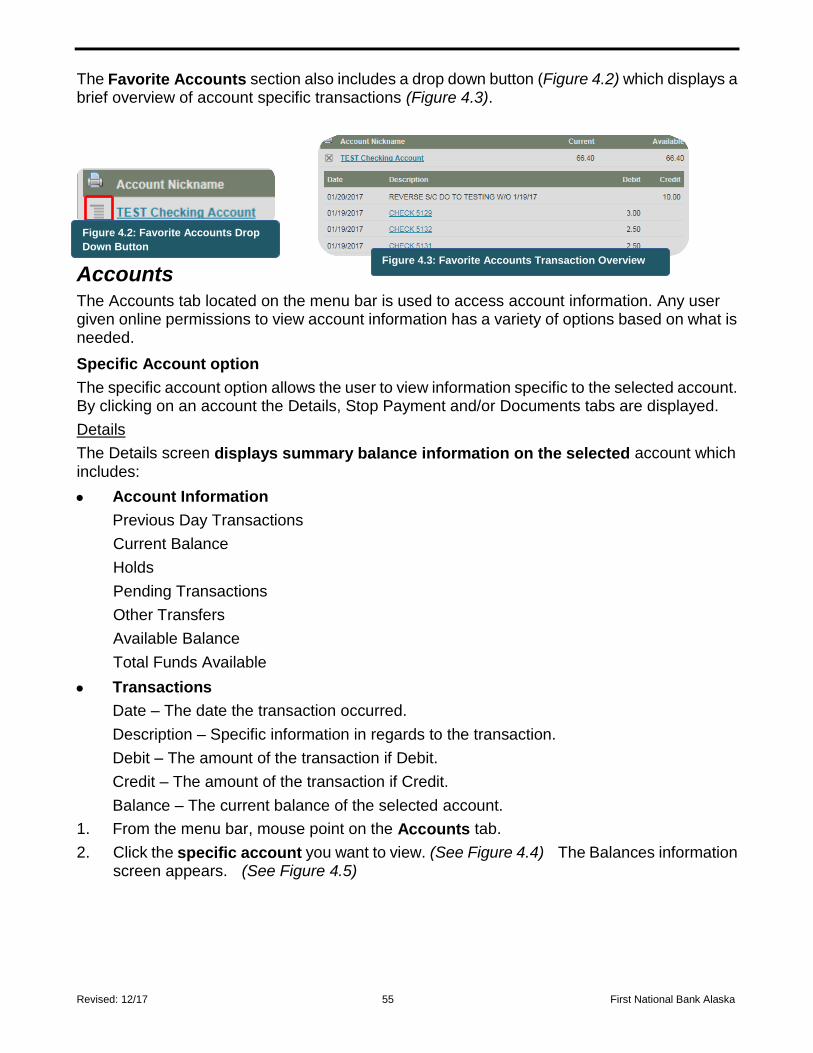
Revised: 12/17 55 First National Bank Alaska
The Favorite Accounts section also includes a drop down button (Figure 4.2) which displays a brief overview of account specific transactions (Figure 4.3).
Accounts
The Accounts tab located on the menu bar is used to access account information. Any user given online permissions to view account information has a variety of options based on what is needed.
Specific Account option
The specific account option allows the user to view information specific to the selected account. By clicking on an account the Details, Stop Payment and/or Documents tabs are displayed.
Details
The Details screen displays summary balance information on the selected account which includes:
Account Information
Previous Day Transactions
Current Balance
Holds
Pending Transactions
Other Transfers
Available Balance
Total Funds Available
Transactions
Date – The date the transaction occurred.
Description – Specific information in regards to the transaction.
Debit – The amount of the transaction if Debit.
Credit – The amount of the transaction if Credit.
Balance – The current balance of the selected account.
1. From the menu bar, mouse point on the Accounts tab.
2. Click the specific account you want to view. (See Figure 4.4) The Balances information screen appears. (See Figure 4.5)
Figure 4.2: Favorite Accounts Drop
Down Button
Figure 4.3: Favorite Accounts Transaction Overview
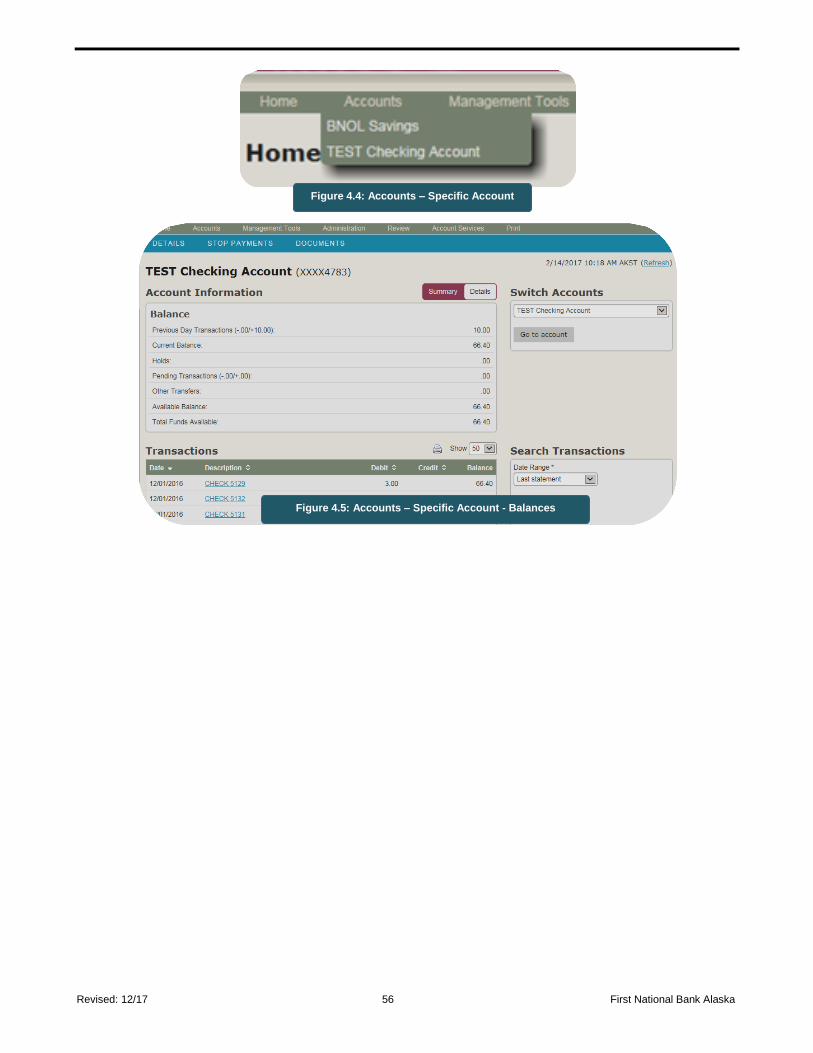
Revised: 12/17 56 First National Bank Alaska
Figure 4.4: Accounts – Specific Account
Figure 4.5: Accounts – Specific Account - Balances
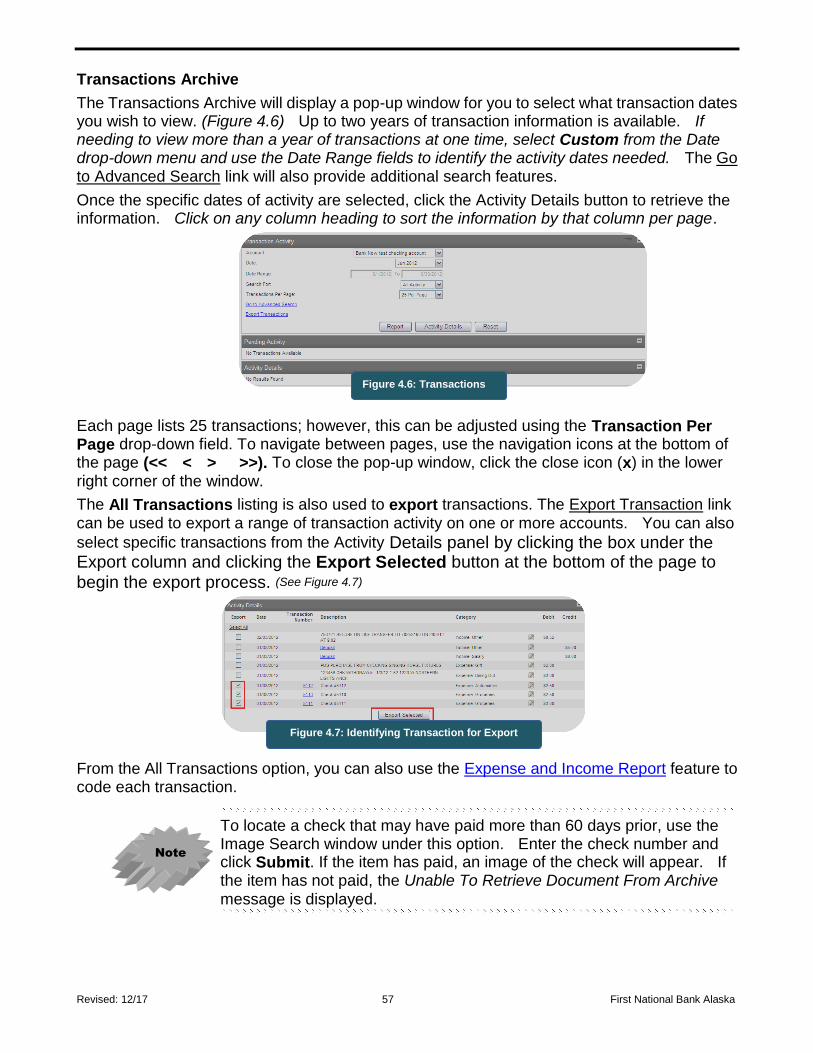
Revised: 12/17 57 First National Bank Alaska
Transactions Archive
The Transactions Archive will display a pop-up window for you to select what transaction dates you wish to view. (Figure 4.6) Up to two years of transaction information is available. If needing to view more than a year of transactions at one time, select Custom from the Date drop-down menu and use the Date Range fields to identify the activity dates needed. The Go to Advanced Search link will also provide additional search features.
Once the specific dates of activity are selected, click the Activity Details button to retrieve the information. Click on any column heading to sort the information by that column per page.
Each page lists 25 transactions; however, this can be adjusted using the Transaction Per Page drop-down field. To navigate between pages, use the navigation icons at the bottom of the page (<< < > >>). To close the pop-up window, click the close icon (x) in the lower right corner of the window.
The All Transactions listing is also used to export transactions. The Export Transaction link can be used to export a range of transaction activity on one or more accounts. You can also
select specific transactions from the Activity Details panel by clicking the box under the Export column and clicking the Export Selected button at the bottom of the page to
begin the export process. (See Figure 4.7)
From the All Transactions option, you can also use the Expense and Income Report feature to code each transaction.
To locate a check that may have paid more than 60 days prior, use the Image Search window under this option. Enter the check number and click Submit. If the item has paid, an image of the check will appear. If the item has not paid, the Unable To Retrieve Document From Archive
message is displayed.
Note
Figure 4.6: Transactions
Figure 4.7: Identifying Transaction for Export
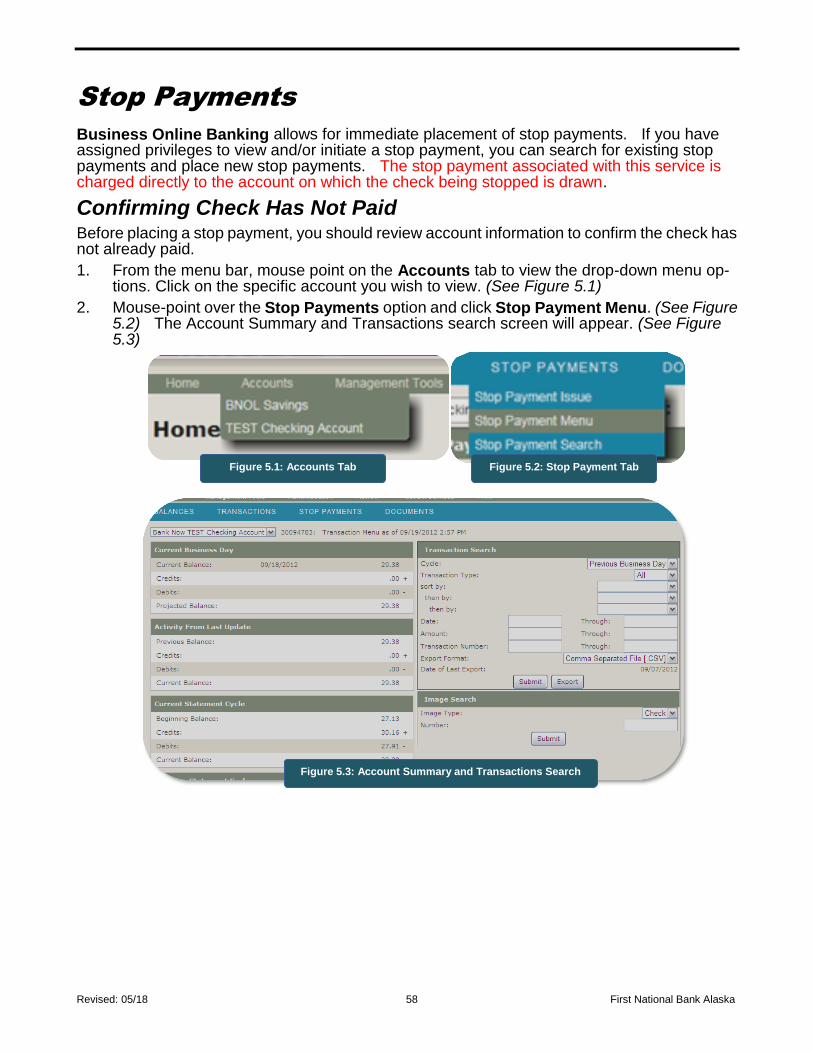
Revised: 05/18 58 First National Bank Alaska
Stop Payments
Business Online Banking allows for immediate placement of stop payments. If you have assigned privileges to view and/or initiate a stop payment, you can search for existing stop payments and place new stop payments. The stop payment associated with this service is charged directly to the account on which the check being stopped is drawn.
Confirming Check Has Not Paid Before placing a stop payment, you should review account information to confirm the check has not already paid.
1. From the menu bar, mouse point on the Accounts tab to view the drop-down menu op-tions. Click on the specific account you wish to view. (See Figure 5.1)
2. Mouse-point over the Stop Payments option and click Stop Payment Menu. (See Figure 5.2) The Account Summary and Transactions search screen will appear. (See Figure 5.3)
Figure 5.1: Accounts Tab
Figure 5.3: Account Summary and Transactions Search
Figure 5.2: Stop Payment Tab
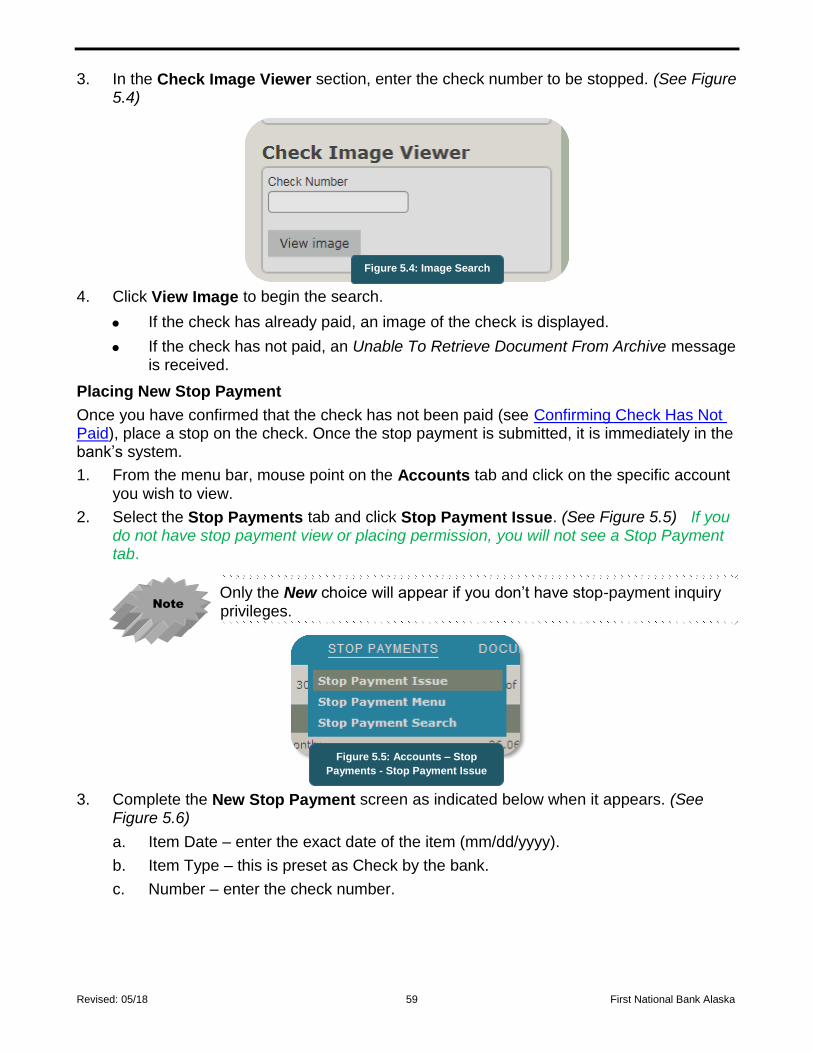
Revised: 05/18 59 First National Bank Alaska
3. In the Check Image Viewer section, enter the check number to be stopped. (See Figure 5.4)
4. Click View Image to begin the search.
If the check has already paid, an image of the check is displayed.
If the check has not paid, an Unable To Retrieve Document From Archive message is received.
Placing New Stop Payment
Once you have confirmed that the check has not been paid (see Confirming Check Has Not Paid), place a stop on the check. Once the stop payment is submitted, it is immediately in the bank’s system.
1. From the menu bar, mouse point on the Accounts tab and click on the specific account you wish to view.
2. Select the Stop Payments tab and click Stop Payment Issue. (See Figure 5.5) If you do not have stop payment view or placing permission, you will not see a Stop Payment tab.
Only the New choice will appear if you don’t have stop-payment inquiry privileges.
3. Complete the New Stop Payment screen as indicated below when it appears. (See Figure 5.6)
a. Item Date – enter the exact date of the item (mm/dd/yyyy).
b. Item Type – this is preset as Check by the bank.
c. Number – enter the check number.
Figure 5.4: Image Search
Note
Figure 5.5: Accounts – Stop
Payments - Stop Payment Issue

Revised: 05/18 60 First National Bank Alaska
d. Payee – enter the name of the payee on the check.
e. Reason – enter the reason for the stop payment (lost, stolen, duplicate).
f. Comment – use this field for any additional information needed for reference (for example, date and check number re-issued).
4. Click Submit to save the information and receive the Stop Payment Confirmation screen.
Viewing List of Stop Payments
If you have privileges to inquire on stop payments placed, you can view existing stop payments initiated. This function is useful for monitoring the expiration dates of stop payments already placed.
1. From the menu bar, mouse point on the Accounts tab and click on the specific account that you wish to view
2. Point to the Stop Payments tab and click Stop Payment Search. (See Figure 5.7) If you do not have stop payment view or placing permissions, no Stop Payment tab will be reflected. Click the Submit button to receive a list of all active stop payments.
3. From the Stop Payment Search window, click the Submit button. (Figure 5.8) A list of all active stop payments will display, if any. (See Figure 5.9)
Figure 5.7: Stop Payments Tab
Figure 5.6: Accounts – Stop
Payments - Stop Payment Issue
Figure 5.8: Stop Payments Tab – Stop Payment Search
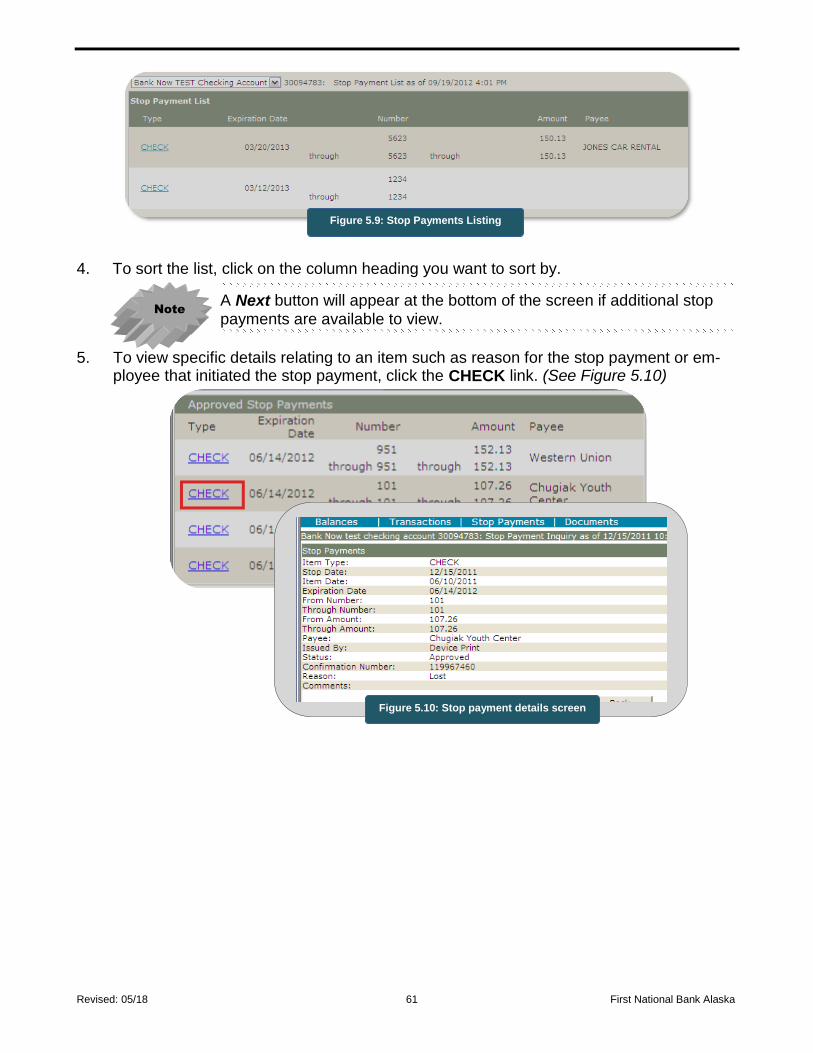
Revised: 05/18 61 First National Bank Alaska
4. To sort the list, click on the column heading you want to sort by.
A Next button will appear at the bottom of the screen if additional stop payments are available to view.
5. To view specific details relating to an item such as reason for the stop payment or em-ployee that initiated the stop payment, click the CHECK link. (See Figure 5.10)
Figure 5.9: Stop Payments Listing
Note
Figure 5.10: Stop payment details screen
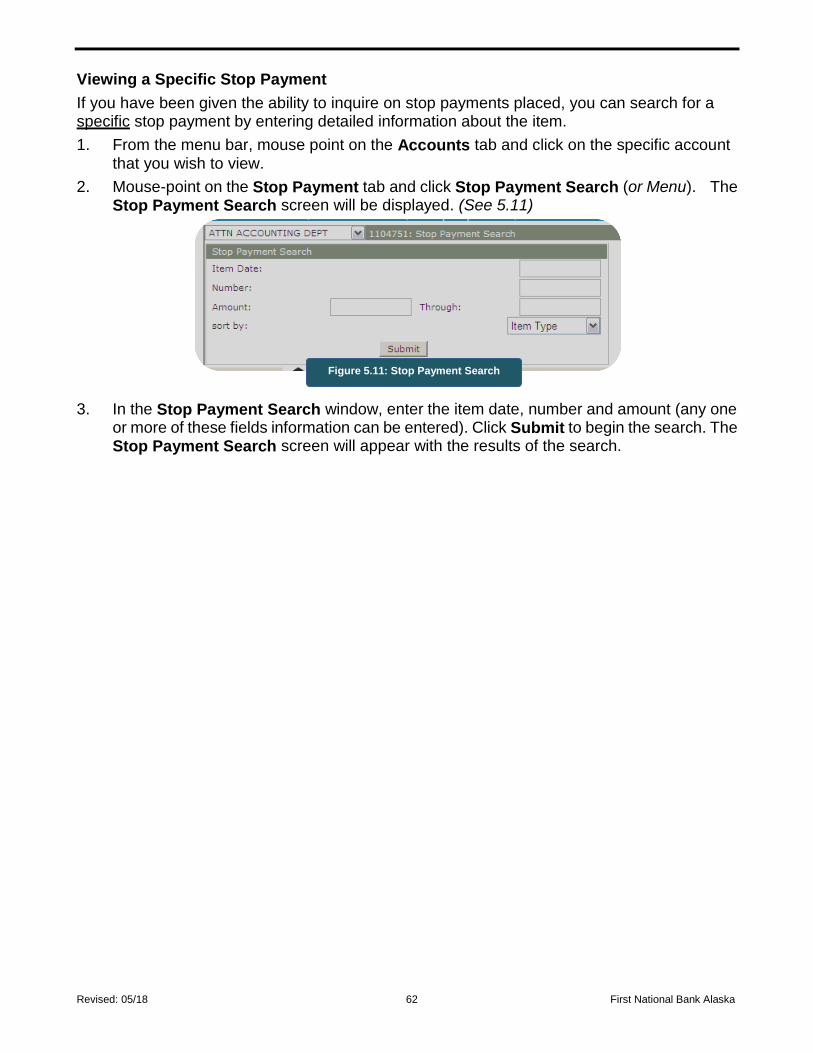
Revised: 05/18 62 First National Bank Alaska
Viewing a Specific Stop Payment
If you have been given the ability to inquire on stop payments placed, you can search for a specific stop payment by entering detailed information about the item.
1. From the menu bar, mouse point on the Accounts tab and click on the specific account that you wish to view.
2. Mouse-point on the Stop Payment tab and click Stop Payment Search (or Menu). The Stop Payment Search screen will be displayed. (See 5.11)
3. In the Stop Payment Search window, enter the item date, number and amount (any one or more of these fields information can be entered). Click Submit to begin the search. The Stop Payment Search screen will appear with the results of the search.
Figure 5.11: Stop Payment Search

Revised: 05/18 63 First National Bank Alaska
Revised: 05/18 64 First National Bank Alaska
e-Documents
Businesses wanting to view, print and/or download various account documents from Business Online Banking must complete an enrollment process, by contacting the bank and completing a Business Essential Online Authorization form, designated what accounts are to be setup for eStatements and/or eNotices.
Once an authorization form is submitted First National Bank Alaska will confirm the authorized and then activate the specified e-Documents for you and any other System Administrator. System Administrators can then give e-Document privileges to other employees. The bank offers two types of e-Documents:
e-Statements – Bank account statements can be viewed online (both checking and savings). When each statement is available, a courtesy email is generated to the Sys-tem Administrator(s) stating that the online statement is available for viewing. State-ments remain available online for 730 days. Selecting this type of e-Document will dis-continue the paper statement typically mailed to the business.
e-Notices – there are four types of notices available.
Repurchase Agreement Confirmation Notices – Daily notices relating to the T-Bill investment can be viewed online. These notices remain available for 30 days. Selecting this type of e-Document will discontinue the paper mailing of the daily no-tice to the business.
Incoming Wire Transfer Notice – Notices of incoming or outgoing wire transfers can be viewed online. These notices remain available for 30 days. Selecting this type of e-Document will discontinue the mailing of the paper notice.
Return Item Notifications – Notices of deposited items being returned can be viewed online. These notices remain available for 30 days. Selecting this type of e-Document does not stop the original notice with referenced deposited item from being mailed – the business will continue to receive the normal printed notice with returned item via mail.
ACH Advice Notices - Notices of debit or credit ACH transaction information posting to the account can be viewed online. These notices remain available online for 30 days. Selecting e-Notices will discontinue the paper mailing of these notices to the business.
Once enrollment has been completed and approved by the bank, e-Document types selected will appear under the Document Options window of the New Employee option screen and Change Employee option screen.
Any authorized person on an account may terminate electronic delivery of statements or notices at any time by visiting the bank in person or by contacting the bank at (907) 777-4362 or toll free at 1-800-856-4362. When electronic statements/notices are terminated, future statements and notices are sent in paper form to the account address of record.
Note
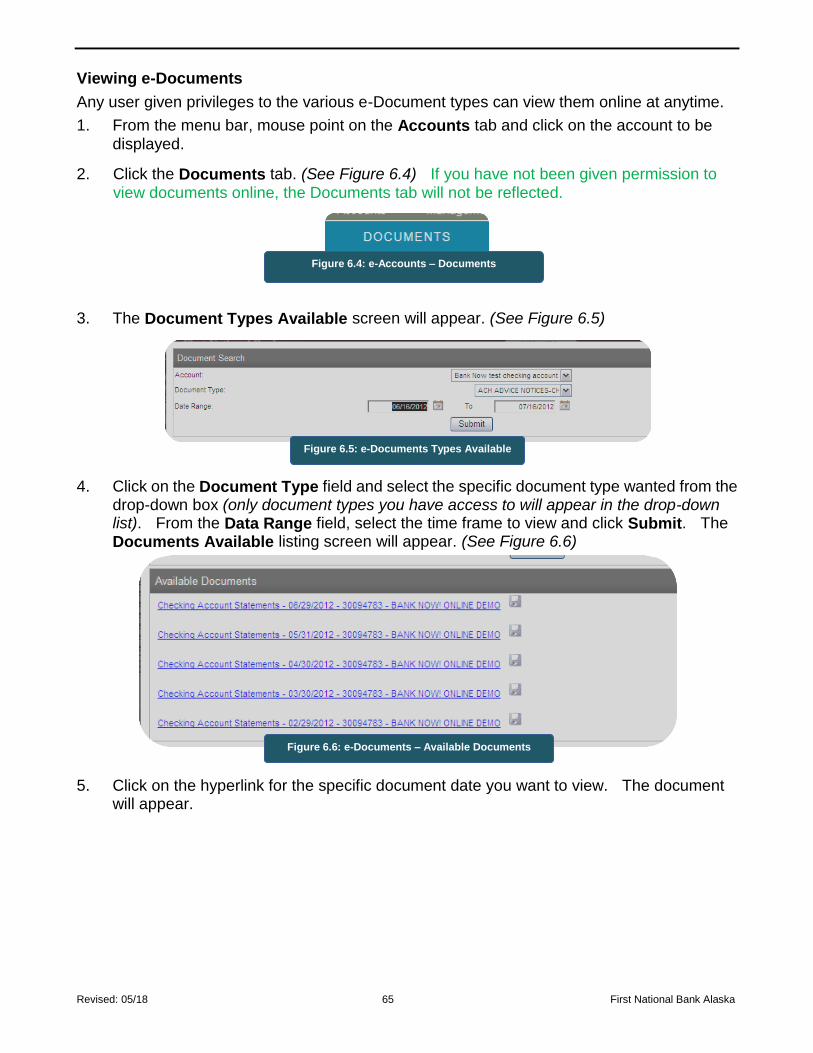
Revised: 05/18 65 First National Bank Alaska
Viewing e-Documents
Any user given privileges to the various e-Document types can view them online at anytime.
1. From the menu bar, mouse point on the Accounts tab and click on the account to be displayed.
2. Click the Documents tab. (See Figure 6.4) If you have not been given permission to view documents online, the Documents tab will not be reflected.
3. The Document Types Available screen will appear. (See Figure 6.5)
4. Click on the Document Type field and select the specific document type wanted from the drop-down box (only document types you have access to will appear in the drop-down list). From the Data Range field, select the time frame to view and click Submit. The Documents Available listing screen will appear. (See Figure 6.6)
5. Click on the hyperlink for the specific document date you want to view. The document will appear.
Figure 6.4: e-Accounts – Documents
Figure 6.5: e-Documents Types Available
Figure 6.6: e-Documents – Available Documents

Revised: 05/18 66 First National Bank Alaska
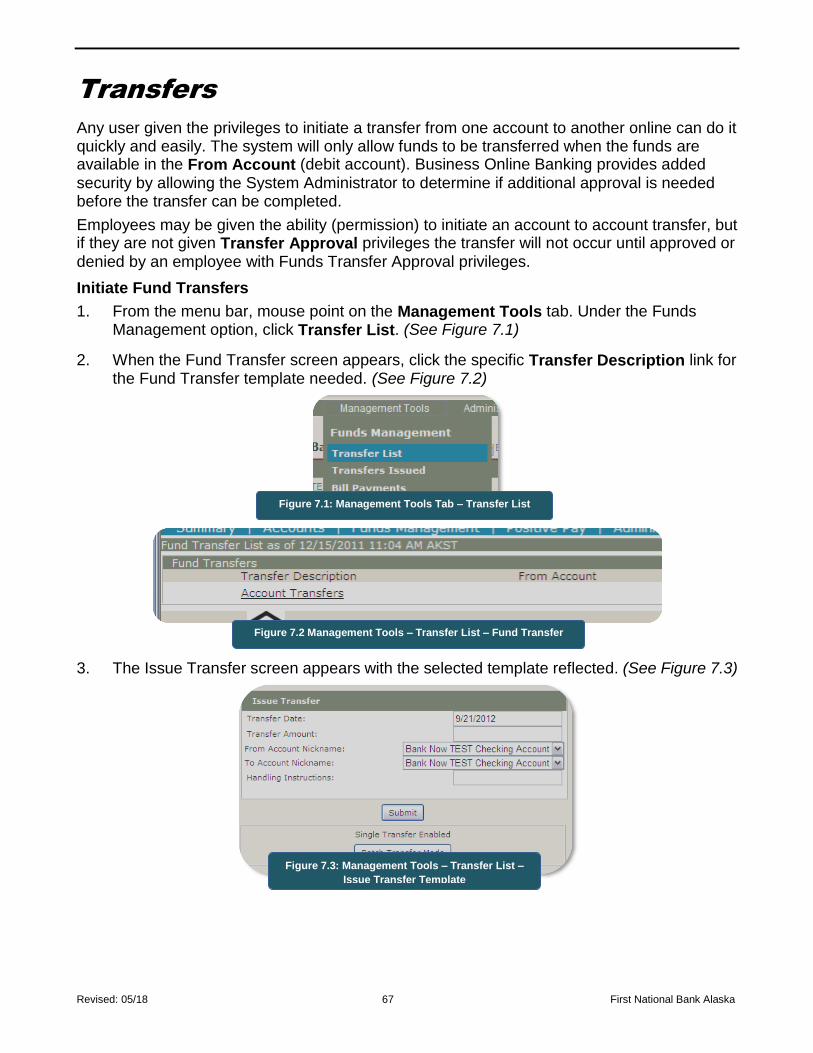
Revised: 05/18 67 First National Bank Alaska
Transfers
Any user given the privileges to initiate a transfer from one account to another online can do it quickly and easily. The system will only allow funds to be transferred when the funds are available in the From Account (debit account). Business Online Banking provides added security by allowing the System Administrator to determine if additional approval is needed before the transfer can be completed.
Employees may be given the ability (permission) to initiate an account to account transfer, but if they are not given Transfer Approval privileges the transfer will not occur until approved or denied by an employee with Funds Transfer Approval privileges.
Initiate Fund Transfers
1. From the menu bar, mouse point on the Management Tools tab. Under the Funds Management option, click Transfer List. (See Figure 7.1)
2. When the Fund Transfer screen appears, click the specific Transfer Description link for the Fund Transfer template needed. (See Figure 7.2)
3. The Issue Transfer screen appears with the selected template reflected. (See Figure 7.3)
Figure 7.1: Management Tools Tab – Transfer List
Figure 7.2 Management Tools – Transfer List – Fund Transfer
Figure 7.3: Management Tools – Transfer List –
Issue Transfer Template
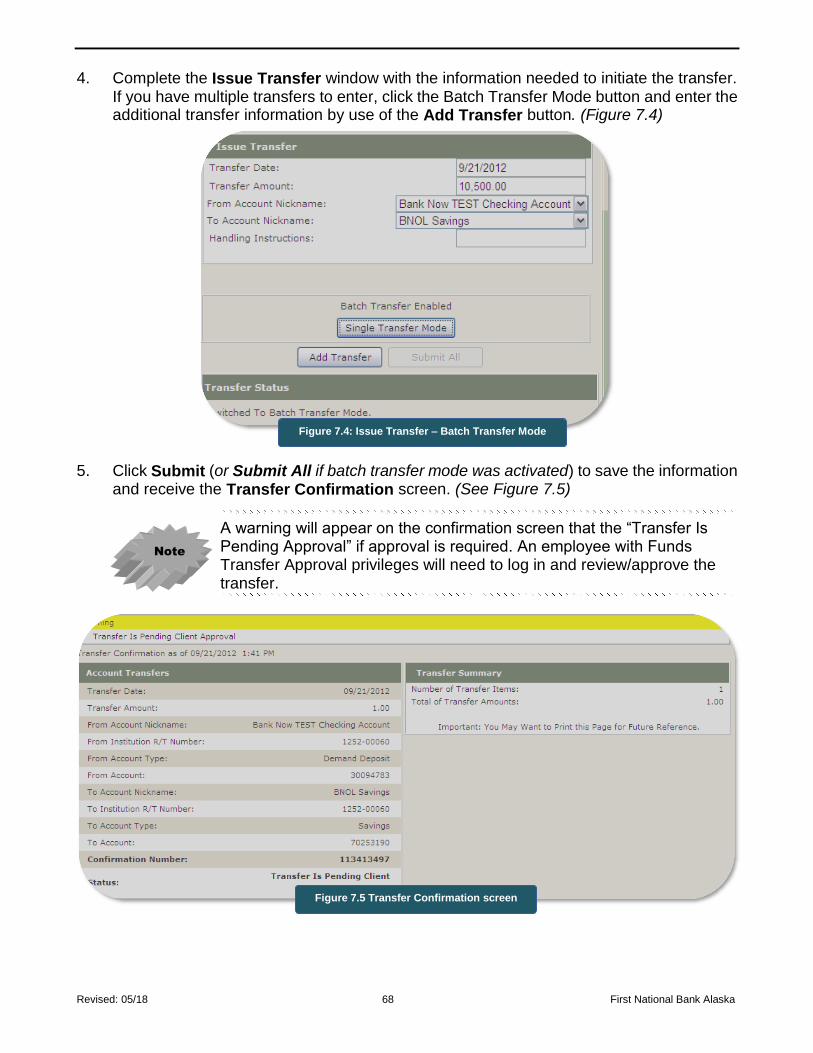
Revised: 05/18 68 First National Bank Alaska
4. Complete the Issue Transfer window with the information needed to initiate the transfer. If you have multiple transfers to enter, click the Batch Transfer Mode button and enter the additional transfer information by use of the Add Transfer button. (Figure 7.4)
5. Click Submit (or Submit All if batch transfer mode was activated) to save the information and receive the Transfer Confirmation screen. (See Figure 7.5)
A warning will appear on the confirmation screen that the “Transfer Is Pending Approval” if approval is required. An employee with Funds Transfer Approval privileges will need to log in and review/approve the transfer.
Note
Figure 7.5 Transfer Confirmation screen
Figure 7.4: Issue Transfer – Batch Transfer Mode

Revised: 05/18 69 First National Bank Alaska
Viewing Fund Transfers
If you have fund transfer viewing privileges, you can review a list of fund transfers that have been initiated prior to the end of the processing day.
1. From the menu bar, mouse point on the Funds Management tab and under the Funds Management option, click Transfers Issued. (See Figure 7.6)
2. The Funds Transfers Issued screen will appear listing the status of each transfer (Pending Client Approval or Processed or Approved). (See Figure 7.7) From this screen, a fund transfer can be edited or deleted by use of hyperlinks when created by the same user performing the Transfers Issued review. If an Employee level user incorrectly en-ters a fund transfer, an Administrator level user with funds transfer approval capabilities will need to ‘disapprove’ the transfer as part of the Approving Funds Transfer process.
Figure 7.6: Funds Management Tab –
Transfers Issued
Figure 7.7: Funds Transfers Issued list
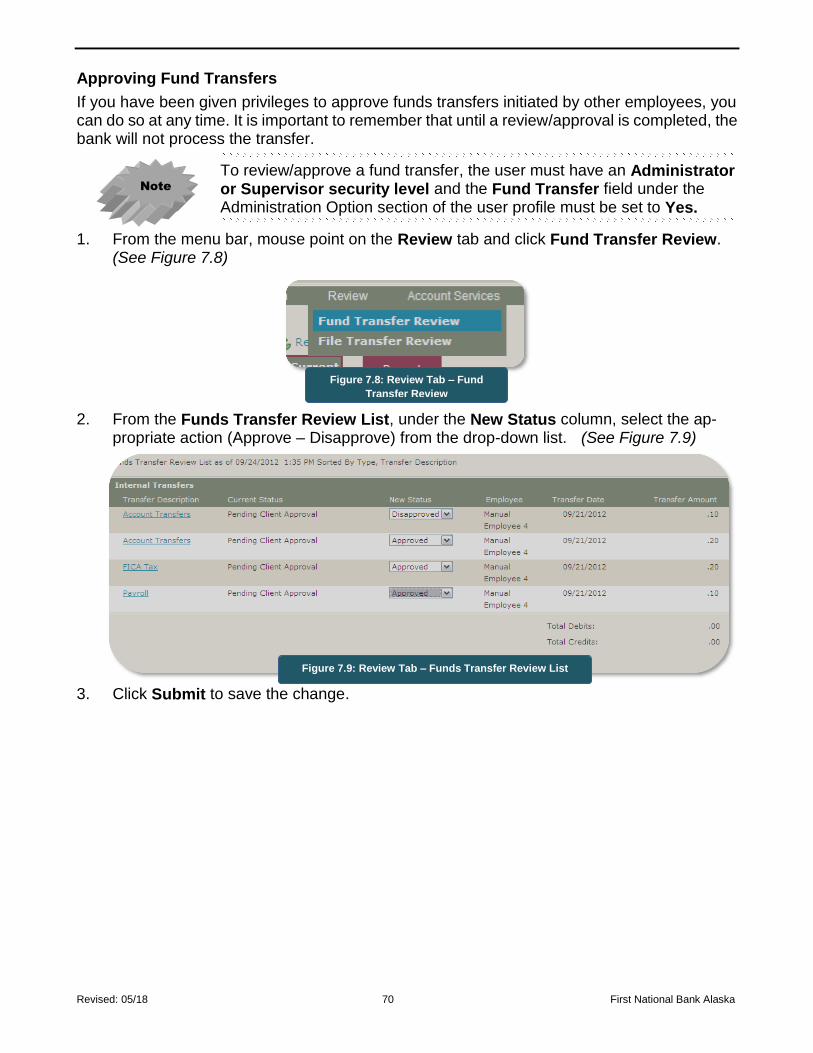
Revised: 05/18 70 First National Bank Alaska
Approving Fund Transfers
If you have been given privileges to approve funds transfers initiated by other employees, you can do so at any time. It is important to remember that until a review/approval is completed, the bank will not process the transfer.
To review/approve a fund transfer, the user must have an Administrator or Supervisor security level and the Fund Transfer field under the Administration Option section of the user profile must be set to Yes.
1. From the menu bar, mouse point on the Review tab and click Fund Transfer Review. (See Figure 7.8)
2. From the Funds Transfer Review List, under the New Status column, select the ap-propriate action (Approve – Disapprove) from the drop-down list. (See Figure 7.9)
3. Click Submit to save the change.
Figure 7.8: Review Tab – Fund
Transfer Review
Figure 7.9: Review Tab – Funds Transfer Review List
Note
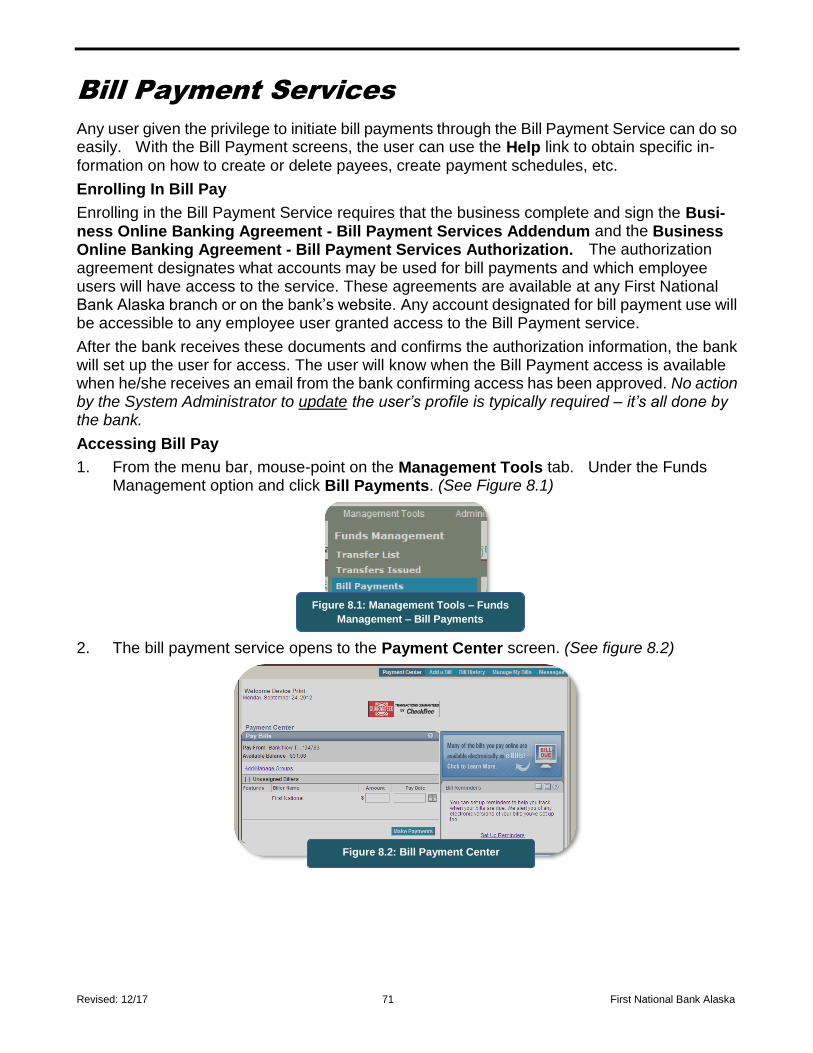
Revised: 12/17 71 First National Bank Alaska
Bill Payment Services
Any user given the privilege to initiate bill payments through the Bill Payment Service can do so easily. With the Bill Payment screens, the user can use the Help link to obtain specific in-formation on how to create or delete payees, create payment schedules, etc.
Enrolling In Bill Pay
Enrolling in the Bill Payment Service requires that the business complete and sign the Busi-ness Online Banking Agreement - Bill Payment Services Addendum and the Business Online Banking Agreement - Bill Payment Services Authorization. The authorization agreement designates what accounts may be used for bill payments and which employee users will have access to the service. These agreements are available at any First National Bank Alaska branch or on the bank’s website. Any account designated for bill payment use will be accessible to any employee user granted access to the Bill Payment service.
After the bank receives these documents and confirms the authorization information, the bank will set up the user for access. The user will know when the Bill Payment access is available when he/she receives an email from the bank confirming access has been approved. No action by the System Administrator to update the user’s profile is typically required – it’s all done by the bank.
Accessing Bill Pay
1. From the menu bar, mouse-point on the Management Tools tab. Under the Funds Management option and click Bill Payments. (See Figure 8.1)
2. The bill payment service opens to the Payment Center screen. (See figure 8.2)
Figure 8.1: Management Tools – Funds
Management – Bill Payments
Figure 8.2: Bill Payment Center
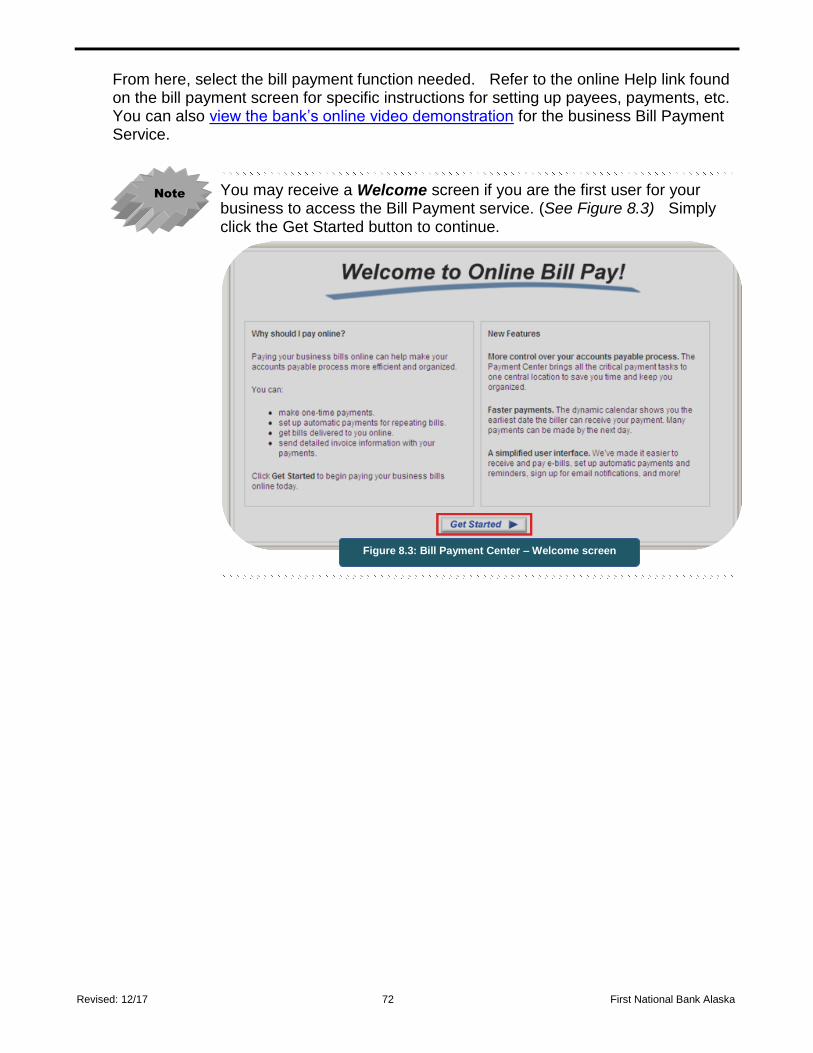
Revised: 12/17 72 First National Bank Alaska
From here, select the bill payment function needed. Refer to the online Help link found on the bill payment screen for specific instructions for setting up payees, payments, etc. You can also view the bank’s online video demonstration for the business Bill Payment Service.
You may receive a Welcome screen if you are the first user for your business to access the Bill Payment service. (See Figure 8.3) Simply click the Get Started button to continue.
Note
Figure 8.3: Bill Payment Center – Welcome screen
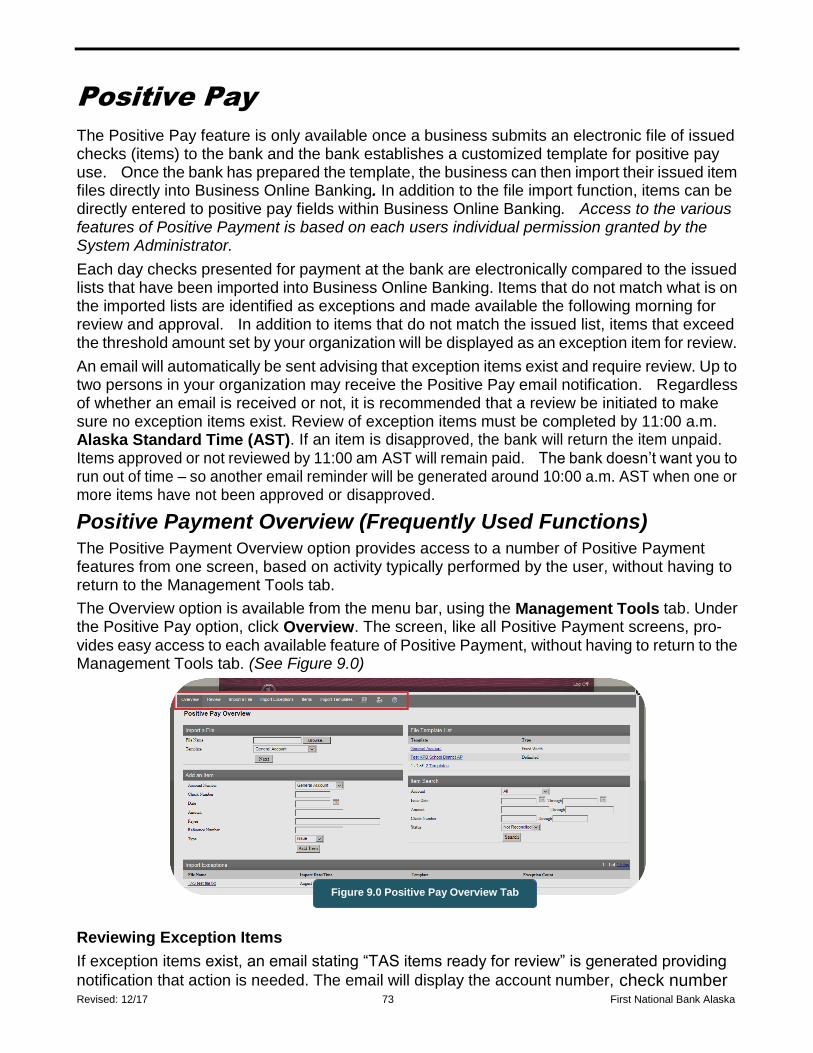
Revised: 12/17 73 First National Bank Alaska
Positive Pay
The Positive Pay feature is only available once a business submits an electronic file of issued checks (items) to the bank and the bank establishes a customized template for positive pay use. Once the bank has prepared the template, the business can then import their issued item files directly into Business Online Banking. In addition to the file import function, items can be directly entered to positive pay fields within Business Online Banking. Access to the various features of Positive Payment is based on each users individual permission granted by the System Administrator.
Each day checks presented for payment at the bank are electronically compared to the issued lists that have been imported into Business Online Banking. Items that do not match what is on the imported lists are identified as exceptions and made available the following morning for review and approval. In addition to items that do not match the issued list, items that exceed the threshold amount set by your organization will be displayed as an exception item for review.
An email will automatically be sent advising that exception items exist and require review. Up to two persons in your organization may receive the Positive Pay email notification. Regardless of whether an email is received or not, it is recommended that a review be initiated to make sure no exception items exist. Review of exception items must be completed by 11:00 a.m. Alaska Standard Time (AST). If an item is disapproved, the bank will return the item unpaid. Items approved or not reviewed by 11:00 am AST will remain paid. The bank doesn’t want you to run out of time – so another email reminder will be generated around 10:00 a.m. AST when one or more items have not been approved or disapproved.
Positive Payment Overview (Frequently Used Functions)
The Positive Payment Overview option provides access to a number of Positive Payment features from one screen, based on activity typically performed by the user, without having to return to the Management Tools tab.
The Overview option is available from the menu bar, using the Management Tools tab. Under the Positive Pay option, click Overview. The screen, like all Positive Payment screens, pro-vides easy access to each available feature of Positive Payment, without having to return to the Management Tools tab. (See Figure 9.0)
Reviewing Exception Items
If exception items exist, an email stating “TAS items ready for review” is generated providing
notification that action is needed. The email will display the account number, check number
Figure 9.0 Positive Pay Overview Tab
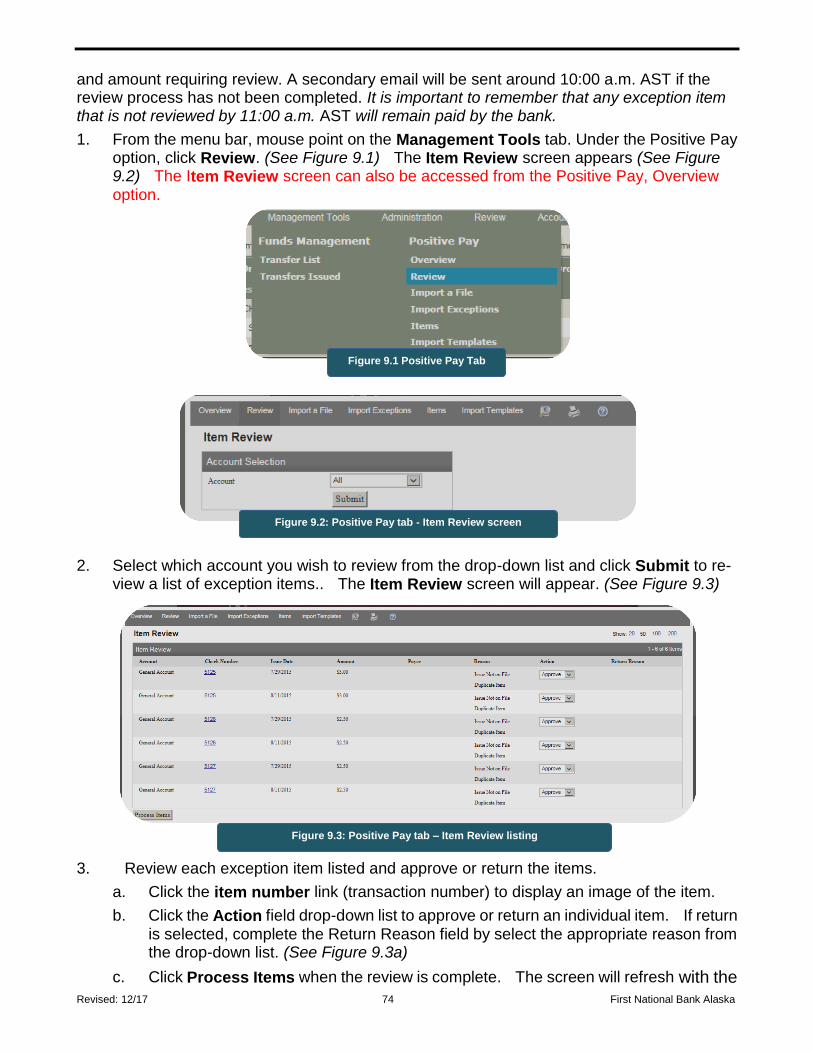
Revised: 12/17 74 First National Bank Alaska
and amount requiring review. A secondary email will be sent around 10:00 a.m. AST if the review process has not been completed. It is important to remember that any exception item that is not reviewed by 11:00 a.m. AST will remain paid by the bank.
1. From the menu bar, mouse point on the Management Tools tab. Under the Positive Pay option, click Review. (See Figure 9.1) The Item Review screen appears (See Figure 9.2) The Item Review screen can also be accessed from the Positive Pay, Overview option.
2. Select which account you wish to review from the drop-down list and click Submit to re-view a list of exception items.. The Item Review screen will appear. (See Figure 9.3)
3. Review each exception item listed and approve or return the items.
a. Click the item number link (transaction number) to display an image of the item.
b. Click the Action field drop-down list to approve or return an individual item. If return is selected, complete the Return Reason field by select the appropriate reason from the drop-down list. (See Figure 9.3a)
c. Click Process Items when the review is complete. The screen will refresh with the
Figure 9.1 Positive Pay Tab
Figure 9.2: Positive Pay tab - Item Review screen
Figure 9.3: Positive Pay tab – Item Review listing
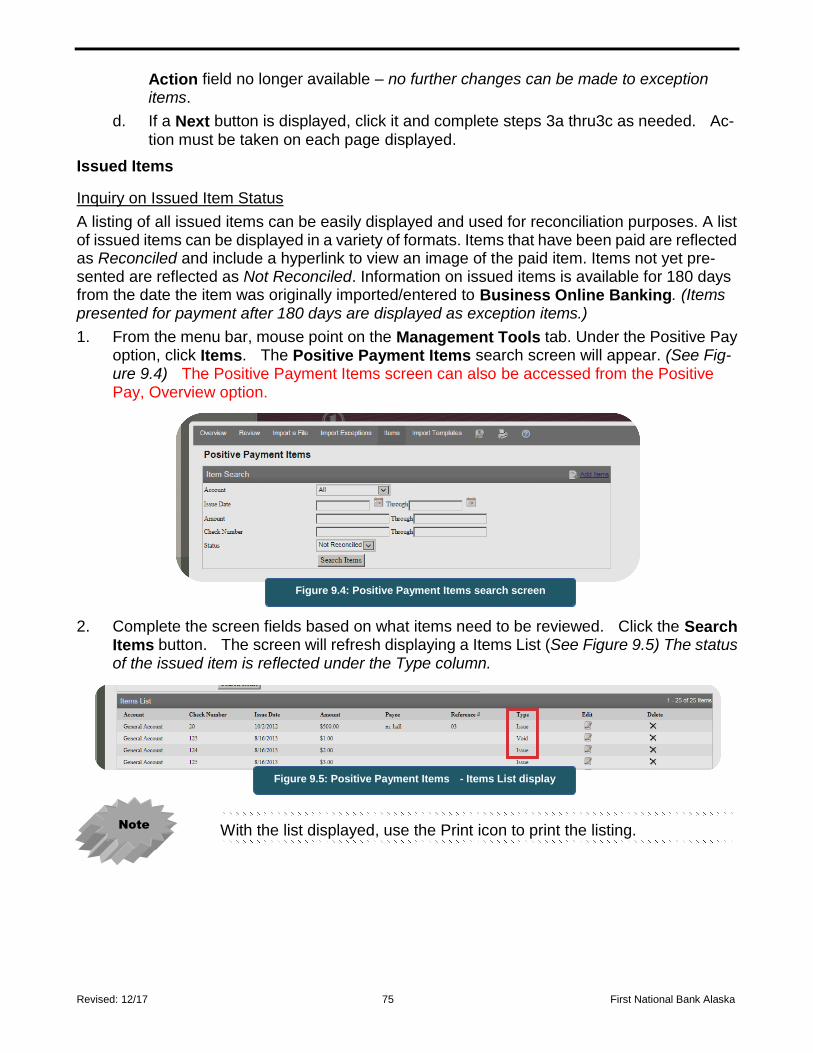
Revised: 12/17 75 First National Bank Alaska
Action field no longer available – no further changes can be made to exception items.
d. If a Next button is displayed, click it and complete steps 3a thru3c as needed. Ac-tion must be taken on each page displayed.
Issued Items
Inquiry on Issued Item Status
A listing of all issued items can be easily displayed and used for reconciliation purposes. A list of issued items can be displayed in a variety of formats. Items that have been paid are reflected as Reconciled and include a hyperlink to view an image of the paid item. Items not yet pre-sented are reflected as Not Reconciled. Information on issued items is available for 180 days from the date the item was originally imported/entered to Business Online Banking. (Items presented for payment after 180 days are displayed as exception items.)
1. From the menu bar, mouse point on the Management Tools tab. Under the Positive Pay option, click Items. The Positive Payment Items search screen will appear. (See Fig-ure 9.4) The Positive Payment Items screen can also be accessed from the Positive Pay, Overview option.
2. Complete the screen fields based on what items need to be reviewed. Click the Search Items button. The screen will refresh displaying a Items List (See Figure 9.5) The status of the issued item is reflected under the Type column.
With the list displayed, use the Print icon to print the listing.
Figure 9.4: Positive Payment Items search screen
Figure 9.5: Positive Payment Items - Items List display
Note

Revised: 12/17 76 First National Bank Alaska
Importing Issued Item Files
Files containing one or more items are imported to Business Online Banking. Once a file is imported, changes to items within the imported file are completed using the Items option. Making changes to a file already imported and then importing it again will cause import exceptions.
1. From the menu bar, mouse point on the Management Tools tab. Under the Positive Pay option, click Import a File. The Import a File screen appears. (See Figure 9.6) The Import a File screen can also be accessed from the Positive Payment, Overview option.
2. Click Browse and locate the file to be imported. Click Open from the Choose file window to bring the file path into the File Name field.
3. Select the appropriate template based on whether the file data is comma delimited, fixed width or tab delimited.
4. Click Next. The system will begin the file import. When successfully completed, the screen will be returned a confirmation number. (See Figure 9.7)
Use the Import Exceptions option to review and correct any import ex-ception items. Also, if the incorrect template was selected (for example, fixed width instead of comma delimited), an Error will be displayed indi-cating (S33) Transaction Authorization encountered a transaction error. Try the import process again, selecting a different template format.
Figure 9.6: File Import Option screen
Figure 9.7: Import - Confirmation screen
Note
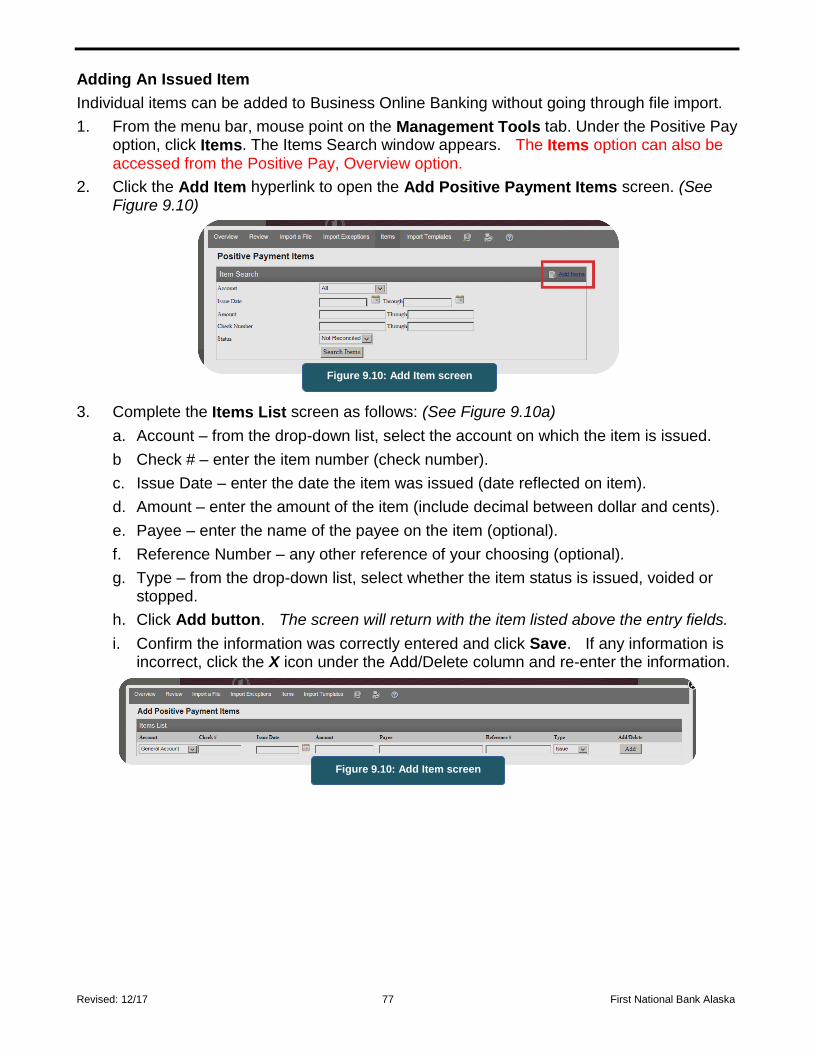
Revised: 12/17 77 First National Bank Alaska
Adding An Issued Item
Individual items can be added to Business Online Banking without going through file import.
1. From the menu bar, mouse point on the Management Tools tab. Under the Positive Pay option, click Items. The Items Search window appears. The Items option can also be accessed from the Positive Pay, Overview option.
2. Click the Add Item hyperlink to open the Add Positive Payment Items screen. (See Figure 9.10)
3. Complete the Items List screen as follows: (See Figure 9.10a)
a. Account – from the drop-down list, select the account on which the item is issued.
b Check # – enter the item number (check number).
c. Issue Date – enter the date the item was issued (date reflected on item).
d. Amount – enter the amount of the item (include decimal between dollar and cents).
e. Payee – enter the name of the payee on the item (optional).
f. Reference Number – any other reference of your choosing (optional).
g. Type – from the drop-down list, select whether the item status is issued, voided or stopped.
h. Click Add button. The screen will return with the item listed above the entry fields.
i. Confirm the information was correctly entered and click Save. If any information is incorrect, click the X icon under the Add/Delete column and re-enter the information.
Figure 9.10: Add Item screen
Figure 9.10: Add Item screen
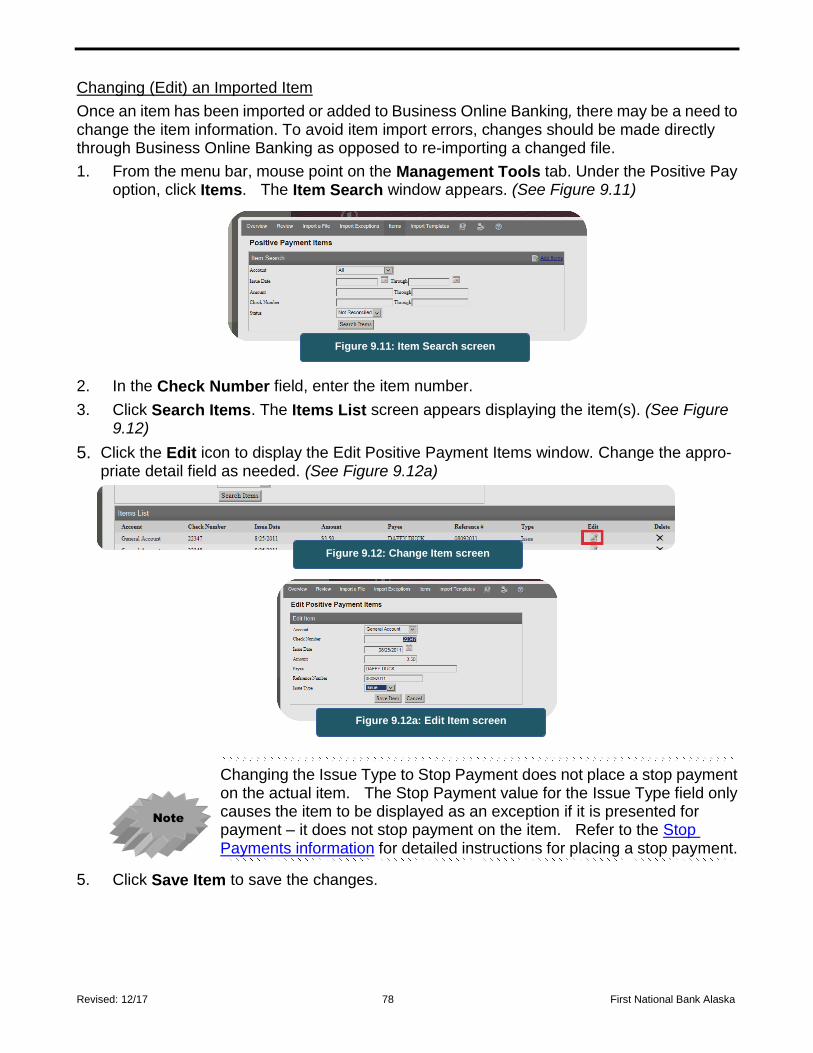
Revised: 12/17 78 First National Bank Alaska
Changing (Edit) an Imported Item
Once an item has been imported or added to Business Online Banking, there may be a need to change the item information. To avoid item import errors, changes should be made directly through Business Online Banking as opposed to re-importing a changed file.
1. From the menu bar, mouse point on the Management Tools tab. Under the Positive Pay option, click Items. The Item Search window appears. (See Figure 9.11)
2. In the Check Number field, enter the item number.
3. Click Search Items. The Items List screen appears displaying the item(s). (See Figure 9.12)
5. Click the Edit icon to display the Edit Positive Payment Items window. Change the appro-priate detail field as needed. (See Figure 9.12a)
Changing the Issue Type to Stop Payment does not place a stop payment on the actual item. The Stop Payment value for the Issue Type field only causes the item to be displayed as an exception if it is presented for payment – it does not stop payment on the item. Refer to the Stop Payments information for detailed instructions for placing a stop payment.
5. Click Save Item to save the changes.
Figure 9.11: Item Search screen
Figure 9.12: Change Item screen
Note
Figure 9.12a: Edit Item screen
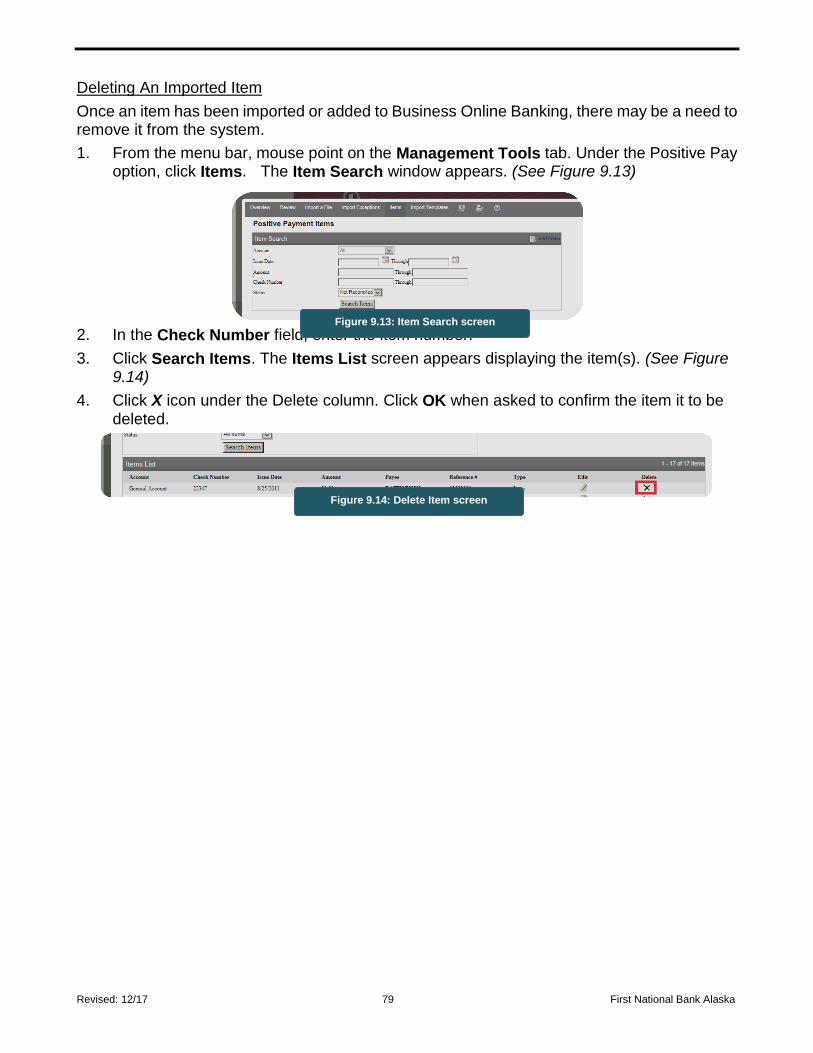
Revised: 12/17 79 First National Bank Alaska
Deleting An Imported Item
Once an item has been imported or added to Business Online Banking, there may be a need to remove it from the system.
1. From the menu bar, mouse point on the Management Tools tab. Under the Positive Pay option, click Items. The Item Search window appears. (See Figure 9.13)
2. In the Check Number field, enter the item number.
3. Click Search Items. The Items List screen appears displaying the item(s). (See Figure 9.14)
4. Click X icon under the Delete column. Click OK when asked to confirm the item it to be deleted.
Figure 9.13: Item Search screen
Figure 9.14: Delete Item screen
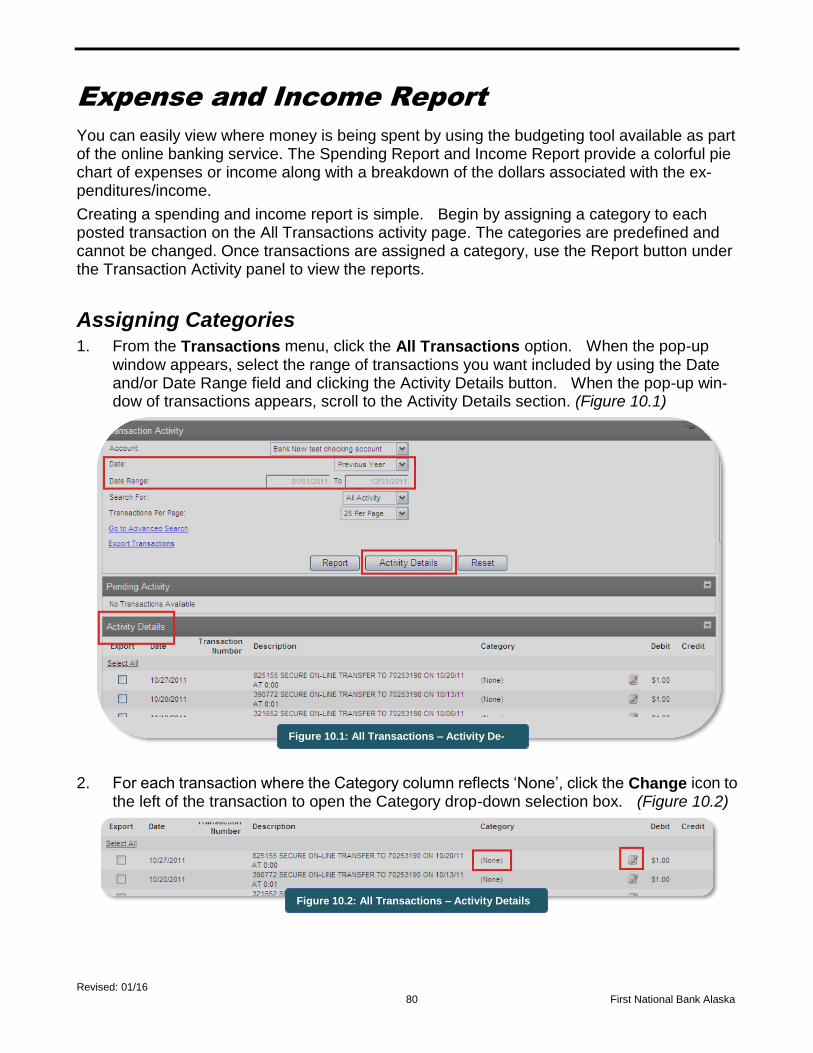
Revised: 01/16 80 First National Bank Alaska
Expense and Income Report
You can easily view where money is being spent by using the budgeting tool available as part of the online banking service. The Spending Report and Income Report provide a colorful pie chart of expenses or income along with a breakdown of the dollars associated with the ex-penditures/income.
Creating a spending and income report is simple. Begin by assigning a category to each posted transaction on the All Transactions activity page. The categories are predefined and cannot be changed. Once transactions are assigned a category, use the Report button under the Transaction Activity panel to view the reports.
Assigning Categories 1. From the Transactions menu, click the All Transactions option. When the pop-up
window appears, select the range of transactions you want included by using the Date and/or Date Range field and clicking the Activity Details button. When the pop-up win-dow of transactions appears, scroll to the Activity Details section. (Figure 10.1)
2. For each transaction where the Category column reflects ‘None’, click the Change icon to the left of the transaction to open the Category drop-down selection box. (Figure 10.2)
Figure 10.1: All Transactions – Activity De-
tails
Figure 10.2: All Transactions – Activity Details
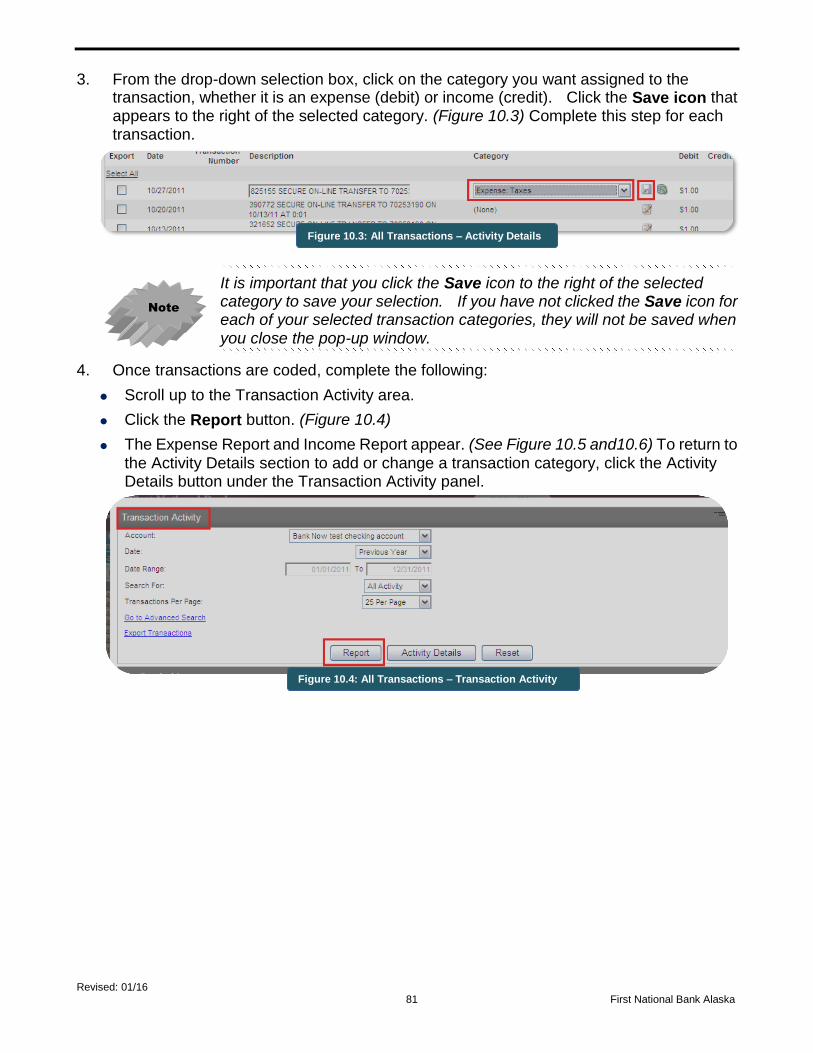
Revised: 01/16 81 First National Bank Alaska
3. From the drop-down selection box, click on the category you want assigned to the transaction, whether it is an expense (debit) or income (credit). Click the Save icon that appears to the right of the selected category. (Figure 10.3) Complete this step for each transaction.
It is important that you click the Save icon to the right of the selected category to save your selection. If you have not clicked the Save icon for each of your selected transaction categories, they will not be saved when you close the pop-up window.
4. Once transactions are coded, complete the following:
Scroll up to the Transaction Activity area.
Click the Report button. (Figure 10.4)
The Expense Report and Income Report appear. (See Figure 10.5 and10.6) To return to the Activity Details section to add or change a transaction category, click the Activity Details button under the Transaction Activity panel.
Figure 10.3: All Transactions – Activity Details
Note
Figure 10.4: All Transactions – Transaction Activity
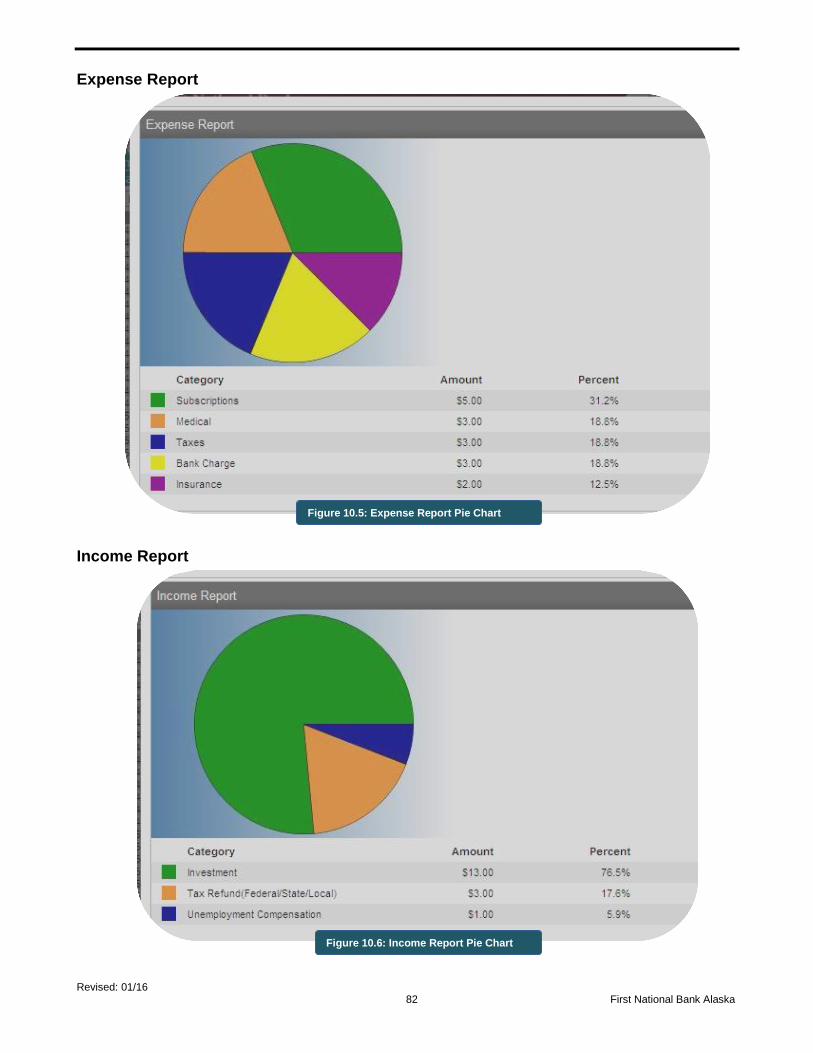
Revised: 01/16 82 First National Bank Alaska
Expense Report
Income Report
Figure 10.5: Expense Report Pie Chart
Figure 10.6: Income Report Pie Chart
Revised: 05/18 83 First National Bank Alaska
Deposit Advantage (Merchant Deposit Capture)
The Deposit Advantage service requires separate enrollment and acceptance of terms and conditions governing electronic capture of check images and transmission of deposits. Once a contract is executed, a bank representative will work with your business to set up the service. Installation will require both the user that will process (scan) the deposits and your local net-work administrator (someone with full credentials to access your business computer system) to download the software drivers needed for the scanning device that will be used. Installation of the Deposit Advantage software must be done at each workstation where deposits will be scanned. Refer to the installation instructions for further details.
Unlike other user changes managed by the company's System Administrator, the bank must add, change or remove a user’s Deposit Advantage access. After a System Administrator has created the user profile in Business Essential, and once the bank receives the appropriate Deposit Advantage authorization documents, the bank will enable the user’s Deposit Ad-vantage permissions.
Image Quality Standards Each check scanned has to meet image quality standards. Not all checks look the same. Some checks do not have signatures; others have more than one. Amounts can be found in the center, the corners, and even across the face of the check. Items that do not meet these standards may require manual data entry or accepting it ‘as is’. For checks to be considered a “good item” and pass through Merchant Deposit Capture without manual intervention by the user, the check must meet the below criteria.
Quality Test
The system tests each scanned image to make sure a readable IRD (image replacement document) can be generated.
Skew – this is when the check is tilted up or down, left or right at an angle. These require the user to rescan the check.
Contrast – this is how light or dark a scanned image appears. If all information on the item can be easily read, the image may be acceptable. However, if it is difficult to read the check information, the users must delete the image and the item must be taken to a branch for deposit.
Streaks and bands – large dark streaks and bands can cause an unclear image. This can sometimes be corrected by cleaning the scanner. Images with dark streaks and bands must be deleted and rescanned. If a check still contains the streaks and bands, the user must delete the image and the item must be taken to a branch for deposit.
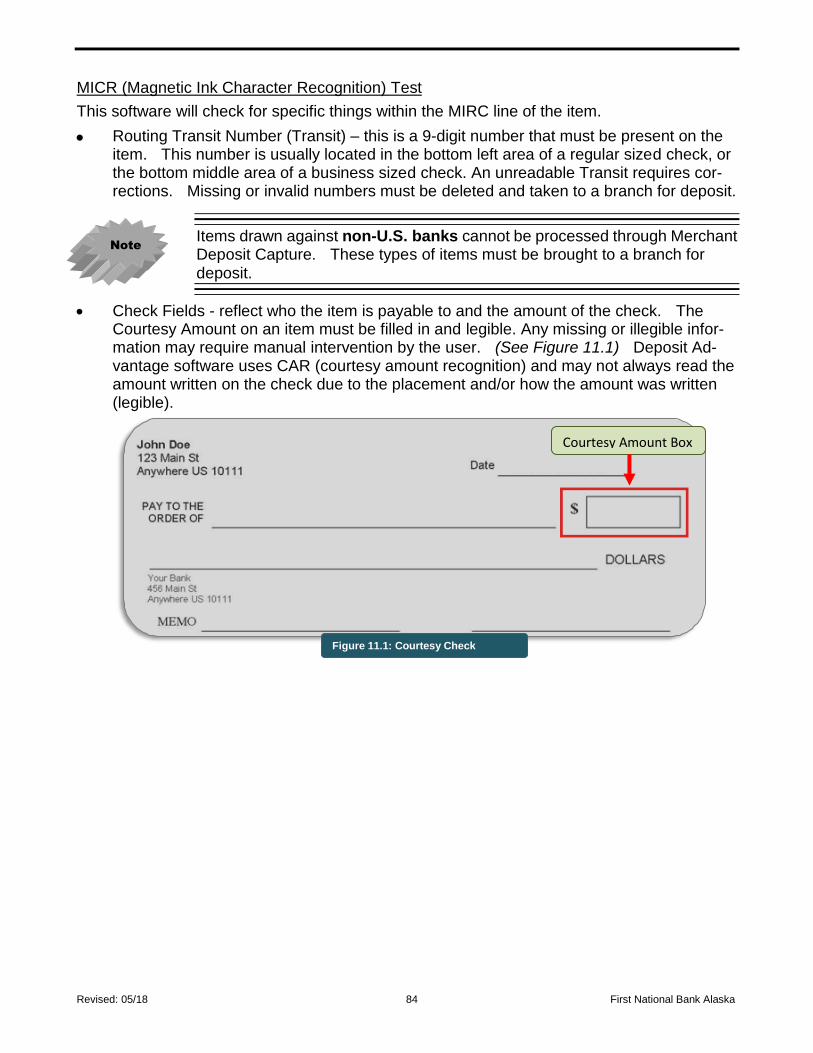
Revised: 05/18 84 First National Bank Alaska
MICR (Magnetic Ink Character Recognition) Test
This software will check for specific things within the MIRC line of the item.
Routing Transit Number (Transit) – this is a 9-digit number that must be present on the item. This number is usually located in the bottom left area of a regular sized check, or the bottom middle area of a business sized check. An unreadable Transit requires cor-rections. Missing or invalid numbers must be deleted and taken to a branch for deposit.
Items drawn against non-U.S. banks cannot be processed through Merchant Deposit Capture. These types of items must be brought to a branch for deposit.
Check Fields - reflect who the item is payable to and the amount of the check. The Courtesy Amount on an item must be filled in and legible. Any missing or illegible infor-mation may require manual intervention by the user. (See Figure 11.1) Deposit Ad-vantage software uses CAR (courtesy amount recognition) and may not always read the amount written on the check due to the placement and/or how the amount was written (legible).
Note
Courtesy Amount Box
Figure 11.1: Courtesy Check
Amount

Revised: 05/18 85 First National Bank Alaska
Accessing Deposit Advantage
Access to the Deposit Advantage service is done through the user's Business Essential log on.
1. Log in to Business Essential. From the Home page, select Account Services then Deposit Advantage. (See Figure 11.2)
Deposit Advantage will not appear in the option list under Account Ser-vices unless the user’s permission for Deposit Advantage has been ena-bled by the bank.
2. At the Merchant Capture Solution screen, confirm your user name is reflected. (See Figure11.3) A Silver Bullet flash screen briefly appears as the connection to the scanner device is recognized. (See Figure 11.4)
Figure 11.2: Home
page
Note
Figure 11.3: Merchant Capture Solution
Figure 11.4: Silver Bullet window

Revised: 05/18 86 First National Bank Alaska
Logging out Of Deposit Advantage 1. From the Merchant Capture Solution screen, click Logout. (See Figure 11.5)
2. When the session ended screen appears, click Close to return to the Business Essential home page. (See Figure 11.6)
Logging out of Deposit Advantage does not log the user out of Business Essential. The Business Essential log out feature is to be used to properly close out of the online banking session.
Figure 11.5: Merchant Capture session ended
Figure 11.6: Merchant Capture session ended
Note
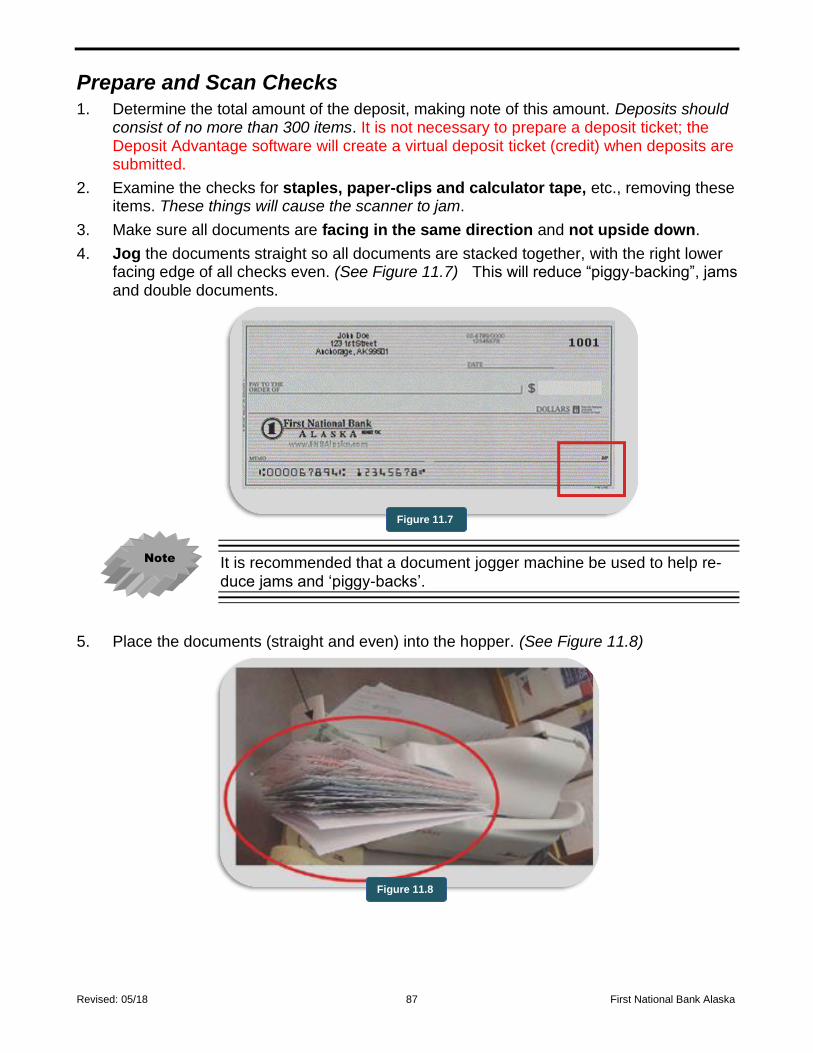
Revised: 05/18 87 First National Bank Alaska
Prepare and Scan Checks 1. Determine the total amount of the deposit, making note of this amount. Deposits should
consist of no more than 300 items. It is not necessary to prepare a deposit ticket; the Deposit Advantage software will create a virtual deposit ticket (credit) when deposits are submitted.
2. Examine the checks for staples, paper-clips and calculator tape, etc., removing these items. These things will cause the scanner to jam.
3. Make sure all documents are facing in the same direction and not upside down.
4. Jog the documents straight so all documents are stacked together, with the right lower facing edge of all checks even. (See Figure 11.7) This will reduce “piggy-backing”, jams and double documents.
It is recommended that a document jogger machine be used to help re-duce jams and ‘piggy-backs’.
5. Place the documents (straight and even) into the hopper. (See Figure 11.8)
Note
Figure 11.8
Figure 11.7
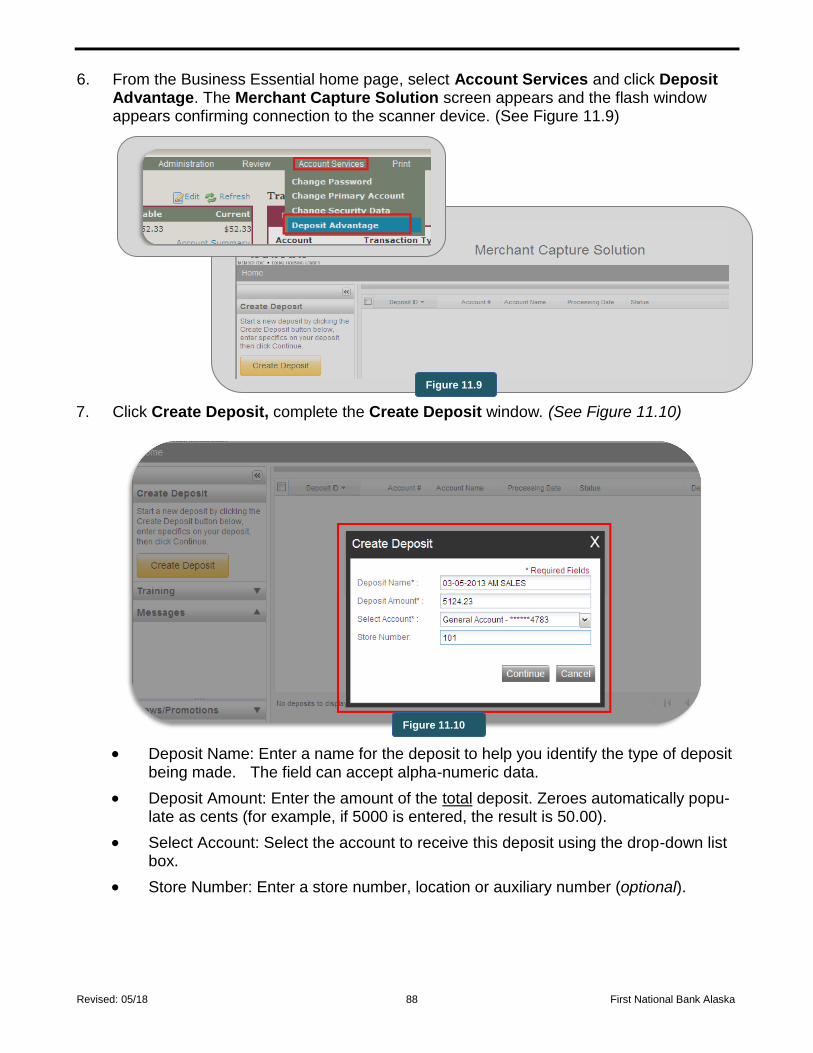
Revised: 05/18 88 First National Bank Alaska
6. From the Business Essential home page, select Account Services and click Deposit Advantage. The Merchant Capture Solution screen appears and the flash window appears confirming connection to the scanner device. (See Figure 11.9)
7. Click Create Deposit, complete the Create Deposit window. (See Figure 11.10)
Deposit Name: Enter a name for the deposit to help you identify the type of deposit being made. The field can accept alpha-numeric data.
Deposit Amount: Enter the amount of the total deposit. Zeroes automatically popu-late as cents (for example, if 5000 is entered, the result is 50.00).
Select Account: Select the account to receive this deposit using the drop-down list box.
Store Number: Enter a store number, location or auxiliary number (optional).
Figure 11.9
Figure 11.10
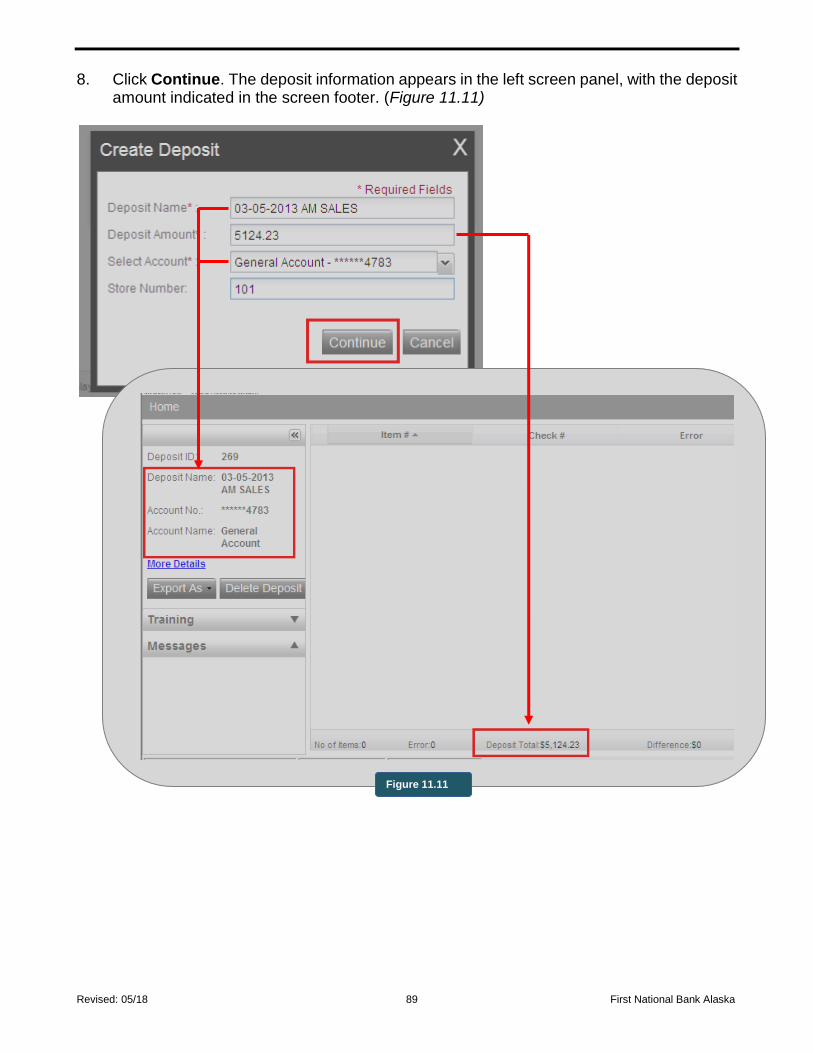
Revised: 05/18 89 First National Bank Alaska
8. Click Continue. The deposit information appears in the left screen panel, with the deposit amount indicated in the screen footer. (Figure 11.11)
Figure 11.11
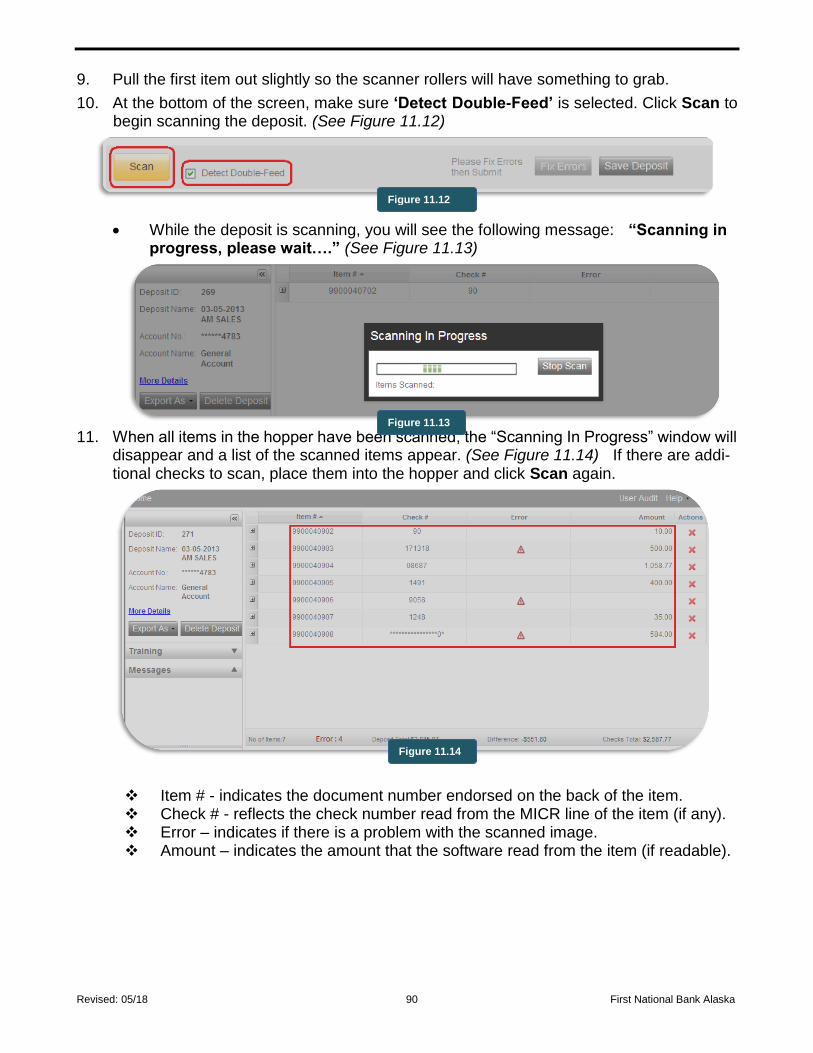
Revised: 05/18 90 First National Bank Alaska
9. Pull the first item out slightly so the scanner rollers will have something to grab.
10. At the bottom of the screen, make sure ‘Detect Double-Feed’ is selected. Click Scan to begin scanning the deposit. (See Figure 11.12)
While the deposit is scanning, you will see the following message: “Scanning in progress, please wait….” (See Figure 11.13)
11. When all items in the hopper have been scanned, the “Scanning In Progress” window will disappear and a list of the scanned items appear. (See Figure 11.14) If there are addi-tional checks to scan, place them into the hopper and click Scan again.
Item # - indicates the document number endorsed on the back of the item. Check # - reflects the check number read from the MICR line of the item (if any). Error – indicates if there is a problem with the scanned image. Amount – indicates the amount that the software read from the item (if readable).
Figure 11.13
Figure 11.12
Figure 11.14
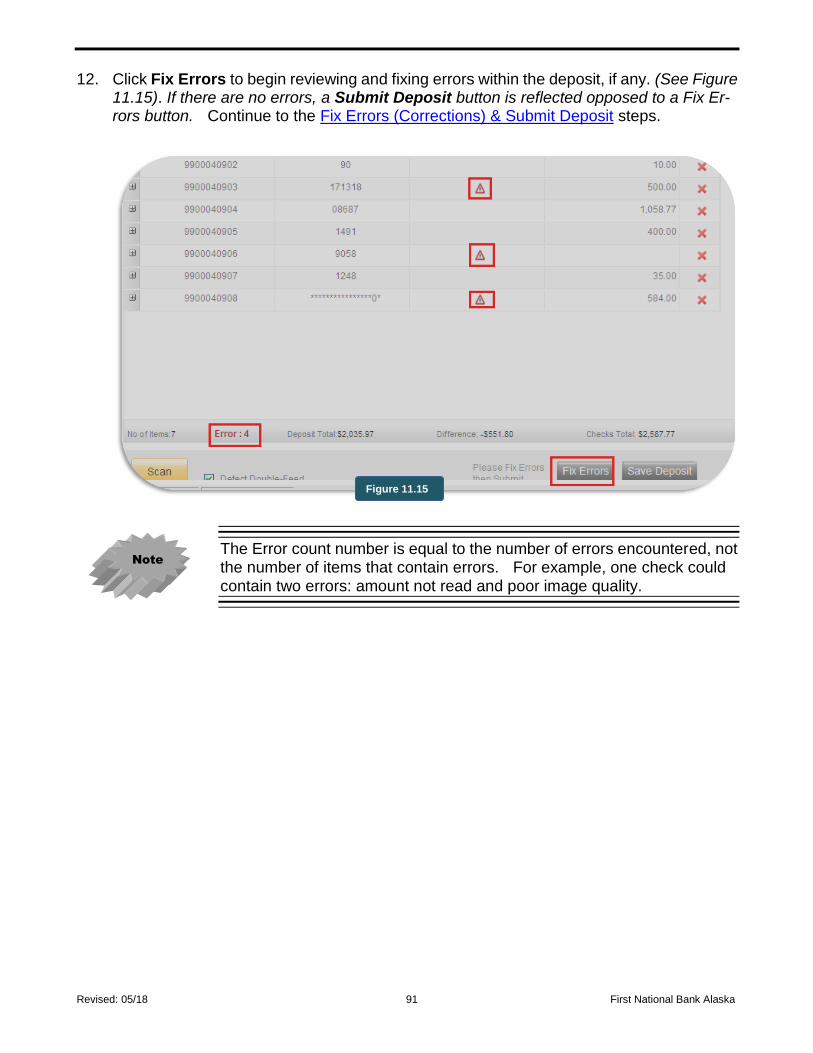
Revised: 05/18 91 First National Bank Alaska
12. Click Fix Errors to begin reviewing and fixing errors within the deposit, if any. (See Figure 11.15). If there are no errors, a Submit Deposit button is reflected opposed to a Fix Er-rors button. Continue to the Fix Errors (Corrections) & Submit Deposit steps.
The Error count number is equal to the number of errors encountered, not the number of items that contain errors. For example, one check could contain two errors: amount not read and poor image quality.
Figure 11.15
Note
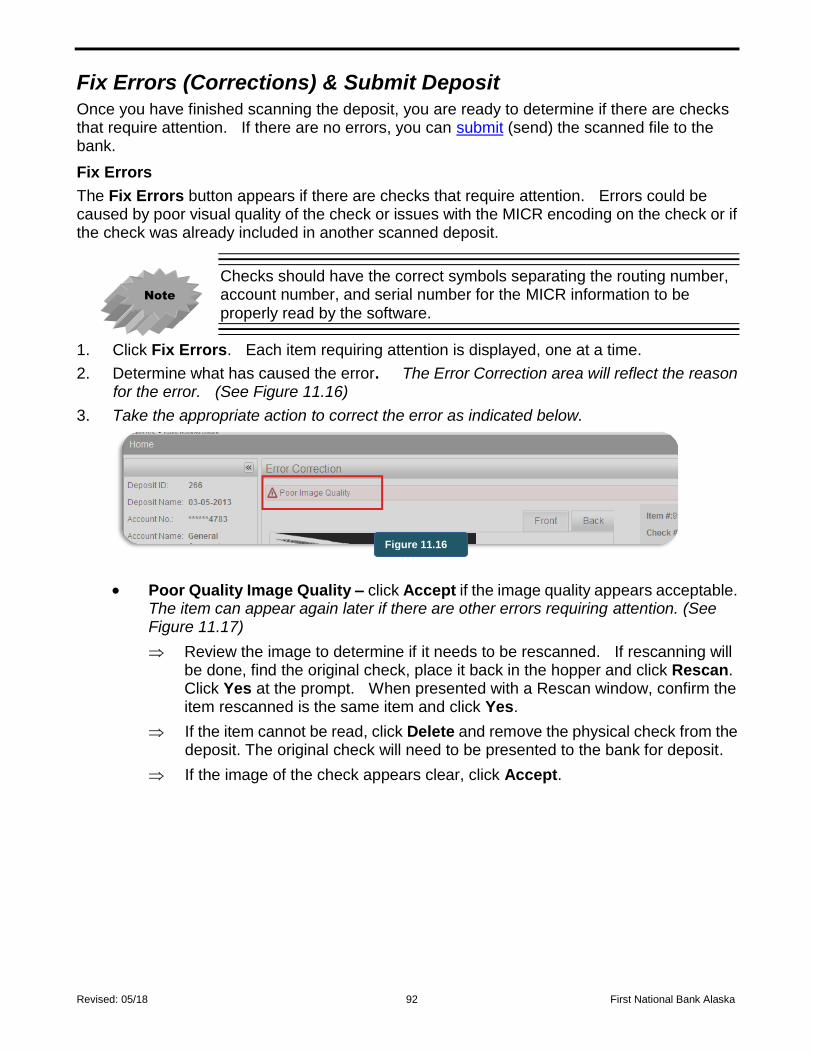
Revised: 05/18 92 First National Bank Alaska
Fix Errors (Corrections) & Submit Deposit
Once you have finished scanning the deposit, you are ready to determine if there are checks that require attention. If there are no errors, you can submit (send) the scanned file to the bank.
Fix Errors
The Fix Errors button appears if there are checks that require attention. Errors could be caused by poor visual quality of the check or issues with the MICR encoding on the check or if the check was already included in another scanned deposit.
Checks should have the correct symbols separating the routing number, account number, and serial number for the MICR information to be properly read by the software.
1. Click Fix Errors. Each item requiring attention is displayed, one at a time.
2. Determine what has caused the error. The Error Correction area will reflect the reason for the error. (See Figure 11.16)
3. Take the appropriate action to correct the error as indicated below.
Poor Quality Image Quality – click Accept if the image quality appears acceptable. The item can appear again later if there are other errors requiring attention. (See Figure 11.17)
Review the image to determine if it needs to be rescanned. If rescanning will be done, find the original check, place it back in the hopper and click Rescan. Click Yes at the prompt. When presented with a Rescan window, confirm the item rescanned is the same item and click Yes.
If the item cannot be read, click Delete and remove the physical check from the deposit. The original check will need to be presented to the bank for deposit.
If the image of the check appears clear, click Accept.
Figure 11.16
Note
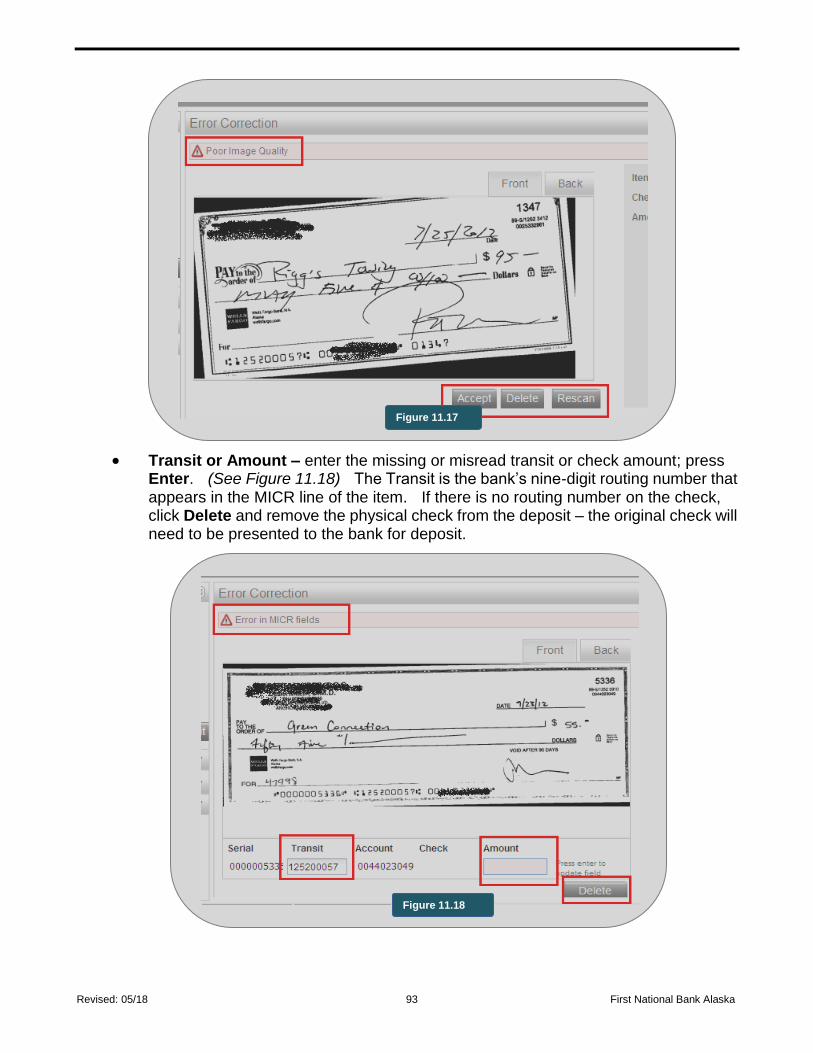
Revised: 05/18 93 First National Bank Alaska
Transit or Amount – enter the missing or misread transit or check amount; press Enter. (See Figure 11.18) The Transit is the bank’s nine-digit routing number that appears in the MICR line of the item. If there is no routing number on the check, click Delete and remove the physical check from the deposit – the original check will need to be presented to the bank for deposit.
Figure 11.17
Figure 11.18
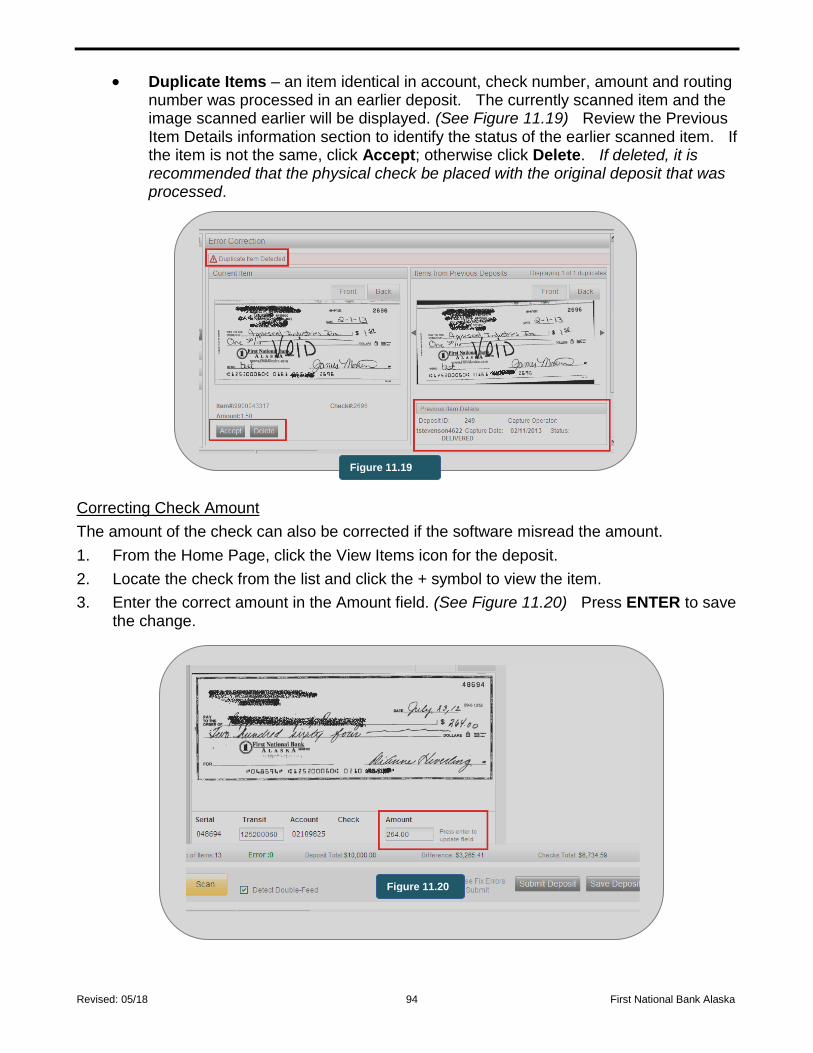
Revised: 05/18 94 First National Bank Alaska
Duplicate Items – an item identical in account, check number, amount and routing number was processed in an earlier deposit. The currently scanned item and the image scanned earlier will be displayed. (See Figure 11.19) Review the Previous Item Details information section to identify the status of the earlier scanned item. If the item is not the same, click Accept; otherwise click Delete. If deleted, it is recommended that the physical check be placed with the original deposit that was processed.
Correcting Check Amount
The amount of the check can also be corrected if the software misread the amount.
1. From the Home Page, click the View Items icon for the deposit.
2. Locate the check from the list and click the + symbol to view the item.
3. Enter the correct amount in the Amount field. (See Figure 11.20) Press ENTER to save the change.
Figure 11.19
Figure 11.20
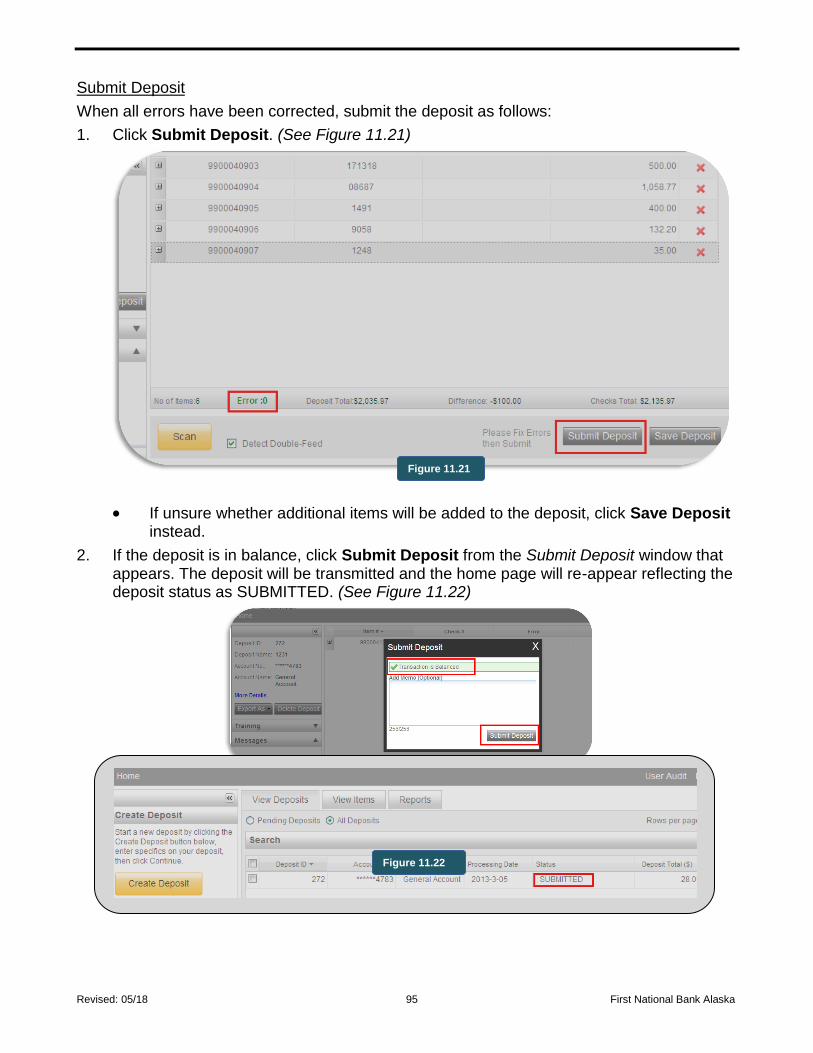
Revised: 05/18 95 First National Bank Alaska
Submit Deposit
When all errors have been corrected, submit the deposit as follows:
1. Click Submit Deposit. (See Figure 11.21)
If unsure whether additional items will be added to the deposit, click Save Deposit instead.
2. If the deposit is in balance, click Submit Deposit from the Submit Deposit window that appears. The deposit will be transmitted and the home page will re-appear reflecting the deposit status as SUBMITTED. (See Figure 11.22)
Figure 11.21
Figure 11.22
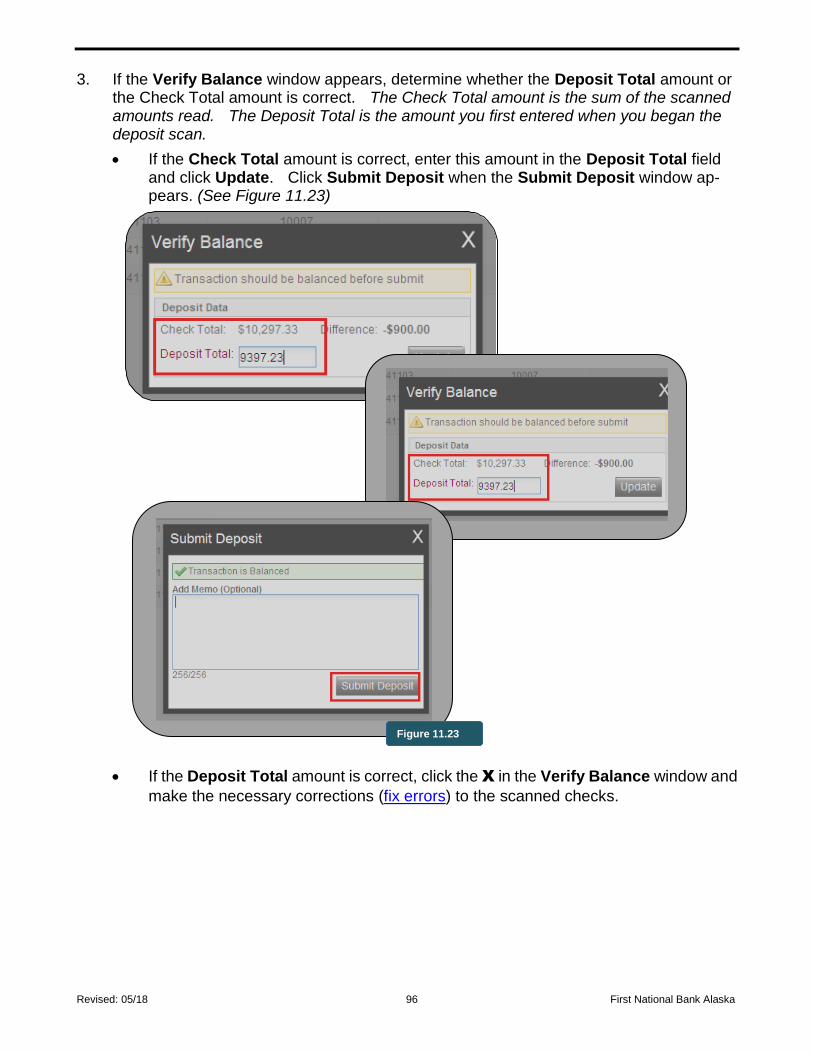
Revised: 05/18 96 First National Bank Alaska
3. If the Verify Balance window appears, determine whether the Deposit Total amount or the Check Total amount is correct. The Check Total amount is the sum of the scanned amounts read. The Deposit Total is the amount you first entered when you began the deposit scan.
If the Check Total amount is correct, enter this amount in the Deposit Total field and click Update. Click Submit Deposit when the Submit Deposit window ap-pears. (See Figure 11.23)
If the Deposit Total amount is correct, click the X in the Verify Balance window and
make the necessary corrections (fix errors) to the scanned checks.
Figure 11.23
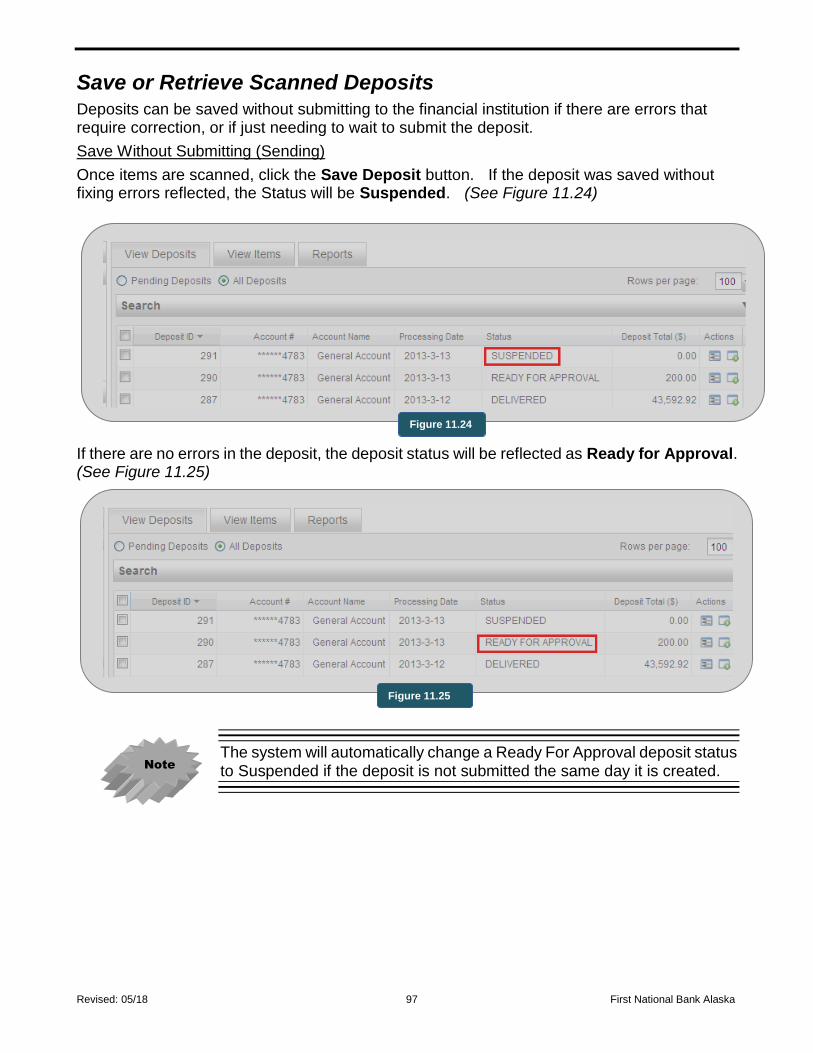
Revised: 05/18 97 First National Bank Alaska
Save or Retrieve Scanned Deposits
Deposits can be saved without submitting to the financial institution if there are errors that require correction, or if just needing to wait to submit the deposit.
Save Without Submitting (Sending)
Once items are scanned, click the Save Deposit button. If the deposit was saved without fixing errors reflected, the Status will be Suspended. (See Figure 11.24)
If there are no errors in the deposit, the deposit status will be reflected as Ready for Approval. (See Figure 11.25)
The system will automatically change a Ready For Approval deposit status to Suspended if the deposit is not submitted the same day it is created.
Note
Figure 11.24
Figure 11.25
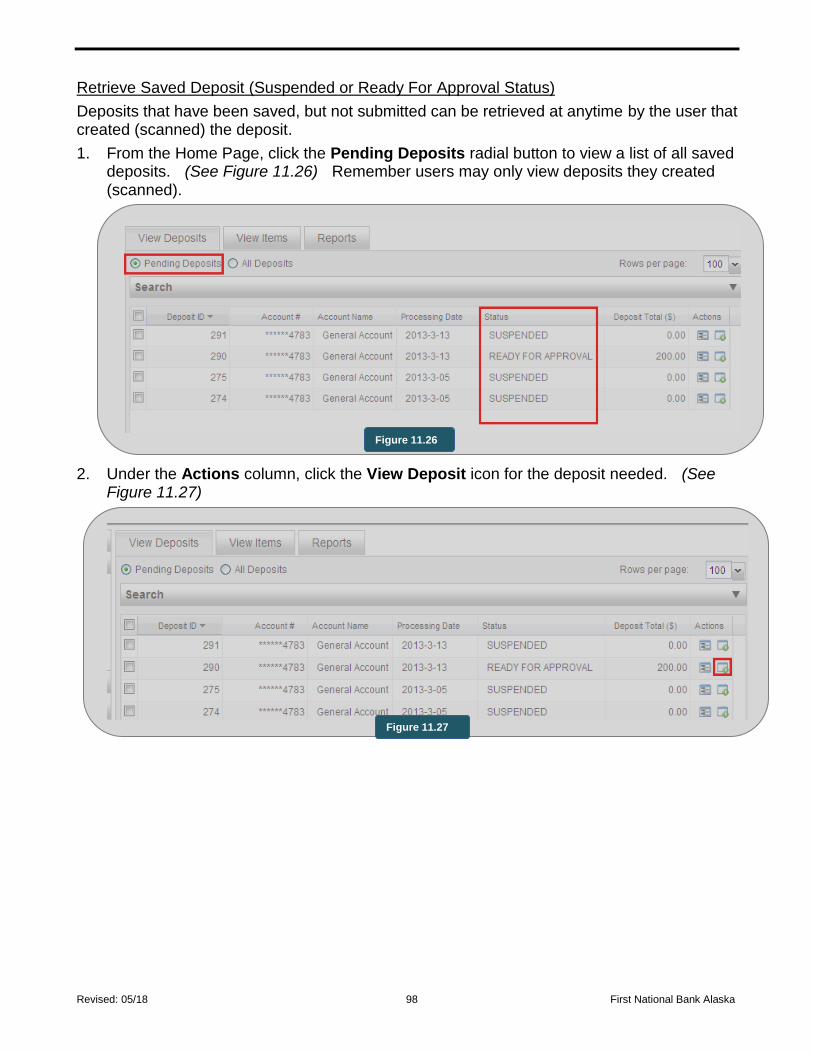
Revised: 05/18 98 First National Bank Alaska
Retrieve Saved Deposit (Suspended or Ready For Approval Status)
Deposits that have been saved, but not submitted can be retrieved at anytime by the user that created (scanned) the deposit.
1. From the Home Page, click the Pending Deposits radial button to view a list of all saved deposits. (See Figure 11.26) Remember users may only view deposits they created (scanned).
2. Under the Actions column, click the View Deposit icon for the deposit needed. (See Figure 11.27)
Figure 11.26
Figure 11.27
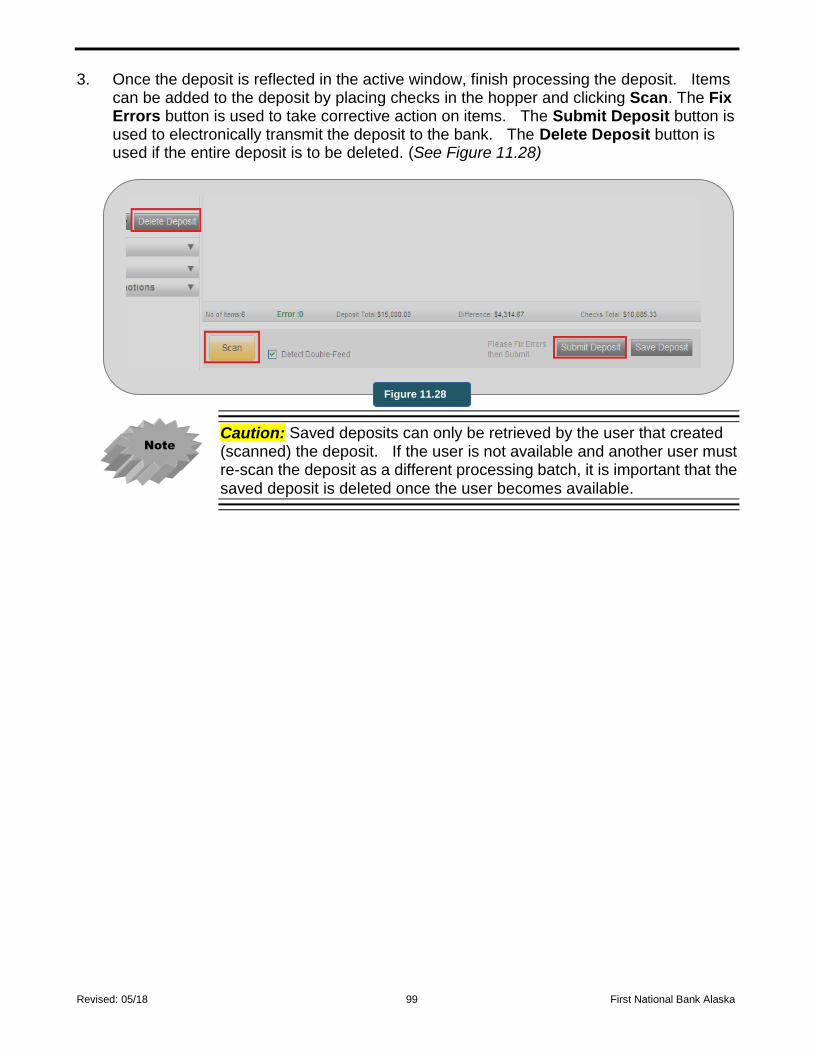
Revised: 05/18 99 First National Bank Alaska
3. Once the deposit is reflected in the active window, finish processing the deposit. Items can be added to the deposit by placing checks in the hopper and clicking Scan. The Fix Errors button is used to take corrective action on items. The Submit Deposit button is used to electronically transmit the deposit to the bank. The Delete Deposit button is used if the entire deposit is to be deleted. (See Figure 11.28)
Caution: Saved deposits can only be retrieved by the user that created (scanned) the deposit. If the user is not available and another user must re-scan the deposit as a different processing batch, it is important that the saved deposit is deleted once the user becomes available.
Figure 11.28
Note
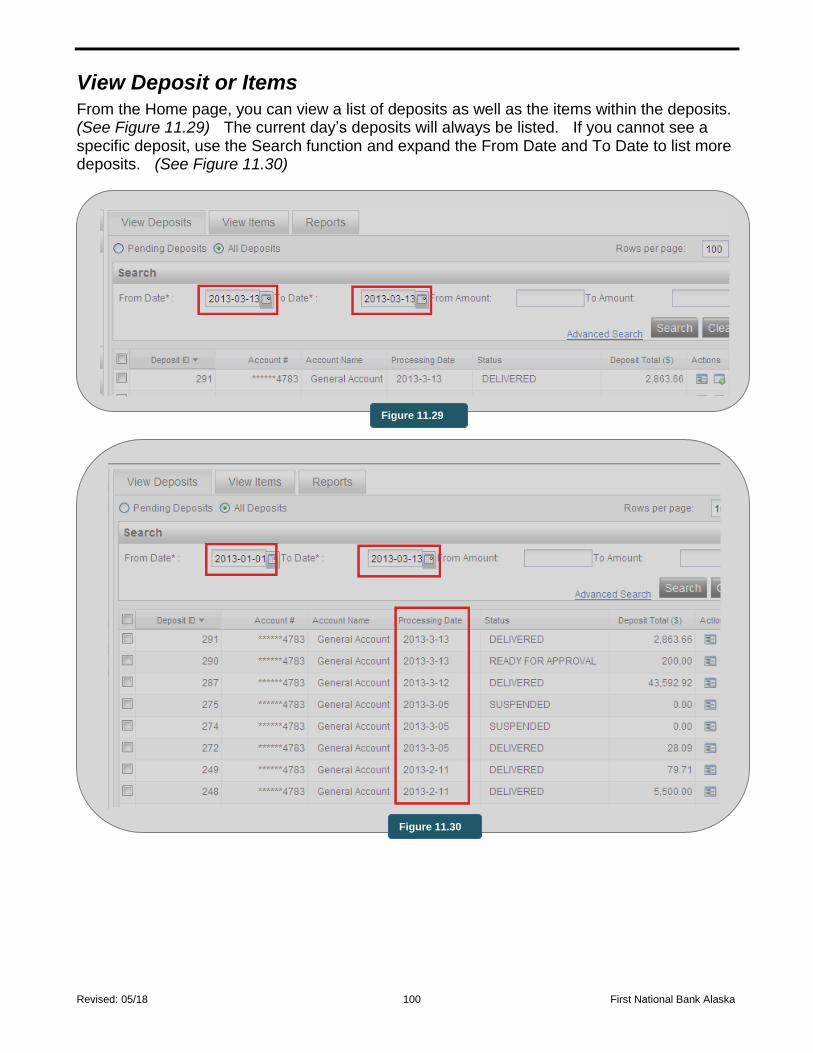
Revised: 05/18 100 First National Bank Alaska
View Deposit or Items
From the Home page, you can view a list of deposits as well as the items within the deposits. (See Figure 11.29) The current day’s deposits will always be listed. If you cannot see a specific deposit, use the Search function and expand the From Date and To Date to list more deposits. (See Figure 11.30)
Figure 11.29
Figure 11.30
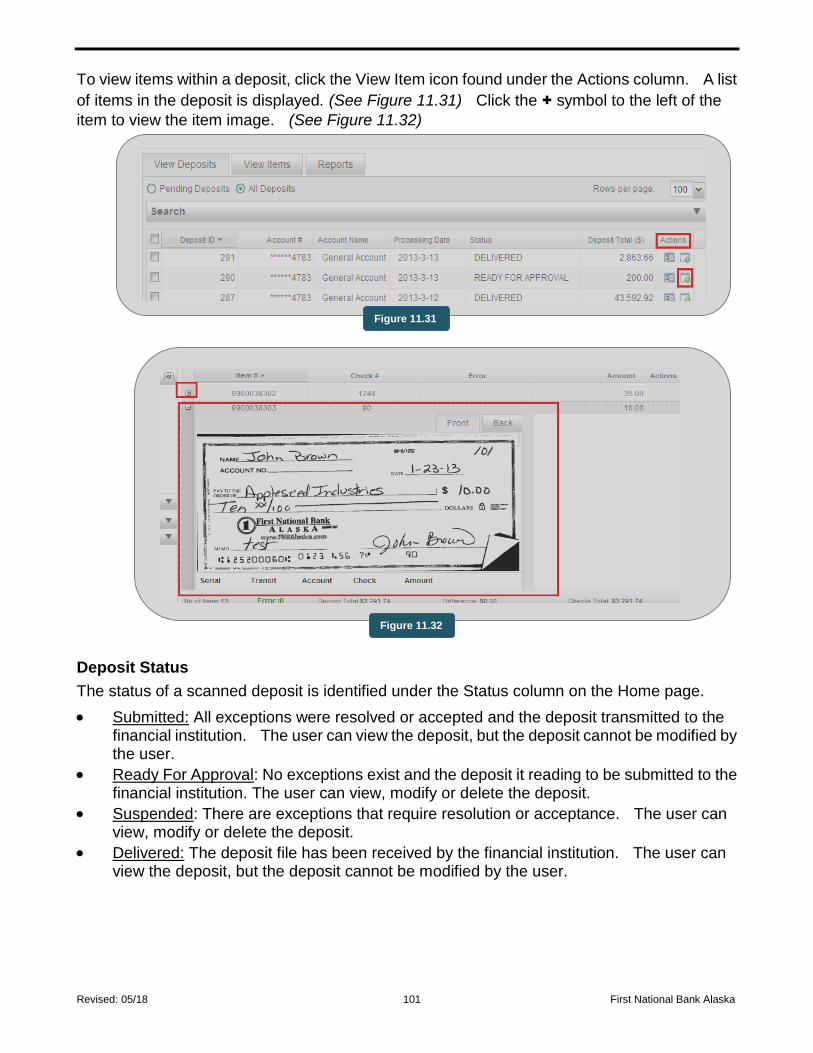
Revised: 05/18 101 First National Bank Alaska
To view items within a deposit, click the View Item icon found under the Actions column. A list
of items in the deposit is displayed. (See Figure 11.31) Click the + symbol to the left of the
item to view the item image. (See Figure 11.32)
Deposit Status
The status of a scanned deposit is identified under the Status column on the Home page.
Submitted: All exceptions were resolved or accepted and the deposit transmitted to the financial institution. The user can view the deposit, but the deposit cannot be modified by the user.
Ready For Approval: No exceptions exist and the deposit it reading to be submitted to the financial institution. The user can view, modify or delete the deposit.
Suspended: There are exceptions that require resolution or acceptance. The user can view, modify or delete the deposit.
Delivered: The deposit file has been received by the financial institution. The user can view the deposit, but the deposit cannot be modified by the user.
Figure 11.31
Figure 11.32
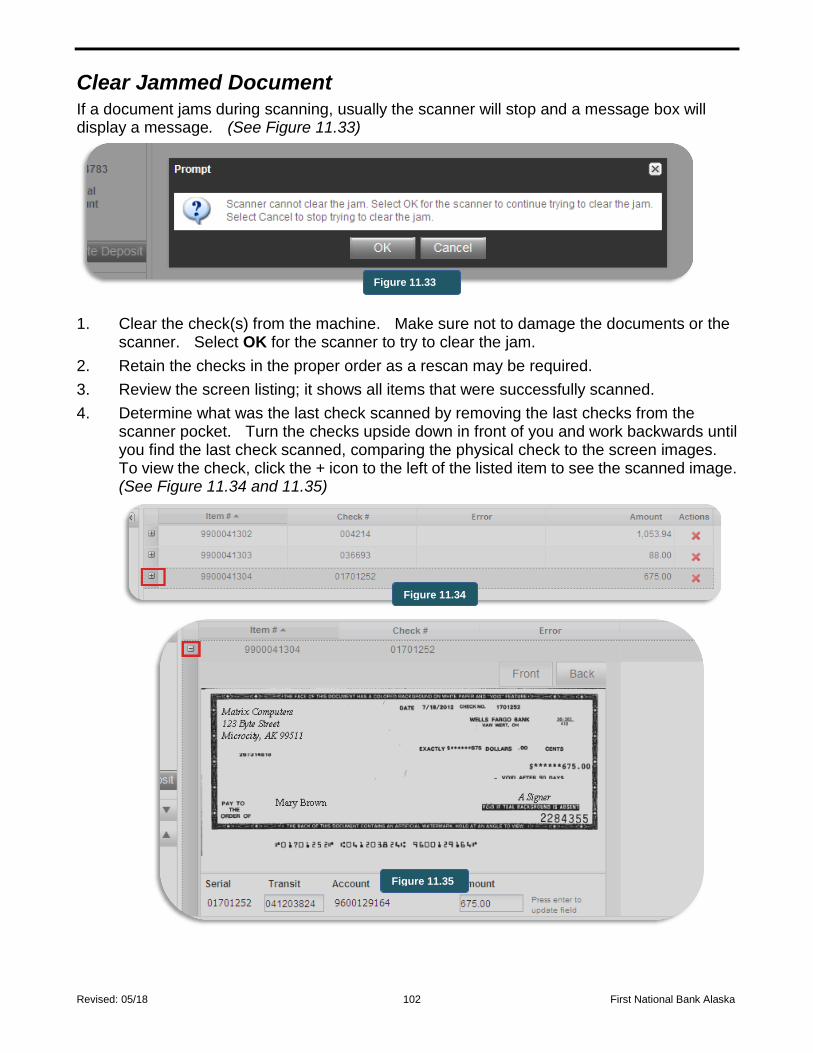
Revised: 05/18 102 First National Bank Alaska
Clear Jammed Document
If a document jams during scanning, usually the scanner will stop and a message box will display a message. (See Figure 11.33)
1. Clear the check(s) from the machine. Make sure not to damage the documents or the scanner. Select OK for the scanner to try to clear the jam.
2. Retain the checks in the proper order as a rescan may be required.
3. Review the screen listing; it shows all items that were successfully scanned.
4. Determine what was the last check scanned by removing the last checks from the scanner pocket. Turn the checks upside down in front of you and work backwards until you find the last check scanned, comparing the physical check to the screen images. To view the check, click the + icon to the left of the listed item to see the scanned image. (See Figure 11.34 and 11.35)
Figure 11.33
Figure 11.34
Figure 11.35
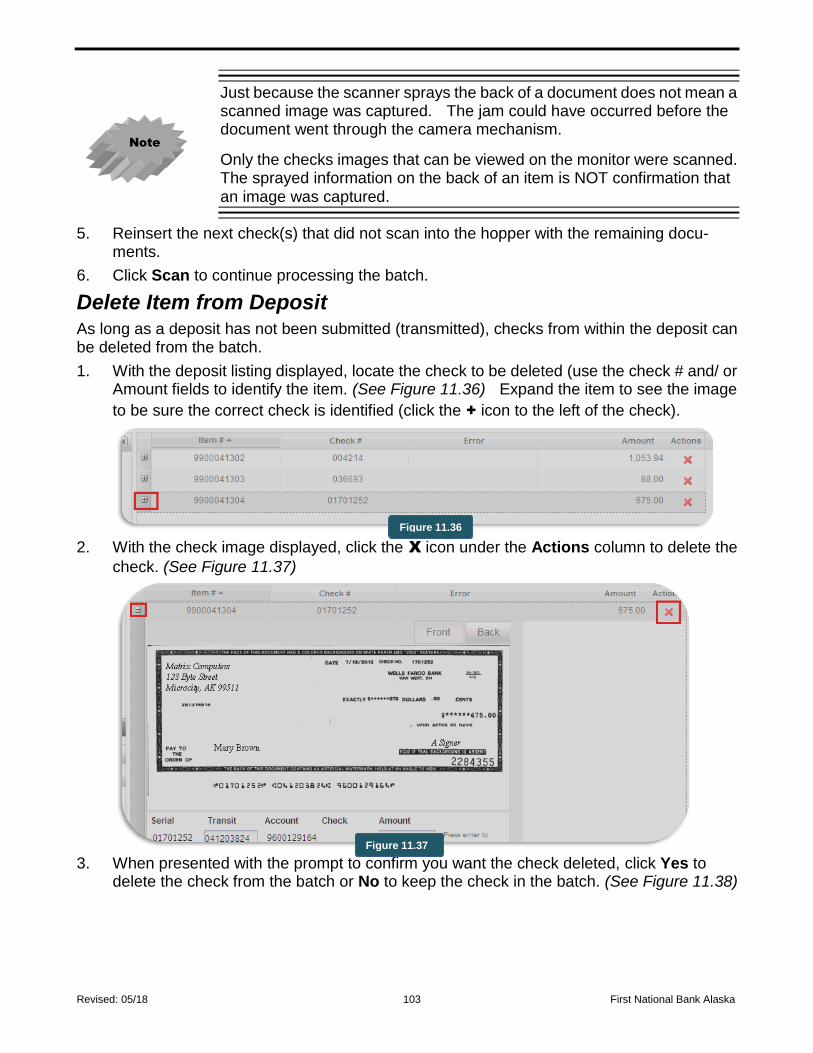
Revised: 05/18 103 First National Bank Alaska
Just because the scanner sprays the back of a document does not mean a scanned image was captured. The jam could have occurred before the document went through the camera mechanism.
Only the checks images that can be viewed on the monitor were scanned. The sprayed information on the back of an item is NOT confirmation that an image was captured.
5. Reinsert the next check(s) that did not scan into the hopper with the remaining docu-ments.
6. Click Scan to continue processing the batch.
Delete Item from Deposit As long as a deposit has not been submitted (transmitted), checks from within the deposit can be deleted from the batch.
1. With the deposit listing displayed, locate the check to be deleted (use the check # and/ or Amount fields to identify the item. (See Figure 11.36) Expand the item to see the image
to be sure the correct check is identified (click the + icon to the left of the check).
2. With the check image displayed, click the X icon under the Actions column to delete the
check. (See Figure 11.37)
3. When presented with the prompt to confirm you want the check deleted, click Yes to delete the check from the batch or No to keep the check in the batch. (See Figure 11.38)
Note
Figure 11.36
Figure 11.37
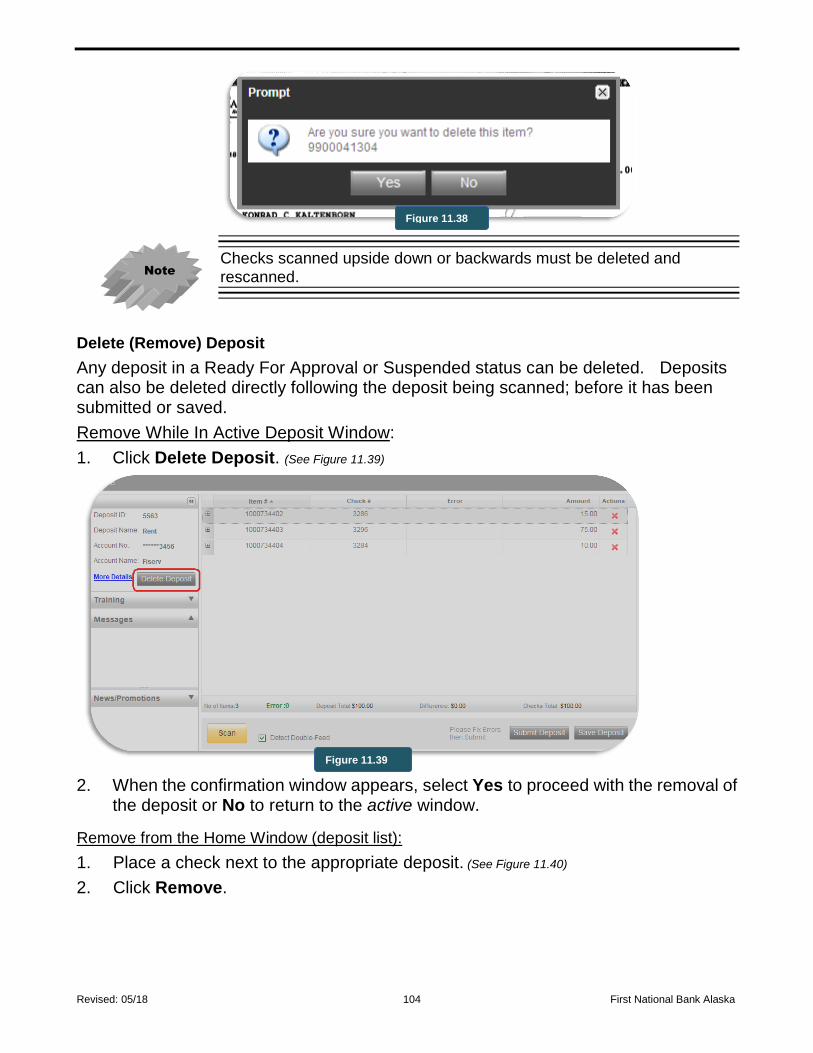
Revised: 05/18 104 First National Bank Alaska
Checks scanned upside down or backwards must be deleted and rescanned.
Delete (Remove) Deposit
Any deposit in a Ready For Approval or Suspended status can be deleted. Deposits can also be deleted directly following the deposit being scanned; before it has been submitted or saved.
Remove While In Active Deposit Window:
1. Click Delete Deposit. (See Figure 11.39)
2. When the confirmation window appears, select Yes to proceed with the removal of the deposit or No to return to the active window.
Remove from the Home Window (deposit list):
1. Place a check next to the appropriate deposit. (See Figure 11.40)
2. Click Remove.
Note
Figure 11.39
Figure 11.38
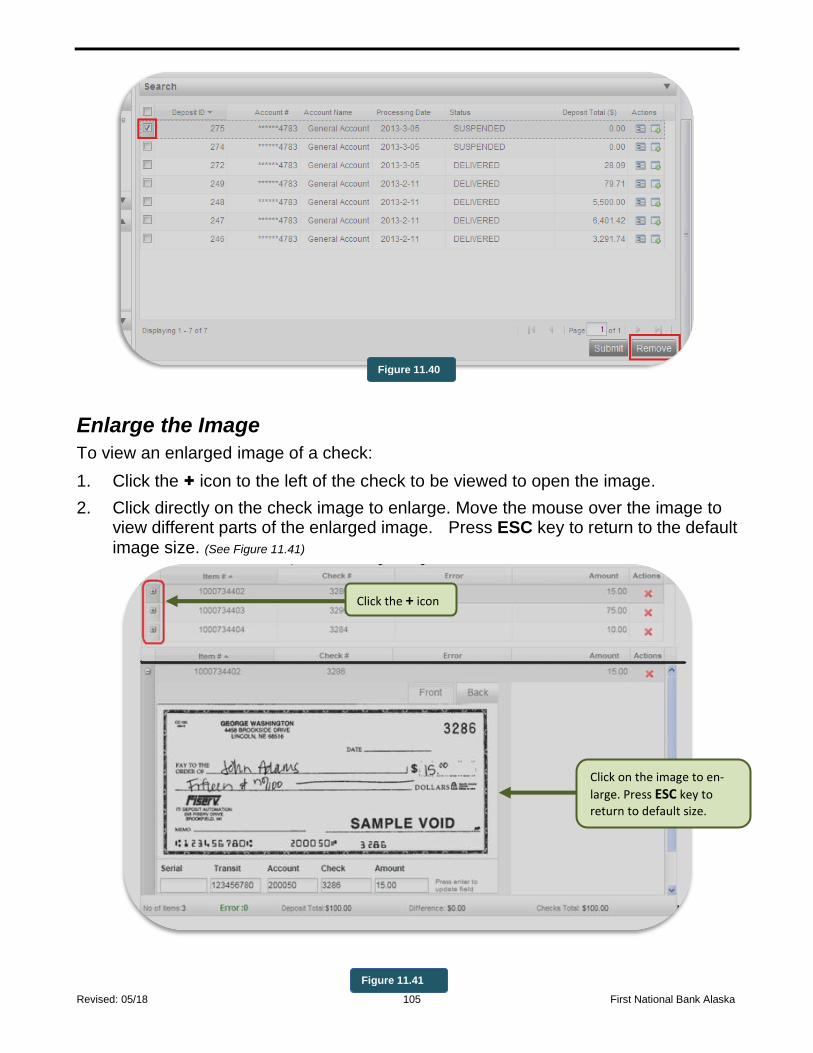
Revised: 05/18 105 First National Bank Alaska
Enlarge the Image
To view an enlarged image of a check:
1. Click the + icon to the left of the check to be viewed to open the image.
2. Click directly on the check image to enlarge. Move the mouse over the image to view different parts of the enlarged image. Press ESC key to return to the default image size. (See Figure 11.41)
Figure 11.40
Click the + icon
Click on the image to en-
large. Press ESC key to
return to default size.
Figure 11.41
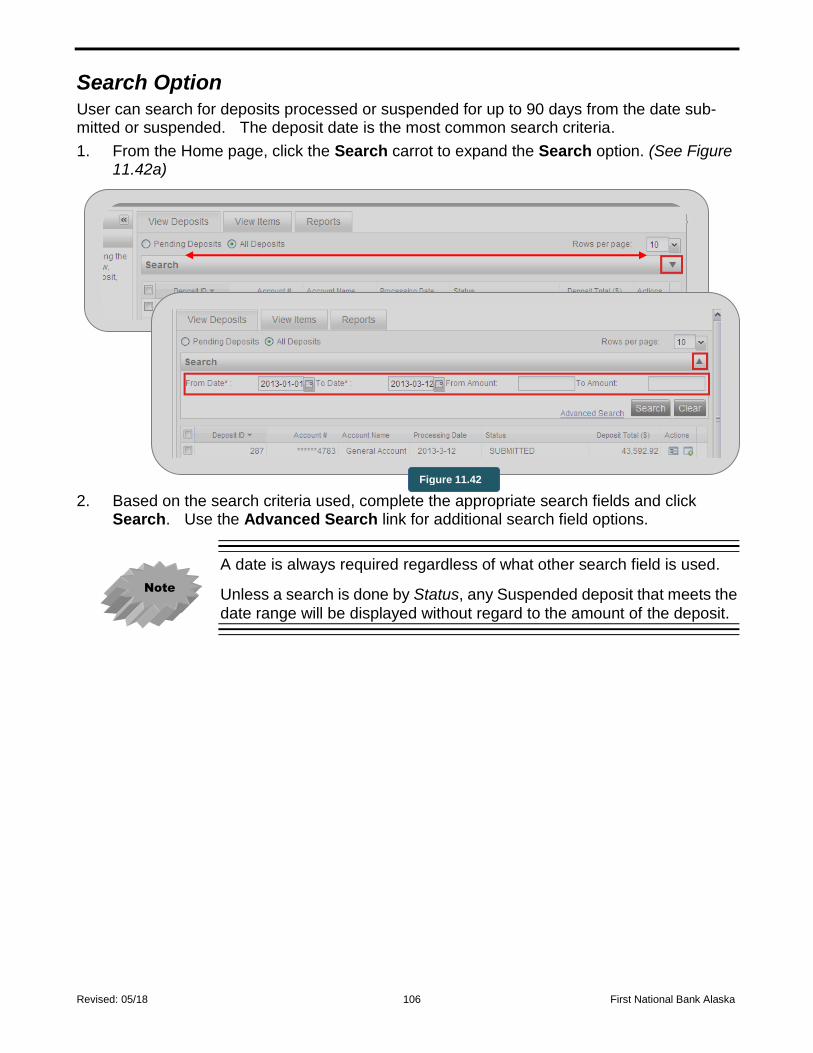
Revised: 05/18 106 First National Bank Alaska
Search Option
User can search for deposits processed or suspended for up to 90 days from the date sub-mitted or suspended. The deposit date is the most common search criteria.
1. From the Home page, click the Search carrot to expand the Search option. (See Figure 11.42a)
2. Based on the search criteria used, complete the appropriate search fields and click Search. Use the Advanced Search link for additional search field options.
A date is always required regardless of what other search field is used.
Unless a search is done by Status, any Suspended deposit that meets the
date range will be displayed without regard to the amount of the deposit.
Figure 11.42
Note
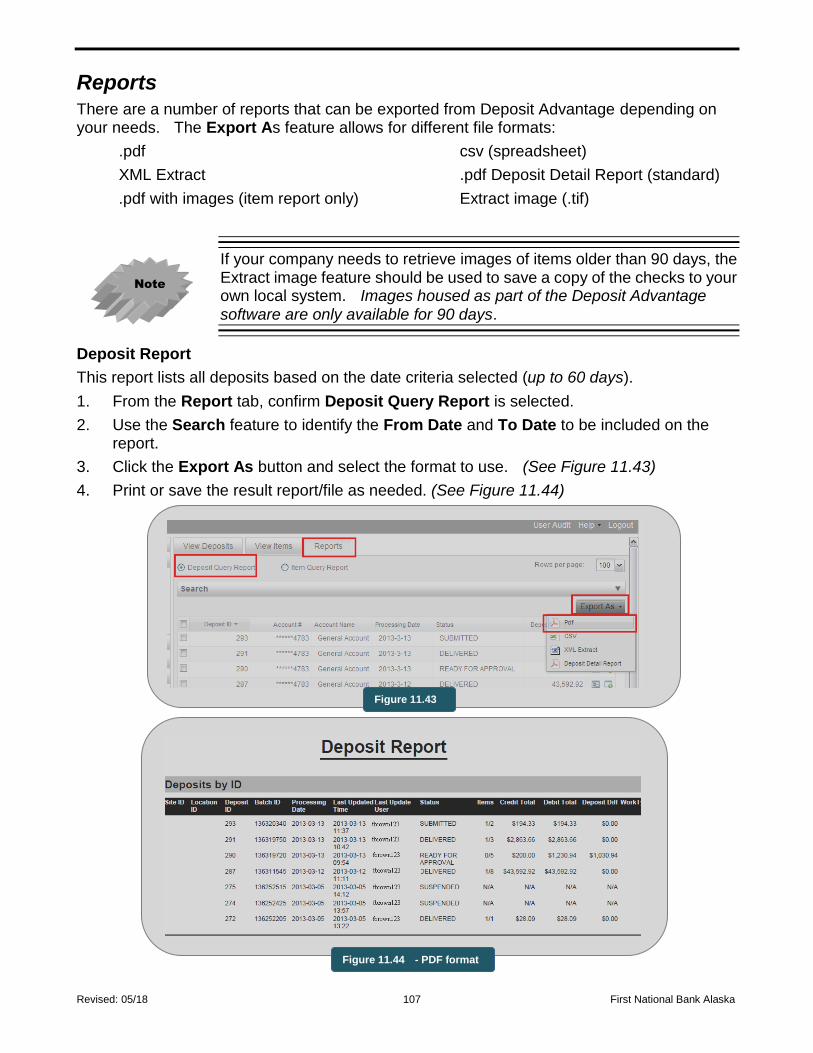
Revised: 05/18 107 First National Bank Alaska
Reports
There are a number of reports that can be exported from Deposit Advantage depending on your needs. The Export As feature allows for different file formats:
.pdf csv (spreadsheet)
XML Extract .pdf Deposit Detail Report (standard)
.pdf with images (item report only) Extract image (.tif)
If your company needs to retrieve images of items older than 90 days, the Extract image feature should be used to save a copy of the checks to your own local system. Images housed as part of the Deposit Advantage software are only available for 90 days.
Deposit Report
This report lists all deposits based on the date criteria selected (up to 60 days).
1. From the Report tab, confirm Deposit Query Report is selected.
2. Use the Search feature to identify the From Date and To Date to be included on the report.
3. Click the Export As button and select the format to use. (See Figure 11.43)
4. Print or save the result report/file as needed. (See Figure 11.44)
Figure 11.43
Figure 11.44 - PDF format
Note
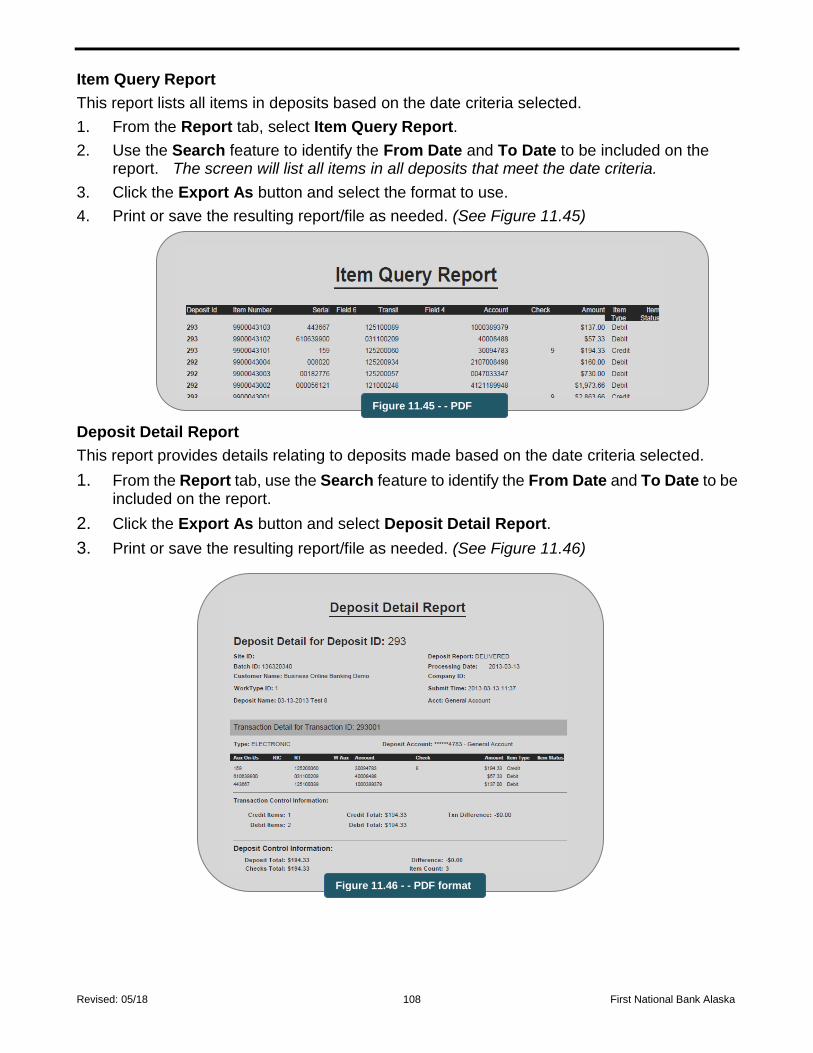
Revised: 05/18 108 First National Bank Alaska
Item Query Report
This report lists all items in deposits based on the date criteria selected.
1. From the Report tab, select Item Query Report.
2. Use the Search feature to identify the From Date and To Date to be included on the report. The screen will list all items in all deposits that meet the date criteria.
3. Click the Export As button and select the format to use.
4. Print or save the resulting report/file as needed. (See Figure 11.45)
Deposit Detail Report
This report provides details relating to deposits made based on the date criteria selected.
1. From the Report tab, use the Search feature to identify the From Date and To Date to be included on the report.
2. Click the Export As button and select Deposit Detail Report.
3. Print or save the resulting report/file as needed. (See Figure 11.46)
Figure 11.45 - - PDF
format
Figure 11.46 - - PDF format
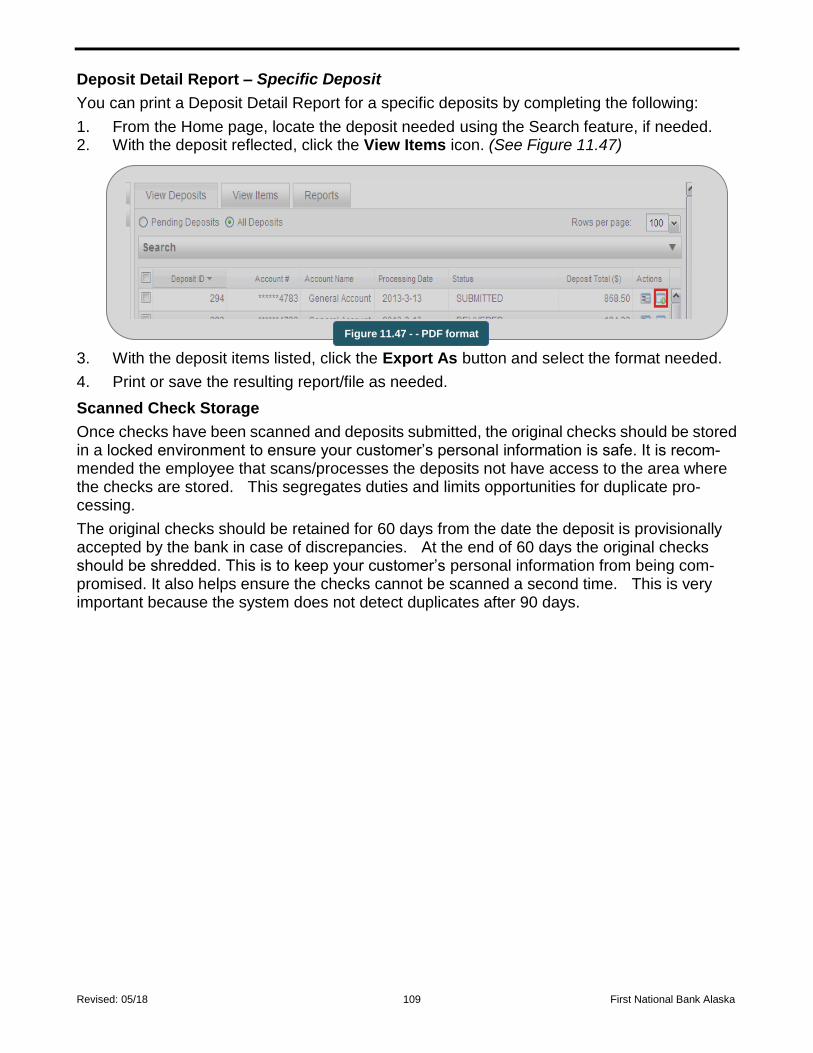
Revised: 05/18 109 First National Bank Alaska
Deposit Detail Report – Specific Deposit
You can print a Deposit Detail Report for a specific deposits by completing the following:
1. From the Home page, locate the deposit needed using the Search feature, if needed. 2. With the deposit reflected, click the View Items icon. (See Figure 11.47)
3. With the deposit items listed, click the Export As button and select the format needed.
4. Print or save the resulting report/file as needed.
Scanned Check Storage
Once checks have been scanned and deposits submitted, the original checks should be stored in a locked environment to ensure your customer’s personal information is safe. It is recom-mended the employee that scans/processes the deposits not have access to the area where the checks are stored. This segregates duties and limits opportunities for duplicate pro-cessing.
The original checks should be retained for 60 days from the date the deposit is provisionally accepted by the bank in case of discrepancies. At the end of 60 days the original checks should be shredded. This is to keep your customer’s personal information from being com-promised. It also helps ensure the checks cannot be scanned a second time. This is very important because the system does not detect duplicates after 90 days.
Figure 11.47 - - PDF format
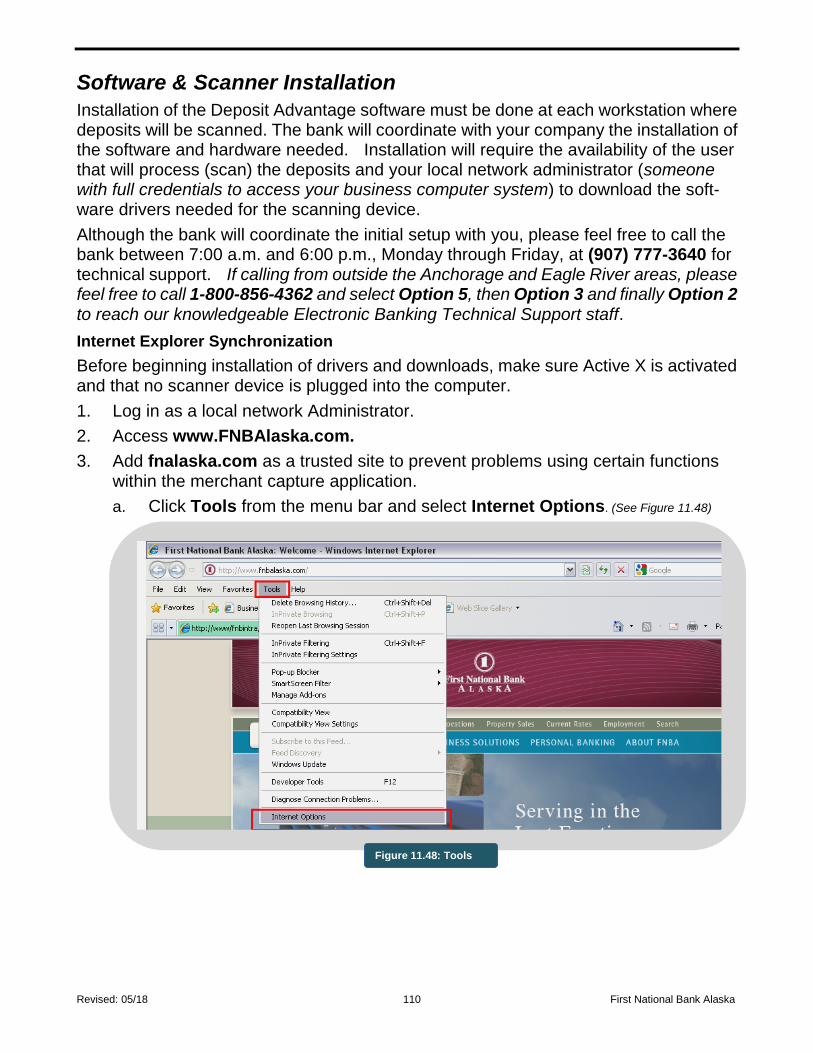
Revised: 05/18 110 First National Bank Alaska
Software & Scanner Installation
Installation of the Deposit Advantage software must be done at each workstation where deposits will be scanned. The bank will coordinate with your company the installation of the software and hardware needed. Installation will require the availability of the user that will process (scan) the deposits and your local network administrator (someone with full credentials to access your business computer system) to download the soft-ware drivers needed for the scanning device.
Although the bank will coordinate the initial setup with you, please feel free to call the bank between 7:00 a.m. and 6:00 p.m., Monday through Friday, at (907) 777-3640 for technical support. If calling from outside the Anchorage and Eagle River areas, please feel free to call 1-800-856-4362 and select Option 5, then Option 3 and finally Option 2 to reach our knowledgeable Electronic Banking Technical Support staff.
Internet Explorer Synchronization
Before beginning installation of drivers and downloads, make sure Active X is activated and that no scanner device is plugged into the computer.
1. Log in as a local network Administrator.
2. Access www.FNBAlaska.com.
3. Add fnalaska.com as a trusted site to prevent problems using certain functions within the merchant capture application.
a. Click Tools from the menu bar and select Internet Options. (See Figure 11.48)
Figure 11.48: Tools
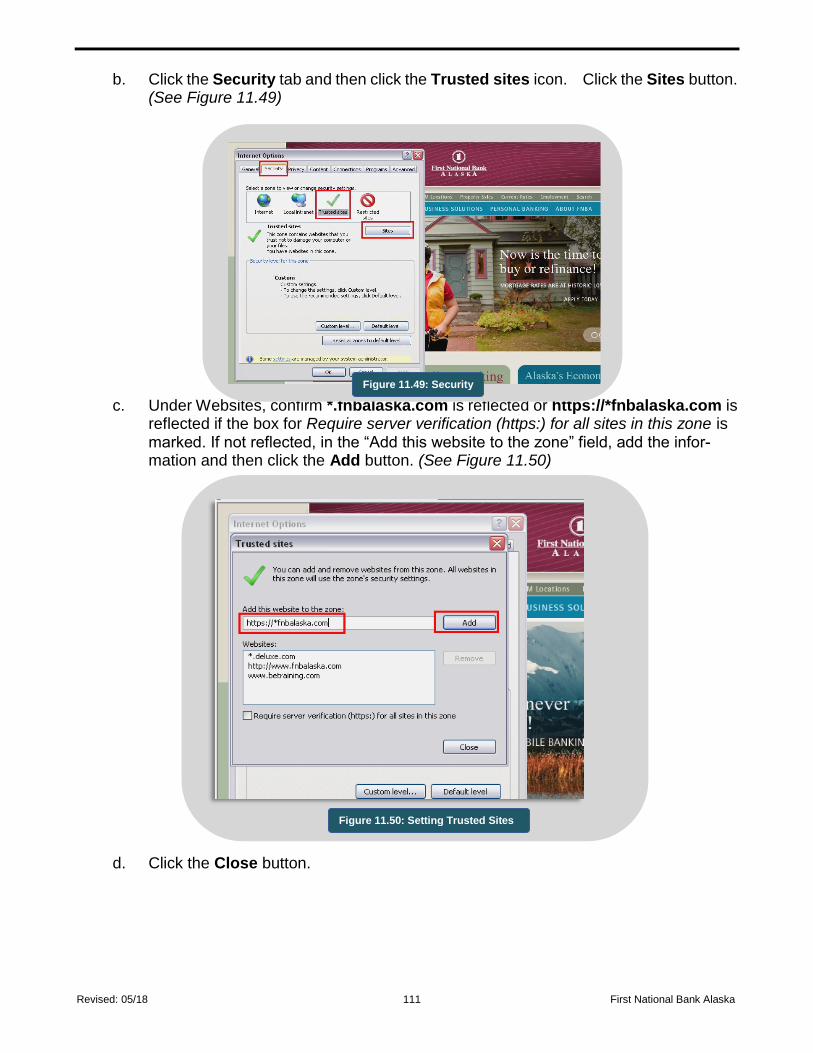
Revised: 05/18 111 First National Bank Alaska
b. Click the Security tab and then click the Trusted sites icon. Click the Sites button. (See Figure 11.49)
c. Under Websites, confirm *.fnbalaska.com is reflected or https://*fnbalaska.com is reflected if the box for Require server verification (https:) for all sites in this zone is marked. If not reflected, in the “Add this website to the zone” field, add the infor-mation and then click the Add button. (See Figure 11.50)
d. Click the Close button.
Figure 62k: Trusted Site
Figure 11.49: Security
Figure 11.50: Setting Trusted Sites
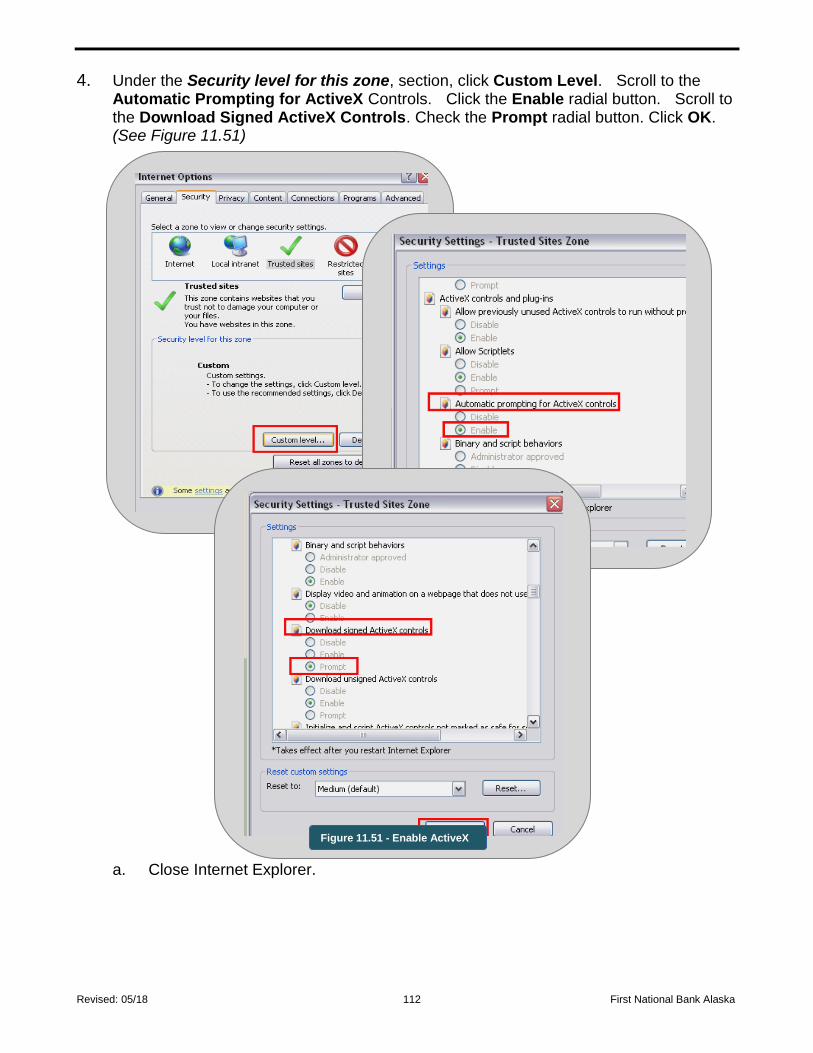
Revised: 05/18 112 First National Bank Alaska
4. Under the Security level for this zone, section, click Custom Level. Scroll to the Automatic Prompting for ActiveX Controls. Click the Enable radial button. Scroll to the Download Signed ActiveX Controls. Check the Prompt radial button. Click OK. (See Figure 11.51)
a. Close Internet Explorer.
Figure 11.51 - Enable ActiveX
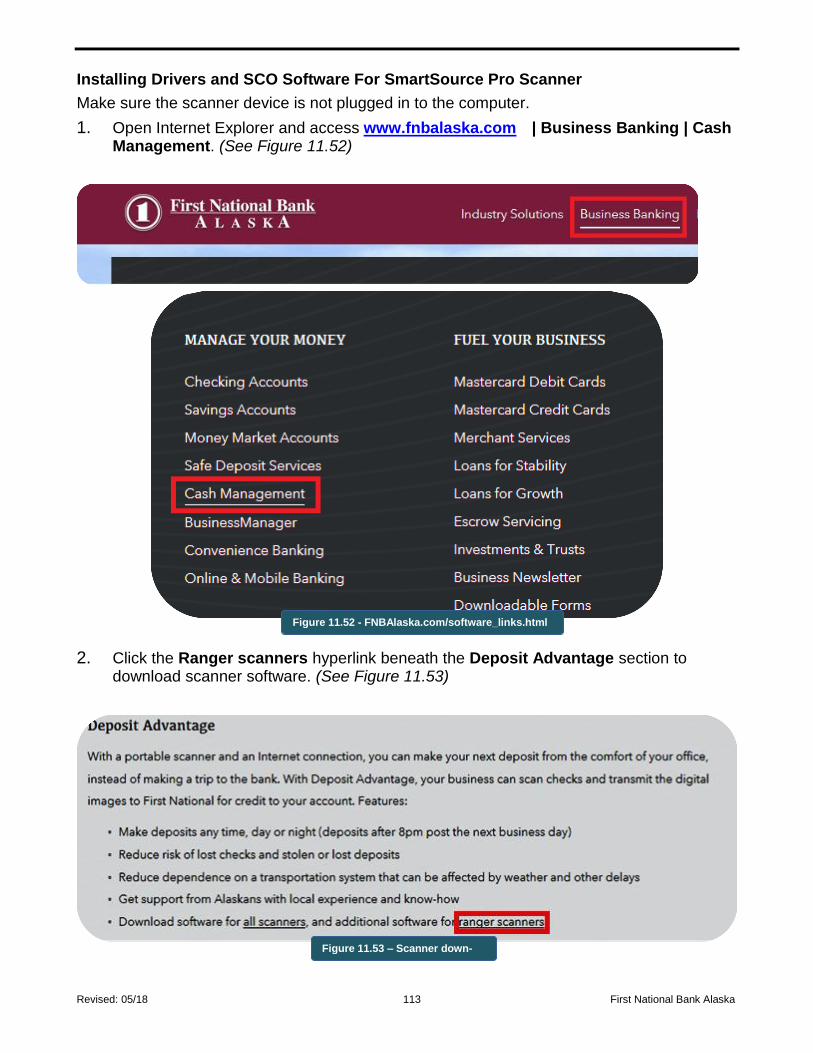
Revised: 05/18 113 First National Bank Alaska
Installing Drivers and SCO Software For SmartSource Pro Scanner
Make sure the scanner device is not plugged in to the computer.
1. Open Internet Explorer and access www.fnbalaska.com | Business Banking | Cash Management. (See Figure 11.52)
2. Click the Ranger scanners hyperlink beneath the Deposit Advantage section to download scanner software. (See Figure 11.53)
Figure 11.53 – Scanner down-
load
Figure 11.52 - FNBAlaska.com/software_links.html
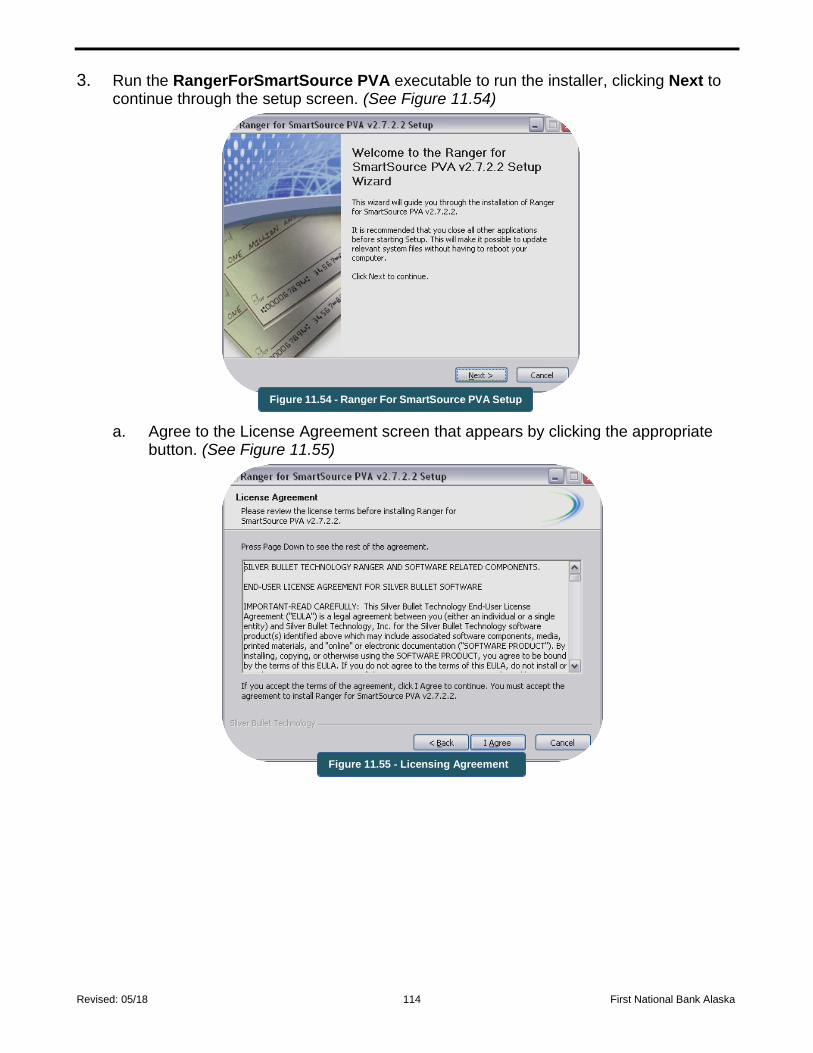
Revised: 05/18 114 First National Bank Alaska
3. Run the RangerForSmartSource PVA executable to run the installer, clicking Next to continue through the setup screen. (See Figure 11.54)
a. Agree to the License Agreement screen that appears by clicking the appropriate button. (See Figure 11.55)
Figure 11.54 - Ranger For SmartSource PVA Setup
Figure 11.55 - Licensing Agreement
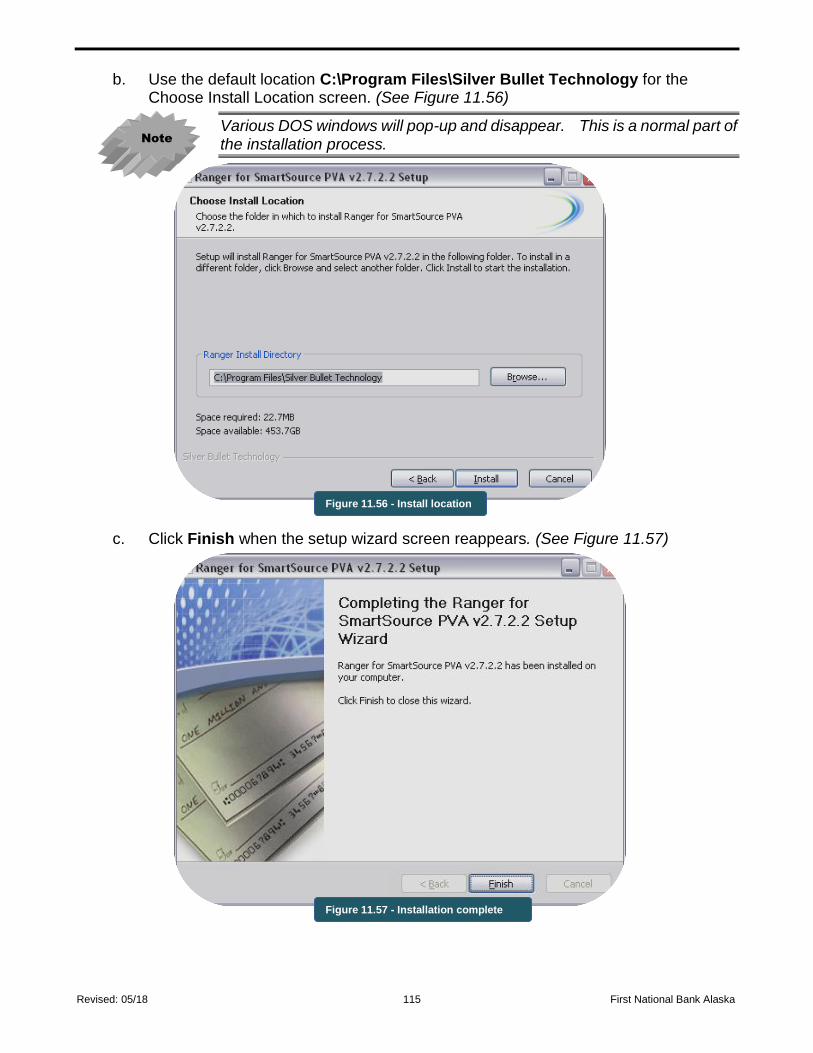
Revised: 05/18 115 First National Bank Alaska
b. Use the default location C:\Program Files\Silver Bullet Technology for the Choose Install Location screen. (See Figure 11.56)
Various DOS windows will pop-up and disappear. This is a normal part of the installation process.
c. Click Finish when the setup wizard screen reappears. (See Figure 11.57)
Note
Figure 11.56 - Install location
Figure 11.57 - Installation complete

Revised: 05/18 116 First National Bank Alaska
4. Run SCO1251S.exe and click Next. (See Figure 11.58)
5. At the Installation Options window, Target Server field, enter 66.223.239.157 as the server address. In the Installation Type field, select Merchant Capture from the drop down field and then click Next. (See Figure 11.59)
Figure 11.58 - SCO software
installation
Figure 11.59 - Installation Options
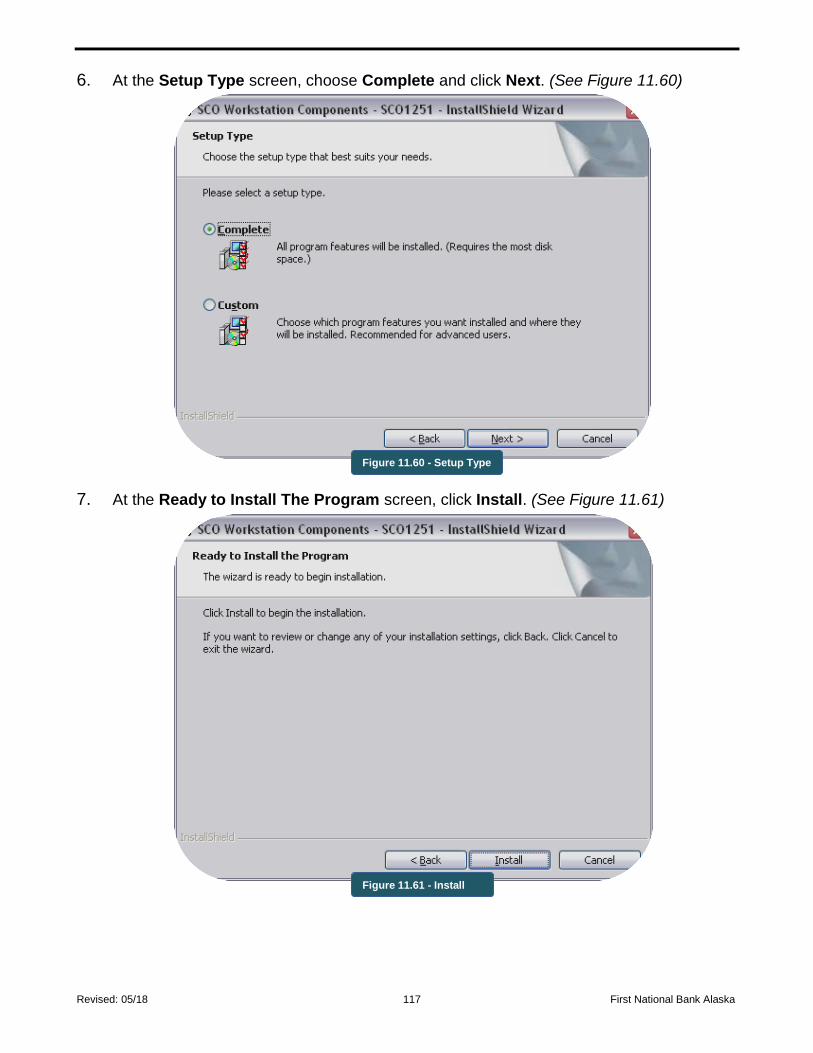
Revised: 05/18 117 First National Bank Alaska
6. At the Setup Type screen, choose Complete and click Next. (See Figure 11.60)
7. At the Ready to Install The Program screen, click Install. (See Figure 11.61)
Figure 11.60 - Setup Type
Figure 11.61 - Install
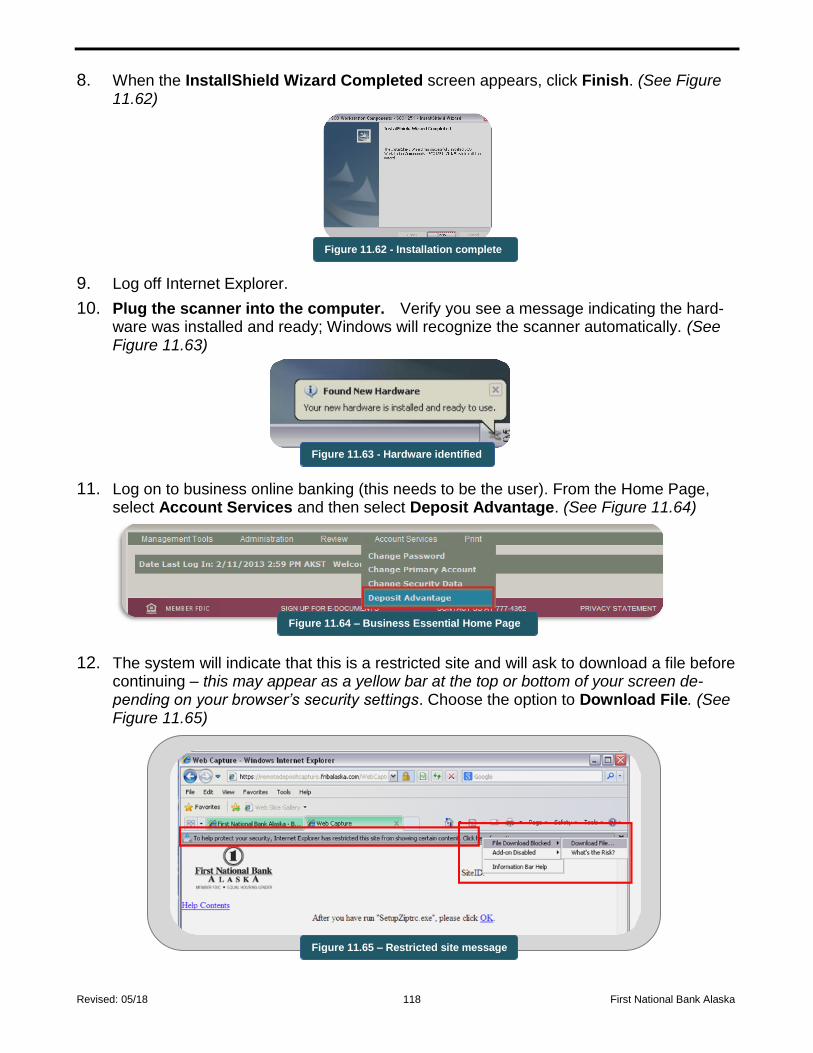
Revised: 05/18 118 First National Bank Alaska
8. When the InstallShield Wizard Completed screen appears, click Finish. (See Figure 11.62)
9. Log off Internet Explorer.
10. Plug the scanner into the computer. Verify you see a message indicating the hard-ware was installed and ready; Windows will recognize the scanner automatically. (See Figure 11.63)
11. Log on to business online banking (this needs to be the user). From the Home Page, select Account Services and then select Deposit Advantage. (See Figure 11.64)
12. The system will indicate that this is a restricted site and will ask to download a file before continuing – this may appear as a yellow bar at the top or bottom of your screen de-pending on your browser’s security settings. Choose the option to Download File. (See Figure 11.65)
Figure 11.62 - Installation complete
Figure 11.64 – Business Essential Home Page
Figure 11.63 - Hardware identified
Figure 11.65 – Restricted site message
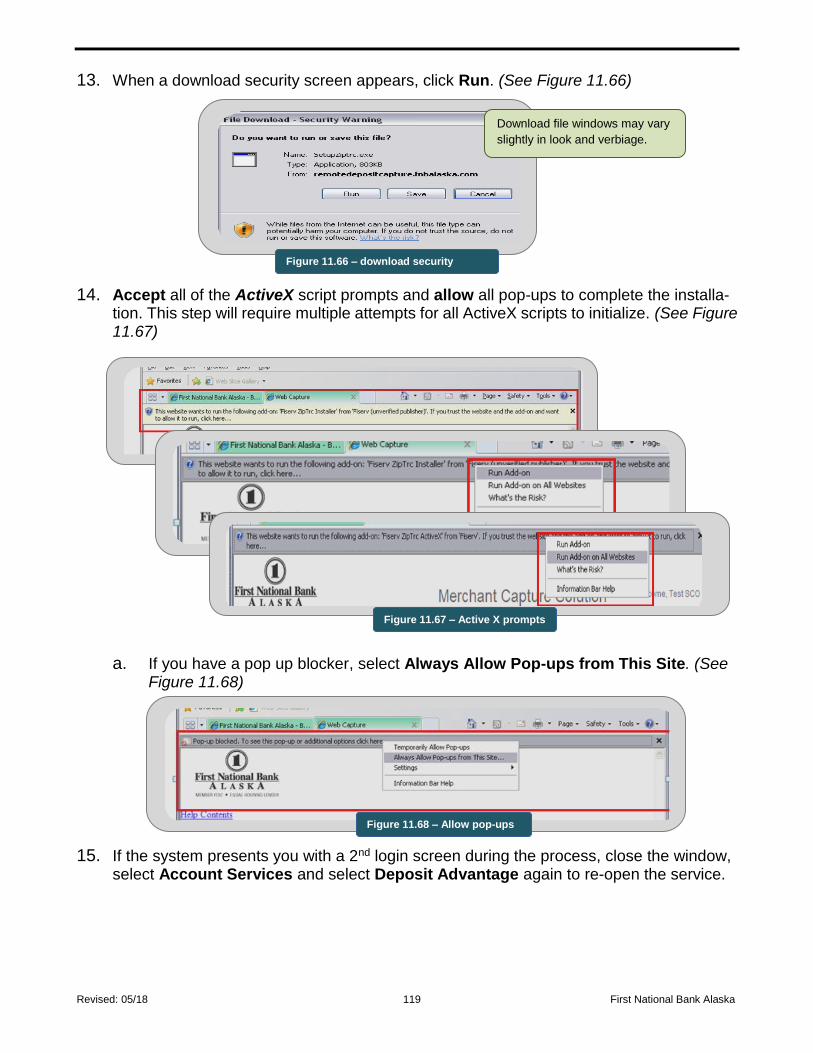
Revised: 05/18 119 First National Bank Alaska
13. When a download security screen appears, click Run. (See Figure 11.66)
14. Accept all of the ActiveX script prompts and allow all pop-ups to complete the installa-tion. This step will require multiple attempts for all ActiveX scripts to initialize. (See Figure 11.67)
a. If you have a pop up blocker, select Always Allow Pop-ups from This Site. (See Figure 11.68)
15. If the system presents you with a 2nd login screen during the process, close the window, select Account Services and select Deposit Advantage again to re-open the service.
Figure 11.67 – Active X prompts
Download file windows may vary
slightly in look and verbiage.
Figure 11.66 – download security
screen
Figure 11.68 – Allow pop-ups
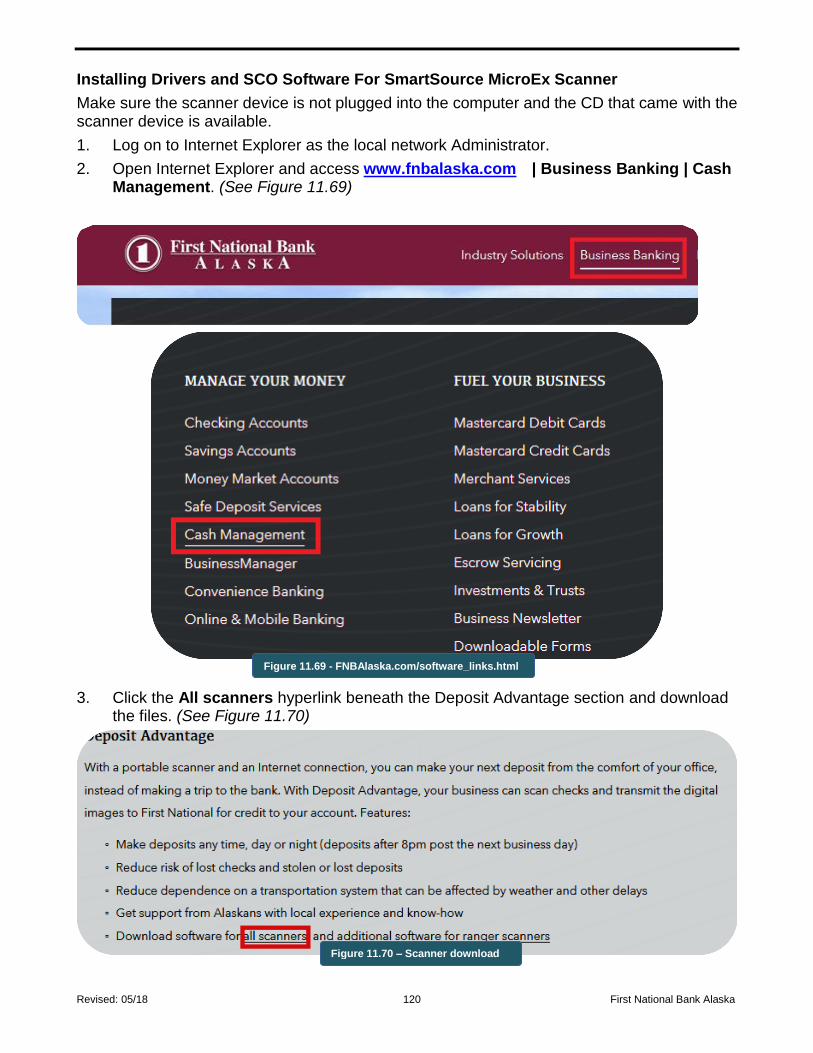
Revised: 05/18 120 First National Bank Alaska
Installing Drivers and SCO Software For SmartSource MicroEx Scanner
Make sure the scanner device is not plugged into the computer and the CD that came with the scanner device is available.
1. Log on to Internet Explorer as the local network Administrator.
2. Open Internet Explorer and access www.fnbalaska.com | Business Banking | Cash Management. (See Figure 11.69)
3. Click the All scanners hyperlink beneath the Deposit Advantage section and download the files. (See Figure 11.70)
Figure 11.70 – Scanner download
Figure 11.69 - FNBAlaska.com/software_links.html
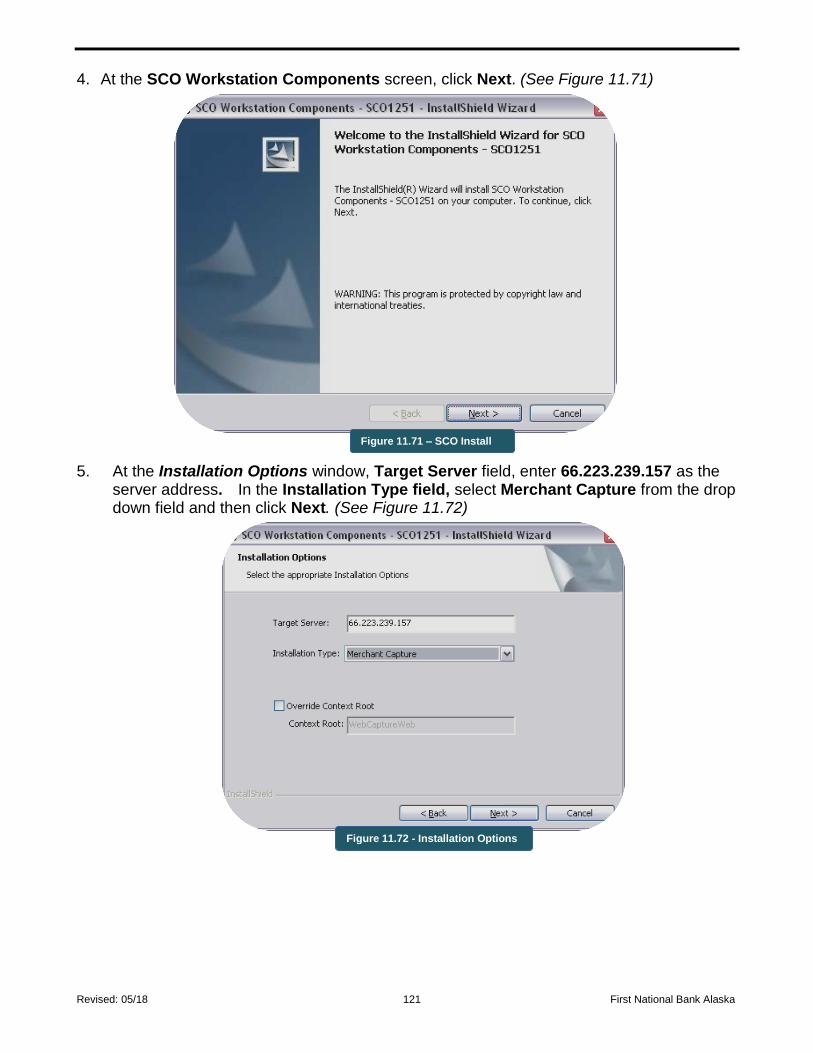
Revised: 05/18 121 First National Bank Alaska
4. At the SCO Workstation Components screen, click Next. (See Figure 11.71)
5. At the Installation Options window, Target Server field, enter 66.223.239.157 as the server address. In the Installation Type field, select Merchant Capture from the drop down field and then click Next. (See Figure 11.72)
Figure 11.71 – SCO Install
Figure 11.72 - Installation Options
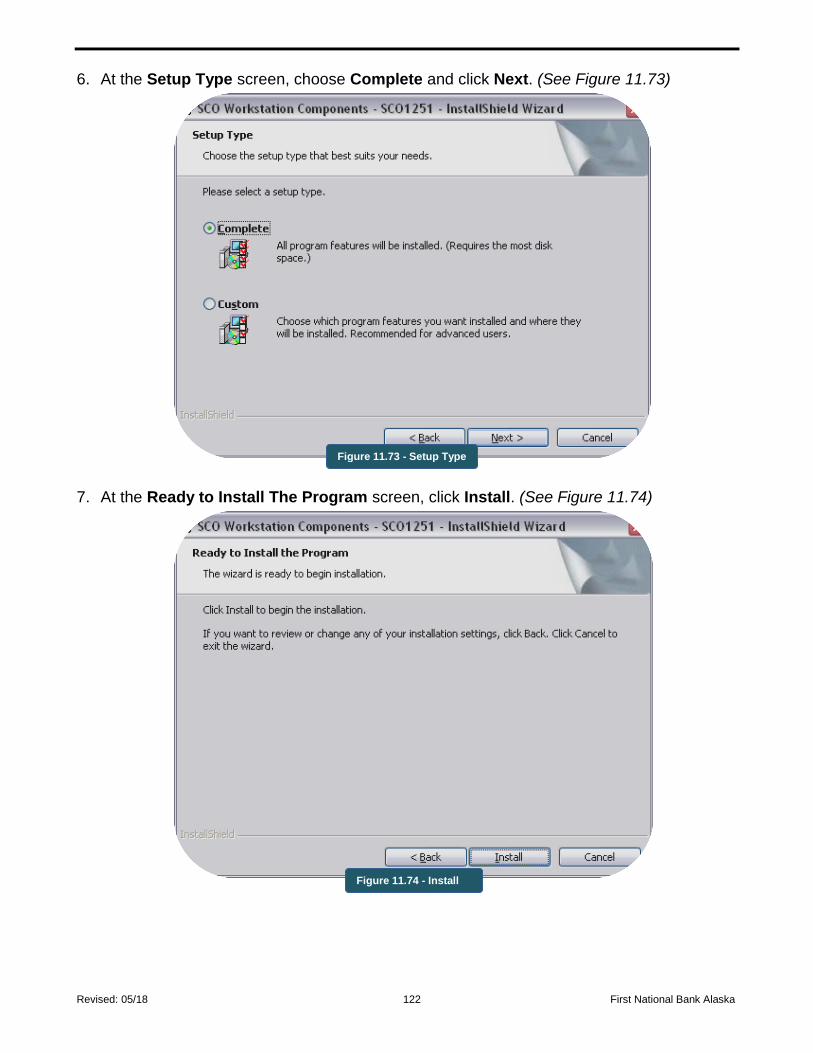
Revised: 05/18 122 First National Bank Alaska
6. At the Setup Type screen, choose Complete and click Next. (See Figure 11.73)
7. At the Ready to Install The Program screen, click Install. (See Figure 11.74)
Figure 11.73 - Setup Type
Figure 11.74 - Install
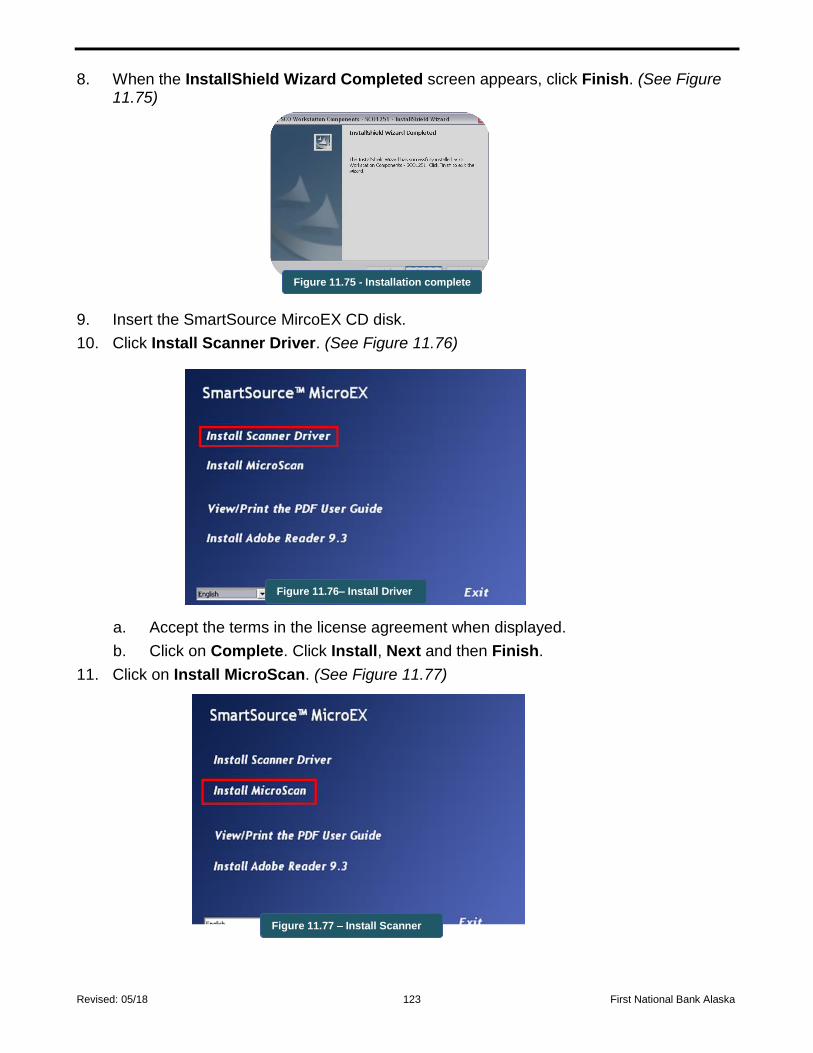
Revised: 05/18 123 First National Bank Alaska
8. When the InstallShield Wizard Completed screen appears, click Finish. (See Figure 11.75)
9. Insert the SmartSource MircoEX CD disk.
10. Click Install Scanner Driver. (See Figure 11.76)
a. Accept the terms in the license agreement when displayed.
b. Click on Complete. Click Install, Next and then Finish.
11. Click on Install MicroScan. (See Figure 11.77)
Figure 11.75 - Installation complete
Figure 11.76– Install Driver
Figure 11.77 – Install Scanner
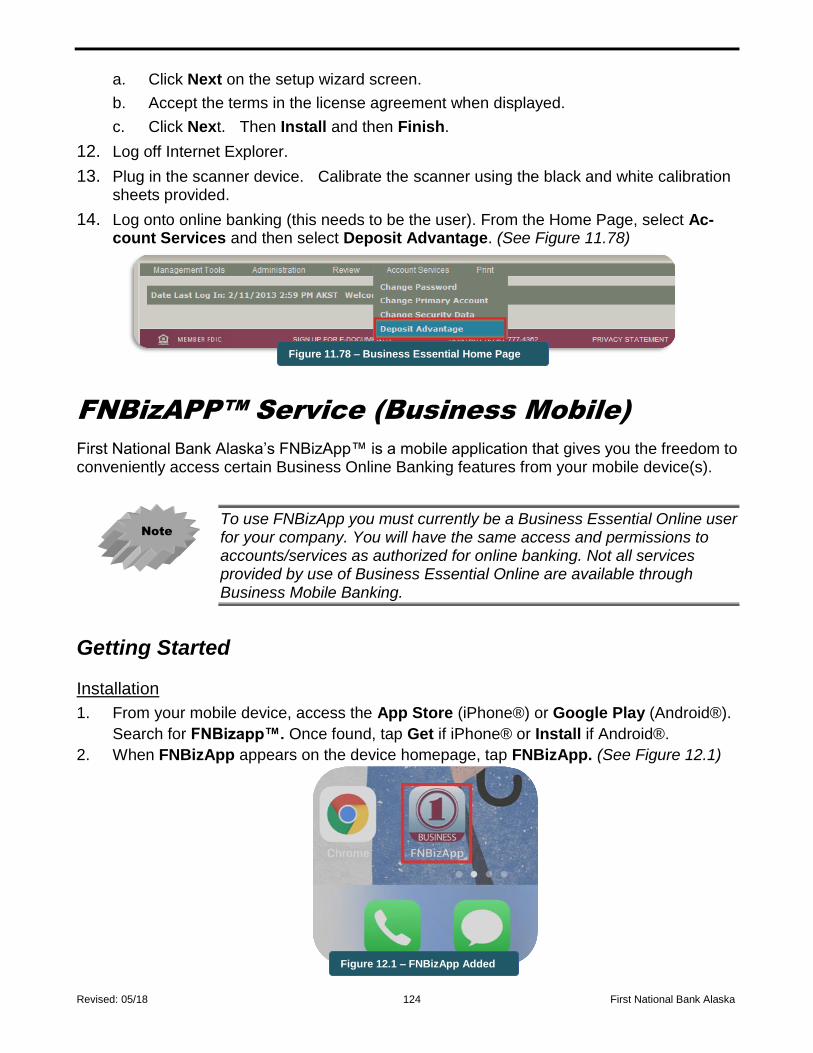
Revised: 05/18 124 First National Bank Alaska
a. Click Next on the setup wizard screen.
b. Accept the terms in the license agreement when displayed.
c. Click Next. Then Install and then Finish.
12. Log off Internet Explorer.
13. Plug in the scanner device. Calibrate the scanner using the black and white calibration sheets provided.
14. Log onto online banking (this needs to be the user). From the Home Page, select Ac-count Services and then select Deposit Advantage. (See Figure 11.78)
FNBizAPP™ Service (Business Mobile)
First National Bank Alaska’s FNBizApp™ is a mobile application that gives you the freedom to conveniently access certain Business Online Banking features from your mobile device(s).
To use FNBizApp you must currently be a Business Essential Online user for your company. You will have the same access and permissions to accounts/services as authorized for online banking. Not all services provided by use of Business Essential Online are available through Business Mobile Banking.
Getting Started
Installation
1. From your mobile device, access the App Store (iPhone®) or Google Play (Android®).
Search for FNBizapp™. Once found, tap Get if iPhone® or Install if Android®.
2. When FNBizApp appears on the device homepage, tap FNBizApp. (See Figure 12.1)
Figure 11.78 – Business Essential Home Page
Note
Figure 12.1 – FNBizApp Added
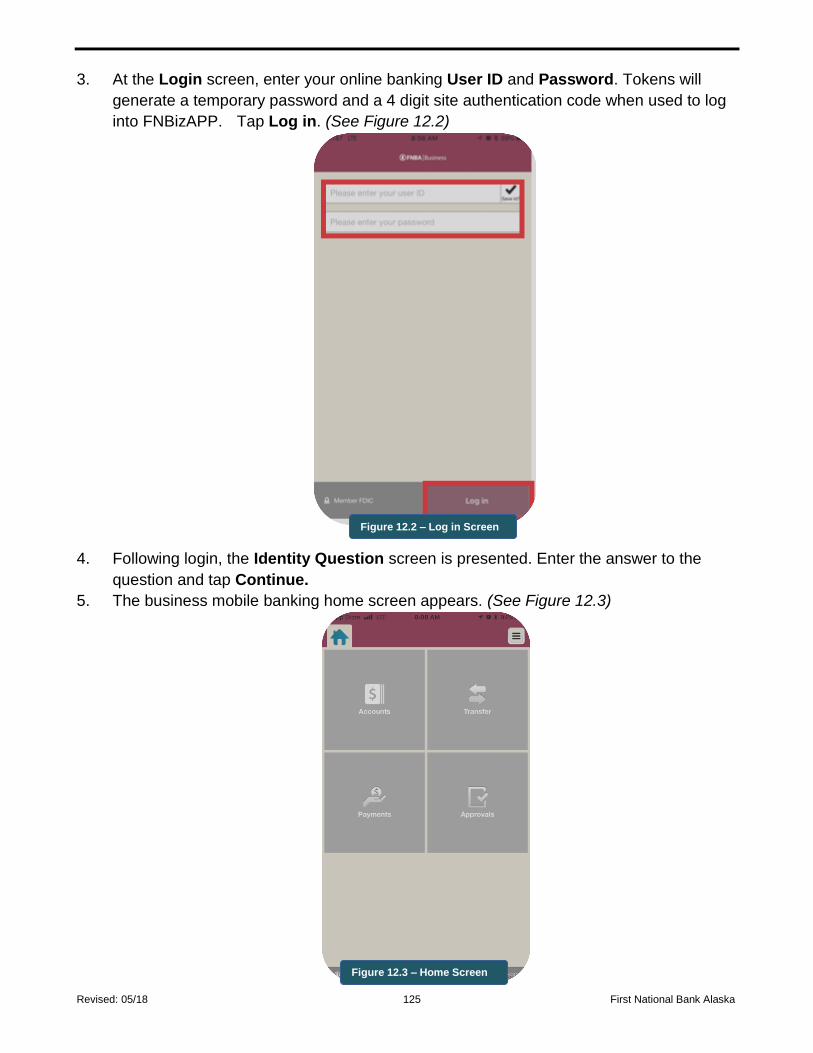
Revised: 05/18 125 First National Bank Alaska
3. At the Login screen, enter your online banking User ID and Password. Tokens will
generate a temporary password and a 4 digit site authentication code when used to log
into FNBizAPP. Tap Log in. (See Figure 12.2)
4. Following login, the Identity Question screen is presented. Enter the answer to the
question and tap Continue.
5. The business mobile banking home screen appears. (See Figure 12.3)
Figure 12.2 – Log in Screen
Figure 12.3 – Home Screen
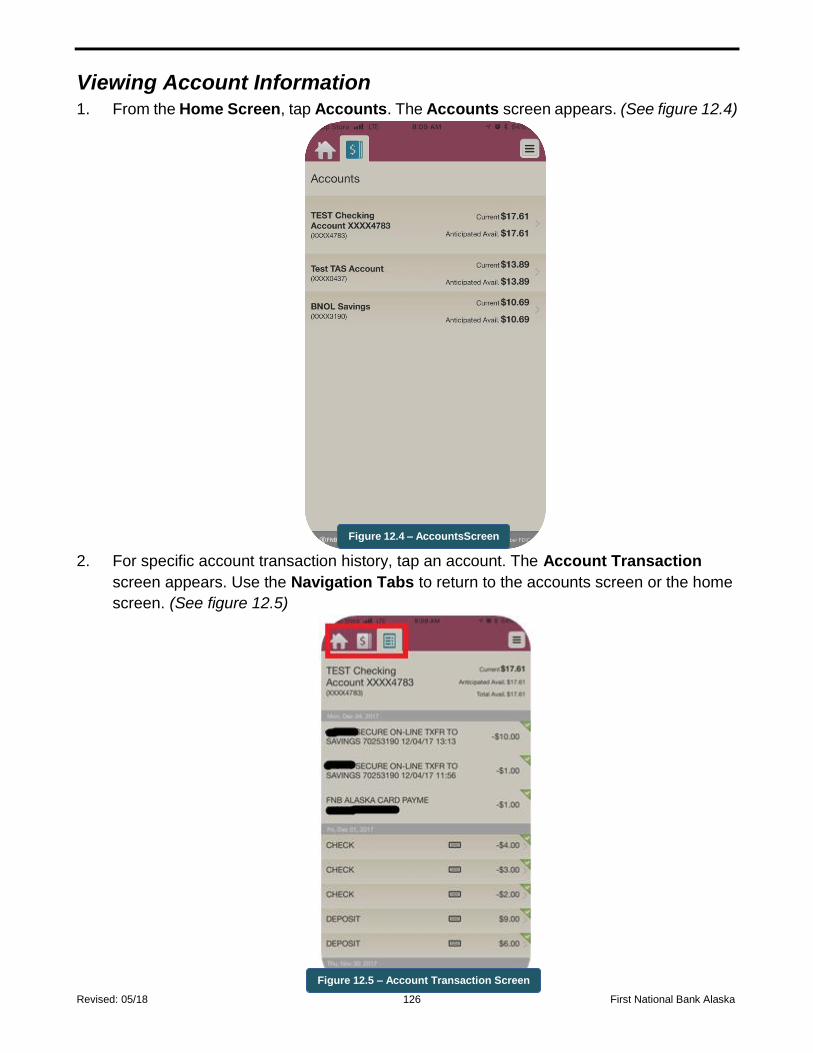
Revised: 05/18 126 First National Bank Alaska
Viewing Account Information 1. From the Home Screen, tap Accounts. The Accounts screen appears. (See figure 12.4)
2. For specific account transaction history, tap an account. The Account Transaction
screen appears. Use the Navigation Tabs to return to the accounts screen or the home
screen. (See figure 12.5)
Figure 12.4 – AccountsScreen
Figure 12.5 – Account Transaction Screen
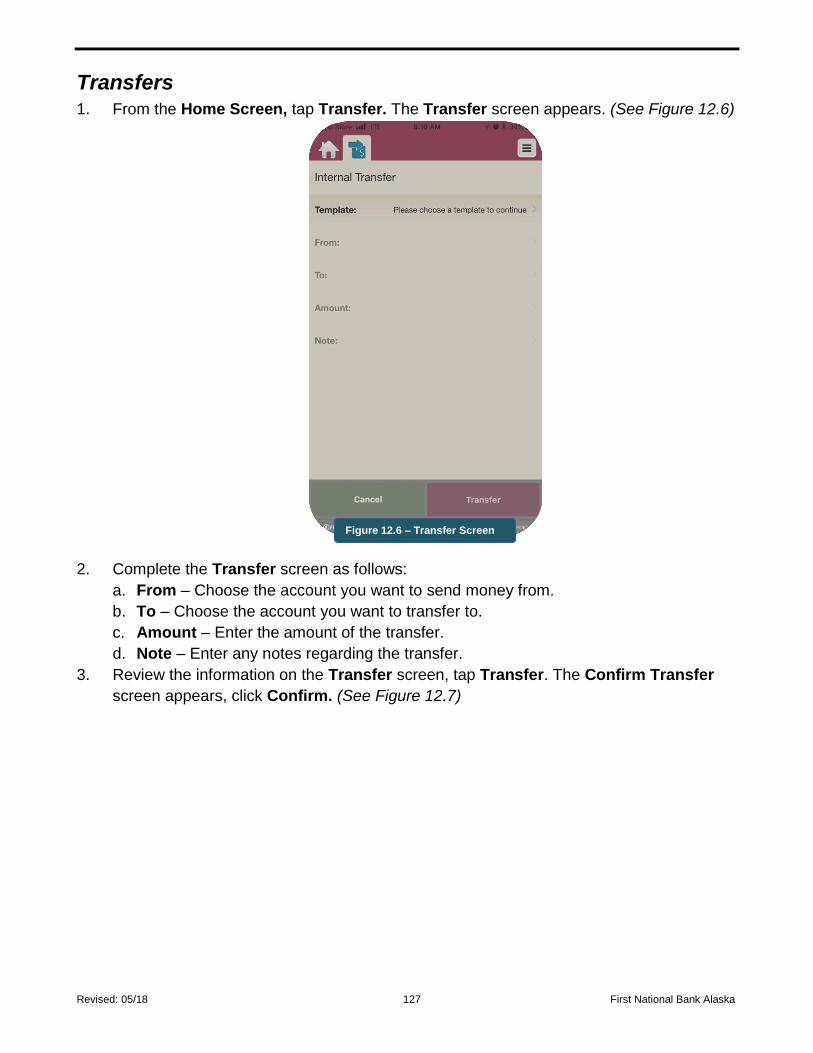
Revised: 05/18 127 First National Bank Alaska
Transfers 1. From the Home Screen, tap Transfer. The Transfer screen appears. (See Figure 12.6)
2. Complete the Transfer screen as follows:
a. From – Choose the account you want to send money from.
b. To – Choose the account you want to transfer to.
c. Amount – Enter the amount of the transfer.
d. Note – Enter any notes regarding the transfer.
3. Review the information on the Transfer screen, tap Transfer. The Confirm Transfer
screen appears, click Confirm. (See Figure 12.7)
Figure 12.6 – Transfer Screen
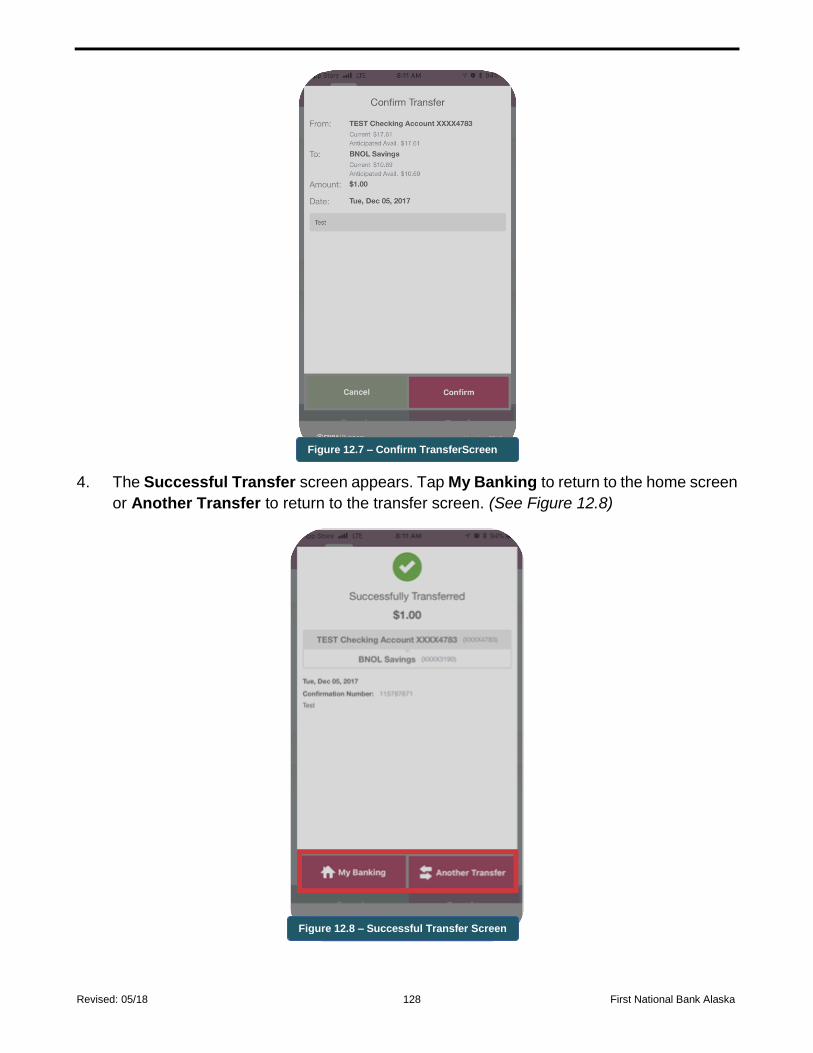
Revised: 05/18 128 First National Bank Alaska
4. The Successful Transfer screen appears. Tap My Banking to return to the home screen
or Another Transfer to return to the transfer screen. (See Figure 12.8)
Figure 12.7 – Confirm TransferScreen
Figure 12.8 – Successful Transfer Screen
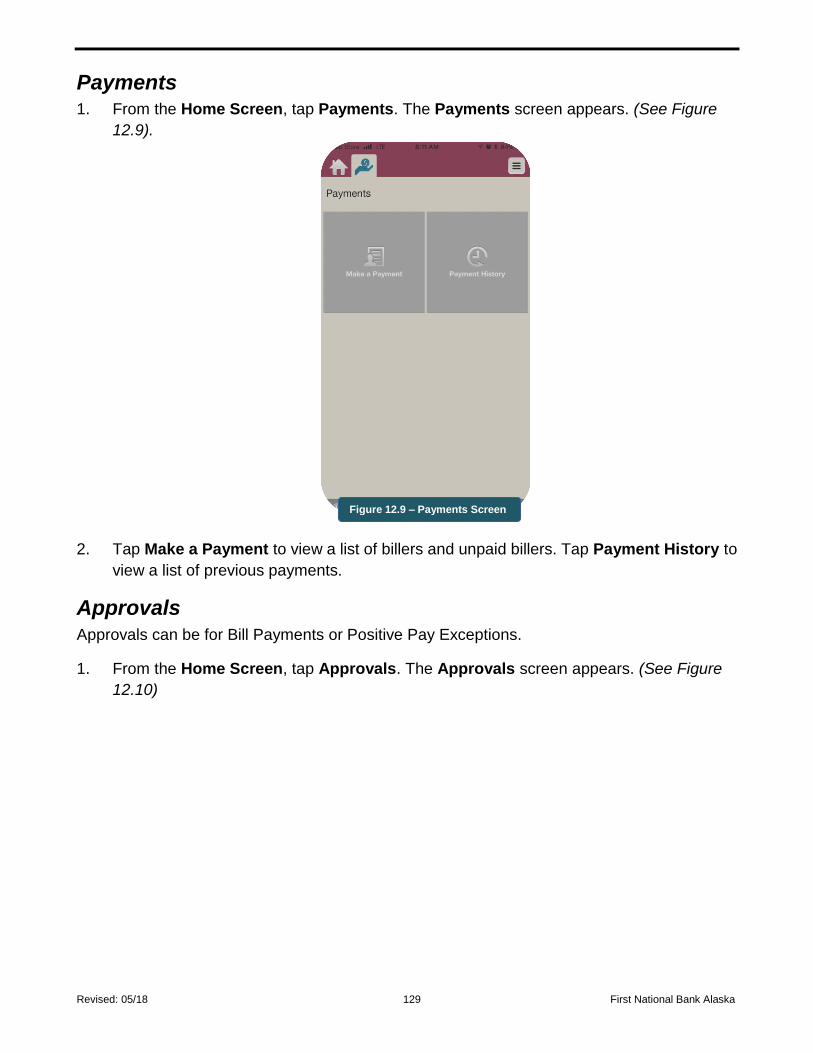
Revised: 05/18 129 First National Bank Alaska
Payments 1. From the Home Screen, tap Payments. The Payments screen appears. (See Figure
12.9).
2. Tap Make a Payment to view a list of billers and unpaid billers. Tap Payment History to
view a list of previous payments.
Approvals
Approvals can be for Bill Payments or Positive Pay Exceptions.
1. From the Home Screen, tap Approvals. The Approvals screen appears. (See Figure
12.10)
Figure 12.9 – Payments Screen
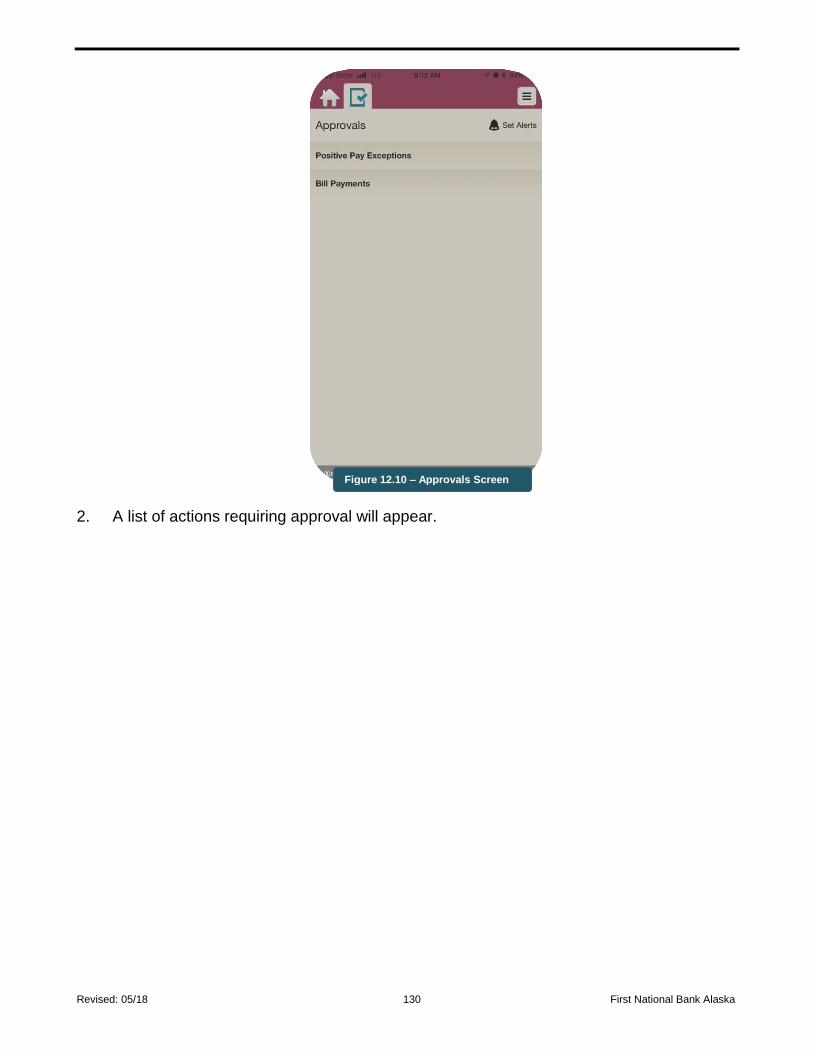
Revised: 05/18 130 First National Bank Alaska
2. A list of actions requiring approval will appear.
Figure 12.10 – Approvals Screen
Revised: 12/17 Appendix 131 First National Bank Alaska
Appendix I
Best Practices The following is a list of Best Practices recommended by First National Bank Alaska.
Use of Best Practices can help provide businesses and individuals with additional internal security. The suggestions point out areas where user control and program settings can be leveraged to attain maximized protection.
Security All users' access levels should be reviewed at least annually to ensure that terminated
employees have been removed from the system and that current users’ access levels remain appropriate.
General Password Standards 1. All users should create a secure password. A secure password:
a. Consists of at least seven characters. Longer passwords are harder to guess.
b. Consists of characters from at least three of the four character types:
Upper case: [A B C D E F]
Lower case: [a b c d e f]
Numbers: [1 2 3 4 5 6]
Special characters, punctuation: [! @ # % & *]
c. Should not contain any of the following:
Dictionary words unless they consist of a mixture of characters [pa55w0Rd]
Names, places, proper nouns, phone numbers
Simple pattern of letters on a keyboard
Avoids using any of the above reversed or linked together in a chain, or numbers added to the beginning or end
d. Is not easily guessed.
e. Is not related to the user’s job or personal life.
Revised: 12/17 Appendix 132 First National Bank Alaska
2. A password should never be written down. If remembering your password is an issue, place it in a sealed envelope and secure that in a protected container such as a safe. There are also computer programs that can be used to store passwords in one central area.
3. Passwords should never be shared with other employees.
4. A different password should be used for each separate application or process to which the employee has access.
5. Passwords should be changed every 60 days.
User Setup Best Practices: 1. Password change interval days for each user should be set to 60 days.
2. All users’ privilege settings (e.g., access levels) to perform such tasks as viewing files, logs and reports, should be limited to only those functions needed to perform assigned duties.
3. All users’ transfer and transaction permissions should be set so that individual users are granted a level of access consistent with their job duties.
4. All users’ dollar limits for wire transfers and ACH transactions should be set so that individual users are granted a level consistent with their job duties and the overall limit of the entire institution.
5. Any monetary transactions such as wire transfers and ACH transactions should re-quire the approval of a second user within your organization before being transmitted to the bank for further processing.
6. Any creations or modifications of a user account to do higher risk transactions for ACH and wires should require dual custody authentication.
Miscellaneous Operations: 1. Business Online Banking System Administrators must fill in the contact data fields in order
to enable FNBA phone support.
2. Assign at least two System Administrators in order to have a backup person in case the other is not available. Ensure staff is adequate to continue operations if the primary employees are not available.
3. Do not use your browser’s back button to navigate while logged into online banking. You must navigate around the application using the drop down menus.
4. Users should sign out of their online banking session rather than just closing their In-ternet browser. This will ensure that the user does not remain logged in for several minutes after done using the system. When in Advantage, users must use the Log Off tab and complete the Log Off button or the user’s account will be automatically disabled.
5. Users should not leave workstations unattended while logged into an application. If you must leave, ensure your workstation is locked or that a password activated screensaver is enabled.
Revised: 12/17 Appendix 133 First National Bank Alaska
6. When setting up message retention times per user (default 90 days) take into account how long the users will need to access the following message types:
a. Remittance information
b. Advices
c. Electronic Messages
7. A daily backup process should be developed and implemented at your site for key reports and information that is needed for longer time periods than are archived at FNBA. Backups should be stored off site in case of a disaster that causes you to move to another worksite or bring in new equipment.
8. Audit logs for high-risk transactions (wire transfers & ACH transactions) should be re-viewed periodically with adequate segregation of duties to identify unauthorized user ac-tions such as additional system user account creations or transactions.