Embed Size (px)
Citation preview
BuySpeed e-Procurement Solutions
Quick Reference Guide
June 8, 2016 1
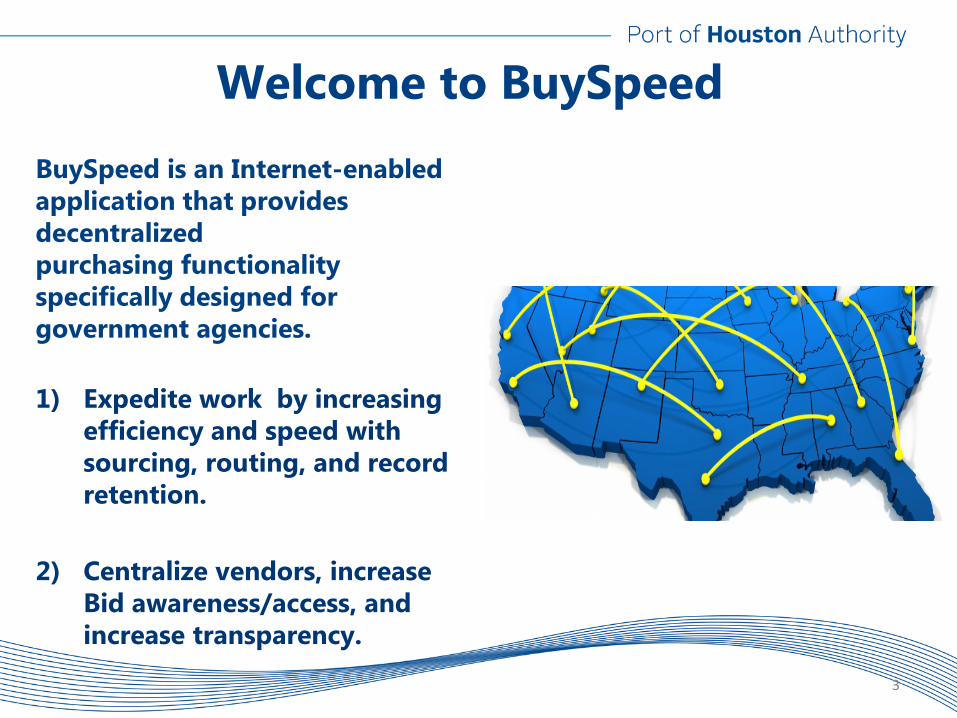
Welcome to BuySpeed
BuySpeed is an Internet-enabled application that provides decentralized purchasing functionality specifically designed for government agencies. 1) Expedite work by increasing
efficiency and speed with sourcing, routing, and record retention.
2) Centralize vendors, increase
Bid awareness/access, and increase transparency.
3
Benefits of BuySpeed BuySpeed offers numerous benefits
to sellers including:
• Electronic Notifications both Internal and External.
• Enhanced Vendor profiles.
• Seller Administration role at the vendor level offering controls.
• Electronic purchase order submission sent to the supplier.
• Time stamps of the process on approving time and date.
• Ad hoc reporting capabilities.
4
Benefits of BuySpeed BuySpeed benefits (continued):
• Advance searches on bids,commodity codes, items, purchaseorders, requisitions.
• Manual override approvalcapability.
• Proxy capability for approvers.
• BuySpeed electronic manual can beviewed on the system.
• NAICS to NIGP crossover walk forsuppliers for conversion assistance.
• News alerts for Vendors and PHAstaff.
5
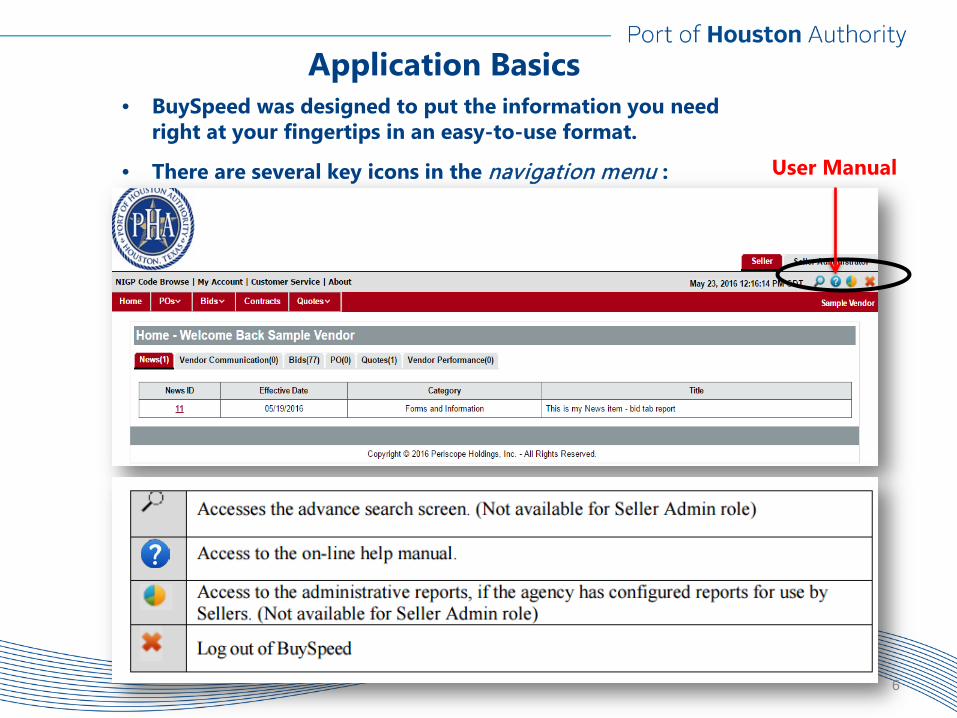
• BuySpeed was designed to put the information you need right at your fingertips in an easy-to-use format.
• There are several key icons in the navigation menu :
Application Basics
6
User Manual
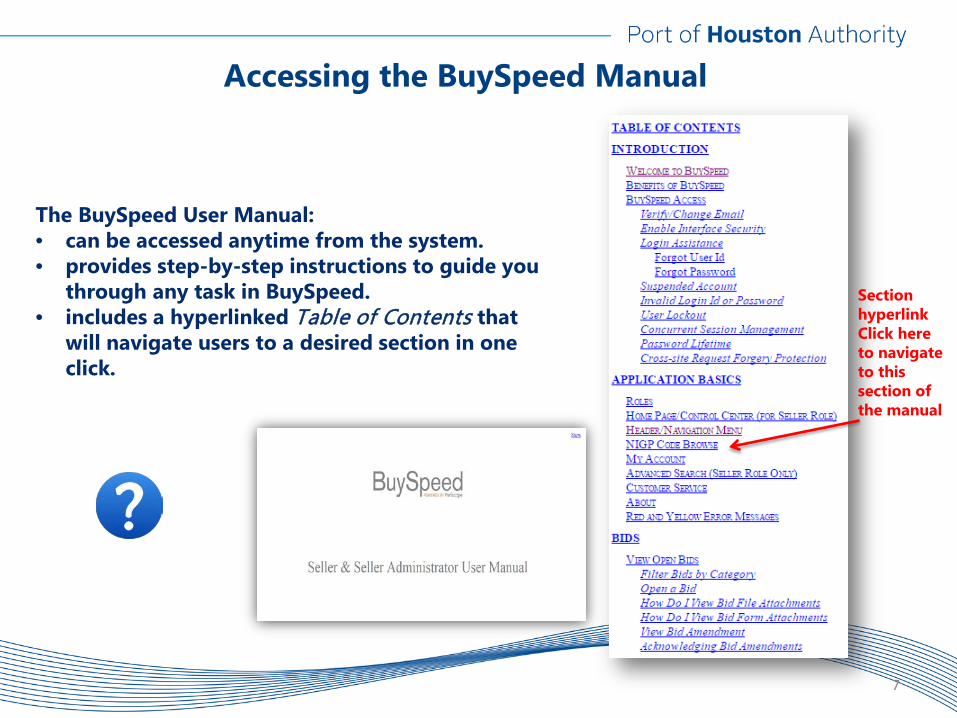
Accessing the BuySpeed Manual
7
The BuySpeed User Manual: • can be accessed anytime from the system. • provides step-by-step instructions to guide you
through any task in BuySpeed. • includes a hyperlinked Table of Contents that
will navigate users to a desired section in one click.
Section hyperlink Click here to navigate to this section of the manual
Application Basics
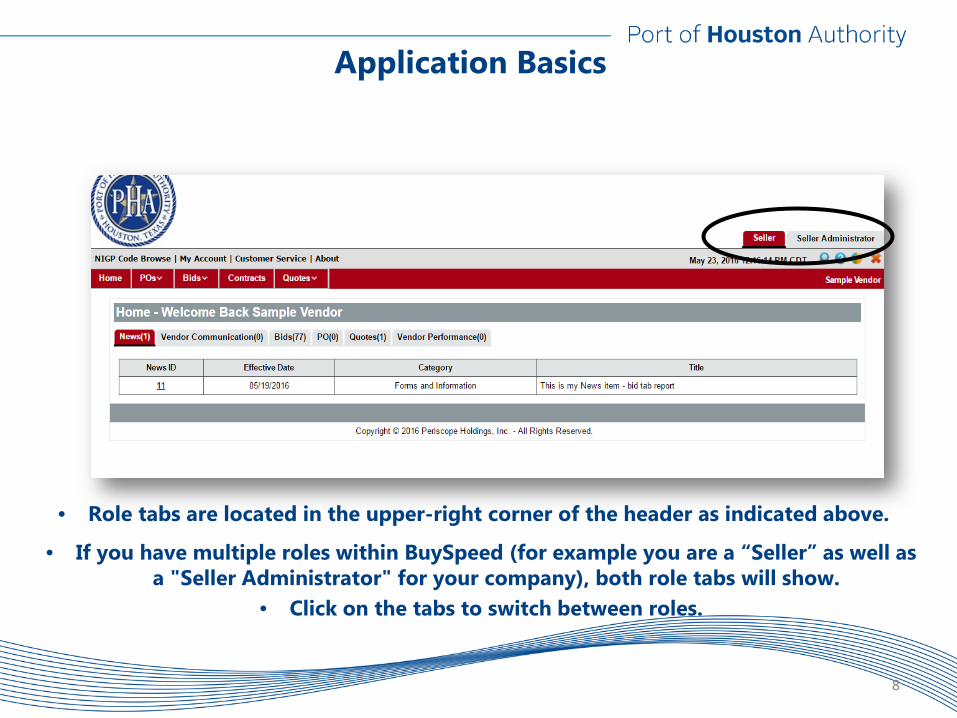
• If you have multiple roles within BuySpeed (for example you are a “Seller” as well as a "Seller Administrator" for your company), both role tabs will show.
• Click on the tabs to switch between roles.
8
• Role tabs are located in the upper-right corner of the header as indicated above.
Application Basics “Seller Administrator” and “Seller”
Roles Defined
There are two seller (vendor) roles in BuySpeed.
9

Role #1 The "Seller Administrator”
Has an organization maintenance focus. The "Seller Administrator” has the ability to:
• Upload administrative documents such as the W-9
• Add/deactivate users • Change passwords • Assign roles to company users
10
Role #2 The “Seller”
Has a purchasing information focus. The “Seller” has the ability to:
• View Formal Solicitations and Amendments • View and electronically submit or modify
Informal Quotes • Attach documents to electronically submitted
Informal quotes • Accept Purchase Order and Contract
Documents
11
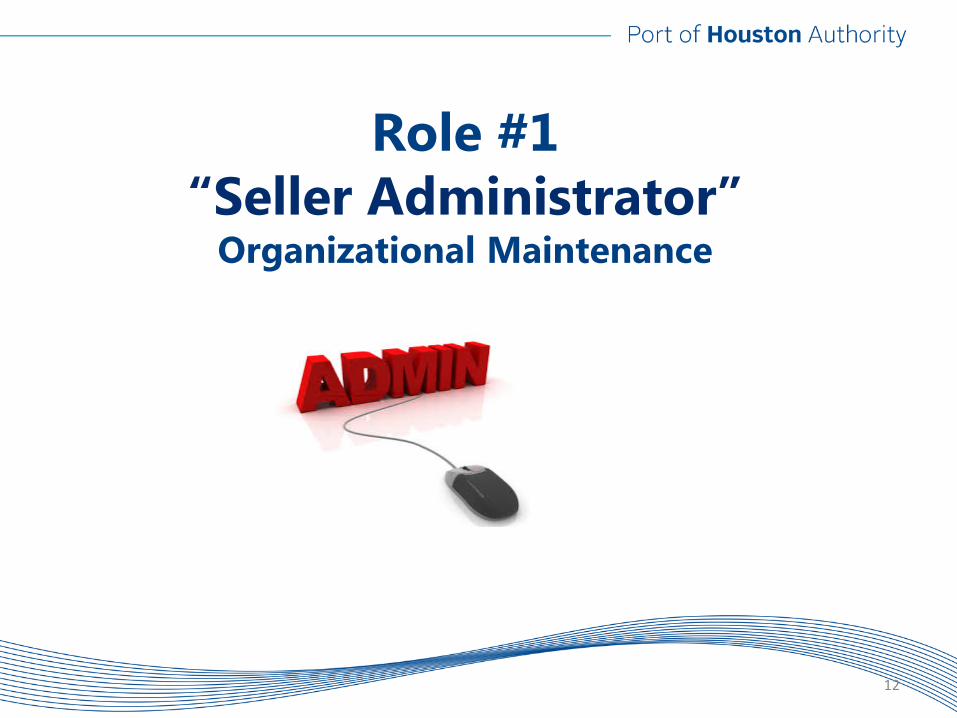
Role #1 “Seller Administrator”
Organizational Maintenance
12
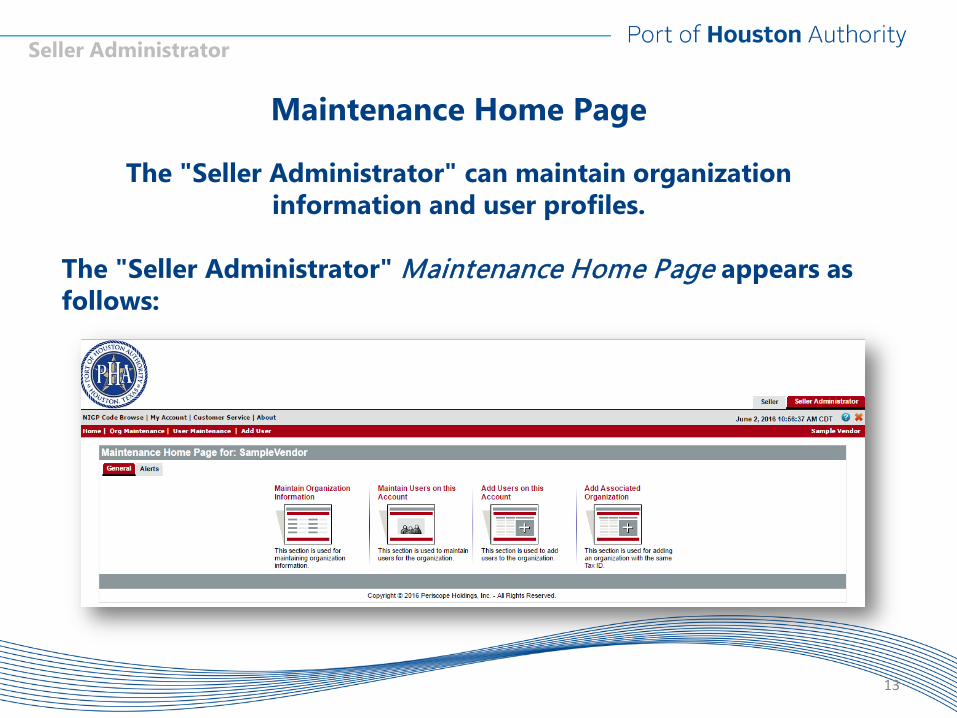
Maintenance Home Page
The "Seller Administrator" can maintain organization information and user profiles.
The "Seller Administrator" Maintenance Home Page appears as follows:
13
Seller Administrator
14
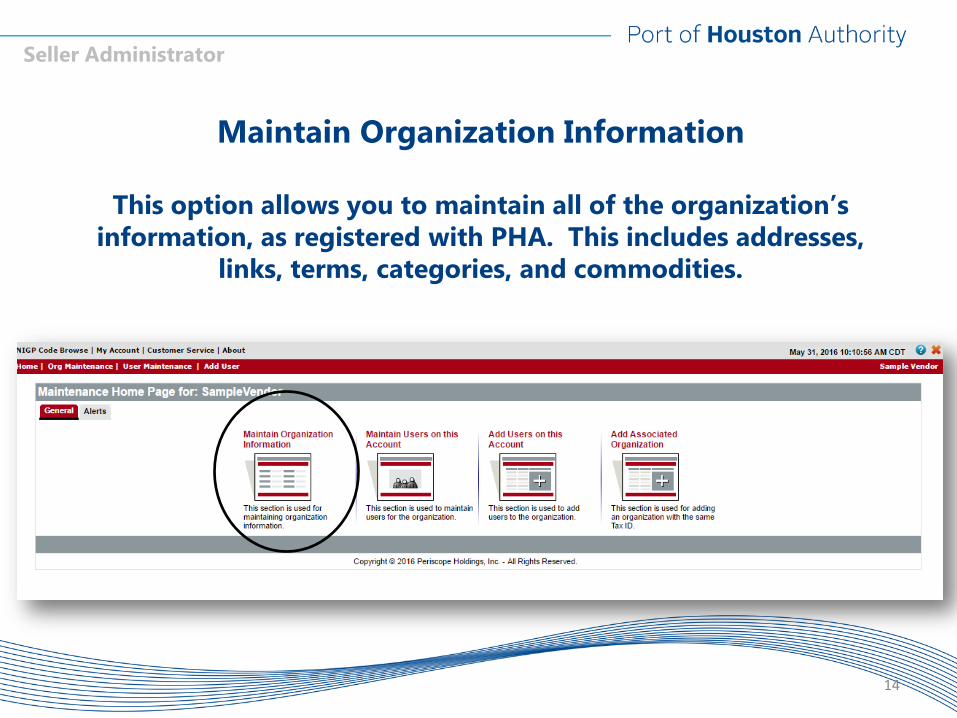
Maintain Organization Information
This option allows you to maintain all of the organization’s information, as registered with PHA. This includes addresses,
links, terms, categories, and commodities.
Seller Administrator
Seller Administrator
15
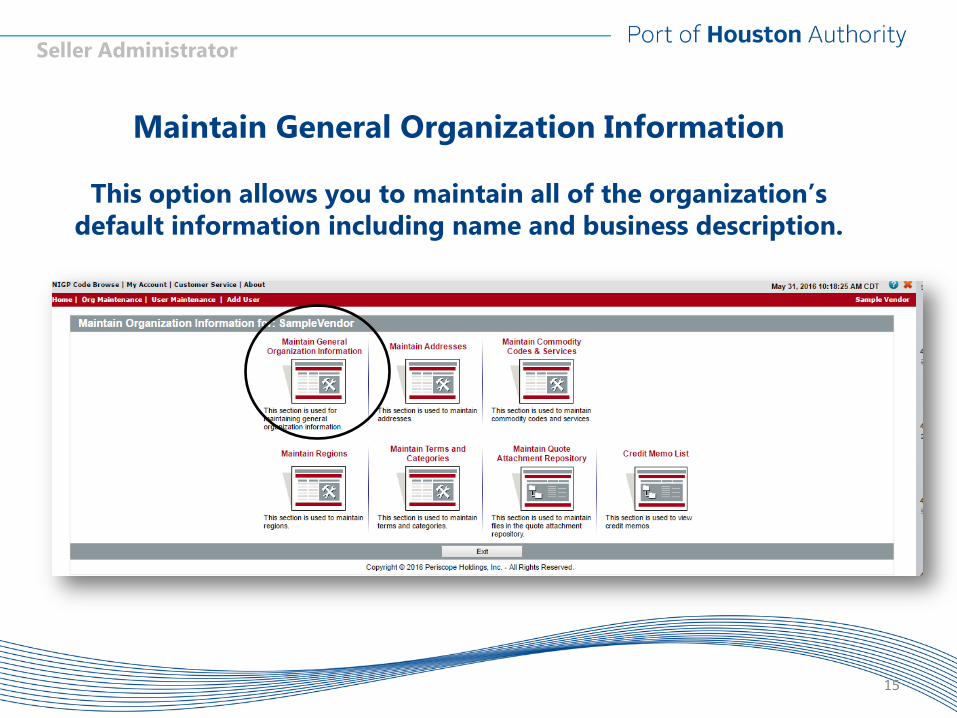
Maintain General Organization Information
This option allows you to maintain all of the organization’s default information including name and business description.
Seller Administrator
16
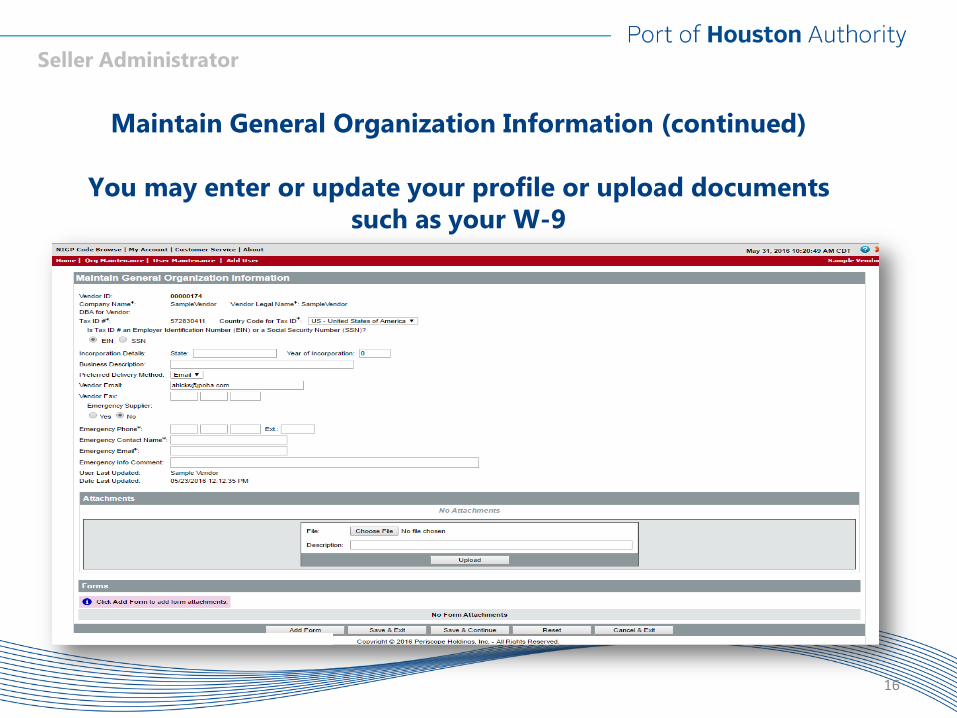
Maintain General Organization Information (continued)
You may enter or update your profile or upload documents such as your W-9
Seller Administrator
17
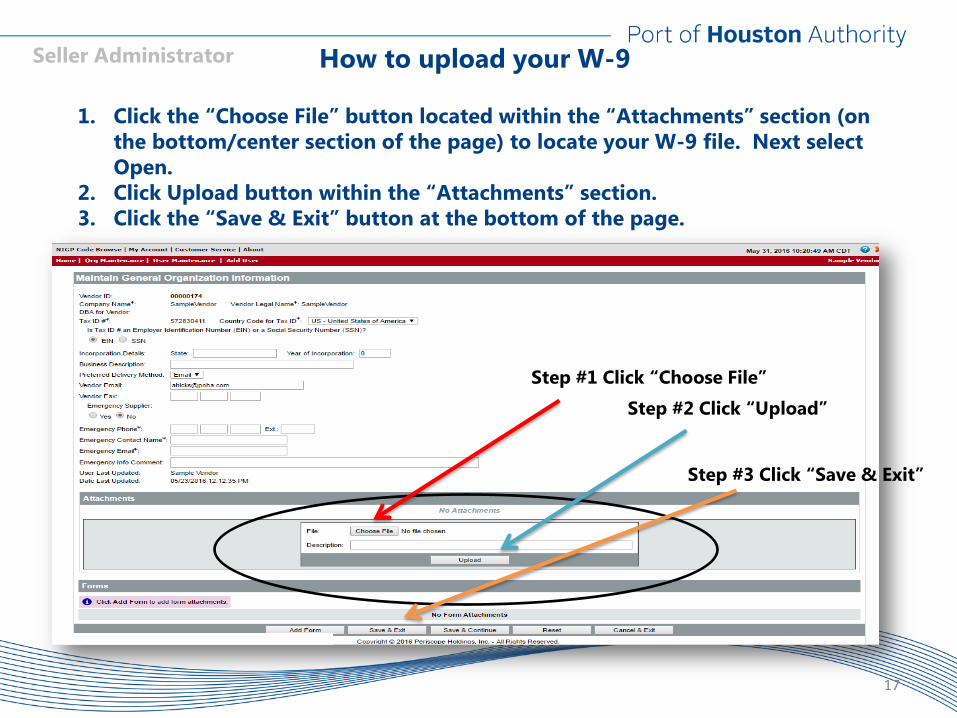
How to upload your W-9
1. Click the “Choose File” button located within the “Attachments” section (on the bottom/center section of the page) to locate your W-9 file. Next select Open.
2. Click Upload button within the “Attachments” section. 3. Click the “Save & Exit” button at the bottom of the page.
Step #1 Click “Choose File”
Step #2 Click “Upload”
Step #3 Click “Save & Exit”
Seller Administrator
18
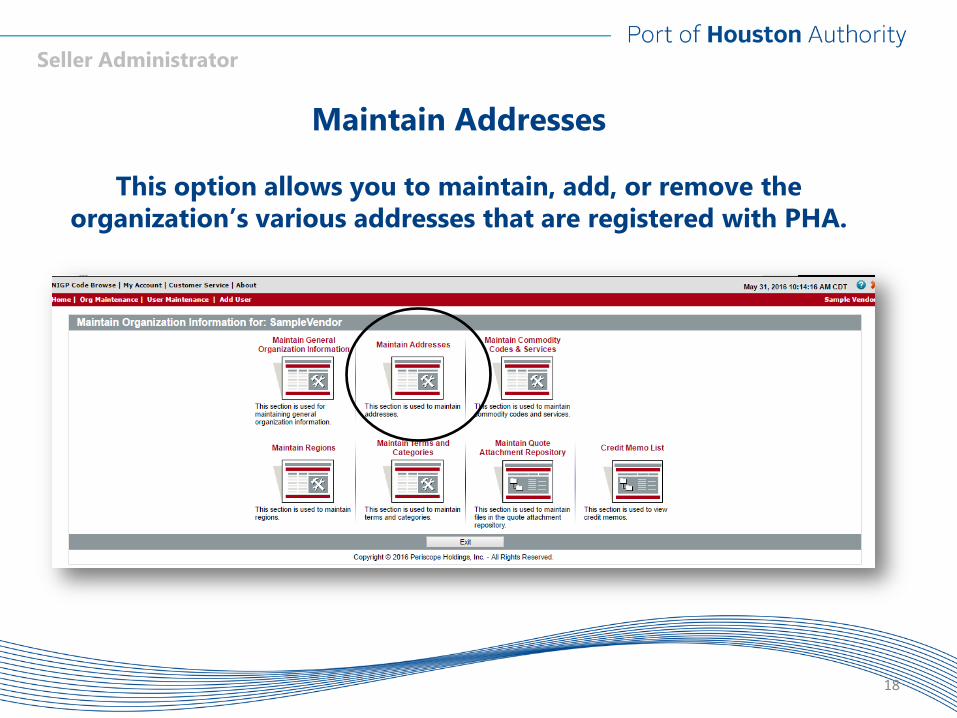
Maintain Addresses
This option allows you to maintain, add, or remove the organization’s various addresses that are registered with PHA.
Seller Administrator
19
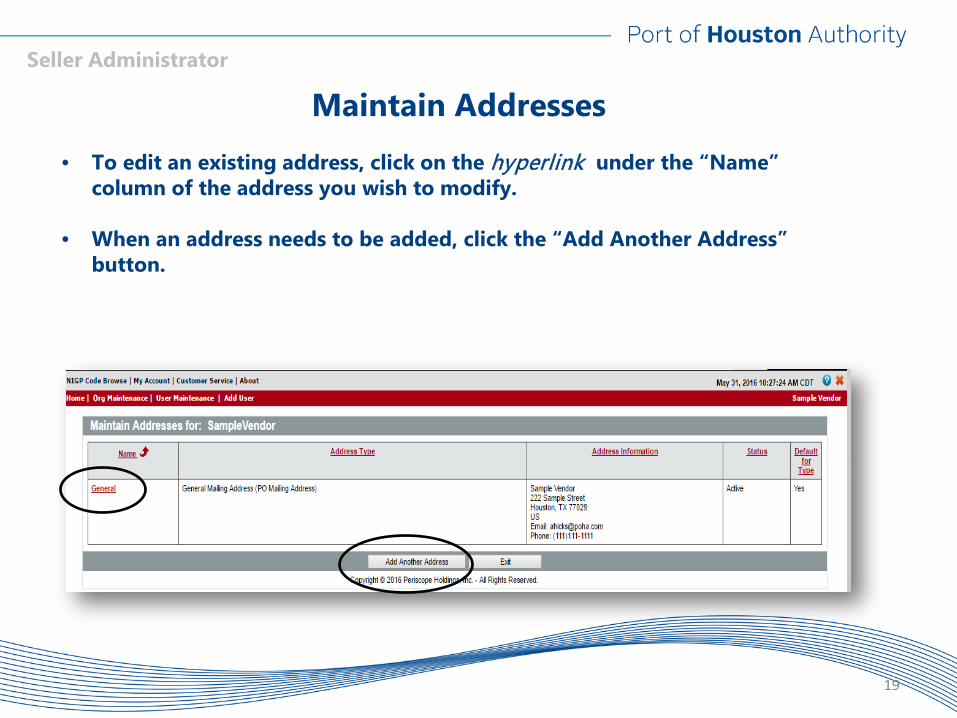
Maintain Addresses • To edit an existing address, click on the hyperlink under the “Name”
column of the address you wish to modify.
• When an address needs to be added, click the “Add Another Address” button.
Seller Administrator
20
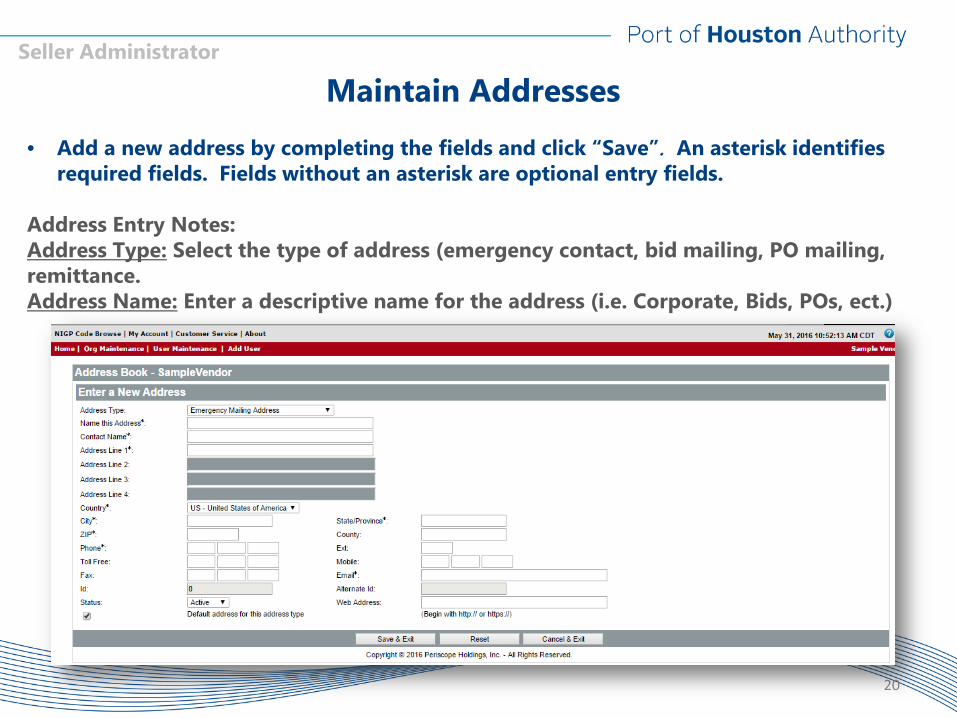
Maintain Addresses
• Add a new address by completing the fields and click “Save”. An asterisk identifies required fields. Fields without an asterisk are optional entry fields.
Address Entry Notes: Address Type: Select the type of address (emergency contact, bid mailing, PO mailing, remittance. Address Name: Enter a descriptive name for the address (i.e. Corporate, Bids, POs, ect.)
Seller Administrator
21
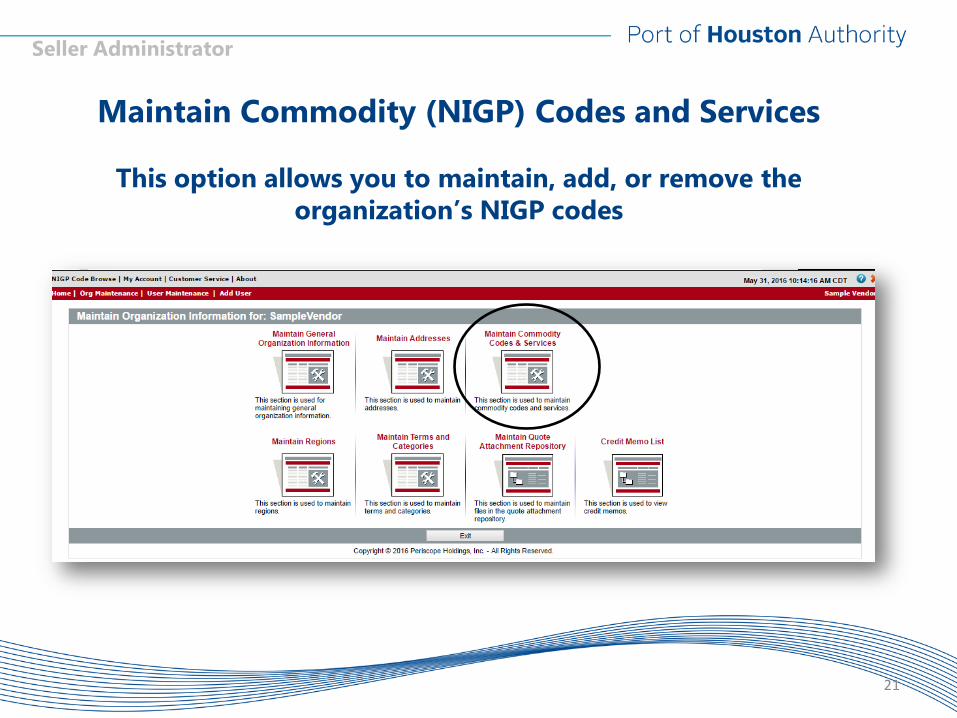
Maintain Commodity (NIGP) Codes and Services
This option allows you to maintain, add, or remove the organization’s NIGP codes
22
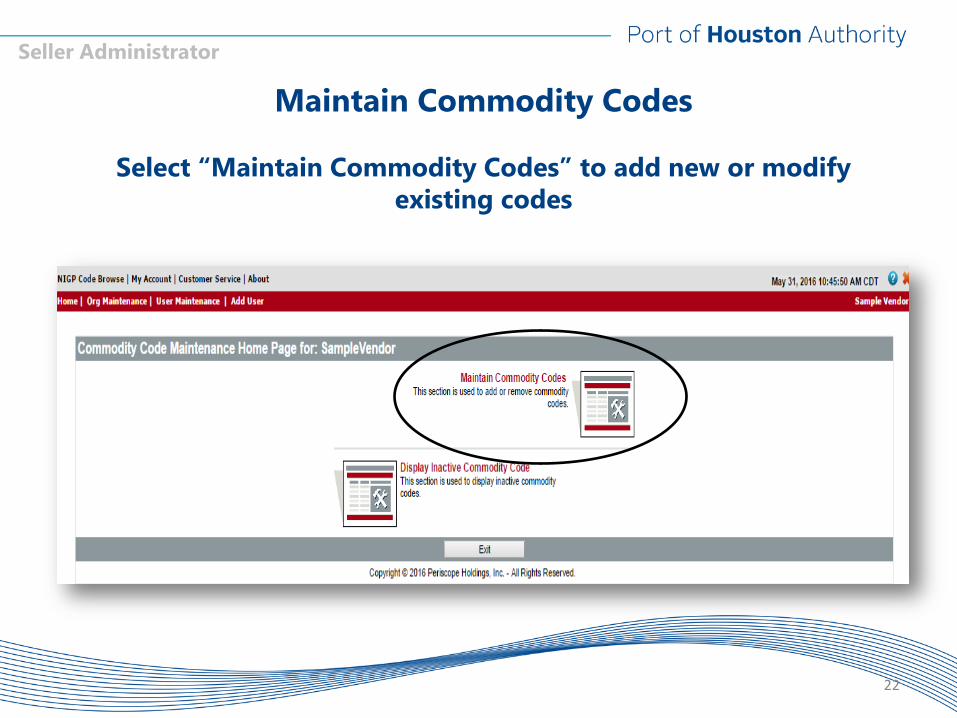
Maintain Commodity Codes
Select “Maintain Commodity Codes” to add new or modify existing codes
Seller Administrator
23
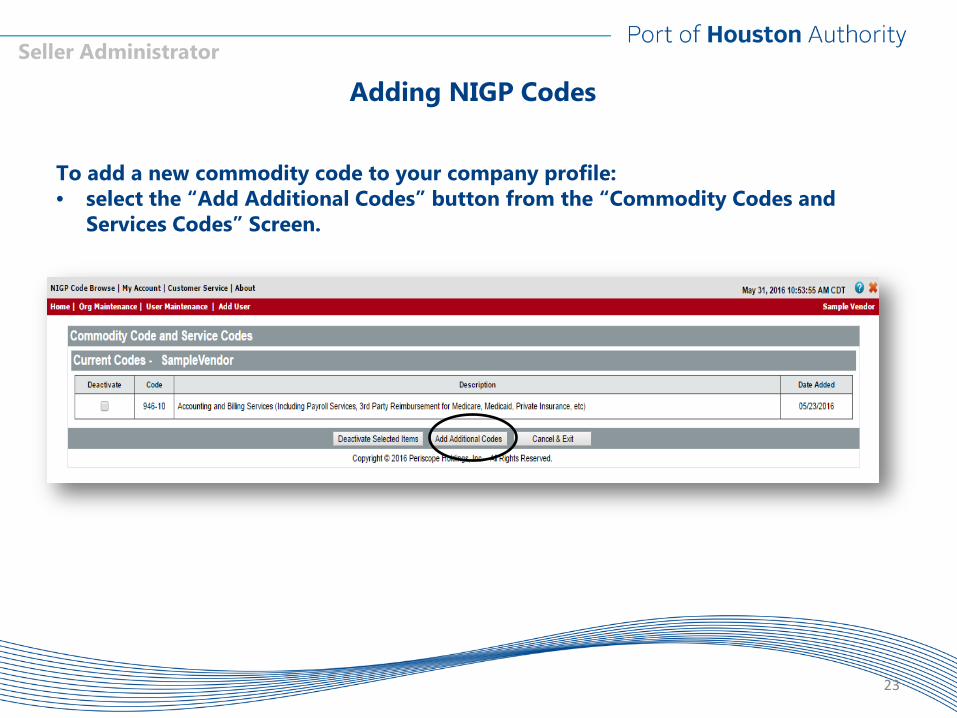
Adding NIGP Codes
To add a new commodity code to your company profile: • select the “Add Additional Codes” button from the “Commodity Codes and
Services Codes” Screen.
Seller Administrator

24
Adding NIGP Codes Option #1
The “NIGP Keyword” search field is a shortcut to finding codes
that can be added to your company profile.
1. Type in a keyword and click
“Search”.
2. A list of NIGP Codes will appear under the “NIGP Code Browse” section of the page. To select a code (or multiple codes) simply check the box to the left of the code.
3. When you are finished, click the “Save and Add More” or “Complete Registration” button located at the bottom of the page.
Seller Administrator

25
Adding NIGP Codes by Using the NIGP Code Browser Feature
Option #2
Using the NIGP Code Browser feature to locate commodity codes
• The NIGP Code Browser is a drill-down
feature that allows you to select from broad categories and drill-down to more
detailed categories.
• At the lowest level you will be presented with what NIGP refers to as class – class
item combinations.
Seller Administrator
26
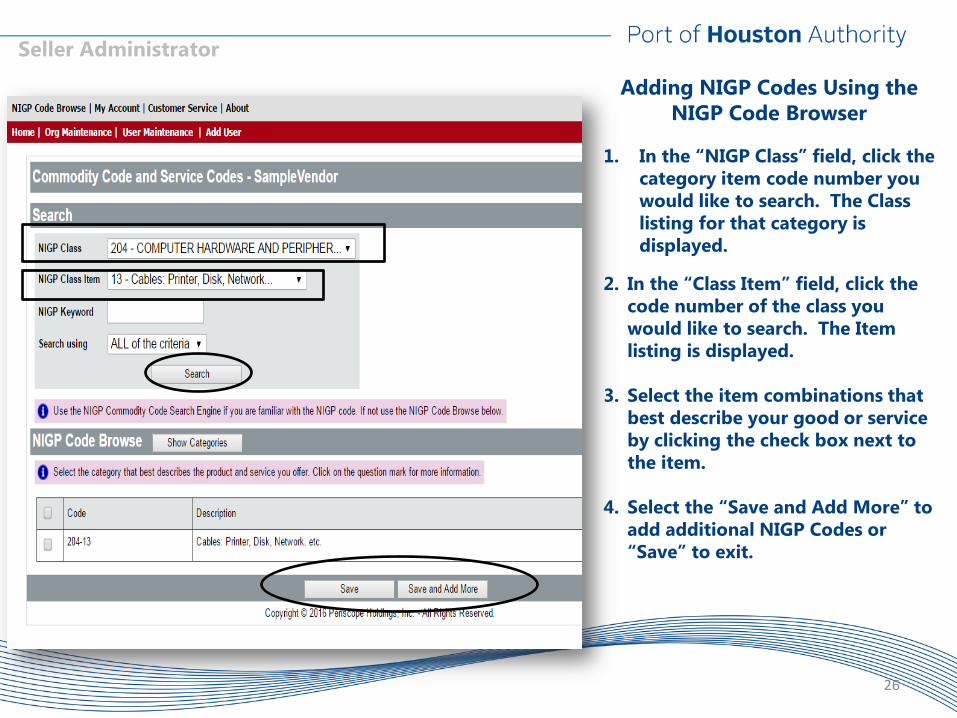
Adding NIGP Codes Using the NIGP Code Browser
1. In the “NIGP Class” field, click the
category item code number you would like to search. The Class listing for that category is displayed.
2. In the “Class Item” field, click the code number of the class you would like to search. The Item listing is displayed.
3. Select the item combinations that best describe your good or service by clicking the check box next to the item.
4. Select the “Save and Add More” to add additional NIGP Codes or “Save” to exit.
Seller Administrator
Seller Administrator
27
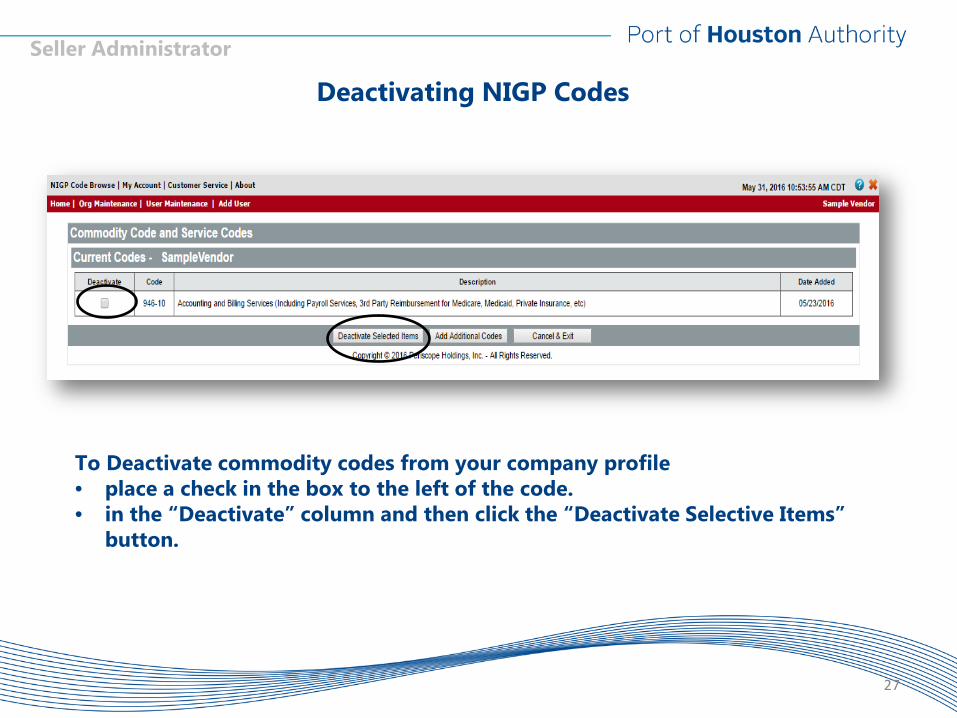
Deactivating NIGP Codes
To Deactivate commodity codes from your company profile • place a check in the box to the left of the code. • in the “Deactivate” column and then click the “Deactivate Selective Items”
button.
Seller Administrator
28
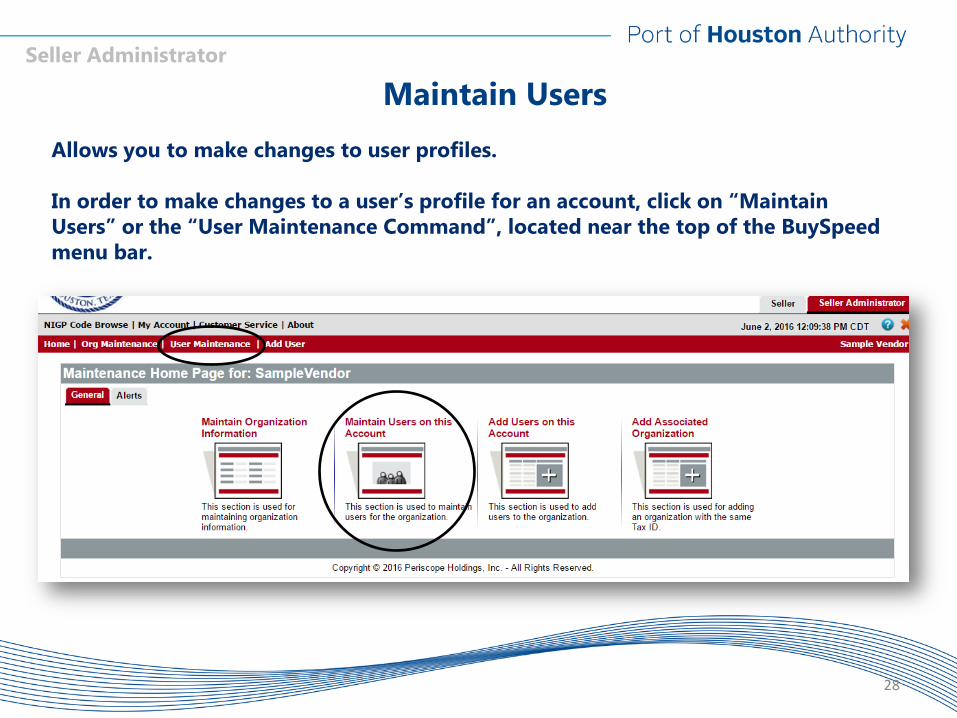
Maintain Users
Allows you to make changes to user profiles. In order to make changes to a user’s profile for an account, click on “Maintain Users” or the “User Maintenance Command”, located near the top of the BuySpeed menu bar.
Seller Administrator
29
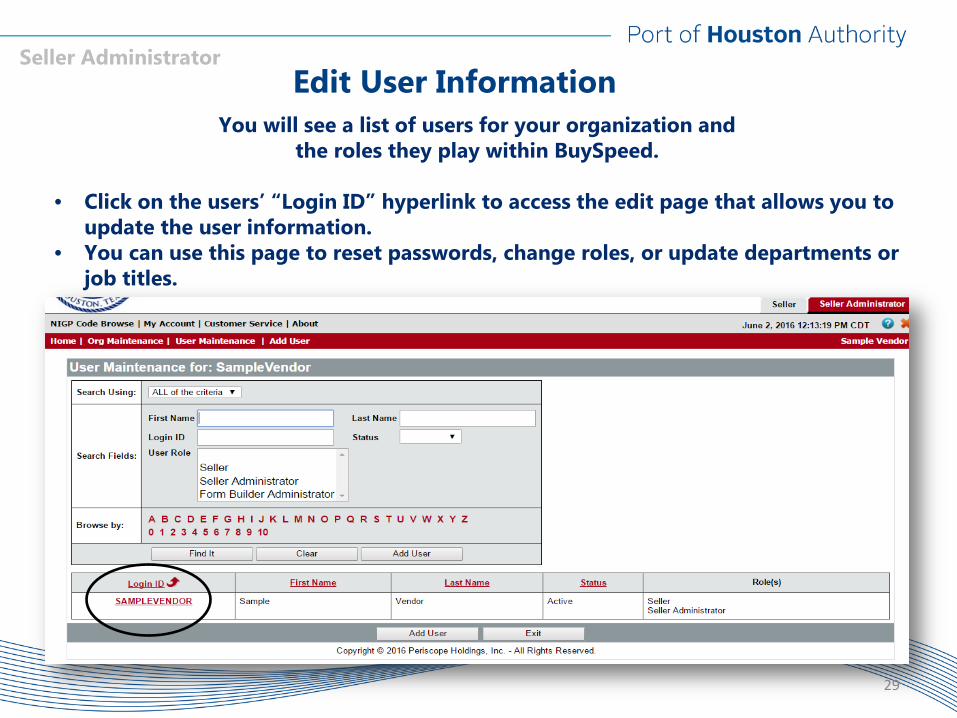
Edit User Information
You will see a list of users for your organization and the roles they play within BuySpeed.
• Click on the users’ “Login ID” hyperlink to access the edit page that allows you to
update the user information. • You can use this page to reset passwords, change roles, or update departments or
job titles.
Seller Administrator
30
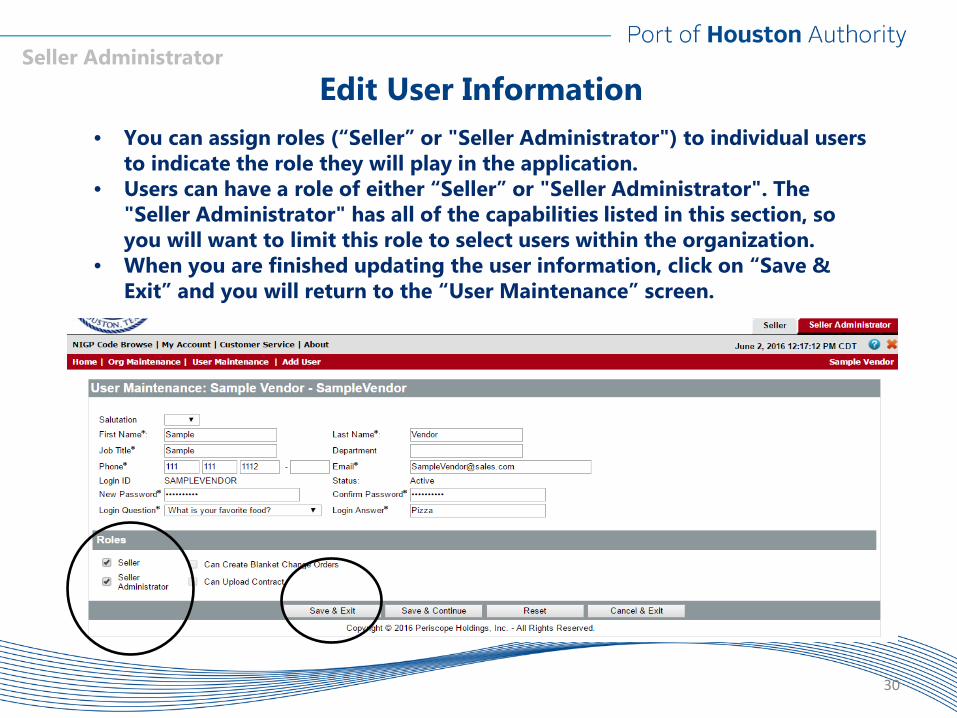
Edit User Information
• You can assign roles (“Seller” or "Seller Administrator") to individual users to indicate the role they will play in the application.
• Users can have a role of either “Seller” or "Seller Administrator". The "Seller Administrator" has all of the capabilities listed in this section, so you will want to limit this role to select users within the organization.
• When you are finished updating the user information, click on “Save & Exit” and you will return to the “User Maintenance” screen.
Seller Administrator
31
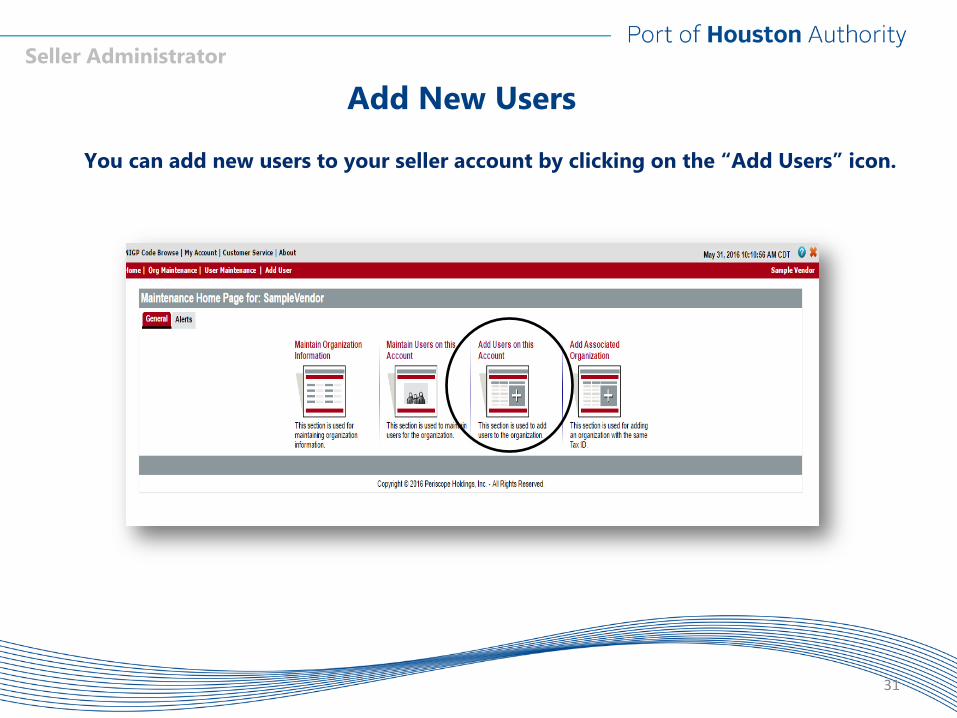
Add New Users
You can add new users to your seller account by clicking on the “Add Users” icon.
32
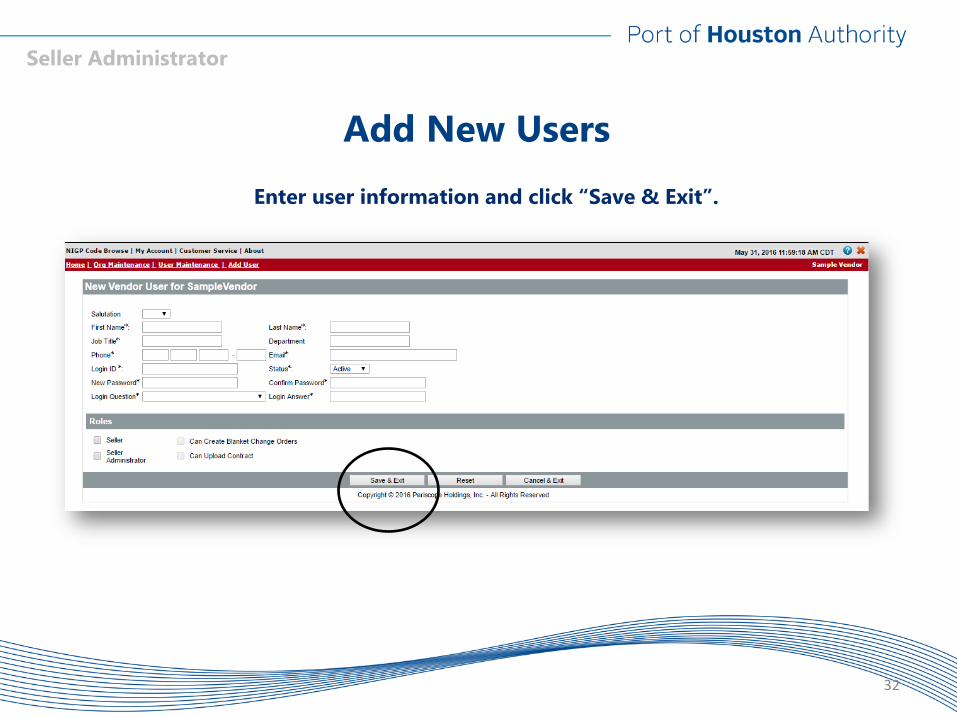
Add New Users
Enter user information and click “Save & Exit”.
Seller Administrator
Role #2 The Seller
The Company Purchaser
33

• As a “seller”, when you first login to the BuySpeed System, you will be
greeted by name and will see a Control Center (easily accessible navigational tabs that will allow you to move through all areas of the system).
Navigating the Home Screen
34
Control Center
Seller
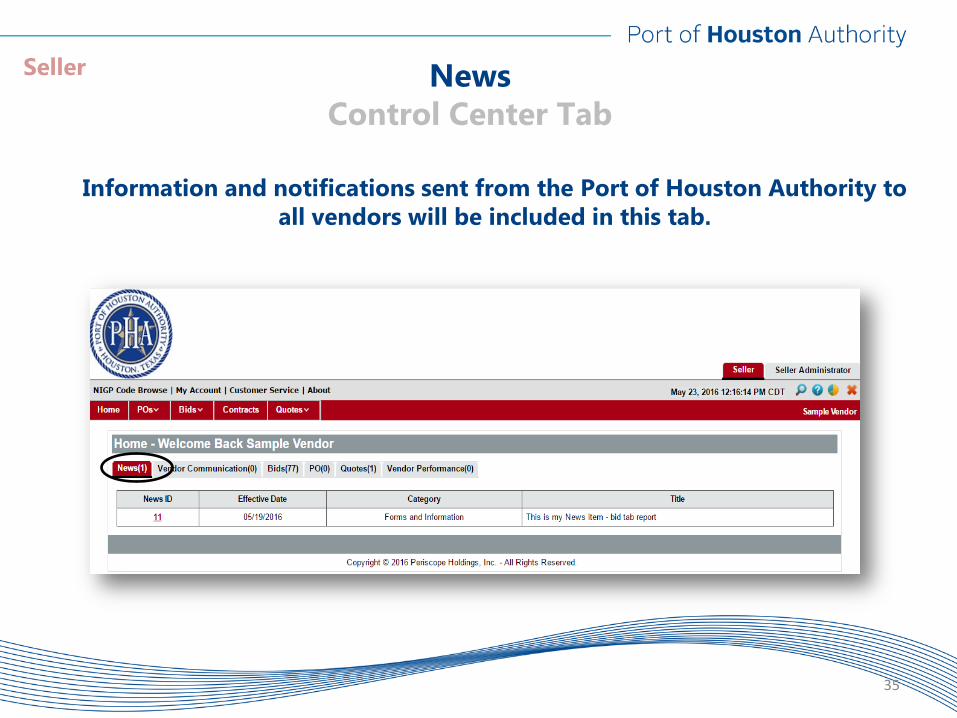
Information and notifications sent from the Port of Houston Authority to all vendors will be included in this tab.
News Control Center Tab
35
Seller
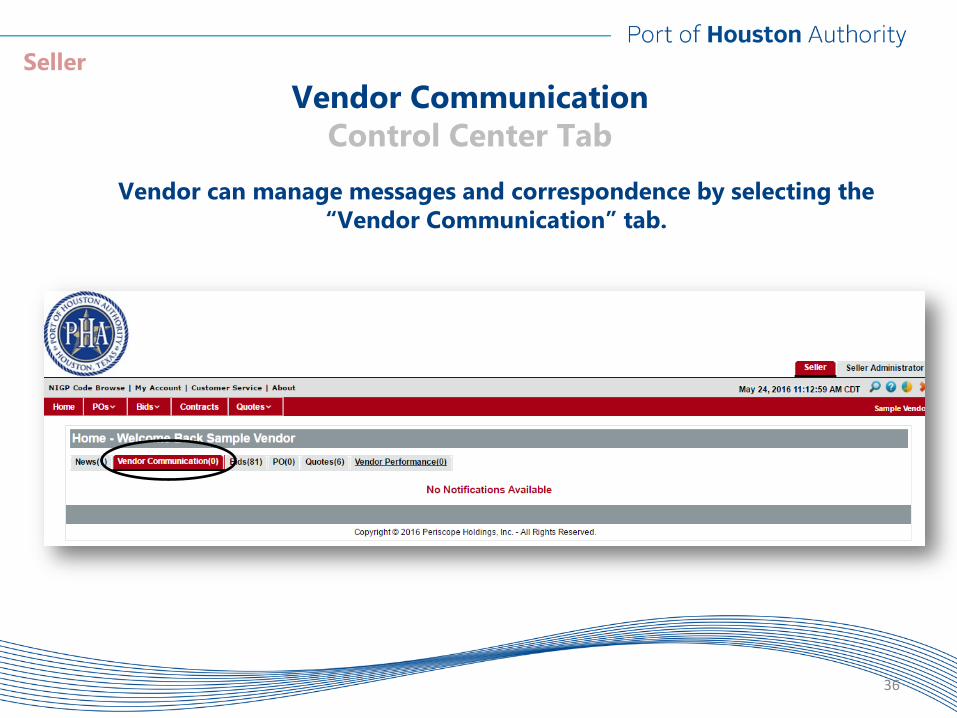
Vendor can manage messages and correspondence by selecting the “Vendor Communication” tab.
Vendor Communication Control Center Tab
36
Seller
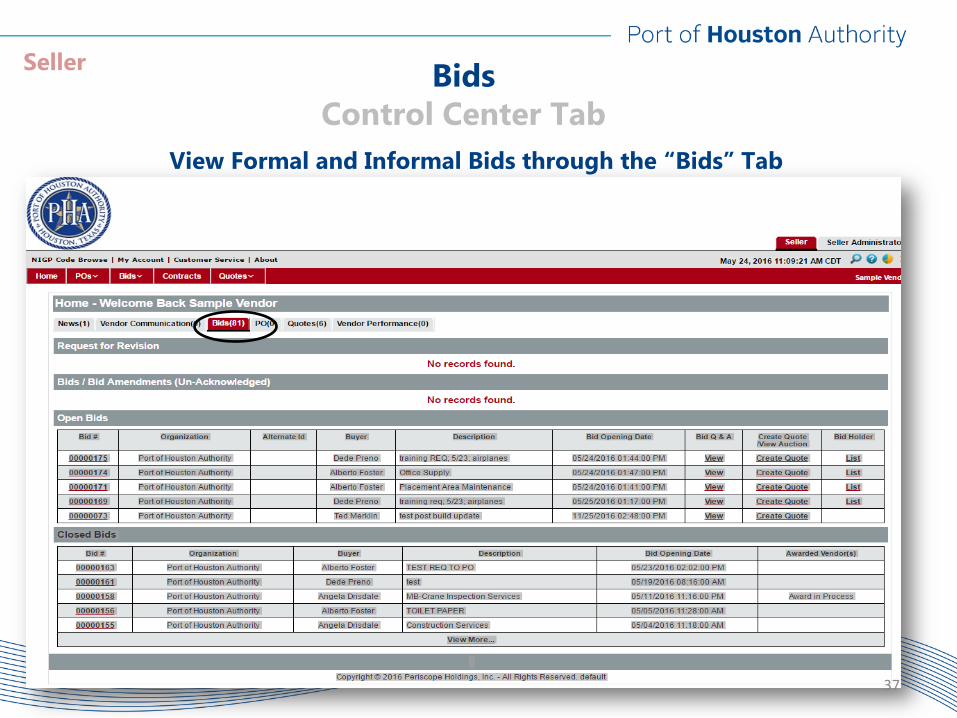
Bids Control Center Tab
View Formal and Informal Bids through the “Bids” Tab
37
Seller
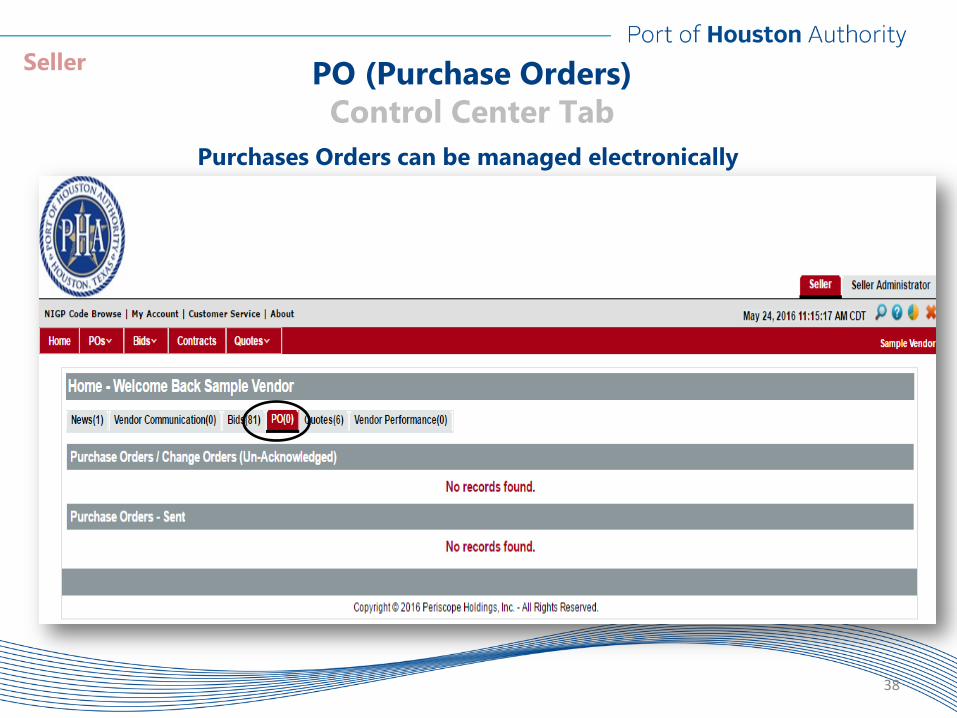
Purchases Orders can be managed electronically
PO (Purchase Orders) Control Center Tab
38
Seller
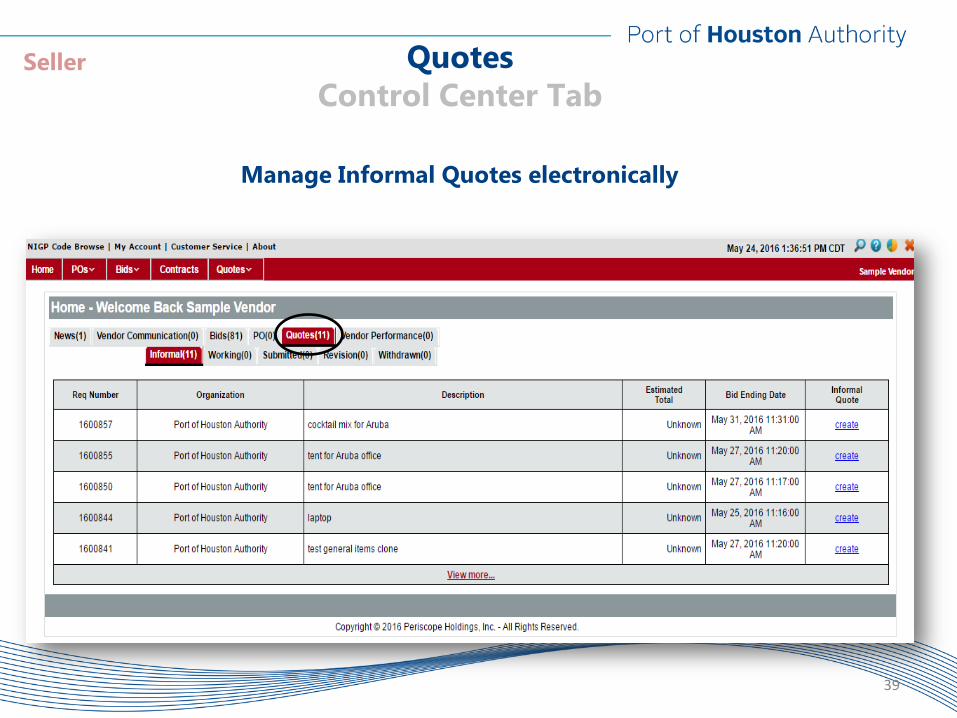
Manage Informal Quotes electronically
Quotes Control Center Tab
39
Seller
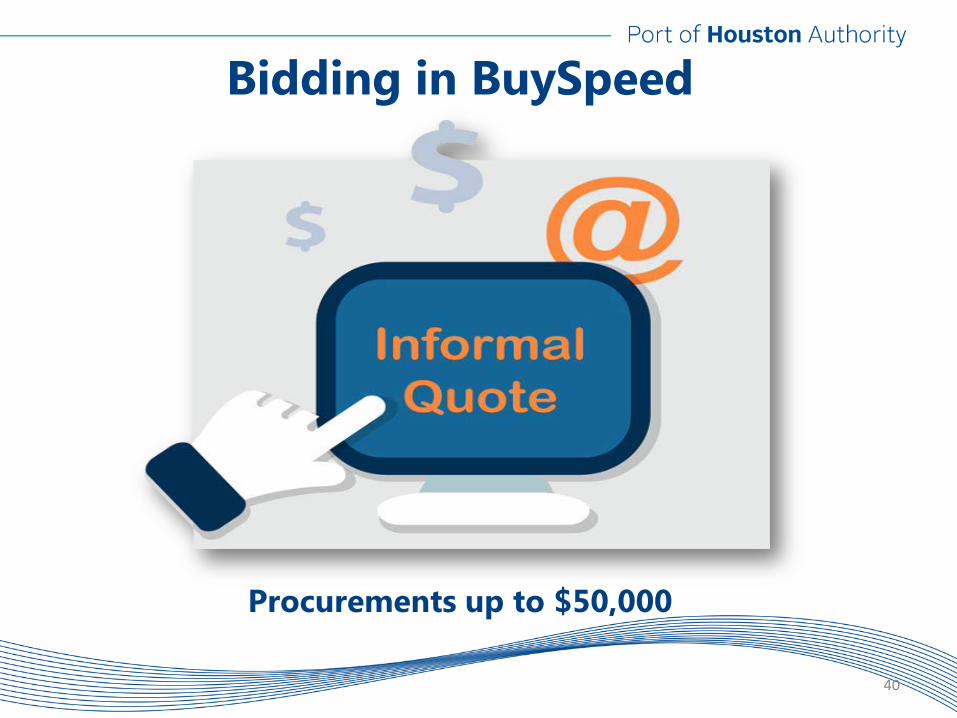
Bidding in BuySpeed
40
Procurements up to $50,000
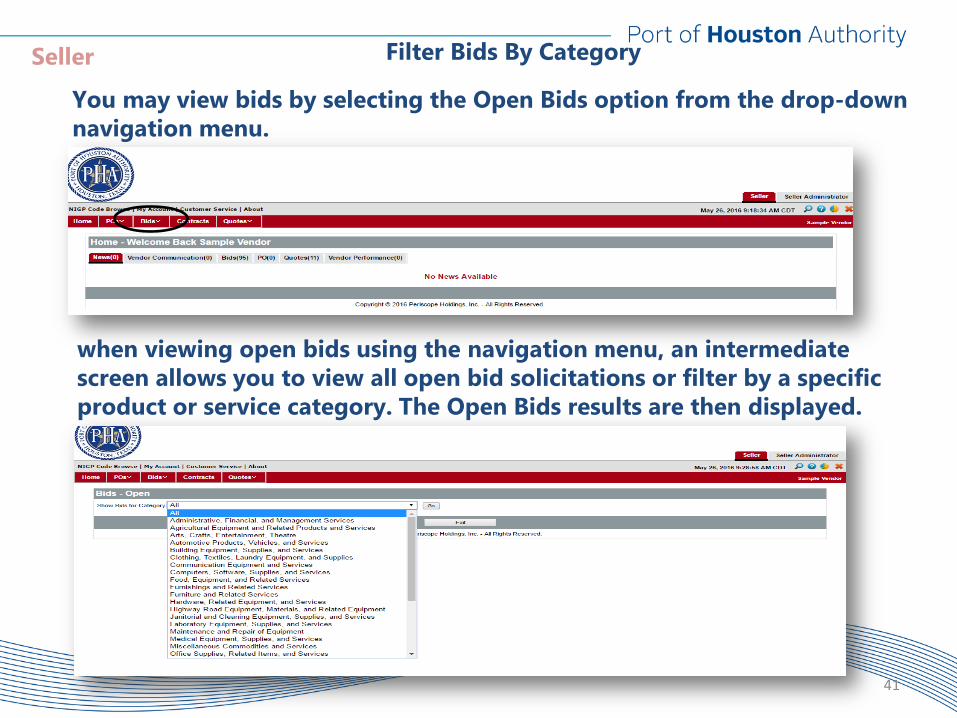
Filter Bids By Category
You may view bids by selecting the Open Bids option from the drop-down navigation menu.
when viewing open bids using the navigation menu, an intermediate screen allows you to view all open bid solicitations or filter by a specific product or service category. The Open Bids results are then displayed.
41
Seller
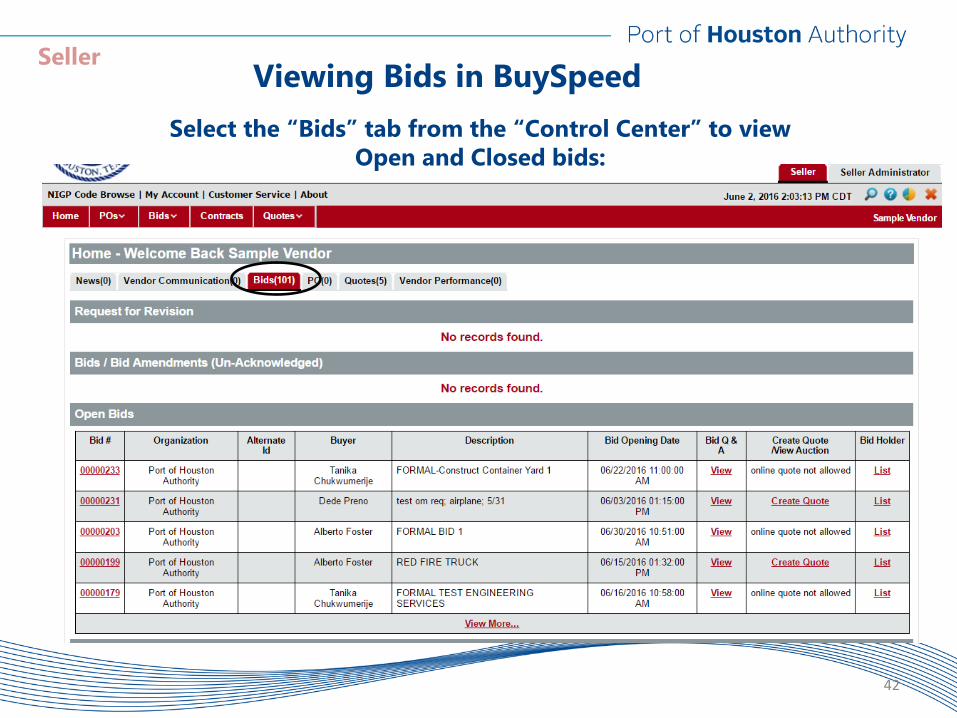
Select the “Bids” tab from the “Control Center” to view Open and Closed bids:
Viewing Bids in BuySpeed
42
Seller
Informal Quote Submittal
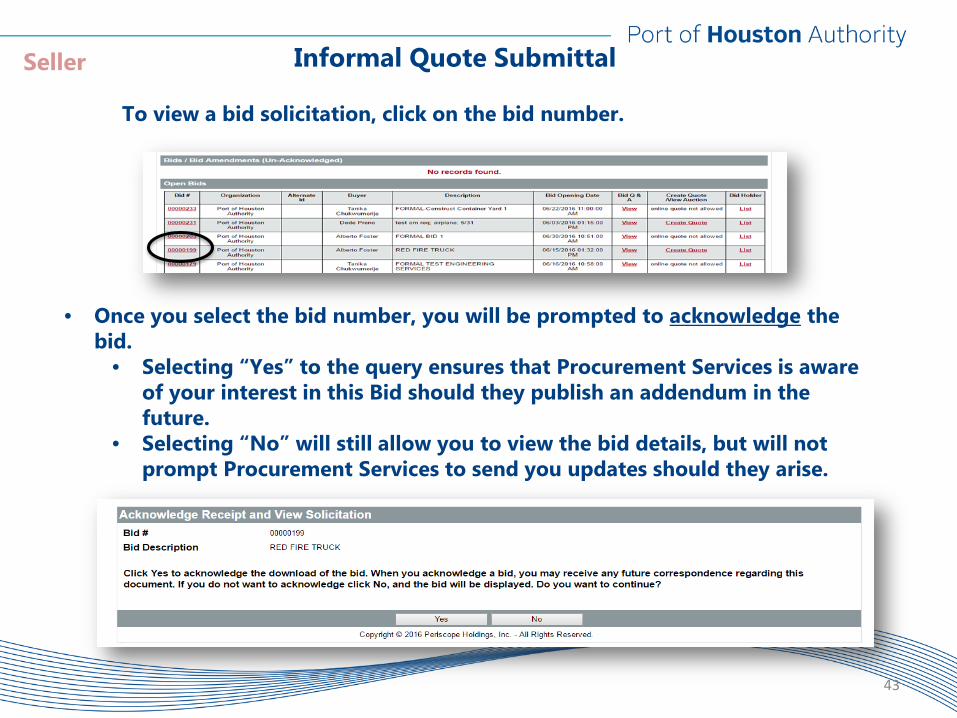
To view a bid solicitation, click on the bid number.
• Once you select the bid number, you will be prompted to acknowledge the bid.
• Selecting “Yes” to the query ensures that Procurement Services is aware of your interest in this Bid should they publish an addendum in the future.
• Selecting “No” will still allow you to view the bid details, but will not prompt Procurement Services to send you updates should they arise.
43
Seller
Informal Quote Submittal
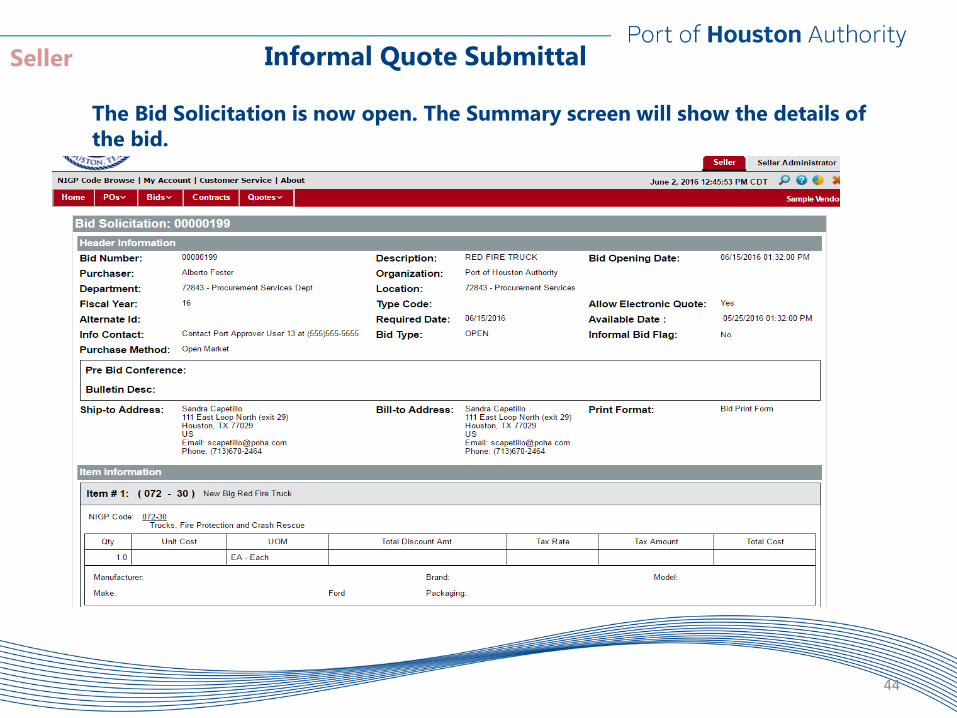
The Bid Solicitation is now open. The Summary screen will show the details of the bid.
44
Seller
Informal Quote Submittal
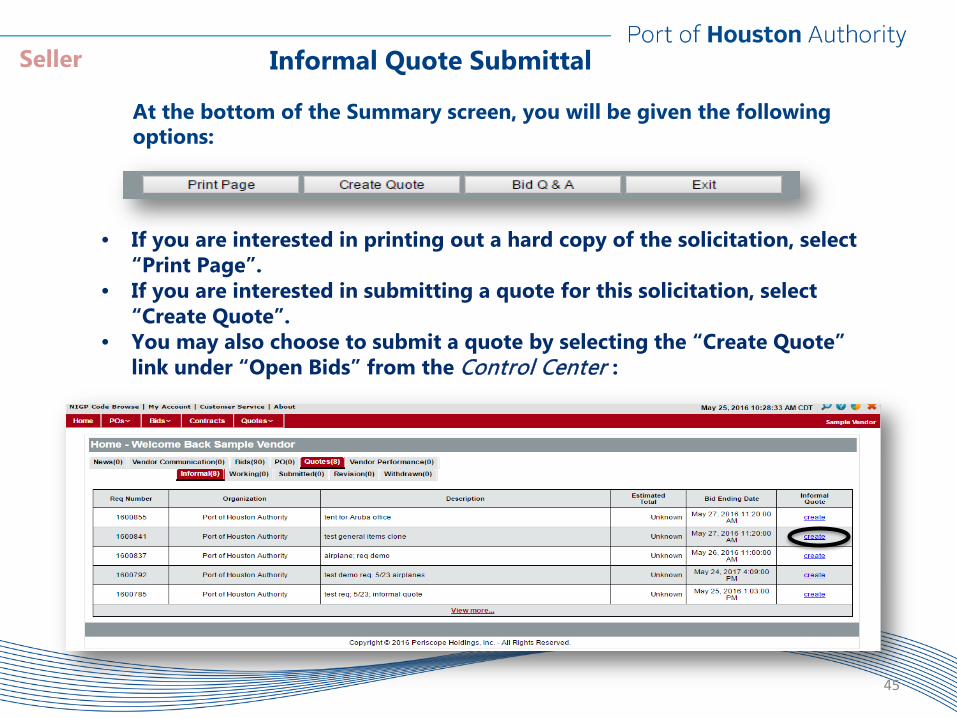
• If you are interested in printing out a hard copy of the solicitation, select “Print Page”.
• If you are interested in submitting a quote for this solicitation, select “Create Quote”.
• You may also choose to submit a quote by selecting the “Create Quote” link under “Open Bids” from the Control Center :
At the bottom of the Summary screen, you will be given the following options:
45
Seller
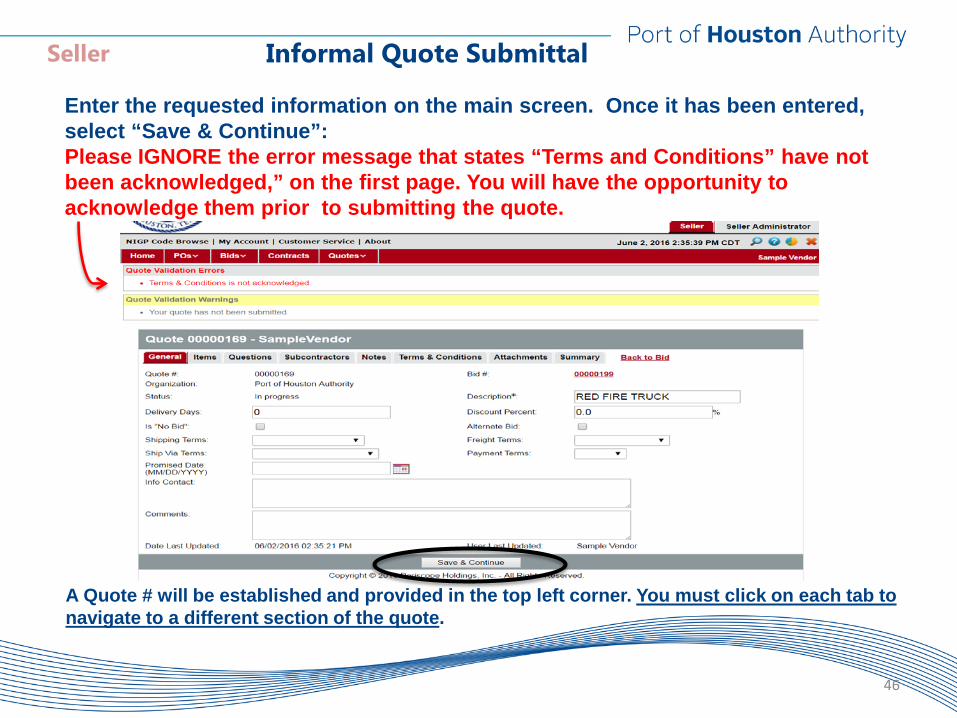
Enter the requested information on the main screen. Once it has been entered, select “Save & Continue”: Please IGNORE the error message that states “Terms and Conditions” have not been acknowledged,” on the first page. You will have the opportunity to acknowledge them prior to submitting the quote.
A Quote # will be established and provided in the top left corner. You must click on each tab to navigate to a different section of the quote.
46
Seller Informal Quote Submittal
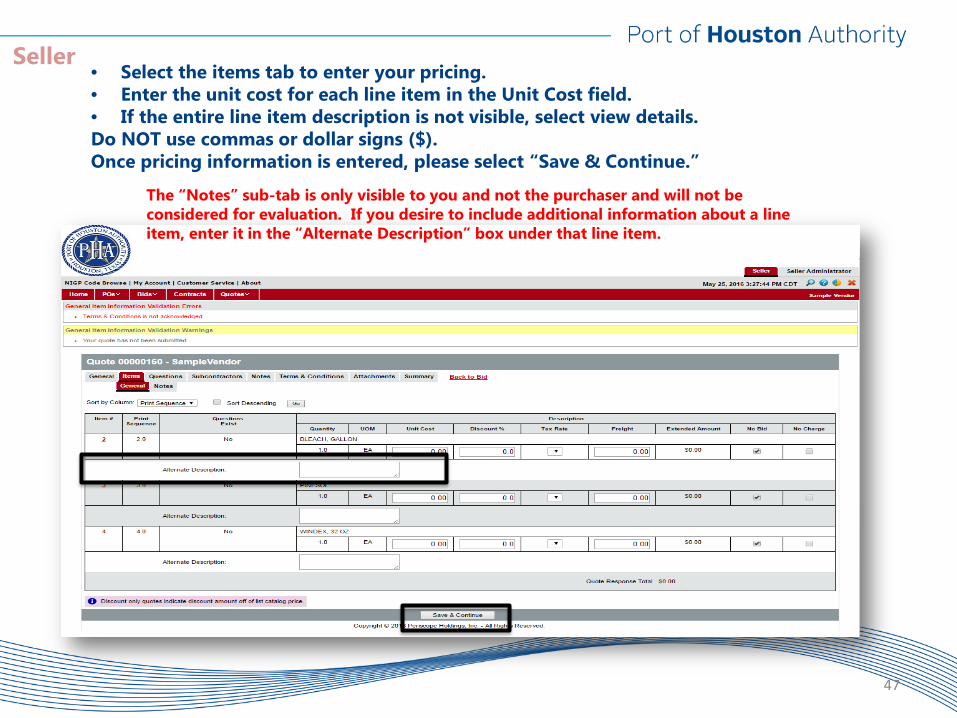
The “Notes” sub-tab is only visible to you and not the purchaser and will not be considered for evaluation. If you desire to include additional information about a line item, enter it in the “Alternate Description” box under that line item.
47
Seller • Select the items tab to enter your pricing. • Enter the unit cost for each line item in the Unit Cost field. • If the entire line item description is not visible, select view details. Do NOT use commas or dollar signs ($). Once pricing information is entered, please select “Save & Continue.”
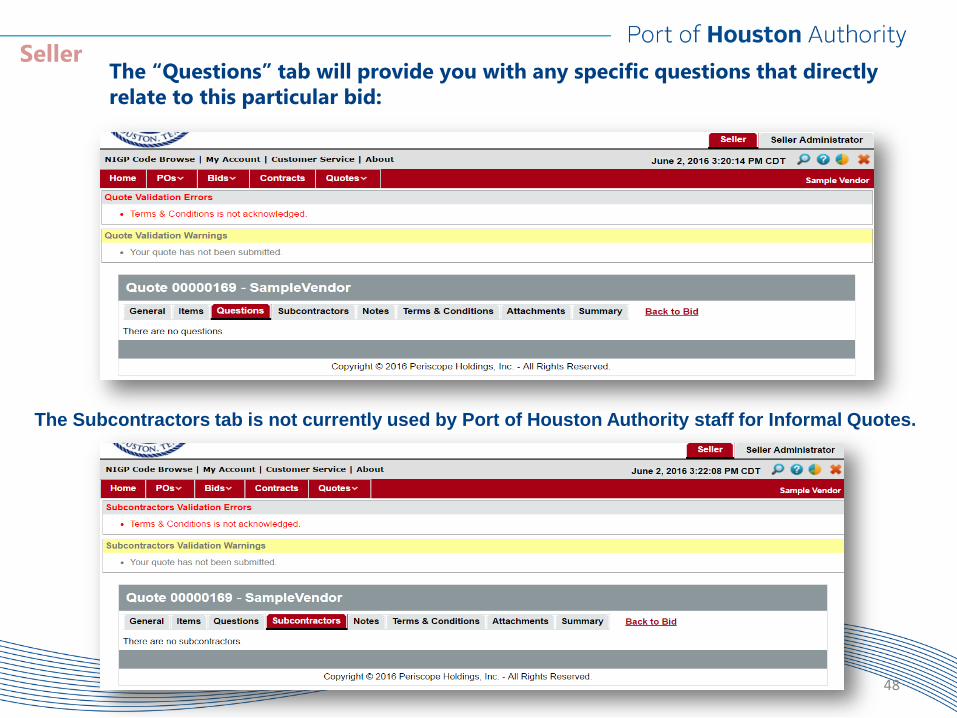
The “Questions” tab will provide you with any specific questions that directly relate to this particular bid:
The Subcontractors tab is not currently used by Port of Houston Authority staff for Informal Quotes.
48
Seller

The “Notes” tab allows the vendor to enter any useful information pertaining to the quote. Please note that this is for your use only, and is not viewable by PHA Staff.
49
Seller
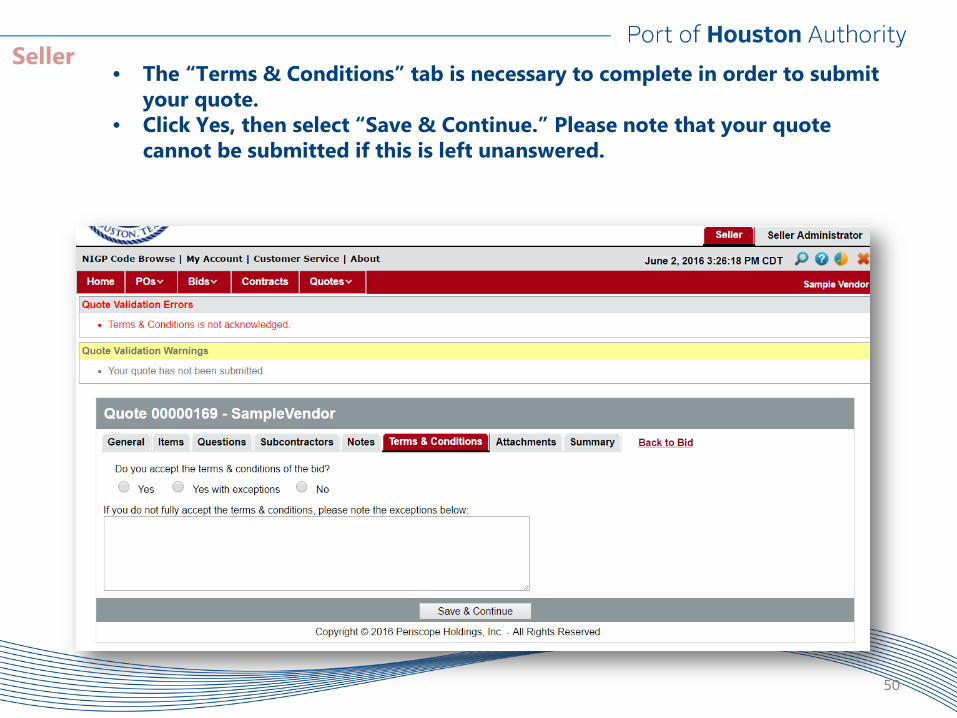
• The “Terms & Conditions” tab is necessary to complete in order to submit your quote.
• Click Yes, then select “Save & Continue.” Please note that your quote cannot be submitted if this is left unanswered.
50
Seller
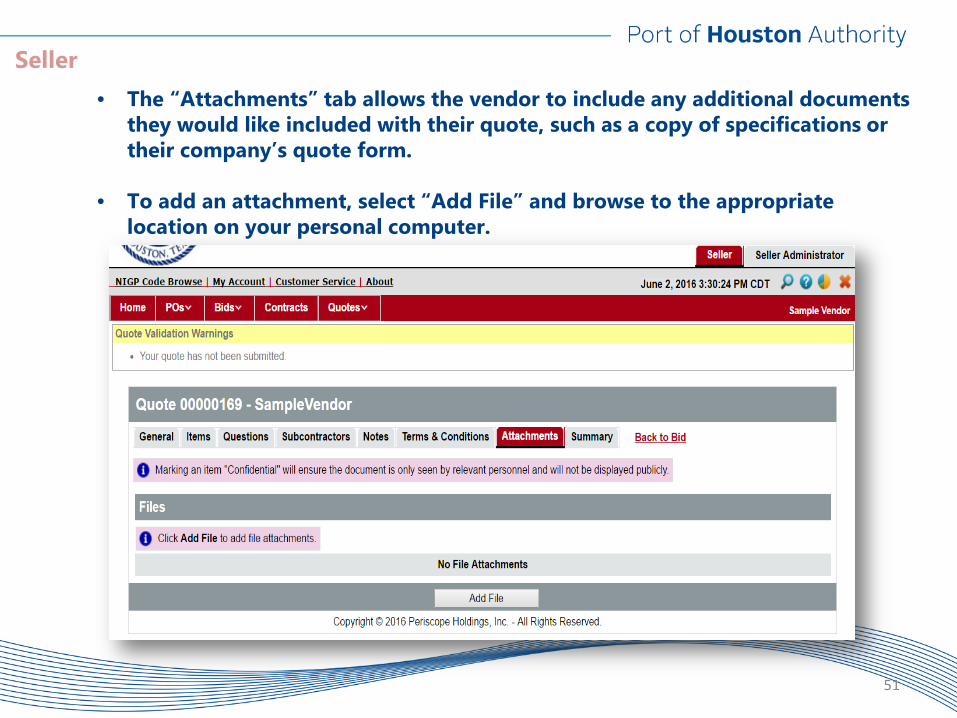
• The “Attachments” tab allows the vendor to include any additional documents they would like included with their quote, such as a copy of specifications or their company’s quote form.
• To add an attachment, select “Add File” and browse to the appropriate location on your personal computer.
51
Seller
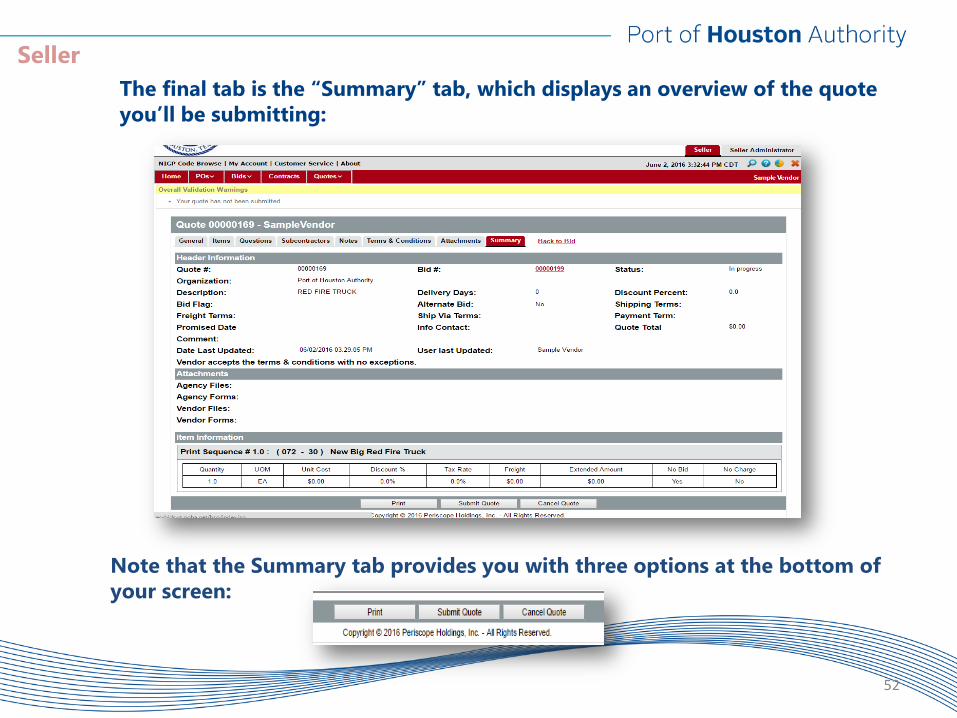
The final tab is the “Summary” tab, which displays an overview of the quote you’ll be submitting:
Note that the Summary tab provides you with three options at the bottom of your screen:
52
Seller
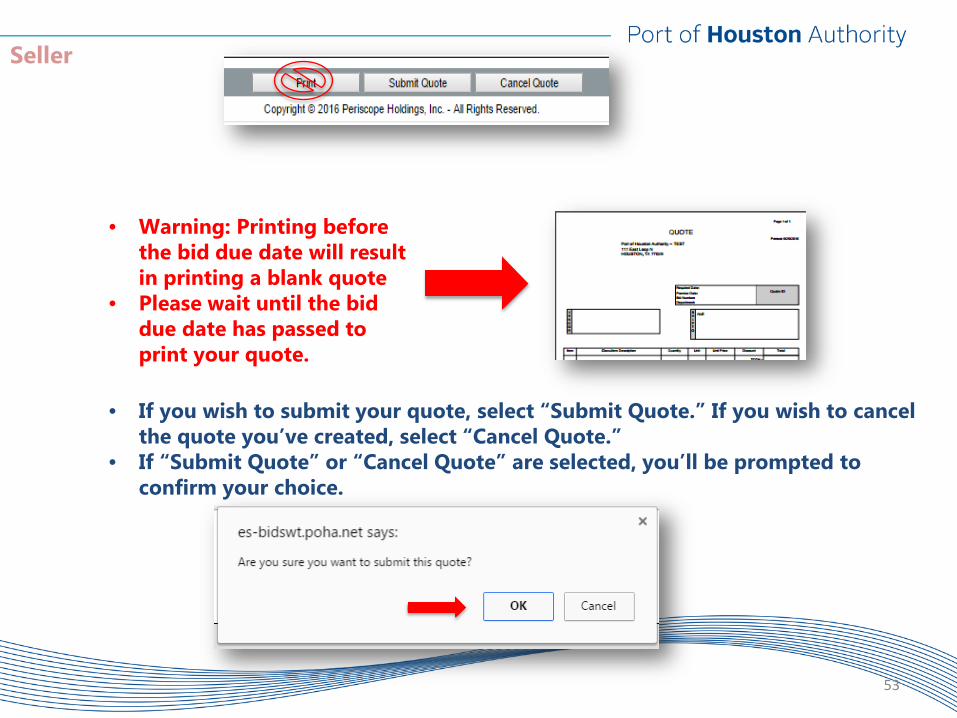
• If you wish to submit your quote, select “Submit Quote.” If you wish to cancel the quote you’ve created, select “Cancel Quote.”
• If “Submit Quote” or “Cancel Quote” are selected, you’ll be prompted to confirm your choice.
• Warning: Printing before the bid due date will result in printing a blank quote
• Please wait until the bid due date has passed to print your quote.
53
Seller
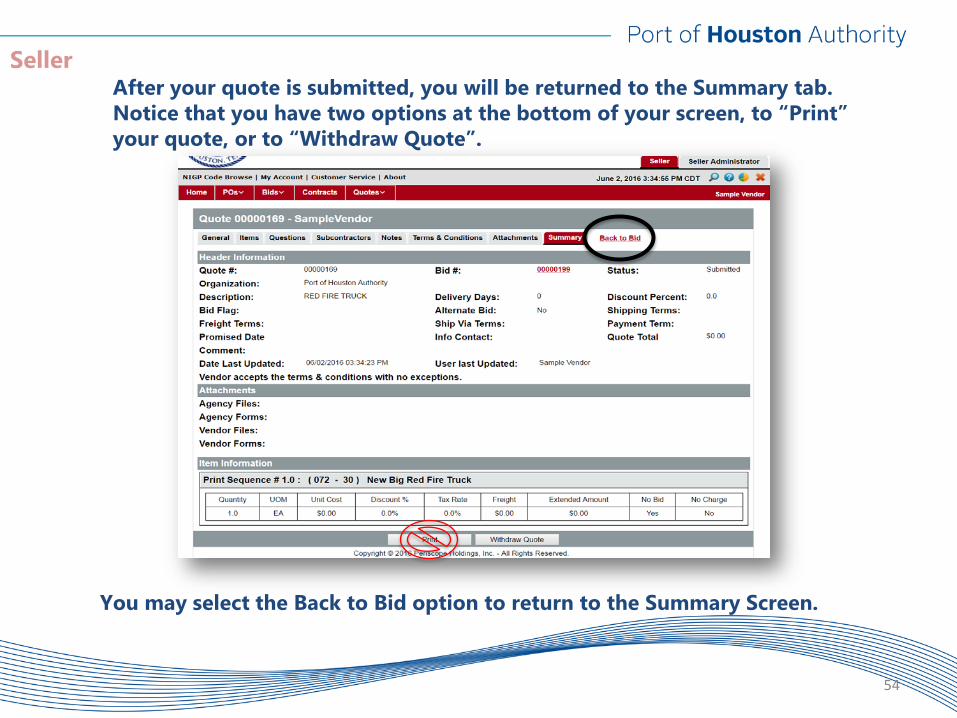
After your quote is submitted, you will be returned to the Summary tab. Notice that you have two options at the bottom of your screen, to “Print” your quote, or to “Withdraw Quote”.
54
Seller
You may select the Back to Bid option to return to the Summary Screen.
55
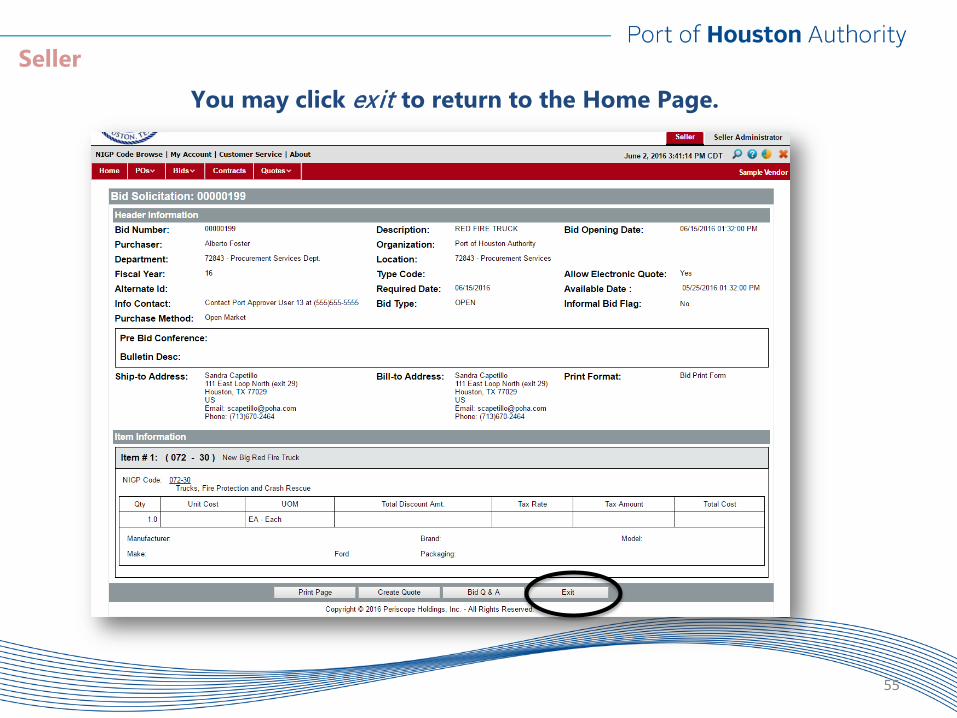
Seller
You may click exit to return to the Home Page.
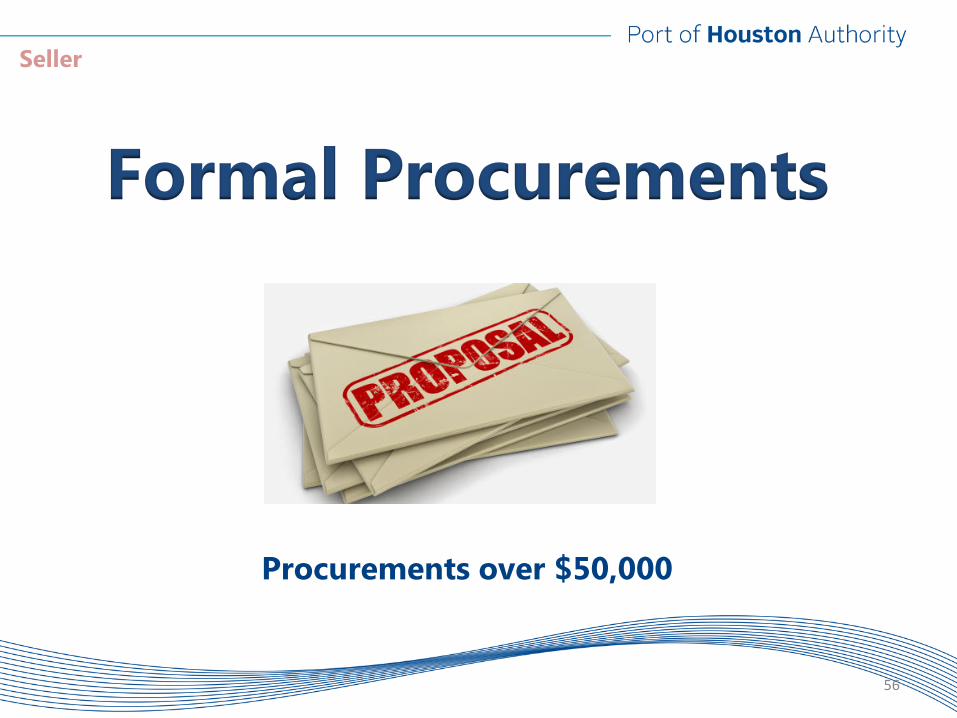
Formal Procurements
56
Seller
Procurements over $50,000
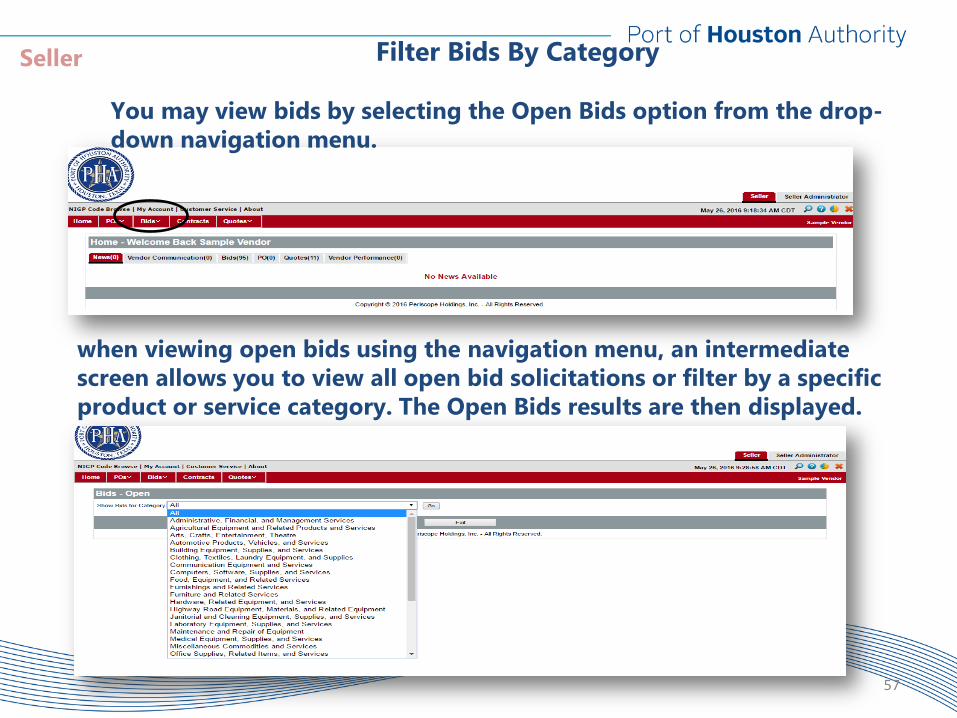
Filter Bids By Category You may view bids by selecting the Open Bids option from the drop-down navigation menu.
when viewing open bids using the navigation menu, an intermediate screen allows you to view all open bid solicitations or filter by a specific product or service category. The Open Bids results are then displayed.
57
Seller
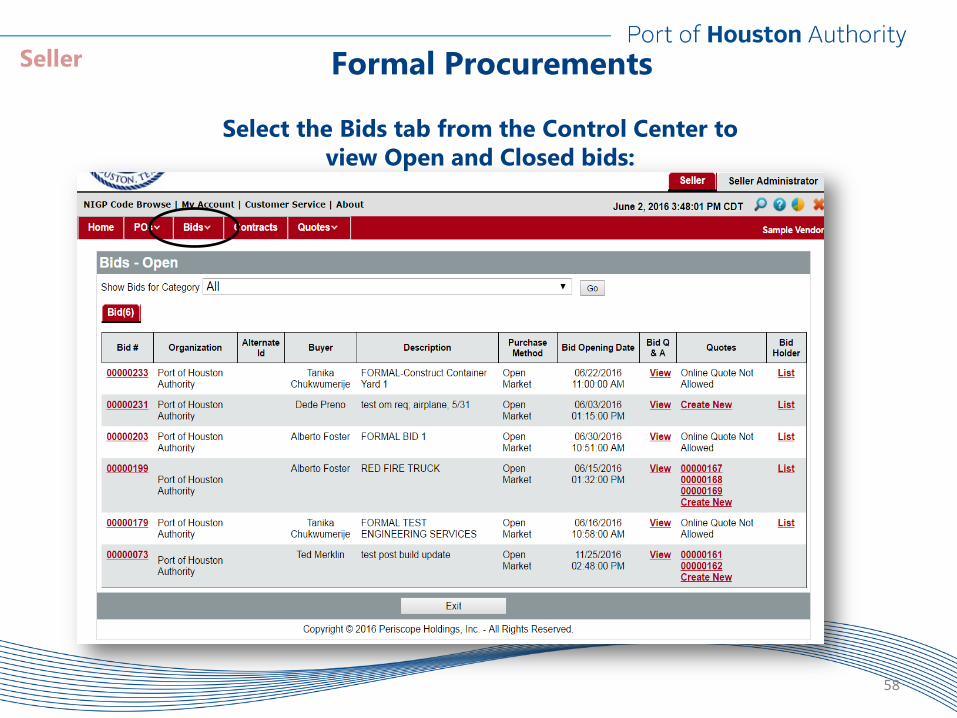
Select the Bids tab from the Control Center to view Open and Closed bids:
Formal Procurements
58
Seller
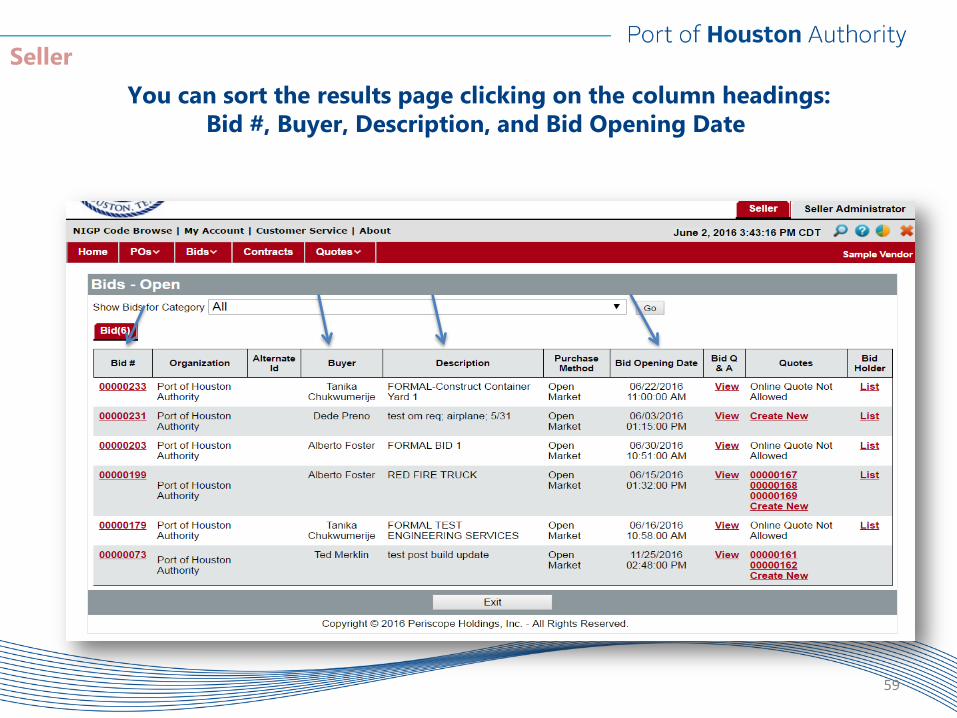
You can sort the results page clicking on the column headings: Bid #, Buyer, Description, and Bid Opening Date
59
Seller
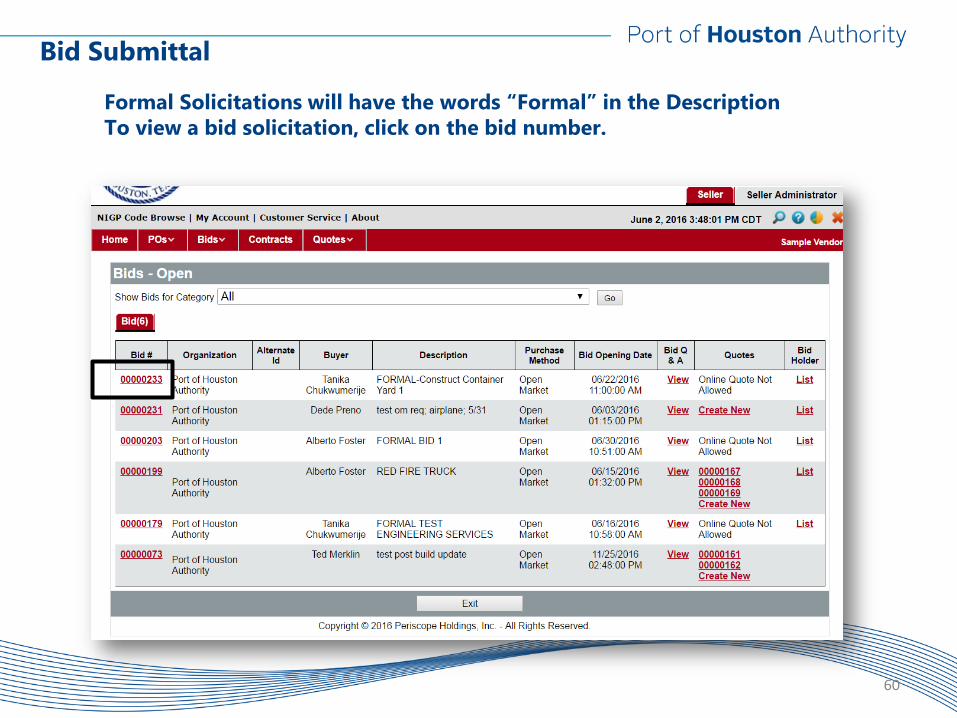
Bid Submittal
Formal Solicitations will have the words “Formal” in the Description To view a bid solicitation, click on the bid number.
60
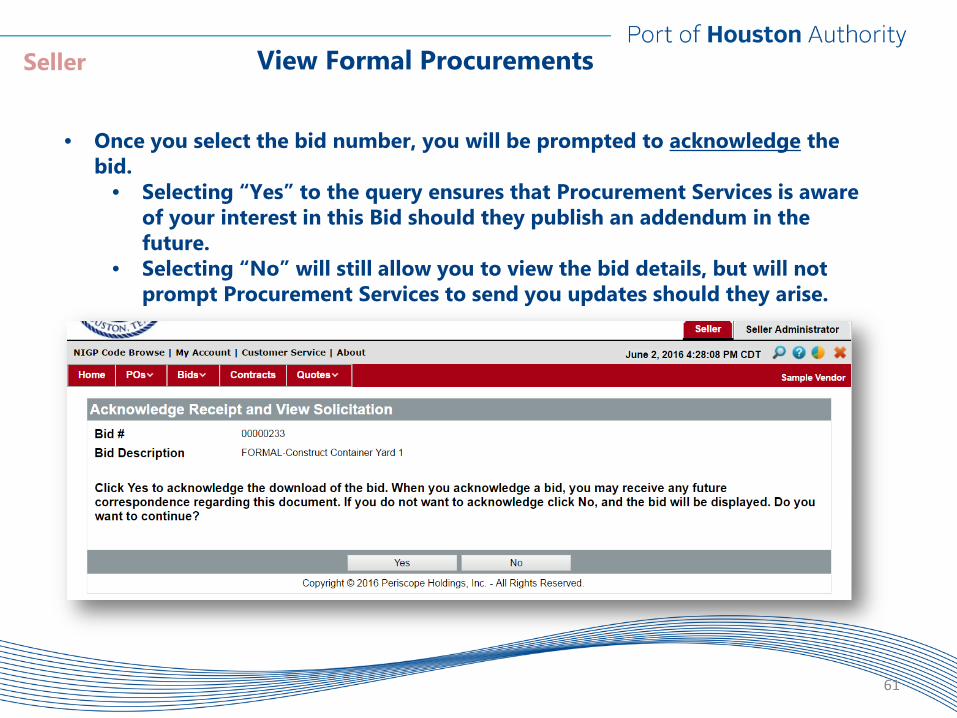
View Formal Procurements
• Once you select the bid number, you will be prompted to acknowledge the bid.
• Selecting “Yes” to the query ensures that Procurement Services is aware of your interest in this Bid should they publish an addendum in the future.
• Selecting “No” will still allow you to view the bid details, but will not prompt Procurement Services to send you updates should they arise.
61
Seller
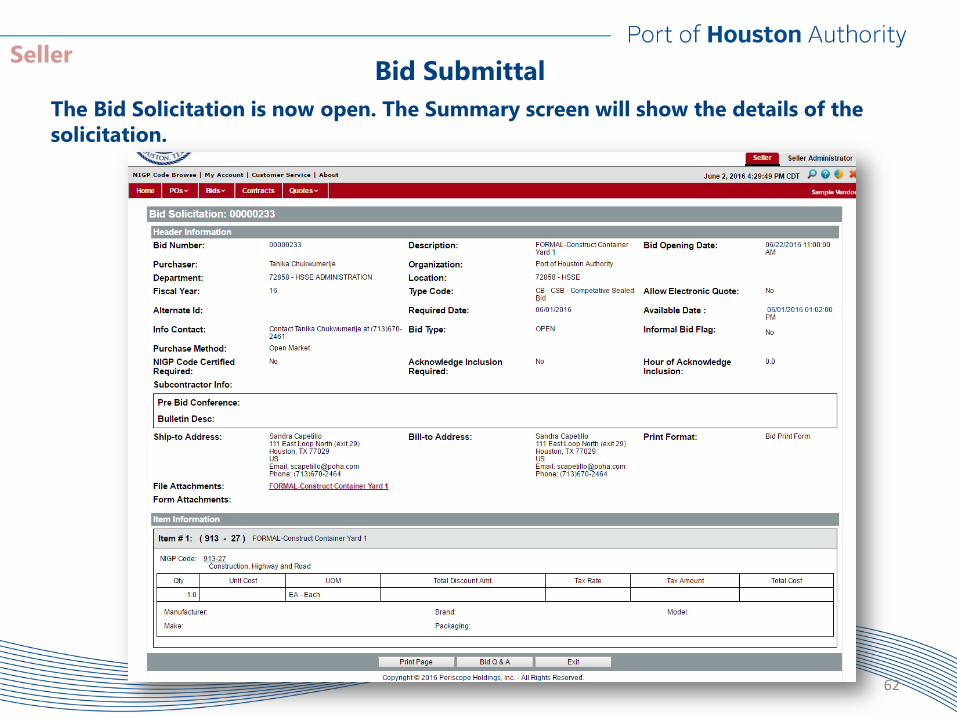
Bid Submittal The Bid Solicitation is now open. The Summary screen will show the details of the solicitation.
62
Seller
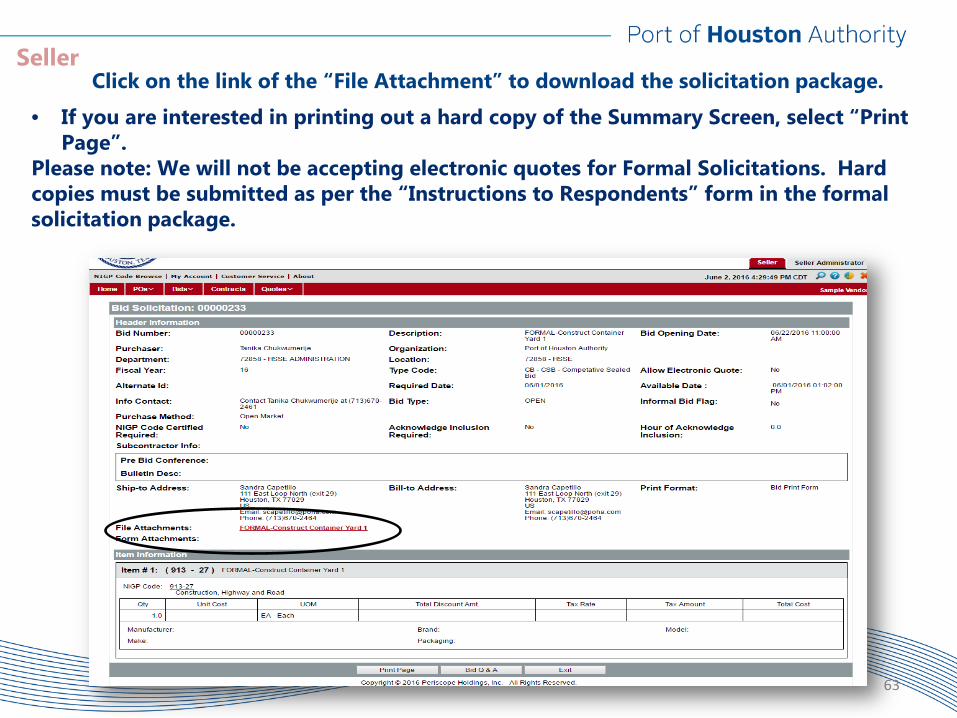
• If you are interested in printing out a hard copy of the Summary Screen, select “Print Page”.
Please note: We will not be accepting electronic quotes for Formal Solicitations. Hard copies must be submitted as per the “Instructions to Respondents” form in the formal solicitation package.
Click on the link of the “File Attachment” to download the solicitation package.
63
Seller