Embed Size (px)
Citation preview

California Election Procedures Manual for the
ES&S AutoMARK Voter Assist Terminal

Filename and Number Revision DATE RELEASE APPROVAL
California User Guide for the ES&S AutoMARK Voter
Assist Terminal
The most current active version of this document is maintained electronically in the Automark Quality System documentation database. Printed copies are considered obsolete.
PUBLISHED BY Automark Technical Systems, LLC 200 W. 22nd St., Ste 226 Lombard, IL 60148 630-916-0030 © Copyright 2003 Automark Technical Systems LLC. All rights reserved. No part of this document may be reproduced, transmitted, transcribed, stored in a retrieval system or translated into any language, in any form, by any means without the prior written permission of Automark Technical Systems LLC. Information in this document is subject to change without notice. Companies, names, and data used in examples herein are fictitious unless otherwise noted.
TRADEMARKS AutoMARK, AutoSCAN, and AutoCHECK are trademarks of Automark Technical Systems LLC. WINDOWS, WINDOWS XP and WINDOWS NT are registered trademarks of Microsoft Corporation in the United States and/or other countries. Other product and company names mentioned herein may be the trademarks of their respective owners.
Page 3 of 87
Contents 1 INTRODUCTION ...........................................................................................6
1.1 DEFINITIONS .............................................................................................6 1.2 DESCRIPTION OF THE AUTOMARK VAT IN A PRECINCT BALLOT TABULATION SYSTEM ............................................................................................................11
2 OVERVIEW .................................................................................................12
A. BASIC FUNCTIONALITY.........................................................................12 2.1 ALTERNATE LANGUAGE SUPPORT .................................................12 2.2 FUNCTIONALITY FOR VISUALLY IMPAIRED VOTERS.....................12 2.3 DUAL-MODE BALLOT CONCEPT.......................................................13 2.4 OPERATING FUNCTIONS ..........................................................................13 2.5 OPERATING MODES ................................................................................13 2.6 ROLES ...................................................................................................13
3 SAFETY INFORMATION ............................................................................15
3.1 INDUSTRY REGULATORY REQUIREMENTS....................................15 3.2 ELECTRICAL WORK AND SERVICE ..................................................15 3.3 LOCKOUT ............................................................................................15 3.4 HAZARD LABELS ................................................................................16 3.5 EXPLANATION OF SYMBOLS USED ON THE EQUIPMENT.............16 3.6 WEIGHT DISTRIBUTION.....................................................................16 3.7 SYSTEM POWER ................................................................................17 3.8 BATTERY REPLACEMENT .........................................................................17 3.9 ENVIRONMENTAL CONDITIONS FOR TRANSPORT AND STORAGE ..................18 3.10 ADDITIONAL SAFETY INSTRUCTIONS AND REQUIRED SPECIFICATIONS..........18
4 HOW A VOTER USES THE VAT ................................................................19 4.1 FEATURES OF THE AUTOMARK VAT .......................................................19 4.2 USING THE AUTOMARK VAT KEYS AND BUTTONS....................................21 4.3 USING AN ADA INPUT DEVICE..................................................................22
5 FOR THE VOTER : HOW TO USE THE VAT ............................................24
5.1 MARKING YOUR BALLOT...........................................................................24 5.2 VERIFYING A MARKED BALLOT .................................................................31 5.3 FREQUENTLY ASKED QUESTIONS .............................................................33
Ballot is not readable ...................................................................................33 Ballot is jammed ..........................................................................................34
WHAT IS A POP-UP SCREEN? .............................................................................35 MORE ALERT .............................................................................................35 Force more alert ..........................................................................................35 WRITE-IN ....................................................................................................36 UNDER-VOTE.............................................................................................37

Page 4 of 87
OVER-VOTE................................................................................................37 EXIT.............................................................................................................38 EXIT THANK YOU.......................................................................................38
5.4 HOW DO I EXIT WITHOUT MARKING THE BALLOT ? .....................................39
6 PRE-ELECTION PROCEDURES FOR THE ELECTION OFFICIAL...........40
6.1 PREPARE THE ACTUAL BALLOTS WHICH WILL BE USED IN THE ELECTION, AND THE ELECTION DATA FILES ..................................................................................41 6.2 IMPORT THE DATA FILES CREATED IN STEP 1 INTO AIMS ............................41 6.3 TEST THAT THE BALLOTS ARE SET UP CORRECTLY AND THAT THE DATA WAS IMPORTED CORRECTLY BY USING THE AIMS PREVIEW FUNCTION...........................41 6.4 CREATE FLASH MEMORY CARD................................................................41 6.5 SETTING THE DATE AND TIME ON THE AUTOMARK VAT............................41 6.6 INSTALLING A NEW INK CARTRIDGE...............................................41 6.7 USING METALLIC INK FOR INFRARED PRINTING ..........................................43 6.8 CHARGING THE BATTERY (IF INSTALLED)......................................44 6.9 INSTALLING THE FLASH MEMORY CARD........................................45 6.10 TESTING THE AUTOMARK VAT OPERATIONS..................................46
Display Screen Test.....................................................................................47 Ballot Insert Test..........................................................................................47 Audio Test....................................................................................................47 Ballot Print Test ...........................................................................................48 Ballot Read Test ..........................................................................................48
6.11 INSTALL OPTIONAL SIGNAGE IN THE POLLING BOOTH FOR VOTERS WHOSE NATIVE LANGUAGE IS NOT ENGLISH.....................................................................49
7 ELECTION DAY PROCEDURES FOR THE POLL WORKER ...................50
7.1 POLLING PLACE PROCEDURES.................................................................50 7.2 OPENING THE LCD FOR USE ...................................................................50 7.3 START UP/SHUT DOWN PROCEDURE........................................................53 7.4 SETTING UP THE AUTOMARK VAT FOR VOTERS......................................53 7.5 ASSISTING THE BLIND VOTER...................................................................54 7.6 ASSISTING THE VOTER WHO USES AN ADA DEVICE ...................................54 7.7 INSTALLING THE FLASH MEMORY CARD ............................................55 7.8 TESTING THE AUTOMARK VAT OPERATIONS..................................56
Display Screen Test.....................................................................................57 Ballot Insert Test..........................................................................................57 Audio Test....................................................................................................57
8 POST-ELECTION PROCEDURES AND MAINTENANCE .........................59
8.1 REMOVING THE INK CARTRIDGE ...............................................................59 8.2 CHARGING THE BATTERY.........................................................................59 8.3 CLEANING THE AUTOMARK VAT.............................................................60 8.4 STORING THE AUTOMARK VAT ..............................................................60
9 ADDITIONAL TEST MODE MAINTENANCE PROCEDURES ...................61
9.1 SETTING THE ADMIN PASSWORD ..............................................................61

9.2 SETTING THE DATE AND TIME...................................................................61 9.3 SELECTING ALL PRE-LOAD PRIORITY PRECINCTS AND BALLOTS .................63 9.4 CALIBRATING THE TOUCH SCREEN ...........................................................64 9.5 CALIBRATING THE PRINTER......................................................................64 9.6 UNLOCKING THE FLASH MEMORY CARD....................................................66 9.7 PRINTING THE OPERATION LOG (SYSTEM LOG FILE) – IF DESIRED ..............66 9.8 PRINTING THE SCAN LOG OR SERVICE LOG...............................................72
10 TROUBLESHOOTING.............................................................................73
10.1 CLEARING A PAPER JAM ..........................................................................73 Reversible Roller Guide and Ballot Size ......................................................73
10.2 FLASH MEMORY CARD ERRORS ...............................................................76 Unlocking the Flash Memory Card...............................................................76 Changing the Flash Card.............................................................................76 If the Flash Card is Removed When the AutoMARK is on...........................77 Resetting the Machine .................................................................................77
10.3 CALIBRATING THE PRINTER......................................................................77 10.4 ERROR MESSAGES .................................................................................79 10.5 TROUBLESHOOTING CHECKLIST ...............................................................83 10.6 SPOILED BALLOT PROCEDURE .................................................................83
11 SECURITY MEASURES..........................................................................84
11.1 ACCESS CONTROL ..................................................................................84 General Access Control Policy ....................................................................84 Individual Access Privileges ........................................................................84
11.2 ACCESS CONTROL MEASURES.................................................................84 11.3 POLLING PLACE SECURITY.......................................................................84
12 CALLING FOR HELP ..............................................................................86
13 REVISION HISTORY ...............................................................................87
Page 6 of 87
1 Introduction The California Election Procedures Manual for ES&S AutoMARK Voter Assist Terminal contains guidelines for following election procedures adopted by California’s Secretary of State according to the state Elections Code sections 19200 and 19205 and govern the use of the ES&S AutoMARK Voter Assist Terminal System at all elections governed by the California Elections Code. Use the information in the California Procedures Manual to conduct all elections governed by the California Elections Code when you use ES&S AutoMARK Voter Assist Terminal. Follow the guidelines included in the California Procedures Manual along with all other statutory and regulatory requirements. Whenever possible, perform all of the procedures described in this manual in the full view of the public. The procedures contained in this manual shall be effective beginning MM/DD/05 and shall be used in conjunction with all other statutory and regulatory requirements. Should there be a conflict with current or future provisions of the Elections Code, such provisions shall take precedence. Insofar as feasible, all procedures prescribed herein shall be carried out in full view of the public. The procedures described here constitute a minimum standard of performance and are not intended to preclude additional measures implemented by individual election officials to enhance security and reliability for the election process. Consult the California Elections Code for the exact election requirements in your jurisdiction. Contact California’s Secretary of State or go online to www.leginfo.ca.gov/cgi-bin/calawquery?codesection=elec&codebody=&hits=20 for a copy of the California Elections Code.
1.1 Definitions VAT Voter Assist Terminal GUI Graphical User Interface FMC Flash Memory Card FEC Federal Election Commission Ballot Ca Code 13200-13220 The printed document which provides a voter the opportunity to vote for all appropriate candidates and ballot measures by using an appropriate marking device to indicate selections in available voting positions. The ballot shall have two detachable serialized stubs. All ballots are controlled by the Secretary of State, pursuant to California Administrative Regulations, and shall be printed with distinctive tints and designs as specified by the Secretary of State, and shall be

produced and distributed in accordance with regulations adopted by the Secretary of State. All ballots must be printed by a state certified printer which includes counties that may wish to produce their own ballots, known as ballot on demand. The ballot with its one or two perforated stubs may be of various dimensions. After removal of all stubs, the ballot shall measure eight (8.5) inches in width. The length must be a minimum of 14 inches with a maximum length of 21 inches. With the ballot positioned in portrait orientation, such as a letter or this typed page would normally be held for reading, the various ballot sections are: a serialized binding stub at the top; followed by a serialized voter’s stub, and the main processable ballot section. The binding stub is stitched or stapled together as a pad when the ballots are gathered, and is the part remaining affixed to the pad when the voter’s ballot and attached voter stub have been removed for voting. All voting positions on the ballot are indicated by an unfilled oval adjacent to the names of candidates, available write-in spaces, and the for or against (Yes/No) ballot measure indications. Such unfilled ovals shall be uniform throughout the ballot, and shall be of such a design as to suggest the necessity of a mark to “fill in” the oval thus indicating a voting choice. The ballot may be scored horizontally for folding, but not vertically. The folding score shall not intersect a voting position. If any voting position on the ballot is used for more than one candidate or ballot measure at the same election, each such ballot shall have a ballot style identification code printed thereon. A party identification code shall be printed on each ballot at the gubernatorial statewide “open” primary election. Ballot Classifications The various ballot classifications are as follows:
• Blank Ballot A blank ballot is one on which there are no voting position marks that can be read by the ES&S 100. It may be truly blank in all voting positions, or it may have marks in these positions which the ES&S 100 cannot read because they are of insufficient marking.
• Damaged Ballot A damaged ballot is one which has been torn, bent, or otherwise mutilated so that it cannot be processed through the ES&S 100. Damaged ballots at the precinct level are spoiled and a new ballot is reissued to the elector.
• Demonstration Ballot This ballot, used for demonstration purposes, displays a mock election. Offices are frequently fictitious; candidates are usually historical figures; and measures are obviously not serious. Such ballots may be used and re-used for demonstrations from voter to voter and from election to election such ballot shall not be produced and printed on state certified ballot stock at any time.
• Error Ballot This is a ballot whose header code does not match the header code expected by the ES&S 100’s Memory Card for a particular precinct or ballot style.
• Normal Ballot This is a description usually applied to a ballot which has been voted and is not distinguished by any anomaly, such as overvoted offices, a damaged condition, blank, etc. “Normal” ballots are customarily directed to the right compartment of the ES&S 100’s ballot box.
• Provisional Voter Ballot

Page 8 of 87
A ballot issued, pursuant to Elections Code section 20107, to a voter claiming to be properly registered to vote, and whose qualification or entitlement to vote cannot be immediately established upon examination of the index of registration for the precinct or upon examination of the records on file with the county election official. Such voters shall be provided a provisional ballot which shall not be tabulated until verification of eligibility has been confirmed. Said ballot votes shall only be added to races in which the said voter is entitled to vote.
• Questioned Ballot A ballot on which the voter’s entitlement must be verified.
• Spoiled Ballot A ballot issued to a voter and returned by the voter for another ballot because of an inadvertent error made during the ballot marking process.
Ballot Layout The ballot configuration unique to each precinct or precinct split which encompasses all candidates, including any rotation of candidate names, and ballot measures to be voted on at a specific election. Ballot Style A unique combination of candidate offices and ballot measures to be voted on at an election. There may be more than one such combination in a given election because of offices or measures, which may be voted on by fewer than all the voters at that election. The rotation of candidate names may also create additional ballot styles, as can partisan contest specific ballots. The terms “ballot style” and “ballot type” are often used interchangeably. Timing Marks These are vertically printed marks appearing along both vertical edges of some types of ballots. Assurance of proper ballot printing registration is given when these marks appear in corresponding positions along each edge of the ballot. Timing marks should be checked upon receipt of ballots from the printer. Election Official As used here, this term shall apply to the County Clerk, the County Registrar of Voters, the City Clerk or any other person who has been properly and legally charged with the responsibility of conducting the election. These Procedures shall be liberally interpreted, so that when permitted by law, the election official may deputize others to perform designated functions. Election Coding This term applies to the election preparation function of providing specific election parameters to Memory Cards using special software. These parameters include, but are not limited to the definition of offices, candidates, voting positions, number of candidates to be elected, statistics to be accumulated, ballot path and striping controls, keypad utility and control codes which may be made available, plus any other election specific parameters. Header Codes Codes are printed in the upper front corners of a ballot, identifying it as being of a specific ballot style, political party, or other grouping. The header code may also designate the ballot as to precinct, if desired. When multiple precinct processing is implemented, header coding identifying each precinct separately is required. If the header coding on a ballot is not identical to that carried by the Memory Card, that ballot will not be accepted for processing and an error message indicating that condition will be printed and displayed.

Log/Results The AutoMARK VAT provides a printable Operations Log. During election preparation and testing the tape indicates or confirms actions taken, results generated, and that selected functions are operable. This printing becomes an election reconstruction audit trail checkpoint. LCD Display and/or Printed Results The Operations Log can be printed from the AutoMARK VAT at the discretion of the Election Official. All diagnostic messages are logged on the unit’s Memory Card irrespective of whether the message is printed and/or LCD displayed. Memory Card A Memory Card is an intermediate storage medium (PCMCIA Card) which must be installed in an AutoMARK VAT in order to process ballots Memory Card Reading (Download and Upload) The parameters of the election and other instructions which have been prepared via appropriate election preparation software for the tabulator which will be used, are then read into the AIMS Personal Computer (PC) where the data is transformed into the format needed by the AutoMARK VAT. This data is transferred via a Flash Memory Card, which is inserted into the AutoMARK VAT. The County should apply appropriate security wherein such PC resides within the county’s operation to prevent unauthorized access to its equipment. Overvote The Overvote condition occurs when the voter marks more candidates than the number of candidates to be elected. In an office to which one candidate can be nominated or elected, a second vote creates an overvote condition. The AutoMARK VAT detects an overvote, and alerts the voter. The ballot will not be marked until the voter clears the overvote. Reusable Test Deck This term is used to designate a stack of ballots which are not election-specific. These Procedures specify that the Reusable Test Deck shall consist of ballots carrying a demonstration, famous name type election. This deck can be used for accuracy testing or voter out reach by the County. Secrecy Sleeve An envelope or folder of such design and dimensions as to hide from view the voted ballot while it is being carried by the voter from the voting booth to the stub removal station. If ballots are to be processed through the AutoMARK VAT in the polling place, the ballot remains in the secrecy sleeve after stub removal as the voter carries it to the tabulator. There the voter inserts the ballot into the throat of the tabulator, taking care that the secrecy sleeve is kept back from the ballot grasping devices at the throat. (If there is no likelihood that ballot secrecy would be compromised, it is suggested that the voter be encouraged to remove the ballot from the secrecy sleeve prior to insertion into the tabulator.) Please refer to California Election Code for use of a secrecy sleeve. Semi-Official Canvass The process of collecting, processing, and tallying ballots on election night. This may include reporting of results to the Secretary of State. The semi-official canvass may include some or all of the absent ballot vote totals. The semi-official canvass is contrasted with the official canvass which begins not later
Page 10 of 87
than the first Thursday following the election and, for statewide elections, must result in final certification 28 days following the election. Source Code The version of a computer program in which the programmer’s original programming statements are expressed in a source language which must be compiled, or assembled, and linked into equivalent machine-executable object code, thereby resulting in an executable software program. Source code comprises two generic categories: Vote Tally Software and Election Preparation Software for Precinct-based Tally Systems that produce election-specific firmware. Tests
• Accuracy Tests Accuracy tests verify that the AutoMARK VAT is operating correctly. Accuracy testing consists of inserting a ballot into the VAT, voting for candidates in each race, and printing the marked ballot. The ballot can then be manually checked that is was marked accurately, or can be inserted into the tabulator to insure that the marks are read correctly. All ballot styles and/or types are subjected to accuracy testing. All equipment used during the election should be tested for accuracy..
• Logic Tests Logic tests must be run both before and after processing official ballots for an election, and are generally confined either to the Election Results Summary System specified in item 1.2.32 or stand-alone, high speed optical scan ballot processing units. For a stand-alone, high speed ballot processing unit, the logic test group of ballots has predetermined totals for all contests on the ballot, with every candidate in a contest receiving a different number of votes than any other candidate in that contest. All ballot styles and/or ballot types are tested. For precinct based units such as the ES&S 100, logic testing encompasses the uploading of precinct(s) vote totals from a unit’s Memory Card to the Elections Results Summary System. Logic Test output can be in the form of a precinct or jurisdiction wide, election results press release bulletin, signed by the Logic and Accuracy Board. Submission of the vote tally programs and election specific files tested must be made to the Secretary of State not less than seven days before the election. The Secretary of State shall certify compliance and accuracy. This process shall take place prior to each election in which reports are electronically reported to the Secretary of State office.
System Proofing System proofing verifies that all materials, files, and programs for an election are correctly prepared. This proofing process occurs over a two week period sometime between 40 days prior to the election day and 14 days prior to election day. Logic and Accuracy Testing is included in system proofing. Any language translations must be provided by a court certified translation service. Date/Time Stamp Feature All entries on the Operations Log from the AutoMARK VAT are date/time stamped. Vote Both Sides Notification The instructional notations printed at the bottom of each side of a two-sided ballot, urging the voter to vote both the front and back sides of the ballot. Such notification is mandatory. On the AutoMARK VAT, the races are presented in the

order that they appear on the ballot, but there is no need to mention front or back, the voter will be alerted if he has not voted in each and every race. The actual ballot will be marked on both the front and back where applicable.
Election Coding Prior to use in any election, the electronic tabulator must be put in readiness to process ballots for that election via election preparation and ballot tabulation application software which must be certified for use by the Secretary of State. This software describes the offices, measures and voting response positions on each precinct’s ballots. It describes the number to be elected to each office, the results to be accumulated, the statistics to be accumulated, the reports and messages to be printed, the selection of ballot path and striping options and other parameters of a specific election. This software transfers or downloads these parameters, which are precinct or ballot style specific, to the tabulator via a Memory Card. This same Memory Card is used by the AIMS software to create the election database in a format for use by the AutoMARK VAT. The information is transferred via a second Flash Memory Card. The Memory Card The Memory Card used by the AutoMARK VAT is a reusable PCMCIA intermediate storage device which contains the election specific information required to present precinct level ballots for a given election to the voter.
1.2 Description of the AutoMARK VAT In a Precinct Ballot Tabulation System
The AutoMARK VAT is part of an optically scanned, precinct based, electronic voting system which is comprised of election definition and ballot generation software, ballots, a vote counting device and its associated firmware and report generating software. The AutoMARK VAT is used only for marking ballots by persons who are visually impaired, physically disabled, or more comfortable reading or hearing instructions and choices in an alternative language. The AutoMARK VAT does not store, count, or tabulate votes.
Page 12 of 87
2 Overview
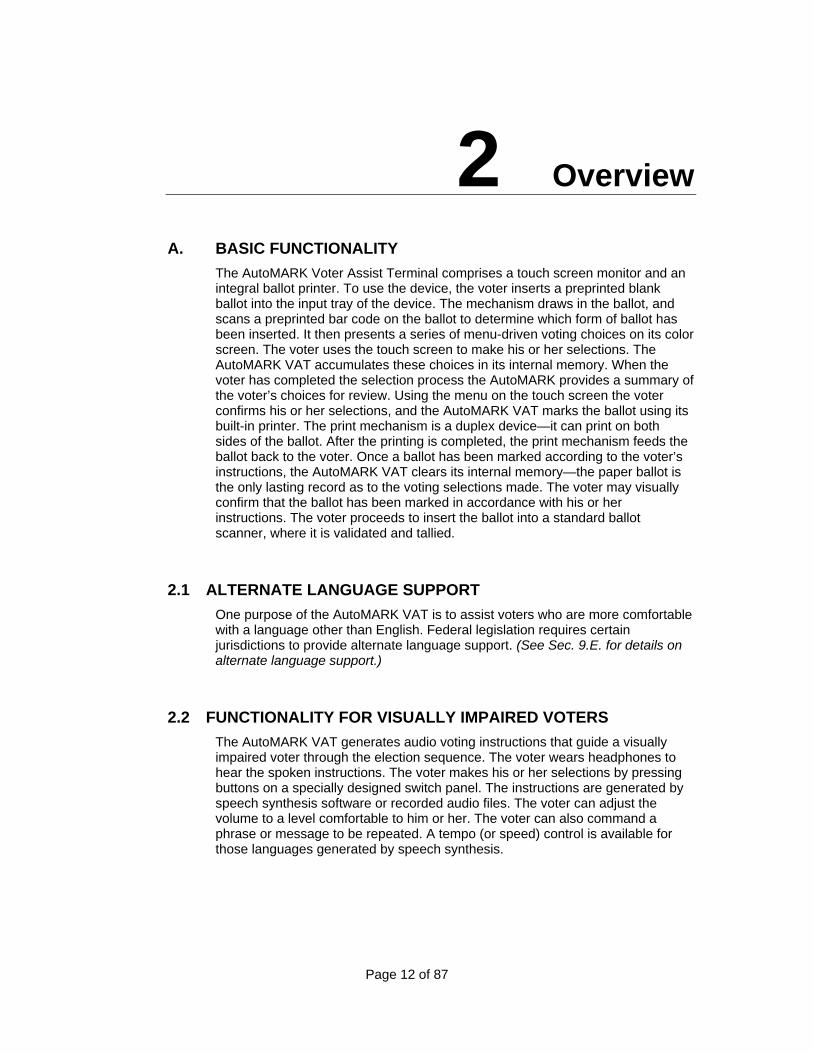
A. BASIC FUNCTIONALITY The AutoMARK Voter Assist Terminal comprises a touch screen monitor and an integral ballot printer. To use the device, the voter inserts a preprinted blank ballot into the input tray of the device. The mechanism draws in the ballot, and scans a preprinted bar code on the ballot to determine which form of ballot has been inserted. It then presents a series of menu-driven voting choices on its color screen. The voter uses the touch screen to make his or her selections. The AutoMARK VAT accumulates these choices in its internal memory. When the voter has completed the selection process the AutoMARK provides a summary of the voter’s choices for review. Using the menu on the touch screen the voter confirms his or her selections, and the AutoMARK VAT marks the ballot using its built-in printer. The print mechanism is a duplex device—it can print on both sides of the ballot. After the printing is completed, the print mechanism feeds the ballot back to the voter. Once a ballot has been marked according to the voter’s instructions, the AutoMARK VAT clears its internal memory—the paper ballot is the only lasting record as to the voting selections made. The voter may visually confirm that the ballot has been marked in accordance with his or her instructions. The voter proceeds to insert the ballot into a standard ballot scanner, where it is validated and tallied.
2.1 ALTERNATE LANGUAGE SUPPORT One purpose of the AutoMARK VAT is to assist voters who are more comfortable with a language other than English. Federal legislation requires certain jurisdictions to provide alternate language support. (See Sec. 9.E. for details on alternate language support.)
2.2 FUNCTIONALITY FOR VISUALLY IMPAIRED VOTERS The AutoMARK VAT generates audio voting instructions that guide a visually impaired voter through the election sequence. The voter wears headphones to hear the spoken instructions. The voter makes his or her selections by pressing buttons on a specially designed switch panel. The instructions are generated by speech synthesis software or recorded audio files. The voter can adjust the volume to a level comfortable to him or her. The voter can also command a phrase or message to be repeated. A tempo (or speed) control is available for those languages generated by speech synthesis.
2.3 DUAL-MODE BALLOT CONCEPT The fundamental system concept for the AutoMARK VAT is to provide a means for voters needing assistance in voting to mark a standard paper ballot. Voters who are comfortable with hand-marking a ballot will continue to vote in the standard way. As contrasted with competitive systems that use touch screen technology and electronic data capture exclusively, this architecture preserves the safeguard of a human-readable, verifiable, auditable paper ballot. In addition, this architecture does not force election jurisdictions to replace their existing ballot-scanning equipment, or their centralized election software. It reduces equipment costs by avoiding the need to have touch screen terminals for all voters. Based on recent experience that touch screen voting is actually slower for those voters who do not need special assistance, the dual-mode ballot concept speeds up voting and avoids congestion at the polling place, while providing access for those who require it.
2.4 Operating Functions The AutoMARK Voter Assist Terminal (VAT) offers the following functions:
• Marks voter selections on a standard ballot form in a human-readable format
• Provides Braille keypad and display shut-off to maintain privacy for voters who are visual impaired
• Provides audio and visual instructions in multiple languages • Processes multiple ballot types and sizes • Provides secure environment via a Compact Flash card protected in
a locked compartment
2.5 Operating Modes The VAT has three operating modes. Modes are selected via a key lock on the front of the terminal (see Figure 4.A.1). The three operating modes are as follows:
• Off. The system must be in ‘Off’ mode prior to unplugging the unit from power and packing for shipping.
• On. Select ‘On’ for selection functions. Voters use the system in this mode.
• Test. The ‘Test’ mode is used for verification testing prior to use in a polling place or to verify system updates.
2.6 Roles The election officials prepare the ballots and the election database to be used by the VAT. See The AutoMARK Information System Election Official’s Guide for more information.
Election officials and/or polling place staff unpack and install the system, conduct the verification test to determine the operational integrity, and are responsible for system shut down, maintenance, and packing. At the polling

Page 14 of 87
place, election officials setup the system hardware and perform the following operations:
• System Installation and Test • System Startup/Shutdown • Database Installation • System Test
Polling place staff (Poll Workers) also assist voters with gaining familiarity with the system, clearing paper jams, etc. (Poll Workers refer to AutoMARK Poll Worker’s Guide for information.)
Voters use the AutoMARK VAT to mark their ballot. (Voter procedures are described in the AutoMARK Voters Guide.)
.

Page 15 of 87
3 Safety Information
Read the safety information, precautions and procedures in this section carefully before attempting to operate the AutoMARK Voter Assist Terminal.
3.1 INDUSTRY REGULATORY REQUIREMENTS
The AutoMARK Voter Assist Terminal has been designed to comply with the industry regulatory requirements set forth in IEEE and Federal Election Commission (FEC) Voting System Standards (VSS), 2002. The Voter Assist Terminal complies with the basic product safety standard UL 60950-1: First Edition: Standard for Safety of Information Technology Equipment.
3.2 ELECTRICAL WORK AND SERVICE
The technical engineering staff of AutoMARK VAT Technical Systems LLC provides AutoMARK VAT electrical work and service.
3.3 LOCKOUT
The AutoMARK VAT has a key-activated switch that is located on the front panel of the enclosure. The key-activated switch is used to control the system’s operating mode. Key switch positions are described as follows:
Key Position Label Key Removable
Right TEST No Center ON Yes
Left OFF Yes
Note Special security keys are provided to access and activate this switch. These keys are to be used by authorized election officials only.
Page 16 of 87
When the key-activated switch is in the TEST or ON positions, the AutoMARK VAT is switched on and power is drawn from the AC power line (if available) or the battery (if AC power is unavailable). When the key-activated switch is in the TEST position, the AutoMARK VAT enters a Test Mode, which allows the election official to perform system setup, reporting, testing and maintenance functions. When the key-activated switch is moved to the ON position, the AutoMARK VAT is ready for normal operations. When the system is powered up and the key-activated switch is moved to the OFF position, AC power continues to be supplied to the AutoMARK VAT. However, current is only drawn for recharging the battery while the key switch is in the OFF position. The terminal is shut down only when the key switch is in the OFF position.
3.4 HAZARD LABELS
Industry standard danger, warning, and caution labels are affixed to all hardware components that may cause hazardous results if accessed incorrectly.
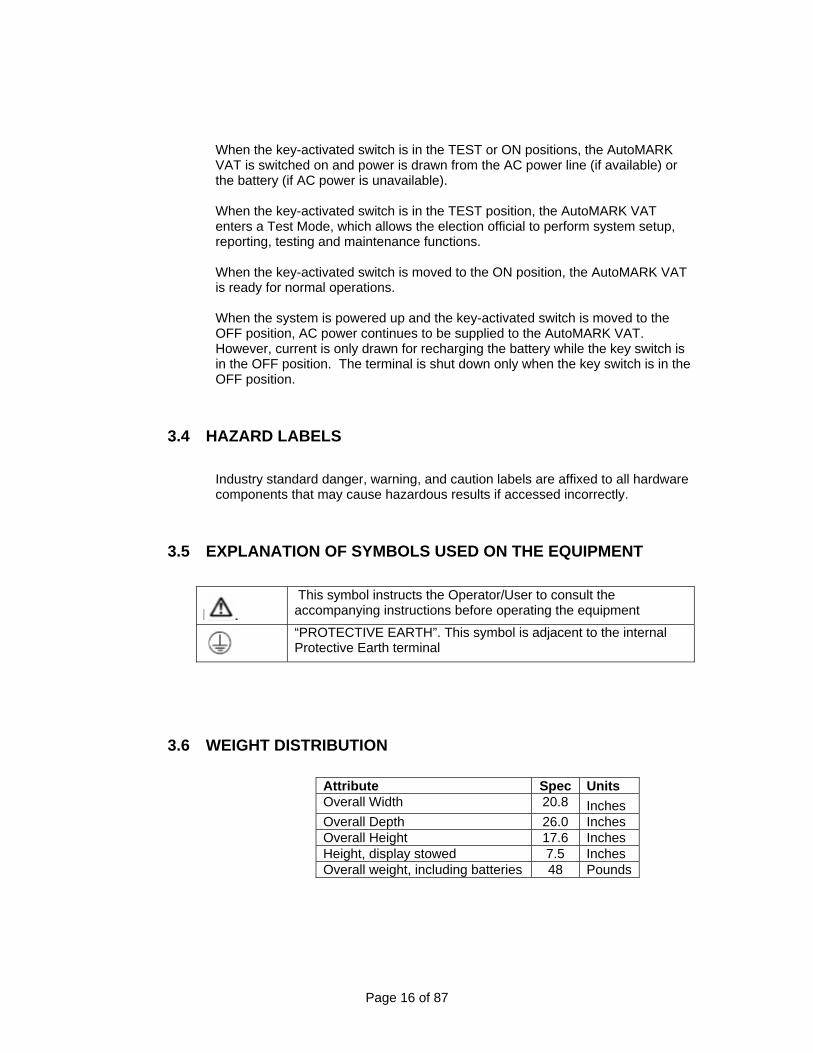
3.5 EXPLANATION OF SYMBOLS USED ON THE EQUIPMENT
This symbol instructs the Operator/User to consult the accompanying instructions before operating the equipment
“PROTECTIVE EARTH”. This symbol is adjacent to the internal Protective Earth terminal
3.6 WEIGHT DISTRIBUTION
Attribute Spec Units Overall Width 20.8 Inches Overall Depth 26.0 Inches Overall Height 17.6 Inches Height, display stowed 7.5 Inches Overall weight, including batteries 48 Pounds

3.7 SYSTEM POWER
The AutoMARK VAT contains a built-in power supply that operates from standard AC line voltages. It also includes batteries with sufficient capacity to allow the unit to continue to operate for at least 2 hours after loss of AC power. Specifications are described below.
Attribute Spec Units Input Power Voltage 93-264 VAC Input Power Frequency 45-66 Hz Battery Hold-Up, Minimum 2 Hours
The AutoMARK VAT has a pilot light and battery monitor (bi-color LED) lamp on the front panel that indicates the current status of the power supply. Specifications are described below.
LED Attribute Power Source Battery Status Steady Green AC Power Batteries Charged Blinking Green AC Power Batteries Low or Discharged Steady Yellow Battery Power Batteries Charged Blinking Yellow Battery Power Batteries Low Steady Red AC Power/key
switch off
Since there is no power switch for the AC Mains Supply, the Disconnect Means for the equipment is the plug on the power supply cord-set (or the Appliance Inlet connector on the rear of the unit) The Mains socket-outlet shall be installed near the equipment and be readily accessible. To remove all power from the equipment, both the AC Mains Plug and the DC Plug of the external Charger must be disconnected from the equipment. Complete Mains electrical rating: 120V~ 60Hz 1.5A. Mains supply voltage fluctuations are not to exceed +10% percent of the rated supply voltage range. The equipment is suitable for continuous operation.
3.8 Battery Replacement The Lithium-Ion Battery Pack (and the 3V lithium coin cell battery in the Single Board Computer) is replaceable only by Authorized Service Personnel. “CAUTION: RISK OF EXPLOSION IF BATTERY IS REPLACED BY AN INCORRECT TYPE. DISPOSE OF USED BATTERIES ACCORDING TO LOCAL REGULATIONS AND CONVENTIONS.”

Page 18 of 87
3.9 Environmental Conditions for Transport and Storage The AutoMARK VAT is intended for indoor use only. The AutoMARK VAT is designed for the following environmental conditions:
CONDITION MINIMUM MAXIMUM UNITS OPERATION 50 104 °F 10% 50% RELATIVE HUMIDITY STORAGE -4 140 °F 10% 85% RELATIVE HUMIDITY TRANSPORT -4 140 °F 10% 85% RELATIVE HUMIDITY
A shipping container is available for the AutoMARK VAT. It provides sufficient padding and protection to permit long-distance shipment of the unit via common carrier.
3.10 Additional Safety Instructions and Required Specifications
1. Indoor Use Only 2. Ordinary Protection (Not protected against harmful ingress of moisture) 3. Class I Equipment (Grounded Type) 4. Electrical rating: 120V~ 60Hz 1.5A 5. Mains supply voltage fluctuations are not to exceed +10% percent of the rated supply voltage range. 6. Pollution Degree 2 for the ambient environment 7. Installation (Over-voltage) Category II for transient over-voltages
Page 19 of 87
4 How a Voter Uses the VAT
The AutoMARK VATTM Voter Assist Terminal (VAT) is used to mark the ballot selections of voters who are visually impaired, have a disability, or who are more comfortable using an alternative language. Ballot choices and instructions are displayed in large text print on the touch screen monitor, as well as read by the audio system in the language choice selected by the voter. Voters enter their selections by touching buttons on the screen, pressing keys on the keypad, or using an ADA device. The AutoMARK VAT marks a ballot with the voter’s selections and returns it to the voter. The voter can then submit the marked ballot in the normal manner for tabulation. This guide contains information on how to set up the AutoMARK VAT prior to an election and how to maintain the AutoMARK VAT between elections.
4.1 Features of the AutoMARK VAT A voter can use the AutoMARK VAT to mark a ballot by using:
The touch screen The Braille keypad An ADA device (such as puff-sip or foot pedal)
The AutoMARK VAT has the capability to display ballots in alternate languages. Language choices are determined by individual jurisdictions. If the jurisdiction does not choose to allow alternate languages, the voter will not see the Language Screen, and the only Language available will be English. The audio matches the language selected. The AutoMARK VAT has several privacy features. Audio volume can be increased or decreased as desired, and the screen can be turned on and off for privacy. If you want to use the audio system to listen to ballot choices and instructions, you will use the audio keys on the keypad (shown on the following page) to control audio sound. A jurisdiction can provide headphones with disposable earpieces. The AutoMARK VAT also has a ZOOM MODE feature which enlarges the text on the screen, and a High Contrast mode which gives contrast to the screen resolution, for those who are visually impaired.

How a Voter Uses the VAT
Page 20 of 87
The AutoMARK VAT consists of the labeled components shown in the picture below.
Touch Screen Monitor
Ballot Feed Tray Headphone Jacks
Cable Port “future use”
ADA Port
Keypad
Forward/Next
Scroll Up Select Back Scroll Down
Screen On
Audio Repeat Audio Speed - Decrease + Increase Volume - Decrease+ Increase
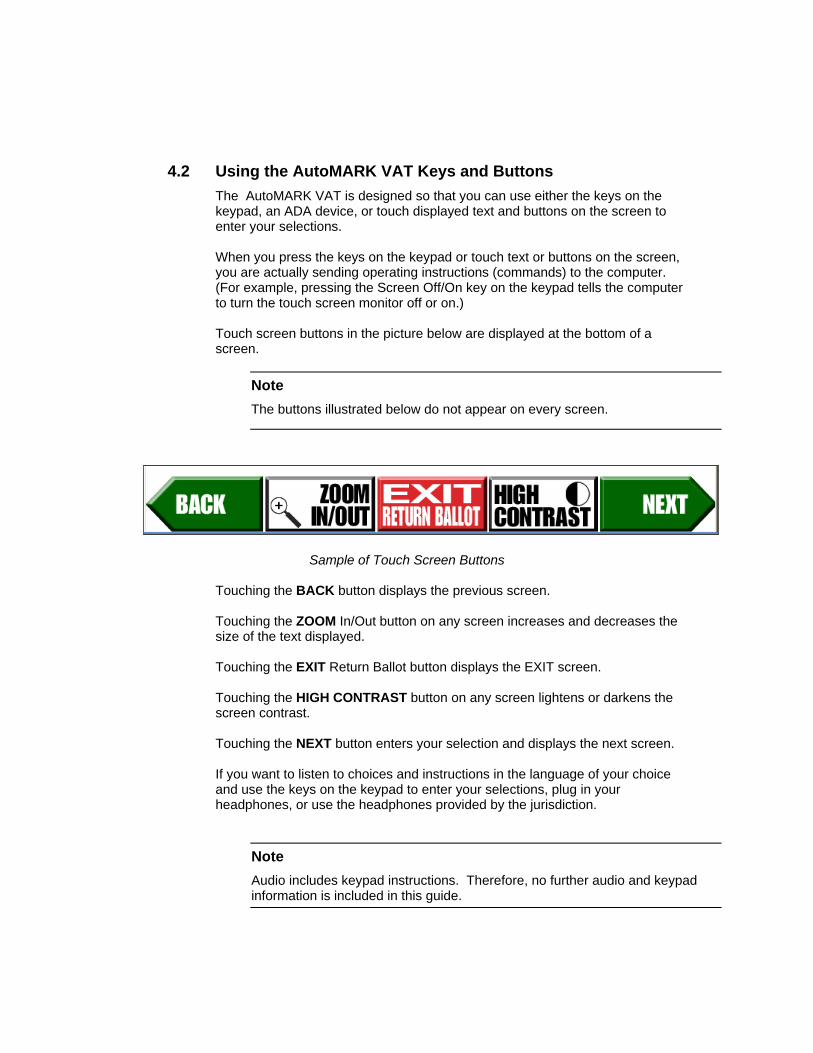
4.2 Using the AutoMARK VAT Keys and Buttons The AutoMARK VAT is designed so that you can use either the keys on the keypad, an ADA device, or touch displayed text and buttons on the screen to enter your selections. When you press the keys on the keypad or touch text or buttons on the screen, you are actually sending operating instructions (commands) to the computer. (For example, pressing the Screen Off/On key on the keypad tells the computer to turn the touch screen monitor off or on.) Touch screen buttons in the picture below are displayed at the bottom of a screen.
Note The buttons illustrated below do not appear on every screen.
Sample of Touch Screen Buttons
Touching the BACK button displays the previous screen. Touching the ZOOM In/Out button on any screen increases and decreases the size of the text displayed. Touching the EXIT Return Ballot button displays the EXIT screen. Touching the HIGH CONTRAST button on any screen lightens or darkens the screen contrast. Touching the NEXT button enters your selection and displays the next screen. If you want to listen to choices and instructions in the language of your choice and use the keys on the keypad to enter your selections, plug in your headphones, or use the headphones provided by the jurisdiction.
Note Audio includes keypad instructions. Therefore, no further audio and keypad information is included in this guide.

How a Voter Uses the VAT
Page 22 of 87
4.3 Using an ADA Input Device The AutoMARK VAT provides an interface for an input device for disabled voters to indicate their selections. This device is often called an ADA device, after the Americans with Disabilities Act, which requires that access be provided to citizens with disabilities. The ADA input device allows the voter to make his or her selections, in place of either the touchscreen, or the keypad, on the AutoMARK machine. ADA input devices supported include a sip and puff device, a paddle switch, a floor switch, or any similar two-position switching device that is comfortable for the voter and meets the electrical specifications below. Typically the voter brings his or her own device to the polling place. The AutoMARK VAT supports a type of electrical interface standard called DSA, dual-switch access. The ADA input device plugs into the 3.5 mm “stereo” jack in the right section of the ACCESS area on the front panel of the AutoMARK VAT. Within the input device there are two momentary switches. These switches are connected to a cable terminated with a 3.5 mm stereo plug. One switch connects to the TIP connection on the stereo plug, and the other switch connects to the RING pin on the stereo plug. Each switch is normally open. When actuated by the user, the switch closes either the TIP or the RING circuit to the common BARREL shaft of the stereo plug. Electrical specifications for the two switches within the ADA input device: switch contact resistance when a switch is closed, less than 100 ohms. DC current handling capability, 5 milliamperes. These specifications are readily met by DSA devices in the market that have been tested by Automark Technical Systems. Circuitry within the AutoMARK VAT detects when an ADA input device has been inserted into the jack, and activates a special interface mode. The sequences of choices on the LCD screen in ADA input mode are adapted to accept either of two responses, YES and NO, or UP and DOWN, or LEFT and RIGHT, as may be suitable in context for the selections being made. Likewise, the audio prompts that are available at the headphone outputs are also adapted for this two-switch interface mode.
The AutoMARK VAT is designed to work with ADA devices such as:
Puff-sip Foot Pedal
The AutoMARK VAT allows a Voter with an ADA device to perform all of the selections available on the key pad or touch screen. When using an ADA device the system responds to a yes or no action. The AutoMARK VAT allows you to complete a ballot entirely with the aid of and ADA device. Instructions for Use of an ADA device: When a screen is displayed, you may select NO to bypass that screen or YES to move to the first selectable choice on that screen. When you are on a selectable item of the screen, the item will be highlighted in yellow. Selecting NO will move

on to the next selectable item on the screen. Selecting YES will provide the same results as if you had clicked on that item. When on a candidate or question choice YES will select or deselect that candidate. When on a MORE scroll bar, YES will cause the screen to scroll up or down as indicated. When on a screen button, YES will invoke that action. For example, entering YES when ZOOM is highlighted will cause the screen to ZOOM. Entering YES again, will return the screen to non-zoomed mode. Pressing NO at any time will move to the next highlighted item. As you enter NO repeatedly, the highlight will move down the screen, across the bottom from right to left and then loop back to the top. When you are done making selections on any given screen, enter NO repeatedly until the yellow highlight is on the NEXT button and then enter YES to move to the next screen. If you encounter a problem operating the AutoMARK Voter Assist Terminal, please ask an election official for assistance.
Page 24 of 87
5 For the Voter : How to Use the VAT
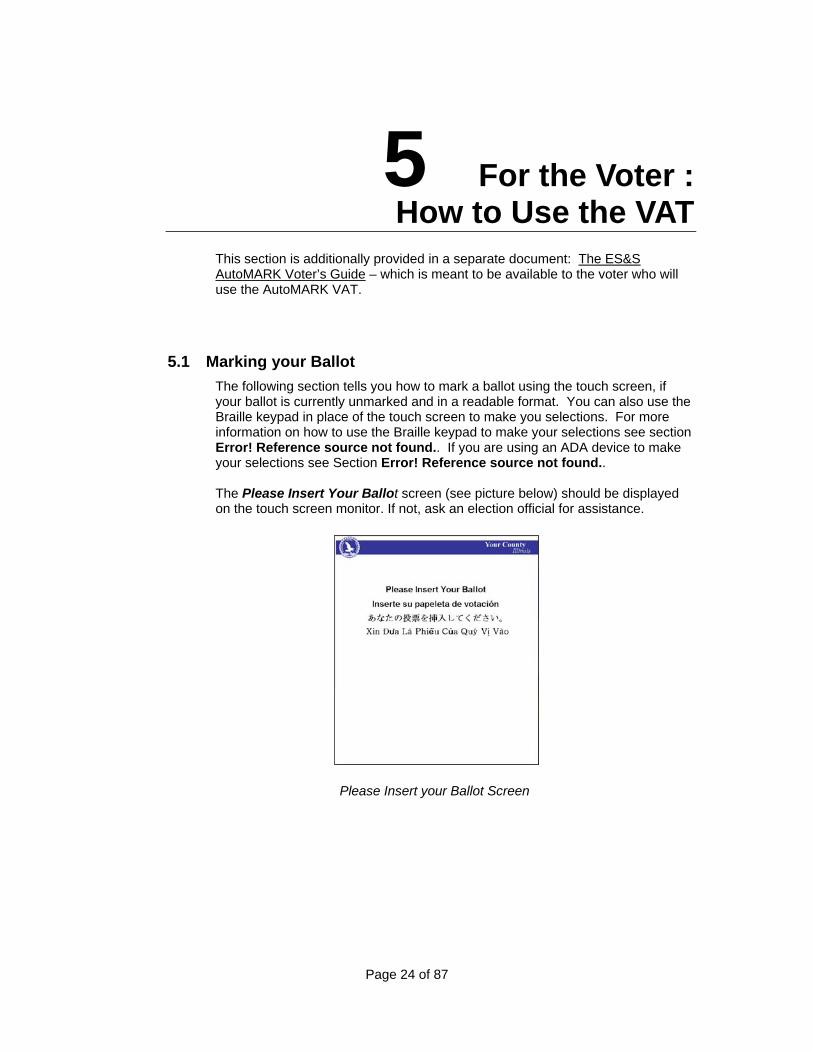
This section is additionally provided in a separate document: The ES&S AutoMARK Voter’s Guide – which is meant to be available to the voter who will use the AutoMARK VAT.
5.1 Marking your Ballot The following section tells you how to mark a ballot using the touch screen, if your ballot is currently unmarked and in a readable format. You can also use the Braille keypad in place of the touch screen to make you selections. For more information on how to use the Braille keypad to make your selections see section Error! Reference source not found.. If you are using an ADA device to make your selections see Section Error! Reference source not found.. The Please Insert Your Ballot screen (see picture below) should be displayed on the touch screen monitor. If not, ask an election official for assistance.
Please Insert your Ballot Screen
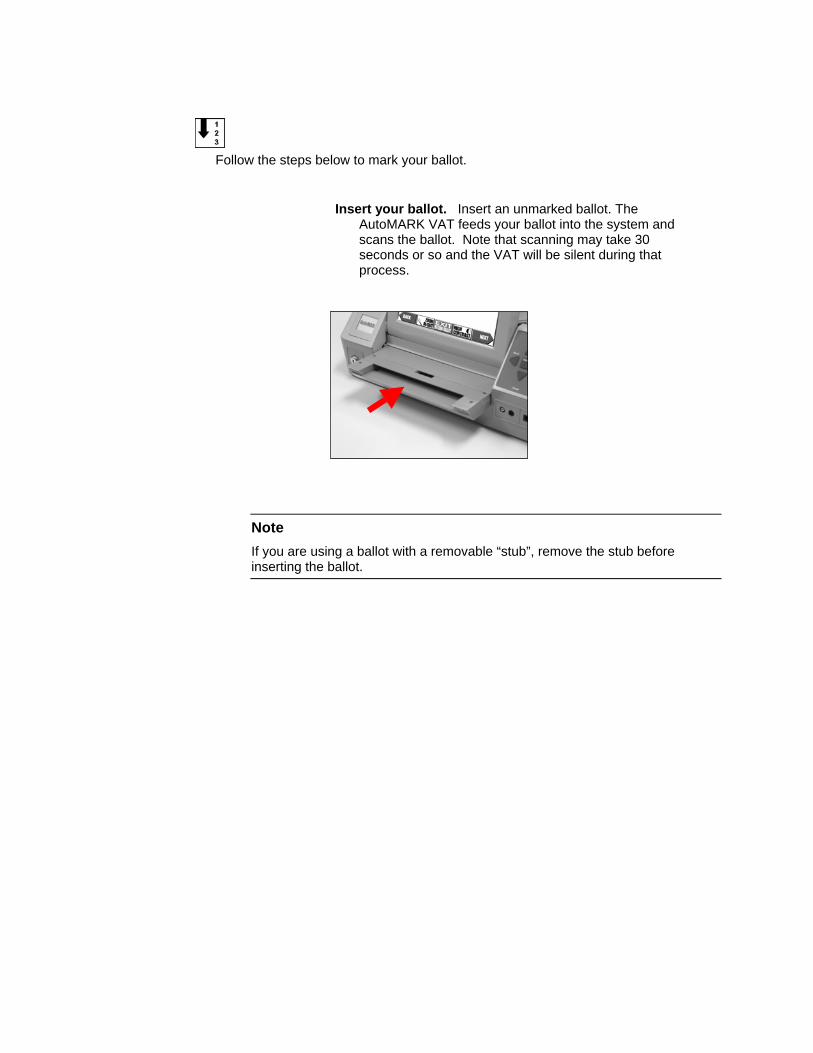
Follow the steps below to mark your ballot.
Insert your ballot. Insert an unmarked ballot. The
AutoMARK VAT feeds your ballot into the system and scans the ballot. Note that scanning may take 30 seconds or so and the VAT will be silent during that process.
Note If you are using a ballot with a removable “stub”, remove the stub before inserting the ballot.

For the Voter : How to Use the VAT
Page 26 of 87
Once you insert your ballot the Language Selection screen is displayed. (See below)
Language Selection Screen
Note
If there is only one language choice at your polling place, the next screen is displayed automatically.
Select your language. When multiple language choices
are listed on the Language Selection screen, touch the language button to make a choice.
Note
If you touch the NEXT button before selecting a language, the default language is selected for you.
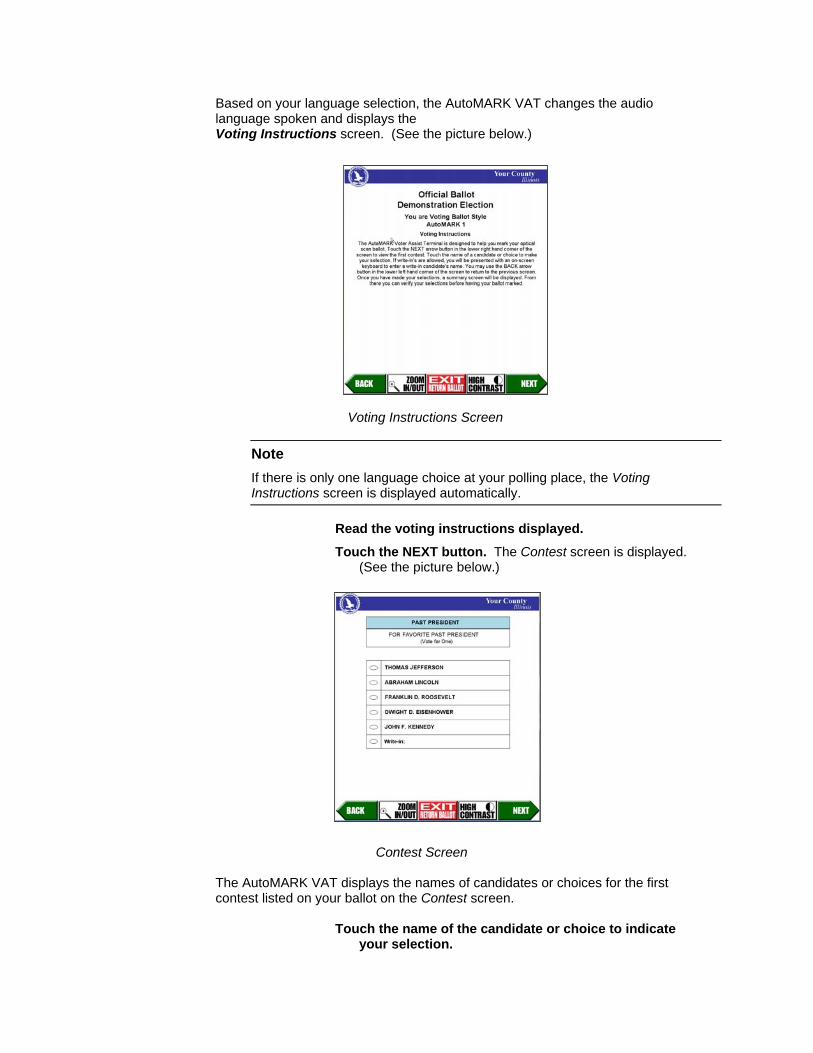
Based on your language selection, the AutoMARK VAT changes the audio language spoken and displays the Voting Instructions screen. (See the picture below.)
Voting Instructions Screen
Note If there is only one language choice at your polling place, the Voting Instructions screen is displayed automatically.
Read the voting instructions displayed.
Touch the NEXT button. The Contest screen is displayed. (See the picture below.)
Contest Screen The AutoMARK VAT displays the names of candidates or choices for the first contest listed on your ballot on the Contest screen.
Touch the name of the candidate or choice to indicate your selection.
For the Voter : How to Use the VAT
Page 28 of 87
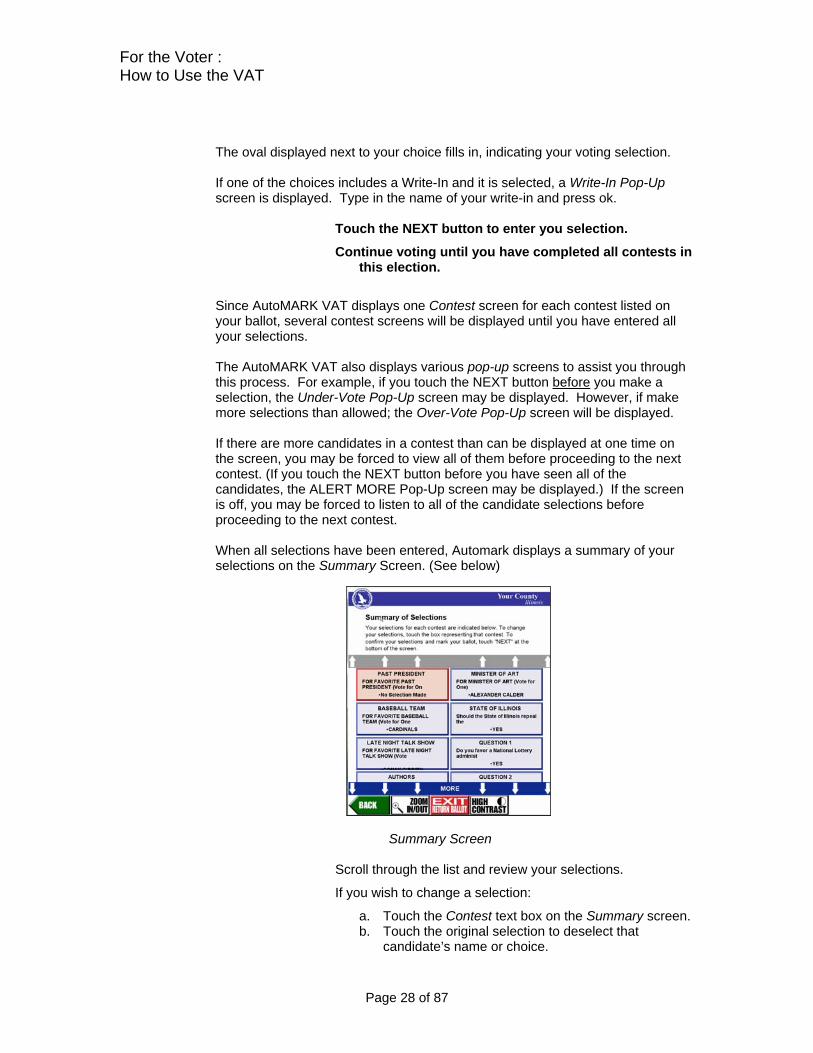
The oval displayed next to your choice fills in, indicating your voting selection. If one of the choices includes a Write-In and it is selected, a Write-In Pop-Up screen is displayed. Type in the name of your write-in and press ok.
Touch the NEXT button to enter you selection.
Continue voting until you have completed all contests in this election.
Since AutoMARK VAT displays one Contest screen for each contest listed on your ballot, several contest screens will be displayed until you have entered all your selections. The AutoMARK VAT also displays various pop-up screens to assist you through this process. For example, if you touch the NEXT button before you make a selection, the Under-Vote Pop-Up screen may be displayed. However, if make more selections than allowed; the Over-Vote Pop-Up screen will be displayed. If there are more candidates in a contest than can be displayed at one time on the screen, you may be forced to view all of them before proceeding to the next contest. (If you touch the NEXT button before you have seen all of the candidates, the ALERT MORE Pop-Up screen may be displayed.) If the screen is off, you may be forced to listen to all of the candidate selections before proceeding to the next contest. When all selections have been entered, Automark displays a summary of your selections on the Summary Screen. (See below)
Summary Screen
Scroll through the list and review your selections.
If you wish to change a selection:
a. Touch the Contest text box on the Summary screen. b. Touch the original selection to deselect that
candidate’s name or choice.
c. Touch your new choice and the NEXT button to return to the Summary screen.
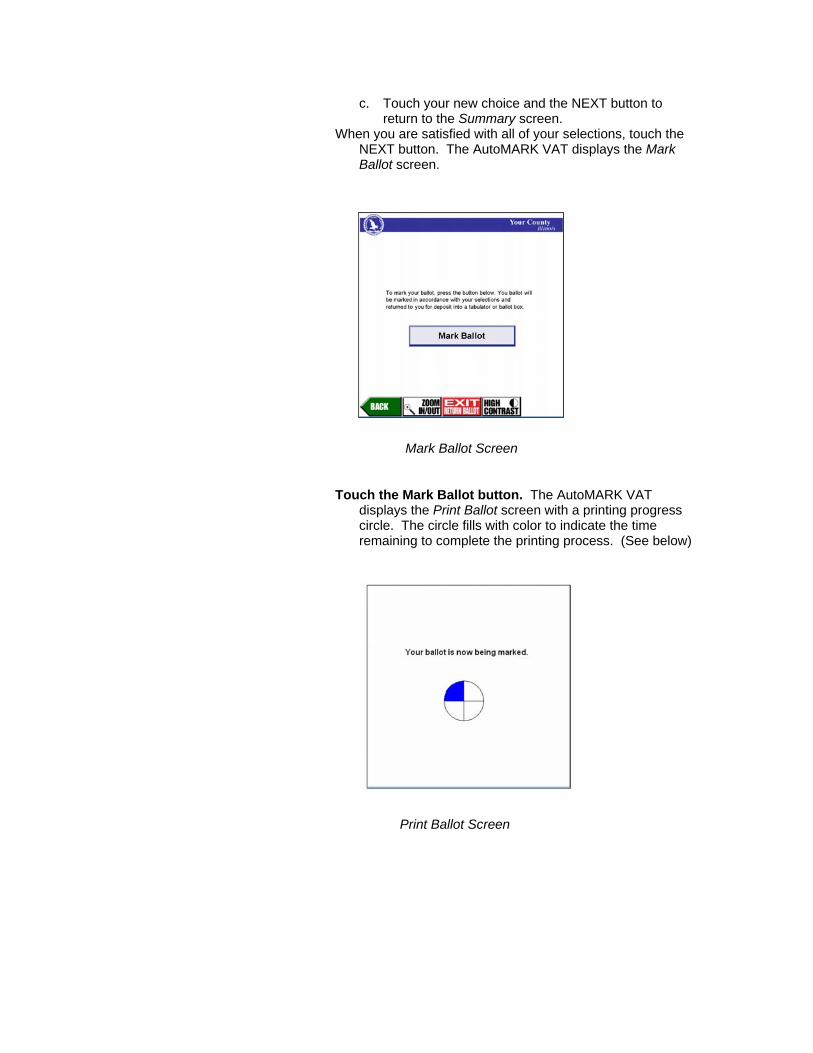
When you are satisfied with all of your selections, touch the NEXT button. The AutoMARK VAT displays the Mark Ballot screen.
Mark Ballot Screen
Touch the Mark Ballot button. The AutoMARK VAT displays the Print Ballot screen with a printing progress circle. The circle fills with color to indicate the time remaining to complete the printing process. (See below)
Print Ballot Screen
For the Voter : How to Use the VAT
Page 30 of 87
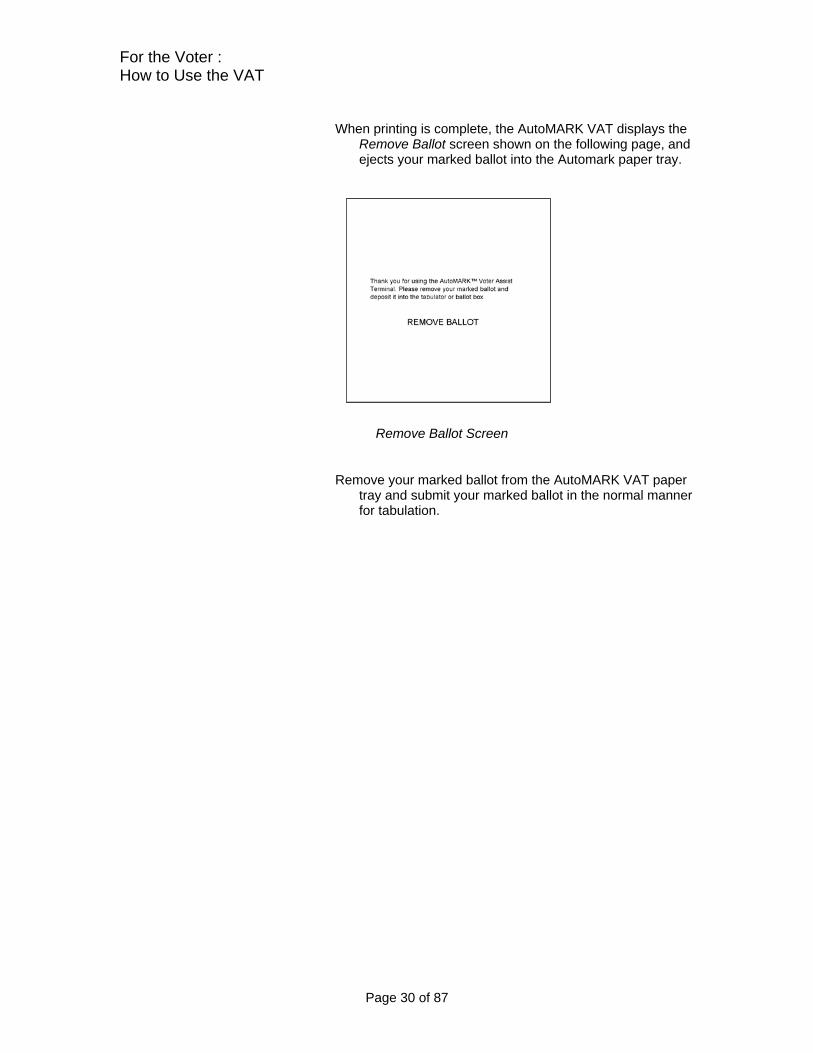
When printing is complete, the AutoMARK VAT displays the Remove Ballot screen shown on the following page, and ejects your marked ballot into the Automark paper tray.
Remove Ballot Screen
Remove your marked ballot from the AutoMARK VAT paper tray and submit your marked ballot in the normal manner for tabulation.
Page 31 of 87
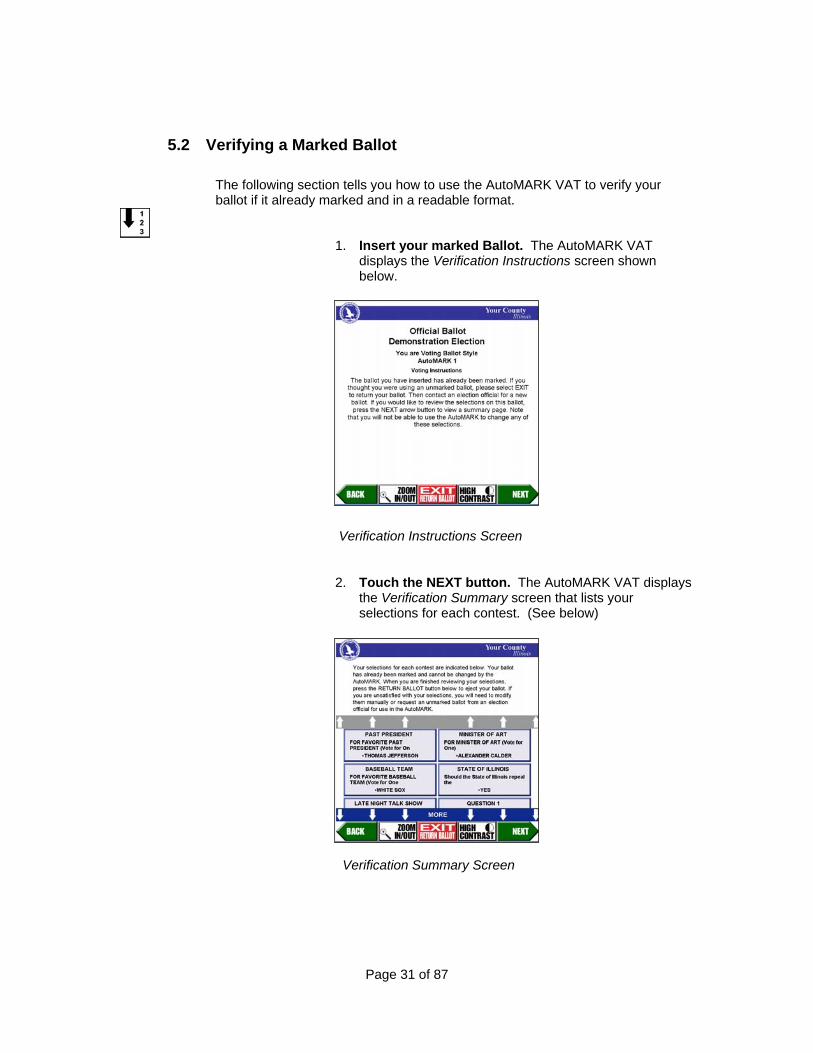
5.2 Verifying a Marked Ballot The following section tells you how to use the AutoMARK VAT to verify your ballot if it already marked and in a readable format.
1. Insert your marked Ballot. The AutoMARK VAT
displays the Verification Instructions screen shown below.
Verification Instructions Screen
2. Touch the NEXT button. The AutoMARK VAT displays the Verification Summary screen that lists your selections for each contest. (See below)
Verification Summary Screen

For the Voter : How to Use the VAT
Page 32 of 87
3. Review the selections that are marked on your ballot.
4. Touch the EXIT button when you are finished verifying your marked ballot selections. The Remove Ballot screen is shown below. The AutoMARK VAT ejects your ballot into the paper tray.
Remove Ballot Screen
5. Remove your marked ballot from the paper tray and submit your marked ballot in the normal manner for tabulation (placing the ballot in the secrecy sleeve and inserting into tabulator).
Note When verifying a marked ballot, the AutoMARK VAT cannot make any changes to your ballot. If you are not satisfied with your marked selections, contact an election official and request a new ballot.

Page 33 of 87
5.3 Frequently Asked Questions
The following is a list of frequently asked questions and situations you may encounter while using the AutoMARK VAT to mark your ballot. The AutoMARK VAT is designed to make marking your ballot as easy as possible. If you encounter a situation that is not listed in this section, contact your election official for help.
Ballot is not readable
Reasons:
Ballot style is not used at this polling place
Ballot is damaged
The AutoMARK VAT displays the Error - Ballot Not Readable pop-up screen and ejects the ballot into the paper tray.
1. Remove your ballot from the paper tray and try inserting it again or contact an election official for assistance.
Error- Ballot Not Readable Screen
For the Voter : How to Use the VAT
Page 34 of 87
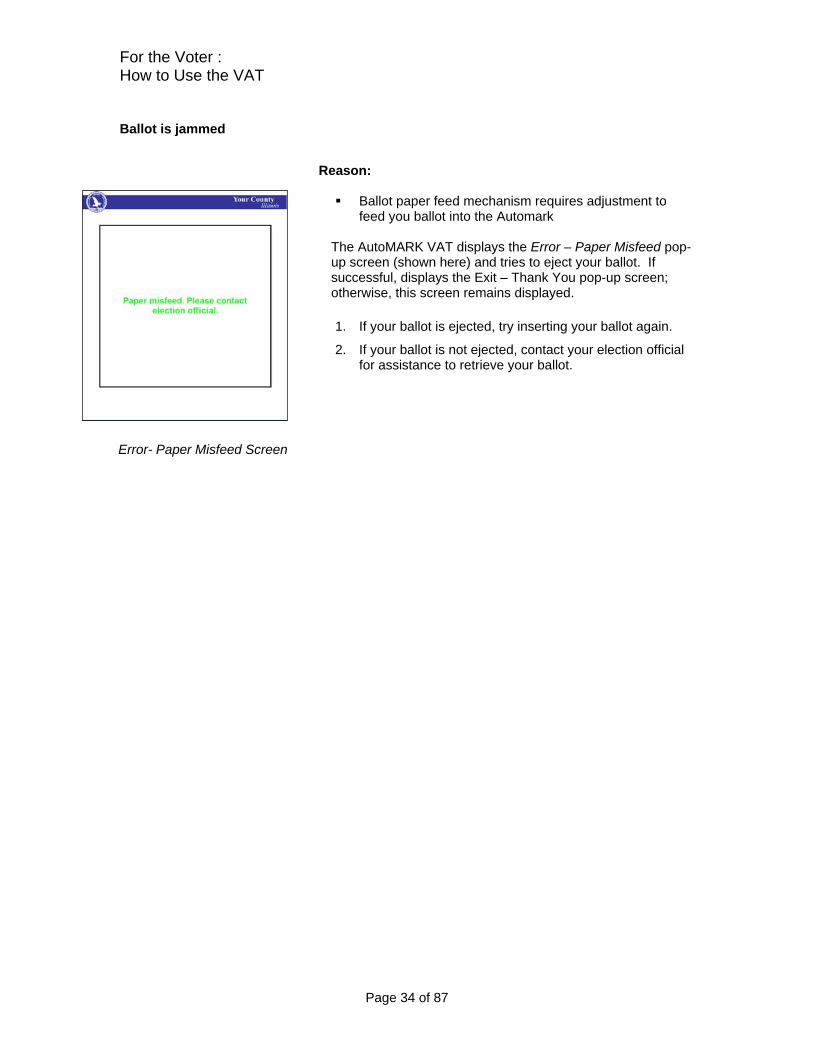
Ballot is jammed
Reason:
Ballot paper feed mechanism requires adjustment to
feed you ballot into the Automark
The AutoMARK VAT displays the Error – Paper Misfeed pop-up screen (shown here) and tries to eject your ballot. If successful, displays the Exit – Thank You pop-up screen; otherwise, this screen remains displayed.
1. If your ballot is ejected, try inserting your ballot again.
2. If your ballot is not ejected, contact your election official for assistance to retrieve your ballot.
Error- Paper Misfeed Screen

What Is a Pop-up Screen? Pop-up screens display messages that require your response before you can continue marking, verifying, or printing your ballot selections. The following pop-up screens may be displayed:
MORE ALERT
The AutoMARK VAT displays the More Alert pop-up screen when all candidates or choices cannot be seen without scrolling or you did not scroll down to view all choices and the word More was listed at the bottom of the list of candidates.
1. Touch the YES button to return to the current Contest
screen and select MORE to review additional candidate names.
2. Touch the NO button to display the next screen.
More Alert
Force more alert
The AutoMARK VAT displays the Force More Alert pop-up screen when all candidates or choices cannot be seen without scrolling or you did not scroll down to view all choices and the word “More” was listed at the bottom of the list of candidates. In this case, the system will not let you display the next screen until you have reviewed all candidates listed.
1. Touch the OK button to return to the current Contest
screen and select MORE to review additional candidate names.
Force More Alert
For the Voter : How to Use the VAT
Page 36 of 87
WRITE-IN
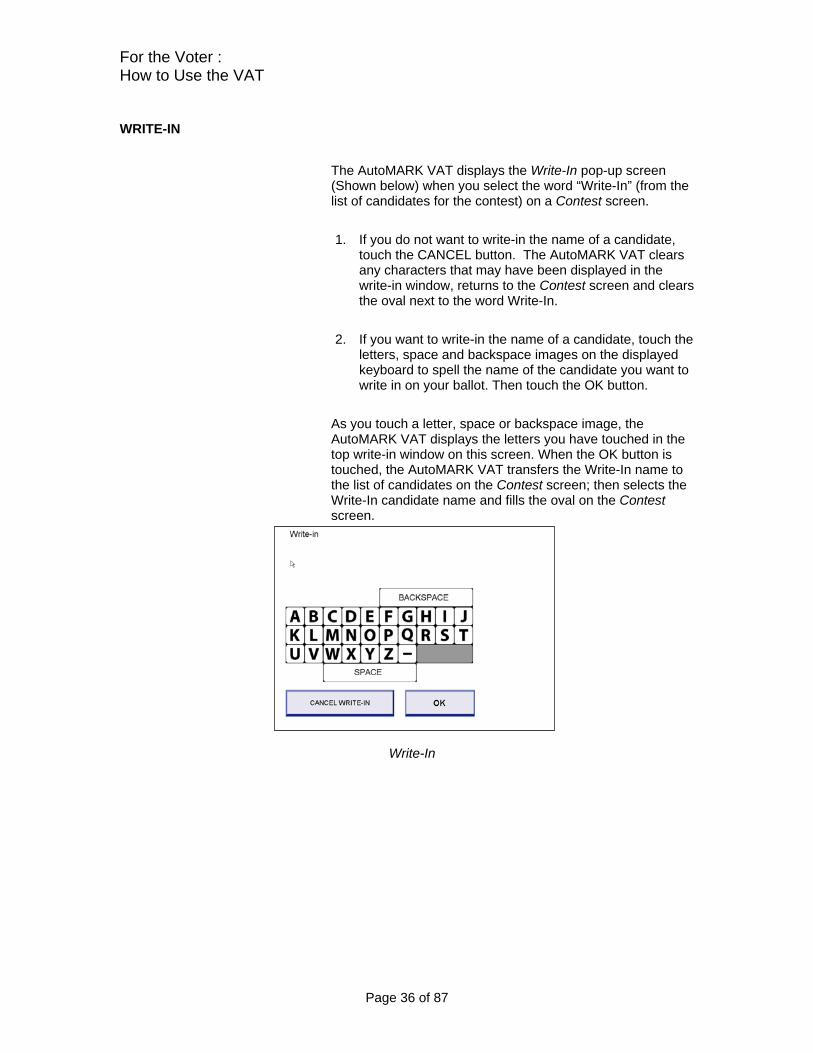
The AutoMARK VAT displays the Write-In pop-up screen (Shown below) when you select the word “Write-In” (from the list of candidates for the contest) on a Contest screen.
1. If you do not want to write-in the name of a candidate, touch the CANCEL button. The AutoMARK VAT clears any characters that may have been displayed in the write-in window, returns to the Contest screen and clears the oval next to the word Write-In.
2. If you want to write-in the name of a candidate, touch the
letters, space and backspace images on the displayed keyboard to spell the name of the candidate you want to write in on your ballot. Then touch the OK button.
As you touch a letter, space or backspace image, the AutoMARK VAT displays the letters you have touched in the top write-in window on this screen. When the OK button is touched, the AutoMARK VAT transfers the Write-In name to the list of candidates on the Contest screen; then selects the Write-In candidate name and fills the oval on the Contest screen.
Write-In
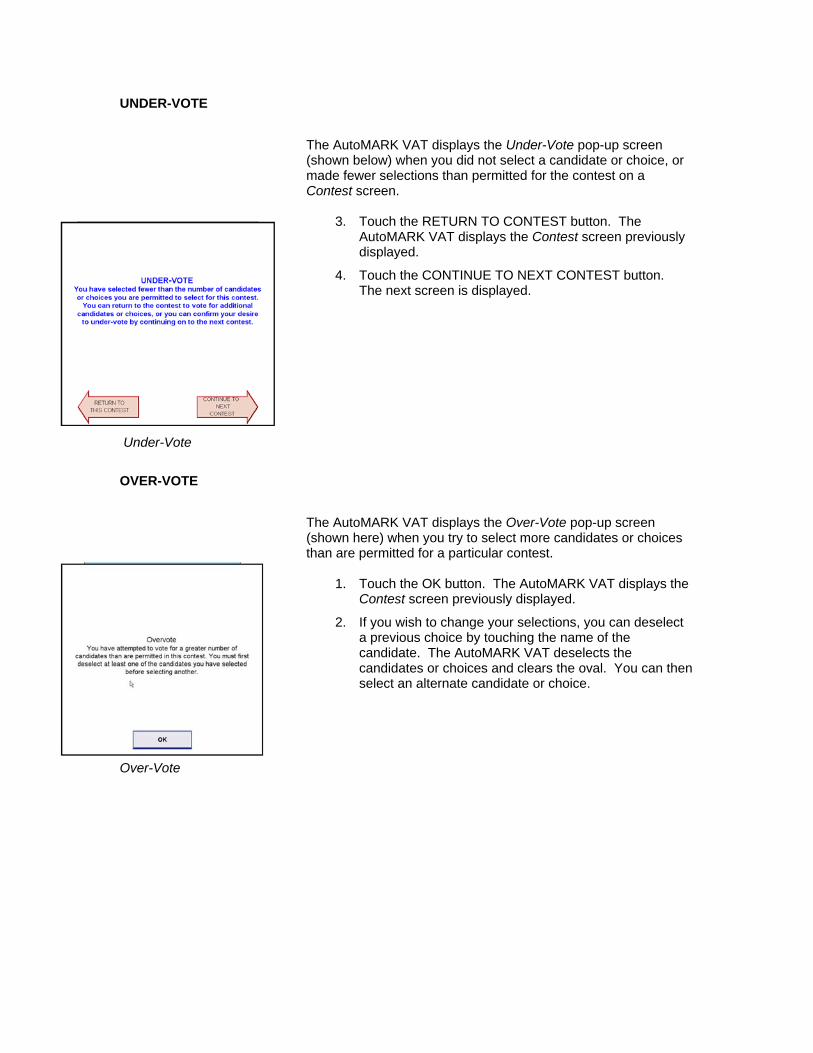
UNDER-VOTE
The AutoMARK VAT displays the Under-Vote pop-up screen (shown below) when you did not select a candidate or choice, or made fewer selections than permitted for the contest on a Contest screen.
3. Touch the RETURN TO CONTEST button. The
AutoMARK VAT displays the Contest screen previously displayed.
4. Touch the CONTINUE TO NEXT CONTEST button. The next screen is displayed.
Under-Vote
OVER-VOTE
The AutoMARK VAT displays the Over-Vote pop-up screen (shown here) when you try to select more candidates or choices than are permitted for a particular contest.
1. Touch the OK button. The AutoMARK VAT displays the
Contest screen previously displayed.
2. If you wish to change your selections, you can deselect a previous choice by touching the name of the candidate. The AutoMARK VAT deselects the candidates or choices and clears the oval. You can then select an alternate candidate or choice.
Over-Vote

For the Voter : How to Use the VAT
Page 38 of 87
EXIT
The AutoMARK VAT displays the Exit pop-up screen (shown here) when you touch the EXIT button before you have completed the voting process.
1. Touch the CONTINUE button to return to the last screen
displayed and continue the voting process.
2. Touch the EXIT button to confirm your decision to exit the system and receive your unmarked ballot.
EXIT EXIT THANK YOU
The AutoMARK VAT displays the EXIT Thank You screen (shown below) and ejects your unmarked ballot into the paper tray.
3. Remove your unmarked ballot from the paper tray.
The AutoMARK VAT displays the Insert Your Ballot screen when the ballot is removed from the paper tray.
Exit Thank You

5.4 How Do I Exit without Marking the Ballot ? To exit without marking the ballot, you can press the BACK key repeatedly, or you can press the SCREEN Key four times in a row.

Page 40 of 87
6 Pre-Election Procedures for the Election Official
This document guides the Election Official in preparing the VAT for use in an election in the State of California. The following steps must occur – an exact time line is not given, but the VAT preparation should be completed and verified well before the election day.
1
Prepare the actual ballots which will be used in the election, and the Election data files, using ballot preparation software.
See the manual which comes with the ballot preparation software for details
2 Import the data files created in Step 1 into AIMS
3
Test that the ballots are set up correctly and that the data was imported correctly by using the AIMS Preview function
4 Create Flash Memory Card
See the AutoMARK Information Management System (AIMS) Election Official’s Guide for details
5 Set the current time and date on the VAT:
6 Install a New Ink Cartridge
7 Charge the battery (if installed).
8 Install correctly programmed Flash Memory Card
9 Test the AutoMARK VAT operations to ensure full functionality of the system
10 Using new Flash Memory Card and ballots, print test ballot(s) on VAT to verify that the data is correct.
This should be completed at least one week prior to the election.
11 Install VAT at polling place before polls open
The instructions for performing the procedures are described in the rest of this chapter.
Note If you need more information about the Flash Memory Card, or information on how to program a Flash Memory Card, see the AutoMARK Information Management System (AIMS) Election Official’s Guide documentation. This documentation is provided with the AIMS Software, which is used to program the Flash Memory Card.
6.1 Prepare the actual ballots which will be used in the election, and the Election data files
This is done with Ballot Preparation Software which is not covered in this document. See the documentation which is provided with the ballot preparation software.
6.2 Import the data files created in Step 1 into AIMS See the AutoMARK Election Official’s Guide for information.
6.3 Test that the ballots are set up correctly and that the data was imported correctly by using the AIMS Preview function
See the AutoMARK Election Official’s Guide for information.
6.4 Create Flash Memory Card See the AutoMARK Election Official’s Guide for information
6.5 Setting the Date and Time on the AutoMARK VAT You can set the date and time that the Automark uses for logging operations in the various operations and diagnostic logs. See Section 9.2 of this document for details.
6.6 INSTALLING A NEW INK CARTRIDGE
The AutoMARK VAT system is shipped without the ink cartridge installed. The ink cartridge should be installed prior to using the system for voting. The system writes with an Inkjet print cartridge from Hewlett Packard. This is a black-only ink cartridge. A new print cartridge should be installed prior to each election.
Pre-Election Procedures for the Election Official
Page 42 of 87
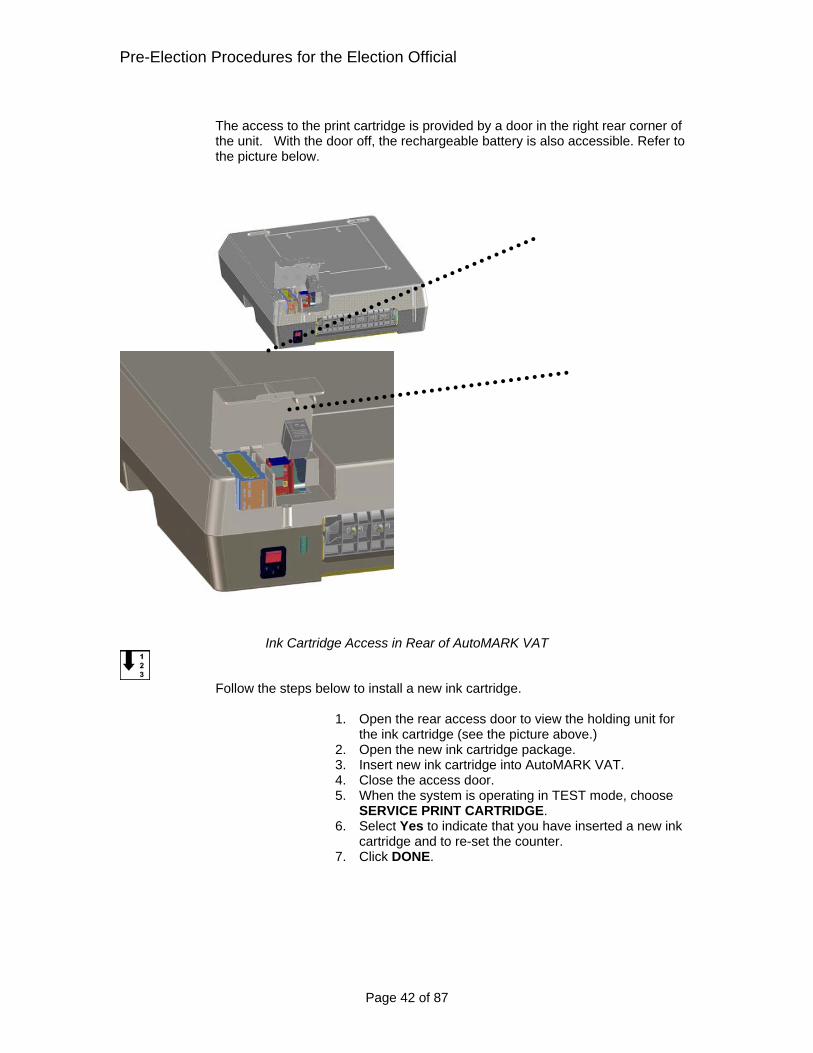
The access to the print cartridge is provided by a door in the right rear corner of the unit. With the door off, the rechargeable battery is also accessible. Refer to the picture below.
Ink Cartridge Access in Rear of AutoMARK VAT
Follow the steps below to install a new ink cartridge.
1. Open the rear access door to view the holding unit for the ink cartridge (see the picture above.)
2. Open the new ink cartridge package. 3. Insert new ink cartridge into AutoMARK VAT. 4. Close the access door. 5. When the system is operating in TEST mode, choose
SERVICE PRINT CARTRIDGE. 6. Select Yes to indicate that you have inserted a new ink
cartridge and to re-set the counter. 7. Click DONE.
6.7 Using Metallic Ink for Infrared Printing If the ballot tabulation machine in use has an infrared scanner, then a special metallic ink must be used in the AutoMARK VAT. (One brand of this special metallic ink is Jumangi, manufactured by Hewlett Packard.) When using this type of ink in the VAT, additional steps must be taken. The metallic ink dries very fast and the metallic flecks in the ink will cause the nozzles in the ink cartridge to clog and dry out in as little as six minutes after the ink cartridge is unsealed and left unused. To prevent the ink from drying in the nozzles, the VAT has a ‘spit and wipe’ functionality implemented. Every 3-4 minutes, the VAT will move the print cartridge to the side, spit ink into a ‘diaper’, and then wipe the print-head over a little rubber wiper. For this reason, the VAT should not be turned off during the Election Day. A new ink cartridge must be installed if the VAT is turned off for a significant amount of time (ten minutes or more.)
Follow the steps below to enable the ‘spit and wipe’ functionality.
1. Go to Test MODE by turning the key switch to the test position.
2. Press the System Maintenance button. 3. Enter Password. 4. Press OK. 5. In the System Maintenance menu, press Printer Head
Selection. 6. Make sure Enable for Infrared Printing is checked. 7. Click DONE 8. Exit Menu
Adjusting the rubber wiper blade (Infrared Printing Only) If the Infrared Printing (spit and wipe) functionality has been enabled, it is also necessary to make sure that the rubber wiper blade is in the proper position to clear the print cartridge nozzles at each pass.
Follow the steps below to adjust the wiper blade.
1. Loosen the torque screw holding the wiper blade in
place, 2. Raise or lower the assembly using the Phillips Head
screw on top. 3. Re-tighten the torque screw.
Replacing the ‘diaper’:
Pre-Election Procedures for the Election Official
Page 44 of 87
The ‘diaper’ is a foam mat in a removable plastic tray located under the flap that opens in the back of the VAT. A new ‘diaper’ should be in place prior to a new election.
6.8 CHARGING THE BATTERY (IF INSTALLED)
Follow the steps below to charge the battery.
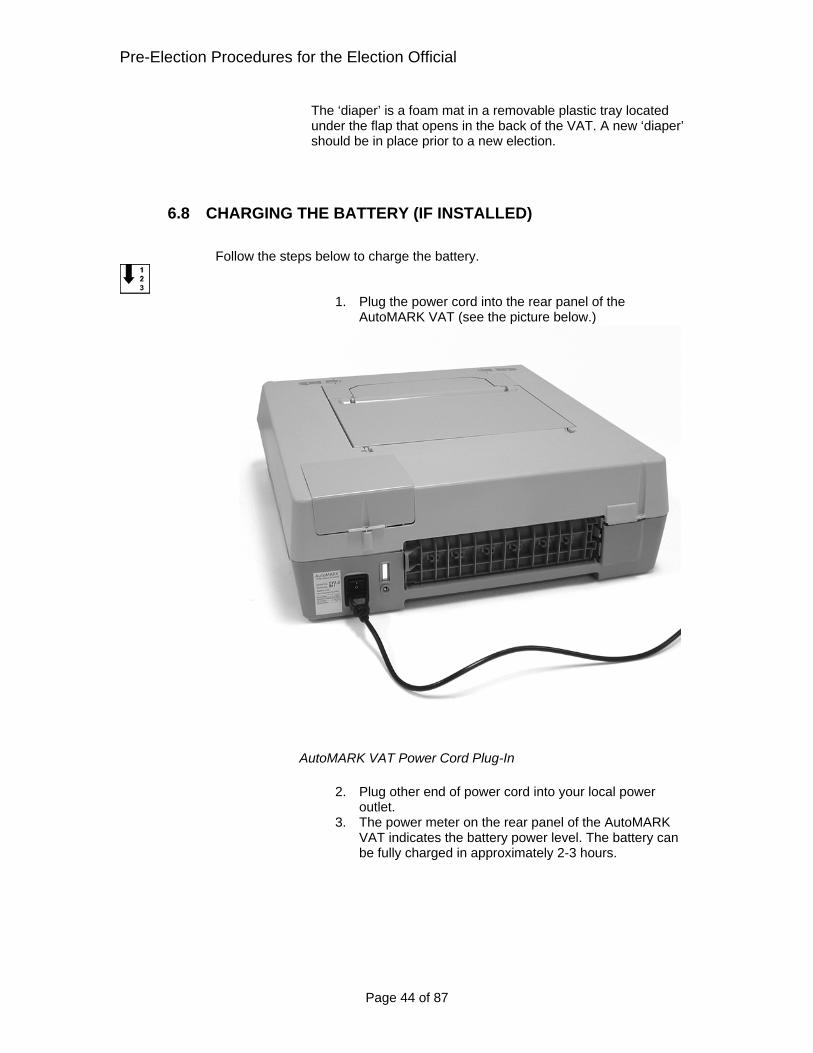
1. Plug the power cord into the rear panel of the
AutoMARK VAT (see the picture below.)
AutoMARK VAT Power Cord Plug-In
2. Plug other end of power cord into your local power outlet.
3. The power meter on the rear panel of the AutoMARK VAT indicates the battery power level. The battery can be fully charged in approximately 2-3 hours.
6.9 INSTALLING THE FLASH MEMORY CARD
You must provide a compact Flash Memory Card (FMC) that contains the data pertaining to your election (contests, candidates or choices and setup instructions). The FMC must be correctly programmed before it is inserted into the AutoMARK VAT. See the AutoMARK Election Official’s Guide for information about programming the FMC.
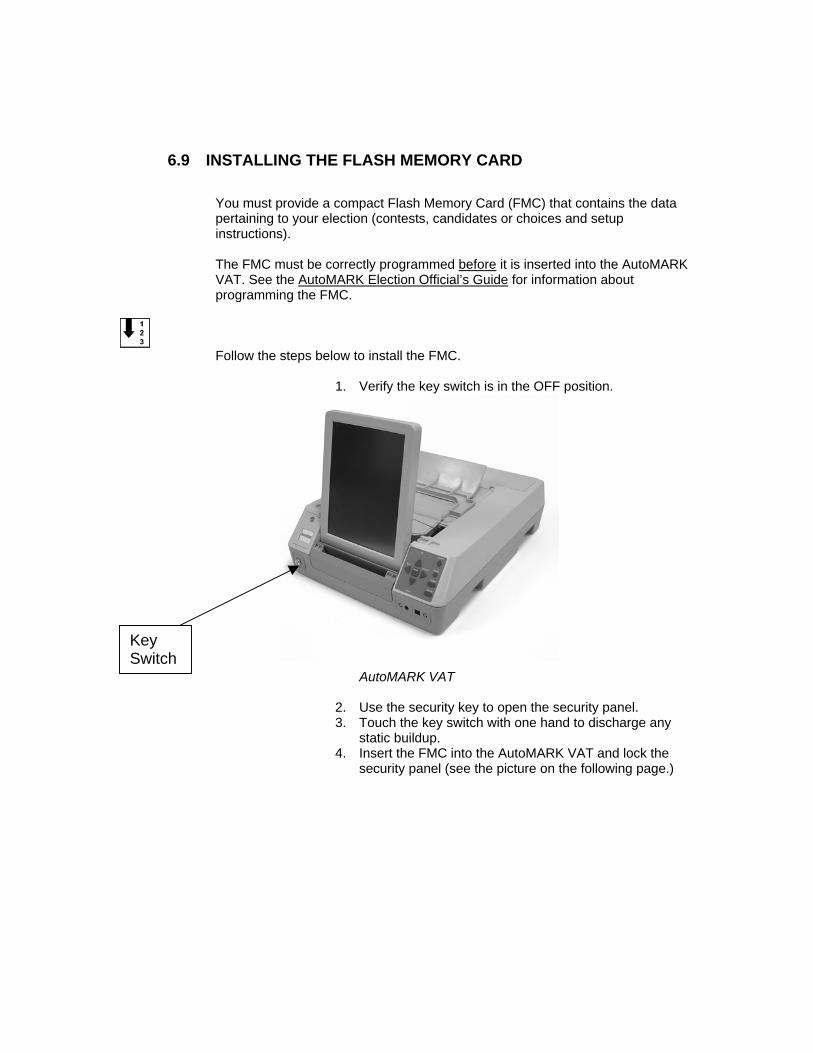
Follow the steps below to install the FMC.
1. Verify the key switch is in the OFF position.
AutoMARK VAT
2. Use the security key to open the security panel. 3. Touch the key switch with one hand to discharge any
static buildup. 4. Insert the FMC into the AutoMARK VAT and lock the
security panel (see the picture on the following page.)
Key Switch
Pre-Election Procedures for the Election Official
Page 46 of 87
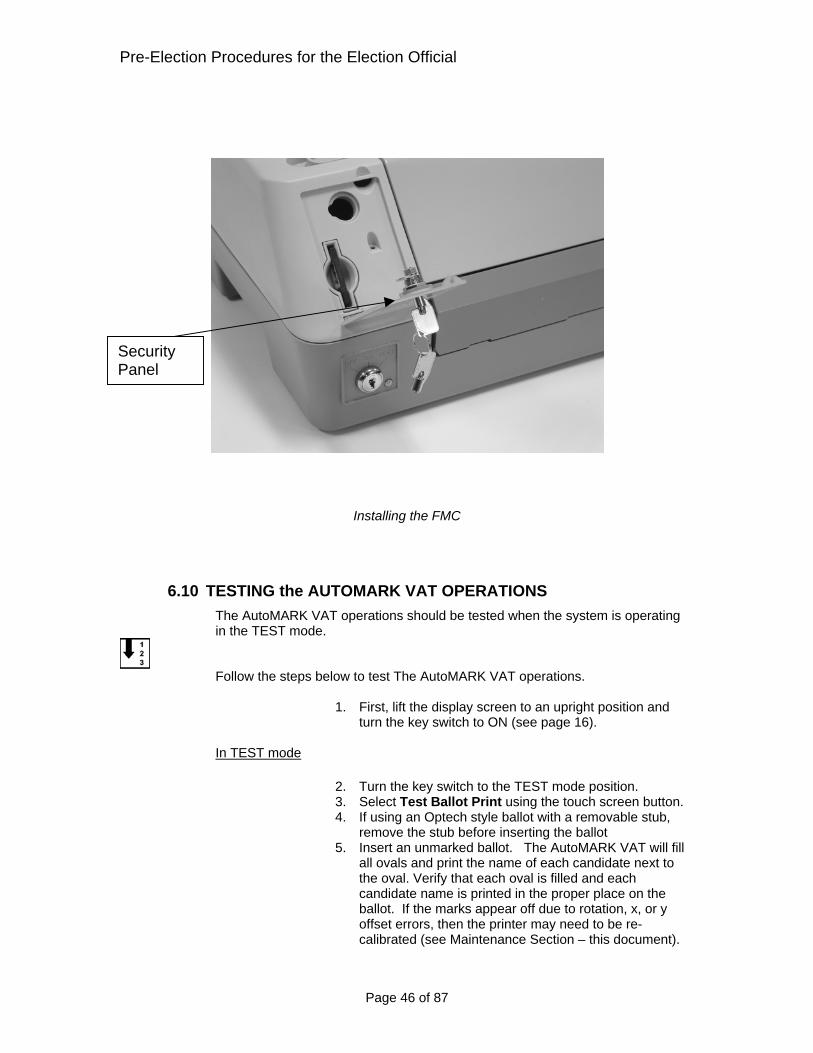
Installing the FMC
6.10 TESTING the AUTOMARK VAT OPERATIONS The AutoMARK VAT operations should be tested when the system is operating in the TEST mode.
Follow the steps below to test The AutoMARK VAT operations.
1. First, lift the display screen to an upright position and turn the key switch to ON (see page 16).
In TEST mode
2. Turn the key switch to the TEST mode position. 3. Select Test Ballot Print using the touch screen button. 4. If using an Optech style ballot with a removable stub,
remove the stub before inserting the ballot 5. Insert an unmarked ballot. The AutoMARK VAT will fill
all ovals and print the name of each candidate next to the oval. Verify that each oval is filled and each candidate name is printed in the proper place on the ballot. If the marks appear off due to rotation, x, or y offset errors, then the printer may need to be re-calibrated (see Maintenance Section – this document).
Security Panel
Display Screen Test
In ON mode
1. Turn the key switch to the ON mode position. 2. The Insert Your Ballot screen should be displayed. If
not, check all power connections to ensure power is being supplied to the AutoMARK VAT.
Ballot Insert Test
1. If using a ballot with a removable stub, remove the stub
before inserting the ballot. 2. Insert an unmarked ballot (corresponding to the FMC
currently installed) into the AutoMARK VAT paper tray 3. The paper feed mechanism should feed your ballot into
the AutoMARK VAT. If the test is successful, the AutoMARK VAT scans the ballot and displays a new screen. If the test is not successful, the AutoMARK VAT attempts to eject the ballot or displays an error message.
Audio Test
Plug in your headphones and use the audio keys on the keypad to test the audio operations as follows:
1. Press the round Audio Repeat key to repeat the presentation.
2. Press and hold the round Audio Repeat key to change the sex of the audio presenter.
3. Press the left side of the Audio Tempo key to decrease the audio speed.
4. Press the right side of the Audio Tempo key to increase the audio speed.
5. Press the left side of the Audio Volume key to decrease the audio volume.
6. Press the right side of the Audio Volume key to increase the audio volume.
Pre-Election Procedures for the Election Official
Page 48 of 87
Ballot Print Test
1. Turn the key switch to Test Mode. 2. Press the Test Ballot Print button on the touch screen. 3. If using an Optech style ballot with a removable stub,
remove the stub before inserting the ballot 4. Insert a ballot that is recognized by the currently inserted
compact flash card. Use a spare ballot that is not needed, because the AutoMARK VAT will print on this ballot.
5. If the ballot is not recognized, repeat a few times. If it still does not recognize, then press Done and go to Select Available Precincts.
6. Confirm that the ballot races on the currently inserted compact flash card are the ones that are shown on the screen and match the ballot that you were trying to insert. If they do not match then you need to replace your compact flash card or your ballot.
7. Scrutinize the placement of the marks in relation to the ovals/voting locations on the ballot. If there is any discernable rotation of the marks with respect to the voting locations, uniform across all marks, that is an error greater than 0.05 degrees, or a couple millimeters, Calibrate the printer. See Calibrating the Printer in the Maintenance section (Section 9.5).
8. Once the marks are printing correctly in all orientations (right-side up, upside down, inserted front-wards, inserted backwards), the printing is working properly.
9. As a final check, move the key switch into test mode and check the ink level. (On the bottom left portion of screen.) If it is lower than 10%, replace the ink cartridge. If you do, make sure to reset the ink level meter using the Replace Ink Cartridge button from the test mode menu.
Ballot Read Test
1. Insert a marked ballot into the AutoMARK VAT paper
tray. 2. The paper feed mechanism should feed your ballot into
the AutoMARK VAT. If the test is successful, The AutoMARK VAT scans the ballot and displays the Language Selection screen (if your jurisdiction is programmed for more than one language) followed by the Verification Summary Screen. If the test is not successful, The AutoMARK VAT attempts to eject the ballot or displays an error message.
6.11 Install Optional Signage in the Polling Booth for Voters whose Native Language is not English
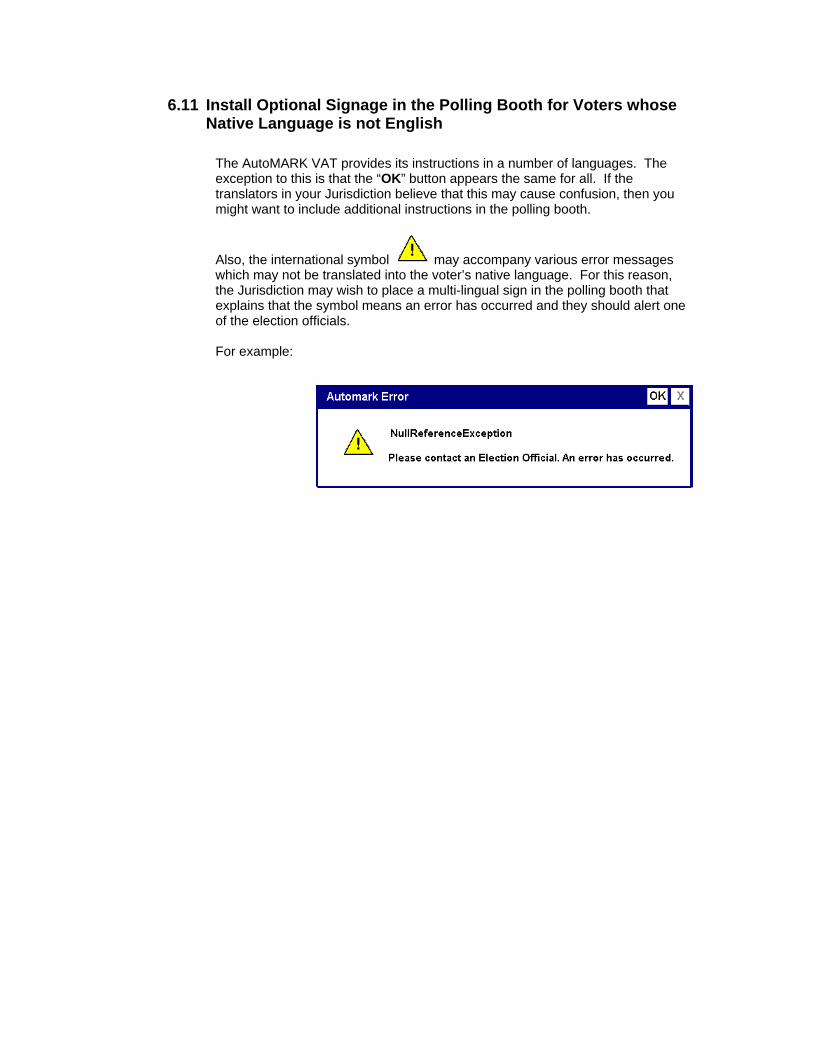
The AutoMARK VAT provides its instructions in a number of languages. The exception to this is that the “OK” button appears the same for all. If the translators in your Jurisdiction believe that this may cause confusion, then you might want to include additional instructions in the polling booth.
Also, the international symbol may accompany various error messages which may not be translated into the voter’s native language. For this reason, the Jurisdiction may wish to place a multi-lingual sign in the polling booth that explains that the symbol means an error has occurred and they should alert one of the election officials. For example:
Page 50 of 87
7 Election Day Procedures for the Poll Worker
7.1 Polling Place Procedures Details for polling place procedures such as completing the Oath of Office, assembling the voting booths, verifying the supply of ballots, setting up the tabulator, etc.,are covered in the document which is supplied with the tabulator being used. Start Up/Shut Down and other Election Day Procedures for the AutoMARK VAT are described below.
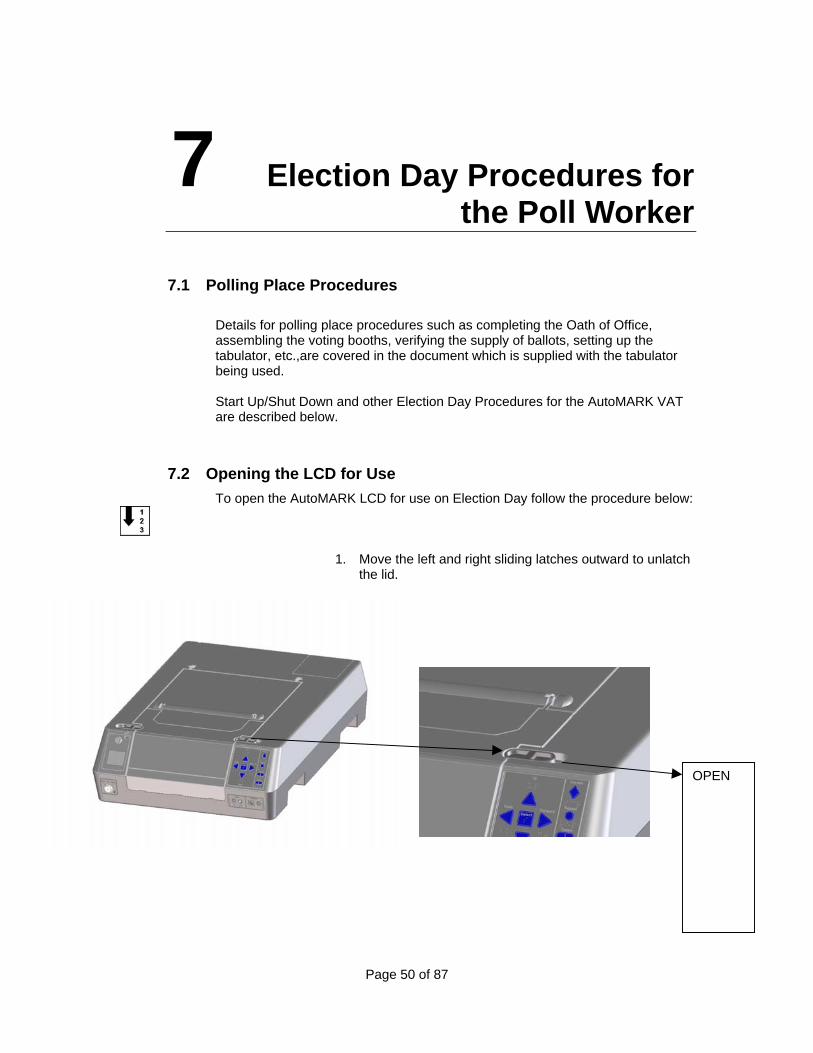
7.2 Opening the LCD for Use To open the AutoMARK LCD for use on Election Day follow the procedure below:
1. Move the left and right sliding latches outward to unlatch the lid.
OPEN
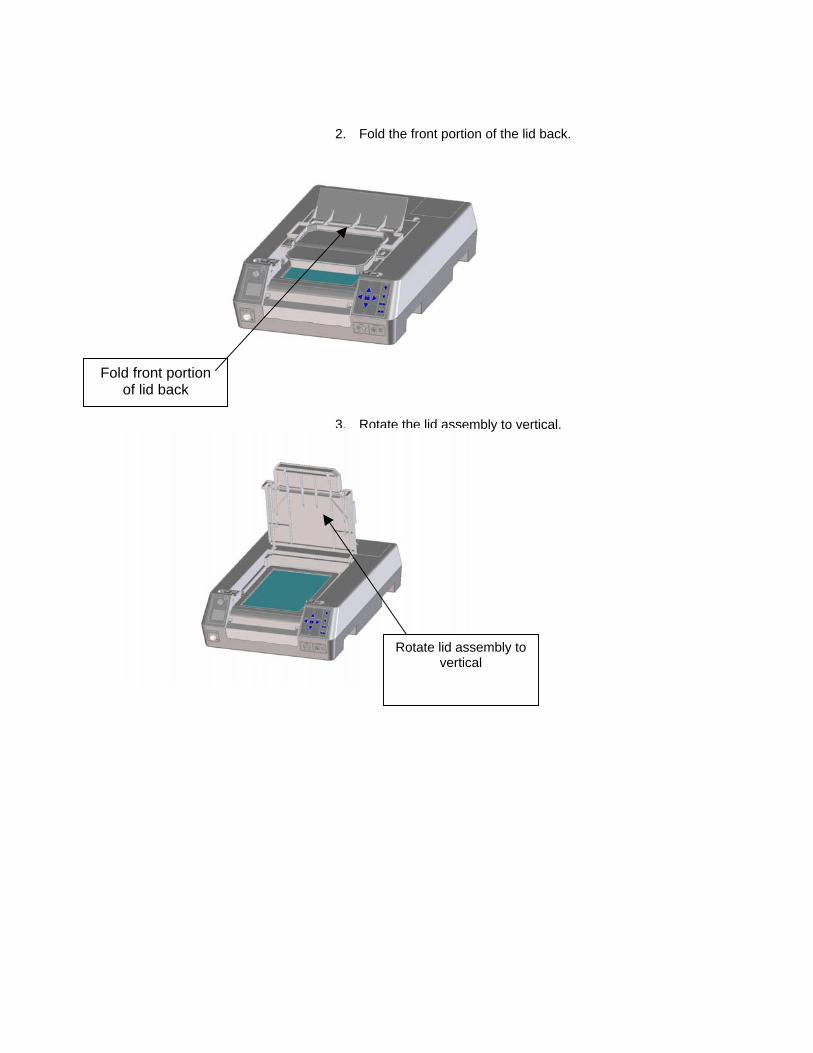
2. Fold the front portion of the lid back. 3. Rotate the lid assembly to vertical.
Fold front portion of lid back
Rotate lid assembly to vertical

Election Day Procedures for the Poll Worker
Page 52 of 87
4.Raise LCD screen, and close the lid behind, leaving the front lid section rotated back. 5. Lower the ballot feed tray.
With the LCD rotated to the vertical position, close the lid leaving the
front lid section rotated back
Lower the ballot feed tray

7.3 Start Up/Shut Down Procedure To start or shut down the AutoMARK follow the procedure below.
1. Open the AutoMARK unit and position the display. 2. Locate the audio headphone jack on the front lower-right
panel (below the keypad) and plug in the headphones. 3. Plug the power cord into a power connection in the back
of the unit and the other end of the cord into a nearby AC power source. Make sure the cord is not in a position where it would be hazardous to anyone walking nearby.
4. Turn the security key located in the front of the unit to the ON position and remove the key before voters are allowed to use the AutoMARK VAT.
5. To shutdown the unit when the polls are closed, insert the security key located in the front of the unit and turn it to the OFF position, to turn off the electrical power.
7.4 Setting Up the AutoMARK VAT for Voters
The following procedure must be followed to set up the AutoMARK VAT for normal operations.
1. Follow the start up/shut down procedure above to start
the AutoMARK VAT. 2. If headphones are being supplied by the polling place,
plug the headphones into the audio jack. 3. If the voter needs to use a Puff-Sip device, plug the Puff-
Sip device into the ADA access port. 4. For a blind voter, direct him to the AutoMARK VAT, and
assist him while he inserts his ballot for scanning. Tell him that the scanning process will take around 30 seconds, and that the VAT will be silent during the scanning process. When the scanning process is complete, the VAT will give him audio instructions for completing his ballot.
5. Give a secrecy sleeve to the voter to use after he has completed marking his ballot
6. The AutoMARK VAT is designed for use in conjunction with the AutoMARK Table which provides the voter with a privacy shield, complies with all ADA accessibility requirements, and ensures stability against movement, or overturning during entry occupancy or exit by a voter. Alternatively, the AutoMARK VAT may be used in conjunction with any ADA compliant table that provides adequate structural stability for unit of the AutoMARK
Election Day Procedures for the Poll Worker
Page 54 of 87
VAT’s size and weight and a privacy screen. Both of these items are commercially available from a number of sources.
7.5 Assisting the Blind Voter For a blind voter, direct him to the AutoMARK VAT. Show him the keypad, and show him where to insert his ballot. Assist him while he inserts his ballot for scanning (if he desires assistance). Tell him that the scanning process will take around 30 seconds, and that the VAT will be silent during the scanning process. When the scanning process is complete, the VAT will give him audio instructions for completing his ballot.
7.6 Assisting the Voter who uses an ADA Device If a voter is using an ADA device, the poll worker should
1. Insert the ballot for the voter, 2. Read these instructions to the voter:
You have plugged in an ADA device. This allows you to
navigate through your ballot using YES or NO inputs. When a screen is displayed, you may select NO to bypass that
screen or YES to move to the first selectable choice on that screen. When you are on a selectable item of the screen, the item will be highlighted in yellow. Selecting NO will move on to the next selectable item on the screen. Selecting YES will provide the same results as if you had clicked on that item.
When on a candidate or question choice YES will select or
deselect that candidate. When on a MORE scroll bar, YES will cause the screen to
scroll up or down as indicated. When on a screen button, YES will invoke that action. For
example, entering YES when ZOOM is highlighted will cause the screen to ZOOM. Entering YES again, will return the screen to non-zoomed mode.
Pressing NO at any time will move to the next highlighted item. As you enter NO repeatedly, the highlight will move down the
screen, across the bottom from right to left and then loop back to the top.
When you are done making selections on any given screen,
enter NO repeatedly until the yellow highlight is on the

NEXT button and then enter YES to move to the next screen.
7.7 Installing THE FLASH MEMORY CARD
The compact Flash Memory Card (FMC) contains the data pertaining to your election (contests, candidates or choices and setup instructions). In most Jurisdictions, the Flash Memory Card (FMC) will be installed into the AutoMARK VAT by the Jurisdiction Personnel, (not by the Poll Worker), prior to Election Day. However, some Jurisdictions may prefer to deliver the VAT and the FMC to separately, so that the Poll Worker will need to install the FMC into the VAT. If so, here are the steps to follow. The FMC must be correctly programmed before it is inserted into the AutoMARK VAT.
Follow the steps below to install the FMC.
5. Verify the key switch is in the OFF position.
AutoMARK VAT
6. Use the security key to open the security panel. 7. Touch the key switch with one hand to discharge any
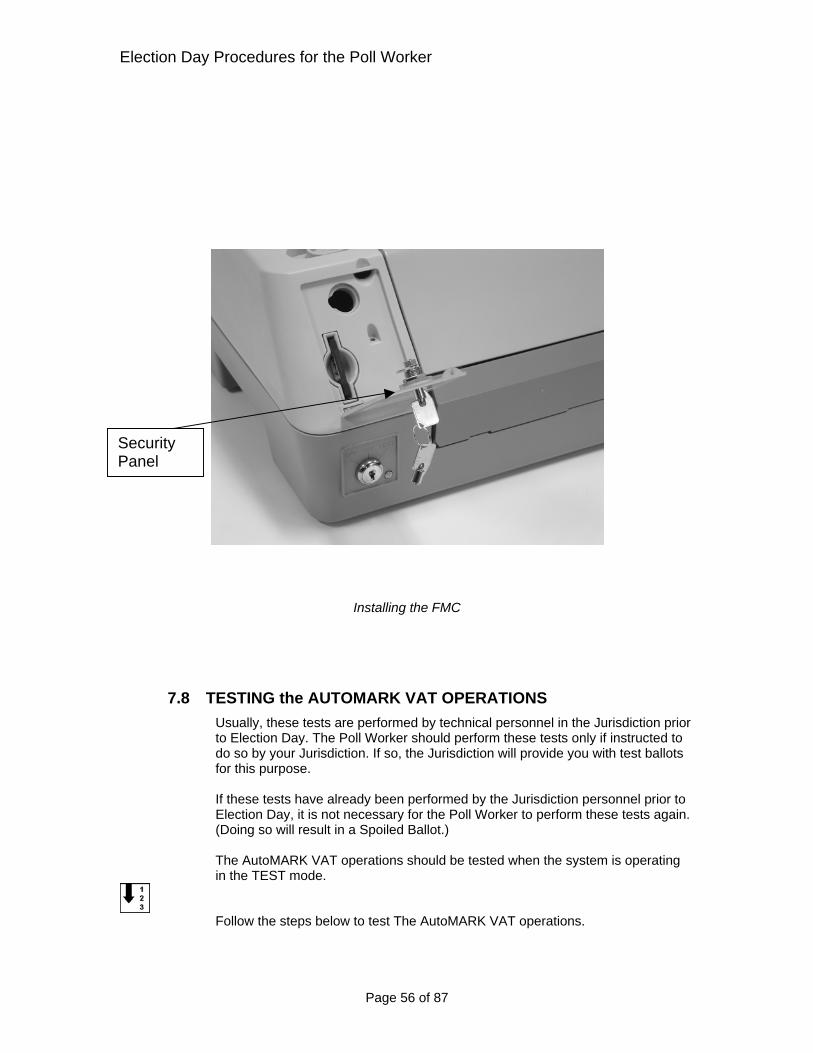
static buildup. 8. Insert the FMC into the AutoMARK VAT and lock the
security panel (see the picture on the following page.)
Key Switch
Election Day Procedures for the Poll Worker
Page 56 of 87
Installing the FMC
7.8 TESTING the AUTOMARK VAT OPERATIONS Usually, these tests are performed by technical personnel in the Jurisdiction prior to Election Day. The Poll Worker should perform these tests only if instructed to do so by your Jurisdiction. If so, the Jurisdiction will provide you with test ballots for this purpose. If these tests have already been performed by the Jurisdiction personnel prior to Election Day, it is not necessary for the Poll Worker to perform these tests again. (Doing so will result in a Spoiled Ballot.) The AutoMARK VAT operations should be tested when the system is operating in the TEST mode.
Follow the steps below to test The AutoMARK VAT operations.
Security Panel
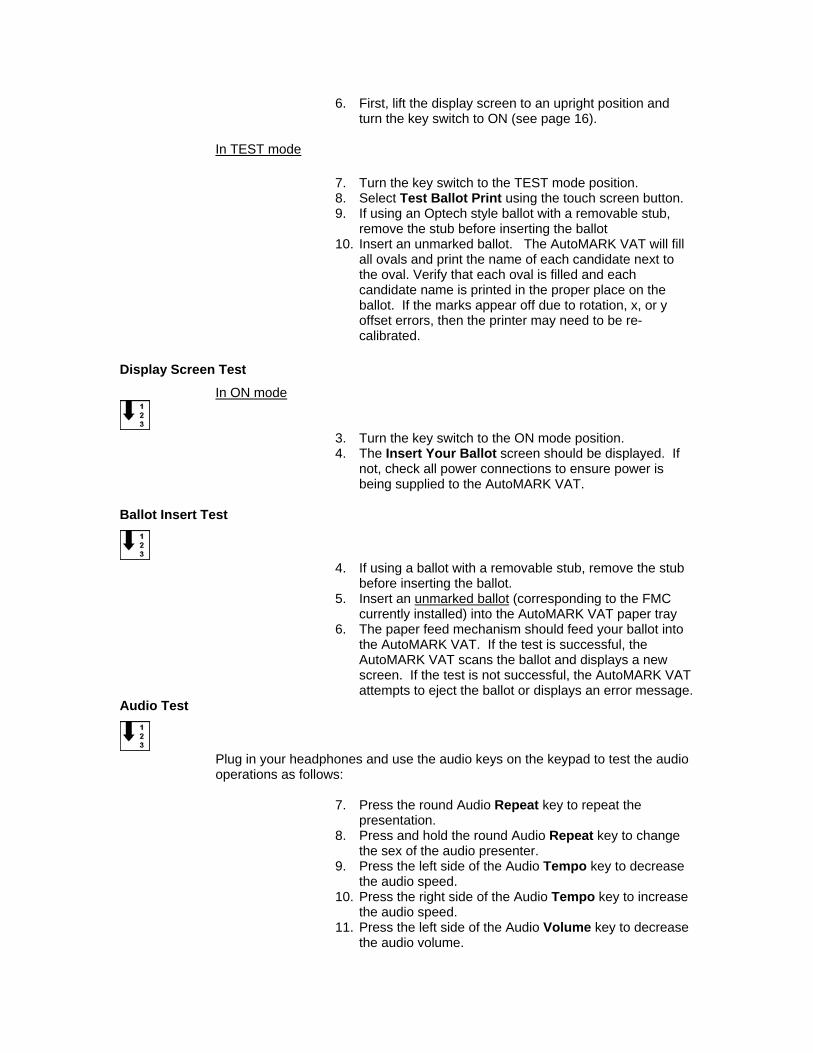
6. First, lift the display screen to an upright position and turn the key switch to ON (see page 16).
In TEST mode
7. Turn the key switch to the TEST mode position. 8. Select Test Ballot Print using the touch screen button. 9. If using an Optech style ballot with a removable stub,
remove the stub before inserting the ballot 10. Insert an unmarked ballot. The AutoMARK VAT will fill
all ovals and print the name of each candidate next to the oval. Verify that each oval is filled and each candidate name is printed in the proper place on the ballot. If the marks appear off due to rotation, x, or y offset errors, then the printer may need to be re-calibrated.
Display Screen Test
In ON mode
3. Turn the key switch to the ON mode position. 4. The Insert Your Ballot screen should be displayed. If
not, check all power connections to ensure power is being supplied to the AutoMARK VAT.
Ballot Insert Test
4. If using a ballot with a removable stub, remove the stub
before inserting the ballot. 5. Insert an unmarked ballot (corresponding to the FMC
currently installed) into the AutoMARK VAT paper tray 6. The paper feed mechanism should feed your ballot into
the AutoMARK VAT. If the test is successful, the AutoMARK VAT scans the ballot and displays a new screen. If the test is not successful, the AutoMARK VAT attempts to eject the ballot or displays an error message.
Audio Test
Plug in your headphones and use the audio keys on the keypad to test the audio operations as follows:
7. Press the round Audio Repeat key to repeat the presentation.
8. Press and hold the round Audio Repeat key to change the sex of the audio presenter.
9. Press the left side of the Audio Tempo key to decrease the audio speed.
10. Press the right side of the Audio Tempo key to increase the audio speed.
11. Press the left side of the Audio Volume key to decrease the audio volume.

Election Day Procedures for the Poll Worker
Page 58 of 87
12. Press the right side of the Audio Volume key to increase the audio volume.
Page 59 of 87
8 Post-Election Procedures and Maintenance
Procedures for Closing the Polls which involve the ballots, the tabulator, and such things as dismantling the voting booths are not covered in this document. Please refer to the documentation supplied with the tabulator. This chapter provides information on maintaining the AutoMARK VAT between elections. It also describes procedures that are completed in the TEST MODE, by an authorized Jurisdiction Official. Before storing the AutoMARK VAT you must complete the following steps:
1. Remove the ink cartridge. 2. Charge the battery. 3. Clean the AutoMARK VAT. 4. Store the AutoMARK VAT.
See the categories below for more details on these steps. The following maintenance procedures may need to be performed before starting an election or at the end of the Election Day.
8.1 Removing the Ink Cartridge Always remove the used ink cartridge from the AutoMARK VAT and discard it before storing the AutoMARK VAT between elections. Spare ink cartridges should be purchased prior to the next election and stored separately from the AutoMARK VAT. When purchasing extra ink cartridges, contact Automark Technical Systems for: Part number 87002 (Non IR) Part number 87003 (IR) See Section 6.6 in this manual for steps to install a new ink cartridge.
8.2 Charging the Battery Between elections and in order to be ready for the next election, you must always charge the battery on the AutoMARK VAT. For information on how to charge the battery, see Section 6.8 in this manual.
Post-Election Procedures and Maintenance
Page 60 of 87
8.3 Cleaning the AutoMARK VAT Before storing the AutoMARK VAT use alcohol wipes to clean the outside panels of the AutoMARK VAT unit.
8.4 Storing the AutoMARK VAT The AutoMARK VAT is designed for storage and operation in any enclosed facility ordinarily used as a warehouse or polling place. During operation, facility temperature range should be 500 F to 1040 F and moisture range should be 10% to 50% relative humidity. For storage, facility temperature range should be -40 F to 1400 F and moisture range should be 10% to 85% relative humidity.
Page 61 of 87
9 Additional Test Mode Maintenance Procedures
The following procedures are performed while the AutoMARK VAT is in TEST MODE, and must be performed by an authorized election official.
9.1 Setting the Admin Password You can change the Administrator Password to keep the machine secure. Unauthorized users of the AutoMARK VAT machine cannot reprogram the module, set the system date and time, or perform other Administrator tasks without knowing what the Administrator Password is. Follow the steps below to set the admin password.
1. Enter the Test Mode screen by turning the key switch to Test.
2. The AutoMARK Main Menu Screen will display 3. Press the System Maintenance button on the touch
screen. 4. You will be prompted to enter a password. Enter the
current Administrator Password 5. The System Maintenance Menu will be displayed 6. Press the Set Administrator Password button. 7. Re-enter the Administrator Password on the next screen.
Press Done/Enter when you have entered this old password.
8. Enter the new password. Press Done/Enter when you are done.
9. Confirm that the screen shows the message indicating that the New Password was successfully saved.
10. Make sure to write down the new password in at least one location so that the password is not forgotten!
11. Move the key switch out of test position.
9.2 Setting the Date and Time You can set the date and time that the AutoMARK VAT uses for logging operations in the various operations and diagnostic logs. Follow the steps below to set the date and time.

Additional Test Mode Maintenance Procedures
Page 62 of 87
1. Enter the Test Mode screen by turning the key switch to
Test. (A Flash Memory Card must be present to go into Test Mode.)
2. The AutoMARK Main Menu Screen will display 3. Press the System Maintenance button on the touch
screen. . 4. Enter the system password. 5. Press Set Date/Time. 6. Press on the button next to either Date or Time to
change either Date or Time. 7. Press CLEAR. 8. Enter the new value on the touch screen keypad.
Note –that the system will accept both 24 hour and 12 hour (AM/PM) entries. If PM is left off, the entry defaults to AM.
9. Press Apply to store the settings. 10. Press Done when you are done editing the date and
time. 11. Move the key switch out of test position.
9.3 Selecting All Pre-Load Priority Precincts and Ballots Selecting all Pre-Load Priority Precincts and Ballots enables the Jurisdiction Official to fine tune the system for quicker performance for a limited sub-set of the ballots that are on the compact flash card. This should only be used if the compact flash card has a massive amount of data. If you want to make the system work faster in the case of slow loading times, then use this feature. Follow the steps below to select the precincts and ballots that get greater priority for loading quicker (by being cached in memory, as it is available):
1. Enter the Test Mode screen by turning the key switch to
Test. 2. The AutoMARK Main Menu Screen will display 3. Press the Select Available Precincts button. 4. Select Limit view to Precincts, or to Ballots. 5. You will see a list of all available precincts/ballots on the
left. On the right is the list of Priority-Load precincts/ballots. Use the right arrow button to move precincts/ballots from the left list to the right list, thus enabling them for higher priority load.
6. If there are any precincts/ballots that you don’t want to priority load, select the precinct/ballot on the right list by touching it on the touch-screen, and press the left arrow button to remove it from the high priority list.
7. When your list of high priority load precinct/ballots (on the right) is acceptable, press Done before exiting from this screen.

Additional Test Mode Maintenance Procedures
Page 64 of 87
9.4 Calibrating the Touch Screen Calibrate the touch screen if you feel the spots that you are pressing on the touch screen are not the same spots that AutoMARK VAT recognizes For example, if it feels like you have to press too high or too low or too far to the left or too far to the right to get to a certain button, then you need to re-calibrate the touch screen. Follow the steps below to calibrate the touch screen.
1. Enter the Test Mode screen by turning the key switch to
Test. 2. The AutoMARK Main Menu Screen will display. 3. Press the Calibrate Touch Screen button on the touch
screen. 4. Press the Calibrate button on the touch screen.. 5. Follow the on-screen instructions simply by touching the
points on the screen that the screen indicates. 6. Press again on the screen when finished. 7. Make sure to press the Done button after you are done
calibrating. If you skip this step, the settings may not be remembered when the system is re-booted.
9.5 Calibrating the Printer
Note This procedure is used to calibrate the machine whenever there is a significant rotation or consistent X or Y offset during normal printing operations.
There are two functional screens which are used to calibrate the printer.
Manual Printer Calibration Utility The Manual Printer Calibration Utility screen is used to enter calibration adjustments manually. You should begin the calibration process here.To access the Manual Printer Calibration Utility,
1. Enter the Test Mode screen by turning the key switch to Test.
2. The AutoMARK Main Menu Screen will display. 3. Press the Printer Calibration button on the touch
screen. 4. To begin calibration, enter -18 for X and 21 for Y. This is
a good “first guess” that will get you in the neighborhood for DV3.0 and DV3.5 machines. (Leave the angle calibrations at 0.)

5. Press the Save Values button on the touch screen. 6. Press the DONE button on the touch screen. 7. Then go to the Automatic Printer Calibration screen
as described below.
Automatic Printer Calibration The AutoMARK VAT implements an automatic printer calibration function that is accessible from the Test Ballot Print feature of Test Mode and may be used with any AutoMARK VAT compatible ballot.
1. Enter the Test Mode screen by turning the key switch to
Test. 2. The AutoMARK Main Menu Screen will display. 3. Press Test Ballot Print button on the touch screen. 4. Use the touch screen to select the Enable Calibration
Suggestions checkbox in the center top of the screen. 5. If using an ballot style with a removable stub, remove the
stub before inserting the ballot 6. Insert a ballot compatible with the currently installed
FMC. For best results, ballot should have oval locations, timing marks on both sides, and should be inserted first page up, front first.
7. After printing, the system will provide feedback based on the print accuracy and will prompt the user whether or not to implement the new settings.
8. If the marks are consistently off in two directions on the front and the two opposite directions on the back, then you should select yes to accept the new settings.
9. If the printing is accurate enough, and the suggestion is just a couple units here and there, you might want to select no, and deem that it is calibrated enough (assuming all the marks are perfectly accurate except for a miniscule amount of rotation or offset that is not symmetrical with the back side).
10. Insert another ballot compatible with the currently installed FMC.
11. After the ballot prints, examine it for print accuracy. If additional refinement is desired, repeat the process from step 7 until the accuracy is acceptable.
12. When the print accuracy is finalized, press no when prompted to accept the new settings.
13. Press done. 14. Exit Test Mode by turning the key switch.
It usually takes about 4 test prints to fully calibrate the printer using the Automatic Printer Calibration suggestions. You can of course use the Manual Printer Calibration Utility to adjust things yourself once you get the hang of it. The Manual Printer Calibration Utility should rarely be used except for the initial “preset” to -18, 21, and also if you already know a particular machine’s calibrations (such as if the machine’s SBC was replaced or if software was re-

Additional Test Mode Maintenance Procedures
Page 66 of 87
installed from scratch). In these cases, you could enter them directly and bypass the Auto print cal procedure.
Note that print calibrations are logged in the Operation Log (See Section Error! Reference source not found.), so that if a machine loses its calibrations (due to changing SBC, re-installing software, or someone tampered with them) then you can go through the Operation Log and pick the values from the Operation Log to use in the Manual settings screen. (This assumes you are using the same Flash Memory Card as was used when the printer was calibrated successfully the first time.)
9.6 Unlocking the Flash Memory Card You may need to unlock the flash card to set a new pin. Follow the procedure below to unlock the flash card and set a new pin.
1. Enter the Test Mode screen by turning the key switch to
Test. 2. The AutoMARK Main Menu Screen will display. 3. Press the Unlock Flash Card button on the touch
screen. 4. Enter the correct PIN number for the compact flash
memory card by pressing the white box for the unlock code and typing the numbers on the touch screen keypad that appears.
5. Press the Unlock button on the touch screen when you are done typing the correct PIN number. If the PIN number was correct and the data on the compact flash card has not been tampered with, and there are no hardware problems on this machine, then the system will respond with Unlocked successfully.
6. Turn the key switch back to the ON position to resume use of the machine.
9.7 Printing the Operation Log (System Log File) – if desired The Operation Log is used to view all signification operations that have occurred on the machine. The log entries are stored in a circular buffer which holds 277,777 entries. The log may be viewed, or printed if desired. Below is an example of entries which might appear in the Operation Log:
(1142) 11/10/2004 13:29:19 Aborted Marking Ballot ID: 1 (1141) 11/10/2004 13:20:12 Ballot Marked Ballot ID: 1 (1140) 11/10/2004 13:19:47 Ballot Marked Ballot ID: 1 (1139) 11/10/2004 13:17:07 Unrecognized Ballot (1138) 11/10/2004 13:16:55 System Powered On Serial Number
000015

(1137) 11/10/2004 13:16:46 Keyswitch Run Mode (1136) 11/10/2004 13:15:01 Test Print Ballot ID: 1 (1135) 11/10/2004 13:14:50 Keyswitch Test Mode (1134) 11/10/2004 13:14:00 Hour Print Report Total Printed: 102 (1133) 11/10/2004 13:14:00 System Powered On Serial Number
000015 If your Jurisdiction desires to print the Operation Log, follow the steps below.
1. Go to Test MODE by turning the key switch to the test
position. 2. Press the Operations Log button. A text box with the
operations log inside it displays. 3. Press the UP button to scroll one page up, press the
DOWN button to scroll one page down, or you can advance the display to a particular page by touching the text box under “GO TO PAGE:” . A number keypad will display. Press the numbers for the page you wish to display. Press DONE. Press GO.
4. To print this log on completely blank ballot stock paper, press the Print button. The screen displays: Insert blank ballot stock paper. (Ballot stock is between 80 and 110 pound index stock. Ballot stock is slightly heavier than normal paper and less likely to jam.)
5. Insert a completely blank ballot stock paper. 6. After inserting the paper, the machine automatically
begins printing the operation log, 66 lines per page. If there are more than 132 entries in the operation log, you will need several pages.
7. After the page has been ejected from the machine, if the message insert another blank sheet of paper appears, followed by Insert a blank ballot stock paper, insert another page. Repeat this process until the message printing done appears. Press DONE to exit the print function.
The following is a list of entries which might appear on the Operation Log.
System Shutdown OK
This entry indicates the system was shut down using the key switch.
Keyswitch Test Mode
This entry indicates the key switch was used to enter test mode.
Keyswitch Run Mode
This entry indicates the key switch was used to enter run mode.

Additional Test Mode Maintenance Procedures
Page 68 of 87
Hour Print Report
Total Printed: XXX This entry is added once per hour during normal operation and lists the number of ballots printed during the previous hour.
Printer Calibration
X=XXX Y=XXX Angle=XXX This entry indicates that the printer has been calibrated through the Test Mode Printer Calibration feature, and gives the X, Y, and Angle settings made.
Unrecognized Ballot
This entry indicates that an unrecognizable ballot was inserted.
Ballot Marked Successful
This entry indicates that a ballot was printed. Ballot Returned Unmarked
This entry indicates that a ballot was inserted, but ejected before it was printed.
Test Print Successful
This entry indicates that a ballot was printed using the Test Print feature of Test Mode.
Printer Malfunction
Failed to Verify Paper Jam Paper Too Short This entry indicates that there was a printer malfunction, and the reason.
Printer Low On Ink
This entry indicates that the printer is running low on ink.
Printer Ink Used Up
This entry indicates that the ink cartridge should be immediately changed.
Scanner Malfunction
Top Scanner Bottom Scanner PV Scanner Scanners/PEB This entry indicates that there was a scanner malfunction, and indicates which scanner was involved.

Paper Misfeed
This entry indicates that the ballot was not inserted correctly.
No Election Data
This entry indicates that no election data was found.
CF Card Access Failure
This entry indicates that the system was unable to read the data on the compact flash memory card.
Loaded Ballot Id xxxx
This entry indicates that election data for a specified ballot was loaded.
Marked Ballot Inserted
This entry indicates that a ballot which has already been marked was inserted into the VAT.
Unit Locked Time Out
This entry indicates that the user (voter) did not take action within a preset amount of time.
Battery Low
This entry indicates that the battery power is low – a new battery will be needed soon.
Running on Battery Power
This entry indicates that the VAT is using battery for its power source.
Running on External Power
This entry indicates that the VAT is using external electrical power source.

Additional Test Mode Maintenance Procedures
Page 70 of 87
Login Successful
This entry indicates that a user logged in successfully.
Login Failure
This entry indicates that a login was attempted, but was not successful.
Date/Time Change
This entry indicates that the current date and time was re-set. Battery Charged
This entry indicates that the battery was charged. Eject Ballot From Test Mode
This entry indicates that the ballot was ejected from the Test Mode screen.
Test Print Screen
Entered Exited This entry indicates that the user entered/ exited the Test Print screen (from Test Mode).
Select Precincts Screen
Entered Exited This entry indicates that the user entered/ exited the Select Precincts screen (from Test Mode).
Service Print Cartridge Screen
Entered Exited This entry indicates that the user entered/ exited the Service Print Cartridge screen.
Manual Print Calibration Screen
Entered Exited This entry indicates that the user entered/ exited the Print Calibration screen.
View Operation Log Screen
Entered Exited This entry indicates that the user entered/ exited the Operation Log Screen
Battery Status Screen
Entered Exited

This entry indicates that the user entered/ exited the Battery Status screen
Software Versions Screen
Entered Exited This entry indicates that the user entered/ exited the Software Versions screen
Calibrate Touch Screen
Entered Exited This entry indicates that the user entered / exited the Calibrate Touch screen.
Unlock Flash Card Screen
Entered Exited This entry indicates that the user entered/ exited the Unlock Flash Card screen.
View Scan/Service Log Screen
Entered Exited This entry indicates that the user entered/ exited the View Scan/Service Log screen.
Upload Firmware Screen
Entered Exited This entry indicates that the user entered/ exited the Upload Firmware screen.
Set Password Screen
Entered Exited This entry indicates that the user entered/ exited the Set Password screen.
Set Date/Time Screen
Entered Exited This entry indicates that the user entered/ exited the Set Date/Time screen.
Set Print Head Screen
Entered Exited This entry indicates that the user entered/ exited the Set Print Head screen
Additional Test Mode Maintenance Procedures
Page 72 of 87
Loaded Election xxxxxxxxxxxx
This entry indicates that the user loaded a new election (actually puts string in operation log with election title (UNICODE) max 39 characters displayed).
Print Head Missing
This entry indicates that the print head was not found.
Unknown Operation
This entry should never appear – it basically means that the Operation Log file has been corrupted.
9.8 Printing the Scan Log or Service Log These log files record scanner error events and service events. To view or print either of these logs,
1. Enter the Test Mode screen by turning the key switch to
Test. 1. The AutoMARK Main Menu Screen will display 2. Select Maintenance Menu. 3. Enter the system password. 4. Select Scan Log, or Service Log. 5. To print the log, follow the steps as for printing the
Operation Log (in previous section).
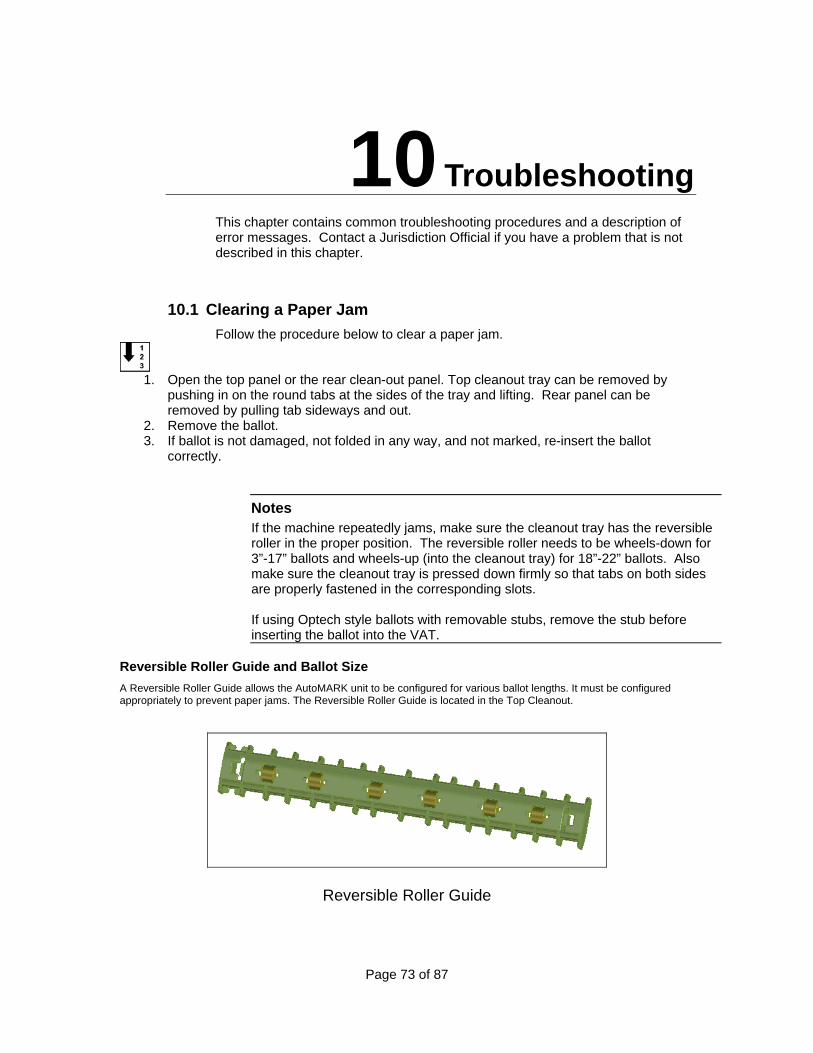
Page 73 of 87
10 Troubleshooting This chapter contains common troubleshooting procedures and a description of error messages. Contact a Jurisdiction Official if you have a problem that is not described in this chapter.
10.1 Clearing a Paper Jam Follow the procedure below to clear a paper jam.
1. Open the top panel or the rear clean-out panel. Top cleanout tray can be removed by
pushing in on the round tabs at the sides of the tray and lifting. Rear panel can be removed by pulling tab sideways and out.
2. Remove the ballot. 3. If ballot is not damaged, not folded in any way, and not marked, re-insert the ballot
correctly.
Notes If the machine repeatedly jams, make sure the cleanout tray has the reversible roller in the proper position. The reversible roller needs to be wheels-down for 3”-17” ballots and wheels-up (into the cleanout tray) for 18”-22” ballots. Also make sure the cleanout tray is pressed down firmly so that tabs on both sides are properly fastened in the corresponding slots. If using Optech style ballots with removable stubs, remove the stub before inserting the ballot into the VAT.
Reversible Roller Guide and Ballot Size A Reversible Roller Guide allows the AutoMARK unit to be configured for various ballot lengths. It must be configured appropriately to prevent paper jams. The Reversible Roller Guide is located in the Top Cleanout.
Reversible Roller Guide

Troubleshooting
Page 74 of 87
Reversible Roller Guide Installed in Top Cleanout (Shown in standard ballot configuration)
Ballot Size Position of Reversible Roller
Under 15 inches Reversible roller nip active (roller wheels down) 15 inches or more Reversible roller nip inactive (roller wheels up)
Roller Guide and Ballot Size
To accommodate long ballots (15” or more), the reversible roller guide must be flipped over so that the black plastic rollers are not exposed. To complete this operation, insert a coin into one of the slots on the Reversible Roller Guide as shown in the picture below.
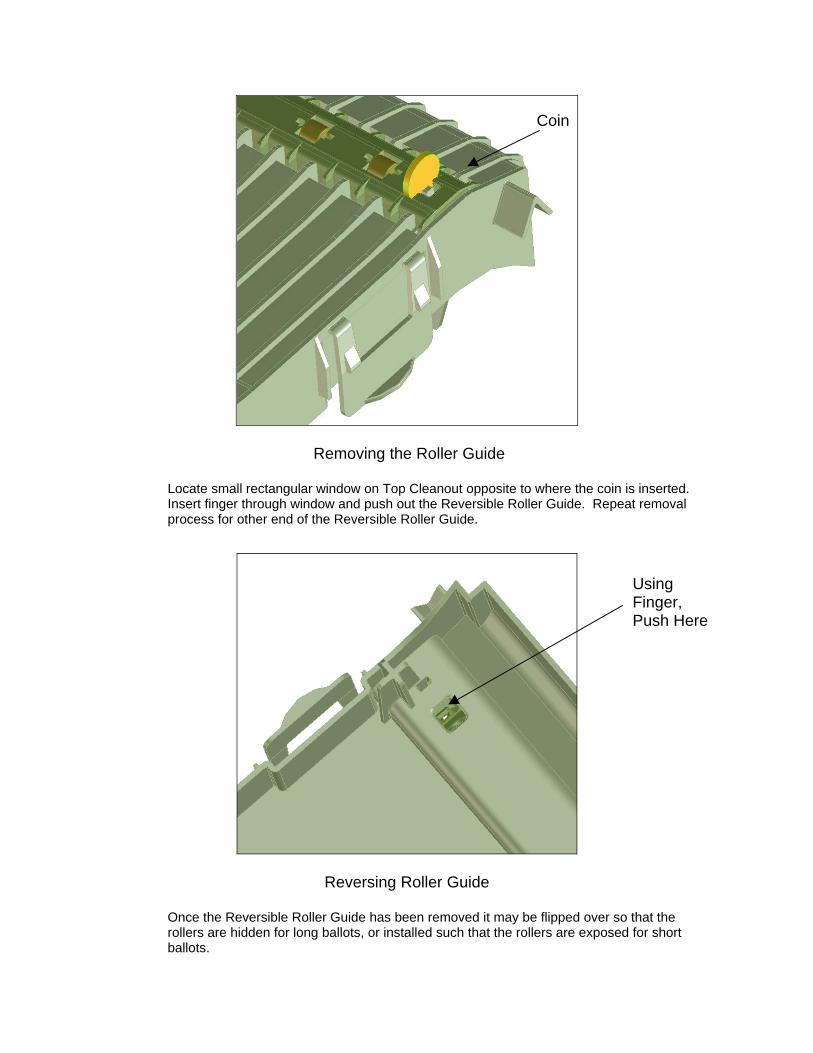
Removing the Roller Guide
Locate small rectangular window on Top Cleanout opposite to where the coin is inserted. Insert finger through window and push out the Reversible Roller Guide. Repeat removal process for other end of the Reversible Roller Guide.
Reversing Roller Guide
Once the Reversible Roller Guide has been removed it may be flipped over so that the rollers are hidden for long ballots, or installed such that the rollers are exposed for short ballots.
Coin
Using Finger, Push Here
Troubleshooting
Page 76 of 87
10.2 Flash Memory Card Errors The following procedures are used if you receive a flashcard error.
Unlocking the Flash Memory Card
You may need to unlock the flash card to set a new pin. Follow the procedure below to unlock the flash card and set a new pin.
1. Turn the key switch to the TEST position. Confirm that
the AutoMARK Main Menu appears. 2. Select Unlock Flash Card. 3. Enter the correct PIN number for the compact flash
memory card by pressing the white box for the unlock code and typing the numbers on the touch screen keypad that appears, then press DONE.
4. Press the Unlock button when you are done typing the correct PIN number. If the PIN number was correct and the data on the compact flash card has not been tampered with, and there are no hardware problems on this machine, then the system will respond with Unlocked successfully.
5. Press DONE then turn the key switch back to the ON position to resume use of the machine.
Changing the Flash Card
If the flash card is bad, follow the procedure below to change the flash card.
1. Turn the power off to the unit by switching the key switch
to the OFF position. 2. Touch the key switch with one hand to discharge any
static build-up. 3. Remove the old compact flash card if there is one in the
system. You may need to unlock the access door to reach the compact flash card. A special circular key is used to unlock this access door.
4. Insert the new compact flash card into the card reader. There is only one correct orientation of the compact flash card and the system will not allow you to insert it the wrong way. Do not force the card in if there is resistance as you may damage the compact flash card reader.
5. Close and lock the access door using the circular key. 6. Turn the key switch to the ON position.
If the Flash Card is Removed When the AutoMARK is on
IF the Flash Card is removed when the AutoMARK is on, follow procedure 3.2.2 Changing the Flash Card.
Resetting the Machine
If you receive any of the following errors you will need to reset the AutoMARK VAT.
You hear a “hissing” noise coming from the inside of the AutoMARK mechanism.
The key switch fails to bring the unit into test mode. The system appears to lock up with no buttons available to
press. The system repeatedly fails to recognize a correct ballot. The compact flash card has been removed. There was an error reading the compact flash card at power-
up. Follow the procedure below to reset the machine.
1. Turn the key switch to the off position. 2. Wait at least 3 seconds for the charge to die down. 3. Turn the key switch to the on position.
10.3 Calibrating the Printer
Note This procedure is used to calibrate the machine whenever there is a significant rotation or consistent X or Y offset during normal printing operations. For manual calibration instructions, see Jurisdiction Guide.
The AutoMARK VAT implements an automatic printer calibration function that is accessible from the Test Ballot Print feature of Test Mode and may be used with any AutoMARK VAT compatible ballot that uses ovals.
8. Enter the Test Mode screen by turning the key switch to
Test. 9. Press Test Ballot Print. 10. Use the touch screen to select the Enable Calibration
Suggestions checkbox in the center top of the screen. 11. Insert a ballot compatible with the currently installed
FMC. The ballot should be inserted first page up, front first for best results. Ballot should have timing marks on both sides.
Troubleshooting
Page 78 of 87
12. After printing, the system will provide feedback based on the print accuracy and will prompt the user whether or not to implement the new settings.
13. Press yes to accept the new settings. 14. Insert another ballot compatible with the currently
installed FMC. 15. After the ballot prints, examine it for print accuracy. If
additional refinement is desired, continue steps 6-8 until the accuracy is acceptable.
16. When the print accuracy is finalized, press no when prompted to accept the new settings.
17. Press done. 18. Exit Test Mode by turning the key switch.
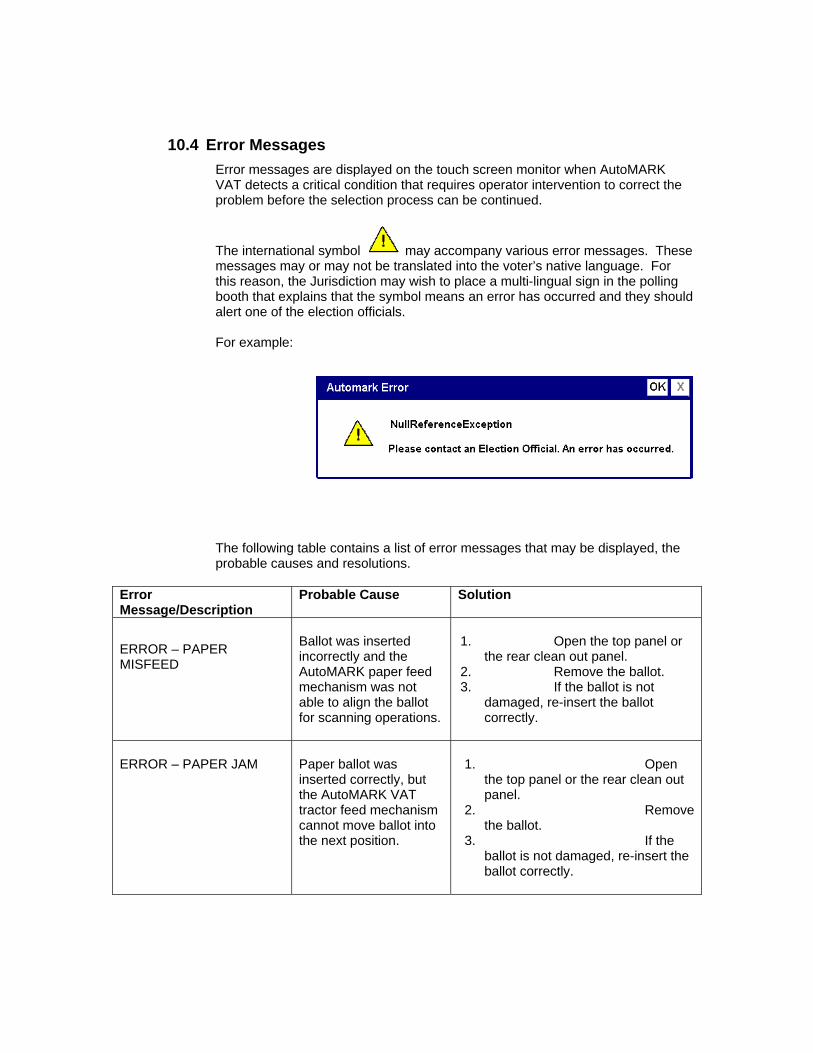
10.4 Error Messages Error messages are displayed on the touch screen monitor when AutoMARK VAT detects a critical condition that requires operator intervention to correct the problem before the selection process can be continued.
The international symbol may accompany various error messages. These messages may or may not be translated into the voter’s native language. For this reason, the Jurisdiction may wish to place a multi-lingual sign in the polling booth that explains that the symbol means an error has occurred and they should alert one of the election officials. For example:
The following table contains a list of error messages that may be displayed, the probable causes and resolutions.
Error Message/Description
Probable Cause Solution
ERROR – PAPER MISFEED
Ballot was inserted incorrectly and the AutoMARK paper feed mechanism was not able to align the ballot for scanning operations.
1. Open the top panel or
the rear clean out panel. 2. Remove the ballot. 3. If the ballot is not
damaged, re-insert the ballot correctly.
ERROR – PAPER JAM
Paper ballot was inserted correctly, but the AutoMARK VAT tractor feed mechanism cannot move ballot into the next position.
1. Open
the top panel or the rear clean out panel.
2. Remove the ballot.
3. If the ballot is not damaged, re-insert the ballot correctly.

Troubleshooting
Page 80 of 87
ERROR – Ballot Has Not Been Recognized
System is unable to read election information programmed and/or stored on the compact flash memory card (FMC).
1. Shutdown AutoMARK VAT. 2. Remove compact FMC. 3. Reprogram FMC with correct
data. 4. Touch the key switch with one
hand to discharge any static build-up
5. Insert FMC in AutoMARK VAT. 6. Startup AutoMARK VAT. Note: If the FMC allows for manually ID ballot, the voter will be allowed to select a ballot format if the AutoMARK VAT does not recognize the ballot upon insertion.
General Error Probable cause is an error in the software or a low memory condition.
1. Make sure that you have election judges/ pollworkers from both parties present.
2. Turn the keyswitch to the off position.
3. Press the OK button on the message box (if there is one).
4. If the system does not power off within 5 to 10 seconds, try pressing the okay button again if it is still on the screen.
5. (Note: the system may take up to 30 seconds to turn off.) After the system has powered off, turn the keyswitch ON again.
6. The system will reboot. If there is a ballot in the VAT, it will be ejected, and any voting sessions that were in progress will have to be restarted. Note that if the ballot was being marked when the error ocurred, a security cover should be placed over the ballot as it comes out, the ballot should be spoiled, and the voter should be given a new blank ballot.

Area Error message/Description Probable Cause Solution
Startup Waiting for Flash Card to become available... (this may take 30 seconds or more)"
There is either no flashcard inserted or the inserted flashcard is not complying with the export format. Another cause for this in DV2.0 machines is that the system was not powered up properly and the compact flash card reader was not enumerated properly.
Try turning the system off, waiting for 15 solid seconds with the system off, and then turn the system on again. If the problem keeps repeating, then try a different compact flash card or have the machine serviced.
Startup There are no ballots on the Flash Card and file read error is seen. Turn OFF the machine and check if a valid Flash Card is present.
The Automark VAT library was not able to import the ballots. There are no ballots available for the GUI to process.
Try a different compact flash card.
Startup AutoMARK Datafile Read Error. Message : <system err. Msg> Filename: <impacted file> Please power-off the system and replace the flash card. Touch the OK button after you have turned the keyswitch to the OFF position.
There is either a missing data file or a data file is not formatted right.
Try turning the system off, waiting for 15 solid seconds with the system off, and then turn the system on again. If the problem keeps repeating, then try a different compact flash card or have the machine serviced.
Startup Alert! A problem has occurred. Please notify an election official. Files have been tampered with or wrong access code!
The system detected that the flashcard data has been tampered and is not the original data that was exported. An additional cause could be that the pin code that was entered in the unlock screen was not the correct pin code for this particular set of data.
Make sure the pin code is correct. See earlier instructions for unlocking the compact flash card. If possible, get a new compact flash card or data set.
Startup (Win XP)
The ballot could not be loaded.
The system was not able to load the ballot that the user attempted to preview.
Restart the computer.
Troubleshooting
Page 82 of 87
Area Error message/Description Probable Cause Solution Scanning File read error.
<Error number> Displayed when a file error occurred during the scanning process.
Try turning the system off, waiting for 15 solid seconds with the system off, and then turn the system on again. If the problem keeps repeating, then try a different compact flash card or have the machine serviced.
Scanning Unknown scanner event <event code>
This message and the displayed event code should be reported to the Automark customer service team.
This message and the displayed event code should be reported to the Automark customer service team.
Flash Card
The Flash Card has been removed. Turn OFF the machine and insert a valid Flash Card.
System detected that the flash card was removed or tampered with.
Turn the key switch to the off position. (Touch the key switch with one hand to discharge any static build-up.) Replace the compact flash card, if necessary, and then turn the key switch to the ON position.

10.5 Troubleshooting Checklist The following table consists of additional troubleshooting suggestions.
Problem Probable Causes Solution Ballot selections not marked Ink supply is low. Replace ink cartridge. Ballot selections marked incorrectly
Election information may be setup wrong on the compact flash memory card (FMC).
Re-program information on FMC and test.
Marked ballot cannot be read Ballot style is unacceptable or optical cameras in scanner device are not functioning correctly.
If ballot style is unacceptable, have the voter mark an acceptable ballot style. Insert Proper ballot style.
AutoMARK will not start up without plugging it into an AC outlet.
Battery is low. Recharge battery.
No response when screen images are touched.
Unknown Shutdown and restart system. If problem still exists, call your service representative for service.
Audio presentation does not correspond with text displayed
Election information may be setup wrong on the compact flash memory card (FMC).
Re-program information on FMC and test.
No response when a key on the keypad is pressed
Unknown Shutdown and restart system. If problem still exists, call your service representative for service.
No response when remote keypad or Puff-Sip device is used.
Device cable connection is not properly attached to the dual-switch access (DSA) port
Check all connections, then shutdown and restart the system if necessary.
Unable to hear audio presentation
Headphone connection is not properly inserted into the audio jack.
Check all connections, then shutdown and restart the system if necessary.
10.6 Spoiled Ballot Procedure If you encounter an error that causes a spoiled ballot, eject the ballot to the voter and do not look at the voter’s selections. Follow your local procedures for a spoiled ballot.
Page 84 of 87
11 Security Measures
11.1 Access Control General Access Control Policy
It is the responsibility of the jurisdiction to provide a secure physical and procedural environment for the storage, handling, preparation, and transportation of the system hardware. The VAT should be kept in a secure location in a manner similar to other voting machines, ballots and other election equipment or records. Recommended policy for access controls are as follows. The Compact Flash content shall be programmed and verified by County or State election staff. Pre-programmed Compact Flash cards will be delivered to each precinct for installation by local precinct staff. Security measures which should be taken when preparing the Compact Flash Card are provided in the AIMS Election Official’s Guide.
Individual Access Privileges
The Election Official or his designee should • Retain possession of the key to power on the VAT. • Retain possession of the key to unlock and lock the Compact Flash
compartment. • Set the password for the VAT System Maintenance Menu and keep
private. Any time the VAT is put into TEST MODE, pollworkers of both parties must be present
11.2 Access Control Measures Unauthorized access to the Compact Flash card is prevented by means of a locked compartment. Election officials at the precinct level will use the Compact Flash compartment key to unlock the compartment, insert the Compact Flash card, and lock the compartment prior to opening the polls for voting. No further access to the Compact Flash is necessary until the polls are closed, when it can be removed.
11.3 Polling Place Security

The AutoMARK VAT is powered on and off by use of a key. Removal of this key will prevent unauthorized use when VAT is left unattended. Physical security measures for the AutoMARK system include a locked compartment to prevent access to the Compact Flash card. The Compact Flash card contains ballot format information. The compartment is locked with a key. The key is held by the precinct staff. A password is required to access the System Maintenance Menu items on the VAT, such as setting the time and date, or uploading new firmware. The password should be reset by the designated official and kept private. Headphones can be used to provide audio of the various ballot choices and the display screen can be turned off to prevent unauthorized access to vote information from a voter with visual impairments.

Page 86 of 87
12 Calling for Help If a problem cannot be resolved using the information in this guide, please contact: Election Systems and Software, Inc. (ES&S) 11208 John Galt Blvd. Omaha, NE 68137 Toll Free: 1-800-247-8683 Fax: 402-593-0101 Email: [email protected]

Page 87 of 87
13 REVISION HISTORY
Revision Date Reason for Revision 5/23/05
End of Document