Embed Size (px)
Citation preview
Camera Control Manager
Application GuideUMC-S3C
C-452-100-11 (1)
© 2016 Sony Corporation
2
Table of contents
Introductions
How to use this application guide .................... 3Required system configurations ...................... 3
Using the Camera Control Manager
How to install Camera Control Manager .............. 5Launching Camera Control Manager ................... 5
Screen operations and settings ........................ 6Still image mode ................................................. 7
Information ........................................................... 7Camera setting menu ............................................ 7Live View .............................................................. 8
Movie image mode ............................................. 9Information ........................................................... 9Camera setting menu ............................................ 9Live View ............................................................10
Settings tab ....................................................... 11Still tab ................................................................ 11Movie tab ............................................................12Image tab ............................................................14Picture Profile 1 tab ............................................15Picture Profile 2 tab ............................................17System1 tab ........................................................ 18System2 tab ........................................................ 19
Appendix
Initialize, Camera Setting Reset ...................... 20Message ............................................................ 23Getting help ...................................................... 25
Installing the software ........................................ 25Connecting the camera to PC .............................25
Index .................................................................. 26
Introductions
This document is the instruction manual for Camera Control Manager, the dedicated PC application software for “UMC-S3C”, a 4K compatible video camera for professional use.
If you install PC application software, you can operate the camera as well as set/adjust the image quality depending on the shooting environment.
Properly install and connect the camera, separately sold accessories, and connecting devices referring to their operating instructions, then operate the camera referring to this application guide.
The screens on this document is for reference only. They might be different from the actual screens.
Designs or specifications of the PC application software and this document are subject to change without notice.
How to use this application guideThis application guide is written with the assumption that it will be displayed on a computer.This section describes things you should know when utilizing this application guide.Read before operation
Jump to the related pagesWhen you read this document on a computer screen, clicking where the related page is displayed allows you to jump to the page with the related instruction. You can search for the related page easily.
Sample screens of the softwarePC application software screens on this application guide is for sample use only. They might be different from the actual screens.Also, the Menu screen is an example for instructions.
Printing out this application guideWhen you print out this application guide, the details of screens or illustrations might not be displayed depending on the system.
Required system configurationsTo control the camera, the environment below is required.(As of October 2016)
OS
Microsoft Windows 7 (32bit, 64bit)Windows 8.1 (32bit, 64bit)Windows 10 (32bit, 64bit)
Operation confirmed editionsWindows 7:Ultimate, ProfessionalWindows 8.1:ProWindows 10:Pro
When you use antivirus software on the computer
If you use antivirus software, security software, personal firewall, pop-up blocker, etc., the performance of the camera, including lower frame rate of image display, might be lower.
3
NOTICE TO USERS
© 2016 Sony Corporation. All rights reserved. This manual or the software described herein, in whole or in part, may not be reproduced, translated or reduced to any machine readable form without prior written approval from Sony Corporation.
SONY CORPORATION PROVIDES NO WARRANTY WITH REGARD TO THIS MANUAL, THE SOFTWARE OR OTHER INFORMATION CONTAINED HEREIN AND HEREBY EXPRESSLY DISCLAIMS ANY IMPLIED WARRANTIES OF MERCHANTABILITY OR FITNESS FOR ANY PARTICULAR PURPOSE WITH REGARD TO THIS MANUAL, THE SOFTWARE OR SUCH OTHER INFORMATION. IN NO EVENT SHALL SONY CORPORATION BE LIABLE FOR ANY INCIDENTAL, CONSEQUENTIAL OR SPECIAL DAMAGES, WHETHER BASED ON TORT, CONTRACT, OR OTHERWISE, ARISING OUT OF OR IN CONNECTION WITH THIS MANUAL, THE SOFTWARE OR OTHER INFORMATION CONTAINED HEREIN OR THE USE THEREOF.
Sony Corporation reserves the right to make any modification to this manual or the information contained herein at any time without notice.The software described herein may also be governed by the terms of a separate user license agreement.
• “Exmor” and are trademarks of Sony Corporation.
• HDMI, HDMI High-Definition Multimedia Interface, and HDMI logo are registered trademark of HDMI Licensing LLC in the U.S. and/or other countries.
• Microsoft, Windows are trademarks of U.S. Microsoft Corporation in the U.S. and/or other countries.
• Adobe, Adobe Reader, and Adobe Flash are trademarks of Adobe Systems Incorporated.
Other system names, product names are generally registered trademarks or trademarks of each manufacturer. ® and TM marks are not described in this document.
4
Using the Camera Control Manager
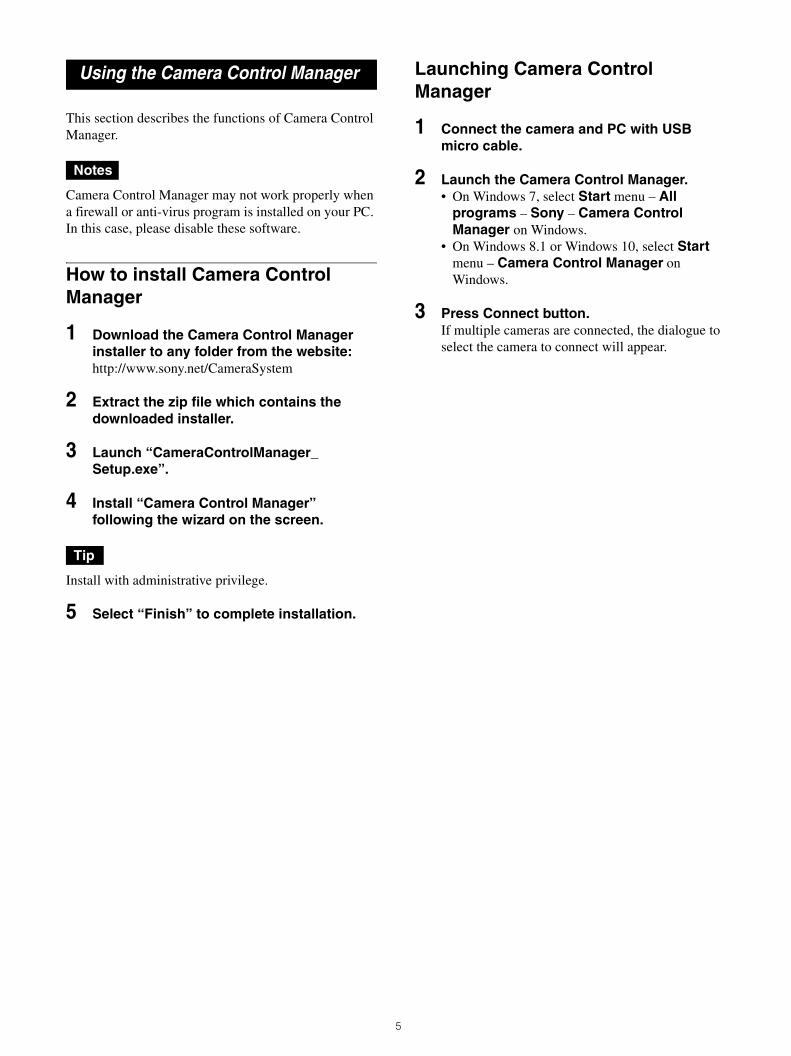
This section describes the functions of Camera Control Manager.
Notes
Camera Control Manager may not work properly when a firewall or anti-virus program is installed on your PC. In this case, please disable these software.
How to install Camera Control Manager
1 Download the Camera Control Manager installer to any folder from the website:http://www.sony.net/CameraSystem
2 Extract the zip file which contains the downloaded installer.
3 Launch “CameraControlManager_Setup.exe”.
4 Install “Camera Control Manager” following the wizard on the screen.
Tip
Install with administrative privilege.
5 Select “Finish” to complete installation.
Launching Camera Control Manager
1 Connect the camera and PC with USB micro cable.
2 Launch the Camera Control Manager.• On Windows 7, select Start menu – All
programs – Sony – Camera Control Manager on Windows.
• On Windows 8.1 or Windows 10, select Start menu – Camera Control Manager on Windows.
3 Press Connect button.If multiple cameras are connected, the dialogue to select the camera to connect will appear.
5
Screen operations and settings
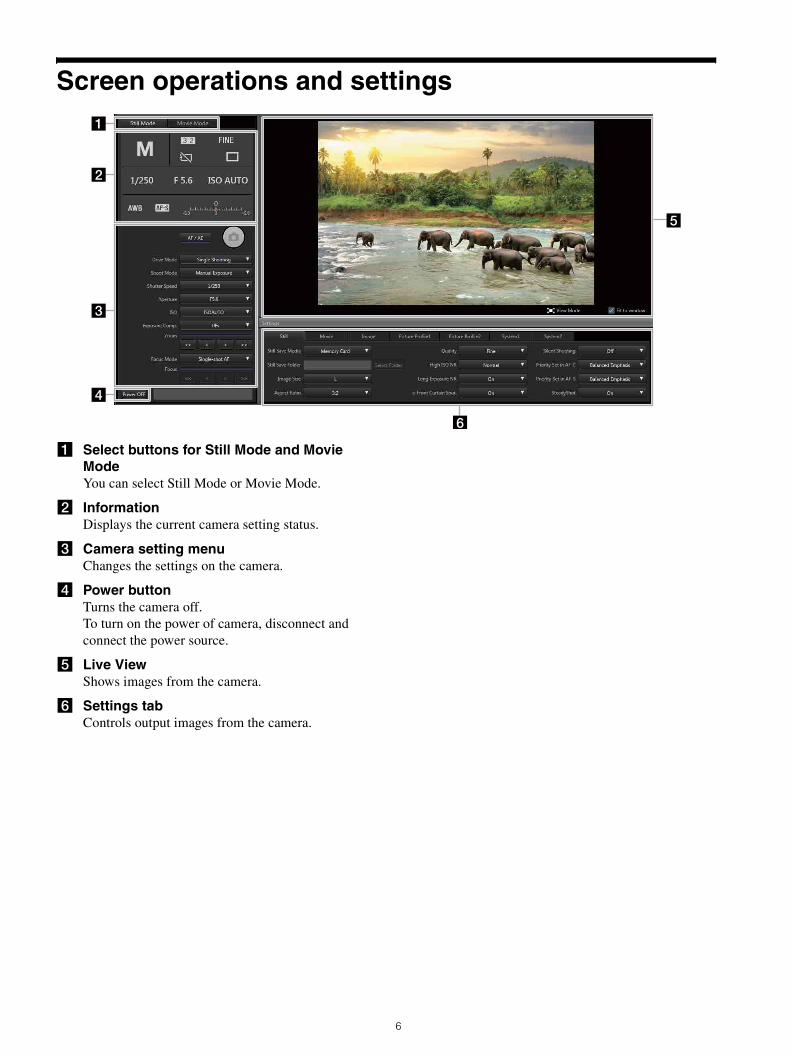
a Select buttons for Still Mode and Movie ModeYou can select Still Mode or Movie Mode.
b InformationDisplays the current camera setting status.
c Camera setting menuChanges the settings on the camera.
d Power buttonTurns the camera off.To turn on the power of camera, disconnect and connect the power source.
e Live ViewShows images from the camera.
f Settings tabControls output images from the camera.
1
2
3
4
6
5
6
Still image mode
Information
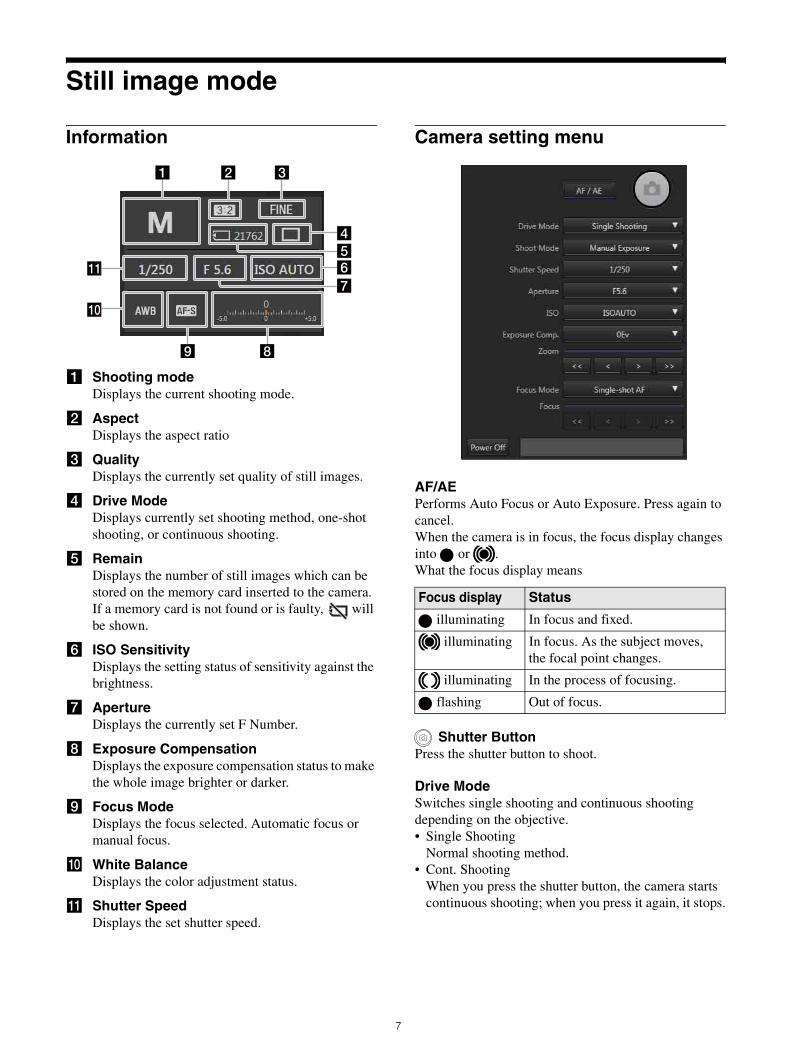
a Shooting modeDisplays the current shooting mode.
b AspectDisplays the aspect ratio
c QualityDisplays the currently set quality of still images.
d Drive ModeDisplays currently set shooting method, one-shot shooting, or continuous shooting.
e RemainDisplays the number of still images which can be stored on the memory card inserted to the camera. If a memory card is not found or is faulty, will be shown.
f ISO SensitivityDisplays the setting status of sensitivity against the brightness.
g ApertureDisplays the currently set F Number.
h Exposure CompensationDisplays the exposure compensation status to make the whole image brighter or darker.
i Focus ModeDisplays the focus selected. Automatic focus or manual focus.
j White BalanceDisplays the color adjustment status.
k Shutter SpeedDisplays the set shutter speed.
Camera setting menu
AF/AEPerforms Auto Focus or Auto Exposure. Press again to cancel.When the camera is in focus, the focus display changes into or .What the focus display means
Shutter ButtonPress the shutter button to shoot.
Drive ModeSwitches single shooting and continuous shooting depending on the objective.• Single Shooting
Normal shooting method.• Cont. Shooting
When you press the shutter button, the camera starts continuous shooting; when you press it again, it stops.
21 3
456
7
89
q;
qa
Focus display Status
illuminating In focus and fixed.
illuminating In focus. As the subject moves, the focal point changes.
illuminating In the process of focusing.
flashing Out of focus.
7
Shoot ModeSelects the shoot mode below.• Intelligent Auto
A value the camera determines the most suitable is set. Easy shooting is possible regardless of objectives and environment.
• Superior AutoThe camera recognizes the shooting status and makes settings automatically. It performs continuous shooting when needed and saves the best image by combining photos or extracting.
• Program AutoThe camera automatically sets exposure (shutter speed and aperture), but other settings can be adjusted by yourself.
• Aperture PriorityYou can adjust the aperture setting manually to change the range in which objects appear in focus and the blurriness of the background.
• Shutter PriorityAdjusts the shutter speed and shoots moving object with different expressions.
• Manual ExposureYou can adjust both the aperture setting and the shutter speed manually to shoot with your own favorite exposure setting.
Shutter SpeedSelects the shutter speed.
ApertureSelects aperture (F number). When the aperture is small, the area around the object will be blurred. When the aperture is large, the area around the object will be focused clearly.
ISO SensitivitySets ISO Sensitivity (ISO 50-409600/ISO AUTO/Multi Flame NR ISO 100-409600/Multi Flame NR ISO AUTO)
Exposure CompensationCompensates the brightness of the whole image. (–5.0EV to +5.0EV)
ZoomDisplay the current zoom position guide. Wide side is on left, Tele side is on right.
Zooms out when pressed down. Press to zoom out slightly. Press to zoom in slightly. Zooms in when pressed down.
Focus mode• Single AF (AF-S)
Press AF/AF and the focus is stacked, then the focus will be fixed.
• Continuous AF (AF-C)Keeps trying to focus on during AF/AE button pressed. To release, press AF/AE button again.* Focus lock is not available.
• Manual focus (MF)When Automatic focus doesn't work effectively, you may want to focus manually. Same settings will be applied for still image and movie shooting.
Focus PositionDisplays the current focus position guide. Near side is on the left, Far side is on the right.
When pressed down, moves focus to the Near side. Press to move focus to the Near side slightly. Press to move focus to the Far side slightly. When pressed down, moves focus to the Far side.
Power OffTurns off the power of the camera.
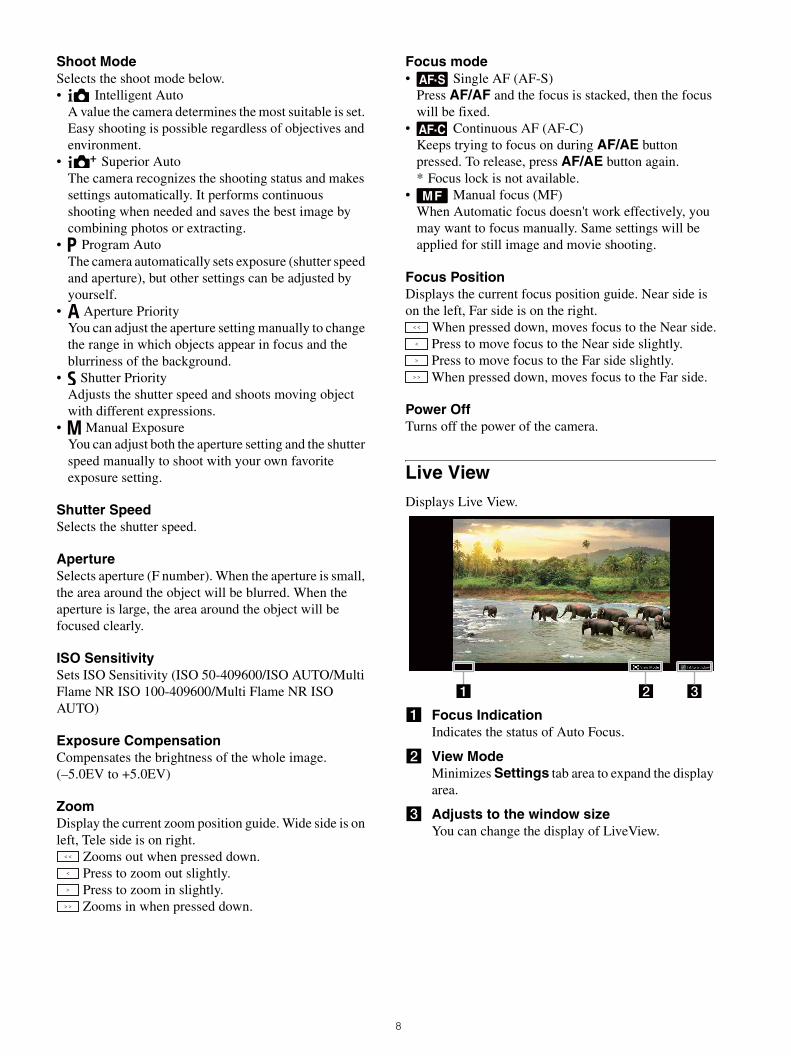
Live ViewDisplays Live View.
a Focus IndicationIndicates the status of Auto Focus.
b View ModeMinimizes Settings tab area to expand the display area.
c Adjusts to the window sizeYou can change the display of LiveView.
1 2 3
8
Movie image mode
Information
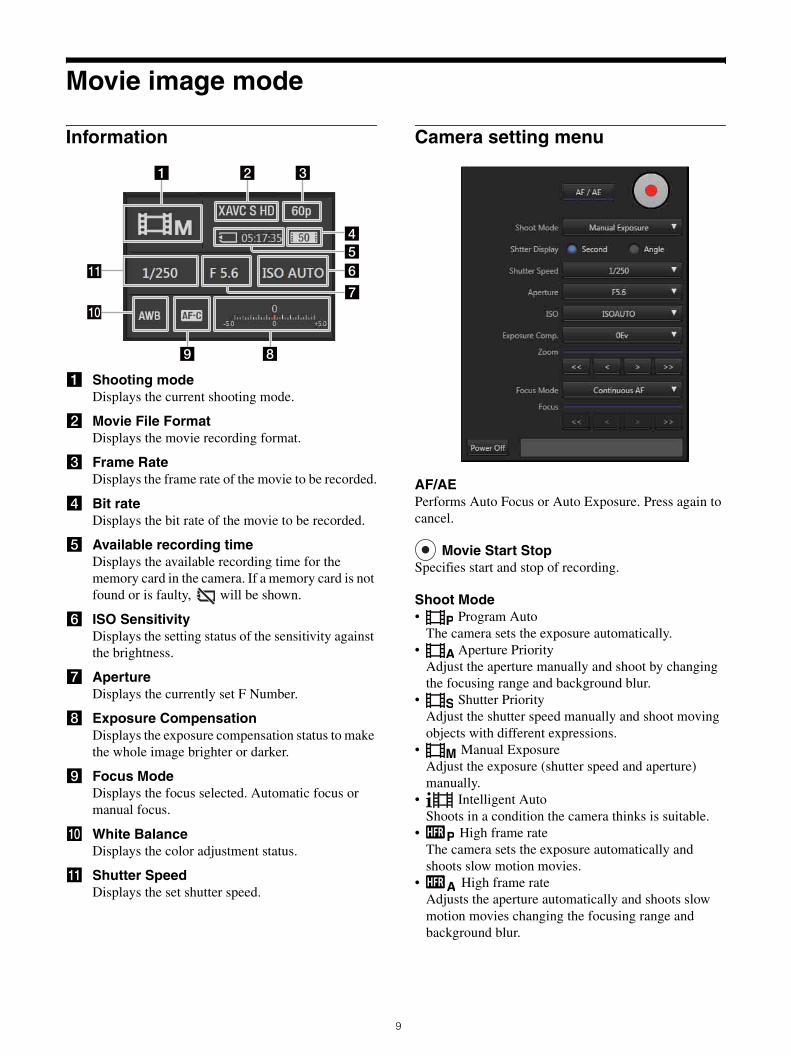
a Shooting modeDisplays the current shooting mode.
b Movie File FormatDisplays the movie recording format.
c Frame RateDisplays the frame rate of the movie to be recorded.
d Bit rateDisplays the bit rate of the movie to be recorded.
e Available recording timeDisplays the available recording time for the memory card in the camera. If a memory card is not found or is faulty, will be shown.
f ISO SensitivityDisplays the setting status of the sensitivity against the brightness.
g ApertureDisplays the currently set F Number.
h Exposure CompensationDisplays the exposure compensation status to make the whole image brighter or darker.
i Focus ModeDisplays the focus selected. Automatic focus or manual focus.
j White BalanceDisplays the color adjustment status.
k Shutter SpeedDisplays the set shutter speed.
Camera setting menu
AF/AEPerforms Auto Focus or Auto Exposure. Press again to cancel.
Movie Start StopSpecifies start and stop of recording.
Shoot Mode• Program Auto
The camera sets the exposure automatically.• Aperture Priority
Adjust the aperture manually and shoot by changing the focusing range and background blur.
• Shutter PriorityAdjust the shutter speed manually and shoot moving objects with different expressions.
• Manual ExposureAdjust the exposure (shutter speed and aperture) manually.
• Intelligent AutoShoots in a condition the camera thinks is suitable.
• High frame rateThe camera sets the exposure automatically and shoots slow motion movies.
• High frame rateAdjusts the aperture automatically and shoots slow motion movies changing the focusing range and background blur.
qa
q;
21 3
4
5
6
7
89
9
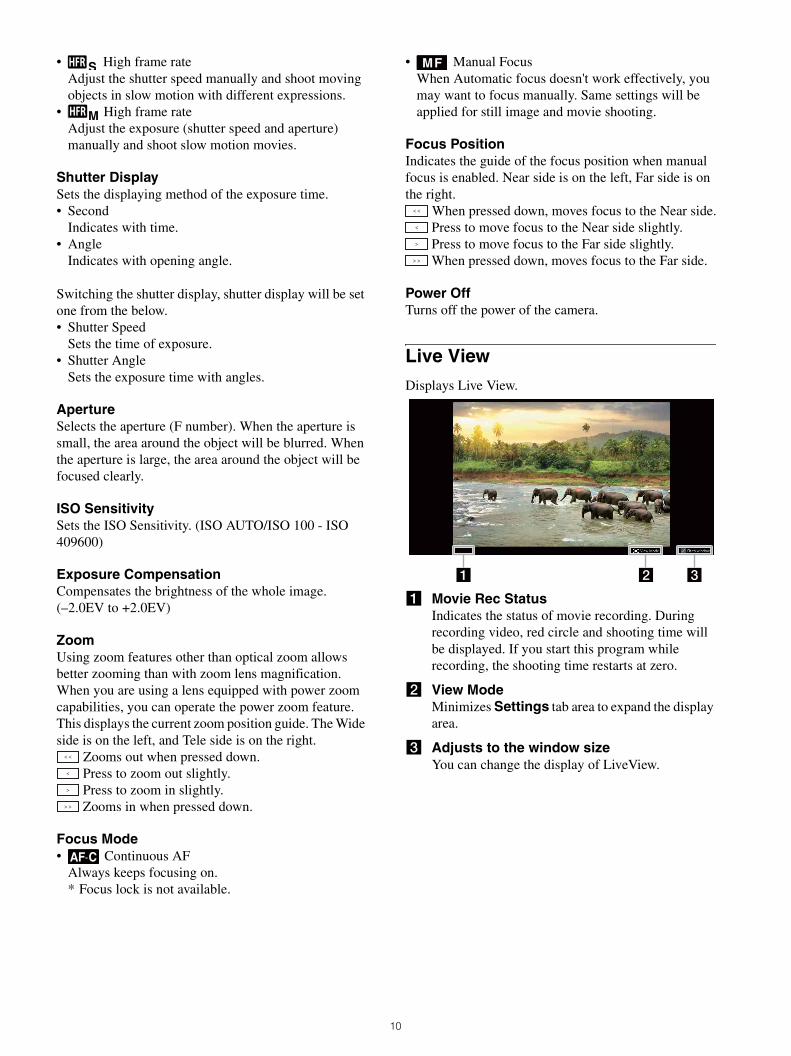
• High frame rateAdjust the shutter speed manually and shoot moving objects in slow motion with different expressions.
• High frame rateAdjust the exposure (shutter speed and aperture) manually and shoot slow motion movies.
Shutter DisplaySets the displaying method of the exposure time.• Second
Indicates with time.• Angle
Indicates with opening angle.
Switching the shutter display, shutter display will be set one from the below.• Shutter Speed
Sets the time of exposure.• Shutter Angle
Sets the exposure time with angles.
ApertureSelects the aperture (F number). When the aperture is small, the area around the object will be blurred. When the aperture is large, the area around the object will be focused clearly.
ISO SensitivitySets the ISO Sensitivity. (ISO AUTO/ISO 100 - ISO 409600)
Exposure CompensationCompensates the brightness of the whole image. (–2.0EV to +2.0EV)
ZoomUsing zoom features other than optical zoom allows better zooming than with zoom lens magnification. When you are using a lens equipped with power zoom capabilities, you can operate the power zoom feature.This displays the current zoom position guide. The Wide side is on the left, and Tele side is on the right.
Zooms out when pressed down. Press to zoom out slightly. Press to zoom in slightly. Zooms in when pressed down.
Focus Mode• Continuous AF
Always keeps focusing on.* Focus lock is not available.
• Manual FocusWhen Automatic focus doesn't work effectively, you may want to focus manually. Same settings will be applied for still image and movie shooting.
Focus PositionIndicates the guide of the focus position when manual focus is enabled. Near side is on the left, Far side is on the right.
When pressed down, moves focus to the Near side. Press to move focus to the Near side slightly. Press to move focus to the Far side slightly. When pressed down, moves focus to the Far side.
Power OffTurns off the power of the camera.
Live View
Displays Live View.
a Movie Rec StatusIndicates the status of movie recording. During recording video, red circle and shooting time will be displayed. If you start this program while recording, the shooting time restarts at zero.
b View ModeMinimizes Settings tab area to expand the display area.
c Adjusts to the window sizeYou can change the display of LiveView.
1 2 3
10
Settings tab
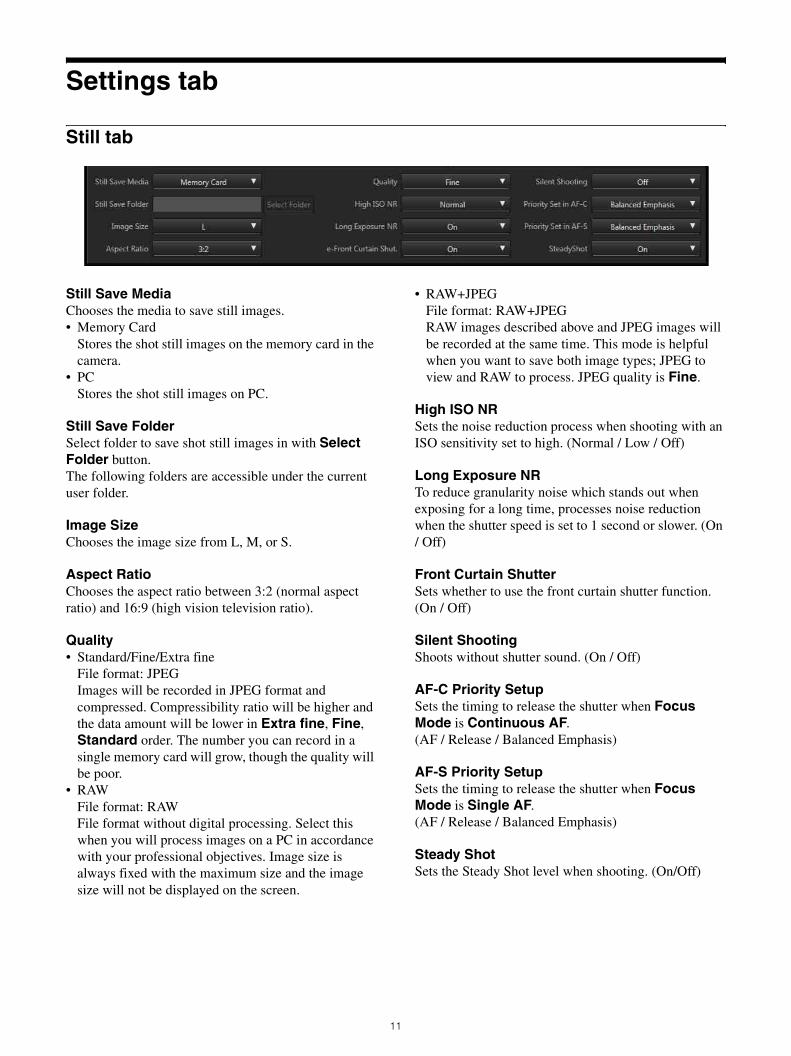
Still tab
Still Save MediaChooses the media to save still images.• Memory Card
Stores the shot still images on the memory card in the camera.
• PCStores the shot still images on PC.
Still Save FolderSelect folder to save shot still images in with Select Folder button.The following folders are accessible under the current user folder.
Image SizeChooses the image size from L, M, or S.
Aspect RatioChooses the aspect ratio between 3:2 (normal aspect ratio) and 16:9 (high vision television ratio).
Quality• Standard/Fine/Extra fine
File format: JPEGImages will be recorded in JPEG format and compressed. Compressibility ratio will be higher and the data amount will be lower in Extra fine, Fine, Standard order. The number you can record in a single memory card will grow, though the quality will be poor.
• RAWFile format: RAWFile format without digital processing. Select this when you will process images on a PC in accordance with your professional objectives. Image size is always fixed with the maximum size and the image size will not be displayed on the screen.
• RAW+JPEGFile format: RAW+JPEGRAW images described above and JPEG images will be recorded at the same time. This mode is helpful when you want to save both image types; JPEG to view and RAW to process. JPEG quality is Fine.
High ISO NRSets the noise reduction process when shooting with an ISO sensitivity set to high. (Normal / Low / Off)
Long Exposure NRTo reduce granularity noise which stands out when exposing for a long time, processes noise reduction when the shutter speed is set to 1 second or slower. (On / Off)
Front Curtain ShutterSets whether to use the front curtain shutter function. (On / Off)
Silent ShootingShoots without shutter sound. (On / Off)
AF-C Priority SetupSets the timing to release the shutter when Focus Mode is Continuous AF.(AF / Release / Balanced Emphasis)
AF-S Priority SetupSets the timing to release the shutter when Focus Mode is Single AF.(AF / Release / Balanced Emphasis)
Steady ShotSets the Steady Shot level when shooting. (On/Off)
11
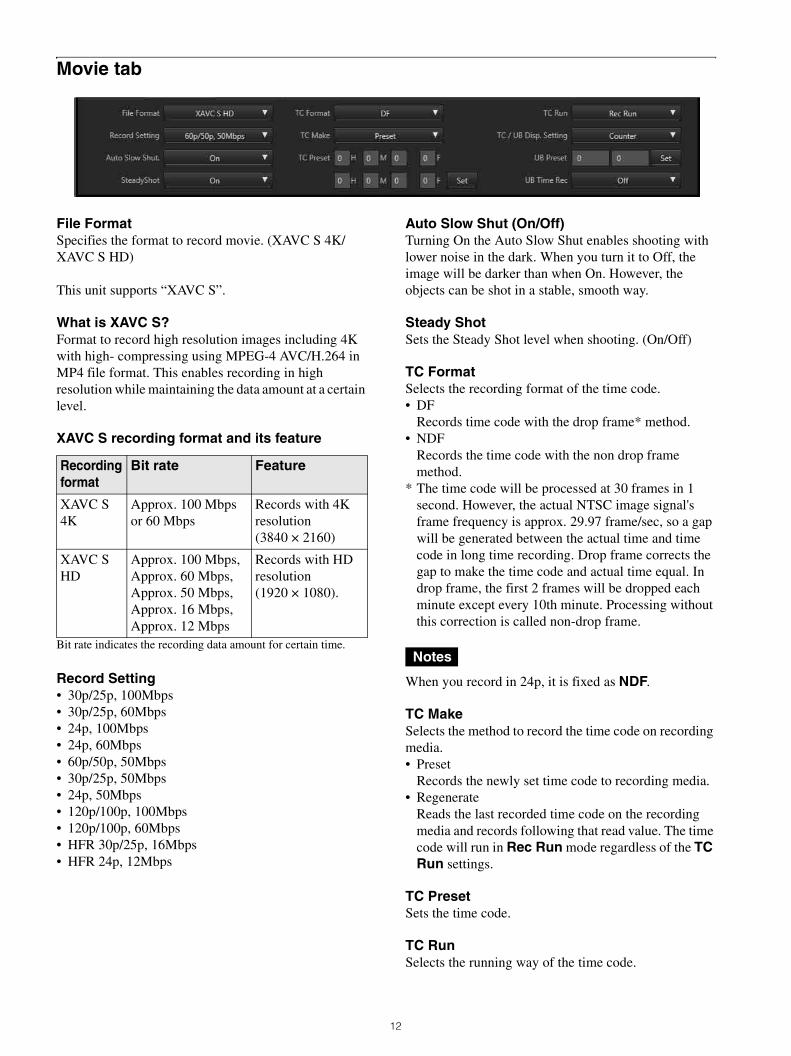
Movie tab
File FormatSpecifies the format to record movie. (XAVC S 4K/XAVC S HD)
This unit supports “XAVC S”.
What is XAVC S?Format to record high resolution images including 4K with high- compressing using MPEG-4 AVC/H.264 in MP4 file format. This enables recording in high resolution while maintaining the data amount at a certain level.
XAVC S recording format and its feature
Bit rate indicates the recording data amount for certain time.
Record Setting• 30p/25p, 100Mbps• 30p/25p, 60Mbps• 24p, 100Mbps• 24p, 60Mbps• 60p/50p, 50Mbps• 30p/25p, 50Mbps• 24p, 50Mbps• 120p/100p, 100Mbps• 120p/100p, 60Mbps• HFR 30p/25p, 16Mbps• HFR 24p, 12Mbps
Auto Slow Shut (On/Off)Turning On the Auto Slow Shut enables shooting with lower noise in the dark. When you turn it to Off, the image will be darker than when On. However, the objects can be shot in a stable, smooth way.
Steady ShotSets the Steady Shot level when shooting. (On/Off)
TC FormatSelects the recording format of the time code.• DF
Records time code with the drop frame* method.• NDF
Records the time code with the non drop frame method.
* The time code will be processed at 30 frames in 1 second. However, the actual NTSC image signal's frame frequency is approx. 29.97 frame/sec, so a gap will be generated between the actual time and time code in long time recording. Drop frame corrects the gap to make the time code and actual time equal. In drop frame, the first 2 frames will be dropped each minute except every 10th minute. Processing without this correction is called non-drop frame.
Notes
When you record in 24p, it is fixed as NDF.
TC MakeSelects the method to record the time code on recording media.• Preset
Records the newly set time code to recording media.• Regenerate
Reads the last recorded time code on the recording media and records following that read value. The time code will run in Rec Run mode regardless of the TC Run settings.
TC PresetSets the time code.
TC RunSelects the running way of the time code.
Recording format
Bit rate Feature
XAVC S 4K
Approx. 100 Mbps or 60 Mbps
Records with 4K resolution (3840 × 2160)
XAVC S HD
Approx. 100 Mbps,Approx. 60 Mbps,Approx. 50 Mbps,Approx. 16 Mbps,Approx. 12 Mbps
Records with HD resolution (1920 × 1080).
12
• Rec RunThe time code will run only during recording.Records following the time code on the last recorded image.
• Free RunThe time code will run continuously.
TC/UB Disp. Setting Sets the contents to display on the monitor when HDMI information display is On. (Counter/TC/U-Bit)
UB PresetSets the user bit.
UB Time RecSelects whether to record the time as a user bit code. (On / Off)
13
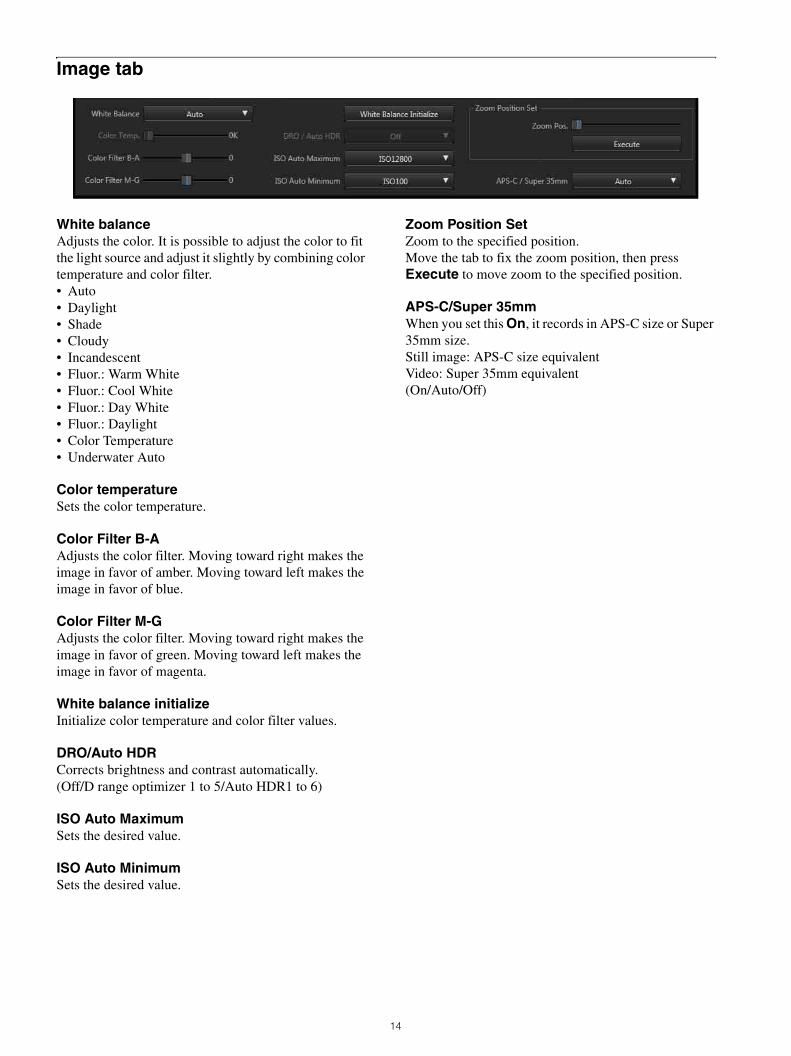
Image tab
White balanceAdjusts the color. It is possible to adjust the color to fit the light source and adjust it slightly by combining color temperature and color filter.• Auto• Daylight• Shade• Cloudy• Incandescent• Fluor.: Warm White• Fluor.: Cool White• Fluor.: Day White• Fluor.: Daylight• Color Temperature• Underwater Auto
Color temperatureSets the color temperature.
Color Filter B-AAdjusts the color filter. Moving toward right makes the image in favor of amber. Moving toward left makes the image in favor of blue.
Color Filter M-GAdjusts the color filter. Moving toward right makes the image in favor of green. Moving toward left makes the image in favor of magenta.
White balance initializeInitialize color temperature and color filter values.
DRO/Auto HDRCorrects brightness and contrast automatically.(Off/D range optimizer 1 to 5/Auto HDR1 to 6)
ISO Auto MaximumSets the desired value.
ISO Auto MinimumSets the desired value.
Zoom Position SetZoom to the specified position.Move the tab to fix the zoom position, then press Execute to move zoom to the specified position.
APS-C/Super 35mmWhen you set this On, it records in APS-C size or Super 35mm size.Still image: APS-C size equivalentVideo: Super 35mm equivalent(On/Auto/Off)
14
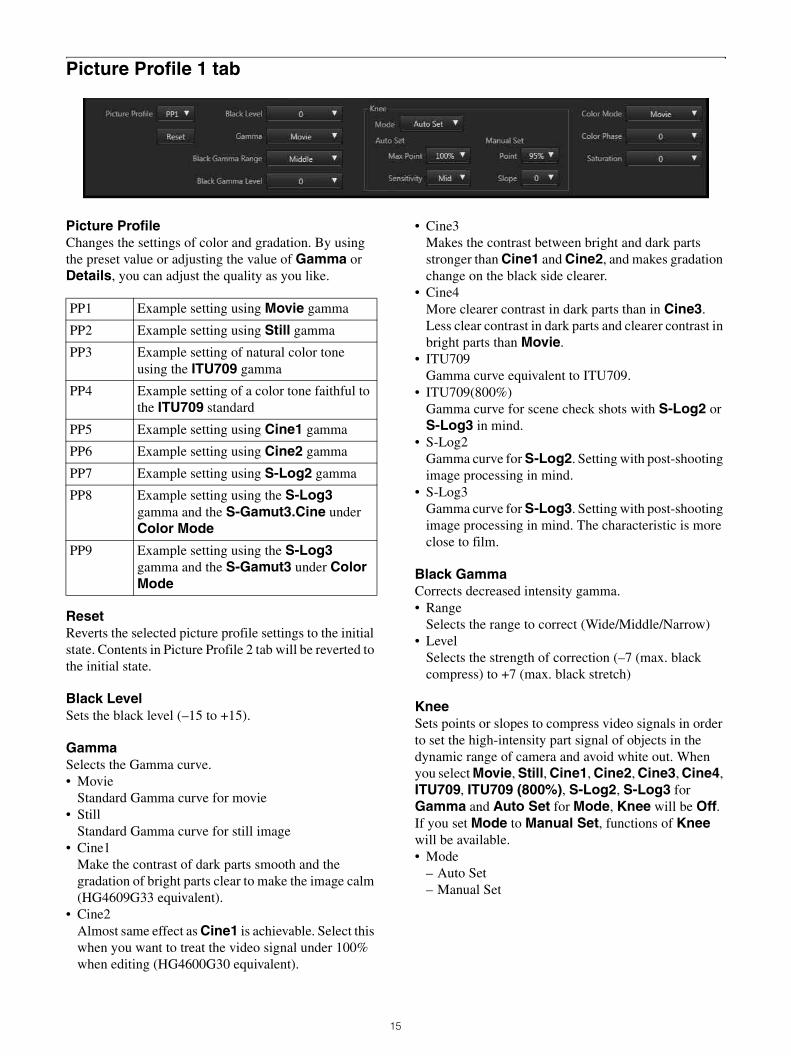
Picture Profile 1 tab
Picture Profile Changes the settings of color and gradation. By using the preset value or adjusting the value of Gamma or Details, you can adjust the quality as you like.
ResetReverts the selected picture profile settings to the initial state. Contents in Picture Profile 2 tab will be reverted to the initial state.
Black LevelSets the black level (–15 to +15).
GammaSelects the Gamma curve.• Movie
Standard Gamma curve for movie• Still
Standard Gamma curve for still image• Cine1
Make the contrast of dark parts smooth and the gradation of bright parts clear to make the image calm (HG4609G33 equivalent).
• Cine2Almost same effect as Cine1 is achievable. Select this when you want to treat the video signal under 100% when editing (HG4600G30 equivalent).
• Cine3Makes the contrast between bright and dark parts stronger than Cine1 and Cine2, and makes gradation change on the black side clearer.
• Cine4More clearer contrast in dark parts than in Cine3. Less clear contrast in dark parts and clearer contrast in bright parts than Movie.
• ITU709Gamma curve equivalent to ITU709.
• ITU709(800%)Gamma curve for scene check shots with S-Log2 or S-Log3 in mind.
• S-Log2Gamma curve for S-Log2. Setting with post-shooting image processing in mind.
• S-Log3Gamma curve for S-Log3. Setting with post-shooting image processing in mind. The characteristic is more close to film.
Black GammaCorrects decreased intensity gamma.• Range
Selects the range to correct (Wide/Middle/Narrow)• Level
Selects the strength of correction (–7 (max. black compress) to +7 (max. black stretch)
KneeSets points or slopes to compress video signals in order to set the high-intensity part signal of objects in the dynamic range of camera and avoid white out. When you select Movie, Still, Cine1, Cine2, Cine3, Cine4, ITU709, ITU709 (800%), S-Log2, S-Log3 for Gamma and Auto Set for Mode, Knee will be Off. If you set Mode to Manual Set, functions of Knee will be available.• Mode
– Auto Set– Manual Set
PP1 Example setting using Movie gamma
PP2 Example setting using Still gamma
PP3 Example setting of natural color tone using the ITU709 gamma
PP4 Example setting of a color tone faithful to the ITU709 standard
PP5 Example setting using Cine1 gamma
PP6 Example setting using Cine2 gamma
PP7 Example setting using S-Log2 gamma
PP8 Example setting using the S-Log3 gamma and the S-Gamut3.Cine under Color Mode
PP9 Example setting using the S-Log3 gamma and the S-Gamut3 under Color Mode
15
• Auto Set– Max Point
Sets the max value of Knee point. (90% to 100%)– Sensitivity
Sets the sensitivity. (High/Mid/Low)• Manual Set
– PointSets the Knee point. (75% to 105%)
– SlopeSets the tilt of Knee slope. (–5 (less tilt) to +5 (more tilt))
Color Mode• Movie
Color which fits when Gamma is Movie.• Still
Color which fits when Gamma is Still.• Cinema
Color which fits when Gamma is Cine1.• Pro
Color which is closest to the standard quality of Sony professional use cameras (when combined with ITU709 gamma).
• ITU709 MatrixColor which is faithful to ITU709 standard (when combined with ITU709 gamma).
• Black & WhiteSets intensity to 0 to shoot with B/W.
• S-GamutSetting with post-shot image processing in mind to use when Gamma is S-Log2.
• S-Gamut3.CineSetting with post-shot image processing in mind to use when Gamma is S-Log3. Shooting in color range which is easy to adjust for digital cinema color range is possible.
• S-Gamut3Setting with post-shot image processing in mind to use when Gamma is S-Log3. Shooting in a wide color range is possible.
Color PhaseSets the color phase. (–7 to +7)
SaturationSets the saturation of color. (–32 to +32)
16
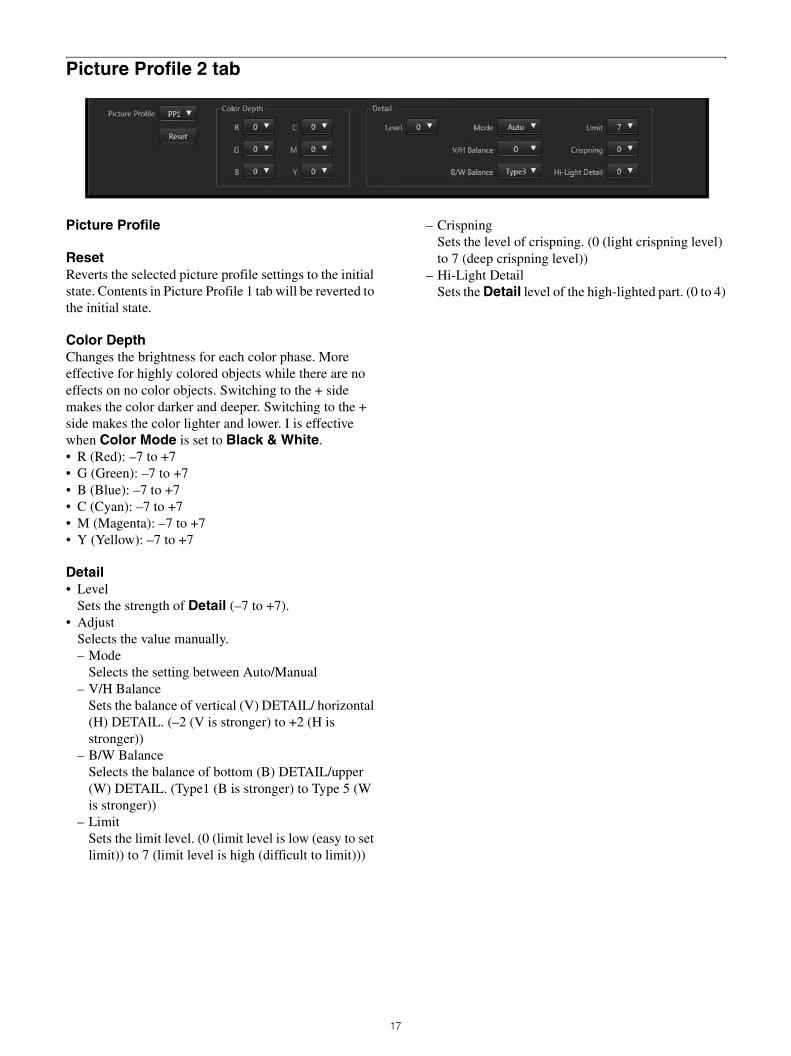
Picture Profile 2 tab
Picture Profile
ResetReverts the selected picture profile settings to the initial state. Contents in Picture Profile 1 tab will be reverted to the initial state.
Color DepthChanges the brightness for each color phase. More effective for highly colored objects while there are no effects on no color objects. Switching to the + side makes the color darker and deeper. Switching to the + side makes the color lighter and lower. I is effective when Color Mode is set to Black & White.• R (Red): –7 to +7• G (Green): –7 to +7• B (Blue): –7 to +7• C (Cyan): –7 to +7• M (Magenta): –7 to +7• Y (Yellow): –7 to +7
Detail• Level
Sets the strength of Detail (–7 to +7).• Adjust
Selects the value manually.– Mode
Selects the setting between Auto/Manual– V/H Balance
Sets the balance of vertical (V) DETAIL/ horizontal (H) DETAIL. (–2 (V is stronger) to +2 (H is stronger))
– B/W BalanceSelects the balance of bottom (B) DETAIL/upper (W) DETAIL. (Type1 (B is stronger) to Type 5 (W is stronger))
– LimitSets the limit level. (0 (limit level is low (easy to set limit)) to 7 (limit level is high (difficult to limit)))
– CrispningSets the level of crispning. (0 (light crispning level) to 7 (deep crispning level))
– Hi-Light DetailSets the Detail level of the high-lighted part. (0 to 4)
17
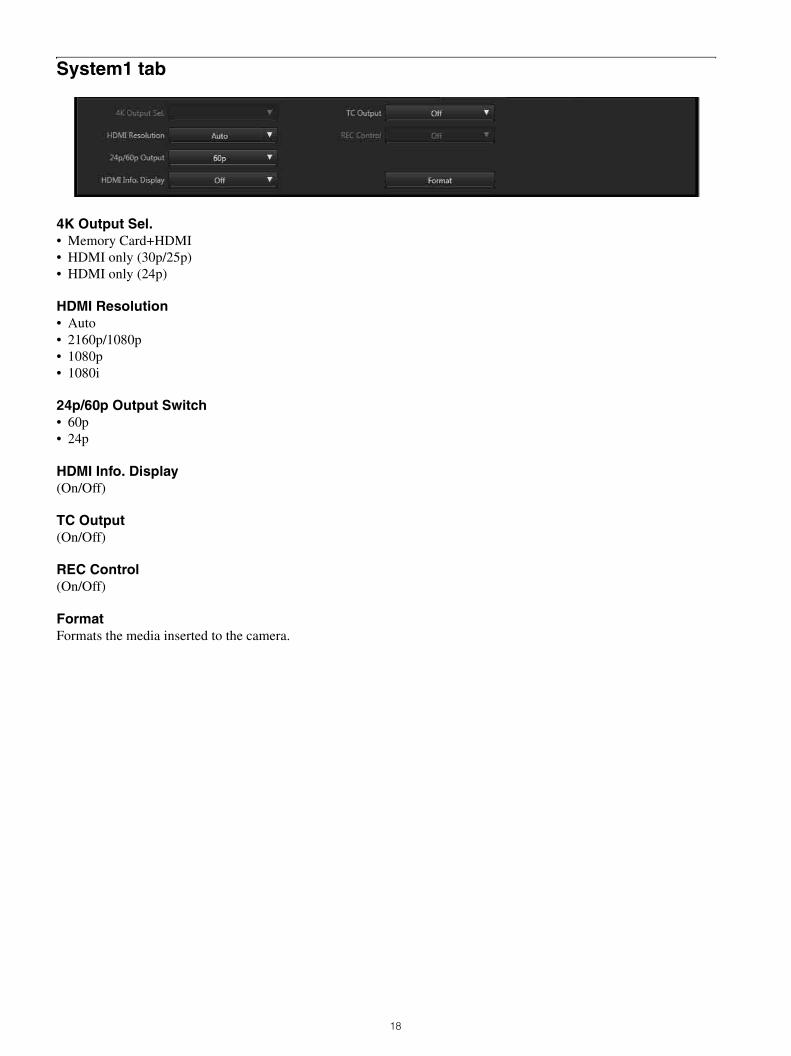
System1 tab
4K Output Sel.• Memory Card+HDMI• HDMI only (30p/25p)• HDMI only (24p)
HDMI Resolution• Auto• 2160p/1080p• 1080p• 1080i
24p/60p Output Switch• 60p• 24p
HDMI Info. Display(On/Off)
TC Output(On/Off)
REC Control(On/Off)
FormatFormats the media inserted to the camera.
18
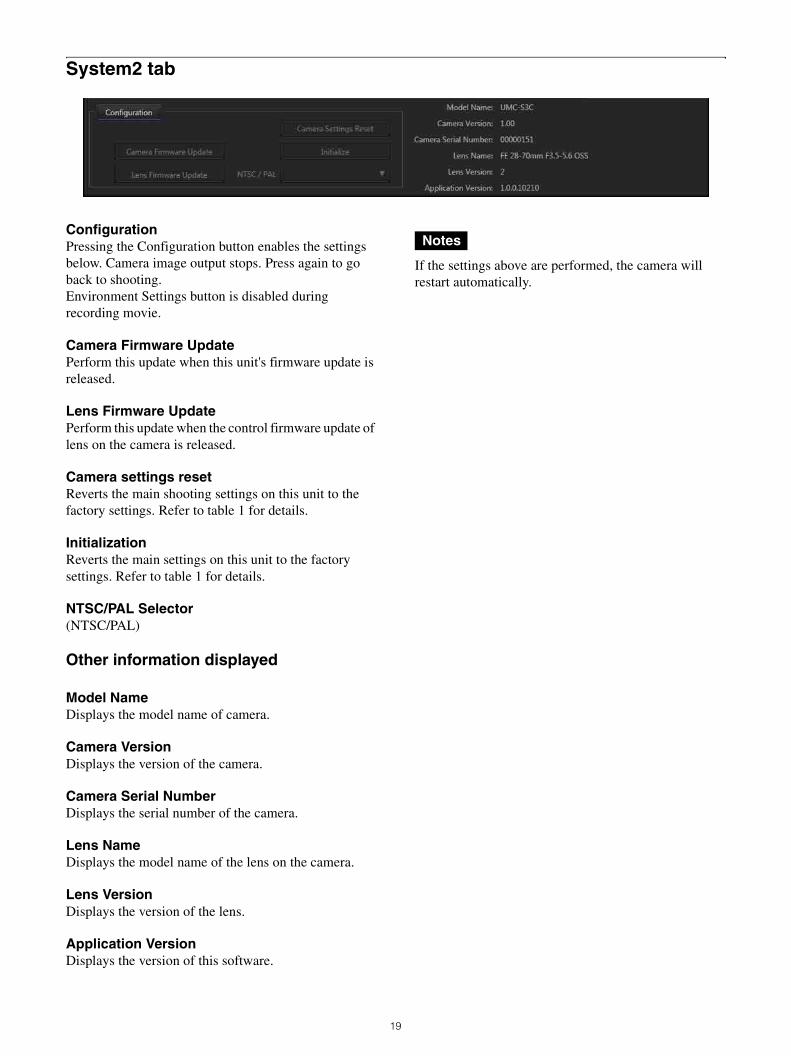
System2 tab
ConfigurationPressing the Configuration button enables the settings below. Camera image output stops. Press again to go back to shooting.Environment Settings button is disabled during recording movie.
Camera Firmware UpdatePerform this update when this unit's firmware update is released.
Lens Firmware UpdatePerform this update when the control firmware update of lens on the camera is released.
Camera settings resetReverts the main shooting settings on this unit to the factory settings. Refer to table 1 for details.
InitializationReverts the main settings on this unit to the factory settings. Refer to table 1 for details.
NTSC/PAL Selector(NTSC/PAL)
Other information displayed
Model NameDisplays the model name of camera.
Camera VersionDisplays the version of the camera.
Camera Serial NumberDisplays the serial number of the camera.
Lens NameDisplays the model name of the lens on the camera.
Lens VersionDisplays the version of the lens.
Application VersionDisplays the version of this software.
Notes
If the settings above are performed, the camera will restart automatically.
19
Appendix
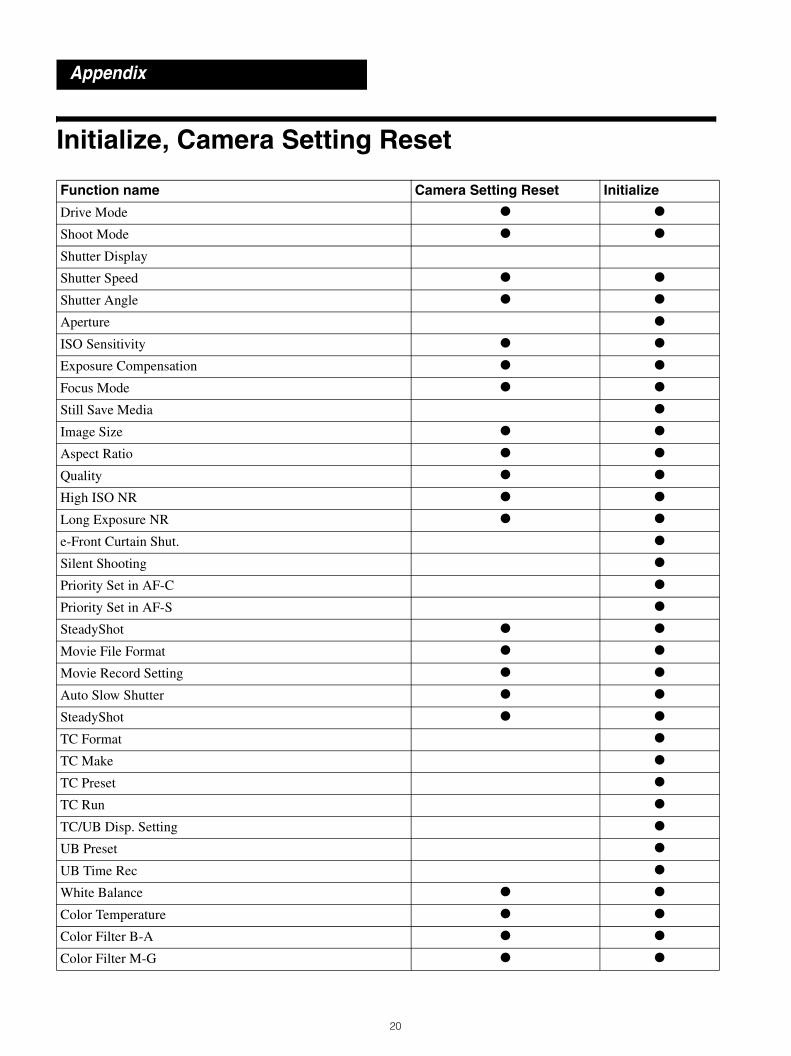
Initialize, Camera Setting Reset
Function name Camera Setting Reset Initialize
Drive Mode z z
Shoot Mode z z
Shutter Display
Shutter Speed z z
Shutter Angle z z
Aperture z
ISO Sensitivity z z
Exposure Compensation z z
Focus Mode z z
Still Save Media z
Image Size z z
Aspect Ratio z z
Quality z z
High ISO NR z z
Long Exposure NR z z
e-Front Curtain Shut. z
Silent Shooting z
Priority Set in AF-C z
Priority Set in AF-S z
SteadyShot z z
Movie File Format z z
Movie Record Setting z z
Auto Slow Shutter z z
SteadyShot z z
TC Format z
TC Make z
TC Preset z
TC Run z
TC/UB Disp. Setting z
UB Preset z
UB Time Rec z
White Balance z z
Color Temperature z z
Color Filter B-A z z
Color Filter M-G z z
20
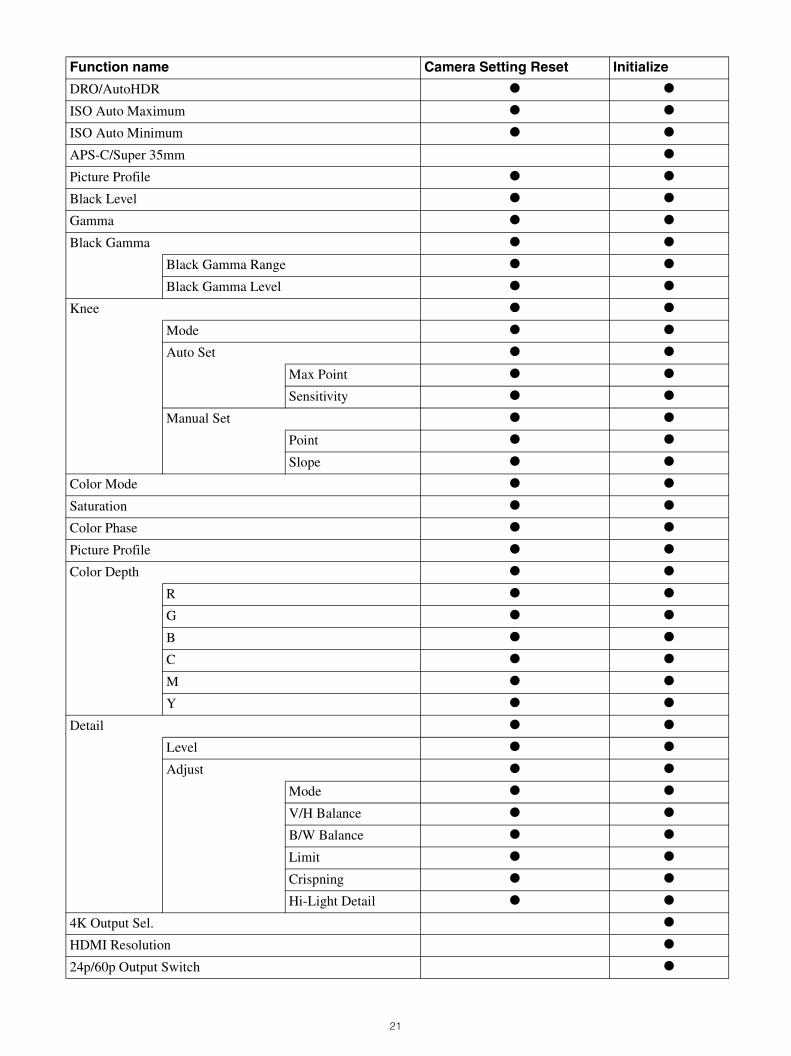
DRO/AutoHDR z z
ISO Auto Maximum z z
ISO Auto Minimum z z
APS-C/Super 35mm z
Picture Profile z z
Black Level z z
Gamma z z
Black Gamma z z
Black Gamma Range z z
Black Gamma Level z z
Knee z z
Mode z z
Auto Set z z
Max Point z z
Sensitivity z z
Manual Set z z
Point z z
Slope z z
Color Mode z z
Saturation z z
Color Phase z z
Picture Profile z z
Color Depth z z
R z z
G z z
B z z
C z z
M z z
Y z z
Detail z z
Level z z
Adjust z z
Mode z z
V/H Balance z z
B/W Balance z z
Limit z z
Crispning z z
Hi-Light Detail z z
4K Output Sel. z
HDMI Resolution z
24p/60p Output Switch z
Function name Camera Setting Reset Initialize
21

z: Resets to the factory setting
HDMI Info. Display z
Time Code Output to HDMI z
REC Control z
NTSC/PAL Selector z
Function name Camera Setting Reset Initialize
22
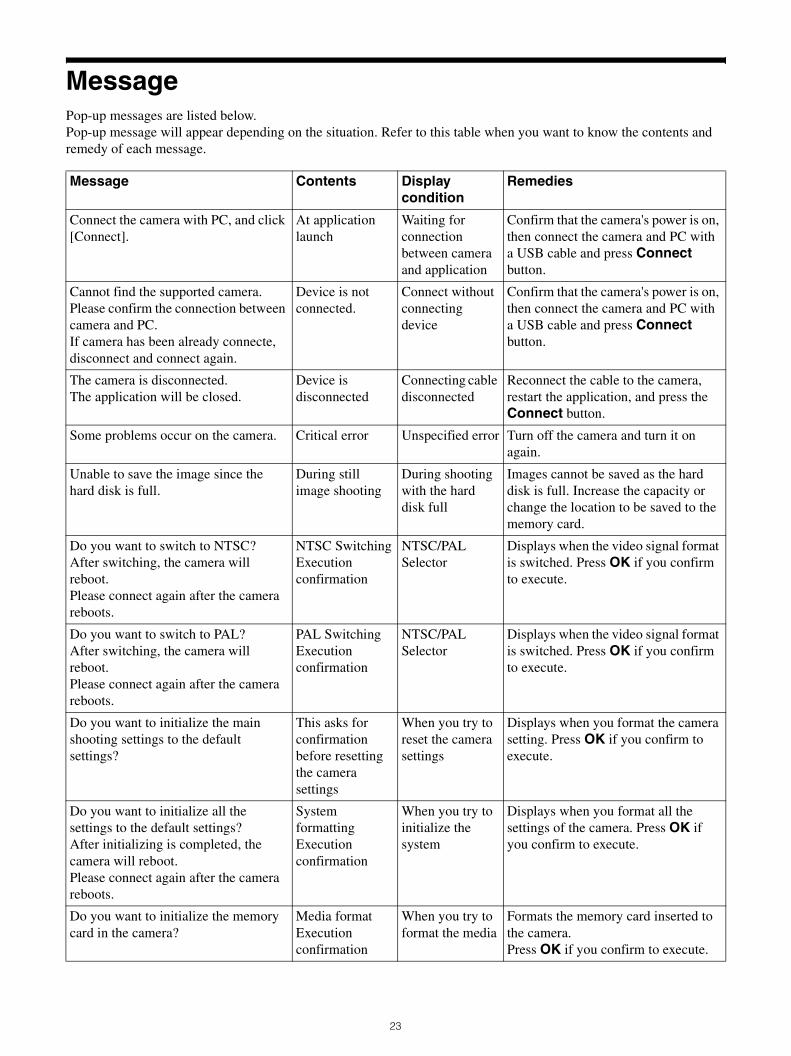
MessagePop-up messages are listed below.Pop-up message will appear depending on the situation. Refer to this table when you want to know the contents and remedy of each message.
Message Contents Display condition
Remedies
Connect the camera with PC, and click [Connect].
At application launch
Waiting for connection between camera and application
Confirm that the camera's power is on, then connect the camera and PC with a USB cable and press Connect button.
Cannot find the supported camera.Please confirm the connection between camera and PC.If camera has been already connecte, disconnect and connect again.
Device is not connected.
Connect without connecting device
Confirm that the camera's power is on, then connect the camera and PC with a USB cable and press Connect button.
The camera is disconnected.The application will be closed.
Device is disconnected
Connecting cable disconnected
Reconnect the cable to the camera, restart the application, and press the Connect button.
Some problems occur on the camera. Critical error Unspecified error Turn off the camera and turn it on again.
Unable to save the image since the hard disk is full.
During still image shooting
During shooting with the hard disk full
Images cannot be saved as the hard disk is full. Increase the capacity or change the location to be saved to the memory card.
Do you want to switch to NTSC?After switching, the camera will reboot.Please connect again after the camera reboots.
NTSC SwitchingExecution confirmation
NTSC/PAL Selector
Displays when the video signal format is switched. Press OK if you confirm to execute.
Do you want to switch to PAL?After switching, the camera will reboot.Please connect again after the camera reboots.
PAL SwitchingExecution confirmation
NTSC/PAL Selector
Displays when the video signal format is switched. Press OK if you confirm to execute.
Do you want to initialize the main shooting settings to the default settings?
This asks for confirmation before resetting the camera settings
When you try to reset the camera settings
Displays when you format the camera setting. Press OK if you confirm to execute.
Do you want to initialize all the settings to the default settings?After initializing is completed, the camera will reboot.Please connect again after the camera reboots.
System formatting Execution confirmation
When you try to initialize the system
Displays when you format all the settings of the camera. Press OK if you confirm to execute.
Do you want to initialize the memory card in the camera?
Media format Execution confirmation
When you try to format the media
Formats the memory card inserted to the camera.Press OK if you confirm to execute.
23
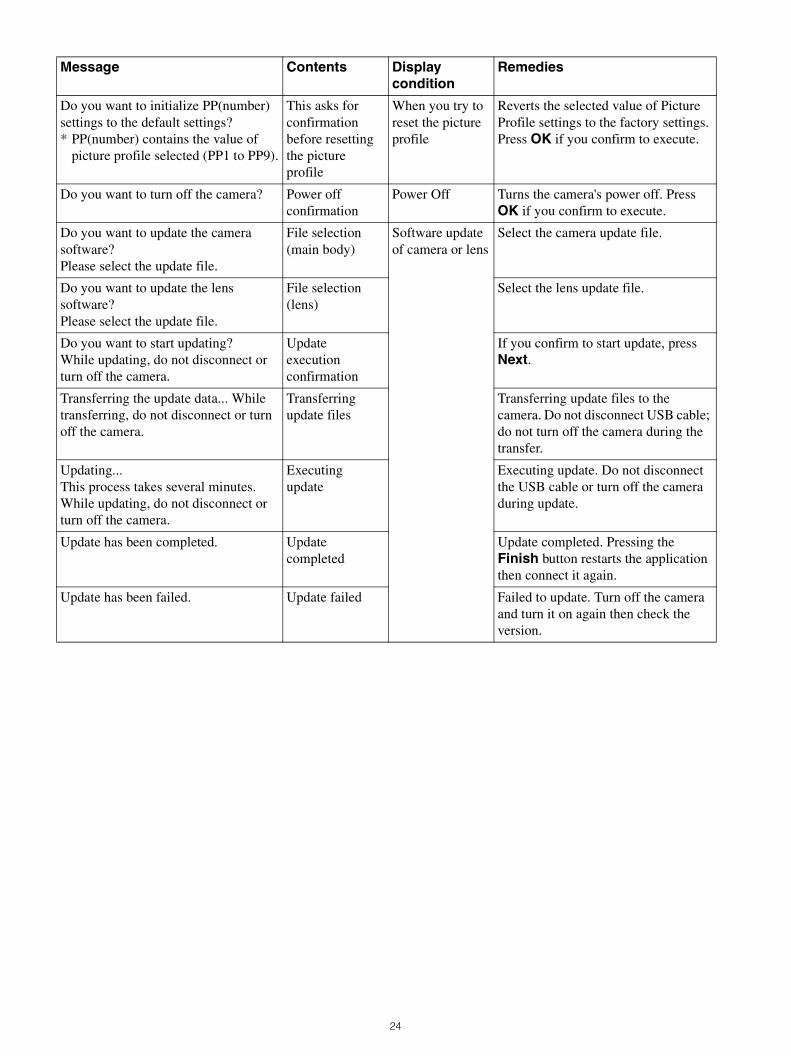
Do you want to initialize PP(number) settings to the default settings?* PP(number) contains the value of
picture profile selected (PP1 to PP9).
This asks for confirmation before resetting the picture profile
When you try to reset the picture profile
Reverts the selected value of Picture Profile settings to the factory settings. Press OK if you confirm to execute.
Do you want to turn off the camera? Power off confirmation
Power Off Turns the camera's power off. Press OK if you confirm to execute.
Do you want to update the camera software?Please select the update file.
File selection(main body)
Software update of camera or lens
Select the camera update file.
Do you want to update the lens software?Please select the update file.
File selection(lens)
Select the lens update file.
Do you want to start updating?While updating, do not disconnect or turn off the camera.
Updateexecution confirmation
If you confirm to start update, press Next.
Transferring the update data... While transferring, do not disconnect or turn off the camera.
Transferring update files
Transferring update files to the camera. Do not disconnect USB cable; do not turn off the camera during the transfer.
Updating...This process takes several minutes.While updating, do not disconnect or turn off the camera.
Executingupdate
Executing update. Do not disconnect the USB cable or turn off the camera during update.
Update has been completed. Update completed
Update completed. Pressing the Finish button restarts the application then connect it again.
Update has been failed. Update failed Failed to update. Turn off the camera and turn it on again then check the version.
Message Contents Display condition
Remedies
24
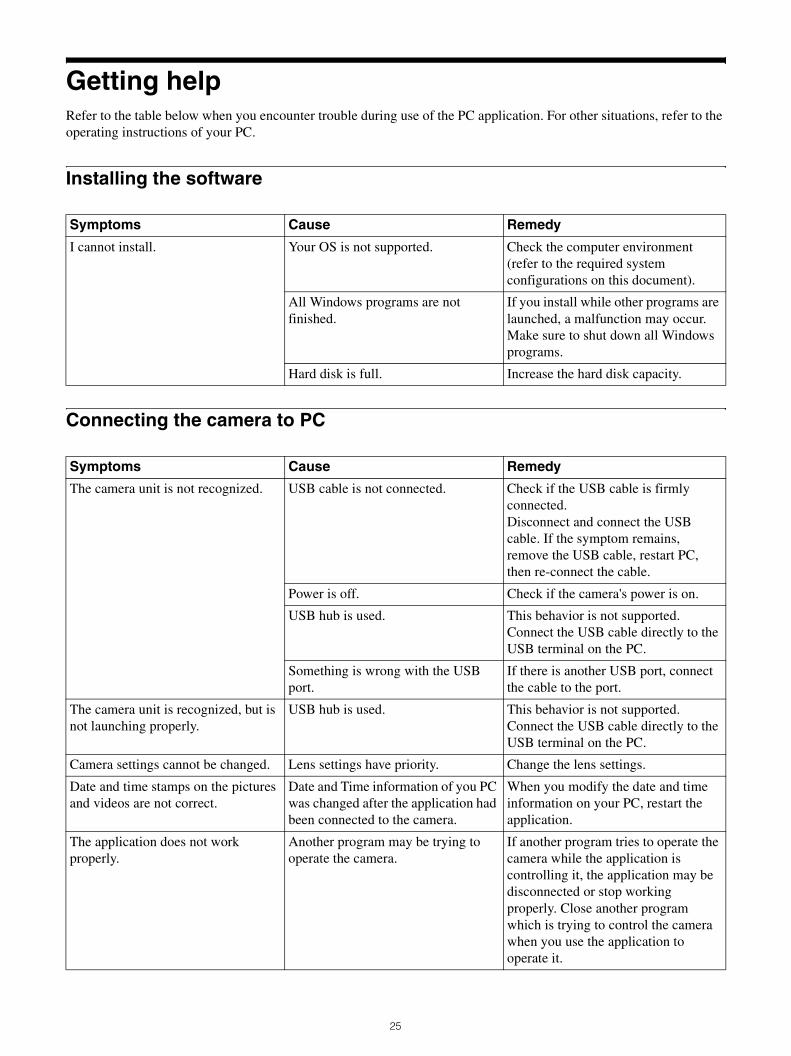
Getting helpRefer to the table below when you encounter trouble during use of the PC application. For other situations, refer to the operating instructions of your PC.
Installing the software
Connecting the camera to PC
Symptoms Cause Remedy
I cannot install. Your OS is not supported. Check the computer environment (refer to the required system configurations on this document).
All Windows programs are not finished.
If you install while other programs are launched, a malfunction may occur. Make sure to shut down all Windows programs.
Hard disk is full. Increase the hard disk capacity.
Symptoms Cause Remedy
The camera unit is not recognized. USB cable is not connected. Check if the USB cable is firmly connected.Disconnect and connect the USB cable. If the symptom remains, remove the USB cable, restart PC, then re-connect the cable.
Power is off. Check if the camera's power is on.
USB hub is used. This behavior is not supported. Connect the USB cable directly to the USB terminal on the PC.
Something is wrong with the USB port.
If there is another USB port, connect the cable to the port.
The camera unit is recognized, but is not launching properly.
USB hub is used. This behavior is not supported. Connect the USB cable directly to the USB terminal on the PC.
Camera settings cannot be changed. Lens settings have priority. Change the lens settings.
Date and time stamps on the pictures and videos are not correct.
Date and Time information of you PC was changed after the application had been connected to the camera.
When you modify the date and time information on your PC, restart the application.
The application does not work properly.
Another program may be trying to operate the camera.
If another program tries to operate the camera while the application is controlling it, the application may be disconnected or stop working properly. Close another program which is trying to control the camera when you use the application to operate it.
25
26
IndexAAF-C Priority Setup . . . . . . . . . . . . . . . . . . . . . . . . . 11AF-S Priority Setup . . . . . . . . . . . . . . . . . . . . . . . . . 11Aperture . . . . . . . . . . . . . . . . . . . . . . . . . . . . . . . . . 7, 9Aspect Ratio . . . . . . . . . . . . . . . . . . . . . . . . . . . . . . . 11
DDrive Mode. . . . . . . . . . . . . . . . . . . . . . . . . . . . . . . . . 7
EExposure Compensation . . . . . . . . . . . . . . . . . . . . 8, 10
FFocus Mode . . . . . . . . . . . . . . . . . . . . . . . . . . . . . 8, 10Focus Position. . . . . . . . . . . . . . . . . . . . . . . . . . . . 8, 10Front Curtain Shutter . . . . . . . . . . . . . . . . . . . . . . . . 11
HHigh ISO NR . . . . . . . . . . . . . . . . . . . . . . . . . . . . . . 11
IImage . . . . . . . . . . . . . . . . . . . . . . . . . . . . . . . . . . . . 14Image Size . . . . . . . . . . . . . . . . . . . . . . . . . . . . . . . . 11ISO . . . . . . . . . . . . . . . . . . . . . . . . . . . . . . . . . . . . . 7, 9
LLong Exposure NR . . . . . . . . . . . . . . . . . . . . . . . . . . 11
MMovie . . . . . . . . . . . . . . . . . . . . . . . . . . . . . . . . . . . . 12Movie Mode . . . . . . . . . . . . . . . . . . . . . . . . . . . . . . . . 9
PPicture Mode. . . . . . . . . . . . . . . . . . . . . . . . . . . . . . . . 7Picture Profile 1 . . . . . . . . . . . . . . . . . . . . . . . . . . . . 15Picture Profile 2 . . . . . . . . . . . . . . . . . . . . . . . . . . . . 17Power Off . . . . . . . . . . . . . . . . . . . . . . . . . . . . . . . 8, 10
QQuality . . . . . . . . . . . . . . . . . . . . . . . . . . . . . . . . . . . 11
SShoot Mode. . . . . . . . . . . . . . . . . . . . . . . . . . . . . . . . . 9Shutter Speed . . . . . . . . . . . . . . . . . . . . . . . . . . . . . . . 8Silent Shooting . . . . . . . . . . . . . . . . . . . . . . . . . . . . . 11Steady Shot . . . . . . . . . . . . . . . . . . . . . . . . . . . . . . . . 11Still . . . . . . . . . . . . . . . . . . . . . . . . . . . . . . . . . . . . . . 11Still Save Folder . . . . . . . . . . . . . . . . . . . . . . . . . . . . 11Still Save Media . . . . . . . . . . . . . . . . . . . . . . . . . . . . 11System1. . . . . . . . . . . . . . . . . . . . . . . . . . . . . . . . . . . 18System2. . . . . . . . . . . . . . . . . . . . . . . . . . . . . . . . . . . 19
ZZoom Position. . . . . . . . . . . . . . . . . . . . . . . . . . . . 8, 10

Sony Corporation


![[1]Oracle® Enterprise Manager Cloud Control … Enterprise Manager Cloud Control Advanced Installation and Configuration Guide. Oracle Enterprise Manager Cloud Control Advanced Installation](https://img.pdfslide.net/doc/110x75/5af023f97f8b9abc788cd02e/1oracle-enterprise-manager-cloud-control-enterprise-manager-cloud-control.jpg)