Embed Size (px)
Citation preview

1
CAMPUS PORTAL
QUICK REFERENCE GUIDE:
STUDENT PORTAL

2
CONTENTS How to Set Up Your Portal Web Account ............................................................................................................................ 3
How to Personalize Your Homepage ................................................................................................................................... 4
How to View Holds Applied to Your Portal Account ........................................................................................................... 4
How to View Web Alerts Sent to Your Portal ...................................................................................................................... 5
How to View Appointments Sent to Your Portal ................................................................................................................. 5
How to View Your College Calendar .................................................................................................................................... 6
How to Access Faculty Contact Information ....................................................................................................................... 6
How to Access Your Class Schedule .................................................................................................................................... 7
How to Download Your Class Syllabus ................................................................................................................................ 7
How to Use the GPA Calculator ........................................................................................................................................... 8
How to View Your Degree Audit .......................................................................................................................................... 8
How to View Your Attendance ............................................................................................................................................ 9
How View Your Final Grades ............................................................................................................................................. 10
How to Request a Change to Your Personal Contact Information .................................................................................... 10
How to Request Adding Additional Addresses (Parent, Billing, etc.) ................................................................................ 10
How to Opt-In to Receive SMS Text Messages From Your College ................................................................................... 11
How to View Your Ledger Card ......................................................................................................................................... 11
How to View Your Student Payment Schedule ................................................................................................................. 12
How to Make a Payment from the Portal ......................................................................................................................... 12
How to Print a Receipt....................................................................................................................................................... 14
How to View Your Financial Aid Awards ........................................................................................................................... 14
How to Upload Your Resume ............................................................................................................................................ 15
How to Access Learning Resources ................................................................................................................................... 15
How to Access Your Student Email .................................................................................................................................... 16

3
HOW TO SET UP YOUR PORTAL WEB
ACCOUNT
1. From the Student Portal Login page click on
Create a New Account.
2. Enter your Social Security Number, First Name,
and Last Name – this information is required to
create your Portal account, and is processed
through a secure connection. Enter your City of
Birth, Birth Mother’s Maiden Name and First
Pet’s Name, which will be the answers to
security questions in case you forget your
password later. Select Next.
3. Confirm that your email address is correct, and
click the Yes button below.
4. Make a note of your username, and enter your
desired password, confirming that the spelling is
correct, then click the Submit button below.
5. Once submitted, an email will be sent to your
confirmed email address for you to authenticate
your web account.
6. Click the link provided in the email to activate
your account.
7. You may now sign into your account using your
assigned username and chosen password.

4
HOW TO PERSONALIZE YOUR HOMEPAGE
1. Once your Portal Account has been activated,
you may customize your homepage by selecting
the Personalize button in the upper right hand
corner of the screen.
2. Select the My Personalized Homepage items by
checking the box to the left of each item you
want as part of your Portal homepage and then
click Save Changes.
3. Now that the items you have selected are a part
of your homepage you can click and hold on the
blue header row and drag them to their desired
column location. Make sure that you hold down
your mouse button and move until you see the
blue line confirmation appear.
HOW TO VIEW HOLDS APPLIED TO YOUR
PORTAL ACCOUNT
A Hold is a restriction that has been applied to your
Student Portal account.
1. You may view Holds that have been applied to
your account by clicking on Holds on your blue
Student Information Bar at the top of your
screen. The number of Holds applied to your
account is indicated by the number to the left of
“Holds.”
2. To view additional details about Holds applied to
your account, select the link for any Holds on
your Student Information Bar.
3. Your Message Center will open, with additional
details about any Holds applied to your account.
You may also reach this page by selecting the My
Profile menu, and the Message Center link.

5
HOW TO VIEW WEB ALERTS SENT TO
YOUR PORTAL
Web Alerts are messages sent from your college to
your Student Portal.
1. You may view a list of current Web Alerts sent to
your Portal by clicking on the Alerts section of
your blue Student Information Bar. The number
of Web Alerts sent to your Portal is indicated by
the number to the left of “Alerts.”
2. To view the text of a Web Alert, select the link
for any Alerts from your Student Information
Bar.
3. The Alerts and Holds Tab of your Message
Center will open with a list of your current Web
Alerts. You may also reach this page by selecting
the My Profile menu, and the Message Center
link.
4. Click on the subject line of a Web Alert to view
the text of the Alert.
5. To remove the Alert from your current Alerts,
select the Acknowledge Alert button.
6. You may view a list of previous Alerts sent to
your Portal by clicking on the View My Previous
Alerts link.
HOW TO VIEW APPOINTMENTS SENT TO
YOUR PORTAL
1. You may view a list of current Appointments and
Events sent to your Portal by clicking on the
Appointments section of your blue Student
Information Bar. The number of Appointments
and Events sent to your Portal is indicated by the
number to the left of “Appointments.”
2. To view details about an Appointment or Event,
select the link for any Appointments from your
Student Information Bar.
3. The Appointments Tab of your Message Center
will open with a list of your open Appointments.
You may also reach this page by selecting the My
Profile menu, and Message Center link, and the
Appointments tab.

6
HOW TO VIEW YOUR COLLEGE CALENDAR
1. Select the My Profile menu, and the My
Calendar link.
2. Your monthly college calendar will open,
including all of your scheduled classes, term start
and end dates, college holidays, appointments,
and events. To view additional details about a
calendar entry, select the entry’s link.
HOW TO ACCESS FACULTY CONTACT
INFORMATION
1. Click the Campus Info menu bar and then click
the Faculty Directory link.
2. Click the first letter of the last name of the
instructor you would like to contact.
3. Click the instructor’s name from the list
provided.
4. If you click on the instructor’s email address your
email client will open for you to compose and
send your chosen instructor an email.

7
HOW TO ACCESS YOUR CLASS SCHEDULE
1. Select the Academics menu bar and then click on
the Class Schedule link.
2. When your schedule appears, you can choose to
view your class schedule in a weekly calendar
view (Week) or in a List view. You may also
navigate between scheduled weeks of the term.
3. By hovering your mouse over a chosen class, you
will be able to see the meeting time, building,
room and instructor for that class session.
4. By clicking on any of your course links you will
access the Class Resources page, where you can
view the campus location, credits, meeting days
and any Assignments, Exams or Syllabi that
instructors have posted for this class.
HOW TO DOWNLOAD YOUR CLASS
SYLLABUS
1. Open your course’s Class Resources page, as
described in the How to Access Your Class
Schedule section.
2. Course syllabi are posted under the
Assignments/Exams section of this page. You
may download a syllabus by selecting the icon
under the Attachments column.

8
HOW TO USE THE GPA CALCULATOR
1. Select the Academics menu bar and then click on
the GPA Calculator link.
2. When your schedule appears, choose your
possible grades per course and then click the
Calculate GPA button.
3. This will return your projected term grade point average as well as your projected cumulative grade point average. Note: This does not have any effect on your student record and NOTHING is stored as a result of utilizing this tool.
HOW TO VIEW YOUR DEGREE AUDIT
1. Select the Academics menu bar and then click on
the Degree Audit link.
2. Notice you can print your Unofficial Transcript
by clicking on the link available. Your Degree
Progress Audit provides information about your
enrollment, including your Start Date, Expected
Graduation Date, Credits Earned/Required, and a
full Required Course List for your program.
3. By scrolling to the bottom of your Degree Audit
you can click the Program Options button to
view programs that you may consider
transferring into.

9
4. Select your desired Program and Program
Version to see a comparison with your current
program.
5. You will be able to review the comparison of
your desired program and your existing program.
6. If you would like to discuss transferring
programs, you may scroll to the bottom and click
Submit to Advisor.
7. You may type a note that indicates that you
would like to discuss the possibilities with your
college’s Education department.
HOW TO VIEW YOUR ATTENDANCE
1. Click the Academics menu bar and then click on
the View Attendance link.
2. By selecting your Enrollment, Term, and Week
of class, you may view your recorded
attendance.
Note: Your attendance will be presented as a
percentage of total attendance. 100% indicates that
you were present for the entire class, 0% indicates
that you were absent for the entire class, and a
percentage between 1% and 99% indicates that you
were present for part of the scheduled class time. If
your attendance for a class is marked as
“Unscheduled,” this class was cancelled. Attendance
that has not been posted yet is marked as “Not
Posted.”

10
HOW VIEW YOUR FINAL GRADES
1. Select the Academics menu bar and then click on
the View Grades link.
2. By selecting your Enrollment and Term, you may
view your recorded Final Grades.
HOW TO REQUEST A CHANGE TO YOUR
PERSONAL CONTACT INFORMATION
1. Select the My Profile menu bar and then click on
the My Information link.
2. Click the Request Change button.
3. Enter a message indicating what information
needs to be changed and then click Submit. This
information will be received by the campus
registrar and your information will be updated in
the college’s database.
HOW TO REQUEST ADDING ADDITIONAL
ADDRESSES (PARENT, BILLING, ETC.)
1. Select the Additional Addresses Tab.
2. Click the Request New Address button.
3. Enter your additional address information and
click Submit. This information will be received by
the school registrar and added to your student
records.

11
HOW TO OPT-IN TO RECEIVE SMS TEXT
MESSAGES FROM YOUR COLLEGE
Your college has the ability to send you text
messages with important information, including
updates about weather out days, if you choose to
“opt in” to receive text messages from the college on
your Student Portal.
1. Select the My Profile menu, and the My
Information link.
2. Click the SMS Tab.
3. Click on the Edit button.
4. You must first check the Yes Enable SMS
Messaging checkbox. This will display the SMS
Messaging Disclaimer which you must accept by
clicking the Accept button on the right side of
the screen.
5. Once you have Accepted the SMS Messaging
Disclaimer, you must enter your Mobile Phone
Number and Mobile Provider prior to clicking
the Save button in the lower right hand corner.
6. Once saved you are now eligible to receive SMS
Text Messages from your college.
HOW TO VIEW YOUR LEDGER CARD
Your Ledger Card includes each charge and payment
that has been posted to your student account. Some
programs charge tuition and fees differently than
others – you may see that you are charged for part
of your total tuition and fees at the beginning of
each term, you may be charged based on the
number of credits that you take in each term, or you
may be charged for your total program once you
start in school.
You can see your Account Balance directly below
your name, start date, and enrollment from the
Account Information page under the My Finances
menu. Negative balances, indicating that payments
posted to your account are larger than the charges
posted to date, are shown in parentheses (see
below).
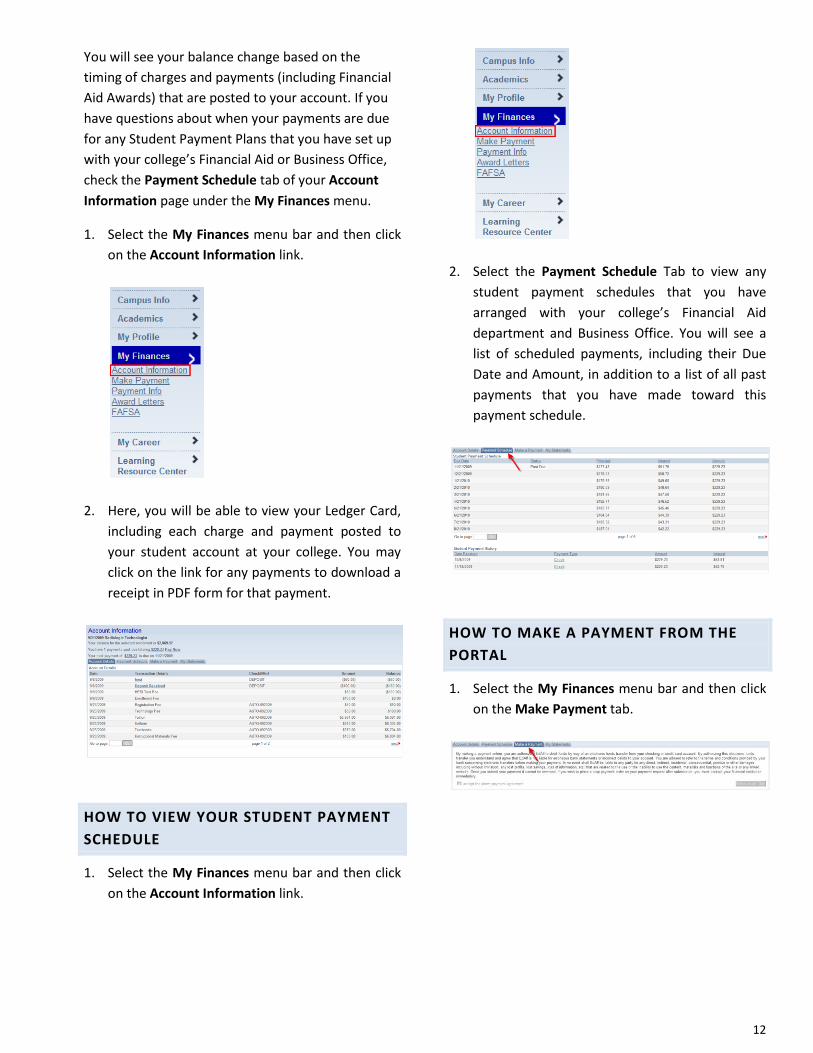
12
You will see your balance change based on the
timing of charges and payments (including Financial
Aid Awards) that are posted to your account. If you
have questions about when your payments are due
for any Student Payment Plans that you have set up
with your college’s Financial Aid or Business Office,
check the Payment Schedule tab of your Account
Information page under the My Finances menu.
1. Select the My Finances menu bar and then click
on the Account Information link.
2. Here, you will be able to view your Ledger Card,
including each charge and payment posted to
your student account at your college. You may
click on the link for any payments to download a
receipt in PDF form for that payment.
HOW TO VIEW YOUR STUDENT PAYMENT
SCHEDULE
1. Select the My Finances menu bar and then click
on the Account Information link.
2. Select the Payment Schedule Tab to view any
student payment schedules that you have
arranged with your college’s Financial Aid
department and Business Office. You will see a
list of scheduled payments, including their Due
Date and Amount, in addition to a list of all past
payments that you have made toward this
payment schedule.
HOW TO MAKE A PAYMENT FROM THE
PORTAL
1. Select the My Finances menu bar and then click
on the Make Payment tab.

13
2. Review the Payment Disclaimer, check the "I
accept the above payment agreement"
checkbox, and click on the Continue button.
3. If you have made a credit card payment on the
Student Portal before, and saved your credit card
information for future payments, select your
preferred credit card from the drop down menu.
If not, select the Add a Payment Method link.
4. Click on Add a New Credit Card.
5. Complete all of the required fields and then click
Save in the lower right hand corner.
Note: If you choose to save your credit card
information for future payments, it will be stored
securely in the VeriSign database.
6. Once saved, return to the Make a Payment tab.
Enter the Card Verification Number and Pay This
Amount fields and then click the Pay button in
the lower right hand corner.
7. Once submitted, the system will request that you
verify the payment amount before continuing:
click the Confirm Payment button.
8. The following warning will appear. Click the OK
button ONE time to submit your payment.
9. The system will provide you with a receipt
number, letting you know that the transaction
was accomplished successfully.

14
HOW TO PRINT A RECEIPT
1. Once successfully processed, this payment will
show on your ledger card. Click the Payment on
Account hyperlink to display your receipt.
2. Select the View PDF Receipt link to display your
receipt.
3. Click on the Open button.
4. Your receipt will open in PDF form.
HOW TO VIEW YOUR FINANCIAL AID
AWARDS
1. Select the My Finances menu bar and then click
on the Award Letters link.
2. Click View to see your financial aid awards for
the selected Academic Year.

15
3. Your Award Letter will be displayed with each
award being in the E = Estimated, P = Pending or
A = Approved status. If you have questions about
your financial aid awards, please contact your
college’s Financial Aid Department.
HOW TO UPLOAD YOUR RESUME
You may upload a resume, and an additional
document, including a cover letter or list of
references, to the Student Portal.
1. Select the My Career menu bar and then click on
the My Resume link.
2. Select the button next to either the Resume or
Add. Doc (Additional Document) row, to indicate
which type of document you will upload.
3. Select the Browse button. A window will open
which will allow you to select the document that
you want to upload.
4. Select your file, and click on the Open button.
5. Click on the Upload button to upload your file.
6. You will see your document’s name in the File
Name column, the date and time that you
uploaded the document will be in the Upload
Date column, and the Status will change to
“Portal Submitted.”
HOW TO ACCESS LEARNING RESOURCES
1. Select the Learning Resource Center menu bar
and then click on the LRC Link.

16
2. Your college’s Learning Resource Center
webpage, including hours of operation and
online resources, will open.
HOW TO ACCESS YOUR STUDENT EMAIL
1. Select the Learning Resource Center menu bar
and then click on the Student Email link.
2. This link will allow you to navigate through your
college’s web based email client.