Embed Size (px)
Citation preview

REMITA ADMINISTRATION AND SUPPORT FOR PARTNER BANKS

The course is designed to empower relevant Bank personnel to successfully administer Remita in support of Bank registered users and customers.


Remita is a proven, end-to-end, e-Payment solution that is Robust, Secured, Web-based and developed to satisfy the peculiar payment requirements in Nigeria.
Remita assists organizations to prepare payroll, pay staff, vendors, suppliers and other 3rd parties in ANY bank; including microfinance banks, mortgage banks and mobile wallets, electronically, FROM THE COMFORT OF THEIR OFFICE.

e-Payroll
e-Payments e-Collections & e-Invoicing e-Schedules

1. Switch Option
2. Remita Straight Through (STP) Option

With Remita, your customers need not log on to the online banking application of all banks to process their transactions.
Remita stands as a SINGLE solution from which your customers can access all their accounts spread across different banks in Nigeria FROM THE COMFORT OF THEIR OFFICE.
Your customers can also issue multiple payment instructions against any of their accounts in any bank in Nigeria. Remita provides access to ALL their accounts in ANY bank in Nigeria from a single solution.

Role Based Access
Definitive Status of Transactions
Multi-Party Schedule Delivery
Integrates with 3rd Party Applications
Advanced Security Feature
Extensive Reporting and Audit Trail

To facilitate the effective and efficient processing of transactions on Remita, we have introduced the Remita Retrieval Reference (RRR) concept.
An unregistered user whether corporate or individual is able to take advantage of the Remita Retrieval Reference option to:
o Register on the platform.
o Pay beneficiaries (salary/ vendor/pensions/tax), family and friends etc.
o Pay registered Biller/ Collector
o Pay electronic invoices sent by a registered Biller
o Setup standing order and Direct debit

This is made easy and seamless through completion of transaction details from the home page www.remita.net. A unique code called the RRR is then generated for the payer.
The user is able to consummate the transaction (apart from
Customer Registration) via any of the channels listed below:
─ Branches of ANY participating bank nationwide;
─ Online Banking site;
─ Debit/Credit cards (Verve, Visa, MasterCard, UnionPay);
─ Remita Direct Access;
─ POS;
─ Direct Debit;
─ Select Micro Finance Banks; and
─ Digital Wallets.


The single RRR generated can be used to make payment via any of the listed channels.
Your customers do not need to send paper schedules or CDs to the bank for processing! They just present the RRR generated on www.remita.net
RRR reduces the data to be entered by the Teller at the bank,
chances of error during data capture, and the time spent attending to each customer.
Brings overall improvement in efficiency of bank‟s operations.

1. A prospective customer completes an online application form at www.remita.net. Duly completed application form contains a unique identifier known as “Remita Retrieval Reference (RRR)” at the top right hand corner.
2. The customer receives login credentials and can begin to familiarize with the platform but cannot make payments until the registration process is finalized by the Bank.
3. Printed copy of the application form is signed by the customer and taken to any branch of the Bank.
4. The branch uses the RRR to retrieve the online form from the system to conduct necessary due diligence, including but not limited to confirmation of account number and signature verification.

4. Customer registration transaction successfully passed by any branch is
automatically routed to the inbox of the Initiators at the Head Office of the Bank for:
a. Mapping of PAN b. Uploading of Expiry Date c. Setting of Daily Transaction Limit on the card. 5. The Final Approver approves the uploaded details to conclude the registration
process. 6. The Bank delivers the PIN to customer. 7. The Customer changes PIN, conduct account balance enquiry and can begin to
make payments via the platform. It is also relevant to note that a report named “RRR Report" is available to the Bank to monitor the list and the progress of pending Corporate Registration applications. The details on the report can be used by the Bank to contact the customers
and facilitate prompt delivery of the form for processing.


1. One of the existing Final Approvers with the old PIN clicks on the
“ADMINISTRATION” menu, then selects the Submenu labeled “Change Account Identification Code-AIC/PIN”.
2. Select the card that is mapped to the Bank account for which the PIN
is to be changed (see below):

3. Ensure the PIN Secured Logo appears on the screen before
entering the old PIN and the new PIN as required in the relevant fields.
4. Wait for the PIN update to be completed before moving on
from the page. A confirmatory statement that “PIN change successful” will be displayed by the system to indicate that the process has been completed.
The new PIN will be required for the next and subsequent transactions to be remitted and for balance enquiry.
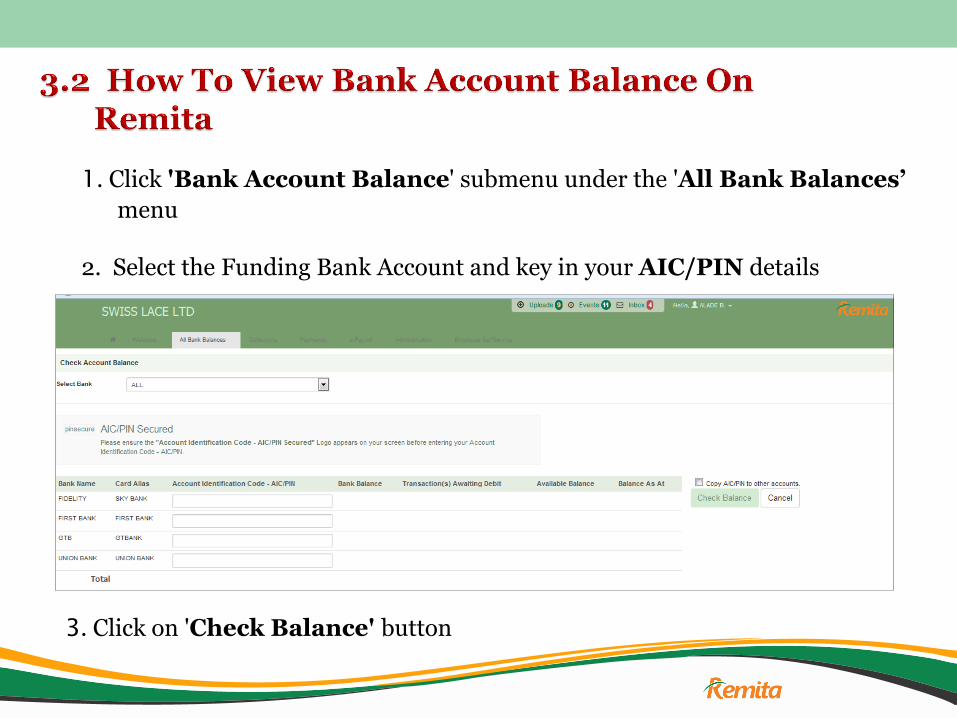
1. Click 'Bank Account Balance' submenu under the 'All Bank Balances‟
menu 2. Select the Funding Bank Account and key in your AIC/PIN details
3. Click on 'Check Balance' button

1. One of the existing initiators logs in to Remita and places the cursor on
the “ADMINISTRATION” menu, then select the submenu “Manage Users”.
2. Fill in the details of the user to be created in the fields as shown below:

3. If desired, assign relevant menus to the user by moving the desired menu items from the “Unassigned Menu” Pane to the “Assigned Menu” Pane.

4. Assign the user to the desired workflow by selecting relevant Transaction
Type and ticking appropriate Group Level . Click on “Add More Users” button to create more users:

5. If the user is a branch user (Teller or Approver), select the desired role from the “Assign Default Role As” option. e.g Branch Teller or Branch Approver.

6. Once either of the Branch Teller or Branch Approver roles is ticked, the system expects that this user is mapped to the desired branch on the platform.
7. Type the bank branch name in the Auto Completer field “Select Bank Branch”. The system displays a list of possible branches.
8. Pick desired branch, enter Fund Holding Account , Transaction Limit and Transaction Authentication Type.

9. Finally click on the “Send for Approval” button. Any of the existing Approvers can pick up the user creation transaction from his/ her inbox and approve. Login details will be sent automatically to the registered email address of the newly created user.

1. One of the existing initiators logs into Remita and clicks on the “ADMINISTRATION” menu to select the submenu “Manage Approval Groups”:

2. Click the button labeled “New Group” and provide the description/
name for the new group being created:

3. Click the “Submit” button for the new name to be registered.
4. When the newly registered group is displayed, use the forward arrow
to attach members to the group by moving them from “Staff List” to “Group Members”

5. Click “Forward for Approval” button at the bottom of
the page to forward the newly created group for approval. 6. Once approved, the group becomes available to be added to
the workflow of the corporate.

1. One of the existing initiators logs in to Remita and places the cursor on
“ADMINISTRATION” menu to select the submenu “Manage Approval Workflow”
2. Click the drop down menu labeled “Transaction Type” to select the
transaction type for which the workflow is to be amended:
3. Under “Transaction Initiator” group, click the drop down menu to
select the name of the group of initiators that was registered previously, e.g, “INITIATOR”. This implies that every member of INITIATOR group will be able to initiate transaction type that was selected in 2 above.
4. Under “Approver 1” group, click the drop down menu to select the
name of the group of users that will act in the first level of approval, for example “APPROVER” group. Select the authentication type to be used by these approvers from available options.
5. Under “Approver 2” group, click the drop down menu to select the
name of the group of users that will act in the second level of approval, for example “APPROVER 2” group. Select the authentication type to be used by these approvers from available options.

6. Repeat the step in 4 and 5 above to build as many approval
layers that may be required for the transaction type, subject to a maximum of 10 levels.
7. Click “Send for Approval” button at the bottom of the page to
forward the Workflow amendment for approval. 8. Once approved, every transaction of the type selected in 2 above
will be routed through the newly defined workflow. Please note that during workflow definition, you are expected to specify an authentication type for at least one out of the 10 approval levels.

While Remita provides users with a number of options to securely authorize transactions, the primary authentication mode used by majority of the Corporates is the soft token (access code) authentication type.
Sometimes, users experience challenges approving transactions on the platform as a result of non receipt/delayed delivery of these access codes in their registered email addresses and/or phones due to issues such as Corporate mail server restrictions, preventing receipt of automated mails, telecommunication network challenges etc.

We continue to look for ways to simplify the authentication process
without compromising security.
To this end, we recently introduced the "Dynamic Authentication Number" (DAN), a proprietary concept that allows the user to define the parameters that make up their transaction authentication combination, known only to the user.
DAN is a useful alternative for corporate users that may experience difficulties in retrieving Remita Access Code through their organisation‟s email system.

DAN is fully internal to Remita. It does not require email transmission, hence removing the current user dependence on an email address, email server settings and network issues. To proceed in adopting this option: 1. The Organization‟s System Administrator nominates "Dynamic
Authentication Number" as the "Authentication Type" on the Corporate Approval Workflow and get this approved by the final Approver for the amendment to be effective.

2. Payment Approvers then define relevant parameters on the
"Change My Password/Security/PSN" page. (A Hint on this screen offers
a short, concise steps in guiding you to achieve this)
These include, selecting the preferred: i. Personal Security Number (PSN) (i.e a 2 to 4 digit number), and ii. Operator {i.e Plus (+), Minus (-), Multiplication (x), Division (/) or
"Do nothing"}.

Once the set-up above has been concluded, the system will provide the Approver with a randomly generated number at the point of transaction approval. The Approver will be required to supply his DAN to gain access to pending transactions awaiting his authorization.

1. One of the existing initiators logs into Remita and places the cursor on the
“ADMINISTRATION” menu, then select the submenu “Manage Approval Group”.

2. Click the drop down menu in front of “Approval Group” to select the
Approval Group to which the new user is to be added. 3. Select the new user from the “Staff List” tab and move him/ her to the
“Group Members” tab using the forward arrow key.

Then click “Forward for Approval” button at the bottom of the page to forward the transaction for approval. Any of the existing Approvers can pick up the transaction from his/ her inbox and approve. Once approved, the new user becomes a member of the approval group and he/ she will be able to act in that capacity on the system.

1. An Initiator on the “Corporate Administration” Workflow logs into
Remita and places the cursor on “ADMINISTRATION” menu to select “Manage Users” sub-menu.
2. Click on the radio button “Edit existing users”.

From the drop down labeled “Select a user”, select the name of the user you wish to deactivate. Check the box “Deactivate user” and click on “Save” button at the bottom of the page.

5. Finally click on “Send for Approval”.
6. The users will be deactivated once the above transactions
are approved by an approver on the “Corporate Administration” workflow.

There is a standard report that can be generated from Remita to obtain information about access right allocation to registered Users of a corporate. The report named "Access Right Menu" can be generated by a user following the steps below: 1. One of the existing users logs into Remita and places the
cursor on the “ADMINISTRATION” menu 2. Among the highlighted sub-menu listing, select “Audit
Reports” and click on “Access Rights”

3. Select the criteria for grouping e.g. "Group by User Name” or
“Group by Menu Options". 4. Select desired display format from the available options of PDF, MS Excel
and HTML. 5. Click on "View report"

1. One of the existing initiators on the “Corporate Administration” workflow logs into Remita and clicks on the “Administration Menu” then selects the Submenu “Manage Users”.
2. Selects the radio button labeled “Edit Existing User” 3. Selects the name of the user whose details are to be edited from the drop
down menu named “Select a User”:

4. Edit the populated fields with the desired changes and
click the “Save” button at the bottom of the page. 5. Finally click on the “Send for approval” button. Any of the existing Approvers on the “Corporate
Administration” workflow can pick up the user amendment transaction from his/ her inbox and approve.

1. One of the existing initiators logs into Remita and clicks on the “ADMINISTRATION” menu to select the submenu “Manage Users”
2. Click on the radio button labeled “Edit Existing User” 3. Select the name of the user from the drop down menu named
“Select A User”:

4. From the list of “Unassigned Menu”, select the menu items
to be added to the profile of the user; then click on the single forward arrow (>) to move this menu to the “Assigned Menu” box.
5. From the list of “Assigned Menu”, select the menu items to
be removed from the profile of the user; then click on the single backward arrow (<) to move this menu to the “Unassigned Menu”, box.
6. Finally click on “Save”, then “Send for Approval” button at
the bottom of the page. Once the above transaction is approved, the updated menu
listing will become available to the user when next he logs into Remita.

1. An initiator on Corporate Administration workflow logs into Remita and
clicks on the “ADMINISTRATION” menu. 2. Clicks “Manage Approval Group” submenu to access existing
approval groups. 3. Selects the approval group in which the staff to be removed currently
functions from the “Approval Group” drop down option.

4. Select the user from the “Group Members” block
5. Move the user to the “Staff List” tab using the backward arrow
6. Click “Forward for Approval” button to forward the Approval Group
modification for approval.
Once approved, the user can no longer function as a member of the approval group.

A. Formatting a Salary Payment File
• Format the contents of the upload file to 'Text' • Type in the details of the beneficiary(ies) in the format provided
• Ensure that the bank codes are correctly entered (e.g 011 for First Bank and 058 for GTBank, etc).
• Ensure that no two Employee IDs are the same i.e. all Employee IDs should be unique to each beneficiary.
• Delete the Header row before uploading the payment file into the system.
B. Uploading a Salary Payment File into Remita • Any of the registered Initiators for Salaries Transaction Type logs into
the system.
• Clicks on the 'Upload Salaries from External Payroll„ submenu under the 'Payments' menu.


• Click the 'Browse' button and selects the already formatted upload file.
• Type in the desired information to appear on the bank statement in the 'Brief Description' field
• Type in the desire information to appear in the payee's email and telephone alert in the 'Detailed Description'
• Click the 'Preview' button
• Once the details are satisfactory, click the “Submit” button
• Retrieve the successfully uploaded salary payment batch from the Initiator‟s inbox to attach funding bank(s) to the payments.
• Forward the Salary payment for approval in line with the predefined Approval Workflow.

A. Formatting a Vendor/Suppliers Payment File
• Type in the details of the beneficiary(ies) in the format provided
and format the contents of the upload file to 'Text'

• Ensure that the bank codes are correctly entered (e.g 011 for FBN and 058 for GTBank, ....)
• Delete the Header row and save the file to your preferred location on your computer
B. Uploading a Vendor/Suppliers Payment File on Remita • Any of the registered Initiators logs into the system.
• Clicks on the “Pay Vendors, Suppliers and Others”
submenu under the 'Payments' Menu.


• Selects the “Upload Payment” radio button.
• Clicks the 'Browse' button and selects the already formatted
upload file.
• Clicks the 'Preview' button
• Once the details are satisfactory, click on the „Submit‟ button
• The transactions are then categorized per Beneficiary Bank and the Initiator goes ahead to attach funding account(s).
• Clicks “Send For Approval” button to forward the transactions
for approval in line with the predefined Approval Workflow.

C. Initiating Payment to a Vendor/Supplier
• Any of the Registered Initiators logs into the system.
• Clicks on the “Pay Vendors, Suppliers and Others” submenu under
the 'Payments' menu.

• Select the Funding Account from the “Select the Account to Pay From” drop down list
• Enter the other details as appropriate (e.g. Beneficiary Name, Beneficiary Account etc.)
• Click on the “Add more payments” button to initiate more transactions or “Send for Approval” button to send the transaction(s) for approval in line with the Predefined Approval Workflow.
NOTE: 1. The system automatically registers details of beneficiaries once successfully entered on the
system.
2. The registered beneficiary names are available on the Beneficiary Name Drop Down option such that you can select a name for successive payments to an already registered beneficiary.

1. Log into Remita and place the cursor on the “PAYMENTS” menu.
2. Select the submenu labeled “Reports” to click on “Payments Made”
3. Supply one or more of the known details in respect of transactions
of interest, such as: a. Reference Number b. Batch Number c. Beneficiary Account d. Funding Bank e. Beneficiary Bank f. Status of Payment g. Type of transaction, etc 4. Define the desired date range 5. Select “Type of Display”, “Type of Payment” and “Display
Format” from available options. 6. Click on the 'View Report' button at the bottom of the page.

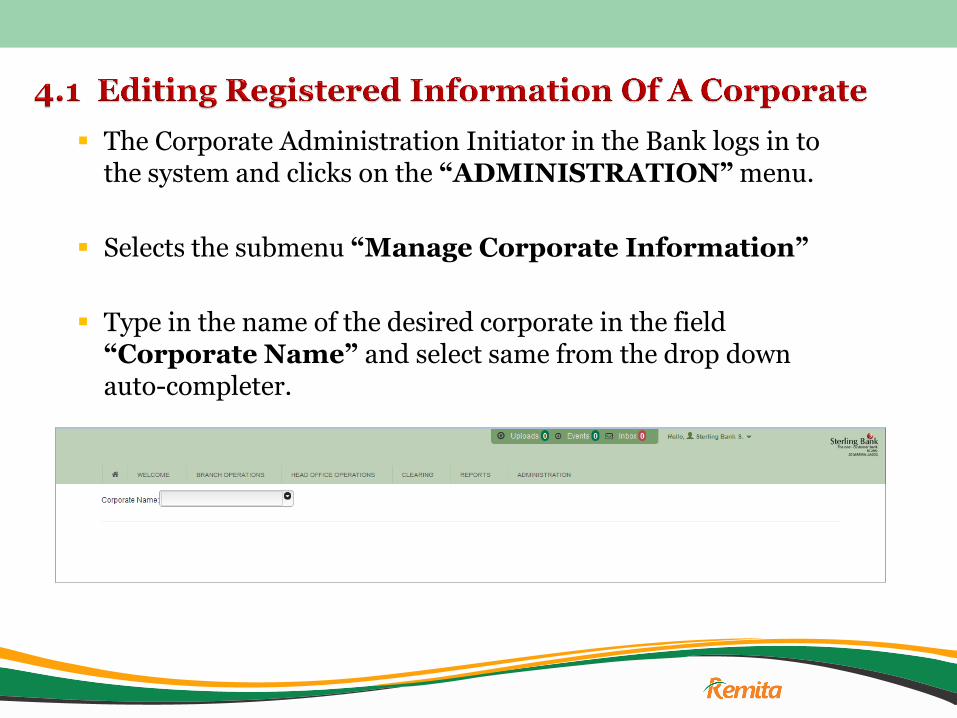
The Corporate Administration Initiator in the Bank logs in to the system and clicks on the “ADMINISTRATION” menu.
Selects the submenu “Manage Corporate Information”
Type in the name of the desired corporate in the field “Corporate Name” and select same from the drop down auto-completer.

4. Details of corporate information for the selected client will be displayed by the
system, as follows:
5. Modify the details as required and click the “Submit” button at the bottom of the page for the transaction to be forwarded to the Approver.

6. Approver logs in to inbox to act on the corporate information update transaction.

1. A Corporate Administration Initiator in the Bank logs in to the system and clicks on the “ADMINISTRATION” menu.
2. Selects the submenu “Bank: Edit Customer Details”.
3. Type in the name of the desired corporate in the field “Select Corporate” and select same from the drop down auto-completer.
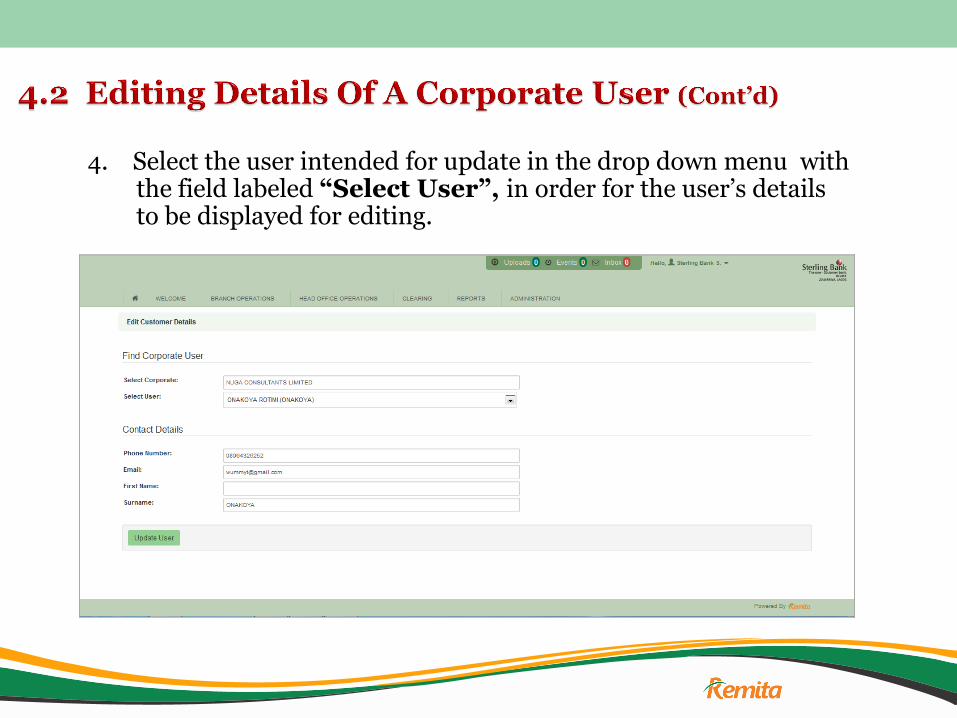
4. Select the user intended for update in the drop down menu with the field labeled “Select User”, in order for the user‟s details to be displayed for editing.

5. Edit User details as required and click „Update User‟ button.
6. The transaction is thus forwarded for approval and one of the Approvers on
the Bank‟s Corporate Administration workflow can call the transaction from his inbox and approve same.

1. The designated officer of the Bank logs in to the system and clicks on the “Administration” menu.
2. Selects the submenu “Bank: Reset Customer Password “
3. Type in the Corporate ID of the desired corporate in the field labeled “Corporate ID” and select the corporate name of the User from the drop down auto-completer.

4. Type in the User ID of the User in the field labeled “User ID”.

5. Click on “Submit” button at the bottom of the page for a new password to be generated and forwarded to the registered e-mail address of the user by the system.

1. The Corporate Administration Initiator in the Bank logs in to Remita and clicks on the “ADMINISTRATION” menu.
2. Select the submenu “Bank: Setup Approval Workflow”
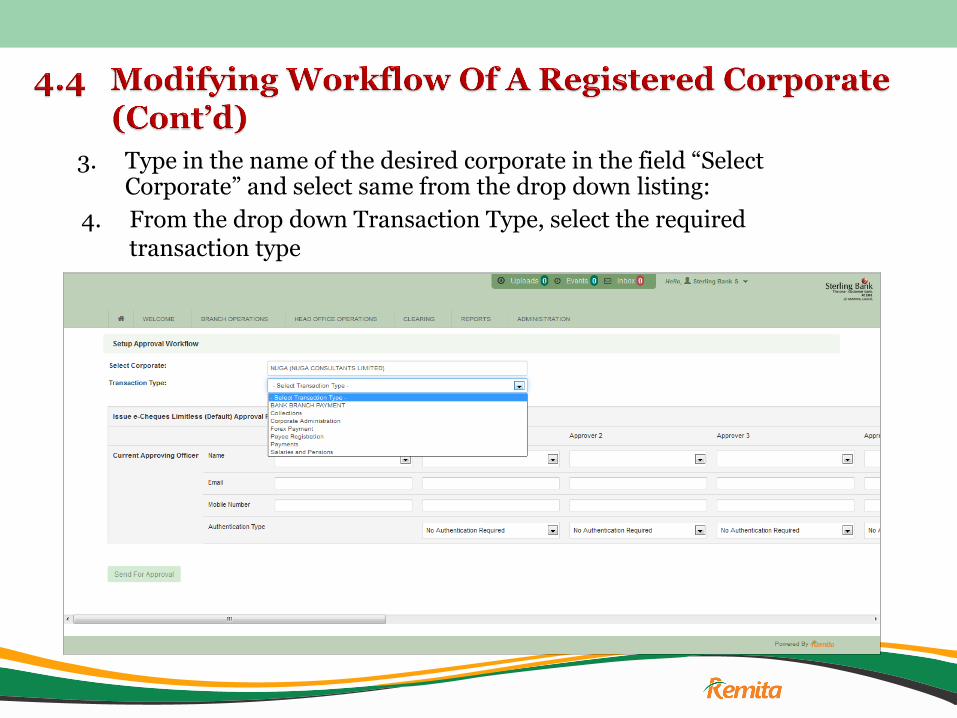
3. Type in the name of the desired corporate in the field “Select Corporate” and select same from the drop down listing:
4. From the drop down Transaction Type, select the required transaction type

5. Select the desired approval groups in the Workflow columns in order to reflect how the Corporate requires the particular transaction type to flow for approval.

Note: As part of the security features of the system, please note that authentication is required for at least one of the approval groups on the workflow.
6. Finally, click on the “Send for Approval” button once the workflow has been modified as desired, in order for this transaction to be forwarded to the Approver for necessary action.

Partner Banks are able to set password expiration and complexity rules that users of Corporates they have introduced to the platform will be guided by.
To do this, the bank administrator clicks on “Setup Company Preference” Submenu under “Administration” Menu. The screen below is displayed

Click on Password Rules Tab, enter desired rules and click on Save Preferences.


The Transactions Awaiting Your Attention window contains the list of pending transactions awaiting the attention of the Bank on the system.
These transactions include:
Listing of Remita STP transactions and the specific actions that the Bank is expected to perform on them. e.g Need to confirm receipt of Remita inflows Need to transfer funds to Beneficiaries in various Banks, etc.
Listing of processed transactions (both Switch and Remita STP) that returned with indefinite feedback as to whether or not the destination accounts were impacted.
Listing of Batches of transactions that the Bank‟s customers have initiated in violation of the Daily Limits that were set on their Remita Cards by the Bank. This class of transactions are coloured in red.

To navigate to the „Transactions Awaiting Your Attention‟ window:
Designated Bank Officer clicks on the menu „Head Office Operations‟
He selects the Submenu labeled „Transactions Awaiting Your Attention‟
The window will be displayed by the system as shown below:

a) Pending transactions that were returned with indefinite feedback are
displayed on the window, preceded by two radio buttons namely “Paid” and “Retry”.
b) The schedule Officer is expected to confirm from the individual funding/ beneficiary accounts if the transactions were successfully applied or not.
c) “Paid” button is selected for successfully applied transactions.
d) “Retry” button is selected for the others that did not impact on the destination accounts. These are due for reprocessing.
e) “Submit” button at the bottom of the page is clicked to process the transactions as nominated in c and d above.

OVER-LIMIT TRANSACTIONS
As stated earlier, transactions initiated by the Bank‟s customers which have
exceeded the Daily Withdrawal Limit are made available on the
Transactions Awaiting Your Attention window.
In treating this class of transactions, the bank has two options, namely:
A. Permanent Enhancement of the Daily Withdrawal Limit
This involves the upward review of the subsisting Daily Withdrawal Limit specified for the Corporate‟s Card details on Remita.

To increase the Withdrawal Limit, the bank officer logs into the platform and takes the following steps: • Clicks on “Limit Management” submenu under “Head Office
Operations” menu
• Selects the Corporate from the Company Name Auto Completer field and waits for the system to load the card details
• Keys in new Daily Withdrawal Limit and clicks Send For Approval button

The amendment takes effect once successfully approved. The current pending transactions can be reprocessed by the bank or from the Initiator‟s inbox. Furthermore, subsequent transactions initiated by the Corporate within the new limit will sail through successfully.

B. One off Approval of the Over-limit Transactions
This means that the bank is not ready to carry out an upward review of the Corporate‟s Daily Withdrawal Limit on Remita at this time.
However, the bank is wiling to approve this particular batch of transactions that have exceeded the limit for the payments to go through.
To do this:
- The relevant Bank officer logs into the platform and navigates to the „Transactions Awaiting Your Attention‟ window
- Selects “Approve – Pay Now” radio button in front of the payments and clicks “Submit” button
The submission goes for approval and once approved, the payment cycle for the transactions begin.
One of the exclusive features of Remita is that a partner Bank is not advised to process a payment until related cash cover has been received by the Bank. It is the acknowledgement of receipt of the fund that triggers transaction processing between the Transit account and the beneficiary accounts. We recommend the permanent mapping of CBN-AUTOMATIC-DEBIT for fund transfers falling due from the Bank. This ensures timely processing of payments, ease of reconciliation and zero cost of fund transfer. To do this, please take the following steps:
o Click on Set Default Transfer mode Submenu under the Administration Menu
o Select CBN T-24 from the Transfer Mode Drop Down field. o Click on Submit button.

The standard transaction processing dynamics on Remita assures that the trigger for payment processing into beneficiaries‟ accounts is the confirmation that the related cash cover has been received by the Bank . The debiting of CBN inflows by STP into the CBN Mirror account of a Bank represent the booking of related assets in the CBN account of the Bank. Consequently: The onward processing of related transactions through the Transit
account should not be constrained.
There is no reason to place any limit on either the CBN Mirror account or the Transit account.
Placing limits on these accounts tend to result in delayed transaction processing and the attendant consequences.

Transaction Switching Settlement (TSS) account are required to be funded to cover switch payments going into the beneficiary accounts in the partner Banks.
For optimal Treasury and Risk Management reasons, it is appreciated that unlimited coverage can not be held in the account at all times.
However, necessary alert system should be put in place to facilitate timely replenishment.
Remita Straight Through Process (STP) installation at the partner Banks can only support the two hour turnaround time prescribed by Central Bank of Nigeria (CBN) for electronic payments if transaction processing on the system is operational during and outside business hours.
As a result, necessary machinery must be put in place to ensure availability of the system on weekdays, weekends and public holidays on a 24 hour basis.

Failed Remita transactions are made available to the initiating corporates for
necessary amendment and retrial for a period of 24 business hours.
However, payments initiated by the federal Ministries, Departments and
Agencies through the GIFMIS system in the Office of The Accountant General
of The Federation (OAGF) are exempted from this general rule.
Failed OAGF transactions are closed by the system on an hourly basis. As a
result, these failed payments are not available for further treatment by the
beneficiary Banks.
Any attempt by the beneficiary Banks to reprocess failed OAGF transactions, other
than those in Urgent Transaction window, are most likely to result in duplicated
payments as replacement transactions could have been initiated for them.

Remita Standing Order/Direct Debit Mandates properly issued by
Bank customers represent valid orders from account holders for Remita service to be extended to them.
The same way other written instructions from customers are currently honoured at branch level, activation of Remita collection mandates are expected to be effected at branch level.

To Activate a Madate on Remita, the bank officer logs into the platform and takes the following steps:
1. Clicks on “Activate Standing Order/DD” submenu under “Branch Operations” menu
2. Types either the Mandate Form ID or the Mandate Name on either of the Auto Completer Fields as appropriate to call up the desired Mandate and wait for the system to load the details.

3. Clicks on Activate Mandate button to activate the Mandate
Mandates can also be stopped using the “Stop Standing Order/DD” submenu under “Branch Operations” menu and following the similar steps detailed above.

Option A – Payer does not have a Remita Retrieval Reference (RRR) Number
1. Clicks on “Process RRR” Submenu under the “Branch Operations” Menu.
2. The screen below is displayed. Request for RRR number from Payer. If not available, Click on “Click here if you don‟t have an RRR” hyperlink.

The screen below is displayed. 3. Click on desired transaction type from the available options as
shown on the screen.

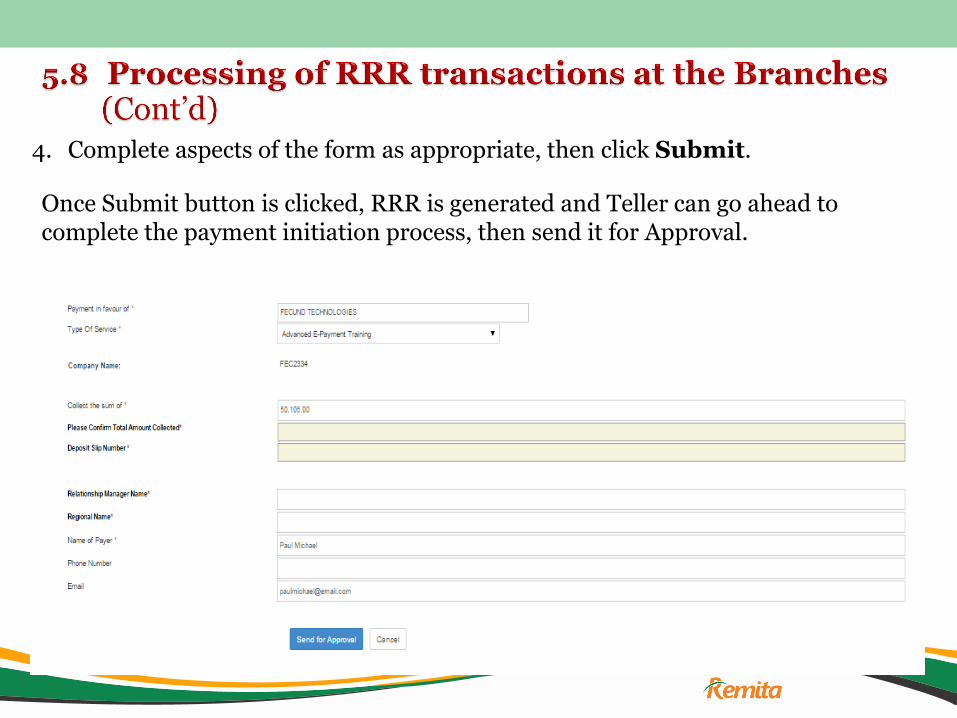
4. Complete aspects of the form as appropriate, then click Submit.
Once Submit button is clicked, RRR is generated and Teller can go ahead to complete the payment initiation process, then send it for Approval.
4. Complete aspects of the form as appropriate, then click Submit.
Once Submit button is clicked, RRR is generated and Teller can go ahead to complete the payment initiation process, then send it for Approval.

Option B– Payer has initiated payment process and is in possession of a Remita Retrieval Reference (RRR) Number
1. If Payer supplied RRR, enter the RRR Number and click on “Continue” button.

2. Payment details (originally entered by Payer are displayed on the screen for Teller to confirm amount and other relevant information).
3. Click Send For Approval button to send the transaction for approval.

• A receipt of the transaction is available for printing and issuance to Payer once the transaction has been approved by the Branch Approving Officer.
• Once Collection transaction is approved, payments are processed accordingly from the Teller‟s Fund‟s Holding Account.
• Relevant reports are available to the Branch officers to ascertain status of processed payments.

In the course of Transaction processing on the system, Remita may at some point receive a wrong feedback from the core banking application on the fate of a set of transactions.
The wrong feedback may be applied to one or more transactions in a Session or the entire transactions in the Session.
When this is observed, the processing officer at the bank is usually notified of the development and informed to escalate same to the bank‟s technical personnel in charge of Remita STP operations.
It is the technical team‟s responsibility to exhaustively look into the wrong feedback cases and conclusively resolve all occurrences.

Where this is not happening however, we advise that the processing officer at the bank continues to mount necessary pressure with a view to ensuring the wrong feedback cases are fully addressed.
This is in the interest of the processing officer and the bank as a whole as
wrong feedback cases makes reconciliation difficult and could result in loss of funds to the bank.
As part of continuous efforts that we make to improve the quality of service delivery on Remita platform, a dependable and seamless reconciliation tool has been developed to assist partner banks in conducting daily reconciliation of the Transit account and the CBN Mirror account.
At the click of a button, exceptional items can be generated from the tool with a view to facilitating their investigation and regularization.

Daily Dumping of Statements
The daily automated dumping of statements of the CBN Mirror Account and Transit Account by partner banks is primarily required for auto population into the reconciliation tool towards empowering the Banks in achieving effective reconciliation of the CBN Mirror and Transit accounts.
In addition, the system uses the daily dump of the statements to confirm whether or not payments that were returned by the Bank with unclear feedback actually impacted on the beneficiary accounts.
It is worthy to note that non provisioning of these statements as at when due and/or in-accurate account statement files impact on service delivery.
Once again, it is the responsibility of the technical team at the banks to ensure accurate and up-to-date account statement generation and dumping of same in the agreed location.


6.0 Reports Remita has robust reporting capabilities designed to meet the requirements forgeneral enquiry, transaction reconciliation, investigation and routine audit purposes. Banks can run the following reports on Remita:
a) CBN Transfers/ Receipts
b) Interbank Transfers Reports c) All Payments/Collections Transactions Report d) Payments Made e) Activity Log f) Audit Trail g) Admin Functions Status h) Transit Account i) Remita customers j) Expiring Cards k) Pending Sessions l) Income Chart m) Access Rights Menu n) RRR Report o) Branch User report

6.1 CBN Transfers and Receipts The CBN Transfer/ Receipts report provides the listing of Remita related CBN inflows and outflows that were processed by the Bank over a specified time period. To view this report, click on the Menu “Reports” and Submenu “CBN Transfers/ Receipts” . The following filters will be displayed by the system to enable the user define the list of inflows and outflows to be extracted from the system: a) Transaction Reference b) Session Number c) Transaction Date Three radio buttons are equally available on the report to define the
required report format to be displayed: a) PDF b) MS EXCEL c) HTML

6.1.1 Typical CBN Transfers and Receipts Reports Screen

6.1.2 Typical CBN Transfers/Receipts Report

6.2 Interbank Transfers Report
This menu displays details of all outbound funds sent to other banks and the details of inflows received from other banks, showing the officer that acted on these transactions and the Inflow reference numbers for these transactions. To view this report: • Click on the menu „Reports‟ and submenu „Interbank Transfers Report‟. • Supply the Session Number • Specify the date range for the Report and select the display format • Click View Report

6.2.1 Typical Interbank Transfers Report Screen

6.2.2 Typical Interbank Transfers‟ Report

6.3.1 Typical All payments/Collections Transactions Screen
• Fill the relevant ones among the listed parameters and the desired Display format for the report
• Click on View Report button

6.3.2 Typical All payments/ Collections Transactions‟ Report

6.4 Payments Made Report
Similar to All Payments/ Collections Transactions report, the Payments
Made report is used to extract information on all transactions processed where your bank is either the funding or receiving bank on Remita. The difference between the two reports is that:
a) The “Payments Made” report provides the listing of transactions based on individual set of transactions that were processed by registered corporates (batches of transactions)
b) The “All Payments/Collections Transactions” report provides the listing of transactions based on individual set of transactions that were processed on the Bank‟s platform (sessions of transactions),
To view this report click on the menu “Reports” and submenu
„Payments Made”. The screen below will be displayed to facilitate the setting of the
parameters and report generation.


6.5 Activity Log Report
The Activity Log extracted from the system provides information on the various activities that were carried out by the system users over a specified time period. To view this report, click on the menu „ADMINISTRATION”, then “Audit Reports” and submenu „Activity Log‟. • Select the range of names in the User Name selection box • Select the type of logged activity to be extracted. • Select the date range for the Log activity to be viewed.
• Click the appropriate check box to select the desired Display Format • Click on View Report button.

6.5.1 Typical Activity Log Screen

6.5.2 Typical Activity Log Report

6.6 Audit Trail
The Audit trail report is used in extracting information on new records and modifications to the existing records in the system by the various users. To view this report, click on the menu “Reports” then “Audit Reports”, then submenu „Audit Trail‟. • Select the desired date range • Select the action type to be viewed. . • Select the appropriate user whose action you want to view • Click on Submit button.

6.6.1 Typical Audit Trail Screen
6.7 Admin Function Status
This report gives the status or stage of completion of approval of set up activities that took place within a specified period of time. This report has several filters that can be used to define the extractions required. To view these report: • Click on the menu “Reports” and submenu “Admin Function Status” Report. • Select type of transaction, status and date of initiation
• Click on View Report

6.7.1 Typical Admin Function Status‟ Screen

6.7.2 Typical „Corporate: Admin Function Status‟ Report
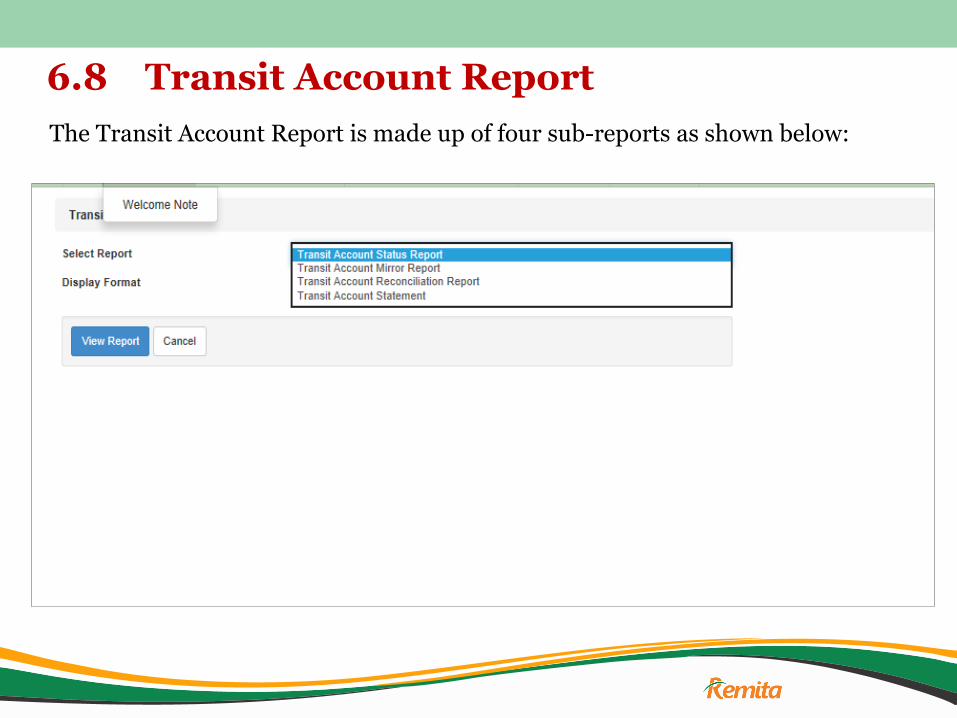
6.8 Transit Account Report
The Transit Account Report is made up of four sub-reports as shown below:

6.8. Transit Account Report (Cont‟d)
Transit Account Status Report - This report is used in proofing/monitoring the expected balance in the Remita Transit Account. Transit Account Mirror Report – This report provides the expected entries to be found on the Transit account, based on the transactions processed through Remita into the account. Transit Account Reconciliation Report - Remita Auto Reconciliation tool assists the Partner Banks in conducting daily reconciliation of the Transit account; a process that is currently handled manually by the Banks. At the click of a button, a reconciliation report listing all the exceptions/ unmatched items can be generated for further review and resolution

6.8. Transit Account Report (Cont‟d)
Transit Account Statement Report – This report is available for downloading a copy of the statement of the Transit Account that was dumped from the Core Banking Application of a Bank into Remita for a specified date range. To view any of the foregoing reports, • Click on the Menu Reports and Submenu Transit Account Report. • Specify the desired display format • Click View Report

6.8.1 Typical Transit Account Status Report

6.8.2 Typical Transit Account Reconciliation Report

6.8.3 Typical Transit Account Statement Report

6.9 Remita Customers
This report makes it possible for a Bank to view all the customers that were set up on Remita over a specified date range. To view this report: Click on the menu “Reports” Select the submenu „Bank: Remita Customers‟. Select the Customer Registration Date range and the desired display format for the report Click on “View Report” button A typical Remita Customers menu is provided below:

6.9 Remita Customers

6.9.1 Sample „Bank: Remita Customers‟Report

6.10 Expiring Cards
This menu displays a list of your customers whose Remita cards are expiring soon and would need your bank to renew their cards. To view these details of expiring cards: • Click on the menu „Head Office Operations‟ and submenu „Cards
about to Expire‟.
• Select the Expiry date range.
• Select the Display Format you want to use to view your report
• Click on “View Report” button.

6.10.1 Typical Expiring Cards Screen

6.11 Pending Sessions
This menu displays the listing of transactions initiated by the customers of the Bank on Remita via the Remita STP platform showing the exact status of such transactions that are being processed. The report indicates the specific actions that the Bank is expected to perform on them, e.g Need to transfer funds to Beneficiaries in various Banks, Need to give feedback on specified sessions etc. To view these transactions click on the menu „Head Office Operations‟ and submenu „Pending Sessions‟.

6.11.1 Pending Sessions Screen

6.11.2 Typical Pending Sessions Report

6.12 Income Report
This menu displays the income earned by your bank on transactions processed via the Remita platform. To generate an income report: • Click on the menu „Reports‟ and submenu „Income Report‟. • Define relevant parameters to define the coverage of the report, e.g
select the Customer and specify the date range for the Income Report you want to spool.
• Click “View Report”

6.12.1 Typical Income Report Screen
Please note that: 1. A Teller can generate income report on the transactions that were processed by him/ her. 2. A branch can generate income report on the transactions relating to the Branch 3. Head Office of a bank can generate report on the income accruable to the Bank as a whole.

6.12.2 Typical Income Report
Future Bank Plc
FED GOVT OF NIGERIA
HIGH ENERGY RESOURCES
ZAMBITO GROUP
EXETER PLC
OLADARE SCHOOLS
NEYLON OIL AND GAS
DEEP WATERS OFFSHORE
FORESHORE HOTELS
REYON GASES
PEOPLE TECH SYSTEMS
OLABODE AND SONS
FINEXCEL LTD
5,345,123.00
156,780.00
4,298,678.00
3,976,452.00
15,223,789.00
1,345,236.00
786,954.00
788,129.00 8,350,900.00 31,210,618.00
31,210,618.00
5,345,123.00
4,298,678.00
450.00
1,345,572.00
325.00
4,763,406.00
25.00
15,232,014.00
1,150.00
14,040.00
176,310.00
33,525.00

6.13 Access Rights menu
Access Rights Menu report enables a Bank and registered corporates to generate a listing of the menu items of the application that are assigned to the individual users in their organisations that are registered on Remita. The report has several filters that can be used to define the extractions required. To view these report: • Place the cursor on the menu „Reports‟
• Click on “Audit Reports” and the submenu „Access Rights” menu report
• Select the criteria for grouping e.g. "Group by User Name” or “Group by Menu Options".
• Select desired display format from the available options of PDF, MS Excel and
HTML. • Click on "View report“

6.13.1 Typical Access Rights Menu screen

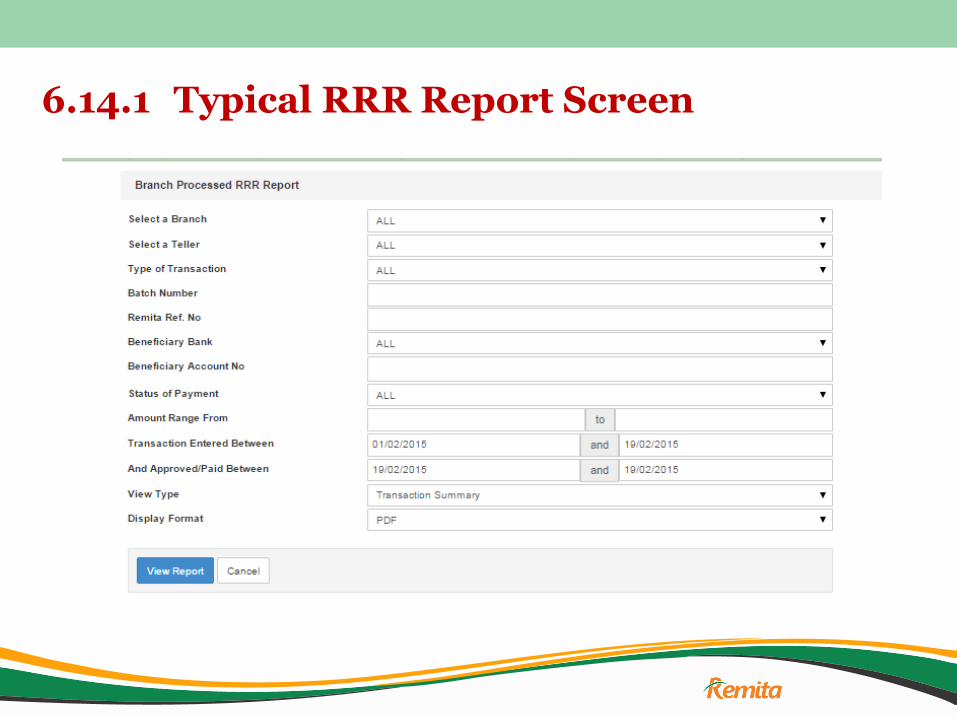
6.14 RRR Report
RRR Report is used to view all RRR transactions processed by the bank. The report has several filters that can be used to define the extractions required. To view these report: • Place the cursor on the menu „Reports‟ and click on “RRR Reports” .
• Select reporting criteria and desired display format from the available options of PDF, MS Excel and HTML.
• Click on "View report“
A branch teller can only spool data for transactions processed via his/her profile only.
A branch approver can only spool data for transactions processed in his/her branch only.
A Head Office user will be able to spool data for transactions processed by all branches in the bank.
6.14.1 Typical RRR Report Screen

6.14.2 Typical RRR Report
Paid
Paid
Paid
Paid
Paid
Paid

6.15 Branch Users Report
The Branch Users Report is used to view all branch users and their respective roles on the platform. The report also displays the following: • The branch each user is currently mapped to on the platform. • The user Transaction Limit • The Teller Fund Holding Account for each Teller • The Branch Income Account for each branch • The Email Address of the branch user • The Mobile phone number of the branch user

6.15.1 Typical Branch Users Report Screen To view these report: • Place the cursor on the menu „Reports‟ and click on “Branch
Users Report” .
• Select reporting criteria and desired display format from the available options of PDF, MS Excel and HTML.
• Click on "View report“

6.15.2 Typical Branch Users Report

Thank You