Embed Size (px)
Citation preview

CESCOM Online User’s Guide
CAMP Systems International, Inc. 8200 E. 34th Street North Building 1600, Suite 1607
Wichita, KS 67226 Toll Free Phone 866-581-CAMP
Phone 316-462-2267 Fax 316-462-2442

This Page Intentionally Left Blank

1
User’s Guide for CESCOM Online
Table of Contents
Section 1: CESCOM Online User’s Guide Usage ........................................................................................... 2
Section 2: Signing up for CESCOM Online .................................................................................................... 2
Section 3: Accessing CESCOM Online .......................................................................................................... 4
Section 4: Creation of a CESCOM 10 Report (Current Aircraft Status) ........................................................ 5
Section 5: Creation of a CESCOM 20 Report (Projected Maintenance Due) .............................................. 7
Section 6: Creation of a CESCOM 30 Report (Maintenance Transaction Summary Report) ....................... 9
Section 7: Accessing the CESCOM 50 Report (Component Reliability Analysis), CESCOM 100 Report
(Long Range Projected Maintenance), Aircraft Information, Aircraft Authorized Access, Auto Notification
Preferences , Fleet Dashboard, Model SB Report and Inspection Program Changes ................................ 10
Section 8: Creation of a new Maintenance Transaction Report (MTR) ..................................................... 12
Section 9: Creation of a Component Type Transaction ............................................................................. 13
Section 10: Creation of an Inspection Type Transaction ........................................................................... 15
Section 11: Creation of a Service Bulletin/Letter/Kit Type Transaction .................................................... 17
Section 12: Creation of an Airworthiness Directive Type Transaction ...................................................... 18
Section 13: Creation of a Miscellaneous Type Transaction ....................................................................... 19
Section 14: Previewing the MTR ................................................................................................................ 20
Section 15: Completing the Footer Section of an MTR ............................................................................. 21
Section 16: Submitting the MTR to CESCOM ............................................................................................. 22
Section 17: Viewing MTRs that are Currently In Work .............................................................................. 23
Section 18: Viewing Submitted MTRs ........................................................................................................ 24
Section 19: System Outages ...................................................................................................................... 25
Appendix A – System Requirements/Product Compatibility .................................................................... 1
2
Section 1: CESCOM Online User’s Guide Usage
1. The CESCOM Online User’s Guide will open up in the Adobe Acrobat Plug-in. While the
manual is being viewed, be sure to use the Adobe functions instead of the browser functions for such things as Printing, Searching, Saving or Zooming.
2. A linked table of contents is provided on the left portion of the screen and can be used to quickly navigate to the desired location of the manual.
3. We suggest that you save a copy of this manual to your local computer using the Adobe Acrobat Plug-in save function (Floppy Disk Button) so that you do not have to wait for the manual to be downloaded off of the web each time you need to reference it.
Section 2: Signing up for CESCOM Online
1. Connect to www.campsystems.com/cescom. 2. Register with the Site by selecting the “Request CESCOM Access” link below the
Customer Log on.
S
E
C
T
I
O
N
1
:
C
E
S
C
O
M
O
N
L
I
N
E
U
S
E
R
’
S
G
U
I
D
E
U
S
A
G
E
S
E
C
T
I
O
N
2
:
S
I
G
N
I
N
G
U
P
F
O
R
C
E
S
C

3
3. Fill out all the required fields. All fields with an “*” by them have to be filled out including the “Desired User Name” and “Desired Password” fields. Be sure to select all areas of interest in the “Desired Areas” section. The “CESCOM Online” box has to be selected and a list of the Aircraft you wish to use CESCOM Online for must be provided at the bottom of the Registration page.
4. Once complete, click on the “Register” button to submit your registration data. 5. You will then receive an e-mail from CESCOM that will provide you with a CESCOM
Online Password and the URL (www.campsystems.com/cescom) for you to access CESCOM Online. You should receive your password within 24 hours.

4
Section 3: Accessing CESCOM Online
1. Connect to www.campsystems.com/cescom. 2. The “CESCOM Online Main Menu” includes “Reports & MTR”, “Fleet Dashboard”,
“Publication Status Reports”, “Password Change” and “Contact Us”. 3. The page will be displayed with all of the aircraft listed that you are approved to access.
For those whose approved access exceeds twenty-five aircraft there is a field that will allow you to search by aircraft model and serial number.
4. Each page also has a common “Header Section” that includes links to the “Home” page,
“Reports & MTR Menu”, “Contact Us”, “Pub Status Reports”, “Fleet Dashboard” or to
“Logout”.
a) Passwords require six characters with at least one letter and one number.
b) Users are locked out after three failed attempts.
c) Passwords can be re-set by CESCOM, and will be e-mailed to the customer.
5. The “Adobe Page” ( ) indicates a report has been created and is ready for viewing. This link will stay available throughout the day but will disappear overnight. Each time a new report is generated it will overwrite any existing reports so save any older reports if you want to keep them.
6. There are three key icons listed to help identify the status of any given Report.
a. The “Clipboard” ( ) is the link to request a report to be created. b. The “Blue Circle” ( ) indicates the report has been requested and is
currently being created.
c. The “Adobe Page” ( ) indicates a report has been created and is ready for viewing.
7. Select the item of choice and proceed.
S
E
C
T
I
O
N
3
:
A
C
C
E
S
S
I
N
G
C
E
S
C
O
M
O
N
L
I
N
E

5
Section 4: Creation of a CESCOM 10 Report (Current Aircraft Status)
1. Select the “Clipboard” icon ( ) next to the CESCOM 10 Report or the report title to initiate the creation process.
2. The “CESCOM 10 Report Times” page will then be displayed with the most recent Hours and Events/Landings currently in the system, or any newer Hours and Events/Landings previously reported via CESCOM Online.
3. Currently displayed Hours and Events/Landings can be overwritten to reflect the current status of the aircraft. Fields are provided for the Airframe, both Engines, and APU or Air Conditioning (A/C Freon) if so equipped so that the numbers may be manually changed. Note: A/C is for Air Conditioning and not Aircraft in this instance.
4. The Hours and Events/Landings entered in these fields are only used for the purpose of generating this report unless you check the “Update aircraft times to values entered above” check box. Checking this box will automatically send CESCOM these times, and update the system automatically. Please allow 24 hours for these updates on the system to take place.
5. Once you are satisfied with the values for Hours and Events/Landings you can select the “Request Report” button and the report will be generated for you.
6. During the Report creation process the screen will change back to the “CESCOM Online Reports & MTR Menu” page and there will now be the “Blue Circle” icon ( ) next to the CESCOM 10 Report. The report generation process typically takes only 15 to 20 seconds.
7. Once the page is refreshed and the “Adobe Page” icon ( ) appears, you can click on the Adobe icon and the CESCOM 10 Report will open up in an Adobe Acrobat Plug-in window from within the browser.
S
E
C
T
I
O
N
4
:
C
R
E
A
T
I
O
N
O
F
A
C
E
S
C
O
M
1
0
R
E
P
O
R
T
(
C
U
R

6
8. While the CESCOM 10 Report is being viewed on screen in the Adobe Acrobat Plug-in,
be sure to use the Adobe functions instead of the browser functions for such things as Printing, Searching, Saving or Zooming. Note: Searching the CESCOM Report can be a very valuable tool and can help locate specific items very quickly.
9. The CESCOM 10 Reports are printed in Portrait format instead of Landscape for better on screen viewing and printing capabilities.
10. Some important items of interest are in the header section, such as the “Report Print/Calculate Date and Time” in the upper left corner, and the “Last Actual Date” in the upper right section that reflects the last date information was processed through CESCOM. Note: The “Last Actual Date” does not reflect this CESCOM 10 Report request in any way.
11. We have also added a time remaining column to the far right of the page under the heading of “Remains”. This column displays the time remaining for each line item and highlights any Over Due items in RED, as calculated off of the “Print/Calculate Date” of the CESCOM 10 Report. Note: There are no units of measure listed in the “Remains” column so reference the TBO column for TBO Control unit of measure for that specific line.
12. The CESCOM 10 Report can be printed to virtually any printer using the “Printer Icon” in the Adobe Acrobat Reader Plug-in. Since we are using Adobe, the size of the report will be automatically corrected for either 8½ by 11 or A4 paper making printing seamless for our International customers.
13. To create other reports or submit MTRs, click on the “Back” link or “Report & MTR” tab. Note: The system has a 20 Minute “Time Out” so if there has not been any page activity for 20 minutes the system will time out and you will have to log back in before doing any additional work in CESCOM Online.

7
Section 5: Creation of a CESCOM 20 Report (Projected Maintenance Due)
1. Select the “Clipboard” icon ( ) next to the CESCOM 20 Report or the report title to initiate the creation process.
2. The “CESCOM 20 Report Times” page will then be displayed with the Hours and Events/Landings currently in the system or any newer Hours and Events/Landings previously reported via CESCOM Online.
3. Currently displayed Hours and Events/Landings can be overwritten to reflect the current status of the aircraft. Fields are provided for Airframe, both Engines and APU or Air Conditioning (A/C Freon) if so equipped so that the numbers may be manually changed. Note: A/C is for Air Conditioning and not Aircraft in this instance.
4. The “CESCOM 20 Report Times” page is different from the CESCOM 10 in that there are three additional “Projection” fields for each Tracking Rate. These Projection fields allow you to change the projected values for Projected Hours and Events/Landings, Days and/or Months to customize the CESCOM 20 to reflect changes in utilization or time. Note 1: This can be very valuable in helping you to project upcoming maintenance for comparisons against upcoming schedules. Note 2: The current rule for figuring the projected default values is the number of days remaining in the current month plus the number of days in the next three months times the Average Daily Utilization (ADU) for this particular aircraft.
5. The Hours and Events/Landings entered in these fields are only used for the purpose of generating this report unless you check the “Update aircraft times to values entered above” check box. Checking this box will automatically send CESCOM these times and update the system automatically. Please allow 24 hours for these updates on the system to take place. Note: The system does not, however; automatically update changes in the “Projected” fields even when the “Update aircraft times to values entered above” check box is checked. If you truly want the “Projected” values changed on the system you will need to call your CESCOM analyst directly.
6. Once you are satisfied with the values for Hours and Events/Landings and Projections, you can select the “Request Report” button and the Report will be generated.
7. During the Report creation process the screen will change back to the “CESCOM Online Reports & MTR Menu” page and there will now be the “Blue Circle” icon ( ) next to the CESCOM 20 Report. The report generation process typically takes only 15 to 20 seconds.
8. Once the report is generated and the page is refreshed, two icons will appear. If you
S
E
C
T
I
O
N
5
:
C
R
E
A
T
I
O
N
O
F
A
C
E
S
C
O
M
2
0
R
E
P
O
R
T
(
P
R
O

8
select the “Adobe Page” icon ( ), the traditional CESCOM 20 Report will open up in an Adobe Acrobat Plug-in window from within the browser. If you select the “Calendar” icon ( ), the Calendar Report displays the same information contained in the CESCOM 20 Report but it is presented in an easy to read calendar format. The content of the CESCOM 20 Report is described below.
9. While the CESCOM 20 Report is being viewed on screen in the Adobe Acrobat Plug-in, be sure to use the Adobe functions instead of the browser functions for such things as Printing, Searching, Saving or Zooming. Note: Searching the CESCOM Report can be a very valuable tool and can help you locate specific items very quickly.
10. The CESCOM 20 Reports are printed in Portrait format instead of Landscape for better on screen viewing and printing capabilities.
11. Some important items of interest are in the header section, such as the “Report Print/Calculate Date and Time” in the upper left corner, and the “Last Actual Date” in the upper right section that reflects the last date information was processed through CESCOM. Note: The “Last Actual Date” does not reflect this CESCOM 20 Report request in any way.
12. We have also added a new time remaining column to the far right of the page under the heading of “Remains”. This new column displays the time remaining for each line item and highlights any Over Due items in RED, as calculated off of the “Print/Calculate Date” of the CESCOM 20 Report. Note: There are no units of measure listed in the “Remains” column so reference the TBO column for TBO Control unit of measure for that specific line.
13. The CESCOM 20 Report can be printed to virtually any printer using the Printer Icon in the Adobe Acrobat Reader Plug-in. Since we are using Adobe, the size of the report will be automatically corrected for either 8½ by 11 or A4 paper, making printing seamless for our International customers.
14. To create other reports or submit MTRs, click on the “Back” link or “Report & MTR” tab. Note: The system has a 20 Minute “Time Out” so if there has not been any page activity

9
for 20 minutes the system will time out and you will have to log back in before doing any additional work in CESCOM Online.
15. CESCOM 20 Reports can be created as often as you like, thus allowing yourself to create several reports based upon different “Projections”. This can be done by returning to the “Report and MTR Menu” page and then clicking on the “Clipboard” icon ( ) next
to the desired report instead of the “Adobe Page” icon ( ) to create another new report. Note: Each time a new report is generated it will overwrite the existing report, so we suggest you either save or print your previously generated reports if you want them for future reference.
Section 6: Creation of a CESCOM 30 Report (Maintenance Transaction Summary Report)
1. Select the “Clipboard” icon ( ) next to the CESCOM 30 Report or the report title to initiate the creation process.
2. The “CESCOM 30 Report Criteria Page” will then be displayed with the default Begin
and End Dates set for the last 30 days, but you have the option to input a different Begin
and End Date for the period of time you want the report to be generated for. The dates
can be either entered manually or you may use the calendar function to select the dates.
3. The CESCOM 30 Report can be generated for any length of time for up to two years
worth of history.
4. Once you are satisfied with the values for the Begin and Ending Dates you can select
the “Request Report” button and the Report will be generated for you. You can also
select the “Reset” button to restore the default dates.
S
E
C
T
I
O
N
6
:
C
R
E
A
T
I
O
N
O
F
A
C
E
S
C
O
M
3
0
R
10
5. Once the report has been requested the CESCOM 30 Report will open up in an Adobe
Acrobat Plug-in window from within the browser.
6. While the CESCOM 30 Report is being viewed on screen in the Adobe Acrobat Plug-in,
be sure to use the Adobe functions instead of the browser functions for such things as
Printing, Searching, Saving or Zooming.
Note: Searching the CESCOM 30 Report can be a very valuable tool and can help you
locate specific items very quickly.
7. The CESCOM 30 Reports are now printed in Portrait format instead of Landscape for
better on screen viewing and printing capabilities.
8. The CESCOM 30 Report can be printed to virtually any printer using the Printer Icon in
the Adobe Acrobat Reader Plug-in. Since we are using Adobe, the size of the report will
be automatically corrected for either 8½ by 11 or A4 paper, making printing seamless for
our International customers.
9. To create other reports or submit MTRs, click on the “Back” link or “Report & MTR” tab.
Note: The system has a 20 Minute “Time Out” so if there has not been any page activity
for 20 minutes the system will time out and you will have to log back in before doing any
additional work in CESCOM Online.
Section 7: Accessing the CESCOM 50 Report (Component Reliability Analysis), CESCOM 100
Report (Long Range Projected Maintenance), Aircraft Information, Aircraft Authorized Access, Auto Notification Preferences , Fleet Dashboard, Model SB Report and Inspection Program Changes
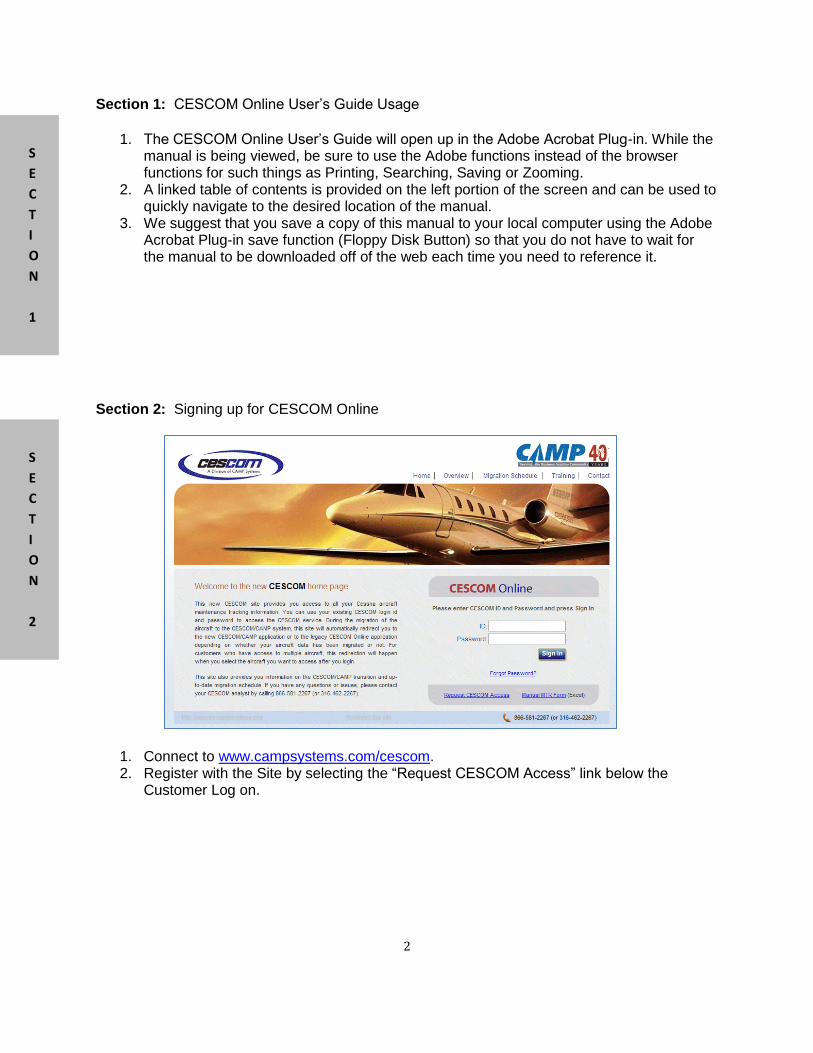
1. Select the “Clipboard” icon ( ) next to the CESCOM 50 Report or the report title to view the report directly.
S
E
C
T
I
O
N
7
:
A
C
C
E
S
S
I
N
G
T
H
E
C
E

11
2. Depending upon your system capabilities, you may select the zipped version in order to eliminate download time by clicking on the “Zip” icon ( ).
3. Select the “Clipboard” icon ( ) next to the CESCOM 100 Report or the report title to view the report directly.
4. The “Aircraft Information Page” lists specific notes for the aircraft such as latest reported paint schemes as well as contact information for your CESCOM Analyst.
5. The “Aircraft Authorized Access Report” is just a list of users that have online access to the CESCOM Reports.
6. If you are a subscriber to maintenance Auto Notification, click on the “Auto Notification Preferences” link to specify your preferences.
7. The “Fleet Dashboard Report” highlights the aircraft’s most significant maintenance
items due.
8. A list of all SBs is available within the “Model SB Report”.
9. The “Inspection Program Changes” provides links to the latest revisions.

12
Section 8: Creation of a new Maintenance Transaction Report (MTR)
1. The first line of the “MTR” is used to identify what type of MTR this is depending upon
whether the aircraft is jet or propeller driven. You should select the type (Airframe, Eng
#1, Eng #2, or APU) for jets and for propeller aircraft (Airframe, GG, PS and PROP) by
clicking the appropriate “Radio” button.
Note: Only one type can be selected for each MTR. If you have multiple transaction
types you will need to create different MTRs for each.
2. The “A/C Serial #” and “Aircraft Unit #” are auto populated and only needs confirmation
that the MTR being created, is for the correct aircraft. The “Reg #” field while auto
populated may be modified to make changes if necessary.
3. The “Date” field is auto populated with today’s date and is in the United States standard
Month/Day/Year format. The date field can be overwritten with any older date, or one
day in the future to support some of our International customers, as long as it is entered
in the Month/Day/Year format.
4. The “City ID” field is a four character field that performs a search to validate the entry.
5. The “Total A/C Hours” and “Total A/C Landings” fields are auto populated with the latest
system or CESCOM 10 or 20 values but can be overwritten to reflect values on the
aircraft at the time of this Maintenance Transaction.
Note 1: “Total A/C Hours” can be entered in tenths but only the whole number will be
stored in the system once processed.
Note 2: “Total A/C Hours” and “Total A/C Landings” can be overwritten with values less
than or greater than the currently displayed system times, with a soft stop being provided
for any values entered greater than 200 hours to help protect against keyboard errors.
6. Fields are provided for “APU Hours”, “APU Events”, and “ACH Hours”. These fields are
also auto populated with current system values if the aircraft is so equipped. These
S
E
C
T
I
O
N
8
:
C
R
E
A
T
I
O
N
O
F
A
N
E
W
M
A
I
N
T
E
N
A
N
C
E
T
R
A
N
S

13
default values should also be overwritten to reflect current values to help maintain
accuracy of the system even if the MTR is not directly related to that system.
7. To create a new transaction, select the appropriate transaction type (Component,
Inspection, Service Bulletin/Letter/Kit, Airworthiness Directive, or Miscellaneous) from
the pull down menu.
Section 9: Creation of a Component Type Transaction
1. After selecting the “Component” type transaction from the “Trans Type” pull down menu a “Component Change” Pop-up window will appear with two free form fields, one for “CESCOM Item Code” and one for “Part Number”. You only need to fill in one of the two fields with an entire value or a partial value and then click on the “GO” button or just hit enter. Note 1: The more precise the value entered, the shorter the possible match list will be. Note 2: Both Cessna and Vendor part numbers can be entered in the Part Number field; a cross reference is provided behind the scenes.
2. A listing will then appear with all of the “Part Numbers” or “Item Codes”, for that particular S/N Aircraft, that match the part number or item code that was entered. All you then need to do is click to checkmark the box or boxes for the line item(s) that contain all of the appropriate information about the item(s) you are completing the MTR on. Note: Several of the line items to select from will be very similar in nature with only subtle differences in one of the columns, so be sure to double check your selection(s) before clicking on the “Process Checked Items” button, located at the bottom of the search list.
3. If for some reason the initial list does not contain the part number or item code in question you can click on the “View All Item Codes for the Model” button at the bottom of the list to see a list of all potential matches for that particular model aircraft, and not just those already setup on your specific serial number. If the second list does not contain
S
E
C
T
I
O
N
9
:
C
R
E
A
T
I
O
N
O
F
A
C
O
M
P
O
N
E
N
T
T
Y
P
E

14
the item you are looking for, and you are certain of the validity of the part number then you can click the “Create Misc Transaction” button at the bottom of the parts list screen which will allow you to enter the part number as a “Miscellaneous” transaction.
4. Once the “Process Checked Items” button has been clicked, a “Component Change” window will pop-up with two major sections (“Component Change-Installed” and “Component Change-Removed”) that contain additional fields that may or may not be required to be filled in to complete the transaction. Note: Required fields will have a “Red” asterisk next to them.
5. The “Component Change-Installed” section has several fields that have pull down menus to make the selections easier, and most fields are self evident for what needs to be filled in.
6. The “Component Change-Removed” section will be auto populated with the information in CESCOM for the item currently installed in that position. If the auto-populated info is not correct you can overwrite it. The “SO Squawk No.” field is a function to tie transactions to a Work or Service Order for future reference and in most cases will not be used. Note: If the auto-populated removed part information is not correct, you should consider why this information is incorrect and contact your analyst to verify if another maintenance transaction might have been improperly recorded.
7. The “Comments” section can be filled in with anything that you want to record about this transaction. This field is limited to 2500 characters.
8. Once all the known data about this line item is entered and the required fields are populated, you can then click the “Add to MTR” button to create that line item and proceed.
9. Once back to the main “MTR page”, each completed line item can be reviewed and if anything is determined to be incorrect, it can be either edited or deleted using the buttons to the far right.
10. To create additional transaction items, simply repeat the process.

15
Section 10: Creation of an Inspection Type Transaction
1. After selecting the “Inspection” type transaction from the “Trans Type” pull down menu an “Inspection” Pop-up window will appear with two free form fields, one for “CESCOM Item Code” and one for “Task Reference”. You may choose to modify the search field with an entire value or a partial value and then click on the “GO” button or just hit enter. Note 1: The more precise the value entered, the shorter the possible match list will be. Note 2: Item codes are more frequently used so we suggest that the “Item Code” be used instead of the “Task Number” for most model aircraft.
2. A listing will appear with all of the Item Codes for that particular S/N Aircraft that match
the item code or task number that was entered. All you need to do is click to checkmark
the box or boxes for the line item(s) that contain all of the appropriate information about
the item(s) you are completing the MTR on.
Note: Several of the line items to select from will be very similar in nature with only
subtle differences in one of the columns, so double check your selection before clicking
on the “Process Checked Items” button, located at the bottom of the search list.
3. If for some reason the initial list does not contain the item code or task number in
question, you can click on the “View All Item Codes for the Model” button at the bottom
of the list to see a list of all potential matches for that particular model aircraft and not
just those already setup on your specific serial number. If the second list still does not
contain the item you are looking for, you will need to cancel the current operation and
either verify the task number, item code or select the “Create Misc Transaction” button
which will allow you to enter the “Inspection Description” and various other fields.
S
E
C
T
I
O
N
1
0
:
C
R
E
A
T
I
O
N
O
F
A
N
I
N
S
P
E
C
T
I
O
N
T
Y
P
E
T
R
A
16
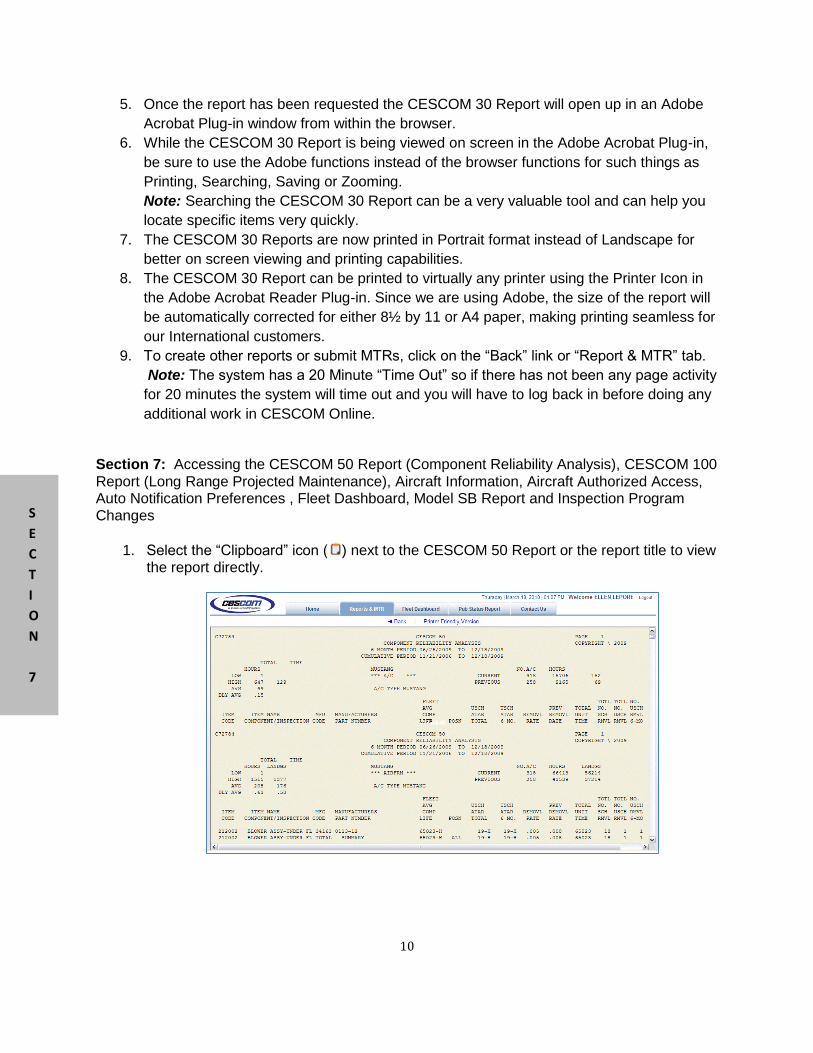
4. Once the “Process Checked Items” button has been clicked, an “Inspection” window will
pop-up with additional fields that may or may not be required to be filled in to complete
the transaction.
Note: Required fields will have a “Red” asterisk next to them.
5. The “Comments” section can be filled in with anything that you want to record about this
transaction. This field is limited to 2500 characters.
6. As soon as all the known data about this line item is entered and the required fields are
populated, you can then click the “Add to MTR” button to create that line item and
proceed.
7. Once back to the main “MTR page” each completed line item can be reviewed and if
anything is determined to be incorrect, it can be either edited or deleted using the
buttons to the far right.
8. To create additional transaction items simply repeat the process.

17
Section 11: Creation of a Service Bulletin/Letter/Kit Type Transaction
1. After selecting the “Service Bulletin/Letter/Kit” type transaction from the “Trans Type” pull down menu a “Service Bulletin/Letter/Kit” Pop-up window will appear with two free form fields. One for “CESCOM Item Code” and one for “Alternate Code”. If, at this point “GO” is selected without modifying this field, a search list will be generated that will bring up a list of all SB’s, SL’s and SK’s for this aircraft. You may choose to modify the search field with an entire value or a partial value and then click on the “GO” button or just hit enter. You only need to fill in one of the two fields, with an entire value or a partial value, and then click on the “GO” button or just hit enter. Note: The more precise the value entered, the shorter the possible match list will be.
2. A listing will appear with all the Service Bulletin/Letter/Kit and Item Codes for that particular S/N Aircraft, that match the Service Bulletin/Letter/Kit or Item Code that was entered. All you need to do is click to checkmark the box or boxes for the line item(s) that contain all of the appropriate information about the item(s) you are completing the MTR on. Note: Several of the line items to select from will be very similar in nature, with only subtle differences in one of the columns so double check your selection before clicking on the “Process Checked Items” button, located at the bottom of the search list.
3. If for some reason the initial list does not contain the Service Bulletin/Letter/Kit or the specific revision to the SB/SL/SK, or the item code in question, you can click on the “View All Item Codes for the Model” button at the bottom of the list to see a list of all potential matches for that particular model aircraft, and not just those already setup on your specific serial number. If the second list still does not contain the item you are looking for, you will need to cancel the current operation and either verify the Service Bulletin/Letter/Kit or Item Code, or select the “Create Misc Transaction” button which will allow you to enter the Service Bulletin/Letter/Kit or Item Code in a free form field. This might be caused by a proof kit situation.
S
E
C
T
I
O
N
1
1
:
C
R
E
A
T
I
O
N
O
F
A
S
E
R
V
I
C
E
B
U
L
L
E
T
I
N
/
L
E
T

18
4. Once the “Process Checked Items” button has been clicked, a “Service
Bulletin/Letter/Kit” window will pop-up with additional fields that may or may not be
required to be filled in to complete the transaction.
Note: Required fields will have a “Red” asterisk next to them.
5. The “Comments” section can be filled in with anything that you want to record about this
transaction. This field is limited to 2500 characters.
6. Once all the known data about this line item is entered, and the required fields are
populated, you can click the “Add to MTR” button to create that line item and proceed.
7. Once back to the main “MTR page” each completed line item can be reviewed and, if
anything is determined to be incorrect, it can be either edited or deleted using the
buttons to the far right.
8. To create additional transaction items, simply repeat the process.
Section 12: Creation of an Airworthiness Directive Type Transaction
1. After selecting the “Airworthiness Directive” type transaction from the “Trans Type” pull
down menu an “Airworthiness Directive” Pop-up window will appear with two free form fields. One for “CESCOM Item Code” and one for “Alternate Code”. You only need to fill in one of the two fields, with an entire value or a partial value, and then click on the “GO” button or just hit enter. Note: The more precise the value entered, the shorter the possible match list will be.
2. A listing will appear with all of the “Airworthiness Directives” and “Item Codes” for that particular S/N Aircraft that match the Airworthiness Directive or item code that was entered. All you need to do is click to checkmark the box or boxes for the line item(s) that contain all of the appropriate information about the item(s) you are completing the MTR on. Note: Several of the line items to select from will be very similar in nature with only
S
E
C
T
I
O
N
1
2
:
C
R
E
A

19
subtle differences in one of the columns, so double check your selection before clicking on the “Process Checked Items” button, located at the bottom of the search list.
3. If for some reason the initial list does not contain the Airworthiness Directive, or the
specific revision to the Airworthiness Directive, or the item code in question, you can
click on the “View All Item Codes for the Model” button at the bottom of the list to
see a list of all potential matches for that particular model aircraft, and not just those
already setup on your specific serial number. If the second list still does not contain
the item you are looking for you will need to cancel the current operation and either
verify the Airworthiness Directive, Item Code, or select the “Create Misc
Transaction” button which will allow you to enter the Airworthiness Directive or item
code in a free form field.
4. Once the “Process Checked Items” button has been clicked, an “Airworthiness
Directive” window will pop-up with additional fields that may or may not be required
to be filled in to complete the transaction.
Note: Required fields will have a “Red” asterisk next to them.
5. The “Comments” section can be filled in with anything that you want to record about this
transaction. This field is limited to 2500 characters.
6. Once all the known data about this line item is entered and the required fields are
populated, you can click the “Add to MTR” button to create that line item and proceed.
7. Once back to the main “MTR page” each completed line item can be reviewed and if
anything is determined to be incorrect, it can be either edited or deleted using the
buttons to the far right.
8. To create additional transaction items simply repeat the process.
Section 13: Creation of a Miscellaneous Type Transaction
S
E
C
T
I
O
N
1
3
:
C
R
E
A
T
I
O
N
O

20
1. After selecting the “Miscellaneous” type transaction from the “Trans Type” pull down menu a “Miscellaneous” window will pop up with two major sections (“Miscellaneous-Installed” and “Miscellaneous-Removed”) that contain additional fields that may or may not be required to be filled in to complete the transaction. Note: Required fields will have a “Red” asterisk next to them.
2. The “Miscellaneous-Installed” section has several fields that have pull down menus to make the selections easier, and most fields are self evident as to what needs to be filled in. The “Trans Type” field will allow you to be more specific about the transactions that you are entering within the “Miscellaneous” category.
3. The “Miscellaneous-Removed” has additional free form fields that can be populated to help identify the component being removed, if applicable.
4. The “Comments” section can be filled in with anything that you want to record about this transaction. This field is limited to 2500 characters. Note: The comments section for “Miscellaneous” type transactions is very important to help the analyst interpret this transaction, and determine how it should be handled in the system.
5. Once all the known data about this line item is entered and the required fields are populated you can click the “Add to MTR” button to create that line item and proceed.
6. Once back to the main “MTR page” each completed line item can be reviewed and if anything is determined to be incorrect, it can be either edited or deleted using the buttons to the far right.
7. To create additional transaction items simply repeat the process.
Section 14: Previewing the MTR
1. At any time during the transaction entry process you can preview the MTR by simply clicking on the “Preview” button.
2. A “Draft” version of the MTR will be created in an Adobe Acrobat Plug-in window from
within the browser.
S
E
C
T
I
O
N
1
4
:
P
R
E
V
I
E
W
I
N
G
T
H

21
Note: Draft pages will be identified by the word “DRAFT” appearing across the top of
the MTR page as well as in the signature block of the footer. This is to protect you from
accidentally signing off a Draft copy of an MTR, and thus possibly failing to actually
submit the MTR to CESCOM. Once you are satisfied with the MTR and have filled out
the Footer section, you will be able to print out a fully completed MTR after it has been
electronically submitted to CESCOM.
3. While the Draft version of the MTR is being viewed on screen in the Adobe Acrobat
Plug-in, be sure to use the Adobe functions instead of the browser functions for such
things as Printing, Searching, Saving or Zooming.
4. Depending upon the number of transaction items and the amount of comments written,
the MTR may actually be multiple pages. If this is the case you may page through the
pages using page forward/back arrows in the bottom left corner of the Adobe Acrobat
Plug-in window.
Note: If the MTR does roll over to multiple pages, the “Line Item Description” and
“Comments” will move together to the next page.
5. The MTR can be printed to virtually any printer using the Printer Icon in the Adobe Acrobat Reader Plug-in. Since we are using Adobe, the size of the report will be automatically corrected for either 8½ by 11 or A4 paper, making printing seamless for our International customers.
6. Once you are satisfied with the Draft copy of the MTR, you can click on the “Back” hyperlink at the top of the page to return to the MTR creation page and either add additional transactions or continue on to finish the Footer section and submit the MTR. Note 1: The system has a 20 Minute “Time Out” so if there has not been any page activity for 20 minutes the system will time out and you will have to Log back in before doing any additional work in CESCOM Online. Once this happens you can select the MTR “View in Work” hyperlink from the “CESCOM Online Report & MTR Menu” page to edit and finish any MTR that is displayed at the bottom of the screen for the transaction that is being modified or is still in work and hasn’t been submitted to CESCOM. Note 2: When editing transactions, the creation and revision information (user name and date) will appear in the lower portion of the screen.
Section 15: Completing the Footer Section of an MTR
1. The “Footer” section of the MTR contains sign-off criteria. The “Work Order Number”, “Maintenance Log: Section”, “Page”, “Repair Facility” and “Certified Repair Station Number” as well as the “Work performed in accordance with” statement can be saved by clicking the “Save” button. The “Performed by” and “Inspected by” as well as their
S
E
C
T
I
O
N
1
5
:
C
O
M
P

22
respective “Certificate Number” data is not saved and will be lost if the MTR is previewed, the system times out or the program is closed before submitting the MTR to CESCOM.
2. All the fields in the Footer section are free form fields and the only ones required by the system are the “Work Performed by” field or “Repair Facility”. However, depending upon your type of operation, other fields may be technically required by the FAA. You will notice that there is a “List Statements” button, which provides you alternative statements to use when addressing the status and airworthiness of the aircraft with regard to the maintenance being performed. Note: A “List” button is available to assist you in filling out the “Repair Facility” field. The system maintains a history of the last ten entries for each user in a “Pull Down” list, thus allowing you to quickly fill out the fields once you have established your default criteria.
3. The “Date” fields are auto-populated with today’s date but can be overwritten. There is also a button located to the right of the “Performed date” field that will allow you to synchronize the date in the footer with the date in the header. If these dates do not match, the user will be prompted to ensure the accuracy of dates being reflected.
4. The “Maintenance Log” section and “Page” fields are also free form fields and are intended to allow you to enter the next appropriate page number and section number for the section of the Aircraft Log book that is being updated. Note: If there are multiple pages of MTRs the page number will incrementally increase with each subsequent page.
Section 16: Submitting the MTR to CESCOM
1. Once the entire MTR is complete, you can submit the MTR by clicking on the “Submit” button at the bottom of the page.
2. The finalized version of the MTR will open up in an Adobe Acrobat Plug-in window from within the browser for viewing and printing purposes.
3. While the Final version of the MTR is being viewed on screen in the Adobe Acrobat
S
E
C
T
I
O
N
1
6
:
S
U
B
M
I
T
T
I
N
G
T
H
E

23
Plug-in, be sure to use the Adobe functions instead of the browser functions for such things as Printing, Searching, Saving or Zooming.
4. Depending upon the number of transaction items and the amount of comments written, the MTR may actually be multiple pages. If this is the case you may page through the pages using page forward/back arrows in the bottom left corner of the Adobe Acrobat Plug-in window. Note: If the MTR does roll over to multiple pages, the “Line Item Description” and “Comments” will move together to the next page.
5. The MTR can be printed to virtually any printer using the Printer Icon in the Adobe Acrobat Reader Plug-in. Since we are using Adobe, the size of the report will be automatically corrected for either 8½ by 11 or A4 paper, making printing seamless for our International customers.
6. Once you have printed the Final copy of the MTR, you can click on the “Back” hyperlink at the top of the page to return to the “CESCOM Online Report & MTR Menu” page, to either view, create another report, or Logout. Note: The system has a 20 Minute “Time Out” so if there has not been any page activity for 20 minutes the system will time out and you will have to Log back in before doing any additional work in CESCOM Online.
Section 17: Viewing MTRs that are Currently In Work
1. Once an MTR has been started and the times have been saved, it will be automatically saved in the system in the event you have to stop and do something else.
2. To return to an existing MTR that is currently in work, you should select the MTR “View In Work” hypertext on the “CESCOM Online Report & MTR Menu” page. This will open up the list of all currently in work MTRs for that aircraft.
S
E
C
T
I
O
N
1
7
:
V
I
E
W
I
N
G
M
T
R
S
T
H
A

24
3. Once the desired MTR has been located in the list, you can click on the “Edit”, “Preview” or “Delete” buttons at the right of the screen to perform the desired function.
4. Once an MTR is finished and submitted to CESCOM, it will move from the MTR “In Work” section to the “View Submitted” MTRs section of the CESCOM Online site.
Section 18: Viewing Submitted MTRs
1. All MTRs submitted via CESCOM Online are available for review or reprint by simply clicking on the MTR “View Submitted” hypertext on the “CESCOM Online Report & MTR Menu” page. The initial list of MTRs available for viewing only goes back 60 days. In order to search for MTRs that fall outside of that 60 day range you may enter specific date ranges or select the “View All MTRs” option to open up the list of all submitted MTRs for that aircraft.
2. Once the desired MTR has been located in the list, you can click on the “View” button at the right of the screen to open the MTR for review or reprint. Note: Once an MTR has been submitted it cannot be edited or altered. If you need to make any changes to a previously submitted transaction, you will have to fill out a new MTR outlining the changes.
3. The finalized version of the MTR will open up in an Adobe Acrobat Plug-in window from
within the browser for viewing and printing purposes.
4. While the Final version of the MTR is being viewed on screen in the Adobe Acrobat
Plug-in, be sure to use the Adobe functions instead of the browser functions for such
things as Printing, Searching, Saving or Zooming.
5. Depending upon the number of transaction items and the amount of comments written,
the MTR may actually be multiple pages. If this is the case you may page through the
S
E
C
T
I
O
N
1
8
:
V
I
E
W
I
N
G
S
U
B
M
I
T
T
E
D
M
T
R
S

25
pages using page forward/back arrows in the bottom left corner of the Adobe Acrobat
Plug-in window.
Note: If the MTR does roll over to multiple pages, the “Line Item Description” and
“Comments” will move together to the next page.
6. The MTR can be printed to virtually any printer using the Printer Icon in the Adobe
Acrobat Reader Plug-in. Since we are using Adobe, the size of the report will be
automatically corrected for either 8½ by 11 or A4 paper, making printing seamless for
our International customers.
7. Once you have finished viewing or printed the Final copy of the MTR, you can click on
the “Back” hyperlink at the top of the page to go back to the list of previously submitted
MTRs, or click on the “Return to Report & MTR Menu” hyperlink at the top of the page to
return to the “CESCOM Online Report & MTR Menu” page, to either view or create
another report, or simply Logout.
Note: The system has a 20 Minute “Time Out” so if there has not been any page activity
for 20 minutes the system will time out and you will have to Log back in before doing any
additional work in CESCOM Online.
Section 19: System Outages
1. In the unlikely event that the system is unavailable there is an Excel template available
for use that will allow the creation of an MTR. This template is located near the bottom
right hand portion of the CESCOM Online login page. Please note that any entries
created with this template will still need to be submitted electronically once the system
becomes available again. This template is only to allow the operator to have the
maintenance documentation filed within the aircraft flight and maintenance log during
system outages.
S
E
C
T
I
O
N
1
9
:
S
Y
S
T
E
M
O
U
T
A
G
E
S

A-1
Appendix A – System Requirements/Product Compatibility
System Requirements
1. Standard Internet Access
2. Browsers: MS Internet Explorer 6.0 or greater or Mozilla Firefox vs. 3.6 or greater, Safari
vs. 4 or greater and Google Chrome vs. 5.0 or greater.
3. Report Viewer: Adobe Acrobat Reader 7.0 or greater
Product Compatibilities
1. Workstation Settings - All workstations that view CESCOM Online must have the
desktop resolution set to a minimum of 1024 x 768 pixels.
2. In addition to the resolution setting, all workstations must also have the font setting established at “Normal” or “Small” depending on the browser version.
A
P
P
E
N
D
I
X
A
–
S
Y
S
T
E
M
R
E
Q
U
I
R
E
M
E
N
T
S
/
P
R
O
D
U
C
T
C
O
M
P
A

A-2
3. MSIE Browser Settings - The recommended browser for CESCOM is MSIE 7.0 although
6.0 and 8.0 will work as well. All images associated with the proceeding settings are displayed from version 7.0 and 8.0.
a. Access the “Tools” pull-down in the browser header and choose “Internet Options.”
b. From the “General Tab” choose the “Settings” button within the Browsing History section and set the corresponding setting to “Automatically” using the radio button. Remember to click “Okay” before closing the window.

A-3
c. From the “Privacy Tab” choose the “Advanced” button and establish “Override Automatic Cookie Handling” and accept both the “First-Party & Third Party Cookies”. Also ensure “Always Allow Session Cookies” is set.
d. On the “Advanced Tab”, within the Accessibility section, select the option to “Reset zoom level to 100% for new windows and tabs”.

A-4
Also within the “Advanced Tab” scroll down into the Security area and make sure the “Empty Temporary Internet Files Folder when Browser is Closed” selection is checked. This is generally the eighth item down in the security area depending on the version of the browser being implemented.
4. Pop-up Blockers – “Pop-up Blockers” are becoming more prevalent and are used to stop
the proliferation of annoying Pop-up Advertisements commonly received while surfing
the Web. CESCOM Online uses Pop-up technology to efficiently provide screens that
allow the user to input and request important data. If a Popup Blocker has been installed
the user may experience the following errors with CESCOM Online’s Pop-up Screens:
a. Some Pop-up screens may not open, giving the illusion that the program has
locked.
b. Certain Pop-up screens may not close out when the user is complete and has
preceded to the next Pop-up.
c. Other errors may arise if a user continues to build from a pop-up that should
have closed but remained open due to the Pop-up Blocker.
d. The main MTR window may not update automatically to show transaction items
that have been added or deleted.
5. If you are experiencing any of the above conditions you can correct the situation by one
of the two following methods:
a. Turn off the Pop-up Blocker when using CESCOM Online. Depending upon
whether or not your Pop-up Blocker is so equipped, you may be able to configure
the Pop-up Blocker to allow Pop-ups from specific Web sites such as CESCOM
Online. This capability is sometimes referred to as a “White List”.