Embed Size (px)
Citation preview
Changing Factory LEDs in your S197 Mustang Page 1 of 16
Last Modified: 2/3/2008 5:06 PM
Changing Factory LEDs in your S197 Mustang
Written By Deric D. Higgins
Changing Factory LEDs in your S197 Mustang Page 2 of 16
Last Modified: 2/3/2008 5:06 PM
One thing that always bugged me about our cars is the mycolor option is only limited to the dash. Why couldn’t Ford really go above and beyond and allow all the LED’s to be controlled by the mycolor buttons? I had some hope when I heard of the ambient lighting package of the 08 but this still leaves the dash buttons and switches that pale boring green. I finally decided to change them out myself. Apparently “Mycolor” is blue since that is what my dash has been set to since I got it. The switches in the mustang use two types of LEDs
• PLCC-2 • Standard through-hole domed
PLCC-2 SMT LED total =50 Radio: 26 Mycolor sw: 3 TCS: 1 A/C: 15 Cruise L: 2 Cruise R: 3 Through Hole LED total =7 (can use PLCC-2 style - details in soldering section) Window DR: 2 Window PS: 1 Lock Driver: 2 Lock Passn: 2 First thing to do is remove the switches from the car. One of the nice things about the S197 mustang is that it is easy to take apart. To do this swap you will need the following:
• PLCC-2 LEDS of your preferred color (See above for quanity) • Through-hole LEDs (I chose not to use them) • Low wattage Soldering Iron (Flat or small tip preferred but not required) • Solder (I use Silver Bearing solder with a Rosin core. This stuff is awesome and I’ve been using it
for almost 10 Years and haven’t found anything that works better on electronics) • Small Tweezers • Solder Sucker (optional) • Desktop vice (optional) • Patience • More Patience
Changing Factory LEDs in your S197 Mustang Page 3 of 16
Last Modified: 2/3/2008 5:06 PM
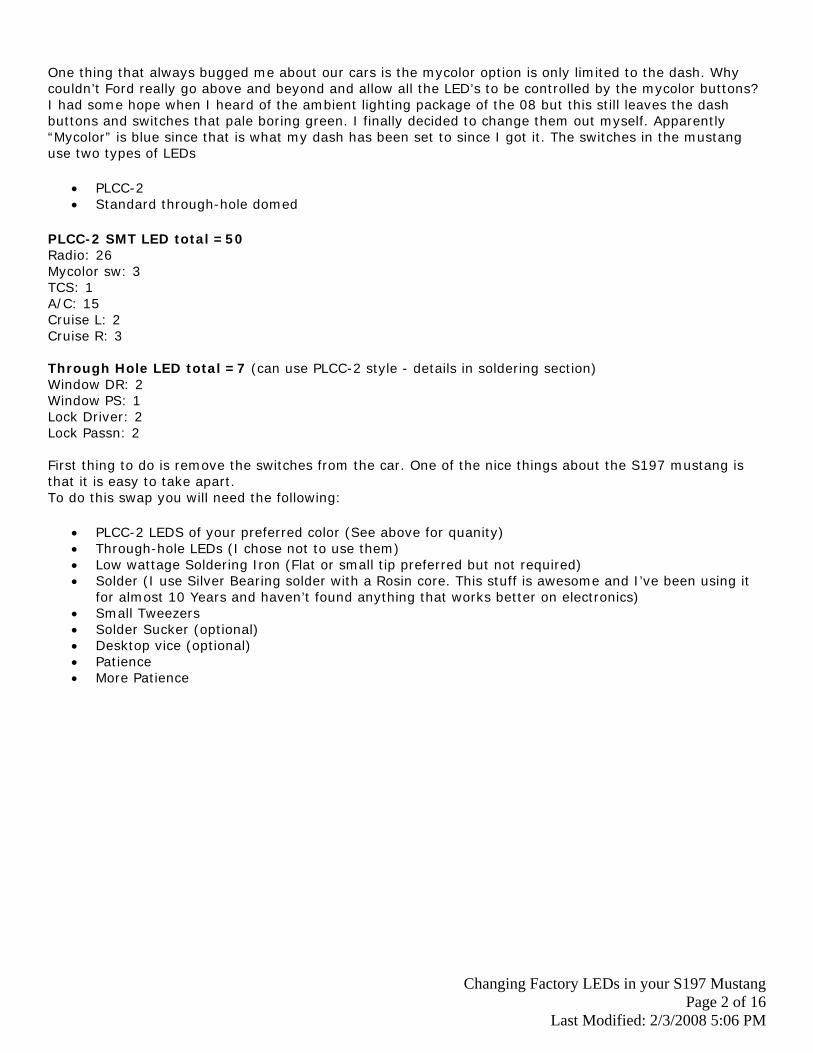
Cruise control switches: My car has the IUP steering wheel so I am unsure of the standard wheel
1. Remove left and right IUP panels by slowly lifting them out.
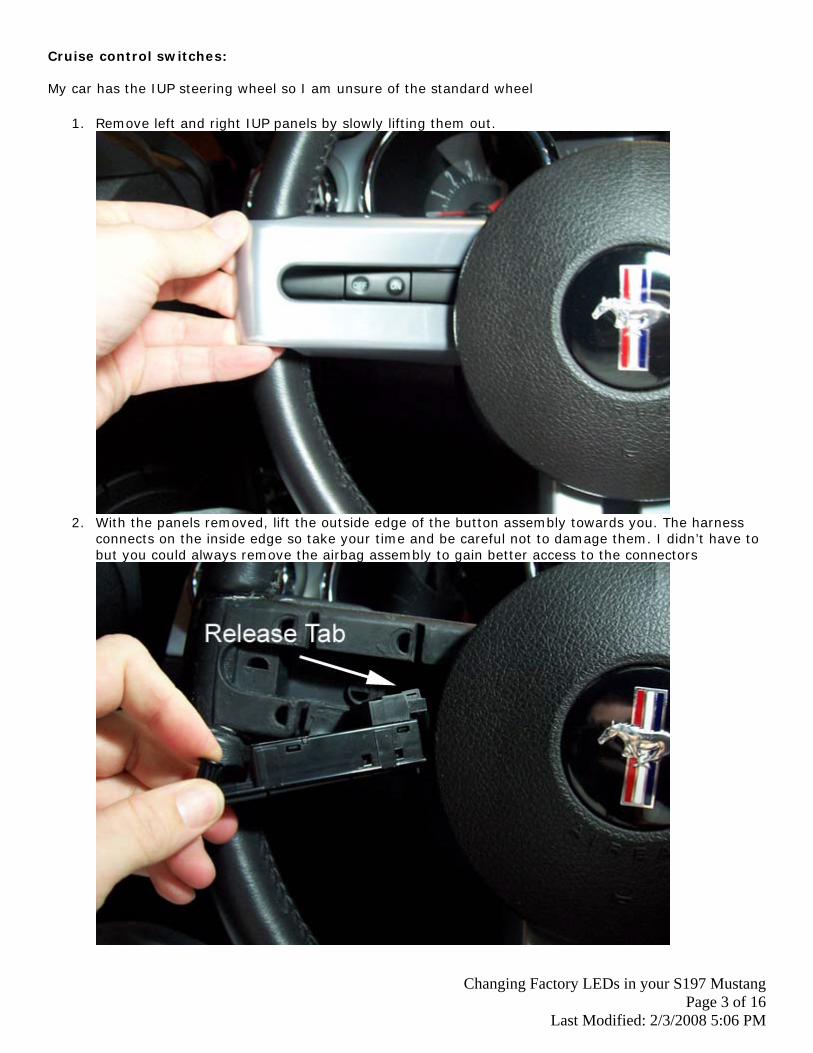
2. With the panels removed, lift the outside edge of the button assembly towards you. The harness
connects on the inside edge so take your time and be careful not to damage them. I didn’t have to but you could always remove the airbag assembly to gain better access to the connectors
Changing Factory LEDs in your S197 Mustang Page 4 of 16
Last Modified: 2/3/2008 5:06 PM
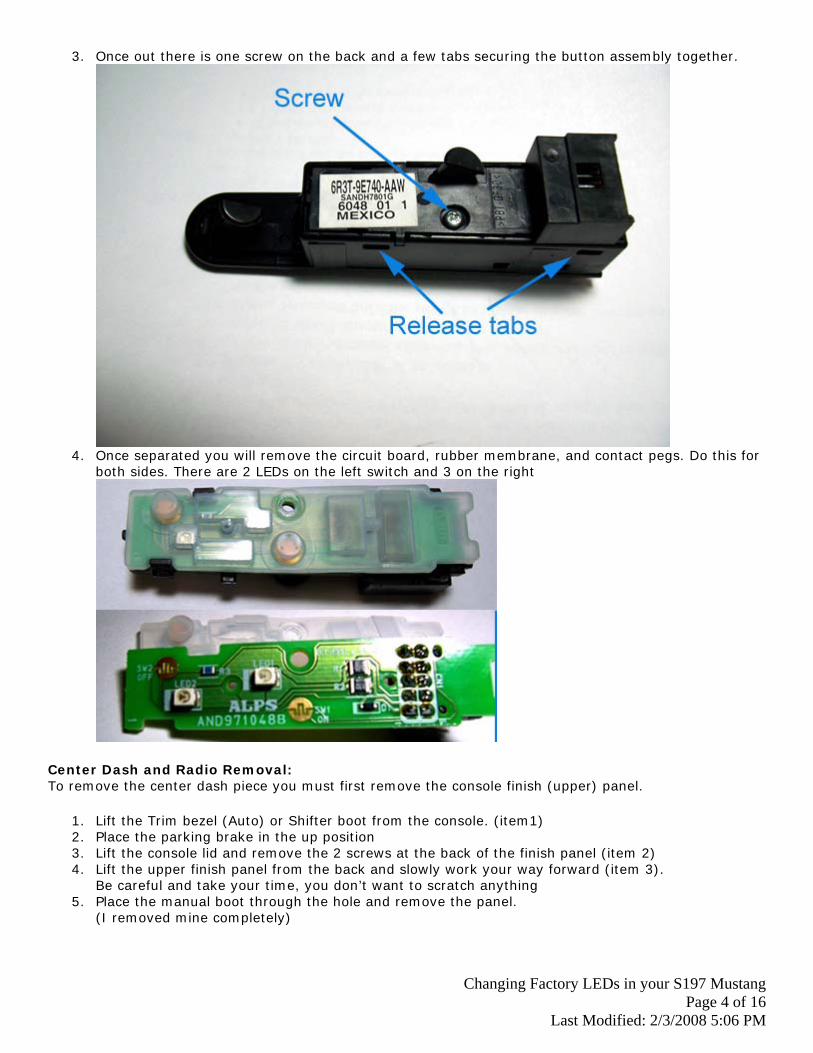
3. Once out there is one screw on the back and a few tabs securing the button assembly together.
4. Once separated you will remove the circuit board, rubber membrane, and contact pegs. Do this for
both sides. There are 2 LEDs on the left switch and 3 on the right
Center Dash and Radio Removal: To remove the center dash piece you must first remove the console finish (upper) panel.
1. Lift the Trim bezel (Auto) or Shifter boot from the console. (item1) 2. Place the parking brake in the up position 3. Lift the console lid and remove the 2 screws at the back of the finish panel (item 2) 4. Lift the upper finish panel from the back and slowly work your way forward (item 3).
Be careful and take your time, you don’t want to scratch anything 5. Place the manual boot through the hole and remove the panel.
(I removed mine completely)
Changing Factory LEDs in your S197 Mustang Page 5 of 16
Last Modified: 2/3/2008 5:06 PM
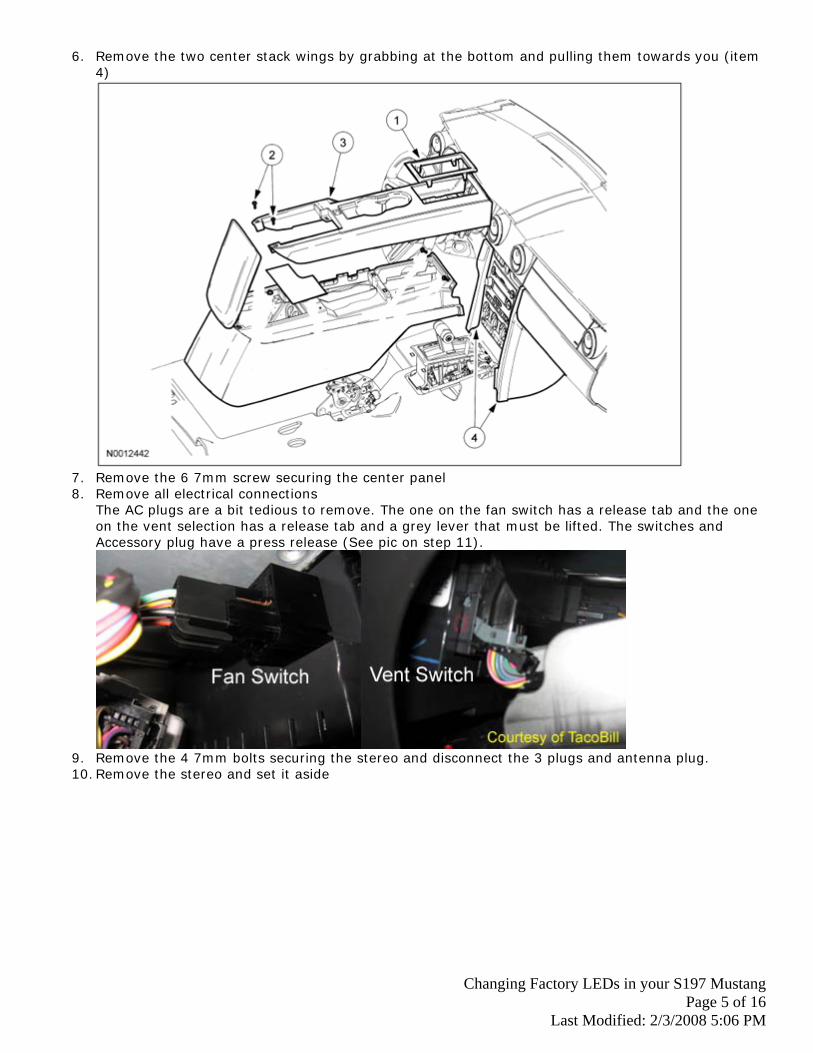
6. Remove the two center stack wings by grabbing at the bottom and pulling them towards you (item 4)
7. Remove the 6 7mm screw securing the center panel 8. Remove all electrical connections
The AC plugs are a bit tedious to remove. The one on the fan switch has a release tab and the one on the vent selection has a release tab and a grey lever that must be lifted. The switches and Accessory plug have a press release (See pic on step 11).
9. Remove the 4 7mm bolts securing the stereo and disconnect the 3 plugs and antenna plug. 10. Remove the stereo and set it aside
Changing Factory LEDs in your S197 Mustang Page 6 of 16
Last Modified: 2/3/2008 5:06 PM
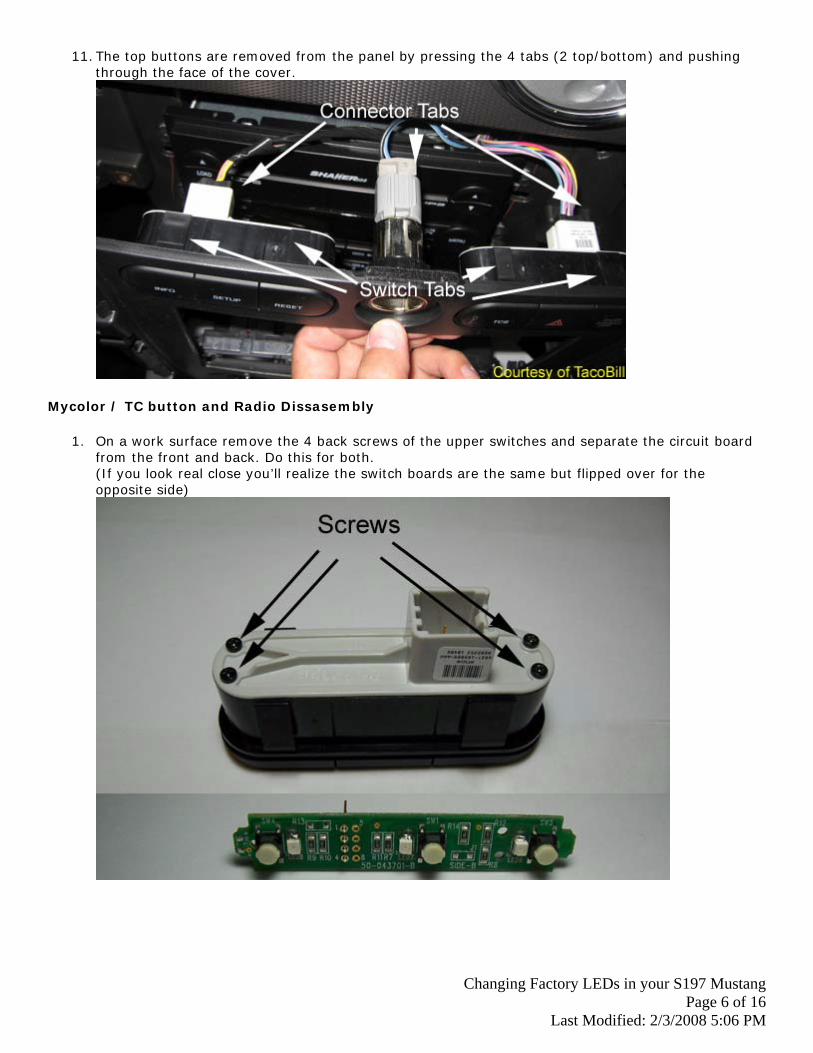
11. The top buttons are removed from the panel by pressing the 4 tabs (2 top/bottom) and pushing through the face of the cover.
Mycolor / TC button and Radio Dissasembly
1. On a work surface remove the 4 back screws of the upper switches and separate the circuit board from the front and back. Do this for both. (If you look real close you’ll realize the switch boards are the same but flipped over for the opposite side)

Changing Factory LEDs in your S197 Mustang Page 7 of 16
Last Modified: 2/3/2008 5:06 PM
2. Stereo: Remove the 2 Torx screws on each side of the face plate
3. Remove the volume knob by pulling it away from the stereo
Changing Factory LEDs in your S197 Mustang Page 8 of 16
Last Modified: 2/3/2008 5:06 PM
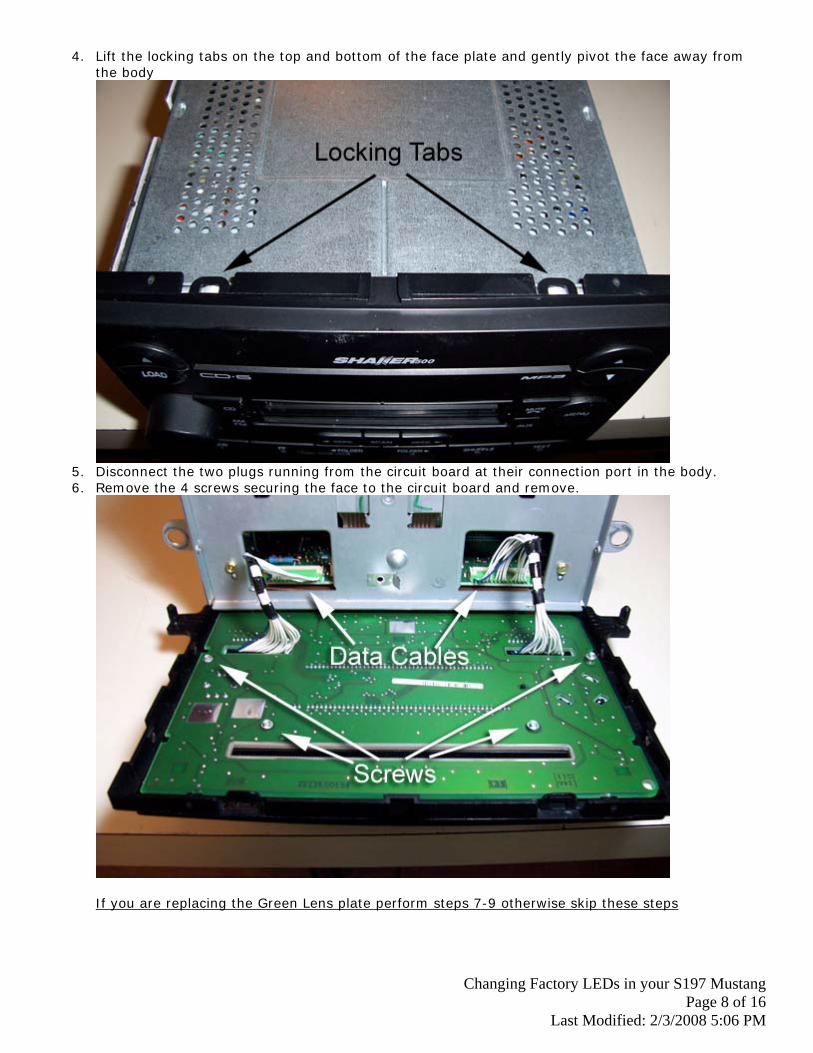
4. Lift the locking tabs on the top and bottom of the face plate and gently pivot the face away from the body
5. Disconnect the two plugs running from the circuit board at their connection port in the body. 6. Remove the 4 screws securing the face to the circuit board and remove.
If you are replacing the Green Lens plate perform steps 7-9 otherwise skip these steps
Changing Factory LEDs in your S197 Mustang Page 9 of 16
Last Modified: 2/3/2008 5:06 PM
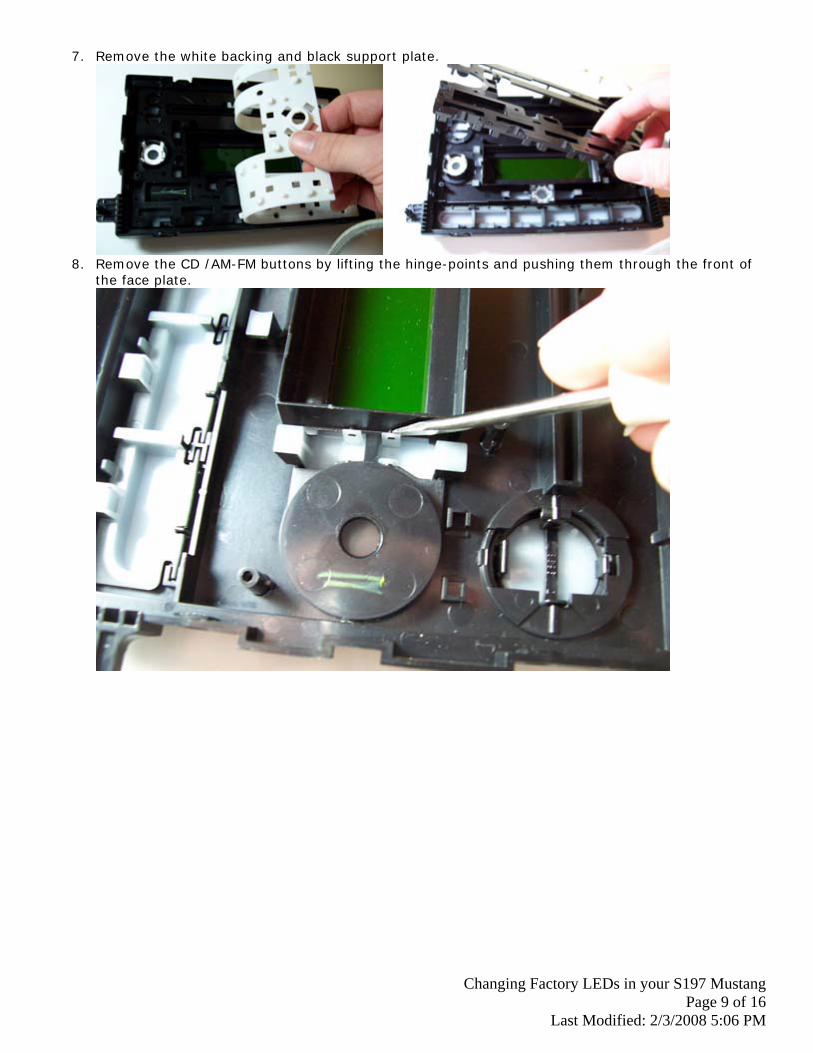
7. Remove the white backing and black support plate.
8. Remove the CD /AM-FM buttons by lifting the hinge-points and pushing them through the front of
the face plate.
Changing Factory LEDs in your S197 Mustang Page 10 of 16
Last Modified: 2/3/2008 5:06 PM
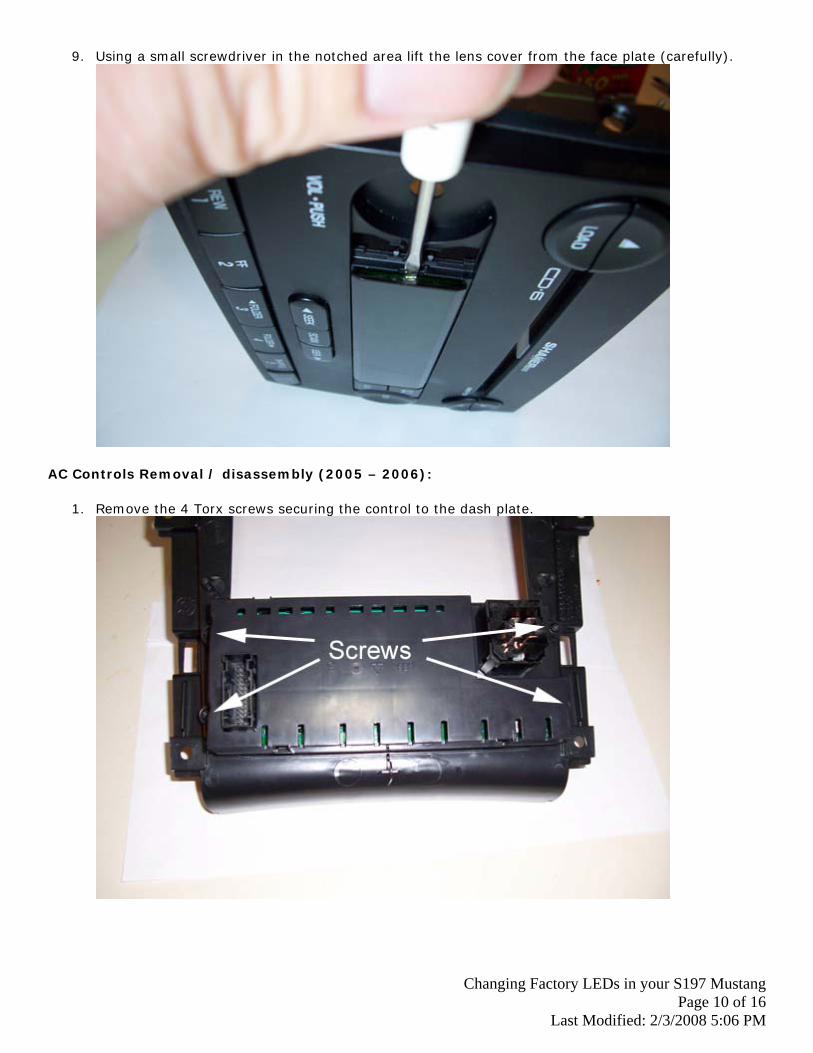
9. Using a small screwdriver in the notched area lift the lens cover from the face plate (carefully).
AC Controls Removal / disassembly (2005 – 2006):
1. Remove the 4 Torx screws securing the control to the dash plate.
Changing Factory LEDs in your S197 Mustang Page 11 of 16
Last Modified: 2/3/2008 5:06 PM
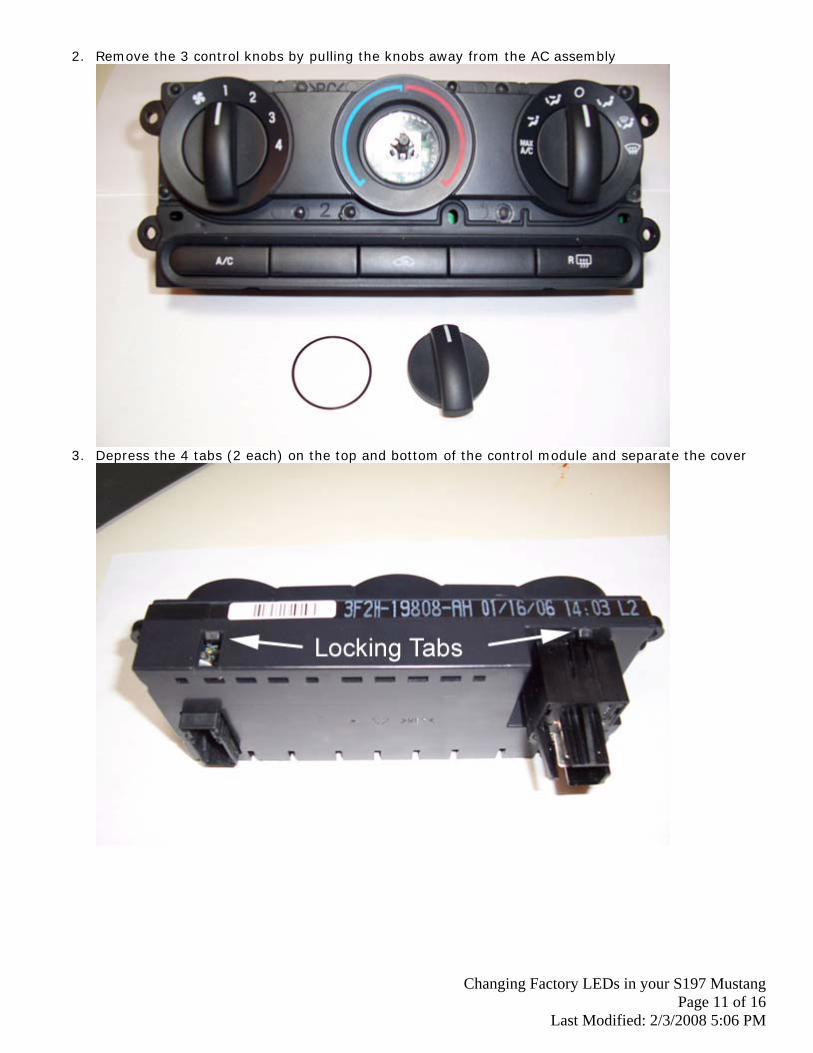
2. Remove the 3 control knobs by pulling the knobs away from the AC assembly
3. Depress the 4 tabs (2 each) on the top and bottom of the control module and separate the cover
Changing Factory LEDs in your S197 Mustang Page 12 of 16
Last Modified: 2/3/2008 5:06 PM
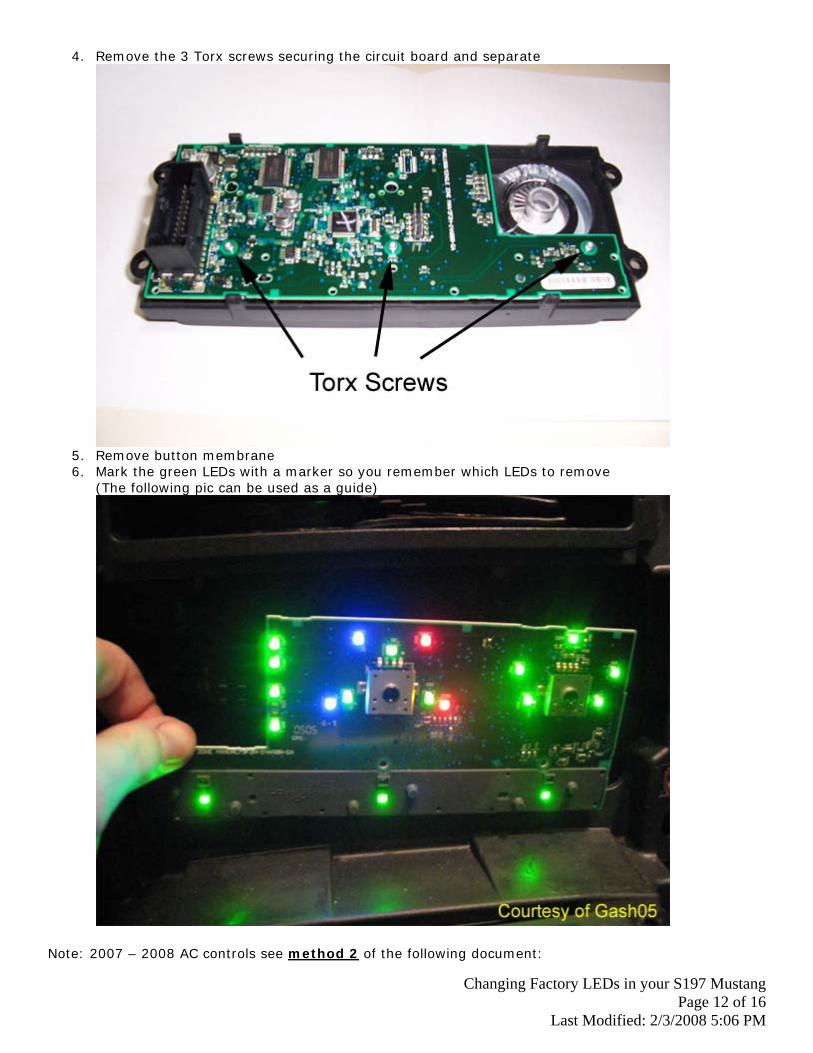
4. Remove the 3 Torx screws securing the circuit board and separate
5. Remove button membrane 6. Mark the green LEDs with a marker so you remember which LEDs to remove
(The following pic can be used as a guide)
Note: 2007 – 2008 AC controls see method 2 of the following document:
Changing Factory LEDs in your S197 Mustang Page 13 of 16
Last Modified: 2/3/2008 5:06 PM
http://www.silverhorseracing.com/Install_sheets/S197-525-07%20Climate%20Control.pdf Door Lock and Window Switches Removal disassembly To remove the lock switches you have to remove the door panel. I removed one without removing the panel and it was quite difficult. 1. Door panel http://www.buildingeleanor.com/images/2008/pdf/doorpanel.pdf 2. Window switch removal http://www.buildingeleanor.com/images/2008/pdf/window.pdf 3. Separate switch assembly by depressing tabs on the side. (be careful the plastic is fragile - I had better luck lifting between the tabs with a screwdriver to seperate) Headlight switch (Non-Fog version) The headlight switch uses a standard bulb. I will update this to LED when I install my DIY ambient light kit. 1. Make sure Left stack wing is removed 2. Pull driver lower pillar cover <Pic coming> 3. Pull the bottom of instrument panel slightly to open enough space <pic coming> 4. Remove 2 screws from the bottom of steering column cover plate 5. Slowly lift panel and separate 6. On the back of the switch there is a small keyed plate. Turn it counter-clockwise to unlock and pull the light out 7. <to be continued> Removing / Installing the LEDs: Surface Mount A low wattage soldering iron is preferred since you want to have as little heat as possible. (I use a 15w) 1. Prepare part by placing it on a flat surface securely 2. Make sure your iron tip is clean. I use a fine point when soldering 3. Make note of factory LED orientation, there should a bevel on the corner noting the polarity of the LED. 4. Apply iron to upper side of factory LED until solder flows. 5. While applying heat, use the solder sucker to remove the solder and repeat for the other side. Continued on Next Page
Changing Factory LEDs in your S197 Mustang Page 14 of 16
Last Modified: 2/3/2008 5:06 PM
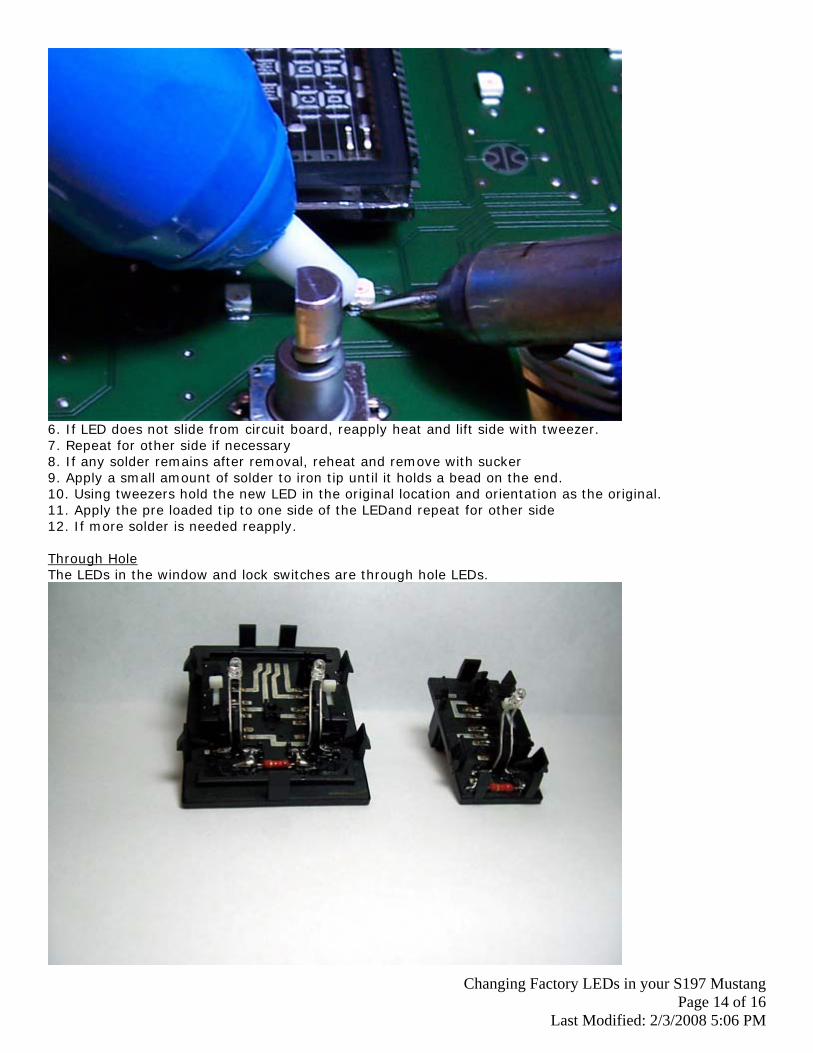
6. If LED does not slide from circuit board, reapply heat and lift side with tweezer. 7. Repeat for other side if necessary 8. If any solder remains after removal, reheat and remove with sucker 9. Apply a small amount of solder to iron tip until it holds a bead on the end. 10. Using tweezers hold the new LED in the original location and orientation as the original. 11. Apply the pre loaded tip to one side of the LEDand repeat for other side 12. If more solder is needed reapply. Through Hole The LEDs in the window and lock switches are through hole LEDs.
Changing Factory LEDs in your S197 Mustang Page 15 of 16
Last Modified: 2/3/2008 5:06 PM
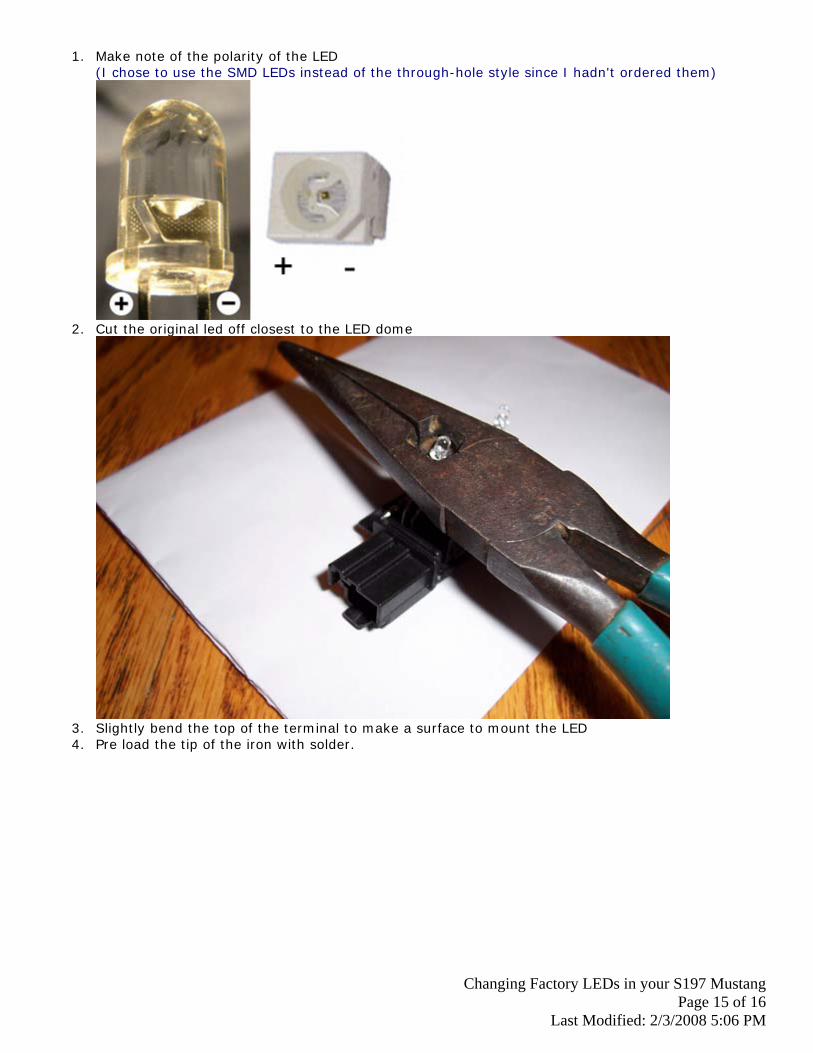
1. Make note of the polarity of the LED (I chose to use the SMD LEDs instead of the through-hole style since I hadn't ordered them)
2. Cut the original led off closest to the LED dome
3. Slightly bend the top of the terminal to make a surface to mount the LED 4. Pre load the tip of the iron with solder.

Changing Factory LEDs in your S197 Mustang Page 16 of 16
Last Modified: 2/3/2008 5:06 PM
5. Using tweezers if necessary place the LED against the terminal and apply pre loaded solder
6. Once complete repeat for remaining LEDs
Reassemble switches in reverse order and reinstall in your mustang. A couple of notes:
• If I were to do it over again I would probably use a lower mcd level LED. The LEDs I used are 600mcd and 200 - 300 would probably be better especially if you have mycolor. If I didn't have mycolor I would have replaced them all and it wouldn't have been that big of a deal
• The door lock switches are difficult to remove. I actually cracked a piece that holds one tab on one of them. This was probably due to it being about 20 degrees outside when I did this. I would pull the door handle assembly and heat the areas with a hair dryer or low watt heat gun to make it easier
• Take your time. I don't have the most steady of hands but I love to solder. I usually rest my hands against something to help keep them steady
• Try to handle all circuit boards by their edges. This helps eliminate the possibility of ESD damaging the components.
• The stereo LEDs are more difficult to remove due to the fact it takes longer for the solder to flow. My soldering iron can switch from 15w - 30w and I only had to switch to 30W once or twice


![SHUOHGLYHUVHOXQJKH]]HGRQGD … · Shimizu, H. et al. Light environment optimization for lettuce growth in plant factory (2011). Singh, D. et al. LEDs for Energy Efficient Greenhouse](https://img.pdfslide.net/doc/110x75/60fa47531a399941fa1cedbf/shuohglyhuvhoxqjkhhgrqgd-shimizu-h-et-al-light-environment-optimization-for.jpg)