Embed Size (px)
Citation preview

1Chariots of Fire—Rules of Play
©2010 GMT Games LLC
GMT Games, LLCP.O. Box 1308, Hanford, CA 93232–1308www.GMTGames.com
WARFARE IN THE BRONZE AGE
a RICHARD BERG / MARK HERMAN game
Table of Contents
RULE BOOK1.0 Introduction ................................................................ 22.0 Game Components, Terminology, Information .......... 2 2.1 The Maps ............................................................ 2 2.2 The Playing Pieces ............................................. 2 2.3 Charts, Tables, and the Die ................................. 3 2.4 Terminology ....................................................... 3 2.5 Game Scale ......................................................... 3 2.6 Game Length ...................................................... 3 2.7 The Military Types ............................................. 43.0 The Sequence of Play ................................................. 54.0 Leaders ....................................................................... 5 4.1 Leader Counter ................................................... 5 4.2 Leaders and Combat ........................................... 55.0 Activation and Orders ................................................ 6 5.1 Initiative.............................................................. 7 5.2 Activation Markers ............................................. 7 5.3 Trumping ............................................................ 7 5.4 Orders ................................................................. 76.0 Movement ................................................................... 7 6.1 Movement Allowances and Restrictions ............ 7 6.2 Terrain ................................................................. 7 6.3 Column Movement ............................................ 8 6.4 Orderly Withdrawal ............................................ 8 6.5 Stacking .............................................................. 9 6.6 Facing ................................................................. 9 6.7 Chariot Pass-Through ......................................... 10 6.8 Chariot Turnover (optional)................................ 10 6.9 Movement Charts and Tables ............................. 11
7.0 Missile Combat........................................................... 11 7.1 Missile Fire ......................................................... 11 7.2 Chariot Fire and Run Tactics .............................. 12 7.3 Chariot Pass-Through Fire ................................. 12 7.4 Reaction Fire ...................................................... 13 8.5. Missile Fire Charts and Tables ........................... 138.0 Shock Combat ............................................................ 13 8.1 Shock Combat Procedure ................................... 13 8.2 Advance After Combat ....................................... 15 8.3 Chariots and Shock ............................................. 16 8.4 Runner Infantry and Chariots ............................. 16 8.5 Aggression Reaction ........................................... 16 8.6 The Combat Charts and Tables ........................... 179.0 The Effects of Combat ............................................... 17 9.1 Cohesion .............................................................. 17 9.2 Engaged ............................................................... 18 9.3 Standards ............................................................. 18 9.4 Rout ..................................................................... 18 9.5 Rally .................................................................... 1810.0 Heroes ......................................................................... 19 10.1 Heroic Leaders .................................................. 19 10.2 Heroic Combat .................................................. 19 10.3 Hero Archers...................................................... 20 10.4 Effects of Heroic Combat .................................. 2011.0 Withdrawal and Victory .............................................. 20Credits ................................................................................ 21Sources ............................................................................... 21
Table of Contents
The Great Battles of History Series — Volume XIV
CHARIOTS OF FIRE

Chariots of Fire—Rules of Play2
©2010 GMT Games LLC
(1.0) INTRODUCTIONCHARIOTS OF FIRE (CoF), the 14th volume in the Great Battles of History series of games, allows players to recreate battles from the Bronze Age, that period of time covering several centuries for which there is little “written evidence”.
The military period covered in CoF could be called The Chariot Era, and CoF will, as much as possible, try to trace the rise of the chariot’s power as a military weapon. The game uses the basic mechanics and systems that have run throughout the GBoH series, with some important modifications and adaptations that highlight the era covered.
We have also included historical notes so that you can see what questions of military history arose. There is also the usual section on Terminology, all so that you can understand more fully where we are going—and where it all came from. Finally, there are indications of how long and how well-balanced (in terms of having a chance to win) the battles are all based on playtest experience and input. Your experiences, to be sure, may vary.
Historical Note: The period following The Bronze Age, from what is known as The Catastrophe of ca. 1200 BC to the rise of the Greek city states, is almost totally devoid of any sort of information, and that in-cludes archaeological remains. It is the true Dark Age of history. When the area emerged from that era, warfare had undergone major changes … and chariots had been relegated to the sidelines.
Notes for Players CoF, while not an overly difficult game to learn, understand or play, uses a tactical system which rewards most those who know what their men can do and how to exploit the capabilities of even the worst of them. To calmly blunder into battle with a "let the gods provide all the help we need" outlook is, regardless of its possible historical accuracy, to find yourself facing your own, personal Armageddon (the Biblical word for Megiddo).
For Those Who Have Never Played a Historical Simulation Before: Your main problem will be that war gaming has its own language, so flip through the rules to see what those mysterious words mean (the section on Terminology is most helpful in this case). We then suggest you set up one of the battles—Sumer (no chariots) and Astarpa River (with chariots) are good introductions to the system—then turn to the Rules Section called Sequence of Play (3.0) and simply start doing what that sequence tells you to do, referring to the rules when you don't understand what to do next. After about 20–30 minutes you'll be just as good at this sort of thing as we are.
For Those Who Have Not Played the System Before: Even if you are quite familiar with simulation gaming, we suggest that you set up a battle and push the counters around for a turn or two before actually starting a game. This will reveal the basic tactical strategies available, how the different types of weapons system may best be used, and how best to (try to) protect against them. The one thing to remember is that the more you know about your units and how they act/interact, the better commander you will be.
For Those Who Have Played the GBoH System: CoF is somewhat less complex than previous volumes. It retains all the core rules from the early titles, although we have greatly expanded the use of chariots, adding much detail to their various embodiments. A number of familiar rules have been dropped, reflecting the changes history and the Creative Muses have wrought. Moreover, several of the familiar charts and tables have undergone era-appropriate revisions. A thorough review of the Charts & Tables is heartily recommended. You will also notice that Missile Combat plays a far more prominent role than in most other titles in the series. Shock Combat, though important, is not as decisive (the Troy scenario being an exception).
(2.0) COMPONENTS AND TERMS(2.1) THE MAPSEach battle uses one of the game maps, four on the two backprinted 22” x 34” maps sheets and one 22” x 17” map sheet printed on one side. A hex grid covers each map to regulate movement and combat. The effects of the different types of terrain on the map are covered in the rules and charts. Several of the battles use the same map—the Blank map featuring only Clear terrain—representing the flat areas most conducive for the use of chariots.
(2.2) THE PLAYING PIECESThere are three types of playing pieces, or counters: combat units, rep-resenting the various types of fighting troops; leaders, the individuals who command the troops; and information markers used to note certain types of information necessary for play.
(2.21) Combat units: All combat units are rated numerically for their Troop Quality (TQ) and Movement capability. Units that are capable of firing missiles also have a Missile Indicator, indicating the type of missile used (B = Self Bow, C = Composite Bow, J = Javelin, S = Slinger, etc.). The Missile Range and Results Table gives the ranges available for these missile types.
Each combat unit has two sides. The reverse side has the same ratings but is used to indicate that the unit is Out of Command.
(2.22) Each unit is of a certain Type (SI—Shock infantry, CH—Chari-ots, etc.), the type being used to determine certain combat results and effectiveness vis a vis other types. Type is important in determining Superiority (see 8.18). See 2.4. Chariot units (Type CH) are further subdivided by Class to differentiate between various weapons systems within that type. Chariot units represent either 2-man (CH-2) or 3-man (CH-3) teams.
Design and Historical Note: There is no cavalry.
(2.23) Examples of Units
Leaders have a variety of ratings. These are discussed in §4.1.
Overall Commander
Design Note: The actual names of the historical leaders of this period, other than the pharaohs and kings, are lost in the mists of time, with some rare exceptions. We have provided typical names for the kingdoms.
Wing/Division Commander
Combat Units have two Ratings: Troop Quality and Movement Allow-ance. Units with Missile capability also have indicator denoting the type of missiles used. Furthermore, many combat units have a Division/Wing ID used to identify units belonging to the same command.
Rank
Command Range
Initiative
Charisma
NameDivision/Wing ID
Rank
Command Range Capability
NameDivision/Wing ID

3Chariots of Fire—Rules of Play
©2010 GMT Games LLC
See 2.5 for detail descriptions on each of combat unit included in the game.
Design Note: We are no longer using “Size” ratings. We know, to some extent, the overall army numbers, and several sources provide “paper” strengths for various levels of units within an army. However, specifics for a given battle are not readily available, not at this level. Literal numbers is not important; relative numbers is.
Informational Markers, such as "Shock/Must Check TQ", "#'s" (rep-resenting Cohesion Hits incurred), "Rallied", “Missile Low”, etc., are used to record certain game functions, as discussed below.
(2.3) CHARTS, TABLES, AND THE DIEThe use of each chart and table is explained in the rules. The game uses a 10-sided die; the '0' is treated as a '0' (not a '10'), and is less than '1'.
Design Note: A caveat for GBoH veterans: many of the old tables have been changed, adjusted for the different style of warfare of this era. This is not a change that would carry over to previous volumes.
(2.4) TERMINOLOGYKnowledge of the following game terms will be useful for play.
Activated Leader: The leader who is giving Orders to his troops at any given instant. Only one leader may be active at any one time.
Activation Marker: Marker usually drawn randomly from the Pool which determines which Division/Wing is activated and undertakes the next Orders Phase.
AM: Acronym for Activation Marker
Capability: A rating for Division/Wing Commanders that reflects their ability to successfully undertake certain game mechanics for the units in their command
Class: Subcategory within type, used to differentiate between various weapons systems within a type. E.g., chariot teams are either 2-man (CH-2) or 3-man (CH-3).
Cohesion: A unit's ability to withstand the rigors of combat and, for some, to remain in formation. This is measured by that unit’s ability to absorb Cohesion Hits (or simply Hits).
Command: A general term for a Wing or Division.
Commander: See Leader
Division: See Wing below. The term is used synonymously with Wing.
DR: Acronym for die roll
DRM: Acronym for die roll modifier
Hero: A special type of leader who is used to conduct Heroic Combat. A Hero, unless he is also a Commander, does not lead troops.
Hit: Shorthand term for Cohesion Hit
Leader: Interchangeable with the word Commander. Leaders were the “generals” who commanded and influenced the troops.
MA: Acronym for a unit's basic Movement Allowance. It also represents a unit's maneuverability vis a vis the other units in the game.
Missile Volley: Friendly units shooting arrows, throwing stones, or hurling javelins at enemy units.
Momentum: The mechanic by which a leader and his command can undertake more than one Orders Phase in a turn.
Orders: The means by which leaders have of getting their troops to move, fight, etc.
Orders Phase: The period during a turn when a leader gives Orders to his troops to move and fight.
Shock Combat: Hand-to-hand, (and, often literally, eyeball-to-eyeball), hack and thrust, slash and crash, melee. More crash and thrust than anything else in this era.
Superiority: The relative capability and "killing" effectiveness of the weapons/armor systems. Superiority, when achieved, will substantially increase an opponent's losses in cohesion.
The Pool: A cup or other opaque container holding the AMs that will be drawn during the game turn.
TQ: Acronym for the all-important Troop Quality rating, measuring the unit’s ability to stand up to the rigors of combat. The TQ Rating is, by far, the most important number a combat unit has. It will be consulted constantly throughout play—at almost any time a unit does something that will endanger its cohesion. The Cohesion Hit and TQ Check Charts summarizes when a player uses the TQ Rating.
Trump: The mechanic by which a player can stop an enemy leader from undergoing an Orders Phase and transfer that phase to one of his, friendly leaders (under somewhat restricted circumstances).
Type: General, categorical description of combat unit, usually used to determine combat effectiveness and results. See 2.5.
Wing: A leader and group of combat units that are activated together. The units in Wing are identified by an ID on the counter or in some cases by the unit’s Type. Each Wing has its own Activation Marker. The term is used synonymously with Division.
(2.5) GAME SCALEAccurate, or even approximate numbers are pretty much guesswork for this period. Therefore, the numerical strength of units is relative, not absolute. Most sources are pretty adamant that the armies were small by even medieval standards.
Design Note: Several sources note the “spatial” ratio between formed infantry and chariots as about 12 (men) to 1 (chariot), with several vagaries entering into the picture.
Each hex is approximately 100 yards from side to side. Each game turn covers about five minutes of real time, although gamers should not take that too literally.
(2.6) GAME LENGTH Each battle has an indeterminate number of Game Turns. A battle is fought until one side withdraws—so there is (usually) no need to keep track of how many turns have passed. Some battles, however, do keep track of time, so we’ve provided you with a Turn Record Track on the Rout Point Track Sheet. We have provided a variety of battles in terms of size. Kadesh is the biggest battle in the box, while Sumer is the smallest. The smaller battles take about two hours to play, the larger battles four hours or more.
(2.7) THE MILITARY UNITS Knowledge of the following types of combat units/terms will be use-ful for play:
Type
Troop Quality Movement Allowance
Missile Type
Division/Wing IDChariot

Chariots of Fire—Rules of Play4
©2010 GMT Games LLC
Barbarian Infantry (BI): This term is used to cover both the non-missile light infantry and their forerunners, the Barbarian Infantry of the mountains, These men fought in a manner—no formations, speed and aggression being their modi operandi—and used weapons—a slashing, thrusting sword (as opposed to the relatively inefficient scythe-like small arms of the period)—that proved effective against chariots (which, to be sure, were rarely used in rough, hilly country) and presaged the military tactics and weaponry that eventually neutralized the wheeled menaces. The term “barbarian” is used here to denote the hill and mountain “tribes” of Anatolia, as well as the Libyans of the western desert in some cases.
Battle Wagons (BW): The early forerunners of chariots, used by the Sumerians and others of the 3rd millennium BC. Battle Wagons were heavy vehicles, with solid wheels and wooden box platforms, usually drawn by donkeys or onagers (effective but temperamental). They were more lumbering than fast, with a poor turning radius. Two-man teams appear to be the usual complement, one of them a spearman. We’re not sure how, why, or even if they were used, other than for the “fright” effect.
Chariots (CH): The ‘2’ or ‘3’ (e.g., CH-2) reflects the number of crew, one of which was the driver (who also held a shield). All wore some chest armor (as did the horses), usually mail, and a helmet. Chariots were 2-wheeled (from 4 to 6 spokes, depending on the era and kingdom), with two horse teams. Despite some (minority) claims to the contrary, it is our view that chariots were basically, if not entirely, rolling missile platforms that were exceptionally efficient against the spear-oriented, relatively immobile close-formation shock infantry of the day. The Composite Bow rendered them king of the battlefield (some chariots appear to have been javelin-armed). The 3-team chariots, usually Hittite, carried an extra spear-holder who, most likely, added to the defense of the system. They were probably less mobile than the Egyptian-style 2-teamers. Charioteers were the elite soldiers, the maryannu (a term used in most armies) of the area of the army.
Design Note: Chariot TQ ratings do not measure their elite status, their training, morale discipline, or anything else like that. It measures their ability to withstand combat from a defensive viewpoint, which was not high. It was this susceptibility to close combat that led to their demise as a useful weapons system, once everyone figured out how to do it.
Heavy Infantry (HI): More heavily armed and armored than typical Shock Infantry of the period. The Sherden in the service of the Egyptian Pharaohs are the represented example.
Light (Missile) Infantry (LI): This class denotes foot archers and other similar troops, used solely for fire capa-bilities. The Sumerians, for example, probably had slingers and javelin-throwing troops. They were neither armed nor trained for shock combat—no armor, no shields—and had to be protected against same by other units. Given that most used self bows (the term for the simple, one-piece bow), their presence in chariot-based armies is debatable. But they do appear in many visuals. The Egyptians did use sizeable contingents of Nubians as archers. And later in the age (by the XIXth Dynasty in Egypt) they did use composite bows.
“Runner” Infantry (RI): A unique form of light infantry, known as phrr (or pherer) in Egyptian. (One could say, if one had enough to drink, that charioteers wore a phrr coat.) These well-trained men, usually in excellent condition, literally ran with the chariots, perhaps only one, or maybe in groups of four, as their protection and became, when the opportunity arose, an interesting strike force. In some instances, it appears they were placed, in loose formation, on the wings of the chariot line (they were very effective against enemy chariots). They were unarmored but may have carried a small shield and they often wore helmets. They used short spears, and often carried sickle-like swords. The idea for these troops, and many of their men, probably came from the barbarians of the day (cf. the use of the elite shardana in armies of the 13th century, a term that may place these men as coming from Sardinia!), and their use varied with the situation and the enemy force. See the Historical Note in 8.4.
Shock Infantry (SI): Spears, if they had a sword it was a slashing (not thrusting) one, perhaps a dagger, little armor (mostly leather cuirass), maybe shields . . . these usually professional soldiers marched in dense, tightly packed, formations but, because of their weapons, fought loosely, in groups more than in line (think bad Hollywood mov-ies). With chariots dominating, they were usually treated as a last hope defensive wall or, if the chariots had done their job, a mop-up, kill the survivor’s crew. It is highly unusual to see them attacking when there were chariots around, and we have little indication how sophisticated their tactical uses were. They were probably very staunch in a defense mode against shock but were highly suscep-tible to missile fire.
2.8 ROUT POINT TRACK SHEETThe purpose of the Rout Point Track Sheet is to keep players from hav-ing to total Rout Points at the end of each turn when checking for army withdrawal. At the beginning of the game each player places markers on the 100s, 10s and 1s tracks on their side of the sheet corresponding to that side’s Withdrawal Level. Then, each time a unit or leader is eliminated or routs off the map move the markers down the number of spaces equal to its Rout Point value (printed on the Track Sheet). When one side’s markers are all in the 0 spaces that army withdraws. If special rules for a scenario adjust a side’s Withdrawal Level during play simply move the markers up or down accordingly.
Design Note—The Composite Bow (C): The ability to make bows from more than one material, and the advantages that gave in tensile strength and power, came fairly early, probably from the tribes to the east and north. The range of composite bows, compared to the one-piece, “self” bows (B), is debatable in absolute terms, but about three times the distance, relatively. The same for penetration power. Given the almost minimal use of armor in the era, composite bows enabled men to kill efficiently (and safely) from a distance, especially when coupled with the speed and mobility of chariots … a major advantage in any form of warfare.
Design Note—Horses: There is no cavalry in this game, or in this era. Horses of the Bronze Age, and the Middle East, were small, pony-like in size, and not bred for bulk or strength … yet. The art of riding a horse had yet to be mastered, and the science of using them as teams (for the chariots) was still not “modern”, especially in terms of bits, bridles and yokes. The arrival of battle cavalry, early in the first millennium BC, or thereabouts, was one of the factors that doomed effective use of chariots.

5Chariots of Fire—Rules of Play
©2010 GMT Games LLC
(3.0) THE SEQUENCE OF PLAYPlayers activate each of their leaders/commands when their Activation Marker (AM) is selected (5.1). When a leader is activated, he gives Orders that allow units in his Wing/Division to move and engage in combat. After all AMs have been used, play proceeds to the Replace, Reload, and Remove Phase, after which each player checks for Army Withdrawal.
The following is the Sequence of Play for each Turn.
A. INITIATIVE DETERMINATION PHASEBoth players roll a die to see which player has the Initiative per 5.1. The player with the Initiative chooses which of his commands will start the turn, holding out the Wing AM which will be used for the first Activation. All other AM are placed in The Pool, as per 5.22. If neither player wins the Initiative, all AM go into the Pool.
B. ACTIVATION PHASE One Player draws an AM from the Pool. No draw is made if an AM is selected in Phase A, that AM is used instead. The player owning the AM either activates the Wing listed on the AM or, if playing the Sumer or Troy scenario, instead undertakes a Heroic Challenge (see 10.2). If the AM was drawn from the Pool, the opposing player has the option to Trump per 5.3. If there are no more AM in the Pool, proceed to Phase D.
C. ORDERS PHASEThe owning player conducts the following steps using the units in the activated command:
1. Movement and Missile Fire Segment a. All units may Move and/or Fire as per 5.44 or 5.45. Eligible units
may Recover hits (9.14) rather than Move and/or Fire; ORb. Active leader may attempt to Disengage (9.22) active units that are
Engaged. Non-Engaged active units cannot take any action; ORc. Routed units may Rally per 9.5. All non-Routed units may Move
and/or Fire, as per 5.45;
Only one of the above three Orders may be performed in a single Orders Phase.
2. Shock Combat Segment All eligible units engage in Shock combat, using the following se-quence [8.1]:
a. Shock Designation: determine who must Shock and who May Shock (8.11)
b. The Pre-Shock TQ Checksc. Resolution of Possible Leader Casualties, including mandatory
Heroic Combat (10.2)d. Resolve the Shock. e. Check for possible Collapse
D. REPLACE, RELOAD, and REMOVE PHASE1. Replace “killed” Leaders , as per 4.252. Reload: Eligible missile units may get more missiles, as per 7.153. Remove: “Moved” and "Rallied" markers.
E. WITHDRAWAL PHASEEach player totals his Rout Points (11.0) to see if his army has left the field … and the other player has won. If neither player’s army withdraws, the game turn is concluded and another game turn begins. There is no set number of game-turns. The battle continues until one side’s army withdraws.
(4.0) LEADERS(4.1) LEADER COUNTERSDesign Note: The Leadership and Command system for CoF is much simpler than in any other of the GBoH volumes.
There are three types of leaders in CoF: Overall Commanders, Wing/Division Commanders, and Heroes. The two types of Commanders appear in all the CoF scenarios. Heroes are present in the Troy scenario only. Most leader counters have two sides. The reverse side is used as either a Replacement leader or to indicate that the leader is on Foot and can engage in Heroic Combat (Troy and Sumer scenarios only).
(4.11) Each Overall Commander (OC) possesses the following ratings:
Command Range: Denotes his overall presence on the battlefield as well as the presence of his aides and the effectiveness of his abilities: the base range in hexes over which that leader may exert his Initiative. See 5.42
Initiative: Denotes his basic ability to “seize the day” and possibly go one up on his opponent. Initiative is also used to determine who gets to specifically choose which command will start the turn; see 5.1.
Charisma: Denotes his ability to Rally his troops and, also, aid them in Shock Combat.
Individual Combat (Sumer and Troy scenarios only): See 10.1
(4.12) Each Wing/Division Commander (WC) possesses the fol-lowing ratings:
Command Range: Denotes ability of the leader to control his troops: the base range in hexes over which that leader may give Orders to his units. See 5.42
Capability: Denotes his basic ability to undertake more than one Orders Phase in a Game Turn as well as getting his troops to Dis-engage. See 5.25 and 9.23.
Individual Combat (Troy scenario only): See 10.1
(4.13) The Movement Allowance (MA) of a leader is not printed on this counter. Rather, the number of Movement Points a leader may expend in a single Orders Phase nine (9) for all leaders. In the Troy and Sumer scenarios, leaders on foot have a MA of five (5).
(4.14) Leaders have no facing and do not pay any cost to change facing. Leaders are treated as CH/BW units for determining any terrain costs or restrictions. In the Sumer and Troy scenarios the preceding applies while the leaders are mounted, if on foot treat the leaders as infantry instead.
Play Note: Leaders have no Finished side as in other games in the GBoH series.
(4.2) LEADERS AND COMBAT (4.21) Leaders usually have no direct effect on combat, other than to allow their units to undertake it and under some circumstances provide beneficial DRMs. In the Sumer and Troy scenarios, leaders can partici-pate in Heroic Combat (10.2).
(4.22) If a WC is stacked with a combat unit involved in Shock Combat:
• add one (+1) to the Shock Resolution DR if that unit is involved in an attack
• subtract one (–1) from the opponent’s Shock Resolution DR if defending
(4.23) If an OC is stacked with a unit involved in Shock Combat, 4.22 applies, but, instead, the player uses the OC’s Charisma Rating as the DRM (instead of a plain +/–1).

Chariots of Fire—Rules of Play6
©2010 GMT Games LLC
(4.24) If a combat unit moves adjacent to an enemy leader alone in the hex, simply place that leader with the nearest friendly unit; if there are no friendly units on the map, the leader is eliminated. Leaders stacked with combat units incur casualties as per 8.15.
(4.25) Leaders that have been eliminated may be replaced under the following circumstances
• if the OC is killed, that player may not Trump, his army has no OC and thus has an Initiative Rating of ‘0’ for purposes of Initiative Determination. The OC is not replaced.
• if a WC is killed, simply remove him from the map. On the reverse side of each WC is his Replacement. In the Replace, Reload, and Remove Phase (Phase D), the player flips the removed WC to his replacement side and places him with any unit in that leader’s Wing/Division. If none of the leader’s units are in play, the leader is not replaced. If a Replacement leader is killed, simply return the Replacement leader per this procedure.
While that leader is “gone” (temporarily if a WC, permanently if an OC), the Wing/Division may not be used for Momentum and its units are automatically Out of Command (for the effects see 5.45).
Play Note: The absence of a leader does not prevent the Wing/Division from activating but the units are limited in what they may do.
(5.0) ACTIVATION AND ORDERSDesign Note: The Activation system for CoF is different from previous GBoH volumes. This represents several factors, ranging from the fact that most battles were small affairs to the problem of not really hav-ing any period sources that discuss battle tactics and unit usage. We therefore wanted to keep this aspect of play as simple as possible, yet retaining a modicum of player decisions along with the chaos combat carries with it.
(5.1) INITIATIVEEach turn, one player has the Initiative which gives him the opportunity to go first and to specifically select which command he wishes to so use. Each OC has an Initiative Rating. To determine which player has the Initiative for the turn, each player rolls one die, to which he adds his OC’s Initiative Rating. The player with the higher modified DR has the Initiative. If the players tie, neither player gets the Initiative; who starts the turn is then determined randomly (5.23). Note that in some battles one of the players starts the game with the Initiative.
Play and Design Note: This is where the abilities of the OC come into play. Not that we have much information on any of these folk. Some of the OC do garner historical comment. E.g., Thutmose III is consid-ered the greatest military commander (if not the greatest pharaoh) in Egyptian history. Ramses II had more self-serving imagery than Paris Hilton, but, for example, the tongue-twisting Suppulliliuma, King of the Hittites, is also considered quite adept.
(5.2) ACTIVATION MARKERS (AM)(5.21) Each Player gets one AM for each Wing/Division in his army, as defined in each scenario setup. He also gets one Momentum AM.
Example: At Megiddo, the Egyptian player has five AMs available: Pharaoh’s Division, the 1st, 2nd, and 3rd Divisions, and the Egypt Mo-mentum AM. The Syrian player has four AMs available: 1st (Megiddo), 5th (Ugarit), and Infantry Wings, and the Syrian Momentum AM. Note that Durusha does not have an AM. He moves when the Syrian Mo-mentum AM is drawn.
(5.22) At the start of each turn, the player with the Initiative gets to select with which of his AMs he wants to use to start the turn. This AM
is set aside, but all of the others are placed in a cup, or other opaque gizmo (The Pool), for blind draw during the turn.
(5.23) In the Activation Phase, a player—it matters little which—draws, blindly and randomly, one AM from the Pool.
(5.24) When a Wing/Division AM is drawn, that command is now ac-tive and undergoes an Orders Phase. In the Sumer and Troy scenarios, the player owning the AM may instead conduct a Heroic Challenge instead of giving that command an Orders Phase.
Example: At Megiddo, when the Syrian Ugarit Wing AM is drawn, the King of Ugarit and the five units in the 5th (Ugarit) Wing are now active and undergo an Orders Phase. At Troy, when the Aeneus AM is drawn, the Trojan player can either use Aeneus to activate combat units or conduct a Heroic Challenge with any of his eligible Heroes.
(5.25) When a Momentum AM is drawn, that player may designate one of his Wings/Divisions that he will try to use, possibly for the second time, possibly before its actual AM appears. The player may choose any Wing/Division; however, its commander must be either the OC, or if a WC, within the Command Range of the OC. The player then rolls one die:
• if the DR is the same as or lower than that Wing/Division Com-mander’s Capability Rating (Initiative Rating if the commander is the OC), that Wing is now active and undergoes an Orders Phase
• if the DR is higher, nothing happens. Draw another AM.
If none of the Wings/Divisions meet the above criteria, the Momentum opportunity is lost. Draw another AM.
Example: At Megiddo, the Syrian Overall Commander Durusha con-trols no troops of his own. If none of his Wing Commanders are within his Command Range of ‘7’, the Momentum opportunity is lost, though the King of Kadesh can still move (5.46).
(5.26) When all AM have been drawn from the Pool, the Orders Phases are over. Proceed to the Replace, Reload and Remove Phase.
(5.3) TRUMPINGDesign Note: This is a game mechanic that is intended to simulate the effect of superiority in the area of overall command. As such, it is likely to be used almost exclusively by the player with palpably better OC. The "inferior" player will often find that, for him, its best application is when it backfires on his supposedly better opponent. To that extent, players should be aware that, simply because this option is available doesn't mean it should be used indiscriminately.
(5.31) Trumping is a play mechanic wherein one player attempts to cancel the use of his opponent’s AM, and instead, substitute an Orders Phase for any one friendly Wing/Division of his choice. Each player has the ability to attempt one (1) Trump per Game Turn.
(5.32) A player may attempt to Trump his opponents AM—whether Wing/Division AM or a Momentum AM—after it is drawn from the Pool. He announces the Trump attempt and rolls one die, comparing it to his OC’s Initiative Rating:
• if the DR is the same as or lower than the OC’s Initiative Rating, the AM just drawn is set aside and is not used this game turn. The Trumping player may now select (he does not need an AM), one of his Wings to undertake an Orders Phase. The commander of the selected Wing must be the either the OC or a WC within the Com-mand Range (5.42) of the OC. This Orders Phase is in addition to any other it may have undertaken, or may undertake, that game turn.
• if the DR is higher, the Trump fails and the opposing player gets to place his Momentum marker back into the Pool if it has already been used, or place it back in after later use that game turn.
7Chariots of Fire—Rules of Play
©2010 GMT Games LLC
Play Note: Just because there is no friendly leader within the OC’s range, doesn’t prevent the Trump attempt. If successful, the Trumped player’s AM is still set aside and that player loses the opportunity to activate that Wing.
Example: At Megiddo, the Syrian player’s Megiddo Wing is drawn. The Egyptian player would rather not see that wing activate at this time, so attempts to Trump. Thutmose III, the Egyptian OC, has an Initiative Rating of ‘6’ and a Command Range of ‘9’. The Egyptian player rolls a ‘5’, so the Trump attempt is successful. The Megiddo Wing does not activate and the AM is set aside. The Egyptian player may now select either Pharaoh’s Division (under the command of Thutmose himself) or any other Egyptian Division whose leader is within ‘9’ hexes of Thutmose. The selected Division then undertakes an Orders Phase. Alternatively, the Egyptian player could choose not to select a Division, simply satisfied with preventing the Megiddo Wing from activating.
(5.33) A Player whose OC is stacked with a unit that is Engaged (9.2) may not attempt to Trump.
(5.34) An AM selected by Initiative (5.22) cannot be Trumped.
(5.4) ORDERS(5.41) Once activated, all units in that Wing/Division may undertake certain actions, depending on whether they start that Orders Phase within their leader’s Command Range or not. Those units that are within that range at the start of the Orders Phase are In Command, those that are not are Out of Command. Flip Out of Command units to their reverse side to indicate that status.
Play Note: Unlike other games in the series, there are no Line Com-mands, Individual Orders, etc.
(5.42) A leader’s Command Range is measured using an unobstructed path of hexes (not Movement Points) equal to or less than his Command Range, traced between leader and combat unit. Count the unit's hex, but not the leader's. A path is obstructed by hexes occupied by enemy combat units or terrain a leader could not cross or enter. All other paths are considered unobstructed. Leaders that are stacked with Engaged units have their Command Ranges halved, rounding down.
(5.43) If the player chooses to Rally (9.5), he may Rally any/all eligible units whether activated or not. All activated non-Routed units are au-tomatically Out of Command. If the player chooses to use the leader to make a Disengage attempt, non-Engaged units can do nothing even if In Command. See 9.22.
(5.44) Units that are In Command may do one of the following:
• Move and/or Missile Fire; or • Recover and remove two (2) Hits (9.14); or • Attempt to Disengage (if Engaged) (9.22).
(5.45) Units that are Out of Command may Move and/or Missile Fire. However, at no time may such a unit move adjacent to an enemy unit. Out of Command Chariots cannot use Fire & Run tactics (7.2) or con-duct Pass-Through (6.7) attacks. Out of Command units cannot Recover Hits nor attempt to Disengage.
Important Play Note: Shock is not listed in either 5.44 or 5.45 above because it is not a direct function of Orders, but a result of movement and location, as per 8.11. A unit’s Command status has no direct bear-ing on its ability or requirement to Shock.
(5.46) Leaders may move under the following conditions:
• OC, except those who also command a Wing/Division, may move when that side’s Momentum AM is drawn after the Momentum attempt is made regardless of the outcome of the attempt.
• WCs and those OCs who command a Wing/Division may move in the Orders Phase when their Wing/Division is active.
(5.47) Orders are not used to directly precipitate shock combat, which occurs in a subsequent segment (8.11). Reaction Fire (7.4) does not require orders; it occurs in response to enemy actions.
(5.48) After Shock combat has been completed, that Orders Phase is finished. Play now proceeds with another Activation Phase (C) if there are AMs remaining in the Pool; if not, then to the Replace, Reload, and Remove Phase (D).
(6.0) MOVEMENT(6.1) MOVEMENT ALLOWANCES AND RESTRICTIONSDesign Note: Movement Allowances simulate not only the time it takes a unit to move from point 'a' to point 'b', but also its maneuverability relative to other, different-type units as well as the tactical doctrines applied to using those units.
(6.11) A combat unit's printed Movement Allowance (MA) is the basic allowance for a single Orders Phase. An activated combat unit may move up to its printed MA, whether it is In Command or Out of Command; see 5.44/5. Units may move less than the printed MA.
(6.12) A unit may move only once per Orders Phase
(6.13) After the first time a Shock Infantry (SI) or Heavy Infantry (HI) unit moves in a Game Turn, place a "Moved" marker on top of it. "Moved" SI or HI units may use their full MA. However, each time a SI/HI unit tagged with a “Moved” marker is moved, it incurs one (1) Hit. This Movement hit penalty does not apply to advances after combat.
Design Note: This applies only to SI/HI units because they are the only units who function in formation.
(6.14) As a unit moves, it traces a path of contiguous hexes through the hex grid, paying the movement and applicable cohesion cost of each hex entered. Generally, one unit's movement must be completed before another can begin. CH-2+RI stacks are an exception. See 6.52 and 8.42.
(6.15) A unit may be moved in any direction or combination of direc-tions. However, a unit may only enter a hex that is to its front (6.61). In order for a unit to change direction it must first change facing as per 6.6.
(6.2) TERRAINGEOGRAPHICAL NOTE: Source maps for these battles are few; the ones we do have (for Megiddo and Kadesh) are based on fairly modern interpretations. Most of the maps for the game’s battles are based on guestimates and modern location maps. Most of the battles were fought on flat, unimpeded surfaces—one of the reasons why chariots were so effective—so difficult terrain was minimal.
There is always a cost in Movement Points to enter/cross each type of terrain. In addition, there may be a possible Cohesion cost in terms of Hits to do so, depending on the unit and/or terrain type.
(6.21) A unit expends Movement Points for each hex it enters and for some hex sides crossed. Some units also pay extra Movement Points to move into a hex of higher elevation.
(6.22) The following units incur one (1) Hit for entering/crossing certain types of terrain:
• CH-2 and CH-3 units for entering Rough hexes• SI or HI units when crossing a Minor River hexside or entering
Rough/Woods/Marsh hexes unless In Column.

Chariots of Fire—Rules of Play8
©2010 GMT Games LLC
All Hits due to movement are applied the instant they occur. Leaders and all other combat units do not incur terrain related Hits.
(6.23) A hex containing two types of terrain uses the "majority" terrain. Thus hex 2635 on the Kadesh map, while it does contain some Woods, is a Clear hex in game terms. Similarly, hex 3738 is a Woods hex even though it has some Clear.
(6.24) Certain hexes and hexsides are impassable; no unit may enter such a hex (e. g. the walls of any city on the maps).
(6.25) A moving unit must have enough MPs to pay the terrain cost of entering a hex; if it doesn't, it cannot enter that hex. Combat units also pay movement point costs to change facing; see 6.62.
(6.26) Elevation and rivers may also affect shock combat results by adjusting the column under which the players roll to determine losses, as per the Shock Combat Results Table.
(6.3) COLUMN MOVEMENTDesign Note: Shock and Heavy Infantry units used a column formation for marching from one location to another, usually when not in the midst of battle (this is an issue at Kadesh, for example).
(6.31) On being given a move order, any SI or HI unit that is not Engaged or Routed may change to (or from) Column at the conclusion of its Movement. It costs one (1) MP to change formation, either in or out of Column, so the unit must have at least one MP remaining to do so. In order for a unit to use Column Movement, it must start the Orders Phase in Column. Use the In Column markers to indicate this status.
Play Note: In CoF, only SI/HI units are allowed to use Column move-ment.
(6.32) Units In Column increase their MA by one (from '4' to '5'). As noted on the Movement Cost Chart, units In Column do not incur Cohesion Hits for entering certain hexes or crossing certain hexsides.
Example: Units In Column ignore the one Hit Cohesion cost when entering Rough, Woods, and Marsh hexes, and crossing a Minor River.
(6.33) Units in Column must face the hex side (not the vertex) and only the hex directly in front of them is frontal. The change in facing is ef-fected when the change to (or from) Column status is announced. When changing formation from column to normal, the unit is always faced to the vertex on either side of the hex side. There is no cost to do so.
(6.34) Units in Column move into either their frontal hex or the flank hexes adjacent to the frontal hex. There is no cost in MPs to change facing to move into a frontal-flank hex; there is to move into any other hex. Units in Column may not move through other units.
(6.35) Units in Column have their TQ ratings temporarily reduced by two (–2). Units in column may not use Missile Fire nor conduct Shock combat; the only thing they do is move. If Shock attacked by an enemy unit, the attacking unit is automatically Attack Superior, regardless of Position or Weapon system.
(6.36) If a unit in Column is Shock attacked, at the conclusion of that Orders Phase the unit automatically goes back to its normal combat formation at the cost of one (1) additional Hit, even if that hit were to cause it to Rout!
(6.37) Units in Column cannot use Orderly Withdrawal (see 6.4).
(6.4) ORDERLY WITHDRAWALOrderly Withdrawal (OW) is a form of retreat—reaction movement, as it were—carried out during the enemy’s Movement and Missile Fire Segment in which faster and more maneuverable units can avoid getting crushed.
Design and Play Note: OW is an extremely valuable maneuver for the missile oriented light chariots allowing them to easily avoid Shock combat with the slow moving infantry and slower moving heavy type chariots.
(6.41) During an enemy Movement and Missile Fire Segment, any friendly unit that is not Engaged (9.2) and that has a higher Movement Allowance than the approaching enemy unit(s), may try to avoid contact with the approaching enemy unit the instant the latter moves within two hexes of the former. This case also applies if the moving unit starts its move at a range of two hexes.
Play Note: Yes, it says within two hexes, so any (eligible) friendly unit can withdraw if an enemy moves within two hexes, even if that unit doesn't actually move in his direction. Thus the friendly player must make his decision to withdraw before the moving enemy makes his full intentions clear!
(6.42) To undertake OW, the player rolls one die for each unit, com-paring it to the unit’s printed TQ. If that unit is stacked with its WC, subtract that leader’s Capability Rating from the DR. If stacked with the OC, subtract the Charisma Rating:
• if the adjusted DR is the same as or lower than the unit’s TQ, the unit may use OW at any time during that enemy Orders Phase (only). When using OW, the defending unit withdraws up to a number of Movement Points (not hexes) equal to the difference between the units’ movement allowances away from the advancing unit. Withdrawal must occur the instant the enemy unit moves into the aforementioned two hex range (stop moving the friendly unit temporarily) or the option is lost. “Away” means that the withdraw-ing unit must move into a hex that is no closer to the moving unit than the hex it leaves. For leaders, see 4.24 and 6.57.
• if the adjusted DR is higher, the unit may not use OW during that enemy Orders Phase. If the adjusted DR is a ‘9’, the unit also in-curs one (1) Hit—it is possible for a unit to Rout from this result.
CH-2 and CH-3 units do not need a die roll to use OW; they may use it automatically. RI units, even if stacked with a CH-2 unit, do need to pass a die roll to withdraw.
(6.43) The withdrawing unit maintains its original facing throughout withdrawal at no cost in Cohesion Hits or Movement Points.
Play Note: Orderly Withdrawal is a "retreat" in the face of an approach-ing enemy, long before that enemy can close. In play/game terms, you simply move the counter backwards.
Example #1: At Kadesh, a Hittite CH-3 (MA of ‘7’) moves within two hexes of the front of an Egyptian CH-2 (MA of ‘9’). The Egyptian CH-2 may withdraw two clear hexes (9–7 = 2 MP). There is no die roll; the OW is automatic for CH type units. After the Egyptian CH-2 withdraws, the Hittite player can continue to move his CH-3 perhaps triggering another OW by the same Egyptian unit.
Example #2: At Senzar, an Egyptian SI unit (MA of ‘4’) starts its move within two hexes of a Mitanni CH-2 (MA of ‘9’) and RI (MA of ‘6’) stacked in the same hex. OW is automatic for the CH-2 unit but the RI (TQ of ‘4’; MA of ‘6’) unit must pass a die roll to withdraw. The Mi-tanni player rolls a ‘7’ so the RI cannot withdraw. The Mitanni player decides to save his chariot and withdraws (9–4 = 5 MP), leaving the RI unit to fight alone.

9Chariots of Fire—Rules of Play
©2010 GMT Games LLC
(6.44) If the Withdrawing unit was being approached from a rear or flank hex (i.e., the hex into which the enemy, moving unit intended to move), it incurs one (1) Hit before withdrawing.
(6.45) A unit may withdraw an unlimited number of times during that enemy Orders Phase as long as it has passed the OW die roll (6.42).
(6.46) A unit may not withdraw into a hex adjacent to an enemy unit or any hex into which movement would be prohibited. Stacking restrictions (6.5) apply during withdrawal. Missile type “C” armed CH units may use Withdrawal Reaction fire (7.42) as part of an Orderly Withdrawal.
Example: Continuing with Example #2 above, the Mitanni CH-2 can fire at the approaching Egyptian SI unit (range of 2 hexes) prior to making its withdrawal, perhaps providing some help to the RI left behind …
(6.47) Orderly Withdrawal takes place during the opposing player's Movement and Missile Fire Segment—a unit may not withdraw in the Shock Combat segment. The moving unit may continue to complete its movement in the face of such withdrawal.
(6.5) STACKINGStacking refers to having more than one unit in a hex at any one time, whether during movement or at the completion of movement, or during retreats or advances.
(6.51) The Basic Stacking Rule: A hex may generally contain, without penalty, one combat unit (6.52 and 6.54 being important exceptions). Leaders and informational markers do not count for stacking purposes. A hex may contain any number of leaders/markers.
(6.52) The Chariot Tactics Stacking Exception: One RI may stack and move with one CH-2 unit as if they were “one” unit. See 8.4.
Design/Play Note: The stacking rules are very simple—with the excep-tion of 6.52, combat unit may not end a move (of any type) stacked with any combat unit.
(6.53) Infantry and Battle Wagon units may never move into or through a hex containing an enemy combat unit. A CH-2+RI stack is treated as a non-infantry unit for the purposes of this rule. See 6.54 below and section 6.7.
(6.54) Chariot Pass-Through Exception: An active, moving CH unit or CH-2+RI stack may pass through (enter and leave, but not stop in) a hex containing an enemy CH unit or a CH-2+RI stack. They may not enter a hex containing any other type of enemy combat unit. See 6.7 for further details.
(6.55) Units may move or withdraw through friendly combat units with the following adverse effects:
• the unit expending Movement Points pays 1 MP, in addition to the terrain. There is no additional movement penalty for non-active units moving in terms of hexes (usually advances or retreats).
• if any SI or HI units are involved, any/all SI/HI units incur one (1) Hit
• a Routed unit moved through by a friendly unit is eliminated unless the routed unit is on a Road hex and the moving unit is moving along the road through the routed unit.
(6.56) Combat units may enter a hex containing only a leader at no movement or cohesion cost. However, leaders pay one additional Movement Point (+1 MP) to enter a hex occupied by a combat unit.
(6.57) A combat unit stacked with a leader may Orderly Withdraw (6.4) together. If they withdraw together, they must stay together (remember that the leader may instead withdraw using 4.24).
(6.6) FACINGDesign Note: The effects of Facing in CoF are somewhat different than those in the previous GBoH volumes because warfare in this era was not linear, as we are used to seeing it.
(6.61) All combat units must be faced in a hex so that the top of the unit (the side with its nation name) faces into the vertex of the hex (between two hex sides, as below).The two hexes to the front are called the Front Hexes; those to the side, the Flanks, and those behind, the Rear. A unit may move only into a hex to its Front.
Play Note: Unlike other games in the GBoH series, there are no Zones of Control (ZOC) in CoF
(6.62) In order for a combat unit to change its facing it must pivot within its hex:
• Infantry units pay a cost of 1 MP for each vertex shifted, but they may reface any number of vertices without leaving the hex
• CH units pay 1 MP to reface, but they may reface only two vertices without leaving the hex. They must leave the hex to change their facing any more
• BW units pay 1 MP to reface, but they may reface only one vertex without leaving the hex. They must leave the hex to change their facing any more
• Leaders do not expend movement points to change facing as they have no facing
(6.63) A unit may not change facing after moving into an enemy unit’s front hex. Exception: Combat units, other than BW, advancing after combat (8.22) may change facing one vertex after advancing into an enemy unit’s frontal hex.
(6.64) A unit that begins the Movement and Missile Fire Segment in the front hex of a single enemy unit may use up to one half (1/2) its MA (rounded up) in facing changes. A unit that changes facing in this manner cannot:
• use Missile Fire • conduct Shock Combat
A unit that is in the front hex of more than one enemy unit may not change facing.
Play Note: See the rules on Engaged units; 9.2.
(6.65) SI and HI units that change facing within a Rough/Marsh/Woods hex incur one (1) Hit for each vertex for which they do so. This does not apply if the units are In Column.
Front Front
RearRear
FlankFlank

Chariots of Fire—Rules of Play10
©2010 GMT Games LLC
(6.66) Reaction Facing Change: Any combat unit other than a BW, may change facing one vertex per Orders Phase when an enemy unit moves adjacent to it (and this includes Advances after Combat). It may not do so if it is already adjacent to another enemy unit. If the reacting unit is infantry, the player rolls one die after changing facing. If the DR is higher than the unit's TQ Rating, apply the difference (DR–TQ) as Hits to the reacting unit. There is no die roll for CH units. A unit capable of Missile Fire may conduct Reaction Fire if eligible to do so regardless of the outcome of the Reaction Facing die roll.
(6.7) CHARIOT PASS-THROUGHHistorical Note: Because friendly chariots operated at some distance from each other, even when in what would pass as a line formation, it appears (emphasis on "appears") that one of the tactics was to have one's chariots ride up to the enemy's and pass by them, using the spaces between the enemy chariots, firing all the while, and then, after having passed through, turn around and repeat the process. Does create some interesting speculation as to what enemy reaction was to this.
(6.71) An active CH unit or CH-2+RI stack may pass through (enter and leave, but not stop in) a hex containing a non-Engaged enemy CH unit or CH-2+RI stack. There is no additional cost in MP to do so, other than the cost to enter the terrain in that hex. The moving unit cannot change facing in the enemy occupied hex. The unit(s) can continue to move up to the limits of their MA.
(6.72) An active CH unit or CH-2+RI stack may always Pass-Through a non-Engaged enemy CH unit. However, an enemy CH-2+RI stack may block Pass-Through. To do that, the non-active player rolls one die and compares it to the printed TQ rating of his CH-2 unit:
• if the DR is lower than the TQ, Pass-Through is blocked and the moving unit stops where it is, adjacent to the non-active unit. Its movement is finished for that Orders Phase.
• if the DR is the same as or higher than the TQ, Pass-Through is allowed
Example: At Nihriya, an Assyrian player has a CH-2 in hex 2036 and a CH-2/RI stack in hex 2038. Both are facing toward the 10xx hex row. There is a Hittite CH-2 in hex 1736 facing toward hexes 1836/1837. The Hittite player’s Light Chariot Wing is activated and he decides to attack the As-syrian units. He moves his CH-2 to 1836 for 1 MP , then 1935 for 1 MP , maintaining the same facing. Note that the Hittite CH-2 cannot change facing in 1935 because it is a enemy front hex (6.63). He then moves into 2036—1 MP, there is no additional MP cost —which is occupied by the Assyrian CH-2. The Assyrian player may use Reaction Fire (7.44) and then the Hittite player may conduct his one active Fire (7.31). The Hittite unit cannot remain in the hex, nor can it be refaced, so it must move to either hex 2135 or 2136. The Hittite player chooses hex 2136, for1 MP . The Hittite player decides to turn his unit around so expends 2 MP in hex 2136 (the maximum allowed—see 6.62) to face toward hexes 2037/2137 . If using the Chariot Turnover optional rule (6.8), the moving player would make a DR for each vertex shifted and apply any hits immediately.
Up to this point, the Hittite CH-2 has used 6 of its 9 MP. The Hittite player continues by moving into 2137—1 MP — and attempts to enter 2038 which is occupied by the Assyrian CH-2+RI stack. The Assyrian player decides to attempt to block the pass through attempt. That player rolls a die (result is a ‘7’) and compares the roll to the TQ of his CH-2 unit (TQ is ‘5’). The attempt fails, so the Hittite player can enter the hex (1 MP) and continue its move. If the attempt had succeeded, the Hittite CH-2 move would have ended in hex 2137. Regardless of the outcome of the block at-tempt, the Assyrian can use Reaction Fire (7.44) against the unit passing through its hex. The Hittite player must expend his last MP to enter either hex 1938 or 2039. He chooses the former and uses the CH-2’s last MP to enter hex 1939.
(6.73) A CH unit or CH-2+RI stack may not use Pass-Through if it has insufficient MP to leave the enemy hex.
(6.74) A CH unit or CH-2+RI stack may attempt Pass-Through into more than one enemy CH or CH-2+RI occupied hex, even if such hexes are adjacent to each other. In the case of adjacent occupied hexes, if, as per 6.72, Pass-Through into any hex beyond the first hex entered is blocked, the moving CH and/or CH-2+RI unit is instead Routed (9.4).
Play Note: Blocking Pass-Through is a tactical decision for the players that will depend on how well he thinks his men can do to disrupt the moving enemy with Fire. See 7.3. Much depends on how he deploys his chariot corps, especially if he has fewer chariots than the enemy.
(6.8) CHARIOT TURNOVER (OPTIONAL) Historical Note: One of the drawbacks of chariots was that, for a variety of reasons, they tended to flip over (and thereby become useless), usu-ally when changing direction. This didn’t happen that often, but it was a function of speed, construction and training. The Hittite-style three-man chariots appear to have been more susceptible to this because of the weight they were carrying and the placement of the wheels. Since the rule requires a bit more die rolling and adds to the complexity, we have made it optional.
(6.81) Prior to moving a CH/BW type unit, the active player must state how many Movement Points he will be using for that unit for that phase (in essence, its “Rate of Speed).
(6.82) While moving the CH/BW unit, the player must check each time the unit changes facing or enters/crosses certain terrain features as noted on the Movement Cost Chart to see if the unit loses any chariots to turnover. To do so, the player cross-references that Rate of Speed on the Chariot Turnover Table with the unit Type and/or Class. If the DR is within the indicated range listed on the table, the Chariot or Battlewagon unit incurs one (1) Hit.

11Chariots of Fire—Rules of Play
©2010 GMT Games LLC
Play Note: Chariots using Fire & Run Tactics (7.2) use that column on the table regardless of Speed.
Example: A 3-man Hittite CH-3 with a Speed Rate of ‘7’ (the planned Movement Points to be used that turn) changes facing by using its 4th MP. The player rolls on the CTT, getting a ‘7’. That means he has suffered some chariot flipping over and immediately incurs one cohesion hit.
(6.83) CH/BW units that change facing without leaving their starting hex are not subject to turnover
(6.9) MOVEMENT CHARTS AND TABLES(6.91) Movement Costs Chart: The chart gives the movement costs to enter/cross the terrain features on the map and other actions such as changing facing. Potential cohesion hits and other special effects are provided in the notes.
(6.92) Chariot Turnover Table: The table is used to determine possible Cohesion Hits from excessive movement when using optional rule 6.8.
(7.0) MISSILE COMBAT(7.1) MISSILE FIREHistorical Note: The ubiquitous use of the Composite Bow during this period made Chariots and Missile fire the major force on the battlefield. This bow provided distance and penetration power, which, in turn, led to the effective tactics adapted by chariots. While there were two types of composite bow—the “triangular” and the “curved”—they both had about the same effect. Non-composite, simple bows, often called Self-bows, were used by foot units. Composite bows were expensive to produce and took far more time to do so than self bows, and that’s why the elite charioteers got to use them. Some chariots were armed with javelins and similar “throwing” spears.
(7.11) There are two types of missile units in CoF: Chariots (CH) and Light Infantry (LI). Chariots use Composite Bows (C) or Javelins (J); Light Infantry use Composite Bows (C), Self-Bows (B), Slings (S), or Javelins (J). When activated, missile units can move, fire, or fire during movement. Missile units may fire during—or instead of—their move-ment. The units of the same Wing/Division do not have to conduct the same action (some may move, others may fire without moving, while still others may both move and fire). A LI unit may fire during movement only if it moved "forward" (towards the target) immediately preceding
actually firing. CH units may fire any time during movement (see the example, below). Firing during movement does not cost any movement points; however, see 7.17.
Example: A “C” missile armed CH-2 unit may move 3 hexes forward, fire at an enemy two hexes away, and then use its remaining points to change facing and ride away.
(7.12) Missile Fire may occur as part of an activated unit’s Orders (and see 7.3) or as Reaction Fire (see 7.4). Missile units must each fire individually; they may not combine fire. Engaged units may neither Fire nor be the target of Missile Fire (see 9.2). An activated unit may fire only once per Orders Phase.
(7.13) A Missile unit may fire at any single target unit which is within its Missile Range and to which it can trace a Line of Sight (LOS):
• for LI units, missile range extends from its frontal and/or flank hexes
• for CH units, Missile Range extends from any of its hexes. CH units may fire front, flank, and rear.
If the target is a CH-2+RI stack, the firing player must pick one of the two units as the target of the fire.
Design Note: While the actual chariot may be facing in a single direc-tion, the bowman on board is free to move around, more or less.
(7.14) A LOS is calculated by tracing a path of hexes between the center of the hex the missile unit is in and the same for the target unit, through the firing unit's frontal, flank, or in the case of CH units rear, hex sides.
Woods hexes block LOS. Combat units block LOS except that LOS is never blocked by just one combat unit (friendly or enemy). A unit may always fire “over” one combat unit; it may not fire over more than one.
LOS is blocked if any part of a hex of higher elevation is between the two units. If the firing unit and target unit are on different levels, the basic premises are:
• if firing unit is higher than target, LOS is blocked when blocking terrain is closer to target
• if firing unit is lower than target, LOS is blocked when blocking terrain is closer to firer
Exactly “halfway” is treated as blocking.
Example: At the Astarpa River, the Hittites have a SI (A) and LI (B) in hexes 2035 and 2036, an SI (C) and LI (D) in 2134 and 2135, and an SI (E) in 2235. All units are facing toward the 19xx hex row. The Arzawans have a CH-2 (X) in hex 1835 facing toward the 17xx hex row, a CH-2 (Y) in hex 1936 facing toward 1837/1937, and a CH-2 (Z) in 2237 facing toward 2136/2236. The LI are armed with Self-bows and the CH-2 with composite bows. The Arzawan CH-2 units are all active.
CH-2 (Z) can target any of the Hittite units - all are in range and in LOS since the unit can fire through one blocking unit. Since a CH can fire in any direction, CH-2 (Y) can fire at all Hittite units except for SI (E). That unit’s LOS is blocked by LI (D) since LOS can be traced through only one combat unit. CH-2 (X) can fire at all Hittite units but SI (E). Here the CH-2 unit’s LOS is blocked and SI (E) is out of range.
For the Hittites, LI (B) can fire at CH-2 (X) and CH-2 (Y), but not at CH-2 (Z) because that unit is in its Rear arc. LI (D) can fire at over LI (B) at CH-2 (Y) or fire at CH-2 (Z) – that unit is its flank arc. LI (D) has a LOS to CH-2 (X), but that unit is out of range for a self-bow.
A B
DC
E Z
Y
X
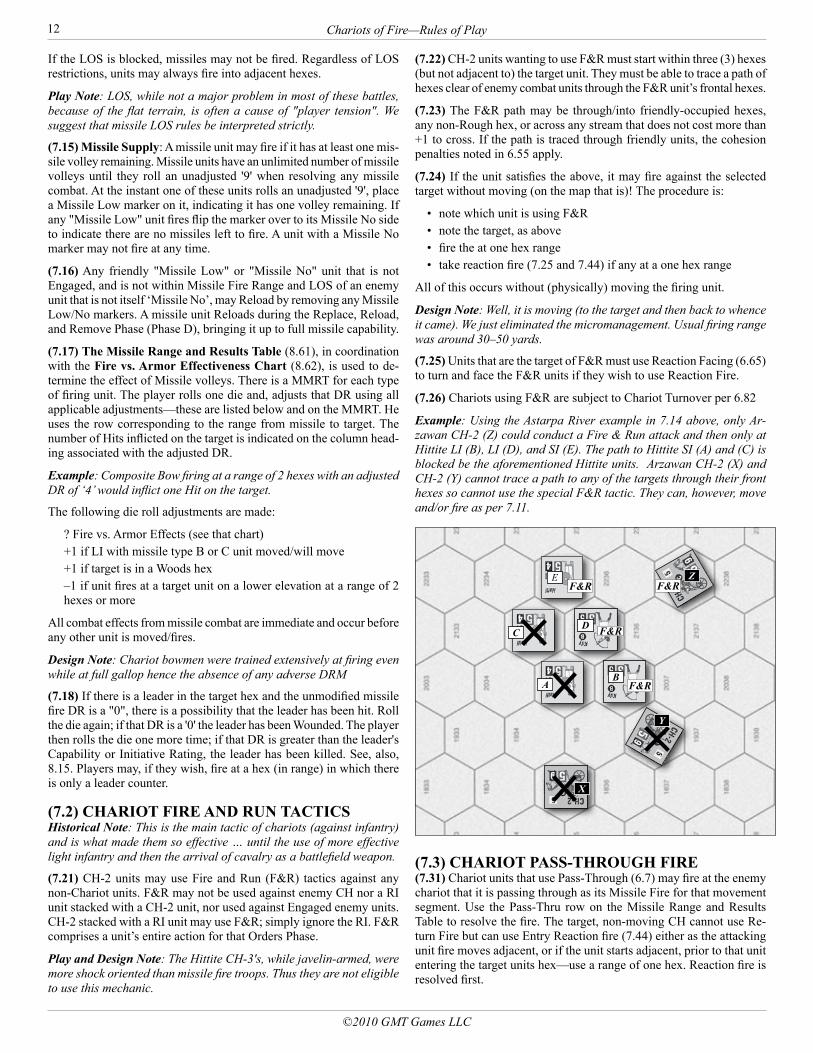
Chariots of Fire—Rules of Play12
©2010 GMT Games LLC
If the LOS is blocked, missiles may not be fired. Regardless of LOS restrictions, units may always fire into adjacent hexes.
Play Note: LOS, while not a major problem in most of these battles, because of the flat terrain, is often a cause of "player tension". We suggest that missile LOS rules be interpreted strictly.
(7.15) Missile Supply: A missile unit may fire if it has at least one mis-sile volley remaining. Missile units have an unlimited number of missile volleys until they roll an unadjusted '9' when resolving any missile combat. At the instant one of these units rolls an unadjusted '9', place a Missile Low marker on it, indicating it has one volley remaining. If any "Missile Low" unit fires flip the marker over to its Missile No side to indicate there are no missiles left to fire. A unit with a Missile No marker may not fire at any time.
(7.16) Any friendly "Missile Low" or "Missile No" unit that is not Engaged, and is not within Missile Fire Range and LOS of an enemy unit that is not itself ‘Missile No’, may Reload by removing any Missile Low/No markers. A missile unit Reloads during the Replace, Reload, and Remove Phase (Phase D), bringing it up to full missile capability.
(7.17) The Missile Range and Results Table (8.61), in coordination with the Fire vs. Armor Effectiveness Chart (8.62), is used to de-termine the effect of Missile volleys. There is a MMRT for each type of firing unit. The player rolls one die and, adjusts that DR using all applicable adjustments—these are listed below and on the MMRT. He uses the row corresponding to the range from missile to target. The number of Hits inflicted on the target is indicated on the column head-ing associated with the adjusted DR.
Example: Composite Bow firing at a range of 2 hexes with an adjusted DR of ‘4’ would inflict one Hit on the target.
The following die roll adjustments are made:
? Fire vs. Armor Effects (see that chart)+1 if LI with missile type B or C unit moved/will move+1 if target is in a Woods hex–1 if unit fires at a target unit on a lower elevation at a range of 2 hexes or more
All combat effects from missile combat are immediate and occur before any other unit is moved/fires.
Design Note: Chariot bowmen were trained extensively at firing even while at full gallop hence the absence of any adverse DRM
(7.18) If there is a leader in the target hex and the unmodified missile fire DR is a "0", there is a possibility that the leader has been hit. Roll the die again; if that DR is a '0' the leader has been Wounded. The player then rolls the die one more time; if that DR is greater than the leader's Capability or Initiative Rating, the leader has been killed. See, also, 8.15. Players may, if they wish, fire at a hex (in range) in which there is only a leader counter.
(7.2) CHARIOT FIRE AND RUN TACTICS Historical Note: This is the main tactic of chariots (against infantry) and is what made them so effective … until the use of more effective light infantry and then the arrival of cavalry as a battlefield weapon.
(7.21) CH-2 units may use Fire and Run (F&R) tactics against any non-Chariot units. F&R may not be used against enemy CH nor a RI unit stacked with a CH-2 unit, nor used against Engaged enemy units. CH-2 stacked with a RI unit may use F&R; simply ignore the RI. F&R comprises a unit’s entire action for that Orders Phase.
Play and Design Note: The Hittite CH-3's, while javelin-armed, were more shock oriented than missile fire troops. Thus they are not eligible to use this mechanic.
(7.22) CH-2 units wanting to use F&R must start within three (3) hexes (but not adjacent to) the target unit. They must be able to trace a path of hexes clear of enemy combat units through the F&R unit’s frontal hexes.
(7.23) The F&R path may be through/into friendly-occupied hexes, any non-Rough hex, or across any stream that does not cost more than +1 to cross. If the path is traced through friendly units, the cohesion penalties noted in 6.55 apply.
(7.24) If the unit satisfies the above, it may fire against the selected target without moving (on the map that is)! The procedure is:
• note which unit is using F&R• note the target, as above• fire the at one hex range• take reaction fire (7.25 and 7.44) if any at a one hex range
All of this occurs without (physically) moving the firing unit.
Design Note: Well, it is moving (to the target and then back to whence it came). We just eliminated the micromanagement. Usual firing range was around 30–50 yards.
(7.25) Units that are the target of F&R must use Reaction Facing (6.65) to turn and face the F&R units if they wish to use Reaction Fire.
(7.26) Chariots using F&R are subject to Chariot Turnover per 6.82
Example: Using the Astarpa River example in 7.14 above, only Ar-zawan CH-2 (Z) could conduct a Fire & Run attack and then only at Hittite LI (B), LI (D), and SI (E). The path to Hittite SI (A) and (C) is blocked be the aforementioned Hittite units. Arzawan CH-2 (X) and CH-2 (Y) cannot trace a path to any of the targets through their front hexes so cannot use the special F&R tactic. They can, however, move and/or fire as per 7.11.
(7.3) CHARIOT PASS-THROUGH FIRE(7.31) Chariot units that use Pass-Through (6.7) may fire at the enemy chariot that it is passing through as its Missile Fire for that movement segment. Use the Pass-Thru row on the Missile Range and Results Table to resolve the fire. The target, non-moving CH cannot use Re-turn Fire but can use Entry Reaction fire (7.44) either as the attacking unit fire moves adjacent, or if the unit starts adjacent, prior to that unit entering the target units hex—use a range of one hex. Reaction fire is resolved first.
F&R F&R
F&R
F&R
AB
DC
E Z
Y
X

13Chariots of Fire—Rules of Play
©2010 GMT Games LLC
(7.32) Chariots using Pass-Through Fire at enemy chariots stacked with RI (8.4) may fire at either the chariot or the RI.
(7.33) Other opposing player units cannot use Reaction Fire against the unit(s) conducting Pass-Through while those unit(s) are in the hex occupied by the target of the Pass-Through.
(7.4) REACTION FIREInactive Missile units may fire in reaction to certain enemy movements into (Entry Reaction) and out of (Retire Reaction) the hexes adjacent to, and within the arc of fire (7.13), the inactive unit as well against active units that fire against them (Return Fire). Reaction Fire does not require an Order.
(7.41) Retire Reaction: Whenever an un-routed unit leaves a hex adjacent to, and within fire arc, of an enemy missile unit, that missile unit, if it has a range of two or more hexes, may fire a free volley at the moving unit. Any results are applied before the unit moves.
(7.42) Withdrawal Reaction: “C” missile armed CH units using Orderly Withdrawal (6.4) may fire at the unit that is affecting the OW. The range is always treated as two (2) hexes and the fire is conducted prior to the movement. All moving modifiers apply. A withdrawing CH unit is limited to one missile fire per triggering unit per Orders Phase.
(7.43) All Retire/Withdrawal Reaction Fire at units moving away from the unit effecting the defensive movement is at a Range of two (2) hexes.
(7.44) Entry Reaction: Whenever a friendly unit moves adjacent to (and within the fire arc, 7.13) of an enemy missile unit, and this includes entry as a result of Advance after Combat, that enemy missile unit may fire at the moving unit before any further movement or friendly fire occurs. All effects from this missile combat occur immediately.
(7.45) Return Fire: A non-phasing unit may Missile Fire “back” at an enemy unit that has fired at it (7.31 is an exception). The phasing unit’s fire is resolved before the return fire; they are not simultaneous. The non-phasing may not use both Entry Reaction fire and Return Fire against the same unit.
(7.4) MISSILE FIRE CHARTS AND TABLES(7.41) Missile Range and Results Table: This table is used to resolve each individual missile fire.
(7.42) Fire vs. Armor Effectiveness Chart: This chart provides die roll adjustments to the Missile Range and Results Table based on the effectiveness of the armor worn/carried by the target compared to that of the missile being fired.
(8.0) SHOCK COMBATHistorical Note: None of the Egyptian sources and few of any others, visual or written, indicates that any organized shock combat by large numbers of infantry (or chariots) ever took place during the Late Bronze Age, when chariots ruled the field. The aggressive use of ordered infan-try is nowhere to be found in these sources. This does not mean that it never took place, but it sure does give one food for thought.
“Prior to the Catastrophe there is no evidence for a clash of close-order infantry formations…” —Robert Drews, in “The End of the Bronze Age”
(8.1) SHOCK COMBAT PROCEDUREPlay Note: The Shock system relies on the interaction of the units' weapons, armor protection (what little there is … the only units that wore any armor to speak of were the charioteers), angle of attack and overall training and quality (TQ) to produce a single result. While no factor is unimportant, the rating to play closest attention to is the TQ,
for that rating determines the ability of a unit to withstand the rigors of toe-to-toe warfare.
At the completion of the Movement and Missile Fire segment of an Orders Phase, shock combat occurs. Shock is part of the leader’s Orders Phase, and all shock engendered by that leader is resolved before the next AM is drawn.
Important Note: Each shock combat is conducted as a series of steps performed in order for all units participating in shock combat—before the next step of shock combat is conducted. See 8.13 for the sequence of steps. We suggest undertaking each separate step from left to right, across the map. Players may use any system they wish to note what has happened up-and-down the lines of attack.
Design Note: It would be easier to resolve each separate combat as one "piece". However, to do so creates a "blitzkrieg" type of effect, wherein the attacker gets to choose which attacks he wants to do first so that he can achieve "breakthroughs". Despite its simplicity, this would be so far from reality as to render the system—and the game—inaccurate. However, isolated shocks can certainly be resolved as a piece, if doing so would not affect other attacks. The method you choose should keep this intent in mind.
(8.11) Shock Designation Segment: The active player designates which unit with Shock capability may/must Shock attack as follows:
• Shock capable units that end their movement adjacent to an enemy unit during the current Orders Phase MUST SHOCK
• Activated Shock capable Engaged units (9.2) MUST SHOCK• Non-Engaged Shock capable units that remained adjacent to an
enemy unit throughout the movement segment may Shock, but must pass a Pre-Shock Resolution TQ check carry out the attack.
Place a SHOCK-NO CHECK marker on units that are required to Shock per bullets #1 and #2 above. Place a SHOCK-MUST CHECK TQ on units where the player chose to attack per bullet #3.
Light Infantry (LI) are not Shock capable and cannot and are never required to Shock attack. All other units are Shock capable, though in some cases a few units do not have Shock capability when attacking certain other unit types. These instances are listed below and are noted on the Shock Superiority and Clash of Arms charts:
• CH-2 units are not Shock capable against any CH-2, CH-3 or CH-2+RI units
• BW units are Shock capable against LI units only
(8.12) The Basic Pre-Shock Procedure: Units that attack by Shock must attack all units in their frontal/adjacent hexes, unless that defend-ing unit is being attacked by another, friendly unit in that same Shock Combat segment. The attacker determines which units will be involved in each, individual combat resolution, with the following restrictions:
• a single friendly unit (or stack) may attack defending units in more than one hex, as long as the targeted defenders are in the attacking unit's front/adjacent hexes
• two or more friendly units (or stacks) in different hexes may com-bine to attack defending units in a single hex only
• each unit may Shock attack only once per Shock Combat segment• a defending unit may be shocked attacked only once per Shock
Combat segment• a CH-2+RI stack must attack the same unit(s); the units cannot
make separate attacks
Other than the above restrictions, the attacking player may divide his attacks amongst his units as he sees fit.

Chariots of Fire—Rules of Play14
©2010 GMT Games LLC
Example: The Egyptian player has two foot units, LI (W) and SI (X) in hexes 1935 and 1936 respectively, and two chariot units, CH-2(Y) and CH-2 (Z), in hexes 1937 and 1938 respectively. All four units are facing the 20xx hex row. The Hittite player has a CH-2 (D) in hex 2036. Two Hittite units, CH-3 (A) and CH-3 (B), have moved into hexes 2039 and 2038 respectively. A third Hittite unit, CH-2 (C) has moved into hex 2037. All four Hittite units are facing the 19xx hex row. All Hittite units are active. None of the units on either side have any hits.
Since all three Hittite units moved, all must Shock attack. Hittite CH-3 (A) must attack Egyptian Ch-2 (Z) since Z is the only unit in its front hexes. Hittite CH-2 (C) cannot attack the Egyptian CH-2 (Y) – CH-2 are not Shock capable against other CH-2 – so must Shock the Egyptian SI (X). This leaves Egyptian CH-2 (Y) as the only target for Hittite CH-3 (B). All three attacks are marked with a “Shock – No TQ Check” marker.
The Hittite player has the option to Shock the Egyptian LI (W) with his CH-2 (D) but is not required to do so. If he chooses to do so, the attack would be marked with a “Shock – Must Check TQ” marker.
If in the above example, the Hittite CH-3 units were instead CH-2 units, there were would be no Shock for those units even though the units moved adjacent since CH-2 are not Shock capable against other CH-2 units.
(8.13) An Overview of the Shock Resolution Procedure
Sections 8.14 through 8.18 are descriptions of the sequence and proce-dure used to resolve Shock Combat. Each step must be completed for all units before proceeding to the next step. These steps are:
1. Check to see if units that “Shock-Must Check TQ" will actually attack (8.14)
2. Check all defending units, except those that are Engaged, to see how they will react to the “threat” of such an attack (8.14 plus 8.55)
3. Check for any Leader casualties (8.15) or undertake Heroic Combat (10.2) if applicable
4. Resolve the Shock a. Use Clash of Arms chart to determine which column on the
Shock CRT will be used (8.16)b. Determine Weapon, Position, and Numerical Superiority (8.17
#1)c. Determine whether terrain and/or leaders will have any effect
(8.17 #2)d. Resolve the Shock using the Shock Combat Results Table
(8.17 #3)
5. Check for Collapse (8.18)
(8.14) Pre-Shock Resolution TQ Checks
1. First, all attacking units with a "SHOCK Must Check TQ" marker (8.11) undergo a TQ check. The attacking player rolls a die for each unit: • if the DR is the same as or lower than the printed TQ, that unit
will Shock Attack• if the DR is higher than the TQ, the unit will not Shock attack
… and incurs one (1) Hit
Exception: If all defending units are Routed, the attacking units need not make a TQ check. The intended targets still do. Note that Routed units have a TQ of 1 (see 9.42).
2. Then, all units other than those that are Engaged, that are now the target of Shock attacks (remember, a Must Check unit that fails its TQ check is no longer attacking) must undergo a TQ check. The defending player rolls a die for each affected unit:• if the DR is the same as or lower than the printed TQ, that unit
is unaffected • if the DR is higher than a unit's TQ, the unit incurs a number of
Hits equal to the difference between the DR result and its TQ.
If the defender has taken sufficient Hits to be equal to or greater than its TQ Rating, it immediately Routs (9.4) and the attacking unit advances into the vacated hex (where it may change its facing one vertex, if desired) provided it is not in the frontal hex of an-other enemy unit. A Routed unit that fails this check is eliminated.
After the TQ checks, if the attacker is still eligible to attack and the defender did not rout, go to the next step.
Example: Continuing the example from 8.12, the Hittite player has chosen to attack the Egyptian LI (W) with CH-2(D), he now must make a TQ check. He rolls a ‘6’, which is higher than the CH-2 TQ of 5. The CH-2 cannot attack and incurs one hit. The other three Hittite units are not required to make this check. However, the two Egyptian CH-2 units and the Egyptian SI must all make a TQ check. The Egyptian player rolls less than a ‘6’ for each and thus both pass the check. For the SI(X), however, he rolls a ‘9’ so the SI incurs two hits since the DR of ‘9’ exceeds its TQ of 7 by two.
(8.15) Possible Leader Casualties: Casualties to leaders are deter-mined prior to resolving the actual shock. If either or both players have a leader stacked with a unit involved in the Shock combat, the player rolls the die for each such leader. If the DR is a ‘0’, the leader has been Wounded. The player then rolls a second time; if that DR is greater than the leader's Capability or Initiative Rating, the leader has been Killed instead. Killed leaders are immediately removed from play (4.25). Wounded leaders remain in play but all the leader’s ratings are reduced by one—to a minimum of '0'. A leader who is already wounded and is wounded again is, instead, Killed.
Example: Barattarna, the Mitanni Overall Commander, is stacked with a unit involved in Shock. The Mitanni player must check to see if Barat-tarna becomes a casualty. The gods have seemingly forsaken him as he rolls ‘0’. Barattarna is Wounded (if Barattarna were already Wounded he would have been Killed instead). The player makes his second roll, this time the result is a ‘3’. This roll is less than Barattarna’s Initiative Rating of ‘5’ so he is not Killed, but remains in play Wounded with all his ratings reduced by one.
Play Note: If Heroes from either side are involved in the Shock Combat, Hero Combat (10.2) is conducted instead of the die roll in 8.15.
W ZYX
B ACD
15Chariots of Fire—Rules of Play
©2010 GMT Games LLC
(8.16) The Clash of Arms: The Clash of Arms chart is now consulted. Cross-index the attacker’s Type with the defender’s Type to determine the column on the Shock Combat Results Table to be used (prior to any adjustments) to resolve the combat. If there is more than one Type of defending unit, defender chooses which Type will be used for determi-nation. If there is more than one Type of defending unit, the defender chooses which to use.
Play Note: Unlike other GBoH games, the angle of attack is not a factor when using the Clash of Arms chart.
Example: Continuing the example from 8.12 and 8.14, the Hittite player would use the “9” column on Shock Combat Results Table for the two CH-3 vs. CH-2 combats. The CH-2 vs. SI combat would use the “2” column.
(8.17) The Hand-to-Hand Struggle: Players now determine the effect of any advantages either side has and then resolve the shock combat:
1. Determine Superiority: There are two "types" of Superiority:• Rear Attack Position Superiority—what results when one side's
angle/position of attack is from the rear• Weapon System Superiority—the weapons system and armor/
protection of one side is so superior to the other that it will result in a marked increase in "losses" to the inferior side (8.17 B)
Either one side or the other may (but not must) gain Rear Attack Posi-tion or Weapon Superiority, either as: Attack Superiority (AS; the most common) or Defense Superiority (DS).
Superiority is determined as follows:
A.If a friendly unit is attacking an enemy through its Rear facing, it is considered Attack Superior to the defender. However, whichever unit the attacker uses to determine Rear Attack Superiority must also be used to determine Shock Column on the Clash of Arms Chart. An attacking unit does not gain Attack Superiority for a Rear attack if it’s in the front hex of any other enemy unit, and that enemy unit is not being attacked by a different friendly unit.
Important Design Note: GBoH veterans will note a change here: there is no major adjustment for Position Superiority for Flank at-tacks. That is because warfare in this era was not truly linear. What the game terms Shock Infantry usually fought in packs/groups, with little formation involved.
B. If the attack does not qualify for Attack Superiority per 8.17 1.A above, the players use the Shock Superiority Chart by cross-indexing the attacker’s Type with the defender’s Type to deter-mine if either weapon system is superior (either Attack Superior or Defense Superior) to the other. If more than one unit Type is involved on any one side the players use the units they chose to determine Shock column on the Clash of Arms Chart.
Play Note: It’s important to note that Rear Attack Position Superiority takes precedence over Weapons Systems Superiority. The attacking unit with Rear Attack Position Superiority is Attack Superior regard-less of what the Shock Superiority Chart says.
Example: Continuing with the example in 8.16, none of the three Shock combats are from the Rear so there is no Rear Position supe-riority. Using the Shock Superiority chart, the Hittite player sees that the CH-3 vs.CH-2 attacks produce no Weapons Systems Superiority. That is not the case for the CH-2 vs. SI attack. Here the SI unit is Defender Superior to the unfortunate charioteers. If, however, the Hittite CH-2 were attacking the Egyptian SI from the Rear case 1.A would apply and hence the CH-2 would instead be Attack Superior!
2. Adjust Columns and Resolve: To resolve the shock, the attacking player uses the “base” column on the Shock Combat Results Table (Shock CRT) determined in 8.16, and adjusts that column for any
Numerical Advantage, Flank Attack Position Advantage and/or Ter-rain effects as follows:• Flank Attack Position Advantage: If at least part of the attack
is against a defender’s flank, the attacker gets a two (2) Column Shift to the right.
• Numerical Advantage: If one side has more combat units (counters) in the combat than the other, that player gets a two (2) Column Shift for each unit it has more than the other side. Such shift would be to the right for the Attacker’s benefit, to the left for the Defender’s benefit.
• Terrain—see Terrain Adjustments section of the Shock Combat Results Table. If more than one defending unit is involved, use the most advantageous terrain available to defender. All adjustments are cumulative.
The attacking player then rolls the die, modifying the die roll per the Leadership Modifiers noted on the Shock Combat Results Table.
2. Apply Results: Results on the Shock CRT are Cohesion Hits for both attacker and defender. The # in parentheses is for the defender. If the attacker was superior (AS) then double the defender's result. If the defender was superior (DS), then triple the attacker's result. If more than one unit (of the same player) was involved in that combat, Hits are distributed as per 9.12.
Play Note: If a unit has incurred hits equal to or more than its TQ, it does not Rout at this time—it will Rout during the Collapse step after all the designated Shocks have been resolved.
Example: Continuing with the example in 8.17 #1B, the Hittite player resolves each of his Shock attacks one at a time. For Hittite CH-3(A) vs. Egyptian CH-2 (Z), he rolls a ‘6’ and using the ‘9’ column the result is one hit on the Hittite CH-3 and two hits on the Egyptian CH-2. Note that none of the column shifts in 8.17 #2 are applicable and no leaders are involved so there is no modifier to the die roll. There is no superiority, so no adjustment to the number of hits. For the Hittite CH-3(B) vs. Egyptian CH-2(Y) attack, the Hittite player fairs better, rolling a ‘9’. On the ‘9’ column; CH-3 (B) receives one hit and the CH-2(Y) takes three hits. Again, no column shifts, DRMs, or hits adjustments are applicable. The final attack is another story. For the CH-2(C) vs. SI(X) attack, the Hittite player rolls a ‘3”. He must use the ‘2’column, so the base result is three hits for the CH-2, and one hit on the SI. No columns shifts or DRMs are applicable. The SI is Defender Superior, however, so the attacking CH-2 hits are tripled—the CH-2 incurs nine hits instead!
(8.18) Collapse. The players now determine which units have collapsed (routed) as a result of combat. First, units that have Hits equal to or greater than their TQ automatically Rout (9.4). However, if all attack-ing and defending units involved in the Shock combat Rout, see 9.13. Next, for those units that were Engaged at the start of Shock combat and are now within one (1) Hit of automatic rout, the players must roll one die for each such unit. If the DR result is higher than the unit’s TQ, the unit Routs (9.4). If the DR is the same or lower, the unit has its Cohesion hits reduced by one (1). Finally, attacking units must advance into any vacated hex (see 8.2). The players place Engaged markers on those units that have not routed or advanced (see 9.21).
Example: Continuing with the example in 8.17 #3, the Hittite CH-2(C) Routs per 9.4. The Hittite player rolls to see how bad the Rout is. He rolls a ‘5’ so the unit passes and is placed near the Hittite Standard. None of the other units have enough hits to check for Rout and so are all now Engaged. None of the Hittite units are eligible to Advance (8.21) nor can the Egyptian SI since that unit was the defender in the Shock.

Chariots of Fire—Rules of Play16
©2010 GMT Games LLC
(8.2) ADVANCE AFTER COMBAT(8.21) Attacking units must advance into any hex vacated by enemy units as a result of Shock combat (only), including Pre-Shock TQ check rout. The advancing unit pays all Cohesion costs engendered by such a move. If the advance would Rout the moving unit, it still advances and does not Rout, but instead has its Hit total set to its TQ minus 1. For example, a TQ 6 unit would have 5 Hits. Units that cause an enemy to vacate a hex because of Pre-Shock TQ check (not the actual shock) rout but are also in another enemy unit’s frontal hex at the time may not advance.
(8.22) Advancing combat units—but not BW units—may change their facing one vertex upon finishing the advance, even if they are in an enemy front hex. This is an exception to 6.63.
(8.23) If there was more than one attacking unit, the unit that had Superiority (if any) must advance. If no such unit, the one with the highest TQ must advance. In case of ties, the attacking player chooses.
(8.24) There is no advance after Missile Fire, alone, regardless of what the target unit does.
(8.3) CHARIOTS AND SHOCKHistorical Digression: There is some disagreement about how chariots actually functioned in the battles of this era. Most sources state they were used as mobile firing platforms; some say they could be, and were, used to Shock attack enemy units. As evidence of such they point to several archaeological pieces showing chariots being manned (in addition to the driver) by a soldier with a long, thrusting spear. The arguments against fall into one or more of the following:
• Horses do not like to “charge” other horse and especially not humans holding spears
• In what way could one possibly use a spear while standing in a chariot in any way approaching efficient? For one, the impact of thrusting a spear into someone while moving would knock the spearman backwards … and off the chariot
• Missile-armed chariots could do far more damage, and with far fewer casualties (horses and chariots were very expensive) than those supposedly armed for shock
We side with the missile folks. We simply cannot see how—or even why—anyone would use chariots as a shock system, except in rare event. However, see 8.4.
(8.31) CH units, by themselves, have a minimum ability to successfully shock most units. A CH unit’s (especially the CH-2 class) chances of taking heavy losses, in terms of Hits, reflects this relationship. This is reflected in the Clash of Arms Chart.
Historical Note: What the chariots are doing when shock attacking the units they are allowed to is to ride over them and trample them, maybe even throwing a spear or two, which they could do against unformed infantry not armed with spears. It was as much a function of Fear vs. discipline as it was weaponry.
(8.32) CH-3 units use a different column on the Class of Arms Chart than CH-2 units. And CH-2 stacked with RI also have their own column.
Historical and Play Note: The Hittites often used 3-team chariots: one driver, one shield-bearer and one spearman. This allowed them to shock to some extent and gave them a small defensive advantage compared to the lighter, 2-team Egyptian chariots, but it did make them somewhat less mobile.
(8.33) CH units may not Shock as part of Pass-Through movement.
(8.4) RUNNER INFANTRY AND CHARIOTSHistorical Note: It is not quite certain when armies started to use Run-ner Infantry or who first used them, although what evidence there is, points to Egypt. As chariots became the main arm of the Bronze Age armies, it soon became apparent that they needed some form of protec-tion, other than the men in the chariot (one of whom was driving). It is our viewpoint, reflected in the game, that the Egyptians started to use accompanying runners by the beginning of the 15th century BC, and their total superiority at Megiddo may have reflected their usage.
With the obvious benefits that this provided, it probably wasn’t long before the other chariot corps adapted and either adopted or invented. The Hittites appear to be the ones that invented, inserting a third man into their now heavier chariots rather than use an outside runners. (For one, it made life for the third man a little less aerobic.) While this 3-man chariot may have been thus more difficult to attack, the prob-lem was that the Hittite chariots were slower, less maneuverable and, because the wheels were placed in the center of the carriage, subject to flipping over at a greater rate than the lighter, rear-wheel Egyptian/Mitanni style chariots.
(8.41) As noted in 6.72, one CH-2 unit may stack with one RI unit. CH-3 cannot stack with RI. While stacked, both units must participate in any Shock attack as single unit. Both must defend as single unit if the hex is attacked. The CH-2+RI stack has its own entry on the Clash of Arms and Shock Superiority charts. Moreover, a CH-2+RI stack is considered one unit for the purposes of determining Numerical Supe-riority. The CH and RI units, however, make separate Pre-Shock TQ checks (8.14) with the results applied to each unit separately. If the RI fails the check, the CH-2 may no longer be eligible to Shock depending on the target of the attack.
(8.42) During movement, the stacked CH-2+RI units may move to-gether, or they may separate at any time during movement with each unit continuing to move up to its individual MA. It costs no MP to separate, nor does it cost any MP to stack.
(8.43) A RI unit may remain stacked with a CH-2 unit during the latter’s attempts at Fire & Run.
(8.44) The various combat charts and tables show how RI units can be used, with or without CH-2 units.
Play Note: Use of RI—where and how—is one of the major decisions players will have to make
(8.45) The CH-2 and RI units are treated as separate units for purposes of allocating hits from Shock Combat (see 9.12).
(8.5) AGGRESSION REACTIONHistorical Note: Aggression Reaction is the ability of certain units to react to enemy fire and/or shock aggressively, turning the tables and attacking the units originally attacking them. Granted, nothing like this is ever “mentioned” in period sources, such as they are, but it seems, to us, from how such units have acted through the ages, as well as the “advantages” that appear to attach to such units, that this sort of tactic was probable.
(8.51) Aggression Reaction (AR) is a form of reaction used by a non-active (not-moving) unit as an attempt to turn such an enemy attack into a Shock attack by the unit capable of AR. It requires no use of MP.
(8.52) AR may be used only by BI and RI that are not stacked with CH-2. Neither may be in Routed status. The only possible targets of AR are CH-2, CH-3 or CH-2+RI units:
• the use of AR by RI units is voluntary• the use of AR by BI units is a mandatory reaction to Missile Fire,
but is voluntary against Shock

17Chariots of Fire—Rules of Play
©2010 GMT Games LLC
(8.53) Fire AR: RI and/or BI may use AR against enemy CH-2 or CH-3 missile fire, including CH-2 using Fire & Run. To see if the inactive unit is successful in its AR vs. Missile Fire attempt, the targeted player rolls one die, adjusting it for distance and then comparing it to the target’s printed TQ. For each hex over a range of one hex, subtract one (–1) from the DR.
If the adjusted DR is:
• the same as or higher than the unit’s printed TQ (yes, higher), that unit must use AR
• lower than the unit’s printed TQ, nothing happens
For a F&R attack, use a range of one.
(8.54) If AR is successful versus a firing unit, the reacting unit is imme-diately moved (if necessary) toward the firing unit so that it is adjacent and facing the firing unit. There is no cost in MP. Furthermore, the reacting unit does not need to make Pre-Shock TQ check to conduct the attack. This individual Shock Attack is then immediately resolved, as per 8.1, before any other movement or fire by any other unit is undertaken.
Play Note: Reaction Fire is only allowable by inactive units so there is no such fire against the unit making the AR attack.
Example: A Mitanni CH-2 (TQ=7) fires at an Egyptian RI (TQ=5) from a distance of two hexes. The Egyptian player decides to react (if the unit were a BI this would not be an option). The Egyptian player rolls a ‘8’. The result is modified ‘7’ (–1 for firing at a range of two hexes). The modified is greater than the RI’s TQ of 5, so the RI must react. The RI immediately moves one hex and is now adjacent to the CH-2. There is no OW nor can the Mitanni player perform reaction fire of any kind. The RI does not make a Pre-Shock check, but the CH-2 must. The Shock is then resolved using 8.14 through 8.18. Note also that case 8.12 ap-plies, so if there were another Mitanni unit in the RI’s other front hex that unit would have to be attacked along with the firing unit.
(8.55) Shock AR: BI that are about to be Shock attacked (8.13) by exclusively CH-2, CH-3 or CH-2+RI, or RI (unstacked) about to be attacked exclusively by CH-3 units, may attempt to turn the tables and, instead, become the attacker. The attempt may not be made if Types other than the above are involved in the Shock, or if none of the at-tackers in are the defender’s Front hexes. Moreover, all of the original attacking units in the AR unit’s front hexes must be attacked.
To see if the inactive unit is successful in its AR vs. Shock attempt, the player rolls one die, comparing it to the target’s printed TQ. If the DR is;
• the same as or lower than the unit’s printed TQ (yes, lower), that unit must use AR
• higher than the unit’s printed TQ, nothing happens and the Shock is resolved in the normal course of events.
(8.56) If AR is successful vs. a shock attacking unit, the reacting unit immediately, and instead, attacks the active unit, resolving such Shock attack (no Pre-Shock TQ required) as per 8.1, but before any other shock attack by any other units is undertaken.
(8.6) THE COMBAT CHARTS AND TABLES(8.61) Clash of Arms Chart: This chart is used to determine which Column will be used on the Shock Combat Results Table (subject to adjustments).
(8.62) Shock Superiority Chart: This chart is used to compare the superiority (if any) of one type of unit compared to another, depending on which side is attacking or defending. Always read down the column from the Attacker's point of view. (Reading across, by row, gives a "false" result.) Superiority is used to (possibly) augment Cohesion hits.
(8.63) Shock Combat Results Table: This table is used to resolve shock combat in terms of Cohesion hits to both attacker and defender (9.11 and 9.12).
Play Note: This time-honored table, in the GBoH system since Volume I has undergone a revision!! This reflects the reduced effect, in terms of Shock, that the weapons and tactics of the day entailed.
(8.64) Cohesion Hit and TQ Check Chart: Use this as a summary of when Cohesion Hits are applied and when TQ checks take place.
(8.65) Leader Casualty Summary Chart: This chart summarizes the Leader Casualty checks.
(9.0) THE EFFECTS OF COMBATUnits suffer cohesion effects (called hits) mostly from combat but pos-sibly from disruptive and/or excessive movement. Too many cohesion hits produce a Rout. Routing units are placed near their Standard or Flee. A routed unit can be rallied under certain circumstances.
(9.1) COHESIONCohesion is a measure of how organized and effective a unit is at any point during the battle. The loss of cohesion is measured in Cohesion Hits (or simply Hits), which are applied against a unit's Troop Quality (TQ) sometimes automatically, sometimes after a die roll. The Cohesion Hit and TQ Check Chart (8.64) summarizes when these occur.
(9.11) Each time that a unit suffers a Cohesion Hit place a Cohesion Marker—representing the cumulative total number of hits taken—on (or under) the unit. Hits do not affect a unit's combat strength or capabilities in any way, other than to show how close it is getting to falling apart. Thus, a unit with a TQ of 6 and 4 hits has the same combat effect as one with no hits. It is just more likely to rout.
(9.12) If there are multiple units involved in a single Shock combat resolution, hits must be divided as equally as possible amongst these units, with any extra hits being given to the unit that was:
1st: used to determine Rear Attack Positional Superiority;2nd: used to determine Weapons Superiority;3rd: Player's choice
This rule applies even if it means that a unit will have to Rout.
Example: A CH-2+RI stack receives three hits. The owning player must give the CH-2 and RI one hit each. The third hit can be applied to either at the owning player’s discretion.
(9.13) When a unit has absorbed Hits equal to or more than its TQ Rat-ing it Routs (9.4). If, as a result of Hits from Shock, all attacking and defending units would rout, the following occurs:
1. Attacker adds to his total hits the number of hits—if any—that he would accumulate were he to advance after combat.
2. The side that has the unit with the greatest discrepancy between Hits and TQ rating Routs. Defending units that do not rout remain in place; attacking units that do not rout advance (if eligible); the unit that does not rout has its Hits set to its TQ minus one (–1).
3. If the difference between the hits and TQ is the same for both sides, the defender routs and the attacker advances after combat (if allowed) and has Cohesion hits equal to its TQ minus one (–1).
If a side has more than one unit involved and at least one unit did not reach or exceed its TQ, then ALL of units of both sides that did so Rout. Items #1-#3 above apply only when all units would have routed.

Chariots of Fire—Rules of Play18
©2010 GMT Games LLC
(9.14) Recovery: During an Orders Phase, any un-routed unit (only) with Cohesion hits that is not adjacent to an enemy unit, nor within range and LOS of any enemy missile unit that is not Missile No, and is in Clear terrain, may remove two (2) Hits as its sole action for that Orders Phase. A unit may not remove more than two Hits per Order Phase. A unit that has Hits removed cannot move/fire in the same Orders Phase, and a unit that has moved or fired may not have hits removed. Units that have Rallied this game turn may not have Hits removed.
(9.15) The Cohesion Hit and TQ Check Chart (8.64) lists the times dur-ing the game when a unit must undergo a TQ Check. These instances have also been noted throughout the rules, above. A TQ Check consists of rolling the die and comparing it to the unit's printed TQ rating. The Cohesion Hit and TQ Check Chart gives the result, usually one or more Hits when/if the die exceeds the rating.
Important: Routed units have a TQ of 1.
(9.2) ENGAGED(9.21) At the conclusion of any Shock resolution in which any opposing units (in that combat) are still adjacent and have not moved (i. e. did not advance or retreat), place an “Engaged” marker atop those units. Those units, when their Wing/Division conducts an Orders Phase:
• cannot not Fire• cannot move or change facing, unless their Wing/Division suc-
cessfully undertakes a Disengage (see 9.22)• must Shock (if capable, see 8.11) if they do not Disengage
Engaged units cannot be the target of missile fire at any time nor can they be the target of Chariot Pass Through (6.7) until the marker is removed.
(9.22) Disengage. When a Wing/Division conducts an Orders Phase and some or all of its units are Engaged, the player may attempt to Disengage those units (so that they do not have to Shock). However, the non-Engaged units in the Wing/Division cannot take any action; they cannot do anything in that Orders Phase.
(9.23) Disengagement is a function of command ability not unit TQ (however, see 9.24). It applies to all Engaged units within their leader’s Command Range. To successfully Disengage, the player rolls one die and compares it to the Capability/Initiative Rating of the units’ leader. If that leader is stacked with or adjacent to the Overall Commander, or if the leader is the OC, add the OC’s Charisma Rating to the Capabil-ity/Initiative Rating:
• if the DR is the same as or lower than the leader’s (adjusted) Capability/Initiative Rating, all Engaged units must Disengage
• if the DR is higher than the (adjusted) Capability/Initiative Rat-ing, the units stay Engaged and must Shock attack if capable of doing so (see 8.11).
Play Note: Disengagement is not easy, for obvious reasons.
(9.24) If the Disengage die roll is successful, all affected units move (retreat) one hex away from the enemy unit with which they were En-gaged. They do not change facing but they may not move adjacent to an enemy unit (or into prohibited terrain). There is no cost in MP (or Cohesion Hits) to do so, but if they cannot Disengage when ordered they stay where they are, Engaged.
(9.25) Engaged chariots, including those stacked with RI, may Dis-engage without a die roll. They simply have to be within Command Range of their leader. In Wings/Divisions with a mixture of Chariot and non-Chariot units, the die must be rolled to enable the non-chariot units to Disengage.
(9.26) The Engaged marker is removed the instant the units become separated.
(9.3) STANDARDS(9.31) Most of the armies start play with a Standard coun-ter assigned to the armies’ Overall Commander (Pharaoh, King, etc.). In some scenarios, towns or other geographical features serve as Standards. The available Standards are noted in the individual scenario instructions. Standards are the rallying points for Routed units. See 9.5.
(9.32) Standards are placed as per the instructions in each individual scenario. They may be moved only if stacked with the Standard’s leader, in which case they move with the Movement capability of that leader. Standards may stack with other units at no cost to either.
(9.33) Standards may be captured by enemy combat units, if they enter a hex with a Standard counter and no friendly combat unit. Note that if the leader of the Standard successfully withdraws per 4.22, his Standard goes with him. When captured, the capturing player has a choice:
• he may immediately eliminate the Standard. In the next Game Turn, the Standard’s owning player may place the Standard with its leader when that leader activates or is eligible to move (these folks traveled with more than one banner).
• he may keep the Standard in play stacked with one of his combat units. The Standard moves with that combat unit. In this case, the Standard is still active in terms of appearing to be a rallying point for units for army. The standard remains Captured until the Standard’s leader is activated or eligible to move in the next Game Turn. At that time, place the Standard with the owning leader. If the Standard’s leader for has been eliminated, the standard is instead removed from play at the end of that next Game Turn.
Play Note: That means that Captured Standards can be used to create confusion. Happened fairly often.
(9.34) If a Standard moves or is Captured (see 9.33), all Routed units within three hexes of that Standard immediately Flee.
(9.4) ROUT (9.41) A unit which has routed immediately checks to see just how bad that rout is. It will either “retreat” in fairly ordered fashion to the armies’ Standard for possible Rally, or it will Flee (and be eliminated, game-wise). Roll the die for each unit the instant it Routs, comparing that DR to the printed TQ of the unit:
• if the DR is the same as or lower than the TQ, the unit is imme-diately placed as close to the armies’ Standard as possible. While there is no actual movement involved, the unit must be able to trace a path to the Standard that is free of any other combat units (enemy or friendly) and/or impassable terrain. Moreover, the “path” may not move adjacent to enemy Chariots. If it cannot trace this “path” it will, instead, Flee
• if the DR is higher than the unit’s TQ, the unit Flees. Remove it from the game; it is eliminated
If the armies’ Standard has been eliminated, Routed units automatically Flee; there is no die roll.
(9.42) Routed units that have been placed with their Standard:
• have a TQ of 1• cannot move or fire after such placement • cannot Shock attack • cannot receive or use Orders, other than Rally
(9.43) If a routed unit is attacked (missile or shock) and suffers any additional Hits, the unit immediately Flees and is eliminated and re-moved from play.

19Chariots of Fire—Rules of Play
©2010 GMT Games LLC
(9.44) If a leader is stacked with a routing unit, that leader may be placed with the unit near the Standard per 9.41. He is otherwise unaffected by the rout. If all the units in a hex Flee, any leaders stacked with them do so and are eliminated for game purposes. Leaders that have fled can be replaced per 4.25.
(9.5) RALLY(9.51) During an Orders Phase, a the player may attempt to Rally any routed unit that are within three (3) hexes of the army’s Standard and that are not adjacent to an enemy unit or within range and LOS of an enemy missile unit that has missiles. The Overall Commander (or other eligible leader) must be stacked with the Standard.
Play Note: Combat units do not have to be active to Rally.
(9.52) The Overall Commander is used during a Wing Commander’s Orders Phase to effect Rally. Even when using the OC for this, it is considered the Wing Commander’s Orders Phase. The WC need not be stacked with or anywhere near the Standard.
(9.53) When undertaking Rally, the player rolls the die for each unit, comparing that DR to the OC’s Charisma Rating (use the Capability Rating if a non-OC is eligible to Rally):
• if the DR is equal to or lower than the Rating, that unit is Rallied. Place a “Rallied” marker on top. It now has Cohesion Hits equal to one-half its printed TQ, rounding down
• if the DR is higher, the unit stays Routed
(9.54) When the player chooses to Rally, all active unrouted units may undertake other actions, but they are all considered Out of Command regardless of Command Range. All Rally attempts are made before the active units take their actions.
(9.55). Units with “Rallied” markers may not be given any Orders until the marker is removed. “Rallied” markers are automatically removed in the Replace, Reload, and Remove Phase (Phase D).
Example: In the Babylon scenario, the Kassite Light Chariot Wing AM is drawn. The Kassite player decides to use the activation to Rally his units. Kashtiliash is stacked with the Kings Standard so meets the conditions of 9.51. The Kassite player makes his rally attempts using Kashtiliash and after all attempts are made, the Light Chariot Wing units that were un-routed at the beginning of the phase move and/or fire subject to the restrictions of 5.45.These units are Out of Command (9.53) even if within command range of Kurigalzu.
(10.0) HEROESThis rule applies only to the Sumer and Troy scenarios.
(10.1) HEROIC LEADERSThere are two types of Heroic Leaders in the scenarios that allow heroic Combat: Commanders and Heroes. Some Commanders are also Heroes; no Heroes are also Commanders. That means that leaders designated as Commanders can lead troops (in addition to functioning as Heroes if they wish), but no leaders designated solely as heroes may lead troops. Commanders that can function as Heroes have an “H” on their counters.
Overall Commander (non-Heroic; on Chariot)— Agamemnon
Overall Commander (Heroic; on Chariot)—Hector
Hero Leader (on Foot)—Achilles
(10.11) All Commanders have Individual Combat Ratings, as they can be challenged to Individual Combat. However, they are not Heroes (un-less specifically noted as such) in that they cannot Challenge another leader, although they do defend against such a challenge. See 2.23 for visuals of non-Heroic Commanders.
(10.12) Commanders and Heroes are either mounted on their Chariots or are on Foot. The front of the counter is used when the Commander/Hero is in his Chariot. The reverse side is used when he is on Foot.
(10.13) The Movement Allowance (MA) of a leader is not printed on this counter. Rather, the number of Movement Points a Leader may expend in a single Orders Phase is:
• nine (9) for all leaders mounted on Chariots• five (5) for all leaders on Foot
Use applicable column on the Movement Costs Chart to determine the MP terrain costs.
(10.14) Heroes move when their side’s Momentum AM is drawn.
(10.15) Leaders may change their movement mode—Foot or Chariot—in one of two ways:
• the instant they are activated. Flip the counter to the other side. They remain in that mode until their next activation (including Momentum)
• when in Chariot mode and they are Challenged (10.23). At which point, if they accept, they are immediately change to Foot mode.
(10.16) Heroes are treated as leaders for the purposes of 4.24. A Hero stacked with a friendly combat unit may move (this includes withdrawal, retreat, and rout placement) along with the combat unit but must end the move stacked with that same unit. A Hero may voluntarily change his movement mode only when activated per 10.14.
(10.17) Heroes, including Commanders who are Heroes, do not check for casualties from Missile Fire (7.18) or Shock combat (8.15).
(10.2) HEROIC COMBAT(10.21) Heroic Combat between leaders takes place in one of the fol-lowing circumstances:
• as part of a Shock combat, when both sides each have a leader involved in that combat (stacked with one of the units in that attack/defense) and at least one of those leaders is a Hero; or
• as a result of a Heroic Challenge, in the Heroic Combat Phase;
(10.22) If opposing leaders are both stacked with units involved in a Shock combat and at least one of those leaders is a Hero, Heroic Com-
Rank
Command Range
Initiative
Charisma
NameMounted on Chariot
Rank
Command Range
Initiative
Charisma
NameMounted on Chariot
Hero Indicator
Name
Combat Rating
Stamina Rating
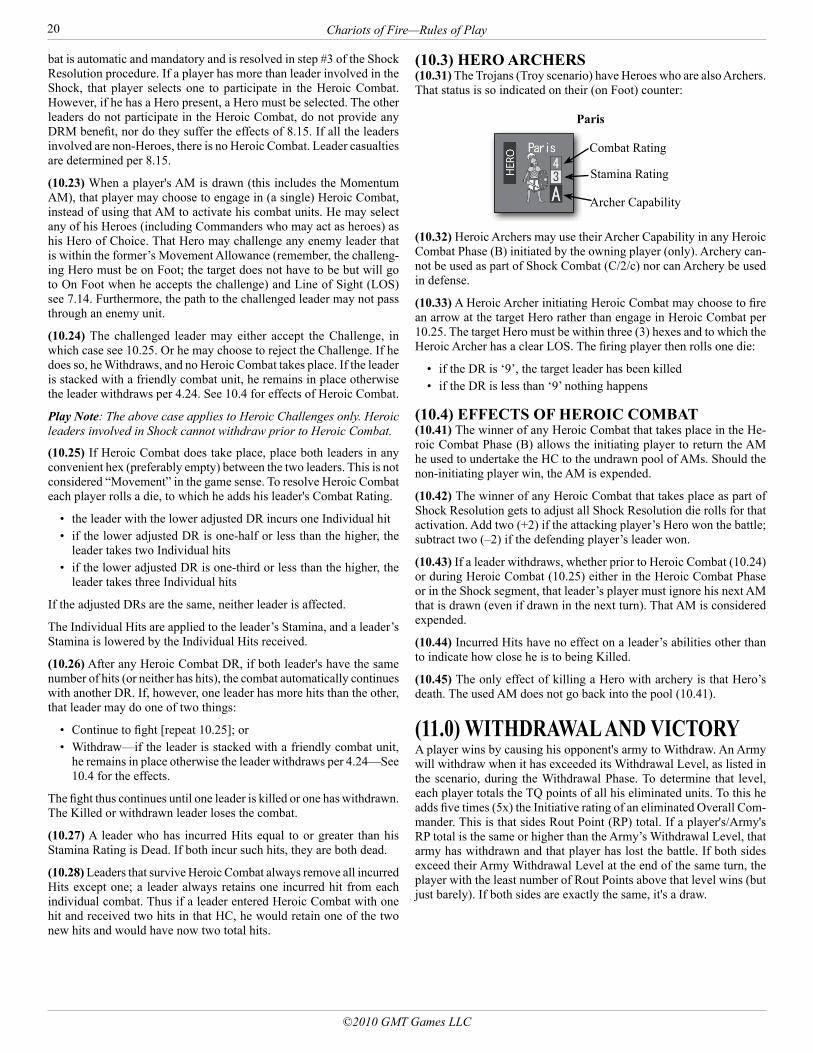
Chariots of Fire—Rules of Play20
©2010 GMT Games LLC
bat is automatic and mandatory and is resolved in step #3 of the Shock Resolution procedure. If a player has more than leader involved in the Shock, that player selects one to participate in the Heroic Combat. However, if he has a Hero present, a Hero must be selected. The other leaders do not participate in the Heroic Combat, do not provide any DRM benefit, nor do they suffer the effects of 8.15. If all the leaders involved are non-Heroes, there is no Heroic Combat. Leader casualties are determined per 8.15.
(10.23) When a player's AM is drawn (this includes the Momentum AM), that player may choose to engage in (a single) Heroic Combat, instead of using that AM to activate his combat units. He may select any of his Heroes (including Commanders who may act as heroes) as his Hero of Choice. That Hero may challenge any enemy leader that is within the former’s Movement Allowance (remember, the challeng-ing Hero must be on Foot; the target does not have to be but will go to On Foot when he accepts the challenge) and Line of Sight (LOS) see 7.14. Furthermore, the path to the challenged leader may not pass through an enemy unit.
(10.24) The challenged leader may either accept the Challenge, in which case see 10.25. Or he may choose to reject the Challenge. If he does so, he Withdraws, and no Heroic Combat takes place. If the leader is stacked with a friendly combat unit, he remains in place otherwise the leader withdraws per 4.24. See 10.4 for effects of Heroic Combat.
Play Note: The above case applies to Heroic Challenges only. Heroic leaders involved in Shock cannot withdraw prior to Heroic Combat.
(10.25) If Heroic Combat does take place, place both leaders in any convenient hex (preferably empty) between the two leaders. This is not considered “Movement” in the game sense. To resolve Heroic Combat each player rolls a die, to which he adds his leader's Combat Rating.
• the leader with the lower adjusted DR incurs one Individual hit• if the lower adjusted DR is one-half or less than the higher, the
leader takes two Individual hits• if the lower adjusted DR is one-third or less than the higher, the
leader takes three Individual hits
If the adjusted DRs are the same, neither leader is affected.
The Individual Hits are applied to the leader’s Stamina, and a leader’s Stamina is lowered by the Individual Hits received.
(10.26) After any Heroic Combat DR, if both leader's have the same number of hits (or neither has hits), the combat automatically continues with another DR. If, however, one leader has more hits than the other, that leader may do one of two things:
• Continue to fight [repeat 10.25]; or• Withdraw—if the leader is stacked with a friendly combat unit,
he remains in place otherwise the leader withdraws per 4.24—See 10.4 for the effects.
The fight thus continues until one leader is killed or one has withdrawn. The Killed or withdrawn leader loses the combat.
(10.27) A leader who has incurred Hits equal to or greater than his Stamina Rating is Dead. If both incur such hits, they are both dead.
(10.28) Leaders that survive Heroic Combat always remove all incurred Hits except one; a leader always retains one incurred hit from each individual combat. Thus if a leader entered Heroic Combat with one hit and received two hits in that HC, he would retain one of the two new hits and would have now two total hits.
(10.3) HERO ARCHERS(10.31) The Trojans (Troy scenario) have Heroes who are also Archers. That status is so indicated on their (on Foot) counter:
Paris
(10.32) Heroic Archers may use their Archer Capability in any Heroic Combat Phase (B) initiated by the owning player (only). Archery can-not be used as part of Shock Combat (C/2/c) nor can Archery be used in defense.
(10.33) A Heroic Archer initiating Heroic Combat may choose to fire an arrow at the target Hero rather than engage in Heroic Combat per 10.25. The target Hero must be within three (3) hexes and to which the Heroic Archer has a clear LOS. The firing player then rolls one die:
• if the DR is ‘9’, the target leader has been killed• if the DR is less than ‘9’ nothing happens
(10.4) EFFECTS OF HEROIC COMBAT(10.41) The winner of any Heroic Combat that takes place in the He-roic Combat Phase (B) allows the initiating player to return the AM he used to undertake the HC to the undrawn pool of AMs. Should the non-initiating player win, the AM is expended.
(10.42) The winner of any Heroic Combat that takes place as part of Shock Resolution gets to adjust all Shock Resolution die rolls for that activation. Add two (+2) if the attacking player’s Hero won the battle; subtract two (–2) if the defending player’s leader won.
(10.43) If a leader withdraws, whether prior to Heroic Combat (10.24) or during Heroic Combat (10.25) either in the Heroic Combat Phase or in the Shock segment, that leader’s player must ignore his next AM that is drawn (even if drawn in the next turn). That AM is considered expended.
(10.44) Incurred Hits have no effect on a leader’s abilities other than to indicate how close he is to being Killed.
(10.45) The only effect of killing a Hero with archery is that Hero’s death. The used AM does not go back into the pool (10.41).
(11.0) WITHDRAWAL AND VICTORY A player wins by causing his opponent's army to Withdraw. An Army will withdraw when it has exceeded its Withdrawal Level, as listed in the scenario, during the Withdrawal Phase. To determine that level, each player totals the TQ points of all his eliminated units. To this he adds five times (5x) the Initiative rating of an eliminated Overall Com-mander. This is that sides Rout Point (RP) total. If a player's/Army's RP total is the same or higher than the Army’s Withdrawal Level, that army has withdrawn and that player has lost the battle. If both sides exceed their Army Withdrawal Level at the end of the same turn, the player with the least number of Rout Points above that level wins (but just barely). If both sides are exactly the same, it's a draw.
Archer Capability
Combat Rating
Stamina Rating
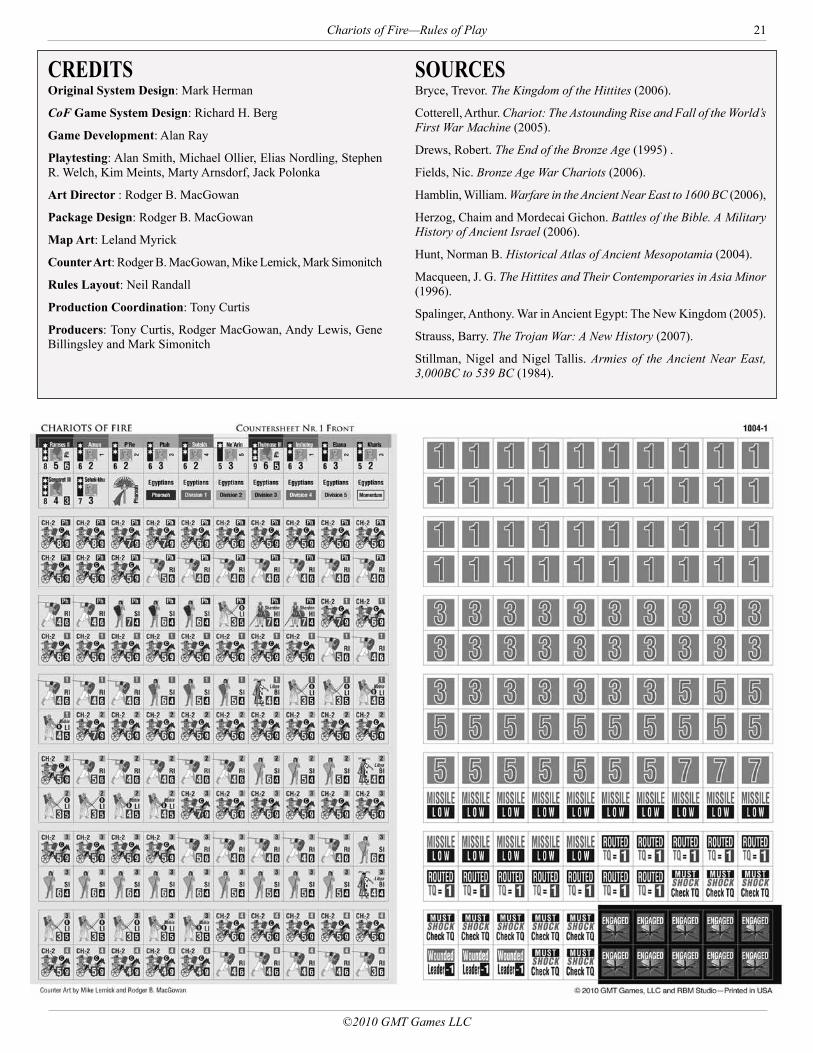
21Chariots of Fire—Rules of Play
©2010 GMT Games LLC
CREDITSOriginal System Design: Mark Herman
CoF Game System Design: Richard H. Berg
Game Development: Alan Ray
Playtesting: Alan Smith, Michael Ollier, Elias Nordling, Stephen R. Welch, Kim Meints, Marty Arnsdorf, Jack Polonka
Art Director : Rodger B. MacGowan
Package Design: Rodger B. MacGowan
Map Art: Leland Myrick
Counter Art: Rodger B. MacGowan, Mike Lemick, Mark Simonitch
Rules Layout: Neil Randall
Production Coordination: Tony Curtis
Producers: Tony Curtis, Rodger MacGowan, Andy Lewis, Gene Billingsley and Mark Simonitch
SOURCESBryce, Trevor. The Kingdom of the Hittites (2006).
Cotterell, Arthur. Chariot: The Astounding Rise and Fall of the World’s First War Machine (2005).
Drews, Robert. The End of the Bronze Age (1995) .
Fields, Nic. Bronze Age War Chariots (2006).
Hamblin, William. Warfare in the Ancient Near East to 1600 BC (2006),
Herzog, Chaim and Mordecai Gichon. Battles of the Bible. A Military History of Ancient Israel (2006).
Hunt, Norman B. Historical Atlas of Ancient Mesopotamia (2004).
Macqueen, J. G. The Hittites and Their Contemporaries in Asia Minor (1996).
Spalinger, Anthony. War in Ancient Egypt: The New Kingdom (2005).
Strauss, Barry. The Trojan War: A New History (2007).
Stillman, Nigel and Nigel Tallis. Armies of the Ancient Near East, 3,000BC to 539 BC (1984).
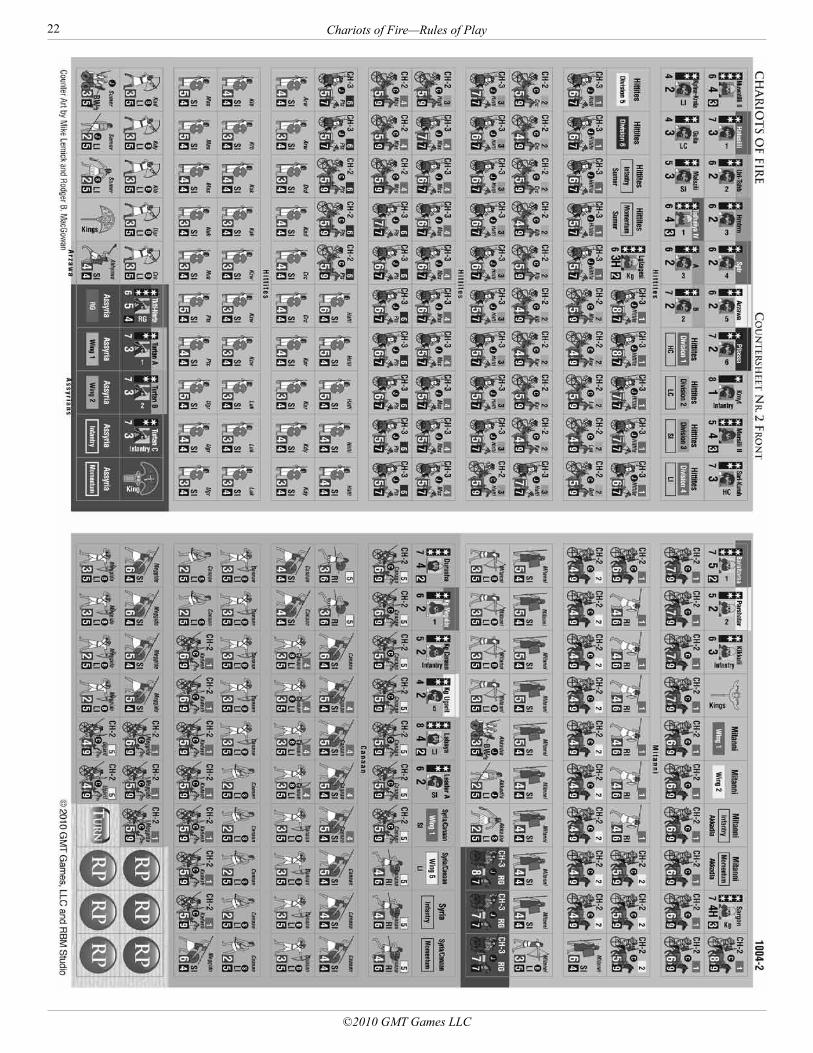
Chariots of Fire—Rules of Play22
©2010 GMT Games LLC

23Chariots of Fire—Rules of Play
©2010 GMT Games LLC

Chariots of Fire—Rules of Play24
©2010 GMT Games LLC
(3.0) THE SEQUENCE OF PLAYPlayers activate each of their leaders/commands when their Activation Marker (AM) is selected (5.1). When a leader is ac-tivated, he gives Orders that allow units in his Wing/Division to move and engage in combat. After all AMs have been used, play proceeds to the Replace, Reload, and Remove Phase, after which each player checks for Army Withdrawal.
The following is the Sequence of Play for each Turn.
A. INITIATIVE DETERMINATION PHASEBoth players roll a die to see which player has the Initiative per 5.1. The player with the Initiative chooses which of his com-mands will start the turn, holding out the Wing AM which will be used for the first Activation. All other AM are placed in The Pool, as per 5.22. If neither player wins the Initiative, all AM go into the Pool.
B. ACTIVATION PHASE One Player draws an AM from the Pool. No draw is made if an AM is selected in Phase A, that AM is used instead. The player owning the AM either activates the Wing listed on the AM or, if playing the Sumer or Troy scenario, instead undertakes a Heroic Challenge (see 10.2). If the AM was drawn from the Pool, the opposing player has the option to Trump per 5.3. If there are no more AM in the Pool, proceed to Phase D.
C. ORDERS PHASEThe owning player conducts the following steps using the units in the activated command:
1. Movement and Missile Fire Segment a. All units may Move and/or Fire as per 5.44 or 5.45. Eligible units may Recover hits (9.14) rather than Move and/or Fire; ORb. Active leader may attempt to Disengage (9.22) active units that are Engaged. Non-Engaged active units cannot take any
action; ORc. Routed units may Rally per 9.5. All non-Routed units may Move and/or Fire, as per 5.45;
Only one of the above three Orders may be performed in a single Orders Phase.
2. Shock Combat Segment All eligible units engage in Shock combat, using the following sequence [8.1]:
a. Shock Designation: determine who must Shock and who May Shock (8.11)b. The Pre-Shock TQ Checksc. Resolution of Possible Leader Casualties, including mandatory Heroic Combat (10.2)d. Resolve the Shock. e. Check for possible Collapse
D. REPLACE, RELOAD, and REMOVE PHASE1. Replace “killed” Leaders , as per 4.252. Reload: Eligible missile units may get more missiles, as per 7.153. Remove: “Moved” and "Rallied" markers.
E. WITHDRAWAL PHASEEach player totals his Rout Points (11.0) to see if his army has left the field … and the other player has won. If neither player’s army withdraws, the game turn is concluded and another game turn begins. There is no set number of game-turns. The battle continues until one side’s army withdraws.