Embed Size (px)
Citation preview

Church Safety, Health, and Environmental Manual
For Managers and Supervisors
D e c e m b e r 2 0 1 8


Church Safety, Health, and Environmental Manual
For Managers and Supervisors
D e c e m b e r 2 0 1 8

Published byThe Church of Jesus Christ of Latter-day Saints
Salt Lake City, Utah© 1994, 2013, 2018 by Intellectual Reserve, Inc.
All rights reserved. Printed in the USA.Version: 12/17. PD60005551 000

iiiS A F E T Y , H E A L T H , A N D E N V I R O N M E N T A L M A N U A L 2 0 1 8 V E R S I O N
Safety, Health, and Environmental Manual
1. Introduction . . . . . . . . . . . . . . . . . . . . . . . . . . . . . . . . . . . . . . . . . . . . . . . . . . . . . . . . . . . . . . . . . . . . . . . . . . . . . . . . 1
2. General Guidelines . . . . . . . . . . . . . . . . . . . . . . . . . . . . . . . . . . . . . . . . . . . . . . . . . . . . . . . . . . . . . . . . . . . . . . . . . . 6
3. Emergency Response . . . . . . . . . . . . . . . . . . . . . . . . . . . . . . . . . . . . . . . . . . . . . . . . . . . . . . . . . . . . . . . . . . . . . . .22
4. Safety Guidelines . . . . . . . . . . . . . . . . . . . . . . . . . . . . . . . . . . . . . . . . . . . . . . . . . . . . . . . . . . . . . . . . . . . . . . . . . . . 31
5. Health Guidelines . . . . . . . . . . . . . . . . . . . . . . . . . . . . . . . . . . . . . . . . . . . . . . . . . . . . . . . . . . . . . . . . . . . . . . . . . . 91
6. Environmental Guidelines . . . . . . . . . . . . . . . . . . . . . . . . . . . . . . . . . . . . . . . . . . . . . . . . . . . . . . . . . . . . . . . . . . 132
7. Forms . . . . . . . . . . . . . . . . . . . . . . . . . . . . . . . . . . . . . . . . . . . . . . . . . . . . . . . . . . . . . . . . . . . . . . . . . . . . . . . . . . . . 145

iv S A F E T Y , H E A L T H , A N D E N V I R O N M E N T A L M A N U A L 2 0 1 8 V E R S I O N

1. Introduction1.1 SCOPE AND PURPOSEThe Church desires to protect the safety and health of employees, volunteers, missionaries, and others who visit and use Church facilities and services. Protecting them is always one of its highest priorities.
To ensure the success of safety and health programs, it is essential that senior management, managers, and supervisors implement the policies in this manual. As part of this stewardship, managers should implement safety and loss-prevention programs. These programs are designed to accomplish the following objectives:
○ Prevent injuries and illnesses to employees and volunteers.
○ Promote sound safety, health, and environmental practices.
○ Prepare for and minimize interruptions to Church operations.
○ Encourage reviews of related safety and health activities.
○ Encourage management to make corrections when necessary.
○ Emphasize continuous improvement.
Managing directors and directors of temporal affairs (DTAs) are responsible for ensuring that the Church achieves these objectives in its worldwide operations. As they do, it will minimize hazards and reduce the costs associated with injuries, illnesses, and fatalities.
Organizations should determine how the terms used in this manual, such as manager, supervisor, employee, management, and supervision, apply to their own organizations. Whenever the term employee is used, it may also refer to anyone entering, serving in, or using a Church facility, including volunteers and missionaries.
This manual outlines safety, health, and environmental requirements and guidelines that all Church employ-ees should follow. It is the responsibility of managers and supervisors of Church employees to be familiar with this manual and train employees and missionaries in the safety, health, and environmental requirements that apply to them. In addition, Church operations should use applicable instructions, guidelines, and forms. All programs, guidelines, and information may not apply to all operations or areas within the Church.
The contents of this manual are intended to provide best-practice guidelines from safety- and health-man-agement systems. Apart from helping prevent occupational injuries and illnesses, these guidelines will also help your department meet local and national government regulations. However, this manual may not contain all requirements for the actual location where you are employed. The policies and procedures in this manual do not create a binding contract or any other liability on the Church.
If you have questions about additional requirements, contact your local safety and health representative or the Risk Management Division for assistance.
1.1.1 UsingThisManualThis manual is designed so topics can be easily found. There is a general contents page at the beginning of the manual, and each section has a detailed contents page. See the glossary at the end of this manual for explanations of key terms. Check boxes are used in the text to indicate steps or items that should be done.

2 S A F E T Y , H E A L T H , A N D E N V I R O N M E N T A L M A N U A L 2 0 1 8 V E R S I O N
Bullets are used to indicate a list of items.
The following are suggestions for using this manual:
□ Use the material in the manual to train employees in safety, health, and environmental issues.
□ Provide access to the manual for employees to review as needed.
□ Provide access to the portions of the manual that apply directly to employees, and discuss them with the employees.
□ Make copies of the checklists in this manual, and use them to (a) help carry out procedures and (b) follow up on items that still need to be done.
1.1.2 AdditionalResourcesThis manual contains guidelines that apply to most Church operations; however, all guidelines may not apply to all operations. In addition, fact sheets are also available that provide guidelines on issues applicable to spe-cific risks or operations. Both the manual and the fact sheets are available on the Risk Management section of the Church intranet site (see “Safety , Health , & Environment Responsibilities”).
1.2 RESPONSIBILITIESThe following are specific responsibilities of managers; supervisors; the safety, health, and environmental manager or coordinator; and employees. Responsibilities are further explained in this manual.
1.2.1 ManagersIn order to protect employees and ensure the success of the safety and health program, it is essential that all levels of management support the program. Management is encouraged to actively support this program and visibly participate in safety and health initiatives. They should make reasonable efforts to implement the guidelines in this manual, including the following:
○ Protect and continually improve existing safety and health processes and programs.
○ Encourage employees to participate in the safety and health program, and allow a reasonable amount of time for them to do so during the workday.
○ Comply with the applicable laws and regulations of their local governments.
○ Implement basic programs and practices that are part of the overall safety and health program, including the following:
• An incident- and injury-prevention program
• Training meetings and programs to improve the safety and health of employees
• The Global Incident Reporting (GIR) system (see incidents .lds .org) to report incidents and near misses
• An active safety and health committee
• A safety inspection program
• A safety and health bulletin board
3S A F E T Y , H E A L T H , A N D E N V I R O N M E N T A L M A N U A L 2 0 1 8 V E R S I O N
Safety and health concerns should be a regular agenda item for management or staff meetings. These items are on a meeting agenda so that management and staff can:
○ Discuss general safety information.
○ Review safety committee reports.
○ Address safety suggestions.
○ Promote health and safety generally.
1.2.2 SupervisorsOne of the many responsibilities of supervisors is to help establish a safe and healthy work environment for each employee. To do this, supervisors should do the following:
□ Conduct an orientation for all employees who are new, have been rehired, or have been transferred. Several resources are available for this purpose, including the online module for new hires “Working Together Safely — Safety Orientation ( HRD -0001 ) .” Groups may continue to use the Safety Orientation Checklist (see chapter 7) or use a customized checklist for orientation if desired.
□ Conduct an orientation for all volunteers and missionaries.
□ Provide necessary personal protective equipment, and train employees in how to use and properly care for it.
□ Take part in safety inspections, job safety observations, and investigations to identify and eliminate job hazards.
□ Consider hazard reports and suggestions to improve safety, and implement them as appropriate.
□ Train, as needed, both new and experienced employees in safe and efficient ways to accomplish each job or task.
□ Ensure employees report any injuries to the supervisor immediately.
□ Review any trends that can be discovered from past incidents, and establish methods for preventing incidents. Using the online Global Incident Reporting (GIR) system at incidents .lds .org to report near-miss incidents and injuries can help provide additional data for review.
□ Attend and participate in general safety meetings and safety and health committee meetings.
□ Investigate and report incidents in a timely manner.
□ Follow the progress of injured workers, and show concern for their recovery and timely return to work.
1.2.3 Safety,Health,andEnvironmentalManagerorLiaisonEach organization should have an assigned safety, health, and environmental manager, collateral duty safety representative ( CDSR ) , or liaison. This person should help implement and administer routine safety, health, and environmental programs. The CDSR should also be involved in:
○ Training and communicating with management and employees about safety, health, and environmental requirements.
○ Maintaining records that will be used to furnish required reports, graphs, trends, and other information.

4 S A F E T Y , H E A L T H , A N D E N V I R O N M E N T A L M A N U A L 2 0 1 8 V E R S I O N
○ Participating in safety committee functions.
○ Planning for emergencies and performing exercises that prepare organizations to recover from a disaster.
○ Reporting to management on safety, health, and environmental issues.
○ Evaluating potential safety and health risks associated with purchased products, raw materials, or other goods and related services before they are introduced into the work environment.
○ Maintaining the information that is required for applicable regulatory reports.
○ Maintaining a safety bulletin board.
○ Investigating incidents, with supervision and support from a safety, health, and environmental manager.
○ Recognizing and controlling hazards.
1.2.4 EmployeesEmployees should follow the safety and health procedures outlined for them by their supervisors. Many of these procedures are outlined on the Safety Orientation Checklist (see chapter 7). For example, employees should:
□ Observe general safety and health rules.
□ Participate in safety and health meetings and safety training.
□ Review and acknowledge motor vehicle safety guidelines if operating vehicles while on the job.
□ Use proper techniques for lifting things manually.
□ Report any job-related injury or illness to their supervisor and promptly seek treatment.
□ Promptly report coworkers’ hazardous behavior or other hazardous conditions to the supervisor or safety and health committee representative. Employees may also report unsafe work conditions or practices by using a Hazard Report (see chapter 7) or by sending an email to [email protected].
□ Keep aisles, walkways, stairways, exit doors, and working areas clear of obstacles and hazards that could cause an incident.
□ Become familiar with the location of emergency exits and evacuation procedures.
□ Become familiar with the location and use of emergency equipment, such as fire extinguishers, fire alarms, and fire department connections.
□ Use equipment and tools only after receiving proper operating, maintenance, and safety training.
□ Observe hazard warning signs and labels.
□ Not use alcohol and other drugs that impair judgment or ability to function.
□ Not work while under the influence of medications, prescription or nonprescription, that impair judgment or ability to function.

5S A F E T Y , H E A L T H , A N D E N V I R O N M E N T A L M A N U A L 2 0 1 8 V E R S I O N
1.3 RISKMANAGEMENTDIVISIONSERVICESInformation and assistance about environmental, occupational health, loss prevention, and safety manage-ment services are available through the Risk Management Division at Church headquarters. Where possible, questions and concerns about these issues should first be resolved with your organization’s management or safety, health, and environmental coordinator or manager. If additional help is needed, please contact the Risk Management Division.
Risk Management Division50 E. North Temple St. Rm. 1608Salt Lake City, UT 84150-0016
Salt Lake area:1-801-240-4049
All other areas:1-800-453-3860, extension 2-4049or 1-866-LDS-RISK (1-866-537-7475)email: [email protected]

6 S A F E T Y , H E A L T H , A N D E N V I R O N M E N T A L M A N U A L 2 0 1 8 V E R S I O N
2. General Guidelines2.1 INTRODUCTIONThis chapter describes general principles and policies that will help managers and supervisors to provide employees, volunteers, and others visiting the premises with a safe and healthy environment. More specific principles, policies, and guidelines are discussed in other chapters of this manual.
2.2 BASICRECORDKEEPINGANDRETENTIONImportant documents that keep a record of inspections, corrective actions, training sessions or topics, the minutes of safety committee meetings, and other safety matters should be retained according to the organization’s established retention schedule. Most forms associated with the Church Safety, Health, and Environmental Manual have a minimum retention time. These retention times are noted in the Description and Retention of Forms table found at the beginning of chapter 7. If documents do not have an established retention schedule, they should be kept for a minimum of three years after the end of the current year.
2.3 BEHAVIOR-BASEDSAFETYBehavior-based safety (BBS) helps employees identify and choose safe behaviors. Safety in the workplace has typically focused on equipment, engineering controls, and conditions in the work environment. Individual behavior is often overlooked as an important part of a good safety and health program.
Managers and supervisors should oversee behavior in the workplace. They should correct unsafe behavior and recognize safe behavior.
2.3.1 JobSafetyObservationA Job Safety Observation ( JSO ) form provides direct, measurable information that will impact an employee’s safe work practices. Managers and supervisors use the JSO to observe tasks in which employees are poten-tially exposed to physical, chemical, or other kinds of hazards (see chapter 7). Instructions for using the JSO can be found on the back of the form.
2.4 FACTSHEETSThe Risk Management Division produces fact sheets on various topics related to safety, health, and environ-mental issues. For a complete list of available fact sheets, go to the Risk Management intranet site under Manuals , Guidelines , and Documents.
2.5 FIRST-AIDTREATMENTANDFIRST-AIDKITSEmployees injured on the job should receive first-aid treatment. Managers should designate first-aid provid-ers if rapid ambulance service cannot be provided by an established emergency response unit. These per-sons should be trained in first aid.

7S A F E T Y , H E A L T H , A N D E N V I R O N M E N T A L M A N U A L 2 0 1 8 V E R S I O N
Specific employees can be assigned to receive training in first aid, CPR, or use of an automatic external defi-brillator (AED) as needed. Those who have received training should maintain appropriate documentation.
A First -Aid Log (see chapter 7) can be used for minor injuries that do not require outside medical treatment. This log should be reviewed by the safety committee on a regular basis. These records should be retained for one year after the end of the current year.
First-aid training, kits, and procedures should be provided in accordance with applicable local regulations and best practices (see section 4.12, “First Aid”).
Any facility that does not have access to rapid ambulance service is required to have an up-to-date first-aid kit. Managers and supervisors should make sure the kit is accessible and well maintained (see section 4.12, “First Aid”).
2.6 HANDLINGANDREPORTINGINCIDENTSAn incident is defined as any unplanned event that results in personal injury or damage to property, equip-ment, or the environment, including a near miss. Incidents may result from natural disasters—such as earth-quakes, storms, or floods—or from such things as fire, structural failure, equipment malfunctions, or failure to follow safety guidelines. An incident may impact employees, volunteers, Church members, or visitors. It is important to make plans for handling incidents, whatever their cause. This section provides recommended procedures for handling and reporting incidents.
2.6.1 IncidentInvestigationandReportingEmployees should report to supervisors all work-related incidents, no matter how minor.
Supervisors should investigate all incidents to determine the causes. Incidents usually have one or more contributing causes, and removing even one of the causes can prevent another incident. An Incident Report form (see chapter 7) may be used to collect information before the supervisor completes the online report at incidents .lds .org. Be sure to secure the scene, take photographs, obtain any surveillance video, gather witness statements, and document any recommendations or corrective actions. Other nonemployee inju-ries involving Church premises or operations may also be reported in this manner (see “Incidents or Injuries Involving Nonemployees” below for more details). The same incidents.lds.org online portal should be used to report all incidents relating to motor vehicle accidents or damage. Also, a Traffic Accident and Exchange form (see chapter 7) should be filled out by the driver. Some types of incidents may require that more than one report be completed.
Incidents typically fall into one of the following five categories:
○ Motor vehicle
○ Property damage
○ Employee injury
○ Nonemployee injury
○ General liability, other, or miscellaneous
8 S A F E T Y , H E A L T H , A N D E N V I R O N M E N T A L M A N U A L 2 0 1 8 V E R S I O N
2.6.2 U.S.OSHAReportingRequirements(The following section applies only to operations located within the United States and its territories.)
For employment-related injuries, OSHA (Occupational Safety and Health Administration) requires that inci-dents be reported within the following time frames:
○ All work-related fatalities reported within 8 hours
○ All work-related inpatient hospitalizations, amputations, or loss of an eye reported within 24 hours
The following incidents should be recorded on OSHA Form 300 within seven calendar days after they occur, if they are found to be work related, and after they have been reported to supervision. Obtain a copy of the form from your safety, health, and environmental manager or coordinator or the Risk Management Division.
Note: State occupational safety and health agencies may have more restrictive reporting requirements, such as if an incident results in the following:
○ Loss of consciousness
○ Restricted work activity or job transfer
○ Medical treatment beyond first aid
2.6.3 Employment-RelatedInjuriesandIllnessesManagers or supervisors should investigate all incidents to determine causes. Incidents usually have one or more contributing causes, and removing even one of the causes can prevent another incident. Interview witnesses and the injured or ill employee, and record or report all of the findings. Provide copies to the ap-propriate management (the safety and health manager or coordinator, and the safety and health committee chairperson), and file a copy in the employee’s file.
Minor Injuries and Illnesses Not Requiring Off-Site Medical Care□ Report the findings at incidents .lds .org or on an Incident Report form (see chapter 7), and complete ac-
cording to the instructions.
Minor Injuries and Illnesses Requiring Off-Site Medical Care□ An Incident Report form (see chapter 7) can be used to collect information, but the supervisor is required
to complete the online report at incidents .lds .org.
Major Injuries and IllnessesFor major injuries and illnesses that require hospital treatment beyond first aid, managers or supervisors should:
□ Immediately notify appropriate management (including the assigned safety and health manager or co-ordinator, and the safety and health committee chairperson) about the incident. The safety and health manager or coordinator, working directly with the Risk Management Division, will report the incident, as appropriate, to the local occupational safety and health administration within the prescribed time period (may be eight hours or less) after the incident occurs. The report should relate the circumstances and the extent of injuries or illnesses.

9S A F E T Y , H E A L T H , A N D E N V I R O N M E N T A L M A N U A L 2 0 1 8 V E R S I O N
□ Ensure that the investigation team completes the steps listed under “Minor Injuries and Illnesses” and en-ters the required information at incidents .lds .org. If practical, the Risk Management Division can assist with conducting an investigation into the causes of the incident. The team performing the investigation should include the supervisor of anyone injured and a representative from the safety and health committee.
Fatalities or Probable FatalitiesFor incidents that result in a fatality or probable fatality, managers and supervisors should also:
□ Ensure that equipment involved in an incident with an immediate fatality is not moved until permission to do so has been granted by the local regulatory agency. However, the equipment may be moved if neces-sary to prevent further incidents or to remove the victim.
□ Promptly enter the required information at incidents .lds .org.
2.6.4 Near-MissIncidentsA near-miss incident is any hazard or unplanned event that could have potentially caused injury or property damage. Supervisors should investigate causes, record what happened, and take remedial measures to pre-vent future incidents. Supervisors may use incidents .lds .org, Incident Report forms, or Hazard Report forms (see chapter 7) to record the hazard or incident.
2.6.5 IncidentsorInjuriesInvolvingNonemployees□ When nonemployees—such as volunteers, members, customers, or visitors—visit or use Church facilities
or services and are involved in an incident or injury, the manager or supervisor of the local operating unit or facility should follow these procedures.
□ When an incident or injury occurs, promptly summon emergency medical care or provide first aid, which-ever is appropriate. Provide first aid only within your level of skill and training. Do not direct additional medical treatment for nonemployees.
□ In the event of a fatality, a serious injury, or potential legal action, immediately contact the Risk Management Division at 1-801-240-4049 or 1-866-LDS-RISK, or promptly enter the required information at incidents .lds .org.
□ Show empathy and concern.
• Ask specifically about what occurred and how it happened.
• Ask about the extent of injuries received.
• Be observant of surrounding conditions.
□ Do not admit fault or make statements concerning any failure or neglect associated with the facilities or services.
□ Do not make any financial commitments on behalf of the Church.
□ Gather initial evidence, such as witnesses’ names, phone numbers, addresses, and accounts of what happened. Also collect video surveillance tapes if available.
• Take photographs of the location of the incident and any objects that allegedly caused injury or property damage.

10 S A F E T Y , H E A L T H , A N D E N V I R O N M E N T A L M A N U A L 2 0 1 8 V E R S I O N
• Preserve any physical evidence for later inspection.
• Avoid speculation or opinions. Gather fact-based narrative descriptions from witnesses or others knowledgeable about some aspect of the incident. Utilize the Incident Report Addendum — Statement form (see chapter 7).
□ Report online using the Global Incident reporting portal at incidents .lds .org. This requires an LDS Account. If you do not have online access, you can manually complete an Incident Report (see chapter 7). If using a paper version of the Incident Report, including witness statements, immediately forward it to your safety and health representative and the Risk Management Division. Keep a copy for your local records.
2.6.6 ChurchActivityMedicalAssistanceProgram(The following section applies only to operations solely located within the United States and Canada.)
If an incident involves injury to a participant in a Church-sponsored activity or someone serving in a Church-service assignment, that individual may be eligible to participate in the Church Activity Medical Assistance (CAMA) program.
○ CAMA is not general liability, workers’ compensation, or premises insurance. It is available regardless of who was at fault, but it is secondary to any available insurance.
○ Individuals are expected to provide their own health and liability insurance (see Handbook 2: Administering the Church [2010], 13.6.9).
○ If you believe CAMA may apply to individuals, encourage them to contact their local ecclesiastical leader to request CAMA enrollment.
○ The current CAMA handbook contains the specific program benefits, limitations, and exclusions.
○ Deseret Mutual Benefit Administrators (DMBA) is the program administrator for CAMA. For CAMA ques-tions, call DMBA at 801-578-5650 (Salt Lake area) or 1-800-777-1647 (toll free), send an email to [email protected], or visit dmba .com/ churchactivity.
2.7 INJURY-PREVENTIONPROGRAMSThis section contains essential elements of an injury-prevention program. Some local regulatory agencies may require additional elements. For example, some agencies may require employers to establish a formalized written injury-prevention program.
2.7.1 RiskEliminationEliminate risks by using the following control measures (or a combination of the measures that are applicable to your situation). The order of the control measures listed below is the preferred order.
1. Eliminate the hazard, or substitute a less hazardous material or process.
2. Use engineering controls, such as welding curtains, exhaust ventilation, machine interlocks, and so on, to reduce or mitigate the hazard.
3. Use administrative controls, such as training, job planning, rotation and scheduling, changes to work pro-cesses or procedures, or temporary work-area protections.
4. Use personal protective equipment (PPE).

11S A F E T Y , H E A L T H , A N D E N V I R O N M E N T A L M A N U A L 2 0 1 8 V E R S I O N
To determine the feasibility of applying control measures in the recommended order above, consider the following:
○ Nature and extent of the risk
○ Level of risk reduction desired
○ Local, state, or federal regulations
○ Recognized best practices
○ Available technology to help reduce risks
○ Cost effectiveness of control measures
○ Internal standards or policies within the overall organization
2.7.2 PhysicalAbilityTesting(PAT)Physical ability testing (PAT) promotes workplace safety by requiring provisional or current employees in cer-tain positions to demonstrate the physical abilities required to perform essential job functions.
The benefits of PAT include ensuring that job applicants are qualified, matching employees to the job best suited to them, and reducing workplace injuries and costs.
2.8 MANAGINGCHANGE
2.8.1 IntroductionPersonnel with safety and health responsibilities should be involved early in the process of designing, review-ing, or changing safety procedures and guidelines. Management, along with safety personnel, should help determine the appropriate scope and degree of design review required:
○ When changes are being considered for existing operations, products, processes, services, or suppliers.
○ When a new process or operation is in early design stages.
2.8.2 OpportunitiesforReviewRisk Management, facilities managers, and property insurance engineers can assist in evaluating any potential risks created by any proposed changes. The following items should be considered during the design review process.
Key Considerations○ Identify tasks and their related health and safety hazards.
○ Consider hazards that could be caused by humans.
○ Consider available control measures.
○ Review applicable regulations, codes, or standards.
○ Consider previous recommendations from property loss or safety consultation reports.

12 S A F E T Y , H E A L T H , A N D E N V I R O N M E N T A L M A N U A L 2 0 1 8 V E R S I O N
2.9 MANAGINGCONSTRUCTIONANDMAINTENANCECONTRACTORSConstruction and maintenance contractors may perform long- or short-term work that may endanger employees or property, expose the contractors’ employees to hazards in areas where contract work is per-formed, and include hazardous operations. Management should do the following to help manage potential health and safety risks during contract work:
○ Ensure that a contract exists and that the contract includes requirements to follow safety and health standards, provides adequate insurance coverage, and requires other safety items. Items that could be in the contract include requiring the contractor to:
• Follow and enforce all local regulatory standards regarding safety and health.
• Create and submit a site-specific safety plan for the project. This exercise will help the contractor review the scope of the project, identify hazards, and list the controls he or she plans on using to mitigate the hazards.
• Use applicable safety permits, such as hot work, red tag (fire suppression system impairment), and confined space.
• Use the appropriate PPE for the work.
• Verify that tools and equipment are in good condition and properly guarded.
• Ensure on-site superintendents or supervisors have attended an appropriate certification course for work-site safety for medium to large construction projects.
• Provide safety data sheets (SDS) of the chemicals the contractor plans on bringing to the project.
• Hold regular safety and health trainings, and document that they have taken place.
• Report all incidents to the owner representative. An owner representative is authorized by the Church to make project, contract, and financial decisions.
• Appoint an on-site safety representative for training and communication purposes.
○ Designate an owner representative to coordinate safety and health issues for the duration of the project. Some duties of this representative could include:
• Attending preconstruction meetings to ensure the contractor understands the owner’s minimum safety and health requirements.
• Holding regular contractor coordination meetings and ensuring that safety and health issues are discussed.
• Receiving and addressing incident reports.
• Ensuring safety permits are issued and used.
• Walking the project regularly to observe safe work practices.
• Helping coordinate hazardous work between the contractor, the owner, and occupants; examples of this work are activities that produce loud noises and dust or involve chemicals.
• Identifying and communicating regularly with the contractor safety representative.
• Being the designated contact if governmental, regulatory, or other agencies visit the project.

13S A F E T Y , H E A L T H , A N D E N V I R O N M E N T A L M A N U A L 2 0 1 8 V E R S I O N
○ Hold preconstruction or preservice meetings. These meetings must be held at the beginning of the project or the drafting of the maintenance contract. They should provide an opportunity for the owner representative to inform the contractor of minimum safety requirements and the owner’s site-spe-cific emergency action plan. This meeting is also for the contractor to discuss and get approval for his or her submitted site-specific safety plan before work begins. This plan should include the scope of the project, the identified hazards, and the controls. Some safety items in the plan may include the following:
• Contractor orientation
• Housekeeping
• Mobile equipment
• Physical agents, such as dust and noise
• Waste management
• Working from heights
• Chemical safety
• Hot work and fire detection
• Electrical hazards, including lockout/tagout
• Emergency and injury reporting
• Personal protective equipment
• Confined spaces
• Other site-specific hazards
○ Hold ongoing contractor coordination meetings that include safety as an agenda item.
○ Hold contractors accountable for safety. This can be done through enforcing the contract language as well as asking contractors to address safety violations. Contractors should not be told how to fix the safety hazard (means and methods), but they should be told that they must fix the hazard and that if they don’t, they may be in breach of contract and could be removed from the job.
2.10 MEASURINGSAFETYPERFORMANCEMeasuring safety performance will help you document the effectiveness of the safety and health program. The goal is to continually improve workplace safety.
2.10.1 IntroductionSafety performance can be measured using a variety of tracking methods. These tracking methods can be divided into leading indicators, which measure activities, and lagging indicators, which measure outcomes.
2.10.2LeadingIndicatorsLeading indicators measure proactive activities that are intended to prevent incidents. These indica-tors should be used to track and measure the number of completed activities in comparison to the

14 S A F E T Y , H E A L T H , A N D E N V I R O N M E N T A L M A N U A L 2 0 1 8 V E R S I O N
established goals for how many activities should be held. Selecting and focusing on a few leading indi-cators can reduce the frequency and severity of incidents. Examples of leading indicators may include tracking the following activities:
○ Safety, health, and environmental program evaluations (SHEPE)
○ Safety trainings
○ Safety committee meetings
○ Hazard Forms
○ Job safety observations
○ Hazard assessment surveys
These leading indicators can be measured by calculating the percent of activities held out of the total number planned.
2.10.3LaggingIndicatorsLagging indicators measure the results of what has happened. They can be used to create benchmarks to gauge positive or negative changes. A positive change, such as a reduction in the incident rate, can be an indication of an effective safety and health program. Negative changes, such as an increase in incident rates, should trigger a review of past incidents. The review may identify conditions that, if corrected, may prevent similar incidents. Examples of lagging indicators may include the following:
○ Incident rate ( see box below )
○ Severity rate
○ Days away from work
○ Restricted work days
○ Near-miss log
○ First-aid log
○ Vehicle accident rate
Lagging indicators can be measured by comparing trends over time.
IncidentRateFormulaMultiply a (an appropriate measure, such as the number of incidents your organization has had in a given year) by 200,000 (the number of hours worked by 100 employees who are working 40 hours per week and 50 weeks per year, providing a standard baseline measure for comparison). Divide that number by b (the total number of employee hours worked in the same year). The result will be your incident rate.
(a × 200,000) ÷ b = incident rate
15S A F E T Y , H E A L T H , A N D E N V I R O N M E N T A L M A N U A L 2 0 1 8 V E R S I O N
2.11 OSHAREPORTINGREQUIREMENTS(FORU.S.ONLY)(See information in section 2.6, “Handling and Reporting Incidents.”)
2.12 OSHAINSPECTIONS(FORU.S.ONLY)OSHA inspects thousands of workplaces every year, including various Church locations. Knowing what to expect before an inspector arrives will help you handle the inspection skillfully and successfully. In most cases you will not receive advanced notice of an inspection. Contact Risk Management or your safety representative as soon as you know you are going to be inspected.
2.12.1 TypicalFormatofInspectionOSHA inspections typically follow this format:
□ Presentation of credentials. Ask for the OSHA inspector’s identification and business card.
□ Opening conference. The inspector will tell you the reason for the visit. If it is because of an employee com-plaint, you are entitled to a copy of the complaint but not the name of the complainant.
□ Examination or review of records. The inspector may ask for OSHA 300 logs to look at work-related injuries and illnesses. He or she may also want to see your written hazard communication program, safety data sheets, and other written safety procedures. Contact Risk Management or your department safety repre-sentative if you have any questions about obtaining logs or written programs.
□ The walk-around inspection. The inspector will examine the location.
□ Closing conference. The closing conference will address violations and citations identified by the inspector.
2.12.2 InspectionPointersThe following are suggestions to help manage an OSHA inspection:
○ Notification. Notify your manager and department safety representative as soon as possible after the inspector arrives. It is not uncommon for an OSHA inspector to wait or delay the inspection until all inter-ested parties are present.
○ Inspector escort. The OSHA inspector should be accompanied by an appropriate management representa-tive at all times unless the inspector is interviewing an employee.
○ Photos and videos. Inspectors may take photographs and videos. The escort should take duplicate photos for documentation.
○ Employee interviews. Inspectors have the right to question any employee privately during regular work hours or at other reasonable times during the course of an inspection.
○ Factual information. Respond simply and accurately to the inspector’s questions. Do not volunteer addi-tional information.
○ Questions. Answer questions if you know the answer. If you don’t know the answer, say, “I don’t know.”

16 S A F E T Y , H E A L T H , A N D E N V I R O N M E N T A L M A N U A L 2 0 1 8 V E R S I O N
2.13 SAFETYANDHEALTHCOMMITTEEManagers and supervisors should establish a safety and health committee in which three or more employees who work at a particular site participate. A Church operation at a single location with multiple departments or groups may have one committee with a representative from each department or group.
The purpose of the safety and health committee is to (1) help prevent accidents; (2) evaluate safety, health, and environmental conditions in the workplace; (3) recommend and implement changes to improve safety, health, and environmental conditions, and teach and train employees about these conditions and changes; (4) identify and track the performance indicators that will be used to improve the safety, health, and environmental pro-gram (see section 2.10, “Measuring Safety Performance”); and (5) determine what regulations apply.
2.13.1 SettingUpaSafetyandHealthCommitteeManagers and supervisors should use the following guidelines to set up a safety and health committee:
○ The committee can be any size that best serves the needs of the operation.
○ At least one representative from management must serve on the committee.
○ Employees appoint peers to represent them on the committee. These representatives serve for at least one year. If a vacancy occurs, a new representative should be appointed.
○ The committee elects a chairperson, and the chairperson conducts meetings.
○ The committee determines the length and frequency of meetings; however, it is recommended they meet regularly, such as monthly or quarterly, based on the type of operation or business.
○ The committee should appoint a secretary to keep records.
2.13.2CommitteeResponsibilitiesThe following are the general responsibilities of the safety and health committee:
□ Help supervisors conduct safety inspections of work areas, and report potentially dangerous situations.
□ Review incident reports to discover trends, and determine how to prevent incidents.
□ Receive, evaluate, and review the results of safety performance indicators such as safety training, job safety observations, safety inspections, Hazard Reports, and incident investigations. Establish follow-up actions when necessary.
□ Develop future safety goals using performance indicators and other criteria.
□ Review job procedures, and recommend ways to improve safety.
□ Promote and publicize safety.
□ Maintain the Safety and Health Committee Meeting Record (see chapter 7) to document attendance and discussion topics. This form will help organize and report on safety and health committee meetings.
□ Keep copies of the Safety and Health Committee Meeting Record on file for one year after the current year ends, and give copies of each meeting record to management for review.
□ Post the most current copy of the Safety and Health Committee Meeting Record on the designated safety bulletin board.

17S A F E T Y , H E A L T H , A N D E N V I R O N M E N T A L M A N U A L 2 0 1 8 V E R S I O N
2.14 SAFETYANDHEALTHPROGRAMREVIEWManagement and safety representatives should perform an annual review of the safety and health program. The review should identify and evaluate progress or deficiencies in the overall safety and health program. The review should include such areas as management involvement and commitment, employee involvement, safety inspections, incident investigations, required safety programs, maintenance, safety training, incident rates, contractor safety, and so forth. The results of this review should be used to establish internal measur-able goals to help improve safety and health outcomes for the coming year.
2.15 SAFETYBULLETINBOARDManagers and supervisors should make sure a bulletin board for safety communications is put in a promi-nent place for employees to see. The following items should be posted:
○ Job safety and health posters (as required by applicable regulations)
○ Workers’ compensation poster (for U.S. only)
○ Emergency Telephone Numbers form (see chapter 7)
○ OSHA 300A summary, which is the previous year’s report and is required to be posted from February 1 to April 30 (for U.S. operations only)
The following items could also be posted on the safety bulletin board:
○ Minutes of safety and health committee meetings and employee safety meetings
○ Other current safety-related items
2.16 SAFETYINSPECTIONSSafety inspections are important to help identify and eliminate hazards. Inspections also provide employees and management a forum to discuss safety concerns. Supervisors and committee members should use the following guidelines for conducting safety inspections:
□ Conduct monthly (more often if needed) general safety and health inspections.
□ Identify the work area to be inspected.
□ Define the items and conditions to be inspected using the Safety and Health Inspection Checklist (Sample) (see chapter 7) as a guide.
□ Record and report inspection results. Use the Safety and Health Inspection Checklist ( Sample ) (see chap-ter 7) or a comparable checklist to compile a report, and use it to follow up on corrective actions.
□ Follow up on all action items after the inspection.
□ Review the report in the safety and health committee meeting to verify that appropriate action and follow-up have taken place.
□ Keep all inspection reports on file for one year after the current year ends.

18 S A F E T Y , H E A L T H , A N D E N V I R O N M E N T A L M A N U A L 2 0 1 8 V E R S I O N
2.17 SAFETYPREPLANNINGAs part of their new-hire orientation and regular safety training, employees should be trained on the hazards and precautions of all their routine tasks. Occasionally, employees may be asked to perform non-routine haz-ardous tasks. This might require additional planning and training to help minimize risks and protect employ-ees from injury. Use the Safety Preplanning Worksheet (see chapter 7).
2.18 SAFETYTRAINING(SCHEDULED)Managers and supervisors should schedule regular safety training meetings that all employees must attend. The frequency of these meetings is determined by department management. It is suggested that training be held monthly for industrial areas and quarterly for office areas. Training may be received through classroom instruction, individual online modules, or self-study.
All safety training should be documented, either electronically or with a Safety Training Meeting Record (see chapter 7). Supervisors should periodically review these records to follow up on attendance. Use the Safety Training Record — Annual form (see chapter 7) to manually track attendance. Keep documentation of training received on file for three years after the current year ends.
2.19 SAFETYTRAINING(ONGOING)Managers and supervisors should see that training to help prevent incidents in the workplace is conducted. All employees should receive ongoing education in safety and health principles, procedures, and practices so they can prevent incidents. This education helps create a spirit of cooperation at work.
2.20 TRAININGGUIDELINESTraining should provide knowledge, direction, and encouragement. Managers and supervisors should use these guidelines to coordinate training:
□ Provide employees access to this manual and other materials they may need for their health and safety.
□ Find qualified people to present the training. Use the Risk Management Division as a resource.
□ Use this manual, applicable regulatory publications, and other relevant materials for training.
□ See that training (or refresher training) is done in the following situations:
• When a new employee is hired.
• When a new safety, health, or environmental guideline is required.
• When problems are noted in existing safety, health, or environmental guidelines or there are mis-conceptions about procedures.
• Before employees operate hazardous equipment or machinery.
• If employees observe a lack of understanding or knowledge about specific processes or operations.
□ Conduct ongoing training as part of regular safety meetings.

19S A F E T Y , H E A L T H , A N D E N V I R O N M E N T A L M A N U A L 2 0 1 8 V E R S I O N
□ Document the training by using the Safety Training Meeting Record (see chapter 7), and place a copy of the record in the employee’s training file. Records of employee training should be kept on file for three years after the current year ends or until the training topic is repeated. The Safety Training Record — Annual form (see chapter 7) can help verify that training is conducted.
Managers and supervisors should review the contents of this manual to help determine areas where training is required or needed. The safety, health, and environmental manager or coordinator can help determine how to conduct training. Additional training aids can also be identified as the need arises.
2.21 WORKERS’COMPENSATION(FORU.S.ANDCANADAONLY)Workers’ compensation is a state- or province-mandated program that uses employer funds to pay for oc-cupational injuries and illnesses. Requirements vary in each state or province. Any Church employee who is injured or becomes ill as a result of and in the course of employment may be eligible for workers’ compensa-tion. The following procedures will assist managers and supervisors in ensuring that eligible workers receive workers’ compensation benefits.
2.21.1BeforeanIncidentTrain all personnel concerning emergency response procedures.
□ Familiarize supervisors and other safety personnel who will respond to injuries and occupational illnesses with the names and locations of the contracted medical providers in your area specializing in the treat-ment of industrial injuries and illnesses. Consult the Risk Management Division for assistance.
• Some states allow injured workers to choose to receive treatment from other medical providers; how-ever, not all medical professionals treat injuries related to workers’ compensation.
• If an employee chooses treatment outside the provider network, he or she may be required to seek prior approval from the claim adjuster and pay disputed charges.
• Only in emergencies should workers receive treatment in hospital emergency rooms.
□ Inform employees of their rights as injured workers by posting notices and reviewing information updates with employees. Managers and supervisors are responsible for ensuring that this information is appropri-ately displayed in compliance with local regulations.
2.21.2ProceduresFollowinganIncident 1. Employee reports incident to supervisor.
□ Church employees must immediately report an injury or occupation-related illness, no matter how mi-nor, to their supervisor. If employees fail to do so within the time required by law, they could reduce or lose their workers’ compensation benefits.
2. Employee seeks medical assistance.
□ Seek appropriate medical assistance. This may include first aid or treatment at industrial clinics or from another provider. Remember, limit treatment in hospital emergency rooms to emergencies only.

20 S A F E T Y , H E A L T H , A N D E N V I R O N M E N T A L M A N U A L 2 0 1 8 V E R S I O N
3. Supervisor reports illness or injury.
□ Within 24 working hours of an incident, the employee’s supervisor or designated safety representa-tive should report any incident using incidents .lds .org.
□ Supervisors in North Dakota, Ohio, West Virginia, and Wyoming must contact their state workers’ compensation offices.
□ Supervisors in Canada must report the incident through the appropriate provincial workers’ com-pensation offices.
□ Be prepared to report the following information:
▪ Claimant (injured worker) information
Employee ID number
Full name: first, middle initial, last
Home telephone number
Home address, city, state, zip, county
▪ Incident information
Description of incident or illness
Cause of incident (slip, spill, fall, etc.)
Primary body part involved (finger, left hand, right hand, etc.)
Specific nature of incident (burned, cut with knife, exposed to chemical, etc.)
Incident location (if different from reporting location): address, city, state
Is this a Church-owned location?
Medical provider information: name, address, city, state, zip, telephone and extension, county
Hospital information (if applicable): name, address, city, state, zip, telephone and extension, county
▪ Witness information
Full name
Home telephone
Work telephone and extension
2.21.3Workers’CompensationCarrierThe workers’ compensation carrier evaluates the report and determines if the employee is eligible for ben-efits. Workers’ compensation is governed in accordance with the regulations of the state or province where the employee was working when the incident occurred. Information on workers’ compensation rights can be obtained from the workers’ compensation carrier.

21S A F E T Y , H E A L T H , A N D E N V I R O N M E N T A L M A N U A L 2 0 1 8 V E R S I O N
2.21.4ReturntoWorkThe supervisor, employee, human resource department representative, and Risk Management Division staff coordinate efforts to help the injured worker return to work. The injured worker may return to full duty or temporary light duty or may request permanent accommodation, depending on the circumstances. Both employer and worker are encouraged to minimize the impact of work-related injuries and illnesses through support of coordinated, temporary light-duty assignments for injured workers. They should do so until they can determine the employee’s ability to permanently return to regular duties.
2.21.5AdditionalInformationDetailed information regarding the Church workers’ compensation plan is in section 3 .3 of Presiding Bishopric Departments Policies (2018).

22 S A F E T Y , H E A L T H , A N D E N V I R O N M E N T A L M A N U A L 2 0 1 8 V E R S I O N
3. Emergency Response3.1 INTRODUCTIONThis section describes the procedures for emergency situations. If there are questions about emergency response that cannot be resolved with your management team, contact the Risk Management Division.
Risk Management Division50 E. North Temple St. Rm. 1608Salt Lake City, UT 84150-0016
Salt Lake area:1-801-240-4049
All other areas: 1-800-453-3860, extension 2-4049or 1-866-LDS-RISK (1-866-537-7475)email: [email protected]
3.2 EMERGENCYRESPONSETEAMAt every location, managers and supervisors should organize an emergency response team (ERT) and provide training. Prompt response by the ERT can save lives, minimize property damage, and prevent interruptions to critical business functions. One individual should be designated as the person in charge or incident com-mander and have a designated backup. He or she should be given the responsibility and authority to take appropriate action during an emergency.
The ERT members carry out specific responsibilities before, during, and after an emergency and should be trained and prepared for the disasters or emergencies that are most likely to occur. They should be assigned to the following positions, if applicable:
○ ERT leader.
○ Floor or area searchers should be familiar with all primary and alternate exits, as well as any alarm systems for the building. They conduct a search of all restrooms and other designated areas, informing the building occupants and visitors that an emergency exists. They help locate and evacuate people with disabilities. They also perform other duties assigned by the ERT leader.
○ Notifier contacts local fire department.
○ Maintenance personnel, such as plumbers, mechanics, electricians, and so forth, assist with any repairs.
○ First-aid and triage team.
○ Salvage squad helps protect or recover furnishings and equipment from further damage.
○ Security.
○ Sprinkler control-valve operator (if the location is equipped with a fire suppression system).
○ Fire pump operator (if the location is equipped with an auxiliary fire pump).

23S A F E T Y , H E A L T H , A N D E N V I R O N M E N T A L M A N U A L 2 0 1 8 V E R S I O N
The size and organization of an ERT will depend on the needs at each location. At all times, regular and al-ternate members who are assigned and trained for each position on the ERT should be present. Emergency response procedures should be discussed regularly in employee meetings.
3.3 PREPARINGANEMERGENCYACTIONPLAN(EAP)Managers and supervisors prepare an emergency action plan (EAP) and review it annually with employees. The EAP may be communicated orally if there are fewer than 10 employees. However, all employees, includ-ing missionaries and volunteers, should be taught what to do in case of an emergency.
Your EAP should have the following essential elements:
□ An emergency procedures list for reporting fires and other emergencies and for obtaining emergency help. Give each occupant a copy.
□ Emergency escape procedures and emergency exit assignments. Provide a basic floor plan showing exits and emergency details.
□ Procedures for assisting personnel who may need special help to get to the evacuation assembly point or guidance on how to shelter in a protected area within the facility.
□ Procedures for employees who must remain at the site to perform critical operations before evacuating.
□ Designation of an assembly point and procedures to account for all personnel when they have gathered at the assembly point.
□ Assignment of first-aid duties.
□ First-aid training where required.
□ Names of people (including regular job titles) or departments to contact for further information or expla-nation of duties.
The plan should be explained to each employee when he or she is newly hired, when his or her job changes, and when the plan changes. Update the plan when there are changes in the building layout or in safety sys-tems such as alarms and emergency lighting.
3.4 EXITSMake sure every exit door and exit access corridor is visible. In a conspicuous area, post the route to reach every exit so that physically and mentally capable occupants will readily know the direction of escape from any point. Exits should be easy to open.
3.4.1 GuidelinesUse the following guidelines for providing exits:
□ Provide two exits if there is a possibility that the size, occupancy, or arrangement of an area, a section, a building, or a structure would endanger occupants attempting to use a single exit blocked by fire or smoke. Arrange the two exits in a way that will minimize the possibility that both might become impass-able in an emergency.

24 S A F E T Y , H E A L T H , A N D E N V I R O N M E N T A L M A N U A L 2 0 1 8 V E R S I O N
□ Mark exits with readily visible signs. Place a sign reading “Exit,” or something similar, with an arrow indicating the exit’s direction if the route to the nearest exit is not immediately apparent.
□ Post signs on doors, passages, or stairways that might be mistaken for an exit or access to an exit. The signs should read “Not an Exit,” or something similar, or should identify the actual area, such as “To Basement,” “Storeroom,” or “Linen Closet.”
□ Make sure signs marking an exit or exit access are in a location, size, color, and design that will make them easily seen. Do not permit decorations, furnishings, or equipment to impair visibility of an exit or exit directions.
□ Illuminate every exit sign with a reliable light source. This light source should be five foot-candles or more on the lighted surface.
□ Make sure the word Exit is plainly legible and that the letters are at least six inches high and three-fourths of an inch wide.
□ Arrange exit doors to be opened readily from the exit side whenever the building is occupied. Make sure locks, if provided, do not require special knowledge, uncommon effort, or use of a key or tool to open from inside the building.
3.5 GENERALINSTRUCTIONSManagers and supervisors should encourage employees to follow these general instructions during an emergency:
□ Avoid panic, remain calm, use common sense, and render assistance.
□ Evacuate buildings immediately upon the request of authorities, upon an audible alarm, or when there is an imminent threat to life or health.
□ Know the location of at least two emergency exits in your working area.
□ Keep a flashlight or other light source available if you are in an area without natural lighting.
□ Have a list of employees available in case it becomes necessary to account for who might possibly be trapped in your building.
3.6 ACTIVESHOOTERAn active shooter is an individual actively engaged in killing or attempting to kill people in a confined and pop-ulated area, typically through the use of firearms. If an active shooter or other assailant enters the building, everyone present should follow the principles and training below:
1. RUN
• Have an escape route and plan in mind.
• Leave your belongings behind.
• Keep your hands visible to emergency responders.

25S A F E T Y , H E A L T H , A N D E N V I R O N M E N T A L M A N U A L 2 0 1 8 V E R S I O N
2. HIDE
• Hide in an area out of the shooter’s view.
• Block entry to your hiding place, and lock the doors.
• Silence your cell phone.
3. FIGHT
• Fight as a last resort and only when your life is in imminent danger.
• Attempt to incapacitate the shooter.
• Act with physical aggression, and throw items at the active shooter.
4. CALL
• Call the local emergency number when safe.
• Provide the following information, if possible:
▪ Location of the active shooters
▪ Number of shooters
▪ Physical description of shooters
▪ Number and type of weapons held by shooters
▪ Number of potential victims at the location
5. When Law Enforcement Responds
• Remain calm and follow instructions.
• Put down any items in your hands (for example, bags or jackets).
• Raise hands and spread fingers.
• Keep hands visible at all times.
• Avoid quick movements toward officers, such as holding on to them for safety.
• Avoid pointing, screaming, or yelling.
• Do not stop to ask officers for help or direction when evacuating.
For additional information on what to do in the case of an active shooter, contact your management, local law enforcement personnel, or the Church Security Department.
3.7 BOMBTHREATORSUSPICIOUSACTIVITIESThe following are essential procedures to follow if you receive a bomb threat or encounter any suspicious activity or object:
□ Immediately report any bomb threat, suspicious activity, or suspicious object to your supervisor, and follow emergency instructions and procedures. The supervisor should contact authorities immediately. If Church Security staff members are on-site, they should also be contacted.
26 S A F E T Y , H E A L T H , A N D E N V I R O N M E N T A L M A N U A L 2 0 1 8 V E R S I O N
□ If you receive a bomb threat by telephone, get as much of the following information as possible from the caller and from your observations, and write it down.
From the caller, try to get the following information:
• When will the bomb go off?
• Where is the bomb?
• What is the type and size of the bomb?
• Why was it placed in the building?
From your personal observation, add the following information:
• What is the caller ID phone number, if available?
• What are some characteristics of the caller’s voice?
• How old do you think the caller is?
□ If you observe a search or are told of a bomb threat, remain calm and wait for instructions.
□ Do not touch or move suspicious objects.
□ Do not use radios or cell phones for communicating.
□ Wait for the police or other security personnel to conduct the search.
3.8 EARTHQUAKEThe following are essential procedures to follow in case of an earthquake:
□ DROP where you are onto your hands and knees. This position protects you from being knocked down and also allows you to stay low and crawl to shelter if shelter is nearby. COVER your head and neck with one arm and a hand. If a sturdy table or desk is nearby, crawl underneath it for shelter. If no shelter is nearby, crawl next to an interior wall (away from windows). Stay on your knees; bend over to protect vital organs. HOLD ON until shaking stops. If under a shelter, hold on to it with one hand; be ready to move with your shelter if it shifts. If there is no shelter, hold on to your head and neck with both arms and hands. If outdoors, go to an open area away from buildings, trees, and power lines.
□ Remain calm, and avoid shouting or running, which may cause others to become more upset. Wait for instructions to evacuate.
□ Seek safety where you are. Do not use stairways or elevators; they are likely to be severely damaged.
After the initial quake, take the following precautions:
□ Be prepared for aftershocks.
□ Check for injuries. Do not attempt to move seriously injured persons unless they are in immediate danger of further injury. Care for the injured as appropriate. In case of serious injury, notify your supervisor and follow procedures for reporting and obtaining help.
□ Do not turn light switches on or off.
□ Do not use any type of open flame for lighting purposes.

27S A F E T Y , H E A L T H , A N D E N V I R O N M E N T A L M A N U A L 2 0 1 8 V E R S I O N
□ Put out small fires. Immediately report any fires, spilled volatile chemicals, or gas leaks.
□ If you smell gas, leave immediately.
• If the odor is faint, open windows as you leave and turn off gas valves.
• Do not use matches, candles, or electrical switches.
• If it is safe to do so, shut down the electrical power at the source.
• Do not use flashlights, battery-powered radios, telephones, cell phones, or anything electrical that is not safe to use in hazardous locations.
□ If you do not smell gas, do the following:
• Hang up all telephones, and use them only to report emergencies.
• Rely on flashlights for light if necessary.
• Turn on a battery-powered radio to hear updates about the situation.
□ Avoid areas where the building may be damaged. Wait in a safe place for instructions; you could be there for several hours. Expect fire alarms and other protection systems to activate.
□ Refrain from flushing toilets until you have been notified that sewer lines are intact.
3.9 FIREOREXPLOSIONThe following are essential procedures to follow in case of fire or explosion:
□ Activate the nearest fire alarm (usually located by fire exits).
□ Report the fire and its location to your supervisor. If trained in using fire extinguishers, fight the fire if it is in the incipient (early) stages. Do not fight the fire alone.
□ Remember that the best breathing air is near the floor in smoky conditions.
□ Touch all doors before opening them. If they are warm, do not open them.
□ If possible, close doors and windows to prevent the fire from spreading.
□ Proceed to your assigned evacuation area. Do not use elevators.
□ Follow instructions from authorities for evacuation.
3.10 HAZARDOUSCHEMICALSPILLThe following are essential procedures to follow if you encounter a chemical spill that may be hazardous (flammable, acidic, and so forth):
□ Call the local emergency number. Detail the emergency and give your location.
□ Do not approach the spill.
□ Evacuate and isolate the affected area immediately.
□ Immediately notify your supervisor and those responsible for controlling and cleaning up the spill.
□ Keep others out of the area until help arrives.
□ Wait in a safe place for instructions, usually upwind from the spill.

28 S A F E T Y , H E A L T H , A N D E N V I R O N M E N T A L M A N U A L 2 0 1 8 V E R S I O N
□ Avoid inhaling all gases, fumes, or smoke.
□ If the source is outside, you may be instructed to shelter right where you are.
3.11 KIDNAPPINGANDEXTORTIONThe following philosophy, policy, and procedures apply in the case of kidnapping and extortion.
3.11.1 PhilosophyThe Church recognizes that the risk of a person being kidnapped during the course of employment is very low. Even where kidnapping for ransom is more common, Church employees and expatriates are not gener-ally viewed as potential targets. However, the following policy is provided in case of such an event.
3.11.2 PolicyIf kidnapping and extortion do occur in the course of a person’s employment, Church policy is to address this critical situation in a prompt and organized fashion. Everything possible will be done to minimize the situation and to maximize resources available to appropriately address the situation.
3.11.3 ProcedureThe Church expects all managers, supervisors, and employees to follow these procedures:
□ Take all kidnapping and extortion attempts and demands seriously.
□ Report any kidnapping, extortion, or other serious security incident immediately to the area office and to Church Security.
□ Follow the directions from the area office and Church Security. Church Security will assist in contacting competent law enforcement authorities or will dispatch experienced negotiators to assist in handling the situation.
□ Follow these recommended “initial responses” to the alleged kidnapper:
• “We want to do whatever is appropriate to ensure the safety of ...”
• “I do not have the authority to speak for the Church. It will take me some time to reach those who have the authority to speak for the Church.”
• “We are a local part of the Church and have very limited resources.”
The object is to delay any crisis or decision until experienced negotiators can arrive.
Contact Church Security or the Risk Management Division for additional information on preventing and handling these types of emergencies.
3.12 MEDICALEMERGENCIESThe following are essential procedures to follow in case of injury or illness, including heart attack:
□ Call your local emergency response personnel or Church Security if Church Security personnel are on-site.
□ Care for the injured or ill person as appropriate until help arrives.

29S A F E T Y , H E A L T H , A N D E N V I R O N M E N T A L M A N U A L 2 0 1 8 V E R S I O N
□ Keep the person as comfortable as possible.
□ Have someone notify the person’s supervisor.
□ Follow instructions from medical personnel after they arrive.
For more information, see “First Aid” in section 4.12.
3.13 SEVEREWEATHEREMERGENCIESThe following are essential procedures to follow if a severe weather emergency occurs:
□ Monitor weather reports.
□ During a severe weather emergency, move to the safest place available, such as the interior of a building.
□ Stay away from windows and open doors.
□ Stay in the safest location until the weather emergency has passed or until you are instructed to return to your work site.
□ Employees are expected to report to and remain at their work location unless they receive other instruc-tions from their immediate supervisor.
3.14 SUSPICIOUSMAILGUIDELINESLetters and parcels that contain an improvised explosive device (IED) or a biological contaminant may:
○ Have a powdery substance on the outside.
○ Be unexpected or from someone unfamiliar to you.
○ Have excessive postage, a handwritten or poorly typed address, incorrect titles or titles with no names, or misspellings of common words.
○ Be addressed to someone no longer with your organization or be otherwise outdated.
○ Have no return address or an address that cannot be verified as legitimate.
○ Have an unusual amount of tape.
○ Be marked with a restrictive endorsement such as “Personal” or “Confidential.”
○ Have a strange odor or stain.
3.14.1 MailThreats—SuspectedImprovisedExplosiveDevice(IED)IEDs can fit inside a letter or small package. If you suspect mail may contain an IED:
○ Do not handle the object.
○ Leave the area immediately.
○ Call building security (if available), the police, or 911 (or your local emergency number).
○ Contact postal inspectors if the item was mailed.
○ Do not use two-way radios or cell phones.
○ Do not turn lights or electronic devices in the area on or off.
30 S A F E T Y , H E A L T H , A N D E N V I R O N M E N T A L M A N U A L 2 0 1 8 V E R S I O N
3.14.2MailThreats—SuspectedBiologicalContaminantIf you suspect a biological contaminant:
○ Do not touch, smell, taste, or try to analyze the substance.
○ If you have already handled the letter or package, place the item on the nearest surface and step away. Wash your hands with soap and warm water in the immediate area if possible.
○ Keep others away from the area.
○ Call building security (if available), the police, 911 (or your local emergency number), the local fire depart-ment, or the local hazmat unit.
○ Contact postal inspectors.
○ Remain in the immediate area to avoid spreading contamination.
○ Wait for emergency response or trained medical and decontamination personnel to arrive.
3.15 UNCOOPERATIVEORDISRUPTIVEINDIVIDUALSBe aware of uncooperative or disruptive individuals or anyone else you feel may cause problems.
□ Do not travel alone on elevators or in isolated areas of the facility if you feel uneasy about any person on the premises.
□ If you come into contact with an uncooperative or disruptive individual, remain calm. Do not be confrontational.
□ Do not try to be a hero. Do not do anything that will jeopardize your safety or the safety of others.

31S A F E T Y , H E A L T H , A N D E N V I R O N M E N T A L M A N U A L 2 0 1 8 V E R S I O N
4. Safety Guidelines4.1 INTRODUCTIONThe safety guidelines in this section are required by the Church and will help managers and supervisors establish a safe work environment and prevent incidents. Managers and supervisors should be familiar with these guidelines and use those that apply to the employees under their supervision.
These guidelines are arranged alphabetically. Additional guidelines or changes may be implemented as the result of changes in laws, directives from the local regulatory authority, or changing best practices.
If there are questions about any of these guidelines that cannot be resolved with your management team, contact the Risk Management Division.
Risk Management Division50 E. North Temple St. Rm. 1608Salt Lake City, UT 84150-0016
Salt Lake area:1-801-240-4049
All other areas:1-800-453-3860, extension 2-4049or 1-866-LDS-RISK (1-866-537-7475)email: [email protected]
4.2 AERIALLIFTSThese guidelines provide standard operating procedures for the use of aerial lifts (see glossary).
Managers and supervisors are responsible to review these guidelines and make reasonable efforts to ensure that they are followed.
□ When operating aerial lifts under, over, or near electric power lines, maintain the following minimum clearances:
• 10 feet (3 m) for lines rated at 50 kilovolts (kV) or less.
• A minimum of 10 feet (3 m) for lines rated in excess of 50 kV. It is recommended that an additional inch (2.5 cm) of distance be added for each kilovolt in excess of 50 kV.
□ Aerial lifts should be secured by locking the device in the lower traveling position before the lift is transported.
□ Lift controls should be tested each day prior to use to ensure that the controls are in a safe working condition.
□ Only trained persons may operate an aerial lift. A supervisor or other qualified individual will determine the level of training necessary to operate a lift. All training should be documented.

32 S A F E T Y , H E A L T H , A N D E N V I R O N M E N T A L M A N U A L 2 0 1 8 V E R S I O N
□ Employees should always stand firmly on the floor of the lift and should not sit or climb on the edge of the basket or on the guardrails.
□ Planks, ladders, or other extension devices should not be used on an aerial or scissor lift.
□ When working from an aerial lift, employees must wear fall-protection or fall-restraint equipment and attach a lanyard to an approved attachment point in the basket. Fall protection is not required in scissor-type lifts unless the basket is not completely enclosed or fall protection is specified by the manufacturer.
□ Do not exceed the load limit specified by the lift manufacturer.
□ Brakes should be set, and outriggers, when used, should be positioned on pads or a solid surface. Wheel chocks should be installed before using an aerial lift on an incline.
□ Contractors should not be allowed to use or operate Church-owned aerial lifts.
□ Operators of aerial lifts should read and be familiar with all manufacturer instructions and recommendations.
□ An aerial lift may not be moved when the boom is elevated in a working position with a person in the basket unless the equipment is specifically designed for this type of operation.
□ Articulating boom and extendable boom platforms, primarily designed as personnel carriers, should have both platform (upper) and lower controls. Lower controls should be able to override the upper controls. Lower controls should not be used unless the employee in the lift has given permission, except in the case of an emergency.
□ Do not use an aerial lift if wind velocity exceeds 30 miles per hour (48 kmph).
□ When using a forklift designed to lift personnel in a safety platform:
• Secure the safety platform firmly to the lifting carriage or forks.
• Provide a way for personnel on the platform to shut off power to the forklift.
• Provide protection from falling objects.
□ Areas beneath aerial lifts are hazard areas for falling objects and should be controlled by barricades or other means to prevent unauthorized entry into the area.
□ Volunteers should not be allowed to operate aerial lifts unless they have the same level of experience and training as the employed staff, as determined by a supervisor.
4.3 COMPRESSEDAIRBest practice guidelines recommend that compressed air should not be used for cleaning purposes except when the air is reduced to less than 30 pounds per square inch (200 kPa) and effective screens or barriers and personal protective equipment (PPE) are used. Compressed air is not to be used for cleaning individuals or clothing. It may be used to clean equipment only. When using compressed air:
□ Use it only for approved processes.
□ Do not point a compressed air gun at yourself or at others. Be aware of individuals in the area; watch for anyone passing by to ensure that no one is exposed to compressed air.

33S A F E T Y , H E A L T H , A N D E N V I R O N M E N T A L M A N U A L 2 0 1 8 V E R S I O N
□ Ensure that compressed air guns used at a pressure greater than 30 psi (200 kPa) are equipped with a relief device that will drop the pressure to less than 30 psi (200 kPa) if the flow is dead-ended (which occurs when the nozzle of the gun is pressed tightly against a surface and creates potentially dangerous back pressure).
□ Use a constant-pressure trigger (dead-man trigger) so that airflow will stop when the trigger is released.
□ Use appropriate PPE, including hearing protection and goggles.
□ Inspect all air hoses before use. If hoses are damaged, frayed, or worn, replace them. Ensure all hose fittings are tight.
□ Make sure hose ends are secured while in use to prevent whipping if a break in the hose occurs.
□ Before disconnecting the air hose, shut off the compressed air. Bleed off any residual air. When finished, coil the hoses and hang them in a designated area to prevent tripping.
□ Never modify or tamper with air guns.
4.4 COMPRESSEDGASCYLINDERSAFETYThese guidelines provide information for safely receiving, handling, and using compressed gas cylinders.
Managers and supervisors should review the following procedures and requirements with those who ship, receive, handle, or use gas cylinders in their jobs:
□ Ensure that proper labels and markings are maintained on cylinders.
□ Install valve-protector caps on all cylinders when not in use and during transportation.
□ Secure all cylinders in a vertical position and around the body of the cylinder during transportation, while in use, or during storage.
□ Store cylinders in a well-ventilated area out of direct sunlight and sources of heat, sparks, and electrical current.
□ Do not tamper with or bypass safety devices or valve equipment.
□ Do not use oil or grease on attachments for oxygen cylinders.
□ For welding operations, turn off oxygen and acetylene at the cylinder valves, and drain lines when not in use.
□ In storage, separate oxygen cylinders from fuel-gas cylinders or combustible materials (especially oil or grease).
□ Store cylinders at a minimum distance of 30 feet (9 m) from combustible materials or inside a 5-foot-high (1.5 m) noncombustible barrier. The barrier should have a fire-resistance rating of at least a half hour.
□ Treat empty cylinders as if they were full.
□ Alterations or repairs to cylinders or valves should be made by the cylinder supplier.
□ Valves that do not have handwheels or other tools approved by the supplier should have a special wrench designed for the valve spindle.
□ Cylinders should have approved pressure regulators (if required in your location).

34 S A F E T Y , H E A L T H , A N D E N V I R O N M E N T A L M A N U A L 2 0 1 8 V E R S I O N
4.5 ELECTRIC CARTS(See Motor Vehicle Safety.)
4.6 ELECTRICALSAFETYThese guidelines provide information that will safeguard those who work with and around electricity.
4.6.1 GeneralRequirements□ Maintain sufficient access and working space around all electrical equipment to permit ready and safe
operation and maintenance of the equipment. The working space in front of the electrical equipment should be the width of the equipment or 30 inches (0.75 m), whichever is greater.
□ Guard all live parts of electrical equipment operating at 50 volts or more against accidental contact by using approved enclosures and covers.
□ Use suitable guards to protect all lamps in light fixtures lower than seven feet (2.1 m) from accidental contact or breakage.
□ Where possible, use ground-fault relays (or sensors) to sense low-magnitude ground faults to help pro-tect personnel.
• A ground-fault circuit interrupter (GFCI), a type of ground-fault relay, is defined as “a device intended for the protection of personnel that functions to de-energize a circuit or portion thereof within an established period of time” (“Article 100,” in NFPA 70: National Electrical Code 2017, 18).
□ Workers not qualified to work near exposed energized or de-energized overhead lines should stay a minimum of 10 feet away from any unguarded equipment.
4.6.2 MoistureAny type of moisture may provide a conductive path for electricity, resulting in a deadly shock. All employees should follow these guidelines regarding moisture when working with and around electricity:
□ Use a ground fault circuit interrupter when there is water present.
□ Use power tools, cords, and outlets approved for outdoor use if exposed to moisture.
□ Limit electrical work during rainy conditions.
4.6.3 AtmosphereMake a reasonable effort to ensure there are no atmospheric hazards in the work area, such as:
○ Dust particles.
○ Flammable vapors.
○ Excess oxygen.
A stray spark in these conditions might cause an explosion or fire. Ventilate your work area to lower the con-centration of atmospheric hazards.

35S A F E T Y , H E A L T H , A N D E N V I R O N M E N T A L M A N U A L 2 0 1 8 V E R S I O N
4.6.4 ClothingandJewelryRemove all jewelry, including rings and metal wristwatches. Gold and silver are dangerously efficient elec-trical conductors.
Employees who have a specific assignment (such as lineman, electrician, electronics maintenance) that requires them to work constantly and directly with electricity must use the PPE required for the jobs they perform. This clothing and equipment should be arc rated and may consist of gloves, hoods, sleeves, face shield, hard hats, rubber matting, and blankets.
4.6.5 ToolsWorn, defective, or carelessly operated tools are the direct cause of many electrical accidents. Always choose the right tool for the job, and use it correctly. Before you start any job, inspect all tools to be sure they are clean, dry, and free of oily film or carbon deposits. Never modify tools or electrical equipment without proper authorization.
Use these guidelines for hand tools:
□ Hand tools should have manufacturer-installed insulated grips.
□ Use insulated tools when working on energized or live circuits.
□ Never try to improvise tool insulation.
□ Do not use any tool with cracks, tears, or gaps in the insulation.
Use these guidelines for power tools:
□ Make sure that all power tools and equipment is connected only to power sources that have ground-fault protection, such as GFCI or its equivalent, during maintenance work; remodeling; repair of buildings, structures, or equipment; or during other construction-like activities. Power cords with ground-fault pro-tection incorporated into the cord may also be used.
□ Ensure that power tools have double-insulated casings or a three-prong plug (plug with a grounding post).
□ Inspect the overall condition of tools for wear or defects.
□ Check tools to be sure all safety guards or shields are in place.
□ Inspect all power cords and switches for cuts, frayed insulation, exposed terminals, and loose connections.
4.6.6 ElectricalOutletsandExtensionCordsUse the following rules regarding electrical outlets and extension cords to help prevent injury, fires, and over-loaded wall outlets and extension cords:
□ Always use grounded electrical outlets; do not overload them.
□ Never remove the grounding post from a three-prong grounding plug to make it fit into a two-prong wall socket.
□ Do not route extension cords through doorways, windows, or holes in walls unless you do something to prevent the cord from being cut or pinched. Extension cords should not be used as a permanent power source.

36 S A F E T Y , H E A L T H , A N D E N V I R O N M E N T A L M A N U A L 2 0 1 8 V E R S I O N
□ Never use an extension cord with cut or damaged insulation. Do not tape over the damaged cord and use it as if it had not been damaged. Extension cords and portable cables should not be used with splices unless the splices are permanently molded, are vulcanized, or are another approved type.
□ Extension cords may only be used during remodeling; maintenance; repair of buildings, structures, or equipment; and similar activities. Extension cords should be removed immediately upon completion of the project or activity for which the cord was installed. Extension cords should not be used as a perma-nent power source.
□ Ensure that all outlet boxes, junction boxes, and fittings have been provided with covers or faceplates.
□ Electrical cords should be fully insulated and free of damage, including nicks or breaks, for the entire length, from plug to appliance. If insulation, plugs, or connectors are damaged or replaced, they should be repaired to the same level of integrity and quality as the original cord or discarded.
□ Electrical cords should be free from tape, pinching, and stress that could lead to insulation or wire failure.
□ Avoid connecting power strips or extension cords in a series (daisy-chaining).
4.6.7 SmallPersonalAppliancesComply with the following rules regarding small personal appliances to prevent injury, fires, and overloaded outlets or extension cords:
□ Before using small appliances such as personal fans, space heaters, toasters, and so forth, ensure that there are enough outlets, electrical capacity, and configurations to support the intended use.
□ All appliances must be certified by Underwriters Laboratories (UL) or other recognized standards that demonstrate the appliance meets or exceeds safe electrical criteria.
□ Appliances need to be rated for commercial use (which usually requires that the electrical components are contained within a metal housing and rated for high or extended usage).
□ Appliances should be regularly inspected in order to ensure that they are safe to use and to educate the user of conditions under which the appliance may become unsafe.
□ Do not allow approved personal appliances to operate unattended.
□ Ensure that the appliances are clean of debris that can damage performance or cause electrical hazards. Devices should be removed from service and appropriately disposed of when they demonstrate signs of failing (making sparks, overheating, smelling like something is burning, shocking users, and so forth).
4.6.8 Lockout/TagoutAlways follow lockout/tagout procedures (see section 4.15, “Hazardous Energy Control (Lockout/Tagout) Program”) before working on circuits or equipment that are or have been electrically charged.
4.6.9 EnergizedElectricalWorkThese guidelines are to help provide a practical, safe working area for employees who face the hazards arising from the use of electricity.
Electrical work on energized equipment should only be performed when necessary. Before performing the

37S A F E T Y , H E A L T H , A N D E N V I R O N M E N T A L M A N U A L 2 0 1 8 V E R S I O N
work with the equipment energized, every option should be considered that will allow employees to work with the equipment de-energized in an electrically safe working condition. Follow section 4.15, “Hazardous Energy Control (Lockout/Tagout) Program,” to place the equipment in an electrically safe working condition. These are the minimum guidelines that should be followed if it is infeasible to place the equipment in an electrically safe work condition and if work on energized equipment is necessary. Some examples of these situations might include interruption of life-support equipment, deactivation of emergency alarm systems, or troubleshooting.
Definitions
Arc-FlashBoundaryThe distance at which a person will be safe from the source of a potential arc flash. This boundary can protect a person from a second-degree burn if an electrical arc flash were to occur. This distance is typically 3 to 14 feet away from the source.
ArcFlashHazardA dangerous condition associated with the possible release of energy caused by an electric arc.
ArcRatingThe value attributed to materials that describes how well they resist exposure to an electrical arc discharge. The arc rating is expressed in calories per square centimer (cal/cm2). Arc-rated clothing or equipment indicates that it has been tested for exposure to an electric arc.
Balaclava(SockHood)An arc-rated hood that protects the neck, head, and face except for the eyes and nose.
De-energizedFree from electrical charge and from any electrical connection to a source of potential energy.
ElectricallySafeWorkConditionA state in which an electrical conductor or circuit part has been disconnected from energized parts and has been locked and tagged in accordance with established standards.
EnergizedElectricalWorkAny work on energized electrical equipment, circuits, devices, or systems in which an employee is required to deliberately or may accidentally place a part of his or her body, tool, or other material in contact with electrical devices. These electrical devices have been deemed to be in excess of 50 V. Energized electrical work is dangerous regardless of the PPE a person is wearing.
IncidentEnergyThe amount of thermal energy impressed on a surface at a certain distance from the source that is generated during an electrical arc event. Incident energy is typically expressed in calories per square centimeter (cal/cm2).
Limited-ApproachBoundaryThe distance at which a person will be safe from an exposed, energized electrical conductor or circuit part that presents a shock hazard. This distance is typically 3 to 5 feet away from the source.

38 S A F E T Y , H E A L T H , A N D E N V I R O N M E N T A L M A N U A L 2 0 1 8 V E R S I O N
NominalVoltageAn approximate value assigned to a circuit or system for the purpose of conveniently designating its voltage class (for example, 120/240 V, 480/277 V, 600 V).
QualifiedPersonOne who has demonstrated skills and knowledge related to the construction and operation of electrical equipment and installations. A qualified person has also received safety training to identify and avoid the hazards involved.
Restricted-ApproachBoundaryThe distance at which a person will be safe from an exposed, energized electrical conductor or circuit part that presents an increased likelihood of electric shock due to electrical arc-over and the possibility of the person inadvertently coming into contact with the electrical source. This boundary is for per-sonnel working in close proximity to the energized electrical conductor or circuit part. This distance is typically 1 foot away from the source.
ShockHazardA dangerous condition associated with the possible release of energy caused by contact or approach to energized electrical conductors or circuit parts.
General Guidelines○ Conductive articles of jewelry and clothing (such as watchbands, bracelets, rings, key chains, necklaces,
metalized aprons, cloth with conductive thread, metal headgear, or metal-framed glasses) cannot be worn within the restricted approach boundary.
○ Employees must not reach blindly into areas that might contain exposed, energized electrical conductors.
○ Where necessary, barricades and safety signs must be used to prevent or limit employee access to work areas containing energized conductors. Barricades must not be placed closer than the arc flash boundary.
○ Once energized electrical work is completed, replace all covers, guards, and barriers.
Incident Energy Analysis○ The facilities manager must perform an incident energy analysis on all electrical equipment, such as
switchboards, panelboards, industrial control panels, and motor control centers. An incident energy analysis will help identify the potential amount of incident energy that may be released during an electri-cal arc event from that specific piece of electrical equipment. Understanding the incident energy level will ultimately help determine the PPE level required to protect employees from serious burns. The incident energy and PPE category can be identified in two ways:
1. Have a qualified person use table 1, “Arc-Flash Hazard PPE Categories for Alternating Current (AC) Systems.”
2. Hire an electrical professional to use an industry-accepted method to calculate the incident energy at a specific distance from the electrical equipment, usually 12–18 inches (30–45 cm).

39S A F E T Y , H E A L T H , A N D E N V I R O N M E N T A L M A N U A L 2 0 1 8 V E R S I O N
TABLE1.ARC-FLASHHAZARDPPECATEGORIESFORALTERNATINGCURRENT(AC)SYSTEMS
Equipment Arc-FlashPPECategory
Arc-FlashBoundary
Panelboards or other equipment rated 240 V and below
Parameters: maximum of 25 kA short-circuit current available; maximum of 0.03 seconds (2 cycles) for fault-clearing time; working distance of 455 mm (18 in.)
1 485 mm
(19 in.)
Panelboards or other equipment rated from 240 V to 600 V
Parameters: maximum of 25 kA short-circuit current available; maximum of 0.03 seconds (2 cycles) for fault-clearing time; working distance of 455 mm (18 in.)
2 900 mm
(3 ft.)
Motor control centers (MCCs), 600-V class
Parameters: maximum of 65 kA short-circuit current available; maximum of 0.03 seconds (2 cycles) for fault-clearing time; working distance of 455 mm (18 in.)
2 1.5 m
(5 ft.)
Motor control centers (MCCs), 600-V class
Parameters: maximum of 42 kA short-circuit current available; max-imum of 0.33 seconds (20 cycles) for fault-clearing time; working distance of 455 mm (18 in.)
4 4.3 m
(14 ft.)
600-V class switchgear (with power circuit breakers or fused switches) and 600-V class switchboards
Parameters: maximum of 35 kA short-circuit current available; maximum of up to 0.5 seconds (30 cycles) for fault-clearing time; working distance of 455 mm (18 in.)
2 1.5 m
(5 ft.)
Other 600-V class equipment (277–600 V, nominal)
Parameters: maximum of 65 kA short-circuit current available; maximum of 0.03 seconds (2 cycles) for fault-clearing time; working distance of 455 mm (18 in.)
2 1.5 m
(5 ft.)
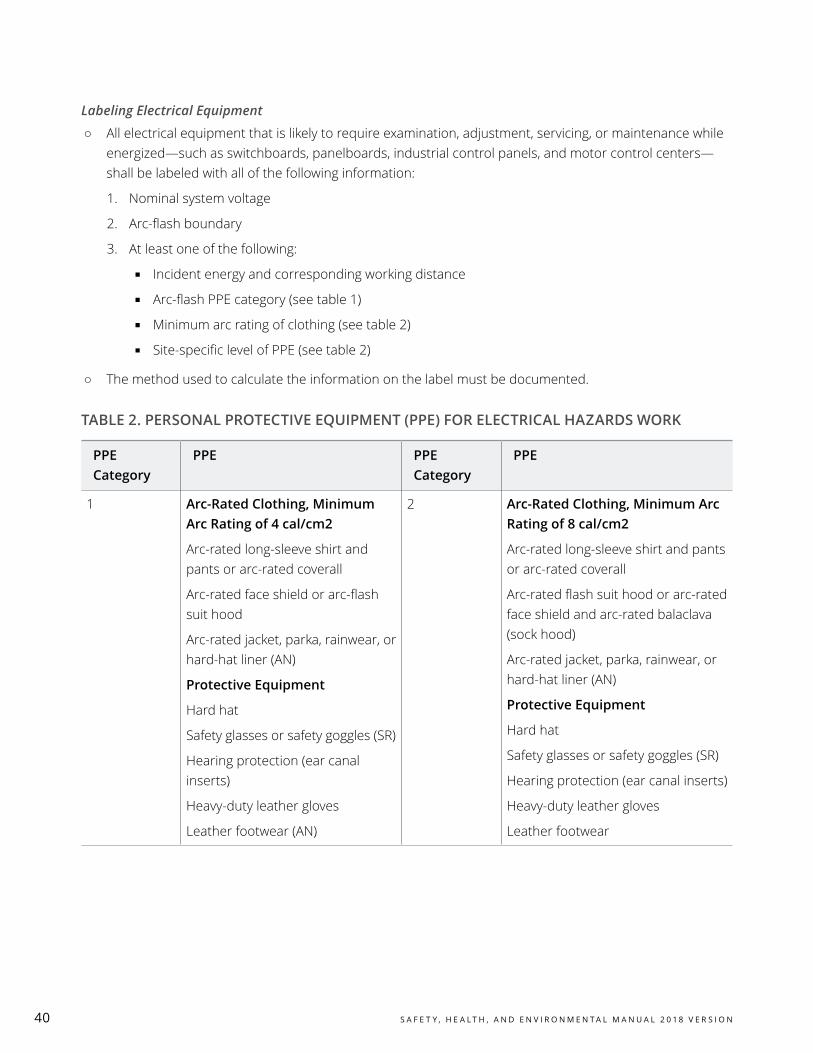
40 S A F E T Y , H E A L T H , A N D E N V I R O N M E N T A L M A N U A L 2 0 1 8 V E R S I O N
Labeling Electrical Equipment○ All electrical equipment that is likely to require examination, adjustment, servicing, or maintenance while
energized—such as switchboards, panelboards, industrial control panels, and motor control centers—shall be labeled with all of the following information:
1. Nominal system voltage
2. Arc-flash boundary
3. At least one of the following:
▪ Incident energy and corresponding working distance
▪ Arc-flash PPE category (see table 1)
▪ Minimum arc rating of clothing (see table 2)
▪ Site-specific level of PPE (see table 2)
○ The method used to calculate the information on the label must be documented.
TABLE2.PERSONALPROTECTIVEEQUIPMENT(PPE)FORELECTRICALHAZARDSWORK
PPE Category
PPE PPE Category
PPE
1 Arc-RatedClothing,MinimumArcRatingof4cal/cm2
Arc-rated long-sleeve shirt and pants or arc-rated coverall
Arc-rated face shield or arc-flash suit hood
Arc-rated jacket, parka, rainwear, or hard-hat liner (AN)
ProtectiveEquipment
Hard hat
Safety glasses or safety goggles (SR)
Hearing protection (ear canal inserts)
Heavy-duty leather gloves
Leather footwear (AN)
2 Arc-RatedClothing,MinimumArcRatingof8cal/cm2
Arc-rated long-sleeve shirt and pants or arc-rated coverall
Arc-rated flash suit hood or arc-rated face shield and arc-rated balaclava (sock hood)
Arc-rated jacket, parka, rainwear, or hard-hat liner (AN)
ProtectiveEquipment
Hard hat
Safety glasses or safety goggles (SR)
Hearing protection (ear canal inserts)
Heavy-duty leather gloves
Leather footwear

41S A F E T Y , H E A L T H , A N D E N V I R O N M E N T A L M A N U A L 2 0 1 8 V E R S I O N
PPE Category
PPE PPE Category
PPE
3 Arc-RatedClothingSelectedsoThattheSystemArcRatingsMeettheRequiredMinimumArcRatingof25cal/cm2
Arc-rated long-sleeve shirt (AR)
Arc-rated pants (AR)
Arc-rated coverall (AR)
Arc-rated arc-flash suit jacket (AR)
Arc-rated arc-flash suit pants (AR)
Arc-rated arc-flash suit hood
Arc-rated gloves
Arc-rated jacket, parka, rainwear, or hard-hat liner (AN)
ProtectiveEquipment
Hard hat
Safety glasses or safety goggles (SR)
Hearing protection (ear canal inserts)
Leather footwear
4 Arc-RatedClothingSelectedsoThattheSystemArcRatingsMeettheRequiredMinimumArcRatingof40cal/cm2
Arc-rated long-sleeve shirt (AR)
Arc-rated pants (AR)
Arc-rated coverall (AR)
Arc-rated arc-flash suit jacket (AR)
Arc-rated arc-flash suit pants (AR)
Arc-rated arc-flash suit hood
Arc-rated glove
Arc-rated jacket, parka, rainwear, or hard-hat liner
ProtectiveEquipment
Hard hat
Safety glasses or safety goggles (SR)
Hearing protection (ear canal inserts)
Leather footwear
AN = as needed
AR = as required
SR = selection is required
Training○ Training is required for all employees that may be exposed to an electrical hazard. Their training must
include the following subjects:
• Specific hazards associated with electrical energy
• Safety-related work practices that will provide protection from job-specific electrical hazards
• Identifying and understanding the relationship between electrical hazards and associated injuries
○ In addition to the training listed above, all qualified persons will receive training on the following subjects:
• Constructing and operating electrical equipment
• Identifying and avoiding electrical hazards
• Becoming familiar with electrical policies and procedures, PPE, insulating and shielding materials,

42 S A F E T Y , H E A L T H , A N D E N V I R O N M E N T A L M A N U A L 2 0 1 8 V E R S I O N
insulated tools, and test equipment
• Selecting an appropriate test instrument and demonstrating how to use the device to verify the ab-sence of voltage
○ Employees permitted to work within the limited-approach boundary (three to five feet from the energized equipment) will receive additional training to do the following:
• Distinguish between exposed energized electrical conductors and other parts
• Determine nominal voltage of exposed, energized electrical conductors
• Understand the approach distances
• Understand the decision-making process necessary to do the following:
▪ Perform the job-safety planning
▪ Identify electrical hazards
▪ Assess the associated risk
▪ Select the appropriate risk-control methods
○ Training can be done in the classroom, on the job, or a combination of the two.
○ Employees exposed to shock hazards must be trained at least annually about how to safely release victims from contact with exposed, energized electrical conductors or circuit parts.
○ Verify at least annually that required training has been completed and documented. Training documents must be maintained for the duration of the employee’s employment.
○ Tasks that are performed less often than once per year will require retraining each year.
○ Supervisors should verify at least annually that employees are complying with the safety-related work practices in these guidelines.
○ Retrain employees every three years if any of the following conditions exist:
• Employees are not complying with these guidelines.
• There is new technology.
• Procedures change.
• An employee performs work not normally done during his or her regular job duties.
Energized Electrical Work Permit○ A permit is required when work is performed within the restricted-approach boundary (approximately
one foot from the electrical equipment).
○ A permit is not required under any of the following conditions if a qualified person uses the PPE required by the label:
• Equipment testing and troubleshooting
• Thermography and visual inspections
• Other nonelectrical tasks performed outside the restricted-approach boundary (staying at least one

43S A F E T Y , H E A L T H , A N D E N V I R O N M E N T A L M A N U A L 2 0 1 8 V E R S I O N
foot away from the electrical equipment)
○ The Energized Electrical Work Permit will include the following:
• Description and location of the electrical equipment to be worked on
• Justification for why the work must be performed energized
• Description of the safe work practices to be followed
• Results of shock and arc-flash risk assessment:
▪ Nominal voltage to which personnel will be exposed
▪ Limited-approach boundary distance
▪ Restricted-approach boundary distance
▪ Shock and arc-flash PPE to be used during the work activity
• Types of barricades to be used to keep unqualified persons away
• Evidence that a job briefing occurred
• Signatures from management that approve energized work
Personal Protective EquipmentEmployees working in areas where electrical hazards are present must be provided with and must use pro-tective equipment that is designed and constructed for the specific part of the body to be protected and for the work to be performed.
When an employee is working within the arc-flash boundary (including testing and troubleshooting), all parts of the body must be protected using PPE. Use table 2 to find the PPE required. In addition to the PPE listed in table 2, any employee working within the restricted-approach boundary must also wear rubber insulating gloves rated for the voltage the gloves will be exposed to.
Employees will use insulated tools or handling equipment when working inside a restricted-approach boundary of exposed, energized electrical conductors where tools or handling equipment might make accidental contact.
All PPE and tools must be inspected before each use for contamination or damage.
Responsibilities of Host Employer and ContractorBefore electrical work begins, a documented meeting between the host employer and contractor must be held to ensure that all parties understand the requirement of these electrical safety guidelines.
Host Employer’s Responsibilities○ Inform the contractor of known electrical hazards related to the contractor’s work.
○ Share electrical installation information related to the contractor’s work.
○ Observe the contract employees while they work, and report any violations of these standards to the contract supervisor.
Contractor’s Responsibilities○ Instruct all contract employees on information and hazards shared by the host employer.

44 S A F E T Y , H E A L T H , A N D E N V I R O N M E N T A L M A N U A L 2 0 1 8 V E R S I O N
○ Instruct all contract employees on the requirements of these electrical safety guidelines, and ensure the guidelines are followed.
○ Tell the host employer of any unique electrical hazards identified during the project.
○ Report back to the host employer any measures taken to correct violations reported by the host employer.
4.7 EMERGENCYEYEWASHESANDSHOWERSThese guidelines provide criteria for emergency eyewashes and showers.
The following guidelines should help managers and supervisors identify where emergency eyewashes and showers should be installed:
□ Combination emergency eyewashes and showers should be installed in locations where employees use chemical products that have been identified by the manufacturer as a “corrosive.” A corrosive is any liquid or solid that causes visible destruction of human skin or tissue. Examples are hydrochloric acid, sulfuric acid, sodium hydroxide, and potassium hydroxide. Corrosives include both acids and bases.
□ Emergency eyewashes are recommended in locations where irritating materials or chemicals are used. Examples are organic solvents and combustible and flammable liquids. However, showers are not re-quired in these locations.
□ Eyewash units and shower areas should be located within 10 seconds of the immediate work area.
□ The access to an eyewash and shower must be unobstructed and prominently identified by a sign.
□ If needed, provide a water-tempering valve specifically designed for eyewash products to maintain a tepid water temperature in the range of 60–100°F (16–38°C).
□ Plumbed eyewash and shower units should be tested weekly with a flush cycle of three minutes. Weekly tests consist of checking that the flow pattern is uniform and washes both eyes simultaneously, that no contamination is present, that the water temperature is tepid, and that there is adequate water pres-sure. Preventive maintenance inspections should be done at least annually and include tests for volume, sustained flow, and valve operation. These tests should also ensure that the units are located within 10 seconds of the hazard, they are clearly marked with a highly visible sign, and employees are instructed on the location and proper use of the units.
□ Records of regular checks and maintenance should be kept. Inspection tags should remain attached to the eyewash unit and shower.
□ Gravity-fed portable eyewash stations should be used only where plumbed, potable water is not available or otherwise infeasible. Fluids should be replaced at intervals recommended by the manufacturer.
□ Many faucet-mounted eyewash devices do not meet regulatory requirements and should be used only where plumbed eyewash units are not feasible.
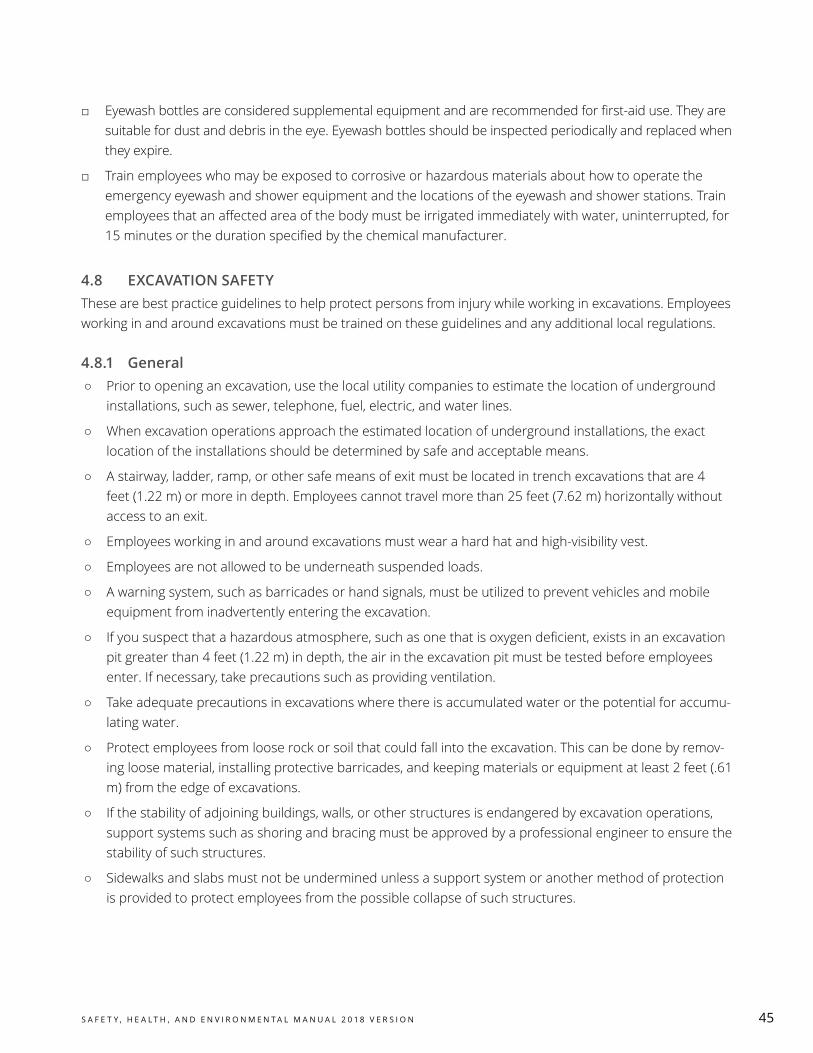
45S A F E T Y , H E A L T H , A N D E N V I R O N M E N T A L M A N U A L 2 0 1 8 V E R S I O N
□ Eyewash bottles are considered supplemental equipment and are recommended for first-aid use. They are suitable for dust and debris in the eye. Eyewash bottles should be inspected periodically and replaced when they expire.
□ Train employees who may be exposed to corrosive or hazardous materials about how to operate the emergency eyewash and shower equipment and the locations of the eyewash and shower stations. Train employees that an affected area of the body must be irrigated immediately with water, uninterrupted, for 15 minutes or the duration specified by the chemical manufacturer.
4.8 EXCAVATIONSAFETYThese are best practice guidelines to help protect persons from injury while working in excavations. Employees working in and around excavations must be trained on these guidelines and any additional local regulations.
4.8.1 General○ Prior to opening an excavation, use the local utility companies to estimate the location of underground
installations, such as sewer, telephone, fuel, electric, and water lines.
○ When excavation operations approach the estimated location of underground installations, the exact location of the installations should be determined by safe and acceptable means.
○ A stairway, ladder, ramp, or other safe means of exit must be located in trench excavations that are 4 feet (1.22 m) or more in depth. Employees cannot travel more than 25 feet (7.62 m) horizontally without access to an exit.
○ Employees working in and around excavations must wear a hard hat and high-visibility vest.
○ Employees are not allowed to be underneath suspended loads.
○ A warning system, such as barricades or hand signals, must be utilized to prevent vehicles and mobile equipment from inadvertently entering the excavation.
○ If you suspect that a hazardous atmosphere, such as one that is oxygen deficient, exists in an excavation pit greater than 4 feet (1.22 m) in depth, the air in the excavation pit must be tested before employees enter. If necessary, take precautions such as providing ventilation.
○ Take adequate precautions in excavations where there is accumulated water or the potential for accumu-lating water.
○ Protect employees from loose rock or soil that could fall into the excavation. This can be done by remov-ing loose material, installing protective barricades, and keeping materials or equipment at least 2 feet (.61 m) from the edge of excavations.
○ If the stability of adjoining buildings, walls, or other structures is endangered by excavation operations, support systems such as shoring and bracing must be approved by a professional engineer to ensure the stability of such structures.
○ Sidewalks and slabs must not be undermined unless a support system or another method of protection is provided to protect employees from the possible collapse of such structures.

46 S A F E T Y , H E A L T H , A N D E N V I R O N M E N T A L M A N U A L 2 0 1 8 V E R S I O N
○ When employees are working in an excavation, daily inspections must be performed by a qualified per-son prior to the start of work, as needed throughout the shift, and after every rainstorm. These inspec-tions must examine the following:
◦ Adjacent areas
◦ Situations that could result in possible cave-ins
◦ The protective systems, looking for any indications of their failure
◦ Any potentially hazardous atmospheres
◦ Other hazards
○ Employees must be removed from an excavation if hazardous conditions exist.
4.8.2 ProtectiveSystemsEach employee in an excavation must be protected from cave-ins by systems such as shielding or sloping unless the excavations are less than 5 feet (1.52 m) in depth.
Shielding○ Trench boxes are a common shielding system and are intended primarily to protect workers from
cave-ins.
○ The excavated area between the outside of the trench box and the face of the trench should be as small as possible. The space between the trench box and the excavation side must be backfilled to prevent lateral movement of the box. Trench boxes should not be subjected to loads beyond those which the system was designed to withstand.
○ Trench boxes may be used in combination with sloping.
○ The box must extend at least 18 inches above the surrounding area if there is sloping toward the excavation.
○ Any modifications to the trench box must be approved by the manufacturer.
○ Trench boxes may ride two feet above the bottom of an excavation, provided they are calculated to sup-port the full depth of the excavation and there is no caving under or behind the system.
○ Workers may not remain in the trench box while it is being moved.

47S A F E T Y , H E A L T H , A N D E N V I R O N M E N T A L M A N U A L 2 0 1 8 V E R S I O N
SlopingThe following diagram shows the maximum slope allowed for excavations less than 20 feet based on soil type and angle to the horizontal. The soil must be classified by the soil classification of the weakest soil layer.
○ Type A (most stable)—clay, silty clay, and hardpan (resists penetration).
○ Type B (medium stability)—silt, sandy loam, medium clay, and unstable dry rock.
○ Type C (least stable)—gravel; loamy sand; soft clay; submerged soil; dense, heavy, and unstable rock; and soil from which water is freely seeping.
4.9 FALLPROTECTIONThese guidelines provide general requirements for establishing a fall-protection program in compliance with Church standards or best practices. Implement local codes if they are more stringent. Managers, supervisors, and employees are responsible to review and comply with these guidelines.
These guidelines apply to employees working or walking on surfaces that are four feet or more above the next lowest level without fall protection.
48 S A F E T Y , H E A L T H , A N D E N V I R O N M E N T A L M A N U A L 2 0 1 8 V E R S I O N
4.9.1 FallHazardAssessmentandControlsManagers or supervisors should perform and document a Fall Hazard Assessment (see chapter 7) for all potential fall exposures associated with the work location. Specific hazard-control measures should be identi-fied, documented, and implemented for each fall hazard. Fall hazard controls may include any of the following (listed in order of effectiveness):
1. Reducing or eliminating exposures to falls. Try to eliminate the need for employees to perform elevated work. If management is unable to eliminate the fall hazard with permanent engineering controls, then other measures should be considered to minimize this risk. Some of these measures may include:
• Installing and using remote monitoring systems (cameras, gas detectors, pressure sensors, leak detectors, wireless meter readers, and so on) to obtain information about elevated areas and equipment.
• Selecting equipment and lighting that have a long service life and require minimal maintenance. This will help reduce the number of times employees or contractors need to access the equipment for maintenance or repair.
• Designing, installing, or replacing light fixtures that are easy to service and provide safe access for maintenance. Examples include installing fixtures that allow workers to change lights from above, use a pole, or lower the light fixture by hoist.
2. Engineering and passive fall controls. Barriers such as guardrails can be important tools to eliminate expo-sures to falls. You can make out-of-reach areas or equipment that needs to be serviced safe to access by installing catwalks surrounded by guardrails.
3. Administrative controls. Administrative controls may include limiting the frequency of access, limiting the number of people authorized to access heights, and making plans that will anticipate hazards and keep people safe when working at heights. Place roof-edge warning lines at safe distances from the edges (be-tween 6 and 15 feet, as defined below under section 4.9.4, “Roof-Edge Requirements”) to clearly indicate to workers the designated work area. Provide authorized employees with appropriate training on using the control measures to minimize the likelihood of a fall. Consider making sure that no one is working alone near fall hazards. Also consider having one person serve as a monitor to ensure the other person remains at least 15 feet from the edge.
4. Fall-restraint and fall-arrest systems. Fall-restraint and fall-arrest systems either help workers keep a safe distance from the edge or slow them down and arrest their bodies should they fall from a height. More information about these systems can be found below. It is important that these systems are used 100 percent of the time to prevent or control a fall.

49S A F E T Y , H E A L T H , A N D E N V I R O N M E N T A L M A N U A L 2 0 1 8 V E R S I O N
4.9.2 Definitions
AnchororAnchoragePointsThe position on the independent structure that a fall-arrest device or lanyard is securely attached to. The minimum requirement for an anchorage point is a 5,000-pound static load strength (needed for six feet of free fall) per person attached. Anchorage points must be designed, installed, and used as part of a complete personal fall-arrest system that maintains a safety factor of at least two.
BodyBeltBody belts are prohibited in personal fall-arrest systems and can only be used in fall-restraint systems.
BodyHarnessA device that encompasses the torso and distributes fall-arrest forces over all the enclosed body parts and can be attached to other parts of a personal fall-arrest system. Suspension trauma-prevention straps should be a part of every body harness.
QualifiedPersonA person who is capable of identifying existing and predictable hazards in the work environment and who is authorized to take prompt measures to eliminate the hazards.
GuardrailSystemBarriers erected to protect workers from falling to a lower level.
LadderSafetySystemConsists of any of the following: personal fall-arrest system, retractable lifeline, rope or wire grab sys-tem, track system, and so forth.
LanyardA short, flexible rope, strap, or webbing.
Lifeline(Dropline)A vertical lifeline that extends from an independent anchorage point and to which a lanyard or body harness is attached using a grabbing device.
Lifeline(Horizontal)An anchoring cable rigged between two fixed anchorage points on the same level. The line may serve as a mobile fixture to attach lanyards, lifelines, or retracting lifelines.
PersonalFall-ArrestSystemA conventional or commonly used fall-protection system designed to stop a single worker from free falling to a lower level. Components include an anchor, a lanyard, and a body harness.
50 S A F E T Y , H E A L T H , A N D E N V I R O N M E N T A L M A N U A L 2 0 1 8 V E R S I O N
RetractingLifelineDeviceA portable, self-contained device that is attached to an anchorage point above the work area. The lifeline acts as an automatic taut lanyard. A lifeline rope, webbing, or cable is attached directly to the worker’s harness. The rope extends out of the device as distance increases and retracts as the worker moves closer. When a fall occurs, a centrifugal locking mechanism is activated to arrest the movement, thereby reducing the potential shock.
Safety-MonitoringSystemA fall-protection system that requires a monitor (qualified person) to be responsible for recognizing fall hazards and warning workers when they are at risk of falling.
Warning-LineSystemA barrier erected on a roof to warn workers they are approaching an unprotected edge. This system designates an area for work without conventional fall-protection systems (guardrail, safety net, or per-sonal fall-arrest system). Warning-line systems may be used only on flat or low-slope working areas.
4.9.3 SafeAccessSafe access to and from elevated areas should be provided to all employees. Safe access includes engineered systems that protect employees from falls to lower levels. This section includes guidelines for preventing falls on walkways, guardrails, ladders, and stairways.
Access hatches. Managers and supervisors ensure that employees are protected from falls and other haz-ards associated with hatches or other roof openings. Protect employees from these hazards by closing the hatch while on the roof or using mechanical devices such as an automated hatch, guardrail system, or grab bar.
Aerial lifts. Fall-protection requirements for aerial lifts may be found in section 4.2, “Aerial Lifts.”
Catwalks and other access to mechanical equipment. Managers and supervisors must provide engineered safe access for employees who access and maintain equipment in attic spaces and mezzanines. For ex-ample, employees should not be expected to balance and walk on trusses or other obstacles while trying to maintain light fixtures or change air filters. Catwalks (preferably made of steel) should be provided with guardrail systems to prevent falls through the ceiling to lower levels.
Workers must be protected when walking or working on a surface with an unprotected edge or when on a surface that is not designed to bear the weight of employees, such as a suspended ceiling.
Docks. Receiving docks should be fitted with a removable guardrail system if (1) the area adjacent to the dock is regularly used by personnel and (2) a fall hazard exists; for example, a bay door is open, and a receiving trailer is not present.
Fixed stairways and ladders. Fixed stairways are preferred over fixed ladders to access equipment or a working or walking surface. Design and installation should be in accordance with local codes and regulations.
• Side rails for a fixed ladder should extend a minimum of 42 inches (1 m) above the landing to permit a safe handhold when accessing a landing or pass-through. Include self-closing safety gates at all landing-access points.

51S A F E T Y , H E A L T H , A N D E N V I R O N M E N T A L M A N U A L 2 0 1 8 V E R S I O N
• Landings for fixed ladders should be equipped with guardrails on any open side.
• The vertical distance between landings for fixed ladders should not be more than 30 feet (9.1 m).
• Ladder safety devices or systems such as rope grabs should be installed when the distance between landings is more than 24 feet (7.3 m). (Note: existing cages for fixed ladders do provide some protec-tion, but safety devices for fixed ladders should gradually be installed on fixed ladders that extend more than 24 feet [7.3 m].)
Safety devices for fixed ladders include the following equipment:
• A full-body harness with a chest D-ring
• A single lanyard with snap hooks
• An engineered safety line or rail system
Guardrails. Guardrail systems may be used to protect employees from falls to lower elevations. A guard-rail system consists of a top-rail, mid-rail, and toeboard. Top-rails must be 39–45 inches (100–114 cm) in height and able to withstand a 200-pound (0.9 kN) force in any direction. The mid-rail should be approx-imately 21 inches (53 cm) in height and able to withstand a 100-pound (0.44 kN) force in any direction. A 4-inch (10 cm) toeboard is required if people must walk below or near the walkway.
Handrails. Handrails are required on stairs with four or more steps. Handrails should be 30–38 inches (76–97 cm) above the surface of the step.
Parapet walls. Parapet walls on flat roofs should be at least 39 inches (1 m) in height to help prevent falls. If parapet walls are lower than 39 inches (1 m) and access to the roof is required, then follow the roof-edge requirements below.
4.9.4 Roof-EdgeRequirements○ Work within 6 feet (1.8 m) of the roof edge requires the use of a guardrail system, personal fall-arrest
systems, or a fall-restraint system attached to anchor points on the roof.
○ If performing infrequent, temporary work between 6 and 15 feet (1.8 and 4.6 m) from the roof edge, there must be a designated warning line at least 6 feet (1.8 m) from the roof edge.
○ Frequent and regular work within 6 and 15 feet (1.8 and 4.6 m) requires the same protection when work-ing within 6 feet (1.8 m) of the roof edge.
○ Work at 15 feet (4.6 m) or more from the roof edge requires administrative controls, such as using a sec-ond employee to act as a monitor.
Skylights. Skylights in the roof of a building through which employees may fall while walking or working should be guarded by a screen or fixed railing on all exposed sides. Alternately, a skylight may be used that is engi-neered to support, without failure, at least twice the weight of employees, equipment, and materials that may be imposed on the cover at any one time.
Surface openings. Elevated openings two inches or wider at the narrowest point must be protected to keep workers from tripping over them and objects or materials from falling through them.

52 S A F E T Y , H E A L T H , A N D E N V I R O N M E N T A L M A N U A L 2 0 1 8 V E R S I O N
4.9.5 Fall-RestraintandFall-ArrestSystemsAnchor points. Anchor points can be used for both fall-restraint and fall-arrest systems. A professional engi-neer should design them and oversee installation. These anchor points should be inspected annually by a qualified person. A documented certification of anchor points must be performed every 10 years or after a fall event.
Fall-restraint system. A fall-restraint system allows employees or contractors to perform work where there are potential fall hazards by preventing them from actually reaching any fall hazard. Anchors for fall-restraint sys-tems need to meet a 1,000-pound (4.5 kN) load requirement or be rated at least two times the foreseeable force. Anchors for fall-restraint systems cannot be used as part of a fall-arrest system. Fall-restraint systems are preferable to fall-arrest systems. Body belts or full-body harnesses may be used for fall restraint.
Personal fall-arrest system. Ropes, straps, and webbing used in lanyards, in lifelines, and in components of body belts and harnesses that must be sturdy and strong should be made from synthetic fibers. Wire rope may be used where synthetic fibers are infeasible, such as for welding or on self-retracting lifelines. The com-plete assembly must be rated to exceed 5,000 pounds (22.2 kN). The lanyard length must limit free fall to a maximum of six feet or limit arresting forces to a maximum of 1,800 pounds (8 kN).
All lanyards must be kept as short as possible to minimize both the possibility and force of a free fall. Self-retracting lifelines automatically adjust the length of the connection. If possible, anchorages should be at shoulder height or higher and directly over the work area.
○ Care must be taken to attach the lanyard to an appropriate anchor by means that will not reduce the lanyard’s strength. Lanyards must not be knotted in any way because this will reduce the lanyard’s overall strength. Lanyards should not be run over sharp or rough surfaces that could damage or sever them.
○ When required to use fall-arrest systems, employees must be tied off 100 percent of the time. A multi-legged or Y-lanyard may be used to accomplish this requirement.
○ Lifeline and lanyard attachment points must be capable of withstanding a minimum deadweight of 5,000 pounds (22.2 kN). If not, they must be designed, installed, and used as part of a complete personal fall-arrest system that maintains a safety factor of at least two.
○ Snap hooks, D-rings, and O-rings must have a minimum tensile strength rating of 5,000 pounds (22.2 kN). Only locking snap hooks may be used. Nonlocking snap hooks are prohibited as parts of personal fall-arrest systems and positioning device systems. Snap hooks, D-rings, O-rings, and anchorage points must be compatibly shaped to prevent unintentional disengagement during use.
○ Lifelines should be of wire rope at least ½ inch in diameter. If used where they might accidentally be cut, lifelines must be wire rope at least ⅞ inch in diameter.
○ Employees must inspect all fall-protection equipment for defects prior to each use. Anchor points should be inspected annually by a qualified person. Any lifelines installed by a certified installer should be in-spected annually by a certified installer. If evidence of excess wear, deterioration, or mechanical malfunc-tion is found, remove the items from use. Replace or repair (if possible) defective items.
○ Each harness and lanyard assembly must have markings that identify the manufacturer and the date of manufacture. The markings must be printed on the harness or stamped onto permanently attached tags. Self-retracting lifelines can be returned to the manufacturer for inspection, repair, and recertification.

53S A F E T Y , H E A L T H , A N D E N V I R O N M E N T A L M A N U A L 2 0 1 8 V E R S I O N
○ Discard harnesses or lanyards that have been used to arrest a fall, have been damaged, or have expired according to the manufacturer’s expiration date.
○ Scaffolds, guardrails, aerial lifts, ladders, or safety nets must be used where the work surface is 25 feet (7.6 m) or more above the next lowest level and harnesses and lifelines are not practical.
○ Workers using fall-protection equipment must have a coworker or observer nearby who can offer assis-tance if needed. A fall rescue plan should be developed for responding to and rescuing an employee who falls using a personal fall-arrest system. Suspension trauma-prevention straps should be included on all full-body harnesses.
4.9.6 TrainingWorkers must be trained so they are familiar with the fall-protection systems or methods they will use to pro-tect themselves from fall hazards. A qualified person must provide training that ensures workers will recog-nize fall hazards and will learn which procedures will minimize exposure to these hazards.
In addition, workers who use personal fall-arrest systems must also be trained to know:
○ How to inspect the equipment before each use.
○ How to properly wear the equipment.
○ How the personal fall-arrest system works.
○ The proper hookup and attachment methods for the equipment.
○ Appropriate anchoring and tie-off techniques.
○ Annual inspection and storage procedures for the equipment.
○ Self-rescue procedures, techniques, and suspension trauma.
4.10 FARMANDLANDSCAPEEQUIPMENTSAFETYThese guidelines provide information to prevent farm accidents and to comply with agricultural safety and health best practices. Farm incidents can be greatly reduced if these guidelines are applied during the course of regular farm operations.
Managers should help employees conduct farm operations in a safe manner and adhere to these guidelines.
4.10.1 TractorSafetyThe following guidelines apply to tractor safety:
□ Provide a rollover protective structure (ROPS) for each tractor except for low-profile tractors used in or-chards, vineyards, or other areas where the vertical clearance of a ROPS would substantially interfere with normal operations. Folding ROPS should be kept upright during operation.
□ Provide a seat belt for each tractor equipped with a ROPS. Instruct employees how to use them, and ensure that they do.
□ Immediately clean leaks from batteries, fuel tanks, oil reservoirs, and radiators, and repair the cause of the leaks.
54 S A F E T Y , H E A L T H , A N D E N V I R O N M E N T A L M A N U A L 2 0 1 8 V E R S I O N
□ Inform every employee who operates a tractor or other piece of equipment about the operating practices listed below and about any other safe practices. Provide training at the time of initial assignments and at least annually thereafter.
4.10.2OperatingPracticesEmployees who use tractors should use the following safe operating practices:
□ Securely fasten the seat belt if the tractor has one.
□ Where possible, avoid operating the tractor near ditches, embankments, or holes.
□ Reduce speed when turning, crossing slopes, or driving on rough, slick, or muddy surfaces.
□ Stay off slopes too steep for safe operation.
□ Watch where you are going, especially at row ends, on roads, and around trees.
□ Do not permit others to ride on the tractor.
□ Operate the tractor smoothly, with no jerky turns, starts, or stops.
□ Hitch only to the drawbar and to hitch points recommended by the manufacturer.
□ When the tractor is not in use, set brakes securely and use the park lock if available.
4.10.3EquipmentSafetyGuardsThe following apply to equipment safety guards:
□ Instruct every employee how to safely operate equipment that uses safety guards. Instruct them when they are initially assigned to the equipment and at least annually thereafter.
□ Keep all guards in place while operating the equipment.
□ Permit no riders on farm field equipment except those who are being instructed or who are necessary in operating the machine.
□ Stop the engine and disconnect the power source before servicing, adjusting, or cleaning.
□ Make sure everyone is clear of the machinery before starting the engine, engaging power, or operating the machine.
□ Lock out power before performing maintenance on farm equipment.
□ Use a guard, shield, rail, or fence to protect employees from moving parts. Each guard should withstand the weight of a 250-pound (113 kg) individual, be free from burrs and sharp edges, and be attached securely to the equipment or building.
□ Ensure that the guards for power take-off (PTO) and driveline are correctly installed and properly maintained.
□ Provide tractors and other pieces of equipment with warning labels to prevent PTO injuries. Keep warning label clean and visible.
□ Guard all power-driven gears, screw conveyors, belts, chains, sheaves, pulleys, sprockets, and idlers. Do not remove guards or access doors until all components have stopped.

55S A F E T Y , H E A L T H , A N D E N V I R O N M E N T A L M A N U A L 2 0 1 8 V E R S I O N
□ Guard grain-bin sweep augers.
□ To prevent potential stored energy from causing injury when equipment is serviced, follow procedures found in section 4.15, “Hazardous Energy Control (Lockout/Tagout) Program.”
4.11 FIREEXTINGUISHERSThese guidelines provide basic information on selecting, placing, and maintaining portable fire extinguishers.
All emergency action plans should address firefighting protocol. Those responsible for using extinguishers should be trained annually to properly use them.
Used properly, a portable fire extinguisher can save lives and property by putting out small fires or controlling them until the fire department arrives. Portable extinguishers are not designed to fight large or spreading fires.
4.11.1 UsingtheExtinguisher□ Remember PASS for basic operating instructions:
• Pull the pin.
• Aim the extinguisher nozzle at the base of the fire.
• Squeeze or press the handle.
• Sweep from side to side at the base of the fire until it appears to be out.
4.11.2 SelectingaFireExtinguisherChoose your extinguisher carefully. A fire extinguisher should:
○ Be approved by an independent testing laboratory.
○ Be labeled as to the type of fire it is intended to extinguish.
○ Be large enough to put out the fire. Most portable extinguishers discharge completely in as few as eight seconds.
The following list describes the classes of fires:
Class A Fire: Ordinary combustibles such as wood, cloth, paper, rubber, and many plastics
Class B Fire: Flammable liquids such as gasoline, oil, grease, tar, oil-based paint, lacquer, and flammable gas
Class C Fire: Energized electrical equipment including wiring, fuse boxes, circuit breakers, machinery, and appliances
Class K Fire: Cooking appliance fires that involve combustible cooking materials such as vegetable oil or animal oils and fats
Many fire extinguishers are multipurpose A-B-C models and can be used on those three classes of fire. However, food preparation areas (kitchens) that use combustible cooking substances should have a class K fire extinguisher readily accessible. Portable extinguishers are rated for the size of fire they can handle. This rating is a number from 1 to 40 for class A fires and 1 to 640 for class B fires. The rating will appear on the label. The larger the number, the larger the fire the extinguisher can put out.

56 S A F E T Y , H E A L T H , A N D E N V I R O N M E N T A L M A N U A L 2 0 1 8 V E R S I O N
4.11.3 PlacingtheFireExtinguisherExtinguishers should be placed within 75 feet (23 m) of class A fire hazards and within 50 feet (15 m) of class B and C fire hazards. Extinguishers should be placed in plain view along normal paths of travel. They should be mounted so that the top of the extinguisher is no more than 5 feet above the floor or in accordance with local fire codes. Where visual obstructions cannot be completely avoided, provide other means to indicate the extinguisher’s location.
4.11.4 MaintainingandInspectingtheExtinguisherAll extinguishers should be maintained at least annually by a certified inspector or a fire extinguisher main-tenance business that has been licensed by a fire marshal. Extinguishers should be inspected monthly. The person assigned to perform the inspection should have adequate knowledge of inspection criteria. The inspectors should ensure that:
□ The extinguisher is placed in a proper location.
□ Access and visibility are not obstructed.
□ Operating instructions on the nameplate are legible and facing outward.
□ Seals and tamper indicators are not broken or missing.
□ The extinguisher is full (determine by lifting).
□ There is no obvious damage, corrosion, or leaking and that the nozzle is not clogged.
□ They have written the date and their initials on the tag after inspecting the extinguisher (monthly inspec-tion record).
4.12 FIRSTAIDPrompt first-aid treatment should be provided for injured employees. You can make sure this treatment is provided either by training employees on first aid or by ensuring that emergency treatment services are within reasonable proximity of the worksite. Adequate first aid should be available in the critical minutes be-tween the occurrence of an injury and the availability of physician or hospital care.
For serious injuries, such as those involving stopped breathing, cardiac arrest, or uncontrolled bleeding, first-aid treatment should be provided within the first few minutes to avoid permanent impairment or death. Therefore, in areas where serious accidents are possible—such as accidents involving falls, suffocation, elec-trocution, or amputation—employees who are trained to render first aid should be available on site unless emergency medical services are available within 3 to 4 minutes. A somewhat longer response time of up to 15 minutes is reasonable in workplaces, such as offices, where the possibility of such serious work-related injuries is more remote.
Design and implement a workplace first-aid program that meets the needs of each location and:
○ Aims to minimize the effects of accidents or exposures.
○ Complies with best practices relating to first aid.
○ Includes sufficient quantities of appropriate and readily accessible first-aid supplies and first-aid equipment.

57S A F E T Y , H E A L T H , A N D E N V I R O N M E N T A L M A N U A L 2 0 1 8 V E R S I O N
○ Assigns and trains first-aid providers who (1) receive first-aid training suitable to the specific workplace and (2) receive periodic refresher courses on first-aid skills and knowledge.
For information on obtaining or placing automatic external defibrillators (AEDs) as part of a workplace first-aid program, please contact your department safety, health, and environmental representative or see the “Automated External Defibrillator ( AED ) Program Fact Sheet.”
4.12.1 First-AidKitsThe following are recommended items to be included in first-aid kits. Each facility should have one kit for ev-ery 50 people. These kits are designed to deal with the most common types of workplace injuries. Periodically check the expiration dates on products, and replace when needed. To obtain a first-aid kit, see your purchas-ing reference guide (PRG), or check with your local purchasing agent. Replacement supplies may be pur-chased locally. (Note: medications, including over-the-counter medications, should not be stocked in first-aid kits or dispensed by first-aid responders.)
RequiredMinimumFill
Quantity Item
10 Antiseptic wipes (benzalkonium chloride)
10 Antibiotic ointment, individual application
1 Burn dressing, gel-soaked
10 Burn treatment, individual application
16 Adhesive bandages, 1″ x 3″ (2.5 x 7.5 cm)
2 Sterile gauze pads, 3″ x 3″ (7.5 x 7.5 cm)
2 Non-adherent eye covering, with means of attachment
2 Trauma dressing, 5″ x 9″ (12.5 x 23 cm)
1 Triangular bandages, 40″ (1 m)
1 Roller bandage, gauze, 2″ x 6 yds. (5 cm x 5.5 m)
1 Adhesive tape, 1″ x 2½ yds. (2.5 cm x 2.3 m)
1 Eyewash/skin wash, 1 fl. oz. (30 mL)
1 Cold pack, 4″ x 5″ (10 x 12.5 cm)
1 First-aid guide
1 Scissors, blunt, 4″ (10 cm)
1 Breathing barrier or CPR mask
4 Medical exam gloves, vinyl or nitrile
6 Hand sanitizer, individual application

58 S A F E T Y , H E A L T H , A N D E N V I R O N M E N T A L M A N U A L 2 0 1 8 V E R S I O N
4.12.2Training—FirstAidandCPRA first-aid responder in the workplace is someone who is trained to deliver initial medical emergency pro-cedures. He or she uses a limited amount of equipment to perform a primary assessment and intervention while waiting for emergency medical service (EMS) personnel to arrive.
Initial and periodic refresher training should be provided through an accredited and recognized provider. The training should focus on the specific needs of the work location, the likely potential injuries, and the average time before EMS personnel will arrive. Training could focus on the following conditions:
○ Chest pain
○ Stroke
○ Breathing problems
○ Anaphylactic reaction
○ Hypoglycemia in diabetics taking insulin
○ Seizures
○ Pregnancy complications
○ Abdominal injury
○ Reduced level of consciousness
○ Impaled object
○ Other non-life-threatening emergencies
4.13 FLAMMABLELIQUIDSANDSTORAGEThe following are general guidelines for flammable liquids and flammable liquid storage rooms.
Flammable liquids should be stored in a way that reduces fire hazards. The following guidelines are a simpli-fied version of flammable liquid storage requirements:
□ Flammable liquids may be stored in approved plastic containers that are designed specifically to store up to one gallon (3.8 L) of flammable liquids or in safety cans (see glossary) that can hold up to five gallons (20 L).
□ When filling containers, always place the container on the ground before refueling. Touch container with gas dispenser nozzle before removing lid. Keep gas dispenser nozzle in contact with container inlet when filling.
□ The amount of flammable liquids in a work area should be limited to the minimum quantity possible.
□ It is permitted to store fewer than 10 gallons (38 L) of flammable liquids outside a flammable liquid stor-age cabinet in a work area.
□ More than 10 gallons (38 L) of flammable liquids should be stored in a flammable liquid storage cabinet (see glossary).
□ Flammable liquids should not be stored in regular storage cabinets.
□ Class I liquids—liquids with a flash point less than 100°F (38°C)—should not be stored in basements.
□ Flammable liquids should be stored away from exit routes so that occupants are not trapped in the event of a fire.
59S A F E T Y , H E A L T H , A N D E N V I R O N M E N T A L M A N U A L 2 0 1 8 V E R S I O N
□ Flammable liquids should not be stored in the same room with reactive materials except in a flammable liquid storage cabinet.
Indoor storage rooms for flammable liquids should be constructed to meet regulations and reduce fire haz-ards. Use the following guidelines:
□ Storage rooms should have raised sills or ramps at least four inches high (10 cm).
□ Rooms should have self-closing fire doors.
□ Rooms should be liquid tight where the walls join the floors.
□ Wood used for shelving must be at least one inch thick (2.5 cm).
□ Rooms must contain fewer than 240 gallons (900 L) of stored liquid per room; of these 240 gallons (900 L), fewer than 60 gallons (230 L) should be class IA liquids.
□ Explosion-proof wiring and electrical fixtures should be used.
□ A ventilation fan must be connected to turn on when the light switch located outside the room is turned on.
□ Six air changes per hour of ventilation should be provided.
□ The switch for a mechanical exhaust system should be outside the door.
4.14 HAND,POWER,PNEUMATIC,ANDPOWDER-ACTUATEDTOOLSThese guidelines establish general requirements for operating hand and power tools safely. They provide best practice guidelines. Employees should be trained in the proper use of all tools. Workers should be able to recognize the hazards associated with the different types of tools and the safety precautions necessary.
4.14.1 GeneralRules□ Properly maintain all tools.
□ Before using the tools, inspect them for damage and ensure they will operate safely.
□ Dispose of tools that are in poor condition and considered unsafe. Replace wooden handles that are loose, cracked, or splintered. Do not tape or lash handles with wire to temporarily repair an unsafe condition.
□ Use tools only for what they were designed to do. Operate tools in accordance with the manufacturer’s instructions.
□ Use the proper tool for the job to be performed. Do not use makeshift or substitute tools not designed for the job.
□ Do not throw tools from place to place or from person to person.
4.14.2HandTools□ Repair or replace impact tools, such as chisels or punches, that become mushroomed or cracked.
□ Keep screwdrivers sharp and even. Do not use a screwdriver with a broken or rounded point. Do not use a screwdriver as a pry bar or chisel.
□ Store sharp-edged tools in a safe manner. Do not carry sharp-edged tools in clothing pockets.
60 S A F E T Y , H E A L T H , A N D E N V I R O N M E N T A L M A N U A L 2 0 1 8 V E R S I O N
□ Do not use a pipe (cheater bar) to extend a wrench handle unless the wrench was designed for such use. Do not use shims to make a wrench fit.
4.14.3PowerTools□ Ground non-current-carrying metal parts of portable electric tools when connected to a power source
unless the tool is an approved double-insulated type.
□ Never use a tool with a broken or frayed electrical cord or with the grounding prong removed.
□ Inspect all power tools for general serviceability and the presence of all applicable safety devices.
4.14.4 PneumaticTools□ Tether pneumatic tools to the air hose and attach hose sections to each other and the compressed air
source unless all these parts have a secure, quick disconnect coupling.
4.14.5Powder-ActuatedTools□ Allow only employees who have been trained to operate the particular tool in use to operate a powder-
actuated tool.
□ Using the manufacturer’s recommended method of testing, test the tool each day before loading to see that the safety devices are in proper working condition.
□ Do not load tools until just prior to the intended firing time. Neither loaded nor empty tools are to be pointed at any person.
□ Keep hands clear of the open barrel end of the tool.
□ Do not leave loaded tools unattended.
□ Do not use powder-actuated tools in an explosive or flammable atmosphere.
4.15 HAZARDOUSENERGYCONTROL(LOCKOUT/TAGOUT)PROGRAMThe Church’s Hazardous Energy Control Program, hereafter referred to as the lockout/tagout program, in-cludes the use of locks and warning tags to protect people from hazardous energy sources (including electric, hydraulic, pneumatic, chemical, and mechanical energy sources) during maintenance and servicing of equip-ment. Employees should follow the procedures outlined below as well as all local laws and regulations.
Follow lockout/tagout procedures before anyone performs any activity in which the unexpected start-up or re-lease of stored energy could cause injury. These procedures should also be followed when an employee needs to do any of the following for service and maintenance that take place during normal production operations:
○ Remove or bypass a guard or other safety device.
○ Work on the area of a machine or piece of equipment where the machine comes in contact with the ma-terial being processed (at the point of operation).
○ Come in contact with or come close to dangerous moving parts of a machine or piece of equipment.
Please note that the instances listed below do not require following the guidelines discussed in the lockout/tagout program:
61S A F E T Y , H E A L T H , A N D E N V I R O N M E N T A L M A N U A L 2 0 1 8 V E R S I O N
○ Minor tool changes and adjustments and other minor servicing activities that take place during normal production operations and that use alternative measures to provide effective protection.
○ Work on electrical equipment that is connected to its electrical source by a cord and a plug that can be disconnected. The employee doing the work must be in exclusive control of the plug.
○ Work on electrical equipment that is energized (this situation is discussed in section 4.6.9, “Energized Electrical Work”).
4.15.1 IndividualsInvolvedintheLockout/TagoutProcedureBelow is a list of the individuals who may be involved in the lockout/tagout procedures:
Authorized employees are those who apply locks or tags to machines or equipment in order to perform ser-vicing or maintenance on that machine or equipment.
Affected employees are those who operate or work with equipment or machinery but are not authorized to use lockout/tagout procedures.
Other employees are those whose work operations are or may be in an area where energy-control proce-dures may occur.
Safety professionals are those who, because of their education, experience, and work assignments, help im-plement, provide training for, and evaluate the implementation of the lockout/tagout program.
Supervisors and managers are those who oversee employees, including authorized and affected employees.
4.15.2 Lockout/TagoutProceduresManagers and supervisors should ensure that employees understand the importance of lockout/tagout safety requirements. Training new and transferred employees about the purpose and use of these proce-dures is especially important.
To develop procedures specific to the servicing of equipment, managers and supervisors should establish a lockout/tagout procedure template (hereafter referred to as the procedure template) or equivalent format (a template or form that is selected internally and meets or exceeds the requirements of the procedure). The equipment-specific procedure identifies the energy sources that need to be isolated for complex equipment. A sample of an electronic procedure template and training on how to use it are available through the Risk Management Division representative. One lockout/tagout procedure may cover multiple types of equipment if they are essentially similar and have identical energy-control requirements.
However, an equipment-specific lockout/tagout procedure does not need to be developed for a specific ma-chine or piece of equipment if all of the following criteria are met:
1. The machine or equipment has no potential for storing energy or holding residual energy.
2. The machine or equipment has a single energy source that can be readily identified and isolated.
3. The isolation and locking out of that single energy source will completely de-energize and deactivate the machine or equipment.
4. The machine or equipment is always isolated from that energy source and locked out during servicing or maintenance.
62 S A F E T Y , H E A L T H , A N D E N V I R O N M E N T A L M A N U A L 2 0 1 8 V E R S I O N
5. A single lockout device will achieve a locked-out condition.
6. The servicing or maintenance of the machine does not create hazards for other employees.
7. When following the guidelines discussed in this exception to policy, there have been no incidents in-volving the unexpected activation or re-energization of the machine or equipment during servicing or maintenance.
Whenever lockout/tagout is required, follow the general steps outlined below.
Determining the Lockout/Tagout Procedure and Notifying Employees□ Determine the lockout/tagout procedure to be followed and who is authorized to implement the proce-
dure. If a lockout/tagout procedure is not already in place, refer to the information above and use the procedure template or similar template or form to establish a procedure. Equipment-specific procedures should identify the energy-isolation devices and prescribe the sequence for isolating energy sources. See the manufacturer’s equipment manual for equipment-specific guidelines.
□ Notify affected employees of the lockout/tagout, and explain the reason for it.
Attaching Locks and TagsThe authorized employee uses the following steps to attach locks and tags:
□ Shut down the machine or equipment using standard operating procedures.
□ Turn off the energy to the machine or equipment (at circuit breakers or other disconnect switches).
□ Block or bleed stored energy and pressure (in springs; raised machine parts; flywheels; hydraulic [fluid] systems; air, gas, and steam systems; and so on).
□ Attach a lock (with accompanying warning tag) to prevent the equipment from being operational.
□ Test the machine or equipment by trying to start it. Ask that employees stand clear.
□ After the test, return the equipment’s operating controls to the neutral or off position.
□ Use warning tags alone when it is not possible to lock out the equipment.
• Write your name on the tag.
• Place the tag near or attached to the energy-isolation device in a place where it can be easily seen.
Maintaining the Lockout/Tagout StatusEnsure safe working conditions by maintaining the lockout/tagout status during the entire period this status is needed.
○ When a lockout/tagout status must be maintained across shifts, employees who are leaving must brief incoming employees on lockout/tagout conditions.
○ The incoming employees will then place their locks or tags on the energy-isolation devices before the departing employees remove their locks or tags.
63S A F E T Y , H E A L T H , A N D E N V I R O N M E N T A L M A N U A L 2 0 1 8 V E R S I O N
Removing Locks and TagsAfter the required servicing and maintenance are complete and the machine or equipment is ready to be used, inspect the area and equipment to ensure the following:
□ Everyone is standing clear of the machine or equipment.
□ Tools and other nonessential items have been removed.
□ All machine and equipment parts are intact.
Only the authorized employee who attached the lock or the warning tag may remove it. Before starting the machine or equipment, the authorized employee should notify all affected employees in the area that the lock or warning tag has been removed and that the machine or equipment is ready to be turned on and used.
However, if the authorized employee cannot be found at the facility or is otherwise unavailable, his or her supervisor may remove the lock or tag when necessary by doing the following:
○ Verifying that the employee who applied the device cannot be found at the facility or is not available.
○ Making all reasonable efforts to contact the authorized employee to determine whether the lock or tag may be removed.
○ Ensuring that the authorized employee is aware that the lock or tag has been removed before the em-ployee resumes work at the facility.
Using Group Lockout/Tagout ProceduresWhen more than one employee is required to lock or tag equipment, the supervisor, manager, or other authorized person designates one authorized employee as being primarily responsible for the lockout/tagout procedure. This employee is responsible to ensure the following:
○ Each authorized employee has a personal lock or tag attached to the energy-isolation device. If more than one lock cannot be attached to a switch or other device, use one of the following methods to secure the device.
◦ Use a multiple-lock device, such as a hasp.
◦ Use a single lock to lock out the machine or equipment, and place the key in a box or cabinet locked with multiple locks.
○ Safe working conditions are maintained throughout the lockout/tagout period by following the guidelines provided above.
4.15.3ContractorsWhen outside contractors service Church machinery and equipment, the Church manager or supervisor and the outside contractor inform each other of their respective lockout/tagout procedures. Church manag-ers help maintenance employees understand and comply with the contractor’s energy-control procedures. Contractors also train their employees to understand and comply with the Church’s energy-control program. Refer to section 2.9, “Managing Construction and Maintenance Contractors,” for more information on working with contractors.

64 S A F E T Y , H E A L T H , A N D E N V I R O N M E N T A L M A N U A L 2 0 1 8 V E R S I O N
4.15.4MaterialsandHardwareManagers and supervisors provide locks, tags, chains, wedges, key blocks, adapters and pins, self-locking fasteners, and other hardware needed for blocking and isolating machines and equipment from their energy sources. These devices are required to be standardized, sturdy, and durable (safety professionals can help identify acceptable devices).
○ Locks and warning tags for controlling energy should be appropriately identified and used solely for lock-out/tagout procedures. The person attaching the lock must have sole control of the key to that lock.
○ Tags must be made of a material that will not be damaged by weather, damp conditions, or conditions in other work environments. Tags must include warning information about the hazards of re-energizing the equipment.
○ Lockout devices must be capable of accommodating the locks of all employees involved in servicing or maintaining the equipment.
4.15.5 TrainingandInspections
Initial TrainingManagers and supervisors, under the direction of safety professionals if needed, ensure that:
○ Authorized employees are trained to use proper lockout/tagout procedures and to recognize hazardous energy sources, the type and magnitude of the energy, and methods to block, bleed, or isolate the energy sources.
○ Affected employees are instructed in the purpose and use of the lockout/tagout procedures.
○ Other employees who work in an area where lockout/tagout procedures may be used are instructed about the lockout/tagout program and procedures. They should be instructed to not remove or bypass lockout/tagout devices or attempt to start locked-out equipment.
Managers and supervisors should also maintain an up-to-date training record that lists the names of all em-ployees and when each received these trainings.
Follow-Up TrainingRetrain or give additional training to employees when any of the following situations occurs:
○ Employees change jobs or are rehired.
○ Machinery or equipment is changed.
○ New hazards are recognized.
○ Energy-control procedures change.
○ Inspections show that employees lack the knowledge needed to effectively follow the energy-control procedures.
○ Employees need to improve proficiency in following lockout/tagout procedures.

65S A F E T Y , H E A L T H , A N D E N V I R O N M E N T A L M A N U A L 2 0 1 8 V E R S I O N
Periodic InspectionsManagers and supervisors partner with safety professionals to ensure that energy-control procedures are inspected periodically. The purpose of these inspections is to determine if the equipment-specific lockout/tagout procedures sufficiently protect workers and to ensure that authorized employees are following the procedures; these inspections are used to discover and correct deficiencies. The inspections should be con-ducted by an authorized employee who is not normally involved in performing lockout/tagout procedures on the equipment being reviewed.
The Lockout/ Tagout Procedure Inspection form (see chapter 7) is used to document the inspection. Managers, supervisors, and safety professionals should maintain the two most recent records of the inspec-tions for each procedure.
4.16 HOTWORKThese guidelines establish requirements that will help protect personnel and property during operations in-volving open flames or producing heat or sparks. This includes, but is not limited to, cutting, grinding, brazing, welding, soldering, thawing pipe, torch applied roofing, and other hot work performed at Church operations. The following guidelines comply with best practices for hot work.
Managers and supervisors should:
□ Establish regular areas where hot work should be performed.
□ Establish procedures for hot work in areas not designated as hot work areas.
□ Designate an individual responsible for authorizing, by permit, hot work operations in areas not des-ignated for such purposes. The Church’s Hot Work Permit (see chapter 7) or other approved hot work permit can be used.
□ Facilities managers should ensure that contractors who conduct hot work operations in their facilities follow Church hot work procedures.
□ Help train welders and cutters in the safe operation of their equipment and in the hot work process.
The following requirements apply in hot work operations performed at Church operations:
□ Before the hot work operation, do the following:
□ Where practical, move the object to be cut or welded to a fire-safe location.
□ If the object cannot be moved, remove all transportable fire hazards within 35 feet (11 m) to a fire-safe location.
□ If the above cannot be accomplished, use guards or fire-resistant blankets to confine heat, sparks, and slag to protect immovable fire hazards.
□ If the above requirements cannot be satisfied, then hot work must not be performed.
□ When there are floor openings, cracks in floors, cracks or holes in walls, open doorways, open or broken windows, or other openings, take adequate precautions to prevent readily combustible materials on the other side from igniting.
□ Keep suitable fire extinguishing equipment ready for instant use.
66 S A F E T Y , H E A L T H , A N D E N V I R O N M E N T A L M A N U A L 2 0 1 8 V E R S I O N
□ Protect workers and other persons adjacent to the hot work areas by using noncombustible or flame-proof screens or shields. Workers should wear appropriate protective goggles at all times. Others should wear protective goggles when there are no screens available.
□ Assign a fire watch for hot work operations in locations where a fire may develop. A fire watch is per-formed by responsible personnel who have immediate access to fire suppression equipment. The per-sonnel watch and patrol an area for fire, and they take action in the event of a fire. The fire watch ensures that if ignition occurs, it can be extinguished as soon as possible. Typically, the duration of a fire watch is outlined in the hot work permit. Fires may develop in some of the following locations:
• Where a significant amount of combustible material is within 35 feet (11 m) of the operation.
• Where wall or floor openings are within 35 feet (11 m) of the operation. (The fire watcher should be in position to observe the opposite side of the wall or floor.)
• Where combustible materials could be ignited by conduction or radiation through a floor, wall, ceiling, or roof.
□ A fire watch should:
• Have fire extinguishing equipment readily available and be trained in its use.
• Try to extinguish fires only within the capacity of available equipment.
• Be familiar with the procedures and location for sounding an alarm in the event of fire.
• Activate the alarm in the event of a fire.
• Maintain a fire watch for at least one hour after the hot work operations have been completed. This will help detect and extinguish possible smoldering fires. Continue to monitor the area frequently for three additional hours after job completion.
□ Provide adequate ventilation for hot work operations. Special ventilation procedures or respiratory pro-tection may be required for operations involving:
• Fluorine compounds
• Cadmium
• Zinc
• Mercury
• Lead
• Beryllium
• Stainless steel
• Aluminum (ozone generation)
• Confined spaces
• Cleaning compounds

67S A F E T Y , H E A L T H , A N D E N V I R O N M E N T A L M A N U A L 2 0 1 8 V E R S I O N
4.17 HOUSEKEEPINGThese guidelines provide information for establishing good housekeeping requirements. By using these guidelines, maximum safety can be achieved through the orderly arrangement of operations, tools, equip-ment, materials, and supplies. Practice the principle of “a place for everything and everything in its place.”
4.17.1 GeneralGuidelinesManagers and supervisors should require all employees to follow these good housekeeping practices in the workplace:
□ Place waste and scrap in designated containers, and properly dispose of them. Establish a regular pro-gram of cleaning as conditions require.
□ Use noncombustible containers for disposing waste.
□ Examine the condition of exits, aisles, and emergency equipment each day when beginning work and throughout the shift. Promptly report unsafe conditions to supervisors.
□ Aisles and exits should be clear of obstacles and hazards. They should be maintained to accommodate the maximum occupant load and the width as required by local codes. Do not park vehicles or store equipment in the path of exits.
□ Keep emergency exits unlocked during operating hours.
□ Clean work-area floors at regular intervals. Promptly clean up spilled oil, materials, or liquids. Do not accu-mulate scrap, waste, dust, or dirt.
□ Tools should be kept in good repair and be properly stored.
4.17.2 RepairsandMaintenanceRepair and maintenance workers should make sure that:
○ All guards, covers, or plates are properly placed.
○ Grease, oil, dirt, or other materials spilled or dropped on the floor or on the equipment are cleaned up immediately.
○ Tools, equipment, spare parts, and materials are removed from the work area.
4.18 INSPECTION,TESTING,ANDMAINTENANCEOFFIREDETECTIONANDSUPPRESSIONSYSTEMSThe purpose of these guidelines is to provide general requirements for inspecting, testing, and maintaining fire protection systems such as fire detection and suppression systems. Fire protection systems provided for facilities and equipment should be inspected, tested, and maintained regularly to ensure proper operation in case of fire. The following guidelines provide information necessary to comply with property insurance requirements and National Fire Protection Association (NFPA) and International Fire Code (IFC) regulations. Managers and supervisors are responsible to review and make reasonable efforts to ensure that they are in compliance with these guidelines.

68 S A F E T Y , H E A L T H , A N D E N V I R O N M E N T A L M A N U A L 2 0 1 8 V E R S I O N
4.18.1 Definitions
AutomaticDetectionEquipmentHeat and smoke detectors that (1) automatically sense heat, flames, and products of combustion, flam-mable gases, or other conditions likely to produce a fire or explosion and that (2) activate fire alarm and fire suppression equipment.
ImpairmentA shutdown of a fire detection and suppression system or portion of it.
InspectionA visual examination of a fire detection and suppression system or portion of it to verify that it is in operating condition and is free from damage.
MaintenanceActions that repair the fire suppression system or that keep it operable.
TestingAction taken to verify that equipment is functioning as intended. The frequency of testing should be according to the following guidelines.
4.18.2GuidelinesUse the following guidelines for inspecting, testing, and maintaining fire detection and suppression systems. The suggested inspection and maintenance frequency is considered a minimum standard. The recommenda-tions of property insurance companies are usually more stringent.
ResponsibilityResponsibility for maintaining the fire protection, detection, and suppression systems should be specifically assigned to in-house staff or contracted out to a company that does maintenance on fire protection systems. Keep proper records to document maintenance and testing of these important systems.
Design and InstallationAll fire detection and suppression systems should be designed and installed according to the appropriate NFPA standard. Careful consideration should be given to commercial property insurance standards specifi-cally designed to prevent property loss and damage.
Inspection□ All fire system valves should be inspected weekly (monthly is acceptable if valves are locked and a good fire
system impairment program is implemented, such as FM Global’s Red Tag system) to make sure they are:
• In the normal open or closed position.
• Properly sealed, locked, or supervised.
• Accessible.
• Provided with appropriate wrenches.
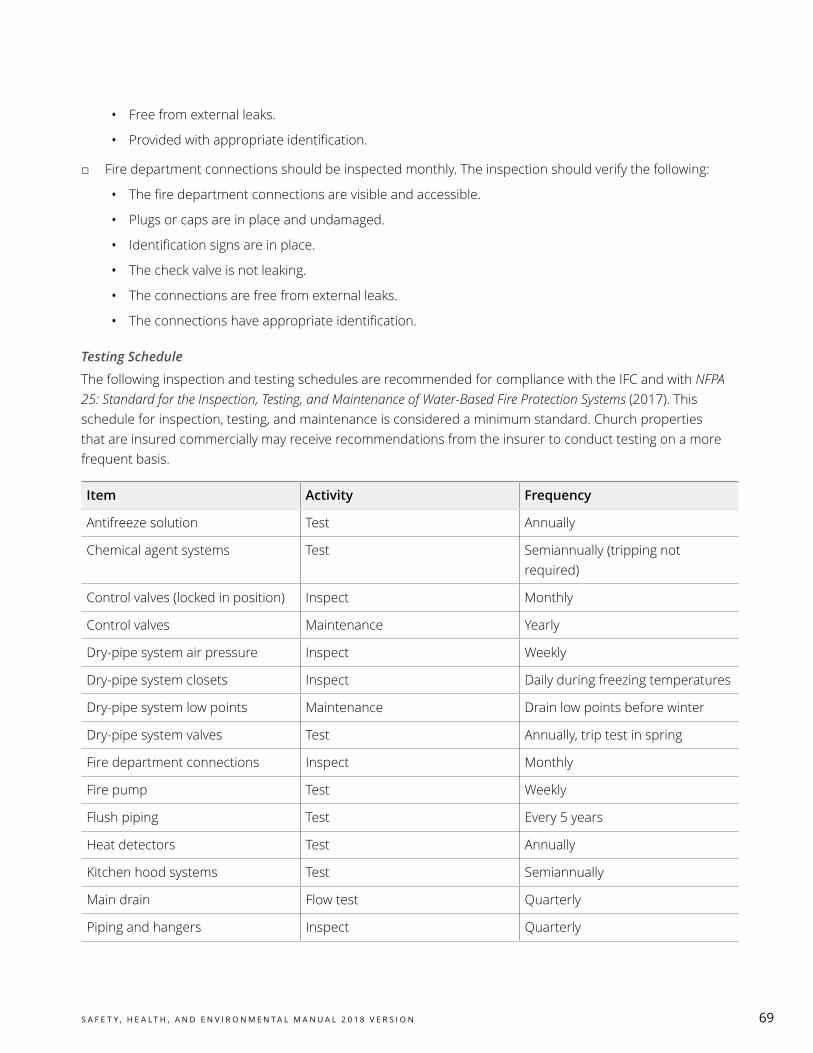
69S A F E T Y , H E A L T H , A N D E N V I R O N M E N T A L M A N U A L 2 0 1 8 V E R S I O N
• Free from external leaks.
• Provided with appropriate identification.
□ Fire department connections should be inspected monthly. The inspection should verify the following:
• The fire department connections are visible and accessible.
• Plugs or caps are in place and undamaged.
• Identification signs are in place.
• The check valve is not leaking.
• The connections are free from external leaks.
• The connections have appropriate identification.
Testing ScheduleThe following inspection and testing schedules are recommended for compliance with the IFC and with NFPA 25: Standard for the Inspection, Testing, and Maintenance of Water-Based Fire Protection Systems (2017). This schedule for inspection, testing, and maintenance is considered a minimum standard. Church properties that are insured commercially may receive recommendations from the insurer to conduct testing on a more frequent basis.
Item Activity Frequency
Antifreeze solution Test Annually
Chemical agent systems Test Semiannually (tripping not required)
Control valves (locked in position) Inspect Monthly
Control valves Maintenance Yearly
Dry-pipe system air pressure Inspect Weekly
Dry-pipe system closets Inspect Daily during freezing temperatures
Dry-pipe system low points Maintenance Drain low points before winter
Dry-pipe system valves Test Annually, trip test in spring
Fire department connections Inspect Monthly
Fire pump Test Weekly
Flush piping Test Every 5 years
Heat detectors Test Annually
Kitchen hood systems Test Semiannually
Main drain Flow test Quarterly
Piping and hangers Inspect Quarterly

70 S A F E T Y , H E A L T H , A N D E N V I R O N M E N T A L M A N U A L 2 0 1 8 V E R S I O N
Item Activity Frequency
Smoke detectors Test Annually
Spare sprinkler heads in box Inspect Quarterly
Sprinkler heads Test At 50 years and every 10 years thereafter
Water flow alarms Test Quarterly
Impairment□ Use the following guidelines when a fire system is shut down for maintenance or repair. This applies to
the following types of impairments:
• Any sprinkler system valve closure (fixed protection systems included)
• Any fire hydrant valve closures
• Any impairment to fire pumps
• Any impairment to broken underground fire mains
□ Before impairment, do the following:
• Where possible, perform all needed hazardous or hot work before the fire system has been impaired.
• Have everything ready before impairing fire protection equipment, including equipment, parts, and personnel.
• Arrange temporary protection, such as extra fire extinguishers, charged hose lines, and so on.
• Notify the emergency response team and perhaps the public fire department of the planned impair-ment so that they can be prepared to handle an emergency if one should arise.
• If the fire protection equipment can be restored during the impairment, have someone available and prepared to restore the system promptly in the event of a fire.
• Use an impairment tag and permit system to tag the impaired system and to authorize the impair-ment of the fire protection equipment. You can get a tag/permit system from the Risk Management Division or directly from the commercial property insurer.
• Notify the Risk Management Division or the commercial insurance impairment office of the pending fire system impairment.
□ During impairment, do the following:
• Stop all work that may cause a fire, for example, hot work such as welding, cutting, and grinding.
• Have personnel or security patrol the area where the fire protection equipment is out of service.

71S A F E T Y , H E A L T H , A N D E N V I R O N M E N T A L M A N U A L 2 0 1 8 V E R S I O N
□ After impairment, do the following:
• Make certain the fire protection equipment is restored to operating service.
• If sprinkler protection was impaired, conduct a two-inch (5 cm) drain test at the sprinkler riser.
• Lock sprinkler control valve in the wide-open position.
• Reset alarm system, and notify the alarm-monitoring agency.
• Notify the emergency response team and the public fire department that the system has been re-stored to operating service.
• Notify the Risk Management Division or the commercial insurance impairment office when the sys-tem has been restored to operating service.
Insurance Loss-Prevention InspectionsIf the facility is insured commercially, the insurance company will conduct the inspection.
4.19 LADDERSAFETYThese guidelines provide information necessary to comply with best practices on ladder safety.
Managers and supervisors should review these guidelines with employees who use ladders. They should ensure that ladders are routinely inspected according to this guideline.
4.19.1 LadderInspectionandCareUse the following guidelines for inspecting and caring for ladders:
□ Inspect ladders before each use to identify any defects that make the ladder unsafe.
□ Determine the weight capacity of the ladder. Do not exceed weight limitations.
□ Take defective ladders out of service immediately. Wooden ladders with broken, split, cracked, or loose steps, rungs, or rails should not be used. Warped, uneven, or rotted parts should be replaced. Metal lad-ders with missing or loose rivets should not be used.
□ Keep ladders clean of acids, alkali solutions, oil, grease, and excessive dirt.
□ All portable ladders should have nonslip bases.
□ Extension ladders should be equipped with nonslip swivel safety shoes and should not be separated or used as separate ladders.
□ Do not paint wooden ladders. Apply clear varnish, shellac, or linseed oil if preservatives are needed.
□ Do not use metal ladders near power lines or electrical equipment. Before metal ladders are used in other locations, they should be stenciled or labeled with the following warning or similar wording:
WARNING: DO NOT USE NEAR ELECTRICAL CIRCUITS.
□ Use a locking device on all wheeled ladders to keep them from moving when they are being used. If the locking device is defective or one is not installed, do not use the ladder.

72 S A F E T Y , H E A L T H , A N D E N V I R O N M E N T A L M A N U A L 2 0 1 8 V E R S I O N
4.19.2 LadderUseFollow these guidelines for using ladders:
□ To set up a straight ladder safely, use the 4-to-1 rule. For every 4 feet (1.2 m) in height, the base of the ladder should be 1 foot (0.3 m) away from the wall. For example, place a 12-foot (3.7 m) ladder so the bottom is 3 feet (1 m) away from the object the ladder is leaning against.
□ Do not use ladders in horizontal positions as runways or scaffolds.
□ Place portable ladders so they are secure and level. When placing ladders on soft ground, provide a solid platform or base to prevent sinking.
□ Do not lean ladders against loose boxes, barrels, round objects, or other unstable supports.
□ Lash ladders to the object when working on cylindrical objects like poles or columns to prevent the ladder from slipping sideways.
□ Do not use stepladders as extension ladders.
□ Extend ladders at least three feet above the upper landing, roof, or platform.
□ Do not place ladders in front of a door that opens toward the ladder unless the door is secured.
□ Divert traffic around a ladder, not under it.
□ Hold on with both hands when going up or down a ladder, and always face the ladder when ascending or descending.
□ Do not carry objects in your hands. Carry small tools in a tool belt. Use a hand line to raise and lower heavy tools.
□ Be sure shoes are not greasy, muddy, or slippery when climbing up or down ladders.
□ Do not climb higher than the third rung from the top of an extension ladder or the second tread from the top of a stepladder.
4.20 MACHINEGUARDINGMETHODSThese guidelines provide general information on machine guarding. Examples of places on machines that expose an employee to injury are pulleys, flywheels, pinch points, belts, gears, shafts, spindle ends, nuts, or any other potentially hazardous projections. Fixed enclosure guards, which completely enclose a hazardous operation point, are preferred to all other types; they provide maximum protection, require minimum main-tenance, are suitable for high production and repetitive operations, and can be constructed to suit many specific applications. Fixed enclosure guards can also effectively control dust and chips. Any machine part, function, or process that may cause injury must be safeguarded.
Follow these guidelines for guarding machines:
□ Provide one or more methods of machine guarding to protect the operator and other employees from hazards created by operation points.
□ Where possible, attach the guards to the machine. If not possible, attach them where they will provide the greatest protection.

73S A F E T Y , H E A L T H , A N D E N V I R O N M E N T A L M A N U A L 2 0 1 8 V E R S I O N
□ A qualified person should design and construct guarding devices that will ensure no part of an operator’s body will be in a danger zone.
□ Construct and mount each machine so it will not “walk,” or move, while operating at full speed.
□ Use abrasive wheels only on machines with safety guards.
□ Keep power and operating controls within easy reach of the operator while at a regular work station. The operator should not need to reach over a machine to adjust controls.
□ Use only approved tools that are specifically designed to move material in and out of machines. These tools should allow workers to easy handle the materials without placing a hand in the danger zone. Tools do not replace required guarding methods.
□ Whenever engineering controls are not available or are not fully capable of protecting the employee, operators must wear protective clothing or personal protective equipment.
□ The abrasive wheel guard on a bench grinder should be mounted to maintain the proper distance with the wheel. The tongue guard should be positioned at a maximum of one-fourth of an inch (6.35 mm) from the abrasive wheel. The tool rest should be no farther than one-eighth of an inch (3.18 mm) from the abrasive wheel.
□ The strength of the fastenings should exceed the strength of the guard.
4.21 MANUALLIFTINGThe following are basic guidelines for manual lifting. The overriding consideration is to design the job to fit the worker. Injuries occur when there is a difference between the strength of the worker and the strength required to do the job. Managers and supervisors should assign workers to tasks they can handle.
4.21.1GeneralLiftingGuidelinesUse the following guidelines for general lifting:
□ Observe the following weight requirements:
○ Loads less than 30 pounds (14 kg). These loads are generally acceptable unless the lift involves fre-quent lifting, awkward and constrained postures, poor grip, or twisting.
○ Loads of 30–50 pounds (14–23 kg). These lifts are marginally hazardous and have an increased risk of injury for some workers. Protect workers by allowing them to select the loads they lift, conducting conditioning exercises, or reducing the amount lifted. Remember that frequent lifting, awkward and constrained postures, poor grip, and twisting will make the lifting hazard more severe.
○ Loads heavier than 50 pounds (23 kg). These lifts are generally considered hazardous. Most workers would be at risk of injury. In addition to the guidelines above, use mechanical lifting devices, such as forklifts, scissor lifts, or pallet jacks. If not possible, use a multiple-person lifting team.
□ Reduce the horizontal distance between you and the load when lifting it, and keep it as close to waist height as possible.
□ Lift slowly and evenly; don’t jerk.

74 S A F E T Y , H E A L T H , A N D E N V I R O N M E N T A L M A N U A L 2 0 1 8 V E R S I O N
□ If possible, avoid lifting loads from the floor or from over the head. Loads generate the least stress on the back when lifted from knuckle height (the area where the knuckles are when the arms hang at the sides of the body).
□ If lifting from the floor, use the legs to lift, not the back. The load should not be overly bulky, and you should be able to get a good grip. Lift in a manner that will keep the load close to the body. If there is any question about your ability to lift the load, get help.
□ Avoid twisting the torso when lifting. Do not lift and then turn the upper body. This dramatically increases the chance of a back injury.
□ While carrying the load, always keep it close to the body.
4.21.2LiftingTaskAnalysisManagers, supervisors, and those lifting should consider the following when analyzing a lifting task:
○ Weight of the load
○ Height of the lift
○ Frequency of the lift
○ Posture during the lift
○ Grip on the load
Rotating employee assignments, providing a short break every hour, or using two-person lifting teams may be helpful in avoiding lifting injuries. Rotating assignments does not mean simply assigning an employee to another job; instead, it means assigning him or her to a job that utilizes a completely different muscle group from the ones exerted during lifting.
There are four basic kinds of lifts. Each is described as follows and assumes the load is held as close to the body as possible:
1. Knuckle to shoulder height. This lift causes the least amount of stress on the spine. If possible, all lifts should be done this way.
2. Floor or pallet height to knuckle. This lift causes more stress on the spine. Avoid this lift if possible by ar-ranging the work area so workers may lift from knuckle height.
3. Floor or pallet height to shoulder height. This lift generally causes the most stress on the spine. Avoid this lift if possible by arranging the work area so workers may lift from knuckle height.
4. Shoulder height to above head. This lift puts stress on the spine and on arm and shoulder joints. Avoid if possible.
4.21.3ConditioningExercisesCompared to those who are not physically fit, those who are physically fit have fewer and less-severe back injuries. They also need less recovery time when injured. Workers can do conditioning exercises for their back muscles to become more physically fit. There are many trained people, such as physical therapists, nurses, physicians, and chiropractors, who can help with a conditioning program.

75S A F E T Y , H E A L T H , A N D E N V I R O N M E N T A L M A N U A L 2 0 1 8 V E R S I O N
4.21.4AbdominalBeltsThere is scientific evidence that abdominal belts may not be an effective method of reducing back injuries. Abdominal belts are not recommended as protective equipment for manual lifting to prevent back injuries.
4.21.5TrainingProgramsIf you have many employees that do manual lifting, you may want to implement a comprehensive training pro-gram for manual lifting. There are many professionals who can help with a training program, such as physical therapists, nurses, physicians, chiropractors, ergonomists, and so forth. A comprehensive program for manual lifting should present a complete approach to back care, including safe lifting, strength, and physical fitness.
A training program for those whose jobs require manual lifting should include the following information:
○ Risks to health because of unskilled lifting
○ Body biomechanics
○ Effects on the body caused by lifting
○ The body’s strengths and weaknesses
○ How to avoid the unexpected physical factors that might contribute to lower-back pain
○ How to develop material-handling skills
○ How to use material-handling aids
Training resources on manual lifting are available on the Risk Management intranet site.
4.22 MOTORCYCLESANDATVS(See Motor Vehicle Safety.)
4.23 MOTORVEHICLESAFETY
4.23.1IntroductionMotor vehicle accidents are the leading cause of work-related deaths in the United States. The Church is committed to promoting safety awareness and responsible driving behavior in its drivers. Each driver must commit to operate his or her vehicle safely and to fulfill the responsibilities and follow the guidelines outlined in this document. The Church’s efforts and the commitment of its drivers will help reduce personal injury and property loss claims.
These guidelines outline minimum requirements. Church departments or Church-affiliated businesses may have additional or more stringent guidelines based on management requirements or local laws.
4.23.2DriversandQualifications
Authorized DriverAn authorized driver is any employee or contract employee who is 18 years of age or older and authorized by management to operate a Church-owned vehicle or a personal vehicle for Church business purposes. The Church may obtain a motor vehicle record (MVR) for all drivers.

76 S A F E T Y , H E A L T H , A N D E N V I R O N M E N T A L M A N U A L 2 0 1 8 V E R S I O N
Authorized drivers must:
○ Maintain a current and valid driver’s license in accordance with local law, as well as an acceptable driving record.
○ Complete driver safety training (as approved by the Risk Management Division) at least once every three years.
○ Report to management any vehicle accident, damage, or traffic violation incurred while on Church busi-ness within 24 hours, regardless of whether it is a Church-owned or personal vehicle.
○ Ensure that repairs and maintenance are done in a timely manner to prevent additional damage.
Unauthorized DriverAn unauthorized driver is any driver who has been involved in multiple moving violations or preventable traf-fic accidents within the past three years. His or her eligibility to drive is determined by the following:
○ His or her driver qualifications
○ A current MVR
○ The Vehicle Safety Board (VSB)
These drivers are not allowed to drive Church-owned vehicles or to drive personal vehicles for Church business.
4.23.3ManagementResponsibilities○ Identify employees who need to drive for Church business.
○ Verify that employees are on the list of authorized drivers before allowing them to operate any vehicle for Church business.
○ Verify that personal vehicles used for business meet liability insurance limits as outlined in these guidelines.
4.23.4GeneralDriverSafetyRules○ All drivers must obey traffic laws, signs, and signals.
○ The driver and all occupants are required to wear seat belts when a vehicle is in operation. The driver is responsible for ensuring that passengers wear their seat belts.
○ The maximum number of occupants allowed to ride in a vehicle is limited to the availability of installed seat belts. Passengers may not ride in cargo areas.
○ Volunteers working for Church business operations may operate Church-owned vehicles if they meet the same criteria as authorized drivers.
○ Drivers should avoid backing up a vehicle whenever possible.
○ Drivers should be aware of surrounding conditions. Before entering the vehicle, the driver should walk around it to check for any vehicle damage, fixed objects, or other hazards.
○ Drivers should not push one vehicle with another unless they are driving a service truck equipped for this purpose, and then only to clear the roadway when necessary.
○ Drivers must not operate a vehicle at any time when their ability to do so is impaired or affected by medi-cation, illness, drowsiness, or injury.

77S A F E T Y , H E A L T H , A N D E N V I R O N M E N T A L M A N U A L 2 0 1 8 V E R S I O N
○ Drivers are responsible to ensure that vehicles are maintained in safe operating condition. Follow the guidelines given in the Vehicle Preventive Care Service Check form (on the back of the What to Do If You Have an Accident packet [12150]; see section 7.3).
○ Drivers are not permitted to:
• Pick up hitchhikers.
• Accept payment for carrying passengers or materials.
• Use any radar detector, laser detector, or similar device.
• Tow a trailer without receiving prior permission from management and complying with Department of Transportation (DOT) regulations, if required.
• Transport flammable liquids, gases, or hazardous materials without complying with DOT regulations.
• Use flares. (Use reflective triangles instead, if needed.)
4.23.5DistractedDrivingA driver may not use any Church-owned or private handheld electronic device, such as a cell phone, two-way radio, tablet, or laptop, at any time while driving a Church-owned vehicle or while driving a personal vehicle on Church business. There are two exceptions to this rule:
○ If allowed by law, cell phones operated with hands-free equipment may be used.
○ If allowed by law, a global positioning system (GPS) device may be used, or a cell phone or similar device may be used to view a GPS or navigation application.
The driver should also refrain from all distracting practices while driving, such as:
○ Eating meals.
○ Reading and writing.
○ Grooming.
4.23.6DrowsyDrivingDrivers and passengers must remain alert and focused. Follow these practices:
○ Get a full night of rest before driving.
○ Recognize the warning signs of fatigue.
○ Stop at regular intervals when driving long distances.
○ Avoid taking medications that cause drowsiness.
○ Be aware of your behavior and the behavior of others on the road late at night, early in the morning, and in the midafternoon hours, when drowsy-driving crashes are most likely to occur.
○ Passengers should help the driver remain alert and pay attention to traffic conditions.

78 S A F E T Y , H E A L T H , A N D E N V I R O N M E N T A L M A N U A L 2 0 1 8 V E R S I O N
4.23.7GuidelinesforSpecificVehicles
Commercial Vans, Buses, and Trucks○ Drivers authorized to operate a vehicle or combination vehicle (power unit with trailer) with a combined
weight or weight rating over 10,000 pounds must comply with regulations for commercial motor vehicles.
○ Fifteen-passenger vans cannot be purchased, rented, or used for Church business or activities.
Personal Vehicles on Church BusinessPersonal vehicles may be used for Church business if authorized by management and only when motor pool or other Church-owned vehicles are not available.
Drivers who use their personal vehicles on Church business are subject to all safety guidelines outlined in this document. Drivers are also required to:
○ Adhere to the vehicle -use policy outlined in Policy Point on the Church intranet. To find it, click on Policies under Ecclesiastical Departments, and then click on Human Resources. Last, click on section 8 , Vehicle -Use Policy.
○ Maintain vehicle liability insurance limits of $100,000 of coverage per person, $300,000 of bodily injury coverage per occurrence, and $50,000 of property damage coverage per occurrence.
○ Understand that the vehicle owner’s personal automobile insurance provides primary protection in the case of an accident, including comprehensive or collision claims.
○ Maintain current vehicle registration with the local government.
○ Maintain the vehicle in safe operating condition.
○ Report any vehicle accident, damage, or traffic violation to management within 24 hours.
Employees who are unauthorized to drive a Church-owned vehicle are not allowed to use their personal vehicle for Church business.
Rental VehiclesIn the United States, drivers should arrange vehicle rentals through Church Travel Services. The Church has contracts with multiple rental car companies, and these contracts include collision damage waiver coverage and auto liability insurance within the negotiated price. When using a contracted rental car company, drivers should decline collision damage waiver coverage and auto liability insurance at the counter if an agent asks so that the Church does not get charged twice for insurance coverage on car rentals. Drivers should check for obvious defects on rental cars before leaving the rental location.
If drivers rent vehicles outside the United States or do not arrange the rental through Church Travel Services with a contracted rental car company, then they should accept collision damage waiver coverage and auto liability insurance to ensure coverage.
Motorcycles, All-Terrain Vehicles, Motorized Scooters, Motorized Carts, Tractors, and Utility Terrain Vehicles (Including Gators, Razors, and Similar Vehicles)Departments should consider the additional risks associated with using these vehicles for Church business. Departments may use them in accordance with the following guidelines.

79S A F E T Y , H E A L T H , A N D E N V I R O N M E N T A L M A N U A L 2 0 1 8 V E R S I O N
Drivers must:
○ Be trained to safely operate each type of vehicle.
○ Ensure that all Church-owned vehicles are clearly identified and are not used by unauthorized operators.
○ Conduct a pre-ride inspection of tires, brakes, headlights, and so on and follow the maintenance sched-ule for the vehicle.
○ Drive responsibly and courteously.
○ Not eat, drink, or talk on cell phones or radios while operating the vehicle.
○ Drive at walking speed when pedestrians are near.
○ Avoid passing pedestrians from behind. If it is necessary to pass pedestrians, drivers should do so only after warning them.
○ Use the vehicle only for the designated business purpose.
○ Allow passengers to ride only in authorized seating made by the manufacturer.
○ Wear seat belts at all times (if provided by the manufacturer).
○ Wear protective safety gear appropriate for the vehicle at all times (such as a helmet, gloves, goggles, and so on).
○ Slow down and be especially attentive at intersections, crosswalks, and blind corners.
○ Be aware of potential hazards such as trees, ruts, rocks, streams, and gullies, and follow posted hazard warnings.
○ Secure tools and equipment during transport, not allowing them to protrude from the sides of the vehicle.
○ Not overload the vehicle with heavy equipment or garbage.
○ Not operate damaged or defective vehicles.
4.23.8IncidentReportingIf a driver is involved in a motor vehicle accident, either with a Church vehicle or with a personal vehicle on Church business, then he or she must do the following:
○ Report the accident to his or her supervisor immediately.
○ Fill out any required report forms and report the accident in the Global Incident Reporting online system at incidents .lds .org within 24 hours.
○ If in a Church vehicle, follow the guidelines outlined in the What to Do If You Have an Accident packet (12150), which should be kept in the glove box (see section 7.3).
○ Upload any additional photos, police reports, or other documents to the online system within seven days of the accident.
Failure to promptly report damage to a Church vehicle or damage caused while operating a Church vehicle may result in loss of driving privileges.

80 S A F E T Y , H E A L T H , A N D E N V I R O N M E N T A L M A N U A L 2 0 1 8 V E R S I O N
4.23.9IncidentReviewAll vehicle accidents should be reviewed by a local Vehicle Safety Board (VSB). The VSB will determine prevent-ability and any corrective actions needed. Area offices should establish a local VSB. A sample of the responsi-bilities of a VSB can be found here.
4.23.10ClassificationofAccidentsAfter an accident occurs, a letter classifying the accident will be sent to the driver. Each accident, subject to review by the VSB, will be classified as one of the following:
NonpreventableAccidentAn accident resulting in loss or damage in which the Church driver was not at fault. Examples may include, but are not limited to, contact with an animal, hail, storm damage, and so on.
MinorPreventableAccidentA minor preventable accident is one that occurs in a parking lot or driveway and results in relatively mi-nor damage and no injuries. Examples of minor preventable accidents include scraping a pole, backing into an unoccupied parked car, and jackknifing a trailer while backing up.
PreventableAccidentA preventable accident is one in which the driver failed to follow safe driving practices, such as antici-pating a hazard or applying appropriate defensive driving techniques.
SeriousPreventableIncidentA serious preventable incident is one that involves one of the following, as determined by the VSB:
○ Any fatality.
○ Bodily injury to a person who, as a result of the accident, immediately leaves the scene (either drives or is transported) to receive medical treatment at an off-site medical location such as a hospital.
○ One or more motor vehicles that have sustained disabling damage (meaning that they are unable to be driven away normally from the scene) and require a tow truck or another motor vehicle to move them away from the scene. This does not include convenience towing (for example, if the driver simply does not want to drive, the vehicle has flat tires, the safety signals are inoperative, and so on).
4.23.11CorrectiveActionThe VSB uses the following guidelines to make appropriate recommendations to management and Human Resources (HR) concerning preventable accidents within the past 24 months. The VSB may also consider moving violations as well as earlier accidents that show a pattern of failing to follow safe driving practices. Management and HR are responsible for enforcing the Church’s guidelines in section 4.23, “Motor Vehicle Safety,” and any VSB recommendations.
Drivers involved in a collision that may be classified as a serious preventable accident should have their driv-ing privileges temporarily suspended by their supervisor until the VSB reviews the accident.

81S A F E T Y , H E A L T H , A N D E N V I R O N M E N T A L M A N U A L 2 0 1 8 V E R S I O N
Incident CorrectiveAction
First minor preventable accident within the last 24 months
Supervisor notification and discussion
Two or more minor preventable accidents or first preventable accident within the last 24 months
Basic online driver safety training (approximately one hour long)
Two or more preventable accidents within the last 24 months
Comprehensive online driver safety training (ap-proximately four hours long) or revocation of driving privileges
First serious preventable accident within the last 24 months
Suspension of driving privileges until completion of comprehensive driver safety training, or revocation of driving privileges (driver becomes unauthorized)
Two or more serious preventable accidents within the last 24 months
Revocation of driving privileges (driver becomes unauthorized)
The VSB will send a letter to communicate its recommendations to the driver, the driver’s supervisor, and the department human resource representative.
4.23.12AppealtoReclassifyAccidentAny driver may make an appeal to the VSB if he or she does not agree with the classification of an accident. The VSB will consider any appeal that is (1) in writing and (2) received within 14 days of the date that the letter classifying the accident was sent to the driver. In reviewing each accident and appeal, the VSB will make every effort to reach a fair and equitable classification. The VSB will communicate the appeal decision to the driver’s supervisor and department human resource representative.
4.23.13AppealtoReinstateDrivingPrivilegesThe VSB will review requests for reinstatement of driving privileges on a case-by-case basis.
4.23.14FormsandOtherDocumentsThe following documents are included in chapter 7, “Forms,” of this manual:
○ Driver Qualification Record
○ What to Do If You Have an Accident (12150)
○ Traffic Accident Report and Exchange Form (for U .S . , 12180; for non -U .S . , 13268)
4.24 PERSONALPROTECTIVEEQUIPMENTThese guidelines provide information necessary to comply with Church standards and best practices for personal protective equipment (PPE). PPE includes devices and clothing designed to provide a barrier of pro-tection between a person and harmful objects, substances, operations, or conditions. Use PPE only when it is infeasible or impractical to eliminate hazards through substitution, engineering controls, warnings, or admin-istrative controls or when a person must handle an emergency.
Managers and supervisors are to assess the workplace to determine if hazards are present or are likely to be present that necessitate the use of PPE by employees and visitors. A workplace hazard assessment must be performed. Use the PPE Hazard Assessment form in chapter 7 to help conduct the evaluation. Managers and supervisors must provide the necessary PPE and training and ensure that the PPE is used to prevent unnec-essary exposure to hazardous objects, substances, operations, or conditions.
If employees provide their own PPE, the supervisor is responsible to assure it is adequate, properly main-tained, and sanitary. At no cost to the employees, the employer must provide them the PPE required for the job. However, the employer is not required to pay for nonspecialty toe-protective footwear (including steel-toe shoes or steel-toe boots) and nonspecialty prescription safety eyewear as long as the employee is allowed to wear these items off the job. When an employee provides adequate PPE that he or she owns, the employer may allow the employee to use it but is not required to reimburse the employee for that equipment.
In addition, managers and supervisors should:
□ Post signs showing appropriate types of PPE, if required.
□ Where applicable, review the safety data sheets (SDS) to help determine required PPE.
□ Train employees and visitors in at least the following:
• When PPE is necessary
• What PPE is necessary
• How to properly put on, adjust, wear, and remove PPE
• The limitations of PPE
• The proper care, maintenance, storage, and disposal of PPE and its useful life
□ Formally document the required training with the name of the trainee, the date of training, and the sub-ject of certification.
□ Ensure that employees maintain their PPE in good working condition, properly store it, and keep it in a sanitary condition. PPE must be inspected before each use and cleaned or replaced when necessary.
□ Employee clothing should be appropriate for the work being done. Loose sleeves, shirttails, ties, gloves, and other clothing that can become entangled in moving machinery must not be worn. Clothing satu-rated with flammable liquids, corrosive substances, irritants, oxidizing agents, or other toxic materials must be removed immediately and not be worn again until properly cleaned.
□ Employees may not wear wristwatches, rings, or other jewelry on the job when such items constitute a safety hazard.
□ Employees’ hair should be confined when there is a risk of it becoming entangled in machinery’s moving parts.
4.25 PERSONALSECURITYThese guidelines provide information that will improve personal and physical security.
Managers and supervisors are responsible for reviewing these guidelines and making reasonable efforts to ensure that employees understand this information.
83S A F E T Y , H E A L T H , A N D E N V I R O N M E N T A L M A N U A L 2 0 1 8 V E R S I O N
4.25.1SixGeneralRulesofPersonalSecurity 1. Be constantly aware of your surroundings.
2. Vary routes and routines.
3. Do not draw undue attention to yourself.
4. If confronted, remain calm and cooperative.
5. Become familiar with and obey all laws and customs of the country.
6. Follow all specific rules unique to your Church assignment.
4.25.2PhysicalSecurityThe actual physical security of your location is a very important part of your personal security. Below are some general physical security recommendations.
Outer Security○ Install good lighting, as it is the best security system you can install. It is especially important to light build-
ing entrances and parking areas at home and at the office.
○ Make sure that all locks function properly and are being used.
○ Keep doors locked that do not need public access.
○ Keep your home doors locked even if you are at home.
○ Do not allow any unknown or uninvited people into your home.
○ Compare the physical security features such as security bars, lights, locks, and alarms of your home and office building to buildings of similar value and function in your area.
Money○ Keep safes and cash deposit boxes in areas where they cannot be seen by the public.
○ Lock safes and cash deposit boxes when not in use.
○ Keep cash held in safes and cash deposit boxes to a minimum.
○ Review the procedures for storing and transporting large amounts of cash to or from banks.
○ When possible, pay salaries and allowances by check or direct deposit, not in cash.
○ Keep the absolute minimum amount of cash necessary in your home or office.
Telephone Preparedness○ Give a bomb-threat checklist to those who answer outside lines. This checklist is available from Church
Security or from the Risk Management Division.
○ Instruct staff on how to deal with harassing or threatening telephone calls or mail, and periodically review these instructions.

Paid Household and Office Staff○ In some parts of the world, a high percentage of break-ins involve paid household or office staff such
as gardeners, security guards, and custodians. Work with the Human Resource staff to review the back-grounds and references of potential staff, even if they are members of the Church.
○ If your predecessor hired the household staff, check with Human Resources to make sure they were properly screened before being hired.
○ Be cautious about tolerating the theft of food, clothing, or other inexpensive items from your home or office. Although the item may be of little value to you, your staff must know that theft of any kind will not be tolerated.
○ Change locks after a household or office staff member resigns or is discharged. This is especially impor-tant if the person was fired under contentious circumstances.
○ Do not leave sensitive documents such as bank statements, credit card numbers, itineraries, or safe com-binations in areas where they can be found by staff.
○ Vary your routes and routines to surprise staff members.
4.25.3TravelSee Safety Tips When Traveling ( 2005 ) .
4.26 POWEREDINDUSTRIALTRUCK(PIT)OPERATIONThese guidelines provide information needed to comply with Church standards and best practices on operat-ing powered industrial trucks.
Those who supervise PIT operators should help develop training programs that will help employees safely operate PITs. Instructors experienced and qualified in all PIT operations should be selected to conduct the training. Managers and supervisors should establish a record-keeping system to document that employees have been trained and evaluated to operate PITs. These guidelines will help instructors and supervisors fulfill the training requirements.
4.26.1TrainingRequirementsIndustry best practices (and U.S. OSHA regulations) require (1) that only trained and authorized operators be permitted to operate PITs and (2) that each employer define methods to train operators to safely operate PITs. Training can be conducted at either the operations site, an off-site location, or at both sites. Training can be conducted by a professional training organization.
Use the following minimum training requirements to make training consistent:
□ Classroom instruction should cover safe PIT operating practices. Review these guidelines with those being trained, and use training resources or vendors to accomplish the training objective.
□ As part of their training, trainees should operate and maneuver the PITs they will use on their jobs. They should use empty pallets or empty containers to practice maneuvering the PIT in typical operating conditions.
□ The instructor should verify the trainee is capable of operating a PIT by watching operating practices.

85S A F E T Y , H E A L T H , A N D E N V I R O N M E N T A L M A N U A L 2 0 1 8 V E R S I O N
□ After trainees complete classroom instruction and the instructor is confident they can operate a PIT safely, the instructor should designate the trainees as PIT operators.
The instructor should complete the Powered Industrial Truck ( PIT ) Training Record (see chapter 7) or equiva-lent and put a copy in the employee’s personal training records or electronic file. Certification cards signifying that training has been completed may be issued by the organization conducting PIT training.
Provide refresher training in relevant topics for the operator when:
○ The operator has been observed to operate the vehicle in an unsafe manner.
○ The operator has been involved in an accident or near-miss incident.
○ The operator has received an evaluation that reveals that he or she is not operating the truck safely.
○ The operator is assigned to drive a different type of truck.
○ A condition in the workplace changes in a manner that could affect safe operation of the truck.
An evaluation of each PIT operator’s performance must be conducted at least once every three years.
4.26.2SafetyRequirementsPIT operators should follow these safety guidelines when choosing, inspecting, and servicing a PIT:
□ In designated hazardous areas, use only PITs designed and approved for use in hazardous locations.
□ Check fuel, oil, water, horns, and brakes on your PITs at the beginning of each shift to make sure they have been properly serviced and are in proper running condition. A daily inspection checklist should be created based on PIT equipment type and the manufacturer’s recommendations. Repair hydraulic or fuel leaks before using the machine.
□ Service PITs at only authorized locations. Shut off motors before fueling. Immediately clean up any fuel spills.
PIT operators should observe these safety guidelines when driving PITs:
□ Do not use substances or medications (prescription or nonprescription) that may affect your driving.
□ Always wear the installed seat belts.
□ Keep your legs within the PIT when it is moving.
□ Do not allow passengers to ride on a PIT unless it is equipped with seats and seat belts for riders.
□ Do not participate in stunt driving or horseplay with PITs.
□ Protect the safety of pedestrians and workers in their areas of operation. The operator of a PIT is entirely in charge of that PIT and will be held accountable for any injuries caused by poor judgment or neglect of safety precautions.
□ Use general highway driving rules for inside and outside operations: keep to the right, stop at blind inter-sections, cross railroad tracks at a 45-degree angle, and follow all other highway driving rules.
□ Always give pedestrians the right-of-way.

□ Do not operate PITs at speeds exceeding 10 mph (16 kmph) on roadways outside of buildings and 5 mph (8 kmph) inside buildings or on docks. Special PITs designed for road travel may go faster when not carry-ing loads. Road conditions, weather, and loads are factors that must be considered to ensure driving at a controlled speed.
□ Drive slowly in wet and slippery conditions, and maintain control over the PIT at all times.
□ Always look in the direction you are moving. PITs may travel backward or forward depending on the situ-ation. PITs should travel in reverse when carrying a load on downgrades. Motorized hand trucks should always travel with the forks downgrade.
□ When turning corners or entering doorways, slow down, sound the horn, and proceed with caution. Watch out for overhead structures or wiring on roads and for lights, pipes, fans, and doorways in build-ings and dock areas. Use horns only as warning signals.
□ Do not shift gears for braking; this will cause serious damage to the PIT. Before changing directions, prop-erly brake the PIT using the braking system.
□ If the PIT begins to tip sideways, stay on the PIT. Hold on tight, brace your feet, and lean away from the direction of the tip.
□ Park PITs only in specified areas off the aisles. Put the forks flat on the floor, put the operating levers in neutral, turn off the ignition, and set the hand brake. Do this when the PIT is left unattended. Do not block an emergency exit by parking in front of it.
PIT operators should observe these safety guidelines when lifting or moving a load with the PIT:
□ Know the capacity of the PIT. This information is located on the manufacturer’s nameplate attached to the PIT. Also, be aware of the center of the load and the maximum fork height.
□ If you notice any mechanical difficulties while operating the PIT, stop immediately to prevent further dam-age and report mechanical failures to your supervisor.
□ Do not move unsafe loads. If you believe a load is too heavy, improperly stacked, or improperly tied down, refuse the load and report the condition to your supervisor.
□ Carry all loads with the channels tipped back.
□ If loads do not have tine channels to secure the load to the forks, tie the load securely to the forks by bands, belts, chains, or other appropriate means approved by supervisors.
□ Depending on the surface, travel with the forks approximately four inches above the floor or road. When traveling with a load, keep the forks close to the floor or road to prevent the load from obstructing your field of vision and to reduce the risk of damage or injury from swaying, bouncing, or falling.
□ When moving a load too high to see over, travel in reverse to get a clear field of vision. When moving extra-wide loads or when your vision is obstructed, use spotters to help you maneuver.
□ Do not leave loads unattended with the forks elevated.
□ Do not push or pull objects with the forks of the PIT. Do not tow other vehicles unless the PIT is approved by supervisors for that purpose.
□ Do not lift anyone or let anyone ride on the forks of the PIT.

87S A F E T Y , H E A L T H , A N D E N V I R O N M E N T A L M A N U A L 2 0 1 8 V E R S I O N
□ Do not let anyone stand under loads being hoisted or lowered by the PIT.
□ Do not remove forks from PITs except to install other authorized attachments for handling special jobs.
□ Do not stack empty pallets higher than eye level.
□ Do not use severely broken or damaged pallets.
□ Use only approved safety platforms to lift people to elevated locations. The platform should have guard-rails, toeboards, and a rear panel to protect personnel from chains, sprockets, and other mechanical hazards associated with the mast. The platform should be securely attached to the PIT. The platform should be metal, and engineered with a 4:1 safety factor. Remain within 20 feet of controls that are not on the platform.
□ Do not attach slings or lifting pads to overhead guards to lift or tow the PIT.
□ Dock plates should be properly secured before driving on the plate.
□ Before anyone enters a trailer, the wheels should be chocked, the brakes locked, and the trailer attached to a tractor or properly supported by nose-end supports.
4.27 SAFETYPERFORMANCEREWARDSANDACCOUNTABILITYGUIDELINES
4.27.1 PurposeSafety rewards and corrective actions can provide important direction for Church employees, volunteers, and Church-service missionaries and can be tools to ensure greater safety success. Proper use of these tools is not necessarily intuitive, and many times what may be considered beneficial may in fact be detrimental or discouraging.
4.27.2SafetyPerformanceRewardsSafety performance rewards can be used to motivate individuals to perform tasks in a safe manner. Rewards can be given in various ways and may include giving recognition, special responsibilities, food, gifts, and addi-tional freedom in tasks and time. Safety performance rewards can be tailored to both individuals and groups. Rewards should not discourage participants from reporting incidents.
4.27.3AccountabilitySafety accountability is also a critical piece of a comprehensive safety system. Corrective actions can be a use-ful tool to motivate appropriate safety behaviors, demonstrate expectations, and achieve a safe and healthy working environment. Administer corrective actions appropriately; doing so hinges upon clearly understand-ing the root causes underlying safety failures. When addressing any safety shortfalls, consider carefully any factors that contribute systemically to safety shortfalls.
Further guidance for ensuring successful implementation of the safety rewards and accountability program can be found in the “Safety Performance Rewards and Accountability Guidelines” fact sheet, available by re-quest from Risk Management.

4.28 SCAFFOLDINGThese guidelines provide general requirements for the erection and use of scaffolding. Experienced vendors or contractors should be used when possible to set up scaffolding. Contractors should use their own scaffolding.
A qualified person is someone who has the necessary training or knowledge and is capable of identifying hazards associated with scaffolding and scaffold components.
○ A qualified person must be present when scaffolding is being erected and used. A qualified person must also have the authority to take prompt corrective action.
○ All employees involved in working with scaffolding must have documented training about the proper setup and use of scaffolds. This training should also include topics such as fall hazards, electrical hazards, and falling object hazards.
○ Volunteers should not be used to erect or use scaffolding.
○ Assemble and use scaffolds following best practices, local regulations, and manufacturer instructions.
○ A tagging system should be used to indicate the status of a scaffold. A qualified person should inspect the scaffold regularly—from erection until the scaffold is taken down and issued the appropriate tag. Tag options are:
• Green. Indicates the scaffold is safe for use
• Yellow. Indicates the scaffold is safe only under certain conditions
• Red. Indicates scaffold is unsafe or unfit for use
○ Guardrails or fall-arrest systems are required on any scaffold platform six feet in height or higher.
○ Top-rails are required to be between 36 and 42 inches (90 and 107 cm) high from the scaffold platform. Mid-rails should be approximately halfway between the top-rail and the platform surface.
○ Toeboards should be at least four inches (10 cm) from the platform to the top of the toeboard and should be installed on all open sides of the scaffold.
○ Wire mesh or an equivalent should be installed between the toeboard and the guardrail if people will be working or passing underneath the scaffold or if materials may fall from the scaffold.
○ Supported scaffolds should be fully planked or decked; space between planks should not be more than one inch (2–3 cm) wide.
○ Scaffold planks should extend 6–18 inches (15–46 cm) past the end supports.
○ Screw jacks or other approved devices for leveling and foundations should be used.
○ Safe access, such as stairs or fixed ladders, must be provided to the working section of the scaffold.
○ If the scaffold has wheels, they must be locked. No person should be on the scaffold when it is moved.
○ If the scaffold is higher than 25 feet (8 m), it should be secured vertically and horizontally every 25 feet (8 m).
○ Scaffolds exceeding 60 feet (18 m) should be designed by a professional engineer.
○ People are not permitted to work on scaffolds in adverse weather conditions (high winds, snow or rain storms, and so on).
89S A F E T Y , H E A L T H , A N D E N V I R O N M E N T A L M A N U A L 2 0 1 8 V E R S I O N
○ Always remain on the scaffold platform while working. Do not work from ladders or step stools while on a scaffold platform.
4.29 WALKINGANDWORKINGSURFACESAll walking and working surfaces should be safe, even, slip resistant, and free of debris and holes. Walking and working surfaces may include, but are not limited to, stairs, parking lots, passenger loading zones, and sidewalks. Use the following standards to ensure walking and working surfaces are safe:
○ Identify and clean up spills quickly.
○ Replace or restretch loose or buckled carpeting.
○ Bevel uneven surfaces with height differences between ¼ inch (0.35 cm) and ½ inch (1.27 cm) with a slope of 1:2 or less.
○ Ramp or replace uneven walking surfaces that have a height difference larger than ½ inch (1.27 cm). The slope of a ramp should not exceed 1:12.
○ Patch or fill cracks or holes greater than a ½ inch (1.27 cm) in walkways and parking areas.
○ Paint elevation transitions on curbs, ramps, or walkways that are difficult to see.
4.30 WORKINGALONEAn employee is considered alone at work when he or she cannot be seen or heard by another person. Employees should not work alone if they are performing high-risk activities. High-risk activities may include, but are not limited to, working in any of the following conditions:
○ At heights
○ In confined spaces
○ With electricity
○ With hazardous substances or materials
○ With hazardous equipment such as chain saws or aerial lifts
○ With materials under great pressure
○ Where there is a potential for violence
The following precautions may be taken to help ensure the safety of someone who is working alone:
○ Establish a check-in procedure.
○ Make sure regular contact is made with all employees.
○ Establish ways to account for people while on the job.
○ Schedule higher-risk tasks to be done during normal business hours or when another worker capable of helping in an emergency is present.

90 S A F E T Y , H E A L T H , A N D E N V I R O N M E N T A L M A N U A L 2 0 1 8 V E R S I O N
4.31 WORKPLACEPROTECTION(VIOLENCEINTHEWORKPLACE)
4.31.1GeneralInformationThe Church strives to provide its employees and others a safe environment. The Church recognizes that outside influences sometimes make this effort an even greater challenge. Violence or threats of violence are strictly prohibited. Any employees involved in such acts will be subject to disciplinary action up to and includ-ing termination (see “No Workplace Violence” in Policy Point [2018], 1.4).
To maintain the safety and protection of its employees, the Church has developed Active Shooter and Uncooperative or Disruptive Individuals emergency response guidelines for situations involving active shooters and uncooperative and disruptive individuals (see sections 3.6 and 3.15 of this manual). These guidelines include training for managers, supervisors, and employees on how to deal with threats of vio-lence and actual incidents.
All threats or acts of violence in the workplace should be reported and will be investigated if the security of any employee is threatened. As much as possible, the confidentiality of employees who provide information will be maintained.
Education and training may include the following:
○ How to appropriately respond to a threat of violence.
○ Who to contact during and after a threat.
○ How to prepare and plan for a threat of violence or active shooter (see section 3.6).
○ Individual plans may need to be adapted to your local area or circumstances (see your local Human Resources and Church Security representatives).
4.31.2ThreatResponseThe following outlines how the Church will respond in the event that a threat of violence is made against the Church or one of its employees. Managers and supervisors must closely follow these procedures in order to bring any situation to a safe and prompt resolution.
4.31.3WhenaThreatOccurs□ Employees should report the threat or incident to a supervisor or telephone local emergency services if
necessary and available.
□ As appropriate, employees should notify a supervisor, department management, an HR representative, or local police or law enforcement.
□ Human Resources contacts the employee being threatened if he or she is unaware of the threat.
91S A F E T Y , H E A L T H , A N D E N V I R O N M E N T A L M A N U A L 2 0 1 8 V E R S I O N
5. Health Guidelines5.1 INTRODUCTIONThe health guidelines in this section should help prevent incidents and promote a healthy work environment. Managers and supervisors should be familiar with these guidelines and follow those that apply to their em-ployees and their jobs.
These guidelines are arranged alphabetically. If questions about any of these guidelines cannot be resolved with your safety and health representative, contact the Risk Management Division.
RiskManagementDivision50 E. North Temple St. Rm. 1608Salt Lake City, UT 84150-0016
Salt Lake area:1-801-240-4049
All other areas:1-800-453-3860, extension 2-4049or 1-866-LDS-RISK (1-866-537-7475)email: [email protected]
5.2 BLOOD-BORNEPATHOGENSThese are best practice guidelines regarding occupational exposure to blood and other potentially infectious materials. These guidelines will help eliminate or minimize occupational exposure to hepatitis B virus (HBV), human immunodeficiency virus (HIV), and other blood-borne pathogens (diseases transmitted by blood).
5.2.1 ScopeThese guidelines apply to employees who experience occupational exposure to blood-borne pathogens. Occupational exposure means that an employee can reasonably anticipate skin, eye, or mucous membrane contact with blood or other potentially infectious materials while performing the duties of his or her job.
Not all exposures to blood and other potentially infectious materials are considered occupational exposures. For example, Good Samaritan acts, such as helping another employee who has a nosebleed or who is bleeding as the result of an accident, would not be considered occupational exposure unless the employee who helps is a designated member of a first-aid team or is expected to render first aid as part of his or her job responsibilities.

92 S A F E T Y , H E A L T H , A N D E N V I R O N M E N T A L M A N U A L 2 0 1 8 V E R S I O N
5.2.2 DeterminingExposureManagers and supervisors should follow these guidelines to determine employees whose job classifications may require exposure to blood-borne pathogens.
Job classifications in which all employees have occupational exposure include employees in medical clinics and members of designated first-aid teams or employees who are expected to render first aid or medical assistance as one of their duties.
Job classifications in which some employees have occupational exposure include staff working closely with cli-ents in sheltered workshops for people with developmental disabilities. These employees have an increased risk due to their clients’ vulnerability to injury, special medical needs, and dependence on the staff for per-sonal care.
5.2.3 MethodsofComplianceFor employees in job classifications with occupational exposure, managers and supervisors should make reasonable efforts to be sure:
□ Employees have the following:
• Guidelines for washing hands
• Guidelines for handling contaminated needles and other contaminated sharps
• Guidelines for using gloves, pocket masks, or other ventilation devices
□ If available, the hepatitis B vaccine should be offered to all employees who experience occupational exposure. Employees who are designated as first-aid providers should be offered the hepatitis B vaccine before they are exposed.
□ Employees who decline the vaccination should sign a copy of the Hepatitis B Vaccine Declination Form, which should be placed in their employment file for the duration of their employment.
□ If an employee is exposed and has not received the hepatitis B vaccine, he or she should see a physician as soon as possible (no more than 24 hours after exposure) to be evaluated for possible hepatitis B, hep-atitis C, or HIV viral infection.
□ When there is an exposure incident, confidential medical evaluations should be made available to the exposed employee at no cost to the employee. The physician should document the routes of exposure and the circumstances under which the exposure incident occurred.
□ Warning labels should be placed on containers of regulated waste, on refrigerators and freezers contain-ing blood, and on containers used to store, transport, or ship blood or other potentially infectious materi-als. Regulated waste should be disposed of in accordance with local health regulations.
□ Employees should be trained. The training should be free and held during working hours. Training records should be kept and maintained.

93S A F E T Y , H E A L T H , A N D E N V I R O N M E N T A L M A N U A L 2 0 1 8 V E R S I O N
5.3 ENTERINGACONFINEDSPACEThese guidelines establish the requirements and the process for entering a confined space, including prepar-ing the space before entering, safety requirements for entering, and emergency rescue procedures.
5.3.1 IntroductionConfined space means a space that (1) is large enough for entering and working, (2) has limited or restricted means for entry or exit, and (3) is not designed to be occupied continuously by workers. Confined spaces may include tanks, vessels, silos, storage bins, manholes, hoppers, vaults, pits, and pipelines.
Permit-required confined spaces (also referred to as a permit space) are confined spaces that (1) may contain a hazardous or potentially hazardous atmosphere, (2) may contain a material that can engulf an entrant, (3) may contain walls that converge inward or floors that slope downward and taper into a smaller area which could trap or asphyxiate an entrant, or (4) may contain other serious physical hazards, such as unguarded machines or exposed live wires.
The following guidelines satisfy best practices for a written program.
5.3.2 GeneralRequirementsThe following are the general requirements for evaluating work areas, issuing entry permits, providing sign-age, training employees, and keeping records for work in confined spaces.
Workplace EvaluationManagers and supervisors should evaluate the workplace to identify and make a list of confined spaces and permit-required confined spaces. When the use or configuration of a nonpermit confined space changes and those changes might increase the hazards to those entering the space, reevaluate the space and, if neces-sary, reclassify it as a permit-required confined space.
Entry PermitEntry supervisors are responsible to determine if acceptable entry conditions exist, to authorize entry into the confined space, and to oversee entry. They issue a Confined Space Entry Permit (see chapter 7) before an employee is allowed to enter a permit-required confined space. The following requirements apply:
○ All work in a permit-required confined space should be delayed until a proper entry permit is issued and all conditions stated in the permit have been met. Conditions should be determined by the entry super-visor and may include using specific kinds of clothing and safety equipment as well as other protective measures.
○ The entry permit should be valid for only one shift or for a maximum of eight hours. When work in the confined space is extended beyond one shift or is continuous, the entry supervisor should issue a new permit. In this case, steps taken earlier to condition the space need not be repeated, but tests may be performed to reconfirm that the space’s atmosphere is safe.
○ If work in the confined space is interrupted for any length of time during a given shift (such as for lunch break), perform appropriate tests before reentering the space.

94 S A F E T Y , H E A L T H , A N D E N V I R O N M E N T A L M A N U A L 2 0 1 8 V E R S I O N
SignsPost danger signs at entrances to any permit-required confined space. A sign reading “Danger—Permit Required. Confined Space. Do Not Enter” satisfies the requirement for a sign. During the work, when there is more than one entrance to the permit-required confined space, post signs at each entrance indicating that workers are inside.
TrainingTrain employees who are working in a permit-required confined space or serving as attendants in safe-entry procedures and rescue procedures. Employees should have a thorough knowledge and understanding of their equipment and the potential hazards. Provide employees training in the following circumstances:
○ Before the employee is assigned duties as an entrant (an employee authorized to enter permit space), at-tendant (an employee stationed outside the permit space who monitors entrants and performs all other assigned duties), or entry supervisor
○ Before there is a change in assigned duties
○ When there is a change in permit-space operations that presents a hazard an employee has not previ-ously been trained for
(Note: Keep employee training records. The records should contain each employee’s name, the signature of the trainers, and the dates of training. See Safety Training Meeting Record [chapter 7].)
Record KeepingKeep each used permit on file for one year after the current year ends. Review the permits within one year after each entry, and revise permit-issuing practices as necessary to protect employees entering permit-re-quired confined spaces.

95S A F E T Y , H E A L T H , A N D E N V I R O N M E N T A L M A N U A L 2 0 1 8 V E R S I O N
5.3.3 ChangingaPermitSpacetoaNonpermitSpaceFollow these guidelines when reclassifying a permit-required confined space as a nonpermit confined space:
□ If the permit space poses no actual or potential atmospheric hazards and if all hazards within the space are eliminated without entering the space, it may be reclassified as a nonpermit confined space.
□ If it is necessary to enter the permit space to eliminate hazards, the entry should be performed following the permit-required confined space requirements.
□ If tests and inspections during that entry show the hazards within the permit space have been eliminated, the permit space may be reclassified as a nonpermit space for as long as the hazards remain eliminated. (Note: control of atmospheric hazards through forced-air ventilation does not constitute elimination of the hazards.)
□ Certify that all hazards in a permit space have been eliminated. They should do so by recording the decision on a document that includes the date, the location of the space, and the signature of the entry supervisor making the determination. The Confined Space Entry Permit (see chapter 7) may be used for making this certification.
□ The certification should be made available to each employee entering the space.
□ If hazards arise within a permit space that has been downgraded to a nonpermit space, each employee must leave the space.
□ If hazards arise within a permit space that has been downgraded to a nonpermit space, reevaluate the space and determine if it must be reclassified as a permit space.
5.3.4 RequirementsforContractorsWhen the Church hires an outside contractor for work that involves entering a permit-required confined space, both the Church and the contractor have responsibilities for the safety of the people working in the area.
Church ResponsibilitiesIt is the Church’s responsibility to:
□ Inform the contractor that the workplace contains a permit-required confined space and that entry is only allowed through compliance with the permit-required confined space requirements.
□ Inform the contractor about the elements that make the space a permit-required confined space, includ-ing the hazards and the Church’s experience with the space.
□ Inform the contractor of any precautions or procedures the Church has implemented for protecting em-ployees in or near the permit spaces where contractor employees will be working.
□ Coordinate entry operations with the contractor when both Church and contractor employees will be working in or near permit spaces.
□ Debrief the contractor at the conclusion of the entry operations regarding the permit-space program followed and any hazards confronted or created in permit spaces during entry operations.

96 S A F E T Y , H E A L T H , A N D E N V I R O N M E N T A L M A N U A L 2 0 1 8 V E R S I O N
Contractor ResponsibilitiesEach contractor who performs permit-required confined space entry should:
□ Obtain from the Church any available information regarding hazards and entry requirements for permit-required confined spaces.
□ Coordinate entry operations with the Church supervisor when both Church and contractor employees will be working in or near permit spaces.
□ Inform the Church supervisor of the permit-space program the contractor will follow and of any hazards confronted or created in permit spaces.
5.3.5 PreparingthePermit-RequiredConfinedSpaceThe entry supervisor should make reasonable efforts to complete the following five steps before entering any permit-required confined space.
1. Condition the SpaceBefore opening the permit space, pump out or drain all residual material as completely as possible. Then flush the space with water or an appropriate cleaning solution followed by a final water flush.
If flammable or toxic gases are present, purge the space after flushing with water. Steam, air, or inert gas can be used. After the space has been purged, any entrances can be opened.
2. Ventilate the SpaceIf required by the Confined Space Entry Permit, start mechanical ventilation of the space. Ventilation should eliminate all pockets of dead air that contain toxic, flammable, or inert gas. Do this by introducing fresh air into the space or exhausting air from the space.
When there is only one opening into the space, suspend a large flex hose into the space, with the end of the hose reaching to one or two feet (0.3 or 0.6 m) from the bottom of the space. Attach the other end of the hose to a high-speed blower. This provides the necessary air changes to compensate for any oxygen depletion.
3. Isolate the SpaceBegin isolating the permit space while it’s being ventilated. Do this by blocking all pipes necessary to keep toxic or harmful materials from flowing into the space. Do one of the following:
○ Blank off entering lines by using in-line or individual blanks.
○ Disconnect pipes, and seal open ends with pipe caps or plugs.
○ Remove a section of the pipes.
4. Immobilize Powered EquipmentImmobilize any powered equipment by mechanical, hydraulic, or electrical means (see section 4.15, “Hazardous Energy Control (Lockout/Tagout) Program”).

97S A F E T Y , H E A L T H , A N D E N V I R O N M E N T A L M A N U A L 2 0 1 8 V E R S I O N
5. Test the AtmosphereAfter all other procedures have been completed, a qualified person should test the atmosphere of the permit-required confined space. All test procedures should comply with current testing practices. Before an employee enters, test the space for the following:
□ Oxygen content. Conduct a test for oxygen content in all cases, regardless of previous contents or prior preparation of the space. The oxygen content should be between 19.5 percent and 22 percent in all lev-els of the space. Continue ventilation if the oxygen content is below these concentrations.
□ Flammability. The atmosphere should be nonexplosive (less than 10 percent of the lower flammable limit).
□ Toxicity. Test the atmosphere in the space to make sure there are no toxic concentrations of vapors. If test levels exceed the established limits for occupational exposure, continue the ventilation procedure. An employee should not enter the space before the level of contaminants is substantially below the estab-lished occupational exposure limit.
These conditions should be maintained while an employee is in the permit space. Tests should be conducted during work in the space to determine if the space remains safe. If conditions are found unsafe, the employee should leave the space until a safe atmosphere is established.
5.3.6 SafelyEnteringthePermit-RequiredConfinedSpaceOnly one employee at a time should be inside the permit-required confined space unless the entry supervisor has given prior approval. Employees involved in the project should comply with the following safety requirements.
Personal Protective EquipmentEmployees entering a permit-required confined space should wear personal protective equipment appro-priate for the condition of the space and the work to be done. Personal protective equipment may include the following:
○ Rubber suits (or similar clothing), boots, gloves, face shield, and other items as indicated
○ Respiratory equipment, including a self-contained breathing apparatus or air line respirator and a source of compressed breathing air
Safety EquipmentThe following safety equipment should be assembled before entering a permit-required confined space. It should then be used as appropriate while an employee is working in the space:
○ A retrieval system including a lifeline, body harness, and lifting device or anchor
○ Ventilating equipment needed to obtain acceptable entry conditions
○ A portable air horn to summon help in an emergency
(Note: if necessary, provide communications equipment for the entrant and the attendant to communi-cate, such as when the attendant needs to alert the entrant to evacuate the space.)
○ Ladders at all entrances and exits where the drop or climb is more than three feet (1 m)
○ Lighting equipment to see well enough to work safely and to exit the space quickly in an emergency
○ Barriers and shields to protect entrants from external hazards such as pedestrians and vehicles, if necessary
98 S A F E T Y , H E A L T H , A N D E N V I R O N M E N T A L M A N U A L 2 0 1 8 V E R S I O N
Duties of Authorized EntrantsThe duties of authorized entrants are:
○ Know the hazards that they may face during entry, including information on the mode, signs or symp-toms, and consequences of exposure to a particular hazard.
○ Use proper equipment for entry.
○ Alert the attendant when the entrants recognize any warning sign or symptom of a dangerous situation.
○ Exit from the space as quickly as possible whenever they recognize any warning sign or symptom of a dangerous situation or the attendant gives an order to evacuate.
Duties of AttendantAn attendant should be present when an entrant enters a permit-required confined space. The attendant should be qualified to administer artificial respiration and first aid. In addition, the attendant should wear appropriate personal protective clothing and keep necessary safety equipment readily available. The duties of the attendant are:
○ Know the hazards that entrants may face during entry, including information on the mode, signs or symp-toms, and consequences of exposure to a particular hazard. The attendant should also be aware of possible behavioral effects of hazard exposure.
○ Keep continuous visual and voice contact with entrants inside the space.
(Note: if the attendant needs to leave his or her post, entrants must come out.)
○ Help with necessary equipment changes.
○ Monitor activities inside and outside the space to determine if it is safe to remain in the space, and order entrants to evacuate the space immediately if (1) behavioral effects are detected in the entrant, (2) a dangerous situation is detected outside the space, or (3) the attendant cannot effectively perform the required duties.
○ Summon rescue and emergency services as soon as the attendant determines that the entrant needs help.
○ Perform no other duties that might interfere with the duty to monitor and protect the entrant.
Duties of Entry SupervisorThe duties of the entry supervisor are:
○ Know the hazards that entrants may face during entry, including information on the mode, signs or symp-toms, and consequences of exposure to a particular hazard.
○ Issue the Confined Space Entry Permit and verify that (1) appropriate entries have been made on the permit, (2) all tests specified by the permit have been conducted, and (3) all necessary procedures and equipment are in place before endorsing the permit and allowing entry to begin.
○ Verify that rescue services are available and that the means for summoning them are operable.
○ Prevent unauthorized persons from entering or attempting to enter the space during entry operations.
○ Review entry operations when there is reason to believe that employees entering permit spaces are not protected. Correct deficiencies before other entries are authorized.

99S A F E T Y , H E A L T H , A N D E N V I R O N M E N T A L M A N U A L 2 0 1 8 V E R S I O N
○ Terminate the entry and cancel the permit when the entry operations covered by the permit have been completed. The entry supervisor should note any problems encountered during the entry operations and file the permit.
Emergency Rescue ProceduresWhen an emergency exists, the attendant should attempt rescue without entering the space if possible. Only when it is infeasible to attempt rescue without entering the space should the attendant enter the permit-re-quired confined space to perform rescue services.
(Note: Employees entering a permit-required confined space to perform rescue services should be properly trained. Training should include simulated practice rescues at least once every 12 months.)
The attendant should initiate the following procedures before entering the permit-required confined space:
1. If applicable, use a portable air horn to summon help.
2. Call the local emergency number to alert emergency personnel that emergency medical help is needed.
3. Help the authorized entrant to exit the permit-required confined space by using a retrieval system includ-ing a lifeline, body harness, and lifting device or anchor.
4. Put on and properly adjust the body harness attached to a lifeline and a self-contained breathing appara-tus (SCBA). Additional emergency equipment should be made ready depending on the circumstances.
(Note: a SCBA is required for emergency rescue unless the authorized entrant has sustained a physical injury and atmospheric testing has determined that the atmosphere remains safe.)
5. Begin a rescue only if a second attendant has arrived and is wearing the proper safety equipment. Under no circumstances should an attendant enter the permit-required confined space unless another em-ployee is standing by.
6. Upon reaching the injured employee, quickly assess the cause of the accident. Three situations require special handling:
1. If the employee is not breathing or if the atmosphere will not sustain life, supply fresh air and begin artificial respiration immediately.
2. If the injured employee is severely bleeding, start first-aid procedures immediately to stop the bleeding.
3. If the injured employee has fallen, immobilize the employee in the position found.
(Note: Each of these situations requires knowing first-aid procedures. Although rescue may be initi-ated by a knowledgeable employee, an employee in these situations should turn over the rescue as quickly as possible to professional emergency personnel for treatment.)
Additional Safety PrecautionAll authorized entrants and attendants should have passed a medical evaluation for respirator use and should have attended a training course.

100 S A F E T Y , H E A L T H , A N D E N V I R O N M E N T A L M A N U A L 2 0 1 8 V E R S I O N
5.4 ERGONOMICSSAFETYANDHEALTHPROGRAMThese instructions provide information about how to create an ergonomics safety and health program that will help prevent musculoskeletal disorders (MSDs) in the workplace.
5.4.1 IntroductionErgonomics is an effort to identify characteristics that will allow people to work safely and effectively with tools, with equipment, and in their work area. Employees who engage in tasks with repetitive motions can develop musculoskeletal disorders.
The ergonomics safety and health program will help identify potential problems in work methods and processes. Once potential problems are identified, corrective action should be taken. The program should include:
○ Management support
○ Work-site analysis
○ Hazard prevention and control
○ Medical management
○ Training
The following activities should also be a part of the program:
○ Reporting and reviewing injury and illness records
○ Analyzing workers’ compensation claims
○ Observing work methods and processes
○ Questioning employees
○ Identifying jobs with potential ergonomic risk factors
○ Taking corrective action
Managers and supervisors of Church facilities with exposure to ergonomic hazards should implement an ergonomic program as outlined in these instructions.
Employee InvolvementManagers and supervisors should encourage employees to:
○ Report hazards, concerns, or suggestions to management without fear of reprisal.
○ Promptly and accurately report signs and symptoms of MSDs so they can be evaluated and treated. Management should designate a physician to conduct evaluations.
○ Participate in the safety and health committee to help formulate, evaluate, and test potential solutions.
Program Review and EvaluationManagers and supervisors should:
○ Review the program regularly.
○ Prepare written progress reports and program updates.

101S A F E T Y , H E A L T H , A N D E N V I R O N M E N T A L M A N U A L 2 0 1 8 V E R S I O N
5.4.2 ProgramElementsThe following are essential elements of an effective ergonomics safety and health program.
Management SupportManager and supervisor support is important for reducing MSDs and communicating support to employees. Management support improves the ability to maintain a sustained effort—by allocating needed resources—and follow up on implementation.
Work-Site AnalysisManagers and supervisors should initiate a work-site analysis to identify hazards. The following activities are part of a work-site analysis:
○ Managers and supervisors should review first-aid records, injury records, and incident reports to identify MSD trends.
○ The safety and health committee should (1) identify work positions requiring a detailed analysis of ergo-nomic hazards, (2) conduct surveys regularly or when operations change, and (3) identify positions with low-risk factors for restricted-duty work activity.
○ Qualified people may be asked to identify and analyze jobs for ergonomic stress and to recommend solutions.
Hazard Prevention and ControlErgonomic hazards can be reduced by designing effective workstations, tools, and functions. Managers and supervisors should establish an ergonomics pilot program to evaluate and test potential solutions. Measures successfully tested in the pilot program should be implemented throughout the facility. Consider the follow-ing controls for the pilot program:
○ Change workstations, work methods, and tools to help eliminate excessive exertion and awkward pos-tures and to reduce MSDs. This could include:
• Installing adjustable workstations.
• Changing work methods to reduce static, extreme, and awkward postures; repetitive motions; and excessive force.
• Designing effective tools and handles.
○ Develop a culture in which proper work techniques, employee conditioning, regular feedback, mainte-nance, adjustments and modifications, and enforcement are all important components. Proper work techniques may include:
• Correct lifting.
• Use and maintenance of appropriate tools and equipment.
• Conditioning or break-in periods for new or returning employees.
○ Reduce the duration, frequency, and severity of conditions or actions that cause musculoskeletal disorders.
102 S A F E T Y , H E A L T H , A N D E N V I R O N M E N T A L M A N U A L 2 0 1 8 V E R S I O N
Medical ManagementManagers and supervisors should designate a physician or other health professionals to help identify and treat MSDs. The medical management program should address the following items:
○ Keeping records of injuries and illnesses
○ Recognizing and reporting problems
○ Creating a system for evaluating and referring for treatment
○ Employing conservative and accepted treatment
○ Returning employees to work with restricted work duties
○ Monitoring treated employees
TrainingTrain supervisors and employees about controlling ergonomic hazards.
Those who receive initial training should include affected employees, engineers and maintenance personnel, management, and healthcare providers. Affected employees should receive general and job-specific training.
The program should be taught by qualified people. Provide ongoing training for new employees, employees who are reassigned, and all employees when new operations are introduced.
5.5 HAZARDCOMMUNICATION
5.5.1 OverviewA hazard communication program is required for all Church employees who work with hazardous chem-icals. These guidelines are intended to be consistent with the provisions of the United Nations Globally Harmonized System of Classification and Labeling of Chemicals (GHS).
The general requirements of the hazard communication program include the following:
□ A written hazard communication program (see Written Hazard Communication Program in chapter 7) that:
• Provides a list of hazardous chemicals (see Chemical Inventory List in chapter 7)
• Designates people responsible for labeling chemicals, maintaining safety data sheets (SDSs), and training
• Describes the labeling system
• Provides the location of SDSs and procedures for getting and updating SDSs
• Provides a format and elements of the training program
• Provides procedures to train new employees
□ Labels (see sample label and pictograms at the end of this section) and other forms of warning that should:
• Be placed on portable and process containers
• Identify contents and have appropriate hazard warnings
• Cross reference with SDSs and the Chemical Inventory List

103S A F E T Y , H E A L T H , A N D E N V I R O N M E N T A L M A N U A L 2 0 1 8 V E R S I O N
□ SDSs that should:
• Be available for each chemical used
• Be current (manufacturers must provide an SDS with the first shipment of a chemical and also update the SDSs if the information changes)
• Be readily accessible to employees in their work area during their work shift
□ Information or training for employees about:
• Hazardous chemicals in the employee’s work area (a) when an employee is initially assigned and (b) when new chemicals are introduced
• The standard requirements for hazard communication
• Locations of hazards
• Location of written program, SDSs, and the Chemical Inventory List
• Ways to determine hazards (warning properties) and specific hazards of chemicals (health effects)
• Labeling
• Precautions
5.5.2 HazardCommunicationProgramThe purpose of the hazard communication program is to ensure that:
○ An evaluation is made of the hazards of all chemicals produced or imported by chemical manufacturers or importers.
○ Information is transmitted to appropriate employees.
5.5.3 DocumentationA complete written hazard communication program should be maintained.
5.5.4 ResponsibilitiesThe Church, as an employer, should develop and implement a hazard communication program at each work location. The program should facilitate the following actions:
1. Identifying hazardous chemicals
2. Labeling chemical containers with warning labels
3. Providing access to SDSs
4. Providing information and training for employees
5. Providing a written hazard communication program for each work location
The following is more information about the five basic parts of the program and a list of tasks for each part.
104 S A F E T Y , H E A L T H , A N D E N V I R O N M E N T A L M A N U A L 2 0 1 8 V E R S I O N
1. Identifying Hazardous ChemicalsThe chemical manufacturer or importer is responsible for determining if a chemical is hazardous. As a user, you may rely on the evaluation from these suppliers through labels on containers and SDSs.
Managers and supervisors should complete the Chemical Inventory List (see chapter 7) and do the following:
□ Conduct an on-site chemical inventory by writing down the names of all hazardous chemicals. Hazardous chemical means any chemical that is classified as a physical hazard or a health hazard, a simple asphyxi-ant, a combustible dust, a pyrophoric gas, or a hazard not otherwise classified. List all hazardous chemi-cals using the identifying name that appears on the appropriate SDS and label for the chemical. Compile the list for the entire workplace or for individual work areas in various sections of the facility.
The list will be part of the written program and should be made available to employees on request. It will also serve as an inventory to ensure all required SDSs are obtained.
□ Review your completed list to determine if any of the items are exempted. The following items are exempt from the hazard communication standard:
• Hazardous wastes
• Wood or wood products
• Manufactured articles or products that do not release hazardous chemicals under normal use
• Foods, drugs, or cosmetics for employees’ personal use
• Any consumer product or hazardous substance that is used in the workplace in the same manner as it is normally used by consumers. Exposure to chemicals that results from using the item must not be greater than normal consumer experience
You may include all chemicals on your Chemical Inventory List, even if they are exempted. If there is any ques-tion regarding a particular chemical, it is best to include that chemical on the list.
2. Labeling Chemical Containers with Warning Labels□ Label all hazardous materials in the workplace with the six required GHS elements, including (1) product
identifier, (2) signal word, (3) hazard statements, (4) pictograms, (5) precautionary statements, and (6) name, address, and telephone number of the chemical manufacturer, importer, or other responsible party.
• A sample hazard communication program label that identifies the required label elements is shown at the end of this section.
• Examples of pictograms are shown at the end of this section. The pictograms on labels are intended to alert users to the chemical hazards they may be exposed to. Each pictogram consists of a symbol on a white background framed within a red border and represents a distinct hazard. The pictogram on the label is determined by the chemical hazard classification.
□ Make sure that labels are in the primary language understood by the employees. If employees speak other languages, the information may also be presented in those languages.
□ Check all incoming shipments of hazardous chemicals to be sure they are labeled.

105S A F E T Y , H E A L T H , A N D E N V I R O N M E N T A L M A N U A L 2 0 1 8 V E R S I O N
□ Do not remove or deface existing labels on incoming containers of hazardous chemicals unless the con-tainer is labeled immediately with the required information.
□ Ensure that each portable container into which hazardous chemicals are transferred is labeled with one of the following:
• A GHS-compliant pre-label from the chemical manufacturer or distributor.
• A secondary label copied from the shipped container.
• Other secondary labels with GHS-compliant information.
□ Ensure that each container of hazardous chemicals, such as a stationary process container or tank, is labeled with one of the following:
• A secondary label copied from the shipped container.
• Other secondary labels with GHS-compliant information.
• A product identifier and words, pictures, symbols, or a combination that provides information regard-ing the physical and health hazards of the chemical. Train employees on understanding the alterna-tive workplace labeling system.
3. Providing Access to Safety Data SheetsSafety data sheets display written or printed information concerning a hazardous chemical prepared by the manufacturer. They should be provided by the chemical supplier when the product is shipped or delivered for the first time or when the SDS is changed.
□ Compile SDSs currently in use as part of the written hazard communication program (see “Provide a Written Hazard Communication Program for Each Work Location” in this section). SDSs for products no longer in use should be retained by the organization for 30 years in a separate file for historical SDSs.
□ Provide electronic access to SDSs if desired. Computers for accessing electronic SDSs should be readily accessible. Train employees how to access electronic SDSs. Provide an adequate back-up so workers can access SDSs during emergencies. Ensure that workers can get hard copies of SDSs if they want them.
□ For all hazardous chemicals, maintain SDS files in readily accessible areas. SDSs should be in the primary language understood by employees (copies may be maintained in other languages). They should contain the following 16 sections:
• Section 1: Identification
• Section 2: Hazard identification
• Section 3: Composition of and information on ingredients
• Section 4: First-aid measures
• Section 5: Firefighting measures
• Section 6: Accidental-release measures
• Section 7: Handling and storage
• Section 8: Exposure controls and personal protection
106 S A F E T Y , H E A L T H , A N D E N V I R O N M E N T A L M A N U A L 2 0 1 8 V E R S I O N
• Section 9: Physical and chemical properties
• Section 10: Stability and reactivity
• Section 11: Toxicological information
• Section 12: Ecological information
• Section 13: Disposal considerations
• Section 14: Transport information
• Section 15: Regulatory information
• Section 16: Other information, including date of preparation or last revision
□ Index SDSs by names that employees or others will recognize. This could be by type of product, trade name, or chemical name, whichever employees are familiar with and can easily recognize. Inform each employee that the information is available, and tell them where it can be found. This location should be readily accessible at all times during working hours and should be on the premises where the em-ployees work.
□ Give each location a full set of SDSs for the chemicals listed on the Chemical Inventory List.
□ If you have not received a particular SDS or if it is missing, request it in writing from the supplier who pro-vided the chemical.
□ Keep a copy on file of letters requesting missing SDSs. The letters should be available for review by local regulators. If the chemical supplier cannot provide SDSs, do not purchase chemicals from them.
□ In case of injury, provide the physician with the information on the SDS so the physician can determine proper treatment. In order to provide the physician with this information quickly, others who might not necessarily be directly involved in using the products should also know the location of the information.
□ Inform people who answer telephone calls in each location where the information is located so they can supply this information if it is requested by a poison control center, hospital, doctor, or others in an emergency.
4. Providing Information and Training for EmployeesTrain employees on the hazardous chemicals in their work area. Employees should learn about:
○ Provisions of the hazard communication program.
○ Operations in employee work areas where hazardous chemicals are present.
○ Location and availability of the written hazard communication program, including the required lists of hazardous chemicals and SDSs.
○ Physical and health hazards of the chemicals in the work area.
○ Measures employees can take to protect themselves from these hazards, including information on work practices, emergency procedures, and personal protective equipment.

107S A F E T Y , H E A L T H , A N D E N V I R O N M E N T A L M A N U A L 2 0 1 8 V E R S I O N
○ Work procedures that ensure protection when cleaning hazardous chemical spills and leaks.
○ Details of the written hazard communication program, including an explanation of the labels received on shipped containers, the workplace labeling system, and SDSs. Employees should also receive training on the order of information on the labels and on how they can obtain and use the appropriate hazard infor-mation on the labels and in the SDSs.
Managers, supervisors, or other qualified persons may be assigned as instructors. Instructors should:
□ Cover the above items during the general training employees receive when they are initially assigned. The depth of training should be relative to the frequency of chemical use and the severity of chemical hazards to which employees are exposed.
□ Instruct employees concerning information in each section of each SDS.
□ Conduct training during the employees’ regular working hours.
□ Give special attention to each product. The primary message should be how to safely use the chemical. Train employees about (a) how the product will affect personal health in any way through its use or mis-use and (b) the dangers of improperly mixing chemical products.
□ Provide employees additional training concerning workplace hazards when:
• Chemicals with new hazards are introduced into the workplace.
• Changes to processes or equipment are made that could cause new or increased exposures.
• Procedures and work practices that could cause new or increased exposures are introduced or changed.
• Employees are transferred from one work area to another where different hazards may be present.
□ Follow up and evaluate the training program periodically to make sure employees know how to apply the training and handle chemicals they use. Provide training periodically (annually) to employees who work frequently with chemicals and may be at high risk.
□ Training should be provided in the language that employees understand.
Documenting Training Sessions. Include a record of employee training in each employee’s training file and in the written hazard communication program. Use the Safety Training Meeting Record (see chapter 7).
□ Keep a log showing the date of the training, who attended, what chemicals were covered, and the name of the instructor. This log should also include the signature of the employees who attended as proof that they were there, that they were trained, and that they understood what was taught.
Hazardous Nonroutine Tasks. The supervisor of an employee performing a hazardous nonroutine task should train that employee concerning the task. Training should include procedures pertaining to the task. The em-ployee should inform the supervisor when a nonroutine task will be performed.
Some nonroutine tasks require special permits before work begins or require that some special procedures be followed. Employees should follow these procedures to ensure their own safety.
Contractors. When contracted employees or their supervisors first enter the premises, advise them of safety regulations.
108 S A F E T Y , H E A L T H , A N D E N V I R O N M E N T A L M A N U A L 2 0 1 8 V E R S I O N
Contractor employees are expected to take appropriate measures to protect themselves from any hazards present. They should be informed of hazards they may be exposed to and of the availability of SDSs. The contractors should, in turn, notify you of hazards they may expose your employees to and provide SDSs for hazardous materials they introduce.
5. Provide a Written Hazard Communication Program for Each Work LocationManagers and supervisors should see that a written hazard communication program is prepared for each location. Make a copy of and complete the Written Hazard Communication Program form (see chapter 7). Put the form in a clearly labeled hazard communication program file or binder, and make it available to all employees and contractors. Keep a copy of the information at each work location. The information should be divided into sections and include the following:
Section 1—Emergency Contacts○ List of emergency telephone numbers, including the toll-free, 24-hour, local poison control number (see
Emergency Telephone Numbers form in chapter 7)
Section 2—Requirements and Methods(See Written Hazard Communication Program form in chapter 7.)
○ Description of how the requirements for SDSs will be met
○ Description of how the requirements for employee information and training will be met
○ Methods for informing employees of the hazards of routine and nonroutine tasks and the hazards asso-ciated with chemicals in unlabeled pipes in their work areas
○ Methods for informing contractors of the hazardous chemicals their employees may be exposed to while performing their work and suggestions for appropriate precautions
○ Methods for contractors to provide SDSs for all hazardous materials they may bring into your workplace and procedures to inform your employees concerning this information
Section 3—Chemical Inventory List and SDS Materials○ Chemical Inventory List (see chapter 7) of hazardous chemicals known to be present in the workplace
○ SDSs for the chemicals at the location, or information on electronic access to SDSs
Section 4—Training Materials○ Training records for the employees who work at the location

109S A F E T Y , H E A L T H , A N D E N V I R O N M E N T A L M A N U A L 2 0 1 8 V E R S I O N
Section 5—Other Materials○ Other pertinent information as necessary
5.6 HEARINGCONSERVATIONANDPROTECTIONThese guidelines have been established to help prevent hearing loss of employees in noise hazard areas or operations.
Continuous and intermittent exposure to high noise levels may, over a period of time, result in hearing loss. A hearing conservation program should be established in areas where the noise exposures equal an eight-hour time-weighted average (TWA) sound level of 85 decibels (dBA) measured on the A scale of an audiometer with a 3-dBA exchange rate.
A hearing conservation program includes the following:
○ Audiometric testing
○ Noise measurement and analysis
○ Engineering controls
○ Hearing protection (for example, earplugs or earmuffs)

110 S A F E T Y , H E A L T H , A N D E N V I R O N M E N T A L M A N U A L 2 0 1 8 V E R S I O N
○ Training program
○ Record keeping
Managers and supervisors should use the following guidelines to review work areas that are potential noise hazard areas:
□ Survey suspected noise hazard areas to determine if the area should be posted as a noise hazard area. Contact the Risk Management Division for help conducting noise surveys.
□ Implement appropriate engineering controls if the hazardous noise (must be less than 85 dBA or TWA) can be minimized or controlled.
□ If engineering controls are unsuccessful in lowering noise levels, then do the following:
• Provide annual training about hearing conservation for exposed employees. The training program should include the following:
▪ The effects of noise on hearing
▪ The purpose of hearing protectors, their advantages, their disadvantages, the thickness of various types, and instructions on selection, fitting, use, and care
▪ The purpose of audiometric testing and an explanation of test procedures
• Provide annual audiometric testing to exposed employees.
• Supply hearing-protection devices to employees, and require their use.
□ Record and file all data regarding training, audiometric testing, and noise measurement.
5.7 INDOORAIRQUALITYASSESSMENTThese guidelines and the Indoor Air Quality Questionnaire (see chapter 7) address concerns about indoor air quality in your workplace.
5.7.1 IntroductionComplaints about indoor air quality (IAQ) range from simple complaints, such as the air smelling odd, to complex ones, such as the air quality causing illness and loss of work time. It may not be easy to identify a single reason for IAQ complaints because of the number and variety of possible sources, causes, and individual sensitivities.
Use these guidelines to help evaluate IAQ complaints, and develop an action plan to monitor and resolve them. Do not use the guidelines and questionnaire for diagnosing individual sensitivities and complaints; use them to help determine if the building is suffering from IAQ problems.
If you still cannot identify the source of IAQ problems after you have followed all the steps in this guideline, before taking other steps, contact the Risk Management Division at Church headquarters or your local safety and health representative for further instruction.
Use these guidelines to:
○ Log complaints.
○ Conduct a background assessment of the building.

111S A F E T Y , H E A L T H , A N D E N V I R O N M E N T A L M A N U A L 2 0 1 8 V E R S I O N
○ Conduct a building walk-through inspection.
○ Assess the performance of heating, ventilating, and air-conditioning systems (HVAC).
○ Determine possible sources of IAQ problems.
○ Develop an action plan to address the likely sources of IAQ problems.
○ Keep building occupants informed about what action is being taken.
5.7.2 LogComplaintsLog each IAQ complaint using the Indoor Air Quality Questionnaire. Ask the person completing the form to be as specific as possible when answering each question. Review each form for the following:
○ Indoor environmental discomforts that have been reported
○ Signs or symptoms of health problems that have been reported
○ When the discomforts and symptoms began and how often they occurred
○ If the discomforts and symptoms continued outside the building
○ Dates and nature of recent episodes of poor air quality at the building
○ Comments that may help identify sources of IAQ problems
5.7.3 ConductaBackgroundAssessmentGather as much of the following historical information as possible about the building:
○ Age of the building
○ Type of construction (masonry, wood frame, and so forth)
○ Types of carpets and other fabrics used in the building
○ Age and type of HVAC equipment
○ Recent renovations
○ Previously reported air quality problems
○ Quality and frequency of maintenance and custodial service
5.7.4 ConductaBuildingWalk-ThroughWalk through the building to get a good idea of any problems that may be present. When possible, interview peo-ple who have submitted air quality complaints to get a better understanding of the nature of complaints received.
Look at the following, and record all your findings:
□ Building layout and potential air-flow problems
□ Ventilation equipment for potential sources of chemical or microbiological contaminants
□ Storage places for cleaning materials, supplies, and equipment (note if and how the spaces are ventilated)
□ Outside air-intake locations and how close they are to possible sources of pollution, such as heating ex-haust vents
□ Outside air dampers to see if they are open and operating

112 S A F E T Y , H E A L T H , A N D E N V I R O N M E N T A L M A N U A L 2 0 1 8 V E R S I O N
□ Storage closets that may contain chemical supplies, such as paints, glues, and so forth (note if containers are open and if and how spaces are ventilated)
□ Temperature levels inside and outside and, when environmental monitoring equipment is available in-house, carbon dioxide levels, humidity levels, and air movement
5.7.5 AssessHVACSystemPerformance□ Look closely at HVAC equipment, including room air conditioners, to see if they are working properly.
□ Look for drain pans, heating and cooling coils, heat exchangers, and other sources of potential chemical or microbiological (fungus and mold) growth.
□ Review equipment maintenance schedules to see if areas of potential microbiological growth have been cleaned recently.
□ Record all findings.
5.7.6 DeterminePossibleCausesReview the information gained from the background assessment, walk-through, and HVAC assessment. When possible, try to determine the sources of the IAQ problems and record all findings. Possible causes include:
1. Inadequate Ventilation. When reviewing for inadequate ventilation, look for the following:
• Closed dampers (intake, exhaust, manual, motorized, fire)
• Blocked or clogged intake and exhaust vents
• Blocked or clogged heating and air-conditioning vents
• Not enough fresh outdoor air being brought into the building
• Not enough inside air being ventilated to the outside
• Poor air distribution within the building
• Draftiness
• Temperature and humidity differences within the building
• Incorrect air filtration
• Dirty filters
2. Inside Contamination. When looking for contamination from inside the building, look for the following:
• Air fresheners
• Copy machine toner
• Chemicals from other equipment
• Stored cleaners and maintenance chemicals
• Stored paints and glues
• Stored lawn and garden chemicals
• Incorrectly diluted cleaning agents

113S A F E T Y , H E A L T H , A N D E N V I R O N M E N T A L M A N U A L 2 0 1 8 V E R S I O N
• Insecticides, pesticides, and other chemical agents used in the building
• Leaking heat exchangers
• Loose and disconnected flues
• Dry traps in floor drains
• Broken sewer lines located below the slab and in crawl spaces
• Fabrics and other finishing materials. Look for the following:
▪ Recently installed carpet and wall coverings
▪ Recently installed adhesives that are uncured or have been excessively applied
▪ Recently installed material that is fibrous, odd smelling, and unfamiliar
▪ Recently installed composite products (particle board, fiberboard, fiberglass panels, and so forth)
▪ Recently installed paints, varnishes, and other finishes
▪ Any of the former items, even if not recent installations, that might be contributing to IAQ problems
▪ Any plans, specifications, submittals, and labels that might indicate the actual content of the products installed
3. Outside Contamination. When looking for outside contamination sources, look for the following:
• Airborne pollutants from on-site and off-site sources
• Exhaust stacks too close to air-intake ducts
• Air-intake ducts close to sources of automobile exhaust
• Other sources of contaminants close to air-intake ducts
• Pollen and allergy-causing plants near air intakes
• Blocked and broken flues
• Blocked air-intake grilles
4. Microbiological Contamination. When looking for microbiological contamination, look for the following:
• Standing water in the HVAC system or signs there has been standing water
• Water damage to carpet and other furnishings
• Other sources of leaking and standing water in the building
• Accumulation of dust and dirt
5.7.7 DevelopanActionPlanAfter you have identified potential sources of indoor air contaminants, develop an action plan to contain or eliminate them, and then carry out the plan.
If the steps taken in your plan do not eliminate the sources of the contaminants and eliminate the air quality complaints, contact the Risk Management Division or your local area’s facilities management group or opera-tions and maintenance (O&M) office for information and instructions.

114 S A F E T Y , H E A L T H , A N D E N V I R O N M E N T A L M A N U A L 2 0 1 8 V E R S I O N
5.7.8 KeepBuildingOccupantsInformedKeep those responsible for the building informed about complaints received and steps taken to correct IAQ problems. Ask them to help correct problems where appropriate.
Provide building occupants who have provided their names and addresses on the Indoor Air Quality Questionnaire with an acknowledgement of their responses and a brief description of the IAQ assessment findings and action plan. Keeping building occupants informed lets them know something has been done and invites them to help maintain the building’s air quality.
5.8 OFFICEERGONOMICSSELF-HELPGUIDELINESThese guidelines can help employees adjust their office furniture so they can work in greater comfort and better health. These standards are best practice guidelines. They deal with the relationship between aver-age body size and the position of office furniture and computer equipment. However, these standards do not apply to every possible variation of body size. The size and shape of the employee’s torso and extrem-ities affect the position and location of the furniture and equipment in an employee’s office. Sit-and-stand workstations are also available in the workplace. They too must be adjusted to the specific employees’ body types.
If you have questions about these guidelines, contact the Risk Management Division or your local area office.
5.8.1 ChairSeatHeightThe seat height is the distance from the floor to the top side of the chair seat when the employee is sitting in his or her chair. Employees may use the following guidelines when adjusting chair height.
□ Sit in the chair in a comfortable, upright position.
□ Adjust the seat height up or down so your feet rest comfortably flat on the floor and your thighs are ap-proximately parallel to the floor.
• If your feet dangle slightly and the backs of your thighs press hard on the front of the seat, the chair is probably too high.
• If your knees are elevated and your thighs do not touch the front of the seat, the chair is probably too low.
□ Consider the following if you like to lean back when working:
• If your heels are lifted off the floor, consider lowering the seat height.
• If your heels rise as you push with your feet to lean back, consider loosening the chair’s tilt tension.
□ If you like to sit forward, consider the following:
• If you must tuck your feet in or place them out in front of you, consider raising the chair seat.
• If you feel the chair seat tilts too much, consider tightening the chair’s tilt tension.

115S A F E T Y , H E A L T H , A N D E N V I R O N M E N T A L M A N U A L 2 0 1 8 V E R S I O N
5.8.2 ChairStandardsWhen the chair has been adjusted, you may use a measuring tape to compare the adjustments with the rec-ommended standards as outlined below.
□ Seat height should range from 16 to 21 inches (41 to 53 cm). This height refers to how high the chair seat should be with a person’s weight pressing on the cushions.
□ Seat depth for chairs with rectangular cushions or chairs made of hard materials should range from 15 to 17 inches (38 to 43 cm). Seat depth refers to the distance from the front edge to the back edge of the seat cushion. Seat depth can be greater if the front edge of the seat is soft or curved.
□ Measured across the middle of the seat, the seat width should be at least 18 inches (46 cm). Seat width refers to the side-to-side distance across the seat cushion.
□ Distance between armrests should be at least 18 inches (46 cm) measured between the inner edges of the armrests.
□ The backrest should be at least 12 inches (31 cm) wide in the lower-back area.
5.8.3WorkSurfaceThe proper height of the work surface is determined by the space between the employee’s legs and the work surface when the employee is seated. If the height of the employee’s work surface is adjustable, employees may use the following suggestions:
□ Sit on the chair and move it into normal working position next to your work surface. With your feet flat on the floor, adjust the height of the work surface so your knees do not bump the edge of the work surface, pencil drawer, or keyboard tray (when the tray is in working position, not in the storage position). The tops of your thighs should not touch the underside of the work surface.
□ When the chair is in normal position for working, your feet and knees should not bump against the back or upright of the work surface or the wall behind the work surface.
□ There should be enough clearance beneath the work surface for you to move freely when you swivel to grasp something within easy reach on the work surface. For example, your knees should not bump against storage drawers or brackets.
□ While you are sitting in an upright position, your forearms should rest comfortably on the work surface.
• If the height of the work surface causes your shoulders to be raised up or hunched, consider lower-ing the work surface.
• If you must slump or hunch over your work surface, consider raising the work surface so you can work in a comfortable, upright position.
If the height of the work surface is not adjustable, adjust the height of the chair to reach a comfortable work position. You may also use a footrest to bring your thighs approximately parallel to the floor.

116 S A F E T Y , H E A L T H , A N D E N V I R O N M E N T A L M A N U A L 2 0 1 8 V E R S I O N
Best Practice StandardsCheck the work surface against the following recommended standards:
□ Knee space should measure at least 20 inches (51 cm) from side to side under the work surface, but 24 inches (61 cm) is preferred.
□ The underside of the work surface or keyboard tray should be higher than your knees. If you work at a desk with a work surface that cannot be raised or lowered, the clearance under the work surface should be at least 26 inches (67 cm).
□ From underneath the front edge of the work surface to the back wall supporting the work surface, there should be at least 12 inches (31 cm) front-to-back clearance at knee height. Taller people will need more clearance.
□ If you are using a standing workstation, stand on an antifatigue floor mat and wear proper footwear. A footrest to change your leg position may also be helpful.
5.8.4 AdjustingtheKeyboard□ Adjust the angle and height of the keyboard so the front of the keyboard is approximately at the same
height as your elbows.
□ Forearms should be parallel to the floor.
□ Wrists should stay relatively straight or somewhere between straight and bent slightly upward.
□ Hands should not drop forward from the wrist.
5.8.5 AdjustingtheComputerMonitor□ After adjusting the keyboard, check the monitor location and angle.
□ Sit in a comfortable position, and look straight ahead to the horizon. The way a person sits (reclining, up-right, and so on) affects the best position for the monitor. The entire monitor screen should be below your line of sight. If the monitor is too high, place it on the work surface (rather than on a processing unit).
□ If you have a standing workstation, elevate the monitor screen to eye level. Tilt the screen to approxi-mately 20 degrees.
□ Some experts suggest that placing the center of the monitor about 30 degrees below the horizon will create the best angle for viewing the screen.
□ Adjust the monitor angle by placing a compact mirror against the center of the screen and tilting the monitor so you can see your eyes in the mirror while seated in a working position. (When doing so, be sure you do not rub the mirror directly across the screen and scratch the screen surface.)
□ If there is a bright light source behind your screen, such as a window, move your monitor or cover the light source with a shade.
□ If you look more often at documents than at the monitor screen while keying information, consider plac-ing the document directly in front of you and the monitor slightly to the side. Do not place the monitor in a corner or other position that makes you twist your neck or body to see it while typing.
□ Some experts suggest that your monitor be at least 18 inches (46 cm) or more from your eyes.

117S A F E T Y , H E A L T H , A N D E N V I R O N M E N T A L M A N U A L 2 0 1 8 V E R S I O N
□ The standards recommend that a capital letter on the screen should be at least 1/8 inch high (0.3 cm). If your eyes are more than 27 inches (69 cm) from the screen, the capital letter should be taller than 1/8 inch (0.3 cm).
5.8.6 AdjustingYourMouseIf you have a mouse and use it only occasionally, you can put it at any convenient place on your work surface. If you use your mouse frequently, you may need to adjust its location.
□ When you are sitting in an upright position, your hand should rest comfortably on the mouse.
• If the location of your mouse on the work surface causes your shoulder to be raised or your arm to be completely extended, you may need to adjust the location of your mouse. Adjustable mouse pads are available that slide out from under the work surface or attach to the keyboard tray. A wide key-board tray will allow enough room for a mouse pad.
5.8.7 AdjustmentsthroughouttheDayWhile working, employees should take a moment from time to time to evaluate their body posture and work movements. Generally, it is beneficial to move frequently and change position.
5.8.8 OtherSuggestionsEmployees should also consider the following questions and suggestions:
□ Are you striking the keyboard keys hard? Remember to soften your touch.
□ Are your shoulders raised or hunched? Relax and lower them. If the armrests of your chair are forcing your shoulders up, consider asking to have the armrests removed. If your work surface is forcing your shoulders up, consider asking to have the work surface lowered.
□ Do you keep your hands poised above the keyboard or telephone? Relax them; do not allow yourself to keep your hands frozen in one position.
□ Are you leaning against a sharply angled edge? Move back to relieve pressure on your forearms.
□ Are you leaning over to reach things at your workstation that could be placed closer? Do you often reach behind your body or above shoulder height to retrieve something that could be moved forward or down? Do your best to find an arrangement that keeps the materials you frequently use within convenient reach, about 20 inches (51 cm) away for a heavy object.
Finally, listen to your body. If you think you may be more comfortable adopting a different posture or way of working, experiment and find what is best for you.
5.9 RESPIRATORYPROTECTIONPROGRAM
5.9.1 PurposeThese guidelines provide a respiratory protection program for employees who wear respirators. The purpose of the respiratory protection program is to make sure Church employees are protected against harmful levels of air contaminants and a lack of oxygen. The Church provides respiratory protection equipment for each employee who is or may be exposed to a hazardous atmosphere in the course of work.

118 S A F E T Y , H E A L T H , A N D E N V I R O N M E N T A L M A N U A L 2 0 1 8 V E R S I O N
Managers and supervisors of Church operations that require respirators should implement these guidelines and designate a respiratory program administrator at each location. The program administrator should make reasonable efforts to ensure that the respiratory protection program outlined in this document is followed.
The best way to control respiratory hazards is through engineering and administrative controls such as improving ventilation, changing processes, and substituting toxic materials for less-toxic materials. However, some situations do require respiratory protection. Respirators may be used on a temporary basis while engi-neering or administrative controls are being implemented. Or they should be used on a routine basis where engineering controls do not exist.
5.9.2 GeneralRulesandProceduresManagers and supervisors should establish and maintain a written respiratory protection program. The re-spiratory program administrator should carry out the following general rules and procedures for establishing and maintaining a respiratory protection program.
Standard Operating Procedures (SOPs)The program administrator should maintain SOPs for respirators. The program administrator should:
□ Develop a list of operations and emergency conditions in which respirators should be used.
□ Determine the appropriate respirators for each operation or condition (see section 5.9.3, “Selecting Respirators”).
□ Write respirator procedures for each operation or condition.
□ Test that the respirators fit employees (known as fit testing).
Employees should use respirators according to written SOPs. If procedures do not exist for a given operation, use one of the following options:
1. Use the most protective respirator available (supplied air or SCBA).
2. The program administrator must develop a new SOP and select an appropriate respirator (see section 5.9.3, “Selecting Respirators”).
Maintaining RespiratorsEmployees should keep respiratory protection equipment clean and in good operating order. They should do so through a program of routine inspection, cleaning, repair, and proper storage when the equipment is not in use (see section 5.9.6, “Maintaining , Cleaning , Inspecting , and Storing Respirators”).
Medical DeterminationThe respiratory program administrator should:
□ Complete a Respirator Medical Determination form (see chapter 7) to give the licensed healthcare profes-sional information about the type of respirator to be used and the nature of the respiratory hazards.
□ Have the licensed healthcare professional perform a medical evaluation using a questionnaire (applicable for the regulatory jurisdiction where you live). The licensed healthcare professional can provide approval by reviewing the questionnaire or conducting an in-person medical evaluation if needed. Make sure the

119S A F E T Y , H E A L T H , A N D E N V I R O N M E N T A L M A N U A L 2 0 1 8 V E R S I O N
licensed healthcare professional returns the Respirator Medical Determination form with an opinion on the employee’s ability to use a respirator.
□ File the Respirator Medical Determination form (see chapter 7).
□ Provide additional medical evaluations if:
• An employee reports medical signs or symptoms related to using a respirator.
• The physician, supervisor, or program administrator observes (for example, during fit testing or pro-gram evaluation) or has information (for example, a change in workplace conditions such as physical work effort, protective clothing, or temperature) that an employee needs to be reevaluated.
Fit-Testing RespiratorsThe program administrator is responsible for annually testing employees who use negative-pressure (air-pu-rifying) respirators. Where possible, conduct qualitative fit retests using the employee’s own respirator (see “Positive Pressure Test” and “Negative Pressure Test” below). If this is not possible, conduct the test only with a respirator of the same make, model, and size as the employee’s own respirator. The Respirator Fit Test Record (see chapter 7) can assist with this process.
The program administrator should keep records of periodic fit tests on file. If an employee fails a periodic fit test, refit him or her with another size or make of respirator. Under no circumstances should an employee continue to use a respirator that does not fit adequately. Employees should not use negative-pressure (air-purifying) respirators in a hazardous or potentially hazardous atmosphere unless they have passed either a quantitative or qualitative fit test. Fit testing may be available from vendors or workplace medical clinics. Procedures and best practices for respirator fit tests are readily available on the internet.
Employees who use supplied-air respirators do not need to be fit tested. However, reasonable efforts should be made to make sure a face piece of proper size is used to minimize air leakage. Powered air-purifying respi-rators do not require fit testing.
Employees with a beard, stubble, or other facial hair in the sealing area of the face piece automatically fail the fit test.
Seal CheckUnder the direction of a qualified person, an employee should choose from various sizes (and brands) of half-face or full-face air-purifying respirators by holding them to his or her face to see which feels right. The employee should then put on the respirator, following the manufacturer’s instructions, and perform positive- and negative-pressure tests to check the seal between the respirator and his or her face.
1. Positive-Pressure Test. Close the exhalation valve by lightly pressing on the valve cover. Exhale gently. The fit is satisfactory if a slight positive pressure builds up inside the face piece without air leaking out between the face piece seal and the employee’s face.
2. Negative-Pressure Test. Block the air inlet to the respirator, either by placing the palms of the hands over the cartridge inlets or by squeezing the breathing tube or blocking its inlet. Inhale gently and hold breath for at least 10 seconds. The fit is satisfactory if the face piece collapses slightly without air leaking out between the face piece seal and the employee’s face.

120 S A F E T Y , H E A L T H , A N D E N V I R O N M E N T A L M A N U A L 2 0 1 8 V E R S I O N
In both tests do not to exert so much pressure with your hands that the respirator face piece is distorted and the fit is changed. Both tests may be difficult or impossible using respirators that have not been designed with these tests in mind. Some cartridges cannot be covered with a normal-sized hand, and some exhalation valves are difficult to seal with the hand. It sometimes helps to remove the covers or cartridges.
The employee must pass the pressure test with the proper size and brand of respirator before beginning the respirator fit test.
Employee TrainingEmployees should be trained before using respiratory protection in a hazardous or potentially hazardous atmosphere. A qualified person should train supervisors and workers. The program administrator should document training and keep the records on file. Conduct annual respirator training for employees with respi-rators. If a new employee received respirator training in the 12 months before being hired by the Church and can demonstrate skill and competence regarding respirator use, then renewed training is not required until the conclusion of the 12-month period. Training should include the following:
□ Instruction on the nature of the hazards in the work atmosphere (whether acute, chronic, or both) and an honest appraisal of what may happen if the respirator is not used.
□ An explanation of why engineering or administrative controls are not immediately feasible to reduce or eliminate the need for respirators.
□ A discussion of why the respirator selected for a given operation is the proper respirator for that purpose.
□ A discussion of the capabilities and limitations of the respirator.
□ Actual use of the respirator and training on the importance of close supervision to make sure proper use continues. This includes training on how to recognize the end of the service life of cartridges and canis-ters or filters (for example, signs include tasting or smelling contaminants, checking the manufacturer’s expiration date, or noticing increased difficulty breathing).
□ Wearing the respirator in a safe environment for an adequate amount of time to ensure the employee is familiar with the operation of the respirator.
□ Instruction on cleaning, storing, and maintaining a respirator.
□ Putting on, wearing, and removing the respirator. This includes proper fit of the face piece and leak test-ing using the positive- and negative-pressure tests.
Program EvaluationThe program administrator should periodically evaluate the effectiveness of the program to make sure em-ployees receive adequate respiratory protection. He or she should do the following:
□ Evaluate Employee Acceptance. Consult with employees periodically about their attitudes toward wearing respirators. Factors that affect their attitudes include:
• Comfort
• Resistance to breathing
• Fatigue
121S A F E T Y , H E A L T H , A N D E N V I R O N M E N T A L M A N U A L 2 0 1 8 V E R S I O N
• Interference with vision
• Interference with communications
• Restriction of movement
• Interference with job performance
• Confidence in the respirator’s effectiveness
□ Inspect and Evaluate Respirator Program Operation. Conduct frequent inspections of the program to be sure that:
• Proper types of respirators are selected.
• Employees are trained properly.
• Correct respirators are issued and used.
• Respirators are worn, maintained, and stored properly.
• Respirators are inspected properly.
• Respiratory hazards are monitored.
• Medical surveillance of workers is carried out.
The program administrator should make sure defects found in the respiratory protection program are docu-mented and corrected. Documentation should include plans to correct faults in the program and target dates for implementing corrective actions.
5.9.3 SelectingRespiratorsThe program administrator should select respirators by matching the respirator to the respiratory hazard. He or she should follow the selection process for all hazardous operations requiring respirators.
The program administrator should prepare and maintain a Respirator Selection form (see chapter 7) that lists the following:
○ Job operations
○ Respiratory hazards present
○ Estimate of employee exposure
○ Respirator required for use in the operation
When preparing the Respirator Selection form, use industry best practice standards and the best information available on hazards involved and respirators available. Under no circumstances should supervisors allow employees to use less-protective respirators for a given operation than those listed on the form.
For potentially hazardous operations not listed on the form, the supervisor or employee should contact the program administrator to help select the proper respirator before starting work.

122 S A F E T Y , H E A L T H , A N D E N V I R O N M E N T A L M A N U A L 2 0 1 8 V E R S I O N
The program administrator should base the selection of proper respiratory protection on the following considerations:
○ Characteristics of the hazard
○ Characteristics of the respirator
○ Other special considerations
Characteristics of the HazardWhen selecting a respirator, identify the hazard you are dealing with and consider the following:
□ Characteristics of the respiratory hazard
• The contaminants
• The concentration of contaminants
• Oxygen deficiency
• Potential for the environment to become immediately dangerous to life and health (IDLH)
• Physical and chemical properties of the contaminant
• Physiological effects on the body
• Warning properties of the contaminant
• Applicable health standards and guidelines for your location
• Where respirators are to be worn as a precautionary measure against a spill, leak, or uncontrolled release, evaluate the potential exposure levels that might result.
□ The nature of the hazardous operation or process
• Characteristics of the operation or process
• Characteristics of the work area
• Availability of oxygen in the area
• Raw materials
• End products and by-products
• Employee activities
Supplied-air respiratory protection is the only type of protection approved for oxygen-deficient atmospheres, for IDLH atmospheres, and for contaminants with poor warning properties. Use full-face respirators when the contaminant is an eye irritant.
□ The location of the hazardous area in relation to the nearest area of breathable air
□ The length of time the respirator must be worn
□ The standards for specific contaminants (for example, benzene, lead, asbestos, formaldehyde, or arsenic)

123S A F E T Y , H E A L T H , A N D E N V I R O N M E N T A L M A N U A L 2 0 1 8 V E R S I O N
Characteristics of the Respirator□ Respirators must be approved by recognized organizations, such as the National Institute for
Occupational Safety and Health (NIOSH) or the Mine Safety and Health Administration (MSHA).
□ Know the characteristics, capabilities, and limitations of the selected respirator.
Special Considerations○ Facial hair. Employees with facial hair are prohibited from using respiratory protection equipment be-
cause facial hair does not allow a good seal between the face and the face piece.
○ Corrective Eyeglasses and Contacts. Employees are prohibited from wearing corrective eyeglasses with a full-face respirator because the face seal is compromised. In most cases in which negative-pressure respirators may be worn, half-masks are acceptable. Half-masks eliminate the concern about corrective glasses interfering with the face piece seal. However, employees who wear corrective glasses and must wear a full-face respirator may use contact lenses or a special eyeglass kit that mounts on the inside of the face piece. The Church will provide these eyeglass kits to employees.
○ Facial characteristics. Employees shall not wear a respirator if scars, missing teeth, or unusual facial config-urations prevent an adequate seal of the respirator to the face.
Providing RespiratorsManagers and supervisors should assign each employee needing an air-purifying respirator with his or her own respirator. The employee’s name should be marked on the respirator. Each employee should care for and store his or her respirator according to requirements under section 5.9.6, “Maintaining , Cleaning , Inspecting , and Storing Respirators.”
Do not assign other types of respirators (if present) for exclusive use. These respirators should be cleaned and disinfected after each use.
Immediately Dangerous to Life and Health (IDLH) ConditionsWhen IDLH conditions exist, employees should use only positive-pressure supplied-air respirators. Conditions immediately dangerous to life and health include the following:
○ High levels of air contaminants
○ Lack of oxygen (less than 19.5 percent)
○ Unknown contaminant and oxygen levels
Employees should not enter areas with IDLH conditions unless absolutely necessary. SOPs for IDLH condi-tions will include requirements for the following:
○ Standby personnel
○ Safety lines and harnesses
○ Monitoring explosive limits
○ Notifying emergency response personnel

124 S A F E T Y , H E A L T H , A N D E N V I R O N M E N T A L M A N U A L 2 0 1 8 V E R S I O N
5.9.4 Air-PurifyingRespiratorsAir-purifying respirators remove contaminants from the atmosphere and can be used only (1) when there is sufficient oxygen to sustain life (more than 19.5 percent) and (2) within specified limitations of the specific face piece, cartridge, or canister.
Particles are removed by mechanical filters. Gases and vapors are removed by absorption or chemical reac-tion. Combination cartridges and canisters are available with both mechanical and chemical filters.
Protection FactorsThe protection factor of an air-purifying respirator is defined as the ratio of contaminant concentration outside of the respirator to levels inside the respirator. A protection factor of 1 indicates no protection. The higher the number, the more protective the respirator.
Employees should not use respirators when contaminants exceed the maximum-use concentration. This is determined by multiplying the assigned protection factor by the exposure limit for the contaminant. For example, if a respirator has a protection factor of 10 and the exposure limit is 50 parts per million (ppm), the respirator may be used for concentrations up to 500 ppm. Contaminants must not exceed the concentration limits of the respirator cartridges or canisters.
Contaminant-Warning PropertiesAir-purifying respirators are used only for gases and vapors that possess good warning properties. Gases and vapors should be detectable through taste, smell, or irritation, and levels must not exceed the exposure limits. The only exceptions to this rule are approved respirators that have an end-of-service-life indicator that informs the wearer the cartridge or canister is nearing the end of its useful life.
When using air-purifying respirators for protection against gases and vapors, replace cartridges or canisters when a contaminant is detected inside the face piece by taste, smell, or irritation.
Many particulate air contaminants do not possess warning properties. However, as mechanical filters be-come loaded with particles, the resistance across the filter increases and it becomes more difficult to pull air through the filter. Replace filters when breathing becomes more difficult.
Types of Air-Purifying RespiratorsThe following are four common types of air-purifying respirators:
1. Single-Use or Disposable Respirator. Single-use respirators are available for both particulates and organic vapors. Because they cannot be fit tested and employees cannot determine the adequacy of fit, these respirators should not be used in situations where contaminants may exceed regulatory limits or other health standards. They should be used only for employee comfort against contaminants of low or no tox-icity. Do not use them when benzene, lead, asbestos, radionuclides, formaldehyde, or arsenic are present, regardless of concentration.
If respirators are provided by the Church for voluntary use or if the employee provides his or her own respirator, precautions should be taken to ensure that the respirator itself does not present a hazard. If use of respirators on a site is voluntary and there is not a justified need for other types of respiratory pro-tection, then that site is not required to participate in the respiratory protection program. For operations
125S A F E T Y , H E A L T H , A N D E N V I R O N M E N T A L M A N U A L 2 0 1 8 V E R S I O N
based in the U.S., provide each employee using a respirator voluntarily with a copy of appendix D to OSHA standard 29 CFR 1910.134, (Mandatory) Information for Employees Using Respirators When Not Required under the Standard.
2. Half-Face Air-Purifying Respirator. Half-face and full-face air-purifying respirators are also referred to as negative-pressure respirators because, on inhalation, the pressure inside the respirator is reduced below atmospheric pressure. Half-face respirators fit under the chin and over the nose and have four-point sus-pensions. These respirators are not appropriate for eye irritants. They have an assigned protection factor of 10. Therefore, they should not be used when air contaminants exceed 10 times the exposure limit.
Concentrations should not exceed the maximum limits stated for the cartridge being used. Cartridges are available for a variety of air contaminants, including particles, organic vapors, acid gases, chlorine, am-monia, radionuclides, asbestos, and combinations of these. Do not use half-face air-purifying respirators against contaminants that:
• Are extremely toxic.
• Have poor warning properties.
• Are irritating to the eyes.
• Are poorly absorbed by available cartridges.
3. Full-Face Air-Purifying Respirator. The full-face respirator covers the face from under the chin to the forehead and has a clear face piece for vision. It offers eye protection and a higher level of protection. It also has a longer service life than the half-face respirator because the air-purifying canister is larger. This respirator has an assigned protection factor of 50. Therefore, it should not be used when concentrations exceed 50 times the exposure limit. When asbestos is present, quantitative fit testing is required.
4. Powered Air-Purifying Respirator (PAPR). In PAPRs, blowers pull air through mechanical filters to a helmet or loose-fitting hood under constant positive pressure. They are available with particle filters, including high-efficiency particulate air (HEPA) filters, and activated charcoal filters for certain organic vapors. They are a good alternative for employees who cannot be fit with negative-pressure respirators.
5.9.5 Air-SupplyingRespiratorsAir-supplying respirators provide grade D air or better (as defined below) under positive pressure. The air source may be a compressed air cylinder or a compressor that pumps clean, filtered ambient air. The air flows through hoses or tubes to either a tight-fitting face piece, hood, or helmet. Air-supplying respirators provide protection against a lack of oxygen and toxic atmospheres.
Self-Contained Breathing Apparatus (SCBA)Self-Contained Breathing Apparatus (SCBA) is a cylinder of compressed air carried on the employee’s back. It supplies breathing air to a face piece through hose and regulator assemblies. Air cylinders provide 20 to 60 minutes of air. They are an excellent source of emergency respiratory protection because they are portable. SCBAs must have tank pressure gauges and low-pressure warning devices.

126 S A F E T Y , H E A L T H , A N D E N V I R O N M E N T A L M A N U A L 2 0 1 8 V E R S I O N
Supplied-Air RespiratorsIn supplied-air or air-line respirators, breathing air is supplied from a compressor or compressed air cylinder through a hose connected to a face piece or hood device. Two advantages are that the employee:
1. Is not limited to 20–30 minutes in the work area.
2. Does not have to carry the weight of the compressed air cylinder on his or her back.
However, the air line can limit mobility, and it can be severed. An accessory escape cylinder with at least five minutes of air is required for emergency exit from IDLH conditions. Hose lengths may range up to 300 feet. Hose fittings should not fit other gas systems.
Where air compressors are used, air-intake ports should be in areas free of contamination to make sure the air supplied is grade D or better (as defined below). A continuous carbon monoxide monitor and alarm should be installed and functioning in the compressor air stream.
An air-purifying system should also be present to remove particles, excess moisture, carbon monoxide, and other air contaminants.
Air QualityGrade-D breathing air includes the following:
○ Oxygen: 19.5 to 23.5 percent
○ Carbon dioxide: 1,000 ppm or less
○ Carbon monoxide: 10 ppm or less
○ Hydrocarbon (condensed): 5 mg/m3
○ Lack of noticeable odor
5.9.6 Maintaining,Cleaning,Inspecting,andStoringRespiratorsSupervisors are responsible for making certain that employees maintain, clean, inspect, and store their respi-rators properly. Supervisors are also responsible for seeing that worn, damaged, or defective respirator parts are repaired or replaced.
Respirator Maintenance and CleaningThe supervisor has primary responsibility for making sure that employees properly maintain and clean their respirators. Supervisors should confirm that employees inspect their respirators before and after each use.
Using the following procedures, employees should clean their respirators at the end of each shift or more often if they are heavily soiled:
□ Remove any filters, cartridges, or canisters.
□ Wash the face piece and breathing tube in a cleaning and disinfecting solution. Use a hand brush to remove dirt.
□ Rinse the face piece and breathing tube completely in clean, warm water. Air-dry in a clean area.
□ Clean other respirator parts as recommended by the manufacturer.
□ Insert new filters, cartridges, or canisters periodically as recommended by the manufacturer. Make sure they seal tight.

127S A F E T Y , H E A L T H , A N D E N V I R O N M E N T A L M A N U A L 2 0 1 8 V E R S I O N
Respirator InspectionSupervisors should make sure that employees inspect their respirators before and after each use. The em-ployees should report problems or defects to their supervisors. Supervisors should supply replacement parts and help replace valves, head straps, and other worn, broken, or defective parts.
Air-Purifying Respirators. Replacement parts must be manufactured by the maker of the respirator. Do not substitute other parts.
Supplied-Air Respirators. The program administrator, or someone he or she designates, should inspect SCBAs each month and keep a record of these inspections. He or she should attach a tag to each SCBA so the date of the inspection and the initials of the inspector can be entered.
The inspector should:
□ Check the air pressure to see that the cylinder is fully charged.
□ Check the regulator and warning devices to see that they are functioning properly.
□ Check the condition of the face piece, valves, headbands, shoulder straps, and all connecting hoses. Stretch connecting hoses to check for breaks and leaks.
□ Hydrostatically test all compressed gas cylinders on a periodic basis. Test cylinders made of steel every five years. Test aluminum tanks every three years.
□ Test cylinders on or before the date stamped on the cylinder. If a cylinder has not been tested within the required time, take the cylinder out of service and depressurize it until the test can be performed. Testing should be performed by a qualified company.
Employees should report problems to supervisors. Employees must not attempt repairs. Only factory-certi-fied technicians should perform repairs on supplied-air equipment.
Respirator StorageThe supervisor should make sure employees:
□ Store air-purifying respirators in a clean, dry, secure location where temperatures do not exceed 120°F (49°C), such as the employee’s locker.
□ Protect respirators against sunlight, heat, extreme cold, excessive moisture, damaging chemicals, and distortion (warping). Large cans with plastic lids or plastic bags are good for storing half-face units.
□ Keep respirators used for emergency purposes out of areas where hazardous situations may occur. This helps make sure they can be retrieved and put on safely.
5.10SUBSTANCEABUSEPROGRAMThese guidelines are employment policies and are not intended as an employment contract.
Legal entities affiliated with The Church of Jesus Christ of Latter-day Saints (collectively referred to as the Church) prohibit the possession, sale, transfer, or personal use of alcohol or illicit drugs at any time. Any Church worker who is under the influence of alcohol or drugs at work is subject to immediate termination from employment or involuntary release from missionary or volunteer service. Church workers who use or distribute substances prohibited by the Word of Wisdom, even while away from work, may also be subject to corrective action.

128 S A F E T Y , H E A L T H , A N D E N V I R O N M E N T A L M A N U A L 2 0 1 8 V E R S I O N
It is of the utmost importance to have a healthy, productive workforce and safe working conditions free from the effects of alcohol and other drugs.
5.10.1 Definitions
AlcoholEthyl alcohol or ethanol.
DrugScreeningTestAny test that tests body fluids (such as blood or urine) to detect a number of physical conditions, in-cluding the presence of alcohol or other drugs. Qualitative tests determine the presence of alcohol or other drugs. Quantitative tests determine the amount present.
OtherDrugsAny other substance recognized as a drug in the International Pharmacopoeia, the United States Pharmacopeia and National Formulary, or other drug compendiums or supplement to any of these compendiums.
ManagementManaging directors, directors, managers, supervisors, and others so designated.
UndertheInfluenceofAlcoholHaving a level of alcohol in the body (as identified by a standardized test, such as urine alcohol, blood alcohol, or breath sample) at or exceeding the urine alcohol, blood alcohol, or Breathalyzer level of 0.08 or at a lower level as enacted by the local jurisdiction. Management can also impose disciplinary action for any violation of the Word of Wisdom during working hours.
UndertheInfluenceofDrugsHaving certain substances in the body (discovered by the test) at or exceeding current established toxicology limits.
5.10.2 TestingProceduresThe following procedures set a fair testing program for alcohol or other drugs in the workplace. They also describe the Church’s policies, procedures, and disciplinary actions with regard to substance abuse.
Testing PolicyUnless prohibited by law, the Church reserves the right to conduct or require tests on any employee who is engaged in Church business or operating Church equipment.
Drug screening tests may occur in response to:
○ A work-related death or an injury requiring hospitalization or major property damage.
○ Reasonable suspicion of prohibited drug or alcohol use or of abnormal behavior or impaired job performance.
129S A F E T Y , H E A L T H , A N D E N V I R O N M E N T A L M A N U A L 2 0 1 8 V E R S I O N
Management should take reasonable steps to protect the employee, other persons, and Church property. The Human Resource Department should be notified before any other action is taken. The employee may be removed from service and requested to undergo evaluations and appropriate testing by medical personnel.
An employee involved in an incident should be asked to submit to drug screening if there is any observed impairment.
Random drug screening tests will not be performed except as part of a reinstatement agreement (see “Conditions of Reinstatement Agreement”) or as part of a local or national governmental agency testing program.
Management may take disciplinary action on the basis of the medical information obtained.
A positive test means the presence of alcohol or other drugs has been confirmed. If a law enforcement or regulatory agency confirms the presence or absence of alcohol or other drugs, the Church will accept these results as sufficient evidence. Sample testing procedures will:
○ Conform to scientifically accepted analytical methods and procedures.
○ Verify or confirm any positive test result (for example, gas chromatography and mass spectrometry, or other comparably reliable analytical methods) before the result is used as a basis for any action.
Disciplinary ActionAny Church worker who is under the influence of alcohol or drugs at work is subject to immediate termina-tion from employment or to involuntary release from missionary or volunteer service. Church workers who use or distribute substances prohibited by the Word of Wisdom, even while away from work, may also be subject to corrective action.
Consequences of Refusing TestingAn employee who refuses to submit to drug screening tests or refuses to sign the Consent or Refusal to Consent to Physical Examination and Tests form may be terminated.
5.10.3RemovalfromServiceAn employee may be removed from service if:
○ Impairment has been observed and documented by management (see list of possible symptoms in this section). Documentation should be reviewed by the Church Human Resource Department before man-agement takes any action with the employee.
○ An industrial accident occurred, and impairment has been observed.
If injured in an accident, the employee should be transported by management to the designated workers’ compensation medical provider or occupational clinic for testing. The employee should agree to a drug and alcohol screen by signing the Consent or Refusal to Consent to Physical Examination and Tests form. Consider the following situations:
○ If the employee is injured or impaired in such a way that he or she cannot sign a consent form, the form can be taken to the medical facility to be signed as soon as possible. Consent and witness of consent should be verified.

130 S A F E T Y , H E A L T H , A N D E N V I R O N M E N T A L M A N U A L 2 0 1 8 V E R S I O N
○ If the drug screen cannot be immediately administered at the medical facility due to the condition of the employee, the sample should be collected at the medical provider’s discretion.
If the employee was in an accident or was observed being impaired, the employee should undergo a medical evaluation that will include blood and urine tests for alcohol or other drugs and a physical examination by medical staff.
Until lab test results are received, the employee should be suspended from work unless:
○ The physician clearly states that the employee who was observed to be potentially impaired is fit for duty following a return-to-work examination.
○ The employee is released by the physician following an industrial accident. The release should state that the employee is fit for duty.
If, after the medical evaluation, the employee is considered to be impaired, management should transport the employee home and release the employee into the care of a family member, if possible.
If the alcohol and other drug screen results are positive, management should follow the guidelines under “Disciplinary Action” in section 5.10.2.
If no alcohol or other drugs are present in the screening test results, management should consider these other situations:
○ If evidence of work-related cause is found (for example, solvent exposure caused drowsiness or stum-bling), the employee should receive treatment. The work-related condition should be evaluated and controlled to prevent a recurrence.
○ If the cause is medical but not work related (for example, uncontrolled diabetes), the employee should receive a release from his or her personal physician stating he or she is fit before returning to work.
○ If the cause is unknown, the employee should receive a release from his or her personal physician stating he or she is fit before returning to work.
5.10.4 PossibleSymptomsExhibiting several of the following symptoms or repeatedly exhibiting any one of these symptoms may indi-cate alcohol or other substance abuse in some, but not all, people. The presence of one or more symptoms does not necessarily verify substance abuse. A number of health problems, both temporary and chronic, as well as a number of disabilities may have one or more of these symptoms. Also, the absence of these symp-toms does not disprove alcohol or other drug use.
○ Has unusually dilated or constricted pupils
○ Has red-streaked eyes; frequently uses drops to clear eyes
○ Has an odor of alcoholic beverage on breath
○ Is nauseated, has sweats, or trembles
○ Has pale, pasty skin or has rashes
○ Associates with known drug users
○ Has a change in attitude or exhibits behavior problems

131S A F E T Y , H E A L T H , A N D E N V I R O N M E N T A L M A N U A L 2 0 1 8 V E R S I O N
○ Blames others for his or her own problems at work
○ Has an obnoxious or belligerent attitude
○ Lies while insisting he or she is telling the truth
○ Sleeps during the day or is suddenly exhausted
○ Exhibits rapid speech (doesn’t slow down) or flat, expressionless speech
○ Has acute anxiety sometimes accompanied by paranoia
○ Loses appetite
○ Exhibits slurred speech
○ Chills easily or gets the shakes
○ Wears sunglasses at inappropriate times
○ Has poor memory or impaired ability to concentrate
○ Does not answer when spoken to or is absentminded
○ Has a blank facial expression
○ Exhibits decreasing performance at work
○ Is absent excessively because of illness
○ Has needle marks on arms and legs
○ May try to hide breath and smoke odors with gum, mints, or spray

132 S A F E T Y , H E A L T H , A N D E N V I R O N M E N T A L M A N U A L 2 0 1 8 V E R S I O N
6. Environmental Guidelines6.1 INTRODUCTIONThe environmental guidelines in this section should help reduce incidents of environmental problems and promote a healthy work environment. Managers and supervisors should be familiar with these guidelines and use those that apply to employees and their jobs.
6.2 DRINKINGWATERQUALITYANDPURIFICATIONSYSTEMSContact your local health department, regulatory body, or government for rules or guidelines regarding non-municipal drinking water systems. The requirements for water quality and the level at which health officials monitor nonmunicipal systems may vary depending on your drinking water system size and type, as well as local rules. Most regulations require periodic monitoring and periodic sanitary surveys by health officials. If you need help complying with drinking water regulations, contact the Natural Resources Section of the Real Estate Division at Church headquarters or your local area office.
6.3 HAZARDOUSWASTEMANAGEMENTThese guidelines provide information about hazardous waste management. They identify the different types of hazardous wastes and how to reduce, store, and dispose of hazardous wastes. These guidelines do not replace regulations from local regulatory agencies; they are general references that supplement these regulations.
6.3.1 OverviewHazardous waste is generated by nearly all industrial activities. Improperly managed hazardous waste causes expensive and often irreversible environmental problems. Responsible hazardous waste management can help minimize these problems.
A hazardous waste is any hazardous solid, liquid, or contained gaseous material that is (1) no longer suitable for its intended use, (2) not recyclable, (3) going to be thrown away, or (4) stored until enough material has accumulated for treatment or disposal. Waste is considered hazardous if it:
○ Causes injury, illness, or death.
○ Damages or pollutes the land, air, or water.
For regulatory purposes in the United States, hazardous wastes are sorted into two categories:
1. Listed hazardous wastes
2. Characteristic hazardous wastes

133S A F E T Y , H E A L T H , A N D E N V I R O N M E N T A L M A N U A L 2 0 1 8 V E R S I O N
6.3.2 ListedHazardousWastesListed hazardous wastes are associated with specific process operations. Listed hazardous wastes include, but are not limited to, the following:
○ Many spent halogenated solvents, such as Freon, perchloroethylene (perc), and mixtures of these sol-vents used as cleaners and degreasers.
○ Many other waste cleaners, such as acetone, methyl ethyl ketone (MEK), methyl alcohol, toluene, and xylene.
○ Wastes derived from products that contain, before use, a total of 10 percent or more (by volume) of indi-vidual solvents or solvent mixtures or blends.
○ Many out-of-date commercial products, such as formaldehyde, lead compounds, mercury compounds, and many pesticides. This category includes more than 200 chemicals.
○ Certain pesticide wastes.
○ Any residue or contaminated soil, water, or other debris from the cleanup of a spill into or on any land or water, or any residues that are federally listed hazardous wastes.
6.3.3 CharacteristicHazardousWastesCharacteristic hazardous wastes exhibit certain properties that make them harmful to human health or the environment. These properties are:
○ Ignitability. A liquid is considered ignitable if it has a flash point below 140°F (49°C). A solid is considered ignitable if it can spontaneously catch fire and burn so persistently that it presents a hazard.
○ Corrosivity. Any water-based waste having a pH of 2 or less or of 12.5 or greater is considered corrosive.
○ Reactivity. Unstable or explosive wastes that react violently when brought into contact with water are con-sidered reactive.
○ Toxicity. Wastes that release certain amounts of toxic metals, solvents, or other materials when subjected to a specific laboratory procedure are known as toxicity characteristic (TC) wastes.
6.3.4 ExcludedWasteSome solid wastes are excluded from regulation as hazardous wastes even though they may possess char-acteristics of hazardous waste. The exclusion depends on the type of material and the method of manage-ment. Below is a partial listing of the most common wastes that are generally excluded from hazardous waste regulations:
○ Household hazardous waste
○ Intact and used lead-acid batteries that are destined for off-site recycling
○ Waste oil that has not been mixed with a hazardous waste (such as a solvent) and will be properly recy-cled or used for energy recovery
○ Residue in empty containers

134 S A F E T Y , H E A L T H , A N D E N V I R O N M E N T A L M A N U A L 2 0 1 8 V E R S I O N
6.3.5 TypesofHazardousWasteProducedAny Church operation or affiliated business may generate hazardous waste. The following is a list of hazard-ous wastes commonly produced by Church operations.
TypeofOperation TypeofHazardousWasteProduced
Construction Acids and bases (cleaners, etching wastes)
Ignitable wastes (waste paint, paint sludge)
Solvents (degreasers, thinners)
Carpentry Acids and bases (cleaning solutions)
Ignitable washes (cleaning solutions)
Reactive solvents (degreasers, paint solvents)
Equipment repair and maintenance Acids and bases (cleaning solutions)
Heavy metals (antifreeze, oils)
Ignitable wastes (paint sludge, thinners)
Solvents (degreasers, cleaners)
Laboratories Acids and bases (cleaning solutions, lab reagents)
Heavy metals (lab waste, reagents)
Ignitable waste (cleaning solutions)
Reactive waste (lab reagents)
Solvents (lab reagents, cleaners)
Printing Acids and bases (plate-etching solutions)
Heavy metals (waste inks, sludge, plating waste)
Solvents (cleaning solutions, fountain solutions, blanket washes)
Vehicle maintenance and auto body work Acids and bases (hot tank waste, lead-acid batteries)
Heavy metals (hot tank waste, antifreeze)
Ignitable wastes (waste paints, paint sludge, thinners)
Solvents (degreasers, cleaners)
Custodial Acids and bases (boiler treatment chemicals, clean-ing solutions)
Solvents (cleaning solutions)

135S A F E T Y , H E A L T H , A N D E N V I R O N M E N T A L M A N U A L 2 0 1 8 V E R S I O N
TypeofOperation TypeofHazardousWasteProduced
Farming Acids and bases (cleaning solutions)
Ignitable wastes (cleaning solutions, waste paints, paint sludge, thinners)
Solvents (cleaning solutions)
Pesticides and herbicides
6.3.6 HazardousWasteGeneratorsFor all Church operations, it is the responsibility of those generating waste to determine if the waste is haz-ardous. Many people do not think their operations generate hazardous waste because they do not involve an industrial or manufacturing process. However, hazardous waste may be generated when:
○ A material, such as a solvent, has been used and is spent.
○ A stored material has exceeded its shelf life, is no longer usable, and must be discarded.
For example, maintenance activities will not generate the types of hazardous waste commonly associated with an industrial process. But they may generate hazardous waste in the form of discarded paints and sol-vents or other materials and thus would be classified as hazardous waste generators.
In the United States, hazardous waste generators fall into the following three categories depending on the amount of waste generated in one month or the amount of waste stored on the site at any one time.
1. Conditionally Exempt Small-Quantity Generator (CEG)The following amounts are generated in one calendar month:
○ 1 kg (2.2 lb) or less of acute hazardous waste
○ 100 kg (220 lb) or less of hazardous waste
○ 100 kg (220 lb) or less of spill cleanup debris containing hazardous waste
Or the following amount is accumulated at any time:
○ Up to 1,000 kg (2,200 lb) of hazardous waste on-site
2. Small-Quantity Generator (SQG)The following amounts are generated in one calendar month:
○ More than 100 kg (220 lb) but less than 1,000 kg (2,200 lb) of hazardous waste
○ More than 100 kg (220 lb) but less than 1,000 kg (2,200 lb) of spill cleanup debris containing hazardous waste
Or the following amount is accumulated at any time:
○ More than 1,000 kg (2,200 lb) of hazardous waste on-site

136 S A F E T Y , H E A L T H , A N D E N V I R O N M E N T A L M A N U A L 2 0 1 8 V E R S I O N
3. Large-Quantity Generator (LQG)The following amounts are generated in one calendar month:
○ 1,000 kg (2,200 lb) or more of hazardous waste
○ 1,000 kg (2,200 lb) or more of spill cleanup debris containing hazardous waste
○ More than 1 kg (2.2 lb) of acute hazardous waste
○ More than 100 kg (220 lb) of spill cleanup debris containing acute hazardous wastes
Or the following amount is accumulated at any time:
○ More than 1 kg (2.2 lb) of acute hazardous waste on-site
6.3.7 DeterminingtheGeneratorCategoryA generator’s category is based on the largest amount of hazardous waste generated during a single month within a year. For example, if an operation produces more than 100 kg (220 lb) of hazardous waste for any calendar month during the year, that operation will not be considered a CEG for that year. The same is true of a generator that stores more than 1,000 kg (2,200 lb) of hazardous waste at any time. (Note: 100 kg [220 lb] is approximately one-half of a 55-gallon drum.)
Since the regulations for each of the hazardous waste generator categories are different, it is important to be aware of changes in the quantity of waste produced for any one calendar month and how those changes may affect your compliance requirements. Most Church operations will be CEGs; however, some operations may be SQGs.
Managers and supervisors should determine the type and maximum amount of hazardous waste generated in one calendar month. When measuring the amount of hazardous waste generated, include the following:
○ Waste accumulated before recycling, transporting, storing, treating, or disposing
○ Waste transported off-site for treatment, storage, disposal, or recycling
○ Waste recycled on-site
After calculating the total amount of hazardous waste produced in one month, refer to the generator status classifications in the previous section.
6.3.8 ObtainingaU.S.EPAIdentificationNumberIf your operation is based in the United States and is an SQG, obtain a U.S. Environmental Protection Agency (EPA) identification number. The 12-character identification numbers used by the EPA and the individual states are part of a national database on hazardous waste activities.
To get a U.S. EPA identification number, do the following:
○ Call or write to your state’s agency for hazardous waste management or the EPA regional office, and ask for a copy of EPA Form 8700-12, Notification of Regulated Waste Activity. You will be sent a booklet containing the two-page form and instructions for filling it out. (Note: a few states use a form that is different from the federal form. Your state should send you the appropriate form to complete. Ask your state environmental agency if you can apply for an ID number electronically. Some states have electronic application systems.)
137S A F E T Y , H E A L T H , A N D E N V I R O N M E N T A L M A N U A L 2 0 1 8 V E R S I O N
○ Make sure your form is filled out completely and correctly, and then sign it.
○ Send the form to your state hazardous waste contact. This information will be recorded by the EPA and the state, and you will be assigned a U.S. EPA identification number. This number will be unique to the site identified on your form. Use this number on all hazardous waste shipping papers. The U.S. EPA iden-tification number will stay with the location. If the operation is moved to another location, you must notify the EPA or the state of your new location and submit a new form.
6.3.9 SpecificWasteManagementRequirementsforCEGsMost U.S.-based Church operations are CEGs. Although the amounts of hazardous waste produced are small and CEGs are not regulated like large producers of hazardous waste, managers and supervisors of CEGs still have a responsibility to manage their waste properly to protect human health and the environment.
Operators of CEGs may treat hazardous waste in an on-site facility or ensure delivery to an off-site treatment, storage, or disposal facility. The off-site management facility must be designated as one of the following:
○ Hazardous waste management facility
○ Recycling facility
Hazardous waste should be disposed of only at approved management facilities. (See section 6 .3 .14, “Approved Treatment, Storage, and Disposal Companies.”)
A CEG is not required to have an EPA identification number, but most transporters and disposal facilities will not accept hazardous waste without an EPA identification number and a proper hazardous waste manifest. Therefore, it is suggested that managers and supervisors get an EPA identification number for their CEG.
6.3.10BenefitsofProperWasteManagementProper hazardous waste management reduces environmental risks for all Church operations. It also makes good business sense. Here are some of the benefits of a sound hazardous waste management program:
○ Reduced economic liability. Improperly disposing of hazardous waste can lead to very costly cleanups. Businesses can be held liable for improper hazardous waste disposal, hazardous waste spills, and haz-ardous waste releases. The economic burden of such liability can be minimized, if not altogether avoided, by using proper waste management procedures.
○ Maintenance of property value. A property with known or suspected contamination from hazardous wastes can suffer serious loss of value.
○ Enhanced public image. Failing to manage hazardous wastes responsibly may lead to negative publicity.
○ Minimized worker exposure. Best practices require that workplace safety measures be followed. Proper hazardous waste management can reduce worker exposure to chemicals.
6.3.11 In-HouseWasteAuditOne of the best ways to begin developing a good hazardous waste management program is for managers and supervisors to see that an in-house waste audit is conducted. The purpose of the audit is not only to de-termine what hazardous wastes are generated but also to explore the options available for storing, treating, and disposing of these wastes. The following are major steps in conducting the in-house audit.

138 S A F E T Y , H E A L T H , A N D E N V I R O N M E N T A L M A N U A L 2 0 1 8 V E R S I O N
□ Step 1: Inventory all the wastes currently produced.
□ Step 2: Decide which wastes are hazardous.
□ Step 3: Evaluate current waste management methods. Evaluate by asking the following questions:
• Handling. How is waste presently handled? How many employees are trained to handle hazardous waste? Is training adequate? Is there enough background information (for example, an SDS) on the chemicals in the waste to understand the health and environmental risks?
• Storage. Where is the waste stored? For how long? Are several small containers used to hold waste, or is it accumulated in large containers? Are all waste containers properly labeled?
• Disposal. What are all the disposal options? What are the costs of different disposal options?
• Recycling, reducing, and reusing. Can any of the waste be recycled, reduced, or reused? Even simple methods to reduce waste can result in significant savings.
• Emergencies. What provisions have been made for emergency response?
6.3.12WasteManagementTipsandRecommendationsThe following are several principles to keep in mind when developing a hazardous waste management program.
Waste ReductionReducing hazardous waste or eliminating it altogether is the best way to avoid liability, the expense of hazard-ous waste management, and the risks to human health and the environment. Consider the following meth-ods of reducing hazardous waste:
□ Substitute raw materials. Nonhazardous or less-toxic materials can sometimes be substituted for hazard-ous materials to reduce or eliminate hazardous waste.
□ Manage your inventory wisely. Use the following suggestions:
• Buy only what you will use.
• Rotate inventory so older material is used first.
• Store material to prevent spills and leaks.
• Set up an inventory tracking system.
• Label all containers with contents and date.
• Don’t accept free samples you won’t use.
□ Segregate wastes. Hazardous waste mixed with nonhazardous waste results in hazardous waste. Mixing different types of hazardous waste may reduce management options.
□ Modify your process and equipment. Old or inefficient processes and equipment often account for excess use of toxic substances and may generate unnecessary hazardous waste.
□ Use good housekeeping practices. Consider the following suggestions:
• Regularly inspect and maintain equipment.
• Replace seals and gaskets.
• Repair leaks immediately.

139S A F E T Y , H E A L T H , A N D E N V I R O N M E N T A L M A N U A L 2 0 1 8 V E R S I O N
• Use tight-fitting lids to prevent evaporation.
• Wipe up spills whenever possible, rather than hosing them down.
• Use spigots and pumps instead of pouring.
• Have a spill-prevention program.
• Use drip pans.
• Train employees in proper management.
□ Reuse and recycle. Using and reusing waste materials on-site reduces the amount of waste generated. Consider:
• Recycling waste materials back into the production process as a raw material.
• Filtering and reusing.
• Sending waste off-site for recycling.
DisposalDo not dispose of hazardous or industrial waste in the following:
○ Septic systems, dry wells, boreholes, or on the land
○ Storm drains, streams, rivers, or other bodies of water
○ Sewer systems or municipal landfills without prior permission
Dispose of hazardous waste only at permitted hazardous waste facilities.
Container Storage○ Do not store hazardous waste containers on a gravel surface. If possible, store hazardous waste on an
impermeable surface with secondary containment. The storage area should be covered to protect waste from storm water. In the U.S., if wastes are exposed to stormwater, an EPA stormwater discharge permit may be required.
○ When storing empty containers outside, keep them closed and on their sides with their stoppers in place. This prevents rainwater from filling the containers.
○ Label all containers with their contents, whether they contain waste or product or are empty.
Hazardous Waste Management FirmsNot all hazardous waste management firms are qualified to manage your wastes. Use only approved manage-ment facilities. (See section 6 .3 .14, “Approved Treatment, Storage, and Disposal Companies.”)
6.3.13WasteManagementOptionsforSpecificKindsofWasteBelow are management options currently in use for specific kinds of waste. The list does not include all available options. The location of your operation and the amount of waste you generate may affect what options are most appropriate. In all cases, consider waste reduction first to minimize the amount of waste that needs to be managed. Many of the methods in the following chart may require the services of a waste management firm.

140 S A F E T Y , H E A L T H , A N D E N V I R O N M E N T A L M A N U A L 2 0 1 8 V E R S I O N
WasteType CommonManagementMethod Comments
Printing ink waste Recycle; use unused ink; take to a landfill (if solidified and not hazard-ous); dispose at a hazardous waste management facility.
Often hazardous due to solvent or metal content.
Solvents Recycle (on-site or off-site); dis-pose at a hazardous waste man-agement facility.
Very often hazardous. Usually recycled.
Paint waste Use; recycle (if possible); donate to those who could use; solidify and take to a landfill if latex; empty and dry if oil based (enamel); dispose at hazardous management facility.
Latex paint is usually not haz-ardous. Oil-based paint is often hazardous.
Used oil Recycle off-site; burn on-site for heat in approved furnace.
Not regulated as hazardous if recycled. Hazardous if contam-inated with another hazardous waste.
Used oil filters Recycle; take to a municipal waste landfill if drained or crushed.
Used oil filters are exempt from being a hazardous waste when properly drained or crushed. (Terne-plated filters are not exempt.)
Antifreeze Recycle on-site or off-site. Can be hazardous. Some sewer agencies allow small amounts to be discharged.
Fluorescent tubes Verify local requirements for dis-posal and recycling.
Empty toner cartridges Empty toner cartridges can be disposed of as normal waste.
Aerosol cans Empty the aerosol cans before disposal so the pressure in the container is equivalent to atmo-spheric pressure.

141S A F E T Y , H E A L T H , A N D E N V I R O N M E N T A L M A N U A L 2 0 1 8 V E R S I O N
WasteType CommonManagementMethod Comments
Empty chemical containers Remove all nonhazardous materi-als from containers. Use accept-able practices to remove materials from containers (for example, pouring, pumping, or aspirating). Crush or cut open all containers greater than five gallons before disposal.
1. Containers that once held water-based hazardous materials must be rinsed three times to be considered empty. Residues in rinse liquid should be used if possible. If not, they should be disposed of as hazardous waste.
2. Do not rinse empty solvent containers.
Batteries Return used automotive batteries to gas stations or battery dealer-ships for recycling. Collect all other batteries for recycling according to local regulations.
Automotive batteries each contain about 18 pounds of lead and about a gallon of corrosive sulfuric acid. Several states have banned lead-acid batteries from their landfills.
6.3.14ApprovedTreatment,Storage,andDisposalCompaniesIn the United States, the Corporation of the Presiding Bishop of The Church of Jesus Christ of Latter-day Saints (CPB) has signed contracts with the companies listed below to provide hazardous waste disposal. These companies have been selected as the most qualified and cost competitive, and they are available for work in all 50 states. The contracts were negotiated by CPB’s Purchasing Division to ensure the consultants’ companies have adequate insurance and to protect CPB legally.
Clean Harbors Environmental Services, Inc.Contact: Chuck LawrenceClean Harbors Environmental Services, Inc. 2150 North 470 East Tooele, UT 84074 Phone: 1-435-843-4840 Mobile: 1-801-597-0283 Fax: 1-435-843-5612 Website: www .cleanharbors .com Email: [email protected]
Stericycle Environmental Solutions, Inc.Contact: Jared Pollack, environmental account managerStericycle Environmental Solutions, Inc.2525 South 1100 WestWoods Cross, UT 84087Phone: 1-303-324-9472 (national corporate offices)Local office: 1-303-324-7472Mobile: 1-303-324-7472Fax: 1- 801-294-7333Website: stericycleenvironmental .comEmail: [email protected]
6.4 REFRIGERATIONSYSTEMSIt is recommended that the handling of a refrigerant in any Church-owned refrigeration system be done by a licensed, qualified professional contractor. This includes, but is not limited to, evacuation, charging, disposal, leak detection, and repair.

142 S A F E T Y , H E A L T H , A N D E N V I R O N M E N T A L M A N U A L 2 0 1 8 V E R S I O N
6.5 UNDERGROUNDSTORAGETANKREQUIREMENTSThese guidelines help Church facilities in the United States comply with the EPA’s underground storage tank (UST) regulations. Facilities outside the United States should comply with local regulatory requirements or use these guidelines as appropriate. Various storage methods are allowed for compliance. Options are outlined as follows. Recommended options are bolded in the outline. Contact the Risk Management Division or your local area office for specific information on recommended compliance options.
6.5.1 ExemptionsThe following types of tanks are exempt from UST rules:
○ Tanks with capacities of less than 110 gallons
○ Farm or residential tanks with capacities of 1,100 gallons or less that are storing motor fuel that is not for resale
○ Tanks for storing heating oil used on-site
UST systems associated with emergency power generators are exempt only from the requirements regarding release detection.
6.5.2 PetroleumTanksPetroleum tanks must have corrosion protection and leak detection according to the following guidelines:
□ Corrosion protection. Tanks must have one or both of the following:
• Cathodic protection system
• Interior lining (regular inspection necessary)
□ Leak detection. This is required for all nonexempt tanks. There are two leak-detection options:
• Monthly monitoring. Monitoring methods include the following:
▪ Automatic gauging
▪ Vapor monitoring
▪ Interstitial monitoring
▪ Groundwater monitoring
▪ Other methods approved by local regulations
• Monthly inventory control and tank tightness testing. This testing should be done according to the following methods.
If the tank has corrosion protection and spill and overflow prevention:
▪ Perform a tank tightness test every five years.
▪ Add monthly monitoring devices.
If the tank lacks corrosion protection or spill and overflow prevention devices:
▪ Perform a tank tightness test annually.
▪ Replace or upgrade system.

143S A F E T Y , H E A L T H , A N D E N V I R O N M E N T A L M A N U A L 2 0 1 8 V E R S I O N
□ Spill and overflow devices. Tanks must have the following:
• Catch basins
• Automatic shutoff devices or overfill alarms or ball float valves
6.5.3 NewPetroleumTanksWhen a new petroleum tank is installed, an aboveground tank is recommended. If an underground tank is the only option available, a double-wall fiberglass tank or jacketed steel tank that has the following features is recommended.
□ Corrosion protection. The tank should have one of the following:
• Jacketed steel with cathodic protection
• Double-wall fiberglass
• Steel-clad fiberglass
□ Leak detection (at installation). There are two options for leak detection:
• Monthly monitoring, by one of the following methods:
▪ Automatic gauging
▪ Vapor monitoring
▪ Interstitial monitoring
▪ Groundwater monitoring
▪ Other methods approved by local regulations
• Monthly inventory control with testing of the tank tightness every five years until the tank is 10 years old, then monthly monitoring.
□ Spill and overflow devices (at installation). Tanks must have the following:
• Catch basins
• Automatic shutoff devices or overfill alarms or ball float valves
6.5.4 PipingPiping must have the following features:
□ Corrosion protection.
• Corrosion protection is required at installation for new piping, using one of the following methods:
▪ Double-wall fiberglass
▪ Coated and cathodic-protected steel
• Corrosion protection is required for existing piping, using one of the following methods:
▪ Cathodic-protected steel
▪ Coated and cathodic-protected steel
▪ Fiberglass

144 S A F E T Y , H E A L T H , A N D E N V I R O N M E N T A L M A N U A L 2 0 1 8 V E R S I O N
□ Leak detection. For new and existing pressurized piping, there are two options for leak detection:
• For new tanks at installation and for existing tanks, use one of the following methods:
▪ Automatic flow restrictor
▪ Automatic shutoff device
▪ Continuous alarm system
• Annual line testing or monthly monitoring (except automatic tank gauging) is required for tanks more than two years old. This testing must be done according to the following guidelines:
▪ No requirements if system meets set design standards
▪ Monthly monitoring (not automatic tank gauging)
▪ Line testing every three years
6.5.5 NewInstallationsorUpgradesThe following are requirements for new installations or upgrades of USTs, UST piping, and UST dispensing equipment that are located within 1,000 feet of a community water system (purifying plant, well, or water source):
□ Collect information on UST manufacturer (contact information and insurance).
□ Collect information on installer (contact information, insurance, and license or certification or certified installation as available).
□ Include secondary containment on USTs and piping.
□ Provide catch basins.
6.5.6 OperatorTrainingComply with local training requirements for persons operating, maintaining, or responding to spills from USTs. Training may include requirements for licensing or certification.
6.5.7 ClosingaUSTPermanentlyIf you decide to close a UST permanently, follow these guidelines:
○ Notify the regulatory agency with jurisdiction, and determine what is required for closure.
○ Hire a qualified environmental professional to determine if the subsurface soils contain contamination from the UST. If contamination is found, you may have to remove and dispose of the contaminated soil.
○ Either remove the UST or abandon it in place. UST removal is the preferred option since the tank will likely need to be removed at some future date. In both cases, the tank must be emptied and cleaned by removing all liquids, dangerous vapor levels, and accumulated sludge. These potentially hazardous actions need to be carried out by a trained environmental professional or contractor who follows standard safety practices.
○ If you abandon the UST, fill it with a harmless, chemically inactive solid, like sand or concrete slurry. The tank should be abandoned in place in a manner approved by the regulatory agency.
○ Obtain final closure approval from the regulatory agency, and keep a record of the tank closure.
145S A F E T Y , H E A L T H , A N D E N V I R O N M E N T A L M A N U A L 2 0 1 8 V E R S I O N
7. Forms7.1 INTRODUCTIONThe forms in this section will help managers and supervisors (1) fulfill legal requirements, (2) promote a safe and healthy work environment, and (3) prevent incidents.
The forms are arranged alphabetically. Make copies of the forms in this section as needed. In cases in which multiple copies of a completed form are required, make one copy of the form from this section, complete the form, and then make the required number of copies from the completed form.
7.2 DESCRIPTIONANDRETENTIONOFFORMSThe following chart lists the forms alphabetically and indicates who is responsible for completing each form, the purpose of each form, where each form is kept or sent, and how long each form should be retained ac-cording to the established record retention policies for the organization.
FormTitle ResponsiblePerson Purpose MinimumRetention
Chemical Inventory List Manager or supervisor Show all chemical prod-ucts at a Church facility and whether or not there is an SDS for a particular chemical. Keep the form at the facility, and update it as changes occur.
Keep lists and supporting SDS documents for 30 years.
Conditions of Reinstatement Agreement
Manager or supervisor Provide for random drug screening tests after rein-statement of employees after initial testing.
Keep as long as the em-ployee is active.
Confined Space Entry Permit
Manager or supervisor Permit employees or contract workers to enter a confined space. Post the permit at the job site.
Keep for 1 year after the current year ends.
Consent or Refusal to Consent to Physical Examination and Tests
Manager or supervisor Allow employees to grant or refuse permission to undergo medical evalu-ation after an accident or observed impairment when substance abuse is suspected.
Keep as long as the em-ployee is active.

146 S A F E T Y , H E A L T H , A N D E N V I R O N M E N T A L M A N U A L 2 0 1 8 V E R S I O N
FormTitle ResponsiblePerson Purpose MinimumRetention
Driver Qualification Record
Manager or supervisor of driver
Collect information needed for individuals driving a vehicle for Church business.
Information may be kept online or on a hard copy of the form as long as the individual is actively driv-ing a vehicle on Church business.
Emergency Telephone Numbers
Manager or supervisor Provide every employee access to emergency telephone numbers. Post near each telephone and at other critical areas.
Always keep an updated copy posted.
Energized Electrical Work Permit
Manager or supervisor Allow workers to work within the restricted-ap-proach boundary.
Keep for 1 year after the current year ends.
Fall Hazard Assessment Manager or supervisor Survey each facility or physical location for fall hazards and determine best controls to protect employees.
Keep for as long as the fall hazards remain the same.
First -Aid Log Manager or supervisor Document minor first-aid injuries that don’t require professional medical attention.
Keep for 3 years after the current year ends.
Hazard Report Employee Report the nature and location of any potential hazard. Give completed form to the manager or supervisor.
Keep 1 year after the current year ends.
Hepatitis B Vaccine Declination Form
Manager or supervisor Allow employees to waive access to a hepatitis B vaccine after an occupa-tional exposure.
Keep as long as the em-ployee is active.
147S A F E T Y , H E A L T H , A N D E N V I R O N M E N T A L M A N U A L 2 0 1 8 V E R S I O N
FormTitle ResponsiblePerson Purpose MinimumRetention
Hot Work Permit Manager or supervisor Allow employees or contract workers with a permit to use tools and equipment that produce sparks, flames, or heat at a Church facility. Post the permit at the job site.
Keep for 3 years after the current year ends.
Incident Report—United States and Canada
Person involved in incident and his or her manager or supervisor
Collect initial information about and report the nature and causes of an incident. File the Incident Report online unless the incident is serious. If the incident is considered se-rious (death, lost time, or hospitalization), contact the Risk Management Division or your local area office as soon as possible. Keep the origi-nal report on file.
Keep for 3 years after the current year ends.
Incident Report Addendum — Statement
Person involved in incident and his or her manager or supervisor
Report information gathered from witnesses or others regarding the incident.
Keep for 3 years after the current year ends.
Indoor Air Quality Questionnaire
Manager, supervisor, or investigator
Report information gathered from individu-als who may have been affected by their indoor environment.
Keep until the indoor air quality investigation is completed and the final report is distributed.
Job Safety Observation Manager or supervisor Assist supervisors and safety committee mem-bers in evaluating a worker’s actual knowl-edge and application of working safely.
Keep for 3 years after the current year ends.

148 S A F E T Y , H E A L T H , A N D E N V I R O N M E N T A L M A N U A L 2 0 1 8 V E R S I O N
FormTitle ResponsiblePerson Purpose MinimumRetention
Lockout/ Tagout Procedure Inspection
Manager or supervisor Provide an independent review and inspection of the lockout/tagout pro-cedures implemented for equipment.
Keep for 2 years after the current year ends.
Powered Industrial Truck ( PIT ) Training Record
Instructor of PIT training or supervisor
Provide a record of employees attending re-quired PIT training. Keep a copy on file.
Keep for 3 years after the current year ends.
PPE Hazard Assessment Manager or supervisor Help supervisors identify hazards that may require personal protective equipment.
Keep for as long as the process or hazards re-main the same.
Respirator Fit Test Record Person testing the fit of the respirator
Determine if the respi-rator properly fits the employee. Keep the completed form in the employee’s file.
Keep as long as the em-ployee is active.
Respirator Medical Determination
Employee and his or her physician
Give a physician the necessary health infor-mation to determine if an employee is medically qualified to use a specific type of respirator. Keep the completed form in the employee’s file.
Keep as long as the em-ployee is active.
Respirator Selection Manager or supervisor Determine the type of respirator required for an employee at a Church facility. Keep a copy in the employee’s file.
Keep as long as this type of respirator is required.
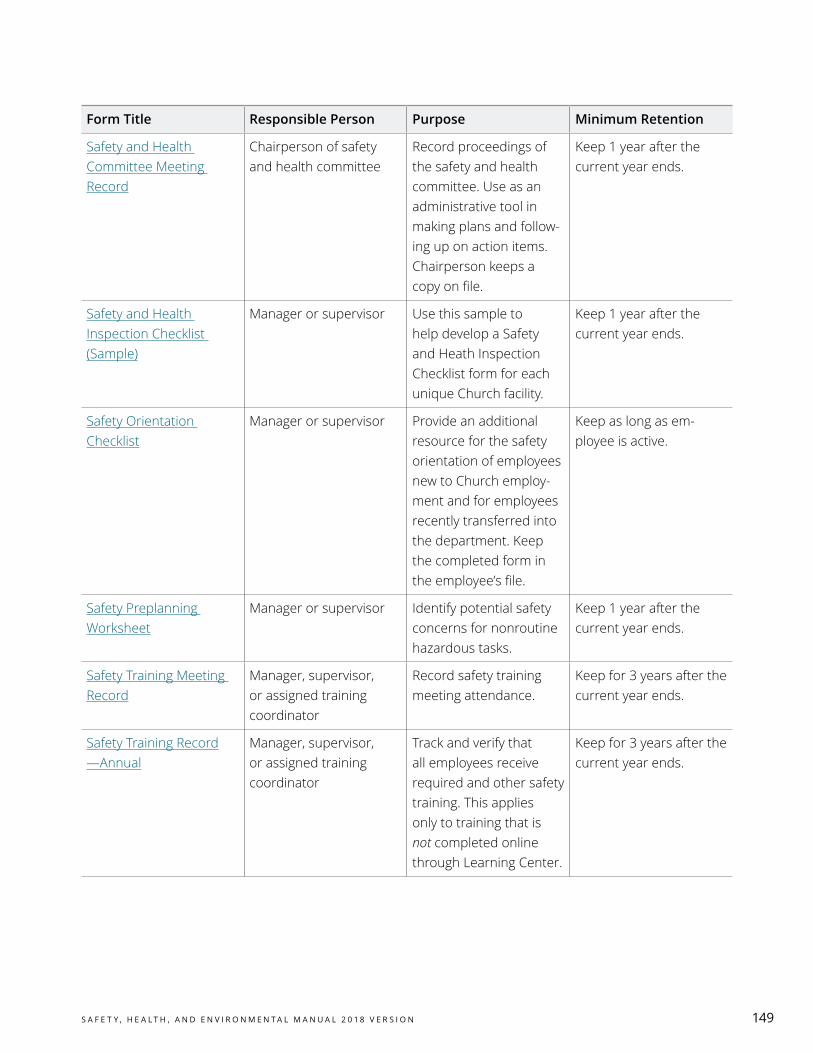
149S A F E T Y , H E A L T H , A N D E N V I R O N M E N T A L M A N U A L 2 0 1 8 V E R S I O N
FormTitle ResponsiblePerson Purpose MinimumRetention
Safety and Health Committee Meeting Record
Chairperson of safety and health committee
Record proceedings of the safety and health committee. Use as an administrative tool in making plans and follow-ing up on action items. Chairperson keeps a copy on file.
Keep 1 year after the current year ends.
Safety and Health Inspection Checklist ( Sample )
Manager or supervisor Use this sample to help develop a Safety and Heath Inspection Checklist form for each unique Church facility.
Keep 1 year after the current year ends.
Safety Orientation Checklist
Manager or supervisor Provide an additional resource for the safety orientation of employees new to Church employ-ment and for employees recently transferred into the department. Keep the completed form in the employee’s file.
Keep as long as em-ployee is active.
Safety Preplanning Worksheet
Manager or supervisor Identify potential safety concerns for nonroutine hazardous tasks.
Keep 1 year after the current year ends.
Safety Training Meeting Record
Manager, supervisor, or assigned training coordinator
Record safety training meeting attendance.
Keep for 3 years after the current year ends.
Safety Training Record — Annual
Manager, supervisor, or assigned training coordinator
Track and verify that all employees receive required and other safety training. This applies only to training that is not completed online through Learning Center.
Keep for 3 years after the current year ends.
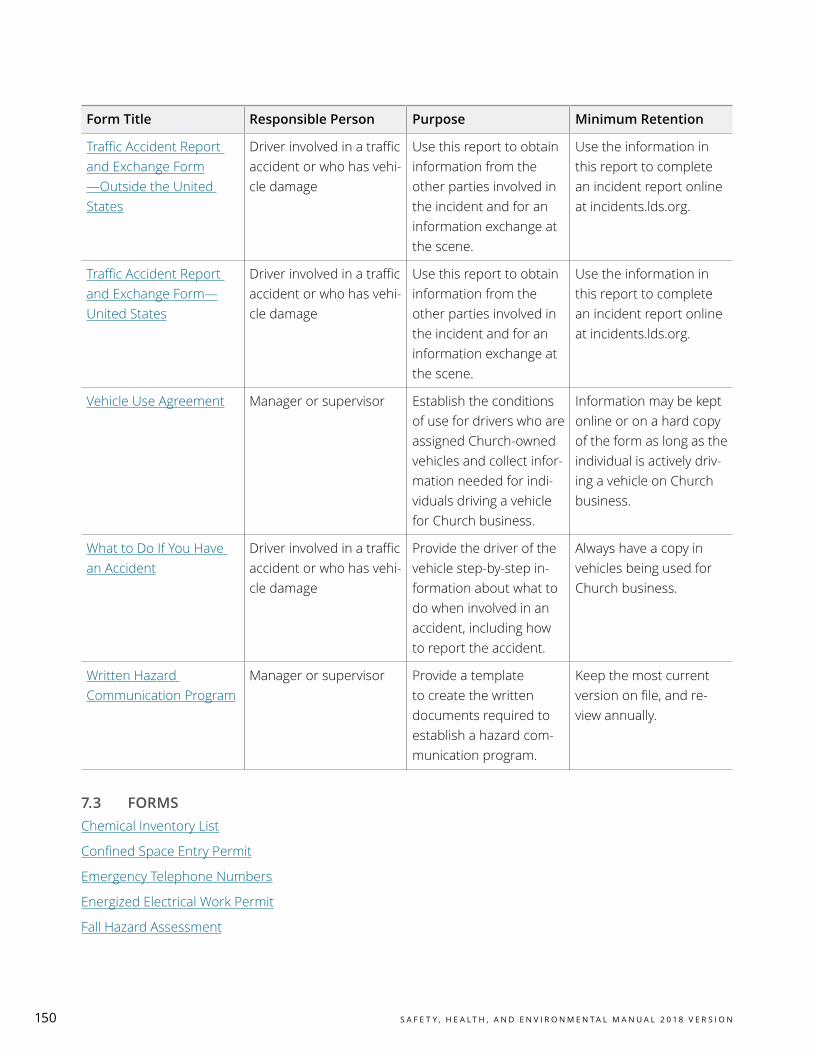
150 S A F E T Y , H E A L T H , A N D E N V I R O N M E N T A L M A N U A L 2 0 1 8 V E R S I O N
FormTitle ResponsiblePerson Purpose MinimumRetention
Traffic Accident Report and Exchange Form — Outside the United States
Driver involved in a traffic accident or who has vehi-cle damage
Use this report to obtain information from the other parties involved in the incident and for an information exchange at the scene.
Use the information in this report to complete an incident report online at incidents.lds.org.
Traffic Accident Report and Exchange Form — United States
Driver involved in a traffic accident or who has vehi-cle damage
Use this report to obtain information from the other parties involved in the incident and for an information exchange at the scene.
Use the information in this report to complete an incident report online at incidents.lds.org.
Vehicle Use Agreement Manager or supervisor Establish the conditions of use for drivers who are assigned Church-owned vehicles and collect infor-mation needed for indi-viduals driving a vehicle for Church business.
Information may be kept online or on a hard copy of the form as long as the individual is actively driv-ing a vehicle on Church business.
What to Do If You Have an Accident
Driver involved in a traffic accident or who has vehi-cle damage
Provide the driver of the vehicle step-by-step in-formation about what to do when involved in an accident, including how to report the accident.
Always have a copy in vehicles being used for Church business.
Written Hazard Communication Program
Manager or supervisor Provide a template to create the written documents required to establish a hazard com-munication program.
Keep the most current version on file, and re-view annually.
7.3 FORMSChemical Inventory List
Confined Space Entry Permit
Emergency Telephone Numbers
Energized Electrical Work Permit
Fall Hazard Assessment

151S A F E T Y , H E A L T H , A N D E N V I R O N M E N T A L M A N U A L 2 0 1 8 V E R S I O N
First -Aid Log
Hazard Report
Hepatitis B Vaccine Declination Form
Hot Work Permit
Incident Report—United States and Canada
Incident Report Addendum — Statement
Indoor Air Quality Questionnaire
Job Safety Observation
Lockout/ Tagout Procedure Inspection
Motor Vehicle Safety Forms
Driver Qualification Record
Traffic Accident Report and Exchange Form — Outside the United States
Traffic Accident Report and Exchange Form — United States
Vehicle Use Agreement
What to Do If You Have an Accident
Powered Industrial Truck ( PIT ) Training Record
PPE Hazard Assessment
Respiratory Protection Program
Respirator Fit Test Record
Respirator Medical Determination
Respirator Selection
Safety and Health Committee Meeting Record
Safety and Health Inspection Checklist ( Sample )
Safety Orientation Checklist
Safety Preplanning Worksheet
Safety Training Meeting Record
Safety Training Record — Annual
Substance Abuse Program
Conditions of Reinstatement Agreement
Consent or Refusal to Consent to Physical Examination and Tests
Written Hazard Communication Program
152 S A F E T Y , H E A L T H , A N D E N V I R O N M E N T A L M A N U A L 2 0 1 8 V E R S I O N
GLOSSARYFor specific subjects or definitions of terms not listed in this glossary, see the index or section contents pages. Forms are not listed in the glossary. Descriptions of the forms and any definitions of terms used in them are in chapter 7 of this manual.
aerialliftIncludes the following types of vehicle-mounted aerial devices used to elevate personnel to job sites above ground: extensible boom platforms, aerial ladders, articulating boom platforms, vertical towers (scissor lifts), or a combination of any such devices. Aerial equipment may be made of metal, wood, fiberglass reinforced plastic (FRP), or other material; powered or manually operated; and deemed to be an aerial lift whether or not it is capable of rotating about a substantially vertical axis.
affectedemployeesIndividuals who operate or work with equipment or machinery but are not authorized to use lockout/tagout procedures.
assignedprotectionfactorOn the average, the minimum anticipated protection provided by a properly functioning respirator or class of respirators to a properly fitted and trained employee.
authorizedemployeesIndividuals who apply locks or tags to machines or equipment in order to perform servicing or mainte-nance on that machine or equipment.
blood-bornepathogenMicroorganisms in human blood that can cause disease in humans. These microorganisms include, but are not limited to, hepatitis B virus (HBV) and human immunodeficiency virus (HIV).
bodybeltA strap secured around the waist and attached to a lanyard, lifeline, or deceleration device.
bodyharnessStraps secured around a person in a manner that will distribute the fall-arrest forces over at least the thighs, pelvis, waist, chest, and shoulders. Also used to attach to other components of a personal fall-arrest system.
contaminantAny unwholesome or undesirable foreign substance that causes the environment to be potentially unfit for use.
contractorA person who is not a Church employee and who performs a specific job for the Church under condi-tions outlined in a contract.

153S A F E T Y , H E A L T H , A N D E N V I R O N M E N T A L M A N U A L 2 0 1 8 V E R S I O N
energizedworkAny work on electrical equipment, circuits, devices, systems, or any other energized part where an em-ployee is required to deliberately or may accidentally place any part of his or her body, a tool, or other material in contact with electrical devices. The voltage of these devices must have been deemed to be in excess of 50 volts.
ergonomicsA science concerned with designing and arranging materials and equipment so that people, materials, and equipment will interact in the most effective and safe manner; also called human factor engineering.
firedepartmentconnectionA device that permits the fire department to pump supplemental water into the automatic fire sprinkler suppression system, by means of fire hose, to boost the water pressure and volume. Typically, these connections are located on the front of the building, adjacent to street access.
flammable-liquidstoragecabinetFlammable- and combustible-liquid storage cabinets are designed to protect internal contents from a fire outside the cabinet. The maximum capacity of the cabinet should not be more than 60 gallons (230 L).
ground-faultcircuitinterrupter(GFCI)A fast-acting circuit breaker. The GFCI will detect an electrical imbalance within milliseconds and open the circuit before a serious shock can occur.
hazardA condition or changing set of circumstances that could cause injury, illness, or property damage.
hazardousatmosphereAny atmosphere dangerous to life or health. A hazardous atmosphere lacks oxygen or has a toxic or disease-producing contaminant exceeding the legally established permissible exposure limit (PEL) or, where applicable, the threshold limit value (TLV) established by the American Conference of Governmental Industrial Hygienists (ACGIH).
hazardousmaterial(hazmat)Any substance capable of producing adverse effects on the health or safety of individuals.
hotworkThe process of welding, cutting, soldering, grinding, or brazing with electricity or gases that create high temperatures. Hot work is extremely hazardous and requires a permit.
immediatelydangeroustolifeorhealth(IDLH)Conditions, including the atmosphere, that pose an immediate hazard to life or health.

154 S A F E T Y , H E A L T H , A N D E N V I R O N M E N T A L M A N U A L 2 0 1 8 V E R S I O N
incidentAny unplanned occurrence, event, or sequence of events that result in:
1. Injury or illness, no matter how slight.
2. Equipment or property damage.
3. Chemical spills considered out of control or that may have contaminated the soil or entered a public waterway or sewer.
live-circuitworkThe process of working on electrical equipment or transmission lines while they are energized.
managerA Church employee whose profession is to direct assigned employees and oversee business affairs for the Church. A manager may have supervisors or team leaders report to him or her. He or she also oversees authorized and affected employees for various safety programs.
managingdirectorThe title of a manager who directs the business affairs of a Church department.
musculoskeletaldisorders(MSDs)Injuries or pain in joints, ligaments, muscles, nerves, tendons, and structures that support limbs, neck, and back. MSDs are degenerative diseases and inflammatory conditions that cause pain and impair normal activities.
near-missincidentsAny unplanned occurrence, event, or sequence of events that (1) causes $500 or less in damages to equipment but does not injure employees or (2) causes no damage, but the likelihood of injury to an employee was great.
otheremployeesIndividuals whose work operations are or may be in an area where energy-control procedures may occur.
oxygendeficiencyWhen the oxygen level is 19.5 percent or less.
plumbedeyewashunitsandshowersFirst-aid stations specifically plumbed with water to rinse the eyes and bodies of those who come in contact with hazardous chemicals.
pneumatictoolsTools powered by air pressure.
powder-actuatedtoolsA fastener-driving tool that uses magazine explosive cartridges to drive nails or other anchors into a hardened surface, such as concrete or metal.

155S A F E T Y , H E A L T H , A N D E N V I R O N M E N T A L M A N U A L 2 0 1 8 V E R S I O N
powertake-off(PTO)shaftA supplementary mechanism (like on a tractor) that lets the engine power operate a nonautomotive apparatus.
protectionfactorThe degree of protection a respirator provides against a given respiratory hazard. The protection factor is generally the concentration outside the respirator divided by the concentration inside the respirator.
protocolA prescribed procedure or strict adherence to guidelines.
respiratorA device worn over the mouth and nose to protect the person’s respiratory tract.
riskThe probability or threat of loss or injury; a peril or danger.
safetycanA listed container having a screen or strainer in each fill and pour opening and having a spring-closing lid and spout cover designed to safely relieve internal pressure when exposed to fire.
safetydatasheets(SDSs)Written or printed sheets with information about a hazardous chemical. They are distributed with chemicals by chemical manufacturers and distributors.
safetyprofessionalsIndividuals who, because of their education, experience, and work assignments, are concerned about all workplace hazards, with an emphasis on preventing traumatic injuries and workplace fatalities. They help implement, provide training for, and evaluate the implementation of safety programs.
substanceabuseThe use of alcohol or other drugs, including prescription medications not prescribed by a medical doc-tor, resulting in an employee’s performance being impaired.
supervisorA Church employee who oversees the work of a group of employees. A supervisor may also oversee a particular project. He or she also oversees authorized and affected employees for the general safety of employees.
volunteerSomeone who donates his or her services to the Church and is not paid a wage for the work provided, including Church-service missionaries.