Embed Size (px)
Citation preview
Strictly Private and Confidential
Cisco ASA SSL VPN and
SendQuick ConeXa One-Time-Password
Configuration Guide
Prepared by
TalariaX Pte LtdNo. 11 Howard Road #04-00Tat Hong Industrial Building
Singapore 369583
Tel: +65 62802881Fax: +65 62806882
E-mail: [email protected]: www.talariax.com
Copyright♥2009-2011, TalariaX Pte Ltd 1OTP for Cisco ASA, SSL VPN Configuration Guide
Strictly Private and Confidential
CISCO ASA SSL VPN & SENQUICK CONEXA ONE TIME PASSWORD
CONFIGURATION GUIDE
1.0 INTRODUCTION
This document is prepared as a guide to configure Cisco ASA SSL VPN to run with SendQuick Conexa for One-time-password via SMS.
The pre-requisite is that SendQuick Conexa OTP server is configured with RADIUS on port 1812. Ensure that both applications are using the same port for radius.
The software version for Cisco ASA is
2.0 CONFIGURE CISCO SSLVPN
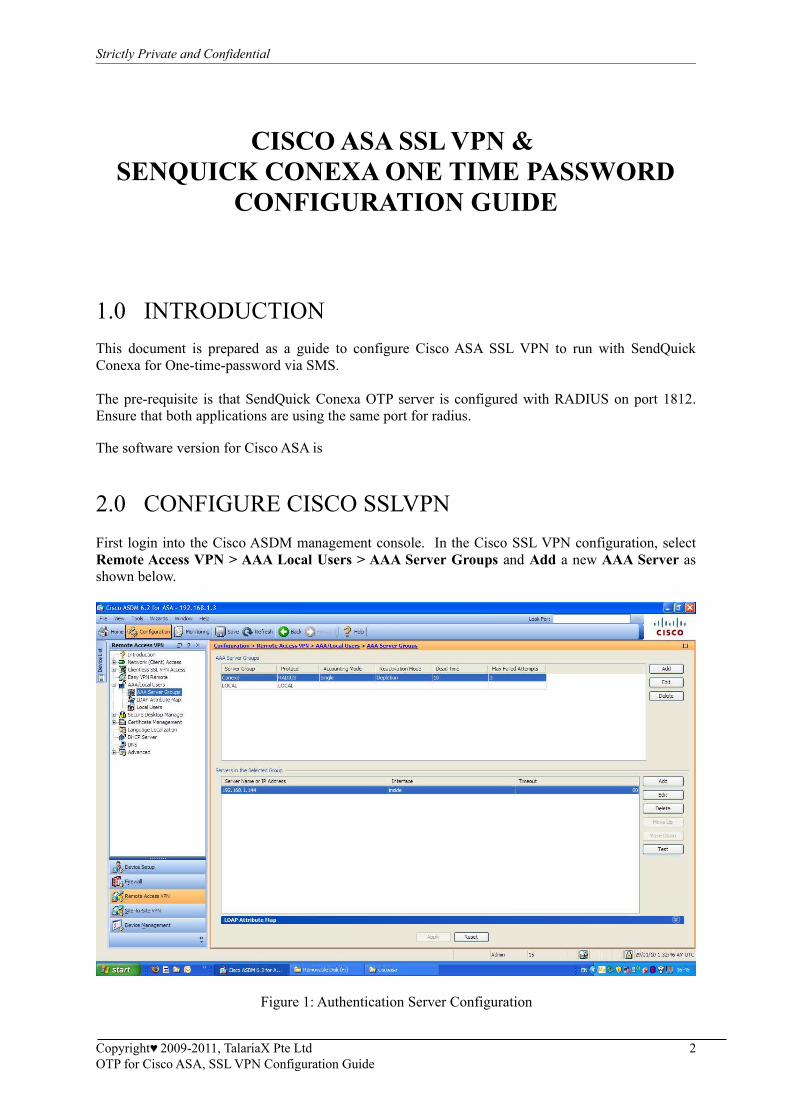
First login into the Cisco ASDM management console. In the Cisco SSL VPN configuration, select Remote Access VPN > AAA Local Users > AAA Server Groups and Add a new AAA Server as shown below.
Figure 1: Authentication Server Configuration
Copyright♥2009-2011, TalariaX Pte Ltd 2OTP for Cisco ASA, SSL VPN Configuration Guide

Strictly Private and Confidential
In the pop-up window, provide a server group name for the sendQuick Conexa (eg, Conexa), select the Radius protocol and leave the failed attempts as 3, as shown in Figure 2 below.
Figure 2: Add AAA Server Group
Select OK once completed. Then, select the Conexa server group and add a server configuration as shown in Figure 3 below.
In the Add AAA Server pop-up window, configure the following items as below:
• Interface Name - Inside• Server Name or IP Address - IP address of sendQuick Conexa• Timeout – configure a value of between 40-60 seconds (value need to be higher than 25
seconds for the system to perform well)• Authentication Port (for Radius): 1812 (this must be 1812 as this is the port used in Conexa).
Accounting port value is non-important as it is not used. Hence, a value of 1813 is fine.• Shared secret - the same secret need to be included in Conexa• ACL Netmask - Standard
Once completed, select OK and the server is configured.
Copyright♥2009-2011, TalariaX Pte Ltd 3OTP for Cisco ASA, SSL VPN Configuration Guide

Strictly Private and Confidential
Figure 3: Add AAA Server
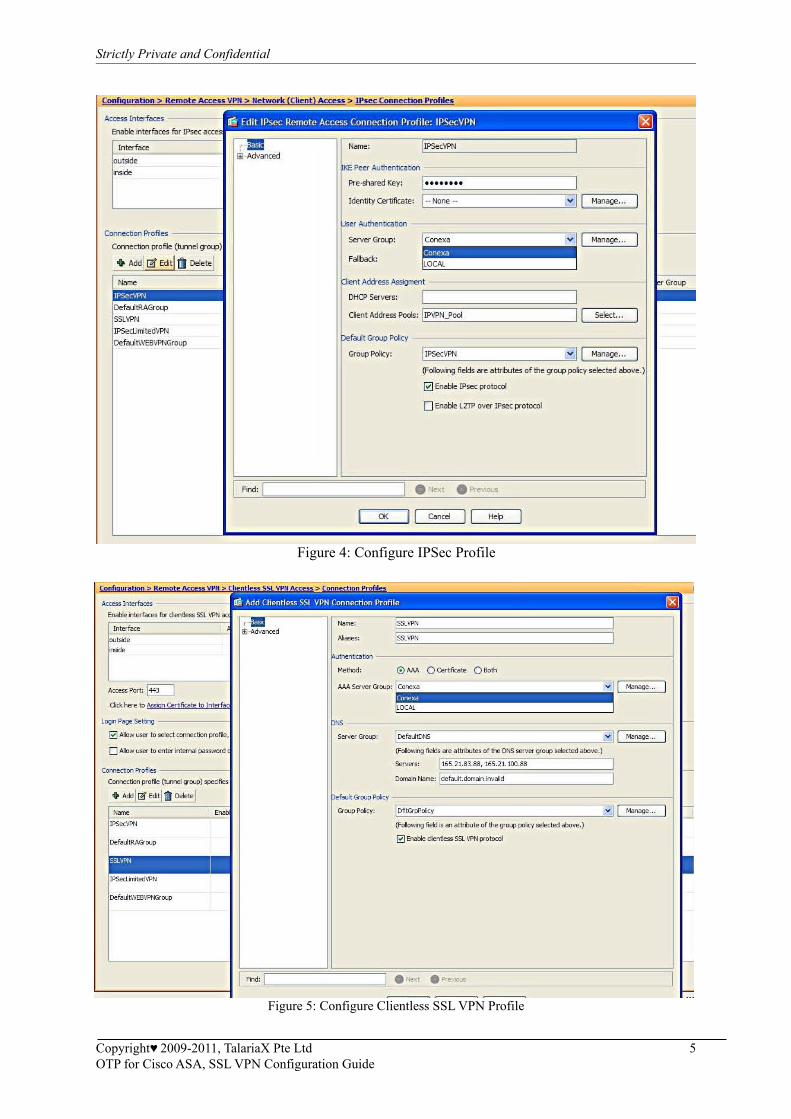
After configuring the AAA servers, it is necessary to configure the IPSec and SSLVPN (clientless) profile for the user to access using the different modes.
This is explained in Figure 4 and 5 respectively.
In the Cisco ASDM, select Remote Access VPN > Network (Client) Access > IPSec Connection Profiles (for IPSec). You will need to Add an IPSec profile and the window in Figure 4 will appear.
Select Conexa (which was configured earlier) in User Authentication > Server Group. This will direct the authentication to Conexa, for IPSec authentication sessions.
For the rest of the IPSec configuration, consult the Cisco manual or refer to your Cisco service provider.
Once the configuration is completed, select OK as shown in Figure 4 below.
Copyright♥2009-2011, TalariaX Pte Ltd 4OTP for Cisco ASA, SSL VPN Configuration Guide
Strictly Private and Confidential
Figure 4: Configure IPSec Profile
Figure 5: Configure Clientless SSL VPN Profile
Copyright♥2009-2011, TalariaX Pte Ltd 5OTP for Cisco ASA, SSL VPN Configuration Guide
Strictly Private and Confidential
Similar to configuring the IPSec profile, you will need to configure the Clientless SSL VPN profile as well. In the Cisco ASDM, select Remote Access VPN > Clientless SSL VPN Access > Connection Profiles (for SSLVPN). You will need to Add a new SSL VPN profile as shown in Figure 5 above.
Assign a Name to the profile. In Authentication, select AAA and Conexa (configured earlier) in AAA Server Group. This will direct the authentication to Conexa, for SSL VPN authentication sessions.
For the rest of the SSL VPN configuration, consult the Cisco manual or refer to your Cisco service provider.
Once the configuration is completed, select OK as shown in Figure 5 above.
After this configuration, you can access via SSL VPN or IPSec with SMS OTP. The example of SSL VPN and IPSec login using 2FA as described in the next section.
Copyright♥2009-2011, TalariaX Pte Ltd 6OTP for Cisco ASA, SSL VPN Configuration Guide

Strictly Private and Confidential
3.0 REMOTE ACCESS WITH TWO FACTOR AUTHENTICATION
Before accessing using IPSec or SSL VPN, you may need to configure the user policy or grouping in the Cisco ASA. Please refer to Cisco ASA manual for the required configuration.
After configuring, start the IPSec client and select the Connection required and the dialog box for Username and Password will appear as shown in Figure 6 below.
Figure 6: IPSec Login with Username and Password
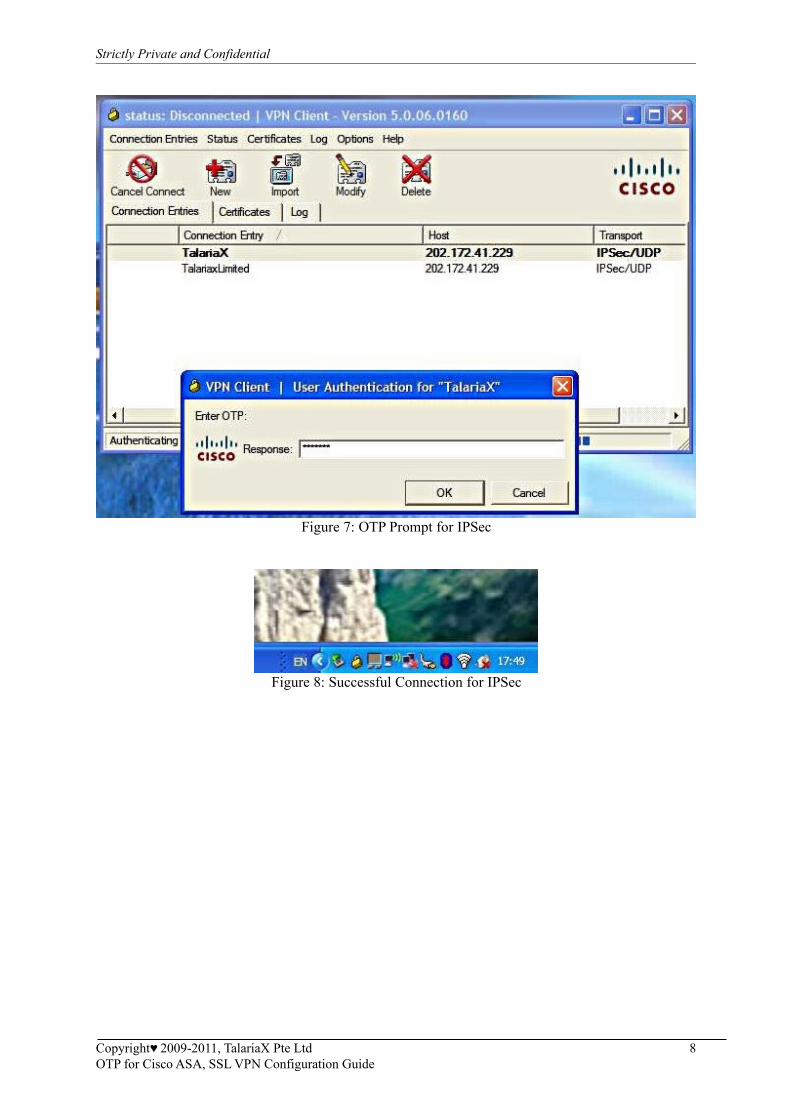
Enter the Username and Password and select OK. Once the first authentication is successful, the Enter OTP page will appear as shown in Figure 7 below.
The OTP will be sent to the mobile phone. Enter the OTP in the space provided and enter OK (Figure 7). Once it is approved, the IPSec will make the connection and the yellow closed padlock will appear at the bottom of the Window taskbar (Figure 8 below).
Copyright♥2009-2011, TalariaX Pte Ltd 7OTP for Cisco ASA, SSL VPN Configuration Guide
Strictly Private and Confidential
Figure 7: OTP Prompt for IPSec
Figure 8: Successful Connection for IPSec
Copyright♥2009-2011, TalariaX Pte Ltd 8OTP for Cisco ASA, SSL VPN Configuration Guide

Strictly Private and Confidential
When accessing using SSL VPN, open a web browser and access the Internet address (URL) for SSL VPN access. The Username and Password will appear as shown in Figure 9 below.
Figure 9: SSLVPN Login with Username and Password
Enter the Username and Password and select Login. Once the first authentication is completed, an Enter OTP page will appear on the web page. The SMS will be sent to the mobile phone.
Enter the OTP in the Response space provided and select Continue, as shown in Figure 10 below. Once the second factor authentication is approved, the success page or user access realm will be shown as in Figure 11 below. Do note that the AnyConnect client can be used at this stage as well.
Figure 10: Enter OTP for SSL VPN Authentication
Copyright♥2009-2011, TalariaX Pte Ltd 9OTP for Cisco ASA, SSL VPN Configuration Guide

Strictly Private and Confidential
Figure 11: Successful Access with SSL VPN
Copyright♥2009-2011, TalariaX Pte Ltd 10OTP for Cisco ASA, SSL VPN Configuration Guide


![STRICTLY OBSERVABLE LINEAR SYSETEMSmst.ufl.edu/pdf papers/Strictly observable systems.pdf · 2017. 5. 18. · strictly observable (HAMMER and . HEYMANN [1981b]). We note that a strictly](https://img.pdfslide.net/doc/110x75/614563f034130627ed50f1f3/strictly-observable-linear-papersstrictly-observable-systemspdf-2017-5-18.jpg)