Embed Size (px)
Citation preview
Cisco Configuration Assurance SolutionAudit and AnalysisAutomation User Guide for IT SentinelSoftware Release 11.5
Corporate HeadquartersCisco Systems, Inc.170 West Tasman DriveSan Jose, CA 95134-1706 USAhttp://www.cisco.comTel: 408 526-4000
800 553-NETS (6387)Fax: 408 526-4100
Text Part Number: OL-7585-02

THE SPECIFICATIONS AND INFORMATION REGARDING THE PRODUCTS IN THIS MANUAL ARE SUBJECT TO CHANGE WITHOUT NOTICE. ALL STATEMENTS, INFORMATION, AND RECOMMENDATIONS IN THIS MANUAL ARE BELIEVED TO BE ACCURATE BUT ARE PRESENTED WITHOUT WARRANTY OF ANY KIND, EXPRESS OR IMPLIED. USERS MUST TAKE FULL RESPONSIBILITY FOR THEIR APPLICATION OF ANY PRODUCTS.
THE SOFTWARE LICENSE AND LIMITED WARRANTY FOR THE ACCOMPANYING PRODUCT ARE SET FORTH IN THE INFORMATION PACKET THAT SHIPPED WITH THE PRODUCT AND ARE INCORPORATED HEREIN BY THIS REFERENCE. IF YOU ARE UNABLE TO LOCATE THE SOFTWARE LICENSE OR LIMITED WARRANTY, CONTACT YOUR CISCO REPRESENTATIVE FOR A COPY.
The Cisco implementation of TCP header compression is an adaptation of a program developed by the University of California, Berkeley (UCB) as part of UCB’s public domain version of the UNIX operating system. All rights reserved. Copyright © 1981, Regents of the University of California.
NOTWITHSTANDING ANY OTHER WARRANTY HEREIN, ALL DOCUMENT FILES AND SOFTWARE OF THESE SUPPLIERS ARE PROVIDED “AS IS” WITH ALL FAULTS. CISCO AND THE ABOVE-NAMED SUPPLIERS DISCLAIM ALL WARRANTIES, EXPRESSED OR IMPLIED, INCLUDING, WITHOUT LIMITATION, THOSE OF MERCHANTABILITY, FITNESS FOR A PARTICULAR PURPOSE AND NONINFRINGEMENT OR ARISING FROM A COURSE OF DEALING, USAGE, OR TRADE PRACTICE.
IN NO EVENT SHALL CISCO OR ITS SUPPLIERS BE LIABLE FOR ANY INDIRECT, SPECIAL, CONSEQUENTIAL, OR INCIDENTAL DAMAGES, INCLUDING, WITHOUT LIMITATION, LOST PROFITS OR LOSS OR DAMAGE TO DATA ARISING OUT OF THE USE OR INABILITY TO USE THIS MANUAL, EVEN IF CISCO OR ITS SUPPLIERS HAVE BEEN ADVISED OF THE POSSIBILITY OF SUCH DAMAGES.
Cisco Configuration Assurance SolutionAudit and AnalysisAutomation User Guide for IT SentinelCopyright © 2005 Cisco Systems, Inc. All rights reserved.
CCSP, CCVP, the Cisco Square Bridge logo, Follow Me Browsing, and StackWise are trademarks of Cisco Systems, Inc.; Changing the Way We Work, Live, Play, and Learn, and iQuick Study are service marks of Cisco Systems, Inc.; and Access Registrar, Aironet, ASIST, BPX, Catalyst, CCDA, CCDP, CCIE, CCIP, CCNA, CCNP, Cisco, the Cisco Certified Internetwork Expert logo, Cisco IOS, Cisco Press, Cisco Systems, Cisco Systems Capital, the Cisco Systems logo, Cisco Unity, Empowering the Internet Generation, Enterprise/Solver, EtherChannel, EtherFast, EtherSwitch, Fast Step, FormShare, GigaDrive, GigaStack, HomeLink, Internet Quotient, IOS, IP/TV, iQ Expertise, the iQ logo, iQ Net Readiness Scorecard, LightStream, Linksys, MeetingPlace, MGX, the Networkers logo, Networking Academy, Network Registrar, Packet, PIX, Post-Routing, Pre-Routing, ProConnect, RateMUX, ScriptShare, SlideCast, SMARTnet, StrataView Plus, TeleRouter, The Fastest Way to Increase Your Internet Quotient, and TransPath are registered trademarks of Cisco Systems, Inc. and/or its affiliates in the United States and certain other countries.
All other trademarks mentioned in this document or Website are the property of their respective owners. The use of the word partner does not imply a partnership relationship between Cisco and any other company. (0502R)
Automation User Guide for IT Sentinel Copyright
Copyright
Document Copyright
Document Title: Automation User Guide for IT SentinelDocument Part Number: D00272Version: 6
© 1987-2005 OPNET Technologies, Inc.All Rights Reserved. Reproduction, adaptation, or translation without prior written permission is prohibited, except as allowed under the copyright laws.
Software Copyright
Product Name: IT SentinelProduct Release: 11.5
© 1987-2005 OPNET Technologies, Inc.All Rights Reserved.
IT Sentinel/Release 11.5 AUG-FM-iii
Documentation Conventions Automation User Guide for IT Sentinel
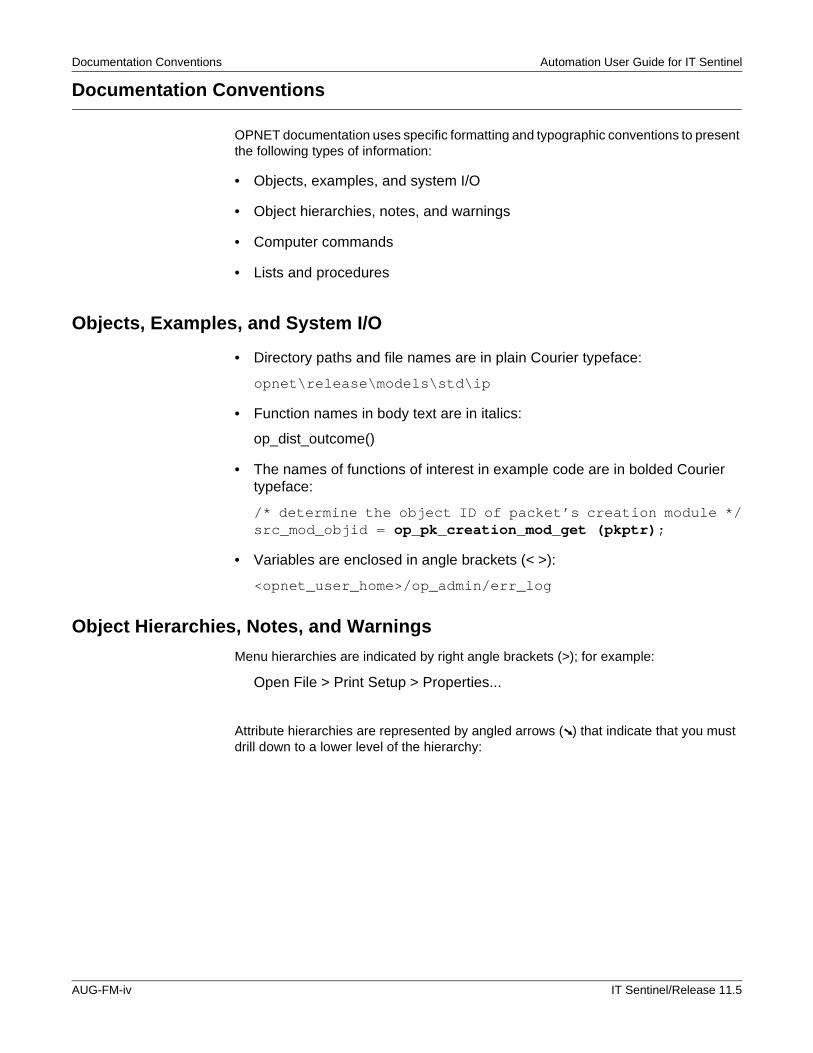
Documentation Conventions
OPNET documentation uses specific formatting and typographic conventions to present the following types of information:
• Objects, examples, and system I/O
• Object hierarchies, notes, and warnings
• Computer commands
• Lists and procedures
Objects, Examples, and System I/O
• Directory paths and file names are in plain Courier typeface:
opnet\release\models\std\ip
• Function names in body text are in italics:
op_dist_outcome()
• The names of functions of interest in example code are in bolded Courier typeface:
/* determine the object ID of packet’s creation module */src_mod_objid = op_pk_creation_mod_get (pkptr);
• Variables are enclosed in angle brackets (< >):
<opnet_user_home>/op_admin/err_log
Object Hierarchies, Notes, and Warnings
Menu hierarchies are indicated by right angle brackets (>); for example:
Open File > Print Setup > Properties...
Attribute hierarchies are represented by angled arrows (➘ ) that indicate that you must drill down to a lower level of the hierarchy:
AUG-FM-iv IT Sentinel/Release 11.5
Automation User Guide for IT Sentinel Documentation Conventions
Attribute level 1 ➘ Attribute level 2 ➘ Attribute level 3
Note—Notes are indicated by text with the word Note at the beginning of the paragraph. Notes advise you of important supplementary information.
WARNING—Warnings are indicated by text with the word WARNING at the beginning of the paragraph. Warnings advise you of vital information about an operation or system behavior.
Computer Commands
These conventions apply to windowing systems and navigation methods that use the standard graphical-user-interface (GUI) terminology such as click, drag, and dialog box.
• Key combinations appear in the form “press <button>+x”; this means press the <button> and x keys at the same time to do the operation.
• The mouse operations left-click (or click) and right-click indicate that you should press the left mouse button or right mouse button, respectively.
Lists and Procedures
Information is often itemized in bulleted (unordered) or numbered (ordered) lists:
• In bulleted lists, the sequence of items is not important.
• In numbered lists, the sequence of items is important.
Procedures are contained within procedure headings and footings that indicate the start and end of the procedure. Each step of a procedure is numbered to indicate the sequence in which you should do the steps. A step may be followed by a description of the results of that step; such descriptions are preceded by an arrow.
Procedure FM-1 Sample Procedure Format
1 Procedure step.
➥ Result of the procedure step.
2 Procedure step.
End of Procedure FM-1
For more information about using and maintaining OPNET documentation, see the OPNET IT Sentinel Documentation Guide.
IT Sentinel/Release 11.5 AUG-FM-v

Documentation Conventions Automation User Guide for IT Sentinel
AUG-FM-vi IT Sentinel/Release 11.5

Automation User Guide for IT Sentinel Document Revision History
Document Revision History
Release DateProduct Version Chapter Description of Change
August 2005 11.5 Defining and Scheduling Automation Tasks
• Updated Automation Logs section for new viewer; added Date and Severity columns.
• Changed “Network Difference Reports” to “Object/Attributes Difference Reports” and added new “Network Difference Reports” in Table 2-1.
August 2004 11.0 Defining and Scheduling Automation Tasks
• Added automation.password preference.
• Revised section Task Execution Requirements on page AUG-2-6.
January 2004 10.5 All • First Issue
IT Sentinel/Release 11.5 AUG-FM-vii

Document Revision History Automation User Guide for IT Sentinel
AUG-FM-viii IT Sentinel/Release 11.5
Automation User Guide for IT Sentinel Contents
Contents
Copyright . . . . . . . . . . . . . . . . . . . . . . . . . . . . . . . . . . . . . . . . . . . . . . . . . . . . . . . . AUG-FM-iii
Documentation Conventions . . . . . . . . . . . . . . . . . . . . . . . . . . . . . . . . . . . . . . . . . AUG-FM-iv
Document Revision History . . . . . . . . . . . . . . . . . . . . . . . . . . . . . . . . . . . . . . . . . . AUG-FM-vii
List of Figures. . . . . . . . . . . . . . . . . . . . . . . . . . . . . . . . . . . . . . . . . . . . . . . . . . . . . AUG-FM-xi
List of Tables . . . . . . . . . . . . . . . . . . . . . . . . . . . . . . . . . . . . . . . . . . . . . . . . . . . . . AUG-FM-xii
List of Procedures . . . . . . . . . . . . . . . . . . . . . . . . . . . . . . . . . . . . . . . . . . . . . . . . .AUG-FM-xiii
1 Overview AUG-1-1Workflow Description . . . . . . . . . . . . . . . . . . . . . . . . . . . . . . . . . . . . . . . . . . . . . . . . . . . . . . . . AUG-1-1
2 Defining and Scheduling Automation Tasks AUG-2-1Creating Task Steps . . . . . . . . . . . . . . . . . . . . . . . . . . . . . . . . . . . . . . . . . . . . . . . . . . . . . . . . . AUG-2-1Creating and Scheduling an Automation Task . . . . . . . . . . . . . . . . . . . . . . . . . . . . . . . . . . . . . AUG-2-5
Task Execution Requirements . . . . . . . . . . . . . . . . . . . . . . . . . . . . . . . . . . . . . . . . . . . . . . AUG-2-6Configure/Run Automation Tasks Dialog Box . . . . . . . . . . . . . . . . . . . . . . . . . . . . . . . . . . AUG-2-6Automation Task Details Dialog Box . . . . . . . . . . . . . . . . . . . . . . . . . . . . . . . . . . . . . . . . . AUG-2-8
Task Steps. . . . . . . . . . . . . . . . . . . . . . . . . . . . . . . . . . . . . . . . . . . . . . . . . . . . . . . . . . AUG-2-9Source Scenarios . . . . . . . . . . . . . . . . . . . . . . . . . . . . . . . . . . . . . . . . . . . . . . . . . . . AUG-2-10Output Scenarios. . . . . . . . . . . . . . . . . . . . . . . . . . . . . . . . . . . . . . . . . . . . . . . . . . . . AUG-2-10Project Contention and Locking. . . . . . . . . . . . . . . . . . . . . . . . . . . . . . . . . . . . . . . . . AUG-2-11
Edit Schedule Dialog Box. . . . . . . . . . . . . . . . . . . . . . . . . . . . . . . . . . . . . . . . . . . . . . . . . AUG-2-12Edit Schedule Dialog Box . . . . . . . . . . . . . . . . . . . . . . . . . . . . . . . . . . . . . . . . . . . . . AUG-2-12
Automation Logs. . . . . . . . . . . . . . . . . . . . . . . . . . . . . . . . . . . . . . . . . . . . . . . . . . . . . . . . . . . AUG-2-13Preferences . . . . . . . . . . . . . . . . . . . . . . . . . . . . . . . . . . . . . . . . . . . . . . . . . . . . . . . . . . . . . . AUG-2-15
auto_log_directory . . . . . . . . . . . . . . . . . . . . . . . . . . . . . . . . . . . . . . . . . . . . . . . . . . . AUG-2-15automation_lock_max_wait_time . . . . . . . . . . . . . . . . . . . . . . . . . . . . . . . . . . . . . . . AUG-2-15automation.password . . . . . . . . . . . . . . . . . . . . . . . . . . . . . . . . . . . . . . . . . . . . . . . . AUG-2-15
Index AUG-IX-1
IT Sentinel/Release 11.5 AUG-FM-ix

Contents Automation User Guide for IT Sentinel
AUG-FM-x IT Sentinel/Release 11.5
Automation User Guide for IT Sentinel List of Figures
IT Sentinel/Release 11.5 AUG-FM-xi
List of Figures
Figure 2-1 Creating a Task Step: Example . . . . . . . . . . . . . . . . . . . . . . . . . . . . . . . . . . . . . . . . . . . . . AUG-2-2Figure 2-2 Save Settings for Automation Button . . . . . . . . . . . . . . . . . . . . . . . . . . . . . . . . . . . . . . . . . AUG-2-2Figure 2-3 Configure/Run Automation Tasks Dialog Box . . . . . . . . . . . . . . . . . . . . . . . . . . . . . . . . . . AUG-2-7Figure 2-4 Automation Task Details Dialog Box . . . . . . . . . . . . . . . . . . . . . . . . . . . . . . . . . . . . . . . . . AUG-2-8Figure 2-5 Edit Schedule Dialog Box. . . . . . . . . . . . . . . . . . . . . . . . . . . . . . . . . . . . . . . . . . . . . . . . . AUG-2-12Figure 2-6 Automation Log Manager Dialog Box . . . . . . . . . . . . . . . . . . . . . . . . . . . . . . . . . . . . . . . AUG-2-13Figure 2-7 Automation Log . . . . . . . . . . . . . . . . . . . . . . . . . . . . . . . . . . . . . . . . . . . . . . . . . . . . . . . . AUG-2-13
List of Tables Automation User Guide for IT Sentinel
AUG-FM-xii IT Sentinel/Release 11.5
List of Tables
Table 2-1 Operations with Automation Support . . . . . . . . . . . . . . . . . . . . . . . . . . . . . . . . . . . . . . . . . AUG-2-3Table 2-2 Configure/Run Automation Tasks Dialog Box . . . . . . . . . . . . . . . . . . . . . . . . . . . . . . . . . . . AUG-2-7Table 2-3 Automation Task Details Dialog Box . . . . . . . . . . . . . . . . . . . . . . . . . . . . . . . . . . . . . . . . . . AUG-2-9Table 2-4 Edit Schedule Dialog Box . . . . . . . . . . . . . . . . . . . . . . . . . . . . . . . . . . . . . . . . . . . . . . . . . AUG-2-12Table 2-5 Automation Log Columns . . . . . . . . . . . . . . . . . . . . . . . . . . . . . . . . . . . . . . . . . . . . . . . . . AUG-2-14
Automation User Guide for IT Sentinel List of Procedures
List of Procedures
Procedure 2-1 Creating an Automation Task Step . . . . . . . . . . . . . . . . . . . . . . . . . . . . . . . . . . . . . . . AUG-2-2Procedure 2-2 Defining and Scheduling an Automation Task. . . . . . . . . . . . . . . . . . . . . . . . . . . . . . . AUG-2-5Procedure 2-3 Creating or Changing a Task Step . . . . . . . . . . . . . . . . . . . . . . . . . . . . . . . . . . . . . . . AUG-2-9Procedure 2-4 Viewing an Automation Log. . . . . . . . . . . . . . . . . . . . . . . . . . . . . . . . . . . . . . . . . . . . AUG-2-13
IT Sentinel/Release 11.5 AUG-FM-xiii

List of Procedures Automation User Guide for IT Sentinel
AUG-FM-xiv IT Sentinel/Release 11.5
Automation User Guide for IT Sentinel 1—Overview
1 Overview
The Automation Module enables you to automate network-analysis tasks using OPNET. Automation is useful when you want the OPNET software to monitor and analyze your network at regular intervals and with no user intervention. Using automation, you can configure a sequence of operations, then schedule the sequence to run periodically and generate reports for each run. This “set-up-once/run-many” capability means that anyone in your organization can analyze your network and view up-to-date results using OPNET.
Workflow Description
The automation workflow consists of the following steps:
1) Create a set of automated operations.
With the Automation Module, you can automate operations such as importing a network, analyzing a network using Flow Analysis or NetDoctor, and generating reports. In most cases, the procedure for creating an automated operation (called an automation task step) is to:
a) Open the dialog box for an operation that supports automation
b) Specify the settings to use for that operation
c) Click an Automation button in the dialog box to save the settings to an automation file
d) Close the dialog box without running the operation
2) Define an automation task that includes a sequence of task steps and the schedule for that task to run.
After you create a set of automation task steps, you assemble them into a sequence of steps called an automation task. The Automation Module includes a configurable task scheduler that can manage multiple tasks, each of which runs on its own defined schedule. An automation task usually consists of the following steps:
a) Import the network (from device configurations or VNE Server)
b) Analyze the network (run Flow Analysis and/or NetDoctor)
c) Generate one or more reports that show the results (generate NetDoctor, Flow Analysis, network difference, object/attribute difference, and/or user-defined reports)
IT Sentinel/Release 11.5 AUG-1-1

1—Overview Automation User Guide for IT Sentinel
3) After an automation task finishes, view results of the run.
An automation run can generate reports from attribute tables (user-defined reports), network comparisons, NetDoctor, and Flow Analysis. You can view results by logging on to a centralized Report Server or from within the OPNET software itself.
For more information about using automation, see Chapter 2 Defining and Scheduling Automation Tasks on page AUG-2-1.
AUG-1-2 IT Sentinel/Release 11.5
Automation User Guide for IT Sentinel 2—Defining and Scheduling Automation Tasks
2 Defining and Scheduling Automation Tasks
This chapter describes the procedures for using the Automation Module. The following sections outline the Automation workflow (as described in Workflow Description on page AUG-1-1):
• Creating Task Steps on page AUG-2-1
• Creating and Scheduling an Automation Task on page AUG-2-5
• Automation Logs on page AUG-2-13
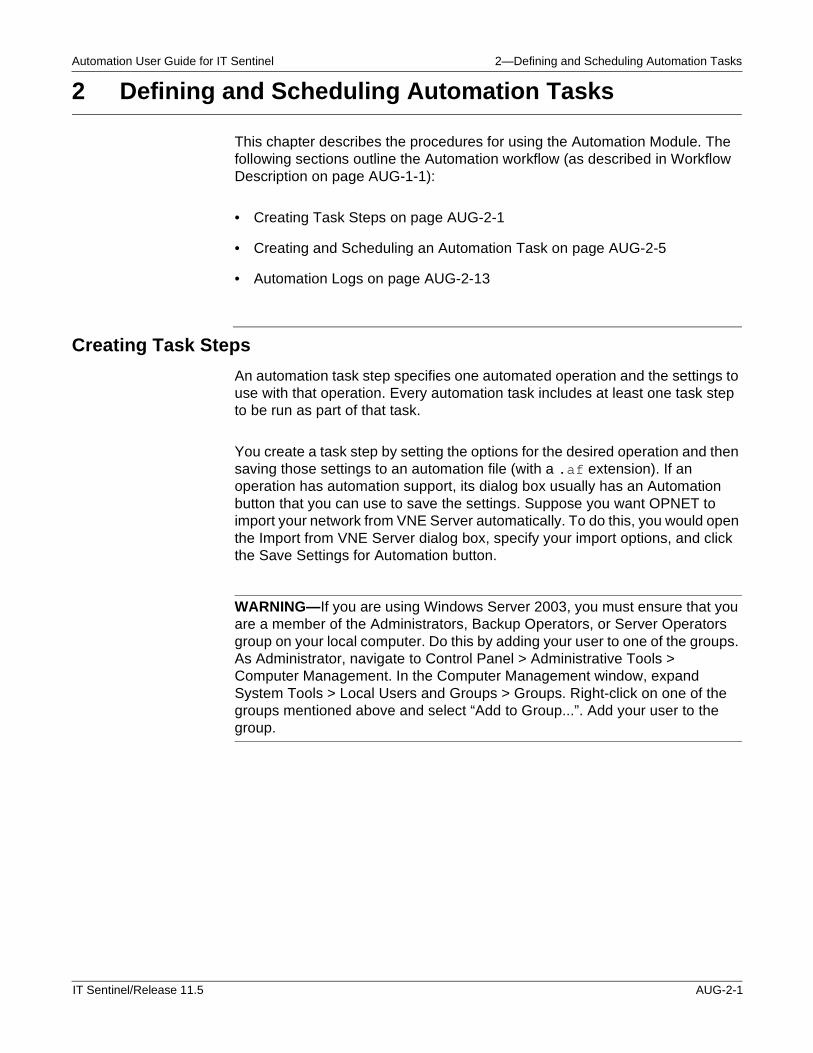
Creating Task Steps
An automation task step specifies one automated operation and the settings to use with that operation. Every automation task includes at least one task step to be run as part of that task.
You create a task step by setting the options for the desired operation and then saving those settings to an automation file (with a .af extension). If an operation has automation support, its dialog box usually has an Automation button that you can use to save the settings. Suppose you want OPNET to import your network from VNE Server automatically. To do this, you would open the Import from VNE Server dialog box, specify your import options, and click the Save Settings for Automation button.
WARNING—If you are using Windows Server 2003, you must ensure that you are a member of the Administrators, Backup Operators, or Server Operators group on your local computer. Do this by adding your user to one of the groups. As Administrator, navigate to Control Panel > Administrative Tools > Computer Management. In the Computer Management window, expand System Tools > Local Users and Groups > Groups. Right-click on one of the groups mentioned above and select “Add to Group...”. Add your user to the group.
IT Sentinel/Release 11.5 AUG-2-1
2—Defining and Scheduling Automation Tasks Automation User Guide for IT Sentinel
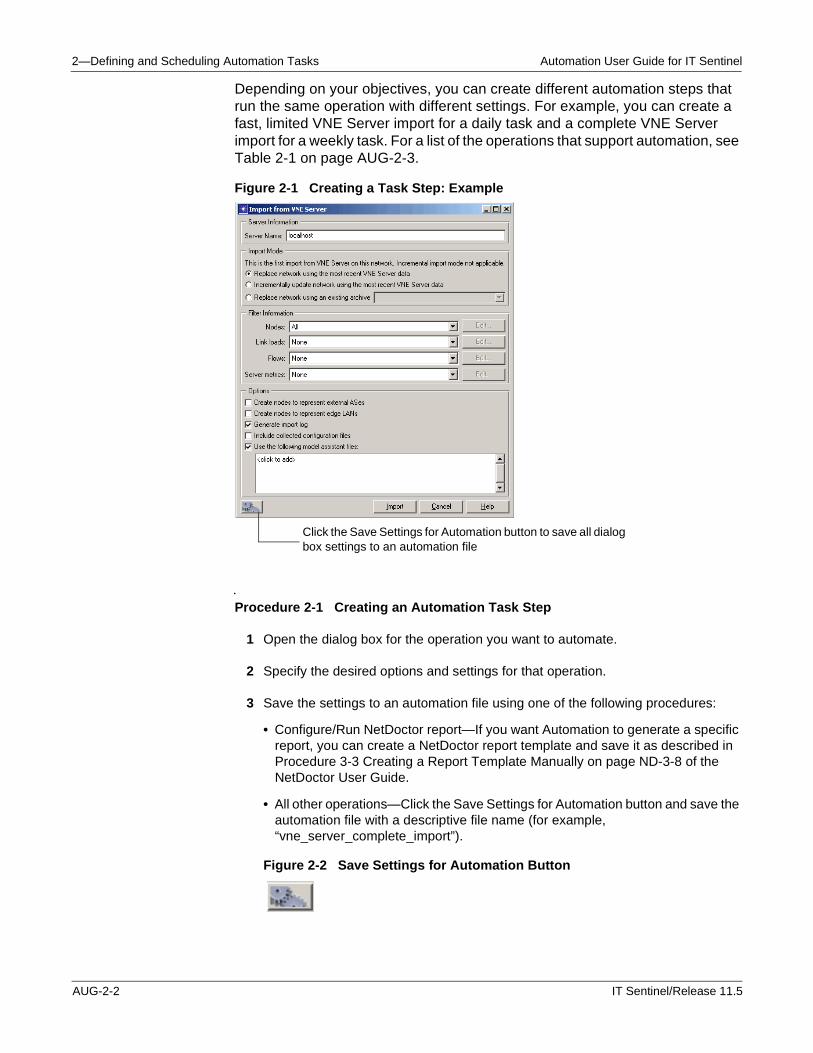
Depending on your objectives, you can create different automation steps that run the same operation with different settings. For example, you can create a fast, limited VNE Server import for a daily task and a complete VNE Server import for a weekly task. For a list of the operations that support automation, see Table 2-1 on page AUG-2-3.
Figure 2-1 Creating a Task Step: Example
Procedure 2-1 Creating an Automation Task Step
1 Open the dialog box for the operation you want to automate.
2 Specify the desired options and settings for that operation.
3 Save the settings to an automation file using one of the following procedures:
• Configure/Run NetDoctor report—If you want Automation to generate a specific report, you can create a NetDoctor report template and save it as described in Procedure 3-3 Creating a Report Template Manually on page ND-3-8 of the NetDoctor User Guide.
• All other operations—Click the Save Settings for Automation button and save the automation file with a descriptive file name (for example, “vne_server_complete_import”).
Figure 2-2 Save Settings for Automation Button
Click the Save Settings for Automation button to save all dialog box settings to an automation file
AUG-2-2 IT Sentinel/Release 11.5
Automation User Guide for IT Sentinel 2—Defining and Scheduling Automation Tasks
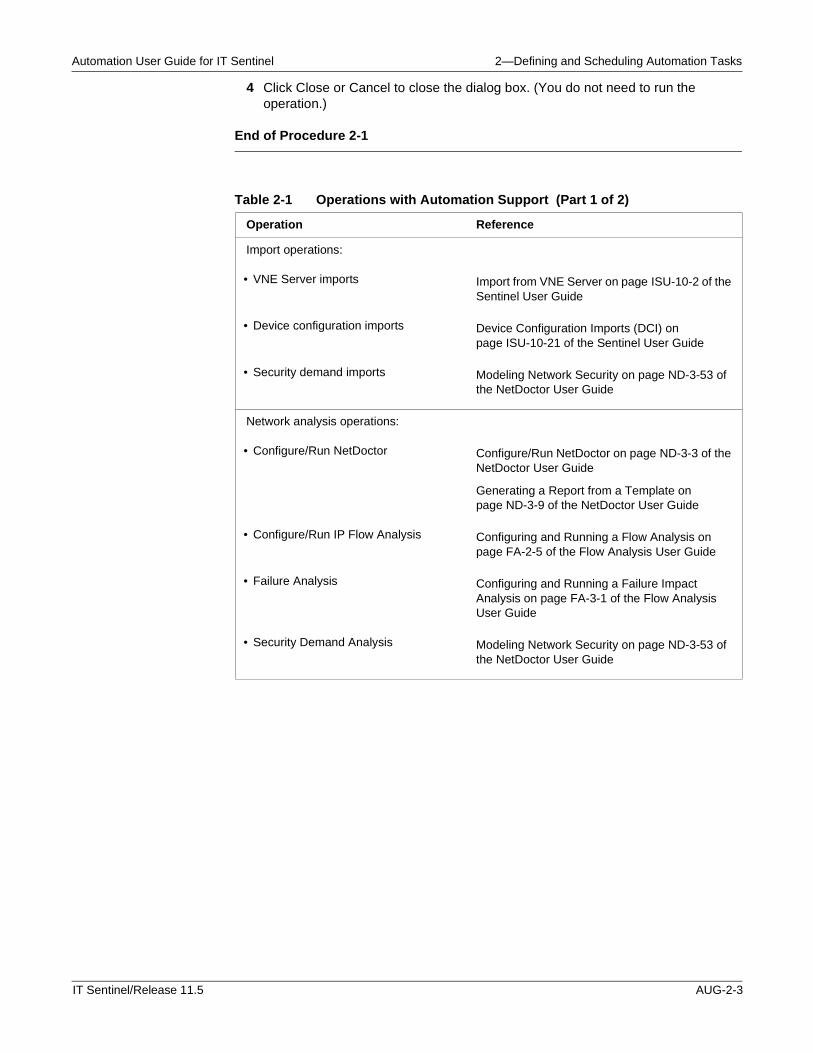
4 Click Close or Cancel to close the dialog box. (You do not need to run the operation.)
End of Procedure 2-1
Table 2-1 Operations with Automation Support (Part 1 of 2)
Operation Reference
Import operations:
• VNE Server imports Import from VNE Server on page ISU-10-2 of the Sentinel User Guide
• Device configuration imports Device Configuration Imports (DCI) on page ISU-10-21 of the Sentinel User Guide
• Security demand imports Modeling Network Security on page ND-3-53 of the NetDoctor User Guide
Network analysis operations:
• Configure/Run NetDoctor Configure/Run NetDoctor on page ND-3-3 of the NetDoctor User Guide
Generating a Report from a Template on page ND-3-9 of the NetDoctor User Guide
• Configure/Run IP Flow Analysis Configuring and Running a Flow Analysis on page FA-2-5 of the Flow Analysis User Guide
• Failure Analysis Configuring and Running a Failure Impact Analysis on page FA-3-1 of the Flow Analysis User Guide
• Security Demand Analysis Modeling Network Security on page ND-3-53 of the NetDoctor User Guide
IT Sentinel/Release 11.5 AUG-2-3
2—Defining and Scheduling Automation Tasks Automation User Guide for IT Sentinel
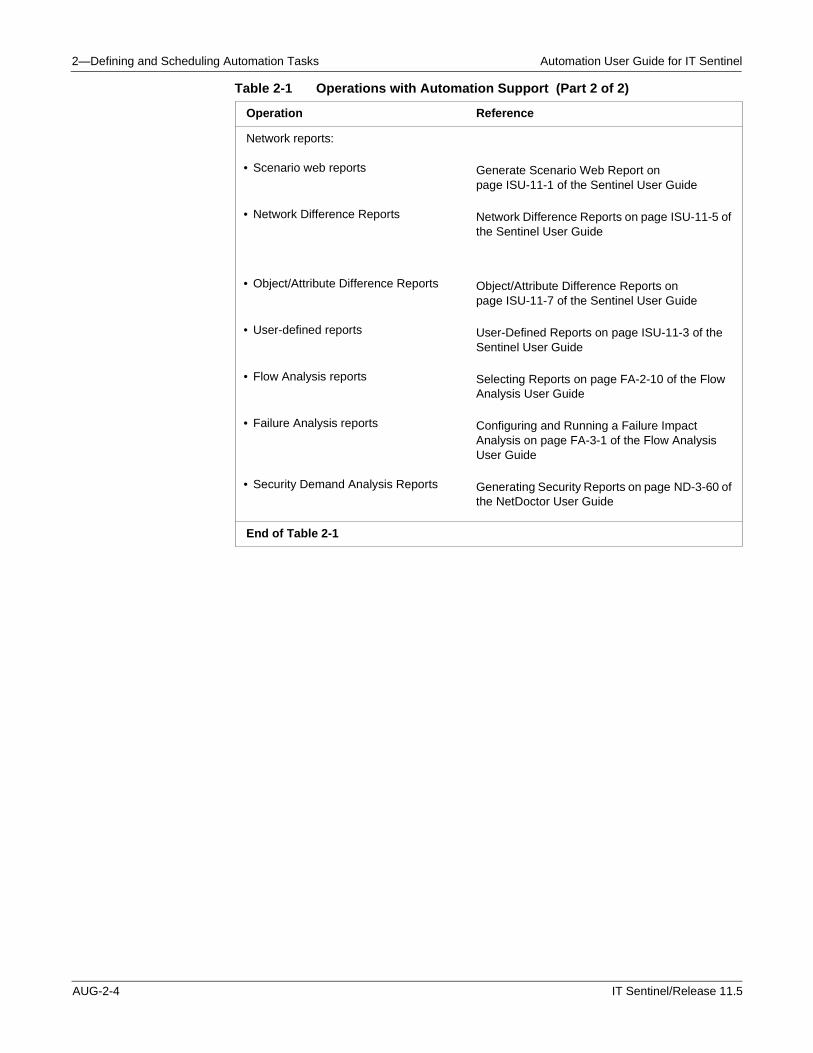
Network reports:
• Scenario web reports Generate Scenario Web Report on page ISU-11-1 of the Sentinel User Guide
• Network Difference Reports Network Difference Reports on page ISU-11-5 of the Sentinel User Guide
• Object/Attribute Difference Reports Object/Attribute Difference Reports on page ISU-11-7 of the Sentinel User Guide
• User-defined reports User-Defined Reports on page ISU-11-3 of the Sentinel User Guide
• Flow Analysis reports Selecting Reports on page FA-2-10 of the Flow Analysis User Guide
• Failure Analysis reports Configuring and Running a Failure Impact Analysis on page FA-3-1 of the Flow Analysis User Guide
• Security Demand Analysis Reports Generating Security Reports on page ND-3-60 of the NetDoctor User Guide
End of Table 2-1
Table 2-1 Operations with Automation Support (Part 2 of 2)
Operation Reference
AUG-2-4 IT Sentinel/Release 11.5
Automation User Guide for IT Sentinel 2—Defining and Scheduling Automation Tasks
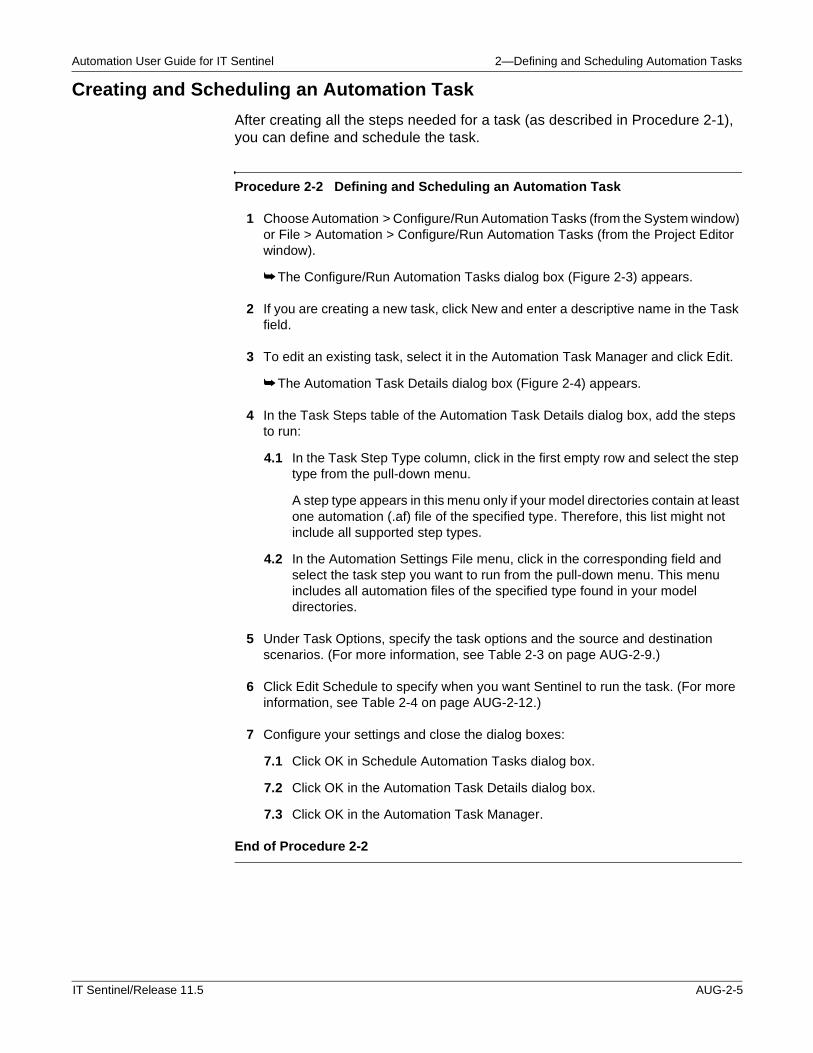
Creating and Scheduling an Automation Task
After creating all the steps needed for a task (as described in Procedure 2-1), you can define and schedule the task.
Procedure 2-2 Defining and Scheduling an Automation Task
1 Choose Automation > Configure/Run Automation Tasks (from the System window) or File > Automation > Configure/Run Automation Tasks (from the Project Editor window).
➥ The Configure/Run Automation Tasks dialog box (Figure 2-3) appears.
2 If you are creating a new task, click New and enter a descriptive name in the Task field.
3 To edit an existing task, select it in the Automation Task Manager and click Edit.
➥ The Automation Task Details dialog box (Figure 2-4) appears.
4 In the Task Steps table of the Automation Task Details dialog box, add the steps to run:
4.1 In the Task Step Type column, click in the first empty row and select the step type from the pull-down menu.
A step type appears in this menu only if your model directories contain at least one automation (.af) file of the specified type. Therefore, this list might not include all supported step types.
4.2 In the Automation Settings File menu, click in the corresponding field and select the task step you want to run from the pull-down menu. This menu includes all automation files of the specified type found in your model directories.
5 Under Task Options, specify the task options and the source and destination scenarios. (For more information, see Table 2-3 on page AUG-2-9.)
6 Click Edit Schedule to specify when you want Sentinel to run the task. (For more information, see Table 2-4 on page AUG-2-12.)
7 Configure your settings and close the dialog boxes:
7.1 Click OK in Schedule Automation Tasks dialog box.
7.2 Click OK in the Automation Task Details dialog box.
7.3 Click OK in the Automation Task Manager.
End of Procedure 2-2
IT Sentinel/Release 11.5 AUG-2-5
2—Defining and Scheduling Automation Tasks Automation User Guide for IT Sentinel
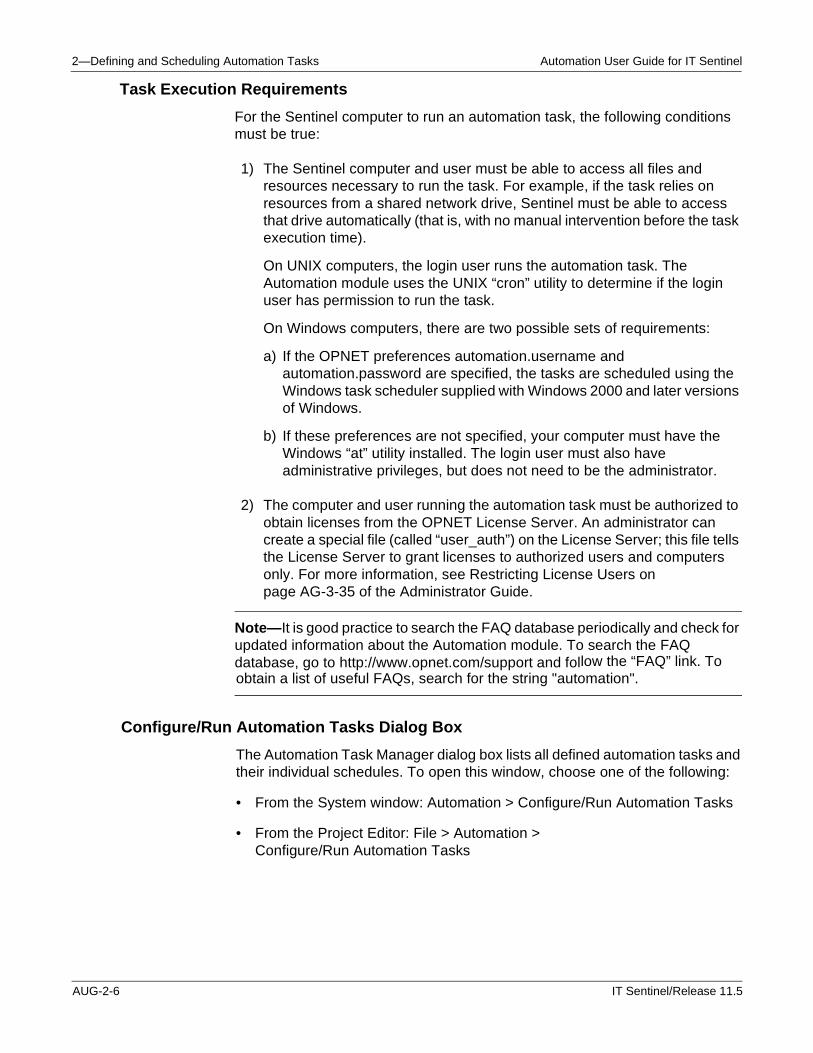
Task Execution Requirements
For the Sentinel computer to run an automation task, the following conditions must be true:
1) The Sentinel computer and user must be able to access all files and resources necessary to run the task. For example, if the task relies on resources from a shared network drive, Sentinel must be able to access that drive automatically (that is, with no manual intervention before the task execution time).
On UNIX computers, the login user runs the automation task. The Automation module uses the UNIX “cron” utility to determine if the login user has permission to run the task.
On Windows computers, there are two possible sets of requirements:
a) If the OPNET preferences automation.username and automation.password are specified, the tasks are scheduled using the Windows task scheduler supplied with Windows 2000 and later versions of Windows.
b) If these preferences are not specified, your computer must have the Windows “at” utility installed. The login user must also have administrative privileges, but does not need to be the administrator.
2) The computer and user running the automation task must be authorized to obtain licenses from the OPNET License Server. An administrator can create a special file (called “user_auth”) on the License Server; this file tells the License Server to grant licenses to authorized users and computers only. For more information, see Restricting License Users on page AG-3-35 of the Administrator Guide.
Note—It is good practice to search the FAQ database periodically and check for updated information about the Automation module. To search the FAQ database, go to http://www.opnet.com/support and follow the “FAQ” link. To obtain a list of useful FAQs, search for the string "automation".
Configure/Run Automation Tasks Dialog Box
The Automation Task Manager dialog box lists all defined automation tasks and their individual schedules. To open this window, choose one of the following:
• From the System window: Automation > Configure/Run Automation Tasks
• From the Project Editor: File > Automation > Configure/Run Automation Tasks
AUG-2-6 IT Sentinel/Release 11.5
Automation User Guide for IT Sentinel 2—Defining and Scheduling Automation Tasks
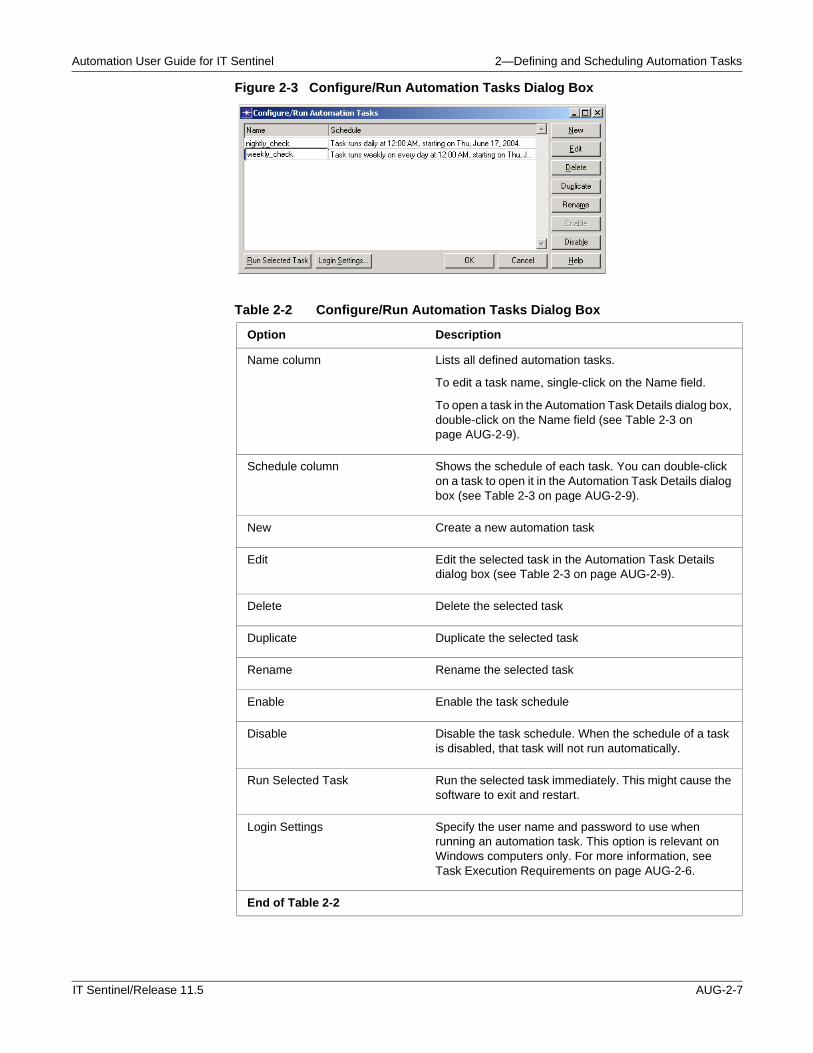
Figure 2-3 Configure/Run Automation Tasks Dialog Box
Table 2-2 Configure/Run Automation Tasks Dialog Box
Option Description
Name column Lists all defined automation tasks.
To edit a task name, single-click on the Name field.
To open a task in the Automation Task Details dialog box, double-click on the Name field (see Table 2-3 on page AUG-2-9).
Schedule column Shows the schedule of each task. You can double-click on a task to open it in the Automation Task Details dialog box (see Table 2-3 on page AUG-2-9).
New Create a new automation task
Edit Edit the selected task in the Automation Task Details dialog box (see Table 2-3 on page AUG-2-9).
Delete Delete the selected task
Duplicate Duplicate the selected task
Rename Rename the selected task
Enable Enable the task schedule
Disable Disable the task schedule. When the schedule of a task is disabled, that task will not run automatically.
Run Selected Task Run the selected task immediately. This might cause the software to exit and restart.
Login Settings Specify the user name and password to use when running an automation task. This option is relevant on Windows computers only. For more information, see Task Execution Requirements on page AUG-2-6.
End of Table 2-2
IT Sentinel/Release 11.5 AUG-2-7
2—Defining and Scheduling Automation Tasks Automation User Guide for IT Sentinel
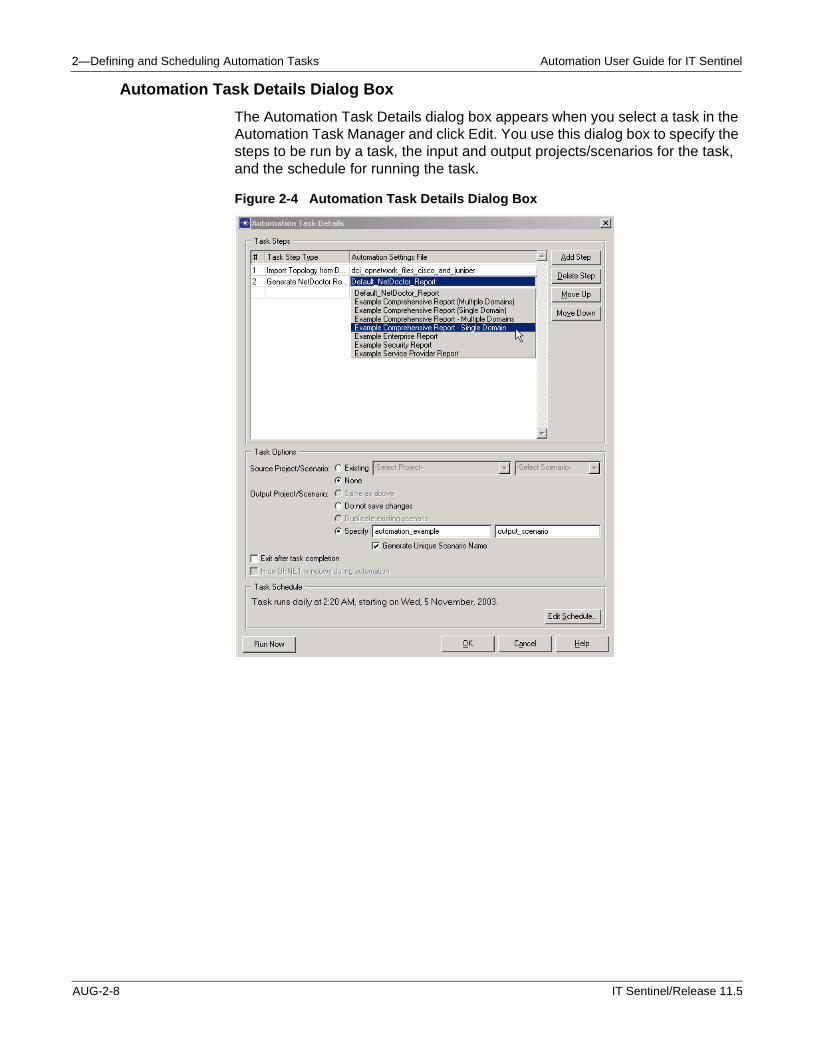
Automation Task Details Dialog Box
The Automation Task Details dialog box appears when you select a task in the Automation Task Manager and click Edit. You use this dialog box to specify the steps to be run by a task, the input and output projects/scenarios for the task, and the schedule for running the task.
Figure 2-4 Automation Task Details Dialog Box
AUG-2-8 IT Sentinel/Release 11.5
Automation User Guide for IT Sentinel 2—Defining and Scheduling Automation Tasks
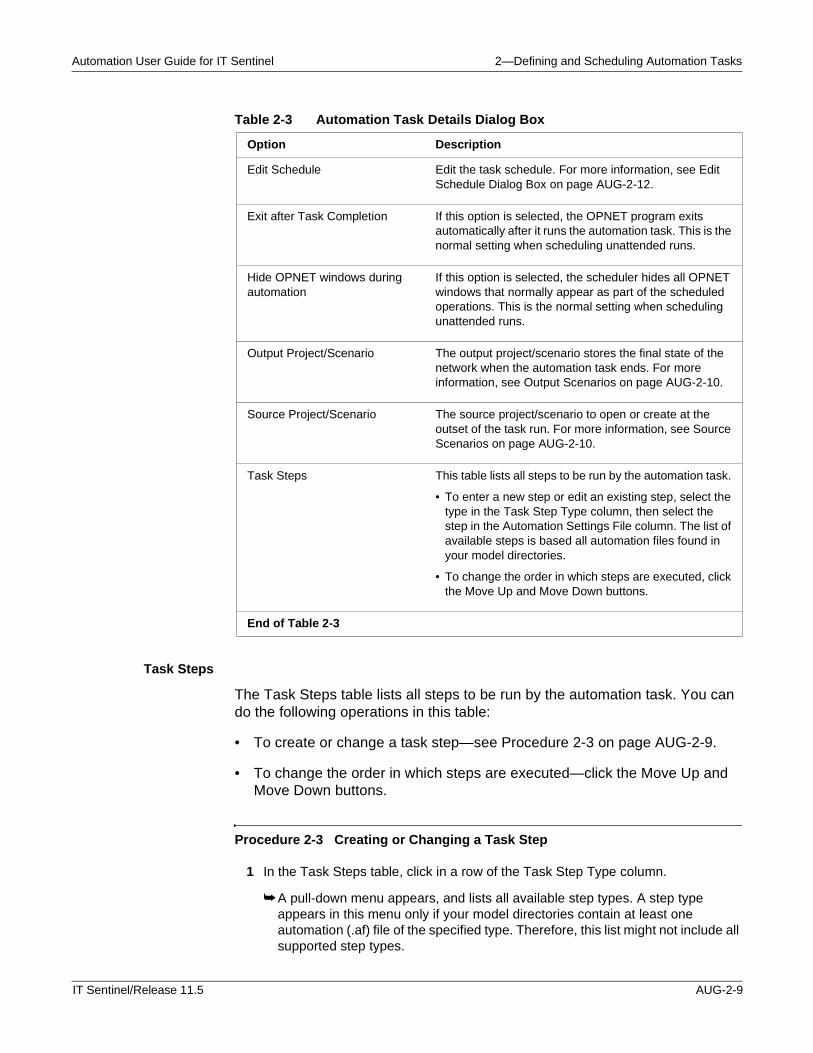
Task Steps
The Task Steps table lists all steps to be run by the automation task. You can do the following operations in this table:
• To create or change a task step—see Procedure 2-3 on page AUG-2-9.
• To change the order in which steps are executed—click the Move Up and Move Down buttons.
Procedure 2-3 Creating or Changing a Task Step
1 In the Task Steps table, click in a row of the Task Step Type column.
➥ A pull-down menu appears, and lists all available step types. A step type appears in this menu only if your model directories contain at least one automation (.af) file of the specified type. Therefore, this list might not include all supported step types.
Table 2-3 Automation Task Details Dialog Box
Option Description
Edit Schedule Edit the task schedule. For more information, see Edit Schedule Dialog Box on page AUG-2-12.
Exit after Task Completion If this option is selected, the OPNET program exits automatically after it runs the automation task. This is the normal setting when scheduling unattended runs.
Hide OPNET windows during automation
If this option is selected, the scheduler hides all OPNET windows that normally appear as part of the scheduled operations. This is the normal setting when scheduling unattended runs.
Output Project/Scenario The output project/scenario stores the final state of the network when the automation task ends. For more information, see Output Scenarios on page AUG-2-10.
Source Project/Scenario The source project/scenario to open or create at the outset of the task run. For more information, see Source Scenarios on page AUG-2-10.
Task Steps This table lists all steps to be run by the automation task.
• To enter a new step or edit an existing step, select the type in the Task Step Type column, then select the step in the Automation Settings File column. The list of available steps is based all automation files found in your model directories.
• To change the order in which steps are executed, click the Move Up and Move Down buttons.
End of Table 2-3
IT Sentinel/Release 11.5 AUG-2-9
2—Defining and Scheduling Automation Tasks Automation User Guide for IT Sentinel
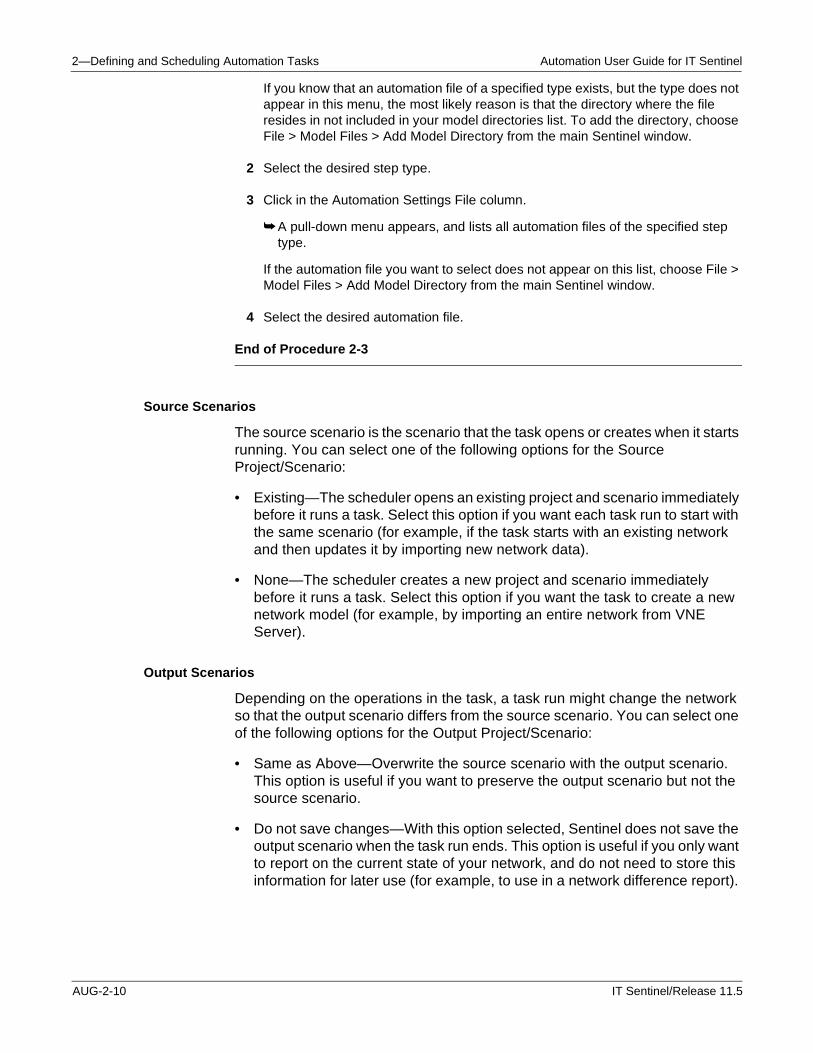
If you know that an automation file of a specified type exists, but the type does not appear in this menu, the most likely reason is that the directory where the file resides in not included in your model directories list. To add the directory, choose File > Model Files > Add Model Directory from the main Sentinel window.
2 Select the desired step type.
3 Click in the Automation Settings File column.
➥ A pull-down menu appears, and lists all automation files of the specified step type.
If the automation file you want to select does not appear on this list, choose File > Model Files > Add Model Directory from the main Sentinel window.
4 Select the desired automation file.
End of Procedure 2-3
Source Scenarios
The source scenario is the scenario that the task opens or creates when it starts running. You can select one of the following options for the Source Project/Scenario:
• Existing—The scheduler opens an existing project and scenario immediately before it runs a task. Select this option if you want each task run to start with the same scenario (for example, if the task starts with an existing network and then updates it by importing new network data).
• None—The scheduler creates a new project and scenario immediately before it runs a task. Select this option if you want the task to create a new network model (for example, by importing an entire network from VNE Server).
Output Scenarios
Depending on the operations in the task, a task run might change the network so that the output scenario differs from the source scenario. You can select one of the following options for the Output Project/Scenario:
• Same as Above—Overwrite the source scenario with the output scenario. This option is useful if you want to preserve the output scenario but not the source scenario.
• Do not save changes—With this option selected, Sentinel does not save the output scenario when the task run ends. This option is useful if you only want to report on the current state of your network, and do not need to store this information for later use (for example, to use in a network difference report).
AUG-2-10 IT Sentinel/Release 11.5
Automation User Guide for IT Sentinel 2—Defining and Scheduling Automation Tasks
• Duplicate Existing Scenario—Save the final network to a duplicate of the source network. Use this option if you want to keep a record of the network state at the start of each run. This can be useful for running network difference reports.
• Specify—Save the final network to a specific project and scenario. If Generate Unique Scenario Name is selected, the output file is saved with a time-stamped scenario name.
If you want to create network difference reports that track network changes over time, select the Specify option and make sure that Generate Unique Scenario Name is selected. With these two options selected, each run creates a new, unique output scenario in the specified project.
Note—Whenever possible, use a unique output project for every task, so that multiple tasks do not try to use the same output project. This reduces the risk of project contention, as described in Project Contention and Locking.
For more information about creating network difference reports, see Network Difference Reports on page ISU-11-5 of the Sentinel User Guide.
Project Contention and Locking
When a project is in use, Sentinel locks that project so that only the active task can modify it. If two tasks use the same output project, there might be occasions when the scheduler runs task A, then tries to run task B while A is still running. When this occurs, the scheduler waits a specified interval for task A to end before it runs task B. This interval is specified by the automation_lock_max_wait_time preference. During this interval, Sentinel checks every 60 seconds to see if the output project is available. If the project is still locked at the end of the specified wait time, Sentinel enters a message in the automation log and the task run ends. To avoid these situations, it is good practice (whenever possible) to specify a unique output project for each task.
Note—If Sentinel exits abnormally while a task is running, the output project might remain locked even after the program restarts. If Sentinel exits abnormally, restart the program, choose File > Unlock Projects…, and unlock any projects that are not currently in use.
IT Sentinel/Release 11.5 AUG-2-11
2—Defining and Scheduling Automation Tasks Automation User Guide for IT Sentinel
Edit Schedule Dialog Box
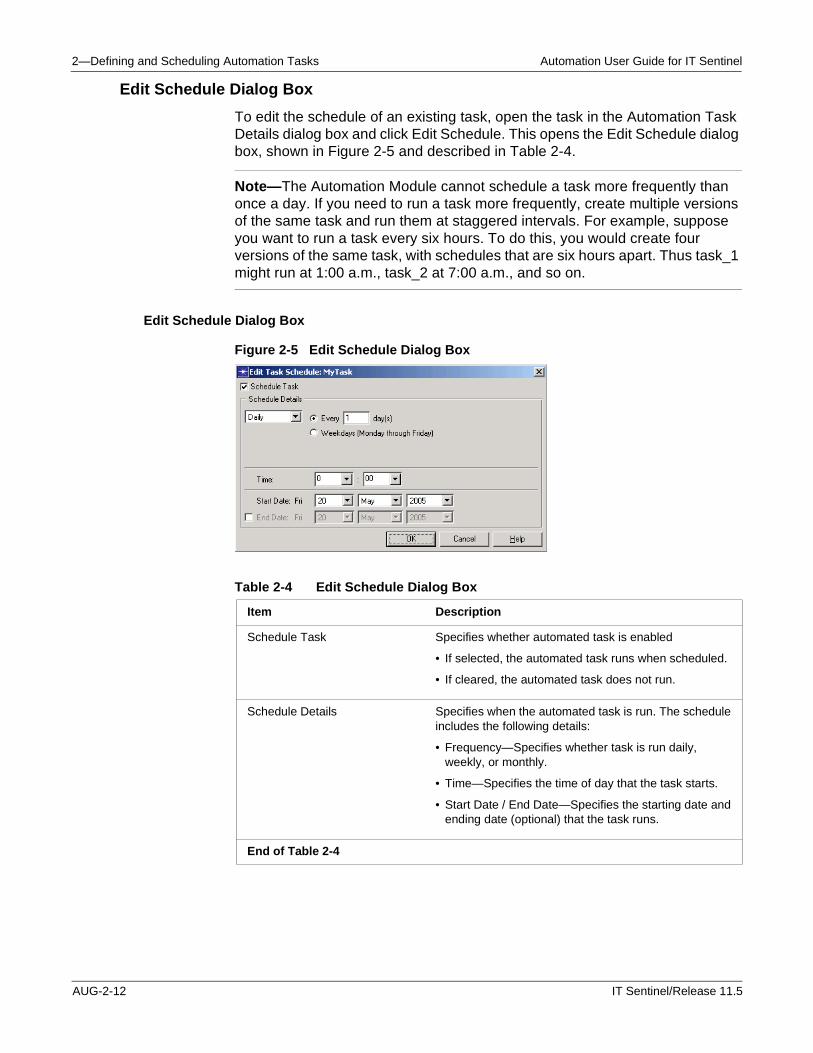
To edit the schedule of an existing task, open the task in the Automation Task Details dialog box and click Edit Schedule. This opens the Edit Schedule dialog box, shown in Figure 2-5 and described in Table 2-4.
Note—The Automation Module cannot schedule a task more frequently than once a day. If you need to run a task more frequently, create multiple versions of the same task and run them at staggered intervals. For example, suppose you want to run a task every six hours. To do this, you would create four versions of the same task, with schedules that are six hours apart. Thus task_1 might run at 1:00 a.m., task_2 at 7:00 a.m., and so on.
Edit Schedule Dialog Box
Figure 2-5 Edit Schedule Dialog Box
Table 2-4 Edit Schedule Dialog Box
Item Description
Schedule Task Specifies whether automated task is enabled
• If selected, the automated task runs when scheduled.
• If cleared, the automated task does not run.
Schedule Details Specifies when the automated task is run. The schedule includes the following details:
• Frequency—Specifies whether task is run daily, weekly, or monthly.
• Time—Specifies the time of day that the task starts.
• Start Date / End Date—Specifies the starting date and ending date (optional) that the task runs.
End of Table 2-4
AUG-2-12 IT Sentinel/Release 11.5
Automation User Guide for IT Sentinel 2—Defining and Scheduling Automation Tasks
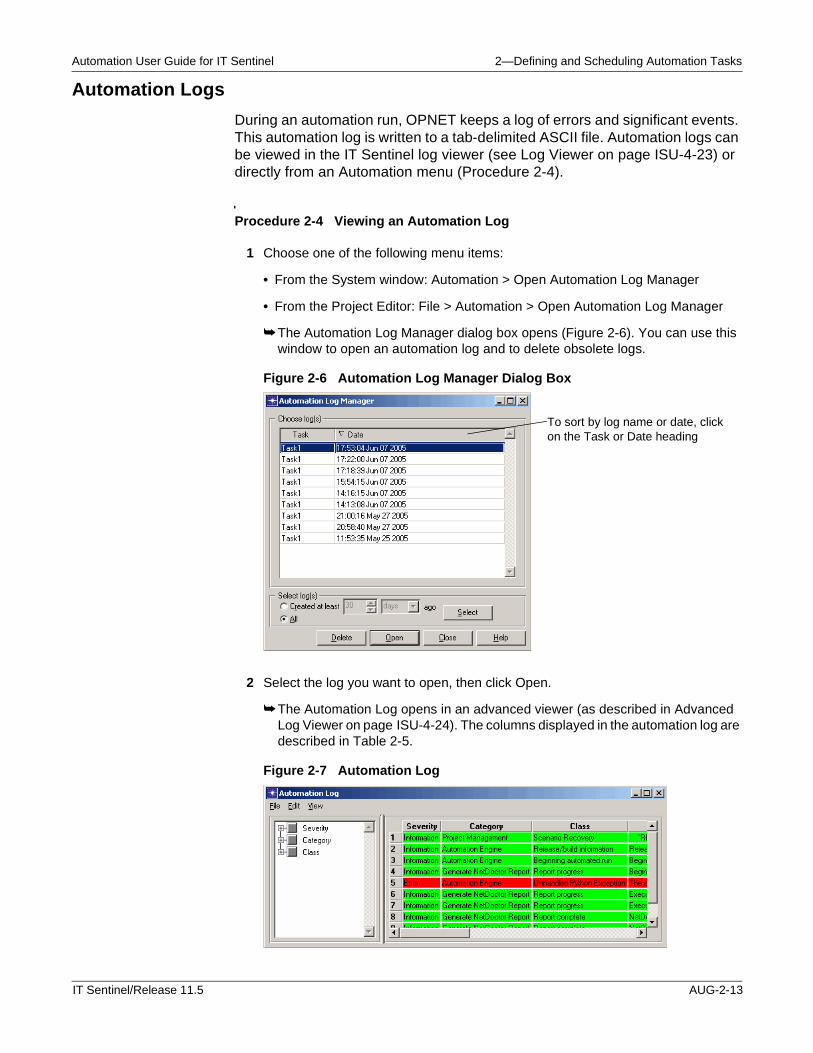
Automation Logs
During an automation run, OPNET keeps a log of errors and significant events. This automation log is written to a tab-delimited ASCII file. Automation logs can be viewed in the IT Sentinel log viewer (see Log Viewer on page ISU-4-23) or directly from an Automation menu (Procedure 2-4).
Procedure 2-4 Viewing an Automation Log
1 Choose one of the following menu items:
• From the System window: Automation > Open Automation Log Manager
• From the Project Editor: File > Automation > Open Automation Log Manager
➥ The Automation Log Manager dialog box opens (Figure 2-6). You can use this window to open an automation log and to delete obsolete logs.
Figure 2-6 Automation Log Manager Dialog Box
2 Select the log you want to open, then click Open.
➥ The Automation Log opens in an advanced viewer (as described in Advanced Log Viewer on page ISU-4-24). The columns displayed in the automation log are described in Table 2-5.
Figure 2-7 Automation Log
To sort by log name or date, click on the Task or Date heading
IT Sentinel/Release 11.5 AUG-2-13
2—Defining and Scheduling Automation Tasks Automation User Guide for IT Sentinel
End of Procedure 2-4
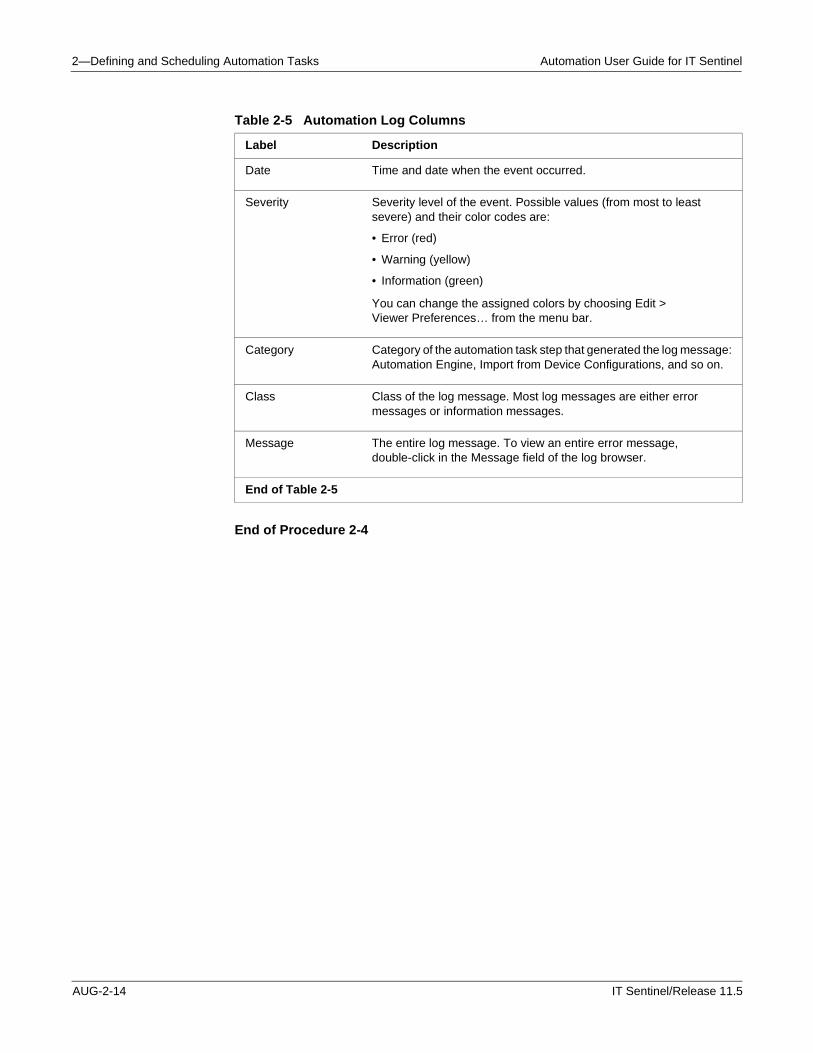
Table 2-5 Automation Log Columns
Label Description
Date Time and date when the event occurred.
Severity Severity level of the event. Possible values (from most to least severe) and their color codes are:
• Error (red)
• Warning (yellow)
• Information (green)
You can change the assigned colors by choosing Edit > Viewer Preferences… from the menu bar.
Category Category of the automation task step that generated the log message: Automation Engine, Import from Device Configurations, and so on.
Class Class of the log message. Most log messages are either error messages or information messages.
Message The entire log message. To view an entire error message, double-click in the Message field of the log browser.
End of Table 2-5
AUG-2-14 IT Sentinel/Release 11.5
Automation User Guide for IT Sentinel 2—Defining and Scheduling Automation Tasks
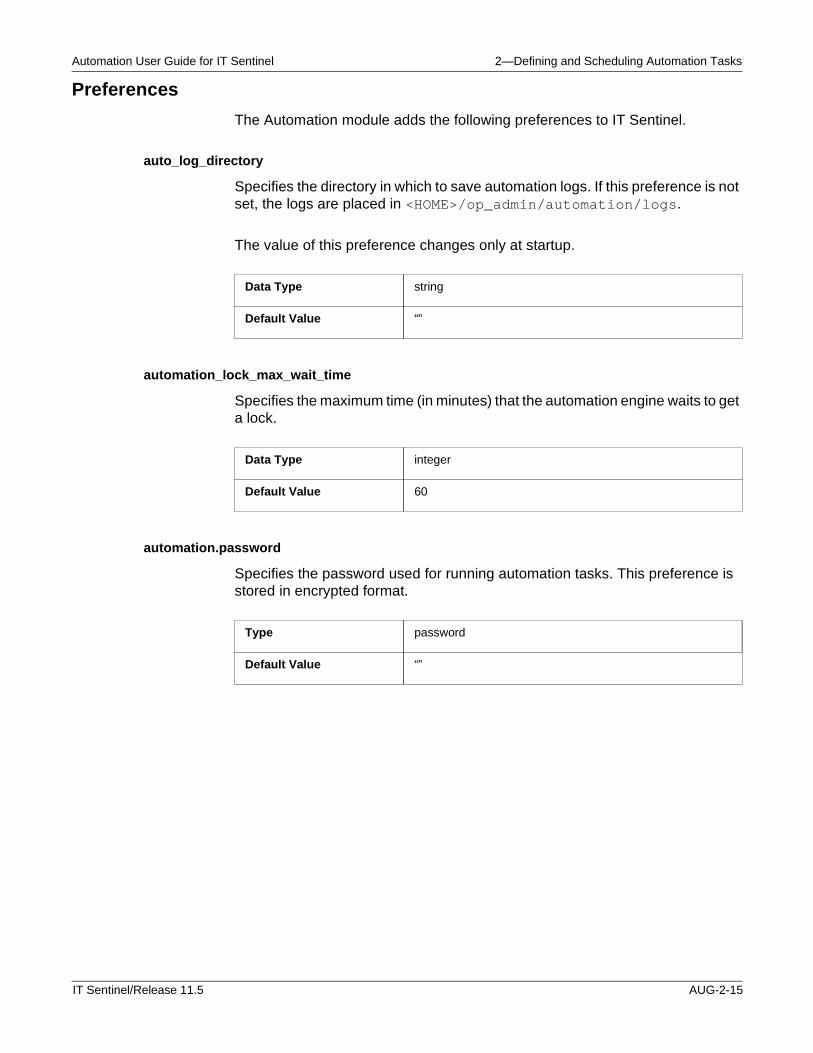
Preferences
The Automation module adds the following preferences to IT Sentinel.
auto_log_directory
Specifies the directory in which to save automation logs. If this preference is not set, the logs are placed in <HOME>/op_admin/automation/logs.
The value of this preference changes only at startup.
automation_lock_max_wait_time
Specifies the maximum time (in minutes) that the automation engine waits to get a lock.
automation.password
Specifies the password used for running automation tasks. This preference is stored in encrypted format.
Data Type string
Default Value “”
Data Type integer
Default Value 60
Type password
Default Value “”
IT Sentinel/Release 11.5 AUG-2-15

2—Defining and Scheduling Automation Tasks Automation User Guide for IT Sentinel
AUG-2-16 IT Sentinel/Release 11.5
Automation User Guide for IT Sentinel Index
Index
A auto_log_directory preference, AUG-2-15 automation log, AUG-2-13
viewing, AUG-2-13 Automation Log Manager dialog box, AUG-2-13 Automation Settings File menu (Automation Task Details
dialog box), AUG-2-5 automation task
defining procedure description, AUG-2-5
description, AUG-1-1 login requirements for running a task, AUG-2-6 scheduling, AUG-2-12
procedure description, AUG-2-5 workflow for creating, AUG-1-1
Automation Task Details dialog box, AUG-2-8 options, AUG-2-9 output scenarios, AUG-2-10 source scenarios, AUG-2-10 Task Steps table, AUG-2-9
Automation Task Manager dialog box, AUG-2-6 automation task step
creating general workflow, AUG-2-1 operations with automation support (list), AUG-2-3 procedure, AUG-2-2 workflow, AUG-1-1
definition, AUG-2-1 automation.password preference, AUG-2-15 automation_lock_max_wait_time preference, AUG-2-15
E Editing Schedule dialog box, AUG-2-12
error message viewing, AUG-2-13
exiting OPNET abnormally effects on open projects, AUG-2-11
G gear (Save Settings for Automation) button, AUG-2-2 Generate Unique Scenario Name option, AUG-2-11
L log
viewing, AUG-2-13
O output scenarios, AUG-2-10
and Network Difference reports, AUG-2-11
P preferences
automation, AUG-2-15 project locking and unlocking, AUG-2-11
S source scenarios, AUG-2-10
T Task Step Type column (Automation Task Details dialog box),
AUG-2-5 Task Steps table (Automation Task Details dialog box),
AUG-2-5, AUG-2-9
IT Sentinel/Release 11.5 AUG-IX-1

T Automation User Guide for IT Sentinel
AUG-IX-2 IT Sentinel/Release 11.5