Embed Size (px)
Citation preview

1
Center for Instruction and Technology Last Updated: 07/15//2015
CIT Training – Photoshop Elements 12 Basics [Basic Editing and Prepare Images for the Web]
Learning Objectives
• Familiarize with the interface and learn basic tools in Photoshop Elements • Learn to use edit images in different modes • Learn to prep images for web use
Topics to be covered
• Photoshop Element’s Interface • Open, create and save files • Quick, Guided, and Expert Editing • Output for print and Image Optimization for web • Tools: Crop, Marquee, Move, Red Eye, Sharpen, Blur, Smudge, Sponge, Dodge, Burn, Cookie
Cutter, Straighten, Healing Brush, Hand, Zoom, Recompose, Photo Merge • Photo Effects, Photo Play • Share projects on Facebook and private web album; or create a photo book or a greeting card

2
Center for Instruction and Technology Last Updated: 07/15//2015
Full Edit Workspace / Full Edit Toolbar
Catalog is a database where small copies of your photos are stored referencing to the folder in your hard drive. It’s better to keep one single Catalog. The default is ‘My catalog’.
Slideshow is just temporary displaying photos with music.

3
Center for Instruction and Technology Last Updated: 07/15//2015
The Organizer Workspace
The Editor Workspace with Different Edit Modes
Quick, Guided and Expert Modes
Taskbar

4
Center for Instruction and Technology Last Updated: 07/15//2015
GETTING STARTED
Importing Photos from Digital Camera or Card Reader
1. Connect your camera or card reader to your computer, if the Photo Downloader dialog box appears automatically, select the name of your devise from the device list.
2. If the Photo Downloader dialog box does not open automatically, choose File > Get Photos and Videos > From Camera or Card Reader.
3. Choose a location for the files, and choose Today’s Date (yyyy mm dd) as folder name format from the menu.
4. Choose Do Not Rename Files for Rename Files Option 5. Choose After Copying, Do Not Delete Originals for Delete Options. 6. Click the Advanced Dialog button. Unselect images are not imported. 7. You can rotate your images at this point as needed. 8. When you are done with all the options, click Get Media.
Getting Photos from Files and Folders
1. In the Organizer, choose File > Get Photos and Videos > From Files and Folders. 2. Navigate to the folder and click once to select the photo that you want. 3. Click the Get Media button.
View Photos as Slide Show
1. Select multiple images. 2. Click Slide Show to start the show in full screen.
Tag people in a single photo
1. Click the Media tab, and double-click a photo. 2. Click Mark Face. 3. Adjust the frame if required. Type the name of the person in the Who is this? box and
click the Confirm button.
Tag people in a set of photos
1. Click the Media tab, and select multiple photos. 2. Click Add People.
Tags/Info are for searching purpose, view tags and metadata. You can create and add new keywords, people, places, events and image tags to each of your photos. Once you have tagged your images, you can quickly use the People, Places, or Events tab to find them.

5
Center for Instruction and Technology Last Updated: 07/15//2015
Photo Fix Options in Organizer Click Instant Fix to open up Photo Fix Options to allow one-click fix to your photo – Crop, Contrast, Red Eye, Color, Sharpen, Levels, Smart Fix.

6
Center for Instruction and Technology Last Updated: 07/15//2015
Create New Album In your organizer, create albums for different grouping of photo sets, which may locate in different folders. Albums are virtual reference of photos you want to gather from different photos in your computer. Adding photos to an abum creates a link to them without moving them from the original folder. If you have many albums, you can even group the albums in album categories. For example, you can create albums to store photos of your different trips and store all of these albums in an album category called Travel.
1. Click on the + sign next to Album and choose Create new album. 2. Enter a name for your new album. 3. Drag and drop images from different folder into the album. 4. Choose Sort by Album Order to allow reordering of your images.
Photo Fix Options in Organizer Workspace If the photos you have imported in Elements Organizer need minor corrections or touch-ups, you can use the Photo Fix Options in the Organizer workspace.
• Edited version has a little icon on top right; and version set is automatically created in Instant Fix only. Click on the arrow to expand/collapse version set.
• Instant Fix effects are cumulative. You can continue adding other effects, but Undo immediately if you change your mind before you try another effect.
• Reset at anytime you are not satisfied with the result. You can also do Edit > Revert.

7
Center for Instruction and Technology Last Updated: 07/15//2015
CREATE AND SHARE PROJECTS
THREE PHOTO EDITING MODES There are three different modes for editing in Photoshop Elements: Quick, Guided, and Expert Photo Edit. In the Organizer, click the Editor button in the taskbar, and choose Photo Editor to open up the Photoshop Elements Editor workspace in a new browser window.

8
Center for Instruction and Technology Last Updated: 07/15//2015
Quick Edit
Guided Edit
Expert Edit

9
Center for Instruction and Technology Last Updated: 07/15//2015
I. QUICK PHOTO EDITING
Smart Fix corrects overall color and lighting in your images.
1. Click the Auto button. 2. You can further move the Amount slider to change adjustments of the image.
Other fixes include Exposure, Levels, Color, Balance, and Sharpen.
IMPORTANT:
Instant Fix effects are cumulative. You can continue adding other effects, but Undo immediately if you change your mind before you try another effect.
If you switch to the Organizer workspace, you’ll see a lock symbol over the thumbnail of the opened file. The file cannot be changed in the Organizer workspace until it is closed in the Editor workspace. Choose View: Before and Afer – Horizontal to compare images.
II. GUIDED PHOTO EDITING Guided Edit workspace is where you can apply creative effects to your image.
Definitions Hue – Color of Colors; color reflected from or through an object. Saturation – Purity or strength of a color. More saturation will result in higher vividness. Tint – Variation of a color produced by adding white, thus increased lightness and lower saturation.
Photo bin

10
Center for Instruction and Technology Last Updated: 07/15//2015
There are 3(4) categories – Touchups, Photo Effects, Photo Play, and Camera Effects (PSE13 only). There are step-by-step instructions for editing, and each with a variation of presets. You can get a live view on each preset in the document window.
Quick Fix or Guided Fix: Removing Color Cast (use ‘goat.jpg’ )
1. Select an image to edit. 2. Choose the Quick Edit > Smart Fix > choose Preset > adjust slider. 3. Or, choose Guided Photo Edit > choose Touchups > Remove Color Cast. 4. Select Before and After – Horizontal near the bottom of the Guided Edit panel as display mode. 5. Click the Reset button to revert or Done/ Cancel.
Adjust Lighting (use ‘prom2.jpg’)
1. Select an image to edit. 2. Choose Guided Photo Edit > Touchups > Lighten and Darken. 3. Click the Auto Fix button under Lighten or Darken a Photo. 4. Or use the slider for Shadows, Highlights and Midtone to adjust the image. 5. Click Done when you are finished.
Correct Skin Tone (use ‘farmboy.jpg’)
1. Select an image to edit. 2. Choose Guided Photo Edit > choose Touchups > Correct Skin Tone. 3. Use the Skin Tone Eyedropper Tool to correct skin tone. 4. Use the slider for to adjust Tan, Blush and Light as desired. 5. Click Done when you are finished.
Crop Photo (use ‘bwmen.jpg’)
1. Select an image to edit.
11
Center for Instruction and Technology Last Updated: 07/15//2015
2. Choose Guided Photo Edit > Crop Photo. 3. Adjust the handles by pulling in or out as desired. 4. Click Done when you are finished.
Scratches and Blemishes Photo (use ‘heal.jpg’)
1. Select an image to edit. 2. Choose Guided Photo Edit > Scratches and Blemishes. 3. Click Done when you are finished.
Recompose (use ‘bwmen.jpg’)
This tool allows you to resize photos without changing important visual content.
1. Select an image to edit. 2. Choose Guided Photo Edit > Recompose. 3. Choose a brush size and choose Protect. 4. Paint on elements that you wish to protect. 5. Drag the handlers on the side or corners to recompose your photo.
Save File To save, choose File > Save As > choose Version Set, Include in Organizer options before Save. That will take you back to the Organizer.
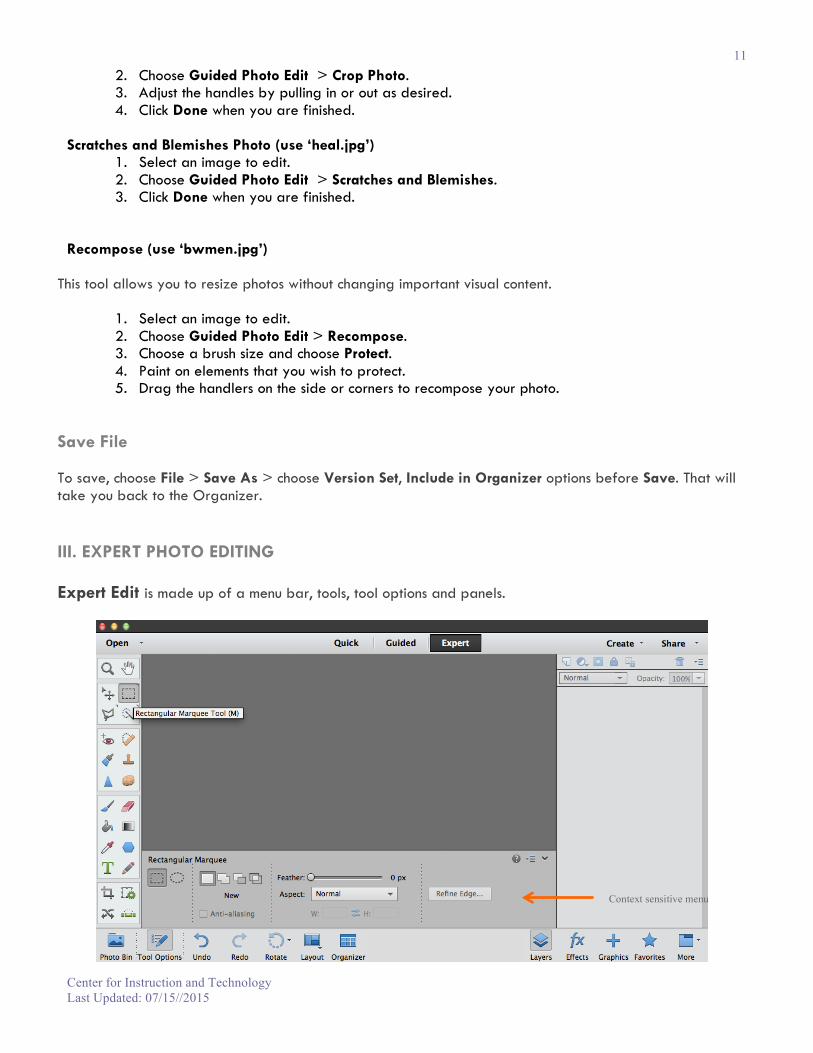
III. EXPERT PHOTO EDITING Expert Edit is made up of a menu bar, tools, tool options and panels.
Context sensitive menu

12
Center for Instruction and Technology Last Updated: 07/15//2015
Create a Panoramic Image
1. Click the Expert tab. 2. Select Enhance > Photomerge > Photomerge Panorama. 3. Click Browse and open the files you want to stitch together. Click OK. 4. To allow Photoshop Elements to fill the edges, click Yes. 5. Click OK.
Use Quick Selection Tool to Make Selections
Use the Quick Selection tool to let Photoshop Elements automatically make a selection based on color and texture when you click or click-drag an area. • To use the Quick Selection tool, click the tool and and click-drag the area you want to select.
Crop Tool
1. Select the Crop tool from the toolbar. 2. Click and drag to define cropping area. (You can further define the cropped area by
dragging on the handlers.)
3. When you are done, click the Commit icon to accept the changes. Rectangular & Elliptical Marquee Tool These are 2 selection tools we can use to select pixels and make changes.
1. Select the Marquee Tool. 2. Click and drag your cursor over your image. 3. Deselect by Ctrl+D.
Feathering This tool softens the edge of a selection. Choose a value for feathering to apply it. Move Tool To move selected pixels to a new document, do the followings:
1. First create a new file. 2. Use the Marquee tool to select part of your image. 3. Select the Move tool. Press Alt (Windows) or Option (Mac OS) while dragging lets you move a
copy of the selection onto the new file. Copying Selection
1. First use the Marquee tool to select part of your image 2. Choose Edit > Copy or (Ctrl/Command-C) 3. Create a new file. Use default. 4. Edit > Paste or Ctrl/Command-V to paste pixels into new document
Zoom Tool • Zoom in – select the zoom in tool on the option bar, and click inside the image. • Zoom out – select the zoom in tool on the option bar, and click inside the image. • Double-click the zoom tool to return to 100%.
Hand Tool • Drag over image to view hidden areas of a large image.

13
Center for Instruction and Technology Last Updated: 07/15//2015
Foreground and background Color
• Click the switch icon top swap your foreground and background color. • Click the bottom left icon to change the colors back to their default.
Rectangle Tool
1. Select the Rectangle tool. 2. Drag in your image to draw the rectangle.
Rounded Rectangle Tool
1. Select the Rounded Rectangle tool. 2. Enter a value in the Radius text box in the options bar to determine the radius of the curved
corners of the rounded rectangle. 3. Drag in your image to draw the rounded rectangle.
Ellipse Tool
1. Select the Ellipse tool. 2. Drag in your image to draw the ellipse.
Polygonal Tool
1. Select the Polygonal tool. 2. In the options bar, enter the number of sides in your polygon in the Sides text box. 3. Drag in your image to draw the polygon.
Line Tool
1. Select the Line tool. 2. In the options bar, enter a pixel width for the line in the Weight text box. 3. Drag in your image to draw the line.
Custom Shape Tool
1. Select the Custom Shape tool. 2. In the options bar, select a shape from the Shape pop-up palette. 3. Drag in your image to draw the shape.
Cookie Cutter Tool (girl.jpg) This tool crops a photo into fun shapes that you choose. Spot Healing Brush Tool (heal.jpg) This tool quickly removes blemishes and other imperfections. Straightening Tool (straighten.psd) This tool straightens and crops a slanted image. Sharpen and Blur Tools
Sharpen - to increase clarity by sharpening soft edges of the image. Blur - to soften hard edges and
Smudge Tool This tool picks up color where the stroke begins and pushes it in the direction you drag.

14
Center for Instruction and Technology Last Updated: 07/15//2015
Sponge Tool This tool changes the saturation of an image. Dodge and Burn Tools This tool corrects images where there’s only a certain area that is too light or too dark.
Dodge - Lightens up areas. Burn - Darkens areas.
Rotate and Flipping Images • Choose Image > Rotate.
Transform Images
• Choose Image > Transform
Free transformation – change size and rotate marquee Skew – change shape by moving the sides Distort – pull corners out and in to alter shape Perspective – change shape by pulling in adjacent corners
Content-Aware Move This tool seamlessly fills a selected area of an image with similar image content nearby.
• Choose Lasso tool to make a loose selection around the area you would like to move • Select the Content-aware Move tool and choose Move or Extend (clone)
Text tool
1. Choose the Horizontal Type tool and drag out a box. 2. Type your text. 3. PSE creates a new layer for you.
Create Layer Style for your Text
1. Select a layer in the Layers panel. 2. In the Effects panel, choose Layer Styles from the category menu. 3. Do any one of the following:
• Select a style, and click Apply. • Double-click a style. • Drag a style onto a layer.
RGB Mode RGB model is used by computer monitors to display colors. It is also the default mode for Photoshop images.
• Choose Image > Mode > RGB (16.7 colors on screen) Grayscale Mode
• Choose Image > Mode > Grayscale (256 shades of gray)
Saving Files
Saving Files
1. Choose File > Save. 1
3
2

15
Center for Instruction and Technology Last Updated: 07/15//2015
Saving Files in Other Formats
• Choose File > Export > As New File to export files in other formats such as TIFF, JPG, PSD, PNG along with options for image size, location and custom file names.
Image Size & Resolution
Bitmap graphics divide an image into grids which are individual squares called pixels. When you zoom in on the image, it becomes ‘pixelated’, and you can see the jagged edges. e.g. a photograph Vector graphics describe lines and curves using points and mathematics and they can be viewed and scaled without any loss of details. e.g. fonts on your computer. Image size (or pixel dimension) of an image is a measure of the number of pixels along an image’s width and height. Resolution is the fineness of detail you can see in an image. It is measured in pixels per inch (ppi). The more pixels per inch, the greater the resolution. Generally, the higher the resolution of your image, the better the printed image quality. Acceptable resolution for home printer is 150+dpi; for web is 72dpi; and for professional printing, asks the printer what they want. Resampling involves either throwing away or adding pixels to the image to achieve the desired dimensions or resolution.
Note:
1. Changing the resolution of an image does not affect the number of pixels in it unless you resample the image.
2. DO NOT increase the number of pixels in an image. 3. Always duplicate the original image before edit. Edit the copy. 4. You should always crop your image BEFORE changing resolution.
Changing resolution to web resolution
1. Choose Image > Resize > Image size 2. Uncheck the Resample Image checkbox. 3. Change the resolution to 72dpi. 4. The document size of the image will change,
keeping the same number of pixels. Changing number of pixels of an image
1. Check the Resample Image checkbox. 2. Check the box next to Constrain
Proportions. 3. Under Pixel Dimensions, change the Width
or Height value to the size of your desired web image.
4. Click OK to finish.
5
4
16
Center for Instruction and Technology Last Updated: 07/15//2015
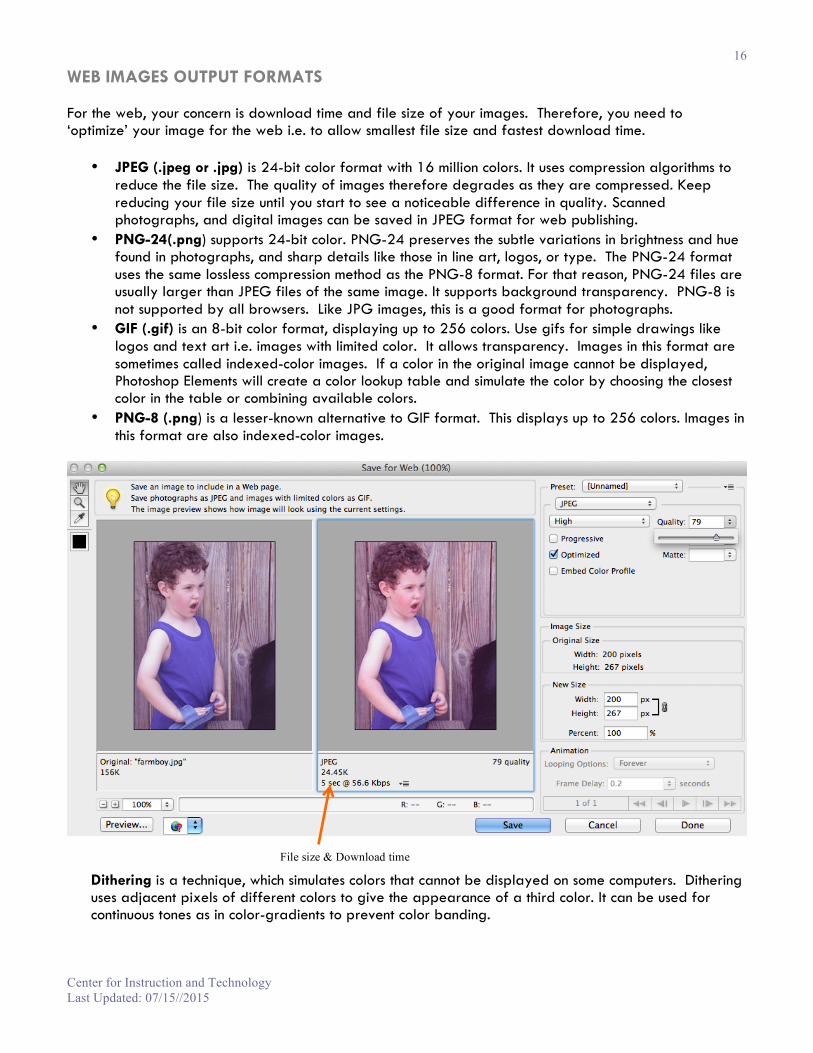
WEB IMAGES OUTPUT FORMATS For the web, your concern is download time and file size of your images. Therefore, you need to ‘optimize’ your image for the web i.e. to allow smallest file size and fastest download time.
• JPEG (.jpeg or .jpg) is 24-bit color format with 16 million colors. It uses compression algorithms to reduce the file size. The quality of images therefore degrades as they are compressed. Keep reducing your file size until you start to see a noticeable difference in quality. Scanned photographs, and digital images can be saved in JPEG format for web publishing.
• PNG-24(.png) supports 24-bit color. PNG-24 preserves the subtle variations in brightness and hue found in photographs, and sharp details like those in line art, logos, or type. The PNG-24 format uses the same lossless compression method as the PNG-8 format. For that reason, PNG-24 files are usually larger than JPEG files of the same image. It supports background transparency. PNG-8 is not supported by all browsers. Like JPG images, this is a good format for photographs.
• GIF (.gif) is an 8-bit color format, displaying up to 256 colors. Use gifs for simple drawings like logos and text art i.e. images with limited color. It allows transparency. Images in this format are sometimes called indexed-color images. If a color in the original image cannot be displayed, Photoshop Elements will create a color lookup table and simulate the color by choosing the closest color in the table or combining available colors.
• PNG-8 (.png) is a lesser-known alternative to GIF format. This displays up to 256 colors. Images in this format are also indexed-color images.
Dithering is a technique, which simulates colors that cannot be displayed on some computers. Dithering uses adjacent pixels of different colors to give the appearance of a third color. It can be used for continuous tones as in color-gradients to prevent color banding.
File size & Download time

17
Center for Instruction and Technology Last Updated: 07/15//2015
Save Your Image for the Web 1. Choose File > Save for Web. 2. Set zoom to 100%. 3. Choose a Preset from the pull-down menu. 4. Adjust Quality if you wish. 5. Compare the download time and file size by looking at the bottom panel of each image of the
Image Preview. 6. Click OK when you are happy with the result. 7. Name and Save your file.
Tips: Saving Transparent GIFs
When you choose to save your image with transparency as GIF, the Transparency checkbox is checked by default. If you don’t check the Transparency box, you will see that your GIF preview will change to a white background. Also, you will see a white ‘halo’ around the image if you check the Transparency box and save. The halo appears because it’s trying to soften the edges against a presumably white background. To correct this, choose the Matte option, and select the color for the matte to be the same color of your Web page background.
SHARING TO FACEBOOK Upload photos on Facebook to share with your friends and family.
1. In the Organizer workspace, select photos and click Share. 2. Select Facebook. 3. If this is the first time you are trying to access Facebook from within Photoshop Elements, authorize
Photoshop Elements to access your Facebook account. Note: If you leave the Download Facebook Friend List option selected, Photoshop Elements downloads the list of friends from your Facebook account.
4. (Optional) If the photos have people tags, select the Upload People Tags In These Photos option.
5. Select an existing album or specify the details of a new album. 6. Specify who can see the photos. 7. Click Upload.
SHARING PRIVATE WEB ALBUM ON ADOBE REVEL
Use Adobe Revel which is an app you can download onto your iPad. You need to setup Mobile Album and share it on the cloud. iPad must have installed the free Adobe Revel app to access the mobile album. Any changes made on the iPad will sync to the computer with a new version set. CREATE PROJECTS Create projects like photo book, photo prints, greetings cards, collage, photo mugs, CD cover and more by choosing the Create tab.

18
Center for Instruction and Technology Last Updated: 07/15//2015
RESOURCES Adobe Online Resources https://helpx.adobe.com/photoshop-elements/topics.html https://helpx.adobe.com/pdf/photoshop-elements_reference.pdf USF Images, Logos and Guidelines http://www.flickr.com/photos/university-of-san-francisco/ http://www.usfca.edu/logo/ http://www.usfca.edu/redesign/styleguide/ http://www.usfca.edu/redesign/styleguide/socialmedia/ Online Tutorials www.lynda.com (access through myUSF) Google Images http://www.google.com (Copyrights must be observed. Please acknowledge image source or email for permission to use.) To save an image, right-click on the image and choose File > Save Picture As on a PC, or Control + Click on the image and choose Save Image As on a Mac. Free and Stock Photos http://www.istockphotos.com http://www.fotolia.com http://www.creativecommons.org http://www.alegriphotos.com/ http://www.freefoto.com/index.jsp http://www.flickr.com/groups/freeuse http://freeimagescollection.com/ http://www.publicdomainpictures.net/ http://4freephotos.com http://www.digitalimagemagazine.com/blog/featured/25-free-stock-photo-sites/ http://monguefile.com