Embed Size (px)
Citation preview
Page 1
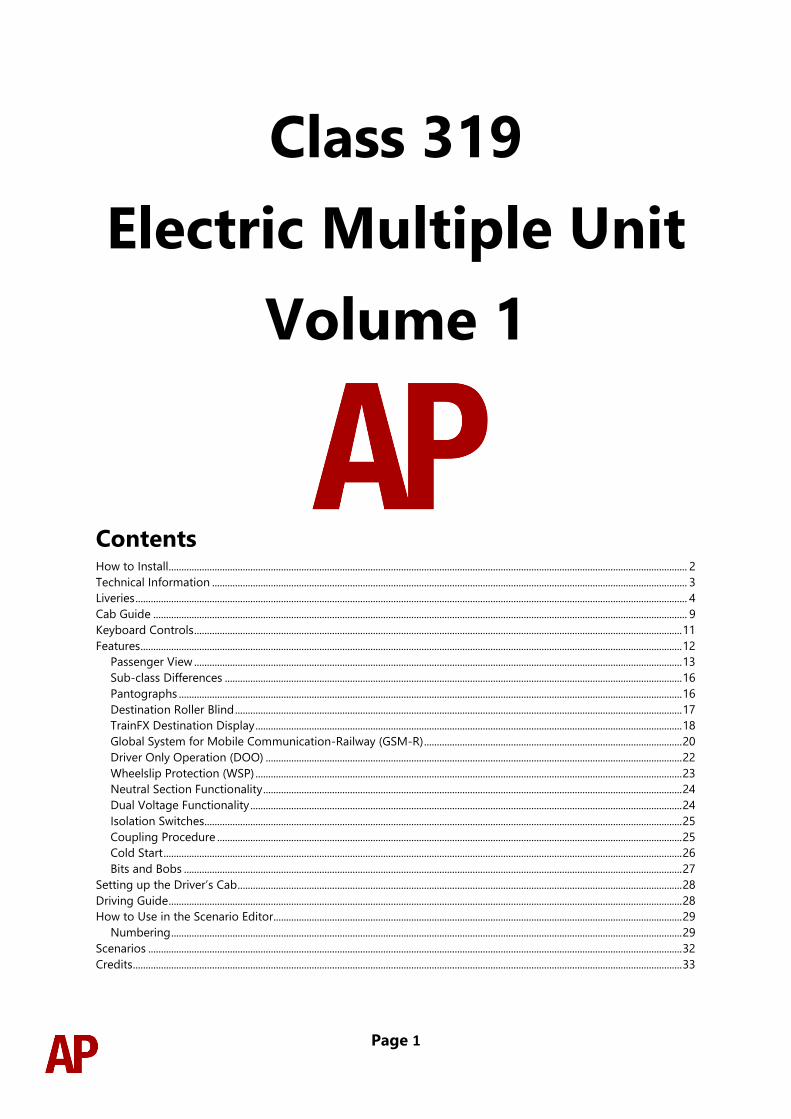
Class 319
Electric Multiple Unit
Volume 1
Contents
How to Install........................................................................................................................................................................................................... 2
Technical Information .......................................................................................................................................................................................... 3
Liveries ........................................................................................................................................................................................................................ 4
Cab Guide ................................................................................................................................................................................................................. 9
Keyboard Controls ............................................................................................................................................................................................... 11
Features .................................................................................................................................................................................................................... 12
Passenger View ............................................................................................................................................................................................... 13
Sub-class Differences ................................................................................................................................................................................... 16
Pantographs ..................................................................................................................................................................................................... 16
Destination Roller Blind ............................................................................................................................................................................... 17
TrainFX Destination Display ....................................................................................................................................................................... 18
Global System for Mobile Communication-Railway (GSM-R) ..................................................................................................... 20
Driver Only Operation (DOO) ................................................................................................................................................................... 22
Wheelslip Protection (WSP) ....................................................................................................................................................................... 23
Neutral Section Functionality .................................................................................................................................................................... 24
Dual Voltage Functionality ......................................................................................................................................................................... 24
Isolation Switches........................................................................................................................................................................................... 25
Coupling Procedure ...................................................................................................................................................................................... 25
Cold Start ........................................................................................................................................................................................................... 26
Bits and Bobs ................................................................................................................................................................................................... 27
Setting up the Driver’s Cab .............................................................................................................................................................................. 28
Driving Guide ......................................................................................................................................................................................................... 28
How to Use in the Scenario Editor................................................................................................................................................................ 29
Numbering ........................................................................................................................................................................................................ 29
Scenarios ................................................................................................................................................................................................................. 32
Credits ....................................................................................................................................................................................................................... 33
Page 2
How to Install
1) Locate where you have downloaded this pack and unzip it. Information on
how to do this can be found here.
2) Go to the location where you have extracted the files from the .zip file.
3) Now find the .exe file called ‘Class 319 EMU Pack Vol 1’. Double-click this file.
4) Follow the steps and by the end of the process, the main part of this pack will
have installed.
5) If you intend to use any of the included scenarios, make sure you have the
freely available extra stock pack and relevant payware add-on packs listed on
the product page installed so the scenarios function as intended.
Page 3
Technical Information
Manufacturer British Rail Engineering Limited (BREL) York
Years built 1987 - 1990
Number built 86 (319001 - 319060) (319161 - 319186)
Traction motors 4 x GEC G315BZ
Maximum speed 100 mph (161 km/h)
Coupling type Tightlock
Length 19.83m (DTCO / DTSO), 19.93m (MSO / TSOL)
Height 3.58 m
Width 2.82 m
Weight 140.3 t
Page 4
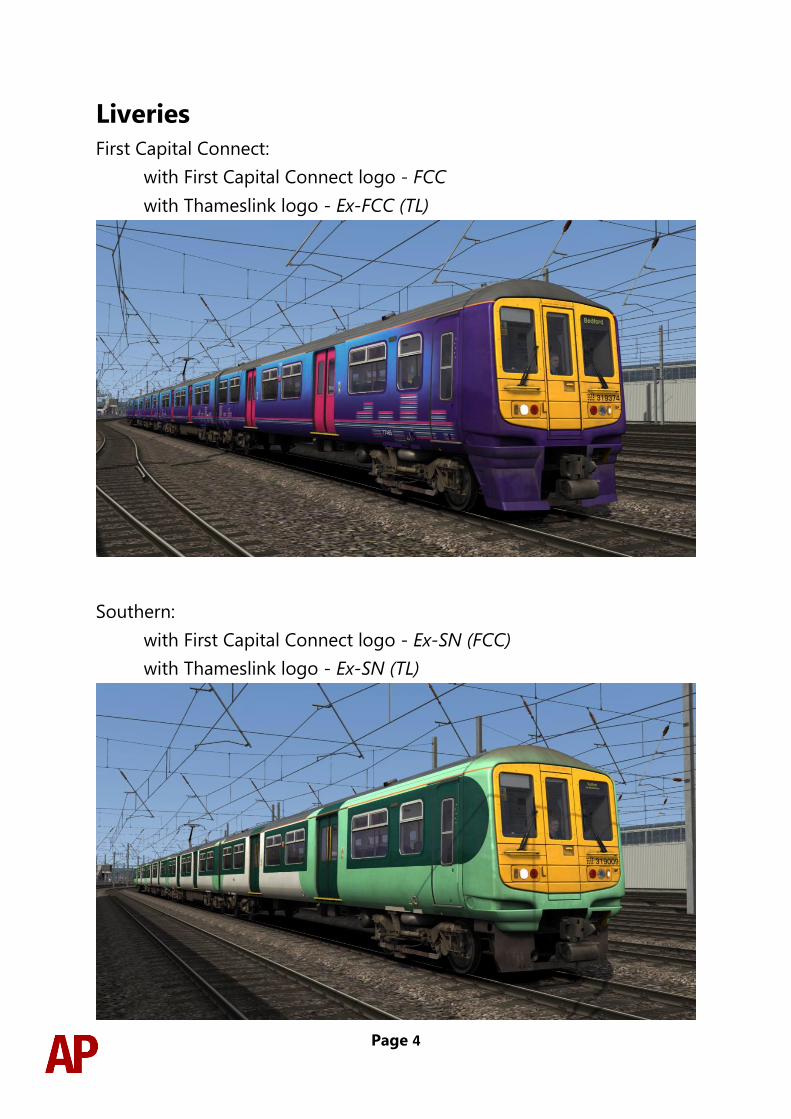
Liveries
First Capital Connect:
with First Capital Connect logo - FCC
with Thameslink logo - Ex-FCC (TL)
Southern:
with First Capital Connect logo - Ex-SN (FCC)
with Thameslink logo - Ex-SN (TL)
Page 5
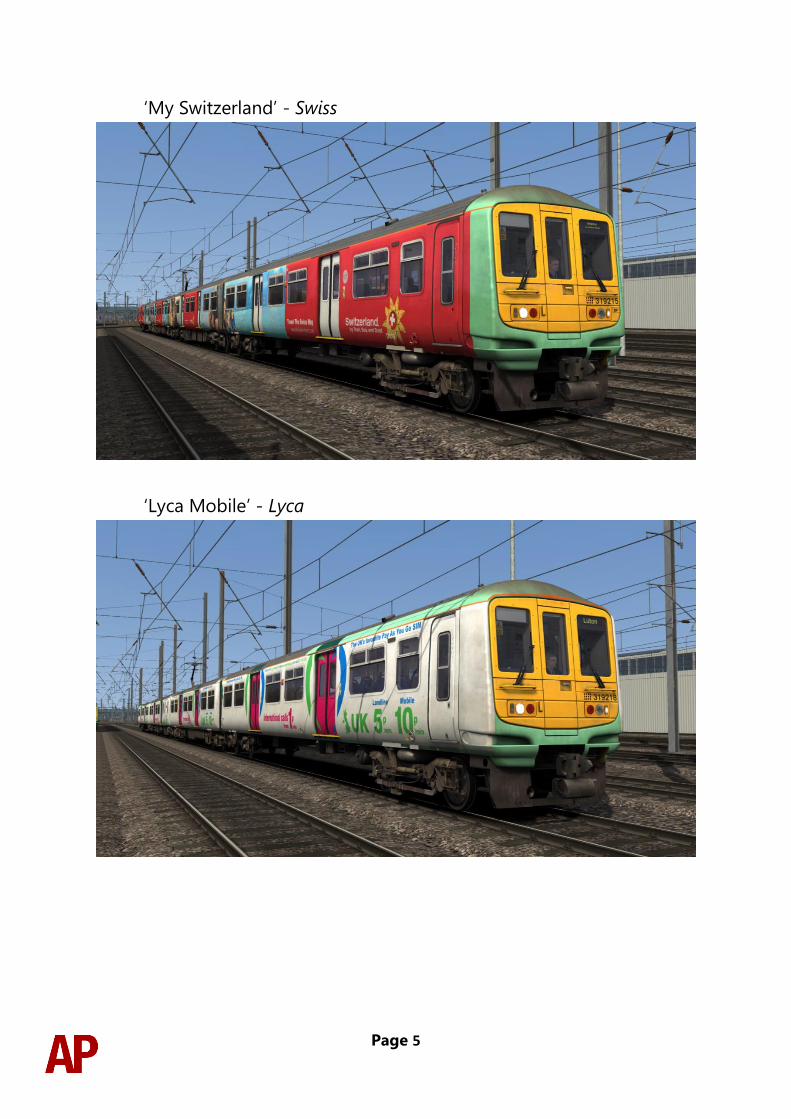
‘My Switzerland’ - Swiss
‘Lyca Mobile’ - Lyca
Page 6
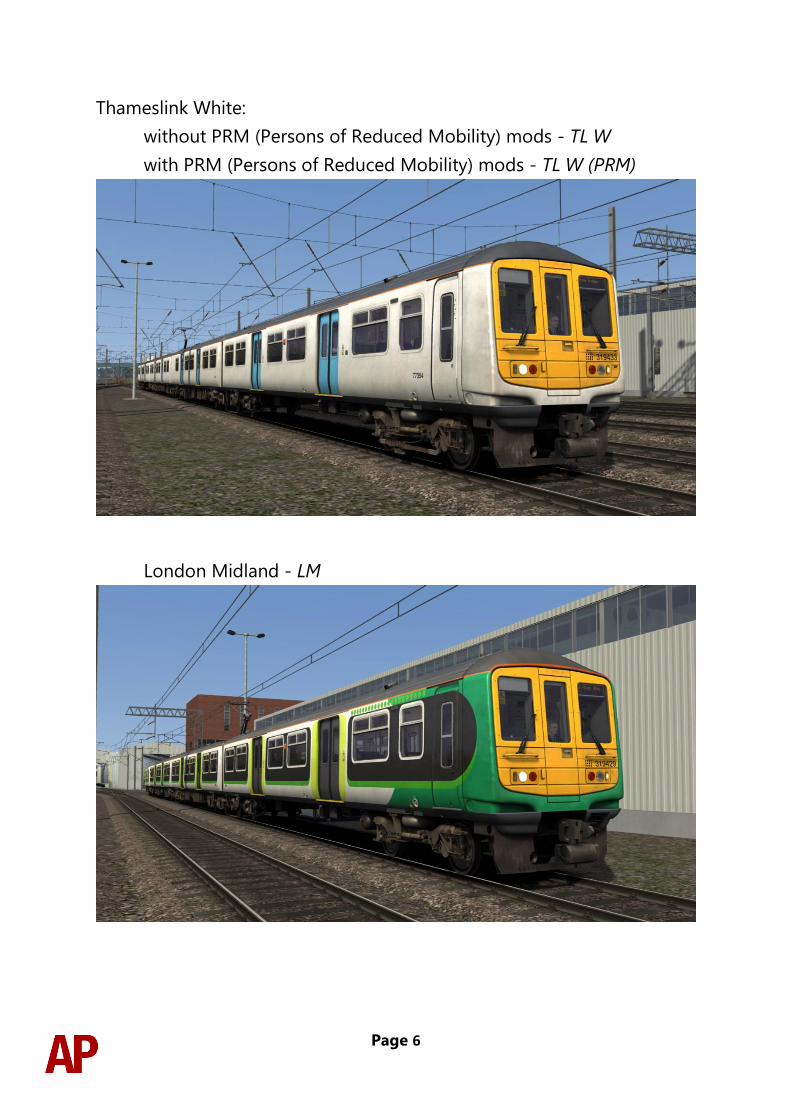
Thameslink White:
without PRM (Persons of Reduced Mobility) mods - TL W
with PRM (Persons of Reduced Mobility) mods - TL W (PRM)
London Midland - LM
Page 7
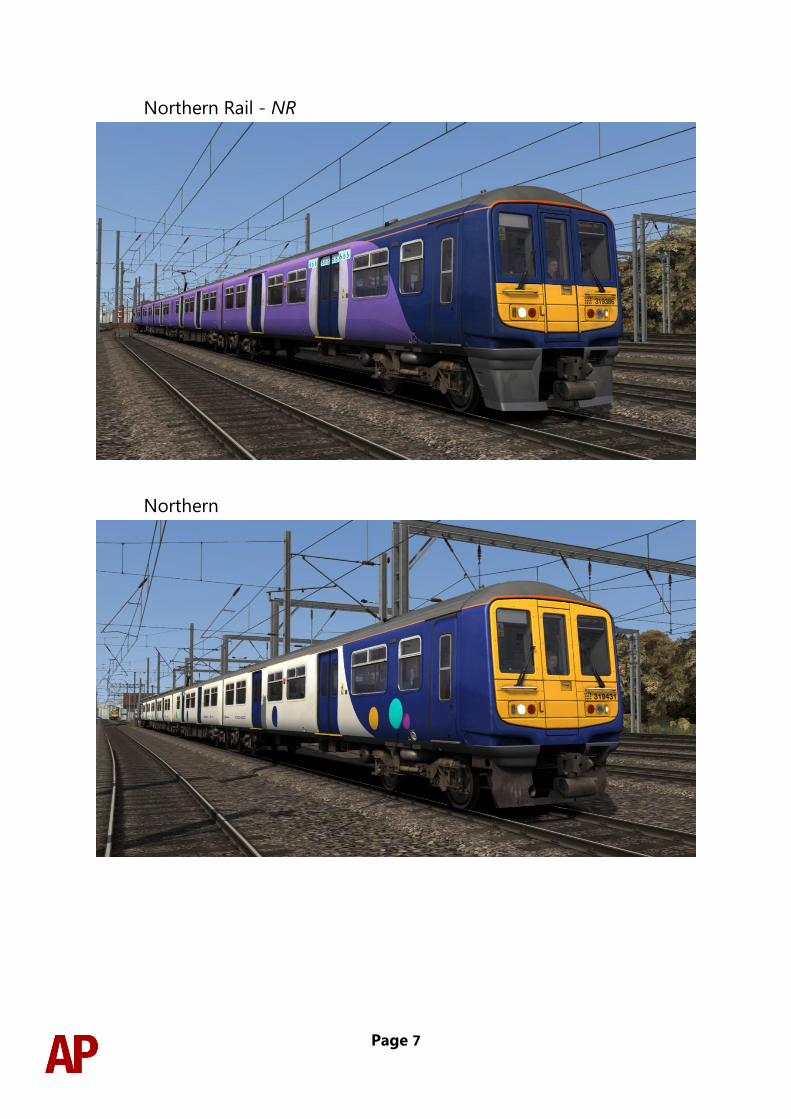
Northern Rail - NR
Northern
Page 8
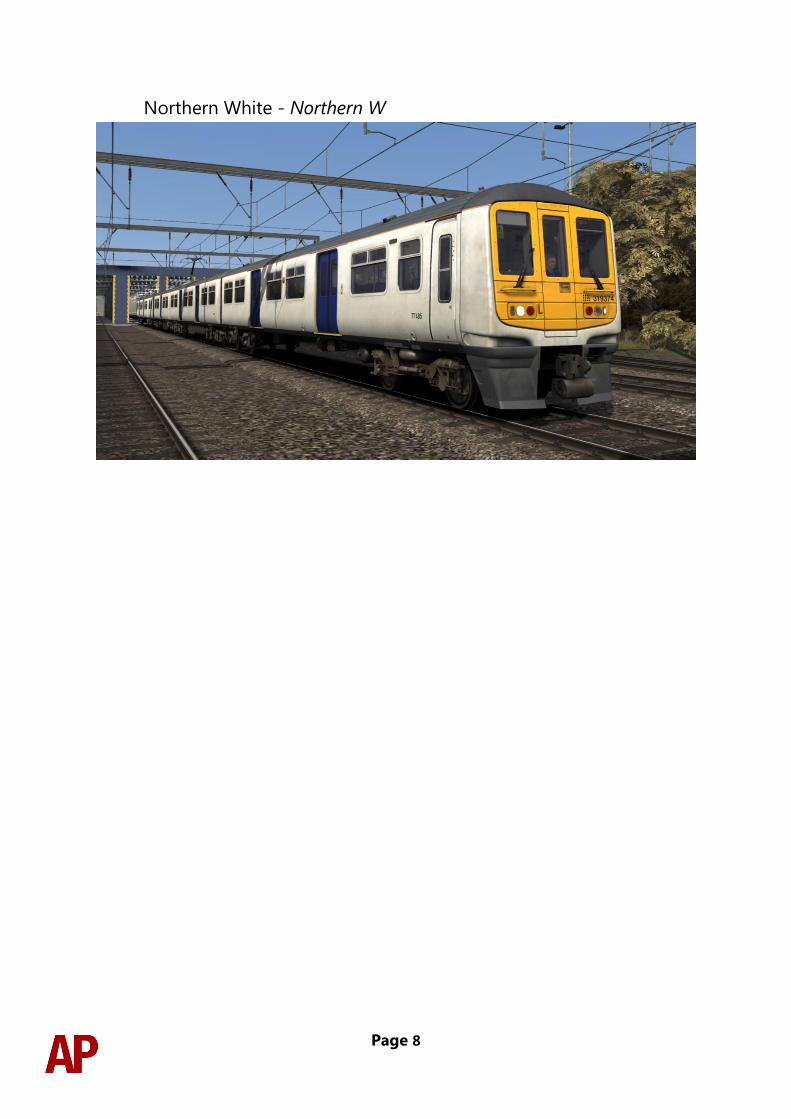
Northern White - Northern W
Page 9
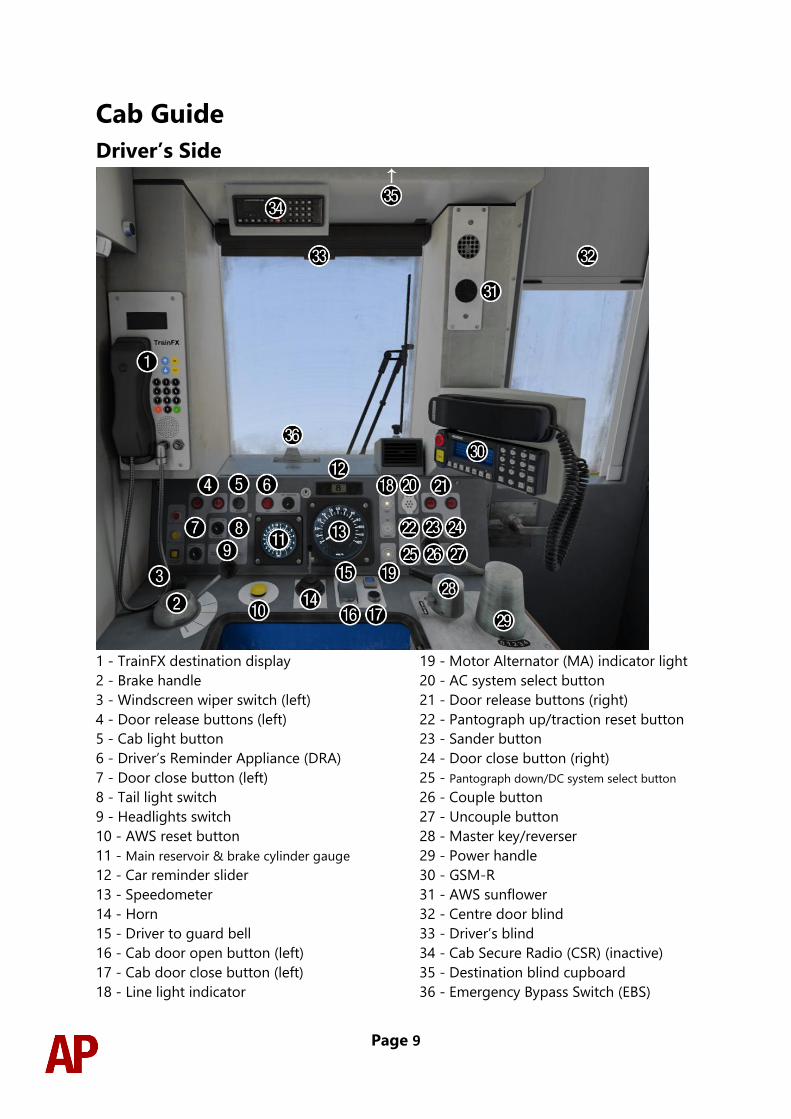
Cab Guide
Driver’s Side
1 - TrainFX destination display
2 - Brake handle
3 - Windscreen wiper switch (left)
4 - Door release buttons (left)
5 - Cab light button
6 - Driver’s Reminder Appliance (DRA)
7 - Door close button (left)
8 - Tail light switch
9 - Headlights switch
10 - AWS reset button
11 - Main reservoir & brake cylinder gauge
12 - Car reminder slider
13 - Speedometer
14 - Horn
15 - Driver to guard bell
16 - Cab door open button (left)
17 - Cab door close button (left)
18 - Line light indicator
19 - Motor Alternator (MA) indicator light
20 - AC system select button
21 - Door release buttons (right)
22 - Pantograph up/traction reset button
23 - Sander button
24 - Door close button (right)
25 - Pantograph down/DC system select button
26 - Couple button
27 - Uncouple button
28 - Master key/reverser
29 - Power handle
30 - GSM-R
31 - AWS sunflower
32 - Centre door blind
33 - Driver’s blind
34 - Cab Secure Radio (CSR) (inactive)
35 - Destination blind cupboard
36 - Emergency Bypass Switch (EBS)
Page 10
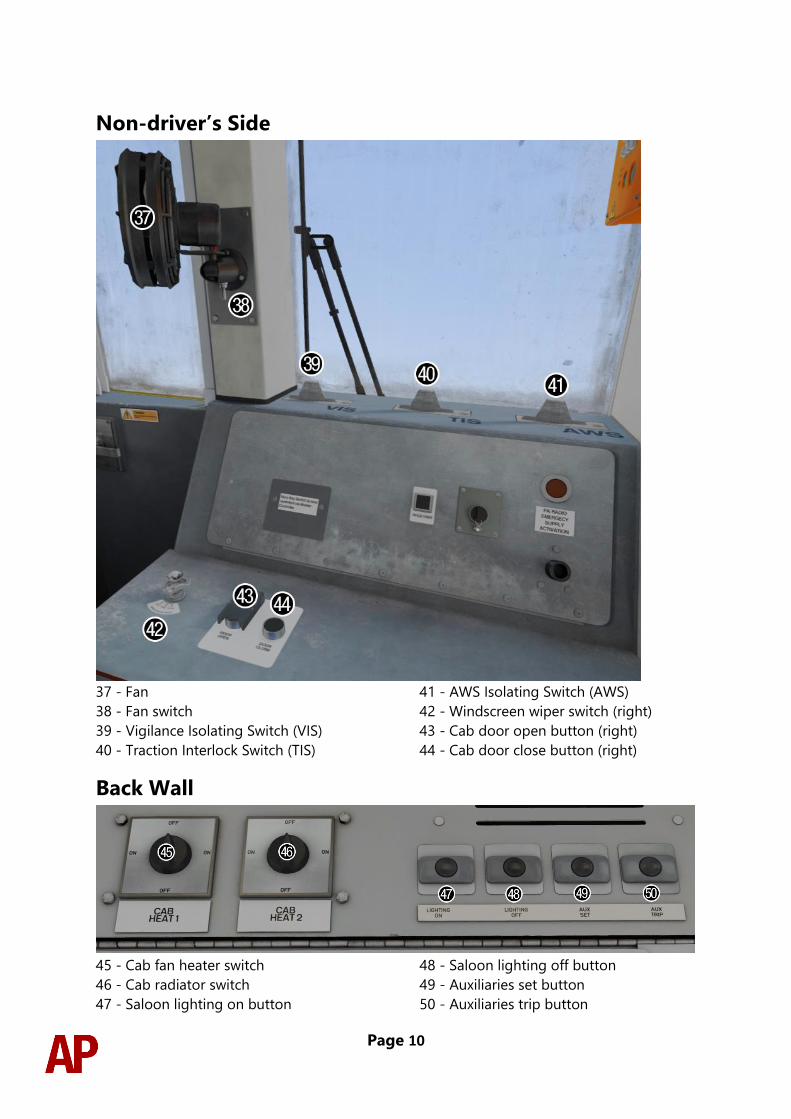
Non-driver’s Side
37 - Fan
38 - Fan switch
39 - Vigilance Isolating Switch (VIS)
40 - Traction Interlock Switch (TIS)
41 - AWS Isolating Switch (AWS)
42 - Windscreen wiper switch (right)
43 - Cab door open button (right)
44 - Cab door close button (right)
Back Wall
45 - Cab fan heater switch
46 - Cab radiator switch
47 - Saloon lighting on button
48 - Saloon lighting off button
49 - Auxiliaries set button
50 - Auxiliaries trip button
Page 11
Keyboard Controls Non-standard keyboard controls are listed below:
Z - Auxiliaries set button
Ctrl+Z - Auxiliaries trip button
L - Cab light button ON/OFF
E - Deadman’s pedal (DVD reset)
R - Door close button
U - Door release buttons (left)
O - Door release buttons (right)
C - Driver to guard bell
Y - Driver reminder appliance (DRA) ON/OFF
Ctrl+D - Driver vigilance device (DVD) ON/OFF
H - Headlight switch CLOCKWISE
Shift+H - Headlight switch ANTI-CLOCKWISE
Space - Horn (low tone)
B - Horn (high tone)
Shift+W - Master key IN/OUT
Shift+P - Pantograph down/DC system select button
P - Pantograph up/traction reset button
Ctrl+R - Passenger door operation toggle DOO/GO
Shift+M - Saloon lighting OFF
M - Saloon lighting ON
K - Tail lights switch ON/OFF
Ctrl+Numpad Enter - Visual aids ON/OFF
Shift+V - Windscreen wiper switch LEFT
V - Windscreen wiper switch RIGHT
Page 12
Features • 9 liveries
• 2 cab variants - ‘Refurbished’ & ‘Northern Refurbished’
• 2 passenger view variants
• Sub-class differences
• 2 pantograph variants
• Nameplates for First Capital Connect, Ex-Southern & Thameslink White
• Detailed internal & external audio
• Accurate acceleration & braking physics
• Destination roller blind
• TrainFX destination display
• Global System for Mobile Communication - Railway (GSM-R)
• Driver only operation (DOO)
• Wheelslip Protection (WSP)
• Neutral section functionality
• Dual voltage functionality
• Isolation switches
• Coupling procedure
• Cold start option
• Opening cab doors
• Automatic unit numbering
• Bits and Bobs
Page 13
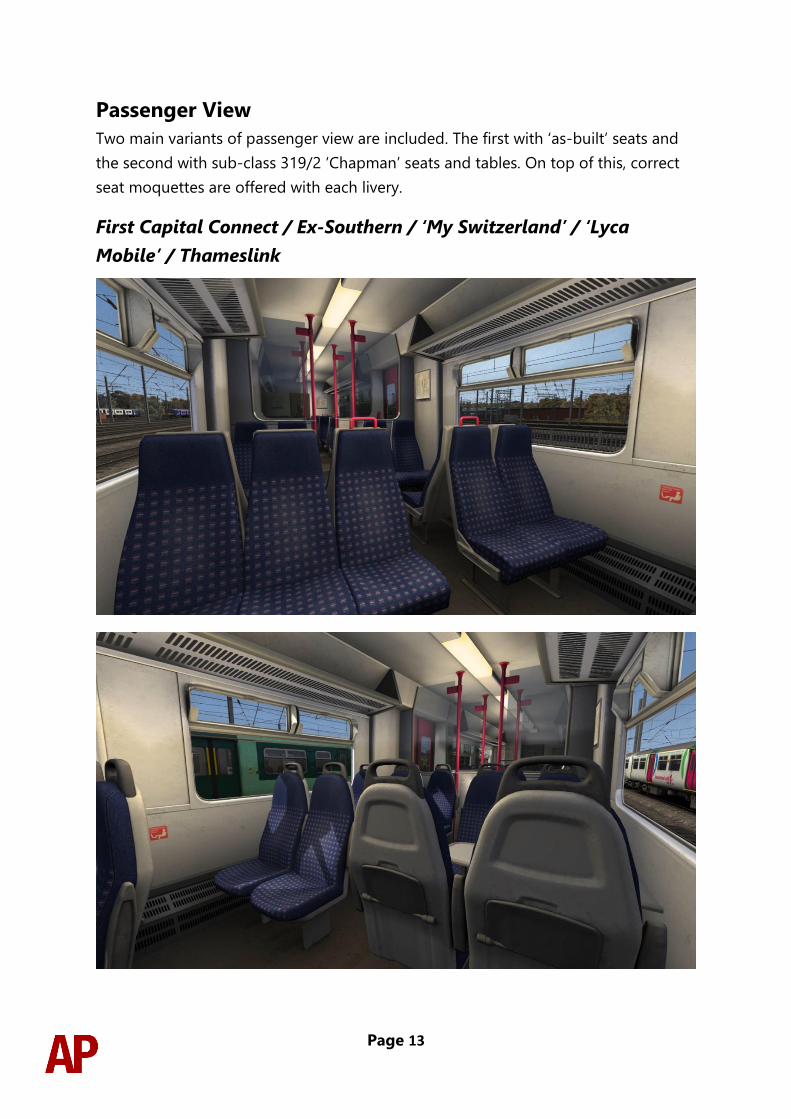
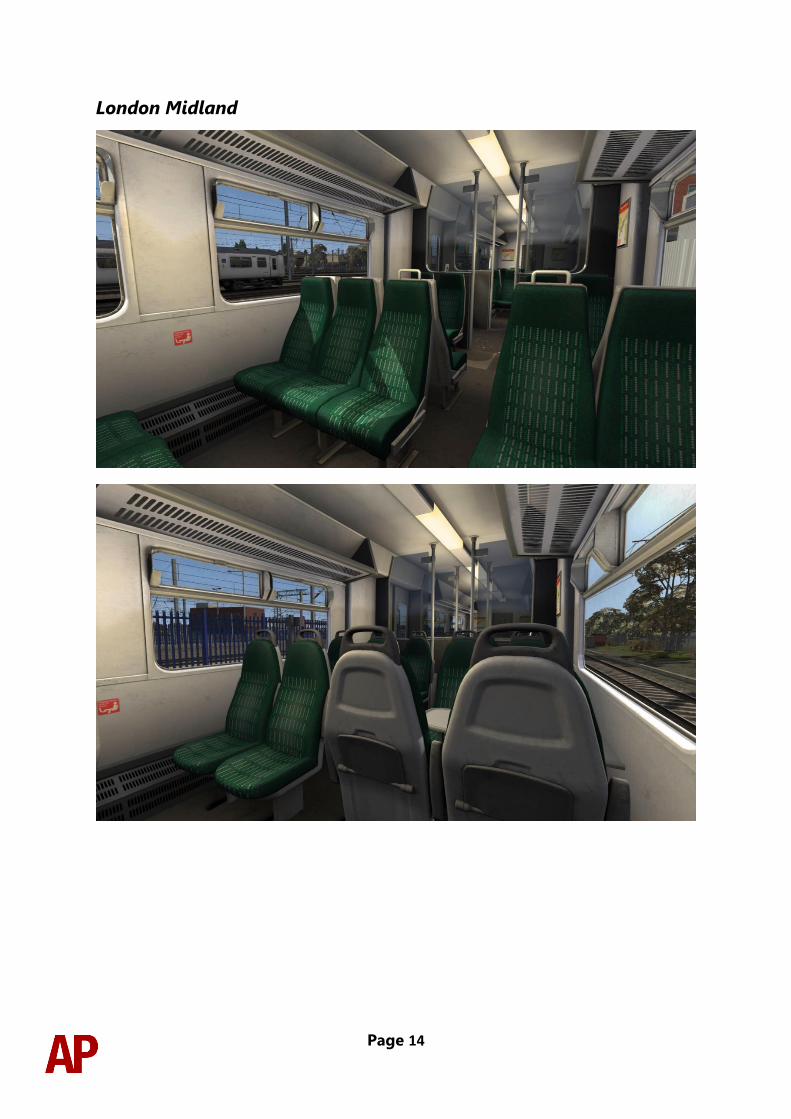
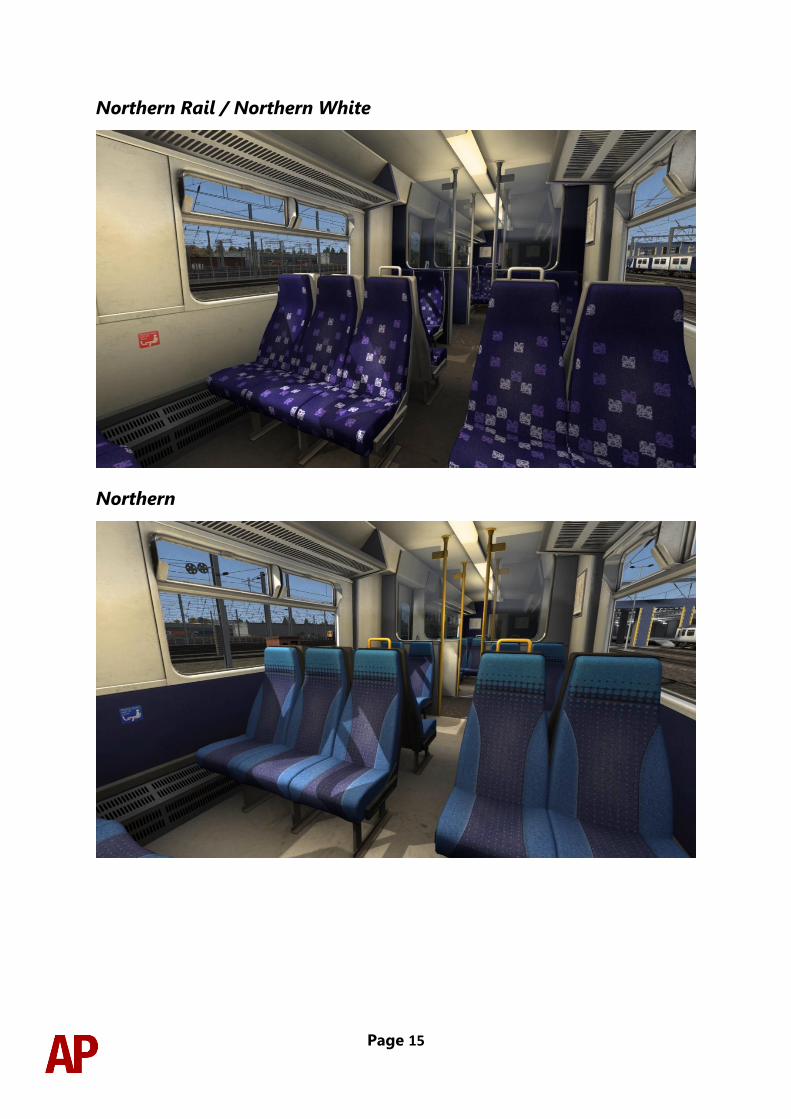
Passenger View
Two main variants of passenger view are included. The first with ‘as-built’ seats and
the second with sub-class 319/2 ‘Chapman’ seats and tables. On top of this, correct
seat moquettes are offered with each livery.
First Capital Connect / Ex-Southern / ‘My Switzerland’ / ‘Lyca
Mobile’ / Thameslink
Page 14
London Midland
Page 15
Northern Rail / Northern White
Northern
Page 16
Sub-class Differences
Many of the differences between each sub-class have been simulated and are
automatically applied depending on the number of the unit. Please see below for the
main characteristics of each sub-class:
Class 319/0
• No first class.
Class 319/2
• Extended first class in the DTCO.
• Additional windows on TSOL for disabled toilet.
• ‘Chapman’ /2 seats and tables.
Class 319/3
• No first class.
• Additional front-end object deflector.
• ‘Ding’ style driver to guard bell compared to the ‘ring’ of other sub-classes.
Class 319/4
• First class.
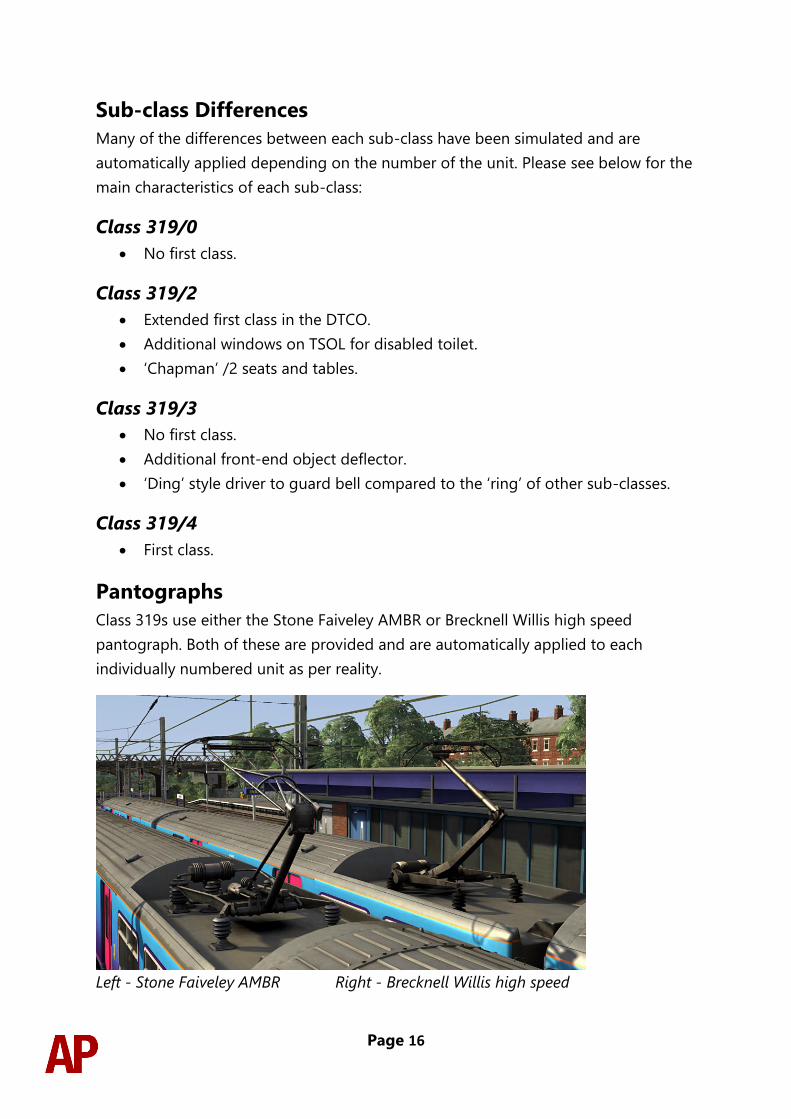
Pantographs
Class 319s use either the Stone Faiveley AMBR or Brecknell Willis high speed
pantograph. Both of these are provided and are automatically applied to each
individually numbered unit as per reality.
Left - Stone Faiveley AMBR Right - Brecknell Willis high speed
Page 17
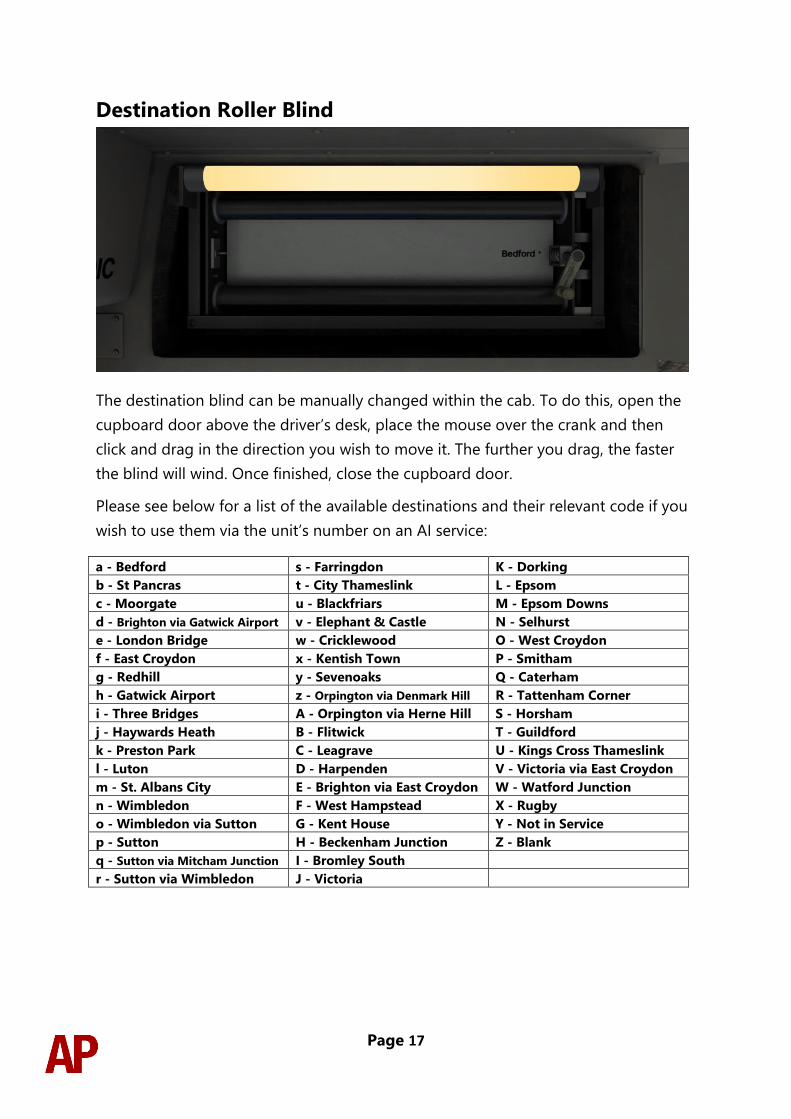
Destination Roller Blind
The destination blind can be manually changed within the cab. To do this, open the
cupboard door above the driver’s desk, place the mouse over the crank and then
click and drag in the direction you wish to move it. The further you drag, the faster
the blind will wind. Once finished, close the cupboard door.
Please see below for a list of the available destinations and their relevant code if you
wish to use them via the unit’s number on an AI service:
a - Bedford s - Farringdon K - Dorking
b - St Pancras t - City Thameslink L - Epsom
c - Moorgate u - Blackfriars M - Epsom Downs
d - Brighton via Gatwick Airport v - Elephant & Castle N - Selhurst
e - London Bridge w - Cricklewood O - West Croydon
f - East Croydon x - Kentish Town P - Smitham
g - Redhill y - Sevenoaks Q - Caterham
h - Gatwick Airport z - Orpington via Denmark Hill R - Tattenham Corner
i - Three Bridges A - Orpington via Herne Hill S - Horsham
j - Haywards Heath B - Flitwick T - Guildford
k - Preston Park C - Leagrave U - Kings Cross Thameslink
l - Luton D - Harpenden V - Victoria via East Croydon
m - St. Albans City E - Brighton via East Croydon W - Watford Junction
n - Wimbledon F - West Hampstead X - Rugby
o - Wimbledon via Sutton G - Kent House Y - Not in Service
p - Sutton H - Beckenham Junction Z - Blank
q - Sutton via Mitcham Junction I - Bromley South
r - Sutton via Wimbledon J - Victoria
Page 18
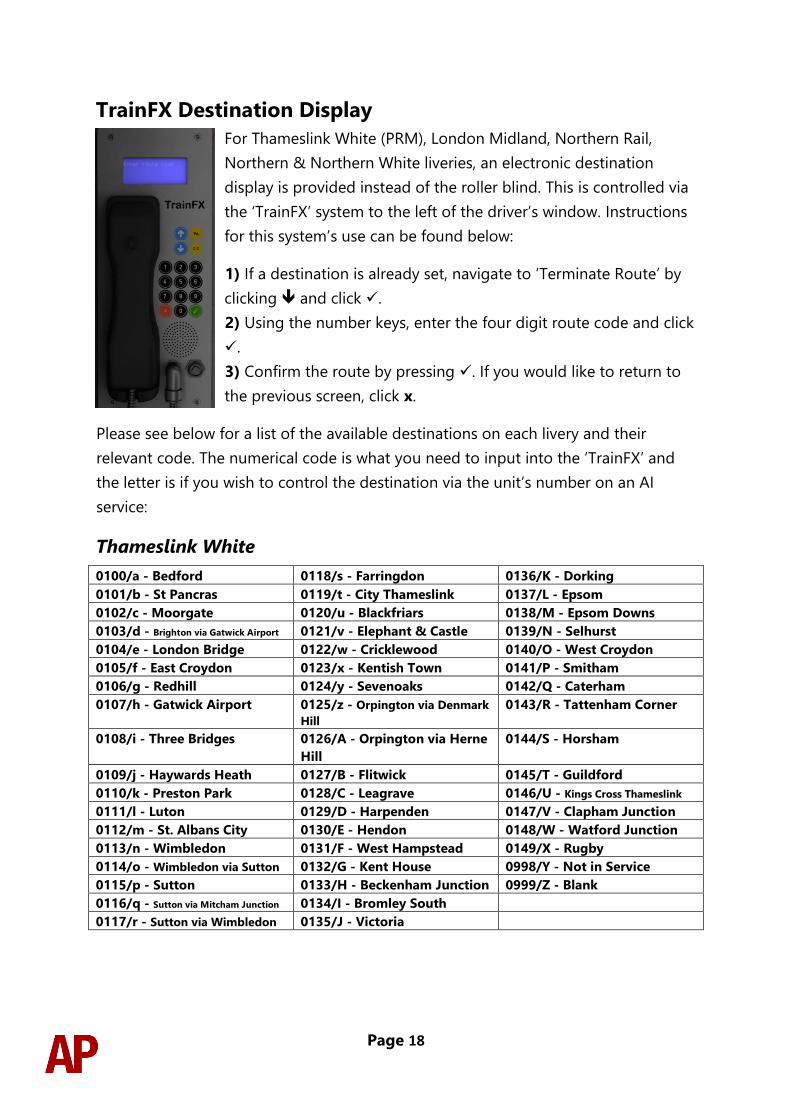
TrainFX Destination Display
For Thameslink White (PRM), London Midland, Northern Rail,
Northern & Northern White liveries, an electronic destination
display is provided instead of the roller blind. This is controlled via
the ‘TrainFX’ system to the left of the driver’s window. Instructions
for this system’s use can be found below:
1) If a destination is already set, navigate to ‘Terminate Route’ by
clicking and click ✓.
2) Using the number keys, enter the four digit route code and click
✓.
3) Confirm the route by pressing ✓. If you would like to return to
the previous screen, click x.
Please see below for a list of the available destinations on each livery and their
relevant code. The numerical code is what you need to input into the ‘TrainFX’ and
the letter is if you wish to control the destination via the unit’s number on an AI
service:
Thameslink White
0100/a - Bedford 0118/s - Farringdon 0136/K - Dorking
0101/b - St Pancras 0119/t - City Thameslink 0137/L - Epsom
0102/c - Moorgate 0120/u - Blackfriars 0138/M - Epsom Downs
0103/d - Brighton via Gatwick Airport 0121/v - Elephant & Castle 0139/N - Selhurst
0104/e - London Bridge 0122/w - Cricklewood 0140/O - West Croydon
0105/f - East Croydon 0123/x - Kentish Town 0141/P - Smitham
0106/g - Redhill 0124/y - Sevenoaks 0142/Q - Caterham
0107/h - Gatwick Airport 0125/z - Orpington via Denmark
Hill
0143/R - Tattenham Corner
0108/i - Three Bridges 0126/A - Orpington via Herne
Hill
0144/S - Horsham
0109/j - Haywards Heath 0127/B - Flitwick 0145/T - Guildford
0110/k - Preston Park 0128/C - Leagrave 0146/U - Kings Cross Thameslink
0111/l - Luton 0129/D - Harpenden 0147/V - Clapham Junction
0112/m - St. Albans City 0130/E - Hendon 0148/W - Watford Junction
0113/n - Wimbledon 0131/F - West Hampstead 0149/X - Rugby
0114/o - Wimbledon via Sutton 0132/G - Kent House 0998/Y - Not in Service
0115/p - Sutton 0133/H - Beckenham Junction 0999/Z - Blank
0116/q - Sutton via Mitcham Junction 0134/I - Bromley South
0117/r - Sutton via Wimbledon 0135/J - Victoria
Page 19
London Midland
0100/a - London Euston 0105/f - Bletchley 0110/k - Birmingham International
0101/b - Wembley Central 0106/g - Milton Keynes Central 0111/l - Birmingham New Street
0102/c - Watford Junction 0107/h - Northampton 0112/m - Special
0103/d - St Albans Abbey 0108/i - Rugby 0113/n - Not in Service
0104/e - Tring 0109/j - Coventry 0114/o - Blank
Northern Rail / Northern / Northern White
0100/a - Blackpool North 0104/e - Manchester Piccadilly 0108/i - Wigan North Western
0101/b - Liverpool Lime Street 0105/f - Manchester Victoria 0109/j - Special
0102/c - Liverpool South Parkway 0106/g - Preston 0110/k - Not in Service
0103/d - Manchester Airport 0107/h - Warrington Bank Quay 0111/l - Blank
Page 20
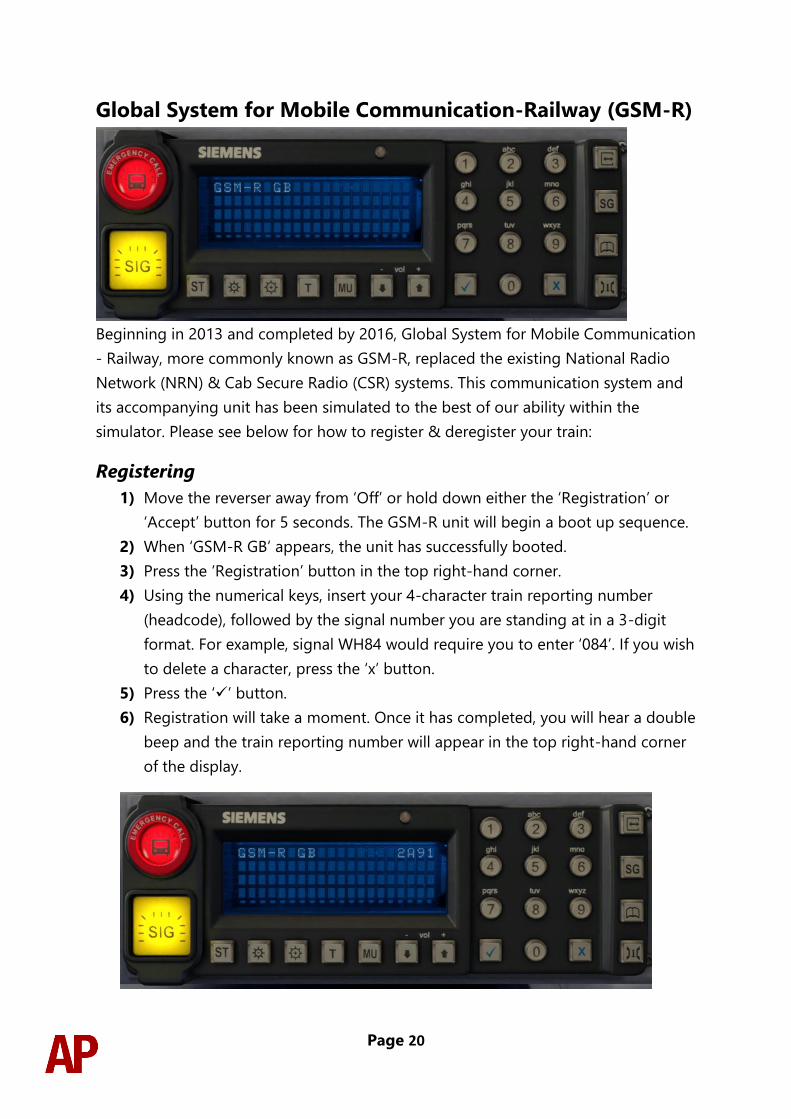
Global System for Mobile Communication-Railway (GSM-R)
Beginning in 2013 and completed by 2016, Global System for Mobile Communication
- Railway, more commonly known as GSM-R, replaced the existing National Radio
Network (NRN) & Cab Secure Radio (CSR) systems. This communication system and
its accompanying unit has been simulated to the best of our ability within the
simulator. Please see below for how to register & deregister your train:
Registering
1) Move the reverser away from ‘Off’ or hold down either the ‘Registration’ or
‘Accept’ button for 5 seconds. The GSM-R unit will begin a boot up sequence.
2) When ‘GSM-R GB’ appears, the unit has successfully booted.
3) Press the ‘Registration’ button in the top right-hand corner.
4) Using the numerical keys, insert your 4-character train reporting number
(headcode), followed by the signal number you are standing at in a 3-digit
format. For example, signal WH84 would require you to enter ‘084’. If you wish
to delete a character, press the ‘x’ button.
5) Press the ‘✓’ button.
6) Registration will take a moment. Once it has completed, you will hear a double
beep and the train reporting number will appear in the top right-hand corner
of the display.
Page 21
Deregistering - Method 1
If you are closing down the driving desk, use this method.
1) Move the reverser to ‘Off’.
2) Deregistration will automatically begin and you will be given the opportunity
for a short moment to retain the registration by pressing the ‘✓’ button.
Simply do nothing if you would like to continue with the deregistration.
3) Deregistration will take a moment. Once it has completed, the train reporting
number will no longer be displayed.
Deregistering - Method 2
If you wish to keep the driving desk active after deregistering, use this method.
1) Press the ‘Registration’ button in the top right-hand corner.
2) A prompt will appear on the unit saying ‘Confirm deregister?’.
3) Press the ‘✓’ button.
4) Deregistration will take a moment. Once it has completed, the train reporting
number will no longer be displayed.

Page 22
Driver Only Operation (DOO)
Full door control is featured in this pack to simulate ‘DOO’. Please see below for what
the relevant procedure is and how to change the type of operation whilst in-game:
Driver Only Operation (DOO)
1) Open the doors by pressing T+U (left-hand side) or T+O (right-hand side).
Alternatively, you can click the corresponding red buttons in the cab which
have arrows pointing to the side the doors will open.
2) If at a platform, wait for the ‘Platform Duties Complete’ message to appear in
the top-right corner and press R to close the doors. If not at a platform, press
R whenever you wish.
3) Once the door interlock light illuminates, you may depart.
Guard Operation (GO)
1) Open the doors by pressing T.
2) Doors will be closed by the guard once passengers have finished
boarding/alighting.
3) Once the door interlock light illuminates, the guard will give you two bells
which you must acknowledge by also giving two bells. This can be carried out
by pressing C twice.
How to change operation
This can be changed in-game by pressing Ctrl+R which will produce a visual
message in the top-right hand corner of the screen to let you know which option you
have selected.

Page 23
Wheelslip Protection (WSP)
Wheelslip protection aids the driver when powering or braking during times of poor
adhesion.
Accelerating
When wheelslip is encountered during acceleration, a two-stage process takes place:
1) The motors can be heard rising rapidly in pitch and power quickly falls to
control the slip.
2) The motors revert to their normal pitch and power returns to the notch
selected on the power handle.
As a driver, you must assess which power notch is most suitable for the conditions
and balance the occurrence of wheelslip with the maximum possible rate of
acceleration. Please see the table below for what to expect during each season and
varying weather conditions:
Dry Rain/snow
Spring No/very little wheelslip Mild wheelslip
Summer No/very little wheelslip Mild wheelslip
Autumn Mild wheelslip Severe wheelslip
Winter Light/mild wheelslip Very severe wheelslip
Braking
When wheelslide is encountered during braking, a two-stage process takes place:
1) Brake pressure is automatically reduced to try and control the slide.
2) Once the slide stops, brake pressure is returned to the notch selected on the
brake handle. If wheelslide reoccurs, the process starts again.
As a driver, you must resist the temptation to reduce the brake yourself as the
wheelslip protection will offer the best braking performance. Please see the table
below for what to expect during each season and varying weather conditions:
Dry Rain/snow
Spring No wheelslide Light wheelslide
Summer No wheelslide Light wheelslide
Autumn Mild wheelslide Severe wheelslide
Winter Light wheelslide Very severe wheelslide
Page 24
Neutral Section Functionality
The class 319 will react to the neutral sections available on the WCML Over Shap
route. On top of this, they will also function with the neutral sections present in the
six included scenarios. These have been placed using our own markers and signage
which are available in the ‘AP/Common’ object set filter folder.
Dual Voltage Functionality
Follow the instructions below to change the power source from AC (overhead wires)
to DC (third rail) and vice versa.
AC to DC
1) Ensure the reverser is in ‘Neutral’.
2) Press the ‘Pan Down/DC System Select’ button and ensure it illuminates.
3) Press the ‘Pan Up/Traction Reset’ button.
4) If the line light is illuminated, you have successfully changed to DC.
DC to AC
1) Ensure the reverser is in ‘Neutral’.
2) Press the ‘AC System Select’ button and ensure it illuminates.
3) Press the ‘Pan Up/Traction Reset’ button.
4) If the line light is illuminated, you have successfully changed to AC.

Page 25
Isolation Switches
Isolation switches allow safety systems to be isolated in the event of a failure or
emergency and these have been simulated. To activate one, you must first insert a
master key into the corresponding lock and click the relevant flag. Please see below
for a list of what each flag does:
• EBS (Emergency Bypass Switch) - Disables emergency brake.
• VIS (Vigilance Isolating Switch) - Disables the DVD (Driver Vigilance Device).
• TIS (Traction Interlock Switch) - Disables the traction interlock so you can
obtain power without door interlock.
• AWS (AWS Isolating Switch) - Disables the AWS (Automatic Warning System).
Coupling Procedure
Please see below for how to couple to another unit in a realistic manner:
1) Approach the unit you are going to couple to at caution and come to a stop
just short of it.
2) Select ‘Notch 1’ power and ease up to the unit. As soon as you have coupled,
apply ‘Step 3’ brake and return the power handle to ‘Off’.
3) To ensure the coupling is secure, you must perform a ‘pull-away’ test. To do
this, select ‘Reverse’ on the reverser, ‘Step 1’ brake and apply ‘Notch 1’ on the
power handle for a few seconds. If you do not move, the coupling has been
successful.
4) Hold the ‘Couple’ button down on the cab desk for 5 seconds. This will
connect the two units’ air and electrical systems.
Page 26
Cold Start
‘Cold Start’ means the unit is in the following state when it loads:
- Main reservoir, brake cylinder pressures are 0.
- Auxiliaries are tripped
- Pantograph is down
- Saloon lighting is off
To prepare a unit from cold, please follow the instructions below:
1) Hold the ‘Aux Set’ button down on the back wall of the cab for 5 seconds.
2) Turn the master key in by pressing Shift+W.
3) Move the reverser to ‘Neutral’ by pressing S.
4) Acknowledge the AWS self-test by pressing Q.
5) Press either the ‘AC System Select’ or ‘DC System Select’ button depending on
whether you are below overhead wires (AC) or on the third rail (DC).
6) Press the ‘Pan Up/Traction Reset’ button. If on DC, power will be fed to the
train and you will hear the main compressor activate. If on AC, the auxiliary
compressor in the MSO will need to build up the air pressure to 5 bar before
the pantograph can be raised. You can obtain updates on how this is
progressing by pressing the ‘Pan Up/Traction Reset’ button. Once 5 bar has
been reached, press ‘Pan Up/Traction Reset’ button and the pantograph will
raise. Power will be fed to the train and you will hear the main compressor
activate.
7) You must now wait for the main reservoir pressure to build to 6.5 bar. Once it
has done so, you will be able to obtain a brake release.
8) If heading out in passenger service, turn the saloon lighting on by pressing M
or the ‘Lighting On’ button on the back wall of the cab.
After carrying out this procedure, your unit will be successfully prepared from cold.

Page 27
Bits and Bobs
This section is dedicated to aspects of this pack that don’t warrant a dedicated
section but are still of note:
• Power cannot be applied if the brake handle is in ‘Step 2’, ‘Step 3’ or ‘Emergency’.
• If the brake handle is placed in ‘Step 2’, ‘Step 3’ or ‘Emergency’ whilst powering,
power will be lost and you must return the power handle to ‘Off’ before being
able to regain power.
• 1 second delay between train passing over AWS magnet and AWS warning sound
occurring. The F3/F4 HUD will show the warning immediately so you must wait 1
second before trying to cancel it.
• The headlights and destination blind lights only provide illumination before
sunrise and after sunset. This is to avoid the unrealistic appearance of projected
light in broad daylight.
• Units not fitted with a wind block have a whistling sound in the cab at speed.
• A special ‘bogie cam’ is available if you switch to the right-hand ‘head-out’ view
(Shift+2 THEN Right Arrow)
• London Midland, Northern Rail, Northern & Northern White liveries do not have a
third rail shoe.
Page 28
Setting up the Driver’s Cab Please follow the steps below to set up the cab so you are ready to move:
1) Ensure the master key is turned in. If not, press Shift+W.
2) Ensure the reverser is in ‘Neutral’. If not, press S and acknowledge the AWS
self-test by pressing Q.
3) Turn off the tail lights by pressing K.
4) Turn on the headlights by pressing H.
5) If applicable, register the GSM-R.
6) If necessary, change the destination blind/display.
7) Check the door interlock light is illuminated.
8) If you have a proceed signal aspect, turn off the Driver’s Reminder Appliance
(DRA) by pressing Y.
You should now be ready to move off. For information on this, please see below.
Driving Guide The following steps should allow you to drive in a realistic and safe manner:
1) Move the reverser to your desired direction of travel by pressing either W for
‘Forward’ or S for ‘Reverse’.
2) Move the brake handle to ‘Step 1’ by pressing ;.
3) Move the power handle to ‘Notch 2’ by pressing A. At the same time, move
the brake handle to ‘Release’ which will ensure you depart without rolling
back.
4) From then on, increase power as you see fit.
5) To brake the train, you may make applications and releases by moving the
handle between ‘Step 1 and ‘Full Service’. It is recommended you only use ‘Full
Service’ as a last resort so as to ensure you always have more brake force
available if required.
6) Just before coming to a stop, aim to have the brakes in ‘Step 1’ so as to
provide a smooth stop.
Page 29
How to Use in the Scenario Editor
How to place
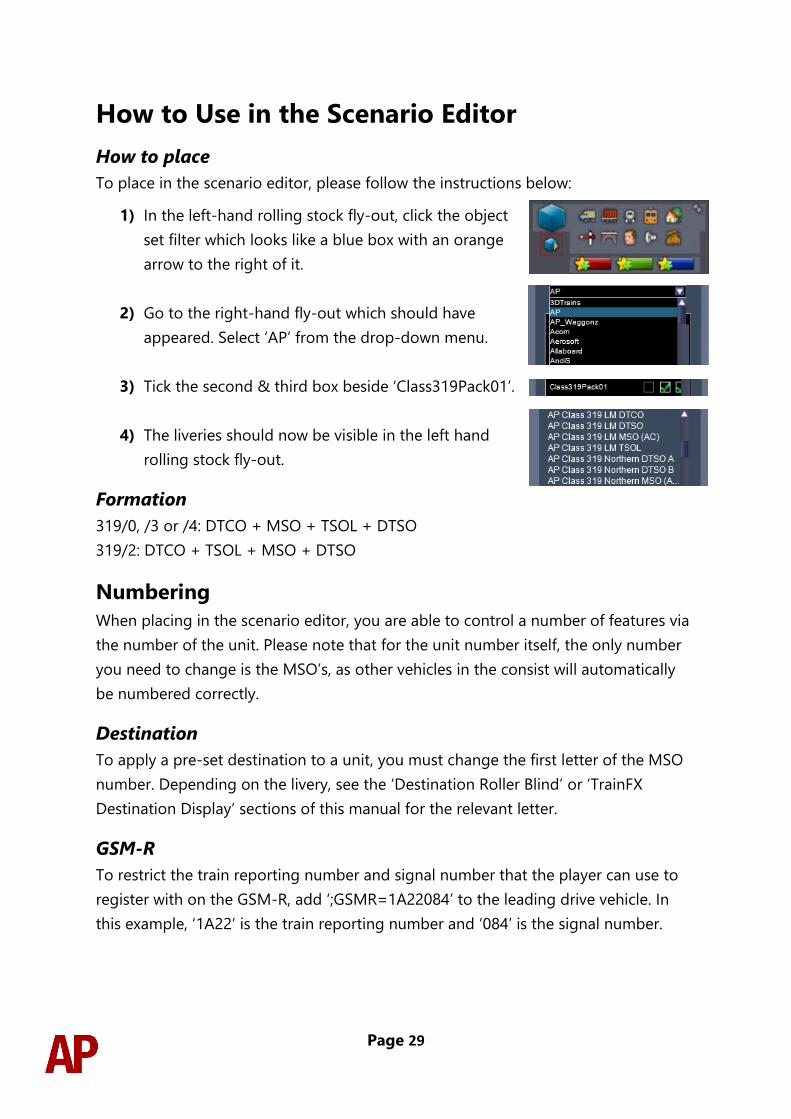
To place in the scenario editor, please follow the instructions below:
1) In the left-hand rolling stock fly-out, click the object
set filter which looks like a blue box with an orange
arrow to the right of it.
2) Go to the right-hand fly-out which should have
appeared. Select ‘AP’ from the drop-down menu.
3) Tick the second & third box beside ‘Class319Pack01’.
4) The liveries should now be visible in the left hand
rolling stock fly-out.
Formation
319/0, /3 or /4: DTCO + MSO + TSOL + DTSO
319/2: DTCO + TSOL + MSO + DTSO
Numbering
When placing in the scenario editor, you are able to control a number of features via
the number of the unit. Please note that for the unit number itself, the only number
you need to change is the MSO’s, as other vehicles in the consist will automatically
be numbered correctly.
Destination
To apply a pre-set destination to a unit, you must change the first letter of the MSO
number. Depending on the livery, see the ‘Destination Roller Blind’ or ‘TrainFX
Destination Display’ sections of this manual for the relevant letter.
GSM-R
To restrict the train reporting number and signal number that the player can use to
register with on the GSM-R, add ‘;GSMR=1A22084’ to the leading drive vehicle. In
this example, ‘1A22’ is the train reporting number and ‘084’ is the signal number.
Page 30
Logos
You can control the logo shown on a whole unit by adding ‘;L=x’ to the MSO
number. Removing ‘;L=x’ will remove all logos. Please see what to put as ‘x’ to receive
your desired result on each livery:
• First Capital Connect, Ex-Southern & Thameslink White: ‘FCC’ = First Capital
Connect. ‘TL’ = Thameslink.
• London Midland: ‘LM’ = London Midland.
• Northern Rail: ‘NE’ = Northern Electrics
• Northern: ‘NR’ = Northern by Arriva
Door buttons
You can control the type of door buttons fitted by adding ‘;D=x’ to the MSO number:
• Old: x = old
• New: x = new
Pantograph
You can control the type of pantograph fitted by adding ‘;Pa=x’ to the MSO number:
• Stone Faiveley AMBR: x = old
• Brecknell Willis high speed: x = new
Power mode
You can control the default power mode of a unit by adding ‘;P=x’ to the MSO
number:
• AC (overhead wires): x = AC
• DC (third rail): x = DC
Wind block
To add the wind block around the centre door of the cab, add ‘;W=1’.
Cold start
To activate cold start mode on a player train, add ‘;Cold=1’ to the number of the
DTCO or DTSO which has the driver icon applied to it.
Page 31
Reversing motor whine
When changing direction, the motors will make a distinctive high pitch whining
sound that slowly fades away over time. After one reversal, this sound activates
automatically but to enable it at the start of a scenario, add ;RW=1 to the MSO
number. This is mostly intended to be used when a scenario starts at a terminus.
Example MSO number
Z319363;L=FCC;D=new;Pa=new;P=DC;W=1
Key:
Z - Destination
319363 - Unit number
;L=FCC - First Capital Connect logo
;D=new - New door buttons
;Pa=new = Brecknell Willis high speed pantograph
;P=DC - DC power is default power mode
;W=1- Wind block
Page 32
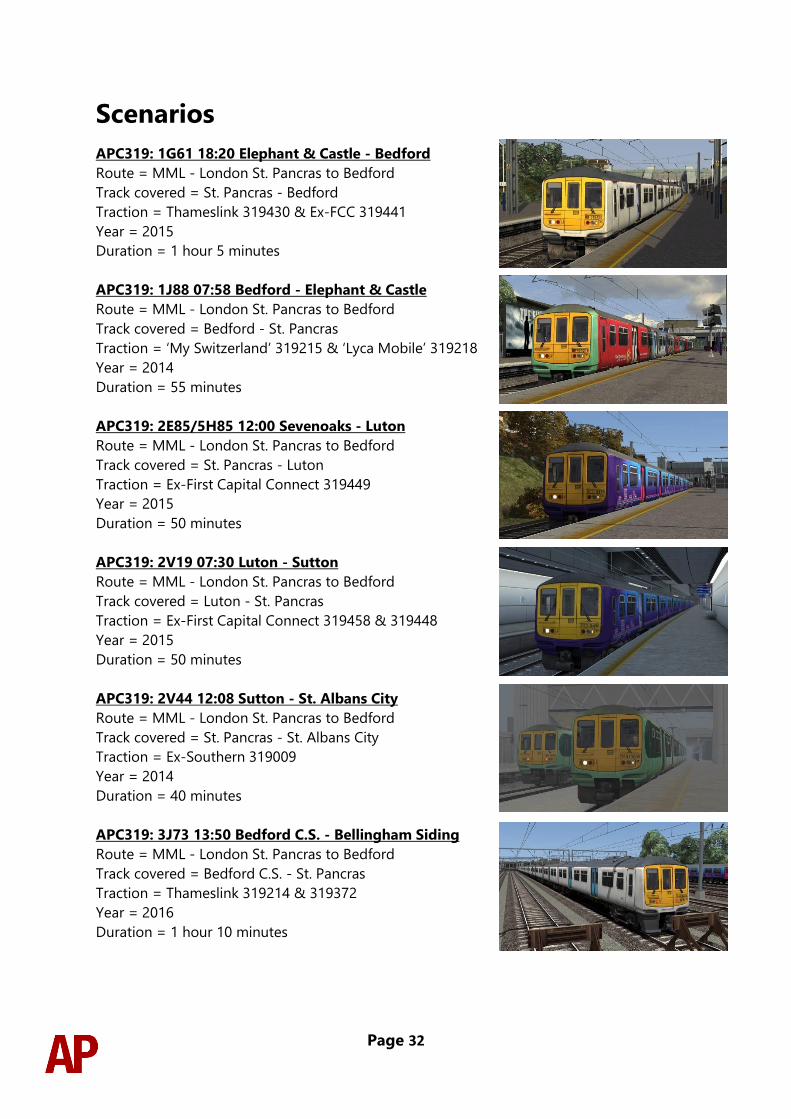
Scenarios
APC319: 1G61 18:20 Elephant & Castle - Bedford
Route = MML - London St. Pancras to Bedford
Track covered = St. Pancras - Bedford
Traction = Thameslink 319430 & Ex-FCC 319441
Year = 2015
Duration = 1 hour 5 minutes
APC319: 1J88 07:58 Bedford - Elephant & Castle
Route = MML - London St. Pancras to Bedford
Track covered = Bedford - St. Pancras
Traction = ‘My Switzerland’ 319215 & ‘Lyca Mobile’ 319218
Year = 2014
Duration = 55 minutes
APC319: 2E85/5H85 12:00 Sevenoaks - Luton
Route = MML - London St. Pancras to Bedford
Track covered = St. Pancras - Luton
Traction = Ex-First Capital Connect 319449
Year = 2015
Duration = 50 minutes
APC319: 2V19 07:30 Luton - Sutton
Route = MML - London St. Pancras to Bedford
Track covered = Luton - St. Pancras
Traction = Ex-First Capital Connect 319458 & 319448
Year = 2015
Duration = 50 minutes
APC319: 2V44 12:08 Sutton - St. Albans City
Route = MML - London St. Pancras to Bedford
Track covered = St. Pancras - St. Albans City
Traction = Ex-Southern 319009
Year = 2014
Duration = 40 minutes
APC319: 3J73 13:50 Bedford C.S. - Bellingham Siding
Route = MML - London St. Pancras to Bedford
Track covered = Bedford C.S. - St. Pancras
Traction = Thameslink 319214 & 319372
Year = 2016
Duration = 1 hour 10 minutes
Page 33
Credits Jordi Blumberg - Modelling & texturing
Nicolas Schichan - Scripting
Thameslink - Assistance in recording sounds