Embed Size (px)
Citation preview
CLIL UNIT: AN INTRODUCTION TO ORIGAMI TECHNIQUE
Maribel García CEIP AmatVerdú
AN INTRODUCTION TO ORIGAMI TECHNIQUE CLIL Unit
Maribel García
Nottingham April 2009

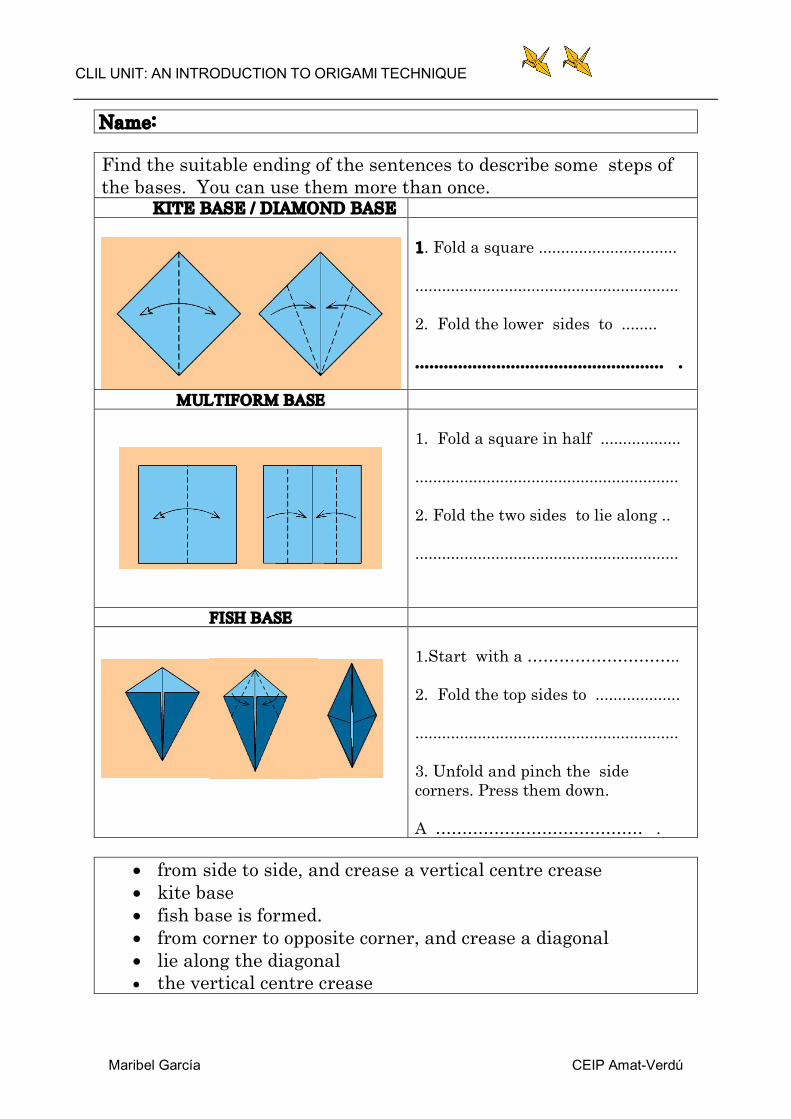
CLIL UNIT: AN INTRODUCTION TO ORIGAMI TECHNIQUE
Maribel García CEIP AmatVerdú
Name:
Classify the words into the right box:
SQUARE OVER DIAGONAL VALLEY STEP IN TWO CORNER – MOUNTAIN – AROUND – TRIANGLE CERCLE EDGE
IN HALF RECTANGLE OUTSIDE REVERSE INSIDE REVERSE
FOLDS
FOLDS
SHAPES
ELEMENTS
POLYGONS
TO TURN

CLIL UNIT: AN INTRODUCTION TO ORIGAMI TECHNIQUE
Maribel García CEIP AmatVerdú
Name:
Write each definition under the appropriate symbol
existing crease valley fold fold and unfold mountain fold fold in this direction step fold turn over
enlarging the diagram fold backward turn around
………………………. …………………………..
………………………. ………..………………
………………………… ………………………….
……………………… ………………………….
………………………… ………………………….
CLIL UNIT: AN INTRODUCTION TO ORIGAMI TECHNIQUE
Maribel García CEIP AmatVerdú
Name:
Find the suitable ending of the sentences to describe some steps of the bases. You can use them more than once.
KITE BASE / DIAMOND BASE
1. Fold a square ...............................
...........................................................
2. Fold the lower sides to ........
.................................................... .
MULTIFORM BASE
1. Fold a square in half ..................
...........................................................
2. Fold the two sides to lie along ..
...........................................................
FISH BASE
1.Start with a ………………………..
2. Fold the top sides to ...................
...........................................................
3. Unfold and pinch the side corners. Press them down.
A ………………………………… .
• from side to side, and crease a vertical centre crease • kite base • fish base is formed. • from corner to opposite corner, and crease a diagonal • lie along the diagonal • the vertical centre crease
CLIL UNIT: AN INTRODUCTION TO ORIGAMI TECHNIQUE
Maribel García CEIP AmatVerdú
Name :
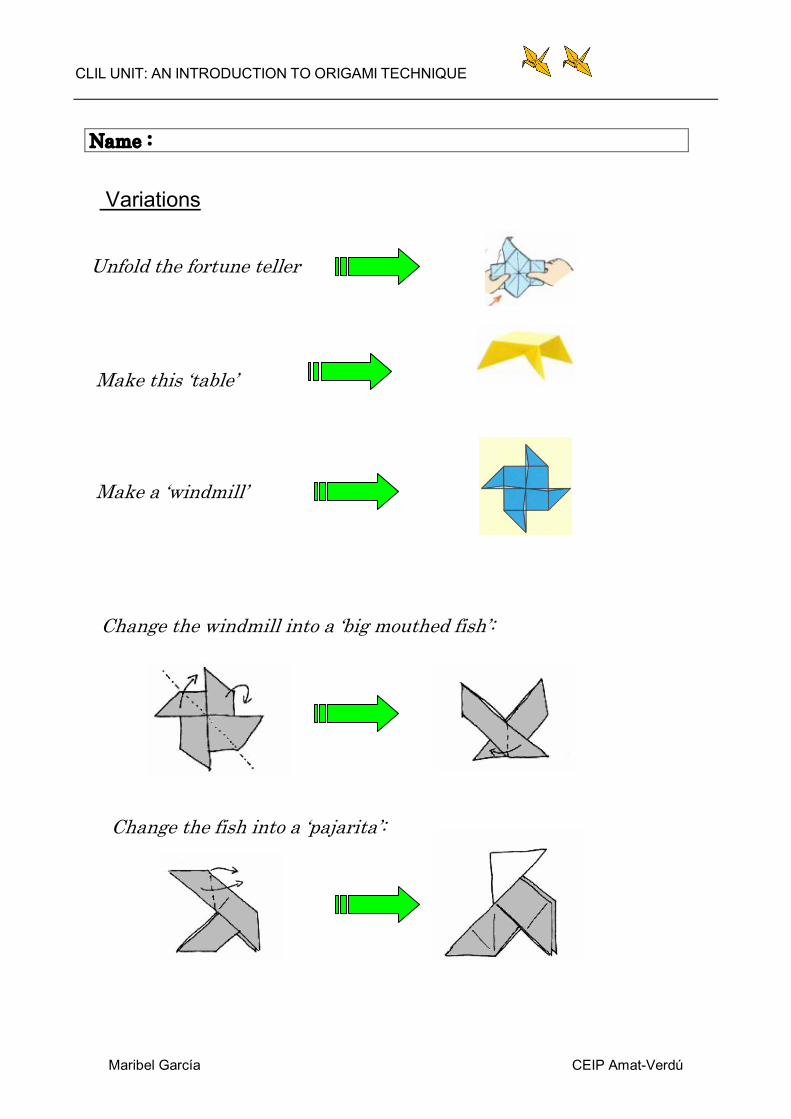
Variations
Unfold the fortune teller
Make this ‘table’
Make a ‘windmill’
Change the windmill into a ‘big mouthed fish’:
Change the fish into a ‘pajarita’:

CLIL UNIT: AN INTRODUCTION TO ORIGAMI TECHNIQUE
Maribel García CEIP AmatVerdú
Waterbomb Base Order the sequence and write the instructions under the pictures
Fold
Open
Finished
Fold and unfold
the square
the rectangle
the flap
behind
waterbomb
again
in half
diagonally
CLIL UNIT: AN INTRODUCTION TO ORIGAMI TECHNIQUE
Maribel García CEIP AmatVerdú
Name:
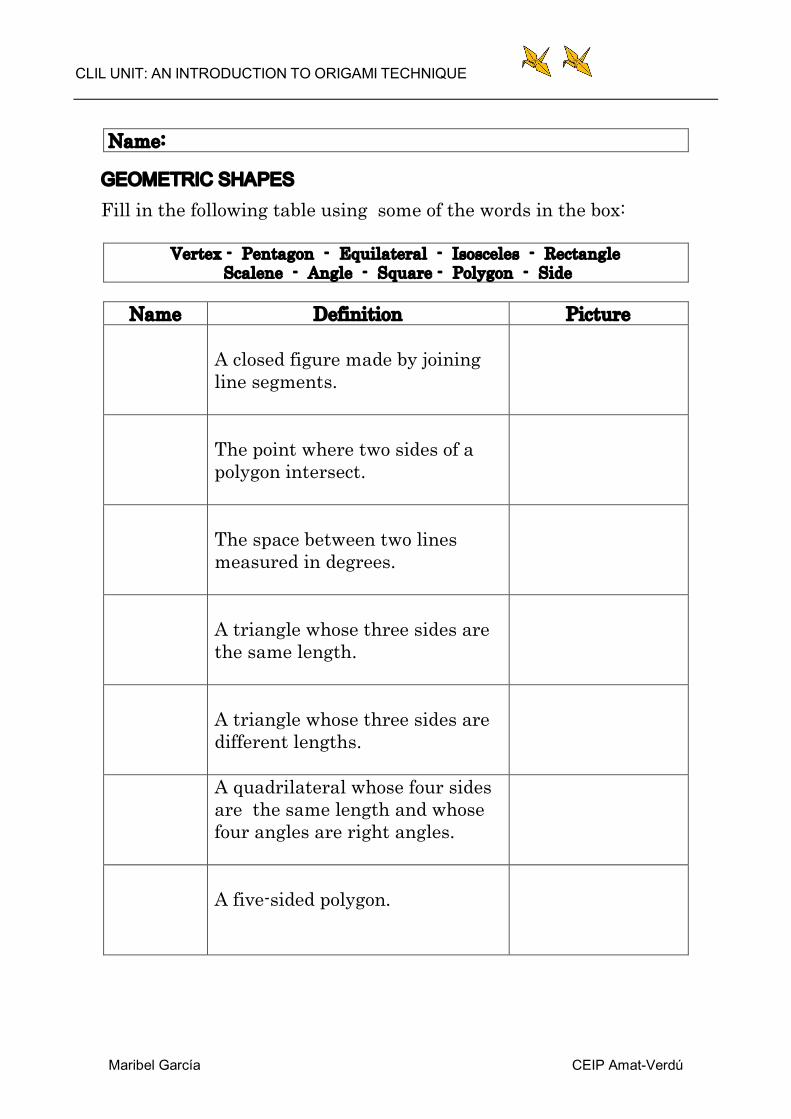
GEOMETRIC SHAPES Fill in the following table using some of the words in the box:
Vertex Pentagon Equilateral Isosceles Rectangle Scalene Angle Square Polygon Side
Name Definition Picture
A closed figure made by joining line segments.
The point where two sides of a polygon intersect.
The space between two lines measured in degrees.
A triangle whose three sides are the same length.
A triangle whose three sides are different lengths.
A quadrilateral whose four sides are the same length and whose four angles are right angles.
A fivesided polygon.
CLIL UNIT: AN INTRODUCTION TO ORIGAMI TECHNIQUE
Maribel García CEIP AmatVerdú
Name:
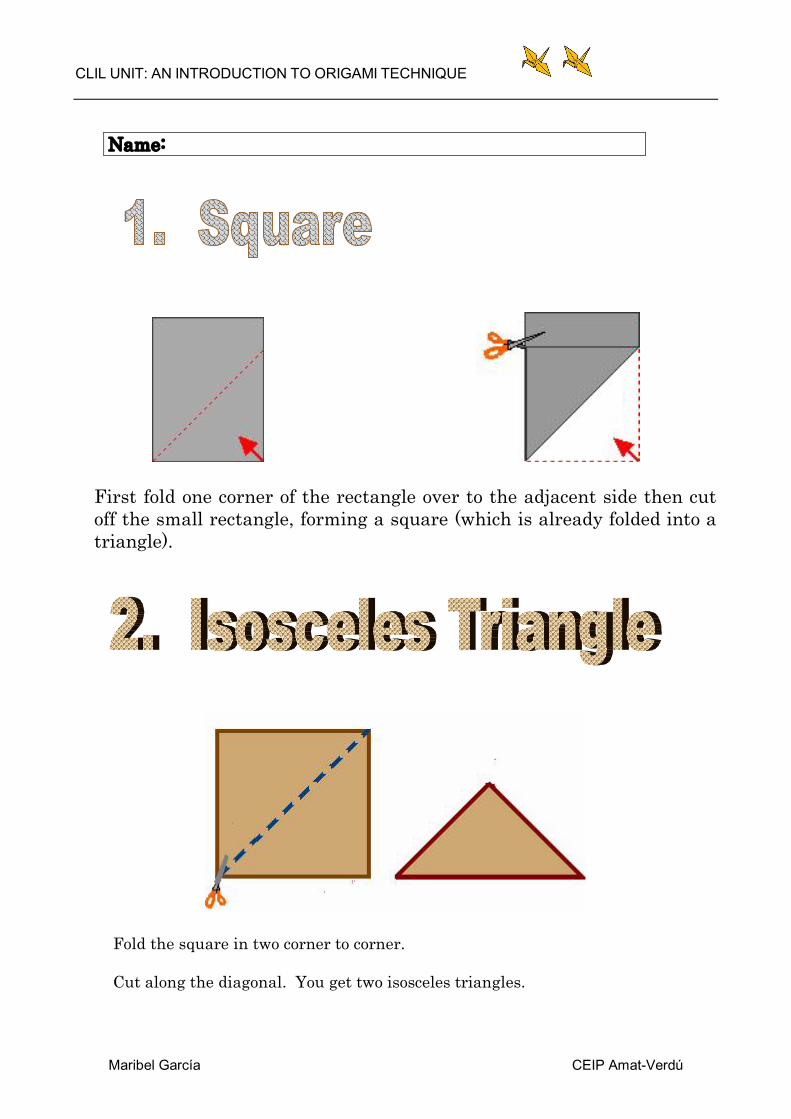
First fold one corner of the rectangle over to the adjacent side then cut off the small rectangle, forming a square (which is already folded into a triangle).
Fold the square in two corner to corner.
Cut along the diagonal. You get two isosceles triangles.

CLIL UNIT: AN INTRODUCTION TO ORIGAMI TECHNIQUE
Maribel García CEIP AmatVerdú
Name:
1 2 3
4 5
1. Make two long pinches at the midpoint of two opposite edges. Turn the paper over.
2. Bring the bottom left corner to the crease mark on the right, beginning the fold at the top left corner.
3. Crease sharply and unfold.
4. Bring the bottom right corner to the crease mark on the left, beginning the fold at the right corner. Crease sharply and unfold.
5. Cut along the long creaselines to give one equilateral triangle
CLIL UNIT: AN INTRODUCTION TO ORIGAMI TECHNIQUE
Maribel García CEIP AmatVerdú
Name:
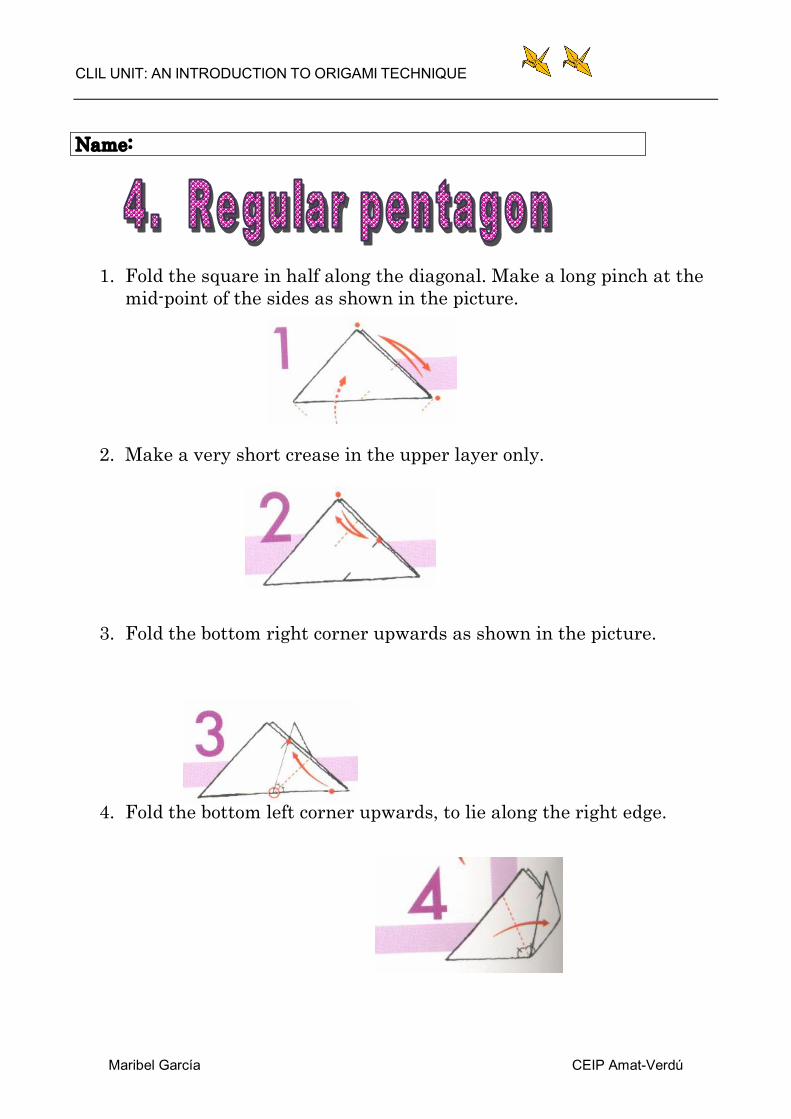
1. Fold the square in half along the diagonal. Make a long pinch at the midpoint of the sides as shown in the picture.
2. Make a very short crease in the upper layer only.
3. Fold the bottom right corner upwards as shown in the picture.
4. Fold the bottom left corner upwards, to lie along the right edge.
CLIL UNIT: AN INTRODUCTION TO ORIGAMI TECHNIQUE
Maribel García CEIP AmatVerdú
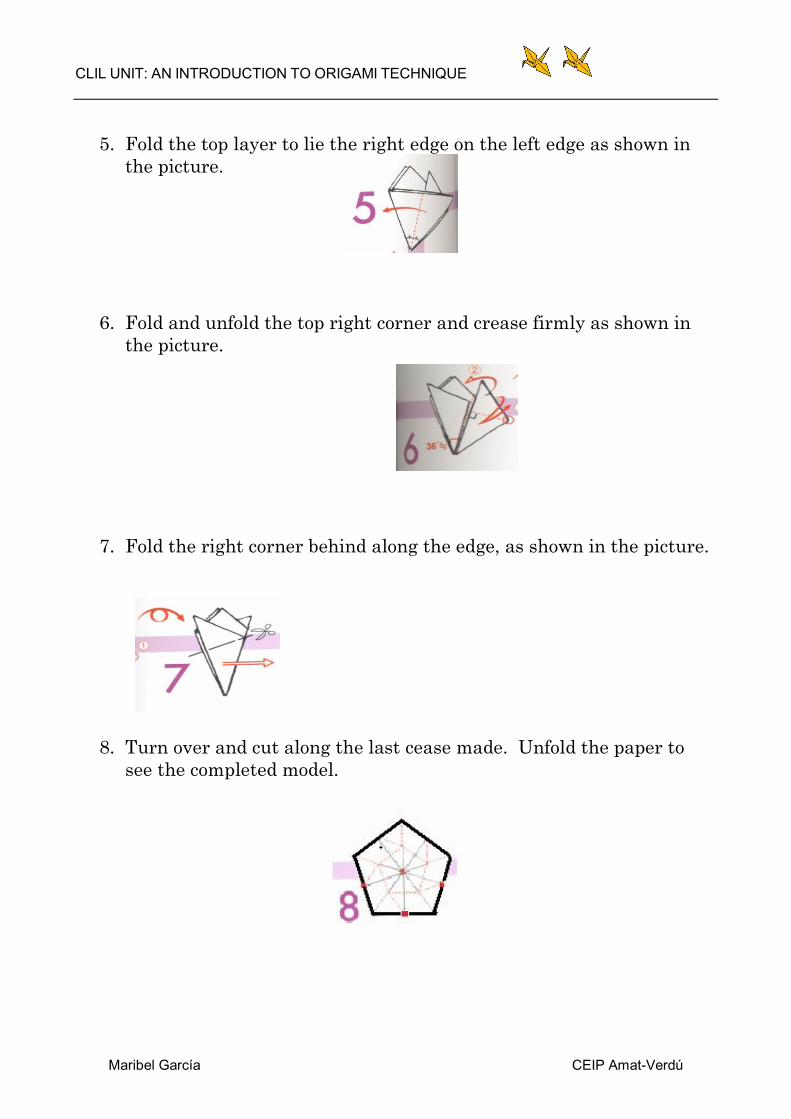
5. Fold the top layer to lie the right edge on the left edge as shown in the picture.
6. Fold and unfold the top right corner and crease firmly as shown in the picture.
7. Fold the right corner behind along the edge, as shown in the picture.
8. Turn over and cut along the last cease made. Unfold the paper to see the completed model.
CLIL UNIT: AN INTRODUCTION TO ORIGAMI TECHNIQUE
Maribel García CEIP AmatVerdú
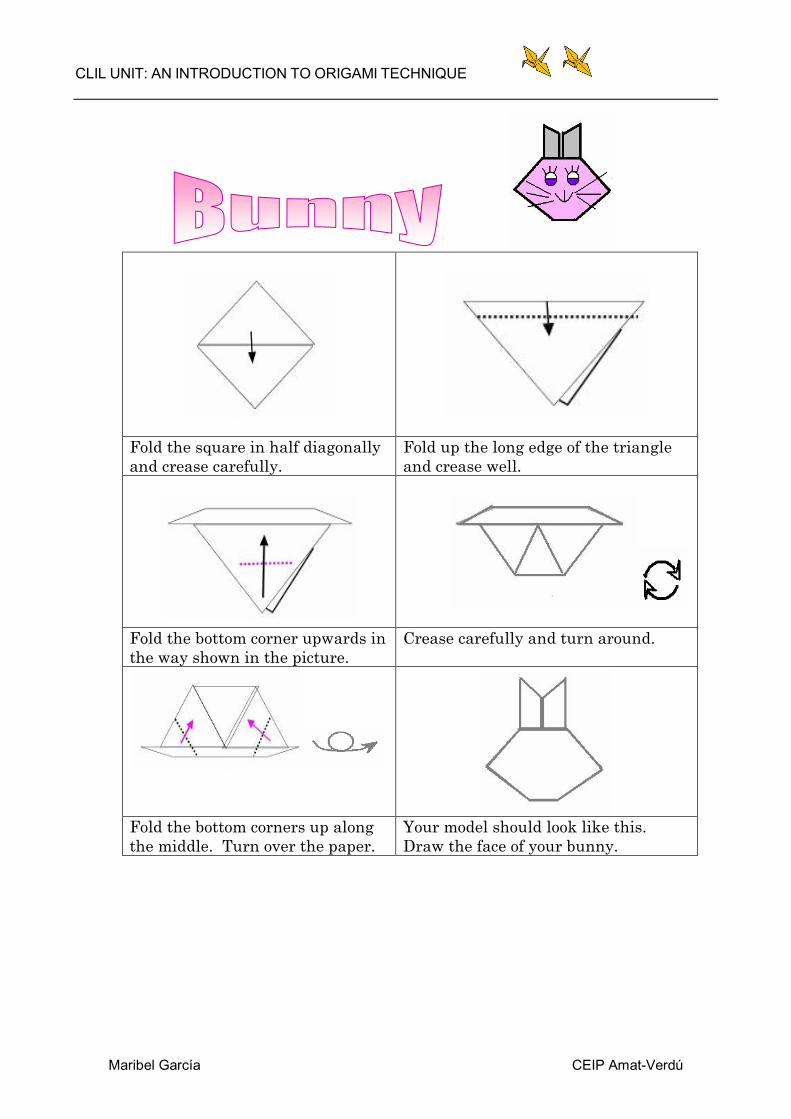
Fold the square in half diagonally and crease carefully.
Fold up the long edge of the triangle and crease well.
Fold the bottom corner upwards in the way shown in the picture.
Crease carefully and turn around.
Fold the bottom corners up along the middle. Turn over the paper.
Your model should look like this. Draw the face of your bunny.
CLIL UNIT: AN INTRODUCTION TO ORIGAMI TECHNIQUE
Maribel García CEIP AmatVerdú
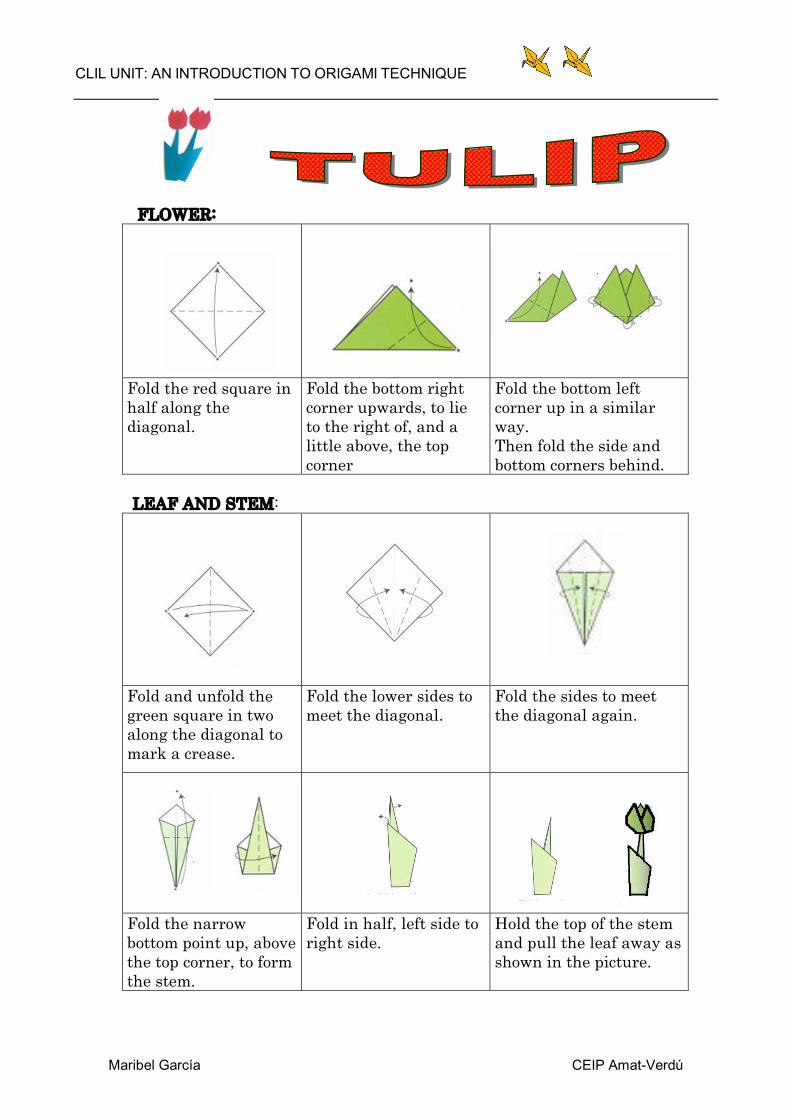
FLOWER:
Fold the red square in half along the diagonal.
Fold the bottom right corner upwards, to lie to the right of, and a little above, the top corner
Fold the bottom left corner up in a similar way. Then fold the side and bottom corners behind.
LEAF AND STEM:
Fold and unfold the green square in two along the diagonal to mark a crease.
Fold the lower sides to meet the diagonal.
Fold the sides to meet the diagonal again.
Fold the narrow bottom point up, above the top corner, to form the stem.
Fold in half, left side to right side.
Hold the top of the stem and pull the leaf away as shown in the picture.
CLIL UNIT: AN INTRODUCTION TO ORIGAMI TECHNIQUE
Maribel García CEIP AmatVerdú
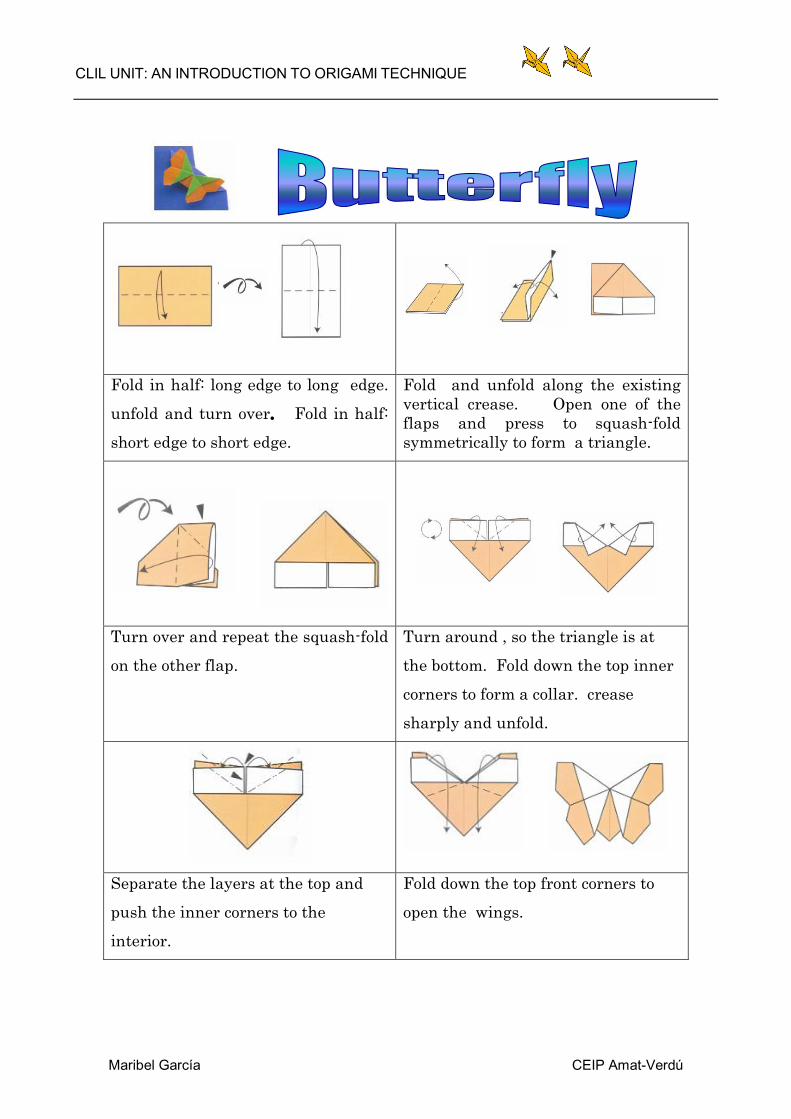
Fold in half: long edge to long edge. unfold and turn over. Fold in half: short edge to short edge.
Fold and unfold along the existing vertical crease. Open one of the flaps and press to squashfold symmetrically to form a triangle.
Turn over and repeat the squashfold on the other flap.
Turn around , so the triangle is at the bottom. Fold down the top inner corners to form a collar. crease sharply and unfold.
Separate the layers at the top and push the inner corners to the interior.
Fold down the top front corners to open the wings.
CLIL UNIT: AN INTRODUCTION TO ORIGAMI TECHNIQUE
Maribel García CEIP AmatVerdú
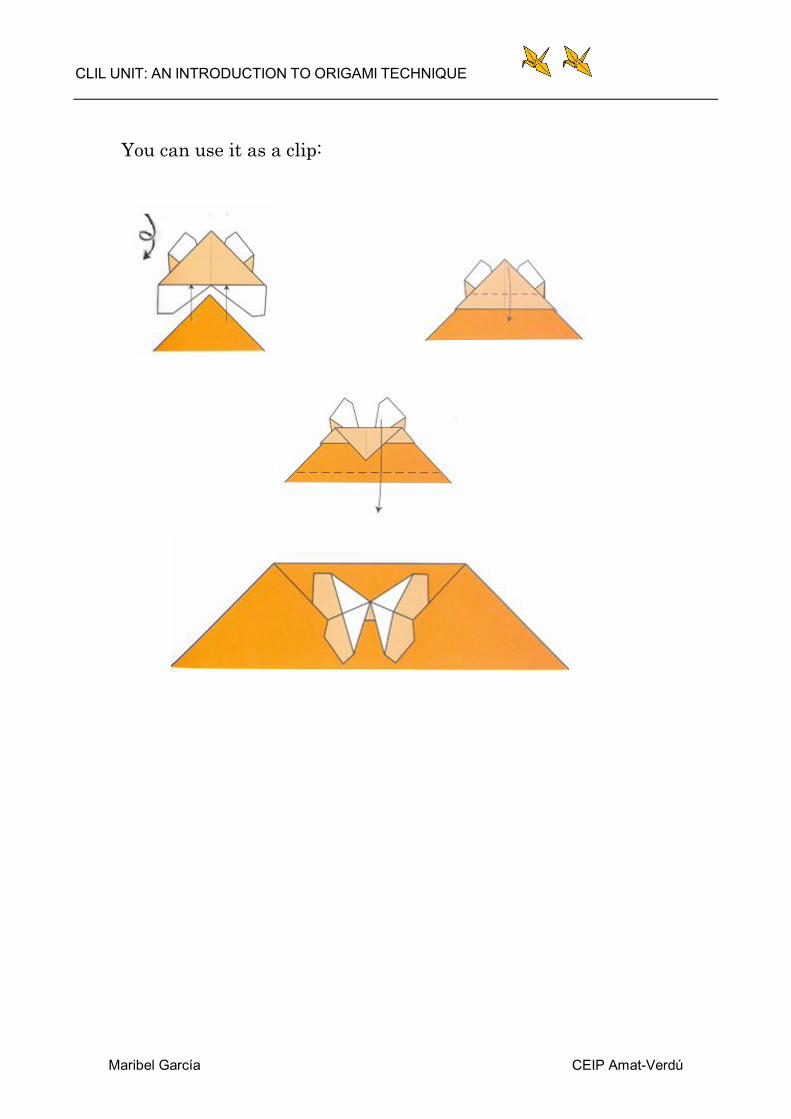
You can use it as a clip:
CLIL UNIT: AN INTRODUCTION TO ORIGAMI TECHNIQUE
Maribel García CEIP AmatVerdú
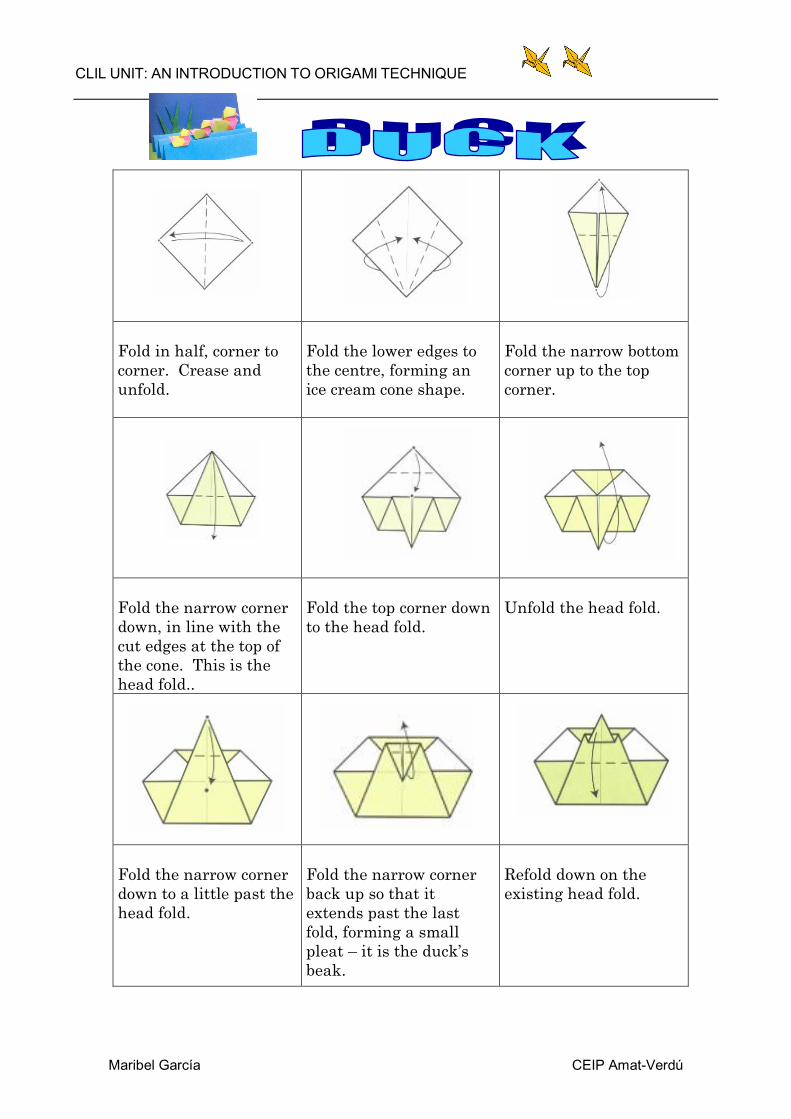
Fold in half, corner to corner. Crease and unfold.
Fold the lower edges to the centre, forming an ice cream cone shape.
Fold the narrow bottom corner up to the top corner.
Fold the narrow corner down, in line with the cut edges at the top of the cone. This is the head fold..
Fold the top corner down to the head fold.
Unfold the head fold.
Fold the narrow corner down to a little past the head fold.
Fold the narrow corner back up so that it extends past the last fold, forming a small pleat – it is the duck’s beak.
Refold down on the existing head fold.
CLIL UNIT: AN INTRODUCTION TO ORIGAMI TECHNIQUE
Maribel García CEIP AmatVerdú
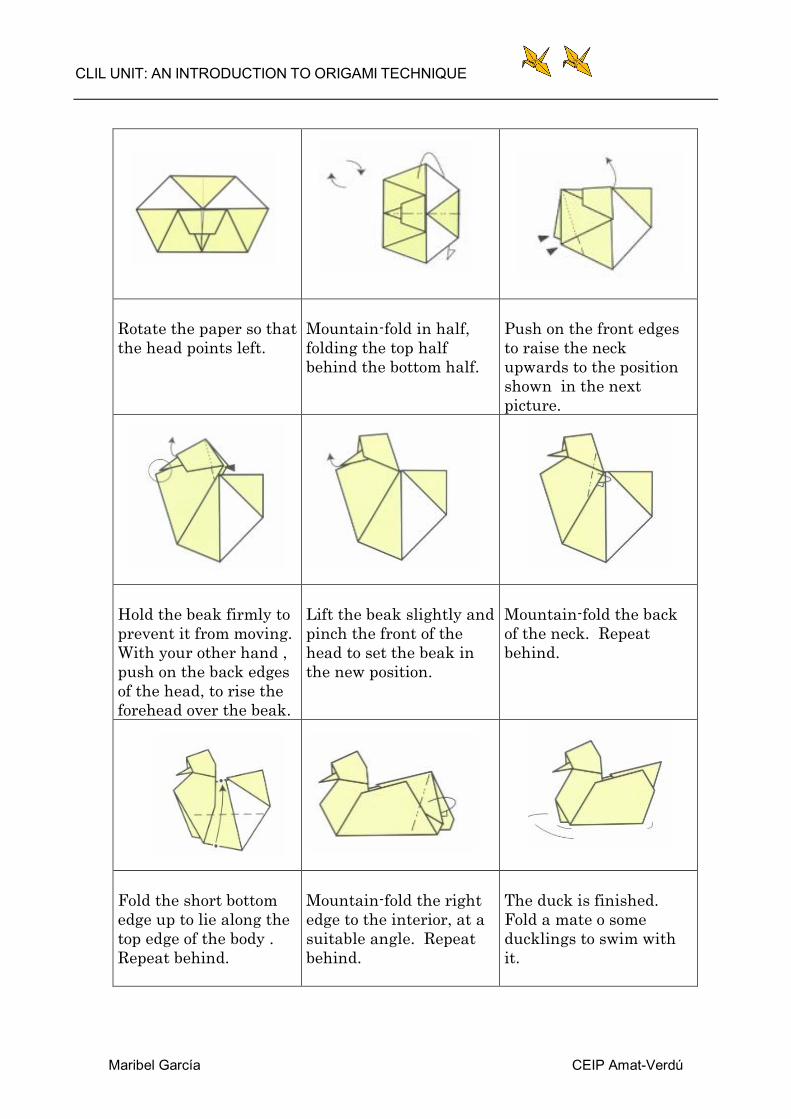
Rotate the paper so that the head points left.
Mountainfold in half, folding the top half behind the bottom half.
Push on the front edges to raise the neck upwards to the position shown in the next picture.
Hold the beak firmly to prevent it from moving. With your other hand , push on the back edges of the head, to rise the forehead over the beak.
Lift the beak slightly and pinch the front of the head to set the beak in the new position.
Mountainfold the back of the neck. Repeat behind.
Fold the short bottom edge up to lie along the top edge of the body . Repeat behind.
Mountainfold the right edge to the interior, at a suitable angle. Repeat behind.
The duck is finished. Fold a mate o some ducklings to swim with it.

CLIL UNIT: AN INTRODUCTION TO ORIGAMI TECHNIQUE
Maribel García CEIP AmatVerdú
1 2 3 (White side up)
Fold in half along both diagonals and unfold.
Fold the bottom and top corners to meet the
centre of the square.
Fold in half, top to bottom, along the
existing crease, to give a trapezoid shape.
4 5 6 Fold the bottom right
corner (obtuse) to meet the midpoint of the top
edge.
Fold the new obtuse corner to meet the mid point of the top edge.
Fold the new obtuse corner to meet the mid point of the top edge.
7 8 9 This is one half of the Twist Fish. Turn over to the back.
Repeat steps 4, 5 and 6. To lock, the two tail flaps switch places: the front flap goes to the back.

CLIL UNIT: AN INTRODUCTION TO ORIGAMI TECHNIQUE
Maribel García CEIP AmatVerdú
Variation:
Fold the top and bottom corners backwards to meet the centre point.
The result is a twocolour trapezoid:
Follow the steps from 4 to 9 in the same way.
The final fish would be this:

CLIL UNIT: AN INTRODUCTION TO ORIGAMI TECHNIQUE
Maribel García CEIP AmatVerdú
Fold and unfold in half along the diagonal to mark a crease.
Fold the lower edges to meet the center crease.
Flatten and turn around.
Fold the side edges to meet the center crease.
Fold up the bottom’s point
Fold again the point down to make the swan’s neck.
Fold in half along the dashed line.
Pull the paper up until the swan’s head is horizontal.
Squeeze the paper at the base of the neck to crease it.
CLIL UNIT: AN INTRODUCTION TO ORIGAMI TECHNIQUE
Maribel García CEIP AmatVerdú
SADAKO AND the thousand cranes
1. Sadako Sasaki was born in which city of Japan? ....................
2. She was born during World War II. True or false? ..................
3. How old was she when the atom bomb was dropped? ...................
4. She never went to school, because she was very ill. True or false? ...................
5. The radiation had caused an illness called ................................
6. Her friend Chizuko made one thousand cranes for her. True or false?
...........................
7. The legend says that : a) You can have a crane if you wish it.
b) If you fold a crane you can make 1,000 wishes. c) If you fold 1,000 cranes you can make a wish.
8. How many cranes could Sadako fold before dying? ........................
9. What was Sadako’s wish? .............................................................
10. What does the statue on top of the Monument represent?
.....................................................
CLIL UNIT: AN INTRODUCTION TO ORIGAMI TECHNIQUE
Maribel García CEIP AmatVerdú
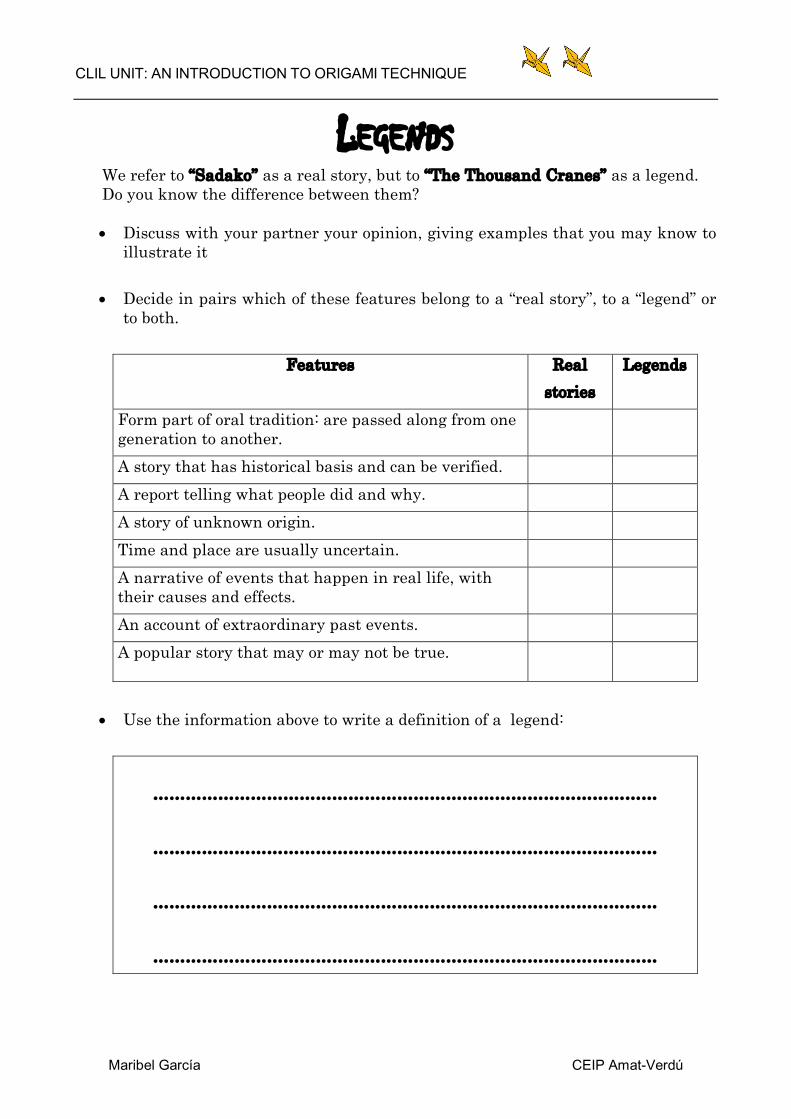
LEGENDS We refer to “Sadako” as a real story, but to “The Thousand Cranes” as a legend. Do you know the difference between them?
• Discuss with your partner your opinion, giving examples that you may know to illustrate it
• Decide in pairs which of these features belong to a “real story”, to a “legend” or to both.
Features Real stories
Legends
Form part of oral tradition: are passed along from one generation to another. A story that has historical basis and can be verified. A report telling what people did and why. A story of unknown origin. Time and place are usually uncertain. A narrative of events that happen in real life, with their causes and effects. An account of extraordinary past events. A popular story that may or may not be true.
• Use the information above to write a definition of a legend:
…………………………………………………………………………………
…………………………………………………………………………………
…………………………………………………………………………………
…………………………………………………………………………………
CLIL UNIT: AN INTRODUCTION TO ORIGAMI TECHNIQUE
Maribel García CEIP AmatVerdú
Name:
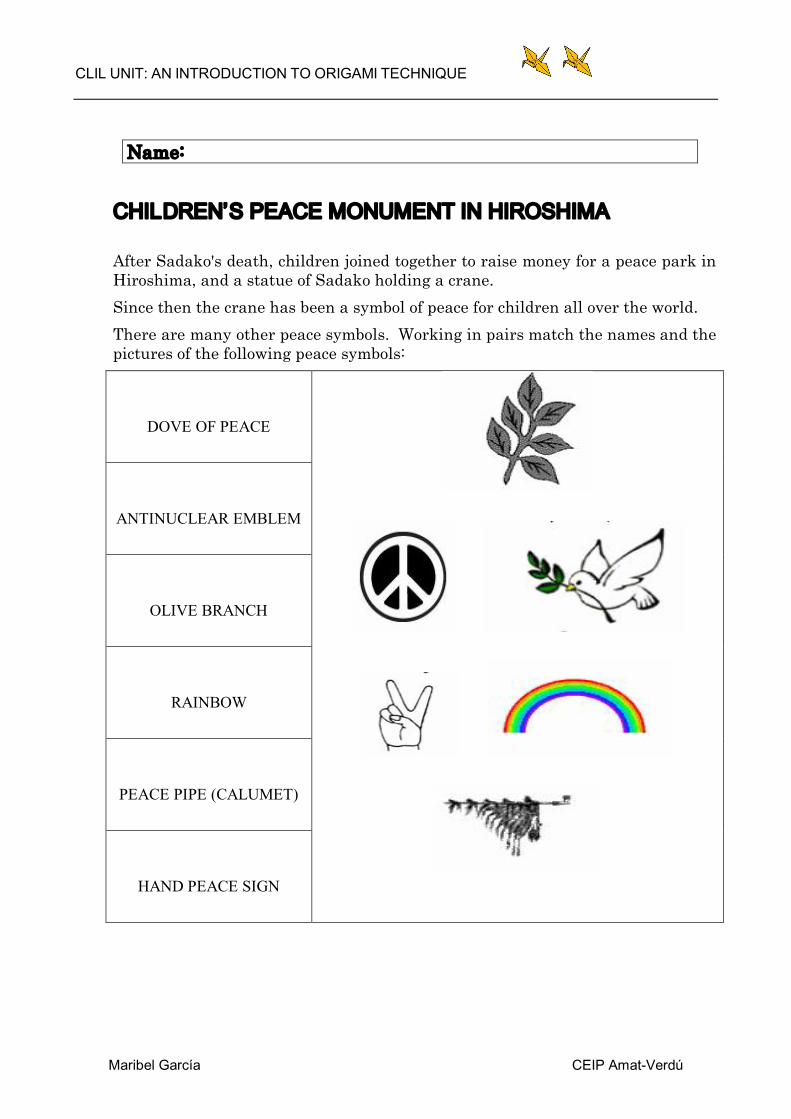
CHILDREN’S PEACE MONUMENT IN HIROSHIMA
After Sadako's death, children joined together to raise money for a peace park in Hiroshima, and a statue of Sadako holding a crane. Since then the crane has been a symbol of peace for children all over the world. There are many other peace symbols. Working in pairs match the names and the pictures of the following peace symbols:
DOVE OF PEACE
ANTINUCLEAR EMBLEM
OLIVE BRANCH
RAINBOW
PEACE PIPE (CALUMET)
HAND PEACE SIGN
CLIL UNIT: AN INTRODUCTION TO ORIGAMI TECHNIQUE
Maribel García CEIP AmatVerdú
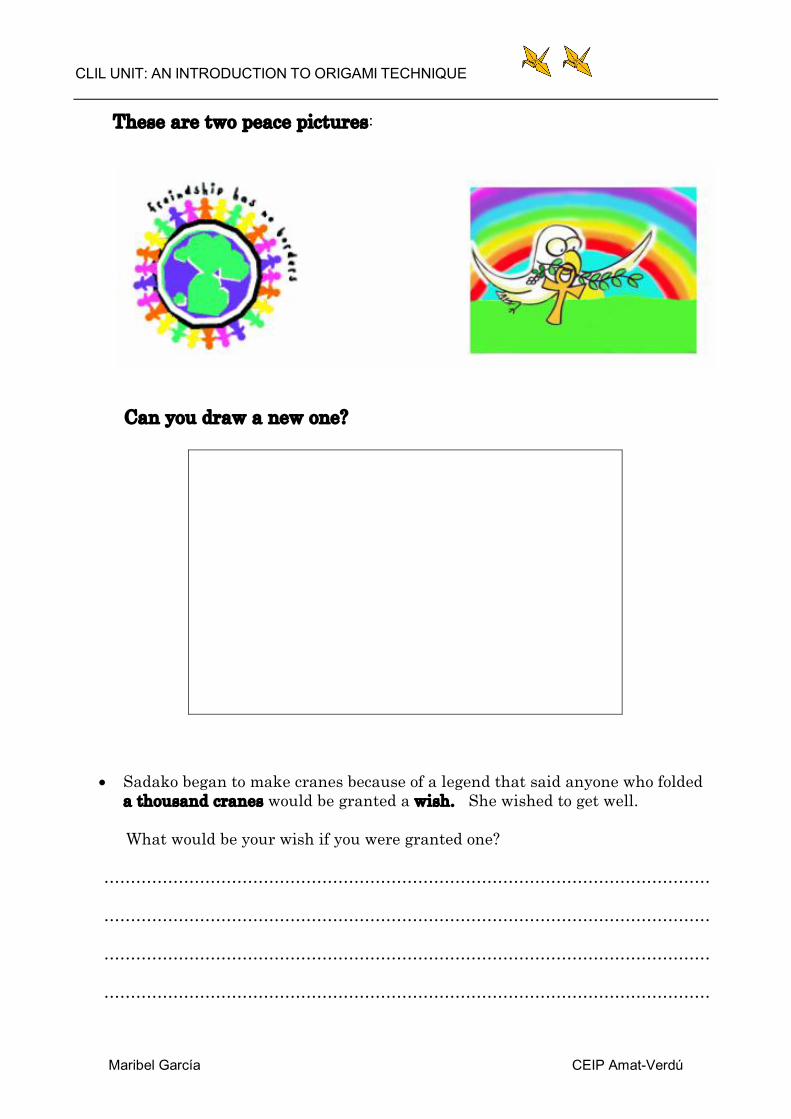
These are two peace pictures:
Can you draw a new one?
• Sadako began to make cranes because of a legend that said anyone who folded a thousand cranes would be granted a wish. She wished to get well.
What would be your wish if you were granted one?
……………………………………………………………………………………………………
……………………………………………………………………………………………………
……………………………………………………………………………………………………
……………………………………………………………………………………………………