Embed Size (px)
Citation preview
Thank you for purchasing this CELSYS product. This book explains how to install CLIP STUDIO PAINT and register the license after installation. Be sure to read this before installing the application.
This book (including in electronic data format) has been written and edited based on product programs current as of March 2016 and may differ from actual product program specifications.
Installing the ApplicationThis section explains how to install the application.
● Be sure to log in to your computer with "System Administrator" authority before installing the application.
● Quit all other applications before starting the installation.
Installing CLIP STUDIO PAINTThis section explains how to install the CLIP STUDIO PAINT application.
● For Windows: Go to "When you are using Windows" (=>P.1).
● For Mac OS X: Go to "When you are using Mac OS X" (=>P.3).
When you are using Windows
This section describes how to perform the installation when you are using Windows.
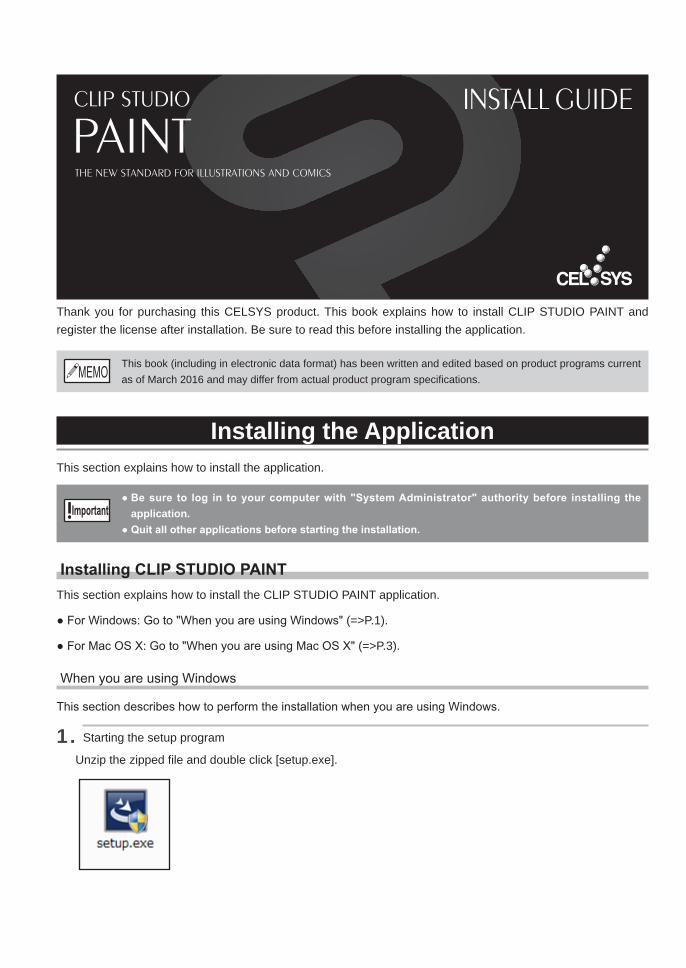
1. Starting the setup program
Unzip the zipped file and double click [setup.exe].
2
CLIP STUDIO PAINT INSTALL GUIDE
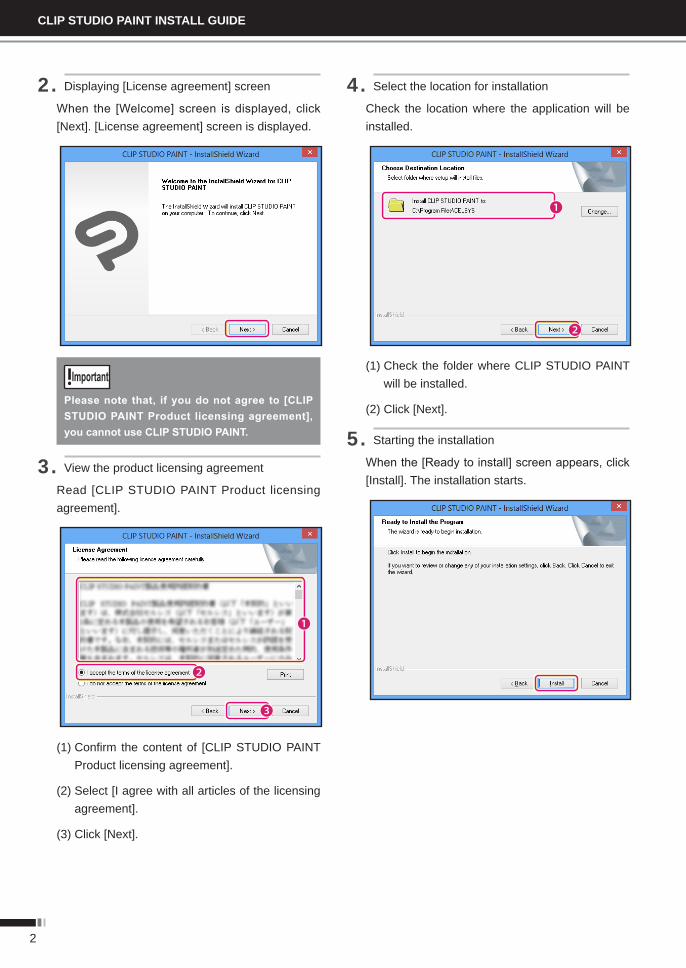
2. Displaying [License agreement] screen
When the [Welcome] screen is displayed, click [Next]. [License agreement] screen is displayed.
Please note that, if you do not agree to [CLIP STUDIO PAINT Product licensing agreement], you cannot use CLIP STUDIO PAINT.
3. View the product licensing agreement
Read [CLIP STUDIO PAINT Product licensing agreement].
(1) Confirm the content of [CLIP STUDIO PAINT Product licensing agreement].
(2) Select [I agree with all articles of the licensing agreement].
(3) Click [Next].
4. Select the location for installation
Check the location where the application will be installed.
(1) Check the folder where CLIP STUDIO PAINT will be installed.
(2) Click [Next].
5. Starting the installation
When the [Ready to install] screen appears, click [Install]. The installation starts.
3
Installing the Application
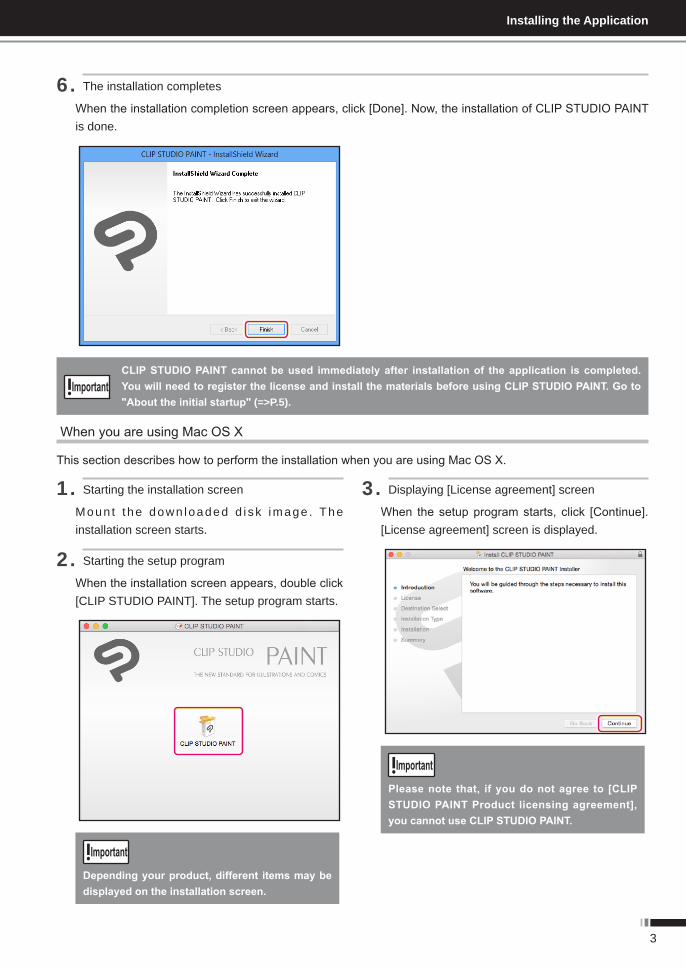
6. The installation completes
When the installation completion screen appears, click [Done]. Now, the installation of CLIP STUDIO PAINT is done.
CLIP STUDIO PAINT cannot be used immediately after installation of the application is completed. You will need to register the license and install the materials before using CLIP STUDIO PAINT. Go to "About the initial startup" (=>P.5).
When you are using Mac OS X
This section describes how to perform the installation when you are using Mac OS X.
1. Starting the installation screen
Moun t t he down loaded d i sk image . The installation screen starts.
2. Starting the setup program
When the installation screen appears, double click [CLIP STUDIO PAINT]. The setup program starts.
Depending your product, different items may be displayed on the installation screen.
3. Displaying [License agreement] screen
When the setup program starts, click [Continue]. [License agreement] screen is displayed.
Please note that, if you do not agree to [CLIP STUDIO PAINT Product licensing agreement], you cannot use CLIP STUDIO PAINT.
4
CLIP STUDIO PAINT INSTALL GUIDE
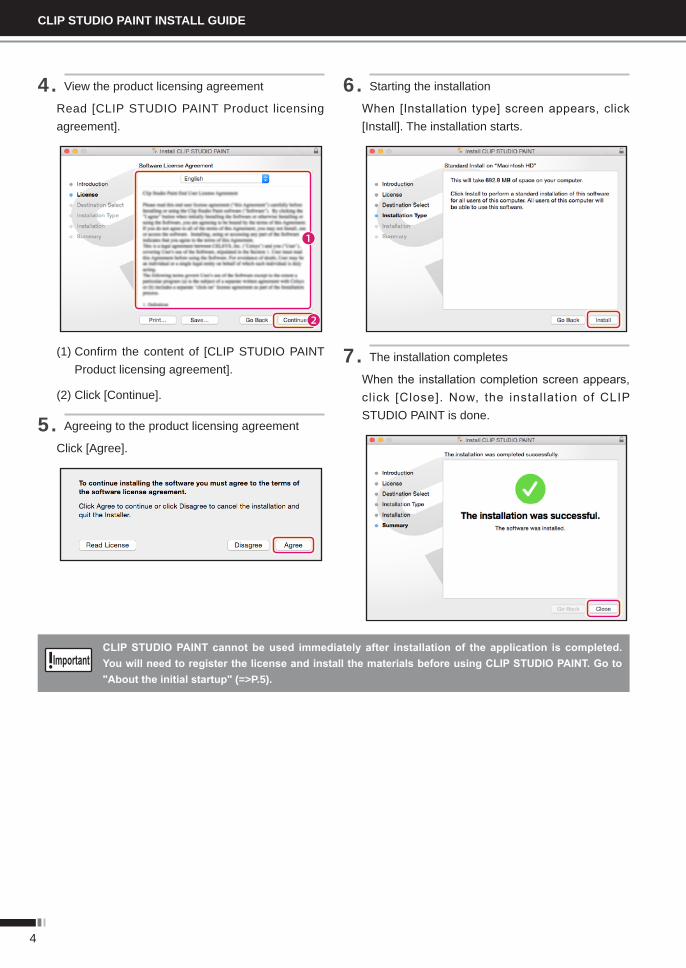
4. View the product licensing agreement
Read [CLIP STUDIO PAINT Product licensing agreement].
(1) Confirm the content of [CLIP STUDIO PAINT Product licensing agreement].
(2) Click [Continue].
5. Agreeing to the product licensing agreement
Click [Agree].
6. Starting the installation
When [Installation type] screen appears, click [Install]. The installation starts.
7. The installation completes
When the installation completion screen appears, cl ick [Close]. Now, the instal lation of CLIP STUDIO PAINT is done.
CLIP STUDIO PAINT cannot be used immediately after installation of the application is completed. You will need to register the license and install the materials before using CLIP STUDIO PAINT. Go to "About the initial startup" (=>P.5).
5
About the initial startup
About the initial startupFirst time you start CLIP STUDIO PAINT, you should register your license by entering your serial number. Registering your license enables all the features in CLIP STUDIO PAINT.
This section uses Windows screens for the description, but even when you use Mac OS X, the operations will be similar.
About a serial numberA serial number will be required during the installation.
● Keep your serial number nicely because this information matters when you use CLIP STUDIO PAINT.
● If you lose your serial number, it will not be reissued.
● The acts of telling the serial number to a third-party or making it available to general public are prohibited.
● All characters of a serial number are single-byte alphanumerics (in upper case).
About registering a license of the applicationFirst time you start CLIP STUDIO PAINT, you should enter the serial number and register your license via the internet.
If you are using the trial version, see "When you use the trial version with limited features" (=> p.8).
● License registration will never cause the personal information to identify you with to be collected, transferred or used.
● In case license registration could not be completed, CLIP STUDIO PAINT will be started as a trial version with limited features.
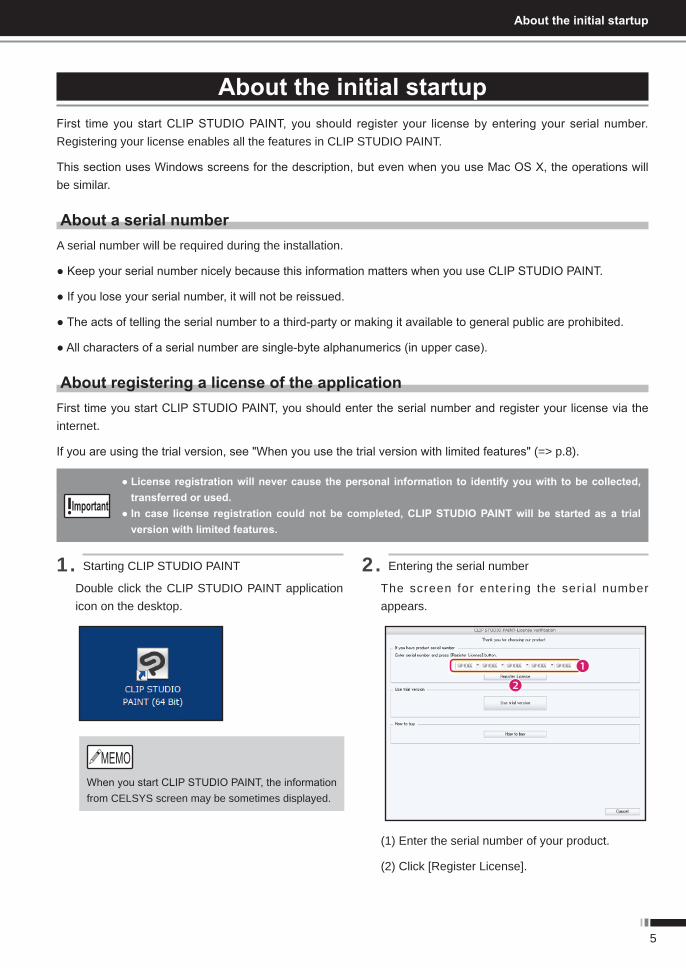
1. Starting CLIP STUDIO PAINT
Double click the CLIP STUDIO PAINT application icon on the desktop.
When you start CLIP STUDIO PAINT, the information from CELSYS screen may be sometimes displayed.
2. Entering the serial number
The screen for entering the serial number appears.
(1) Enter the serial number of your product.
(2) Click [Register License].
6
CLIP STUDIO PAINT INSTALL GUIDE
Clicking [Use trial version] starts the trial version with limited features.
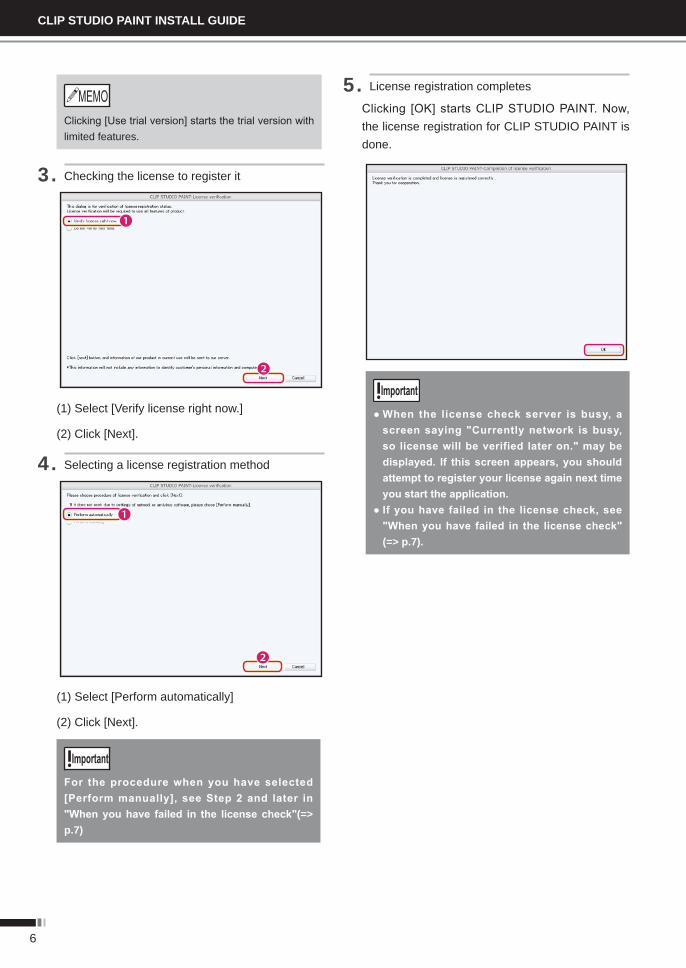
3. Checking the license to register it
(1) Select [Verify license right now.]
(2) Click [Next].
4. Selecting a license registration method
(1) Select [Perform automatically]
(2) Click [Next].
For the procedure when you have selected [Perform manually], see Step 2 and later in "When you have failed in the license check"(=> p.7)
5. License registration completes
Clicking [OK] starts CLIP STUDIO PAINT. Now, the license registration for CLIP STUDIO PAINT is done.
● When the license check server is busy, a screen saying "Currently network is busy, so license will be verified later on." may be displayed. If this screen appears, you should attempt to register your license again next time you start the application.
● If you have failed in the license check, see "When you have failed in the license check" (=> p.7).

7
About the initial startup
When you have failed in the license check
If you have failed in the license check, you can perform it from a web browser or mobile phone.
1. Starting the license check screen
If you fail in the license check, [CLIP STUDIO PAINT-Error of license verification] screen appears.
(1) Select [Yes, verify license in another procedure.]
(2) Clicking [Next] displays [CLIP STUDIO PAINT-License verification] screen.
2. Checking the license
Connect to the website from your web browser, issue an authentication key and check your license.
A
B
(1) Issue an authentication key from your web browser.
● For a web browser, click the link in [A] and follow the displayed screen to issue an authentication key.
● For a smartphone that supports a two-dimensional code, read open the two-dimensional code in [B].
● Then, a license authentication key will be automatically entered. Issue the authentication key by following the displayed screen.
(2) Enter the issued authentication key.
(3) Click [Next].
8
CLIP STUDIO PAINT INSTALL GUIDE
For more information on how to read the two-dimensional code, refer to the manual of your mobile phone. The two-dimensional code may called a "QR-code®" or a "bar-code" depending on a mobile phone you use.
3. License check completes
Clicking [OK] starts CLIP STUDIO PAINT. Now, the license check for CLIP STUDIO PAINT is done.
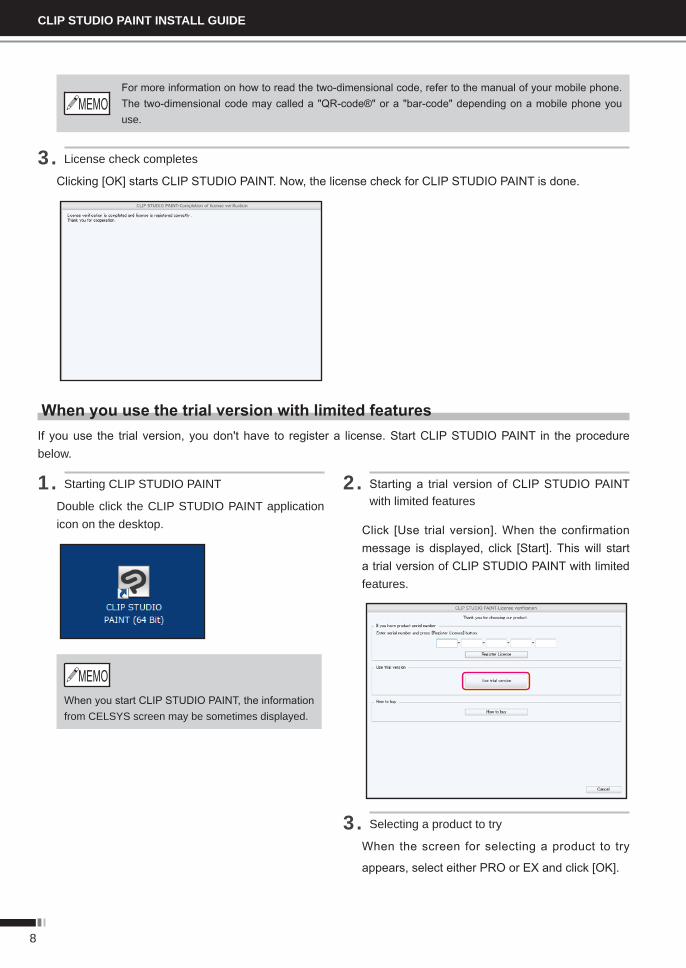
When you use the trial version with limited featuresIf you use the trial version, you don't have to register a license. Start CLIP STUDIO PAINT in the procedure below.
1. Starting CLIP STUDIO PAINT
Double click the CLIP STUDIO PAINT application icon on the desktop.
When you start CLIP STUDIO PAINT, the information from CELSYS screen may be sometimes displayed.
2. Starting a trial version of CLIP STUDIO PAINT with limited features
Click [Use trial version]. When the confirmation message is displayed, click [Start]. This will start a trial version of CLIP STUDIO PAINT with limited features.
3. Selecting a product to try
When the screen for selecting a product to try
appears, select either PRO or EX and click [OK].
9
About the initial startup
Viewing the Information from CELSYSBefore CLIP STUDIO PAINT starts, a screen for confirming to connect to the network to view the information from CELSYS is displayed. Clicking [Yes] starts your browser to display the information on update and good deals.
When you start it the second time and later, it will behave as below:
● When you have selected [Yes] during the initial startup, you will be automatically connected to the network to let you view the information from CELSYS.
● When you have selected [No] during the initial startup, CLIP STUDIO PAINT will start up without letting you view the information from CELSYS. Note that, even if you have selected [No], a message confirming to display the information from CELSYS will be displayed 15 days after the initial startup.
In addition, confirming to view the information from CELSYS will never cause the personal information to identify you with to be collected, transferred or used.
Manual license check
If you cannot connect to the network when the license check is to be done, the license check error is displayed. Selecting [Help] menu ([CLIP STUDIO PAINT] menu in Mac OS X version) -> [Check License] enables you to manually check your license beforehand, independently of the number of remaining days. In this case, the next license check will be held in a certain period that is 15 days after the date you checked the license.
When registering the license from CLIP STUDIO PAINTEven when you have started a trial version of CLIP STUDIO PAINT, selecting [Help] menu ([CLIP STUDIO PAINT] menu in Mac OS X version) -> [Register License] will enable you to register the license.
For more information on license registration, refer to steps on entering your serial number in "About the initial startup" (=> p.5).
Upgrading the softwareUsers of CLIP STUDIO PAINT DEBUT and PRO, who have acquired the upgrade license, are required for license registration via CLIP STUDIO PAINT in use. [Help] menu ([CLIP STUDIO PAINT] menu for Mac OS X version) -> choosing [Register License] allows the user for license registration.
For more information on license registration, refer to steps on entering your serial number in "About the initial startup" (=> p.5).
When "License registration error" or "Expiration of license effective term" messages appearIf the license was not determined to be registered for the product that has an effective term, or if the effective term elapsed, "License registration error" or "Expiration of license effective term" messages are displayed. Click [OK] on the message screen to see the information from the displayed message.
10
CLIP STUDIO PAINT INSTALL GUIDE
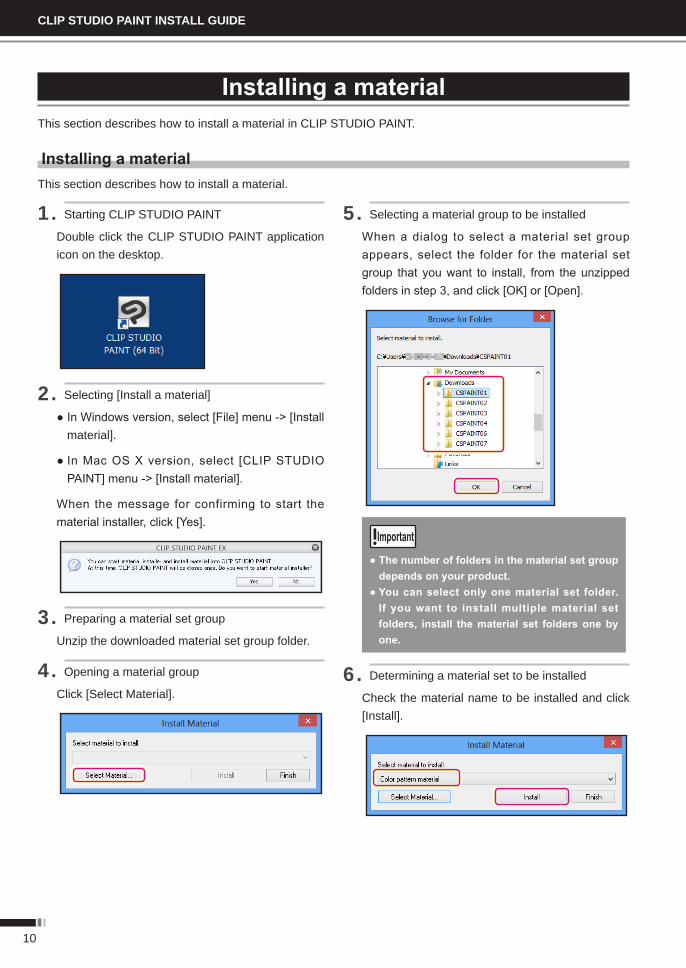
Installing a materialThis section describes how to install a material in CLIP STUDIO PAINT.
Installing a materialThis section describes how to install a material.
1. Starting CLIP STUDIO PAINT
Double click the CLIP STUDIO PAINT application icon on the desktop.
2. Selecting [Install a material]
● In Windows version, select [File] menu -> [Install material].
● In Mac OS X version, select [CLIP STUDIO PAINT] menu -> [Install material].
When the message for confirming to start the material installer, click [Yes].
3. Preparing a material set group
Unzip the downloaded material set group folder.
4. Opening a material group
Click [Select Material].
5. Selecting a material group to be installed
When a dialog to select a material set group appears, select the folder for the material set group that you want to install, from the unzipped folders in step 3, and click [OK] or [Open].
● The number of folders in the material set group depends on your product.
● You can select only one material set folder. If you want to install multiple material set folders, install the material set folders one by one.
6. Determining a material set to be installed
Check the material name to be installed and click [Install].
11
Installing a material
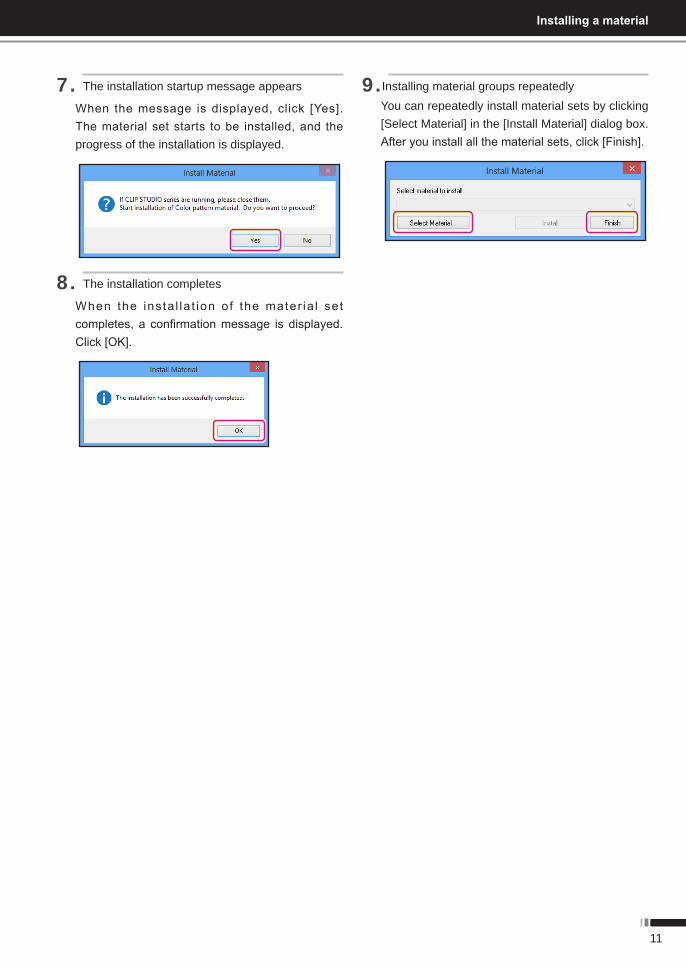
7. The installation startup message appears
When the message is displayed, click [Yes]. The material set starts to be installed, and the progress of the installation is displayed.
8. The installation completes
When the ins ta l la t ion o f the mater ia l set completes, a confirmation message is displayed. Click [OK].
9.Installing material groups repeatedlyYou can repeatedly install material sets by clicking [Select Material] in the [Install Material] dialog box. After you install all the material sets, click [Finish].
12
CLIP STUDIO PAINT INSTALL GUIDE
Uninstalling the ApplicationWhen you need to uninstall the application, perform the procedure below.
Delete a registered material set before uninstalling the application.
Deleting a registered material set
Delete a registered material set before uninstalling the application.
When you are using Windows 10
Select Windows [Start] button -> [All Applications] -> [CLIP STUDIO] and click [Uninstall Material].
When you are using Windows 8
From Windows Start screen, click [Uninstall Material].
When you are using Windows 7
Select Windows [Start] button -> [All Programs] -> [CLIP STUDIO] and click [Uninstall Material].
When you are using Mac OS X
For a hard disk where CLIP STUDIO PAINT is installed, select [Application] folder -> [CLIP STUDIO 1.5 EN] and click [MaterialUninstaller].
Deleting the application
When you need to uninstall the application, perform the procedure below.
When you are using Windows 10
Right click Windows [Start] button, then select [Control Panel] -> [Programs] -> [Programs and Features] -> [CLIP STUDIO PAINT 1.X.X] and click [Uninstall] button.
When you are using Windows 8
Display the desktop and place the mouse cursor on the right upper corner of the screen. Select [Settings] -> [Control Panel] -> [Programs] -> [Programs and Features] -> [CLIP STUDIO PAINT1.X.X] and click [Uninstall] button.
When you are using Windows 7
Select Windows [Start] button -> [Control Panel] -> [Programs] -> [Programs and Features] -> [CLIP STUDIO PAINT1.X.X] and click [Uninstall] button.
When you are using Mac OS X
Delete [CLIP STUDIO 1.5 EN] folder from [Application] folder.
13
Information for Services and Supports
Information for Services and SupportsIn case you have difficulty in using your product, the latest product information and support information are available and you can contact us, too.
Before contacting usWe provide you with the latest product information and support information via web pages. Please check them out before consulting our support help desk.
CLIP STUDIO official site "CLIP STUDIO.NET"
This is the homepage where various newest information regarding CLIP STUDIO PAINT are available. The product information, update downloading services, and dealing store information are updated accordingly.
Downloading and installing the newest update may solve your problem. You can also check the specifications of your product here.
CLIP STUDIO.NET
URL:http://www.clipstudio.net/en/
Training and Tutorials
This will let you learn as a course how to use CLIP STUDIO PAINT and the drawing techniques of popular drawers.
URL:http://www.clipstudio.net/en/howto/
CLIP STUDIO PAINT support information
Support information is available for the questions determined after the shipment of the products and frequently asked questions to our support center. Check them out before consulting our support help desk.
CLIP STUDIO PAINT support information page
URL:http://www.clipstudio.net/en/support/

14
CLIP STUDIO PAINT INSTALL GUIDE
Inquiries about the productsWe have created online support help desk for customers. If you have some questions, contact us at the inquiry help desk described below.
Checking before contacting us
Before contacting us, ensure to see "Before contacting us"(=> p.13) and check each item in it.
Your system environment
Prepare your system environment. The items marked with * will be required if you have changed the settings.
Product version [Example] CLIP STUDIO PAINT PRO 1.5.4Your computer's OS and its version [Example] Windows 8.1 (64bit)Folder where CLIP STUDIO PAINT is installed (*)
[Example] C:\Program Files\CELSYS\CLIP STUDIO 1.5 EN\
Memory allocation size of CLIP STUDIO PAINT (*)
[Example] 1 GB
Tablet type and driver version [Example] WACOM XXXXXX driver version:
Trouble
Determine the situation when your trouble occurred.
Characteristics of the data where your trouble takes place
Let us know the characteristics of your data, if any, that you have used in your task.
Point where the trouble happened and the trouble's situation
(1) What operation you did when your trouble occurred(2) What state was caused as a result of performing the operation. If a
dialog was displayed, inform us of the content of the dialog, too.(3) What operation you did subsequently
Frequency where the trouble happens
Always occurs/often occurs/sometimes occurs/has never occurred
Inquiry help desk
If you are using a PC
Access the URL below and contact us from the web form:
URL: https://www2.celsys.co.jp/support/service_en/service.html
In case mail rejection is set, we may not able to respond. Please be aware of your mail settings.
4th edition published March 2016
1st edition published August 2013
Published and produced by CELSYS, Inc.
* We will replace this book if any pages are missing or out of order. Please contact our inquiry help desk in such cases. We apologize for the inconvenience.
* This manual (including its data version) must not be duplicated or copied in any way except in cases permitted by law or when consent is given by the proprietor.
* This book (including in electronic data format) has been written and edited based on product programs current as of March 2016 and may differ from actual product program specifications.
* CELSYS, CLIP STUDIO PAINT and CLIP STUDIO are registered trademarks of CELSYS, Inc.
* Microsoft and Windows are trademarks or registered trademarks of Microsoft Corporation in the United States and other countries.
* Apple and Macintosh are trademarks or registered trademarks of Apple Inc. in the United States and other countries.
* QR Code is a registered trademark of Denso Wave Inc.
* Other company and product names noted herein are trademarks or registered trademarks of their respective companies.
CLIP STUDIO PAINT Install GuideCopyright© CELSYS,Inc. All Rights Reserved.
CLIP STUDIO.net
http://www.clipstudio.net/