Embed Size (px)
Citation preview


Coaching Guide
© 2013 USBC Coaching Certification and Development P a g e | 1
High School Bowling Coaches & Volunteers,
The mission of USBC High School is to offer tools and guidance to grow the sport of bowling at the high
school level. We believe that bowling is a sport that all students can learn, excel in and enjoy during their
years of high school and beyond.
In an effort to help those who dedicate their time to high school bowling, USBC High School and USBC
Coaching Certification & Development have collaborated to develop a coaching guide specifically for
high school coaches and volunteers.
This guide contains information on the basic fundamentals of the physical game, framework for a
summer bowling clinic, equipment and lane overview, and practice drills to help enhance the learning
experience for you and your team.
We encourage you to use this resource to assist in the development of your team. The information,
activities and drills in this guide are simply suggestions to help advance and refine your high school
athletes’ skills. Please feel free to add any drills or suggestions you feel will help your team succeed. Our
hope is that this informational guide can be one of many tools to assist your efforts in the development of
these student-athletes.
On behalf of the United States Bowling Congress (USBC), Bowling Proprietors’ Association of America
(BPAA), and the International Bowling Campus Youth Development Team, we thank you for your
continued efforts to grow the sport of bowling, and for making a difference in a student-athlete’s life.
Sincerely,
Brian English
Varsity Bowling Manager

Coaching Guide
P a g e | 2 © 2013 USBC Coaching Certification and Development
Table of Contents The Clinic 3
Three Day Schedule 4
Individual Player Assessment 7
Keeping Score 8
Playing Field 11
Equipment 13
Fundamentals 17
Ball Motion 23
Lane Surface and Characteristics 27
Pattern Shape, Length and Volume 29
Lane Play 35
Targeting Drill 37
Spares 41
Spare Drills 45
Warm up and Cool Down 48
The History of the Baker Game 52
Baker Game Strategic Lineup Guideline 53
Baker Game Teamwork Drill 54
Trouble Shooting 55
Posture in Stance 55
Ball Start 56
Armswing Direction 58
Footwork 61
Opposite Arm 62
Timing 64
Release 65
Finish Position 67
Team Building Exercises 70
Coaching Glossary 73
USBC Membership Opportunities 82
Grant/Scholarship Opportunities 83
Contact Information 84
Coaching Guide
© 2013 USBC Coaching Certification and Development P a g e | 3
The Clinic
Getting Started 1. Make arrangements with the Bowling Center
a. Dates b. Times c. Meeting room availability d. Lane availability e. Costs
2. Choose additional staff a. Based on the number of players, how many coaches will be required?
3. Prepare for the clinic and familiarize yourself with the material 4. Have a coaches meeting
a. Discus the plan and the material b. Go over the material and create the schedule c. Decide if you will be giving the players any material to take home
5. Notify athletes a. Call or email players
6. Run your Clinic Preparation 1. Create your schedule 2. If you are going to have classroom curriculum for the athletes, set up the room one hour
before 3. Have student handouts available 4. Create folders for each player and place an assessment sheet in each 5. Decide what drills will be used
The Schedule A sample three day schedule is included; you can design your own program that will meet your needs including
1. How many days your clinic will run 2. How long they will last 3. Type of activities 4. Classroom curriculum 5. On Lane group drills, individual items of concern, spare drills, Team Competitions 6. Team building activities on or off the lanes

Coaching Guide
P a g e | 4 © 2013 USBC Coaching Certification and Development
The Clinic Three Day Schedule
{Enter name of High School} {Enter dates of clinic}
DAY 1
Start Time End Time Activity Description
8:30 AM 9:00 AM Athletes Arrive
9:00 AM 10:00 AM Classroom Staff Introduction, Curriculum: The Playing Field
10:00 AM 10:10 am Break
10:15 AM 10:30 AM On Lanes Warm-up
10:30 AM 11:50 AM On Lanes Player Assessment
11:50 AM 12:00 PM On Lanes Cool Down
12:00 PM 12:30 PM Lunch
12:30 PM 1:00 PM Classroom Curriculum: Fundamentals
1:00 PM 1:15 PM On Lanes Warm Up
1:15 2:15 On Lanes Work on Physical Game
2:15 PM 2:45 PM Competition 2 Baker Games
2:45 PM 3:00 PM Cool Down Cool Down

Coaching Guide
© 2013 USBC Coaching Certification and Development P a g e | 5
The Clinic
{Enter name of High School} {Enter dates of clinic}
DAY 2
Start Time End Time Activity Description
8:30 AM 9:00 AM Athletes Arrive
9:00 AM 10:00 AM Classroom Curriculum: Spares
10:00 AM 10:10 am Break
10:15 AM 10:30 AM On Lanes Warm-up
10:30 AM 11:50 AM On Lanes Spare Drills
11:50 AM 12:00 PM On Lanes Cool Down
12:00 PM 12:30 PM Lunch
12:30 PM 1:00 PM Classroom Curriculum: Lane Play
1:00 PM 1:15 PM On Lanes Warm Up
1:15 2:15 On Lanes Targeting Drill
2:15 PM 2:45 PM Competition 2 Baker Games
2:45 PM 3:00 PM Cool Down Cool Down

Coaching Guide
P a g e | 6 © 2013 USBC Coaching Certification and Development
The Clinic
{Enter name of High School} {Enter dates of clinic}
DAY 3
Start Time End Time Activity Description
8:30 AM 9:00 AM Athletes Arrive
9:00 AM 10:00 AM Classroom Curriculum: Team Work
10:00 AM 10:10 am Break
10:15 AM 10:30 AM On Lanes Warm-up
10:30 AM 11:50 AM On Lanes Team Work Drill
11:50 AM 12:00 PM On Lanes Cool Down
12:00 PM 12:30 PM Lunch
12:30 PM 1:00 PM Classroom Curriculum: Coaches Choice
1:00 PM 1:15 PM On Lanes Warm Up
1:15 PM 2:15 PM On Lanes Based on Coaches Choice
2:15 PM 2:45 PM Competition 2 Baker Games
2:45 PM 3:00 PM Cool Down Cool Down

Coaching Guide
© 2013 USBC Coaching Certification and Development P a g e | 7
Individual Player Assessment
Position Item of concern Correction
Ball Fit
ST
AN
CE
Position Item of concern Correction
Upper body posture
Ball position
Hand position
Opposite hand
Shoulders
Feet
Body alignment
AP
PR
OA
CH
Step one of a four-step (or step two of a five-step)
Position Item of concern Correction
Ball start
Posture
Armswing
Timing
Opposite arm/hand
Footwork
Step two of a four-step (or step three of a five-step)
Position Item of concern Correction
Posture
Armswing
Timing
Hand position
Opposite arm/hand
Footwork
Step three of a four-step (or step four of a five-step)
Position Item of concern Correction
Posture
Armswing
Timing
Hand position
Opposite arm/hand
Footwork
Step four of a four-step/slide (or step five of a five-step/slide)
Position Item of concern Correction
Posture
Armswing
Timing
Hand position
Opposite arm/hand
Trail leg
Finish Position
Position Item of concern Correction
Posture
Balance
Opposite arm
Trail leg
RE
LE
AS
E
Position Item of concern Correction
Hand position
Wrist position
Ball to ankle distance
Follow through

Coaching Guide
P a g e | 8 © 2013 USBC Coaching Certification and Development
Keeping Score Even though automatic scores are used, teach your athlete’s how to keep score. This information is valuable during competitions. When the game is close, it will help them know what is needed for the team to get the win.
This is a frame
You get to roll the ball 2 times in one frame, unless you get a strike.
There are 10 frames in 1 game
Strike A strike is marked when you knock down all the pins with your first roll. A strike gives you extra pins as a bonus. You do not add up the score for this frame until you have rolled the ball two more times.
Spare A spare is marked when you knock down all the pins with two rolls. A spare gives you extra pins as a bonus, too. You do not add up the score for this frame until you have rolled the ball one more time. Miss or Open If you roll the ball into the gutter on the first roll, it means no pins were hit. Remember, you have two rolls per frame so you still have a chance to knock down some pins or maybe you might knock them all down and get a spare. If you knock down eight pins on your first roll and then you miss the two pins that were standing on the second roll, that also is a miss and you only get to add the eight pins you knocked down to your score.

Coaching Guide
© 2013 USBC Coaching Certification and Development P a g e | 9
Keeping Score, continued
1
st Frame Roll #1 – Athlete knocks down 8 pins.
Roll #2 – Athlete misses the 2 pins left standing, for a score of 8 in the first frame.
2nd
Frame Roll #1 – Athlete knocks down 5 pins. Roll #2 – Athlete knocks down the 5 pins left standing for a spare.
3rd
Frame Roll #1 – Athlete knocks down 3 pins; now the score for the second frame goes in. How do you do this? Simply add the 8 from the first frame, plus 10 for the spare in the second frame, plus the 3 pins that were knocked down on the first roll in the third frame: 8+10+3 = 21.
Roll #2 – Athlete knocks down 5 of the 7 pins that were left standing, so the total for the third frame is 29 (21+8 = 29).
4th
Frame Roll # 1 – Athlete knocks down 8 pins. Roll # 2 – Athlete knocks down 1 of the 2 left standing, so the score in the fourth frame is 38 (29+9=
38).
5th
Frame Roll #1 – Athlete knocks down 7 pins. Roll #2 – Athlete knocks down 1 of the 3 pins left standing, so the score in the fifth frame is 46 (38+8
= 46).
6th
Frame Roll #1 – Athlete knocks down all 10 pins for a strike, so mark an X. Roll #2 – Since the athlete knocked them all down on the first roll, they do not get to roll again until
the next frame.
7th
Frame Roll #1 –Athlete knocks down 9 pins but you must wait to add the score for the sixth frame since the athlete gets one more roll before that happens.
Roll#2 – The athlete knocks the pin down for a spare, so the score for the sixth frame is 66; the 46 plus 10 for the strike, then 10 for the next two rolls: 46+10+10 = 66.
8th
Frame Roll #1 – Athlete knocks down all 10 pins for a strike, mark an X and a score of 86 goes into the seventh frame: 66+10+10 = 86.
Roll #2 – No roll, cannot add score yet
9th
Frame Roll #1 – Athlete knocks down all 10 pin for another strike, mark an X. Roll #2 – No roll, cannot add score yet.
10th
Frame Roll #1 – Athlete knocks down 8 pins, since strikes count 10 plus the next two rolls, a score of 114 gets marked in the eighth frame. Here is how it works: After the strike in the eighth, the first roll was a strike in the ninth frame and the second roll was the 8 pins knocked down in the 10th frame (86+10+10+8 = 114).
Roll #2 – Athlete knocks down the two pins standing for a spare, which is the second roll for the strike that was rolled in the ninth frame so 20 (10+10) gets added to the 114 for a score of 134 in the ninth frame. Since the athlete got a spare they get one more bonus roll.
Roll #3 – Athlete knocks down 6 pins, now 16 (10+6) pins are added to the 134 for a total score of 150.

Coaching Guide
P a g e | 10 © 2013 USBC Coaching Certification and Development
Keeping Score, continued
Here are a few practice frames for you to try.
Fill in the score
Bowl a game and keep score

Coaching Guide
© 2013 USBC Coaching Certification and Development P a g e | 11
Playing Field
The Lane A bowling lane includes: the pin deck (where the pins are located) which is approximately three feet in length; the lane surface (wood or synthetic material), which is 60 feet in length from the foul line to middle of the front pin (called the head pin); gutters (also called channels) along both sides of the lane. The foul line is located at the end of the approach; athletes must stay behind the foul line at all times. Locator Dots & Arrows The approach must be a minimum of 15 feet in length. There are three sets of locator dots on the approach, approximately 2-6 inches and 12-16 feet from the foul line. Some bowling centers have five dots on the back of the approach and others have seven. These dots are used by the athlete to line up before they make their delivery. There also are 10 dots on the lane, approximately 7-9 feet from the foul line and seven arrows approximately 12-16 feet from the foul line that are used as targets. When counting the arrows, right-handed athletes start from the right and count left, and left-handed athletes start from the left and count right.

Coaching Guide
P a g e | 12 © 2013 USBC Coaching Certification and Development
Playing Field, continued
Range Finders At a point 33-44 feet beyond the foul line, there may be a maximum of four targets known as range finders. Each target must be uniform in appearance and shall not be wider than a single board or longer than 36 inches. Range Fingers are located on the 10 and 15 boards on both sides of the lane. These help bowlers see the direction of the ball path farther down the lane.
Pins There are 10 pins arranged in a triangle and they are approximately 12 inches apart. The front pin (head pin) being the No. 1 continuing left to right and front to back.
Coaching Guide
© 2013 USBC Coaching Certification and Development P a g e | 13
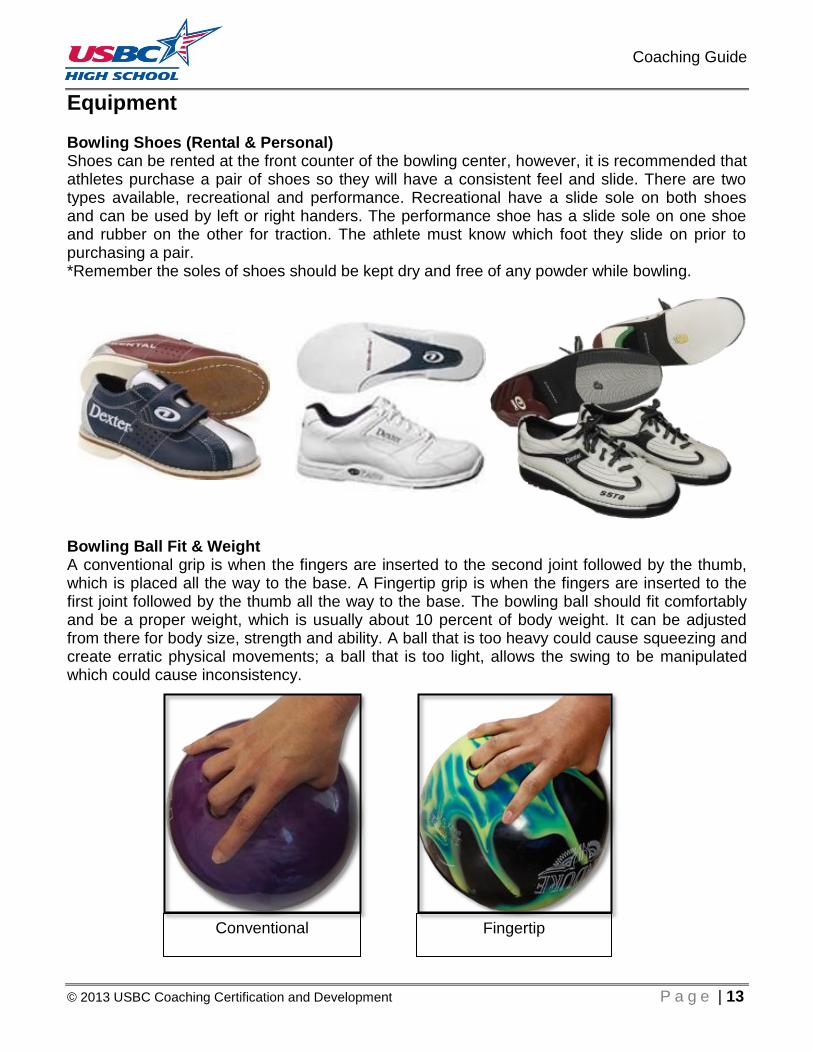
Equipment Bowling Shoes (Rental & Personal) Shoes can be rented at the front counter of the bowling center, however, it is recommended that athletes purchase a pair of shoes so they will have a consistent feel and slide. There are two types available, recreational and performance. Recreational have a slide sole on both shoes and can be used by left or right handers. The performance shoe has a slide sole on one shoe and rubber on the other for traction. The athlete must know which foot they slide on prior to purchasing a pair. *Remember the soles of shoes should be kept dry and free of any powder while bowling. Bowling Ball Fit & Weight A conventional grip is when the fingers are inserted to the second joint followed by the thumb, which is placed all the way to the base. A Fingertip grip is when the fingers are inserted to the first joint followed by the thumb all the way to the base. The bowling ball should fit comfortably and be a proper weight, which is usually about 10 percent of body weight. It can be adjusted from there for body size, strength and ability. A ball that is too heavy could cause squeezing and create erratic physical movements; a ball that is too light, allows the swing to be manipulated which could cause inconsistency.
Conventional Fingertip

Coaching Guide
P a g e | 14 © 2013 USBC Coaching Certification and Development
Equipment, continued Coverstock The coverstock of a bowling ball is the composition of the shell around the core. The amount of friction (or the coefficient of friction) between the lanes and ball is one of the factors in generating hook. Today’s coverstocks greatly enhance the dynamics of bowling balls. The finish of a coverstock is determined by sanding grit. A coverstock finished with lower grit increases friction, creating earlier hook, and a coverstock finished with a higher grit decreases the friction, creating more length. The coverstock can be altered, known as changing the surface to reduce or increase a ball’s original hook potential. Check the procedures adopted by your state athletic/activities association before making any changes. Currently, there are four types of coverstocks:
Plastic (polyester)
Urethane
Resin
Resin with additives
Coverstock Description
of Surface
Amount of
Friction
General Characteristics
Recommended For
Plastic Smooth Very low Generally straight
Beginning athletes or as a spare ball for advanced athletes
Urethane Porous Low to medium
Produce a smooth arching motion
Beginners progressing into intermediate athletes
Resin Tacky Medium to high
Skid in high volume oil, gain traction in low volume oil or on dry portion of lane
Intermediate to advanced athletes
Resin with additives
Rough (contains additives)
High Potentially earlier hook; increased traction in high volume oil
Advanced athletes

Coaching Guide
© 2013 USBC Coaching Certification and Development P a g e | 15
Equipment, continued Coverstock Management Today’s coverstocks greatly enhance the dynamics of bowling balls. The surface of the coverstock can be altered to reduce or increase a ball’s original hook potential. Understanding the characteristics of coverstocks and how you can alter them will help you maximize the athlete’s ability to compete. The coefficient of friction is the governing factor that determines hook potential. Maintaining or altering ball surfaces means adjusting the friction level of your athlete’s equipment so they can match up and effectively play the lanes. The process used to make changes to the surface of the ball is accomplished by:
Sanding
Polishing Changing the surface alters the ball path by affecting when, where and how much a ball will react on a lane. Sanding Sanding scratches the ball’s surface, making it rougher or smoother. Using a rougher grit gives the oil a place to go, allowing the peaks to maintain contact with the lanes surface. Lower grits will create deeper scratches that increase friction and hook potential. Higher grits create a smoother surface, which allows the ball to skid further before reacting. Abralon sanding pads are industry standards for surface management and ball motion manipulation. Sanding grits range from 180 to 4000 and can be used wet or dry, by hand or in ball resurfacing machines. Using 180 grit gives the ball a rough surface, decreasing skid and creating earlier roll; 4000 grit gives the ball a smoother surface, increasing skid creating later roll. Regardless of the grit applied, a slow change in the ball’s reaction will occur with use and the type of lane surface. Overtime a bowling balls surface will gradually change. A ball sanded rough with a lower grit will become smoother and a ball sanded smooth with a higher grit will get rougher. Maintenance is required to maintain the desired ball reaction.
Abralon Sanding Grits
360 500 1000 2000 4000
Rougher Smoother
Earlier Hook Potential Later Hook Potential
High Volume Oil Low Volume Oil

Coaching Guide
P a g e | 16 © 2013 USBC Coaching Certification and Development
Equipment, continued Polishing (Liquid Compounds) After sanding the ball with a higher grit to create that smooth finish, a liquid compound can be added to fine-tune the ball reaction. If your athlete encounters dry lanes, the friction will be higher, so adding polishing compound will help increase the skid phase. While liquid compounds work as a polish, there are some that have a sanding agent in them that can alter the ball surface similar to sandpaper. Read the label to know when they may be used and if they are USBC Approved. Go to the Equipment and Specifications page on BOWL.com for a list of approved products. Building an Arsenal As an athlete’s game continues to develop and become consistent, they will begin to notice that lanes play differently. The lane surface, time of day, weather conditions, number of games bowled and who has bowled on them are a few of the variables that affect ball reaction. Smart choices need to be made when investing in new equipment. If your athlete already owns an aggressive ball, buying another one with the same characteristics will not help; they should look to expanding their versatility to combat the lanes and patterns by creating an arsenal ranging from least aggressive to very aggressive. Take Golf for instance, golfers carry different types of clubs. Each club is designed to drive the ball a different distance. So, by purchasing only aggressive bowling balls, it would be equivalent to a golfer having only drivers in their bag. When starting an arsenal it should contain three types of surface preparations:
Sanded (rough and dull in appearance) earlier roll and is best suited for lanes with a higher volume of oil.
Polished (smooth and shiny in appearance) increases the skid phase and is best suited for a lower volume of oil.
Benchmark (lightly sanded and or lightly polished, matt finish in appearance) in-between the sanded and polished ball. The athlete should start with this ball. It will help determine how the pattern plays and give them a choice to choose the sanded or polished ball if needed.
Lane Condition Coverstock Finish
High Volume Oil Sanded
Medium Volume Oil Benchmark ball
Low Volume Oil Polished
Polish Compounds Add polish compound to fine-tune ball reaction
Decreases skid Increases skid
High Oil Volume Low Oil Volume

Coaching Guide
© 2013 USBC Coaching Certification and Development P a g e | 17
Fundamentals
Right-handed and left-handed distinctions To make the instructions easier to understand, we have made the terms generic.
Ball-side - the hand or side the athlete uses to swing the ball.
Balance arm or opposite arm/hand - the left arm for right-handers and the right arm for left-handers.
Slide foot or opposite foot - the left foot for right-handers and the right foot for left-handers. Picking up the Ball Use two hands when picking up the ball; lift the ball up from the outer sides so the fingers will not get hit by another ball coming through the ball return. Lane Courtesy Before the athlete steps on the approach they should look to their left and right and make sure no one is on the approach next to them. If two athletes step up on the approach at the same time, the athlete on the right has the right-of-way.
Correct Incorrect

Coaching Guide
P a g e | 18 © 2013 USBC Coaching Certification and Development
Fundamentals, continued Athletic Pose & Hand Position The Athletic Pose is a balanced starting position that is used when athletes begin utilizing steps to deliver the ball.
The athlete lines up with the non-ball side foot using the dots on the approach.
Ball-side foot, hip and shoulder set back about two to five inches.
Knees bent slightly.
Spine tilted forward slightly.
Hand is placed in the ball, fingers first, followed by the thumb.
Opposite hand is used to support weight of ball.
Ball is held waist high between chin and shoulder.
Wrist is firm and straight.

Coaching Guide
© 2013 USBC Coaching Certification and Development P a g e | 19
Fundamentals, continued
Four-step delivery, distance to start from the foul line The four-step delivery is great for athletes to develop sound fundamentals. Have the athlete walk to the foul line; turn around with their back to the pins and the center dot two inches behind their feet. They will take four and one-half steps back from the foul line and turn on their toe to face the pins. This is the starting point; adjust as needed.
Four-step delivery
(Start) Set up in Athletic Pose (page 18).
(1) The push away and the first step move together
(2) In the second step, during the down swing, the opposite arm will go out to the side for balance, at the completion of the step the ball will be near the ball-side leg.
(3) In the third step, the ball continues into the backswing and will be at the top of the backswing at the completion of the step.
(4) In the fourth step (slide) as the ball swings forward, the ball-side leg moves behind them with the foot rolling on its side. The ball is released as it passes the ankle of the slide foot.
(Follow-through) After releasing the ball, they follow through towards the target bringing the elbow above the shoulder. Staying in a balanced position watching the ball until it rolls over the target and into the pins.
*It is important to reach out and fully extend the arm so the elbow finishes above the shoulder. This completes the motion of the armswing and reinforces the direction toward the target.
Start 1 2 3 4 (slide) Follow-through

Coaching Guide
P a g e | 20 © 2013 USBC Coaching Certification and Development
Fundamentals, continued
Alternative: Five-step delivery For athletes having a hard time starting with their ball-side foot, have the athlete try adding an additional step at the beginning of the delivery, this is known as the five-step delivery.
To find the starting distance. The athlete will walk back five and one-half steps from foul line.
(Start) Set up in Athletic Pose (page 18).
(1) Begin the delivery by taking a small step forward with the non-ball side foot, without moving the ball.
(2) In the second step, the push away and step move together.
(3) In the third step, during the down swing, the opposite arm will go out to the side for balance, at the completion of the step the ball will be near the ball-side leg.
(4) In the fourth step, the ball continues into the backswing and will be at the top of the backswing at the completion of the step.
(5) In the fifth step (slide), as the ball swings forward, the ball-side leg moves behind them with the foot rolling on its side. The ball is released as it passes the ankle of the slide foot.
(Follow-through) After releasing the ball, they follow through towards the target bringing the elbow above the shoulder. Staying in a balanced position and watch the ball until it rolls over the target and into the pins.
Start & 1 2 3 4 5 (slide) Follow-through
Coaching Guide
© 2013 USBC Coaching Certification and Development P a g e | 21
Fundamentals, continued
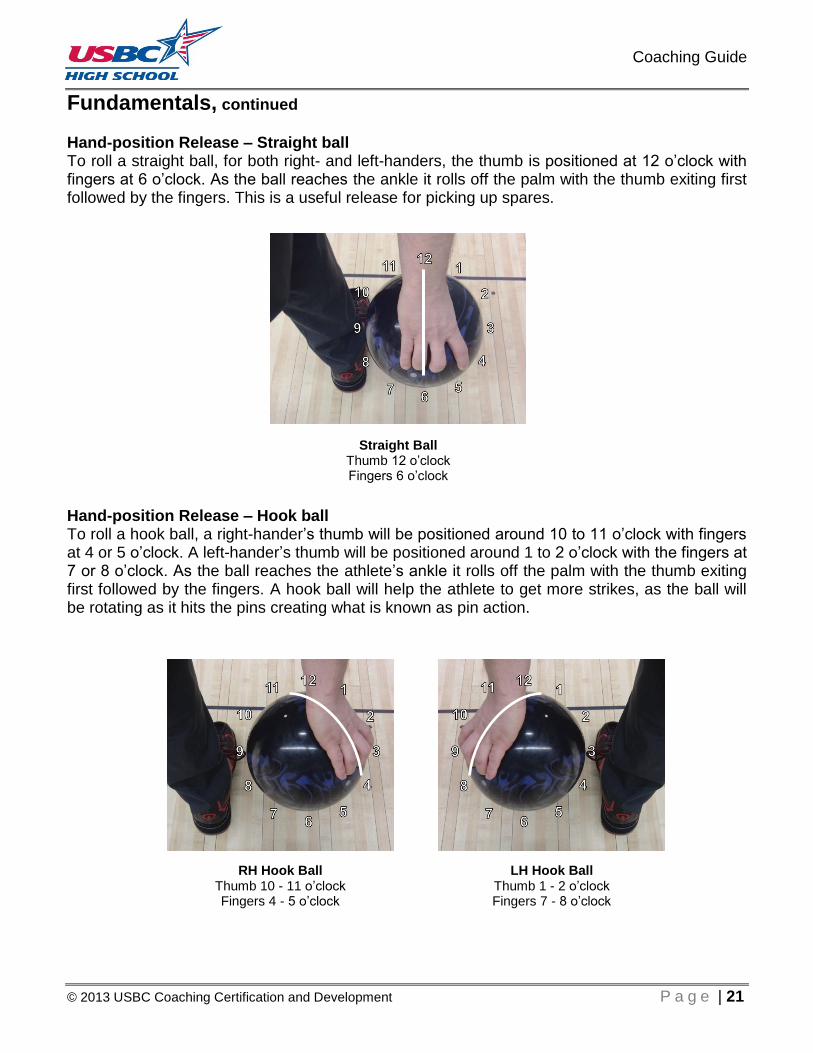
Hand-position Release – Straight ball To roll a straight ball, for both right- and left-handers, the thumb is positioned at 12 o’clock with fingers at 6 o’clock. As the ball reaches the ankle it rolls off the palm with the thumb exiting first followed by the fingers. This is a useful release for picking up spares.
Hand-position Release – Hook ball To roll a hook ball, a right-hander’s thumb will be positioned around 10 to 11 o’clock with fingers at 4 or 5 o’clock. A left-hander’s thumb will be positioned around 1 to 2 o’clock with the fingers at 7 or 8 o’clock. As the ball reaches the athlete’s ankle it rolls off the palm with the thumb exiting first followed by the fingers. A hook ball will help the athlete to get more strikes, as the ball will be rotating as it hits the pins creating what is known as pin action.
Straight Ball Thumb 12 o’clock Fingers 6 o’clock
RH Hook Ball Thumb 10 - 11 o’clock Fingers 4 - 5 o’clock
LH Hook Ball Thumb 1 - 2 o’clock Fingers 7 - 8 o’clock

Coaching Guide
P a g e | 22 © 2013 USBC Coaching Certification and Development
Fundamentals, continued
Finish Position
The most important part of the delivery is the finish position. When a “good shot” has been made it can be seen in the follow through and finish position. The ball-side arm should be fully extended so the elbow is above the shoulder (they should then relax the arm and let it swing down naturally while holding the finish position). The opposite arm will remain out to the side during the delivery and follow through. This keeps them balanced and helps the body remain square with the direction of the ball path. The ball-side leg finishes behind them with the foot rolled on its side. To determine if they had good balance through-out the delivery, they should be able to hold this position until the ball hits the pins. Footwork Footwork is the foundation to a solid physical game. Since bowling balls are heavy, maintaining balance and good footwork throughout the delivery is important.
(1) The first step of a four-step delivery crosses slightly in front of the other foot. This helps the armswing stay in a straight line.
(2) The second step also will go slightly left as the ball needs to clear the ball-side leg.
(3) The third step goes straight as the ball goes into the top of the backswing.
(4) The fourth or slide step will go toward the ball path as the ball comes down from the top of the backswing into the release.

Coaching Guide
© 2013 USBC Coaching Certification and Development P a g e | 23
Ball Motion Influence Ball speed refers to the rate of speed that the ball travels down the lane. Friction between the ball surface and the lane helps the ball to slow down, creating hook potential.
The faster the ball speed, the less time it has to travel down the lane, decreasing hook potential. The slower the ball speed, the more time it has to travel down the lane, increasing hook potential.
Revolutions A revolution, or rev, is one complete turn or rotation of a round object on its axis – 360 degrees equals one revolution. When an athlete increases the revolutions to a bowling ball it will shorten the skid phase, creating an earlier hook and roll phase.
There is a direct correlation between the hand position at the point of release and the number of revolutions an athlete may potentially impart to the ball. The further the fingers are under the equator of the ball, the longer the fingers remain in the ball, creating more revolutions.

Coaching Guide
P a g e | 24 © 2013 USBC Coaching Certification and Development
Ball Motion, continued Rotation The amount of axis rotation at release will affect the hook potential. As a ball starts to lose axis rotation, the hook phase begins.
Axis rotation comes from the athlete’s hand position at the release. When the ball is released with the hand towards the outside of the ball it will have side rotation, this creates hook. When the hand is behind the ball it will have forward rotation, this creates a straighter roll.
Coaching Guide
© 2013 USBC Coaching Certification and Development P a g e | 25
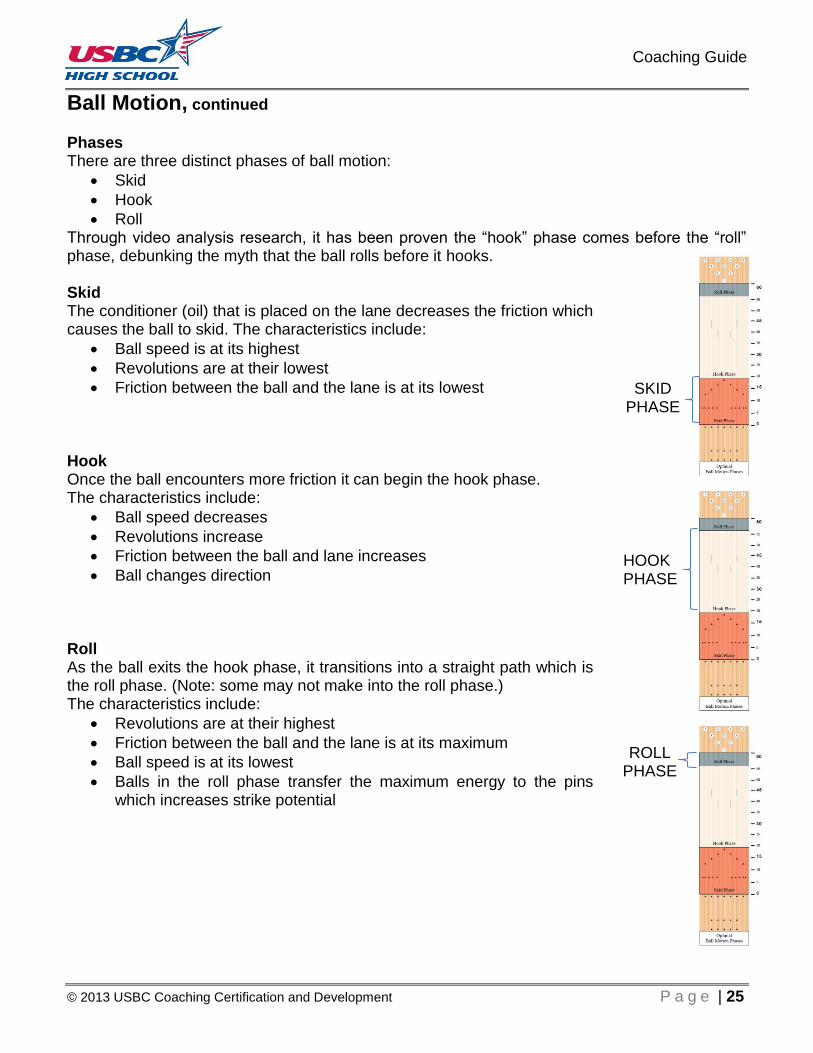
Ball Motion, continued Phases There are three distinct phases of ball motion:
Skid
Hook
Roll Through video analysis research, it has been proven the “hook” phase comes before the “roll” phase, debunking the myth that the ball rolls before it hooks. Skid The conditioner (oil) that is placed on the lane decreases the friction which causes the ball to skid. The characteristics include:
Ball speed is at its highest
Revolutions are at their lowest
Friction between the ball and the lane is at its lowest Hook Once the ball encounters more friction it can begin the hook phase. The characteristics include:
Ball speed decreases
Revolutions increase
Friction between the ball and lane increases
Ball changes direction
Roll As the ball exits the hook phase, it transitions into a straight path which is the roll phase. (Note: some may not make into the roll phase.) The characteristics include:
Revolutions are at their highest
Friction between the ball and the lane is at its maximum
Ball speed is at its lowest
Balls in the roll phase transfer the maximum energy to the pins which increases strike potential
SKID PHASE
HOOK PHASE
ROLL PHASE

Coaching Guide
P a g e | 26 © 2013 USBC Coaching Certification and Development
Ball Motion, continued Understanding Ball Motion Phases Lane surface types, oil patterns and bowling balls can create different ball reactions. As a coach it is your job to understand ball reaction based on the pattern your athlete is bowling on. This can make the difference between striking or not.
Early – Shorter Skid Phase, Earlier Hook and Roll Phase
Late – Longer Skid Phase, Later Hook Phase and little or no Roll Phase
Coaching Guide
© 2013 USBC Coaching Certification and Development P a g e | 27
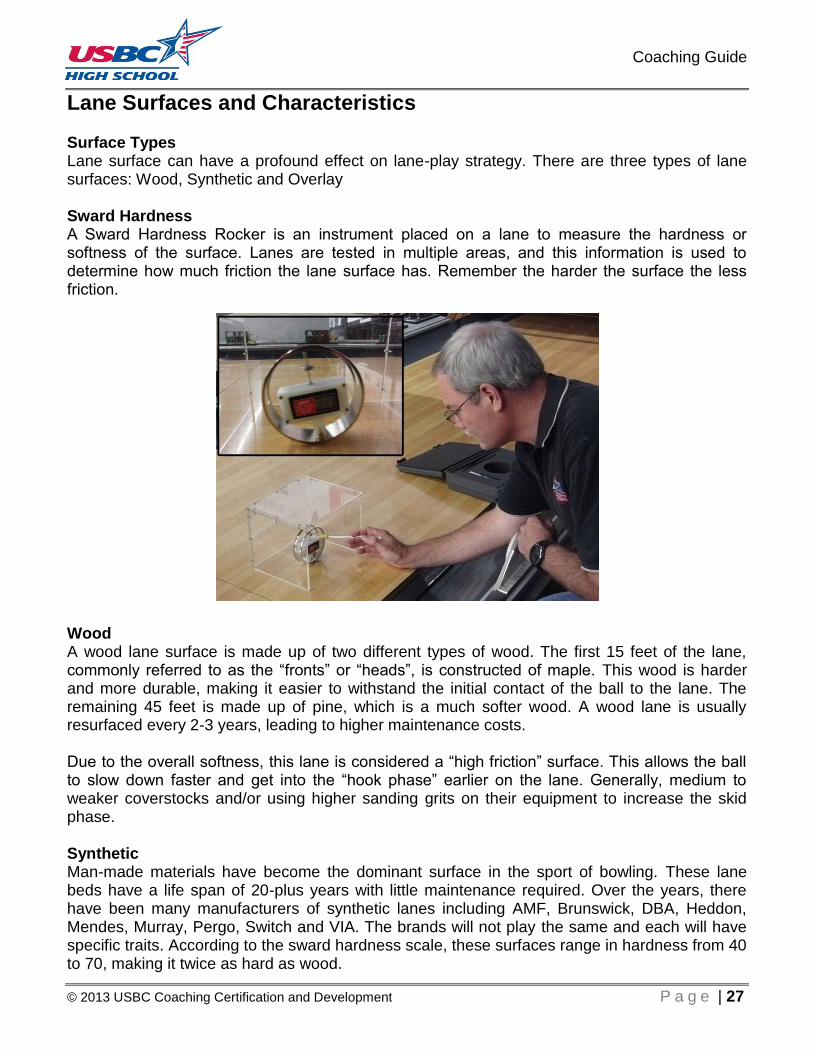
Lane Surfaces and Characteristics Surface Types Lane surface can have a profound effect on lane-play strategy. There are three types of lane surfaces: Wood, Synthetic and Overlay Sward Hardness A Sward Hardness Rocker is an instrument placed on a lane to measure the hardness or softness of the surface. Lanes are tested in multiple areas, and this information is used to determine how much friction the lane surface has. Remember the harder the surface the less friction.
Wood A wood lane surface is made up of two different types of wood. The first 15 feet of the lane, commonly referred to as the “fronts” or “heads”, is constructed of maple. This wood is harder and more durable, making it easier to withstand the initial contact of the ball to the lane. The remaining 45 feet is made up of pine, which is a much softer wood. A wood lane is usually resurfaced every 2-3 years, leading to higher maintenance costs. Due to the overall softness, this lane is considered a “high friction” surface. This allows the ball to slow down faster and get into the “hook phase” earlier on the lane. Generally, medium to weaker coverstocks and/or using higher sanding grits on their equipment to increase the skid phase. Synthetic Man-made materials have become the dominant surface in the sport of bowling. These lane beds have a life span of 20-plus years with little maintenance required. Over the years, there have been many manufacturers of synthetic lanes including AMF, Brunswick, DBA, Heddon, Mendes, Murray, Pergo, Switch and VIA. The brands will not play the same and each will have specific traits. According to the sward hardness scale, these surfaces range in hardness from 40 to 70, making it twice as hard as wood.

Coaching Guide
P a g e | 28 © 2013 USBC Coaching Certification and Development
Lane Surfaces and Characteristics Synthetic, continued The harder the surface, the less friction there is, they tend to play straighter allowing ball to retain more energy through the front part of the lane, delaying the “hook” and “roll” phases. To combat this slicker surface, players will generally use medium to strong coverstocks, and/or lower sanding grits on their equipment, to shorten the skid phase.
Overlay This surface gets its name from the material applied on top of the existing wood lanes. An overlay surface is typically used to extend the life of wood lanes that can no longer be refinished. It is a less expensive alternative to installing new synthetic lanes. There are two major brands of overlay surfaces: Guardian – It adheres to the surface and is the softest of all the different surfaces, ranging from 5 to 15 on the sward hardness scale. The soft surface causes the ball to hook earlier, making medium to weak coverstocks a better choice and/or using higher sanding grits on their equipment, to increase the skid phase.
Lane Shield – This product is adhered at the foul line and the rest of the lane is held down by static electricity. Ranging from 30 to 40 on the sward hardness scale makes it the second-lowest friction surface behind synthetics. Being harder than wood but softer than synthetic, allows for a wider range of equipment choices depending on the lane pattern in play.

Coaching Guide
© 2013 USBC Coaching Certification and Development P a g e | 29
Pattern Shape, Length, and Volume When oil is applied to the lane, it is applied in terms of volume (amount), shape (width of lane) and distance (length of lane). When looking at a bowling lane, look at the oil pattern as being three dimensional – height, width and length. Recreational patterns are designed to give the ball easier access to the pocket. This is accomplished by applying a high concentration of oil width-wise across the center and less toward the outside, which will create hook when the ball is thrown toward the outside part of the lane. The oil ratio on recreational patterns is about 10 to 1. These patterns are also known as “house patterns.” USBC Red, White and Blue patterns The Red pattern is designed to provide the greatest amount of forgiveness and be typical of conditions found in most bowling centers today. This pattern is the least challenging of the three. White patterns are a bit tougher, with a smaller ratio of oil from inside to out. And while the Blue pattern is slightly easier than Sport conditions, it is more challenging than the White pattern. Red, White and Blue patterns give the athlete a nice stepping stone to work their way from the house shot to a Team USA Experience or PBA Experience league. It helps educate them as to the role lane conditions play and how it affects their bowling. The USBC Open Championships uses a Sport-compliant condition every year, so these patterns give athletes an opportunity to prepare for the event.

Coaching Guide
P a g e | 30 © 2013 USBC Coaching Certification and Development
Pattern Shape, Length, and Volume, continued Sport bowling is available in many centers. Bowling centers must be Sport certified and athletes competing in a Sport league must purchase a Sport membership upgrade in addition to their Standard membership. If that is the only league they bowl, they must use the average adjustment scale when joining a regular league or tournament. Sport patterns are designed to reward good shot-making. The application of oil is flatter width-wise across the lane, creating a less defined area for “hold” or “hook.” On these patterns, a controllable reaction is essential for optimal scoring. The oil ratio on Sport patterns is a 3:1 compliance. For more information on Sport bowling, visit the Sport bowling page on BOWL.com. Oil pattern lengths can be defined as:
Short – 36 feet or less
Medium – 37 feet to 41 feet
Long – 42 feet or more When bowling internationally, World Tenpin Bowling Association (WTBA) patterns are used. WTBA patterns utilize the three different lengths listed above. Because Team USA participates in international events such as the World Men, Women and Youth Championships, these patterns are used at the Team USA Trials For more information about WTBA patterns, go to www.worldtenpinbowling.com.
SHORT MEDIUM LONG
33 Feet – Sydney 38 Feet – Atlanta 43 Feet – Tokyo
34 Feet – Stockholm 39 Feet – Seoul 44 Feet – London
35 Feet – Beijing 40 Feet – Athens 45 Feet – Mexico City
36 Feet – Los Angeles 41 Feet – Montreal 47 Feet – Paris

Coaching Guide
© 2013 USBC Coaching Certification and Development P a g e | 31
Pattern Shape, Length, and Volume, continued
Short Oil Patterns are 36 feet or shorter in length. This shorter length provides increased friction on the backend of the lane and usually offers less hold towards the middle part of the lane. Breakpoints on these lengths of patterns are generally outside.

Coaching Guide
P a g e | 32 © 2013 USBC Coaching Certification and Development
Pattern Shape, Length, and Volume, continued Medium oil patterns are 37 to 41 feet in length. These patterns allow for the largest variety of equipment choice. Breakpoint on these pattern lengths are generally between the eighth and 12th boards, using moderate launch angles.

Coaching Guide
© 2013 USBC Coaching Certification and Development P a g e | 33
Pattern Shape, Length, and Volume, continued Long oil patterns are 42 feet or longer in length. Breakpoints on these lengths of patterns are generally around the 12th board. Shallow launch angles and inside lines usually yield better results.

Coaching Guide
P a g e | 34 © 2013 USBC Coaching Certification and Development
Pattern Shape, Length, and Volume, continued One of the most misunderstood parts of today’s game is the amount of oil applied to a lane. Most people believe there to be a much greater amount and fail to realize that the distance of the oil pattern determines where to play the breakpoint, and the volume determines what coverstock, surface and core a player should use. Think about it like this: There is 20 milliliters of oil and that amount is used on one lane at a distance of 35 feet. On the next lane, that same amount of oil is used but at a distance of 44 feet. This means the oil has to be spread out on a larger surface so the oil will be thinner for the long pattern and will create more lane surface friction. Whether a short or long pattern, coaches will need to know the player’s style and ball speed in order to select the right ball and ball surface. If the pattern has a high volume of oil, the athlete most likely will use a ball sanded with a lower grit, this will shorten the skid phase. If the pattern has a lower volume of oil, the athlete most likely will use a ball sanded with a higher grit, this will lengthen the skid phase. Low oil volume – under 20 ml Medium oil volume – 21 to 26 ml High oil volume – 26 ml and over
25 ml of oil

Coaching Guide
© 2013 USBC Coaching Certification and Development P a g e | 35
Lane Play Targeting The goal is to hit the pocket, the strike pocket is an area in the pin triangle between the no.1 and No.3 pins for right-handed athletes and between the No.1 and No.2 pins for left-handed athletes. Have your athletes aim at a target that is easy to see, like the arrows. After the ball rolls over the intended arrow, they should continue to watch the path of the ball as it travels down the lane. As consistency is developed the path becomes more predictable. Prior to making any adjustments the athlete should make sure the ball hits their target and follows the intended ball path. Boards For athletes to make more precise adjustments, moving their feet a specific amount of boards is beneficial. Lanes are constructed with 39 one-inch boards; synthetic lanes have the image of boards laminated on the surface. Each locator dot on the approach and at the foul line is five boards apart. Right-handers will count the boards from right to left, and left-handers will count from left to right.

Coaching Guide
P a g e | 36 © 2013 USBC Coaching Certification and Development
Lane Play, continued
Breakpoint Breakpoint is determined from the length of the pattern and can be defined as the farthest outside (closest to channel) point the ball reaches before making its way to the pocket. One of the easiest ways to determine the Breakpoint is by using the minus (-) 31 rule. Take the length of the pattern and subtract 31 this will give you an area for the Breakpoint. Lining up Remember the athlete’s ball will swing next to their body and be released next to their slide foot, so use the slide foot to line up, Right-handers line up using their slide foot to the left of the target and left-handers line up using their slide foot to the right of the target, this will allow for a straight armswing and follow through.
36 Feet – 31 = 5 Board 41 Feet -31 = 10 Board 47 Feet – 31 = 16 Board

Coaching Guide
© 2013 USBC Coaching Certification and Development P a g e | 37
Lane Play, continued
Targeting Drill Instructions Coach chooses arrow for target. A spotter stands behind the athlete in the settee area and watches the ball go down the lane and assigns points based on how close it is to the target. A Post-It-Note tab placed on the target will make it easier for the spotter to determine if the ball went over the intended target. Athletes can keep score on the tracking sheet (Best out of 6).
Points: 3 Direct Hit – Ball rolls over arrow 2 Just Missed – Ball rolls next to arrow (right or left) 1 I So Missed – Ball rolls between arrows (right or left) 0 Complete Miss – Ball rolls over the arrow next to it
Name Date
Shot # 1 2 3 4 5 6 Total Points
Points
* Photo illustrates points based off the second arrow

Coaching Guide
P a g e | 38 © 2013 USBC Coaching Certification and Development
Lane Play, continued
Targeting Drill To make the game a little more challenging try adding a second target using the Breakpoint. This will help create a consistent ball path.
Name Date
Targets
Write in chosen targets (ball must hit both targets)
H=Hit M=Miss Shot #1
H=Hit M=Miss Shot #2
H=Hit M=Miss Shot #3
H=Hit M=Miss Shot #4
H=Hit M=Miss Shot #5
H=Hit M=Miss Shot #6
2
1

Coaching Guide
© 2013 USBC Coaching Certification and Development P a g e | 39
Lane Play, continued
Parallel Move Making a parallel move is a change where the athlete makes a right or left parallel move on the approach and at their target on the lane. This type of move will change the athletes breakpoint, but keep their launch angle the same.
Abstract Move An abstract move can be described as when the athlete moves only their feet and keeps their target the same or they move only their target and keep their feet the same. In both cases, both the launch angle and breakpoint are changed.
Diagonal Move As lanes transition, a diagonal move is most prevalent. An athlete will move their feet and eyes using a 2:1 ratio. This move changes the launch angle, but keeps the breakpoint the same.
Example: Five Board Parallel Move
Example: Athlete moves feet only to the right
Example: Athlete moves feet two boards left and eyes one board left

Coaching Guide
P a g e | 40 © 2013 USBC Coaching Certification and Development
Lane Play, continued
Launch Angle The launch angle is the direction the ball goes through the front part of the lane from the foul line toward the target.
Preset Body Angle USBC Coaching advocates the use of preset launch angles in the stance based on the launch angle intended for the shot. This keeps the body alignment and swing direction “square” to the target line at all times. After changing the starting position on the approach, the athlete must remember to adjust his or her body to the new target line to complete the angular change. If the athlete fails to get the ball to the same target on the lane, he/she needs to understand that this shot represents a different ball path and is not an adjusted path over the original target. The size of the adjustment depends on how badly the object pin was missed. If the ball missed the object pin by two to three boards, a subtle 1- to 1½-board adjustment on the approach is sufficient. If the ball misses the object by more than three boards, a larger adjustment must be made.
Laydown Point The laydown point is how many boards the center of the ball is from the ankle. To figure out the laydown point, the release needs to be filmed and freeze-framed as the ball is at the bottom of the swing next to the ankle. By drawing a line next to the ankle and a line through the center of the ball, it will show the athlete’s laydown point. In the photo below, the athlete’s laydown point is four boards from their ankle. When an athlete knows their specific laydown point, it will help them understand where the ball is at the foul line, which tells them the projection of the launch angle.

Coaching Guide
© 2013 USBC Coaching Certification and Development P a g e | 41
Spares
Know the pin numbers The pins are arranged in a triangle and numbered from 1 to 10 with the pin closest to the foul line (head pin) being No. 1 and numbering left to right from front to back.
The key pin In most cases, the Key Pin needs to be hit first. This is the pin that is closest to the athlete in any spare combination. Exception baby split; use the missing pin as the key pin. Zones Each key pin resides in one of seven zones.

Coaching Guide
P a g e | 42 © 2013 USBC Coaching Certification and Development
Spares, continued
Move feet to a new position on approach Once the key pin has been determined, the next step is to move the slide foot the appropriate amount of boards.
Face the spare After the position on the approach has been changed, set up in the stance so the ball-side feet, knees, hips and shoulders are in line with the intended spare. The adjusted position is very slight and allows them to shoot at the spare without changing the direction of the swing. Draw an imaginary line through the target to the spare and roll the ball across the lane in a straight line towards the pin(s). If the athlete leaves the No. 1 or No. 5 pin, no adjustment is necessary.

Coaching Guide
© 2013 USBC Coaching Certification and Development P a g e | 43
Spares, continued
The adjustment for the following spare system is based off the strike target being the 2nd arrow (10th board) with the starting position on the approach being the center dot (20th board). The adjustments are in 3 board increments (or 3-6-9) for zones on the athlete’s non-ball side and four-board increments (or 4-8-12) for the zones on the athlete’s ball side. The target at the arrows also changes.
Right-handed Spare Chart Use the chart below to help athletes increase their spare making percentage.

Coaching Guide
P a g e | 44 © 2013 USBC Coaching Certification and Development
Spares, continued
Left-handed Spare Chart Use the chart below to help athletes increase the spare making percentage.

Coaching Guide
© 2013 USBC Coaching Certification and Development P a g e | 45
Spares, continued
Low Ball Spare Drill Instructions Low ball is played as a full game. The object is to get the lowest score possible. The athletes will need to keep score on the Low Ball tracking sheet (on following page). Athlete tries to knock the 7 pin and 10 pin out of a full rack using two rolls (one frame). The ball must stay on the lane. On the first roll, if the athlete rolls a real strike or the ball goes into the channel, it counts as a strike. On the second roll, if the ball goes into the channel or does not make contact with at least one pin, it counts as a spare. Coach’s Notes Coaches should help athletes with keeping score and make sure the game is played correctly. Athletes should turn in their tracking sheets. Coaches should keep records to track each athlete’s progress.
7 and 10 Pin for Right-hander

Coaching Guide
P a g e | 46 © 2013 USBC Coaching Certification and Development
Spares, continued
Low Ball Tracking Sheet Name Date
Game
Game
Game
Total
Pins
9
8 95 6 7
2
1 2 3 98
1 2 3 4
84 5 6 7
1
1 2 3
3
10
10
104 5 6 7
Rules Athlete must try and knock out the 7 pin and 10 pin only with the two rolls allowed per frame. (or knock down as few pins as possible) Athlete writes in the number of pins knocked down in the small boxes and totals the score in the larger boxes. A real strike on the first roll counts as a strike. A ball that goes into the channel (gutter) on the first roll is marked as a strike. A ball that goes into the channel (gutter) on the second roll is marked as a spare. A ball that does not make contact with any of the remaining pins standing is marked as a spare.
5
32
8
21

Coaching Guide
© 2013 USBC Coaching Certification and Development P a g e | 47
Spares, continued
Random Single Pin Instructions The coach writes out the following pin numbers on a piece of paper: 2, 3, 4, 6, 7 and 10. They will fold and place the numbers in a bag or container. After the number is drawn, the athletes will line up to shoot the spare out of a full rack of pins (unless the center has the ability to set specific spares) and mark hit or miss on the tracking sheet. (Repeat 3 times for each pin). Coach’s Notes Coaches need to watch the athletes to make sure they line up properly and that the ball makes contact with the intended pin or teammates can watch and make the call. Athletes should turn in their tracking sheets. Coaches should keep records to track each bowler’s progress. Name Date
Pin Target
Write in chosen targets (ball must hit both targets)
H=Hit M=Miss Shot #1
H=Hit M=Miss Shot #2
H=Hit M=Miss Shot #3
2
3
4
6
7
10
Random 2 Pin for Right-hander
Coaching Guide
P a g e | 48 © 2013 USBC Coaching Certification and Development
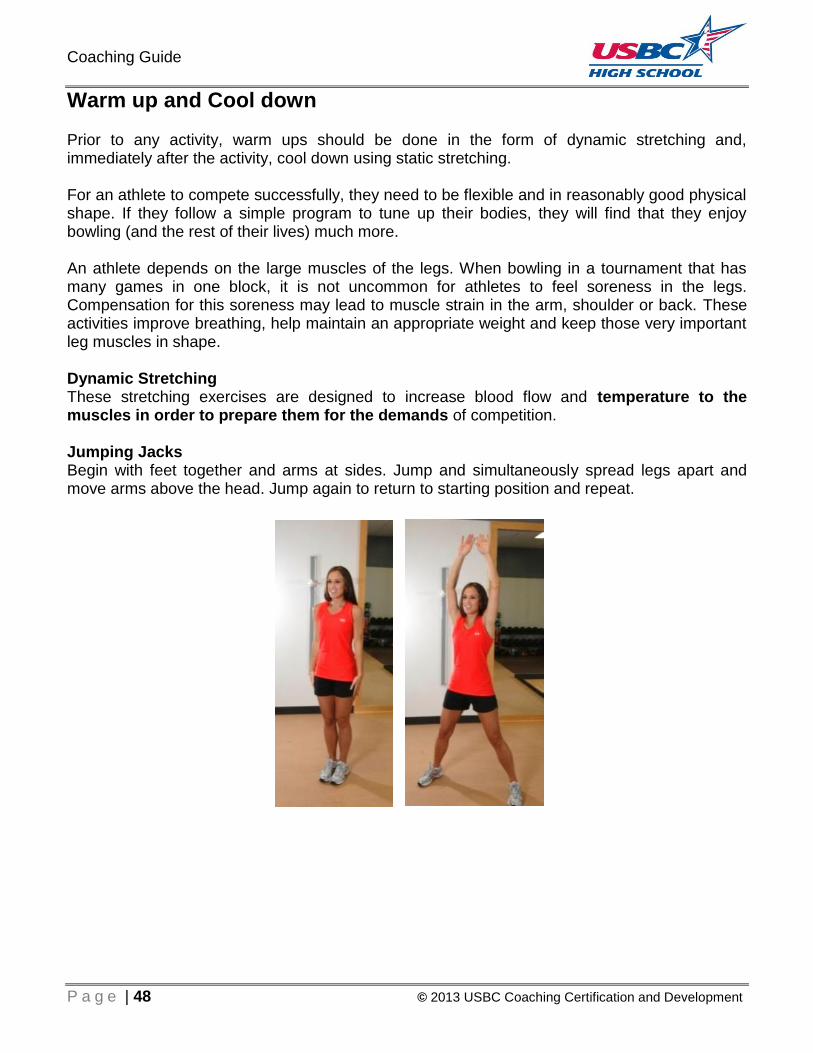
Warm up and Cool down Prior to any activity, warm ups should be done in the form of dynamic stretching and, immediately after the activity, cool down using static stretching. For an athlete to compete successfully, they need to be flexible and in reasonably good physical shape. If they follow a simple program to tune up their bodies, they will find that they enjoy bowling (and the rest of their lives) much more. An athlete depends on the large muscles of the legs. When bowling in a tournament that has many games in one block, it is not uncommon for athletes to feel soreness in the legs. Compensation for this soreness may lead to muscle strain in the arm, shoulder or back. These activities improve breathing, help maintain an appropriate weight and keep those very important leg muscles in shape. Dynamic Stretching These stretching exercises are designed to increase blood flow and temperature to the muscles in order to prepare them for the demands of competition. Jumping Jacks Begin with feet together and arms at sides. Jump and simultaneously spread legs apart and move arms above the head. Jump again to return to starting position and repeat.
Coaching Guide
© 2013 USBC Coaching Certification and Development P a g e | 49
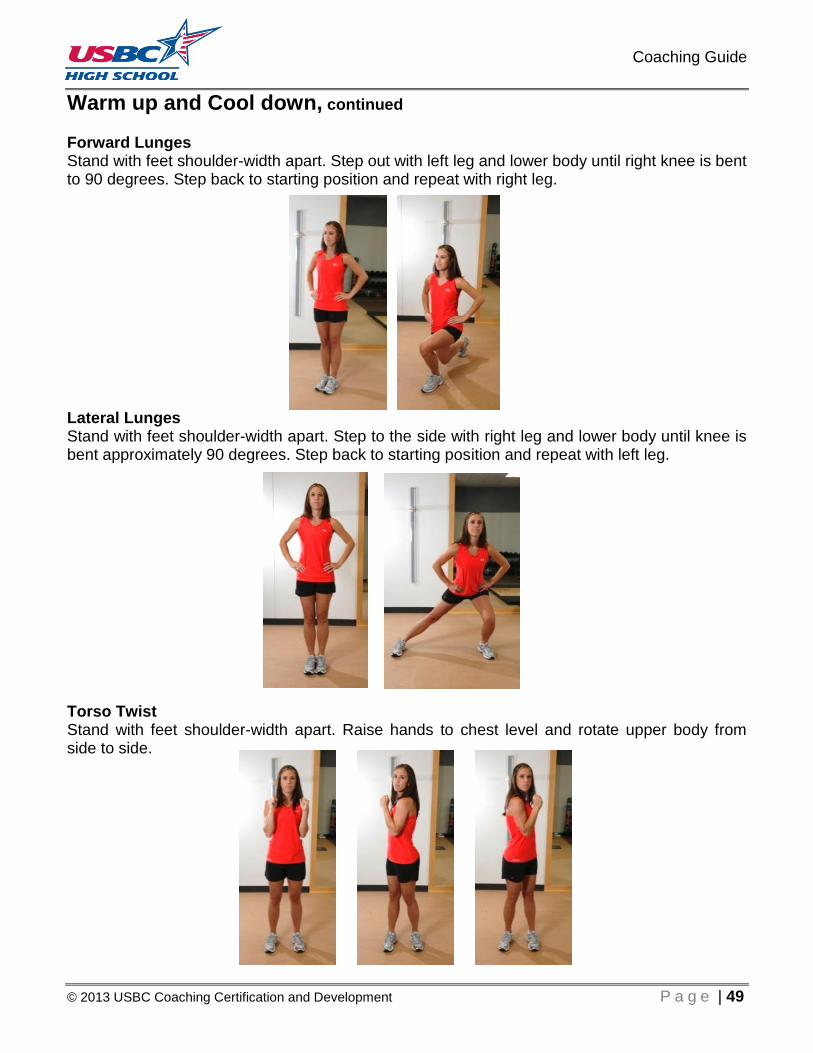
Warm up and Cool down, continued Forward Lunges Stand with feet shoulder-width apart. Step out with left leg and lower body until right knee is bent to 90 degrees. Step back to starting position and repeat with right leg. Lateral Lunges Stand with feet shoulder-width apart. Step to the side with right leg and lower body until knee is bent approximately 90 degrees. Step back to starting position and repeat with left leg. Torso Twist Stand with feet shoulder-width apart. Raise hands to chest level and rotate upper body from side to side.

Coaching Guide
P a g e | 50 © 2013 USBC Coaching Certification and Development
Warm up and Cool down, continued Static Stretching The following stretching exercises are designed to limber those areas that are used the most during bowling. These exercises are most effective when they are performed after bowling. (It is recommended to hold each exercise for 10 seconds.) Hamstring Stretch Stand with feet together with a slight bend in the knees. Bend over at the hips and attempt to touch toes or floor with fingertips. Quadriceps Stretch Balance on one foot while grasping the foot of the opposite leg. Bring foot up to the buttock of the same leg. Repeat with opposite leg.

Coaching Guide
© 2013 USBC Coaching Certification and Development P a g e | 51
Warm up and Cool down, continued Triceps Stretch Lift the bent elbow of one arm above the head so that the hand is resting on the upper back. Grasp the elbow with the opposite hand and gently pull back and toward the middle of the head. Repeat with opposite arm. Low Back Stretch Sit on the floor with legs extended out. Bend one knee and cross leg over the opposite leg so that the foot is placed flat on the floor against the knee. Rotate torso toward leg that is bent. Repeat on opposite side.
Coaching Guide
P a g e | 52 © 2013 USBC Coaching Certification and Development
The History of the Baker Game The format is named after Frank K. Baker, former executive secretary treasurer of the American Bowling Congress.
Baker competitions are unique because they are always bowled as a team and every member must work together on the same bowling game. Typically found in Collegiate tournaments, the Baker format comprises of a team of athletes (usually 5), who rotate bowling in each frame in a game. This is much different than a normal team event in which each athlete will bowl for their own individual scores. In a Baker format a higher emphasis is put on bowling as a team as each shot is absolutely crucial to your team's success. Resource Bowling Tourney.com Frank K. Baker devised the Baker system of scoring in the 1950's while he was Executive Secretary of the American Bowling Congress. This system involves the lead-off person bowling frames one and six, the second person bowling frames two and seven, and so forth. Baker developed his system after the professional National Bowling League failed because of its lack of spectator appeal. It was felt that the traditional system was too tedious for the average spectator to follow. Baker also felt that the five-person team concept in league play was deteriorating. After developing his new system, Baker confronted the Professional Athletes Association regarding the possibility of forming a new league using the Baker system but was unsuccessful in his attempt. Similarly, the American Bowling Congress did not consider utilizing the new format. Thus, the unused Baker scoring system was set aside. In the early 1970's, the National Bowling Council initiated plans for a Bowling Spectacular, involving professional, amateur, collegiate, and military athletes. The Baker system was given consideration as a format to be used in the Collegiate Division of this tournament. In 1974, various colleges and universities, including Kansas State University, experimented with the Baker format in order to assess reactions to this untested, twenty year old system. As a result, the unique Baker format was accepted and was used in the 1975 Bowling Spectacular during the final twelve games to determine the National Collegiate Team Champions. The athletes felt that the Baker system emphasized the idea of performing as a team by capitalizing upon each other's strikes and spares for team count. They felt that the system brought out the best in each athlete for the good of the team. The Baker system was again used in the 1976 and 1977 Bowling Spectaculars to determine the Collegiate Team Champions. However, there are no indications to date that the Baker system has ever been used in a league situation. Resources: Robert E. Yecke The Baker System: An alternative for league bowling, Mort Luby, Jr., "Remembering F. K. B.," The National Bowler’s Journal and Billiard Revue, June, 1975, p. 49., “Wow ' is Reaction of Collegians," The Woman Athlete, May/June,1975, p. 52.

Coaching Guide
© 2013 USBC Coaching Certification and Development P a g e | 53
Five-player Baker Game Strategic lineup guideline A Baker Game is when multiple athletes combine to bowl one game.
Athlete 1 (frames 1 & 6) –Trustworthy and the most consistent, the leadoff athlete will help the
rest of the team get a good read on the lane conditions. This player is positive, energetic and
helps motivate the team throughout competition.
Athlete 2 (frames 2 & 7) – Trusting and comfortable in making moves based off Athlete 1’s
information, this player is positive and will be able to keep the energy level of the team positive
and upbeat.
Athlete 3 (frames 3 & 8) – Steady and reliable in filling frames, this player is level-headed and
able to keep a positive outlook.
Athlete 4 (frames 4 & 9) – Fundamentally solid, this player will share the weight of pressure
toward the end of a game while being able to strike to set up the anchor athlete.
Athlete 5 (frames 5 & 10) – The best and most consistent player on the team, this athlete can
handle the pressure of the 10th frame and keep the motivation going.
Note: Sometimes, a coach can switch players at any time (frame) during the game or have
another player come in and throw the final shot of the 10th frame. Check the procedures
adopted by your state athletic/activities association before making any changes.
Coaching Guide
P a g e | 54 © 2013 USBC Coaching Certification and Development
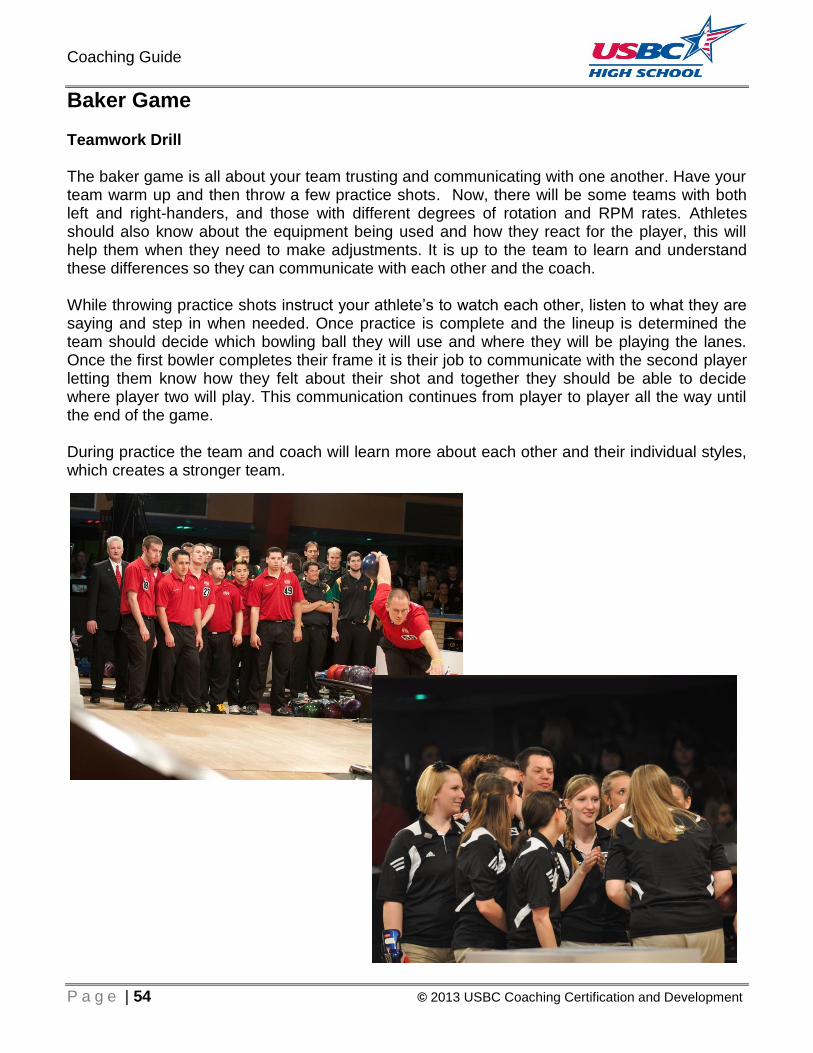
Baker Game Teamwork Drill The baker game is all about your team trusting and communicating with one another. Have your team warm up and then throw a few practice shots. Now, there will be some teams with both left and right-handers, and those with different degrees of rotation and RPM rates. Athletes should also know about the equipment being used and how they react for the player, this will help them when they need to make adjustments. It is up to the team to learn and understand these differences so they can communicate with each other and the coach. While throwing practice shots instruct your athlete’s to watch each other, listen to what they are saying and step in when needed. Once practice is complete and the lineup is determined the team should decide which bowling ball they will use and where they will be playing the lanes. Once the first bowler completes their frame it is their job to communicate with the second player letting them know how they felt about their shot and together they should be able to decide where player two will play. This communication continues from player to player all the way until the end of the game. During practice the team and coach will learn more about each other and their individual styles, which creates a stronger team.
Coaching Guide
© 2013 USBC Coaching Certification and Development P a g e | 55
Trouble Shooting Following are a few common problems, solutions and drills for your athletes. As a coach you will encounter other problems in which you will need a solution. The Athlete Development Guidebook has more drills to help you fine tune your athletes. This book may be purchased at http://usbcbowlingstore.com under the coaching tab. Item of Concern: Posture in Stance
Too stiff
Too far forward
Too far back
Lack of knee bend
Ball held too far in front of the body
Ball held too far away from the body laterally
Feet are positioned incorrect
Lining up with wrong foot
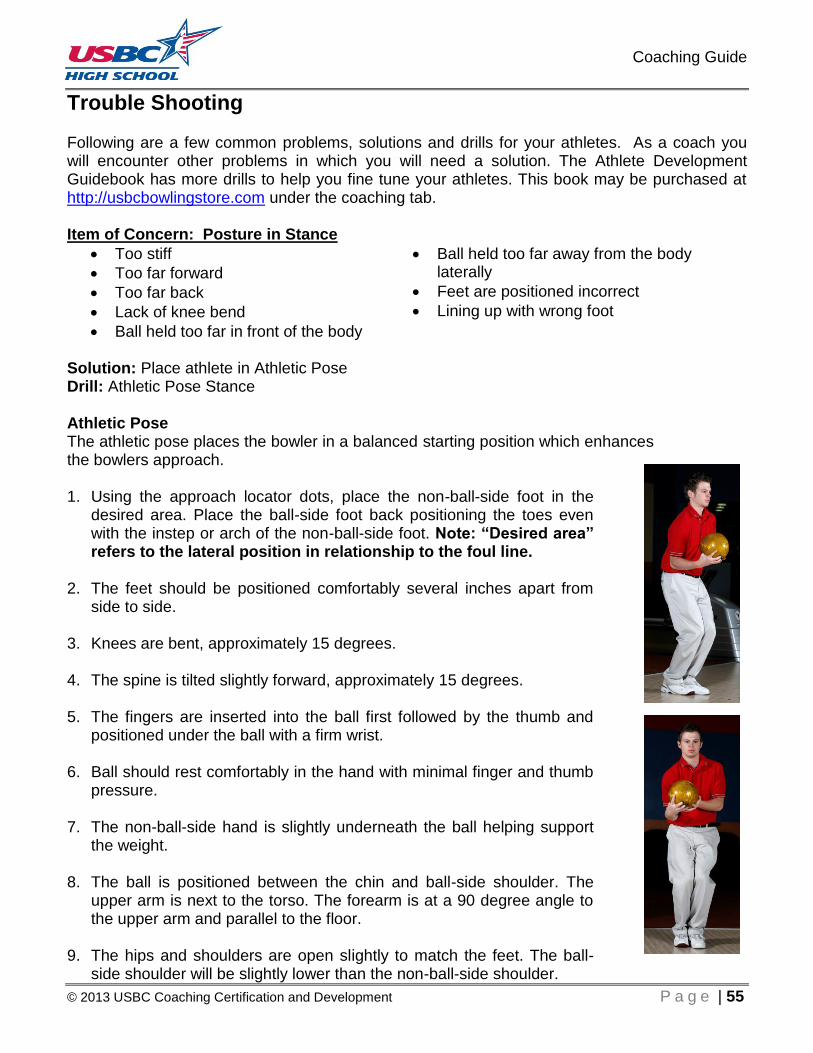
Solution: Place athlete in Athletic Pose Drill: Athletic Pose Stance Athletic Pose The athletic pose places the bowler in a balanced starting position which enhances the bowlers approach. 1. Using the approach locator dots, place the non-ball-side foot in the
desired area. Place the ball-side foot back positioning the toes even with the instep or arch of the non-ball-side foot. Note: “Desired area” refers to the lateral position in relationship to the foul line.
2. The feet should be positioned comfortably several inches apart from
side to side. 3. Knees are bent, approximately 15 degrees. 4. The spine is tilted slightly forward, approximately 15 degrees. 5. The fingers are inserted into the ball first followed by the thumb and
positioned under the ball with a firm wrist. 6. Ball should rest comfortably in the hand with minimal finger and thumb
pressure.
7. The non-ball-side hand is slightly underneath the ball helping support the weight.
8. The ball is positioned between the chin and ball-side shoulder. The upper arm is next to the torso. The forearm is at a 90 degree angle to the upper arm and parallel to the floor.
9. The hips and shoulders are open slightly to match the feet. The ball-
side shoulder will be slightly lower than the non-ball-side shoulder.

Coaching Guide
P a g e | 56 © 2013 USBC Coaching Certification and Development
Trouble Shooting, continued
Item of Concern: Ball Start
Push away is extended too far in front of body
Push away goes up
Push away goes down sharply
Wrist position collapses as ball is moved out
Upper body posture moves forward with push away Solution: While maintaining a firm wrist position, the athlete should keep push away waist level, rounded and the motion should be smooth Drills: Assisted Ball Start, Unassisted Ball Start
Assisted Ball Start This drill requires the assistance of a coach. Prior to starting the drill inform the athlete that the coach will be holding their elbow. Make sure the athlete gives their consent. The athlete should focus the feel of ball and ball-side foot move together.
1. Observe your athlete to find out how many steps they use during their delivery. This will determine how many steps the athlete will use for this drill. Note: This will be the first step of a four-step approach or the second step of a five-step approach.
2. Athlete sets up in the athletic pose (page 55).
3. Coach stands on the ball-side of athlete placing their hand behind the athlete’s elbow.
4. Keeping both hands on the ball, the athlete steps forward with the ball-side foot. The coach will move the athlete’s ball-side arm forward by pushing the elbow lightly until the step is complete and the ball is about 4-6 inches past the ball-side foot. Note: If the athlete’s normal approach is five steps the ball will not move until their second step.
5. Return to athletic pose and repeat.
2 & 3 4 5

Coaching Guide
© 2013 USBC Coaching Certification and Development P a g e | 57
Trouble Shooting, continued
Unassisted Ball Start The focus is on moving the ball and ball-side foot together. 1. Athlete sets up in the athletic pose (page 55). 2. The ball and ball-side foot will move together in a “one-piece movement.” Note: If the
athlete uses a four-step approach the first step and ball move together, if a five step approach is used the second step and ball move together.
3. Keeping both hands on the ball, the ball-side foot moves forward with the ball-side arm until the step is complete with the ball about 4-6 inches past the ball-side foot. Note: At the completion of the step, the athlete should be able to maintain their balance.
4. Return to athletic pose and repeat.
1 2 & 3 4

Coaching Guide
P a g e | 58 © 2013 USBC Coaching Certification and Development
Trouble Shooting, continued
Item of Concern: Armswing Direction
Ball is pushed outside (away from their body)
Ball is pushed inside (in towards the center of their body)
Elbow rolls out during the forward swing Solution: Check the athlete’s set up in stance, make sure they are facing the target path; the push away needs to go straight towards their target and remain close to their body Drills: Armswing, Assisted Swing (These two drills us the Staggered Stance set up, shown below).
Staggered Stance 1. Using the approach locator dots at the foul line, place the non-ball-side foot in the desired
area. Place the ball-side foot 6 – 18 inches behind the non-ball-side foot comfortably with the ball-side foot at an angle for good balance and out of the way of the ball path. Note: “Desired area” refers to the lateral position in relationship to the foul line.
1. The knees are bent so the non-ball side knee is positioned in line with the toe. 2. The spine is tilted slightly forward, approximately 15 degrees. 3. The fingers are inserted into the ball first followed by the thumb. The hand is positioned
under the ball with a firm wrist. 4. Ball should rest comfortably in the hand with minimal finger and thumb pressure. 5. The non-ball-side hand helps support the weight of the ball. 6. The ball is positioned waist high between the chin and ball-side shoulder. The upper arm is
next to the torso. The forearm is at a 90 degree angle to the upper arm and parallel to the floor.
7. The hips and shoulders are open to match the feet. The ball-side shoulder will be slightly
lower than the non-ball-side shoulder. Note: Make sure the athlete has good balance.

Coaching Guide
© 2013 USBC Coaching Certification and Development P a g e | 59
Trouble Shooting, continued
Armswing The athlete should focus on keeping the armswing motion smooth, straight and close to their body. 1. The athlete starts at the foul line in a staggered stance (page 58).
2. The ball is extended about two-thirds away from body and the opposite arm goes out to the
side for balance. Note: If over-extension of the ball occurs, it will affect the athlete’s balance, stability and hand position.
3. The ball swings freely to the top of backswing. 4. From the top of the backswing, the ball goes into the downswing and is released as the ball
passes the non-ball-side ankle.
5. The athlete will continue with the follow through so the elbow finishes next to the athlete’s head. The arm should be allowed to swing back down and relax.
1 2
3 4 5

Coaching Guide
P a g e | 60 © 2013 USBC Coaching Certification and Development
Trouble Shooting, continued
Assisted Swing This drill requires the assistance of a coach. The athlete should focus on the feel of how the ball swings the arm freely from the shoulder. 1. At the foul line the athlete starts in a staggered stance (page 58).
2. The coach stands on the ball-side of the athlete, helping them hold the ball straight out in
front of them at approximately waist level. The coach supports the entire weight of the ball using one or both hands, if necessary. This allows the athlete to relax their arm while keeping a secure grip on the ball.
Note: With a proper fitting ball, the athlete will need minimal grip pressure to hold onto the ball, thus allowing the arm to maintain a relaxed swing.
3. The athlete’s non-ball-side arm is out to the side for balance.
4. Coach informs the athlete they will be letting go of the ball and steps out of the way once
they remove their hand from the ball. Athlete lets the ball swing down and back.
5. From the top of the backswing, the ball goes into the forward swing and is released as the ball passes the non-ball-side ankle. The athlete will continue with the follow through so the elbow finishes next to the athlete’s head. The arm should be allowed to swing back down and relax. Note: The thumb should release first, allowing the ball to roll off the hand and fingers.
5
1,2 & 3
5
4

Coaching Guide
© 2013 USBC Coaching Certification and Development P a g e | 61
Trouble Shooting, continued
Item of Concern: Footwork
First step goes outside (away from their body)
Footwork is choppy
Footwork and swing do not match up
Athlete slides on wrong foot Solution: Check the athlete’s swing direction from the back, have the athlete find the proper starting position (see Four-step delivery, distance to start from the foul line, page 19) Drills: Assisted Four-step, Practice Swing and Four-step Assisted Four-step This drill requires the assistance of a coach. The athlete should focus on the feel of how the armswing and footwork work together to create a consistent approach. 1. Coach will control the armswing during the athlete’s approach and ask the athlete to
concentrate on the feel of a loose armswing while taking four-steps.
2. Set up four and a half steps behind the foul line in the athletic pose (page 55). Coach stands on the ball-side of the athlete facing the same direction. The coach prepares to walk side-by-side with the athlete while holding the athlete’s wrist. The coach must pay attention to the athlete’s steps to accurately move the athlete’s arm.
3. On the initial movement of the athlete’s ball-side foot, the coach gently moves the ball-side
hand into the pushaway. Do not extend the athlete’s arm completely, just enough to place the ball and arm in motion. Note: Coach should not use excessive force when moving the athlete’s arm. If the athlete overpowers the coach during the ball swing, stop the drill and tell the athlete to relax their arm.
4. As the second step begins, the coach moves the athlete’s hand into the downswing. The
hand will be near the ball-side leg at the end of the second step.
5. The coach continues moving the hand and arm into the backswing. At the completion of the third step, the hand will be at the top of the backswing.
6. As the fourth and final step begins, the coach moves the hand and arm into the forward
swing. Note: To clear a path for the armswing and ball, the athlete moves the ball-side leg behind them with the foot rolling onto the outer edge of the shoe.
7. As the coach swings the hand and arm past the non-ball-side ankle, the athlete releases the
ball and the coach continues bringing the hand and arm up into the follow through position.

Coaching Guide
P a g e | 62 © 2013 USBC Coaching Certification and Development
Trouble Shooting, continued
Assisted Four-step, continued
Item of Concern: Opposite Arm
Opposite hand on leg at finish
Opposite arm high in the air
Opposite arm has a lot of movement Solution: The opposite arm is used for balance, once the ball goes into the pushaway the opposite hand should come off the ball and the arm should go out to the side waist high with the arm rolling the thumb down from the shoulder, it should keep still until the final step, as the athlete releases the ball the opposite arm will move backward to counterbalance the weight of the ball. Drill: Opposite Arm, Extend and Catch Opposite Arm The athlete should focus on the feel of opposite arm once it releases the ball. 1. The athlete starts at the foul line in a staggered stance (page 58).
2. During the push away the opposite arm moves away from the ball. The arm is rolled from the
shoulder so the thumb is pointed down as the arm moves out to the side. (The arm should have minimal vertical movement).
1 & 2
3 4
5 6 & 7
Coaching Guide
© 2013 USBC Coaching Certification and Development P a g e | 63
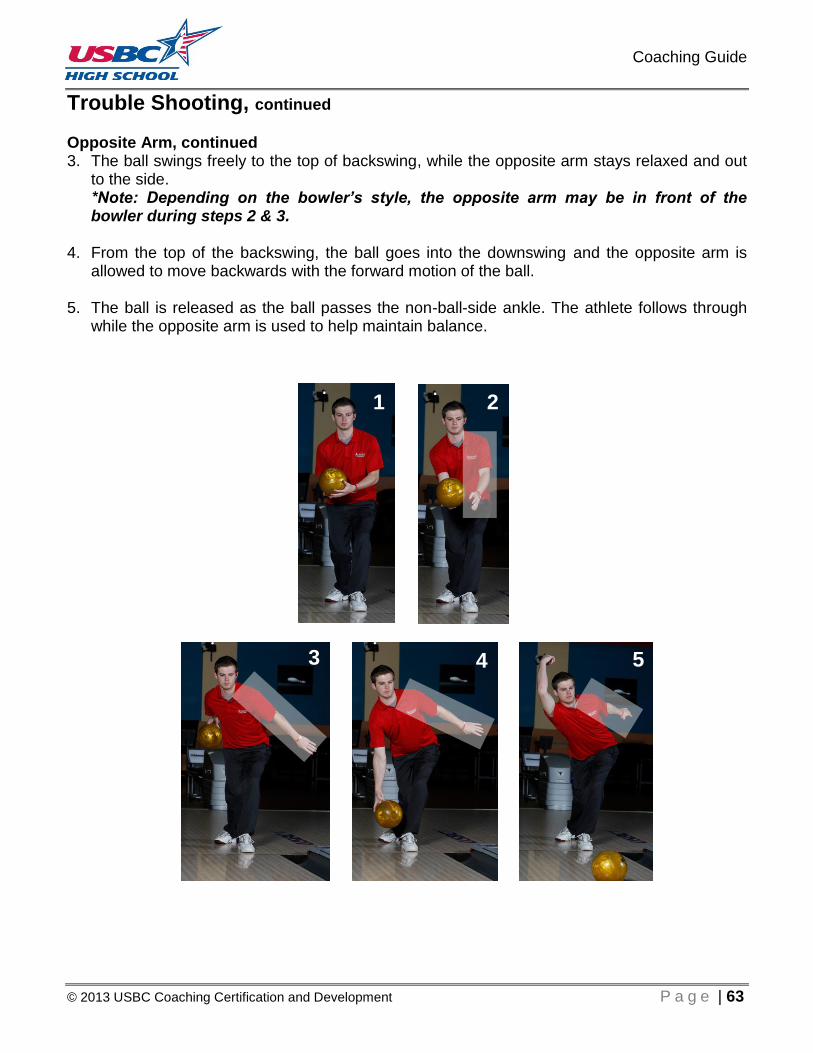
Trouble Shooting, continued
Opposite Arm, continued 3. The ball swings freely to the top of backswing, while the opposite arm stays relaxed and out
to the side. *Note: Depending on the bowler’s style, the opposite arm may be in front of the bowler during steps 2 & 3.
4. From the top of the backswing, the ball goes into the downswing and the opposite arm is allowed to move backwards with the forward motion of the ball.
5. The ball is released as the ball passes the non-ball-side ankle. The athlete follows through
while the opposite arm is used to help maintain balance.
3 4
1 2
5

Coaching Guide
P a g e | 64 © 2013 USBC Coaching Certification and Development
Trouble Shooting, continued Extend and Catch This drill requires two individuals (coach and athlete or two athletes). The athlete should focus on the feel of the opposite arm as the hand comes off the ball and moves out to the side. 1. Coach gets in position directly in front of the ball-side shoulder of the athlete. Athlete
demonstrates the ball start so the coach can gauge how far away to stand. Note: Coach should stand as if preparing to catch a heavy object. (The feet should be shoulder width apart, knees bent, with arms out ready to catch the ball).
2. Athlete sets up in an athletic pose (page 55). 3. Athlete takes a step with the ball-side foot while pushing the ball in a rounded smooth
motion.
4. During the push away the opposite arm moves away from the ball. The arm is rolled from the shoulder so the thumb is pointed down as the arm moves out to the side.
5. The coach catches the ball and supports the weight, while the athlete relaxes the arm
holding the ball.
6. Return to starting position and repeat.
Item of Concern: Timing
Ball and step do not move together (first step of four, second step of five. etc.)
Athlete gets to the foul line before the ball starts the forward swing Solution: Check the athlete’s pushaway and timing of the first step (see four-step approach) Remember to check how many steps the athlete uses before making changes! Drills: Assisted Ball Start (page 56), Unassisted Ball Start (page 57), Extend and Catch (page 64), Assisted four-step (page 61-62).
*Note: The athlete can perform any of the drills listed and their focus should be on how the armswing and footwork move together.
1 & 2 3, 4 & 5
Coaching Guide
© 2013 USBC Coaching Certification and Development P a g e | 65
Trouble Shooting, continued Item of Concern: Release
Head movement
Ball falls off hand
Athlete slows down going into the finish
Wrist collapses prior to release
Ball hooks too much
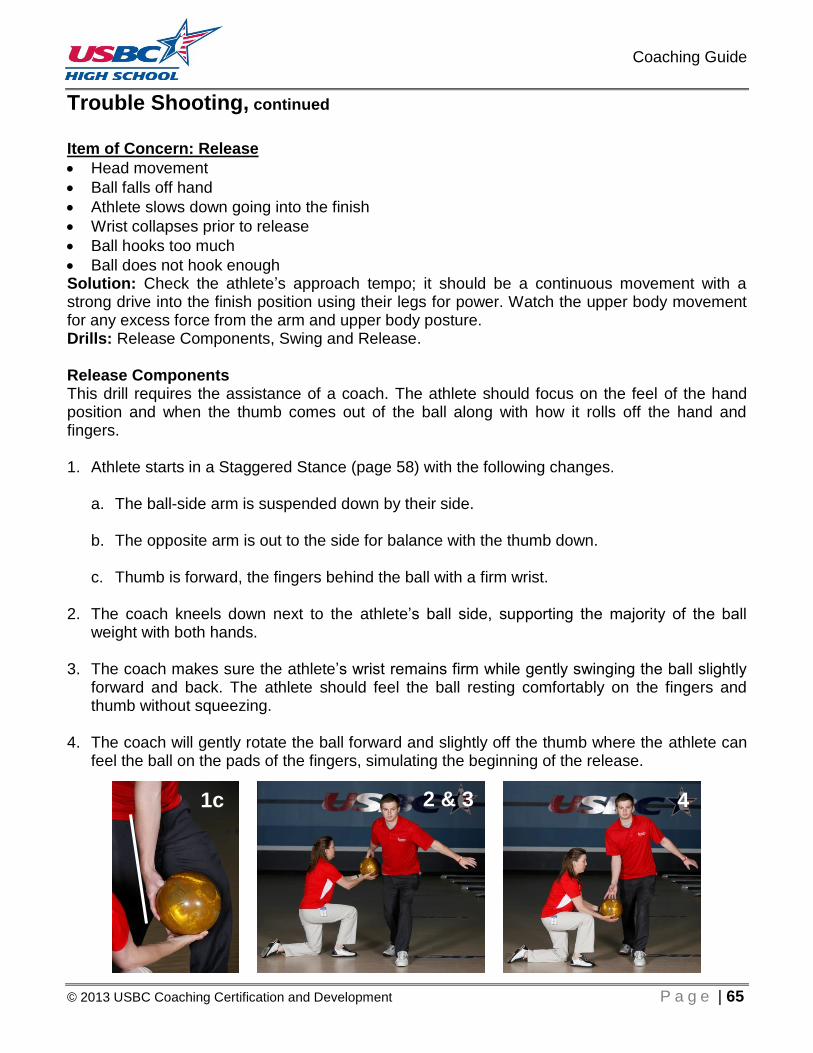
Ball does not hook enough Solution: Check the athlete’s approach tempo; it should be a continuous movement with a strong drive into the finish position using their legs for power. Watch the upper body movement for any excess force from the arm and upper body posture. Drills: Release Components, Swing and Release. Release Components This drill requires the assistance of a coach. The athlete should focus on the feel of the hand position and when the thumb comes out of the ball along with how it rolls off the hand and fingers. 1. Athlete starts in a Staggered Stance (page 58) with the following changes.
a. The ball-side arm is suspended down by their side.
b. The opposite arm is out to the side for balance with the thumb down.
c. Thumb is forward, the fingers behind the ball with a firm wrist. 2. The coach kneels down next to the athlete’s ball side, supporting the majority of the ball
weight with both hands. 3. The coach makes sure the athlete’s wrist remains firm while gently swinging the ball slightly
forward and back. The athlete should feel the ball resting comfortably on the fingers and thumb without squeezing.
4. The coach will gently rotate the ball forward and slightly off the thumb where the athlete can
feel the ball on the pads of the fingers, simulating the beginning of the release.
1c 2 & 3 4

Coaching Guide
P a g e | 66 © 2013 USBC Coaching Certification and Development
Trouble Shooting, continued
Swing and Release The athletes focus should be to keep the hand in the same position while executing the swing. 1. While holding the ball securely with both hands, the athlete will set up in the finish position.
2. Have the athlete place the non-ball-side foot at the foul line, then lean forward, transferring
entire body weight to the non-ball-side foot.
3. While bending the non-ball-side knee, have them slowly move the other leg 12-15 inches behind and past the non-ball-side leg, placing the outside edge of the shoe on the floor.
4. Once the athlete is in a balanced position, have them suspend the bowling ball down by their side with the thumb positioned at 12 o’clock and fingers at 6 o’clock. Their opposite hand will be held out to the side for balance with the thumb down.
5. To start the motion, swing the ball forward. 6. Allow the weight of the ball to bring the armswing into the backswing naturally.
Note: Loss of balance or excessive movement of torso indicates that the ball is being forced into motion by the armswing.
7. There will be one swing prior to the release.
8. The ball is released as it passes the non-ball-side ankle. The athlete will continue with the follow through so the elbow finishes next to the athlete’s head. The arm should be allowed to swing back down and relax.
1 2, 3 & 4 5 8

Coaching Guide
© 2013 USBC Coaching Certification and Development P a g e | 67
Trouble Shooting, continued
Item of Concern: Finish Position
Follow-through not complete
Falls off balance
Upper body posture to far forward
Upper body posture too far back
Trail leg not in proper position Solution: The athlete should be able to maintain their balance in the finish position until the ball hits the pins, check upper body posture, trail leg and foot position and armswing to see if there is any excess force, also check the swing alignment as the weight of the ball could cause them to fall off. Drills: Leverage Demonstration #1 and #2, Trail Leg Position. Leverage Demonstration #1 The athlete should focus on how much easier it is to pick up the chair when in a balanced leverage position. (While bowling this position is optimum for the athlete as it allows the forward swing to swing freely from the shoulder and gives the athlete an opportunity to keep the hand in a stronger position going into the release). 1. Have the athlete stand a minimum of one and a half feet behind the chair and get into their
finish position. The trial leg should be on the floor, knees bent, hips underneath them and upper body posture slightly forward (toe, knee, and shoulders should be vertically in line with each other). Ask them to grasp underneath the back rest of the chair and to pick it up with one hand. This will be difficult to do.
2. Have them move closer so they are approximately four to six inches behind the chair and get
into their finish position. The trail leg should be on the floor, knees bent, hips underneath them and upper body posture slightly forward (toe, knee, and shoulders should be vertically in line with each other). Ask them again to pick up the chair. This should be easily done. The reason this is easier is because the athlete is now in a balanced leverage position.
Lack of leverage
Good leverage
1
2

Coaching Guide
P a g e | 68 © 2013 USBC Coaching Certification and Development
Trouble Shooting, continued Leverage Demonstration #2 This drill requires the assistance of a coach. This drill allows the bowler to feel how posture affects the strength of their release. The athlete starts in the finish position with the trail leg behind them. The coach will kneel down on the athlete’s ball-side and move the athlete’s hand and upper body posture in three different positions. At each position, the coach will apply light pressure toward the floor. Position #1 The coach positions the athlete’s hand 12-18 inches in front of their shoulder. In
this position, the athlete’s upper body posture will be forward. As the coach applies slight pressure to the hand, it creates imbalance and the athlete will usually fall forward.
Position #2 The coach positions the athlete’s hand 12-18 inches behind their shoulder. In this position, the athlete’s upper body posture will be back. As the coach applies slight pressure to the hand, it creates imbalance and the athlete will usually fall off to the side or backward.
Position #3 The coach positions the athlete’s hand directly below their shoulder. In this position the athlete’s upper body posture will be slightly forward with the toe, knee, and shoulders vertically in line. As the coach applies slight pressure to the hand, the athlete should be able to remain in a balanced position.
Note: Position number three is the best leverage position. It puts the athlete’s body in position to help maintain balance, place the shoulder in an optimum position for a relaxed forward swing and strong release.
Position #1 Posture is forward, Imbalance.
No leverage
Position #2 Posture is back, Imbalance.
No leverage
Position #3 Posture is centered, good
balance and leverage.

Coaching Guide
© 2013 USBC Coaching Certification and Development P a g e | 69
Trouble Shooting, continued Trail Leg Position The athlete should focus on the fee of the trail leg and how it moves out of the way for the ball swing and how it is used for balance and leverage.
1. Athlete sets up in the athletic pose (page 55) one and a half steps away from the foul line.
2. The athlete initiates the swing, keeping the motion smooth and rounded, allowing gravity to bring the ball into the backswing. The opposite arm moves out to the side for balance with the thumb down.
3. As the ball is at the top of the backswing and starting its descent, the athlete slides or steps
forward with their non-ball-side foot and bending the knee. 4. The ball-side leg moves behind them as the bowler starts to step forward and the foot is
rolled onto the outer edge. 5. The ball is released as it passes the non-ball-side ankle. 6. The athlete will continue with the follow through, the back leg should be separated slightly
from the front leg and slightly bent to help keep the ball side hip forward.
4 & 5 6
1
1 ½ Steps
2 3

Coaching Guide
P a g e | 70 © 2013 USBC Coaching Certification and Development
Team Building Exercises Team building exercises are a great way to get your team working together; here are a few exercises that can be added into the clinic schedule. Resource: Championship Team Building, Jeff Janssen, M.S
Team Building Challenge-Team Transport Objective The purpose of the Team Transport exercise is to demonstrate that teams need to plan and work together to achieve a common goal. Setup The challenge can be used with groups of three to 30 or more people. We'll use 15 people for this example but you will easily see how it can be adapted to larger or smaller numbers. You will need some towels or old carpet samples for this exercise. You will also need a moderately sized open space or a large room measuring at least 30 feet long. Instructions Start your group at one end of the open space and hand them three towels. The group's challenge is to transport the team from one end of the open space to the other. The catch is that the open space is like water and the group needs to use the towels like lily pads to jump across the space. The conditions are that the towels can only make a one way trip across and the team must work together to get there. To successfully complete the challenge, your players will have to get several people on two of the towels and then pass up the third towel and lay it down in front of the team to help them advance. This process of advancing ahead towel by towel continues until the team reaches its final destination. If a person should step or fall off of a towel, the whole team needs to go back to the start and begin again. To make the challenge a bit more interesting, you can give the team a time limit that they must complete the exercise within to be successful. The time will vary depending on the number of people, towels and the distance you want them to travel. You could secretly time the group's initial attempt and then challenge them to beat it once they completed the exercise the first time. If you are working with several teams or a very large team, you could have each of the groups compete against each other. Discussion Once completed, be sure to have your players discuss how the challenge relates to their team. Also help them notice that it takes everyone working together on the goal in order for the whole team to advance.

Coaching Guide
© 2013 USBC Coaching Certification and Development P a g e | 71
Team Building Exercises, continued Team Building Challenge-Trust Walk Objective The trust walk activity communicates several important messages to your team, especially the importance of commitment and trust. Setup All you will need for this exercise are blindfolds for half of your team members. You can use bandanas or folded T-shirts to create the blindfolds. Instructions Have your player’s pair up with a teammate who they may not know as well or interact with as frequently. Blindfold one person from each pair while the other person will act as a guide. Instruct the guides to lead their blindfolded partner around the area for roughly five minutes. The guide should communicate often while safely leading the person through a variety of different challenges including steps, bleachers, narrow spaces and different surfaces if at all possible. The guide's major responsibility is to make sure that their blindfolded partner is kept safe during the entire process. After about five minutes, have all the pairs return to where you started. Discussion Remove the blindfolds and ask each of the blindfolded players to describe what it felt like during their experience. Of course, you will want them to discuss how they need to trust their teammates, especially when they were feeling unsure or afraid. Additionally, it is important for the guides to give their perspectives on the exercise. You will want them to understand the commitment, responsibility and accountability they felt toward their blindfolded teammate. Occasionally, a blindfolded person might experience a minor bump or scrape and you can use this as an opportunity to discuss what happens when a teammate is either not accountable or not trusting. Have the partners switch roles, repeat the exercise, and discuss what it was like to change roles.

Coaching Guide
P a g e | 72 © 2013 USBC Coaching Certification and Development
Team Building Exercises, continued Team Building Challenge-Strung Together Objective The purpose of Strung Together is to help your players understand and appreciate each other's roles. The exercise also demonstrates how the team's success depends on everyone playing their roles. Setup All you need for this exercise is a large ball of string or yarn. Instructions Have your team sit down in a large circle. Hand the ball of string to a player and have them hold one end of it. As they are holding the end of the string, have them toss the ball of string to a teammate. The original player should then talk about the things the team needs from the teammate with the ball of string in order for the team to be successful. Encourage your other players to add anything that might have been left out. Then have the player with the ball of string hang on to part of the string as they toss the ball to a different teammate. Again, this player will talk about the role and the important contributions the person holding the ball of string makes to the overall success of the team. Continue tossing the ball from player to player, defining and appreciating their roles until the entire team has part of the string in their hand. Discussion While everyone is holding a part of the string, have your players discuss their perceptions of the exercise and what it means to the team. They will likely talk about the fact that everyone is dependent on each other in some way because of the various connections of the string. Have them talk about what it means to be connected to each other and how it relates to responsibility, accountability and trust. Get them to think about what happens if a connection is cut or a person lets go of the string.

Coaching Guide
© 2013 USBC Coaching Certification and Development P a g e | 73
Glossary A ABC – American Bowling Congress, founded in 1895, was one of four organizations that merged to form the United States Bowling Congress on Jan. 1, 2005. At one time, ABC was the world's largest sports membership organization. With the Women’s International Bowling Congress (WIBC), ABC was an official rules-making body of tenpin bowling in the United States, Puerto Rico and military bases worldwide. ACTUAL – See SCRATCH ABSENT – A score used in league when a bowler on the team is not there to bowl. ADJUST – When a bowler changes his/her starting point on the approach and/or target on the lane. ALLEY – See LANE ALL-EVENTS – In a tournament, the combined total score of singles, doubles and team events. ANCHOR – Last player in a lineup for team competition. ABSTRACT MOVE – An adjustment where the bowler moves only their feet and keeps their target the same or they move only their target and keep their feet the same. APPROACH – 1) Portion of the lane behind the foul line used by bowlers to take their approach and deliver the ball. 2) The movement of a bowler from stance to the delivery. AREA – The margin of error where the bowler can miss their target and still hit the pocket. ARROWS – Targets on the lane about 12 -15 feet past the foul line. ASSOCIATIONS – Name applied to volunteer organizations serving at the local and state levels for USBC. ATHLETIC POSE (Also STANCE) – The balanced starting position that bowlers assume before making their approach and delivery. AVERAGE – The total number of pins knocked down by a bowler, divided by the number of games bowled. B BABY SPLIT – A split where there is one pin missing between those left. For example, the 2-7, 3-10, 4-5, 5-6 splits. BACK UP – See REVERSE HOOK BACK END – The last 15 feet of the lane before the pins. BAKER SYSTEM – A format that calls for different players bowling in different frames. Mainly used in five-person team competition where the number 1 bowler throws in the first and sixth frames, the number 2 bowler in the second and seventh, etc. BALL – The object rolled at the pins in order to knock them down. BALL RETURN – 1) The machine that returns the ball to the player. 2) Where the ball rests on or near the approach. BALL RACK – Storage structure where establishments keep house balls. BALL TRACK – 1) The portion of the ball that comes in contact with the lane surface. 2) The area on the lane where the majority of balls are rolled creating a worn path. BIG FOUR – A split resulting in the 4, 6, 7 and 10 pins standing after the first shot. BLIND – Score allowed for absent member, usually lower than his/her average as a penalty. BLOCK – 1) A term to describe an easy lane condition. 2) A specific squad or time bowled. BLOW THE RACK – Expression that applies to a variety of strikes, especially a light, sweeping strike.

Coaching Guide
P a g e | 74 © 2013 USBC Coaching Certification and Development
Glossary, continued B continued BOARD – Wooden lanes have 39 boards approximately one-inch wide. Synthetic lanes feature an image of boards. Bowlers use specific boards to line up their stance and for a target on the lane. BONUS – Extra pins or points awarded during match-play competition for winning a match. BOWLER’S AREA (Also SETTEE) – The area where players wait between shots. Usually contains seats and a scoring unit. BOWLING CENTER – A facility where people go to bowl. BRACKETS FORMAT – In a tournament, where bowlers or teams are paired to compete and the winner advances to bowl other winners. This continues until there is only one bowler or team left undefeated. BREAKDOWN – 1) The change or deterioration of the initial oil pattern. 2) Malfunction of the pinsetter or ball return BREAK POINT – Place on the lane where the ball begins to hook toward the pins. BRIDGE – The area between the finger holes on a bowling ball. BROOKLYN (Also CROSSOVER) – Describes a strike ball that goes to the opposite side it was intended. For example, a right-hander hitting the left side of the head pin. (In Brooklyn, it is called a “Jersey.”) BUCKET – A term used to describe the 2-4-5-8 or 3-5-6-9 spare leaves. C CARRY DOWN – The oil that is moved, or transferred, down the lane from bowling balls. CERTIFICATION – 1) Competition and leagues registered with and conducted in accordance with USBC rules. All certified bowling centers must have their lanes inspected by USBC annually to ensure they meet specifications. 2) The accreditation earned by USBC coaches upon completion of training courses. CHANNEL (Also GUTTER) – The 10-inch out-of-bounds area to the right and left of the lane that guides the ball to the pit once it leaves the playing area. CHAMPIONSHIP FORMAT – A tournament format usually run for local, state and national tournaments consisting of multiple events. CHOP (Also CHERRY and PICK) – To hit the front pin of a spare leave while the pin behind or alongside remains standing. CLASSIFIED – Leagues or tournaments with average limitations or other restrictions. CLEAN GAME – A game with a spare or strike in each frame. CLOSED SHOULDERS – When a bowler's shoulders remain parallel with the foul line or return to this position from being open. See also open shoulders. CONCOURSE – The main walkway and spectator area in a bowling center; where food and drinks should be kept. CONDITIONER – See LANE CONDITIONER CONTROL DESK – The main hub in a bowling center for customer service. CONVENTIONAL GRIP – The grip in which the fingers are inserted into the second knuckle and the thumb fully inserted; recommended for beginning bowlers. CONVERT – Knock down the remaining pins for a spare. COUNT – Number of pins knocked down on each ball. COVERSTOCK (Also SHELL) – Refers to the outside material the ball is made of. CORE – The interior of a bowling ball.

Coaching Guide
© 2013 USBC Coaching Certification and Development P a g e | 75
Glossary, continued C, continued CRANKER – A bowling style that describes a bowler who throws a powerful hook. CROSSLANE – 1) The starting position being on the opposite side of the approach from where the spare stands. For example, a bowler stands on the far left side of the lane to throw at the 10 pin. 2) Alternating between two lanes during a game. CROSSOVER – See BROOKLYN CUSHION – The padding at the rear of the pit to absorb the shock of the ball and pins. D DEAD BALL – 1) When the delivery does not count and the correct pins must be respotted. The player is allowed to rebowl that delivery. See USBC Rule Book. 2) Any ball that encounters a foreign obstacle. DEAD WOOD – Pins that fall over but remain on the lane or in the channel that must be removed before the next shot. DEFLECTION – The movement of the ball after it hits the pins. DELIVERY – The combination of a bowler's approach and release. DIAGONAL – A move made using a 2:1 ration, Example, feet move two boards left and the eyes move one board left. DOTS – 1) Imbedded in the lane just past the foul line and used by some bowlers as their target. 2) A series of dots on the approach used to assist the bowler in lining up. DOUBLE – Two consecutive strikes. DOUBLES EVENT – A team of two players. DOUBLE WOOD (Also SLEEPER) – When one pin is directly behind the other. For example, the 1-5, 2-8 or 3-9. DRIFT – A bowler’s inability to finish in the same spot at the foul line. DRY LANE – A lane that has a little amount of conditioner (oil). DUROMETER TEST – An instrument that inserts a needle into the ball's surface to determine its hardness. DUTCH 200 – A 200 game scored by alternating strikes and spares. DYNAMIC STRECHING – Used as a warm up prior to bowling, designed to increase blood flow and temperature to the muscles in order to prepare them for the demands of competition. Example, Jumping jacks and Torso twists. E ELIMINATION FORMAT – In a tournament, after a game or series of games have been bowled, bowler(s) with the lowest scores are eliminated. F FAST EIGHT – A high pocket hit that leaves the 4-7 for a right-hander or the 6-10 for a left-hander. FILL – Pins knocked down following a spare or two consecutive strikes in the 10th frame. FINGERTIP GRIP – The grip in which the fingers are inserted to the first knuckle and thumb fully inserted; recommended for advanced bowlers. FIT –The way a hand fits in the bowling ball. FLUSH (Also PACK) – When a ball hits the pocket solid for a strike. FOUL – Going beyond the foul line at delivery. Results in a zero scored for that delivery.

Coaching Guide
P a g e | 76 © 2013 USBC Coaching Certification and Development
Glossary, continued F continued FOUL LINE – A solid black stripe which separates the approach from the lane. FOUNDATION FRAME – The ninth frame. The desire is to roll a strike or spare as a “foundation” for the 10th frame. FRAME – Each game is divided into 10 frames, the first nine allowing a maximum of two shots with three shots allowed in the 10th frame. FRONTS (Also HEADS) – The first 15 feet of the lane past the foul line. FULL ROLLER – A ball that rolls over its full circumference and produces a track between the thumb and fingers. G GREEK CHURCH – The 4-6-7-8-10 (LH) or 4-6-7-9-10 (RH) leave. GRIP – The way the hand fits in the ball. Either conventional or fingertip. GUTTER – See CHANNEL H HANDICAP – Pins given to individuals or teams in an attempt to equalize the competition. HEADS – See FRONTS HEAD PIN – The No. 1 pin. HIGH HIT – A ball that makes contact near the center of the head pin on a strike attempt. HITTING UP – Releasing the ball late on the upswing. HOLD – An area on the lane that resists the hook action of the ball, preventing it from hitting high on the head pin. HOOK – 1) A ball path that usually curves sharply near the pins. 2) The second phase of ball motion. HOOKING LANE – A lane on which the ball has more tendencies to curve or hook. HOUSE – A term for a bowling center. HOUSE BALL – Bowling ball provided by the center. HOUSE SHOES – Rental shoes provided by the center. HOUSE SHOT (Also HOUSE CONDITION) – The oil pattern typically used by bowling centers for leagues and other events. I INSIDE – A line used by a bowler who plays toward the center of the lane such as the third, fourth or fifth arrows. J JUNIOR TEAM USA – The official USBC team comprised of male and female bowlers age 20 and under who represent the United States in international competition. K KEGLER – German word for bowler. The term was used to describe bowlers for many years. KEY PIN – In spare shooting, it is the pin that the ball must initially hit to convert the spare. KICKBACK – Vertical division boards between lanes in the pit. On most hits, the pins bounce off the kickbacks to knock down additional pins.

Coaching Guide
© 2013 USBC Coaching Certification and Development P a g e | 77
Glossary, continued L LABEL – The manufacturer's marking on the ball, pin or lane. LANE (Also ALLEY) – Playing surface made of wood or a synthetic surface. LANE CONDITIONER (Also LANE OIL or LANE DRESSING) – 1) Oil used to coat or dress the lanes to protect the lane surface. 2) Placed on the lane in specific patterns affecting the reaction of a bowling ball. LANE COURTESY – Only one bowler on the approach at a time; if two bowlers step up on the approach at the same time the bowler on the right has the right of way. LANE FINISH – A Urethane based product placed on wood lanes to protect the lanes surface. LAYDOWN POINT – 1) Where the center of the ball is on the lane at the release. 2) The distance in boards the center of the ball is from the bowler’s ankle. LEADOFF – First player in a team lineup. LEAGUE – A competition where individual bowlers or teams of bowlers compete against others in a series of weeks or sessions. LEVERAGE – 1) Being in the proper posture position at the foul line with the knee solidly under the body to allow maximum strength in rolling the ball. 2) A type of drilling layout for a bowling ball. LIGHT – Describes a shot that is not fully in the pocket. For a right-hander, a ball that lightly hits the right edge of the No. 1 pin. LINE – 1) The path a bowling ball takes from the release to the pins. 2) One game of bowling. LOCATOR DOTS – 1) Markings imbedded in the lane 7-8 feet past the foul line and used as targets. 2) Three sets of dots on the approach used to assist the bowler in lining up on the approach. LOFT – The distance past the foul line the ball travels in the air after leaving the bowler’s hand to the point of impact on the lane surface. M MAPLE – Very hard wood used in the front of wood lanes, approaches and bowling pins. MARK – 1) Getting a strike or spare in a frame. 2) The spot on the lane bowler’s use as their target. MATCH PLAY – Portion of tournament or league play where bowlers are competing one on one. MESSENGER – A pin that goes back across the pin deck to knock down additional pins. MID-LANE (Also PINES) – The 30-foot section between the fronts and back end. MISS – See OPEN MIXED LEAGUES – Leagues of men and women competing together. MIXER – A hit that causes the pins to bounce around. N NO TAP – A form of competition that awards a strike when nine pins are knocked down on the first ball. It also can be eight-pin no tap where eight pins are knocked down. NOSE HIT – When the ball hits the front center of the head pin. O OIL – See LANE CONDITIONER

Coaching Guide
P a g e | 78 © 2013 USBC Coaching Certification and Development
Glossary, continued
O continued OILY (Also SLICK) – Indicates that there is a heavy coating of conditioner on the lane, making it difficult to hook the ball. OPEN (Also MISS) – A frame that doesn't include a strike or spare. OPEN BOWLING – Non-league, non-tournament play, practice. OPEN SHOULDERS – When a bowler’s shoulders are turned toward the ball side. OUTSIDE – Rolling the ball starting from an area close to the channel, such as the first arrow. OVER – In tournament play, 200 is often used for “par.” If an individual is averaging over that figure, he/she is considered over for that tournament. Example: Bowler has a score of 652 for 3 games; par would be 600 so they are 52 over for the tournament. P PATTERN – When oil is applied to the lane, it is applied in terms of volume (amount), shape (width of lane) and distance (length of lane) which is used to create specific patterns. PARTICLE BALLS – Developed in the mid-1990s, bowling balls made using high-tech manufacturing processes to insert minute pieces of silica such as glass beads in the ball’s shell to increase hook potential. PACK – See FLUSH PARALLEL MOVE – A move where the athlete makes a right or left parallel move on the approach and their target equal distances. PERFECT GAME – Rolling 12 consecutive strikes in one game for a score of 300. PLASTIC BALLS – Developed during the 1950s and made of polyester. PICK – See SPARE or CHOP PIN – The free-standing targets at the end of the lane. They are set in groups of 10 for each frame. PIN ACTION – Pins that bounce or roll around the pin deck knocking down other pins. PIN DECK – The area at the end of the lane where the pins are set. PINFALL – The total count of pins knocked over in a given shot, series of shots or games. PIN TRIANGLE – The arrangement of pins sitting on the pin deck. PINES – See MID-LANE PIT – Open area behind the pin deck where pins and balls go after leaving the back of the pin deck. PITCH – Angle at which holes are drilled into a bowling ball. POCKET– Where a ball hits solidly, between the 1 and 3 pin for right-handers and the 1 and 2 pin for left-handers. POLISH – A compound used to shine bowling balls in order to decrease hook potential. POSITION ROUNDS – Part of leagues or tournaments when teams or players face each other based on their standings. Example: First place meets second, third meets fourth, etc. POT GAME – Competition in which two or more bowlers post some sort of stake on a winner-take-all basis or to be divided by the number of entrants. Youth are prohibited from partaking in any event offering Pot Games, per USBC Youth Rule 400. PUNCH OUT – Refers to getting three strikes in the 10th frame. Q QUALIFYING FORMAT – In a tournament, a set number of games bowled attempting to advance to the next round.

Coaching Guide
© 2013 USBC Coaching Certification and Development P a g e | 79
Glossary, continued R RANGE FINDERS – A maximum of four targets located 34 - 44 feet past the foul line on the 10 and 15 boards on both sides of the lane. REACTIVE RESIN BALLS – Developed in the 1990s, made of an advanced urethane which increased hook potential. READING THE LANES – A bowler’s observation of the overall ball reaction used to determine the best path to roll the ball for a strike. RELEASE – The point at which a bowler releases the ball. RELEASE POINT – The moment the bowler releases the ball with the thumb, rolling off the fingers and imparting rotation to the ball. RESURFACE – 1) Wood lanes, when a center cuts the worn out damaged lanes down to bare wood in preparation for recoating the lane finish. 2) A bowling ball sanded to remove cuts and scratches. REVERSE HOOK (Also BACKUP) – A ball that hooks toward the hand from which the bowler delivered it. For example, when the ball hooks to the right for a right-hander. REVOLUTIONS – Also known as “revs." The amount of rotation a bowler imparts to a bowling ball as it travels from the foul line to the pins. ROLL OUT – A ball that stops hooking and begins to go straight. S SANDBAGGER – Bowler who purposely keeps their average down to receive a higher handicap. SANDING – A process used on bowling balls to increase hook potential. SCOTCH DOUBLES – A competition where two partners alternate shots during a game. SCRATCH (Also ACTUAL) – Bowling score that does not include handicap. SEMI-ROLLER – A ball that rolls off its center and produces a track outside of the thumb and fingers. SET – 1) A series of games. 2)Ball holding into the pocket. SETTEE – See BOWLERS AREA SHELL – See COVERSTOCK SHOT – 1) A single delivery 2) Reference to where a bowler plays due to a specific oil pattern. SINGLES EVENT – When one person competes against all others, in his/her division, usually in a tournament. SKID – The first phase of ball motion when the ball slides though the front portion of the lane. SLEEPER – See DOUBLE WOOD SLICK – See OILY SNOWPLOW – A ball that hits straight on the head pin and clears the pins for a strike. SPAN – The distance between the thumb and finger holes on a bowling ball. SPARE – Knocking down all 10 pins in two shots. SPLICE – On wood lanes, the way the hard and soft wood parts of the lane come together. SPLIT – A spare leave in which the head pin is down and the remaining combination of pins have a gap between them, ranging from the 4-5 to the 7-10. SPOT – A target on the lane surface at which the bowler aims, ranging from a dot to an arrow to a board or area. SQUARE – A reference to having the shoulders, hips or body parallel to the foul line. STANCE – SEE ATHLETIC POSE

Coaching Guide
P a g e | 80 © 2013 USBC Coaching Certification and Development
Glossary, continued
S continued STATIC STRETCHING – Used as a cool down after bowling. To limber those areas that are used the most during bowling. Example Hamstring stretch and Quadriceps stretch. STEPLADDER – A competition in which the lower qualifier bowls against the next-highest qualifier. This is usually done in the final phase of a competition known as stepladder finals. STONE 10 – Leaving a 10 pin on a seemingly good first ball. STRIKE – Knocking down all 10 pins on the first ball. STRIKING OUT – Finishing the game with a string of consecutive strikes. STRING – A number of continuous strikes. STROKER – A bowling style that relies on being smooth and accurate, creating only a minimal amount of hook. SWEEPER – 1) A form of competition that usually is conducted in association with another tournament. 2) A separate competition at the end of a league. SYNTHETIC LANE – A non-wood or manmade lane surface that may be placed over an existing wood lane or a pre-constructed unit placed on a foundation. SYNTHETIC PINS – Non-wood pins. T TAP – A single pin that stands on a seemingly perfect strike shot. TARGET – A mark or area of the lane the bowler uses to aim his or her shot. TARGETING – Selecting a spot on the lane for the ball to roll over such as the dots, the arrows, a particular board or area. Some bowlers select the pins. TEAM USA – The official USBC team composed of men and women representing the United States in international competition. TIMING – A measurement of where the ball is in relationship to the steps during the approach. TOPPING THE BALL – When the fingers are on top of the ball at the release, instead of behind, below or on the side. TOURNAMENT – A competition where bowlers or teams compete in a single or series of events against all others in their division. TRACK – 1) The worn or most used part of a lane 2) The part of the ball that contacts the lane surface when rolling. TRACK FLARE – When a track migrates over a slightly different part of the ball with each revolution. TURKEY – Three consecutive strikes. TURN – 1) The hand motion that imparts rotation to a ball upon release. 2) A ball that hooks. U UNITED STATES BOWLING CONGRESS – The organization created when the American Bowling Congress, Women’s International Bowling Congress, Young American Bowling Alliance and USA Bowling merged into one organization on Jan. 1, 2005. USA BOWLING – 1) Formerly recognized by the U.S. Olympic Committee as the organization responsible for amateur competition in the United States. 2) A sports program developed by the IBC (International Bowling Campus) Youth Department. USBC COACHING – Organization headquartered in Arlington, Texas, that trains and certifies coaches to teach the sport of bowling. USBC Coaching is the only bowling coaching program recognized by the U.S. Olympic Committee.

Coaching Guide
© 2013 USBC Coaching Certification and Development P a g e | 81
Glossary, continued
U continued UNDER – In tournament play, 200 often is used for “par” and if an individual is averaging below that figure, they are considered under for that tournament. Example: Bowler has a score of 550 for three games; par would be 600 so they are 50 under for the tournament. URETHANE – A material used in making the cover of a bowling ball. V VACANCY – A score given to a team when they do not have a full roster in a league. VISUALIZATION – A mental-game technique that helps a bowler concentrate or see a specific physical action or ball path they wish to execute. W WIBC – Women's International Bowling Congress, one of four organizations that merged to form the United States Bowling Congress on Jan. 1, 2005. WASHOUT - The 1-2-4-7-10, 1-2-4-10 or 1-2-10; or, for left-handers, leaving the 1-3-6-7-10, 1-3-6-7 or 1-3-7 after the first ball. WEIGHT BLOCK – Part of the core or interior of a ball. WOOD LANE – A lane constructed from maple and pine. Y YABA – Young American Bowling Alliance, one of four organizations that merged to form the United States Bowling Congress on Jan. 1, 2005.

Coaching Guide
P a g e | 82 © 2013 USBC Coaching Certification and Development
USBC Membership Opportunities USBC Scholastic Membership The United States Bowling Congress (USBC) offers a specific membership to those student-athletes who bowl at the middle school and high school level. The USBC Scholastic Membership benefits include:
USBC Youth Membership card
USBC official average (minimum of 12 games)
Eligible to bowl in USBC certified tournaments, like the Youth Open (through July 31)
Eligible to apply for USBC scholarships, including the Dexter/USBC High School All-American Team (High School students only)
Ability to earn USBC Scholastic Awards
Ability to earn USBC Youth High Score Awards This is an INDIVIDUAL membership, meaning only those who wish to have the membership have to purchase the membership. The USBC Scholastic Membership is $5, unless the youth bowler has a current Youth Standard Membership. If the bowler has a current Standard, the fee is waived. Either case, the youth bowler must fill out the Youth Membership card applying for the USBC Scholastic Membership. For more helpful information regarding the USBC Scholastic Membership, please visit www.bowl.com/highschool and click on the “Membership” tab.

Coaching Guide
© 2013 USBC Coaching Certification and Development P a g e | 83
Grant/Scholarship Opportunities The YES Fund High School Grant
The High School Grant Program, administered by USBC High School through the Youth Education Services (YES) Fund, will provide $2,500 to four high school programs annually.
The high school teams must show financial need because of budget cuts or other changes, or may request funding to start a new program.
For the grant qualifications, application form and more information regarding the YES Fund High School Grant, please visit www.bowl.com/highschool and click on the “Grant Programs” tab.
The S.E.T.S. Equipment Grant
The Bowling Foundation, BPAA and USBC are working together with help from some industry suppliers and manufacturers to put forth an equipment grant program to high school teams that cannot afford equipment.
For the grant qualifications, application forms and more information regarding the S.E.T.S Equipment Grant, please visit www.bowl.com/highschool and click on the “Grant Programs” tab.
The Dexter/USBC All-American Team
Five male and five female USBC High School members are selected each year for the prestigious Dexter/USBC High School All-American Team and a $1,000 scholarship. Coaches or athletic directors must nominate the high school bowler for the All-American team. Selection to the Dexter/USBC High School All-American Team is based on bowling accomplishments, academic achievement, letters of recommendation, extracurricular and community involvement, submitted essays and resumes. Minimum requirements for selection include a 3.0 grade point average on a 4.0 scale (or equivalent) and at least one letter of recommendation.
The high school bowler must have a USBC Scholastic High School Membership to qualify.
For award qualifications, application form and more information regarding the Dexter/USBC All-American program, please visit www.bowl.com/highschool and click on the “Dexter/USBC All-American Team” tab.

Coaching Guide
P a g e | 84 © 2013 USBC Coaching Certification and Development
Contact Information If you have any questions regarding this guide, or the information discussed in this guide, please feel free to contact the following parties at any time. The International Bowling Campus (USBC, BPAA) is here to assist you and offer any guidance possible to aid in the development of your high school bowling program. Again, we thank you for your dedication in developing the sport of bowling.
Brian English, IBC Varsity Bowling Manager Office Phone: 817-385-8434 E-mail: [email protected] Website: www.bowl.com/highschool USBC Coaching Certification & Development Office Phone: 800-514-BOWL x8969 E-mail: [email protected] Website: www.bowl.com/coaching