Embed Size (px)
Citation preview

Collateral Headquarters User Manual
for Chase Correspondent Pre-Delivery
2 © 2012 FNC, Inc. All Rights Reserved
Disclaimer © 2012 FNC, Inc. All Rights Reserved. This training manual and the information found in it are provided as a service of FNC, Inc. (“FNC”), solely for the convenience of its users. The information, computations (if any) and map images (including the location of individual parcels on maps), while believed reliable, cannot be guaranteed as accurate, and the users of this training manual are obligated to secure such confirmation of such information and computations as good professional practices dictate. While FNC attempts to keep this manual as up-to-date as possible, the changing nature of the FNC systems may result in some information being outdated from time to time. FNC may have patents, patent applications, trademarks, copyrights, or other intellectual property rights covering subject matter in this document. Except as expressly provided in any written license agreement from FNC, the furnishing of this document does not give you any license to these patents, trademarks, copyrights, or other intellectual property (including trade secrets).

3 © 2012 FNC, Inc. All Rights Reserved
Table of Contents
Administration………………………………………………………………………...4 Add/Edit UCDP Information……………………………………………………………………………………………..4 Create a New User……………………………………………………………………………………………………….…5 Editing an Existing User………………………………………………………………………………………………....12
System Basics…………………………………………………………………………14
Logging In………………………………………………………………………………………………………………..……14 Change Temporary Password……………………………………………………………………………………….....16
CHQ Menu Toolbar………………………………………………………………………………………………….….…..19 Search Results……………………………………………………………………………………………………….….……20 Order Screen……………………………………………………………………………………………………………..…..21 Order Summary………………………………………………………………………………………………………..…….22 Workspace……………………………………………………………………………………………………………………..23
Status Definitions………………………………………………………………...…24
Create a New Order…………………………………………………………………26 Create a New Order for Review………………………………………………………………………………………..26 Upload an Appraisal Product……………………………………………………………………………………………28
Search for Orders…………………………………………………………………....31 By Loan Number…………….………………………………………………………………………………………..….…31 By Property Address..…………………………………………………………………………………………………..…34 My Orders………………………….……………………………………………………………………………………….…37
Working with Orders..………………………………………………………..…....39 Loan Information……………………………………………………………………………………………………………39 Associated Files……………………………………………………………………………………………………………...40 Open File………………………………………………………………………………………………………….……40 Print File………………………………………………………………………………………………………………..41
Add File…………………………………………………………………………………………………………..…….43 Email File……………………………………………………………………………………………………….………43 Log and Message…………………………………………………………………………………………………………….44 Compose Message………………………………………………………………………………………………….45 UCDP………………………………………………………………………………………………………………………….….46 Exception – UCDP…………………………………………………………………………………………………..48 Manual Override…………………………………………………………………………………………….…...49 Submit Corrected Appraisal Product………………………………………………………………….…..50 GAAR……………………………………………………………………………………………………………………….…….52 GAAR Viewer…………………………………………………………………………………………………………….…….55 Appraisal Score………………………………………………………………………………………………………….……56
Change Password………………………….…………………………………….…..58
Support…………………………………………………………………………………59

4 © 2012 FNC, Inc. All Rights Reserved
Administration
The User Management module is used to add and maintain Correspondent, Loan Officer, and UCDP information.
Add/Edit UCDP Information:
1. Click the User Management menu.
2. Select Manage Subordinate Users.
3. The Correspondent page will open. Add/edit basic information about the correspondent, like address and phone number.
Note: The Price Plan, Fee Plan, Is Billable, Display vendor fee, and Allow Rush Ordering fields do not apply to the current use of the system and should be left as-is.
4. Scroll down to the UCDP section and add or edit necessary information. This information includes Business Unit, Fannie Seller Service Number, and Freddie Seller Service Number. The Submit to Fannie and Submit to Freddie checkboxes allow you to determine which GSE (can be both) to submit files to.
5. Click Save.

5 © 2012 FNC, Inc. All Rights Reserved
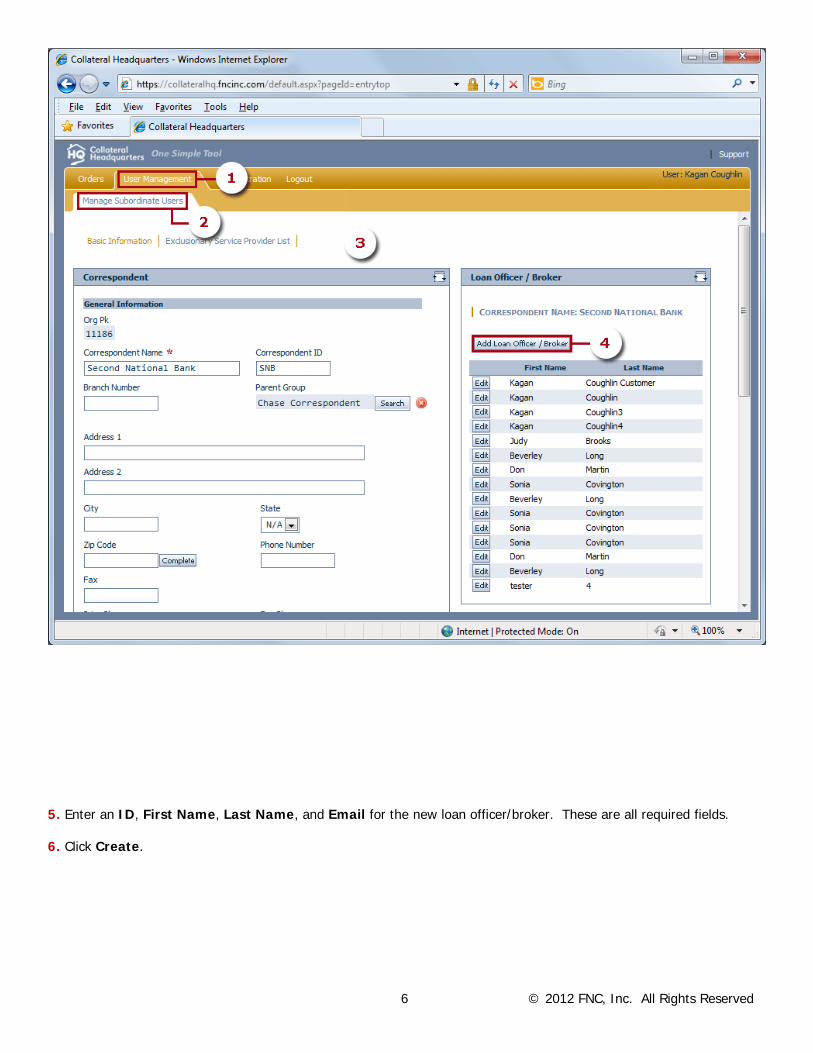
Add a New Loan Officer/Broker: 1. Click the User Management menu. 2. Select Manage Subordinate Users. 3. The Correspondent page will open. 4. Click the Add Loan Officer/Broker button.
6 © 2012 FNC, Inc. All Rights Reserved
5. Enter an ID, First Name, Last Name, and Email for the new loan officer/broker. These are all required fields. 6. Click Create.

7 © 2012 FNC, Inc. All Rights Reserved
Note: When a new loan officer/broker is created, there are three pages of information within their profile: Basic Information, Access Control Level, and Email Alerts. A. Basic Information

8 © 2012 FNC, Inc. All Rights Reserved
The Basic Information page provides the ability to edit and maintain the loan officer/broker’s name and email address. This page is also used to assign the user a User Name and enable and/or disable their CHQ account. Enter or edit the loan officer/broker’s general information. Remember to click Save after making any changes. Enter a User Name for the CHQ user under the Login Control section. Click Enable to enable the loan officer/broker’s CHQ account. When the Enable button is selected, CHQ will automatically send the loan officer/broker an email containing their User Name and a temporary password to use to log in to CHQ. Deactivate a loan officer/broker by clicking the Disable button. After completing the new loan officer/broker setup, click the RETURN TO Correspondent link under the Basic Information page to go back and continue adding users or editing users in the current correspondent. Note: To reset a loan officer/broker’s password, simply click the Disable button, and then the Enable button immediately after. CHQ will send the loan officer/broker an email containing a newly generated temporary password.
B. Access Control Level
The Access Control Level page is where a loan officer/broker is given permissions to perform duties within CHQ. Each attribute provides different levels of access for the loan officer/broker. Refer to the table on the next page for a detailed description of each attribute.

9 © 2012 FNC, Inc. All Rights Reserved
Mark the appropriate checkboxes and click the Save button at the bottom of the screen.
Access Control Level Description
Provides the user access to the order form, search module, and limited view of an order.

10 © 2012 FNC, Inc. All Rights Reserved
C. Email Alerts The Email Alerts page is used to set up a loan officer/broker to receive email alerts outside of CHQ based on certain events within the system. Email alerts can be generated and sent to a loan officer/broker based on order status changes, when an inspection date is set, and when there is a new message received for an order.
Broker
Brokers can add government case numbers to an FHA order, message back and forth with lender, upload a purchase agreement, and view completed appraisal product.
Create User
Allows the ability to create additional loan officer CHQ users within an existing Correspondent.
GAAR Results
Allows the user to access and view GAAR findings using the GAAR Viewer, Appraisal Score, and GAAR Compliance Report.
Loan Officer
Provides the user access to the order form, search module, and limited view of an order. Loan Officers can add government case numbers to an FHA order, message back and forth with lender, upload a purchase agreement, and view completed appraisal product.
Create Automated Review
Allows the user to create new automated review orders using the Review option under the Orders main menu.
Read-Only
Read-Only access will allow a user to search for an order and view order information. Read-Only users are not able to save any changes/updates to an order.
Loan Officer Supervisor
User can access, view, and maintain orders created by other loan officers/brokers within their Customer.
Create Order
Provides the loan officer/broker access to create a new service request using the manual order form.
Parent Organization Manager
Provides the customer user with access to all orders associated with any customers who have been selected as children customers.
Add/Change Service
A user with this attribute is able to update the existing service request type (under the Loan Information page) or add an additional service to the order using the Add New Service page.
UCDP
Allows a user to view and modify UCDP information within an order. When this access control is selected, the user will see a UCDP page in the workspace of each order.
Upload Appraisal File
Provides the user the ability to upload and view appraisal files.

11 © 2012 FNC, Inc. All Rights Reserved
Mark the appropriate checkboxes for the events you wish the loan officer/broker to receive email alerts for. Click the Save button. Note: Use the Select/Deselect All button to check or uncheck all options at the same time.
After completing the new loan officer/broker setup, click the RETURN TO Correspondent link under the Basic Information page to go back and continue adding users or editing users in the current correspondent.

12 © 2012 FNC, Inc. All Rights Reserved
Edit an Existing Loan Officer/Broker: 1. Click the User Management menu. 2. Select Manage Subordinate Users.

13 © 2012 FNC, Inc. All Rights Reserved
3. The Correspondent page will open. 4. Locate the appropriate loan officer/broker the Edit button.
5. The selected loan officer/broker will open. Make the needed edits or additions and click the Save button.

14 © 2012 FNC, Inc. All Rights Reserved
System Basics
Logging In

15 © 2012 FNC, Inc. All Rights Reserved
Before logging in for the first time, you will receive an email from Collateral Headquarters containing your production URL (web address), User Name, and a temporary password. 1. Point your web browser to the following URL: https://www.collateralhq.com. 2. Select the Login option.
3. Enter your assigned User Name and Password. 4. Click the Log In button.

16 © 2012 FNC, Inc. All Rights Reserved
Change Temporary Password When logging in for the first time, you will be prompted to select a permanent password:

17 © 2012 FNC, Inc. All Rights Reserved
1. Enter your temporary password in the Old Password field. 2. Select and enter your new password into the New Password and Confirm New Password fields. Note: Your password must be at least 8 characters and include all four of the following requirements:
• One or more lowercase characters • One or more uppercase characters • One or more special characters • One or more numbers
3. Select and enter a Secret Question and Secret Answer. 4. Click Save when you are finished. Note: The password you select will expire in 90 days.
5. A message will pop-up indicating you have successfully changed your password. Click the OK button.

18 © 2012 FNC, Inc. All Rights Reserved
Note: After changing your password, you will be prompted to log in to CHQ again using your new password.
Upon logging in to CHQ, a welcome screen will be displayed providing order summary information about orders that are currently in the CHQ pipeline.

19 © 2012 FNC, Inc. All Rights Reserved
CHQ Menu Toolbar The CHQ Menu Toolbar provides access to all modules within CHQ.

20 © 2012 FNC, Inc. All Rights Reserved
• Orders – provides access to the Search module.
• User Management – provides users the ability to add a new loan officer to a Correspondent.
• Administration – provides users the ability to change their password.
• Logout – allows a user to log out of their current CHQ session. Note: Depending on how you are set up in CHQ, you may not have access to the User Management menu.
Search Results The Search Results section of CHQ will display all orders that match the search criteria selected. The Search Results lists each order individually and provides a great deal of information about each order. Use the scroll bar on the right side of

21 © 2012 FNC, Inc. All Rights Reserved
the screen to move through the Search Results. Sort each column by clicking on the heading. Select an order by clicking on the magnifying glass in the far left column.
• The number of orders returned is displayed at the top left corner of the order list. If there are multiple pages, arrows will be available to move from page to page.
• Select the Auto Sync checkbox to automatically open the first order that appears in the search results list.
• Click Refresh Results to re-run the last search to get the most up-to-date results.
• Clicking Export to Excel will transfer the Search Results into an Excel spreadsheet format.
• Generate Chart provides the user the ability to view the Search Results in a bar, pie, or line chart based on
order status.
• Hide Results will collapse the Search Results section. Show Results will expand the Search Results section (after it has been collapsed).
• An envelope icon to the left of an order indicates that the order has a new message for the user to read.
• A flag icon indicates a follow-up action item is open for the order.
• The different colors in the Search Results pertains to the product due date for the order.
• Red—product is past due or due the current day • Orange—product is due in one additional day from the current day • White or Blue—product is due two or more days from current day
• When an order is selected (by clicking the magnifying glass) the color of the order will change to yellow.
Order Screen Once an order has been searched for and selected, it will open in the CHQ window. The order screen is divided into two different sections: Order Summary and Workspace.
22 © 2012 FNC, Inc. All Rights Reserved
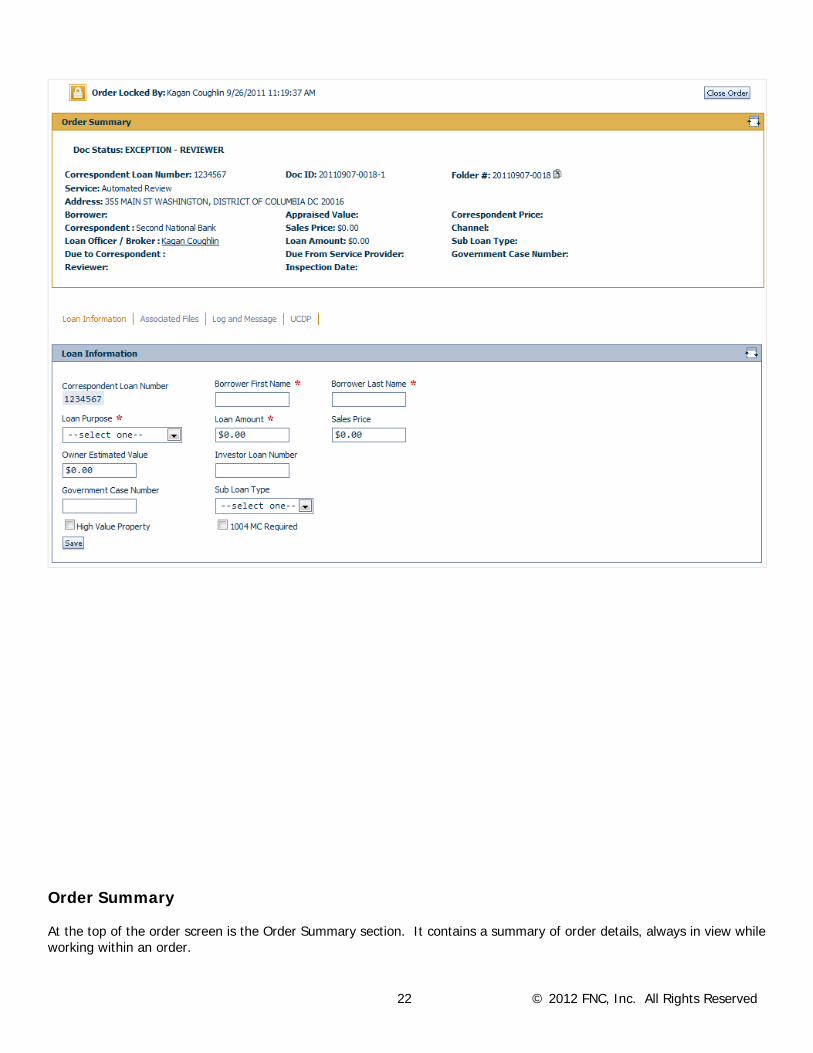
Order Summary At the top of the order screen is the Order Summary section. It contains a summary of order details, always in view while working within an order.

23 © 2012 FNC, Inc. All Rights Reserved
A. General information about the order including the correspondent loan number and property address can be found within the Order Summary. B. Order Status can be found at the top of the Order Summary in bold print. C. The Order Locked By section will list the CHQ user who currently has the order opened and locked. The locked by user is the only person who is able to save any changes made to the order. D. Click the Close Order button to close the order screen.
Workspace Directly under the Order Summary is the Workspace. The Workspace consists of four different working pages: Loan Information, Associated Files, Log and Message, and UCDP. An explanation of each working page can be found within the Working with Orders section of this manual.

24 © 2012 FNC, Inc. All Rights Reserved
Status Definitions CHQ is a status based system. The status of an order indicates at what point in the CHQ process the order is currently in. The statuses highlighted in all bold print are the statuses that will be seen/used most often.

25 © 2012 FNC, Inc. All Rights Reserved
Accepted The service provider has accepted the assignment. This will occur automatically when service providers accept the assignment on AppraisalPort or InspectionPort.
Approved – As Is The received product has been reviewed and the reviewer decision of Acceptable has been selected.
Approved – With
Conditions
The received product has been reviewed and the reviewer decision of Acceptable with Minor Defects has been selected. The product is approved and values are now available for viewing by the Customer.
Assigned to Provider The order has been assigned to the service provider either automatically or manually, but not yet accepted (or rejected) by the service provider.
Auto Assign Reviewer
The valuation product has been received and GAAR has run. The order is ready to be auto-assigned by the system or manually assigned to a reviewer.
Cancelled - By Request A processor should select this status if he/she receives notification to cancel the order.
Cancel Pending
A CHQ user can manually place the order in this status when waiting on confirmation to officially cancel the order, or to put it back in an active status.
Cancelled – Duplicate
Request
After researching an Exception - Duplicate Order, place the order in this status to cancel when duplication is verified.
Cancelled - General This is a catch-all status to use when cancelling an order if the reason for the cancellation does not fit into any of the other Cancelled statuses.
Cancelled – Refund Due An order that has been paid for by the Customer when it was placed, and is cancelled before the product is completed by the service provider.
Cancelled – With Fee An order that is cancelled, but the service provider is due a partial or full fee for work completed.
Declined
After the review of the valuation product/report is complete, the order is manually changed to this status if the reviewer determines that the loan should not be approved.
Draft Not Acceptable The report is deemed unacceptable because of missing, incomplete, or inaccurate information.
Draft Received From Provider
The report has been received from the service provider and is currently being reviewed by GAAR.
Escalated Review A reviewer/underwriter has determined that an escalated review is needed for the order by selecting the Escalated Review Required reviewer decision.
Exception – Duplicate Order
The order was found to be a duplicate of an open, existing order based on property address. An entry in the message log is made stating which order was a match to the current order.
Exception - Manual Assign
Indicates the system was unable to automatically assign the order or the service provider rejected the order. Before manually assigning an order, the user should read the Message Log to learn the history.
Exception - Processor Access Instructions were entered by the Customer on the order form and must

26 © 2012 FNC, Inc. All Rights Reserved
be reviewed by a processor and approved before the order can be assigned to a service provider.
Exception - Reviewer
The appraisal product has been uploaded in CHQ, but data cannot be analyzed from the appraisal format received. Please verify the appraisal is either AIReady, MISMO or 1st Generation PDF.
Exception – UCDP
The upload to UCDP failed and must now be researched to determine what caused the failure. Once any adjustments are made, the file can be manually uploaded again to UCDP.
In Process
An order is in this status after it has been entered using the Review order form and the valuation product has been uploaded. The valuation product is currently being reviewed by GAAR.
Incoming (New) An order is in this status when it is initially received and is waiting for the appraisal file to be uploaded.
On Hold The order has been manually placed on hold pending information to determine the next step needed for the order in the CHQ process.
Provider Accepts w/ Condition
This status occurs automatically when a service provider on AppraisalPort or InspectionPort accepts the order with a condition. The Message Log records the condition i.e. higher fee.
Ready For Review
The appraisal has successfully been loaded in CHQ and GAAR and Appraisal Score have successfully executed. The appraisal, GAAR and Appraisal Score Report are now available for viewing from the Associated Files tab.
Rejected Online By Provider
This status occurs automatically when the service provider rejects the service request on AppraisalPort or InspectionPort.
Rejected – No Provider Response
This status occurs automatically when the service provider does not accept or reject the order within the set amount of time.
UCDP in Progress
The file upload to UCDP is currently in progress. If the upload is successful, the order will change to the Exception – Reviewer status. If the upload fails, the order will change to the Exception – UCDP status.
Waiting For Payment
An order will remain in this status until payment by credit card is received by the system.
Wholesale – Waiting for
APSL
The Wholesale order is waiting for the valuation product to be uploaded to CHQ.
With Reviewer The order has been assigned to a reviewer and is currently under review.
Create an Order and Upload an Appraisal Product To Create an Order for Review

27 © 2012 FNC, Inc. All Rights Reserved
The Review option is used to create an order in CHQ. Once the order is created, the completed appraisal product can be uploaded to the order. When the appraisal product is received in CHQ, the system will run the report through GAAR, and the GAAR results and Appraisal Score Report will become available. 1. Click the Orders menu. 2. Select Review. 3. The order form will open. Note: Required fields are marked by a red asterisk *. 4. Begin filling out the form.
o Date/Time Ordered: This field will auto-populate based on the current date and time.
o Correspondent Loan Number: Enter the correspondent loan number for the order. This is a required field.
o Investor Loan Number: Enter the investor loan number for the order. This is an optional field.
o Correspondent: The correspondent for the order will auto-populate.
o Street: Enter the street number and name, including any prefix, suffix, or unit number, and then click
the Populate button. CHQ will distribute the address into the appropriate fields.
o Street #: Type the Street Number directly into this field if not using the Populate option.
o Prefix: Type the Prefix directly into this field if not using the Populate option.
o Street: Type the Street Name directly into this field if not using the Populate option.
o Suffix: Type the Suffix directly into this field if not using the Populate option.
o Unit #: Type the Unit Number directly into this field if not using the Populate option.
o Zip: Enter the subject’s Zip Code, and then click the Complete button. CHQ will auto-populate the City, State, and County fields based on the zip code entered.
o Service Type: The Automated Review option will automatically be selected. All orders should have
Automated Review selected as the Service Type.
o City: Type the City directly into this field if not using the Complete option.
o State: Use the drop-down arrow to select the State if not using the Complete option.
o County: Type the County directly into this field if not using the Complete option. 5. Click Submit.

28 © 2012 FNC, Inc. All Rights Reserved
6. The order confirmation screen will open. 7. Click Upload Files to upload the completed appraisal product to the order.

29 © 2012 FNC, Inc. All Rights Reserved
Upload an Appraisal Product 8. The order will open to the Associated Files page. Click the Browse button under the Add File section.

30 © 2012 FNC, Inc. All Rights Reserved
9. Select the appraisal product file being uploaded from the browser window. 10. Click Open.

31 © 2012 FNC, Inc. All Rights Reserved
11. Use the File Type drop-down arrow to select Appraisal Report. 12. Click Upload.
The appraisal product will upload to the order and begin the internal review process.
Search for Orders

32 © 2012 FNC, Inc. All Rights Reserved
The Search module in CHQ provides users the ability to enter search criteria and find the order(s) they wish to open. There are three search menus available which provide many options for a user to search for an order: My Orders, General Search, and Research. The following pages provide a few examples on how to search for an order. Search by Correspondent Loan Number 1. Click the Orders menu. 2. Select Search. 3. Click to expand the General Search menu. 4. Select By Correspondent Loan Number.
5. Enter the correspondent loan number of the order being searched for. 6. Click the Search button.

33 © 2012 FNC, Inc. All Rights Reserved
7. All orders matching the correspondent loan number entered will be displayed in the Search Results. 8. To select an order, click the magnifying glass on the left side.

34 © 2012 FNC, Inc. All Rights Reserved
9. The order will open in the Workspace. Note: Order status can be found in both the Search Results and the Order Summary.
Search by Property Address

35 © 2012 FNC, Inc. All Rights Reserved
1. Click the Orders menu. 2. Select Search. 3. Click to expand the General Search menu. 4. Select By Property Address.
5. Enter the property address of the order being searched for. You can enter as little or as much information as you would like as all fields are optional. Just remember the more information entered, the more precise the search results will be.

36 © 2012 FNC, Inc. All Rights Reserved
6. Click the Search button.
7. All orders matching the property address entered will be displayed in the Search Results. 8. To select an order, click the magnifying glass on the left side.
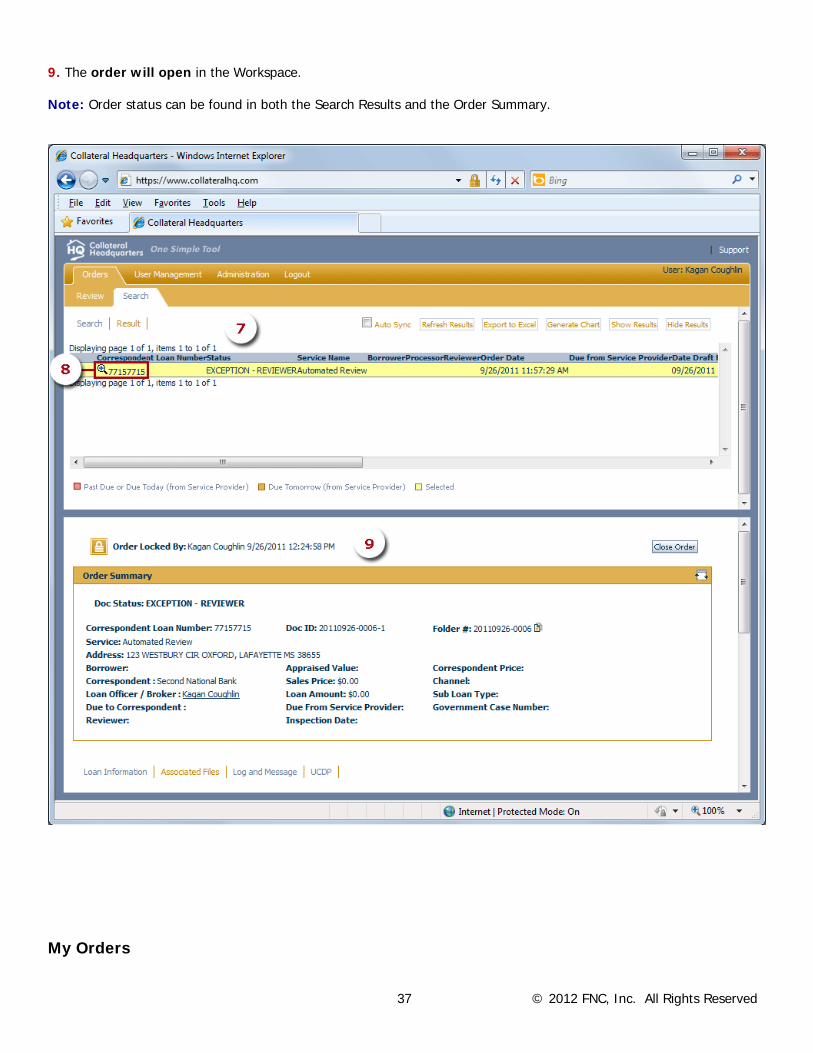
37 © 2012 FNC, Inc. All Rights Reserved
9. The order will open in the Workspace. Note: Order status can be found in both the Search Results and the Order Summary.
My Orders

38 © 2012 FNC, Inc. All Rights Reserved
The My Orders search menu is a status search that will search for orders associated with the loan officer. My Orders also provides the ability to search for orders that have new messages and/or follow-ups. 1. Click the Orders menu. 2. Select Search. 3. The My Orders search will open on the CHQ screen. 4. Select the status/statuses for the orders you wish to search for. Note: Click the Select All button to select all statuses at once and return all orders you have created. Note: To search for orders that have a new message and/or a follow-up, mark the checkbox(es) at the bottom of the page. 5. Click Search.
6. All orders associated with the loan officer in the statuses selected will be displayed in the Search Results.

39 © 2012 FNC, Inc. All Rights Reserved
7. Click the magnifying glass on the left side to select an order. 8. The order will open in the Workspace. Note: Order status can be found in both the Search Results and the Order Summary.
Working with Orders

40 © 2012 FNC, Inc. All Rights Reserved
The following pages provide a brief explanation of each working page for an order and what information can be accessed within each page.
Loan Information The Loan Information page contains details about the order, including correspondent loan number and investor loan number. If any changes need to be made to the information listed here, simply type directly into the appropriate field and click the Save button. Note: The only information that cannot be updated on this page is Correspondent Loan Number.
Associated Files

41 © 2012 FNC, Inc. All Rights Reserved
The Associated Files page provides access to all documents associated with the order. This is where the appraisal product is uploaded to the order. When the order changes to the Ready for Review status, the GAAR results and Appraisal Score Report will become available for viewing. Once the upload to UCDP is successful, the Fannie Mae SSR and/or Freddie Mac SSR documents can be viewed and printed from Associated Files. This page can also be used to upload documents to an order, and to email files out from CHQ. To Open an Associated File: 1. Under the File Type list, locate the file you wish to open. 2. Click either the magnifying glass or Download button. The file will then open in a new window on the screen. Note: Click the GAAR button to view the GAAR results. Click the Score Report button to open the Appraisal Score report.
Print an Associated File:

42 © 2012 FNC, Inc. All Rights Reserved
Once you have a file opened, you can print out a hard copy of the file.
If you use the Download option to open a file, click the printer icon to print a hard copy of the document. The Download option is available for the Appraisal Report, Fannie Mae SSR, and Freddie Mac SSR.
If you use the magnifying glass to open the Appraisal Score, Fannie Mae SSR, or Freddie Mac SSR or when clicking the Score Report button to open the Appraisal Score Report, there are several print options available depending on your browser settings:

43 © 2012 FNC, Inc. All Rights Reserved
• Click to open the File menu at the top left corner of the screen, then select the Print option. • Click the printer icon located in the toolbar at the top of the screen (if visible). • Right-click with your mouse to open a menu of options, then select Print. • Enter Ctrl + P on your keyboard
Note: The FilePrint option is highlighted in the screen shot below.
Add a File to the Associated Files Page: 1. Under the Add File section, click the Browse button to retrieve the file being uploaded.

44 © 2012 FNC, Inc. All Rights Reserved
2. Use the drop-down arrow to select the File Type. Note: It is important to select the correct file type when uploading a file. Your options are to select either Purchase Agreement when uploading a sales contract, or Other Documents for all other types of files. 3. Click the Upload button.
Email a Document from Associated Files: 1. Mark the checkbox(es) of the file(s) you wish to send. 2. Enter the email address of the recipient(s). Separate multiple email addresses with a comma. 3. Click Send Email.
Log and Message

45 © 2012 FNC, Inc. All Rights Reserved
The Log and Message Page contains a listing of all messages associated with an order. Messages can be composed, read, and replied to from this page. A. Click Compose New Message to enter and send a new message. B. Each message received will list who the message is from along with the subject of the message. C. A closed envelope icon indicates a new message. An open envelope icon indicates a read or opened message. D. Click the plus sign button to open the body of the message. Click the same button to close the message. E. Click the reply icon to send a reply to the received message. F. Click the edit button to change the status of the message from new to read. G. Mark the Show system messages checkbox to view all system generated messages.
To Compose a New Message: 1. Click Compose New Message.

46 © 2012 FNC, Inc. All Rights Reserved
2. Enter a Subject and Body. 3. Click Save. Note: Before clicking Save to send the message, you can check your spelling by clicking the Check Spelling link, or you can mark the message for a follow up (red flag) by selecting the Follow up required checkbox.
UCDP

47 © 2012 FNC, Inc. All Rights Reserved
The UCDP page will display the Business Unit number, Fannie Seller Service number, and/or Freddie Seller Service Number as well as the results (success or failure) of the appraisal product upload to UCDP. Click the Summary Report link at the bottom of the page to view a summary of the upload. In the case of a failure, the Summary Report will provide further details on why the upload was not successful. When the upload is successful, the status of the order will be Ready for Review and the appropriate SSR(s) will be available under the Associated Files page. When the upload fails, the status of the order will be Exception – UCDP. If there is a failure, the UCDP page will display the cause of the failure and can then be used to manually override the exception or a corrected file can be re-submitted under the Associated Files page. The UCDP page is available to those users who have been given access within their individual user profile. If you do not see this page, any UCDP issues will be handled by the correspondent. To be granted access to the UCDP page, contact your system administrator. Note: The UCDP page screen shot below represents a successful file upload.
Example of a Summary Report:

48 © 2012 FNC, Inc. All Rights Reserved
Exception – UCDP:

49 © 2012 FNC, Inc. All Rights Reserved
When there is a failure, the status of the order will change to Exception – UCDP and the UCDP page will display the cause of the failure. At this point, the UCDP page can be used to manually override the exception or a corrected file can be submitted under the Associated Files page. Remember to click the Summary Report link to view a more detailed description on why the upload was not successful.
A. Manual Override

50 © 2012 FNC, Inc. All Rights Reserved
1. Click the Manual Override link located at the bottom of the UCDP page.
2. The UCDP Gateway window will open. 3. Use the drop-down arrow to select the appropriate Override Reason. 4. Enter any Comments. 5. Click the Submit button.
B. Submit a Corrected File

51 © 2012 FNC, Inc. All Rights Reserved
After reviewing the Summary Report and requesting and receiving the corrected appraisal product, 1. Open the appropriate order and navigate to the Associated Files page.
2. Click the Browse button under the Add File section.
3. Select the appraisal product file being uploaded from the browser window.
4. Click Open.
5. Use the File Type drop-down arrow to select Appraisal Report.

52 © 2012 FNC, Inc. All Rights Reserved
6. Click Upload.
The corrected appraisal product will upload to the order. The system will submit the corrected appraisal product to UCDP and the file will re-run through the internal review process, providing new GAAR and Appraisal Score results. GAAR™

53 © 2012 FNC, Inc. All Rights Reserved
What is GAAR™?
• The Generally Accepted Appraisal Rules (GAAR™) is a collection of standardized appraisal review rules that:
– Check for compliance with respect to regulations and industry standards – Search for inconsistent, unusual, or potentially aggressive opinions that reduce the credibility of an
appraisal report – Disclose unusual property traits, or omissions in the valuation report itself, that increases collateral
risk in the lending decision Purpose of GAAR™
• Enhance speed of valuation review process • More efficient reviews of valuation products • Adds consistency to the review process • Quality control in the valuation review process • Allows users to focus on problem reports for a more thorough manual review • Provides automated tracking of valuation review procedures, guidelines, and results
Locations in CHQ
• GAAR™ results can be found in CHQ: – Associated Files
• Appraisal Score Report • GAAR Viewer
GAAR™ Categories
• Compliance Series - The foundation of the compliance rule set is based on a variety of appraisal
guidelines and regulatory requirements, such as the Uniform Standards of Appraisal Practice (USPAP), along with Government Sponsored Enterprises (GSE’s) such as Fannie Mae and Freddie Mac. This series reflects industry minimal appraisal standards and guidelines.
• Risk Series -This series provides the next level of review with rules that target risk. These rules are
based on experience/input of FNC’s Chief Appraiser and other Real Estate and Appraisal Quality Control subject matter experts. On-going analysis of appraisals enhances and updates this series. These rules are not published in existing industry sources/guidebooks. This series focuses on potential red flag issues. Its goal is to mitigate risk and provides alerts to areas within the appraisal that may warrant follow up action, such as inconsistencies and weak support for the final valuation.
• External Data Series - This set of rules supplements GAAR™ by bringing in external sources of data.
The focus of this module is to provide additional market information about the subject property and its neighborhood. For example, the subject property’s gross living area as reported in the appraisal is checked against public records. A market based price trend and momentum analysis is also provided to identify declining trends.
• FHA Series – The FHA series automatically reviews each appraisal, checking for FHA’s minimal property
standards. All FHA appraisals must undergo manual review. The FHA – GAAR™ series accommodates the process by providing the reviewer with alerts based on the automated review. The FHA rules search the appraisal for certain keywords that may indicate a problem, and if any red flags are found, an alert is issued.
• UAD Series - The UAD (Uniform Appraisal Dataset) is a collection of very specific instructions for how to fill out an appraisal form. Since the instructions are consistent and all appraisers are required to follow them explicitly, underwriters will see uniform terms, terminology and descriptions in the appraisals. The GAAR™ engine includes Compliance rules to check appraisal conformance to these UAD requirements. The goal is to make sure the appraiser has completed the form properly such that when an appraisal is subsequently processed by your systems and submitted to the UCDP, that no UAD issues are present.
Appraisal Forms Supported By GAAR™

54 © 2012 FNC, Inc. All Rights Reserved
• Fannie Mae 1004/Freddie Mac 70 –Uniform Residential Appraisal Report (URAR) – March, 2005 • Fannie Mae 1004C/Freddie Mac 70B – Manufactured Home Appraisal Report – March, 2005 • Fannie Mae 2055/Freddie Mac 2055 – Exterior Only Inspection Residential Appraisal Report • Fannie Mae 1073/Freddie Mac 465 – Individual Condominium Unit Appraisal Report – March, 2005 • Fannie Mae 1075/Freddie Mac 466 – Exterior –Only Inspection Individual Condominium Unit Appraisal Report
– March, 2005 • Fannie Mae 1025/Freddie Mac 72 – Small Residential Income Property Appraisal Report
GAAR™ Naming Convention Ex: FNC- C –CONT -006-00
I did (did not) analyze the contract for sale for the subject: Description field is blank and ASSIGNMENT TYPE is noted as PURCHASE TRANSACTION
XXX (FNC) = Ownership X (C) = Type of Rule (Compliance, Risk, External, FHA) XX (CONT) = Section of form XXX (006 -00) = Rule Number Uniform Residential Appraisal Report (URAR) Sections of Form:
• SUB = Subject
• SCAHIS = Sales Comparison Analysis History
• CONT = Contract
• SCAVALUE = Indicated Value by Sales Comparison Approach
• N = Neighborhood • REC = Reconciliation
• S = Site
• CA = Cost Approach
• IMP = Description of Improvements
• PUDINFO = PUD Information
• SCA = Sales Comparison Approach
• CERT = Appraiser Details
• ATT = Appraisal Attachments • EXT = External Rule GAAR™ Examples
• Compliance Series
– FNC-C-SCA-099-03 Date of Sale/Time: Field for any comparable 1-3 is more than six months old
– FNC-C-SCAHIS-024-01 COMPARABLES: DATE of Prior Sale/Transfer: Field contains date for the year prior to the date of sale of the comparable sale
• Risk Series
– FNC-R-SCA-099-01
Date of Sale/Time: Comparables: Fields for any comparables contain NEGATIVE adjustments and are closed sales
– FNC-R-SCAHIS-030-01 Price of Prior Sale/Transfer: COMPARABLES: Prior Sales Price is HIGHER than COMPARABLE’S PRICE reported in appraisal
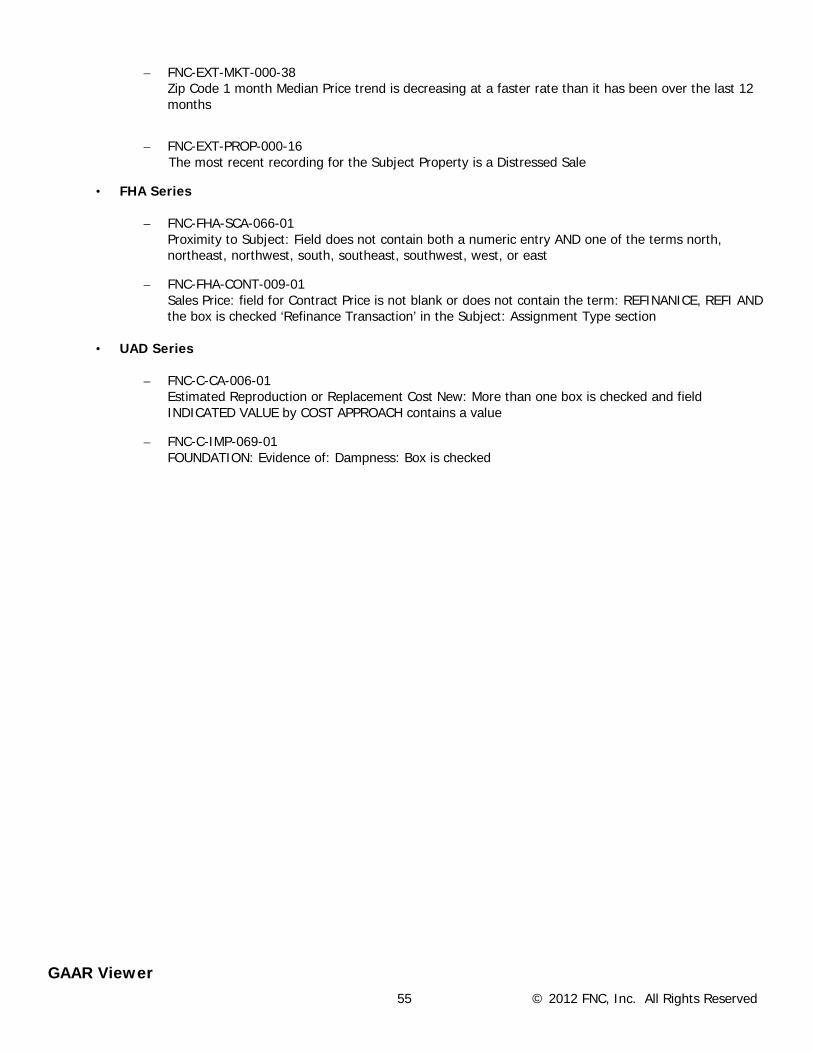
• External Data Series
55 © 2012 FNC, Inc. All Rights Reserved
– FNC-EXT-MKT-000-38
Zip Code 1 month Median Price trend is decreasing at a faster rate than it has been over the last 12 months
– FNC-EXT-PROP-000-16 The most recent recording for the Subject Property is a Distressed Sale
• FHA Series
– FNC-FHA-SCA-066-01 Proximity to Subject: Field does not contain both a numeric entry AND one of the terms north, northeast, northwest, south, southeast, southwest, west, or east
– FNC-FHA-CONT-009-01 Sales Price: field for Contract Price is not blank or does not contain the term: REFINANICE, REFI AND the box is checked ‘Refinance Transaction’ in the Subject: Assignment Type section
• UAD Series
– FNC-C-CA-006-01
Estimated Reproduction or Replacement Cost New: More than one box is checked and field INDICATED VALUE by COST APPROACH contains a value
– FNC-C-IMP-069-01 FOUNDATION: Evidence of: Dampness: Box is checked
GAAR Viewer

56 © 2012 FNC, Inc. All Rights Reserved
The GAAR Viewer is a reviewer tool that provides a visual of the GAAR™ findings for an appraisal. Open the GAAR viewer by clicking the GAAR button in the Associated Files tab.
Once opened, the GAAR viewer will list all rules that fired against the appraisal on the left hand side of the screen, while displaying the appraisal file on the right. The red highlighted areas indicate where a rule fired against the appraisal. Select a rule from the list on the left to pinpoint the location of that rule firing within the appraisal. The chosen rule will highlight in green on the appraisal and the rule definition will be displayed at the bottom of the page.
Appraisal Score

57 © 2012 FNC, Inc. All Rights Reserved
What is the Appraisal Score?
• The Appraisal Score is an automated collateral underwriting tool that is based on weighted Generally Accepted Appraisal Rules (GAAR™). The Appraisal Score scores appraisals on a range of 0 to 1000, where 1000 is best.
• The score is intended to allow lenders to preset a risk threshold score to determine the follow up action required, if any.
• The Appraisal Score is calculated once the appraisal has been run through GAAR™. Available Appraisal Forms for Appraisal Score
• Fannie Mae 1004/Freddie Mac 70 –Uniform Residential Appraisal Report (URAR) – March, 2005 • Fannie Mae 1004C/Freddie Mac 70B – Manufactured Home Appraisal Report – March, 2005 • Fannie Mae 2055/Freddie Mac 2055 – Exterior Only Inspection Residential Appraisal Report • Fannie Mae 1073/Freddie Mac 465 – Individual Condominium Unit Appraisal Report – March, 2005 • Fannie Mae 1075/Freddie Mac 466 – Exterior –Only Inspection Individual Condominium Unit Appraisal Report
– March, 2005 Locations in CHQ The Appraisal Score will be automatically generated on every order.
• The Appraisal Score can be found in CHQ: – Associated Files
• Score Report
Benefits of Using Appraisal Score
• Separates out those appraisals that might require more intensive follow up review. • Reduces the costs and time associated with appraisals that may not require manual reviews. • Ensures regulatory compliance and mitigates risk. • Establishes a standard quality level for capital markets and investors. • Provides a means to achieve and document a consistent comprehensive review of 100% of appraisal volume.
Information Provided by Appraisal Score
• Front view image of subject property (pulled directly from the appraisal) • Appraisal Score and score report date • Subject property details (address, value, appraiser info, sq. ft., etc.) • GAAR™ results
Example of Appraisal Score Report

58 © 2012 FNC, Inc. All Rights Reserved

59 © 2012 FNC, Inc. All Rights Reserved
Administration – Change Password The Administration menu provides users with the ability to manually change their password at any time.
Change Password 1. Click the Administration menu. 2. Select Change Password. 3. Enter your current password in the Old Password field. 4. Select and enter your new password into the New Password and Confirm New Password fields. Note: Your password must be at least 8 characters long and include all four of the following requirements:
• One or more lowercase characters • One or more uppercase characters • One or more special characters • One or more numbers
5. Select and enter a Secret Question and Secret Answer. 6. Click Save when you are finished. Note: The password you select will expire in 90 days.

60 © 2012 FNC, Inc. All Rights Reserved
7. A message will pop-up indicating you have successfully changed your password. Click the OK button.
Support FNC’s Customer Support department is available to help with any questions you have concerning CHQ. Here’s how to reach them: Monday through Friday, 7:00 AM to 7:00 PM CST
Phone: 1-888-963-3330
Email: [email protected]