Embed Size (px)
Citation preview
7/22/2019 Colle System
http://slidepdf.com/reader/full/colle-system 1/105

7/22/2019 Colle System
http://slidepdf.com/reader/full/colle-system 2/105

7/22/2019 Colle System
http://slidepdf.com/reader/full/colle-system 3/105
COLLE SYSTEM ZUKERTORT VARIATION, 5 b3
GM Andrew Soltis
A White Opening You Can Use for
the Rest of Your Career
Chess Digest, Inc.
1998

7/22/2019 Colle System
http://slidepdf.com/reader/full/colle-system 4/105
COLLE SYSTEM
ZUKERTORT VARIATION, 5 b3
Copyright©1998 Andrew Soltis
All rights reserved under Fan American and International Copyrightconventions.
ISBN: 0-87568-288-X
No part of this publication may be reproduced, stored in a retrieval system,
or transmitted in any form, or by any means: electronic, electrostatic, magnetic
tapes, mechanical photocopying, recording, or otherwise without prior and current
permission from the publisher.
Author: Andrew Soltis
Editors: Ken Smith and Roy DeVault
Computer Typesetting: Roy DeVault
Cover Design: Lance Klenk
Final Proof and Diagrams: Roy DeVault
Publisher: Chess Digest, Inc.® 1317 W. Oakdale Rd, Grand Prairie, Texas 75050
(P.O. Box 535699, Grand Prairie, TX 75053)
Send the publisher $3.00 for the New Chess Guide that catalogs every chess book for general sale in the United States. You are given publishers, page counts, notation and critical reviews. Also included is a free Chess Improvement course for beginners up through Master level players.

7/22/2019 Colle System
http://slidepdf.com/reader/full/colle-system 5/105
TABLE OF CONTENTS
INTRODUCTION 5
The Other CoWe 5
CHAPTER ONE 14
Zukertort 5 b3 vs Koltanowski 5 c3 14
The c-pawn strategies 18
CHAPTER TWO 23
How White Wins 23
Stonewalling 31
CHAPTER THREE 45
How White Loses 45
Queenside Disasters 49
CHAPTER FOUR 57
Common Strategic Mistakes 57
(1) Black loses when he allows the 57game to become focused onWhite's bishops and theirdominating diagonals
(2) For White, the biggest mistake is 62usually to lose control of e5
(3) One of the principal causes for 65
Black's downfall over the years is apremature exchange of pawns ond4
7/22/2019 Colle System
http://slidepdf.com/reader/full/colle-system 6/105
4 COLLE SYSTEMZUKERTORT VARIATION, 5 b3
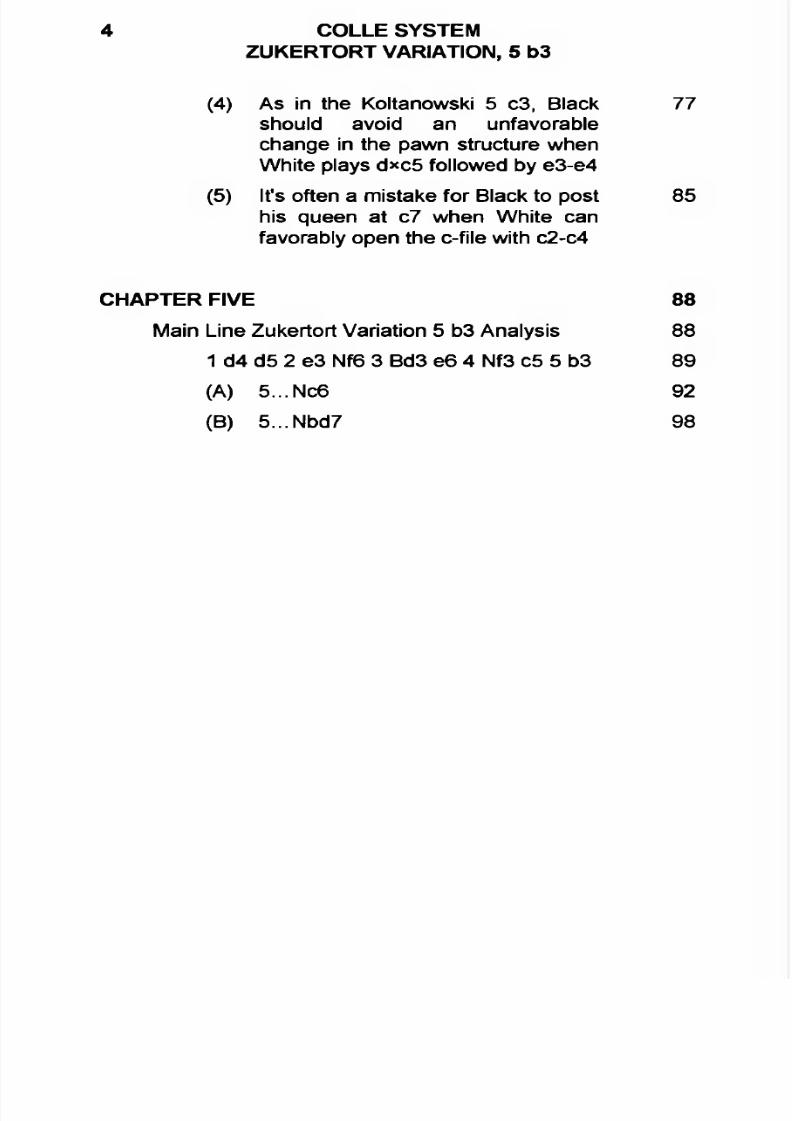
(4) As in the Koltanowski 5 c3, Black 77should avoid an unfavorablechange in the pawn structure when
White plays d*c5 followed by e3-e4
(5) It's often a mistake for Black to post 85his queen at c7 when White canfavorably open the c-file with c2-c4
CHAPTER FIVE 88
Main Line Zukertort Variation 5 b3 Analysis 88
1 d4 d5 2 e3 Nf6 3 Bd3 e6 4 Nf3 c5 5 b3 89
(A) 5...NC6 92
(B) 5...Nbd7 98
7/22/2019 Colle System
http://slidepdf.com/reader/full/colle-system 7/105
5
INTRODUCTION
The Other Colle
There are two faces to what we call the Colle System — butmany authorities recognize only one. Weighty tomes like The
Encyclopedia of Chess and The Oxford Companion to Chess, and even the Russian Chess — Encyclopedic Dictionary, define the Colle as an opening in which White puts pawns at d4,e3, and c3.
But there's another version: the pawns remain at d4 and e3,and the c-pawn is held back, while the c1 bishop is fianchet-toed at b2. This simplifies the problem of how to get that
bishop into the game while giving White greater flexibility inhandling the center.
The variation is named after Johannes Hermann Zukertort, thefirst player to demonstrate the wonderful attacking potential ofWhite bishops lined up on the b1-h7 and b2-g7 diagonals.
Here's a typical Zukertort-ure, from his 1883-84 tour of theUnited States. His opponent in the game played at the Man
hattan Chess Club was one of the leading U.S. players forthree decades.
As we'll see, there are many move orders by Black in theColle-Zukertort, but White usually gets by with a single sequence: 1 d4, 2 e3, 3 Bd3 and 4 Nf3 — although in this bookwe'll see a lot of other orders. Here his task is made easier byBlack's first move, which makes ...Bf5 impossible (compare1.. .d5 2 Nf3 Nf6 3 e3 Bf5).
Zukertort - Judd New York 1883
1 d42 Nf3
e6
2 ...
3e3
4 Bd3
Nf6d5
Bd6
7/22/2019 Colle System
http://slidepdf.com/reader/full/colle-system 8/105
6 COLLE SYSTEMZUKERTORT VARIATION, 5 b3
Black apparently waits for an indication of his opponent'sstrategy. Will it be the Colle-Koltanowski with Nbd2 and c2-c3and the eventual e3-e4? Usually, White now plays 5 b3.
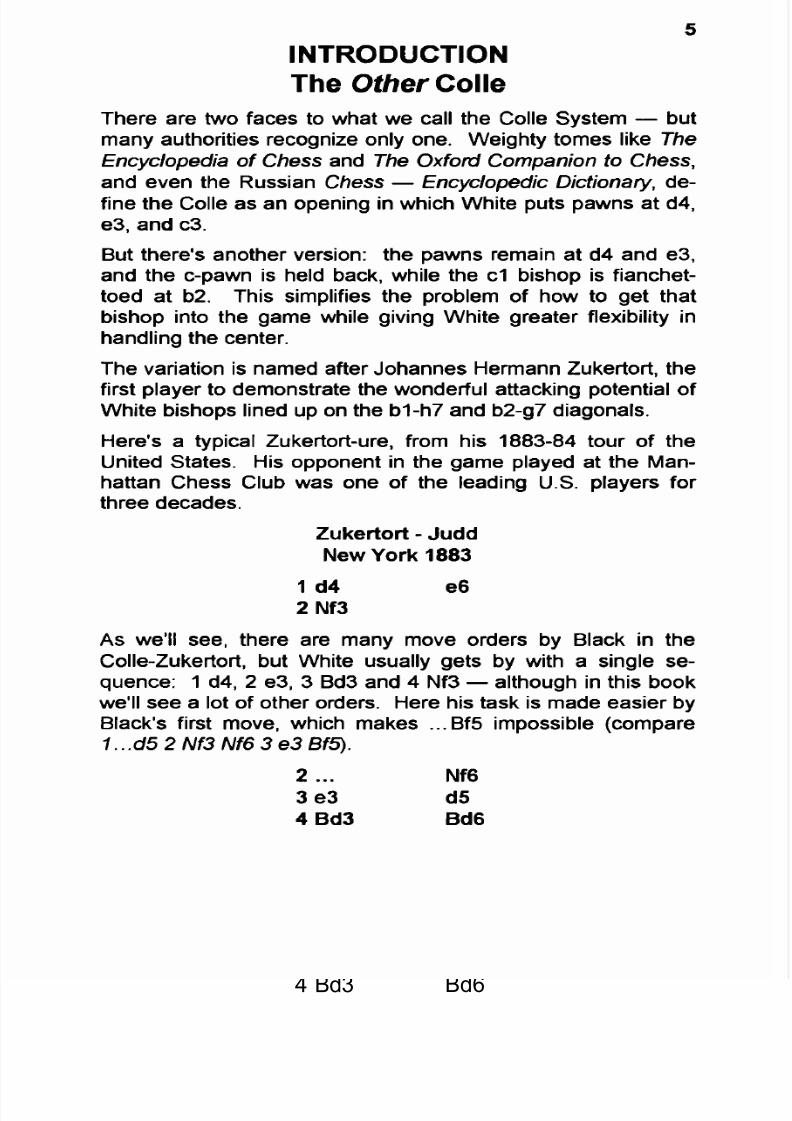
50-0 0-06 b3
No. White wants to retain other options. One is to attack thecenter with the c-pawn (c2-c4) and another, quite differentidea to keep the center closed and attack on the kingside with
Ne5, f2-f4, and Rf3-h3.6 ... Re8?l
There are times when symmetry (6...b6) is risky. But hereBlack begins a good plan — promoting ...e6-e5 — that henever carries out.
7 Bb2 Nbd7
8 c4 c6
Later White found that the right response to this setup wasNe5! to keep Black bottled up. Black probably didn't like8. .. e5 because of 9c5.
9 Nbd2?
Now with 9...e5 Black should equalize.
9 ... Nf8?
(see diagram on next page)
7/22/2019 Colle System
http://slidepdf.com/reader/full/colle-system 9/105
INTRODUCTIONThe Other Colle
7
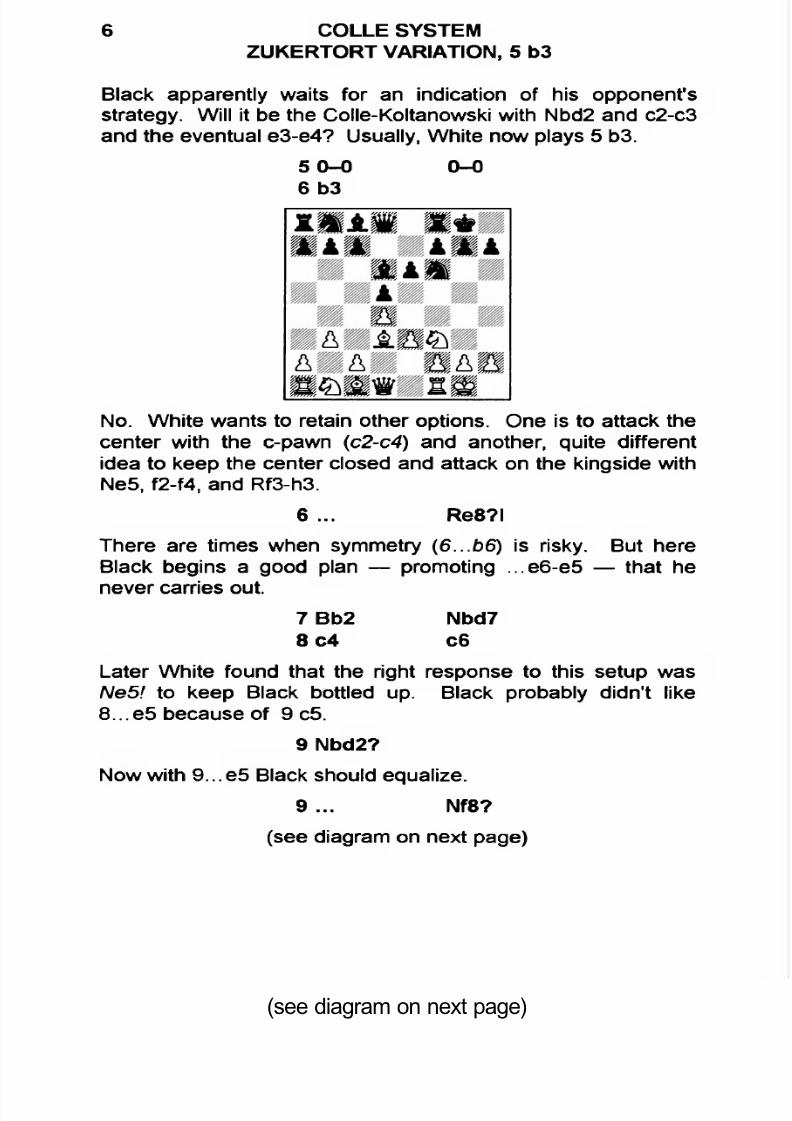
This method of covering h7, a natural target for White's d3-bishop, shows his sixth move was played with a dubious planin mind. Now White obtains the initiative and never gives it up.
10 e4!
If Black declines the opportunity to open the center, White willaccept it.
10... dxe4
Black cannot allow 10...Bc7 11 e5! with a huge spatial edgefor his opponent.
11 N*e4 N*e412 B*e4 f5?
Max Judd had his positional blind spots and this move, makinge6 a horribly backward pawn, is indicative, he probably had...f5-f4 in mind.
13 Bc2 Ng614 Qd2 Nh415 Nxh4 Qxh416 f4!
(see diagram on next page)
7/22/2019 Colle System
http://slidepdf.com/reader/full/colle-system 10/105
8 COLLE SYSTEMZUKERTORT VARIATION, 5 b3
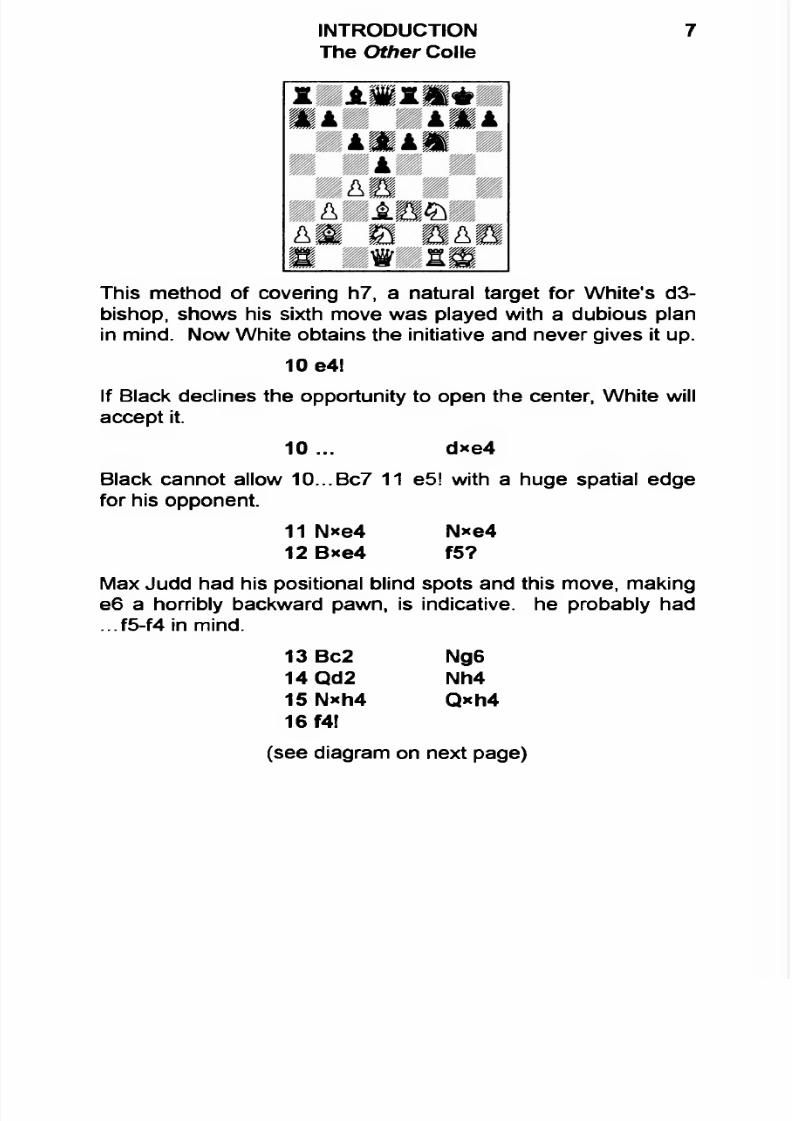
But this thwarts that idea and fixes the e-pawn as well.White's plan now is to bombard e6 with a bishop at b3 androoks on the e-file.
16 ... Bd7
This was Black's last chance for 16...c5 but he was probablyafraid of opening the diagonal for the b2-bishop.
17 b4! Kf7
To protect e6 but, as it turns out, this, and his next, only encourage the winning breakthrough.
18 Bb3 a5
19 c5! Bc720 b5l
An excellent stroke. Black doesn't want to have his pieceslocked in by 21 b6 so he allows the center to be opened.
20 ... cxb521 d5
Now 21 ...exd5 22 Qxd5ch wins a piece (22...Be6 23 Q*f5ch).
21 ... Rad822 d6 Bc623 Qc3 Qg4
24 Rf2 b4

7/22/2019 Colle System
http://slidepdf.com/reader/full/colle-system 11/105
INTRODUCTIONThe Other Colle
9
25 Qe5 Bb8
A graphic illustration of the power of White's bishops. Hecould win by 26 h3 followed by Kh2 and preparing g2-g4. Butthe bishops have another, more direct, way of finishing off.
26 Bd1! Qg627 Bh5
Black resigns because of 27...Q*h5 28 Q*g7 mate.
Despite Zukertort's experience with the system, it gained fewimmediate supporters. But by the end of the last century asimilar system — with the White c-pawn at c3 and queensidefianchetto — was appearing in master chess. It was lateradopted with spectacular success by Belgium's Edgar Colleand George Koltanowski in the 1920s and became known asthe Colle System, Koltanowski Variation.
Colle didn't claim the superiority of one variation over another
and, in fact, he adopted the Zukertort setup on occasion:
Colle - Grunfeld
Berlin 1926
1 d4 Nf62 Nf3 e6 3e3 b6
4 Bd3 Bb75 Nbd2 c5
7/22/2019 Colle System
http://slidepdf.com/reader/full/colle-system 12/105
10 COLLE SYSTEMZUKERTORT VARIATION, 5 b3
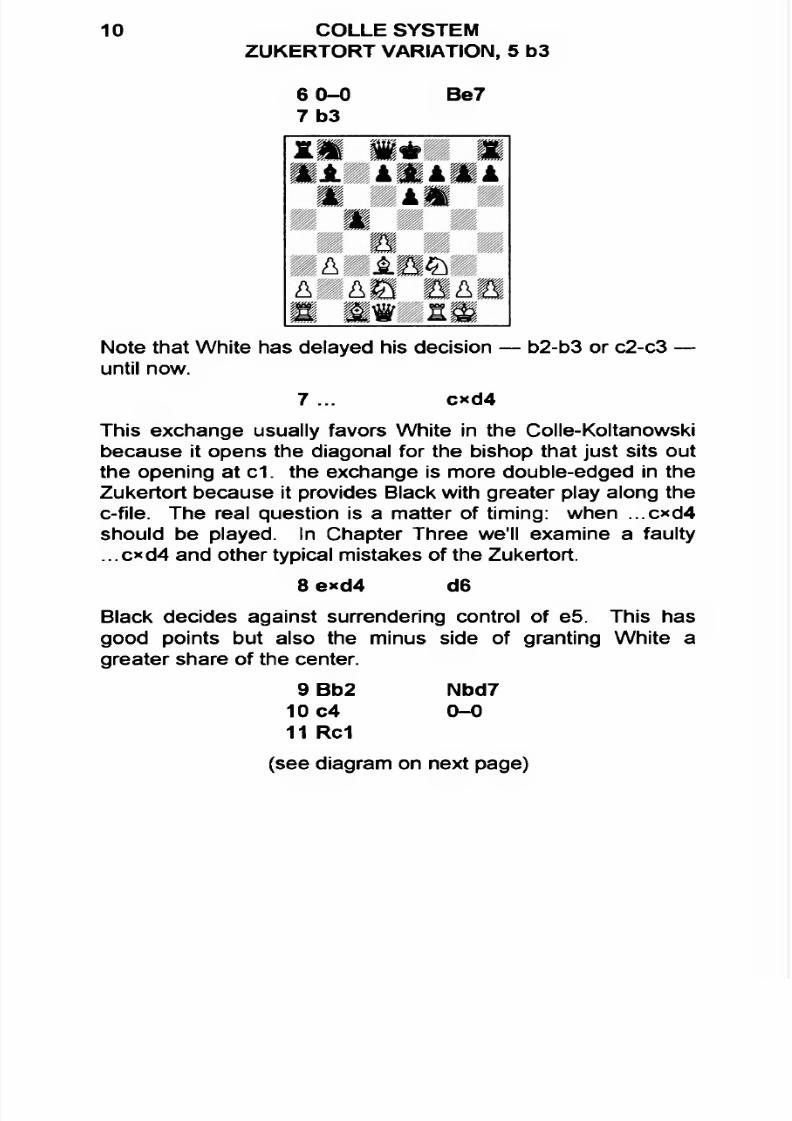
6 0-0 Be77 b3
Note that White has delayed his decision — b2-b3 or c2-c3 —until now.
7 ... c*d4
This exchange usually favors White in the Colle-Koltanowskibecause it opens the diagonal for the bishop that just sits outthe opening at c1. the exchange is more double-edged in the
Zukertort because it provides Black with greater play along thec-file. The real question is a matter of timing: when ...c*d4should be played. In Chapter Three we'll examine a faulty...c*d4 and other typical mistakes of the Zukertort.
8 e*d4 d6
Black decides against surrendering control of e5. This hasgood points but also the minus side of granting White a
greater share of the center.
9 Bb2 Nbd710 c4 0-011 Rc1
(see diagram on next page)
7/22/2019 Colle System
http://slidepdf.com/reader/full/colle-system 13/105
INTRODUCTIONThe Other Colle
11
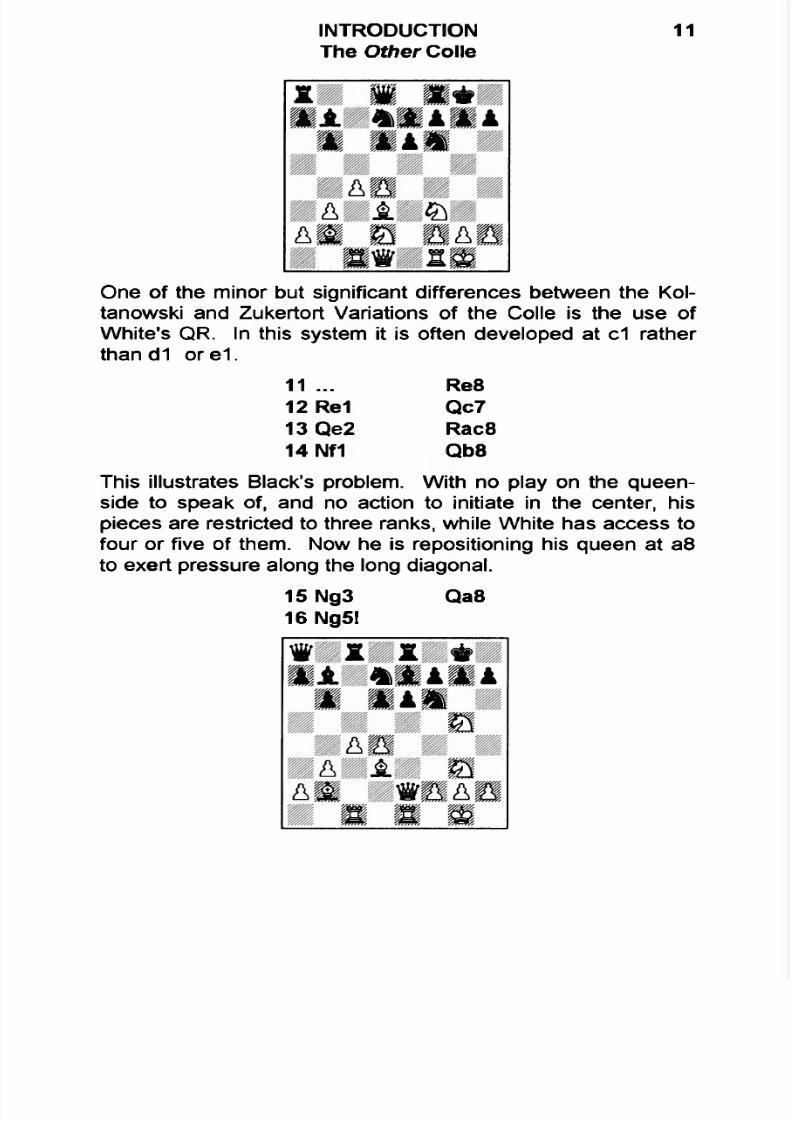
One of the minor but significant differences between the Kol-tanowski and Zukertort Variations of the Colle is the use ofWhite's QR. In this system it is often developed at c1 ratherthan d1 o re l
11 ... Re812 Re1 Qc713Qe2 Rac814 Nf1 Qb8
This illustrates Black's problem. With no play on the queen-side to speak of, and no action to initiate in the center, hispieces are restricted to three ranks, while White has access tofour or five of them. Now he is repositioning his queen at a8to exert pressure along the long diagonal.
15 Ng3 Qa816 Ng5!
7/22/2019 Colle System
http://slidepdf.com/reader/full/colle-system 14/105
12 COLLE SYSTEMZUKERTORT VARIATION, 5 b3
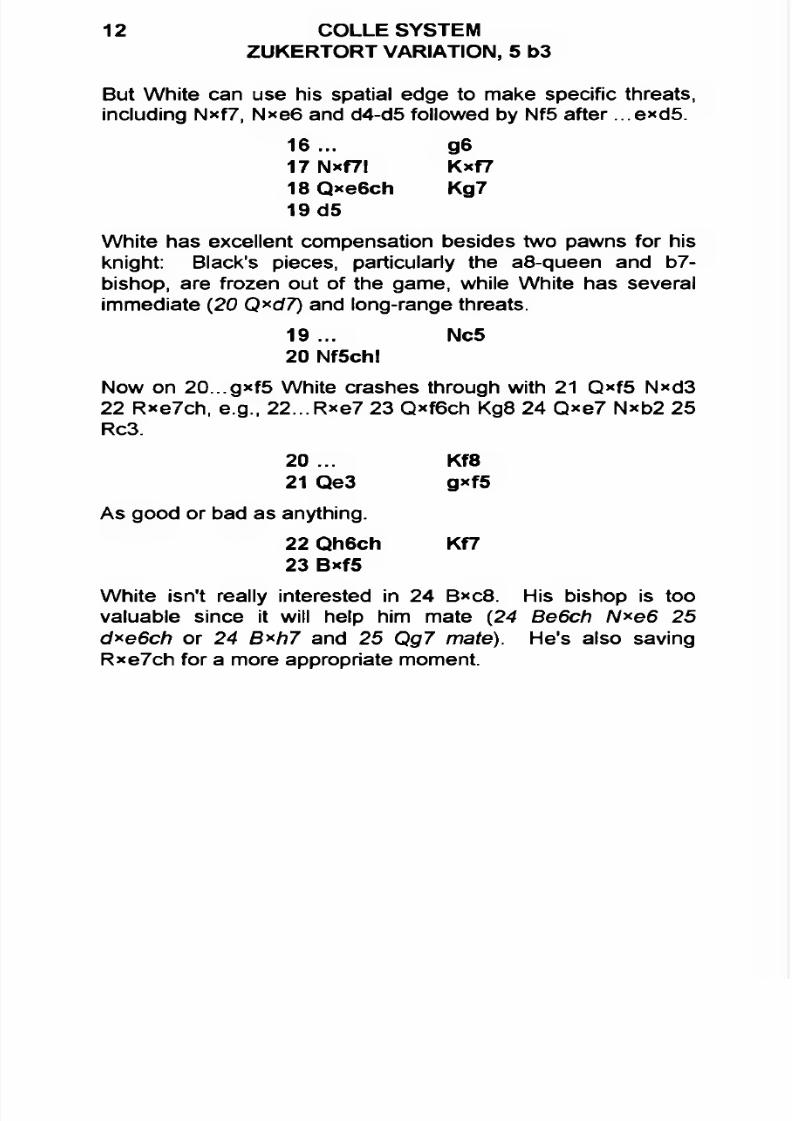
But White can use his spatial edge to make specific threats,including N*f7, N*e6 and d4-d5 followed by Nf5 after ...exd5.
16... g6
17 Nxf7! Kxf718 Qxe6ch Kg719 d5
White has excellent compensation besides two pawns for hisknight: Black's pieces, particularly the a8-queen and b7-bishop, are frozen out of the game, while White has severalimmediate (20 Q*d7) and long-range threats.
19 ... Nc520 Nf5ch!
Now on 20...gxf5 White crashes through with 21 Q*f5 Nxd322 Rxe7ch, e.g., 22...Rxe7 23 Qxf6ch Kg8 24 Qxe7 Nxb2 25Rc3.
20 ... Kf8
21 Qe3 gxf5 As good or bad as anything.
22 Qh6ch Kf723 Bxf5
White isn't really interested in 24 Bxc8. His bishop is toovaluable since it will help him mate (24 Be6ch N*e6 25 d*e6ch or 24 B*h7 and 25 Qg7 mate). He's also saving
Rxe7ch for a more appropriate moment.
7/22/2019 Colle System
http://slidepdf.com/reader/full/colle-system 15/105
INTRODUCTIONThe Other Colle
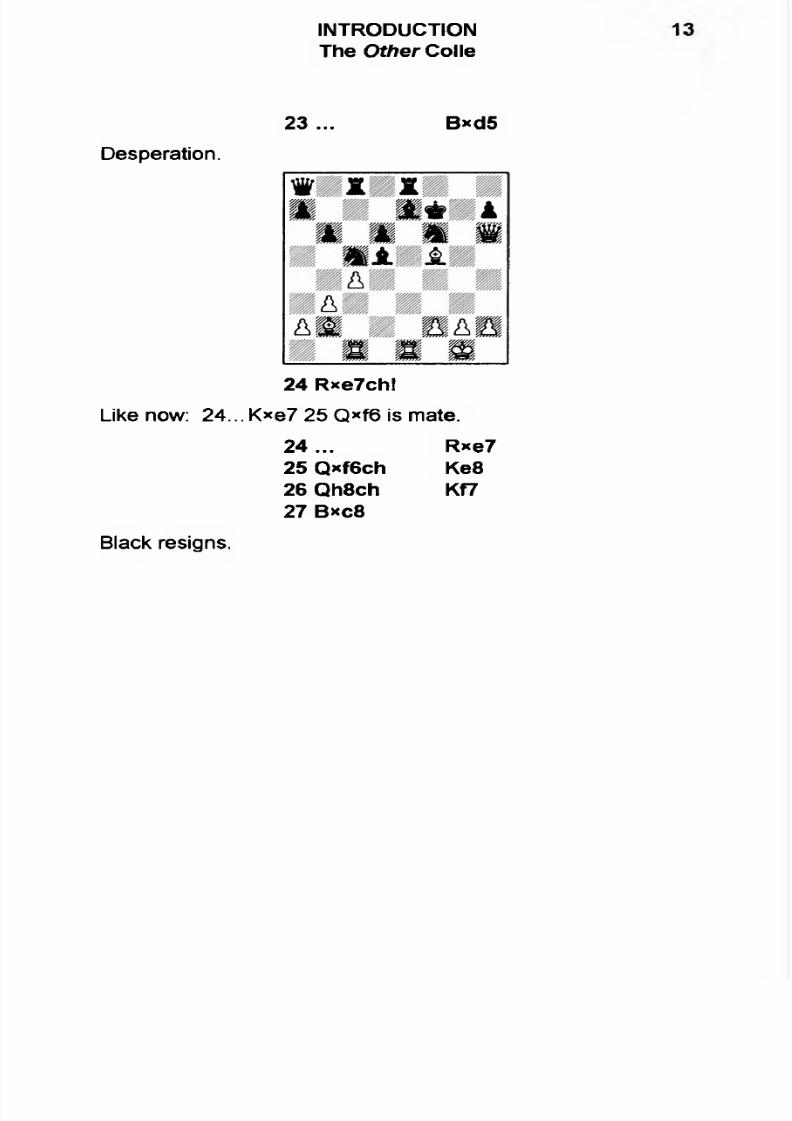
23... B*d5
Desperation.
24 Rxe7ch!
Like now: 24... K*e7 25 Q*f6 is mate.
24... Rxe725 Qxf6ch Ke8
26 Qh8ch Kf727 Bxc8
Black resigns.
7/22/2019 Colle System
http://slidepdf.com/reader/full/colle-system 16/105
CHAPTER ONE
Zukertort 5 b3 vs Koltanowski 5 c3
There are major differences between the Koltanowski andZukertort systems and they are primarily concerned with the
pawn structures. The Koltanowski employs a structure basedon solidity and stability — White enjoys rock-solid control of d4because he has pawns at both e3 and c3. This comes at thecost of some rigidity.
White surrenders some of that solidity in the Zukertort by controlling d4 with one pawn, at e3, plus the bishop at b2. Thismeans his queen bishop will probably have much greaterreach and flexibility. It also means that he will have holes atc3 and a3 that Black can exploit. Usually the advantages ofthe reach outweigh the holes.
Here's an illustration:
Donnelly - Gray
Correspondence 1992-3
1 Nf3
This is not a good way of reaching the Colle if that's your intention all along.
1 ... d5
2d4 Nf63e3 e64 Bd3 c5
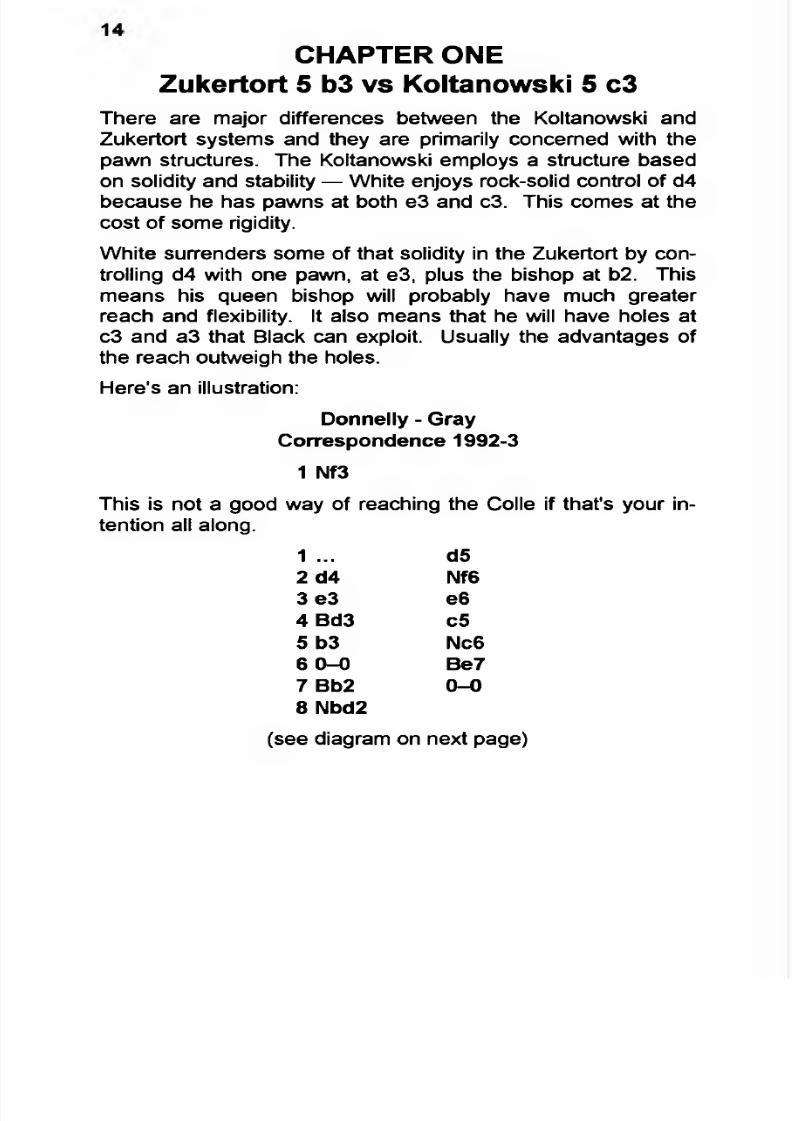
5 b3 Nc66 0-0 Be77 Bb2 0-0
8 Nbd2
(see diagram on next page)
7/22/2019 Colle System
http://slidepdf.com/reader/full/colle-system 17/105
CHAPTER ONEZukertort 5 b3 vs Koltanowski 5 c3
15
White's development is fairly straightforward and he is readyto begin the middlegame — that is, by moving his pieces forthe second time, such as Ne5, and advancing his rooks, suchas Rf3 after f2-f4.
8... b69 Ne5 Nb4
You'll probably find opponents play this against you from timeto time — especially opponents who have been burned by
B*h7ch mating attacks. The threat to remove your wonderfuld3-bishop is only a temporary gain of time that Black must return in two moves.
10 Be2 Bb7
Black may have intended 10...Ba6, to trade off the dangerousbishop. But after 11 a3! B*e2 12 Qxe2 White exploits theknight's unfortunate raid (13...N*c2 14 Rac1).
11 a3 Nc612 f4
This, plus Bd3, is more or less what White had in mind atmove 8. Even the move a2-a3 is useful in certain ways, aswe'll see in Chapter Four.
12... Rc8
13 Bd3 Qc714 Qe2
7/22/2019 Colle System
http://slidepdf.com/reader/full/colle-system 18/105
16 COLLE SYSTEMZUKERTORT VARIATION, 5 b3
Note that White keeps his knight at d2 in order to prevent theline-blocking strategy of ...Ne4.
Here's Black's problem: his opponent can make progress,
e.g., Rf3-h3 or g2-g4-g5. But Black has no obvious way ofimproving his position. An exchange on d4 doesn't help muchbecause there is no penetration point on the half-open c-file.
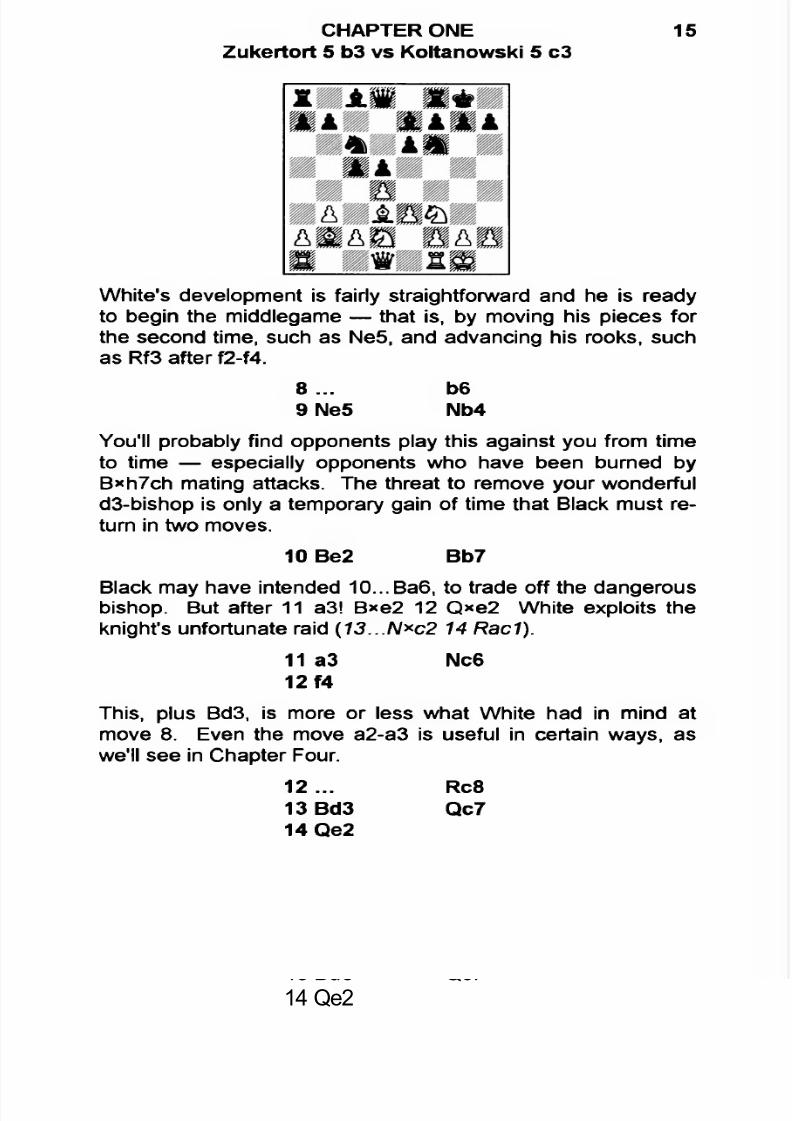
An exchange of knights on e5 only seems to play into enemyhands (14...N*e5 15 f*e5). But this might have been his bestchance, after either 15...Ne4or 15...Nd7 and 16...f5.
14... Bd6?
This is a blunder because it allows White to carry out a tacticyou'll often find in the Zukertort (but not the Koltanowski).
15 Nxc6! Q*c616 dxc5
Thanks to the b2-bishop, this exchange has much greater im
pact in the Zukertort. Now 16...B*c5 17 Bxf6 gxf6 allows atextbook sacrifice: 18 Bxh7ch! Kxh7 19 Qh5ch, K-moves, 20Qg4ch!, K moves, 21 Rf3 and Rh3 mating.
16... Be7
Sad, but best.
17 cxb6 axb6
18 Nf3 Ne4
7/22/2019 Colle System
http://slidepdf.com/reader/full/colle-system 19/105
CHAPTER ONEZukertort 5 b3 vs Koltanowski 5 c3
17
Black can claim some compensation for his lost pawn — hecontrols c3 and can occupy it with a knight. (And if Whiteblunders and Black wins, he can even claim 14...Bd6! was a
planned sacrifice.)But White wins this game in a manner that has nothing to dowith his extra pawn: the usual attack on h7.
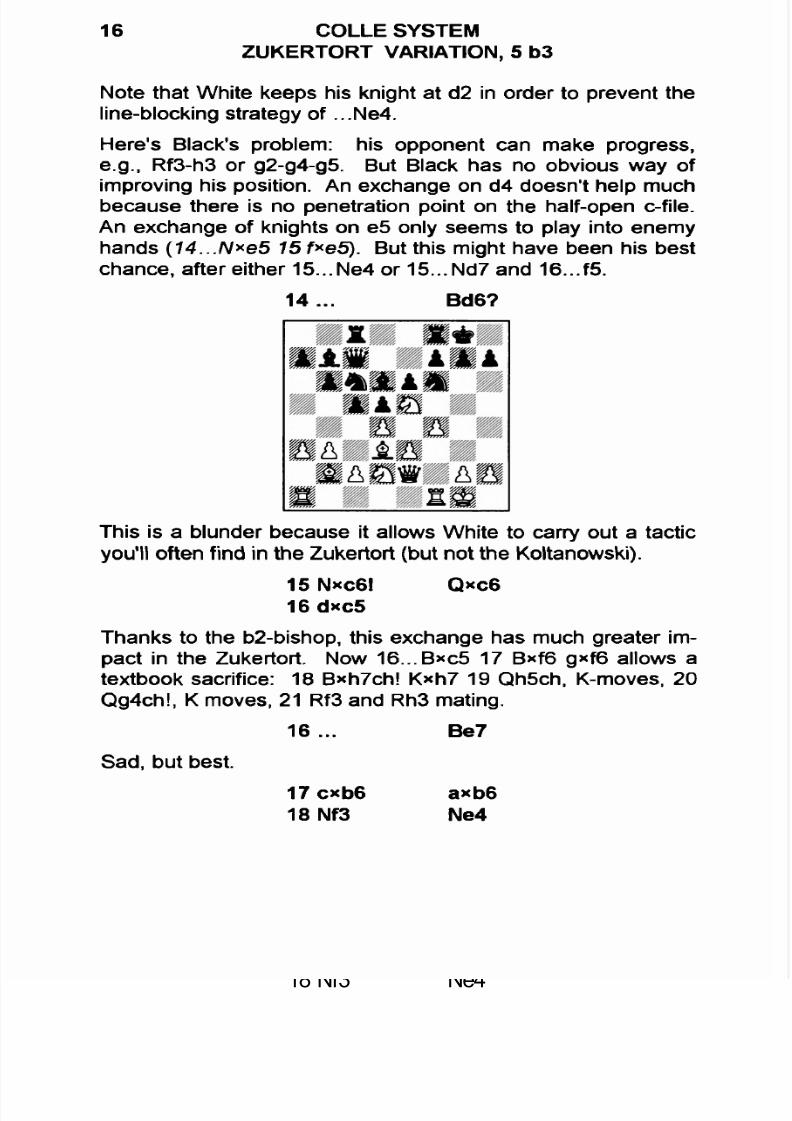
19 Nd4 Qc520 Rf3! Bf6
21 Rd1 Rfd8
Here h7 would prove to be a greater weakness than c3:21...NC3 22 B*c3 Qxc3 23 Bxh7ch! followed by Rh3ch/Qh5.
The vacating of f8 gives Black's king an escape square at f8.But White can take control of the kingside dark squares whileBlack tries to do the same to the queenside dark squares.
22 g4! Nc323 Bxc3 Qxc324 Qf2 g625 g5 Be7
Black probably counted on meeting Qh4 with ...h5, sinceWhite cannot safely take en passant. But, with the bishop notat g7, there's another way of attacking the kingside.
26 a427 h4! Qb2
7/22/2019 Colle System
http://slidepdf.com/reader/full/colle-system 20/105
18 COLLE SYSTEMZUKERTORT VARIATION, 5 b3
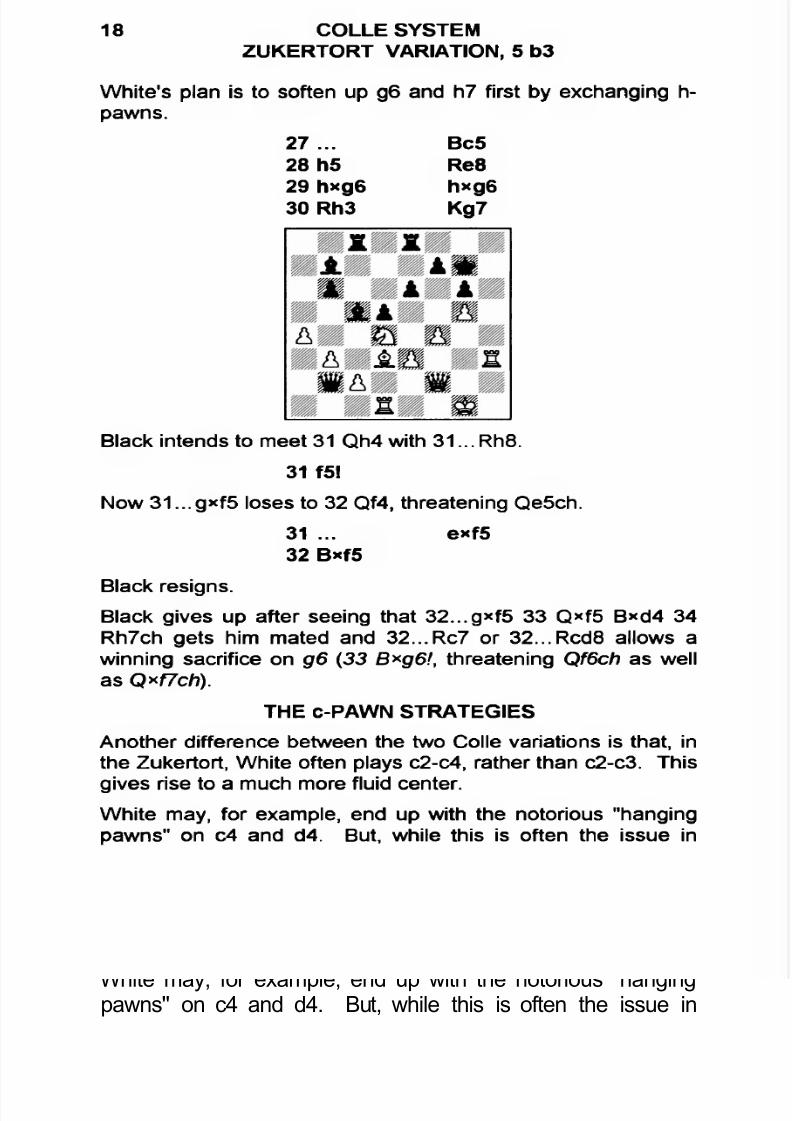
White's plan is to soften up g6 and h7 first by exchanging h-pawns.
27... Bc5
28 h5 Re829 h*g6 hxg6
30 Rh3 Kg7
Black intends to meet 31 Qh4 with 31... Rh8.
31 f5!
Now 31...g*f5 loses to 32 Qf4, threatening Qe5ch.
31 ... exf532 Bxf5
Black resigns.
Black gives up after seeing that 32...gxf5 33 Q*f5 B*d4 34Rh7ch gets him mated and 32...Rc7 or 32...Rcd8 allows a
winning sacrifice on g6 (33 B*g6f, threatening Qf6ch as wellas Q*f7ch).
THE c-PAWN STRATEGIES
Another difference between the two Colle variations is that, inthe Zukertort, White often plays c2-c4, rather than c2-c3. Thisgives rise to a much more fluid center.
White may, for example, end up with the notorious "hangingpawns" on c4 and d4. But, while this is often the issue in
7/22/2019 Colle System
http://slidepdf.com/reader/full/colle-system 21/105
CHAPTER ONEZukertort 5 b3 vs Koltanowski 5 c3
19
complex positional middlegames, the presence of this pawnpair does not deny White his chances for kingside attack.
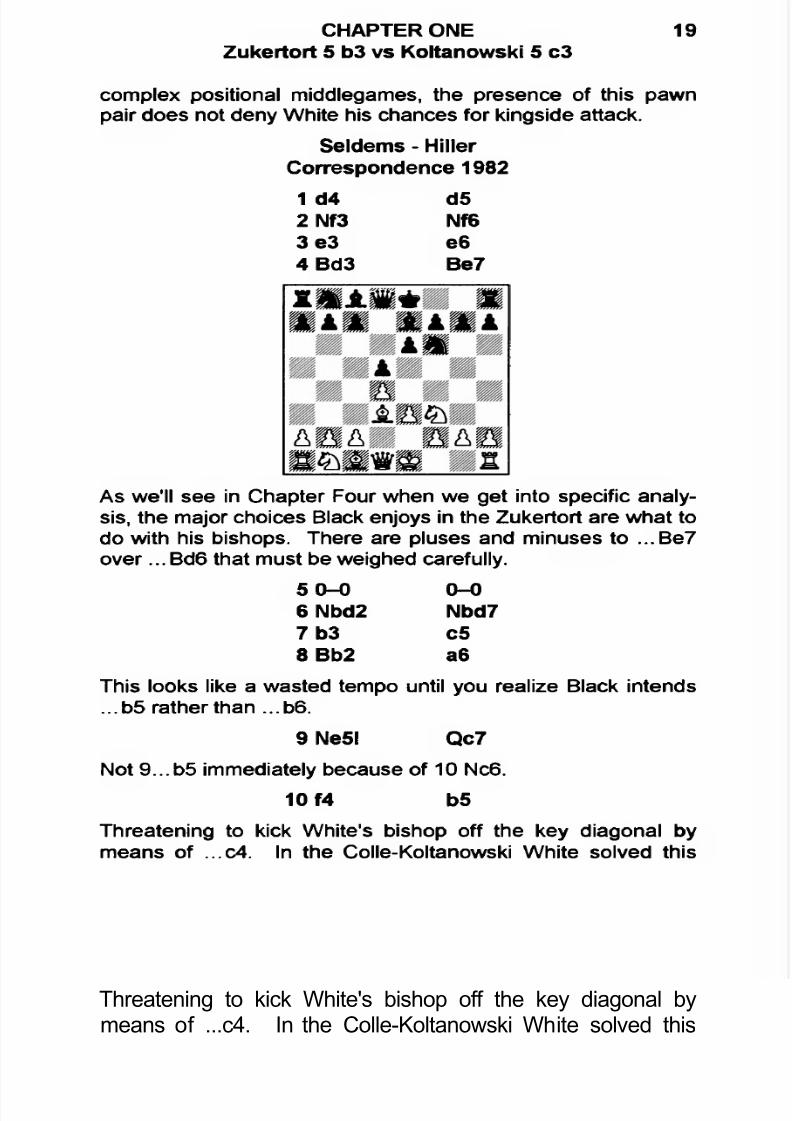
Seldems - Hiller
Correspondence 1982
1 d4 d5
2 Nf3 Nf63 e3 e64 Bd3 Be7
As we'll see in Chapter Four when we get into specific analysis, the major choices Black enjoys in the Zukertort are what todo with his bishops. There are pluses and minuses to ...Be7over... Bd6 that must be weighed carefully.
50-0 0-06 Nbd2 Nbd7
7b3 c5
8 Bb2 a6
This looks like a wasted tempo until you realize Black intends...b5 rather than ...b6.
9 Ne5l Qc7
Not 9...b5 immediately because of 10 Nc6.
10 f4 b5
Threatening to kick White's bishop off the key diagonal bymeans of ...c4. In the Colle-Koltanowski White solved this
7/22/2019 Colle System
http://slidepdf.com/reader/full/colle-system 22/105
20 COLLE SYSTEMZUKERTORT VARIATION, 5 b3
problem with c2-c3, and if Black dared to go ahead with ...c4he found that it only made e3-e4 by White even stronger because then Black had no counterplay at all in the center.
11 c4
Here White has a different option. He's willing to open up thequeenside in order to exploit the position of Black's queen.Note that White could have kept matters relatively closed with11 dxc5, and if 11...Nxc5 then 12 Ndf3 and 13 Nd4.
11 ... dxc4
Black plays for a queenside majority at the cost of grantingWhite a greater share of the center.
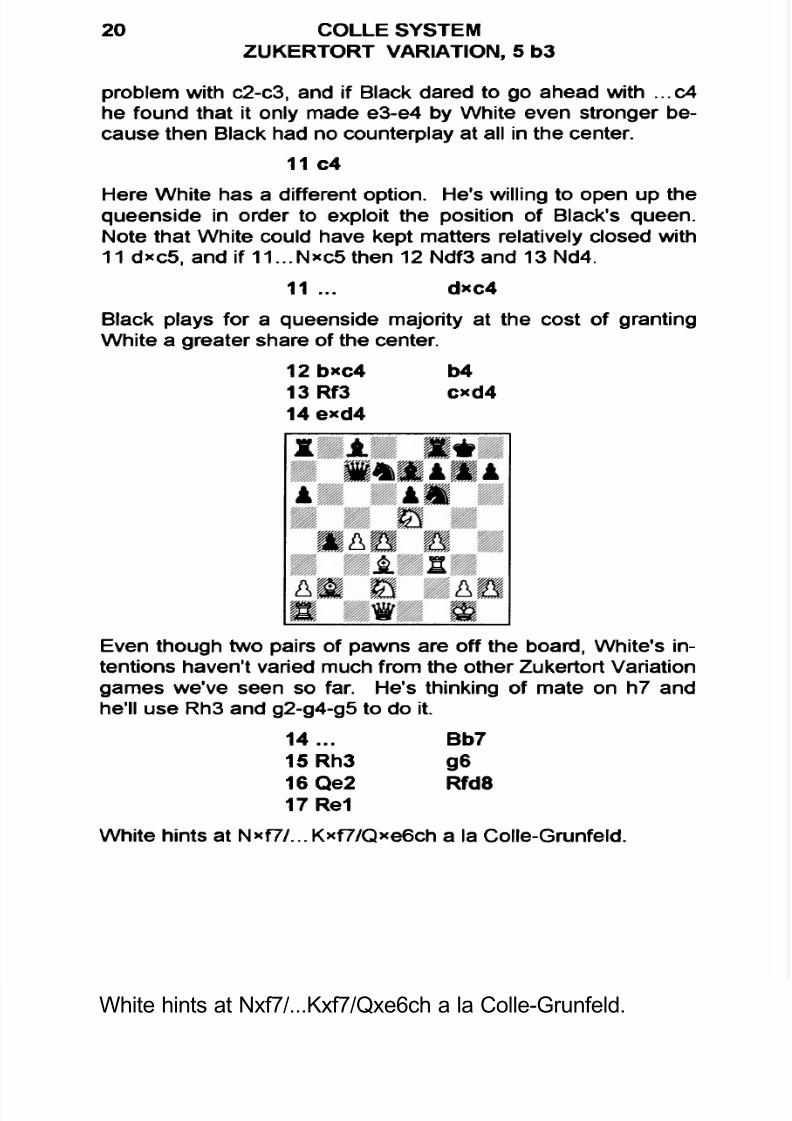
12 bxc4 b413 Rf3 cxd414 exd4
Even though two pairs of pawns are off the board, White's intentions haven't varied much from the other Zukertort Variationgames we've seen so far. He's thinking of mate on h7 andhe'll use Rh3 and g2-g4-g5 to do it.
14 ...
15 Rh316 Qe217 Re1
White hints at Nxf7/...Kxf7/Qxe6ch a la Colle-Grunfeld.
Bb7
geRfd8
7/22/2019 Colle System
http://slidepdf.com/reader/full/colle-system 23/105
CHAPTER ONEZukertort 5 b3 vs Koltanowski 5 c3
21
17... Nf818 Ndf3 Bxf3
Otherwise 19 Ng5. Note that Black's queenside majority plays
no role and he'd be better off if he could have played ...b4-b5!?*c4 at some point — making an illegal retreat of thepawn.
19 Qxf3 Rac8
20 g4! Bd621 f5
White may have considered 21 g5 Nh5 22 R*h5 but the text,threatening f*g6/Q*f6 has more immediate impact.
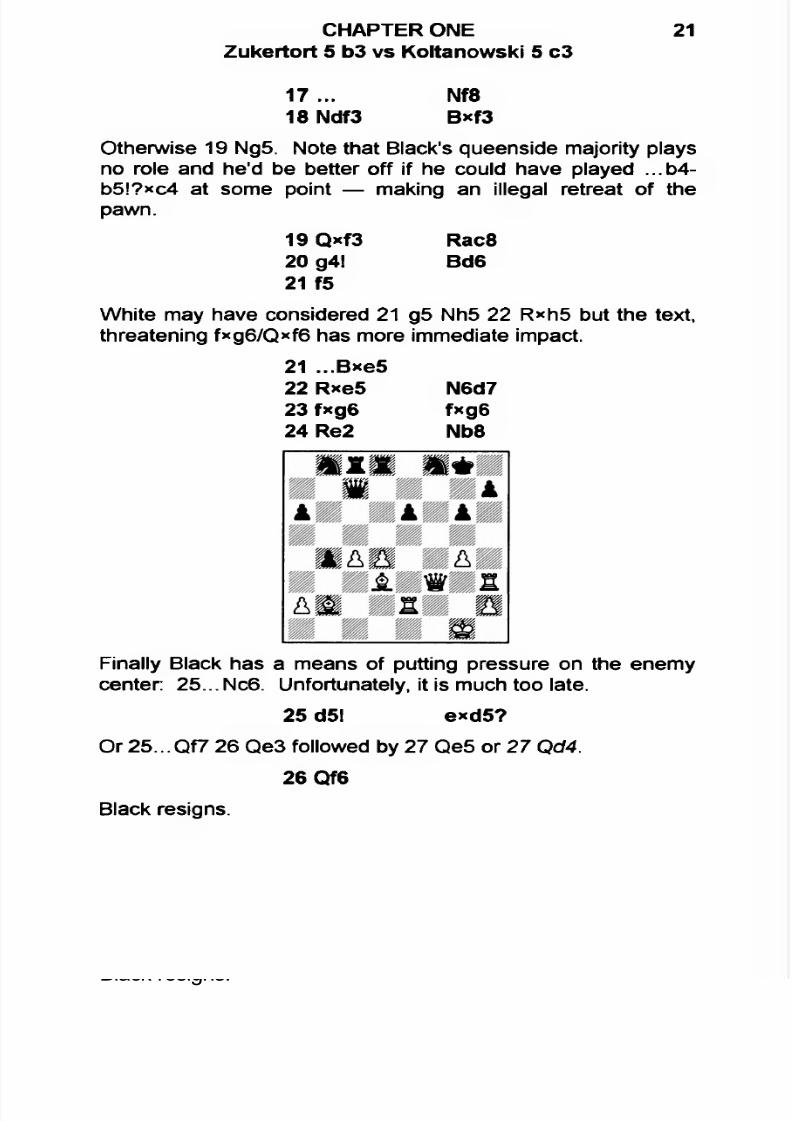
21 ...Bxe522 Rxe5 N6d723 fxg6 fxg624 Re2 Nb8
Finally Black has a means of putting pressure on the enemycenter: 25...Nc6. Unfortunately, it is much too late.
25 d5! exd5?
Or 25...Qf7 26 Qe3 followed by 27 Qe5 or 27 Qd4.
26 Qf6
Black resigns.

7/22/2019 Colle System
http://slidepdf.com/reader/full/colle-system 24/105
22 COLLE SYSTEMZUKERTORT VARIATION, 5 b3
We'll be examining the Zukertort Variation thematically. InChapter Two, we'll see how White wins — when he does. InChapter Three, we'll consider what can go wrong. In Chapter
Four, we'll analyze the typical mistakes to be made. Finally inChapter Five, we'll get into the specific sub-variations you arelikely to encounter when you adopt the Colle System, ZukertortVariation.
7/22/2019 Colle System
http://slidepdf.com/reader/full/colle-system 25/105
CHAPTER TWO
How White Wins
23
White's most successful strategies in the Colle-Zukertort beara resemblance to his winning ways in the Colle-Koltanowski.
He attacks, usually by driving away Black's best defensivepieces so that his bishops can take aim at the kingside.
In both systems, this is often accomplished by a quick rush ofWhite's e-pawn or g-pawn to the fifth rank — or by the thematic Ne5 and if ...N*e5, then dxe5.
True, the exchange of knights gives White doubled e-pawns.But this is usually well compensated by the pressure he de
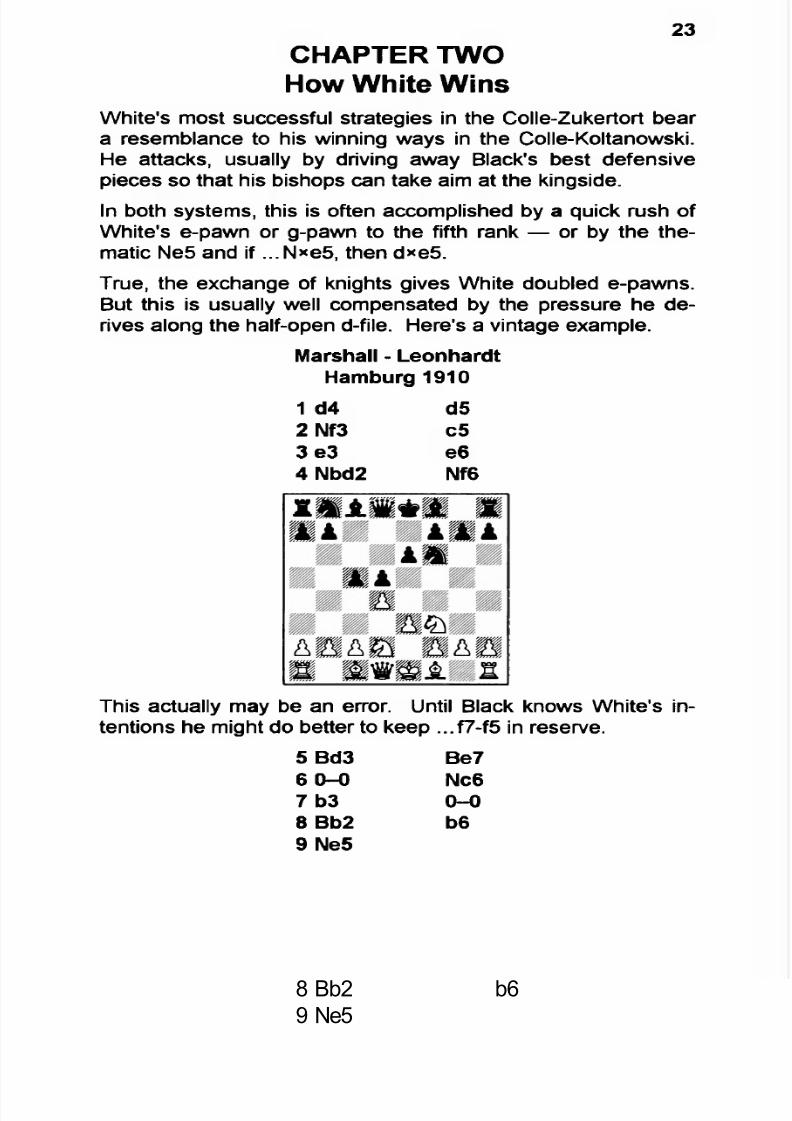
rives along the half-open d-file. Here's a vintage example.Marshall - Leonhardt
Hamburg 1910
1 d4 d52 Nf3 c5
3 e3 e64 Nbd2 Nf6
This actually may be an error. Until Black knows White's intentions he might do better to keep ...f7-f5 in reserve.
5 Bd3 Be7
6 0-0 Nc67 b3 0-0
8 Bb2 b69 Ne5
7/22/2019 Colle System
http://slidepdf.com/reader/full/colle-system 26/105
24 COLLE SYSTEMZUKERTORT VARIATION, 5 b3
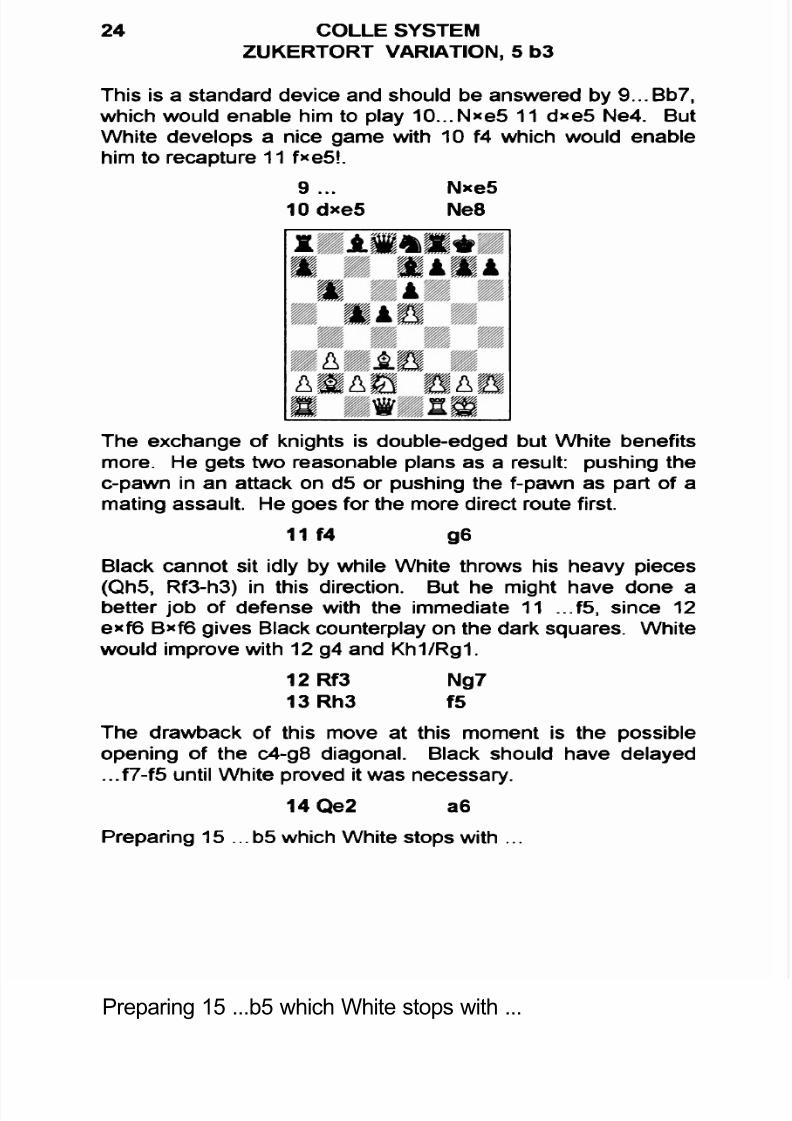
This is a standard device and should be answered by 9...Bb7,which would enable him to play 10...Nxe5 11 d*e5 Ne4. ButWhite develops a nice game with 10 f4 which would enable
him to recapture 11 f*e5!.9... N*e5
10 dxe5 Ne8
The exchange of knights is double-edged but White benefitsmore. He gets two reasonable plans as a result: pushing the
c-pawn in an attack on d5 or pushing the f-pawn as part of amating assault. He goes for the more direct route first.
11 f4 g6
Black cannot sit idly by while White throws his heavy pieces(Qh5, Rf3-h3) in this direction. But he might have done abetter job of defense with the immediate 11 ...f5, since 12exf6 Bxf6 gives Black counterplay on the dark squares. White
would improve with 12 g4 and Kh1/Rg1.12 Rf3 Ng713 Rh3 f5
The drawback of this move at this moment is the possibleopening of the c4-g8 diagonal. Black should have delayed...f7-f5 until White proved it was necessary.
14 Qe2 a6
Preparing 15 ...b5 which White stops with ...
7/22/2019 Colle System
http://slidepdf.com/reader/full/colle-system 27/105
CHAPTER TWOHow White Wins
25
15 c4 Bb716 Rd1
In light of what explodes in the center now, Black should have
followed general principles and gotten his queen off the d-file(16...Qc7).
16... Qd717 cxd5 e*d5
On 17 ... Bxd5 18 e4 opens lines nicely for White.
18 e4!
This still works here, thanks to the position of the d7-queen.
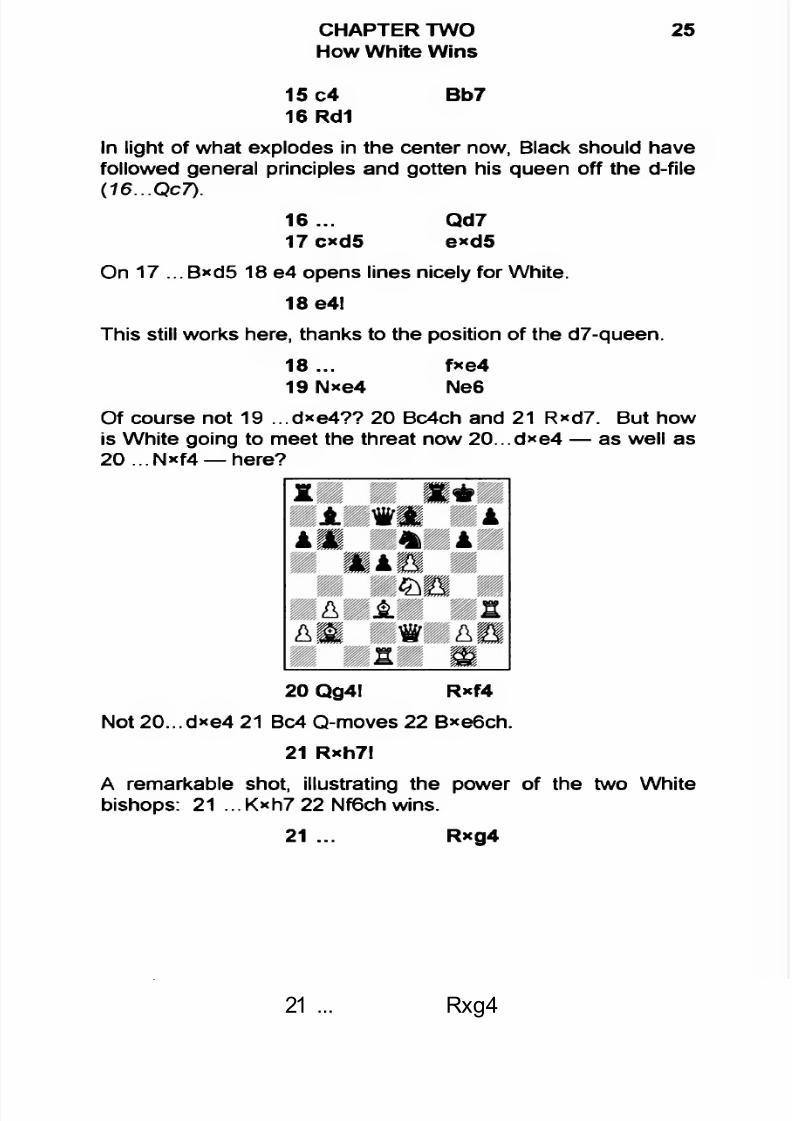
18... fxe419 Nxe4 Ne6
Of course not 19 ...d*e4?? 20 Bc4ch and 21 Rxd7. But howis White going to meet the threat now 20...dxe4 — as well as20 ...Nxf4 — here?
20 Qg4! Rxf4
Not 20...dxe4 21 Bc4 Q-moves 22 Bxe6ch.
21 Rxh7!
A remarkable shot, illustrating the power of the two Whitebishops: 21 ...Kxh7 22 Nf6ch wins.
21 ... Rxg4

7/22/2019 Colle System
http://slidepdf.com/reader/full/colle-system 28/105
26 COLLE SYSTEMZUKERTORT VARIATION, 5 b3
22 Nf6ch Bxf623 Rxd7 Bc8
Otherwise White wins back one of the enemy bishops with a
powerful endgame.
24 Rxd5 Be725 h3 Rh426 Bxg6 Nc7
This leads to a stunning finish.
27 Rd8ch! Bxd8
28 Rxd8ch Kg7
29 Bf5?
Now 29 ...Bxf5 30 e6ch Kg6 31 e7 Re4! but...
29 ... Bb7?30 e6ch Kh6
31 e7
Black resigns. Since 31 ...Bc6 is met by 32 Rd6ch.
As we noted in the introduction, the Colle-Zukertort is moreflexible than the Colle-Koltanowski because of the options offered by White’s c-pawn. This is true whether or not Whiteplays Ne5 as in the last example.
In the Koltanowski we saw that White's best manner ofchanging the pawn structure was the e3-e4 advance (with or
7/22/2019 Colle System
http://slidepdf.com/reader/full/colle-system 29/105
CHAPTER TWOHow White Wins
27
without an exchange of his d-pawn on c5). But in the Zuker-tort White has the alternative idea of c2-c4*d5. Here's amodem illustration that shows White winning without even at
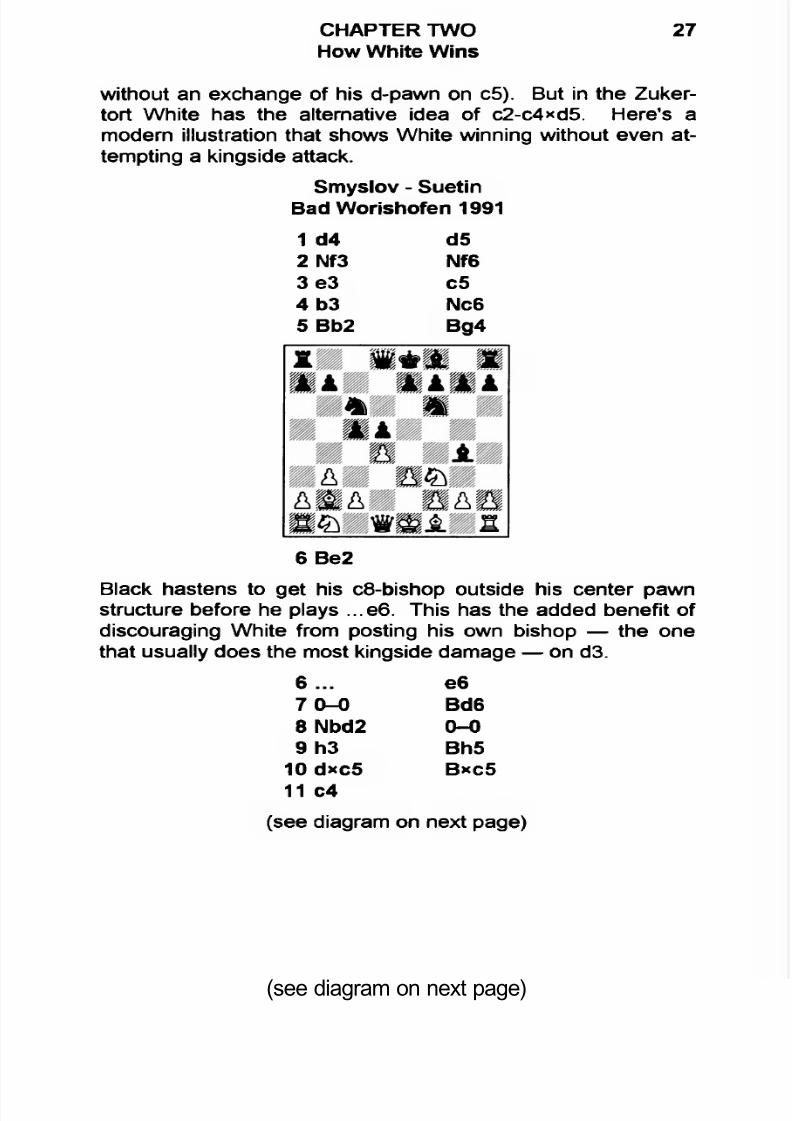
tempting a kingside attack.Smyslov - Suetin
Bad Worishofen 1991
1 d4 d52 Nf3 Nf63 e3 c54 b3 Nc6
5 Bb2 Bg4
6 Be2
Black hastens to get his c8-bishop outside his center pawnstructure before he plays ...e6. This has the added benefit ofdiscouraging White from posting his own bishop — the one
that usually does the most kingside damage — on d3.
6 ... e670-0 Bd6
8 Nbd2 0-09 h3 Bh5
10 dxc5 B*c511 c4
(see diagram on next page)
7/22/2019 Colle System
http://slidepdf.com/reader/full/colle-system 30/105
28 COLLE SYSTEMZUKERTORT VARIATION, 5 b3
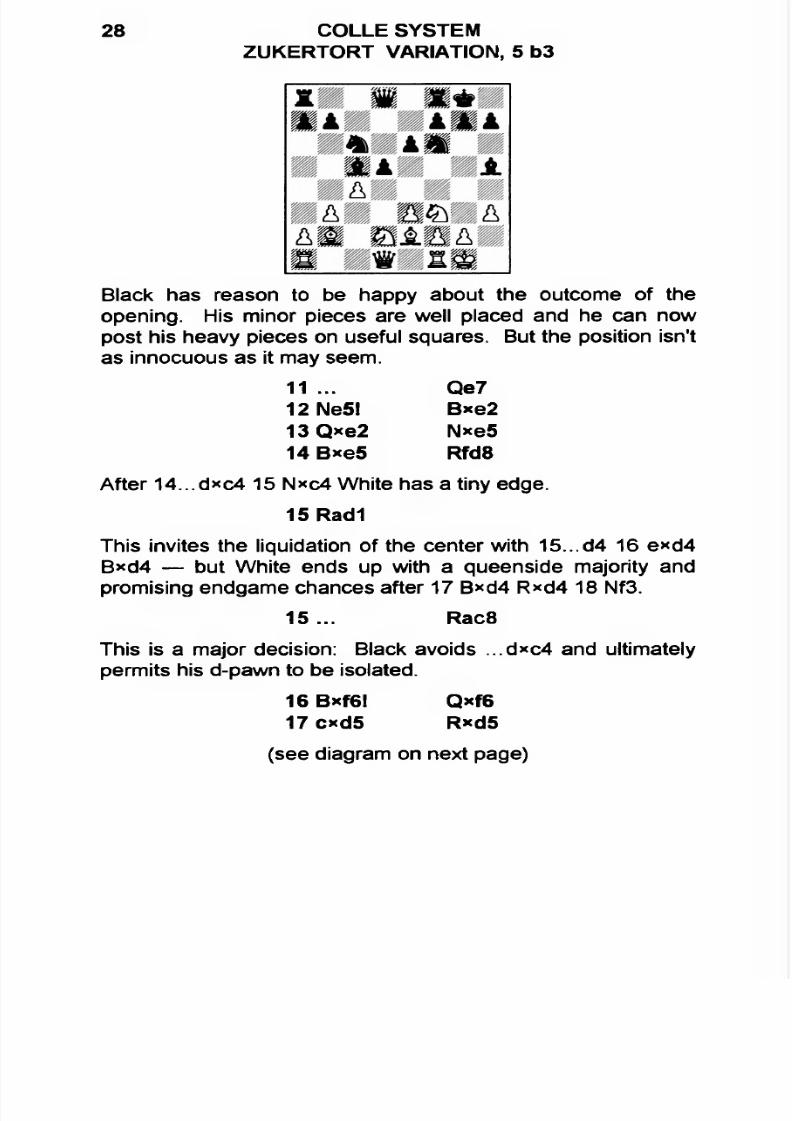
Black has reason to be happy about the outcome of theopening. His minor pieces are well placed and he can nowpost his heavy pieces on useful squares. But the position isn'tas innocuous as it may seem.
11 ... Qe712 Ne5! Bxe2
13 Qxe2 N*e514 Bxe5 Rfd8
After 14...d*c4 15 N*c4 White has a tiny edge.15 Radi
This invites the liquidation of the center with 15...d4 16 exd4B*d4 — but White ends up with a queenside majority andpromising endgame chances after 17 B*d4 Rxd4 18 Nf3.
15... Rac8
This is a major decision: Black avoids ...d*c4 and ultimatelypermits his d-pawn to be isolated.
16 Bxf6! Qxf6
17 cxd5 Rxd5
(see diagram on next page)
7/22/2019 Colle System
http://slidepdf.com/reader/full/colle-system 31/105
CHAPTER TWOHow White Wins
29
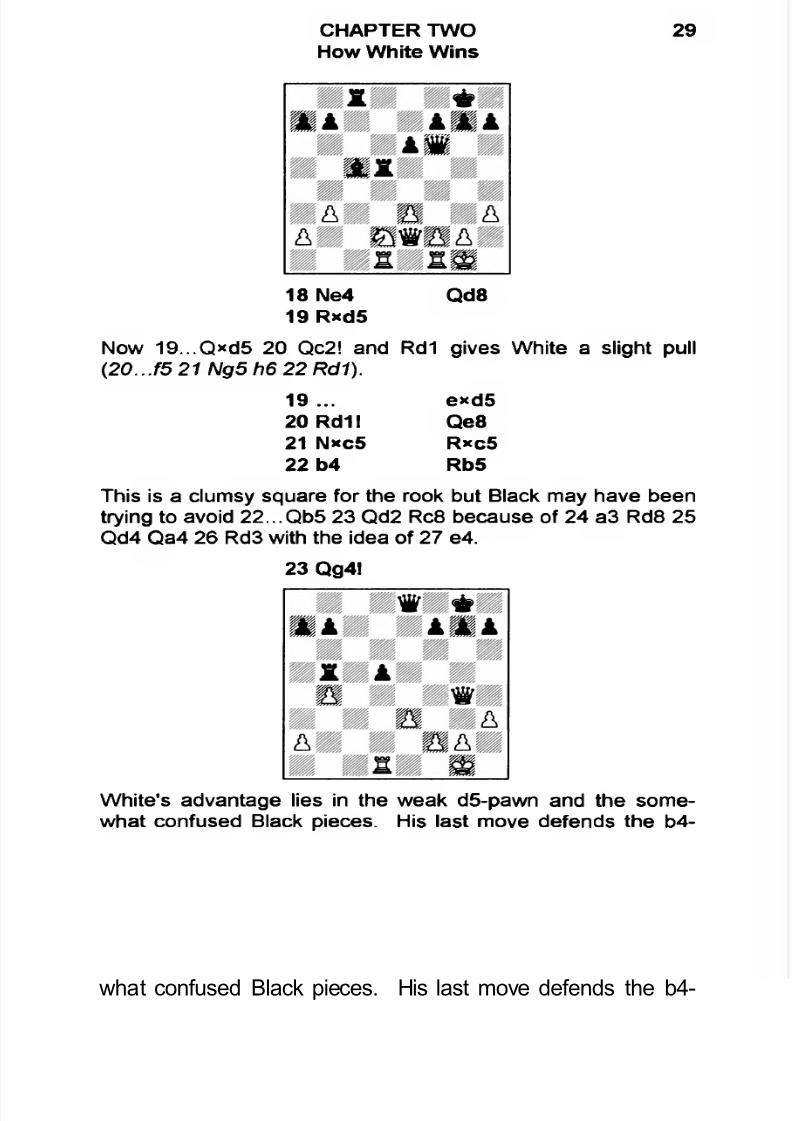
18 Ne4 Qd8
19 Rxd5Now 19...Qxd5 20 Qc2! and Rd1 gives White a slight pull(20...f5 21 Ng5 h6 22 Rd1).
19... e*d520 Rd11 Qe821 Nxc5 Rxc522 b4 Rb5
This is a clumsy square for the rook but Black may have beentrying to avoid 22...Qb5 23 Qd2 Rc8 because of 24 a3 Rd8 25Qd4 Qa4 26 Rd3 with the idea of 27 e4.
23 Qg4!
White's advantage lies in the weak d5-pawn and the some
what confused Black pieces. His last move defends the b4-
7/22/2019 Colle System
http://slidepdf.com/reader/full/colle-system 32/105
30 COLLE SYSTEMZUKERTORT VARIATION, 5 b3
pawn and threatens to win a pawn with 24 a4 — but more importantly it threatens 24 Rc1! and 25 Rc8.
23... Qe6
White's advantage is clear after 23...h6 24 a4 Rb6 25 Rxd5Q*a4 26 Rd8ch Kh7 27 Qf5ch.
24 Qf4 h625 a4 Rb6
26 Qd4 a6
Black would be happy to trade off his weak pawn (27 Q*d5
Qxd5 28 R*d5 R*b4).
27 Qc5 Kh728 b5
Not 28 Rxd5 Rxb4. Now that the b-pawn is on the fifth rank,29 Rxd5 is threatened.
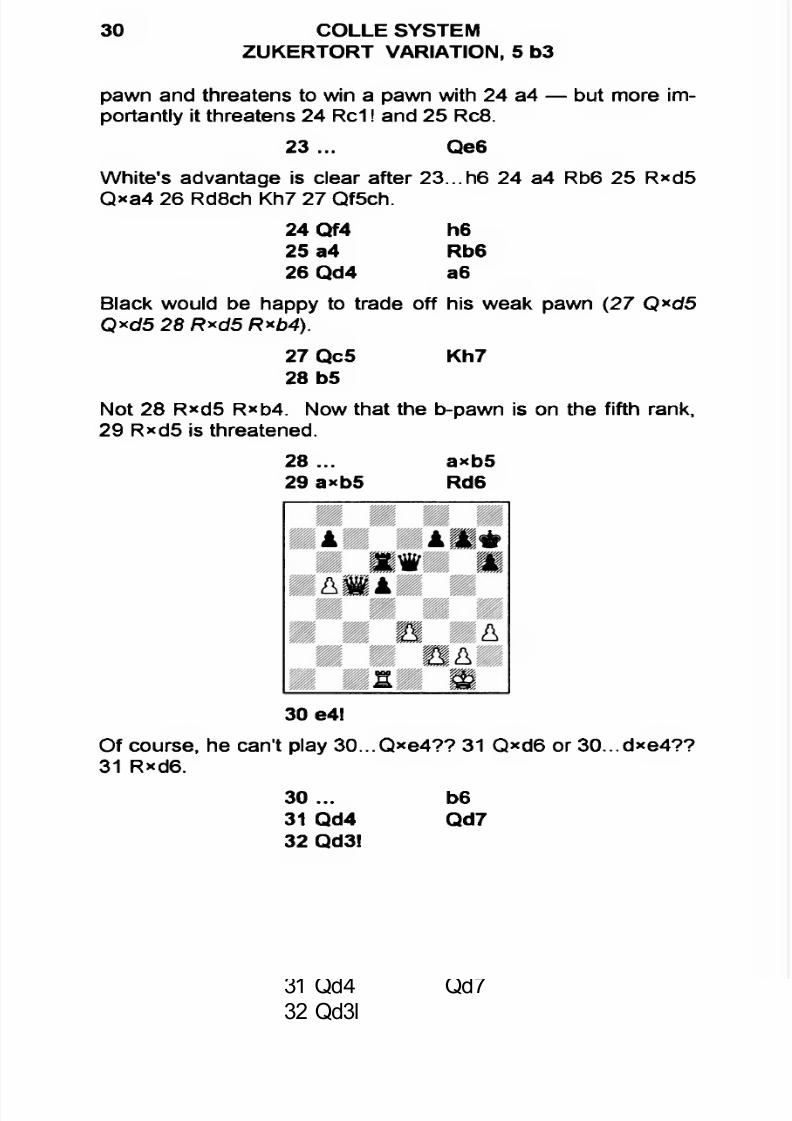
28... axb5
29 axb5 Rd6
30 e4l
Of course, he can't play 30...Qxe4?? 31 Qxd6 or 30...dxe4??31 Rxd6.
30 ... b6
31 Qd4 Qd732 Qd3l
7/22/2019 Colle System
http://slidepdf.com/reader/full/colle-system 33/105
CHAPTER TWOHow White Wins
31
The threat of 33 e5ch, and defense of b5, wins a pawn.
32 ... d433 e5ch Rg6
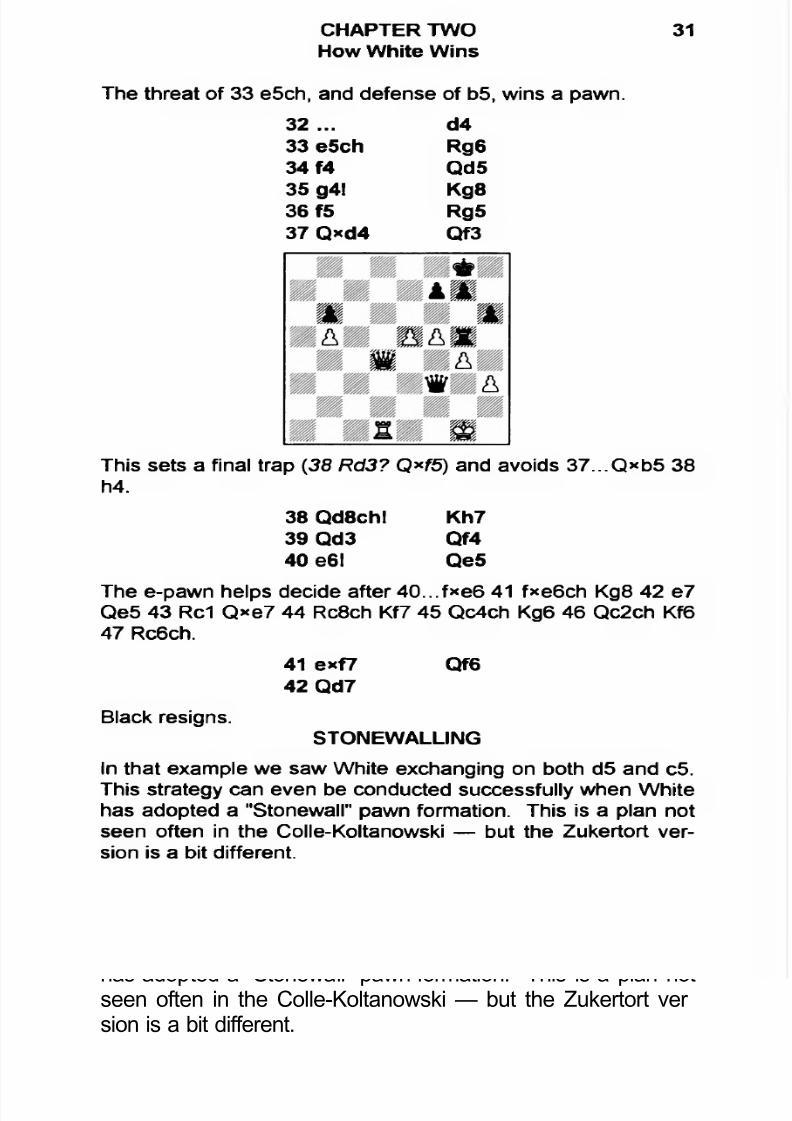
34 f4 Qd535 g4! Kg836 f5 Rg537 Qxd4 Qf3
This sets a final trap (38 Rd3? Q*f5) and avoids 37...Q*b5 38
h4.38 Qd8ch! Kh739 Qd3 Qf440 e6l Qe5
The e-pawn helps decide after 40...f*e6 41 fxe6ch Kg8 42 e7Qe5 43 Rc1 Q*e7 44 Rc8ch Kf7 45 Qc4ch Kg6 46 Qc2ch Kf647 Rc6ch.
41 exf7 Qf642 Qd7
Black resigns.STONEWALLING
In that example we saw White exchanging on both d5 and c5.This strategy can even be conducted successfully when White
has adopted a "Stonewall" pawn formation. This is a plan notseen often in the Colle-Koltanowski — but the Zukertort version is a bit different.
7/22/2019 Colle System
http://slidepdf.com/reader/full/colle-system 34/105
32 COLLE SYSTEMZUKERTORT VARIATION, 5 b3
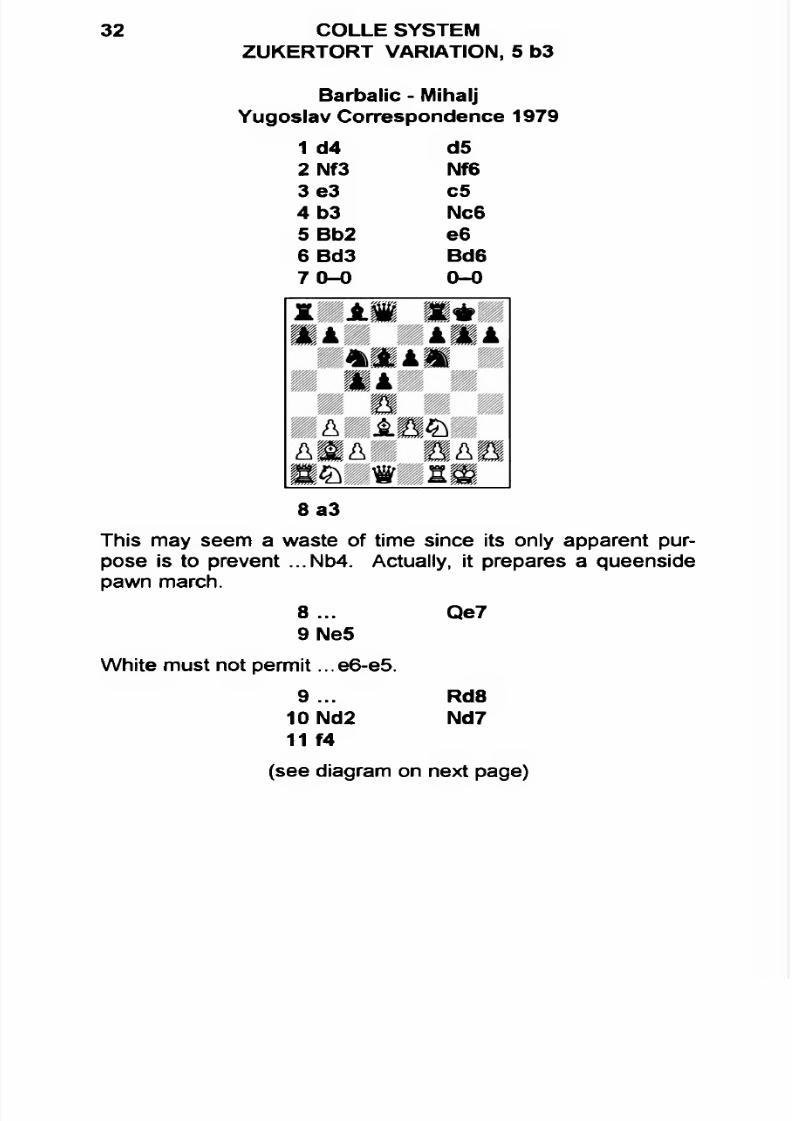
Barbalic - Mihalj Yugoslav Correspondence 1979
1 d4 d5
2 Nf3 Nf63e3 c54b3 Nc65 Bb2 e66 Bd3 Bd6
7 0-0 0-0
8a3
This may seem a waste of time since its only apparent purpose is to prevent ...Nb4. Actually, it prepares a queensidepawn march.
8... Qe7
9 Ne5
White must not permit ...e6-e5.
9... Rd8
10 Nd2 Nd711 f4
(see diagram on next page)
7/22/2019 Colle System
http://slidepdf.com/reader/full/colle-system 35/105
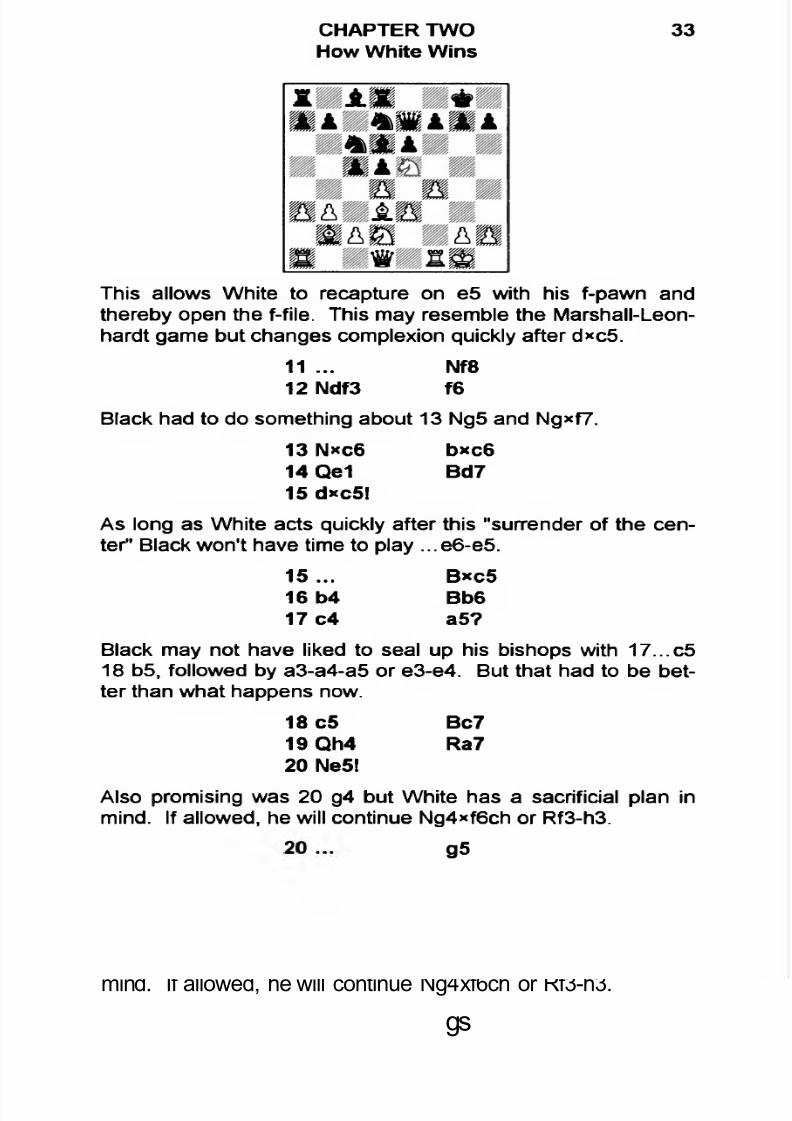
CHAPTER TWOHow White Wins
33
This allows White to recapture on e5 with his f-pawn andthereby open the f-file. This may resemble the Marshall-Leon-hardt game but changes complexion quickly after d*c5.
11 ... Nf812 Ndf3 f6
Black had to do something about 13 Ng5 and Ngxf7.
13 Nxc6 bxc6
14 Qe1 Bd7
15 dxC5l
As long as White acts quickly after this "surrender of the center" Black won't have time to play ...e6-e5.
15... Bxc516 b4 Bb617 c4 a5?
Black may not have liked to seal up his bishops with 17...c518 b5, followed by a3-a4-a5 or e3-e4. But that had to be better than what happens now.
18 c5 Bc719 Qh4 Ra720 Ne5!
Also promising was 20 g4 but White has a sacrificial plan in
mind. If allowed, he will continue Ng4xf6ch or Rf3-h3.
gs
7/22/2019 Colle System
http://slidepdf.com/reader/full/colle-system 36/105
34 COLLE SYSTEMZUKERTORT VARIATION, 5 b3
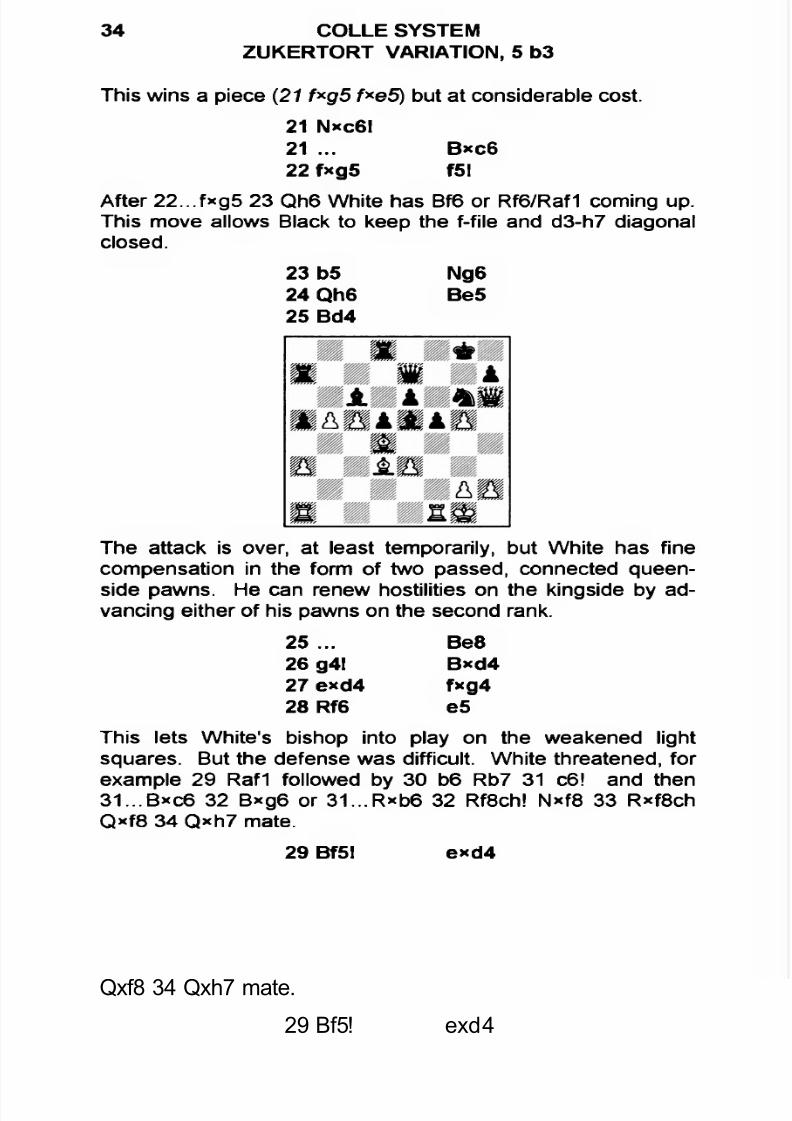
This wins a piece (21 f*g5 f*e5) but at considerable cost.
21 Nxc6l21 ... B*c622 fxg5 f5!
After 22...fxg5 23 Qh6 White has Bf6 or Rf6/Raf1 coming up.This move allows Black to keep the f-file and d3-h7 diagonalclosed.
23 b5 Ng624 Qh6 Be525 Bd4
The attack is over, at least temporarily, but White has finecompensation in the form of two passed, connected queen-side pawns. He can renew hostilities on the kingside by advancing either of his pawns on the second rank.
25... Be826 g4! Bxd427 exd4 fxg428 Rf6 e5
This lets White's bishop into play on the weakened lightsquares. But the defense was difficult. White threatened, forexample 29 Raf1 followed by 30 b6 Rb7 31 c6! and then31...BXC6 32 Bxg6 or 31...Rxb6 32 Rf8ch! Nxf8 33 Rxf8ch
Qxf8 34 Qxh7 mate.
29 Bf5! exd4
7/22/2019 Colle System
http://slidepdf.com/reader/full/colle-system 37/105
CHAPTER TWOHow White Wins
35
30 Be6ch Kh831 Raf1 Bxb5
White's rooks were going to penetrate at f8 or f7 in any event.
32 Rf7 Qxf733 Rxf7 Rxf7
34 Bxf7 Bd3
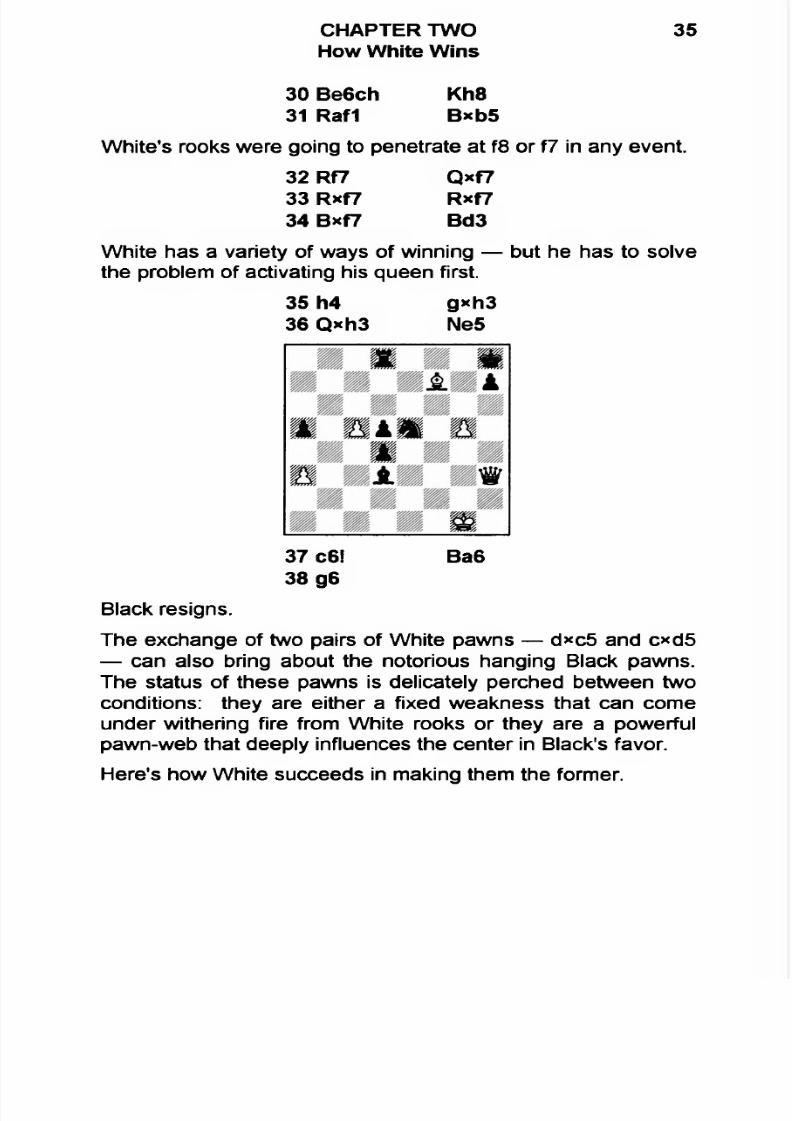
White has a variety of ways of winning — but he has to solvethe problem of activating his queen first.
35 h4 gxh3
36 Qxh3 Ne5
37 c6l Ba6
38 g6
Black resigns.
The exchange of two pairs of White pawns — d*c5 and cxd5 — can also bring about the notorious hanging Black pawns.The status of these pawns is delicately perched between twoconditions: they are either a fixed weakness that can comeunder withering fire from White rooks or they are a powerfulpawn-web that deeply influences the center in Black's favor.
Here's how White succeeds in making them the former.
7/22/2019 Colle System
http://slidepdf.com/reader/full/colle-system 38/105
36 COLLE SYSTEMZUKERTORT VARIATION, 5 b3
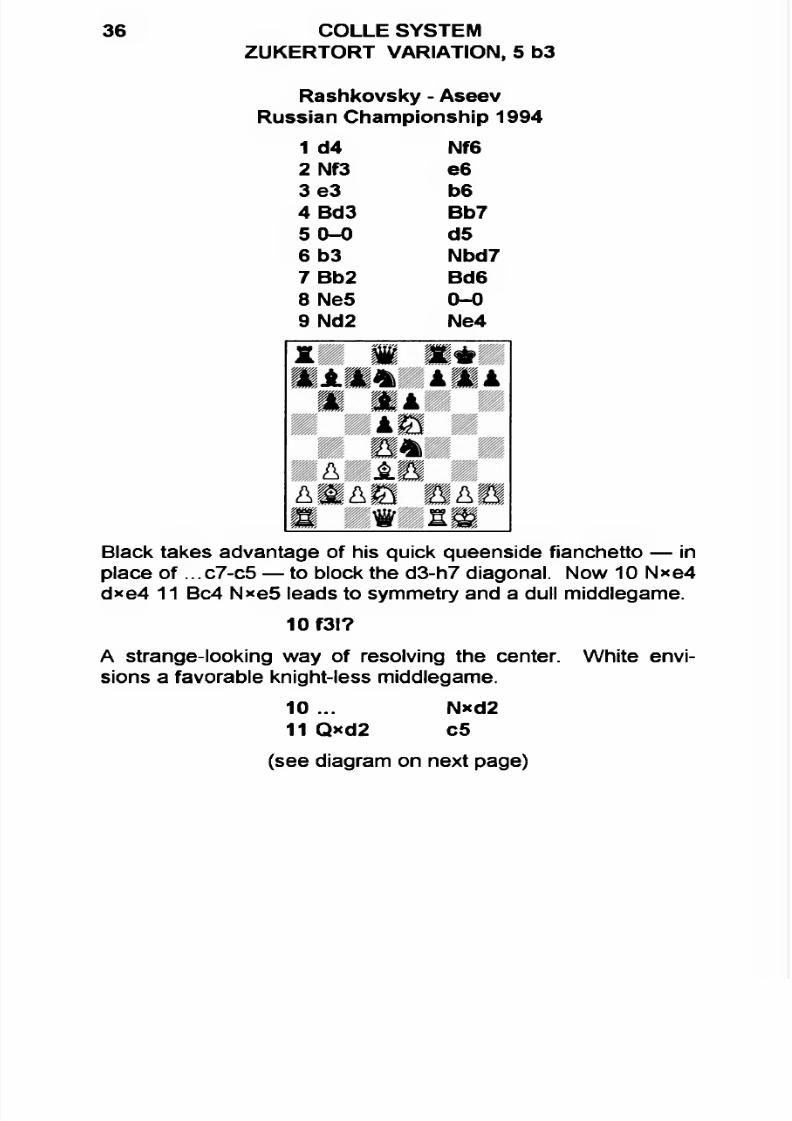
Rashkovsky - Aseev Russian Championship 1994
1 d4 Nf6
2 Nf3 e6 3e3 b64 Bd3 Bb7
5 0-0 d56 b3 Nbd77 Bb2 Bd68 Ne5 0-0
9 Nd2 Ne4
Black takes advantage of his quick queenside fianchetto — inplace of ...c7-c5 — to block the d3-h7 diagonal. Now 10 N*e4d*e4 11 Bc4 N*e5 leads to symmetry and a dull middlegame.
10 f3l?
A strange-looking way of resolving the center. White envisions a favorable knight-less middlegame.
10... N*d211 Qxd2 c5
(see diagram on next page)
7/22/2019 Colle System
http://slidepdf.com/reader/full/colle-system 39/105
CHAPTER TWOHow White Wins
37
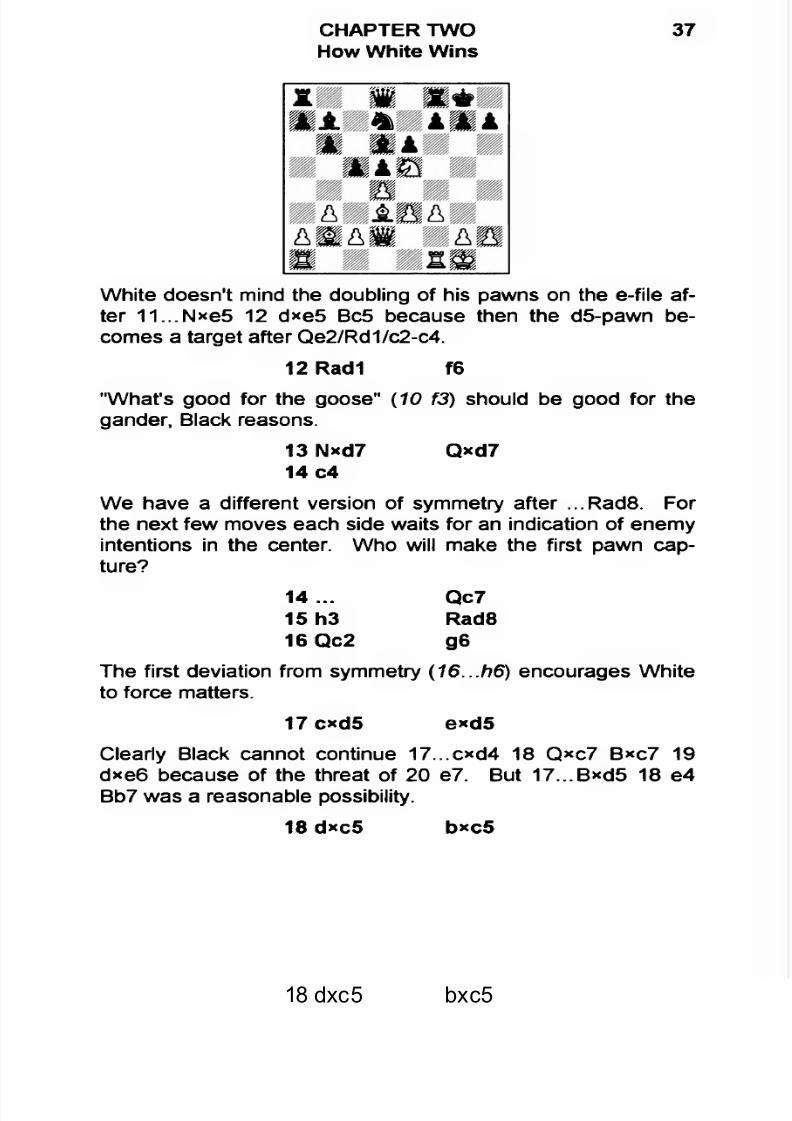
White doesn't mind the doubling of his pawns on the e-file after 11...N*e5 12 d*e5 Bc5 because then the d5-pawn becomes a target after Qe2/Rd1/c2-c4.
12 Radi f6
"What's good for the goose" (10 f3) should be good for thegander, Black reasons.
13 Nxd7 Q*d714 c4
We have a different version of symmetry after ...Rad8. Forthe next few moves each side waits for an indication of enemyintentions in the center. Who will make the first pawn capture?
14... Qc715 h3 Rad816 Qc2 g6
The first deviation from symmetry (16...h6) encourages Whiteto force matters.
17 cxd5 exd5
Clearly Black cannot continue 17...cxd4 18 Qxc7 Bxc7 19dxe6 because of the threat of 20 e7. But 17...Bxd5 18 e4Bb7 was a reasonable possibility.
18 dxc5 bxc5
7/22/2019 Colle System
http://slidepdf.com/reader/full/colle-system 40/105
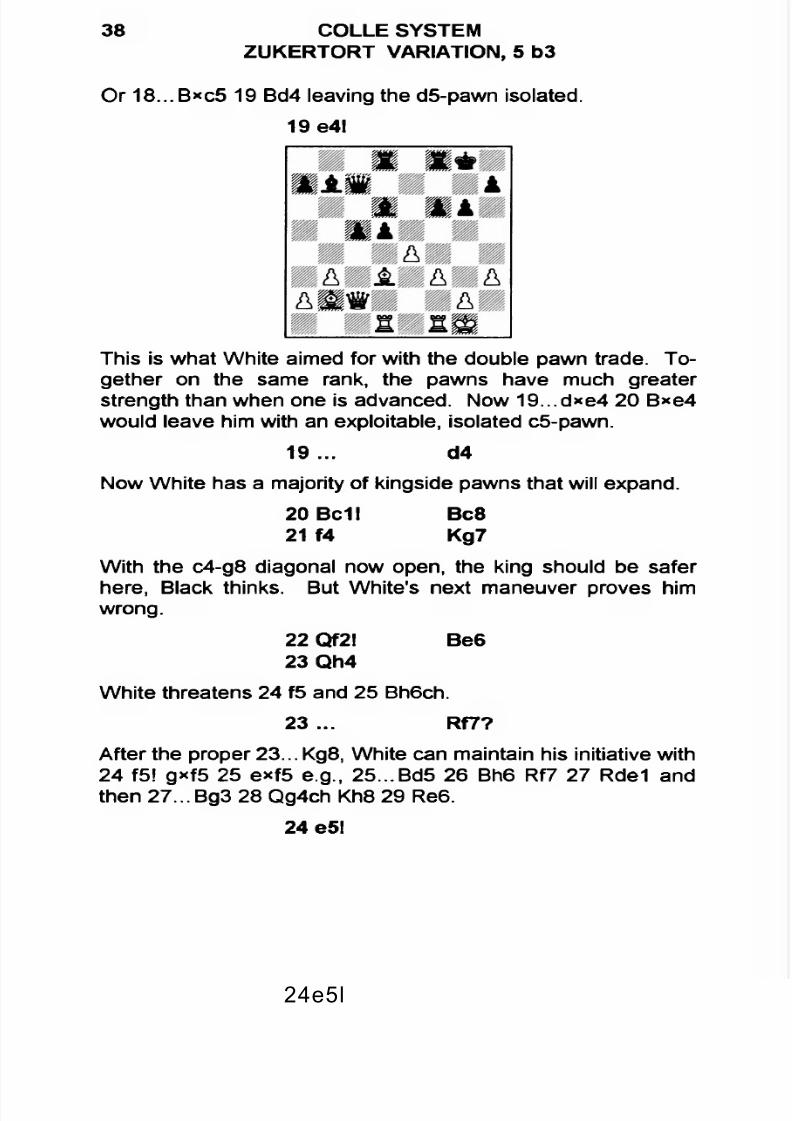
B*c5 19 Bd4 leaving the d5-pawn isolated.
19 e4l
COLLE SYSTEMZUKERTORT VARIATION, 5 b3
This is what White aimed for with the double pawn trade. Together on the same rank, the pawns have much greaterstrength than when one is advanced. Now 19...d*e4 20 B*e4would leave him with an exploitable, isolated c5-pawn.
19... d4
Now White has a majority of kingside pawns that will expand.20 Bc1! Bc821 f4 Kg7
With the c4-g8 diagonal now open, the king should be saferhere, Black thinks. But White's next maneuver proves himwrong.
22 Qf2! Be623 Qh4
White threatens 24 f5 and 25 Bh6ch.
23 ... Rf7?
After the proper 23... Kg8, White can maintain his initiative with24 f5! g*f5 25 e*f5 e.g., 25...Bd5 26 Bh6 Rf7 27 Rde1 andthen 27...Bg3 28 Qg4ch Kh8 29 Re6.
Or 18...
38
24e5l
7/22/2019 Colle System
http://slidepdf.com/reader/full/colle-system 41/105
CHAPTER TWOHow White Wins
39
This wins because Black cannot allow the kingside to beopened by 24...f*e5 25 f*e5 B*e5 26 Bxg6! Then 26...hxg627 Qh6ch Kg8 28 Q*g6ch Bg7 29 Qxe6 with advantage.
24... Bf825 f5! gxf526 Bxf5 Bxf527 Rxf5
Here 27...fxe5 28 Qg5ch Kh8 29 Rxf7 costs a rook.
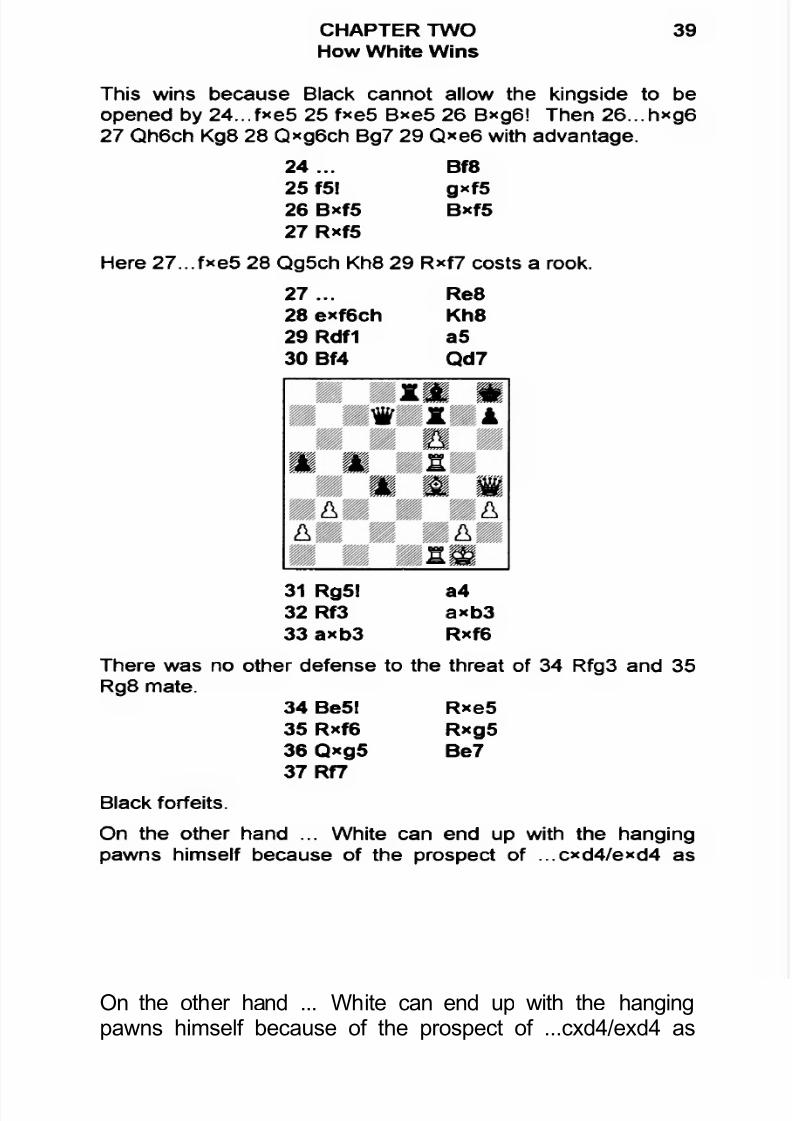
27... Re828 exf6ch Kh829 Rdf1 a530 Bf4 Qd7
31 Rg5l a432 Rf3 axb333 axb3 Rxf6
There was no other defense to the threat of 34 Rfg3 and 35Rg8 mate.
34 Be5l Rxe535 Rxf6 Rxg536 Qxg5 Be737 Rf7
Black forfeits.
On the other hand ... White can end up with the hangingpawns himself because of the prospect of ...cxd4/exd4 as
7/22/2019 Colle System
http://slidepdf.com/reader/full/colle-system 42/105
40 COLLE SYSTEMZUKERTORT VARIATION, 5 b3
well as c2-c4/...dxc4. Then he has to be on the lookout for atactical means of blowing the center open for his b2-bishop.
Often this means a pawn sacrifice, since an attentive defender
with the Black pieces will keep the d5-square under heavysurveillance.
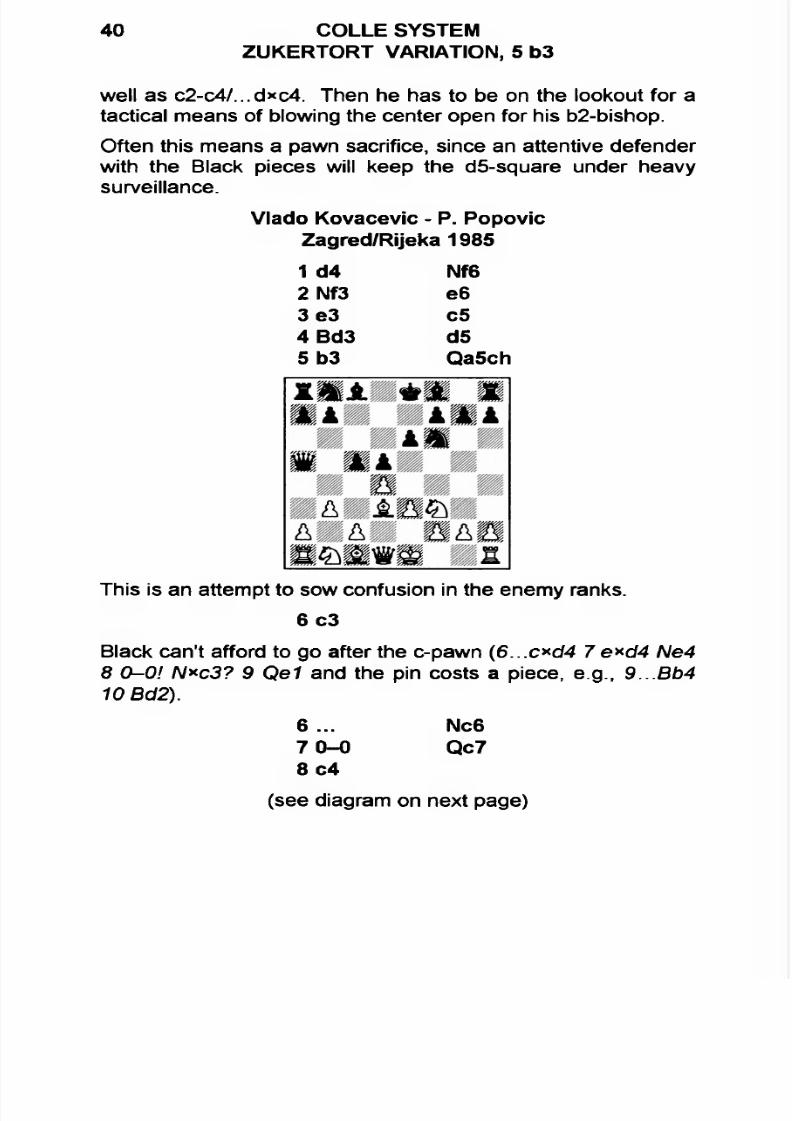
Vlado Kovacevic - P. Popovic Zagred/Rijeka 1985
1 d4 Nf6
2 Nf3 e63 e3 c54 Bd3 d55 b3 Qa5ch
This is an attempt to sow confusion in the enemy ranks.
6 c3
Black can't afford to go after the c-pawn (6...c*d4 7 e*d4 Ne4 8 0-0! N*c3? 9 Qe1 and the pin costs a piece, e.g., 9...Bb410 Bd2).
6 ... Nc67 0-0 Qc78 c4
(see diagram on next page)

7/22/2019 Colle System
http://slidepdf.com/reader/full/colle-system 43/105
CHAPTER TWOHow White Wins
41
So it took White two moves to get his pawn to the fourth rankwhile it took Black two moves to shift his queen to c7: the twolost tempi balance out.
8 ... dxc4
9 b*c4 Be710 Bb2 cxd4
This apparently routine capture is an error here, since Whitegets more immediate use out of the e-file than Black gets in
the form of pressure against c4. Since White wasn't ready todo anything with his d4-pawn, Black should have waited.
11 exd4 0-0
12 Nbd2 b613 Rc1 Bb7
White can begin calculating the consequences of d4-d5 already. Here, for example, 14 d5 exd5 15 cxd5 Nxd5 16 Nd4!
7/22/2019 Colle System
http://slidepdf.com/reader/full/colle-system 44/105
42 COLLE SYSTEMZUKERTORT VARIATION, 5 b3
gives him a strong attack. But White was unsure about14...Nb4!.
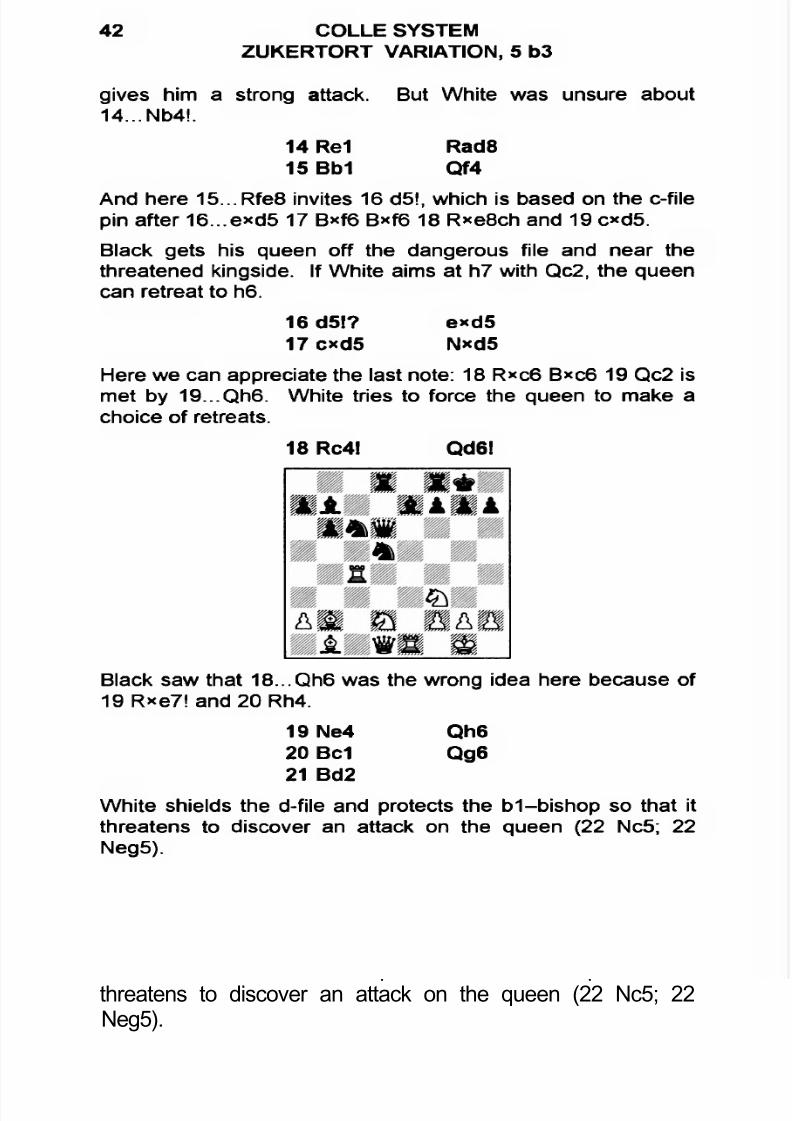
14 Re1 Rad8
15 Bb1 Qf4
And here 15...Rfe8 invites 16 d5!, which is based on the c-filepin after 16...exd5 17 B*f6 B*f6 18 Rxe8ch and 19 c*d5.
Black gets his queen off the dangerous file and near thethreatened kingside. If White aims at h7 with Qc2, the queencan retreat to h6.
16 d5!? e*d517 cxd5 N«d5
Here we can appreciate the last note: 18 R*c6 Bxc6 19 Qc2 ismet by 19...Qh6. White tries to force the queen to make achoice of retreats.
18 Rc4! Qd6!
Black saw that 18...Qh6 was the wrong idea here because of 19 Rxe7! and 20 Rh4.
19 Ne4 Qh620 Bc1 Qg621 Bd2
White shields the d-file and protects the b1-bishop so that itthreatens to discover an attack on the queen (22 Nc5; 22Neg5).

7/22/2019 Colle System
http://slidepdf.com/reader/full/colle-system 45/105
CHAPTER TWOHow White Wins
43
21 ... f5l22 Ng3 Kh823 Qb3 Ba8
24 h3!
A remarkable strong "quiet" move which supports Rg4 andkeeps the N*f5 idea on tap.
24... Bc5?
The losing move. White meets the threat of 25...Qxg3 with a
nice combination.
25 Nxf5! Rxf5
26 Rxc5! bxc527 Nh4 Qf628 Nxf5 Nd4
White was winning after 28...g6 29 Q*d5! Rxd5 30 Re8ch or 29...gxf5 30 Qxf5.
29 Nxd4 cxd4
Despite material equality, White's bishops give him a big edge,as the following queen maneuver demonstrates.
30 Qd3 g631 Qg3 Qg732 Qh4 Rc8
33 Bd3 h5?

7/22/2019 Colle System
http://slidepdf.com/reader/full/colle-system 46/105
Shortening what would have been a gradual loss (after 33...Qf6 34 Bg5 Qg7 35 Re7! and 36 Bf6).
34 Re6 Qb7
44 COLLE SYSTEMZUKERTORT VARIATION, 5 b3
And Black resigned before 35 Rxg6.
7/22/2019 Colle System
http://slidepdf.com/reader/full/colle-system 47/105
45
CHAPTER THREE
How White Loses
There are, naturally, as many ways for White to lose as thereare for him to win, and in this chapter we'll examine some of
the most common scenarios.White often loses when he dilly-dallies in the opening andloses control of e5. Normally, he has three units attacking thatkey point — a knight at f3, pawn at d4 and bishop at b2.That's one more than he usually has in the Colle-Koltanowski,when White's bishop often sulks at c1 until the middlegamebegins.
But if Black outguns White on e5 — and engineers ...e6-e5 —the initiative can turn quickly.
What they used to call a "country move" — the amateur's favorite way of anticipating pins like ...Bg4. But it loses a keytempo.
Moses - Rubinstein Southport 1924.
1 d42 Nf3 3e3
4 Bd3 5h3?
d5Nf6c5
Nc6
5 ...6 0-0 7 b3
e6
Bd6e5l
(see diagram on next page)
7/22/2019 Colle System
http://slidepdf.com/reader/full/colle-system 48/105
46 COLLE SYSTEMZUKERTORT VARIATION, 5 b3
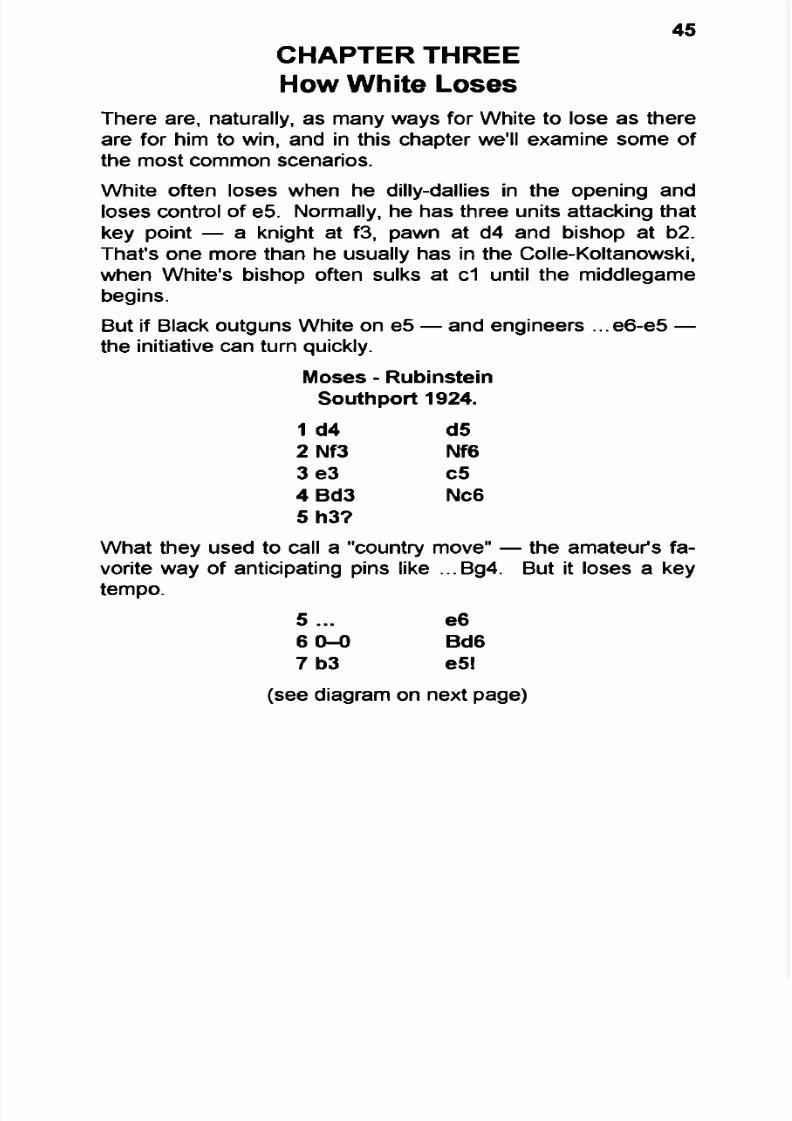
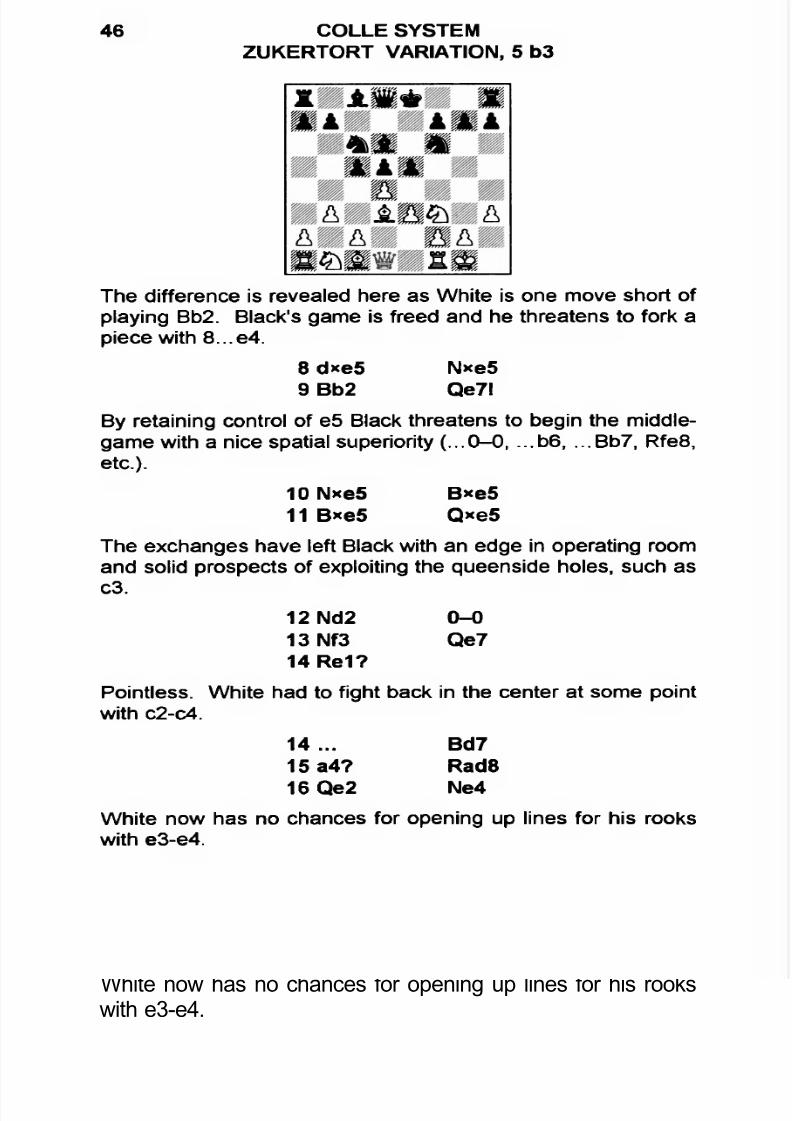
The difference is revealed here as White is one move short of
playing Bb2. Black's game is freed and he threatens to fork apiece with 8...e4.
8 dxe5 N*e5
9 Bb2 Qe7l
By retaining control of e5 Black threatens to begin the middle-game with a nice spatial superiority (...0-0, ...b6, ...Bb7, Rfe8,etc.).
10 Nxe5 Bxe511 Bxe5 Qxe5
The exchanges have left Black with an edge in operating roomand solid prospects of exploiting the queenside holes, such asc3.
12 Nd2 0-0
13 Nf3 Qe714 Re1?
Pointless. White had to fight back in the center at some pointwith c2-c4.
14... Bd715 a4? Rad816 Qe2 Ne4
White now has no chances for opening up lines for his rookswith e3-e4.
7/22/2019 Colle System
http://slidepdf.com/reader/full/colle-system 49/105
CHAPTER THREEHow White Loses
47
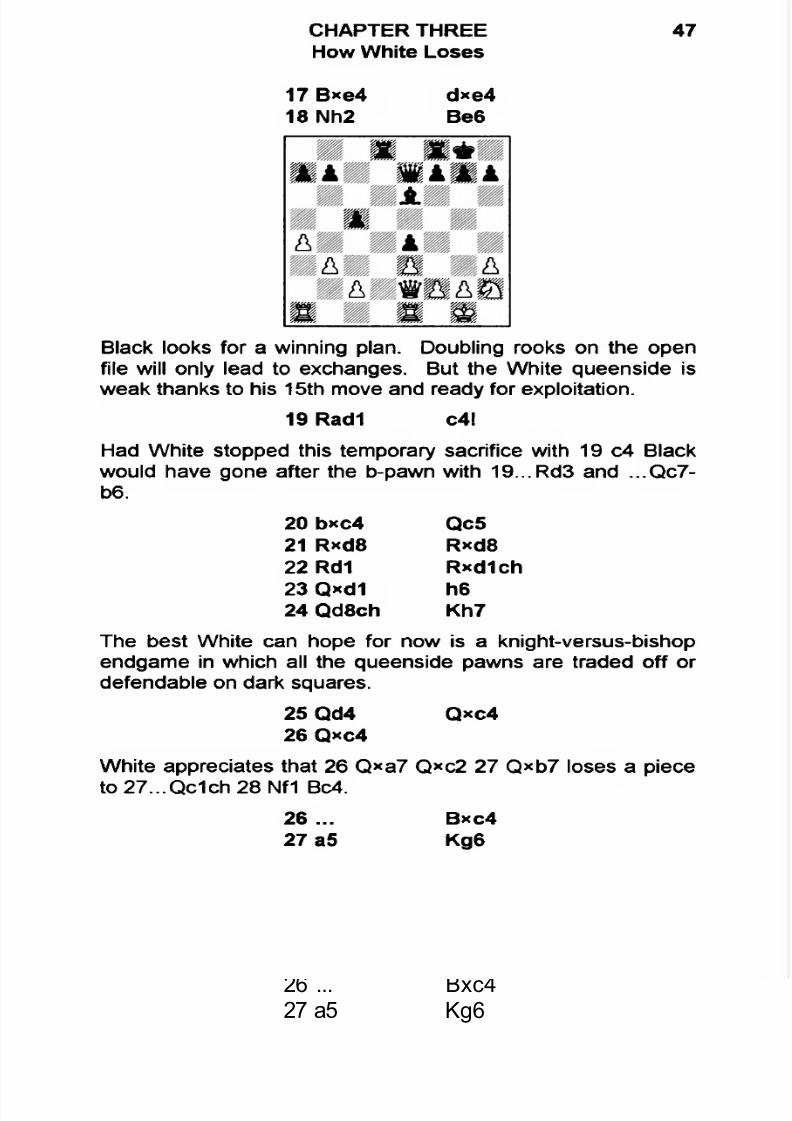
17 Bxe4 d*e418 Nh2 Be6
Black looks for a winning plan. Doubling rooks on the openfile will only lead to exchanges. But the White queenside isweak thanks to his 15th move and ready for exploitation.
19 Radi c4!
Had White stopped this temporary sacrifice with 19 c4 Blackwould have gone after the b-pawn with 19...Rd3 and ...Qc7-
b6.
20 bxc4 Qc521 Rxd8 Rxd8
22 Rd1 Rxdlch23 Qxd1 h624 Qd8ch Kh7
The best White can hope for now is a knight-versus-bishopendgame in which all the queenside pawns are traded off ordefendable on dark squares.
25 Qd4 Qxc426 Qxc4
White appreciates that 26 Qxa7 Qxc2 27 Qxb7 loses a pieceto 27...Qc1ch 28 Nf1 Bc4.
26 ... 27 a5
Bxc4Kg6
7/22/2019 Colle System
http://slidepdf.com/reader/full/colle-system 50/105
48 COLLE SYSTEMZUKERTORT VARIATION, 5 b3
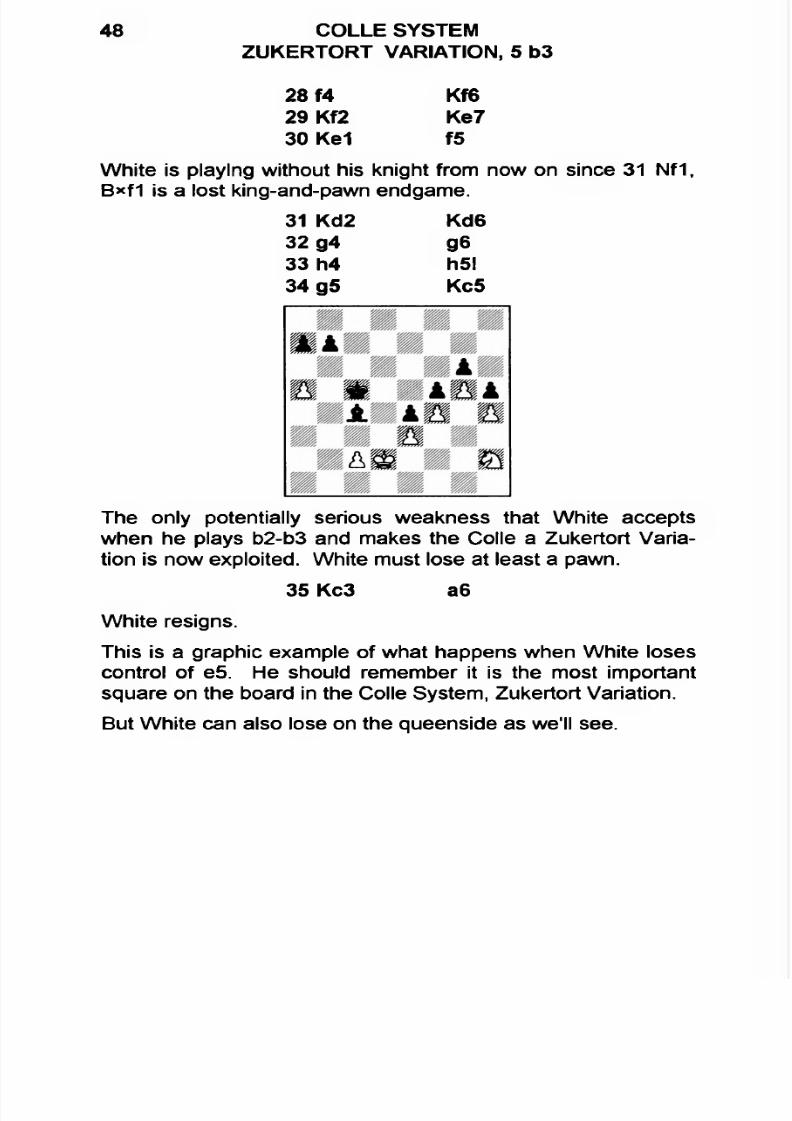
28 f4 Kf629 Kf2 Ke730 Ke1 f5
White is playing without his knight from now on since 31 Nf 1,B*f1 is a lost king-and-pawn endgame.
31 Kd2 Kd632 g4 g633 h4 h5l34 g5 Kc5
The only potentially serious weakness that White acceptswhen he plays b2-b3 and makes the Colie a Zukertort Variation is now exploited. White must lose at least a pawn.
35 Kc3 a6
White resigns.
This is a graphic example of what happens when White losescontrol of e5. He should remember it is the most importantsquare on the board in the Colle System, Zukertort Variation.
But White can also lose on the queenside as we'll see.
7/22/2019 Colle System
http://slidepdf.com/reader/full/colle-system 51/105
50 COLLE SYSTEMZUKERTORT VARIATION, 5 b3
But this was the other Black threat. The exchange of bishopsgives Black excellent queenside chances against the c2-pawnand the c3-hole.
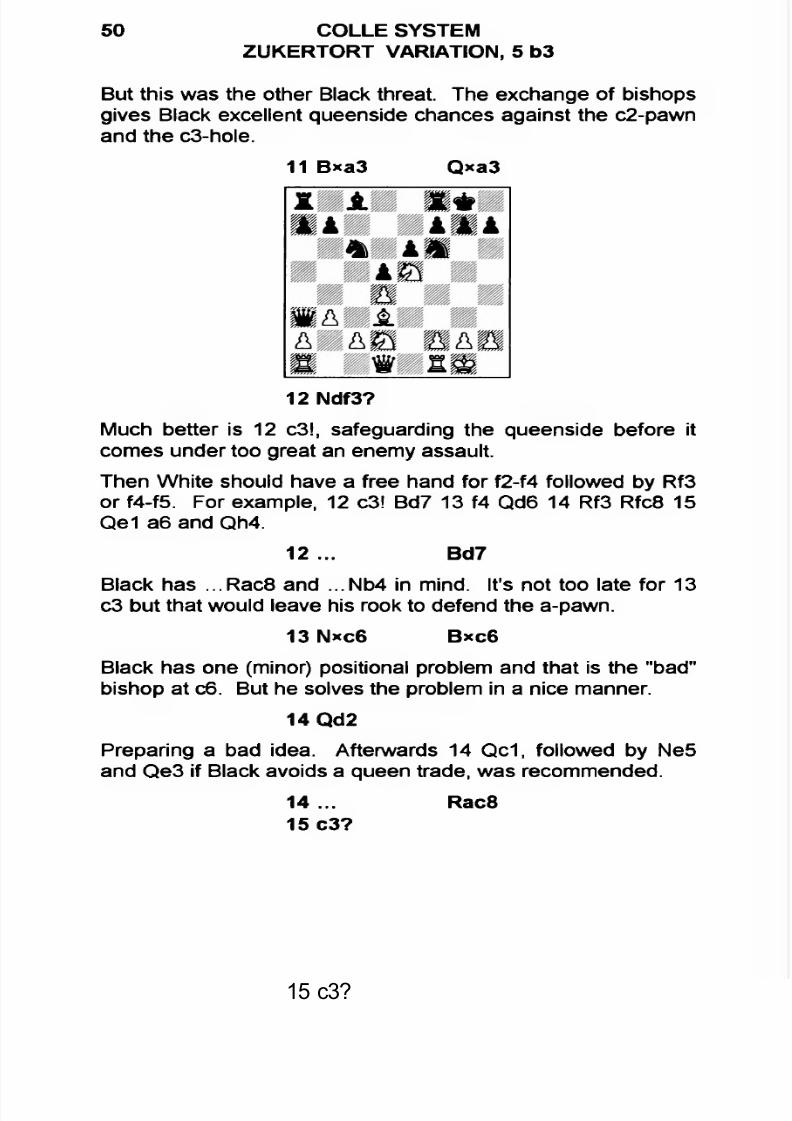
11 B*a3 Qxa3
12 Ndf3?
Much better is 12 c3!, safeguarding the queenside before itcomes under too great an enemy assault.
Then White should have a free hand for f2-f4 followed by Rf3or f4-f5. For example, 12 c3! Bd7 13 f4 Qd6 14 Rf3 Rfc8 15Qe1 a6 and Qh4.
12 ... Bd7
Black has ...Rac8 and ...Nb4 in mind. It's not too late for 13c3 but that would leave his rook to defend the a-pawn.
13 N*c6 Bxc6
Black has one (minor) positional problem and that is the "bad"bishop at c6. But he solves the problem in a nice manner.
14 Qd2
Preparing a bad idea. Afterwards 14 Qc1, followed by Ne5and Qe3 if Black avoids a queen trade, was recommended.
14... Rac8
15 c3?
7/22/2019 Colle System
http://slidepdf.com/reader/full/colle-system 52/105
CHAPTER THREEHow White Loses
51
Now this turns out to be a horrible way of defending the weakc2-pawn — turning it into a c3-pawn is even weaker.
15... a6l
Black will exchange off his bishop with ...Bb5, not fearingB*b5/...a*b5 because White's a-pawn will turn out to beweaker than Black's b5-pawn.
16 Ne5 Bb5
17 f3
An ugly way of keeping the enemy knight off e4. Black has
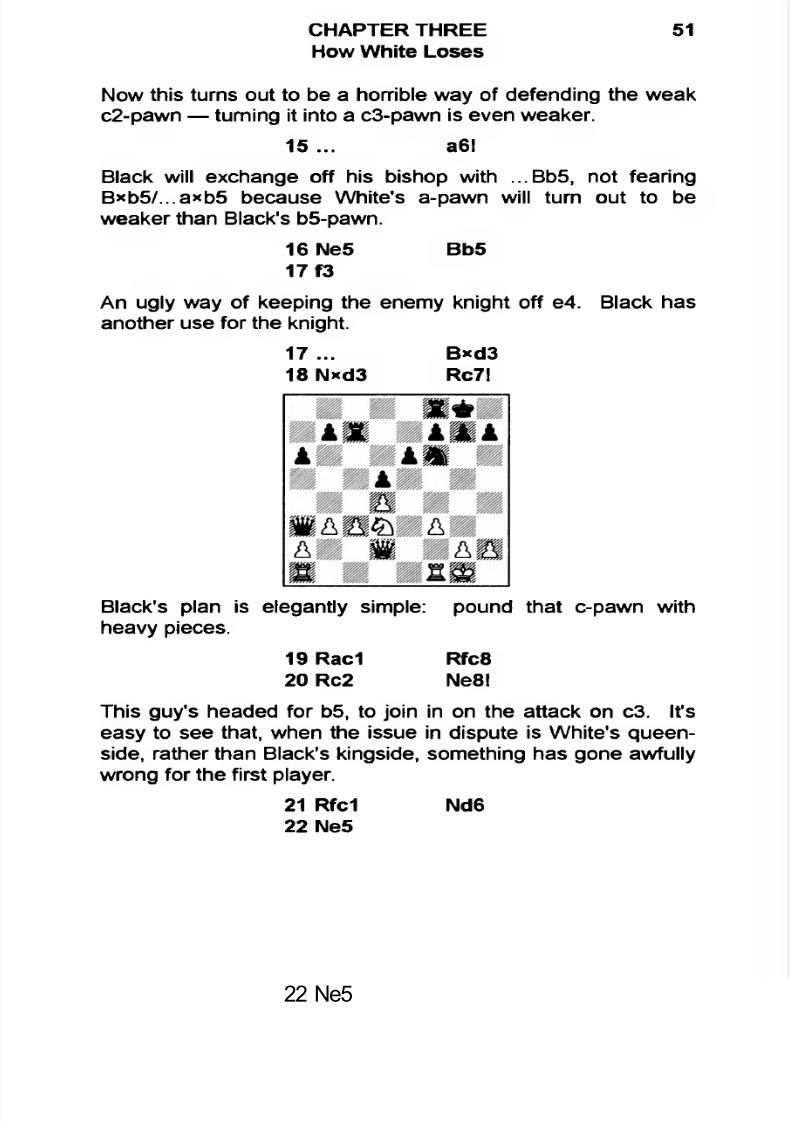
another use for the knight.17 ... B*d318 Nxd3 Rc7l
Black's plan is elegantly simple: pound that c-pawn withheavy pieces.
19 Rac1 Rfc820 Rc2 Ne8!
This guy's headed for b5, to join in on the attack on c3. It'seasy to see that, when the issue in dispute is White's queen-side, rather than Black's kingside, something has gone awfullywrong for the first player.
21 Rfc1 Nd622 Ne5
7/22/2019 Colle System
http://slidepdf.com/reader/full/colle-system 53/105
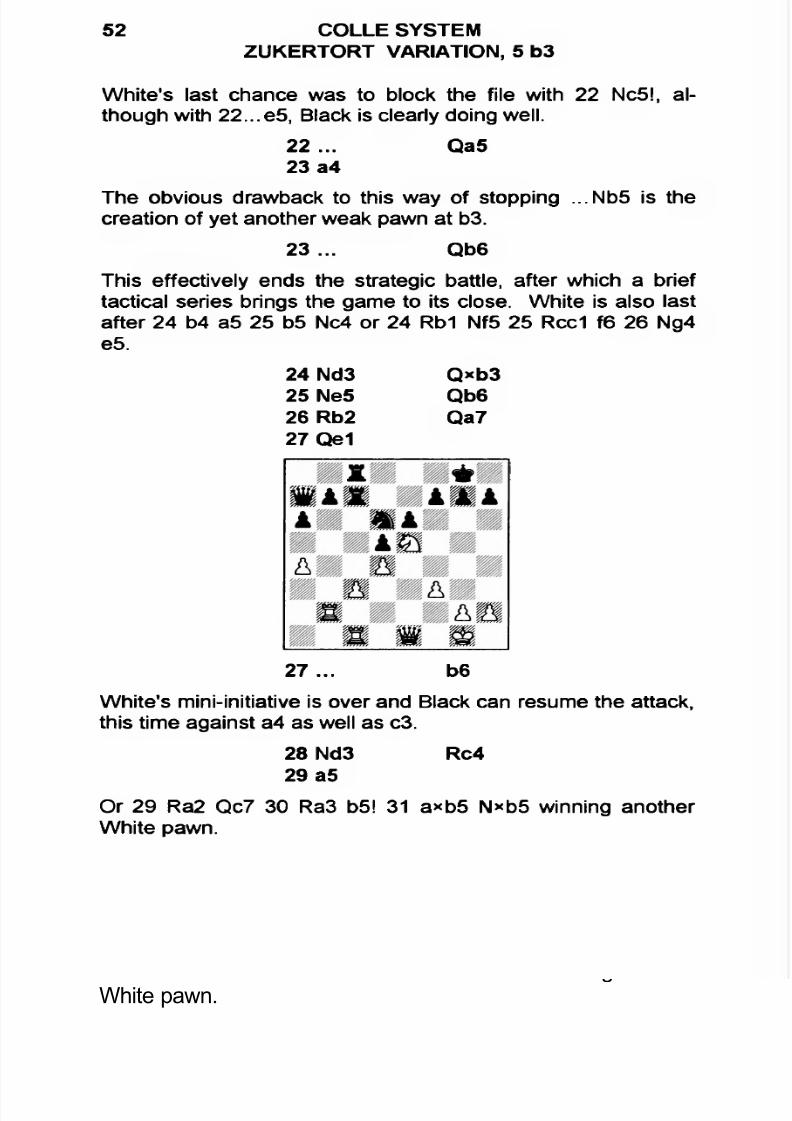
52 COLLE SYSTEMZUKERTORT VARIATION, 5 b3
White's last chance was to block the file with 22 Nc5!, although with 22...e5, Black is clearly doing well.
22... Qa5
23 a4
The obvious drawback to this way of stopping ...Nb5 is thecreation of yet another weak pawn at b3.
23... Qb6
This effectively ends the strategic battle, after which a brieftactical series brings the game to its close. White is also last
after 24 b4 a5 25 b5 Nc4 or 24 Rb1 Nf5 25 Red f6 26 Ng4e5.
24 Nd3 Q*b325 Ne5 Qb626 Rb2 Qa727 Qe1
27... b6
White's mini-initiative is over and Black can resume the attack,this time against a4 as well as c3.
28 Nd3 Rc4
29 a5
Or 29 Ra2 Qc7 30 Ra3 b5! 31 axb5 N*b5 winning anotherWhite pawn.
7/22/2019 Colle System
http://slidepdf.com/reader/full/colle-system 54/105
CHAPTER THREEHow White Loses
53
29... b*a530 Nc5 Nb531 Re2 N»d4!
A nice combination that strikes at the very foundation of theColle System, the d4-pawn.
32 cxd4 R8*c5
White resigned when saw that he will remain three pawnsdown (33 dxc5 Q*c5ch).
White should always be looking for opportunities on the king-
side — but with one eye on the queenside, where Black hashis best chance for a breakthrough.
The center is usually closed or semi-open in the Colle-Zuker-tort and this enables White to perform some elaborate maneuvers and execute long-range plans denied him when the center is open. But, at the same time, he risks having his piecesturn out to be badly misplaced if the queenside turns out to be
just as much of a battleground as the kingside.
Here's an example of Black winning a skirmish on the queenside that leads to a final battle on the kingside.
Chiburdananidze - Galliamova
Women's Candidates Match 1995
1 d4 d52 Nf3 Nf6
3e3 eS4 Bd3 c55 b3 Nc66 Bb2 Bd670-0 0-08a3 b69 Nbd2 Bb7
10 Qe2 Qe7
7/22/2019 Colle System
http://slidepdf.com/reader/full/colle-system 55/105
54 COLLE SYSTEMZUKERTORT VARIATION, 5 b3
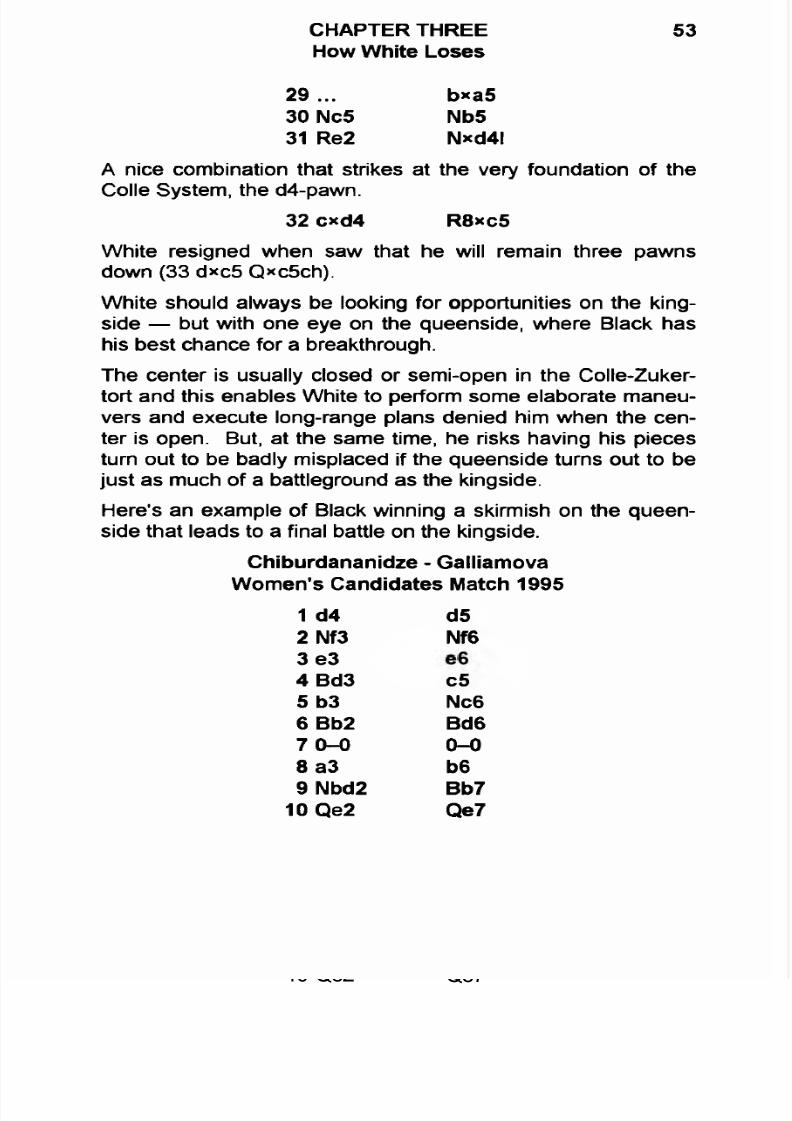
11 Ne5 Rac8
A standard way of beginning the middlegame. White now optsfor the Stonewall strategy, with f2-f4 and Rf3-h3 taking deadaim at h7.
12 f4 Bb813 Rf3 Ne4
This is tactically based on 14 N*e4 dxe4 15 Bxe4 Nxe5 and16 f*e5 Bxe4 or 16 B*b7 Nxf3ch.
14 Rh3 N*e515 dxe5?l h616 Rf1? N*d2I17 Qxd2 c4l
White didn't want to play c2-c4, which would have been consistent with the dxe5 recapture, out of fear of allowing Black to
7/22/2019 Colle System
http://slidepdf.com/reader/full/colle-system 56/105
CHAPTER THREEHow White Loses
55
open the long b7-f3 diagonal. But now Black gains valuablespace on the queenside and drives White's light-squaredbishop out of play.
18 Be2 Qc5
Now 19 Bd4 Qxa3 costs a pawn.
19 b4 c3!
White can't afford 20 b*c5 c*d2 21 c*b6 R*c2.
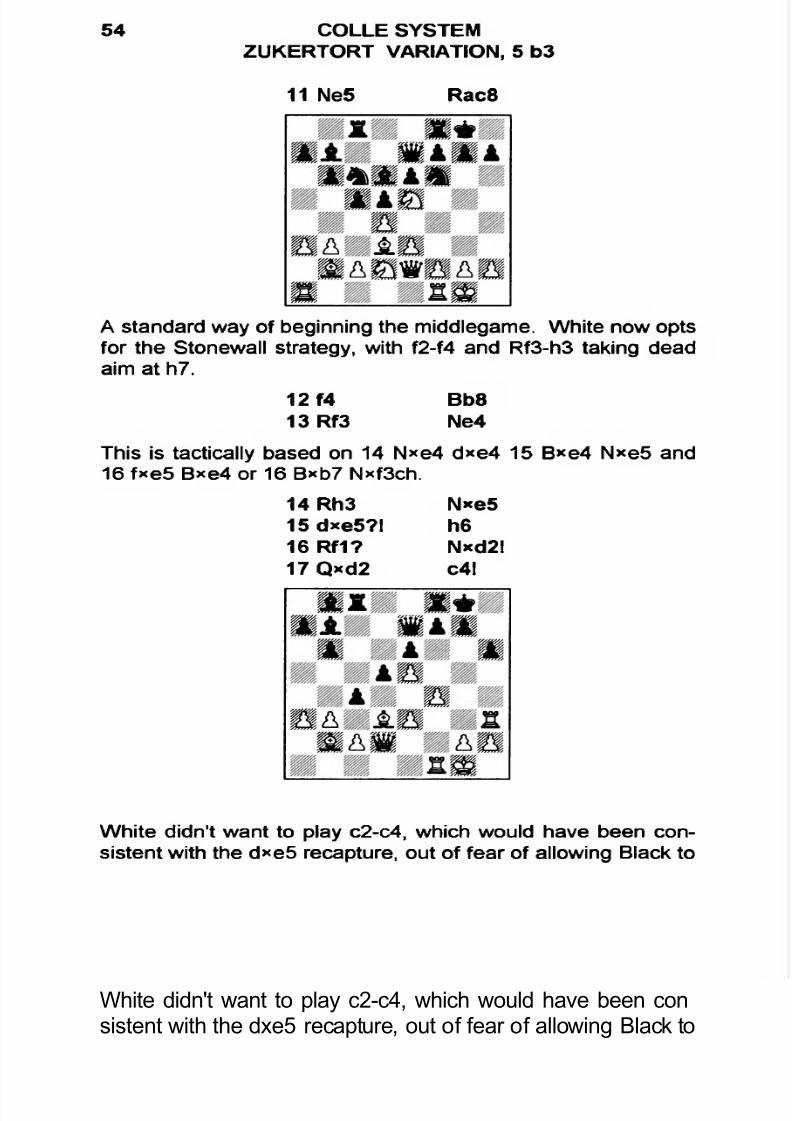
20 Qe1 Qc721 Bc1 f6
With both of White's bishops out of commission right now,Black senses it is time to strike on the kingside.
22 e*f6 R*f6
23 Rh5?! Qf724 Qh4 Rf825 g4
25 ... g5!
Thanks to the problems he created for White's bishops with...c4-c3, Black can now seize a decisive initiative on the king-side.
26 Qh3 Qg7
The f4-square now falls to Black and the b8-h2 diagonal isopened.

7/22/2019 Colle System
http://slidepdf.com/reader/full/colle-system 57/105
56 COLLE SYSTEMZUKERTORT VARIATION, 5 b3
27 fxg5 Rxflch28 Bxf1 Qf7
29 Qg2 d4l
And it's Black's bishops who have the final say (30 e4 B*e4 31 Q*e4 Q*f1 mate).
30 Qe2 Ba631 b5 Bxb532 g6 Qxflch
White resigns.
7/22/2019 Colle System
http://slidepdf.com/reader/full/colle-system 58/105
CHAPTER FOUR Common Strategic Mistakes
There are so many ways of losing on either side of the Colle-Zukertort that we can only touch on the major mistakes here.
(1) Black loses when he allows the game to become focused on the White bishops and their diagonals.
Yusupov- Scheeren
Plovdiv, 1983
1 d4 Nf62 Nf3 e6
3e3 c54 Bd3 d5
5 b3 Nbd76 Bb2 b67 0-0 Bb7
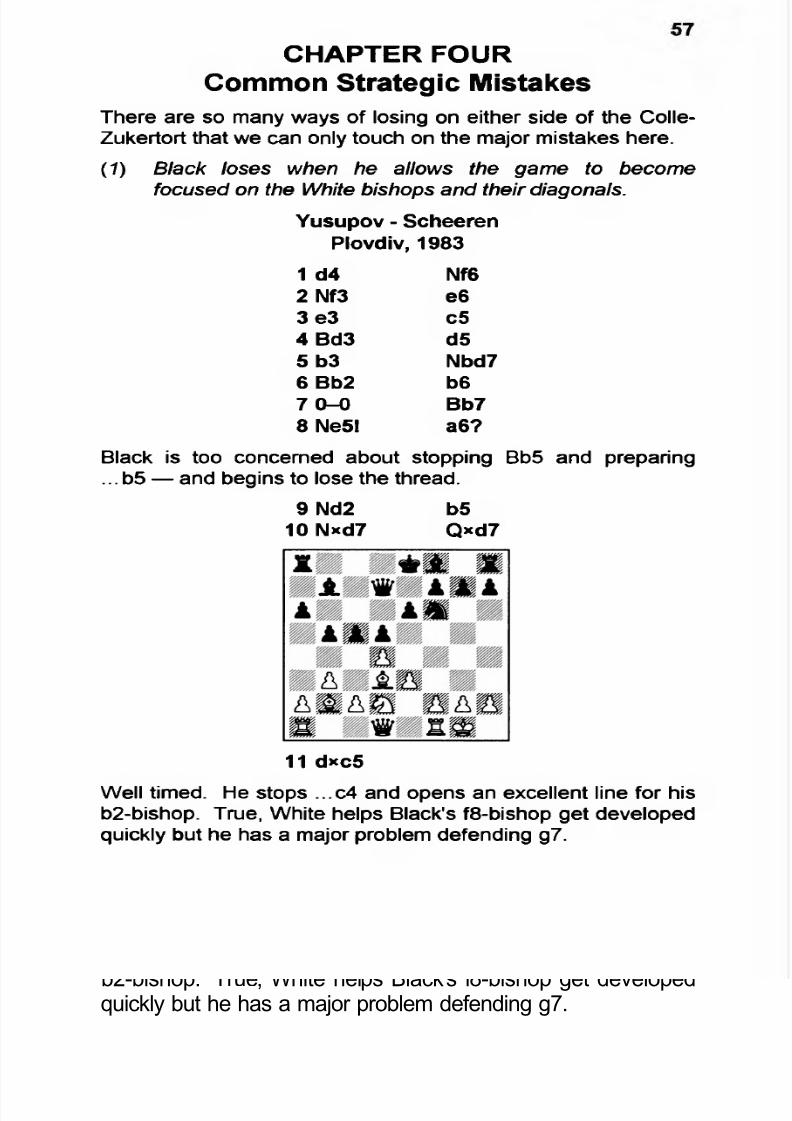
8 Ne5l a6?
Black is too concerned about stopping Bb5 and preparing...b5 — and begins to lose the thread.
9 Nd2 b510 N*d7 Q*d7
11 d*c5
Well timed. He stops ...c4 and opens an excellent line for his
b2-bishop. True, White helps Black's f8-bishop get developedquickly but he has a major problem defending g7.
7/22/2019 Colle System
http://slidepdf.com/reader/full/colle-system 59/105
58 COLLE SYSTEMZUKERTORT VARIATION, 5 b3
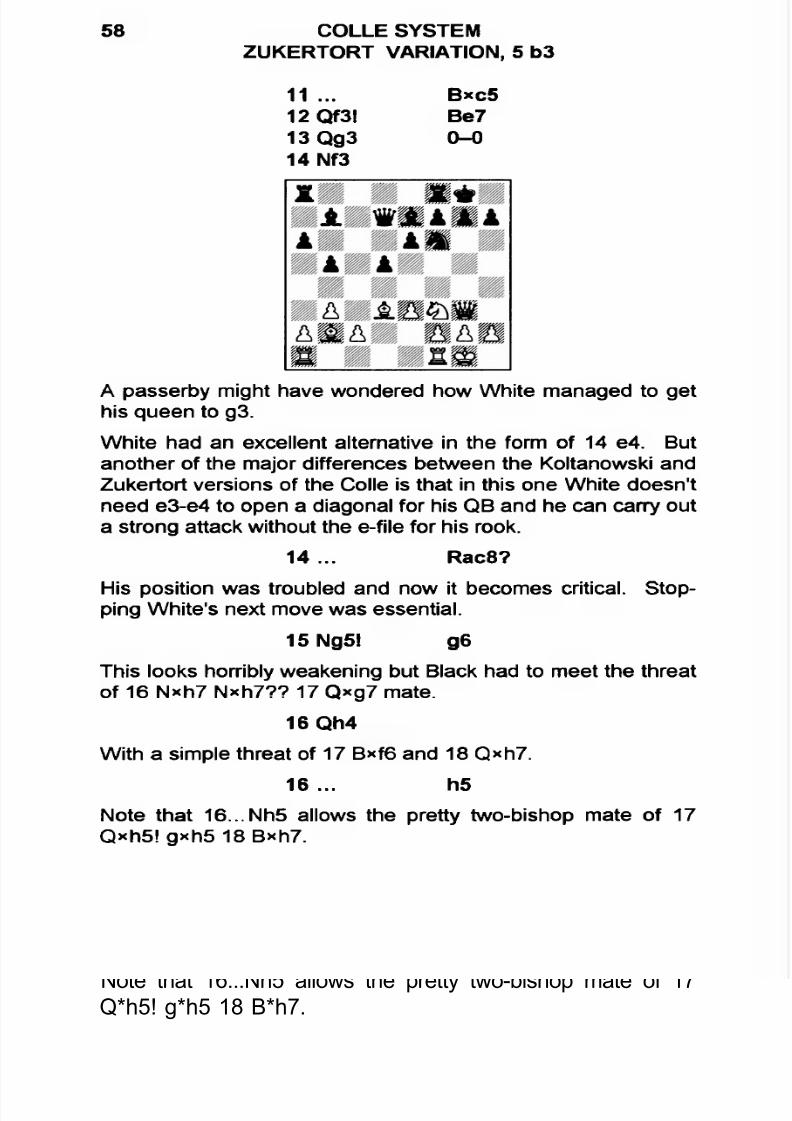
11 ... B*c512 Qf3l Be713 Qg3 0-0
14 Nf3
A passerby might have wondered how White managed to gethis queen to g3.
White had an excellent alternative in the form of 14 e4. Butanother of the major differences between the Koltanowski and
Zukertort versions of the Colle is that in this one White doesn'tneed e3-e4 to open a diagonal for his QB and he can carry outa strong attack without the e-file for his rook.
14... Rac8?
His position was troubled and now it becomes critical. Stopping White's next move was essential.
15 Ng5! g6
This looks horribly weakening but Black had to meet the threatof 16 Nxh7 Nxh7?? 17 Qxg7 mate.
16 Qh4
With a simple threat of 17 B*f6 and 18 Q*h7.
16 ... h5
Note that 16...Nh5 allows the pretty two-bishop mate of 17Q*h5! g*h5 18 B*h7.
7/22/2019 Colle System
http://slidepdf.com/reader/full/colle-system 60/105
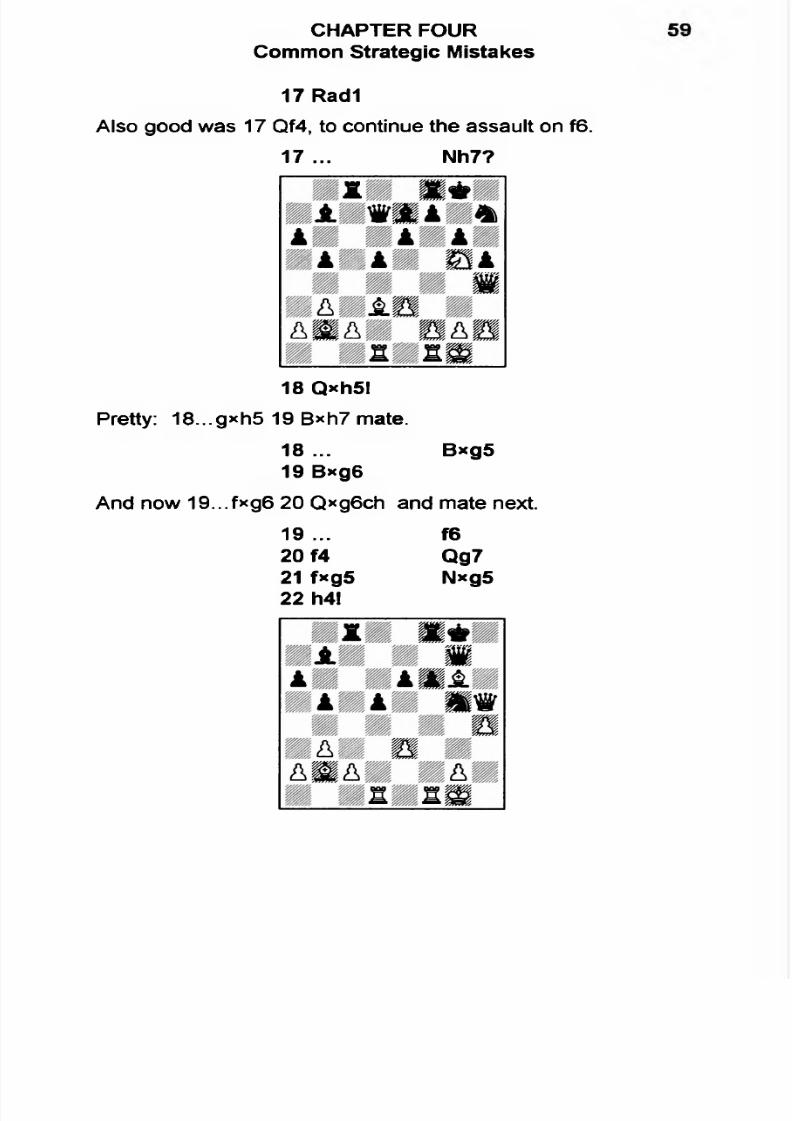
17 Radi
Also good was 17 Qf4, to continue the assault on f6.
17 ... Nh7?
CHAPTER FOURCommon Strategic Mistakes
18 Qxh5l
Pretty: 18...gxh5 19 B*h7 mate.
18 ... Bxg519 B*g6
And now 19...fxg6 20 Qxg6ch and mate next.
19 ... f620 f4 Qg721 fxg5 Nxg522 h4!
7/22/2019 Colle System
http://slidepdf.com/reader/full/colle-system 61/105
60 COLLE SYSTEMZUKERTORT VARIATION, 5 b3
The game is over after either 22... Nh7 23 Rd4! and 24 Rg4 or,as play went, 22...Ne4 23 B*e4 d*e4 24 Rf4! and Black resigns.
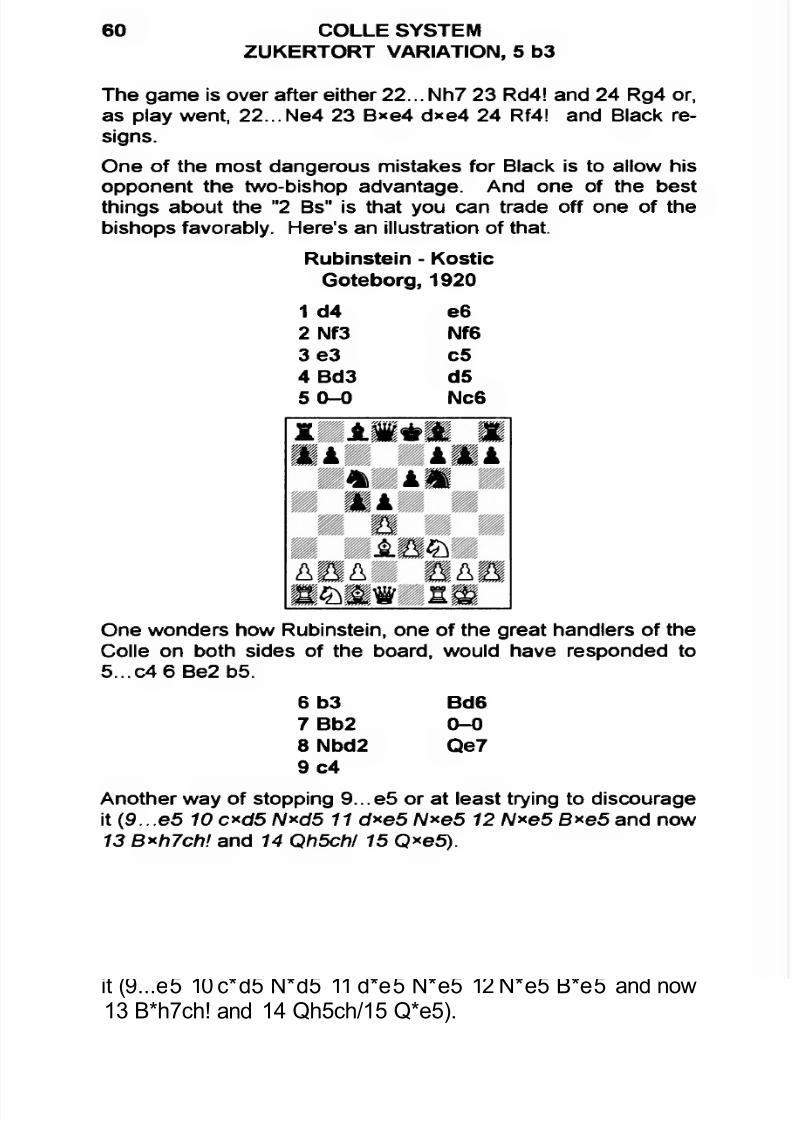
One of the most dangerous mistakes for Black is to allow hisopponent the two-bishop advantage. And one of the bestthings about the "2 Bs" is that you can trade off one of thebishops favorably. Here's an illustration of that.
Rubinstein • Kostic Goteborg, 1920
1 d4 e6
2 Nf3 Nf63 e3 c54 Bd3 d55 0-0 Nc6
One wonders how Rubinstein, one of the great handlers of the
Colle on both sides of the board, would have responded to5...C4 6 Be2 b5.
6 b3 Bd67 Bb2 0-08 Nbd2 Qe79 c4
Another way of stopping 9...e5 or at least trying to discourage
it (9...e5 10 c*d5 N*d5 11 d*e5 N*e5 12 N*e5 B*e5 and now13 B*h7ch! and 14 Qh5ch/15 Q*e5).
7/22/2019 Colle System
http://slidepdf.com/reader/full/colle-system 62/105
CHAPTER FOURCommon Strategic Mistakes
61
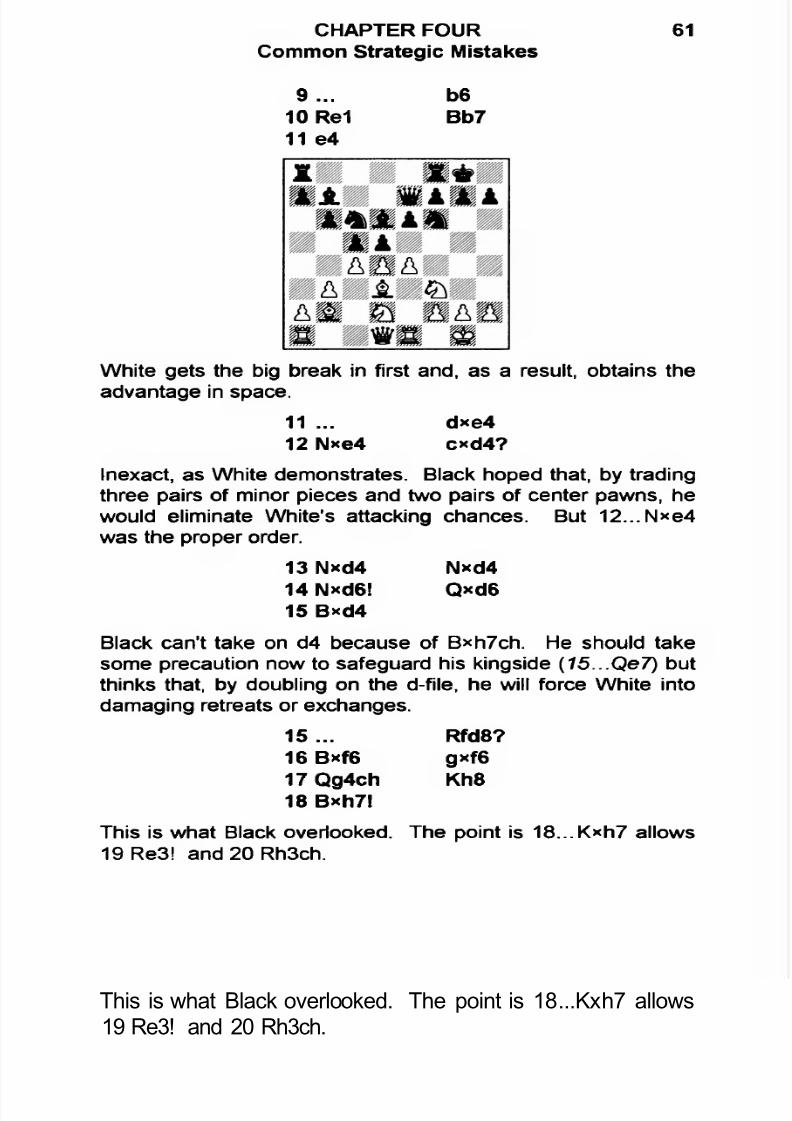
9... b610 Re1 Bb7
11 e4
White gets the big break in first and, as a result, obtains theadvantage in space.
11 ... dxe4
12 N*e4 c*d4?
Inexact, as White demonstrates. Black hoped that, by trading
three pairs of minor pieces and two pairs of center pawns, hewould eliminate White's attacking chances. But 12...N*e4was the proper order.
13 N*d4 N*d414 Nxd6! Qxd615 Bxd4
Black can't take on d4 because of Bxh7ch. He should takesome precaution now to safeguard his kingside (15...Qe7) butthinks that, by doubling on the d-file, he will force White intodamaging retreats or exchanges.
15... Rfd8?16 Bxf6 gxf617 Qg4ch Kh818 Bxh7l
This is what Black overlooked. The point is 18...Kxh7 allows19 Re3! and 20 Rh3ch.
7/22/2019 Colle System
http://slidepdf.com/reader/full/colle-system 63/105
62 COLLE SYSTEMZUKERTORT VARIATION, 5 b3
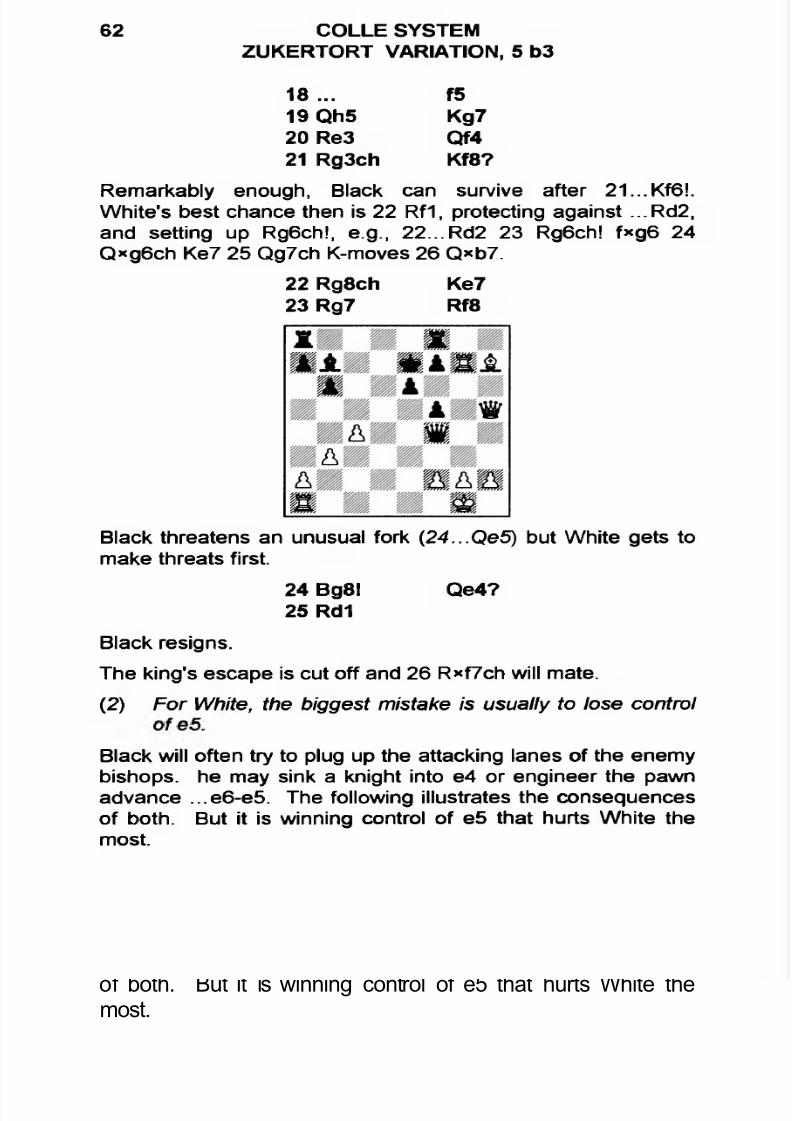
18 ... f519 Qh5 Kg720 Re3 Qf4
21 Rg3ch Kf8?Remarkably enough, Black can survive after 21...Kf6!.White's best chance then is 22 Rf1, protecting against ...Rd2,and setting up Rg6ch!, e.g., 22...Rd2 23 Rg6ch! f*g6 24Qxg6ch Ke7 25 Qg7ch K-moves 26 Q*b7.
22 Rg8ch Ke723 Rg7 Rf8
Black threatens an unusual fork (24...Qe5) but White gets tomake threats first.
24 Bg8! Qe4?25 Rd1
Black resigns.
The king's escape is cut off and 26 R*f7ch will mate.
(2) For White, the biggest mistake is usually to lose controlof e5.
Black will often try to plug up the attacking lanes of the enemybishops, he may sink a knight into e4 or engineer the pawnadvance ...e6-e5. The following illustrates the consequences
of both. But it is winning control of e5 that hurts White themost.
7/22/2019 Colle System
http://slidepdf.com/reader/full/colle-system 64/105
CHAPTER FOURCommon Strategic Mistakes
63
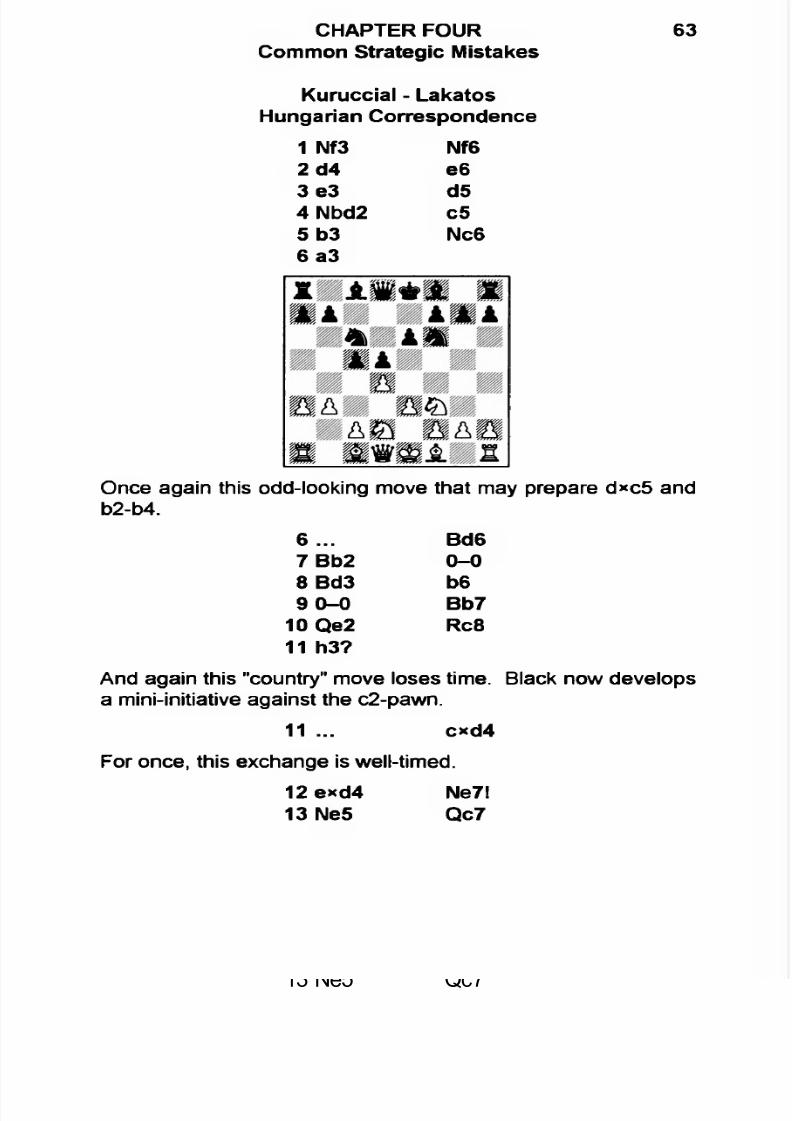
Kuruccial - Lakatos Hungarian Correspondence
1 Nf3 Nf6
2d4 e63e3 d54 Nbd2 c55 b3 Nc6
6a3
Once again this odd-looking move that may prepare d*c5 andb2-b4.
6 ... Bd67 Bb2 0-08 Bd3 b690-0 Bb7
10 Qe2 Rc8
11 h3? And again this "country" move loses time. Black now developsa mini-initiative against the c2-pawn.
11 ... c*d4
For once, this exchange is well-timed.
12 exd4 Ne7!
13 Ne5 Qc7
7/22/2019 Colle System
http://slidepdf.com/reader/full/colle-system 65/105
64 COLLE SYSTEMZUKERTORT VARIATION, 5 b3
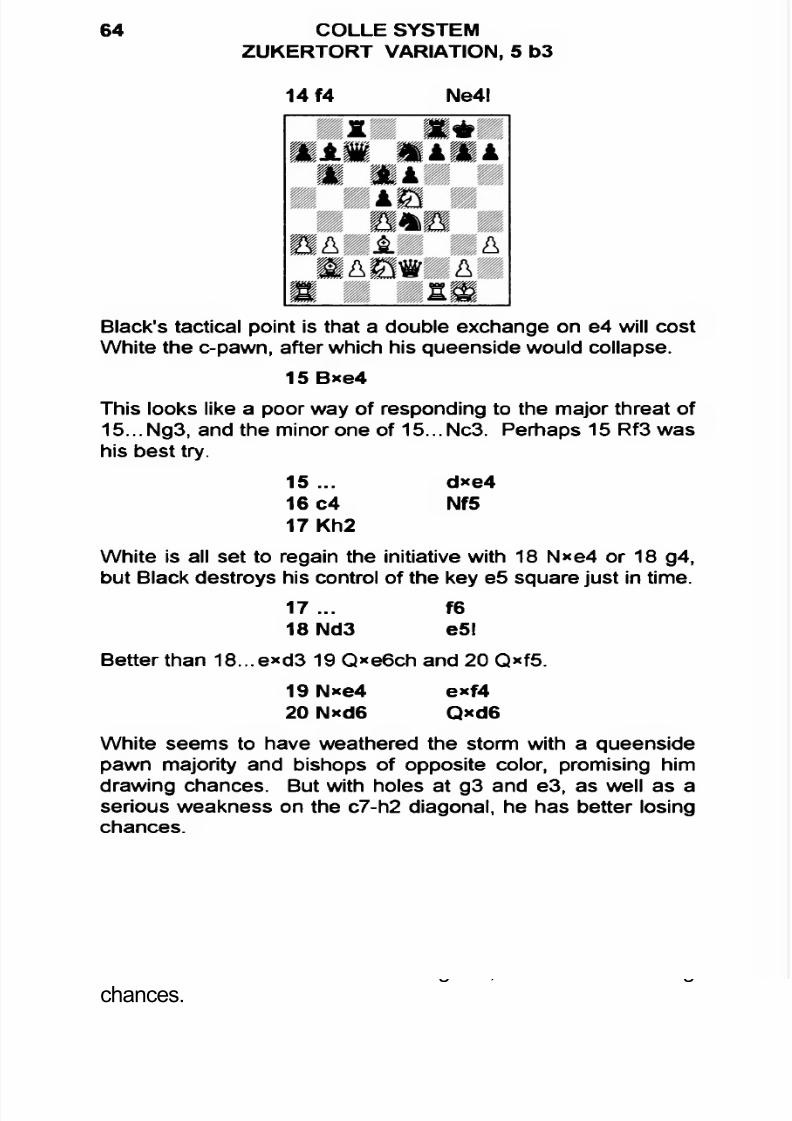
14 f4 Ne4!
Black's tactical point is that a double exchange on e4 will costWhite the c-pawn, after which his queenside would collapse.
15Bxe4
This looks like a poor way of responding to the major threat of 15... Ng3, and the minor one of 15... Nc3. Perhaps 15 Rf3 washis best try.
15... dxe416 c4 Nf517 Kh2
White is all set to regain the initiative with 18 N*e4 or 18 g4,but Black destroys his control of the key e5 square just in time.
17 ... f618 Nd3 e5l
Better than 18...exd3 19 Q*e6ch and 20 Qxf5.
19 N*e4 exf420 Nxd6 Qxd6
White seems to have weathered the storm with a queensidepawn majority and bishops of opposite color, promising himdrawing chances. But with holes at g3 and e3, as well as aserious weakness on the c7-h2 diagonal, he has better losingchances.
7/22/2019 Colle System
http://slidepdf.com/reader/full/colle-system 66/105
CHAPTER FOURCommon Strategic Mistakes
65
21 c5 b*c522 Nxf4? cxd4
23 Qd3 Ne324 Rf2 g5!
The game is virtually decided by this.
25 Qxd4 Qxd426 Bxd4 gxf427 Bxa7 Nd5
28 b4 Kf7!
All of Black's pieces will coordinate now in the final attack, on
92.
29 Bc5 Rg830 a4 Rg331 Kg1 Rcg8
32 Raa2 f333 Bd6 Rxg2ch
White resigns.
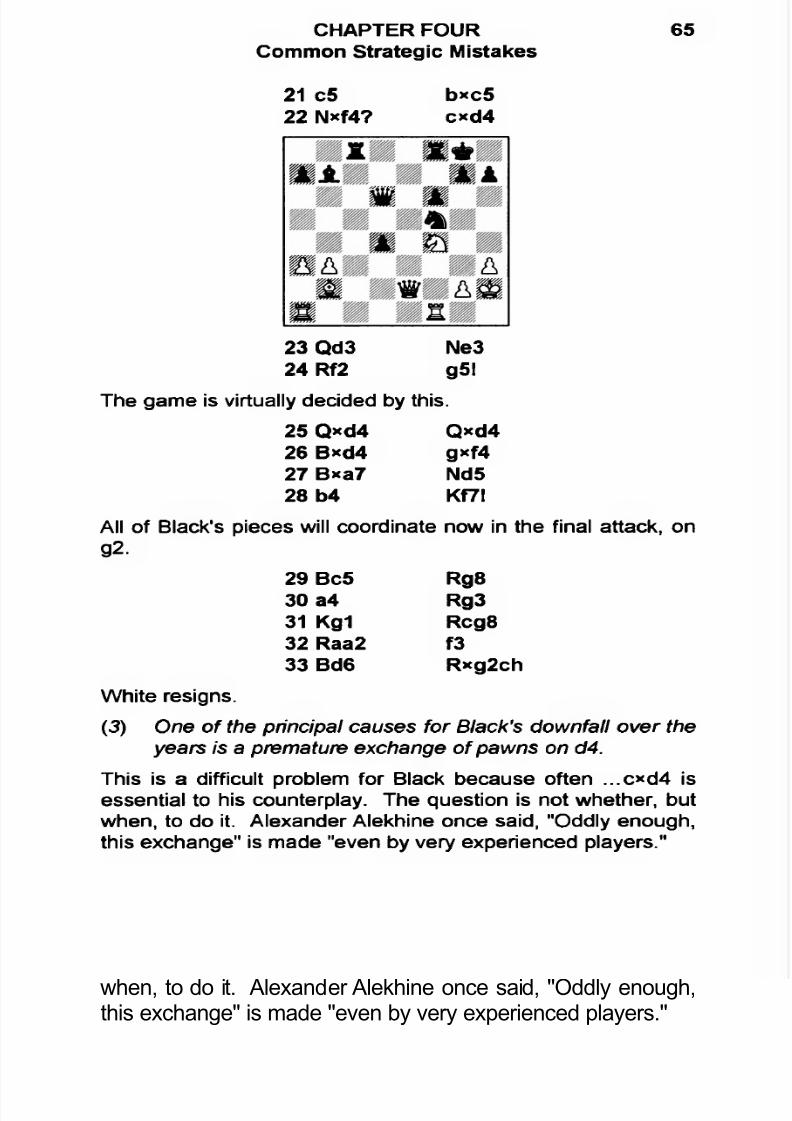
(3) One of the principal causes for Black's downfall over the years is a premature exchange of pawns on d4.
This is a difficult problem for Black because often ...cxd4 isessential to his counterplay. The question is not whether, but
when, to do it. Alexander Alekhine once said, "Oddly enough,this exchange" is made "even by very experienced players."
7/22/2019 Colle System
http://slidepdf.com/reader/full/colle-system 67/105
66 COLLE SYSTEMZUKERTORT VARIATION, 5 b3
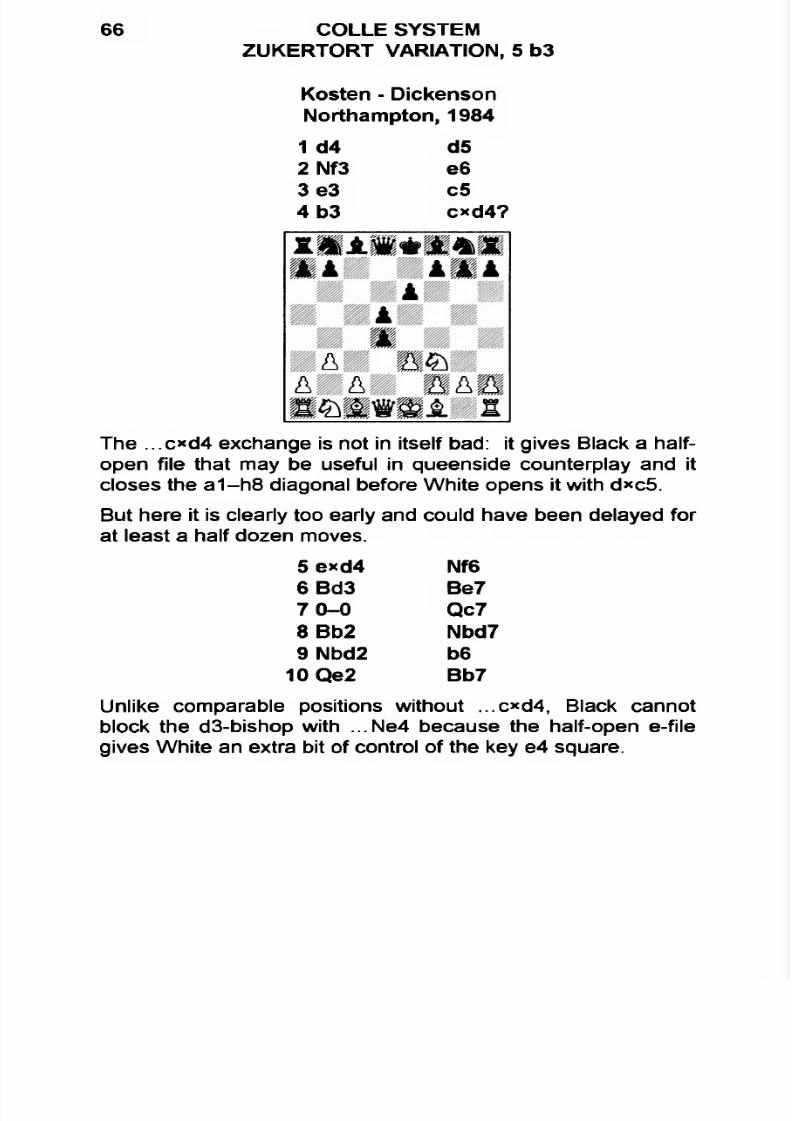
Kosten - Dickenson Northampton, 1984
1 d4 d5
2 Nf3 e63 e3 c54 b3 c»d4?
The ...c*d4 exchange is not in itself bad: it gives Black a halfopen file that may be useful in queenside counterplay and it
closes the a1-h8 diagonal before White opens it with d*c5.But here it is clearly too early and could have been delayed forat least a half dozen moves.
5 e*d4 Nf66 Bd3 Be770-0 Qc7
8 Bb2 Nbd7
9 Nbd2 b610 Qe2 Bb7
Unlike comparable positions without ...c*d4, Black cannotblock the d3-bishop with ...Ne4 because the half-open e-filegives White an extra bit of control of the key e4 square.
7/22/2019 Colle System
http://slidepdf.com/reader/full/colle-system 68/105
CHAPTER FOURCommon Strategic Mistakes
67
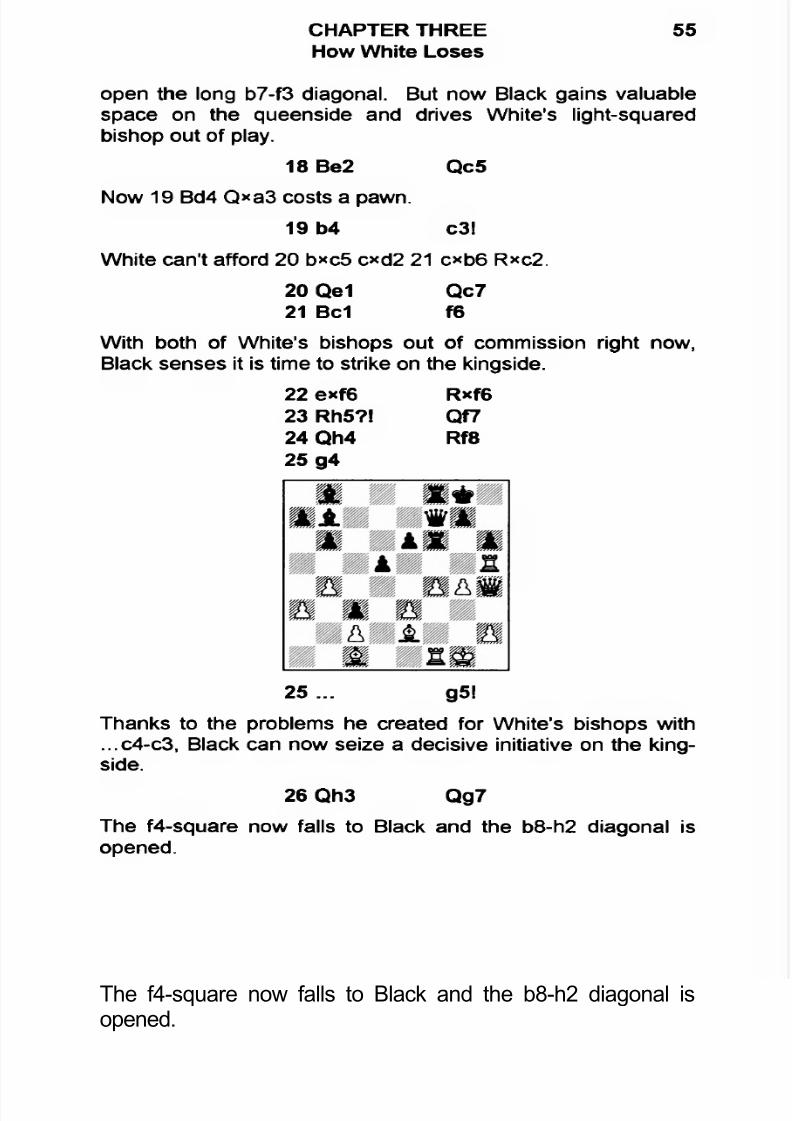
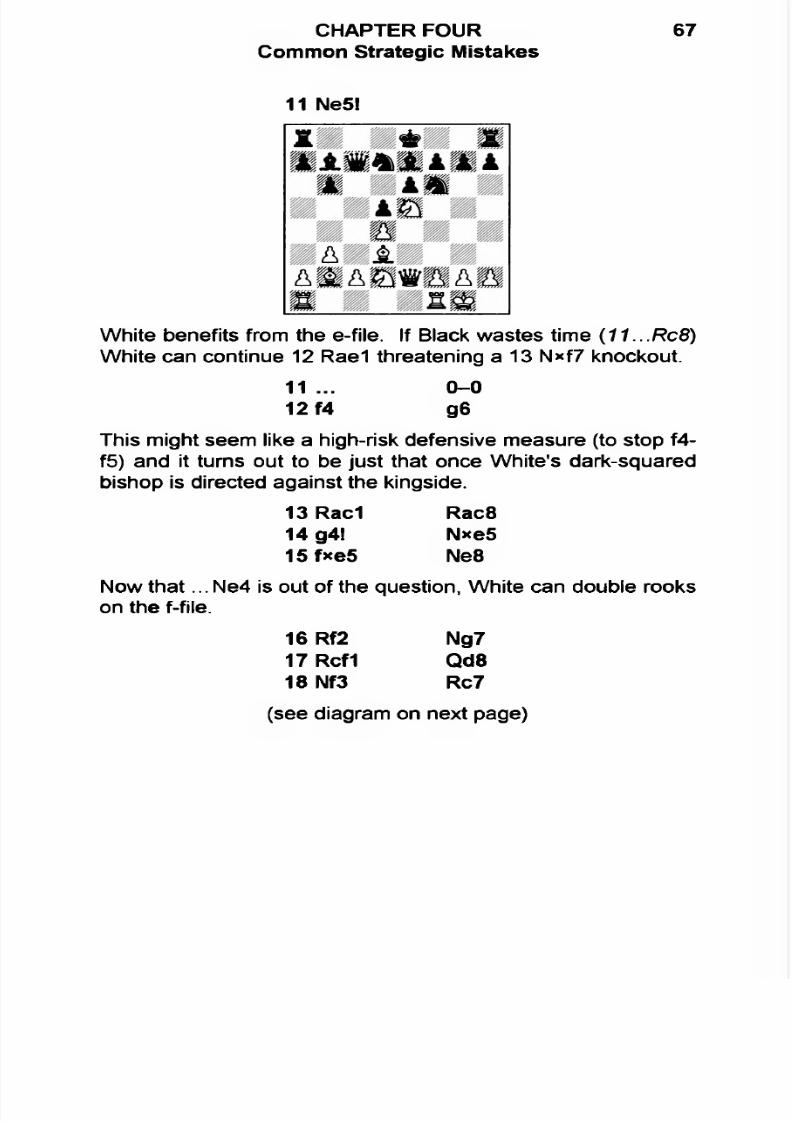
11 Ne5!
White benefits from the e-file. If Black wastes time (11...Rc8) White can continue 12 Rae1 threatening a 13 N*f7 knockout.
11 ... 0-0
12 f4 g6
This might seem like a high-risk defensive measure (to stop f4-f5) and it turns out to be just that once White's dark-squared
bishop is directed against the kingside.13 Rac1 Rac814 g4! Nxe515 fxe5 Ne8
Now tha t... Ne4 is out of the question, White can double rookson the f-file.
16 Rf2 Ng7
17 Rcf1 Qd818 Nf3 Rc7
(see diagram on next page)
7/22/2019 Colle System
http://slidepdf.com/reader/full/colle-system 69/105
68 COLLE SYSTEMZUKERTORT VARIATION, 5 b3
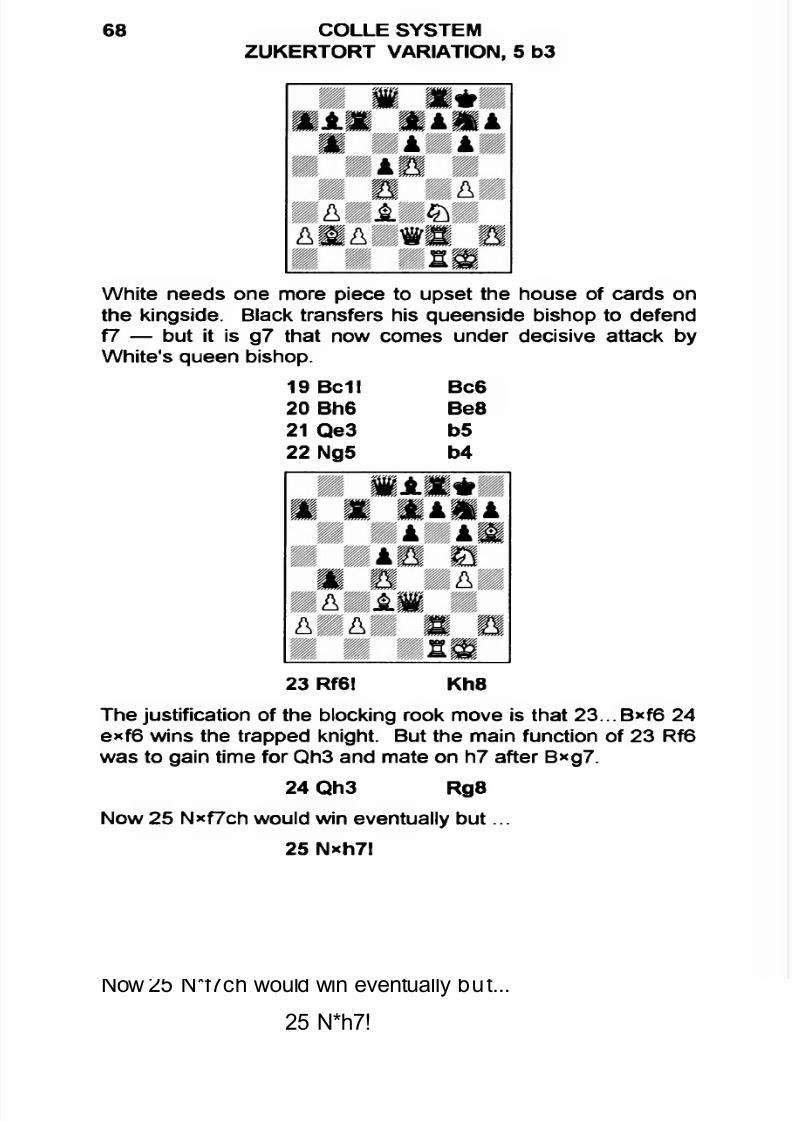
White needs one more piece to upset the house of cards onthe kingside. Black transfers his queenside bishop to defendf7 — but it is g7 that now comes under decisive attack byWhite's queen bishop.
19 Bc1! Bc620 Bh6 Be821 Qe3 b5
22 Ng5 b4
23 Rf6l Kh8
The justification of the blocking rook move is that 23... Bxf6 24e*f6 wins the trapped knight. But the main function of 23 Rf6was to gain time for Qh3 and mate on h7 after Bxg7.
24 Qh3 Rg8
Now 25 N*f7ch would win eventually but...
25 N*h7!
7/22/2019 Colle System
http://slidepdf.com/reader/full/colle-system 70/105
CHAPTER FOURCommon Strategic Mistakes
69
Black resigns.
There is no defense to 26 Ng5 and 27 B*g7ch.
As we've seen, a major trouble with ...c*d4 is that Whiteusually gets more out of the e-file than Black gets from the c-file. But Black also loses the possible option of ...e6-e5 —while giving White the option of using his queenside majority.
Here's a case in point.
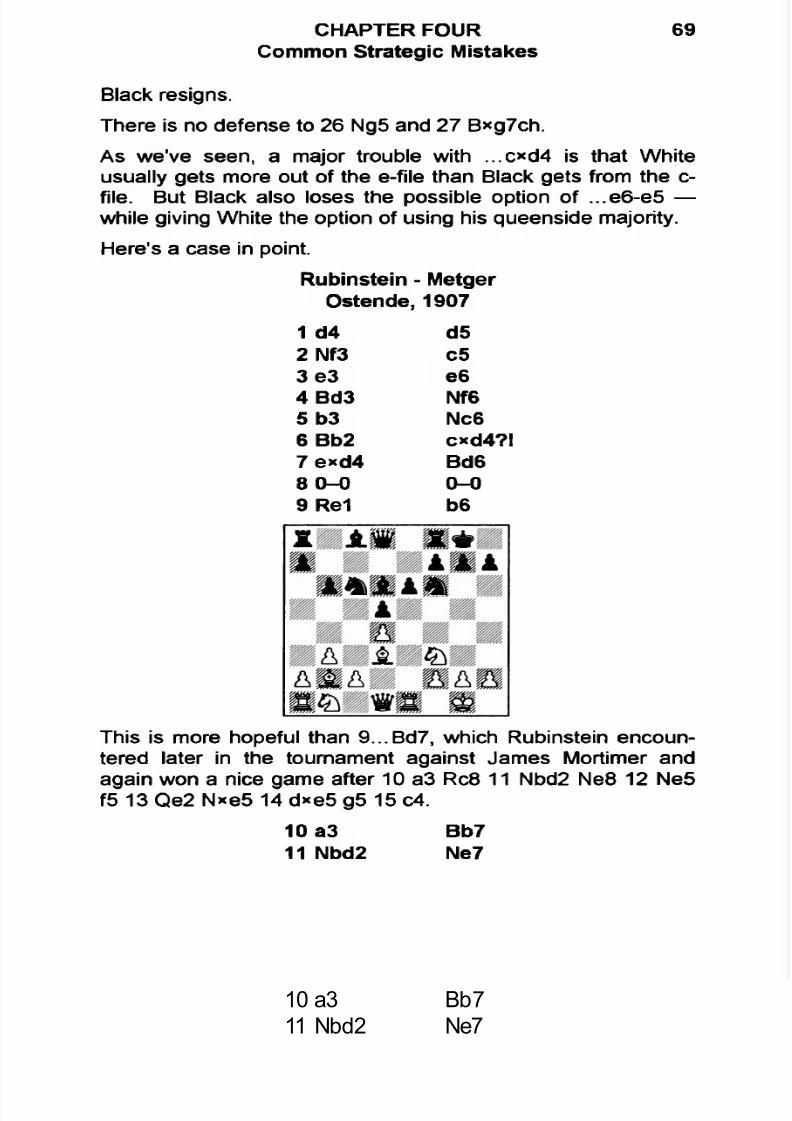
Rubinstein - Metger Ostende, 1907
1 d4 d52 Nf3 c5
3 e3 e64 Bd3 Nf65 b3 Nc66 Bb2 cxd4?l7 e*d4 Bd6
8 0—0 0—09 Re1 b6
This is more hopeful than 9...Bd7, which Rubinstein encountered later in the tournament against James Mortimer andagain won a nice game after 10 a3 Rc8 11 Nbd2 Ne8 12 Ne5f5 13 Qe2 N*e5 14 d*e5 g5 15 c4.
10 a3 Bb711 Nbd2 Ne7
7/22/2019 Colle System
http://slidepdf.com/reader/full/colle-system 71/105
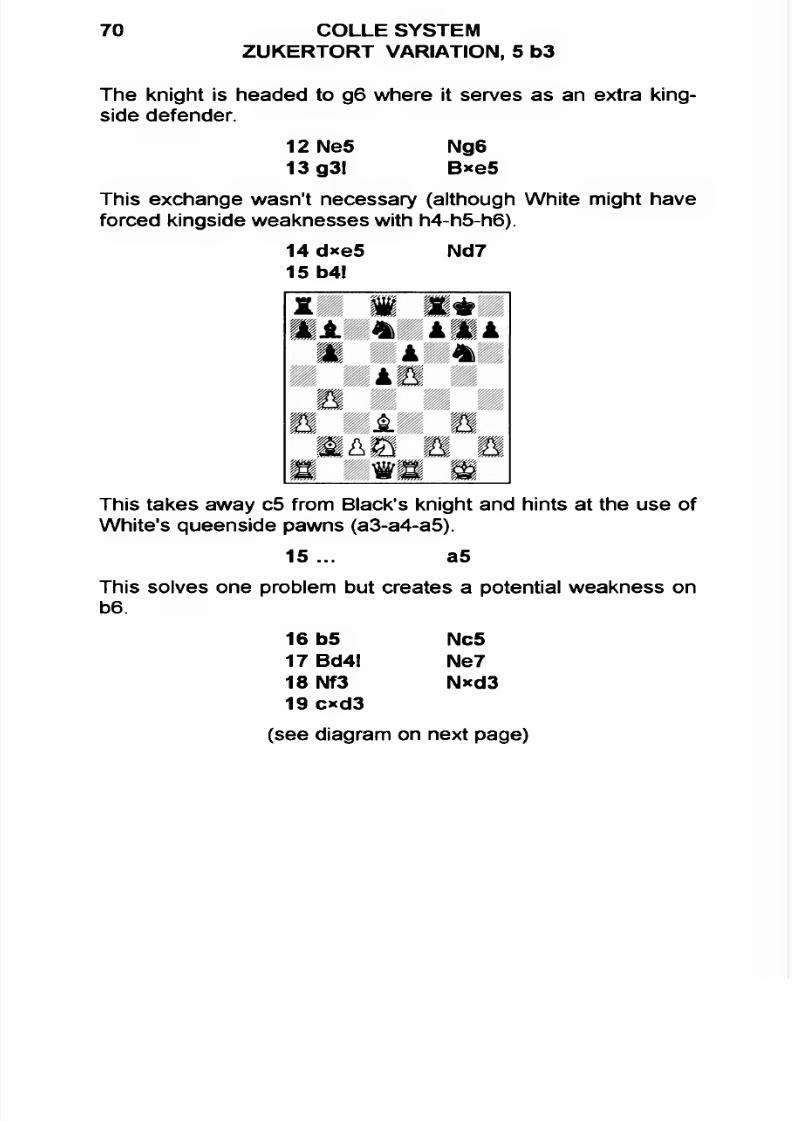
The knight is headed to g6 where it serves as an extra king-side defender.
12 Ne5 Ng6
13 g3! B*e5
This exchange wasn't necessary (although White might haveforced kingside weaknesses with h4-h5-h6).
14 d*e5 Nd715 b4l
70 COLLE SYSTEMZUKERTORT VARIATION, 5 b3
This takes away c5 from Black's knight and hints at the use ofWhite's queenside pawns (a3-a4-a5).
15... a5
This solves one problem but creates a potential weakness onb6.
16 b5 Nc517 Bd4l Ne7
18 Nf3 N*d319 c*d3
(see diagram on next page)
7/22/2019 Colle System
http://slidepdf.com/reader/full/colle-system 72/105
CHAPTER FOURCommon Strategic Mistakes
71
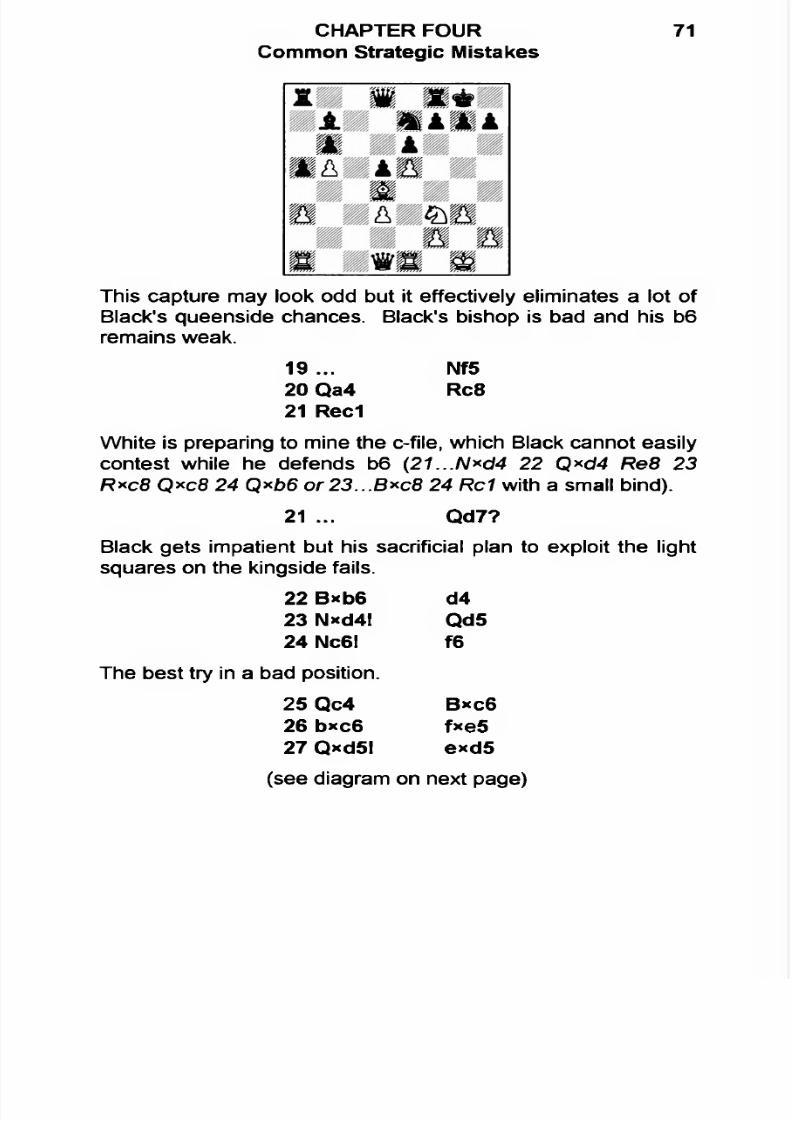
This capture may look odd but it effectively eliminates a lot of
Black's queenside chances. Black's bishop is bad and his b6remains weak.
19 ... Nf520 Qa4 Rc821 Red
White is preparing to mine the c-file, which Black cannot easilycontest while he defends b6 (21...N*d4 22 Q*d4 Re8 23
R*c8 Qxc8 24 Q*b6 or23...B*c8 24 Rc1 with a small bind).21 ... Qd7?
Black gets impatient but his sacrificial plan to exploit the lightsquares on the kingside fails.
22 Bxb6 d423 Nxd4! Qd524 Nc6! f6
The best try in a bad position.
25 Qc4 Bxc6
26 bxc6 fxe527 Qxd5! exd5
(see diagram on next page)
7/22/2019 Colle System
http://slidepdf.com/reader/full/colle-system 73/105
72 COLLE SYSTEMZUKERTORT VARIATION, 5 b3
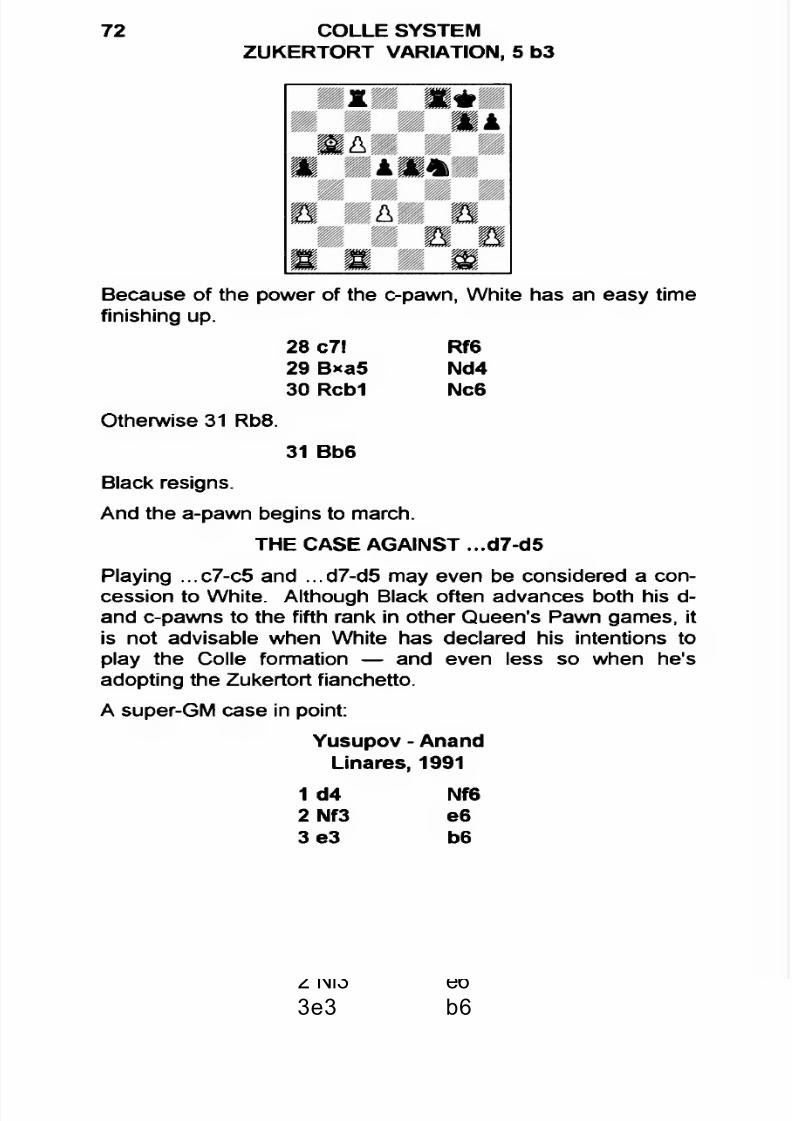
Because of the power of the c-pawn, White has an easy timefinishing up.
28 c7!29 Bxa530 Rcb1
Otherwise 31 Rb8.
31 Bb6
Black resigns. And the a-pawn begins to march.
THE CASE AGAINST ...d7-d5
Playing ...c7-c5 and ...d7-d5 may even be considered a concession to White. Although Black often advances both his d-and c-pawns to the fifth rank in other Queen's Pawn games, itis not advisable when White has declared his intentions to
play the Colle formation — and even less so when he'sadopting the Zukertort fianchetto.
A super-GM case in point:
Yusupov - Anand Linares, 1991
Rf6Nd4Nc6
1 d4 Nf6
2 Nf3 e6 3e3 b6
7/22/2019 Colle System
http://slidepdf.com/reader/full/colle-system 74/105
CHAPTER FOURCommon Strategic Mistakes
73
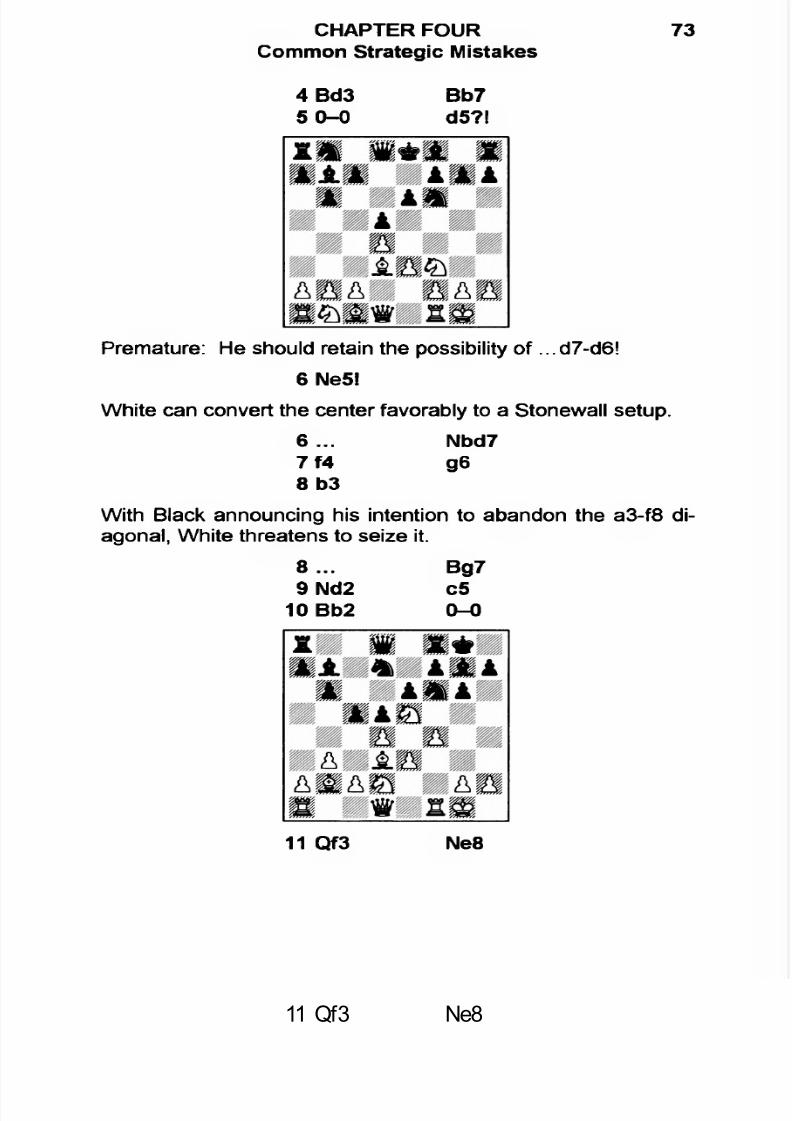
4 Bd3 Bb75 0-0 dS?!
Premature: He should retain the possibility of ...d7-d6!
6 Ne5!
White can convert the center favorably to a Stonewall setup.
6... Nbd7 7f4 g6
8 b3With Black announcing his intention to abandon the a3-f8 diagonal, White threatens to seize it.
8... Bg79 Nd2 c5
10 Bb2 0-0
11 Qf3 Ne8
7/22/2019 Colle System
http://slidepdf.com/reader/full/colle-system 75/105
74 COLLE SYSTEMZUKERTORT VARIATION, 5 b3
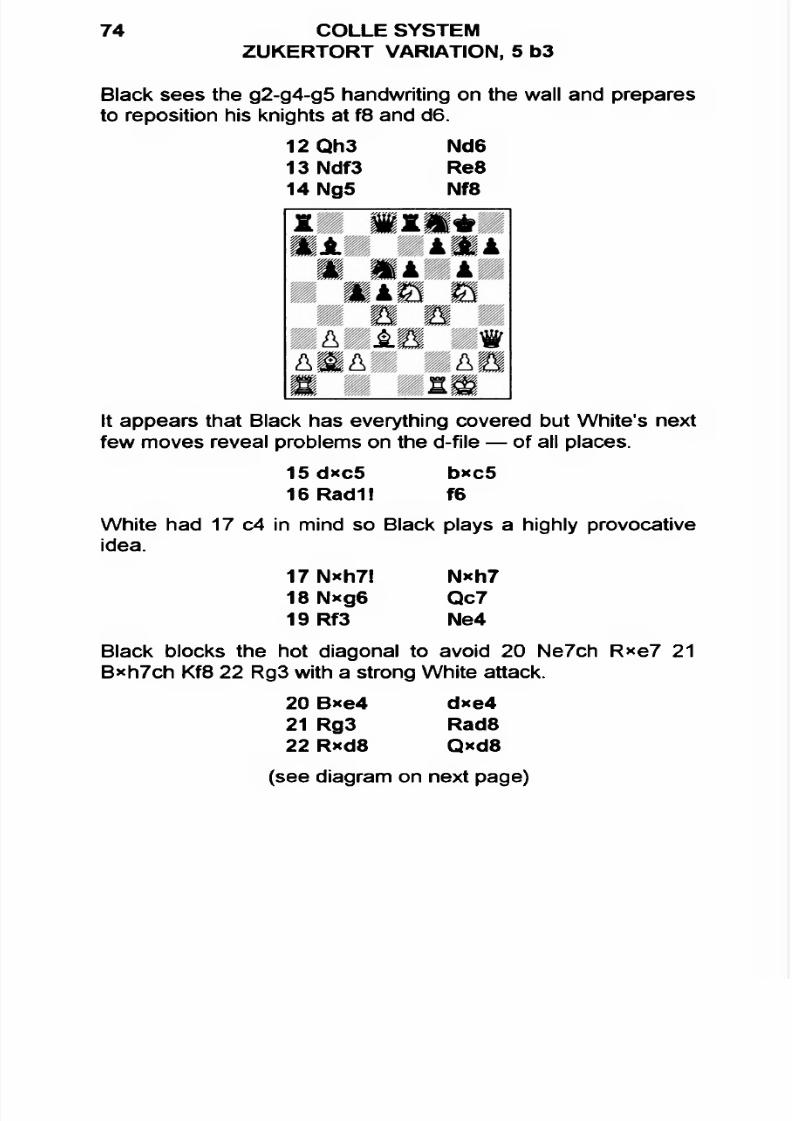
Black sees the g2-g4-g5 handwriting on the wall and preparesto reposition his knights at f8 and d6.
12 Qh3 Nd6
13 Ndf3 Re814 Ng5 Nf8
It appears that Black has everything covered but White's nextfew moves reveal problems on the d-file — of all places.
15 dxc5 b*c5
16 Radii f6
White had 17 c4 in mind so Black plays a highly provocativeidea.
17 N*h7! N*h718 Nxg6 Qc719 Rf3 Ne4
Black blocks the hot diagonal to avoid 20 Ne7ch R*e7 21Bxh7ch Kf8 22 Rg3 with a strong White attack.
20 Bxe4 dxe421 Rg3 Rad822 Rxd8 Qxd8
(see diagram on next page)

7/22/2019 Colle System
http://slidepdf.com/reader/full/colle-system 76/105
CHAPTER FOURCommon Strategic Mistakes
75
23 Qg4 Qd524 h4 Qf525 Qd1 Qd526 Qg4 Qf527 Qd1 Qd5
28 Qe2l
Correctly rejecting a draw because he has a dangerous plan
of h5-h6 coming up.
28 ... Bc8
29 h5 Kf730 Qg4l
Now Black has no time for 30...Qf5 because of 31 Ne5ch and32 Qxg7ch.
30... Ng5l
7/22/2019 Colle System
http://slidepdf.com/reader/full/colle-system 77/105
76 COLLE SYSTEMZUKERTORT VARIATION, 5 b3
This is the only way to continue the game — although it shouldlose soon after 31 Ne5ch! f*e5 32 f*g5.
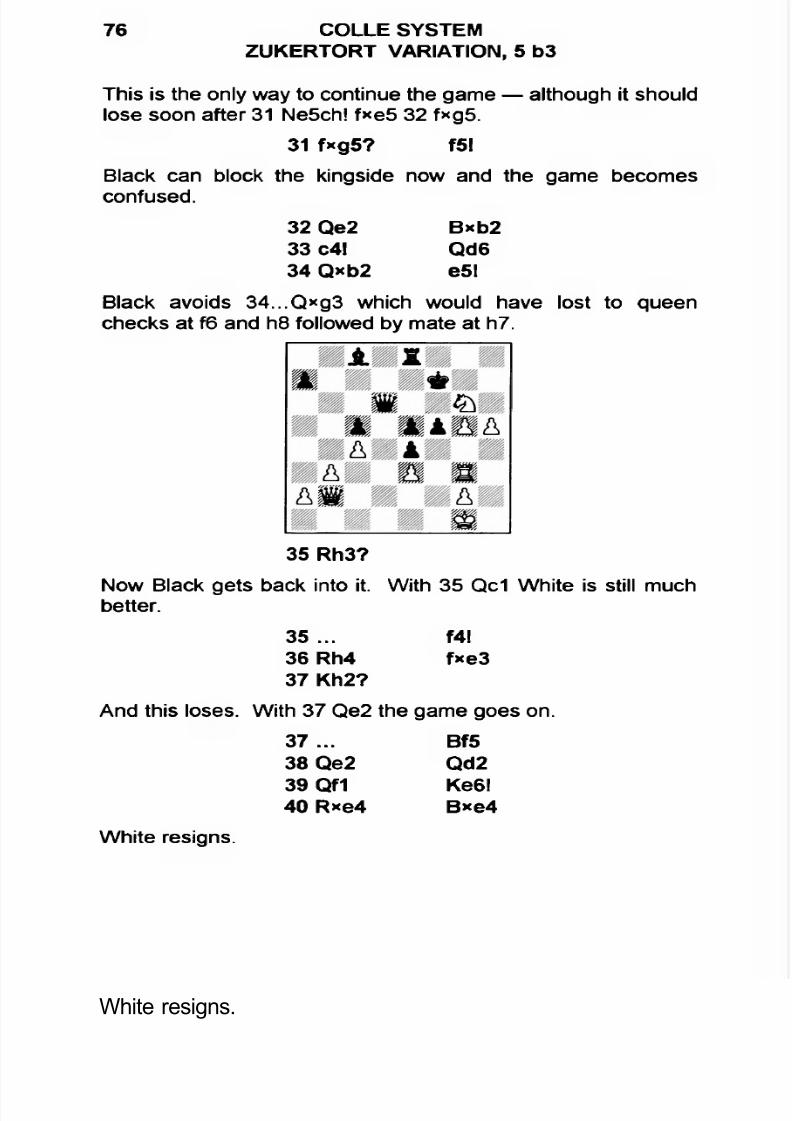
31 f*g5? fS!
Black can block the kingside now and the game becomesconfused.
32 Qe2 Bxb233 c4l Qd634 Qxb2 e5l
Black avoids 34...Qxg3 which would have lost to queen
checks at f6 and h8 followed by mate at h7.
35 Rh3?
Now Black gets back into it.With 35 Qc1 White is still muchbetter.
35 ... f4!
36 Rh4 fxe337 Kh2?
And this loses. With 37 Qe2 the game goes on.
37 ... Bf538 Qe2 Qd2
39 Qf1 Ke6l40 Rxe4 Bxe4
White resigns.
7/22/2019 Colle System
http://slidepdf.com/reader/full/colle-system 78/105
CHAPTER FOURCommon Strategic Mistakes
77
The checks are quickly exhausted.
(4) As in the Koltanowski, Black should avoid an unfavorable change in the pawn structure when White plays d*c5
followed by e3-e4.
Then he is usually better off exchanging pawns on e4, ratherthan allowing White to advance his e-pawn to the fifth rank,where it creates a powerful attacking wedge. The followingshould illustrate the risk to Black of allowing e4-e5.
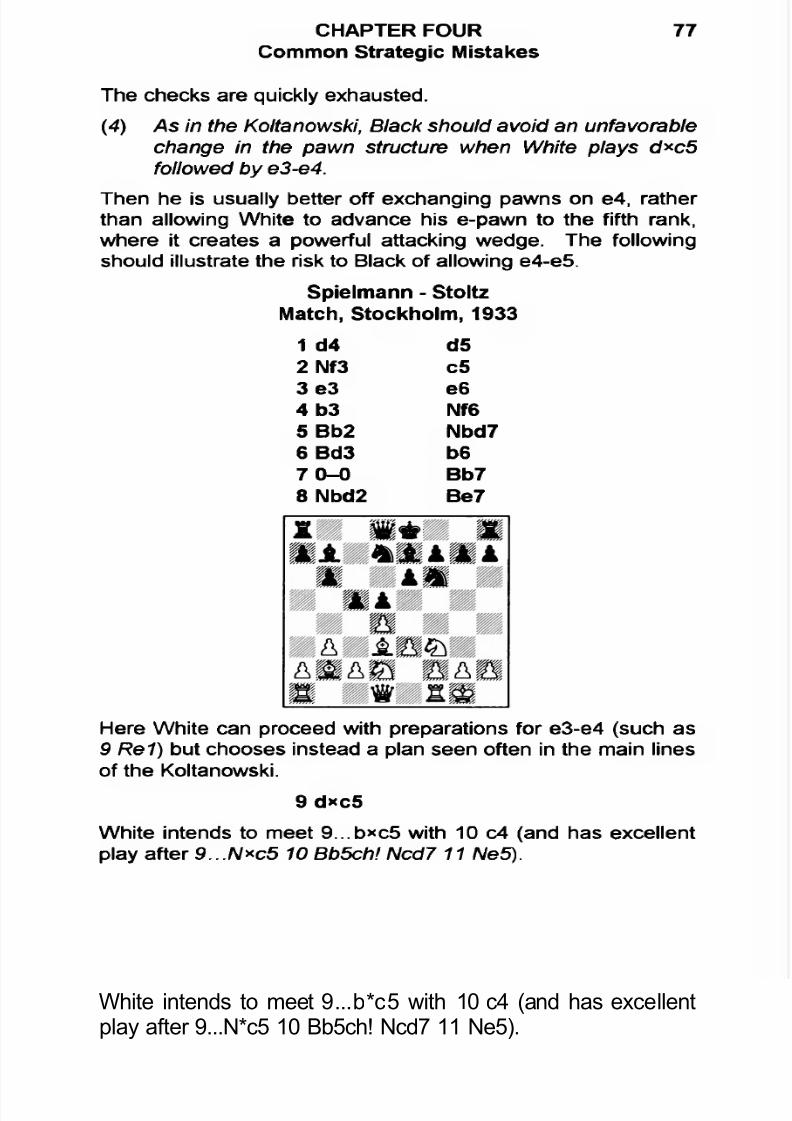
Spielmann - Stoltz Match, Stockholm, 1933
1 d4 d5
2 Nf3 c5
3e3 e64b3 Nf65 Bb2 Nbd76 Bd3 b67 0-0 Bb7
8 Nbd2 Be7
Here White can proceed with preparations for e3-e4 (such as9 Re1) but chooses instead a plan seen often in the main linesof the Koltanowski.
9 d*c5
White intends to meet 9...b*c5 with 10 c4 (and has excellentplay after 9...N*c5 10 Bb5ch! Ncd7 11 Ne5).
7/22/2019 Colle System
http://slidepdf.com/reader/full/colle-system 79/105
78 COLLE SYSTEMZUKERTORT VARIATION, 5 b3
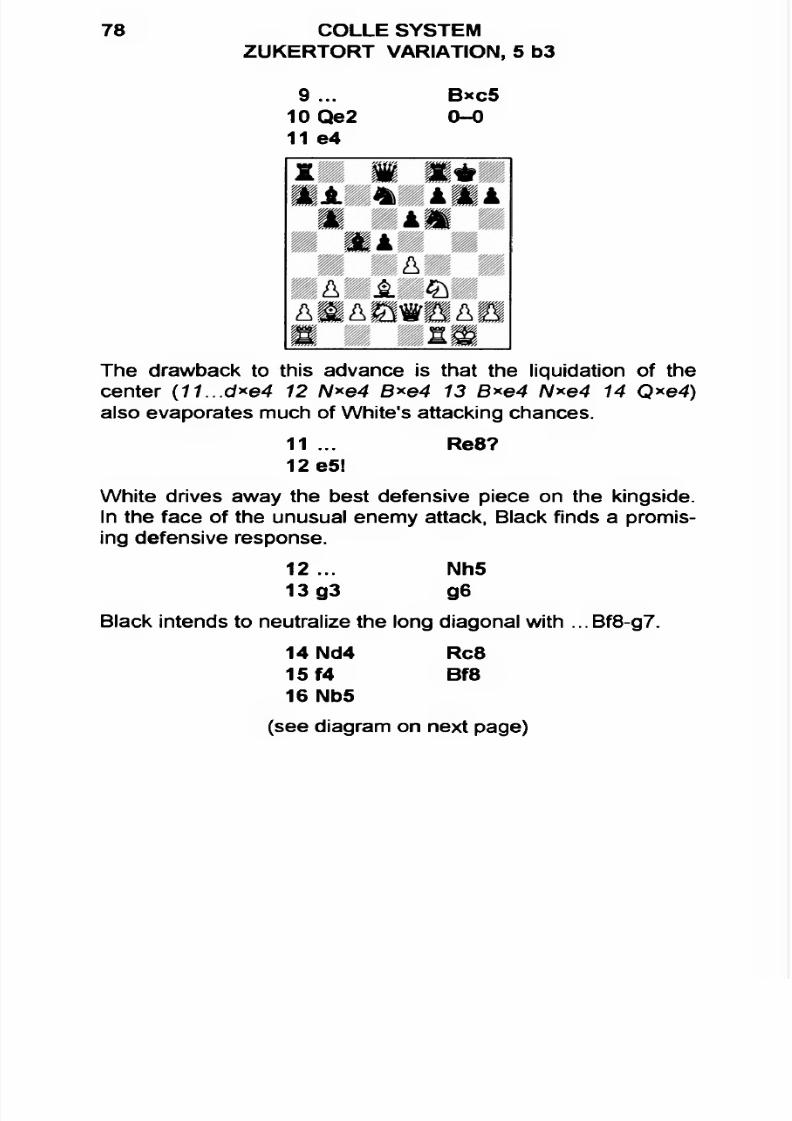
9 ... Bxc510 Qe2 0-011 e4
The drawback to this advance is that the liquidation of thecenter (11...d*e4 12 N*e4 B*e4 13 B*e4 N*e4 14 Q*e4) also evaporates much of White's attacking chances.
11 ... Re8?12 e5!
White drives away the best defensive piece on the kingside.In the face of the unusual enemy attack, Black finds a promising defensive response.
12... Nh513 g3 g6
Black intends to neutralize the long diagonal with ...Bf8-g7.
14 Nd4 Rc8 15f4 Bf816 Nb5
(see diagram on next page)
7/22/2019 Colle System
http://slidepdf.com/reader/full/colle-system 80/105
CHAPTER FOURCommon Strategic Mistakes
79
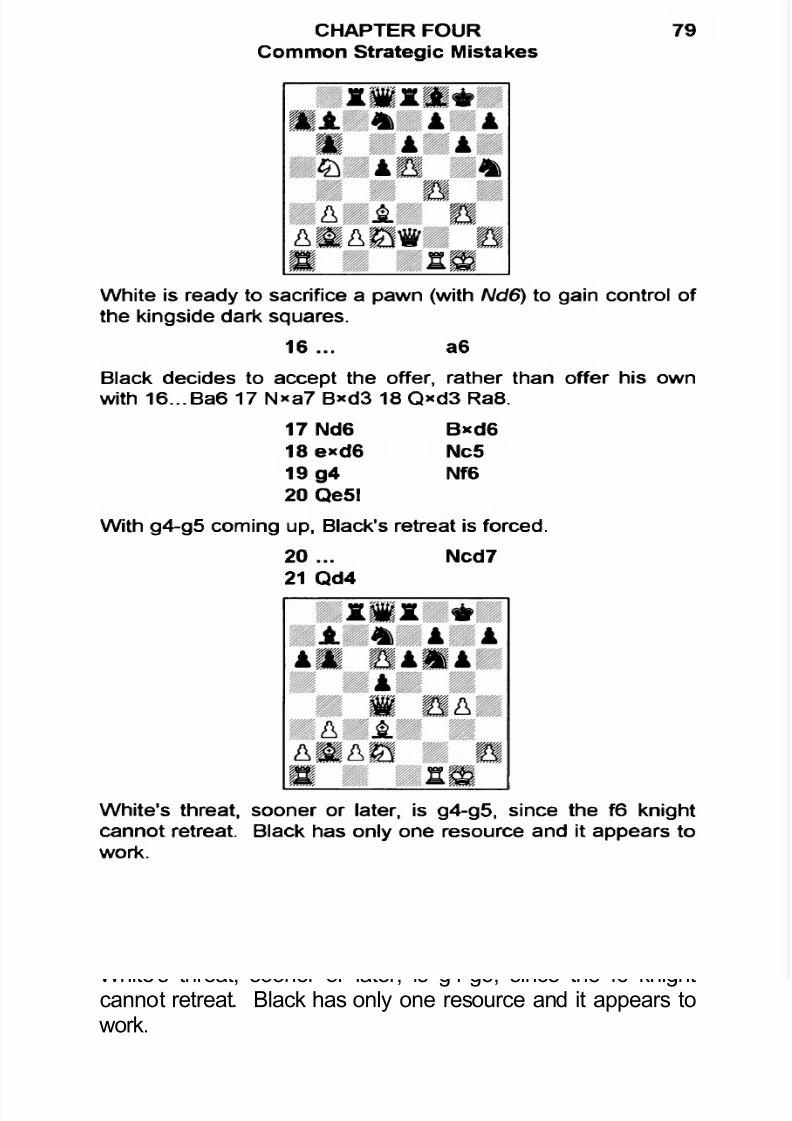
White is ready to sacrifice a pawn (with Nd6) to gain control ofthe kingside dark squares.
16... a6
Black decides to accept the offer, rather than offer his ownwith 16...Ba6 17 N*a7 B*d3 18 Q*d3 Ra8.
17 Nd6 B*d618 e*d6 Nc519 g4 Nf6
20 Qe5!
With g4-g5 coming up, Black's retreat is forced.
20... Ncd721 Qd4
White's threat, sooner or later, is g4-g5, since the f6 knightcannot retreat. Black has only one resource and it appears towork.
7/22/2019 Colle System
http://slidepdf.com/reader/full/colle-system 81/105
80 COLLE SYSTEMZUKERTORT VARIATION, 5 b3
21 ... e522 fxe5 Nxe5
Not 22...Rxe5 23 Nf3 Re6 24 g5 and the long diagonal is de
cisive.
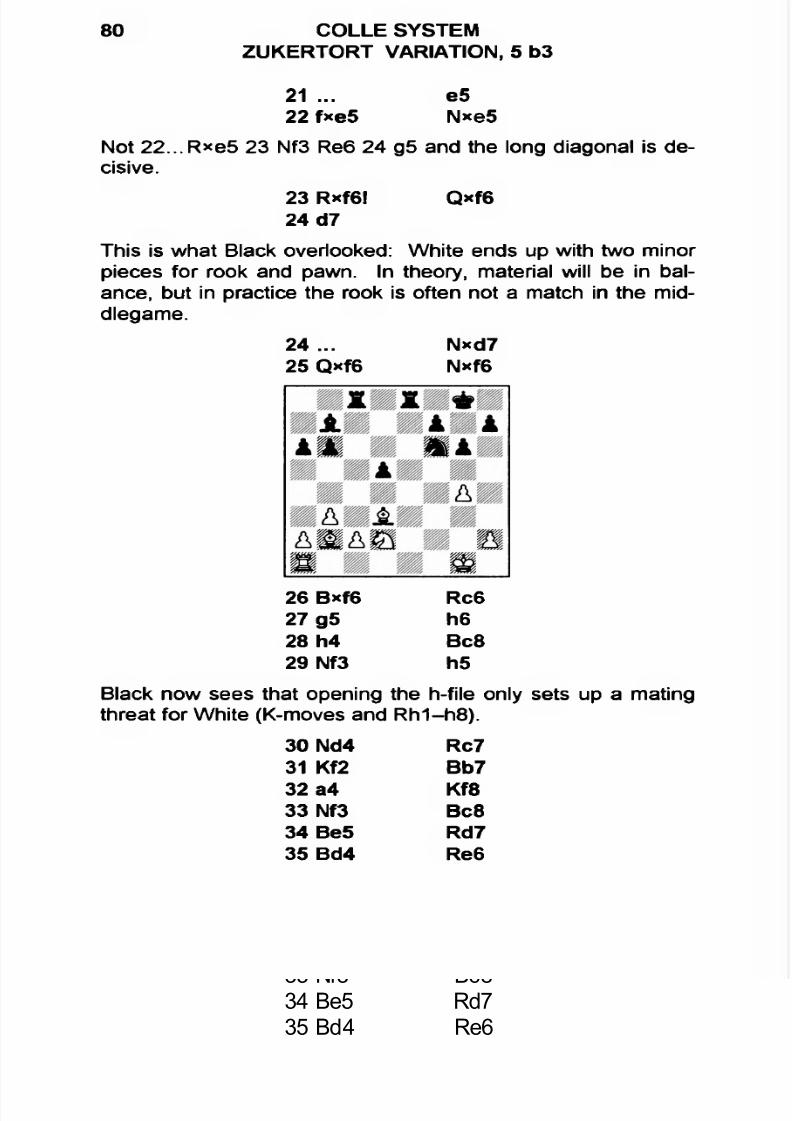
23 Rxf6! Qxf624 d7
This is what Black overlooked: White ends up with two minorpieces for rook and pawn. In theory, material will be in balance, but in practice the rook is often not a match in the mid-dlegame.
24 ... Nxd725 Qxf6 Nxf6
26 Bxf6 Rc627 g5 h6
28 h4 Bc829 Nf3 h5
Black now sees that openingthe h-file only sets up a matingthreat for White (K-moves and Rh1-h8).
30 Nd4 Rc731 Kf2 Bb7
32 a4 Kf8
33 Nf3 Bc834 Be5 Rd735 Bd4 Re6
7/22/2019 Colle System
http://slidepdf.com/reader/full/colle-system 82/105
CHAPTER FOURCommon Strategic Mistakes
81
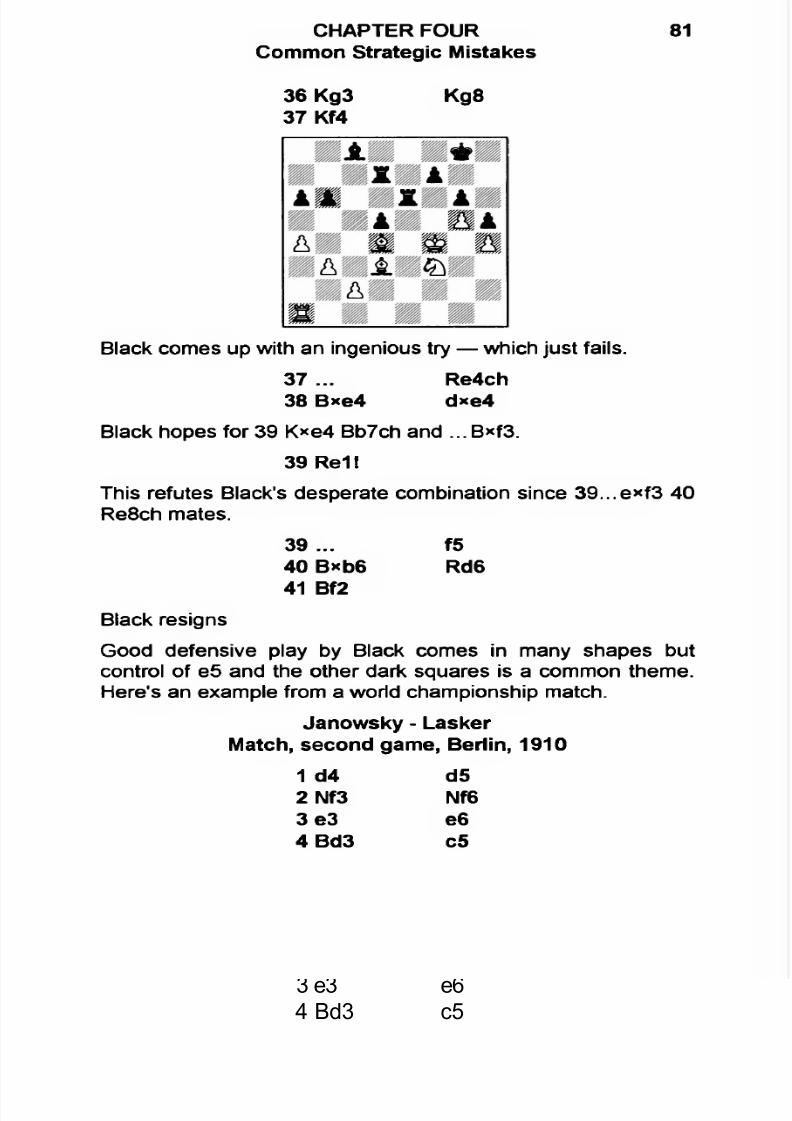
36 Kg3 Kg837 Kf4
Black comes up with an ingenious try — which just fails.
37... Re4ch38 Bxe4 d*e4
Black hopes for 39 K*e4 Bb7ch and ... Bxf3.
39 Re1l
This refutes Black's desperate combination since 39...exf3 40Re8ch mates.
39 ... f540 Bxb6 Rd641 Bf2
Black resigns
Good defensive play by Black comes in many shapes butcontrol of e5 and the other dark squares is a common theme.Here's an example from a world championship match.
Janowsky - Lasker Match, second game, Berlin, 1910
1 d4 d52 Nf3 Nf6
3 e3 e64 Bd3 c5
7/22/2019 Colle System
http://slidepdf.com/reader/full/colle-system 83/105
82 COLLE SYSTEMZUKERTORT VARIATION, 5 b3
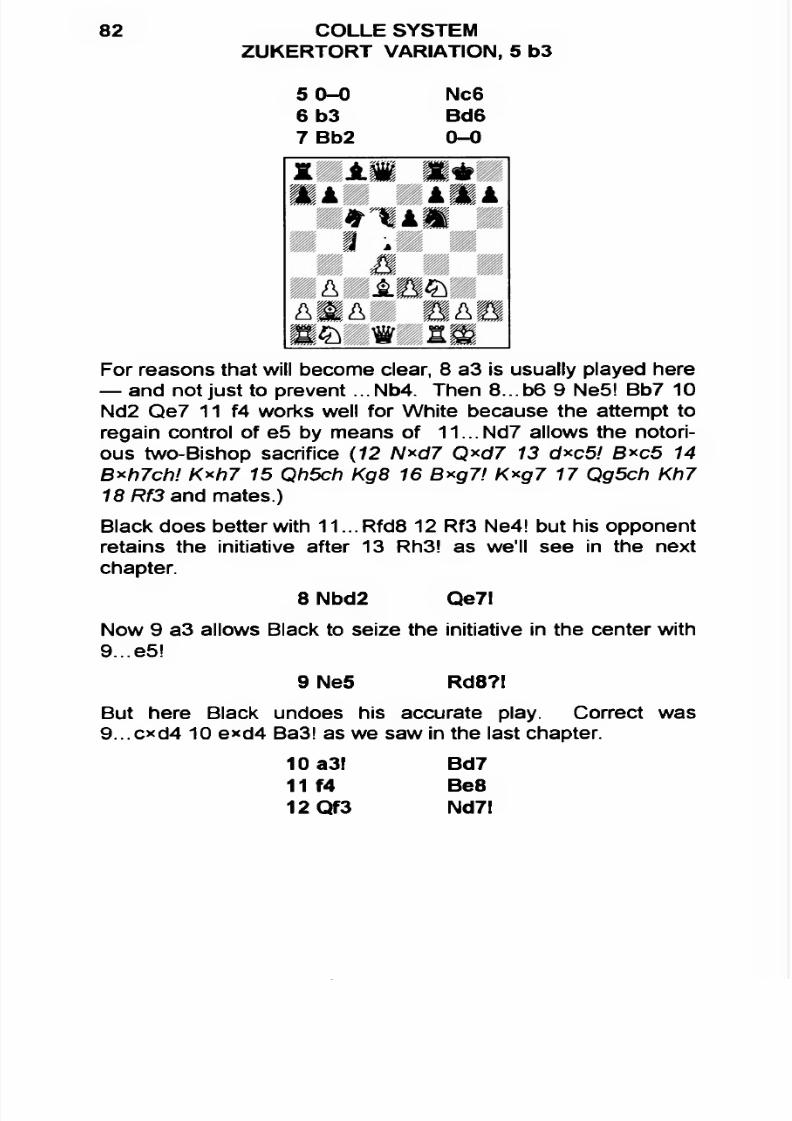
5 0-0 Nc66 b3 Bd67 Bb2 0-0
For reasons that will become clear, 8 a3 is usually played here — and not just to prevent ...Nb4. Then 8...b6 9 Ne5! Bb7 10Nd2 Qe7 11 f4 works well for White because the attempt toregain control of e5 by means of 11...Nd7 allows the notorious two-Bishop sacrifice (12 N*d7 Q*d7 13 d*c5! B*c5 14 B*h7ch! K*h7 15 Qh5ch Kg8 16 B*g7! K*g7 17 Qg5ch Kh7
18 Rf3 and mates.)
Black does better with 11...Rfd8 12 Rf3 Ne4! but his opponentretains the initiative after 13 Rh3! as we'll see in the nextchapter.
8 Nbd2 Qe7!
Now 9 a3 allows Black to seize the initiative in the center with
9...e5!9 Ne5 Rd8?l
But here Black undoes his accurate play. Correct was9...c*d4 10 e*d4 Ba3! as we saw in the last chapter.
10 a3l Bd711 f4 Be8
12 Qf3 Nd7l
7/22/2019 Colle System
http://slidepdf.com/reader/full/colle-system 84/105
CHAPTER FOURCommon Strategic Mistakes
83
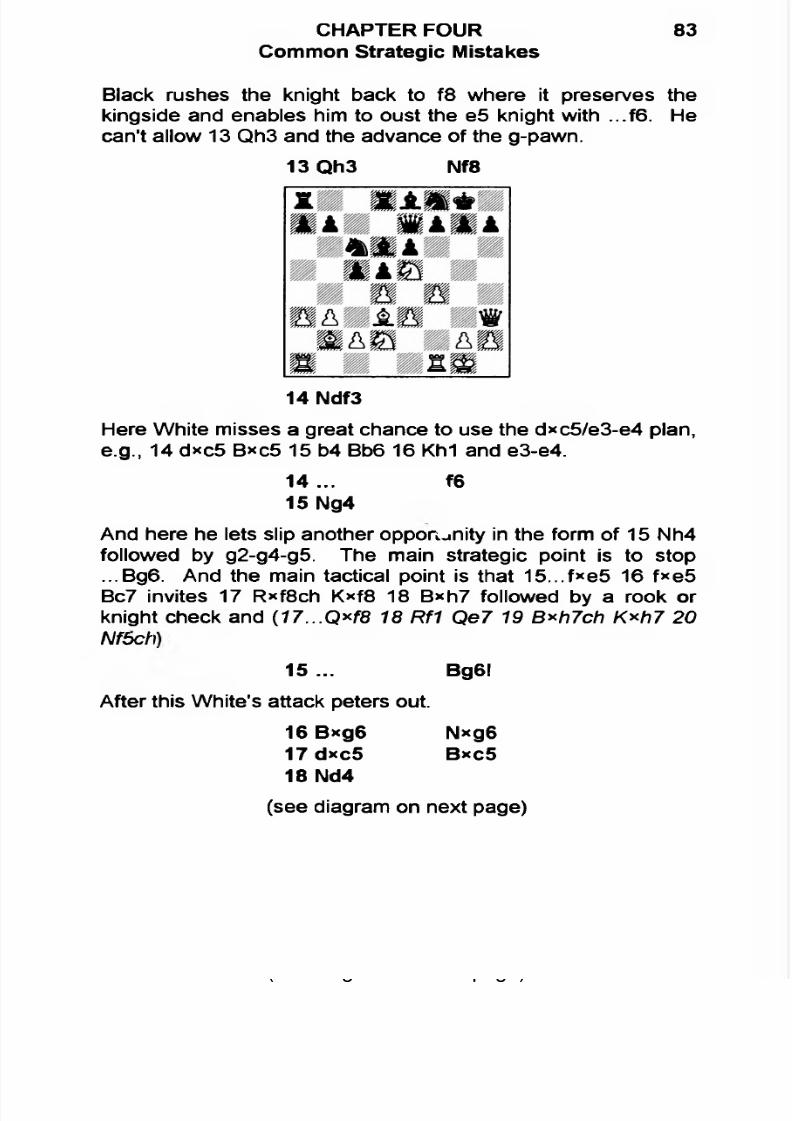
Black rushes the knight back to f8 where it preserves thekingside and enables him to oust the e5 knight with ...f6. Hecan't allow 13 Qh3 and the advance of the g-pawn.
13 Qh3 Nf8
14 Ndf3
Here White misses a great chance to use the dxc5/e3-e4 plan,e.g., 14 d*c5 Bxc5 15 b4 Bb6 16 Kh1 and e3-e4.
14... f615 Ng4
And here he lets slip another opportunity in the form of 15 Nh4followed by g2-g4-g5. The main strategic point is to stop...Bg6. And the main tactical point is that 15...f*e5 16 f*e5Bc7 invites 17 R*f8ch Kxf8 18 Bxh7 followed by a rook orknight check and (17...Q*f8 18 Rf1 Qe7 19 B*h7ch K*h7 20 Nf5ch)
15 ... Bg6!
After this White's attack peters out.
16 Bxg6 Nxg617 dxc5 Bxc518 Nd4
(see diagram on next page)

7/22/2019 Colle System
http://slidepdf.com/reader/full/colle-system 85/105
84 COLLE SYSTEMZUKERTORT VARIATION, 5 b3
This meets the threat of 18...N*f4 and makes its own threat of19N*e6Q*e6? 20 Nh6ch.
18... f5!19 Nxc6 bxc620 Ne5 Nxe521 Bxe5l? Bxa3l
Black can safely grab this pawn because ...Bd6xe5 or ...e5will reduce White's last kingside chances to nothingness.
22 Rf3 Bd623 Bb2 Rf824 Ra6 Rac825 Rg3 Rf7?
26 Qh6!
Black missed his winning chance (25...e5!) and now must dealwith the threat of 27 Bxg7 Rxg7 28 Rxg7ch Qxg7 29 Qxe6ch.
7/22/2019 Colle System
http://slidepdf.com/reader/full/colle-system 86/105
CHAPTER FOURCommon Strategic Mistakes
85
26... e5
This leads to a major liquidation that enabled White to drawafter 27 f*e5 B*e5 28 Bxe5 Qxe5 29 Rxc6 Rfc7 30 Qf6! Qxf6
31 Rxf6 RxC2 32 Rxf5 Rd2 33 h4 , etc.
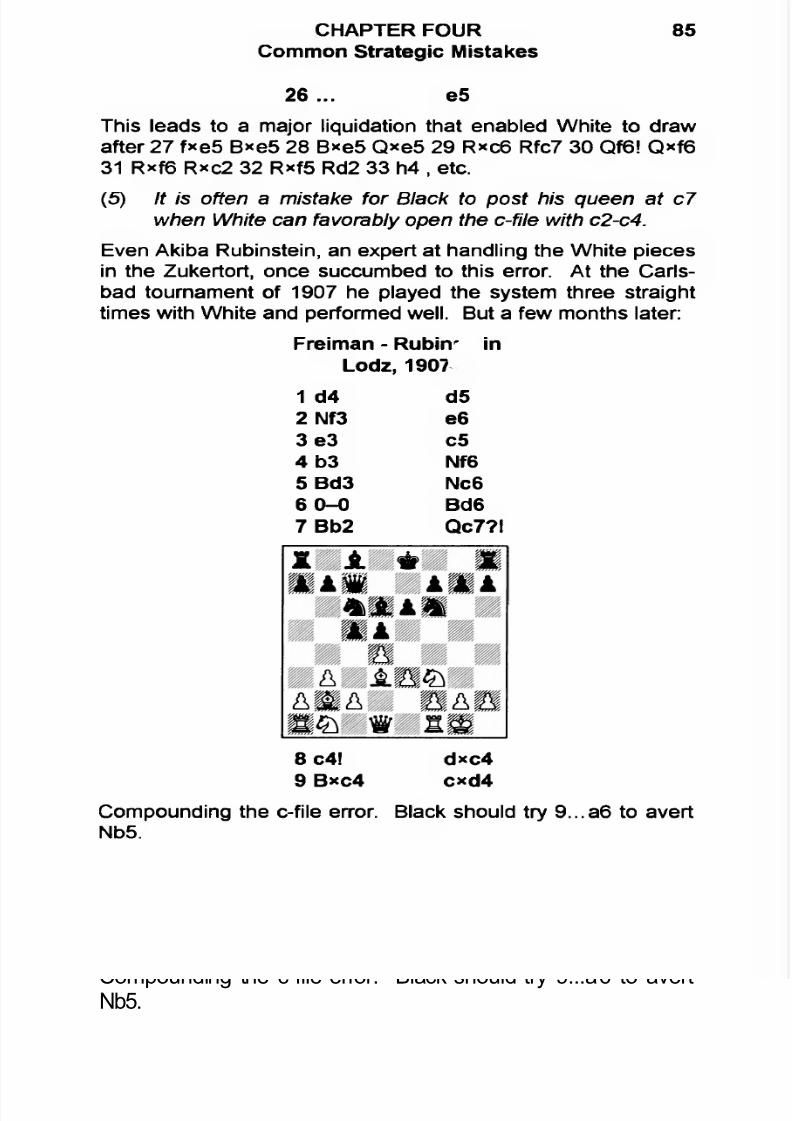
(5) It is often a mistake for Black to post his queen at c7 when White can favorably open the c-file with c2-c4.
Even Akiba Rubinstein, an expert at handling the White piecesin the Zukertort, once succumbed to this error. At the Carlsbad tournament of 1907 he played the system three straighttimes with White and performed well. But a few months later:
Freiman - Rubin' in Lodz, 190?
1 d4 d5
2 Nf3 e63 e3 c54 b3 Nf6
5 Bd3 Nc66 0-0 Bd67 Bb2 Qc7?l
8 c4! dxc49 Bxc4 cxd4
Compounding the c-file error. Black should try 9...a6 to avertNb5.
7/22/2019 Colle System
http://slidepdf.com/reader/full/colle-system 87/105
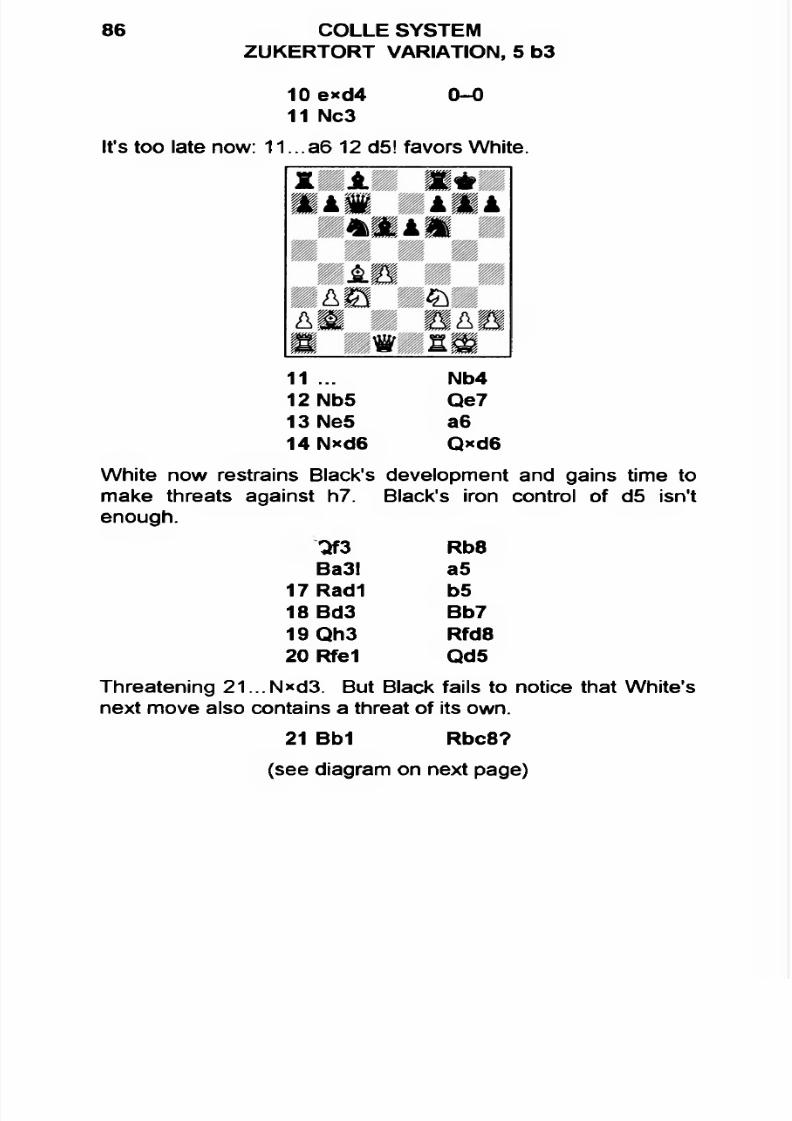
10 e*d4 0-011 Nc3
It's too late now: 11...a6 12 d5! favors White.
86 COLLE SYSTEMZUKERTORT VARIATION, 5 b3
11 ... Nb412 Nb5 Qe713 Ne5 a6
14 N*d6 Qxd6
White now restrains Black's development and gains time to
make threats against h7. Black's iron control of d5 isn'tenough.
Qf3 Rb8Ba3! a5
17 Radi b518 Bd3 Bb7
19 Qh3 Rfd8
20 Rfe1 Qd5
Threatening 21...N*d3. But Black fails to notice that White'snext move also contains a threat of its own.
21 Bb1 Rbc8?
(see diagram on next page)
7/22/2019 Colle System
http://slidepdf.com/reader/full/colle-system 88/105
CHAPTER FOURCommon Strategic Mistakes
87
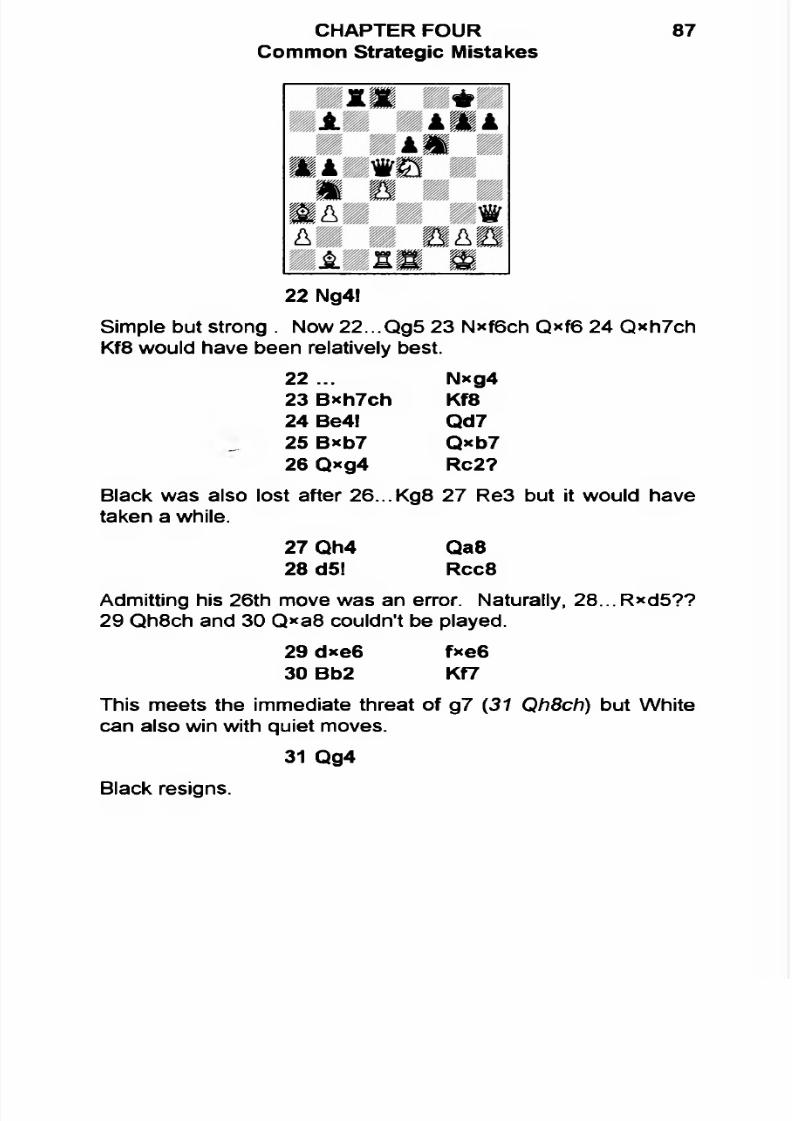
22 Ng4!
Simple but strong . Now 22...Qg5 23 N*f6ch Q*f6 24 Qxh7chKf8 would have been relatively best.
22 ... Nxg423 Bxh7ch Kf824 Be4! Qd725 Bxb7 Qxb726 Qxg4 Rc2?
Black was also lost after 26...Kg8 27 Re3 but it would havetaken a while.
27 Qh4 Qa8
28 d5l Rcc8
Admitting his 26th move was an error. Naturally, 28...Rxd5??29 Qh8ch and 30 Qxa8 couldn't be played.
29 dxe6 fxe630 Bb2 Kf7
This meets the immediate threat of g7 (31 Qh8ch) but Whitecan also win with quiet moves.
31 Qg4
Black resigns.
7/22/2019 Colle System
http://slidepdf.com/reader/full/colle-system 89/105
CHAPTER FIVE
Main Line Zukertort Variation Analysis
Before we get into specific lines, we should consider move order. The most natural way of playing the Colle is 1 d4
followed by 2 Nf3 and then 3 e3. This sequence may have apsychologist wondering where the opening is headed.
For example:
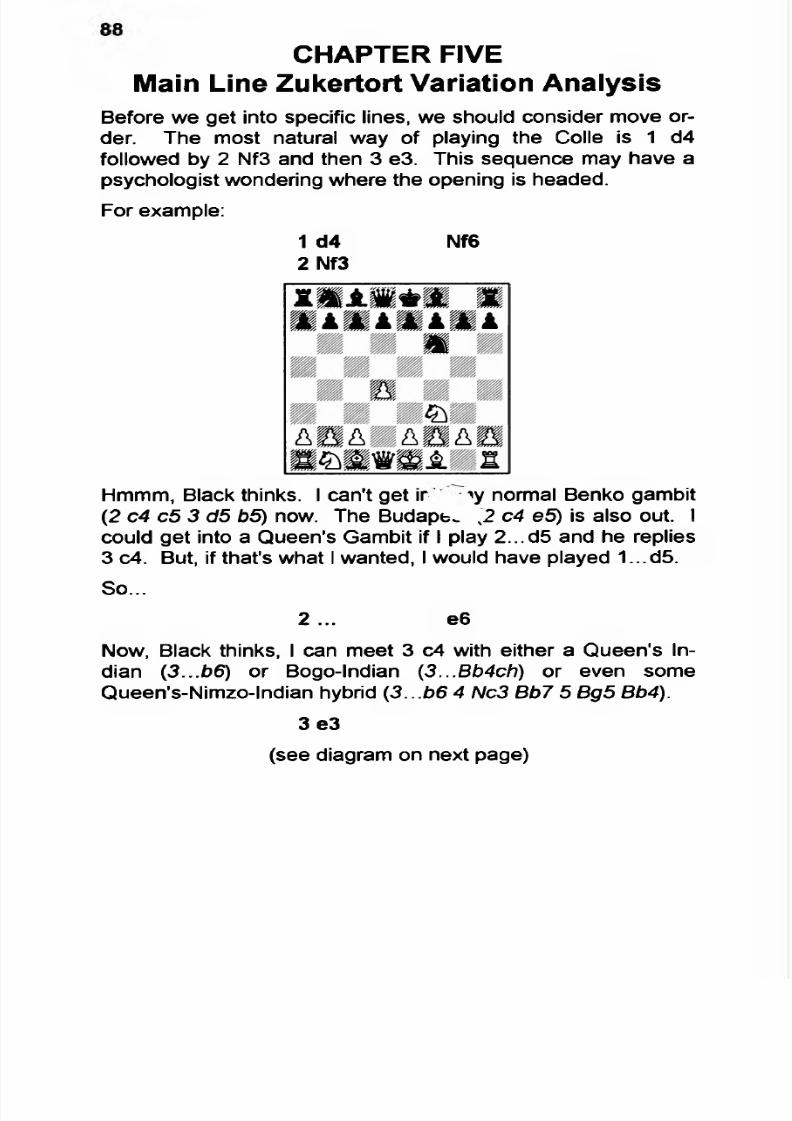
1 d4 Nf62 Nf3
Hmmm, Black thinks. I can't get ir 'y normal Benko gambit(2 c4 c5 3 d5 b5) now. The Budapt^ v2 c4 e5) is also out. Icould get into a Queen's Gambit if I play 2...d5 and he replies3 c4. But, if that's what I wanted, I would have played 1... d5.
So...
2... e6
Now, Black thinks, I can meet 3 c4 with either a Queen’s Indian (3...b6) or Bogo-lndian (3...Bb4ch) or even someQueen's-Nimzo-lndian hybrid (3...b6 4 Nc3 Bb7 5 Bg5 Bb4).
3e3
(see diagram on next page)
7/22/2019 Colle System
http://slidepdf.com/reader/full/colle-system 90/105
MAIN LINE ZUKERTORT VARIATION ANALYSIS 89
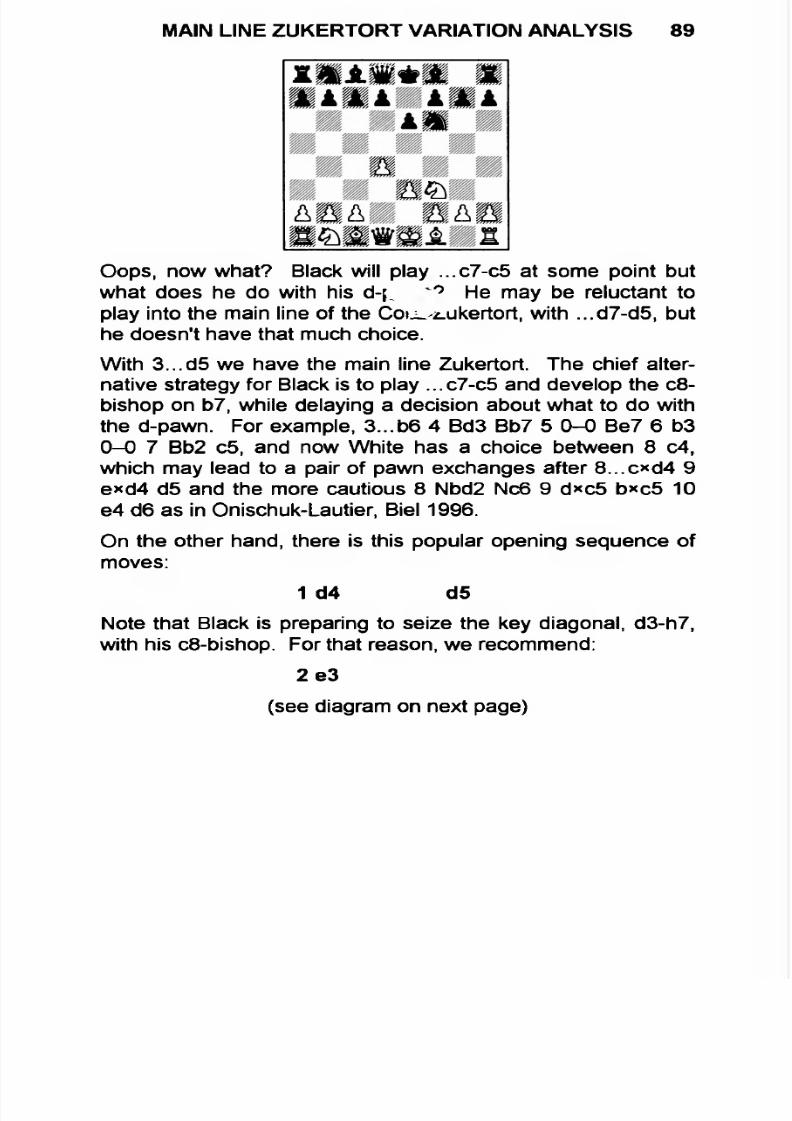
Oops, now what? Black will play ...c7-c5 at some point butwhat does he do with his d-^ ° He may be reluctant toplay into the main line of the Coi^*.ukertort, with ...d7-d5, buthe doesn't have that much choice.
With 3...d5 we have the main line Zukertort. The chief alternative strategy for Black is to play ...c7-c5 and develop the c8-bishop on b7, while delaying a decision about what to do withthe d-pawn. For example, 3...b6 4 Bd3 Bb7 5 0-0 Be7 6 b30-0 7 Bb2 c5, and now White has a choice between 8 c4,which may lead to a pair of pawn exchanges after 8...c*d4 9
e*d4 d5 and the more cautious 8 Nbd2 Nc6 9 d*c5 b*c5 10e4 d6 as in Onischuk-Lautier, Biel 1996.
On the other hand, there is this popular opening sequence ofmoves:
1 d4 d5
Note that Black is preparing to seize the key diagonal, d3-h7,
with his c8-bishop. For that reason, we recommend:2e3
(see diagram on next page)
7/22/2019 Colle System
http://slidepdf.com/reader/full/colle-system 91/105
90 COLLE SYSTEMZUKERTORT VARIATION, 5 b3
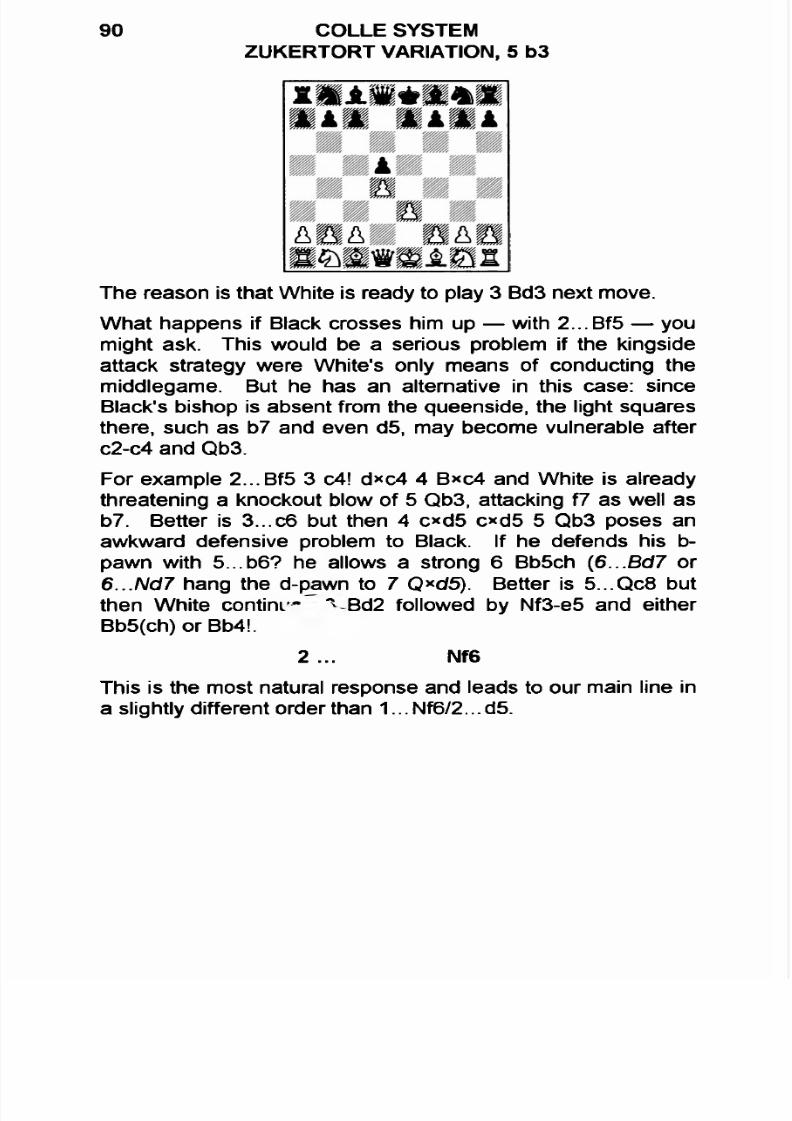
The reason is that White is ready to play 3 Bd3 next move.
What happens if Black crosses him up — with 2...Bf5 — youmight ask. This would be a serious problem if the kingsideattack strategy were White's only means of conducting themiddlegame. But he has an alternative in this case: sinceBlack's bishop is absent from the queenside, the light squaresthere, such as b7 and even d5, may become vulnerable afterc2-c4 and Qb3.
For example 2...Bf5 3 c4! d*c4 4 B*c4 and White is alreadythreatening a knockout blow of 5 Qb3, attacking f7 as well asb7. Better is 3...c6 but then 4 c*d5 c*d5 5 Qb3 poses anawkward defensive problem to Black. If he defends his b-pawn with 5...b6? he allows a strong 6 Bb5ch (6...Bd7 or 6...Nd7 hang the d-pawn to 7 Q*d5). Better is 5...Qc8 butthen White contim-~ ^ Bd2 followed by Nf3-e5 and eitherBb5(ch) or Bb4!.
2 ... Nf6
This is the most natural response and leads to our main line ina slightly different order than 1... Nf6/2... d5.
7/22/2019 Colle System
http://slidepdf.com/reader/full/colle-system 92/105
MAIN LINE ZUKERTORT VARIATION ANALYSIS 91
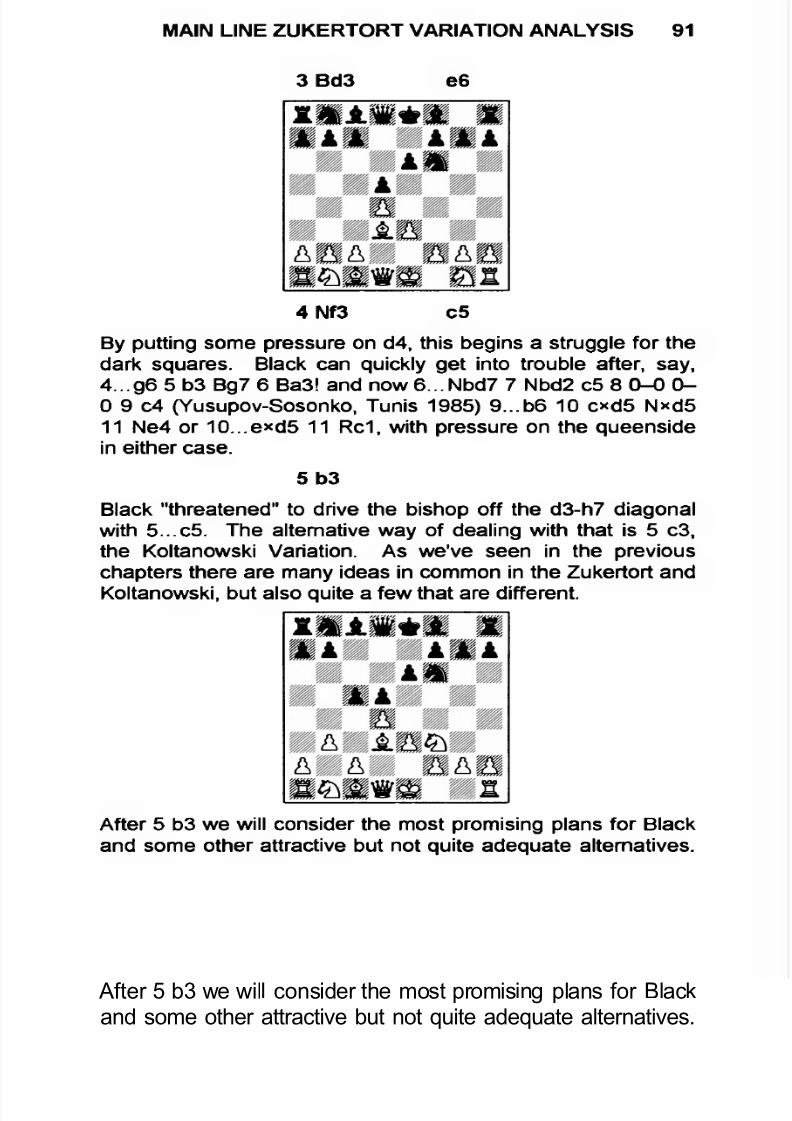
3 Bd3 e6
4 Nf3 c5
By putting some pressure on d4, this begins a struggle for thedark squares. Black can quickly get into trouble after, say,4...g6 5 b3 Bg7 6 Ba3! and now 6...Nbd7 7 Nbd2 c5 8 0-0 0 -0 9 c4 (Yusupov-Sosonko, Tunis 1985) 9...b6 10 cxd5 Nxd511 Ne4 or 10...exd5 11 Rc1, with pressure on the queensidein either case.
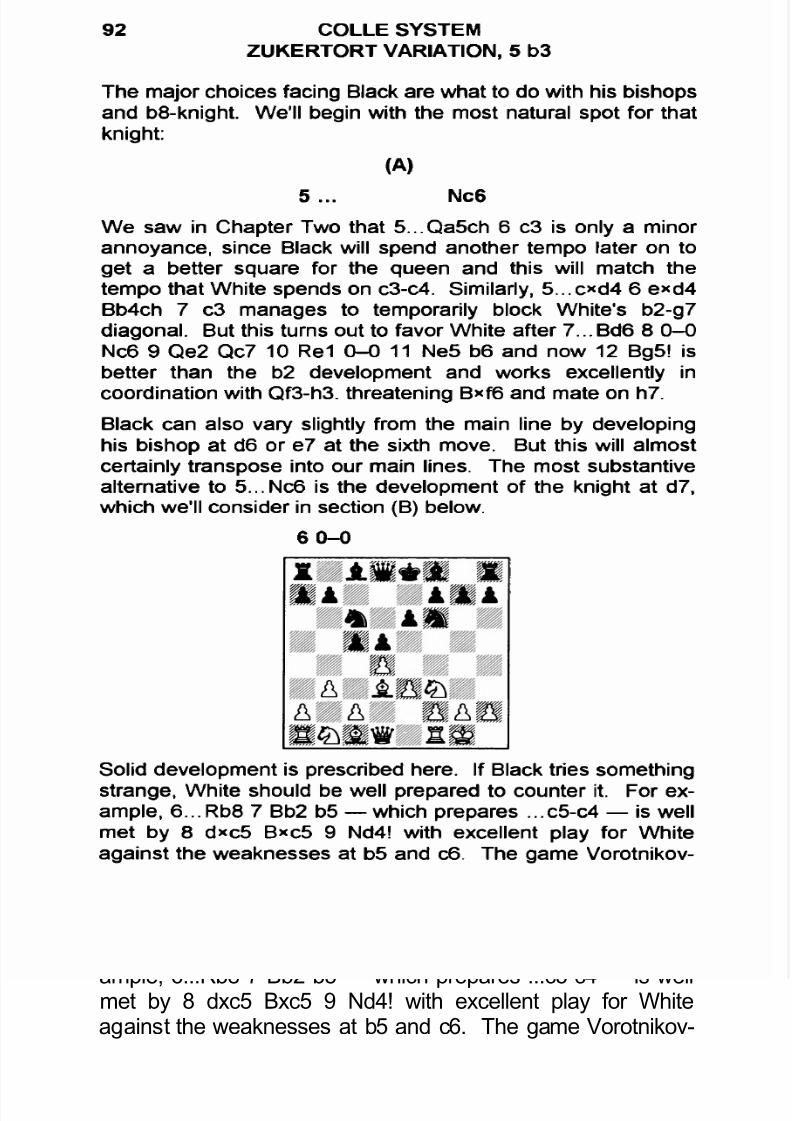
5b3
Black "threatened" to drive the bishop off the d3-h7 diagonalwith 5...c5. The alternative way of dealing with that is 5 c3,the Koltanowski Variation. As we've seen in the previouschapters there are many ideas in common in the Zukertort andKoltanowski, but also quite a few that are different.
After 5 b3 we will consider the most promising plans for Blackand some other attractive but not quite adequate alternatives.
7/22/2019 Colle System
http://slidepdf.com/reader/full/colle-system 93/105
92 COLLE SYSTEMZUKERTORT VARIATION, 5 b3
The major choices facing Black are what to do with his bishopsand b8-knight. We'll begin with the most natural spot for thatknight:
(A)
5... Nc6
We saw in Chapter Two that 5...Qa5ch 6 c3 is only a minorannoyance, since Black will spend another tempo later on toget a better square for the queen and this will match thetempo that White spends on c3-c4. Similarly, 5...cxd4 6 e*d4Bb4ch 7 c3 manages to temporarily block White's b2-g7
diagonal. But this turns out to favor White after 7... Bd6 8 0-0Nc6 9 Qe2 Qc7 10 Re1 0-0 11 Ne5 b6 and now 12 Bg5! isbetter than the b2 development and works excellently incoordination with Qf3-h3. threatening Bxf6 and mate on h7.
Black can also vary slightly from the main line by developinghis bishop at d6 or e7 at the sixth move. But this will almostcertainly transpose into our main lines. The most substantive
alternative to 5...Nc6 is the development of the knight at d7,which we'll consider in section (B) below.
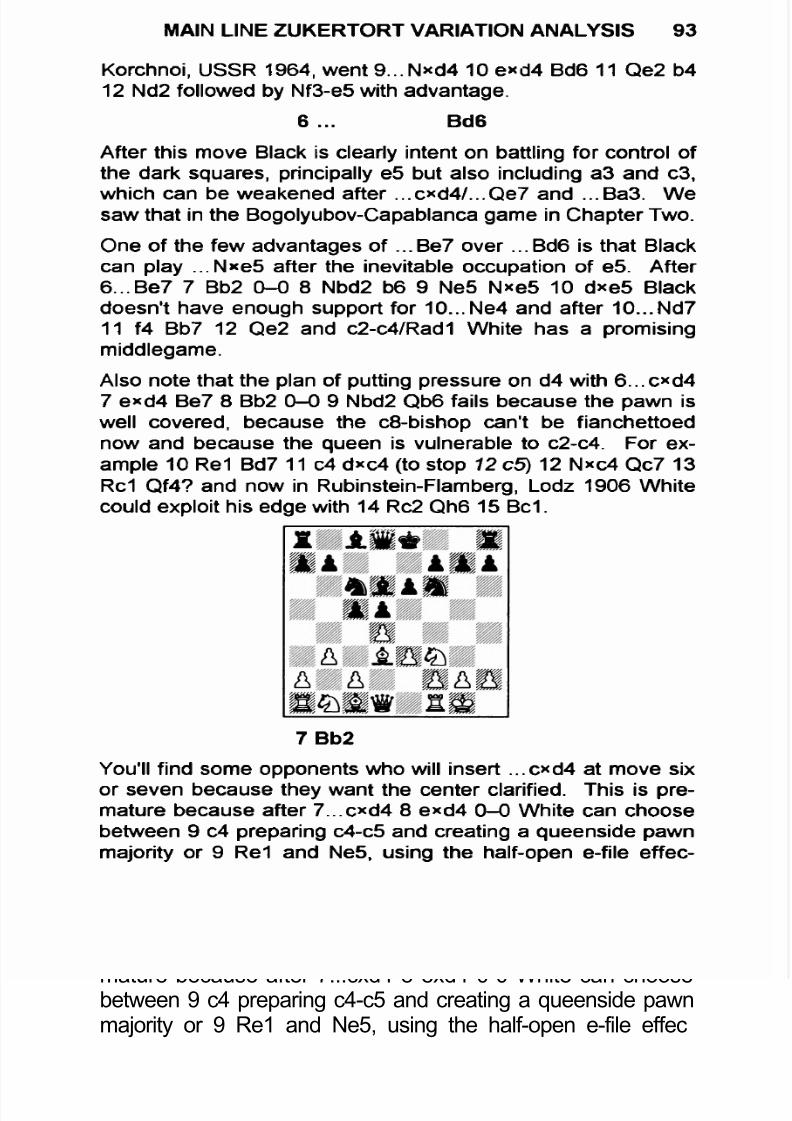
60-0
Solid development is prescribed here. If Black tries somethingstrange, White should be well prepared to counter it. For ex
ample, 6...Rb8 7 Bb2 b5 — which prepares ...c5-c4 — is wellmet by 8 dxc5 Bxc5 9 Nd4! with excellent play for Whiteagainst the weaknesses at b5 and c6. The game Vorotnikov-
7/22/2019 Colle System
http://slidepdf.com/reader/full/colle-system 94/105
MAIN LINE ZUKERTORT VARIATION ANALYSIS 93
Korchnoi, USSR 1964, went 9...N*d4 10 e*d4 Bd6 11 Qe2 b412 Nd2 followed by Nf3-e5 with advantage.
6 ... Bd6
After this move Black is clearly intent on battling for control ofthe dark squares, principally e5 but also including a3 and c3,which can be weakened after ...cxd4/...Qe7 and ...Ba3. Wesaw that in the Bogolyubov-Capablanca game in Chapter Two.
One of the few advantages of ...Be7 over ...Bd6 is that Blackcan play ... N*e5 after the inevitable occupation of e5. After 6...Be7 7 Bb2 0-0 8 Nbd2 b6 9 Ne5 Nxe5 10 dxe5 Blackdoesn't have enough support for 10...Ne4 and after 10...Nd7
11 f4 Bb7 12 Qe2 and c2-c4/Rad1 White has a promisingmiddlegame.
Also note that the plan of putting pressure on d4 with 6...cxd47 exd4 Be7 8 Bb2 0-0 9 Nbd2 Qb6 fails because the pawn iswell covered, because the c8-bishop can't be fianchettoednow and because the queen is vulnerable to c2-c4. For example 10 Re1 Bd7 11 c4 dxc4 (to stop 12 c5) 12 Nxc4 Qc7 13
Rc1 Qf4? and now in Rubinstein-Flamberg, Lodz 1906 Whitecould exploit his edge with 14 Rc2 Qh6 15 Bc1.
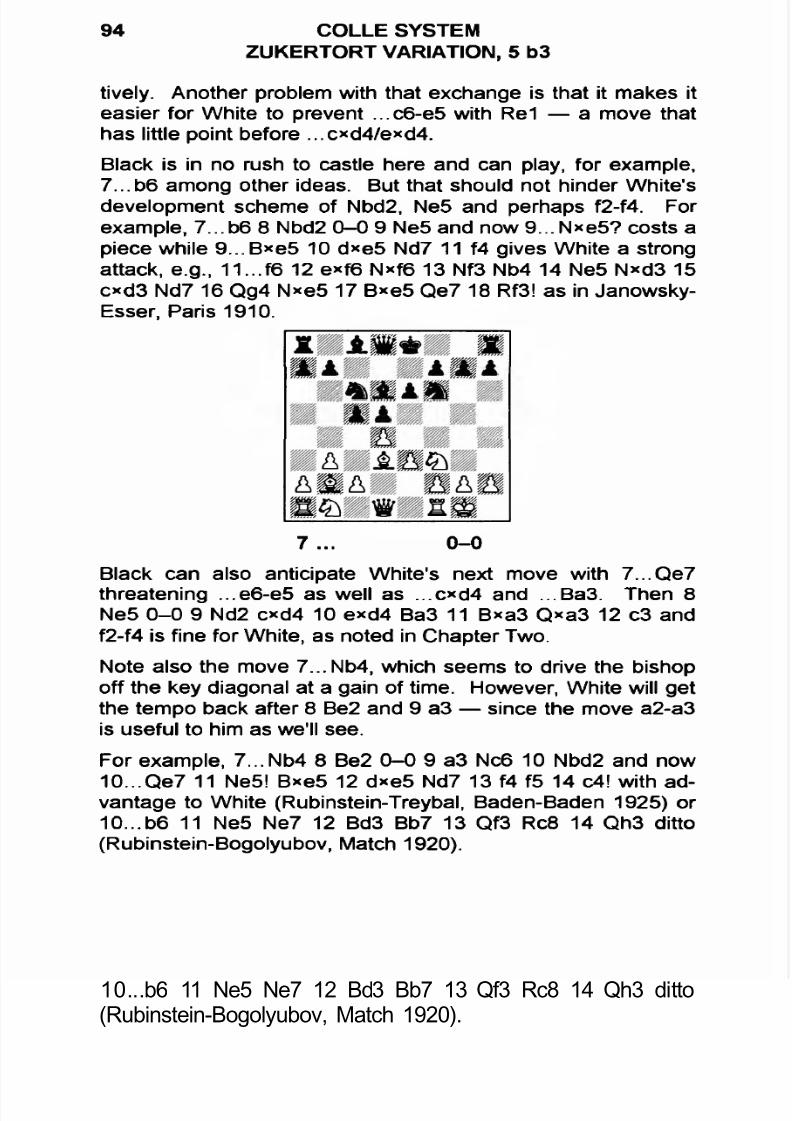
7 Bb2
You'll find some opponents who will insert ...cxd4 at move sixor seven because they want the center clarified. This is pre
mature because after 7...cxd4 8 exd4 0-0 White can choosebetween 9 c4 preparing c4-c5 and creating a queenside pawnmajority or 9 Re1 and Ne5, using the half-open e-file effec
7/22/2019 Colle System
http://slidepdf.com/reader/full/colle-system 95/105
94 COLLE SYSTEMZUKERTORT VARIATION, 5 b3
tively. Another problem with that exchange is that it makes iteasier for White to prevent ...c6-e5 with Re1 — a move thathas little point before ...c*d4/exd4.
Black is in no rush to castle here and can play, for example,7...b6 among other ideas. But that should not hinder White'sdevelopment scheme of Nbd2, Ne5 and perhaps f2-f4. Forexample, 7...b6 8 Nbd2 0-0 9 Ne5 and now 9...Nxe5? costs apiece while 9...B*e5 10 d*e5 Nd7 11 f4 gives White a strongattack, e.g., 11...f6 12 exf6 Nxf6 13 Nf3 Nb4 14 Ne5 N*d3 15c*d3 Nd7 16 Qg4 Nxe5 17 Bxe5 Qe7 18 Rf3! as in Janowsky-Esser, Paris 1910.
7 ... 0-0
Black can also anticipate White's next move with 7...Qe7threatening ...e6-e5 as well as ...cxd4 and ...Ba3. Then 8Ne5 0-0 9 Nd2 cxd4 10 exd4 Ba3 11 Bxa3 Qxa3 12 c3 andf2-f4 is fine for White, as noted in Chapter Two.
Note also the move 7...Nb4, which seems to drive the bishopoff the key diagonal at a gain of time. However, White will getthe tempo back after 8 Be2 and 9 a3 — since the move a2-a3is useful to him as we'll see.
For example, 7...Nb4 8 Be2 0-0 9 a3 Nc6 10 Nbd2 and now10...Qe7 11 Ne5! Bxe5 12 dxe5 Nd7 13 f4 f5 14 c4! with advantage to White (Rubinstein-Treybal, Baden-Baden 1925) or 10...b6 11 Ne5 Ne7 12 Bd3 Bb7 13 Qf3 Rc8 14 Qh3 ditto(Rubinstein-Bogolyubov, Match 1920).

7/22/2019 Colle System
http://slidepdf.com/reader/full/colle-system 96/105
MAIN LINE ZUKERTORT VARIATION ANALYSIS 95
8a3
Now, the capture on d4 eases White's attack and gives Blacklittle in the way of pressure on the c-file. For instance,8...c*d4 9 exd4 b6 10 Nbd2 Bb7 11 Qe2 Qc7 12 Ne5 Ne7 13
f4 Rac8 and with 14 Rac1! g6 15 g4! followed by c2-c4 Whitegets an edge as in Alekhine-Rosselli, Zurich 1934.
8... b6
The rush to exploit the c-file with 8...Bd7 9 Nbd2 cxd4 10e*d4 Rc8 only leaves the bishop misplaced at d7. White can
easily defend the c-pawn — and it may turn out to be safer atc4 than c2.
For instance, 11 Ne5 a6 12 Qe2 Ne7 13 f4 Ng6 14 g4! Bb5 15c4! and, despite the opening of a good diagonal for Black, theposition on the kingside has improved enough for White togive him a clear edge, e.g., 15...dxc4 16 bxc4 Bc6 17 g5Bxe5 18 fxe5 (Plaskett-Sadler, London 1991).
9 Ne5
White could also play 9 Nbd2 and, if 9...Bb7, then 10 Ne5 butthe text, threatening the c6-knight, is more forceful.
9 ... Bb7
On 9...Qc7 White can reinforce the knight with 10 f4 or go infor 10 Nxc6 Qxc6 11 dxc5 followed by Bxf6.
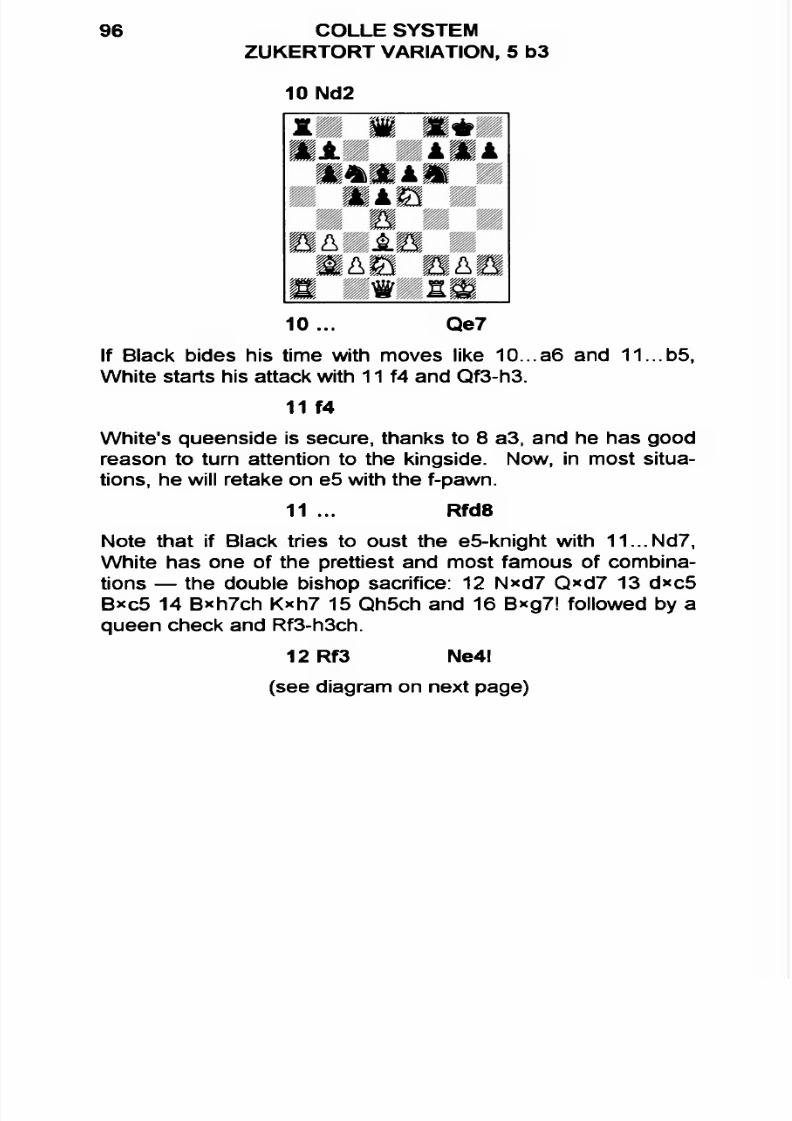
7/22/2019 Colle System
http://slidepdf.com/reader/full/colle-system 97/105
96 COLLE SYSTEMZUKERTORT VARIATION, 5 b3
10 Nd2
10... Qe7If Black bides his time with moves like 10...a6 and 11...b5,White starts his attack with 11 f4 and Qf3-h3.
11 f4
White's queenside is secure, thanks to 8 a3, and he has goodreason to turn attention to the kingside. Now, in most situations, he will retake on e5 with the f-pawn.
11 ... Rfd8
Note that if Black tries to oust the e5-knight with 11...Nd7,White has one of the prettiest and most famous of combinations — the double bishop sacrifice: 12 Nxd7 Q*d7 13 d*c5Bxc5 14 Bxh7ch K*h7 15 Qh5ch and 16 Bxg7! followed by aqueen check and Rf3-h3ch.
12 Rf3 Ne4l
(see diagram on next page)
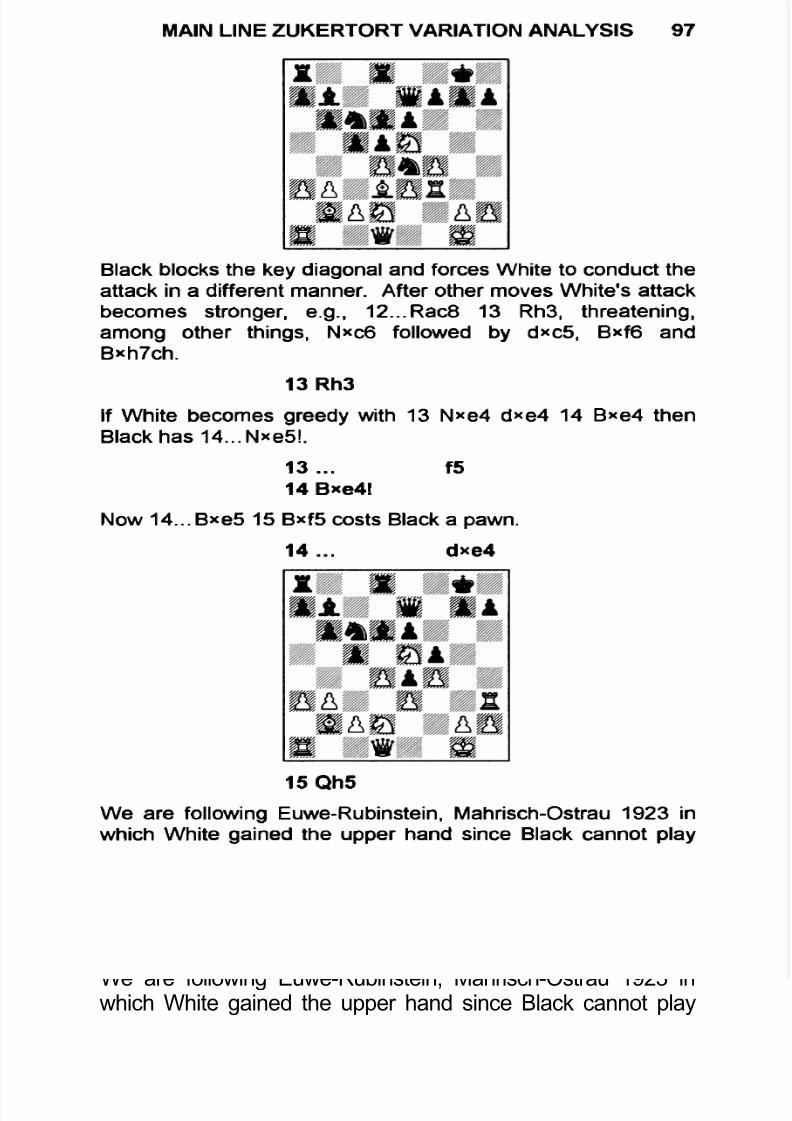
7/22/2019 Colle System
http://slidepdf.com/reader/full/colle-system 98/105
MAIN LINE ZUKERTORT VARIATION ANALYSIS 97
Black blocks the key diagonal and forces White to conduct theattack in a different manner. After other moves White's attackbecomes stronger, e.g., 12...Rac8 13 Rh3, threatening,
among other things, N*c6 followed by dxc5, B*f6 andB*h7ch.
13 Rh3
If White becomes greedy with 13 N*e4 d*e4 14 B*e4 thenBlack has 14...Nxe5l.
13 ... f5
14 Bxe4l
Now 14...Bxe5 15 Bxf5 costs Black a pawn.
14... d*e4
15 Qh5
We are following Euwe-Rubinstein, Mahrisch-Ostrau 1923 inwhich White gained the upper hand since Black cannot play
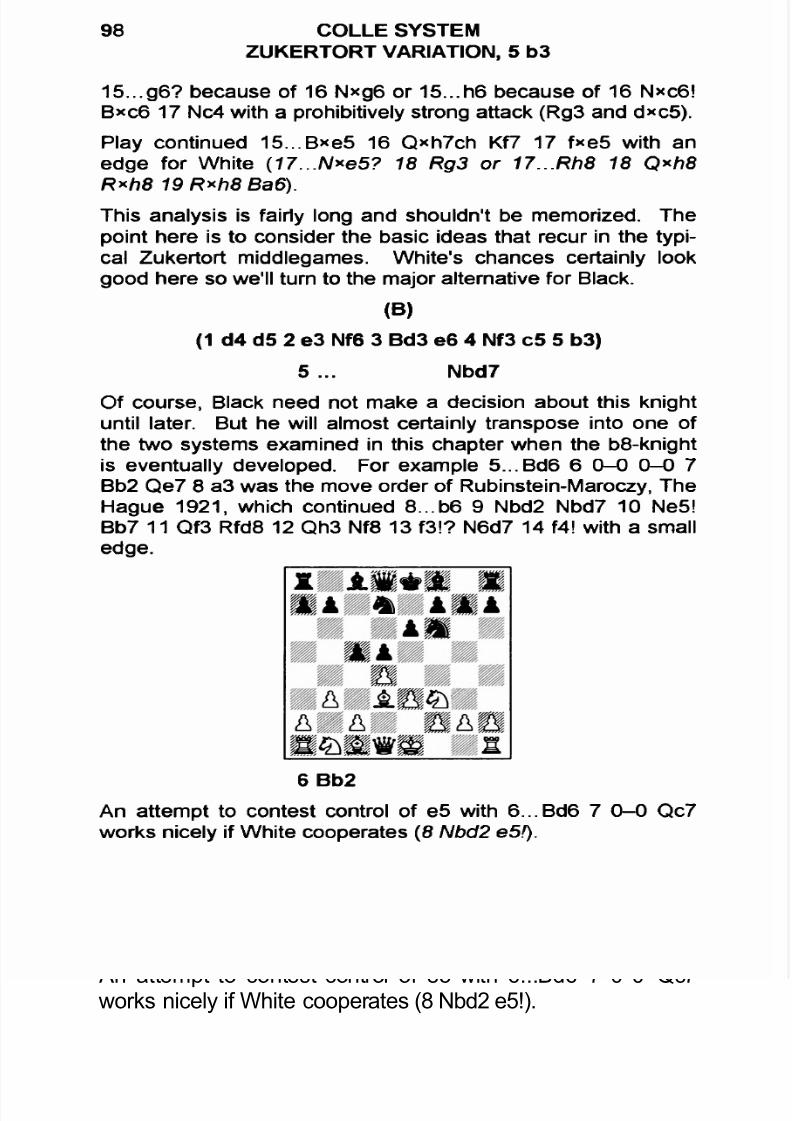
7/22/2019 Colle System
http://slidepdf.com/reader/full/colle-system 99/105
98 COLLE SYSTEMZUKERTORT VARIATION, 5 b3
15...g6? because of 16 N*g6 or 15...h6 because of 16 N*c6!B*c6 17 Nc4 with a prohibitively strong attack (Rg3 and dxc5).
Play continued 15...Bxe5 16 Qxh7ch Kf7 17 fxe5 with an
edge for White (17...N*e5? 18 Rg3 or 17...Rh8 18 Q*h8 R*h8 19 R*h8 Ba6).
This analysis is fairly long and shouldn't be memorized. Thepoint here is to consider the basic ideas that recur in the typical Zukertort middlegames. White's chances certainly lookgood here so we'll turn to the major alternative for Black.
(B)
(1 d4 d5 2 e3 Nf6 3 Bd3 e6 4 Nf3 c5 5 b3)
5 ... Nbd7
Of course, Black need not make a decision about this knightuntil later. But he will almost certainly transpose into one ofthe two systems examined in this chapter when the b8-knightis eventually developed. For example 5...Bd6 6 0-0 0-0 7
Bb2 Qe7 8 a3 was the move order of Rubinstein-Maroczy, TheHague 1921, which continued 8...b6 9 Nbd2 Nbd7 10 Ne5!Bb7 11 Qf3 Rfd8 12 Qh3 Nf8 13 f3!? N6d7 14 f4! with a smalledge.
6 Bb2
An attempt to contest control of e5 with 6...Bd6 7 0-0 Qc7works nicely if White cooperates (8 Nbd2 e5!).
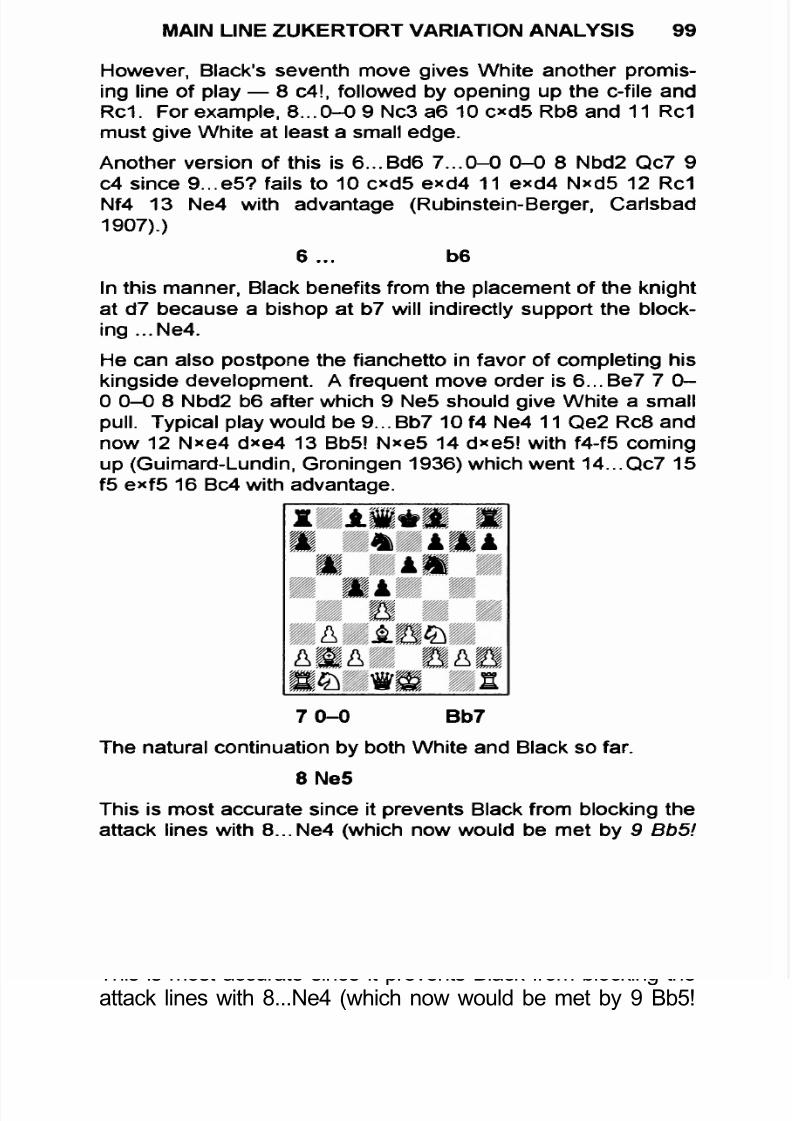
7/22/2019 Colle System
http://slidepdf.com/reader/full/colle-system 100/105
MAIN LINE ZUKERTORT VARIATION ANALYSIS 99
However, Black's seventh move gives White another promising line of play — 8 c4!, followed by opening up the c-file andRc1. For example, 8...0-0 9 Nc3 a6 10 cxd5 Rb8 and 11 Rc1must give White at least a small edge.
Another version of this is 6...Bd6 7...0-0 0-0 8 Nbd2 Qc7 9c4 since 9...e5? fails to 10 c*d5 exd4 11 exd4 Nxd5 12 Rc1Nf4 13 Ne4 with advantage (Rubinstein-Berger, Carlsbad1907).)
6... b6
In this manner, Black benefits from the placement of the knightat d7 because a bishop at b7 will indirectly support the block
ing ...Ne4.
He can also postpone the fianchetto in favor of completing hiskingside development. A frequent move order is 6...Be7 7 0-0 0-0 8 Nbd2 b6 after which 9 Ne5 should give White a smallpull. Typical play would be 9... Bb7 10 f4 Ne4 11 Qe2 Rc8 andnow 12 Nxe4 dxe4 13 Bb5! Nxe5 14 dxe5! with f4-f5 comingup (Guimard-Lundin, Groningen 1936) which went 14...Qc7 15
f5 exf5 16 Bc4 with advantage.
7 0-0 Bb7
The natural continuation by both White and Black so far.
8 Ne5
This is most accurate since it prevents Black from blocking theattack lines with 8...Ne4 (which now would be met by 9 Bb5!
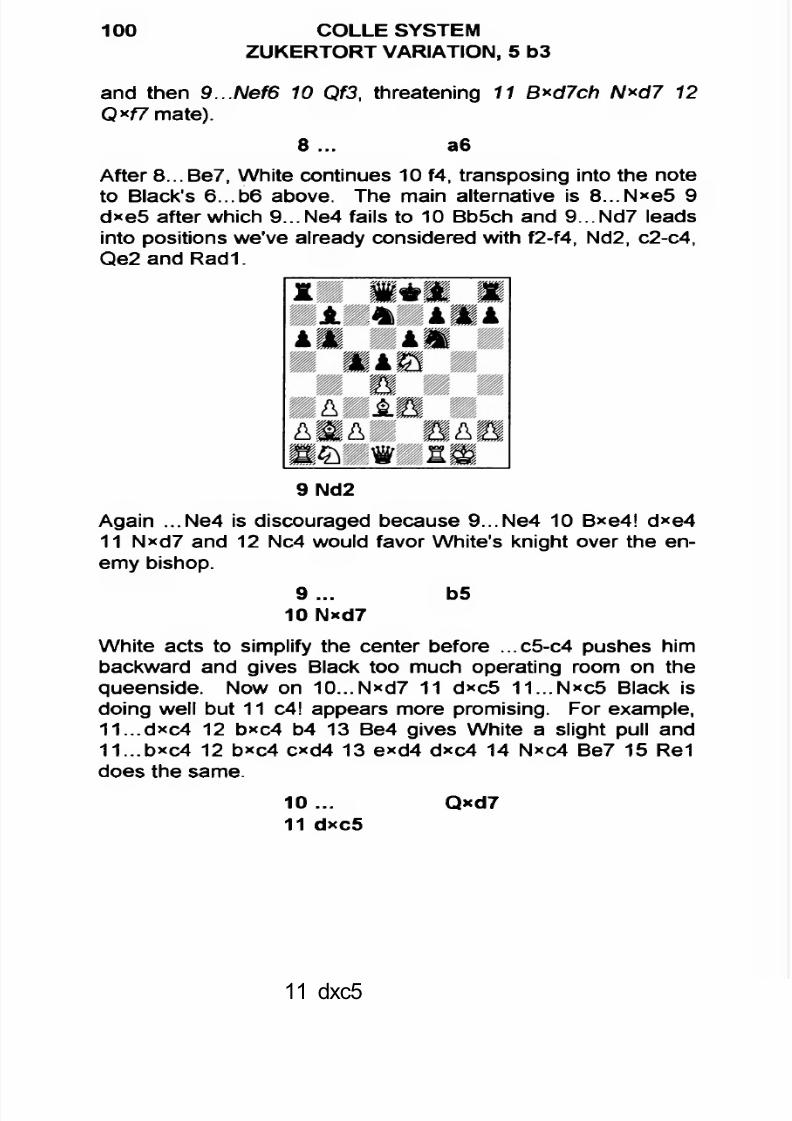
7/22/2019 Colle System
http://slidepdf.com/reader/full/colle-system 101/105
100 COLLE SYSTEMZUKERTORT VARIATION, 5 b3
and then 9...Nef6 10 Qf3, threatening 11 B*d7ch N*d7 12 Q*f7 mate).
8... a6
After 8...Be7, White continues 10 f4, transposing into the noteto Black's 6...b6 above. The main alternative is 8...N*e5 9d*e5 after which 9...Ne4 fails to 10 Bb5ch and 9...Nd7 leadsinto positions we’ve already considered with f2-f4, Nd2, c2-c4,Qe2 and Radi.
9 Nd2
Again ...Ne4 is discouraged because 9...Ne4 10 Bxe4! dxe411 N*d7 and 12 Nc4 would favor White's knight over the enemy bishop.
9 ... b510Nxd7
White acts to simplify the center before ...c5-c4 pushes himbackward and gives Black too much operating room on thequeenside. Now on 10...N*d7 11 d*c5 11...N*c5 Black isdoing well but 11 c4! appears more promising. For example,11...d*c4 12 b*c4 b4 13 Be4 gives White a slight pull and11...b*c4 12 bxc4 cxd4 13 exd4 dxc4 14 Nxc4 Be7 15 Re1does the same.
10... Qxd711 dxc5
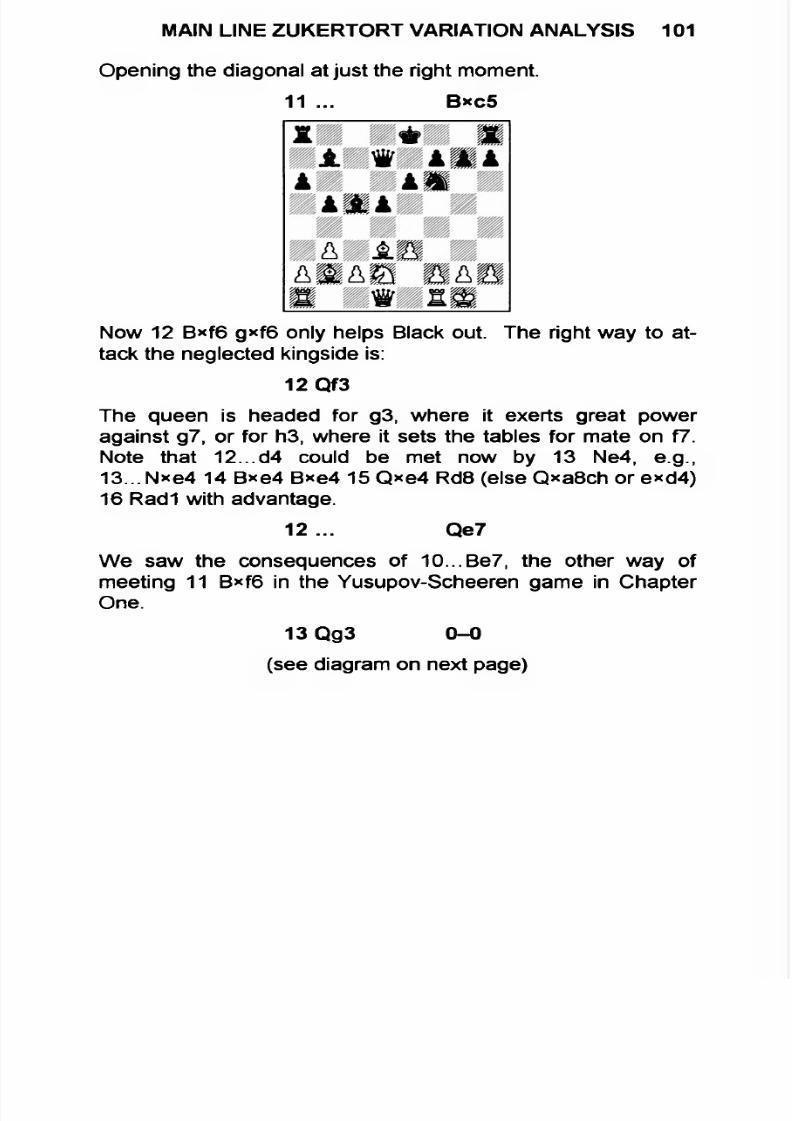
7/22/2019 Colle System
http://slidepdf.com/reader/full/colle-system 102/105
Opening the diagonal at just the right moment.
11 ... B*c5
MAIN LINE ZUKERTORT VARIATION ANALYSIS 101
Now 12 B*f6 g*f6 only helps Black out. The right way to attack the neglected kingside is:
12 Qf3
The queen is headed for g3, where it exerts great poweragainst g7, or for h3, where it sets the tables for mate on f7.Note that 12...d4 could be met now by 13 Ne4, e.g.,13...N*e4 14 B*e4 B*e4 15 Q*e4 Rd8 (else Q*a8ch or e*d4)16 Radi with advantage.
12... Qe7
We saw the consequences of 10...Be7, the other way ofmeeting 11 B*f6 in the Yusupov-Scheeren game in ChapterOne.
13 Qg3 0-0
(see diagram on next page)
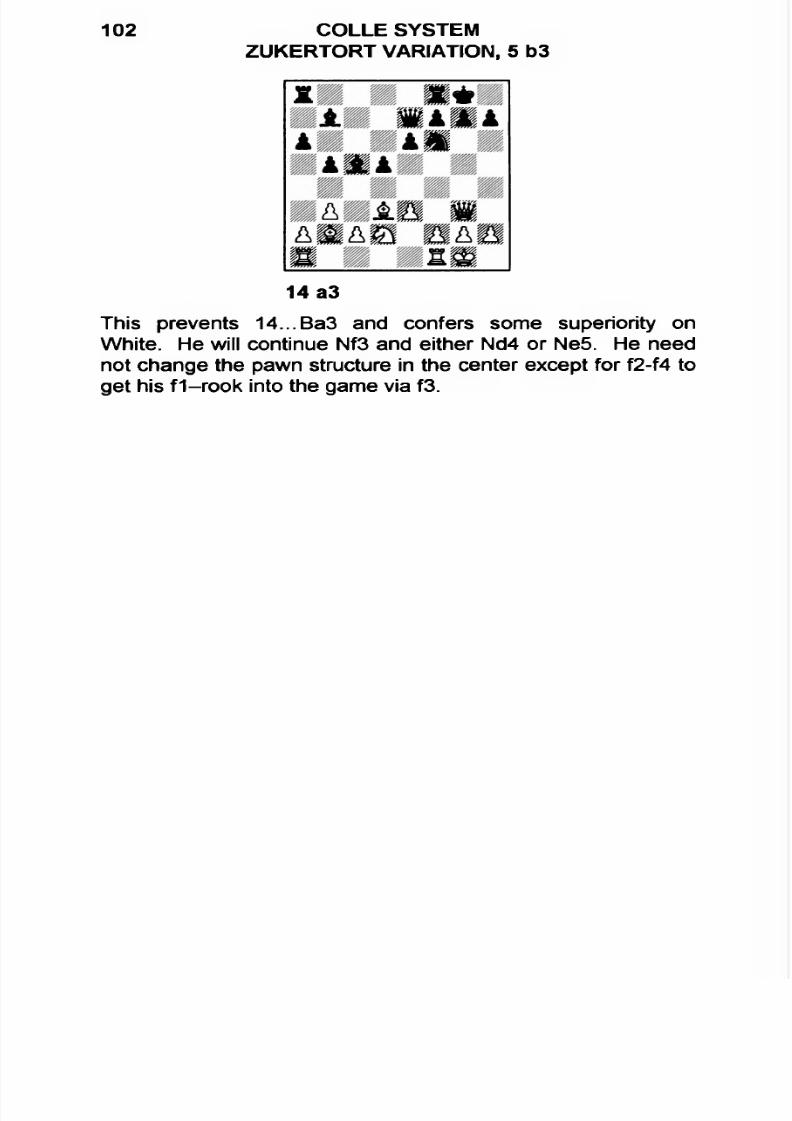
7/22/2019 Colle System
http://slidepdf.com/reader/full/colle-system 103/105
102 COLLE SYSTEMZUKERTORT VARIATION, 5 b3
14 a3
This prevents 14...Ba3 and confers some superiority onWhite. He will continue Nf3 and either Nd4 or Ne5. He neednot change the pawn structure in the center except for f2-f4 toget his f1-rook into the game via f3.

7/22/2019 Colle System
http://slidepdf.com/reader/full/colle-system 104/105
NOTES

7/22/2019 Colle System
http://slidepdf.com/reader/full/colle-system 105/105