Embed Size (px)
Citation preview
jillwisemandesigns.com Page 1
Color Blend Rope by Jill Wiseman
© 2016. All rights reserved.
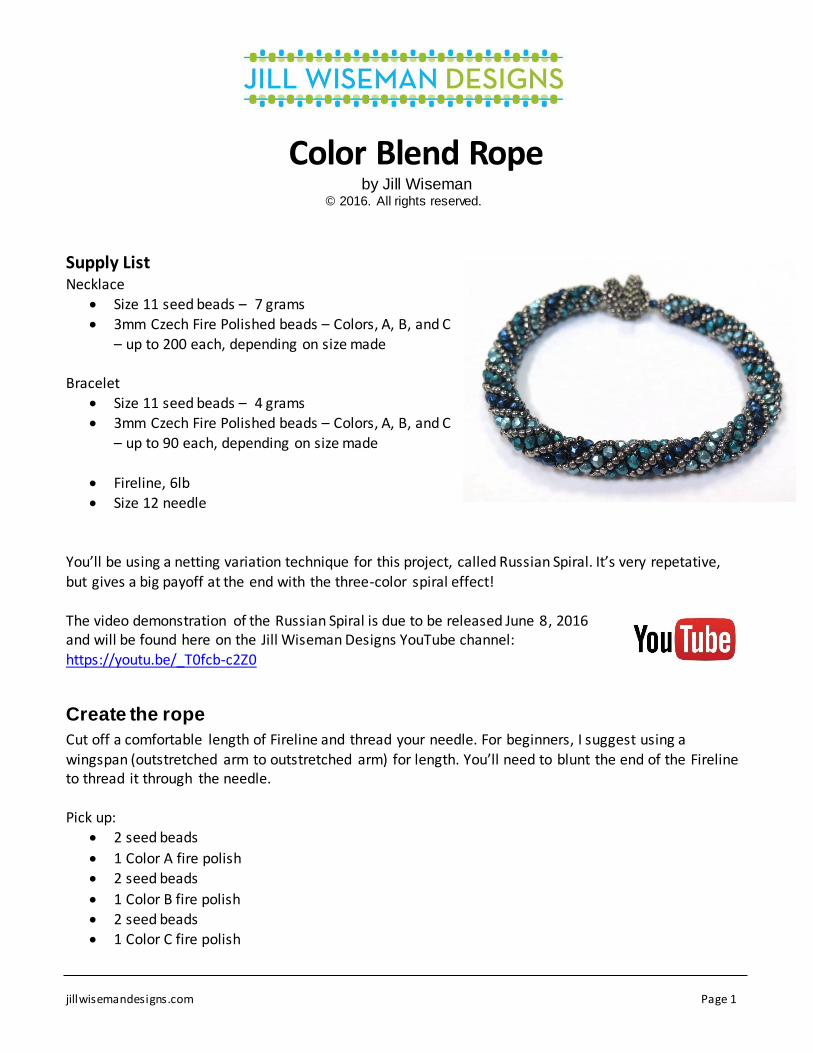
Supply List Necklace
• Size 11 seed beads – 7 grams
• 3mm Czech Fire Polished beads – Colors, A, B, and C – up to 200 each, depending on size made
Bracelet
• Size 11 seed beads – 4 grams • 3mm Czech Fire Polished beads – Colors, A, B, and C
– up to 90 each, depending on size made
• Fireline, 6lb
• Size 12 needle
You’ll be using a netting variation technique for this project, called Russian Spiral. It’s very repetative,
but gives a big payoff at the end with the three-color spiral effect! The video demonstration of the Russian Spiral is due to be released June 8, 2016 and will be found here on the Jill Wiseman Designs YouTube channel: https://youtu.be/_T0fcb-c2Z0
Create the rope
Cut off a comfortable length of Fireline and thread your needle. For beginners, I suggest using a wingspan (outstretched arm to outstretched arm) for length. You’ll need to blunt the end of the Fireline to thread it through the needle.
Pick up:
• 2 seed beads
• 1 Color A fire polish
• 2 seed beads
• 1 Color B fire polish
• 2 seed beads • 1 Color C fire polish
jillwisemandesigns.com Page 2
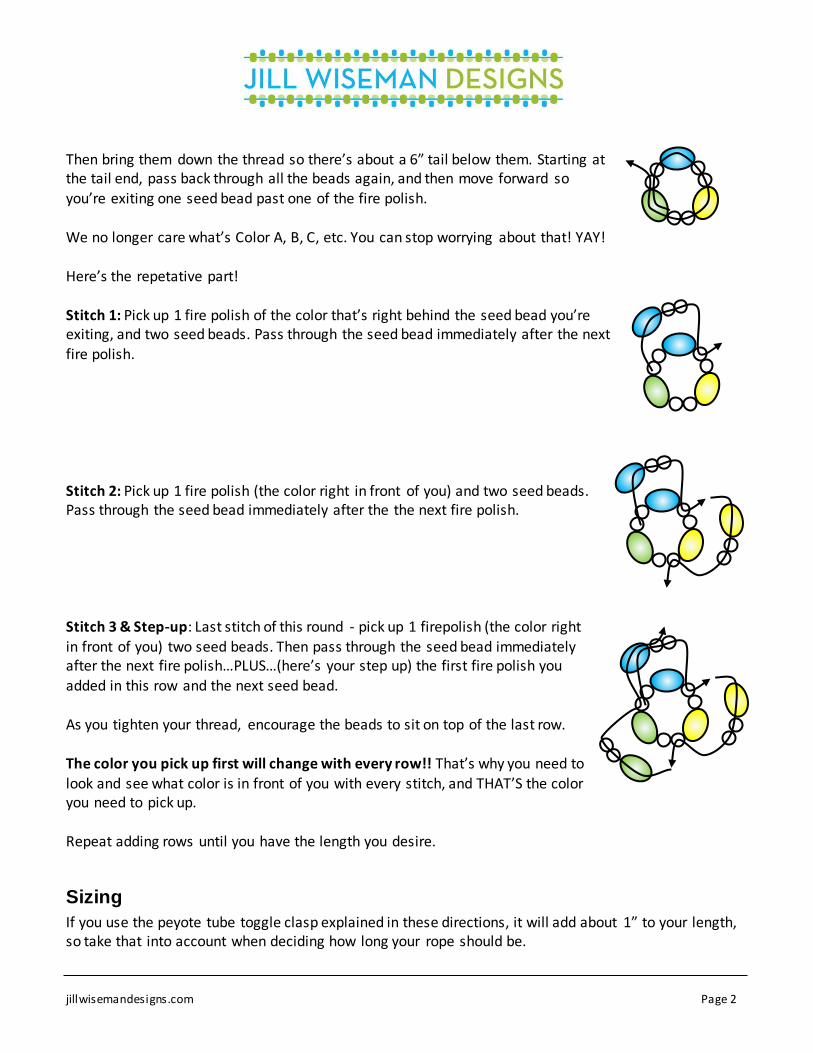
Then bring them down the thread so there’s about a 6” tail below them. Starting at the tail end, pass back through all the beads again, and then move forward so
you’re exiting one seed bead past one of the fire polish.
We no longer care what’s Color A, B, C, etc. You can stop worrying about that! YAY! Here’s the repetative part! Stitch 1: Pick up 1 fire polish of the color that’s right behind the seed bead you’re exiting, and two seed beads. Pass through the seed bead immediately after the next fire polish.
Stitch 2: Pick up 1 fire polish (the color right in front of you) and two seed beads. Pass through the seed bead immediately after the the next fire polish.
Stitch 3 & Step-up: Last stitch of this round - pick up 1 firepolish (the color right
in front of you) two seed beads. Then pass through the seed bead immediately after the next fire polish…PLUS…(here’s your step up) the first fire polish you
added in this row and the next seed bead.
As you tighten your thread, encourage the beads to sit on top of the last row.
The color you pick up first will change with every row!! That’s why you need to
look and see what color is in front of you with every stitch, and THAT’S the color you need to pick up.
Repeat adding rows until you have the length you desire.
Sizing
If you use the peyote tube toggle clasp explained in these directions, it will add about 1” to your length, so take that into account when deciding how long your rope should be.
jillwisemandesigns.com Page 3
Make the peyote tube toggle
Cut a length of Fireline (thread) that’s about 18” long and thread your needle. This is enough to stitch one peyote tube. You will need to flatten the end of the Fireline to get it through the eye of the needle.
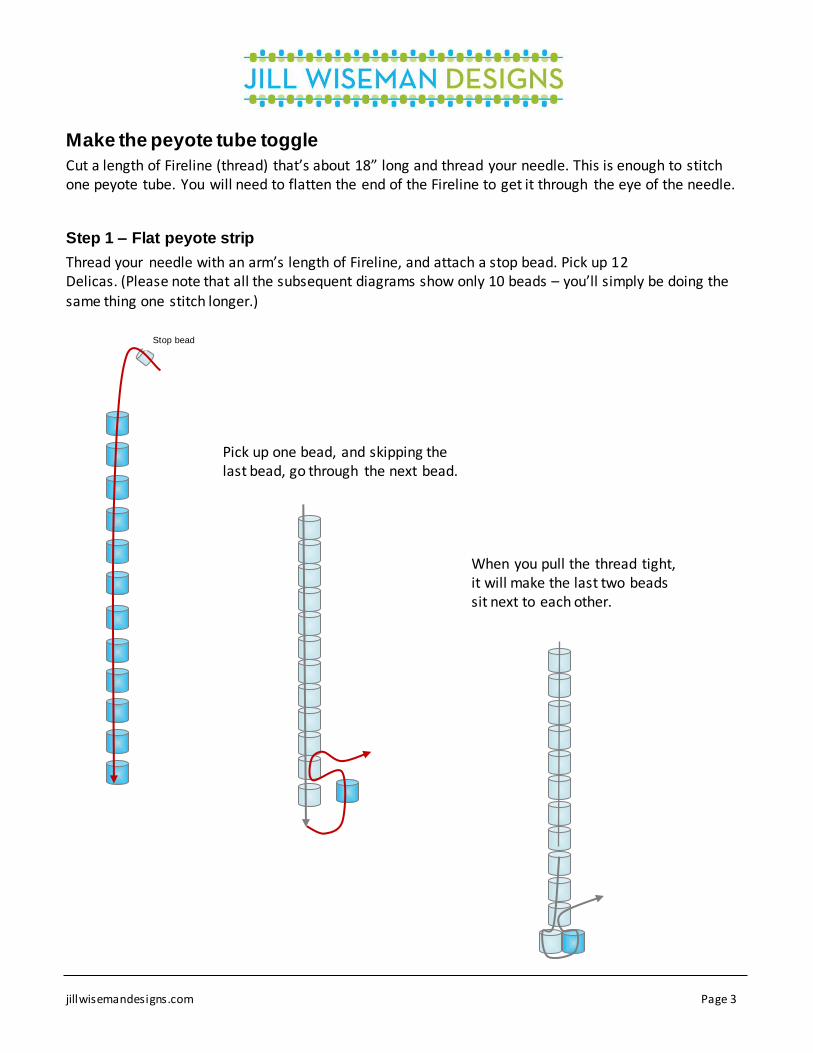
Step 1 – Flat peyote strip
Thread your needle with an arm’s length of Fireline, and attach a stop bead. Pick up 12 Delicas. (Please note that all the subsequent diagrams show only 10 beads – you’ll simply be doing the
same thing one stitch longer.)
Pick up one bead, and skipping the last bead, go through the next bead.
Stop bead
When you pull the thread tight, it will make the last two beads sit next to each other.
jillwisemandesigns.com Page 4
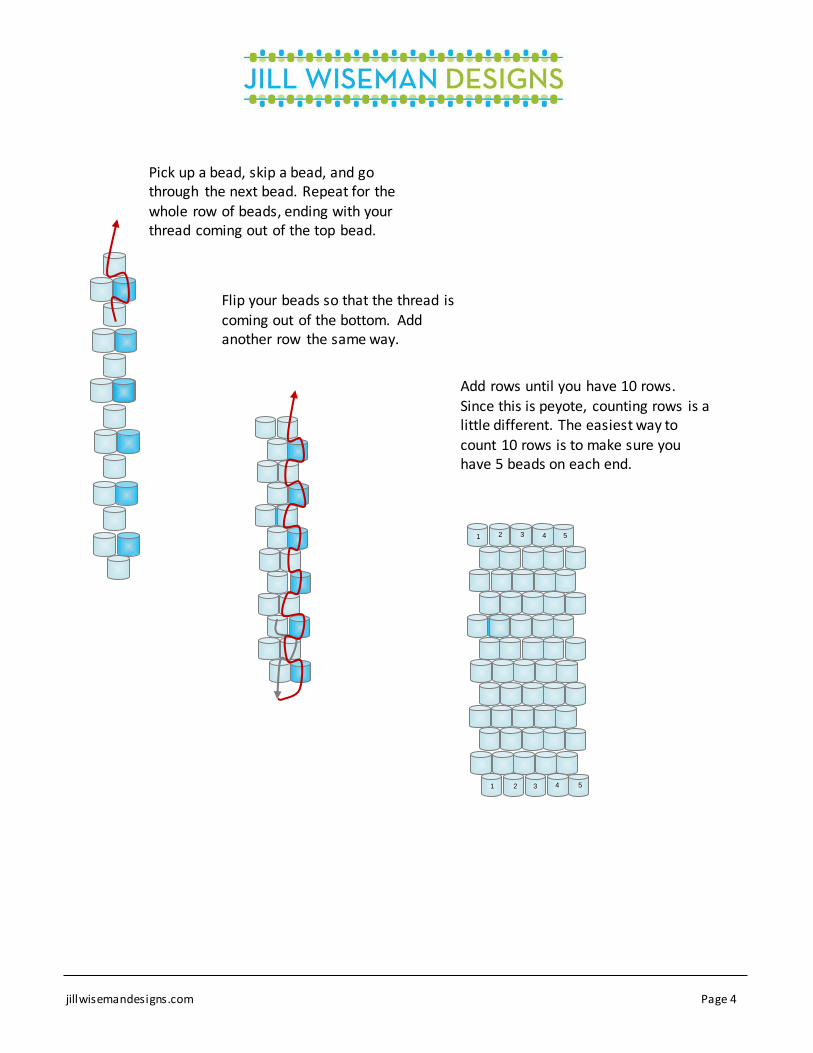
Pick up a bead, skip a bead, and go through the next bead. Repeat for the whole row of beads, ending with your thread coming out of the top bead.
Flip your beads so that the thread is coming out of the bottom. Add another row the same way.
1 2 3 4 5
1 2 3 4 5
Add rows until you have 10 rows.
Since this is peyote, counting rows is a little different. The easiest way to
count 10 rows is to make sure you have 5 beads on each end.
jillwisemandesigns.com Page 5
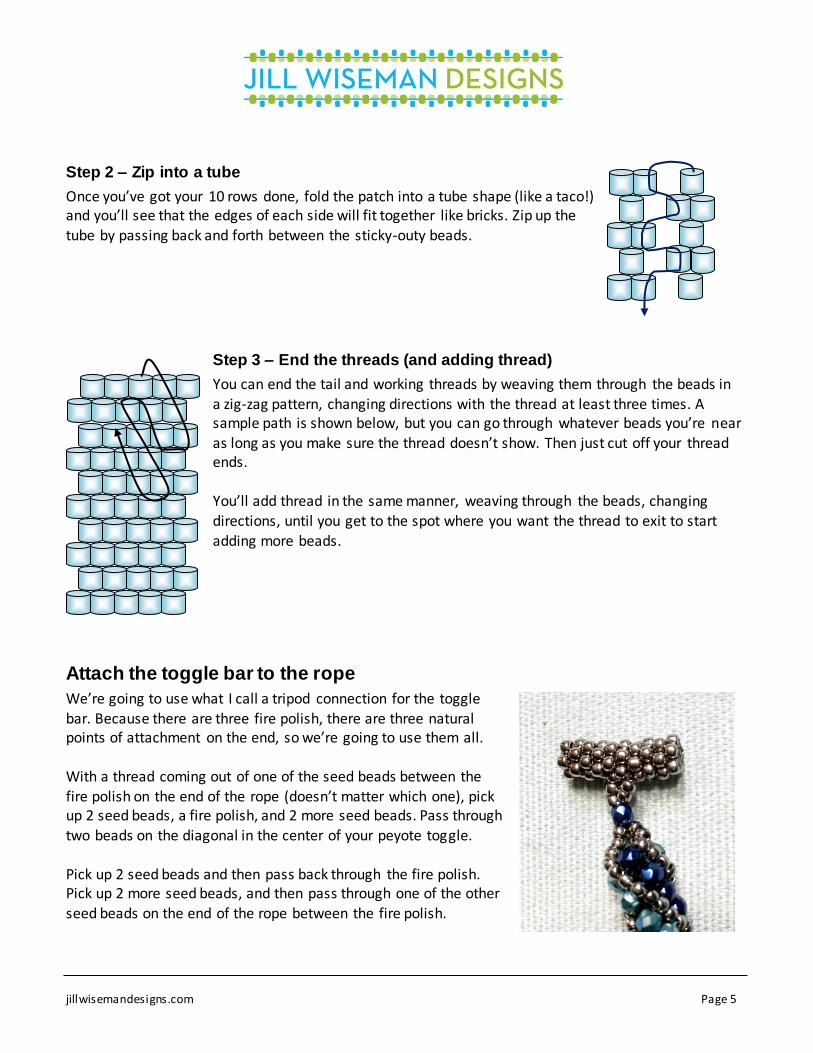
Step 2 – Zip into a tube
Once you’ve got your 10 rows done, fold the patch into a tube shape (like a taco!) and you’ll see that the edges of each side will fit together like bricks. Zip up the
tube by passing back and forth between the sticky-outy beads.
Step 3 – End the threads (and adding thread)
You can end the tail and working threads by weaving them through the beads in
a zig-zag pattern, changing directions with the thread at least three times. A sample path is shown below, but you can go through whatever beads you’re near
as long as you make sure the thread doesn’t show. Then just cut off your thread ends. You’ll add thread in the same manner, weaving through the beads, changing directions, until you get to the spot where you want the thread to exit to start
adding more beads.
Attach the toggle bar to the rope
We’re going to use what I call a tripod connection for the toggle
bar. Because there are three fire polish, there are three natural points of attachment on the end, so we’re going to use them all.
With a thread coming out of one of the seed beads between the fire polish on the end of the rope (doesn’t matter which one), pick up 2 seed beads, a fire polish, and 2 more seed beads. Pass through two beads on the diagonal in the center of your peyote toggle. Pick up 2 seed beads and then pass back through the fire polish. Pick up 2 more seed beads, and then pass through one of the other
seed beads on the end of the rope between the fire polish.

jillwisemandesigns.com Page 6
Travel through the beads on that end row until you’re exiting the last seed bead between fire polish
beads. Pick up 2 seed beads, and then pass back up through the fire polish toward the toggle bar again. Now all the connections are made.
The rest of this attachment is simply doing some reinforcing – try to reinforce all three of the tripod legs
as you do so.
Create the loop
With a thread coming out of one of the seed beads
between the fire polish on the end of the rope (doesn’t matter which one), pick up 2 seed beads, a fire polish, and
then enough seed beads to create a loop that will go over the peyote tube on the opposite side of the rope. In the sample, I used 21. Then pass back down through the fire
polish. Pick up 2 more seed beads, and then pass through one of the other seed beads on the end of the rope
between the fire polish.
Travel through the beads on that end row until you’re exiting the last seed bead between fire polish beads. Pick up 2 seed beads, and then pass back up through the fire polish toward the loop again. Now all the connections are made. On the reinforcing rounds though, you can add some extra embellishment! The first time I went back around the loop, I did peyote stitch all the way around, passing through a single seed bead above the fire polish before I started
adding beads.
On the last reinforcing round, I added two seed beads between each sticky-outy bead instead of just a single. End off any remaining threads, and enjoy wearing your new bracelet and/or necklace!
Visit our website at www.jillwisemandesigns for kits, patterns (many free), beads, and all your beading
supplies. Also take a look at Jill’s YouTube channel at https://www.youtube.com/user/JillWisemanDesigns

jillwisemandesigns.com Page 7
Please Note: By purchasing this pattern, you agree to the following Jill Wiseman Designs conditions:
1. You may sell any work made from the pattern if you yourself hand-created the piece (in other
words, no mass production). It would be nice if you credited the designer as well.
2. You may use any of our free YouTube projects, including this pattern, to teach a class. A list of free YouTube patterns which may be taught can be found on our website, www.jillwisemandesigns.com.