Embed Size (px)
Citation preview
1
Conducting a Manual Handling Risk
Assessment.
2
CONTENTS
1. Roles and Responsibilities
2. Management Responsibilities
3. What is Manual Handling?
4. Legislation
5. Risk Assessment
6. Manual Handling Process
7. What to Consider Whilst Conduction a Risk Assessment
8. When Should You Need to Perform a Risk Assessment
9. The Importance of Keeping Lifted Weight as Close to Your Body as Possible
10. How Different Positions Affect Spinal Pressure
11. Simple Techniques of Safe Lifting
12. The Anatomy of the Human Spine and Biomechanics
13. Care of Your Spine
14. Appendices
Appendix 1
Appendix 2
Appendix 3
Appendix 4
15. Relevant Legislation, Bibliography and Associated Documentation

3
1. ROLES AND RESPONSIBILITIES
Risk assessors may be a manager with responsibility for a department, or a suitably trained and
competent individual appointed to assist the manager in discharging their responsibilities.
Criteria
The factors that would help to facilitate the risk assessor's role:
Clinically / department based - This would help in understanding the issues in the work
environment.
Ability to work in partnership - Management, health and safety representatives and manual
handling Key Workers can offer valued support and many issues can be addressed as a
group.
A commitment by staff at all levels to completing risk assessments within the work
environment. (Refer to Trust Manual Handling Policy).
NOTE:
RISK ASSESSORS WHO ARE NOT LINE MANAGERS CARRY NO ADDITIONAL LEGAL
RESPONSIBILITY OVER THAT OF ANY OTHER EMPLOYEE FOR THE OUTCOMES OF THEIR
ASSESSMENTS.
(Refer to the Trust Health and Safety Policy)
NB: To be read in conjunction with the manager's role and responsibility.
2. MANAGEMENT RESPONSIBILITY
Local line managers are responsible for the overall operation of the risk assessment process at
the local level and must be involved in the process.
Management must be committed to:
Ensuring the risk assessor has allocated time to complete the risk assessments
Ensuring that the risk assessor is released from the workplace to attend training / update sessions in order that the assessor can maintain the necessary skills and knowledge liaising and supporting the assessor
4
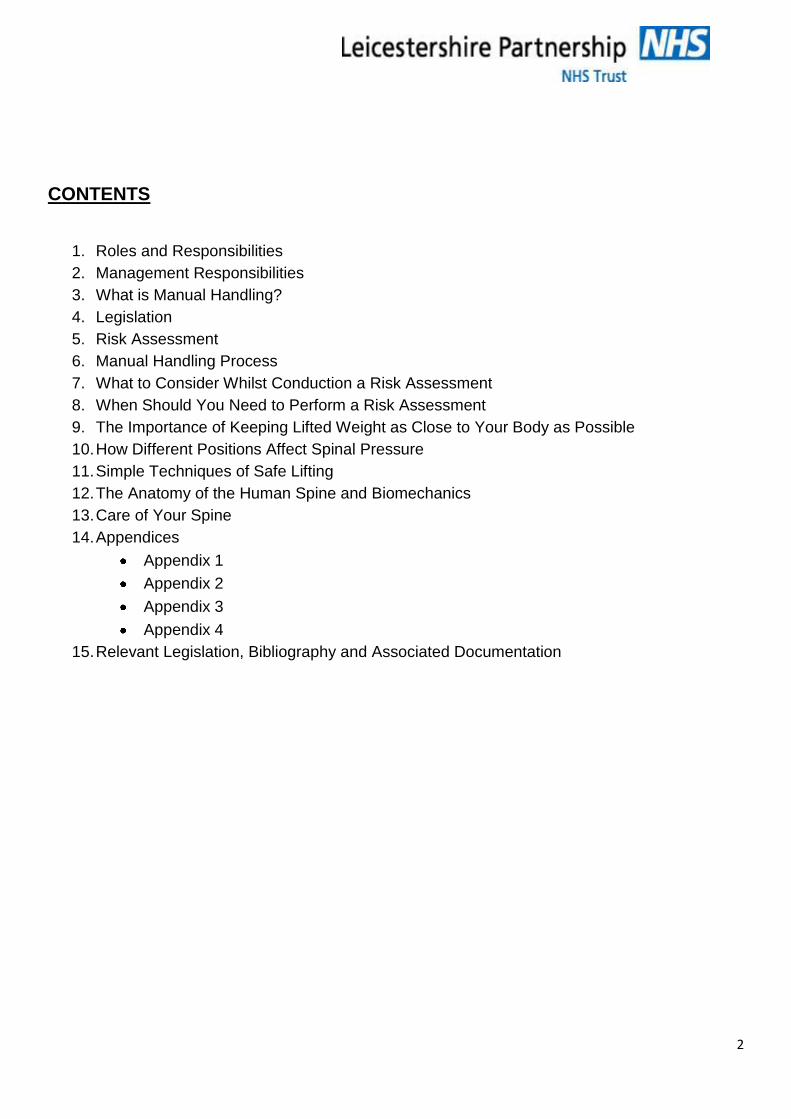
3. WHAT IS MANUAL HANDLING?
A manual handling operation is interpreted as:
"Any transporting or supporting of a load, including:
Lifting; lowering; holding; carrying; pushing; pulling; throwing; moving.
Anything that applies bodily force to move an object."
(Manual Handling Operations 1992)
Furniture People
Animals
Packages
Boxes
Tools
5
4. LEGISLATION
There are five pieces of legislation relevant to manual handling
These are:
The Health and Safety at Work Act (1974)
The Management of Health and Safety at Work Regulations (1999)
The Manual Handling Operations Regulations (1992)
The Provision and Use of Work Equipment Regulations (1998)
The Lifting Operation and Lifting Equipment Regulations (1998)
The Health and Safety at Work Act (1974) places duties on the employer to ensure health,
safety and welfare of employees at work so far as reasonably practicable by:
Section 2:
Providing and maintaining safe systems of work
Providing arrangements to ensure safety and health in transporting, storage, and handling of articles and substances.
Providing information, instruction, supervision, and training to protect employees
Maintaining the work place in a safe and healthy condition
Section 7: Duties on the employee
The employee must:
Take reasonable care of their own health and safety and that of others
Co-operate with the employers in discharging their duties under the act
The Management of Health and Safety at Work Regulations (1999) impose a requirement
upon employers to undertake an assessment of any risk to health and safety of their employees,
Relevant Points are:
Regulation 3:
Every employer shall make a suitable and sufficient assessment of:
“The risks to the health and safety of his employees to which they are exposed whilst they are at work” (refer to risk assessments).
6
Regulation 6:
Every employer shall appoint one or more competent persons to assist him in undertaking the measures he needs to comply with the requirements.
The employer shall ensure that the number of persons appointed will have the time available for them to fulfill their functions and the means at their disposal are adequate having regard to the size of his undertaking.
Manual Handling Operations Regulations (1992) (amended 2002)
http://www.hse.gov.uk/pubns/priced/l23.pdf
This has an established hierarchy of measures to reduce manual handling risks
AVOID handling where ever possible
ASSESS the risks of those tasks, which cannot be avoided, using T.I.L.E.
REDUCE the risk as far as reasonably practicable
MONITOR and review
PROVIDE INFORMATION for example the weight of the load to be handled
There was only a small change to the regulations in the 2002 amendment. This took in the factors
that a worker may be at risk if he/she:
A. Is physically unsuited to carry out the task in question
B. Is wearing unsuitable clothing, footwear or other personal effects
C. Does not have adequate or appropriate knowledge or training
These factors were in schedule 1 of the 1992 Regulations but are now included in a new
regulation 4(3). This amendment does not introduce any new duties on employers.
The Provision and use of work Equipment Regulations 1998
http://www.hse.gov.uk/pubns/priced/l22.pdf
(PUWER 98) PUWER 98 replaces PUWER 92
PUWER 98 applies to the provision and use of all work equipment, including mobile and lifting
equipment.
7
Although PUWER 98 applies to all lifting equipment, LOLER (Lifting Operations and Lifting
Equipment Regulations) applies over and above the general requirements of PUWER98, in
dealing with specific hazards/risks associated with lifting equipment and lifting operations.
Regulations 4 – 10
Are the management duties of PUWER 98 covering
Selection of suitable equipment
Maintenance
Inspection
Specific risks
Information, instruction and training.
PUWER 1998 cannot be considered in isolation from other health and safety legislation. In
particular it needs to be considered with the requirements of the HSW Act.
The Lifting Operations and Lifting Equipment Regulations 1998 (LOLER 98)
http://www.hse.gov.uk/pubns/hsis4.pdf
The Regulations aim to reduce risks to people’s health and safety from lifting equipment provided
for use at work. In addition to the requirements of LOLER, lifting equipment is also subject to the
requirements of the Provision and Use of Work Equipment Regulations 1998 (PUWER)
Generally, the Regulations require that lifting equipment provided for use at work is:
Strong and stable enough for the particular use and marked to indicate safe working
loads;
Positioned and installed to minimise any risks;
Used safely, i.e. the work is planned, organised and performed by competent people;
and
Subject to ongoing thorough examination and, where appropriate, inspection by
competent people.
The employer needs to ensure that in using any lifting equipment the requirements of LOLER are met.
8
For example, you should ensure that all lifting equipment is:
Sufficiently strong, stable and suitable for the proposed use. Similarly, the load and
anything attached must be suitable;
Positioned or installed to prevent the risk of injury, e.g. from the equipment or the load
falling or striking people;
Visibly marked with any appropriate information to be taken into account for its safe use,
e.g. safe working loads. Accessories, e.g. slings should be similarly marked.
Additionally, you must ensure that:
Lifting operations are planned, supervised and carried out in a safe manner by people
who are competent;
Where equipment is used for lifting people it is marked accordingly, and it should be
safe for such a purpose, e.g. all necessary precautions have been taken to eliminate or
reduce any risk;
Where appropriate, before lifting equipment (including accessories) is used for the first
time, it is thoroughly examined. Lifting equipment may need to be thoroughly examined
in use at periods specified in the Regulations (i.e. at least six-monthly for accessories
and equipment used for lifting people and, at a minimum, annually for all other
equipment) or at intervals laid down in an examination scheme drawn up by a
competent person. All examination work should be performed by a competent person;
and following a thorough examination or inspection of any lifting equipment, a report is
submitted by the competent person to the employer to take the appropriate action.
9
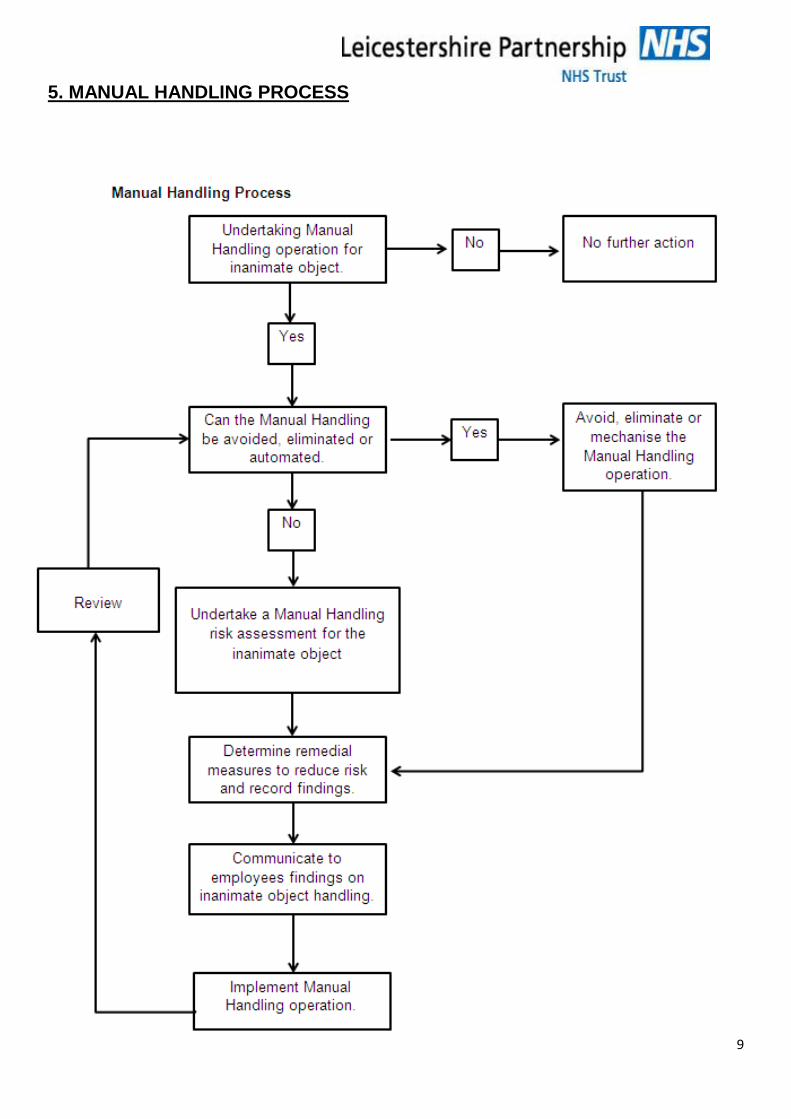
5. MANUAL HANDLING PROCESS
10
6.RISK ASSESSMENT
What is a Risk Assessment?
A risk assessment is a proactive system of assessing the hazards associated with activities and
processes within an organisation. It is an essential part to managing health and safety as well as
quality issues.
Why do a Risk Assessment?
Legislation requires that risk assessments are performed. Regulations 3(1) of the management of
Health and Safety at Work Regulations 1999 requires employers to make a suitable and sufficient
assessment of the risks to the health and safety of employers whilst at work.
Where this general assessment indicates the possibility of risks to employees from the manual
handling of loads the requirement of the present regulations should be followed. This relates to
the manual handling operation regulations 1992 Regulation 4(1) which establishes a clear
hierarchy of measures and these are to:
A. Avoid hazardous manual handling operations so far as is reasonably practicable – this may
be done by redesigning the task to avoid moving the load or by automating the load.
B. Make a suitable and sufficient assessment of any hazardous manual handling operations
that can be avoided, and
C. Reduce the risk of injury from those operations so far as is reasonably practicable.
Many manual handling tasks may have been performed for years with little thought being given to
how the task can be made easier. To prevent injuries occurring we need to ask ourselves
questions such as, does the task still need to be done or are we continually doing it through habit?
11
7. WHAT TO CONSIDER WHILST CONDUCTING A RISK ASSESSMENT
The Manual Handling Regulations 1992 (MHOR) state clearly that four factors need to be
assessed, these are T.I.L.E
TASK
INDIVIDUAL
LOAD
ENVIRONMENT
The following are prompts associated with the risk assessment factors:
TASK
Is the load being held at a distance from the trunk?
Holding the load at arm’s length imposes about five times the stress experienced when holding
the same load very close to the trunk
Check the posture
Hands and feet which are not well placed, many result in lost control of the load and a sudden
increase in physical stress
Does the task involve stooping?
Stooping can also increase stress on the lower back
Does the task involve reaching upwards?
This places stress on the arms and back
Does the task involve a combination of the above movements?
This would reduce an individual’s capability
Does the task involve excessive lifting or lowering distances?
Large distances are physically more demanding than small ones
Does the task involve excessive carrying distances?
This may result in reduced individual capacity
Does the task involve excessive pushing or pulling of the load?
The risk of injury is increased if pushing or pulling is carried out with the hands much below
knuckle height or above shoulder height
Does the task involve a risk of sudden movement of the load?
12
Sudden movement creates unpredictable stresses which can injure the body
Does the task involve frequent or prolonged physical effort?
Frequent lifting or even a modest load can lead to injury
Does the task involve sufficient rest or recovery periods?
Insufficient rest or recovery periods lead to fatigue
Does the task involve a rate of work imposed by a process?
This may lead to fatigue
Handling while seated
This involves the task being carried out by the trunk and arms, resulting in twisting, stooping,
leaning, forward and reaching
INDIVIDUAL
Individual capability means taking into account of the fact that each individual varies according to
height, weight, fitness skills and knowledge. Naturally there are significant variations in any group
of employees, but the intention of the regulations is that manual handling operations are designed
by employer to be safe for the majority of its people. It follows therefore; that employers should be
aware of any factors which might place individuals at significant risk of handling injury and take
necessary precautions to protect that person.
Special features of individual capability should be given attention by the risk assessor. They
include:
The differences between men and women
On average, the manual handling ability of women is less than that of men depending on the type
of activity involved. HSE guidance suggests that safe loads for women are about 70% of the loads
for men, these figures only refer to averages however and some women are significantly stronger
than men.
Age/fitness
Age is an important factor in strength. Strength peaks in the early 20s and declines gradually from
that point, with the rate of decline accelerating from the mid 40s. Young workers particularly, have
less experience and may be inclined to take more risks because of this.
Experience
In fact, experience and skills acquired over some years spent doing a particular job are important
factors and it may be that loads which appear to be handled comfortably by the existing
employees are deemed to be excessive by the assessment process. The regulations are quite

13
clear: the employer should regard an operation as unacceptable if it cannot be performed by the
majority of reasonably fit employees.
Pregnancy/health
Women should not handle significant loads during and after pregnancy, especially three months
before and three months after delivery. This is due to the fact that hormonal and biochemical
processes soften the ligaments enabling the fibres to stretch and accommodate the baby growing;
it does mean that the restraining properties of ligaments are reduced and significant manual
handling injury can occur without this protection.
Knowledge/training
Previous training on how to perform principles of good movement and handling equipment
such as slide sheets and hoists will help safeguard the individual against injury.
LOAD
If we consider the load to be the patient, there are numerous factors to consider including:
The medical condition
A person with difficulty breathing would find it very distressing if laid supine for a movement up
the bed
Comprehension
A person with difficulty understanding commands or having no insight into their own disabilities
can potentially put themselves and staff at risk.
Medical interventions
Having an intravenous drip, cardiac monitor leads or a catheter may restrict movement for a
patient or the patient may feel they have to lay motionless!
Weight
The weight of the patient will/may exceed the safe working load requirements of the
equipment. It may also cause problems with ensuring there are enough handlers available to
ensure the safe movement of a load.
Communication
A person with hearing or visual problems may potentially provide a barrier for ensuring the
patient understands manoeuvres affecting them.
Cultural issues
Particular cultures may discourage movements in which close contact is needed.
14
ENVIRONMENT
Are there space constraints preventing good posture?
This may lead to stooping, twisting or leaning
Are there uneven, slippery or unstable floors?
Are there variations in level of floors or work surfaces
Are there extremes of temperature or humidity?
High temperatures cause rapid fatigue and perspiration may reduce the effectiveness of grip.
Low temperatures also affects grip.
Are there poor lighting conditions?
Dimness of glare may cause poor posture and contract between bright light and deep shadow
may aggravate tripping hazards
For more information on T.I.L.E see appendix 1
8. WHEN SHOULD YOU NEED TO PERFORM A RISK ASSESSMENT?
As guidance, the MHOR 1992 produced a flow chart to assist in the decision to perform risk
assessments on common or generic tasks. Examples of such tasks could be emptying linen
trolleys, bathing children or pushing a child in the bed.
A detailed assessment of every manual handling operation however, could be a major undertaking
and might involve wasted effort. Many handling operations, e.g. lifting a teacup, will involve
negligible handling risk. To help identify situations where a more detailed risk assessment is
necessary, the Health and Safety Executive has developed a filter to screen out straightforward
cases.
The filter is based on a set of numerical guidelines developed from data in published scientific
literature and on practical experience of assessing risks from manual handling. They are
pragmatic, tried and tested; they are not based on any precise scientific formulae. The intention is
to set out an approximate boundary within which the load is unlikely to create a risk of injury
sufficient to warrant a detailed assessment.
15
The application of the guidelines will provide a reasonable level of protection to around 95% of
working men and women. However, the guidelines should not be regarded as safe weight limits
for lifting. There is no threshold below which manual handling operations may be regarded as
‘safe’. Even operations lying within the boundary mapped out by the guidelines should be avoided
or made less demanding wherever it is reasonably practicable to do so.
Guidelines for Lifting & Lowering
The guidelines for lifting and lowering operations assume that the load is easy to grasp with both
hands and that the operation takes place in reasonable working conditions with the handler in a
stable body position. They take into consideration the vertical and horizontal position of the hands
as they move the load during the operation, as well as the height and reach of the individual
handler. For example, if a load is held at arm’ length or the hands pass above shoulder height, the
capability to lift or lower is reduced significantly. The basic guideline figures for identifying when
the manual lifting and lowering operations may need a detailed assessment are set out in
Appendix 2.
If the handler’s hands enter more than one of the box zones during the operation, the smallest
weight figures apply. It is important to remember, however, that the transition from one box zone
to another is not abrupt; an intermediate figure may be chosen when the handler’s hands are close
to a boundary. Where lifting or lowering with the hands beyond the box zone is unavoidable, a
more detailed assessment should always be made.
These basic guideline figures for lifting and lowering are for relatively infrequent operations – up to
approximately 30 operations per hour. The guideline figures will have to be reduced if the
operation is repeated more often. As a rough guide, the figures should be reduced by 30% where
the operation is repeated once or twice per minute, by 50% where the operation is repeated
around five to eight times per minute and by 80% where the operation is repeated more than 12
times per minute.
Even if the above conditions are satisfied, a risk assessment should be made where:
the worker does not control the pace of work
pauses for rest are inadequate or there is on change of activity which provides an opportunity
to use different muscles
the handler must support the load for any length of time
Concerns are expressed by staff, accident forms indicate a need for assessments or work
related musculo-skeletal injuries have occurred.
Guidelines for Carrying
16
Similar guideline figures apply to carrying out operations where the load is held against the body
and is carried no further than about 10m without resting. If the load is carried over a longer
distance without resting or the hands are below knuckle height then a more detailed risk
assessment should be made.
Where the load can be carried securely on the shoulder without first having to be lifted (as for
example when unloading sacks from a lorry) the guideline figures can be applied to carrying
distances in excess of 10m.
Guidelines for Pushing & Pulling
For pushing and pulling operations (whether the load is slid, rolled or supported on wheels), the
guidelines figures assume the force is applied with the hands between knuckle and shoulder
height. The guideline figure for starting or stopping the load is a force of about 25kg (i.e. about
250 Newtons) for men and about 16kg (i.e. about 160 Newtons) for women. The guideline figure
for keeping the load in motion is a force of about 10kg (i.e. about 100 Newton’s) for men and about
7kg (i.e. about 70 Newtons) for women.
There is no specific limit to the distance over which the load is pushed or pulled provided there are
adequate opportunities for rest or recovery.
See Appendix 3 and 4 for further guidance
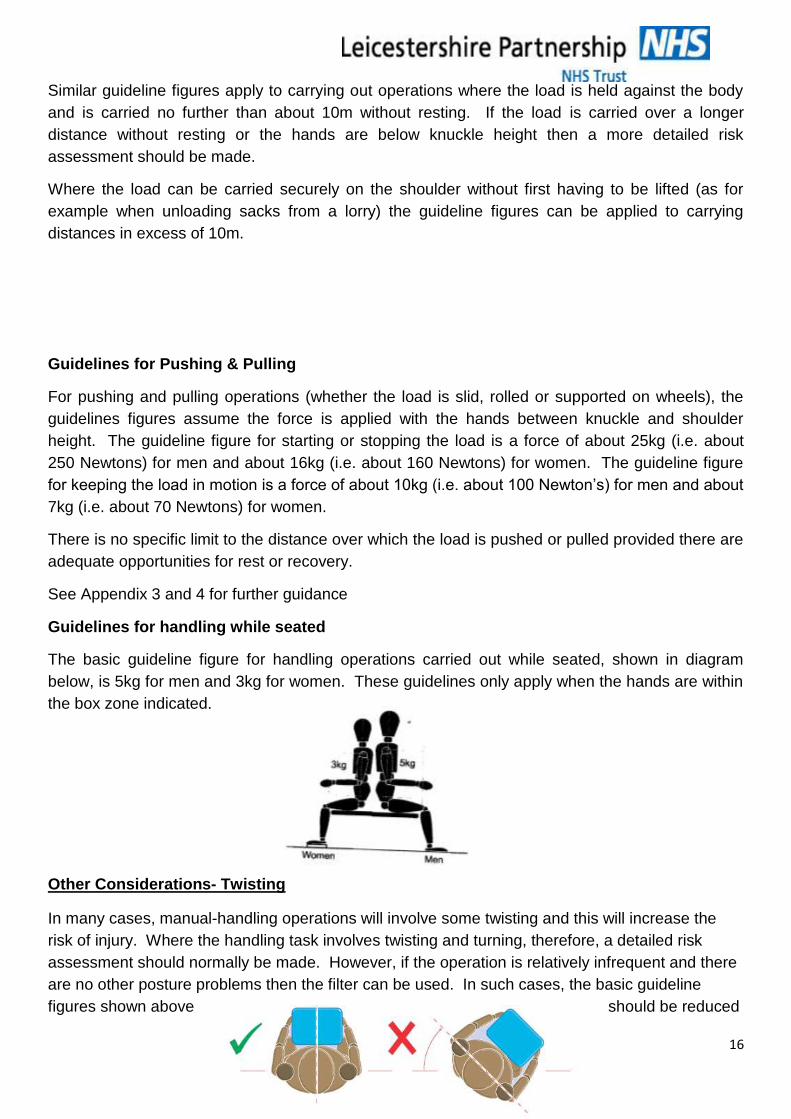
Guidelines for handling while seated
The basic guideline figure for handling operations carried out while seated, shown in diagram
below, is 5kg for men and 3kg for women. These guidelines only apply when the hands are within
the box zone indicated.
Other Considerations- Twisting
In many cases, manual-handling operations will involve some twisting and this will increase the
risk of injury. Where the handling task involves twisting and turning, therefore, a detailed risk
assessment should normally be made. However, if the operation is relatively infrequent and there
are no other posture problems then the filter can be used. In such cases, the basic guideline
figures shown above should be reduced
17
if the handler twists to the side during the operation. As a rough guide, the figures should be
reduced by about 10% where the handler twists through 45o and by about 20% where the handler
twists through 90o.
Remember: The use of these guidelines does not affect the employer’s duty to avoid or reduce
risk of injury where this is reasonably practicable. The guideline figures therefore, should not be
regarded as weight limits for safe lifting. They are an aid to highlight where a risk assessment is
most needed.
9.PERFORMING A RISK ASSESSMENT
Manual handling key workers are ideal for performing risk assessment. This is because they will
have a good understanding of the nature of the work and processes within their areas.
It is very important to ensure the manager is also aware when the assessment is being performed
and that they take responsibility for ‘actioning’ strategies of reducing the risk to employees.
Actions to reduce the risk to employees may be to provide training sessions, purchase new
equipment or to redesign the task.
Some actions will have cost implications; it will be the managers’ decision to compare the nature
of the risk against the cost of reducing the risk.
Source: Manual Handling at Work a Brief Guide
http://www.hse.gov.uk/pubns/indg143.pdf
18
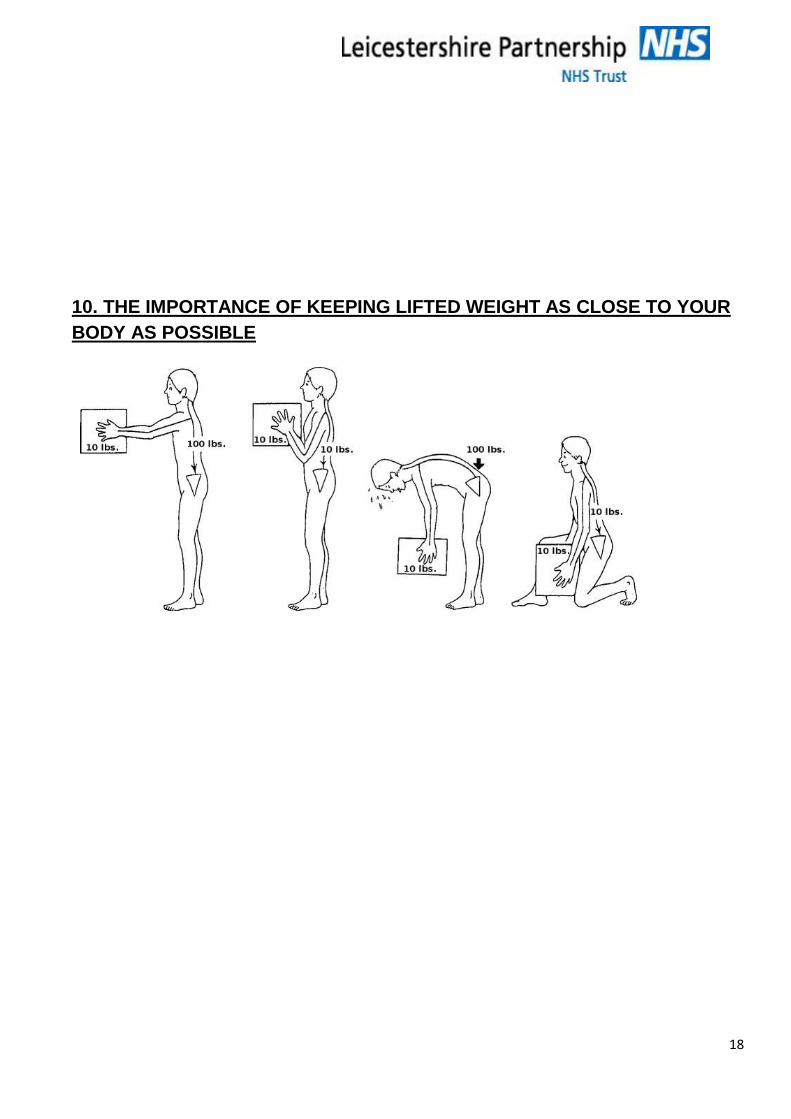
10. THE IMPORTANCE OF KEEPING LIFTED WEIGHT AS CLOSE TO YOUR
BODY AS POSSIBLE

19
10. HOW DIFFERENT POSITIONS AFFECT SPINAL PRESSURE
Relative changes in spinal pressure/load in the 3rd lumbar disc in various positions in living
subjects.
11. SIMPLE TECHNIQUES OF SAFE LIFTING
Think before lifting/handling.
Plan the lift. Roughly how heavy is it? Will
you need help-another person, a mechanical
aid? Where is the load going to be put? How
do you intend to get it there?
20
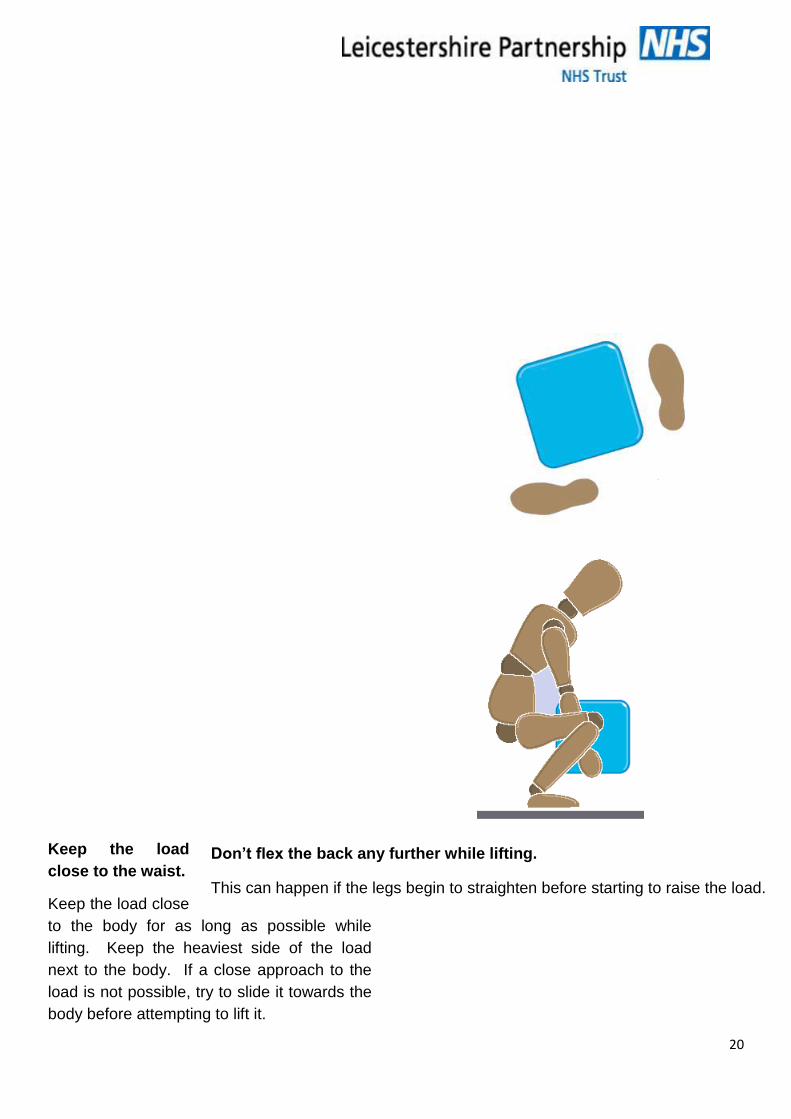
Don’t flex the back any further while lifting.
This can happen if the legs begin to straighten before starting to raise the load.
Keep the load
close to the waist.
Keep the load close
to the body for as long as possible while
lifting. Keep the heaviest side of the load
next to the body. If a close approach to the
load is not possible, try to slide it towards the
body before attempting to lift it.

21
Avoid twisting the back or leaning sideways, especially while the back is bent.
Shoulders should be kept level and facing in the same direction as the hips. Turning by
moving the feet is better than twisting and lifting at the same time.
Adopt a stable position.
The feet should be apart with one leg slightly
forward to maintain balance (alongside the
load, if it is on the ground). Be prepared to
move your feet during the lift to maintain your
stability.
Get a good hold.
Where possible the load should be hugged as
close as possible to the body.
Start in a good position.
At the start of the lift, slight bending of the
back, hips and knees is preferable to fully
flexing the back (stooping) or fully flexing the
hips and knees (squatting).
22
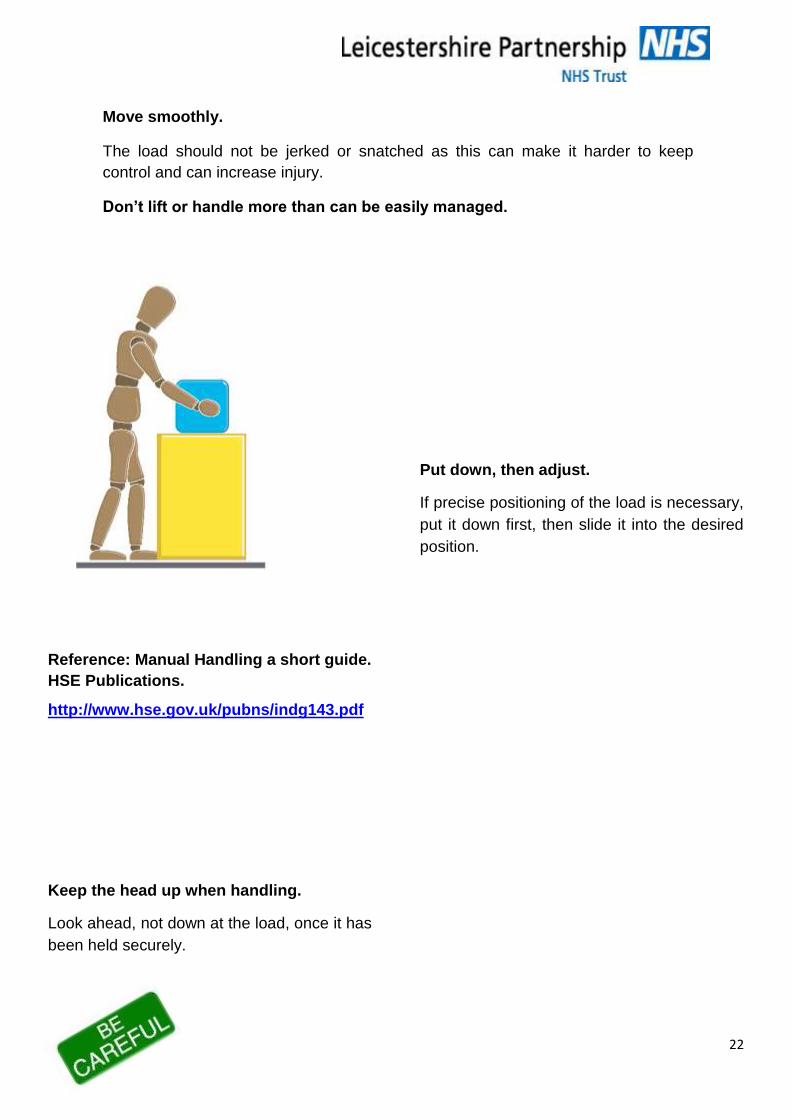
Move smoothly.
The load should not be jerked or snatched as this can make it harder to keep
control and can increase injury.
Don’t lift or handle more than can be easily managed.
There is a difference between what people can lift and what they can safely
lift.
Reference: Manual Handling a short guide.
HSE Publications.
http://www.hse.gov.uk/pubns/indg143.pdf
Keep the head up when handling.
Look ahead, not down at the load, once it has
been held securely.
Put down, then adjust.
If precise positioning of the load is necessary,
put it down first, then slide it into the desired
position.
23
Situations Where Special Care is Needed
Lifting Odd Shapes:
Be sure to get help if the item is too bulky or awkward to handle alone. If you can handle it alone:
Test the load to check its weight.
Get as close as you can to the load.
Follow the steps for lifting correctly, remembering to lift with your legs.
12. THE ANATOMY OF THE HUMAN SPINE
24
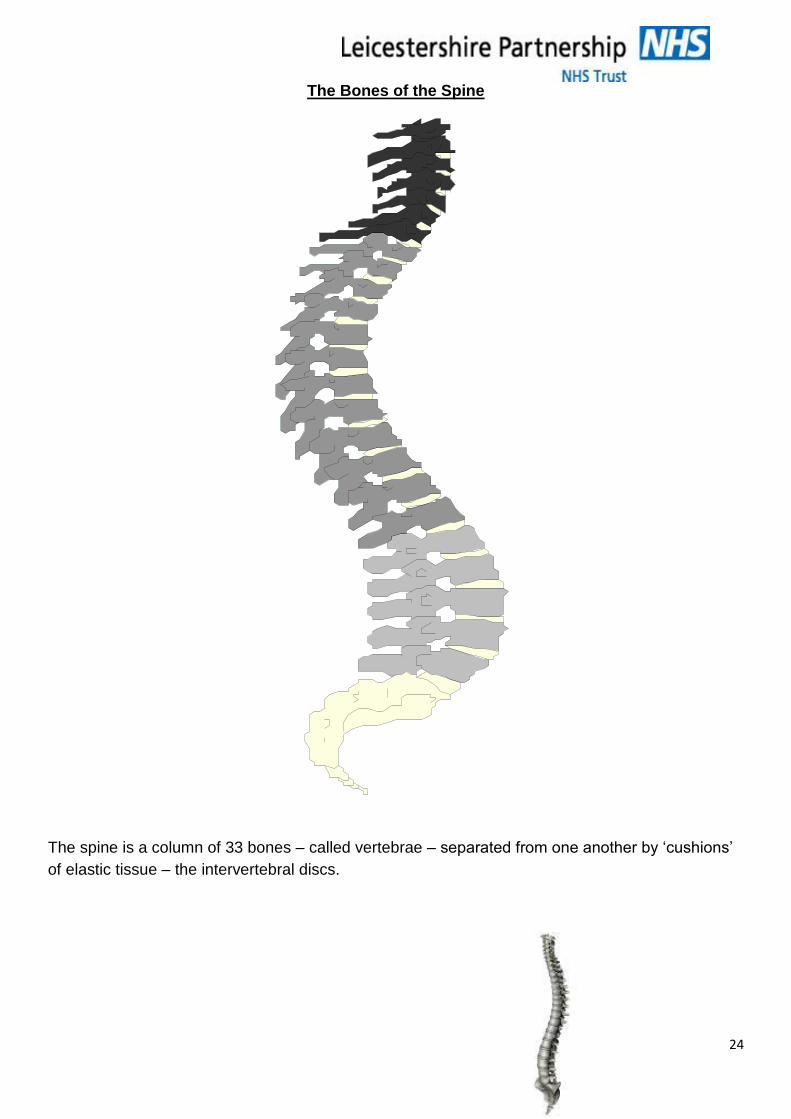
The Bones of the Spine
The spine is a column of 33 bones – called vertebrae – separated from one another by ‘cushions’
of elastic tissue – the intervertebral discs.

25
The spine has 3 main functions:
To support the upper body
To allow you to be mobile
To provide a protective casing for the spinal cord
The spine of a newborn baby is ‘C’ shaped having two primary curves in the chest and sacral
regions. Once the infant lifts its head and, later, begins to walk, the secondary curves of the
neck and the lower back regions develop, and the spine takes on its characteristic 4 curved
‘double S’ shape.
No two vertebrae are exactly alike: their size and shape varies slightly according to their position in
the spinal column. The first two cervical vertebrae – the atlas and the axis - are especially
designed to give the greatest degree of mobility for head movements, but the general shape of all
the vertebrae permits wide ranging mobility in all directions. However, the bones of the sacrum
and coccyx are fused together and are generally classed as just two bones. There is very little
movement in this region of the spine. The upper surface of S1 bears the full weight of the whole
upper body: this would tend to rotate the whole sacrum forwards were it not for strong controlling
ligaments.
The remaining vertebrae have a broadly similar structure. Although formed from just one piece of
bone, each vertebra has several parts: at the front is the body, the thick, kidney shaped weight-
bearing portion; from this, two short thick portions – the pedicles – project backwards, one on
either side, and join with a flat piece of bone called the lamina. Thus, a space is formed through
which the spinal cord and blood vessels can pass. Intervertebral notches between the pedicles of
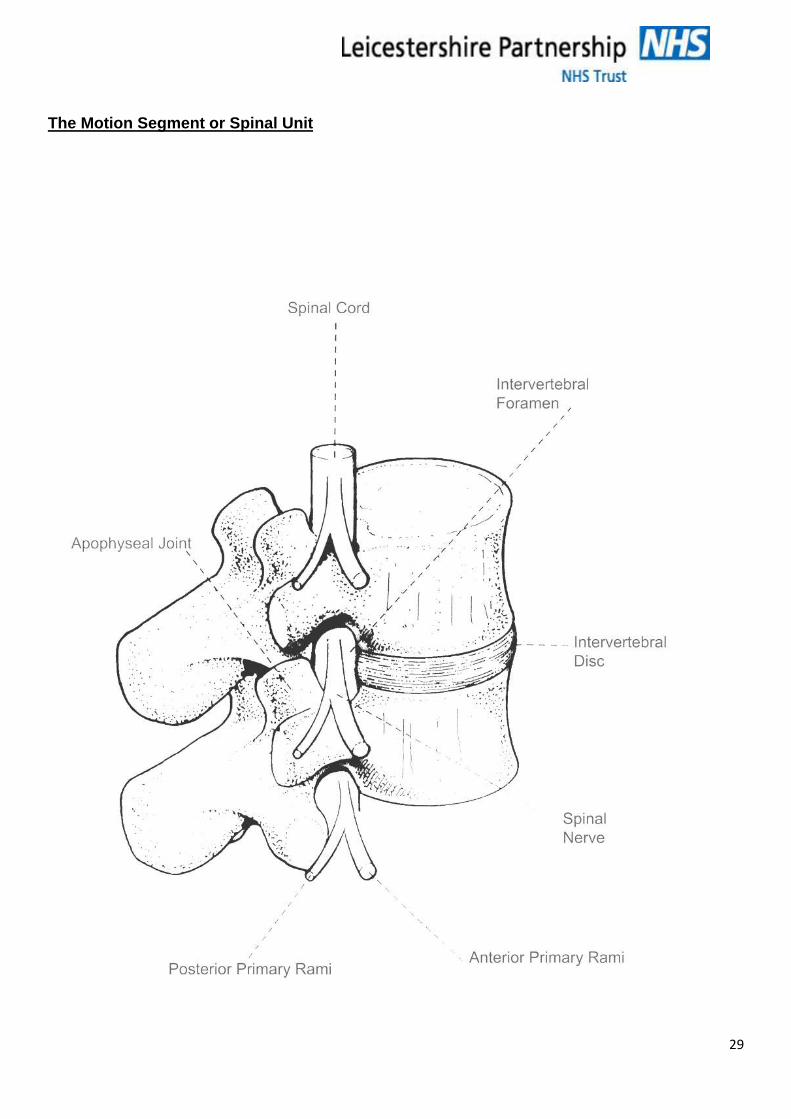
adjacent vertebra form the intervertebral foramen through which the spinal nerves emerge, and
through which blood vessels pass. Finally, 7 small pieces of bone – the processes – project from
the lamina: those projecting backward and to either side provide points to which ligaments and
muscles are attached, and those projecting upwards and downwards form facet or
zygapophyseal joints (sometimes referred to, more simply, as Z joints) with the vertebrae above
and below.
The thoracic vertebrae provide attachments for the rib cage, which, in turn, limits spinal movement
in this region. The lumbar vertebrae are the biggest and the toughest, designed to bear the full
weight of the trunk, arms and head and to withstand the strain placed upon them from the stresses
of twisting trunk movements. There is a considerable degree of mobility in this region of the spine.
With the exception of the intervertebral disc, all the structures of the vertebral column have a
liberal blood and nerve supply.
Any two vertebrae and all the structures around and between them form the motion segment -
also known as a spinal unit.
The Joints of the Spine
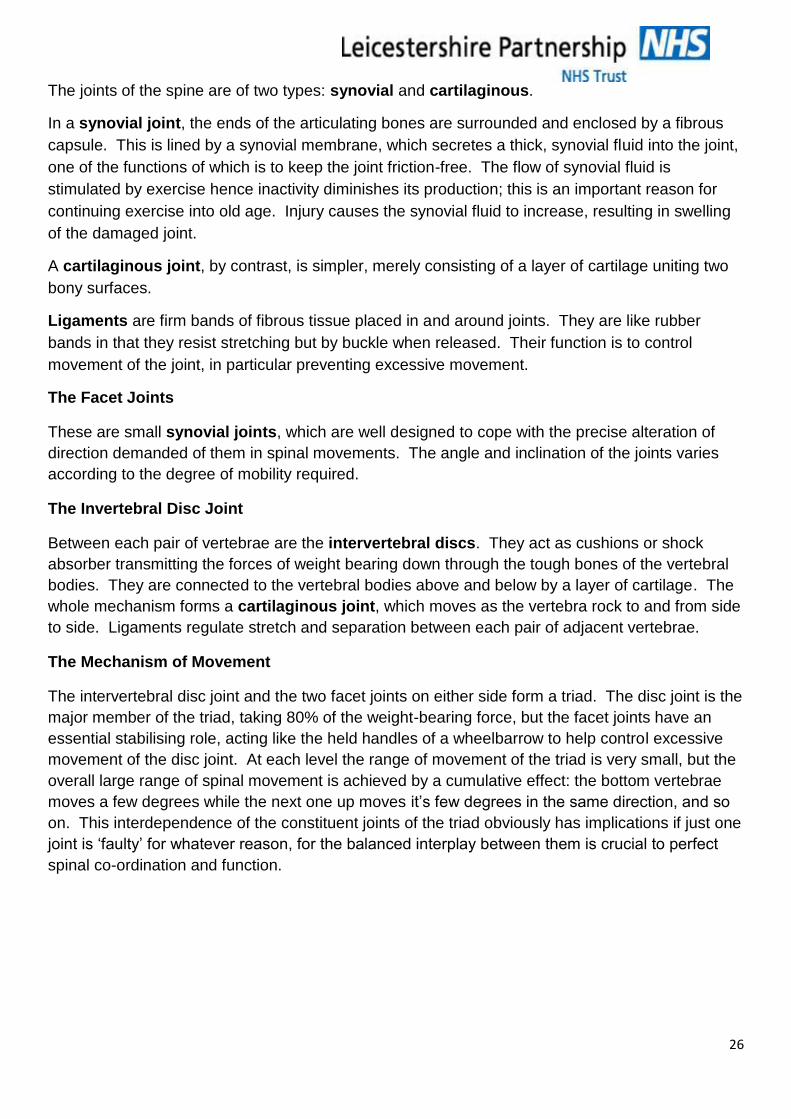
26
The joints of the spine are of two types: synovial and cartilaginous.
In a synovial joint, the ends of the articulating bones are surrounded and enclosed by a fibrous
capsule. This is lined by a synovial membrane, which secretes a thick, synovial fluid into the joint,
one of the functions of which is to keep the joint friction-free. The flow of synovial fluid is
stimulated by exercise hence inactivity diminishes its production; this is an important reason for
continuing exercise into old age. Injury causes the synovial fluid to increase, resulting in swelling
of the damaged joint.
A cartilaginous joint, by contrast, is simpler, merely consisting of a layer of cartilage uniting two
bony surfaces.
Ligaments are firm bands of fibrous tissue placed in and around joints. They are like rubber
bands in that they resist stretching but by buckle when released. Their function is to control
movement of the joint, in particular preventing excessive movement.
The Facet Joints
These are small synovial joints, which are well designed to cope with the precise alteration of
direction demanded of them in spinal movements. The angle and inclination of the joints varies
according to the degree of mobility required.
The Invertebral Disc Joint
Between each pair of vertebrae are the intervertebral discs. They act as cushions or shock
absorber transmitting the forces of weight bearing down through the tough bones of the vertebral
bodies. They are connected to the vertebral bodies above and below by a layer of cartilage. The
whole mechanism forms a cartilaginous joint, which moves as the vertebra rock to and from side
to side. Ligaments regulate stretch and separation between each pair of adjacent vertebrae.
The Mechanism of Movement
The intervertebral disc joint and the two facet joints on either side form a triad. The disc joint is the
major member of the triad, taking 80% of the weight-bearing force, but the facet joints have an
essential stabilising role, acting like the held handles of a wheelbarrow to help control excessive
movement of the disc joint. At each level the range of movement of the triad is very small, but the
overall large range of spinal movement is achieved by a cumulative effect: the bottom vertebrae
moves a few degrees while the next one up moves it’s few degrees in the same direction, and so
on. This interdependence of the constituent joints of the triad obviously has implications if just one
joint is ‘faulty’ for whatever reason, for the balanced interplay between them is crucial to perfect
spinal co-ordination and function.
27
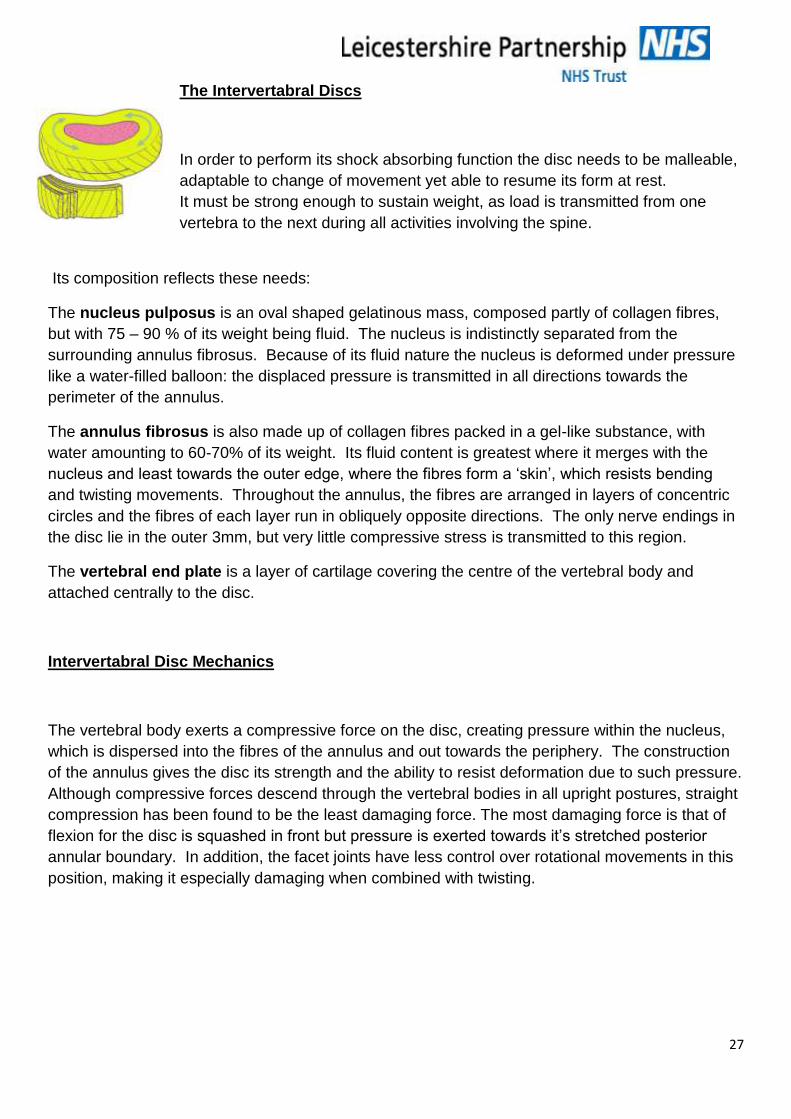
The Intervertabral Discs
In order to perform its shock absorbing function the disc needs to be malleable,
adaptable to change of movement yet able to resume its form at rest.
It must be strong enough to sustain weight, as load is transmitted from one
vertebra to the next during all activities involving the spine.
Its composition reflects these needs:
The nucleus pulposus is an oval shaped gelatinous mass, composed partly of collagen fibres,
but with 75 – 90 % of its weight being fluid. The nucleus is indistinctly separated from the
surrounding annulus fibrosus. Because of its fluid nature the nucleus is deformed under pressure
like a water-filled balloon: the displaced pressure is transmitted in all directions towards the
perimeter of the annulus.
The annulus fibrosus is also made up of collagen fibres packed in a gel-like substance, with
water amounting to 60-70% of its weight. Its fluid content is greatest where it merges with the
nucleus and least towards the outer edge, where the fibres form a ‘skin’, which resists bending
and twisting movements. Throughout the annulus, the fibres are arranged in layers of concentric
circles and the fibres of each layer run in obliquely opposite directions. The only nerve endings in
the disc lie in the outer 3mm, but very little compressive stress is transmitted to this region.
The vertebral end plate is a layer of cartilage covering the centre of the vertebral body and
attached centrally to the disc.
Intervertabral Disc Mechanics
The vertebral body exerts a compressive force on the disc, creating pressure within the nucleus,
which is dispersed into the fibres of the annulus and out towards the periphery. The construction
of the annulus gives the disc its strength and the ability to resist deformation due to such pressure.
Although compressive forces descend through the vertebral bodies in all upright postures, straight
compression has been found to be the least damaging force. The most damaging force is that of
flexion for the disc is squashed in front but pressure is exerted towards it’s stretched posterior
annular boundary. In addition, the facet joints have less control over rotational movements in this
position, making it especially damaging when combined with twisting.
28
Disc Nutrition
The disc has no blood supply of its own, and so obtains its nourishment in one of two ways:
By diffusion from a capillary bed beneath the vertebral end plates
By fluid absorption from the surrounding tissues
Fluid absorption is greatest when lying – the stress-free discs tank up with fluid overnight, causing
an increase in height of 15-25mm. During the day, forces on the discs resulting from activity in
upright postures cause moisture to be squeezed out, and we lose height again. The greatest loss
of fluid takes place within the first ½ - 1 hour of rising, and exercise or lifting during this period
increases the potential for injury.
Because the discs have no blood supply of their own, injured discs heal very slowly, if at all.
Wear and tear – as a result of prolonged abuse of static and repetitive postures – together with
trauma can lead to a variety of changes within the disc, all of which compromise its efficiency. In
addition, ageing affects flexibility of the disc, and thus the mobility of the spine. Forward bending
and rotation, particularly traumatises the back of the disc and the resulting distortion may progress
to herniation or prolapse of the disc, should this occur the spinal cord, or the adjacent spinal nerve
root, will be compressed, resulting in the pain.
29
The Motion Segment or Spinal Unit
30
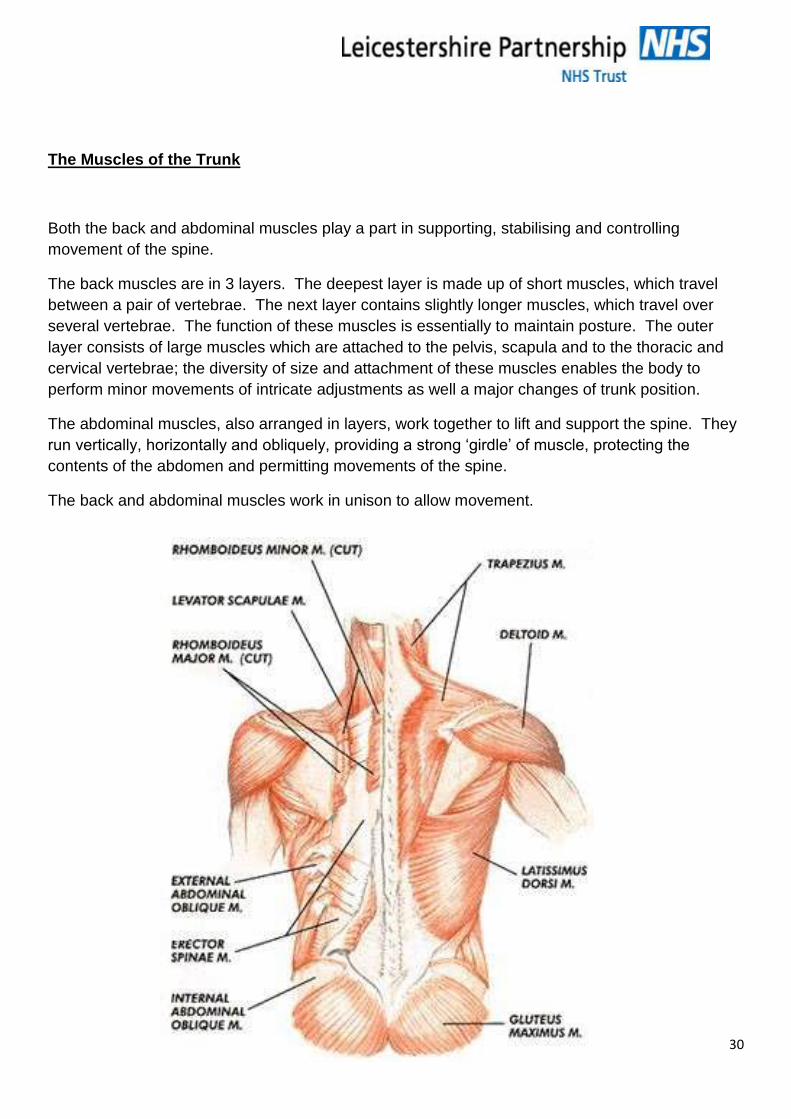
The Muscles of the Trunk
Both the back and abdominal muscles play a part in supporting, stabilising and controlling
movement of the spine.
The back muscles are in 3 layers. The deepest layer is made up of short muscles, which travel
between a pair of vertebrae. The next layer contains slightly longer muscles, which travel over
several vertebrae. The function of these muscles is essentially to maintain posture. The outer
layer consists of large muscles which are attached to the pelvis, scapula and to the thoracic and
cervical vertebrae; the diversity of size and attachment of these muscles enables the body to
perform minor movements of intricate adjustments as well a major changes of trunk position.
The abdominal muscles, also arranged in layers, work together to lift and support the spine. They
run vertically, horizontally and obliquely, providing a strong ‘girdle’ of muscle, protecting the
contents of the abdomen and permitting movements of the spine.
The back and abdominal muscles work in unison to allow movement.
31
Mechanisms to Support the Spine Whilst Lifting
There are 3 main physiological and anatomical mechanisms that enable the spine to be supported
during lifting, carrying, pulling and pushing.
These are:
Raised intra-abdominal pressure:
Tension in the thoracolumbar fascia:
And combinations of the two together with correct use of muscles of the
abdomen and back.
The first of these – intra-abdominal pressure is a physiological mechanism created by contraction
of the transverse and oblique abdominal muscles and the muscles of the pelvic floor. These
muscles contract involuntarily during lifting which raises the intra-abdominal pressure. This then
acts upwards on the diaphragm like a balloon, which has the effect of converting the trunk into a
more solid cylinder. The spine is, therefore, braced and the load is transmitted over a wider area.
The described movement can be performed actively by contracting the abdominal muscles to
expel air against a close glottis. This forcing movement is known as the Valsalva Manoeuvre and
is used to evaluate low back pain. The movement increases intradiscal pressure and increases
pain because the mechanical load on the spine, produced by muscular contraction, is raised.
The Thoracolumbar Fascia comes into action passively at the limit of lumbar flexion on a
contraction of the back and abdominal muscles. It has the effect of stabilising the ligamentous
mechanisms of the back and helps to maintain the equilibrium of the spine by resisting flexion.
This provides a major support mechanism for lifting.
The abdominal and back muscles provide the third mechanism for back support. These muscles
interact in a complex way to resist the force of flexion and stabilise the spine. They are an
important part of the process of lifting and it is vital that their strength is maintained.
Biomechanics
“Biomechanics is the study of the application of mechanical principles to living tissue, for example,
forces and levers.”
(Guide to the Handling of People (2005)
There are two main areas we wish to explore:
Centre of Gravity
32
Line of Gravity and stability
Centre of Gravity
Centre of gravity is the centre of the space that a body occupies.
This is straightforward with bodies of a regular or uniform shape such as a cylinder.
The human body is not a uniform shape however, and the centre of gravity moves as the body changes position.
When a person stands upright with arms by his sides the centre of gravity approximates to his pelvis – (i.e. the centre of his physical dimensions.)
People who cannot control their pelvis when standing cannot stand without help.
In order to walk the body needs to shift the pelvis to one side. This alters the centre or gravity to allow the non-weight bearing leg to swing forward.
In summary therefore:
A person with no static pelvic control cannot stand.
And a person with no dynamic pelvic control cannot walk.
If a person raises his arms above his head the centre of gravity will rise.
This results in the body becoming less stable. The general rule being that the further the centre of gravity is from the centre of the body the more effort is needed to keep the body stable.
Sometimes the centre of gravity will face outside the physical body – for example when a person is in a sitting position. Though this may seem strange it explains the movement a body has to make in order to get out of such positions. To move from a seated position the person would have to move to the edge of the seat in order that the centre of gravity moves closer in to the body.
Though straightforward for many of us, this manoeuvre is difficult for people who have problems with the muscles of the abdomen such as pregnant women or elderly, frail men and women. This is because in order to move from sitting, the body must be able to lean forward at the abdomen.
Line of Gravity
This is an imaginary line that runs in a vertical direction down from the centre of gravity.
33
For a body to remain stable it must retain the line of gravity within its base (The Guide to the
Handling of People 2005).
When walking normally as already mentioned the centre of gravity moves from side to side. The
line of gravity therefore always falls along the supporting leg; the foot forming the supporting base.
The supporting base could be widened by spreading the feet, changing position, or by artificial
means such as crutches or a Zimmer Frame if stability has been lost. In order to move from a
position of stability a temporary instability must be created – for example when divers or speed
skaters lean forward. Their position is unstable but needs to be so to help them move.
If, however, instability is created by adopting a leaning forward position but no movement occurs
the body is forced to provide a counterbalance. This is provided by the effort of internal structures
of muscles and ligaments in the back. If the body did not do this it would topple over. The person
has become unstable in this care because the centre of gravity has moved forward and the line of
gravity has fallen outside the base.
The longer the external lever which pulls the body forward the greater force the muscles ligaments
must produce in order to keep the body in this leaning position. Unfortunately for the body this
causes compression of the spinal discs, which in turn leads to muscles becoming fatigued.
Ultimately all the major groups of muscles are working to prevent the body falling forward. If the
person wanted to move something from this position only the minor muscle groups of the arms are
available to provide the effort needed. The action intended has therefore become inefficient.
In effort, when load bearing, the greater the distance of the lever arm from the centre of gravity the
more impact that load has on the structures of the spine.
In order to reduce these forces the body must bend the knees and spread the feet therefore
widening the base. The line of gravity is therefore brought back into the base and the body
remains stable. Now there is less demand on the muscles and ligaments and less tension in the
body as a whole. Because the lever arm has been reduced the effective force of any load has
been minimised though the weight remains constant.
References: The Guide to the Handling of People 5th Edition, Published by Backcare, RCN and the
National Back Exchange (2005)
The Back Functions, Malfunctions and Care.
Braggins S Mosby (1994)
Static Muscle Work
34
When you are using a muscle but it is not moving, then the muscle is working statically e.g. when
holding a tray your arm muscles are working statically.
When muscles work statically, the blood flow is restricted, causing a build-up of waste products.
This rapidly makes the muscles fatigue and more prone to injury.
“IT IS IMPORTANT WHEN HANDLING TO LIMIT THE AMOUNT OF STATIC WORK”
What is static loading?
Static loading (or static postures) occurs when the body is kept in the same and unsound position
for a prolonged period of time.
Sometimes known as the “invisible load”.
Occurs during all kinds of ordinary activities within health:
Making beds
Chatting with clients in wheelchairs
Taking care of hygiene needs
Working at computers
Gripping tools
These static positions can cause pain in the neck back and shoulders
Not moving impedes the flow of blood that is needed to bring nutrients to the muscles and to carry
away the waste products of muscle metabolism. When awkward working positions must be
maintained (without support) it also increases the static loading of muscles and tendons, and
causes the body to fatigue even more quickly.
Exposure to contact stress maybe a by-product of prolonged static loading. When muscles
become fatigued, employees look for ways to rest the affected areas. Sometimes employees may
rest their arms or wrists on the hard surface and edges of the workstation. For example computer
operators may relieve static loading on their forearms and wrists by resting their wrists on
computer table. However the blood flow and the movement of their wrist may continue to be, due
to the contact stress.
Constant muscle tension can lead to swelling and pressure on nearby nerves, static loading of the
tendons can also lead to inflammation and swelling to the point where motion is restricted and the
swelling may put pressure on (pinch) the nerves.
35
13. CARE OF YOUR SPINE
Care of your spine is not just work related. It is vital to look after your spine at home, at work and
in leisure activities. There is evidence that heavy manual labour, awkward postures, manual
handling, and a previous or existing injury are all risk factors in the development of
musculoskeletal disorders.
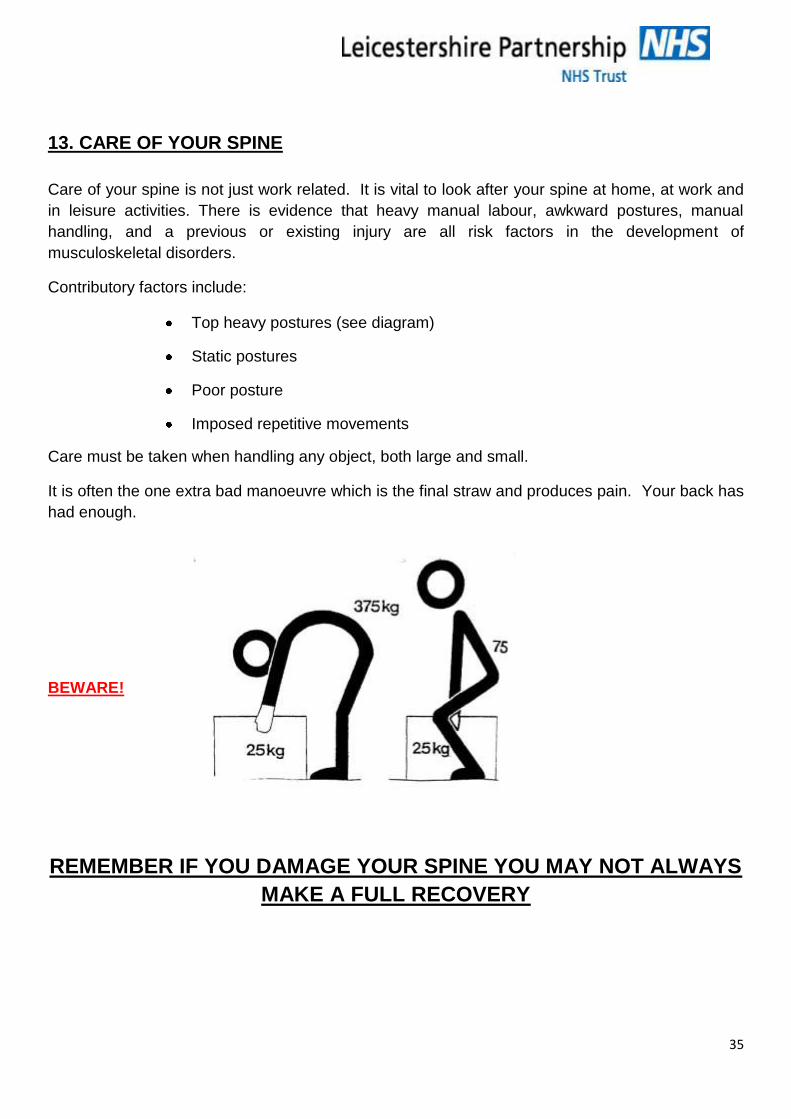
Contributory factors include:
Top heavy postures (see diagram)
Static postures
Poor posture
Imposed repetitive movements
Care must be taken when handling any object, both large and small.
It is often the one extra bad manoeuvre which is the final straw and produces pain. Your back has
had enough.
BEWARE!
REMEMBER IF YOU DAMAGE YOUR SPINE YOU MAY NOT ALWAYS
MAKE A FULL RECOVERY

36
There are four situations which are known to be especially risky for your back.
They are:
Lifting after sitting for prolonged
periods (e.g. lifting suitcases out of the
car after a long journey) – because the
back has been kept in a static posture for
a long period of time (imagine the forces
on your discs and the amount of sustained
stretch in your muscles and ligaments)
Avoid injury by arching your back as soon
as you stand up (you should also do this
after stooping - although you should, of
course, avoid stooping!)
Slouching after vigorous exercise (the
resulting aches are usually – incorrectly –
blamed on the exercise) – because the
muscles are warm yet tired and are easily
over-stretched and damaged)
Avoid injury by lying face down (or flat on
your back if this is more comfortable) for
10-15 minutes, then arch your back when
you stand up (it is a good idea to arch your
back when you stand up after resting – as
well as after sitting and stooping!).
Alternatively, lie on your back on the floor
with both lower legs on a chair.
37
Reaching or stretching – because your body weight is often not evenly distributed between
both feet and the spine is stretched at one side more than the other, making it easily prone to
injury.
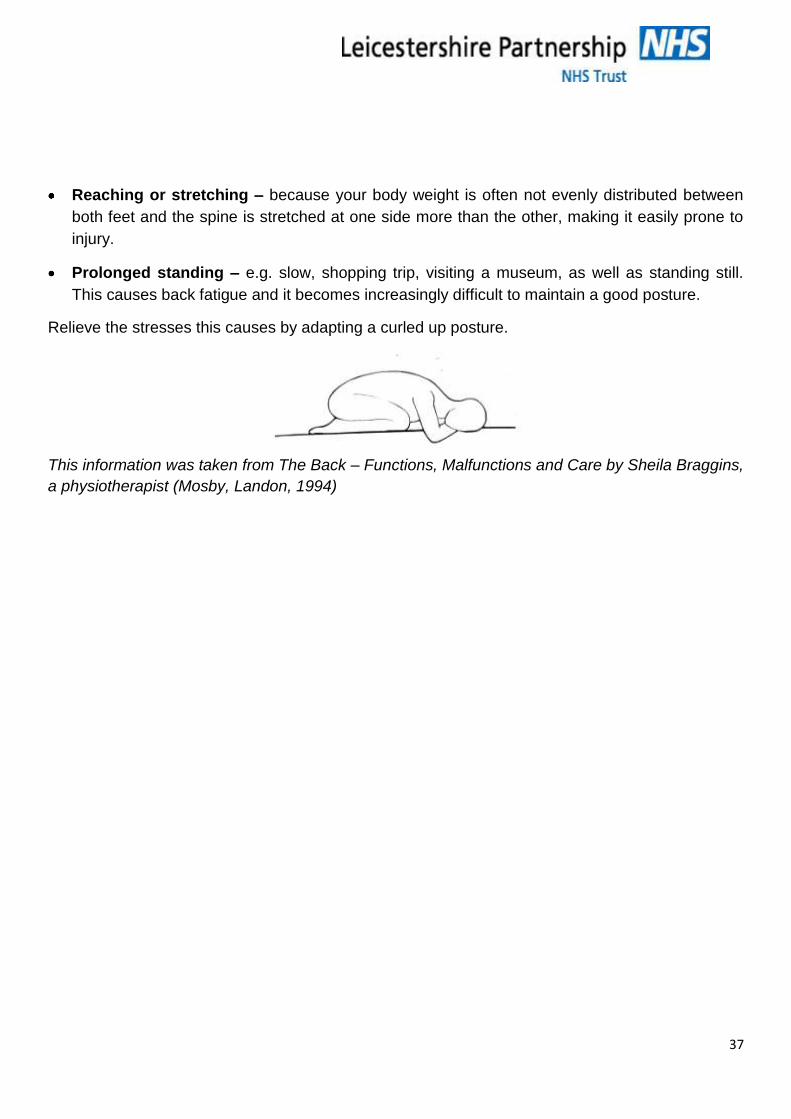
Prolonged standing – e.g. slow, shopping trip, visiting a museum, as well as standing still.
This causes back fatigue and it becomes increasingly difficult to maintain a good posture.
Relieve the stresses this causes by adapting a curled up posture.
This information was taken from The Back – Functions, Malfunctions and Care by Sheila Braggins,
a physiotherapist (Mosby, Landon, 1994)
38
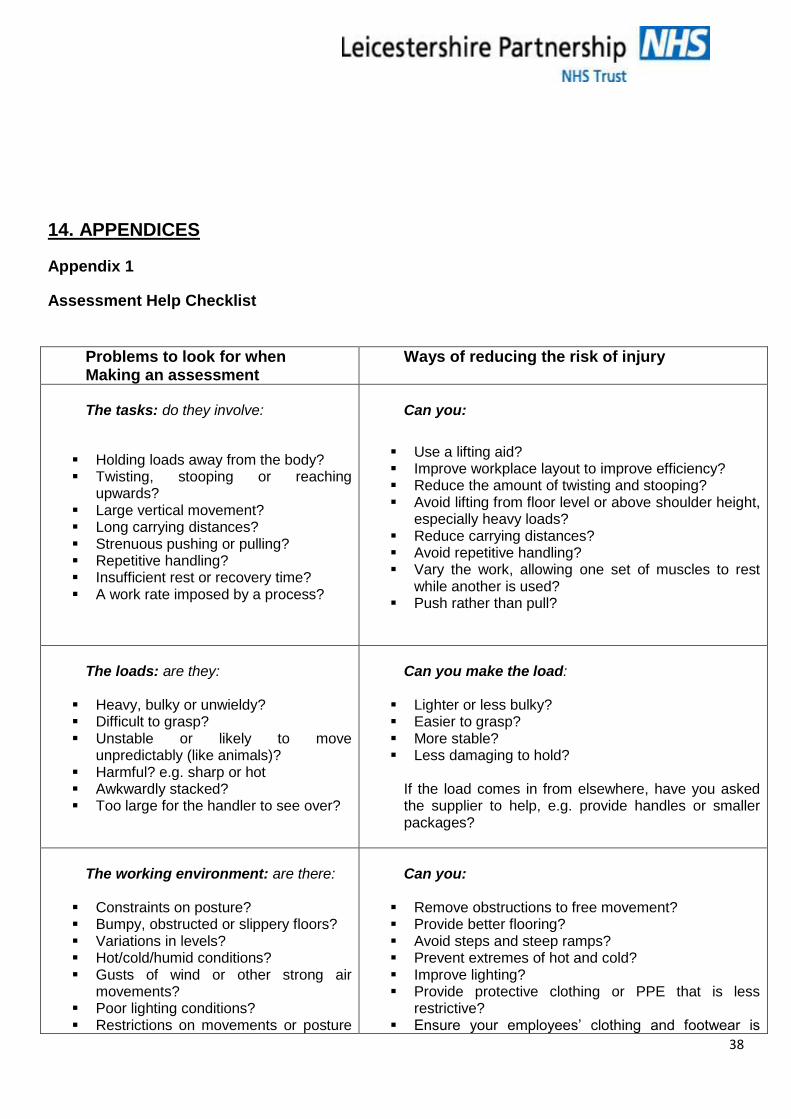
14. APPENDICES
Appendix 1
Assessment Help Checklist
Problems to look for when Making an assessment
Ways of reducing the risk of injury
The tasks: do they involve:
Holding loads away from the body? Twisting, stooping or reaching
upwards? Large vertical movement? Long carrying distances? Strenuous pushing or pulling? Repetitive handling? Insufficient rest or recovery time? A work rate imposed by a process?
Can you:
Use a lifting aid? Improve workplace layout to improve efficiency? Reduce the amount of twisting and stooping? Avoid lifting from floor level or above shoulder height,
especially heavy loads? Reduce carrying distances? Avoid repetitive handling? Vary the work, allowing one set of muscles to rest
while another is used? Push rather than pull?
The loads: are they:
Heavy, bulky or unwieldy? Difficult to grasp? Unstable or likely to move
unpredictably (like animals)? Harmful? e.g. sharp or hot Awkwardly stacked? Too large for the handler to see over?
Can you make the load:
Lighter or less bulky? Easier to grasp? More stable? Less damaging to hold?
If the load comes in from elsewhere, have you asked the supplier to help, e.g. provide handles or smaller packages?
The working environment: are there:
Constraints on posture? Bumpy, obstructed or slippery floors? Variations in levels? Hot/cold/humid conditions? Gusts of wind or other strong air
movements? Poor lighting conditions? Restrictions on movements or posture
Can you:
Remove obstructions to free movement? Provide better flooring? Avoid steps and steep ramps? Prevent extremes of hot and cold? Improve lighting? Provide protective clothing or PPE that is less
restrictive? Ensure your employees’ clothing and footwear is
39
from clothes or personal protective equipment (PPE)?
suitable for their work?
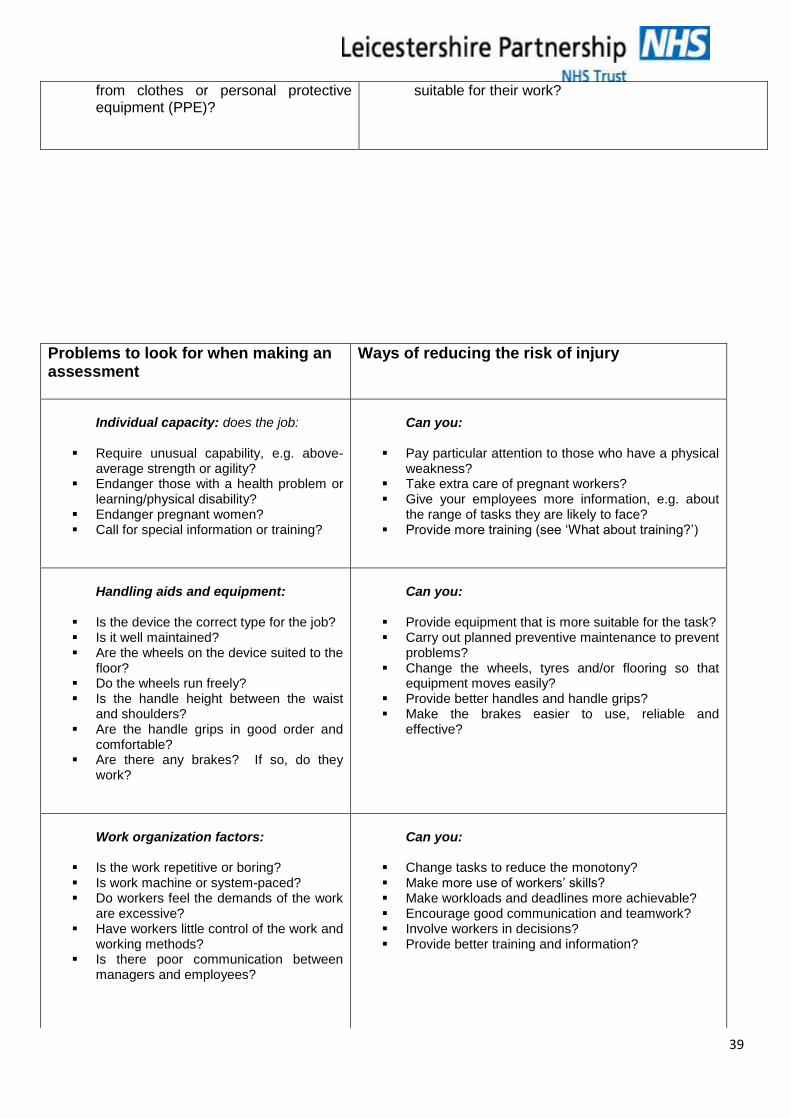
Problems to look for when making an assessment
Ways of reducing the risk of injury
Individual capacity: does the job:
Require unusual capability, e.g. above-
average strength or agility? Endanger those with a health problem or
learning/physical disability? Endanger pregnant women? Call for special information or training?
Can you:
Pay particular attention to those who have a physical
weakness? Take extra care of pregnant workers? Give your employees more information, e.g. about
the range of tasks they are likely to face? Provide more training (see ‘What about training?’)
Handling aids and equipment:
Is the device the correct type for the job? Is it well maintained? Are the wheels on the device suited to the
floor? Do the wheels run freely? Is the handle height between the waist
and shoulders? Are the handle grips in good order and
comfortable? Are there any brakes? If so, do they
work?
Can you:
Provide equipment that is more suitable for the task? Carry out planned preventive maintenance to prevent
problems? Change the wheels, tyres and/or flooring so that
equipment moves easily? Provide better handles and handle grips? Make the brakes easier to use, reliable and
effective?
Work organization factors:
Is the work repetitive or boring? Is work machine or system-paced? Do workers feel the demands of the work
are excessive? Have workers little control of the work and
working methods? Is there poor communication between
managers and employees?
Can you:
Change tasks to reduce the monotony? Make more use of workers’ skills? Make workloads and deadlines more achievable? Encourage good communication and teamwork? Involve workers in decisions? Provide better training and information?
40
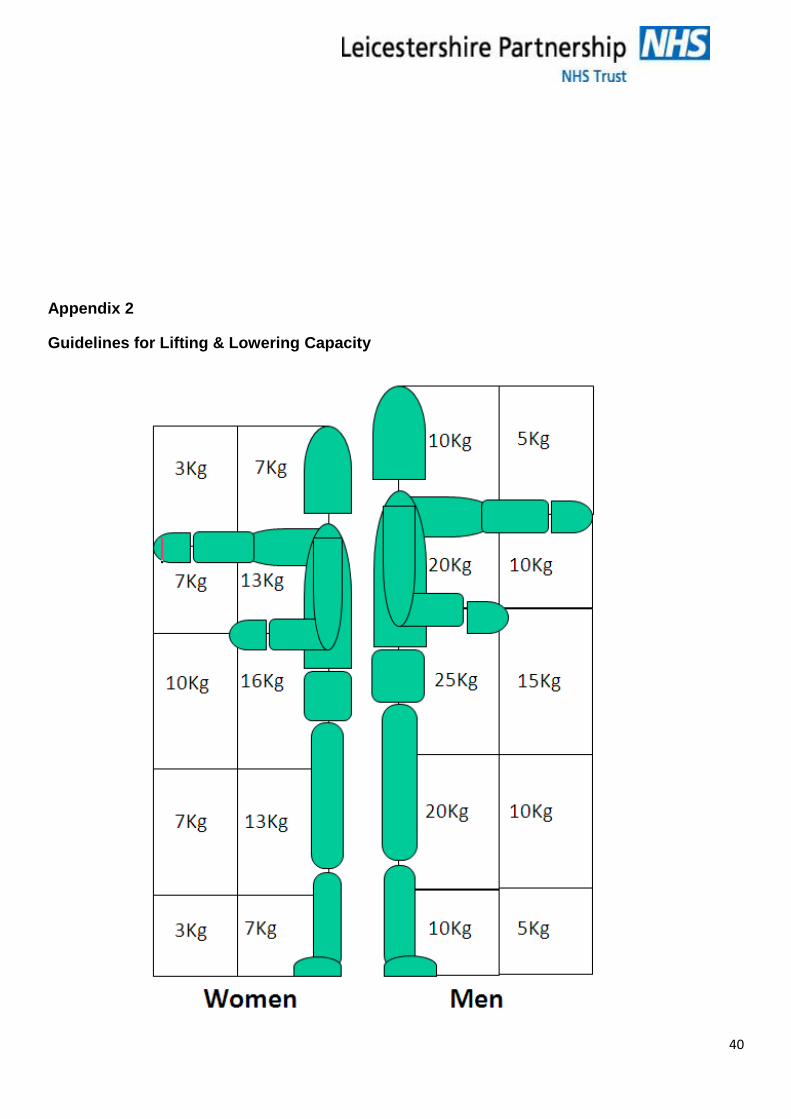
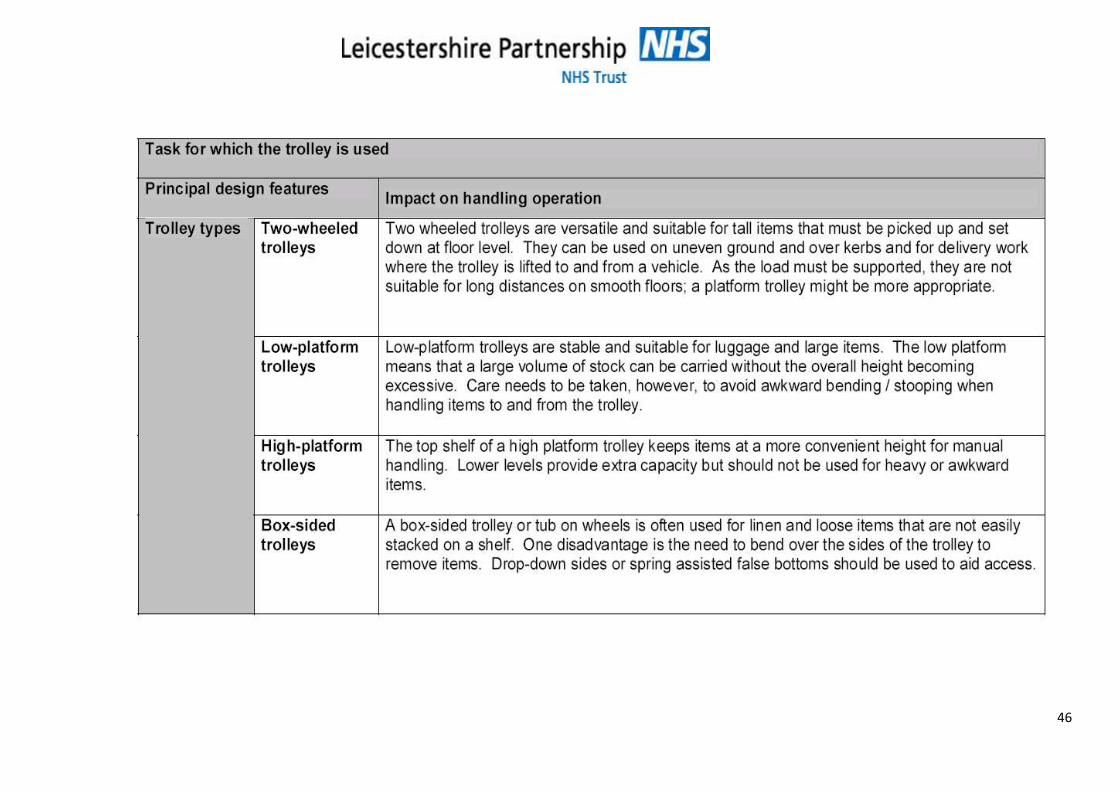
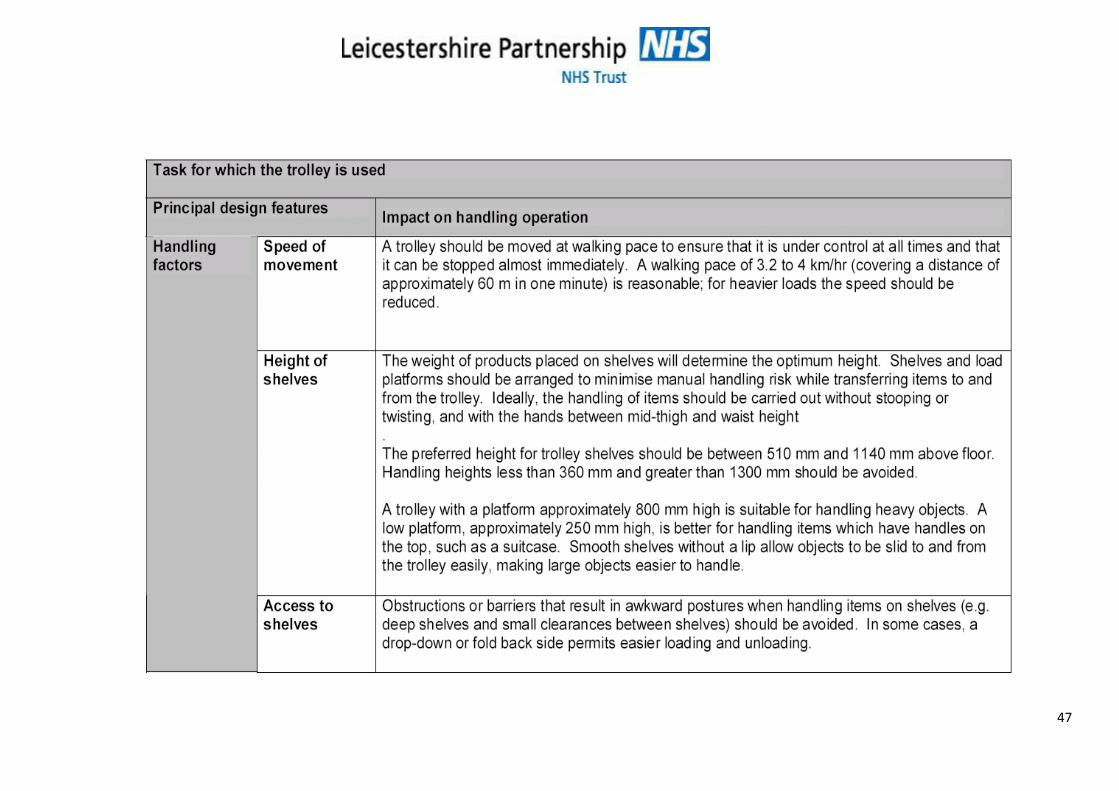
Appendix 2
Guidelines for Lifting & Lowering Capacity
41
Adapted from: Homes D (1997) Risk Assessment the practice – The guide to the handling of
patients. RCN. London - Graham Calvert – Pediatric Clinical Support Nurse – 2004.
These guidelines assume that the handler is fit, well trained, working under favourable conditions,
in a stable body position and with a load that is easy to grasp. If this is not the case, the
recommended weights should be reduced further.
Appendix 3
Manual Pushing & Pulling
Few definitions exist which describe the application of human effort involved in pushing and
pulling. This may well stem from the considerable variations in bodily actions, which these types of
force exertion entail.
Hoozemans et al. (1998), in a review of musculoskeletal risk factors associated with pushing and
pulling, elected to use definitions provided by Martin and Chaffin (1972), and Baril-Gingras and
Lortie (1995):
“Pushing and pulling could be defined as the exertion of (hand) force, of which the direction of the
major component of the resultant force is horizontal, by someone on another object or person. In
pushing the (hand) force is directed away from the body
They went on to specify that:
“The exertion of force is not always directed horizontal to be called a push or a pull force, for
instance, in pulling a cord to start a lawn mower engine (Garg et al., 1988)”
Adapted from NIOSH, 1997)
Design Principles for
Pushing / Pulling Tasks
Possible Control Measures for Reducing the Risks
Eliminate the need to
Push or pull using mechanical aids, where applicable
Powered conveyors
Powered trucks
Lift tables
Slides or chutes
Reduce the force required
to push or pull
Reduce size and/or weight of load
Use four-wheeled trucks or dollies
Use non-powered conveyors
Ensure wheels and castors on hand-trucks or dollies have: 1) Periodic lubrication of bearings
42
2) Adequate maintenance
3) Proper sizing (provide larger diameter wheels & castors)
Maintain the floors to eliminate holes and bumps
Use surface treatment of floors to reduce friction
Reduce the distance of
the push or pull
Move receiving, storage, production, or shipping areas closer to work production areas
Improve the production process to eliminate unnecessary materials handling steps.
Optimise the technique of
the push or pull
Provide variable-height handles so that both short and tall employees can maintain an elbow bend of 80 to 100 degrees
Replace a pull with a push wherever possible
Use ramps with a slope of less than 1:10 (9°)
It should be recognised that the competency required to assess a pushing or pulling operation
may be greater than that required to assess a lifting or carrying operation. Users may require
further information on how and why pushing and pulling force must be measured and how such
measurements shall be used.
When pushing and pulling loads, floor or ground surfaces should be level, clean, dry and
unbroken. Slopes or ramps should be low gradient. For pushing and pulling loads on uneven
surfaces the force required to start the load moving could increase by as much as 10%.
Where more than one level is involved, the transition should preferably be made by a gentle slope
or, by well-positioned and properly maintained steps. Manual handling on steep slopes should
be avoided as far as possible.
The presence of slopes is an important consideration when pushing or pulling loads. Pushing is
generally preferable to pulling. Slopes should not be so steep as to make keeping control of the
load difficult.
Another risk from pushing/pulling on a slope is that the forces involved are increased. For
example, for a load of 400 kg and a slope of 1 in 12 (4.8°), the additional force required is 33 kg
(330 Newton’s). This is above the guideline weight for males and well in excess of the guideline
weight for females. Table 2 shows the approximate increase in push forces that can be expected
per 100 kg of load, on different slope angles.
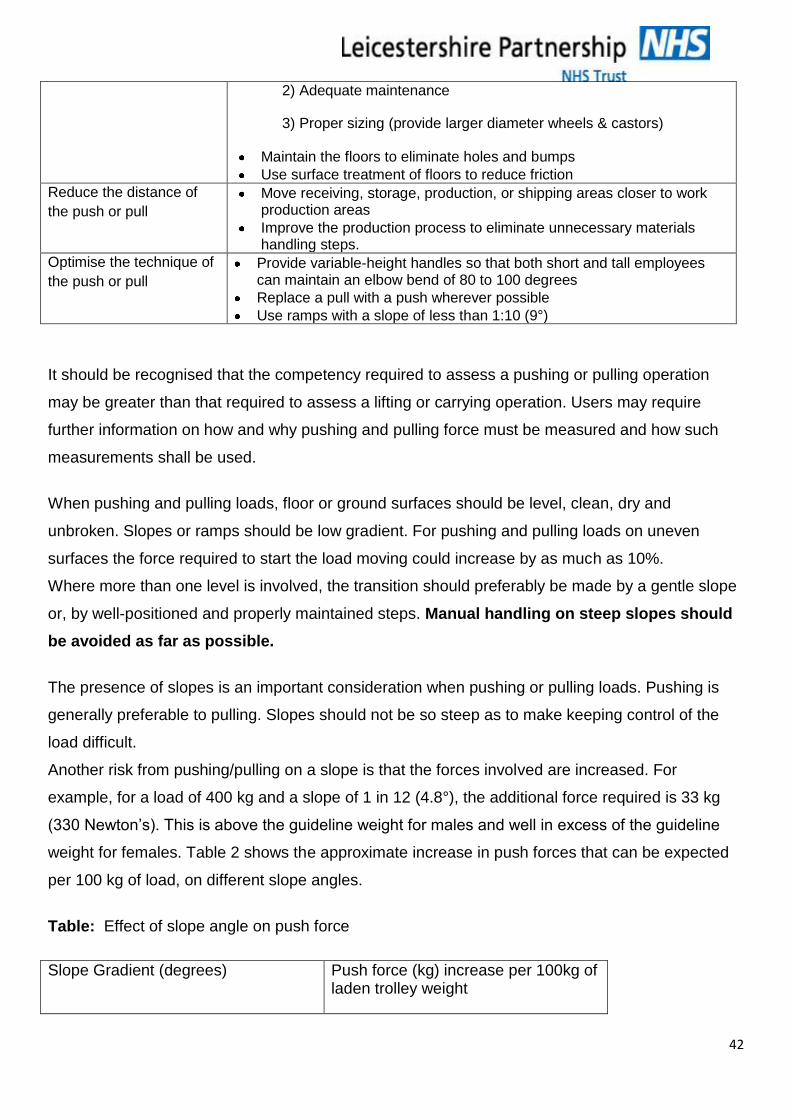
Table: Effect of slope angle on push force
Slope Gradient (degrees) Push force (kg) increase per 100kg of laden trolley weight
43
1 2
3 5
5 9
7 12
10 17.5
Appendix 4
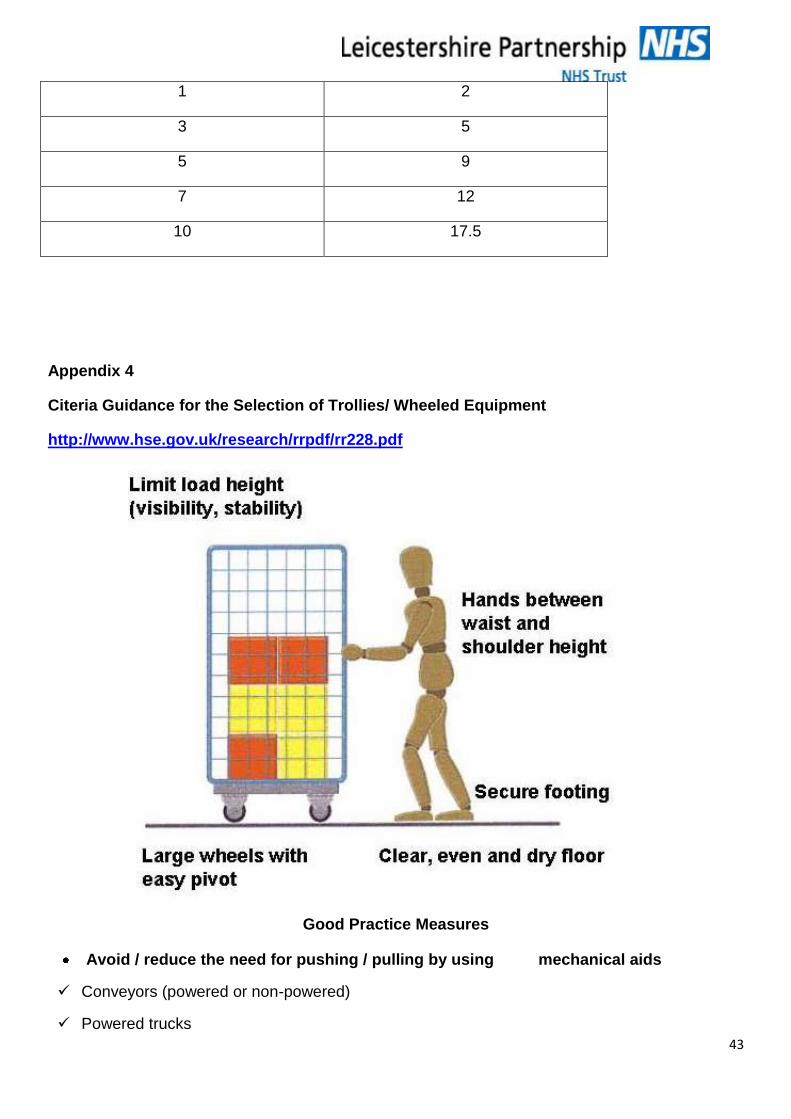
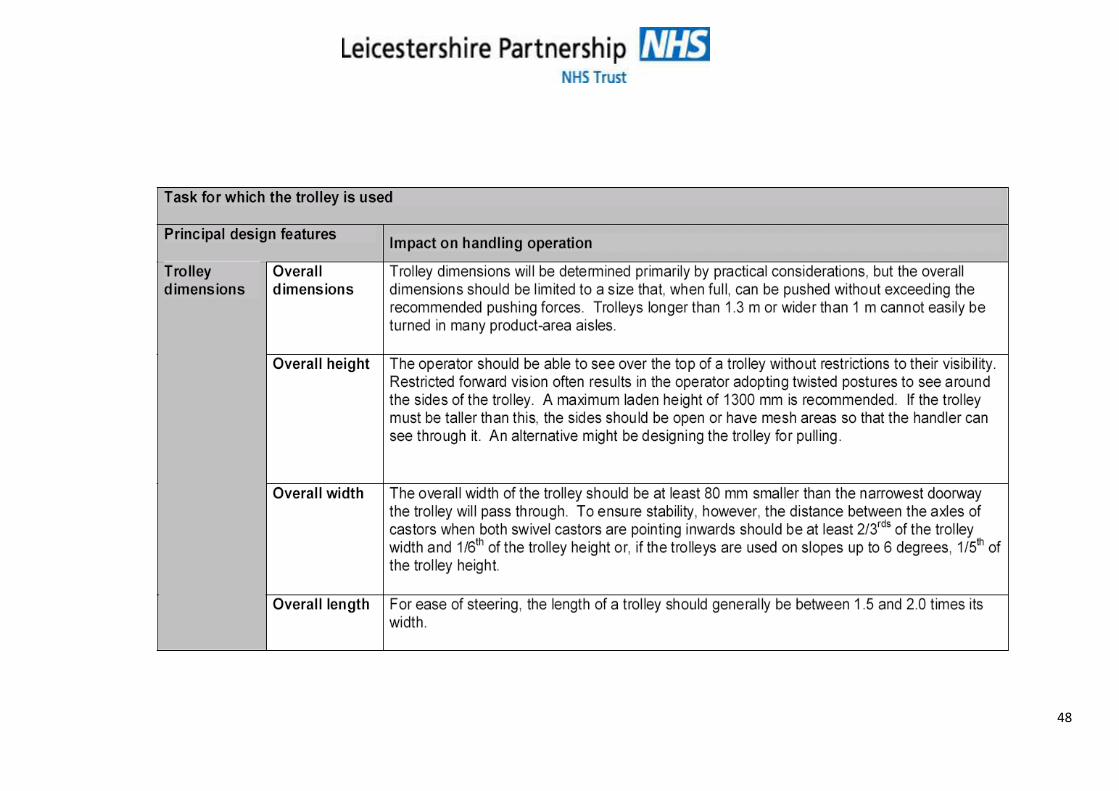
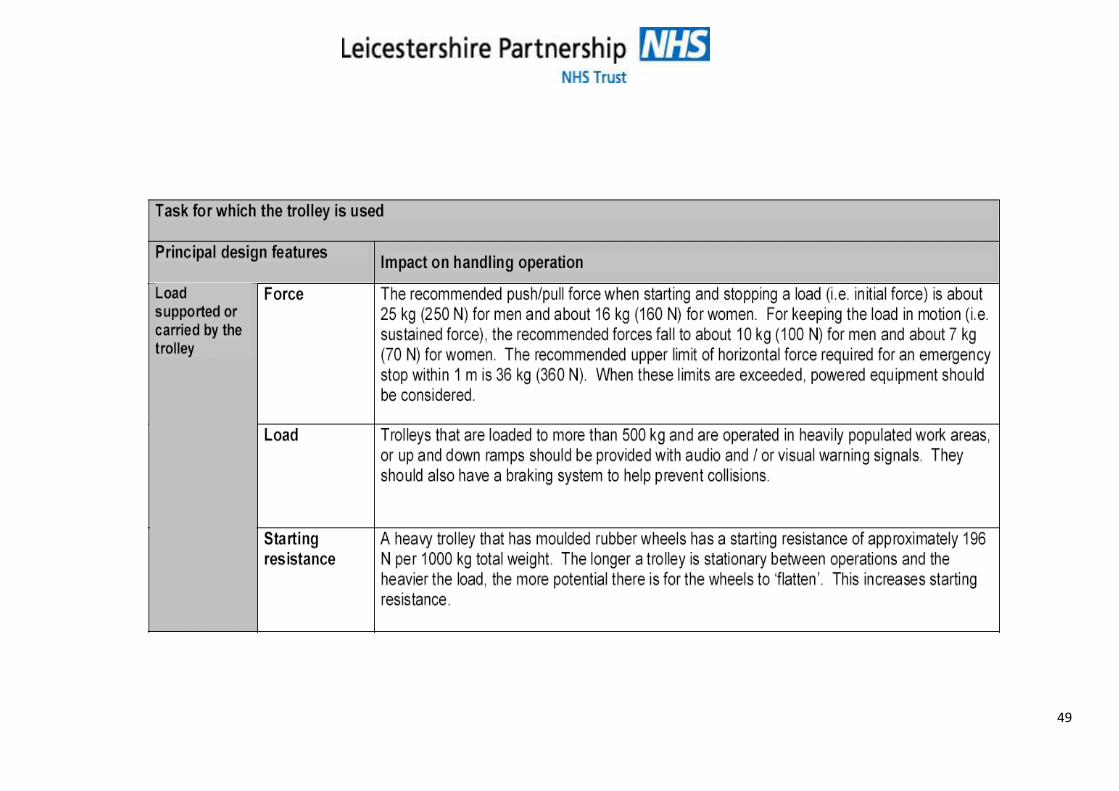
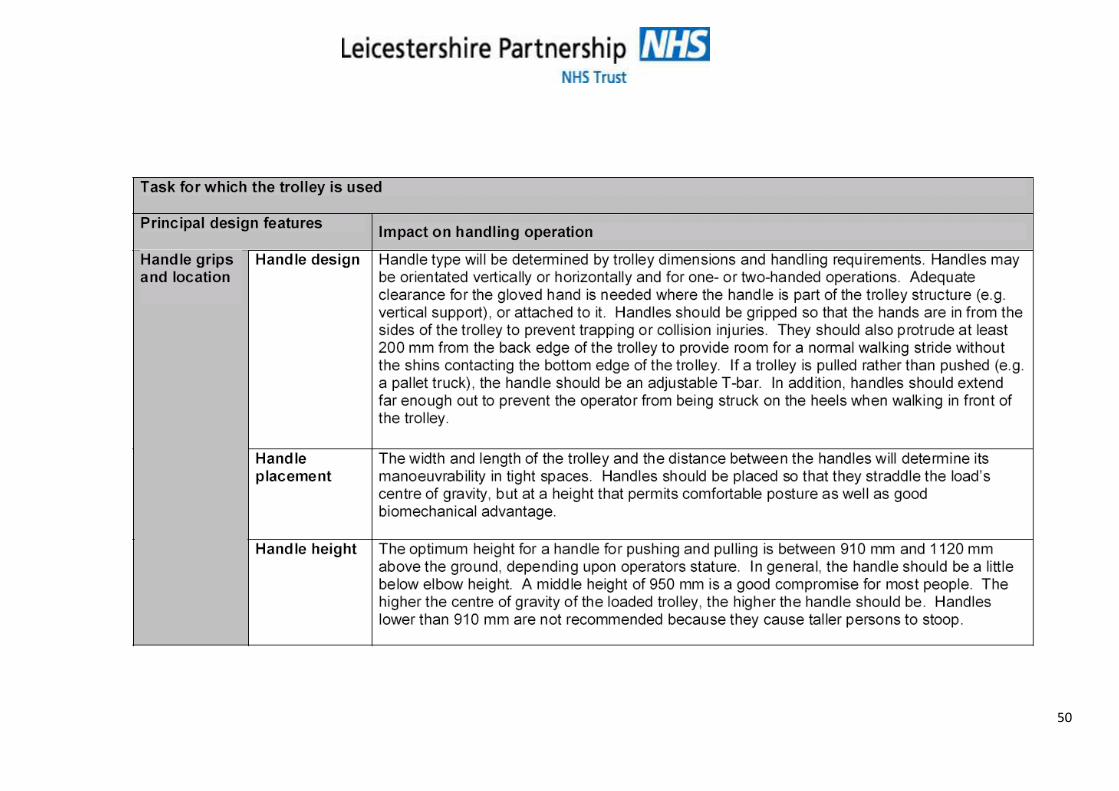
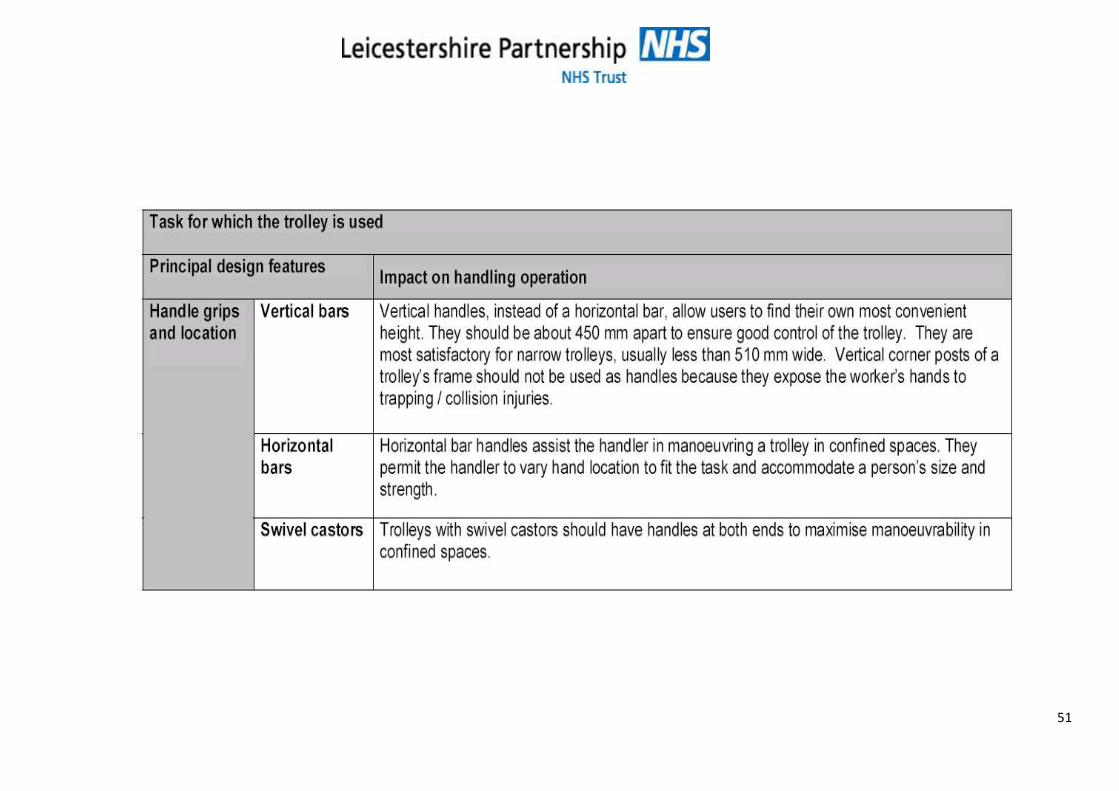
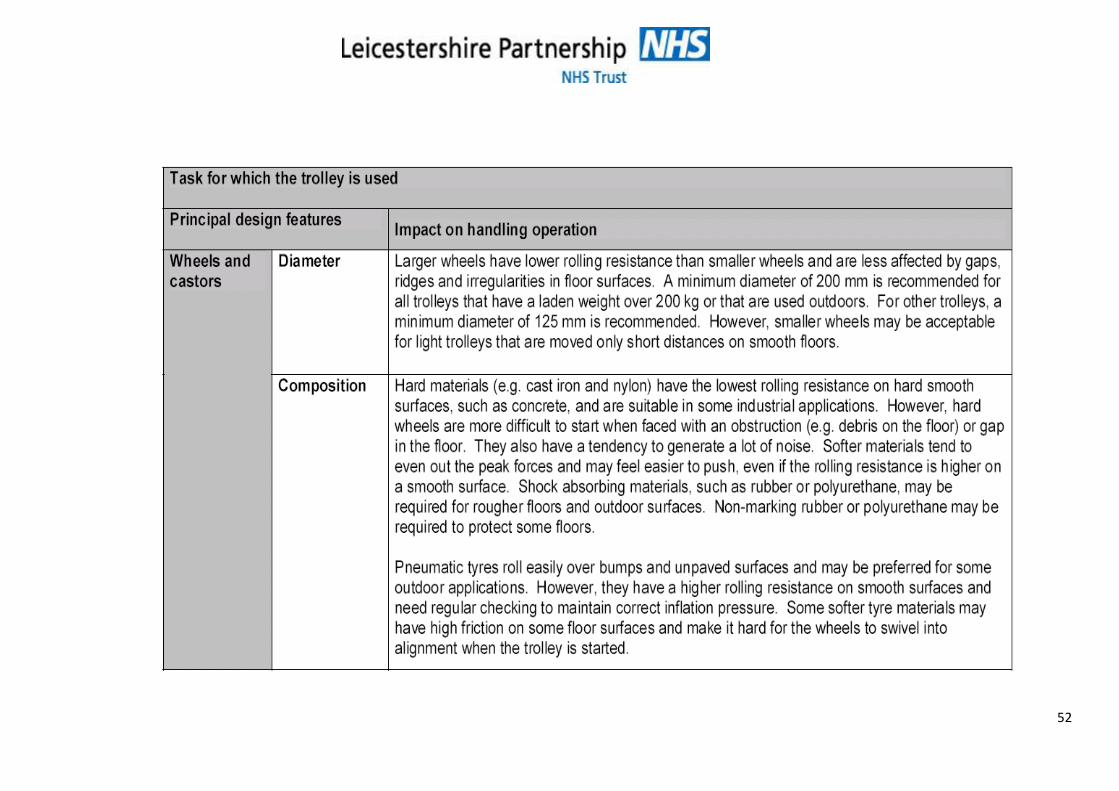
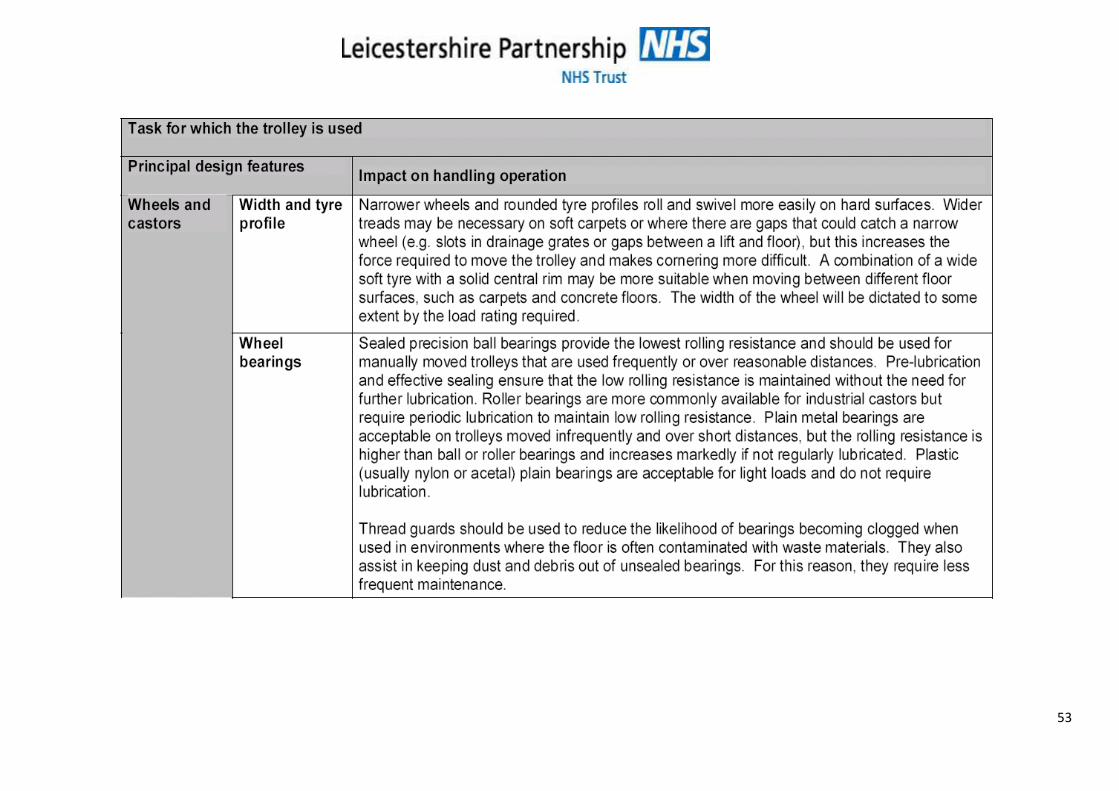
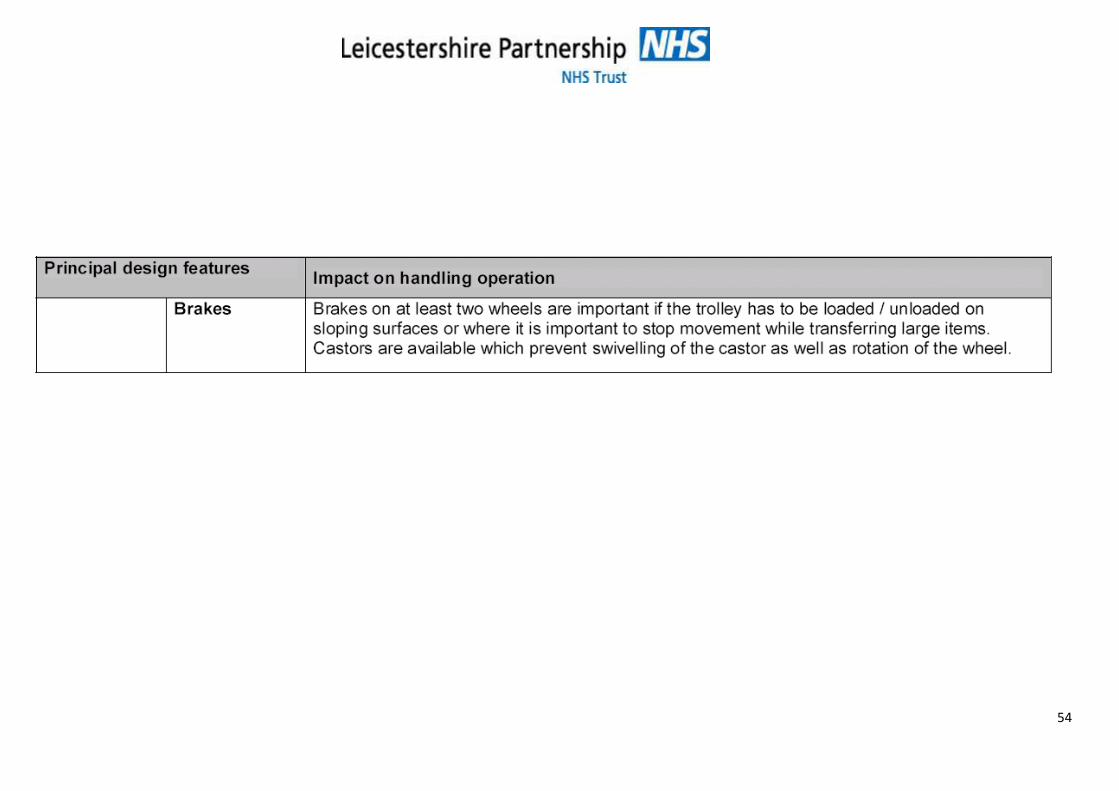
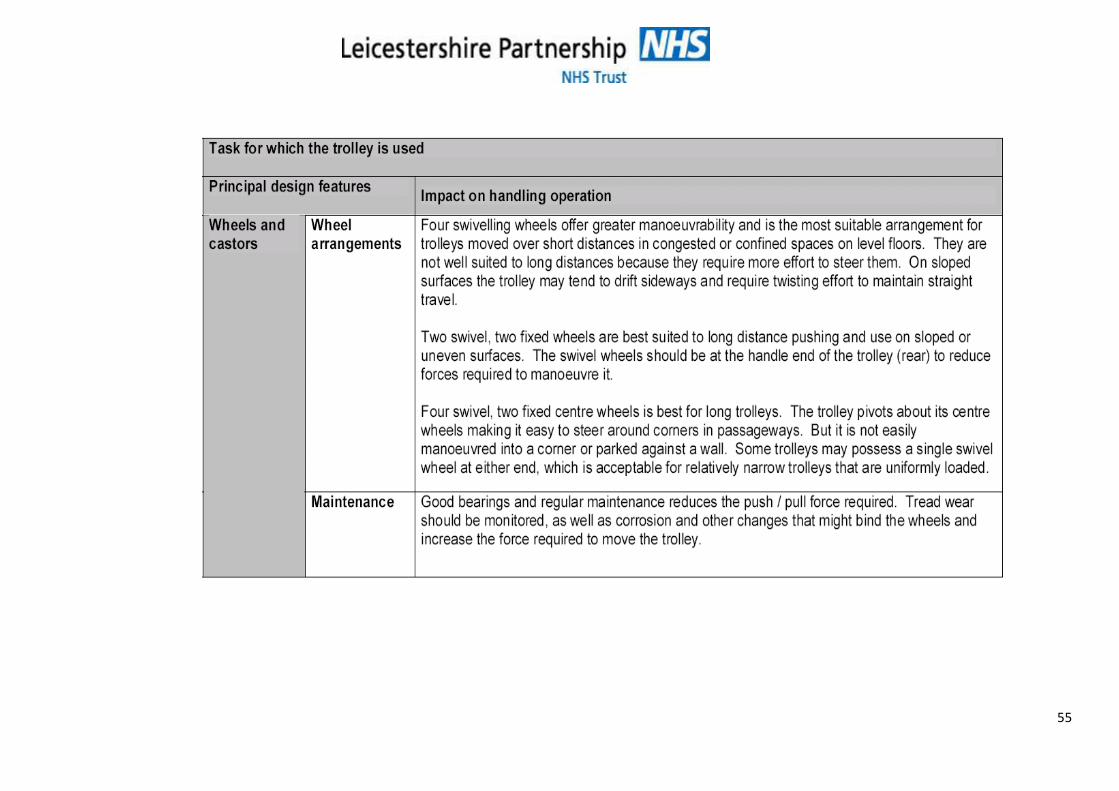
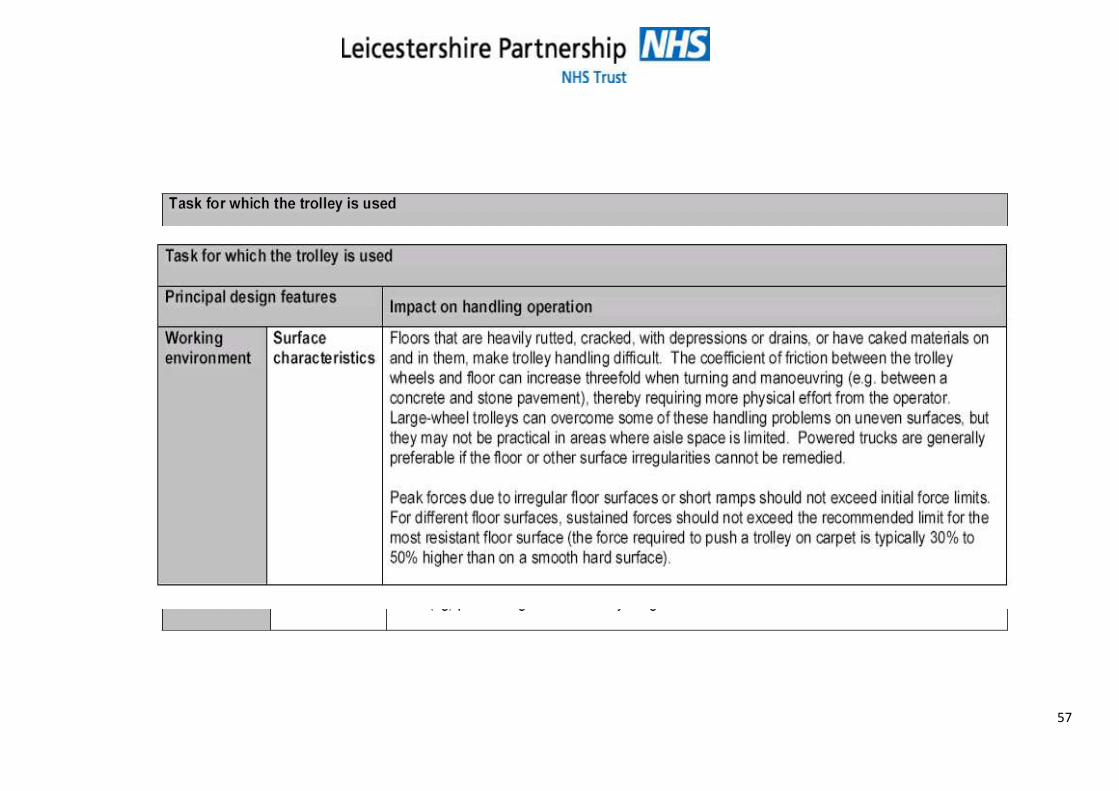
Citeria Guidance for the Selection of Trollies/ Wheeled Equipment
http://www.hse.gov.uk/research/rrpdf/rr228.pdf
Good Practice Measures
Avoid / reduce the need for pushing / pulling by using mechanical aids
Conveyors (powered or non-powered)
Powered trucks

44
Lift tables
Slides or chutes
Reduce the force required to push / pull
Reduce the weight of the trolley and/or load
Provide suitable handles positioned between waist and shoulder height
Provide trolleys with suitable wheels / castors (e.g. proper sizing, composition) and ensure that they are regularly lubricated and adequately maintained according to manufacturer’s specifications
Provide even, but slightly rough, and unbroken floor surfaces which are clean and dry
Provide soft sole shoes with good grip
Reduce the distance of the push / pull
Reposition receiving and storage areas closer to production areas
Improve production process to eliminate unnecessary materials handling
Optimise handling techniques when pushing / pulling
Provide variable handle heights, which are at a suitable distance apart.
Ensure low gradient ramps / slopes.
Restrict maximum stacking heights to improve visibility, weight and body posture.
Provide automatic opening doors.

45
46
47
48
49
50
51
52
53
54
55

56
57

58
59
15. RELEVANT LEGISLATION, BIBLIOGRAPHY AND ASSOSIATED DOCUMENTATION
This document was drafted with reference to the following:
Relevant Legislation
Health and Safety at Work Act 1974 Management of Health and Safety at Work Regulations 1999 Manual Handling Operations Regulations 1992 (as amended 2002) Lifting Operations and Lifting Equipment Regulations 1998 Provision and Use of Work Equipment Regulations 1998 Bibliography
Manual Handling in the Health Service (Health Services Advisory Commission 1998) The Guide to the Handling of People a Systems Approach 6th Edition (Backcare 2011) Manual Handling at Work: A brief guide Health and Safety Executive 2012 Handling Assessments in Hospital and Community (RCN 1999) Introducing a Safer Patient Handling Policy (RCN 1999) RCN Code of Practice for Patient Handling (1999) Handling Home Care: Achieving safe, efficient and positive outcomes for care workers and clients (HSE 2002) The handling of objects other than boxes: univariate analysis of handling techniques in a large transport company(1995) Baril-Gingras and Lortie. Ergonomics, 38, 905 – 925. Prediction of metabolic rates for manual material handling jobs (1988).Garge, A, Chaffin, D B and Herrin, G. D American Industrial Hygiene Journal, 39, 661 – 674 Pushing and pulling in relation to musculoskeletal disorders: a review of risk factors (1998). Hoozemans, M. J.M van der Beek, A.J, Frings-Dresen, M. H. W, van Dijk, FJH and van der Woude, L H V Ergonomics 41, 757 – 781
Biomechanical computerized simulation of human strength in sagittal plane activities (1972) Martin, J. B and Chaffin, D.B, A I I E Transactions, 4, 19 – 28
No Backsliding (2000) Minett S, Management of HS&E August, P29-30
Working Well Initiative (2002) Code of Practice for Patient Handling Royal College of Nursing
http://www.hse.gov.uk/msd/index.htm
http://www.ergonomics.org.uk/
http://www.hse.gov.uk/research/rrpdf/rr228.pdf
60
Leicestershire Partnership NHS Trust Policies Manual Handling Policy Health and Safety Policy Medical Devices Policy Dress Code and Uniform Policy Risk Management Strategy Risk Assessment Guidance All policy documents are available via the Policy Document Store available on E-source. Leicestershire Partnership NHS Trust Manual Handling Procedures, Pathways, Guidelines and associated documentation are available from the Moving and Handling Section of the E-source