Embed Size (px)
Citation preview
ConfirmDelivery for
Windows™
Quick Start Guide Version 2.1.3.52
ConfirmDelivery for Windows™
© 2014 ConfirmDelivery, Inc. Page 2
Table of Contents Introduction ............................................................................................................................................................................ 3
Launching the Software .......................................................................................................................................................... 4
Connecting to an Address Database ....................................................................................................................................... 5
Start New Mailing ................................................................................................................................................................... 8
Saved Label Queue ................................................................................................................................................................ 12
Basic Settings ........................................................................................................................................................................ 13
Troubleshooting .................................................................................................................................................................... 14
ConfirmDelivery for Windows™
© 2014 ConfirmDelivery, Inc. Page 3
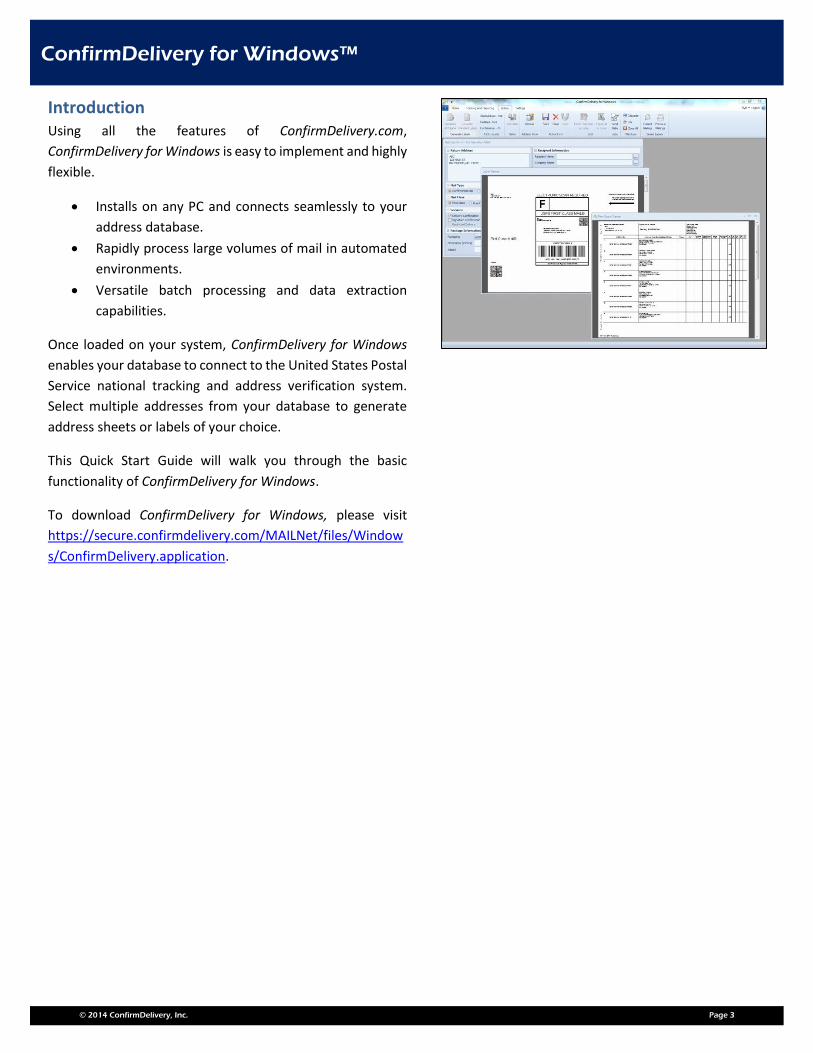
Introduction Using all the features of ConfirmDelivery.com,
ConfirmDelivery for Windows is easy to implement and highly
flexible.
Installs on any PC and connects seamlessly to your
address database.
Rapidly process large volumes of mail in automated
environments.
Versatile batch processing and data extraction
capabilities.
Once loaded on your system, ConfirmDelivery for Windows
enables your database to connect to the United States Postal
Service national tracking and address verification system.
Select multiple addresses from your database to generate
address sheets or labels of your choice.
This Quick Start Guide will walk you through the basic
functionality of ConfirmDelivery for Windows.
To download ConfirmDelivery for Windows, please visit
https://secure.confirmdelivery.com/MAILNet/files/Window
s/ConfirmDelivery.application.
ConfirmDelivery for Windows™
© 2014 ConfirmDelivery, Inc. Page 4
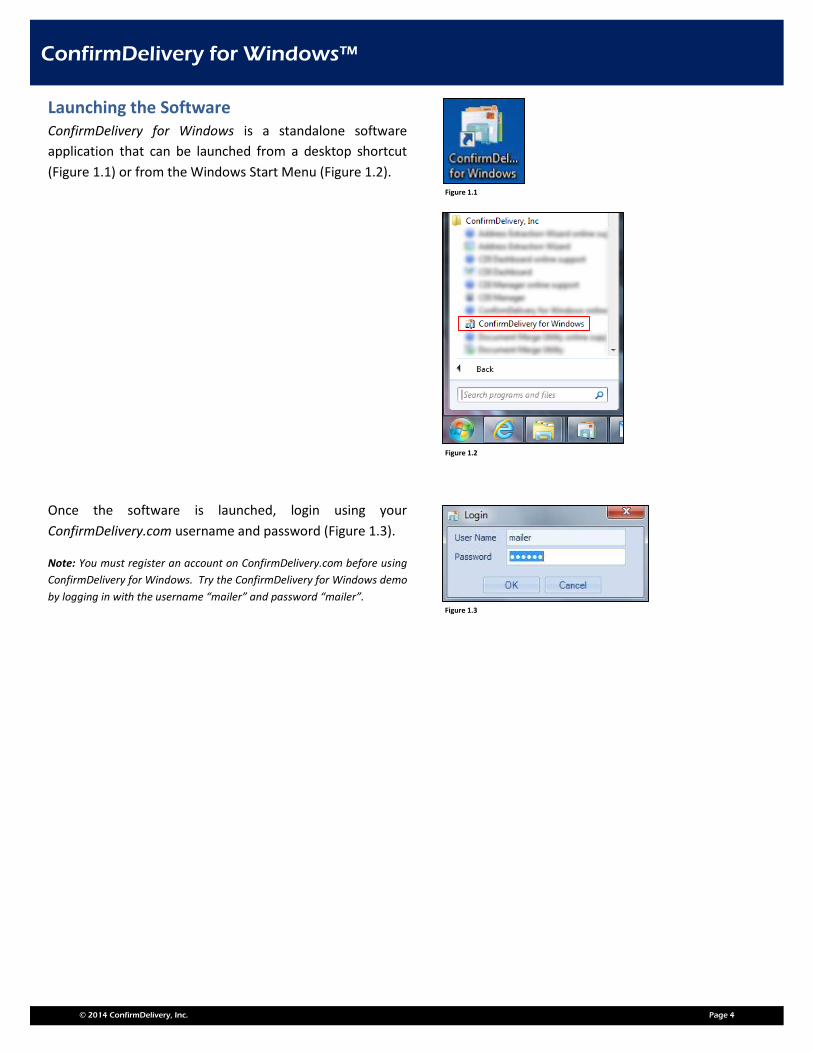
Launching the Software ConfirmDelivery for Windows is a standalone software
application that can be launched from a desktop shortcut
(Figure 1.1) or from the Windows Start Menu (Figure 1.2).
Once the software is launched, login using your
ConfirmDelivery.com username and password (Figure 1.3).
Note: You must register an account on ConfirmDelivery.com before using
ConfirmDelivery for Windows. Try the ConfirmDelivery for Windows demo
by logging in with the username “mailer” and password “mailer”.
Figure 1.1
Figure 1.2
Figure 1.3

ConfirmDelivery for Windows™
© 2014 ConfirmDelivery, Inc. Page 5
Connecting to an Address Database ConfirmDelivery for Windows can connect to virtually any
type of address database, from a simple Excel file to a SQL
Server database. The following step by step instructions will
guide you through connecting to an Excel file (.xls or .csv).
Step 1: On the Settings tab, select “External Data Connection
Wizard” (Figure 2.1). This will open the Data Connection
Wizard (Figure 2.2).
Step 2: Select “Address Book” and click Next (Figure 2.3).
Step 3: Select the type of database to connect with and click
Next. As an example, Microsoft Excel Spreadsheet has been
selected (Figure 2.4).
Step 4: Click the “…” button (Figure 2.5). This will open the
file explorer dialog (Figure 2.6).
Figure 2.1
Figure 2.2
Figure 2.3
Figure 2.4
Figure 2.5
ConfirmDelivery for Windows™
© 2014 ConfirmDelivery, Inc. Page 6
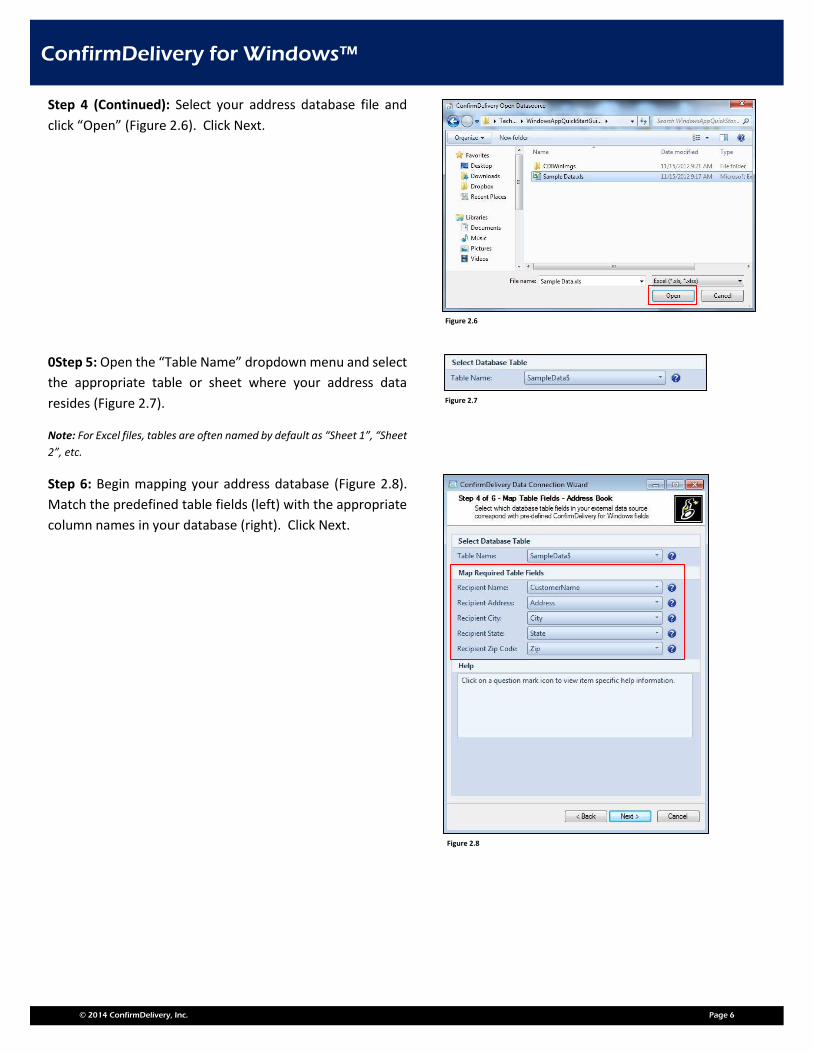
Step 4 (Continued): Select your address database file and
click “Open” (Figure 2.6). Click Next.
0Step 5: Open the “Table Name” dropdown menu and select
the appropriate table or sheet where your address data
resides (Figure 2.7).
Note: For Excel files, tables are often named by default as “Sheet 1”, “Sheet
2”, etc.
Step 6: Begin mapping your address database (Figure 2.8).
Match the predefined table fields (left) with the appropriate
column names in your database (right). Click Next.
Figure 2.6
Figure 2.7
Figure 2.8
ConfirmDelivery for Windows™
© 2014 ConfirmDelivery, Inc. Page 7
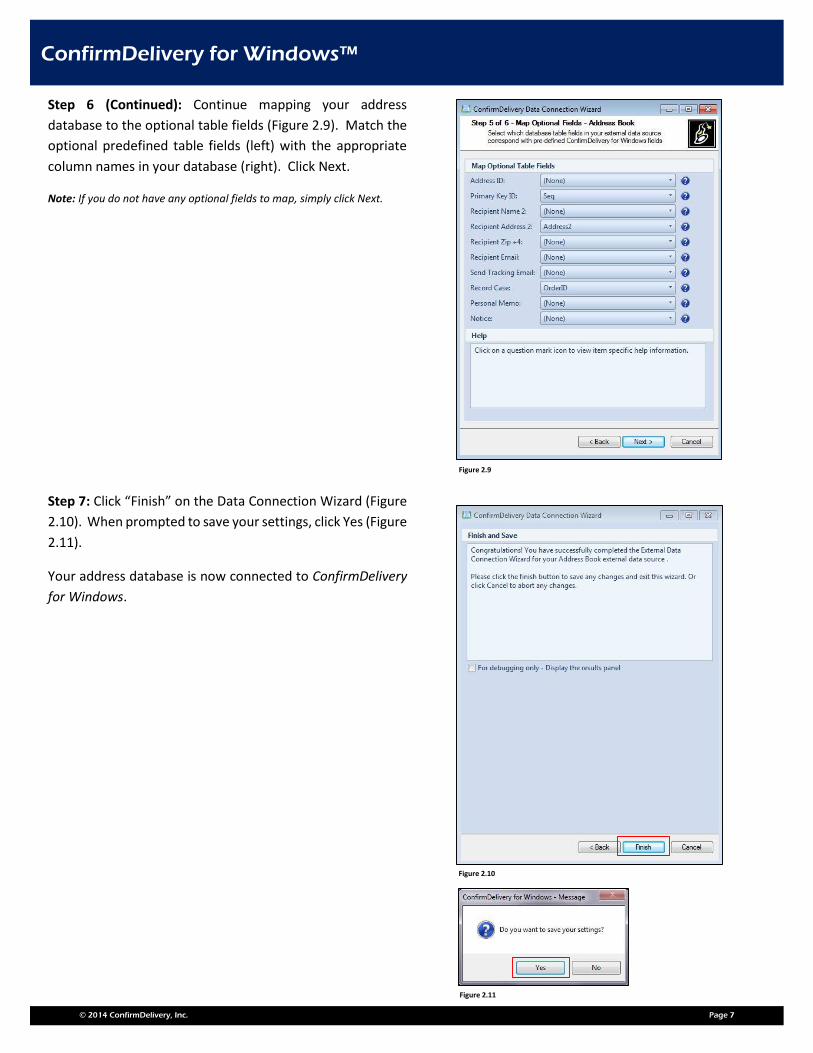
Step 6 (Continued): Continue mapping your address
database to the optional table fields (Figure 2.9). Match the
optional predefined table fields (left) with the appropriate
column names in your database (right). Click Next.
Note: If you do not have any optional fields to map, simply click Next.
Step 7: Click “Finish” on the Data Connection Wizard (Figure
2.10). When prompted to save your settings, click Yes (Figure
2.11).
Your address database is now connected to ConfirmDelivery
for Windows.
Figure 2.9
Figure 2.10
Figure 2.11
ConfirmDelivery for Windows™
© 2014 ConfirmDelivery, Inc. Page 8
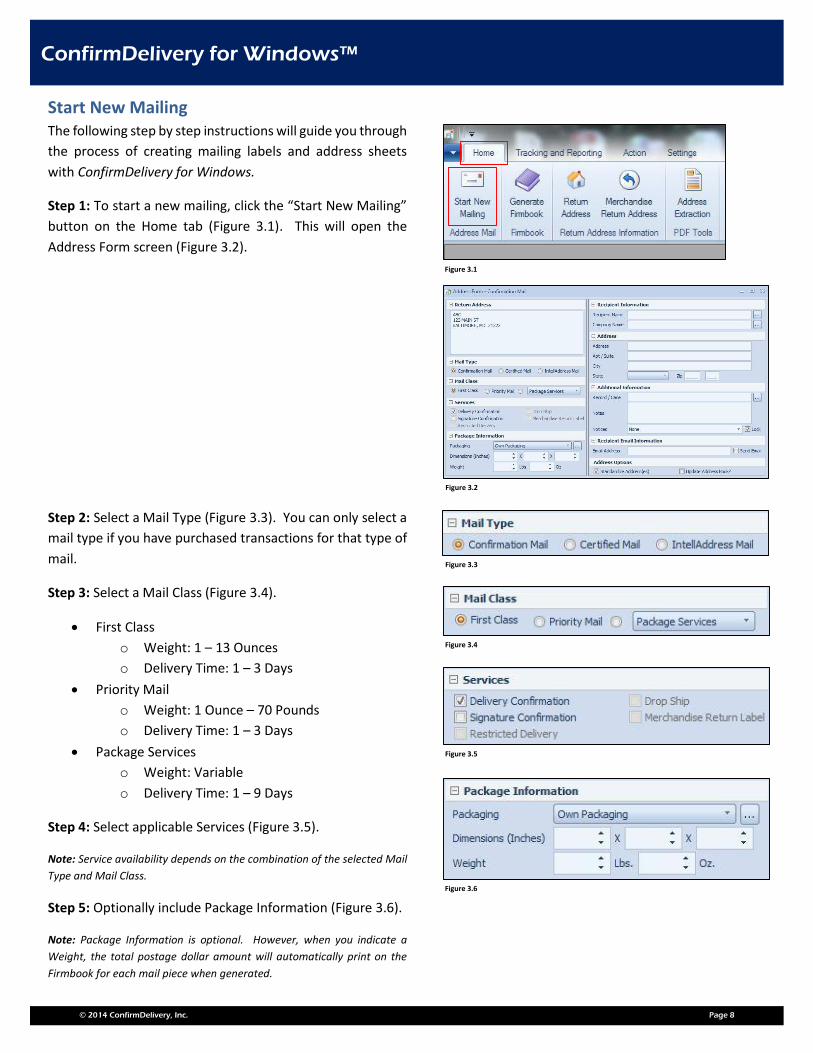
Start New Mailing The following step by step instructions will guide you through
the process of creating mailing labels and address sheets
with ConfirmDelivery for Windows.
Step 1: To start a new mailing, click the “Start New Mailing”
button on the Home tab (Figure 3.1). This will open the
Address Form screen (Figure 3.2).
Step 2: Select a Mail Type (Figure 3.3). You can only select a
mail type if you have purchased transactions for that type of
mail.
Step 3: Select a Mail Class (Figure 3.4).
First Class
o Weight: 1 – 13 Ounces
o Delivery Time: 1 – 3 Days
Priority Mail
o Weight: 1 Ounce – 70 Pounds
o Delivery Time: 1 – 3 Days
Package Services
o Weight: Variable
o Delivery Time: 1 – 9 Days
Step 4: Select applicable Services (Figure 3.5).
Note: Service availability depends on the combination of the selected Mail
Type and Mail Class.
Step 5: Optionally include Package Information (Figure 3.6).
Note: Package Information is optional. However, when you indicate a
Weight, the total postage dollar amount will automatically print on the
Firmbook for each mail piece when generated.
Figure 3.1
Figure 3.2
Figure 3.3
Figure 3.4
Figure 3.5
Figure 3.6
ConfirmDelivery for Windows™
© 2014 ConfirmDelivery, Inc. Page 9
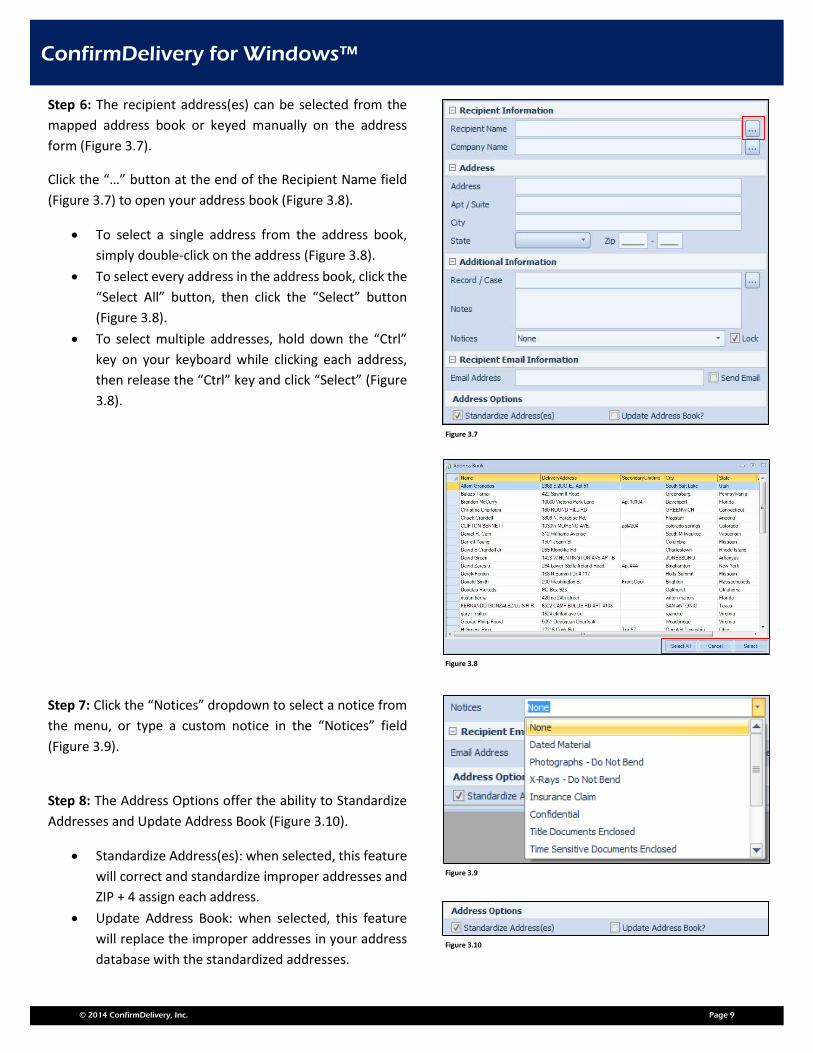
Step 6: The recipient address(es) can be selected from the
mapped address book or keyed manually on the address
form (Figure 3.7).
Click the “…” button at the end of the Recipient Name field
(Figure 3.7) to open your address book (Figure 3.8).
To select a single address from the address book,
simply double-click on the address (Figure 3.8).
To select every address in the address book, click the
“Select All” button, then click the “Select” button
(Figure 3.8).
To select multiple addresses, hold down the “Ctrl”
key on your keyboard while clicking each address,
then release the “Ctrl” key and click “Select” (Figure
3.8).
Step 7: Click the “Notices” dropdown to select a notice from
the menu, or type a custom notice in the “Notices” field
(Figure 3.9).
Step 8: The Address Options offer the ability to Standardize
Addresses and Update Address Book (Figure 3.10).
Standardize Address(es): when selected, this feature
will correct and standardize improper addresses and
ZIP + 4 assign each address.
Update Address Book: when selected, this feature
will replace the improper addresses in your address
database with the standardized addresses.
Figure 3.7
Figure 3.8
Figure 3.9
Figure 3.10
ConfirmDelivery for Windows™
© 2014 ConfirmDelivery, Inc. Page 10
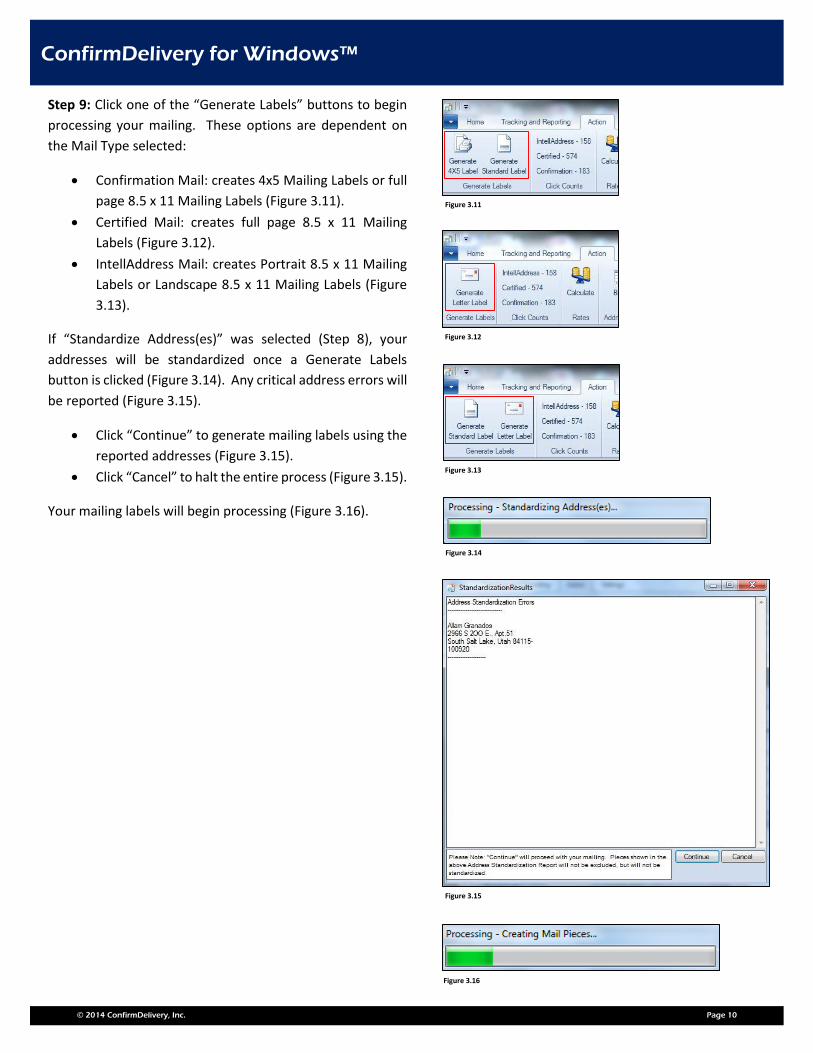
Step 9: Click one of the “Generate Labels” buttons to begin
processing your mailing. These options are dependent on
the Mail Type selected:
Confirmation Mail: creates 4x5 Mailing Labels or full
page 8.5 x 11 Mailing Labels (Figure 3.11).
Certified Mail: creates full page 8.5 x 11 Mailing
Labels (Figure 3.12).
IntellAddress Mail: creates Portrait 8.5 x 11 Mailing
Labels or Landscape 8.5 x 11 Mailing Labels (Figure
3.13).
If “Standardize Address(es)” was selected (Step 8), your
addresses will be standardized once a Generate Labels
button is clicked (Figure 3.14). Any critical address errors will
be reported (Figure 3.15).
Click “Continue” to generate mailing labels using the
reported addresses (Figure 3.15).
Click “Cancel” to halt the entire process (Figure 3.15).
Your mailing labels will begin processing (Figure 3.16).
Figure 3.11
Figure 3.12
Figure 3.13
Figure 3.14
Figure 3.15
Figure 3.16
ConfirmDelivery for Windows™
© 2014 ConfirmDelivery, Inc. Page 11
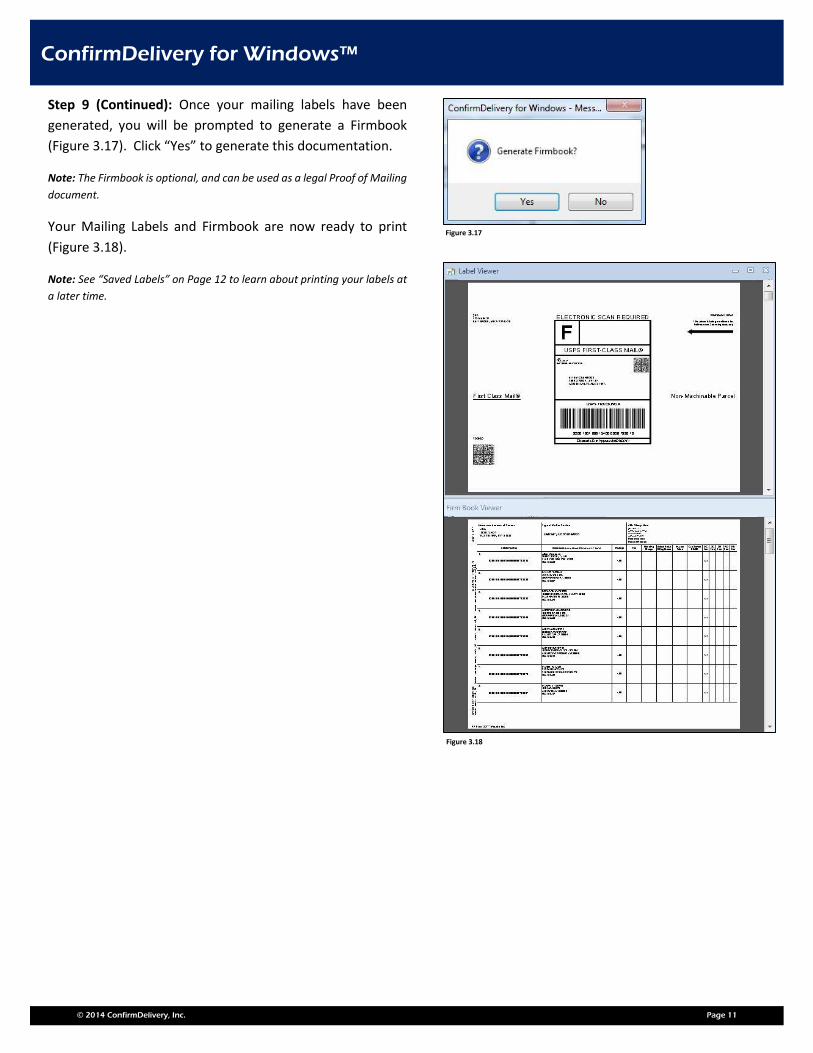
Step 9 (Continued): Once your mailing labels have been
generated, you will be prompted to generate a Firmbook
(Figure 3.17). Click “Yes” to generate this documentation.
Note: The Firmbook is optional, and can be used as a legal Proof of Mailing
document.
Your Mailing Labels and Firmbook are now ready to print
(Figure 3.18).
Note: See “Saved Labels” on Page 12 to learn about printing your labels at
a later time.
Figure 3.17
Figure 3.18
ConfirmDelivery for Windows™
© 2014 ConfirmDelivery, Inc. Page 12
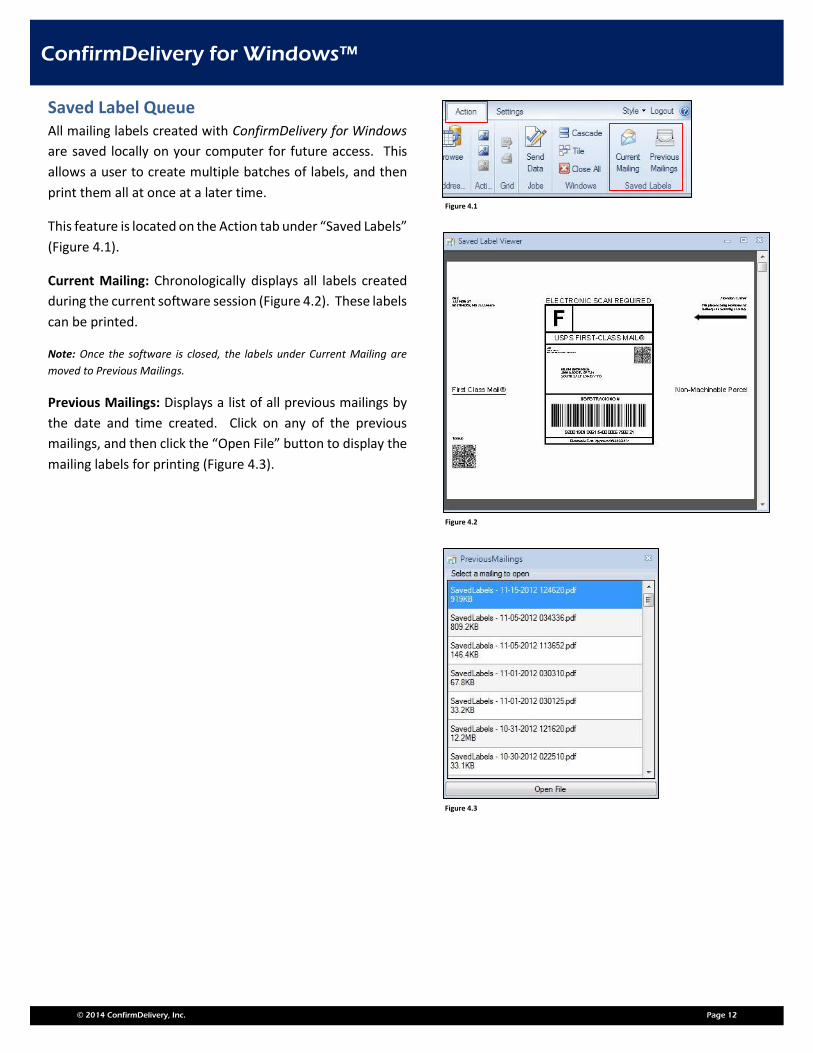
Saved Label Queue All mailing labels created with ConfirmDelivery for Windows
are saved locally on your computer for future access. This
allows a user to create multiple batches of labels, and then
print them all at once at a later time.
This feature is located on the Action tab under “Saved Labels”
(Figure 4.1).
Current Mailing: Chronologically displays all labels created
during the current software session (Figure 4.2). These labels
can be printed.
Note: Once the software is closed, the labels under Current Mailing are
moved to Previous Mailings.
Previous Mailings: Displays a list of all previous mailings by
the date and time created. Click on any of the previous
mailings, and then click the “Open File” button to display the
mailing labels for printing (Figure 4.3).
Figure 4.1
Figure 4.2
Figure 4.3
ConfirmDelivery for Windows™
© 2014 ConfirmDelivery, Inc. Page 13
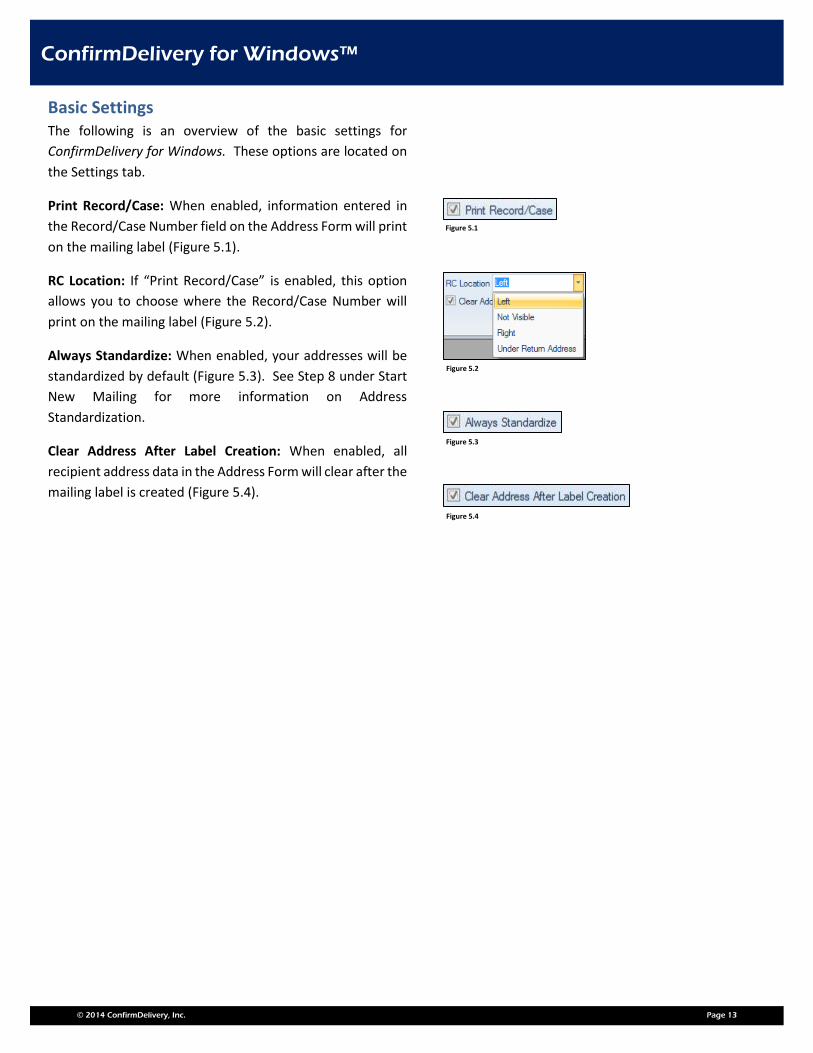
Basic Settings The following is an overview of the basic settings for
ConfirmDelivery for Windows. These options are located on
the Settings tab.
Print Record/Case: When enabled, information entered in
the Record/Case Number field on the Address Form will print
on the mailing label (Figure 5.1).
RC Location: If “Print Record/Case” is enabled, this option
allows you to choose where the Record/Case Number will
print on the mailing label (Figure 5.2).
Always Standardize: When enabled, your addresses will be
standardized by default (Figure 5.3). See Step 8 under Start
New Mailing for more information on Address
Standardization.
Clear Address After Label Creation: When enabled, all
recipient address data in the Address Form will clear after the
mailing label is created (Figure 5.4).
Figure 5.1
Figure 5.2
Figure 5.3
Figure 5.4
ConfirmDelivery for Windows™
© 2014 ConfirmDelivery, Inc. Page 14
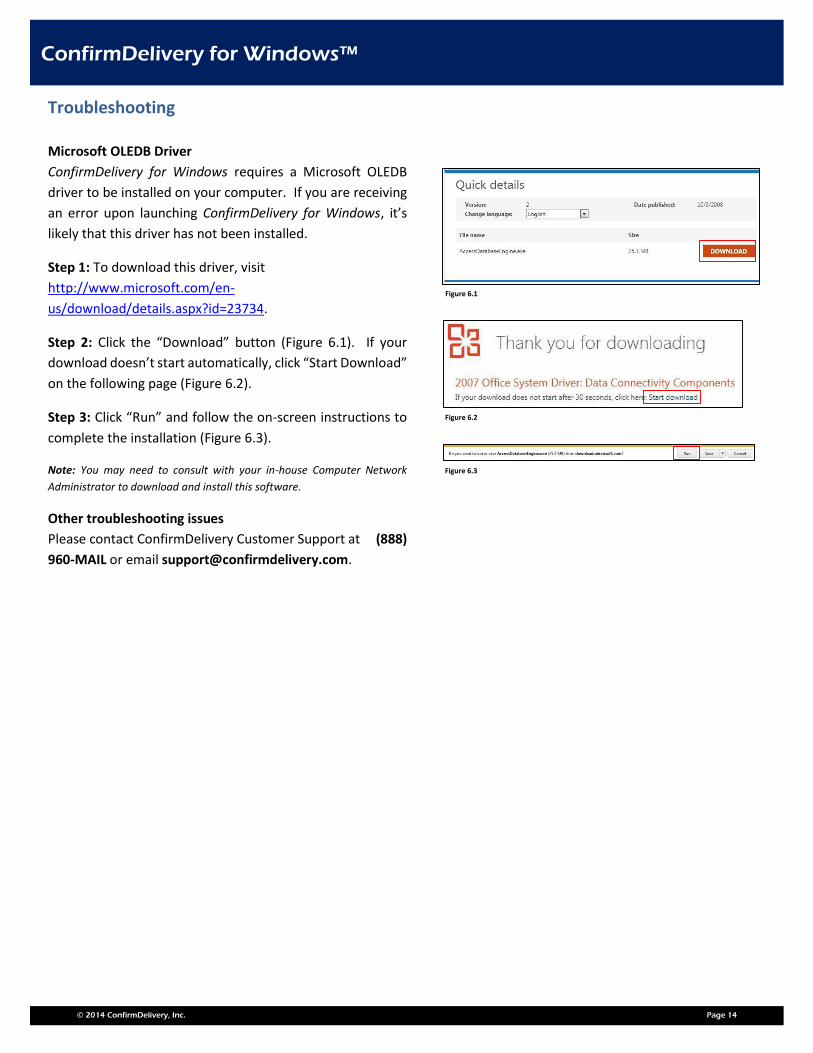
Troubleshooting
Microsoft OLEDB Driver
ConfirmDelivery for Windows requires a Microsoft OLEDB
driver to be installed on your computer. If you are receiving
an error upon launching ConfirmDelivery for Windows, it’s
likely that this driver has not been installed.
Step 1: To download this driver, visit
http://www.microsoft.com/en-
us/download/details.aspx?id=23734.
Step 2: Click the “Download” button (Figure 6.1). If your
download doesn’t start automatically, click “Start Download”
on the following page (Figure 6.2).
Step 3: Click “Run” and follow the on-screen instructions to
complete the installation (Figure 6.3).
Note: You may need to consult with your in-house Computer Network
Administrator to download and install this software.
Other troubleshooting issues
Please contact ConfirmDelivery Customer Support at (888)
960-MAIL or email [email protected].
Figure 6.1
Figure 6.2
Figure 6.3