Embed Size (px)
Citation preview
1
Countertop Thermo Electric
Hot and Cold Water Cooler
INSTRUCTION MANUAL
MODEL NUMBER: RWC-120
120V 60HZ 75W Cooling
120V 60HZ 550W Heating
For customer service in USA and Canada please call:
1-866-499-6389
WWW.RAGALTAUSA.COM
SAVE THIS INSTRUCTION MANUAL
2
BEFORE USE, PLEASE READ AND FOLLOW ALL SAFETY RULES AND OPERATING
INSTRUCTIONS.
Ragalta has a policy of continuous improvement on its products and reserves the right to change materials and specifications without notice. Ragalta tiene una política de mejora continua en sus productos y se reserva el derecho de cambiar los materiales y especificaciones sin previo aviso
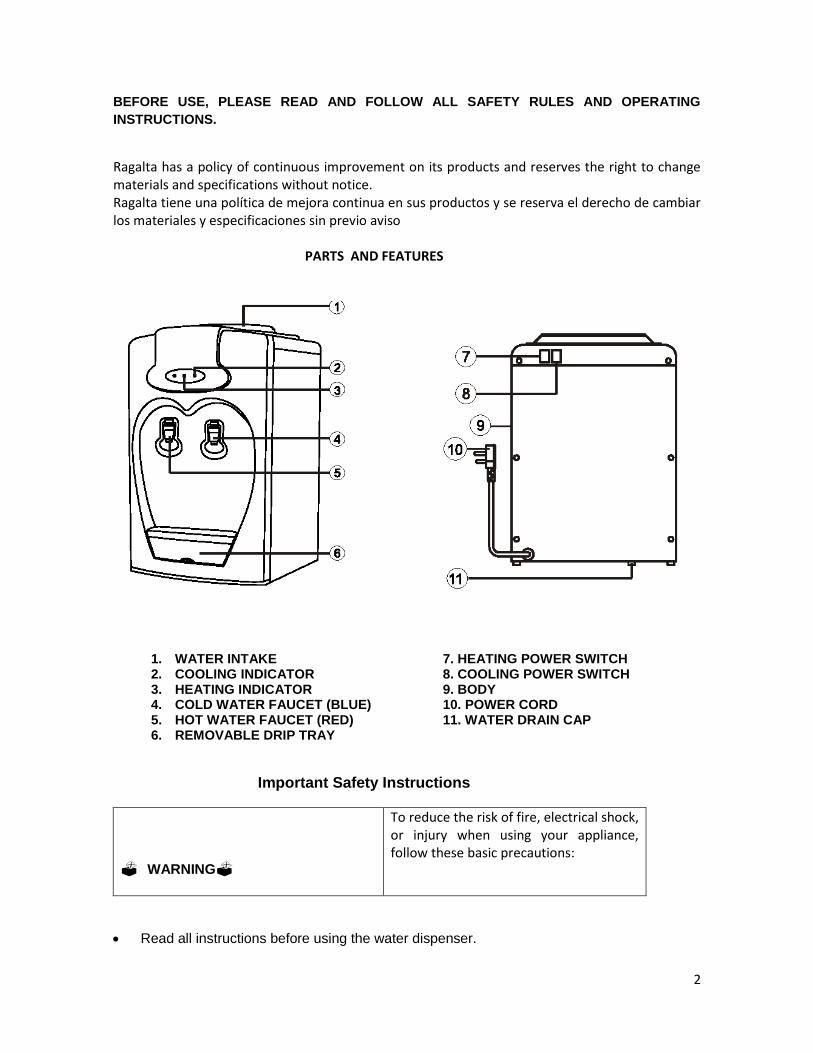
PARTS AND FEATURES
1. WATER INTAKE 7. HEATING POWER SWITCH 2. COOLING INDICATOR 8. COOLING POWER SWITCH 3. HEATING INDICATOR 9. BODY 4. COLD WATER FAUCET (BLUE) 10. POWER CORD 5. HOT WATER FAUCET (RED) 11. WATER DRAIN CAP 6. REMOVABLE DRIP TRAY
Important Safety Instructions
WARNING
To reduce the risk of fire, electrical shock, or injury when using your appliance, follow these basic precautions:
Read all instructions before using the water dispenser.
3
Never clean parts with flammable fluids. The fumes can create a fire hazard or explosion.
Do not store or use gasoline or any other flammable vapors and liquids in the vicinity of this or any other water dispenser. The fumes can create a fire hazard or explosion
Do not plug unit into receptacle until you ensure the water tank switch is off.
INSTALLATION GUIDELINES
Remove the exterior and interior packing.
Place your water dispenser on a desk that is strong enough to support the dispenser when it is fully loaded.
Locate the appliance away from direct sunlight and sources of heat (stove, heater, radiator, etc.).
Direct sunlight may affect the acrylic coating and heat sources may increase electrical . consumption Extreme cold ambient temperatures may also cause the appliance not to perform properly. Allow 2 inches of space between the water dispenser and the wall which allows proper air
circulation.
Plug the appliance into an exclusive properly installed-grounded wall outlet. Do not under, any circumstances, cut or remove the third (ground) prong from the power cord. Any questions concerning power and/or grounding should be directed toward a certified electrician or an authorized Products Service Center.
This water dispenser is not recommended for outdoor use.
Do not locate the dispenser in area where the temperature may fall below freezing (32º F).
Keep area around dispenser free of dust and dirt.
Keep the reserve supply of water bottles away from excessive heat and light.
Never unplug the water cooler, except for maintenance.
Before Using Your Water Dispenser
Before connecting the appliance to the power source, let it stand upright to approximately 2 hours. This will reduce the possibility of a malfunction in the cooling system from handling during transportation.
The water dispenser is pre-cleaned at the factory but the reservoir and water lines must be flushed with fresh water before use as follows.
Keep the unit unplugged.
Fill water tank with tap water full to capacity .Wait for 5 minutes until water settles.
Slide child safety button, then push the hot water faucet until water comes out, and then stop.
Proceed to drain the water from the faucets until no more water remains.
Drain any water left in the tank by opening the water drain plug located on the bottom until it drains completely.
Proceed to close the drain cap. Also make sure both faucets are released completely.
Place the water bottle on the water intake; allow water to stand for approximately one minute.
Push both water faucets to insure water flows from both faucets, then release both faucets.
Plug dispenser into the electrical outlet.
Turn power switch ON (at the rear).
4
Now you are ready to use your water dispenser.
ATTENTION:
If you do not plan to use the water heating function for more than two or three days, we
recommend that you turn off the hot water function.
WARNING
IMPROPER USE OF THE GROUNDED PLUG CAN RESULT IN THE RISK OF ELECTRICAL
SHOCK. IF THE POWER CORD IS DAMAGED, HAVE IT REPLACED BY AN AUTHORIZED
PRODUCTS SERVICE CENTER.
OPERATING YOUR WATER DISPENSER
Electrical Connection
This appliance should be properly grounded for your safety. The power cord of this appliance is equipped with a three-prong plug which mates with standard three prong wall outlets to minimize the possibility of electrical shock. Plug the appliance into an exclusive properly installed-grounded wall outlet. Do not, under any circumstances cut or remove the third (ground) prong from the power cord. Any questions concerning power and/or grounding should be directed toward a certified electrician or an authorized Product Service Center. This appliance requires a standard 120 Volts A.C. / 60Hz electrical outlet with three-prong ground. The cord should be secured behind the appliance and not left exposed or dangling to prevent accidental injury. Do not use an adapter plug with this appliance. Do not use an extension cord with this appliance. If the power cord is too short, have a qualified electrician or service technician install an outlet near the appliance.
Steps To Replace Water Bottle
Use a clean cloth to wipe off neck of bottle. Remove cap, if there is one on. Insert the water bottle on the water intake over reservoir opening so it settles properly on it. Wipe off any water, which may have splashed on dispenser top.
Note: The hot water faucet has a child safety guard attachment
5
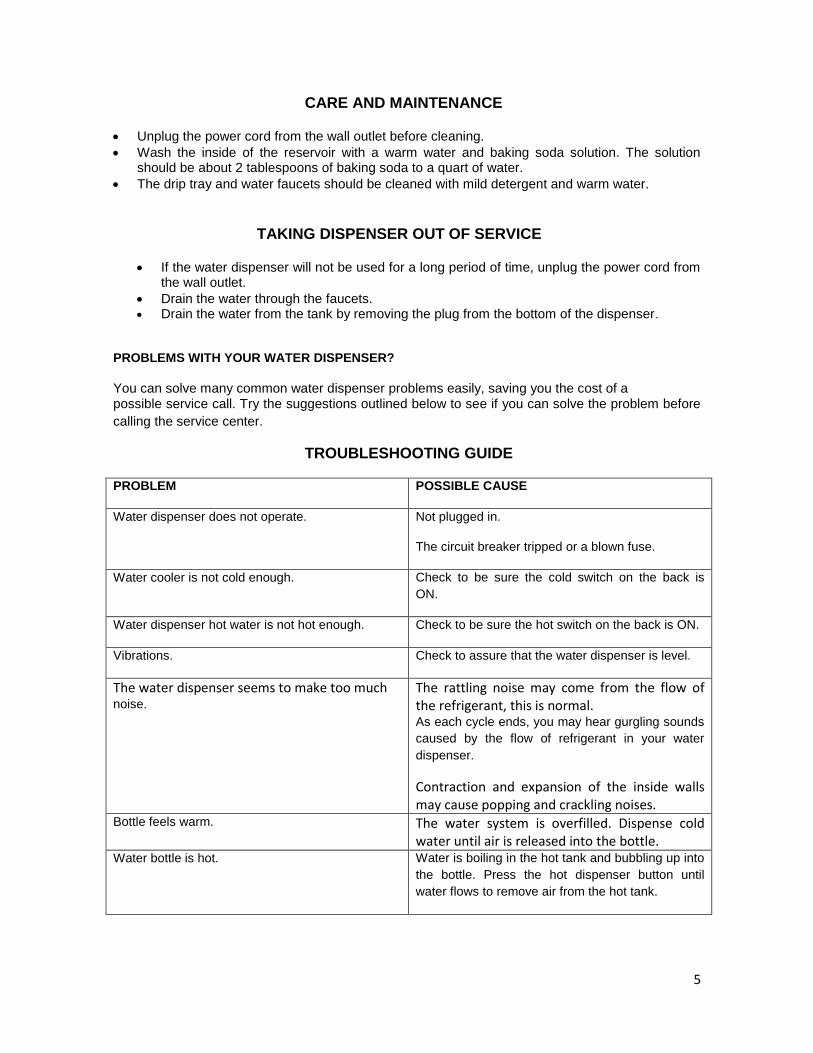
CARE AND MAINTENANCE
Unplug the power cord from the wall outlet before cleaning.
Wash the inside of the reservoir with a warm water and baking soda solution. The solution should be about 2 tablespoons of baking soda to a quart of water.
The drip tray and water faucets should be cleaned with mild detergent and warm water.
TAKING DISPENSER OUT OF SERVICE
If the water dispenser will not be used for a long period of time, unplug the power cord from the wall outlet.
Drain the water through the faucets. Drain the water from the tank by removing the plug from the bottom of the dispenser.
PROBLEMS WITH YOUR WATER DISPENSER?
You can solve many common water dispenser problems easily, saving you the cost of a possible service call. Try the suggestions outlined below to see if you can solve the problem before
calling the service center.
TROUBLESHOOTING GUIDE
PROBLEM POSSIBLE CAUSE
Water dispenser does not operate. Not plugged in.
The circuit breaker tripped or a blown fuse.
Water cooler is not cold enough. Check to be sure the cold switch on the back is
ON.
Water dispenser hot water is not hot enough. Check to be sure the hot switch on the back is ON.
Vibrations. Check to assure that the water dispenser is level.
The water dispenser seems to make too much noise.
The rattling noise may come from the flow of the refrigerant, this is normal. As each cycle ends, you may hear gurgling sounds
caused by the flow of refrigerant in your water
dispenser.
Contraction and expansion of the inside walls may cause popping and crackling noises.
Bottle feels warm. The water system is overfilled. Dispense cold water until air is released into the bottle.
Water bottle is hot. Water is boiling in the hot tank and bubbling up into
the bottle. Press the hot dispenser button until
water flows to remove air from the hot tank.

6
WIRING DIAGRAM
1. HEATING SWITCH 2. 85º C THERMOSTAT 3. HEATER 4. HEATING INDICATOR 5. COOLING SWITCH 6. FUSE 7. COOLER 8. COOLING INDICATOR 9. 95º C THERMOSTAT
TECHNICAL PARAMETERS
Model RWC120
Power Source 120V/60Hz
Rated input Power Cooling Heating
75W 550 W
Water Cold Water Hot Water
8°C -15°C 85°C - 95°C
Cooling Capacity 2 L/ h
Heating Capacity 5 L / h
Net Weight (Kg.) 6
Protection against electric shock TYPE I
7
USA & Canada Customer Service Number:
1-866-499-6389 www.ragaltausa.com
5870 NW 163th Street, Miami Lakes, Florida 33014
USA
1 Year limited warranty: Covers all defective materials and workmanship under normal household use.
MADE IN CHINA
8
Dispensador Termo Eléctrico de Mesa
de Agua Fría y Caliente
MANUAL DE INSTRUCCIONES
NUMERO DE MODELO: RWC-120
120V 60HZ 75W Frío
120V 60HZ 550W Caliente
Para servicio al cliente en USA y Canadá llame al:
1-866-499-6389
WWW.RAGALTAUSA.COM
LEA ESTAS INSTRUCCIONES COMPLETAMENTE
9
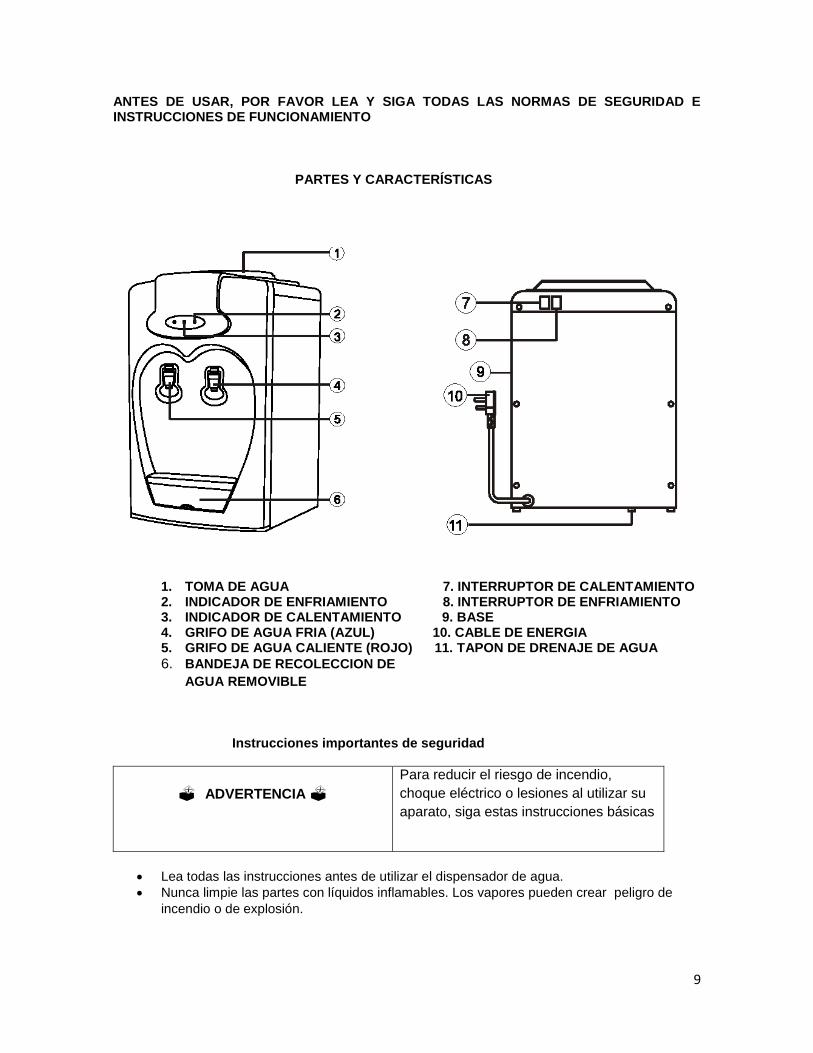
ANTES DE USAR, POR FAVOR LEA Y SIGA TODAS LAS NORMAS DE SEGURIDAD E INSTRUCCIONES DE FUNCIONAMIENTO
PARTES Y CARACTERÍSTICAS
1. TOMA DE AGUA 7. INTERRUPTOR DE CALENTAMIENTO 2. INDICADOR DE ENFRIAMIENTO 8. INTERRUPTOR DE ENFRIAMIENTO 3. INDICADOR DE CALENTAMIENTO 9. BASE 4. GRIFO DE AGUA FRIA (AZUL) 10. CABLE DE ENERGIA 5. GRIFO DE AGUA CALIENTE (ROJO) 11. TAPON DE DRENAJE DE AGUA
6. BANDEJA DE RECOLECCION DE
AGUA REMOVIBLE
Instrucciones importantes de seguridad
ADVERTENCIA Para reducir el riesgo de incendio,
choque eléctrico o lesiones al utilizar su
aparato, siga estas instrucciones básicas
Lea todas las instrucciones antes de utilizar el dispensador de agua.
Nunca limpie las partes con líquidos inflamables. Los vapores pueden crear peligro de
incendio o deexplosión.
10
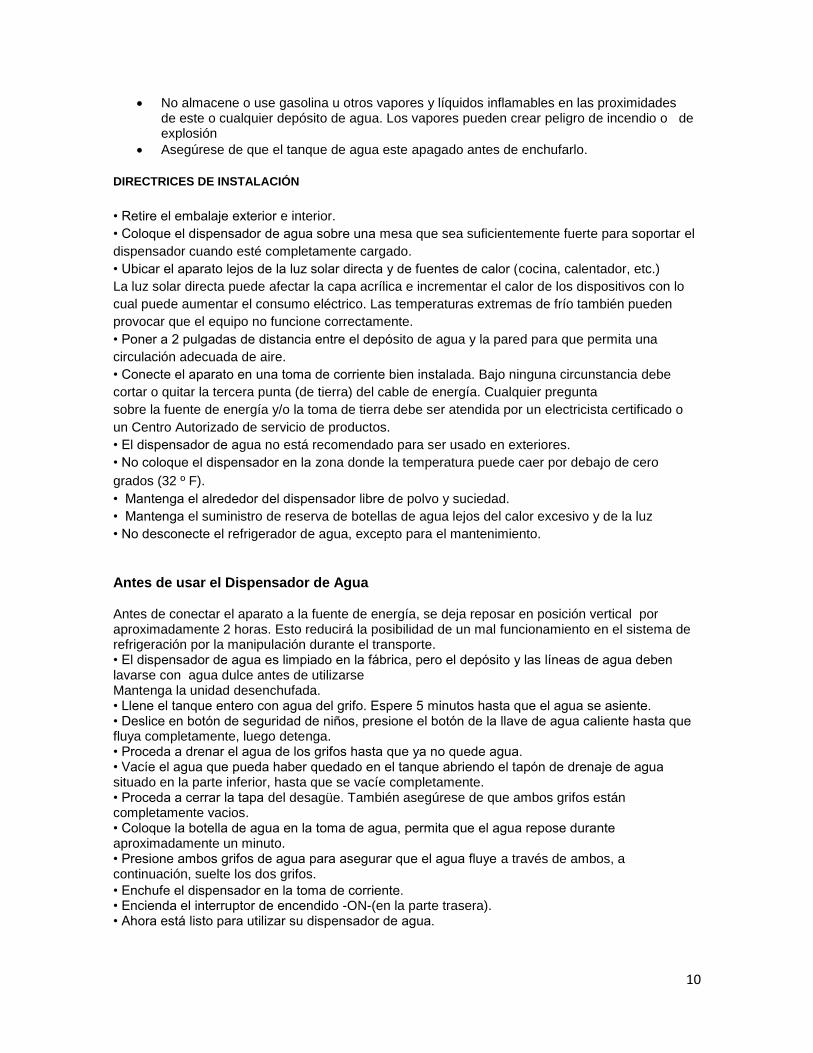
No almacene o use gasolina u otros vapores y líquidos inflamables en las proximidades de este o cualquier depósito de agua. Los vapores pueden crear peligro de incendio o de explosión
Asegúrese de que el tanque de agua este apagado antes de enchufarlo.
DIRECTRICES DE INSTALACIÓN
• Retire el embalaje exterior e interior.
• Coloque el dispensador de agua sobre una mesa que sea suficientemente fuerte para soportar el
dispensador cuando esté completamente cargado.
• Ubicar el aparato lejos de la luz solar directa y de fuentes de calor (cocina, calentador, etc.)
La luz solar directa puede afectar la capa acrílica e incrementar el calor de los dispositivos con lo
cual puede aumentar el consumo eléctrico. Las temperaturas extremas de frío también pueden
provocar que el equipo no funcione correctamente.
• Poner a 2 pulgadas de distancia entre el depósito de agua y la pared para que permita una
circulación adecuada de aire.
• Conecte el aparato en una toma de corriente bien instalada. Bajo ninguna circunstancia debe
cortar o quitar la tercera punta (de tierra) del cable de energía. Cualquier pregunta
sobre la fuente de energía y/o la toma de tierra debe ser atendida por un electricista certificado o
un Centro Autorizado de servicio de productos.
• El dispensador de agua no está recomendado para ser usado en exteriores.
• No coloque el dispensador en la zona donde la temperatura puede caer por debajo de cero
grados (32 º F).
• Mantenga el alrededor del dispensador libre de polvo y suciedad.
• Mantenga el suministro de reserva de botellas de agua lejos del calor excesivo y de la luz
• No desconecte el refrigerador de agua, excepto para el mantenimiento.
Antes de usar el Dispensador de Agua
Antes de conectar el aparato a la fuente de energía, se deja reposar en posición vertical por aproximadamente 2 horas. Esto reducirá la posibilidad de un mal funcionamiento en el sistema de refrigeración por la manipulación durante el transporte. • El dispensador de agua es limpiado en la fábrica, pero el depósito y las líneas de agua deben lavarse con agua dulce antes de utilizarse Mantenga la unidad desenchufada. • Llene el tanque entero con agua del grifo. Espere 5 minutos hasta que el agua se asiente. • Deslice en botón de seguridad de niños, presione el botón de la llave de agua caliente hasta que fluya completamente, luego detenga. • Proceda a drenar el agua de los grifos hasta que ya no quede agua. • Vacíe el agua que pueda haber quedado en el tanque abriendo el tapón de drenaje de agua situado en la parte inferior, hasta que se vacíe completamente. • Proceda a cerrar la tapa del desagüe. También asegúrese de que ambos grifos están completamente vacios. • Coloque la botella de agua en la toma de agua, permita que el agua repose durante aproximadamente un minuto. • Presione ambos grifos de agua para asegurar que el agua fluye a través de ambos, a continuación, suelte los dos grifos.
• Enchufe el dispensador en la toma de corriente. • Encienda el interruptor de encendido -ON-(en la parte trasera). • Ahora está listo para utilizar su dispensador de agua.
11
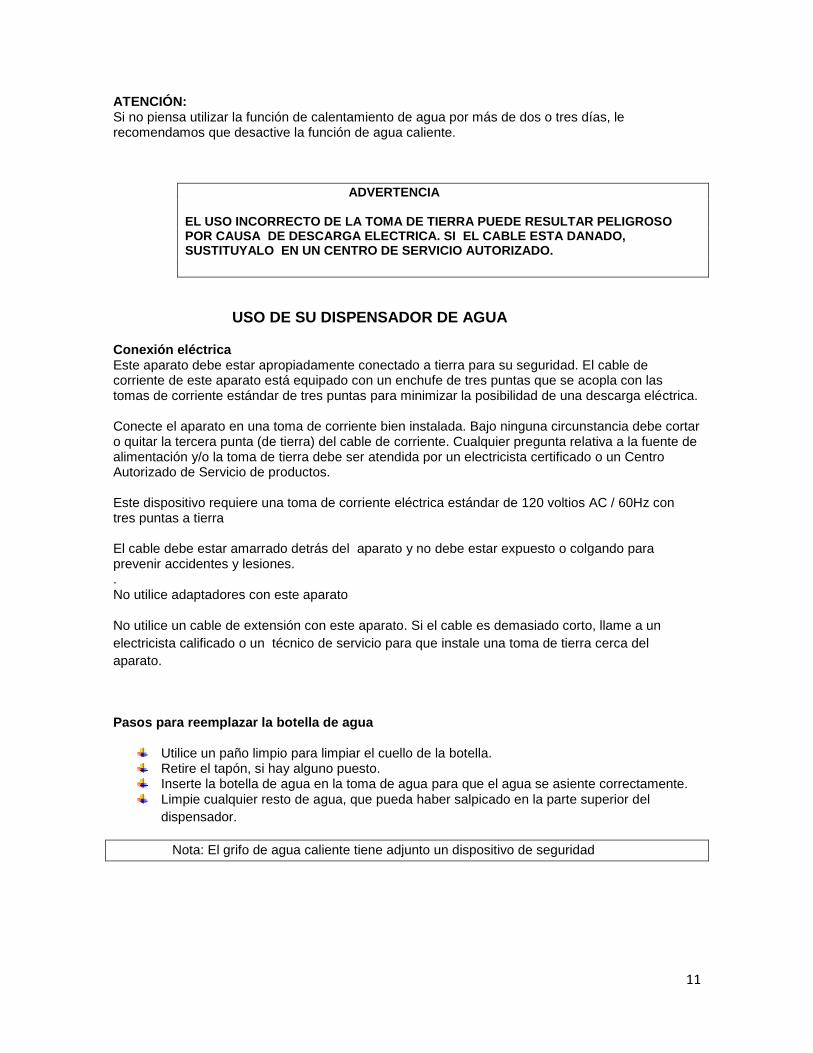
ATENCIÓN: Si no piensa utilizar la función de calentamiento de agua por más de dos o tres días, le recomendamos que desactive la función de agua caliente.
ADVERTENCIA EL USO INCORRECTO DE LA TOMA DE TIERRA PUEDE RESULTAR PELIGROSO POR CAUSA DE DESCARGA ELECTRICA. SI EL CABLE ESTA DANADO, SUSTITUYALO EN UN CENTRO DE SERVICIO AUTORIZADO.
USO DE SU DISPENSADOR DE AGUA
Conexión eléctrica Este aparato debe estar apropiadamente conectado a tierra para su seguridad. El cable de corriente de este aparato está equipado con un enchufe de tres puntas que se acopla con las tomas de corriente estándar de tres puntas para minimizar la posibilidad de una descarga eléctrica. Conecte el aparato en una toma de corriente bien instalada. Bajo ninguna circunstancia debe cortar o quitar la tercera punta (de tierra) del cable de corriente. Cualquier pregunta relativa a la fuente de alimentación y/o la toma de tierra debe ser atendida por un electricista certificado o un Centro Autorizado de Servicio de productos. Este dispositivo requiere una toma de corriente eléctrica estándar de 120 voltios AC / 60Hz con tres puntas a tierra El cable debe estar amarrado detrás del aparato y no debe estar expuesto o colgando para prevenir accidentes y lesiones. . No utilice adaptadores con este aparato
No utilice un cable de extensión con este aparato. Si el cable es demasiado corto, llame a un
electricista calificado o un técnico de servicio para que instale una toma de tierra cerca del
aparato.
Pasos para reemplazar la botella de agua
Utilice un paño limpio para limpiar el cuello de la botella. Retire el tapón, si hay alguno puesto. Inserte la botella de agua en la toma de agua para que el agua se asiente correctamente. Limpie cualquier resto de agua, que pueda haber salpicado en la parte superior del
dispensador.
Nota: El grifo de agua caliente tiene adjunto un dispositivo de seguridad

12
CUIDADO Y MANTENIMIENTO
Desconecte el cable de energía de la toma de corriente antes de limpiarlo
Lave el interior del depósito con una solución de agua tibia y bicarbonato. Ponga aproximadamente 2 cucharadas de bicarbonato por cada cuarto de litro de agua
El recolector de agua y los grifos deben limpiarse con detergente suave y agua tibia.
RECOMENDACIONES
Si el dispensador de agua no se utiliza durante un largo periodo de tiempo, desconecte el cable de energía del enchufe de la pared.
Vacíe el agua a través de los grifos.
Vacíe el agua de la cisterna quitando el tapón de la parte inferior del dispensador.
PROBLEMAS CON SU DISPENSADOR DE AGUA
Usted puede resolver con facilidad muchos de los problemas comunes del dispensador de agua, ahorrándose la llamada al Servicio Técnico. Pruebe leyendo las sugerencias que se indican a continuación para ver si puede resolver el problema antes de llamar al Servicio Técnico
GUÍA DE RESOLUCIÓN DE PROBLEMAS
PROBLEMA POSIBLE CAUSA
Dispensador de agua no funciona. No está enchufado El circuito eléctrico está roto o tiene un fusible quemado.
El enfriador de agua no enfría lo suficiente. Asegúrese de que el interruptor de frío en la parte de atrás este encendido.
El calentador de agua no calienta lo suficiente. Asegúrese de que el interruptor de caliente en la parte de atrás este encendido.
Vibraciones. Asegúrese de que el dispensador de agua este nivelado.
El dispensador de agua parece que hace
demasiado ruido.
El ruido de golpeteo puede provenir del flujo del refrigerante, esto es normal. Cuando cada ciclo termina, usted puede escuchar sonidos de gorgoteo causados por el flujo de refrigerante en el dispensador de agua. La contracción y expansión de las paredes interiores pueden causar ruidos como estallidos y crujidos.
La botella se siente tibia El sistema de agua está demasiado lleno. Suministre agua fría hasta liberar aire dentro de la botella.
La botella de agua está caliente. El agua esta hirviendo en el tanque y burbujeando en la botella. Pulse el botón dispensador de agua caliente hasta que fluya el agua para eliminar el aire del tanque caliente.
13
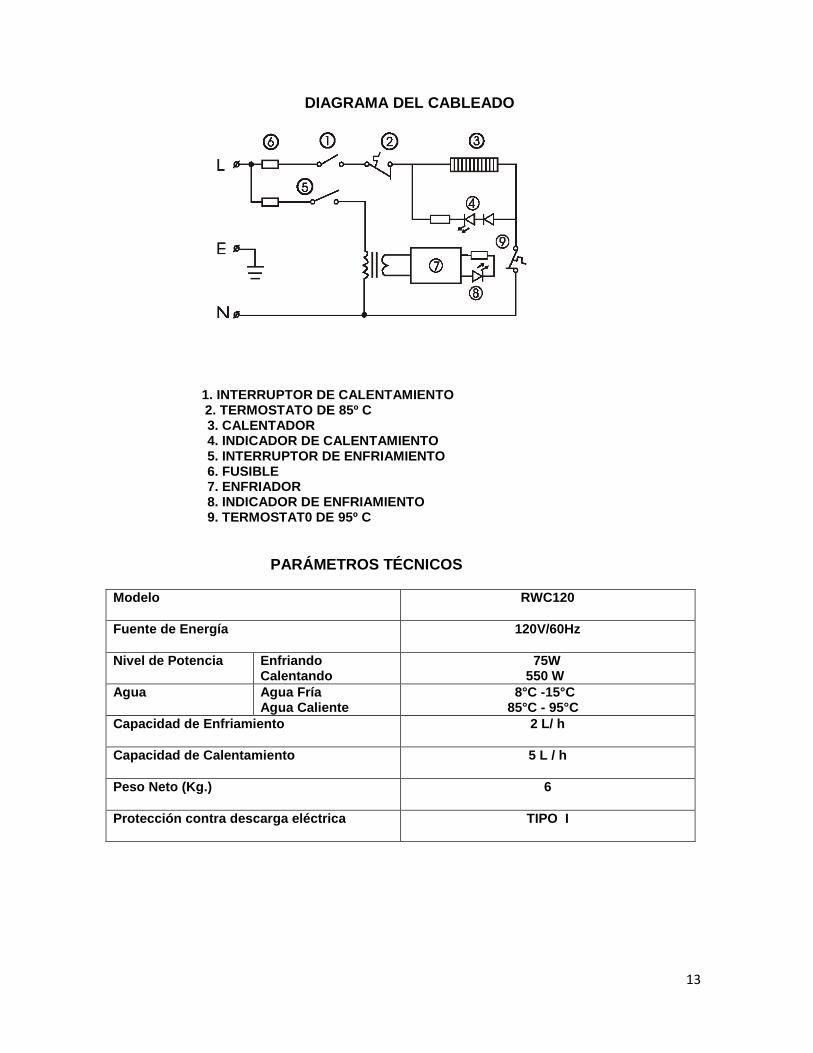
DIAGRAMA DEL CABLEADO
1. INTERRUPTOR DE CALENTAMIENTO 2. TERMOSTATO DE 85º C 3. CALENTADOR 4. INDICADOR DE CALENTAMIENTO 5. INTERRUPTOR DE ENFRIAMIENTO 6. FUSIBLE 7. ENFRIADOR 8. INDICADOR DE ENFRIAMIENTO 9. TERMOSTAT0 DE 95º C
PARÁMETROS TÉCNICOS
Modelo RWC120
Fuente de Energía 120V/60Hz
Nivel de Potencia Enfriando Calentando
75W 550 W
Agua Agua Fría Agua Caliente
8°C -15°C 85°C - 95°C
Capacidad de Enfriamiento 2 L/ h
Capacidad de Calentamiento 5 L / h
Peso Neto (Kg.) 6
Protección contra descarga eléctrica TIPO I
14
Para servicio al cliente en Estados Unidos y Canadá llame al: 1-866-499-6389
WWW.RAGALTAUSA.COM
5870 NW 163th Street, Miami Lakes, Florida 33014
USA
1 Año de Garantía Limitada: Cubre cualquier defecto en el material utilizado y mano de obra
bajo uso doméstico normal.
FABRICADO EN CHINA