Embed Size (px)
Citation preview

4.01 RSC_MOD HQ - Create Pre-Scoping Project.doc Page 1 of 13
Work Instruction Create Project - Pre-Scoping
Module
Purpose
This work instruction is used to out line the steps to complete the following Manage Pre-Scoping activities:
• Create Study Project (Pre-Scoping)• Perform Pre-Scoping
Prerequisites None
Navigation
Via Menu Path Log in to the MIP > Workbench > Create Project >
and
Claim > Create Study Project

4.01 RSC_MOD HQ - Create Pre-Scoping Project.doc Page 2 of 13
Work Steps
Only users with permissions to create a project will see the Create Project tab when they log in.
1. Click on: to create a study project
2. Click on: radio button
3. Click the Region dropdown box to select the Region in which the project occurs
4. Click on: to create the project

4.01 RSC_MOD HQ - Create Pre-Scoping Project.doc Page 3 of 13
Recommended information to create a project name may include: - Location of study - State - Fiscal year the project started - Type of project (pre-scoping)
5. Click to enter the Project Name
6. Use the calendar icon or click to enter the Planned Start Date for pre-scoping activities
7. Use the calendar icon or click to enter the Planned End Date for pre-scoping activities
8. Click to enter the Negotiated Cost
9. Click the Organization Type dropdown box and select the organization type performing the pre-scoping activities
10. Click the Organization Name dropdown box and select the name of the organization performing the pre-scoping activities
11. Click on: to move to the Community Information screen

4.01 RSC_MOD HQ - Create Pre-Scoping Project.doc Page 4 of 13
If you have the CID for the county or community, enter it in the CID field and click Add Area. That will populate the State, County and Community fields. OR If you do not know the CID, choose the State, County and Community from the dropdown boxes and click Add Area.
12. Click the State dropdown box and select the state the project is in
13. Click the County dropdown box and select the county the project is in
If doing a county-wide project, choose the option listed in lower-case. The community in upper-case and with an asterisk (*) indicates the portion of the county that is unincorporated.
14. Click the Community dropdown box to choose the county or community to include in the project. If there are multiple communities in the project, add them one at a time.
Always click Add Area before Continue. If you click Continue before Add Area, all previously entered information will be lost.
15. Click on:
If creating a county-wide project, only include the county-wide option. To add multiple communities, continue to add each community and click Add Area until all communities are listed.
16. Once all areas are added, click to move to the Review screen

4.01 RSC_MOD HQ - Create Pre-Scoping Project.doc Page 5 of 13
Once you click Complete Task you cannot return to this task. Confirm all information is correct before clicking the Complete Task button. Click the Back button to make any changes to previous screens.
17. Review the information and when satisfied, click
The project is created and a project number is generated.
The first two digits of the project number indicate the fiscal year in which the project was created, the second two digits indicate the Region, the next four digits are a sequentially generated number, and the letter at the end indicates the project type.
The list below displays the letter options of the project types: A: Amendment or eLOMA projects C: Amendment Conditional P: Revision R: Revision Conditional S: Study T: Pre-Scoping V: Amendment (V Zone) X: Amendment & Revision Corrected Copy Case
4.01 RSC_MOD HQ - Create Pre-Scoping Project.doc Page 6 of 13
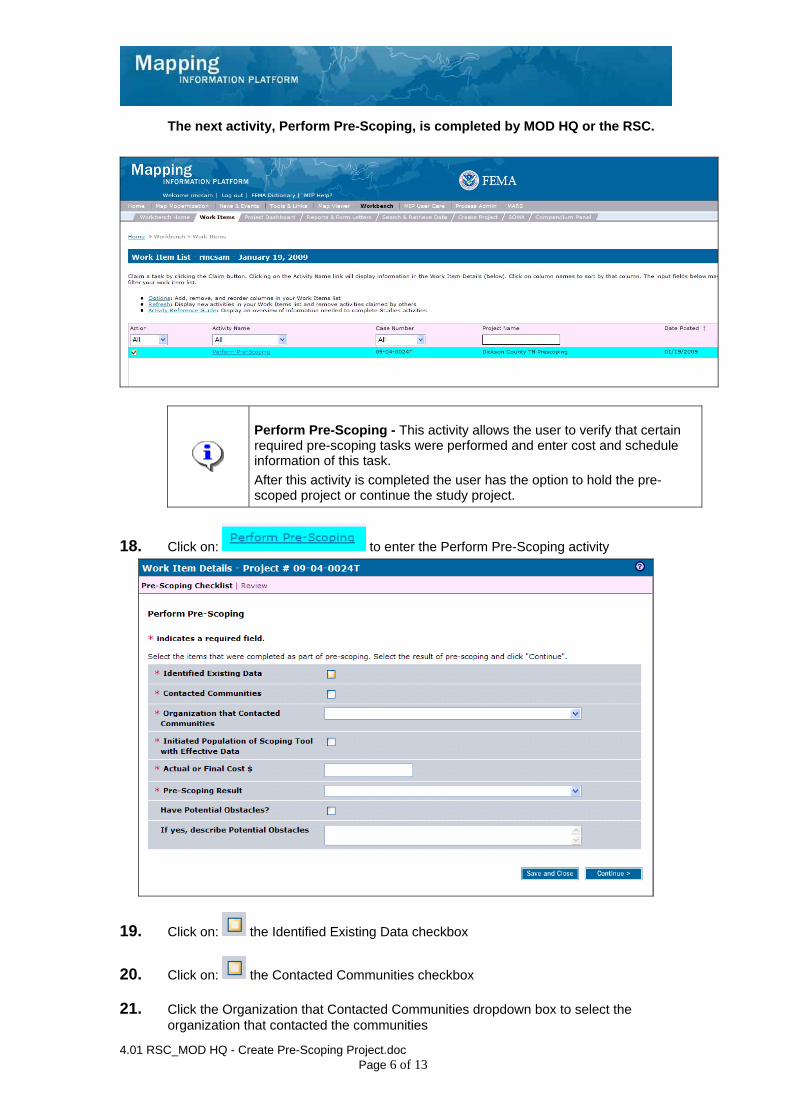
The next activity, Perform Pre-Scoping, is completed by MOD HQ or the RSC.
Perform Pre-Scoping - This activity allows the user to verify that certain required pre-scoping tasks were performed and enter cost and schedule information of this task. After this activity is completed the user has the option to hold the pre-scoped project or continue the study project.
18. Click on: to enter the Perform Pre-Scoping activity
19. Click on: the Identified Existing Data checkbox
20. Click on: the Contacted Communities checkbox
21. Click the Organization that Contacted Communities dropdown box to select the organization that contacted the communities

4.01 RSC_MOD HQ - Create Pre-Scoping Project.doc Page 7 of 13
22. Click the Initiated Population of Scoping Tool with Effective Data checkbox
23. Click to enter the Actual or Final Cost for pre-scoping
Selecting ‘Hold study project’ creates a new activity on the Work Item List: Hold Pre-Scoped Project. Selecting ‘Continue to study project’ moves the workflow directly to Initiate Study Project.
24. Click the Pre-Scoping Result dropdown box to indicate whether to continue with the project
25. If potential obstacles exist, click the Have Potential Obstacles checkbox
26. Click to enter text for any potential obstacles
27. Click on: to move to the Review screen
Once you click Complete Task you cannot return to this task. Confirm all information is correct before clicking the Complete Task button. Click the Back button to make any changes to previous screens.
28. Review the information and when satisfied, click

4.01 RSC_MOD HQ - Create Pre-Scoping Project.doc Page 8 of 13
The next activity in the workflow, Hold Pre-Scoped Project, is completed by MOD HQ or the RSC.
Only claim an activity that you are certain you own or have been instructed to claim. Contact your manager if you claimed an activity in error.
29. Click on to claim the activity
Hold Pre-Scoped Project - This activity is performed if additional time is required to determine the needs of a project. The hold can be removed or set to expire on a certain date. If Hold is selected, a reason is listed and the project only advances after the date has expired. The project then moves to Initiate Study Project, completed by the RSC, MOD HQ or FEMA.
30. Click on: to enter the Hold Pre-Scoped Project activity

4.01 RSC_MOD HQ - Create Pre-Scoping Project.doc Page 9 of 13
To continue the hold, enter a date in the Hold Expires On field and enter text in the Reason for Hold field. Once the date expires, the next activity (Initiate Study Project) appears on the Work Item List. To continue the study without a hold, click the Do not hold, continue study checkbox
31. Click the checkbox to proceed with the study project, or enter the date that the hold expires on
32. Click on: to move to the Review screen
Once you click Complete Task you cannot return to this task. Confirm all information is correct before clicking the Complete Task button. Click the Back button to make any changes to previous screens.
33. Review the information and when satisfied, click

4.01 RSC_MOD HQ - Create Pre-Scoping Project.doc Page 10 of 13
The next activity, Initiate Study Project, is completed by the RMC, MOD HQ, or FEMA.
Only claim an activity that you are certain you own or have been instructed to claim. Contact your manager if you claimed an activity in error.
34. Click on: to claim the activity
Initiate Study Project - In this activity, all scoping costs are captured and added to the project. The map panel numbers for the study area are added to the MIP, along with the tasks necessary to produce new DFIRMs. The project area is added to complete the task.
Completion of this activity triggers the Obligate Project Funds activity, completed by the RSC, MOD HQ, or FEMA.
35. Click on: to enter the Initiate Study Project activity

4.01 RSC_MOD HQ - Create Pre-Scoping Project.doc Page 11 of 13
36. Use the calendar icon or click to enter the Planned Start Date for scoping, as per the contract
37. Use the calendar icon or click to enter the Planned End Date for scoping, as per the contract
38. Click the Organization Type dropdown box to select the organization type
39. Click the Organization Name dropdown box to select the organization name
40. Click to enter the Amount
41. Click to select the Federal Funding Year dropdown box
42. Click the Cost Type dropdown box to select the cost type
43. Click to enter the Contract or Agreement Number and Task Order Number, if applicable
Always click Add Cost before continuing. If you click Save and Close or Continue before Add Cost, all previously entered information will be lost.
44. Click on:
45. Click on: to move to the Contact List screen

4.01 RSC_MOD HQ - Create Pre-Scoping Project.doc Page 12 of 13
These fields are not required, but the information is useful when running reports on the project.
Tips: • Names are not required. Titles can be used in these fields,
especially if turnover is likely in the position.
• Be consistent with names and titles across all projects. For example, don't use Bob Smith as RSC Manager for this project and Mr. B. Smith in a different project.
• FEMA Regional Engineer and FEMA Regional Floodplain Manager are fields that appear in MARS reports.
Add contact names for each of these fields, except NSP Territory Manager.
46. Enter the information on the Contact List screen
47. Click on: to move to the Review screen

4.01 RSC_MOD HQ - Create Pre-Scoping Project.doc Page 13 of 13
Once you click Complete Task you cannot return to this task. Confirm all information is correct before clicking the Complete Task button. Click the Back button to make any changes to previous screens.
48. Review the information and when satisfied, click
Results
The next activity in the workflow is Obligate Project Funds, completed by MOD HQ, the RSC or FEMA. Last updated: March 2009