Embed Size (px)
Citation preview

Copyright © 2019 DXC Technology September 6, 2019
Create Tips: componentVersion: IMDS Release 11.0

September 6, 2019 2Copyright © 2019 DXC Technology
Introduction
This presentation gives a recommended step-by-step procedure for creating MDSs in the IMDS, with an emphasis on the creation of components.
While this presentation gives recommendations on how to input data,
it does not replace the individual OEM requirements that can be found on the IMDS Information Pages > Help > OEM Specific Info
nor does it replace specific product recommendations.
Note: These examples have been developed in the Model Office environment and represent demonstration data only.

September 6, 2019 3Copyright © 2019 DXC Technology
Table of Contents
Basic MDS Structure
Locate Recommendations
How to Search
Create a Component
Recyclate Information
Application Codes
Parts Marking
Release Referenced Datasheet
Adding Component Directly in Tree
Adding Recipient
Send vs. Propose
Creating a Semi-component
Click on the link to go directly to that section.

September 6, 2019 4Copyright © 2019 DXC Technology
Basic MDS Structure
In IMDS, the requirement is to reduce all parts to Basic Substances.
The system allows mixing of types at the same level (siblings). However, there are some OEM and Tier One that require all siblings to be of the same type. Therefore, understand your customer’s requirements before expending a lot of effort. Please review Recommendation 001 and other recommendations that pertain to your product.
Mixing types will generate a Warning

September 6, 2019 5Copyright © 2019 DXC Technology
Where To Find Recommendations
The Recommendation menu opens the following screen: IMDS 001 is what is commonly referred to as Recommendation 001.

September 6, 2019 6DXC Proprietary and Confidential
How to Search for a Component

September 6, 2019 7Copyright © 2019 DXC Technology
Filters – Component Search Page I
The best way to find anything in IMDS is by IMDS ID. Also, …
Determine if it was created by your company or another.
Use wild card searches (e.g. if looking for published SAE 1010 steel, use *1010 in the Name field).
Begin by selecting Component Search from the functions menu or the toolbar. Then select the Filters.
September 6, 2019 8Copyright © 2019 DXC Technology
Filters – Component Search Page II
Name – the name given on the Ingredients page Note: If you cannot find the MDS, you may want to do a wild card search.
Part/Item No. – the Part/Item number from the Ingredients page Note: If you cannot find the MDS, you may want to do a wild card search.
ID – the IMDS ID number / Version
Current versions: Displays the highest version number or all the versions in edit mode if your company created it. Or the highest version number that you have visibility to if another company created it.
All versions: Lists all versions of the specified component.
Preliminary MDS – if yes, will return only the MDSs with “Preliminary MDS” checked on the Ingredients page.

September 6, 2019 9Copyright © 2019 DXC Technology
Filters – Creation and Release Dates
Published / accepted / internally released – this option will return only released MDSs (whole number version) and whether they are created by your own company or a supplier or both will depend on how you set other flags on this screen.
Created (own MDSs) – this option will return only MDSs created by your company, regardless of whether they have been released or not.
Date from/to – this option will limit your results to MDSs released during the time frame (if first box checked) or created during the time frame (if second box checked). Note: The dates must be given in the specified format. Only MDSs have the date tracked (as opposed to modules).
Regulation Request – with this option, the result only shows MDSs for which regulation requests(in a certain time period) have been received.

September 6, 2019 10Copyright © 2019 DXC Technology
Filters – Supplier MDSs
You can limit your search for Supplier MDSs to data from a select list of suppliers.
Accepted MDSs – returns only data that has been accepted by your company.
Published MDSs – returns only data that has been published.
Supplier – adding suppliers will restrict search returns to only the suppliers listed. See next page for how to add/remove suppliers and a more complete discussion of how this works.
Save List – saves the supplier list for future sessions. This list is saved to the login ID.
The “save list” from this Search screen is also attached to the MDS Inbox allowing a company to have users focused on certain suppliers. There is a second “save list” available on the MDS Outbox.

September 6, 2019 11Copyright © 2019 DXC Technology
Filters – Add to Supplier List
To add another supplier to the list shown, click on the
A screen appears for Search Criteria, where you can either search on a Company or an Org.-Unit.
After the result list returns, select your supplier and click Apply.

September 6, 2019 12Copyright © 2019 DXC Technology
Filters – Remove from Supplier List
To remove a supplier from the Supplier list, first highlight the supplier to remove (HPE Service Desk in this example) and then click on the

September 6, 2019 13Copyright © 2019 DXC Technology
Filters – Organizational Info
Own MDSs – the search results will include MDSs created by your company
Own Modules – the search results will include modules created by your company
Assigned Org.-Unit – the search result will be limited to MDSs assigned to a particular Org.-Unit
Assigned Contact – the search result will be limited to MDSs associated with the contact person selected. Contacts are populated by the Client Manager under Administration > Contact Person
Last edited by me – the search result will be limited to those MDSs or Modules last edited by the user ID currently logged in
obsolete – will list own MDSs marked as obsolete

September 6, 2019 14DXC Proprietary and Confidential
Create a Component
September 6, 2019 15Copyright © 2019 DXC Technology
IMDS Hierarchy
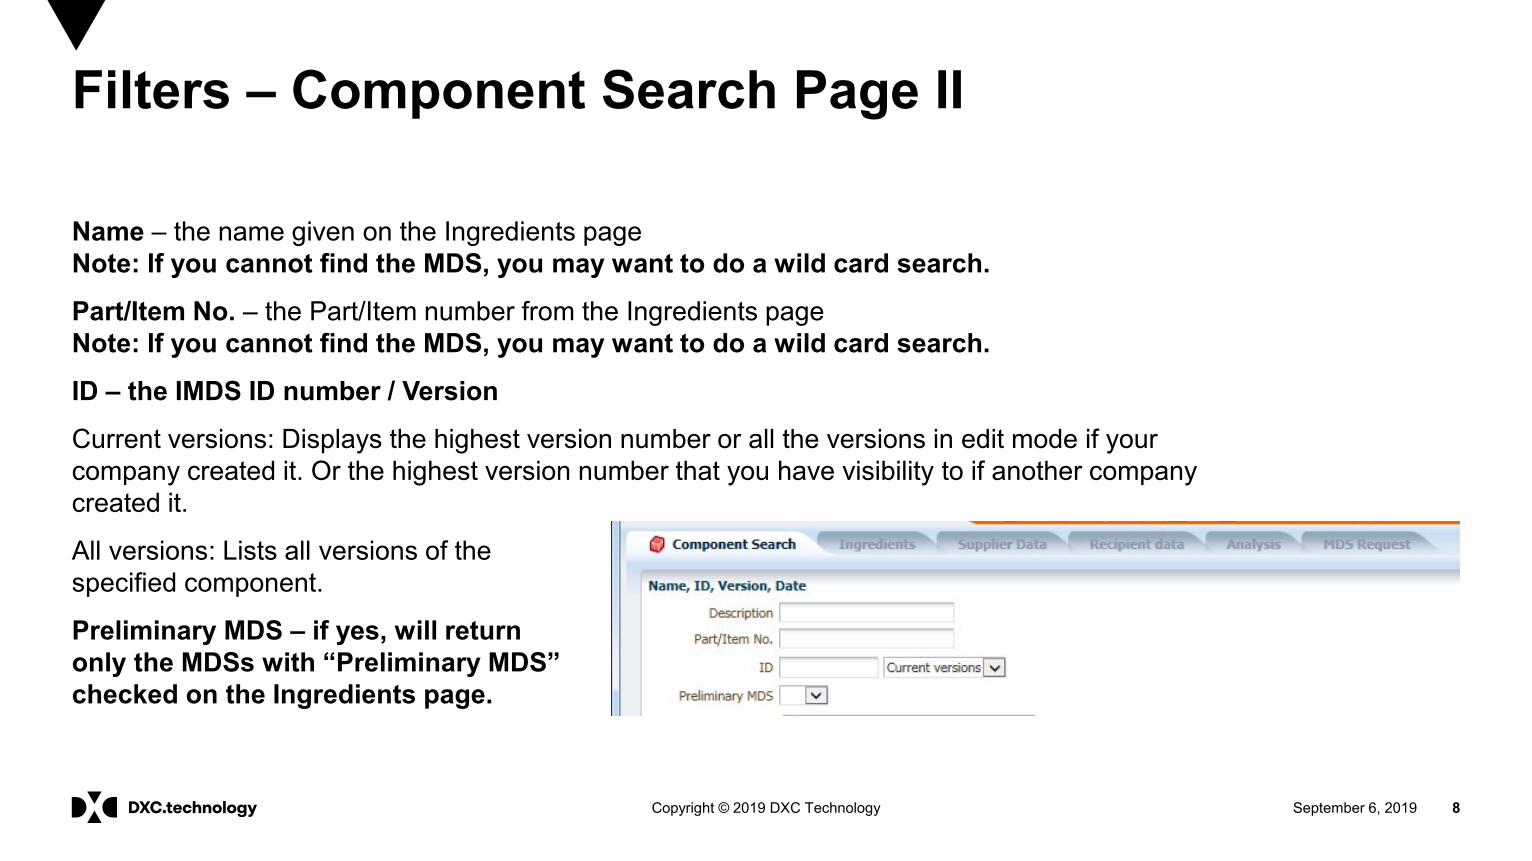
Be aware of the rules about the hierarchy (tree structure) in IMDS when creating a component or semi-component. Think of the tree structure in IMDS in terms of a “parent” and “child” relationship: A Material “parent” can only have materials or substances as “children”.
A Semi-component “parent” can only have semi-components or materials as a sub-node or “children”.
A Component “parent” can have components, semi-components, or materials as a sub-node or “children”.
A “parent” in IMDS can have several “children”. However, Recommendation 001 says that all “children” of the same parent must be of the same type. This means that you may have to introduce a component or semi-component into your tree structure that wouldn’t normally be there and attach the semi-component or material to it in order to keep all the children of the same parent the same type.
You can easily “change” a material or semi-component into a component by attaching it to a component “parent”. You cannot change a component into anything lower.

September 6, 2019 16Copyright © 2019 DXC Technology
First, Select MDS or Module
Select from the Create menu options:
MDSs require all information to be filled in: Ingredients, Supplier Data, Recipient Data
Modules only require Ingredients to be defined as the rest gets set when used in an MDS. Modules cannot be send to customer or get assigned to an Org.-Unit.

September 6, 2019 17Copyright © 2019 DXC Technology
Next, Choose Component / Semi-component
Most of the MDSs entered in IMDS are either Components or Materials. However, there is a need for the Semi-component.
Component – represents a part, or a placeholder in the tree structure to make the structure meet IMDS Recommendation 001 requirements. It has weight and is used in an assembly in whole numbers (e.g. 1 of n, 2 of n)
Semi-component – represents a product that is used per weight, length, volume. It does not have weight until added to a component, although in Release 7.0, a function was added to track the density. Examples: leather hide, wire, etc.
Select New > Datasheet > Component.

September 6, 2019 18Copyright © 2019 DXC Technology
Fill in the Ingredient Details
Fill in the Description and Part/Item No – it is how you refer to the item within your company and used for finding it later.
Theoretically, anything can be used for the Part/Item No. and Description – but if it will later be attached to another tree, some OEM and hence Tier One may have other requirements.
If the part is to be sent to a customer, their Part number and Description must appear in the Recipient Data because they see values from the Recipient Data in their view, not the values shown on this screen.
You must change the default Description. The name shown depicts the number of MDSs created, 905428947. Make the name descriptive.

September 6, 2019 19Copyright © 2019 DXC Technology
Fill in the Weight
Enter the weight, select the units, and select the tolerance percentage (%).
Tolerance is not the same as the part design, but used for checking to see if all the component weights sum correctly.
In this example, the weight is 120 g.
Weight – fill in the weight and then select the units. Note: Metric units used

September 6, 2019 20Copyright © 2019 DXC Technology
Add the Structure
Under a component, you can add other Components, Semi-components or Materials.
Let’s start with a material since you will probably have a component made of all materials initially.
Click on the Add a Material reference button.
Add an existing component to the tree – or create one “on the fly”.
Add an existing semi-component to the tree – or create one “on the fly”.
Add an existing material to the tree.

September 6, 2019 21Copyright © 2019 DXC Technology
Apply Material
To add a Material for Fasteners:
Select Published MDSs.
Search using the wildcard in the name field, *fasteners.
Select Apply.
Note: If you select a material that does not have a whole number version, you will have to come back later and release it before you can release or send the component.

September 6, 2019 22Copyright © 2019 DXC Technology
Add the Material Weight
All the information except the weight is from the Material MDS –you cannot change anything except the weight.
Fill in the Weight and Units – in this case the component has 100g of this material.
Save and run the check.
2. Run Check
1. Fill in Weight and select units
Note that the version of this material is 8 – it is released. You cannot make changes on a released MDS.
September 6, 2019 23Copyright © 2019 DXC Technology
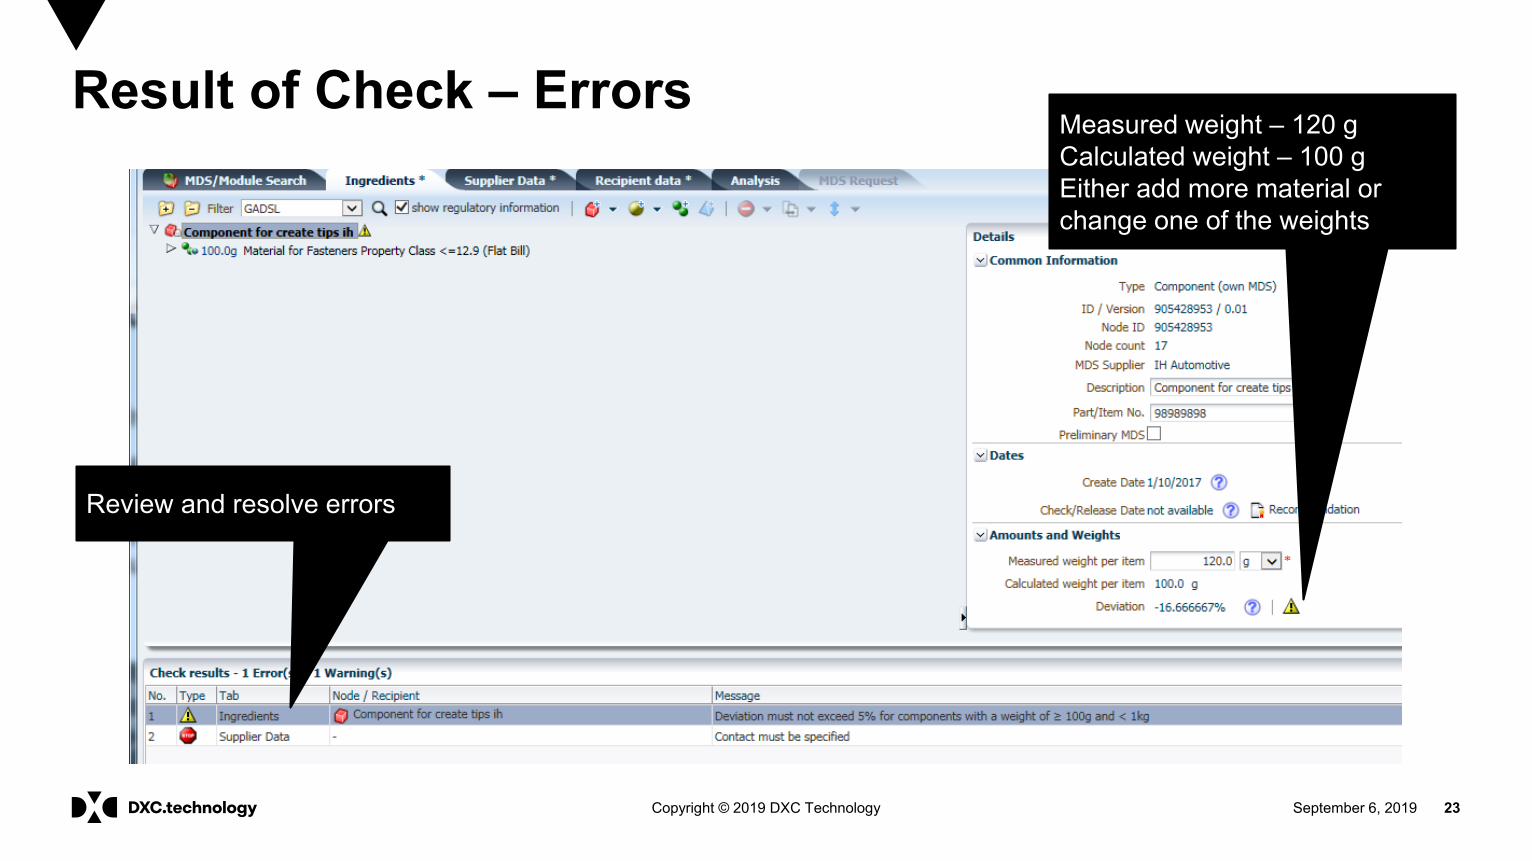
Result of Check – Errors
Review and resolve errors
Measured weight – 120 g Calculated weight – 100 g Either add more material or change one of the weights

September 6, 2019 24Copyright © 2019 DXC Technology
Weight Changed
Top node weight changed so now deviation is 0.

September 6, 2019 25Copyright © 2019 DXC Technology
Recyclate Information
Recyclate is the recycled content of the material. Although it is associated with the material, the recyclate input fields appear only when the material is added to a component or a semi-component.
If the material contains Recyclates, select the type and enter the percentage present:
Post industrial recyclates might come from injection molding, rejected parts, etc.
Post consumer recyclates might come from scrapped and damaged vehicles, packaging wastes, scrapped household appliances, etc.
This information is important as there are some governments that give rebates for using recycled materials and there is a requirement in the future to be using recycled content.

September 6, 2019 26Copyright © 2019 DXC Technology
Add Recyclate Information
If the material is applicable for Recyclate information, you can only add it if you are in edit mode (version is a decimal and the MDS is not it “handshake” status).
Unless you selected ‘Yes’,all values will be grayed out.
Fill in information if desired/required

September 6, 2019 27Copyright © 2019 DXC Technology
Application Codes
There is also an Application information field. That means that one or more of the substances on the tree structure is a substance that requires an application code to indicate how the substance is used.
Filter that highlights all substances requiring an application.
Since Nickel requires an application, there is a new field.

September 6, 2019 28Copyright © 2019 DXC Technology
Application-Relevant Substances
There are only certain families of substances that require you to indicate how you are using the substance. They are:
– Lead – Mercury – Cadmium – Hexavalent Chromium – Polycyclic Aromatic Hydrocarbon (PAH) – Nickel (Nickel only, not the family)
For further information on the possible application codes, see IMDS Information Pages > Help > FAQ > MDS Ingredients screen > Is there any further explanation as to how to select an Application ID?

September 6, 2019 29Copyright © 2019 DXC Technology
Application Dialog
Based on the material classification, the substance and the weight the system will make a suggestion. (This example is for illustrative purposes only.)
You can double-click on the entered Application to see the other options – you can only make changes if the MDS is in edit mode.
Note: Although the system may suggest an application code, it is the responsibility of the user to ensure that the correct application is selected. For more information on the possible applications see IMDS Information Pages > Help > FAQ > MDS Ingredients screen > Is there any further explanation as to how to select an Application ID?

September 6, 2019 30Copyright © 2019 DXC Technology
Add Material Requiring Parts Marking
If an MDS is created/modified, the Parts Marking information may need to be supplied when the MDS meets all the following criteria:
The parent node is a component .
At least one child node of the component parent node is a material with one of the 5.* classifications.
Select the Add a Material reference button to add a material that requires Parts Marking data.
Note: Multiple information fields only appear when the material is selected (not when the top node is viewed). However, do not contact the supplier of the material MDS to add the application code – you must add the application when adding the material to the tree.
Add Material.

September 6, 2019 31Copyright © 2019 DXC Technology
Answer Parts Marking Question
Component is selected (top node). At this point, because a material with a Polymer classification was just added, you’re being asked if you’ve physically marked the part.
Note: If you click on the question mark nearby the dropdown box, you will get the complete explanation of what you should be doing. If you’re unsure, you should have someone go out and look at a part that’s ready to leave the plant and check to see if it is marked.
New question at top node

September 6, 2019 32Copyright © 2019 DXC Technology
Polymeric Parts Marking Question
This question will occur if the component has a material attached that falls under one of the following material classifications:
5.1.a filled Thermoplastics
5.1.b unfilled Thermoplastics
5.2 Thermoplastic elastomers
5.3 Elastomers / elastomeric compounds
5.4 Duromers
5.4.1 Polyurethane
5.4.2 Unsaturated polyester
5.4.3 Other duromers
5.5.1 Plastics (in polymeric compounds)
5.5.2 Textiles (in polymeric compounds)
To answer this question you need:
Access to the drawing
Access to the part
Did you mark your polymeric part(s) according to respective applicable ISO Standards (e.g. ISO 1043, ISO 1629, ISO 18064, ISO 11469)?
Yes (Parts are marked as required on drawing)
No (Parts are not marked as required)
Not applicable (Parts do not require marking due to specifications of weight, geometric restrictions or surface requirements)

September 6, 2019 33Copyright © 2019 DXC Technology
Need More Recyclate Information?
Once again, you may have to answer the Recyclate question.

September 6, 2019 34Copyright © 2019 DXC Technology
Top Level View
You have to increase the weight after adding the last material.
“Attaching” is also called “Referencing”.
Run the Check now.
Changed weight.Run the Check.
September 6, 2019 35Copyright © 2019 DXC Technology
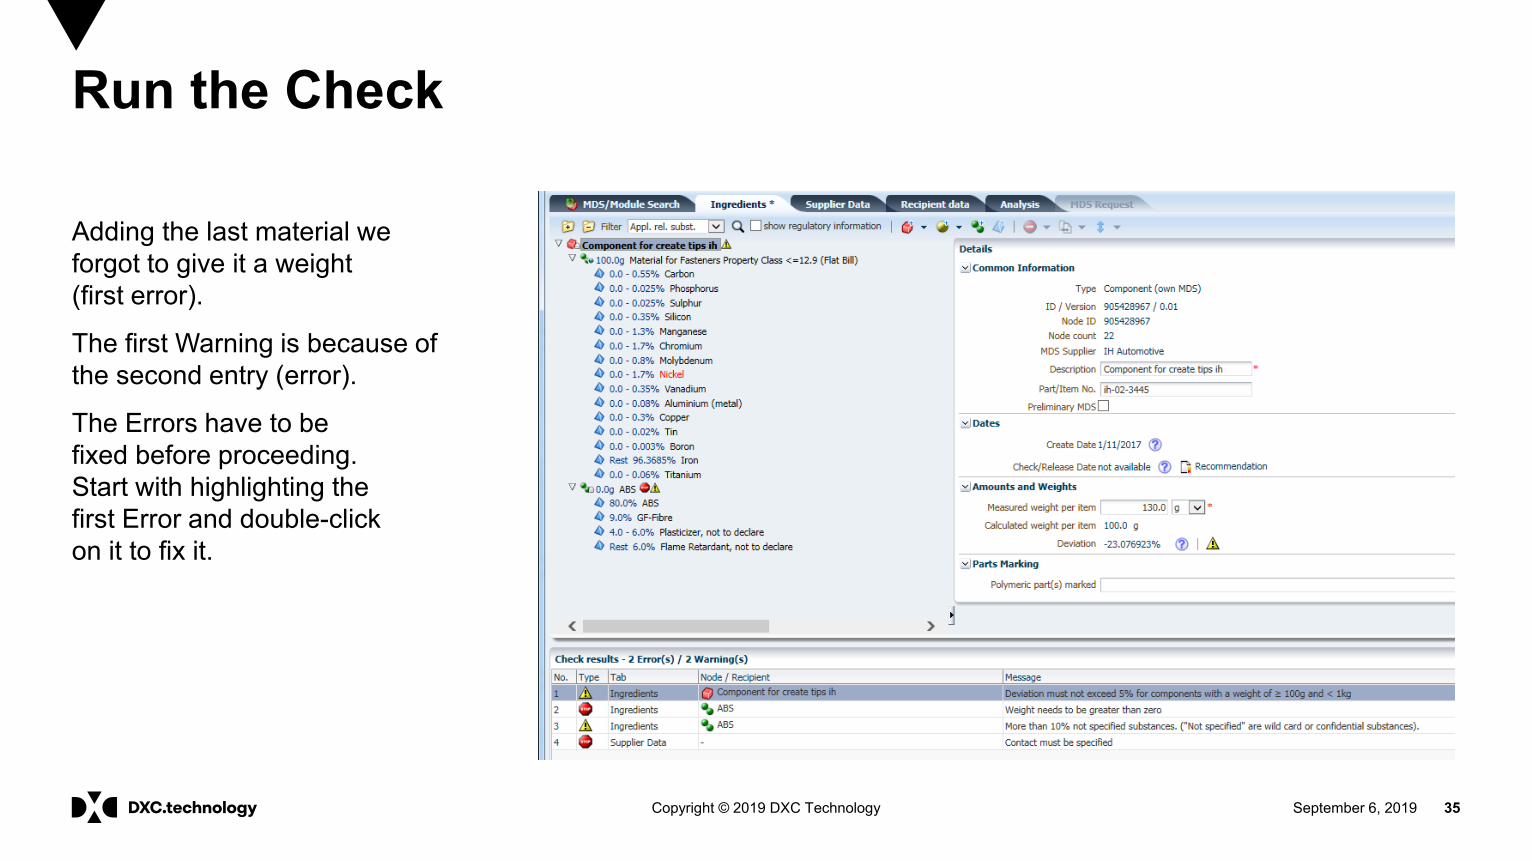
Run the Check
Adding the last material we forgot to give it a weight (first error).
The first Warning is because of the second entry (error).
The Errors have to be fixed before proceeding. Start with highlighting the first Error and double-click on it to fix it.

September 6, 2019 36Copyright © 2019 DXC Technology
Releasing Referenced Datasheet
Release the MDS by using the Release Internal button in Recipient data (see page 40).
If not released there will be a “modify” button.
Version .01 is meaning: Not released.
Modify leaves the MDS you are working on and goes directly to the one that isn’t released.

September 6, 2019 37Copyright © 2019 DXC Technology
Material Released
Now the material is released.
You can return to the main MDS (top node).
Button to go back to where you were.Version 1 (whole
number)
Note: If your Company/Org.-Unit and your user ID have been authorized for publishing, there is an additional button available to “Publish” the MDS.

September 6, 2019 38Copyright © 2019 DXC Technology
Returned to Main MDS
Now the weight problem is fixed and the material is released.
Running the check again shows an Error and a Warning.
Need to fix the contact Error.
This Warning is acceptable so you can ignore it.

September 6, 2019 39Copyright © 2019 DXC Technology
Supplier Data
Contact is added on the Supplier Data page.
Select the Organization Unit if applicable.
Select the Contact Person.
Click on tab “Recipient data” to release the MDS.

September 6, 2019 40Copyright © 2019 DXC Technology
Internally Release Component
The correction has been made and you can go directly to the Recipient data screen and choose Release Internal.
Note: Although the system allows you to Release, Send, and Propose with Warnings, that does not mean it will meet your customer’s requirements.
Note: The Send and Propose buttons are grayed out – you cannot use them until you add a recipient.
Click on Release Internal.
Click on Release Internal.

September 6, 2019 41Copyright © 2019 DXC Technology
Component Released
Component is internally released.
Now go back to Menu and to Create another component.
Now Release Internal is also grayed out – you can still Send and Propose, should you add a recipient.
Version number changed (whole number)
Status changed

September 6, 2019 42Copyright © 2019 DXC Technology
New Component – Assembly
This is going to be an assembly of existing components.
Enter the total weight. Click on the “Add a Component reference ” button.
When the screen comes up, search on own.
Add existing MDS.
Enter total weight and units.
Note: Referencing is also known as “Add an existing MDS”.

September 6, 2019 43Copyright © 2019 DXC Technology
Attach / Reference First Component
The component you just created is selected.
Click on Apply.

September 6, 2019 44Copyright © 2019 DXC Technology
Assembly Updated and Added
Doesn’t look like there’s much to do beyond indicating how many of these are in the assembly.
To add another component, you must click on the top node of the tree.
Enter how many of these are going to be in the assembly.

September 6, 2019 45Copyright © 2019 DXC Technology
Prepare for Second Component
Going to be creating a plated component: To maintain tree structure according to Recommendation 001, you are going to have to create a place-holding component for the plating.
Although Materials must be created separately, you can create a sub-component in the tree – it exists only in this tree structure.
Create a sub-component “on the fly” by clicking on the “Add Component Node” button.
“Add Component Node” button

September 6, 2019 46Copyright © 2019 DXC Technology
Add Second Component and Check
Add a Description for this second component.
Save.
Click on the toolbar icon to run the Check.

September 6, 2019 47Copyright © 2019 DXC Technology
Result of Check – Errors
No quantity has been specified for the added component.
No materialsare contained in the component.
No weight has been entered for the component.
Therefore please add component weight, quantity, published material, and replace the default name of the datasheet.

September 6, 2019 48Copyright © 2019 DXC Technology
Fix, Check Again – Less Errors
You need to add the weight of material in this screen and the contact person in Supplier Data.

September 6, 2019 49Copyright © 2019 DXC Technology
Add Recipient Data
Go to the Recipient data tab.
No recipients assigned to this MDS indicates a Recipient has not been added yet.
The Internal button is the only option available until a Recipient is added. If a User is allowed to Publish, this option is also available.
Click on Add Recipient to find the recipient.
“Add recipient” button
Before recipient added Send and Propose buttons are grayed out.

September 6, 2019 50Copyright © 2019 DXC Technology
Select the Recipient
In this case, an Org.-Unit of an example company is highlighted. Please click Apply.
Which one to select? In this case the recipient company has Org.-Units. Theoretically, you should only have to send/propose to a company once because once accepted, it’s available to all in the roof company. You can list a Company Name only once on the recipient list. For example, the system will not allow you to put both IH Automotive and First Org.-Unit as recipients. If sending to an Org.-Unit, make sure that someone in the other company has access to MDSs sent to it. Make sure you have the correct recipient.

September 6, 2019 51Copyright © 2019 DXC Technology
Recipient Changes
Note the changes to the screen now that a Recipient has been added:
More buttons…
Name – this is what your customer will see –not the same as on the Ingredients page.
You see exactly where you are sending it.

September 6, 2019 52Copyright © 2019 DXC Technology
Enter Recipient Data
Enter recipient specific information: Customer’s part number, Description, Supplier code and any other customer requested information.
Supplier Code –Depends on how your customer refers to you –some OEMs have special codes they assign, others use DUNS Numbers, others use nothing at all.
If your customer rejects the MDS and says it is not their part number or you need to change the description, you must change it here as this is their view.
Company selection appears here and the Org.-Unit is in ()
Please check the FAQ on Forwarding for information on this topic.

September 6, 2019 53Copyright © 2019 DXC Technology
Recipient Data Decoded
This page contains your customer’s information and status of MDS:
Supplier Code – how customer refers to you (commonly DUNS) (required)
Name – how your customer commonly refers to the product (required)
Part/Item No. – your customer’s number (required)
Report No. – if you checked Preliminary MDSyou should have an entry here (optional)
If your customer says they cannot see the MDS, be sure to check here to see if you sent to correct ID.
If your Company Administrator adds a DUNS number to your company profile, this field is pre-populated – but you can still edit.
Note: Certain OEMs have a slightly different data page. Different customers have different data requirements on this page – be sure to check with them on what needs to be supplied.

September 6, 2019 54Copyright © 2019 DXC Technology
Send or Propose to Recipient?
Send – You send this MDS only to this customer. The version number will remain .0x until your customer accepts. It is in “handshake” mode.
Propose – You make this part for several customers under different customer part numbers. The version number will go to the next whole number immediately and you can only change the Recipient data information should your customer reject it.

September 6, 2019 55Copyright © 2019 DXC Technology
Send
Click Send.
Check is successful – you can send with a Warning. Some of the newer Warnings, you cannot correct without making a new version of the MDS.
Click Send again.
You must click Send to complete sending.

September 6, 2019 56Copyright © 2019 DXC Technology
Result of Send
Send is a 1-to-1 relationship. If your customer wants changes on the tree and it is still in edit mode, you can make changes after the customer has rejected.
If you Propose, the version increases to a whole number and you can not make changes – though you can add more recipients.
Status “not yet browsed”
“Handskake” mode
Version hasn’t changed
Note: If the status is Edit Mode or Modified, you must resend or repropose.

September 6, 2019 57DXC Proprietary and Confidential
Miscellaneous topics

September 6, 2019 58Copyright © 2019 DXC Technology
Semi-component ≠ Sub-Component
Semi-components are basically created the same way as a component except they do not have application codes or parts marking questions to be answered. They are often misused. A Semi-component is not the same as what is commonly referred to a sub-component. If you use something in “one of”, “two of”, etc. you should be making components.
Semi-components can be used for a bolt of cloth, a wire wrap that is cut down, vinyl tubing that is cut from a roll, paint, etc. – something that is used by weight, length, or volume during processing.
In IMDS, sub-components are the same as components.

September 6, 2019 59Copyright © 2019 DXC Technology
Adding Semi-component with a Component Sibling
In this particular case, it was first added a component in the tree structure.
When you go to add a semi-component node, you get an IMDS message. Please enter the name of a new node to be placed in this MDS to solve the problem, and select Yes.
With this name a component is added to the tree – thereby maintaining appropriate structure.
Note: While this works if adding a semi-component after adding a component as a child, if you add the semi-component first, you will not get this option.

September 6, 2019 60Copyright © 2019 DXC Technology
Adding Weight Characteristics to Semi-components
When creating a semi-component, you have the option of adding a weight characteristic based on length, area, or volume – as well as none.

September 6, 2019 61Copyright © 2019 DXC Technology
Adding a Semi-component (Created in Release 7.0 or Later)Should a semi-component have a weight component defined, the system can now calculate the weight of the semi-component when added to a component.
Weight Component given
System calculated weight
Enter how many of the specified unit and select Calculate.

September 6, 2019 62Copyright © 2019 DXC Technology
In Conclusion – Ask Your Customer
IMDS is a common system for data, but each OEM and many Tier One have their own acceptance criteria regarding:
• Tree structure
• Amount of miscellaneous material allowed
• What goes on the company data screen
• What has to be declared
If a question arises, ask your customer what is required.

September 6, 2019 63Copyright © 2019 DXC Technology
Read the IMDS Information Pages
Many questions can be answered from the IMDS Information Pages > Help > FAQ.
The FAQs are available to help you discover answers to common questions without the wait you may experience when calling the IMDS Service Center, who responds to thousands of users and for a question that can be answered by a FAQ, the IMDS Service Center will direct you to read the FAQ.
Familiarize yourself with changes in the system. The login screen frequently has a message about a new release and a link to the release notes.

September 6, 2019 64Copyright © 2019 DXC Technology
Create Tips Series
Remember to view all of the presentations available in the Create Tips series:
• Materials
• Components
Location:
IMDS Public Pages > FAQ
Select “How to Tips” from drop-down and Go
Select Where can I find a walk through of creating an entry in IMDS?