Embed Size (px)
Citation preview
Simple Raspberry Pi RobotCreated by Tony DiCola
Last updated on 2018-08-22 03:51:47 PM UTC
2344556
10
Guide Contents
Guide ContentsOverviewHardwarePartsRaspberry Pi SetupMotor HATAssemblySoftware
© Adafruit Industries https://learn.adafruit.com/simple-raspberry-pi-robot Page 2 of 13

Overview
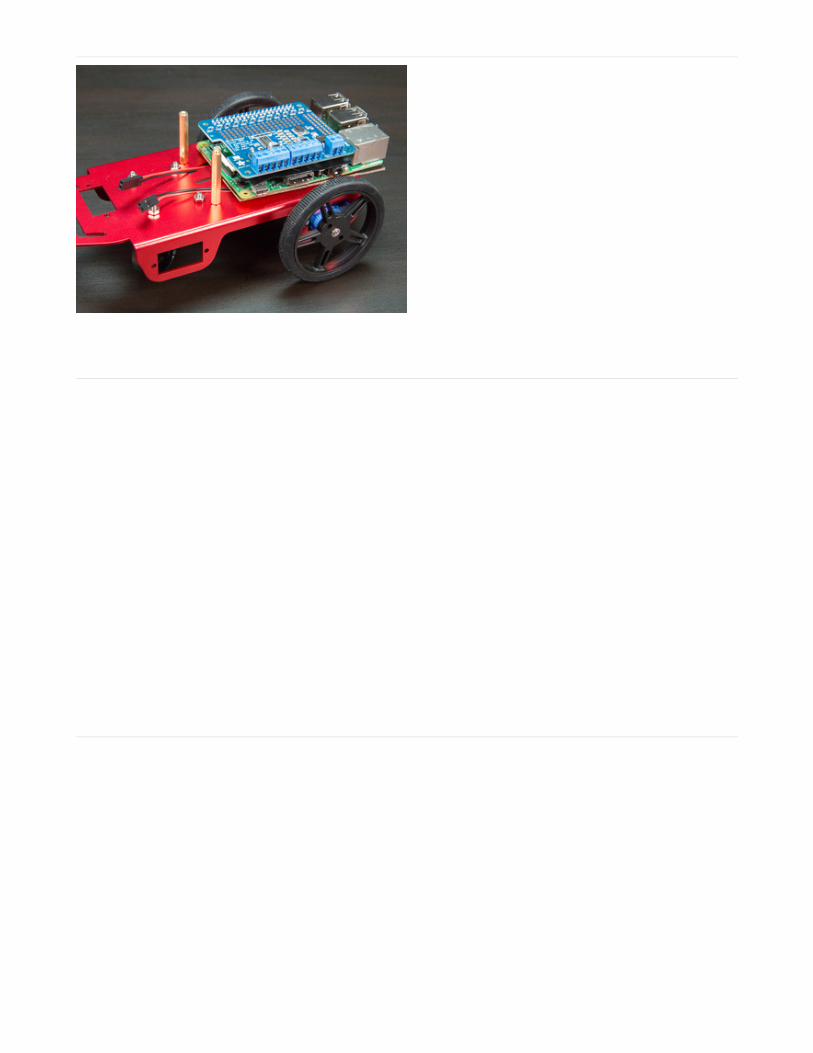
This is a fun project to build a simple robot using the Raspberry Pi and Adafruit's awesome robot chassiskit (http://adafru.it/2939). This robot is one of the simplest robots you can build and uses two DC motors to control apair of wheels. A swivel caster in the front holds the robot up, and the Raspberry Pi with motorHAT (http://adafru.it/2348) controls the motors.
There are no sensors or other inputs to the robot, it will just follow a set of instructions in Python code that tell therobot how to move. Use this project as a starting point for your own amazing Raspberry Pi robot projects! You couldadd sensors to detect objects around the Pi, add a camera to get a robot's eye view of the world, or even connect therobot to web services that control its actions--there's almost no limit to what you can do with this amazing robot!
To build this project it will help to familiarize yourself with using the Raspberry Pi. Follow these great learn RaspberryPi guides (https://adafru.it/dpe) to learn the basics. You will also want to review the motor HATguide (https://adafru.it/kCC), and skim the Bluefruit LE feather robot guide (https://adafru.it/kCD) to learn more aboutthe robot chassis.
© Adafruit Industries https://learn.adafruit.com/simple-raspberry-pi-robot Page 3 of 13

Hardware
Parts
You'll need the following parts to build this robot:
Mini Rover Robot Chassis Kit (http://adafru.it/2939)
This kit includes almost everything needed to build the robot: a beautiful anodized aluminumchassis (http://adafru.it/2943), two mini DC motors in a stepper case (http://adafru.it/2941), two motorwheels (http://adafru.it/2744), a front caster wheel (http://adafru.it/2942), and a top plate withstandoffs (http://adafru.it/2944).
Raspberry Pi Model 2 (https://adafru.it/eCB), B+ (http://adafru.it/1914), or A+ (http://adafru.it/2266)
Stick with a more recent Raspberry Pi Model 2, B+, A+ as these boards have convenient mounting holes forattaching to the robot chassis. I recommend the Model 2 because it's the most capable. You couldpotentially use the Pi Zero but it is a bit small for mounting the motor HAT securely.
Motor HAT (http://adafru.it/2348)
This has everything needed to drive DC & stepper motors from the Pi, perfect for small robot projects.
Brass M2.5 Standoffs for Raspberry Pi HATs (http://adafru.it/2336)
These help hold the Motor HAT securely to the Pi. Although not shown in the photos these are highlyrecommended!
4x AA Battery Holder With Switch (http://adafru.it/830)
The motors need a separate power supply from the Pi since they can draw a lot of current (much morecurrent than the Pi can source!). A small 4x AA battery pack with switch like this is perfect.
Small USB Battery Pack (http://adafru.it/1959)
This will power the Raspberry Pi. Use a pack that's small and light enough to mount on the robot. A ~2200mAH pack like this one will run a Pi with WiFi dongle for about 5 hours on a full charge.
© Adafruit Industries https://learn.adafruit.com/simple-raspberry-pi-robot Page 4 of 13

Miniature WiFi Module (http://adafru.it/814)
Although not technically required, a small Pi-compatible WiFi adapter will make it much easier to log intoand control the Pi robot.
2x #4-40 3/8" or longer machine screws and nuts
You'll need a couple machine screws to hold the Pi to the robot chassis.
Small Piece of Cardboard
You'll want a small piece of cardboard that's as large as the Raspberry Pi to help protect the bottom of thePi from touching the metal robot chassis and shorting out. Cut out a square from the box your parts ship toyou inside.
Jumper Wires (http://adafru.it/153)Precision Screwdrivers & Small Adjustable Wrench or PliersSoldering Tools (https://adafru.it/fE3)
You'll need to solder a header and a few connectors onto the motor HAT. This is a relatively easysoldering job, be sure to follow the guide to excellent soldering (https://adafru.it/dxy) if you're new to it!
Raspberry Pi Setup
You'll want to make sure your Raspberry Pi is running the latest version of the Raspbian Jessie operatingsystem (https://adafru.it/fQi). In addition the Pi will need access to the internet through a wired or wirless networkconnection so it can download necessary software.
If you're new to the Raspberry Pi be sure to follow a few getting started guides (https://adafru.it/dpe) to learn how toload an operating system on the Pi (https://adafru.it/jd0), setup a wired or wireless networkconnection (https://adafru.it/dDN), and connect to its command line terminal (https://adafru.it/jvB).
Motor HAT
Start the project by following the motor HAT guide (https://adafru.it/kCC) to assemble and test the HAT. Make sure youcan install the motor HAT software and test each DC motor to verify it spins. It's much easier to troubleshoot issueswith the HAT and motors when it's outside the robot chassis!
Once you've assembled and checked the motor HAT works, continue on to learn how to put together the robot.
© Adafruit Industries https://learn.adafruit.com/simple-raspberry-pi-robot Page 5 of 13

AssemblyFollow the steps below to build the robot. It will help to also skim the Bluefruit LE feather robotguide (https://adafru.it/kBl) to see more pictures of assembling the robot chassis. There are a few small differences inthe assembly of the Pi robot that will be noted below.
Start by screwing the DC motors to the back of the
chassis (i.e. the end farther away from the angled front).
Make sure the motors have the same orientation, with
the side that the wire exits facing forward.
Next screw in the caster to the center mounting holes.
Assemble the wheels by stretching the tires onto the
hubs, then push the wheel into place on the motor head
and screw it in.
You can feed the DC motor wires up through the angled
mounting slots in the chassis.
Flip the robot over so it stands on its wheels.
Cut out a small square of cardboard that's about the
same size as the Raspberry Pi. This cardboard will
protect the bottom of the Pi from touching the metal
robot chassis and shorting out. It's very important to
prevent the bottom of the Pi from touching the metal
chassis or you could damage the Pi!
Screw the top plate standoffs into the mounting holes
near the center of the chassis (flanking where the
angled mounting slots meet).
© Adafruit Industries https://learn.adafruit.com/simple-raspberry-pi-robot Page 6 of 13
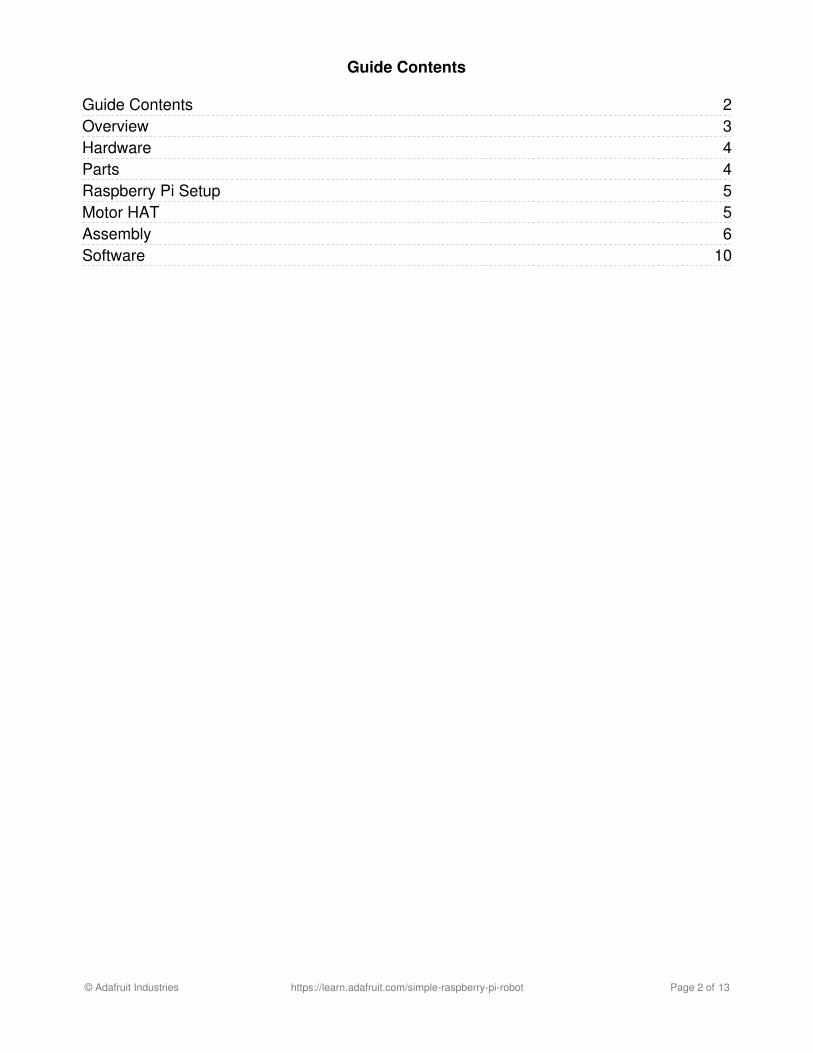
Place the Pi on the cardboard and position it so the Pi's
rear mounting holes (near the USB ports) are directly
above the long mounting slot at the back of the chassis.
Use the #4-40 machine screws and nuts to screw
through the Pi and cardboard to securely hold the Pi in
place.
If you aren't using Pi HAT standoffs to hold the motor
HAT place a piece of electrical tape across the HDMI
connector side of the Pi. This will help prevent the
motor HAT from getting pushed down into the
connectors and shorting out. If you are using the
standoffs you can place them over the front mounting
holes of the Pi (not shown).
https://adafru.it/rad
https://adafru.it/rad
© Adafruit Industries https://learn.adafruit.com/simple-raspberry-pi-robot Page 7 of 13
Push the motor HAT into place on the Pi's GPIO
connector. Screw down the standoffs if being used to
hold the HAT.
Connect the DC motors to the motor HAT as shown to
the left.
The left (or 'driver side' for US/right side of the road
drivers) DC motor should be connected to port M1 on
the motor HAT. The right (or 'passenger side') DC motor
should be connected to port M2 on the motor HAT.
The black motor wire connects to the left screw terminal
of the port, and the red motor wire connects to the right
screw terminal of the port. The middle GND screw
terminal is unused.
Connect the 4x AA battery pack red wire to the
+/positive power screw terminal on the HAT, and the
black wire to the -/negative power screw terminal.
© Adafruit Industries https://learn.adafruit.com/simple-raspberry-pi-robot Page 8 of 13

Finish the robot by screwing the top plate firmly to the
standoffs in the center. Use double sided foam tape or
electrical tape to hold the 4xAA battery pack to the top
plate, and the USB battery pack to the front of the robot.
Woo hoo, that's all there is to building the bot! Your
robot should look something like the pictures to the left.
Continue on to learn about simple Python software to
make the robot move.
© Adafruit Industries https://learn.adafruit.com/simple-raspberry-pi-robot Page 9 of 13

SoftwareThe software for this project is actually included in the motor HAT library examples. There's aRobotTest.py (https://adafru.it/kCE) script that tells the robot to move forward, backward, and turn in differentdirections. This script uses a little helper class in Robot.py (https://adafru.it/kCF) that talks to the motor HAT andexposes simple functions to move the robot.
Make sure you've followed the motor HAT guide software installation (https://adafru.it/kCG). As a quick summary you'llneed to connect to a terminal on the Pi and first enable I2C on the Pi (https://adafru.it/dEO). Then run the followingcommands to download dependencies and install the motor HAT software & examples:
After the software is installed the robot code will be in the examples subdirectory, change to that folder by running:
To run the robot code first make sure the 4x AA battery pack connected to the motor HAT is powered on. Then placethe robot on the floor where there are no obstructions around it for a few feet. Remember this is a simple robot thathas no sensors to know if it's hitting something or about to fall off a table! Be very careful to ensure the path of therobot is free and safe to travel!
When the RobotTest.py script runs it will instruct the robot to move forward a few inches, turn to the left, move forwardagain a few inches, turn to the left etc. Then it will spin in place to the right for a few seconds, and finally movebackwards, turn right, move backwards, etc. a few times. When you've ensured the path of the robot is clear run thefollowing command to run the robot code:
Be ready to pick up the bot or flip off its motor power supply in case it comes close to hitting something or falling!
Woo hoo, you should see the robot start to move around! If you see an error message check that you've followed allof the steps above and in the motor HAT guide to install the software. Try testing each motor individually with themotor HAT guide DC motor test software (https://adafru.it/kCH) to make sure they can spin.
Note that if the robot spins instead of moving forward you likely have the motors connected incorrectly. Try swappingthe order of the connections and testing again. You can flip the robot over and watch the wheels move to check thatthey both move in the same direction when moving forward, and they move in opposite directions when turning.
You can edit the RobotTest.py script to control how the robot moves. This is just a very simple script that moves therobot in a fixed pattern. You can add much more complex logic to control your robot however you desire.
Open the script in the nano text editor by running:
sudo apt-get updatesudo apt-get install build-essential python-dev python-smbus gitcd ~git clone https://github.com/adafruit/Adafruit-Motor-HAT-Python-Library.gitcd Adafruit-Motor-HAT-Python-Librarysudo python setup.py install
cd examples
sudo python RobotTest.py
nano RobotTest.py
© Adafruit Industries https://learn.adafruit.com/simple-raspberry-pi-robot Page 10 of 13

I'll walk through the code and explain it in more detail below.
First the script imports a few Python dependencies. The time library has a useful sleep function that can pause theexecution of the script (kind of like the delay function in Arduino).
The import Robot line tells the script to import a Python module called Robot. This module is located in the samedirectory as the RobotTest.py script and is called Robot.py. You can look at the Robot.pycode (https://adafru.it/kCF) later to see how it interfaces with the motor HAT. For the example code here we'll use theclass inside Robot.py to control our robot.
Note that if you want to write your own script that uses the Robot.py class make sure to copy Robot.py into the samefolder as your script!
Next the code sets a left and right trim variable to a default zero value. The comments for the code explain what thetrim value means. This is a small offset you can use to adjust the speed of each motor. This is important to getperfectly straight movement as the motors can spin at slightly different speeds (and the robot has no knowledge ofhow fast the motors move). You can ignore setting the trim for now and come back later to adjust it by instructing therobot to move forward and watching which way it veers.
An instance of the Robot class is created and the trim values are passed in to its initializer. There are a few otheroptional parameters that aren't shown and generally don't need to be changed (see the comments for more info onthem).
# Simple two DC motor robot class usage example.# Author: Tony DiCola# License: MIT License https://opensource.org/licenses/MITimport time
# Import the Robot.py file (must be in the same directory as this file!).import Robot
# Set the trim offset for each motor (left and right). This is a value that# will offset the speed of movement of each motor in order to make them both# move at the same desired speed. Because there's no feedback the robot doesn't# know how fast each motor is spinning and the robot can pull to a side if one# motor spins faster than the other motor. To determine the trim values move the# robot forward slowly (around 100 speed) and watch if it veers to the left or# right. If it veers left then the _right_ motor is spinning faster so try# setting RIGHT_TRIM to a small negative value, like -5, to slow down the right# motor. Likewise if it veers right then adjust the _left_ motor trim to a small# negative value. Increase or decrease the trim value until the bot moves# straight forward/backward.LEFT_TRIM = 0RIGHT_TRIM = 0
# Create an instance of the robot with the specified trim values.# Not shown are other optional parameters:# - addr: The I2C address of the motor HAT, default is 0x60.# - left_id: The ID of the left motor, default is 1.# - right_id: The ID of the right motor, default is 2.robot = Robot.Robot(left_trim=LEFT_TRIM, right_trim=RIGHT_TRIM)
© Adafruit Industries https://learn.adafruit.com/simple-raspberry-pi-robot Page 11 of 13

Now the fun starts with the code to move the robot! You can see the robot class instance has simple functions tomove the robot forward, turn it left, turn it right, move backwards, and stop.
Each of these functions takes up to two parameters, the first one is the speed of the movement. Speed should be avalue between 0 and 255. The higher the value the faster the movement. Note that you'll need to start with a valuearound 75-100 or so to move the motors with enough torque to get the robot started.
The second parameter is the amount of time (in seconds) to perform the action. For example a call torobot.forward(150, 1.0) will move the robot forward at a speed of 150 for 1.0 second.
Another way to use the functions is to just pass the first parameter, the speed, to them. This will start the robot movingand then return to your script so you can do other things. In the snippet above the robot will start spinning to the rightat a speed of 100, then the code will sleep for 2 seconds, and finally stop the robot. Instead of sleeping you couldperform other actions though, like reading sensors, talking to web services, etc--the sky is the limit as far as what youcan do with the robot & Python code!
Finally the robot code will demonstrate moving backwards and spinning right a few times.
That's all there is to the robot code! You can see it's a very simple robot that has no sensors or other knowledge ofthe world. The robot will blindly follow the instructions given to it. You can use this as a base for building your own
# Now move the robot around!# Each call below takes two parameters:# - speed: The speed of the movement, a value from 0-255. The higher the value# the faster the movement. You need to start with a value around 100# to get enough torque to move the robot.# - time (seconds): Amount of time to perform the movement. After moving for# this amount of seconds the robot will stop. This parameter# is optional and if not specified the robot will start moving# forever.robot.forward(150, 1.0) # Move forward at speed 150 for 1 second.robot.left(200, 0.5) # Spin left at speed 200 for 0.5 seconds.robot.forward(150, 1.0) # Repeat the same movement 3 times below...robot.left(200, 0.5)robot.forward(150, 1.0)robot.left(200, 0.5)robot.forward(150, 1.0)robot.right(200, 0.5)
# Spin in place slowly for a few seconds.robot.right(100) # No time is specified so the robot will start spinning forever.time.sleep(2.0) # Pause for a few seconds while the robot spins (you could do # other processing here though!).robot.stop() # Stop the robot from moving.
# Now move backwards and spin right a few times.robot.backward(150, 1.0)robot.right(200, 0.5)robot.backward(150, 1.0)robot.right(200, 0.5)robot.backward(150, 1.0)robot.right(200, 0.5)robot.backward(150, 1.0)
© Adafruit Industries https://learn.adafruit.com/simple-raspberry-pi-robot Page 12 of 13

amazing robot projects with a Raspberry Pi, good luck!
© Adafruit Industries Last Updated: 2018-08-22 03:51:42 PM UTC Page 13 of 13


![Volume 7, Issue 3, May - June 2018 Design of an Embedded ... · module and Raspberry Pi. [2] Tony Di Cola: This work “Raspberry Pi Face Recognition in Treasure Box” is a great](https://img.pdfslide.net/doc/110x75/5f6dc2985c25171f27390f70/volume-7-issue-3-may-june-2018-design-of-an-embedded-module-and-raspberry.jpg)