Embed Size (px)
Citation preview

8/14/2019 Creating a Basic Web Page in Visual Web Developer
http://slidepdf.com/reader/full/creating-a-basic-web-page-in-visual-web-developer 1/40

8/14/2019 Creating a Basic Web Page in Visual Web Developer
http://slidepdf.com/reader/full/creating-a-basic-web-page-in-visual-web-developer 2/40
جيع خدم النرنت ي صفح – لج – وم – إاء – برد إليكترونى
3. Under Visual Studio installed templates, click ASP.NET Web Site.
When you create a Web site, you specify a template. Each template creates a Web application that contains
different files and folders. In this walkthrough, you are creating a Web site based on the ASP.NET Web Sitetemplate, which creates some folders and a few default files.
4. In the Location box, select the File System box, and then enter the name of the folder where you want to
keep the pages of your Web site.
For example, type the folder name C:\BasicWebSite.
5. In the Language list, click Visual Basic or Visual C#.
The programming language you choose will be the default for your Web site. However, you can use multiplelanguages in the same Web application by creating pages and components in different programming
languages.
6. Click OK.
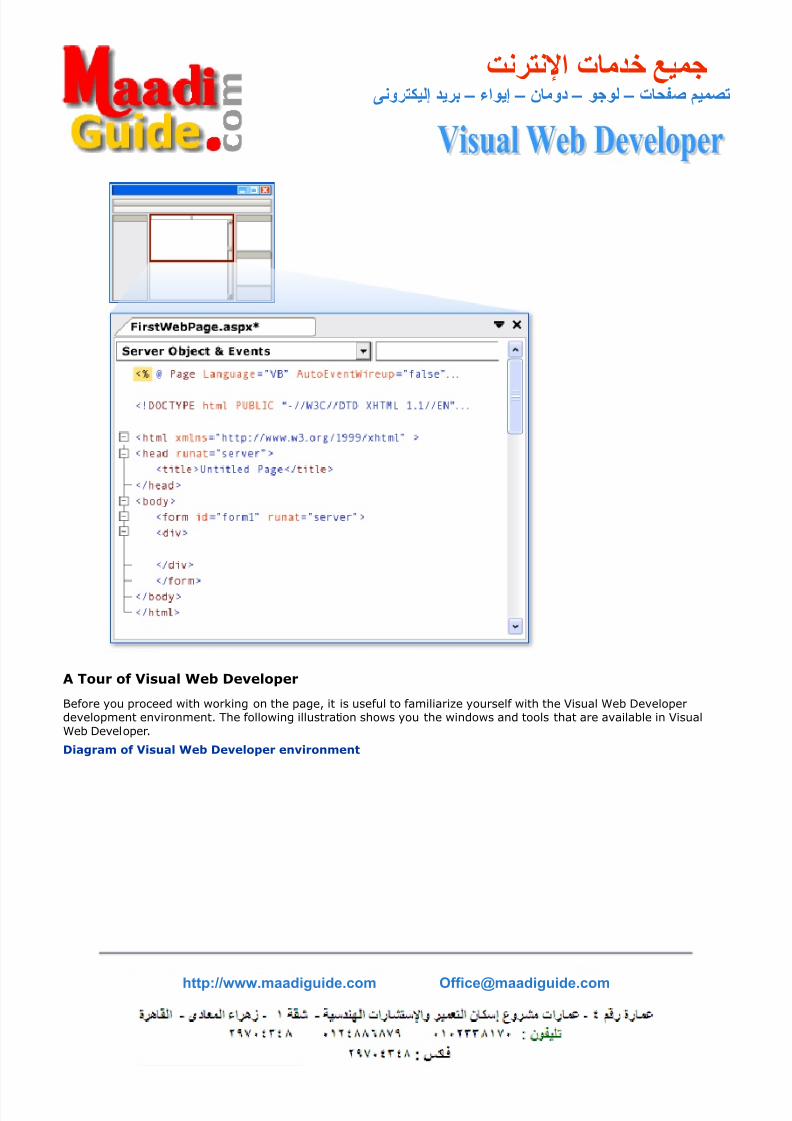
Visual Web Developer creates the folder and a new page named Default.aspx. When a new page is created,
by default Visual Web Developer displays the page in Source view, where you can see the page's HTMLelements. The following screen shot shows the Source view of a default Web page.
Source view of default page
http://www.maadiguide.com [email protected]
8/14/2019 Creating a Basic Web Page in Visual Web Developer
http://slidepdf.com/reader/full/creating-a-basic-web-page-in-visual-web-developer 3/40
جيع خدم النرنت ي صفح – لج – وم – إاء – برد إليكترونى
A Tour of Visual Web Developer
Before you proceed with working on the page, it is useful to familiarize yourself with the Visual Web Developerdevelopment environment. The following illustration shows you the windows and tools that are available in Visual
Web Developer.
Diagram of Visual Web Developer environment
http://www.maadiguide.com [email protected]

8/14/2019 Creating a Basic Web Page in Visual Web Developer
http://slidepdf.com/reader/full/creating-a-basic-web-page-in-visual-web-developer 4/40
جيع خدم النرنت ي صفح – لج – وم – إاء – برد إليكترونى
To familiarize yourself with the Web designer in Visual Web Developer
• Examine the preceding illustration and match the text to the following list, which describes the most commonly
used windows and tools. (Not all windows and tools that you see are listed here, only those marked in the
preceding illustration.)
• Toolbars. Provide commands for formatting text, finding text, and so on. Some toolbars are available only
when you are working in Design view.
• Solution Explorer. Displays the files and folders in your Web site.
• Document windows. Displays the documents you are working on in tabbed windows. You can switch
between documents by clicking tabs.
• Properties window. Allows you to change settings for the page, HTML elements, controls, and other objects.
• View tabs. Present you with different views of the same document. Design view is a near-WYSIWYG editing
surface. Source view is the HTML editor for the page. You will work with these views later in thiswalkthrough. If you prefer to open Web pages in Design view, on the Tools menu, click Options, select the
HTML Designer node, and change the Start Pages In option.
• Toolbox. Provides controls and HTML elements that you can drag onto your page. Toolbox elements are
grouped by common function.
• Server Explorer. Displays database connections. If Server Explorer is not visible in Visual Web Developer, on
the View menu, click Other Windows, and then click Server Explorer.
Note
You can rearrange and resize the windows to suit your preferences. TheView menu allows you to display additional windows.
Creating a New Web Forms Page
When you create a new Web site, Visual Web Developer adds an ASP.NET page (Web Forms page) named
Default.aspx. You can use the Default.aspx page as the home page for your Web site. However, for this walkthrough,you will create and work with a new page.
To add a page to the Web site
http://www.maadiguide.com [email protected]

8/14/2019 Creating a Basic Web Page in Visual Web Developer
http://slidepdf.com/reader/full/creating-a-basic-web-page-in-visual-web-developer 5/40
جيع خدم النرنت ي صفح – لج – وم – إاء – برد إليكترونى
1. Close the Default.aspx page. To do this, right-click the tab containing the file name and select Close.2. In Solution Explorer, right-click the Web site (for example, C:\BasicWebSite), and then click Add New
Item.
3. Under Visual Studio installed templates, click Web Form.
4. In the Name box, type FirstWebPage.
5. In the Language list, choose the programming language you prefer to use (Visual Basic, C#, or J#).
When you created the Web site, you specified a default language. However, each time you create a new pageor component for your Web site, you can change the language from the default. You can use different
programming languages in the same Web site.
6. Clear the Place code in separate file check box. The following screen shot shows the Add New Item
dialog box.
Add New Item dialog box
In this walkthrough, you are creating a single-file page with the code and HTML in the same page. The codefor ASP.NET pages can be located either in the page or in a separate class file. To learn more about keepingthe code in a separate file, see Walkthrough: Creating a Basic Web Page with Code Separation in Visual Web
Developer.
7. Click Add.
Visual Web Developer creates the new page and opens it in Source view.
Adding HTML to the Page
http://www.maadiguide.com [email protected]

8/14/2019 Creating a Basic Web Page in Visual Web Developer
http://slidepdf.com/reader/full/creating-a-basic-web-page-in-visual-web-developer 6/40
جيع خدم النرنت ي صفح – لج – وم – إاء – برد إليكترونى
In this part of the walkthrough, you will add some static text to the page.
To add text to the page
1. At the bottom of the document window, click the Design tab to switch to Design view.
Design view displays the page that you are working on in a WYSIWYG-like way. At this point, you do not haveany text or controls on the page, so the page is blank.
2. On the page, type Welcome to Visual Web Developer.
The following screen shot shows the text you typed in Design view.
Welcome text as seen in Design view
3. Switch to Source view.
You can see the HTML that you created by typing in Design view, as shown in the following screen shot.
Welcome text as seen in Source view
http://www.maadiguide.com [email protected]

8/14/2019 Creating a Basic Web Page in Visual Web Developer
http://slidepdf.com/reader/full/creating-a-basic-web-page-in-visual-web-developer 7/40
جيع خدم النرنت ي صفح – لج – وم – إاء – برد إليكترونى
Running the Page
Before you proceed with adding controls to the page, you can try running it. To run a page, you need a Web server.
In a production Web site, you use IIS as your Web server. However, to test a page, you can use the ASP.NETDevelopment Server, which runs locally and does not require IIS. For file system Web sites, the default Web server in
Visual Web Developer is the ASP.NET Development Server.
To run the page
1. Press CTRL+F5 to run the page.
Visual Web Developer starts the ASP.NET Development Server. An icon appears on the toolbar to indicate that
the Visual Web Developer Web server is running, as shown in the following screen shot.
Visual Web Developer Web server icon
The page is displayed in the browser. Although the page you created has an extension of .aspx, it currently
runs like any HTML page.
Note
http://www.maadiguide.com [email protected]

8/14/2019 Creating a Basic Web Page in Visual Web Developer
http://slidepdf.com/reader/full/creating-a-basic-web-page-in-visual-web-developer 8/40
جيع خدم النرنت ي صفح – لج – وم – إاء – برد إليكترونى
If the browser displays a 502 error or an error indicating that the pagecannot be displayed, you might need to configure your browser tobypass proxy servers for local requests. For details, see How to: Bypass
a Proxy Server for Local Web Requests.
2. Close the browser.
Adding and Programming Controls
In this part of the walkthrough, you will add a Button, a TextBox, and a Label control to the page and write code tohandle the Click event for the Button control.
You will now add server controls to the page. Server controls, which include buttons, labels, text boxes, and otherfamiliar controls, provide typical form-processing capabilities for your ASP.NET Web pages. However, you can
program the controls with code that runs on the server, not the client.
To add controls to the page
1. Click the Design tab to switch to Design view.
2. Press SHIFT+ENTER a few times to make some room.
3. In the Toolbox, from the Standard group, drag three controls onto the page: a TextBox control, a Button
control, and a Label control.
4. Put the insertion point above the TextBox control, and then type Enter your name:.
This static HTML text is the caption for the TextBox control. You can mix static HTML and server controls onthe same page. The following screen shot shows how the three controls appear in Design view.
Controls in Design View
Setting Control Properties
http://www.maadiguide.com [email protected]

8/14/2019 Creating a Basic Web Page in Visual Web Developer
http://slidepdf.com/reader/full/creating-a-basic-web-page-in-visual-web-developer 9/40
جيع خدم النرنت ي صفح – لج – وم – إاء – برد إليكترونى
Visual Web Developer offers you various ways to set the properties of controls on the page. In this part of thewalkthrough, you will set properties in both Design view and Source view.
To set control properties
1. Select the Button control, and then in the Properties window, set Text to Display Name, as shown in the
following screen shot.
Changed Button control text
2. Switch to Source view.
Source view displays the HTML for the page, including the elements that Visual Web Developer has createdfor the server controls. Controls are declared using HTML-like syntax, except that the tags use the prefix asp:
and include the attribute runat="server".
Control properties are declared as attributes. For example, when you set the Text property for the Button
control, in Step 1, you were actually setting the Text attribute in the control's markup.
Note that all the controls are inside a <form> element, which also has the attribute runat="server". The
runat="server" attribute and the asp: prefix for control tags mark the controls so that they are processedby ASP.NET on the server side when the page runs. Code outside of <form runat="server"> and <script
runat="server"> elements is interpreted by the browser as client-side code, which is why the ASP.NET codemust be inside.
3. Put the insertion point in a space within the <asp:label> tag, and then press SPACEBAR.
A drop-down list appears that displays the list of properties you can set for a Label control. This feature,referred to as IntelliSense, helps you in Source view with the syntax of server controls, HTML elements, and
other items on the page. The following screen shot shows the IntelliSense drop-down list for the Labelcontrol.
IntelliSense for Label control
http://www.maadiguide.com [email protected]

8/14/2019 Creating a Basic Web Page in Visual Web Developer
http://slidepdf.com/reader/full/creating-a-basic-web-page-in-visual-web-developer 10/40

8/14/2019 Creating a Basic Web Page in Visual Web Developer
http://slidepdf.com/reader/full/creating-a-basic-web-page-in-visual-web-developer 11/40
جيع خدم النرنت ي صفح – لج – وم – إاء – برد إليكترونى
Double-clicking a control in Design view is just one of several ways youcan create event handlers.
3. Inside the handler, type the following:
Label1.
Visual Web Developer displays a list of available members for the Label control, as shown in the followingscreen shot.
Available Label control members
4. Finish the Click event handler for the button so that it reads as shown in the following code example.
Visual Basic
Protected Sub Button1_Click(ByVal sender As Object, ByVal eAs System.EventArgs)
Label1.Text = Textbox1.Text & ", welcome to Visual WebDeveloper!"End Sub
C#
http://www.maadiguide.com [email protected]

8/14/2019 Creating a Basic Web Page in Visual Web Developer
http://slidepdf.com/reader/full/creating-a-basic-web-page-in-visual-web-developer 12/40

8/14/2019 Creating a Basic Web Page in Visual Web Developer
http://slidepdf.com/reader/full/creating-a-basic-web-page-in-visual-web-developer 13/40
جيع خدم النرنت ي صفح – لج – وم – إاء – برد إليكترونى
To add a Calendar control1. In Visual Web Developer, switch to Design view.
2. From the Standard section of the Toolbox, drag a Calendar control onto the page:
The calendar's smart tag panel is displayed. The panel displays commands that make it easy for you to
perform the most common tasks for the selected control. The following screen shot shows the Calendarcontrol as rendered in the Design view.
Calendar control in Design view
3. In the smart tag panel, choose Auto Format.
The Auto Format dialog box is displayed, which allows you to select a formatting scheme for the calendar.
The following screen shot shows the Auto Format dialog box for the Calendar control.
Auto Format dialog box for the Calendar control
http://www.maadiguide.com [email protected]

8/14/2019 Creating a Basic Web Page in Visual Web Developer
http://slidepdf.com/reader/full/creating-a-basic-web-page-in-visual-web-developer 14/40
جيع خدم النرنت ي صفح – لج – وم – إاء – برد إليكترونى
4. From the Select a scheme list, select Simple and then click OK.
5. Switch to Source view.You can see the <asp:Calendar> element. This element is much longer than the elements for the simple
controls you created earlier. It also includes subelements, such as <WeekEndDayStyle>, which representvarious formatting settings. The following screen shot shows the Calendar control in Source view.
Calendar control in Source view
http://www.maadiguide.com [email protected]

8/14/2019 Creating a Basic Web Page in Visual Web Developer
http://slidepdf.com/reader/full/creating-a-basic-web-page-in-visual-web-developer 15/40
جيع خدم النرنت ي صفح – لج – وم – إاء – برد إليكترونى
Programming the Calendar Control
In this section, you will program the Calendar control to display the currently selected date.
To program the Calendar control
1. From the left-hand drop-down list at the top of Source view, select Calendar1.
The drop-down list displays a list of all the objects you can write code for.
2. From the right-hand drop-down list, select SelectionChanged.
Visual Web Developer creates a skeleton event handler for the Calendar control's SelectionChanged event.
You have now seen two ways to create an event handler for a control. The first was to double-click the
control in Design view. The second is to use the drop-down lists in Source view to select an object and theevent to write code for.
3. Finish the SelectionChanged event handler with the following highlighted code.
Visual Basic
Protected Sub Calendar1_SelectionChanged(ByVal sender AsObject, ByVal e As System.EventArgs)
Label1.Text = Calendar1.SelectedDate.ToString()
End Sub
http://www.maadiguide.com [email protected]

8/14/2019 Creating a Basic Web Page in Visual Web Developer
http://slidepdf.com/reader/full/creating-a-basic-web-page-in-visual-web-developer 16/40
جيع خدم النرنت ي صفح – لج – وم – إاء – برد إليكترونى
C#
protected void Calendar1_SelectionChanged(object sender,System.EventArgs e){
Label1.Text = Calendar1.SelectedDate.ToString();
}
Running the Page
You can now test the calendar.
To run the page
1. Press CTRL+F5 to run the page in the browser.
2. Click a date in the calendar.
The date you clicked is displayed in the Label control.
3. In the browser, view the source code for the page.
Note that the Calendar control has been rendered to the page as a table, with each day as a <td> elementcontaining an <a> element.
4. Close the browser.
Next Steps
This walkthrough has illustrated the basic features of the Visual Web Developer page designer. Now that youunderstand how to create and edit a Web page in Visual Web Developer, you might want to explore other features.
For example, you might want to:
• Learn more about how to edit HTML in Visual Web Developer. For details, see Walkthrough: Basic HTML Editing
in Visual Web Developer.
• Add data access to Web pages. For details, see Walkthrough: Basic Data Access in Web Pages.
• Learn about the debugger for Web pages. For details, see Walkthrough: Debugging Web Pages in Visual Web
Developer.
• Create Web pages that are specifically designed for mobile phones and other devices. For details, see
Walkthrough: Creating Web Pages for Mobile Devices.
• Create a consistent site layout using master pages. For details, see Walkthrough: Creating and Using ASP.NET
Master Pages in Visual Web Developer.
•
Add navigation to your site so users can easily move between pages. For details, see Walkthrough: Adding SiteNavigation to a Web Site.
Visual Web Developer
Walkthrough: Basic HTML Editing in Visual Web Developer
http://www.maadiguide.com [email protected]

8/14/2019 Creating a Basic Web Page in Visual Web Developer
http://slidepdf.com/reader/full/creating-a-basic-web-page-in-visual-web-developer 17/40
جيع خدم النرنت ي صفح – لج – وم – إاء – برد إليكترونى
The Microsoft Visual Web Developer Web development tool provides a rich HTML editing experience that lets youwork in WYSIWYG mode for visualizing Web pages and also lets you work directly with HTML markup for finercontrol. This walkthrough introduces you to the HTML editing features of Visual Web Developer.
Tasks illustrated in this walkthrough include the following:
• Creating and editing HTML in Design view.
• Creating and editing HTML in Source view.
• Using navigation tools to move quickly through your HTML tags.
Prerequisites
In order to complete this walkthrough, you will need the following:
• A general understanding of Visual Web Developer.
For an introduction to creating Web pages in Visual Web Developer, see Walkthrough: Creating a Basic Web Page in
Visual Web Developer.
In this walkthrough, you will work with a Web site and a single ASP.NET Web page that is similar to the one that iscreated in Walkthrough: Creating a Basic Web Page in Visual Web Developer. If you have completed thatwalkthrough, you can use that Web site and page.
Creating the Web Site and Page
If you have already created a Web site in Visual Web Developer (for example, by completing Walkthrough: Creating a
Basic Web Page in Visual Web Developer), you can use that Web site and go to the next section. Otherwise, create anew Web site and page by following these steps.
To create a file system Web site1. Open Visual Web Developer.
2. On the File menu, point to New, and then click Web Site.
The New Web Site dialog box appears.
3. Under Visual Studio installed templates, click ASP.NET Web Site.
4. In the Location box, enter the name of the folder where you want to keep the pages of the Web site.
For example, type the folder name C:\WebSites.
5. In the Language list, click the programming language that you prefer to work in.
6. Click OK.
Visual Web Developer creates the folder and a new page named Default.aspx.
Working in Design View
In this part of the walkthrough, you will learn how to work in Design view, which provides a WYSIWYG-like view of the page. You can add text by typing, as you would in a word processing program. You can format text directly with
formatting commands or by creating in-line styles.
Design view displays your page in a way that is similar to how it will appear in a browser, with some differences. The
first difference is that in Design view, the text and elements are editable. The second difference is that to help youedit your pages, Design view displays some elements and controls that will not appear in the browser. Additionally,
some elements, such as HTML tables, have a special Design view rendering that adds additional space for the editor.Overall, Design view helps you visualize your page, but it is not an exact representation of how the page will render
in a browser.
http://www.maadiguide.com [email protected]

8/14/2019 Creating a Basic Web Page in Visual Web Developer
http://slidepdf.com/reader/full/creating-a-basic-web-page-in-visual-web-developer 18/40
جيع خدم النرنت ي صفح – لج – وم – إاء – برد إليكترونى
To add and format static HTML in Design view1. If you are not in Design view, click Design, which is located at the lower left of the window.
2. At the top of the page, type ASP.NET Web Page.
3. Highlight the text to format to select it, and then on the Format toolbar, in the left-most list, click Heading
1.
4. Position the insertion pointer below ASP.NET Web Page, and then type This page is powered by
ASP.NET.
5. Right-click This page is powered by ASP.NET., and then click Style.
The Style Builder dialog box appears.
6. Click Font, and then in Family, click the ellipsis (…) button.
The Font Picker dialog box appears.
7. Under Installed fonts, click Verdana, and then click the add (>>) button.
8. Click OK to close the Font Picker dialog box.
9. Click Text, and then in the Horizontal list, click Centered.
10. Click OK.
Viewing Tag Information
When you are working in Design view, you might find it useful to see the design surface tags, such as div and span,
and others that do not have a visual rendering.
To see HTML design surface tags in Design view
• On the View menu, click Details.
The designer displays symbols for paragraphs, line breaks, and other tags that do not render text.
Adding Controls and Elements
In Design view, you can drag controls from the Toolbox onto the page. You can add some elements, such as HTML
tables, using a dialog box. In this section, you will add some controls and a table so that you have elements to workwith later in the walkthrough.
To add controls and a table
1. Position the insertion pointer to the right of the closing paragraph mark for This page is powered by
ASP.NET., and then press ENTER.
2. From the Standard group in the Toolbox, drag a TextBox control onto the page.
Note
You can also add a control by double-clicking it.
3. Drag a Button control onto the page.
The TextBox and Button controls are ASP.NET Web server controls, not HTML elements.
4. On the Layout menu, click Insert Table.
The Insert Table dialog box appears.
5. Click OK.
http://www.maadiguide.com [email protected]

8/14/2019 Creating a Basic Web Page in Visual Web Developer
http://slidepdf.com/reader/full/creating-a-basic-web-page-in-visual-web-developer 19/40
جيع خدم النرنت ي صفح – لج – وم – إاء – برد إليكترونى
The Insert Table dialog box provides options for configuring the table that you are creating. However, forthis walkthrough, you can use a default table layout.
Creating Hyperlinks
Design view provides builders and other tools to help you create HTML elements that require property settings.
To create a hyperlink
1. In the text This page is powered by ASP.NET., highlight ASP.NET to select it.
2. On the Format menu, click Convert to Hyperlink.
The Hyperlink dialog box appears.
3. In the URL box, type http://www.asp.net.
4. Click OK.
Setting Properties in the Properties Window
You can change the look and behavior of the elements on the page by setting values in Properties.
To set properties by using the Properties window
1. Click the Button control that you added in "Adding Controls and Elements," earlier in this walkthrough.
2. In Properties, set Text to Click Here, ForeColor to a different color, and Bold to true.
3. Place the insertion point in the ASP.NET hyperlink that you created in the preceding section.
Notice that in Properties, the HRef property for the a element is set to the URL that you provided for thehyperlink.
Testing the Page
You can see the results of your editing by viewing the page in the browser.
To start the page in the browser externally
• Right-click the page, and then click View in Browser.
• If you are prompted to save your changes, click Yes.
Visual Web Developer starts the Visual Web Developer Web server, which is a local Web server that you can use
to test pages without using IIS.
Changing the Default View
By default, Visual Web Developer opens new pages in Source view.
To change the default page view to Design view
1. On the Tools menu, click Options
2. In the Options dialog box, click HTML Designer, and then under Start Pages in, click Design view.
Note
You can run pages in several ways. If you press CTRL+F5, Visual Web
http://www.maadiguide.com [email protected]

8/14/2019 Creating a Basic Web Page in Visual Web Developer
http://slidepdf.com/reader/full/creating-a-basic-web-page-in-visual-web-developer 20/40
جيع خدم النرنت ي صفح – لج – وم – إاء – برد إليكترونى
Developer performs the start action that is configured on the propertypage for Start Options. The default start option for CTRL+F5 is to runthe current page; that is, the page that is currently active in Source or
Design view. You can also run pages in the debugger. For moreinformation, see Walkthrough: Debugging Web Pages in Visual WebDeveloper.
Working in Source View
Source view lets you edit the markup of the page directly. The Source view editor gives you many features that help
you as you create HTML and ASP.NET controls. You can use the Toolbox in Source view just as you do in Design viewto add new elements to the page.
To add elements in Source view
1. Switch to Source view by clicking Source, which is located at the lower left of the window.
The controls that you have added are created as <asp:> elements. For example, the Button control is the
<asp:button> element. The property settings that you made are preserved as attribute settings in the
<asp:button> tag.
2. From the HTML group in the Toolbox (not the Standard group), drag a Table control onto the page and
place it just above the closing </form> tag.
The editor also helps you when you type markup manually. For example, the editor provides context sensitive
choices finishing HTML tags and attributes as you type. The editor also provides error and warning information onmarkup by underlining questionable markup with a wavy line. The error or warning information is available by
positioning the mouse over the markup text.
To edit HTML in Source view
1. Position the insertion point above the closing </form> tag, and then type a left angle bracket (<).
Notice that the editor offers you a list of tags that are appropriate in the current context.
2. Highlight a to select it, and then press the SPACEBAR.
The editor displays a list of attributes that are appropriate for an anchor tag.
3. In the list, click href , and then type an equal sign and a double quotation mark (=").
The editor offers you a list of currently available pages to link to and an option to open the Homepickerdialog box.
4. In file list, double-click Default.aspx, press the SPACEBAR, and then type a right angle bracket (>) to closethe tag.
The editor inserts a closing </a> tag.
5. Finish the anchor element so that it links to the Default.aspx page using the link text Home and reads as
follows:
<a href="Default.aspx">Home</a>
6. Position the insertion point in the a tag.
http://www.maadiguide.com [email protected]

8/14/2019 Creating a Basic Web Page in Visual Web Developer
http://slidepdf.com/reader/full/creating-a-basic-web-page-in-visual-web-developer 21/40
جيع خدم النرنت ي صفح – لج – وم – إاء – برد إليكترونى
Notice that Properties displays the attributes for the tag.7. In Properties, for the HRef property, click the ellipsis (…) button.
The Select Project Item dialog box appears.
Now, you can select a page in the current Web site as the target page. If you do not have other pages in the
Web site to choose from, close the Select Project Item dialog box and type a favorite URL into the Href box of the Properties window.
8. Position the insertion point just above the closing </form> tag, and then type <invalid>.
The editor underlines the tag with a wavy line, indicating that the tag is not a recognized HTML tag.
9. Remove the tag that you created in the preceding step.
Examining HTML Formatting
An important feature of the page designer is that it preserves the HTML formatting that you apply to the page unless
you explicitly specify that the editor reformat the document.
To examine HTML formatting
1. Reformat the attributes for the Button control by aligning the attributes so that the declarative syntax looks
like the following:
<asp:Buttonid="Button1"
runat="server"
Font-Bold="True"ForeColor="Blue"
Text="Click Here" />2. Notice that after you indent the first attribute, if you press ENTER in the tag, subsequent lines are indented to
match.
3. Switch to Design view.
4. Right-click the new Button control, and then click Copy.
5. Position the insertion point below the new Button control, right-click, and then click Paste.
This creates a button with the ID of Button2.
6. From the Standard group in the Toolbox, drag a third Button control onto the page, which creates
<Button3>.
7. Switch to Source view.Notice that <Button2> is formatted exactly the way that you formatted <Button1>. On the other hand,
<Button3> is formatted using the default formatting for asp:button elements.
Note
For more information on how to customize the formatting of individualelements, see Walkthrough: Advanced HTML Editing in Visual Web
Developer.
http://www.maadiguide.com [email protected]

8/14/2019 Creating a Basic Web Page in Visual Web Developer
http://slidepdf.com/reader/full/creating-a-basic-web-page-in-visual-web-developer 22/40
جيع خدم النرنت ي صفح – لج – وم – إاء – برد إليكترونى
8. Edit the document so that <Button1> and <Button2> are on the same line without a space between them:
<asp:Button ID="Button1" runat="server" Font-Bold="True"ForeColor="Blue" Text="Click Here" /><asp:ButtonID="Button2"runat="server" Font-Bold="True" ForeColor="Blue"Text="Click Here"/>
9. The elements can wrap, but the end of <Button1> (that is, />) must be followed immediately by the
beginning of <Button2> (that is <asp:Button ID=).
10. Switch to Design view.Notice that <Button1> and <Button2> are right next to each other without a space between them.
11. Switch to Source view
12. On the Edit menu, point to Advanced, and then click Format Document.
The document is reformatted, but <Button1> and <Button2> remain on the same line. If the editor were to
separate the buttons, it would introduce a space during rendering. Therefore, the editor does not change theformatting that you have created.
Navigating Between Elements
As pages become larger and more complex, it is useful to be able to find tags quickly and to reduce the clutter in the
page. Visual Web Developer provides the following tools to help you with these tasks when you are working inSource view:
• Document Outline, which provides a complete view of the document.
• Tag navigator, which provides information about the currently selected tag and where it is in the page
hierarchy.
To start, add more elements to the page so that you will be able to examine navigation features.
To add elements
1. Switch to Design view.
2. From the HTML group in the Toolbox, drag a Table control into a cell of the table that you created in
"Working in Source View," earlier in this walkthrough.
3. From the Standard group in the Toolbox, drag a Button control into the middle cell of the nested table.
With several nested elements on the page, you can see how Document Outline provides quick navigation to any tagin the page.
To navigate with Document Outline
1. Switch to Source view.
2. On the View menu, point to Other Windows, and then click Document Outline.
3. In Document Outline, click Button4.
In the editor, the <Button4> control that you added in the preceding procedure is selected.
4. Right-click the <table> tag of the outer table, and then click Synchronize Document Outline.
http://www.maadiguide.com [email protected]

8/14/2019 Creating a Basic Web Page in Visual Web Developer
http://slidepdf.com/reader/full/creating-a-basic-web-page-in-visual-web-developer 23/40
جيع خدم النرنت ي صفح – لج – وم – إاء – برد إليكترونى
The selection in Document Outline is moved to the outer table tag.The tag navigator provides information about the currently selected tag and where it is in the page hierarchy.
To navigate with tag navigator
1. Position the insertion point in the <asp:button> tag.
Notice the tag navigator at the bottom of the window, which shows the <asp:button> tag and its parent
tags. The tag navigator includes the ID of the element, if any, so that you can identify which element is being
displayed. The tag navigator also displays the assigned cascading style sheet, if any, that was set with theClass attribute.
2. In the tag navigator, click the <table> tag that is closest to the <asp:button#Button4> tag.
The tag navigator moves to the inner <table> element and selects it.
3. In the tag navigator, click the<td>
tag to the left of the selected<table>
.
The whole cell that contains the nested table is selected.
Note
You can click to select either the tag or its contents by using the drop-down list in the tag navigator tag. By default, clicking a tag in the tagnavigator selects the tag and its contents.
You can also use the tag navigator to help you move or copy elements.
To move or copy elements using the tag navigator
1. Using the tag navigator, select the <tr> tag that contains <Button4>.
2. Press CTRL+C to copy the tag.
3. Use the tag navigator to move to the outer table.
4. In Source view, place the insertion pointer between the <table> tag and the first <tr> tag.
5. Press CTRL+V to paste the copied row into the table.
6. Switch to Design view.
Notice that the new row has been added, including a Button control.
Formatting Text
• The Formatting toolbar applies inline styles for most settings. Bold and italic formatting is applied by using the
b and i tags. Paragraph formatting is applied a block tag, such as p (for normal), pre (for formatted), and so
on. Paragraph alignment is applied by using inline styles to conform with XHTML 1.1 standards.• The designer also lets you create a style block and a link to a cascading style sheet. For more information, see
Walkthrough: Working with Cascading Style Sheet Styles in Visual Web Developer.
• By default, the editor creates markup that is compatible with the XHTML 1.1 standard and converts all HTML
tag names to lowercase, even if you type them in uppercase. The editor also encloses attribute (property)
values in quotation marks. For more information, see Walkthrough: Advanced HTML Editing in Visual WebDeveloper.
To change the default markup validation
1. In Source view, right-click the page, and then click Formatting and Validation.
http://www.maadiguide.com [email protected]

8/14/2019 Creating a Basic Web Page in Visual Web Developer
http://slidepdf.com/reader/full/creating-a-basic-web-page-in-visual-web-developer 24/40
جيع خدم النرنت ي صفح – لج – وم – إاء – برد إليكترونى
2. In the Options dialog box, expand Text Editor, expand HTML, and then click Validation.3. In the Target list, enter a validation type.
Next Steps
This walkthrough has given you an overview of the HTML capabilities of the Web page editor. This includes how tocreate HTML in Design view and Source view, basic formatting, and navigation. You might want to learn more aboutthe editing facilities in Visual Web Developer. For example, you might want to do the following:
• Learn about the additional capabilities of the HTML editor, including custom formatting options, outlining, and
HTML validation. For more information, see Walkthrough: Advanced HTML Editing in Visual Web Developer.
• Learn how to work with cascading style sheet styles. For more information, see Walkthrough: Working with
Cascading Style Sheet Styles in Visual Web Developer .
http://www.maadiguide.com [email protected]

8/14/2019 Creating a Basic Web Page in Visual Web Developer
http://slidepdf.com/reader/full/creating-a-basic-web-page-in-visual-web-developer 25/40
جيع خدم النرنت ي صفح – لج – وم – إاء – برد إليكترونى
Visual Web Developer
Walkthrough: Advanced HTML Editing in Visual Web Developer
The Microsoft Visual Web Developer Web development tool provides a rich HTML editing experience for creating Webpages. This walkthrough introduces some of the more advanced HTML editing features of Visual Web Developer.
Note
For an introduction to HTML editing, see Walkthrough: Basic HTMLEditing in Visual Web Developer.
Tasks illustrated in this walkthrough include the following:
• Specifying options for how the HTML editor formats elements in the page.
• Selecting options so that the HTML editor that you create is compatible with specific browsers.
• Outlining your page — that is, creating collapsible regions in the editor to reduce clutter.
Prerequisites
In order to complete this walkthrough, you will need:
• A general understanding of working in Visual Web Developer.
For an introduction to Visual Web Developer, see Walkthrough: Basic HTML Editing in Visual Web Developer.
Creating the Web Site and Page
If you have already created a Web site in Visual Web Developer (by completing Walkthrough: Basic HTML Editing inVisual Web Developer), go to the next section. Otherwise, create a new Web site and page by following these steps.
To create a file system Web site
1. Open Visual Web Developer.
2. On the File menu, click New Web Site.
The New Web Site dialog box appears.
3. Under Visual Studio installed templates, click ASP.NET Web Site.
4. In the Location box, enter the name of the folder where you want to keep the pages of the Web site.
For example, type the folder name C:\WebSites.
5. In the Language list, click the programming language that you prefer to work in.
6. Click OK.
Visual Web Developer creates the folder and a new page named Default.aspx.
Note
By default, Visual Web Developer creates ASP.NET Web pages using thecode-behind model. For more information, see ASP.NET Web Page Code
http://www.maadiguide.com [email protected]

8/14/2019 Creating a Basic Web Page in Visual Web Developer
http://slidepdf.com/reader/full/creating-a-basic-web-page-in-visual-web-developer 26/40
جيع خدم النرنت ي صفح – لج – وم – إاء – برد إليكترونى
Model. In this walkthrough, you will not be using the code-behind page.
Formatting Markup
The HTML editor provides a variety of options to help you format the markup in your pages according to your ownpreferences. Formatting options include the following:
• Whether tag and attribute names are in uppercase or lowercase letters. You can specify options separately for
HTML tags and ASP.NET Web server controls.
• Whether attributes are added by enclosing them in quotation marks.
• Whether elements are closed automatically by the editor. Choices include creating self-closing tags (forexample, <br />), creating opening and closing tags (<p></p>), and automatically inserting closing tags.
• How child elements of a tag are indented.
• Where line breaks are positioned around tags.
Regardless of what formatting options you set, an important feature of HTML formatting is that you have ultimate
control over the layout and appearance of the markup in the page. You can format elements manually (for example,by indenting them), and the editor leaves your formatting as is unless you explicitly make a request to have themarkup reformatted.
In this part of the walkthrough, you will explore different formatting options and see the effect of different settings.You will also learn how to apply formatting to the whole page or to a selection within the page.
Note
This walkthrough reviews only the formatting features that are unique toworking with HTML. As a Visual Web Developer text editor, the HTMLeditor also supports various options that apply to all text editing, such
as setting tab size and line wrap. For information about general textediting options, see Editing Text, Code, and Markup.
In this part of the walkthrough, you will add some simple HTML to the page, change formatting options, and then
add more HTML. This illustrates how changing the settings affects how the HTML is formatted.
To add HTML elements that have default formatting options1. Switch to Design view.
2. On the Layout menu, click Insert Table, and then click OK.
Do not change any one of the default settings in the dialog box.
The designer creates an HTML table with three columns and three rows.
3. Below the table, click the page.
4. Press ENTER several times to create some blank space, and then from the HTML group in the Toolbox, drag
an Image control onto the page.
5. Switch to Source view.
You will see that the <table> and <img> elements have been inserted in the page.
http://www.maadiguide.com [email protected]

8/14/2019 Creating a Basic Web Page in Visual Web Developer
http://slidepdf.com/reader/full/creating-a-basic-web-page-in-visual-web-developer 27/40
جيع خدم النرنت ي صفح – لج – وم – إاء – برد إليكترونى
By default, the designer creates elements in which the tag and attribute names are lowercase and attributesare enclosed in quotation marks.
You can now change the formatting options.
To change formatting and validation options
1. On the Tools menu, click Options.
2. Click Validation, and then in the Target list, click Internet Explorer 6.0.
3. Click Format.
You can set some options separately for server tags (ASP.NET server controls) and client tags (HTML
elements).
4. In the Client tag list, click Uppercase.
5. Clear the Insert attribute value quotes when formatting and Insert attribute value quotes whentyping check boxes.
6. Click OK to return the editor.
Notice that although you changed formatting options, the existing markup in the page does not change.
You can now add new elements.
To add HTML elements using the new formatting options
1. Scroll to the bottom of the page.
2. From the HTML group in the Toolbox, drag a Table control onto the page and position it above the </form>
tag.
This time, the tags in the <TABLE> element are in uppercase letters.
3. Below the table that you just created, position the insertion point, and then type a right angle bracket (<) tostart a new tag.
A list appears in which all the tag names are offered in uppercase, because that is the option that you have
set for formatting.
4. In the list, double-click IMG, and then press the SPACEBAR.
A list of attributes for the <img> tag appears. The attributes are in lowercase, because when you set
formatting options, you left Client attributes as the default setting for Lowercase.
5. In Properties, set Src to graphic.gif , which is an invented graphic file name, and make sure that the tag
now looks similar to the following:
<IMGsrc=graphic.gif
6. Because you disable the Insert attribute value quotes when typing option in the preceding procedure,
the editor does not automatically enclose the attribute in quotation marks.
Note
The editor inserts quotation marks, regardless of the options setting, if
the attribute requires them, such as when an attribute value contains aspace.
http://www.maadiguide.com [email protected]

8/14/2019 Creating a Basic Web Page in Visual Web Developer
http://slidepdf.com/reader/full/creating-a-basic-web-page-in-visual-web-developer 28/40
جيع خدم النرنت ي صفح – لج – وم – إاء – برد إليكترونى
7. Type a slash mark (/) and a right angle bracket (>) to close the <img> tag.
As noted earlier in this section, the formatting options that you set were not applied to existing markup in the page.
However, if you want, you can apply formatting settings to the page or to individual elements in the page.
To apply formatting to existing elements
1. In Source view, highlight to select the first table that you created.
2. On the Edit menu, click Format Selection.
The tag names are changed to uppercase.
Note
The editor does not remove quotation marks, even if you change the
option setting. Similarly, the editor does not change the termination of existing tags, even if you change the option for how to close tags.
You can see from this example how formatting works in the HTML editor. When you use editing tools, such as Toolbox
or Properties, to edit elements, the editor uses the current set of formatting options to generate the markup.However, the editor does not change any existing markup. If you want to apply new formatting options to existing
markup, you can apply it manually by using the Edit menu commands.
Setting Tag Formatting Options
The formatting options that you have worked with up to this point apply to all elements in the page. If you want, youcan specify formatting options for individual tags also. This is useful if you frequently use certain tags and want to
use non-default formatting for those tags. Per-tag formatting lets you set the following formatting options:• How the tags are closed—that is, not closed, self-terminated, or with a separate closing tag.
• How line breaks are used around and within tags.
• How child elements of a tag are indented.
Note
Tag-specific formatting rules that you specify can be overridden by therule that the HTML editor will not change the rendering of tags. If a tagformatting rule would change the way a tag is rendered, the rule isignored.
In this part of the walkthrough, you will set several tag formatting options and see how the editor works with them.Up to this point, you have worked with HTML elements, such as the <table> element. Now, you will work with some
ASP.NET server controls, so that you can see that formatting options apply equally to controls and elements.
You will start by setting some options that apply to all tags of a certain type. You can set options for the following
types of elements:
• HTML elements that do not have content, such as br and input.
• HTML elements that can have content, such as table and span.
• Server elements (asp:) that cannot have content, such as asp:image.
http://www.maadiguide.com [email protected]

8/14/2019 Creating a Basic Web Page in Visual Web Developer
http://slidepdf.com/reader/full/creating-a-basic-web-page-in-visual-web-developer 29/40
جيع خدم النرنت ي صفح – لج – وم – إاء – برد إليكترونى
•Server elements that can have content, such as asp:textbox.
For the first part of this section, you will add an HTML table. You will then change the tag formatting rules for tableelements and reformat the document to see the effect of changing the formatting rule.
To set tag-formatting rules for an HTML table
1. In Source view,in a blank part of the window, right-click, and then click Formatting and Validation.
The Options dialog box appears with the options for formatting that you set in the preceding section.
2. In the Client Tag list, click Lowercase to reset the formatting for client tags.
3. Click OK to close the Options dialog box.
4. From the HTML group in the Toolbox, drag a Table control onto the page.
The editor creates a <table> element that has three rows (<tr> elements) and three cells (<td> elements)
in each row. Each tag is on a separate line:
<table><tr>
<td></td>
</tr>
5. In a blank part of the window, right-click, and then click Formatting and Validation.
6. Click Tag specific options.
7. Expand Default Settings.
A list of tag types appears, starting with Client tag does not support contents. By selecting an item in the
list, you can set different options for client and server elements, for elements that have content (such as atable element), and for elements that do not (such as an img element).
8. Click Client tag supports contents.
Notice that the default setting is that tags use a separate closing tag and that the tags have line breaksbefore, within, and after the tag.
9. Expand Client HTML tags.
10. Click td.
You will set options to change how td tags are formatted.
11. In the Line breaks list, click None.
12. Click OK to close the Tag Specific Options dialog box, and then click OK to close the Options dialog box.
13. On the Edit menu, click Format Document.
The document is reformatted. The <td> tags in the table that you added are placed in a single line:
<table><tr>
<td></td><td></td><td></td>
http://www.maadiguide.com [email protected]

8/14/2019 Creating a Basic Web Page in Visual Web Developer
http://slidepdf.com/reader/full/creating-a-basic-web-page-in-visual-web-developer 30/40
جيع خدم النرنت ي صفح – لج – وم – إاء – برد إليكترونى
You can work with tag-specific options for an ASP.NET server control.
To set formatting options for an ASP.NET server control
1. Switch to Design view.
2. From the Standard group in the Toolbox, drag a ListBox control onto the page.
3. Right-click the ListBox control, and then click Show Smart Tag.
4. In the ListBox Tasks dialog box, click Edit Items.
The ListItem Collection Editor dialog box appears.
5. Click Add two times to add two items.
6. Under Members, click the first ListItem, and then under ListItem properties, set Text to Item 1.
7. Under Members, click the first ListItem, and then under ListItem properties,, set Text to Item 2.
8. Click OK to close the ListItem Collection Editor dialog box.
9. Switch to Source view.
Notice that the control has been formatted in the following manner:
<asp:Listbox ID="ListBox1" runat="server"><asp:ListItem>Item 1</asp:Listitem><asp:ListItem>Item 2</asp:Listitem>
</asp:Listbox>
10. In a blank part of the window, right-click, and then click Formatting and Validation.
11. Click Tag specific options.
12. In the Tag Specific Options dialog box, click ASP.NET Controls, and then click New Tag.
13. In the Tag name box, type asp:listitem.
Do not type the right and left angle brackets (< and >) as part of the tag name.
You are setting options for the asp:ListItem element that is used inside a ListBox control. You are notsetting options for the asp:ListBox element, because you want to control how the contents (children) of theasp:ListBox element are formatted.
14. Click OK to close the New Tag dialog box.
15. In the Line breaks list, click None.
This will cause the control to have no line breaks in it.
16. Click OK to close the Tag Specific Options dialog box, and then click OK to close the Options dialog box.
You can now see the effect of your new formatting options.
To add an ASP.NET server control using the new formatting options
1. Switch to Design view.
2. From the Standard group in the Toolbox, drag a second ListBox control onto the page.
3. Right-click ListBox, and then click Show Smart Tag.
4. On the ListBox Tasks menu, click Edit Items.
5. For the ListBox control, create two items as you did in the preceding procedure.
6. Switch to Source view.
http://www.maadiguide.com [email protected]

8/14/2019 Creating a Basic Web Page in Visual Web Developer
http://slidepdf.com/reader/full/creating-a-basic-web-page-in-visual-web-developer 31/40
جيع خدم النرنت ي صفح – لج – وم – إاء – برد إليكترونى
Notice that the <asp:ListItem> elements are all on one line. The </asp:ListBox> element appears on thenext line because tag wrapping is set to 80 characters. You can modify this value in the Options dialog box.
Although you worked with only two controls and changed only one formatting option (line breaks), you can see how
to apply options to any element that you typically work with.
Outlining Elements
In Source view, you can outline elements (collapse and expand them) so that they are out of your way when you are
not working with them. This is particularly useful for elements such as tables, which often take up a lot of space. Youcan also use the collapse feature for any elements in the page.
To outline elements
1. Switch to Source view.
2. Select one of the tables that you added earlier.
• If you no longer have the tables, from the HTML group in the Toolbox, drag one onto the page.
3. On the Edit menu, point to Outlining, and then click Hide Selection.
The <table> tag is collapsed and a plus sign (+) is displayed in the margin.
4. Click the plus sign to expand the table element.
You can also configure elements so that the plus (+) and minus (-) signs appear automatically in the margin when
the elements exceed a certain size.
To configure how elements are outlined automatically
1. Right-click the page, click Formatting and Validation, click Format, and then click Tag specific options.
2. In the Tab Specific Options dialog box, expand Client HTML tags, and then click table.
3. Under Outlining in code editor, in the Minimum lines box, enter 5.
4. Click OK, and then click OK.
For existing tables and any new tables that are added, outlining appears automatically, if the table exceedsfive lines.
Validating HTML
The HTML editor can validate your HTML or make sure that it complies with the rules for specific browsers or
standards, such as XHTML. For example, the editor can find tags and attributes that are not accepted by NetscapeNavigator 4.0 or that do not comply with XHTML standards.
In this part of the walkthrough, you will work with different schemas (browser types or standards) and introducevarious types of small errors to see how the editor flags the errors.
To test validation in the editor
1. In Source view, open or switch to the Default.aspx page.
2. On the HTML Source Editing toolbar, in the list, click Internet Explorer 3.02/Netscape Navigator 3.0.
3. Scroll to the bottom of the page.
4. Inside the </form> tag, type the following HTML:
<font face=arial>
http://www.maadiguide.com [email protected]

8/14/2019 Creating a Basic Web Page in Visual Web Developer
http://slidepdf.com/reader/full/creating-a-basic-web-page-in-visual-web-developer 32/40
جيع خدم النرنت ي صفح – لج – وم – إاء – برد إليكترونى
<a href=Default.aspx >Default Page </a></font>
5. As you type, Microsoft IntelliSense technology provides assistance in completing the tags.
6. On the HTML Source Editing toolbar, in the list, click XHTML 1.0 Transitional (Netscape 7, Opera 7,
Internet Explorer 6).
After a short pause (because validation is performed as a background task), you see red squiggly linesunderneath various parts of the tags. Like a spell checker, the HTML validation feature finds markup in yourpage that is not acceptable for the currently selected browser.
7. In the <font> tag, rest the mouse pointer over the word font.
A ToolTip informs you that the font element is considered outdated. Current standards now recommend thatyou use cascading style sheet styles for text formatting. For example, <span style="font-
name:Arial;">.
8. In the href attribute of the <a> tag, rest the mouse pointer over Default.aspx.
A TooTip informs you that in the current schema, attributes must be enclosed in quotation marks.
9. Enclose Default.aspx in quotation marks.
The value for the href attribute is no longer underlined. If you use relative references for anchor tags or
other tags that require a URL, validation determines whether the target element is available.
10. In the line below the HTML you are working with, type a right angle bracket (<).
The IntelliSense drop-down list appears, but this time it does not offer font, because the font element is not
valid in XHTML schemas.
11. Delete the right angle bracket (<).
Setting Validation Options
You can control the types of errors that validation shows you. This is useful if you want validation to find certain
types of errors, even if the errors would be allowed in a particular schema.
To set validation options
1. Right-click anywhere in the page, and then click Formatting and Validation.
Note
The Formatting and Validation command is available only in Sourceview.
2. In the Options dialog box, click Validation.
Notice that regardless of whether you select or clear the Show errors check box, the error display for checkboxes is not enabled. This is because the current schema is XHTML, which already shows you all possible
validation errors.
3. In the Target list, click Internet Explorer 6.
4. Make sure that the Show errors check box is selected, and then under Show errors, select all check boxes.
5. Click OK to return to the editor.
6. Select the HTML that you entered in the preceding procedure, and then on the Edit menu, click Make
Uppercase.
After a brief pause, the tag names are underlined. When you rest the mouse pointer over a tag name, a
ToolTip indicates that the name contains uppercase letters. Generally, Internet Explorer 6 allows for
http://www.maadiguide.com [email protected]

8/14/2019 Creating a Basic Web Page in Visual Web Developer
http://slidepdf.com/reader/full/creating-a-basic-web-page-in-visual-web-developer 33/40
جيع خدم النرنت ي صفح – لج – وم – إاء – برد إليكترونى
uppercase tag names, but you now see this validation error because you have changed the validation optionsfor that schema.
Validation can find many other types of errors also, such as duplicated control IDs, crossed opening and closing tags
(for example, <b><i></b></i>), and so on. However, validation in the editor does not prevent you from creating
any HTML code that you want. Validation just identifies markup that does not comply with the rules for the specified
browser.
You should understand that when an ASP.NET page runs, the resulting output consists not only of the HTML elements
that you create, but also of the HTML that is rendered by ASP.NET server controls and any code that writes to thepage. Validation cannot examine the output of those dynamic elements; that is, the editor cannot examine the
validity of generated output. By default, ASP.NET controls generate output that complies with XHTML 1.1 standards.This means that the output is suited for most browsers. For more information about the markup that is generated by
ASP.NET controls, see ASP.NET and XHTML.
Next Steps
This walkthrough has introduced you to some of the more advanced features of the HTML editor. Although thewalkthrough did not illustrate every feature, you have seen how formatting options, outlining, and validation can
help you produce well-formed, custom-formatted markup, although still giving you final control over the markup.
Visual Web Developer
Walkthrough: Working with Cascading Style Sheet Styles in Visual WebDeveloper
The Microsoft Visual Web Developer Web development tool gives you complete support for creating and applying
styles to the text, elements, and controls on Web pages.
Tasks illustrated in this walkthrough include the following:
• Setting inline styles for individual elements.
• Creating a style block for a page.
• Creating a cascading style sheet (.css file), and then applying the .css file to one or more pages in your site.
• Changing style sheet references programmatically.
Note
In addition to explicitly setting styles and style sheet references in a
page, you can use ASP.NET themes to set the overall appearance of thepages in your site. For detailed information, see ASP.NET Themes and
Skins Overview.
Prerequisites
In order to complete this walkthrough, you will need the following:
• Visual Web Developer and the .NET Framework.
• A general understanding of working in Microsoft Visual Studio.
For an introduction to Visual Studio, see Walkthrough: Creating a Basic Web Page in Visual Web Developer.
http://www.maadiguide.com [email protected]

8/14/2019 Creating a Basic Web Page in Visual Web Developer
http://slidepdf.com/reader/full/creating-a-basic-web-page-in-visual-web-developer 34/40
جيع خدم النرنت ي صفح – لج – وم – إاء – برد إليكترونى
Creating the Web Site and PageIn the first part of the walkthrough, you will create a Web site and a page where you can work with styles.
If you have already created a Web site in Visual Studio by completing Walkthrough: Creating a Basic Web Page inVisual Web Developer, you can use that Web site and go to the next section. Otherwise, create a new Web site and
page by following these steps.
To create a file system Web site
1. Open Visual Web Developer.
2. On the File menu, click New Web Site.
The New Web Site dialog box appears.
3. In the Language list, click the programming language that you prefer to work in.
The programming language that you choose will be the default for the Web site, but you can set theprogramming language for each page individually.
4. Under Visual Studio installed templates, click ASP.NET Web Site.
5. In the right-most Location box, type the name of the folder where you want to keep the pages of the Web
site.
For example, type the folder name C:\WebSites.
6. Click OK.
Visual Web Developer creates the folder and a new page named Default.aspx.
Adding Controls
The next step is to add some controls to the page. The code will be simple, but enough to let you add breakpoints
later.
To add controls
1. Switch to Design view.
2. From the Standard group in the Toolbox, drag the following controls onto the page and set their properties
as follows:
a. Control b. Properties
Label ID: CaptionLabel
Text: (empty)
TextBox ID: NumberTextbox
Text: (empty)
Button ID: SquareButton
Text: Square
Label ID: ResultLabel
http://www.maadiguide.com [email protected]

8/14/2019 Creating a Basic Web Page in Visual Web Developer
http://slidepdf.com/reader/full/creating-a-basic-web-page-in-visual-web-developer 35/40
جيع خدم النرنت ي صفح – لج – وم – إاء – برد إليكترونى
Text: (empty)
Note
For this walkthrough, the layout of the page is not
important.
Setting Inline Styles
You set inline styles when you want to apply formatting to a single element on the page. Visual Web Developer gives
you a rich editor for editing inline styles for elements on the page. In this section of the walkthrough, you will set
styles in both Design view and Source view.
To set inline styles in Design view
1. Switch to Design view.
2. Right-click CaptionLabel, and then click Style.
The Style Builder dialog box appears.
The Style Builder helps you set style information by organizing style information into logical categories andoffering you appropriate values and options for each style setting.
3. Click Font, click Family, and then click the ellipsis (...) that is located to the right of the text box.
The Font Picker dialog box appears.
Under Installed fonts, click Arial, and then click add (>>).
Arial appears under Selected fonts.
4. Repeat the preceding step to add Times New Roman and Verdana to the list of selected fonts, and then
click OK.
When you return to the Style Builder dialog box, the three font names are in the Family box. You have
created the list of fonts that will be used to render the contents of the Label control in order of preference.
5. Under Size, click Specific, in the box, type 1.2, and then in the list, enter em.
By setting the size to 1.2 ems, you are indicating that the text will appear 1.2 times larger than the currentfont size setting in the user's browser. At the bottom of the dialog box, you can see a preview of what the
text will look similar to.
6. Click Background, click the ellipsis (…) that is located to the right of the Color box, and in the Color Picker
dialog box, click a color.
7. Click OK to close the Style Builder dialog box.
The text in the label now reflects the style settings that you made.
From these few steps, you can see that the Style Builder lets you set any inline style for any element without
requiring that you know the syntax.
If you prefer working directly with HTML, you can also set styles in Source view.
To set inline styles in Source view
1. Switch to Source view.
The <asp:label> element for the CaptionLabel control now has a style attribute that reflects the settings
that you made in the Style Builder.
2. Position the insertion pointer on a space in the <asp:button> element, and then type style=.
http://www.maadiguide.com [email protected]

8/14/2019 Creating a Basic Web Page in Visual Web Developer
http://slidepdf.com/reader/full/creating-a-basic-web-page-in-visual-web-developer 36/40
جيع خدم النرنت ي صفح – لج – وم – إاء – برد إليكترونى
Note
The editor always puts quotation marks around the style attribute,regardless of the formatting options that you have set. For detailed
information, see Walkthrough: Advanced HTML Editing in Visual WebDeveloper.
3. Double-click background-color, and then type a colon (:).
Microsoft IntelliSense functionality displays a list of color names. A ToolTip displays the syntax for thebackground-color style setting.
4. Double-click Blue, type a semicolon (;), which is the delimiter between style settings, and then press
SPACEBAR to display IntelliSense functionality.
5. Double-click color, type a colon (:), and then double-click a contrasting color, such as Yellow or White.
6. To see the effect of your choices, switch to Design view.
Creating and Applying a CSS Style Sheet
Besides setting inline styles for individual elements, you can also create and apply cascading style sheet (CSS) files.
A cascading style sheet lets you define styles that can be applied to multiple controls and pages without having toedit elements individually.
In this section of the walkthrough, you will create a style sheet, which lets you use the same tools that you used toset inline styles. You will then apply the style sheet to the page that you have been editing.
To create a style sheet1. In Solution Explorer, right-click the name of the Web site (for example, C:\WebSites), and then click Add
New Item.
2. Under Visual Studio installed templates, click Style Sheet.
3. In the Name box, type dark.css, and then click Add.
The editor opens with a new style sheet that contains a body style element.
4. Position the insertion pointer between the opening and closing braces ({ }), and then on the Styles menu,
click Build Style.
The Style Builder - body dialog box appears.
5. Click Font, under Font Attributes, click the ellipsis (…) that is located to the right Color box, in the Color
Picker dialog box, click a light color, and then click OK.
Note
Be sure to select a color that is different from the default color of thepages in the Web site.
6. Click Background, click a dark color, such as Maroon, that contrasts with the font color you selected in the
preceding step, and then click OK to close the Style Builder- body dialog box.
7. Position the insertion pointer after the closing brace of the body element, right-click, and then click Add
Style Rule.
The Add Style Rule dialog box appears.
http://www.maadiguide.com [email protected]

8/14/2019 Creating a Basic Web Page in Visual Web Developer
http://slidepdf.com/reader/full/creating-a-basic-web-page-in-visual-web-developer 37/40
جيع خدم النرنت ي صفح – لج – وم – إاء – برد إليكترونى
The Add Style Rule dialog box lets you create new styles that are bound to a particular HTML element type,to a style class name, or to a specific element.
8. Click Class name, and then in the box, type reverse.
This will create a new style class named .reverse. You will be able to apply the style settings that youdefined for .reverse to any element on your page. You could optionally create the class so that it applies toonly specific types of elements (anchors, buttons, and so on), but in this walkthrough you will create a simple
style class.
9. Click OK to close the Add Style Rule dialog box.
10. Use the style builder or IntelliSense functionality to set the colors for the .reverse style to the opposite of
the styles for the body. The element will look similar to the following:
.reverse{background-color:white;color:maroon;}
Now that you have a style sheet, you can reference it in the page you have been editing.
To reference the style sheet the Web page
1. Open Default.aspx page and switch to Design view.
2. From Solution Explorer, drag the dark.css file onto the page.
The page is updated, displaying the effect of the style sheet.3. Click Square, and then in Properties, set CssClass reverse.
This applies the reverse style to Square.
4. Switch to Source view.
In the <head> element, you can see that the editor has added a <link> element that references the style
sheet. You can also see that the cssclass attribute of the <asp:button> element has been set to reverse.
5. Right-click the page, and then click View in Browser.
The page appears in the browser with the style sheet applied.
Changing Style Sheets Programmatically
Sometimes, you might want to be able to dynamically change the style sheet that is referenced by a page. In this
part of the walkthrough, you will create a second style sheet, and then in your page, write several lines of code thatswitch style sheets programmatically.
To create a new style sheet
1. In Solution Explorer, right-click the Web site name, and then click Add New Item.
2. Under Visual Studio installed templates, click Style Sheet, in the Name box, type light.css, and then
click Add.
3. In the new style sheet, use the Style Builder or IntelliSense functionality to create the following styles:
http://www.maadiguide.com [email protected]

8/14/2019 Creating a Basic Web Page in Visual Web Developer
http://slidepdf.com/reader/full/creating-a-basic-web-page-in-visual-web-developer 38/40
جيع خدم النرنت ي صفح – لج – وم – إاء – برد إليكترونى
body{background-color:white;color:Black;}.reverse{background-color:Black;color:White;
}4. Save the new style sheet.
In your original page, you can now add the ability to switch style sheets. You will add two radio buttons that let the
user select between a dark look and a light look.
To let users change style sheets
1. Open the Default.aspx page and switch to Source view.
2. In the <link> element, which is in the <head> element, add the attributes runat="server" and
ID="stylesheet".
The tag will look similar to the following:
<link href="dark.css" type="css/text" rel="stylesheet"runat="server" id="stylesheet" />
Adding these two elements makes the <link> element a server control that you can program using server-
based code.
3. Switch to Design view, and then from the Standard group in the Toolbox, drag two RadioButton controls
onto the page.
Note
The layout of the RadioButton controls is not important for thiswalkthrough.
4. Set the following properties for the RadioButton controls.
a. Control b. Properties
RadioButton1 ID: radioDark
AutoPostBack: true
Checked: true
http://www.maadiguide.com [email protected]

8/14/2019 Creating a Basic Web Page in Visual Web Developer
http://slidepdf.com/reader/full/creating-a-basic-web-page-in-visual-web-developer 39/40
جيع خدم النرنت ي صفح – لج – وم – إاء – برد إليكترونى
GroupName: grpSelectStylesheet
Text: Dark
RadioButton2 ID: radioLight
AutoPostBack: true
Checked: false GroupName:grpSelectStylesheet
Text: Light
5. Click radioDark and on the Properties toolbar, click the events icon to display available events.
6. In the CheckedChanged box, type SwitchStylesheets, and then press ENTER.
The editor creates a handler for the CheckedChanged event of the radioDark control.
7. Type or copy the following code, which switches the Href attribute of the <link>.
Visual Basic
Sub SwitchStylesheets(ByVal sender As Object, _ByVal e As System.EventArgs)
If radioDark.Checked Thenstylesheet.Href = "dark.css"
ElseIf radioLight.Checked Thenstylesheet.Href = "light.css"
End IfEnd Sub
C#
void SwitchStylesheets(Object sender, EventArgs e){
if(radioDark.Checked)
stylesheet.Href = "dark.css";if(radioLight.Checked)stylesheet.Href = "light.css";
}
8. The code determines which option button is selected and sets the Href attribute of the <link> element,
which you named stylesheet, appropriately.
9. Switch to Design view.
10. Click radioLight, and in Properties, click the events icon.
11. In the CheckedChanged box, click SwitchStylesheets.
http://www.maadiguide.com [email protected]

8/14/2019 Creating a Basic Web Page in Visual Web Developer
http://slidepdf.com/reader/full/creating-a-basic-web-page-in-visual-web-developer 40/40
جيع خدم النرنت ي صفح – لج – وم – إاء – برد إليكترونى
This binds the CheckedChanged event of the radioLight control to the handler that you have alreadywritten to switch style sheets. Both radio buttons will call the same handler when they are clicked.
You can now test your page.
To test the page
1. Press Ctrl+F5 to run the page.
2. Click Light.
The appearance of the page changes.
3. Click Dark to make sure that both option buttons work.
Next Steps
This walkthrough has illustrated the basic techniques for working with CSS styles in your ASP.NET Web pages. Youmight also want to explore the following ways you can control the appearance of the Web pages:
• Setting style information programmatically for HTML elements.
For detailed information, see How to: Set HTML Server Control Properties Programmatically.
• Creating styles programmatically and applying the styles to ASP.NET server controls.
For detailed information, see Customizing the Appearance of ASP.NET Server Controls Using Styles (VisualStudio).
• Creating themes and skins, which let you specify not only CSS styles, but virtually any property of an ASP.NET
control.
For details, see ASP.NET Themes and Skins Overview.