Embed Size (px)
Citation preview
Genuine Accessory User’s Guide
© 2018 Honda Motor Co., Ltd. 71MKK000_REV1 of 9
CRF1000L/L2/LD/L2D
ACCESSORY SOCKET
• The maximum power rating of connected accessories is 24W (12V, 2A).
• Use accessories with engine running to avoid discharging the battery.
• Do not use a cigarette lighter, as this can cause a malfunction.
• Cover the socket with the cap when the accessory socket is not used to prevent entry of foreign objects.
• Carefully secure any connected devices, as vibrations may cause them to shift unexpectedly.
• Make sure that the device cable connected to the accessory socket does not disturb the steering operation or riding. To prevent damage, do not pinch the cable.
COMFORT PASSENGER FOOTPEG
• When this accessory becomes dirty, rinse it thoroughly with cool water to remove loose dirt, then wipe with a clean cloth or sponge.
Do not use a brush to clean this accessory as it may scratch the surface.
• Never use organic solvents such as gasoline, thinner and benzine to clean this accessory. Also do not use acid or alkaline cleaners to clean this accessory.
Wipe up spilled brake or battery fluid at once as they may damage the surface.
• Do not try to move the passenger bar to the inside after it stops.COMFORT
PASSENGERFOOTPEG
PASSENGER BAR
ACCESSORY SOCKET
CENTERSTAND
• Before starting your motorcycle, check that the side stand and the centerstand are fully retracted.
• Always choose flat ground when setting the centerstand.
• Always use the parking brake when parking the CRF1000LD/L2D and using the centerstand.
HOW TO USE THE CENTERSTAND1. Park safely on level ground and stop the engine.2. Setting the centerstand.
• Stand on the left side of the motorcycle
and lower the centerstand with your right
foot. Hold the left handgrip with your left
hand and the rear carrier with your right
hand. Press down on the tip of the stand
with your right foot and, simultaneously,
pull up and back on the rear carrier.
CENTER STAND
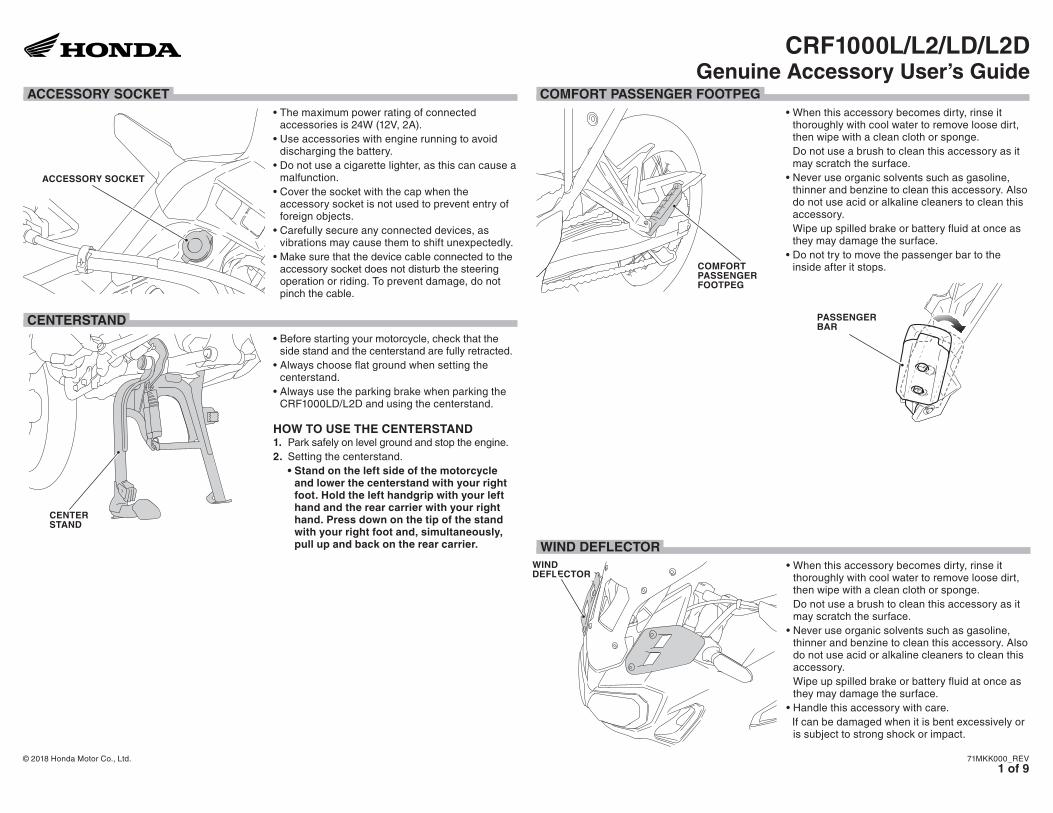
• When this accessory becomes dirty, rinse it thoroughly with cool water to remove loose dirt, then wipe with a clean cloth or sponge.
Do not use a brush to clean this accessory as it may scratch the surface.
• Never use organic solvents such as gasoline, thinner and benzine to clean this accessory. Also do not use acid or alkaline cleaners to clean this accessory.
Wipe up spilled brake or battery fluid at once as they may damage the surface.
• Handle this accessory with care. If can be damaged when it is bent excessively or
is subject to strong shock or impact.
WIND DEFLECTOR
WINDDEFLECTOR
CRF1000L/L2/LD/L2DGenuine Accessory User’s Guide
2 of 9
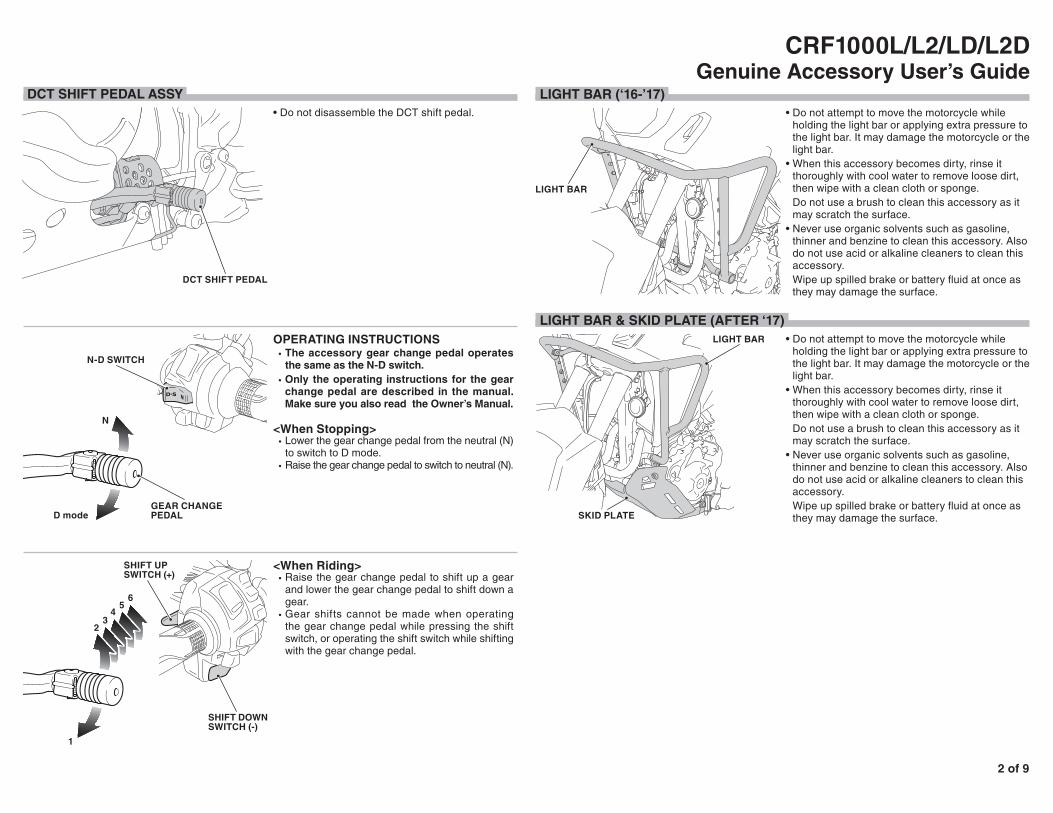
OPERATING INSTRUCTIONS • The accessory gear change pedal operates
the same as the N-D switch.
• Only the operating instructions for the gear
change pedal are described in the manual.
Make sure you also read the Owner’s Manual.
<When Stopping> • Lower the gear change pedal from the neutral (N) to switch to D mode.
• Raise the gear change pedal to switch to neutral (N).
<When Riding> • Raise the gear change pedal to shift up a gear and lower the gear change pedal to shift down a gear.
• Gear shifts cannot be made when operating the gear change pedal while pressing the shift switch, or operating the shift switch while shifting with the gear change pedal.
• Do not disassemble the DCT shift pedal.
DCT SHIFT PEDAL ASSY
GEAR CHANGE PEDAL
DCT SHIFT PEDAL
SHIFT UP SWITCH (+)
N-D SWITCH
N
D mode
SHIFT DOWN SWITCH (-)
1
54
6
32
LIGHT BAR (‘16-’17)
• Do not attempt to move the motorcycle while holding the light bar or applying extra pressure to the light bar. It may damage the motorcycle or the light bar.
• When this accessory becomes dirty, rinse it thoroughly with cool water to remove loose dirt, then wipe with a clean cloth or sponge.
Do not use a brush to clean this accessory as it may scratch the surface.
• Never use organic solvents such as gasoline, thinner and benzine to clean this accessory. Also do not use acid or alkaline cleaners to clean this accessory.
Wipe up spilled brake or battery fluid at once as they may damage the surface.
LIGHT BAR
LIGHT BAR & SKID PLATE (AFTER ‘17)
• Do not attempt to move the motorcycle while holding the light bar or applying extra pressure to the light bar. It may damage the motorcycle or the light bar.
• When this accessory becomes dirty, rinse it thoroughly with cool water to remove loose dirt, then wipe with a clean cloth or sponge.
Do not use a brush to clean this accessory as it may scratch the surface.
• Never use organic solvents such as gasoline, thinner and benzine to clean this accessory. Also do not use acid or alkaline cleaners to clean this accessory.
Wipe up spilled brake or battery fluid at once as they may damage the surface.
LIGHT BAR
SKID PLATE

CRF1000L/L2/LD/L2DGenuine Accessory User’s Guide
3 of 9
HEATED GRIPS
• Wear gloves to protect your hands from the heated grips.
• Do not use the heated grip with the engine at idle for a long time. It may result in a low (or dead) battery.
• The heated grip warms up the right and left grips of the handlebar for comfortable riding on a cold day.
• Adjust the temperature by repeatedly pressing the switch.
The temperature can be set to five levels.• The heated grip maintains the selected level
when the ignition switch is turned off.• The heater level is not changed if the ignition
switch is turned to the OFF position within 5 seconds of changing the heater level.
• Do not leave the heated grip in the high position for a long time on a warm day.
HEATED GRIP INDICATOR
HEATER SWITCH
INDICATOR• Displayed when the heated grip is on.• The selected heater level is indicated by the
number of times the indicator blinks when the heater is turned on and the heater level is changed. For example, If you select heater level 5, the indicator blinks 5 times and repeats it 7 times.
HEATER LEVEL• The selected heater level is indicated for a few
seconds when the heater switch is operated.
HEATER LEVELHEATED GRIP STATUS ICON
HEATED GRIP STATUS ICON• Displayed when the heated grip is on.• If the heated grip system has an error, the heated
grip status icon will blink. If the “E1”, “E2” or “E3” blinking does not go off, see your Honda dealer as soon as possible.
HOW TO USE THE HEATED GRIPS1. Start the engine.2. Press the heater switch. The heated grip is on.3. Select the heater level by pressing the heater
switch.• The clock on the display automatically
switches to indicate the heater level. The
indicator will return to the ordinary mode
after blinking for about 5 seconds.
4. To turn off the heater, press the heater switch until the status icon on the display disappears.• Also to turn off, press and hold the heater
switch.
OFF
Press the heater switch.
Press and hold the heater switch.
LEVEL 5Highest temperature
LEVEL 1Lowest temperature
LEVEL 4
LEVEL 3
LEVEL 2

CRF1000L/L2/LD/L2DGenuine Accessory User’s Guide
4 of 9
TALL WINDSCREEN
• Reduce speed when running in strong wind.• Replace this accessory with a new one if it is
damaged or discolored excessively.• When this accessory becomes dirty, rinse it
thoroughly with cool water to remove loose dirt, then wipe with a clean cloth or sponge.
Do not use a brush to clean this accessory as it may scratch the surface.
• Never use organic solvents such as gasoline, thinner and benzine to clean this accessory. Also do not use acid or alkaline cleaners to clean this accessory.
Wipe up spilled brake or battery fluid at once as they may damage the surface.
• If the motorcycle is left covered for an extended period of time, park in the shade. Parking a covered motorcycle in direct sunlight can cause the windscreen to deform due to heat buildup under the cover.
• Handle this accessory with care. It can be damaged when it is bent excessively or
is subject to strong shock or impact.• Select a firm, level surface when you park the
motorcycle. Also bear in mind that strong wind can cause the
motorcycle to topple to the ground.
TALL WINDSCREEN
PANNIERS
• The weight of the cargo must not exceed the following maximum weight capacity:Each pannier case 11.0 lb (5.0 kg)
• Load weight equally on both sides to minimize imbalance. If the weight is not loaded equally on both sides or if it exceeds the maximum weight capacity of this accessory, handling is proportionally affected, resulting in serious accident or injury.
• Do not store valuables or fragile articles in the panniers.
• Be sure that the panniers are installed securely before riding.
• Before riding, confirm that lid is closed.• To prevent burns, allow the engine, exhaust
system, radiator, etc., to cool before installing and removing the accessory.
• The pannier is hot while the engine is running and after it has been stopped (after riding etc.).
Especially the lower part of the pannier on the right side is close to the muffler and thus becomes very hot, for that reason it should not be touched for some time.
• The panniers are not perfectly watertight, and water may enter when washing the motorcycle, when it rains, etc.
• Always install panniers on both the left and the right side.
• Don’t place a heavy object on the opened lid or apply an excessive force from the top of opened lid.
• Open and close the lid gently.• If the pannier gets dirty, clean it with a sponge or
a shop towel moistened with a neutral detergent, remove the detergent with clean water, and then wipe them dry with a clean sponge or shop towel.
• Never use organic solvents such as gasoline, thinner and benzine to clean this accessory. Also do not use acid or alkaline cleaners to clean this accessory.
Wipe up spilled brake or battery fluid at once as they may damage the surface.
PANNIER

CRF1000L/L2/LD/L2DGenuine Accessory User’s Guide
5 of 9
HOW TO INSTALL THE PANNIERS1. Release the lock by turning the key clockwise.
2. Install the saddlebag.• Install the pannier with this lever raised.
• First engage at the rubber and then install at the two holes.
3. Lower the lever as shown.
HOLE
RUBBER
LEVER
LEVER
4. Lock the pannier by turning the key counter-clockwise as shown.
5. Remove the key. Be sure that the lever cannot be released and the pannier is installed securely.• The pannier come off during riding unless
it is mounted securely.
LEVER
PANNIER
KEY
KEY
HOW TO REMOVE THE PANNIERS1. Remove the panniers in the reverse order of
installation.
HOW TO OPEN THE PANNIERS1. Release the lock by turning the key clockwise.
2. Open the latch.
3. Open the lid.
LATCH
LID
KEY

CRF1000L/L2/LD/L2DGenuine Accessory User’s Guide
6 of 9
HOW TO CLOSE THE PANNIERS1. Close the panniers in reverse order of opening.
• Be careful not to pinch the stored item
when the pannier is closed.
QUICK SHIFTER
QUICK SHIFTER
• Do not disassemble the quick shifter.• If there is a problem with the gear position
display, the shift feeling may change.• If the qucik shifter does not operate normally,
the gear shift can be made by normal clutch operation.
• If the PGM-FI malfunction indicator lamp comes on or the gear position indicator flashes “-” in the current gear position, the Quick Shifter system may not operate. If either of the above occurs, contact your dealer as soon as possible.
HOW TO STORE THE PANNIER INNER BAG1. Open the pannier and store the pannier inner
bag.2. Close the pannier.
• Be careful not to pinch the stored item
pinched when the pannier is closed.
HOW TO USE THE QUICK SHIFTER • This accessory enables up and down
gearshifts without using the clutch. (Engine
speed is more than 1,600 rpm on upshifting or
more than the idle speed on downshifting).
• This system does not funct ion when
upshifting with the throttle closed.
• This system does not function when the
clutch lever is being operated.
QUICK SHIFTER SETTING • The Quick Shifter can be individually turned
ON (activate) and OFF (deactivate), also
the shift pedal sensitivity (load required to
activate ignition cut /throttle blip) can be
independently adjusted for up and down
shifting.
1. Turn the ignition switch to the ON position.2. Press and hold the SEL or switch and the
MODE switch.3. When the time format setting is displayed, press
the MODE switch several times to display each setting of Quick Shifter.
Normal display
Time format setting
UP setting
DOWN setting
UP LVL setting(Not displayed when the UP setting is OFF.)
DOWN LVL setting(Not displayed when the DOWN setting is OFF.)
<UP setting> • You can select “ON” (act ivate) or “OFF” (deactivate) for upshifting with the Quick Shifter.
1. Press the SEL or switch to select “ON” or “OFF”.
2. Press the MODE switch to set the UP setting. Select “ON” to switch to the UP LVL setting.

CRF1000L/L2/LD/L2DGenuine Accessory User’s Guide
7 of 9
<UP LVL setting> • You can select the shift pedal load level for activating the Quick Shifter when upshifting.
1. Press the SEL or switch to select one of the three levels.• 1 light load required (most sensitive) to 3
heavy load required (least sensitive)
2. Press the MODE switch to set the UP LVL setting, then automatically switch to the DOWN setting.
<DOWN LVL setting> • You can select the shift pedal load level for activating the Quick Shifter when downshifting.
1. Press the SEL or switch to select one of the three levels.• 1 light load required (most sensitive) to 3
heavy load required (least sensitive)
2. Press the mode switch to set the DOWN LVL setting, then automatically return to the normal display.
<DOWN setting> • You can select “ON” (act ivate) or “OFF” (deactivate) for downshifting with the Quick Shifter.
1. Press the SEL or switch to select “ON” or “OFF”.
2. Press the MODE switch to set the DOWN setting. Select “ON” to switch to the DOWN LVL setting.
TOP CASE
• The weight of the cargo must not exceed the following maximum weight capacity:13.2 lb (6.0 kg)
• The mounting and loading of a top case on a motorcycle, particularly when placed above the original center of gravity, can negatively affect handling and stability. When adding and using the top case, do not exceed the allowable cargo weight recommendations and proceed carefully until you understand the effect on your motorcycle’s handling and stability.
• Be sure that the top case is installed securely before riding.
• Before riding, confirm that lid is closed.• The top case is not perfectly watertight, and
water may enter when washing the motorcycle, when it rains, etc.
• To prevent burns, allow the engine, exhaust system, radiator, etc., to cool before installing and removing the accessory.
• Do not store valuables or fragile articles in the top case.
• Don’t place a heavy object on the opened lid or apply an excessive force from the top of opened lid.
• Open and close the lid gently.• If the top case gets dirty, clean it with a sponge or
a shop towel moistened with a neutral detergent, remove the detergent with clean water, and then wipe them dry with a clean sponge or shop towel.
• Never use organic solvents such as gasoline, thinner and benzine to clean this accessory. Also do not use acid or alkaline cleaners to clean this accessory.
Wipe up spilled brake or battery fluid at once as they may damage the surface.
TOP CASE
BACKREST
CRF1000L/L2/LD/L2DGenuine Accessory User’s Guide
8 of 9
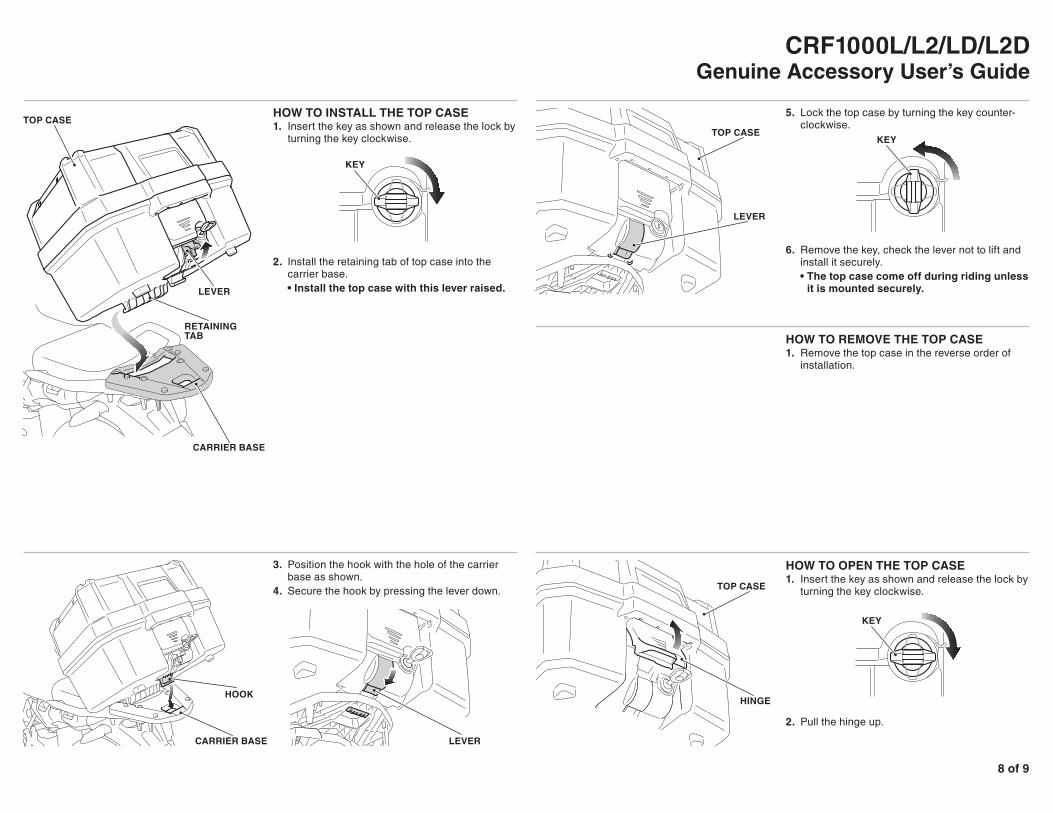
3. Position the hook with the hole of the carrier base as shown.
4. Secure the hook by pressing the lever down.
TOP CASE
LEVERCARRIER BASE
CARRIER BASE
HOOK
RETAINING TAB
LEVER
HOW TO INSTALL THE TOP CASE1. Insert the key as shown and release the lock by
turning the key clockwise.
2. Install the retaining tab of top case into the carrier base.• Install the top case with this lever raised.
KEY
6. Remove the key, check the lever not to lift and install it securely.• The top case come off during riding unless
it is mounted securely.
HOW TO REMOVE THE TOP CASE1. Remove the top case in the reverse order of
installation.
TOP CASE
TOP CASE
HOW TO OPEN THE TOP CASE1. Insert the key as shown and release the lock by
turning the key clockwise.
2. Pull the hinge up.
HINGE
LEVER
5. Lock the top case by turning the key counter-clockwise.
KEY
KEY

CRF1000L/L2/LD/L2DGenuine Accessory User’s Guide
9 of 9
2. Close the lid.
HINGE
HINGE
3. Rising the upper part of hinge, move the hinge down as shown and open the lid.
HOW TO CLOSE THE TOP CASE1. Confirm that the key position is as shown.
3. Holding the upper part of the hinge, push the hinge down.
4. Lock the top case by turning the key counter-clockwise.• Be careful not to have the stored item
pinched when the top case is closed.
LID
LIDKEY
KEY
5. Remove the key.• Make sure the lid and hinge are locked
down securely.
HOW TO STORE THE TOP CASE INNER BAG1. Open the top case and store the top case inner
bag.2. Close the top case.
• Be careful not to have the stored item
pinched when the top case is closed.