Embed Size (px)
Citation preview

CCrriicckkeett WWiicckkeettss
INTRODUCTION .............................................................................................................................................................................. 1
PART I. SELECTION OF BLACK SOIL ....................................................................................................................................... 2
(A) A SIMPLE TEST................................................................................................................................................................... 2 (B) MORE SOPHISTICATED TESTS .......................................................................................................................................... 2 (C) PRACTICAL APPLICATION OF LABORATORY TESTS...................................................................................................... 4
PART II. SOME USEFUL RULES REGARDING BLACK SOIL........................................................................................................ 6
(A) THE FIRST RULE.................................................................................................................................................................. 6 (B) THE SECOND RULE .......................................................................................................................................................... 6 (C) THE THIRD RULE ................................................................................................................................................................ 7 (D) THE FOURTH RULE ............................................................................................................................................................ 7 (E) THE FIFTH RULE ................................................................................................................................................................. 8 (F) THE SIXTH RULE................................................................................................................................................................. 9
PART III. SELECTION OF TURF GRASS FOR THE SUB-TROPICS............................................................................................... 11
PART IV. SELECTION OF FERTILISERS ...................................................................................................................................... 13
PART V. CONSTRUCTING A WICKET FROM SCRATCH......................................................................................................... 16
PART VI. NEW WICKET GRASS ESTABLISHMENT..................................................................................................................... 24
PART VII. PRE-SEASON WICKET PREPARATION ...................................................................................................................... 25
PART VIII. PRE-GAME PREPARATION....................................................................................................................................... 27
PART IX. OFF SEASON CARE & MAINTENANCE.................................................................................................................... 28
PART X. WATER RESTRICTIONS .............................................................................................................................................. 30
Appendix (One) Some Closing Remarks On Expectations Of The Perfect Wicket.......................................................31
Appendix (Two) Preparation Of A Wicket By Kevin Mitchell (Snr) ................................................................................33
Appendix (Three) Oval Dimensions To Suit Turf Wickets .................................................................................................36

Cricket Wickets by Kevin Mitchell (Snr) Copyright © Page 1 of 37
INTRODUCTION I would like to present the following to assist in the preparation of cricket wickets. I sincerely hope that this knowledge will aid in the development of cricket as a growing sport within our State. Going back to the basics, there are good reasons for choosing a rich black soil, rich in clay, for our cricket wickets. It is the only material known to man that can: allow the penetration of water to produce initial plasticity and expansion enhance the movement of water through the material by capillary action permit the evaporation of water through its surface have sufficient permeability to allow water to be drawn down through it by gravity change in density through the increase or decrease of water content increase it’s density by application of pressure through rolling dry in a uniform manner to produce a firm consistent surface that will last for days contract after drying, to leave a pattern of small even cracks over its entire surface provide an excellent medium and range of nutrients for growing green couch accept green couch as an effective binding and reinforcing plant withstand regular regeneration and renovation to produce a desirable playing wicket be reduced to powdered form to allow the application of additional material to the wicket surface be purchased and laid as a wicket very economically produce exciting bounce when used as a cricket wicket
Also: it can be played on for months by footballers with tagged boots and recover miraculously in a few weeks it can provide the subject for more rumour, false assumptions and downright lies than any other sticky substance that I know.
Not all black soil is the same and it is important that the soil you plan to use, or even the soil on your own wicket is up to the job you ask of it

Cricket Wickets by Kevin Mitchell (Snr) Copyright © Page 2 of 37
PART I. SELECTION OF BLACK SOIL
(a) A SIMPLE TEST People often ask how to examine a sample of black soil that they are thinking of using for a new wicket or even the soil in their existing wicket. There is an easy test using a test kit as simple as a glass of water. This test will give you an early indication as to whether you should do any further testing or get any more advice on your sample. This test can also be done on a sample taken from an existing wicket. Simply roll a sample of soil into a ball about 30mm in diameter. Place into a glass of water and let it sit for several hours. A suitable sample should settle into three distinct layers; clay, fine silt and medium silt. It should reduce in size gradually and evenly. If your sample decays quickly, you can be sure it has too much silt and too little clay. It is therefore unsuitable for use in a wicket. There is also a drying test. Again, roll the sample into a small ball and let it dry naturally in the atmosphere out of the sun. If it holds together it is probably O.K. If it crumbles when handled you know that the silt content is too high. Another test can be applied to established wickets. Just by cutting a 40mm deep sample core from a wicket, an experienced eye can pick up problems that often occur in the soil through poor practice; eg. the problem of organic material in upper layers. More on this important wicket deficiency later. (b) MORE SOPHISTICATED TESTS Like other soils, wicket black soil can be subjected to a number of tests from the disciplines of soil physics and physical chemistry. Examples of these tests include - Dispersion index (DI): Acidity/alkalinity (pH): Exchangeable cations: Cation exchange capacity for soil (CEC)
- Ca2+; Mg2+; Na2+; K+; H+:

Cricket Wickets by Kevin Mitchell (Snr) Copyright © Page 3 of 37
Cation exchange capacity for clay; Ca2+/Mg2+ ratio; Particle size and distribution; Hydraulic conductivity (permeability to water); Linear swelling; Carbonate content; Clay content - (e.g. kaolinite, vermiculite, illite, montmorillinite); Organic matter content
(c) PRACTICAL APPLICATION OF LABORATORY TESTS It is important to recognise that while laboratory testing can pin point accurately the physical and chemical properties of selected black soils, these results will NOT be an indicator of how well the soils perform in situ. The elements and curator interventions serve to change ratios, alter organic content, change pH values and introduce new compounds and ions into the soil. In my experience and that of other curators, you will rarely find agreement between the “soil scientist” camp and the “curators” camp; those people that week after week, year after year have the job of producing a perfect wicket for the weekend game. This is not to unfairly denigrate soil scientists, they do a wonderful job in agricultural situations and some try to link the application of their science to the art of wicket establishment and maintenance. I really believe you can get confused with the complexities of a science that few curators will understand and apply. How can we use the science available to produce the results we want without relying on the intricacies of scientific analysis? I believe that the three main properties that groundsmen should look for when choosing wicket black soil are: Soil acidity. (pH) Soil pH values in Queensland wickets are best at around values of 6.5 to 7.5. It will pay you to buy a good soil test kit that will enable you to check wicket soil pH quickly and accurately. Once the pH in your wicket drops below a value of 6, ions of A1 will come into solution and lead to a reduction in swelling capacity.

Cricket Wickets by Kevin Mitchell (Snr) Copyright © Page 4 of 37
Of course, no one these days inadvertently elevates pH values through the use of lime to mark creases; although this practice has spoiled many good wickets in the past. Permeability (hydraulic conductivity) I cannot stress enough that this is a major factor in retaining a healthy wicket. It is important that water can pass or leach through the black soil to the drainage system below. This leaching process facilitates the removal of undesirable substances, particularly Sodium and other salts which are delivered via the irrigation system, particularly if Brisbane town water is used. Note that soluble salts content of over 2,000 parts per million (ppm) will begin to reduce that rate of grass growth and self repair. Permeability is also important because it allows water applied through at the surface through irrigation to pass through to the lower soil depths to reach deep grass roots and provide a healthy binding turf. During rolling, water has to make its way to the surface to evaporate and produce the drying and hardening process that results in a wicket surface with that illusive “bounce” quality. Only black soil with good permeability characteristics will perform all of these functions efficiently. Clay content There are many “guru’s” in the cricket game who claim to have all the answers when questioned about the correct percentage of clay content in the perfect wicket. The facts are that black soils with a clay content of between 65% and 75% will have the potential to produce the perfect wicket that will hold up for days in our local situation. On the continuum of clay content found in soils, as shown below, we can note that the ideal soil for south east Queensland is not an extreme soil, although it sits on the high side of the continuum for clay against sandy loam comparisons. A further comparison shows that clay content of 65% to 75% is moderate compared with Adelaide wickets (51%) and Perth wickets (up to 82%). 100% 65%-70% 50/50 clay silt 100% sandy loan 82% 65%-75% 51% Perth Brisbane Adelaide (Reference D.S. McIntyre, H.J. Beaty CSIRO Division of Soils, 1983)

Cricket Wickets by Kevin Mitchell (Snr) Copyright © Page 5 of 37
Remember that the higher the clay content, the harder the wicket will be to manage and the harder the surface it can produce. Conversely, the larger the percentage of silt, the more quickly the wicket will break and powder. For those interested in the physical chemistry of clays it should be noted that the clay compound montmorillinite (mentioned in the testing schedule above) contributes significantly to the expansion and contraction properties of black soil.
Cricket Wickets by Kevin Mitchell (Snr) Copyright © Page 6 of 37
PART II. SOME USEFUL RULES REGARDING BLACK SOIL Over the many years I have been involved in constructing and preparing wickets, I have provided answers to questions and comments raised regarding the performance of black soil wickets. Here are some of the most common answers that I have given, presented here in the form of “rules” (a) THE FIRST RULE
When you install your new wicket, the black soil that you use will be at it’s premium best, it will never improve and there is nothing you can do to improve it or it’s potential performance. In other words, from the moment you start using your new wicket, it begins to go into a steady decline. Whether this decline becomes a steep dive leading to an early death or a gradual decline lasting many years, depends on the quality of care the wicket gets from it’s curator. I have seen beautiful new wickets go to rack and ruin in only a few years through groundsmen unintentional lly poisoning the soil. The replacement wicket in these cases is usually looked after by a replacement groundsman! Because a wicket can’t improve, it is easy to see why it is so important to procure the best black soil available, right at the start.
(b) THE SECOND RULE It takes time for a wicket to be rested and restored to a state ready for rolling and preparation for the next game. With good curator care, restoration takes six weeks. During this period water needs to be absorbed back into the sub-surface which has dried out during rolling and play. This process takes the wicket clays back to their previous state; expanded and swollen and ready for heavy rolling which forms that hard even surface ready for the next game.
Figure 1: Spreading and levelling wicket soil
Figure 2; Wicket scarified and top dressed
Cricket Wickets by Kevin Mitchell (Snr) Copyright © Page 7 of 37
Remember too that unless you get the water into your wicket during the rest and renovation period, it won’t absorb water later; particularly after heavy rolling. (c) THE THIRD RULE Cracking must be kept to a minimum. Legend which dates from the last century had it that the larger and wider the cracks you induced in the soil during renovation, the better the ‘airing’ of the soil and the better the potential for water infusion. Fortunately legends fade into obscurity. Wide cracks only serve to tear the turf root structure apart as the cracks develop and widen. Once wide cracks are induced in a wicket they will return, as surely as the sun rises, every time the wicket is allowed to dry out, prematurely and in exactly the same place even after rolling. This is because the fractured roots have not and will not rejoin, the binding effect of the couch grass has been destroyed even though the cracks have swelled and closed. These cracks can appear in the middle of a game which can be very embarrassing. The proper approach is far more effective and less damaging to the wicket. Controlled drying produces narrow and even cracking in the surface layer only. Following correct renovation procedures ensure that these cracks don’t deepen and penetrate to the bottom of the black soil wicket section and damage your root system. (c) THE FOURTH RULE Good water permeability and subsoil drainage are absolutely essential if you want to produce first class wickets year after year. In the past wicket guru’s told groundsmen to build wickets 300mm, or more, deep, these deep wickets produced many problems for curators. They were too deep to allow leaching and transpiration (through the surface) and were unpredictable and unmanageable because they retained a plastic middle layer. This made remoulding difficult, build up of salts in the thick block of clay also occurs and high salt content leads to a crumbling soil and makes remoulding difficult.
Cricket Wickets by Kevin Mitchell (Snr) Copyright © Page 8 of 37
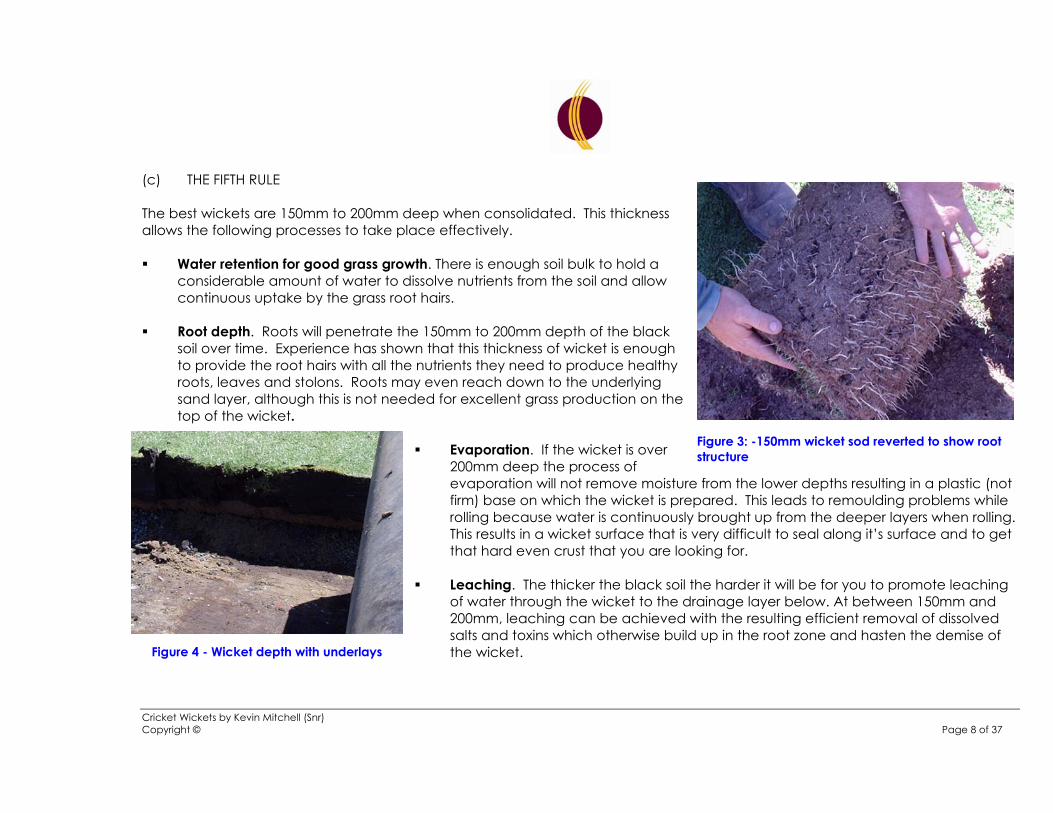
(c) THE FIFTH RULE The best wickets are 150mm to 200mm deep when consolidated. This thickness allows the following processes to take place effectively. Water retention for good grass growth. There is enough soil bulk to hold a
considerable amount of water to dissolve nutrients from the soil and allow continuous uptake by the grass root hairs.
Root depth. Roots will penetrate the 150mm to 200mm depth of the black
soil over time. Experience has shown that this thickness of wicket is enough to provide the root hairs with all the nutrients they need to produce healthy roots, leaves and stolons. Roots may even reach down to the underlying sand layer, although this is not needed for excellent grass production on the top of the wicket.
Evaporation. If the wicket is over
200mm deep the process of evaporation will not remove moisture from the lower depths resulting in a plastic (not firm) base on which the wicket is prepared. This leads to remoulding problems while rolling because water is continuously brought up from the deeper layers when rolling. This results in a wicket surface that is very difficult to seal along it’s surface and to get that hard even crust that you are looking for.
Leaching. The thicker the black soil the harder it will be for you to promote leaching
of water through the wicket to the drainage layer below. At between 150mm and 200mm, leaching can be achieved with the resulting efficient removal of dissolved salts and toxins which otherwise build up in the root zone and hasten the demise of the wicket. Figure 4 - Wicket depth with underlays
Figure 3: -150mm wicket sod reverted to show root structure
Cricket Wickets by Kevin Mitchell (Snr) Copyright © Page 9 of 37
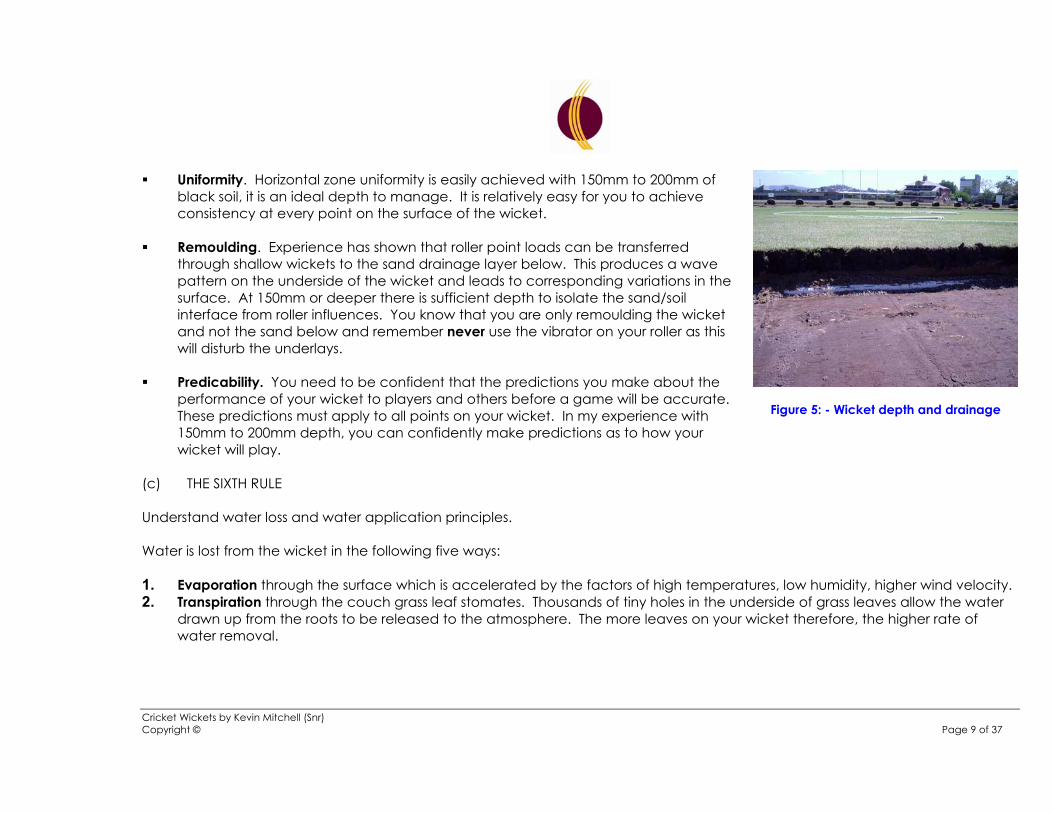
Uniformity. Horizontal zone uniformity is easily achieved with 150mm to 200mm of
black soil, it is an ideal depth to manage. It is relatively easy for you to achieve consistency at every point on the surface of the wicket.
Remoulding. Experience has shown that roller point loads can be transferred through shallow wickets to the sand drainage layer below. This produces a wave pattern on the underside of the wicket and leads to corresponding variations in the surface. At 150mm or deeper there is sufficient depth to isolate the sand/soil interface from roller influences. You know that you are only remoulding the wicket and not the sand below and remember never use the vibrator on your roller as this will disturb the underlays.
Predicability. You need to be confident that the predictions you make about the performance of your wicket to players and others before a game will be accurate. These predictions must apply to all points on your wicket. In my experience with 150mm to 200mm depth, you can confidently make predictions as to how your wicket will play.
(c) THE SIXTH RULE Understand water loss and water application principles. Water is lost from the wicket in the following five ways: 1. Evaporation through the surface which is accelerated by the factors of high temperatures, low humidity, higher wind velocity. 2. Transpiration through the couch grass leaf stomates. Thousands of tiny holes in the underside of grass leaves allow the water
drawn up from the roots to be released to the atmosphere. The more leaves on your wicket therefore, the higher rate of water removal.
Figure 5: - Wicket depth and drainage

Cricket Wickets by Kevin Mitchell (Snr) Copyright © Page 10 of 37
3. Sweating. This is seen as water droplets which condense on the covers when left on over night. Cooling of the surface layer
of the wicket at night produces a temperature gradient which moves water upwards to the surface in vapour form. It leaves the surface as water vapour and condenses into water drops on the cool cover surface.
4. Rolling. This process compacts the black soil, squeezing out the water from the surface layers as they are compressed by the roller.
5. Gravity. This draws water down into the subsoil drainage from the lower layers of the block. Obviously, if you don’t have a subsoil drainage layer, water removal by this process is minimal.
Water should be controlled and applied only through: even hand watering a travelling irrigator
I personally don’t believe in automated sprinkler systems with sprinklers located along the wicket perimeter, it is too difficult to get properly controlled water application. A wicket that has not been watered evenly throughout will result in variation of bounce and pace and will be quite unpredictable in play.

Cricket Wickets by Kevin Mitchell (Snr) Copyright © Page 11 of 37
PART III. SELECTION OF TURF GRASS FOR THE SUB-TROPICS Up until 1980, there were many trials and experiments done with a wide range of grasses in an effort to seek improved growth, resistance to wear, compaction survival and binding qualities. Fortunately these experiments have been completed by brave pioneers, so we do not have to suffer the pain of failure already experienced by them. The results of their efforts, however, brings me to the grasses which we don’t want to see in any wicket. The reasons for avoiding these grasses are important. Crowning grasses such as paspalum, crows foot, wire grass and blue couch fit in the unwanted category. Firstly, the crowns formed by these grasses are soft and if left in the wicket, when struck by the ball, it will not bounce but will change direction along the surface of the wicket. Very embarrassing for the curator and can be dangerous! Secondly, as crowning grasses produce their crown, black soil is dispersed in the small area under the crown. Black soil is replaced by grass. The curator must then remove the crown and fill the cavity and the hole left after the removal of the root with powdered black soil to restore the evenness of his surface. Soft grasses should also be removed from the wicket. These include rye grass and Greenlees Park; grasses that will not withstand the compression through heavy rolling. Thatching grasses. Wintergreen, Couch 328, Tiff dwarf and hybrid species produce a thatch on the surface through rapid growth. This will require eradication as these grasses have a dense root structure which is undesirable. Encroaching often occurs from the outfield grasses adjoining the wicket block, eradication must be performed once this encroachment is noticed, to avoid contamination of the wicket.
Figure 6: - Laying full turf on new wicket.
Cricket Wickets by Kevin Mitchell (Snr) Copyright © Page 12 of 37
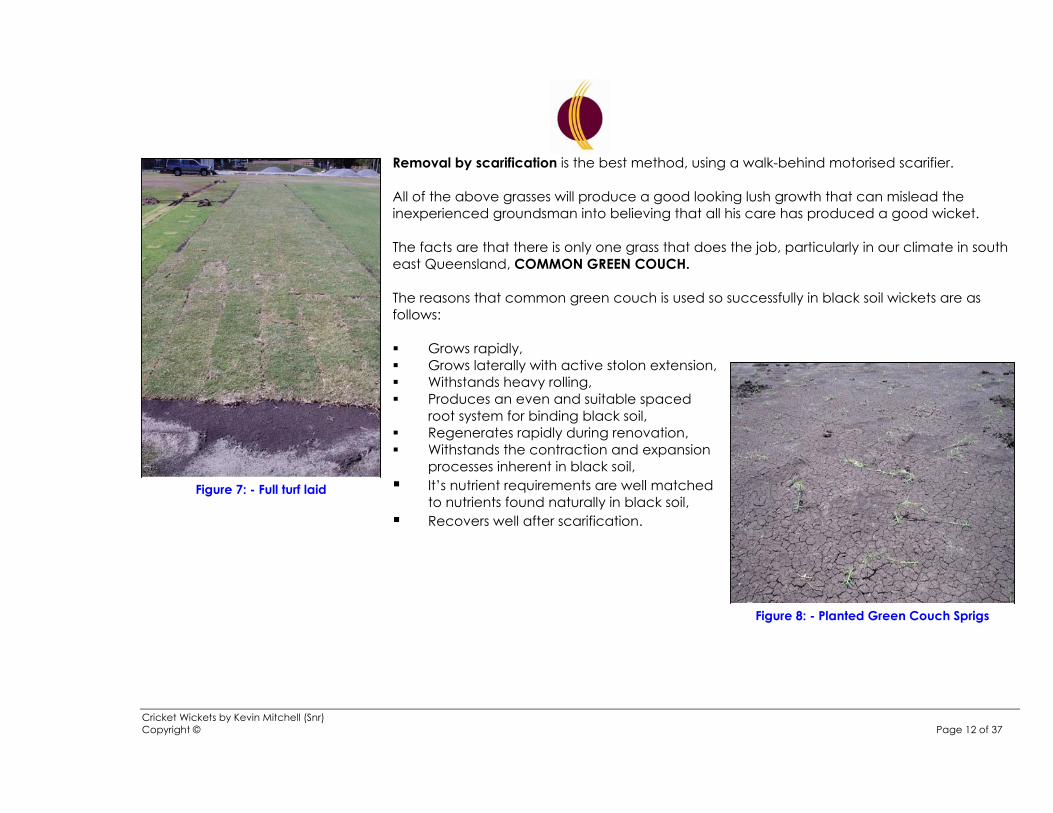
Removal by scarification is the best method, using a walk-behind motorised scarifier. All of the above grasses will produce a good looking lush growth that can mislead the inexperienced groundsman into believing that all his care has produced a good wicket. The facts are that there is only one grass that does the job, particularly in our climate in south east Queensland, COMMON GREEN COUCH. The reasons that common green couch is used so successfully in black soil wickets are as follows: Grows rapidly, Grows laterally with active stolon extension, Withstands heavy rolling, Produces an even and suitable spaced
root system for binding black soil, Regenerates rapidly during renovation, Withstands the contraction and expansion
processes inherent in black soil, It’s nutrient requirements are well matched
to nutrients found naturally in black soil, Recovers well after scarification.
Figure 7: - Full turf laid
Figure 8: - Planted Green Couch Sprigs
Cricket Wickets by Kevin Mitchell (Snr) Copyright © Page 13 of 37
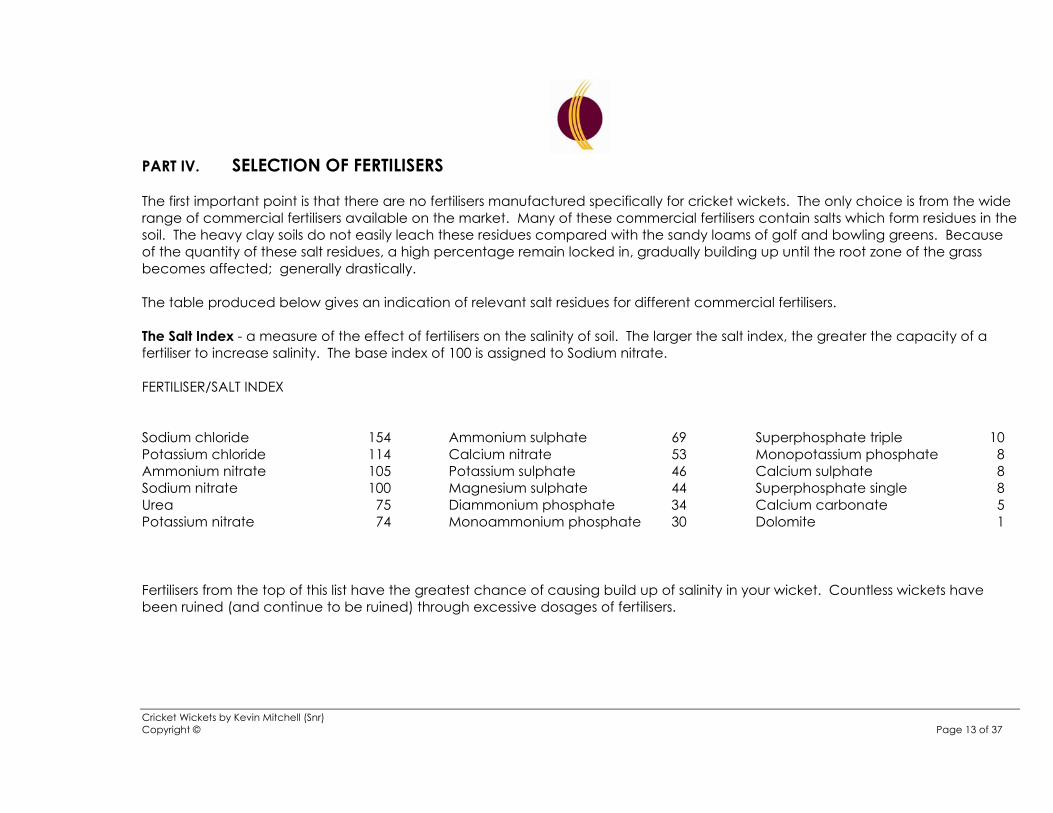
PART IV. SELECTION OF FERTILISERS The first important point is that there are no fertilisers manufactured specifically for cricket wickets. The only choice is from the wide range of commercial fertilisers available on the market. Many of these commercial fertilisers contain salts which form residues in the soil. The heavy clay soils do not easily leach these residues compared with the sandy loams of golf and bowling greens. Because of the quantity of these salt residues, a high percentage remain locked in, gradually building up until the root zone of the grass becomes affected; generally drastically. The table produced below gives an indication of relevant salt residues for different commercial fertilisers. The Salt Index - a measure of the effect of fertilisers on the salinity of soil. The larger the salt index, the greater the capacity of a fertiliser to increase salinity. The base index of 100 is assigned to Sodium nitrate. FERTILISER/SALT INDEX Sodium chloride 154 Potassium chloride 114 Ammonium nitrate 105 Sodium nitrate 100 Urea 75 Potassium nitrate 74
Ammonium sulphate 69 Calcium nitrate 53 Potassium sulphate 46 Magnesium sulphate 44 Diammonium phosphate 34 Monoammonium phosphate 30
Superphosphate triple 10 Monopotassium phosphate 8 Calcium sulphate 8 Superphosphate single 8 Calcium carbonate 5 Dolomite 1
Fertilisers from the top of this list have the greatest chance of causing build up of salinity in your wicket. Countless wickets have been ruined (and continue to be ruined) through excessive dosages of fertilisers.
Cricket Wickets by Kevin Mitchell (Snr) Copyright © Page 14 of 37
I have calculated that the total mass of plant nutrients removed annually from a single (correctly constructed) wicket through mowing and leaching would rarely exceed: 13kg Nitrogen 6.5kg Phosphate 6.5kg Potash SPRING (August) applied with top dressing (note: “Pre-season Wicket Preparation”) on page 25 Blood and bone (soluble) 15kg per wicket Selected lawn food 5kg per wicket SEPTEMBER Urea 5kg per wicket OCTOBER Lawn food 5kg per wicket Urea 5kg per wicket
NOVEMBER Sulphate of potash 5kg per wicket DECEMBER Urea 5kg per wicket Lawn food 5kg per wicket FEBRUARY Urea 5kg per wicket Diammonium phosphate 5kg per wicket
APRIL-MAY Blood and bone (soluble) 15kg per wicket
TOTAL PERCENTAGE Nitrogen:PPhosphatge:Potash:- Nitrogen (N) 13.3kg Phosphate (P205) 6.51kg Potash (K20) 6.73kg
It should be noted that the above is intended as an illustration of a well balanced program for established wickets. For your own situation, which will differ in several respects, regular observation and common sense as well as testing will be a guide. If the turf is in good condition, in my experience, it is best left alone until yellowing or reddening indicate a deficiency.

Cricket Wickets by Kevin Mitchell (Snr) Copyright © Page 15 of 37
Remember, fertilising your wicket is considerably different to fertilising your lawn. We have many ready mixed blends available on the market and very few are suitable for wicket soils as our soil is of an organic material. Soluble Blood and Bone should be our main structural fertiliser. Root Zone - a selected lawn food used sparingly. Stolons and rhizomes - Nitrogen (Nitram e.g.) leaf structure to be used 6 to 8 weeks between applications. It cannot be stressed enough that the main aim of any fertilising program is to produce a tough, slow growing prostrate grass; not an over boosted lush, soft growth which will not endure heavy rolling.
Cricket Wickets by Kevin Mitchell (Snr) Copyright © Page 16 of 37
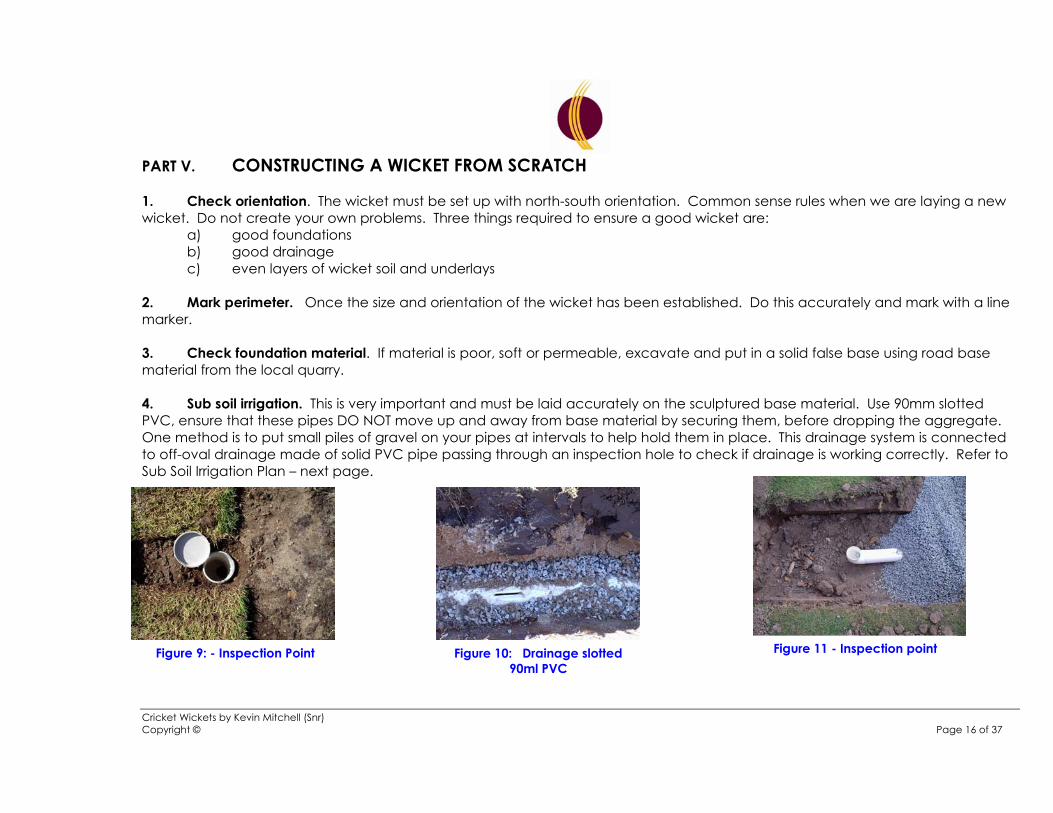
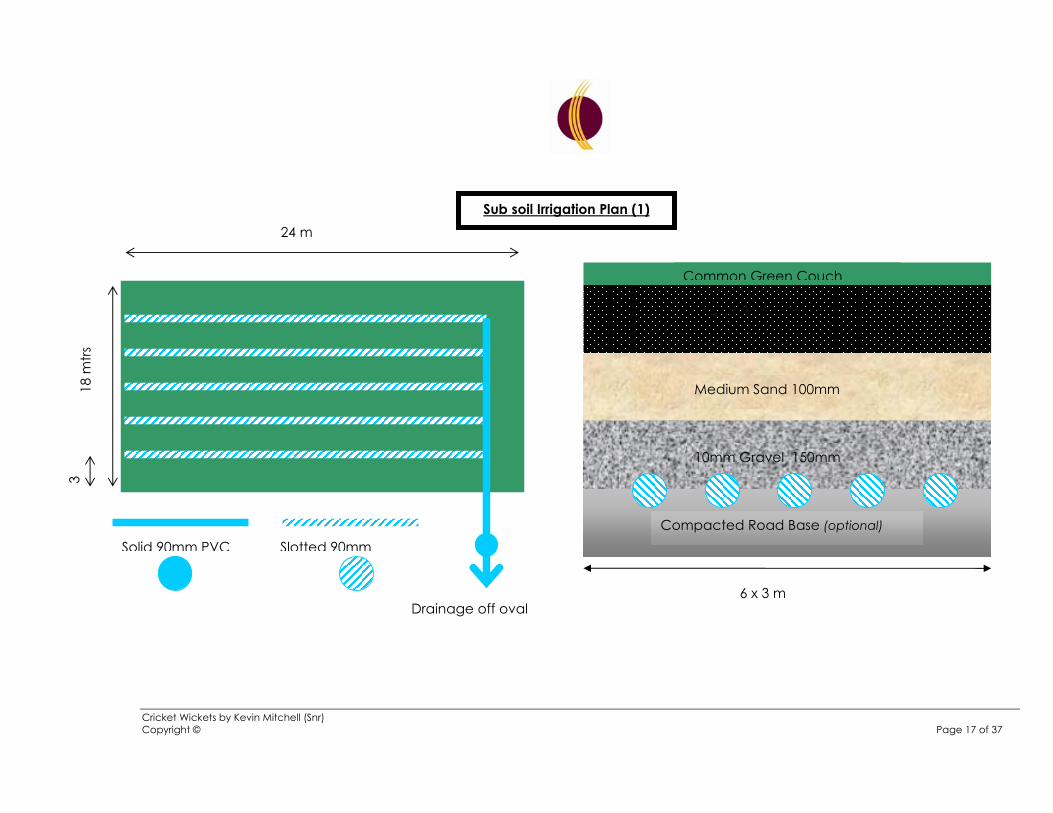
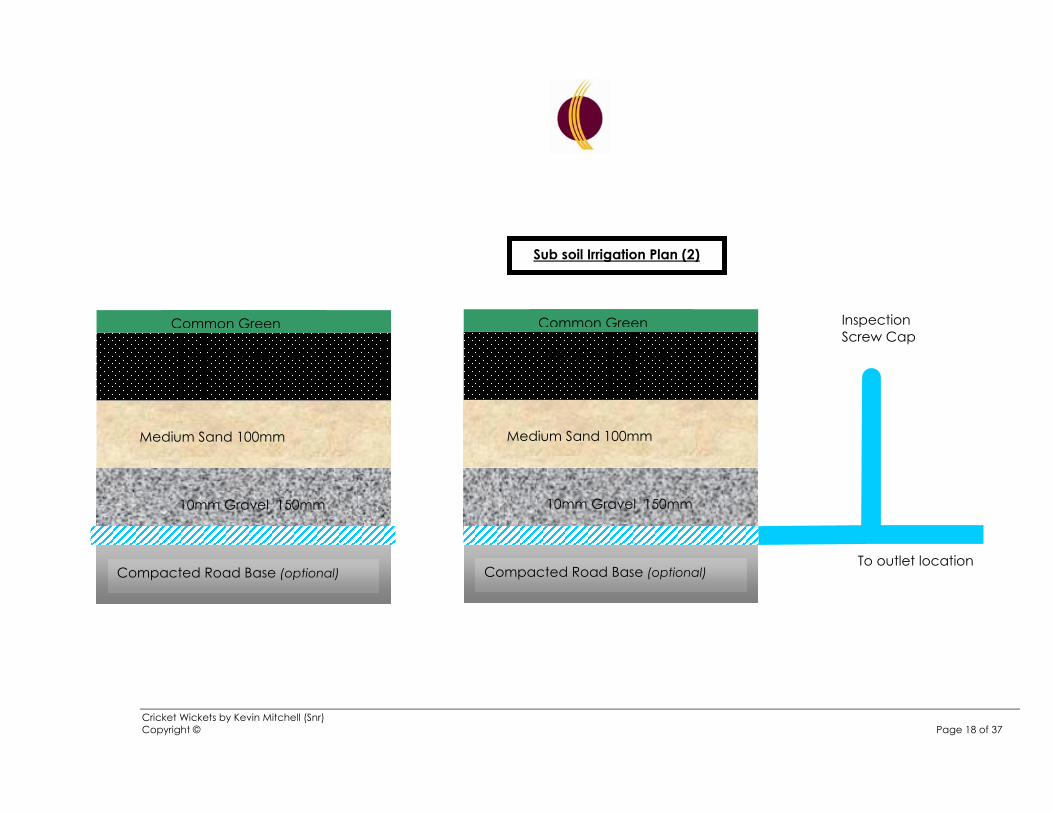
PART V. CONSTRUCTING A WICKET FROM SCRATCH 1. Check orientation. The wicket must be set up with north-south orientation. Common sense rules when we are laying a new wicket. Do not create your own problems. Three things required to ensure a good wicket are: a) good foundations b) good drainage c) even layers of wicket soil and underlays 2. Mark perimeter. Once the size and orientation of the wicket has been established. Do this accurately and mark with a line marker. 3. Check foundation material. If material is poor, soft or permeable, excavate and put in a solid false base using road base material from the local quarry. 4. Sub soil irrigation. This is very important and must be laid accurately on the sculptured base material. Use 90mm slotted PVC, ensure that these pipes DO NOT move up and away from base material by securing them, before dropping the aggregate. One method is to put small piles of gravel on your pipes at intervals to help hold them in place. This drainage system is connected to off-oval drainage made of solid PVC pipe passing through an inspection hole to check if drainage is working correctly. Refer to Sub Soil Irrigation Plan – next page.
Figure 11 - Inspection point Figure 10: Drainage slotted 90ml PVC
Figure 9: - Inspection Point
Cricket Wickets by Kevin Mitchell (Snr) Copyright © Page 17 of 37
3
6 x 3 m
Wicket Soil 150mm
Medium Sand 100mm
10mm Gravel 150mm
Compacted Road Base (optional)
Common Green Couch
Drainage off oval
18 m
trs
Slotted 90mm Solid 90mm PVC
24 m Sub soil Irrigation Plan (1)
Cricket Wickets by Kevin Mitchell (Snr) Copyright © Page 18 of 37
Wicket Soil 150mm
Medium Sand 100mm
10mm Gravel 150mm
Compacted Road Base (optional)
Common Green
Wicket Soil 150mm
Medium Sand 100mm
10mm Gravel 150mm
Compacted Road Base (optional)
Common Green Inspection Screw Cap
To outlet location
Sub soil Irrigation Plan (2)
Cricket Wickets by Kevin Mitchell (Snr) Copyright © Page 19 of 37
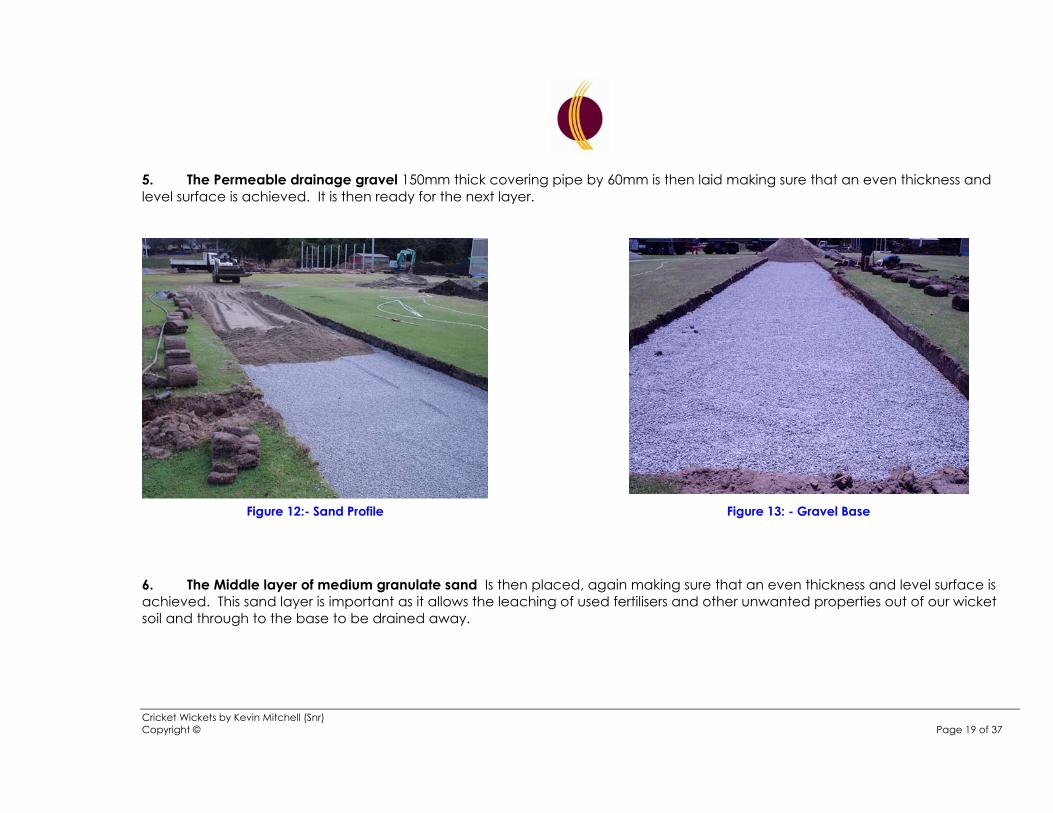
5. The Permeable drainage gravel 150mm thick covering pipe by 60mm is then laid making sure that an even thickness and level surface is achieved. It is then ready for the next layer. 6. The Middle layer of medium granulate sand Is then placed, again making sure that an even thickness and level surface is achieved. This sand layer is important as it allows the leaching of used fertilisers and other unwanted properties out of our wicket soil and through to the base to be drained away.
Figure 13: - Gravel Base Figure 12:- Sand Profile
Cricket Wickets by Kevin Mitchell (Snr) Copyright © Page 20 of 37
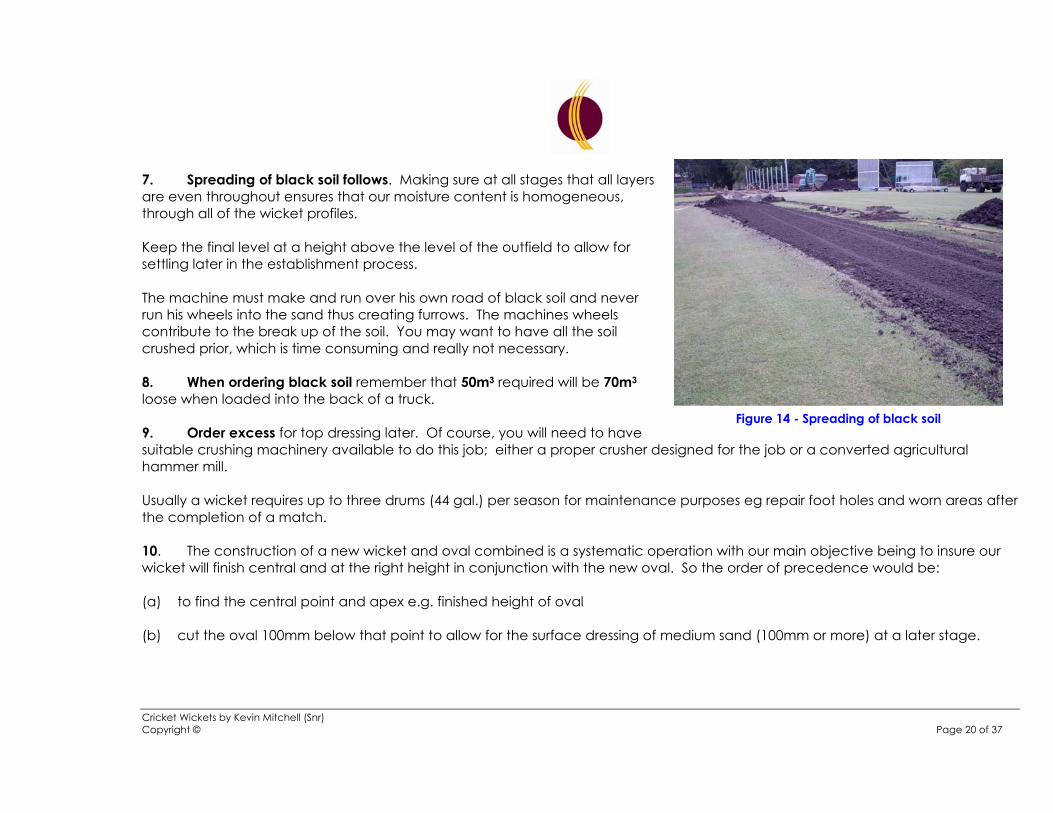
7. Spreading of black soil follows. Making sure at all stages that all layers are even throughout ensures that our moisture content is homogeneous, through all of the wicket profiles. Keep the final level at a height above the level of the outfield to allow for settling later in the establishment process. The machine must make and run over his own road of black soil and never run his wheels into the sand thus creating furrows. The machines wheels contribute to the break up of the soil. You may want to have all the soil crushed prior, which is time consuming and really not necessary. 8. When ordering black soil remember that 50m3 required will be 70m3 loose when loaded into the back of a truck. 9. Order excess for top dressing later. Of course, you will need to have suitable crushing machinery available to do this job; either a proper crusher designed for the job or a converted agricultural hammer mill. Usually a wicket requires up to three drums (44 gal.) per season for maintenance purposes eg repair foot holes and worn areas after the completion of a match. 10. The construction of a new wicket and oval combined is a systematic operation with our main objective being to insure our wicket will finish central and at the right height in conjunction with the new oval. So the order of precedence would be: (a) to find the central point and apex e.g. finished height of oval
(b) cut the oval 100mm below that point to allow for the surface dressing of medium sand (100mm or more) at a later stage.
Figure 14 - Spreading of black soil
Cricket Wickets by Kevin Mitchell (Snr) Copyright © Page 21 of 37
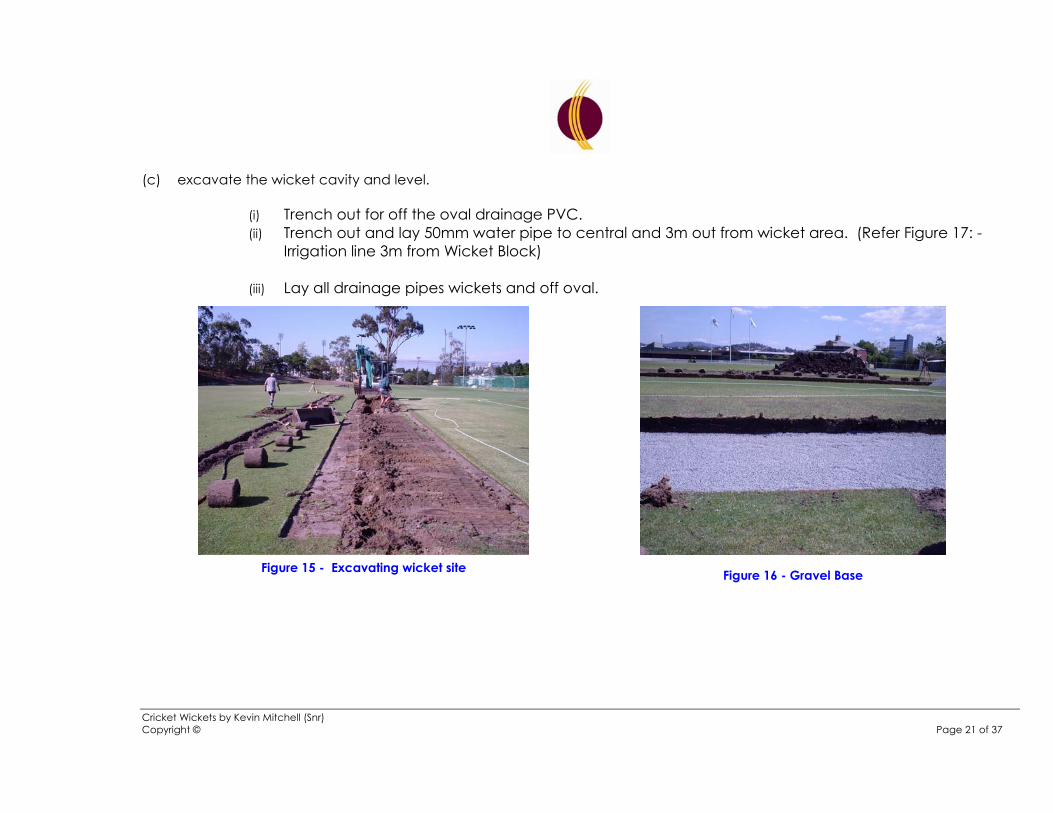
(c) excavate the wicket cavity and level.
(i) Trench out for off the oval drainage PVC. (ii) Trench out and lay 50mm water pipe to central and 3m out from wicket area. (Refer Figure 17: -
Irrigation line 3m from Wicket Block)
(iii) Lay all drainage pipes wickets and off oval.
Figure 16 - Gravel Base Figure 15 - Excavating wicket site

Cricket Wickets by Kevin Mitchell (Snr) Copyright © Page 22 of 37
(d) Construct wicket with a 100mm above finished oval surface or our apex marker and turf (Refer Figure 18:- Fully Turfed).
(e) Construct an apron 3m radius around finished wicket with our growing medium (sand) to oval height and lay full turf to the
wicket edge which could be then boxed (optional). The finished height of the turf should be 75mm and this will allow 35mm to 40mm for shrinkage and consolidation that will occur and will leave your wicket at the precise height that is required. The oval can now be constructed without interference to the wicket.
(f) Keep in mind that turf cannot be laid until water is readily available.
Figure 17: - Irrigation line 3m from Wicket BlockFigure 18:- Fully Turfed

Cricket Wickets by Kevin Mitchell (Snr) Copyright © Page 23 of 37
finished wicket height 3 m
oval cut
oval apex oval surface full turf
100mm to oval surface 3 m
75mm to laid turf
Cricket Wickets by Kevin Mitchell (Snr) Copyright © Page 24 of 37
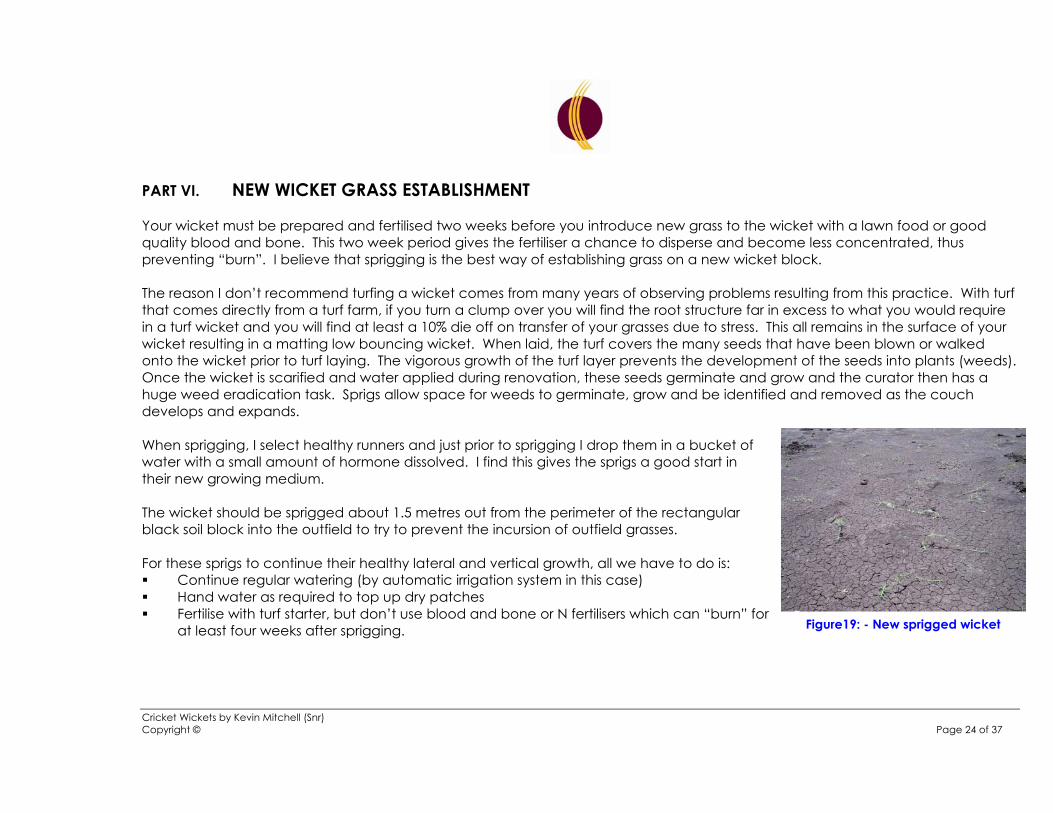
PART VI. NEW WICKET GRASS ESTABLISHMENT Your wicket must be prepared and fertilised two weeks before you introduce new grass to the wicket with a lawn food or good quality blood and bone. This two week period gives the fertiliser a chance to disperse and become less concentrated, thus preventing “burn”. I believe that sprigging is the best way of establishing grass on a new wicket block. The reason I don’t recommend turfing a wicket comes from many years of observing problems resulting from this practice. With turf that comes directly from a turf farm, if you turn a clump over you will find the root structure far in excess to what you would require in a turf wicket and you will find at least a 10% die off on transfer of your grasses due to stress. This all remains in the surface of your wicket resulting in a matting low bouncing wicket. When laid, the turf covers the many seeds that have been blown or walked onto the wicket prior to turf laying. The vigorous growth of the turf layer prevents the development of the seeds into plants (weeds). Once the wicket is scarified and water applied during renovation, these seeds germinate and grow and the curator then has a huge weed eradication task. Sprigs allow space for weeds to germinate, grow and be identified and removed as the couch develops and expands. When sprigging, I select healthy runners and just prior to sprigging I drop them in a bucket of water with a small amount of hormone dissolved. I find this gives the sprigs a good start in their new growing medium. The wicket should be sprigged about 1.5 metres out from the perimeter of the rectangular black soil block into the outfield to try to prevent the incursion of outfield grasses. For these sprigs to continue their healthy lateral and vertical growth, all we have to do is: Continue regular watering (by automatic irrigation system in this case) Hand water as required to top up dry patches Fertilise with turf starter, but don’t use blood and bone or N fertilisers which can “burn” for
at least four weeks after sprigging.
Figure19: - New sprigged wicket

Cricket Wickets by Kevin Mitchell (Snr) Copyright © Page 25 of 37
PART VII. PRE-SEASON WICKET PREPARATION Machinery you require: 2 stroke rotary mower Cylinder mower Scarifier Vacuum collection machine Black soil crusher Spiked roller
Step 1. Mowing Ensure wicket surface is dry before mowing. Take all the grasses off while mowing, using first the rotary mower, then the cylinder mower. The aim is to get the grass cut as low as possible. Remember to use clippings catchers on your mowers to ensure organic material is removed. Step 2. Cleaning All clippings are removed using the catchers on both mowers. Expert follow-up use of the vacuum machine ensures that we have no clippings left on the wicket prior to the next process. The mowing and removal of organic material is an exhaustive process but it should be completed thoroughly and with great care. If you don’t have a vacuum, you should consider hiring one. Step 3. Scarifying When you have your turf cut as low as possible so that there is a predominance of black soil showing in all areas of your wicket, you are ready to scarify. A walk-behind scarifier is ideal for this task. This process is complete when you have taken all the visible grasses off. You are then right down to the black soil, in fact the scarifying process should cut down 5mm (¼ inch) below the surface of the black soil. This depth ensures that when we put our black soil top dressing down, we have no organic or other debris on top of the wicket surface.
Cricket Wickets by Kevin Mitchell (Snr) Copyright © Page 26 of 37
I cannot emphasise enough how important this process is, if any organic material or debris is sitting on the surface when we put our crushed top dressing down, it will mix with the black soil and cause layering. As discussed earlier, this condition will make it very difficult to prepare a good playing wicket. Step 4. Rolling with spiked roller Many wickets require this treatment following a long fallow period during the football season or just from neglect and lack of use. The spiked roller has tapered spikes which serve to simply open up the soil without removing any material. It is quite different from a coring machine which actually takes material from the wicket leaving empty cores. The holes penetrated by the action allow us to quickly and easily introduce moisture, blood and bone and crushed black soil to the upper sections of the wicket. Step 5. Fertilising and top dressing You will need 10kgs of soluble blood and bone and 5kgs of a suitable lawn food per wicket, you will also need between two and three drums (44 gallon) for each wicket per season, this should be crushed before the season starts. The crushed soil should be spread either by (a) the use of a laser leveller or (b) by raking the loose soil as evenly as possible over the wicket surface. It should then be hosed into the wicket surface, until the soil becomes completely broken down (like mud). A second hose should then be used to screed off, by pulling it up and down the wicket, whilst still being hosed, a wave of water should be seen in front of the hose being used for screeding off. When satisfied that the surface is reasonably level, note any small areas of the wicket that are pooling, then at a later date gradually fill these low areas in by hand. The wicket block should be watered every day, at least for the first week, then every second day thereafter until an even layer of grass leaf appears, if possible. Six weeks should be allowed between commencement of season preparation and preparing a wicket for play Your entire wicket table should now be ready for use at any given notice so that, you would now draw a plan for the season. This should be put on paper, as to which wicket you will use for which particular game. You should feel confident, there will be no reason to alter your programme. Remember one wicket – one game. Then rest the wicket for a minimum of five to six weeks. The normal custom is to start to prepare our follow-up wicket almost two weeks before it is to be used. That is by mowing the wicket shorter and light mowing. By drawing your plan and using it, this rotational practice will be come common practice. Step 6. Follow up with the renovation program that works successfully for your wicket.
Cricket Wickets by Kevin Mitchell (Snr) Copyright © Page 27 of 37
PART VIII. PRE-GAME PREPARATION There are three points to make here. 1. I have appended a suggested preparation program and the tasks I usually perform prior to a Saturday game. Now, I must
stress that this is an example only, most curators have sequences of tasks that work well in their own situation on their own wickets.
2. Ponding on wickets is sometimes observed in wickets during pre-game renovation. Ponding causes serious problems by
creating ‘dead’ patches on your wicket. During the day the water pond heats to high temperatures in the sun, consequently the couch leaves and roots subjected to such high temperatures soon die, leaving a bare patch on your wicket. Of course this cannot be rectified in the week before the next game, this area will never recover and would need replanting.
3. The program is not carried out regardless of weather. Of course, daily variations and changes usually have to be made as the weather changes.
Grass clippings are a useful asset in the early make up of your new wicket. Your wicket block and wicket perimeter (3m out) should be kept in pristine condition and so produce sufficient clippings for your needs. These are normally harvested the day prior and spread out over night in a clean dry area to dry. Clippings are used for three reasons:- So as to allow the preparer to heavy roll as soon as possible realising we must start with a moist surface in order to consolidate and seal off our wicket (refer to “Appendix Two - Preparation of a Wicket, Wednesday” on page 33 ) Protection from the elements, that is to slow down the drying process over the make up period. For presentation, an evenly covered wicket looks good and usually plays good. Be proud of your finished produce.
Cricket Wickets by Kevin Mitchell (Snr) Copyright © Page 28 of 37
PART IX. OFF SEASON CARE & MAINTENANCE There is no room for complacency during the cricket off season. Most ovals will be multi-purpose or used for winter cricket, it is the latter this will present many problems. The main one being maintenance, good root structure and lack of grass growth due to dormancy. To me winter cricket is a no-no. But if you are compelled to use your wickets during winter, purchase a spiked roller, or construct one. This roller should be used on a completed wicket after use when water penetration would be required before spiking. This will help relieve the stress on your grasses. Do no over use any particular wicket. That is ÐON’T use one wicket on the block on consecutive occasions, stick to your schedule. Football should not be a great concern to wickets, as far as the powers to be are concerned and commonsense prevails. As with cricket the wicket area should be covered during rainy periods, prior to the day of the game, this will prevent the gouging out of ruts and embedding debris into the wicket. The football players will agree, there is nothing worse than playing on a wicket area that is rutted and dried out. Rules to Apply Promote maximum grass growth at the end of the cricket season. Use an acrylic paint only on wicket area. No use of sand or soil on wicket area. No bounce circle on wicket quad. Oval to be maintained in good condition by –
a. filling all divots with medium granulated sand; b. regularly mowed and de-weeding.

Cricket Wickets by Kevin Mitchell (Snr) Copyright © Page 29 of 37
It is the responsibility of every club to ensure through its ground manager, that machinery (mowers and rollers) is maintained. That is to say that mowers, rollers etc have their motors reconditioned, repaired, oil changed, and other repairs completed prior to the up-coming cricket season. Also all additional tools including rakes, brooms, weeders, string lines, buckets, bins etc are replenished. A minimum of 8 bins of broken down wicket soil will be ready for the new season preparation and six additional bins prepared for the season (four wicket block). 1. A “Fertiliser Book” must be kept up-to-date showing -
o quantity, type of fertiliser used and when; o quantity, type of poison used and when.
2. The “Maintenance Book” should show daily activities, the weather and important remarks.
Cricket Wickets by Kevin Mitchell (Snr) Copyright © Page 30 of 37
PART X. WATER RESTRICTIONS Currently, in South-east Queensland, water restrictions apply and are listed on Queensland Water Commission’s website (www.qwc.qld.gov.au) While it is understood that these restrictions will cause great difficulties, all users of water on sporting facilities are strongly urged to adhere to the conditions in place. Appendices Appendix (One) Some Closing Remarks on Expectations of the Perfect Wicket. Appendix (Two) Preparation Of Wicket. Appendix (Three) Oval Dimensions to suit First Class Turf Wickets.
Cricket Wickets by Kevin Mitchell (Snr) Copyright © Page 31 of 37
Appendix (One) SOME CLOSING REMARKS ON EXPECTATIONS OF THE PERFECT WICKET I have often been asked what do I consider is the ideal wicket. This is always thought to be a terribly difficult question to answer, but when you think about it, it has a logical answer. The answer has inherent in its lessons for curators such as ourselves. The ideal wicket is one that is equally favourable to both batsman and bowler. If we have a wicket that is primarily a batsman’s paradise, then that’s not a cricket wicket. Conversely, if we have a wicket that’s primarily a bowler’s wicket then that’s not what I’d call a cricket wicket. You get a batsman’s wicket when the wicket has been made up too early or it has been allowed to dry out, this produces a slow wicket. The ball strikes the dried surface, slows and bounces gently towards the batsman; giving him time to line up the ball more easily and make a strong accurate batting stroke. A good bowler’s wicket is one that is still moist, often because it’s been made too late. On overcast days this type of wicket will produce excessive bounce. Sometimes a one day game follows a test game and I have seen situations where the same wicket is used for both games. The result is a drying wicket which favours batsman and as it dries and begins to crumble, may favour spin bowlers. The real problem with following this sort of practice is that in attempting to remake the old wicket in 5 or 6 days we get curators trying to get water back into a wicket prematurely. An ‘old’ wicket will not soak up water evenly like blotting paper, water will run off in the still compacted areas, and be absorbed in the dry and disturbed areas. The result is an uneven surface that will deliver huge variations in bounce and can be quite dangerous. It can make a conscientious wicketkeeper look quite ridiculous. Another way of measuring a good wicket is by counting total runs and total wickets. In short, a good four day game should produce 1,200 runs and deliver 40 wickets. And doing so should guarantee a result.

Cricket Wickets by Kevin Mitchell (Snr) Copyright © Page 32 of 37
When preparing a wicket, both batsman and bowler should be kept in mind. Early life in a wicket is essential Even bounce throughout the game is vital; whether it is high, medium or low The good wicket should produce turn for the spinners later in the game.
Excessive length of grass on a wicket can also favour the bowler. My rule is that there should be 3 mm or less of grass on the wicket, the higher the grass the more the seam of the ball can be used to the advantage of the bowler.
Cricket Wickets by Kevin Mitchell (Snr) Copyright © Page 33 of 37
Appendix (Two) PREPARATION OF A WICKET BY KEVIN MITCHELL (SNR)
This is a typical program I have used to prepare a wicket for an upcoming game. If you have done your pre-season preparation properly, your wicket should respond well to this type of preparation. Once the game is over, the follow up program should be started for the block that was just played on. You are welcome to use this as a guide but do adapt the program to your own situation and prevailing weather conditions. MONDAY Mow the wicket block Broom off any loose grass clippings or soil Fill in stump holes and repair any damage to wicket from the last game - bowlers footmarks etc. Water whole block well
TUESDAY Mark out new wicket area to be used with string lines Mow within string lines Roll wicket with heavy roller for 10 minutes Water whole block
WEDNESDAY Lightly water wicket to be used Cover bare spots with grass clippings and roll in with light roller until clippings stay in place – refer to “Pre-
Game Preparation”. Roll with heavy roller for 30 -45 minutes. (The whole purpose of the first heavy roll is to seal off the surface to retain the moisture
content and consolidate). Continue periodic rolls with heavy roller for 30-45 minutes three times per day. Finish off with light roller if creasing persists Water rest of wicket block lightly.
Cricket Wickets by Kevin Mitchell (Snr) Copyright © Page 34 of 37
THURSDAY Roll with heavy roller for 15 minutes (early morning). Continue periodic rolls with heavy roller for 30-45 minutes three times per day. In very dry conditions another light watering may be necessary. To prevent premature drying out of the wicket surface, the
spreading out of hessian or shade cloth over the wicket in the intervals between rolling will prove helpful. Mow the rest of the wicket block and water lightly. Heavy roll first twice on Friday for 30 minutes. Cover with hessian or shade cloth between rolls if dry weather. Mow outfield.
SATURDAY Roll wicket for 30 minutes. Mow wicket to be used. Mark wicket. Mow the whole wicket block.
SUNDAY/ OR MONDAY Maintenance, weeding of block, levelling watering
Please note: I never use poisons on a wicket to remove weeds. The only way to weed a wicket properly is to dig the weeds and roots out with a suitable blade and fill the resulting cavities. This eliminates any chance of poisoning your wicket.

Cricket Wickets by Kevin Mitchell (Snr) Copyright © Page 35 of 37
IMPORTANT NOTES TO REMEMBER Do not let your wicket be used, for practice purposes if it has not been made up (consolidated) as it would be for a competitive match. Using an unprepared surface will result in the killing of the root structure and divots to be replaced where the ball makes contact. Do not roll out a dry wicket, this puts stress on your grass, ensure that there is some moisture in the surface so that it will give under pressure. When rolling a wicket table out other than for a match, the practice should be, roll and then water immediately after, this helps to relieve the stress on your grass. Be kind to your grasses and those nasty bare patches will disappear. Undulations in a wicket are always a problem especially when they start to represent a piece of corrugated iron. Generally the cause is from: (1) Wicket soil too dense. Where we have profile of 12 inches or more and especially when our immediate under lay is not of a porous type of material, the sub soil remains damp like plasticine and moves under pressure. (2) Rolling out a wicket too early after it has been heavily watered or after heavy rain, subsurface holding too much moisture. (3) Lack of good root structure. Observation of your wicket will show the high spots fairly barren and the low spots well grassed, the action of the root structure in the low grassed areas dispersing the soil and pushing it upward forming a ridge. To remedy, after play and periodically throughout the week fill in the low areas across the wicket and hose in well. When repairing your wicket after a game do not forget to include repairs to the immediate playing surface, divots to the run up area caused by the bowlers and trenches usually in the shape of a big X should be filled in with a medium granulate sand. The playing surface should be as important as the wicket table and kept in good repair. Do not use lime to mark up your wicket, use instead a cheap plastic plaint diluted with water to the texture required. Lime not only burns off the grass around the crease area but also changes the composition of your soil. Lime virtually turns it into garden soil so the bowlers are able to create ankle breaking craters at the bowling crease. DO NOT USE LIME TO MARK UP YOUR WICKET, USE INSTEAD A LINE MARKING PAINT FOR GRASS OR A CHEAP PLASTIC PAINT DILUTED WITH WATER TO THE TEXTURE REQUIRED. LIME NOT ONLY BURNS OFF THE GRASS AROUND THE CREASE AREA BUT ALSO CHANGES THE COMPOSITION OF YOUR SOIL. LIME VIRTUALLY TURNS IT INTO GARDEN SOIL SO THE BOWLERS ARE ABLE TO CREATE ANKLE BREAKING CRATERS AT THE BOWLING CREASE.
Cricket Wickets by Kevin Mitchell (Snr) Copyright © Page 36 of 37
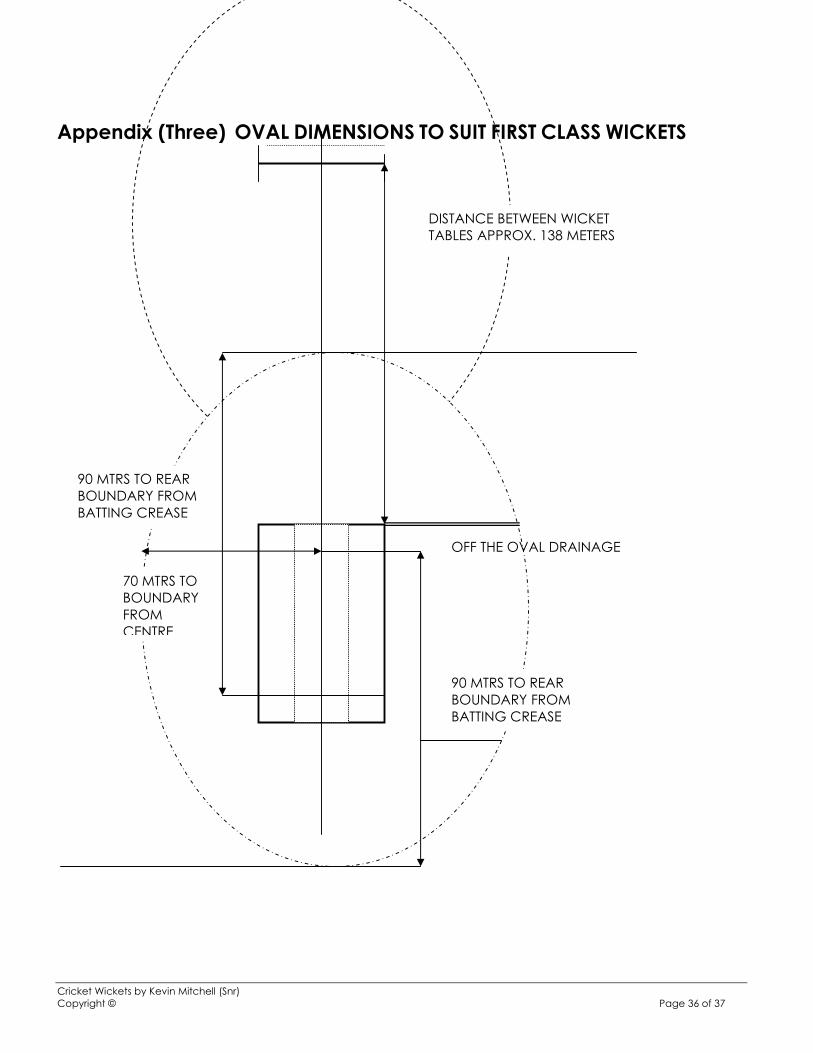
Appendix (Three) OVAL DIMENSIONS TO SUIT FIRST CLASS WICKETS 90 MTRS TO REAR
BOUNDARY FROM BATTING CREASE
OFF THE OVAL DRAINAGE
90 MTRS TO REAR BOUNDARY FROM BATTING CREASE
70 MTRS TO BOUNDARY FROM CENTRE
DISTANCE BETWEEN WICKET TABLES APPROX. 138 METERS

Cricket Wickets by Kevin Mitchell (Snr) Copyright © Page 37 of 37
NOTES:
For further information or consultation contact Queensland Cricket’s ground staff: Kev Mitchell Snr (0409 954 116) Ross Harris (0409 483 058) David Sandurski (0407 168346)


![Moran Cricket CollectiblesLancashire Cricket Legend, 2000, g-vg, dw [Austin played 9 ODIs for England] $14 6 Trevor Bailey, Wickets, Catches and the Odd Run, 1986, g-vg, v.sl.ch.dw](https://img.pdfslide.net/doc/110x75/5f24102a7e9a5c38bc56fdb8/moran-cricket-collectibles-lancashire-cricket-legend-2000-g-vg-dw-austin-played.jpg)