Embed Size (px)
Citation preview
TRAINING FOR PRIMARY SCHOOL TEACHERS IN CRISIS CONTEXTS
CURRICULUMAND
PLANNING
MODULE 4

© UNHCR / Hélène Caux

Core Competencies• Teacher demonstrates knowledge of the national curriculum scope,
sequence, approaches, and objectives.
• Teacher’s plans are in line with curriculum objectives, scope and sequence.
• Teacher’s lessons contain one or more SMART objective, an introduction, a learning activity, practice, and an evaluation (or equivalent structure and sequence).
• Teacher identifies and utilizes teaching and learning resources in the community.
SUMMARY
Session 1 Using Curriculum
Session 2 Long Term Planning and Learning Objectives
Session 3 Lesson Planning
Session 4 Making Lessons Relevant and Meaningful
Grouping TechniqueFor this module, group participants by subject area and grade level (if this is not possible group participants by subject or grade level). Groups should be made up of 4 people. This is a useful technique in the classroom when you want certain students to work together for a particular project.
Module 4 - Curriculum and Planning Summary
1
Focus TechniqueExplain to the participants that you will use the ‘clap once if you can hear me’ strategy to get their attention. When you would like them to be quiet and to focus on the facilitator, you will say ‘clap once if you can hear me’ and clap your hands. All participants should clap their hands and focus on the teacher. If they don’t, the facilitator will say ‘clap twice if you can hear me’. Keep going until all participants are paying attention. Explain to participants that this is a fun strategy to use in the classroom, particularly with large class sizes and during group work.
Contextualization and Adaptation GuidanceSession 1: Using Curriculum
• Please locate the curriculum used by the local schools and have copies available for the training (for participants in each grade level and subject). If an annual scope and sequence are available corresponding with the curriculum, please also provide copies for the participants.
• Contact a local curriculum expert to attend the session.
• If there are significant differences between the curricula from the country of origin and the country of asylum for participants help participants to recognize these differences so they can adapt.
• If the curriculum contains negative stereotypes, help prepare teachers to recognize and deal with this sensitively in their classrooms.
Session 2: Long Term Planning and Learning Objectives
• Identify relevant activity (i.e. football or cooking) for modeling long-term planning.
• If available please use scheme of work templates used in context, and use the local term for ‘scheme of work’.
Module 4 - Curriculum and Planning Summary
2
Session 3: Lesson Planning
• If possible, please locate local lesson plan templates and use these to inform the session (if this is not possible, there are sample template lesson plans provided).
• If possible, change the example lesson plans to reflect the local curriculum used by participants.
Session 4: Making Lessons Relevant and Meaningful
• Find local learning and teaching resources to use in the session.
• Please review Appendix 4E and modify it according to resources available in the community.
Sessions 1-4: Review PowerPoint slides and contextualize as appropriate. Please note that if PowerPoint is not available, the PowerPoint slides for the session should be written on flipchart paper instead.
Module 4 - Curriculum and Planning Summary
3
This icon indicates the length of Time a particular Session should take.
This icon shows a Tip or Suggestion to help you along with the Session.
This icon points to Questions you should ask your participants.
This icon represents the Scripted section of the Session.
HOW TO USE THIS MANUALIcons
Module 4 - Curriculum and Planning How to Use this Manual
4
SESSION 1
Using Curriculum
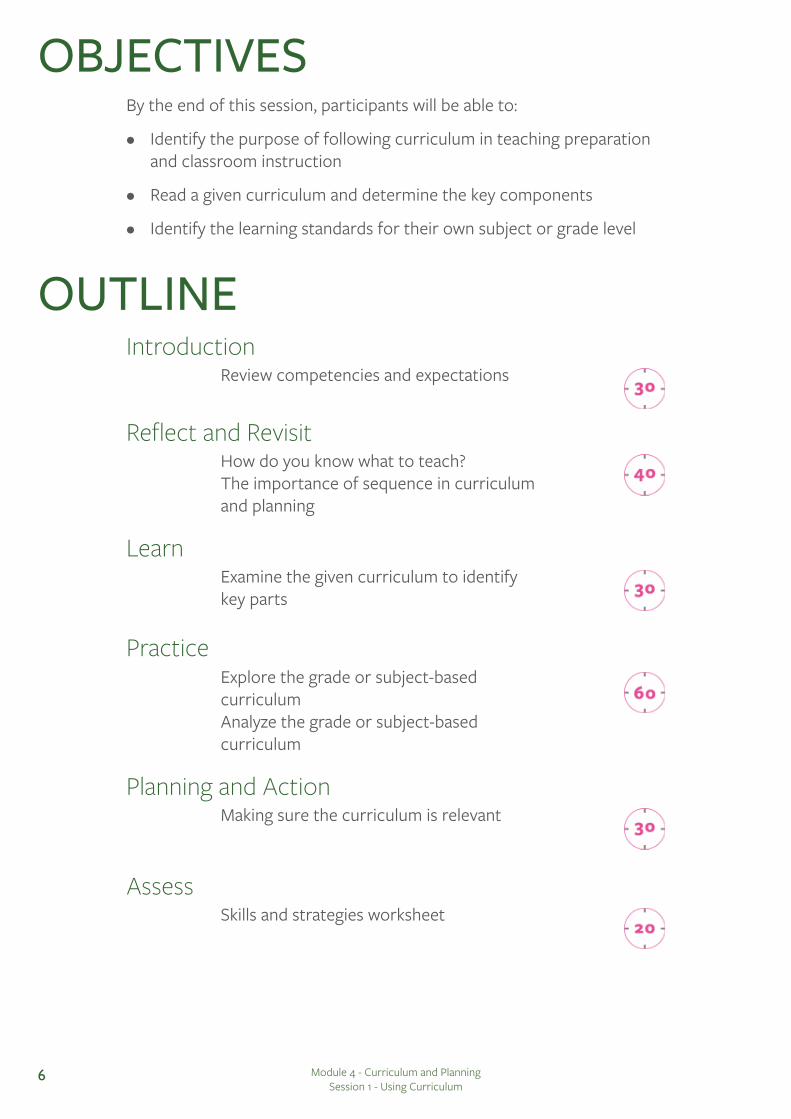
OBJECTIVESBy the end of this session, participants will be able to:
• Identify the purpose of following curriculum in teaching preparation and classroom instruction
• Read a given curriculum and determine the key components
• Identify the learning standards for their own subject or grade level
OUTLINEReview competencies and expectations
How do you know what to teach?The importance of sequence in curriculum and planning
Examine the given curriculum to identify key parts
Explore the grade or subject-based curriculumAnalyze the grade or subject-based curriculum
Making sure the curriculum is relevant
Skills and strategies worksheet
Introduction
Reflect and Revisit
Learn
Practice
Planning and Action
Assess
Module 4 - Curriculum and Planning Session 1 - Using Curriculum
6
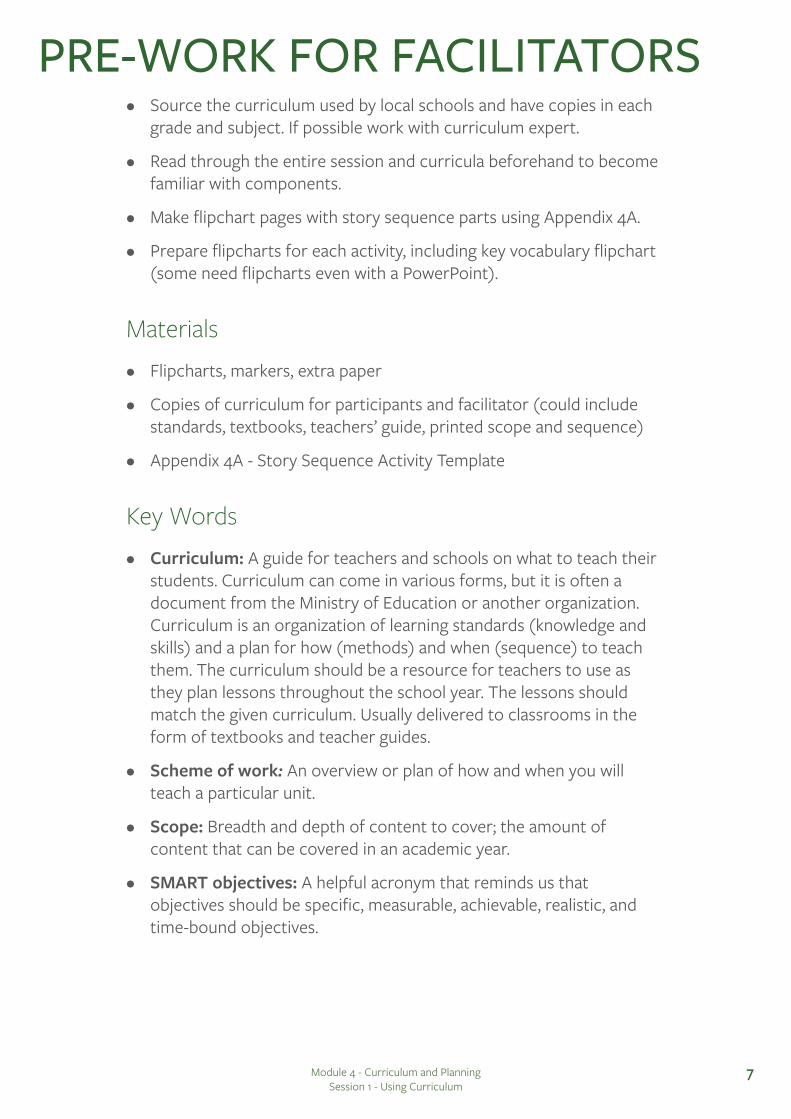
PRE-WORK FOR FACILITATORS• Source the curriculum used by local schools and have copies in each
grade and subject. If possible work with curriculum expert.
• Read through the entire session and curricula beforehand to become familiar with components.
• Make flipchart pages with story sequence parts using Appendix 4A.
• Prepare flipcharts for each activity, including key vocabulary flipchart (some need flipcharts even with a PowerPoint).
Materials• Flipcharts, markers, extra paper
• Copies of curriculum for participants and facilitator (could include standards, textbooks, teachers’ guide, printed scope and sequence)
• Appendix 4A - Story Sequence Activity Template
Key Words• Curriculum: A guide for teachers and schools on what to teach their
students. Curriculum can come in various forms, but it is often a document from the Ministry of Education or another organization. Curriculum is an organization of learning standards (knowledge and skills) and a plan for how (methods) and when (sequence) to teach them. The curriculum should be a resource for teachers to use as they plan lessons throughout the school year. The lessons should match the given curriculum. Usually delivered to classrooms in the form of textbooks and teacher guides.
• Scheme of work: An overview or plan of how and when you will teach a particular unit.
• Scope: Breadth and depth of content to cover; the amount of content that can be covered in an academic year.
• SMART objectives: A helpful acronym that reminds us that objectives should be specific, measurable, achievable, realistic, and time-bound objectives.
Module 4 - Curriculum and Planning Session 1 - Using Curriculum
7
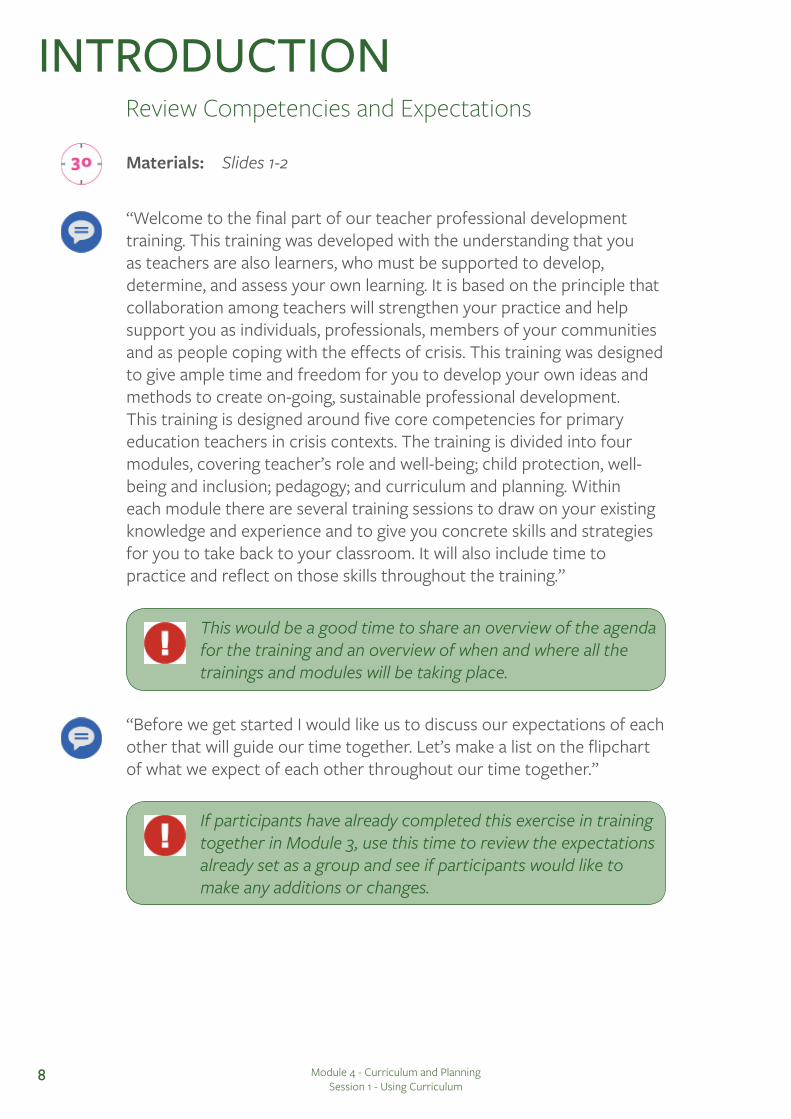
Materials: Slides 1-2
“Welcome to the final part of our teacher professional development training. This training was developed with the understanding that you as teachers are also learners, who must be supported to develop, determine, and assess your own learning. It is based on the principle that collaboration among teachers will strengthen your practice and help support you as individuals, professionals, members of your communities and as people coping with the effects of crisis. This training was designed to give ample time and freedom for you to develop your own ideas and methods to create on-going, sustainable professional development. This training is designed around five core competencies for primary education teachers in crisis contexts. The training is divided into four modules, covering teacher’s role and well-being; child protection, well-being and inclusion; pedagogy; and curriculum and planning. Within each module there are several training sessions to draw on your existing knowledge and experience and to give you concrete skills and strategies for you to take back to your classroom. It will also include time to practice and reflect on those skills throughout the training.”
“Before we get started I would like us to discuss our expectations of each other that will guide our time together. Let’s make a list on the flipchart of what we expect of each other throughout our time together.”
This would be a good time to share an overview of the agenda for the training and an overview of when and where all the trainings and modules will be taking place.
If participants have already completed this exercise in training together in Module 3, use this time to review the expectations already set as a group and see if participants would like to make any additions or changes.
INTRODUCTIONReview Competencies and Expectations
Module 4 - Curriculum and Planning Session 1 - Using Curriculum
8

“In this module we are going to explore Curriculum and Planning. This includes examining the process of following a curriculum, using curriculum in teacher preparation and instruction, understanding learning standards, long-term planning, writing lesson plans using SMART objectives, and utilizing resources. Let’s get started.”
Insert an opportunity for participants to introduce themselves formally or through an energizer/ice-breaker game.
Introduce the grouping technique and the focus technique that will be used throughout the module.
Example Answers:
• Be on time.
• No cell phones.
• Respect each other.
• Give everyone opportunity to respond.
• Raise your hand.
• Be open to new ideas.
• Don’t be afraid to ask questions.
• Provide feedback.
Module 4 - Curriculum and Planning Session 1 - Using Curriculum
9
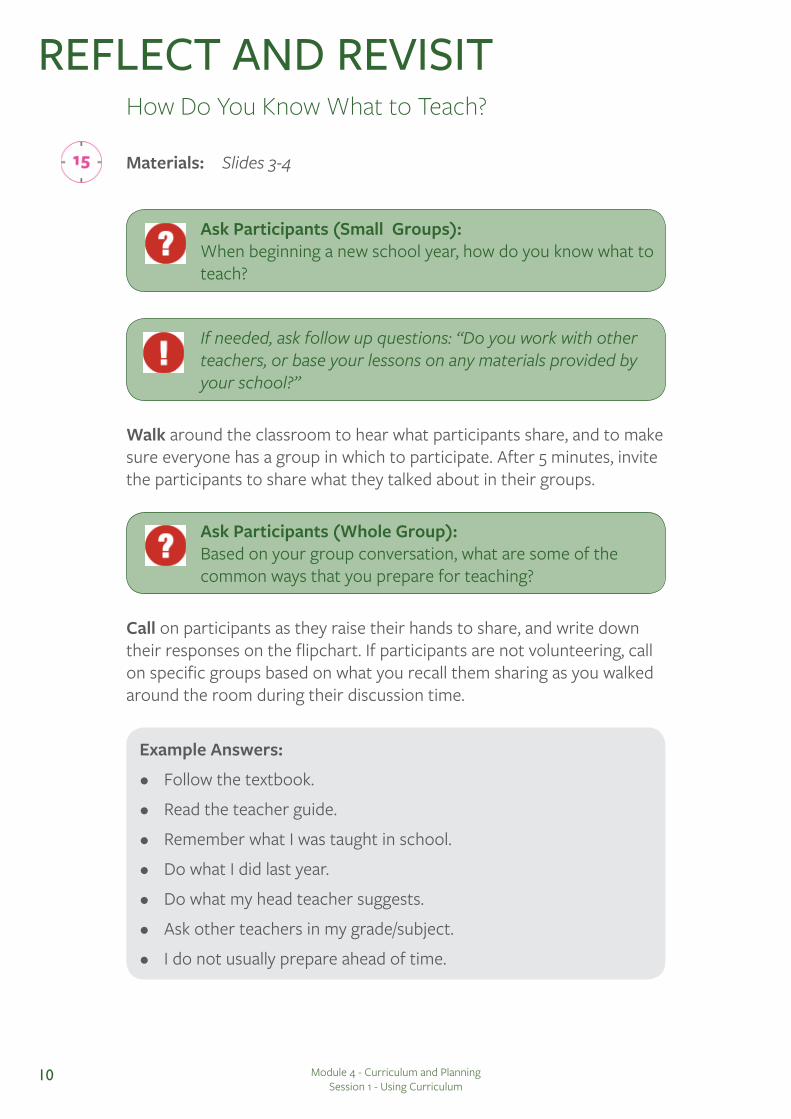
Materials: Slides 3-4
Walk around the classroom to hear what participants share, and to make sure everyone has a group in which to participate. After 5 minutes, invite the participants to share what they talked about in their groups.
Call on participants as they raise their hands to share, and write down their responses on the flipchart. If participants are not volunteering, call on specific groups based on what you recall them sharing as you walked around the room during their discussion time.
REFLECT AND REVISITHow Do You Know What to Teach?
Ask Participants (Small Groups):When beginning a new school year, how do you know what to teach?
Ask Participants (Whole Group):Based on your group conversation, what are some of the common ways that you prepare for teaching?
If needed, ask follow up questions: “Do you work with other teachers, or base your lessons on any materials provided by your school?”
Example Answers:
• Follow the textbook.
• Read the teacher guide.
• Remember what I was taught in school.
• Do what I did last year.
• Do what my head teacher suggests.
• Ask other teachers in my grade/subject.
• I do not usually prepare ahead of time.
Module 4 - Curriculum and Planning Session 1 - Using Curriculum
10

“Before we look at the curriculum we need to make sure that we have a shared understanding of what the word curriculum means. The curriculum is a guide for teachers and schools on what to teach their students. Curriculum can come in various forms, but it is often a document from the Ministry of Education or another organization. Curriculum is an organization of learning standards (knowledge and skills) and a plan for how (methods) and when (sequence) to teach them. Please write this definition in your notes.”
“We just explored what you currently use to plan what to teach your students. An important tool to help with this planning is the curriculum. By the end of this session, you will be able to:
• Identify the purpose of following curriculum in teaching preparation and classroom instruction.
• Read a given curriculum and determine the key components.
• Identify the learning standards for your own subject or grade level.”
Point to the definition of curriculum on the key word flipchart.
Materials: Appendix 4A - Story Sequence Activity Template
“Curriculum is necessary for planning ahead and choosing what students should learn and when. The curriculum includes the skills and knowledge that students should acquire before they move onto the next grade level, and this needs to occur in a particular order. Our next activity will help us see the importance of following a given sequence.”
Post the five pre-made flipchart pages at the front of the classroom, but make sure to place them out of order.
The Importance of Sequence in Curriculum and Planning
Module 4 - Curriculum and Planning Session 1 - Using Curriculum
11

“If you are telling a story, the plot needs to unfold in a certain order. Most stories follow a similar pattern like a pyramid. First is the exposition where you introduce the main characters and set up the story. Then there is the rising action where you introduce the conflict and the story builds. Next is the climax - the most exciting part of the story and often the turning point, falling somewhere after the middle. Then there is the falling action – the path toward the last part of a story, which is the resolution. We are going to read a story together, and figure out the correct order. This story is called “The Clever Farmer.” This story has five parts. Let’s work out the correct order of the five parts together. Look at the flipchart pages I have posted on the board, and take a couple of minutes to read them on your own.”
“Now that we have the correct order of this story, let’s see what happens if one of the parts is taken away. What would happen if the third part was missing?”
Remove part 3 and set aside.
Go through each section. After participants identify each part rearrange the story into the correct order. Read the story aloud for all to hear.
Wait for responses and write “1” on the correct first part. Then read it out loud.
“What comes next?”
After a couple of minutes, ask -
Ask Participants (Whole Group):Which one comes first? Instead of raising your hand, show me by pointing at the correct part. This is called non-verbal response and it is useful in large classes.
Ask Participants (Whole Group):How does this impact the story?
Example Answers:You would not understand that the judge asked the farmer to prove himself.
Module 4 - Curriculum and Planning Session 1 - Using Curriculum
12
“Just like telling a story, learning also has to occur in a certain order. Students need to learn how to add before they can understand how to multiply. Students need to know the letters of the alphabet before they can learn to read. This order of learning is mapped out in the curriculum.
If one of the steps in learning to read is missing, students will struggle to keep up with the next lessons when they do return to school. When the process of learning is disrupted, or when a unit is missing from the overall curriculum, students may not meet learning standards. This can happen for all kinds of reasons.”
Walk around the room for 3 minutes to hear responses.
Ask Participants (Small Group):What are some of the reasons your students may have missed parts of the curriculum? Turn to the teachers at your table to share your answers.
Example Answers:
• Illness.
• Work.
• Flooding.
• Supporting the family at home.
• Menstruation (and lack of adequate facilities).
• Conflict or war.
Example Answers:
• Lend the student a text book to catch up.
• Organize a peer mentor for the student.
• Spend time at break-time, lunchtime, or after-school tutoring the students.
Ask Participants (Small Groups):What can you do to support these children?
Module 4 - Curriculum and Planning Session 1 - Using Curriculum
13
“While you cannot always control what lessons your students miss, knowing your curriculum will help you fill in the gaps for your students. Knowledge and skills are cumulative – that means the lessons build upon each other, just like the story of the clever farmer. As a teacher, it is important to know in what order students should learn. Knowing your curriculum will help you help your students when they miss something.”
Remind participants that they should monitor student attendance - if a student is continually absent/late to school there may be an underlying problem and the child may need further support. In Module 2 the participants look at how to respond to this - see Module 2 Sessions 1 and 5 if appropriate.
Module 4 - Curriculum and Planning Session 1 - Using Curriculum
14

LEARNExamine the Given Curriculum to Identify Key Parts
Materials: Copy of the appropriate curriculum for each participant
“Your curriculum will help you see what the learning goals are for your students in a given subject and in a given year. It is an important tool for planning ahead and choosing what students should learn and when. I have just given each of you a copy of the curriculum your school uses. We will go over each section as a whole class to see how the curriculum is organized and to identify the key parts. These key parts might be learning objectives, units, topics, subtopics, lessons, assessment, etc.”
Hand out a copy of the curriculum to each participant. If there are not enough copies for every participant, group the participants so they can share.
Use this time to give participants a chance to study and analyze the curriculum that they will be using. The facilitator should review the curriculum in advance to create an outline of the key components and note the context-specific vocabulary and titles used. This information should go into a PowerPoint or flipchart.
If possible a curriculum expert should be consulted and come in for this session. The curriculum expert should take the participants through the locally appropriate curriculum and help them map this out. If possible, provide participants with a scope and sequence for their grade level or subject for the school year.
Module 4 - Curriculum and Planning Session 1 - Using Curriculum
15
Circulate around the room to support the discussion. After 10 minutes ask participants to share their ideas. Work logically through each section of the curriculum, mapping out on the flipchart the different key parts that make up the curriculum. Participants should record this in their notes.
Ask Participants (Small Groups):
In your groups briefly examine the curriculum and discuss the following for 10 minutes.
1. How is the curriculum organized?
2. What are the key parts that make up the curriculum? Look out for any subheadings.
Module 4 - Curriculum and Planning Session 1 - Using Curriculum
16
Materials: Copy of the appropriate curriculum for each participant
“In your small groups, you are now going to take a closer look at the curriculum that is relevant to your own teaching in school. You will work with other teachers of your subject or grade level.”
“You now have an outline of the key components of your curriculum. This is called the scope – a timeline of what you will teach and when. This will guide you as you plan your lessons throughout the year and it will help you to stay organized in your teaching.”
Circulate around the room to support the different groups. Give time warnings throughout.
After 20 minutes -
“In your groups you are going to create an outline of your curriculum. Analyze the curriculum to find out the key learning standards, the key topics and assessments that the students need to cover throughout the year. Decide how you would divide the curriculum into smaller sections - these sections are often called units. Pay attention to the order in which these units should happen. Write this out as a clear outline in your notes. You have 20 minutes.”
If you have not already, divide the class into small groups based on grade level and subject area to map out the curriculum for their subject or grade level.
PRACTICEExplore the Grade or Subject-Based Curriculum
Adapt the language and questions to match the local curriculum.
Give participants the opportunity to ask questions and express any concerns about the curriculum.
Module 4 - Curriculum and Planning Session 1 - Using Curriculum
17
“Now I would like you to discuss each of the following questions and take turns within your group writing down answers on the piece of flipchart paper. Try to make sure every person in your group has at least one turn. We will regroup to share some responses with the whole class. You will have 20 minutes to discuss these questions.”
Display the questions on the PowerPoint/flipchart. Call one participant per group to read one of the listed questions until all questions have been read aloud.
1. What are the essential learning standards for the school year for your grade or subject? In other words, what MUST your students know before moving on to the next grade level? This may not include every standard or objective listed in the curriculum.
2. How many units are in the curriculum for your subject/grade? How many lessons? Think about your own classroom experience. Do you think this is enough or too much to cover in one school year?
3. Look at the given order or sequence of units and lessons. Is this logical? Would you like to make any changes to help your students be more successful in learning the listed skills or knowledge?
4. Consider your own teaching preparation. What would it look like to plan your lessons based on the curriculum provided?
5. Consider your students and local community. How does the curriculum include or exclude students and community members? How might the content of the curriculum be more inclusive?
6. Do you think any important lessons are missing from the given curriculum? Are any important skills missing from the learning standards?
Circulate around the classroom during this time to listen to and support the groups. Give time warnings throughout. It is okay if they do not make it through every question. After 20 minutes bring the groups’ attention to the front and call on each group to answer one of the questions above.
Analyze the Grade or Subject-Based Curriculum
Materials: Slide 5 Copy of the appropriate curriculum for each participant
Module 4 - Curriculum and Planning Session 1 - Using Curriculum
18
Materials: Slide 6
After asking each question, ask each group to share their thoughts and ideas. Explain to participants that in Session 4 they will study how to make lessons relevant and meaningful for their students.
PLANNING AND ACTIONMaking Sure the Curriculum Is Relevant
If you are using a curriculum that is unfamiliar to participants, particularly in displacement contexts, it is worth taking time to discuss which curriculum is being used and why.
Ask Participants (Small Groups):
1. Is the curriculum that we have studied today different to the one you used as a child, or the one you used in your home country? What are the similarities and differences?
2. How can you improve your own knowledge about topic areas that you are not so familiar with?
3. How can you make sure that the curriculum is still relevant to your students’ lives?
Example Answers:
1. Answers will vary.
2. Talk to a colleague who is an expert in that area. Read books and textbooks.
3. We will talk about this later in the module but they might include some stories about the children’s country of origin, and use examples from their lives.
Module 4 - Curriculum and Planning Session 1 - Using Curriculum
19
Materials: Handout 4.0 - Skills and Strategies Worksheet
“Now let’s look back on everything we have learned together today and brainstorm a list of skills or strategies you can use in your classrooms.”
ASSESSSkills and Strategies Worksheet
Encourage participants to come up with the skills and strategies themselves. Example answers may include: • Creating an overview of the curriculum • Analyzing the curriculum• Identifying learning standards • Making the curriculum relevant and inclusive
Example Answers:
• I will review the curriculum on my own and make sure my lessons help students achieve the listed learning standards.
• I will make a scope or timeline of what order I will teach my units.
Write the skills and strategies on the flipchart for everyone to see and encourage participants to write these down in their notes.
“Review the skills and strategies you can bring to your classroom that you learned in this session. Choose one skill or strategy you would like to develop. It is important to be honest with yourself and open to learning new things.
Once you’ve selected a skill or strategy from this session that you would like to develop, write it in the box labeled ‘1’ on your Handout 4.0. In the box labeled ‘Today’, use the water glass scale to fill in how well you currently use the skill in your classroom right now. Then go to the ‘Goal’ box and use the water glass scale to show how well you would like to use the skill in the next week or so. Then in the Action box write how you will achieve your goal i.e. -- What will you do in the next week to use or practice the skill? Do NOT fill out the ‘Practice’ box now; this is to be completed AFTER you have practiced the skill on your own.”
Module 4 - Curriculum and Planning Session 1 - Using Curriculum
20
“Thank you for your exceptional work today. Your next session will be on long-term planning. In the meantime, please continue to review your school’s curriculum, and meet with other teachers in your grade or subject to review and go over any questions or concerns that may come up.”
Use the example to help explain the instructions if needed. Before beginning the activity, have participants explain the instructions back to you to make sure they understand the activity.
Module 4 - Curriculum and Planning Session 1 - Using Curriculum
21
SESSION 2
Long Term Planning and Learning Objectives
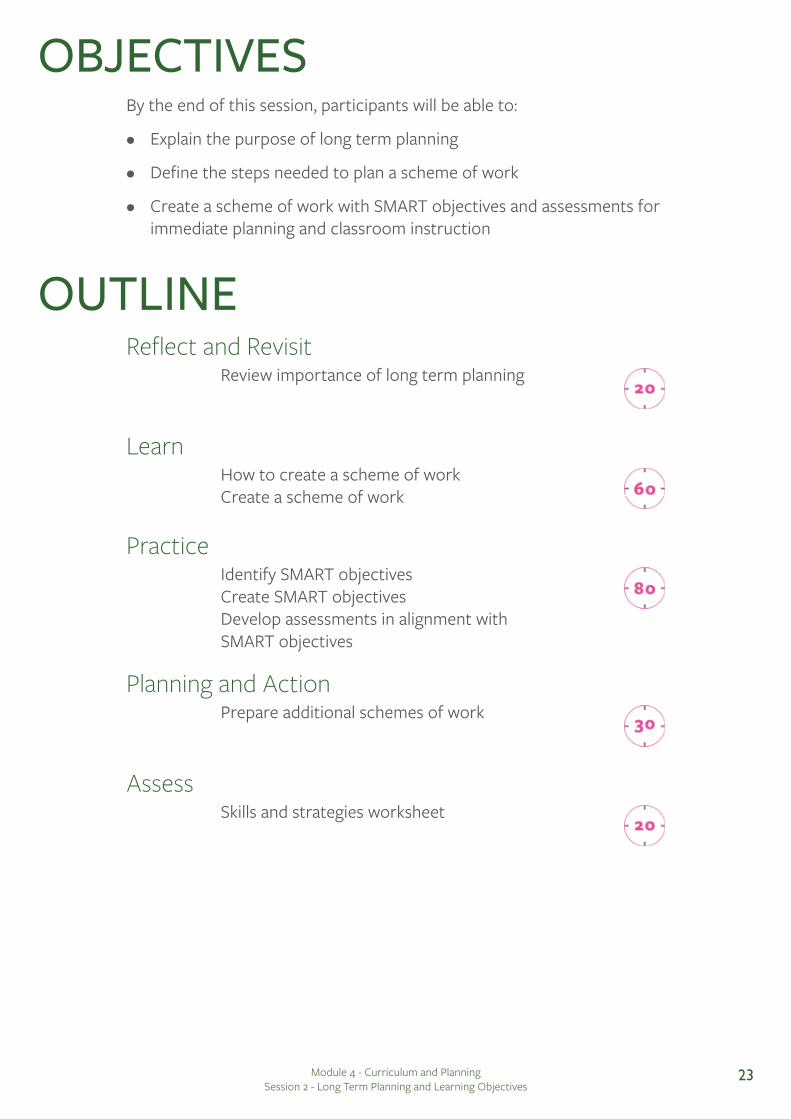
OUTLINEReview importance of long term planning
How to create a scheme of workCreate a scheme of work
Identify SMART objectivesCreate SMART objectivesDevelop assessments in alignment with SMART objectives
Prepare additional schemes of work
Skills and strategies worksheet
Reflect and Revisit
Learn
Practice
Planning and Action
Assess
OBJECTIVESBy the end of this session, participants will be able to:
• Explain the purpose of long term planning
• Define the steps needed to plan a scheme of work
• Create a scheme of work with SMART objectives and assessments for immediate planning and classroom instruction
Module 4 - Curriculum and Planning Session 2 - Long Term Planning and Learning Objectives
23
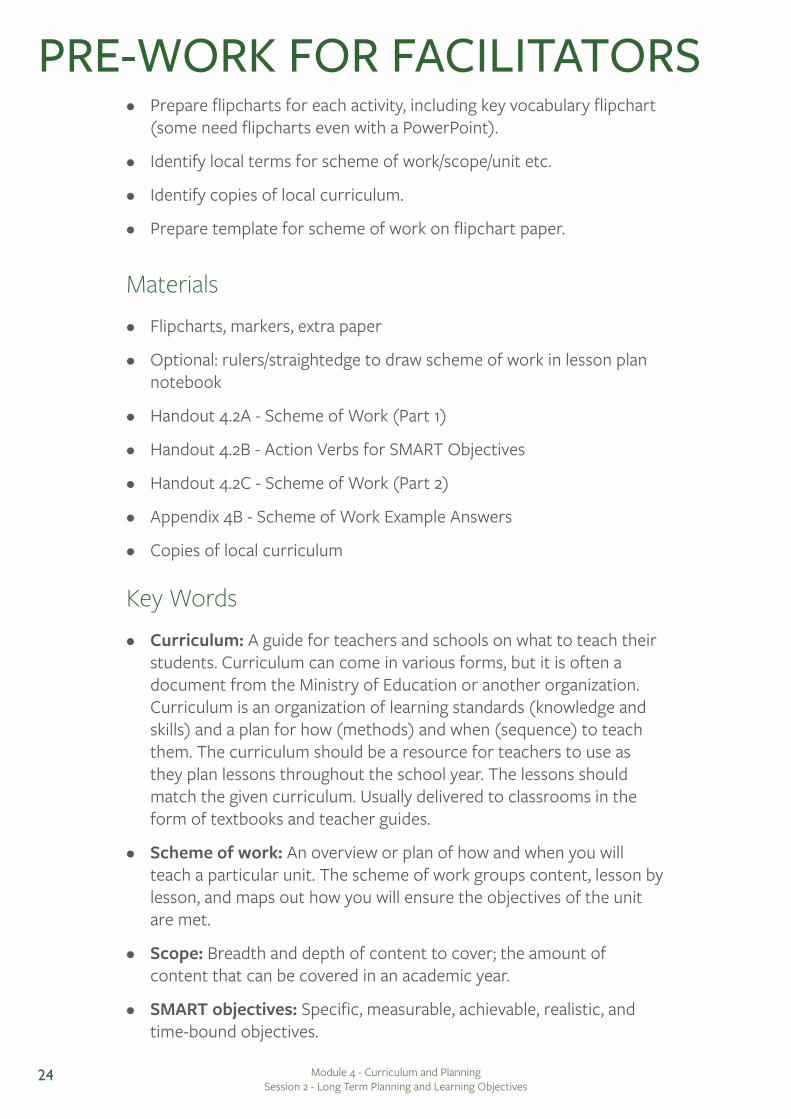
PRE-WORK FOR FACILITATORS• Prepare flipcharts for each activity, including key vocabulary flipchart
(some need flipcharts even with a PowerPoint).
• Identify local terms for scheme of work/scope/unit etc.
• Identify copies of local curriculum.
• Prepare template for scheme of work on flipchart paper.
Materials• Flipcharts, markers, extra paper
• Optional: rulers/straightedge to draw scheme of work in lesson plan notebook
• Handout 4.2A - Scheme of Work (Part 1)
• Handout 4.2B - Action Verbs for SMART Objectives
• Handout 4.2C - Scheme of Work (Part 2)
• Appendix 4B - Scheme of Work Example Answers
• Copies of local curriculum
Key Words• Curriculum: A guide for teachers and schools on what to teach their
students. Curriculum can come in various forms, but it is often a document from the Ministry of Education or another organization. Curriculum is an organization of learning standards (knowledge and skills) and a plan for how (methods) and when (sequence) to teach them. The curriculum should be a resource for teachers to use as they plan lessons throughout the school year. The lessons should match the given curriculum. Usually delivered to classrooms in the form of textbooks and teacher guides.
• Scheme of work: An overview or plan of how and when you will teach a particular unit. The scheme of work groups content, lesson by lesson, and maps out how you will ensure the objectives of the unit are met.
• Scope: Breadth and depth of content to cover; the amount of content that can be covered in an academic year.
• SMART objectives: Specific, measurable, achievable, realistic, and time-bound objectives.
Module 4 - Curriculum and Planning Session 2 - Long Term Planning and Learning Objectives
24
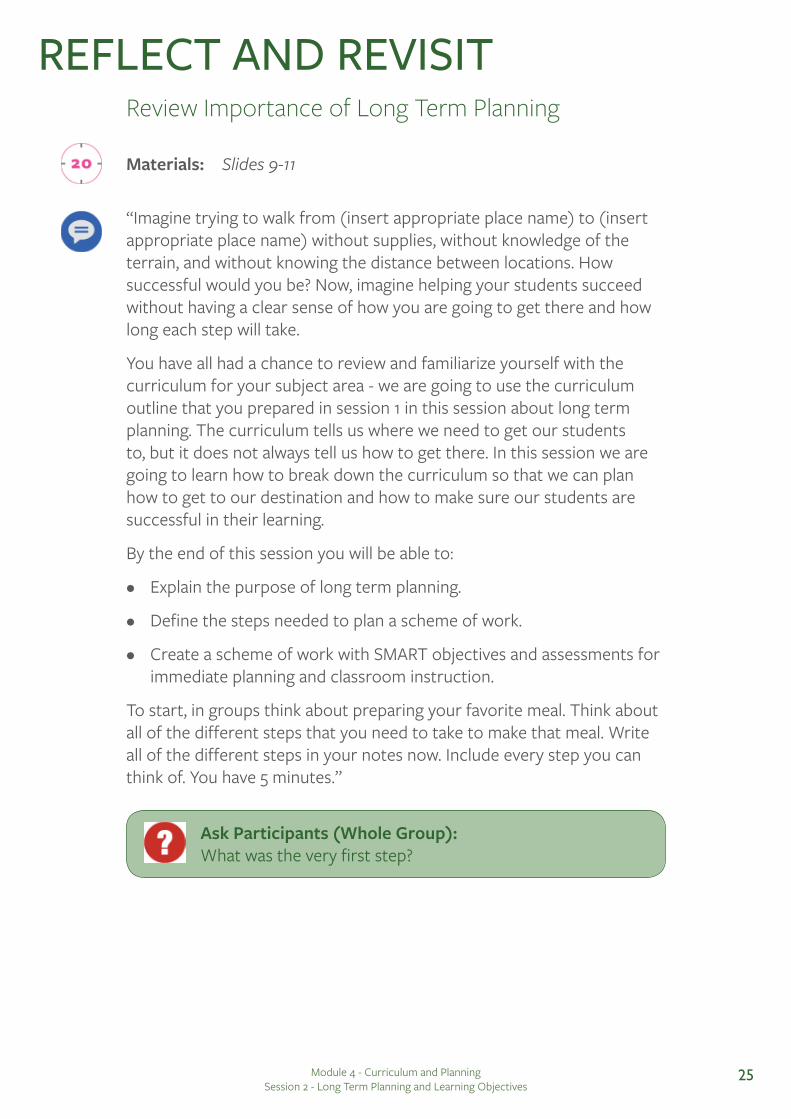
Materials: Slides 9-11
“Imagine trying to walk from (insert appropriate place name) to (insert appropriate place name) without supplies, without knowledge of the terrain, and without knowing the distance between locations. How successful would you be? Now, imagine helping your students succeed without having a clear sense of how you are going to get there and how long each step will take.
You have all had a chance to review and familiarize yourself with the curriculum for your subject area - we are going to use the curriculum outline that you prepared in session 1 in this session about long term planning. The curriculum tells us where we need to get our students to, but it does not always tell us how to get there. In this session we are going to learn how to break down the curriculum so that we can plan how to get to our destination and how to make sure our students are successful in their learning.
By the end of this session you will be able to:
• Explain the purpose of long term planning.
• Define the steps needed to plan a scheme of work.
• Create a scheme of work with SMART objectives and assessments for immediate planning and classroom instruction.
To start, in groups think about preparing your favorite meal. Think about all of the different steps that you need to take to make that meal. Write all of the different steps in your notes now. Include every step you can think of. You have 5 minutes.”
REFLECT AND REVISITReview Importance of Long Term Planning
Ask Participants (Whole Group):What was the very first step?
Module 4 - Curriculum and Planning Session 2 - Long Term Planning and Learning Objectives
25
“Yes! The first thing to decide is your goal. You have to know where you are going to plan how to get there. As teachers we can often use the curriculum or the textbook to see what the goal of the course or unit is.”
“The main goal, the steps, the order and the timing are all important factors to consider when you are planning what to teach throughout the year. Thinking about these things in advance will help you relieve some of the stress from day-to-day planning - and this is called long-term planning.”
Ask participants to share their ideas. Summarize their points and make connections. Point out that the different ingredients, different skills and processes take different amounts of time.
Take suggestions from the participants. Encourage them to think about the very first thing they need to do/plan. Keep encouraging the participants until someone says they had to decide what meal they were going to cook.
Ask Participants (Whole Group):Is the order of the steps important? Why?
Ask Participants (Whole Group):Is the timing of the steps important? Why?
Example Answers:Yes! There’s no point cooking the food before you have prepared the ingredients, or before you have even bought them.
Example Answers:Yes! You need to plan enough time to complete all of the steps properly or the recipe will not work.
Module 4 - Curriculum and Planning Session 2 - Long Term Planning and Learning Objectives
26
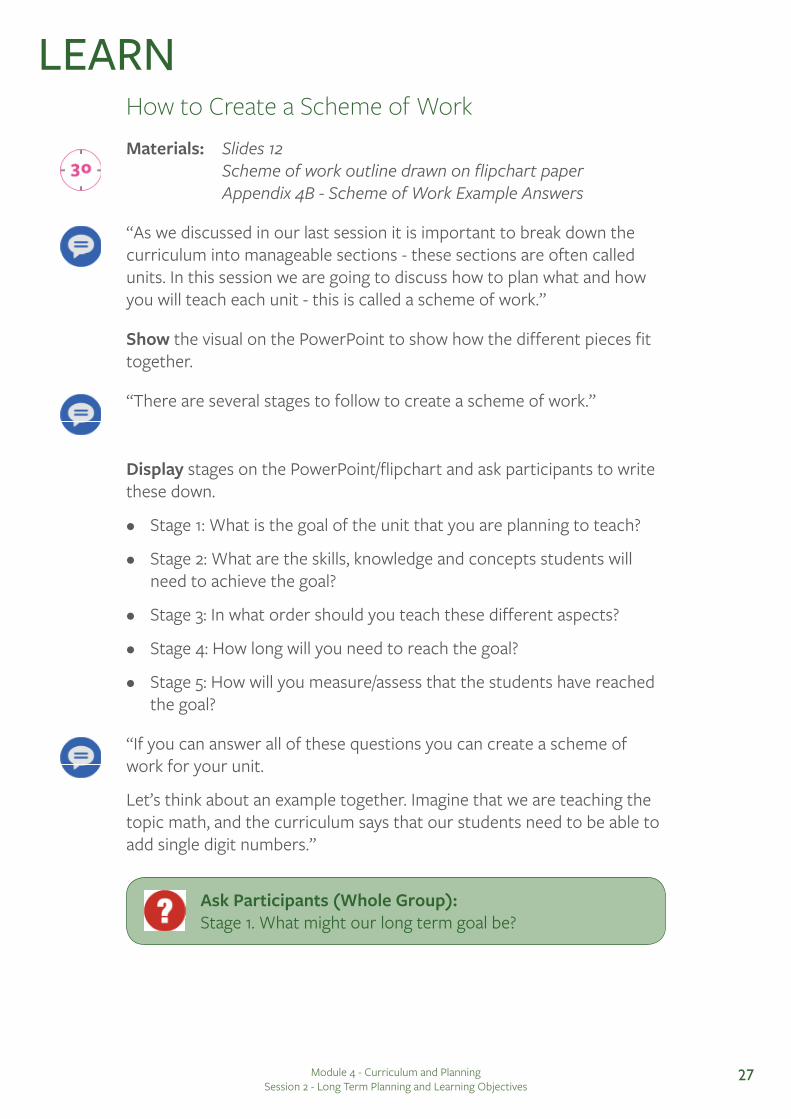
LEARNHow to Create a Scheme of WorkMaterials: Slides 12 Scheme of work outline drawn on flipchart paper Appendix 4B - Scheme of Work Example Answers
“As we discussed in our last session it is important to break down the curriculum into manageable sections - these sections are often called units. In this session we are going to discuss how to plan what and how you will teach each unit - this is called a scheme of work.”
“If you can answer all of these questions you can create a scheme of work for your unit.
Let’s think about an example together. Imagine that we are teaching the topic math, and the curriculum says that our students need to be able to add single digit numbers.”
Display stages on the PowerPoint/flipchart and ask participants to write these down.
• Stage 1: What is the goal of the unit that you are planning to teach?
• Stage 2: What are the skills, knowledge and concepts students will need to achieve the goal?
• Stage 3: In what order should you teach these different aspects?
• Stage 4: How long will you need to reach the goal?
• Stage 5: How will you measure/assess that the students have reached the goal?
“There are several stages to follow to create a scheme of work.”
Show the visual on the PowerPoint to show how the different pieces fit together.
Ask Participants (Whole Group):Stage 1. What might our long term goal be?
Module 4 - Curriculum and Planning Session 2 - Long Term Planning and Learning Objectives
27
Write the long term goal, ‘to add single digit numbers’, on the premade flipchart with scheme of work template.
“These different steps will be the topics for our lessons in this unit. Think of them as building blocks - one lesson should build on the next and connect to the main topic of the unit. We will now add them to our scheme of work in the correct order. Some steps may need more than one lesson - that’s ok - we can make that clear in the scheme of work.”
When seeking responses for the scope, remind the participants that we need to account for learners of different abilities and needs. Write an appropriate example answer on the board.
Write the lesson topics on the scheme of work on the flipchart.
Ask participants to share their ideas. Create a master list of the different steps needed to reach the goal. Make sure everyone agrees on the steps included and the order that they are in. Give time for participants to discuss their opinions and to reach an agreement. Use Appendix 4B to guide you if the participants struggle.
Ask Participants (Whole Group):Stage 2: What are the skills, knowledge and concepts students will need to achieve the goal? In your groups make a list of the different skills and knowledge that we would need to achieve our goal. You have 5 minutes.
Ask Participants (Whole Group):Stage 3: Now remember, we need to think about the order. In what order should we master these different steps? Number your ideas to show the order we should follow.
Ask Participants (Whole Group):Stage 4: How much time will we need to teach this unit?
Module 4 - Curriculum and Planning Session 2 - Long Term Planning and Learning Objectives
28

“We now have all the ingredients we need to make an effective scheme of work.”
“In subject groups we are going to create a two-week scheme of work for a unit in the curriculum. I am going to give you a few moments to decide on the unit you will prepare for your own subject area - look at the curriculum outline that you created yesterday. You have 5 minutes to decide on your unit and the main goal of your unit. You can fill this information into the top of Handout 4.2A.”
“There is a copy of the scheme of work template on Handout 4.2A, but in the future we can draw these into our lesson planning notebooks. It is a series of columns and can be drawn easily with a straight edge.”
Give the participants an opportunity to share their chosen topic and goal with the other groups.
Give the participants time to raise any questions or concerns about the scheme of work.
Take example answers from participants. Write the assessment, for example to take a test with 10 simple additions, on the flipchart.
Ask Participants (Whole Group):Stage 5. How will we measure/assess that we have achieved our goal?
Create a Scheme of Work
Materials: Handout 4.2A - Scheme of Work (Part 1)
It is important to stress that the participants are preparing scheme of works that they can use immediately, within the coming two weeks.
Module 4 - Curriculum and Planning Session 2 - Long Term Planning and Learning Objectives
29
“Now work together to go through the 5 stages and decide upon the lesson topics and sequence for your two-week scheme of work. Fill in the topics column on Handout 4.2A. If your unit will take more than two weeks to teach - that’s ok - prioritize a portion of the unit that you can successfully teach in that time. We will have 20 minutes to work.”
Take answers from several participants. Remind participants that some steps may need to be prioritized or may need more than one lesson to master.
Move about the room stopping to check in with each group. Ask questions such as: Will some steps take more than one lesson to master? Should some skills be prioritized over others and given more lessons? Make sure the participants just fill in the lesson topic column. Give participants time warnings at the 10 and 15 minute mark. Bring the groups back together after 20 minutes.
Ask Participants (Whole Group):Were you able to follow the curriculum? Did you find that some lesson topics would need more practice, or priority, compared to others?
Module 4 - Curriculum and Planning Session 2 - Long Term Planning and Learning Objectives
30
Materials: Slides 13-14 Handout 4.2B - Action Verbs for SMART Objectives
“The next step in completing a scheme of work is to fill in the objectives column. An objective explains what you want your students to be able to do by the end of each lesson. They illustrate what you are setting out to teach and what you want the students to learn. Objectives help guide your lesson planning and they help students understand what their expected learning outcomes are for that particular lesson. The definition of a learning objective is: a brief statement that describes what students will be able to do by the end of the lesson.”
“Let’s look at some examples together and decide whether they are SMART or not. We will use our scheme of work about adding single digit numbers as our example.”
Give participants time to write down the meaning of SMART.
Objectives have to be SMART. SMART is an acronym that stands for Specific, Measurable, Achievable, Relevant, and Time-bound.
• Specific means that the objective states exactly what the student should be able to know and do by the end of the lesson. Objectives should match what you plan to assess.
• Measurable means that you can give a student an assessment at the end of the lesson and be able to tell if the student has learned something or not.
• Achievable means that the objective is within the student’s ability to learn.
• Relevant means that the objective helps lead the student to succeed on the assessment.
• Time-bound means that the objective can be achieved within a class period.”
Display the definition on the flipchart/PowerPoint. Give the participants time to write the definition down and signal for completion.
PRACTICEIdentify SMART Objectives
Module 4 - Curriculum and Planning Session 2 - Long Term Planning and Learning Objectives
31
Before you begin the activity, model the first example for the group in the following way.
“By the end of the lesson, students will understand addition. Firstly, I would think - is this specific? No, addition is a very broad topic. Secondly, is it measurable? The verb to understand is very hard to measure – a student might be able to explain what addition means but they might not be able to do complex addition questions. What about achievable? I’m not sure students could learn everything about addition in one lesson! Is it relevant? It is relevant if this is a math lesson about addition. Is it time-bound? No, it could take many lessons for students to really understand addition. The objective does not meet the five criteria. A better objective would be - Students will be able to identify single digit numbers. Let’s look at some more objectives together.”
1. “Let’s think of a geography example. By the end of the lesson, students will be able to draw and label the key features of a river.
2. Now an English example. By the end of the lesson, students will understand the story.
3. A Science example. By the end of the lesson students will know the parts of the human body.”
Move through the list one by one, have the participants put their thumbs up if the objective meets the SMART criteria, and down if it does not. Call on one participant to explain why it is SMART or not and call on a second participant to improve the objective if it does not already meet the criteria.
Example Answers:
1. Thumbs up: This objective is SMART.
2. Thumbs down: The verb to ‘understand’ is too vague and hard to measure - SMART objectives need to be specific and measurable. A better objective would be ‘students will be able to describe the plot of the Acholi story’ or ‘Students will be able to identify the main characters in the story’.
3. Thumbs down: The verb to “know,” is too vague and hard to measure. A better example would be “Students can draw and label 10 parts of the human body”, or “Students can describe the functions of 5 parts of the human body.”
32 Module 4 - Curriculum and Planning Session 2 - Long Term Planning and Learning Objectives

Materials: Handout 4.2A - Scheme of Work (Part 1) Handout 4.2B - Action Verbs for SMART Objectives
Create SMART Objectives
“We have organized our lesson topics from our curriculum and now we can include our objectives on the scheme of work template. In your groups, begin to fill in the objectives on your scheme of work. Remember that they must be SMART so use Handout 4.2B. We will have 30 minutes to work, but you may find that writing objectives will take you longer.”
Move around the room stopping to check in with each group. Point to the flipchart paper reminding groups of the characteristics of a SMART objective. Encourage participants to use the examples on Handout 4.2B. Give participants time warnings throughout.
Allow 20 minutes.
Example Answers:
Measurable verbs
• Math: count, calculate, compare and contrast, explain, measure, practice, order.
• Science: draw, experiment, explain, classify, categorize, group, label.
• Reading and writing: read, characterize, debate, summarize, sound, describe, spell, write, describe, explain.
“When you are writing your own objectives, think carefully about the verb you are using - this will determine whether your objective is SMART or not. You need to choose action verbs that are achievable for your students. While we want our students to understand, for example, “understanding” is hard to measure. Verbs such as list, define, calculate, make, perform, illustrate, compare, defend, describe, classify, and state are better to use in SMART objectives. They can assess or measure our students’ progress and can ensure they are attaining the information or skill. These are verbs that involve a task. Look at Handout 4.2B and use this to help you in the next task.”
Module 4 - Curriculum and Planning Session 2 - Long Term Planning and Learning Objectives
33

Ask Participants (Whole Group):1. Did you have a hard time creating SMART objectives? What
was the most challenging part?2. In order for it to be realistic for the ability/grade level and
time-bound, did you find that you had to change the order of your lessons, perhaps giving some subtopics more time or priority than originally planned?
3. Who would like to share an example of one of their objectives?
Example Answers:Answers will vary, but encourage participants to share objectives so they can be workshopped.
Use this time to workshop objectives as a class. Ask to see several examples and run through each letter of SMART to ensure everyone is in agreement about a SMART objective. Encourage the participants to identify if there are some verbs that prove more useful in one subject over another. Listen for new verbs to add to the flipchart. Give participants the time to write the new verbs down in their notes as well. Invite the participants to ask any final questions or seek clarifications.
“We are now going to complete the assessment portion of our schemes of work. Remember, assessment means ‘checking for understanding’ or ‘checking student learning’. We want to align our assessments with our objectives so that by the end of the lesson you know whether you have achieved the goal of the lesson. We do not want to give our students an exam every lesson - so we need to use examples of continuous assessment.”
Materials: Handout 4.2A - Scheme of Work (Part 1)
Develop Assessments in Alignment with SMART Objectives
Module 4 - Curriculum and Planning Session 2 - Long Term Planning and Learning Objectives
34

“If your objectives are SMART, then you should have a clear understanding of what you will be measuring and how you will be measuring it.”
“Do you see how important it is to have SMART objectives? If we remember our bad examples, such as ‘understand the story,’ we will not know what to measure or how to measure the students’ progress. We will have a hard time justifying whether the student has achieved the goal of the lesson.”
“The assessments will also guide your planning as you determine whether your students are prepared to move on to the next lesson or not. You may find that your students were not able to meet the objective and you have to reconsider and attempt the lesson again.”
Allow 20 minutes of work before bringing participants back together and give warnings at the 10 and 15 minute mark. Move about the room and gather a few examples. Ask participants to share examples of objectives and aligning assessments that they have been working on. Call on those who are doing well and support those who might need more guidance.
Move about the room and listen for answers. Practice with other SMART objectives that the group came up with in the earlier activity. As you hear good examples, share them with the whole group.
If participants have completed Module 3, remind them of the examples they studied. If they have not completed this module, explain the meaning of continuous assessment and talk through several examples (see Module 3 session 5).
Ask Participants (Think-Pair-Share):How would I assess when my objective is: ‘By the end of the lesson, students will be able to draw and label the key features of a river’?
Module 4 - Curriculum and Planning Session 2 - Long Term Planning and Learning Objectives
35
Materials: Handout 4.2C - Scheme of Work (Part 2)
“For the remaining time, we will work in pairs to prepare more schemes of work from the units found in your curriculum. We have worked together as a class to develop a scheme of work, you have worked in small groups (grade/ability level), and now you will work in pairs to create your own schemes of work using Handout 4.2C. We will have time later to come back together to seek feedback.”
“Swap schemes of work with the pair nearest to you. Take a few minutes to read over their scheme of work. Look to see if anything is missing or if points can be clarified. Are the objectives SMART? Do the assessments align with the objectives? Do the assessments include both the what and how? On the scheme of work write 2 stars and a wish - 2 things the pair has done really well, and one thing that they can do even better.”
“It is often useful to work with your fellow teachers to prepare schemes of work - when you collaborate, you work more quickly and often come up with better ideas. It is also means that you are teaching similar material so you can help each other during the year.”
Select a few examples of good schemes of work from among the participants. Ask the selected participants if they are willing to explain their schemes of work to the whole group - explain to the group why it is a good scheme of work. Ask the participants if they have any questions or queries about schemes of work.
Remind participants of the phases they should follow. Move around the room to support the participants and give time warnings throughout. Spend time with any participants who are struggling.
PLANNING AND ACTIONPrepare Additional Schemes of Work
Module 4 - Curriculum and Planning Session 2 - Long Term Planning and Learning Objectives
36
“Let’s look back on everything we have learned together today and brainstorm a list of skills or strategies.”
Write the skills and strategies on the flipchart for everyone to see and encourage participants to write these down in their notes.
ASSESS
Encourage participants to come up with the skills and strategies themselves. Example answers may include: • Create a two-week scheme of work• Create smart objectives• Choose assessments that align with objectives
Materials: Handout 4.0 - Skills and Strategies Worksheet
Skills and Strategies Worksheet
“Review the skills and strategies you can bring to your classroom that you learned in this session that you can use in relation to long term planning. Choose one skill or strategy you would like to develop. It is important to be honest with yourself and open to learning new things.
Once you’ve selected a skill or strategy from this session that you would like to develop, write it in the box labeled ‘2’ on your Handout 4.0. In the box labeled ‘Today’, use the water glass scale to fill in how well you currently use the skill in your classroom right now. Then go to the ‘Goal’ box and use the water glass scale to show how well you would like to use the skill in the next week or so. Then in the ‘Action’ box write how you will achieve your goal i.e. -- What will you do in the next week to use or practice the skill? Do NOT fill out the Practice box now; this is to be completed AFTER you have practiced the skill in your classroom.”
Module 4 - Curriculum and Planning Session 2 - Long Term Planning and Learning Objectives
37

“Great work today everyone. I hope you will try out these new teaching strategies as soon as possible.”
Use the example to help explain the instructions if needed. Before beginning the activity, have participants explain the instructions back to you to make sure they understand the activity.
Example Answers:
• Before I begin writing daily lesson plans, I will prepare a scheme of work.
• My objectives will be specific, measurable, achievable, relevant, and time-bound.
• My assessments will reflect the “what” I am teaching and “how”.
• I will measure my students’ progress.
Module 4 - Curriculum and Planning Session 2 - Long Term Planning and Learning Objectives
38
SESSION 3
Lesson Planning
OUTLINEImportance of lesson planningCharacteristics of a good lesson
Lesson plan overviewAnalyzing lesson plans
Planning a lesson togetherCompleting a lesson plan independently
Review why lesson planning is important
Skills and strategies worksheet
Reflect and Revisit
Learn
Practice
Planning and Action
Assess
OBJECTIVESBy the end of this lesson teachers will be able to:
• Describe the key components of a good lesson plan
• Explain how to use a lesson plan to achieve learning objectives
• Effectively plan lessons according the lesson plan criteria
Module 4 - Curriculum and Planning Session 3 - Lesson Planning
40
PRE-WORK FOR FACILITATORS• Locate local lesson plans and adjust session to reflect local lesson
plan structure.
• Prepare flipcharts for each activity, including key vocabulary flipchart (some need flipcharts even with a PowerPoint).
Materials• Flipcharts, markers, extra paper
• Local curriculum, local lesson plans
• Handout 4.3A - Lesson Planning Guide
• Handout 4.3B - Lesson Plan Analysis (Example 1)
• Handout 4.3C - Lesson Plan Analysis (Example 2)
• Handout 4.3D - Lesson Plan Template (Blank)
• Handout 4.3E - Lesson Plan Template (Example)
• Handout 4.3F - Lesson Plan Template (Blank)
Key Words• Assessment: A way to check what students understand or do not
understand used to inform your instruction, evaluate students, and give grades.
• Curriculum: A guide for teachers and schools on what to teach their students. Curriculum can come in various forms, but it is often a document from the Ministry of Education or another organization. Curriculum is an organization of learning standards (knowledge and skills) and a plan for how (methods) and when (sequence) to teach them. The curriculum should be a resource for teachers to use as they plan lessons throughout the school year. The lessons should match the given curriculum. Usually delivered to classrooms in the form of textbooks and teacher guides.
Module 4 - Curriculum and Planning Session 3 - Lesson Planning
41

• Differentiation: Ensuring all teaching practices account for different abilities and needs.
• Inclusion: Ensuring that every person, irrespective of gender, language, ability, religion, nationality, or other characteristics, is supported to meaningfully participate alongside his/her peers.
• Scheme of work: A weekly grouping of lesson content.
• SMART objectives: Objectives that are specific, measurable, achievable, realistic, and time-bound.
Module 4 - Curriculum and Planning Session 3 - Lesson Planning
42

Materials: Blank sheet of paper for each participant
“Before we start this lesson, we are going to do an activity to think about why lesson planning is important. At the end of this lesson, we will repeat this activity so that you can see what you have learned. First, write your name on your piece of paper. This is your reflection paper. Without talking to anyone around you, write down why you think planning a lesson is important. You will have 2 minutes and you can only write on one side of the paper. Go.”
Pass out blank sheets of paper. Every participant should have one piece.
After 2 minutes have passed -
“Please make sure your name is on your sheet of paper and pass it towards the front. This is an example of a ‘quick-write’- it is a technique you can use to assess what your students remember from a previous lesson or what they already know about a topic.”
“Thank you all for sharing your answers. We can see that there are many reasons why lesson planning is important. During this session you may see that there are even more reasons. Lesson plans outline what you are trying to achieve and how you are going to do it. Planning lessons in advance allows you to focus on the needs of your students and helps you meet many demands that may come your way in the classroom.”
Call on participants to share their answers.
REFLECT AND REVISITImportance of Lesson Planning
Ask Participants (Whole Group):Now that we have thought about why planning a lesson might be important, let’s share our ideas. Who can tell me why they think lesson planning is important?
Module 4 - Curriculum and Planning Session 3 - Lesson Planning
43
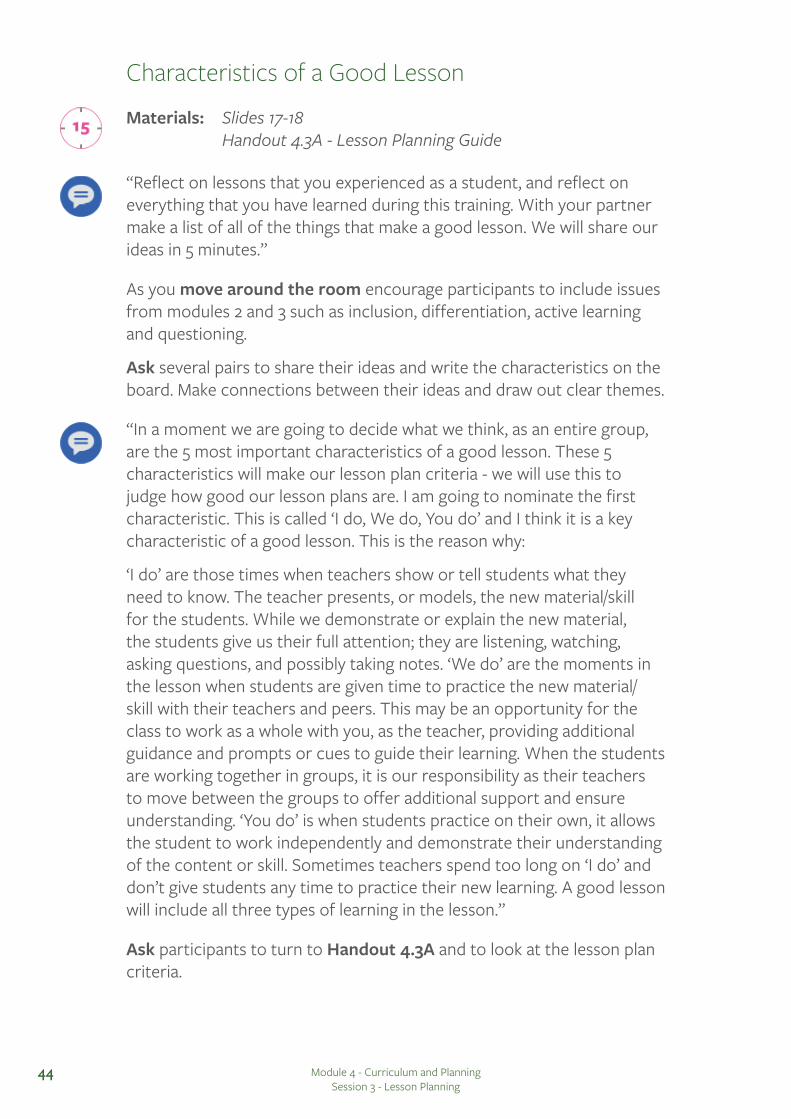
“Reflect on lessons that you experienced as a student, and reflect on everything that you have learned during this training. With your partner make a list of all of the things that make a good lesson. We will share our ideas in 5 minutes.”
Ask participants to turn to Handout 4.3A and to look at the lesson plan criteria.
“In a moment we are going to decide what we think, as an entire group, are the 5 most important characteristics of a good lesson. These 5 characteristics will make our lesson plan criteria - we will use this to judge how good our lesson plans are. I am going to nominate the first characteristic. This is called ‘I do, We do, You do’ and I think it is a key characteristic of a good lesson. This is the reason why:
‘I do’ are those times when teachers show or tell students what they need to know. The teacher presents, or models, the new material/skill for the students. While we demonstrate or explain the new material, the students give us their full attention; they are listening, watching, asking questions, and possibly taking notes. ‘We do’ are the moments in the lesson when students are given time to practice the new material/skill with their teachers and peers. This may be an opportunity for the class to work as a whole with you, as the teacher, providing additional guidance and prompts or cues to guide their learning. When the students are working together in groups, it is our responsibility as their teachers to move between the groups to offer additional support and ensure understanding. ‘You do’ is when students practice on their own, it allows the student to work independently and demonstrate their understanding of the content or skill. Sometimes teachers spend too long on ‘I do’ and don’t give students any time to practice their new learning. A good lesson will include all three types of learning in the lesson.”
As you move around the room encourage participants to include issues from modules 2 and 3 such as inclusion, differentiation, active learning and questioning.
Ask several pairs to share their ideas and write the characteristics on the board. Make connections between their ideas and draw out clear themes.
Materials: Slides 17-18 Handout 4.3A - Lesson Planning Guide
Characteristics of a Good Lesson
Module 4 - Curriculum and Planning Session 3 - Lesson Planning
44
“Would anyone else like to nominate something for our criteria? Remember, choose something that is essential to a good lesson -you must be able to defend your opinion.”
“Now that we have made our lesson plan criteria, let’s write it at the top of Handout 4.3A - our lesson planning guide. Creating criteria is a good task to use with students, as it encourages them to prioritize and to make a judgment.
To teach good lessons we need to plan them in advance to make sure that we achieve all of the things we have identified in our criteria. By the end of this session, you will be able to:
• Describe the key components of a good lesson plan.
• Explain how to use a lesson plan to achieve learning objectives.
• Effectively plan your own lessons according the lesson plan criteria.”
Take suggestions from the participants. Ask the other teachers to show if they agree by a show of hands.
Encourage participants to include differentiation, assessment, questioning, active learning in their criteria, but be prepared to add alternatives if the participants make a strong argument.
Module 4 - Curriculum and Planning Session 3 - Lesson Planning
45
LEARNLesson Plan Overview
Analyzing Lesson Plans
Materials: Handout 4.3A - Lesson Planning Guide
Materials: Slide 19 Handout 4.3A - Lesson Planning Guide Handout 4.3B - Lesson Plan Analysis (Example 1) Handout 4.3C - Lesson Plan Analysis (Example 2)
“Let’s now go over the parts of the lesson plan to familiarize ourselves with the way it is organized and structured, and to think about what we need to include in each section. Please look at Handout 4.3A.”
“This handout can help you as you plan your own lessons. We are going to spend time today practicing using it so that lesson planning becomes much easier and more effective.”
Ask participants to look at Handout 4.3A and to take turns reading aloud different sections. Talk participants through the structure of the lesson plan, and what is expected in each part.
“Now we are going to use our lesson plan guidelines to analyze and critique a lesson plan. In pairs I would like you to look at Handout 4.3B and to consider the strengths and weaknesses of the plan. Please use Handout 4.3A to help you. You may write comments and annotations on the handout. You have 10 minutes.”
Circulate around the room and support participants.
Use Handout 4.3A unless there is a local lesson plan available, in which case substitute as needed.
Module 4 - Curriculum and Planning Session 3 - Lesson Planning
46
“Lastly, with your partner, I want you to go through the lesson plan and make a note of where the teacher is using ‘I do’, where they are using ‘We do’ and where they are using ‘You do’.”
Circulate around the room and support participants. Ask several participants to share their ideas.
Ask several participants to share their ideas.
“Now let’s look at Handout 4.3C and do the same thing - in pairs, analyze the strengths and weaknesses of the lesson plan. Think very carefully about how you would change the plan. You have 10 minutes.”
Example Answers:
1. SMART objectives:
• Active Learning.
• Continuous Assessment.
• Relevant to students’ lives.
• I do, We do, You do.
2. Answers will vary.
3. Answers will vary.
Ask Participants (Think-Pair-Share):1. What does this lesson plan do well?2. What are the problems with the lesson plan?3. What would you do to improve the lesson plan?
Module 4 - Curriculum and Planning Session 3 - Lesson Planning
47
Example Answers:
1. Answers will vary.
2. The objectives are not SMART:
• The timings are wrong - too much time for the recap and not enough time to practice.
• No differentiation.
• Closed questions not open.
• No effective assessment.
• The lesson is not engaging for students.
3. Answers will vary.
Ask Participants (Think-Pair-Share):1. What does this lesson plan do well?2. What are the problems with the lesson plan?3. What would you do to improve the lesson plan?
Ask several participants to share their ideas.
“There are lots of different elements to include when making a lesson plan. At first it can take a long time but it is worth it. Lesson planning not only ensures that you have more successful lessons, but it also helps you to stay organized, and to be more confident and creative in the classroom. We are now going to practice lesson planning.”
Module 4 - Curriculum and Planning Session 3 - Lesson Planning
48
PRACTICEPlanning a Lesson TogetherMaterials: Handout 4.3A - Lesson Planning Guide Handout 4.3D - Lesson Plan Template (Blank) Handout 4.3E - Lesson Plan Template (Example)
“We are now going to go through the lesson planning process together. For this activity you will work in your subject groups so that you create lesson plans that you can use in the next few weeks. The lesson plans you create are going to be from your own curriculum and your own grade level or subject. Take 2 minutes to discuss as a group which topic you will plan a lesson about. Use the scheme of work that you created in the last session to help you decide.”
Ask each group to share their subject and topic with the whole group.
Ask participants to look at Handout 4.3D.
Example Answers:
• Specific
• Measurable
• Achievable
• Relevant
• Time-bound
Ask Participants (Whole Group):Now, what are the key characteristics of good lesson objectives?
Adjust these instructions if a local lesson plan is available.
“In your group, decide on the lesson objectives you will use for this lesson. Remember, the objectives guide the entire lesson. You have 10 minutes to write your objectives.”
Module 4 - Curriculum and Planning Session 3 - Lesson Planning
49
Ask Participants (Whole Group):What are the key characteristics of a good introduction?
Ask Participants (Whole Group):What are the characteristics of a good main body?
Ask Participants (Whole Group):What are the characteristics for a good conclusion?
“In your groups, now think about a good introduction for the lesson. Use Handout 4.3E to help you - it has activity suggestions. You have 10 minutes to plan your introduction.”
Circulate around the room. Encourage participants to make sure they meet the lesson plan criteria. Ask several groups to share their main body.
“For the next 10 minutes plan the main body, again use Handout 4.3E to help you.”
Ask the groups to swap lesson plans and to use the checklist to peer assess.
In your groups, now think about a good conclusion for the lesson. Use Handout 4.3E to help you - it has activity suggestions. You have 10 minutes to plan your conclusion.
Lastly, spend 10 minutes adding the organizational details and teacher notes to fully prepare you to teach the lesson.”
Circulate around the room. Encourage participants to make sure they meet the lesson plan criteria. Ask several groups to share their introductions.
Circulate around the room. Encourage participants to make sure their objectives are SMART. They can use their scheme of work from the last session if it is available. Ask several groups to share an example of their objectives.
Module 4 - Curriculum and Planning Session 3 - Lesson Planning
50
After 15 minutes have passed -
Ask Participants (Whole Group):Why is it useful to plan lessons with colleagues? This is called co-planning.
“Take 15 minutes to use the lesson plan guide to assess each other’s lesson plans. Refer to the criteria and guide and think of ways that you could improve the other group’s lesson or ideas that you want to take from their lesson and use in your own. You have 15 minutes to read over their lesson plan.”
Completing a Lesson Plan Independently
Materials: Handout 4.3F - Lesson Plan Template (Blank) Handout 4.3E - Lesson Plan Template (Example)
“Now we are going to create a lesson plan independently. You will still use your own curriculum so that you can use the plan in the future. Start by looking at your scheme of work to decide on your topic. You will then have 45 minutes to create the plan on Handout 4.3F. Remember to use Handout 4.3E for ideas.”
Make sure that everyone has immediately started looking at their scheme of work to decide a topic. Walk around the room and help keep participants on track and focused on their next steps. Use this time to assess how much participants know about lesson planning.
Example Answers:
• Share knowledge and ideas.
• Motivate each other and share workload.
• Inspire more creative ideas.
• You can reflect on the lesson together after you have both taught it.
Module 4 - Curriculum and Planning Session 3 - Lesson Planning
51
“You have 15 minutes left. If you have not started the body of your lesson, you should start that now.”
“You have 5 minutes left. If you have not started the conclusion of your lesson, you should start that now.”
Use the lesson plan guide to revise independently.
“We are going to use the Lesson Plan Guide again to make sure that we really understand how to plan each section of the lesson well. This time we are going to use self-assessment. This is another technique to use in the classroom. By yourself, go over this criterion and think about how you can improve your lesson. If you get through the entire list you can start making those improvements to your lesson. You have 15 minutes.”
Move around the room to support participants and to answer any questions. Let participants know when there are 5 minutes left.
Respond to the comments made and help clarify any misconceptions.
When there are only 15 minutes left -
When there are only 5 minutes left -
Ask Participants (Whole Group):What improvements did you make on your lesson plans and what did you find the most difficult while you were creating the lesson?
Module 4 - Curriculum and Planning Session 3 - Lesson Planning
52

Materials: Reflection papers from the start of the session
“Now that we have gone over the different parts of a lesson plan, let’s think about reasons we think creating a lesson plan is important. Remember at the beginning of this session you all wrote down reasons you thought lesson planning was important? I am going to pass out your reflection papers but do not flip them over. Your answers from before this session should be facing down.”
“Take 1 minute to write down why you think creating a lesson plan is important now. Do not flip your paper over. You will have 1 minute. Go.”
Place each participant’s reflection paper on the desks/tables face down. Be sure to look at the names and give the correct paper to the correct participant.
PLANNING AND ACTIONReview Why Lesson Planning Is Important
Example Answers:
• Organize: Gives teachers a chance to organize their ideas for the lesson.
• Curriculum: Gives teachers a chance to ensure the lesson is in line with the curriculum.
• Time: Saves time during the actual lesson because the teacher has already figured out what they should be doing.
• Confidence: Builds the teachers’ confidence if they know what they will teach.
• Creativity: Allows teachers to be more creative with their lesson.
• Problem Solving: Teachers are more prepared to deal with problems that come their way.
• Students: Gives teachers a chance to think about how to help students who are on different learning levels.
Module 4 - Curriculum and Planning Session 3 - Lesson Planning
53
Walk around the room making sure participants are writing and they are not flipping their papers over.
“Ok, let’s come back together. Go ahead and turn over your papers to see what you wrote before this session. Use this time to reflect on all that you have learned in this session. Think about how much more you now know about planning lessons and how you will be able to improve your teaching using lesson planning.”
After 1 minute has passed -
Module 4 - Curriculum and Planning Session 3 - Lesson Planning
54
Make sure participants have their Skills and Strategies Worksheet for Module 3.
“Let’s think back on all of the different parts of a lesson plan and what each part of the lesson plan should include.
Choose one of the parts of a lesson plan that you would like to improve on. Maybe you want to work on including assessment, or maybe you want to work on making the introduction engaging. Once you have selected one part of the lesson plan you would like to work on or use, write it in the box labeled ‘3’. In the box labeled Today, use the water glass scale to fill in how well you currently include this in your lesson plans right now. Then go to the Goal box and use the water glass scale to show how well you would like to use the skill in the next week or so. Then in the Action box write how you will achieve your goal i.e. -- What will you do in the next week to use or practice the skill? Do NOT fill out the Practice box now; this is to be completed AFTER you have practiced the skill in your classroom.”
Use the example to help explain the instructions if needed. Before beginning the activity, have participants explain the instructions back to you to make sure they understand the activity.
“Thank you for everyone’s contributions to work together to expand our understanding of lesson planning. When we are more aware of the lessons we will teach, we will be better teachers.”
ASSESSSkills and Strategies Worksheet
Materials: Handout 4.0 - Skills and Strategies Worksheet
Example Answers:
• I will work on improving my:
• Introduction.
• Body.
• Conclusion.
• Teacher notes.
• Timing.
• Use the checklist to check my lesson plan.
Module 4 - Curriculum and Planning Session 3 - Lesson Planning
55

SESSION 4
Making Lessons Relevant and Meaningful
OUTLINEWhat interests my students?The importance of meaningful lessons
Transforming tasks and examples from general to meaningfulIn MathIn Literacy
Creating a list of local resources Explore ways to use local resources in the classroom
Lesson plan reviewStudent interest reflection and action plan
Skills and strategies worksheet
Reflect and Revisit
Learn
Practice
Planning and Action
Assess
OBJECTIVESBy the end of this session, participants will be able to:
• Explain why lessons should be meaningful and relevant to students’ lives
• Plan lessons that relate to students’ lives by using meaningful examples
• Plan lessons that incorporate local resources to inspire students
Module 4 - Curriculum and Planning Session 4 - Making Lessons Relevant and Meaningful
57
PRE-WORK FOR FACILITATORS• Prepare flipcharts for each activity, including key vocabulary flipchart
(some need flipcharts even with a PowerPoint).
• Bring in examples of locally available resources that can be used as teaching and learning aids.
• Read Appendix 4E and modify it according to the resources available in the community.
Materials• Flipcharts, markers, extra paper
• Local resources
• Handout 4.4A - Example Lesson in Module
• Handout 4.4B - Local Resource List
• Appendix 4E - Examples of Local Resources
Key Words• Curriculum: A guide for teachers and schools on what to teach their
students. Curriculum can come in various forms, but it is often a document from the Ministry of Education or another organization. Curriculum is an organization of learning standards (knowledge and skills) and a plan for how (methods) and when (sequence) to teach them. The curriculum should be a resource for teachers to use as they plan lessons throughout the school year. The lessons should match the given curriculum. Usually delivered to classrooms in the form of textbooks and teacher guides.
Module 4 - Curriculum and Planning Session 4 - Making Lessons Relevant and Meaningful
58
Materials: Slides 22-24
“Today we are going to keep thinking about how to make lessons meaningful and relevant for our pupils. If lessons are meaningful and engaging, it will help with both classroom management and inclusion.
By the end of this session, you will be able to:
• Explain why lessons should be meaningful and relevant to students’ lives.
• Plan lessons that relate to students’ lives by using meaningful examples.
• Plan lessons that incorporate local resources to inspire students.
One way to develop engaging and meaningful lessons is to think about what your students are excited about and interested in.
In your groups, for 10 minutes discuss what issues really interest and motivate your students at the moment. (For example, a song, a sport, a game or an event) One person in the group should take notes.”
Move around the room to encourage participants and answer any questions. Give time warnings throughout. After 10 minutes ask several groups to share their answers.
REFLECT AND REVISITWhat Interests My Students?
Ask Participants (Small Groups):How can you incorporate these things in your lessons? Could you use this to start a lesson to really engage your students? For example, if the students love sports, maybe you could use football results to help them understand math? Is there a song that might have important learning messages? Has something happened in the news that could make your history lesson more meaningful?
Module 4 - Curriculum and Planning Session 4 - Making Lessons Relevant and Meaningful
59
Move around the room to encourage participants and answer any questions. Give time warnings throughout. After 10 minutes ask several groups to share their answers.
Ask Participants (Whole Group):Was it easy or difficult to use these ideas in lessons? Why do you think it might be a good method to get students engaged?
Materials: Handout 4.4A - Example Lesson in Module
“I am now going to read aloud a teaching example. I want you to write down anything that makes this an example of good teaching. Think about everything that you have learned in your training. Please write down at least 3 ideas. You can read along using Handout 4.4A.
In a Science class at Kismayo, the teacher began a lesson about heat transfer.
To start the lesson the teacher wanted to connect the lesson to the everyday lives of the refugee students. On the board he drew examples of heat conductors that were familiar to students in the camp. Students played a game to work out whether each example was a good or bad conductor of heat and why.
Second, the teacher showed the class a piece of metal and asked what would happen if you put it over a candle. “Can you hold the metal after 10 minutes? Can you do it?” He then answered his own question: “No, maybe hold it for 2 minutes, but after conduction happens, no.”
The Importance of Meaningful Lessons
Module 4 - Curriculum and Planning Session 4 - Making Lessons Relevant and Meaningful
60

“The next step of his lesson was to share with the students stories that they could relate to. For example, one story he shared was this:
Mr. Kalulu went to the market and bought a colorful vessel, but it was made of plastic. After he set it out to heat his water for his tea, he came back and found that it was gone. He thought someone had bewitched him, but, no. Mr. Kalulu had just made bad choices.
He then used open questions and think-pair-share to encourage students to explain what had happened to his water jar. The students then used diagrams and their own words to explain heat transfer in their notebooks.
Finally, the teacher concluded the lesson by asking students to bring in examples the following day of good/poor heat conductors to be used as part of a practical training exercise in the next lesson.”
“Students are most engaged when their learning reflects a world that they know and care about. Think very closely about what keeps the age groups and individuals you teach engaged and how you can use this to engage them in their school work.”
Give participants 3 minutes to finish writing down their ideas. Ask participants to discuss their ideas with their partner for a further 3 minutes. Then ask participants to share their ideas with the whole group.
Example Answers:
• The lesson involved a range of active learning strategies.
• The teacher used open questions.
• The lesson was meaningful to students.
• The lesson was engaging for students.
• The teacher applied the lesson to the students’ everyday lives.
• The teacher used continuous assessment strategies.
• The teacher used local resources to engage learners.
Module 4 - Curriculum and Planning Session 4 - Making Lessons Relevant and Meaningful
61
LEARNTransforming Tasks and Examples from General to Meaningful
“One way of making lessons meaningful and relevant for students is by thinking about the content of your lessons - are the examples and activities you use meaningful and relevant to their lives? Do they feel that their learning matters? Sometimes examples are very general, or are about other children in other places. As the teacher, you can alter examples and make them more specific to your children. Sometimes it just needs to be a very small change.”
Ask several participants to share their ideas.
Ask several participants to share their ideas. Then show the next example.
‘Why is hygiene is important?’
‘Write a story about why hygiene is so important in your community.’
Show the participants the following two examples on the board.
‘What is the distance between point A and point B?’
‘John walks from his home for half a kilometer to collect water from the community well. How far does John have to walk with his full bucket to reach home?’
Materials: Slide 24
Ask Participants (Whole Group):Which example will be more engaging for students? Why?
Ask Participants (Whole Group):Which is more engaging for students? Why?
Module 4 - Curriculum and Planning Session 4 - Making Lessons Relevant and Meaningful
62
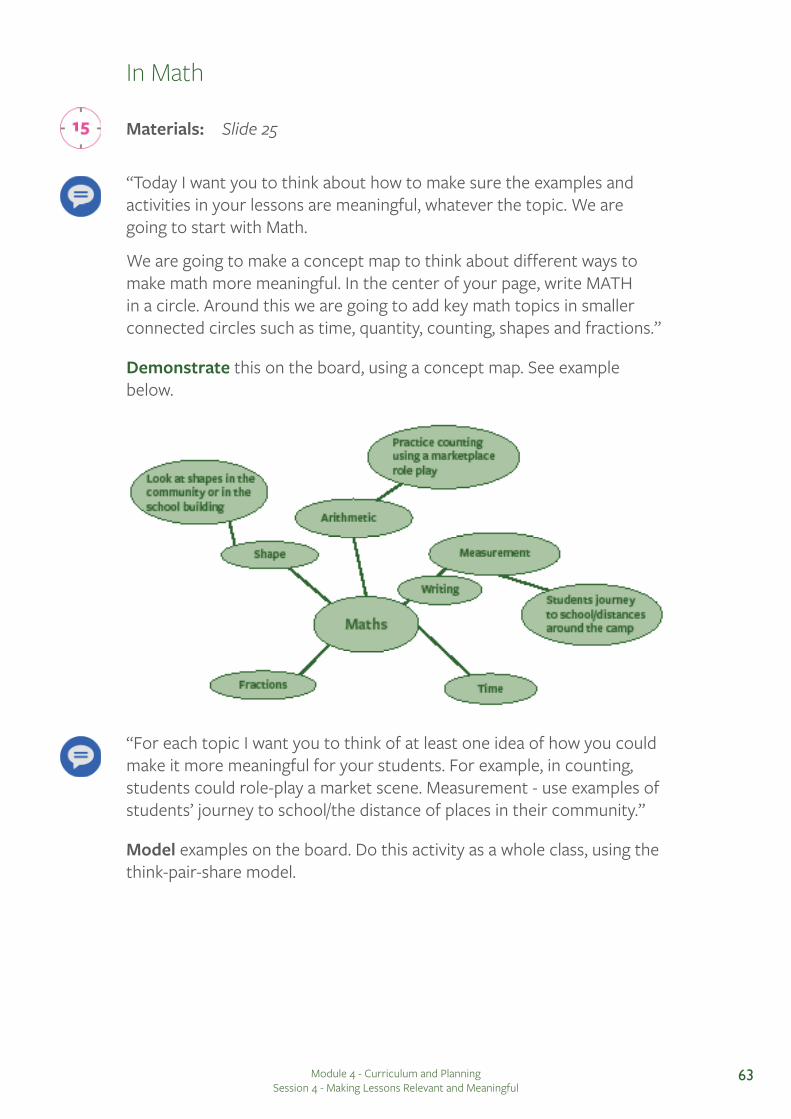
In Math
“Today I want you to think about how to make sure the examples and activities in your lessons are meaningful, whatever the topic. We are going to start with Math.
We are going to make a concept map to think about different ways to make math more meaningful. In the center of your page, write MATH in a circle. Around this we are going to add key math topics in smaller connected circles such as time, quantity, counting, shapes and fractions.”
“For each topic I want you to think of at least one idea of how you could make it more meaningful for your students. For example, in counting, students could role-play a market scene. Measurement - use examples of students’ journey to school/the distance of places in their community.”
Model examples on the board. Do this activity as a whole class, using the think-pair-share model.
Demonstrate this on the board, using a concept map. See example below.
Materials: Slide 25
Module 4 - Curriculum and Planning Session 4 - Making Lessons Relevant and Meaningful
63
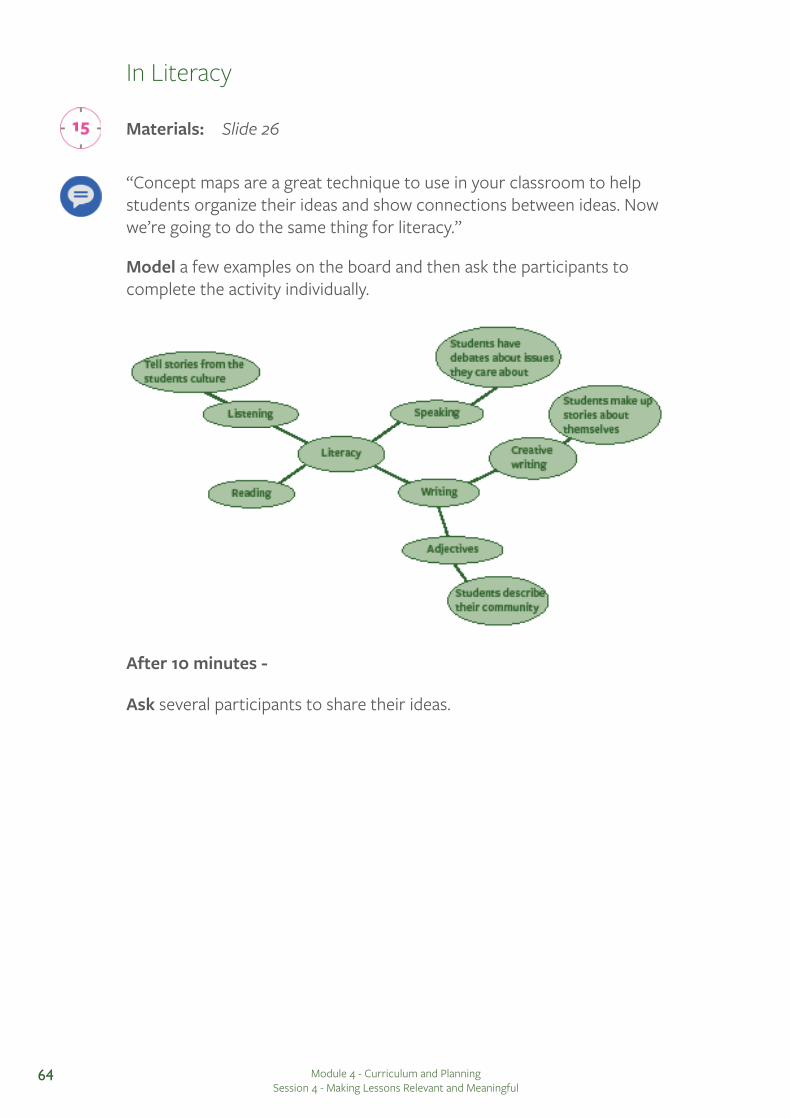
In Literacy
“Concept maps are a great technique to use in your classroom to help students organize their ideas and show connections between ideas. Now we’re going to do the same thing for literacy.”
Model a few examples on the board and then ask the participants to complete the activity individually.
After 10 minutes -
Ask several participants to share their ideas.
Materials: Slide 26
Module 4 - Curriculum and Planning Session 4 - Making Lessons Relevant and Meaningful
64
PRACTICECreating a List of Local Resources
“Another way to make lessons relevant and meaningful is to use the environment and community around you. Think back to the story we heard at the start of the lesson – the teacher used materials from the camp itself to bring the science lesson to life.
In the next activity we will create a list of things that we can find in our community to support teaching and learning. In your groups you will have 5 minutes to come up with as many locally available teaching and learning resources as possible. This is a technique called brainstorming and it is a useful activity in the classroom to encourage students to generate ideas.”
“Now each group will take turns listing one item without repeating others’ until they run out of items. The group that has the most items is the winner.”
“We now have a long list of local resources. Some are easier to find than others, and you might have a preference to use one more than the other. In the rest of the session we will explore ways to use these resources in the classroom and how to find human resources in our community. Keep adding to your list throughout the session when you hear interesting ideas from your peers.”
As the groups take turns, write down their examples on the flipchart at the front. Celebrate the winning group. Add anything important that has not been said (see Appendix 4E for ideas).
Ask participants to look at Handout 4.4B. Ask participants to add examples from the list at the front to their handout. Remind them to try and group the examples by category (as shown on the handout).
Give each group a flipchart paper and markers. Walk around the classroom to encourage and support participants. Use Appendix 4E to give examples if participants are struggling. Give participants a 1 minute warning.
Materials: Handout 4.4A - Example Lesson in Module Handout 4.4B - Local Resource List Appendix 4E - Examples of Local Resources Flipchart paper, markers/colored pens for participants
Module 4 - Curriculum and Planning Session 4 - Making Lessons Relevant and Meaningful
65
Explore Ways to Use Local Resources in the Classroom
“Now we are going to explore how to use different local resources in our class. As you can see in the classroom, I have set up 7 stations with resources on them. These resources can all be found in our community. You have to walk around and study the resources and come up with creative and effective ways to use them in your classrooms. You can discuss your ideas with your fellow participants. There will be three rounds. You must choose a resource and then come up with 5 different ways to use that resource.
Please take 3 minutes to walk around the stations and take a look at each resource. Feel free to touch them. Think about how you could use this in your class. In 3 minutes time you will have to choose your first resource.”
“Choose your first resource. Head over to its station and discuss with other participants how you will use it. Your goal as a group at each station is to come up with at least 5 different ways of using this resource. You have 5 minutes.”
“Now let’s hear about some ideas you have about how to use them.”
Check in with each station. Make sure each station has 2-4 people. After 5 minutes, remind participants to choose their second resource and do the same activity. Then the third after another 5 minutes.
Walk around the classroom with participants. Answer their questions.
Set up 7 stations in the room to display different local resources that can be used for teaching and learning.
Locate 7 examples of local resources. The resources should be easy to find and can be used in many classroom activities. Examples include materials (stones, bottle caps, leaves, cloths) and non-materials (students, songs, festivals). Non-materials can be displayed using pictures. It is better to pick materials from different categories. The number of stations can be adjusted according to the number of participants.
Module 4 - Curriculum and Planning Session 4 - Making Lessons Relevant and Meaningful
66
For each resource invite one participant to share ideas. Remind participants to add to their handout lists if they hear any new ideas.
Example Answers:
[Resource 1: stones]
• To teach numbers.
• Present addition and subtraction.
• To teach adjectives about colors.
• Weight, shapes, etc.
• To demonstrate gravity.
• Ask students to make a story about a stone.
Ask Participants (Whole Group):What are different ways to use [resource 1] in class?
Module 4 - Curriculum and Planning Session 4 - Making Lessons Relevant and Meaningful
67

Materials: Slide 27-28
PLANNING AND ACTION
“Think about everything we have learned in today’s session. How will you use these skills in your upcoming lessons?”
“Look back at your original notes about what interests your students. With your group see if you can generate more ideas about how to incorporate these ideas now that you have completed the session. Discuss in your groups for 5 minutes”
After 5 minutes ask several participants to share their ideas. Ask participants to choose one of the ideas from their group discussion to try in their teaching next week.
Move around the room to encourage participants and answer any questions. Give time warnings throughout. After 10 minutes ask participants to share their strategies with their partner.
“Think about the lessons you have coming up, and plan how you will make those lessons more relevant and meaningful for your students. Please complete the following steps. You have 20 minutes.
1. Think of three lessons you are teaching next week.
2. For each lesson come up with two strategies to make those lessons more meaningful and relevant for your students.
3. After 10 minutes share your ideas with your partner.
4. Tell your partner two positive things about their strategies. Tell them one thing that they could do to make it even better.”
If participants have recently completed session 3 ask them to take out their lesson plans from that session to use now.
Lesson Plan Review
Student Interest Reflection and Action Plan
Module 4 - Curriculum and Planning Session 4 - Making Lessons Relevant and Meaningful
68
“Let’s think back on everything we have learned together today and brainstorm a list of skills or strategies you can use in your classroom.”
Write the skills and strategies on flipchart for everyone to see and encourage participants to write these down in their notes.
ASSESSSkills and Strategies Worksheet
Materials: Handout 4.0 - Skills and Strategies Worksheet
“Review the skills and strategies you can bring to your classroom that you learned in this session to make your lessons more meaningful and relevant. Choose one skill or strategy you would like to work on next week. It is important to be honest with yourself and open to learning new things.
Once you’ve selected a skill or strategy from this session that you would like to develop, write it in the box labeled ‘4’. In the box labeled ‘Today’, use the water glass scale to fill in how well you currently use the skill in your classroom right now. Then go to the ‘Goal’ box and use the water glass scale to show how well you would like to use the skill in the next week or so. Then in the ‘Action’ box write how you will achieve your goal i.e. -- What will you do in the next week to use or practice the skill? Do NOT fill out the Practice box now; this is to be completed AFTER you have practiced the skill in your classroom.”
Encourage participants to come up with the skills and strategies themselves. Example answers may include: • Using local resources• Changing examples to connect to students’ lives • Marketplace role-play• Measuring objects in the community• Using stories to teach• Group work• Think-pair-share • Brainstorming• Concept mapping
Module 4 - Curriculum and Planning Session 4 - Making Lessons Relevant and Meaningful
69
“Great work today everyone. I hope you will try and make your lessons meaningful and relevant in the coming week.”
Use the example to help explain the instructions if needed. Before beginning the activity, have participants explain the instructions back to you to make sure they understand the activity.
Example Answers:
• I will use three activities this week that connect to students’ lives.
• I will create a starter for a lesson that uses materials from the local environment.
Module 4 - Curriculum and Planning Session 4 - Making Lessons Relevant and Meaningful
70
Session 1: Curriculum
Appendix 4A: Story Sequence Activity Template
Session 2: Long Term Planning
Appendix 4B: Scheme of Work Example Answers
Session 3: Lesson Planning
Appendix 4C: Lesson Plan Analysis 1
Appendix 4D: Lesson Plan Analysis 2
Session 4: Resources
Appendix 4E: Examples of Local Resources
Appendix 4F: Skills and Strategies Worksheet Example Answers
APPENDICES
Module 4 - Curriculum and Planning Appendices
71
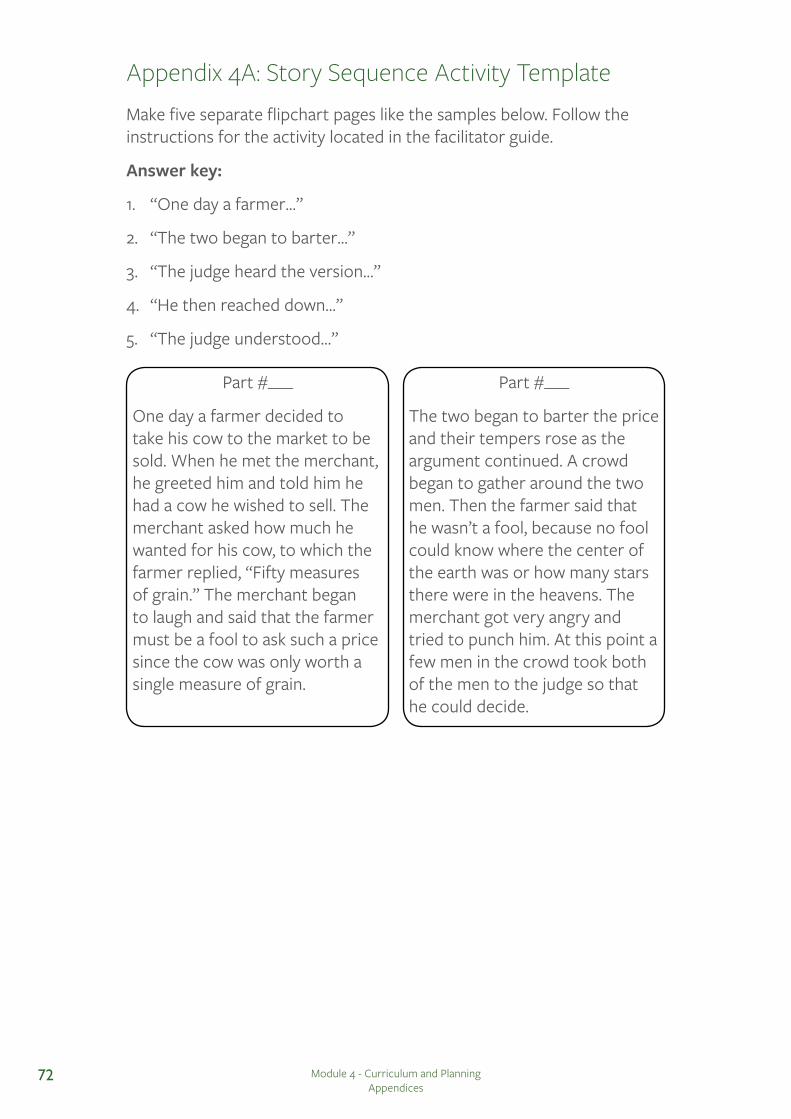
Make five separate flipchart pages like the samples below. Follow the instructions for the activity located in the facilitator guide.
Answer key:
1. “One day a farmer…”
2. “The two began to barter…”
3. “The judge heard the version…”
4. “He then reached down…”
5. “The judge understood…”
Part #___
The two began to barter the price and their tempers rose as the argument continued. A crowd began to gather around the two men. Then the farmer said that he wasn’t a fool, because no fool could know where the center of the earth was or how many stars there were in the heavens. The merchant got very angry and tried to punch him. At this point a few men in the crowd took both of the men to the judge so that he could decide.
Part #___
One day a farmer decided to take his cow to the market to be sold. When he met the merchant, he greeted him and told him he had a cow he wished to sell. The merchant asked how much he wanted for his cow, to which the farmer replied, “Fifty measures of grain.” The merchant began to laugh and said that the farmer must be a fool to ask such a price since the cow was only worth a single measure of grain.
Appendix 4A: Story Sequence Activity Template
Module 4 - Curriculum and Planning Appendices
72
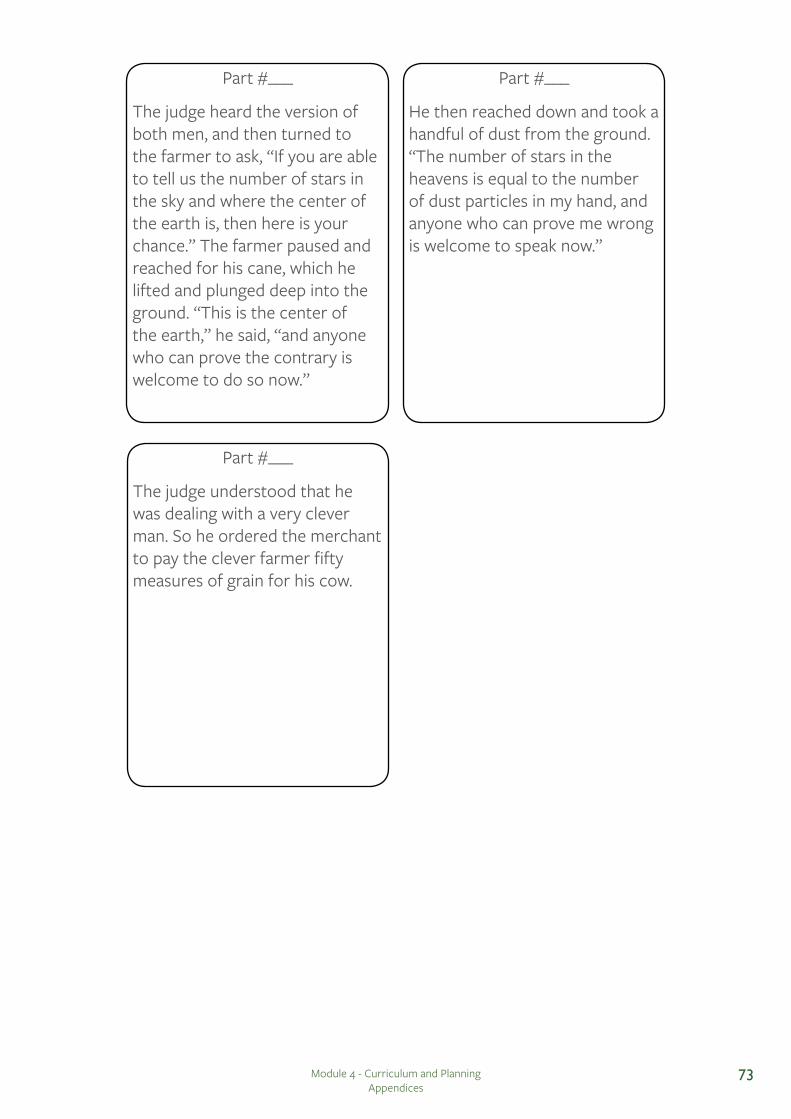
Part #___
The judge understood that he was dealing with a very clever man. So he ordered the merchant to pay the clever farmer fifty measures of grain for his cow.
Part #___
He then reached down and took a handful of dust from the ground. “The number of stars in the heavens is equal to the number of dust particles in my hand, and anyone who can prove me wrong is welcome to speak now.”
Part #___
The judge heard the version of both men, and then turned to the farmer to ask, “If you are able to tell us the number of stars in the sky and where the center of the earth is, then here is your chance.” The farmer paused and reached for his cane, which he lifted and plunged deep into the ground. “This is the center of the earth,” he said, “and anyone who can prove the contrary is welcome to do so now.”
Module 4 - Curriculum and Planning Appendices
73
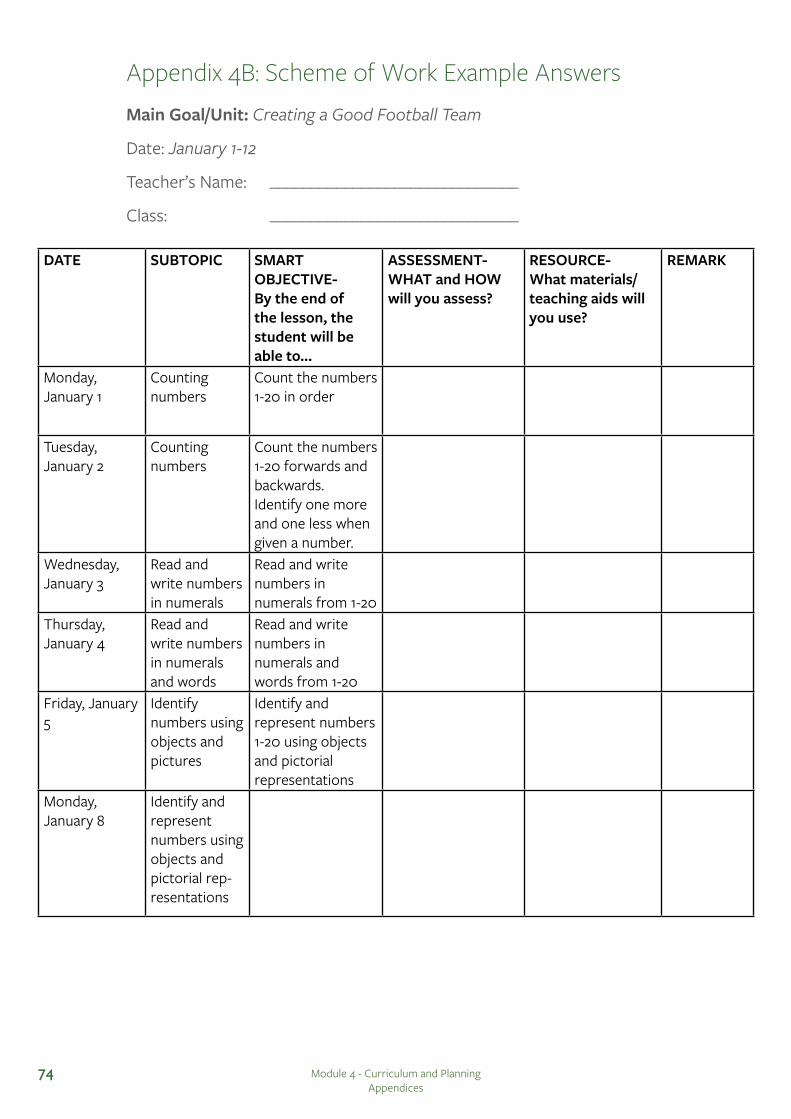
Main Goal/Unit: Creating a Good Football Team
Date: January 1-12
Teacher’s Name: ______________________________
Class: ______________________________
DATE SUBTOPIC SMART OBJECTIVE- By the end of the lesson, the student will be able to...
ASSESSMENT- WHAT and HOW will you assess?
RESOURCE- What materials/ teaching aids will you use?
REMARK
Monday, January 1
Counting numbers
Count the numbers 1-20 in order
Tuesday, January 2
Counting numbers
Count the numbers 1-20 forwards and backwards.Identify one more and one less when given a number.
Wednesday, January 3
Read and write numbers in numerals
Read and write numbers in numerals from 1-20
Thursday, January 4
Read and write numbers in numerals and words
Read and write numbers in numerals and words from 1-20
Friday, January 5
Identify numbers using objects and pictures
Identify and represent numbers 1-20 using objects and pictorial representations
Monday, January 8
Identify and represent numbers using objects and pictorial rep-resentations
Appendix 4B: Scheme of Work Example Answers
Module 4 - Curriculum and Planning Appendices
74
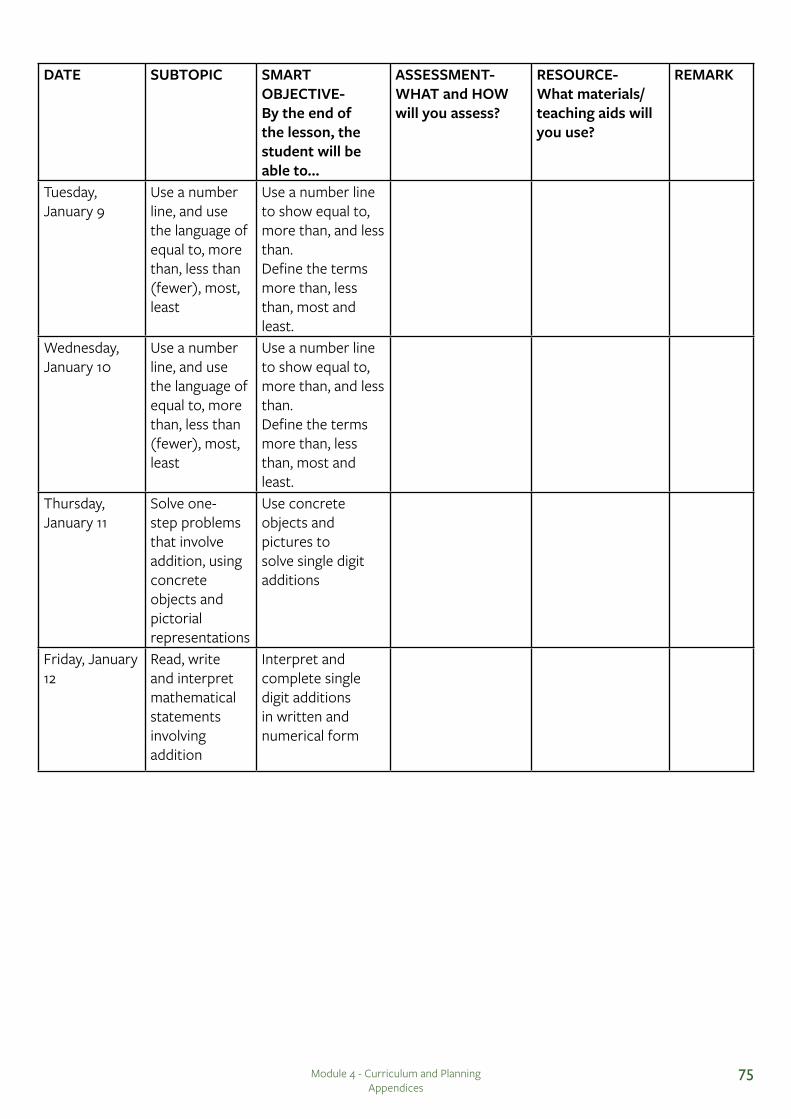
DATE SUBTOPIC SMART OBJECTIVE- By the end of the lesson, the student will be able to...
ASSESSMENT- WHAT and HOW will you assess?
RESOURCE- What materials/ teaching aids will you use?
REMARK
Tuesday, January 9
Use a number line, and use the language of equal to, more than, less than (fewer), most, least
Use a number line to show equal to, more than, and less than.Define the terms more than, less than, most and least.
Wednesday, January 10
Use a number line, and use the language of equal to, more than, less than (fewer), most, least
Use a number line to show equal to, more than, and less than.Define the terms more than, less than, most and least.
Thursday, January 11
Solve one-step problems that involve addition, using concrete objects and pictorial representations
Use concrete objects and pictures to solve single digit additions
Friday, January 12
Read, write and interpret mathematical statements involving addition
Interpret and complete single digit additions in written and numerical form
Module 4 - Curriculum and Planning Appendices
75
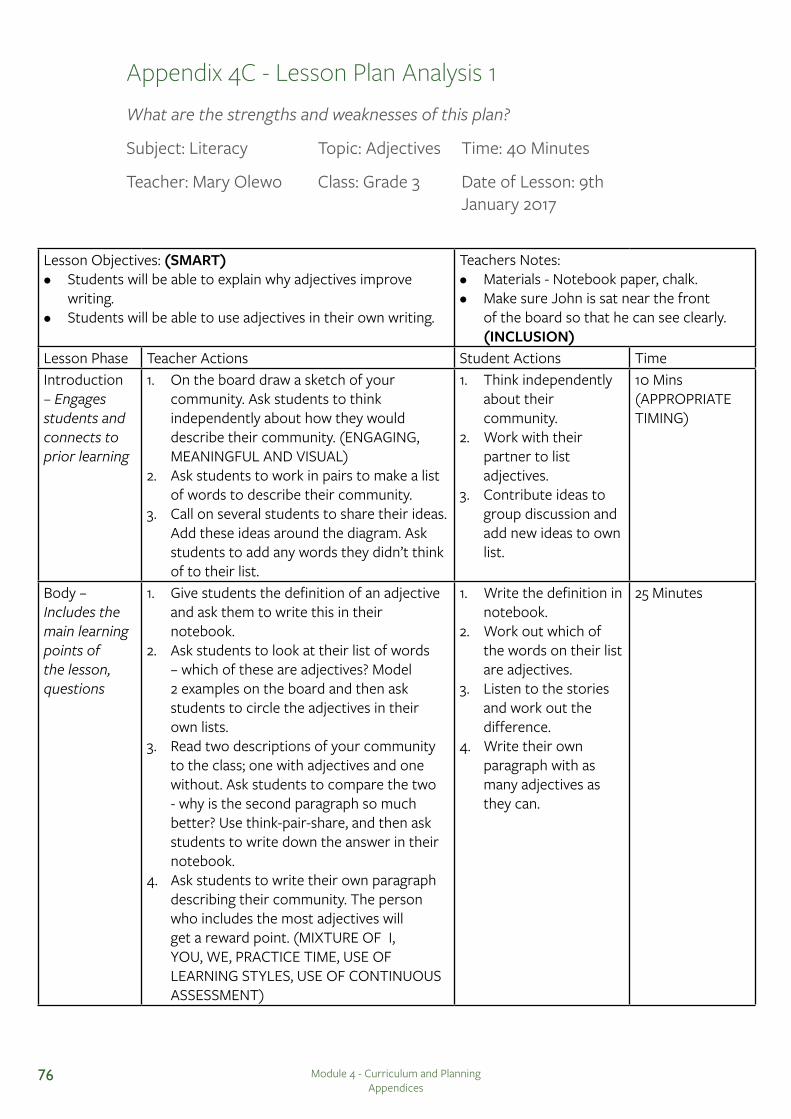
What are the strengths and weaknesses of this plan?
Subject: Literacy Topic: Adjectives Time: 40 Minutes
Teacher: Mary Olewo Class: Grade 3 Date of Lesson: 9th January 2017
Lesson Objectives: (SMART)• Students will be able to explain why adjectives improve
writing.• Students will be able to use adjectives in their own writing.
Teachers Notes:• Materials - Notebook paper, chalk.• Make sure John is sat near the front
of the board so that he can see clearly. (INCLUSION)
Lesson Phase Teacher Actions Student Actions TimeIntroduction – Engages students and connects to prior learning
1. On the board draw a sketch of your community. Ask students to think independently about how they would describe their community. (ENGAGING, MEANINGFUL AND VISUAL)
2. Ask students to work in pairs to make a list of words to describe their community.
3. Call on several students to share their ideas. Add these ideas around the diagram. Ask students to add any words they didn’t think of to their list.
1. Think independently about their community.
2. Work with their partner to list adjectives.
3. Contribute ideas to group discussion and add new ideas to own list.
10 Mins(APPROPRIATE TIMING)
Body –Includes the main learning points of the lesson, questions
1. Give students the definition of an adjective and ask them to write this in their notebook.
2. Ask students to look at their list of words – which of these are adjectives? Model 2 examples on the board and then ask students to circle the adjectives in their own lists.
3. Read two descriptions of your community to the class; one with adjectives and one without. Ask students to compare the two - why is the second paragraph so much better? Use think-pair-share, and then ask students to write down the answer in their notebook.
4. Ask students to write their own paragraph describing their community. The person who includes the most adjectives will get a reward point. (MIXTURE OF I, YOU, WE, PRACTICE TIME, USE OF LEARNING STYLES, USE OF CONTINUOUS ASSESSMENT)
1. Write the definition in notebook.
2. Work out which of the words on their list are adjectives.
3. Listen to the stories and work out the difference.
4. Write their own paragraph with as many adjectives as they can.
25 Minutes
Appendix 4C - Lesson Plan Analysis 1
Module 4 - Curriculum and Planning Appendices
76
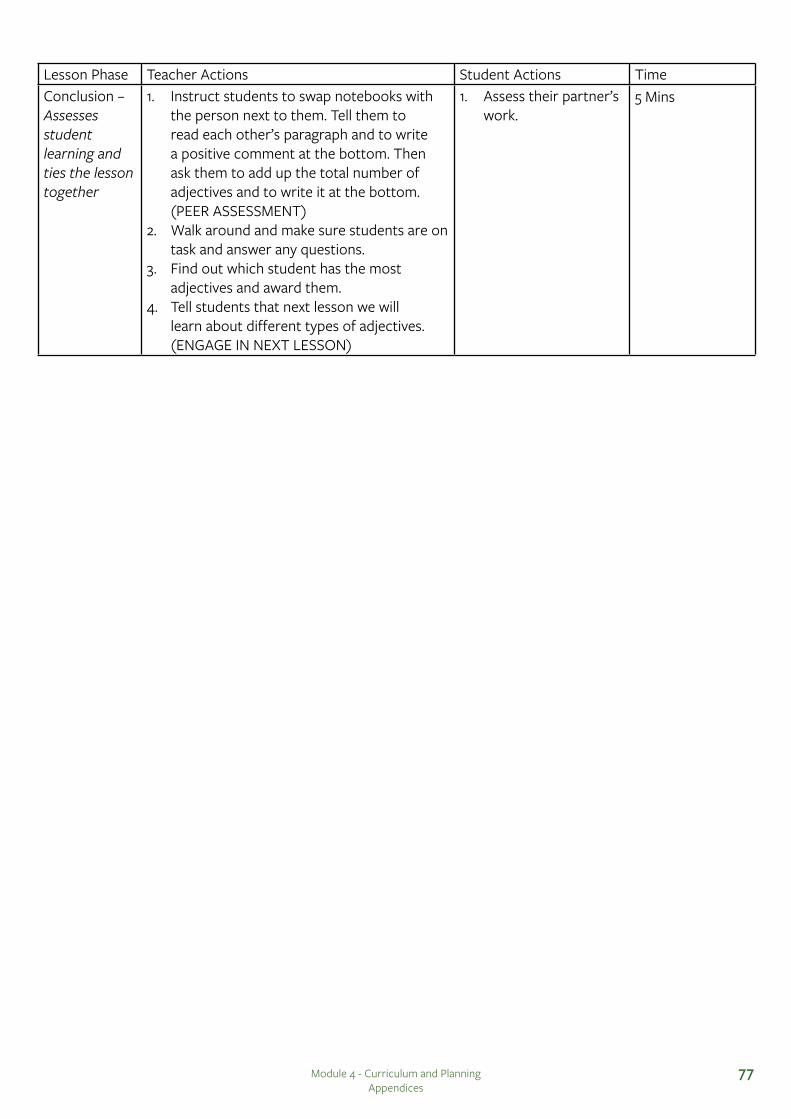
Lesson Phase Teacher Actions Student Actions TimeConclusion –Assesses student learning and ties the lesson together
1. Instruct students to swap notebooks with the person next to them. Tell them to read each other’s paragraph and to write a positive comment at the bottom. Then ask them to add up the total number of adjectives and to write it at the bottom. (PEER ASSESSMENT)
2. Walk around and make sure students are on task and answer any questions.
3. Find out which student has the most adjectives and award them.
4. Tell students that next lesson we will learn about different types of adjectives. (ENGAGE IN NEXT LESSON)
1. Assess their partner’s work.
5 Mins
Module 4 - Curriculum and Planning Appendices
77
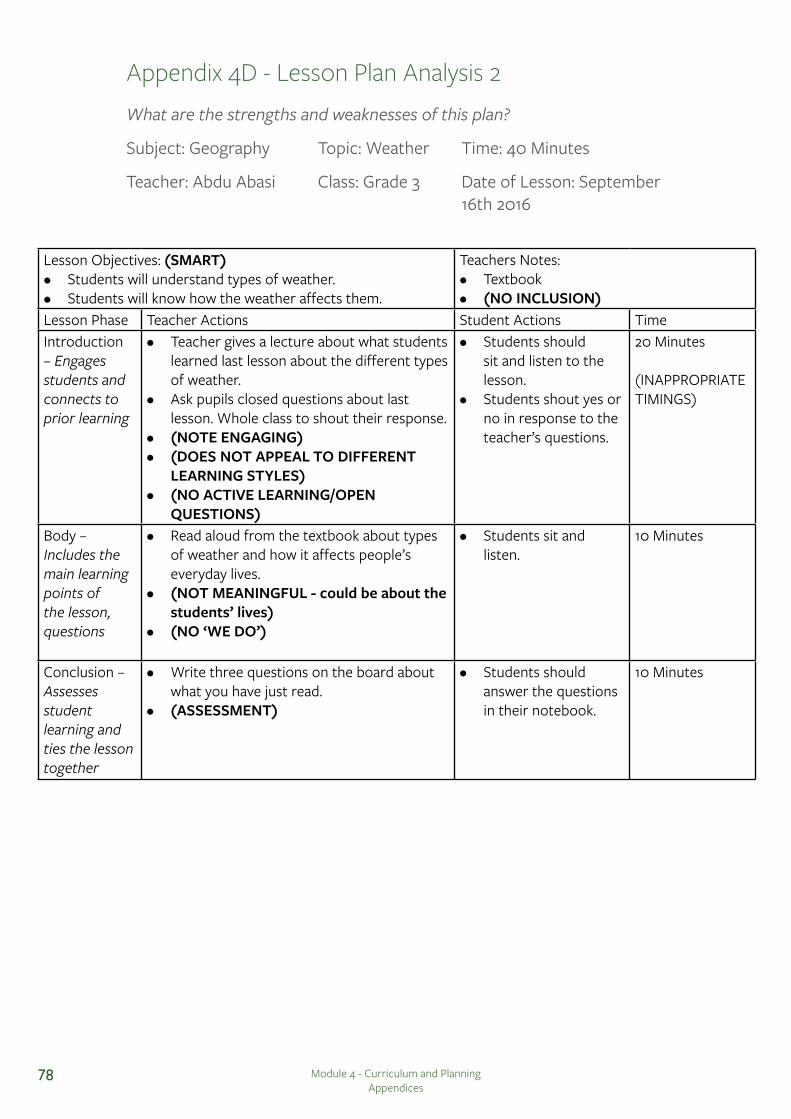
What are the strengths and weaknesses of this plan?
Subject: Geography Topic: Weather Time: 40 Minutes
Teacher: Abdu Abasi Class: Grade 3 Date of Lesson: September 16th 2016
Lesson Objectives: (SMART)• Students will understand types of weather.• Students will know how the weather affects them.
Teachers Notes:• Textbook• (NO INCLUSION)
Lesson Phase Teacher Actions Student Actions TimeIntroduction – Engages students and connects to prior learning
• Teacher gives a lecture about what students learned last lesson about the different types of weather.
• Ask pupils closed questions about last lesson. Whole class to shout their response.
• (NOTE ENGAGING)• (DOES NOT APPEAL TO DIFFERENT
LEARNING STYLES)• (NO ACTIVE LEARNING/OPEN
QUESTIONS)
• Students should sit and listen to the lesson.
• Students shout yes or no in response to the teacher’s questions.
20 Minutes
(INAPPROPRIATE TIMINGS)
Body –Includes the main learning points of the lesson, questions
• Read aloud from the textbook about types of weather and how it affects people’s everyday lives.
• (NOT MEANINGFUL - could be about the students’ lives)
• (NO ‘WE DO’)
• Students sit and listen.
10 Minutes
Conclusion –Assesses student learning and ties the lesson together
• Write three questions on the board about what you have just read.
• (ASSESSMENT)
• Students should answer the questions in their notebook.
10 Minutes
Appendix 4D - Lesson Plan Analysis 2
Module 4 - Curriculum and Planning Appendices
78
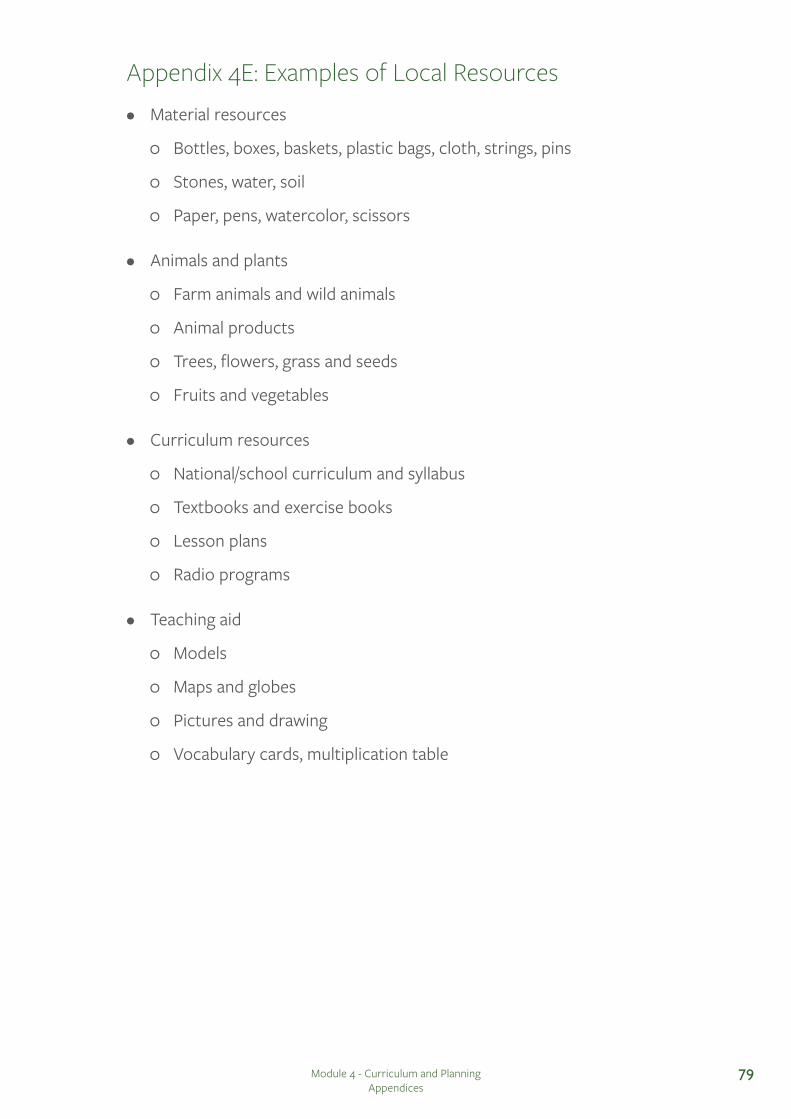
• Material resources
0 Bottles, boxes, baskets, plastic bags, cloth, strings, pins
0 Stones, water, soil
0 Paper, pens, watercolor, scissors
• Animals and plants
0 Farm animals and wild animals
0 Animal products
0 Trees, flowers, grass and seeds
0 Fruits and vegetables
• Curriculum resources
0 National/school curriculum and syllabus
0 Textbooks and exercise books
0 Lesson plans
0 Radio programs
• Teaching aid
0 Models
0 Maps and globes
0 Pictures and drawing
0 Vocabulary cards, multiplication table
Appendix 4E: Examples of Local Resources
Module 4 - Curriculum and Planning Appendices
79

• Human resources
0 Other teachers, school principal and teaching coach
0 Community members of different professions
0 International organizations
0 Students
• Cultural resources
0 Language including proverbs
0 Songs, dances, tales and poems, etc.
0 Rituals and festivals
0 Games
Module 4 - Curriculum and Planning Appendices
80
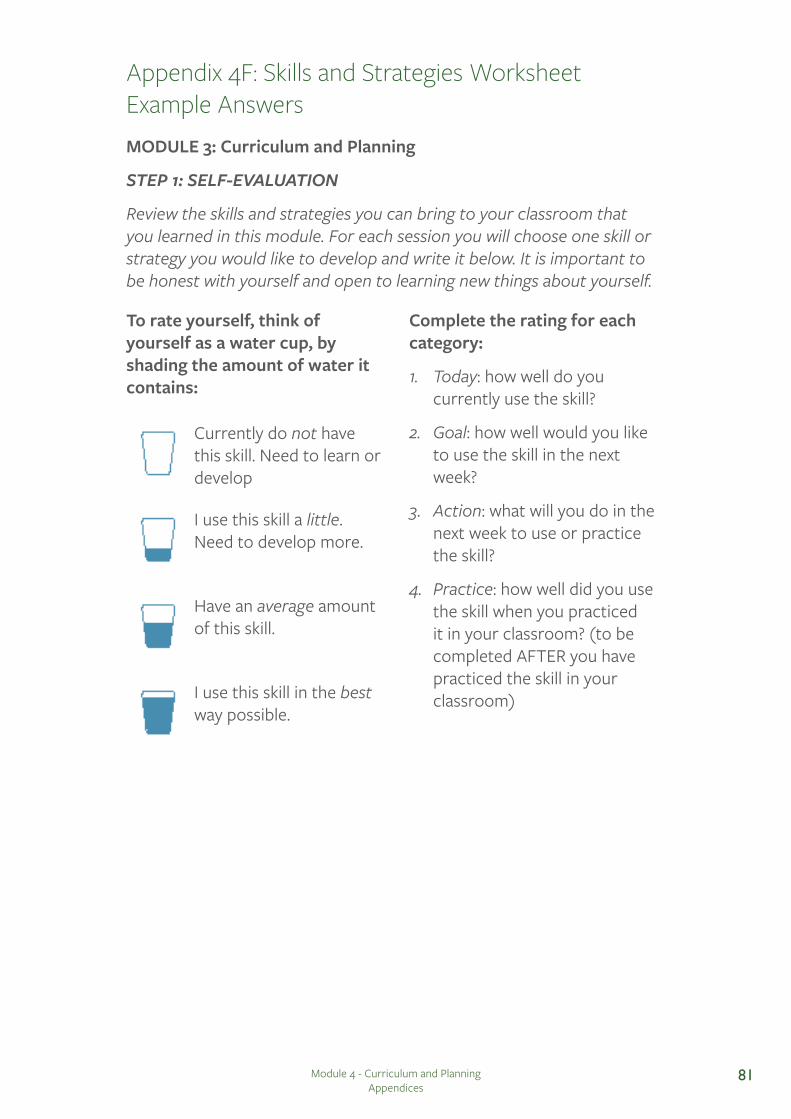
Appendix 4F: Skills and Strategies Worksheet Example AnswersMODULE 3: Curriculum and Planning
STEP 1: SELF-EVALUATION
Review the skills and strategies you can bring to your classroom that you learned in this module. For each session you will choose one skill or strategy you would like to develop and write it below. It is important to be honest with yourself and open to learning new things about yourself.
Currently do not have this skill. Need to learn or develop
I use this skill a little. Need to develop more.
Have an average amount of this skill.
I use this skill in the best way possible.
To rate yourself, think of yourself as a water cup, by shading the amount of water it contains:
Complete the rating for each category:
1. Today: how well do you currently use the skill?
2. Goal: how well would you like to use the skill in the next week?
3. Action: what will you do in the next week to use or practice the skill?
4. Practice: how well did you use the skill when you practiced it in your classroom? (to be completed AFTER you have practiced the skill in your classroom)
Module 4 - Curriculum and Planning Appendices
81
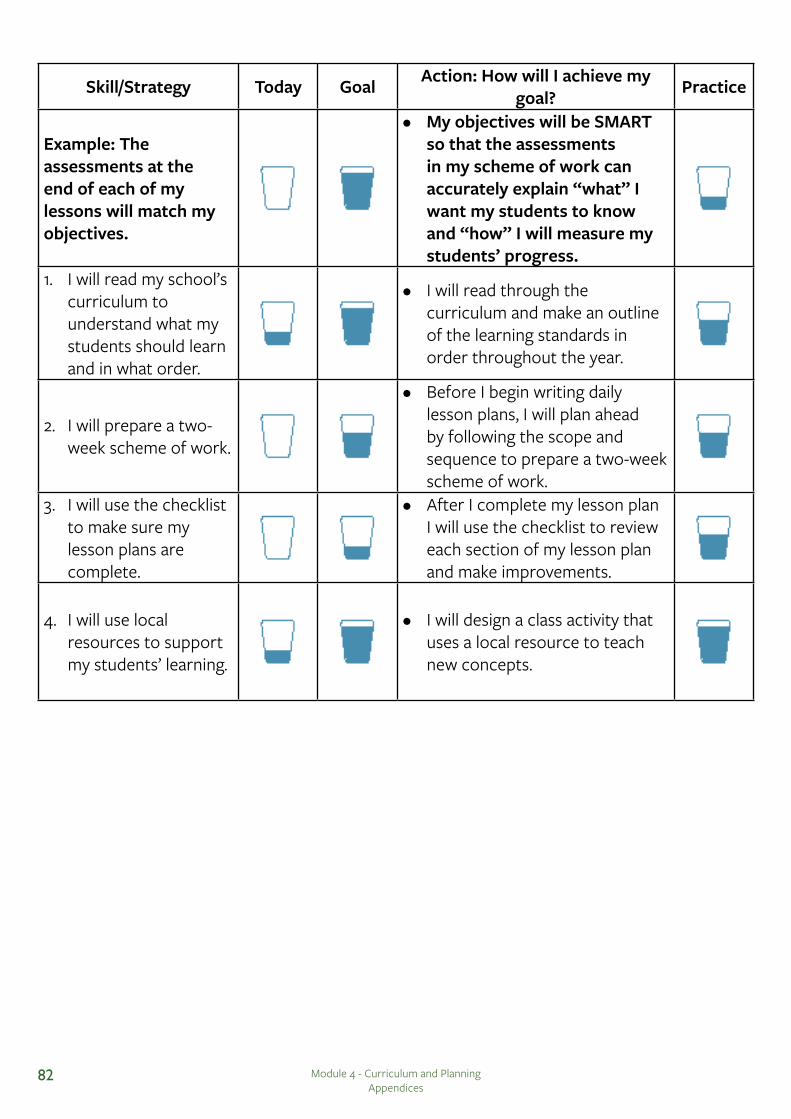
Skill/Strategy Today Goal Action: How will I achieve my goal? Practice
Example: The assessments at the end of each of my lessons will match my objectives.
• My objectives will be SMART so that the assessments in my scheme of work can accurately explain “what” I want my students to know and “how” I will measure my students’ progress.
1. I will read my school’s curriculum to understand what my students should learn and in what order.
• I will read through the curriculum and make an outline of the learning standards in order throughout the year.
2. I will prepare a two-week scheme of work.
• Before I begin writing daily lesson plans, I will plan ahead by following the scope and sequence to prepare a two-week scheme of work.
3. I will use the checklist to make sure my lesson plans are complete.
• After I complete my lesson plan I will use the checklist to review each section of my lesson plan and make improvements.
4. I will use local resources to support my students’ learning.
• I will design a class activity that uses a local resource to teach new concepts.
Module 4 - Curriculum and Planning Appendices
82
STEP 2: PLAN
Choose 1-2 of the skills/strategies from the sessions that you would like to develop. Write an action plan of the steps you will take to achieve your goal.
Area for Growth: I will create SMART objectives for my scheme of work.
Action Plan:When I am creating a scheme of work for the next couple of weeks, I am going to make sure each of my objectives is specific, measurable, achievable, relevant, and time-bound. I will choose action verbs that are specific and measurable, not vague, like “know” or “understand.” I will ensure that the objective, or skill or content I want to teach, is achievable by my students in the span of one day’s lesson. I will ensure that the objective is relevant to my students’ interest and ability level.
Area for Growth: I will use the checklist to make sure my lesson plans are complete.
Action Plan:After I complete my lesson plan I will use the checklist to review each section of my lesson plan. If I am missing something from one of the sections I will work to make improvements to my lesson plan. I will make sure I have used lesson objectives from my scheme of work and that I have thought through how much time the lesson will take to teach. I will include teacher and student actions and will ensure that I have listed ways to include every student into the lesson. I will ensure that my materials are listed out and that I have noted any reminders about the lesson. I will create an introduction that is engaging and related to my lesson topic, include time for my students to practice in the body of the lesson, and assess my students during the conclusion of my lesson.
Module 4 - Curriculum and Planning Appendices
83
STEP 3: REFLECTION AND COLLABORATION
Instructions: Step 3 can be completed individually or in a group (TLC). Answer the questions below independently and discuss your answers in a group if you feel comfortable. Discussion can be used to identify common challenges and create possible solutions or share resources.
Reflect on how you used a new skill or strategy from the goals that you listed above in your classroom.
1. What did you do to try a new skill or strategy? 2. What successes and challenges did you have in the classroom?I started creating SMART objectives for my scheme of work for my next two weeks of class. The students are learning about order of operations in math. I used my checklist to make sure the plan was complete. One challenge I had was making sure the objectives were specific and time-bound.
Learn
3. Brainstorm possible solutions. Consider previously learned concepts.I need to make my objectives more specific. I need to think more about the steps so that the objectives can be measured easily and broken down into smaller parts. I think that would make them more specific and able to be achieved in a certain time frame.
Plan
4. What will you do again? 5. What will you change or do differently? Share your plan with a peer
for feedback.Instead of just saying “my students will know how to use the order of operations in math by the end of next week,” I will break this down into more steps, and each step will be a goal. They will first understand what math operation comes first, then second, etc.
Take action in the classroom.
Module 4 - Curriculum and Planning Appendices
84
Here are additional ways to build on your skills within this module through an individual journal reflection or in a discussion with a supportive group of collaborative teachers (TLC)
Reflection and Collaboration Activity #1 - Review Lesson Plan Using Checklist
Participants should review the lesson plan using the lesson planning checklist (from Session 3 following the lesson plan template) to make sure the lesson has everything listed on the checklist. If participants are in TLC groups, they can review lesson plans among group members in pairs, provide feedback for each other’s lesson plan and brainstorm strategies to improve the lesson plans.
Reflection and Collaboration Activity #2 - Find Human Resource in Community (continued)
Since participants might not be able to complete the human resource checklist (from Session 4) in the training session, they should continue the “Find Human Resource in Community” activity outside the training. If they are in a TLC group, they can do this activity in the group and expand their contact sheet to include TLC group members. If not, they should talk to their colleagues, school principal, teaching coach and/or other people that they identify as potential human resource to complete the checklist. Eventually their goal is to have a solid list of people who they can seek help about teaching as well as their contact information.
Module 4 - Curriculum and Planning Appendices
85
RESOURCES USED OR REFERENCED IN THIS MODULE
Annan, J., Castelli, L., Devreux, A., & Locatelli, E. (2003, February). Handbook for teachers. Kampala: Uganda: AVSI.
Annan, J., Castelli, L., Devreux, A., & Locatelli, E. (2003, February). Training manual for teachers. Kampala: Uganda: AVSI.
Gove, A., & Cvelich, P. (2011). Early reading: Igniting education for all. A report by the Early Grade Learning Community of Practice. Revised Edition. Research Triangle Park, NC: Research Triangle Institute.
Harris, R., Miske, S., & Attig, G. (2004). Embracing Diversity: Toolkit for Creating Inclusive Learning-Friendly Environments. UNESCO Bangkok.
INEE/UNHCR. (2011). Peace Education Teacher Training Manual.
International Rescue Committee (IRC). (2011). Creating healing classrooms – A multimedia teacher training resource.
International Rescue Committee (IRC). (2006). Creating healing classrooms: Tools for teachers and teacher educators. United States: International Rescue Committee, Children and Youth Protection Development Unit.
Malawi Institute of Education. (2004). Talular a user’s guide: Teaching and learning using locally available resources. Dasami, Malawi: Malawi Institute of Education.
Malawi Institute of Education (2008). TALULAR workshop report. Dasami, Malawi: Malawi Institute of Education.
Mendenhall, M., Dryden-Peterson, S., Bartlett, L. Ndirangu, C., Imonje, R. Gakunga, D., Gichuhi, L., Nyagah, G., Okoth, U., and Tangelder, M. (2015). Quality education for refugees in Kenya: Pedagogy in urban Nairobi and Kakuma Refugee Camp settings. Journal on Education in Emergencies 1(1), pp. 92-130.
Nicolai, S. (2003). Education in emergencies: A tool kit for starting and managing education in emergencies. Save the Children UK.
UNESCO. (2006). Chapter 5.1: Curriculum content and review processes. In Guidebook for planning education in emergencies and reconstruction. Paris, France: International Institute for Educational Planning (IIEP).
Teachers College Education in Emergencies Course, Teacher Training Companion Handbook
Teacher Education in Sub-Saharan Africa (TESSA). Key resources.
UNICEF. Sierra Leone – Emerging Issues (Pre-service).
UNRWA. (2013). Training manual for effective teaching and learning in emergencies and recovery.