Embed Size (px)
Citation preview

1
Department of Industrial Relations
User Guide for Electronic Certified Payroll Reporting via the Online Form
July 2016
Version 1.6

2
Contents 1. Introduction ................................................................................................................................. 3
2. Overview of Changes Made to the Online Form in the Latest Release (2.6) .............................. 3
3. System Requirements for the Online Form ................................................................................. 3
4. Using the Online Form to Submit Certified Payroll Records ........................................................ 3
4.1. Contractor Information ........................................................................................................ 5
4.2. Project Information .............................................................................................................. 6
4.3. Payroll Information ............................................................................................................ 10
4.4. Submitting Corrections ...................................................................................................... 17

3
1. Introduction This manual should help you understand the steps in reporting certified payroll records electronically via the Online Form. (A separate User Guide provides instructions for submitting records via XML upload.)
2. Overview of Changes Made to the Online Form in the Latest Release (2.6) • The field asking for the Public Works Contractor Registration Number is now in a
prominent location. • The Payroll Information section addresses
o the possible need to submit multiple crafts for one employee o the need to submit weekly, biweekly, and semi-monthly payrolls.
3. System Requirements for the Online Form The electronic reporting application supports Internet Explorer 9, 10, and the latest versions of Chrome, Firefox, and Safari. No additional software is required.
4. Using the Online Form to Submit Certified Payroll Records To get started, go to the landing page for Certified Payroll Reporting on the Public Works website. Select the link for the Online Form, and then click on the Start button that will appear.

4
• You will need to have the following information on hand to complete the Online Form:
1. Contractor Information: a. The contractor’s Public Works Contractor Registration Number b. The contractor’s Social Security Number (SSN) or Federal Employer Identification
Number (FEIN).
(For more details, see Section 4.1.)
2. Project Information: The DIR Project ID number (also called the PWC-100 number)
(For more details, see Section 4.2.)
3. Payroll Information a. Employee information b. Payroll deductions c. Contributions d. Payments made to employees
(For more details, see Section 4.3.)

5
4.1. Contractor Information
1. Enter your Public Works Contractor Registration Number. If you are not registered, enter NA (upper case, no slash) in that field. The only contractors not required to register with DIR are those whose public works projects were bid on or before April 1, 2015.
2. Click the Go button next to that field. 3. Enter your Social Security Number (SSN) or your Federal Employer Identification
Number (FEIN) in the second field that appears. 4. Click the Go button next to that field. 5. If the rest of the Contractor Information fields auto fill, click the Next button, to get
to the Project Information section of the form.
6. If any of the fields remain empty (with a light yellow background), complete those
fields to add the contractor to the database, and then click the Next button to get to the Project Information section.

6
4.2. Project Information
1. Select the DIR Project ID (also called the PWC-100) number from the drop down
menu. If it is not in the list, type it into the field. 2. If you do not know the DIR Project ID number, and you are the prime contractor, the
awarding body should provide it to you. If you are a subcontractor, contact your prime contractor to obtain it. You may also search for it by using the DIR Project ID Lookup link provided next to the DIR Project ID field.
• Enter at least one search criteria for the project (Project Name, Project Number, Award Date, City, etc.) and click the Search button. In the example below, we know the Awarding Body Name is “City of DIR.”

7
• On the Search Results screen that appears in a new window, you will find the DIR Project ID (i.e., PWC-100) number in the first column, in blue.
Now go back to the online payroll form window and enter the DIR Project ID number. Then click the Go button.
3. If the project information does not display, a message in red will appear indicating that the project must first be registered in the PWC-100 database. Please contact the awarding body on your project to inform them or send an email to [email protected].
8
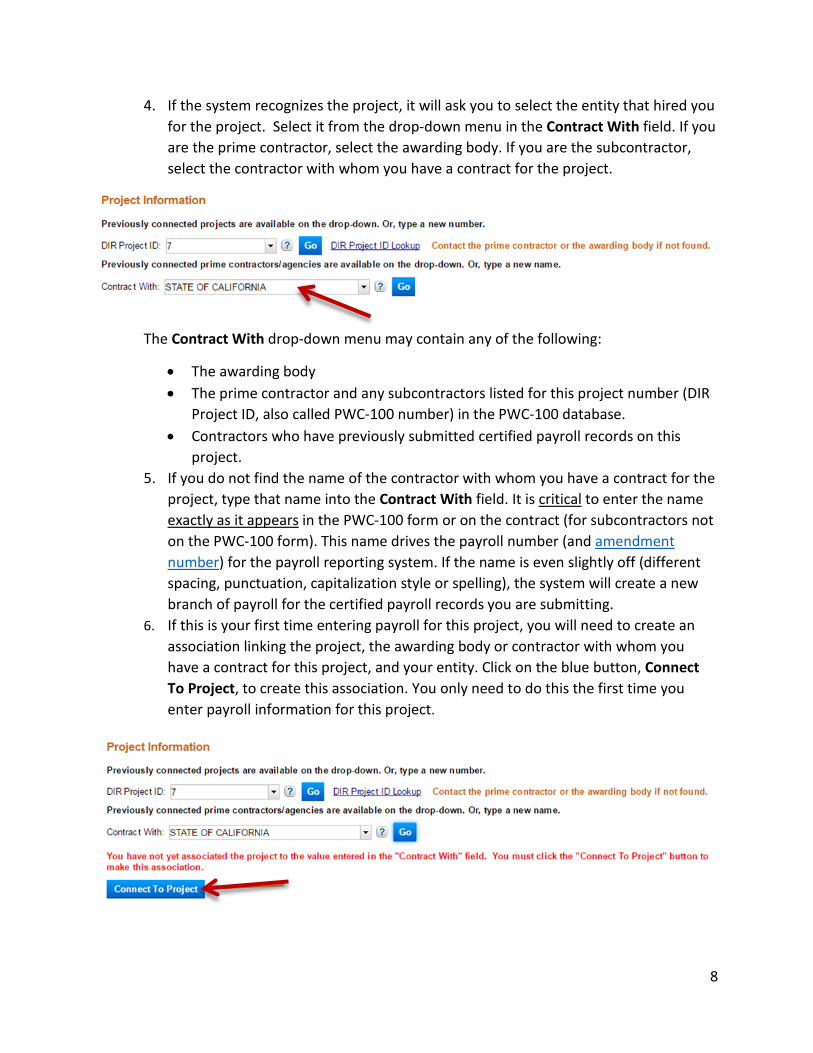
4. If the system recognizes the project, it will ask you to select the entity that hired you for the project. Select it from the drop-down menu in the Contract With field. If you are the prime contractor, select the awarding body. If you are the subcontractor, select the contractor with whom you have a contract for the project.
The Contract With drop-down menu may contain any of the following:
• The awarding body • The prime contractor and any subcontractors listed for this project number (DIR
Project ID, also called PWC-100 number) in the PWC-100 database. • Contractors who have previously submitted certified payroll records on this
project. 5. If you do not find the name of the contractor with whom you have a contract for the
project, type that name into the Contract With field. It is critical to enter the name exactly as it appears in the PWC-100 form or on the contract (for subcontractors not on the PWC-100 form). This name drives the payroll number (and amendment number) for the payroll reporting system. If the name is even slightly off (different spacing, punctuation, capitalization style or spelling), the system will create a new branch of payroll for the certified payroll records you are submitting.
6. If this is your first time entering payroll for this project, you will need to create an association linking the project, the awarding body or contractor with whom you have a contract for this project, and your entity. Click on the blue button, Connect To Project, to create this association. You only need to do this the first time you enter payroll information for this project.

9
7. The Project Detail and Payroll Information sections will now appear. 8. Before you begin filling out the Payroll Information fields, review the information
that auto fills the Project Detail section to make sure that the system has identified the correct project.

10
4.3. Payroll Information
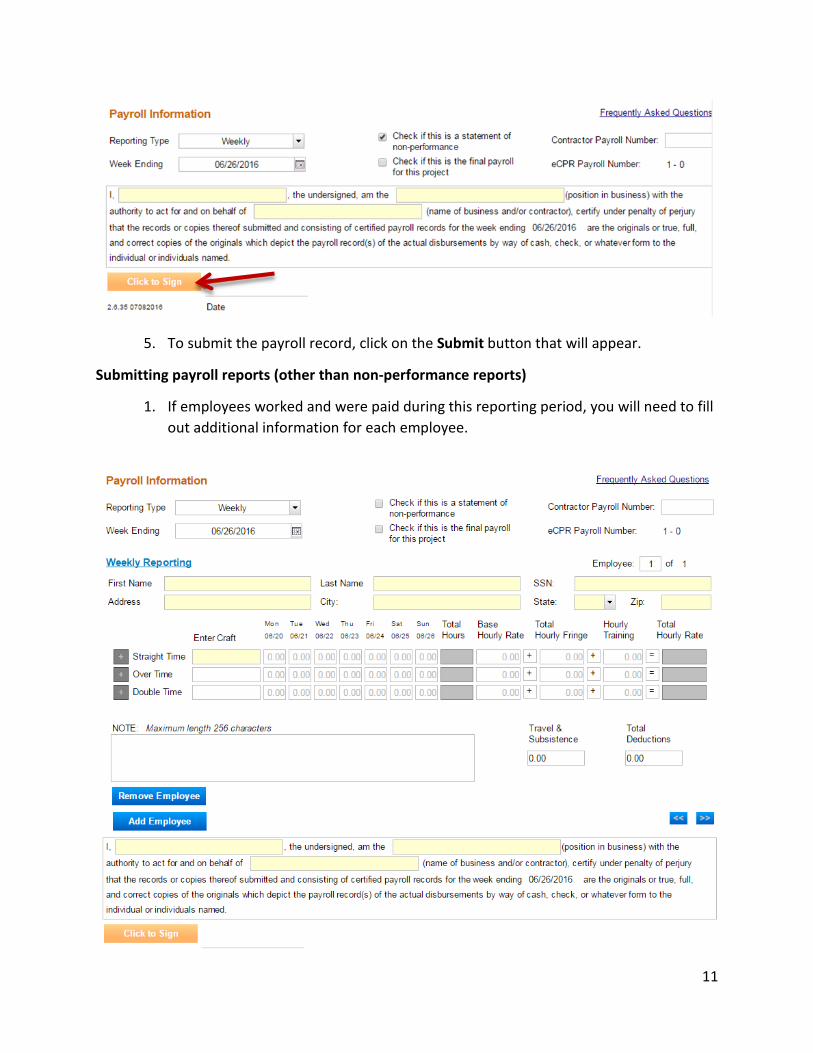
Statements of non-performance
1. If no one has worked or been paid on the project in question for this pay period, then select the checkbox in the middle column (see screen shot above) indicating “non-performance.” In the confirmation box that will appear, choose Yes to continue (or Cancel if you wish to uncheck the box). If you close this box without clicking on either Yes or Cancel, your submission will not be accepted.
2. Choose the drop-down menu next to Reporting Type and select the appropriate payment frequency (Weekly, Bi-Weekly or Semi-Monthly). (see screen shot on next page)
3. Select the Week Ending day from the built-in calendar, or manually enter the date in the following format: mm/dd/yy. Please note that for statements of non-performance this is the only employee and payroll information you need to fill out.
4. Fill in the required fields for the signature statement, and then sign it by clicking the Click to Sign button (as shown on the next page). Be sure to review all the records carefully before you click on this button, since you will not be able to make any edits to them afterwards.
11
5. To submit the payroll record, click on the Submit button that will appear.
Submitting payroll reports (other than non-performance reports)
1. If employees worked and were paid during this reporting period, you will need to fill out additional information for each employee.
12
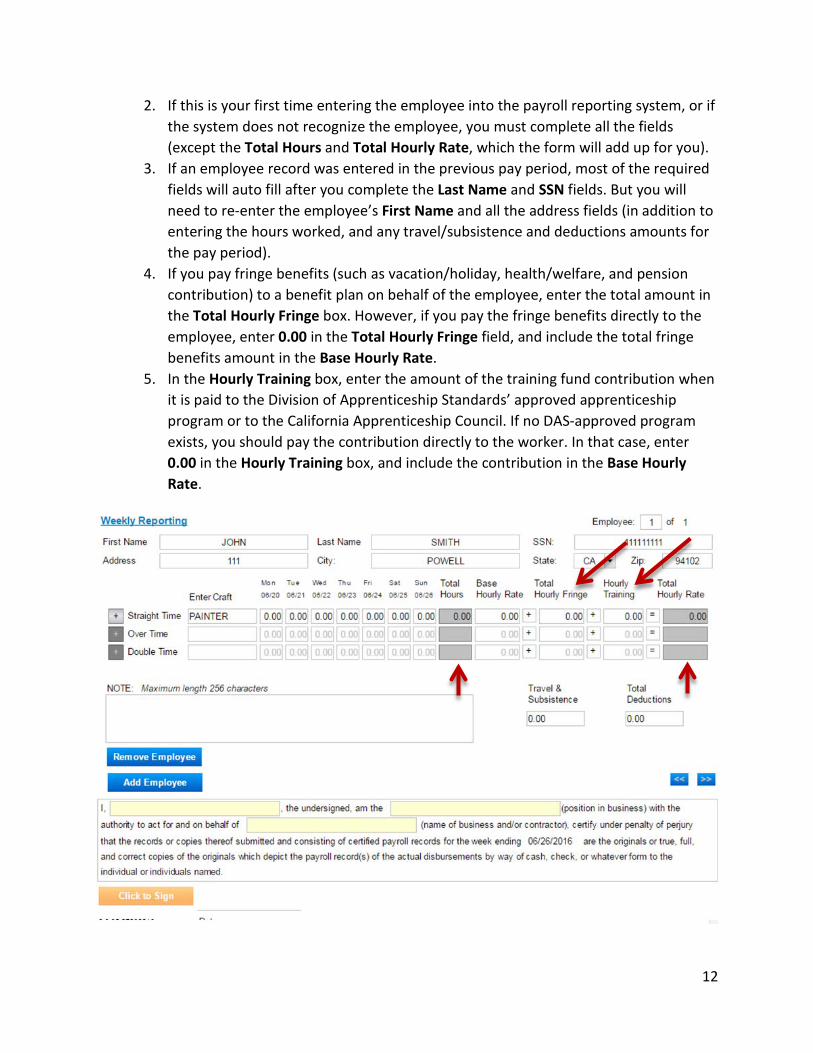
2. If this is your first time entering the employee into the payroll reporting system, or if the system does not recognize the employee, you must complete all the fields (except the Total Hours and Total Hourly Rate, which the form will add up for you).
3. If an employee record was entered in the previous pay period, most of the required fields will auto fill after you complete the Last Name and SSN fields. But you will need to re-enter the employee’s First Name and all the address fields (in addition to entering the hours worked, and any travel/subsistence and deductions amounts for the pay period).
4. If you pay fringe benefits (such as vacation/holiday, health/welfare, and pension contribution) to a benefit plan on behalf of the employee, enter the total amount in the Total Hourly Fringe box. However, if you pay the fringe benefits directly to the employee, enter 0.00 in the Total Hourly Fringe field, and include the total fringe benefits amount in the Base Hourly Rate.
5. In the Hourly Training box, enter the amount of the training fund contribution when it is paid to the Division of Apprenticeship Standards’ approved apprenticeship program or to the California Apprenticeship Council. If no DAS-approved program exists, you should pay the contribution directly to the worker. In that case, enter 0.00 in the Hourly Training box, and include the contribution in the Base Hourly Rate.

13
6. If the employee worked multiple crafts, click on the plus symbol (+) to add an
additional row. 7. If you create an additional row and then decide you do not need it, you can click on
the minus symbol (-) to remove it.
8. If a value other than zero is entered in Total Hourly Fringe box, the system will ask for their breakdown (Vacation/Holiday, Health/Welfare, Pension, Other).
9. In the Total Deductions box, enter the employee’s federal tax, FICA (Federal Insurance Contributions Act tax, which means Social Security and Medicare), state tax, SDI (State Disability Insurance), and any other deductions listed on the employee’s pay stub.

14
10. To provide additional information to the awarding body, prime contractor, or DIR about an employee’s payroll, use the Note field. This is an optional field.
11. To add employees, click the Add Employee button. Repeat all the steps outlined as many times as necessary to report payroll for all of your employees.
12. To remove an employee from the form, click the Remove Employee button.

15
13. To edit the payroll record for any of the employees entered before you have
submitted the records, go to the payroll screen of the record you want to edit by clicking the blue arrow buttons (<< or >>) . You can also enter the employee number in the box in the upper right corner.
13. After you have entered all payroll records and have finished editing them, complete
the certification box and sign the form (by clicking on the Click to sign button). Be sure to review all the records carefully before you click on this button, since you will not be able to make any edits to them afterwards.
14. To finish the reporting process, click the Submit button that will appear.
16
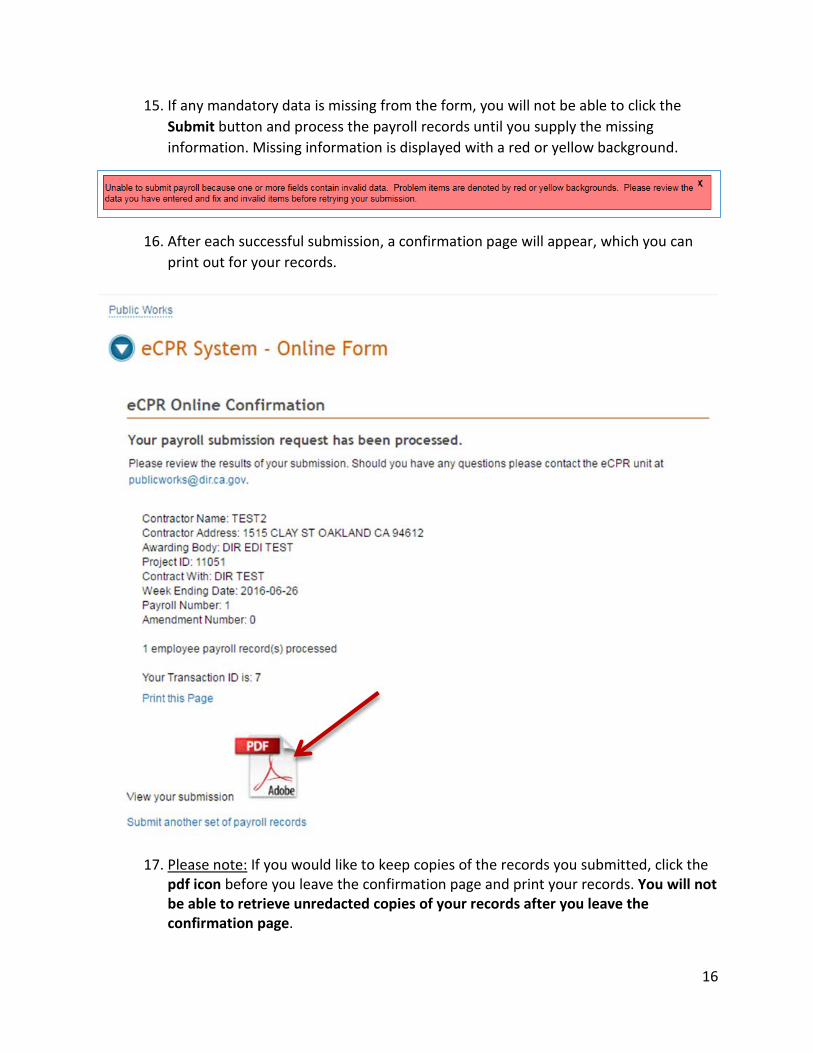
15. If any mandatory data is missing from the form, you will not be able to click the Submit button and process the payroll records until you supply the missing information. Missing information is displayed with a red or yellow background.
16. After each successful submission, a confirmation page will appear, which you can print out for your records.
17. Please note: If you would like to keep copies of the records you submitted, click the
pdf icon before you leave the confirmation page and print your records. You will not be able to retrieve unredacted copies of your records after you leave the confirmation page.

17
4.4. Submitting Corrections After you have submitted a payroll record in the Online Form, you can still make corrections to the submitted form, even though the system does not allow you to retrieve and change any of the records you have submitted.
1. To do so, you must resubmit all the original employee information, entering the corrected information for that employee along with the information that was correct the first time around.
2. You only need to resubmit the record for the employee(s) whose information had errors (not the records for all employees, unless they all contained errors). Corrected versions of a payroll record are referred to as “Amendments” within the system.
3. The following fields in the payroll you are correcting must match the original payroll exactly as first entered in order for your corrected report to replace the first version:
• Contractor’s SSN (or the FEIN)
• DIR Project ID (also called the PWC-100) number
• Contract agency name (the awarding body, primer contractor or other hiring contractor indicated in the Contract With field)
• Week Ending date
• Employee’s SSN
• Craft
• Base Hourly Rate
Please note: If the error that you need to correct is in one of the fields listed above, your payroll record will be considered a new payroll report. In that case, you should explain the situation in the Notes field.
4. The confirmation page includes key information about the payroll records submitted, including the Amendment Number. This number refers to the corrected version of records already submitted. Amendment Number 1 refers to the first resubmission/correction of a payroll record; if you need to correct it a second time, the subsequent correction would be named Amendment 2.