Embed Size (px)
Citation preview
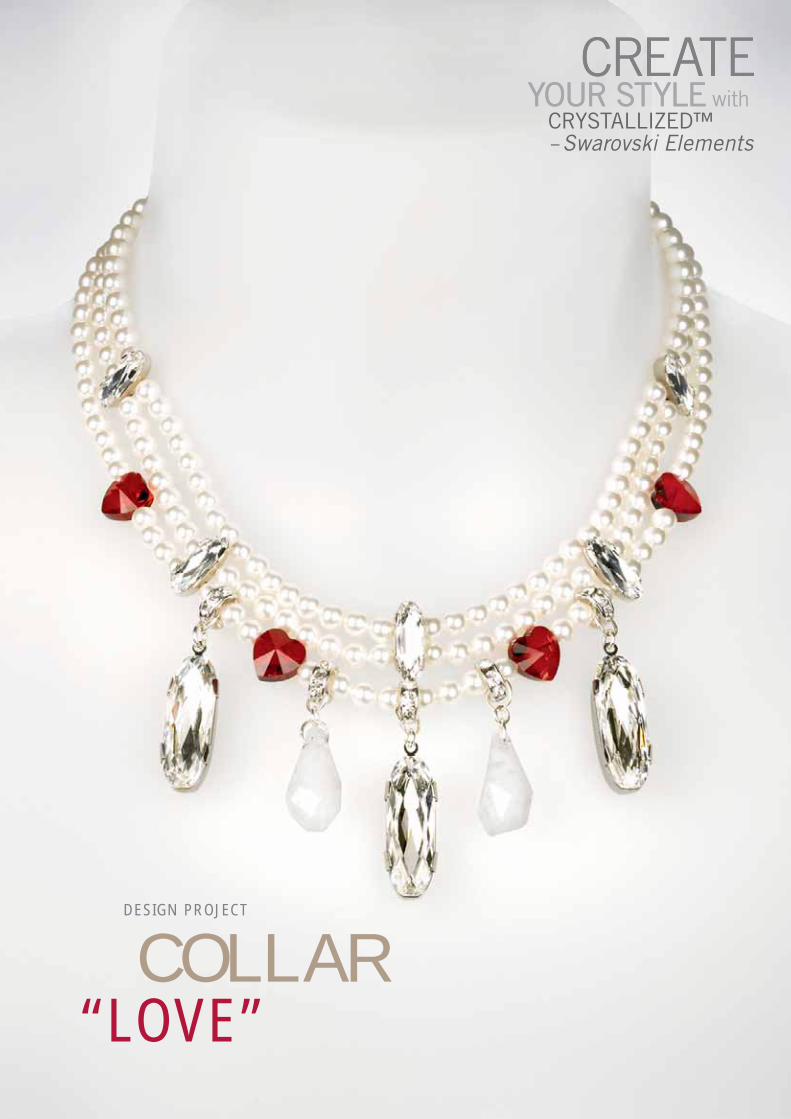
“LOVE”COLLAR
DESIGN PROJECT
2 /10 WWW.CREATE-YOUR-STYLE.COM
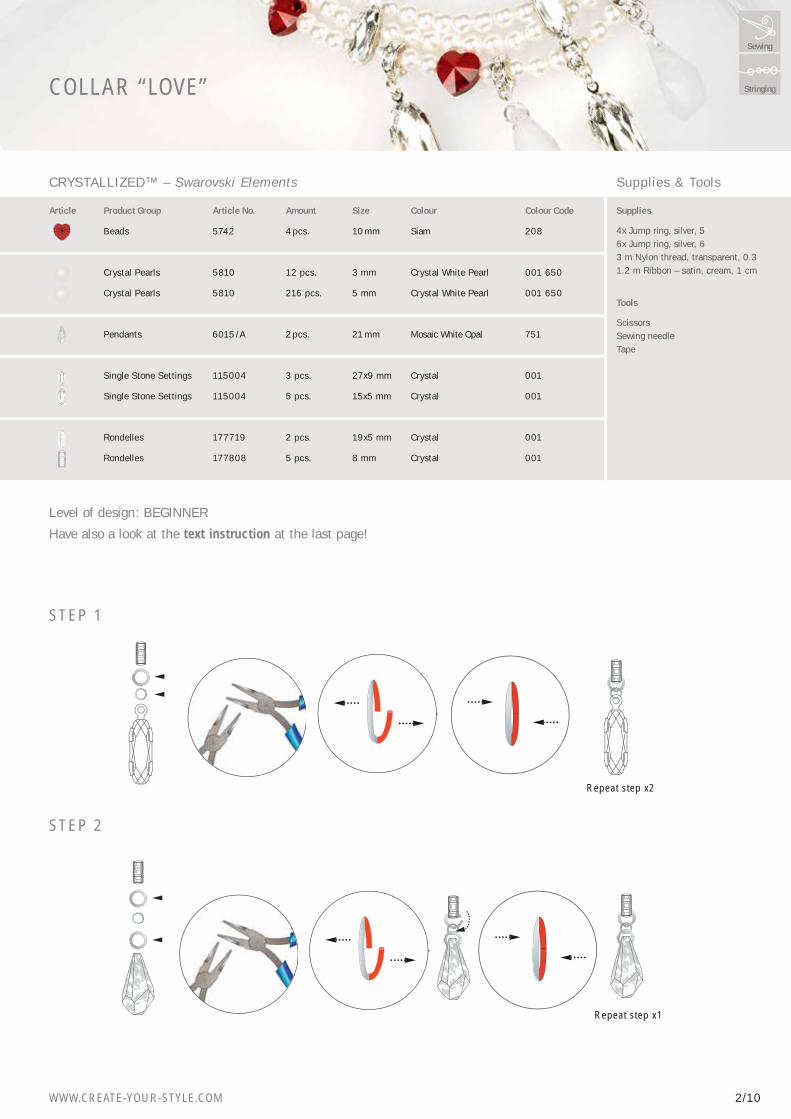
COLLAR “LOVE”
Article Product Group Article No. Amount Size Colour Colour Code
Beads 5742 4 pcs. 10 mm Siam 208
Crystal Pearls 5810 12 pcs. 3 mm Crystal White Pearl 001 650
Crystal Pearls 5810 216 pcs. 5 mm Crystal White Pearl 001 650
Pendants 6015 / A 2 pcs. 21 mm Mosaic White Opal 751
Single Stone Settings 115004 3 pcs. 27x9 mm Crystal 001
Single Stone Settings 115004 5 pcs. 15x5 mm Crystal 001
Rondelles 177719 2 pcs. 19x5 mm Crystal 001
Rondelles 177808 5 pcs. 8 mm Crystal 001
Supplies
4x Jump ring, silver, 56x Jump ring, silver, 63 m Nylon thread, transparent, 0.31.2 m Ribbon – satin, cream, 1 cm
Tools
ScissorsSewing needleTape
CRYSTALLIZED™ – Swarovski Elements Supplies & Tools
Stringing
Sewing
Level of design: BEGINNER
Have also a look at the text instruction at the last page!
STEP 1
Step 2
Repeat step x1
Repeat step x2
STEP 2

3 /10 WWW.CREATE-YOUR-STYLE.COM
STEP 3
x6
x19x19
x17
x17
2 m0.3 mm0.3 mm
20 cm
STEP 4
4 /10 WWW.CREATE-YOUR-STYLE.COM
x8x8
x9
x19
x9
x19
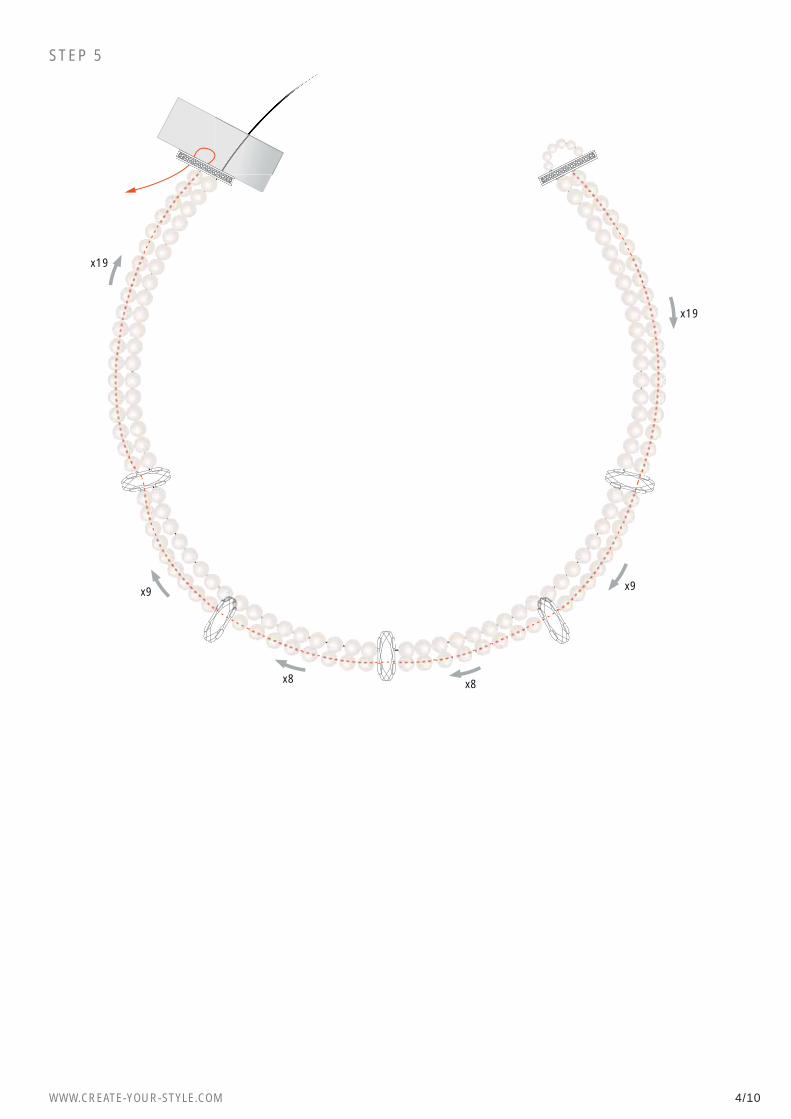
STEP 5
5 /10 WWW.CREATE-YOUR-STYLE.COM
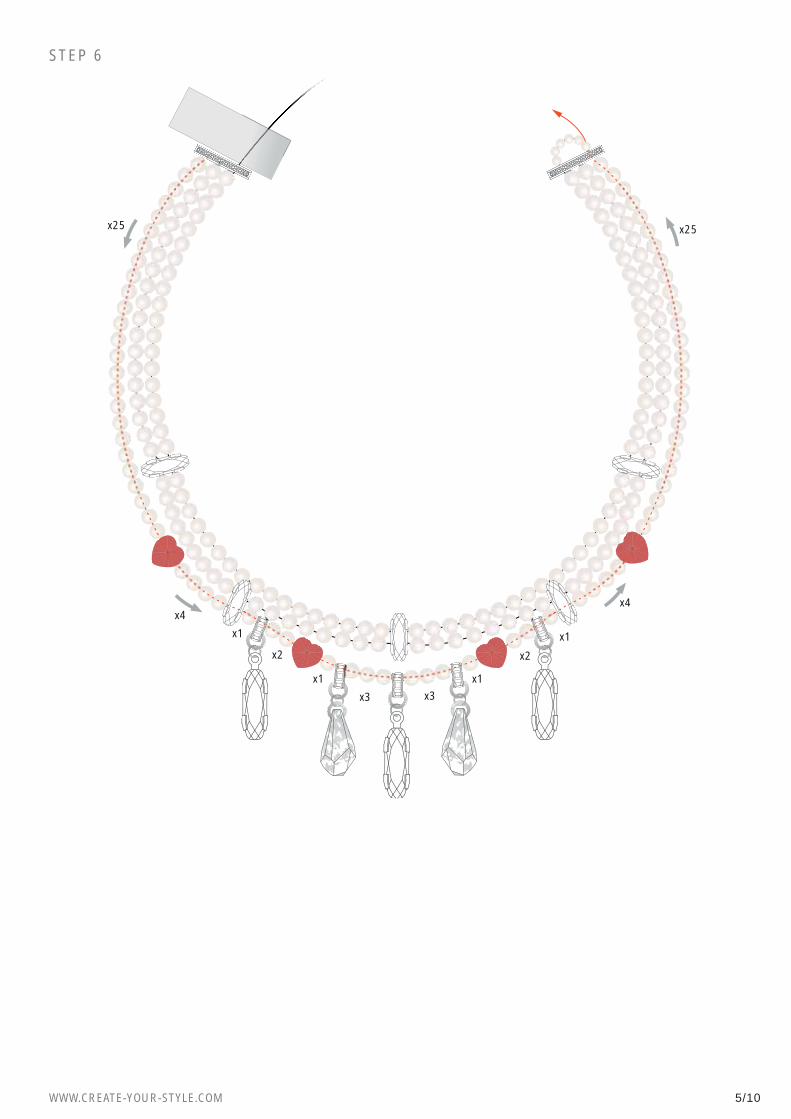
STEP 6
x25
x4
x25
x4
x2x2
x1
x1x1
x1
x3x3
6 /10 WWW.CREATE-YOUR-STYLE.COM
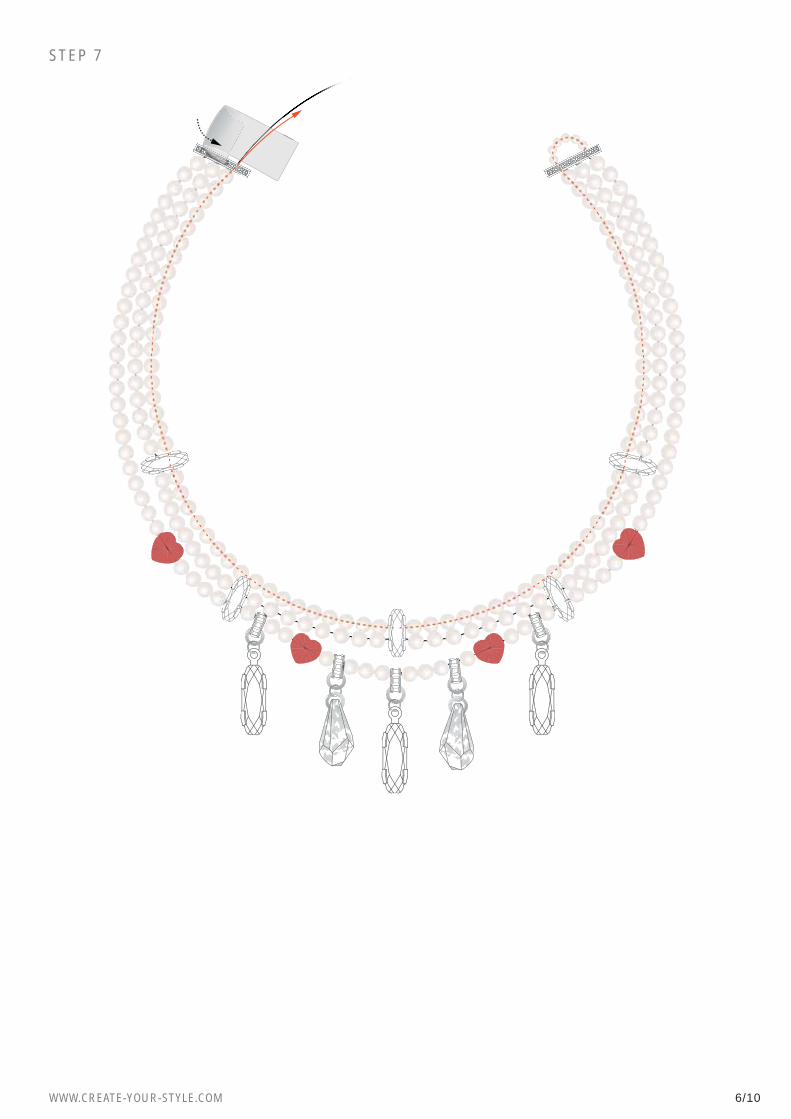
Step 7STEP 7
7 /10 WWW.CREATE-YOUR-STYLE.COM
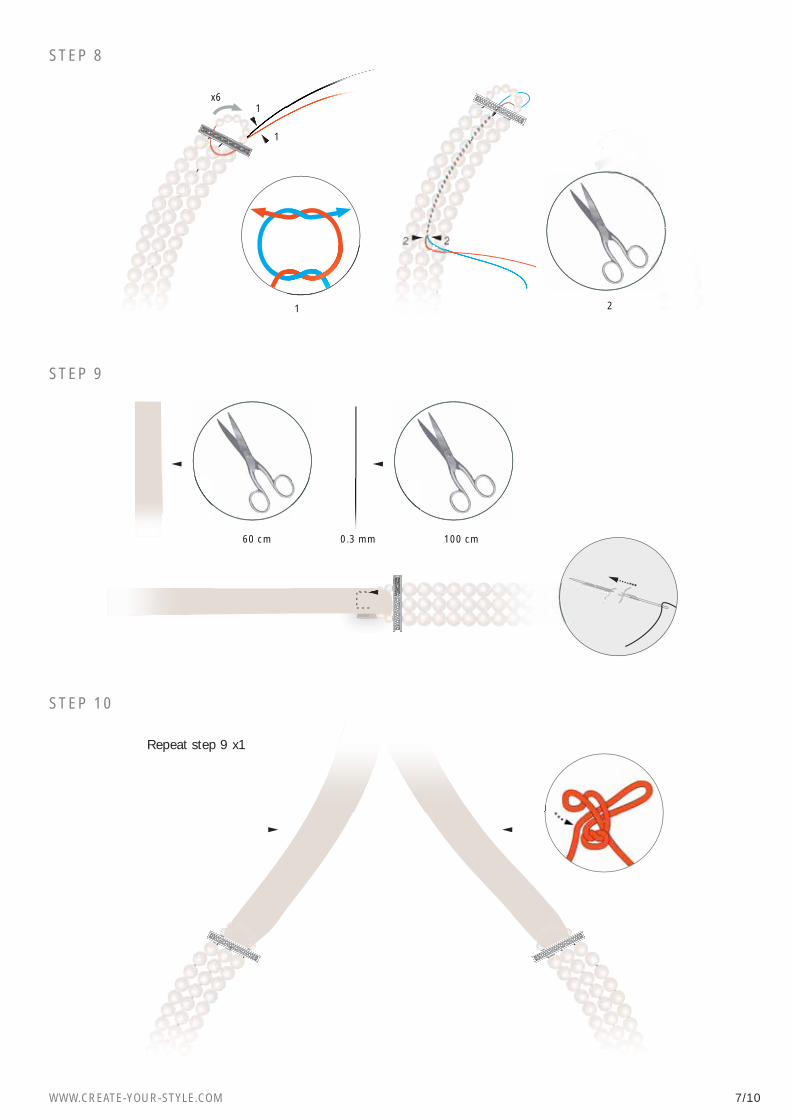
STEP 8
STEP 9
x6
1
1
1 2
22
60 cm 100 cm0.3 mm
Step 10
Repeat step 9 x1:
STEP 10
Repeat step 9 x1

8 /10 WWW.CREATE-YOUR-STYLE.COM
9 /10 WWW.CREATE-YOUR-STYLE.COM
STEP 1: Open a 4 mm & 6 mm jump ring with fl at nose pliers. Attach the 4 mm jump ring into the loop of theCRYSTALLIZED™ Single Stone Setting, article 115004 in 27 mm 1TC. Attach the 6 mm jump ring intothe 4 mm jump ring and the CRYSTALLIZED™ Rondelle, article 1778080. Close the jump ring. Repeatthis step twice to get 2 more settings on Rondelles.
STEP 2: Open two 6 mm jump rings with fl at nose pliers. Attach one 6 mm jump ring to a 4 mm jump ring, the CRYSTALLIZED™ Pendant, article 6015/A and the 2nd 6 mm jump ring. Attach the top 6 mm jump ringto the CRYSTALLIZED™ Rondelle, article 1778080: Close the jump rings. Repeat this step once to get one more CRYSTALLIZED™ Pendant 6015 on a Rondelle.
STEP 3: Cut 2 m of the 0.3 mm nylon thread and fi x it with tape about 20 cm from one end. From the un-taped side, slide on the following CRYSTALLIZED™ articles:1 x Rondelle, article 177808, 19 x Crystal Pearl, 5 mm, 1 x Setting 115004 with 2 holes, 17 x Crystal Pearls 5 mm, 1 x Setting 115004 with 2 holes, 17 x Crystal Pearls 5 mm, 1 x Setting 115004 with 2 holes, 19 x Crystal Pearls, 5 mm1 x Rondelle, article 177808
STEP 4: After the last Rondelle, slide on 6 CRYSTALLIZED™ Crystal Pearls in 3 mm and go through the Rondelle three times as you see in illustration.
STEP 5: Slide onto nylon thread 19 CRYSTALLIZED™ Crystal Pearls, 5 mm,Go through Setting 115004 with 2 holes, Slide on: 9 x Crystal Pearls 5 mm, 1 x Setting 115004 with 2 holes and 8 x Crystal Pearls 5 mm, Go through Setting 115004 with 2 holes,Slide on: 8 x Crystal Pearls 5 mm, 1 x Setting 115004 with 2 holes and 9 x Crystal Pearls 5 mm,Go through Setting 115004 with 2 holes,Slide on 19 CRYSTALLIZED™ Crystal Pearls, 5 mmGo through the Rondelle with nylon thread as shown in illustration.
STEP 6: Slide onto nylon thread third row with CRYSTALLIZED™ articles of collar:25 x Crystal Pearls, 5 mm1 x CRYSTALLIZED™ Bead article 57424 x Crystal Pearls, 5 mmGo through Setting 115004 with 2 holes1 x Crystal Pearl, 5 mm1 x Setting on Rondelle2 x Crystal Pearls, 5 mm1 x Bead article 57421 x Crystal Pearl, 5 mm1 x CRYSTALLIZED™ Pendant article 6015 on Rondelle3 x Crystal Pearls, 5 mm1 x Setting on Rondelle3 x Crystal Pearls, 5 mm1 x 6015 on Rondelle1 x Crystal Pearls, 5mm1 x Bead article 57422 x Crystal Pearls, 5mm1 x Setting on Rondelle1 x Crystal Pearls, 5 mmGo through Setting 115004 with 2 holes4 x Crystal Pearls, 5 mm1 x Bead article 574225 x Crystal Pearls, 5 mm
CREATE YOUR STYLE with CRYSTALLIZED™ – Swarovski Elements Design Project Collar “Love”
10 /10 WWW.CREATE-YOUR-STYLE.COM
STEP 7: Slide thread end through pearl loop with small Crystal Pearls and through whole 1st row of collar and remove tape on other end (see illustration).
STEP 8: Slide onto nylon thread end 6 CRYSTALLIZED™ Crystal Pearls in 3 mm and go through Rondelle as you see in illustration. Make a double knot with both nylon thread ends and go back trough some Crystal Pearls of second Crystal Pearl row in collar and cut thread ends off.
STEP 9: Cut 60 cm of satin ribbon and 100 cm of nylon thread. Take the satin ribbon and slide it into one small pearl loop as you see in illustration. Attach ribbon to pearl loop with needle and nylon thread as you see in illustration.
STEP 10: Repeat step 9 on second end of collar and tie a bow with satin ribbons.
CREATE YOUR STYLE with CRYSTALLIZED™ – Swarovski Elements Design Project Collar “Love”