Embed Size (px)
Citation preview
Rev 03/26/19 Page 1 of 3www.holley.com
Technical Support 866-464-6553
Installa on Instruc ons for
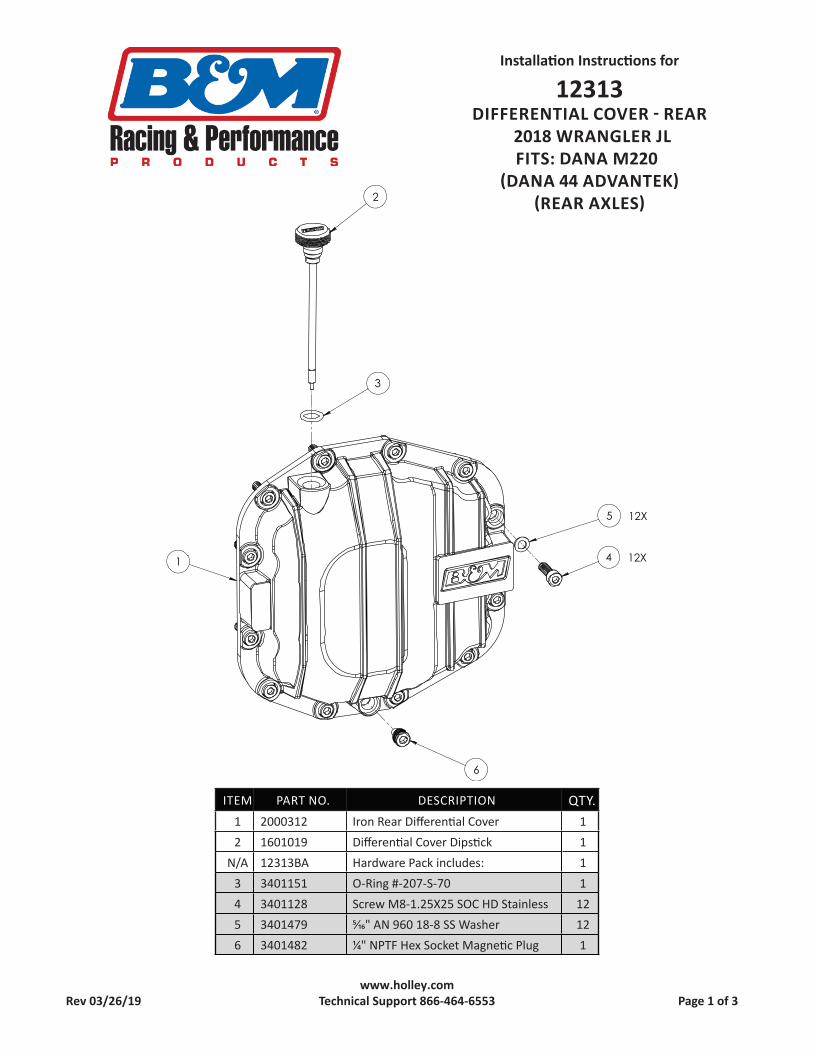
12313DIFFERENTIAL COVER REAR
2018 WRANGLER JLFITS: DANA M220
DANA 44 ADVANTEKREAR AXLES2
3
4 12X
5 12X
6
1
ITEM PART NO. DESCRIPTION QTY.1 2000312 Iron Rear Diff eren al Cover 12 1601019 Diff eren al Cover Dips ck 1
N/A 12313BA Hardware Pack includes: 13 3401151 O-Ring #-207-S-70 14 3401128 Screw M8-1.25X25 SOC HD Stainless 125 3401479 ⁄ " AN 960 18-8 SS Washer 126 3401482 ⁄ " NPTF Hex Socket Magne c Plug 1
12313Rev 03/26/19 Page 2 of 3
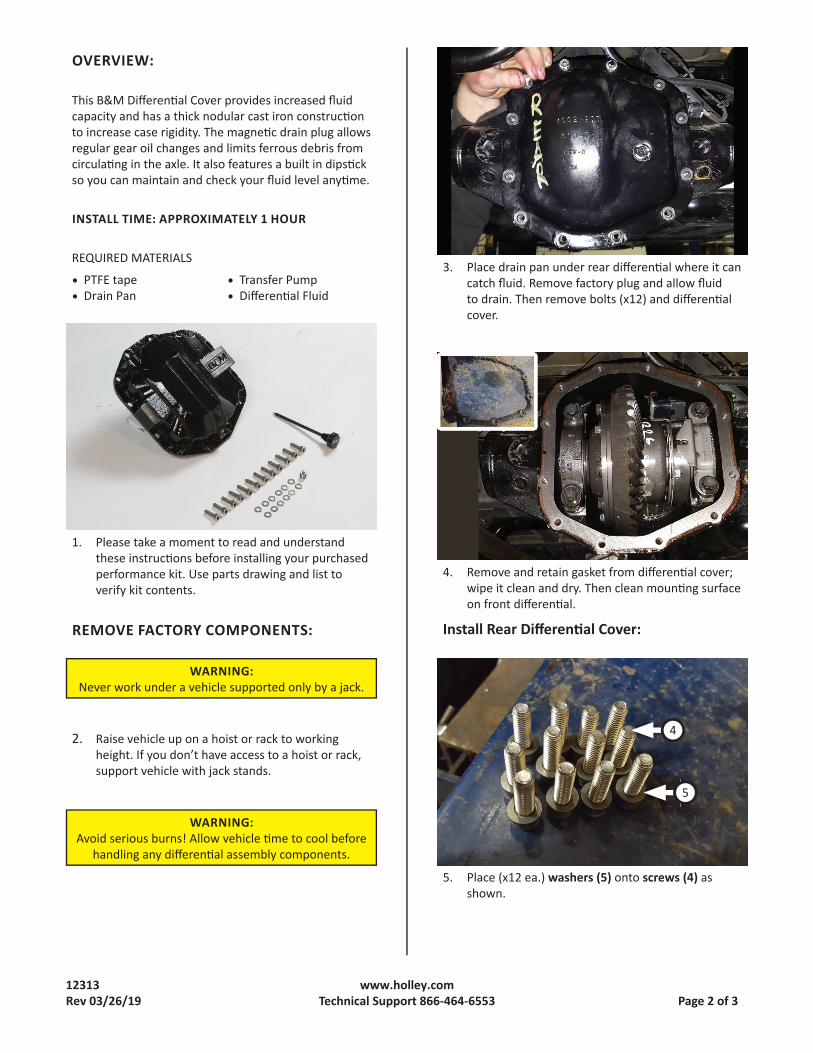
4. Remove and retain gasket from diff eren al cover;wipe it clean and dry. Then clean moun ng surfaceon front diff eren al.
5. Place (x12 ea.) washers (5) onto screws (4) asshown.
1. Please take a moment to read and understandthese instruc ons before installing your purchasedperformance kit. Use parts drawing and list toverify kit contents.
3. Place drain pan under rear diff eren al where it cancatch fl uid. Remove factory plug and allow fl uidto drain. Then remove bolts (x12) and diff eren alcover.
Install Rear Diff eren al Cover:
5
4
REMOVE FACTORY COMPONENTS:
OVERVIEW:
REQUIRED MATERIALS
• PTFE tape• Drain Pan
• Transfer Pump• Diff eren al Fluid
This B&M Diff eren al Cover provides increased fl uid capacity and has a thick nodular cast iron construc on to increase case rigidity. The magne c drain plug allows regular gear oil changes and limits ferrous debris from circula ng in the axle. It also features a built in dips ck so you can maintain and check your fl uid level any me.
INSTALL TIME: APPROXIMATELY 1 HOUR
WARNING: Avoid serious burns! Allow vehicle me to cool before
handling any diff eren al assembly components.
WARNING: Never work under a vehicle supported only by a jack.
2. Raise vehicle up on a hoist or rack to workingheight. If you don’t have access to a hoist or rack,support vehicle with jack stands.
www.holley.comTechnical Support 866-464-6553
12313Rev 03/26/19 Page 3 of 3
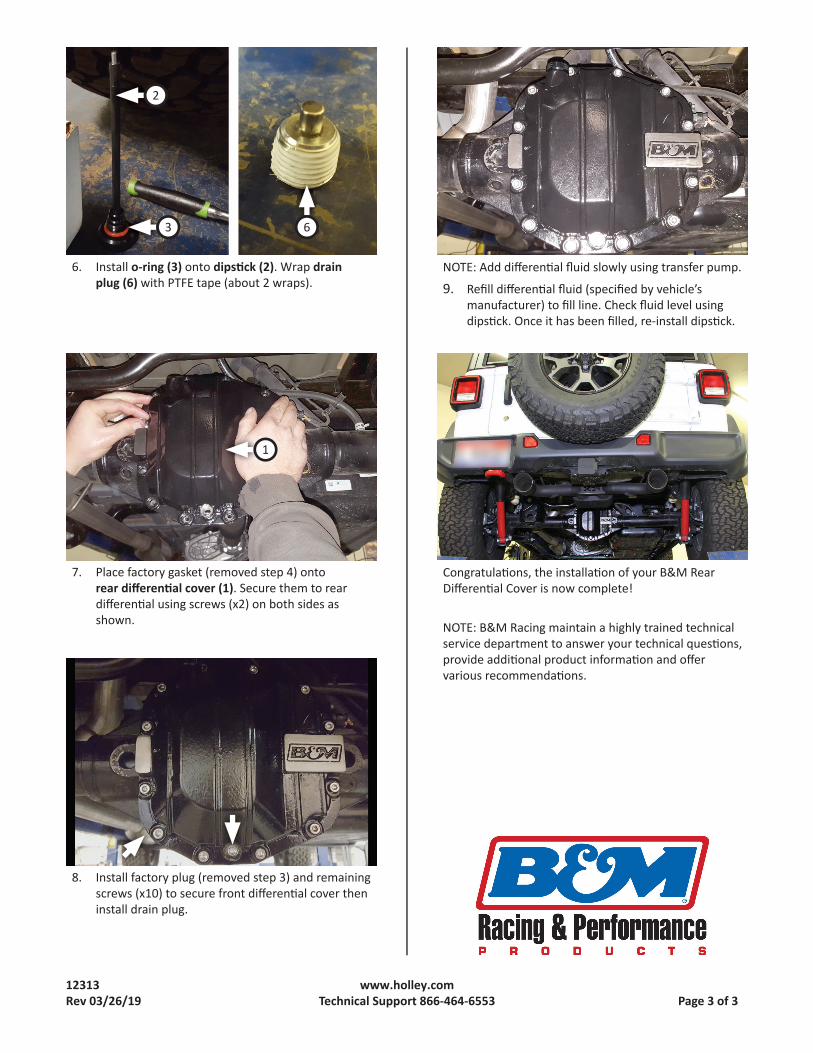
9. Refi ll diff eren al fl uid (specifi ed by vehicle’smanufacturer) to fi ll line. Check fl uid level usingdips ck. Once it has been fi lled, re-install dips ck.
6. Install o-ring (3) onto dips ck (2). Wrap drainplug (6) with PTFE tape (about 2 wraps).
7. Place factory gasket (removed step 4) ontorear diff eren al cover (1). Secure them to reardiff eren al using screws (x2) on both sides asshown.
8. Install factory plug (removed step 3) and remainingscrews (x10) to secure front diff eren al cover theninstall drain plug.
1
NOTE: Add diff eren al fl uid slowly using transfer pump.
NOTE: B&M Racing maintain a highly trained technical service department to answer your technical ques ons, provide addi onal product informa on and off er various recommenda ons.
Congratula ons, the installa on of your B&M Rear Diff eren al Cover is now complete!
2
3 6
www.holley.comTechnical Support 866-464-6553