Embed Size (px)
Citation preview
Digital Camera
Operating Manual
To ensure the best performance fromyour camera, please read the OperatingManual before using the camera.
e01_kb338_OFC_IFC_41e.qk 3/17/03 3:31 PM Page 1
Thank you for buying the Pentax Optio 550 Digital Camera. Pleaseread this manual before using the camera in order to get the mostout of all the features and functions. Keep this manual safe, as itcan be a valuable tool in helping you to understand all the cam-era’s capabilities.
Regarding copyrightsImages taken using the Optio 550 that are for anything other than personalenjoyment cannot be used without permission according to the rights asspecified in the Copyright Act. Please take care, as there are even caseswhere limitations are placed on taking pictures even for personal enjoymentduring demonstrations, industrial enterprise or as items for display. Imagestaken with the purpose of obtaining copyrights also cannot be used outsidethe scope of use of the copyright as laid out in the Copyright Act, and careshould be taken here also.
Regarding trademarks• The SD logo is a trademark.• PENTAX is a trademark of PENTAX Corporation.• Optio is a trademark of PENTAX Corporation.• All other brands or product names are trademarks of registered trade-
marks of their respective companies.• This product supports PRINT Image Matching II.
When used in combination, PRINT Image Matching II enabled digital stillcameras, printers and software help photographers to produce imagesmore faithful to their intentions.Copyright 2001 Seiko Epson Corporation. All Rights Reserved.PRINT Image Matching is a trademark of Seiko Epson Corporation.
e01_kb338_OFC_IFC_41e.qk 3/17/03 3:31 PM Page 2
FOR SAFE USE OF YOUR CAMERA
Sufficient attention has been paid to the safety of this product but pleasepay particular attention to the warnings indicated by the following symbolsduring use.
Warning These symbols indicate that it is possible that theuser may experience serious difficulties if the warnings are not heeded.
Caution These symbols indicate that it is possible that theuser may experience minor or middling difficulties orphysical difficulties if the warnings are not heeded.
Warning:• Do not attempt to take the camera apart or remodel the camera. High voltages are
present within the camera, and there is therefore a danger of electric shocks.• If the inside of the camera should become exposed as a result of, for example, the
camera being dropped, please do not under any circumstances touch such exposedportions, as there is a danger of receiving an electric shock.
• Wrapping the strap of the camera around your neck is also dangerous, please takecare that small children do not hang the strap around their necks.
• To avoid the risk of it being swallowed by mistake, keep the SD Memory Card out ofthe reach of small children. Seek medical attention immediately if accidentally swal-lowed.
• Use an AC adapter that are of the power and voltage specified for exclusive use withthis product. The use of an AC adapter other than that specified exclusively for usewith this product may cause fire or electric shocks.
• If the camera emits smoke or a strange smell, or in the event of any other irregularity,stop using the camera immediately, remove the battery or disconnect the AC adapterand contact your nearest Pentax service center. Continued use of the camera mayresult in fire or electric shock.
• Discontinue use of the AC adapter during thunderstorms. This can cause a fire orelectrical shock.
Caution:• Never try to disassemble, short the battery. Also, do not dispose of the battery in fire,
as it may explode.• Remove the battery from the camera immediately if it becomes hot or begins to smoke.
Be careful not to burn yourself during removal.• Some portions of the camera heat up during use, so please take care, as there is a risk
of low temperature burns if such portions are held for long periods of time.• Do not place your finger on the flash when it is discharging as there is a risk of burns.• If any of the battery leakage should come in contact with your eyes, do not rub them.
Flush your eyes with clean water and get medical attention immediately.• If any of the battery leakage should come in contact with skin or clothes, wash the
affected areas thoroughly with water.
1
e02_kb338_001_023_41e.qk 3/17/03 3:33 PM Page 1
Care to be Taken During Handling
• Do not clean the product with organic solvents such as thinner or alcohol benzene.• Places of high temperature and humidity should be avoided. Particular care should be
taken regarding vehicles, which can become very hot inside.• Storing the camera where pesticides and chemicals are handled should be avoided.
Remove from case and store in a well-ventilated place to prevent the camera frombecoming moldy during storage.
• Do not use the camera where it may come in contact with rain, water or any other liquid, because the camera is not weather, water, or liquid resistant. Should the cam-era get wet from rain, splashing water, or any other liquid, wipe it off immediately witha dry soft cloth.
• Ensure that the camera is not subjected to substantial vibrations, shocks or pressure.Place the camera on a cushion for protection when the camera is subjected to thevibrations of a motorbike, car, or ship, etc.
• The liquid crystal display will become black at temperatures of approximately 60°C(140°F) but will return to normal when normal temperatures are returned to.
• The response speed of the liquid crystal display becomes slow at low temperatures.This is due to the properties of the liquid crystal and is not a fault.
• Remove dust from the lens and viewfinder using a blower or clean off dust using alens brush.
• Periodic checks are recommended every 1 to 2 years in order to maintain high-performance.
• When the camera has not been used for a long time, confirm that it is still workingproperly, particularly prior to taking important pictures (such as at a wedding or dur-ing travelling). Pentax is not responsible for consequential damages (costs incurred asa result of taking pictures, loss of benefits that were to be obtained through taking pic-tures) arising from failure of this product.
• If the camera is subjected to rapid temperature changes, condensation may form onthe inside and outside of the camera. Therefore put the camera in a bag or plasticbag, and take the camera out when the difference in temperature has subsided.
• The temperature range in which the camera can be used is 0°C to 40°C (32°F to104°F).
• Avoid contact with garbage, dirt, sand, dust, water, toxic gases, salt, etc. as this maycause damage to the camera. If rain or drops of water get onto the camera, pleasewipe dry.
• Refer to “Precautions When Using an SD Memory Card/MultiMediaCard” (p.17) regard-ing the SD Memory Card/MultiMediaCard.
• Be sure to use the rechargeable lithium-ion battery D-LI7 provided for this camera. Ifyou use any other battery the camera may be damaged or malfunction.
2
e02_kb338_001_023_41e.qk 3/17/03 3:33 PM Page 2
To users of this camera• There is a possibility that recorded data may be erased or that the camera may
not function correctly when used in surroundings such as installations generatingstrong electromagnetic radiation or magnetic fields.
• The liquid crystal panel used in the LCD display is manufactured using extreme-ly high precision technology. Although the level of functioning pixels is 99.99% orbetter, you should be aware that 0.01% or fewer of the pixels may not illuminateor may illuminate when they should not. However, this has no effect on therecorded image.
• There is a possibility that the illustrations and the display screen of the LCDmonitor in this manual are different form the actual product.
3
e02_kb338_001_023_41e.qk 3/17/03 3:33 PM Page 3
4
ContentsFOR SAFE USE OF YOUR CAMERA ·····················································1Care to be Taken During Handling ···························································2Contents ···································································································4Contents of the Operating Manual ···························································7Checking the Contents of the Package ····················································8Name of Parts ··························································································9Names of Operating Parts ····································································10
Getting Started ············································································11Attaching the Strap ··························································································11Powering the Camera ······················································································12
Charging the Battery ··············································································12Installing the Battery ··············································································13Using the AC Adapter (optional) ····························································15
Installing the SD Memory Card/MultiMediaCard ·······························································································16Turning the Camera On and Off ······································································18Adjusting the Viewfinder ··················································································19Initial Settings ··································································································20
Setting the Display Language ································································20Setting the Home Town ··········································································21Setting the D.S.T. Mode ··········································································21Setting the Date and Time ·····································································22
Quick Start ····················································································24Taking Still Pictures ·························································································24Playing Back Still Pictures ···············································································26
Playing Back Images ··············································································26Playing Back Previous or Next Images ··················································26
How to View the Recorded Images ·································································28
Common Operations ···································································30Changing the Mode ··························································································30Using the Button Functions ··············································································31
Capture Mode ························································································31Playback Mode ·······················································································33
Using the Menus ·····························································································34How to Set the Menus ············································································34Menu List ································································································36
Taking Pictures ············································································38Displaying Shooting Information (Capture Mode) ············································38Setting the Shooting Functions ········································································40
Selecting the Focus Mode ·····································································40Selecting the Flash Mode ······································································42Selecting the Recorded Pixels ·······························································43Selecting the Quality Levels ···································································44Adjusting the Color Balance according to Lighting (White Balance) ·····45Changing the AF Area (Focusing Area) ·················································47Setting the Light Metering Range to Determine the Exposure (AE Metering) ·························································································48
e02_kb338_001_023_41e.qk 3/17/03 3:33 PM Page 4
5
Setting the Sensitivity ·············································································49Setting the Instant Review time (Instant Review) ··································50Setting the Image Sharpness (Sharpness) ············································51Setting the Color Saturation (Saturation) ···············································52Setting the Image Contrast (Contrast) ···················································53
Taking Pictures ·································································································54Letting the Camera Set the Exposure (Program Mode) ························54Setting the Aperture Value (Aperture Priority Mode) ·····························55Setting the Shutter Speed (Shutter Priority Mode) ································56Setting the Exposure Manually (Manual Exposure Mode) ·····················57Selecting the Picture Mode According to the Shooting ························59Scene (Picture mode) ············································································59Taking Movie Pictures (Movie Picture Mode) ·········································61Taking Panorama Pictures (Panorama Assist Mode) ·····························63Taking Stereo Pictures (3D Image Mode) ··············································65Taking Pictures with Digital Filters (Digital Filter Mode) ·························70Using Preset Function Settings (User Mode) ········································72Recording Sound (Voice Recording Mode) ············································73Using the Zoom ······················································································74EV Compensation ··················································································76Using the Self-Timer ··············································································77Using the Remote Control Unit (optional) ··············································78Continuous Shooting ··············································································79Taking Pictures at Fixed Intervals (Interval Shooting) ····························80Superimposing One Picture on Top of Another (Multiple Exposure Mode) ······································································82Automatically Changing the Shooting Conditions (Auto bracket) ··········84Taking Fast Forward Movie Pictures (Fast Fwd Movie) ·························86
Saving the Settings (Memory) ··········································································87Saving the Menu Items (Memory) ··························································87Registering Functions in User Mode ······················································88
Playback/Erasing ·········································································89Playing Back Images and Sound ····································································89
Playing Back Still Pictures ······································································89Zoom Display ·························································································89Adding a Voice Memo ············································································90Playing Back Movie Pictures ··································································91Playing Back Sound ···············································································92Playing back Shooting Information (Playback Mode) ·····························93Nine-image Display ················································································94Slideshow ·······························································································95
Erasing Images ·······························································································96Erasing a Single Image or Sound ··························································96Erasing All Images ·················································································98Protecting Images from Deletion (Protect) ·············································99
Viewing Images on a TV ················································································100Setting the Printing Service (DPOF) ·····························································101
Printing Single Image ···········································································101Printing All Images ···············································································103
e02_kb338_001_023_41e.qk 3/17/03 3:33 PM Page 5
Viewing Images with your PC ·······································································104About the included software ·································································104System environment ············································································104Installing the software ··········································································105Displaying and copying images using ACDSee™ ·······························112Joining panorama images using ACD photostitcher ····························113Disconnecting the camera from your computer ···································116
Viewing Images with your Macintosh ····························································118About the included software ·································································118System environment ············································································118Installing the software ··········································································118Displaying and copying images using ACDSee™ ·······························120Disconnecting the camera from your Macintosh ··································121
Editing/Settings ·········································································123Editing Images ·······························································································123
Changing the Image Size ·····································································123Trimming Images ··················································································125
Camera Settings ····························································································126Formatting a SD Memory Card/MultiMediaCard ··································126Changing the Sound Settings ······························································127Setting the Date Style ··········································································129Changing the Date/Time ······································································130Setting the World Time ·········································································130Changing the Display Language ··························································132Changing the Video Output Format ·····················································132Changing the Start-up Screen ·····························································133LCD Power Saving (Sleep Timeout) ····················································134Setting Auto Power Off ·········································································134Setting the Quick Delete Function ·······················································135Setting the Quick Zoom Function ·························································135Registering Functions ··········································································136Adjusting the Focus Limit ·····································································138Resetting to Default Settings (Reset) ···················································138
Setting the Alarm ···························································································139Checking the Alarm ··············································································139Setting the Alarm ·················································································139Turning the Alarm Off ···········································································140
Appendix ····················································································141List of City Names ·························································································141List of Menu Default Settings ········································································142Adjustable [Rec.Mode] Menu Items by Shooting Mode ································144Messages ······································································································145Troubleshooting ·····························································································147Optional Accessories ·····················································································150WARRANTY POLICY ····················································································151Main Specifications ·······················································································152
6
e02_kb338_001_023_41e.qk 3/17/03 3:33 PM Page 6
7
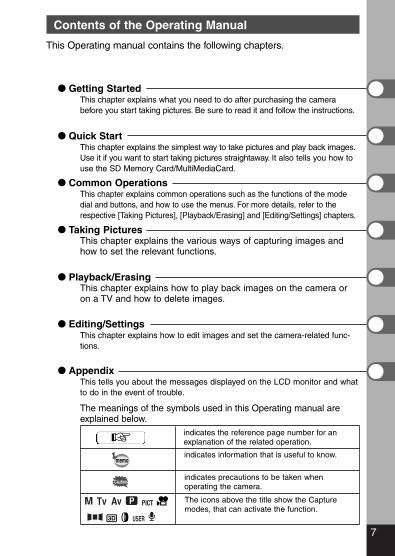
Contents of the Operating Manual
This Operating manual contains the following chapters.
� Getting StartedThis chapter explains what you need to do after purchasing the camerabefore you start taking pictures. Be sure to read it and follow the instructions.
� Quick StartThis chapter explains the simplest way to take pictures and play back images.Use it if you want to start taking pictures straightaway. It also tells you how touse the SD Memory Card/MultiMediaCard.
� Common OperationsThis chapter explains common operations such as the functions of the modedial and buttons, and how to use the menus. For more details, refer to therespective [Taking Pictures], [Playback/Erasing] and [Editing/Settings] chapters.
� Taking PicturesThis chapter explains the various ways of capturing images andhow to set the relevant functions.
� Playback/ErasingThis chapter explains how to play back images on the camera oron a TV and how to delete images.
� Editing/SettingsThis chapter explains how to edit images and set the camera-related func-tions.
� AppendixThis tells you about the messages displayed on the LCD monitor and whatto do in the event of trouble.
The meanings of the symbols used in this Operating manual areexplained below.
Contents of the Package
memo
Caution
indicates the reference page number for anexplanation of the related operation.�
indicates precautions to be taken when operating the camera.
The icons above the title show the Capturemodes, that can activate the function.
indicates information that is useful to know.
e02_kb338_001_023_41e.qk 3/17/03 3:33 PM Page 7
8
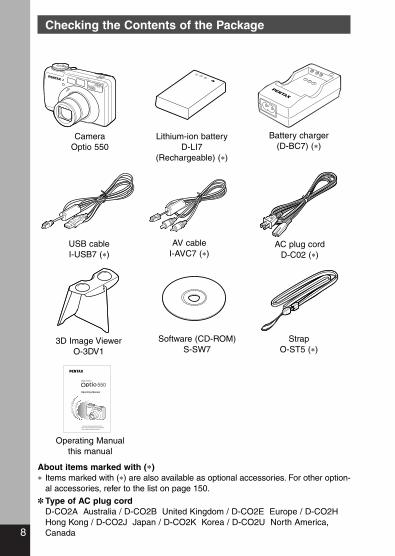
Checking the Contents of the Package
CameraOptio 550
USB cableI-USB7 (∗)
AV cableI-AVC7 (∗)
3D Image ViewerO-3DV1
Software (CD-ROM)S-SW7
StrapO-ST5 (∗)
Lithium-ion batteryD-LI7
(Rechargeable) (∗)
Battery charger(D-BC7) (∗)
Digital Camera
Operating Manual
To ensure the best performance fromyour camera, please read the OperatingManual before using the camera.
AC plug cordD-C02 (∗)
Operating Manualthis manual
About items marked with (∗)∗ Items marked with (∗) are also available as optional accessories. For other option-
al accessories, refer to the list on page 150.
✽ Type of AC plug cordD-CO2A Australia / D-CO2B United Kingdom / D-CO2E Europe / D-CO2HHong Kong / D-CO2J Japan / D-CO2K Korea / D-CO2U North America,Canada
e02_kb338_001_023_41e.qk 3/17/03 3:33 PM Page 8
9
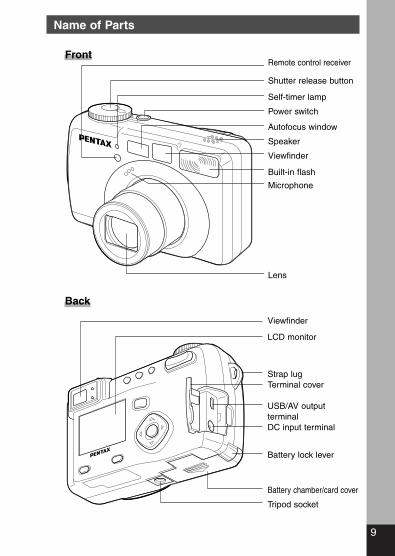
Name of Parts
Front
Back
Remote control receiver
Shutter release button
Self-timer lamp
Power switch
Autofocus window
Speaker
Viewfinder
Built-in flash
Microphone
Lens
Viewfinder
LCD monitor
Strap lugTerminal cover
USB/AV output terminalDC input terminal
Battery lock lever
Battery chamber/card cover
Tripod socket
e02_kb338_001_023_41e.qk 3/17/03 3:33 PM Page 9
10
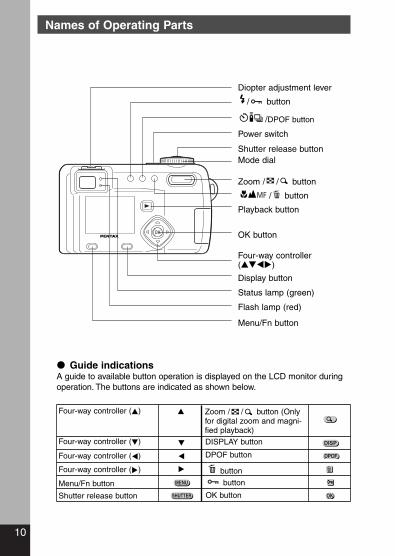
Names of Operating Parts
� Guide indicationsA guide to available button operation is displayed on the LCD monitor duringoperation. The buttons are indicated as shown below.
Diopter adjustment lever
/ button
/DPOF button
Power switch
Shutter release buttonMode dial
Zoom / / button
/ button
Playback button
OK button
Four-way controller (����)
Display button
Status lamp (green)
Flash lamp (red)
Menu/Fn button
Four-way controller (�)
�
Four-way controller (�)
DISPLAY button
Zoom / / button (Onlyfor digital zoom and magni-fied playback)
�
�
Four-way controller (�) DPOF button
�Four-way controller (�) button
Menu/Fn button button
Shutter release button OK button
e02_kb338_001_023_41e.qk 3/17/03 3:33 PM Page 10

11
Getting S
tarted
Pass the narrow end of the strap through the strap lug and passthe other end through the loop.
Getting Started
Attaching the Strap
e02_kb338_001_023_41e.qk 3/17/03 3:33 PM Page 11
12
Getting S
tarted
Caution
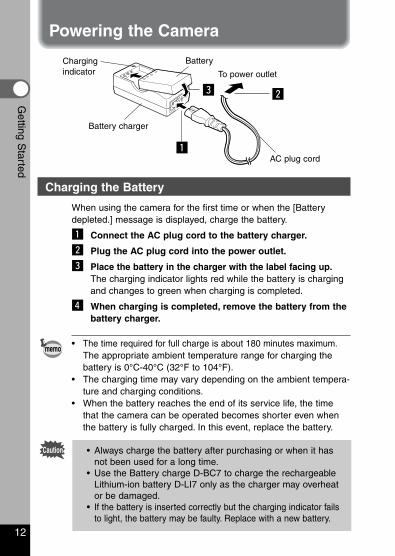
Powering the Camera
Charging the Battery
When using the camera for the first time or when the [Batterydepleted.] message is displayed, charge the battery.
z Connect the AC plug cord to the battery charger.
x Plug the AC plug cord into the power outlet.
c Place the battery in the charger with the label facing up.The charging indicator lights red while the battery is chargingand changes to green when charging is completed.
v When charging is completed, remove the battery from thebattery charger.
• The time required for full charge is about 180 minutes maximum.The appropriate ambient temperature range for charging thebattery is 0°C-40°C (32°F to 104°F).
• The charging time may vary depending on the ambient tempera-ture and charging conditions.
• When the battery reaches the end of its service life, the timethat the camera can be operated becomes shorter even whenthe battery is fully charged. In this event, replace the battery.
• Always charge the battery after purchasing or when it hasnot been used for a long time.
• Use the Battery charge D-BC7 to charge the rechargeableLithium-ion battery D-LI7 only as the charger may overheator be damaged.
• If the battery is inserted correctly but the charging indicator failsto light, the battery may be faulty. Replace with a new battery.
memo
Charging indicator
Battery
AC plug cord
To power outlet
Battery charger
z
xc
e02_kb338_001_023_41e.qk 3/17/03 3:33 PM Page 12
13
Getting S
tarted
Caution
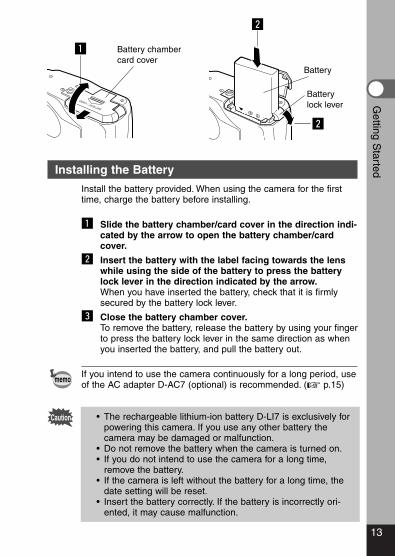
Installing the Battery
Install the battery provided. When using the camera for the firsttime, charge the battery before installing.
z Slide the battery chamber/card cover in the direction indi-cated by the arrow to open the battery chamber/cardcover.
x Insert the battery with the label facing towards the lenswhile using the side of the battery to press the batterylock lever in the direction indicated by the arrow.When you have inserted the battery, check that it is firmlysecured by the battery lock lever.
c Close the battery chamber cover.To remove the battery, release the battery by using your fingerto press the battery lock lever in the same direction as whenyou inserted the battery, and pull the battery out.
If you intend to use the camera continuously for a long period, useof the AC adapter D-AC7 (optional) is recommended. (� p.15)
• The rechargeable lithium-ion battery D-LI7 is exclusively forpowering this camera. If you use any other battery thecamera may be damaged or malfunction.
• Do not remove the battery when the camera is turned on.• If you do not intend to use the camera for a long time,
remove the battery.• If the camera is left without the battery for a long time, the
date setting will be reset.• Insert the battery correctly. If the battery is incorrectly ori-
ented, it may cause malfunction.
memo
Battery chambercard cover
Battery
Battery lock lever
z
x
x
e02_kb338_001_023_41e.qk 3/17/03 3:33 PM Page 13
14
Getting S
tarted
Caution
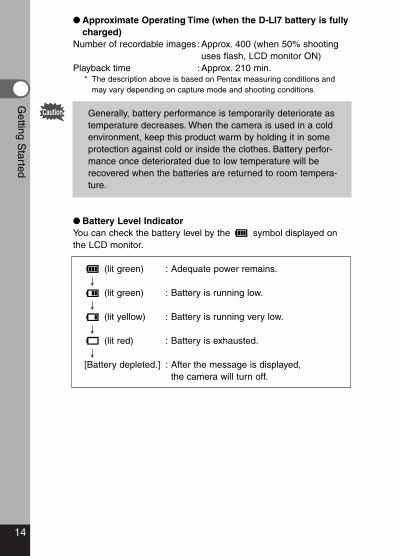
� Approximate Operating Time (when the D-LI7 battery is fullycharged)
Number of recordable images :Approx. 400 (when 50% shootinguses flash, LCD monitor ON)
Playback time :Approx. 210 min.* The description above is based on Pentax measuring conditions and
may vary depending on capture mode and shooting conditions.
Generally, battery performance is temporarily deteriorate astemperature decreases. When the camera is used in a coldenvironment, keep this product warm by holding it in someprotection against cold or inside the clothes. Battery perfor-mance once deteriorated due to low temperature will berecovered when the batteries are returned to room tempera-ture.
� Battery Level IndicatorYou can check the battery level by the symbol displayed onthe LCD monitor.
(lit green) : Adequate power remains.↓
(lit green) : Battery is running low.↓
(lit yellow) : Battery is running very low.↓
(lit red) : Battery is exhausted.↓
[Battery depleted.] : After the message is displayed, the camera will turn off.
e02_kb338_001_023_41e.qk 3/17/03 3:33 PM Page 14
15
Getting S
tarted
Caution
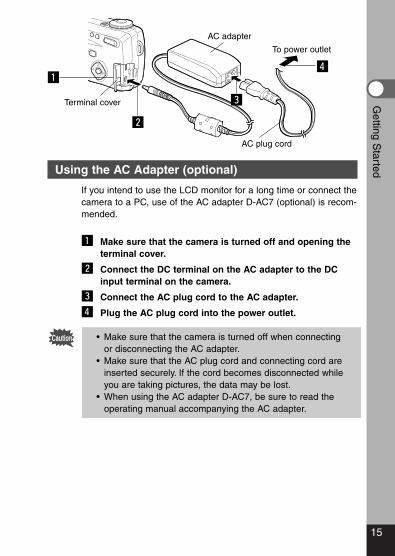
Using the AC Adapter (optional)
If you intend to use the LCD monitor for a long time or connect thecamera to a PC, use of the AC adapter D-AC7 (optional) is recom-mended.
z Make sure that the camera is turned off and opening theterminal cover.
x Connect the DC terminal on the AC adapter to the DCinput terminal on the camera.
c Connect the AC plug cord to the AC adapter.
v Plug the AC plug cord into the power outlet.
• Make sure that the camera is turned off when connectingor disconnecting the AC adapter.
• Make sure that the AC plug cord and connecting cord areinserted securely. If the cord becomes disconnected whileyou are taking pictures, the data may be lost.
• When using the AC adapter D-AC7, be sure to read theoperating manual accompanying the AC adapter.
AC adapter
AC plug cord
To power outlet
Terminal cover
z
x
c
v
e02_kb338_001_023_41e.qk 3/17/03 3:33 PM Page 15
16
Getting S
tarted
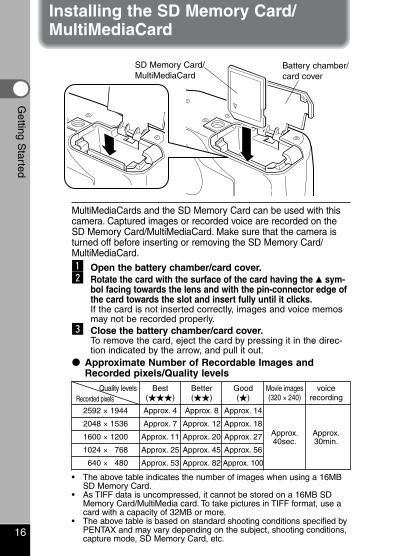
MultiMediaCards and the SD Memory Card can be used with thiscamera. Captured images or recorded voice are recorded on theSD Memory Card/MultiMediaCard. Make sure that the camera isturned off before inserting or removing the SD Memory Card/MultiMediaCard.z Open the battery chamber/card cover.x Rotate the card with the surface of the card having the � sym-
bol facing towards the lens and with the pin-connector edge ofthe card towards the slot and insert fully until it clicks.If the card is not inserted correctly, images and voice memosmay not be recorded properly.
c Close the battery chamber/card cover.To remove the card, eject the card by pressing it in the direc-tion indicated by the arrow, and pull it out.
� Approximate Number of Recordable Images andRecorded pixels/Quality levels
Quality levels Best Better Good Movie images voiceRecorded pixels (���) (��) (�) (320 × 240) recording
2592 × 1944 Approx. 4 Approx. 8 Approx. 14
2048 × 1536 Approx. 7 Approx. 12 Approx. 18Approx. Approx.1600 × 1200 Approx. 11 Approx. 20 Approx. 2740sec. 30min.
1024 × 0768 Approx. 25 Approx. 45 Approx. 56
0640 × 0480 Approx. 53 Approx. 82 Approx. 100
• The above table indicates the number of images when using a 16MBSD Memory Card.
• As TIFF data is uncompressed, it cannot be stored on a 16MB SDMemory Card/MultiMedia card. To take pictures in TIFF format, use acard with a capacity of 32MB or more.
• The above table is based on standard shooting conditions specified byPENTAX and may vary depending on the subject, shooting conditions,capture mode, SD Memory Card, etc.
Installing the SD Memory Card/MultiMediaCard
Battery chamber/card cover
SD Memory Card/MultiMediaCard
e02_kb338_001_023_41e.qk 3/17/03 3:33 PM Page 16
17
Getting S
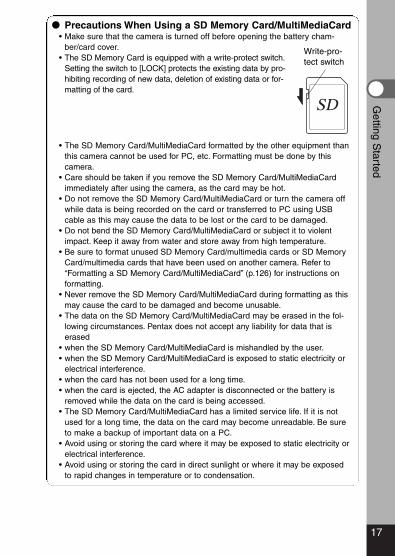
tarted� Precautions When Using a SD Memory Card/MultiMediaCard
• Make sure that the camera is turned off before opening the battery cham-ber/card cover.
• The SD Memory Card is equipped with a write-protect switch.Setting the switch to [LOCK] protects the existing data by pro-hibiting recording of new data, deletion of existing data or for-matting of the card.
• The SD Memory Card/MultiMediaCard formatted by the other equipment thanthis camera cannot be used for PC, etc. Formatting must be done by thiscamera.
• Care should be taken if you remove the SD Memory Card/MultiMediaCardimmediately after using the camera, as the card may be hot.
• Do not remove the SD Memory Card/MultiMediaCard or turn the camera offwhile data is being recorded on the card or transferred to PC using USBcable as this may cause the data to be lost or the card to be damaged.
• Do not bend the SD Memory Card/MultiMediaCard or subject it to violentimpact. Keep it away from water and store away from high temperature.
• Be sure to format unused SD Memory Card/multimedia cards or SD MemoryCard/multimedia cards that have been used on another camera. Refer to“Formatting a SD Memory Card/MultiMediaCard” (p.126) for instructions onformatting.
• Never remove the SD Memory Card/MultiMediaCard during formatting as thismay cause the card to be damaged and become unusable.
• The data on the SD Memory Card/MultiMediaCard may be erased in the fol-lowing circumstances. Pentax does not accept any liability for data that iserased
• when the SD Memory Card/MultiMediaCard is mishandled by the user.• when the SD Memory Card/MultiMediaCard is exposed to static electricity or
electrical interference.• when the card has not been used for a long time.• when the card is ejected, the AC adapter is disconnected or the battery is
removed while the data on the card is being accessed.• The SD Memory Card/MultiMediaCard has a limited service life. If it is not
used for a long time, the data on the card may become unreadable. Be sureto make a backup of important data on a PC.
• Avoid using or storing the card where it may be exposed to static electricity orelectrical interference.
• Avoid using or storing the card in direct sunlight or where it may be exposedto rapid changes in temperature or to condensation.
Write-pro-tect switch
e02_kb338_001_023_41e.qk 3/17/03 3:33 PM Page 17
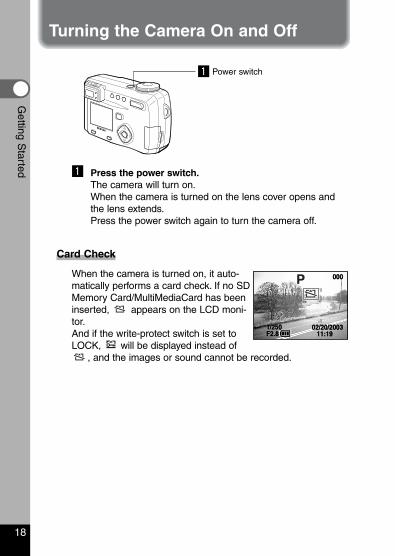
z Press the power switch.The camera will turn on.When the camera is turned on the lens cover opens andthe lens extends.Press the power switch again to turn the camera off.
Card Check
When the camera is turned on, it auto-matically performs a card check. If no SDMemory Card/MultiMediaCard has beeninserted, appears on the LCD moni-tor.And if the write-protect switch is set toLOCK, will be displayed instead of
, and the images or sound cannot be recorded.
18
Turning the Camera On and Off
Getting S
tarted
z Power switch
000000
11:19 11:19 02/20/200302/20/2003
F2.81/250F2.81/250
e02_kb338_001_023_41e.qk 3/17/03 3:33 PM Page 18
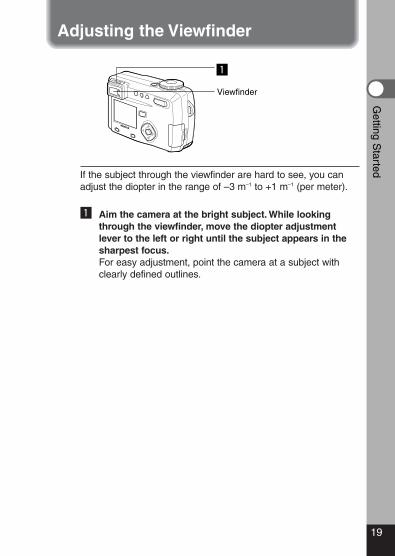
If the subject through the viewfinder are hard to see, you canadjust the diopter in the range of –3 m–1 to +1 m–1 (per meter).
z Aim the camera at the bright subject. While lookingthrough the viewfinder, move the diopter adjustmentlever to the left or right until the subject appears in thesharpest focus.For easy adjustment, point the camera at a subject withclearly defined outlines.
19
Adjusting the ViewfinderG
etting Started
z
Viewfinder
e02_kb338_001_023_41e.qk 3/17/03 3:33 PM Page 19
20
Getting S
tarted
Power switch
OK button
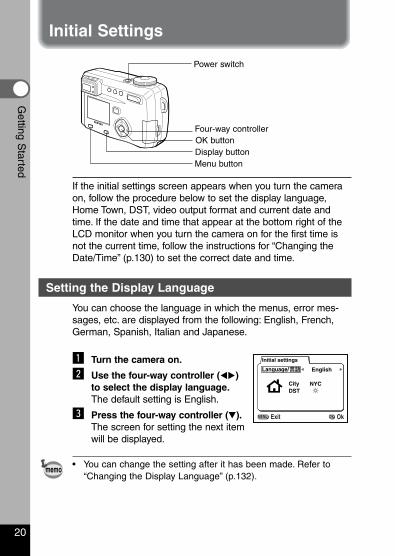
If the initial settings screen appears when you turn the cameraon, follow the procedure below to set the display language,Home Town, DST, video output format and current date andtime. If the date and time that appear at the bottom right of theLCD monitor when you turn the camera on for the first time isnot the current time, follow the instructions for “Changing theDate/Time” (p.130) to set the correct date and time.
Setting the Display Language
You can choose the language in which the menus, error mes-sages, etc. are displayed from the following: English, French,German, Spanish, Italian and Japanese.
z Turn the camera on.
x Use the four-way controller (��)to select the display language.The default setting is English.
c Press the four-way controller (�).The screen for setting the next itemwill be displayed.
• You can change the setting after it has been made. Refer to“Changing the Display Language” (p.132).
memo
Menu buttonDisplay button
Four-way controller
Language/
Initial settings
NYC
English
CityDST
MENU OkOKExit
Initial Settings
e02_kb338_001_023_41e.qk 3/17/03 3:33 PM Page 20
21
Getting S
tartedSetting the Home Town
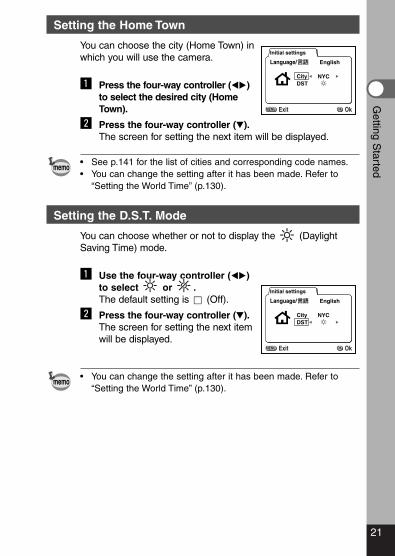
You can choose the city (Home Town) inwhich you will use the camera.
z Press the four-way controller (��)to select the desired city (HomeTown).
x Press the four-way controller (�).The screen for setting the next item will be displayed.
• See p.141 for the list of cities and corresponding code names.• You can change the setting after it has been made. Refer to
“Setting the World Time” (p.130).
Setting the D.S.T. Mode
You can choose whether or not to display the (DaylightSaving Time) mode.
z Use the four-way controller (��)to select or .The default setting is (Off).
x Press the four-way controller (�).The screen for setting the next itemwill be displayed.
• You can change the setting after it has been made. Refer to“Setting the World Time” (p.130).
memo
memo
Language/
Initial settings
NYC
English
CityDST
MENU OkOKExit
Language/
Initial settings
NYC
English
CityDST
MENU OkOKExit
e02_kb338_001_023_41e.qk 3/17/03 3:33 PM Page 21
22
Getting S
tarted
Setting the Date and Time
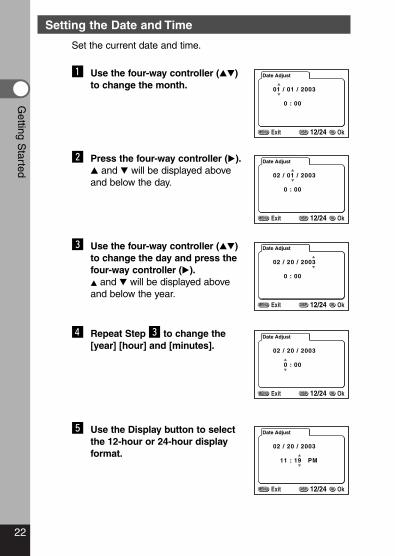
Set the current date and time.
z Use the four-way controller (��)to change the month.
x Press the four-way controller (�).� and � will be displayed aboveand below the day.
c Use the four-way controller (��)to change the day and press thefour-way controller (�).� and � will be displayed aboveand below the year.
v Repeat Step c to change the[year] [hour] and [minutes].
b Use the Display button to selectthe 12-hour or 24-hour displayformat.
Date Adjust
01 / 01 / 2003
0 : 00
MENU OkOKExit DISP 12/24
Date Adjust
02 / 20 / 2003
0 : 00
MENU OkOKExit DISP 12/24
Date Adjust
02 / 20 / 2003
11 : 19 PM
MENU OkOKExit DISP 12/24
Date Adjust
02 / 01 / 2003
0 : 00
MENU OkOKExit DISP 12/24
Date Adjust
02 / 20 / 2003
0 : 00
MENU OkOKExit DISP 12/24
e02_kb338_001_023_41e.qk 3/17/03 3:33 PM Page 22
23
Getting S
tartedn When you have finished the settings, press the OK but-
ton when the clock reaches 00 seconds.The camera is ready to take a picture.When you set date and time except the initial settings,press the OK button again after pressing the OK buttonwhen the clock reaches 00 seconds to return to capturemode.
• For an accurate time setting, when you have finished the set-tings, press the OK button when the clock reaches 00 seconds.
• When the initial settings screen is displayed, you can cancelthe settings operation and switch to Capture mode by press-ing the MENU/Fn button. If this is done, the initial settingsscreen will be displayed next time you turn the camera on.
• You can change the settings after they have been made.Refer to “Changing the Date/Time” (p.130).
memo
e02_kb338_001_023_41e.qk 3/17/03 3:33 PM Page 23
Shutter release button
Taking Still Pictures
24
Quick Start
Quick S
tart
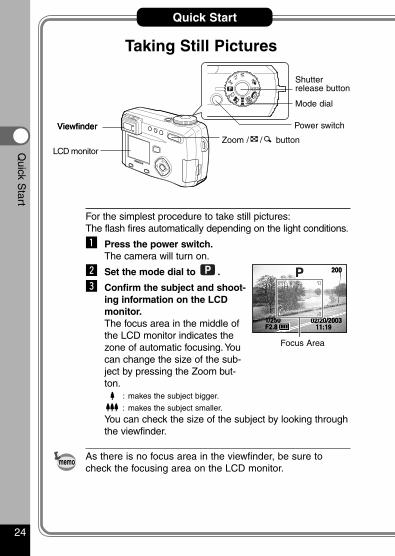
For the simplest procedure to take still pictures:The flash fires automatically depending on the light conditions.
z Press the power switch.The camera will turn on.
x Set the mode dial to .
c Confirm the subject and shoot-ing information on the LCDmonitor.The focus area in the middle ofthe LCD monitor indicates thezone of automatic focusing.Youcan change the size of the sub-ject by pressing the Zoom but-ton.
: makes the subject bigger.
: makes the subject smaller.
You can check the size of the subject by looking throughthe viewfinder.
As there is no focus area in the viewfinder, be sure tocheck the focusing area on the LCD monitor.
memo
200200
11:19 11:19 02/20/200302/20/2003
F2.81/250F2.81/250
Focus Area
Mode dial
Power switchViewfinderViewfinder
LCD monitorZoom / / button
e03_kb338_024_037_41e.qk 3/17/03 3:37 PM Page 24
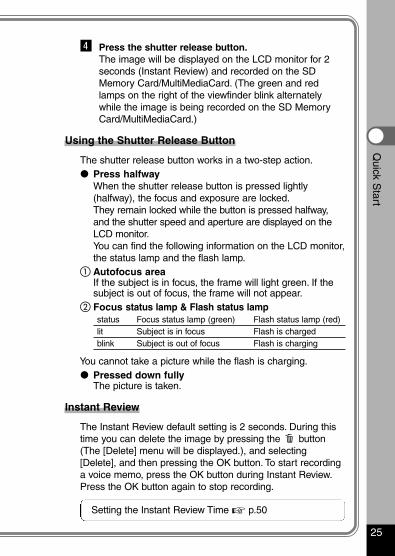
v Press the shutter release button.The image will be displayed on the LCD monitor for 2seconds (Instant Review) and recorded on the SDMemory Card/MultiMediaCard. (The green and redlamps on the right of the viewfinder blink alternatelywhile the image is being recorded on the SD MemoryCard/MultiMediaCard.)
Using the Shutter Release Button
The shutter release button works in a two-step action.� Press halfway
When the shutter release button is pressed lightly(halfway), the focus and exposure are locked.They remain locked while the button is pressed halfway,and the shutter speed and aperture are displayed on theLCD monitor.You can find the following information on the LCD monitor,the status lamp and the flash lamp.
� Autofocus areaIf the subject is in focus, the frame will light green. If thesubject is out of focus, the frame will not appear.
� Focus status lamp & Flash status lamp status Focus status lamp (green) Flash status lamp (red)lit Subject is in focus Flash is chargedblink Subject is out of focus Flash is charging
You cannot take a picture while the flash is charging.� Pressed down fully
The picture is taken.
Instant Review
The Instant Review default setting is 2 seconds. During thistime you can delete the image by pressing the button(The [Delete] menu will be displayed.), and selecting[Delete], and then pressing the OK button. To start recordinga voice memo, press the OK button during Instant Review.Press the OK button again to stop recording.
Setting the Instant Review Time � p.50
25
Quick S
tart
e03_kb338_024_037_41e.qk 3/17/03 3:37 PM Page 25
26
Quick S
tart
Quick Start
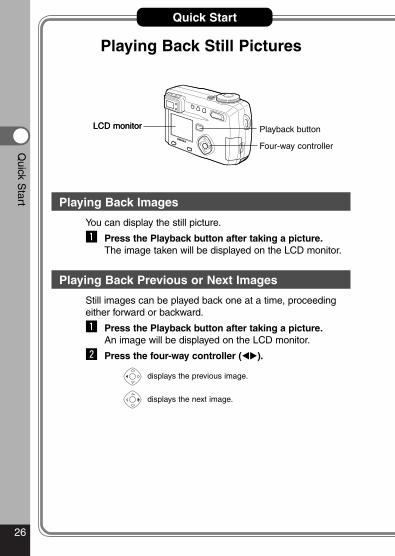
Playing Back Still Pictures
Playing Back Images
You can display the still picture.
z Press the Playback button after taking a picture.The image taken will be displayed on the LCD monitor.
Playing Back Previous or Next Images
Still images can be played back one at a time, proceedingeither forward or backward.
z Press the Playback button after taking a picture.An image will be displayed on the LCD monitor.
x Press the four-way controller (��).
displays the previous image.
displays the next image.
LCD monitorLCD monitor Playback button
Four-way controller
e03_kb338_024_037_41e.qk 3/17/03 3:37 PM Page 26
27
Quick S
tart
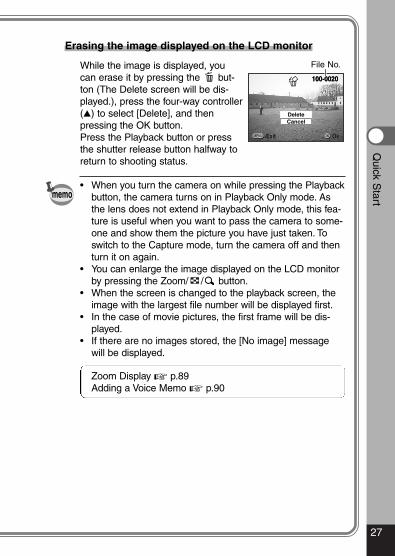
Erasing the image displayed on the LCD monitor
While the image is displayed, youcan erase it by pressing the but-ton (The Delete screen will be dis-played.), press the four-way controller(�) to select [Delete], and thenpressing the OK button.Press the Playback button or pressthe shutter release button halfway toreturn to shooting status.
• When you turn the camera on while pressing the Playbackbutton, the camera turns on in Playback Only mode. Asthe lens does not extend in Playback Only mode, this fea-ture is useful when you want to pass the camera to some-one and show them the picture you have just taken. Toswitch to the Capture mode, turn the camera off and thenturn it on again.
• You can enlarge the image displayed on the LCD monitorby pressing the Zoom/ / button.
• When the screen is changed to the playback screen, theimage with the largest file number will be displayed first.
• In the case of movie pictures, the first frame will be dis-played.
• If there are no images stored, the [No image] messagewill be displayed.
Zoom Display � p.89Adding a Voice Memo � p.90
memo
100-0020100-0020
CancelDelete
MENU OK OkExit OkExit
File No.
e03_kb338_024_037_41e.qk 3/17/03 3:37 PM Page 27
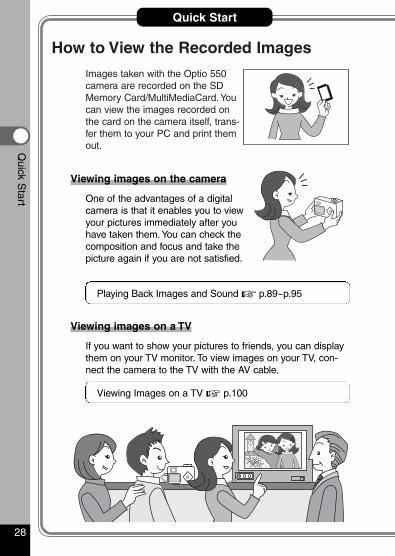
How to View the Recorded Images
Images taken with the Optio 550camera are recorded on the SDMemory Card/MultiMediaCard.Youcan view the images recorded onthe card on the camera itself, trans-fer them to your PC and print themout.
Viewing images on the camera
One of the advantages of a digitalcamera is that it enables you to viewyour pictures immediately after youhave taken them.You can check thecomposition and focus and take thepicture again if you are not satisfied.
Playing Back Images and Sound � p.89~p.95
Viewing images on a TV
If you want to show your pictures to friends, you can displaythem on your TV monitor. To view images on your TV, con-nect the camera to the TV with the AV cable.
Viewing Images on a TV � p.100
28
Quick Start
Quick S
tart
e03_kb338_024_037_41e.qk 3/17/03 3:37 PM Page 28

29
Quick S
tart
Viewing images on a PC
You can view recorded images and edit them on the PC justby connecting the camera to the PC with the USB cable anddownloading the images (you need to install the USB driver ifyou are using Windows 98). Or you can remove the SDMemory Card/MultiMediaCard from the camera and transferthe data to your PC using a card reader. If you use a laptopcomputer, you can transfer the image data by fitting the SDMemory Card/MultiMediaCard into the card adapter andinserting the card adapter into the card slot.
Viewing Images with your PC � p.104Viewing Images with your Macintosh � p.118
Printing images by a printing service
Prints of images recorded on the SD MemoryCard/MultiMediaCard can be ordered in the same way aswith conventional photographs by taking the SD MemoryCard/MultiMediaCard to a store that performs printing.The number of prints can be specified and dates can be includ-ed in the prints if DPOF (Digital Print Order Format) is set beforetaking the SD Memory Card/MultiMediaCard to a store that per-forms DPOF printing.
Setting the Printing Service � p.101
e03_kb338_024_037_41e.qk 3/17/03 3:37 PM Page 29
30
Com
mon O
perations
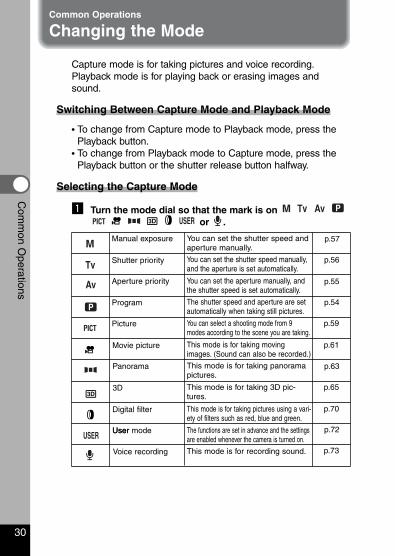
Capture mode is for taking pictures and voice recording.Playback mode is for playing back or erasing images andsound.
Switching Between Capture Mode and Playback Mode
• To change from Capture mode to Playback mode, press thePlayback button.
• To change from Playback mode to Capture mode, press thePlayback button or the shutter release button halfway.
Selecting the Capture Mode
z Turn the mode dial so that the mark is on or .
Common Operations
Changing the Mode
Manual exposure You can set the shutter speed andaperture manually.
Aperture priority
You can select a shooting mode from 9modes according to the scene you are taking.
Program
You can set the aperture manually, andthe shutter speed is set automatically.
The shutter speed and aperture are setautomatically when taking still pictures.
p.57
Picture
You can set the shutter speed manually,and the aperture is set automatically.
Shutter priority
Movie picture
Digital filter
User modeUser
Voice recording
This mode is for taking movingimages. (Sound can also be recorded.)
The functions are set in advance and the settingsare enabled whenever the camera is turned on.
This mode is for taking 3D pic-tures.
This mode is for taking pictures using a vari-ety of filters such as red, blue and green.
This mode is for taking panoramapictures.
This mode is for recording sound.
p.56
p.55
p.54
p.59
p.61
p.63
p.65
p.70
p.72
p.73
3D
Panorama
e03_kb338_024_037_41e.qk 3/17/03 3:37 PM Page 30
31
Using the Button FunctionsC
omm
on Operations
� � ��
��
�
��
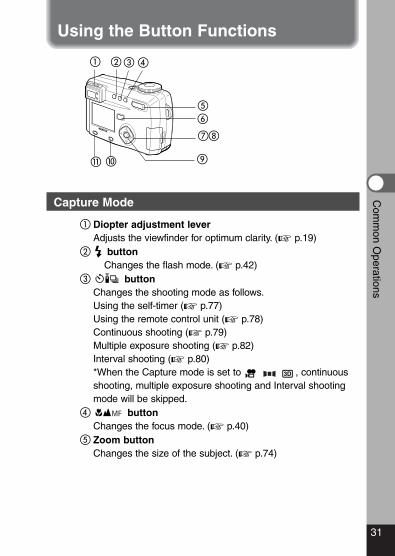
Capture Mode
� Diopter adjustment leverAdjusts the viewfinder for optimum clarity. (� p.19)
� buttonChanges the flash mode. (� p.42)
� buttonChanges the shooting mode as follows.Using the self-timer (� p.77)Using the remote control unit (� p.78)Continuous shooting (� p.79)Multiple exposure shooting (� p.82)Interval shooting (� p.80)*When the Capture mode is set to , continuousshooting, multiple exposure shooting and Interval shootingmode will be skipped.
� buttonChanges the focus mode. (� p.40)
� Zoom buttonChanges the size of the subject. (� p.74)
e03_kb338_024_037_41e.qk 3/17/03 3:37 PM Page 31
32
Com
mon O
perations
� Playback buttonSwitches to Playback mode. (� p.30)
� Four-way controller (��)Changes the EV compensation in modes other than and
. (� p.76)Changes the shutter speed in mode. (� p.57)
Four-way controller (��)Adjusts the focus in mode. (� p.41)Sets the aperture value in and mode. (� p.57, 55)Sets the shutter speed in mode. (� p.56)Selects the type of filter in mode. (� p.70)Selects Picture mode in mode. (� p.59)
OK buttonSets the selected menu item. (� p.34)When pressed in mode, the function on the four-waycontroller (��) reverts to the function set by the mode dial.
� Display buttonChanges the information displayed on the LCD monitor.(� p.38)
� Menu/Fn buttonDisplays the active menus in Capture mode and retrieves thefunctions registered on the four-way controller. (� p.34, 137)
e03_kb338_024_037_41e.qk 3/17/03 3:37 PM Page 32
33
Com
mon O
perations
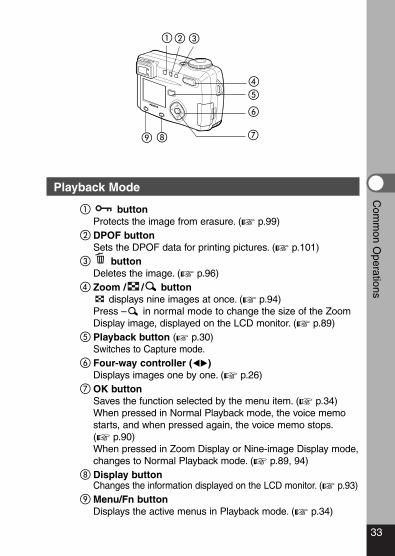
Playback Mode
� buttonProtects the image from erasure. (� p.99)
� DPOF buttonSets the DPOF data for printing pictures. (� p.101)
� buttonDeletes the image. (� p.96)
� Zoom / / buttondisplays nine images at once. (� p.94)
Press – in normal mode to change the size of the ZoomDisplay image, displayed on the LCD monitor. (� p.89)
� Playback button (� p.30)Switches to Capture mode.
� Four-way controller (��)Displays images one by one. (� p.26)
� OK buttonSaves the function selected by the menu item. (� p.34)When pressed in Normal Playback mode, the voice memostarts, and when pressed again, the voice memo stops.(� p.90)When pressed in Zoom Display or Nine-image Display mode,changes to Normal Playback mode. (� p.89, 94)
Display buttonChanges the information displayed on the LCD monitor. (� p.93)
Menu/Fn buttonDisplays the active menus in Playback mode. (� p.34)
� ��
��
�
�
e03_kb338_024_037_41e.qk 3/17/03 3:37 PM Page 33
34
Com
mon O
perations
Caution
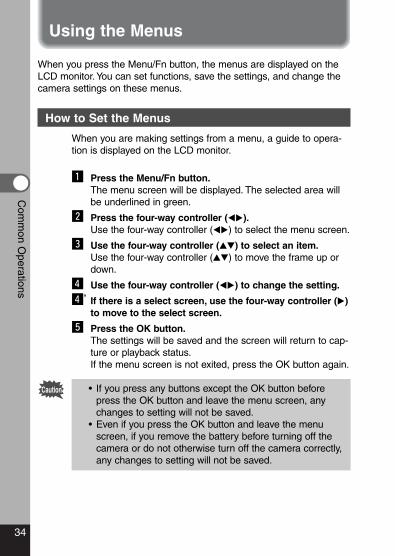
When you press the Menu/Fn button, the menus are displayed on theLCD monitor.You can set functions, save the settings, and change thecamera settings on these menus.
How to Set the Menus
When you are making settings from a menu, a guide to opera-tion is displayed on the LCD monitor.
z Press the Menu/Fn button.The menu screen will be displayed. The selected area willbe underlined in green.
x Press the four-way controller (��).Use the four-way controller (��) to select the menu screen.
c Use the four-way controller (��) to select an item.Use the four-way controller (��) to move the frame up ordown.
v Use the four-way controller (��) to change the setting.
v’ If there is a select screen, use the four-way controller (�)to move to the select screen.
b Press the OK button.The settings will be saved and the screen will return to cap-ture or playback status.If the menu screen is not exited, press the OK button again.
• If you press any buttons except the OK button beforepress the OK button and leave the menu screen, anychanges to setting will not be saved.
• Even if you press the OK button and leave the menuscreen, if you remove the battery before turning off thecamera or do not otherwise turn off the camera correctly,any changes to setting will not be saved.
Using the Menus
e03_kb338_024_037_41e.qk 3/17/03 3:37 PM Page 34

35
Com
mon O
perations
• If you press the shutter release button halfway and move the camera toCapture mode, any changes to the setting will not be saved.
• When you display the menu from Capture mode, the [ Rec. Mode] menuwill be displayed, and when you display the menu from Playback mode, the[ Playback] menu will be displayed.
Example of menu operation
z Menu/Fn button
c
c v
c
c
v’
[ Rec.Mode] menu
To the next screen
Select screen
Rec. Mode
WideAWB
Auto
2592 1944Recorded PixelsQuality LevelWhite BalanceFocusing AreaAE MeteringSensitivity
Exit1/3 MENU OkOK
Playback
ResizeTrimmingAlarmSlideshow 3sec
Off
ExitMENU OkOK
Set-up
FormatSoundDate Style mm/dd/yy
1/ 1/2003Off
Date AdjustWorld TimeLanguage/ English
1/3 ExitMENU OkOK
[ Set-up] menu[ Playback] menu
Rec. Mode
WideAWB
Auto
2592 1944Recorded PixelsQuality LevelWhite BalanceFocusing AreaAE MeteringSensitivity
1/3 ExitMENU OkOK
Rec. Mode
WideAWB
Auto
2592 1944Recorded PixelsQuality LevelWhite BalanceFocusing AreaAE MeteringSensitivity
1/3 ExitMENU OkOK
Rec. Mode
WideAWB
Auto
2592 1944Recorded PixelsQuality LevelWhite BalanceFocusing AreaAE MeteringSensitivity
1/3 ExitMENU OkOK
x
Auto BracketDigital ZoomInstant ReviewInterval Shoot
OffParallel
On2sec
Fast Fwd Movie3D Mode
Rec. Mode
2/3 ExitMENU OkOK
Interval Shoot
Interval
Number of Shot
Start Time0hr 0min
02
1min 10sec
MENU OkOKExit
memo
e03_kb338_024_037_41e.qk 3/17/03 3:37 PM Page 35
36
Com
mon O
perations
Menu List
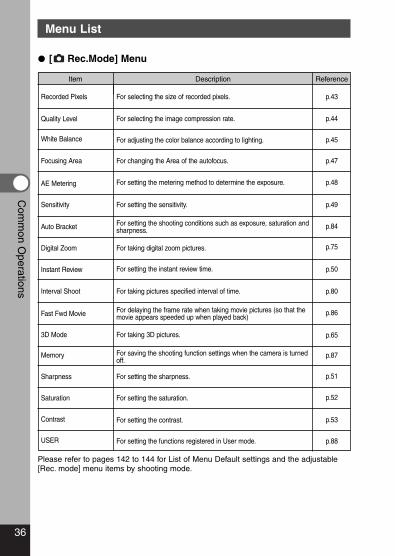
� [ Rec.Mode] Menu
Item Description Reference
Please refer to pages 142 to 144 for List of Menu Default settings and the adjustable[Rec. mode] menu items by shooting mode.
Quality Level For selecting the image compression rate.
White Balance For adjusting the color balance according to lighting.
Focusing Area For changing the Area of the autofocus.
Digital Zoom For taking digital zoom pictures.
Sensitivity For setting the sensitivity.
Instant Review For setting the instant review time.
Sharpness For setting the sharpness.
Saturation For setting the saturation.
Contrast For setting the contrast.
3D Mode For taking 3D pictures.
Auto Bracket For setting the shooting conditions such as exposure, saturation andsharpness.
Memory For saving the shooting function settings when the camera is turnedoff.
AE Metering For setting the metering method to determine the exposure.
Interval Shoot For taking pictures specified interval of time.
Fast Fwd Movie For delaying the frame rate when taking movie pictures (so that themovie appears speeded up when played back)
USER For setting the functions registered in User mode.
p.45
p.47
p.48
p.49
p.84
p.75
p.65
p.80
p.86
p.87
p.51
p.52
p.53
p.44
p.50
p.88
Recorded Pixels For selecting the size of recorded pixels. p.43
e03_kb338_024_037_41e.qk 3/17/03 3:37 PM Page 36

37
Com
mon O
perations� [ Playback] Menu
Item Description Reference
� [ Set-up] Menu
Item Description Reference
Resize For changing the size of images p.123
Slideshow Recorded images are played successively. p.95
Trimming For trimming images p.125
Alarm For setting the alarm to ring at specified time p.139
Format For formatting the SD Memory Card/MultiMediaCard p.126
World Time For setting the world time p.130
SoundFor adjusting the beep sound when a button is pressedFor setting the button operation, start-up, shutter sounds and volume.
p.127
Date Adjust For adjusting the date and time p.130
Language/ For changing the language in which menus and messages are dis-played
p.132
Start-up screen For setting the Start-up screen when the camera is turned on p.133
Video Out For setting the video output format p.132
Sleep Timeout For setting the power saving function p.134
Auto Power Off For turning off the power automatically. p.134
Quick Delete When this option is turned on, the Delete screen is displayed with[Delete] or [All Images] selected.
p.135
Quick Zoom For playing back images at the maximum zoom size with the Zoombutton pressed only once.
p.135
Fn Setting For registering a function on the four-way controller. p.136
Focus Limiter For switching between limiting and not limiting lens movement dur-ing normal shooting and macro shooting.
p.138
Reset For returning the camera settings to defaults p.138
Date Style For setting the date style p.129
e03_kb338_024_037_41e.qk 3/17/03 3:37 PM Page 37
38
Taking Pictures
Taking Pictures
Displaying Shooting Information (Capture Mode)
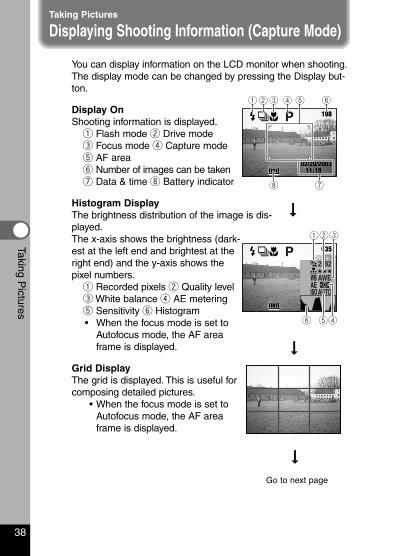
You can display information on the LCD monitor when shooting.The display mode can be changed by pressing the Display but-ton.
Display OnShooting information is displayed.
q Flash mode w Drive modee Focus mode r Capture modet AF area y Number of images can be takenu Data & time i Battery indicator
Histogram DisplayThe brightness distribution of the image is dis-played.The x-axis shows the brightness (dark-est at the left end and brightest at theright end) and the y-axis shows thepixel numbers.
q Recorded pixels w Quality levele White balance r AE meteringt Sensitivity y Histogram• When the focus mode is set to
Autofocus mode, the AF areaframe is displayed.
Grid DisplayThe grid is displayed. This is useful forcomposing detailed pictures.
• When the focus mode is set toAutofocus mode, the AF areaframe is displayed.
198198
11:19 11:19 02/20/200302/20/2003
4 6321
8 7
5
Go to next page
�
AWB
2592
AUTO
035035
231
56 4
��
e04_kb338_038_088_41e.qk 3/17/03 5:22 PM Page 38
39
Taking Pictures
Caution
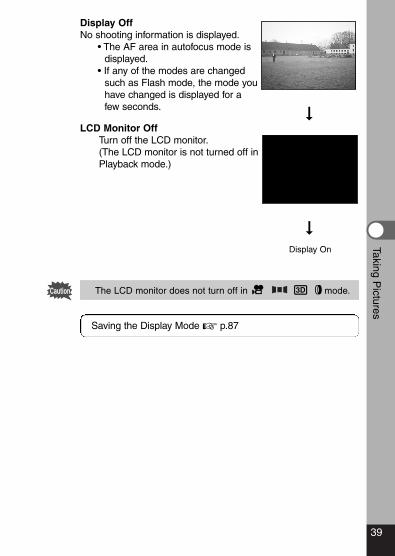
Display OffNo shooting information is displayed.
• The AF area in autofocus mode isdisplayed.
• If any of the modes are changedsuch as Flash mode, the mode youhave changed is displayed for afew seconds.
LCD Monitor OffTurn off the LCD monitor.(The LCD monitor is not turned off inPlayback mode.)
The LCD monitor does not turn off in mode.
Saving the Display Mode � p.87
��
Display On
e04_kb338_038_088_41e.qk 3/17/03 5:23 PM Page 39
40
Setting the Shooting Functions
Taking Pictures
z
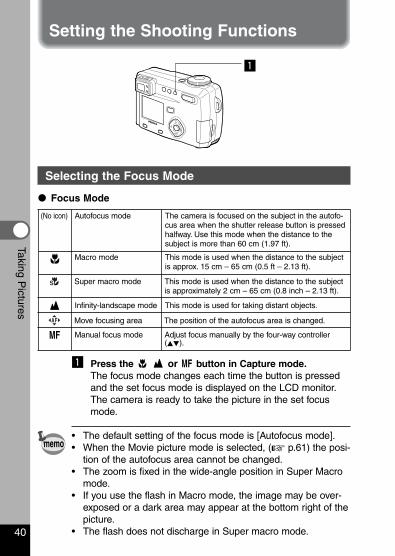
Selecting the Focus Mode
� Focus Mode
z Press the or button in Capture mode.The focus mode changes each time the button is pressedand the set focus mode is displayed on the LCD monitor.The camera is ready to take the picture in the set focusmode.
• The default setting of the focus mode is [Autofocus mode].• When the Movie picture mode is selected, (� p.61) the posi-
tion of the autofocus area cannot be changed.• The zoom is fixed in the wide-angle position in Super Macro
mode.• If you use the flash in Macro mode, the image may be over-
exposed or a dark area may appear at the bottom right of thepicture.
• The flash does not discharge in Super macro mode.
(No icon) Autofocus mode The camera is focused on the subject in the autofo-cus area when the shutter release button is pressedhalfway. Use this mode when the distance to thesubject is more than 60 cm (1.97 ft).
Macro mode This mode is used when the distance to the subjectis approx. 15 cm – 65 cm (0.5 ft – 2.13 ft).
Infinity-landscape mode
Manual focus mode
This mode is used for taking distant objects.
Adjust focus manually by the four-way controller(��).
Super macro mode This mode is used when the distance to the subjectis approximately 2 cm – 65 cm (0.8 inch – 2.13 ft).
Move focusing area The position of the autofocus area is changed.
memo
e04_kb338_038_088_41e.qk 3/17/03 5:23 PM Page 40
41
Taking Pictures
Caution If you take a picture while looking through the viewfinderwhen the focus mode is set on Macro or Super Macro, therange of the resulting picture will differ from what was seenin the viewfinder.Be sure to check the image on the LCD monitor.
Manual Focus
When the mode is set on and press the four-way controller(��), the central portion of the picture is enlarged to full screenon the LCD monitor. Adjust the focus with the four-way controllerwhile looking at the image on the monitor.
For distant focus
For closer focus
After the focus is set, press any buttons except the four-way con-troller (��) or take a finger off from the four-way controller (� �),the screen returns to the normal display two seconds later.
• Keep pressing the four-way controller (��) will move thefocusing position rapidly.
• The central portion of picture is also enlarged in the Digitalzoom mode except at maximum magnification.
Saving the Focus Mode � p.87
memo
e04_kb338_038_088_41e.qk 3/17/03 5:23 PM Page 41
42
Taking Pictures
memo
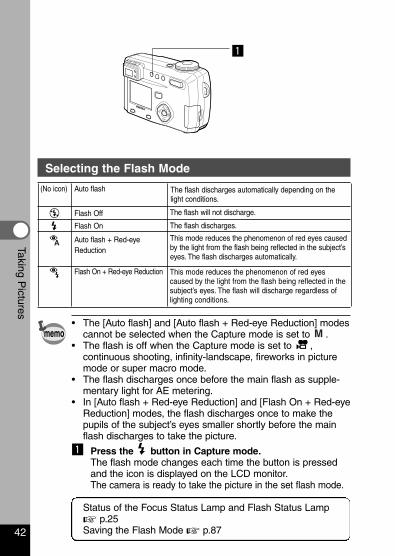
Selecting the Flash Mode
• The [Auto flash] and [Auto flash + Red-eye Reduction] modescannot be selected when the Capture mode is set to .
• The flash is off when the Capture mode is set to ,continuous shooting, infinity-landscape, fireworks in picturemode or super macro mode.
• The flash discharges once before the main flash as supple-mentary light for AE metering.
• In [Auto flash + Red-eye Reduction] and [Flash On + Red-eyeReduction] modes, the flash discharges once to make thepupils of the subject’s eyes smaller shortly before the mainflash discharges to take the picture.
z Press the button in Capture mode.The flash mode changes each time the button is pressedand the icon is displayed on the LCD monitor.The camera is ready to take the picture in the set flash mode.
Status of the Focus Status Lamp and Flash Status Lamp� p.25Saving the Flash Mode � p.87
(No icon) Auto flash The flash discharges automatically depending on thelight conditions.
Auto flash + Red-eyeReduction
This mode reduces the phenomenon of red eyescaused by the light from the flash being reflected in thesubject’s eyes. The flash will discharge regardless oflighting conditions.
This mode reduces the phenomenon of red eyes causedby the light from the flash being reflected in the subject’seyes. The flash discharges automatically.
Flash Off The flash will not discharge.
Flash On + Red-eye Reduction
Flash On The flash discharges.
z
e04_kb338_038_088_41e.qk 3/17/03 5:23 PM Page 42
43
Taking Pictures
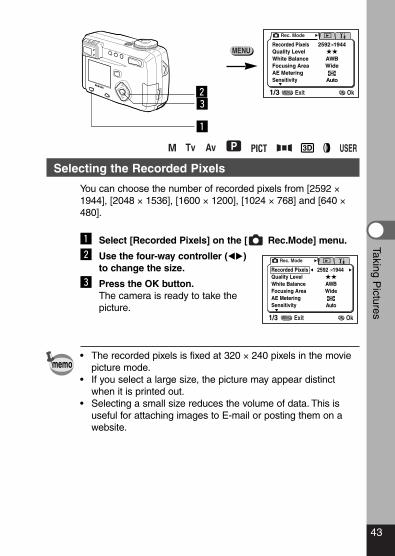
Selecting the Recorded Pixels
You can choose the number of recorded pixels from [2592 ×1944], [2048 × 1536], [1600 × 1200], [1024 × 768] and [640 ×480].
z Select [Recorded Pixels] on the [ Rec.Mode] menu.
x Use the four-way controller (��)to change the size.
c Press the OK button.The camera is ready to take thepicture.
• The recorded pixels is fixed at 320 × 240 pixels in the moviepicture mode.
• If you select a large size, the picture may appear distinctwhen it is printed out.
• Selecting a small size reduces the volume of data. This isuseful for attaching images to E-mail or posting them on awebsite.
z
cx
Rec. Mode
WideAWB
Auto
2592 1944Recorded PixelsQuality LevelWhite BalanceFocusing AreaAE MeteringSensitivity
1/3 ExitMENU OkOK
memo
Rec. Mode
WideAWB
Auto
2592 1944Recorded PixelsQuality LevelWhite BalanceFocusing AreaAE MeteringSensitivity
1/3 ExitMENU OkOK
e04_kb338_038_088_41e.qk 3/17/03 5:23 PM Page 43
44
Taking Pictures
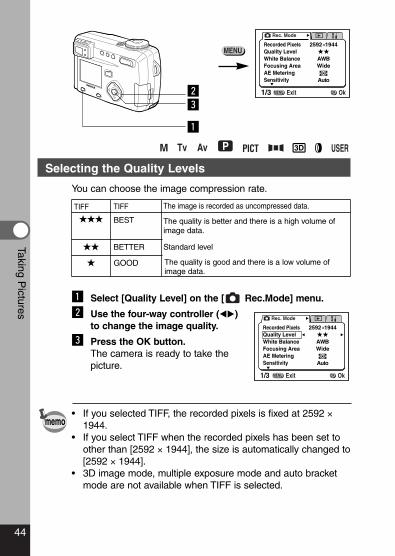
Selecting the Quality Levels
You can choose the image compression rate.
z Select [Quality Level] on the [ Rec.Mode] menu.
x Use the four-way controller (��)to change the image quality.
c Press the OK button.The camera is ready to take thepicture.
• If you selected TIFF, the recorded pixels is fixed at 2592 ×1944.
• If you select TIFF when the recorded pixels has been set toother than [2592 × 1944], the size is automatically changed to[2592 × 1944].
• 3D image mode, multiple exposure mode and auto bracketmode are not available when TIFF is selected.
Rec. Mode
WideAWB
Auto
2592 1944Recorded PixelsQuality LevelWhite BalanceFocusing AreaAE MeteringSensitivity
1/3 ExitMENU OkOK
BEST The quality is better and there is a high volume ofimage data.
���
GOOD The quality is good and there is a low volume ofimage data.
�
BETTER Standard level��
z
cx
Rec. Mode
WideAWB
Auto
2592 1944Recorded PixelsQuality LevelWhite BalanceFocusing AreaAE MeteringSensitivity
1/3 ExitMENU OkOK
TIFF The image is recorded as uncompressed data.TIFF
memo
e04_kb338_038_088_41e.qk 3/17/03 5:23 PM Page 44
45
Taking Pictures
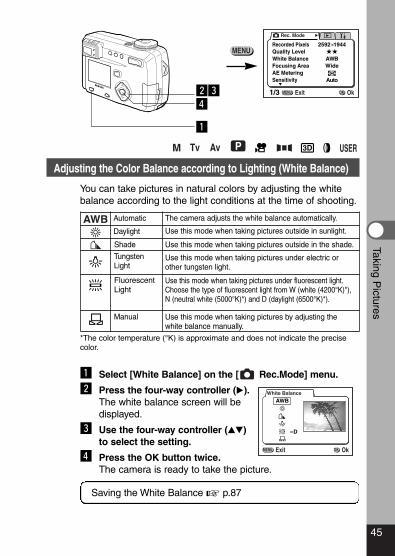
Adjusting the Color Balance according to Lighting (White Balance)
You can take pictures in natural colors by adjusting the whitebalance according to the light conditions at the time of shooting.
*The color temperature (°K) is approximate and does not indicate the precisecolor.
z Select [White Balance] on the [ Rec.Mode] menu.
x Press the four-way controller (�).The white balance screen will bedisplayed.
c Use the four-way controller (��)to select the setting.
v Press the OK button twice.The camera is ready to take the picture.
Saving the White Balance � p.87
z
vxc
Rec. Mode
WideAWB
Auto
2592 1944Recorded PixelsQuality LevelWhite BalanceFocusing AreaAE MeteringSensitivity
1/3 ExitMENU OkOK
Automatic The camera adjusts the white balance automatically.
Daylight
Shade
TungstenLight
FluorescentLight
Manual
Use this mode when taking pictures outside in sunlight.
Use this mode when taking pictures outside in the shade.
Use this mode when taking pictures under electric orother tungsten light.
Use this mode when taking pictures under fluorescent light.Choose the type of fluorescent light from W (white (4200°K)*),N (neutral white (5000°K)*) and D (daylight (6500°K)*).
Use this mode when taking pictures by adjusting thewhite balance manually.
White Balance
AWB
-D
MENU OkOKExit
e04_kb338_038_088_41e.qk 3/17/03 5:23 PM Page 45
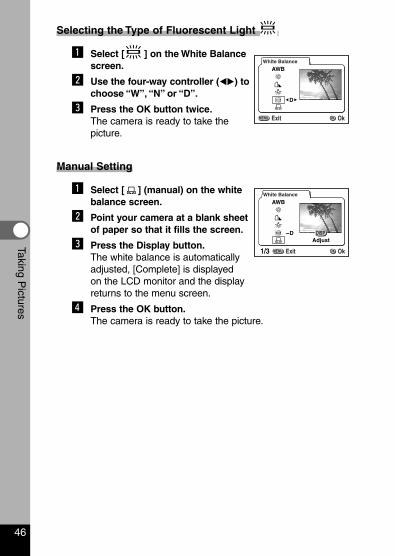
Selecting the Type of Fluorescent Light
z Select [ ] on the White Balancescreen.
x Use the four-way controller (��) tochoose “W”, “N” or “D”.
c Press the OK button twice.The camera is ready to take thepicture.
Manual Setting
z Select [ ] (manual) on the whitebalance screen.
x Point your camera at a blank sheetof paper so that it fills the screen.
c Press the Display button.The white balance is automaticallyadjusted, [Complete] is displayedon the LCD monitor and the displayreturns to the menu screen.
v Press the OK button.The camera is ready to take the picture.
46
Taking Pictures
AWBWhite Balance
D
MENU OkOKExit
White Balance
AdjustDISP
AWB
-D
1/3 ExitMENU OkOK
e04_kb338_038_088_41e.qk 3/17/03 5:23 PM Page 46
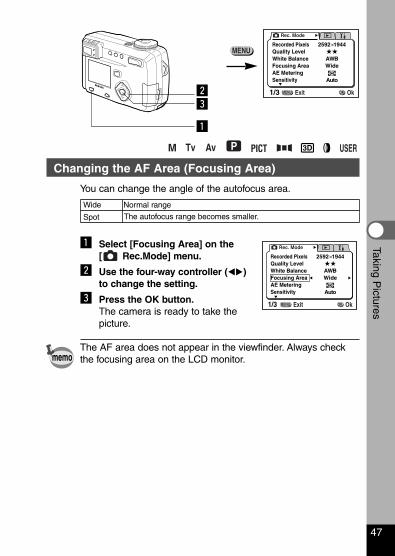
Changing the AF Area (Focusing Area)
You can change the angle of the autofocus area.
z Select [Focusing Area] on the [ Rec.Mode] menu.
x Use the four-way controller (��)to change the setting.
c Press the OK button.The camera is ready to take thepicture.
The AF area does not appear in the viewfinder. Always checkthe focusing area on the LCD monitor.
47
Taking Pictures
z
cx
Rec. Mode
WideAWB
Auto
2592 1944Recorded PixelsQuality LevelWhite BalanceFocusing AreaAE MeteringSensitivity
1/3 ExitMENU OkOK
Normal range
The autofocus range becomes smaller.
Wide
Spot
Rec. Mode
WideAWB
Auto
2592 1944Recorded PixelsQuality LevelWhite BalanceFocusing AreaAE MeteringSensitivity
1/3 ExitMENU OkOK
memo
e04_kb338_038_088_41e.qk 3/17/03 5:23 PM Page 47
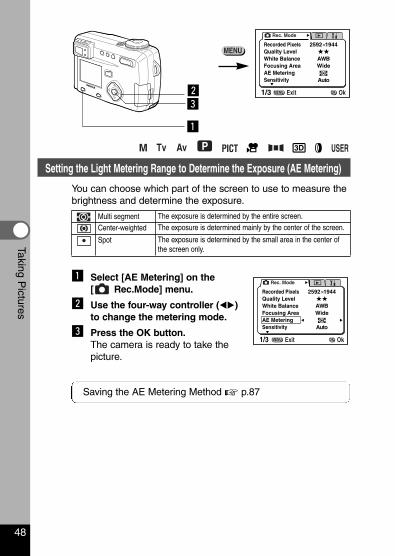
Setting the Light Metering Range to Determine the Exposure (AE Metering)
You can choose which part of the screen to use to measure thebrightness and determine the exposure.
z Select [AE Metering] on the [ Rec.Mode] menu.
x Use the four-way controller (��)to change the metering mode.
c Press the OK button.The camera is ready to take thepicture.
Saving the AE Metering Method � p.87
48
Taking Pictures
z
cx
Rec. Mode
WideAWB
Auto
2592 1944Recorded PixelsQuality LevelWhite BalanceFocusing AreaAE MeteringSensitivity
1/3 ExitMENU OkOK
Multi segment The exposure is determined by the entire screen.
Center-weighted The exposure is determined mainly by the center of the screen.
Spot The exposure is determined by the small area in the center ofthe screen only.
Rec. Mode
WideAWB
Auto
2592 1944Recorded PixelsQuality LevelWhite BalanceFocusing AreaAE MeteringSensitivity
1/3 ExitMENU OkOK
e04_kb338_038_088_41e.qk 3/17/03 5:23 PM Page 48
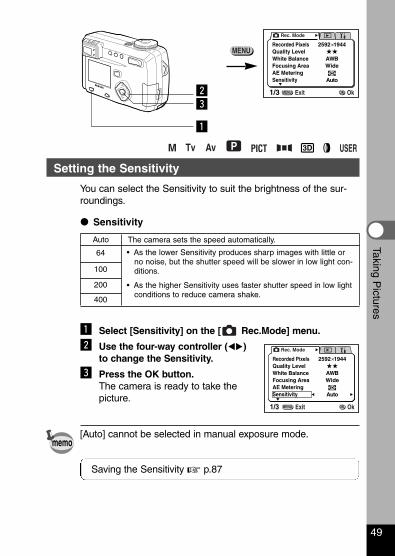
Setting the Sensitivity
You can select the Sensitivity to suit the brightness of the sur-roundings.
� Sensitivity
z Select [Sensitivity] on the [ Rec.Mode] menu.
x Use the four-way controller (��)to change the Sensitivity.
c Press the OK button.The camera is ready to take thepicture.
[Auto] cannot be selected in manual exposure mode.
Saving the Sensitivity � p.87
49
Taking Pictures
z
cx
Rec. Mode
WideAWB
Auto
2592 1944Recorded PixelsQuality LevelWhite BalanceFocusing AreaAE MeteringSensitivity
1/3 ExitMENU OkOK
Auto The camera sets the speed automatically.
100
200
400
• As the lower Sensitivity produces sharp images with little orno noise, but the shutter speed will be slower in low light con-ditions.
• As the higher Sensitivity uses faster shutter speed in low lightconditions to reduce camera shake.
64
memo
Rec. Mode
WideAWB
Auto
2592 1944Recorded PixelsQuality LevelWhite BalanceFocusing AreaAE MeteringSensitivity
1/3 ExitMENU OkOK
e04_kb338_038_088_41e.qk 3/17/03 5:23 PM Page 49
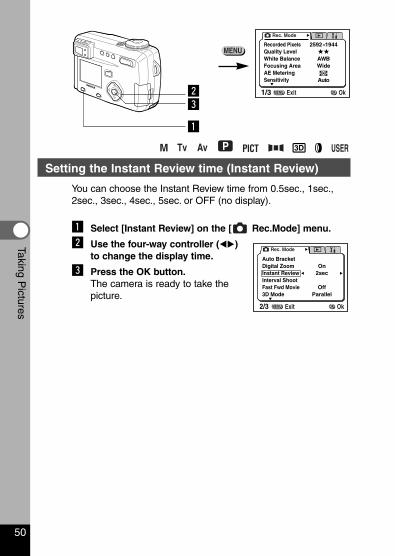
Setting the Instant Review time (Instant Review)
You can choose the Instant Review time from 0.5sec., 1sec.,2sec., 3sec., 4sec., 5sec. or OFF (no display).
z Select [Instant Review] on the [ Rec.Mode] menu.
x Use the four-way controller (��)to change the display time.
c Press the OK button.The camera is ready to take thepicture.
50
Taking Pictures
z
cx
Rec. Mode
WideAWB
Auto
2592 1944Recorded PixelsQuality LevelWhite BalanceFocusing AreaAE MeteringSensitivity
1/3 ExitMENU OkOK
Auto BracketDigital ZoomInstant ReviewInterval Shoot
Parallel
2sec
Off
On
Fast Fwd Movie3D Mode
Rec. Mode
2/3 ExitMENU OkOK
e04_kb338_038_088_41e.qk 3/17/03 5:23 PM Page 50
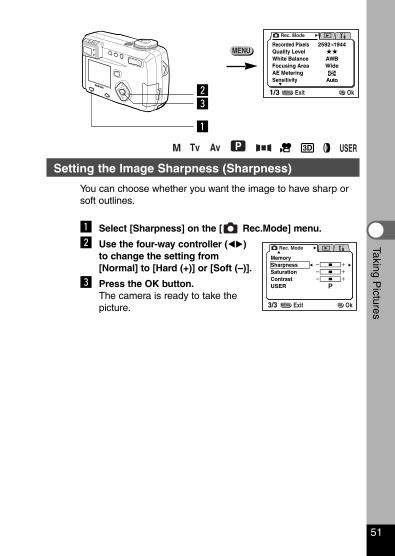
Setting the Image Sharpness (Sharpness)
You can choose whether you want the image to have sharp orsoft outlines.
z Select [Sharpness] on the [ Rec.Mode] menu.
x Use the four-way controller (��)to change the setting from[Normal] to [Hard (+)] or [Soft (–)].
c Press the OK button.The camera is ready to take thepicture.
51
Taking Pictures
z
cx
Rec. Mode
WideAWB
Auto
2592 1944Recorded PixelsQuality LevelWhite BalanceFocusing AreaAE MeteringSensitivity
1/3 ExitMENU OkOK
MemorySharpnessSaturationContrast
Rec. Mode
3/3 ExitMENU OkOK
USER
e04_kb338_038_088_41e.qk 3/17/03 5:23 PM Page 51
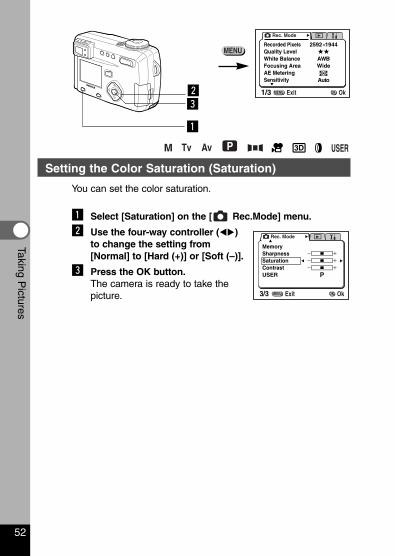
Setting the Color Saturation (Saturation)
You can set the color saturation.
z Select [Saturation] on the [ Rec.Mode] menu.
x Use the four-way controller (��)to change the setting from[Normal] to [Hard (+)] or [Soft (–)].
c Press the OK button.The camera is ready to take thepicture.
52
Taking Pictures
z
cx
Rec. Mode
WideAWB
Auto
2592 1944Recorded PixelsQuality LevelWhite BalanceFocusing AreaAE MeteringSensitivity
1/3 ExitMENU OkOK
MemorySharpnessSaturationContrast
Rec. Mode
3/3 ExitMENU OkOK
USER
e04_kb338_038_088_41e.qk 3/17/03 5:23 PM Page 52
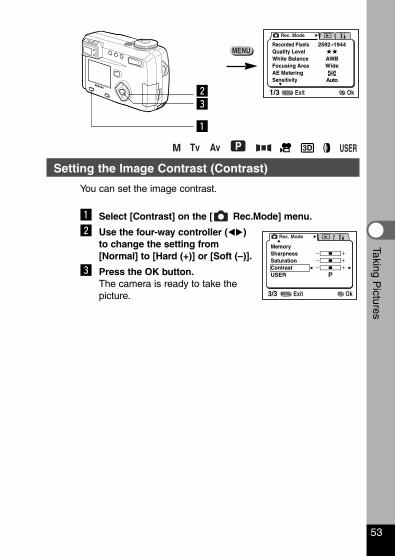
Setting the Image Contrast (Contrast)
You can set the image contrast.
z Select [Contrast] on the [ Rec.Mode] menu.
x Use the four-way controller (��)to change the setting from[Normal] to [Hard (+)] or [Soft (–)].
c Press the OK button.The camera is ready to take thepicture.
53
Taking Pictures
z
cx
Rec. Mode
WideAWB
Auto
2592 1944Recorded PixelsQuality LevelWhite BalanceFocusing AreaAE MeteringSensitivity
1/3 ExitMENU OkOK
MemorySharpnessSaturationContrast
Rec. Mode
3/3 ExitMENU OkOK
USER
e04_kb338_038_088_41e.qk 3/17/03 5:23 PM Page 53
54
Taking Pictures
Taking Pictures
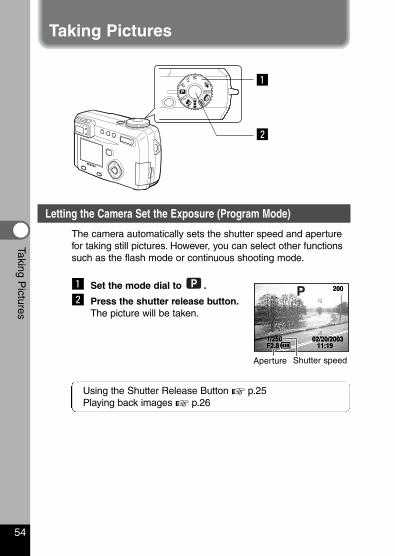
Letting the Camera Set the Exposure (Program Mode)
The camera automatically sets the shutter speed and aperturefor taking still pictures. However, you can select other functionssuch as the flash mode or continuous shooting mode.
z Set the mode dial to .
x Press the shutter release button.The picture will be taken.
Using the Shutter Release Button � p.25Playing back images � p.26
x
z
200200
11:19 11:19 F2.81/250F2.81/250 02/20/200302/20/2003
Aperture Shutter speed
e04_kb338_038_088_41e.qk 3/17/03 5:23 PM Page 54
55
Taking Pictures
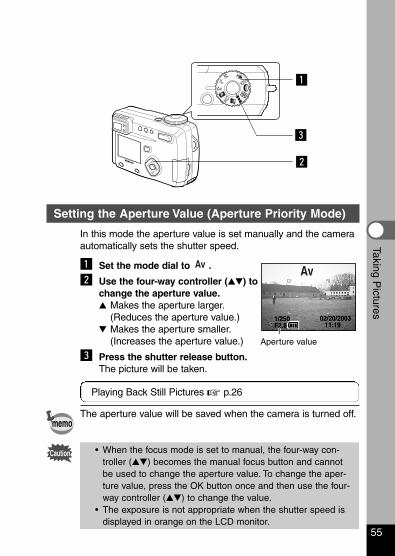
Setting the Aperture Value (Aperture Priority Mode)
In this mode the aperture value is set manually and the cameraautomatically sets the shutter speed.
z Set the mode dial to .
x Use the four-way controller (��) tochange the aperture value.� Makes the aperture larger.
(Reduces the aperture value.)� Makes the aperture smaller.
(Increases the aperture value.)
c Press the shutter release button.The picture will be taken.
Playing Back Still Pictures � p.26
The aperture value will be saved when the camera is turned off.
• When the focus mode is set to manual, the four-way con-troller (��) becomes the manual focus button and cannotbe used to change the aperture value. To change the aper-ture value, press the OK button once and then use the four-way controller (��) to change the value.
• The exposure is not appropriate when the shutter speed isdisplayed in orange on the LCD monitor.
c
z
x
memo
11:19 11:19 F2.81/250F2.81/250 02/20/200302/20/2003
Aperture value
Caution
e04_kb338_038_088_41e.qk 3/17/03 5:23 PM Page 55
56
Taking Pictures
Caution
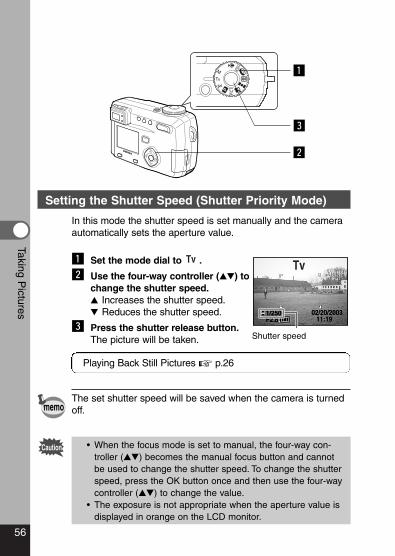
Setting the Shutter Speed (Shutter Priority Mode)
In this mode the shutter speed is set manually and the cameraautomatically sets the aperture value.
z Set the mode dial to .
x Use the four-way controller (��) tochange the shutter speed.� Increases the shutter speed.� Reduces the shutter speed.
c Press the shutter release button.The picture will be taken.
Playing Back Still Pictures � p.26
The set shutter speed will be saved when the camera is turnedoff.
• When the focus mode is set to manual, the four-way con-troller (��) becomes the manual focus button and cannotbe used to change the shutter speed. To change the shutterspeed, press the OK button once and then use the four-waycontroller (��) to change the value.
• The exposure is not appropriate when the aperture value isdisplayed in orange on the LCD monitor.
c
z
x
memo
11:19 11:19 F2.81/250F2.81/250 02/20/200302/20/2003
Shutter speed
e04_kb338_038_088_41e.qk 3/17/03 5:23 PM Page 56
57
Taking Pictures
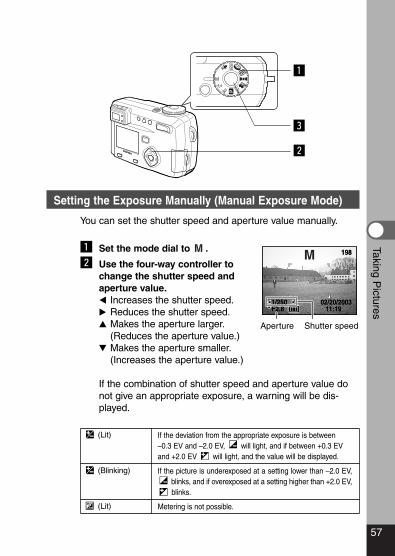
Setting the Exposure Manually (Manual Exposure Mode)
You can set the shutter speed and aperture value manually.
z Set the mode dial to .
x Use the four-way controller tochange the shutter speed andaperture value.� Increases the shutter speed.� Reduces the shutter speed.� Makes the aperture larger.
(Reduces the aperture value.)� Makes the aperture smaller.
(Increases the aperture value.)
If the combination of shutter speed and aperture value donot give an appropriate exposure, a warning will be dis-played.
(Lit)
(Blinking)
(Lit)
c
z
x
198
1/250F2.8
198
1/250F2.8 11:19 11:19
02/20/200302/20/2003
Aperture Shutter speed
If the deviation from the appropriate exposure is between –0.3 EV and –2.0 EV, will light, and if between +0.3 EVand +2.0 EV will light, and the value will be displayed.
If the picture is underexposed at a setting lower than –2.0 EV,blinks, and if overexposed at a setting higher than +2.0 EV,blinks.
Metering is not possible.
e04_kb338_038_088_41e.qk 3/17/03 5:23 PM Page 57
58
Taking Pictures
Caution
c Press the shutter release button.The picture will be taken at the set shutter speed and aper-ture value.
Playing Back Still Pictures � p.26
The shutter speed and aperture value will be saved when thecamera is turned off.
• EV compensation is not available in this mode.• When the focus mode is set to manual, the four-way con-
troller (��) becomes the manual focus button and cannotbe used to change the aperture value. To change the aper-ture value, press the OK button once and then use the four-way controller (��) to change the value.
• The [Auto flash] and [Auto flash + Red-eye Reduction] flashmodes cannot be selected.
memo
e04_kb338_038_088_41e.qk 3/17/03 5:23 PM Page 58

59
Taking Pictures
c
z
x
Selecting the Picture Mode According to the Shooting Scene (Picture mode)
You can select the Picture mode according to the shooting scene.Picture modeThere are nine available modes in Picture mode.
z Set the Mode dial to .x Press the four-way controller
(��) to select the required mode.c Press the shutter release button.
The picture will be taken.
Playing Back Still Pictures � p.26
Landscape Enables to take landscape photos with bright colors.
Flower Enables to take flower photos bright in color.
Surf &Snow
Enables to take clear photos at dazzling places like beach-es and snow covered mountains.
Sunset Enables to reproduce beautiful colors for sunrise andsunset photos.
Portrait Enables to take portraits with spatial effect, by emphasiz-ing the person.
Night-SceneMode
Enables you to take dark scenes such as night views.
AutumnColors
Enables you to take colorful photos of trees in autumn.
Fireworks Enables you to take bright photos of fireworks.
Text Enables you to take clear photos of text.
200200
11:19 11:19 02/20/200302/20/2003
e04_kb338_038_088_41e.qk 3/17/03 5:23 PM Page 59
60
Taking Pictures
Caution
• The picture mode will be saved when the camera is turnedoff.
• The flash is disabled in Fireworks mode and the focus is fixedat infinity.
• When the focus mode is set to manual, the four-way con-troller (��) becomes the manual focus button and can-not be used to change the picture mode. To change thepicture mode, press the OK button once and then use thefour-way controller (��) to change the mode.
• To avoid camera movement in Night-scene, Sunset andFireworks mode, you are recommended to fix the cameraon a tripod.
memo
e04_kb338_038_088_41e.qk 3/17/03 5:23 PM Page 60
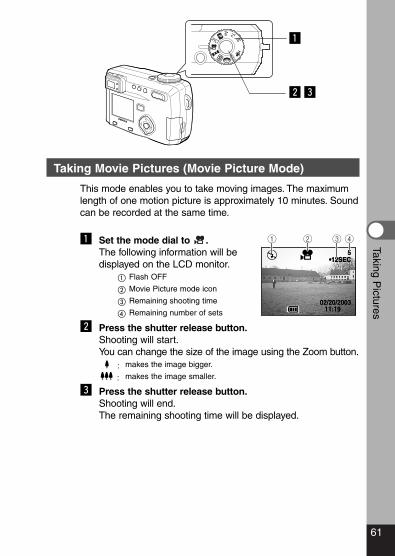
61
Taking Pictures
Taking Movie Pictures (Movie Picture Mode)
This mode enables you to take moving images. The maximumlength of one motion picture is approximately 10 minutes. Soundcan be recorded at the same time.
z Set the mode dial to .The following information will bedisplayed on the LCD monitor.
� Flash OFF
� Movie Picture mode icon
� Remaining shooting time
� Remaining number of sets
x Press the shutter release button.Shooting will start.You can change the size of the image using the Zoom button.
: makes the image bigger.
: makes the image smaller.
c Press the shutter release button.Shooting will end.The remaining shooting time will be displayed.
xc
z
55•12SEC•12SEC
11:19 11:19
2 431
02/20/200302/20/2003
e04_kb338_038_088_41e.qk 3/17/03 5:23 PM Page 61
62
Taking Pictures
Caution
Keeping the shutter release button pressed
If you keep the shutter release button pressed for more thanone second, pictures will be taken for as long as you keep thebutton pressed. Shooting stops when you take a finger off fromthe shutter release button.
Playing Back Movie Pictures � p.91
• The flash will not discharge in Movie Picture mode.• Continuous shooting, interval shooting and multiple expo-
sure shooting are not possible in Movie Picture mode.• The LCD monitor cannot be turned off in Movie Picture
mode.• Focusing Area mode is not available in Movie Picture
mode.• When shooting in Movie Picture mode, only the digital
zoom can be operated.
e04_kb338_038_088_41e.qk 3/17/03 5:23 PM Page 62
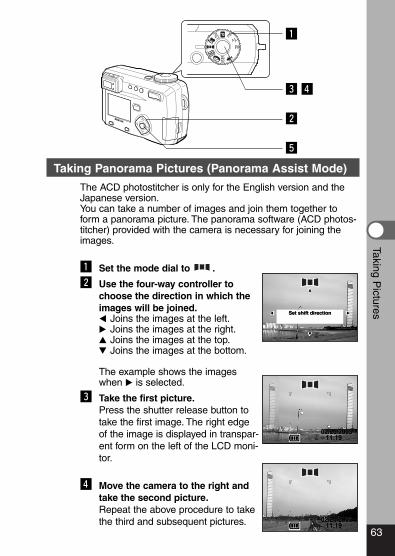
63
Taking Pictures
Taking Panorama Pictures (Panorama Assist Mode)
The ACD photostitcher is only for the English version and theJapanese version.You can take a number of images and join them together toform a panorama picture. The panorama software (ACD photos-titcher) provided with the camera is necessary for joining theimages.
z Set the mode dial to .
x Use the four-way controller tochoose the direction in which theimages will be joined.� Joins the images at the left.� Joins the images at the right.� Joins the images at the top.� Joins the images at the bottom.
The example shows the imageswhen � is selected.
c Take the first picture.Press the shutter release button totake the first image. The right edgeof the image is displayed in transpar-ent form on the left of the LCD moni-tor.
v Move the camera to the right andtake the second picture.Repeat the above procedure to takethe third and subsequent pictures.
c v
z
x
b
Set shift directionSet shift direction
11:19 11:19 02/20/200302/20/2003
11:19 11:19 02/20/200302/20/2003
e04_kb338_038_088_41e.qk 3/17/03 5:23 PM Page 63
64
Taking Pictures
Caution
b Press the OK button.The screen returns to Step z.
To cancel Panorama assist mode, change to another mode.
• The camera cannot join the images. Use the panoramasoftware (ACD photostitcher) provided with the camera.
• Continuous shooting, Multiple Exposure mode and inter-val shooting are not possible in Panorama assist mode.
• A computer running Windows is necessary for joiningimages. (The ACD photostitcher software provided withthe camera is not supported by Macintosh.)
memo
e04_kb338_038_088_41e.qk 3/17/03 5:23 PM Page 64
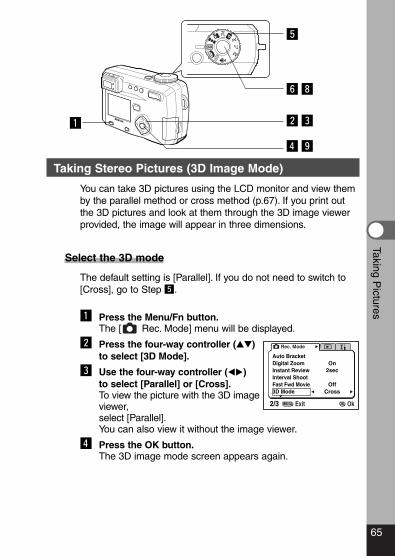
65
Taking Pictures
Taking Stereo Pictures (3D Image Mode)
You can take 3D pictures using the LCD monitor and view themby the parallel method or cross method (p.67). If you print outthe 3D pictures and look at them through the 3D image viewerprovided, the image will appear in three dimensions.
Select the 3D mode
The default setting is [Parallel]. If you do not need to switch to[Cross], go to Step b.
z Press the Menu/Fn button.The [ Rec. Mode] menu will be displayed.
x Press the four-way controller (��)to select [3D Mode].
c Use the four-way controller (��)to select [Parallel] or [Cross].To view the picture with the 3D imageviewer, select [Parallel].You can also view it without the image viewer.
v Press the OK button.The 3D image mode screen appears again.
n,
b
xc
v.
z
Auto BracketDigital ZoomInstant ReviewInterval Shoot
Cross
2secOn
OffFast Fwd Movie3D Mode
Rec. Mode
2/3 ExitMENU OkOK
e04_kb338_038_088_41e.qk 3/17/03 5:23 PM Page 65
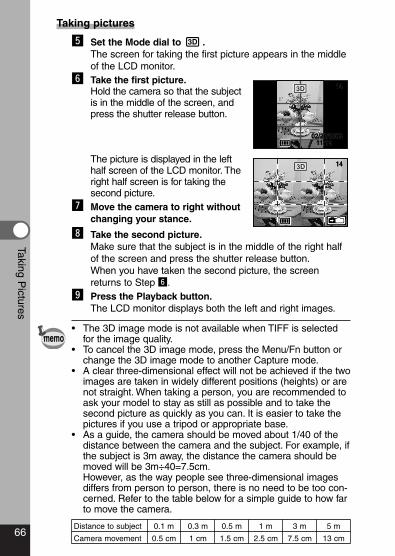
66
Taking Pictures
Taking pictures
b Set the Mode dial to .The screen for taking the first picture appears in the middleof the LCD monitor.
n Take the first picture.Hold the camera so that the subjectis in the middle of the screen, andpress the shutter release button.
The picture is displayed in the lefthalf screen of the LCD monitor. Theright half screen is for taking thesecond picture.
m Move the camera to right withoutchanging your stance.
, Take the second picture.Make sure that the subject is in the middle of the right halfof the screen and press the shutter release button.When you have taken the second picture, the screenreturns to Step n.
. Press the Playback button.The LCD monitor displays both the left and right images.
• The 3D image mode is not available when TIFF is selectedfor the image quality.
• To cancel the 3D image mode, press the Menu/Fn button orchange the 3D image mode to another Capture mode.
• A clear three-dimensional effect will not be achieved if the twoimages are taken in widely different positions (heights) or arenot straight. When taking a person, you are recommended toask your model to stay as still as possible and to take thesecond picture as quickly as you can. It is easier to take thepictures if you use a tripod or appropriate base.
• As a guide, the camera should be moved about 1/40 of thedistance between the camera and the subject. For example, ifthe subject is 3m away, the distance the camera should bemoved will be 3m÷40=7.5cm.However, as the way people see three-dimensional imagesdiffers from person to person, there is no need to be too con-cerned. Refer to the table below for a simple guide to how farto move the camera.
memo
1414
Distance to subject
Camera movement
0.1 m
0.5 cm
0.3 m
1 cm
0.5 m
1.5 cm
1 m
2.5 cm
3 m
7.5 cm
5 m
13 cm
1414
11:19 11:19 02/20/200302/20/2003
e04_kb338_038_088_41e.qk 3/17/03 5:23 PM Page 66

67
Taking Pictures
� Viewing 3D pictures by the parallel method and crossmethod
As our eyes are positioned about 6 – 7 cm apart, there is a veryslight deviation between what we see with our right eye andwhat we see with our left eye. The difference is processed byour brain to produce a three-dimensional image. This principle isapplied to taking and viewing 3D pictures.3D pictures can be viewed by the parallel method where the leftand right lines of vision are virtually parallel, as when looking ata distant scene, or the cross method where the left and rightlines of vision are crossed, as when you cross your eyes. A cer-tain amount of practice may be necessary to view 3D pictureswithout using the viewer.
� How to Assemble the 3D Image ViewerAssemble the 3D image viewer supplied with the camera asshown below.
e04_kb338_038_088_41e.qk 3/17/03 5:23 PM Page 67

68
Taking Pictures
Caution
� How to view 3D pictures using the 3D image viewerPrint out the pictures so that they are about 11cm or 12cm wideand place the divider of the 3D image viewer in the middle ofthe two.
As the distance between the left and right eyes differs from per-son to person, some people may have difficulty obtaining athree-dimensional effect even when looking at prints that are thesame size. It may be especially difficult if the pictures are verylarge or very small. Try different sizes until the right effect isachieved.
• Never look at the sun through the 3D image viewer.• Do not leave the 3D image viewer where it is exposed to
direct sunlight as this may lead to fire.
memo
e04_kb338_038_088_41e.qk 3/17/03 5:23 PM Page 68
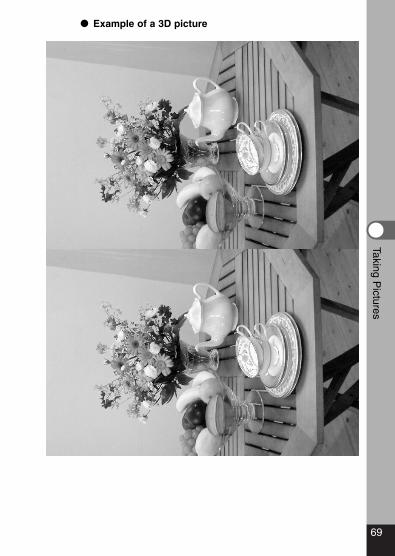
69
Taking Pictures
� Example of a 3D picture
e04_kb338_038_088_41e.qk 3/17/03 5:23 PM Page 69
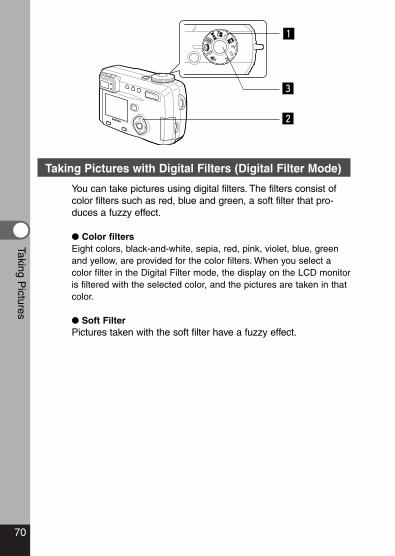
70
Taking Pictures
Taking Pictures with Digital Filters (Digital Filter Mode)
You can take pictures using digital filters. The filters consist ofcolor filters such as red, blue and green, a soft filter that pro-duces a fuzzy effect.
� Color filtersEight colors, black-and-white, sepia, red, pink, violet, blue, greenand yellow, are provided for the color filters. When you select acolor filter in the Digital Filter mode, the display on the LCD monitoris filtered with the selected color, and the pictures are taken in thatcolor.
� Soft FilterPictures taken with the soft filter have a fuzzy effect.
c
z
x
e04_kb338_038_088_41e.qk 3/17/03 5:23 PM Page 70
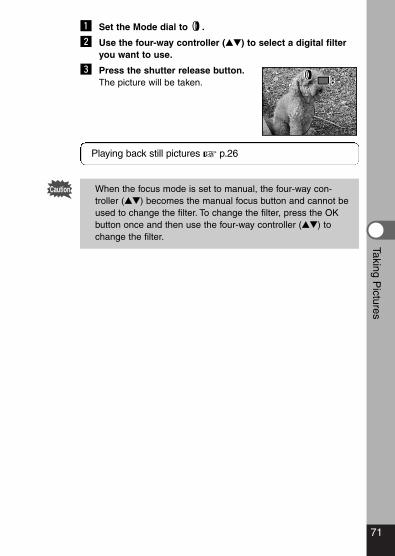
71
Taking Pictures
Caution
z Set the Mode dial to .
x Use the four-way controller (��) to select a digital filteryou want to use.
c Press the shutter release button.The picture will be taken.
Playing back still pictures � p.26
When the focus mode is set to manual, the four-way con-troller (��) becomes the manual focus button and cannot beused to change the filter. To change the filter, press the OKbutton once and then use the four-way controller (��) tochange the filter.
e04_kb338_038_088_41e.qk 3/17/03 5:23 PM Page 71
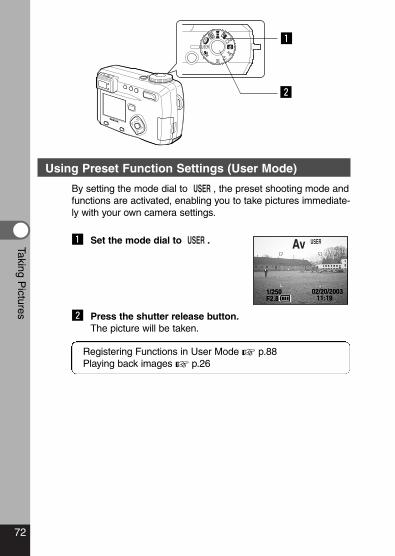
72
Taking Pictures
Using Preset Function Settings (User Mode)
By setting the mode dial to , the preset shooting mode andfunctions are activated, enabling you to take pictures immediate-ly with your own camera settings.
z Set the mode dial to .
x Press the shutter release button.The picture will be taken.
Registering Functions in User Mode � p.88Playing back images � p.26
x
z
F2.81/250F2.81/250
11:19 11:19 02/20/200302/20/2003
e04_kb338_038_088_41e.qk 3/17/03 5:23 PM Page 72
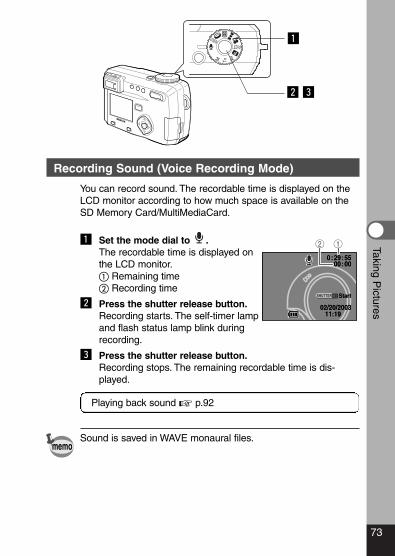
73
Taking Pictures
Recording Sound (Voice Recording Mode)
You can record sound. The recordable time is displayed on theLCD monitor according to how much space is available on theSD Memory Card/MultiMediaCard.
z Set the mode dial to .The recordable time is displayed onthe LCD monitor.� Remaining time� Recording time
x Press the shutter release button.Recording starts. The self-timer lampand flash status lamp blink duringrecording.
c Press the shutter release button.Recording stops. The remaining recordable time is dis-played.
Playing back sound � p.92
Sound is saved in WAVE monaural files.
x c
z
memo
11:19 11:19
0 :29:5500:00
0:29:5500:00
02/20/200302/20/2003
StartStart
12
e04_kb338_038_088_41e.qk 3/17/03 5:23 PM Page 73
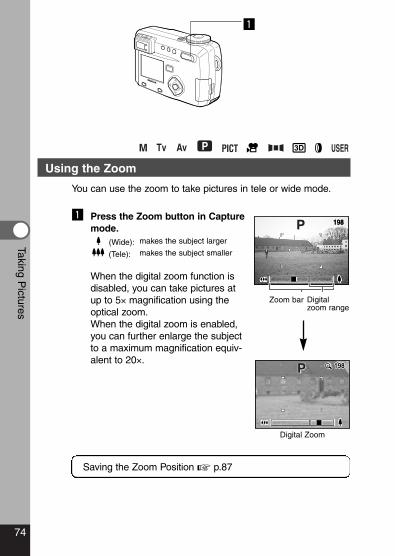
74
Taking Pictures
Using the Zoom
You can use the zoom to take pictures in tele or wide mode.
z Press the Zoom button in Capturemode.
(Wide): makes the subject larger
(Tele): makes the subject smaller
When the digital zoom function isdisabled, you can take pictures atup to 5× magnification using theoptical zoom.When the digital zoom is enabled,you can further enlarge the subjectto a maximum magnification equiv-alent to 20×.
Saving the Zoom Position � p.87
z
198198
198198198
Digitalzoom range
Zoom bar
Digital Zoom
e04_kb338_038_088_41e.qk 3/17/03 5:23 PM Page 74
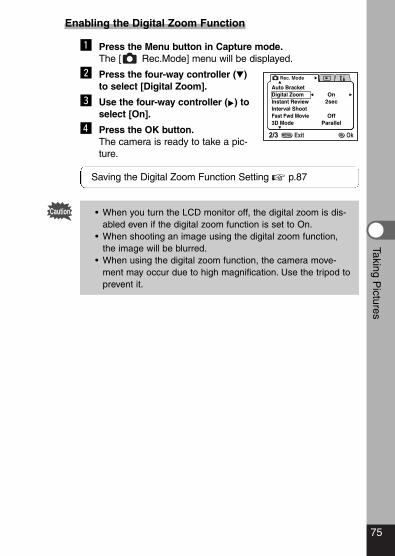
75
Taking Pictures
Caution
Enabling the Digital Zoom Function
z Press the Menu button in Capture mode.The [ Rec.Mode] menu will be displayed.
x Press the four-way controller (�)to select [Digital Zoom].
c Use the four-way controller (�) toselect [On].
v Press the OK button.The camera is ready to take a pic-ture.
Saving the Digital Zoom Function Setting � p.87
• When you turn the LCD monitor off, the digital zoom is dis-abled even if the digital zoom function is set to On.
• When shooting an image using the digital zoom function,the image will be blurred.
• When using the digital zoom function, the camera move-ment may occur due to high magnification. Use the tripod toprevent it.
Auto BracketDigital ZoomInstant ReviewInterval Shoot
Parallel
2sec
Off
On
Fast Fwd Movie3D Mode
Rec. Mode
2/3 ExitMENU OkOK
e04_kb338_038_088_41e.qk 3/17/03 5:23 PM Page 75
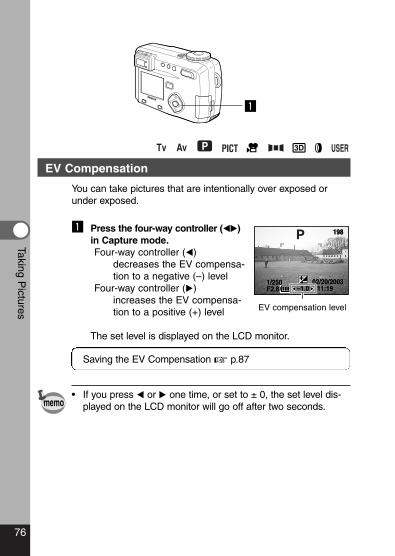
76
Taking Pictures
EV Compensation
You can take pictures that are intentionally over exposed orunder exposed.
z Press the four-way controller (��)in Capture mode.Four-way controller (�)
decreases the EV compensa-tion to a negative (–) level
Four-way controller (�) increases the EV compensa-tion to a positive (+) level
The set level is displayed on the LCD monitor.
Saving the EV Compensation � p.87
• If you press � or � one time, or set to ± 0, the set level dis-played on the LCD monitor will go off after two seconds.
198198
11:19 11:19 02/20/200302/20/2003
–1.0–1.0F2.81/250F2.81/250
EV compensation level
z
memo
e04_kb338_038_088_41e.qk 3/17/03 5:23 PM Page 76
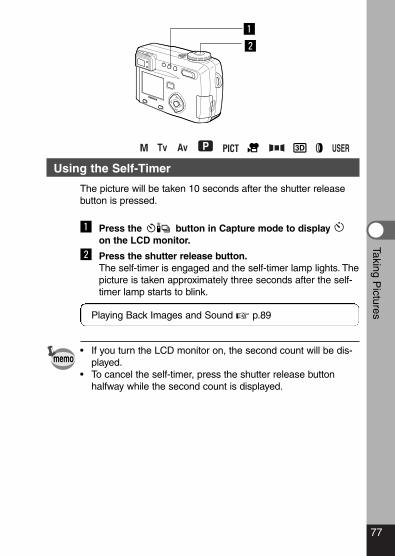
77
Taking Pictures
Using the Self-Timer
The picture will be taken 10 seconds after the shutter releasebutton is pressed.
z Press the button in Capture mode to display on the LCD monitor.
x Press the shutter release button.The self-timer is engaged and the self-timer lamp lights. Thepicture is taken approximately three seconds after the self-timer lamp starts to blink.
Playing Back Images and Sound � p.89
• If you turn the LCD monitor on, the second count will be dis-played.
• To cancel the self-timer, press the shutter release buttonhalfway while the second count is displayed.
z
x
memo
e04_kb338_038_088_41e.qk 3/17/03 5:23 PM Page 77
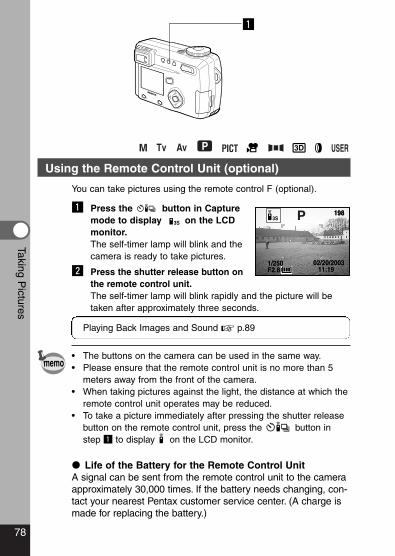
78
Taking Pictures
z
Using the Remote Control Unit (optional)
You can take pictures using the remote control F (optional).
z Press the button in Capturemode to display on the LCDmonitor.The self-timer lamp will blink and thecamera is ready to take pictures.
x Press the shutter release button onthe remote control unit.The self-timer lamp will blink rapidly and the picture will betaken after approximately three seconds.
Playing Back Images and Sound � p.89
• The buttons on the camera can be used in the same way.• Please ensure that the remote control unit is no more than 5
meters away from the front of the camera.• When taking pictures against the light, the distance at which the
remote control unit operates may be reduced.• To take a picture immediately after pressing the shutter release
button on the remote control unit, press the button instep z to display on the LCD monitor.
� Life of the Battery for the Remote Control UnitA signal can be sent from the remote control unit to the cameraapproximately 30,000 times. If the battery needs changing, con-tact your nearest Pentax customer service center. (A charge ismade for replacing the battery.)
198198
11:19 11:19 F2.81/250F2.81/250 02/20/200302/20/2003
memo
e04_kb338_038_088_41e.qk 3/17/03 5:23 PM Page 78
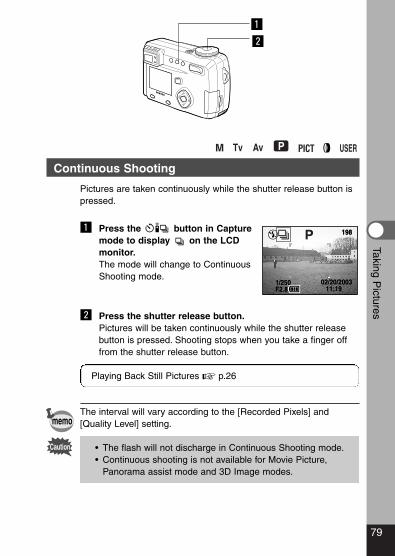
79
Taking Pictures
Caution
z
x
Continuous Shooting
Pictures are taken continuously while the shutter release button ispressed.
z Press the button in Capturemode to display on the LCDmonitor.The mode will change to ContinuousShooting mode.
x Press the shutter release button.Pictures will be taken continuously while the shutter releasebutton is pressed. Shooting stops when you take a finger offfrom the shutter release button.
Playing Back Still Pictures � p.26
The interval will vary according to the [Recorded Pixels] and[Quality Level] setting.
• The flash will not discharge in Continuous Shooting mode.• Continuous shooting is not available for Movie Picture,
Panorama assist mode and 3D Image modes.
198198
11:19 11:19 02/20/200302/20/2003
F2.81/250F2.81/250
memo
e04_kb338_038_088_41e.qk 3/17/03 5:23 PM Page 79
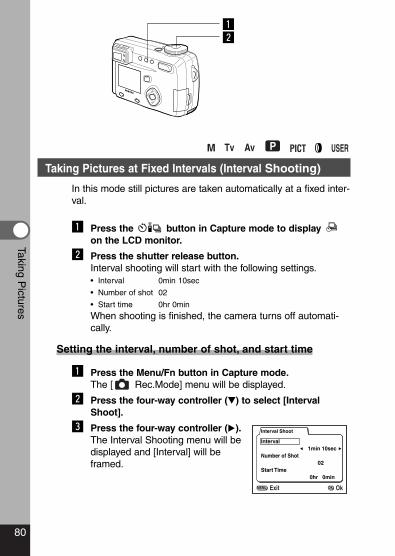
80
Taking Pictures
Taking Pictures at Fixed Intervals (Interval Shooting)
In this mode still pictures are taken automatically at a fixed inter-val.
z Press the button in Capture mode to display on the LCD monitor.
x Press the shutter release button.Interval shooting will start with the following settings.• Interval 0min 10sec
• Number of shot 02
• Start time 0hr 0min
When shooting is finished, the camera turns off automati-cally.
Setting the interval, number of shot, and start time
z Press the Menu/Fn button in Capture mode.The [ Rec.Mode] menu will be displayed.
x Press the four-way controller (�) to select [IntervalShoot].
c Press the four-way controller (�).The Interval Shooting menu will bedisplayed and [Interval] will beframed.
zx
Interval Shoot
Interval
Number of Shot
Start Time0hr 0min
02
1min 10sec
MENU OkOKExit
e04_kb338_038_088_41e.qk 3/17/03 5:23 PM Page 80
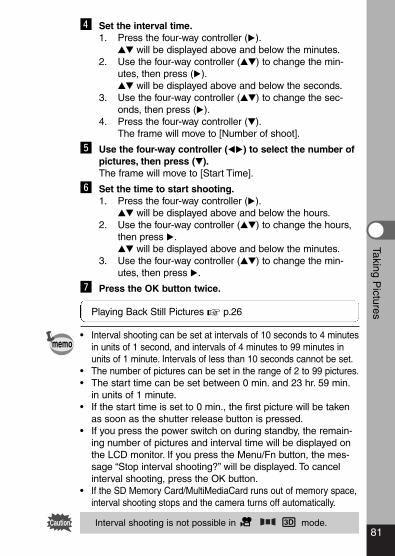
81
Taking Pictures
Caution
v Set the interval time.1. Press the four-way controller (�).
�� will be displayed above and below the minutes.2. Use the four-way controller (��) to change the min-
utes, then press (�).�� will be displayed above and below the seconds.
3. Use the four-way controller (��) to change the sec-onds, then press (�).
4. Press the four-way controller (�).The frame will move to [Number of shoot].
b Use the four-way controller (��) to select the number ofpictures, then press (�).The frame will move to [Start Time].
n Set the time to start shooting.1. Press the four-way controller (�).
�� will be displayed above and below the hours.2. Use the four-way controller (��) to change the hours,
then press �.�� will be displayed above and below the minutes.
3. Use the four-way controller (��) to change the min-utes, then press �.
m Press the OK button twice.
Playing Back Still Pictures � p.26
• Interval shooting can be set at intervals of 10 seconds to 4 minutesin units of 1 second, and intervals of 4 minutes to 99 minutes inunits of 1 minute. Intervals of less than 10 seconds cannot be set.
• The number of pictures can be set in the range of 2 to 99 pictures.• The start time can be set between 0 min. and 23 hr. 59 min.
in units of 1 minute.• If the start time is set to 0 min., the first picture will be taken
as soon as the shutter release button is pressed.• If you press the power switch on during standby, the remain-
ing number of pictures and interval time will be displayed onthe LCD monitor. If you press the Menu/Fn button, the mes-sage “Stop interval shooting?” will be displayed. To cancelinterval shooting, press the OK button.
• If the SD Memory Card/MultiMediaCard runs out of memory space,interval shooting stops and the camera turns off automatically.
Interval shooting is not possible in mode.
memo
e04_kb338_038_088_41e.qk 3/17/03 5:23 PM Page 81
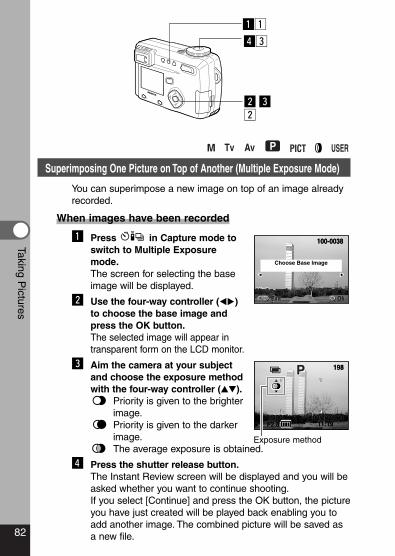
82
Taking Pictures
zz
vc
xcx
Superimposing One Picture on Top of Another (Multiple Exposure Mode)
You can superimpose a new image on top of an image alreadyrecorded.
When images have been recorded
z Press in Capture mode toswitch to Multiple Exposuremode.The screen for selecting the baseimage will be displayed.
x Use the four-way controller (��)to choose the base image andpress the OK button.The selected image will appear intransparent form on the LCD monitor.
c Aim the camera at your subjectand choose the exposure methodwith the four-way controller (��).
Priority is given to the brighterimage.Priority is given to the darkerimage.The average exposure is obtained.
v Press the shutter release button.The Instant Review screen will be displayed and you will beasked whether you want to continue shooting.If you select [Continue] and press the OK button, the pictureyou have just created will be played back enabling you toadd another image. The combined picture will be saved asa new file.
100-0038100-0038
MENU OK OkExit OkExit
Choose Base Image
198198
11:19 11:19 02/20/200302/20/2003
F2.81/250F2.81/250
Exposure method
e04_kb338_038_088_41e.qk 3/17/03 5:23 PM Page 82
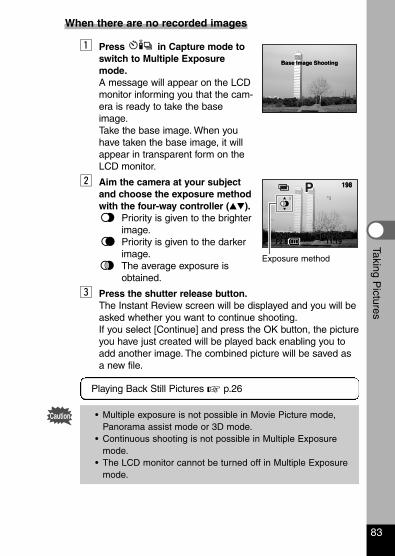
Caution
When there are no recorded images
z Press in Capture mode toswitch to Multiple Exposuremode.A message will appear on the LCDmonitor informing you that the cam-era is ready to take the baseimage.Take the base image. When youhave taken the base image, it willappear in transparent form on theLCD monitor.
x Aim the camera at your subjectand choose the exposure methodwith the four-way controller (��).
Priority is given to the brighterimage.Priority is given to the darkerimage.The average exposure isobtained.
c Press the shutter release button.The Instant Review screen will be displayed and you will beasked whether you want to continue shooting.If you select [Continue] and press the OK button, the pictureyou have just created will be played back enabling you toadd another image. The combined picture will be saved asa new file.
Playing Back Still Pictures � p.26
• Multiple exposure is not possible in Movie Picture mode,Panorama assist mode or 3D mode.
• Continuous shooting is not possible in Multiple Exposuremode.
• The LCD monitor cannot be turned off in Multiple Exposuremode.
83
Taking Pictures
Base Image ShootingBase Image Shooting
198198
11:19 11:19 02/20/200302/20/2003
F2.81/250F2.81/250
Exposure method
e04_kb338_038_088_41e.qk 3/17/03 5:23 PM Page 83
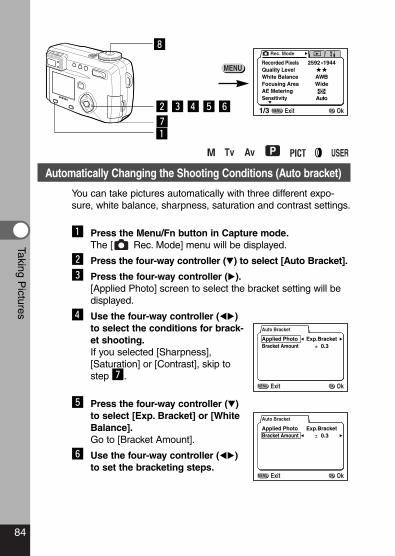
84
Taking Pictures
Automatically Changing the Shooting Conditions (Auto bracket)
You can take pictures automatically with three different expo-sure, white balance, sharpness, saturation and contrast settings.
z Press the Menu/Fn button in Capture mode.The [ Rec. Mode] menu will be displayed.
x Press the four-way controller (�) to select [Auto Bracket].
c Press the four-way controller (�).[Applied Photo] screen to select the bracket setting will bedisplayed.
v Use the four-way controller (��)to select the conditions for brack-et shooting.If you selected [Sharpness],[Saturation] or [Contrast], skip tostep m.
b Press the four-way controller (�)to select [Exp. Bracket] or [WhiteBalance].Go to [Bracket Amount].
n Use the four-way controller (��)to set the bracketing steps.
,
x c v b nmz
Auto Bracket
Applied PhotoBracket Amount
Exp.Bracket± 0.3
MENU OkOKExit
Auto Bracket
Applied PhotoBracket Amount
Exp.Bracket± 0.3
MENU OkOKExit
Rec. Mode
WideAWB
Auto
2592 1944Recorded PixelsQuality LevelWhite BalanceFocusing AreaAE MeteringSensitivity
1/3 ExitMENU OkOK
e04_kb338_038_088_41e.qk 3/17/03 5:23 PM Page 84
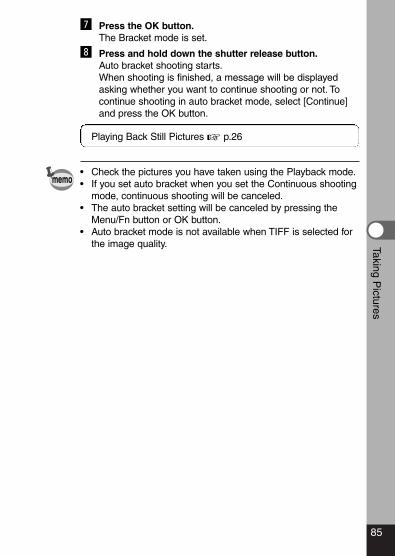
85
Taking Pictures
m Press the OK button.The Bracket mode is set.
, Press and hold down the shutter release button.Auto bracket shooting starts.When shooting is finished, a message will be displayedasking whether you want to continue shooting or not. Tocontinue shooting in auto bracket mode, select [Continue]and press the OK button.
Playing Back Still Pictures � p.26
• Check the pictures you have taken using the Playback mode.• If you set auto bracket when you set the Continuous shooting
mode, continuous shooting will be canceled.• The auto bracket setting will be canceled by pressing the
Menu/Fn button or OK button.• Auto bracket mode is not available when TIFF is selected for
the image quality.
memo
e04_kb338_038_088_41e.qk 3/17/03 5:23 PM Page 85
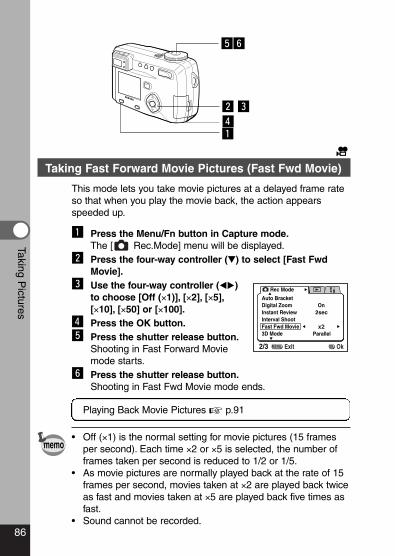
86
Taking Pictures
Taking Fast Forward Movie Pictures (Fast Fwd Movie)
This mode lets you take movie pictures at a delayed frame rateso that when you play the movie back, the action appearsspeeded up.
z Press the Menu/Fn button in Capture mode.The [ Rec.Mode] menu will be displayed.
x Press the four-way controller (�) to select [Fast FwdMovie].
c Use the four-way controller (��)to choose [Off (×1)], [×2], [×5],[×10], [×50] or [×100].
v Press the OK button.b Press the shutter release button.
Shooting in Fast Forward Moviemode starts.
n Press the shutter release button.Shooting in Fast Fwd Movie mode ends.
Playing Back Movie Pictures � p.91
• Off (×1) is the normal setting for movie pictures (15 framesper second). Each time ×2 or ×5 is selected, the number offrames taken per second is reduced to 1/2 or 1/5.
• As movie pictures are normally played back at the rate of 15frames per second, movies taken at ×2 are played back twiceas fast and movies taken at ×5 are played back five times asfast.
• Sound cannot be recorded.
bn
x cvz
memo
Rec Mode
Auto Bracket
Instant Review
Parallel
Digital Zoom
Interval Shoot
3D ModeFast Fwd Movie x2
On2sec
2/3 ExitMENU OkOK
e04_kb338_038_088_41e.qk 3/17/03 5:23 PM Page 86
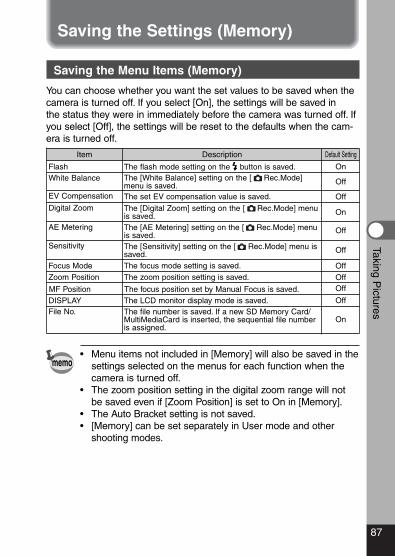
87
Taking Pictures
Saving the Menu Items (Memory)
You can choose whether you want the set values to be saved when thecamera is turned off. If you select [On], the settings will be saved inthe status they were in immediately before the camera was turned off. Ifyou select [Off], the settings will be reset to the defaults when the cam-era is turned off.
• Menu items not included in [Memory] will also be saved in thesettings selected on the menus for each function when thecamera is turned off.
• The zoom position setting in the digital zoom range will notbe saved even if [Zoom Position] is set to On in [Memory].
• The Auto Bracket setting is not saved.• [Memory] can be set separately in User mode and other
shooting modes.
Saving the Settings (Memory)
Flash
Default Setting
The flash mode setting on the button is saved.
Focus Mode The focus mode setting is saved.
Item Description
White Balance The [White Balance] setting on the [ Rec.Mode]menu is saved.
Digital Zoom The [Digital Zoom] setting on the [ Rec.Mode] menuis saved.
AE Metering The [AE Metering] setting on the [ Rec.Mode] menuis saved.
File No. The file number is saved. If a new SD Memory Card/MultiMediaCard is inserted, the sequential file numberis assigned.
Sensitivity The [Sensitivity] setting on the [ Rec.Mode] menu issaved.
Zoom Position The zoom position setting is saved.
DISPLAY The LCD monitor display mode is saved.
EV Compensation The set EV compensation value is saved.
MF Position The focus position set by Manual Focus is saved.
memo
Off
OffOffOff
Off
Off
Off
Off
On
On
On
e04_kb338_038_088_41e.qk 3/17/03 5:23 PM Page 87
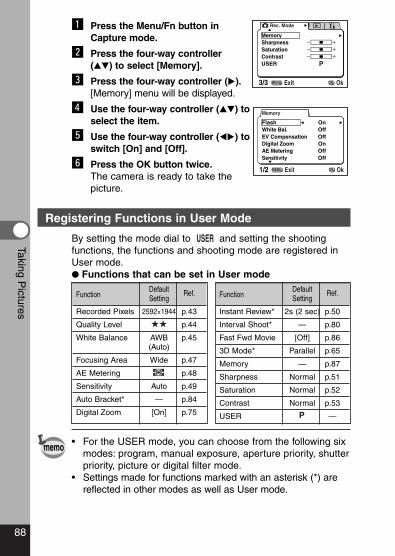
88
Taking Pictures
z Press the Menu/Fn button inCapture mode.
x Press the four-way controller(��) to select [Memory].
c Press the four-way controller (�).[Memory] menu will be displayed.
v Use the four-way controller (��) toselect the item.
b Use the four-way controller (��) toswitch [On] and [Off].
n Press the OK button twice.The camera is ready to take thepicture.
Registering Functions in User Mode
By setting the mode dial to and setting the shootingfunctions, the functions and shooting mode are registered inUser mode.� Functions that can be set in User mode
• For the USER mode, you can choose from the following sixmodes: program, manual exposure, aperture priority, shutterpriority, picture or digital filter mode.
• Settings made for functions marked with an asterisk (*) arereflected in other modes as well as User mode.
memo
FunctionDefaultSetting
Ref.
Recorded Pixels 2592×1944 p.43
Quality Level p.44
White Balance AWB p.45(Auto)
Focusing Area Wide p.47
AE Metering p.48
Sensitivity Auto p.49
Auto Bracket* — p.84
Digital Zoom [On] p.75
FunctionDefaultSetting
Ref.
Instant Review* 2s (2 sec) p.50
Interval Shoot* — p.80
Fast Fwd Movie [Off] p.86
3D Mode* Parallel p.65
Memory — p.87
Sharpness Normal p.51
Saturation Normal p.52
Contrast Normal p.53
USER —
MemorySharpnessSaturationContrast
Rec. Mode
3/3 ExitMENU OkOK
USER
Memory
Flash OnOffOffOnOffOff
EV Compensation
AE MeteringSensitivity
Digital Zoom
White Bal.
1/2 ExitMENU OkOK
e04_kb338_038_088_41e.qk 3/17/03 5:23 PM Page 88
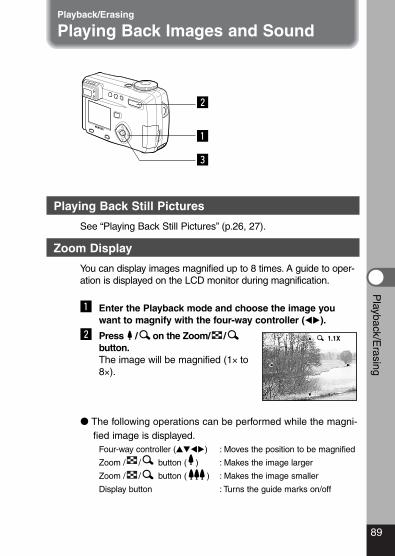
89
Playback/E
rasing
Playing Back Still Pictures
See “Playing Back Still Pictures” (p.26, 27).
Zoom Display
You can display images magnified up to 8 times. A guide to oper-ation is displayed on the LCD monitor during magnification.
z Enter the Playback mode and choose the image youwant to magnify with the four-way controller (��).
x Press / on the Zoom/ /button.The image will be magnified (1× to8×).
� The following operations can be performed while the magni-fied image is displayed.
Four-way controller (����) : Moves the position to be magnified
Zoom / / button ( ) : Makes the image larger
Zoom / / button ( ) : Makes the image smaller
Display button : Turns the guide marks on/off
Playback/Erasing
Playing Back Images and Sound
1.1X
z
c
x
e05_kb338_089_122_41e.qk 3/17/03 5:21 PM Page 89
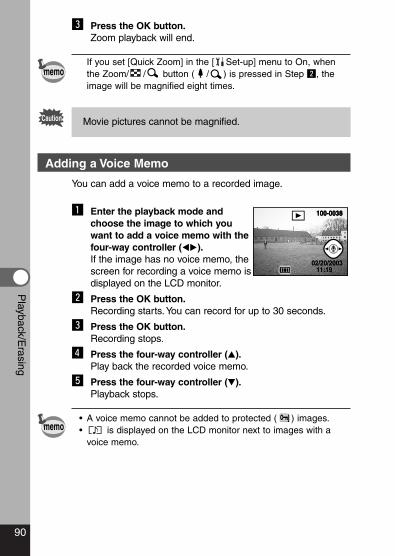
90
Playback/E
rasing
Caution
c Press the OK button.Zoom playback will end.
If you set [Quick Zoom] in the [ Set-up] menu to On, whenthe Zoom/ / button ( / ) is pressed in Step x, theimage will be magnified eight times.
Movie pictures cannot be magnified.
Adding a Voice Memo
You can add a voice memo to a recorded image.
z Enter the playback mode andchoose the image to which youwant to add a voice memo with thefour-way controller (��).If the image has no voice memo, thescreen for recording a voice memo isdisplayed on the LCD monitor.
x Press the OK button.Recording starts.You can record for up to 30 seconds.
c Press the OK button.Recording stops.
v Press the four-way controller (�).Play back the recorded voice memo.
b Press the four-way controller (�).Playback stops.
• A voice memo cannot be added to protected ( ) images.• is displayed on the LCD monitor next to images with a
voice memo.
memo
memo
100-0019100-0038100-0038
11:19 11:19 02/20/200302/20/2003
e05_kb338_089_122_41e.qk 3/17/03 5:21 PM Page 90
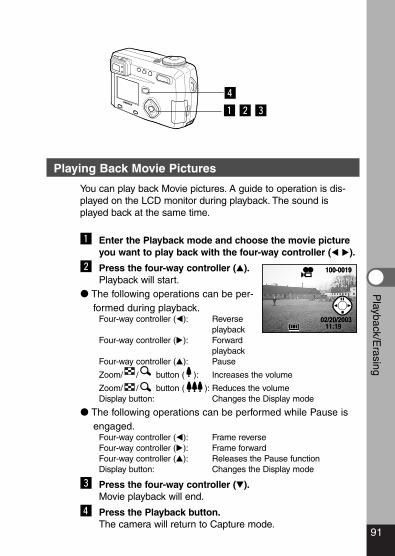
91
Playback/E
rasing
Playing Back Movie Pictures
You can play back Movie pictures. A guide to operation is dis-played on the LCD monitor during playback. The sound isplayed back at the same time.
z Enter the Playback mode and choose the movie pictureyou want to play back with the four-way controller (� �).
x Press the four-way controller (�).Playback will start.
� The following operations can be per-formed during playback.
Four-way controller (�): Reverse playback
Four-way controller (�): Forward playback
Four-way controller (�): Pause
Zoom/ / button ( ): Increases the volume
Zoom/ / button ( ): Reduces the volumeDisplay button: Changes the Display mode
� The following operations can be performed while Pause isengaged.
Four-way controller (�): Frame reverseFour-way controller (�): Frame forwardFour-way controller (�): Releases the Pause functionDisplay button: Changes the Display mode
c Press the four-way controller (�).Movie playback will end.
v Press the Playback button.The camera will return to Capture mode.
100-0019100-0019
11:19 11:19 02/20/200302/20/2003
v
z x c
e05_kb338_089_122_41e.qk 3/17/03 5:21 PM Page 91
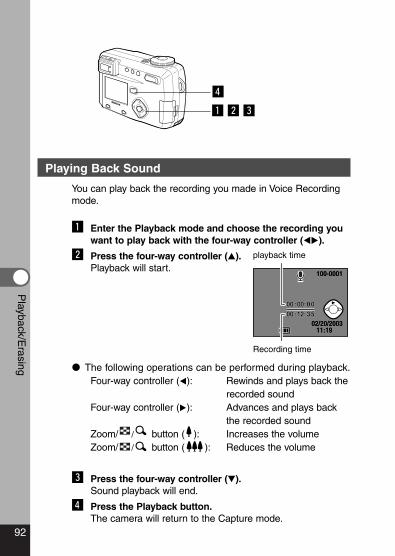
92
Playback/E
rasing
Playing Back Sound
You can play back the recording you made in Voice Recordingmode.
z Enter the Playback mode and choose the recording youwant to play back with the four-way controller (��).
x Press the four-way controller (�).Playback will start.
� The following operations can be performed during playback.Four-way controller (�): Rewinds and plays back the
recorded soundFour-way controller (�): Advances and plays back
the recorded soundZoom/ / button ( ): Increases the volumeZoom/ / button ( ): Reduces the volume
c Press the four-way controller (�).Sound playback will end.
v Press the Playback button.The camera will return to the Capture mode.
v
z x c
11:19 11:19 02/20/200302/20/2003
100-0001100-0001
00:00:0000:00:0000:12:3500:12:35
playback time
Recording time
e05_kb338_089_122_41e.qk 3/17/03 5:21 PM Page 92
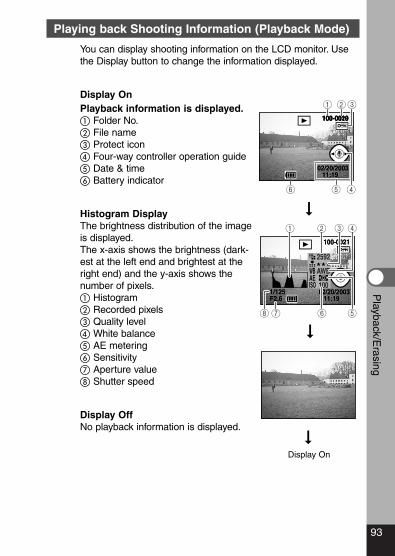
93
Playback/E
rasingPlaying back Shooting Information (Playback Mode)
You can display shooting information on the LCD monitor. Usethe Display button to change the information displayed.
Display OnPlayback information is displayed.� Folder No.� File name� Protect icon� Four-way controller operation guide� Date & time� Battery indicator
Histogram DisplayThe brightness distribution of the imageis displayed.The x-axis shows the brightness (dark-est at the left end and brightest at theright end) and the y-axis shows thenumber of pixels.� Histogram� Recorded pixels� Quality level� White balance� AE metering� Sensitivity� Aperture value Shutter speed
Display OffNo playback information is displayed.
�
100-0019100-0019100-0020100-0020
11:19 11:19 02/20/200302/20/2003
321
6 5 4
1/125F2.61/125F2.6
AWB
2592
100
11:19 11:19 02/20/200302/20/2003
100-0021100-0021
87
3 421
6 5
��
Display On
e05_kb338_089_122_41e.qk 3/17/03 5:21 PM Page 93
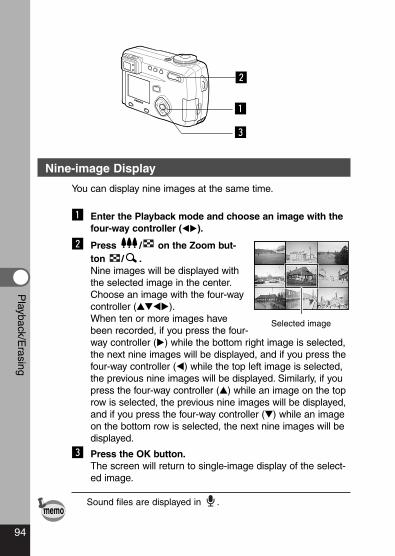
94
Playback/E
rasing
Nine-image Display
You can display nine images at the same time.
z Enter the Playback mode and choose an image with thefour-way controller (��).
x Press / on the Zoom but-ton / .Nine images will be displayed withthe selected image in the center.Choose an image with the four-waycontroller (����).When ten or more images havebeen recorded, if you press the four-way controller (�) while the bottom right image is selected,the next nine images will be displayed, and if you press thefour-way controller (�) while the top left image is selected,the previous nine images will be displayed. Similarly, if youpress the four-way controller (�) while an image on the toprow is selected, the previous nine images will be displayed,and if you press the four-way controller (�) while an imageon the bottom row is selected, the next nine images will bedisplayed.
c Press the OK button.The screen will return to single-image display of the select-ed image.
Sound files are displayed in .
Selected image
x
z
c
memo
e05_kb338_089_122_41e.qk 3/17/03 5:21 PM Page 94
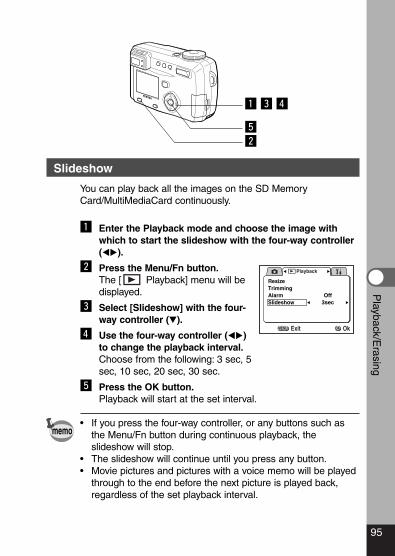
95
Playback/E
rasing
Slideshow
You can play back all the images on the SD MemoryCard/MultiMediaCard continuously.
z Enter the Playback mode and choose the image withwhich to start the slideshow with the four-way controller(��).
x Press the Menu/Fn button.The [ Playback] menu will bedisplayed.
c Select [Slideshow] with the four-way controller (�).
v Use the four-way controller (��)to change the playback interval.Choose from the following: 3 sec, 5sec, 10 sec, 20 sec, 30 sec.
b Press the OK button.Playback will start at the set interval.
• If you press the four-way controller, or any buttons such asthe Menu/Fn button during continuous playback, theslideshow will stop.
• The slideshow will continue until you press any button.• Movie pictures and pictures with a voice memo will be played
through to the end before the next picture is played back,regardless of the set playback interval.
Playback
ResizeTrimmingAlarmSlideshow 3sec
Off
ExitMENU OkOK
z c v
bx
memo
e05_kb338_089_122_41e.qk 3/17/03 5:21 PM Page 95
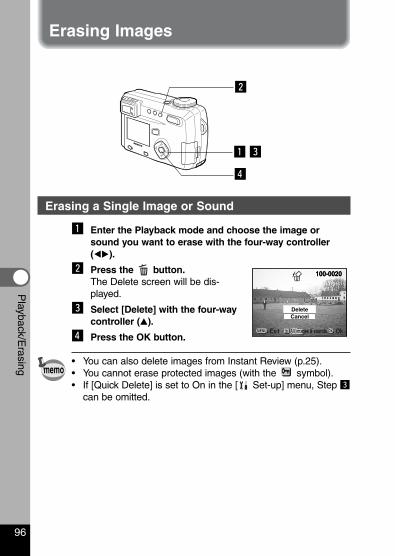
96
Playback/E
rasing
Erasing a Single Image or Sound
z Enter the Playback mode and choose the image orsound you want to erase with the four-way controller(��).
x Press the button.The Delete screen will be dis-played.
c Select [Delete] with the four-waycontroller (�).
v Press the OK button.
• You can also delete images from Instant Review (p.25).• You cannot erase protected images (with the symbol).• If [Quick Delete] is set to On in the [ Set-up] menu, Step c
can be omitted.
Erasing Images
z c
v
x
memo
100-0020100-0020
CancelDelete
MENU OKAll imaAll images & soundsAll images & sounds OkExit OkExit
e05_kb338_089_122_41e.qk 3/17/03 5:21 PM Page 96
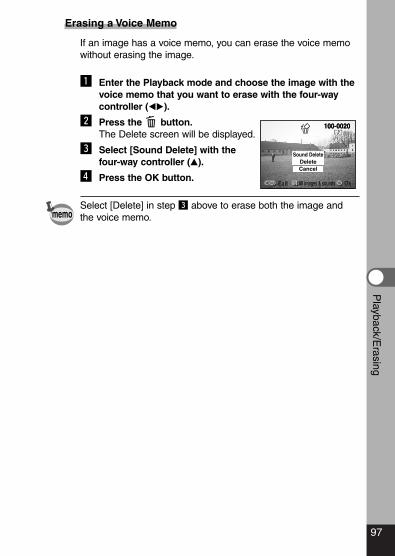
97
Playback/E
rasingErasing a Voice Memo
If an image has a voice memo, you can erase the voice memowithout erasing the image.
z Enter the Playback mode and choose the image with thevoice memo that you want to erase with the four-waycontroller (��).
x Press the button.The Delete screen will be displayed.
c Select [Sound Delete] with thefour-way controller (�).
v Press the OK button.
Select [Delete] in step c above to erase both the image andthe voice memo.memo
100-0020100-0020
CancelDelete
Sound Delete
MENU OKAll images & soundsAll images & sounds OkExit OkExit
e05_kb338_089_122_41e.qk 3/17/03 5:21 PM Page 97
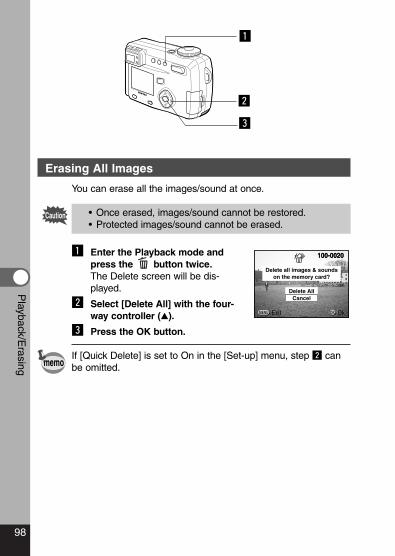
98
Playback/E
rasing
Caution
Erasing All Images
You can erase all the images/sound at once.
• Once erased, images/sound cannot be restored.• Protected images/sound cannot be erased.
z Enter the Playback mode andpress the button twice.The Delete screen will be dis-played.
x Select [Delete All] with the four-way controller (�).
c Press the OK button.
If [Quick Delete] is set to On in the [Set-up] menu, step x canbe omitted.
x
c
z
100-0020100-0020
CancelDelete All
Delete all images & soundson the memory card?
MENU OK OkExit OkExit
memo
e05_kb338_089_122_41e.qk 3/17/03 5:21 PM Page 98
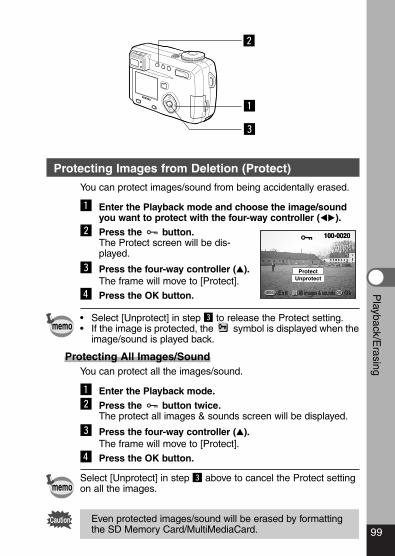
99
Playback/E
rasing
Caution
Protecting Images from Deletion (Protect)
You can protect images/sound from being accidentally erased.
z Enter the Playback mode and choose the image/soundyou want to protect with the four-way controller (��).
x Press the button.The Protect screen will be dis-played.
c Press the four-way controller (�).The frame will move to [Protect].
v Press the OK button.
• Select [Unprotect] in step c to release the Protect setting.• If the image is protected, the symbol is displayed when the
image/sound is played back.
Protecting All Images/SoundYou can protect all the images/sound.
z Enter the Playback mode.x Press the button twice.
The protect all images & sounds screen will be displayed.
c Press the four-way controller (�).The frame will move to [Protect].
v Press the OK button.
Select [Unprotect] in step c above to cancel the Protect settingon all the images.
Even protected images/sound will be erased by formattingthe SD Memory Card/MultiMediaCard.
z
c
x
memo
memo
100-0020100-0020
UnprotectProtect
MENU OKAll images & soundsAll images & sounds OkExit OkExit
e05_kb338_089_122_41e.qk 3/17/03 5:21 PM Page 99
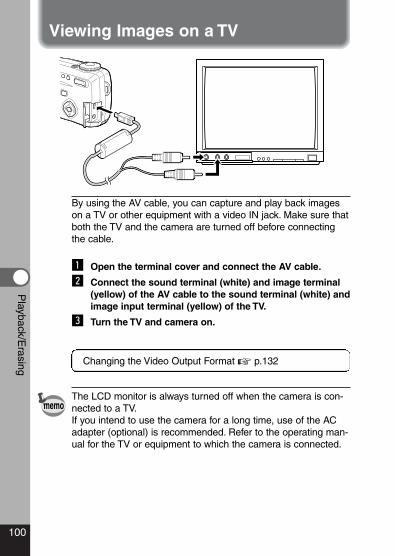
100
Playback/E
rasing
Viewing Images on a TV
By using the AV cable, you can capture and play back imageson a TV or other equipment with a video IN jack. Make sure thatboth the TV and the camera are turned off before connectingthe cable.
z Open the terminal cover and connect the AV cable.
x Connect the sound terminal (white) and image terminal(yellow) of the AV cable to the sound terminal (white) andimage input terminal (yellow) of the TV.
c Turn the TV and camera on.
Changing the Video Output Format � p.132
The LCD monitor is always turned off when the camera is con-nected to a TV.If you intend to use the camera for a long time, use of the ACadapter (optional) is recommended. Refer to the operating man-ual for the TV or equipment to which the camera is connected.
memo
e05_kb338_089_122_41e.qk 3/17/03 5:21 PM Page 100
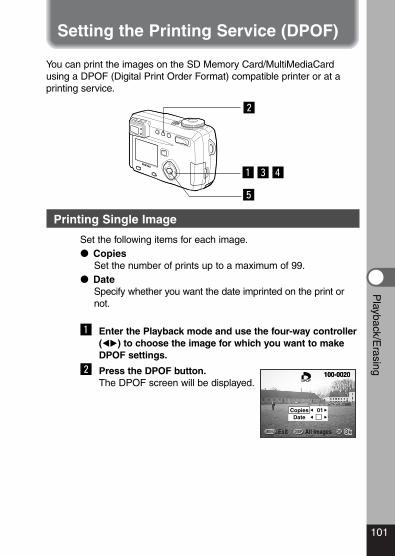
101
Playback/E
rasing
You can print the images on the SD Memory Card/MultiMediaCardusing a DPOF (Digital Print Order Format) compatible printer or at aprinting service.
Setting the Printing Service (DPOF)
Printing Single Image
Set the following items for each image.� Copies
Set the number of prints up to a maximum of 99.� Date
Specify whether you want the date imprinted on the print ornot.
z Enter the Playback mode and use the four-way controller(��) to choose the image for which you want to makeDPOF settings.
x Press the DPOF button.The DPOF screen will be displayed.
zcv
b
x
100-0020100-0020
MENU OKDISP
DateCopies 01
All ImagesAll Images OkOkExit OkExit
e05_kb338_089_122_41e.qk 3/17/03 5:21 PM Page 101
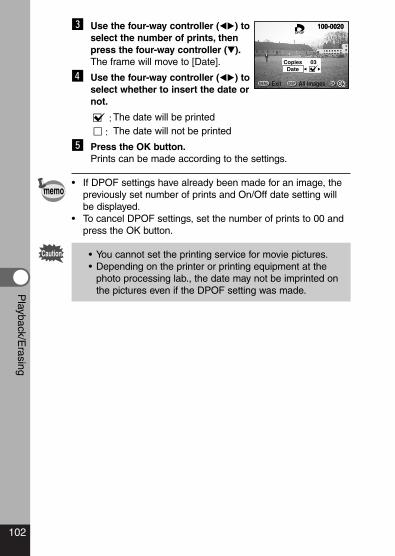
102
Playback/E
rasing
Caution
c Use the four-way controller (��) toselect the number of prints, thenpress the four-way controller (�).The frame will move to [Date].
v Use the four-way controller (��) toselect whether to insert the date ornot.
: The date will be printed
: The date will not be printed
b Press the OK button.Prints can be made according to the settings.
• If DPOF settings have already been made for an image, thepreviously set number of prints and On/Off date setting willbe displayed.
• To cancel DPOF settings, set the number of prints to 00 andpress the OK button.
• You cannot set the printing service for movie pictures.• Depending on the printer or printing equipment at the
photo processing lab., the date may not be imprinted onthe pictures even if the DPOF setting was made.
memo
100-0020100-0020
MENU OKDISP
DateCopies 03
All ImagesAll Images OkOkExit OkExit
e05_kb338_089_122_41e.qk 3/17/03 5:21 PM Page 102
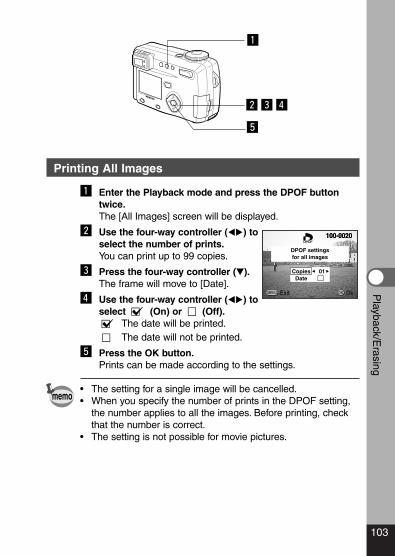
103
Playback/E
rasing
Printing All Images
z Enter the Playback mode and press the DPOF buttontwice.The [All Images] screen will be displayed.
x Use the four-way controller (��) toselect the number of prints.You can print up to 99 copies.
c Press the four-way controller (�).The frame will move to [Date].
v Use the four-way controller (��) toselect (On) or (Off).
The date will be printed.The date will not be printed.
b Press the OK button.Prints can be made according to the settings.
• The setting for a single image will be cancelled.• When you specify the number of prints in the DPOF setting,
the number applies to all the images. Before printing, checkthat the number is correct.
• The setting is not possible for movie pictures.
xcv
b
z
memo
DPOF settingsfor all images
100-0020100-0020
MENU OK
DateCopies 01
OkExit OkExit
e05_kb338_089_122_41e.qk 3/17/03 5:21 PM Page 103

104
Playback/E
rasing
Caution
Viewing Images with your PC
By using the provided USB cable (I-USB7) or card reader andimage-browser software, you can transfer images recorded withthe camera to your PC and edit them or print them out.This section explains how to view images on your PC using theprovided USB driver and software.
About the included software
The included CD-ROM (S-SW7) contains the following software:- USB driver- Image viewing software (ACDSee™)- ACD Photostitcher
ACD photostitcher is only for the English and the Japaneseversion.
System environment
OS: Windows 98/98 SE/2000/MeWindows XP Home Edition/Professional
CPU: Pentium or later recommendedMemory: 64MB or moreHard disk space: 15MB or moreStandard equipped USB port
To view movie pictures on your PC, Direct X 8.0 or later andMedia Player pre-installed on system, or QuickTime 3.0 or laterare required. For Windows Me/XP, Media Player pre-installed onsystem, QuickTime 3.0 or later is required.
• Not compatible with Windows 95/NT.• When you connect the camera to your PC, you are rec-
ommended to use the AC adapter kit D-AC7.If the battery power runs out while image data is beingtransferred, the data may be lost.
e05_kb338_089_122_41e.qk 3/17/03 5:21 PM Page 104
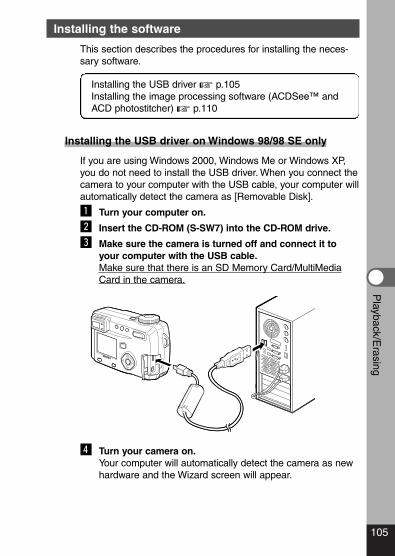
105
Playback/E
rasingInstalling the software
This section describes the procedures for installing the neces-sary software.
Installing the USB driver � p.105Installing the image processing software (ACDSee™ andACD photostitcher) � p.110
Installing the USB driver on Windows 98/98 SE only
If you are using Windows 2000, Windows Me or Windows XP,you do not need to install the USB driver. When you connect thecamera to your computer with the USB cable, your computer willautomatically detect the camera as [Removable Disk].
z Turn your computer on.
x Insert the CD-ROM (S-SW7) into the CD-ROM drive.
c Make sure the camera is turned off and connect it toyour computer with the USB cable.Make sure that there is an SD Memory Card/MultiMediaCard in the camera.
v Turn your camera on.Your computer will automatically detect the camera as newhardware and the Wizard screen will appear.
e05_kb338_089_122_41e.qk 3/17/03 5:21 PM Page 105
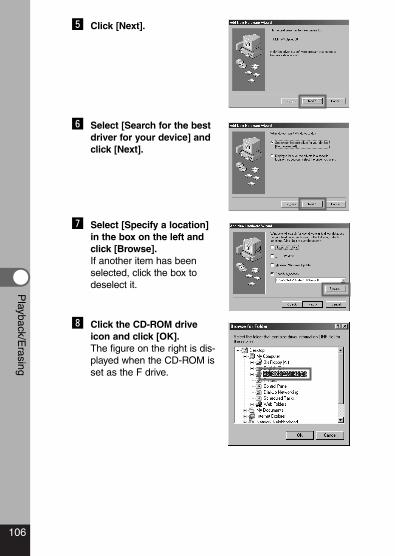
106
Playback/E
rasing
b Click [Next].
n Select [Search for the bestdriver for your device] andclick [Next].
m Select [Specify a location]in the box on the left andclick [Browse].If another item has beenselected, click the box todeselect it.
, Click the CD-ROM driveicon and click [OK].The figure on the right is dis-played when the CD-ROM isset as the F drive.
e05_kb338_089_122_41e.qk 3/17/03 5:21 PM Page 106
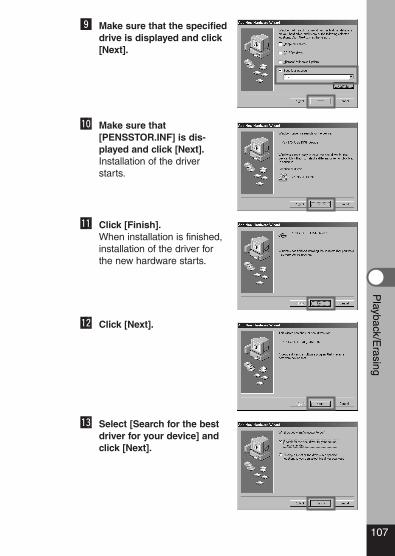
. Make sure that the specifieddrive is displayed and click[Next].
⁄0 Make sure that[PENSSTOR.INF] is dis-played and click [Next].Installation of the driverstarts.
⁄1 Click [Finish].When installation is finished,installation of the driver forthe new hardware starts.
⁄2 Click [Next].
⁄3 Select [Search for the bestdriver for your device] andclick [Next].
107
Playback/E
rasing
e05_kb338_089_122_41e.qk 3/17/03 5:21 PM Page 107

⁄4 Select [Specify a location]and click [Browse].If another item has beenselected, click the box todeselect it.
⁄5 Click the CD-ROM driveicon and click [OK].The figure on the right is dis-played when the CD-ROM isset as the F drive.
⁄6 Make sure that the specifieddrive is displayed and click[Next].
⁄7 Make sure that[PENSPDR.INF] is displayedand click [Next].
108
Playback/E
rasing
e05_kb338_089_122_41e.qk 3/17/03 5:21 PM Page 108
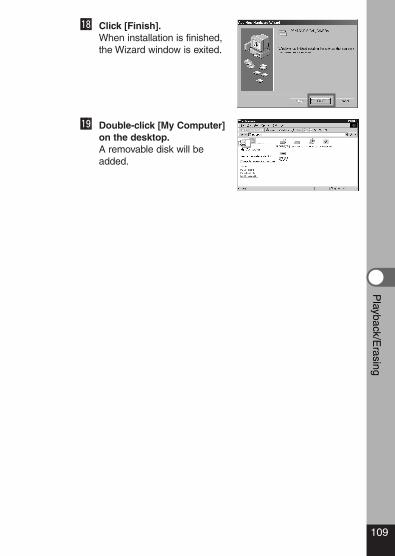
⁄8 Click [Finish].When installation is finished,the Wizard window is exited.
⁄9 Double-click [My Computer]on the desktop.A removable disk will beadded.
109
Playback/E
rasing
e05_kb338_089_122_41e.qk 3/17/03 5:21 PM Page 109
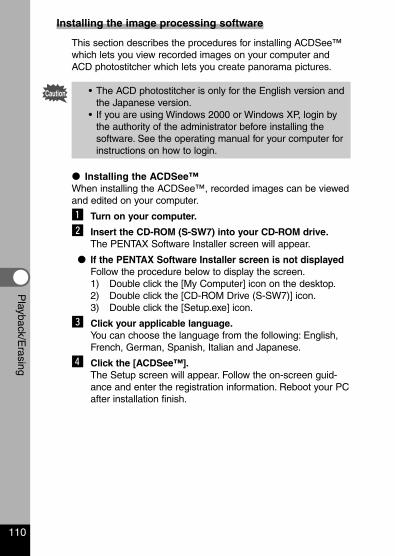
Caution
Installing the image processing software
This section describes the procedures for installing ACDSee™which lets you view recorded images on your computer andACD photostitcher which lets you create panorama pictures.
• The ACD photostitcher is only for the English version andthe Japanese version.
• If you are using Windows 2000 or Windows XP, login bythe authority of the administrator before installing thesoftware. See the operating manual for your computer forinstructions on how to login.
� Installing the ACDSee™When installing the ACDSee™, recorded images can be viewedand edited on your computer.
z Turn on your computer.
x Insert the CD-ROM (S-SW7) into your CD-ROM drive.The PENTAX Software Installer screen will appear.
� If the PENTAX Software Installer screen is not displayedFollow the procedure below to display the screen.1) Double click the [My Computer] icon on the desktop.2) Double click the [CD-ROM Drive (S-SW7)] icon.3) Double click the [Setup.exe] icon.
c Click your applicable language.You can choose the language from the following: English,French, German, Spanish, Italian and Japanese.
v Click the [ACDSee™].The Setup screen will appear. Follow the on-screen guid-ance and enter the registration information. Reboot your PCafter installation finish.
110
Playback/E
rasing
e05_kb338_089_122_41e.qk 3/17/03 5:21 PM Page 110
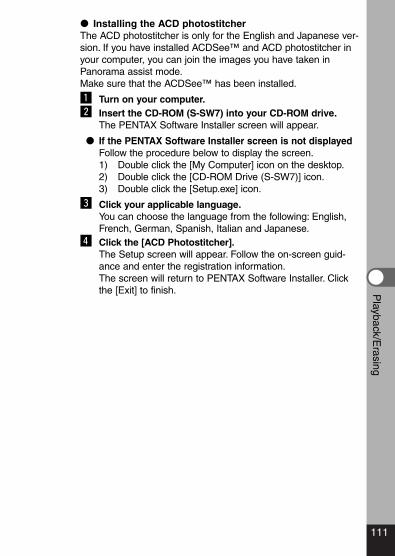
111
Playback/E
rasing� Installing the ACD photostitcherThe ACD photostitcher is only for the English and Japanese ver-sion. If you have installed ACDSee™ and ACD photostitcher inyour computer, you can join the images you have taken inPanorama assist mode.Make sure that the ACDSee™ has been installed.
z Turn on your computer.x Insert the CD-ROM (S-SW7) into your CD-ROM drive.
The PENTAX Software Installer screen will appear.
� If the PENTAX Software Installer screen is not displayedFollow the procedure below to display the screen.1) Double click the [My Computer] icon on the desktop.2) Double click the [CD-ROM Drive (S-SW7)] icon.3) Double click the [Setup.exe] icon.
c Click your applicable language.You can choose the language from the following: English,French, German, Spanish, Italian and Japanese.
v Click the [ACD Photostitcher].The Setup screen will appear. Follow the on-screen guid-ance and enter the registration information.The screen will return to PENTAX Software Installer. Clickthe [Exit] to finish.
e05_kb338_089_122_41e.qk 3/17/03 5:21 PM Page 111
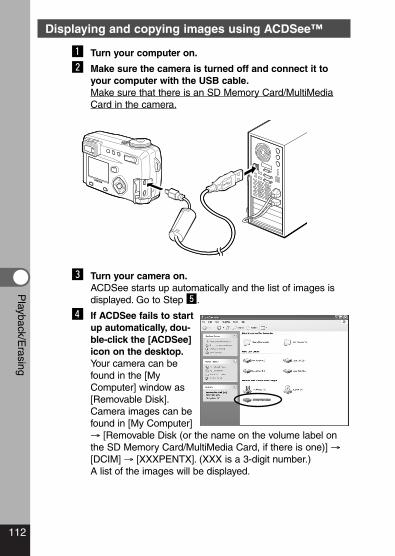
112
Playback/E
rasing
Displaying and copying images using ACDSee™
z Turn your computer on.
x Make sure the camera is turned off and connect it toyour computer with the USB cable.Make sure that there is an SD Memory Card/MultiMediaCard in the camera.
c Turn your camera on.ACDSee starts up automatically and the list of images isdisplayed. Go to Step b.
v If ACDSee fails to startup automatically, dou-ble-click the [ACDSee]icon on the desktop.Your camera can befound in the [MyComputer] window as[Removable Disk].Camera images can befound in [My Computer]→ [Removable Disk (or the name on the volume label onthe SD Memory Card/MultiMedia Card, if there is one)] →[DCIM] → [XXXPENTX]. (XXX is a 3-digit number.)A list of the images will be displayed.
e05_kb338_089_122_41e.qk 3/17/03 5:21 PM Page 112
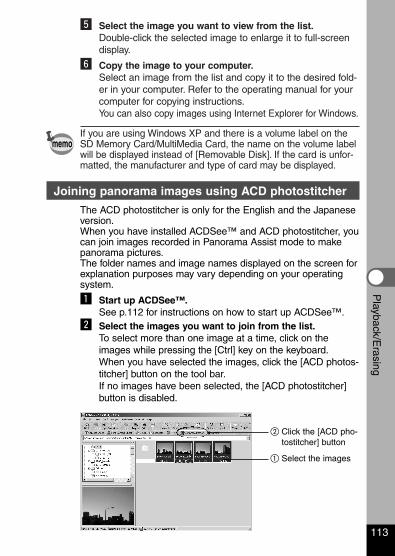
b Select the image you want to view from the list.Double-click the selected image to enlarge it to full-screendisplay.
n Copy the image to your computer.Select an image from the list and copy it to the desired fold-er in your computer. Refer to the operating manual for yourcomputer for copying instructions.You can also copy images using Internet Explorer for Windows.
If you are using Windows XP and there is a volume label on theSD Memory Card/MultiMedia Card, the name on the volume labelwill be displayed instead of [Removable Disk]. If the card is unfor-matted, the manufacturer and type of card may be displayed.
Joining panorama images using ACD photostitcher
The ACD photostitcher is only for the English and the Japaneseversion.When you have installed ACDSee™ and ACD photostitcher, youcan join images recorded in Panorama Assist mode to makepanorama pictures.The folder names and image names displayed on the screen forexplanation purposes may vary depending on your operatingsystem.
z Start up ACDSee™.See p.112 for instructions on how to start up ACDSee™.
x Select the images you want to join from the list.To select more than one image at a time, click on theimages while pressing the [Ctrl] key on the keyboard.When you have selected the images, click the [ACD photos-titcher] button on the tool bar.If no images have been selected, the [ACD photostitcher]button is disabled.
113
Playback/E
rasing
memo
� Click the [ACD pho-tostitcher] button
� Select the images
e05_kb338_089_122_41e.qk 3/17/03 5:21 PM Page 113
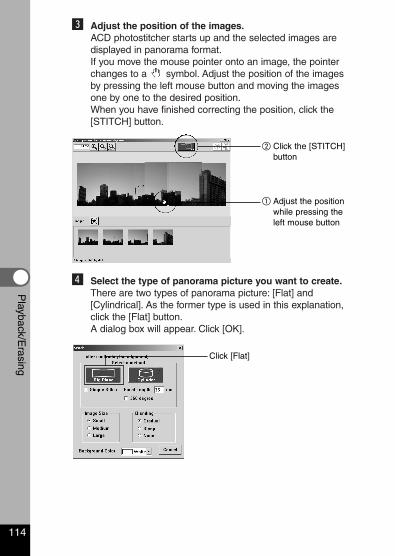
c Adjust the position of the images.ACD photostitcher starts up and the selected images aredisplayed in panorama format.If you move the mouse pointer onto an image, the pointerchanges to a symbol. Adjust the position of the imagesby pressing the left mouse button and moving the imagesone by one to the desired position.When you have finished correcting the position, click the[STITCH] button.
v Select the type of panorama picture you want to create.There are two types of panorama picture: [Flat] and[Cylindrical]. As the former type is used in this explanation,click the [Flat] button.A dialog box will appear. Click [OK].
114
Playback/E
rasing
� Click the [STITCH]button
� Adjust the positionwhile pressing theleft mouse button
Click [Flat]
e05_kb338_089_122_41e.qk 3/17/03 5:21 PM Page 114
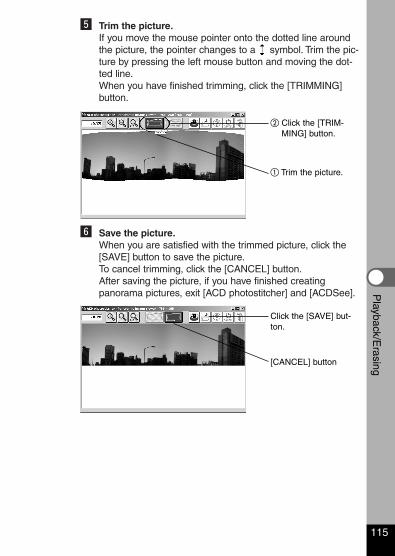
b Trim the picture.If you move the mouse pointer onto the dotted line aroundthe picture, the pointer changes to a symbol. Trim the pic-ture by pressing the left mouse button and moving the dot-ted line.When you have finished trimming, click the [TRIMMING]button.
n Save the picture.When you are satisfied with the trimmed picture, click the[SAVE] button to save the picture.To cancel trimming, click the [CANCEL] button.After saving the picture, if you have finished creatingpanorama pictures, exit [ACD photostitcher] and [ACDSee].
115
Playback/E
rasing
� Click the [TRIM-MING] button.
� Trim the picture.
[CANCEL] button
Click the [SAVE] but-ton.
e05_kb338_089_122_41e.qk 3/17/03 5:21 PM Page 115
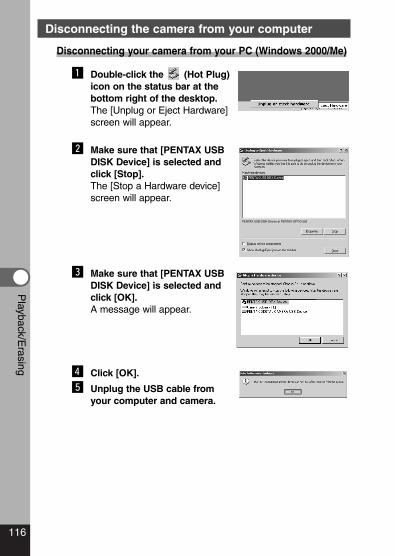
116
Playback/E
rasing
Disconnecting the camera from your computer
Disconnecting your camera from your PC (Windows 2000/Me)
z Double-click the (Hot Plug)icon on the status bar at thebottom right of the desktop.The [Unplug or Eject Hardware]screen will appear.
x Make sure that [PENTAX USBDISK Device] is selected andclick [Stop].The [Stop a Hardware device]screen will appear.
c Make sure that [PENTAX USBDISK Device] is selected andclick [OK].A message will appear.
v Click [OK].
b Unplug the USB cable fromyour computer and camera.
PENTAX USB DISK Device at PENTAX OPTIO 550
e05_kb338_089_122_41e.qk 3/17/03 5:21 PM Page 116
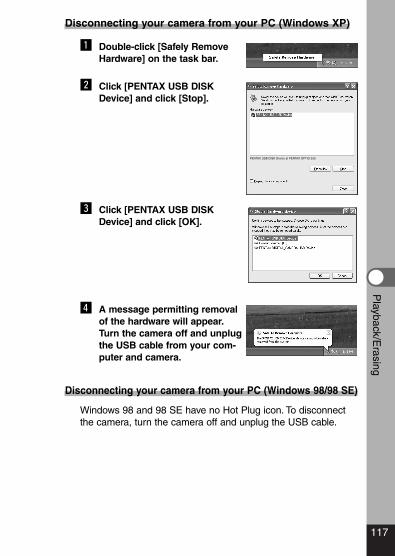
117
Playback/E
rasingDisconnecting your camera from your PC (Windows XP)
z Double-click [Safely RemoveHardware] on the task bar.
x Click [PENTAX USB DISKDevice] and click [Stop].
c Click [PENTAX USB DISKDevice] and click [OK].
v A message permitting removalof the hardware will appear.Turn the camera off and unplugthe USB cable from your com-puter and camera.
Disconnecting your camera from your PC (Windows 98/98 SE)
Windows 98 and 98 SE have no Hot Plug icon. To disconnectthe camera, turn the camera off and unplug the USB cable.
PENTAX USB DISK Device at PENTAX OPTIO 550
e05_kb338_089_122_41e.qk 3/17/03 5:21 PM Page 117
Caution
By using the provided USB cable (I-USB7) or card reader andimage-browser software, you can transfer images recorded withthe camera to your Macintosh and edit them or print them out.This section explains how to view images on your Macintoshusing the provided USB driver and software.
About the included software
The included CD-ROM (S-SW7) contains the following software:• Image-browser software (ACDSee™)
System environment
OS: Mac OS 8.6 or later (QuickTime 4.0 or later required)CPU: Power PC 266MHz or higherMemory: 8MB or moreHard disk space: 6MB or moreStandard equipped USB port
• When you connect the camera to your Macintosh, youare recommended to use the AC adapter. If the batterypower runs out while image data is being transferred, the data may be lost.
Installing the software
Installing the USB Driver and the ACDSee™ on your Macintosh
The procedures for installing the necessary software areexplained.Many current and recent Macintosh computers will automaticallyrecognize the camera and load their own USB mass storagedrivers. When you attach the camera to your Mac, the camerashould automatically appear on your desktop as an “untitled”disk drive, which you can double click to access.
118
Viewing Images with your Macintosh
Playback/E
rasing
e05_kb338_089_122_41e.qk 3/17/03 5:21 PM Page 118
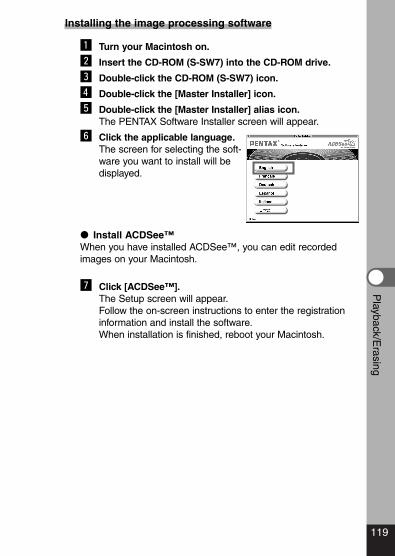
119
Playback/E
rasingInstalling the image processing software
z Turn your Macintosh on.
x Insert the CD-ROM (S-SW7) into the CD-ROM drive.
c Double-click the CD-ROM (S-SW7) icon.
v Double-click the [Master Installer] icon.
b Double-click the [Master Installer] alias icon.The PENTAX Software Installer screen will appear.
n Click the applicable language.The screen for selecting the soft-ware you want to install will bedisplayed.
� Install ACDSee™When you have installed ACDSee™, you can edit recordedimages on your Macintosh.
m Click [ACDSee™].The Setup screen will appear.Follow the on-screen instructions to enter the registrationinformation and install the software.When installation is finished, reboot your Macintosh.
e05_kb338_089_122_41e.qk 3/17/03 5:21 PM Page 119
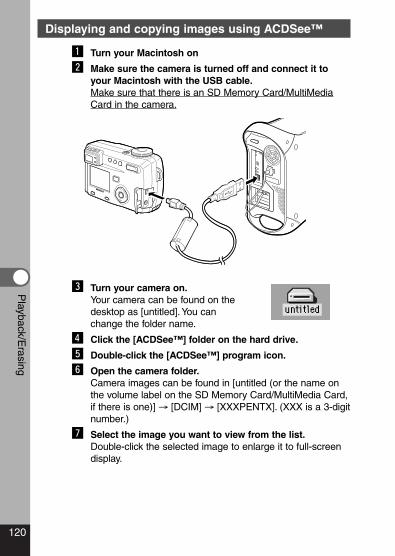
120
Playback/E
rasing
Displaying and copying images using ACDSee™
z Turn your Macintosh on
x Make sure the camera is turned off and connect it toyour Macintosh with the USB cable.Make sure that there is an SD Memory Card/MultiMediaCard in the camera.
c Turn your camera on.Your camera can be found on thedesktop as [untitled].You canchange the folder name.
v Click the [ACDSee™] folder on the hard drive.
b Double-click the [ACDSee™] program icon.
n Open the camera folder.Camera images can be found in [untitled (or the name onthe volume label on the SD Memory Card/MultiMedia Card,if there is one)] → [DCIM] → [XXXPENTX]. (XXX is a 3-digitnumber.)
m Select the image you want to view from the list.Double-click the selected image to enlarge it to full-screendisplay.
e05_kb338_089_122_41e.qk 3/17/03 5:21 PM Page 120
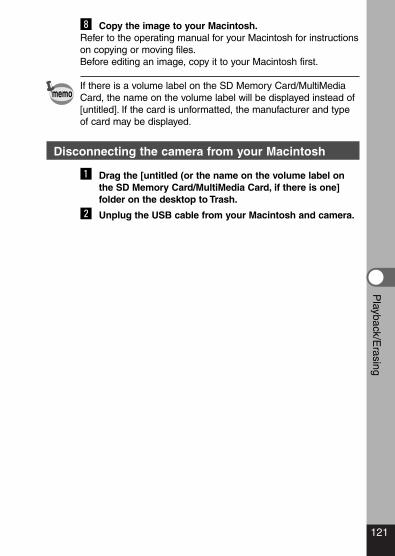
121
Playback/E
rasing, Copy the image to your Macintosh.Refer to the operating manual for your Macintosh for instructionson copying or moving files.Before editing an image, copy it to your Macintosh first.
If there is a volume label on the SD Memory Card/MultiMediaCard, the name on the volume label will be displayed instead of[untitled]. If the card is unformatted, the manufacturer and typeof card may be displayed.
Disconnecting the camera from your Macintosh
z Drag the [untitled (or the name on the volume label onthe SD Memory Card/MultiMedia Card, if there is one]folder on the desktop to Trash.
x Unplug the USB cable from your Macintosh and camera.
memo
e05_kb338_089_122_41e.qk 3/17/03 5:21 PM Page 121

MEMO
122
e05_kb338_089_122_41e.qk 3/17/03 5:21 PM Page 122
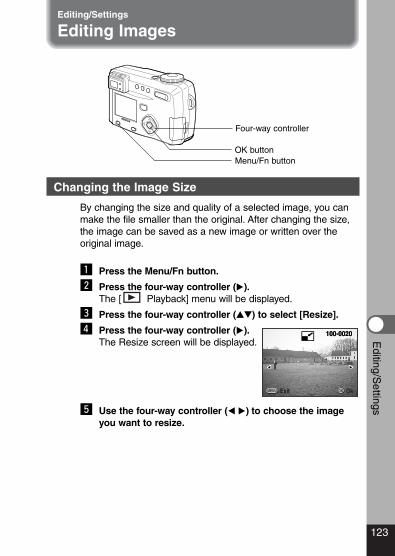
123
Editing/S
ettings
Changing the Image Size
By changing the size and quality of a selected image, you canmake the file smaller than the original. After changing the size,the image can be saved as a new image or written over theoriginal image.
z Press the Menu/Fn button.
x Press the four-way controller (�).The [ Playback] menu will be displayed.
c Press the four-way controller (��) to select [Resize].
v Press the four-way controller (�).The Resize screen will be displayed.
b Use the four-way controller (� �) to choose the imageyou want to resize.
Editing/Settings
Editing Images
Four-way controller
OK buttonMenu/Fn button
100-0020100-0020
MENU OK OkExit OkExit
e06_kb338_123_157_41e.qk 3/17/03 4:10 PM Page 123

124
Editing/S
ettings
memo
n Press the OK button.
m Press the four-way controller (��) to select [Recordedpixels].
, Press the four-way controller (�).The frame will move to [Quality Level].
. Press the four-way controller (��) to select [QualityLevel].
⁄0 Press the OK button.
⁄1 Press the four-way controller (��) to select [Overwrite]or [Save as].
⁄2 Press the OK button.The image will be resized.
• Movie pictures cannot be resized.• You cannot select a larger size than that of the original
image.• You cannot select a higher quality level than that of the origi-
nal image.• TIFF images cannot be resized.
100-0020100-0020
Select resolutionand quality
MENU OK
Quality LevelRecorded Pixels 640×480
OkExit OkExit
e06_kb338_123_157_41e.qk 3/17/03 4:10 PM Page 124
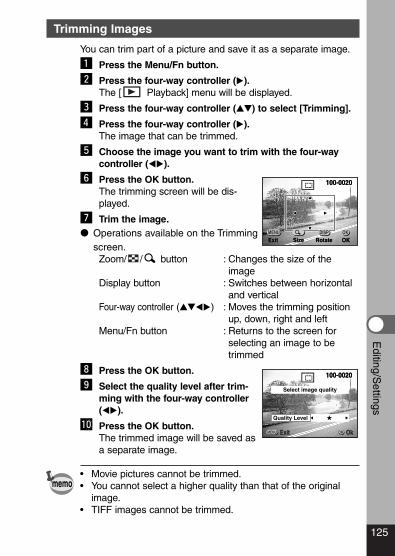
125
Editing/S
ettingsTrimming Images
You can trim part of a picture and save it as a separate image.
z Press the Menu/Fn button.
x Press the four-way controller (�).The [ Playback] menu will be displayed.
c Press the four-way controller (��) to select [Trimming].
v Press the four-way controller (�).The image that can be trimmed.
b Choose the image you want to trim with the four-waycontroller (��).
n Press the OK button.The trimming screen will be dis-played.
m Trim the image.� Operations available on the Trimming
screen.Zoom/ / button : Changes the size of the
imageDisplay button : Switches between horizontal
and verticalFour-way controller (����) : Moves the trimming position
up, down, right and leftMenu/Fn button : Returns to the screen for
selecting an image to betrimmed
, Press the OK button.
. Select the quality level after trim-ming with the four-way controller(��).
⁄0 Press the OK button.The trimmed image will be saved asa separate image.
• Movie pictures cannot be trimmed.• You cannot select a higher quality than that of the original
image.• TIFF images cannot be trimmed.
memo
100-0020100-0020
MENU OK
Exit OKSizeSizeDISP
RotateRotateExit OK
Select image quality
100-0020100-0020
MENU OK
Quality Level
OkExit OkExit
e06_kb338_123_157_41e.qk 3/17/03 4:10 PM Page 125
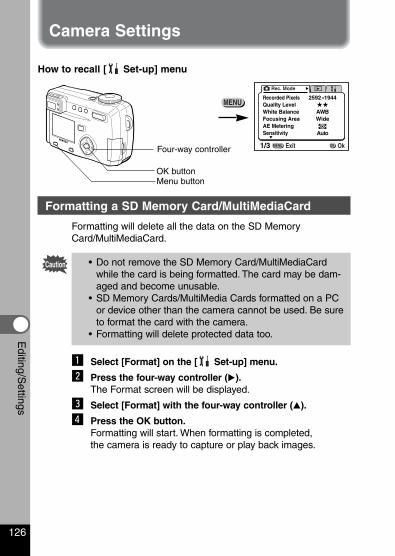
126
Editing/S
ettings
Caution
How to recall [ Set-up] menu
Camera Settings
Formatting a SD Memory Card/MultiMediaCard
Formatting will delete all the data on the SD MemoryCard/MultiMediaCard.
• Do not remove the SD Memory Card/MultiMediaCardwhile the card is being formatted. The card may be dam-aged and become unusable.
• SD Memory Cards/MultiMedia Cards formatted on a PCor device other than the camera cannot be used. Be sureto format the card with the camera.
• Formatting will delete protected data too.
z Select [Format] on the [ Set-up] menu.
x Press the four-way controller (�).The Format screen will be displayed.
c Select [Format] with the four-way controller (�).
v Press the OK button.Formatting will start. When formatting is completed, the camera is ready to capture or play back images.
Four-way controller
OK buttonMenu button
Rec. Mode
WideAWB
Auto
2592 1944Recorded PixelsQuality LevelWhite BalanceFocusing AreaAE MeteringSensitivity
1/3 ExitMENU OkOK
e06_kb338_123_157_41e.qk 3/17/03 4:11 PM Page 126
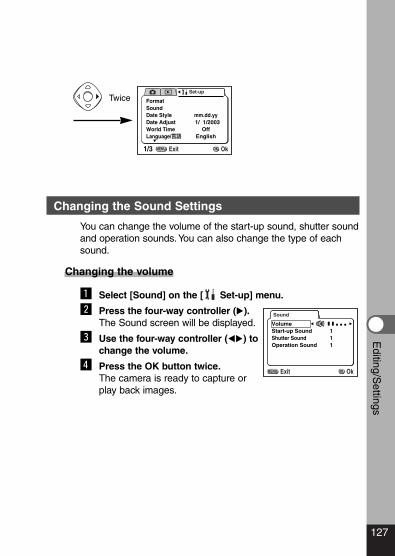
127
Editing/S
ettings
Changing the Sound Settings
You can change the volume of the start-up sound, shutter soundand operation sounds.You can also change the type of eachsound.
Changing the volume
z Select [Sound] on the [ Set-up] menu.
x Press the four-way controller (�).The Sound screen will be displayed.
c Use the four-way controller (��) tochange the volume.
v Press the OK button twice.The camera is ready to capture orplay back images.
Set-up
FormatSoundDate Style mm.dd.yy
1/ 1/2003Date AdjustWorld TimeLanguage/ English
Off
1/3 ExitMENU OkOK
VolumeStart-up SoundShutter SoundOperation Sound 1
11
Sound
MENU OkOKExit
Twice
e06_kb338_123_157_41e.qk 3/17/03 4:11 PM Page 127
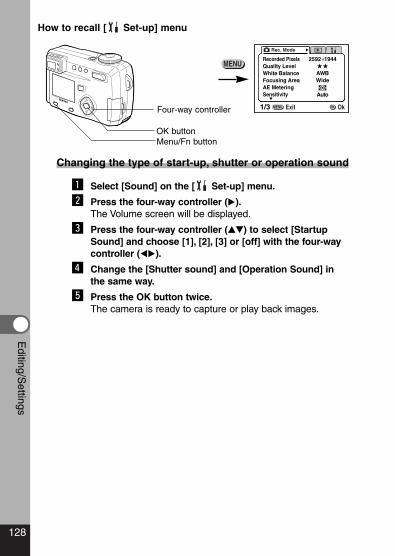
128
Editing/S
ettings
Changing the type of start-up, shutter or operation sound
z Select [Sound] on the [ Set-up] menu.
x Press the four-way controller (�).The Volume screen will be displayed.
c Press the four-way controller (��) to select [StartupSound] and choose [1], [2], [3] or [off] with the four-waycontroller (��).
v Change the [Shutter sound] and [Operation Sound] inthe same way.
b Press the OK button twice.The camera is ready to capture or play back images.
Four-way controller
OK buttonMenu/Fn button
Rec. Mode
WideAWB
Auto
2592 1944Recorded PixelsQuality LevelWhite BalanceFocusing AreaAE MeteringSensitivity
1/3 ExitMENU OkOK
How to recall [ Set-up] menu
e06_kb338_123_157_41e.qk 3/17/03 4:11 PM Page 128

129
Editing/S
ettings
Setting the Date Style
You can set the style in which the date is displayed on the cam-era. Choose [mm/dd/yy], [dd/mm/yy] or [yy/mm/dd].
z Select [Date Style] on the [ Set-up] menu.
x Use the four-way controller (��) to change the datestyle.
c Press the OK button.The camera is ready to capture or play back images withthe selected date style.
The style in which the time is displayed is set by [Date Adjust].memo
Set-up
FormatSoundDate Style mm.dd.yy
1/ 1/2003Date AdjustWorld TimeLanguage/ English
Off
1/3 ExitMENU OkOK
Twice
e06_kb338_123_157_41e.qk 3/17/03 4:11 PM Page 129
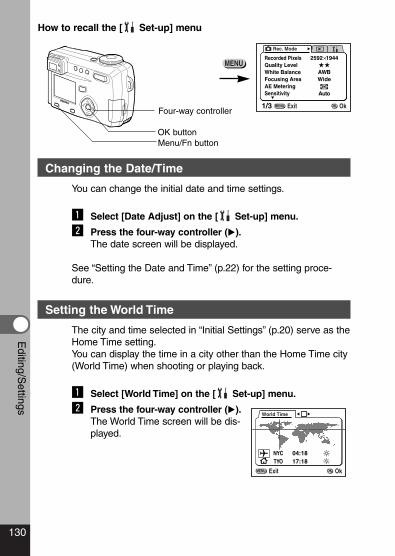
130
Editing/S
ettings
Changing the Date/Time
You can change the initial date and time settings.
z Select [Date Adjust] on the [ Set-up] menu.
x Press the four-way controller (�).The date screen will be displayed.
See “Setting the Date and Time” (p.22) for the setting proce-dure.
Setting the World Time
The city and time selected in “Initial Settings” (p.20) serve as theHome Time setting.You can display the time in a city other than the Home Time city(World Time) when shooting or playing back.
z Select [World Time] on the [ Set-up] menu.
x Press the four-way controller (�).The World Time screen will be dis-played.
How to recall the [ Set-up] menu
Four-way controller
OK buttonMenu/Fn button
Rec. Mode
WideAWB
Auto
2592 1944Recorded PixelsQuality LevelWhite BalanceFocusing AreaAE MeteringSensitivity
1/3 ExitMENU OkOK
NYCTYO 17:18
04:18
World Time
MENU OkOKExit
e06_kb338_123_157_41e.qk 3/17/03 4:11 PM Page 130
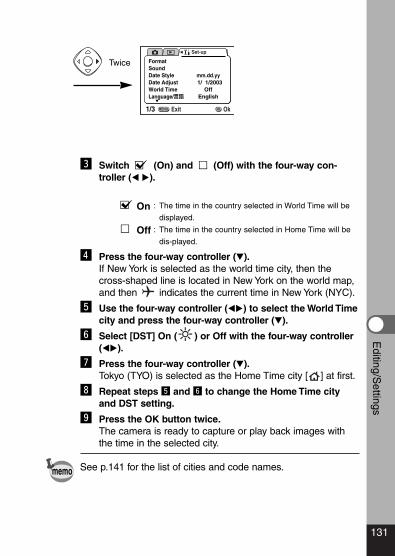
131
Editing/S
ettings
c Switch (On) and (Off) with the four-way con-troller (� �).
On : The time in the country selected in World Time will be
displayed.
Off : The time in the country selected in Home Time will be
dis-played.
v Press the four-way controller (�).If New York is selected as the world time city, then thecross-shaped line is located in New York on the world map,and then indicates the current time in New York (NYC).
b Use the four-way controller (��) to select the World Timecity and press the four-way controller (�).
n Select [DST] On ( ) or Off with the four-way controller(��).
m Press the four-way controller (�).Tokyo (TYO) is selected as the Home Time city [ ] at first.
, Repeat steps b and n to change the Home Time cityand DST setting.
. Press the OK button twice.The camera is ready to capture or play back images withthe time in the selected city.
See p.141 for the list of cities and code names.
Set-up
FormatSoundDate Style mm.dd.yy
1/ 1/2003Date AdjustWorld TimeLanguage/ English
Off
1/3 ExitMENU OkOK
memo
Twice
e06_kb338_123_157_41e.qk 3/17/03 4:11 PM Page 131
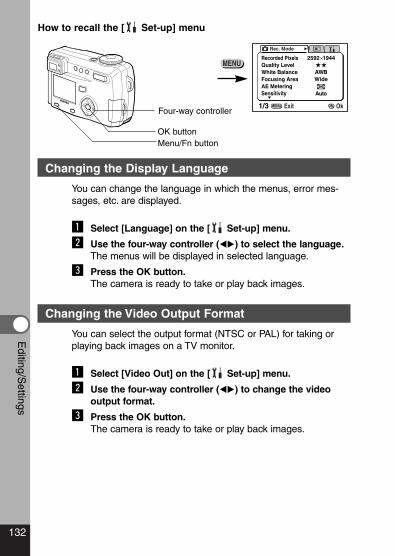
132
Editing/S
ettings
Changing the Display Language
You can change the language in which the menus, error mes-sages, etc. are displayed.
z Select [Language] on the [ Set-up] menu.
x Use the four-way controller (��) to select the language.The menus will be displayed in selected language.
c Press the OK button.The camera is ready to take or play back images.
Changing the Video Output Format
You can select the output format (NTSC or PAL) for taking orplaying back images on a TV monitor.
z Select [Video Out] on the [ Set-up] menu.
x Use the four-way controller (��) to change the videooutput format.
c Press the OK button.The camera is ready to take or play back images.
How to recall the [ Set-up] menu
Four-way controller
OK buttonMenu/Fn button
Rec. Mode
WideAWB
Auto
2592 1944Recorded PixelsQuality LevelWhite BalanceFocusing AreaAE MeteringSensitivity
1/3 ExitMENU OkOK
e06_kb338_123_157_41e.qk 3/17/03 4:11 PM Page 132
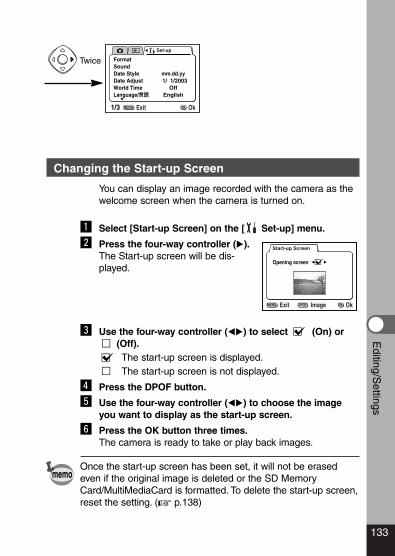
133
Editing/S
ettings
Changing the Start-up Screen
You can display an image recorded with the camera as thewelcome screen when the camera is turned on.
z Select [Start-up Screen] on the [ Set-up] menu.
x Press the four-way controller (�).The Start-up screen will be dis-played.
c Use the four-way controller (��) to select (On) or(Off).The start-up screen is displayed.The start-up screen is not displayed.
v Press the DPOF button.
b Use the four-way controller (��) to choose the imageyou want to display as the start-up screen.
n Press the OK button three times.The camera is ready to take or play back images.
Once the start-up screen has been set, it will not be erasedeven if the original image is deleted or the SD MemoryCard/MultiMediaCard is formatted. To delete the start-up screen,reset the setting. (� p.138)
memo
TwiceSet-up
FormatSoundDate Style mm.dd.yy
1/ 1/2003Date AdjustWorld TimeLanguage/ English
Off
1/3 ExitMENU OkOK
DPOF
Opening screen
Start-up Screen
MENU OkOKExit Image
e06_kb338_123_157_41e.qk 3/17/03 4:11 PM Page 133
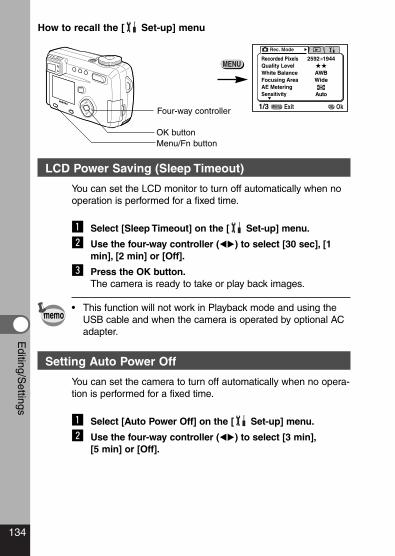
134
Editing/S
ettings
LCD Power Saving (Sleep Timeout)
You can set the LCD monitor to turn off automatically when nooperation is performed for a fixed time.
z Select [Sleep Timeout] on the [ Set-up] menu.
x Use the four-way controller (��) to select [30 sec], [1min], [2 min] or [Off].
c Press the OK button.The camera is ready to take or play back images.
• This function will not work in Playback mode and using theUSB cable and when the camera is operated by optional ACadapter.
Setting Auto Power Off
You can set the camera to turn off automatically when no opera-tion is performed for a fixed time.
z Select [Auto Power Off] on the [ Set-up] menu.
x Use the four-way controller (��) to select [3 min],[5 min] or [Off].
How to recall the [ Set-up] menu
memo
Four-way controller
OK buttonMenu/Fn button
Rec. Mode
WideAWB
Auto
2592 1944Recorded PixelsQuality LevelWhite BalanceFocusing AreaAE MeteringSensitivity
1/3 ExitMENU OkOK
e06_kb338_123_157_41e.qk 3/17/03 4:11 PM Page 134
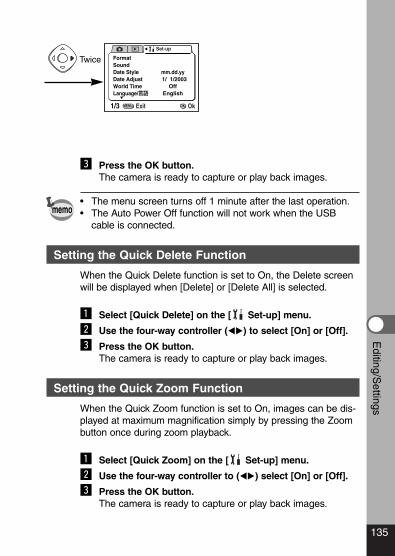
135
Editing/S
ettings
c Press the OK button.The camera is ready to capture or play back images.
• The menu screen turns off 1 minute after the last operation.• The Auto Power Off function will not work when the USB
cable is connected.
Setting the Quick Delete Function
When the Quick Delete function is set to On, the Delete screenwill be displayed when [Delete] or [Delete All] is selected.
z Select [Quick Delete] on the [ Set-up] menu.
x Use the four-way controller (��) to select [On] or [Off].
c Press the OK button.The camera is ready to capture or play back images.
Setting the Quick Zoom Function
When the Quick Zoom function is set to On, images can be dis-played at maximum magnification simply by pressing the Zoombutton once during zoom playback.
z Select [Quick Zoom] on the [ Set-up] menu.
x Use the four-way controller to (��) select [On] or [Off].
c Press the OK button.The camera is ready to capture or play back images.
memo
TwiceSet-up
FormatSoundDate Style mm.dd.yy
1/ 1/2003Date AdjustWorld TimeLanguage/ English
Off
1/3 ExitMENU OkOK
e06_kb338_123_157_41e.qk 3/17/03 4:11 PM Page 135
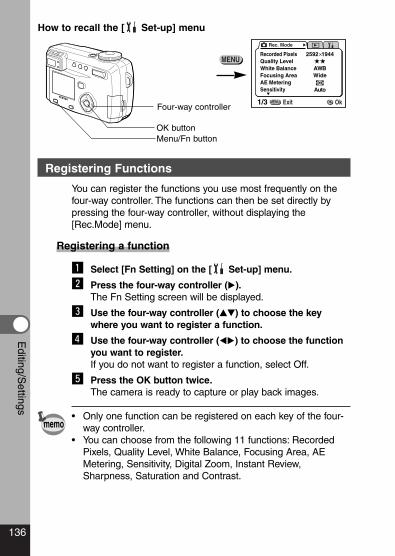
136
Editing/S
ettings
Registering Functions
You can register the functions you use most frequently on thefour-way controller. The functions can then be set directly bypressing the four-way controller, without displaying the[Rec.Mode] menu.
Registering a function
z Select [Fn Setting] on the [ Set-up] menu.
x Press the four-way controller (�).The Fn Setting screen will be displayed.
c Use the four-way controller (��) to choose the keywhere you want to register a function.
v Use the four-way controller (��) to choose the functionyou want to register.If you do not want to register a function, select Off.
b Press the OK button twice.The camera is ready to capture or play back images.
• Only one function can be registered on each key of the four-way controller.
• You can choose from the following 11 functions: RecordedPixels, Quality Level, White Balance, Focusing Area, AEMetering, Sensitivity, Digital Zoom, Instant Review,Sharpness, Saturation and Contrast.
memo
Four-way controller
OK buttonMenu/Fn button
Rec. Mode
WideAWB
Auto
2592 1944Recorded PixelsQuality LevelWhite BalanceFocusing AreaAE MeteringSensitivity
1/3 ExitMENU OkOK
How to recall the [ Set-up] menu
e06_kb338_123_157_41e.qk 3/17/03 4:11 PM Page 136
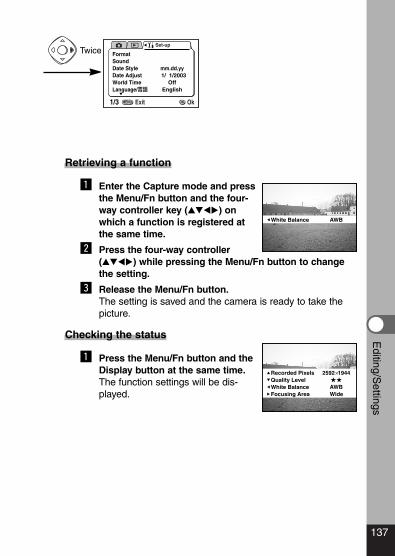
137
Editing/S
ettings
Retrieving a function
z Enter the Capture mode and pressthe Menu/Fn button and the four-way controller key (����) onwhich a function is registered atthe same time.
x Press the four-way controller(����) while pressing the Menu/Fn button to changethe setting.
c Release the Menu/Fn button.The setting is saved and the camera is ready to take thepicture.
Checking the status
z Press the Menu/Fn button and theDisplay button at the same time.The function settings will be dis-played.
Set-up
FormatSoundDate Style mm.dd.yy
1/ 1/2003Date AdjustWorld TimeLanguage/ English
Off
1/3 ExitMENU OkOK
Twice
White Balance AWB
Recorded PixelsQuality LevelWhite BalanceFocusing Area Wide
AWB
2592 1944
e06_kb338_123_157_41e.qk 3/17/03 4:11 PM Page 137
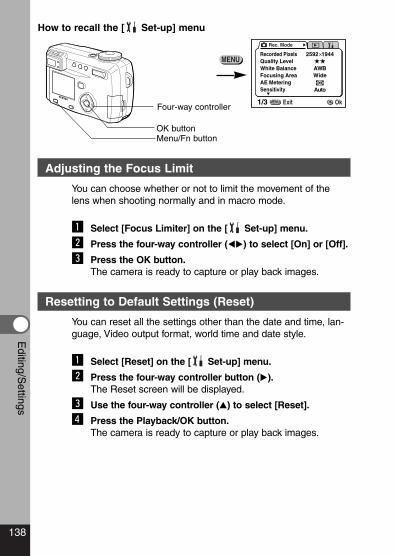
138
Editing/S
ettings
Adjusting the Focus Limit
You can choose whether or not to limit the movement of thelens when shooting normally and in macro mode.
z Select [Focus Limiter] on the [ Set-up] menu.
x Press the four-way controller (��) to select [On] or [Off].
c Press the OK button.The camera is ready to capture or play back images.
Resetting to Default Settings (Reset)
You can reset all the settings other than the date and time, lan-guage, Video output format, world time and date style.
z Select [Reset] on the [ Set-up] menu.
x Press the four-way controller button (�).The Reset screen will be displayed.
c Use the four-way controller (�) to select [Reset].
v Press the Playback/OK button.The camera is ready to capture or play back images.
Four-way controller
OK buttonMenu/Fn button
Rec. Mode
WideAWB
Auto
2592 1944Recorded PixelsQuality LevelWhite BalanceFocusing AreaAE MeteringSensitivity
1/3 ExitMENU OkOK
How to recall the [ Set-up] menu
e06_kb338_123_157_41e.qk 3/17/03 4:11 PM Page 138
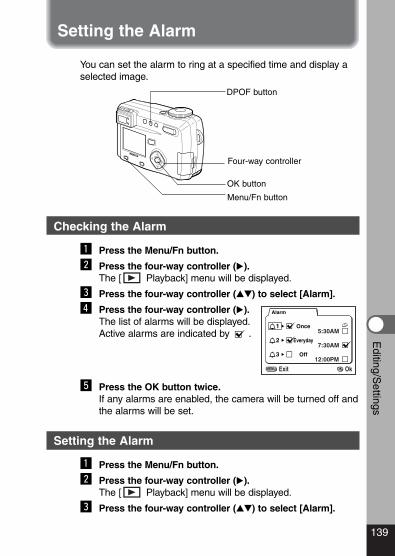
139
Editing/S
ettings
You can set the alarm to ring at a specified time and display aselected image.
Checking the Alarm
z Press the Menu/Fn button.
x Press the four-way controller (�).The [ Playback] menu will be displayed.
c Press the four-way controller (��) to select [Alarm].
v Press the four-way controller (�).The list of alarms will be displayed.Active alarms are indicated by .
b Press the OK button twice.If any alarms are enabled, the camera will be turned off andthe alarms will be set.
Setting the Alarm
z Press the Menu/Fn button.
x Press the four-way controller (�).The [ Playback] menu will be displayed.
c Press the four-way controller (��) to select [Alarm].
Setting the Alarm
Four-way controller
OK button
Menu/Fn button
DPOF button
Alarm
1 Once 5:30AM
2 Everyday 7:30AM
3 Off12:00PM
MENU OkOKExit
e06_kb338_123_157_41e.qk 3/17/03 4:11 PM Page 139
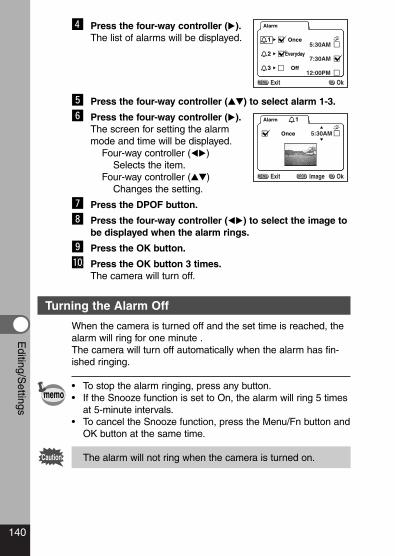
140
Editing/S
ettings
Caution
v Press the four-way controller (�).The list of alarms will be displayed.
b Press the four-way controller (��) to select alarm 1-3.
n Press the four-way controller (�).The screen for setting the alarmmode and time will be displayed.
Four-way controller (��)Selects the item.
Four-way controller (��)Changes the setting.
m Press the DPOF button.
, Press the four-way controller (��) to select the image tobe displayed when the alarm rings.
. Press the OK button.
⁄0 Press the OK button 3 times.The camera will turn off.
Turning the Alarm Off
When the camera is turned off and the set time is reached, thealarm will ring for one minute .The camera will turn off automatically when the alarm has fin-ished ringing.
• To stop the alarm ringing, press any button.• If the Snooze function is set to On, the alarm will ring 5 times
at 5-minute intervals.• To cancel the Snooze function, press the Menu/Fn button and
OK button at the same time.
The alarm will not ring when the camera is turned on.
memo
Alarm
1 Once 5:30AM
2 Everyday 7:30AM
3 Off12:00PM
MENU OkOKExit
Alarm 1
Once 5:30AM
ImageMENU OkOKExit DPOF
e06_kb338_123_157_41e.qk 3/17/03 4:11 PM Page 140
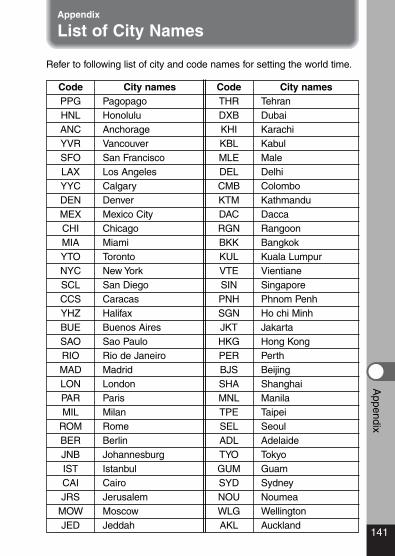
141
Appendix
Appendix
List of City Names
CodePPG
City namesPagopago
CodeTHR
City namesTehran
HNL Honolulu DXB DubaiANC Anchorage KHI KarachiYVR Vancouver KBL KabulSFO San Francisco MLE MaleLAX Los Angeles DEL DelhiYYC Calgary CMB ColomboDEN Denver KTM KathmanduMEX Mexico City DAC DaccaCHI Chicago RGN RangoonMIA Miami BKK BangkokYTO Toronto KUL Kuala LumpurNYC New York VTE VientianeSCL San Diego SIN SingaporeCCS Caracas PNH Phnom PenhYHZ Halifax SGN Ho chi MinhBUE Buenos Aires JKT JakartaSAO Sao Paulo HKG Hong KongRIO Rio de Janeiro PER PerthMAD Madrid BJS BeijingLON London SHA ShanghaiPAR Paris MNL ManilaMIL Milan TPE Taipei
ROM Rome SEL SeoulBER Berlin ADL AdelaideJNB Johannesburg TYO TokyoIST Istanbul GUM GuamCAI Cairo SYD SydneyJRS Jerusalem NOU Noumea
MOW Moscow WLG WellingtonJED Jeddah AKL Auckland
Refer to following list of city and code names for setting the world time.
e06_kb338_123_157_41e.qk 3/17/03 4:11 PM Page 141
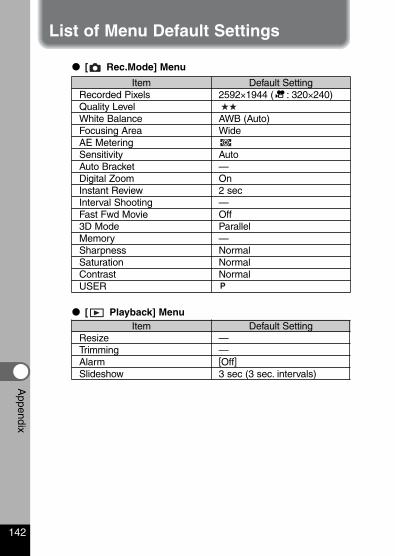
142
Appendix
� [ Rec.Mode] Menu
Item Default SettingRecorded Pixels 2592×1944 ( : 320×240)Quality LevelWhite Balance AWB (Auto)Focusing Area WideAE Metering Sensitivity AutoAuto Bracket —Digital Zoom OnInstant Review 2 secInterval Shooting —Fast Fwd Movie Off3D Mode ParallelMemory —Sharpness NormalSaturation NormalContrast NormalUSER
� [ Playback] MenuItem Default Setting
Resize —Trimming —Alarm [Off]Slideshow 3 sec (3 sec. intervals)
List of Menu Default Settings
e06_kb338_123_157_41e.qk 3/17/03 4:11 PM Page 142
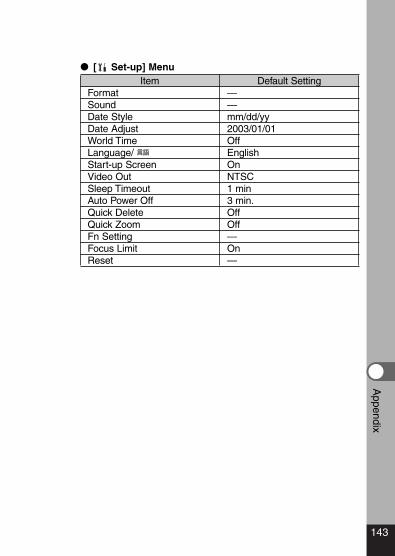
143
Appendix
� [ Set-up] MenuItem Default Setting
Format —Sound —Date Style mm/dd/yyDate Adjust 2003/01/01World Time OffLanguage/ EnglishStart-up Screen OnVideo Out NTSCSleep Timeout 1 minAuto Power Off 3 min.Quick Delete OffQuick Zoom OffFn Setting —Focus Limit OnReset —
e06_kb338_123_157_41e.qk 3/17/03 4:11 PM Page 143
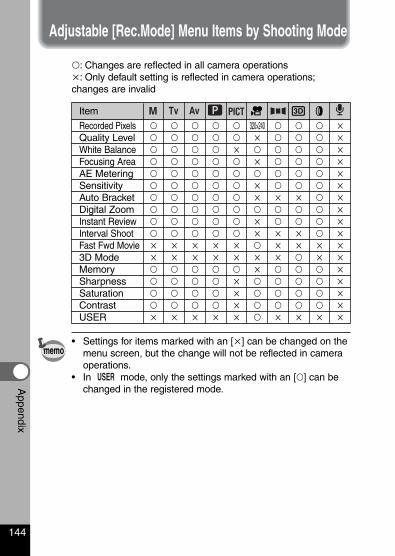
144
Appendix
Adjustable [Rec.Mode] Menu Items by Shooting Mode
�: Changes are reflected in all camera operations�: Only default setting is reflected in camera operations;changes are invalid
Item
Recorded Pixels � � � � � 320×240 � � � �Quality Level � � � � � � � � � �White Balance � � � � � � � � � �Focusing Area � � � � � � � � � �AE Metering � � � � � � � � � �Sensitivity � � � � � � � � � �Auto Bracket � � � � � � � � � �Digital Zoom � � � � � � � � � �Instant Review � � � � � � � � � �Interval Shoot � � � � � � � � � �Fast Fwd Movie � � � � � � � � � �3D Mode � � � � � � � � � �Memory � � � � � � � � � �Sharpness � � � � � � � � � �Saturation � � � � � � � � � �Contrast � � � � � � � � � �USER � � � � � � � � � �
• Settings for items marked with an [�] can be changed on themenu screen, but the change will not be reflected in cameraoperations.
• In mode, only the settings marked with an [�] can bechanged in the registered mode.
memo
e06_kb338_123_157_41e.qk 3/17/03 4:11 PM Page 144
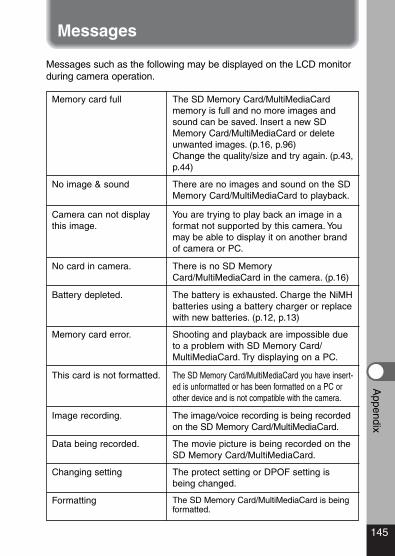
145
Appendix
Messages
Memory card full
No image & sound
Camera can not displaythis image.
No card in camera.
Battery depleted.
Memory card error.
This card is not formatted.
Image recording.
Data being recorded.
Changing setting
Formatting
The SD Memory Card/MultiMediaCardmemory is full and no more images andsound can be saved. Insert a new SDMemory Card/MultiMediaCard or deleteunwanted images. (p.16, p.96)Change the quality/size and try again. (p.43,p.44)
There are no images and sound on the SDMemory Card/MultiMediaCard to playback.
There is no SD MemoryCard/MultiMediaCard in the camera. (p.16)
The battery is exhausted. Charge the NiMHbatteries using a battery charger or replacewith new batteries. (p.12, p.13)
Shooting and playback are impossible dueto a problem with SD Memory Card/MultiMediaCard. Try displaying on a PC.
The SD Memory Card/MultiMediaCard you have insert-ed is unformatted or has been formatted on a PC orother device and is not compatible with the camera.
The image/voice recording is being recordedon the SD Memory Card/MultiMediaCard.
The movie picture is being recorded on theSD Memory Card/MultiMediaCard.
The protect setting or DPOF setting isbeing changed.
The SD Memory Card/MultiMediaCard is beingformatted.
You are trying to play back an image in aformat not supported by this camera. Youmay be able to display it on another brandof camera or PC.
Messages such as the following may be displayed on the LCD monitorduring camera operation.
e06_kb338_123_157_41e.qk 3/17/03 4:11 PM Page 145
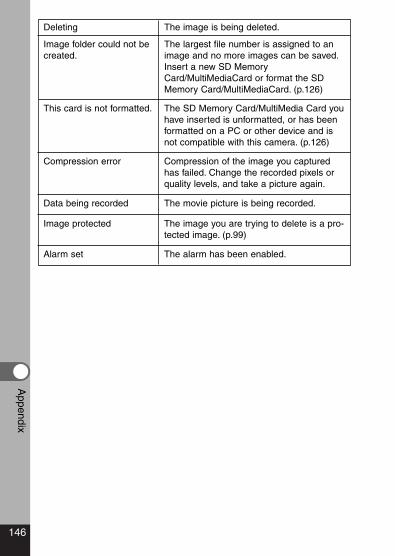
146
Appendix
Deleting
The largest file number is assigned to animage and no more images can be saved.Insert a new SD MemoryCard/MultiMediaCard or format the SDMemory Card/MultiMediaCard. (p.126)
The image is being deleted.
Image folder could not becreated.
The SD Memory Card/MultiMedia Card youhave inserted is unformatted, or has beenformatted on a PC or other device and isnot compatible with this camera. (p.126)
This card is not formatted.
Compression of the image you capturedhas failed. Change the recorded pixels orquality levels, and take a picture again.
Compression error
The movie picture is being recorded.Data being recorded
The image you are trying to delete is a pro-tected image. (p.99)
Image protected
The alarm has been enabled.Alarm set
e06_kb338_123_157_41e.qk 3/17/03 4:11 PM Page 146
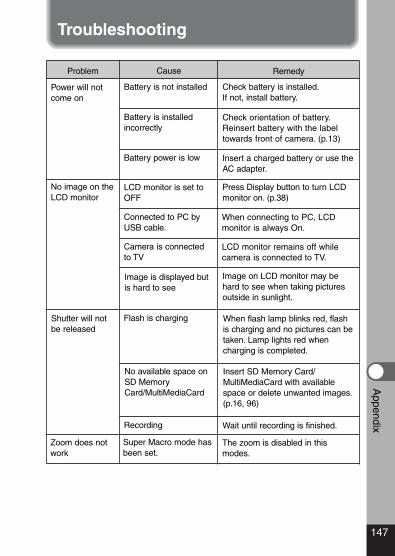
147
Appendix
Troubleshooting
Problem Cause Remedy
Power will notcome on
No image on theLCD monitor
Shutter will notbe released
Battery is not installed Check battery is installed.If not, install battery.
Battery is installedincorrectly
Check orientation of battery.Reinsert battery with the labeltowards front of camera. (p.13)
Battery power is low
LCD monitor is set toOFF
Camera is connectedto TV
Image is displayed butis hard to see
Flash is charging
No available space onSD MemoryCard/MultiMediaCard
Insert SD Memory Card/MultiMediaCard with availablespace or delete unwanted images.(p.16, 96)
When flash lamp blinks red, flashis charging and no pictures can betaken. Lamp lights red whencharging is completed.
Insert a charged battery or use theAC adapter.
Press Display button to turn LCDmonitor on. (p.38)
LCD monitor remains off whilecamera is connected to TV.
Image on LCD monitor may behard to see when taking picturesoutside in sunlight.
Recording Wait until recording is finished.
Zoom does notwork
Super Macro mode hasbeen set.
The zoom is disabled in thismodes.
Connected to PC byUSB cable.
When connecting to PC, LCDmonitor is always On.
e06_kb338_123_157_41e.qk 3/17/03 4:11 PM Page 147

148
Appendix
Problem Cause Remedy
Subject is not infocus
Subject difficult tofocus on
Subjects difficult to focus on usingautofocus: objects with little con-trast (blue sky, white walls, etc.),dark objects, finely patternedobjects, fast-moving objects,scenery through window or net,etc. Lock focus on another objectlocated at same distance (pressshutter release button halfway),then aim at target and press shut-ter release button fully.
Subject is not in focus-ing area
Position subject in AF frame(focusing area) in middle of LCDmonitor. If the subject is outsidethe focusing area, aim the cameraat the subject and lock focus(press shutter release buttonhalfway), then compose pictureand press the shutter release but-ton fully.
Subject is too close Set focus mode on . (p.40)
Focus mode is set on Normal pictures will be out offocus if taken with focus mode seton .
Picture is dark Subject is too far awayin a dark environment,such as a night scene.
Picture becomes dark if subject istoo far away. Take picture withinrange of flash.
Background is dark When taking a picture of a personagainst dark background, such asnight scene, the person mayappear dark if the flash does notreach background even with cor-rect exposure. Set to mode toensure both person and back-ground are clear. (p.59)
e06_kb338_123_157_41e.qk 3/17/03 4:11 PM Page 148
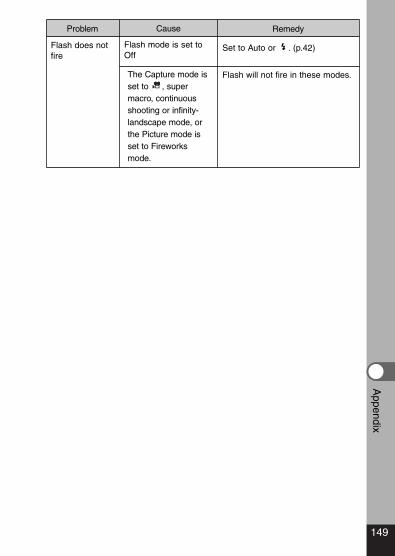
149
Appendix
Problem Cause Remedy
Flash does notfire
Flash mode is set toOff
The Capture mode isset to , supermacro, continuousshooting or infinity-landscape mode, orthe Picture mode isset to Fireworksmode.
Set to Auto or . (p.42)
Flash will not fire in these modes.
e06_kb338_123_157_41e.qk 3/17/03 4:11 PM Page 149
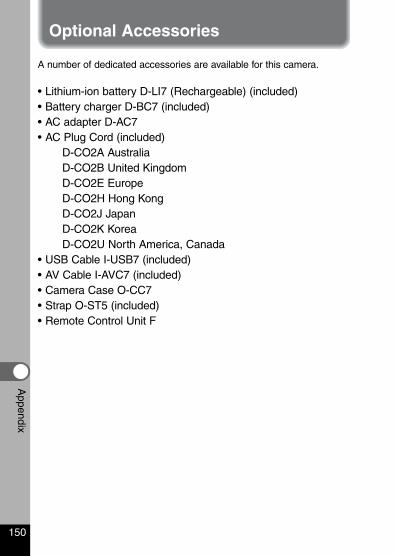
150
Appendix
A number of dedicated accessories are available for this camera.
• Lithium-ion battery D-LI7 (Rechargeable) (included)• Battery charger D-BC7 (included)• AC adapter D-AC7• AC Plug Cord (included)
D-CO2A AustraliaD-CO2B United KingdomD-CO2E EuropeD-CO2H Hong KongD-CO2J JapanD-CO2K KoreaD-CO2U North America, Canada
• USB Cable I-USB7 (included)• AV Cable I-AVC7 (included)• Camera Case O-CC7• Strap O-ST5 (included)• Remote Control Unit F
Optional Accessories
e06_kb338_123_157_41e.qk 3/17/03 4:11 PM Page 150
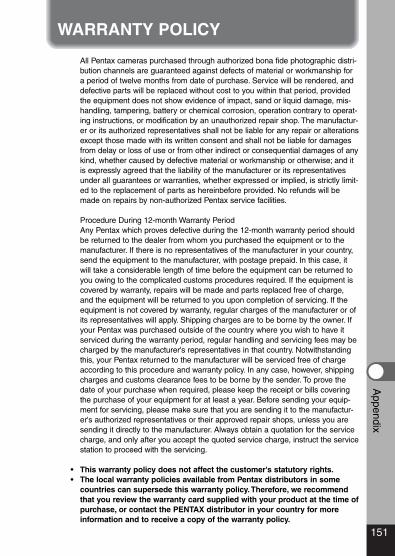
151
Appendix
WARRANTY POLICY
All Pentax cameras purchased through authorized bona fide photographic distri-bution channels are guaranteed against defects of material or workmanship fora period of twelve months from date of purchase. Service will be rendered, anddefective parts will be replaced without cost to you within that period, providedthe equipment does not show evidence of impact, sand or liquid damage, mis-handling, tampering, battery or chemical corrosion, operation contrary to operat-ing instructions, or modification by an unauthorized repair shop. The manufactur-er or its authorized representatives shall not be liable for any repair or alterationsexcept those made with its written consent and shall not be liable for damagesfrom delay or loss of use or from other indirect or consequential damages of anykind, whether caused by defective material or workmanship or otherwise; and itis expressly agreed that the liability of the manufacturer or its representativesunder all guarantees or warranties, whether expressed or implied, is strictly limit-ed to the replacement of parts as hereinbefore provided. No refunds will bemade on repairs by non-authorized Pentax service facilities.
Procedure During 12-month Warranty Period Any Pentax which proves defective during the 12-month warranty period shouldbe returned to the dealer from whom you purchased the equipment or to themanufacturer. If there is no representatives of the manufacturer in your country,send the equipment to the manufacturer, with postage prepaid. In this case, itwill take a considerable length of time before the equipment can be returned toyou owing to the complicated customs procedures required. If the equipment iscovered by warranty, repairs will be made and parts replaced free of charge,and the equipment will be returned to you upon completion of servicing. If theequipment is not covered by warranty, regular charges of the manufacturer or ofits representatives will apply. Shipping charges are to be borne by the owner. Ifyour Pentax was purchased outside of the country where you wish to have itserviced during the warranty period, regular handling and servicing fees may becharged by the manufacturer's representatives in that country. Notwithstandingthis, your Pentax returned to the manufacturer will be serviced free of chargeaccording to this procedure and warranty policy. In any case, however, shippingcharges and customs clearance fees to be borne by the sender. To prove thedate of your purchase when required, please keep the receipt or bills coveringthe purchase of your equipment for at least a year. Before sending your equip-ment for servicing, please make sure that you are sending it to the manufactur-er's authorized representatives or their approved repair shops, unless you aresending it directly to the manufacturer. Always obtain a quotation for the servicecharge, and only after you accept the quoted service charge, instruct the servicestation to proceed with the servicing.
• This warranty policy does not affect the customer's statutory rights.• The local warranty policies available from Pentax distributors in some
countries can supersede this warranty policy. Therefore, we recommendthat you review the warranty card supplied with your product at the time ofpurchase, or contact the PENTAX distributor in your country for moreinformation and to receive a copy of the warranty policy.
e06_kb338_123_157_41e.qk 3/17/03 4:11 PM Page 151
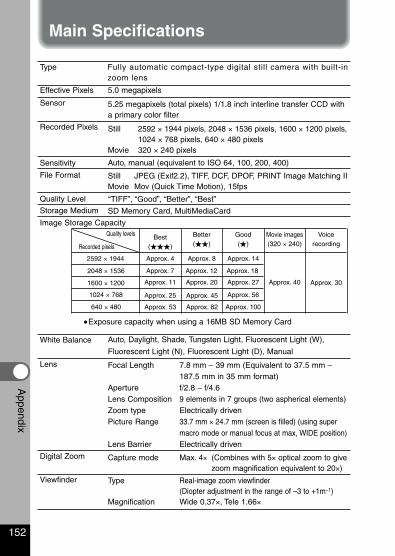
152
Appendix
�Exposure capacity when using a 16MB SD Memory Card
Main Specifications
Approx. 30
5.25 megapixels (total pixels) 1/1.8 inch interline transfer CCD witha primary color filter
Still JPEG (Exif2.2), TIFF, DCF, DPOF, PRINT Image Matching IIMovie Mov (Quick Time Motion), 15fps
Capture mode Max. 4× (Combines with 5× optical zoom to givezoom magnification equivalent to 20×)
Type Real-image zoom viewfinder (Diopter adjustment in the range of –3 to +1m–1)
Magnification Wide 0.37×, Tele 1.66×
Still 2592 × 1944 pixels, 2048 × 1536 pixels, 1600 × 1200 pixels,1024 × 768 pixels, 640 × 480 pixels
Movie 320 × 240 pixels
Effective Pixels
Type
Sensor
Fully automatic compact-type digital still camera with built-inzoom lens
5.0 megapixels
Auto, manual (equivalent to ISO 64, 100, 200, 400)
“TIFF”, “Good”, “Better”, “Best”
SD Memory Card, MultiMediaCard
Recorded Pixels
Sensitivity
File Format
Quality Level
Storage Medium
Auto, Daylight, Shade, Tungsten Light, Fluorescent Light (W),
Fluorescent Light (N), Fluorescent Light (D), Manual
White Balance
Image Storage Capacity
2048 × 1536
1024 × 768
1600 × 1200
Approx. 12 Approx. 18
Approx. 20 Approx. 27 Approx. 40
Approx. 45 Approx. 56
Approx. 82 Approx. 100640 × 480
Lens
Digital Zoom
Viewfinder
Better (��)
Good (�)
Movie images(320 × 240)
Voice recording
Quality levels
Recorded pixelsBest
(���)
Approx. 4
Approx. 11
Approx. 25
Approx. 53
Approx. 7
Approx. 8 Approx. 142592 × 1944
Focal Length 7.8 mm – 39 mm (Equivalent to 37.5 mm – 187.5 mm in 35 mm format)
Aperture f/2.8 – f/4.6Lens Composition 9 elements in 7 groups (two aspherical elements)Zoom type Electrically drivenPicture Range 33.7 mm × 24.7 mm (screen is filled) (using super
macro mode or manual focus at max, WIDE position)Lens Barrier Electrically driven
e06_kb338_123_157_41e.qk 3/17/03 4:11 PM Page 152
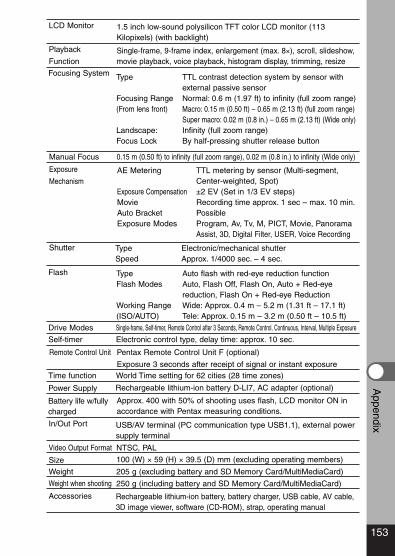
153
Appendix
1.5 inch low-sound polysilicon TFT color LCD monitor (113Kilopixels) (with backlight)
LCD Monitor
Single-frame, 9-frame index, enlargement (max. 8×), scroll, slideshow,movie playback, voice playback, histogram display, trimming, resize
Playback
Function
Type Electronic/mechanical shutterSpeed Approx. 1/4000 sec. – 4 sec.
Shutter
Rechargeable lithium-ion battery D-LI7, AC adapter (optional)Power Supply
USB/AV terminal (PC communication type USB1.1), external powersupply terminal
In/Out Port
Rechargeable lithium-ion battery, battery charger, USB cable, AV cable,3D image viewer, software (CD-ROM), strap, operating manual
Accessories
Type TTL contrast detection system by sensor with external passive sensor
Focusing Range Normal: 0.6 m (1.97 ft) to infinity (full zoom range)(From lens front) Macro: 0.15 m (0.50 ft) – 0.65 m (2.13 ft) (full zoom range)
Super macro: 0.02 m (0.8 in.) – 0.65 m (2.13 ft) (Wide only)Landscape: Infinity (full zoom range)Focus Lock By half-pressing shutter release button
Focusing System
Manual Focus 0.15 m (0.50 ft) to infinity (full zoom range), 0.02 m (0.8 in.) to infinity (Wide only)
Drive Modes Single-frame, Self-timer, Remote Control after 3 Seconds, Remote Control, Continuous, Interval, Multiple Exposure
Self-timer Electronic control type, delay time: approx. 10 sec.
Time function World Time setting for 62 cities (28 time zones)
Video Output Format NTSC, PAL
Size 100 (W) × 59 (H) × 39.5 (D) mm (excluding operating members)
Weight 205 g (excluding battery and SD Memory Card/MultiMediaCard)
Weight when shooting 250 g (including battery and SD Memory Card/MultiMediaCard)
AE Metering TTL metering by sensor (Multi-segment, Center-weighted, Spot)
Exposure Compensation ±2 EV (Set in 1/3 EV steps)Movie Recording time approx. 1 sec – max. 10 min.Auto Bracket PossibleExposure Modes Program, Av, Tv, M, PICT, Movie, Panorama
Assist, 3D, Digital Filter, USER, Voice Recording
Exposure
Mechanism
Type Auto flash with red-eye reduction functionFlash Modes Auto, Flash Off, Flash On, Auto + Red-eye
reduction, Flash On + Red-eye ReductionWorking Range Wide: Approx. 0.4 m – 5.2 m (1.31 ft – 17.1 ft)(ISO/AUTO) Tele: Approx. 0.15 m – 3.2 m (0.50 ft – 10.5 ft)
Flash
Approx. 400 with 50% of shooting uses flash, LCD monitor ON inaccordance with Pentax measuring conditions.
Battery life w/fullycharged
Remote Control Unit Pentax Remote Control Unit F (optional)
Exposure 3 seconds after receipt of signal or instant exposure
e06_kb338_123_157_41e.qk 3/17/03 4:11 PM Page 153
154
Appendix
For customers in USASTATEMENT OF FCC COMPLIANCEThis device complies with Part 15 of the FCC Rules. Operation is sub-ject to the following two conditions: (1) This device may not cause harm-ful interference, and (2) this device must accept any interferencereceived, including interference that may cause undesired operation.Changes or modifications not approved by the party responsible forcompliance could void the user's authority to operate the equipment.This equipment has been tested and found comply with the limits for aClass B digital device, pursuant to part 15 of the FCC Rules.These limits are designed to provide reasonable protection againstharmful interference in a residential installation. This equipment gener-ates, uses and can radiate frequency energy and, if not installed andused in accordance with the instructions, may cause harmful interfer-ence to radio communications. However, there is no guarantee thatinterference will not occur in a particular installation.If this equipment does cause harmful interference to radio or televisionreception, which can be determined by turning the equipment off andon, the user is encouraged to try to correct the interference by one ormore of the following measures:• Reorient or relocate the receiving antenna.
Increase the separation between the equipment and receiver.Connect the equipment into an outlet on a circuit different from that towhich the receiver is connected.
* Consult the dealer or an experienced radio/TV technician for help.
For customers in CanadaThis Class B digital apparatus meets all requirements of theCanadian Interference - Causing Equipment Regulations.
Pour les utilisateurs au CanadaCet apareil numérique de la classe B respecte toutes les exigences duRèglement sur le matériel brouilleur du Canada.
The CE Mark is a Directive conformity mark of the EuropeanCommunity.
The CE Mark is a Directive conformity mark of the EuropeanCommunity.
e06_kb338_123_157_41e.qk 3/17/03 4:11 PM Page 154
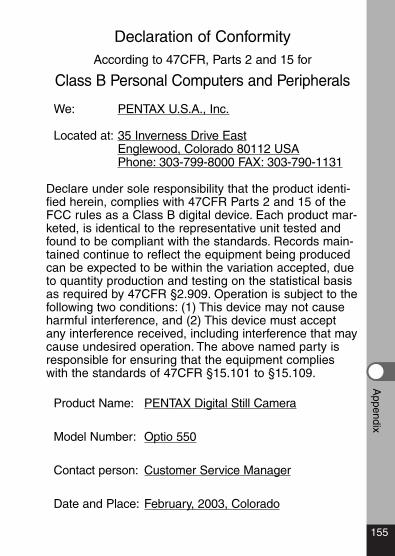
155
Appendix
Declaration of ConformityAccording to 47CFR, Parts 2 and 15 for
Class B Personal Computers and Peripherals
We: PENTAX U.S.A., Inc.
Located at: 35 Inverness Drive EastEnglewood, Colorado 80112 USAPhone: 303-799-8000 FAX: 303-790-1131
Declare under sole responsibility that the product identi-fied herein, complies with 47CFR Parts 2 and 15 of theFCC rules as a Class B digital device. Each product mar-keted, is identical to the representative unit tested andfound to be compliant with the standards. Records main-tained continue to reflect the equipment being producedcan be expected to be within the variation accepted, dueto quantity production and testing on the statistical basisas required by 47CFR §2.909. Operation is subject to thefollowing two conditions: (1) This device may not causeharmful interference, and (2) This device must acceptany interference received, including interference that maycause undesired operation. The above named party isresponsible for ensuring that the equipment complieswith the standards of 47CFR §15.101 to §15.109.
Product Name: PENTAX Digital Still Camera
Model Number: Optio 550
Contact person: Customer Service Manager
Date and Place: February, 2003, Colorado
e06_kb338_123_157_41e.qk 3/17/03 4:11 PM Page 155

MEMO
e06_kb338_123_157_41e.qk 3/17/03 4:11 PM Page 156

e06_kb338_123_157_41e.qk 3/17/03 4:11 PM Page 157

PENTAX Corporation 2-36-9,Maeno-cho, Itabashi-ku, Tokyo 174-8639,JAPAN(http://www.pentax.co.jp/)
PENTAX Europe GmbH (European Headquarters)Julius-Vosseler-Strasse, 104, 22527 Hamburg, GERMANY(HQ - http://www.pentaxeurope.com)(Germany - http://www.pentax.de)
PENTAX U.K. Limited Pentax House, Heron Drive, Langley, Slough, BerksSL3 8PN, U.K. (http://www.pentax.co.uk)
PENTAX France S.A.S. 12/14, rue Jean Poulmarch, 95106 Argenteuil Cedex,FRANCE
PENTAX Benelux B.V. (for Netherlands) Spinveld 25, 4815 HR Breda, NETHERLANDS (http://www.pentax.nl) (for Belgium & Luxembourg) Weiveldlaan 3-5, 1930 Zaventem, BELGIUM (http://www.pentax.be)
PENTAX (Schweiz) AG Widenholzstrasse 1 Postfach 367 8305 Dietlikon,SWITZERLAND (http://www.pentax.ch)
PENTAX Scandinavia AB P.O. Box 650, 75127 Uppsala, SWEDEN (http://www.pentax.se)
PENTAX U.S.A., Inc. 35 Inverness Drive East, Englewood, Colorado80112, U.S.A. (http://www.pentax.com)
PENTAX Canada Inc. 3131 Universal Drive, Mississauga, Ontario L4X 2E5,CANADA(http://www.pentaxcanada.ca)
http://www.digital.pentax.co.jp
• Printed on recycled paper
• Specifications and external dimensions are subject to change without notice.
57227 Copyright © PENTAX Corporation 2003
02-200304 Printed in Japan
e07_kb338_OBC_41e.qk 3/17/03 4:12 PM Page 158