Embed Size (px)
Citation preview

Disaster Recovery System Administration Guide for Cisco Unified Expert Advisor, Release 7.6(1)
May 2009
This guide provides an overview of the Disaster Recovery System (DRS), describes how to use the DRS, and provides procedures for completing various backup-related tasks and restore-related tasks. This guide serves as a reference and procedural guide that is intended for users of Cisco Unified Expert Advisor and other Cisco Unified Communications applications.
Note This document may not represent the latest Cisco product information available. You can obtain the most current documentation by accessing Cisco's product documentation page at this URL: http://www.cisco.com/go/ea
This document includes the following topics:
• What is DRS?, page 2
• Reference Tables for Backup and Restore Procedures, page 2
• Supported Feature Components, page 4
• System Requirements, page 4
• How to Access the DRS, page 4
• Master Agent Duties and Activation, page 5
• Local Agent Duties and Activation, page 6
• Managing Backup Devices, page 6
• Creating and Editing Backup Schedules, page 7
• Enabling, Disabling, and Deleting Schedules, page 8
• Starting a Manual Backup, page 9
• Checking Backup Status, page 9
• Restoring a Backup Version, page 10
• Restoring a Cluster, page 11
Americas Headquarters:
© 2009 Cisco Systems, Inc. All rights reserved.
Cisco Systems, Inc., 170 West Tasman Drive, San Jose, CA 95134-1706 USA
What is DRS?
• Viewing the Restore Status, page 15
• Viewing the Backup and Restore History, page 16
• Trace Files, page 17
• Error Messages, page 17
• Related Documentation, page 18
What is DRS?The Disaster Recovery System (DRS), which can be invoked from Cisco Unified Expert Advisor operations console, provides full data backup and restore capabilities for all servers in the cluster. The DRS allows you to perform regularly scheduled automatic or user-invoked data backups.
The DRS performs a cluster-level backup, which means that it collects backups for all servers in a Cisco Unified Expert Advisor cluster to a central location and archives the backup data to physical storage device.
When restoring system data, you can choose which servers in the cluster you want to restore.
The DRS includes a user interface and a distributed system architecture to perform the following functions:
• Backup and restore tasks
• Schedule backups
• Archive backups to a physical tape drive or remote SFTP server
The DRS contains two key capabilities, Master Agent and Local Agent. The master agent coordinates backup and restore activity with local agents.
The system automatically activates both the master agent and the local agent on all servers in the cluster.
Caution Schedule backups during off-peak hours to avoid call-processing interruptions and impact to service.
Reference Tables for Backup and Restore ProceduresThe tables in this section provide a quick reference for the backup and restore procedures.
Caution Backup and purge cannot occur within three hours of each other.
Backup Quick ReferenceTable 2 provides a quick, high-level reference of the major steps required to perform a backup procedure using the DRS.
2Disaster Recovery System Administration Guide for Cisco Unified Expert Advisor, Release 7.6(1)

Reference Tables for Backup and Restore Procedures
Restore Quick ReferenceTable 2 provides a quick, high-level reference of the major steps required to perform a restore procedure using DRS.
Table 1 Major Steps for Performing a Backup Procedure
Action Reference
Create storage location on which to back up data. “Managing Backup Devices” section on page 6
Create and edit backup schedules to back up data on a schedule.
Note Either a manual or a scheduled backup backs up the whole cluster.
“Creating and Editing Backup Schedules” section on page 7
Enable and disable backup schedules to back up data.
“Enabling, Disabling, and Deleting Schedules” section on page 8
Optionally, run a manual backup. “Starting a Manual Backup” section on page 9
Check the status of the backup—while a backup is running, you can check the status of the current backup job.
“Checking Backup Status” section on page 9
Table 2 Major Steps for Performing a Restore Procedure
Action Reference
Choose Storage Location—You must first choose the storage location from which you want to restore a backup version.
“Restoring a Backup Version” section on page 10
Choose the Backup Version—From a list of available files, choose the backup version that you want to restore.
Choose Features—From the list of available features, choose the features that you want to restore.
Choose Servers—If the feature was backed up from multiple servers, you must choose the servers that you want to restore.
Check the Status of the Restore—While the restore process is running, you can check the status of the current restore job.
“Viewing the Restore Status” section on page 15
3Disaster Recovery System Administration Guide for Cisco Unified Expert Advisor, Release 7.6(1)

Supported Feature Components
Supported Feature ComponentsFor each selected feature, the system automatically backs up all components. If you select the CUEA feature, the system backs up all components and files within the Cisco Unified Expert Advisor (see Table 3).
System RequirementsMake sure that the DRF services (Cisco DRF master and local) are running.
Note DRF refers to the Disaster Recovery Framework (DRF) which provides the customer interface for the disaster recovery process. DRF itself, does not backup or restore any data—it merely provides a user interface and set of tools/utilities to perform different DRS tasks.
Make sure that Cisco Unified Expert Advisor is running on all servers in the cluster.
To back up data to a remote device on the network, you must have an SFTP server configured. The following SFTP servers are supported and recommended, but you may use any SFTP server:
• Open SSH (for Unix systems)
• Cygwin (refer to http://sshwindows.sourceforge.net/)
• freeFTPD (refer to http://www.freeftpd.com/?ctt=download)
How to Access the DRS
Note You set the Administrator username and password during Cisco Unified Expert Advisor installation, and you can change the Administrator password or set up a new Administrator account by using the Command Line Interface (CLI). Refer to the Cisco Unified Operating System Administration Guide for Cisco Unified Expert Advisor for more information.
Table 3 Component Details for the Cisco Unified Expert Advisor Option
Component Details
Cisco Unified Expert Advisor database (EADB)
Stores configuration information for the entire system. This database is installed on all servers in the Cisco Unified Expert Advisor cluster.
Platform (PLATFORM) Stores certificate and licensing information.
Cisco Unified Expert Advisor configuration (EA_CONFIG)
Stores OAMP, CLI, RTMT, SNMP, license, and serviceability information.
Historical database (HRDB) Stores data used in the historical reporting templates as well as system tables for the reporting server. This database is installed on the reporting server only.
4Disaster Recovery System Administration Guide for Cisco Unified Expert Advisor, Release 7.6(1)

Master Agent Duties and Activation
Tip Only users with superuser privilege in Cisco Unified Expert Advisor can access DRS. Refer to the Cisco Unified Operating System Administration Guide for Cisco Unified Expert Advisor for more information.
Method 1
You can also directly access DRS for the Cisco Unified Expert Advisor directly by entering the following URL:
http://server-name/drf.
where drf refers to the Disaster Recovery Framework (DRF) which provides the customer interface for the disaster recovery process. DRF itself, does not backup or restore any data—it merely provides a user interface and set of tools/utilities to perform different DRS tasks.
Method 2
Alternately, you can access this console through the Cisco Unified Expert Advisor operations console as provided in the following procedure.
Procedure
Step 1 Access the DRS operations console (see How to Access the DRS, page 4)
Step 2 Log in to Cisco Unified Expert Advisor operations console, choose Disaster Recovery System from the Navigation menu in the upper, right corner of the Cisco Unified Expert Advisor operations console window,.
Step 3 Click Go.
The DRS Logon window displays.
Master Agent Duties and ActivationThe system automatically activates the master agent (background process in DRS) on the server.
In a cluster, the master agent is automatically activated on all servers in the cluster, but only the master agent running on the publisher server is fully active.
Duties That the Master Agent PerformsThe master agent performs the following duties:
• The master agent stores systemwide component registration information.
• The master agent maintains a complete set of scheduled tasks in the database. When it receives updates from the user interface, the master agent sends executable tasks to the applicable local agents, as scheduled. (Local agents execute immediate-backup tasks without delay.)
• You access the master agent through the DRS user interface to perform activities such as configuring storage locations, scheduling backups by adding new backup schedules, viewing or updating an existing schedule, displaying status of executed schedules, and performing system restoration.
• The master agent stores backup data on a locally attached tape drive or a remote network location.
5Disaster Recovery System Administration Guide for Cisco Unified Expert Advisor, Release 7.6(1)

Local Agent Duties and Activation
Local Agent Duties and ActivationThe server also has a local agent (background process in DRS) to perform backup and restore functions.
Each server in a Cisco Unified Expert Advisor cluster, including the server that contains the master agent, must have its own local agent to perform backup and restore functions for its server.
Note By default, a local agent is automatically activated on each server in the cluster.
Duties That Local Agents PerformThe local agent runs backup and restore scripts on the server.
In a cluster, the local agent runs backup and restore scripts on each server in the cluster.
Managing Backup DevicesBefore using the DRS, you must configure the locations where you want the backup versions to be stored. You can configure up to 10 backup devices.
Perform the following steps to configure backup devices.
Procedure
Step 1 Access the DRS operations console (see How to Access the DRS, page 4)
Step 2 Log in to the DRS by using the same Administrator username and password that you use for Cisco Unified Expert Advisor operations console.
Step 3 Navigate to Backup > Backup Device.
The Backup Device List window displays.
Step 4 To configure a new backup device, click Add New.
Step 5 To edit a backup device, click on the required device in the Backup Device list.
The Backup Device window displays.
Step 6 In the Backup device name field, enter the backup device name.
Note The backup device name may contain only alphanumeric characters, spaces ( ), dashes (-) and underscores (_). No other characters are allowed.
Step 7 Choose one of the following backup devices and enter the appropriate field values in the Select Destination area:
• Tape Device—Stores the backup version on a locally attached tape drive. Choose the appropriate tape device from the list.
Note You cannot span tapes or store more than one backup per tape.
6Disaster Recovery System Administration Guide for Cisco Unified Expert Advisor, Release 7.6(1)

Creating and Editing Backup Schedules
• Network Directory—Stores the backup version on a networked drive that is accessed through an SFTP connection. Enter the following required information:
– Server name: Name or IP address of the network server
– Path name: Path name for the directory where you want to store the backup version
– User name: Valid username for an account on the remote system
– Password: Valid password for the account on the remote system
– Number of backups to store on Network Directory: The number of backups to store on this network directory.
Note You must have access to an SFTP server to configure a network storage location. The SFTP path must exist prior to the backup. The account that is used to access the SFTP server must have write permission for the selected path.
Step 8 To update these settings, click Save.
Note After you click the Save button, the DRS master agent validates the selected backup device. If the user name, password, server name, or directory path is invalid, the save will fail.
Step 9 To delete a backup device, select it in the Backup Device list, then click Delete Selected.
Note You cannot delete a backup device that is configured as the backup device in a backup schedule.
Creating and Editing Backup SchedulesYou can create up to 10 backup schedules. Each backup schedule has its own set of properties, including a schedule for automatic backups, the set of features to back up, and a storage location.
Caution Schedule backups during off-peak hours to avoid call-processing interruptions and impact to service. Backup and purge cannot occur within three hours of each other.
Perform the following steps to manage backup schedules:
Procedure
Step 1 Access the DRS operations console (see How to Access the DRS, page 4)
Step 2 Log in to the DRS by using the same Administrator username and password that you use for Cisco Unified Operating System administration console for Cisco Unified Expert Advisor.
Step 3 Navigate to Backup > Scheduler.
The Schedule List window displays.
7Disaster Recovery System Administration Guide for Cisco Unified Expert Advisor, Release 7.6(1)

Enabling, Disabling, and Deleting Schedules
Step 4 Perform one of the following steps to add a new schedule or edit an existing schedule:
a. To create a new schedule, click Add New.
b. To configure an existing schedule, click its name in the Schedule List column.
The scheduler window displays.
Step 5 Enter a schedule name in the Schedule Name field.
Note You cannot change the name of the default schedule.
Step 6 In the Select Backup Device area, select the backup device.
Step 7 Select the check box next to the CUEA feature to select the Cisco Unified Expert Advisor.
Step 8 In the Start Backup at area, choose the date and time when you want the backup to begin.
Step 9 In the Frequency area, choose the frequency at which you want the backup to occur: Once, Daily, Weekly, or Monthly. If you choose Weekly, you can also choose the days of the week when the backup will occur.
Step 10 To update these settings, click Save.
Step 11 To enable the schedule, click Enable Schedule.
The next backup occurs automatically at the time that you set.
Note Ensure that all servers in the cluster are running the same version of Cisco Unified Expert Advisor and are reachable through the network. Servers that are not running at the time of the scheduled backup will not be backed up.
Step 12 To disable the schedule, click Disable Schedule.
Enabling, Disabling, and Deleting SchedulesPerform the following steps to enable, disable, or delete schedules.
Procedure
Step 1 Access the DRS operations console (see How to Access the DRS, page 4).
Step 2 Log in to the DRS by using the same Administrator username and password that you use for Cisco Unified Operating System administration console for Cisco Unified Expert Advisor.
Step 3 Navigate to Backup > Scheduler.
The Schedule List window displays.
Step 4 Check the check boxes next to the schedules that you want to modify.
• To select all schedules, click Select All.
• To clear all check boxes, click Clear All.
Step 5 Select the required task from the following choices:
8Disaster Recovery System Administration Guide for Cisco Unified Expert Advisor, Release 7.6(1)

Starting a Manual Backup
• To enable the selected schedules, click Enable Selected Schedules.
• To disable the selected schedules, click Disable Selected Schedules.
• To delete the selected schedules, click Delete Selected.
Starting a Manual Backup
Caution Backup and purge cannot occur within three hours of each other.
Perform the following steps to start a manual backup.
Procedure
Step 1 Access the DRS operations console (see How to Access the DRS, page 4)
Step 2 Log in to the DRS by using the same Administrator username and password that you use for Cisco Unified Operating System administration console for Cisco Unified Expert Advisor.
Step 3 Navigate to Backup > Manual Backup. The Manual Backup window displays.
Step 4 Select a backup device in the Select Backup Device drop-down list.
Step 5 Select the check box next to the CUEA feature to select the Cisco Unified Expert Advisor.
Step 6 To start the manual backup, click Start Backup.
The backup progresses and the status summary is displayed on the screen.
Checking Backup StatusYou can check the status of the current backup job and cancel the current backup job. To view the backup history, see the “Viewing the Backup and Restore History” section on page 16.
Checking the Status of the Current Backup Job
Caution Backup and purge cannot occur within three hours of each other.
Perform the following steps to check the status of the current backup job.
Procedure
Step 1 Access the DRS operations console (see How to Access the DRS, page 4)
Step 2 Log in to the DRS by using the same Administrator username and password that you use for Cisco Unified Operating System administration console for Cisco Unified Expert Advisor.
9Disaster Recovery System Administration Guide for Cisco Unified Expert Advisor, Release 7.6(1)

Restoring a Backup Version
Step 3 Navigate to Backup > Current Status. The Backup Status window displays.
Step 4 To view the backup log file, click the log filename link.
Step 5 To cancel the current backup, click Cancel Backup.
Note The backup cancels after the current component has completed its backup operation.
Restoring a Backup VersionThe Restore Wizard walks you through the steps that are required to restore a backup version.
Tip To restore all servers in a cluster, see the “Restoring a Cluster” section on page 11.
Caution Before you restore Cisco Unified Expert Advisor, ensure that the version installed on the server matches the version of the backup version that you want to restore.
Perform the following steps to restore a backup version.
Procedure
Step 1 Access the DRS operations console (see How to Access the DRS, page 4)
Step 2 Log in to the DRS by using the same Administrator username and password that you use for Cisco Unified Operating System administration console for Cisco Unified Expert Advisorn.
Step 3 Navigate to Restore > Restore Wizard.
The Restore Wizard Step 1 window displays.
Step 4 Choose the backup device from which to restore in the Select Backup Device area, then click Next.
The Restore Wizard Step 2 window displays.
Step 5 Choose the backup file version that you want to restore.
Note The backup file version name indicates the date and time that the system created the backup version.
Step 6 Click Next.
The Restore Wizard Step 3 window displays.
Step 7 Choose the features that you want to restore. Select the check box next to the CUEA feature to select the Cisco Unified Expert Advisor.
Step 8 Click Next.
The Restore Wizard Step 4 window displays.
Step 9 Choose the appropriate server to be restored.
10Disaster Recovery System Administration Guide for Cisco Unified Expert Advisor, Release 7.6(1)

Restoring a Cluster
Caution After you choose the server to which you want the data restored, any existing data on that server gets overwritten.
Step 10 To start restoring the data, click Restore.
The restore status details are displayed in this window as the restore progresses.
Step 11 Your data gets restored on the servers that you chose. To view the status of the restore, see the “Viewing the Restore Status” section on page 15.
Step 12 Restart the server. For more information on restarting, see the Cisco Unified Operating System Administration Guide for Cisco Unified Expert Advisor.
Note Depending on the size of your database and the components that you choose to restore, the system can require one hour or more to restore.
Restoring a Cluster
Tip See the Hardware and System Software Specification (Bill of Materials) at the following web site to obtain a complete list of supported hardware and software information for Cisco Unified Expert Advisor: http://www.cisco.com/en/US/products/sw/custcosw/ps1001/products_user_guide_list.html
If a major failure or a hardware upgrade occurs, you may need to restore all servers in the cluster. While restoring data for a cluster, you must select each server in the cluster and each image individually. First restore the publisher and then restore the other servers after the publisher.
A cluster in the Cisco Unified Expert Advisor environment is made up of three servers:
• The primary server (also referred to as a runtime server or a publisher or active server). This is the first runtime server installed in a cluster.
• Subsequent servers in the cluster (also referred to as subscribers):
– The High Availability (HA) server (also referred to as a runtime server or standby server or secondary server).
– The reporting server (also referred to as the historical reporting server). This is an optional server.
Note In Cisco Unified Expert Advisor, the terms publisher and subscriber are used in the context of database replication. The Cisco Unified Expert Advisor publisher (primary server) publishes OAMP configuration data. The Cisco Unified Expert Advisor subscribers (high availability and reporting servers) subscribe to the data.
Caution DRS does not block restore attempts between minor restore versions of the Cisco Unified Expert Advisor software. Therefore, performing a restore between certain minor versions of previously-installed Cisco Unified Expert Advisor software may cause system issues. Exercise caution when using the restore
11Disaster Recovery System Administration Guide for Cisco Unified Expert Advisor, Release 7.6(1)

Restoring a Cluster
function. DRS displays a warning message explaining the consequences before such restores are about to be performed. We recommend you reinstall the system with the earlier version before performing a restore. Otherwise, downgrades to earlier installations of major versions are blocked by DRS.
The restore for each server depends on when your last back up was initiated. Table 5 provides a general guideline for restore scenarios.
Note The term node and server are used interchangeably in this document and refers to a computer that provides services or resources to other computers (called clients) connected to it through a network.
Perform the following steps to restore an entire cluster:
Procedure
Step 1 Shut down all servers in the cluster.
Note Refer to the Cisco Unified Expert Advisor Option OAMP Configuration Guide for more information on starting, shutting down, or restarting a server and its associated impact on a Cisco Unified Expert Advisor cluster.
Step 2 Restore the first cluster server.
See the “Restoring the Primary Server” section on page 13.
Step 3 Restore the subsequent cluster servers in the same order in which they were initially installed.
See the “Restoring Subsequent Cluster Servers” section on page 14.
The following sections provide the procedures for restoring cluster servers:
• “Restoring the Primary Server” section on page 13
• “Restoring Subsequent Cluster Servers” section on page 14
• “Restoring License Information” section on page 15
Table 4 List of Restored Components in the Cisco Unified Expert Advisor Cluster
Components to be Restored
Publisher (first node in cluster) Subscribers (subsequent servers in the cluster)
Primary Runtime Server(Publisher/Active)
High Availability Runtime Server (Secondary/Standby)
Historical Reporting Server (Reporting)
Cisco Unified Expert Advisor database (EADB)
Yes No No
Platform (PLATFORM) Yes Yes Yes
Cisco Unified Expert Advisor configuration (EA_CONFIG)
Maybe. This depends on the delta between the current version and the last backed-up version.
Yes
Historical database (HRDB) No No Yes
12Disaster Recovery System Administration Guide for Cisco Unified Expert Advisor, Release 7.6(1)

Restoring a Cluster
Restoring the Primary ServerPerform the following steps to restore primary server or publisher server in the cluster.
Caution You must shut down subsequent cluster servers before restoring the first cluster server.
Procedure
Step 1 Perform a fresh installation of Cisco Unified Expert Advisor on the first server or publisher server. For more information on installing Cisco Unified Expert Advisor, see Installation Guide for Cisco Unified Expert Advisor.
Caution Before you restore the Cisco Unified Expert Advisor, ensure that the Cisco Unified Expert Advisor version that is installed on the server matches the version of the backup version to restore.
Step 2 Access the DRS operations console (see How to Access the DRS, page 4)
Step 3 Log in to the DRS by using the same Administrator username and password that you use for Cisco Unified Operating System administration console for Cisco Unified Expert Advisor.
Step 4 Navigate to Restore > Restore Wizard.
The Restore Wizard Step 1 window displays.
Step 5 In the Select Backup Device area, choose the backup device from which to restore.
Step 6 Click Next.
The Restore Wizard Step 2 window displays.
Step 7 Choose the backup version that you want to restore.
Note The backup version name indicates the date and time that the system created the backup version.
Step 8 Click Next.
The Restore Wizard Step 3 window displays.
Step 9 Choose the features that you want to restore.
Note Only the features that were backed up to the file that you chose display.
Step 10 Click Next. The Restore Wizard Step 4 window displays.
Step 11 To start restoring the data, click Restore.
Step 12 When you are prompted to choose the servers to restore, choose only the primary server (the publisher).
Your data is restored on the publisher server.
To view the status of the restore, see the “Viewing the Restore Status” section on page 15.
Note During the restore process, do not perform any tasks with Cisco Unified Expert Advisor operations console or User Pages.
13Disaster Recovery System Administration Guide for Cisco Unified Expert Advisor, Release 7.6(1)

Restoring a Cluster
Step 13 Restart the server. For more information on restarting, see the Cisco Unified Operating System Administration Guide for Cisco Unified Expert Advisor.
Note Depending on the size of your database and the components that you choose to restore, the system can require one hour or more to restore.
Step 14 After the first server restarts, continue with the “Restoring Subsequent Cluster Servers” section on page 14.
Restoring Subsequent Cluster ServersPerform the following steps to restore subsequent servers in the cluster.
Caution When restoring an entire cluster, you must restore the first server, then restore the subsequent servers in the order in which they were initially installed. For more information, see the “Restoring a Cluster” section on page 11.
Procedure
Step 1 Perform a fresh installation of Cisco Unified Expert Advisor on the subsequent servers. For more information on installing Cisco Unified Expert Advisor, see Installation Guide for Cisco Unified Expert Advisor.
Caution Before you restore Cisco Unified Expert Advisor, ensure that the Cisco Unified Expert Advisor version that is installed on the server matches the version of the backup version to restore.
Step 2 Access the DRS operations console (see How to Access the DRS, page 4)
Step 3 Log in to the DRS by using the same Administrator username and password that you use for Cisco Unified Operating System administration console for Cisco Unified Expert Advisor.
Step 4 Navigate to Restore > Restore Wizard.
The Restore Wizard Step 1window displays.
Step 5 In the Select Backup Device area, choose the backup device from which to restore.
Step 6 Click Next.
The Restore Wizard Step 2 window displays.
Step 7 Choose the backup version that you want to restore.
Caution To restore subsequent servers in the cluster, you must choose the same backup version that you used to restore the primary server.
Step 8 Click Next.
The Restore Wizard Step 3 window displays.
14Disaster Recovery System Administration Guide for Cisco Unified Expert Advisor, Release 7.6(1)

Viewing the Restore Status
Step 9 Choose the features that you want to restore.
Note Only the features that were backed up to the file that you chose display.
Step 10 Click Next.
Step 11 The Restore Wizard Step 4 window displays.
Step 12 To start restoring the data, click Restore.
Step 13 When you get prompted to choose the servers to restore, choose only the subsequent servers.
Your data gets restored on the subsequent servers.
To view the status of the restore, see the “Viewing the Restore Status” section on page 15.
Step 14 Restart the server. For more information on restarting, see the Cisco Unified Operating System Administration Guide for Cisco Unified Expert Advisor.
Note Depending on the size of your database and the components that you choose to restore, the system can require one hour or more to restore.
Restoring License InformationThe Cisco Unified Expert Advisor Option includes five seats for evaluation purposes. When completing the initial configuration, you can upload the additional license that you purchase. If you do not upload an additional license, the five evaluation seats are used by default.
The system checks if an additional license was uploaded. If an uploaded license is found, the system uses the uploaded license to overwrite the five evaluation seats. The uploaded license determines the maximum number of configured seats.
Note If you backup a system with only the five evaluation seats, then proceed to refresh with a new image containing an uploaded license, and finally decide to restore the original image with the five evaluation seats, you will still be allowed to use the maximum number of seats provided with the uploaded license. This is because DRS does not remove uploaded licenses. At any given time, a restored image uses the uploaded license—if this license exists. If it does not exist, the system continues to use the five evaluation seats.
Viewing the Restore StatusPerform the following steps to check the status of the current restore job.
Procedure
Step 1 Access the DRS operations console (see How to Access the DRS, page 4)
Step 2 Log in to the Disaster Recovery System by using the same Administrator username and password that you use for Cisco Unified Operating System administration console for Cisco Unified Expert Advisor.
15Disaster Recovery System Administration Guide for Cisco Unified Expert Advisor, Release 7.6(1)

Viewing the Backup and Restore History
Step 3 Navigate to Restore > Status. The Restore Status window displays.
Step 4 To view the restore log file, click the log filename link.
Viewing the Backup and Restore HistoryUsing the following procedures, you can see the last 20 backup and restore jobs:
• Backup History
• Restore History
Backup HistoryPerform the following steps to view the backup history.
Procedure
Step 1 Access the DRS operations console (see How to Access the DRS, page 4)
Step 2 Log in to the DRS by using the same Administrator username and password that you use for Cisco Unified Operating System administration console for Cisco Unified Expert Advisor.
Step 3 Navigate to Backup > History.
The Backup History window displays.
From the Backup History window, you can view the backups that you have performed, including filename, backup device, completion date, result, and features that are backed up.
Note The Backup History window displays only the last 20 backup jobs.
Restore HistoryPerform the following steps to view the restore history.
Procedure
Step 1 Access the DRS operations console (see How to Access the DRS, page 4)
Step 2 Log in to the DRS by using the same Administrator username and password that you use for Cisco Unified Operating System administration console for Cisco Unified Expert Advisor.
Step 3 Navigate to Restore>History. The Restore History window displays.
Step 4 From the Restore History window, you can view the restores that you have performed, including filename, backup device, completion date, result, and the features that were restored.
16Disaster Recovery System Administration Guide for Cisco Unified Expert Advisor, Release 7.6(1)
Trace Files
Note The Restore History window displays only the last 20 restore jobs.
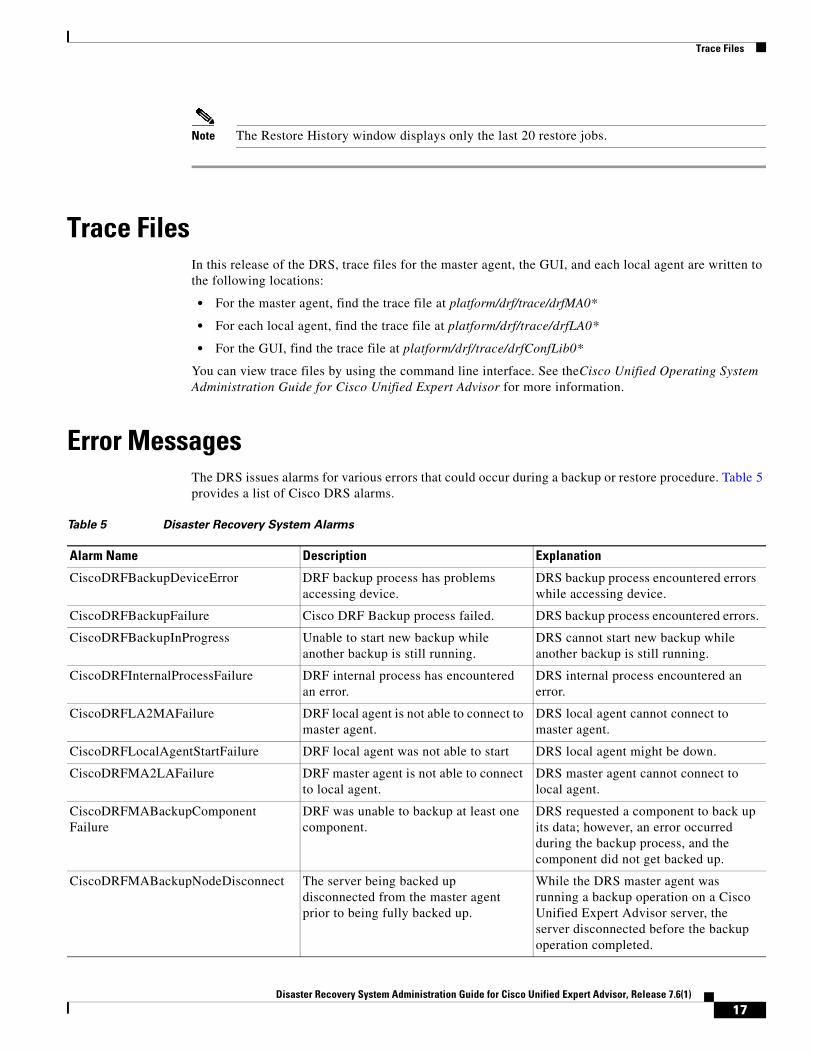
Trace FilesIn this release of the DRS, trace files for the master agent, the GUI, and each local agent are written to the following locations:
• For the master agent, find the trace file at platform/drf/trace/drfMA0*
• For each local agent, find the trace file at platform/drf/trace/drfLA0*
• For the GUI, find the trace file at platform/drf/trace/drfConfLib0*
You can view trace files by using the command line interface. See theCisco Unified Operating System Administration Guide for Cisco Unified Expert Advisor for more information.
Error MessagesThe DRS issues alarms for various errors that could occur during a backup or restore procedure. Table 5 provides a list of Cisco DRS alarms.
Table 5 Disaster Recovery System Alarms
Alarm Name Description Explanation
CiscoDRFBackupDeviceError DRF backup process has problems accessing device.
DRS backup process encountered errors while accessing device.
CiscoDRFBackupFailure Cisco DRF Backup process failed. DRS backup process encountered errors.
CiscoDRFBackupInProgress Unable to start new backup while another backup is still running.
DRS cannot start new backup while another backup is still running.
CiscoDRFInternalProcessFailure DRF internal process has encountered an error.
DRS internal process encountered an error.
CiscoDRFLA2MAFailure DRF local agent is not able to connect to master agent.
DRS local agent cannot connect to master agent.
CiscoDRFLocalAgentStartFailure DRF local agent was not able to start DRS local agent might be down.
CiscoDRFMA2LAFailure DRF master agent is not able to connect to local agent.
DRS master agent cannot connect to local agent.
CiscoDRFMABackupComponent Failure
DRF was unable to backup at least one component.
DRS requested a component to back up its data; however, an error occurred during the backup process, and the component did not get backed up.
CiscoDRFMABackupNodeDisconnect The server being backed up disconnected from the master agent prior to being fully backed up.
While the DRS master agent was running a backup operation on a Cisco Unified Expert Advisor server, the server disconnected before the backup operation completed.
17Disaster Recovery System Administration Guide for Cisco Unified Expert Advisor, Release 7.6(1)

Related Documentation
Related DocumentationYou can obtain the most current documentation list by accessing Cisco's product documentation page at this URL: http://www.cisco.com/en/US/products/ps9675/tsd_products_support_series_home.html
Obtaining DocumentationFor information on obtaining documentation, submitting a service request, and gathering additional information, see the monthly What’s New in Cisco Product Documentation, which also lists all new and revised Cisco technical documentation, at: http://www.cisco.com/en/US/docs/general/whatsnew/whatsnew.html
Subscribe to the What’s New in Cisco Product Documentation as a Really Simple Syndication (RSS) feed and set content to be delivered directly to your desktop using a reader application. The RSS feeds are a free service and Cisco currently supports RSS Version 2.0.
Documentation FeedbackYou can provide comments about this document by sending email to the following address: [email protected].
CiscoDRFMARestoreComponent Failure
DRF was unable to restore at least one component.
DRS requested a component to restore its data; however, an error occurred during the restore process, and the component did not get restored.
CiscoDRFMARestoreNodeDisconnect The server being restored disconnected from the master agent prior to being fully restored.
While the DRS master agent was running a restore operation on a Cisco Unified Expert Advisor server, the server disconnected before the restore operation completed.
CiscoDRFMasterAgentStartFailure DRF master agent was not able to start. DRS master agent might be down.
CiscoDRFNoRegisteredComponent No registered components available, backup failed.
DRS backup failed because no registered components are available.
CiscoDRFNoRegisteredComponent No feature selected for backup. No feature got selected for backup.
CiscoDRFRestoreDeviceError DRF restore process has problems accessing device.
DRS restore process cannot read from device.
CiscoDRFRestoreFailure DRF restore process failed. DRS restore process encountered errors.
CiscoDRFSftpFailure DRF SFTPoperation has errors. Errors exist in DRS SFTP operation.
Table 5 Disaster Recovery System Alarms (continued)
Alarm Name Description Explanation
18Disaster Recovery System Administration Guide for Cisco Unified Expert Advisor, Release 7.6(1)

Related Documentation
19Disaster Recovery System Administration Guide for Cisco Unified Expert Advisor, Release 7.6(1)

Related Documentation
CCDE, CCENT, Cisco Eos, Cisco HealthPresence, the Cisco logo, Cisco Lumin, Cisco Nexus, Cisco StadiumVision, Cisco TelePresence, Cisco WebEx, DCE, and Welcome to the Human Network are trademarks; Changing the Way We Work, Live, Play, and Learn and Cisco Store are service marks; and Access Registrar, Aironet, AsyncOS, Bringing the Meeting To You, Catalyst, CCDA, CCDP, CCIE, CCIP, CCNA, CCNP, CCSP, CCVP, Cisco, the Cisco Certified Internetwork Expert logo, Cisco IOS, Cisco Press, Cisco Systems, Cisco Systems Capital, the Cisco Systems logo, Cisco Unity, Collaboration Without Limitation, EtherFast, EtherSwitch, Event Center, Fast Step, Follow Me Browsing, FormShare, GigaDrive, HomeLink, Internet Quotient, IOS, iPhone, iQuick Study, IronPort, the IronPort logo, LightStream, Linksys, MediaTone, MeetingPlace, MeetingPlace Chime Sound, MGX, Networkers, Networking Academy, Network Registrar, PCNow, PIX, PowerPanels, ProConnect, ScriptShare, SenderBase, SMARTnet, Spectrum Expert, StackWise, The Fastest Way to Increase Your Internet Quotient, TransPath, WebEx, and the WebEx logo are registered trademarks of Cisco Systems, Inc. and/or its affiliates in the United States and certain other countries.
All other trademarks mentioned in this document or website are the property of their respective owners. The use of the word partner does not imply a partnership relationship between Cisco and any other company. (0812R)
Copyright © 2009. Cisco Systems, Inc. All rights reserved.
20Disaster Recovery System Administration Guide for Cisco Unified Expert Advisor, Release 7.6(1)


![Disaster Recovery Center (Disaster Assistance … Library/Disaster Recovery Center...Disaster Recovery Center (Disaster Assistance Center) Standard Operating Guide [Appendix to: ]](https://img.pdfslide.net/doc/110x75/5b0334ba7f8b9a2d518bd9d9/disaster-recovery-center-disaster-assistance-librarydisaster-recovery-centerdisaster.jpg)