Embed Size (px)
Citation preview
•
•
•
JOB SHEET 158
Disc Brake Caliper Inspection, Cleaning, and Service
Name: __________________________ _ Station: _____________ _ Date: ___ _
NATEF Correlation This Job Sheet addresses the following NATEF task(s):
S.D.2 Remove caliper assembly; inspect for leaks and damage to caliper housing; determine necessary action. (P-1)
5.D.3 Clean and inspect caliper mounting and slides/pins for operation, wear, and damage; determine necessary action. (P-1)
5.D.4
5.0.5
Remove, inspect, and replace pads and retaining hardware; determine necessary action. (P-1)
Disassemble and clean caliper assembly, inspect parts for wear, rust, scoring, and damage, · replace seal, boot, and damaged or worn parts. (P-3)
5.D.6 Reassemble, lubricate, and reinstall caliper, pads, and related hardware; seat pads, and inspect for leaks. (P-1)
Performance Objective(s) Upon completion of this Job Sheet, you will be able to properly remove, inspect, clean, rebuild, and reinstall disc brake calipers.
Tools and Materials
Service manual Technician's tool set Torque wrench Disc brake pad clamp Wire brush Brake cleaning equipment Brake line clamps Air blowgun
Protective Clothing/Equipment
Goggles or safety glasses with side shields
Describe the vehicle being worked on:
Year Make Model
t;:., ..,f\ .. 'l r""-----.... I ... • - I. - .... --.-1 ~..... ...,. o~.:
VIN Engine type and size
569
570 Job Sheet 158
~ROCEDURE .1. Raise the vehicle on the hoist and remove the wheels. Task Completed ___ _
2. Remove all dust and dirt from the disc brake assembly by using the brake cleaning equipment. Task Completed ___ _
3. Clamp the brake hose and remove the caliper and the caliper bracket. Describe the type of caliper based on its construction (sliding, floating, fixed, etc.).
4. Place the caliper face down on a bench. Insert the old inner pad and a shop towel so that when you remove the piston it will not hit the bench.
•
Task Completed ___ _
5. Use an air blowgun to force air into the inlet where the hose was mounted. Use an air blowgun with a rubber tip so that the threads are not damaged.
Note: Apply the air pressure slowly and the piston will come out. If the piston does not easily come out then there may be rust on the inside. Use a ntbber mallet to tap on the end of the piston and then reapply air pressure.
Note: Some pistons use an internal snap ring to hold the piston in. You will need a snap ring pliers to remove this type .
Task Completed ___ _
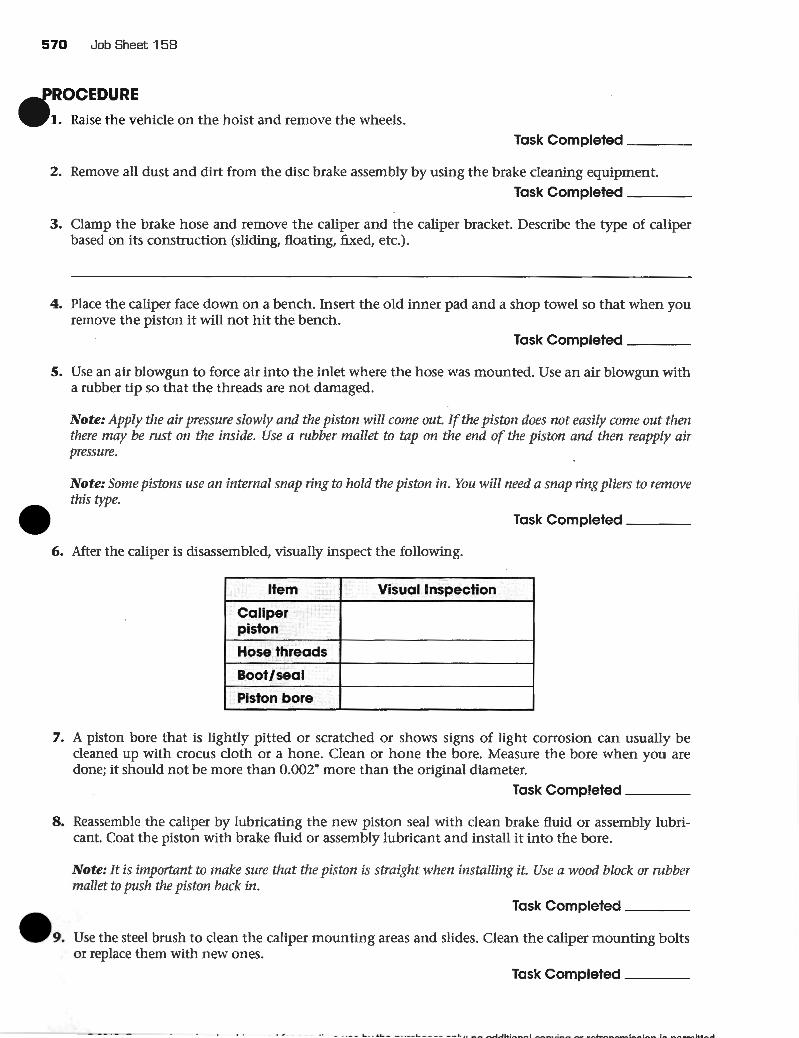
6. After the caliper is disassembled, visually inspect the following.
Item Visual Inspection
Caliper piston
Hose threads
Boot/seal
Piston bore
7. A piston bore that is lightly pitted or scratched or shows signs of light corrosion can usually be cleaned up with crocus cloth or a hone. Clean or hone the bore. Measure the bore when you are done; it should not be more than 0.002" more than the original diameter.
Task Completed ___ _
8. Reassemble the caliper by lubricating the new piston seal with clean brake fluid or assembly lubricant. Coat the piston with brake fluid or assembly lubricant and install it into the bore.
Note: It is important to make sure that the piston is straight when installing it. Use a wood block or rubber mallet to push the piston back in.
Task Completed ___ _
Use the steel brush to clean the caliper mounting areas and slides. Clean the caliper mounting bolts or replace them with new ones.
Task Completed ___ _
------- ·--
•
•
•
Job Sheet 158 571
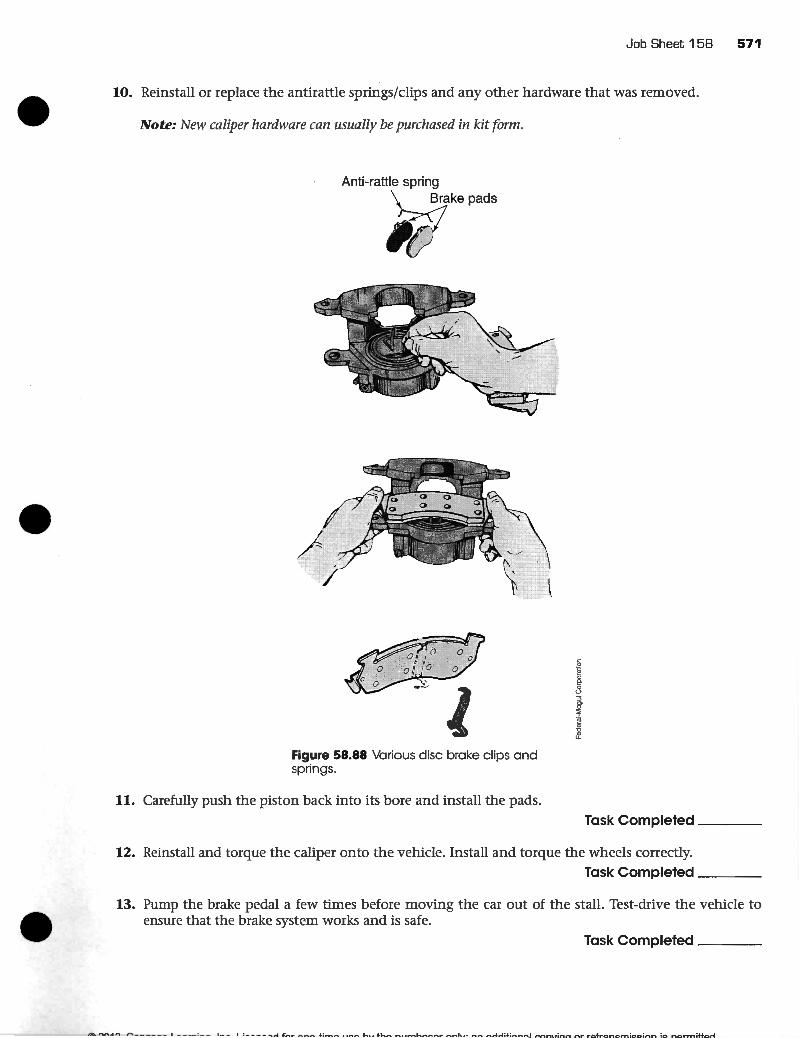
10. Reinstall or replace the antirattle springs/clips and any other hardware that was removed .
Note: New caliper hardware can usually be purchased in kit form.
Anti-rattle spring iiikepads
Figure 58.88 Various disc brake clips and springs.
11. Carefully push the piston back into its bore and install the pads. Task Completed ___ _
12. Reinstall and torque the caliper onto the vehicle. Install and torque the wheels correctly. Task Completed ___ _
13. Pump the brake pedal a few times before moving the car out of the stall. Test-drive the vehicle to ensure that the brake system works and is safe.
Task Completed ___ _
572 Job Sheet 158
14. Based on your inspection and measurement, what services or further inspections would you suggest? • Problems Encountered
INSTRUCTOR EVALUATION
D 4 Mastered Task
D 3 Able to Perform Task Independently; Some Additional Training Suggested D 2 Able to Perform Task with Close Supervision; Requires Additional Training
D 1 Unable to Perform Task D 0 Not Attempted
Comments
-~-------------------
Instructor Name: ------------------------ Date: -------
Instructor Signature: ----------------------------------
• t?.. ?f11? r.onn~n.o I c~,.ninn lnr- I ir-onc:orl fn,. nno-tim~ IIC:.t:l- f-n1 th.:. n1 .rr.h~!=:Ar nnlv· nn !=lrlrlitinn;:::tl r.nnvinn nr rP.tr;:::tn~mis~inn i~ nP-rmittP.rt _
•
•
•
JOB SHEET 157
Disc Brake Diagnosis and Inspection
Name: --------------------------- Station: ___________ _ Date: ___ _
NATEF Correlation This Job Sheet addresses the following NATEF task(s):
5.D.l Diagnose poor stopping, noise, vibration, pulling, grabbing, dragging, or pulsation concerns; determine necessary action. (P-1)
5.D.7
5.D.12
5.A.2
5.D.l3
Clean, inspect, and measure rotor thickness, lateral runout, and thickness variation; determine necessary action. (P-1)
Install wheel, torque lug nuts, and make final checks and adjustments. (P-1)
Identify and interpret brake system concern; determine necessary action. (P-1)
Check brake pad wear indicator system operation; determine necessary action. (P-2)
Performance Objective(s) Upon completion of this Job Sheet, you will be able to properly diagnose the cause of brake problems as-sociated with the disc brake system. ·
Tools and Materials
Service manual
Technician's tool set Torque wrench
Dial indicator with clamping extension Brake micrometer
Disc brake pad clamp
Protective Clothing/Equipment
Goggles or safety glasses with side shields
Describe the vehicle being worked on:
Year Make Model VIN Engine type and size
561
562 Job Sheet 157
~ROCEDURE
~1. Open the hood of the vehicle and check the brake fluid level. Add fluid if needed. Task Completed ___ _
2. Check and inflate the tires to the correct pressure. Task Completed ___ _
3. Take the vehicle for a test-drive (if available).
•
Warning: Always obey traffic safety laws and pay attention to your driving. Try to find an open parking lot or a low traffic back road for your test-drive. Typically a technidan will have a designated test-drive route that incorporates different roads and driving situations. Try to find a smooth road on which to do your testing. Never test-drive a vehicle that is not safe for the road.
Task Completed ___ _
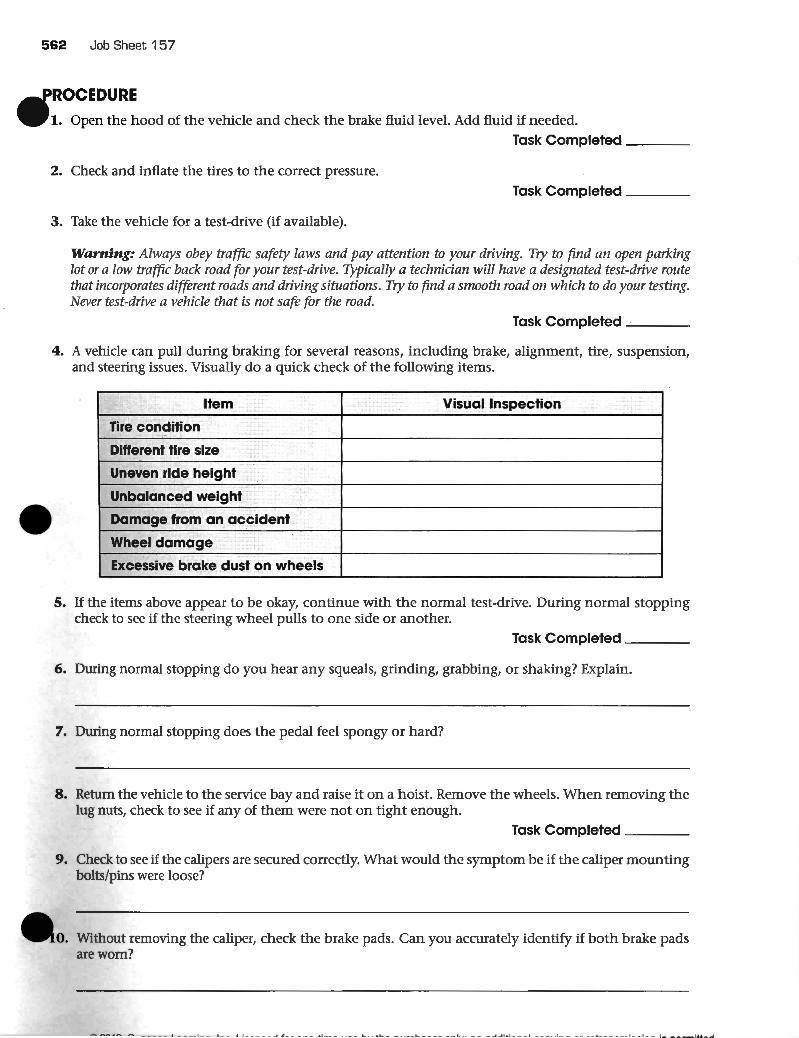
4. A vehicle can pull during braking for several reasons, including brake, alignment, tire, suspension, and steering issues. Visually do a quick check of the following items.
Item Visual Inspection
Tire condition
Different tire size
Uneven ride height
Unbalanced weight
Damage from an accident
Wheel damage
Excessive brake dust on wheels
5. If the items above appear to be okay, continue with the normal test-drive. During normal stopping check to see if the steering wheel pulls to one side or another.
Task Completed ___ _
6. During normal stopping do you hear any squeals, grinding, grabbing, or shaking? Explain.
7. During normal stopping does the pedal feel spongy or hard?
8. Return the vehicle to the service bay and raise it on a hoist. Remove the wheels. When removing the lug nuts, check to see if any of them were not on tight enough.
Task Completed ___ _
9. Check to see if the calipers are secured correctly. What would the symptom be if the caliper mounting bolts/pins were loose?
Without removing the caliper, check the brake pads. Can you accurately identify if both brake pads are worn?
_____ ...,._~~'!\ .. ~ -----
Job Sheet 157 563
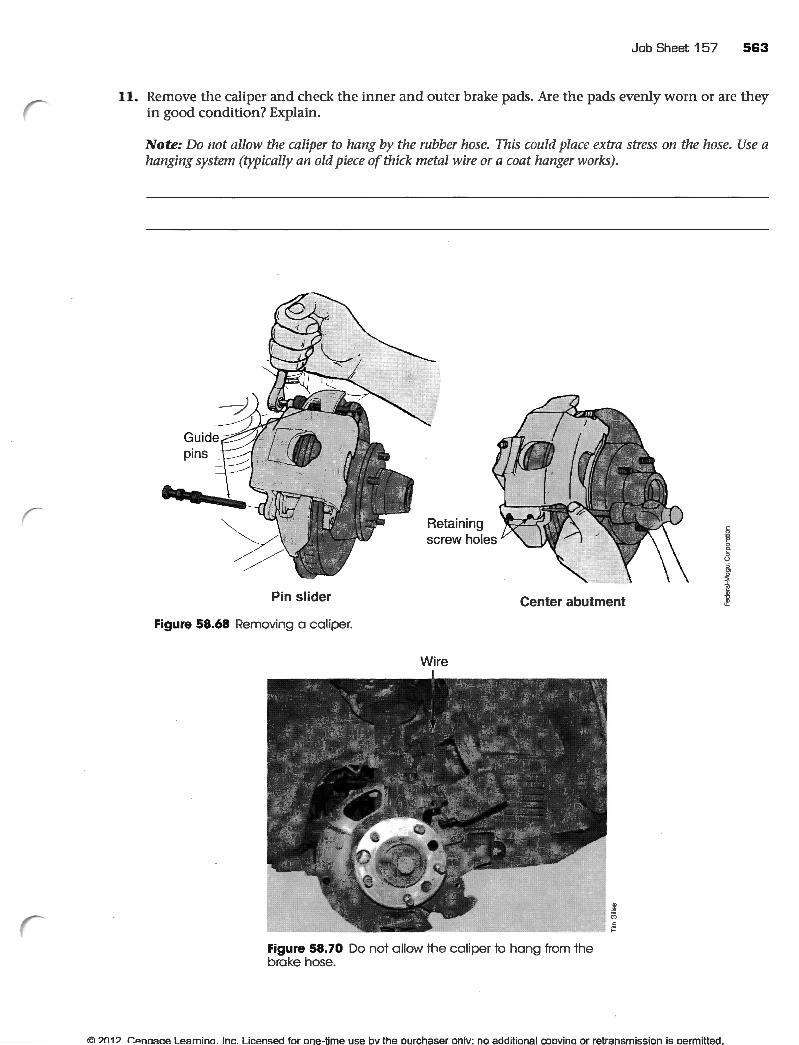
11. Remove the caliper and check the inner and outer brake pads. Are the pads evenly worn or are they in good condition? Explain.
Note: Do not allow the caliper to hang by the rubber hose. This could place extra stress on the hose. Use a hanging system (typically an old piece of thick metal wire or a coat hanger works).
Pin slider
Figure 58.68 Removing a caliper.
Retaining screw holes
Wire
Center abutment
Figure 58.70 Do not allow the caliper to hang from the brake hose.
© ?01?. Cenaaae Learnina. Inc. Licensed for one-time use bv the ourchaser onlv: no additional coovina or retransmission is oermitted.
564 Job Sheet 157
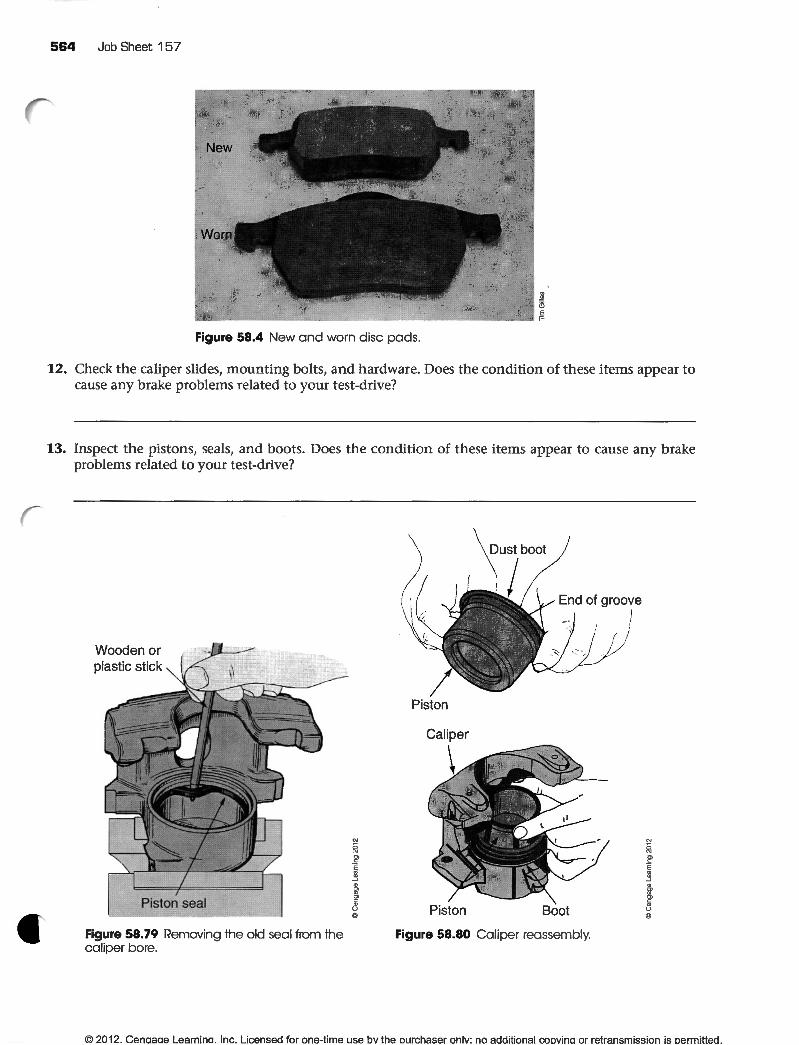
Figure 58.4 New and worn disc pads.
12. Check the caliper slides, mounting bolts, and hardware. Does the condition of these items appear to cause any brake problems related to your test-drive?
13. Inspect the pistons, seals, and boots. Does the condition of these items appear to cause any brake problems related to your test-drive?
Wooden or plastic stick
Piston seal
Figure 58.79 Removing the old seal from the caliper bore.
Piston
Caliper
Piston Boot
Figure 58.80 Caliper reassembly.
© 2012. Cenaaae Learnina. Inc. Licensed for one-time use bv the ourchaser onlv: no additional coovina or retransmission is oenmitted.
Job Sheet 157 565
14. If there is an electrical brake pad warning sensor, check its operation. Describe its operation and condition.
15. If there is a brake wear warning tab on the brake pads, describe how close it is to touching the rotor. Is the wear warning tab bent, broken, or missing? Explain.
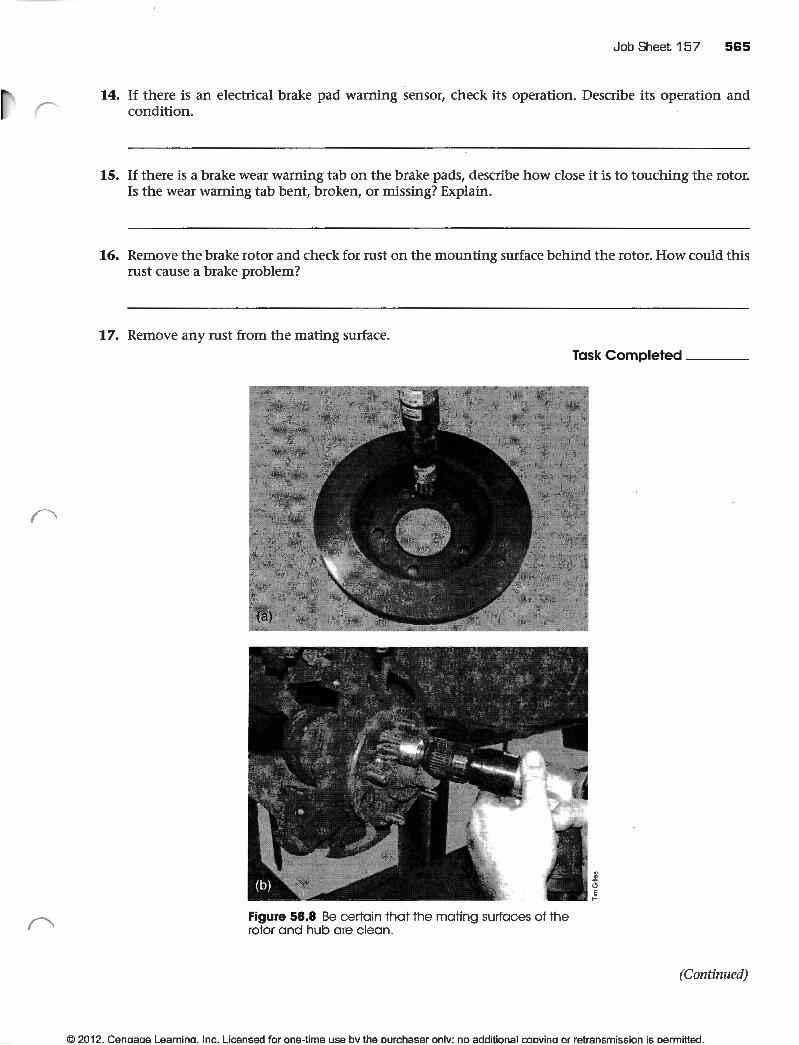
16. Remove the brake rotor and check for rust on the mounting surface behind the rotor. How could this rust cause a brake problem?
17. Remove any rust from the mating surface.
Figure 58.8 Be certain that the mating surfaces of the rotor and hub are clean .
Task Completed ___ _
(Continued)
© 2012. Cenaaae Leamina. Inc. Licensed for one-time use bv the ourchaser onlv: no additional coovina or retransmission is oermitted.
r
566 Job Sheet 157
Concluded)
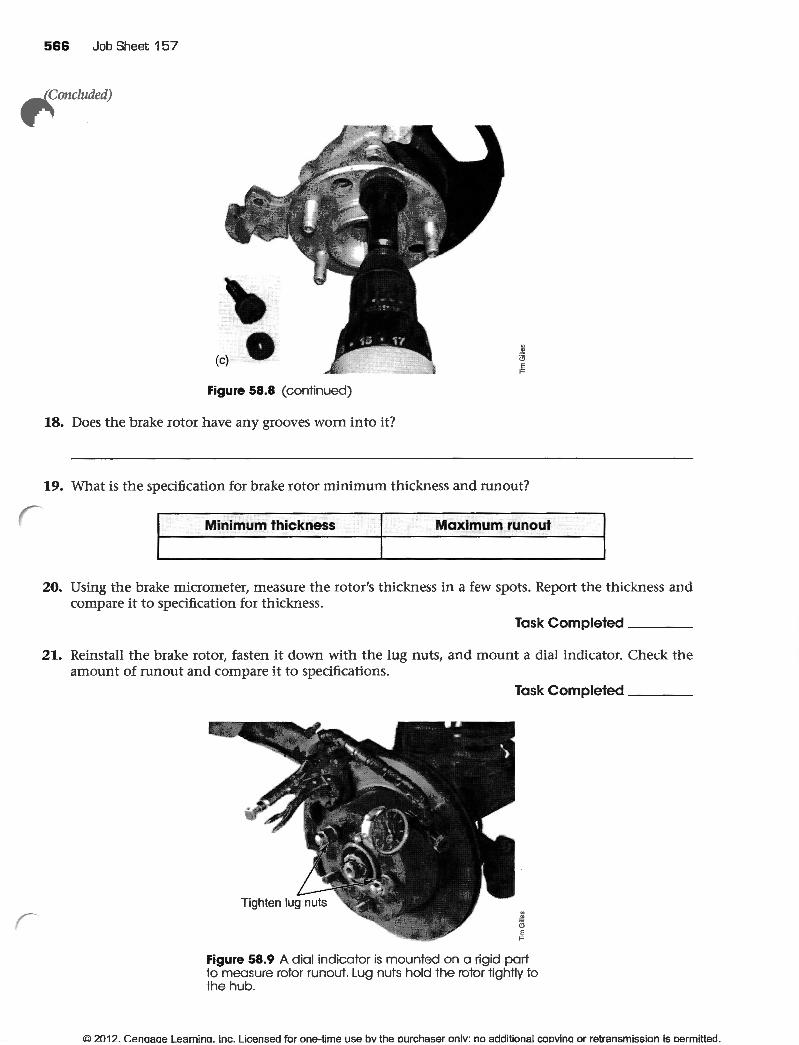
(c) • Figure 58.8 (continued)
18. Does the brake rotor have any grooves worn into it?
19. What is the specification for brake rotor minimum thickness and runout?
Minimum thickness Maximum runout
20. Using the brake micrometer, measure the rotor's thickness in a few spots. Report the thickness and compare it to specification for thickness.
Task Completed ___ _
21. Reinstall the brake rotor, fasten it down with the lug nuts, and mount a dial indicator. Check the amount of runout and compare it to specifications.
Task Completed ___ _
0 .!!! (; E ;::
Figure 58.9 A dial indicator is mounted on a rigid part to measure rotor runout. Lug nuts hold the rotor tightly to the hub.
© 2012. Cenaaae Learnina. Inc. Licensed for one-time use bv the ourchaser onlv: no additional coovina or retransmission is oermitted.
•
Job Sheet 157 567
22. Based on your inspection and measurements of the rotors, what service would you recommend?
23. Could a rotor that has excessive run out cause a brake pedal pulsation?
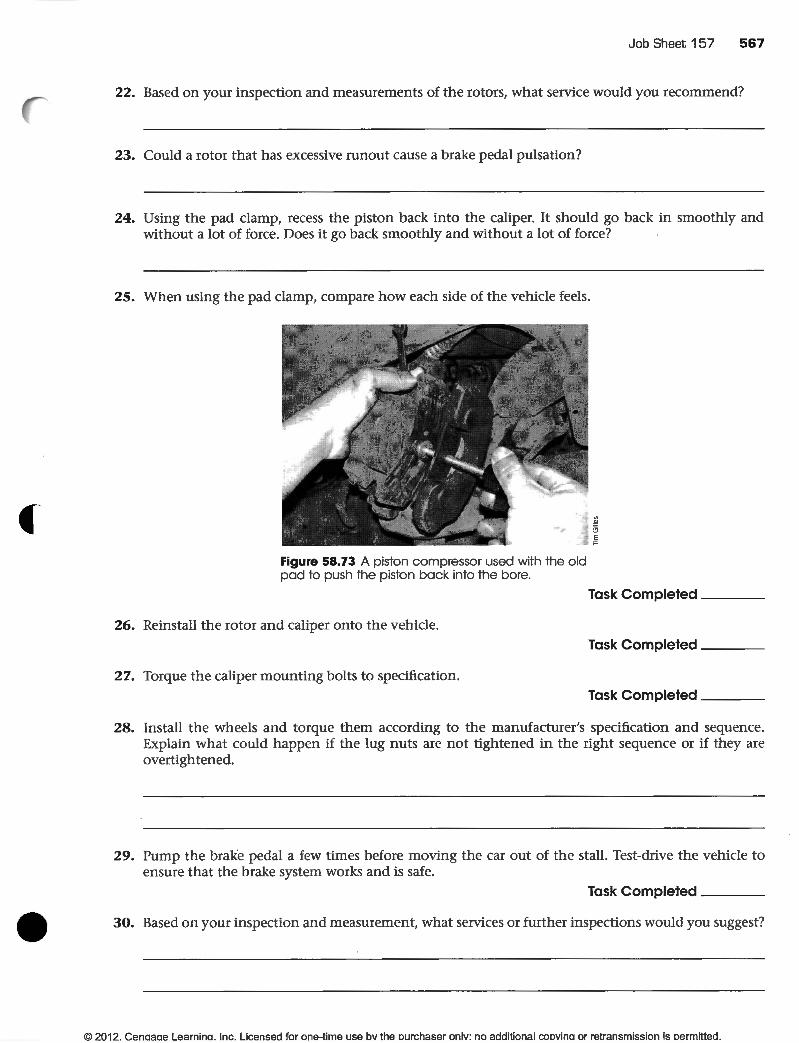
24. Using the pad clamp, recess the piston back into the caliper. It should go back in smoothly and without a lot of force. Does it go back smoothly and without a lot of force?
25. When using the pad clamp, compare how each side of the vehicle feels.
Figure 58.73 A piston compressor used with the old pad to push the p iston back into the bore.
26. Reinstall the rotor and caliper onto the vehicle.
21. Torque the caliper mounting bolts to specification.
Task Completed ___ _
Task Completed ___ _
Task Completed ___ _
28. Install the wheels and torque them according to the manufacturer's specification and sequence. Explain what could happen if the lug nuts are not tightened in the right sequence or if they are overtightened.
29. Pump the brake pedal a few times before moving the car out of the stall. Test-drive the vehicle to ensure that the brake system works and is safe.
Task Completed ___ _
30. Based on your inspection and measurement, what services or further inspections would you suggest?
© 2012. Cenaaae Learnina. Inc. Licensed for one-time use bv the ourchaser onlv: no additional coovina or retransmission is oermitted.
568 Job Sheet 157
roblems Encountered
INSTRUCTOR EVALUATION
0 4 Mastered Task
0 3 Able to Perform Task Independently; Some Additional Training Suggested
0 2 Able to Perform Task with Close Supervision; Requires Additional Training
0 1 Unable to Perform Task
0 0 Not Attempted
Comments
Instructor Name: ------------------------ Date: ______ _
mstructor Signature: --------------------------------
lcl ?01? r.Ann"nA I A"mina . Inc. Licensed for one-time use bv the ourchaser onlv: no additional coovina or retransmission is oermitted.
Brake Rotor (Off-Car) Resurfacing
Name: --------------------------- Station: ---------------------- Date: ______ __
NATEF Correlation
This Job Sheet addresses the following NATEF task(s):
5.D.8 Remove and reinstall rotor. (P-1)
5.D.10 Refinish rotor off vehicle; measure final rotor thickness. (P-1)
Perfo.rmance Objective(s)
Upon completion of this Job Sheet, you will be able to properly resurface a rotor on a brake lathe that is bench mounted.
Tools and Materials
Service manual
f Technician's tool set .;rake micrometer
Dial indicator
Emery cloth Sanding disc power tool
Bench-mounted brake lathe and equipment
Protective Clothing/Equipment
Goggles or safety glasses with side shields
Describe the vehicle being worked on:
Year Make Model
PROCEDURE
VlN
1. Raise the vehicle on the hoist. Remove the wheels.
594
Engine type and size
Task Completed ___ _
tM ")f\1 ") ronn~roo I OOI"ninn lnl"' I j,...oncari fru· nno-+im,:a IIC:t:l h\1 tho nllrr.:h:::l~Ar nnlv· nn ~rlrlitinn~l r.nnvinn nr rP.trR~n~mi~!=tion is oermitted_
Job Sheet 1 63 595
2. Complete the following chart.
Actual rotor Minimum Is there a thickness thickness pulsation?
Actual Maximum Heat spots or lateral runout run out scoring?
3. Remove the rotor from the vehicle and clean any rust and oil from the rotor. Task Completed ___ _
4. Describe the type of brake lathe that you will be working with.
5. Check the condition of the lathe and the attachments. Check the cutting tool to make sure it is in good condition.
Task Completed ___ _
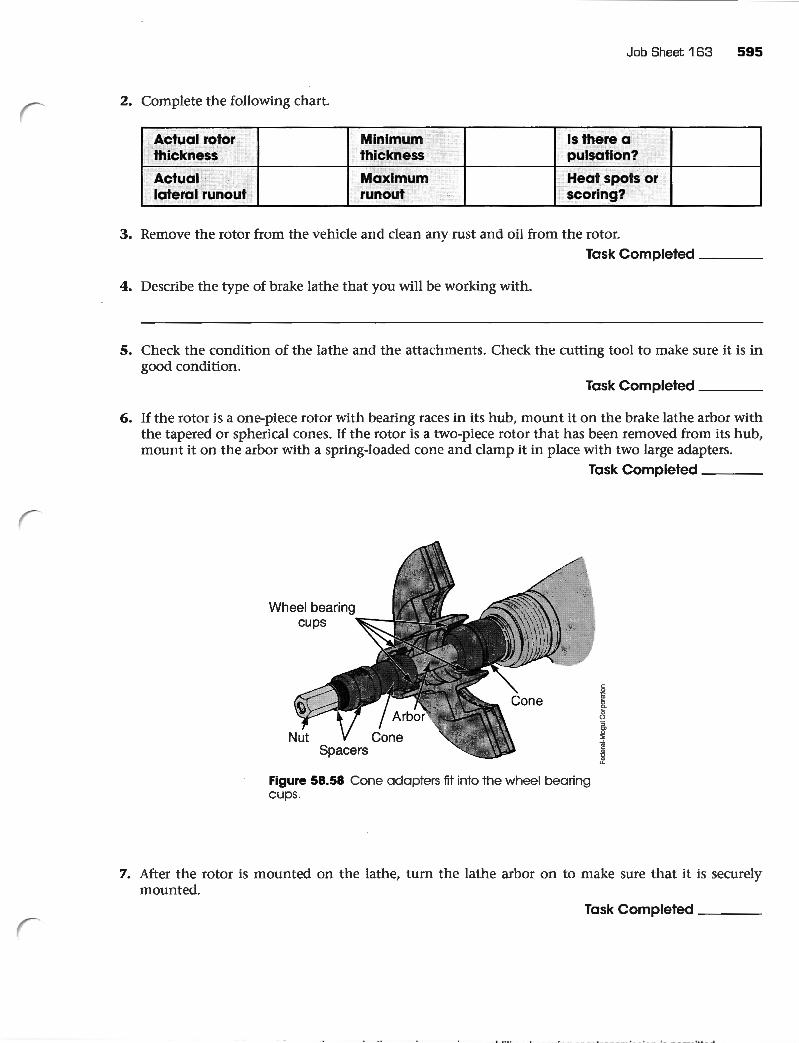
6. If the rotor is a one-piece rotor with bearing races in its hub, mount it on the brake lathe arbor with the tapered or spherical cones. If the rotor is a two-piece rotor that has been removed from its hub, mount it on the arbor with a spring-loaded cone and clamp it in place with two large adapters.
Task Completed ___ _
Figure 58.58 Cone adapters fit into the wheel bearing cups.
7. After the rotor is mounted on the lathe, tum the lathe arbor on to make sure that it is securely mounted.
Task Completed ___ _
596 Job Sheet 1 63
r
r
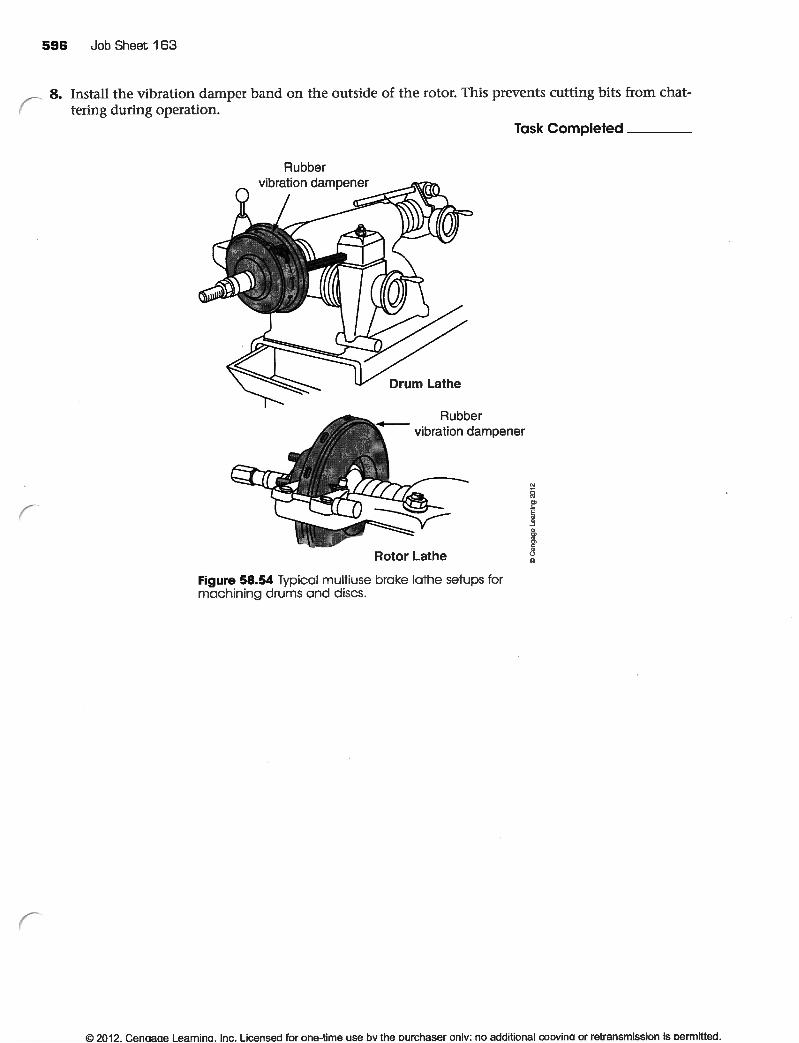
8. Install the vibration damper band on the outside of the rotor. This prevents cutting bits from chattering during operation.
Task Completed ___ _
Rubber
Rubber vibration dampener
Rotor Lathe
Figure 58.54 Typical multiuse brake lathe setups tor machining drums and discs.
c ena ae earnina. Inc. Licensed for one-time use bv the ourchaser onlv: no additional coovina or retransmission is oermitted .
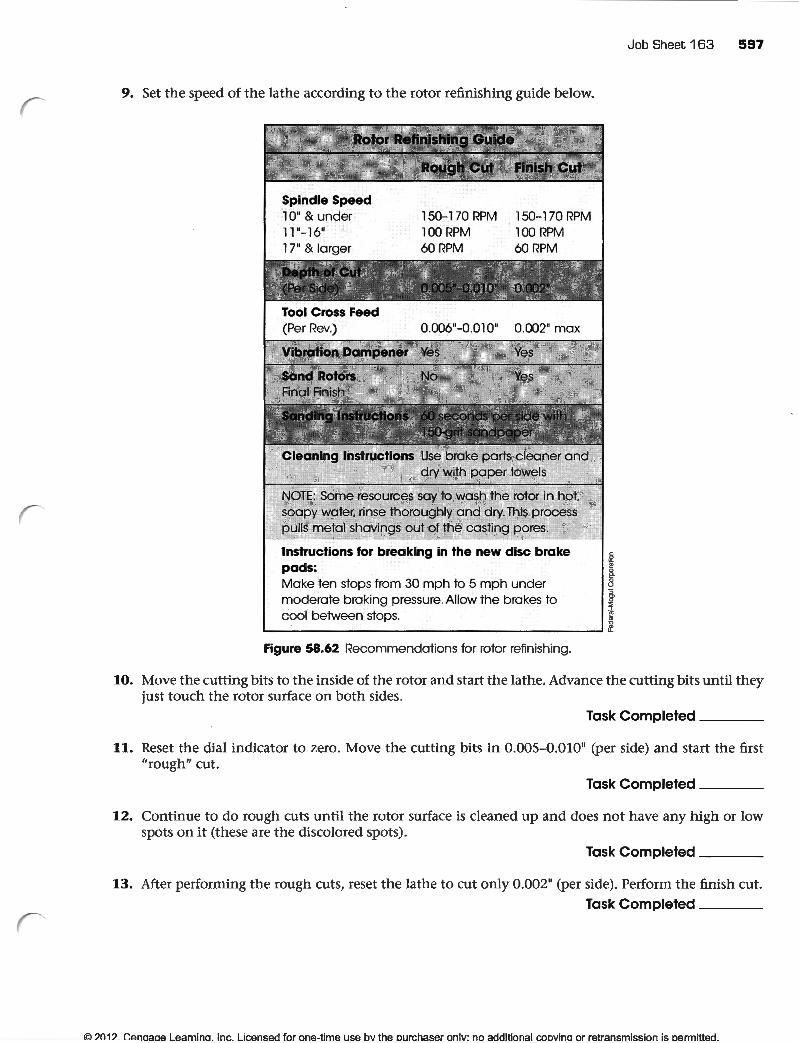
9. Set the speed of the lathe according to the rotor refinishing guide below.
Rotor Refinishing Guide
Spindle Speed 10" & under 11"-16" 17" & larger
Tool Cross Feed (Per Rev.)
150-170 RPM 100 RPM 60RPM
0.006"--0.01 0"
Vibration Dampener Yes
Sand Rotors No
Finish Cut
150-170 RPM 100 RPM 60RPM
0.002" max
Yes
Cleaning Instructions Use brake parts cleaner and dry with paper towels
NOTE: Some resources say to wash the rotor in hot. soapy water. rinse thoroughly and dry. This process pulls metal shavings out of the casting pores.
Instructions for breaking in the new disc brake 6
p~~ l Make ten stops from 30 mph to 5 mph under 8 moderate braking pressure. Allow the brakes to "§>
~ cool between stops. ;
L---------------------------------------~ ~ Figure 58.62 Recommendations for rotor refinishing.
Job Sheet 163 597
10. Move the cutting bits to the inside of the rotor and start the lathe. Advance the cutting bits until they just touch the rotor surface on both sides.
Task Completed ___ _
11. Reset the dial indicator to zero. Move the cutting bits in 0.005-0.010" (per side) and start the first "rough" cut.
Task Completed ___ _
12. Continue to do rough cuts until the rotor surface is cleaned up and does not have any high or low spots on it (these are the discolored spots).
Task Completed ___ _
13. After performing the rough cuts, reset the lathe to cut only 0.002" (per side). Perform the finish cut. Task Completed ___ _
© 2012. Cenoaoe Leamino. Inc. Licensed for one-time use bv the ourchaser onlv: no additional coovino or retransmission is oermitted.

r
598 Job Sheet 163
4. After performing the finish cut sand the rotor with a sanding disc that is using 150-grit sandpaper until you get a nondirectional crosshatch finish.
Nondirectional surface finish
Figure 58.63 A nondirectional crosshatch finish smoothes the threads in the rotor surface.
Figure 58.64 Use an orbital sander to sand off the threaded finish while the lathe turns.
15. Check the rotor for runout with a dial indicator after the resurfacing is finished. Task Completed ___ _
16. Recheck the thickness of the brake rotor. Make sure that it is above the minimum specification before continuing.
Note: Do not install a rotor on the vehicle that is below the minimum thickness. Task Completed ___ _
r.::-. """',..,... - -----·- • __ __ : __ •-- 1 =- ----_j z __ --- 4.: __ .. ....... L.. .... ........ _ , . ........................... .......... 1. •• ...,,... ..... .....1 i+i ..... ... 1 ·~ .

Job Sheet 163 599
17. Explain what could happen if you do install a rotor that is thinner than the specification.
18. Clean the rotor with brake parts cleaner and reinstall it onto the vehicle. Task Completed ___ _
19. Install the wheels and torque the lug nuts to specification using the proper sequence. Task Completed ___ _
Problems Encountered
INSTRUCTOR EVALUATION
D 4 Mastered Task
D 3 Able to Perform Task Independently; Some Additional Training Suggested D 2 Able to Perform Task with Close Supervision; Requires Additional Training
D 1 Unable to Perform Task D 0 Not Attempted
Comments
Instructor Name: ----------------------- Date: -------
Instructor Signature: -------------------------------
Brake Rotor (On-Car) Resurfacing
Name: __________________________ _ Station:---------------------- Date: ____ _
NATEF Correlation This Job Sheet addresses the following NATEF task(s):
5.D.9 Refinish rotor on vehicle. (P-1)
Performance Objective(s) Upon completion of this Job Sheet, you will be able to properly resurface a rotor on the car.
Tools and Materials
Service manual Technician's tool set
Brake micrometer Oial indicator
..C:mery cloth Sanding disc power tool
On-car brake lathe and equipment Dial indicator
Protective Clothing/Equipment
Goggles or safety glasses with side shields
Describe the vehicle being worked on:
Year Make Model
590
VIN Engine type and size
© 2012. Cenaaae Leamina. Inc. Licensed for one-time use bv the ourchaser onlv: no additional coovina or retransmission is oermitted.
r
Job Sheet 162 591
PROCEDURE
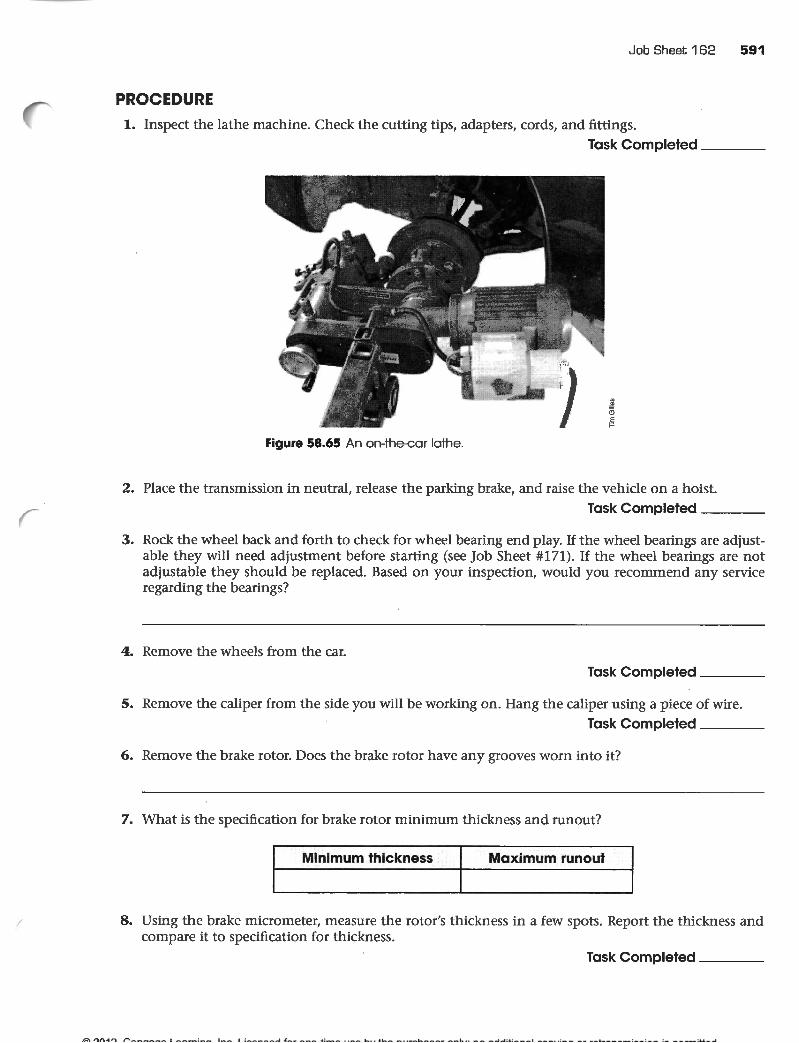
1. Inspect the lathe machine. Check the cutting tips, adapters, cords, and fittings. Task Completed ___ _
··-- ) Figure 58.65 An on-the-car lathe.
2. Place the transmission in neutral, release the parking brake, and raise the vehicle on a hoist. Task Completed ___ _
3. Rock the wheel back and forth to check for wheel bearing end play. If the wheel bearings are adjustable they will need adjustment before starting (see Job Sheet #171). If the wheel bearings are not adjustable they should be replaced. Based on your inspection, would you recommend any service regarding the bearings?
4. Remove the wheels from the car. Task Completed ___ _
5. Remove the caliper from the side you will be working on. Hang the caliper using a piece of wire. Task Completed ___ _
6. Remove the brake rotor. Does the brake rotor have any grooves worn into it?
7. What is the specification for brake rotor minimum thickness and runout?
Minimum thickness Maximum runout
8. Using the brake micrometer, measure the rotor's thickness in a few spots. Report the thickness and compare it to specification for thickness.
Task Completed ___ _
I '
592 Job Sheet 162
9. Reinstall the brake rotor, fasten it down with the lug nuts, and mount a dial indicator. Check the amount of runout and compare it to specifications.
Task Completed ___ _
10. Based on your inspection and measurements of the rotors, how much metal should be removed?
11. Mount the rotor drive adapter on the wheel studs. Use all of the lug nuts to hold down the adapter. Task Completed ___ _
12. On-car brake lathes can mount on the caliper or be self-calibrating. Describe the type of lathe that you are using.
13. Follow the lathe manufacturer's owner's manual to continue to set up the tool. Task Completed ___ _
14. Turn the motor on, calibrate the head if necessary, and start to move the cutting tips in until they lightly touch the rotor.
Task Completed ___ _
15. Move the cutting bits outward so they can remove the rust from the outer edge of the rotor. Task Completed ___ _
16. Set the lathe up for the first cut. Cut no more than 0.004" (0.10 mm). Proceed with the initial cut. Task Completed ___ _
17. After the first cut, check the rotor to make sure that the lathe cut it straight and uniform. What did you find?
18. Make additional cuts if needed. The final cut should be no more than 0.002" (0.05 mm). Task Completed ___ _
19. After cutting is complete, sand the rotor with the sanding tool. Task Completed ___ _
20. Remove the lathe from the rotor. Reinstall the caliper according to the service manual procedures. Continue to machine the other rotor(s) in the same manner.
Task Completed ___ _
Problems Encountered
,-, '>111'> f"'onno no I oorninn lnf' I if't>n<:t>rl fnr nnA-timP. II"P. hv thP. nurch::1ser oniV: no additional CQDVina Or retransmiSSiOn iS oermitted.
r
INSTRUCTOR EVALUATION
D 4 Mastered Task
D 3 Able to Perform Task Independently; Some Additional Training Suggested
D 2 Able to Perform Task with Close Supervision; Requires Additional Training D 1 Unable to Perform Task
D 0 Not Attempted
Comments
Job Sheet 162 593
Instructor Name: ------------------------- Date: ______ _
Instructor Signature: ----------------------------------
1M ')()1 ') f'onn~no I <><>rn;nn lnr I ;l'Anco=i fnr nnA-timP. II"" hv thP. nurr.h::~sP.r onlv: no additional coovina or retransmission is oermitted.
Rear Disc Brake Service
Name: __________________________ _ Station: ----------- Date: ____ _
NATEF Correlation
This Job Sheet addresses the following NATEF task(s):
S.D.ll Retract caliper piston on an integrated parking brake system. (P-3)
Performance Objective(s)
Upon completion of this Job Sheet, you will be able to understand how to properly remove the rear calipers, reset and service the integrated parking brake, and reinstall brake pads.
Tools and Materials
Service manual
Technician's tool set Vehicle with rear disc brakes with integrated parking brake option in caliper
...:aliper piston tool set
Protective Clothing/Equipment
Goggles or safety glasses with side shields
Describe the vehicle being worked on:
Year Make Model
PROCEDURE
1. Raise the vehicle and remove the rear wheels.
VIN
2. Remove the caliper and brake pads from both sides of the vehicle.
Engine type and size
Task Completed ___ _
Task Completed ___ _
3. Describe why this type of caliper piston must be reset when installing new disc brake pads.
SOB
© 2012. Cenaaae Learnina. Inc. Licensed for one-time use bv the ourchaser onlv: no additional coovina or retransmission is oermitted.
Job Sheet 166 609
4. Explain how the special service tool will fit into the caliper.
5. Open the master cylinder reservoir cap so that excess fluid can escape. Task Completed ___ _
6. Install the tool and rotate the piston so that it starts to retract and have just enough clearance to install the old brake pads or a new set.
Task Completed ___ _
7. Install the brake pads and move the caliper into position to check if there is enough clearance between the brake pads and rotors. There should be just a tiny air gap between the brake pads and rotors.
Task Completed ___ _
8. After adjusting the brake caliper accordingly, tighten all bolts and reinstall the wheels. Task Completed ___ _
9. Tighten the lug nuts to the manufacturer's specification. Task Completed ___ _
10. Explain how moving the emergency brake adjusts the rear caliper piston.
Problems Encountered
INSTRUCTOR EVALUATION
D 4 Mastered Task
D 3 Able to Perform Task Independently; Some Additional Training Suggested
D 2 Able to Perform Task with Close Supervision; Requires Additional Training D 1 Unable to Perform Task
D 0 Not Attempted
ICl ?01? r.P.nn:::~ne Leamina. Inc. Licensed for one-time use bv the ourchaser onlv: no additional coovina or retransmission is oermitted.
610 Job Sheet 166
( Comments
Instructor Name: ------------------------ Date: ______ _
Instructor Signature: ------------------=---------------------
© 2012. Cenaaae Leamina. Inc. Licensed for one-time use bv the ourchaser onlv: no additional coovina or retransmission is oermitted.